

Page 1

Email Firewall
User Guide
User Guide for the 3Com® Email Firewall
http://www.3com.com/
Part No. DUA-MFA100-AAA01
Published January 2005
Page 2

3Com Corporation
350 Campus Drive
Marlborough,
MA 01752-3064
Copyright © 2000-2005, BorderWare Technologies Inc. Used under license by 3Com Corporation. All rights
reserved. No part of this documentation may be reproduced in any form or by any means or used to make any
derivative work (such as translation, transformation, or adaptation) without written permission from
BorderWare Technologies Inc.
3Com Corporation and its licensors reserve the right to revise this documentation and to make changes in
content from time to time without obligation on the part of 3Com Corporation or its licensors to provide
notification of such revision or change.
3Com Corporation and its licensors provide this documentation without warranty, term, or condition of any
kind, either implied or expressed, including, but not limited to, the implied warranties, terms or conditions of
merchantability, satisfactory quality, and fitness for a particular purpose. 3Com Corporation and its licensors
may make improvements or changes in the product(s) and/or the program(s) described in this documentation
at any time.
If there is any software on removable media described in this documentation, it is furnished under a license
agreement included with the product as a separate document, in the hard copy documentation, or on the
removable media in a directory file named LICENSE.TXT or !LICENSE.TXT. If you are unable to locate a copy,
please contact 3Com and a copy will be provided to you.
UNITED STATES GOVERNMENT LEGEND
If you are a United States government agency, then this documentation and the software described herein are
provided to you subject to the following:
All technical data and computer software are commercial in nature and developed solely at private expense.
Software is delivered as “Commercial Computer Software” as defined in DFARS 252.227-7014 (June 1995) or
as a “commercial item” as defined in FAR
provided in 3Com’s standard commercial license for the Software. Technical data is provided with limited
rights only as provided in DFAR 252.227-7015 (Nov
applicable. You agree not to remove or deface any portion of any legend provided on any licensed program or
documentation contained in, or delivered to you in conjunction with, this User Guide.
Unless otherwise indicated, 3Com registered trademarks are registered in the United States and may or may not
be registered in other countries.
3Com, the 3Com logo are registered trademarks of 3Com Corporation.
BorderWare, the Powered by BorderWare Logo, and BorderWare Security Network are trademarks or
registered trademarks of BorderWare Technologies Inc. in the United States and other jurisdictions.
Microsoft and Windows are registered trademarks of Microsoft Corporation.
All other company and product names may be trademarks of the respective companies with which they are
associated.
ENVIRONMENTAL STATEMENT
It is the policy of 3Com Corporation to be environmentally-friendly in all operations. To uphold our policy, we
are committed to:
Establishing environmental performance standards that comply with national legislation and regulations.
Conserving energy, materials and natural resources in all operations.
Reducing the waste generated by all operations. Ensuring that all waste conforms to recognized
environmental standards. Maximizing the recyclable and reusable content of all products.
Ensuring that all products can be recycled, reused and disposed of safely.
Ensuring that all products are labelled according to recognized environmental standards.
Improving our environmental record on a continual basis.
End of Life Statement
3Com processes allow for the recovery, reclamation and safe disposal of all end-of-life electronic components.
Regulated Materials Statement
3Com products do not contain any hazardous or ozone-depleting material.
Environmental Statement about the Documentation
The documentation for this product is printed on paper that comes from sustainable, managed forests; it is
fully biodegradable and recyclable, and is completely chlorine-free. The varnish is environmentally-friendly, and
the inks are vegetable-based with a low heavy-metal content.
ENCRYPTION
This product contains encryption and may require U.S. and/or local government authorization prior to export
or import to another country.
2.101(a) and as such is provided with only such rights as are
1995) or FAR 52.227-14 (June 1987), whichever is
Page 3
CONTENTS
ABOUT THIS GUIDE
Conventions 10
Related Documentation 11
Documentation Comments 11
1 3COM EMAIL FIREWALL OVERVIEW
Deployment and Installation 13
Installation 14
Features 14
Anti-Spam 14
Anti-Virus Scanning 14
Malformed Email Checks 14
Attachment Control 15
Email Security 15
Reporting 15
System Administration 16
Main Menu 17
2 CONFIGURING MAIL DELIVERY
Mail Routing 19
Additional Mail Route Rules 21
Delivery Settings 23
Delivery Settings 23
Gateway Features 23
Default Mail Relay 23
BCC All Mail 24
Annotations 24
Advanced Delivery Settings 25
Mail Mappings 26
Uploading Mapping List 27
Page 4
Virtual Mappings 28
Uploading Virtual Mapping List 29
3 CONFIGURING MAIL SECURITY
Anti-Virus 31
Notifications 33
Pattern Files 33
Attachment Control 34
Notifications 35
Editing Attachment Types 36
Mail Access/Filtering 37
Specific Access Patterns 38
Pattern Based Message Filtering 39
Message Restrictions 39
SMTP Authenticated Relay 40
SMTP Banner 40
SMTP Security 41
Incoming Mail 42
Mail Delivery 42
Malformed Email 44
4 ANTI-SPAM CONFIGURATION
Anti-Spam Features 47
DCC 49
STA 50
Spam Action 52
Maybe Spam Action 52
Diagnostics 53
STA Training 54
Pattern Based Message Filtering 54
Message Part 55
Match Option 58
Pattern 58
Priority 58
Action 58
Upload or Download File 59
PBMF Preferences 59
Page 5

59
Objectionable Content Filtering 61
Actions 61
Notifications 62
Upload and Download Filter List 62
Trusted Senders List 62
Adding Trusted Senders 63
Spam Quarantine 64
Spam Quarantine Configuration 64
User Notification 65
Set Redirect Action for Anti-Spam Features 65
Enabling User Access on a Network Interface 66
Examining the Quarantine 66
Quarantine and Trusted Senders List Users 67
Upload and Download User Lists 68
Enabling User Access on a Network Interface 68
Advanced Anti-Spam Options 69
RBL (Realtime Blackhole List) 69
Mail Access/Filtering 70
Anti-Spam Header 70
5 REPORTING
Generating Reports 71
Report Configuration 72
Report Generation 73
Report Fields 74
System Logs 77
Viewing Log Details 78
Configuring a Syslog Server 78
Email History 79
System History 80
Event Types 80
Configure History Settings 82
6 SYSTEM CONFIGURATION
Setup Wizard 83
Change Password 84
Page 6

Time Zone 84
Network Configuration 85
Mail Configuration 85
Admin Account 86
System Users 86
Creating an Admin User 87
Upload and Download User Lists 88
Enabling User Access on a Network Interface 88
Network Settings 89
Network Interfaces 90
Advanced Parameters 90
Web Proxy 91
Static Routes 92
Licensing 93
Installed License 93
License Agreements 94
License Renewal or Upgrade 94
SSL Certificates 94
Software Updates 96
Uploading a Software Update 96
Security Connection 97
7 SYSTEM MANAGEMENT
Status and Utility 99
Utility Functions 100
Current Admin and Spam Quarantine Users 104
Configuration Information 104
Mail Queues 104
Quarantine 105
Expiry Settings 105
Daily Tasks 106
Backup and Restore 107
Starting a Backup 107
Restores 111
Reboot and Shutdown 113
Reset to Factory Settings 113
Page 7

8 MONITORING ACTIVITY AND STATUS
Monitoring Mail Processing Activity 115
Mail Server Status 116
Mail Queue (Mail Q) 116
Mail Queue Statistics 116
Mail Received Recently 116
Troubleshooting Mail Queue Problems 116
Email Firewall Status 117
System Alarms 118
Licensing 118
BorderWare Mail Security Services 118
Network Settings 118
Report Problems 119
Troubleshooting Mail Delivery Problems 120
Examining Log Files 121
Troubleshooting Content Issues 123
Email History 123
A CUSTOMIZING SYSTEM MESSAGES
B RESET TO FACTORY DEFAULT SETTINGS FROM CONSOLE
C THIRD PARTY COPYRIGHT AND LICENSE AGREEMENTS
GLOSSARY
Page 8

Page 9

ABOUT THIS GUIDE
The instructions in this guide are designed to help you with configuration
and system administration tasks for the 3Com
This guide is intended for the system or network administrator who is
responsible for configuring, using, and managing the 3Com Email
Firewall. It assumes a working knowledge of TCP/IP network and email
communications protocols.
For more detailed information on 3Com Email Firewall installation, please
see the accompanying Installation Guide.
If release notes are shipped with your product and the information there
differs from the information in this guide, follow the instructions in the
release notes.
Most user guides and release notes are available in Adobe Acrobat
Reader Portable Document Format (PDF) or HTML on the 3Com
Wide Web site:
World
http://www.3com.com/products
®
Email Firewall.
Page 10
10 ABOUT THIS GUIDE
Conventions Table 1 and Table 2 list conventions that are used throughout this guide.
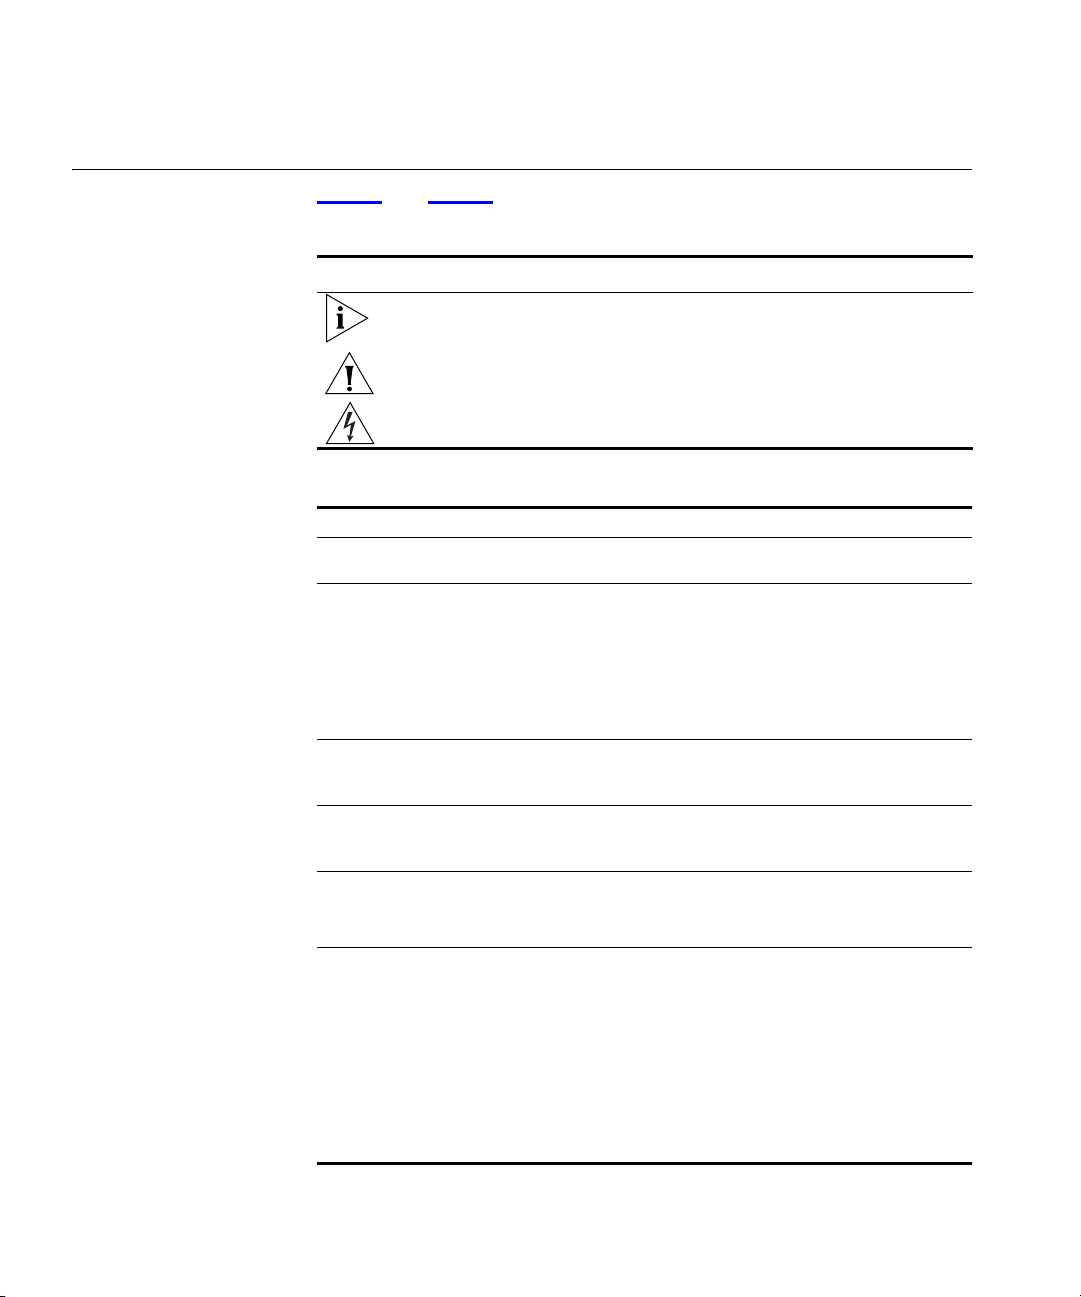
Table 1 Notice Icons
Icon Notice Type Description
Information note Information that describes important features or
instructions
Caution Information that alerts you to potential loss of data or
potential damage to an application, system, or device
Warning Information that alerts you to potential personal injury
Table 2 Text Conventions
Convention Description
Screen displays This typeface represents information as it appears on the
screen.
Syntax The word “syntax” means that you must evaluate the syntax
provided and then supply the appropriate values for the
placeholders that appear in angle brackets. Example:
To change your password, use the following syntax:
system password <password>
In this example, you must supply a password for <password>.
Commands The word “command” means that you must enter the
command exactly as shown and then press Return or Enter.
Commands appear in bold.
The words “enter”
and
“type”
Keyboard key names If you must press two or more keys simultaneously, the key
Words in
italics
When you see the word “enter” in this guide, you must type
something, and then press Return or Enter. Do not press
Return or Enter when an instruction simply says “type.”
names are linked with a plus sign (+). Example:
Press Ctrl+Alt+Del
Italics are used to:
■ Emphasize a point.
■ Denote a new term at the place where it is defined in the
text.
■ Identify menu names, menu commands, and software
button names. Examples:
From the
Help
menu, select
Contents
.
Click OK.
Page 11
Related Documentation
11
Related
Documentation
Documentation Comments
In addition to this guide, each 3Com Email Firewall documentation set
includes the following:
■
3Com Email Firewall Installation Guide
This guide contains detailed information on installing the 3Com Email
Firewall.
■
Release Notes
These notes provide information about the current software release,
including new features, modifications, and known problems.
Your suggestions are very important to us. They will help make our
documentation more useful to you. Please send comments about this
document to 3Com via the following URL:
http://www.3com.com/corpinfo/en_US/contactus/index.html
Please include the following information when contacting us:
■ Document title
■ Document part number (on the title page)
■ Page number (if appropriate)
Example:
■ 3Com Email Firewall User Guide
■ Part number: DUA-MFA100-AAA01
■ Page 25
Please note that we can only respond to comments and questions about
3Com product documentation. Questions related to technical support or
sales should be directed in the first instance to your network supplier.
Page 12

12 ABOUT THIS GUIDE
Page 13
1
3COM EMAIL FIREWALL OVERVIEW
This chapter provides an overview of the 3Com Email Firewall and its
features, and includes the following topics:
■ Deployment and Installation
■ Features
■ System Administration
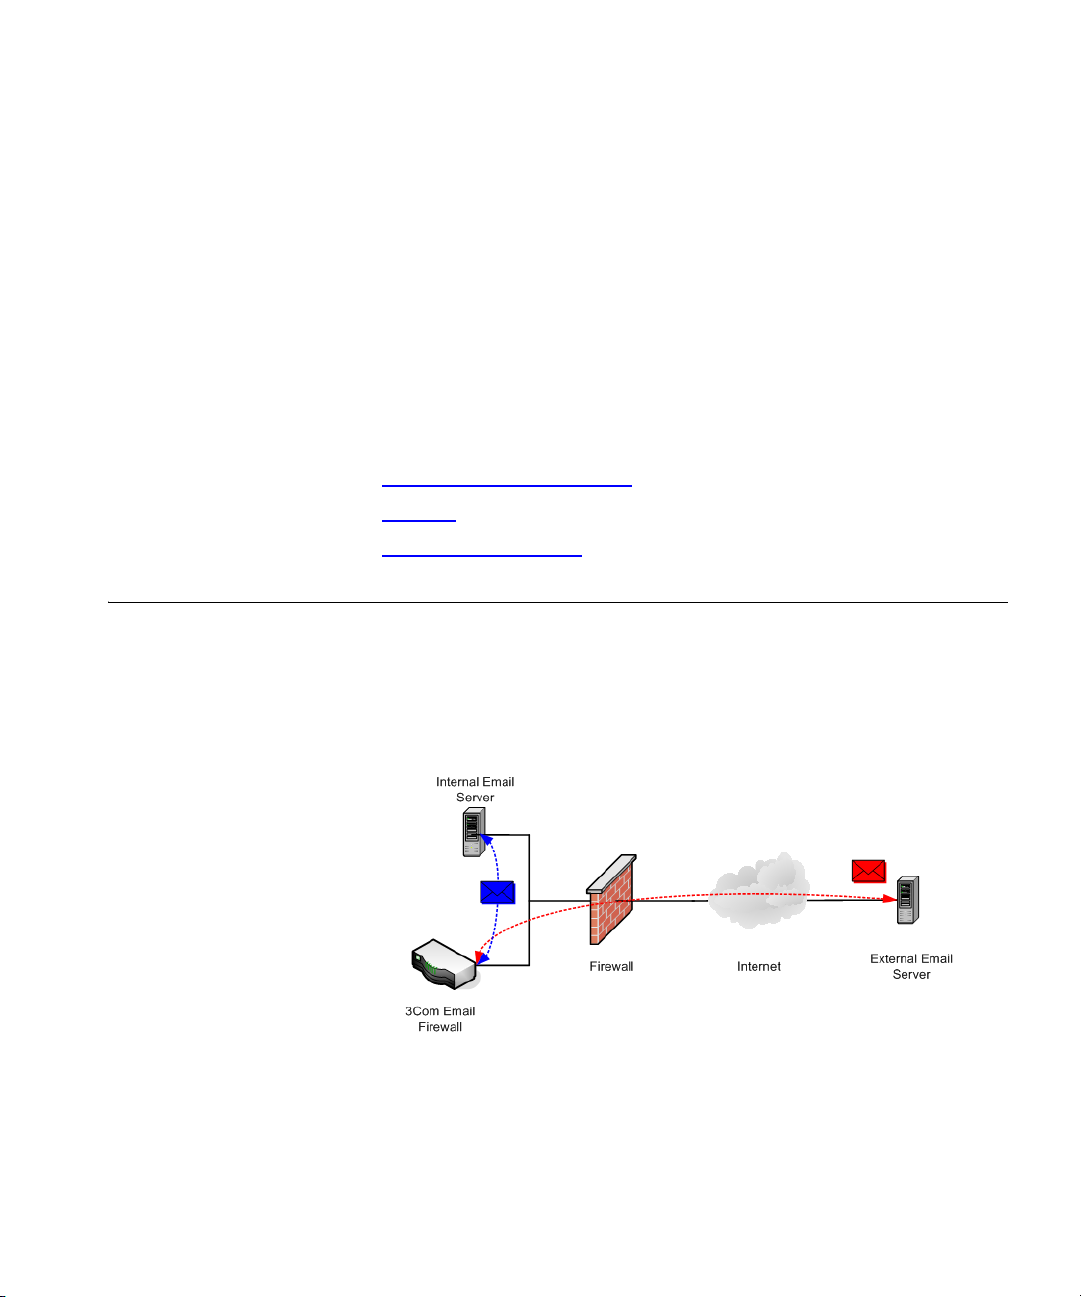
Deployment and Installation
The 3Com Email Firewall is designed to be situated between your mail
servers and the Internet so that there are no direct SMTP (Simple Mail
Transport Protocol) connections between external and internal servers.
The 3Com Email Firewall is installed behind the existing firewall on the
Internal network.
Inbound mail will be forwarded from the Firewall or Router to the 3Com
Email Firewall where it will be scanned, processed, and then sent to your
internal mail server for delivery.
Outbound mail will be sent from your internal mail server to the 3Com
Email Firewall to be scanned, processed, and then delivered to the
destination SMTP server on the Internet.
Page 14
14 CHAPTER 1: 3COM EMAIL FIREWALL OVERVIEW
Installation For detailed information on installation, see the
Installation Guide
that
came with your 3Com Email Firewall.
Features The following sections provide an overview of the main features of the
3Com Email Firewall.
Anti-Spam The 3Com Email Firewall contains a variety of powerful features to
prevent spam messages, including the following:
■ Server-based tools such as DCC (Distributed Checksum
Clearinghouse), STA (Statistical Token Analysis), Objectionable
Content Filtering, and Pattern Based Message Filtering that prevent
spam messages from being delivered to an end user’s mailbox.
■ User-based tools for managing quarantined spam and building trusted
senders lists for whitelisting.
Anti-Virus Scanning The 3Com Email Firewall provides a built-in virus scanning service.
When enabled, all messages (inbound and outbound) passing through
the 3Com Email Firewall are scanned for viruses.
Viruses can be selectively blocked depending on whether they are found
in inbound or outbound messages. Message attachments are recursively
disassembled to help ensure that viruses cannot be concealed.
Malformed Email
Checks
Many viruses try to elude virus scanners by concealing themselves in
malformed messages. The scan engines cannot detect the attachment
and pass the complete message through to an internal server.
Some mail clients try to rebuild malformed messages and may rebuild or
activate a virus-infected attachment. Other types of malformed messages
are designed to attack mail servers directly. These types of messages are
often used in denial-of-service (DoS) attacks.
The 3Com Email Firewall analyzes each message with very extensive
integrity checks. Malformed messages are quarantined if they cannot be
processed.
Page 15

Features
Attachment Control Attachment filtering can be used to control a wide range of problems
originating from the use of attachments, such as viruses, objectionable
content, and confidential documents leaving your network.
Both inbound and outbound email can be scanned. Messages containing
forbidden attachments can be rejected or quarantined.
Email Security Communications between email gateways that are normally sent in clear
text can be protected from interception and eavesdropping via TLS
(Transport Layer Security) encryption.
Reporting The 3Com Email Firewall's reporting features allow you to create
customized reports on mail and system activity, including the following:
■ Traffic Summary
■ System Health
■ Top Mailbox Disk Users
■ Spam Statistics
15
■ Virus Reports
■ Email History
■ System Events History
The reports are derived from information written to the various systems
logs and then stored in the database. Reports are stored on the system
for online viewing and can also be emailed automatically to specified
users.
Page 16
16 CHAPTER 1: 3COM EMAIL FIREWALL OVERVIEW
System Administration
The 3Com Email Firewall is administered via a web browser.
The following web browsers are supported:
■ Microsoft Internet Explorer 5.5 or greater
■ Netscape 7.0 or greater
■ Mozilla Firefox 1.0 or greater
■ Safari 1.2.3 or greater
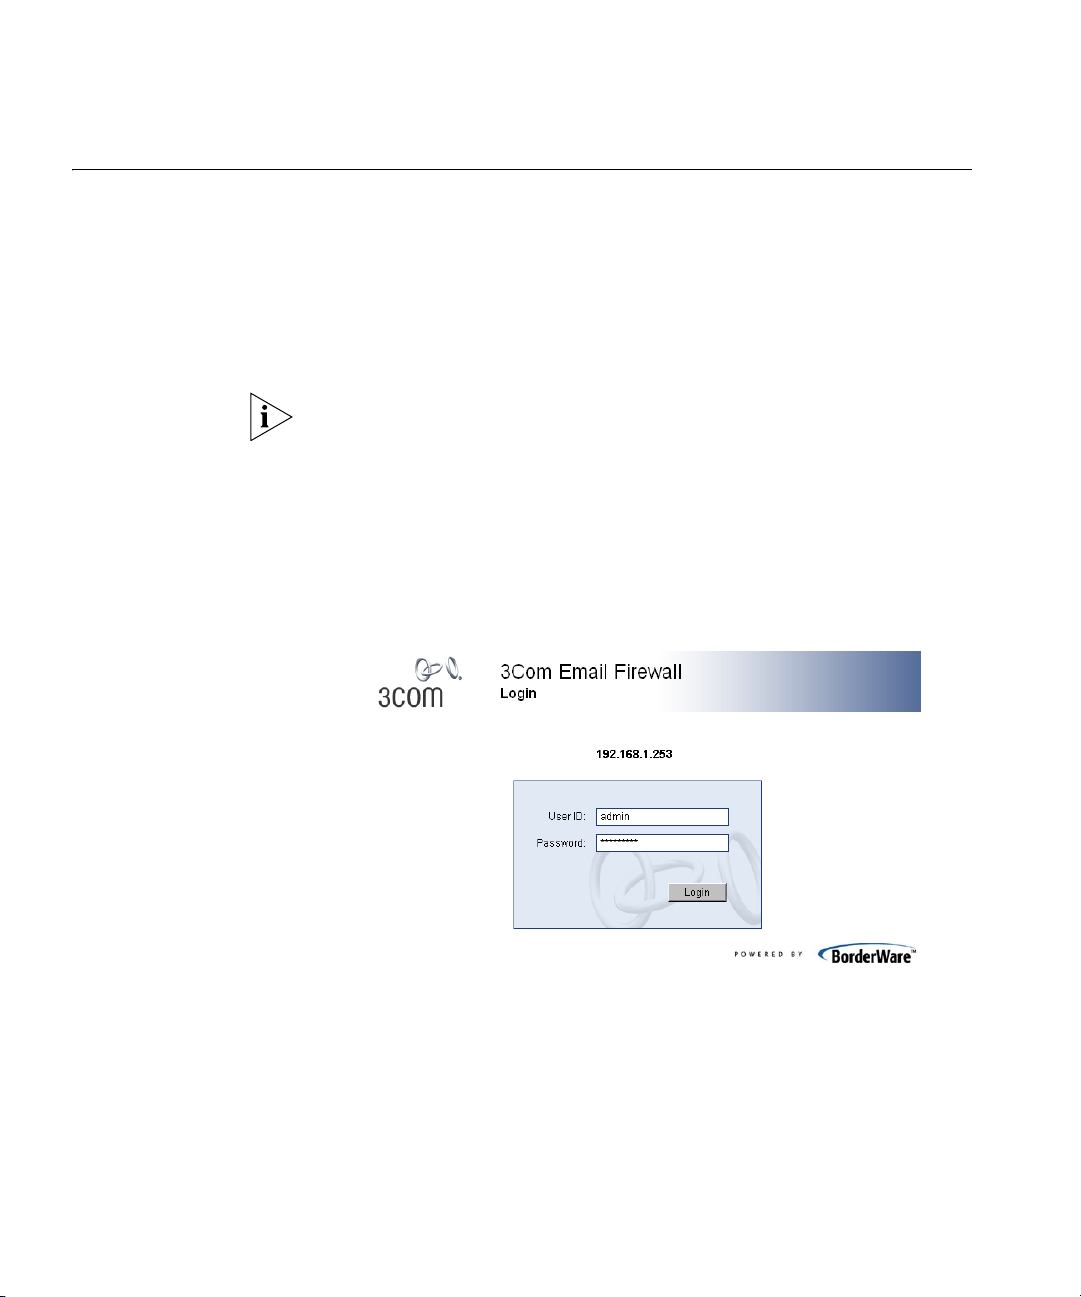
Your web browser must have cookies enabled to be able to connect and
login to the 3Com Email Firewall.
Launch a web browser on your computer and enter the IP address or
hostname into the location bar, such as https://192.168.1.253, or
https://mail.example.com.
The login screen will then be displayed. Enter the user name admin and
the corresponding password.
The
Activity
screen and main menu will then be displayed.
Page 17
System Administration
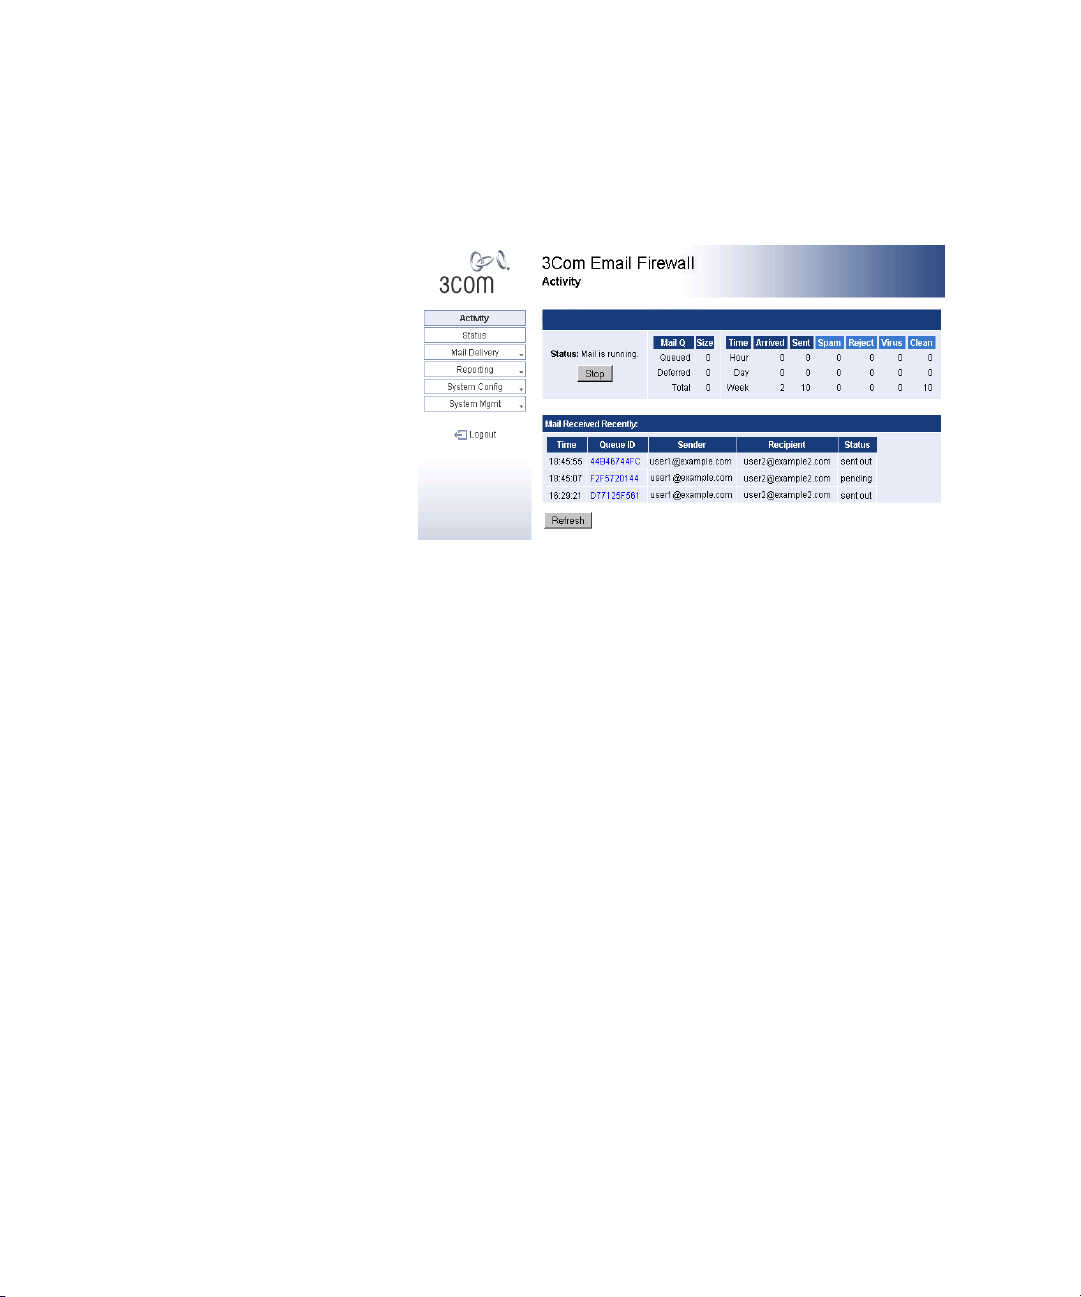
Main Menu The main menu provides quick access to the 3Com Email Firewall’s
configuration and management options.
The menu is divided into the following sections:
17
■ Activity — The
Activity
screen provides you with a variety of
information on mail processing activity, such as the number of
messages in the mail queue, the number of different types of
messages received and sent, and current message activity.
■ Status — The
Status
page displays a list of system services and their
current status. Network and system tests can also be performed.
■ Mail Delivery — This menu allows you to configure mail delivery
features such as:
■ Anti-Spam
■ Anti-Virus
■ Attachment Control
■ Mail Routing
■ Delivery Settings
■ Mail Access/Filtering
■ Mail Mappings
■ Virtual Mappings
■ SMTP Security
■ Malformed Email detection
Page 18

18 CHAPTER 1: 3COM EMAIL FIREWALL OVERVIEW
■ Reporting — This menu allows you to view and configure the
reporting and system log features of the 3Com Email Firewall.
■ System Configuration — This menu allows you to view and modify
system configuration settings such as:
■ The Setup Wizard
■ Admin Account
■ System Users
■ Network Settings
■ Web Proxy
■ Static Routes
■ Licensing
■ SSL Certificates
■ Software Updates
■ System Management — This menu is used for system management
features such as:
■ Status and Utility menu for troubleshooting
■ Mail Queues
■ Quarantine
■ Backup and Restore
■ Reboot and Shutdown
■ Returning the system to factory settings
Page 19
2
CONFIGURING MAIL DELIVERY
This chapter describes how to configure your 3Com Email Firewall to
accept and deliver mail, and includes the following topics:
■ Mail Routing
■ Delivery Settings
■ Mail Mappings
■ Virtual Mappings
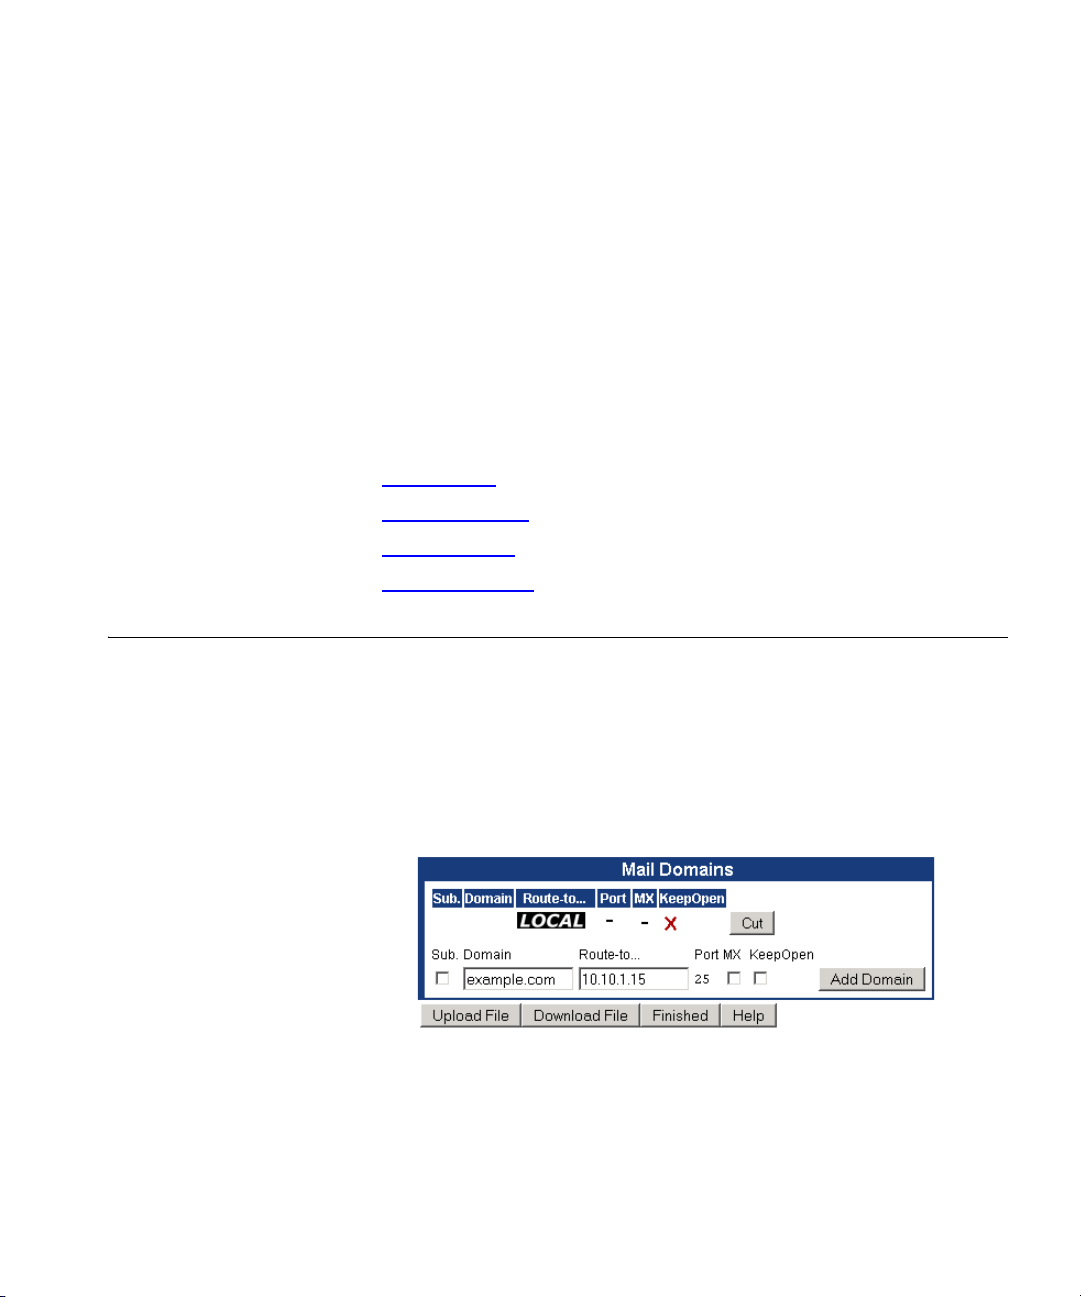
Mail Routing Mail Routes are used to define the domains you will be accepting mail
for, and where locally to deliver the mail such as an internal Microsoft
Exchange mail server. The Mail Domain you configured at installation
time using the Setup Wizard will automatically be created.
Select Mail Delivery -> Mail Routing from the menu to define additional
mail routes.
■ Sub — Select this check box to accept and relay subdomains for the
specified domain.
■ Domain — Enter the domain for which mail is to be accepted, such as
example.com
.
®
Page 20
20 CHAPTER 2: CONFIGURING MAIL DELIVERY
■ Route-to — Enter the address for the mail server to which mail will be
delivered. This is your local mail server, such as a Microsoft Exchange
mail system.
■ MX — (Optional) Select the MX check box if you need to look up the
mail routes in DNS before delivery. If this is not enabled, MX records
will be ignored. Generally, you do not need to select this item unless
you are using multiple mail server DNS entries for load
balancing/failover purposes. By checking the MX record, DNS will be
able to send the request to the next mail server in the list.
■ KeepOpen — (Optional) Select the KeepOpen check box to ensure
that each mail message to the domain will not be removed from the
active queue until delivery is attempted, even if the preceding mail
failed or was deferred. This setting ensures that local mail servers
receive high priority.
The KeepOpen option should only be used for domains that are usually
very reliable. If the domain is unavailable, it may cause system
performance problems due to excessive error conditions and deferred
mail.
A list of domains can also be uploaded in one text file. The file must
contain comma or tab separated entries in the form:
[domain],[route],[port],[ignore_mx],[subdomains_too],[keep_open]
For example:
example.com,10.10.1.1,25,on,off,off
The file (
domains.csv
) should be created in csv file format using Excel,
Notepad or other Windows text editor. It is recommended that you
download the domain file first by clicking Download File, editing it as
required, and uploading it using the Upload File button.
Page 21
Mail Routing
21
Additional Mail Route
Rules
When adding an additional mail route for a local email server, you must
add a Specific Access Pattern and a Pattern Based Message Filter to trust
mail from that server for Anti-Spam training purposes.
These procedures are not required for the default mail route you
configured at installation time with the Setup Wizard.
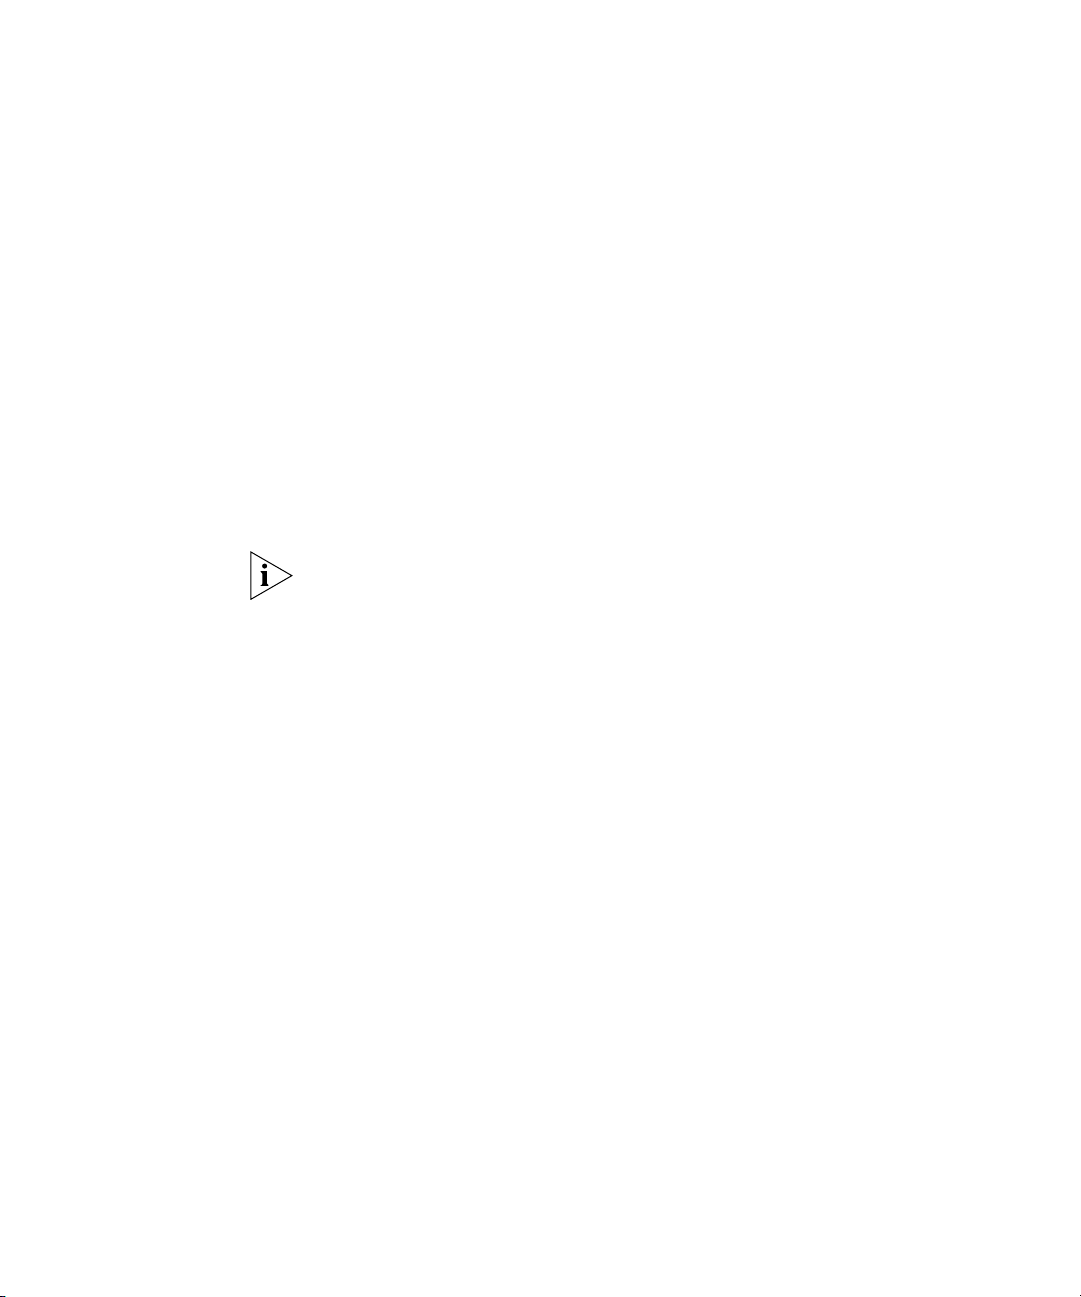
Adding a Specific Access Pattern
1 Select Mail Delivery -> Mail Access/Filtering from the menu.
Your primary mail route defined during installation will already be
configured.
2 Click Add Pattern to add a new pattern for the additional mail route.
3 Enter the IP address of the mail server you are routing to in the
Pattern
field.
Page 22
22 CHAPTER 2: CONFIGURING MAIL DELIVERY
4 Select
5 Select Trust for the action if the pattern matches, and click OK.
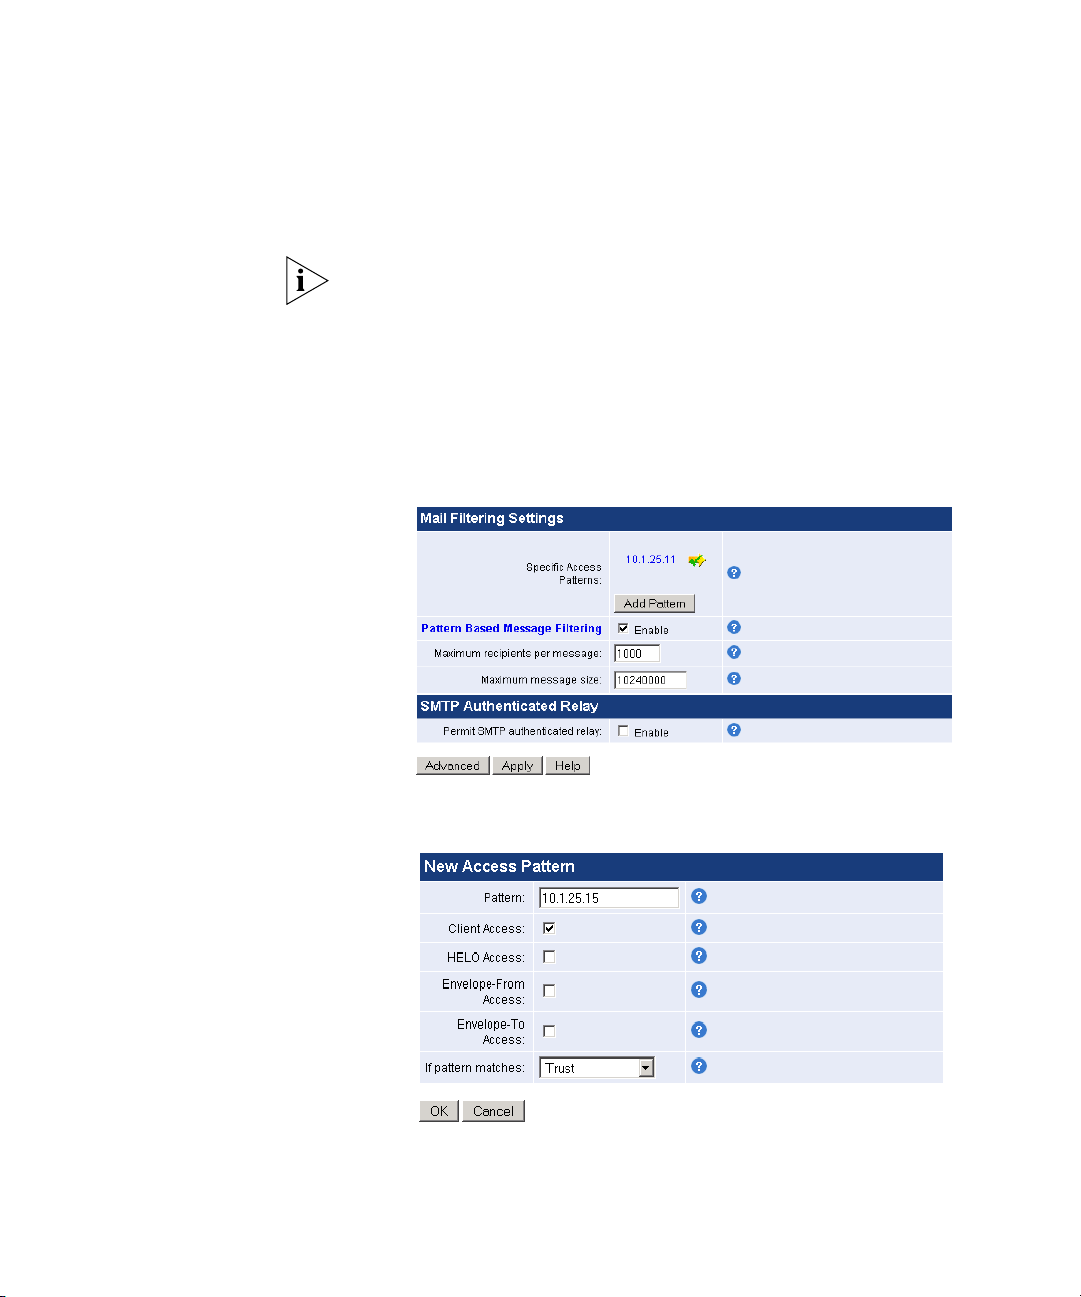
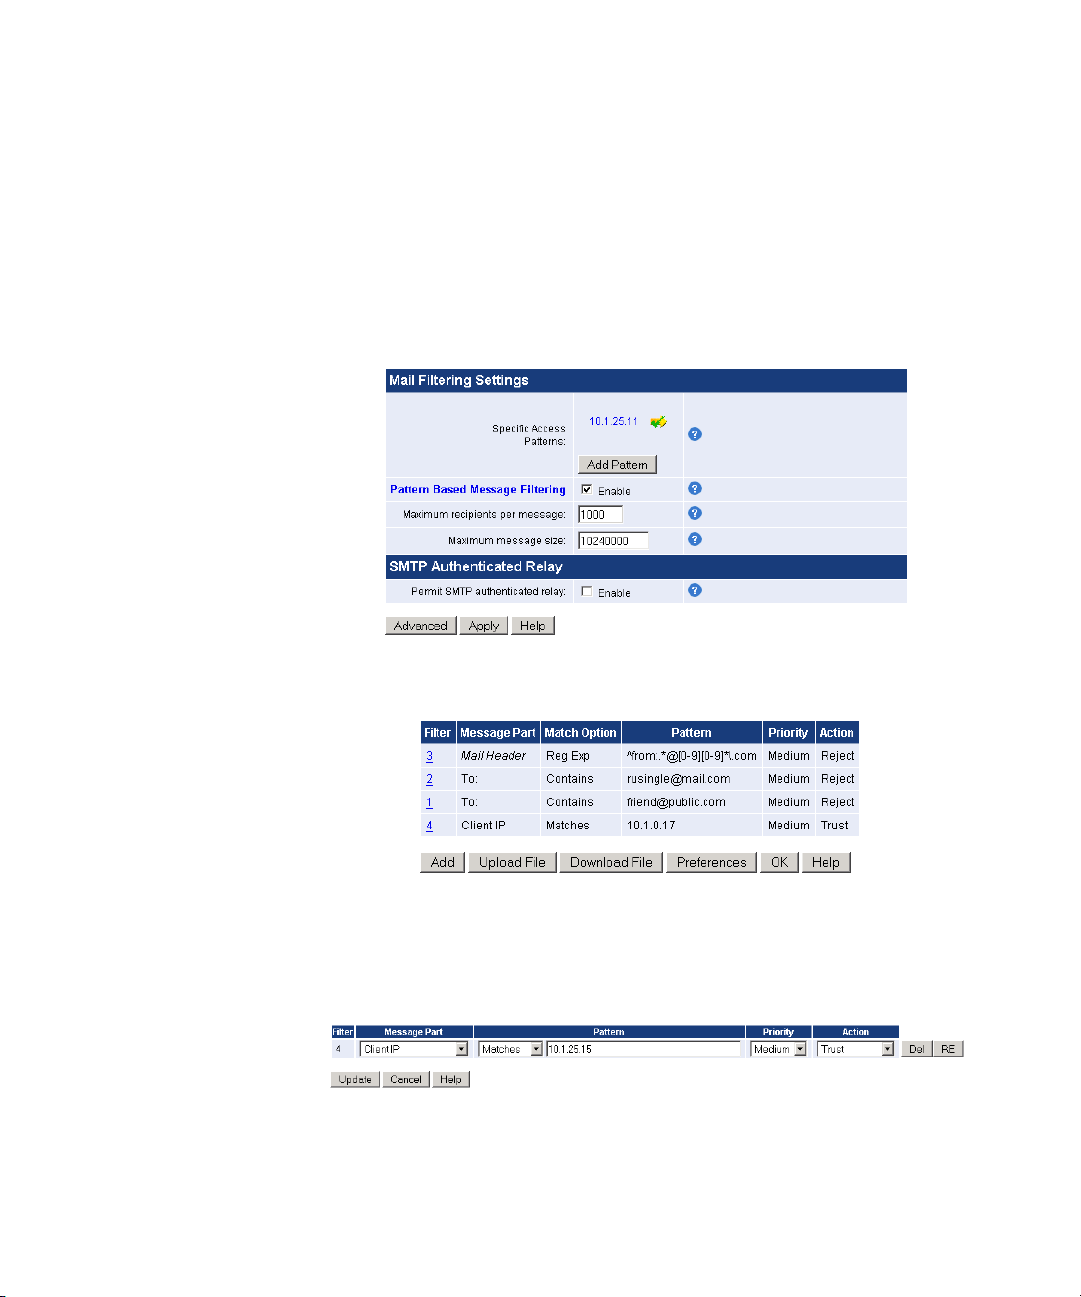
1 Select Mail Delivery -> Mail Access/Filtering from the menu. Select Pattern
2 Click Add to add a new filter rule.
Client Access
Adding a Pattern Based Message Filter
Based Message Filtering.
3 Select Client IP as the
for the mail route as the pattern.
4 Set the
Action
to Trust and click Update to add the new rule.
Message Part
, and set the address of the mail server
Page 23
Delivery Settings
23
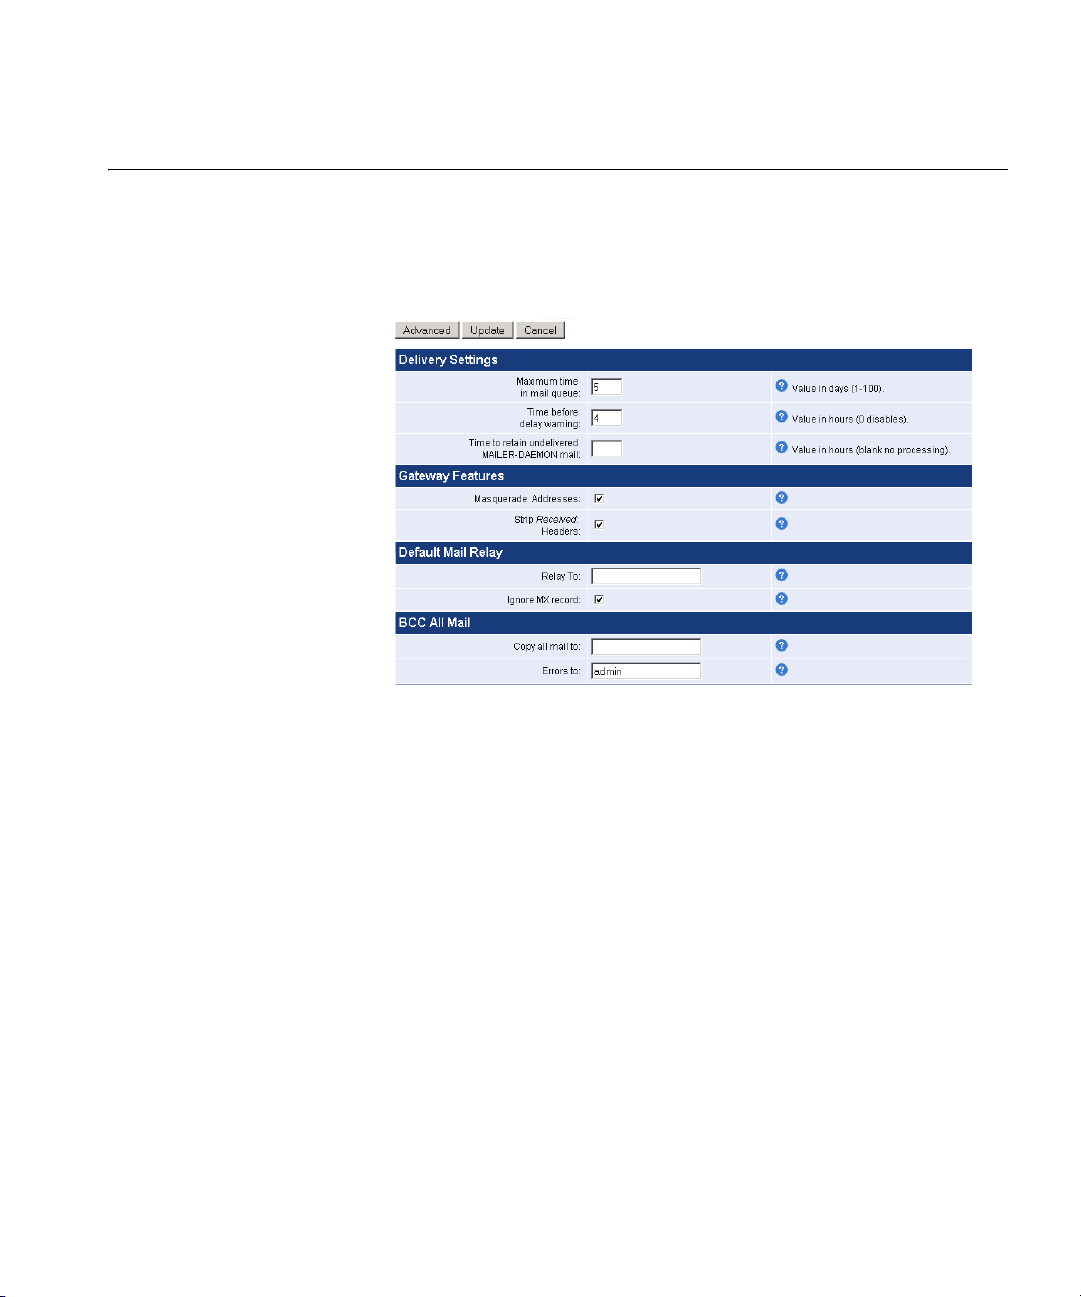
Delivery Settings You can customize various delivery settings that affect how you accept
and deliver mail messages.
Select Mail Delivery -> Delivery Settings from the menu.
Delivery Settings ■ Maximum time in mail queue — Enter the number of days for a
message to stay in the queue before being returned to the sender as
"undeliverable."
■ Time before delay warning — Number of hours before issuing the
sender a notification that mail is delayed.
■ Time to retain undelivered MAILER-DAEMON mail — The number of
hours to keep undelivered mail addressed to MAILER-DAEMON (the
internal mail server process.)
Gateway Features ■ Masquerade Addresses — Masquerades internal hostnames by
rewriting headers to only include the address of the 3Com Email
Firewall.
■ Strip Received Headers — Strip all Received headers from outgoing
messages.
Default Mail Relay ■ Relay To — (Optional) Enter an optional hostname or IP address of a
mail server (not this 3Com Email Firewall) to relay mail to for all email
with unspecified destinations. A recipient's email domain will be
Page 24
24 CHAPTER 2: CONFIGURING MAIL DELIVERY
checked against the Mail Routing table, and if the destination is not
specified the email will be sent to the Default Mail Relay server for
delivery. This option is typically used when the 3Com Email Firewall
cannot deliver email directly to remote mail servers.
■ Ignore MX record — Enable this option to prevent an MX record
lookup for this host to force relay settings.
BCC All Mail The 3Com Email Firewall offers an archiving feature for organizations
that require storage of all email that passes through their corporate mail
servers. This option sends a blind carbon copy (BCC) of each message
that passes through the 3Com Email Firewall to the specified address.
This address can be local or on any other system. Once copied, the mail
can be effectively managed and archived from this account.
■ Copy all mail to — Enter an email address to copy mail to.
■ Errors to — Specify an address that will receive error messages if there
are problems delivering the BCC mail.
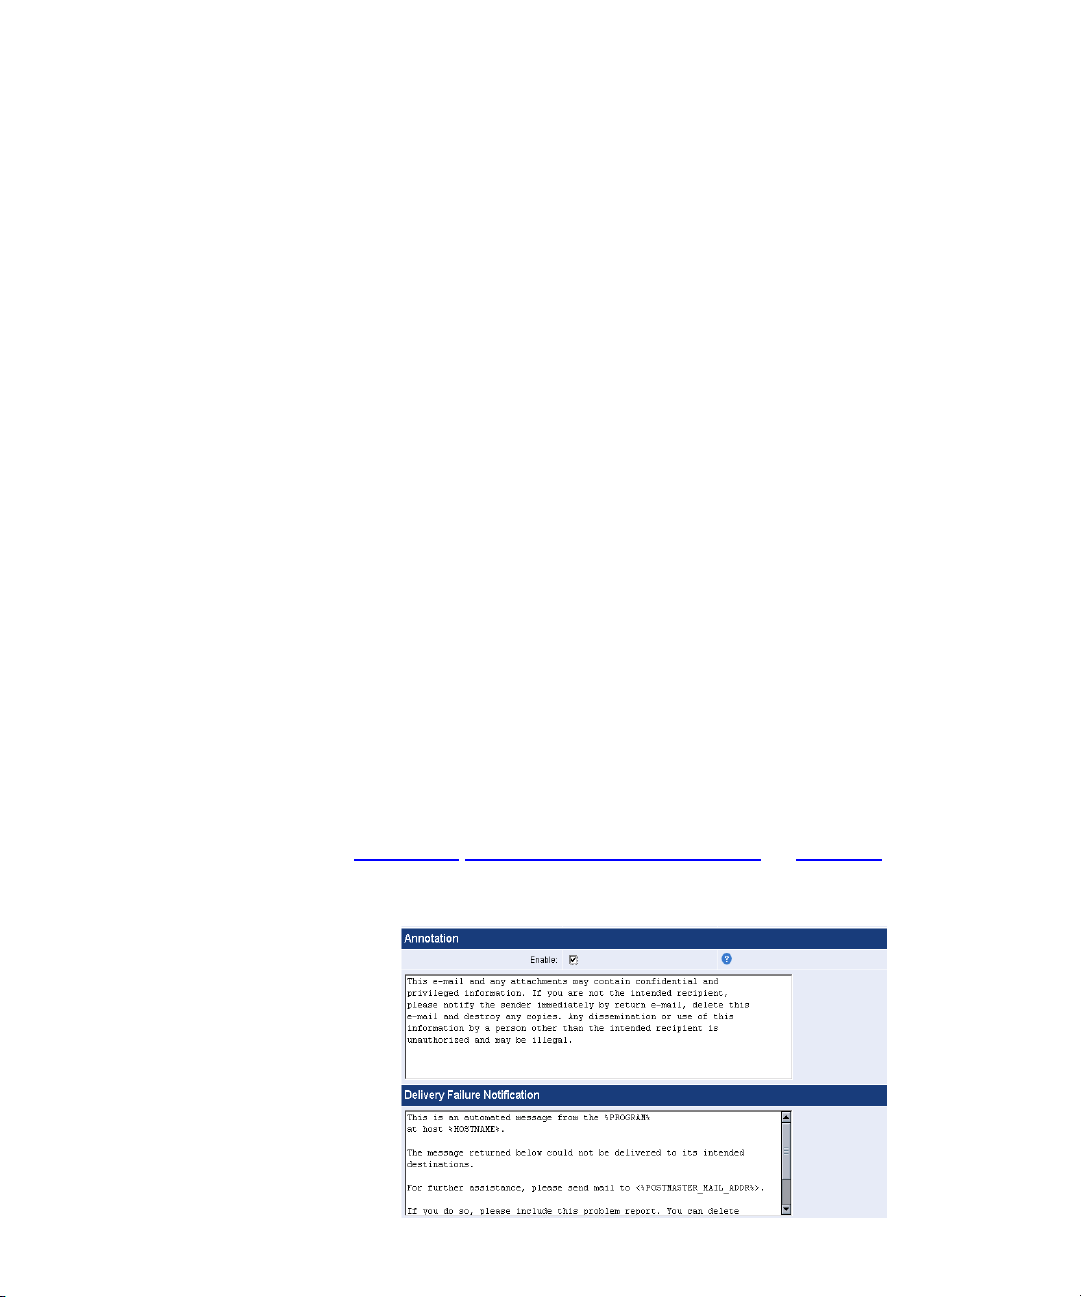
Annotations In the
appended to all emails and customize
Warning
The variables in the messages, such as
%HOSTNAME%
substituted at the time the message is sent.
See Appendix A “Customizing System Messages” on page 125 for a full
list of variables that can be used.
Annotations
messages.
, are local system settings that are automatically
section, you can enable annotations that are
Delivery Failure
%PROGRAM%
and
Delivery Delay
and
Page 25
Delivery Settings
25
Advanced Delivery
Settings
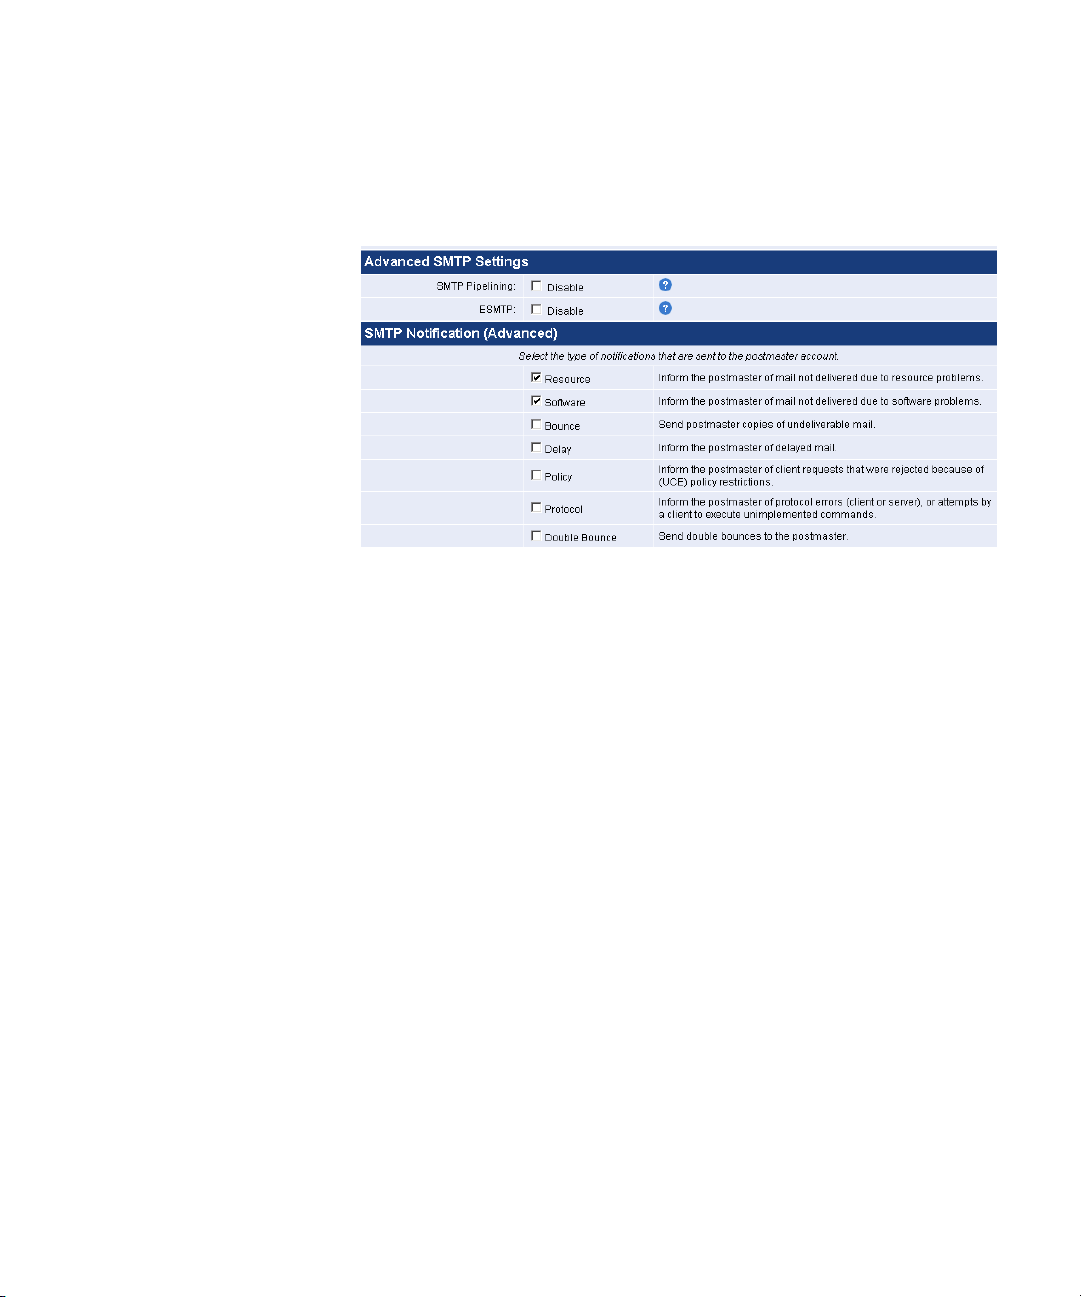
Click the Advanced button to reveal options for advanced SMTP (Simple
Mail Transport Protocol) settings and SMTP notifications.
Advanced SMTP Settings
■ SMTP Pipelining — Pipelining allows more than one SMTP command
to be inserted into a network packet which reduces SMTP connection
times. Some mail servers may experience problems with SMTP
command pipelining and you may have to disable this feature if
required.
■ ESMTP — ESMTP (Extended SMTP) extends basic SMTP functionality
to support additional media types in email messages. Some mail
servers may not support ESMTP and you may have to disable this
feature if you are experiencing problems.
SMTP Notification (Advanced)
Select the type of notifications that are sent to the postmaster account.
■ Resource — Mail not delivered due to resource problems such as
queue file write errors.
■ Software — Mail not delivered due to software problems.
■ Bounce — Send postmaster copies of undeliverable mail. If mail is
undeliverable, a single bounce message is sent to the postmaster with
a copy of the message that was not delivered. For privacy reasons, the
postmaster copy is truncated after the original message headers. If a
single bounce message is undeliverable, the postmaster receives a
Page 26
26 CHAPTER 2: CONFIGURING MAIL DELIVERY
double bounce message with a copy of the entire single bounce
message.
■ Delay — Inform the postmaster of delayed mail. In this case, the
postmaster receives message headers only.
■ Policy — Inform the postmaster of client requests that were rejected
because of unsolicited mail policy restrictions. The postmaster will
receive a transcript of the entire SMTP session.
■ Protocol — Inform the postmaster of protocol errors (client or server),
or attempts by a client to execute unimplemented commands. The
postmaster will receive a transcript of the entire SMTP session.
■ Double Bounce — Send double bounces to the postmaster.
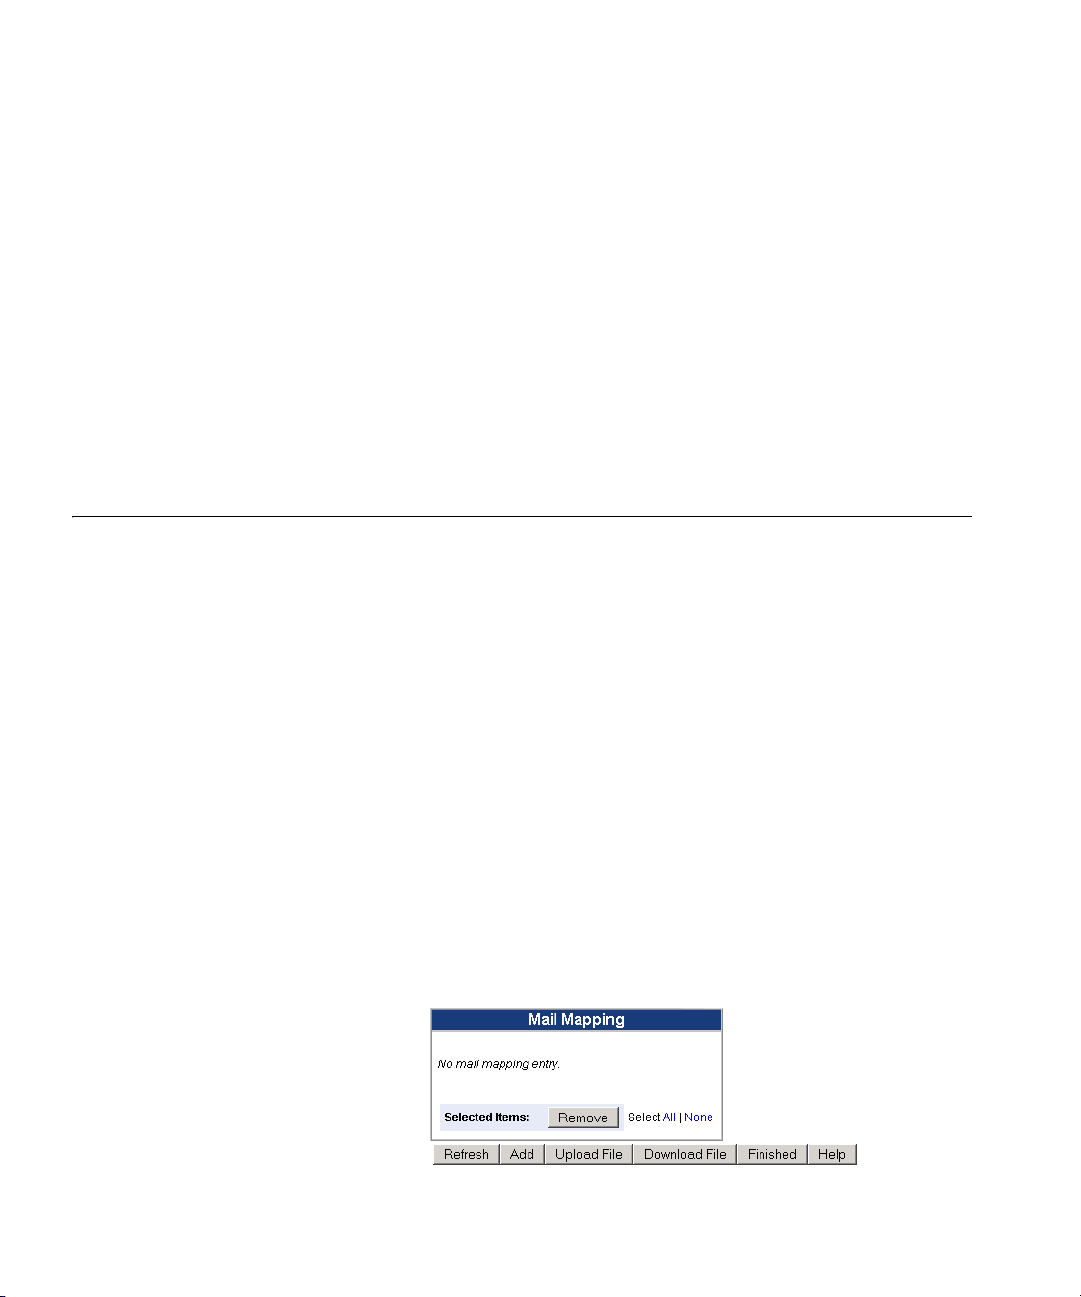
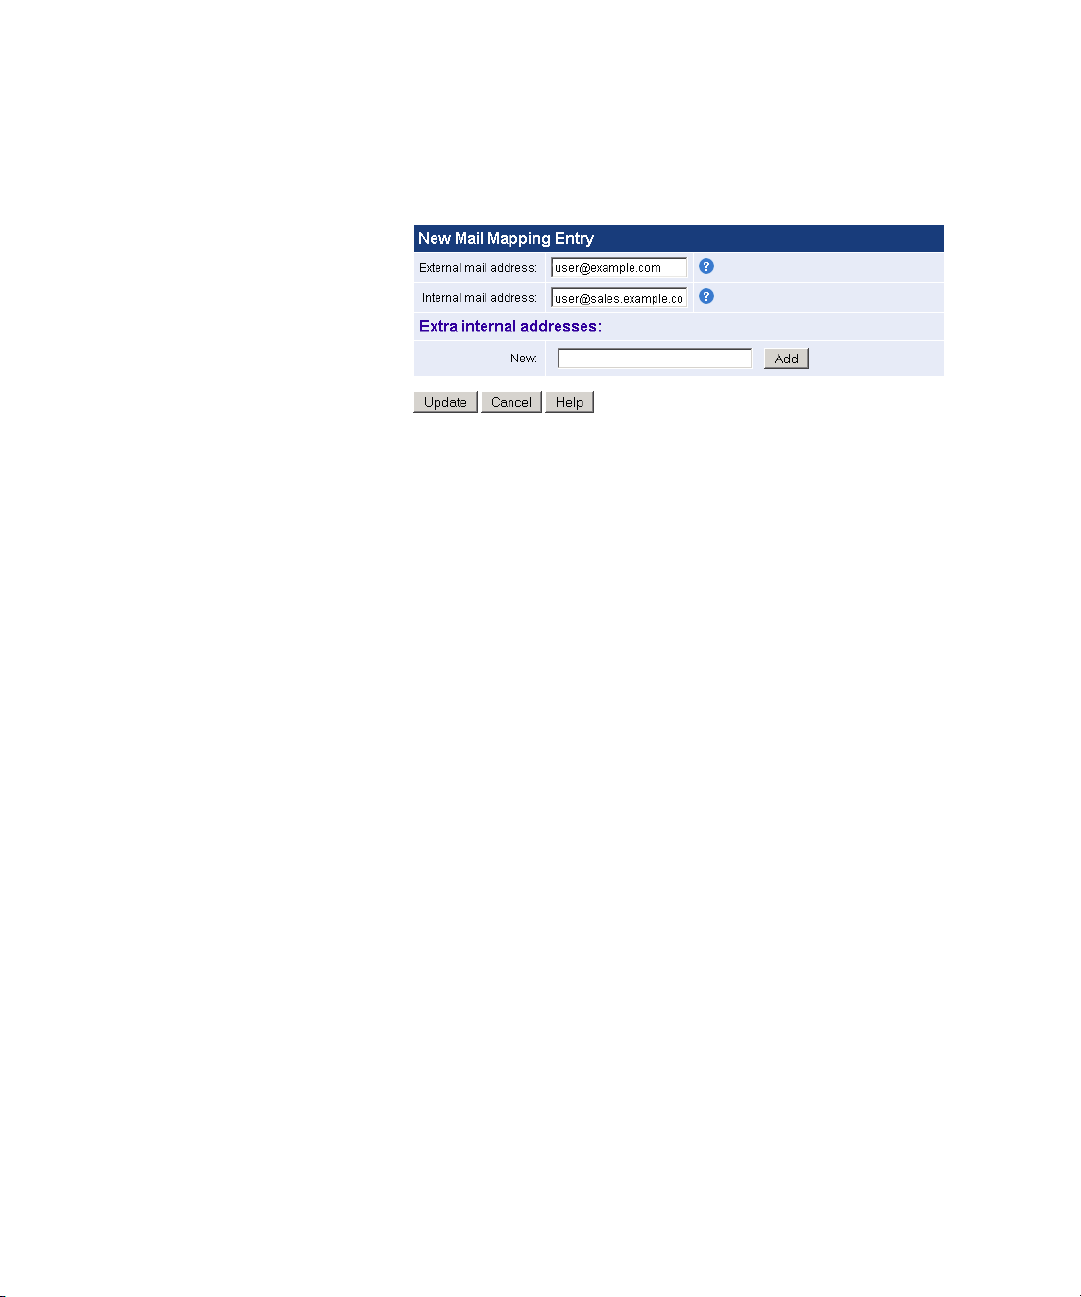
Mail Mappings Mail Mappings are used to map an external address to a different internal
address and vice versa. This is useful for hiding internal mail server
addresses from external users.
For mail originating externally, the mail mapping translates the address in
the To: and CC: mail header field into a corresponding internal address to
be delivered to a specific internal mailbox.
For example, mail addressed to
the internal mail address
user@example.com
user@sales.example.com
can be redirected to
. This enables the
message to be delivered to the user's preferred mailbox.
Similarly, mail originating internally will have the address in the From:,
Reply-To:, and Sender: header modified by a mail mapping so it appears
to have come from the preferred external form of the mail address,
user@example.com
.
Select Mail Delivery -> Mail Mappings to configure your mail mappings.
Page 27
Mail Mappings
27
Click Add to add a new mapping to your list.
■ External mail address — Enter the external mail address that you want
to be converted to the specified internal email address for incoming
mail. The specified internal address will be converted to this external
address for outgoing mail.
■ Internal mail address — Enter the internal mail address that you want
external addresses to be mapped to for incoming mail. The internal
address will be converted to the specified external address for
outgoing mail.
■ Extra internal addresses — Enter any additional internal mappings that
will be included in the outgoing mail conversion.
Click Update when finished.
Uploading Mapping List A list of mappings can also be uploaded in one text file. The file must
contain comma or tab separated entries in the form:
["sender" or "recipient"],[map_in],[map_out],[value ("on" or "off")]
For example:
sender,user@example.com,user@sales.example.com,on
The file (
mailmapping.csv
) should be created in csv file format using Excel,
Notepad or other Windows text editor. It is recommended that you
download the mail mapping file first by clicking Download File, editing it
as required, and uploading it using the Upload File button.
Page 28
28 CHAPTER 2: CONFIGURING MAIL DELIVERY
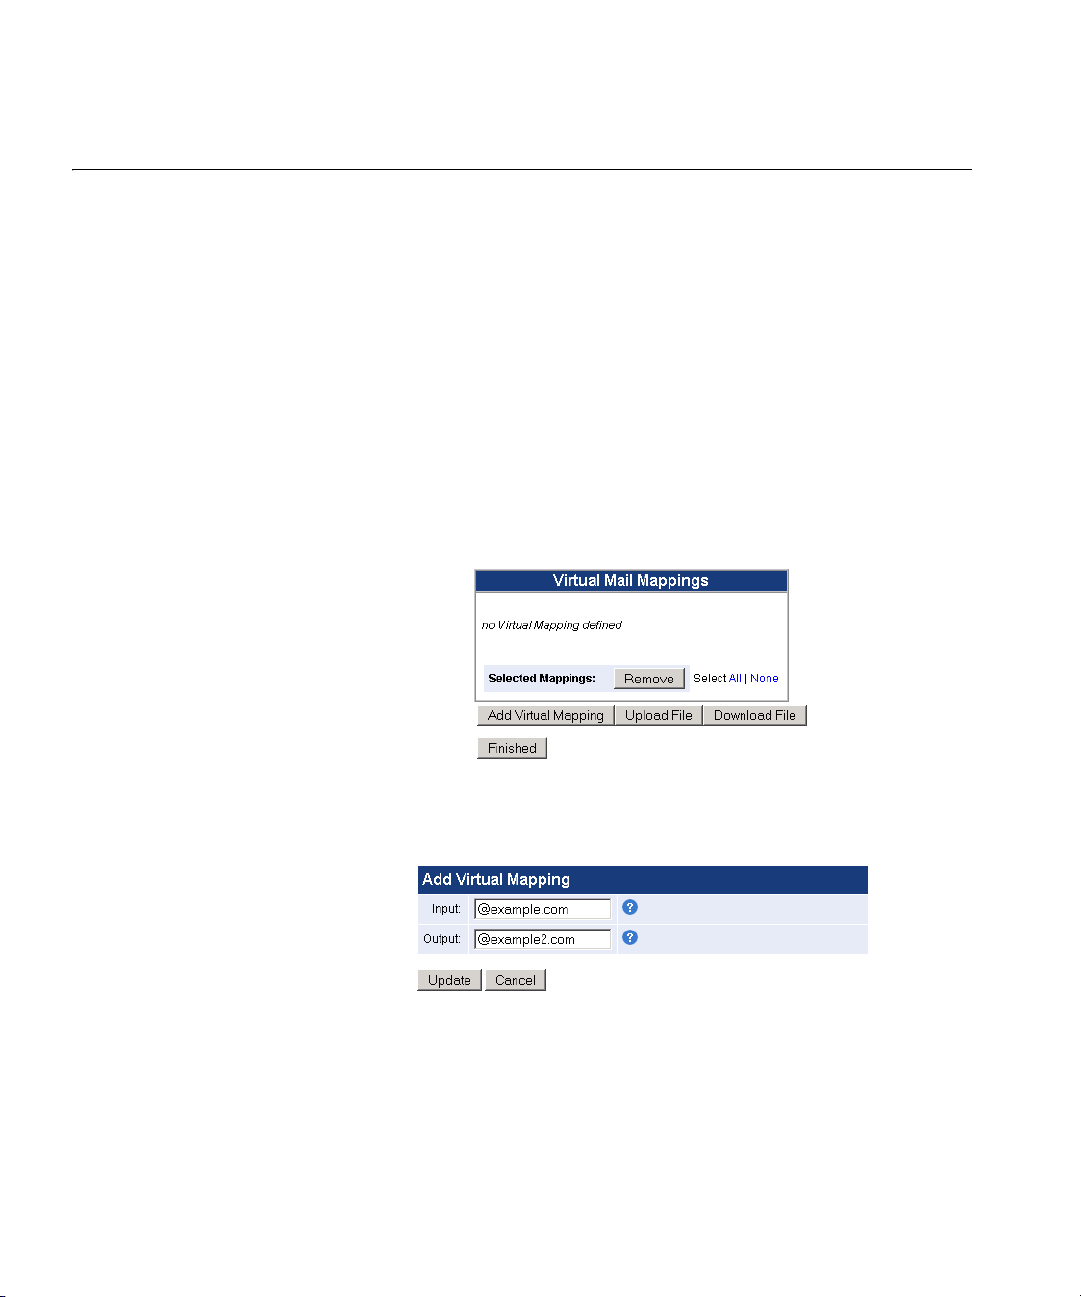
Virtual Mappings Virtual Mappings are used to redirect mail addressed for one domain to a
different domain. This process is performed without modifying the To:
and From: headers in the mail, as virtual mappings modify the
envelope-recipient address.
For example, the 3Com Email Firewall can be configured to accept mail
example.com
for
Email Firewall to distribute mail to multiple internal servers based on the
Recipient: address of the incoming mail.
Virtual Mappings are useful for acting as a wildcard mail mapping, such
as mail for
Select Mail Delivery -> Virtual Mappings to configure your mappings.
and deliver it to
example.com
is sent to
example2.com
. This allows the 3Com
exchange.example.com
.
Click the Add Virtual Mapping button to add a new mapping.
■ Input — Enter the domain or address to which incoming mail is
directed in the Input box.
■ Output — Enter the domain or address to which mail should be
redirected to in the Output box.
Page 29

Virtual Mappings
29
Uploading Virtual
Mapping List
A list of virtual mappings can also be uploaded in one text file. The file
must contain comma or tab separated entries in the form:
[map_in],[map_out]
For example:
user@example.com,user
user@example.com,user@example2.com
@example.com,@example2.com
The file (
virtmap.csv
) should be created in csv file format using Excel,
Notepad or other Windows text editor. It is recommended that you
download the virtual mapping file first by clicking Download File, editing
it as required, and uploading it using the Upload File button.
Page 30

30 CHAPTER 2: CONFIGURING MAIL DELIVERY
Page 31

CONFIGURING MAIL SECURITY
3
This chapter describes how to configure mail security settings on your
3Com Email Firewall, and includes the following topics:
■ Anti-Virus
■ Attachment Control
■ Mail Access/Filtering
■ SMTP Security
■ Malformed Email
Anti-Virus The 3Com Email Firewall provides a built-in virus scanning service.
When enabled, all messages (inbound and outbound) passing through
the 3Com Email Firewall are scanned for viruses.
Viruses can be selectively blocked depending on whether they are found
in inbound or outbound messages. Message attachments are recursively
disassembled to help ensure that viruses cannot be concealed.
When a virus-infected message is received, it can be deleted,
quarantined, or the event can be logged. Quarantined messages may be
viewed, forwarded, downloaded, or deleted. Quarantined messages can
also be automatically deleted based on their age.
Page 32

32 CHAPTER 3: CONFIGURING MAIL SECURITY
Select Mail Delivery -> Anti-Virus from the menu to enable and configure
virus scanning.
■ Enable virus scanning — Select the check box to enable virus
scanning.
■ Quarantine unopenable attachments —This option is enabled by
default to quarantine attachments that are password-protected and
flag them in the logs as "suspicious". This feature prevents
password-protected zip files that contain viruses or worms from being
passed through the system.
This option will only take effect if the Anti-Virus action is set to
Quarantine Mail.
■ Action — Configure the action for both inbound and outbound mail.
Possible actions include:
■ Just log: Log the event and take no further action.
■ Reject mail: The message is rejected with notification to the
sending system.
■ Quarantine mail: The message is placed into quarantine.
■ Discard mail: The message is discarded without notification to the
sending system.
You can view and manage the quarantine area by selecting System Mgmt
-> Quarantine from the menu. See
“Quarantine”
on
page 105
for more
information on the Quarantine area.
Page 33

Anti-Virus
Notifications Notifications for inbound and outbound messages can be enabled for all
recipients, the sender, and the administrator. Customize the content for
the
Inbound
and
Outbound
notification in the corresponding text boxes.
33
See
Appendix A “Customizing System Messages”
on
page 125
for a full
list of variables that can be used.
Pattern Files Virus pattern files must be continuously updated to ensure that you are
protected from new virus threats. The frequency of virus pattern file
updates can be configured in the
Select the time interval to check for pattern file updates. Options include
15, 30, and 60 minutes.
Click the Get Pattern Update button to retrieve a new pattern update file
immediately.
Virus Pattern Files
section.
Page 34

34 CHAPTER 3: CONFIGURING MAIL SECURITY
Attachment Control Attachment filtering can be used to control a wide range of problems
originating from the use of attachments, including the following:
■ Viruses — Attachments that can potentially contain viruses can be
blocked.
■ Offensive Content — The 3Com Email Firewall can block the transfer
of images which reduces the possibility that an offensive picture will
be transmitted to or from your company mail system.
■ Confidentiality — Prevents unauthorized documents from being
transmitted through the 3Com Email Firewall.
■ Productivity — Prevents your systems from being abused by
employees.
Select Mail Delivery -> Attachment Control from the menu to configure
your attachment types and actions.
■ Default action — Set the default attachment control action for items
not specifically listed in the
Attachment Types
list. The default is
“Pass” which allows all attachments. Any file types defined in the
Attachment Types
■ Enable Attachment Control — Select the check box to enable
list will override the default setting.
Attachment Control for inbound and/or outbound mail.
■ Attachment Types — Click Edit to configure the attachment types.
■ Action — Select an action to be performed. Options include:
■ Just log: Log the event and take no further action.
■ Reject mail: The message is rejected with notification to the
sending system.
■ Quarantine mail: The message is placed into quarantine.
■ Discard mail: The message is discarded without notification to the
sending system.
Page 35

Attachment Control
Notifications Notifications for inbound and outbound messages can be enabled for all
recipients, the sender, and the administrator. Customize the content for
the
Inbound
and
Outbound
notification in the corresponding text boxes.
35
See
Appendix A “Customizing System Messages”
list of variables that can be used.
on
page 125
for a full
Page 36

36 CHAPTER 3: CONFIGURING MAIL SECURITY
Editing Attachment
Types
Click the Edit button to edit your attachment types. You can add file
.mp3
extensions (
attachment type, choose whether you want to "BLOCK" or "Pass" the
attachment.
Select the
content scanning for attachments with the specified extension. The
attachment will still be checked for viruses if the
option is selected.
), or MIME content types (
DS (Disable Content Scan)
image/gif
check box if you want to disable
). For each
Disable Content Scan
Click the Add Extension button to add a file extension or MIME type to
the list, and then click Update.
The following example adds a MIME type of
attachment types list.
image/png
to the
Page 37

Mail Access/Filtering
37
Mail Access/Filtering The 3Com Email Firewall provides a number of filtering options to ensure
that specific mail messages are not accepted from the incoming SMTP
connection.
In the
Mail Access/Mail Filtering
match for on incoming connections and configure an appropriate action.
The maximum number of recipients and the maximum size of a message
can also be configured.
Select Mail Delivery -> Mail Access/Filtering to configure access patterns
and mail filters.
settings, you can specify patterns to
Page 38

38 CHAPTER 3: CONFIGURING MAIL SECURITY
Specific Access Patterns Click the Add Pattern button to add a new specific access pattern.
■ Pattern — Enter a mail address, hostname, domain name, or IP
Address.
■ Client Access — This parameter is used for domain, hostname, or IP
address patterns. This item is the most reliable and may be used to
block spam as well as whitelist.
Only the Client Access parameter can be relied upon because spammers
can easily forge all other message properties. The other parameters,
however, are useful for whitelisting.
■ HELO Access — This parameter requires either a domain or hostname
pattern. It is not reliable as spammers can fake this property.
■ Envelope-From Access — This parameter requires a valid email address
pattern. It is not reliable as spammers can fake this property.
■ Envelope-To Access — This parameter requires a valid email address
pattern. It is not reliable as spammers can fake this property.
■ If Pattern Matches:
■ Reject: The connection will be dropped.
■ Allow relaying: Messages from this address will be relayed and
processed for spam.
■ Trust: Messages from this address will be relayed and not
processed for spam.
Page 39

Mail Access/Filtering
39
Pattern Based Message
Filtering
Pattern Based Message Filtering is the primary tool for whitelisting and
blacklisting messages. An administrator can specify that mail is rejected
or whitelisted according to the contents of the message envelope,
message header (such as the sender, recipient, subject), and body text.
See “Pattern Based Message Filtering” on page 54 for more details on
configuring these types of filters.
Message Restrictions The following parameters allow you to reject messages based on the
number of recipients, the message size, or free queue space available.
■ Maximum recipients per message — Set the maximum number of
recipients accepted per message. This helps prevent delivery of spam
messages that typically contain a large number of recipients.
■ Maximum message size — Set the maximum message size (in bytes)
that will be accepted by the 3Com Email Firewall. Ensure that the
specified size can accommodate email attachments.
■ Minimum Free Queue Space (Advanced)— Set the minimum free
queue space available (in bytes) before the system will stop receiving
mail. This option only appears if you click the Advanced button.
Page 40

40 CHAPTER 3: CONFIGURING MAIL SECURITY
SMTP Authenticated
Relay
SMTP Banner Click the Advanced button to reveal an option for the SMTP banner.
This feature allows authenticated clients to use the 3Com Email Firewall
as an external mail relay for sending mail. For example, you may have
remote users that need to send mail via this system.
Client systems must use a login and password to authenticate to the
system before being allowed to relay mail. Authenticated relay can also
allow authorized mail servers to use this 3Com Email Firewall as a relay.
Users must have a local account on this 3Com Email Firewall for the
feature to work.
It is recommended that you accept SSL/TLS for incoming mail connections
so that account details cannot be intercepted when the relay is enabled.
“SMTP Security”
See
on
page 41
for more detailed information on
setting up SSL/TLS encryption.
The SMTP banner is exchanged during the HELO session of an SMTP
connection. This banner contains identifying information for your 3Com
Email Firewall which can be used as information to launch attacks against
it. This option allows you to customize the SMTP banner and remove the
3Com Email Firewall’s hostname by using the
Domain only
option.
Page 41

SMTP Security
41
SMTP Security The 3Com Email Firewall offers a simple mechanism for encrypting mail
delivery via SSL (Secure Sockets Layer) and TLS (Transport Layer Security)
support. A flexible policy can be implemented to allow other servers and
clients to establish encrypted sessions with the 3Com Email Firewall to
send and receive mail.
The following types of traffic can be encrypted:
■ Server to Server — Used to create an email VPN (Virtual Private
Network) and protect company email over the Internet.
■ Client to Server — Many email clients support TLS for sending and
receiving mail. This allows email messages to be sent confidentiality
from desktop to desktop but without the difficulties of implementing
other encryption schemes.
Encryption can be enforced between particular systems, such as setting
up an email VPN between two 3Com Email Firewalls at remote sites.
Encryption can also be set as optional so that users who are concerned
about the confidentiality of their messages on the internal network can
specify encryption in their mail client when it communicates with the
3Com Email Firewall.
The 3Com Email Firewall supports the use of certificates to initiate the
negotiation of encryption keys. The 3Com Email Firewall can generate its
own site certificates and it can also import Certificate Authority (CA)
signed certificates.
See “SSL Certificates” on page 94 for more information on installing
certificates.
Page 42

42 CHAPTER 3: CONFIGURING MAIL SECURITY
Select Mail Delivery -> SMTP Security from the menu to enable and
configure email encryption.
Incoming Mail ■ Accept TLS — Enable this option to accept SSL/TLS for incoming mail
connections.
■ Require TLS for SMTP AUTH — This value is used to require SSL/TLS
when accepting mail for authenticated relay. See the
“SMTP
Authenticated Relay” section on page 40 for more detailed
information.
Mail Delivery By Default
■ Offer TLS — Enable this option to offer remote mail servers the option
of using SSL/TLS when sending mail.
■ Enforce TLS — Enabling this option will require the validation of a
CA-signed certificate when delivering mail to a remote mail server.
Failure to do so will result in mail delivery failure.
Page 43

SMTP Security
43
Specific Site Policy
This option supports the specification of exceptions to the default
settings for SSL/TLS. For example, you may need to exempt a mail server
from using SSL/TLS because of lack of TLS support.
To exempt a system, specify the IP Address or FQDN (Fully Qualified
Domain Name) of the remote mail server in the
Add/Update Site
field.
Select Don't Use TLS from the dropdown box and click the Update
button. The exempted mail server will be listed under the
.
Policy
Specific Site
TLS options include the following:
■ Don't Use TLS — TLS Mail Delivery is never used with the specified
system.
■ May Use TLS — Use TLS if the specified system supports it.
■ Enforce TLS — Deliver to the specified system only if a TLS connection
with a valid CA-signed certificate can be established.
■ Loose TLS — Similar to
Enforce TLS
but will accept a mismatch
between the specified server name and the Common Name in the
certificate
See “SSL Certificates” on page 94 for more information on installing
certificates.
Page 44

44 CHAPTER 3: CONFIGURING MAIL SECURITY
Malformed Email Many viruses try to elude virus scanners by concealing themselves in
malformed messages. The scanning engines cannot detect the
attachment and pass the complete message through to an internal
server.
Some mail clients try to rebuild malformed messages and may rebuild or
activate a virus-infected attachment. Other types of malformed messages
are designed to attack mail servers directly. These types of messages are
often used in denial-of-service (DoS) attacks.
The 3Com Email Firewall analyzes each message with very extensive
integrity checks. Malformed messages are quarantined if they cannot be
processed.
Select Mail Delivery -> Malformed Email from the menu to configure
malformed email checks.
■ Enable malformed scanning — Select this option to enable scanning
for malformed emails.
■ Enable NULL Character Detect — Select this option to enable null
character detection. Any messages with null characters in them (a byte
value of 0) will be considered a malformed message.
Page 45

Malformed Email
■ Actions — Select an action to be performed. Options include:
■ Just log: Log the event and take no further action.
■ Reject mail: The message is rejected with notification to the
sending system.
■ Quarantine mail: The message is placed into quarantine.
■ Discard mail: The message is discarded without notification to the
sending system.
■ Notifications — Notifications for inbound and outbound messages
can be enabled for all recipients, the sender, and the administrator,
and the notification message can be customized.
See
Appendix A “Customizing System Messages”
on
page 125
for a full
list of variables that can be used.
45
Page 46

46 CHAPTER 3: CONFIGURING MAIL SECURITY
Page 47

4
ANTI-SPAM CONFIGURATION
This chapter describes how to configure the Anti-Spam features of your
3Com Email Firewall, and includes the following topics:
■ Anti-Spam Features
■ DCC
■ STA
■ Pattern Based Message Filtering
■ Objectionable Content Filtering
■ Trusted Senders List
■ Spam Quarantine
■ Quarantine and Trusted Senders List Users
■ Advanced Anti-Spam Options
Anti-Spam Features The 3Com Email Firewall contains a variety of powerful features to
prevent spam messages, including the following:
■ Server-based tools such as DCC (Distributed Checksum
Clearinghouse), STA (Statistical Token Analysis), Objectionable
Content Filtering, and Pattern Based Message Filtering that prevent
spam messages from being delivered to an end user’s mailbox.
■ User-based tools for managing quarantined spam and building trusted
senders lists for whitelisting.
Page 48

48 CHAPTER 4: ANTI-SPAM CONFIGURATION
Select Mail Delivery -> Anti-Spam from the menu to configure the 3Com
Email Firewall’s Anti-Spam features.
The
Default Anti-Spam Action
the preselected Anti-Spam features. Possible actions include:
defines the type of action to be used for
■ Disable Anti-Spam — The Anti-Spam features are disabled.
■ Set Action to Modify Subject Header — Anti-Spam features are
enabled. Messages determined to be spam will have their subject
field modified with the text [SPAM].
■ Set Action to User-Quarantine Mail — User Spam Quarantine
Anti-Spam features are enabled. Messages determined to be spam
will be redirected to the User Spam Quarantine. The Action for
each feature will be set to
Redirect To
, and the Action data set to
the address of this 3Com Email Firewall for quarantine.
CAUTION: If you set the global Anti-Spam action to User Quarantine
Mail, you must ensure you have local Spam Quarantine users configured
to accept the messages. If there are no Spam Quarantine users
configured, the messages will be rejected.
See
“Quarantine and Trusted Senders List Users”
on
page 67
for more
information on creating Spam Quarantine users.
Page 49

DCC
49
DCC DCC (Distributed Checksum Clearinghouse) is a tool used to identify bulk
mail and is based on a number of servers that maintain databases of
message checksums. These checksums are derived from numeric values
that uniquely identify a message. DCC provides a simple but very
effective way to successfully identify spam and control its disposition
while updating its database with new spam message types.
Mail users and ISPs all over the world submit checksums of all messages
received. The database records how many of each message is submitted.
If requested, the DCC server can return a count of how many instances of
a message have been received. The 3Com Email Firewall uses this count
to determine the disposition of a message.
A DCC server receives no mail, address, headers, or any similar
information, but only the cryptographically secure checksums of such
information. A DCC server cannot determine the text or other
information that corresponds to the checksums it receives. It only acts as
a clearinghouse of counts of checksums computed by clients.
You must allow a connection on UDP port 6277 on your network firewall
or router to allow communications with a DCC server. If this port is not
available, DCC server calls will fail and slow down mail delivery.
Select DCC from the Mail Delivery -> Anti-Spam menu to configure DCC
settings.
■ Action — The action can be one of the following:
■ Just log: An entry is made in the log and no other action is taken.
■ Modify Subject Header: The text specified in Action Data will be
inserted into the message subject line.
■ Add header: An "X-" mail header will be added as specified in the
Action Data.
Page 50

50 CHAPTER 4: ANTI-SPAM CONFIGURATION
■ Redirect to: The message will be delivered to the mail address
specified in Action Data.
■ Reject mail: The mail will not be accepted and the connecting mail
server is forced to return it.
■ BCC (Blind Carbon Copy): The message will be copied to the mail
address specified in Action Data.
■ Action data — Depending on the specified action:
■ Modify Subject Header: The specified text will be inserted into the
subject line, such as [BULK].
■ Add header: A message header will be added with the specified
text, such as [BULK].
■ Redirect to: Send the message to a mailbox such as
spam@example.com
.
STA STA (Statistical Token Analysis) is a sophisticated method of identifying
spam based on statistical analysis of mail content. Simple text matches
can lead to false positives because a word or phrase can have many
meanings depending on the context. STA provides a way to accurately
measure how likely any particular message is to be spam without having
to specify every word and phrase.
STA achieves this by deriving a measure of a word or phrase contributing
to the likelihood of a message being spam. This is based on the relative
frequency of words and phrases in a large number of spam messages.
From this analysis, it creates a table of “discriminators” (words associated
with spam) and associated measures of how likely a message is spam.
When a new incoming message is received, STA analyzes the message,
extracts the discriminators (words and phrases), finds their measures from
the table, and aggregates these measures to produce a spam metric for
the message between 1 and 100.
STA uses three sources of data to build its run-time database:
■ The initial database tables based on analysis of known spam.
■ Tables derived from an analysis of local legitimate mail. This is referred
to as “training.”
Page 51

STA
51
■ Mail identified as "bulk" by DCC is also analyzed to provide an
example of local spam.
Select STA from the Mail Delivery -> Anti-Spam menu to configure STA
settings.
■ STA Mode — Use one of the following three modes for STA:
■ Normal: This is the default mode and is recommended in most
cases. The STA upper threshold is set to 85, and the lower
threshold to 65. Any message with a metric 85 or above will be
considered spam. A metric between 85 and 65 will be considered
Maybe Spam, and will trigger an action if you have the Maybe
Spam option enabled. A metric lower than 65 is considered
legitimate mail.
■ Aggressive: Increases STA’s aggressiveness to ensure more spam is
caught, but also increases the possibility of false positives.The STA
upper threshold is set to 80, and the lower threshold to 50. Any
message with a metric 80 or above will be considered spam. A
metric between 80 and 50 will be considered Maybe Spam, and
will trigger an action if you have the Maybe Spam option enabled.
A metric lower than 50 is considered legitimate mail.
■ Lenient: Reduces the possibility of false positives, but more spam
may get through. The STA upper threshold is set to 90, and the
lower threshold to 80. Any message with a metric 90 or above will
be considered spam. A metric between 90 and 80 will be
considered Maybe Spam, and will trigger an action if you have the
Maybe Spam option enabled. A metric lower than 80 is considered
legitimate mail.
Page 52

52 CHAPTER 4: ANTI-SPAM CONFIGURATION
Spam Action Specify an action when STA flags a message as spam.
■ Action — The action can be one of the following:
■ Just log: An entry is made in the log and no other action is taken.
■ Modify Subject Header: The text specified in Action Data will be
inserted into the message subject line.
■ Add header: An "X-" mail header will be added as specified in the
Action Data.
■ Redirect to: The message will be delivered to the mail address
specified in Action Data.
■ Reject mail: The mail will not be accepted and the connecting mail
server is forced to return it.
■ BCC: The message will be copied to the mail address specified in
Action Data.
■ Action data — Depending on the specified action:
■ Modify Subject Header: The specified text will be inserted into the
subject line, such as [SPAM].
■ Add header: A message header will be added with the specified
text, such as [SPAM].
■ Redirect to: Send the message to a mailbox such as
spam@example.com
.
Maybe Spam Action This features allows you to take action on messages that STA identifies as
“maybe spam” which indicates it could be spam but may also be
legitimate mail. A message is considered to be “maybe spam” if its metric
is between the upper and lower thresholds as configured by your STA
mode (Normal, Aggressive, Lenient).
■ Enable Maybe Spam — Select the check box to enable actions for
“maybe” spam.
■ Action — The action can be one of the following:
■ Just log: An entry is made in the log, and no other action is taken.
■ Modify Subject Header: The text specified in Action Data will be
inserted into the message subject line.
■ Add header: An "X-" mail header will be added as specified in the
Action Data.
Page 53

STA
■ Redirect to: The message will be delivered to the mail address
specified in Action Data.
■ Reject mail: The mail will not be accepted and the connecting mail
server is forced to return it.
■ BCC: The message will be copied to the mail address specified in
Action Data.
■ Action data — Depending on the specified action:
■ Modify Subject Header: The specified text will be inserted into the
subject line, such as [SPAM].
■ Add header: A message header will be added with the specified
text, such as [SPAM].
■ Redirect to: Send the message to a mailbox such as
spam@example.com
.
Diagnostics ■ Enable X-STA Headers — This setting inserts X-STA headers into all
messages. These are not visible to the user (although they can be
filtered in most mail clients), but can be used to gather information on
why mail is processed in a particular way.
The following headers will be inserted:
53
■ X-STA-Metric: The "score" assigned by STA, such as 95, which
would indicate a spam message.
■ X-STA-NotSpam: Indicates the words with the highest non-spam
value found in the message.
■ X-STA-Spam: Indicates the words with the highest spam value
found in the message.
Page 54

54 CHAPTER 4: ANTI-SPAM CONFIGURATION
STA Training The STA training section displays statistics of all mail analyzed by the
3Com Email Firewall.
Click the Rebuild STA button to rebuild the STA database. The STA
run-time engine is built and rebuilt at 12 hour intervals using several
sources such as the supplied spam data, the DCC spam (if enabled), and
local training. Since the database is not built for the first time until 12
hours after installation, you can use this button to immediately rebuild
the STA database.
Click the Delete Training button to delete all training material if your
3Com Email Firewall has been misconfigured and starts to treat
legitimate mail as spam or vice versa.
Pattern Based Message Filtering
Pattern Based Message Filtering is the primary tool for whitelisting and
blacklisting messages. An administrator can specify that mail is rejected
or whitelisted according to the contents of the message envelope,
message header (such as the sender, recipient, subject), and body text.
Select Pattern Based Message Filtering from the Mail Delivery ->
Anti-Spam menu to configure your PBMF rules.
Page 55

Pattern Based Message Filtering
55
Some default PBMF rules are provided and more can be added by clicking
the Add button.
Message Part Select a
sections explain each part of the mail message.
Message Part
from the dropdown list. The following diagram and
Page 56

56 CHAPTER 4: ANTI-SPAM CONFIGURATION
Message Envelope Parameters
These parameters will not be visible to the user. They are the
“handshake” part of the SMTP protocol. You will need to look for these
in the transport logs or have other knowledge of them.
■ <<Mail Envelope>> — This parameter allows for a match on any part
of the message envelope which includes the HELO, Client IP and
Client Host.
■ HELO — This field is easily faked and is not recommended for use in
spam control. It may be useful in whitelisting a source of mail.
Example:
■ Client IP — This field will be accurately reported and may be reliably
used for both blacklisting and whitelisting. It is the IP address of the
system initiating the SMTP connection. Example:
■ Client Host — This field will be accurately reported and may be
reliably used for both blacklisting and whitelisting. Example:
mail.example.com
mail.example.com
.
.
174.17.19.241
.
The following envelope parameters (
Envelope From
) may be visible if your client supports reading the message
Envelope Addr, Envelope To and
source. They can also be found in the transport logs. Other header fields
may be visible as supported by the mail client.
■ Envelope Addr — This matches on either the Envelope To or Envelope
From. These fields are easily faked and are not recommended for use
in spam control. They may be useful in whitelisting a source of mail.
Example:
■ Envelope To — This field is easily faked, and is not recommended for
user@example.com
.
use in spam control. It may be useful in whitelisting a source of mail.
Example:
■ Envelope From — This field is easily faked, and is not recommended
user@example.com
.
for use in spam control. It may be useful in whitelisting a source of
mail. Example:
user@example.com
.
Page 57

Pattern Based Message Filtering
57
Message Header Parameters
Spammers will typically enter false information into these fields and,
except for the Subject field, they are usually not useful in controlling
spam. These fields may be useful in whitelisting certain users or legitimate
source of email.
■ <<Mail Header>> — This parameter allows for a match on any part of
the message header.
■ <<Recipient>> — This parameter matches the To: or CC: fields.
■ CC:
■ From:
■ Message-ID:
■ Received:
■ Reply-to:
■ Sender:
■ Subject:
■ To:
Message Body Parameters
■ <<Raw Mail Body>> — This parameter allows for a match on any part
of the encoded message body. This encoded content includes Base64,
MIME, and HTML. Since messages are not decoded, a simple text
match may not work. Use <<Mail Content>> for text matching on the
decoded content.
■ <<Mail Content>> — This parameter allows for a match on the visible
decoded message body.
STA Token
STA tokens can also be selected for pattern based message filters. This
allows you to match patterns for common spam words that could be
hidden or disguised with fake or invisible HTML text comments that
would not be caught by a normal pattern filter. For example, STA extracts
the token "viagra" from the text "vi<spam>ag<spam>ra" and
"v.i.a.g.r.a.".
Page 58

58 CHAPTER 4: ANTI-SPAM CONFIGURATION
Match Option The match option looks for the specified text in each line. You can specify
one of the following:
■ Contains — Looks for the text to be contained in a line or field. This
allows for spaces or other characters that may make an exact match
fail.
■ Ends with — Looks for the text at the end of the line or field (no
characters, spaces and so on, between the text and the non-printed
end-of-line character.)
■ Matches — The entire line or field must match the text.
■ Starts with — Looks for the text at the start of the line or field (no
characters between the text and the start of line.)
■ Reg Exp — Use a Regular Expression to define a pattern that matches
various text strings.
Pattern Enter the pattern you wish to search for.
Priority Select a priority for the filter (
High, Medium, Low
). The entire message is
read before making the decision. If a message matches multiple filters,
the filter with the highest priority will be used. If more than one matched
filter has the highest priority, the filter with the strongest action will be
used, in order, from highest priority to lowest (
Valid, Accept)
. If more than one matched rule has the highest priority and
Spam, Reject, Trust, Relay,
highest action, then the filter with the highest rule number will be used.
Action When a rule has been triggered, the specified action is carried out:
■ Reject — Mail is received, then rejected before the close of an SMTP
session.
■ Spam — Mail is received, then trained as spam for STA, and then
rejected.
■ Accept — Mail is delivered normally and not trained by STA, or
marked as spam or bulk. Attempted relays are rejected.
■ Valid — Mail is delivered normally and trained as valid by STA.
Attempted relays are rejected.
■ Relay — Relay is enabled for this mail. Mail is not trained by STA.
■ Trust — Relay is enabled for this mail. Mail is trained as valid by STA.
Page 59

Pattern Based Message Filtering
■ Do Not Train — Do not use the message for STA training purposes.
59
This option will not override other PBMF’s if it applies to the same
message.
■ BCC — Send a blind carbon copy mail to the mail address specified in
Action Data. This option only appears if you have a BCC Email Address
set up in the
Preferences
section.
Upload or Download
You can create a list of PBMF rules and upload them together in one file.
File
The file must contain comma or tab separated entries in the form:
[Section],[type],[pattern],[action],[priority(seq)],[rulenumber]
For example:
to:,contains,user@example.com,reject,medium,1
The file (
pbmf.csv
) should be created in csv file format using Excel,
Notepad or other Windows text editor. It is recommended that you
download the PBMF file first by clicking Download File, edit it as required,
and upload it using the Upload File button.
PBMF Preferences Click the Preferences button to set your preferences for any spam PBMF’s.
■ Train as STA Spam — Select this option to allow any mail that triggers
an action to be trained as spam for STA purposes.
■ Action — Specify one of the following actions:
■ Just log: An entry is made in the log and no other action is taken.
Page 60

60 CHAPTER 4: ANTI-SPAM CONFIGURATION
■ Modify Subject Header: The text specified in Action Data will be
inserted into the message subject line.
■ Add header: An "X-" mail header will be added as specified in the
Action Data.
■ Redirect to: The message will be delivered to the mail address
specified in Action Data.
■ Reject mail: The mail will not be accepted and the connecting mail
server is forced to return it.
■ BCC: Send a blind carbon copy mail to the mail address specified in
Action Data.
■ Action data — Depending on the specified action:
■ Modify Subject Header: The specified text will be inserted into the
subject line, such as [SPAM].
■ Add header: A message header will be added with the specified
text, such as [SPAM].
■ Redirect to: Send the message to a mailbox such as
spam@example.com
.
■ PBMF BCC Action — Send a blind carbon copy of the message to the
address specified. This is a separate action from the PBMF spam
actions.
Page 61

Objectionable Content Filtering
61
Objectionable
Content Filtering
The Objectionable Content Filter defines a list of key words that will
cause a message to be blocked if any of those words appear in the
message.
Select Objectionable Content Filtering from the Mail Delivery ->
Anti-Spam menu to configure the filter.
Actions You can set actions for both inbound and outbound messages. The
following actions can be set:
■ Just log: Log the event and take no further action.
■ Reject mail: The message is rejected with notification to the
sending system.
■ Quarantine mail: The message is placed into quarantine.
■ Discard mail: The message is discarded without notification to the
sending system.
Page 62

62 CHAPTER 4: ANTI-SPAM CONFIGURATION
Notifications Notifications for inbound and outbound messages can be enabled for all
recipients, the sender, and the administrator. The content for the
Inbound
See
and
Appendix A “Customizing System Messages”
list of variables that can be used.
Outbound
notification can be customized.
on
page 125
for a full
Upload and Download
Filter List
A predefined list of objectionable words is included with the 3Com Email
Firewall. To customize the list and to add or remove words, click
Download File to download the list to a local system.
Use a text editor to edit the file using one word or phrase per line. When
finished, upload the file by clicking the Upload File button.
Trusted Senders List The Trusted Senders List allows users to define specific email addresses
that are considered “trusted” and bypass the 3Com Email Firewall’s
Anti-Spam controls (DCC, STA, RBL, and PBMF “Spam”).
If the action for an Anti-Spam feature is set to “Reject”, it cannot be
bypassed by the Trusted Senders List. Additionally, the Trusted Senders
List only applies to PBMF “Spam” messages with a low priority.
Local 3Com Email Firewall users can log in and create their own list of
Trusted Senders.
The Trusted Senders List must first be enabled globally by the
administrator by clicking on Trusted Senders List in the Mail Delivery ->
Anti-Spam menu.
■ Enable Trusted Senders List — The Trusted Senders List must be
enabled by the administrator before individual users can add
addresses to their list.
■ Domain Part of Email Address — Enter the mail domain part of the
local user’s email address for the domain you are receiving mail for.
Page 63

Trusted Senders List
■ Maximum number of entries per user — Enter a maximum number of
list entries for each user.
Adding Trusted Senders When the Trusted Senders List option is enabled globally, local 3Com
Email Firewall users can log in and add their own addresses using the
same interface as they use for checking the Spam Quarantine.
See
“Quarantine and Trusted Senders List Users”
on
page 67
for details
on how to add local users to the system.
Log in to the 3Com Email Firewall and select Trusted Senders in the left
menu.
63
Enter an email address and then click the Add button. The specified
address will bypass the 3Com Email Firewall’s Anti-Spam controls when
they send you messages.
Page 64

64 CHAPTER 4: ANTI-SPAM CONFIGURATION
Spam Quarantine The Spam Quarantine contains quarantined mail messages for each local
user on the 3Com Email Firewall.
For each Anti-Spam feature (DCC, STA, and so on) that you want to use
the user Spam Quarantine, you must set the Action to
Redirect To
the Action Data to the 3Com Email Firewall address such as
mail.example.com
.
This will redirect the message to the spam quarantine where it will be
placed in a folder for that particular user. Users can log in to the 3Com
Email Firewall and manage their quarantined spam. Messages can be
viewed, returned to the inbox, or deleted.
Select Spam Quarantine from the Mail Delivery -> Anti-Spam menu.
, and
Spam Quarantine
Configuration
■ Enable Spam Quarantine — Select the check box to enable the spam
quarantine.
■ Expiry Period — Select an expiry period for mail in each quarantine
folder. Any mail quarantined for longer than the specified value will
be deleted.
■ Folder Size Limit — Set a value, in megabytes, to limit the amount of
stored quarantined mail in each quarantine folder.
Page 65

Spam Quarantine
65
User Notification ■ Enable Summary Email — Select the check box to enable a summary
email notification that alerts users to mail that has been placed in their
quarantine folder.
■ Notification Domain — Enter the domain for which notifications are
sent to. This is typically the FQDN (Fully Qualified Domain Name) of
the email server.
■ Notification Days — Select the specific Notification Days to send the
summary.
■ Allow releasing of email — When enabled, a link labelled “Not Spam”
is inserted into the spam summary email so that the user may release
the message to their inbox and additionally add the sender to the their
trusted senders list.
■ Allow reading messages — When enabled, a link is inserted into the
spam summary message to allow the user to read the original
message.
■ Mail Subject — Enter a subject for the notification email.
■ Mail Content Preamble — Customize the preamble that will appear in
the message.
Set Redirect Action for
Anti-Spam Features
For each Anti-Spam feature (DCC, STA, and so on) that you want to use
the user Spam Quarantine, you must set the Action to
Redirect To
, and
the Action Data to the 3Com Email Firewall address such as
mail.example.com
.
CAUTION: You must ensure you have local Spam Quarantine users
configured to accept the quarantined message. If there are no Spam
Quarantine users configured, the message will be rejected.
See
“Quarantine and Trusted Senders List Users”
on
page 67
for more
information on creating Spam Quarantine users.
Page 66

66 CHAPTER 4: ANTI-SPAM CONFIGURATION
Enabling User Access on
a Network Interface
Examining the
Quarantine
You must enable User Access on the network interface to allow users to
login to the Spam Quarantine via that interface.
Select System Config -> Network Settings and go to the
Interface
section.
Network
Select the User Access check box to allow access to the Spam Quarantine
via this interface. Click Apply to save the network settings.
Local Email Firewall users can log in and examine the messages in their
Spam Quarantine. Messages in the quarantine can be released back into
the user’s Inbox by clicking the Not Spam link.
Page 67

Quarantine and Trusted Senders List Users
67
Quarantine and
Trusted Senders List
Users
You must add local users to the 3Com Email Firewall if you require the
ability for users to view the Spam Quarantine or configure their Trusted
Senders Lists.
Select System Config -> Users from the menu.
Click the Add a New User button to add a new user to the system.
Enter a user ID and a password.
If this user will be an additional administrator for this Email Firewall, select
the Full Admin option in the
Administrator Privileges
section.
Page 68

68 CHAPTER 4: ANTI-SPAM CONFIGURATION
Upload and Download
User Lists
Enabling User Access on
a Network Interface
You can upload lists of users using comma or tab separated text files.
You can specify the login ID, password, email address, and disk quota in
megabytes. Use the following format:
[login],[password],[email address],[quota]
For example,
user,ajg7rY,user@example.com,0
The file (
user.csv
) should be created in csv file format using Excel,
Notepad or other Windows text editor. It is recommended that you
download the user list file first by clicking File Download, editing it as
required, and then uploading it using the File Upload button.
You must enable User Access on the network interface to allow users to
log in via that interface.
Select System Config -> Network Settings and go to the
Interface
section.
Network
Select the User Access check box to allow local access to the Spam
Quarantine and Trusted Senders List via this interface. Click Apply to save
the network settings.
Page 69

Advanced Anti-Spam Options
69
Advanced Anti-Spam
Options
RBL (Realtime Blackhole
List)
Click the Advanced button to reveal the following advanced Anti-Spam
options.
RBLs contain the addresses of known sources of spam and are
maintained by both commercial and non-commercial organizations.
The RBL mechanism is based on DNS. Every server that attempts to
connect to the 3Com Email Firewall will be looked up on the specified
RBL servers using DNS. If the server is blacklisted, then the server is
considered an origin of known spam and the connection dropped.
Note the following considerations when using RBL:
■ If the RBL server is not available, the DNS request times out. This may
affect performance and requires monitoring for timed-out
connections.
■ If a message that you want to receive is blocked by an RBL, add an
item to the
Pattern Based Message Filtering
list to “Trust” (to train for
STA) or “Accept” (not train for STA) this message.
■ Enable RBLs — Select this check box to enable RBLs.
■ Check Relays — The Check Relays setting deals with spammers who
are relaying their messages through an intermediate server. The
information about the originating server is carried in the headers of
the message which is checked against the RBL. For example, set
to “2” to look for the last two relays.
Relays
■ Action — Specify one of the following actions:
■ Just log: An entry is made in the log and no other action is taken.
■ Modify Subject Header: The text specified in Action Data will be
Check
inserted into the message subject line.
Page 70

70 CHAPTER 4: ANTI-SPAM CONFIGURATION
■ Add header: An "X-" mail header will be added as specified in the
Action Data.
■ Redirect to: The message will be delivered to the mail address
specified in Action Data.
■ Reject mail: The mail will not be accepted and the connecting mail
server is forced to return it.
■ BCC: The message will be copied to the mail address specified in
Action Data.
■ Action data — Depending on the specified action:
■ Modify Subject Header: The specified text will be inserted into the
subject line, such as [RBL].
■ Add header: A message header will be added with the specified
text, such as [RBL].
■ Redirect to: Send the message to a mailbox such as
spam@example.com
■ RBL Servers — Click the Edit button to edit your RBL server addresses.
.
Mail Access/Filtering In the
Mail Access/Mail Filtering
settings, you can specify patterns to
match for on incoming connections and configure an appropriate action.
The maximum number of recipients and the maximum size of a message
can also be configured.
See “Mail Access/Filtering” on page 37 for more detailed information on
configuring Mail Access/Filtering settings.
Anti-Spam Header This feature adds a header to scanned email messages displaying the
results of the 3Com Email Firewall’s Anti-Spam processing.
The header output is similar to the following:
X-AntiSpam: sta:false/0/020,dcc:off,rbl:off,wlbl:none
Page 71

REPORTING
5
This chapter describes the reporting features of the 3Com Email Firewall,
and includes the following topics:
■ Generating Reports
■ System Logs
■ Email History
■ System History
■ Configure History Settings
Generating Reports The 3Com Email Firewall's reporting features provide a comprehensive
range of informative reports including the following:
■ Traffic Summary
■ System Health
■ Top Mailbox Disk Users
■ Spam Statistics
■ Virus Reports
■ Email History
■ System Events History
The reports are derived from information written to the various systems
logs and then stored in the database. Reports are stored on the system
for online viewing and can also be emailed automatically to specified
users. Reports can be generated on demand and at scheduled times.
Reports can also be filtered to provide reporting on only mail domains,
user groups, or specific hosts.
Page 72

72 CHAPTER 5: REPORTING
Administrators can specify which data is to be included in each report,
how it is to be displayed, the order of data, and the number of entries to
report, such as “Top 10 Disk Space Users”.
Select Reporting from the menu to view and configure reports.
To view a previously generated report, click on the report name. To
configure a report, click the Configure button. Click Generate Now to
immediately generate a report.
Report Configuration Click the Configure button to set up a new report.
■ Report Title — Title to display at the top of the report.
■ Email To (HTML, PDF) — Specify an email address, such as
admin@example.com
. Use a comma-separated list if you wish to
distribute the report to multiple users.
Page 73

Generating Reports
■ Paper Size — For PDF format, select the paper size such as Letter, A4,
or Legal.
■ Describe fields in report — Select this option to include a short
description of each field in the report.
Report Generation ■ Enable Auto Generate — Select this check box to automatically
generate reports.
■ Auto Generate Report at — Select the time to generate the report.
■ Auto Generate on Week Days… — Choose the days of the week to
generate the report.
■ ...and/or Day(s) of Month — Choose specific days of the month to
generate the report.
■ Timespan Covered — Select the timespan covered for this report.
■ Timespan Ends at… — Select the end of the timespan. It is
recommended to set the timespan end time a few hours prior to
report generation to allow all deferred mail to be finalized.
■ ...Timespan Offset (Days Ago) — Select the number of days to offset
the timespan. This amount of time is subtracted before setting the
timespan.
73
Click the Generate Now button to generate a report on demand using
the specified settings. This will also automatically email the report to the
specified address.
To generate a report daily at 2.00am for the previous day (up to
11:00pm) use the following settings:
Auto Generate Report at: 02:00
Auto Generate on Week Days:All
Timespan covered:1 day
Timespan ends at:23:00
Timespan offset:0 days
Page 74

74 CHAPTER 5: REPORTING
Report Fields The
information you wish to include in the report. You can include or exclude
fields as required. Use the
that field, such as listing the “Top Ten” viruses.
Fields
section allows you to choose which fields or items of
Limit
column to limit the number of items for
Table 3 Report Field Descriptions
Field Description
System name The system host name, such as
Date time Date and time of report generation.
Version Software version.
Timespan Period covered by report.
Uptime How long the system has been running since the
Filter summary A summary of the filters applied to this report.
Head comment Freeform comment that you may enter.
Traffic blocking A table showing the number of messages
mail.example.com
last reboot.
caught by each method over the preceding
hour, day, week, month, and report timespan.
.
Page 75

Generating Reports
Field Description
Blocking pie chart A pie chart of the same data as the right hand
column of Traffic Blocking (timespan).
Total traffic Received Graphs of the number of messages received per
hour over the reporting period (timespan).
Total traffic sent Graphs of the number of messages sent per
hour over the reporting period (timespan).
Total received message
size
Total sent out message
size
Processing time The average time a message waits between
Spam metrics Graph of the number of messages per STA
Top virus List of the top viruses found.
Recent virus list List of the most recent viruses found.
Top PBMFs List of the top pattern based message filters.
Top forbidden
attachments
Recent forbidden
attachments
Disk usage Shows disk usage by partition.
Disk load Graph of average disk load (MB/s) over the
CPU load Graph of average CPU load (number of waiting
NIC load Graph for each active network interface load
Swap usage Swap file usage.
Paging Paging usage.
Top spam quarantine
sizes
Active mail queue Graph showing number of queued messages (as
Deferred mail queue Graph showing maximum number of messages
Total message size of incoming messages per
hour.
Total message size of outgoing messages per
hour.
initial handshake and disposition, including
RBL/DCC lookups if any. Messages that are
deferred are not included.
assigned spam metric (0 - 100).
List of the top forbidden attachments caught by
attachment control.
List of the most recent forbidden attachments
caught by attachment control.
reporting period.
processes) over the reporting period.
(Bytes/hour) for the reporting period.
Lists the top users based on the size of their
spam quarantine in MB.
sampled every 5 minutes) over the reporting
period.
(as sampled every 5 minutes) in the deferred
queue over the reporting period.
75
Page 76

76 CHAPTER 5: REPORTING
Field Description
Top senders The top sender (judged by Envelope from, not
Header from) during the report timespan, sorted
by number of messages. If the title contains one
or more comma characters, the list will be
restricted to those senders which include any
string after the first comma. The limit parameter
in the report configuration sets the maximum
number listed.
Top sending hosts The top sending hostnames (in FQDN format)
during the report timespan, sorted by number of
messages. If the title contains one or more
comma characters, the list will be restricted to
those sender FQDNs which include any string
after the first comma. The limit parameter in the
report configuration sets the maximum number
listed.
Top recipients The top recipients during the report timespan,
sorted by number of messages. The sum of the
message sizes is also listed. If the title contains
one or more comma characters, the list will be
restricted to those recipients which include any
string after the first comma. The limit parameter
in the report configuration sets the maximum
number listed.
DCC Servers Graph showing the average round trip, in
seconds, to the preferred DCC server over the
reporting period.
RBL Servers Graph showing the round trip, in seconds, to
the RBL servers over the reporting period. The
value is averaged over all enabled RBL servers.
End comment Comment text.
Extra comment Extra comment text.
Page 77

System Logs
System Logs The system logs provide detailed information on all mail transport and
system related events.
Select Reporting -> System Logs from the menu to view the log files.
77
The Mail Transport log is the most important log to monitor because it
contains a record of all mail processed by the 3Com Email Firewall.
Other logs include:
■ Authentication — Contains messages from Spam Quarantine logins.
■ Web Server Access — A log of access to the web server.
■ Web Server Errors — Contains error messages from the web server.
■ Web Server Encryption Engine — Contains messages for the web
server encryption engine.
■ Web Server Encrypted Accesses — A log of SSL web server access.
■ Messages — Contains system messages, including file uploads.
■ Kernel — A log of kernel generated messages.
■ Archive — This option allows you to view an amalgamation of all the
logs.
Page 78

78 CHAPTER 5: REPORTING
Viewing Log Details Select a specific log to view, search, and download its detailed entry
information.
Configuring a Syslog
Server
Logs can also be forwarded to a
syslog
server which is a host that collects
and stores log files from many sources.
You can define a syslog host in the System Config -> Network Settings
screen.
Page 79

Email History
79
Email History Every message that passes through the 3Com Email Firewall generates a
database entry that records information about how it was processed,
including a detailed journal identifying the results of the mail processing.
Select Reporting -> Email History from the menu to view the message
history.
You can quickly search the email history by entering a specific field to
search on and a pattern. Click on an individual message Queue ID to
display the details for the message and how it was processed.
Page 80

80 CHAPTER 5: REPORTING
System History The system history is a record of system events, such as login failures, and
disk space and CPU usage.
Select Reporting -> System History from the menu to view the system
event history.
Event Types The following table describes the event types that can appear in the
System History database.
Table 4 System Events
Event Type Description Parameters
Admin Actions Shows
AV Updates The time of the
CPU Load The load
administrative
functions that
have been
performed
last update, its
success or
failure, and the
name of the
new pattern file
average for the
past 1, 5, and
15 minutes
Number of processes waiting
for CPU. A very busy system
may have 50 or more.
Page 81

System History
Event Type Description Parameters
DCC Preferred The round trip
time to
preferred DCC
server
Disk IO MB per second
transfer, KB per
transfer,
transfers per
second for a
disk
Disk Usage Amount of used
and total
available disk
space for each
disk slice
Logins A single web
based login
Logouts A single web
based logout
(not including
timed-out
sessions)
Login failure Login failure UserID and IP address
Network IO Amount of data
in and out of
network card
Paging This shows the
swap paging
activity (pages
in/out) over 5
seconds
Queue Sizes Number of
messages in
active and
deferred queues
RBL Responses Average round
time to RBL
server with
minimum and
maximum values
Swap usage This shows the
swap usage,
and total swap
space available
Name of preferred server
UserID and IP address
UserID and IP address
Active queue size in bytes,
deferred queue size in bytes
RBL server
Used and available swap
space in megabytes
81
Page 82

82 CHAPTER 5: REPORTING
Configure History Settings
In the
Configure Reporting History Size
screen, you can configure how
many emails and system events to keep in the logs and how long you
want to keep them.
Setting higher values will use up more disk space and cause backups to
take much longer to complete if they include the reporting data.
Select Reporting -> Configure History from the menu to modify your
reporting history settings.
■ Limit Total Number of Email to — Select the total number of emails to
keep in the email history.
■ Limit Number of System Events (per event type) — Select the limit for
the number of system events to keep.
■ Report Expiry — Choose how long you wish to keep reports.
Page 83

6
SYSTEM CONFIGURATION
This chapter describes how to view and modify the system configuration
of the 3Com Email Firewall, and includes the following topics:
■ Setup Wizard
■ Admin Account
■ System Users
■ Network Settings
■ Web Proxy
■ Static Routes
■ Licensing
■ SSL Certificates
■ Software Updates
Setup Wizard The Setup Wizard can quickly guide you through the steps to change
your networking or system mail setup information. For additional
information regarding the Setup Wizard, refer to the
that you received with your 3Com Email Firewall.
Using the Setup Wizard, you can change the following settings:
■ Admin Password
■ Time Zone
■ Network Configuration
■ Mail Configuration
Installation Guide
Page 84

84 CHAPTER 6: SYSTEM CONFIGURATION
Select System Config -> Setup Wizard from the menu to start the Setup
Wizard.
Click Finish at any time to exit the Setup Wizard. Click Back to go to the
previous step.
Change Password Enter your old password and set a new password if required. Click Apply
if you have made any changes. If you do not want to modify your current
password, leave all fields blank and click Next to continue.
Time Zone Modify your time zone, if required. Click Apply if you have made any
changes. If you do not want to modify your time zone information, click
Next to continue.
Page 85

Setup Wizard
Network Configuration Modify your network settings if required, and click Apply if you have
made any changes. If you do not want to modify your networking
information, click Next to continue.
85
Mail Configuration Modify your mail configuration and proxy settings if required, and click
Apply if you have made any changes. If you do not want to modify your
mail configuration settings, click Finish.
Page 86

86 CHAPTER 6: SYSTEM CONFIGURATION
Admin Account Select System Config -> Admin Account from the menu to modify the
administrator account settings.
You can modify the address to which mail to the administrator is
forwarded to, and change the admin account password.
CAUTION: If you forget your admin password, you will have to reinstall
the system. Please choose your password carefully, and store it in a safe
place. See
Appendix B
on
page 127
for information on resetting the
system if you have forgotten your admin password.
Click Add Admin User to create a new user with admin privileges.
System Users You must add local users to the 3Com Email Firewall if you require the
ability to view the user Spam Quarantine or configure the Trusted
Senders Lists.
Select System Config -> Users to manage your local users.
Page 87

System Users
Click the Add a New User button to add a new user to the system.
Enter a User ID and a Password.
Creating an Admin User If this user will be an additional administrator for this 3Com Email
Firewall, select the Full Admin option in the
Administrator Privileges
section.
87
When a Full Admin user logs into the 3Com Email Firewall, they must
click the Administration link on the left menu to open up the admin
menu.
Page 88

88 CHAPTER 6: SYSTEM CONFIGURATION
Upload and Download
User Lists
Enabling User Access on
a Network Interface
You can upload lists of users using comma or tab separated text files. You
can specify the login ID, password, email address, and disk quota in
megabytes. Use the following format:
[login],[password],[email address],[quota]
For example,
user,ajg7rY,user@example.com,0
The file (
user.csv
) should be created in csv file format using Excel,
Notepad or other Windows text editor. It is recommended that you
download the user list file first by clicking File Download, editing it as
required, and then uploading it using the File Upload button.
You must enable User Access on the network interface to allow users to
log in via that interface.
Select System Config -> Network Settings and go to the
Interface
section.
Network
Select the User Access check box to allow local access to the Spam
Quarantine and Trusted Senders List via this interface. Click Apply to save
the network settings.
Page 89

Network Settings
89
Network Settings The
such as the Hostname, Domain name, IP address, Name Server, and
network interface settings.
Select System Config -> Network Settings from the menu to manage
your networking information.
■ Hostname — Enter the hostname (not the full domain name) of the
Network Settings
screen allows you to modify your network settings
3Com Email Firewall, such as
mail.example.com
.
mail
in the domain name
■ Domain — Enter the domain name, such as
■ Gateway — Enter the default gateway for this 3Com Email Firewall.
example.com
.
This is typically your network router.
■ Syslog host — Enter an optional
A
syslog
server collects and stores log files from many sources.
■ Name Server — Enter the address of your DNS server, and enter
syslog
host to forward logs to.
secondary name servers if required.
Page 90

90 CHAPTER 6: SYSTEM CONFIGURATION
Network Interfaces In the
information such as the IP address, netmask, and enable local user access.
■ IP Address — Enter the IP address for this 3Com Email Firewall.
■ Netmask — Enter the appropriate netmask for your network.
■ Media — Select the type of network card. Use
automatic configuration.
■ User Access — Enables local access to the Spam Quarantine and
Trusted Senders List on this interface.
Network Interfaces
section, you can modify your network interface
Auto select
for
Advanced Parameters The following advanced network parameters are enabled by default and
should only be modified if you are experiencing connection problems
with certain mail delivery hosts.
■ Enable RFC 1323 — These are TCP extensions to improve
performance and to provide reliable operation over very high-speed
paths.
■ Enable RFC 1644 — This is an experimental TCP extension for efficient
transaction-oriented (request/response) service.
Page 91

Web Proxy
Web Proxy A secure proxy server may be used to cache and proxy requests to
systems external to your network, such as an HTTP web proxy server.
If you use a proxy server on your network, you must enter the proxy
server address and a username and password to allow Anti-Virus,
Anti-Spam, and Licensing services to retrieve updates.
Select System Config -> Web Proxy from the menu.
91
■ Use Secure Web Proxy — Select the check box to enable use of the
secure web proxy.
■ Server Address — Enter the proxy server address in the format
https://hostname:port, such as
■ User Name — Enter a username to log into the secure web proxy
https://proxy.example.com:8080
.
server.
■ Password — Enter a corresponding password for the user name you
entered.
■ Re-Enter Password — Confirm the password.
Page 92

92 CHAPTER 6: SYSTEM CONFIGURATION
Static Routes Static routes are required if the mail servers to which mail must be relayed
are located on another network, such as behind an internal firewall or
accessed via a VPN.
Select System Config -> Static Routes from the menu to define any static
routes.
To add a new static route, enter the network address, netmask and
gateway for the route, and then click New Route.
Page 93

Licensing
93
Licensing Your 3Com Email Firewall must be licensed before it can process mail.
The
Licensing
and enter a new license key if you are renewing or upgrading your
current license.
Select System Config -> Licensing from the menu to view and manage
your license information.
screen allows you to view your current license information
Installed License The
If your license expires, the system will not accept incoming mail
connections. You can switch to
corresponding check box which will allow you to accept mail, but the
Anti-Spam and Anti-Virus services will not scan these messages.
Installed License
section displays your current license information.
Degraded
mode by selecting the
Page 94

94 CHAPTER 6: SYSTEM CONFIGURATION
License Agreements Click the specified button to view the license agreements for the 3Com
Email Firewall, the Anti-Virus software, and Third Party Open Source
products.
License Renewal or
Upgrade
To renew or upgrade your license, you will need an annual subscription
renewal key or an additional user key. You can obtain a key by contacting
your 3Com reseller, or you can visit
When you have obtained a renewal or upgrade key, return to this screen
and enter the key in the
New License Key
www.3com.com.
field and click License.
SSL Certificates A valid SSL certificate is required to support the encryption services
available on the 3Com Email Firewall. The SSL encrypted channel from
the server to the web browser (such as when using a URL that begins
https
with
certificates generated by the 3Com Email Firewall, or import certificates
purchased from commercial Certificate Authorities (CA) such as Verisign.
The disadvantage of self-signed certificates is that web browsers will
display warnings that the "company" (in this case, the 3Com Email
Firewall) issuing the certificate is untrusted. When you purchase a
commercial certificate, the browser will recognize the company that
signed the certificate and will not generate the warning messages.
A web server digital certificate can only contain one domain name, such
server.example.com
as
one certificate per IP address. Some web browsers will display a warning
message when trying to connect to any domain on the server that has a
different domain name than the server specified in the single certificate.
Digital certificates eventually expire and are no longer valid after a certain
period of time, and need to be renewed before the expiry date.
), requires a valid digital certificate. You can use self-signed
, and a limitation in the SSL protocol only allows
Page 95

SSL Certificates
95
To install a commercial certificate:
1 Select System Config -> SSL Certificates from the menu to view and
manage your certificates.
2 Create a new self-signed certificate by clicking the Generate a
'self-signed' certificate button.
3 Click Apply. You must then reboot to install the new certificate.
4 Click the Show installed certificate button to display the certificate and an
accompanying certificate request.
5 Forward the request portion of the certificate to a commercial Certificate
Authority (CA) for signing.
6 When received, install the commercial certificate by clicking the Load a
site certificate button. Copy and paste the SSL Certificate and private key
portions into the indicated fields, and then click Continue.
7 When completed, click Show installed certificate to ensure the certificate
is loaded and that the information is correct.
Page 96

96 CHAPTER 6: SYSTEM CONFIGURATION
Software Updates It is important to keep your 3Com Email Firewall software updated with
the latest patches and upgrades. A key aspect of good security is
responding quickly to new attacks and exposures by updating the system
software when updates are available.
Software updates can be delivered or retrieved using a variety of
methods, including email, FTP, or from 3Com’s support servers.
The
Security Connection
automatically and notify you when they are available.
The
Update Software
(loaded onto the 3Com Email Firewall, but not applied) and
Updates
uninstall a previously installed update.
Select System Config -> Software Updates from the menu to install new
updates.
(applied and active.) You can install an available update, or
, if enabled, will download any patches
screen shows updates that are
Available Updates
Installed
Uploading a Software
Update
When these software update files are downloaded to your local system,
they can be installed by clicking Browse in the
section, navigating to the downloaded file, and then clicking Next.
The update will now appear in the
section. Click on the update you want to apply, then click Install. After
applying any updates, you must restart the system.
Available Updates (not installed)
Upload a Software Update
Page 97

Software Updates
97
When the system restarts, the update will appear in the
section.
Before applying any update, backup your system configuration and data.
Select System Mgmt -> Backup & Restore from the menu to perform a
backup.
Security Connection The
that polls 3Com’s support servers for new updates, security alerts, and
other important information. When new information and updates are
received, an email can be sent to the administrator.
Click the Security Connection link in the System Config -> Software
Updates screen.
■ Send Email — Enable this option to send an email to the address
Security Connection
specified in the
Send Emails To
available.
Installed Updates
is a service running on the 3Com Email Firewall
field when an Email Firewall update is
■ Send Emails To — Specify an email address to receive messages from
Security Connection.
Click the Connect Now button to run Security Connection immediately.
Page 98

98 CHAPTER 6: SYSTEM CONFIGURATION
Page 99

SYSTEM MANAGEMENT
7
This chapter describes how to use the system management features of
the 3Com Email Firewall, and includes the following topics:
■ Status and Utility
■ Mail Queues
■ Quarantine
■ Daily Tasks
■ Backup and Restore
■ Reboot and Shutdown
■ Reset to Factory Settings
Status and Utility Select System Mgmt -> Status and Utility from the menu to view a
number of system statistics such as the total system uptime, load average,
the amount of used swap and disk partition space, and NTP server status.
Page 100

100 CHAPTER 7: SYSTEM MANAGEMENT
Utility Functions The
network and diagnostic utilities.
■ Mail System Control — Use this button to Stop and Start all mail
■ Mail Receiving — Use this button to disable and enable mail receiving
■ Mail Sending — Use this button to disable and enable mail sending
Utility Functions
queues.
only.
only.
section allows you to control mail services and run
■ Flush Mail Queue — The Flush Mail Queue button is used reprocess
any queued mail in the system. Only click this button once. If the mail
queue does not process, you may be experiencing other types of
delivery problems and reprocessing the mail queue will only add
additional load to the system.
 Loading...