

Hp COLOR LASERJET CP1210 User Manual [ru]

HP Color LaserJet CP1210 Series Printer
Getting Started Guide
Guide de mise en route
Кратко ръководство за потребителя
Οδηγός Εκκίνησης
Алғашқы іске қосу жөніндегі нұсқаулық
Руководство по началу работы
Başlangıç Kılavuzu
Посібник користувача
Imprimante HP Color LaserJet série CP1210

Copyright and License
© 2007 Copyright Hewlett-Packard Development Company, L.P.
Reproduction, adaptation or translation without prior written
permission is prohibited, except as allowed under the copyright
laws.
The information contained herein is subject to change without
notice.
The only warranties for HP products and services are set forth in
the express warranty statements accompanying such products
and services. Nothing herein should be construed as constituting
an additional warranty. HP shall not be liable for technical or
editorial errors or omissions contained herein.
Part number: CC376-90941
Edition 1, 10/2007
FCC Regulations
This equipment has been tested and found to comply with the
limits for a Class B digital device, pursuant to Part 15 of the FCC
rules. These limits are designed to provide reasonable protection
against harmful interference in a residential installation. This
equipment generates, uses, and can radiate radio-frequency
energy. If this equipment is not installed and used in accordance
with the instructions, it may cause harmful interference to
radio communications. However, there is no guarantee that
interference will not occur in a particular installation. If this
equipment does cause harmful interference to radio or television
reception, which can be determined by turning the equipment
off and on, correct the interference by one or more of the
following measures:
• Reorient or relocate the receiving antenna.
• Increase separation between equipment and receiver.
• Connect equipment to an outlet on a circuit different from
that to which the receiver is located.
• Consult your dealer or an experienced radio/TV technician.
Any changes or modications to the product that are not
expressly approved by HP could void the user’s authority to
operate this equipment. Use of a shielded interface cable is
required to comply with the Class B limits of Part 15 of FCC
rules. For more regulatory information, see the electronic
user guide. Hewlett-Packard shall not be liable for any direct,
indirect, incidental, consequential, or other damage alleged in
connection with the furnishing or use of this information.
Trademark Credits
Windows® is a U.S. registered trademark of Microsoft
Corporation.
Copyright et licence
© 2007 Copyright Hewlett-Packard Development Company, L.P.
Toute reproduction, adaptation ou traduction sans autorisation
expresse par écrit est interdite, sauf dans les cas permis par les
lois régissant les droits d'auteur.
Les informations contenues dans ce document peuvent être
modiées sans préavis.
Les seules garanties pour les produits et services HP sont décrites
dans les déclarations de garantie expresses accompagnant
ces mêmes produits et services. Les informations contenues
dans ce document ne constituent en aucun cas une garantie
supplémentaire. HP n'est pas responsable des erreurs d'ordre
technique ou éditorial ou des omissions contenues dans ce
document.
Référence : CC376-90941
Edition 1, 10/2007
Réglementations de la FCC
Les tests effectués sur cet équipement ont déterminé qu’il est
conforme aux prescriptions des unités numériques de classe B,
telles que spéciées à l’article 15 des normes de la FCC
(Commission fédérale des communications). Ces limites
sont destinées à assurer une protection sufsante contre les
interférences produites dans une installation résidentielle. Cet
équipement génère, utilise et peut émettre de l’énergie sous
forme de fréquences radio. Si ce matériel n’est pas installé
et utilisé conformément aux instructions, il peut causer des
interférences nuisibles aux communications radio. Aucune
garantie n'est néanmoins fournie quant à l'apparition
d'interférences dans une installation particulière. Si cet
appareil provoque des interférences nuisibles (qui peuvent
être déterminées en éteignant et rallumant l'appareil) à des
communications radio ou télévision, corrigez ce problème en
appliquant une ou plusieurs des mesures suivantes :
• Réorientez ou déplacez l’antenne de réception.
• Augmentez la distance séparant l’équipement du récepteur.
• Connectez l’équipement à une prise située sur un circuit
différent de celui sur lequel se trouve le récepteur.
• Consultez votre revendeur ou un technicien radio/télévision
expérimenté.
Toute modication apportée au produit sans le consentement de
HP peut se traduire par la révocation du droit d’exploitation de
l’équipement dont jouit l’utilisateur. Un câble d’interface blindé
est requis an de satisfaire aux stipulations de l’article 15 des
réglementations de la FCC sur les appareils de classe B. Pour de
plus amples informations sur les réglementations, reportez-vous
au Guide de l'utilisateur au format électronique. Hewlett-Packard
ne sera en aucun cas tenu responsable des dommages directs,
indirects, accessoires, consécutifs ou autres pouvant résulter de
la mise à disposition de ces informations ou de leur utilisation.
Marques commerciales et déposées
Windows® est une marque déposée aux Etats-Unis de Microsoft
Corporation.
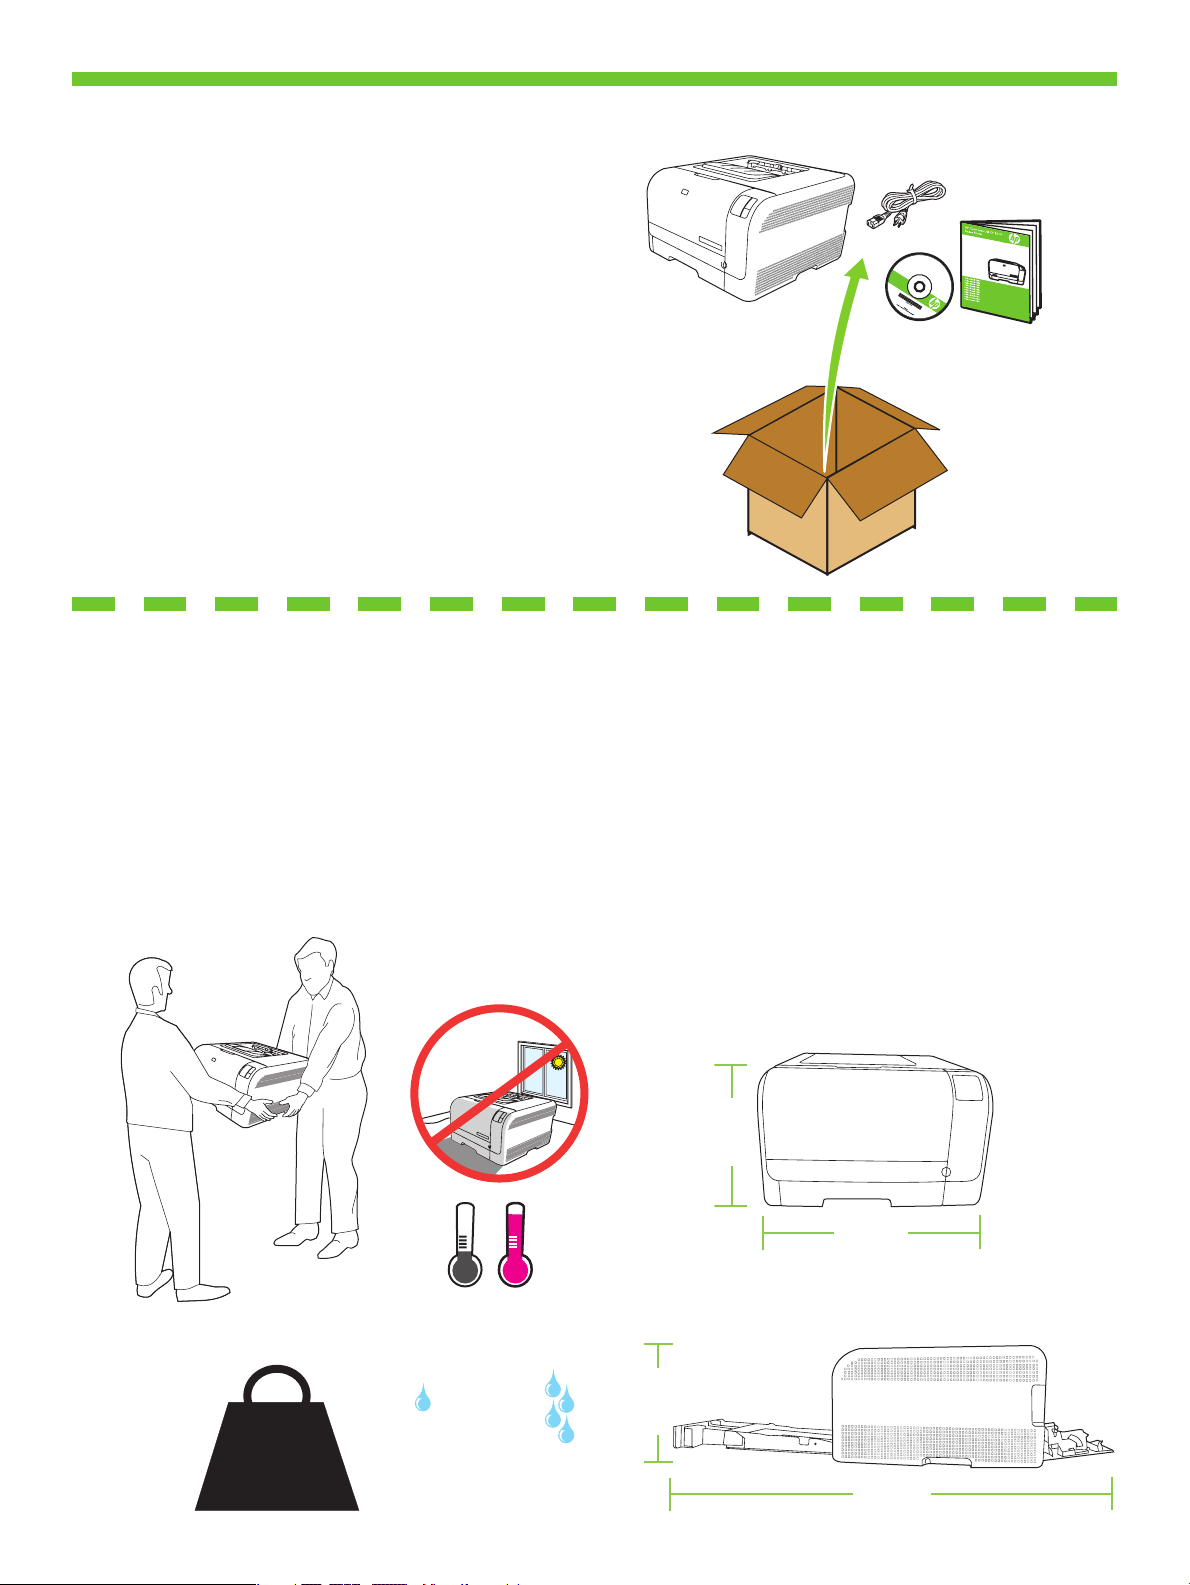
15° - 30°C
(32° - 86°F)
10% - 80%
17.6 kg
38.9 lb
254 mm
(10.0 inches)
1045 mm
(41.1 inches)
254 mm
(10.0 inches)
399 mm
(15.7 inches)
HP
Co
lor
L
as
e
rJet CP
1
21
0
Se
ri
es
Unpack the product.
1
Déballez le produit.
Разопаковайте продукта.
Αποσυσκευάστε το προϊόν.
Бұйымды қорабынан шығарыңыз.
Извлеките изделие из упаковки.
Ürünü ambalajından çıkarın.
Розпакуйте пристрій.
Select a sturdy, well-ventilated, dust-free area to position the product.
Choisissez un emplacement stable, aéré et non poussiéreux pour installer le produit.
Изберете добре вентилирано и незапрашено място, където да поставите продукта.
Για την τοποθέτηση του προϊόντος, επιλέξτε ένα σταθερό σημείο σε καλά αεριζόμενο χώρο χωρίς σκόνη.
Бұйымды орналастыру үшін орнықты, жақсы желдетілетін және шаңсыз бір жерді таңдап алыңыз.
Устанавливайте устройство на твердую поверхность в хорошо вентилируемом непыльном помещении.
Ürünü, iyi havalandırılan, tozdan arındırılmış bir alanda sağlam bir yere yerleştirin.
Поставте пристрій на стійкій поверхні у добре провітрюваному й незапиленому місці.
1
HP
Co
lor
L
aserJet CP
1
21
0
Se
ri
es
H
P
C
o
lo
r
L
a
s
e
r
J
e
t
C
P
1
2
1
0
S
e
r
i
e
s
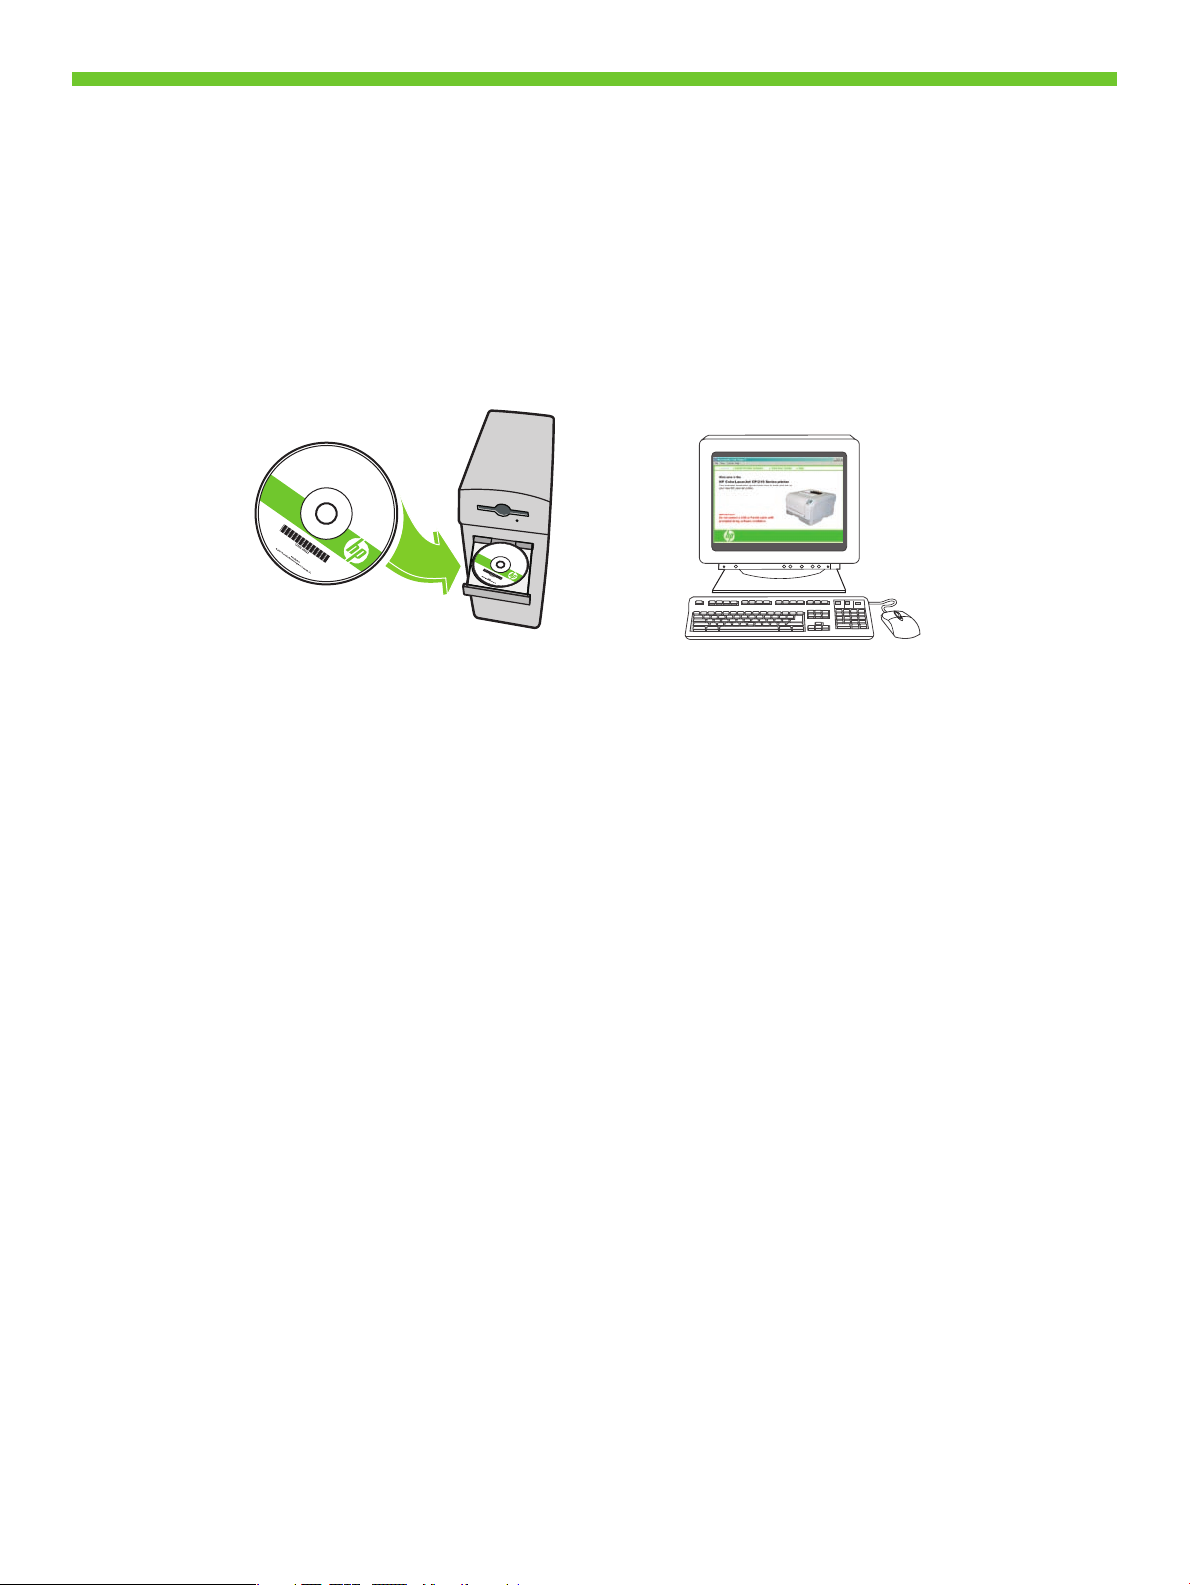
Place the CD in the CD-ROM drive, and click Begin Setup.
2
Placez le CD dans le lecteur de CD-ROM, puis cliquez sur Commencer l'installation.
Поставете CD в CD-ROM устройството и щракнете върху Begin Setup (Начало на инсталацията).
Τοποθετήστε το CD στη μονάδα CD-ROM και κάντε κλικ στο Έναρξη ρύθμισης.
Компакт-дискіні CD-ROM жетегіне салып, Begin Setup (Орнатуды бастау) түймесін басыңыз.
Вставьте компакт-диск в дисковод и нажмите кнопку Начать установку.
CD'yi CD-ROM sürücüsüne yerleştirin ve Kurulumu Başlat'ı tıklatın.
Вставте компакт-диск у пристрій читання компакт-дисків і натисніть Begin Setup (Почати встановлення).
2
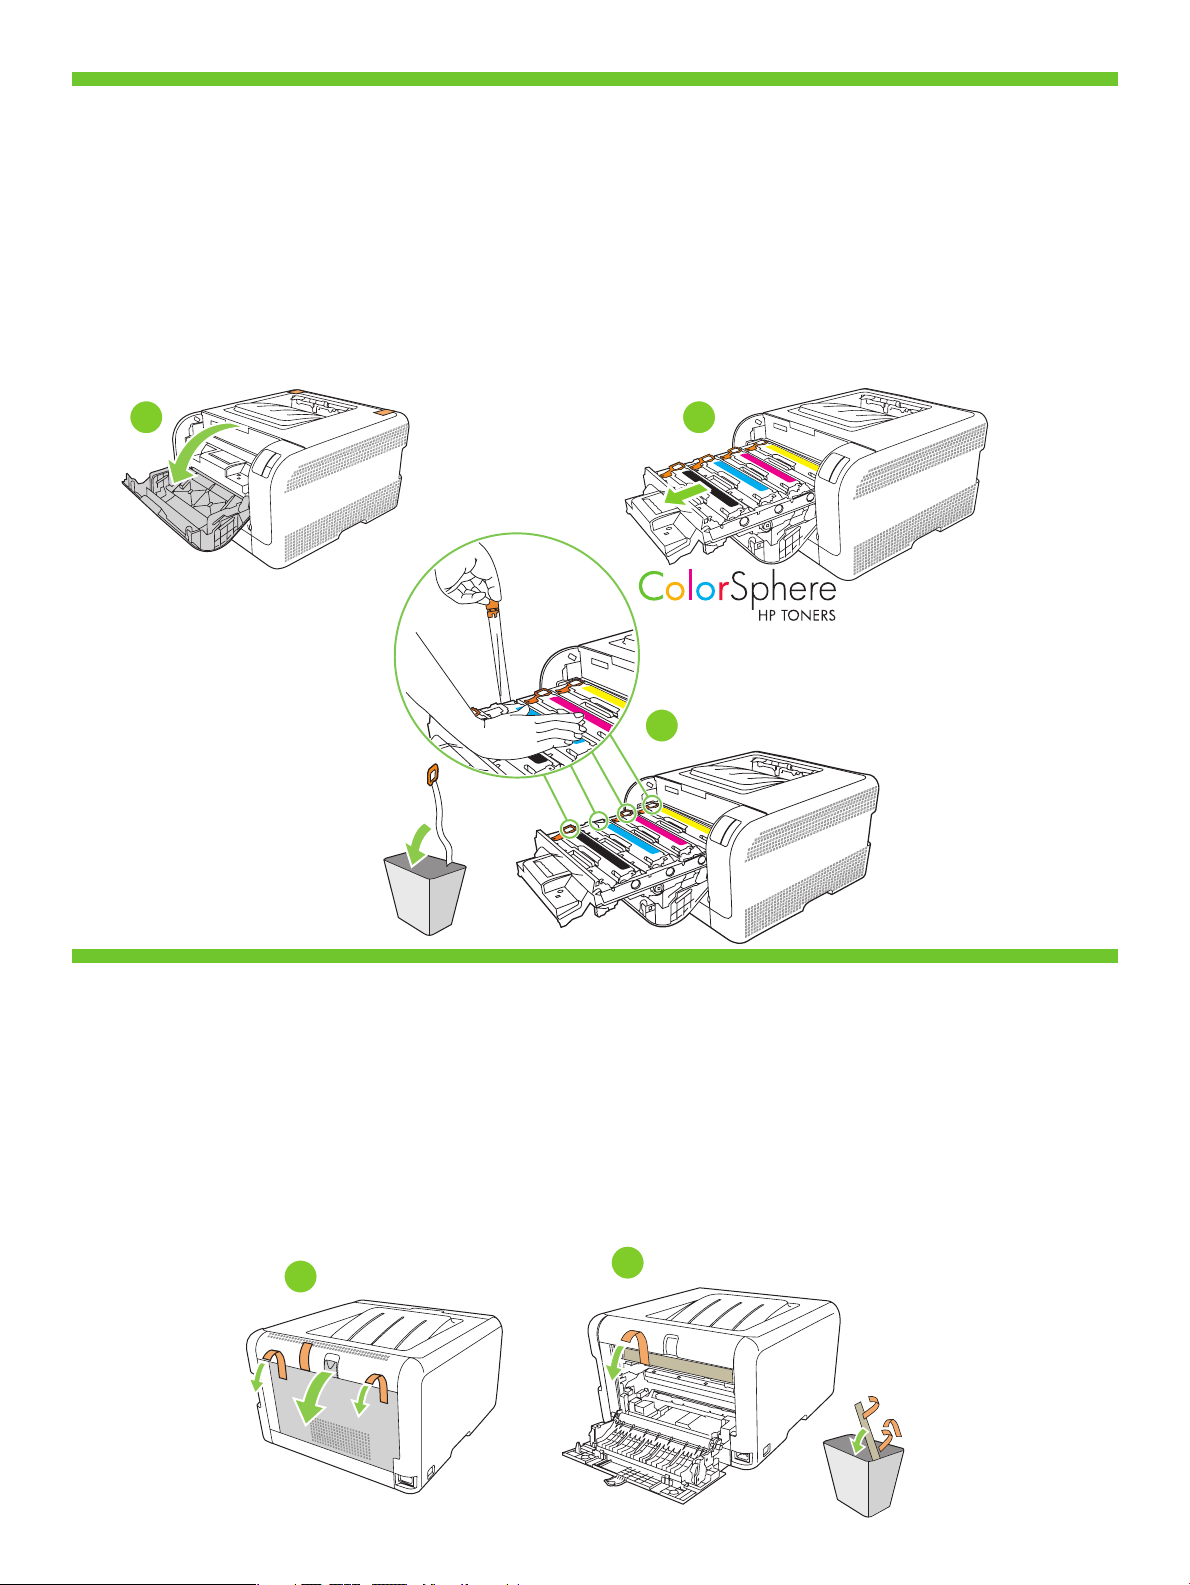
Remove the tape from all four print cartridges.
3
Retirez les bandes des quatre cartouches d'impression.
Премахнете лентата от четирите печатащи касети.
Αφαιρέστε την ταινία και από τις τέσσερις κασέτες εκτύπωσης.
Таспаны баспа картриджінің төртеуінен де алып тастаңыз.
Снимите ленту со всех четырех картриджей для принтера.
Dört baskı kartuşunun koruma bandını çıkarın.
Зніміть стрічку з усіх чотирьох картриджів.
1
4X
Remove the packing material from the back of the product.
4
Retirez l'emballage à l'arrière du produit.
Отстранете опаковката отзад на продукта.
Αφαιρέστε τα υλικά συσκευασίας από το πίσω μέρος του προϊόντος.
Өнімнің артындағы ораушы материалы шешіп алыңыз.
Снимите упаковочный материал с обратной стороны изделия.
Ürünün arka yüzeyinden paketleme malzemesini çıkarın.
Зніміть пакувальні матеріали із задньої панелі пристрою.
2
3
1
2
3

Load paper.
5
Chargez du papier.
Заредете хартия.
Τοποθετήστε χαρτί.
Қағазды салыңыз.
Загрузите бумагу.
Kağıt yerleştirin.
Завантажте папір.
1
2 3
4
 Loading...