

Page 1
8550MFP
Copy Module
User Guide
English
Page 2
Page 3

HP Color LaserJet 8550MFP
Copy Module User Guide______
Page 4

Copyright Information
© Copyright Hewlett-Packard
Company 2001
All Right Reserved. Except as
allowed by copyright laws or
herein, reproduction,
adaptation, or translation
without prior written permission
is prohibited.
A user of an HP LaserJet
8550MFP is granted a license
to: a) print hard copies of this
HP LaserJet 8550MFP copy
module User Guide for
PERSONAL, INTERNAL or
COMPANY use subject to the
restriction not to sell, re-sell or
otherwise distribute the hard
copies; and b) place an
electronic copy of this
HP LaserJet copy module User
Guide on a network server
provided access to the
electronic copy is limited to
PERSONAL, INTERNAL users
of the HP LaserJet 8550MFP.
Second Edition, Marchl 2001
Warranty
The information contained in
this document is subject to
change without notice.
Hewlett-Packard makes no
warranty of any kind with
respect to this information.
HEWLETT-PACKARD
SPECIFICALLY DISCLAIMS
THE IMPLIED WARRANTY OF
MERCHANTABILITY AND
FITNESS FOR A PARTICULAR
PURPOSE.
Hewlett-Packard shall not be
liable for any direct, indirect,
incidental, consequential, or
other damage alleged in
connection with the furnishing or
use of this information.
Trademark Credits
Adobe
®
, Acrobat
®,
and
PostScript™ are trademarks of
Adobe Systems Incorporated
which may be registered in
certain jurisdictions.
CompuServe™ is a U.S.
trademark of CompuServe, Inc.
E
NERGY STAR
®
is a U.S.
registered service mark of the
United States Environmental
Protection Agency.
Microsoft
Windows
MS-DOS
®
, Windows®, MS
®
, Windows NT®, and
®
are U.S. registered
trademarks of Microsoft
Corporation.
®
PANTONE
* is Pantone, Inc.s
check-standard trademark for
color.
TrueType™ is a U.S. trademark
of Apple Computer, Inc.
®
UNIX
is a registered trademark
in the United States and other
countries, licensed exclusively
through X/Open Company
Limited.
All other products mentioned
herein may be trademarks of
their respective companies.
Hewlett-Packard Company
11311 Chinden Boulevard
Boise, Idaho 83714 U.S.A.
Page 5

How to use this online user guide
This user guide is provided online in an Adobe® Acrobat® portable
document format (PDF). This section will help familiarize you with
using PDF documents in Acrobat Reader version 4.0. For complete
instructions on how to view PDF documents, see the documentation
included with Acrobat Reader.
Features of Acrobat Reader 4.0
Finding topics in the online user guide
There are two primary ways to navigate to the information you need:
! click the topic you want to read about in the Bookmarks section
of the screen
! click Contents or Index in the Bookmarks section of the screen,
then click the topic you want to read about from the list of items
displayed on the page
Finding words
Use the Find command to find part of a word, a complete word, or
multiple words in the document.
EN
Click the Find button, or choose Find from the Edit menu.
How to use this online user guide 5
Page 6
Magnifying the page view
Acrobat Reader offers several magnification choices that control how
the page fits on-screen.
the zoom-in tool
!
! the Magnification button in the status bar
! the toolbar buttons
Once you zoom in on a document, y ou can select the hand tool or use
the scroll bars to move the page.
To increase magnification: Select the zoom-in tool and click on t he
document page to double the current magnification.
To decrease magnification: Select the zoom-in tool while holding
down Ctrl (Windo ws and UNIX) or Option (Macintosh), and clic k the
center of the area you want to reduce.
Click the Magnification button to select how large or small to make
the page. Select from preset magnification levels and page views.
Actual Size scales the page to fit within the main window.
6
Fit in Window fills the window with the page’s content area only.
Fit Width scales the page to fit the width of the main window.
EN
Page 7
Paging through a document
The following options are available for paging through a document.
To go to the next page: Click the Next P a ge b utton in the to olbar or
status bar, or press Page Up or Page Down on your keyboard.
To return to the previous page: Click the Previous Page button in
the toolbar, or press the Left Arrow or Up Arrow.
To go to the first page: Click the First Page button in the toolbar.
To go to the last page: Click the Last Page button in the toolbar.
To jump to a specific numbered page: Click the page number box
in the status bar at the bottom of the main window, type the page
number, and click OK.
Browsing with thumbnails
A thumbnail is a miniature view of each docume nt page. Click a page
in the Thumbnails section of the window to jump quic kly to t hat page .
Printing the document
T o print select ed pages: From the File menu, choose Print. Choose
Pages. In the From and To boxes type the r ange of pages y ou wish to
print. Then click OK.
To print the whole document: From the File menu, choose Print.
Choose All n pages (n represents the total number of pages in the
document), and then click OK.
Note Go to http://www.adobe.com/ for the latest versions and additional
languages of Adobe Acrobat Reader.
EN
How to use this online user guide 7
Page 8
Where to look for more info rmation. . .
Several references are available for use with the system. For
additional copies of the guides below, contact HP Direct at
(800) 538-8787 (U.S.) or contact your HP-authorized dealer.
Additional information is available at http://www.hp.com.
Setting up the system (the copy module and the printer unit)
System Getting Started Guide
Step-by-step instructions for installing
and setting up the system.
Printer Getting Started Guide
Contains basic tips for installing and
setting up the printer unit.
8
EN
Page 9
Using the system
System Ready Reference Guide
Tips and quick information in a booklet
to keep by the system. See your
network administrator for the copy that
came with the system.
Printer Quick Reference Guide
Tips and quick information in a booklet
to keep by the printer unit. See your
network administrator for the copy that
came with the printer unit.
Copy Module Online User Guide
Detailed information on using and
troubleshooting the copy module.
EN
Printer Online User Guide
Detailed information on using and
troubleshooting the printer unit.
Paper Handling Addendum
Detailed information on using the
optional 1,000-sheet side input tray
(Tray 4).
Where to look for more information. . . 9
Page 10

HP Customer Care service and support
Online services
For 24-hour access to information, we suggest these services:
World Wide Web
Printer drivers, updated HP printer software, plus product and support
information may be obtained from the following URLs:
in the U.S. http://www.hp.com/go/support
Printer drivers may be obtained from the following sites:
in China ftp://www.hp.co m.cn/go/support
in Japan ftp://www.jpn.hp.com/go/suppo rt
in Korea http://www.hp.co.kr/go/support
in Taiwan http://www.hp.com.tw/go/support
or the local driver website
http://www.dds.com.tw
Obtaining software utilities and electronic information for the U.S.:
10
Monday - Friday: 6:00 am - 10:00 pm MST
Saturday: 9:00 am - 4:00 pm MST
Phone: (805) 257-5565
Fax: (805) 257-6995
HP website: http://www.hp.com /
Mail:
Hewlett-Packard Co.
P.O. Box 907
Santa Clarita, CA 91380-9007
U.S.A.
For Canada:
Phone: (905) 206-4663
EN
Page 11

For Europe:
HP Distribution Europe
The languages supported are listed beside the telephone numbers.
Hours of operation are 7:30 am GMT (8:30 am CET) to 17:00 pm
GMT (18:00 p.m. CET).
Within UK Internationally
English speaking line 01429 865511 +44 1429 865511
French speaking line +44 1429 863343
German speaking line +44 1429 863353
Italian speaking line +44 1429 520013
Spanish speaking line +44 1429 520012
Portuguese speaking line +44 1429 890466
For Asia Pacific Countries/Regions:
Australia +61 3 9272 8000
China (Beijing) +86 10 65053888
Hong Kong SAR +65 740-4477
India +91 (011) 682 6035
Indonesia +65 740-4477
Japan +81 3 53461891
Korea +82 2 3270 0805
Malaysia +65 740-4477
New Zealand 0800-445-543 (toll free) or (09) 356 6640
Philippines +65 740-4477
Singapore +65 740-4477
Taiwan +886 (02) 717 0055
Thailand +66 (02) 661-3900 ext 3224
For Latin America:
Argentina
Buenos Aires: 787-8080
8:30 to19:30 hrs.
Brazil
São Paulo: 011-829-6612
8:00 to19:00 hrs.
Chile
8:30 to18:30 hrs. 800-360999
Colombia
* Local dealers provide technical assistance
Mexico “HP Contigo”
8:00 to18:00 hrs. 01-800-4726684
EN
01-800-4720684
HP Customer Care service and support 11
Page 12

Venezuela
Caracas: 207-8488
8:00 to18:00 hrs. 800-47-888
Note Technical assistance for other Latin American countries is provided
by local dealers.
HP Direct Ordering for accessories or supplies:
Call (800) 538-8787 (U.S.) or (800) 387-3154 (Canada).
HP Direct Ordering for genuine HP parts:
In the U.S., call (800) 227-8164
12
EN
Page 13

Customer support options worldwide
HP Customer Care and Product Repair Assistance for the U.S. and Canada
Note If you purchased y our HP Color LaserJet 8550MFP with a
reseller-provided service contract, please see your reseller for
technical support, service, and warranty specifics.
Call (208) 323-2551 Monday through Friday from 6 am to 6 pm
(Mountain Time) free of charge during the warranty period. Standard
long-distance phone charges still apply. Have your system nearby
and your serial number ready when calling.
If you know y our printer unit needs to be repaired, ca ll (800) 243-9816
to locate your nearest authorized HP service provider.
Post-warranty telephone assistance is available to answer your
product questions. Call (900) 55 5-1500 ($ 2.50* per min ute , U.S. only)
or call (800) 999-1148 ($25* per call, Visa or MasterCard, U.S. and
Canada) Monday t hrough Friday from 7 am to 6 pm (Mountain Time).
Charges begin only when you connect with a support technician.
EN
*Prices subject to change.
Customer support options worldwide 13
Page 14

European HP Customer Care Center language
and in-country/region options available
Note If you purchased y our HP Color LaserJet 8550MFP with a service
contract included, please see your reseller for warranty specifics and
technical support.
Open Monday through Friday 8:30 - 18:00 Central European Time
(CET).
HP provides a free telephone support service during the warranty
period. When you call one of the telephone n umbers listed belo w, you
will be connected to a responsive team waiting to help you. If you
require support after your warranty has expired, you can receive
support for a fee throug h the same telephone number. The fee is
charged on a per-incident basis. When calling HP, have the following
information ready: product name and serial number, date of
purchase, and description of the problem.
English Ireland: (353) (1) 662-5525
U.K.: (44) (171) 512-5202
International: (44) (171) 512-5202
Dutch Belgium: (32) (2) 626-8806
Netherlands: (31) (20) 606-8751
French France: (33) (01) 43-62-3434
Belgium: (32) (2) 626-8807
Switzerland: (41) (84) 880-1111
German Germany: (49) (180) 525-8143
Austria: (43) (1) 7114-201080
Norwegian Norway: (47) 2211-6299
Danish Denmark: (45) 3929-4099
Finnish Finland: 358 (0) 203-47288
Swedish Sweden: (46) (8) 619-2170
Italian Italy: (39) (2) 264-10350
Spanish Spain: (34) (90) 232-1123
Portuguese Portugal: (351) (1) 317-6333
14
EN
Page 15

In-country/region support numbers
Argentina (541)778-8386
Australia (61) (0) 3 8877 8000
Brazil 011-829-6612
Canada (905) 206-4663
Chile 800-360999
China (86) (10) 65053888-5959
Czech Republic (420) (2) 613 07310
Greece (30) (1) 689-6411
Hong Kong SAR 800 96 7729
Hungary (36) (1) 382-1111
India (91) (0) 11 682 6035
Indonesia (62) (0) 21 350 3408
Korea (Seoul) (82) (0) 2 3270 0700
Korea outside Seoul 080 999 0700
Japan (81) (3) 3335 8333
Malaysia (60) (0) 3 295 2566
Mexico (Mexico City) 01 800 4726684
Mexico (outside Mexico City) 01 800-90529
New Zealand (64) (0) 9 356 6640
Philippines (63) (0) 2 867 3551
Poland (48) (22) 519 0600
Portugal 351 (0) 1 3176333
Russian Federation 7 (95) 7973520
Singapore +65 272 5300
Switzerland 41(0) 848 8011 11
Taiwan 886 (0) 2 717 0055
Thailand +66 (0) 2 661 4000
Turkey (90) (212) 224-5925
Vietnam 84 (0) 8 823 4530
EN
Customer support options worldwide 15
Page 16

16
EN
Page 17

Contents
How to use this online user guide . . . . . . . . . . . . . . . . . . . . . . . . . . . 5
Features of Acrobat Reader 4.0 . . . . . . . . . . . . . . . . . . . . . . . . . 5
Where to look for more information. . . . . . . . . . . . . . . . . . . . . . . . . . 8
Setting up the system (the copy module and the printer unit). . . 8
Using the system . . . . . . . . . . . . . . . . . . . . . . . . . . . . . . . . . . . . 9
HP Customer Care service and support . . . . . . . . . . . . . . . . . . . . . 10
Online services . . . . . . . . . . . . . . . . . . . . . . . . . . . . . . . . . . . . . 10
World Wide Web. . . . . . . . . . . . . . . . . . . . . . . . . . . . . . . . . . . . 10
Obtaining software utilities and
electronic information for the U.S.: . . . . . . . . . . . . . . . . . . . . 10
Customer support options worldwide . . . . . . . . . . . . . . . . . . . . . . . 13
HP Customer Care and Product Repair Assistance for the
U.S. and Canada . . . . . . . . . . . . . . . . . . . . . . . . . . . . . . . . . . 13
European HP Customer Care Center language and in-country/
region options available . . . . . . . . . . . . . . . . . . . . . . . . . . . . 14
In-country/region support numbers . . . . . . . . . . . . . . . . . . . . . . 15
1 Product introduction
Copy module features . . . . . . . . . . . . . . . . . . . . . . . . . . . . . . . . . . . 24
Identifying the copy module parts . . . . . . . . . . . . . . . . . . . . . . . . . . 26
Main copy module parts . . . . . . . . . . . . . . . . . . . . . . . . . . . . . . 26
Optional accessories. . . . . . . . . . . . . . . . . . . . . . . . . . . . . . . . . 27
Copy module control panel features . . . . . . . . . . . . . . . . . . . . . . . . 28
Interpreting status lights . . . . . . . . . . . . . . . . . . . . . . . . . . . . . . 34
Help key function . . . . . . . . . . . . . . . . . . . . . . . . . . . . . . . . . . . 35
Touch panel display . . . . . . . . . . . . . . . . . . . . . . . . . . . . . . . . . . . . 37
Adjusting the brightness of the touch panel display . . . . . . . . . 38
Basic Features screen . . . . . . . . . . . . . . . . . . . . . . . . . . . . . . . 39
Special Features screen . . . . . . . . . . . . . . . . . . . . . . . . . . . . . . 41
Entering characters on the touch panel display . . . . . . . . . . . . 43
Legal limitations of color copying . . . . . . . . . . . . . . . . . . . . . . . . . . 47
2 Basic copy module functions
Turning the copy module on . . . . . . . . . . . . . . . . . . . . . . . . . . . . . . 50
Turning the copy module off . . . . . . . . . . . . . . . . . . . . . . . . . . . . . . 52
Additional features. . . . . . . . . . . . . . . . . . . . . . . . . . . . . . . . . . . . . . 53
Energy-saving features. . . . . . . . . . . . . . . . . . . . . . . . . . . . . . . 53
Automatic functions. . . . . . . . . . . . . . . . . . . . . . . . . . . . . . . . . . 53
EN
Contents 17
Page 18

3 Common copying tasks
Selecting media. . . . . . . . . . . . . . . . . . . . . . . . . . . . . . . . . . . . . . . . 56
Media specifications . . . . . . . . . . . . . . . . . . . . . . . . . . . . . . . . . 57
Loading media. . . . . . . . . . . . . . . . . . . . . . . . . . . . . . . . . . . . . . . . . 60
Loading the system input trays. . . . . . . . . . . . . . . . . . . . . . . . . 60
Selecting the copy media size. . . . . . . . . . . . . . . . . . . . . . . . . . . . . 65
Using Automatic Paper Selection . . . . . . . . . . . . . . . . . . . . . . . 65
Selecting copy media size in Tray 1 . . . . . . . . . . . . . . . . . . . . . 68
Selecting envelope sizes in Tray 1 (stack bypass). . . . . . . . . . 70
Selecting copy media size using Tray 1 for double-sided
copies . . . . . . . . . . . . . . . . . . . . . . . . . . . . . . . . . . . . . . . . . . 71
Selecting paper manually . . . . . . . . . . . . . . . . . . . . . . . . . . . . . 73
Making copies . . . . . . . . . . . . . . . . . . . . . . . . . . . . . . . . . . . . . . . . . 74
Basic copying operations . . . . . . . . . . . . . . . . . . . . . . . . . . . . . 74
Placing the original on the glass . . . . . . . . . . . . . . . . . . . . . . . . 76
Placing the original in the optional ADF . . . . . . . . . . . . . . . . . . 77
Adjusting copy exposure . . . . . . . . . . . . . . . . . . . . . . . . . . . . . . . . . 79
Manually adjusting the exposure . . . . . . . . . . . . . . . . . . . . . . . 79
Selecting Automatic Exposure Control. . . . . . . . . . . . . . . . . . . 79
Enlarging or reducing originals . . . . . . . . . . . . . . . . . . . . . . . . . . . . 80
Using preset copy ratios . . . . . . . . . . . . . . . . . . . . . . . . . . . . . . 81
Using Automatic Zoom . . . . . . . . . . . . . . . . . . . . . . . . . . . . . . . 82
Using the manual Zoom feature . . . . . . . . . . . . . . . . . . . . . . . . 85
Using Entire Image reduction . . . . . . . . . . . . . . . . . . . . . . . . . . 86
Using the Zoom Program . . . . . . . . . . . . . . . . . . . . . . . . . . . . . 88
Using Zoom mode. . . . . . . . . . . . . . . . . . . . . . . . . . . . . . . . . . . 89
Using XY Zoom mode. . . . . . . . . . . . . . . . . . . . . . . . . . . . . . . . 92
Using Multi-page Enlargement mode . . . . . . . . . . . . . . . . . . . . 96
Selecting original type . . . . . . . . . . . . . . . . . . . . . . . . . . . . . . . . . . 104
Making double-sided copies . . . . . . . . . . . . . . . . . . . . . . . . . . . . . 108
Using 1 2-SIDED mode. . . . . . . . . . . . . . . . . . . . . . . . . . . . 110
Using 2 2-SIDED mode. . . . . . . . . . . . . . . . . . . . . . . . . . . . 113
Using 2 1-SIDED mode. . . . . . . . . . . . . . . . . . . . . . . . . . . . 115
Making copies of a book or magazine . . . . . . . . . . . . . . . . . . 117
Additional basic copying features . . . . . . . . . . . . . . . . . . . . . . . . . 120
Interrupt mode. . . . . . . . . . . . . . . . . . . . . . . . . . . . . . . . . . . . . 120
Entering the department ID (identification) and password . . . 123
Using Automatic Color Selection (ACS) . . . . . . . . . . . . . . . . . 125
Making black and white copies of originals containing color. . 125
Confirming, canceling, or changing the mode settings . . . . . . . . . 126
Canceling or changing the mode settings. . . . . . . . . . . . . . . . 128
18 Contents
4 Special image adjustments
Separating pages . . . . . . . . . . . . . . . . . . . . . . . . . . . . . . . . . . . . . 130
To make copies of facing pages . . . . . . . . . . . . . . . . . . . . . . . 131
EN
Page 19

Shifting images . . . . . . . . . . . . . . . . . . . . . . . . . . . . . . . . . . . . . . . 132
Shifting images to the edge, corner, or center . . . . . . . . . . . . 132
Shifting images to a designated position on the copy media . 134
Shifting images to create margins. . . . . . . . . . . . . . . . . . . . . . 137
Erasing frames . . . . . . . . . . . . . . . . . . . . . . . . . . . . . . . . . . . . . . . 140
Erasing shadows or dark borders from copies . . . . . . . . . . . . 140
Erasing shadows from the edges of copies . . . . . . . . . . . . . . 143
Erasing the center line or dark border from the copies of
bound documents . . . . . . . . . . . . . . . . . . . . . . . . . . . . . . . . 145
Erasing binding holes on copies . . . . . . . . . . . . . . . . . . . . . . . 148
Combining images. . . . . . . . . . . . . . . . . . . . . . . . . . . . . . . . . . . . . 151
Separating images . . . . . . . . . . . . . . . . . . . . . . . . . . . . . . . . . . . . 156
Copying from special-media originals . . . . . . . . . . . . . . . . . . . . . . 161
5 Image manipulation
Framing. . . . . . . . . . . . . . . . . . . . . . . . . . . . . . . . . . . . . . . . . . . . . 164
Designating image areas to copy . . . . . . . . . . . . . . . . . . . . . . 165
Editing an already defined image area. . . . . . . . . . . . . . . . . . 167
Clearing designated image areas. . . . . . . . . . . . . . . . . . . . . . 168
Blanking. . . . . . . . . . . . . . . . . . . . . . . . . . . . . . . . . . . . . . . . . . . . . 169
Designating image areas to exclude. . . . . . . . . . . . . . . . . . . . 170
Editing an already defined image area. . . . . . . . . . . . . . . . . . 172
Clearing designated image areas. . . . . . . . . . . . . . . . . . . . . . 173
Negative/positive (Nega/Posi). . . . . . . . . . . . . . . . . . . . . . . . . . . . 174
Making negative images from positive originals. . . . . . . . . . . 175
Repeating images . . . . . . . . . . . . . . . . . . . . . . . . . . . . . . . . . . . . . 177
Making copies with repeated images . . . . . . . . . . . . . . . . . . . 178
Mirroring images . . . . . . . . . . . . . . . . . . . . . . . . . . . . . . . . . . . . . . 180
Making mirror-image copies . . . . . . . . . . . . . . . . . . . . . . . . . . 181
Slanting images. . . . . . . . . . . . . . . . . . . . . . . . . . . . . . . . . . . . . . . 183
Copying images at a slant. . . . . . . . . . . . . . . . . . . . . . . . . . . . 184
Sharpening contrast . . . . . . . . . . . . . . . . . . . . . . . . . . . . . . . . . . . 186
High. . . . . . . . . . . . . . . . . . . . . . . . . . . . . . . . . . . . . . . . . . . . . 186
Low . . . . . . . . . . . . . . . . . . . . . . . . . . . . . . . . . . . . . . . . . . . . . 186
Modifying the sharpness of the copies . . . . . . . . . . . . . . . . . . 187
EN
6 Color balance and color creation
Color settings . . . . . . . . . . . . . . . . . . . . . . . . . . . . . . . . . . . . . . . . 190
Color Balance . . . . . . . . . . . . . . . . . . . . . . . . . . . . . . . . . . . . . 190
Color Density . . . . . . . . . . . . . . . . . . . . . . . . . . . . . . . . . . . . . 192
Storing color settings . . . . . . . . . . . . . . . . . . . . . . . . . . . . . . . 194
One Touch Color. . . . . . . . . . . . . . . . . . . . . . . . . . . . . . . . . . . . . . 201
Making single-color copies . . . . . . . . . . . . . . . . . . . . . . . . . . . 204
Background color adjustment . . . . . . . . . . . . . . . . . . . . . . . . . . . . 205
Adjusting the background color. . . . . . . . . . . . . . . . . . . . . . . . 206
Second Side Elimination . . . . . . . . . . . . . . . . . . . . . . . . . . . . . . . . 208
Contents 19
Page 20

7 Stored copy job settings
Mode Memory . . . . . . . . . . . . . . . . . . . . . . . . . . . . . . . . . . . . . . . . 212
Using Mode Memory. . . . . . . . . . . . . . . . . . . . . . . . . . . . . . . . 212
Storing copy job settings. . . . . . . . . . . . . . . . . . . . . . . . . . . . . 212
Recalling copy job settings . . . . . . . . . . . . . . . . . . . . . . . . . . . 217
Erasing stored copy settings. . . . . . . . . . . . . . . . . . . . . . . . . . 218
Recall feature . . . . . . . . . . . . . . . . . . . . . . . . . . . . . . . . . . . . . . . . 220
Recalling copy job settings . . . . . . . . . . . . . . . . . . . . . . . . . . . 221
8 Administration Functions
Administration Functions. . . . . . . . . . . . . . . . . . . . . . . . . . . . . . . . 224
Using Administration Functions . . . . . . . . . . . . . . . . . . . . . . . 225
Administration Functions settings . . . . . . . . . . . . . . . . . . . . . . 227
Custom Common settings. . . . . . . . . . . . . . . . . . . . . . . . . . . . . . . 232
Audible tones . . . . . . . . . . . . . . . . . . . . . . . . . . . . . . . . . . . . . 232
Tray Eligibility for APS/ADS . . . . . . . . . . . . . . . . . . . . . . . . . . 234
Black Text Automatic Exposure Adjustment priority. . . . . . . . 236
Text/Photo Priority in Black mode. . . . . . . . . . . . . . . . . . . . . . 238
Energy Saver Adjustment . . . . . . . . . . . . . . . . . . . . . . . . . . . . 240
Inch Entry . . . . . . . . . . . . . . . . . . . . . . . . . . . . . . . . . . . . . . . . 242
Copy Tray setting . . . . . . . . . . . . . . . . . . . . . . . . . . . . . . . . . . 244
Heavy Paper tray . . . . . . . . . . . . . . . . . . . . . . . . . . . . . . . . . . 246
System Password. . . . . . . . . . . . . . . . . . . . . . . . . . . . . . . . . . 248
Setting Department ID Management . . . . . . . . . . . . . . . . . . . 251
Initialize Custom Common settings. . . . . . . . . . . . . . . . . . . . . 261
Custom Copy settings . . . . . . . . . . . . . . . . . . . . . . . . . . . . . . . . . . 262
Standard Key settings. . . . . . . . . . . . . . . . . . . . . . . . . . . . . . . 262
Changing Standard Settings. . . . . . . . . . . . . . . . . . . . . . . . . . 264
Timer settings . . . . . . . . . . . . . . . . . . . . . . . . . . . . . . . . . . . . . . . . 269
Automatic Clear Time . . . . . . . . . . . . . . . . . . . . . . . . . . . . . . . 269
Automatic Energy Saver mode . . . . . . . . . . . . . . . . . . . . . . . . 271
Low-power mode . . . . . . . . . . . . . . . . . . . . . . . . . . . . . . . . . . 272
Automatic Power-off . . . . . . . . . . . . . . . . . . . . . . . . . . . . . . . . 273
Adjustment/cleaning . . . . . . . . . . . . . . . . . . . . . . . . . . . . . . . . . . . 274
Zoom Fine Adjustment . . . . . . . . . . . . . . . . . . . . . . . . . . . . . . 274
Exposure Recalibration. . . . . . . . . . . . . . . . . . . . . . . . . . . . . . 276
Automatic Gradation Adjustment . . . . . . . . . . . . . . . . . . . . . . 277
Cleaning the optional ADF . . . . . . . . . . . . . . . . . . . . . . . . . . . 281
Counter Check . . . . . . . . . . . . . . . . . . . . . . . . . . . . . . . . . . . . . . . 284
20 Contents
9 Maintenance and troubleshooting
Loading media. . . . . . . . . . . . . . . . . . . . . . . . . . . . . . . . . . . . . . . . 286
Replacing toner cartridges . . . . . . . . . . . . . . . . . . . . . . . . . . . . . . 287
Replacing the drum cartridge . . . . . . . . . . . . . . . . . . . . . . . . . . . . 289
EN
Page 21

Clearing media jams . . . . . . . . . . . . . . . . . . . . . . . . . . . . . . . . . . . 290
Messages when media jams occur. . . . . . . . . . . . . . . . . . . . . 290
Media jam locations . . . . . . . . . . . . . . . . . . . . . . . . . . . . . . . . 291
Service-call message . . . . . . . . . . . . . . . . . . . . . . . . . . . . . . . . . . 293
Service-call message procedures. . . . . . . . . . . . . . . . . . . . . . 294
Self-diagnostic messages . . . . . . . . . . . . . . . . . . . . . . . . . . . . . . . 296
Routine cleaning . . . . . . . . . . . . . . . . . . . . . . . . . . . . . . . . . . . . . . 298
Cleaning guidelines. . . . . . . . . . . . . . . . . . . . . . . . . . . . . . . . . 298
Cleaning the glass . . . . . . . . . . . . . . . . . . . . . . . . . . . . . . . . . 299
Cleaning the copy module cover. . . . . . . . . . . . . . . . . . . . . . . 299
Cleaning the ADF feeding belt . . . . . . . . . . . . . . . . . . . . . . . . 300
10 Optional Automatic Document Feeder (ADF)
Operating the optional ADF. . . . . . . . . . . . . . . . . . . . . . . . . . . . . . 302
Avoiding media jams. . . . . . . . . . . . . . . . . . . . . . . . . . . . . . . . 302
Basic parts of the optional ADF . . . . . . . . . . . . . . . . . . . . . . . 303
Clearing media jams . . . . . . . . . . . . . . . . . . . . . . . . . . . . . . . . . . . 304
Clearing media jams in the input tray . . . . . . . . . . . . . . . . . . . 304
Clearing media jams in the original output bin . . . . . . . . . . . . 308
A Specifications
Electrical Specifications. . . . . . . . . . . . . . . . . . . . . . . . . . . . . . . . . 311
Operating environment specifications. . . . . . . . . . . . . . . . . . . . . . 312
Copy module specifications. . . . . . . . . . . . . . . . . . . . . . . . . . . . . . 312
ADF specifications. . . . . . . . . . . . . . . . . . . . . . . . . . . . . . . . . . . . . 315
Environmental Product Stewardship Program . . . . . . . . . . . . . . . 316
Protecting the Environment. . . . . . . . . . . . . . . . . . . . . . . . . . . 316
Regulatory Statements . . . . . . . . . . . . . . . . . . . . . . . . . . . . . . . . . 320
FCC Regulations. . . . . . . . . . . . . . . . . . . . . . . . . . . . . . . . . . . 320
Canadian DOC Regulations . . . . . . . . . . . . . . . . . . . . . . . . . . 320
Declaration of Conformity . . . . . . . . . . . . . . . . . . . . . . . . . . . . 321
VCCI Statement (Japan). . . . . . . . . . . . . . . . . . . . . . . . . . . . . 325
Korean EMI Statement . . . . . . . . . . . . . . . . . . . . . . . . . . . . . . 325
Safety Information . . . . . . . . . . . . . . . . . . . . . . . . . . . . . . . . . . . . . 326
Laser Safety . . . . . . . . . . . . . . . . . . . . . . . . . . . . . . . . . . . . . . 326
Product Information Sheet . . . . . . . . . . . . . . . . . . . . . . . . . . . 326
Laser Statement for Finland . . . . . . . . . . . . . . . . . . . . . . . . . . 327
EN
B Warranty and support information
Index
Contents 21
Page 22

22 Contents
EN
Page 23

1
Product introduction
Overview
This chapter provides an ov erview of the HP Color LaserJet 8550MFP
system, including the follo wing:
! Copy module features
! Identifying the copy module parts
! Copy module control panel features
! Legal limitations of color copying
EN
Overview 23
Page 24

Copy module features
This system brings you the quality and reliability of Hewlett-Packard
products. Below are some specific features of the copy module.
Features of the HP Color LaserJet 8550MFP
Image Quality
Performance
Media Handling/
Magnification
! Uses 600 dpi optical resolution
! 256 colors
! Copies 24 pages per minutes (ppm) in black and white
! Copies 6 ppm in color
! Time to first copy: 18 seconds for black and white, 34
seconds for full color
! 2 500-sheet input trays
! 1 bypass tray with 100-sheet capacity
! Multiple copies up to 100
! Adjusts image to the size of the media using preset or
manual adjustments
! Reduces or enlarges images from 25% to 400%
Supports the following media sizes:
! Letter – 216 by 279 mm (8.5 by 11 in)
! Executive – 184 by 267 mm (7.25 by 10.5 in)
! Legal – 216 by 365 mm (8.5 by 14 in)
! Ledger – 279 by 432 mm (11 by 17 in)
! A4 – 210 by 297 mm (8.3 by 11.7 in)
! A3 – 297 by 420 mm (11.7 by 16.5 in)
! A5 – 148 by 210 mm (5.8 by 8.3 in)
! Minimum (custom sizes): 99 by 190.5 mm
(3.9 in by 7.5 in)
! Maximum (custom sizes): 305 by 470 mm
(12 by 18.5 in)
Maximum size of the original is Ledger/A3.
24 Chapter 1 Product introduction
EN
Page 25

Features of the HP Color LaserJet 8550MFP (continued)
Media Types Supports the following media types:
! paper
! prepunched media
transparencies (4 to 5 mils or 0.1 to 0.13 mm thick)
!
! envelopes
! labels
Tray 1 supports 60 to 216 g/m
2
(16 to 58 lb) media
Other input tra ys supp ort 60 to 105 g/m
For more information on supported media, see “Selecting
media” on page 56.
2
(16 to 28 lb) media
Accessories
! Optional Automatic Document Feeder (ADF)
! Optional 1,000-sheet side input tr ay (Tray 4) for printing
only
EN
Copy module features 25
Page 26

Identifying the copy module parts
Main copy module parts
The following fi gure shows the locations of the copy module parts.
1
5
Figure 1 Copy module parts
1 Copy module cover
2 Glass
3 Control panel
4 Control panel menu map
5 System stand
2
3
4
26 Chapter 1 Product introduction
EN
Page 27
Optional accessories
The following figure shows the optional copy module accessories.
1
2
Figure 2 Optional accessories
1 Optional Automatic Document Feeder (ADF)
2 Optional 1,000-sheet side input tray (Tray 4) for printing only
EN
Identifying the copy module parts 27
Page 28
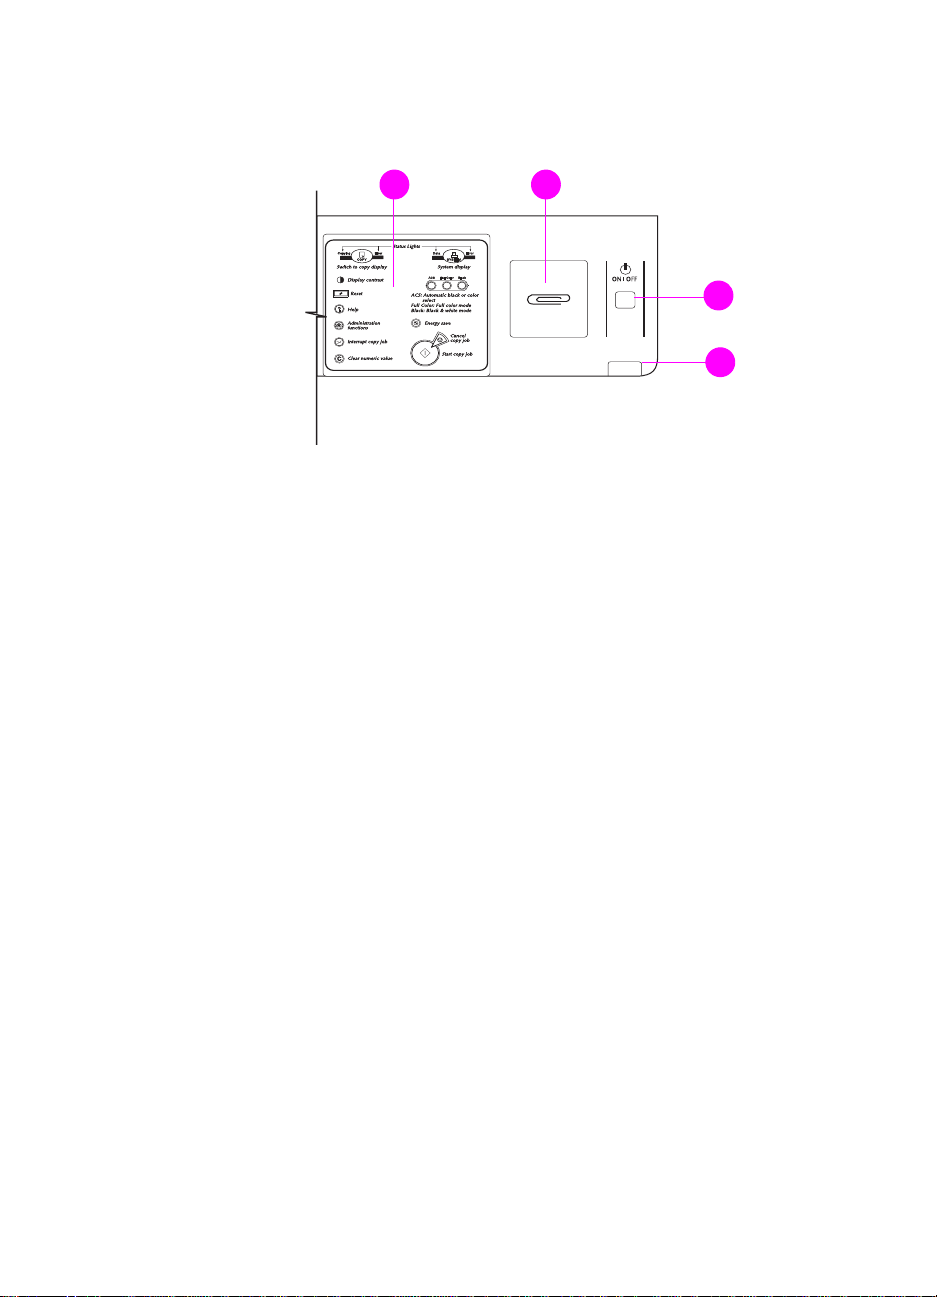
Copy module control panel features
The front portion of the copy module, shown below, is called the
control panel. From here you can control all copying functions, enter
copy quantities or department ID numbers, determine the status of
the copy module , and troubleshoot copying errors using the display
panel Help feature.
Figure 3 Copy module control panel in its entirety
Note The system control panel is used to configure the copy module mode
settings or to obtain status information. Unless otherwise specified,
“control panel” refers to the control panel on the copy module. Keys
font. Mode
on the copy module cont rol panel are in dicated b y the K
settings on the touch panel display are indicated by the
font.
PANEL
EY
DISPLAY
28 Chapter 1 Product introduction
EN
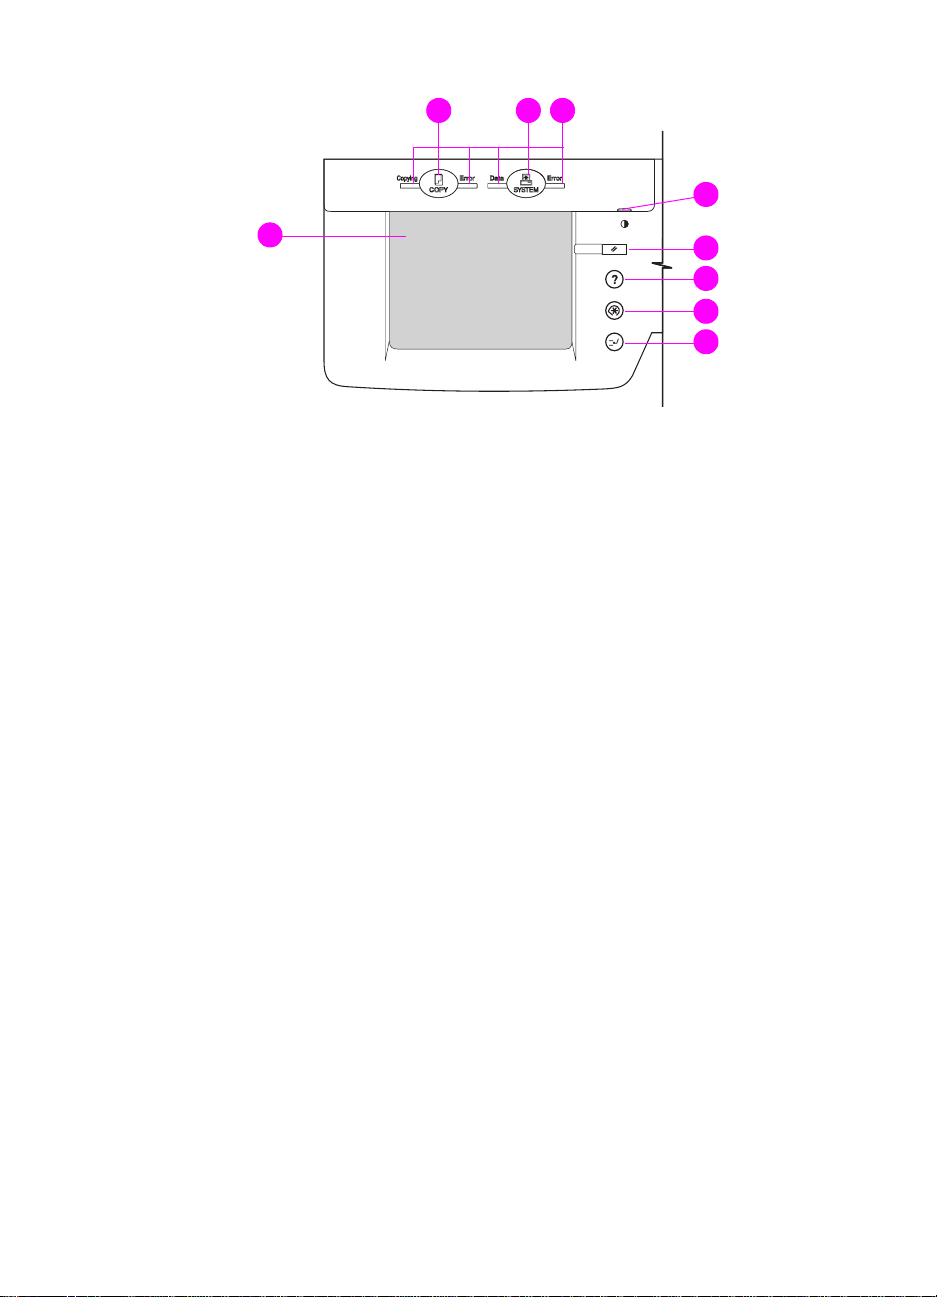
Page 29
The following fi gures show each element of the copy module control
panel.
1
Figure 4 Right-side view of copy module control panel
1Menu map: Provides brief descriptions of control panel keys.
2 Paper clip tray: Store removed paper clips here.
3Power button: Press to turn the power on or off. (There is also a
power switch, which is located on the right side of the copy
module.)
4 Pilot light: A green light indicates that the copy module is
turned on.
2
3
4
EN
Copy module control panel features 29
Page 30
32 4
5
1
Figure 5 Left-side view of the copy module control panel
1 Touch panel display: Adjust the copy module’s features using
the touch panel display.
OPY
2 C
key: Press to switch to the copy feature or to take the copy
module out of Energy Saver mode.
YSTEM
3 S
key: Displays system and printer unit information on the
touch panel display.
4 Status lights: These four lights indicate the status of the system.
(See page 34 for a description of how to interpret the colors and
behavior of the status lights.)
5 Display contrast dial: Turn to adjust the contrast on the touch
panel display. (See page 38 for instructions on adjusting the
contrast on the touch panel display.)
6
7
8
9
30 Chapter 1 Product introduction
EN
Page 31

6 R
ESET
key: Press to return the copy module to its default
setting (Default mo de). F or more in f ormation about Def ault mode ,
see page 51.
ELP
7 H
key: Press to display explanations of the system keys
and features.
8 A
DMINISTRATION FUNCTIONS
key: Press to sele ct or cance l ou t
of the Administration Functions (also called Additional Fun ctions).
9 I
NTERRUPT COPY JOB
key: Press to interrupt the current copy
job to copy a job that has a higher priority.
EN
Copy module control panel features 31
Page 32

Figure 6 Numerical key pad
1 Numerical key pad: Press to enter the desired n umbe r of copies
or to enter other numerical values when setting a copy mode.
1
2
3
2 C
LEAR NUMERIC VALUE
key: Press to reset t he cop y quantity to
one, or to clear the last numerical value that was entered while
setting a copy mode.
3 ID (identification) key: Enter an identification number, then
press ID to access the system. Return the system to a locked
mode by pressing ID when the job is complete.
Note The ID key is used only when identificat ion numbers are assigned to
departments or users. Identification numbers are assigned in the
Administration (Additional) functions setting. For more information on
creating department user ID numbers, see page 251.
32 Chapter 1 Product introduction
EN
Page 33

1 2 3
Figure 7 Additional copy module keys
1 ACS (Automatic Color Selection) key: Press to allow the system
to automatically select between the b lack- and-white and full-color
modes.
ULL COLOR
2 F
key: Press to select the Full Color mode (copies are
made in black, cyan, magenta, and yellow).
LACK
3 B
key: Press to select the Black Monochrome mode.
4
5
6
EN
4 E
NERGY SAVER
key: Press to select the Energy Saver mode
and reduce energy consumption. Press the key again to cancel
the Energy Saver mode. This mode is similar to the printer unit
PowerSave mode.
key: Press to cancel a copy job.
5 S
6 S
TOP
TART
key: Press to begin making copies.
Copy module control panel features 33
Page 34

Interpreting status lights
Use the following table to interpret the status lights on the copy
module.
Copy module status lights
Light Function Color and
behavior
C
OPY
S
YSTEM
All lights on the
Copying Flashing green The system is copying
Error Flashing orange Ensure that media is in
Continuous orange Contact your service
Data Flashing green The system is receiving
Error Flashing orange A printer unit error has
Continuous orange The copy module needs
Flashing orange Copying cannot be
status display are
on
Continuous orange Contact your service
Meaning
the selected tray.
Check for a media jam.
Replace the toner
cartridge.
representative.
data (print or copy).
occurred.
Ensure that media is in
the selected tray.
Check for a media jam.
Replace or install the
required consumable or
maintenance item.
servicing.
performed:
Ensure that media is in
the selected tray.
Check for a media jam.
Replace or install the
required consumable or
maintenance item.
representative.
34 Chapter 1 Product introduction
EN
Page 35

Help key function
The H
key, shown below, provides several functions.
ELP
Note In the touch panel display, the H
key.
Figure 8 Control panel Help key
! Press the H
key while a functio n is selected f or a n e xplanation
ELP
of that particular function.
! Use the H
key if you do not understand how to use the copy
ELP
mode that you want to set. For example, to display the Help
screen for the Zoom mode, use the following procedure:
1 Press
on the touch panel display, and then press H
ZOOM
The display will s witch to the Help screen that explains the
Zoom mode.
key is referred to as the G
ELP
UIDE
Help key
ELP
.
EN
2 To return to the Zoom mode display, press
You can also use the H
key to find the right functi on for your
ELP
DONE
.
specific copying needs, or to find a brief explanation of a particular
feature.
To do so, press H
when the Basic Features screen (see page 39)
ELP
or Special Features screen (see p age41) appears in the touch panel
display. The touch panel display switches to the Help screen.
Copy module control panel features 35
Page 36

1
To use the Help key
For example, if you are not sure how to
make copies of a magazine, use the
following procedure:
, and then press
1 Press H
TYPES OF ORIGINALS
ELP
VARIOUS
.
2 Press
3 The touch panel display switches to
2
4 To return to the screen that was
3
PHOTO/MAP
the Help screen for Original Type.
Use this mode for making copies of
originals containing photographs and
text. If there are m ultiple screens, use
the ▼ or ▲ keys to view additional
information.
previously displa yed, press
the touch panel display.
.
on
DONE
36 Chapter 1 Product introduction
EN
Page 37

Touch panel display
Use the touch panel displa y to progr am the cop y module settings or to
make copies using various copying modes. Error messages caused
by media jams or operational errors also appear in this display.
The following table provides an explanation of some of the functions
of the touch panel display.
Touch panel display functions
Display Explanation of functions
C
OK
DONE
The touch panel display has two primary feature screens: the Basic
Features screen and the Special Features screen. The following
sections include diagrams and brief descriptions of both screens and
their features.
Press to cancel settings that you are in the process
of selecting and return to the last operational step.
Press to finalize settings that you have selected.
The display will proceed to the next operational
step.
Press to return to the original display (the Special
Features screen or the Basic F eatures screen) af ter
selecting a mode.
EN
Touch panel display 37
Page 38

Adjusting the brightness of the touch panel display
You can make the touch panel display brighter or darker by adjusting
the contrast. To do so, turn the dial located on the right side of the
copy module control panel, as shown below.
! To lighten the display, turn the dial in the clockwise direction.
! To darken the display, turn the dial in the counterclockwise
direction.
Figure 9 Control panel display contrast adjustment
38 Chapter 1 Product introduction
EN
Page 39

Basic Features screen
The Basic Features screen is the default screen in the touch panel
display. From this screen, you can learn about or set up the features
described below.
5
6
3
4
10
1
2
Figure 10 Touch panel display—Basic Features screen
1 Messag e d is pl ay. Displays the system status and operator
instructions.
2 Copy ratio display (Reduce, Direct, Enlarge). Displays the
copy ratio setting. For more information, see “Enlarging or
reducing originals” on page 80.
3 Reduce, Direct, Enlarge. Press to select the most suitable
setting for reducing or enlarging the image using preset ratios or
to perform a direct copy (resets the copy module to 1:1 copying).
For more information, see “Enlarging or reducing originals” on
page 80.
13
8
7
9
11
12
EN
4Zoom. Press to specify the copy ratios, selectable in 1%
increments, or to enlarge or reduce images in either the vertical
direction or the horizontal direction. For more information, see
“Enlarging or reducing originals” on page 80.
5 Paper quantity indicator. Displays the remaining quantity of
media in the selected tray.
6 Paper size display. Displays the media size in the selected tray.
For more information, see “Selecting the copy media size” on
page 65.
7 Paper Select. Press to select Automatic Paper Selection or a
specific tray. For more information, see “Using Automatic Paper
Selection” on page 65.
Touch panel display 39
Page 40

Note STACK BYPASS
8 Copy quantity indicator. Displays t he number of copies to be
made. For more information, see “Making copies” on page 74.
9 Exposure control. Press the left-facing arrow () for lighter
copies or press the right-facing arro w () f or darker copies . Press
(automatic) to select automatic exposure control. The copy
A
module automatically adjusts the copy exposure to the most
appropriate level for the original. For more information, see
“Adjusting copy exposure” on page 79.
10 Two-sided copying (duplexing). Press to select or cancel
duplexing. Make copies of both sides of the original or on both
sides of the copy media. Functionality differs depending on
installed options. For more inf ormation, see “Making double-sided
copies” on page 108.
11 Original type. Press to select the setting most suitable for the
type of original to be copied. For more inf ormation, see “Selecting
original type” on page 104.
12 Special Features. Press to display the Special Features screen
on the touch panel displa y. Use the Special Features mode to
select the desired copy image quality or the desired layout
settings. For more information, see “Special Features screen” on
page 41.
refers to Tray 1.
13 Setting confirmation. Press to check and confirm the selected
programmed job settings. This button is only visible when job
settings have been programmed. For more information, see
“Confirming, canceling, or changing the mode settings” on
page 126.
40 Chapter 1 Product introduction
EN
Page 41

Special Features screen
The Special Features screen allows you to modify your copy job
beyond the features offered in the Basic Features screen. To access
the Special Features screen, press Special Features in the Basic
Features screen.
The Special Features screen allows you to configure and use the
features described below.
1 2 43 5 6
7
8
16
9
15
14
111213
Figure 11 Touch panel display—Special Features screen
1 Two-page Separation. Press to create single-sided copies of
facing pages (such as in a book or magazine). For more
information, see “Separating pages” on page 130.
2 Heavy Sheet Original. Press to make copies of originals that
were printed on special types of media. For more inf ormation, see
“Copying from special-media originals” on page 161.
3Shift. Press to move the original image to a selec te d ar ea of the
copy. For more information, “Shifting images” on page 132.
4Margin. Press to establish a margin on copies. For more
information, see “Shifting images to create margins” on page 137.
5Frame Erase. Press to erase shadows on copies. For more
information, see “Erasing frames” on page 140.
10
EN
Touch panel display 41
Page 42

6 Color Balance. Press to adjust color levels for color copies . For
more information, see “Color settings” on page 190.
7 One Touch Color. Press to apply preselected image
enhancements to copies. For more information, see “One Touch
Color” on page 201.
8 Image Quality Adjustment. Press to adjust background color or
eliminate the copying of the back side of the original (in the case
of thin media, such as a magazine). For more information, see
“Background color adjustment” on page 205 and “Second Side
Elimination” on page 208.
9 Sharpness. Press to adjust the image sharpness. For more
information, see “Sharpening contrast” on page 186.
10 Single Color. Press t o create a one-color cop y of the original. F or
more information, see “Making single-color copies” on page 204.
11 Image Separation. Press to create a multi-page copy of a
larger-size original. For more information, see “Separating
images” on page 156.
12 Image Creation. Press to change the original image (such as
mirroring, repeating, or slanting it) on the copy. For more
information, see pages 177 to 186.
13 Recall. Press to recall copy settings stored in mode me mory. For
more information, see “Recall feature” on page 220.
14 Mode Memory. Press to store copy settings for the Rec. (recall)
function. For more information, see “Mode Memory” on page 212.
15 Framing/Blanking. Press to copy only certain portions of the
original. For more information, see “Framing” on page 164 and
“Blanking” on page 169.
16 Image Combination. Press to automatically reduce several
originals to fit on one copy. F or more information, see “Combining
images” on page 151.
42 Chapter 1 Product introduction
EN
Page 43

Entering characters on the touch panel display
Alphabetical characters are used to person alize the entry modes on
the copy module. For example, y ou can assign a name to a color
balance setting or to a mode key.
To enter characters, use the alphabetical keys that appear in the
touch panel display. You can enter alphabetical char acters (upper
case or lower case) and special characters.
Note The modes that you select and the n umber of characters that you
enter may v ary. Up to 10 characters can be enter ed dependin g on the
mode to be stored. A special character is counted as two normal
characters. Enter numbers using the numeric keys on the copy
module control panel.
EN
Touch panel display 43
Page 44

1
Entering alphabetical
characters
The following example provides
instructions on entering alphabetical
characters to personalize entry modes.
Example: Enter “Copy A”.
1 Press
2
Note
Each time
the entry mode changes.
2 Type “Copy A” by tou ching t he letter s
3 When you have entered all the
INPUT MODE
appears.
INPUT MODE
on the touch panel display.
characters, press
until
UPPER
is pressed, the
.
OK
44 Chapter 1 Product introduction
EN
Page 45

1
Entering special characters
The following example provides
instructions on entering special
characters to personalize entry modes.
Example: Enter “è.”
1 Press
Note
2
3
Each time
the entry mode changes.
2 Press the ▼ key or the ▲ key to
3 Press the number of the desired
Note
You can also select the desired special
character by pressing the equivalent
numerical images.
If you make a mistake when entering
special characters, press
delete the character.
You can also delete all the entered
characters by pressing C.
INPUT MODE
displayed.
INPUT MODE
display the desired special character.
special character in the touch panel
display.
until
is pressed, the
OTHER
is
BACK SPACE
to
EN
Touch panel display 45
Page 46

4
4 Press
5 When all of the special characters
are entered, press
Enter additional characters by pressing
INPUT MODE
before pressing
5
DONE
.
until
OK
OK
UPPER
.
.
is displayed
46 Chapter 1 Product introduction
EN
Page 47

Legal limitations of color copying
Copying certain documents in color may be illegal and may result in
either criminal or civil liability. The following list is intended to be a
guide rather than a complete listing of every possible restriction.
Check with your legal counsel if you are copying a questionable
document not listed here.
The following documents may not be copied:
! Paper money, traveler s checks, or money orders
! Food stamps
! Certificates of deposit
! Passports
! Postage stamps (canceled or uncanceled)
! Immigration papers
! Identifying badges or insignias
! Selective service or draft papers
! Bonds or other certificates of indebtedness
! Checks or drafts drawn by governmental agencies
! Stock certificates
! Motor vehicle licenses and certificates of title
! Copyrighted works or works of art without the permission of the
copyright owner
Note The copy module is provided with a security key to ensure that only
authorized copies are made. Use of this key should be strictly
supervised.
EN
Legal limitations of color copying 47
Page 48

48 Chapter 1 Product introduction
EN
Page 49

Basic copy module
2
functions
Overview
This chapter covers the basic functions of the HP Color LaserJet
8550MFP copy module. Topics include:
! Turning the copy module on
! Turning the copy module off
! Energy-saving features
! Automatic Start function
EN
Overview 49
Page 50

Turning the copy module on
1
2
3
1 Turn on the power switch that is
located on the right rear side of the
copy module.
2 Make sure that the copy module key
is in the ON position.
Note
Keep the po wer s witch and k ey in the ON
position at all times. Use the power
button specified in step 3 to turn the
system on and off. If the rear power
switch gets turned off, wait at least 5
seconds before turning it back on.
3 Press the power button located on
the right side of the copy module
control panel to turn the system on.
The green light beneath the power
button is lit when the power is on.
Note
This power button provides power to
both the copy module and the printer
unit. If you turn off the power using this
button, wait at least 5 seconds before
turning it back on.
50 Chapter 2 Basic copy module functions
EN
Page 51

4
4 During the copy module warm-up
cycle, this screen appears on the
touch panel display. The message
PLEASE WAIT
is displayed in the
upper left hand corner.
Note
You can set your copy job settings while
the system is warming up. (See
“Automatic Start function” on page 53.)
After the warm-up cycle is complete, the
Basic Features screen appears with the
message
READY TO COPY
in the
upper-left hand corner . The cop y module
is now ready to make copies and is in
Default mode (see page 31), which
means that the default settings are
activated.
The default copy settings are:
! Copy ratio: direct (100%)
! Copy paper selection: Automatic
Paper Selection
EN
! Copy exposure: manual exposure
control
! Copy quantity: 1
! Original type: Text/Photo/Map
To change the default settings, see
“Changing Standard Settings” on
page 264.
Note
This screen may differ depending on the
optional accessories that hav e been
installed.
Turning the copy module on 51
Page 52

Turning the copy module off
Figure 12 System power button
To turn off power to the system (both the copy module and the printer
unit), press the power button located on the right side of the copy
module control panel. The green light located beneath the power
button will be off when the power button is turned off.
Below are some suggestions for determining when to turn the system
off:
! Turn off the system when not in use for a prolonged period of
time (for example, turn off the system overnight).
After turning the system on, the touch panel display should
!
appear before turning the system off again.
52 Chapter 2 Basic copy module functions
EN
Page 53

Additional features
Energy-saving features
The copy module features two energy-saving modes. These settings
lower the power consumption of the system while it is not in use . For
more information about energy-saving features, see the following
sections:
! Energy Saver mode (see page 240)
! Low-power mode (see page 272)
Automatic functions
The copy module features several automatic modes. These modes
allow you to set certain copy module functions to operate
automatically. For more information about automatic functions, see
the following sections:
! Automatic Power-off Time function (see page 273)
! Automatic Clear Time function (see page 269)
Automatic Start function
The Automatic Start function allows copying to automatically start
after the system has warmed up.
Automatic Start will occur:
! after you have turned the power on
! after you have canceled the Energy Saver mode
! after you have cleared jammed copy media
Note Automatic Start will not work if the system is processing a copy or
print job.
EN
Additional features 53
Page 54

To set Automatic Start
1 Place your original on the glass or in the optional ADF, and then
enter the desired copy settings.
to make copies.
2 Press S
TART
3 This following message appears:
WARMED UP
.
4 When the copy module is ready, copying will begin automatically.
Note To cancel Automatic Start, press S
be canceled automatically when the cover of the copy module is
opened.
You cannot use the Interrupt mode with Automatic Start.
COPYING WILL BEGIN WHEN
TOP
or R
. Automatic Start will
ESET
54 Chapter 2 Basic copy module functions
EN
Page 55

Common copying
3
tasks
Overview
This chapter covers information about selecting the correct media for
your copy module and performing the basic copying tasks. These
tasks can be selected in the Basic Features screen on the touch
panel display.
This chapter includes information on the following:
! Selecting media
! Loading media
! Making copies
! Adjusting copy e xposure
! Selecting the copy media size
! Enlarging or reducing originals
! Selecting original type
! Making double-sided copies
! Additional basic copying features
! Confirming, canceling, or changing the mode settings
Note Many of the tasks in this section refer to a media type called
Letter-Rotated or A4-Rotated. This refers to standard Letter-size and
A4-size media. But in order for some copy module features to function
correctly, the Letter-size and A4-size media must be placed into the
tray short-edge first (rotated).
EN
Overview 55
Page 56

Selecting media
Many types of media and other print media can be used with the copy
module, within certain specifications. Using media that does not meet
the specifications outlined in this chapter can increase the incidence
of media jams, contribute to repa ir and maintenance costs, and cause
premature wear, copy quality problems, and problems requiring
service. This service might not be covered by the HP warranty or
service agreements.
Before purchasing media or specia lized f orms, test a small quantity in
the system. Make sure your media supplier obtains and understands
the media and print media specifications in the HP LaserJet Printer
Family Paper Specification Guide.
Note It is possible that media could meet all of the specifications in this
chapter and still not copy satisfactorily. This might be caused by
abnormal characteristics of the operating environment or other
variables over which HP has no control, such as extremes in
temperature and humidity.
! Use only media that meet the specifications outlined in this
chapter.
! Do not attempt to use unsupported sizes or weights of media or
other unsupported media. For more information on supported
media, see the “Media specifications” table on page 57.
! Always handle transparencies and glossy media by their edges to
avoid fingerprints in the image area.
! Do not use media that has already passed thr o ug h a printer or
through a copy machine, even if there is no printing on the page.
! Recycled media can be used with this copy module. Recycled
media must meet the specifications shown in this chapter.
56 Chapter 3 Common copying tasks
EN
Page 57

Media specifications
The following table contains information about loading media into the
copying tra ys . The tab le includes specificat ions about special types of
media such as transparencies, envelopes, labels, and prepunched
paper.
Media specifications
Tray
Location
Tray 1
(multipurpose or
stack bypass
tray; located
on the printer
unit)
Media type &
size
Media
Letter
A4
Executive
Legal
Ledger
A3
A5
Custom sizes:
minimum 99.1 by
190.5 mm
(3.9 by 7.5 in)
maximum 305 by
470 mm (12 by
18.5 in)
Prepunched
media
Letter
A4
Media weight Orientation M ax imum
capacity
2
60 to 216 g/m
(16 to 58 lb)
bond
Heavy media:
(105 to 216
2
; 28 to
g/m
58 lb) bond
60 to 216 g/m
(16 to 58 lb)
bond
SS*: Face up
DS*: Face down
L&F*: Short edge
(top) toward the
rear of tray
Letter/A4:
Long edge toward
the printer unit
2
SS*: Face up, with
the holes toward
printer unit
DS*: Face down,
with the holes
away from printer
unit
100 sheets of
2
75 g/m
bond.
Limit to media-fill
mark on the
media-width
guides.
100 sheets of
75 g/m
bond.
Limit to media-fill
mark on the
media-width
guides.
(20 lb)
2
(20 lb)
* SS = single-sided printing; DS = double-sided printing; L&F = letterhead and preprinted
forms
** HP recommends using 5 mils (0.13 mm) thick transparencies with this system.
EN
Selecting media 57
Page 58

Media specifications (continued)
Tray
Location
Tray 1,
continued
When placing originals horizontally in the optional ADF, you must rotate media loaded in
Tray 1 for proper copying.
* SS = single-sided printing; DS = double-sided printing; L&F = letterhead and preprinted
forms
** HP recommends using 5 mils (0.13 mm) thick transparencies with this system.
Media type &
size
Transparencies**
Letter
A4
Envelopes
Double postcard
(JPOSTD)
B5
Commercial #10
C5
DL
Monarch
Labels:
Letter
A4
Media weight Orientation M ax imum
capacity
4 to 5 mils
(0.10 to 0.13
mm) thick
Maximum of
2
90 g/m
bond
— Face up, with
(24 lb)
Face up, with the
long edge
toward the printer
unit
Face up, with the
short edge toward
the printer unit
the long edge
toward the printer
unit
Fill to media-fill
mark on the
media-width
guides.
Approximately
10
Fill to media-fill
mark on the
media-width
guides.
Fill to media-fill
mark on the
media-width
guides.
58 Chapter 3 Common copying tasks
EN
Page 59

Media specifications (continued)
Tray
Location
T rays 2 and 3
(front-loading
trays on the
printer unit)
Tray 3 only
(bottom frontloading tray
on the printer
unit)
Media type &
size
Media
Letter
A4
Executive
Legal
Prepunched
media
Letter
A4
Transparencies**
Letter
A4
11 by 17 in
A3
Media weight Orientation M ax imum
capacity
2
60 to 105 g/m
(16 to 28 lb)
bond
2
60 to 105 g/m
(16 to 28 lb)
bond
4 to 5 mils (0.10
to 0.13 mm)
thick**
2
60 to 105 g/m
(16 to 28 lb)
bond
SS*: Face down
DS*: Face up
L&F*: Short edge
(top) toward the
rear of tray
SS*: Face down,
with the holes to
the right
DS*: Face up , with
the holes to the
left
Face down Limit to media-fill
SS*: Face down
DS*: Face up
L&F*: Short edge
(top) toward the
rear of tray
500 sheets of
2
75 g/m
(20 lb)
bond
Limit to media-fill
mark on the
media-width
guides.
500 sheets of
2
75 g/m
(20 lb)
bond
Limit to media-fill
mark on the
media-width
guides.
mark on the
media-width
guides.
500 sheets of
2
75 g/m
(20 lb)
bond
Limit to media-fill
mark on the
media-width
guides.
* SS = single-sided printing; DS = double-sided printing; L&F = letterhead and preprinted
forms
** HP recommends using 5 mils (0.13 mm) thick transparencies with this system.
EN
Selecting media 59
Page 60

Loading media
Loading the system input trays
For complete instructions on loading and configuring input trays, see
the HP Color LaserJet 8500, 8550N, 8550DN, 8550GN, 8550MFP
Printer User Guide (on CD-ROM).
To load the system input tra ys , first adjust the media-width guides and
then load the media, as shown in the following procedures. After
loading the media, configure the input tr ay in the printer unit control
panel.
Note To avoid media jams, ne v er add or remo v e media while the printer unit
is printing. Neve r overload an input tray.
60 Chapter 3 Common copying tasks
EN
Page 61

Loading media in Tray 1 (stack bypass)
1
1 After placing your original on the
glass or in the ADF tray, open Tray 1
(stack bypass).
Note
When using large copy media, pull out
the tray extension.
2 Place sheets of copy media in Tray 1
with the side to be copied on facing
up.
2
The media size selection screen
automatically appears in the touch panel
display.
Note
Make sure that the height of the media
stack does not exceed the media-fill
mark.
3 Adjust the media-width guides to fit
the size of the copy media.
3
Note
If media loaded in Tray 1 is too loose or
tight, media jams can occur or copies
might misalign.
EN
Loading media 61
Page 62

Loading envelopes into Tray 1
1
Using Tray 1, you can copy on a varying
sizes of envelopes (see “Media
specifications” on page 57).
1 Place a bundle of envelopes on an
even surface and flatten them out
neatly with your fingers. Make sure
the envelopes are not nested
together.
Note
Always flat ten envelopes on an even
2
surface.
2 Hold the bundle by the edge with
both hands. Fan the envelopes out
well before use.
Note
Take care not to put extra air into the
envelopes. If this happens, remove the
air by pressing the bundle from above.
62 Chapter 3 Common copying tasks
EN
Page 63

3
3 Place the bundle of envelopes with
the front side placed face up in
Tray 1. Confirm that the flaps of the
envelopes are placed on the left side
(facing the side of the front cover) of
the tray.
The media size selection screen
appears automatically in the touch p anel
display.
4
Up to 10 envelop es ca n be pl aced in th e
stack bypass. Make sure that the height
of the media stack does not exceed the
media-fill mark at the back of the tray.
4 Adjust the media-width guides to fit
the size of the envelopes.
Note
! You cannot copy onto the back side
of envelopes (the side with the flap).
If you use top-flap envelopes, place
the flap toward the copy module.
! If you use ISO-B5 envelopes, place
them so that the flap is firmly folded
down and facing downwards in the
tray.
Note
Align the envelopes properly with the
media-width guides. If envelopes are
loaded too loosely or tightly in Tra y 1,
media jams or misalignment may occur.
EN
Loading media 63
Page 64

Loading media into Trays 2 and 3
1 Open Tray 2 or 3.
2 To load media that is a different size from the media previously
loaded in the tra y, move the tw o media-width guides to th e correct
positions.
3 Load media up to the media-fill marks. For example, 500 sheets
2
of 75 g/m
(20 lb) bond media will fit in either tray. Do not fill the
tray above the media-fill mark.
4 Push the tray into the printer unit.
5 Configure the media type in the
printer unit control panel.
64 Chapter 3 Common copying tasks
PAPER HANDLING MENU
in the
EN
Page 65

Selecting the copy media size
Using Automatic Paper Selection
When Automatic Paper Selection is on, the copy module
automatically selects the appropriate copy media size, depending on
the size of the original and the selected copy ratio. Automatic Paper
Selection is enabled in the copy module Default settings.
Do not use the following types of originals with Automatic Paper
Selection:
! non-standard size originals
! highly transparent originals
! originals with an extremely dark background
! executive-size and smaller-size originals
You cannot use Automatic Paper Selection with the following settings:
! Automatic XY Zoom
! Automatic Zoom
! Image Combination
! Image Separation
! Automatic Repeat setting in Image Repeat
Before using Automatic Paper Selection
Use the following feature and guidelines to optimize your copying
using Automatic Paper Selection.
! Automatic tray switching
Note In the touch panel display, this f e atur e re ads as
SWITCHING
EN
.
Selecting the copy media size 65
AUTOMATIC DRAWER
Page 66

By setting this feature, if a tray runs out of copy media during copying,
the copy module automatically locates another tray loaded with the
same copy media size. The system will automatically f eed media from
the alternative media tray.
Note You can set whether or not a tray is subject to Automatic Tray
Switching. (See “Tray Eligibility for APS/ADS” on page 234.)
! Media guidelines
• Make sure that transparencies, glossy films, or thick copy
media are output to the left output tray when making copies.
Remove the output copies immediately. Failure to do so may
result in media jams.
• When either transparencies or glossy films are placed in Tra y 1
(stack bypass), place them vertically (long-edge first).
• You cannot select the ACS (Automatic Color Selection)
function when placing originals in the optional ADF and
making copies using Tray 1 (stack bypass) when you have
selected Transparency, Heavy Paper 2, or Glossy Film for the
copy media material. Select Full Color mode or Black
Monochrome mode.
• To obtain the best copies and to prevent damage to the cop y
module, use the transparencies or glossy films that HP
recommends for use with this copy module (see the “Media
specifications” table on page 57).
• When copying both color and black-and-white originals,
separate the color originals from the black-and-white originals
or copy all of them using the Full Color mode. (When making
copies in the Full Color mode, black-and-white originals will be
counted as full-color copies.)
CAUTION Using copy media that has not been specified for use with a color
laser copier can damage the copy module. For fu rther information,
see the HP LaserJet Printer Family Paper Specification Guide or
contact your service representative.
66 Chapter 3 Common copying tasks
EN
Page 67

1
To set Automatic Paper
Selection
To automatically select the media size of
the copy:
1 After placing your original on the
glass or in the optional ADF, and then
press
PAPER SELECT
panel display.
in the touch
2 Press
2
press S
control panel to make copies.
Note
The screen that appears in the touch
panel display varies depending on the
optional accessories that are attached.
Note
You can set Automatic Paper Selection
for specific trays (see “Tray Eligibility for
APS/ADS” on page 234).
(automatic), and then
AUTO
on the copy module
TART
EN
Selecting the copy media size 67
Page 68

Selecting copy media size in Tray 1
1
2
1 Load media into Tray 1. (For more
information on how to load Tra y 1 see
page 61.) Select the copy media size,
then press
2 The media type selection screen
appears. There are five types of copy
media:
•
PLAIN PAPER
(17 lb) bond and less than
105 g/m
•
TRANSPARENCY
•
HEAVY PAPER 1
heavier than plain paper
105 g/m
•
HEAVY PAPER 2
heavier than heavy paper 1
135 g/m
•
GLOSSY FILM
Press the copy media you want, and
then press
.
OK
: more than 64 g/m2
2
(28 lb) bond
: Transparencies
: Copy media
2
(28 lb) bond
: Copy media
2
(32 lb) bond
: Glossy films
.
OK
68 Chapter 3 Common copying tasks
Note
When
IRREG. SIZE
is pressed, you can specify the cop y
media size, selectable in 1 mm (1/16
inch) increments.
When
A/B-SIZE
select the International Standards
Organization (ISO) media size.
(irregular size)
is pressed, you can
EN
Page 69

3
Note
For additional information, see the
HP LaserJet Printer Family Paper
Specification Guide.
3 The media size selection screen
appears. Press
S
on the copy module control
TART
, and then press
DONE
panel to begin the copy job.
EN
Selecting the copy media size 69
Page 70

Selecting envelope sizes in Tray 1 (stack bypass)
1
2
1 Load envelopes into Tray 1. (For
more information on how to load
envelope into Tray 1 see page 62.) In
the paper size selection screen,
press
ENVELOPE
selection screen appears.
2 Select the size of the env elopes to be
copied, and then press
CAUTION
Always sele ct t he sa me envelope size to
match the envelopes to be copied.
Failure to do so could result in media
jams.
. The envelope size
.
DONE
70 Chapter 3 Common copying tasks
EN
Page 71

Selecting copy media size using Tray 1 for double-sided copies
1
2
3
You can use Tray 1 to copy onto the
second side of a sheet. However , the first
side of the originals must have already
been copied. Place originals with the
printed side down in Tray 1.
Note
Use 105 g/m
double-sided copies using Tray 1.
1 Place the media in Tray 1 so that the
top of the sheet is placed on the left
side, facing the copy module front
cover.
The media size selection screen
automatically appears.
2 Select the copy media size, and then
press
3 Select the copy media, and then
press
(Do not select
GLOSSY FILM
2
(28-lb) bond when making
.
OK
2ND SIDE OF 2-SIDED COPY
TRANSPARENCY
.)
or
.
EN
Selecting the copy media size 71
Page 72

4
4 Press
, and then press S
OK
TART
on
the copy module control panel to
begin the copy job.
72 Chapter 3 Common copying tasks
EN
Page 73

Selecting paper manually
1
2
You can manually select the desired
copy media size.
1 After placing your original on the
glass or in the optional ADF, press
PAPER SELECT
2 Select the copy media size, and then
press S
control panel to begin the copy job.
Note
The screen that appears in the touch
panel display varies depending on the
optional accessories that are attached.
TART
.
on the copy module
EN
Selecting the copy media size 73
Page 74

Making copies
Basic copying operations
1
2
3
1 Place your originals on the glass (see
page 76)
or
2 place your originals in the optional
ADF (see page 77).
3 Enter the copy quantity using the
numeric key pad on the copy module
control panel and set the copy mode.
The basic copy modes include the
following:
• Copy exposure
• Copy media size
• Enlarging or reducing the copy
ratio
• Original type
• Special Features mode settings
4 Press S
control panel to begin the copy job.
on the copy module
TART
74 Chapter 3 Common copying tasks
Note
Do not touch the copy module cover
during a copying job. Doing so may
cause the original to shift, which can
adversely affect the quality of the copies
or prevent images from copying.
EN
Page 75

1
To stop before a copy job is
complete
on the copy module
1 Press S
control panel.
Note
Several sheets may out put even after
S
TOP
TOP
has been pressed.
EN
Making copies 75
Page 76

Placing the original on the glass
1
1 Lift the cover and place the original
face-down on the glass.
2 Align the corner of the original with
the “arrow” mark in the upper-left
corner of the glass.
Note
The size of the original determines
whether you should place the original
vertically (portrait) or horizontally
(landscape) on the glass. The position of
2
the original affects the Automatic Paper
Selection feature.
3 Lower the copy module cover and
on the copy module
press S
TART
control panel.
CAUTION
When copying thick items, such as
books, do not press down hard on the
copy module cover. Doing so may
3
damage the glass and result in injury.
76 Chapter 3 Common copying tasks
Note
When copying originals that are
composed of both color and
black-and-white, make copies of them by
separating the color originals from the
black-and-white originals or make copies
of them all using Full Color mode. (When
making copies in the Full Color mode,
black-and-white originals will be counted
as full-color copies.)
EN
Page 77

Placing the original in the optional ADF
1
When you place several sheets of
originals in the optional ADF and press
S
, they are automatically fed to the
TART
glass for cop ying. Do uble -sided originals
are automatically flipped inside the
optional ADF to make copies of both
sides.
1 Adjust the media-width guides on the
optional ADF to fit the size of your
originals.
2
2 Load the originals into the ADF tray
face up.
Note
When enlarging from Letter- or A4-size
originals, place the originals horizontally.
3 Flip up the ADF tray extension for
copying rotated or long originals
(such as Legal-size or A3 media).
3
Note
Remember to load rotated media
short-edge first into Tray 1 (the stack
bypass or multipurpose tray) when
copying from rotated originals or when
reducing A3-, Legal-, or Ledger-size
media.
EN
Making copies 77
Page 78

The following ty pes of originals can be used in the optional ADF:
! Original media weight: 50 to 105 g/m
! Original media size: 11 by 17 in, Legal, Letter, Ex ecutive, A4, A3
2
(15 to 28-lb) bond
(Executive-size originals must be placed vertically.)
Original tray capacity:
!
11 by 17 in, Legal, A3: up to 25 sheets (80 g/m
Letter, Executive, A4: up to 50 sheets (80 g/m
2
or 20-lb bond)
2
or 20-lb bond)
When originals are placed in the optional ADF, the copy module will
automatically select the left output tray or the face-down output bin to
output copies, depending on the selected copy settings. To change
this setting, press A
COMMON SETTINGS
DMINISTRATION FUNCTIONS
(see “Copy Tray setting” on page 244).
and then press
CUSTOM
Do not use the following types of originals in the optional ADF:
! originals with tears, large holes, or binding holes
! severely curled originals or originals with sharp folds
! originals that are paper clipped or stapled
! transparencies or other highly transparent originals
! other originals that may not feed smoothly
Note Color copies made with the copy module, or other originals that
contain large quantities of toner, may not feed properly through the
optional ADF. It is recommended that you use the glass when copying
these types of originals.
Note Check the condition of originals that have been repeatedly fed
through the optional ADF. When making several copies using the
same originals, the originals may become folded or wrinkled and may
not feed smoothly.
Note You cannot select the A CS (Automatic Color Selection) function when
making copies using Tra y 1 and select ing Transparency, Heavy Paper
2, or Glossy Film for the copy media material. Press F
B
on the copy module control panel.
LACK
78 Chapter 3 Common copying tasks
ULL COLOR
or
EN
Page 79

Adjusting copy exposure
Manually adjusting the exposure
1
To manually adjust how light or dark the
copied image appears on the media,
follow the steps below.
1 After placing your original on the
glass or in the optional ADF, press
the arrow keys ( or ) to manually
lighten or darken the copy exposure.
on the copy module
2 Press S
control panel to begin the copy job.
TART
Selecting Automatic Exposure Control
1
To automatically adjust how light or dark
the copied image appears on the media
follow the steps below.
1 After placing your original on the
glass or in the optional ADF, press
(automatic). The copy module will
automatically select the correct level
of exposure for your copies.
A
EN
on the copy module
2 Press S
control panel to begin the copy job.
TART
Adjusting copy exposure 79
Page 80

Enlarging or reducing originals
There are several ways to enlarge and reduce originals onto your
copies. These include:
! using preset copy rati os
! using Automatic Zoom
using the manual Zoom feature
!
! using Entire Image reduction
! using the Zoom Program
! using XY Zoom mode
! using Multi-page Enlargement mode
Each method for enlarging and reducing images is described in this
section.
80 Chapter 3 Common copying tasks
EN
Page 81

Using preset copy ratios
Use preset copy r atios to r educe o r enlarg e stan da rd size originals to
different standard sizes (for example, Letter or A4-size originals
enlarged to Legal or A3-size copies).
1
2
Note
When enlarging Letter- or A4-sized
originals to Ledger-, Legal-, or A3-sized
copies, be sure to place the original on
the glass horizontally. When reducing
Ledger-, Legal-, or A4-sized originals to
Letter- or A4-size, be sure to place
Letter-R or A4-R media in Tray 1. Also
make sure that the media in Tray 1 is
loaded short-edge first (rotated).
1 After placing your original on the
glass or in the optional ADF, press
(reduce) or E (enlarge).
R
Note
LOAD **-SIZE PAPER
touch panel display when no cop y me dia
is loaded in either Tray 1 (stack bypass)
or the selected media tray.
2 Select a preset copy ratio (Legal,
Letter, Executive, or Maximum), and
then press S
module control panel to start the
copy job.
TART
appears in the
on the copy
EN
Enlarging or reducing originals 81
Page 82

Using Automatic Zoom
Depending on the size of the originals and the selected copy media,
you can use Automatic Zoom to automatically select the appropriate
copy ratio. The copies will be scaled proportionately using the same
ratio in both the horizontal and vertical directions. The following copy
media sizes can be used with the Automatic Zoom mode:
! 11 by 17 in
! Legal
! Letter
! Letter-R
! Executive-R
! A4
! A4-R
! A3
The example below illustrates what the finished copy will look like.
Original: Letter Copy: 11 by 17 in
11 by 17 in size selected
Figure 13 Letter-size image automatically enlarged to 11 by 17 in
Note You cannot use Automatic Zoom with Automatic Paper Selection.
Note In Automatic Zoom, you cannot make copies of highly transparent
originals, such as transparencies.
82 Chapter 3 Common copying tasks
EN
Page 83

1
2
To use Automatic Zoom
1 After placing your original on the
glass or in the optional ADF, press
PAPER SELECT
Note
LOAD **-SIZE PAPER
touch panel display when no cop y me dia
is loaded in the selected media tray.
2 Select the copy media size. (Select a
preset copy media size other than
[automatic].)
AUTO
Note
The copy module automatically selects
the appropriate copy ratio depending on
the size of the originals and the selected
copy media.
.
appears in the
EN
Enlarging or reducing originals 83
Page 84

3
3 Press
4 Press
press S
.
ZOOM
. Press
AUTO
TART
DONE
on the copy module
, and then
control panel to begin the copy job.
4
84 Chapter 3 Common copying tasks
EN
Page 85

Using the manual Zoom feature
1
To enlarge or reduce in 1%
increments
If you do not want to use a preset image
size, you can manually enlarge or reduce
copied images to any ratio from 25% to
400% of the original size.
1 After placing your original on the
glass or in the optional ADF, press
.
ZOOM
2
2 Press
up or down in 1% increments . You
also can enter the exact copy ratio
using the numeric keys . Press
and then press S
module control panel to begin the
copy job.
Note
Press C (clear) on the copy module
control panel to cancel the entered
values.
or + to adjust the copy ratio
-
on the copy
TART
DONE
,
EN
Press
screen to return to direct copying
(100%).
(direct) in the basic features
DIR
Enlarging or reducing originals 85
Page 86

Using Entire Image reduction
When the image on your original has little or no margins, the resulting
image copied onto the same size media might looked cropped or
unfinished. To prevent making poor-quality copies of full-page
originals, use the Entire Image setting. This setting slightly reduces
the original to create a margin of white space around the copied
image. The result is a more “finished” looking document.
Original Copy
Figure 14 Copied image is reduced slightly using the Entire Image setting
86 Chapter 3 Common copying tasks
EN
Page 87

1
To copy an entire image
1 After placing your original on the
glass or in the optional ADF, press
.
ZOOM
2 Press
2
ENTIRE IMAGE
and then press S
module control panel to begin the
copy job.
. Press
on the copy
TART
DONE
,
EN
Enlarging or reducing originals 87
Page 88

Using the Zoom Program
The Zoom Program is a feature that calculates the appropriate copy
ratio for your document using the sizes of the original media and the
copy media.
When using this program , the touch p anel display prompts you for the
media sizes. It then displays the suggested copy ratio, which you can
select or change. The Zoom Program has two modes.
The first mode, Zoom mode, will adjust the image proportionately in
both the horizontal and vertical directions.
Original Copy
150 mm
(5-7/8 in)
200 mm
(7-7/8 in)
Figure 15 Copy created using Zoom mode of the Zoom Program
The second mode, XY Zoom mode, will allow va riable adjustments to
the image in either the horizontal or vertical direction (or a
combination of the two).
Original Copy
Figure 16 Copy created using XY Zoom mode of the Zoom Program
88 Chapter 3 Common copying tasks
EN
Page 89

Using Zoom mode
The sizes of the original and the copy media can be entered in 1 mm
or 1/16 in increments using a number entry screen on the display
panel. Once you have entered the sizes, the copy module calculates
the copy ratio using the following formula:
[copy ratio (%) = copy size (mm or in) / original size (mm or in)] x 100
If the calculated copy ratio is smaller than 25%, it will be set to 25%. If
the ratio is larger than 400%, it will be set to 400%.
EN
Enlarging or reducing originals 89
Page 90

1
T o make copies using the Zoom
Program
1 After placing your original on the
glass or in the optional ADF, press
.
ZOOM
Note
LOAD **-SIZE PAPER
touch panel display when no cop y me dia
is loaded in the selected media tray.
appears in the
2
3
2 Select
3 Select
SIZE
appears.
! Enter the width (X) or the length (Y)
of the original.
Press
screen appears.
! Enter the desired width (X) or the
length (Y) of the copy media.
ZOOM PROGRAM
. Then press
ZOOM
; the numeric entry screen
COPY SIZE
.
ORIGINAL
; the numeric entry
90 Chapter 3 Common copying tasks
EN
Page 91

4
4 Confirm the settings, and then press
. The copy module will
OK
automatically calculate the
proportionate ratio. Then press
S
on the copy module control
TART
panel to begin the copy job.
Note
Press C (Clear) to cancel the entered
values.
Press
to enter values in millimeters
MM
instead of inches.
EN
Enlarging or reducing originals 91
Page 92

Using XY Zoom mode
If you want to str etch or shrink the copied image non-proportionately,
use the XY Zoom mode. This mode has two settings:
! manual
automatic
!
Use Manual XY Zoom to manually specify the copy ratio for the
horizontal (X) and/or the vertical (Y) image directions in 1%
increments:
Original Copy
Figure 17 Manual XY Zoom
Use Automatic XY Zoom to automatically spec ify the copy ratio to
match the size of the selected copy media:
Y = 130%
x = 80%
Original
Letter-size selected
Copy
Figure 18 Automatic XY Zoom
Note You cannot use Automatic XY Zoom with Automatic Paper Selection.
92 Chapter 3 Common copying tasks
EN
Page 93

1
To use Manual XY Zoom
1 After placing your original on the
glass or in the optional ADF, press
.
ZOOM
2 Press
3 Press
2
3
XY ZOOM
(the horizontal direction) and
X
enter the copy ratio using the
numeric keys on the copy module
control panel, or using
the touch panel display. Then press
(the vertical direction), and repeat the
process.
After confirming the settings, press
, and then press S
OK
copy module contro l panel to begin
the copy job.
Note
Press C (clear) if you need to cancel
the entered values.
.
and + on
Y
on the
TART
EN
Enlarging or reducing originals 93
Page 94

1
2
To use Automatic XY Zoom
1 After placing your original on the
glass or in the optional ADF, press
PAPER SELECT
2 Select the copy media size. (Press a
copy media size other than
[automatic]).
Note
The screen that appears in the touch
panel display varies depending on the
optional accessories that are attached.
.
AUTO
3 Press
3
ZOOM
.
94 Chapter 3 Common copying tasks
EN
Page 95

4
4 Press
5 Press
XY ZOOM
AUTO XY ZOOM
confirming the settings, press
and then press S
.
TART
. After
,
OK
on the copy
module control panel to begin the
copy job.
5
EN
Enlarging or reducing originals 95
Page 96

Using Multi-page Enlargement mode
Using this mode, you can mak e copies of an original image on sev er al
sheets of copy media, and then paste them together to produce a
copy that is larger than 279 by 432 mm (11 by 17 in).
Note Only the following standard size originals can be selected in the
Multi-page Enlargement mode: 11 by 17 in; Legal; Letter; Letter-R;
Executive; Executive-R; A4; A4-R; A3.
The following tw o methods are a vailab le f or specifying the cop y media
size to be output:
! Specify the copy ratio by % (
COPY RATIO(S
)
• The cop y media size is automatically set.
! Specify the copy ratio by size and number of output pages
(
NUMBER OF OUTPUT PGS
)
• When specifying the copy media size and number of output
pages, the copy ratio is automatically set.
Original Copies Copies cut and pasted
together
Figure 19 Original copied onto multiple sheets of paper
Note Copies output in the Multi-page Enlargement mode have adjacent
images that are overlapping. Cut and paste these copies together by
overlapping the duplicate image areas.
96 Chapter 3 Common copying tasks
EN
Page 97

Copy ratio specification and required media sizes and
quantities
When making an enlarged copy wit h a specified cop y r atio , the size of
the copy media and the number of sheets required for the resulting
copy depend on the copy ratio that is specified. The following table
shows typical copy ratios and the siz e and number of sheets of copy
media required. Use this table as a guide when determining the
desired copy ratio.
Typical copy ratios (Original size: Ledger/A3)
Copy Ratio Selected Paper Size Number of
Pages
200% Ledger/A3 9 559 by 864 mm
200% Letter/A4 15 559 by 864 mm
200% Letter-R/A4-R 12 559 by 864 mm
300% Ledger/A3 16 838 by 1295 mm
300% Letter/A4 28 838 by 1295 mm
300% Letter-R/A4-R 25 838 by 1295 mm
300% Ledger/A3 25 1117 by 1727 mm
400% Letter/A4 45 1117 by 1727 mm
400% Letter-R/A4-R 42 1117 by 1727 mm
Total Size
(22 by 34 in)
(22 by 34 in)
(22 by 34 in)
(33 by 51 in)
(33 by 51 in)
(33 by 51 in)
(44 by 68 in)
(44 by 68 in)
(44 by 68 in)
Note The values shown in the above table are only guidelines. The actual
values may be slightly different.
The resulting size after the printed copies have been cut and pasted
together will be slightly smaller than the size indicated in the above
table.
EN
Enlarging or reducing originals 97
Page 98

The Multi-page Enlargement mode can still be used to make an
enlarged copy even if the original or the copy ratio that you want to
use is not included in the table. The size of originals can be specified
up to 11 by 17 in, and the copy ratio can be specified up to 400%.
Horizontal
placement
Vertical
placement
Figure 20 Horizontal and vertical placement
Far side
Near side (closer to the
control panel)
98 Chapter 3 Common copying tasks
EN
Page 99

1
To specify the copy ratio by %
(copy ratio(s))
1 After placing your original on the
glass or in the optional ADF, press
.
ZOOM
2 Press
3 Select
2
3
Note
For more information on specifying the
copy ratio by size and number of output
pages (
page 102.
MULTI-PG ENLARGE
COPY RATIO(S)
.
OK
NUMBER OF OUTPUT PGS
.
, then press
), see
EN
Enlarging or reducing originals 99
Page 100

4
4 Specify the copy ratio (
), using the
%
numeric keys on the control panel or
press
or + in the touch panel
-
display. After confirming the settings,
press
, and then press S
OK
TART
on
the copy module control panel to
begin the copy job.
Note
Press C if you need to cancel the
entered values.
100 Chapter 3 Common copying tasks
EN
 Loading...