

HP Color LaserJet 8550, Color LaserJet 8550DN, Color LaserJet 8550GN, Color LaserJet 8550MFP, Color LaserJet 8550N Quick Reference Guide
Page 1
8550, 8550N, 8550DN, 8550GN,
8550MFP Printer
Quick
Reference
Guide
English
Page 2

Page 3

Quick
Reference
Guide
HP LaserJet 8550,
8550N, 8550DN,
8550GN, 8550MFP
Printer
Page 4

©2000 Hewlett-Packard
Company
All Rights Reserved.
Reproduction, adaptation, or
translation without prior written
permission is prohibited, except
as allowed under the copyright
laws.
Publication number
C7096-90904
First edition, April 2000
Warranty
The information contained in
this document is subject to
change without notice.
Hewlett-Packard makes no
warranty of any kind with
respect to this information.
HEWLETT-PACKARD
SPECIFICALLY DISCLAIMS
THE IMPLIED WARRANTY OF
MERCHANTABILITY AND
FITNESS FOR A PARTICULAR
PURPOSE.
Hewlett-Packard shall not be
liable for any direct, indirect,
incidental, consequential, or
other damage alleged in
connection with the furnishing
or use of this information.
T rademark Credits
Adobe, PostScript, and Adobe
Photoshop are trademarks of
Adobe Systems Incorporated
which may be registered in
certain jurisdictions.
Arial, Monotype, and Times
New Roman are U .S. registe red
trademarks of the Monotype
Corporation.
CompuServe is a U.S.
trademark of CompuServe, Inc.
Helvetica, Palatino, Times, and
Times Roman are trademarks
of Linotype AG and/or its
subsidiaries in the U.S. and
other countries.
Microsoft, MS Windows,
Windows, and Windows NT are
U.S. registered trademarks of
Microsoft Corporation.
TrueType is a U.S. trademark of
Apple Computer, Inc.
NERGY STAR
E
is a U.S.
registered service mark of the
U.S. EPA.
Page 5

Contents
Printer Information.....................................................2
Control Panel Features..............................................5
Using the Printer Online Help System.......................... 5
Using the Printer Control Panel.................................... 6
Printer Control Panel Messages...................................9
Loading Media.......................................................... 17
Media Specifications ..................................................17
Paper Trays and Capacities.......................................19
Configuring Media Type and Size.............................. 32
Media Jams...............................................................34
Replacing Consumables..........................................49
For More Information............................................... 50
EN Contents 1
Page 6
Printer Information
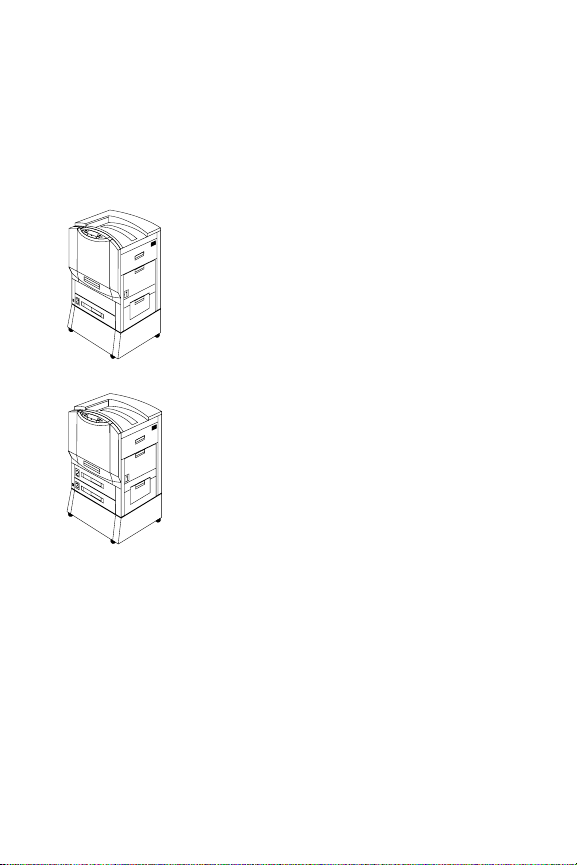
Configurations
This printer is available in five configurations, as
described below:
HP Color LaserJet 8550
The HP Color LaserJet 8550 comes
standard with a 100-sheet tray 1, a
500-sheet tray 3, a printer stand, and
32 MB RAM.
HP Color LaserJet 8550N
The HP Color LaserJet 8550N comes
standard with a 100-sheet tray 1, a
500-sheet tray 2, a 500-sheet tray 3,
a printer stand, 32 MB RAM, an HP
JetDirect print server (10/100
Base-TX), and an internal hard disk.
EN
Printer Information 2
Page 7
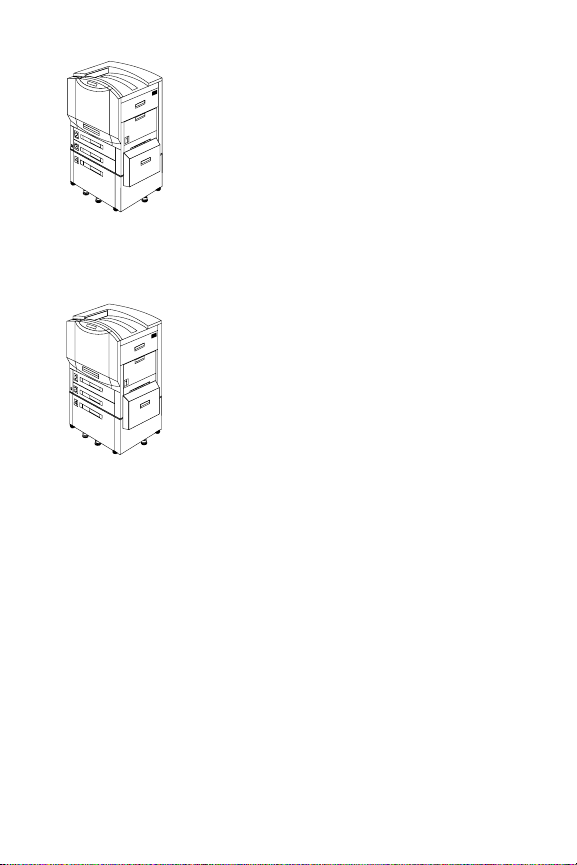
HP Color LaserJet 8550DN
The HP Color LaserJet 8550DN
comes standard with a 100-sheet
tray 1, a 500-sheet tray 2, a
500-sheet tray 3, a (tray 4)
2,000-sheet input tray, a duplexer,
64 MB RAM, an HP JetDirect print
server (10/100 Base-TX), an internal
hard disk, and five stabilizing legs.
HP Color LaserJet 8550GN
The HP Color LaserJet 8550GN
comes standard with a 100-sheet
tray 1, a 500-sheet tray 2, a
500-sheet tray 3, a (tray 4)
2,000-sheet input tray, a duplexer,
128 MB RAM, an HP JetDirect print
server (10/100 Base-TX), an internal
hard disk, five stabilizing legs, and a
higher performance processor.
EN
Printer Information 3
Page 8

HP Color LaserJet 8550MFP
The HP Color LaserJet 8550MFP
comes standard with a 100-sheet
tray 1, a 500-sheet tray 2, a
500-sheet tray 3, a duplexer, 64 MB
RAM, an HP JetDirect print server
(10/100 Base-TX), an internal hard
disk, a printer/copy module stand,
and a copy module.
EN
Printer Information 4
Page 9

Control Panel Features
Using the Printer Online Help System
This printer features an online Help system that
provides instructions for resolving most printer errors.
Certain control panel error messages alternate with
instructions on accessing the online help system.
Whenever a
appears in an error message or a
message alternates with FOR HELP PRESS THE ? KEY,
press the I
key to navigate through a sequence of
TEM
instructions. If there is more than one message
alternating on the control panel, press M
+ to display
ENU
the Help for the first message. Continue to press
M
+ to display the other Help messages. When the
ENU
desired Help message is displayed, press I
TEM
+ to
scroll through the Help messages.
To exit the online Help system, press G
.
O
EN
Control Panel Features 5
Page 10
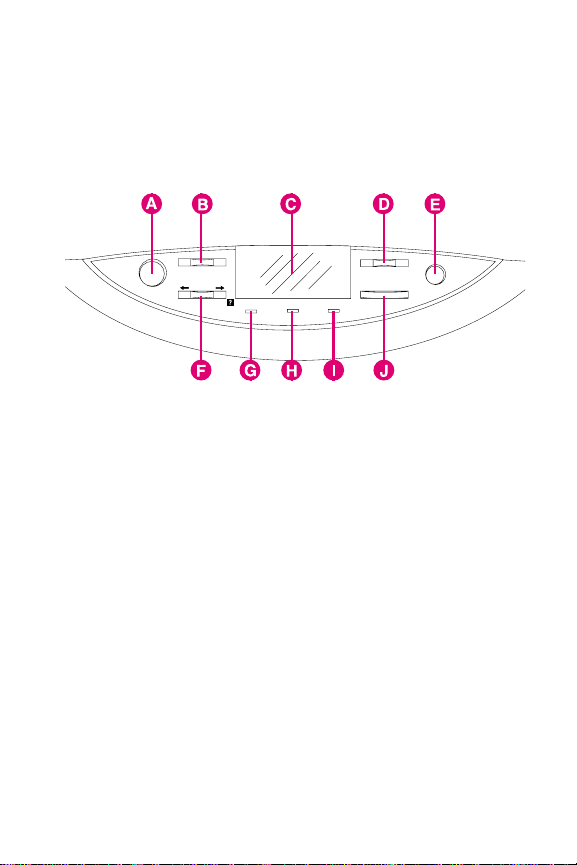
Using the Printer Control Panel
The following figure shows the locations of printer
control panel features.
AGo
Brings the printer online or offline, and exits menus.
BMenu
Accesses the printer control panel menus to set the
printer defaults. This key permits both forward and
backward movement through the list of available
menus.
CDisplay
Presents data about the printer (such as printer
status, required actions, or data and print errors) in
one or two lines of characters.
EN
Control Panel Features 6
Page 11

D-Value+
Steps through the value choices for a particular
menu item using -/+. This key permits both forward
and backward movement through the values.
E Cancel Job
Stops the currently printing job from printing. If no
job is printing and the display indicates that a job is
processing, C
ANCEL JOB
cancels the currently
processing job and the next job begins printing.
While the job is being canceled, CANCELING JOB is
displayed.
FItem
Steps through the items in a particular menu. This
key permits both forward and backward movement
through the available items. The I
key also
TEM
steps through the control panel help messages.
G Ready Indicator
(green)
• On—The printer is online and able to accept and
process data.
• Off—The printer is offline and unable to process
data.
• Flashing—The printer is going from online to
offline, or from offline to online.
EN
Control Panel Features 7
Page 12

H Data Indicator
• On—Data is in the printer buffer, or the printer is
processing data.
• Off—The printer buffer is empty.
• Flashing—The printer is receiving or processing
data.
I Attention Indicator
• On—An error has occurred in the printer.
• Off—The printer does not require attention.
• Flashing—The printer requires attention.
J Select
Selects the item or value currently shown on the
printer control panel display. An asterisk (*) is
displayed when an item has been selected.
(green)
(amber)
EN
Control Panel Features 8
Page 13
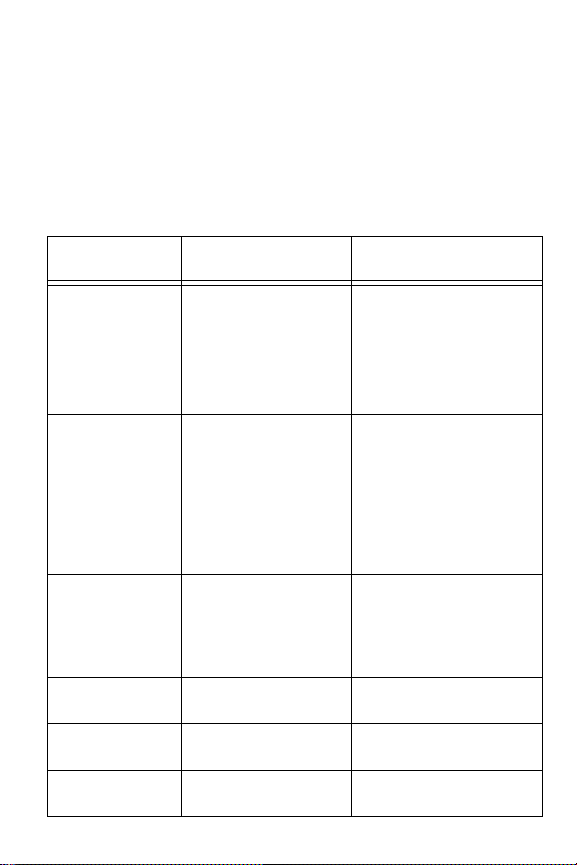
Printer Control Panel Messages
The following are common printer control panel
messages for conditions that will cause the printer to
stop working. For a more complete list of messages,
see the online user guide, or contact the system
administrator.
Control Panel
Message Description Recommended Action
41.3 UNEXPECTED
PAPER SIZE
LOAD TRAY 1
<Type> <Size>
41.3 UNEXPECTED
PAPER SIZE
LOAD TRAY 1
<Width> <Length>
41.5 UNEXPECTED
PAPER TYPE
LOAD TRAY <X>
<Type> <Size>
CLEAR DUPLEX JAM
LOWER LEFT DOOR
CLEAR FUSER JAM
LOWER LEFT DOOR
CLEAR INPUT JAM
T ra y 1 is configured for one
media size, but the printer
detects that a different size
has been fed from tray 1.
<Type>
media type and size
specified in the printer
driver or application.
Tray 1 is configured for a
custom media size, but the
printer detects a different
size being fed from the
tray 1.
<Width>
the media width and length
selected in the application
or printer driver.
The printer was expecting
one type of media to be fed
from an input tray and
another type was fed.
The printer senses a media
jam in the duplex unit.
The printer senses a media
jam in the fuser area.
The printer senses a media
jam in an input tray
and
and
<Size>
<Length>
are the
Load the proper-size media in
tray 1 or reconfigure tray 1 for
the media size it contains.
Load the requested size media
in tray 1.
are
Open and close the front door.
The printer should feed the
page through the printer. Verify
that the printer control panel
configuration and media are
correct.
See “To clear jams from the
optional duplexer” on page 46.
See “To clear jams from the
fuser area” on page 40.
See “Removing Jammed
Media” on page 34.
EN
Control Panel Features 9
Page 14
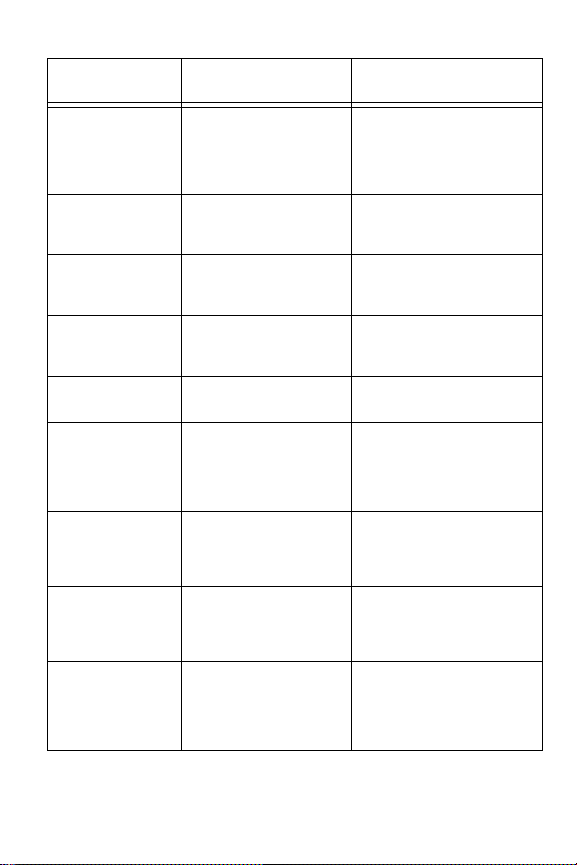
Control Panel
Message Description Recommended Action
CLEAR
MAILBOX JAM
CLEAR OUTPUT JAM
UPPER LEFT DOOR
CLEAR PAPER JAM
CLEAR TRANSFER
JAM
CLEAR TRAY 4 JAM
CLEAR TRAY X JAM
CLEAR UNEXPECTED
PAPER SIZE JAM
THEN LOAD TRAY 1
<Type> <Size>
CLEARING PAPER
FROM PRINTER
CLOSE
<Location> DOOR
The printer senses a media
jam in the multi-bin
mailbox.
The printer senses a media
jam in the top output bin.
The printer senses a media
jam.
The printer senses a media
jam in the transfer drum
area.
The printer senses a media
jam in tray 4.
The printer senses a media
jam in one of the optional
paper trays.
The printer senses a media
jam in tray 1.
The printer is attempting to
remove unusable media
(such as media damaged
in a media jam).
The printer senses that
one of the printer doors is
not closed properly.
<Location>
printer doors.
is one of the
See “To clear jams from a
finishing device (the optional
multi-bin mailbox, 3000-sheet
stapler, 3000-sheet
stapler/stacker)” on page 48.
See “To clear top output bin
and upper left door jams” on
page 47.
Open the printer to locate and
clear the jam. See “Removing
Jammed Media” on page 34.
See “To clear regi strati on and
transfer area jams” on
page 44.
See “To clear jams in the
optional tray 4” on page 39.
Open the indicated tray and
remove the jammed media .
Close the tray and wait for the
printer to warm up before
resuming printing.
See “Remove media from tray
1.” on page 37.
No action is required.
Close the door indicated in the
message. After all printer
doors are closed, the printer
control panel might display the
WARMING UP
message
.
EN
Control Panel Features 10
Page 15
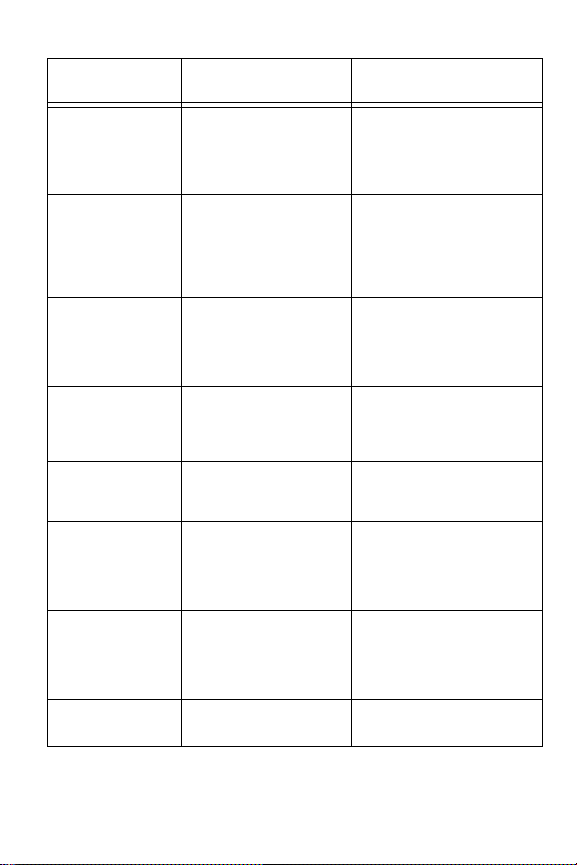
Control Panel
Message Description Recommended Action
DRUM ERROR
REPLACE KIT
DRUM LIFE LOW
REPLACE KIT
DRUM LIFE OUT
REPLACE DRUM KIT
DUPLEX ERROR
CHECK DUPLEXER
FACE UP
OUTPUT BIN FULL
FUSER LIFE LOW
REPLACE KIT
FUSER LIFE OUT
REPLACE KIT
INPUT DEVICE
PAPER PATH OPEN
The printer has detected
an error in the imaging
drum.
The imaging drum is
almost past its specified
life.
The imaging drum is past
its specified life.
The printer has detected
an error in the duplexer
preventing two-sided
printing.
The top output bin of the
multi-bin mailbox is full.
The fuser is almost past its
specified life.
The fuser and paper rollers
are past their specified life.
The media transfer door on
tray 4 is open.
Printing cannot continue until
the drum kit has been
replaced. See the installation
guide included with the drum
kit.
Although printing can continue,
the drum kit should be
replaced for optimum printer
operation. See the installation
guide included with the drum
kit.
Printing cannot continue until
the drum kit has been
replaced. See the installation
guide included with the drum
kit.
Remove the duplexer. Check
for and remove any jammed
media from the duplexer and
reinstall the duplexer.
Remove all media from the top
output bin on the multi-bin
mailbox.
Although printing can continue,
the fuser should be replaced
for optimum printer operation.
See the installation guide
included with the fuser kit.
Replace the fuser kit and reset
the fuser counter before
attempting to print. See the
installation guide included with
the fuser kit.
Close the media transfer door.
EN
Control Panel Features 11
Page 16
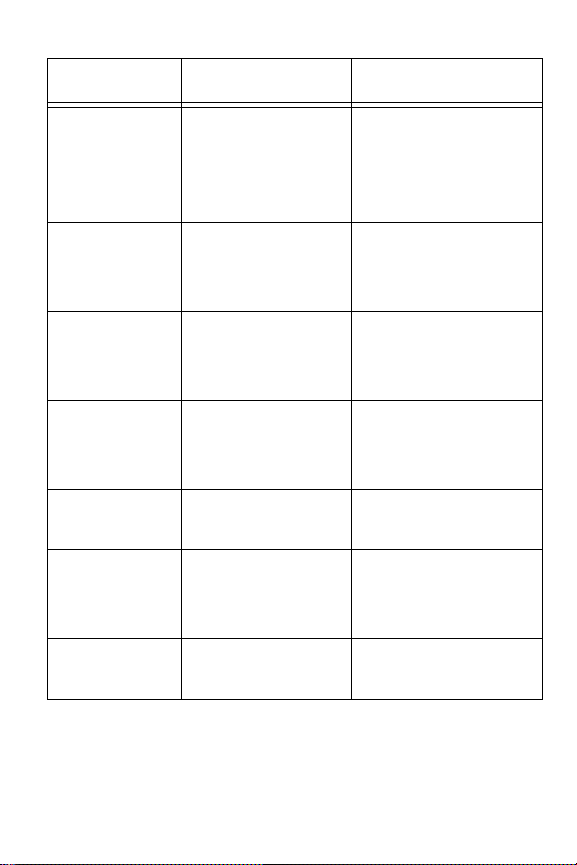
Control Panel
Message Description Recommended Action
INSTALL <Color>
TONER
INSTALL FUSER
LOWER LEFT DOOR
INSTALL IMAGING
DRUM
OPEN FRONT DOOR
INSTALL
TRANSFER DRUM
OPEN RIGHT DOOR
LEFT
OUTPUT BIN FULL
LOCK TONER LEVER
MAILBOX X
OUTPUT BIN FULL
One or more of the four
toner cartridges are either
not installed or not
correctly installed in the
printer.
<Color>
can be cyan,
magenta, yellow, or black.
The printer has detected
that the fuser is not
installed.
The printer has detected
that the imaging drum is
not installed.
The printer has detected
that the transfer drum is
not installed.
The left output bin on the
printer is full.
The blue lever inside the
clear door is not locked.
A mailbox on the multi-bin
mailbox is full (X can be
mailbox 1 through 8).
Insert the cartridge or make
sure the installed cartridge is
fully seated in the printer.
Install the fuser and verify that
it is properly seated in the
printer before attempting to
print. See the installation guide
included with the fuser kit.
Install the imaging drum before
attempting to print. See the
getting started guide or the
installation guide included with
the drum kit.
Install the transfer d rum before
attempting to print. See the
getting started guide or the
installation guide included with
the transfer kit.
Remove all media from the left
output bin of the printer to
continue printing.
Open the front door of the
printer, open the clear door,
swing the blue lever to the left
to lock it, and close the clear
door and the front door.
Remove all media from the
mailbox.
EN
Control Panel Features 12
Page 17
Control Panel
Message Description Recommended Action
MAILBOX
COMM ERROR
CHECK CABLES
AND CYCLE POWER
MAILBOX NOT
ATTACHED
MANUALLY FEED
<Type> <Size>
NEW TONER
CARTRIDGE? = NO
OFFLINE
OUTPUT BIN FULL
alternates with
CLEAR PAPER FROM
FACE UP
OUTPUT BIN FULL
alternates with
CLEAR PAPER FROM
OPTIONAL BIN 1
Indicates a communication
error between the multi-bin
mailbox and the printer.
The multi-bin mailbo x is not
correctly attached to the
printer.
The printer is requesting
that a sheet of media or an
envelope be manually fed.
This message will appear if
the printer senses that a
TONER LOW
message has appeared
and then gone away,
indicating that a new toner
cartridge may have been
installed.
The printer is offline and
there are no error
messages pending.
The bin-full sensor in the
left Face-up Bin has been
reached.
The Stacker Bin is full. Empty the Stacker Bin.
TONER OUT
or
Verify tha t the communication
and power cables are
connected. Press G
continue printing. If the
message persists, turn the
printer off and on to reset the
printer. If the condition still
persists, contact a local
authorized HP dealer or
service representative for
service.
Push the mailbox up against
the printer. Verify that the
wheels on the multi-bin
mailbox are not preventing the
mailbox from attaching to the
printer.
Load the proper type and size
media into tray 1.
YES
Change to
S
ELECT
if you just installed a
toner cartridge.
TEM
Press I
+ until you see
NEW TONER=BLACK
ALUE
Press V
cartridge appears, then press
S
Press Go to bring the printer
online.
Empty the Face-up Bin.
ELECT
+ until the new
.
and press
.
O
to
EN
Control Panel Features 13
Page 18

Control Panel
Message Description Recommended Action
POWERSAVE ON
PROCESSING
COPY <X> OF <Y>
SEPARATOR
OUTPUT BIN FULL
STACKER
OUTPUT BIN FULL
STAPLER LOW ON
STAPLES
STKR: ATTACH TO
PRINTER
STKR: CLOSE
STAPLER DOOR
STKR: DETACH AND
CLEAR JAM
13.xx Paper Jam
alternates with
STKR: DETACH AND
CLEAR STAPLE JAM
STKR: TRAY
OVERLOAD
alternates with
CLEAR PAPER FROM
OPTIONAL BIN 1
The printer is in power
save mode.
The printer is processing a
proof and print or mopy
print job.
The multi-bin mailbox
output bins are full.
The multi-bin mailbox
output bins are full.
The Stapler Cartridge has
20 to 50 staples remaining.
The device is not attached
to the printer properly.
The Stapler door is open or
it is not closed properly.
A paper jam occurred in
the device.
A staple jam occurred. Open the Stapler door, and
The weight capacity of the
stacker bin has been
reached.
Clear this message by
pressing any key or by sending
a print job to the printer.
No action is required.
Remove all media from the
output bins on the multi-bin
mailbox.
Remove all media from the
output bins on the multi-bin
mailbox.
No action required.
Make sure that there is a
proper attachment between
the device and the printer, and
wait for a solid green status
light on the user LED on the
device.
Close the Stapler door
properly.
Clear the paper jam.
clear the paper or staple jam.
Clear the paper from the
Stacker Bin.
EN
Control Panel Features 14
Page 19

Control Panel
Message Description Recommended Action
TONER LOW
REPLACE <Color>
TONER OUT
REPLACE <Color>
TOO MANY PAGES IN
JOB TO STAPLE
TOP
OUTPUT BIN FULL
TRANSFER KIT LOW
REPLACE KIT
TRANSFER KIT OUT
REPLACE KIT
TRAY 1 CONTAINS
UNKNOWN MEDIA
TRAY 1 LOAD
<Type> <Size>
The printer is almost out of
the specified toner.
<Color>
can be cyan,
magenta, yellow, or black.
The printer is out of the
specified color of toner.
<Color>
can be cyan,
magenta, yellow, or black.
The job height is greater
than the stapler capacity.
The height of the job to be
stapled should not exceed
5 mm.
The top output bin on the
printer is full.
The transfer drum, transfer
belt, cleaning roller, and
filters are almost past their
specified life.
The transfer drum, transfer
belt, cleaning roller, and
filters are past their
specified life.
Media was stacked in tray
1 for continuous manual
feed printing and the job
has been completed.
However , media remains in
tray 1. Tray 1 is considered
to be not configured.
There is a user request for
a media size that is not
currently installed in tray 1.
Although printing can continue,
the toner cartridge should be
replaced for optimum printer
operation. See the installation
guide included with the toner
cartridge.
Printing cannot continue until
the specified toner cartridge
has been replaced. See the
installation guide included with
the toner cartridge.
See the stapling specifications
in the user guide for more
information.
Remove all media from the top
output bin.
Although printing can continue,
the transfer kit should be
replaced for optimum printer
operation. See the installation
guide included with the transfer
kit.
Replace the transfer kit and
reset the transfer counter
before attempting to print. See
the installation guide included
with the transfer kit.
Configure the media type for
tray 1 or remove the remaining
media. See “Configuring Media
Ty pe and Size” on page 32.
Load the media type and size
specified on the display. After
loading the tray, the printer
brings itself online.
EN
Control Panel Features 15
Page 20

Control Panel
Message Description Recommended Action
TRAY X EMPTY
<Type> <Size>
TRAY X LOAD
<Type> <Size>
CHECK CONTROL
PANEL SETTING
A tray not currently
selected has run out of
media.
There is a user request for
a media size that is not
currently installed in the
printer.
-OrThe tray has run out of
media.
Load the media type and size
specified on the display.
Load the media specified on
the display, and configure the
input tray in the printer control
panel. After the tray is loaded,
the printer brings itself online.
Pressing Go will cause the
printer to attempt to print the
page on the default size media.
EN
Control Panel Features 16
Page 21

Loading Media
Media Specifications
The table below contains information about loading
media including special types such as transparencies,
envelopes, labels, and prepunched media. For more
complete information on media specifications for this
printer, see the online user guide.
Tray Media Type & Size Media Weight Orientation
1 Paper
Heavy paper
(28 to 58 lb; 105 to 216 g/m
Letter
A4
Executive
Legal
11-by-17 inch
A3
A5
Custom sizes:
minimum 3.9 by 7.5 inch
maximum 12 by 18.5 inch
Prepunched media
Letter
A4
Transparencies
Letter
A4
Envelopes
Double postcard (JPOSTD)
B5
Commercial #10
C5
DL
Monarch
2
)
16 to 58 lb
(60 to 216 g/m
bond
16 to 58 lb
(60 to 216 g/m
bond
4 to 5 mils
(0.10 to
0.13 mm) thick**
Maximum of 24
2
lb (90 g/m
2
)
2
)
)
SS: Face up
DS: Face down
L&F: Short edge
(top) toward the rear
of tray
Letter/A4: Long edge
toward the printer
SS: Face up, with
the holes toward
printer
DS: Face down, with
the holes away
from printer
Face up, with the
long edge toward the
printer
Face up, with the
short edge toward
the printer
EN
Loading Media 17
Page 22

Tray Media Type & Size Media Weight Orientation
1 Labels
Letter
A4
2
Paper
3
Letter
4
A4
Executive
l
Lega
Trays 3 and 4 only
11-by-17 inch
A3
Prepunched media
Letter
A4
2
Transparencies
3
Letter
A4
* SS = single-sided printing; DS = double-sided printing; L&F = letterhead and preprinted
forms
**HP recommends using 5 mils (0.13 mm) thick transparencies with this printer.
— Face up, with
16 to 28 lb
(60 to 105 g/m
16 to 28 lb
(60 to 105 g/m
4 to 5 mils
(0.10 to
0.13 mm) thick**
the long edge
toward the printer
SS: Face down
2
)
DS: Face up
L&F: Short edge
(top) toward the rear
of tray
SS: Face down,
2
)
with the holes to the
right
DS: Face up, with
the holes to the left
Face down
EN
Loading Media 18
Page 23

Paper Trays and Capacities
The table below contains information about paper trays
and capacities. For more information, see the online
user guide.
Tray Maximum Capacity
2
1 Paper, pre-punched media: 100 sheets of 20 lb (75 g/m
Limit to media-fill mark on the media width guides.
Transparencies, labels: limit to media-fill mark on the media width guides.
Envelopes: approximately 10.
Limit to media-fill mark on the media width guides.
2 Paper, pre-punched media: 500 sheets of 20 lb (75 g/m
Limit to media-fill mark on the media width guides.
Transparencies, labels: limit to media-fill mark on the media width guides.
3 Paper, pre-punched media: 500 sheets of 20 lb (75 g/m
Limit to media-fill mark on the media width guides.
Transparencies, labels: limit to media-fill mark on the media width guides.
4 2,000 sheets of 20 lb (75 g/m
Limit to media-fill mark on the media width guides.
2
) bond.
) bond.
2
) bond.
2
) bond.
CAUTION
To avoid media jams, never open an input
tray while the printer is printing from that
input tray.
Note
Do not fill any input tray abo ve the media fill mark
on the media guides.
EN
Loading Media 19
Page 24

To load media into
tray 1
CAUTION
To avoid media jams,
never add or remove
media from tray 1
while the printer is
printing from tray 1.
1
Open tray 1.
2
Slide the media width
guides to the size that
matches the media.
3
Load up to 100 sheets
of 20 lb (75 g/m
bond paper into the
input tray f ace up , with
the long edge of the
letter- or A4-sized
media toward the
printer. Do not fill the
input tray above the
media-fill mark on the
media guides.
2
)
EN
Loading Media 20
Page 25

Slide the media into the
printer as far as it will go
(until the leading edge rests
lightly against the printer)
and adjust the media width
guides until the media fits
squarely and firmly
between the media width
guides without bending the
media.
Use the control panel to
select the size and type of
media in tray 1. (See
“Configuring Media Type
and Size” on page 32.)
EN
Loading Media 21
Page 26

To load envelopes
in tray 1
CAUTION
Never use envelopes
with clasps, snaps,
windows, coated linings,
or self-stick adhesives.
These items can damage
the printer. Never try to
print on both sides of an
envelope. Media jams
and printer damage can
result.
1
Open tray 1.
2
Place up to ten
envelopes in tray 1
between the media
width guides, face up,
with the back flap
against the input tray
and the return address
area (short edge of the
envelope) towards the
printer.
EN
Loading Media 22
Page 27

Slide the media width
3
guides until they touch
both sides of the
envelopes without
bending the
envelopes.
Set the envelope size
4
in the printer control
panel. (See
“Configuring Media
Type and Size” on
page 32.)
EN
Loading Media 23
Page 28

Orienting Media in Tray 1
Place media into the input tray with the side to be
printed on face up for single-sided printing. For letter- or
A4-sized media, place the top of the page toward the
rear of the printer and the long edge toward the printer.
For media sizes larger than letter and A4, place the top
(short) edge of the page toward the printer.
Load letterhead and preprinted forms face up.
The duplexer prints the second side of the paper first,
so paper such as letterhead and preprinted paper
needs to be oriented as shown.
EN
Loading Media 24
Page 29

• Load letter and A4 paper with the front side down and
the top, short edge toward the rear of the printer for
double-sided printing.
• Load other sizes of paper with the front side down
and the top, short edge toward the printer for
double-sided printing.
EN
Loading Media 25
Page 30

To load media into
trays 2 and 3
1
Firmly grip the handle
in the center of the
input tray, squeeze the
release lever, and pull
the input tray out until
it stops.
NOTE
To use the media size
currently configured in
the input tray, go to
step 8. To use a media
size different from the
current setting, go to
step 2 to reconfigure
the input tray.
2
Turn the media guide
lock to the unlocked
position.
3
Slide the media width
guides to the size that
matches the media.
EN
4
Turn the media guide
lock to the locked
position.
Loading Media 26
Page 31

Adjust the left media
5
guide by pushing it in
(A) and lifting up and
out (B).
NOTE
Lift here (C) to remove
paper from the tray.
Position the left media
6
guide over the correct
media size marked on
the input tray.
Press the left media
7
guide into the rear slot
(D), and then lower it
down (E) into the front
slot (F). Verify the
guide is not skewed.
Load up to 500 sheets
8
of 20 lb (75 g/m
2
)
bond paper in the
input tray.
EN
Loading Media 27
Page 32

Ensure that the media
9
size tab on the front of
the input tray is set to
the correct media size.
Slide the input tray
10
back into the printer.
Set the media type in
11
the printer control
panel.
NOTE
Always configure the
media type in the
printer control panel to
prevent users from
printing on the wrong
media type (such as
transparencies instead
of plain paper). (See
“Configuring Media
Type and Size” on
page 32.)
Note
If media curls or skews excessively during
printing, open the input tray and turn the stack of
media over . To av oid media jams , ne ver open the
input tray while the printer is printing.
EN
Loading Media 28
Page 33

To load media into
tray 4
1
Firmly grip the handle
in the center of the
input tray, squeeze the
release lever, and pull
the input tray out until
it stops.
NOTE
To use the media size
currently configured in
the input tray, go to
step 5. To use a
different size, go to
step 2.
2
Adjust the front media
guide by pulling up on
the pin (A), placing the
media guide into the
slots on the top and
bottom of the input tray
that correspond to the
media size you are
loading (B), and
pushing in the pin.
EN
3
Repeat step 2 to
adjust the back media
guide.
Loading Media 29
Page 34

Repeat step 2 to
4
adjust the left media
guide.
NOTE
For 11-by-17 inch
media, move the left
media guide to the
back of the input tray.
Load up to 2,000
5
sheets of 20 lb
2
(75 g/m
) bond paper
into the input tray.
EN
CAUTION
Do not place
anything in the input tray
to the left of the media
guides because the input
tray will not be able to lift
the media to print and
could damage the input
tray.
Press down on all four
6
corners of the media
stack to ensure the
media rests flat in the
input tray.
Close tray 4.
7
Loading Media 30
Page 35

Set the media type in the printer control panel. See
“Configuring Media Type and Size” on page 32.
Note
Always configure the media type in the printer
control panel to prevent printing on the wrong
media type (such as transparencies instead of
plain paper). (See “Configuring Media Type and
Size” on page 32.)
EN
Loading Media 31
Page 36

Configuring Media Type and Size
Configure the media type (such as plain paper,
letterhead, or transparencies) for each of the input
trays. If the media type and size have been correctly
configured for the input tra ys, the printer will print based
on the type and size of media and will automatically use
the correct input tray. Configuring the media type is
beneficial for several reasons:
• Setting the media type prevents printing on the
wrong, possibly expensive, media.
• The printer will automatically adjust its print speed to
accommodate special media (such as card stock,
labels, and transparencies). These adjustments will
give the best quality output, saving time and
resources.
Note
If the media type is not set properly, the printer
might not print on the correct media or at the
correct speed for the media type, which can result
in poor print quality.
EN
Loading Media 32
Page 37

To configure the input trays
Follow the steps below to configure the media type.
Press M
1
until PAPER HANDLING MENU appears on
ENU
the printer control panel display.
Press I
2
until TRAY [number] TYPE = appears on
TEM
the display.
Press -V
3
+ until the correct media type appears
ALUE
on the display.
Press S
4
to save the selection. An asterisk (*)
ELECT
appears to the right of the selection.
To configure the media size in tray 1, repeat steps 1-4
(“size” will replace references to “type”).
T rays 2, 3, and the optional tra y 4 will automatically
Note
sense the media size.
Repeat steps 2 through 4 to configure the media type
5
in another input tray.
- Or Press G
to bring the printer online.
O
EN
Loading Media 33
Page 38

Media Jams
Removing Jammed Media
The procedures on the following pages explain how to
clear the most commonly occurring jams. After all
jammed media have been removed, the printer will
warm up and resume printing.
The printer control panel displays messages about
where jams occur and which doors to open to clear
jams. As a first step, try opening and then closing the
front door of the printer. The printer will attempt to clear
a jam from the paper path and send the page to an
output bin.
If the printer does not clear the jam, try the following:
• Remove all portions of the jammed media from the
printer.
• After removing media that has jammed in one area of
the printer, check other areas to make sure all media
has been removed.
EN
Media Jams 34
Page 39

Solving Repetitive Media Jams
If the printer continues to jam, try the following:
• Use only media that meets the media specifications
detailed in “Loading Media” on page 17.
• Make sure that the media is correctly loaded in the
input trays and that all media width guides are
correctly set.
• Make sure the tray is not overloaded with media.
• Do not use media that is torn, worn, or irregular.
• Turn over the stack of media in the tray.
• Print heavy media from tray 1.
If the printer continues to jam, contact a local
authorized HP service provider. For more information
on solving repetitive jams, see the online user guide.
EN
Media Jams 35
Page 40

To clear jams from the lower right door
Open the lower right door.
1
Remove any jammed media.
2
At the left side of the opening, pull the green tab
3
down to lower the bar, remove any jammed media,
and release the tab.
Close the lower right door.
4
EN
Media Jams 36
Page 41

To clear jams in tray 1
Remove media from tray 1.
1
Gently remove any jammed media.
2
Load media back into tray 1 and resume printing.
3
If the media does not come out easily, see “To
Note
clear registration and transfer area jams” on
page 44.
EN
Media Jams 37
Page 42

To clear jams in trays 2 and 3
Open tray 2 or tray 3.
1
Remove any jammed media. You might have to
2
remove the tray, by lifting it slightly and pulling it out,
and look into the opening to locate the jammed
media.
Close the tray.
3
EN
Media Jams 38
Page 43

To clear jams in the optional tray 4
Open tray 4.
1
Remove any jammed media.
2
Open the media transfer door and remove any
3
media.
Lift the green bar, remove any jammed media, and
4
release the bar.
Close the media transfer door and tray 4.
5
EN
Media Jams 39
Page 44

To clear jams from the fuser area
Open the lower left door.
1
Gently remove any jammed media from the inside of
2
the door or from between the rollers near the top of
the opening.
If an optional duplexer is installed, contin ue with step 3;
otherwise, proceed to step 6.
Press the green tab on the right side of the duplexer
3
and pull the duplexer out of the printer.
Remove any jammed media from the duplexer.
4
Lift the green guide, remove any media, and lower
5
the green guide.
WARNING!
EN
Do not touch the fuser; it might be very hot
and could cause burns.
Media Jams 40
Page 45

On the left side of the fuser, pull down on the green
6
tab, carefully remove any media, and release the tab.
Repeated jams in the fuser area indicate that the
fuser might be installed improperly . Complete steps 7
through 9 if you experience repeated jams in the
fuser area; otherwise, proceed to step 10.
Press down on the large green lev er on the right side
7
of the fuser to ensure that it is in its proper position.
On each side of the fuser, rotate the b lue lev ers down
8
slightly.
Rotate the blue levers back up until they snap into
9
place.
If an optional duplexer w as remove d from the printer,
10
slide the duplexer back into the printer until it clicks
into place.
Close the lower left door.
11
EN
Media Jams 41
Page 46

To clear transfer drum jams
Open the front door, press the white button on the
1
lower (green) lever, and swing the lever to the right.
Open the upper right door.
2
Using the handles, gently pull out the transfer drum
3
until it stops.
From the front of the printer, remove any jammed
4
media.
Lift the transfer drum out of the printer and remove
5
any media wrapped around the drum.
Align the arrows on ends of the transfer drum with
6
the matching arrows on the tracks inside the printer.
Push the transfer drum into the printer.
7
Close the upper right door.
8
If the upper right door does not close, the transfer
Note
drum might not be all the way in the printer.
EN
Media Jams 42
Page 47

In the front of the printer, s wing the lower (green)
9
lever back to the left, making sure it clicks into place.
If the lever does not return to its original position,
Note
the transfer drum might not be all the way in the
printer.
Close the front door.
10
EN
Media Jams 43
Page 48

To clear registration and transfer area jams
Open the front door, press the white button on the
1
lower (green) lever, and swing the lever to the right.
Open the upper right door.
2
Using the handles, gently pull out the transfer drum
3
until it stops.
Remove jammed media from inside the opening.
4
If the entire page can be removed easily, without
forcing it out, continue to step 7. If only one edge of
the media can be removed easily, do not force the
other edge out.
In the front of the printer, turn the blue knob
5
counterclockwise to feed the jammed media into the
printer.
From the front of the printer, remove the jammed
6
media.
Push the transfer drum into the printer.
7
EN
Media Jams 44
Page 49

Close the upper right door.
8
If the upper right door does not close, the transfer
Note
drum might not be all the way in the printer.
In the front of the printer, s wing the lower (green)
9
lever back to the left, making sure it clicks into place.
If the lever does not return to its original position,
Note
the transfer drum might not be all the way in the
printer.
Close the front door.
10
EN
Media Jams 45
Page 50

To clear jams from the optional duplexer
Open the lower left door.
1
Remove any jammed media from the duplexer.
2
Press the green tab on the right side of the duplexer,
3
and pull the duplexer out.
Lift the green guide, remove any media, and lower
4
the green guide.
Slide the duplexer back into the printer until it clicks
5
into place.
Close the lower left door.
6
EN
Media Jams 46
Page 51

To clear top output bin and upper left door jams
Slowly remove any jammed media from the top
1
output bin.
Open the upper left door.
2
Gently remove any jammed media.
3
Close the upper left door.
4
EN
Media Jams 47
Page 52

To clear jams from a finishing device (the optional
multi-bin mailbox, 3000-sheet stapler, 3000-sheet
stapler/stacker)
Pull the finishing device away from the printer.
1
Remove any jammed media from between the
2
finishing device and printer.
Push the finishing device back toward the printer.
3
EN
Media Jams 48
Page 53

Replacing Consumables
Consumables are items that are expended during
normal use of the printer. These include the toner
cartridges and the fuser, transfer , and drum assemblies.
To replace consumable items, see the installation
instructions included with each kit.
EN
Replacing Consumables 49
Page 54

For More Information
See the online user guide for information about printer
operation, service, and support.
EN
For More Information 50
Page 55

Page 56

Printed on at least
50% Total Recycled Fiber with
at least 10% Post-Consumer Paper
*C7096-90904*
*C7096-90904*
Copyright 2000
Hewlett-Packard Co.
Printed in USA 04/00
Manual Part No.
C7096-90904
©
C7096-90904
 Loading...