

HP Color LaserJet 8550, Color LaserJet 8550DN, Color LaserJet 8550GN, Color LaserJet 8550MFP, Color LaserJet 8550N User Guide
Page 1
8550, 8550N, 8550DN, 8550GN,
8550MFP Printer
User Guide
English
Page 2

HP Color LaserJet 8550, 8550N,
8550DN, 8550GN, 8550MFP
Printer
User Guide
Use of this electronic document indicates that you accept the Terms of Use.
2000 Hewlett-Packard Company
©
Page 3

Copyright Information
© Copyright 2001
Hewlett-Packard Company
All Rights Reserved.
Reproduction, adaptation, or
translation without prior written
permission is prohibited, except
as allowed under the copyright
laws.
A user of an HP Color LaserJet
8550 printer is granted a license
to: a) print hard copies of this
HP Color LaserJet 8550 printer
user guide for PERSONAL,
INTERNAL or COMPANY use
subject to the restriction not to
sell, re-sell or otherwise
distribute the hard copies; and
b) place an electronic copy of
this HP Color LaserJet 8550
printer user guide on a network
server provided access to the
electronic copy is limited to
PERSONAL, INTERNAL users
of the HP Color LaserJet 8550
printer.
Part number: C7096-online
Edition 3, 4/2009
rranty
Wa
The information contained in
this document is subject to
change without notice.
Hewlett-Packard makes no
warranty of any kind with
respect to this information.
HEWLETT-PACKARD
SPECIFICALLY DISCLAIMS
THE IMPLIED WARRANTY OF
MERCHANTABILITY AND
FITNESS FOR A PARTICULAR
PURPOSE.
Hewlett-Packard shall not be
liable for any dire ct, indirect,
incidental, consequential, or
other damage alleged in
connection with the furnishing or
use of this information.
Trademark Credits
Adobe
™ and
PostScript
™ are
trademarks of Adobe Systems
Incorporated which may be
registered in certain
jurisdictions.
®
Arial
and
Times New Roman
are U.S. registered trademarks
of the Monotype Corporation.
CompuServe
™ is a U.S.
trademark of CompuServe, Inc.
®
dBASE
is a U.S. registered
trademark of Borland
International, Inc.
NERGY STAR
E
®
is a U.S.
registered service mark of the
United States Environmental
Protection Agency.
HP-UX 9.* and 10.0 for HP 9000
Series 700 and 800 computers
are X/Open Company UNIX 93
branded products.
®
Lotus
1-2-3
Symphony
®
and
®
are U.S. registered
Lotus
®
trademarks of Lotus
Development Corporation.
Microsoft
Windows
MS-DOS
®
,
Windows
®
,
Windows NT
®
are U.S. registered
®
,
MS
®
, and
trademarks of Microsoft
Corporation.
PANTONE
®
* is Pantone, Inc.s
check-standard trademark for
color.
TrueType
™ is a U.S. trademark
of Apple Computer, Inc.
®
UNIX
is a registered trademark
in the United States and other
countries, licensed exclusively
through X/Open Company
Limited.
All other products mentioned
herein may be trademarks of
their respective companies.
®
Page 4

HP Customer Care
Thank you for your purchase. Along with your product, you receive a
variety of support services from Hewlett-Packard and our support
partners. These services are designed to give you the results you
need, quickly and professionally.
Online Services:
For 24 hour access to information over your modem, we suggest
these services:
World Wide Web
Printer drivers, updated HP printer software, plus product and support
information may be obtained from the following URLs:
in the U.S. http://www.hp.com
in Europe http://www2.hp.com
Printer drivers may be obtained from the following sites:
in Japan ftp://www.jpn.hp.com/drivers/
in Korea http://www.hp.co.kr
in Taiwan http://www.hp.com.tw
or the local driver website http://www.dds.com.tw
EN
America Online
America Online/Bertelsmann is available in the U.S., France,
Germany, and U.K. Printer drivers, updated HP printer software, and
support documentation to help answer your questions about HP
products are available. Use Keyword HP to start your tour or call
1 800-827-6364 preferred customer # 1118 to subscribe. In Europe,
call the appropriate number below:
Austria 0222 58 58 485
France ++353 1 704 90 00
Germany 0180 531 31 64
Switzerland 0848 80 10 11
United Kingdom 0800 279 1234
3
Page 5

CompuServe
Printer drivers, updated HP printer software, and interactive sharing
of technical information with other members is available on
CompuServe’s “HP User’s forums” (GO HP), or call 1 800-524-3388
and ask for representative #51 to subscribe. (CompuServe is also
available in the U.K., France, Belgium, Switzerland, Germany, and
Austria.)
Obtaining software utilities and electronic information:
For U.S. and Canada:
Phone:
(661) 257-5565
Fax:
(661) 257-6995
Mail:
Hewlett-Packard
P.O. Box 907
Santa Clarita, CA
91380-9007
U.S.A.
For Asia-Pacific Countries/Regions:
Contact Fulfill Plus at (65) 740-4477 (Hong Kong SAR, Indonesia,
Philippines, Malaysia, or Singapore). For Korea, call (82) (2)
3270-0805 or (82) (2) 3270-0893.
For Australia, New Zealand, and India:
For Australia and New Zealand, call (61) (2) 565-6099. For India, call
(91) (11) 682-6035.
For European English:
For U.K., call (44) (142) 986-5511. For Ireland and outside U.K., call
(44) (142) 986-5511.
4
EN
Page 6

HP direct ordering for accessories or supplies:
Call (800) 538-8787 (U.S.) or (800) 387-3154 (Canada).
HP Support Assistant compact disc:
This support tool offers a comprehensive online information system
designed to provide technical and product information on HP
products. To subscribe to this quarterly service in the U.S. or Canada,
call (800) 457-1762. In Hong Kong SAR, Indonesia, Philippines, Malaysia,
or Singapore, call Fulfill Plus at (65) 740-4477.
HP Service Information:
To locate HP-Authorized Dealers, call (800) 243-9816 (U.S.) or
(800) 387-3867 (Canada).
HP Service Agreements:
Call (800) 835-4747 (U.S.) or (800) 268-1221 (Canada). Extended
Service (800) 446-0522.
HP FIRST:
HP FIRST Fax will deliver detailed troubleshooting information on
common software and troubleshooting tips for your HP product. Call
from any touch tone phone and request up to three documents per
call. These documents will be sent to the fax of your choice.
North and Latin America
Outside the U.S. and Canada (208) 344-4809
U.S. and Canada (800) 333-1917
EN
5
Page 7

Asia-Pacific Countries/Regions
Australia 61 (0)3 9272 2627
China 86 (0)10 6505 5280
Hong Kong SAR 85 (0)2 2506 2422
India 91 (0)11 682 6031
Indonesia 21 (0)352 2044
Japan 81 (0)3 3335 8622
Korea 82 (0)02 769 0543
Malaysia 03 (0)298 2478
New Zealand 64 (0)09 356 6642
Philippines 65 (0)275 7251
Singapore 65 (0)275 7251
Thailand 66 (0)02 661 3511
6
EN
Page 8

Customer support options worldwide
Customer Support and Product Repair Assistance for
the U.S. and Canada
Call (208) 323-2551 Monday through F riday from 6 am to 6 pm free of
charge during the warranty period. However, your standard
long-distance phone charges still apply. Have your system nearby
and your serial number ready when calling.
If you know your printer needs repair, call (800) 243-9816 to locate
your nearest HP Authorized service provider, or call (208) 323-2551
for HP centralized service dispatch.
Post-warranty telephone assistance is available to answer your
product questions. Call (900) 555-1500 ($2.50* per minute, U .S . only)
or call (800) 999-1148 ($25* per call, Visa or MasterCard, U.S. and
Canada) Monday through Friday from 7 am to 6 pm and Saturday
from 9 am to 3 pm (Mountain Time). Charges begin only when you
connect with a support technician. *Prices subject to change.
EN
7
Page 9

European Customer Support Center Language and
In-country/region Options Available
Open Monday through Friday 8:30–18:00 CET
HP provides a free telephone support service dur ing the warranty
period. By calling a telephone number listed below, you will be
connected to a responsive team waiting to help you. If you require
support after your warranty has expired, you can receiv e support for a
fee through the same telephone number. The fee is charged on a per
incident basis. When calling HP, ha v e the f ollo wing inf ormation ready:
product name and serial number, date of purchase, and description of
the problem.
English Ireland: (353) (1) 662-5525
U.K.: (44) (171) 512-5202
International: (44) (171) 512-5202
Dutch Belgium: (32) (2) 626-8806
Netherlands: (31) (20) 606-8751
French France: (33) (01) 43-62-3434
Belgium: (32) (2) 626-8807
Switzerland: (41) (84) 880-1111
German Germany: (49) (180) 532-6222
Austria: (43) (1) 0660-6386
Norwegian Norway: (47) 2211-6299
Danish Denmark: (45) 3929-4099
Finnish Finland: (358) (9) 0203-47288
Swedish Sweden: (46) (8) 619-2170
Italian Italy: (39) (2) 264-10350
Spanish Spain: (34) (90) 232-1123
PortuguesePortugal: (351) (1) 441-7199
8
In-country/region support numbers
If you require support after your warranty has expired, additional
repair services, or if your country/region is not listed below, see the
HP Customer Care Centers
Argentina 787-8080
Australia (61) (3) 2728000
Brazil 022-829-6612
Canada (208) 3232551
Chile 800-360999
China (86) (10) 65053888-5959
Czech Republic (42) (2) 4717321
Greece (30) (1) 6896411
Hong Kong SAR (852) 800-96-7729
section.
EN
Page 10

Hungary (36) (1) 382-1111
India (91) (11) 6826035
(91) (11) 6826069
Indonesia (62) (21) 3503408
Korea (82) (2) 32700700
Korea outside Seoul (82) (080) 9990700
Japan (81) (3) 33358333
Malaysia (60) (3) 2952566
Mexico (Mexico City) 01 800-22147
Mexico (outside MexicoCity) 01 800-90529
New Zealand (64) (9) 3566640
Philippines (63) (2) 8941451
Poland (48) (22) 375065
Portugal (351) (1) 3017330
Russia (7) (95) 9235001
Singapore (65) 2725300
Taiwan (886) (02) 7170055
Thailand +66 (0) 2 661-4011
Turkey (90) (1) 2245925
EN
9
Page 11

HP Customer Care Centers
Asia Pacific Countries/Regions
Australia + 61 3 8877 8000
China+ 86 10 6564 5959
Hong Kon SAR 800 96 7729
India+ 91 11 682 6035
Indonesia+ 62 21 350 3408
Japan+ 81 3 5346 1891
Korea+ 82 2 3270 0805
Outside Seoul only 080 999 0700
Malaysia+ 60 3 295 2566
New Zealand+64 (9) 356 6640
Penang1 300 88 0028
Philippines+ 63 2 867 3551
Singapore+ 65 272 5300
Taiwan+ 886 2 2717 0055
Thailand+ 66 2 661 4000
Viet Nam+84 8 823 4530
North & Latin America
10
Argentina(54 11) 4778 8380
Brazil (011) 829 6612
Canada 905-206-4663
Chile 800 360 999
Mexico 800 427 6684
United States (208) 323-2551
Venezuela 800 47 888
Caracas 207 8488
Europe, Middle East, and Africa
Austria + 43 (0)7114 201080
Belgium
Dutch + 32 (0)2 626 8806
French + 32 (0)2 626 8807
Denmark + 45 39 29 4099
English International + 44 (0)171 512 52 02
Finland + 358 (0)203 47 288
France + 33 (0)1 43 62 34 34
Germany + 49 (0)180 52 58 143
EN
Page 12

Ireland + 353 (0)1 662 5525
Israel
Tel. + 972 (0)9 9524848
Fax + 972 (0)9 9524849
Italy + 39 02 264 10350
Netherlands + 31 (0)20 606 8751
Norway + 47 22 11 6299
Poland + 48 22 519 06 00
+ 48 22 519 06 01
Portugal + 351 (0)1 318 00 65
Russian Federation + 7 095 916 98 21
+ 7 095 916 98 35
South Africa +27 (0)11 8061030
Spain + 34 902 321 123
Sweden + 46 (0)8 619 2170
Switzerland + 41 (0)848 80 11 11
Turkey + 90 212 224 59 25
United Kingdom + 44 (0)171 512 52 02
EN
11
Page 13

12
EN
Page 14

Contents
1 The HP Color LaserJet 8550 Printer
Features 17
Printer Information 20
Configurations 20
Locating the Printer's Parts 22
Optional Paper Handling Accessories and Status Lights 24
2 Using the Printer Control Panel
Overview 27
Printer Control Panel Keys and Indicator Lights 28
When to Use the Printer Control Panel Menus 30
Using the Printer Control Panel in Shared Environments 30
Resetting the Printer 31
Factory Defaults 32
Printing Menu Maps 37
Changing Settings in the Printer Control Panel 38
Configuring Menu Selections 38
Auto Continue 39
Tray 1 Auto 39
Configuring Media Type and Size 40
Selecting an Output Bin 42
Setting Media Type and Size Overrides 43
Selecting the A4 Override 44
Selecting Toner Low Response 45
Setting the Power Save Mode 46
Selecting Parallel Advanced Function 46
Selecting the Default Printer Personality 47
Setting the I/O Timeout 48
Locking the Printer Control Panel 49
Selecting the Display Language 50
Printing Internal Pages 51
Interpreting the Configuration Page 52
Duplex Registration 54
Managing Memory 56
Resource Saving 57
Configuring the Printer for the Network 57
EN
13
Page 15

3 Common Printing Tasks
Selecting Media 59
Supported Media Weights and Sizes for Input Trays 60
Supported Media Weights and Sizes for the Optional Multi-bin Mailbox 63
Supported Media Weights and Sizes for the Optional Duplexer 65
Supported Media Weights and Sizes for the Optional 3000-sheet
Stapler/Stacker and Optional 3000-sheet Stacker 66
Preprinted Forms and Letterhead 68
Recycled Media 69
Envelopes 69
Transparencies 70
Heavy Paper Stock 70
Labels 71
Colored Media 72
Media to Avoid 72
Controlling Your Print Job 73
Changing Page Orientation 73
Printing from Tray 1 74
Printing Tips for Tray 1 77
Orienting Media 78
Printing from Trays 2 (some printer models only) and 3 80
Printing Tips for Trays 2 and 3 83
Printing from Tray 4 (some printer models only) 84
Printing Tips for Tray 4 (some printer models only) 86
4 Advanced Printing Features
Overview 87
Using the HP TonerGauge 88
Printing by Type and Size of Paper 89
Benefits of Printing by Type and Size of Paper 89
Different First Page 91
Printing Multiple Pages on One Sheet of Paper 92
Creating and Using Quick Sets 93
Quick Copying a Job 95
Printing Additional Copies of a Quick Copy Job 95
Deleting a Stored Quick Copy Job 96
Proofing and Holding a Job 97
Printing the Remaining Copies of a Held Job 97
Deleting a Held Job 97
Printing a Private Job 99
Specifying a Private Job 99
Releasing a Private Job 99
Deleting a Private Job 100
14
EN
Page 16

Storing a Print Job
Printing a Stored Job 101
Deleting a Stored Job 101
Variable Data Printing 102
Booklet Printing 103
Print on Backside of Heavy Media 104
HP JetSend Communications Technology 105
How the JetSend Communications Technology Works 105
Managing Fonts and Forms on Disk 106
HP LaserJet Resource Manager (Windows) 106
HP LaserJet Utility (Macintosh) 107
101
5 Using Color
Controlling Color Output with Printer Drivers 109
Using Color 110
Manual Mode 111
ICC/CMS 112
Black and White 112
Automatic PANTONE® Matching 113
CMYK Ink Set Emulation 113
Adjusting the Print Color and Quality Settings 114
Selecting Colors 115
PANTONE Colors 115
Color Swatch 115
Resolution Considerations for Graphics, Images, and Photographs 116
Using Digital Cameras 116
Using Scanners 117
Adjusting the Color Balance 118
6 Maintaining the Printer
Making Room for Printer Maintenance 123
Replacing Printer Consumables 124
Locating Printer Consumables 124
Frequency for Replacing Printer Consumables 125
Recycling Consumables 127
Resetting the HP TonerGauge 127
7 Printer Control Panel Messages
Printer Messages 129
Using the Printer Online Help System 129
EN
15
Page 17

8 Solving Printer Problems
Performing Basic Troubleshooting Steps 161
Working with Toner 162
Media Jam Locations 163
Media Handling Problems 165
Printer Response Problems 173
Printer Control Panel and Configuration Problems 179
Application Problems 181
Incorrect Printer Output 183
Color Printing Problems 185
Print Quality Problems 187
Cleaning the Transfer Drum 198
Accessories, Options, and Related Products 204
A DIMM Installation
Supported DIMMs 207
Installing DIMMs 207
B Specifications
Electrical Specifications 211
Operating Environmental Specifications 212
Environmental Product Stewardship Program 213
Protecting the Environment 213
Regulatory Statements 217
FCC Regulations 217
Canadian DOC Regulations 217
Declaration of Conformity 218
VCCI Statement (Japan) 224
Korean EMI Statement 224
Safety Information 225
Laser Safety 225
Product Information Sheet 225
Laser Statement for Finland 226
C Warranty Information
Hewlett-Packard Limited Warranty Statement 229
16
EN
Page 18

The HP Color
1
Performance
LaserJet 8550 Printer
Features
Congratulations on your purchase of the HP Color LaserJet
8550, 8550N, 8550DN, 8550GN, or 8550MFP printer. This
printer is designed to produce high-quality, high-speed color
printouts for business environments.
This printer provides the quality and reliability of Hewlett-Pac kard
printers as well as these specific features:
24 pages per minute (ppm) black and white printing
z
6 ppm color printing
z
Provides the ability to mopy (multiple original prints)
z
Approximate Print
Speeds
EN
z
Letter-, A4-sized media:
6 ppm color
z
Legal-, Executive-, 11-by-17 inch sized media:
12 ppm black and white; 3 ppm color
z
Transparencies:
color
z
Labels:
12 ppm black and white; 3 ppm color
2.8 ppm black and white; 2.1 ppm
24 ppm black and white;
Features
17
Page 19

Paper Handling Note: See “Printer Information” for printer configurations.
z Prints on up to 12-by-18.50 inch
(304.80-by-469.90 mm) sized media
z Printing on heavy media up to 58 lb (216 g/m
z A 500-sheet input tray (tray 3) that supports letter-,
2
) bond
legal-, A4-, 11-by-17 inch and A3-sized media
z A 500-sheet input tray (tray 2) that supports letter-,
legal-, and A4-sized media; standard on some printer
models
z 2,000-sheet input tray (tray 4); standard on some
printer models
z Optional duplexer, which provides two-sided printing;
standard on some printer models
z A 100-sheet multipurpose tray that supports letter-,
legal-, executive-, A3-, A4-, B4-, 11-by-17 inch, B5-,
and custom-sized media, as well as envelopes, labels,
and card stock
z Face-down (top) output bin
z Printer driver selectable face-up (left) output bin with
straight-through paper path
Font and Memory z 32 MB minimum DIMM (dual inline memory module)
memory, expandable to 512 MB
z HP LaserJet 45 TrueType font set and 65 additional
TrueType fonts for Microsoft® Windows 3.1,
Windows 9x, Windows NT 4.0, Windows 2000, and
Macintosh
z Supports forms and fonts on the disk using
HP Resource Manager
Printer Personality
Support
User Interface and
EIO
z PCL 5 color extension support in the printer
z PostScript 3™ support (includes PDF)
z Automatic printer personality switching
z Standard ECP or bidirectional parallel cable interface
(IEEE-1284 compliant)
z 2 enhanced input/output (EIO) slots
z Automatic I/O (input/output) switching
z HP Web JetAdmin software
z
HP LaserJet Utility (Macintosh only)
18 1 The HP Color LaserJet 8550 Printer
EN
Page 20

Accessories
See “Printer Information
Note:
Printer hard disk, which provides storage for fonts and
z
” for printer configurations.
macros as well as proof and hold, private jobs, quick
copy jobs, and mopying capabilities
Optional ROM (read-only memory) or synchronous
z
DRAM (dynamic random-access memory) DIMM
device memory
Optional multi-bin mailbox, which provides multiple
z
output destinations
Optional 3000-sheet Stapler/Stacker
z
Optional 3000-sheet Stacker
z
Optional HP JetDirect internal print server for network
z
connection
For more information on supported media, see “Selecting Media
” in
chapter 3.
The approximate print speeds offered by this printer might vary from
those listed above because the following factors affect processing
time:
Complex graphics or large graphics
z
I/O configuration
z
Type of computer
z
Computer configuration
z
Amount of printer memory
z
Network operating system
z
Network configuration
z
Print media
z
EN
Features
19
Page 21
Printer Information
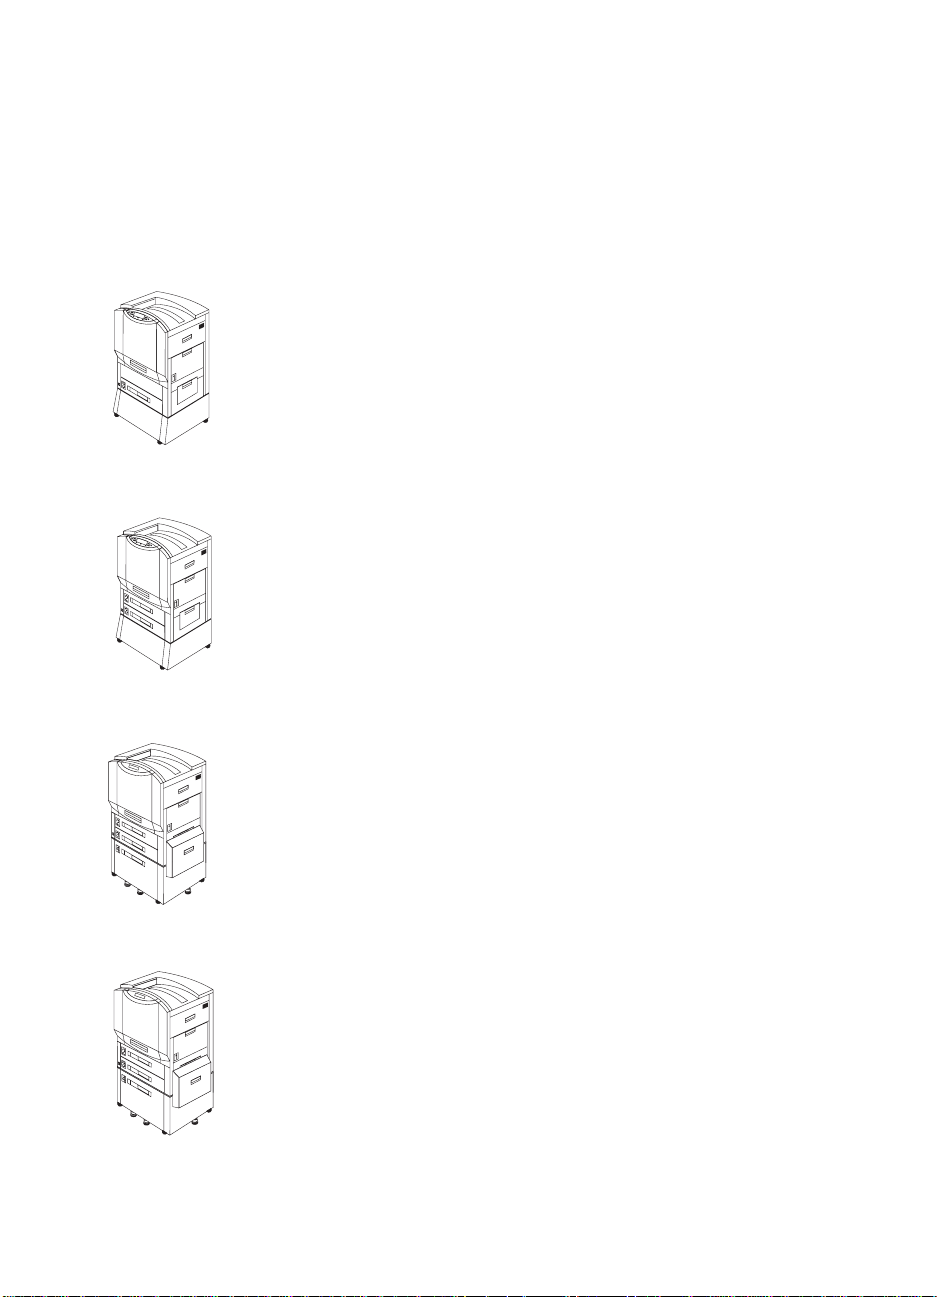
Configurations
This printer is available in five configurations, as described below:
HP Color LaserJet 8550
The HP Color LaserJet 8550 comes standard with a 100-sheet tray 1,
a 500-sheet tray 3, a printer stand, and 32 MB RAM.
HP Color LaserJet 8550N
The HP Color LaserJet 8550N comes standard with a 100-sheet
tray 1, a 500-sheet tray 2, a 500-sheet tray 3, a printer stand, 32 MB
RAM, an HP JetDirect print server (10/100 Base-TX), and an internal
hard disk.
HP Color LaserJet 8550DN
The HP Color LaserJet 8550DN comes standard with a 100-sheet
tray 1, a 500-sheet tray 2, a 500-sheet tray 3, a (tray 4) 2000-sheet
input tray, a duplexer, 64 MB RAM, an HP JetDirect print server
(10/100 Base-TX), an internal hard disk, and five stabilizing legs.
HP Color LaserJet 8550GN
The HP Color LaserJet 8550GN comes standard with a 100-sheet
tray 1, a 500-sheet tray 2, a 500-sheet tray 3, a (tray 4) 2000-sheet
input tray, a duplexer, 128 MB RAM, an HP JetDirect print server
(10/100 Base-TX), an internal hard disk, five stabilizing legs, and a
higher performance processor.
20 1 The HP Color LaserJet 8550 Printer
EN
Page 22

HP Color LaserJet 8550MFP
The HP Color LaserJet 8550MFP comes standard with a 100-sheet
tray 1, a 500-sheet tra y 2, a 500-sheet tra y 3, a duple xer, 64 MB RAM,
an HP JetDirect print server (10/100 Base-TX), an internal hard disk,
a printer/copy module stand, and a copy module.
EN
Printer Information
21
Page 23
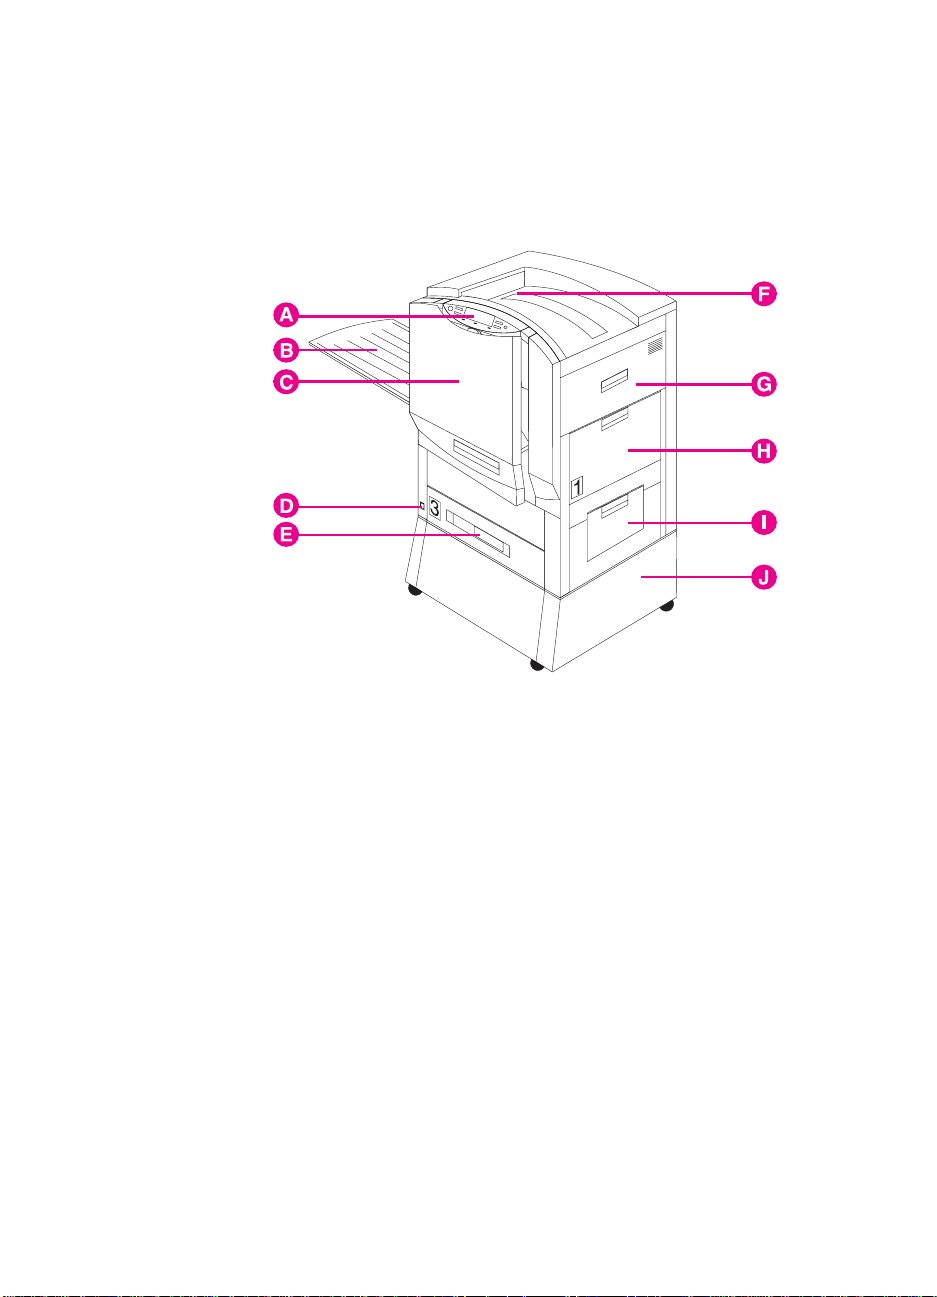
Locating the Printer's Parts
The following figures show the locations of the printer's parts.
(HP Color LaserJet 8550 shown below.)
Figure 1
A Printer Control Panel
B Left Output Bin (face up)
C Front Door
D Power Button
E Input Tray 3
F Top Output Bin (face down)
G Upper Right Door
H Input Tray 1
I Lower Right Door
J Printer Stand
22 1 The HP Color LaserJet 8550 Printer
EN
Page 24
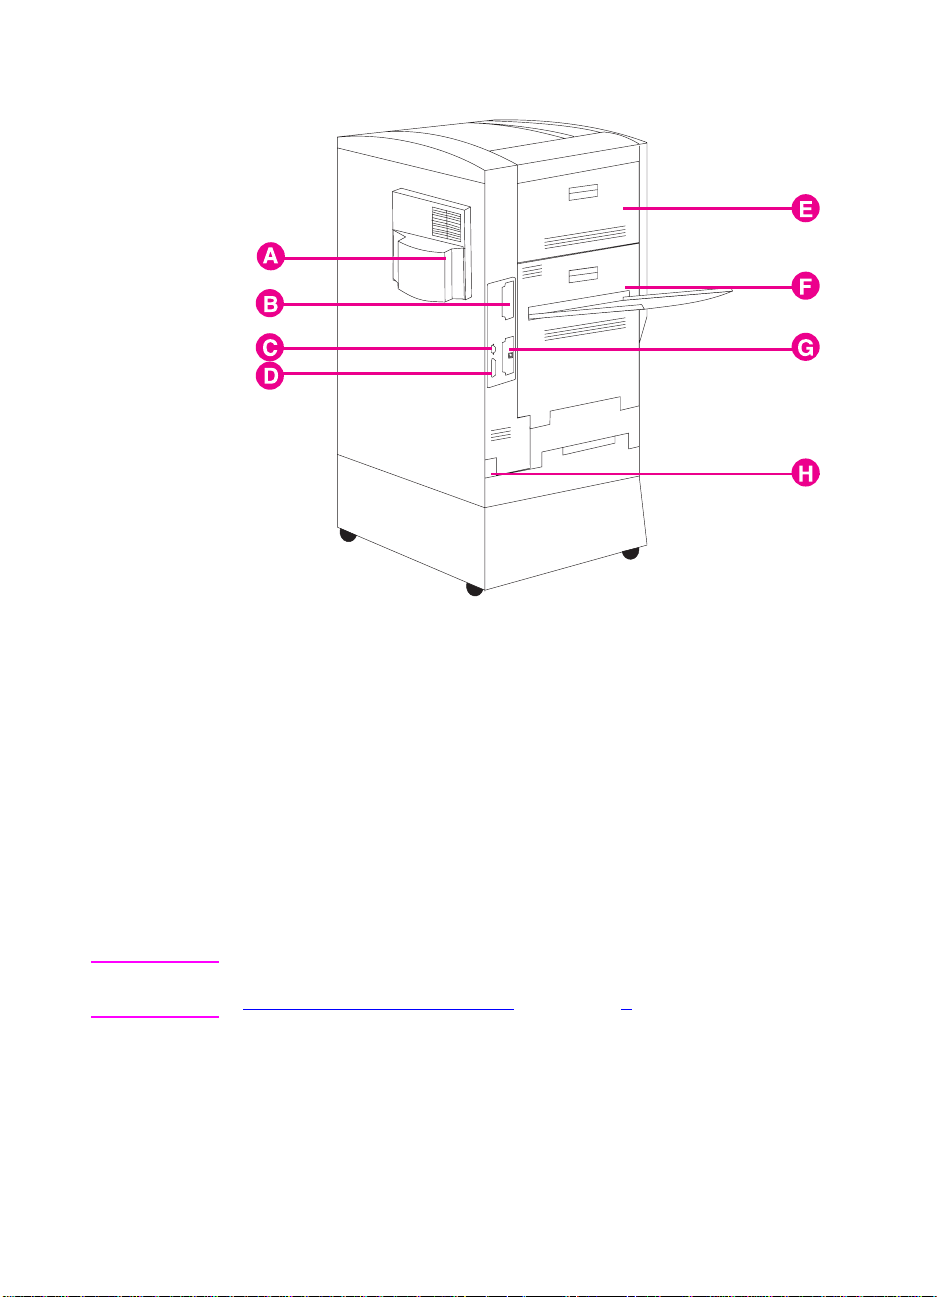
Figure 2
Note
EN
Air Filter Door
A
EIO Slot 2
B
Tray 4 Connector (C-Link Connector)
C
Parallel Connector
D
Upper Left Door
E
Lower Left Door
F
EIO Slot 1 (shown with optional HP JetDirect internal print server)
G
Po wer Connector
H
For information on the locations of printer consumables, see
“Locating Printer Consumables” in chapter 6.
Locating the Printer's Parts
23
Page 25
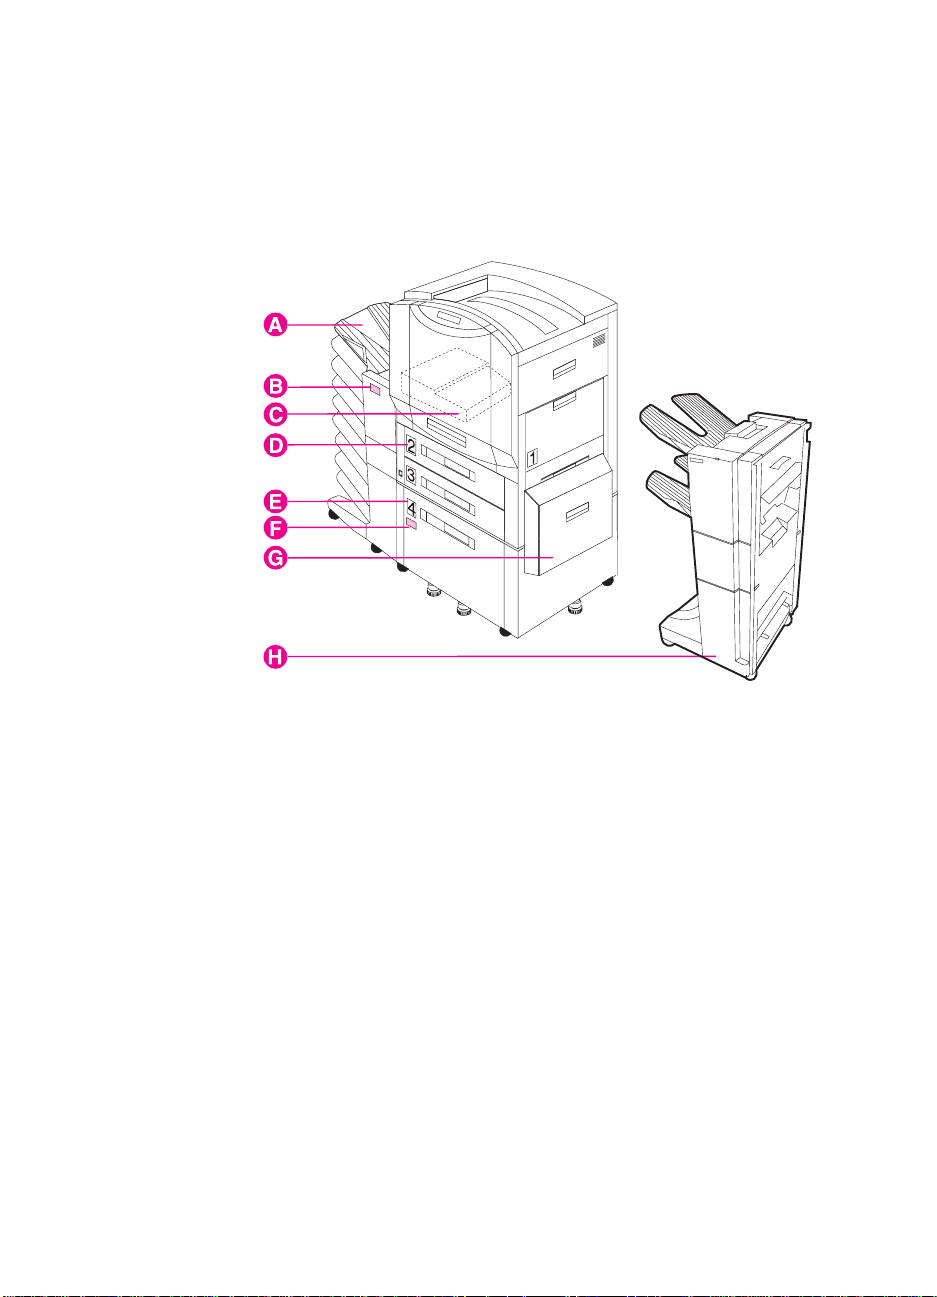
Figure 3
Optional Paper Handling Accessories and Status Lights
The following figure shows the locations of optional or packaged
accessories and their status lights (if applicable).
A Multi-bin Mailbox
B Multi-bin Mailbox Status Light
C Duplexer (some printer models only)
D Tray 2 (some printer models only)
E Tray 4 (some printer models only)
F Tray 4 Status Light
G Media Transfer Door
H 3000-sheet Stapler/Stacker (optional) or 3000-sheet Stacker
(optional)
24 1 The HP Color LaserJet 8550 Printer
EN
Page 26
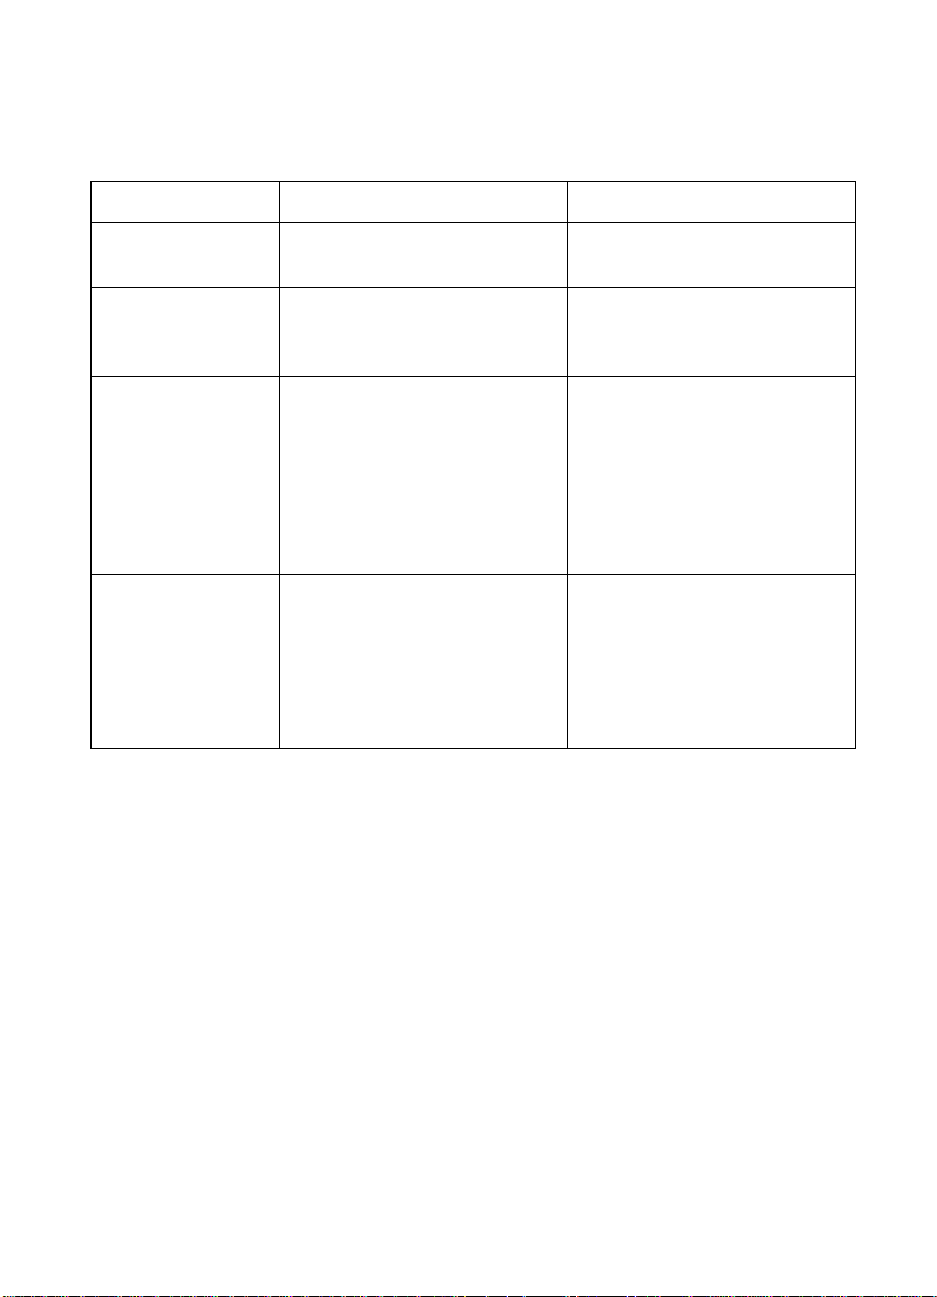
Use the following table to interpret the status lights on tray 4 and the
multi-bin mailbox.
Light Tray 4 Multi-Bin Mailbox
Solid Green The accessory is on and
ready.
Solid Amber The accessory is
experiencing a hardware
malfunction.
Flashing Amber The accessory has a media
jam or a page needs to be
removed from tray 4, even if
the page is not jammed.
The lower right door might be
open.
Off The printer might be in Power
Save mode. Press G
.
O
The accessory is not
receiving power. Check both
the power supply and the
power cables.
The accessory is on and
ready.
The accessory is
experiencing a hardware
malfunction.
The accessory has a media
jam or a page needs to be
removed from the multi-bin
mailbox, even if the page is
not jammed.
The accessory is not correctly
attached to the printer.
The printer might be in Power
Save mode. Press GO.
The accessory is not
receiving power. Check both
the power supply and the
power cables.
EN
Locating the Printer's Parts
25
Page 27

26 1 The HP Color LaserJet 8550 Printer
EN
Page 28

Using the Printer
Note
2
Unless otherwise specified,
on the printer. Keys on the printer control panel are indicated by the
KEY font.
Control Panel
Overview
The most convenient way to control the printer is through your
application or the printer driver. The commands in your
application override the printer control panel settings. For more
information on changing the printer settings from within an
application or printer driver, see the associated online help files.
Use the printer control panel to configure the default settings for
the printer or to obtain printer status information. Also, use the
printer control panel to access printer features not supported by
the application.
control panel
refers to the control panel
Note
EN
For more information on controlling the printer in a network
environment, see the HP JetDirect software installation guide and the
HP Web JetAdmin online help.
Overview
27
Page 29
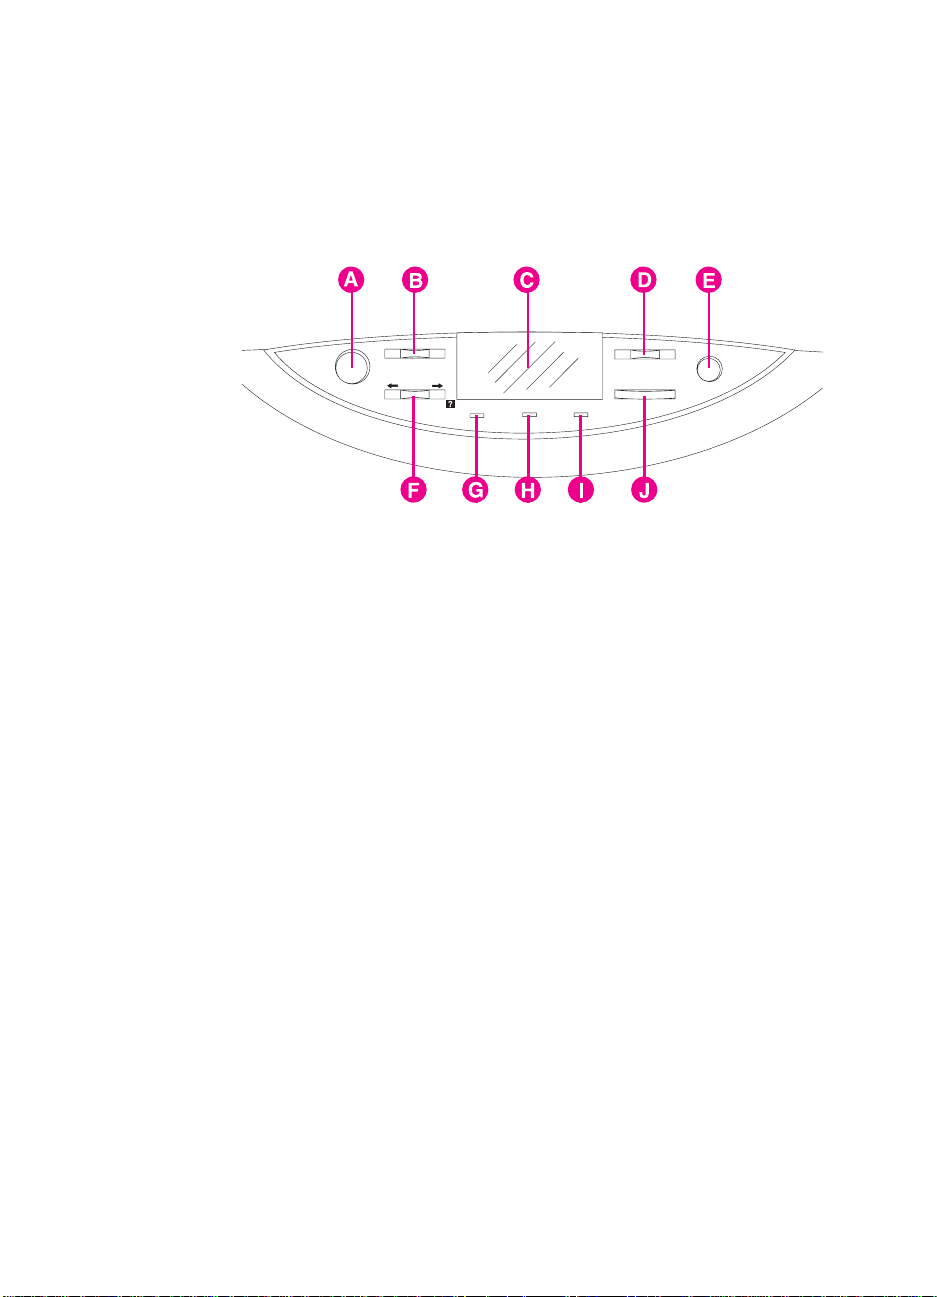
Figure 4
Printer Control Panel Keys and Indicator Lights
The following figure shows the locations of printer control panel
features.
AGo
Brings the printer online or offline, and exits menus.
B Menu
Accesses the printer control panel menus to set the printer
defaults. This key permits both forward and backward movement
through the list of available menus.
CDisplay
Presents data about the printer (such as printer status, required
actions, or data and print errors) in one or two lines of characters.
D-Value+
Steps through the value choices for a particular menu item using
-/+. This key permits both forward and backward movement
through the values.
E Cancel Job
Stops the currently printing job from printing. If no job is printing
and the display indicates that a job is processing, C
cancels the currently processing job and the next job begins
printing. While the job is being canceled, CANCELING JOB is
displayed.
ANCEL JOB
28 2 Using the Printer Control Panel
EN
Page 30

FItem
Steps through the items in a particular menu. This key permits
both forward and backward movement through the available
items. The I
key also steps through the control panel help
TEM
messages.
G Ready Indicator
(green)
• On—The printer is online and able to accept and process data.
• Off—The printer is offline and unable to process data.
• Flashing—The printer is going from online to offline, or from
offline to online.
H Data Indicator
(green)
• On—Data is in the printer buffer, or the printer is processing
data.
• Off—The printer buffer is empty.
• Flashing—The printer is receiving or processing data.
I Attention Indicator
(amber)
• On—An error has occurred in the printer.
• Off—The printer does not require attention.
• Flashing—The printer requires attention.
J Select
Selects the item or value currently shown on the printer control
panel display. An asterisk (*) is displayed when an item has been
selected.
For information on the status lights for the multi-bin mailbox and
tray 4, see “Optional Paper Handling Accessories and Status Lights
in chapter 1.
”
EN
Overview
29
Page 31

When to Use the Printer Control Panel Menus
The printer control panel menus allow you to select items such as the
number of copies and test pages. Use the printer control panel to
perform the following tasks:
z Set the media type for each input tray and the size for tray 1
z Job management:
• Continue a proof and hold job
• Quick copy a job
• Job storage
• Private printing
z Step through the control panel help messages
z Switch between online and offline status
z Print configuration pages
z Set the printer defaults when the application does not support the
option
z Change the printer's EIO configuration
z Print a file directory page to identify the fonts and macros
available on the printer hard disk
z Adjust duplex registration
Using the Printer Control Panel in Shared Environments
The printer control panel functions in a network or other
shared-printer environment in the same way as it does when it is
connected to a standalone computer. Follow these guidelines before
you change printer control panel settings:
z See the system administrator before making printer control panel
changes. Any printer control panel changes could affect other
print jobs.
z Coordinate setting the default printer font and downloading fonts
with other users. Coordinating these operations conserves
memory and reduces the chances of unexpected printer output.
30 2 Using the Printer Control Panel
EN
Page 32

Resetting the Printer
Use the procedures below to reset the printer to the factory defaults
listed in the table following this section.
To reset the printer to factory defaults
Note
1
Press M
ENU
until
INFORMATION MENU
appears on the printer
control panel display.
2
3
4
5
6
Press I
Press S
Press M
Press I
Press S
TEM
ELECT
ENU
TEM
ELECT
until
PRINT CONFIG PAGE
appears on the display.
to print the page.
until
RESETS MENU
until
FACTORY DEFAULT RESET
appears on the display.
appears on the display.
. The printer will reset all factory defaults.
Resetting the printer to factory defaults clears all print jobs from the
print buffer. After resetting the defaults, reprint any lost print jobs.
Reset the EIO type and configure the printer, if necessary.
7
Press G
8
Use the printer configuration page to reconfigure the printer.
9
to bring the printer online.
O
EN
When to Use the Printer Control Panel Menus
31
Page 33

Factory Defaults
The following table lists factory defaults for printer settings.
Menu Item Factory Default
INFORMATION MENU PRINT MENU MAP
PRINT CONFIG
PAGE
PRINT PCL FONT
LIST
PRINT PS FONT
LIST
PRINT LASERJET
DEMONSTRATION
QUICK COPY JOBS
c
MENU
PRIVATE/STORED
JOBS MENU
PRINT FILE
DIRECTORY
PRINT EIO PAGE
a
b
PRINT CONTINUOUS
CONFIG PAGES
PRINT EVENT LOG
COPIES=nn
COPIES=nn
32 2 Using the Printer Control Panel
EN
Page 34

Menu Item Factory Default
PAPER HANDLING MENU TRAY 1 TYPE =
TRAY 1 SIZE =
TRAY 2 TYPE =
TRAY 3 TYPE = PLAIN
TRAY 4 TYPE =
PAPER DEST = TOP OUTPUT BIN
DUPLEX =
BINDING
MANUAL FEED
f
g
OVERRIDE A4 WITH LETTER
AUTO PAPER OVERRIDE
CONFIGURATION MENU
POWERSAVE =
PERSONALITY
CLEARABLE WARNINGS
TONER LOW
d
e
AUTO
AUTO
PLAIN
PLAIN
OFF
LONG EDGE
OFF
NO
OFF
1 HOUR
AUTO
ON
CONTINUE
EN
NEW TONER
CARTRIDGE=
NEW TONER=
h
QUICK COPY
JOBS
PRINT PS ERRORS
INITIALIZE DISK
When to Use the Printer Control Panel Menus
NO
BLACK
YELLOW
MAGENTA
CYAN
32
i
OFF
33
Page 35

Menu Item Factory Default
PRINTING MENU COPIES= 1
j
PAPER LETTER
CONFIGURE CUSTOM
PAPER=
k
NO
UNIT OF MEASURE= INCHES
X DIMENSION= 12.00
RANGE 3.87 - 12.00
Y DIMENSION= 18.50
RANGE 7.48 - 18.50
ORIENTATION PORTRAIT
FORM LENGTH 60 LINES
PCL FONT SOURCE INTERNAL
PCL FONT NUMBER 0 (Courier)
PCL PITCH 10.00
PCL POINT SIZE 12.00
PCL SYMBOL SET PC-8
COURIER REGULAR
WIDE A4 NO
APPEND CR TO LF NO
34 2 Using the Printer Control Panel
EN
Page 36

Menu Item Factory Default
REGISTRATION
DUPLEX MENU
TRAY 1
PRINT TEST PAGE
TRAY 1 X = 0
TRAY 1 Y = 0
TRAY 2
l
PRINT TEST PAGE
TRAY 2 X = 0
TRAY 2 Y = 0
TRAY 3
PRINT TEST PAGE
TRAY 3 X = 0
TRAY 3 Y = 0
TRAY 4
m
PRINT TEST PAGE
TRAY 4 X = 0
TRAY 4 Y = 0
I/O MENU
I/O TIMEOUT
PARALLEL ADV FUNCTIONS = ON
RESETS MENU FACTORY DEFAULT
RESET
RESET ACTIVE I/O
RESET ALL I/O
RESET TRANSFER
LIFE COUNT
RESET FUSER LIFE
COUNT
<other menus>
EN
n
supplied by installed devices
When to Use the Printer Control Panel Menus
(seconds)
30
35
Page 37

Menu Item Factory Default
COLOR ADJUST
MENU
PRINT
TEST PAGE
BLACK SMOOTH
VALUE=
CYAN SMOOTH
VALUE=
MAGENTA SMOOTH
VALUE=
YELLOW SMOOTH
VALUE=
BLACK DETAIL
VALUE=
CYAN DETAIL
VALUE=
MAGENTA DETAIL
VALUE=
YELLOW DETAIL
VALUE=
a. App ears only if the printer has a disk installed.
b. Appears only if an EIO card is installed and an EIO page exists.
QUICK COPYJOBS MENU
c.
is in the queue.
d. Appears only if tray 2 is properly installed.
e. Appears only if tray 4 is properly installed.
f. Appears only if the optional duplexer is installed.
g. Appears only if the optional duplexer is installed and
h. Appears only if
i. Initialize functions only appear if appropriate disk is installed.
j.This setting will default to A4 in some countries/regions.
UNIT OF MEASURE, X DIMENSION
k.
l. Tray 2 items appear only if tray 2 is installed.
m. Tray 4 items appear only if tray 4 is installed.
n. Appears only if appropriate device (EIO) menu exists.
NEW TONER = YES
PRIVATE/JOBS MENU
and
.
, and
only appear if disk is installed and at le ast one job
Y DIMENSION
DUPLEX
is set to ON.
only appear if
0
0
0
0
0
0
0
0
CONFIGURE CUSTOM
is set to
YES
.
36 2 Using the Printer Control Panel
EN
Page 38

Printing Menu Maps
Print menu maps from the printer control panel, and then use the
menu maps to view printer settings and to help navigate the printer
control panel menus.
To print menu maps
1
Press M
ENU
control panel display.
2
3
Press I
Press S
TEM
ELECT
until
online.
until
INFORMATION MENU
PRINT MENU MAP
appears on the printer
appears on the display.
to print. The printer will automatically bring itself
EN
When to Use the Printer Control Panel Menus
37
Page 39

Changing Settings in the Printer Control Panel
Use the printer control panel to configure the default printer selections
and to obtain printer status information. Also, use the printer control
panel to access printer features not supported by your application.
For more information on navigating the printer control panel, see
“Printing Menu Maps
Configuring Menu Selections
Use the following instructions to configure all printer control panel
settings, including the default printer settings.
To configure menu selections in the printer control
panel
” on the previous page.
1 Press M
control panel display.
2 Press I
3 Press -V
4 Press S
right of the selection.
5 Repeat steps 1 through 4 until all of your changes are complete.
6 Press G
Note Changes to the printer control panel will not take eff ect until all current
data in the print buffer prints or until the next print job.
until the menu you want appears on the printer
ENU
until the item you want appears on the display.
TEM
+ until the value you want appears on the display.
ALUE
to save the selection. An asterisk (*) appears to the
ELECT
to bring the printer online.
O
38 2 Using the Printer Control Panel
EN
Page 40

Auto Continue
The Auto Continue feature allows the printer to continue printing
when certain warnings or conditions occur (such as
printer message will be displayed on the printer control panel, but the
printer will continue printing. Auto Continue is always on, and most
printer control panel messages that do not disable the printer will not
stop subsequent jobs from printing. However, the job where the error
occurred might not print correctly.
TONER LOW
). The
Note
If in the Configuration Menu
printer control panel messages can be cleared by pressing G
CLEARABLE WARNINGS
cleared from the display automatically when the job where the error
occurred finishes printing.
is set to
CLEARABLE WARNINGS
, the clearable messages will be
JOB
is set to ON, many
. If
O
Tray 1 Auto
From the control panel, you can also set the media size and type for
tray 1 to AUTO. The printer tries to match the media size and/or type
specified for the current print job in the print driver to the settings in
the control panel and prints from tray 1 if it can. For ex ample, if you
set the media size and type for tray 1 to AUTO in the control panel,
load letter-size transparencies into tray 1, and send a job to the
printer specifying plain Letter in the print driver, the printer prints from
tray 1 even if other trays are configured for plain Letter. You can use
the AUTO setting to override the printer's tray selection process,
forcing the printer to print from tray 1 regardless of the media size
and/or type specified in the print driver or loaded in tray 1.
Although tray 1 does not fully sense the media size , the printer will not
print on media that it senses is the wrong width.
EN
Changing Settings in the Printer Control Panel
39
Page 41

Configuring Media Type and Size
Configure the media type (such as plain paper, letterhead, or
transparencies) for each of the input trays. If the media type and size
have been correctly configured f or the input tr ays, the printer will print
based on the type and size of media and will automatically use the
correct input tray. Configuring the media type is beneficial for several
reasons:
z Setting the media type prevents printing on the wrong, possibly
expensive, media.
z The printer will automatically adjust its print speed to
accommodate special media (such as card stock, labels, and
transparencies). These adjustments will give the best quality
output, saving time and resources.
Note If the media type is not set properly, the printer might not print on the
correct media or at the correct speed for the media type, which can
result in poor print quality.
40 2 Using the Printer Control Panel
EN
Page 42

To configure the input trays
Follow the steps below to configure the media type.
Note
1
Press M
ENU
until
PAPER HANDLING MENU
appears on the printer
control panel display.
2
3
Press I
Press -V
until
TEM
ALUE
TRAY [number] TYPE =
+ until the correct media type appears on the
appears on the display.
display.
4
Press S
to save the selection. An asterisk (*) appears to the
ELECT
right of the selection.
To configure the media size in tray 1, repeat steps 1-4 (“size” will
replace references to “type”).
Trays 2, 3, and the optional tray 4 will automatically sense the media
size.
Repeat steps 2 through 4 to configure the media type in another
5
input tray.
- Or Press G
to bring the printer online.
O
EN
Changing Settings in the Printer Control Panel
41
Page 43

Selecting an Output Bin
Select the top output bin (face down) or the left output bin (f ace up) in
the printer control panel. The top output bin stacks the pages in
sequential order, so that the first page is on top and the last page is
on bottom. The left output bin provides a straight paper path which is
useful to prevent curling when printing on card stock, labels, or other
special media.
If you have an optional multi-bin mailbox, an optional 3000-sheet
Stacker, or an optional 3000-sheet Stapler/Stacker, then select the
appropriate output bin as your default. To configure other available
modes, see your network administrator.
Note For more information on the optional multi-bin mailbox, the optional
3000-sheet Stacker, and the optional 3000-sheet Stapler/Stacker
modes, see the guides that came with them.
Select the default destination for print jobs in the printer control panel.
The printer will send print jobs to the default destination if a
destination is not selected in the printer driver, or if your printing
environment does not use printer drivers. For more information on
using the HP Web JetAdmin software, see the online help.
Note Changes made to the multi-bin mailbox mode settings in the printer
driver will not override the multi-bin mailbox mode set in the
HP Web JetAdmin software or through PJL commands.
42 2 Using the Printer Control Panel
EN
Page 44

To select an output bin
1
Press M
ENU
until
PAPER HANDLING MENU
appears on the printer
control panel display.
2
3
Press I
Press -V
until
TEM
ALUE
PAPER DEST =
+ until the correct destination appears on the
appears on the display.
display.
4
Press S
to save the selection. An asterisk (*) appears to the
ELECT
right of the selection.
5
Press G
to bring the printer online.
O
Setting Media Type and Size Overrides
Set the media override option to select the media on which a job will
print if the selected media is not available.
To set the media override
1
Press M
ENU
control panel display.
until
PAPER HANDLING MENU
appears on the printer
EN
2
3
Press I
Press -V
until
TEM
+ until the ON or
ALUE
AUTO PAPER OVERRIDE
appears on the display.
OFF
•ON—If the requested media is not found,
<Size>
will appear on the display. There will be a delay before
the printer automatically prints on plain paper on the default
media size (set in the
PRINTING MENU
panel). The delay time can be configured through the
HP Web JetAdmin software. For more information on
configuring HP Web JetAdmin software, see the associated
online help file.
•
OFF—TRAY X LOAD <Type> <Size>
The printer will not print until it detects the correct media type
and size or G
is pressed.
O
Changing Settings in the Printer Control Panel
appears on the display.
TRAY X LOAD <Type>
on the printer control
will appear on the display.
43
Page 45

Note If the requested media size is larger than the default paper size (for
example, 11-by-17 inch size is requested, but the default is letter
size), then the image will be cropped to fit on the smaller page size.
4 Press S
to save the selection. An asterisk (*) appears to the
ELECT
right of the selection.
5 Press GO to bring the printer online.
Selecting the A4 Override
Enabling OVERRIDE A4 WITH LETTER will print A4-sized documents on
letter-sized media, or letter-sized documents on A4-sized media.
Howev er if an input tr a y is configured f or the siz e y ou want to o v erride
(letter or A4), even if the tray is empty, then the printer will continue to
try and print on the correct size of media regardless of the override
setting.
To select the A4 override
1 Press M
control panel display.
2 Press I
display.
3 Press -V
until PAPER HANDLING MENU appears on the printer
ENU
until OVERRIDE A4 WITH LETTER appears on the
TEM
+ to display ON or OFF.
ALUE
4 Press S
to save the selection. An asterisk (*) appears to the
ELECT
right of the selection.
5 Press GO to bring the printer online.
44 2 Using the Printer Control Panel
EN
Page 46

Selecting Toner Low Response
Selecting the toner low response allows you to determine how the
printer will behave when the printer detects a toner level is low.
Note
The printer uses the toner low response setting as the setting for
TRANSFER KIT LOW REPLACE KIT, FUSER LIFE LOW REPLACE KIT
TONER LOW
, and
DRUM LIFE LOW REPLACE DRUM KIT
example, if the toner low response is set to
TRANSFER KIT LOW REPLACE KIT
message appears on the printer
STOP
messages. For
, then when the
control panel the printer will stop printing until the transfer kit is
replaced or GO is pressed.
To select the toner low response
1
Press M
ENU
until
CONFIGURATION MENU
control panel display.
2
3
Press I
Press -V
until
TEM
ALUE
TONER LOW
+ until the option you want appears on the display.
appears on the display.
The available options include the following:
•
will take the printer offline. Pressing GO will bring the
STOP
printer online and allow printing to continue until the toner
cartridge is empty. When the toner cartridge is empty, the
message
•
CONTINUE
TONER OUT REPLACE <Color>
will display the
TONER LOW REPLACE <Color>
until the toner cartridge is empty.
appears on the printer
will be displayed.
warning
,
Note
EN
4
Press S
to save the selection. An asterisk (*) appears to the
ELECT
right of the selection.
Press GO to bring the printer online.
5
Although this option allows you to configure the printer behavior when
the consumable lives are low, print quality will eventually degrade
after a consumable's life has reached low, regardless of how you have
configured the printer response. These print quality problems can be
fixed by replacing the consumable.
Changing Settings in the Printer Control Panel
45
Page 47

Setting the Power Save Mode
The Power Save mode conserves electricity by reducing the amount
of power the printer uses when it has been idle for a length of time
specified in the printer control panel. The default setting is 60 minutes
(60 MIN). However, the Power Save mode can be adjusted to start
between 10 seconds and 8 hours after the last print job finishes. The
printer fans will run for 30 minutes after entering P o wer Sa ve mode to
cool the printer.
Note The 10 seconds setting is for use by service personnel and is not
recommended for daily use.
To set the Power Save mode
1 Press M
until CONFIGURATION MENU appears on the printer
ENU
control panel display.
2 Press I
3 Press -V
until POWERSAVE appears on the display.
TEM
+ until the interval you want (between 30 minutes
ALUE
and 8 hours) appears on the display.
4 Press S
to save the selection. An asterisk (*) appears to the
ELECT
right of the selection.
5 Press G
to bring the printer online.
O
Selecting Parallel Advanced Function
If the printer is not correctly interpreting data transmitted across the
ECP (enhanced capability parallel) port, turn the parallel advanced
functions off to send the printer into compatibility mode. Compatibility
mode turns the bidirectional communication off so that an
HP LaserJet fax or other peripheral between the host computer and
the printer will work correctly.
Note You must have the parallel advanced functions turned off for a
peripheral connected between the host computer and the printer to
work correctly.
46 2 Using the Printer Control Panel
EN
Page 48

To select the parallel advanced function
1
Press M
ENU
until
I/O MENU
appears on the printer control panel
display.
2
Press I
TEM
until
PARALLEL ADV FUNCTIONS =
appears on the
display.
3
4
Press -V
Press S
+ to display ON or
ALUE
to save the selection. An asterisk (*) appears to the
ELECT
OFF
.
right of the selection.
5
Press G
to bring the printer online.
O
Selecting the Default Printer Personality
Select the default printer personality for multi-platform environments,
or select a personality if your printer driver does not send the PJL
header with the print job.
To select the printer personality
Press M
1
control panel display.
ENU
until
CONFIGURATION MENU
is the default setting.
AUTO
appears on the printer
EN
2
3
Press I
Press -V
until
TEM
ALUE
PERSONALITY
+ until the option you want appears on the display.
appears on the display.
The available options include the following:
•
enables switching by file type or PJL description. This is
AUTO
the default setting and the best setting to maintain all printer
capabilities.
•
selects printer control language (PCL) as the printer
PCL
personality.
•
POSTSCRIPT
selects the PostScript language as the printer
personality.
4
Press S
to save the selection. An asterisk (*) appears to the
ELECT
right of the selection.
5
Press G
to bring the printer online.
O
Changing Settings in the Printer Control Panel
47
Page 49

Setting the I/O Timeout
The I/O timeout sets the amount of time the printer waits after
receiving print data before switching I/O ports. The default time is
30 seconds.
To set the I/O timeout
1 Press M
until I/O MENU appears on the printer control panel
ENU
display.
2 Press I
3 Press -V
until I/O TIMEOUT appears on the display.
TEM
+ until the interval you want (between 5 and
ALUE
300 seconds) appears on the display.
4 Press S
to save the selection. An asterisk (*) appears to the
ELECT
right of the selection.
5 Press G
to bring the printer online.
O
Note If the I/O timeout is too short, print jobs might be incomplete. If the I/O
timeout is too long, print jobs might be unnecessarily delayed.
48 2 Using the Printer Control Panel
EN
Page 50

Locking the Printer Control Panel
You can prevent users from changing the printer control panel
settings by establishing a password, thus enabling the printer control
panel lock. When locked, unauthorized users who try to change
settings in the printer control panel will receive an
message.
If you are using Microsoft Windows, use either the HP Web JetAdmin
software or a PJL Command. The easier of the two methods is
through the HP Web JetAdmin software. For more information on
using the HP Web JetAdmin software to perf orm this function, see the
HP Web JetAdmin online help.
If you are using Mac OS, use the HP LaserJet utility. From the
HP LaserJet utility, on the Security tab select
ACCESS DENIED
Lock Control Panel
.
Note
If you have forgotten the password for the printer control panel, print
a configuration page, an EIO page, and a menu map page, then reset
the printer with a cold reset. To perform a cold reset, turn the printer
off then hold down the green G
the front panel displays
printer settings (including internal print server card settings) will
return to the factory defaults, all passwords will be cleared, and the
printer control panel will be unlocked. Use the pages listed above to
restore the printer settings. For more information on printing these
pages, see “Printing Internal Pages” later in this chapter.
COLD RESET
button and turn the printer on. When
O
, release the green GO button.
All
EN
Changing Settings in the Printer Control Panel
49
Page 51

Selecting the Display Language
Using the printer control panel, you can set the printer to display
printer messages and print test pages in a variety of supported
languages.
To select the display language
1 Hold down S
CONFIG LANGUAGE (in English) appears on the printer control
panel display for appro ximately one second. Once the printer has
restarted, LANGUAGE=ENGLISH will appear.
Note Only -V
is being configured. All other keys are ignored.
If you press G
itself online and all subsequent messages will be displayed in
English. However, since no display language was selected, the
LANGUAGE=ENGLISH message will reappear (after the power-on self
test) when the printer is next turned on. This message will be
displayed every time the printer is turned on until you select a
language through the configure language mode.
2 Press -V
display.
3 Press S
right of the selection. The language selected will be the default
language until another selection is made by restarting the printer
in the configure language mode.
ALUE
while turning the printer off and then on.
ELECT
+, S
O
ALUE
ELECT
, and GO are active while the display language
ELECT
without selecting a language, the printer will bring
+ until the language you want appears on the
to save the selection. An asterisk (*) appears to the
4 Press G
to bring the printer online.
O
50 2 Using the Printer Control Panel
EN
Page 52

Printing Internal Pages
Print a configuration page to verify that the printer is set up correctly
or to verify information about the printer's configuration.
To print an internal page
Press M
1
control panel display.
Press I
2
available options include the following:
•
PRINT MENU MAP
•
PRINT CONFIG PAGE
•
PRINT PCL FONT LIST
•
PRINT PS FONT LIST
•
PRINT LASERJET DEMONSTRATION
•
PRINT FILE DIRECTORY PAGE
installed)
•
PRINT CONTINUOUS CONFIG PAGES
•
PRINT EVENT LOG
•
PRINT EIO PAGE
Press S
3
bring itself online.
If you want to print another page, repeat steps 1 though 3.
4
until
ENU
TEM
ELECT
INFORMATION MENU
until the option you want appears on the display. The
(appears only if the EIO card is installed)
to print the page. The printer will automatically
appears on the printer
(appears only if the disk is
EN
Printing Internal Pages
51
Page 53

Figure 5
Interpreting the Configuration Page
The following figure is an example of a configuration page.
A Printer Information—Lists the printer product number, serial
number, PCL firmware date code, PostScript version, total pages
printed during the life of the printer, number of color pages printed
during the life of the printer, HP JetSend ID, processor installed,
and number of duplex pages printed during the life of the printer.
B Installed Options—Shows whether options have been installed,
such as the printer hard disk, DIMMs, duplexer, multi-bin mailbox,
and optional input trays.
C Consumables:% of Life Remaining—Shows the percentage of
life remaining for consumable kits in the printer.
D Memory—Shows the total memory installed in the printer
(including a printer hard disk) and the settings that affect how the
memory is used.
E Paper Tray Configuration—Lists the types and sizes of media
configured for each input tray.
F Duplex Registration—Lists the offset values set for each input
tray.
G Security—Shows whether the security features have been
activated, such as the printer control panel lock, printer control
panel password, and printer hard disk lock. There also is a
service information code for service personnel.
H Event Log—Lists the last five printer events, including printer
jams, service errors, and other printer actions.
52 2 Using the Printer Control Panel
EN
Page 54

I Color Adjust
—Lists the number of pages since the last color
adjustment and the color calibration information.
Note
Print the Menu Map from the printer control panel to view the current
color adjustment values.
EN
Printing Internal Pages
53
Page 55

Figure 6
Tray 2 Duplex
Registration
Adjustment
Y Axis X Axis
Duplex Registration
The duplex registration f eature allows precise alignment of images on
the front and back of a duplexed page. Image placement varies
slightly for each input tray. The alignment procedure must be
performed for each tray.
1 Press M
ENU
printer control panel display.
2 Press I
3 Press S
4 Hold the printed page up to a light source and choose the number
on each axis where the lines on the front and back of the page
align most accurately.
TEM
ELECT
5 Repeat step 1.
6 Press I
TEM
number you selected from the test page in step 4.
7 Repeat step 6 for the y axis.
8 Press I
TEM
PRINT TEST PAGE appears for the tray you want.
54 2 Using the Printer Control Panel
until DUPLEX REGISTRATION MENU appears on the
until PRINT TEST PAGE appears for the tray you want.
to print the page.
until TRAY n X= appears and use -V
+ to enter the
ALUE
to scroll up through the duplex registration menu until
EN
Page 56

Press S
9
Repeat step 4 to verify that the lines on the front and back of the
10
to print the page.
ELECT
page are now properly aligned.
Note
If the lines on the front and back of the page do not properly align,
then repeat steps 4-9 until they are properly aligned.
EN
Printing Internal Pages
55
Page 57

Managing Memory
The printer supports an optional printer hard disk as well as ROM
(read-only memory) and synchronous DRAM (dynamic
random-access memory) DIMMs (dual inline memory modules).
DRAM DIMMs must be installed in synchronized pairs (two DIMMs)
with the same amount of memory installed in slots such as 1 and 2
(see task 5
appendix A, “DIMM Installation.”
The printer comes with a minimum of 32 MB of RAM and can be
expanded with additional DIMMs. The printer has four a vailab le DIMM
slots for additional 8, 16, 32, or 64 MB DIMMs.
An optional printer hard disk is available for storing downloaded fonts
and forms in the printer. Unlike standard printer memory, information
stored on the printer hard disk is permanently downloaded and can
remain in the printer even when the printer is turned off. A printer hard
disk also enables proof and hold and mopying features (which can
significantly decrease the processing time for multiple copies, or large
or complex jobs). For information on ordering a printer hard disk, see
“Accessories, Options, and Related Products
on page 209). For more information on DIMMs, see
” in chapter 8.
Note A printer hard disk is required to mopy or proof and hold.
56 2 Using the Printer Control Panel
EN
Page 58

Resource Saving
Resource Saving allows PCL and PostScript fonts and macros
downloaded to the printer's RAM when the printer switches between
PCL and PostScript personalities. The printer determines the amount
of RAM allocated to save each of the printer personality
environments. Resource Saving is always enabled.
Note
All data downloaded to the printer's RAM will be lost when the printer
is turned off.
Configuring the Printer for the Network
For information on configuring the printer for the network, see your
getting started guide or the
Installation Guide
.
HP JetDirect Print Server Software
EN
Managing Memory
57
Page 59

58 2 Using the Printer Control Panel
EN
Page 60

Common Printing
3
Tasks
Selecting Media
Many types of paper and other print media can be used with the
printer, within certain specifications. Using media that does not
meet the specifications outlined in this chapter can increase the
incidence of media jams, contribute to repair and maintenance
costs, and cause premature wear, print quality problems, and
problems requiring service. This service might not be covered by
the HP warranty or service agreements.
Before purchasing media or specialized forms, test a small
quantity in the printer. Make sure your media supplier obtains
and understands the media and print media specifications in the
HP LaserJet Printer Family Paper Specifications Guide
ordering information, see “Accessories, Options, and Related
Products” in chapter 8.)
. (For
Note
EN
It is possible that media could meet all of the specifications in this
chapter and still not print satisfactorily. This might be caused by
abnormal characteristics of the printing environment or other
variables over which HP has no control, such as extremes in
temperature and humidity.
Use only print media that meets the specifications outlined in
z
this chapter.
Do not attempt to print unsupported sizes or weights of
z
media or other unsupported media. For more information on
supported media, see “Supported Media Weights and Sizes
for Input Trays” on the next page.
Always handle transparencies and glossy media by their
z
edges to avoid fingerprints in the image area.
Selecting Media
59
Page 61

Do not use media that has already passed through the printer or
z
through a copy machine, even if there is no printing on the page.
z Recycled media can be used with this printer. Recycled media
must meet the specifications shown in this chapter.
Supported Media Weights and Sizes for Input Trays
The following table lists the types and sizes of media supported by
each input tray. For best results, use HP LaserJet paper or
conventional white xerographic paper. The media should be good
quality and free of cuts, nicks, tears, spots, loose particles, dust,
wrinkles, voids, perforations, and curled or bent edges. For a
complete list of media specifications, see the
Family Paper Specifications Guide
For more information on orienting the media in each of the input trays ,
see the appropriate section later in this chapter.
.
HP LaserJet Printer
60 3 Common Printing Tasks
EN
Page 62

Tray
Location Media Type
Media Size
(Common Name
and Dimensions) Media Weight
Maximum
Capacity
Tray 1 Paper:
Plain
Preprinted
Letterhead
Prepunched
Bond
Recycled
Color
Card Stock
Heavy
(greater
than 28 lb/105
g/m2 bond)
Glossy
Executive (7.25 by
10.50 in, 184.15 by
266.70 mm)
Letter (8.50 by 11 in,
215.90 by 279.40 mm)
Legal (8.50 by 14 in,
215.90 by 355.60 mm)
11 by 17 in (279.40 by
431.80 mm)
A5 (148 by 210 mm,
5.83 by 8.27 in)
ISO B5 (176 by
250 mm, 6.93 by
9.85 in)
JIS B5 (182 by
257 mm, 7.17 by
10.13 in)
A4 (210 by 297 mm,
8.27 by 11.70 in)
JIS B4 (257 by
364 mm, 10.13 by
14.34 in)
A3 (297 by 420 mm,
11.70 by 16.55 in)
12 by 18.50 in (304.80
by 469.90 mm)
312 by 440 mm (12.29
by 17.33 in)
Custom minimum 99 by
190 mm (3.90
by 7.49 in), maximum
304 by 469 mm
11.98 by 18.48 in)
16 to 58 lb
(60 to 216 g/m
bond
)
100 sheets of 20
lb (75 g/m2) bond
Limit to media-fill
mark on the
media width
guides
2
EN
Selecting Media
61
Page 63

Tray
Location Media Type
Media Size
(Common Name
and Dimensions) Media Weight
Maximum
Capacity
Envelopes Monarch (3.90 by
Labels Letter (8.50 by 11 in,
Transparencies Letter (8.50 by 11 in,
Trays 2 and 3 Paper:
Plain
Preprinted
Letterhead
Prepunched
Bond
Recycled
Color
Glossy
7.50 in, 99.06 by
90.50 mm)
Commercial #10
(Com10) (4.10 by
9.50 in, 104.14 by
241.30 mm)
DL (110 by 220 mm,
4.33 by 8.67 in)
Double Post Card
(JPOSTD) (148 by
200 mm, 5.83 by
7.88 in)
C5 (162 by 229 mm,
6.38 by 9.02 in)
B5 (176 by 250 mm,
6.93 by 9.85 in)
215.90 by 279.40 mm)
A4 (210 by 297 mm,
8.27 by 11.70 in)
215.90 by 279.40 mm)
A4 (210 by 297 mm,
8.27 by 11.70 in)
Letter (8.50 by 11 in,
215.90 by 279.40 mm)
Legal (8.50 by 14 in,
215.90 by 355.60 mm)
A4 (210 by 297 mm,
8.27 by 11.70 in)
Tray 3 only
11 by 17 in (279.40 by
431.80 mm)
A3 (297 by 420 mm,
11.70 by 16.55 in)
Maximum 24 lb
2
(90 g/m
— Limit to media-fill
4 to 5 mils (0.10 to
0.13 mm) thick
16 to 28 lb
(60 to 105 g/m
bond
) bond
a
2
)
Approximately 10
Limit to media-fill
mark on the
media width
guides
mark on the
media width
guides
Limit to media-fill
mark on the
media width
guides
500 sheets of
20 lb (75 g/m2)
bond
Limit to media-fill
mark on the
media width
guides
Transparencies Letter (8.50 by 11 in,
62 3 Common Printing Tasks
215.90 by 279.40 mm)
A4 (210 by 297 mm,
8.27 by 11.70 in)
4 to 5 mils (0.10 to
0.13 mm) thick
a
Limit to media-fill
mark on the
media width
guides
EN
Page 64

Tray
Location Media Type
Media Size
(Common Name
and Dimensions) Media Weight
Maximum
Capacity
Tray 4 Paper :
Plain
Preprinted
Letterhead
Prepunched
Bond
Recycled
Color
Glossy
a. HP recommends using 5 mil (0.13 mm) thick transparencies with this printer.
Letter (8.50 by 11 in,
215.90 by 279.40 mm)
Legal (8.50 by 14 in,
215.90 by 355.60 mm)
11 by 17 in (279.40 by
431.80 mm)
A4 (210 by 297 mm,
8.27 by 11.70 in)
JIS B4 (257 by
364 mm, 10.13 by
14.34 in)
A3 (297 by 420 mm,
11.70 by 16.55 in)
16 to 28 lb
(60 to 105 g/m
bond
2
Supported Media Weights and Sizes for the Optional Multi-bin Mailbox
The following table lists the types and sizes of media supported by
multi-bin mailbox output bins.
)
2,000 sheets of
20 lb
(75 g/m2) bond
Limit to media-fill
mark on the
media width
guides
Bin Media Type
Mailboxes Paper:
Plain
Preprinted
Letterhead
Prepunched
Bond
Recycled
Color
EN
Media Size
(Common Name and
Dimensions)
Letter (8.50 by 11 in,
215.90 by 279.40 mm)
Legal (8.50 by 14 in, 215.90
by 355.60 mm)
11 by 17 inch (279.40 by
431.80 mm)
A4 (210 by 297 mm, 8.27
by 11.70 in)
A3 (297 by 420 mm, 11.70
by 16.55 in)
JIS B4 (257 by 364 mm,
10.13 by 14.34 in)
Media
Weight
16 to 28 lb
(60 to
2
105 g/m
bond
Maximum
Capacity
250 sheets of 20
lb (75 g/m
)
Selecting Media
2
) bond
63
Page 65

Bin Media Type
Media Size
(Common Name and
Dimensions)
Media
Weight
Maximum
Capacity
Left (face-up)
Output Bin
Paper:
Plain
Preprinted
Letterhead
Prepunched
Bond
Recycled
Color
Card Stock
Heavy (greater
than 28 lb/105
g/m2 bond)
Glossy
Letter (8.50 by 11 in,
215.90 by 279.40 mm)
Legal (8.50 by 14 in, 215.90
by 355.60 mm)
11 by 17 in (279.40 by
431.80 mm)
Executive (7.25 by 10.50 in,
184.15 by 266.70 mm)
A4 (210 by 297 mm, 8.27
by 11.70 in)
A5 (148 by 210 mm, 5.83
by 8.27 in)
A3 (297 by 420 mm, 11.70
by 16.55 in)
JIS B5 (182 by 257 mm,
7.17 by 10.13 in)
JIS B4 (257 by 364 mm,
10.13 by 14.34 in)
ISO B5 (176 by 250 mm,
6.93 by 9.85 in)
12 by 18.50 in (304.80 by
469.90 mm)
312 by 440 mm (12.29 by
17.33 in)
Custom minimum 99 by
190 mm (3.90 by
7.49 in), maximum 304 by
469 mm 11.98 by 18.48 in)
16 to 58 lb
(60 to 216
2
g/m
) bond
125 sheets of
20 lb (75 g/m2)
bond
Labels Letter (8.50 by 11 in,
Transparencies Letter (8.50 by 11 in,
64 3 Common Printing Tasks
215.90 by 279.40 mm)
A4 (210 by 297 mm, 8.27
by 11.70 in)
215.90 by 279.40 mm)
A4 (210 by 297 mm, 8.27
by 11.70 in)
—
4 to 5 mils
(0.10 to
0.13 mm)
a
thick
EN
Page 66

Bin Media Type
Media Size
(Common Name and
Dimensions)
Media
Weight
Maximum
Capacity
Envelopes Commercial #10 (Com10)
(4.10 by 9.50 in,
104.14 by 241.30 mm)
Monarch (3.90 by 7.50 in,
99.06 by 190.50 mm)
C5 (162 by 229 mm, 6.38
by 9.02 in)
DL (110 by 220 mm, 4.33
by 8.67 in)
B5 (176 by 250 mm, 6.93
by 9.85 in)
Double Post Card
(JPOSTD) (148 by
200 mm, 5.83 by 7.88 in)
a. HP recommends using 5 mil (0.13 mm) thick transparencies with this printer.
Maximum
24 lb
2
(90 g/m
bond
)
Supported Media Weights and Sizes for the Optional Duplexer
The following table lists the types and sizes of media supported by
the optional duplexer.
30 Monarch-sized
envelopes
Media Type
Duplexer Paper:
Plain
Preprinted
Letterhead
Prepunched
Bond
Recycled
Glossy
EN
Media Size
(Common Name and
Dimensions)
Letter (8.50 by 11 in,
215.90 by 279.40 mm)
Legal (8.50 by 14 in, 215.90
by 355.60 mm)
11 by 17 inch (279.40 by
431.80 mm)
A4 (210 by 297 mm, 8.27
by 11.70 in)
A3 (297 by 420 mm, 11.70
by 16.55 in)
JIS B4 (257 by 364 mm,
10.13 by 14.34 in)
B5 (176 by 250 mm, 6.93
by 9.85 in)
Media
Weight
16 to 28 lb
(60 to 105
2
g/m
) bond
Maximum
Capacity
Selecting Media
65
Page 67

Supported Media Weights and Sizes for the
Optional 3000-sheet Stapler/Stacker and
Optional 3000-sheet Stacker
The following table lists the types and sizes of media supported by
the optional 3000-sheet Stapler/Stacker and 3000-sheet Stack er tr ay,
bin, or stapler.
T ray , Bin, or
Stapler Media Type
Left (face-up)
Output Bin
Paper:
Plain
Preprinted
Letterhead
Prepunched
Bond
Recycled
Color
Card Stock
Heavy
(greater
than 28
lb/105 g/m2
bond)
Glossy
Media Size
(Common Name and
Dimensions)
z
Letter, ISO A4
(landscape orientation
only)
z
Legal, Ledger
(11 x17 in.), A3,
JIS B4, JIS Double
Postcard, JPostD, JIS
B5, A5, Executive,
JIS Exec, 8K, 16K
(portrait orientation
only)
Custom:
Minimum - 190 mm
length x 98 mm width
Maximum - 460 mm
length x 305 mm width
z
Universal
Envelopes: COM 10, C5,
DL, Monarch, B5 (portrait
orientation only)
Media
Weight
16 to 53 lb
bond
(60 to
199 g/m2)
Maximum
Capacity
Up to 125 sheets
Letter (20 lb bond)
A4 (80 g/m2)
66 3 Common Printing Tasks
EN
Page 68

T ray , Bin, or
Stapler Media Type
Media Size
(Common Name and
Dimensions)
Media
Weight
Maximum
Capacity
Stacker Bin
(Optional Bin 1)
Stapler Paper:
Paper:
Plain
Preprinted
Letterhead
Prepunched
Bond
Recycled
Color
Plain
Preprinted
Letterhead
Prepunched
Bond
Recycled
Color
z Letter, ISO A4
(landscape orientation
only)
z Legal, Ledger
(11 x17 in.), A3,
JIS B4, JIS B5, A5,
Executive, JISExec,
8K, 16K (portrait
orientation only)
z Custom:
Minimum - 190 mm
length x 148 mm width
Maximum - 460 mm
length x 297 mm width
Note
Envelopes,
transparencies, and
labels are ONLY
supported in the Face-up
Bin.
z Letter, ISO A4
(landscape orientation
only)
z Legal, Ledger
(11 x17 in.), A3, JIS
B4, JIS B5, A5,
Executive, JIS
Executive, 8K, 16K
(portrait orientation
only)
Note
Envelopes,
transparencies, and
labels are ONLY
supported in the Face-up
Bin.
16 to 28 lb
bond
(60 to
2
110 g/m
16 to 28 lb
bond
(60 to
2
110 g/m
Up to 3,000 sheets
Letter (20 lb bond)
A4 (80 g/m2)
)
Note
The Stacker Bin’s
capacity varies
depending on the
paper’s size and
weight. For
example, using
11 x 17 in. (20 lb
bond), the
capacity can be
approximately
1,500 sheets.
Maximum 5 mm
stack height. For
example, 50 sheets
)
of 20 lb bond.
Note
The stapling
capacity varies
depending on the
paper’s
thickness.
EN
Selecting Media
67
Page 69

Preprinted Forms and Letterhead
Observe the following guidelines to avoid problems with preprinted
forms and letterhead.
z Forms and letterhead must have been printed with heat-resistant
inks that will not melt, vaporize, or release hazardous emissions
when subjected to the printer's fusing temperatures
(approximately 374° F, or 190° C).
z The inks must be non-flammable and must not adversely affect
any printer rollers.
z Forms and letterhead should be sealed in a moisture-proof
wrapping to prevent moisture damage during storage.
z Inks must be completely dry on forms and letterhead before they
are used in the printer. Ink that is not completely dry can come off
the page during the fusing process.
68 3 Common Printing Tasks
EN
Page 70

Recycled Media
Choose recycled media that meets the same specifications as
standard paper (see “Supported Media Weights and Sizes for Input
Trays” earlier in this chapter). HP recommends that recycled media
contain no more than five percent ground wood.
Envelopes
Envelopes can only be printed from tra y 1. The weight of the env elope
paper should not exceed 24 lb (90 g/m2) bond; otherwise, jamming
might occur. F or more inf ormation on printing envelopes, see “Printing
Envelopes from Tray 1” later in this chapter.
Envelopes should lie flat, with less than 0.25 inches (6.35 mm)
z
curl.
Output envelopes to the left (f ace-up) output bin rather than to the
z
top (face-down) output bin to reduce curl.
The optional multi-bin mailbox does not support envelopes e xcept
z
in its left (face-up) output bin.
Do not use envelopes with windows or clasps.
z
Make sure envelopes are not wrinkled, nicked, or otherwise
z
damaged.
Envelopes with a peel-off adhesive strip or with more than one
z
flap must use adhesives compatible with the printer's fusing
temperatures (approximately 374° F, or 190° C). Extra flaps or
strips can result in wrinkling or creasing, and can cause jamming.
All folds must be well scored and sharply creased.
z
Envelopes must be tightly constructed and should not contain air.
z
Envelopes that contain air may wrinkle as they pass through the
printer.
EN
Selecting Media
69
Page 71

Transparencies
CAUTION Use only transparencies supported for use in this printer, such as
HP Color LaserJet transparencies (for ordering information, see
“Accessories, Options, and Related Products
transparencies that do not meet the specifications for this printer can
cause poor print quality, media jams, and damage to the printer.
Although this printer supports transparencies between 4 and 5 mils
(0.10 to 0.13 mm) thick, HP recommends using 5-mil (0.13-mm) thick
transparencies.
To prevent damage to the printer, transparencies must be able to
withstand the printer's fusing temperature (approximately 374° F, or
190° C).
Handle transparencies by the edges. Oils from your fingers can be
deposited on the transparencies, causing print quality problems.
” in chapter 8). Using
Heavy Paper Stock
Heavy paper stock is any paper hea vier than 28 lb up to 58 lb (105 to
216 g/m2) bond. Always print heavy paper stock from tray 1. In the
printer driver, select Hea vy P a per as the paper type on the P aper tab
to ensure the correct finish on the media. Also, use the left (face-up)
output bin to prevent media jams. For more information on changing
the printer driver settings, see the online help.
Do not
use extremely heavy paper stock (greater than 58 lb, or
216 g/m2 bond). Misfeeds, mis-stacking, media jams, poor toner
fusing, poor print quality, and excessive mechanical wear can result.
70 3 Common Printing Tasks
EN
Page 72

Labels
Labels consist of three parts: the top or face sheet that the printer
prints on, the adhesive, and the carrier sheet (also referred to as the
backing or liner). When printing on labels with this printer, observe the
following:
Top sheets, which are the printing surface, are usually composed
z
of xerographic paper. Label top sheets must provide good toner
adhesion.
Carrier sheets must be compatible with the printer's fusing
z
temperature (approximately 374° F, or 190° C) and the pressure
of the fusing process. The carrier sheet also must be coated for
easy release of the top sheet.
CAUTION
Note
Do not remove labels from the carrier sheet and then print on the
remaining labels; printer damage can result.
Adhesives must be able to withstand the printer's fusing
z
temperature (approximately 374° F, or 190° C). The adhesives
must not produce emissions that exceed exposure levels or
threshold limits established by the U.S. Occupational Safety and
Health Administration and other safety agencies. Adhesiv es must
not come in direct contact with any part of the printer. No
adhesive should be pressed out of the edges or between die-cuts
(the cuts between individual labels).
Labels should be arranged so that the carrier sheet is not
z
exposed. Using label stock with spaces between the horizontal
rows of labels might result in labels peeling off during printing,
causing jams and possible printer damage. Labels might be
specifically manufactured to leave a margin around the outside
edges that correspond to the outer margins of the printable area.
Do not remove
the excess top sheet material from the carrier
sheet.
Labels could meet all of the guidelines in this chapter and still not
print satisfactorily because of the printing environment or other
variables over which HP has no control.
EN
Selecting Media
71
Page 73

Colored Media
Colored media should be of the same high quality as white
xerographic paper. Pigments used must be able to withstand the
printer's fusing temperature (approximately 374° F, or 190° C). Do not
use media with colored coating that was added after the media was
produced.
The printer cannot detect the color of media you are using. Varying
the shade or color of the media can change the shades of the printed
colors.
Media to Avoid
Follow these guidelines to avoid poor print quality or damage to the
printer:
z Do not use media that contains embossing.
z Do not use media with cutouts or perforations.
z Do not use multi-part forms.
z Do not use media with irregularities, such as tabs or staples.
z Do not use preprinted media that contains thermography or inks
that melt, vaporize, or release hazardous emissions when
subjected to the fusing temperature (approximately 374° F, or
190° C).
z Do not use any media that produces hazardous emissions, melts,
offsets, or discolors when heated to the printer's fusing
temperatures (approximately 374° F, or 190° C).
z Do not use media that has already been through a photocopier or
printer, even if there is no printing on the page.
z Do not use media with a watermark if solid fill areas are to be
printed.
z Do not use transparencies designed for ink jet printers.
72 3 Common Printing Tasks
EN
Page 74

Controlling Your Print Job
Control your print jobs from the printer or your computer. Changes to
the printer setup made from the printer control panel become default
settings for all print jobs. Changes to the printer setup made through
the printer driver on the computer will override settings in the printer
control panel and affect only the print jobs initiated from that
computer. Changes made from an application will remain in effect for
the current print job or until changed, depending on the application.
Most changes made to the printer should be made from the computer
so that the changes do not affect other users' print jobs.
Changing Page Orientation
The following figure shows different page orientations:
Figure 7
EN
Portrait
A
Landscape
B
Control the page orientation from your application, the printer driver,
or the printer control panel (PCL print jobs only):
To print across the width (short edge) of the media, select portrait
z
page orientation from your application or the printer driver.
To print across the length (long edge) of the media, select
z
landscape page orientation from your application or the printer
driver.
For more information on changing the page orientation, see the online
help for your application or the printer driver.
Controlling Your Print Job
73
Page 75

Printing from Tray 1
Load up to 100 sheets of 20 lb (75 g/m2)
bond paper in tray 1.
CAUTION
To avoid media jams, never add or
remove media from tray 1 while the
printer is printing from tray 1.
To load media into tray 1
1 Open tray 1.
2 Slide the media width guides to the
size that matches the media.
3 Load up to 100 sheets of 20 lb
(75 g/m
tray f ace up , with the long edge of the
letter- or A4-sized media toward the
printer. For more information on
loading other sizes into tray 1, see
“Orienting Media
Note
Do not fill the input tray above the
media-fill mark on the media guides.
4 Slide the media into the printer as far
as it will go (until the leading edge
rests lightly against the printer) and
adjust the media width guides until
the media fits squarely and firmly
between the media width guides
without bending the media.
5 Use the control panel to select the
size and type of media in tray 1 (see
Configuring Media Type and Size
chapter 2).
2
) bond paper into the input
” later in this chapter.
in
74 3 Common Printing Tasks
EN
Page 76

Printing Envelopes from Tray 1
Load up to ten envelopes in tray 1.
CAUTION
Never use en v elopes with clasps, snaps ,
windows, coated linings, or self-stick
adhesives. These items can damage the
printer. Nev er try to print on both sides of
an envelope. Media jams and printer
damage can result.
To load envelopes in tray 1
Open tray 1.
1
Place up to ten envelopes in tray 1
2
between the media width guides, face
up, with the back flap against the
input tray and the return address area
(short edge of the envelope) towards
the printer.
EN
Slide the media width guides until
3
they touch both sides of the
envelopes without bending the
envelopes.
Set the envelope size in the printer
4
control panel. For more information
on configuring the printer control
panel, see “Configuring Media Type
and Size” in chapter 2.
Printing from Tray 1
75
Page 77

To print envelopes from tray 1
1 Select envelope in your application or in the printer driver if your
application does not support printing on envelopes. For more
information on printing on envelopes, see the online help.
2 Set the envelope size and type in your application or the printer
driver.
3 If your application does not have an option to automatically format
an envelope, select Landscape for the page orientation.
4 Use the following table to set the margins for a return and mailing
address on a Commercial #10- (Com10) or DL-sized envelope.
Type of Address Left Margin Top Margin
Return 0.50 in (12.70 mm) 0.50 in (12.70 mm)
Mailing 4 in (101.60 mm) 2 in (50.80 mm)
For other sizes of envelopes, adjust the margins as necessary.
Avoid printing over the area where the envelope's three back
flaps (seams) meet.
5 Print the file from your application.
76 3 Common Printing Tasks
EN
Page 78

Printing Tips for Tray 1
CAUTION
For letter- or A4-sized media, load the media with the
z
long edge
of the media toward the printer.
For legal-, executive-, 11-by-17 inch, or A3-sized media, load the
z
media with the
Heavy paper stock is any paper heavier than 28 lb up to 58 lb
z
short edge
of the media toward the printer.
(105 to 216 g/m2) bond. Always print heavy paper stock from tr ay
1. In the printer driver, select
Heavy Paper
as the paper type on
the Paper tab to ensure the correct finish on the media. Also, use
the left (face-up) output bin to prevent media jams.
To print on custom-sized media, set the media size in your
z
application or the printer driver. The printer will accept custom
sizes between 3.90 by 7.49 in (99 b y 190 mm) and 12 by 18.50 in
(304.80 by 469.90 mm). If the media size set in your application
or the printer driver does not match the size of the media being
fed into the printer, then the printer might not feed the media or
the media might jam.
Do not use media heavier than 58 lb (216 g/m2) bond.
z
Handle transparencies by the edges to avoid leaving fingerprints
z
on the transparency.
Use only transparencies and glossy media that meet the
specifications for this printer. Using an incorrect type of media can
damage the printer. For more information on glossy media, see
“Supported Media Weights and Sizes for Input Trays
” earlier in this
chapter.
EN
Printing from Tray 1
77
Page 79

Figure 8
Orienting Media
Orienting Media in Tray 1
Place media into the input tray with the side to be printed on face up
for single-sided printing (see figure 8
place the top of the page toward the rear of the printer and the long
edge toward the printer. For media sizes larger than letter and A4,
place the top (short) edge of the page toward the printer.
). For letter- or A4-sized media,
Figure 9
Load letterhead and preprinted forms face up.
The duplexer prints the second side of the paper first, so paper such
as letterhead and preprinted paper needs to be oriented as shown.
z Load letter and A4 paper with the front side down and the top,
short edge toward the rear of the printer for double-sided printing.
z Load other sizes of paper with the front side down and the top,
short edge toward the printer for double-sided printing.
78 3 Common Printing Tasks
EN
Page 80

Figure 10
Figure 11
Orienting Media for All Other Trays
Place the media into the input tray with the side to be printed on face
down (see figure 10
Load letterhead with the top toward the rear of the input tray.
) for single-sided printing.
Note
EN
Load letter and A4 paper with the front side up and the top, short
z
edge toward the rear of the tray for double-sided printing.
Load other sizes with the front side up and the top, short edge
z
toward the right of the tray for double-sided printing.
Media Orientation for Printing Prepunched Paper
When printing with prepunched paper, alwa ys load the paper with the
holes toward the printer for tra y 1 (see figure 8). Load the prepunched
paper with the holes toward the right of the printer for tra ys 2, 3, and 4
(see figure 10
you must select prepunched paper as the paper type in the Paper
Handling menu from the control panel and select prepunched paper
from your printer driver.
When printing on both sides of prepunched paper with stapling
enabled, the staple will be in the lower right corner of your print job.
). When printing on both sides of prepunched paper,
Printing from Tray 1
79
Page 81

Printing from Trays 2 (some printer models only) and 3
Load up to 500 sheets of 20 lb (75 g/m2)
bond paper in trays 2 and 3.
To load media into trays 2 and 3
CAUTION
To avoid media jams, never open an
input tray while the printer is printing
from that input tray.
1 Firmly grip the handle in the center of
the input tray, squeeze the release
lever , and pull the input tr ay out until it
stops.
Note
To use the media size currently
configured in the input tray, go to step 8.
To use a media size different from the
current setting, go to step 2 to
reconfigure the input tray.
80 3 Common Printing Tasks
2 Turn the media guide lock to the
unlocked position.
3 Slide the media width guides to the
size that matches the media.
4 Turn the media guide lock to the
locked position.
EN
Page 82

Adjust the left media guide by
5
pushing it in (A) and lifting up and out
(B).
Note
Lift here (C) to remove paper from the
tray.
Position the left media guide over the
6
correct media size marked on the
input tray.
Press the left media guide into the
7
rear slot (D), and then lower it down
(E) into the front slot (F). Verify the
guide is not skewed.
Load up to 500 sheets of 20 lb
8
(75 g/m
2
) bond paper in the input
tray. For information on loading
different types of media, see
“Orienting Media for All Other Trays
later in this chapter.
CAUTION
Do not fill the input tray above the
media-fill mark. Excessive media in the
input trays can cause media jams.
”
EN
Printing from Trays 2 (some printer models only) and 3
81
Page 83

9 Ensure that the media size tab on the
front of the input tray is set to the
correct media size.
10 Slide the input tray back into the
printer.
11 Set the media type in the printer
control panel. For more information
on configuring the printer control
panel, see “Configuring Media Type
and Size” in chapter 2.
Note
Always configure the media type in the
printer control panel to prevent users
from printing on the wrong media type
(such as transparencies instead of plain
paper).
Note
If media curls or skews excessively
during printing, open the input tray and
turn the stack of media over. To avoid
media jams, never open the input tray
while the printer is printing.
To print from trays 2 and 3
1 Select the media type and size from your application or the printer
driver. To set the media type and size in the printer control panel,
see “Configuring Media Type and Size
2 Print the file from your application.
82 3 Common Printing Tasks
” in chapter 2.
EN
Page 84

Printing Tips for Trays 2 and 3
Handle transparencies by the edges to avoid leaving fingerprints
z
on the transparencies.
Use transparencies that meet the media specifications for this
z
printer. Using the incorrect type of transparencies can damage
the printer. For more information on transparencies, see
“Supported Media Weights and Sizes for Input Trays
this chapter.
Use letterhead that meets the media specifications for this printer .
z
For more information on letterhead specifications, see
“Preprinted Forms and Letterhead
” earlier in this chapter.
” earlier in
EN
Printing from Trays 2 (some printer models only) and 3
83
Page 85

Printing from Tray 4 (some printer models only)
Load up to 2,000 sheets of 20 lb
(75 g/m2) bond paper in tray 4.
To load media into tray 4
1 Firmly grip the handle in the center of
the input tray, squeeze the release
lever , and pull the input tr ay out until it
stops.
Note
To use the media size currently
configured in the input tray, go to step 5.
To use a different size, go to step 2.
2 Adjust the front media guide by
pulling up on the pin (A), placing the
media guide into the slots on the top
and bottom of the input tray that
correspond to the media size you are
loading (B), and pushing in the pin.
3 Repeat step 2 to adjust the back
media guide.
84 3 Common Printing Tasks
4 Repeat step 2 to adjust the left media
guide.
Note
For 11-by-17 inch media, move the left
media guide to the back of the input tray.
EN
Page 86

Load up to 2,000 sheets of 20 lb
5
(75 g/m
2
) bond paper into the input
tray. For information on loading
different types of media, see
“Orienting Media for All Other Trays
”
later in this chapter.
CAUTION
Do not place anything in the input tray to
the left of the media guides because the
input tray will not be able to lift the media
to print and could damage the input tray.
Also, do not fill the input tray above the
media-fill mark on the left media guide.
Excessive media can cause media jams.
Press down on all four corners of the
6
media stack to ensure the media
rests flat in the input tray.
Close tray 4.
7
Set the media type in the printer
8
control panel. For more information
on configuring the printer control
panel, see “Configuring Media Type
and Size” in chapter 2.
EN
Note
Always configure the media type in the
printer control panel to prevent printing
on the wrong media type (such as
transparencies instead of plain paper).
To print from tray 4
Select the media type and size from your application or the printer
1
driver. To set the media type and size in the printer control panel,
see “Configuring Media Type and Size
Print the file from your application.
2
Printing from Tray 4 (some printer models only)
” in chapter 2.
85
Page 87

Printing Tips for Tray 4 (some printer models only)
Use letterhead that meets the media specifications for this printer
(see “Preprinted Forms and Letterhead” earlier in this chapter).
86 3 Common Printing Tasks
EN
Page 88

Advanced Printing
4
Features
Overview
This chapter introduces some
you take full advantage of the printer’s features. These tasks are
“advanced” because they require you to change settings from a
software application, the printer driver, or the printer’s control
panel.
advanced printing tasks
to help
EN
Overview
87
Page 89

Using the HP TonerGauge
The HP TonerGauge feature allows the user to estimate how much
toner is left in the cartridges. The HP TonerGauge indicator appears
on the configuration page, on the status tab of the driver, and in
HP Web JetAdmin (for the network administrator). The toner level
indicated by the gauge may be used to estimate whether enough
toner remains in the cartridges to complete a print job.
Note The user must reset the HP TonerGauge each time a new cartridge is
installed to ensure that the HP TonerGauge reports accurate
information. See “Resetting the HP TonerGauge” on page 127.
88 4 Advanced Printing Features
EN
Page 90

Printing by Type and Size of Paper
You can configure the printer to select paper by
letterhead) and
paper tray).
(such as letter or A4), as opposed to
size
(such as plain or
type
source
(a
Benefits of Printing by Type and Size of Paper
If you frequently use several different kinds of paper, once trays are
set up correctly, you do not have to check which paper is loaded in
each tray before you print. This is especially helpful when the printer
is shared and more than one person loads or removes paper.
Printing by type and size of paper is a way to be sure that print jobs
always print on the desired paper. (Some printers have a feature that
“locks out” trays to prevent printing on the wrong paper. Printing by
type and size of paper eliminates the need to lock out trays.)
To print by type and size of paper, do the following:
Be sure to adjust and load the trays correctly. (See the sections
1
on loading paper, starting on page 77
From the Paper Handling Menu in the printer’s control panel,
2
select the paper
you are loading (such as bond or recycled), check the label on the
package of paper. For supported types, see page 60
for each tray. If you are unsure what type
type
.)
.
EN
Select the paper size settings from the control panel.
3
•
•
: If custom paper is loaded, set the size of custom paper
Tray 1
from the Printing Menu to match the paper loaded in tray 1.
Other trays
properly loaded into the printer. (See the sections on loading
paper, starting on page 77
: Paper size settings are adjusted when paper is
.)
Printing by Type and Size of Paper
89
Page 91

4 From the software or printer driver, select the desired type and
size of paper .
Note The type and size settings can also be configured from HP Web
JetAdmin for networked printers. See the printer software help.
Settings in the printer driver and software application override control
panel settings. (Software application settings override printer driver
settings.)
90 4 Advanced Printing Features
EN
Page 92

Different First Page
For Windows, select “Use different paper for first page” in your
1
printer driver. Choose a tray or type under First Page for the first
page and then select a tray or type from Other Pages for the
remaining pages. Place the paper with the side-to-be-printed up,
the top of the page facing the rear of the printer, and the long
edge leading into the printer.
For Macintosh, select “First from” and “Remaining from” in the print
dialog box.
Note
Note
Where and how you make selections depends on your software
application or associated printer driver. (Some options may only be
available through the printer driver.)
Load the paper for the remaining pages of the document into
2
another tray. You may select the first and remaining pages by type
of paper. For more information, see Printing by Type and Size of
Paper on page 89.
The paper size must be the same for the first and remaining pages.
EN
Different First Page
91
Page 93

Printing Multiple Pages on One Sheet of P aper
You can print more than one page on a single sheet of paper. This
feature is available in some printer drivers and provides a
cost-effective way to print draft pages.
To print more than one page on a sheet of paper, look for the Pages
Per Sheet option in the Finishing Tab of the printer driver. (This is
sometimes called 2-up, 4-up, or n-up printing.)
92 4 Advanced Printing Features
EN
Page 94

Creating and Using Quick Sets
Quick Sets allow you to save the current driver settings (for example,
page orientation, n-up printing or paper source) for reuse. For
convenience, Quick Sets can be selected and saved from most
printer driver tabs. You can also restore printer driver default settings
by selecting Defaults from the Quick Sets drop-down list.
Note
Quick Sets are available only for Windows.
Quick Sets
Printer Driver Procedure
(Windows 3.1/9x/
NT 4.0/Windows
2000)
Creating Quick Sets
If you are using NT 4.0 or Windows
Note:
2000 and are running the printer driver from
the server, you need administrator rights to
save new Quick Sets.
Access the printer driver.
1
Select the desired print settings.
2
In the Quick Sets box, type a name for
3
the selected settings (for example
“Quarterly Report” or “My Project
Status”).
Click Save.
4
EN
When you save Quick Sets, all current
5
driver settings are saved. The printer
driver will now remember these settings.
Click OK.
6
Creating and Using Quick Sets
93
Page 95

Quick Sets (continued)
Printer Driver Procedure
Using Quick Sets
1 Access the printer driver.
2 Select the desired item from the Quick
Sets drop-down list.
3 Click OK. The printer is now set to print
according to the settings in the Quick
Sets you selected.
94 4 Advanced Printing Features
EN
Page 96

Quick Copying a Job
The quick copy f eature prints the requested number of copies of a job
and stores a copy of the job on the printer’s hard disk. Additional
copies of the job can be printed later.
CAUTION
The quick copy f eature allows e v ery user to print the last 32 jobs. This
feature can be turned off in the driver.
This feature is the default for every job. This feature can be turned off
from the driver. For more information about specifying the number of
quick copy jobs that can be stored, see the
panel item described on page 32
.
QUICK COPY JOBS
control
Printing Additional Copies of a Quick Copy Job
To print additional copies of a job stored on the printer’s hard disk
from the control panel:
1
2
3
4
Press M
Press I
Press S
Press - V
repeatedly until
ENU
until the desired job name appears.
TEM
to select the job.
ELECT
+ until the desired number of copies appears.
ALUE
QUICK COPY JOBS MENU
COPIES=1
appears.
appears.
EN
5
Press S
to print the job.
ELECT
Quick Copying a Job
95
Page 97

Deleting a Stored Quick Copy Job
When a user sends a quick copy job, the printer overwrites any
previous jobs with the same name. If there is not a quick copy job
already stored under the job name and the printer needs additional
space, the printer may delete other stored quick copy jobs starting
with the oldest job. The def ault n umber of quic k copy jobs that can be
stored is 32. The number of quick copy jobs that can be stored is set
from the control panel.
Note If you turn the printer off and then back on, all quick copy, proof and
hold, and private jobs are deleted.
A stored quick copy job can also be deleted from the control panel.
1 Press M
2 Press I
TEM
3 Press S
4 Press - V
5 Press S
repeatedly until QUICK COPY JOBS MENU appears.
ENU
until the desired job name appears.
to select the job. COPIES=1 appears.
ELECT
until DELETE appears.
ALUE
to delete the job.
ELECT
96 4 Advanced Printing Features
EN
Page 98

Proofing and Holding a Job
The proof and hold feature provides a quic k and easy wa y to print and
proof one copy of a job and then print the additional copies.
To permanently store the job and prevent the printer from deleting it
when space is needed for something else, select the Stored Job
option in the driver.
Printing the Remaining Copies of a Held Job
The user can print the remaining copies of a job held on the printer’s
hard disk from the control panel.
Note
1
2
3
4
5
Press M
Press I
Press S
Press - V
Press S
repeatedly until
ENU
until the desired job name appears.
TEM
to select the job.
ELECT
+ until the desired number of copies appears.
ALUE
to print the job.
ELECT
QUICK COPY JOBS MENU
COPIES=1
appears.
appears.
Deleting a Held Job
When a user sends a proof and hold job, the printer automatically
deletes that user’s pre vious stored proof and hold job. If there is not a
proof and hold job already stored for that job name and the printer
needs additional space, the printer may delete other stored proof and
hold jobs starting with the oldest one.
If you turn the printer off and then back on, all quick copy, proof and
hold, and private jobs are deleted.
EN
Proofing and Holding a Job
97
Page 99

A stored proof and hold job can also be deleted from the control
panel.
1 Press M
2 Press I
TEM
3 Press S
4 Press - V
5 Press S
repeatedly until QUICK COPY JOBS MENU appears.
ENU
until the desired job name appears.
to select the job. COPIES=1 appears.
ELECT
until DELETE appears.
ALUE
to delete the job.
ELECT
98 4 Advanced Printing Features
EN
Page 100

Printing a Private Job
The private printing feature lets a user specify that a job is not printed
until that user releases it using a 4-digit Personal Identification
Number (PIN) through the printer’s control panel. The user specifies
the PIN in the driver and it is sent to the printer as part of the print job.
Specifying a Private Job
To specify that a job is private from the driver, select the Private Job
option and type a 4-digit PIN.
Releasing a Private Job
The user can print a private job from the control panel.
1
Press M
repeatedly until
ENU
PRIVATE/STORED JOBS MENU
appears.
2
3
4
Press I
Press S
Press - V
press S
until the desired job name appears.
TEM
.
ELECT
ELECT
PIN:0000
+ to change the first number of the PIN, and then
ALUE
. An * appears in place of the number. Repeat these
appears.
steps to change the remaining three numbers of the PIN.
appears.
+ until the desired number of copies appears.
ALUE
to print the job.
ELECT
5
6
COPIES=1
Press - V
Press S
EN
Printing a Private Job
99
 Loading...