

HP COLOR LASERJET 5550, COLOR LASERJET 9500, LASERJET 4345, COLOR LASERJET 9500MFP, LASERJET 9040/9050MFP User Manual
...Page 1
install
network
installation
Installation
installazione
instalación
installatie
instalação
réseau
Netzwerk
rete
red
netwerk
rede
Page 2

Copyright
Copyright
© 2004 Copyright Hewlett-Packard Development
Company, L.P.
Reproduction, adaptation or translation without prior
written permission is prohibited, except as allowed
under the copyright laws.
The information contained herein is subject to change
without notice.
The only warranties for HP products and services are
set forth in the express warranty statements
accompanying such products and services. Nothing
herein should be construed as constituting an
additional warranty. HP shall not be liable for technical
or editorial errors or omissions contained herein.
Part number: 5851-2343
Edition 1, 11/2004
Trademark Acknowledgements
Windows® is a U.S. registered trademark of Microsoft
Corporation.
© 2004 Copyright Hewlett-Packard Development
Company, L.P.
Il est interdit de reproduire, adapter ou traduire ce
manuel sans autorisation expresse par écrit, sauf
dans les cas permis par les lois régissant les droits
d’auteur.
Les informations contenues dans ce document sont
sujettes à modification san s pr éavis.
Les seules garanties concernant les produits et
services HP sont énoncées dans la garantie qui
accompagne ces produits et services. Rien en ceci ne
devra être interprété comme constituant une garantie
supplémentaire. HP ne pourra être tenue pour
responsable des erreurs techniques et rédactionnelles
ou des omissions présentes dans ce document.
Numéro de référence : 5851-2343
Edition 1, 11/2004
Marques
Windows® est une marque déposée aux Etats-Unis
de Microsoft Corporation.
Page 3

Page 4
Networked and shared printer install guide for Windows OSs
HP recommends that you use the HP software installer on the CD to
set up printer drivers for the network configurations described here.
English
The installer utility is available on the CD that comes with the
printer. You are not required to install additional printer software
using this installer.
You can also set up these configurations using the Add Printer
Wizard, but instructions on how to do this are not included here.
See the User Guide, located on the CD that shipped with the printer ,
for these instructions and for more detailed instructions on using the
installer. Instructions for other operating systems can also be found
there. The HP JetDirect Administrator Guide and the Installation
Notes, also located on the CD, have additional instructions.
Possible network configurations
Four possible network printer configurations include:
A. Network port-connected printer configuration (direct mode or
peer-to-peer printing)
B. Network port-connected and shared printer (client-ser ver
printing)
C. Direct-connected shared printer (client-server printing)
D. PC client setup
The following sections provide information about each network
configuration and provide basic installation information.
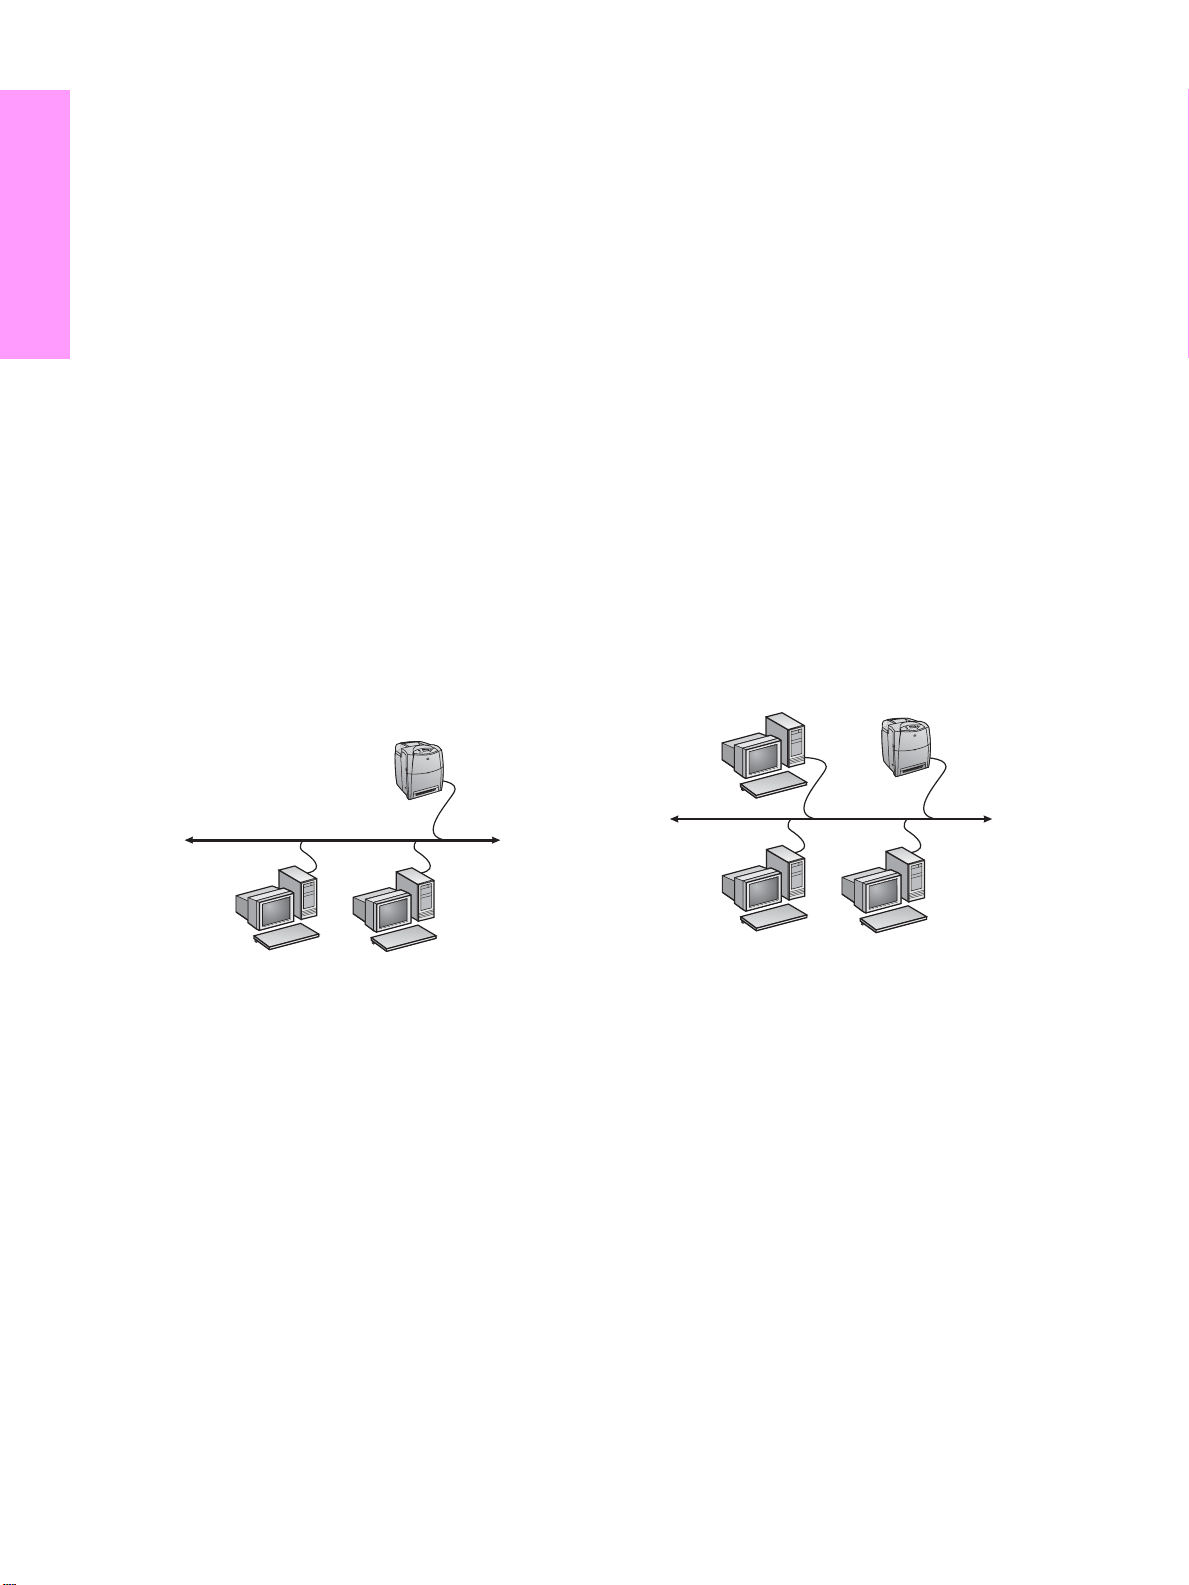
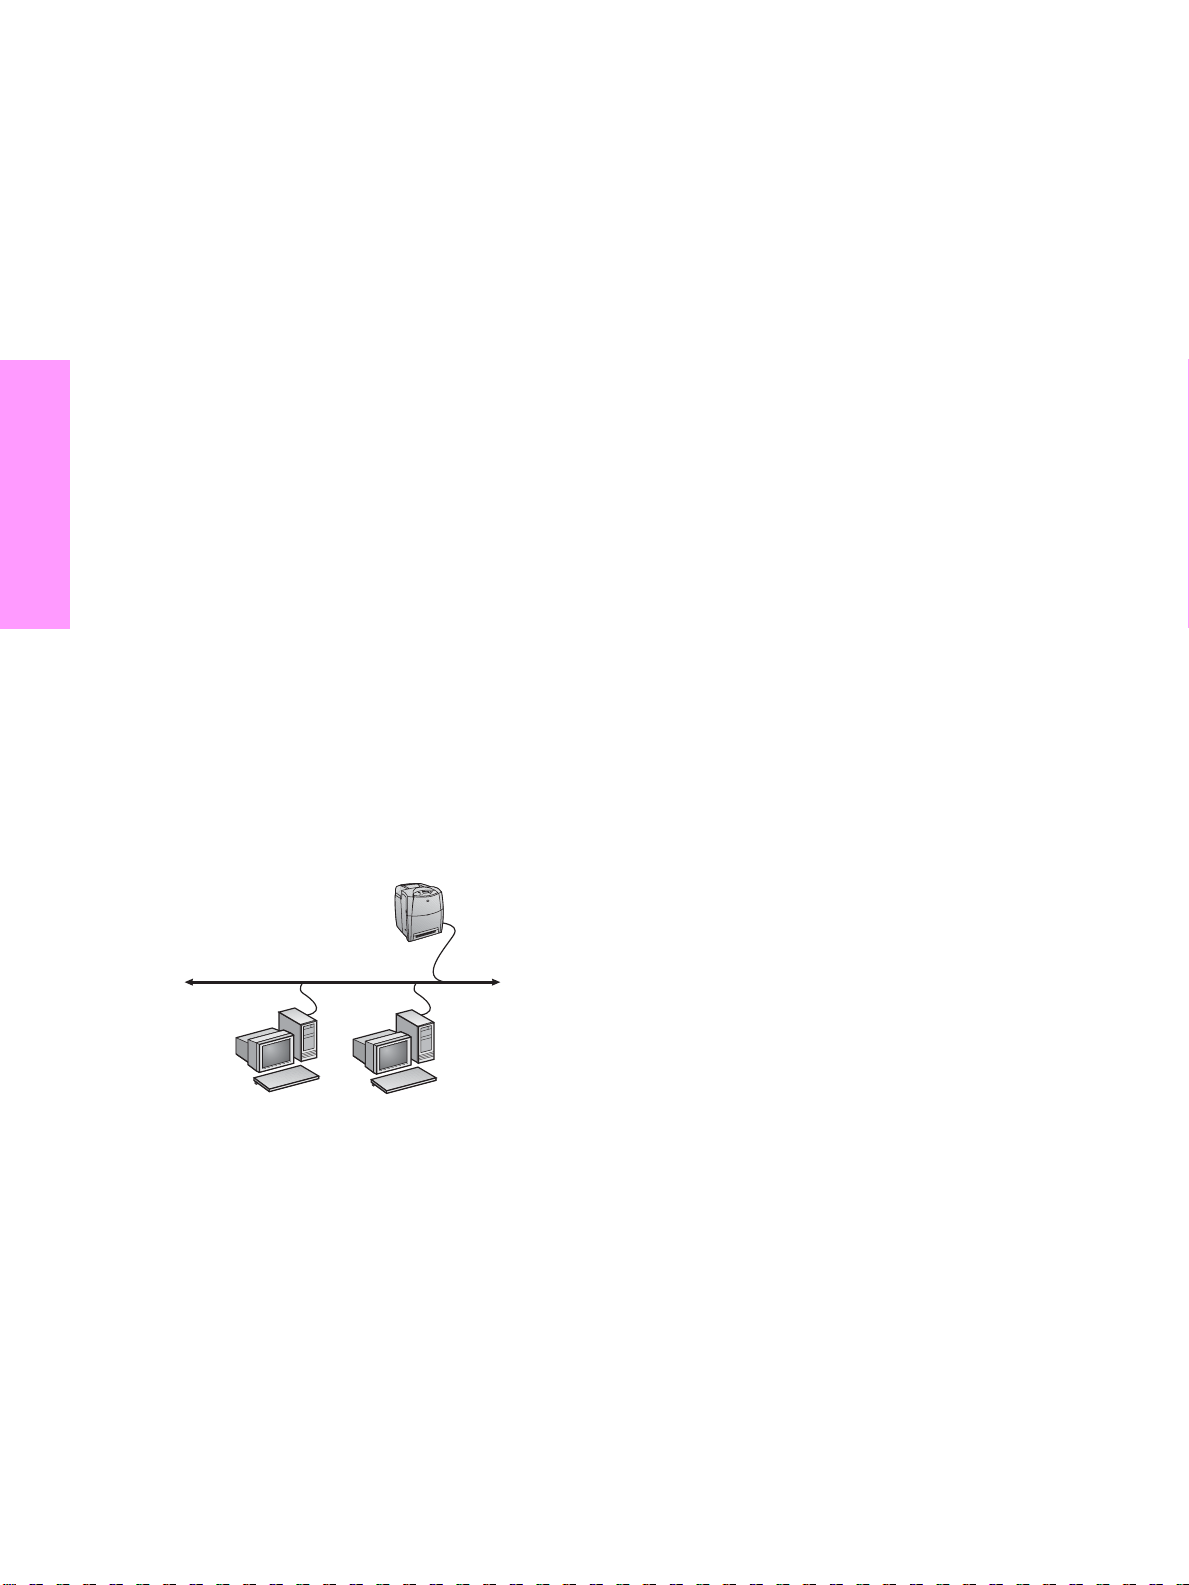
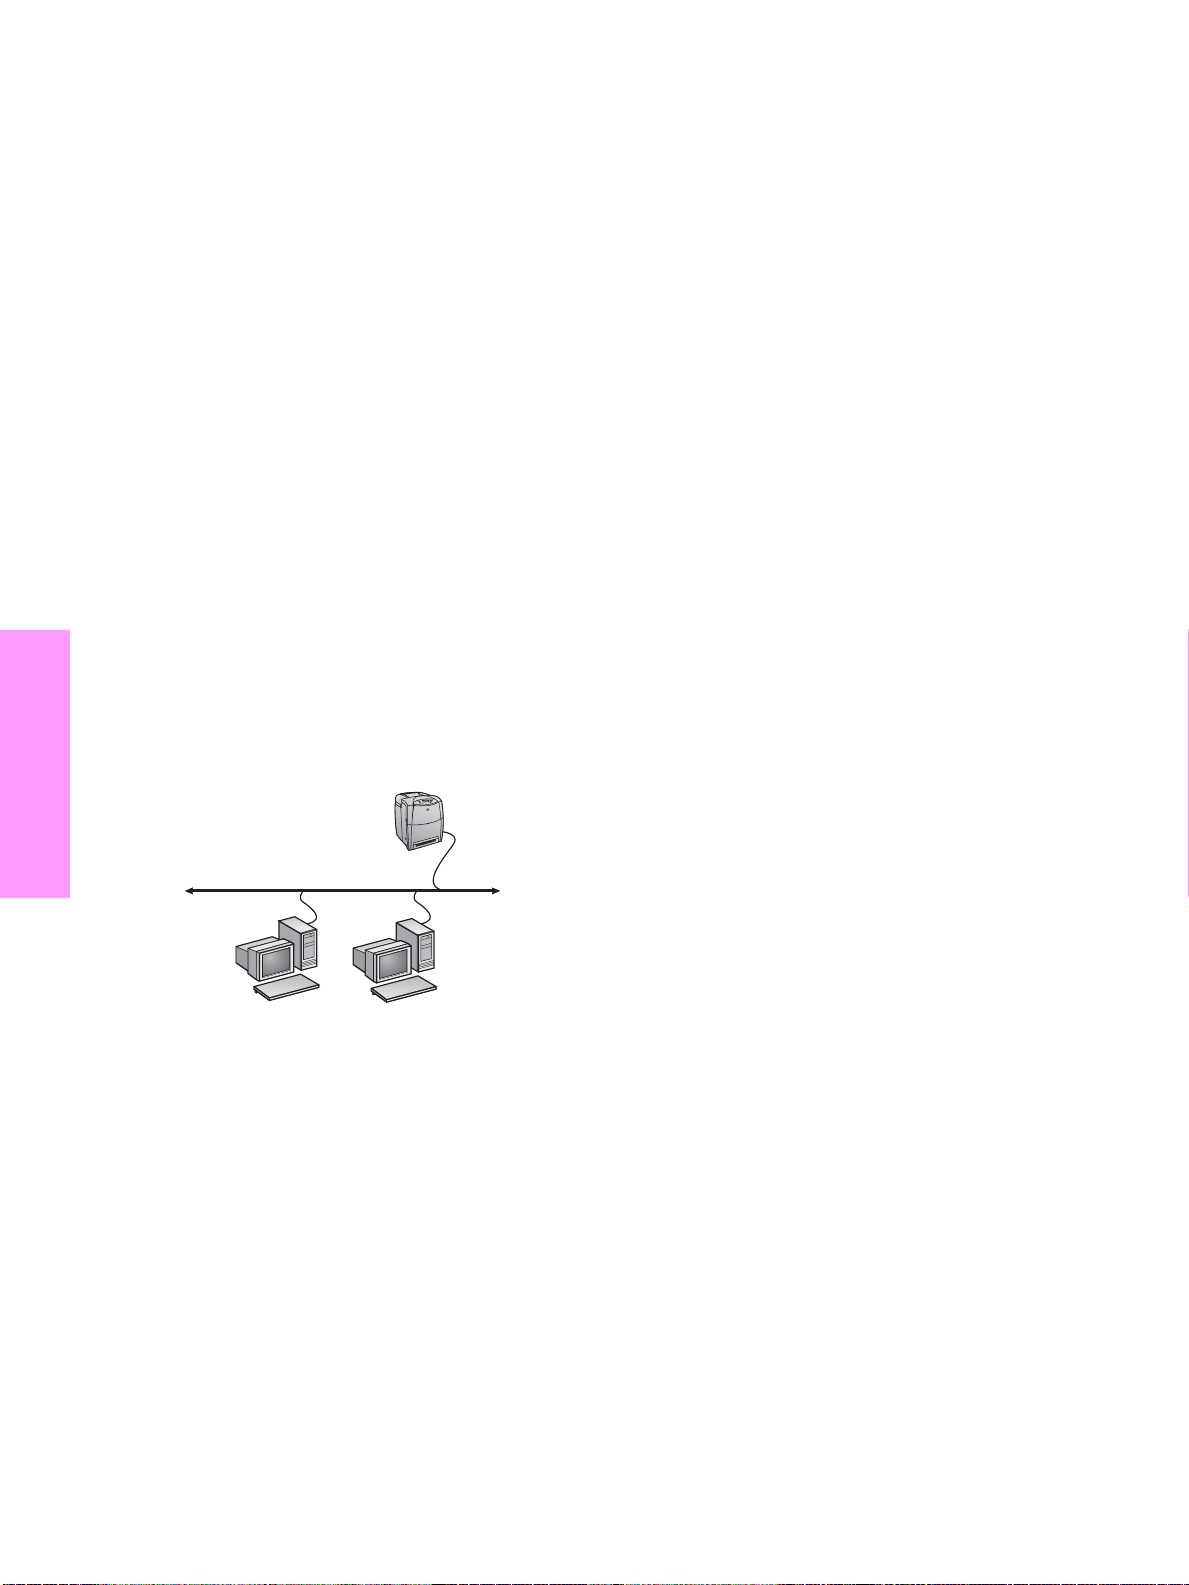
A. Network port-connected printer configuration (direct mode or peer-to-peer printing)
The printer is connected directly to the network and all PCs or
clients print directly to the printer.
Printer
3. Select the language you would like the installer to display and
accept the License Agreement.
4. On the Printer Connection screen, select Connected via the
network.
5. On the Network Setup screen, select Basic network setup for
a PC or server.
6. On the Identify Printer screen, identify the printer either by
searching or by specifying a hardware or IP address. In most
cases, an IP address is assigned but you can change it later in
step 8.
7. If you specified your IP address, you will be asked if this is the
printer you want to install to. If y ou searched for printers, y ou will
be asked to choose one of the printers found to install to.
8. On the confirm settings dialog, you may change the IP address
of the printer by clicking Change TCP/IP Settings.
9. Select the model of the printer.
10.If you want the typical software installed, select Typical
Installation; or, if you want to select the software to be installed,
select Custom Installation.
11.Give the printer a name to be used in the Printers folder.
12.On the Printer Sharing screen, select Not Shared.
13.Provide a location and descriptive information if you want.
14.Allow the installation to complete.
B. Network port-connected and shared printer (client-server printing)
The printer is connected to the network and installed on a network
server. The server then manages the printing.
Print Server
Printer
Clients
● Recommended for groups of 10 to 20 users or small offices.
● Requires a network connection on the printer or an internal or
external print server. If the printer does not have one, use
configuration C below.
● Installation overvi ew:
• Hardware setup - plug the printer directly into the network
using a network cable.
• Run the CD that came with the printer and follow the steps
below for each PC to enable printing.
• Information required during software setup - printer
hardware or IP address obtained from page 2 of the printer
configuration page.
Installation steps:
1. Print a configuration page and note the IP address on the
second page under "TCP/IP". For instructions on how to print the
configuration page, see the printer's User Guide on the CD. If the
IP address is 0.0.0.0 or 192.0.0.192, wait 5 to 10 minutes and
print a configuration page again. The network software should
assign an IP address to your printer. If it does not, or if you want
to assign a particular IP address, go to the instructions at the
end of this document.
2. Insert the CD that came with the printer. The software installer
should start without assistance. Click on Ins tall Printer. If the
software installer does not start, browse to setup.exe in the root
directory of the CD and double-click on it; then click on Install
Printer.
Clients
● Recommended for larger workgroups, more than 30 users.
Allows administrator control of client printer driver settings.
● Requires a network connection on the printer or an internal or
external print server. If the printer does not have a network
connection, use configuration C below.
● Installation ov erview:
• Hardware setup - plug the printer directly into the network
using a network cable.
• Run the CD that came with the printer on the server PC to
enable printing.
● Information required during software setup:
• Determine the printer’s hardware or IP address, obtained
from page 2 of the printer configuration page. For
instructions on how to print the configuration page see the
printer's User Guide on the CD.
• Decide on a printer share name.
Installation steps:
1. Print a configuration page and note the IP address on the
second page under "TCP/IP". For instructions on how to print the
configuration page, see the printer's User Guide on the CD. If the
IP address is 0.0.0.0 or 192.0.0.192, wait 5 to 10 minutes and
print a configuration page again. The network software should
assign an IP address to your printer. If it does not, or if you want
to assign a particular IP address, go to the instructions at the
end of this document.
1 ENWW
Page 5
2. Insert the CD that came with the printer. The software installer
should start without assistance. Click on Ins tall Printer. If the
software installer does not start, browse to setup.exe in the root
directory of the CD and double-click on it; then click on Install
Printer.
3. Select the language you would like the installer to display and
accept the License Agreement.
4. On the Printer Connection screen, select Connected via the
network.
5. On the Network Setup screen, select Basic network setup for
a PC or server.
6. On the Identify Printer screen, identify the printer either by
searching or by specifying a hardware or IP address. In most
cases, an IP address is assigned but you can change it later in
step 8.
7. If you specified your IP address, you will be asked if this is the
printer you want to install to . If y ou searched f or printers , y ou will
be asked to choose one of the printers found to install to.
8. On the confirm settings dialog, you may change the IP address
of the printer by clicking Change TCP/IP Settings.
9. Select the model of the printer.
10.If you want the typical software installed, select Typical
Installation; or, if you want to select the software to be installed,
select Custom Installation.
11.Give the printer a name to be used in the Printers folder.
12.On the Printer Sharing screen, select Share As and give the
printer a share name.
13.If you are sharing the printer with other PCs running operating
systems different than the PC you are using, then on the Client
Driver Support screen, select the drivers for those operating
systems.
14.For Windows 2000 and XP, you can provide location and
descriptive information if you want.
15.Allow the installation to complete.
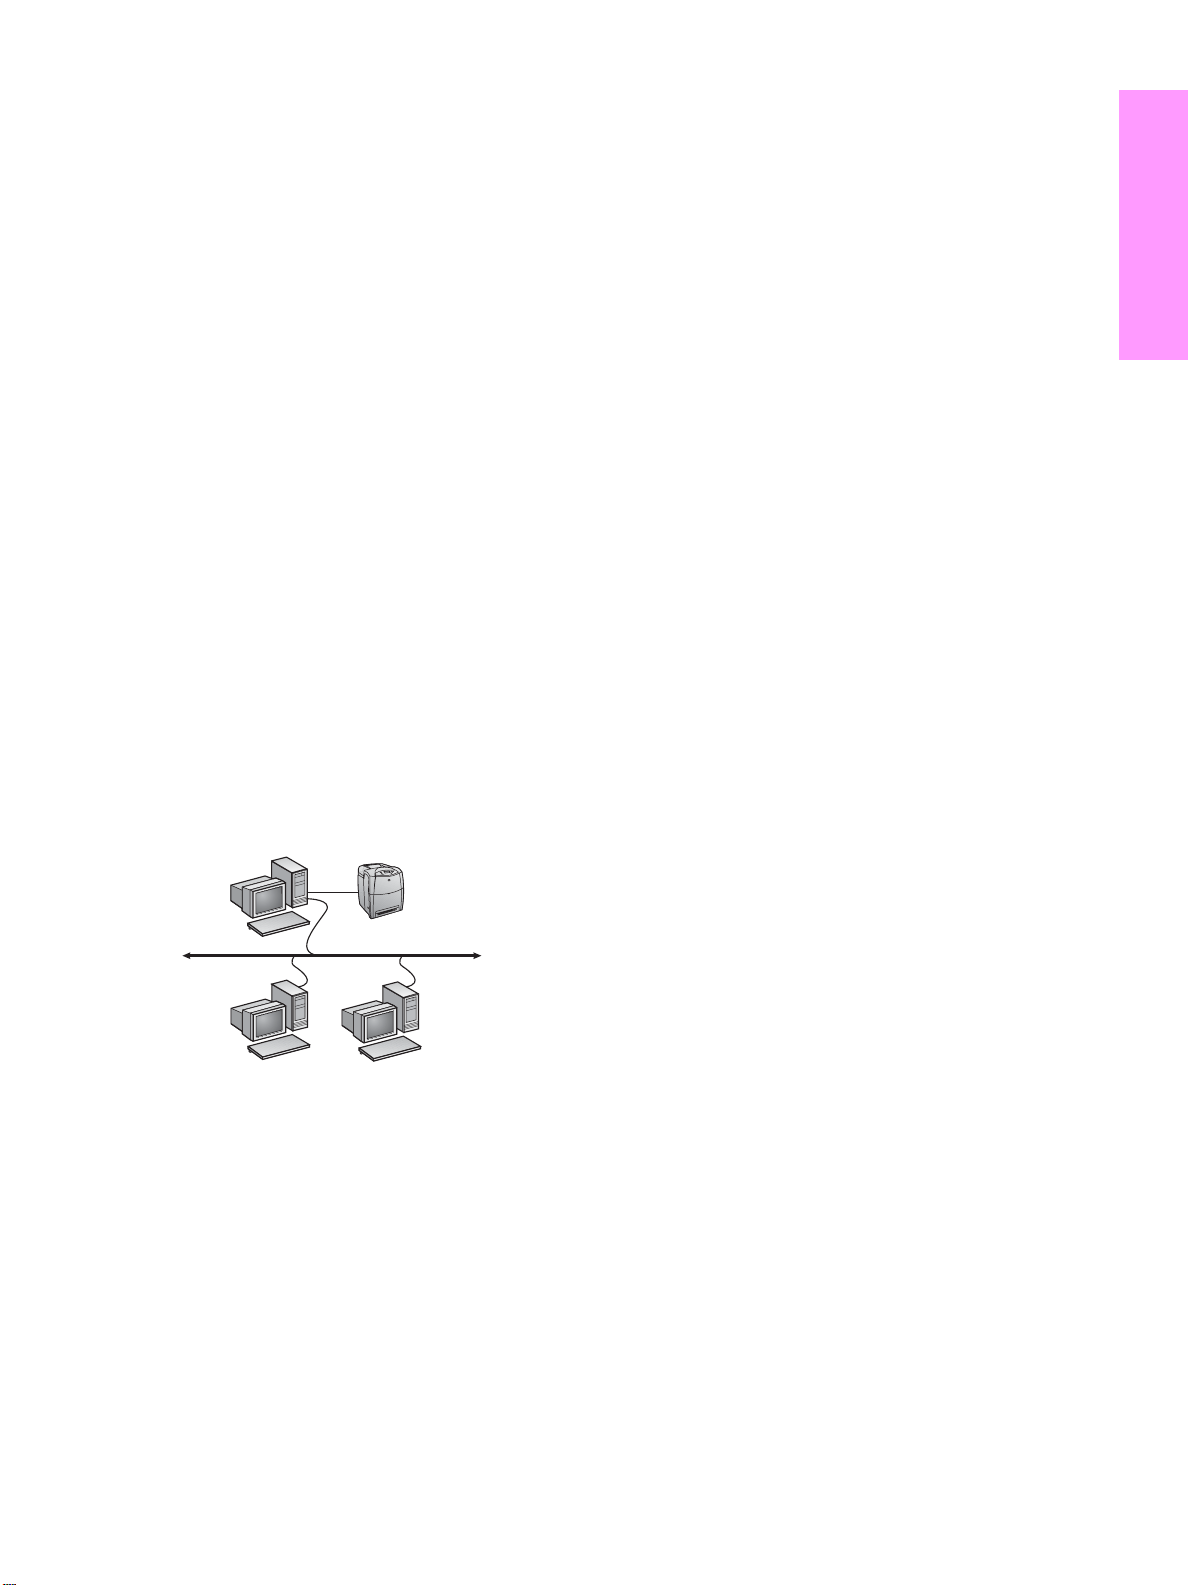
C. Direct-connected shared printer (client-server printing)
The printer is connected to a PC using a USB or parallel cable and
is shared out to other PCs or clients on the network.
Print Server
Clients
Printer
2. Select the language you would like the installer to display and
accept the License Agreement.
3. On the Printer Connection screen, select Connected directly
to this computer.
4. On the Connector Type screen, select the type of cable used to
connect the printer.
5. Select the model of the printer.
6. If you want the typical software installed, select Typical
Installation; or, if you want to select the software to be installed,
select Custom Installation.
7. Give the printer a name to be used in the Printers folder.
8. Select Share As on the Printer Sharing screen and give the
printer a share name.
9. If you are sharing the printer with other PCs running operating
systems different than the PC you are using, then on the Client
Driver Support screen, select the drivers for those operating
systems.
10.For Windows 2000 and XP you can provide location and
descriptive information if you want.
11.Allow the installation to complete.
D. PC client setup
● Recommended when the printer has already been connected
to a PC and shared, or connected directly to the network,
that is the printer is shared on the network using
configurations B or C above.
● Run the CD that came with the printer on the client PC to enable
printing.
● Information required during software setup - a server and printer
share name \\server-name\printer-share-name.
Installation steps:
1. Insert the CD that came with the printer. The software installer
should start without assistance. Click on Install Printer. If the
software installer does not start, browse to setup.exe in the root
directory of the CD and double-click on it; then click on Install
Printer.
2. Select the language you would like the installer to display and
accept the License Agreement.
3. On the Printer Connection screen, select Connected via the
network.
4. On the Network Setup screen, select Client setup for
client-server printing.
5. On the Specify Network Path screen, identify the printer by
entering the server and printer share name or by browsing to the
printer.
6. Select the model of the printer.
7. If you want the typical software installed, select Typical
Installation; or, if you want to select the software to be installed,
select Custom Installation.
8. Allow the installation to complete.
EnglishEnglish
● Recommended for printers that do not have a network
connection.
● Requires the printer to be directly connected to a PC with either a
parallel or USB cable.
● Installation Overview:
• Run the CD, which came with the printer, on the server PC
to enable printing.
• Hardware setup - plug the printer directly into the PC with a
parallel or USB cable.
● Information required during software setup - decide on a printer
share name.
Installation steps:
1. Insert the CD that came with the printer. The software installer
should start without assistance. Click on Ins tall Printer. If the
software installer does not start, browse to setup.exe in the root
directory of the CD and double-click on it; then click on Install
Printer. For best results do not connect the printer to the PC
until you are prompted to do so by the software installer.
ENWW 2
The printer can automatically pick up an IP address from your
network BootP/DHCP server, or it can be configured from software.
But if you wish to assign a particular IP address to your printer, you
can configure an IP address manually from the printer control panel.
Press the Menu button on the printer control panel and locate the
JETDIRECT menu. Typically, you will select the CONFIGURE
DEVICE menu, then the I/O menu, and then the JETDIRECT menu.
In the JETDIRECT menu, select the TCP/IP menu, the CONFIG
METHOD menu, and then select MANUAL. A MANUAL
SETTINGS item is added to the TCP/IP menu. Use the MANUAL
SETTINGS menu and your control-panel keys to set the values for
IP ADDRESS, SUBNET MASK, DEFAULT GATEWAY, SYSLOG
SERVER and IDLE TIMEOUT.
Manually configure an IP addre ss
Page 6
Guide d’installation d’imprimantes réseau et partagées pour systèmes d’exploitation Windows
HP recommande d’utiliser le programme d’installation de logiciel
HP situé sur le CD pour configurer les pilotes d’imprimante dans
le cadre des configurations réseau décrites dans ce document.
L’utilitaire d’installation est disponible sur le CD livré avec
l’imprimante. Vous n'êtes pas tenu d’installer de logiciels
d’imprimante supplémentaires à l’aide de ce programme
d’installation.
Vous pouvez également définir ces configurations via l’assistant
Ajout d’imprimante, mais les instructions appropriées ne figurent
pas dans le présent document. Pour de plus amples informations,
notamment sur l’utilisation de ce programme d’installation,
reportez-vous au Manuel d’utilisation, situé sur le CD livré avec
l’imprimante. Les instructions relatives aux autres systèmes
d’exploitation sont également disponibles à cet emplacement.
Le Guide d’administration du serveur d’impression HP JetDirect
et les notes d’installation, également situés sur le CD, fournissent
Français
des instructions supplémentaires.
Configurations réseau possibles
Les quatre configurations d’imprimante réseau possibles incluent :
A. Configuration d’imprimante connectée à un port réseau (mode
direct ou impression homologue)
B. Imprimante partagée et connectée à un port réseau (impression
client-serveur)
C. Imprimante partagée directement connectée (impression
client-serveur)
D. Configuration de client PC
Les sections suivantes fournissent des informations sur chaque
configuration réseau ainsi que des informations élémentaires
d’installation.
A. Configuration d’imprimante connectée à un port réseau (mode direct ou impression homologue)
L’imprimante est directement connectée au réseau et tous les PC
ou clients impriment directement vers l’imprimante.
Imprimante
Procédure d’installation :
1. Imprimez une page de configuration et notez l'adresse IP
figurant sur la seconde page sous TCP/IP. Pour obtenir des
instructions sur l'impression d'une page de configuration,
reportez-vous au Guide de l'utilisateur de l'imprimante sur le
CD-ROM. Si l'adresse IP correspond à 0.0.0.0 ou à 192.0.0.192,
patientez 5 à 10 minutes et réimprimez une page de
configuration. Le logiciel réseau doit affecter une adresse IP à
l'imprimante. S'il ne le fait pas ou si vous voulez affecter une
adresse IP spécifique, consultez les instructions à la fin de ce
document.
2. Exécutez le CD livré avec l’imprimante. Le programme
d’installation du logiciel doit démarrer sans assistance. Cliquez
sur Installer l’impri man te. Si le programme d’installation du
logiciel ne démarre pas, recherchez le fichier setup.exe dans le
répertoire racine du CD, cliquez deux fois dessus, puis cliquez
sur Installer l’impri man te.
3. Sélectionnez la langue d’affichage du programme d’installation,
puis acceptez le contrat de licence.
4. Dans l’écran Connexion d’imprimante, sélectionnez Connectée
via le réseau.
5. Dans l’écran Configuration du réseau, sélectionnez
Configuration de réseau de base pour un PC ou serveur.
6. Dans l’écran Identification de l’imprimante, identifiez
l’imprimante en recherchant ou en spécifiant une adresse IP ou
matérielle. Dans la plupart des cas, une adresse IP est attribuée
mais vous pouvez la modifier ultérieurement à l’étape 8.
7. Si vous avez spécifié une adresse IP, vous êtes invité à préciser
si l'imprimante correspondante doit être installée. Si vous avez
recherché des imprimantes, vous êtes invité à choisir
l’imprimante à installer parmi celles trouvées.
8. Dans la boîte de dialogue de confirmation des paramètres, vous
pouvez modifier l’adresse IP de l’imprimante en cliquant sur
Modifier les paramètres TCP/IP.
9. Sélectionnez le modèle de l’imprimante.
10.Pour installer le logiciel par défaut, sélectionnez Installation par
défaut ; ou, pour sélectionner le logiciel à installer, sélectionnez
Installation personnalisée.
11.Donnez à l’imprimante un nom à utiliser dans le dossier
Imprimantes.
12.Dans l’écran Partage d’imprimante, sélectionnez Non partagée.
13.Si vous le souhaitez, fournissez un emplacement et des
informations descriptives.
14.Laissez l’installation se terminer.
Clients
● Conf iguration recommandée pour les groupes de 10 à 20
utilisateurs ou les petits bureaux.
● Requiert une connexion réseau sur l’imprimante ou un serveur
d’impression interne ou externe. Si l’imprimante n’en est pas
dotée, utilisez la configuration C ci-dessous.
● Présentation de l’installation :
• Configuration matérielle - raccordez directement
l’imprimante au réseau à l'aide d'un câble réseau.
• Exécutez le CD livré avec l’imprimante et suivez la
procédure ci-dessous pour chaque PC afin d’activer
l’impression.
• Informations requises durant la configuration logicielle adresse IP ou matérielle de l’imprimante obtenue à partir
de la page 2 de la page de configuration de l’imprimante.
1 FRWW
Page 7

B. Imprimante partagée et connectée à un port réseau (impression client-serveur)
L’imprimante est connectée au réseau et installée sur un serveur
réseau. Le serveur gère ensuite l’impression.
Serveur
d’impression
Clients
Imprimante
11.Donnez à l’imprimante un nom à utiliser dans le dossier
Imprimantes.
12.Dans l’écran Partage d’imprimante, sélectionnez Partager en
tant que et donnez à l’imprimante un nom de partage.
13.Si vous partagez l’imprimante avec d’autres PC qui exécutent
un système d’exploitation différent de celui du PC que vous
utilisez, dans l’écran Prise en charge du pilote client,
sélectionnez les pilotes pour ces systèmes d’exploitation.
14.Pour Windows 2000 et XP, vous pouvez fournir un emplacement
et des informations descriptives, si vous le souhaitez.
15.Laissez l’installation se terminer.
C. Imprimante partagée directement connectée (impression client-serveur)
L’imprimante est connectée à un PC via un câble USB ou parallèle
et est partagée avec d’autres PC ou clients sur le réseau.
● Configuration recommandée pour les groupes de travail de
plus grande taille, comportant plus de 30 utilisateurs. Offre
un contrôle administratif des paramètres du pilote
d’imprimante des clients.
● Requiert une connexion réseau sur l’imprimante ou un serveur
d’impression interne ou externe. Si l’imprimante n’est pas dotée
d’une connexion réseau, utilisez la configuration C ci-dessous.
● Présentation de l’installation :
• Configuration matérielle - raccordez directement
l’imprimante au réseau à l'aide d'un câble réseau.
• Exécutez le CD livré avec l’imprimante sur le PC serveur
afin d’activer l’impression.
● Informations requises durant la configuration logicielle :
• Déterminez l’adresse IP ou matérielle de l’imprimante,
obtenue à partir de la page 2 de la page de configuration
de l’imprimante.
• Donnez à l’imprimante un nom de partage.
Procédure d’installation :
1. Imprimez une page de configuration et notez l'adresse IP
figurant sur la seconde page sous TCP/IP. Pour obtenir des
instructions sur l'impression d'une page de configuration,
reportez-vous au Guide de l'utilisateur de l'imprimante sur le
CD-ROM. Si l'adresse IP correspond à 0.0.0.0 ou à 192.0.0.192,
patientez 5 à 10 minutes et réimprimez une page de
configuration. Le logiciel réseau doit affecter une adresse IP à
l'imprimante. S'il ne le fait pas ou si vous voulez affecter une
adresse IP spécifique, consultez les instructions à la fin de ce
document.
2. Exécutez le CD livré avec l’imprimante. Le programme
d’installation du logiciel doit démarrer sans assistance. Cliquez
sur Installer l’ imprimante. Si le programme d’installation du
logiciel ne démarre pas, recherchez le fichier setup.exe dans le
répertoire racine du CD, cliquez deux fois dessus, puis cliquez
sur Installer l’ imprimante.
3. Sélectionnez la langue d’affichage du programme d’installation,
puis acceptez le contrat de licence.
4. Dans l’écran Connexion d’imprimante, sélectionnez Connectée
via le réseau.
5. Dans l’écran Configuration du réseau, sélectionnez
Configuration de réseau de base pour un PC ou serveur.
6. Dans l’écran Identification de l’imprimante, identifiez
l’imprimante en recherchant ou en spécifiant une adresse IP ou
matérielle. Dans la plupart des cas, une adresse IP est attribuée
mais vous pouvez la modifier ultérieurement à l’étape 8.
7. Si vous avez spécifié une adresse IP, vous êtes in vité à préciser
si l'imprimante correspondante doit être installée. Si vous avez
recherché des imprimantes, vous êtes invité à choisir
l’imprimante à installer parmi celles trouvées.
8. Dans la boîte de dialogue de confirmation des paramètres, vous
pouvez modifier l’adresse IP de l’imprimante en cliquant sur
Modifier les paramètres TCP/IP.
9. Sélectionnez le modèle de l’imprimante.
10.Pour installer le logiciel par défaut, sélectionnez Installa tion par
défaut ; ou, pour sélectionner le logiciel à installer, sélectionnez
Installation pers onnalisée.
Serveur
d’impression
Imprimante
Clients
● Configuration recommandée pour les imprimantes non
dotées d’une connexion réseau.
● Requiert de connecter directement l’imprimante à un PC via un
câble USB ou parallèle.
● Présentation de l’installation:
• Exécutez le CD livré avec l’imprimante sur le PC serveur
afin d’activer l’impression.
• Configuration matérielle - raccordez directement
l’imprimante au PC à l'aide d'un câble USB ou parallèle.
● Inf ormations requises durant la configuration logicielle - donnez à
l’imprimante un nom de partage.
Procédure d’installation :
1. Exécutez le CD livré avec l’imprimante. Le programme
d’installation du logiciel doit démarrer sans assistance. Cliquez
sur Installer l’impri man te. Si le programme d’installation du
logiciel ne démarre pas, recherchez le fichier setup.exe dans le
répertoire racine du CD, cliquez deux fois dessus, puis cliquez
sur Installer l’imprimante. Afin d’obtenir des résultats optimaux,
ne connectez pas l’imprimante au PC tant que vous n’y êtes pas
invité par le programme d’installation du logiciel.
2. Sélectionnez la langue d’affichage du programme d’installation,
puis acceptez le contrat de licence.
3. Dans l’écran Connexion d’imprimante, sélectionnez
Directement connectée à cet ordinateur.
4. Dans l’écran Type de connecteur, sélectionnez le type de câble
utilisé pour connecter l’imprimante.
5. Sélectionnez le modèle de l’imprimante.
6. Pour installer le logiciel par défaut, sélectionnez Installation par
défaut ; ou, pour sélectionner le logiciel à installer, sélectionnez
Installation personnalisée.
7. Donnez à l’imprimante un nom à utiliser dans le dossier
Imprimantes.
8. Dans l’écran Partage d’imprimante, sélectionnez Partager en
tant que et donnez à l’imprimante un nom de partage.
9. Si vous partagez l’imprimante avec d’autres PC qui exécutent
un système d’exploitation différent de celui du PC que vous
utilisez, dans l’écran Prise en charge du pilote client,
sélectionnez les pilotes pour ces systèmes d’exploitation.
10.Pour Windows 2000 et XP, vous pouvez fournir un emplacement
et des informations descriptives, si vous le souhaitez.
11.Laissez l’installation se terminer.
Français
FRWW 2
Page 8

D. Configuration de client PC
● Configuration recommandée lorsque l’imprimante a déjà été
connectée à un PC et partagée, ou directement connectée au
réseau (en d’autres termes, l’imprimante est partagée sur le
réseau à l’aide de la configuration B ou C ci-dessus).
● Exécutez le CD livré avec l’imprimante sur le PC client afin
d’activer l’impression.
● Informations requises durant la configuration logicielle - un nom
de serveur et un nom de partage d’imprimante
\\nom-serveur\nom-partage-imprimante.
Procédure d’installation :
1. Exécut ez le CD livré avec l’imprimante. Le programme
d’installation du logiciel doit démarrer sans assistance. Cliquez
sur Installer l’ imprimante. Si le programme d’installation du
logiciel ne démarre pas, recherchez le fichier setup.exe dans le
répertoire racine du CD, cliquez deux fois dessus, puis cliquez
sur Installer l’ imprimante.
2. Sélectionnez la langue d’affichage du programme d’installation,
Français
puis acceptez le contrat de licence.
3. Dans l’écran Connexion d’imprimante, sélectionnez Connectée
via le réseau.
4. Dans l’écran Configuration du réseau, sélectionnez
Configuration du client pour l’impression client-serveur.
5. Dans l’écran Spécification du chemin du réseau, identifiez
l’imprimante en entrant le nom du serveur et le nom de partage
de l’imprimante ou en recherchant celle-ci.
6. Sélectionnez le modèle de l’imprimante.
7. Pour installer le logiciel par déf aut, sélectionnez Inst allation par
défaut ; ou, pour sélectionner le logiciel à installer, sélectionnez
Installation pers onnalisée.
8. Laissez l’installation se terminer.
Configuration manuelle d'une adresse IP
L'imprimante peut sélectionner automatiquement une adresse IP à
partir du serveur BootP/DHCP réseau. Cette adresse peut aussi
être configurée à partir du logiciel. Toutefois, si vous souhaitez
affecter une adresse IP spécifique à l'imprimante, vous pouvez
effectuer une configuration manuelle à partir du panneau de
commande de l'imprimante.
Appuyez sur le bouton Menu sur le panneau de commande de
l'imprimante et repérez le menu JETDIRECT. Vous sélectionnerez
généralement le menu CONFIGURATION PERIPHERIQUE, E/S,
puis le menu JETDIRECT. Dans le menu JETDIRECT, sélectionnez
le menu TCP/IP, METHODE DE CONFIGURATION, puis
sélectionnez MANUEL. Un élément de paramètres MANUEL est
ajouté au menu TCP/IP. Utilisez ce menu et les touches du panneau
de commande pour définir les valeurs suivantes : ADRESSE IP,
MASQUE SOUS-RES EAU, PASSERELLE PAR DEFAUT,
SERVEUR SYSLOG et DELAI D'INACTIVITE.
3 FRWW
Page 9

Page 10
Installationshandbuch für Netzwerkdrucker und freigegebene Drucker unter Windows-Betriebssystemen
Zur Installation von Druckertreibern für die in diesem Handbuch
beschriebenen Netzwerkkonfigurationen empfiehlt sich die
Verwendung des HP Software-Installationsprogramms, das auf der
mit dem Drucker gelieferten CD enthalten ist. Wenn Sie dieses
Installationsprogramm verwenden, müssen Sie keine weitere
Druckersoftware installieren.
Sie können diese Konfigurationen auch mit dem Druckerinstallations-Assistenten einrichten. Die entsprechenden
Anweisungen sind in diesem Handbuch jedoch nicht enthalten. Sie
finden diese Anweisungen sowie weitere ausführliche Anweisungen
zur Verwendung des Installationsprogramms im Benutzerhandbuch,
das auf der mit dem Drucker gelieferten CD enthalten ist. Es enthält
auch Anweisungen zu an deren Be triebssystemen. Das HP JetDir ect
Administratorhandbuch und die Installationshinweise, die sich
ebenfalls auf der CD befinden, enthalten weitere Anweisungen.
Mögliche Netzwerkkonfigurationen
Es gibt z. B. die folgenden Netzwerkdruckerkonfigurationen:
A. Drucker mit Netzwerkanschluss (Direktmodus oder
Peer-to-Peer-Druck).
B. Freigegebener Drucker mit Netzwerkanschluss
(Client-Server-Druck).
C. Direkt angeschlossener, freigegebener Drucker
(Client-Server-Druck).
D. Einrichten eines PC-Clients.
Die folgenden Abschnitte stellen Informationen zu den
verschiedenen Netzwerkkonfigurationen sowie grundlegende
Installationsinformationen bereit.
A. Drucker mit Netzwerkanschluss
Deutsch
(Direktmodus oder Peer-to-Peer-Druck)
Der Drucker ist direkt an das Netzwerk angeschlossen, und alle
PCs oder Clients drucken direkt auf dem Drucker.
Drucker
Clients
● Empfohlen für Gruppen mit 10 bis 20 Benutzern oder
kleine Büros.
● Netzwerkverbindung am Drucker bzw. interner oder externer
Druckserver erforderlich. Wenn der Drucker keinen besitzt,
verwenden Sie Konfiguration C unten.
● Überbli ck über die Installation:
• Einrichten der Hardware – Verbinden Sie den Drucker über
ein Netzwerkkabel direkt mit dem Netzwerk.
• Führen Sie die mit dem Drucker gelieferte CD aus, und
befolgen Sie die Schritte unten für jeden PC, um das
Drucken auf dem PC zu ermöglichen.
• Bei der Software-Installation erforderliche Informationen –
Druckerhardware- oder IP-Adresse von Seite 2 der
Konfigurationsseite des Druckers.
Installation:
1. Drucken Sie eine Konfigurationsseite, und suchen Sie auf der
zweiten Seite unter "TCP/IP" nach der IP-Adresse.
Informationen zum Drucken einer Konfigur ationsseite finden Sie
im Benutzerhandbuch des Druckers auf der CD. Wenn die
IP-Adresse 0.0.0.0 oder 192.0.0.192 lautet, warten Sie 5 bis 10
Minuten, und drucken Sie die Konfigurationsseite erneut. Dem
Drucker sollte von der Netzwerksoftware automatisch eine
IP-Adresse zugewiesen werden. Wenn dies nicht der Fall ist
oder Sie eine bestimmte IP-Adresse verwenden möchten,
führen Sie die Schritte am Ende dieses Dokuments durch.
2. Legen Sie die CD ein, die mit dem Drucker geliefert wurde.
Das Software-Installationsprogramm müsste automatisch
gestartet werden. Klicken Sie auf Drucker hinzufügen. Wenn
das Software-Installationsprogramm nicht gestartet wird,
suchen Sie im Stammverzeichnis der CD nach „setup.exe“,
und doppelklicken Sie auf den Dateinamen. Klicken Sie
anschließend auf Drucker installieren.
3. Wählen Sie die Sprache aus, in der das Installationsprogramm
angezeigt werden soll, und akzeptieren Sie die Lizenzvereinbarung.
4. Wählen Sie auf dem Bildschirm „Druckerverbindung“ die Option
Verbindung über das Netzwerk aus.
5. Wählen Sie auf dem Bildschirm „Netzwerkkonfiguration“ die
Option Grundlegende Net zwerkkonfiguration für eine n PC
oder Server aus.
6. Geben Sie auf dem Bildschirm „Drucker bestimmen“ den
Drucker an, indem Sie eine Hardware- oder IP-Adresse suchen
oder angeben. In den meisten Fällen ist eine IP-Adresse
zugewiesen, Sie können sie jedoch wie unter Punkt 8
beschrieben ändern.
7. Wenn Sie die IP-Adresse angegeben haben, werden Sie
gefragt, ob dies der zu installierende Drucker ist. Wenn Sie nach
dem Drucker gesucht haben, werden Sie aufgefordert, einen der
gefundenen Drucker auszuwählen.
8. Im Dialogfeld Einstellungen bestätigen können Sie die
IP-Adresse des Druckers ändern, indem Sie auf
TCP/IP-Einstellungen ändern klicken.
9. Wählen Sie das Druckermodell aus.
10.Wenn eine Standardinstallation ausgeführt werden soll, wählen
Sie Standardinstallation aus. Wenn Sie hingegen auswählen
möchten, welche Software installiert werden soll, wählen Sie
Benutzerdefinierte Installation aus.
11.Weisen Sie dem Drucker einen Namen zu, der im Druckerordner
verwendet werden soll.
12.Wählen Sie auf dem Bildschirm „Dr u ckerfreigabe“ die Option
Nicht freigegeben aus.
13.Geben Sie eine Position und eine Beschreibung an (falls
gewünscht).
14.Warten Sie, bis die Installation beendet wurde.
1 DEWW
Page 11

B. Freigegebener Drucker mit Netzwerkanschluss (Client-Server-Druck)
Der Drucker ist an das Netzwerk angeschlossen und auf einem
Netzwerkserver installiert. Der Server verwaltet den Druckprozess.
Druckserver
Clients
● Empfohlen für größere Arbeitsgruppen mit mehr als 30
Benutzern. Der Administrator kann die Einstellungen für die
Client-Druckertreiber steuern.
● Netzwerkverbindung am Drucker bzw. interner oder externer
Druckserver erforderlich. Wenn der Drucker keine Netzwerkverbindung besitzt, verwenden Sie Konfiguration C unten.
● Überbli ck über die Installation:
• Einrichten der Hardware – Verbinden Sie den Drucker über
ein Netzwerkkabel direkt mit dem Netzwerk.
• Führen Sie die mit dem Drucker gelieferte CD auf dem
Server-PC aus, um das Drucken zu ermöglichen.
● Bei der Software-Installation erforderliche Informationen:
• Legen Sie die Hardware- oder IP-Adresse des Druckers
fest, die Seite 2 der Konfigurationsseite zu entnehmen ist.
• Legen Sie den Freigabenamen für den Drucker fest.
Installation:
1. Drucken Sie eine Konfigurationsseite, und suchen Sie auf der
zweiten Seite unter "TCP/IP" nach der IP-Adresse.
Informationen zum Drucken einer Konfigurationsseite fi nden Sie
im Benutzerhandbuch des Druckers auf der CD. Wenn die
IP-Adresse 0.0.0.0 oder 192.0.0.192 lautet, warten Sie 5 bis 10
Minuten, und drucken Sie die Konfigurationsseite erneut. Dem
Drucker sollte von der Netzwerksoftware automatisch eine
IP-Adresse zugewiesen werden. Wenn dies nicht der Fall ist
oder Sie eine bestimmte IP-Adresse verwenden möchten,
führen Sie die Schritte am Ende dieses Dokuments durch.
2. Legen Sie die CD ein, die mit dem Drucker geliefert wurde. Das
Software-Installationsprogramm müsste automatisch gestartet
werden. Klicken Sie auf Drucker hinzufügen. Wenn das
Software-Installationsprogramm nicht gestartet wird, suchen Sie
im Stammverzeichnis der CD nach „setup.exe“, und
doppelklicken Sie auf den Dateinamen. Klicken Sie
anschließend auf Drucker installieren.
3. Wählen Sie die Sprache aus, in der das Installationsprogramm
angezeigt werden soll, und akzeptieren Sie die Lizenzvereinbarung.
4. Wählen Sie auf dem Bildschirm „Druckerverbindung“ die Option
Verbindung über das Netzwerk aus.
5. Wählen Sie auf dem Bildschirm „Netzwerkkonfiguration“ die
Option Grundlegende Netzwerkkonfiguration für einen PC
oder Server aus.
6. Geben Sie auf dem Bildschirm „Drucker bestimmen“ den
Drucker an, indem Sie eine Hardware- oder IP-Adresse suchen
oder angeben. In den meisten Fällen ist eine IP-Adresse
zugewiesen, Sie können sie jedoch wie unter Punkt 8
beschrieben ändern.
7. Wenn Sie die IP-Adresse angegeben haben, werden Sie
gefragt, ob dies der zu installierende Drucker ist. Wenn Sie nach
dem Drucker gesucht haben, werden Sie aufgefordert, einen der
gefundenen Drucker auszuwählen.
8. Im Dialogfeld Einstellungen bestätigen können Sie die
IP-Adresse des Druckers ändern, indem Sie auf
TCP/IP-Einstellungen ändern klicken.
9. Wählen Sie das Druckermodell aus.
Drucker
10.Wenn eine Standardinstallation ausgeführt werden soll, wählen
Sie Standardinstallation aus. Wenn Sie hingegen auswählen
möchten, welche Software installiert werden soll, wählen Sie
Benutzerdefinierte Installation aus.
11.Weisen Sie dem Drucker einen Namen zu, der im Druckerordner
verwendet werden soll.
12.Wählen Sie auf dem Bildschirm „Dr u ckerfreigabe“ die Option
Freigeben als aus, und weisen Sie dem Drucker einen
Freigabenamen zu.
13.Wenn Sie den Drucker mit anderen PCs gemeinsam nutzen, die
unter einem anderen Betriebssystem laufen als Ihr PC, müssen
Sie auf dem Bildschirm „Client-Treiberunterstützung“ die Treiber
für diese Betriebssysteme auswählen.
14.Bei Windows 2000 und XP können Sie eine Position und eine
Beschreibung angeben (falls gewünscht).
15.Warten Sie, bis die Installation beendet wurde.
C. Direkt angesc hl ossener, freigegebener Drucker (Client-Server-Druck)
Der Drucker ist mit einem USB- oder einem Parallelkabel an einen
PC angeschlossen und für andere PCs oder Clients im Netzwerk
freigegeben.
Druckserver
Clients
● Empfohlen für Drucker, die keine Netzwerk verbindung besitzen.
● Der Drucker muss entweder mit einem Parallel- oder einem
USB-Kabel direkt an einen PC angeschlossen werden.
● Überblick über die Installation:
• Führen Sie die mit dem Drucker gelieferte CD auf dem
Server-PC aus, um das Drucken zu ermöglichen.
• Einrichten der Hardware – Verbinden Sie den Drucker über
ein Parallel- oder USB-Kabel direkt mit dem PC.
● Bei der Software-Installation erforderliche Informationen –
Freigabenname des Druckers.
Installation:
1. Legen Sie die CD ein, die mit dem Drucker geliefert wurde. Das
Software-Installationsprogramm müsste automatisch gestartet
werden. Klicken Sie auf Drucker hinzufügen. Wenn das
Software-Installationsprogramm nicht gestartet wird, suchen Sie
im Stammverzeichnis der CD nach „setup.exe“, und doppelklicken Sie auf den Dateinamen. Klicken Sie anschließend auf
Drucker installieren. Die besten Ergebnisse werden erzielt,
wenn Sie den Drucker erst an den PC anschließen, wenn Sie
vom Software-Installationsprogramm dazu aufgefordert werden.
2. Wählen Sie die Sprache aus, in der das Installationsprogramm
angezeigt werden soll, und akzeptieren Sie die
Lizenzvereinbarung.
3. Wählen Sie auf dem Bildschirm „Druckerverbindung“ die Option
Direkte Verbindung zum Comput e r aus .
4. Wählen Sie auf dem Bildschirm „Anschlusstyp“ den Kabeltyp
aus, der zum Anschließen des Druckers verwendet wird.
5. Wählen Sie das Druckermodell aus.
6. Wenn eine Standardinstallation ausgeführt werden soll, wählen
Sie Standardinstallation aus. Wenn Sie hingegen auswählen
möchten, welche Software installiert werden soll, wählen Sie
Benutzerdefinierte Installation aus.
7. Weisen Sie dem Drucker einen Namen zu, der im Druckerordner
verwendet werden soll.
8. Wählen Sie auf dem Bildschirm „Druckerfreigabe“ die Option
Freigeben als aus, und weisen Sie dem Drucker einen
Freigabenamen zu.
Drucker
Deutsch
DEWW 2
Page 12

9. Wenn Sie den Drucker mit anderen PCs gemeinsam nutz en, die
unter einem anderen Betriebssystem laufen als Ihr PC, müssen
Sie auf dem Bildschirm „Client-Treiberunterstützung“ die Treiber
für diese Betriebssysteme auswählen.
10.Bei Windows 2000 und XP können Sie eine Position und eine
Beschreibung angeben (falls gewünscht).
11.Warten Sie, bis die Installation beendet wurde.
D. Einrichten eines PC-Clients
● Empfohlen, wenn der Drucker bereits an einen PC
angeschlossen ist und freigegeben wurde oder direkt mit
dem Netzwerk verbunden ist, d. h. der Drucker wurde mit
Konfiguration B oder C (siehe oben) im Netzwerk
freigegeben.
● Führen Sie die mit dem Drucker gelief erte CD auf dem Client-PC
aus, um das Drucken zu ermöglichen.
● Bei der Software-Installation erforderliche Informationen –
Servername und Freigabename für Drucker
\\Server-Name\Freigabename-des -Druckers.
Installation:
1. Legen Sie die CD ein, die mit dem Drucker geliefert wurde. Das
Software-Installationsprogramm müsste automatisch gestartet
werden. Klicken Sie auf Drucker hinzufügen. Wenn das
Software-Installationsprogramm nicht gestartet wird, suchen Sie
im Stammverzeichnis der CD nach „setup.exe“, und
doppelklicken Sie auf den Dateinamen. Klicken Sie
anschließend auf Drucker installieren.
2. Wählen Sie die Sprache aus, in der das Installationsprogramm
angezeigt werden soll, und akzeptieren Sie die
Lizenzvereinbarung.
3. Wählen Sie auf dem Bildschirm „Druckerverbindung“ die Option
Verbindung über das Netzwerk aus.
4. Wählen Sie auf dem Bildschirm „Netzwerkkonfiguration“ die
Deutsch
Option Client-Setup für Client-Server-Druck aus.
5. Geben Sie auf dem Bildschirm „Netzwerkpfad angeben“ den
Drucker an, indem Sie den Server-Namen und den Freigabenamen des Druckers eingeben oder den Drucker suchen.
6. Wählen Sie das Druckermodell aus.
7. Wenn eine Standardinstallation ausgeführt werden soll, wählen
Sie Standardinstallation aus; oder, wenn Sie die zu
installierende Software auswählen möchten, wählen Sie
Benutzerdefinierte Installation aus.
8. Warten Sie, bis die Installation beendet wurde.
Manuelles Konfigurieren einer IP-Adresse
Der Drucker kann seine IP-Adresse automatisch von Ihrem
BootP/DHCP-Server im Netzwerk beziehen oder per Software
konfiguriert werden. Wenn Sie jedoch eine bestimmte IP-Adresse
zuweisen möchten, müssen Sie die Einstellung manuell am
Bedienfeld durchführen.
Drücken Sie am Bedienfeld die Taste Menü, und wechseln Sie zum
Menü JETDIRECT. Wählen Sie dazu GERÄT KONFIGURIEREN,
E/A und JETDIRECT. Wählen Sie im Menü JETDIRECT den
Eintrag TCP/IP, dann KONFIGURATIONSMETHODE und zuletzt
MANUELL. Im Menü TCP/IP wird nun der Eintrag MANUELLE
EINST. angezeigt. Geben Sie über das Menü M ANUE LLE EINST.
und die entsprechenden Bedienfeldtasten die Werte für die
Einstellungen IP-ADRESSE, SUBNETZMASKE,
STANDARD-GATEWAY, SYSLOG-SERVER und ZEITLIMIT ein.
3 DEWW
Page 13

Page 14

Guida all’installazione della stampante in rete e condivisa per i sistemi operativi Windows
HP consiglia di utilizzare il programma di installazione del software
HP presente sul CD per impostare i driver per la stampante per le
seguenti configurazioni di rete. Il programma di installazione è
disponibile sul CD fornito con la stampante. Non è necessario
installare ulteriori software di stampa mediante questo programma
di installazione.
È anche possibile impostare le configurazioni mediante la
procedura guidata Aggiungi stampante, le istruzioni per eseguire
questa operazione non sono incluse. V edere la Guida dell’utente sul
CD fornito con la stampante per le suddette informazioni e per
istruzioni dettagliate sull’utilizzo del programma di installazione.
Sulla suddetta guida è possibile trovare anche le istruzioni per altri
sistemi operativi. Anche la HP JetDirect Print Server Administrator’s
Guide (Guida dell’amministratore Server di stampa HP JetDirect) e
le Note sull’installazione contengono ulteriori informazioni.
Configurazioni di rete possibili
Le quattro possibili configurazioni della stampante in rete includono:
A. Configurazione della stampante collegata a una porta di rete
(modalità diretta o stampa peer-to-peer).
B. Configurazione della stampante collegata a una porta di rete
e condivisa (stampa client-server).
C. Configurazione con collegamento diretto di una stampante
condivisa con collegamento diretto (stampa client-server).
D. Impostazione PC client.
La seguente sezione fornisce informazioni riguardanti ogni
configurazione di rete e le informazioni di base di installazione.
A. Configurazione della stampante
collegata a una porta di rete (modalità
diretta o stampa peer-to-peer)
La stampante è collegata direttamente alla rete e tutti i PC o client
stampano direttamente sulla stampante.
Stampante
Passaggi di installazione:
1. Stampare una pagina di configurazione e prendere nota
dell'indirizzo IP sulla seconda pagina sotto "TCP/IP". Per le
istruzioni relative a come stampare la pagina di configurazione,
consultare la Guida dell'utente della stampante reperibile nel
CD. Se l'indirizzo IP è 0.0.0.0 o 192.0.0.192, attendere 5-10
minuti e ristampare una pagina di configurazione. L'indirizzo IP
della stampante viene assegnato dal software di rete. Se ciò
non avviene, o se si desidera assegnare un indirizzo IP
particolare, consultare le istruzioni riportate alla fine di questo
documento.
2. Inserire il CD fornito con la stampante. Il programma di
installazione si avvia automaticamente. Fare clic su Installa
stampante. Se il programma di installazione non viene avviato,
fare doppio clic su setup.exe nella directory principale del CD;
quindi fare clic su Installa stampante.
3. Selezionare la lingua di visualizzazione del programma di
installazione e accettare il Contratto di licenza.
4. Dalla schermata Connessione della stampante, selezionare
Connessa mediante la rete.
5. Dalla schermata Installazione di rete, selezionare Installazione
di rete di base per un PC o server.
6. Dalla schermata Identificazione stampante, individuare la
stampante o specificare l’indirizzo IP o hardware. Nella maggior
parte dei casi, l’indirizzo IP viene assegnato, ma è possibile
modificarlo in seguito al punto 8.
7. Se è stato specificato un indirizzo IP, verrà richiesto se questa è
la stampante che si desidera installare. Se è stata eseguita una
ricerca delle stampanti, verrà richiesto di scegliere una delle
stampanti trovate per l’installazione.
8. Nella finestra di dialogo di conferma delle impostazioni, è
possibile cambiare l'indirizzo IP della stampante facendo clic su
Modifica impostazioni TCP/IP.
9. Selezionare il modello della stampante.
10.Se si desidera l’installazione software tipica, selezionare
Installazione tipica; se invece si desidera selezionare il
software da installare, selezionare Installazione
personalizzata.
11.Immettere un nome per la stampante da utilizzare nella cartella
Stampanti.
12.Dalla scherm ata Condivisione stampante, selezionare
Non condivisa.
13.Fornire una posizione e informazioni descrittive.
14.Consentire il completamento dell’installazione.
Italiano
● Consigliato per gruppi di 10-20 utenti o piccoli uffici.
● Richiede un collegamento di rete sulla stampante o un server di
stampa interno o esterno. Se questo non fosse possibile,
utilizzare la configurazione numero C.
● Panoramica dell’installazione:
Client
• Impostazione hardware - collegare la stampante
direttamente alla rete utilizzando un cavo di rete.
• Inserire il CD fornito con la stampante e seguire i passi
seguenti per ogni PC per attivare la stampa.
• Informazioni necessarie durante l’impostazione del
software - indirizzo IP o dell’hardware disponibile a pagina
2 della pagina di configurazione della stampante.
1 ITWW
Page 15

B. Configurazione della stampante collegata a una porta di rete e condivisa (stampa client-server)
La stampante è collegata alla rete e installata su un server di rete. Il
server consente di gestire la stampa.
Server di
stampa
Client
Stampante
11.Immettere un nome per la stampante da utilizzare nella cartella
Stampanti.
12.Dalla scherm ata Condivisione stampante, selezionare
Condividi come e assegnare un nome di condivisione alla
stampante.
13.Se la stampante viene condivisa con altri PC con sistemi
operativi diversi dal PC in uso, selezionare i driver per quei
sistemi operativi dalla schermata Supporto driver client.
14.Per Windows 2000 e XP è possibile fornire una posizione e
informazioni descrittive.
15.Consentire il completamento dell’installazione.
C. Configurazione con collegamento diretto di una stampante condivisa (stampa c l i e n t -s erver)
La stampante è collegata a un PC mediante un cavo USB o
parallelo ed è condivisa con altri PC o client sulla rete.
● Consigliata per gruppi di lavoro più grand i, con più di 30
utenti. Consente all’amministratore di controllare le
impostazioni dei driver per la stampante dei client.
● Richiede un collegamento di rete sulla stampante o un server di
stampa interno o esterno. Se la stampante non è fornita di un
collegamento di rete, utilizzare la configurazione numero C.
● Panoramica dell’installazione:
• Impostazione hardware - collegare la stampante
direttamente alla rete utilizzando un cavo di rete.
• Inserire il CD fornito con la stampante sul PC server per
attivare la stampa.
● Informazioni necessarie durante l’installazione del software:
• Individuare l’indirizzo IP o hardware della stampante,
disponibile a pagina 2 della pagina di configurazione della
stampante.
• Stabilire un nome di condivisione della stampante.
Passaggi di installazione:
1. Stampare una pagina di configurazione e prendere nota
dell'indirizzo IP sulla seconda pagina sotto "TCP/IP". Per le
istruzioni relative a come stampare la pagina di configurazione,
consultare la Guida dell'utente della stampante reperibile nel
CD. Se l'indirizzo IP è 0.0.0.0 o 192.0.0.192, attendere 5-10
minuti e ristampare una pagina di configurazione. L'indirizzo IP
della stampante viene assegnato dal software di rete. Se ciò
non avviene, o se si desidera assegnare un indirizzo IP
particolare, consultare le istruzioni riportate alla fine di questo
documento.
2. Inserire il CD fornito con la stampante. Il programma di
installazione si avvia automaticamente. Fare clic su Installa
stampante. Se il programma di installazione non viene avviato,
fare doppio clic su setup.ex e nella directory principale del CD;
quindi fare clic su Installa stampante.
3. Selezionare la lingua di visualizzazione del programma di
installazione e accettare il Contratto di licenza.
4. Dalla schermata Connessione della stampante, selezionare
Connessa mediante la rete.
5. Dalla schermata Installazione di rete, selezionare Installazione
di rete di base per un PC o server.
6. Dalla schermata Identificazione stampante, individuare la
stampante o specificare l’indirizzo IP o hardware. Nella maggior
parte dei casi, l’indirizzo IP viene assegnato, ma è possibile
modificarlo in seguito al punto 8.
7. Se è stato specificato un indirizzo IP, verrà richiesto se questa è
la stampante che si desidera installare. Se è stata eseguita una
ricerca delle stampanti, verrà richiesto di scegliere una delle
stampanti trovate per l’installazione.
8. Nella finestra di dialogo di conferma delle impostazioni, è
possibile cambiare l'indirizzo IP della stampante facendo clic su
Modifica impostazioni TCP/IP.
9. Selezionare il modello della stampante.
10.Se si desidera l’installazione software tipica, selezionare
Installazione tipica; se invece si desidera selezionare il
software da installare, selezionare Installazione
personalizzata.
Server di
stampa
Stampante
Client
● Consigliata per stampanti che non sono fornite di un
collegamento di rete.
● È necessario che la stampante sia collegata direttamente a un
PC mediante un cavo USB o parallelo.
● Panoramica dell’installazione:
• Inserire il CD fornito con la stampante sul PC server per
attivare la stampa.
• Impostazione hardware - collegare la stampante
direttamente al PC mediante un cavo USB o parallelo.
● Informazioni necessarie durante l’installazione hardware -
stabilire un nome di condivisione della stampante.
Passaggi di installazione:
1. Inserire il CD fornito con la stampante. Il programma di
installazione si avvia automaticamente. Fare clic su Installa
stampante. Se il programma di installazione non viene avviato,
fare doppio clic su setup.exe nella directory principale del CD;
quindi fare clic su Installa stampante. Collegare la stampante al
PC solo nel momento in cui viene richiesto dal programma di
installazione del software.
2. Selezionare la lingua di visualizzazione del programma di
installazione e accettare il Contratto di licenza.
3. Dalla schermata Connessione della stampante, selezionare
Connessa direttamente al computer.
4. Dalla schermata Tipo di connettore, selezionare il tipo di cavo
utilizzato per collegare la stampante.
5. Selezionare il modello della stampante.
6. Se si desidera l’installazione software tipica, selezionare
Installazione tipica; se invece si desidera selezionare il
software da installare, selezionare Installazione
personalizzata.
7. Immettere un nome per la stampante da utilizzare nella cartella
Stampanti.
8. Dalla schermata Condivisione stampante, selezionare
Condividi come e assegnare un nome di condivisione alla
stampante.
9. Se la stampante viene condivisa con altri PC con sistemi
operativi diversi dal PC in uso, selezionare i driver per quei
sistemi operativi dalla schermata Supporto driver client.
10.Per Windows 2000 e XP è possibile fornire una posizione e
informazioni descrittive.
11.Consentire il completamento dell’installazione.
Italiano
ITWW 2
Page 16

D. Impostazione PC client
● Consigliata se la stampante è già collegata a un PC e
condivisa, o collegata direttamente alla rete, cioè se la
stampante è condivis a in ret e utilizzando le configurazioni
numero B o C sopra descritte.
● Inserire il CD fornito con la stampante sul PC client per attivare la
stampa.
● Informazioni necessarie durante l’installazione del software - un
nome di condivisione per il server e per la stampante
\\nome-server\nome-condivisione-stampante.
Passaggi di installazione:
1. Inserire il CD fornito con la stampante. Il programma di
installazione si avvia automaticamente. Fare clic su Installa
stampante. Se il programma di installazione non viene avviato,
fare doppio clic su setup.ex e nella directory principale del CD;
quindi fare clic su Installa stampante.
2. Selezionare la lingua di visualizzazione del programma di
installazione e accettare il Contratto di licenza.
3. Dalla schermata Connessione della stampante, selezionare
Connessa mediante la rete.
4. Dalla schermata Installazione di rete, selezionare Installazione
del client per la stampa client-server.
5. Dalla schermata Specifica percorso di rete, individuare la
stampante immettendo i nomi di condivisione del server e della
stampante o selezionando la stampante.
6. Selezionare il modello della stampante.
7. Se si desidera l’installazione software tipica, selezionare
Installazione tipica; se invece si desidera selezionare il
software da installare, selezionare Installazione
personalizzata.
8. Consentire il completamento dell’installazione.
Configurazione manuale di un indirizzo IP
La stampante può selezionare automaticamente un indirizzo IP dal
server di rete BootP/DHCP, oppure è possibile configurarlo
mediante il software. Se si desidera assegnare alla stampante un
indirizzo IP particolare, è possibile configurarlo manualmente dal
pannello di controllo della stampante.
Premere il pulsante Menu sul pannello di controllo della stampante
ed individuare il menu JETDIRECT. In genere, si dev e selezionare il
menu CONFIGURA PERIFERICA, quindi il menu I/O, quindi il
menu JETDIRECT. Nel menu JETDIRECT, selezionare il menu
TCP/IP, il menu the CONFIGURA METODO, quindi selezionare
MANUALE. Al menu TCP/IP viene aggiunta la voce
IMPOSTAZIONI MANUALI. Utilizzare il menu IMPOSTAZIONI
MANUALI e i tasti del pannello di controllo per impostare i valori
relativi a INDIRIZZO IP, SUBNET MASK, GATEWAY
PREDEFINITO, SERVER SYSLOG e TIMEOUT DI INATTIVITÀ.
Italiano
3 ITWW
Page 17

Page 18

Guía de instalación de impresoras compartidas y conectadas en red
para sistemas operativos Windows
HP recomienda utilizar el instalador de software de HP incluido en
el CD para configurar los controladores de impresora para las
configuraciones de red aquí descritas. La utilidad del instalador
está disponible en el CD suministrado con la impresora. No es
necesario instalar software adicional de la impresora con este
instalador.
También puede realizar estas configuraciones mediante el
asistente Agregar impresora, pero no se incluyen las instrucciones
para ello. Consulte la Guía del usuario del CD suministrado con la
impresora para obtener dichas instrucciones y más detalles sobre
el uso del instalador. También encontrará instrucciones para otros
sistemas operativos. La Guía del administrador de HP JetDirect y
las notas de instalación, también contenidas en el CD, ofrecen
instrucciones adicionales.
Posi bles configuraciones de red
Cuatro de las posibles configuraciones de impresoras de red son
las siguientes:
A. Configuración de impresora de red conectada a un puerto
(impresión en modo directo o de igual a igual)
B. Impresora compartida y de red conectada a un puerto
(impresión cliente-servidor)
C. Impresora compartida conectada directamente (impresión
cliente-servidor)
D. Configuración de un PC cliente
Las siguientes secciones ofrecen información sobre las distintas
configuraciones de red, así como información de instalación
necesaria.
A. Configuración de impresora de red
conectada a un puerto (impresión en
modo directo o de igual a igual)
La impresora está conectada directamente a la red y todos los PC
o clientes imprimen directamente en la impresora.
Impresora
Pasos para la instalación:
1. Imprima una página de configuración y anote la dirección IP de
la segunda página, en "TCP/IP". Para obtener instrucciones
sobre cómo imprimir la página de configuración, consulte la
Guía del usuario de la impresora en el CD. Si la dirección IP es
0.0.0.0 o 192.0.0.192, espere de 5 a 10 minutos e imprima de
nuevo una página de configuración. El software de red debería
asignar una dirección IP a la impresora. Si no fuera así, o si
desea asignar una dirección IP determinada, vaya a las
instrucciones al final de este documento.
2. Inserte el CD suministrado con la impresora. El instalador del
software deberá iniciarse automáticamente. Haga clic en
Instalar impresora. Si el instalador del software no se inicia,
busque el archivo setup.ex e en el directorio raíz del CD y haga
doble clic en él; a continuación, haga clic en Instalar
impresora.
3. Seleccione el idioma en que desee que aparezca el instalador y
acepte el Acuerdo de licencia.
4. En la pantalla Conexión de impresora, seleccione Conectada a
través de la red.
5. En la pantalla Configuración de red, seleccione Configuración
de red básica para un PC o un servidor.
6. En la pantalla Identificar impresora, identifique la impresora
buscándola o indicando una dirección IP o hardware. En la
mayoría de los casos hay una dirección IP asignada pero puede
cambiarla si lo desea más adelante en el paso 8.
7. Si ya especificó su dirección IP, se le preguntará si ésta es la
impresora que desea instalar. Si realizó una búsqueda de
impresoras, se le pedirá que seleccione una de las impresoras
encontradas para instalar.
8. En el cuadro de diálogo de confirmación de configuración,
puede cambiar la dirección IP de la impresora haciendo clic en
Change TCP/IP Settings (Cambiar configuración TCP/IP).
9. Seleccione el modelo de la impresora.
10.Si desea instalar el software típico, seleccione Instalación
típica; si desea seleccionar el software que va a instalar,
seleccione Instalación personalizada.
11.Dé un nombre a la impresora en la carpeta Impresoras.
12.En la pantalla Compartir impresora, seleccione No compartida.
13.Proporcione una ubicación e información descriptiva si lo desea.
14.Deje que finalice la instalación.
Clientes
● Recomendado para grupos de 10 ó 20 usuarios u oficinas
pequeñas.
● Requiere una conexión de red en la impresora o un servidor de
impresión interno o externo. Si la impresora no dispone de
ninguno, utilice la configuración número C.
● Descripción general de la instalación:
• Instalación de hardware: enchufe la impresora
directamente a la red mediante un cable de red.
• Ejecute el CD suministrado con al impresora y siga los
Español
pasos con cada PC para habilitar la impresión.
• Información necesaria durante la instalación del software:
hardware de la impresora o dirección IP que aparece en la
página 2 de la página de configuración de la impresora.
1 ESWW
Page 19

B. Impresora compartida y de red conectada a un puerto (impresión cliente-servidor)
La impresora está conectada directamente a la red e instalada en
un servidor de red. El servidor gestiona la impresión.
Servidor de
impresión
Clientes
Impresora
11.Dé un nombre a la impresora en la carpeta Impresoras.
12.En la pantalla Compartir impresora, seleccion e Compartir
como y dé a la impresora un nombre compartido.
13.Si comparte la impresora con otros PC que tengan sistemas
operativos diferentes al que está usando, seleccione los
controladores de dichos sistemas operativos en la pantalla
Compatibilidad de controladores cliente.
14.Para Windows 2000 y XP, puede proporcionar información
descriptiva y sobre la ubicación si lo desea.
15.Deje que finalice la instalación.
C. Impresora compartida conectada directamente (impresión cliente-servidor)
La impresora está conectada a un PC mediante un cable paralelo o
USB y la comparten otros PC o clientes en la red.
● Recomend ado p ar a gru pos grande s, de más de 30 usua ri os.
Permite al administrador controlar la configuración de los
controladores de impresora clientes.
● Requiere una conexión de red en la impresora o un servidor de
impresión interno o externo. Si la impresora no dispone de
conexión de red, utilice la configuración número C.
● Descripción general de la instalación:
• Instalación de hardware: enchufe la impresora
directamente a la red mediante un cable de red.
• Ejecute el CD suministrado con la impresora en el PC
servidor para habilitar la impresión.
● Información necesaria durante la instalación del software:
• Determine la dirección IP o hardware de la impresora, que
aparece en la página 2 de la página de configuración de la
impresora.
• Decida un nombre compartido para la impresora.
Pasos para la instalación:
1. Imprima una página de configuración y anote la dirección IP de
la segunda página, en "TCP/IP". Para obtener instrucciones
sobre cómo imprimir la página de configuración, consulte la
Guía del usuario de la impresora en el CD. Si la dirección IP es
0.0.0.0 o 192.0.0.192, espere de 5 a 10 minutos e imprima de
nuevo una página de configuración. El software de red debería
asignar una dirección IP a la impresora. Si no fuera así, o si
desea asignar una dirección IP determinada, vaya a las
instrucciones al final de este documento.
2. Inserte el CD suministrado con la impresora. El instalador del
software deberá iniciarse automáticamente. Haga clic en
Instalar impresora. Si el instalador del software no se inicia,
busque el archivo setup.exe en el directorio raíz del CD y haga
doble clic en él; a continuación, haga clic en Instalar
impresora.
3. Seleccione el idioma en que desee que aparezca el instalador y
acepte el Acuerdo de licencia.
4. En la pantalla Conexión de impresora, seleccione Conectada a
través de la red.
5. En la pantalla Configuración de red, seleccione Configuración
de red básica para un PC o un servidor.
6. En la pantalla Identificar impresora, identifique la impresora
buscándola o indicando una dirección IP o hardware. En la
mayoría de los casos hay una dirección IP asignada pero puede
cambiarla si lo desea más adelante en el paso 8.
7. Si ya especificó su dirección IP, se le preguntará si ésta es la
impresora que desea instalar. Si realizó una búsqueda de
impresoras, se le pedirá que seleccione una de las impresoras
encontradas para instalar.
8. En el cuadro de diálogo de confirmación de configuración,
puede cambiar la dirección IP de la impresora haciendo clic en
Change TCP/IP Settings (Cambiar configuración TCP/IP).
9. Seleccione el modelo de la impresora.
10.Si desea instalar el software típico, seleccione Instalación
típica; si desea seleccionar el software que va a instalar,
seleccione Instalación personalizada.
Servidor de
impresión
Impresora
Clientes
● Recomendado para impresoras que no disponen de
conexión de red.
● Requiere conexión directa de la impresora a un PC mediante un
cable paralelo o USB.
● Descripción general de la instalación:
• Ejecute el CD suministrado con la impresora en el PC
servidor para habilitar la impresión.
• Instalación de hardware: enchufe la impresora
directamente al PC mediante un cable paralelo o USB.
● Inf ormación necesaria durante la instalación del software: decida
un nombre compartido para la impresora.
Pasos para la instalación:
1. Inserte el CD suministrado con la impresora. El instalador del
software deberá iniciarse automáticamente. Haga clic en
Instalar impresora. Si el instalador del software no se inicia,
busque el archivo setup.ex e en el directorio raíz del CD y haga
doble clic en él; a continuación, haga clic en Instalar impresora.
Para obtener resultados óptimos, no conecte la impresora al PC
hasta que el instalador del software se lo pida.
2. Seleccione el idioma en que desee que aparezca el instalador y
acepte el Acuerdo de licencia.
3. En la pantalla Conexión de impresora, seleccione Conectada
directamente a este equipo.
4. En la pantalla Tipo de conector, seleccione el tipo de cable
utilizado para conectar la impresora.
5. Seleccione el modelo de la impresora.
6. Si desea instalar el software típico, seleccione Instalación
típica; si desea seleccionar el software que va a instalar,
seleccione Instalación personalizada.
7. Dé un nombre a la impresora en la carpeta Impresoras.
8. En la pantalla Compartir impresora, seleccione Compartir
como y dé a la impresora un nombre compartido.
9. Si comparte la impresora con otros PC que tengan sistemas
operativos diferentes al que está usando, seleccione los
controladores de dichos sistemas operativos en la pantalla
Compatibilidad de controladores cliente.
10.Para Windows 2000 y XP, puede proporcionar información
descriptiva y sobre la ubicación si lo desea.
11.Deje que finalice la instalación.
Español
ESWW 2
Page 20

D. Configuración de un PC cliente
● Recomendada cuando la impresora se haya conectado a un
PC y se haya compartido o cuando se haya conectado
directamente a la red, es decir, la impresora cuando se
comparta en la red con las configuraciones B y C anteriores.
● Ejecute el CD suministrado con la impresora en el PC cliente
para habilitar la impresión.
● Información necesaria durante la instalación del software:
un nombre para el servidor y un nombre compartido para la
impresora \\nombre-servidor\nombre-compartido-impresora.
Pasos para la instalación:
1. Inserte el CD suministrado con la impresora. El instalador del
software deberá iniciarse automáticamente. Haga clic en
Instalar impresora. Si el instalador del software no se inicia,
busque el archivo setup.exe en el directorio raíz del CD y haga
doble clic en él; a continuación, haga clic en Instalar impresora.
2. Seleccione el idioma en que desee que aparezca el instalador y
acepte el Acuerdo de licencia.
3. En la pantalla Conexión de impresora, seleccione Conectada a
través de la red.
4. En la pantalla Configuración de red, seleccione Configuración
del cliente para configuración cliente/servidor.
5. En la pantalla Especificar ruta de red, identifique la impresora
introduciendo el nombre del servidor y el nombre compartido de
la impresora o buscando la impresora.
6. Seleccione el modelo de la impresora.
7. Si desea instalar el software típico, seleccione Instalación
típica; si desea seleccionar el software que va a instalar,
seleccione Instalación personalizada.
8. Deje que finalice la instalación.
Configurar manualmente una dirección IP
La impresora puede elegir automáticamente una dirección IP del
servidor BootP/DHCP de red, o bien puede configurarse desde el
software. Pero si desea asignar una dirección IP determinada a la
impresora, puede configurar la dirección IP manualmente desde el
panel de control de la impresora.
Pulse el botón Menú en el panel de control de la impresora y vaya
al menú JETDIRECT. Normalmente, seleccionará el menú
CONFIGURAR DISPOSITIVO, a continuación, el menú E/S, y
después el menú JETDIRECT. En el menú JETDIRECT, seleccione
el menú TCP/IP, el menú MÉTODO DE CONFIG., y a continuación
seleccione MANUAL. En el menú TCP/IP, se añade el elemento
CONFIGURACIÓN MANUAL. Utilice el menú CONFIGURACIÓN
MANUAL y las teclas del panel de control para establecer los
valores de DIRECCIÓN IP, MÁSCARA SUBRED, PASARELA
PREDETERMINADA, SERVIDOR SYSLOG y TIEMPO DE
INACTIVIDAD.
Español
3 ESWW
Page 21

Page 22

Installatiehandleiding voor printers in een netwerk en gedeelde printers in Windows
Nederlands
U kunt het beste het software-installatieprogramma van HP vanaf
de cd gebruiken om de printerstuurprogramma's te installeren voor
de netwerkconfiguraties die hier worden beschreven. Het
installatieprogramma staat op de cd die is geleverd bij de printer.
U hoeft geen extra printersoftware te installeren als u dit
installatieprogramma gebruikt.
U kunt deze configuraties ook instellen met de wizard Printer
toevoegen, maar instructies voor deze werkwijze worden hier
niet gegeven. Raadpleeg de gebruikershandleiding op de cd
bij de printer voor deze instructies en voor meer informatie over
het gebruik van het installatieprogramma. Instructies voor
andere besturingssystemen kunt u hier ook vinden. In
de beheerdershandleiding voor HP Jetdirect en in
de installatieopmerkingen vindt u ook meer informatie.
Deze staan ook op de cd.
Mogelijke netwerkconfiguraties
Vier mogelijke netwerkprinterconfiguraties:
A. Netwerkprinterconfiguratie (directmodus of peer-to-peer
afdrukken)
B. Netwerkprinter en gedeelde printer (client-server afdrukken)
C. Gedeelde printer die rechtstreeks is aangesloten (client-server
afdrukken)
D. Clientinstallatie
In de volgende gedeelten vindt u informatie over elke
netwerkconfiguratie en algemene installatiegegevens.
A. Netwerkprinterconfiguratie (directmodus of peer-to-peer afdrukken)
De printer is rechtstreeks aangesloten op het netwerk en alle
computers of clients drukken rechtstreeks af naar deze printer.
Printer
Installatieprocedure:
1. Druk een configuratiepagina af en controleer het IP-adres op de
tweede pagina onder 'TCP/IP'. Zie voor meer informatie ov er het
afdrukken van de configuratiepagina de Gebruikershandleiding
op de cd. Als het IP-adres 0.0.0.0 of 192.0.0.192 is, wacht u 5
tot 10 minuten en drukt u weer een configuratiepagina af. De
netwerksoftware moet een IP-adres toewijzen aan uw printer.
Als de software dat niet doet of als u een specifiek IP-adres wilt
toewijzen, gaat u naar de instructies aan het einde van dit
document.
2. Plaats de cd die bij de printer is geleverd. Het
installatieprogramma voor de software wordt automatisch
gestart. Klik op Printe r in s t a l le r e n. Als het
installatieprogramma niet automatisch wordt gestart, gaat u
naar setup.exe in de hoofdmap van de cd en dubbelklikt u
hierop; vervolgens klikt u op Printer installeren.
3. Selecteer de taal die u wilt gebruiken in het hulpprogramma en
accepteer de Gebruiksrechtovereenkomst.
4. Selecteer Via het netwerk in het venster Printeraansluiting.
5. Selecteer Standaardnetwerkinstallatie voor een computer of
server in het venster Netwerkinstallatie.
6. Geef de printer op door te zoeken of een hardware- of IP-adres
op te geven in het venster Printer identificeren. In de meeste
gevallen wordt een IP-adres toegewez en, maar u kunt dit later in
stap 8 wijzigen.
7. Als u het IP-adres hebt opgegeven, wordt u gevraagd of u dit
adres aan deze printer wilt toewijzen. Als u naar printers zoekt,
wordt u gevraagd om één van de gevonden printers te kiezen
om het adres aan toe te wijzen.
8. In het dialoogvenster voor het bevestigen van de instellingen
kunt u het IP-adres van de printer wijzigen door op de optie voor
het wijzigen van de TCP/IP-instellingen te klikken.
9. Selecteer het model van de printer.
10.Als u de standaardsoftware wilt installeren, selecteert u
Standaardinstallatie. Als u de te installeren software wilt
selecteren, kiest u Aangepaste installatie.
11.Geef de printer een naam die moet worden gebruikt in de map
Printers.
12.Selecteer Niet gedeeld in het venster Printer delen.
13.Geef een locatie en desgewenst beschrijvende informatie op.
14.Wacht tot de installatie is voltooid.
Clients
● Aanbevolen voor groepen van tien tot twintig gebruikers of
kleine bedrijven.
● Hiervoor is een netwerkverbinding op de printer of een interne of
externe printserver vereist. Als deze niet aanwezig is, moet u
configuratie C gebruiken. Deze wordt hieronder weergegeven.
● Installatieoverzicht:
• Hardware-installatie: sluit de printer rechtstreeks aan op
het netwerk met een netwerkkabel.
• Start de cd die bij de printer is geleverd en voer de
onderstaande procedure uit voor elke computer om
afdrukken mogelijk te maken.
• Vereiste gege vens tijdens de software-installatie:
printerhardware of IP-adres verkregen van pagina 2 van
de configuratiepagina van de printer.
1 NLWW
Page 23

B. Netwerkprinter en gedeelde printer (client-server afdrukken)
De printer is aangesloten op het netwerk en is geïnstalleerd op een
netwerkserver. Het afdrukken wordt beheerd met de server.
Printserver
Clients
Printer
12.Selecteer Gedeeld als in het venster Printer delen en geef de
printer een sharenaam.
13.Als u de printer deelt met andere computers waarop andere
besturingssystemen worden uitgevoerd dan op de computer die
u gebruikt, moet u de stuurprogramma's voor die
besturingssystemen selecteren in het venster Ondersteuning
van het stuurprogramma voor clients.
14.Voor Windows 2000 en XP kunt u desgewenst een locatie en
een beschrijving opgeven.
15.Wacht tot de installatie is voltooid.
C. Gedeelde printer die rechtstreeks is aangesloten (c lie nt-server afdrukken)
De printer is aangesloten op een computer met een parallelle of
USB-kabel en is gedeeld met andere computers of clients via het
netwerk.
EnglishNederlands
● Aanbevolen voor grotere werkgroepen van meer dan 30
gebruikers. De instellingen van het printerstuurprogramma
van de client worden beheer d door de beheerder.
● Hiervoor is een netwerkverbinding op de printer of een interne of
externe printserver vereist. Als er geen netwerkverbinding is,
moet u configuratie C gebruiken. Deze wordt hieronder
weergegeven.
● Installatieoverzicht:
• Hardware-installatie: sluit de printer rechtstreeks aan op
het netwerk met een netwerkkabel.
• Start de cd die bij de printer is geleverd op de
servercomputer om afdrukken in te schakelen.
● Vereiste informatie tijdens de installatie van de software:
• Bepaal het hardware- of IP-adres van de printer. Deze
staat op pagina 2 van de configuratiepagina van de printer.
• Geef een sharenaam op voor de printer.
Installatieprocedure:
1. Druk een configuratiepagina af en controleer het IP-adres op de
tweede pagina onder 'TCP/IP'. Zie voor meer informatie over het
afdrukken van de configuratiepagina de Gebruikershandleiding
op de cd Als het IP-adres 0.0.0.0 of 192.0.0.192 is, wacht u 5 tot
10 minuten en drukt u weer een configuratiepagina af. De
netwerksoftware moet een IP-adres toewijzen aan uw printer.
Als de software dat niet doet of als u een specifiek IP-adres wilt
toewijzen, gaat u naar de instructies aan het einde van dit
document.
2. Plaats de cd die bij de printer is geleverd. Het
installatieprogramma voor de software wordt automatisch
gestart. Klik op Printer installeren. Als het
installatieprogramma niet automatisch wordt gestart, gaat u
naar setup.exe in de hoofdmap van de cd en dubbelklikt u
hierop; vervolgens klikt u op Printer ins talleren.
3. Selecteer de taal die u wilt gebruiken in het hulpprogramma en
accepteer de Gebruiksrechtovereenkomst.
4. Selecteer Via het netwerk in het venster Printeraansluiting.
5. Selecteer Standaardnetwerkinstallatie voor een computer of
server in het venster Netwerkinstallatie.
6. Geef de printer op door te zoeken of een hardware- of IP-adres
op te geven in het venster Printer identificeren. In de meeste
gevallen wordt een IP-adres toegewez en, maar u kunt dit later in
stap 8 wijzigen.
7. Als u het IP-adres hebt opgegeven, wordt u gevraagd of u dit
adres aan deze printer wilt toewijzen. Als u naar printers zoekt,
wordt u gevraagd om één van de gevonden printers te kiezen
om het adres aan toe te wijzen.
8. In het dialoogvenster voor het bevestigen van de instellingen
kunt u het IP-adres van de printer wijzigen door op de optie voor
het wijzigen van de TCP/IP-instellingen te klikken.
9. Selecteer het model van de printer.
10.Als u de standaardsoftware wilt installeren, selecteert u
Standaardinstallatie. Als u de te installeren software wilt
selecteren, kiest u Aangepaste installatie.
11.Geef de printer een naam die moet worden gebruikt in de map
Printers.
Printserver
Printer
Clients
● Aanbevolen voor printers zonder netwerkverbinding.
● De printer moet rechtstreeks zijn aangesloten op een computer
met een parallelle of USB-kabel.
● Installatieoverzicht:
• Start de cd die bij de printer is geleverd op de
servercomputer om afdrukken in te schakelen.
• Hardware-installatie: sluit de printer rechtstreeks aan op de
computer met een parallelle of USB-kabel.
● Ve reiste gegevens tijdens de software-installatie: geef de printer
een sharenaam.
Installatieprocedure:
1. Plaats de cd die bij de printer is geleverd. Het
installatieprogramma voor de software wordt automatisch
gestart. Klik op Printer installeren. Als het installatieprogramma
niet automatisch wordt gestart, gaat u naar setup.exe in de
hoofdmap van de cd en dubbelklikt u hierop; vervolgens klikt u
op Printer installeren. Sluit de printer niet aan op de computer
tot hierom wordt gevraagd door het installatieprogramma.
2. Selecteer de taal die u wilt gebruiken in het hulpprogramma en
accepteer de Gebruiksrechtovereenkomst.
3. Selecteer Rechtstreeks op deze computer in het venster
Printeraansluiting.
4. Selecteer de kabel die is gebruikt voor de aansluiting op de
computer in het venster Connectortype.
5. Selecteer het model van de printer.
6. Als u de standaardsoftware wilt installeren, selecteert u
Standaardinstallatie. Als u de te installeren software wilt
selecteren, kiest u Aangepaste installatie.
7. Geef de printer een naam die moet worden gebruikt in de map
Printers.
8. Selecteer Gedeeld als in het venster Printer delen en geef de
printer een sharenaam.
9. Als u de printer deelt met andere computers waarop andere
besturingssystemen worden uitgevoerd dan op de computer
die u gebruikt, moet u de stuurprogramma's voor die
besturingssystemen selecteren in het venster Ondersteuning
van het stuurprogramma voor clients.
10.Voor Windows 2000 en XP kunt u desgewenst een locatie en
een beschrijving opgeven.
11.Wacht tot de installatie is voltooid.
NLWW 2
Page 24

D. Clientinstallatie
● Deze installatie wordt aanbevolen wanneer de printer al is
Nederlands
aangesloten op een computer en is gedeeld of rechtstreeks
is aangesloten op het netwerk. De printer is dus gedeeld via
het netwerk met configuratie B of C.
● Start de cd die bij de printer is geleverd op de clientcomputer om
afdrukken in te schakelen.
● Vereiste informatie tijdens de installatie van de software: een
sharenaam voor de server en de printer
\\servernaam\printersharenaam.
Installatieprocedure:
1. Plaats de cd die bij de printer is geleverd. Het
installatieprogramma voor de software wordt automatisch
gestart. Klik op Printer installeren. Als het installatieprogramma
niet automatisch wordt gestart, gaat u naar setup.exe in de
hoofdmap van de cd en dubbelklikt u hierop; vervolgens klikt u
op Printer in s t a l le r e n .
2. Selecteer de taal die u wilt gebruiken in het hulpprogramma en
accepteer de Gebruiksrechtovereenkomst.
3. Selecteer Via het netwerk in het venster Printeraansluiting.
4. Selecteer Clientinstallatie voor afdrukken via client-server in
het venster Netwerkinstallatie.
5. Geef de printer op in het venster Het netwerkpad opgeven door
de sharenaam van de server en de printer op te geven of door
naar de printer te bladeren.
6. Selecteer het model van de printer.
7. Als u de standaardsoftware wilt installeren, selecteert u
Standaardinstallatie. Als u de te installeren software wilt
selecteren, kiest u Aangepaste installatie.
8. Wacht tot de installatie is voltooid.
Handmatig een IP-adres configureren
De printer kan automatisch een IP-adres ophalen vanaf de
BootP/DHCP-netwerkserver; het adres kan ook op basis van
software worden geconfigureerd. Als u echter een specifiek
IP-adres wilt toewijzen aan de printer, kunt u een dergelijk adres
handmatig configureren op het bedieningspaneel van de printer.
Druk op de knop Menu op het bedieningspaneel van de printer en
ga naar het menu JETDIRECT. Normaal gesproken selecteert u het
menu APPARAAT CONFIGUREREN, vervolgens het menu I/O en
tot slot het menu JETDIRECT. Selecteer in het menu JETDIRECT
achtereenvolgens het menu TCP/IP, het menu
CONFIGURATIEMETHODE en HANDMATIG. Het onderwerp
HANDMATIGE INSTELLINGEN wordt toegevoegd aan het menu
TCP/IP. Via het menu HANDMATIGE INSTELLINGEN en de
toetsen van het bedieningspaneel stelt u de waarden in voor
IP-ADRES, SUBNETMASKER, STANDAARDGATEWAY,
SYSLOG-SERVER en TIMEOUT BIJ NIET-ACTIEF.
3 NLWW
Page 25

Page 26

Guia de instalação para impressoras em rede e compartilhadas
em sistemas operacionais Windows
A HP recomenda a utilização do instalador de software HP no CD
para instalar drivers da impressora nas configurações de rede
descritas aqui. O instalador está disponível no CD fornecido com
a impressora. Você não precisa instalar nenhum software de
impressora adicional utilizando esse instalador.
Também é possível instalar essas configurações utilizando o
Assistente para Adicionar impressora, mas as instruções sobre
como fazer isso não foram incluídas aqui. Consulte o Guia do
usuário, localizado no CD enviado com a impressora, para obter
essas instruções e instruções mais detalhadas sobre a utilização
do instalador. Instruções para outros sistemas operacionais
também podem ser encontradas nele. O HP JetDirect Administrator
Guide (Guia do administrador do HP JetDirect) e as Installation
Notes (Notas sobre a instalação), também localizados no CD,
fornecem instruções adicionais.
Português
Possí veis configurações de rede
As quatro possíveis configurações da impressora em rede incluem:
A. Configuração de impressora conectada à porta de rede (modo
direto ou impressão ponto a ponto)
B. Impressora conectada à porta de rede e compartilhada
(impressão cliente-servidor)
C. Impressora conectada diretamente e compartilhada (impressão
cliente-servidor)
D. Configuração de cliente PC
As seções a seguir fornecem informações sobre cada configuração
de rede e informações básicas sobre a instalação.
A. Configuração de impressora conectada à porta de rede (modo direto ou impressão ponto a ponto)
A impressora é conectada diretamente à rede e todos os PCs ou
clientes imprimem diretamente na impressora.
Impressora
Etapas de instalação:
1. Imprima a página de configuração e anote o endereço IP
localizado na segunda página, na seção "TCP/IP". Para obter
instruções sobre como imprimir essa página, consulte o Guia do
usuário da impressora no CD. Se o endereço IP for 0.0.0.0 ou
192.0.0.192, aguarde de 5 a 10 minutos e imprima uma nova
página de configuração. O software da rede deve determinar um
endereço IP para sua impressora. Se isso não acontecer ou se
você quiser determinar um endereço IP específico, consulte as
instruções no final deste documento.
2. Insira o CD fornecido com a impressora. O instalador do
software deve iniciar sem assistência. Clique em Instalar
impressora. Se o instalador de software não iniciar, procure
o setup.exe no diretório raiz do CD e clique duas vezes nele.
Em seguida, clique em Instalar impressora.
3. Selecione o idioma que gostaria que o instalador exibisse e
aceite o Contrato de licença.
4. Na tela Conexão da impressora, selecione Conectada
pela rede.
5. Na tela Configuração da rede, selecione Configuração básica
de rede para PC ou servidor.
6. Na tela Identificação da impressora, identifique a impressora
pesquisando ou especificando um endereço de hardware ou IP.
Na maioria dos casos, um endereço IP é atribuído, mas você
poderá mudá-lo mais tarde na etapa 8.
7. Se você especificou seu endereço IP, aparecerá uma
mensagem perguntando se esta é a impressora que deseja
instalar. Se você fez uma busca por impressoras, aparecerá
uma mensagem solicitando a escolha de uma das impressoras
encontradas para instalação.
8. Na caixa de diálogo de confirma ção das configurações, você
poderá alterar o endereço IP da impressora clicando em Alterar
configurações de TCP/IP.
9. Selecione o modelo da impressora.
10.Se quiser instalar o software típico, selecione Instalação típica;
ou, se quiser selecionar o software a ser instalado, selecione
Instalação personalizada.
11.Dê um nome à impressora para ser utilizado na pasta
Impressoras.
12.Na tela Compartilhamento da impressora, selecione
Não compartilhado.
13.Forneça uma localização e informações descritivas, se quiser.
14.Permita a conclusão da instalação.
Clientes
rede e compartilhada (impressão
cliente-servidor)
B. Impressora conectada à porta de
● Recomendada para grupos de 10 a 20 usuários ou
escritórios pequenos.
● Requer uma conexão de rede na impressora ou um servidor de
impressão interno ou externo. Se a impressora não tiver uma,
utilize a configuração C a seguir.
● Visão geral da instalação:
• Configuração de hardware – conecte a impressora
diretamente à rede utilizando um cabo de rede.
• Execute o CD fornecido com a impressora e siga as
etapas a seguir em cada PC para ativar a impressão.
• Informações necessárias durante a configuração do
software – hardware ou endereço IP da impressora obtido
na página 2 da configuração da impressora.
1 PTWW
A impressora está conectada à rede e instalada em um servidor de
rede. O servidor então gerencia a impressão.
Servidor de
impressão
Impressora
Clientes
● Recomendada para grupos de trabalho grandes, mais de 30
usuários. Permite qu e o adm inistrador controle as
configurações do driver da impressora cliente.
Page 27

● Requer uma conexão de rede na impressora ou um servidor de
impressão interno ou externo. Se a impressora não tiver uma
conexão de rede, utilize a configuração C a seguir.
● Visão geral da instalação:
• Configuração de hardware – conecte a impressora
diretamente à rede utilizando um cabo de rede.
• Execute o CD fornecido com a impressora no PC servidor
para ativar a impressão.
● Informações necessárias durante a configuração do software:
• Determine o endereço do hardware ou IP da i mpressora ,
obtido na página 2 da conf igur aç ão da impre ssor a.
• Defina um nome de compartilhamento para a impressora.
Etapas de instalação:
1. Imprima a página de configuração e anote o endereço IP
localizado na segunda página, na seção "TCP/IP". Para obter
instruções sobre como imprimir essa página, consulte o Guia do
usuário da impressora no CD. Se o endereço IP for 0.0.0.0 ou
192.0.0.192, aguarde de 5 a 10 minutos e imprima uma nova
página de configuração. O software da rede dev e determinar um
endereço IP para sua impressora. Se isso não acontecer ou se
você quiser determinar um endereço IP específico, consulte as
instruções no final deste documento.
2. Insira o CD fornecido com a impressora. O instalador do
software deve iniciar sem assistência. Clique em Instalar
impressora. Se o instalador de software não iniciar, procure
o setup.exe no diretório raiz do CD e clique duas vezes nele.
Em seguida, clique em Instalar impressora.
3. Selecione o idioma que gostaria que o instalador exibisse e
aceite o Contrato de licença.
4. Na tela Conexão da impressora, selecione Conectada
pela rede.
5. Na tela Configuração da rede, selecione Configuração básica
de rede para PC ou servidor.
6. Na tela Identificação da impressora, identifique a impressora
pesquisando ou especificando um endereço de hardware ou IP.
Na maioria dos casos, um endereço IP é atribuído, mas você
poderá mudá-lo mais tarde na etapa 8.
7. Se você especificou seu endereço IP, aparecerá uma
mensagem perguntando se esta é a impressora que deseja
instalar. Se você fez uma busca por impressoras, aparecerá
uma mensagem solicitando a escolha de uma das impressoras
encontradas para instalação.
8. Na caixa de diálogo de confirmação das configurações, você
poderá alterar o endereço IP da impressora clicando em Alterar
configurações de TCP/IP.
9. Selecione o modelo da impressora.
10.Se quiser instalar o software típico, selecione Instalação típica;
ou, se quiser selecionar o software a ser instalado, selecione
Instalação personalizada.
11.Dê um nome à impressora para ser utilizado na pasta
Impressoras.
12.Na tela Compartilhamento da impressora, selecione
Compartilhar como e dê um nome de compartilhamento
à impressora.
13.Se estiver compartilhando a impressora com outros PCs que
estão executando sistemas operacionais diferentes do PC que
você está utilizando, então, na tela Suporte ao driver do cliente,
selecione os drivers para aqueles sistemas operacionais.
14.Para o Windows 2000 e XP, é possível fornecer a localização
e informações descritivas, se quiser.
15.Permita a conclusão da instalação.
C. Impressora conectada diretamente e compartilhada (impressão cliente-servidor)
A impressora é conectada a um PC que utiliza um cabo USB ou
paralelo e é compartilhada com outros PCs ou clientes na rede.
Servidor de
impressão
Clientes
● Recomendada para impressoras que não possuem uma
conexão de rede.
● Requer que a impressora esteja conectada diretamente a um PC
com um cabo paralelo ou USB.
● Visão geral da instalação:
• Execute o CD fornecido com a impressora no PC servidor
para ativar a impressão.
• Configuração de hardware – conecte a impressora
diretamente ao PC com um cabo paralelo ou USB.
● Informações necessárias durante a configuração do software –
defina um nome de compartilhamento para a impressora.
Etapas de instalação:
1. Insira o CD fornecido com a impressora. O instalador do
software deve iniciar sem assistência. Clique em Instalar
impressora. Se o instalador de software não iniciar, procure
o setup.exe no diretório raiz do CD e clique duas vezes nele.
Em seguida, clique em Instalar impressora. Para obter
melhores resultados, não conecte a impressora ao PC até ser
solicitado a fazer isso pelo instalador do software.
2. Selecione o idioma que gostaria que o instalador exibisse e
aceite o Contrato de licença.
3. Na tela Conexão da impressora, selecione Conectada
diretamente ao computador.
4. Na tela Tipo de conector, selecione o tipo de cabo utilizado para
conectar a impressora.
5. Selecione o modelo da impressora.
6. Se quiser instalar o software típico, selecione Instalação típica;
ou, se quiser selecionar o software a ser instalado, selecione
Instalação personalizada.
7. Dê um nome à impressora para ser utilizado na pasta
Impressoras.
8. Selecione Compartilhar como na tela Compartilhamento da
impressora e dê um nome de compartilhamento à impressora.
9. Se estiver compartilhando a impressora com outros PCs que
estão executando sistemas operacionais diferentes do PC que
você está utilizando, então na tela Suporte ao driver do cliente
selecione os drivers para aqueles sistemas operacionais.
10.Para o Windows 2000 e XP, é possível fornecer a localização
e informações descritivas, se quiser.
11.Permita a conclusão da instalação.
Impressora
Português
PTWW 2
Page 28

D. Configuração de cliente PC
● Recomendada quando a impressora já foi conectada a um
PC e compartilhada ou conectada diretamente à rede, ou
seja, a impressora está compartilhada na rede utilizando a
configuração B ou C anterior.
● Execute o CD fornecido com a impressora no PC cliente para
ativar a impressão.
● Informações necessárias durante a configuração do software –
um nome de compartilhamento para o servidor e a impressora
\\nome do servidor\nome de compartilhamento da impressora.
Etapas de instalação:
1. Insira o CD fornecido com a impressora. O instalador do
software deve iniciar sem assistência. Clique em Instalar
impressora. Se o instalador de software não iniciar, procure
o setup.exe no diretório raiz do CD e clique duas vezes nele.
Em seguida, clique em Instalar impressora.
2. Selecione o idioma que gostaria que o instalador exibisse
Português
e aceite o Contrato de licença.
3. Na tela Conexão da impressora, selecione Conectada
pela rede.
4. Na tela Configuração da rede, selecione Instalação do cliente
para imprimir a partir do servidor cliente.
5. Na tela Especificar o caminho da rede, identifique a impressora
inserindo o nome de compartilhamento para o servidor e a
impressora ou procurando a impressora.
6. Selecione o modelo da impressora.
7. Se quiser instalar o software típico, selecione Instalação típica;
ou, se quiser selecionar o software a ser instalado, selecione
Instalação personalizada.
8. Permita a conclusão da instalação.
Configure um endereço IP manualmente
A impressora pode utilizar, automaticamente, um endereço IP do
servidor da rede BootP/DHCP ou um endereço pode ser
configurado a partir do software. Mas, se quiser determinar um
endereço IP específico para sua impressora, configure-o
manualmente a partir do painel de controle da impressora.
Pressione o botão Menu no painel de controle da impressora e
localize o menu JETDIRECT. Normalmente, você deve selecionar o
menu CONFIGURAR DISPOSITIVO, em seguida o menu E/S e,
por fim, JETDIRECT. Nesse menu, selecione TCP/IP, o menu
MÉTODO DE CONFIGURAÇÃO e, em seguida, MANUAL. Um
item CONFIGURAÇÕES MANUAIS será adicionado ao menu
TCP/IP. Utilize o menu CONFIGURAÇÕES MANUAIS e as teclas
do painel de controle para definir os valores para ENDEREÇO IP,
MÁSCARA DE SUB-REDE, GATEWAY PADRÃO, SERVIDOR
SYSLOG e TEMPO LIMITE DE INATIVIDADE.
3 PTWW
Page 29

Page 30

2. רחב תא הפשה הבש ךנוצרב גיצהל תא ןיקתמה רשאו תא
םכסה ןוישירה.
3. ךסמב רוביח תספדמה ,רחב תרבוחמ תורישי בשחמל הז.
4. ךסמב גוס רבחמ ,רחב תא גוס לבכה ששמשי רוביחל תספדמה.
5. רחב תא םגד תספדמה.
6. םא ךנה ןיינועמ תנקתהב הנכות הליגר ,רחב בהנקתה תינייפוא .
םא הצרת רוחבל תא גוס הנכותה ןקתותש ,רחב בהנקתה
תמאתומ תישיא.
7. קנעה תספדמל םש גצויש היקיתב תוספדמ.
8. ךסמב ףותיש תספדמה, רחב בתפתושמ כ: קנעהו תספדמל תא
םש ףותישה.
הלעפה תורחא ,תונושה תאזמ תנקתומש לע-יבג בשחמה ךלש ,ךסמב
הכימת להנמב ןקתה חוקל ,רחב תא ילהנמ םינקתהה רובע תוכרעמ
הלעפה הלא.
Windows 2000 רובעו Windows XPלכות ןיזהל תא םוקימה
9. םא ךנה ףתשמ תספדמ םע בשחמםי ילעשםה תונקתומ תוכרעמ
IP
10. רובע
רואיתו תספדמה ,םא הצרת.
11. רשפא הנקתהל םייתסהל.
TCP/IP.
ד .תנקתה בשחמ חוקל
setup.exeץחלו רוטילקתה לש סיסבה תייקיתב
םיימעפ וילע;ןכמ רחאל , לע ץחלתספדמ ןקתה.
IP םירקמה תיברמב ,ה תבותכ-IPתיצקומ , לכות םלוא
בלשב רתוי רחואמ התוא תונשל8.
IPךלש , ךנוצרבש תספדמה וז םאה לאשית
ןיקתהל .תוספדמ רחא תשפיח םא , תוספדמהמ תחא רוחבל שקבתת
הנקתהל ואצמנש.
תספדמה לש ,לע- לע הציחל ידי תורדגה יוניש
תמאתומ תישיא.
• ץלמומ עצבל רשאכ תספדמה רבכ הרבוח בשחמל הפתושו וא הרבוחש
תורישי תשרל–תספדמה תפתושמ תשרב תועצמאב רוצתתו ב וא ג ,
ליעל.
רשפאל הספדה.
• לעפה תא רוטילקתה ףרוצמה תספדמל ,לע-יבג בשחמ חוקלה ,ידכ
\\server-name\printer-share-name.
setup.exe ץחלו רוטילקתה לש סיסבה תייקיתב
הנכותה גוס תא רוחבל הצרתןקתותש ,ב רחבתישיא תמאתומ הנקתה.
תספדמהו
יבלש הנקתהה:
1. סנכה תא רוטילקתה ףרוצמה תספדמל .ןיקתמ הנכותה רומא ליחתהל
לועפל ןפואב יאמצע . לע ץחלהנכות ןקתה . ליחתמ וניא הנכותה ןיקתמ םא
לועפל , תא רתאץבוקה
םיימעפ וילע;ןכמ רחאל , לע ץחלתספדמ ןקתה.
2. רחב תא הפשה הבש ךנוצרב גיצהל תא ןיקתמה רשאו תא םכסה ןוישירה.
3. ךסמב רוביח תספדמה ,רחב תרבוחמ ךרד תשרה.
4. ךסמב הנקתה תשרב ,רחב בתנקתה חוקל תספדהל חוקל-תרש.
5. ךסמב ןייצ ביתנ תשר ,ההז תא תספדמה ,תועצמאב תנזה תומש ףותישה
לש תרשה תספדמהו וא לע-ידי ףודפד לא תספדמה.
6. תספדמה םגד תא רחב.
7. הליגר הנכות תנקתהב ןיינועמ ךנה םא ,ב רחבתינייפוא הנקתה . םא
8. הנקתהל רשפאםייתסהל.
תרש הספדה תספדמ
תוחוקל
• עדימ ץוחנה ךלהמב תנקתה הנכותה–תומש ףותישה לש תרשה
Windows 2000 רובעו Windows XP לכות ןיזהל תא םוקימה רואיתו
הלעפה תורחא ,תונושה תאזמ תנקתומש לע-יבג בשחמה ךלש ,ךסמב
הכימת בלהנמ ןקתה חוקל ,רחב תא ילהנמ םינקתהה רובע תוכרעמ
הלעפה הלא.
תספדמה ,םא הצרת.
2. סנכה תא רוטילקתה ףרוצמה תספדמל .ןיקתמ הנכותה רומא ליחתהל
לפלוע ןפואב יאמצע . לע ץחלהנכות ןקתה . ליחתמ וניא הנכותה ןיקתמ םא
לועפל , ץבוקה תא רתא
3. רחב תא הפשה הבש ךנוצרב גיצהל תא ןיקתמה רשאו תא םכסה ןוישירה.
4. ךסמב רוביח תספדמה ,רחב תרבוחמ ךרד תשרה.
5. ךסמב הנקתה תשרב ,רחב בתרדגה תשר תיסיסב רובע בשחמ
וא תרש.
6. ךסמב יוהיז תספדמ ,ההז תא תספדמה תועצמאב שופיח וא תועצמאב ןויצ
תבותכ הרמוח וא .
7. תבותכ תא תנייצ םאה -
8. ודה תביתב- חישתורדגה רושיא ,ה תבותכ תא תונשל ךתורשפאב-
9. רחב תא םגד תספדמה.
10. םא ךנה נועמןיי תנקתהב הנכות הליגר ,רחב בהנקתה תינייפוא .
םא הצרת רוחבל תא גוס הנכותה ןקתותש ,רחב בהנקתה
11. קנעה תספדמל םש גצויש היקיתב תוספדמ.
12. ךסמב ףותיש תספדמה, רחב בתפתושמ כ: קנעהו תספדמל תא
םש ףותישה.
13. םא ךנה ףתשמ תספדמ םע בשחמםי ,ילעשםה ומתונקת תוכרעמ
14. רובע
15. רשפא הנקתהל םייתסהל.
ג .תספדמ תפתושמ ,תרבוחמרוביחב רישי
)תספדה חוקל-תרש(
תספדמה תרבוחמ בשחמל ישיא תועצמאב לבכ יליבקמ וא לבכ USB איהו
תפתושמ םיבשחמל וא תוחוקל םירחא תשרב.
• ץלמומ תוספדמל ןיאש ןהל רוביח תשר.
תבותכ לש תינדי הרדגהIP
IP
IP הרקבה חולמ ינדי ןפואב
תבותכ גישהל הלוכי תספדמהIP תרשמ יטמוטוא ןפואב BootP/DHCPתשרב ,
הנכותהמ תבותכה תא רידגהל ןתינש וא . תבותכ תוצקהל ךנוצרב םא
IP ,הנשמ תשר תכסמ ,לדחמ תרירב רעש , תרש
תספדמל תמיוסמ , תבותכ רידגהל ךתורשפאב
תספדמה לש.
ןצחלה לע ץחלטירפת חולב טירפתה תא רתאו תספדמה לש הרקבה
JETDIRECT . טירפתב רחבהרוצת ןקתה , טירפתב ןכמ רחאלטלק/טלפ
JETDIRECT . טירפתבJETDIRECT , טירפתב רחבTCP/IP , טירפתב
טירפתבו
הטיש תרדגה רחב ןכמ רחאלו ינדי . טירפתוינדי תורדגהטירפתל ףסונ
TCP/IP . טירפתב שמתשהתוינדי תורדגהינצחלבו הרקבה חול , עובקל ידכ
רובע םיכרעה תא תבותכ
SYSLOGו הלועפ רסוח בצמב ןמז קספ.
setup.exe ץחלו רוטילקתה לש סיסבה תייקיתב
USB
USB
יליבקמ וא לבכ .
ידכ רשפאל הספדה.
לבכ יליבקמ וא לבכ .
םיימעפ וילע;ןכמ רחאל , לע ץחלמ ןקתהתספד. ידכ לבקל תא תואצותה
תובוטה רתויב ,לא רבחת תא תספדמה בשחמל דע שקבתתש תושעל
• תספדמה שרדנת תויהל תרבוחמ תורישי בשחמל ,תועצמאב לבכ
• תריקס הנקתה:
• לעפה תא רוטילקתה ףרוצמה תספדמל ,לע-יבג בשחמ תרשה ,
• תנקתה הרמוח–רבח תא תספדמה תורישי תשרל ,תועצמאב
• עדימ ץוחנה ךלהמב תנקתה הנכותה - ברח םש ףותיש תספדמל.
יבלש הנקתהה:
1. סנכה תא רוטילקתה ףרוצמה תספדמל .ןיקתמ הנכותה רומא ליחתהל
לועפל ןפואב יאמצע . לע ץחלהנכות ןקתה . ליחתמ וניא הנכותה ןיקתמ םא
לועפל , ץבוקה תא רתא
תאז ,לע-ידי ןיקתמ הנכותה.
2 HEWW
Page 31

ךירדמ הנקתה תספדמל תפתושמ תרבוחמה תשרל רובע תוכרעמ הלעפה לש Windows
3. רחב תא הפשה הבש ךנוצרב גיצהל תא ןיקתמה רשאו תא םכסה ןוישירה.
4. ךסמב רוביח תספדמ ,רחב תרבוחמ ךרד תשרה.
5. ךסמב הנקתה תשרב ,רחב בתרדגה תשר תיסיסב רובע בשחמ
וא תרש.
בלשב רתוי רחואמ התוא תונשל8.
IP םירקמה תיברמב ,ה תבותכ-IPתיצקומ , לכות םלוא
IPךלש , ךנוצרבש תספדמה וז םאה לאשית
ןיקתהל .תוספדמ רחא תשפיח םא ,תת תוספדמהמ תחא רוחבל שקב
הנקתהל ואצמנש.
IP
תספדמה לש ,לע-לע הציחל ידי תורדגה יונישTCP/IP.
6. ךסמב יוהיז תספדמ ,ההז תא תספדמה תועצמאב שופיח וא תועצמאב ןויצ
תבותכ הרמוח או .
7. ה תבותכ תא תנייצ םא-
HP JetDirect Administrator Guide
8. ודה תביתב- חישתורדגה רושיא ,ה תבותכ תא תונשל ךתורשפאב-
9. רחב תא םגד תספדמה.
10. םא ךנה ןיינועמ תנקתהב הנכות הליגר ,רחב בהנקתה תינייפוא .םא
הצרת רוחבל תא גוס הנכותה ןקתותש ,רחב בהנקתה תמאתומ תישיא.
11. קנעה תספדמל םש גצויש היקיתב תוספדמ.
12. ךסמב ףותיש תספדמה ,רחב באל תפתושמ.
13. ןייצ םוקימ ןכו רואית רצק ,םא הצרת ךכב.
14. רשפא הנקתהל םייתסהל.
HP JetDirect ןכו Installation Notes )תורעה רובע הנקתהה(
peer-to-peer(
ב .תספדמ תרבוחמה תאיציל תשר תפתושמו
)תספדה חוקל-תרש(
תספדמה מתרבוח תורישי תשרל םע תרש הספדה .תרשה להנמ תא
הספדהה.
תרש הספדה
תספדמ
HP הצילממ ךל שמתשהל ןיקתמב הנכותה לש HP ,אצמנה לע-יבג רוטילקתה ,
ךרוצל תנקתה ילהנמ נקתההםי לש תספדמה ,רובע תורדגה הרוצתה תשרל ,
םיראותמה ןלהל .תינכות רזעה לש ןיקתמה ,הנימז לע-יבג רוטילקתה
ףרוצמה תספדמל .ךניא שרדנ ןיקתהל תנכות תספדמ תפסונ ,בקע שומישה
ןיקתמב הז.
לכות םג רידגהל תורוצת הלא ,תועצמאב ףשא תפסוה תספדמה ,םלוא
תויחנהה ךכל ןניא תוטרופמ ןאכ .תלבקל תויחנה הלא תלבקלו תויחנה
תוטרופמ רתוי שומישל ןיקתמב ,ןייע בךירדמ מתשמלש, אצמנה לע-יבג
רוטילקתה ףרוצמה תספדמל .ןתינ אוצמל םש םג תויחנה רובע הנקתה לע-יבג
תוכרעמ הלעפה תורחא .ךירדמה
)ךירדמ להנמל (
םג ןכ םיאצמנ לע-יבג רוטילקתה םיליכמו תויחנה תופסונ.
תורוצת תשר תוירשפא
עברא תורוצת תוירשפא תספדמל תשר ,תוללוכ:
א. תשר תאיציל תרבוחמה תספדמ תרוצת)וא רישי הספדה בצמ
בצמ
ב. ושמו תשר תאיציל תרבוחמה תספדמ תפת)חוקל תספדה-תרש(
ג. תפתושמ תספדמ , רישי רוביחב תרבוחמ)חוקל תספדה-תרש(
ד. חוקל בשחמ תנקתה
קלחה אבה קפסמ עדימ תודוא לכ תרוצת תשר ןכו קפסמ עדימ הנקתה יסיסב.
א. תרוצת תספדמ תרבוחמה תאיציל תשר
)בצמ הספדה רישי וא בצמ (peer-to-peer
תספדמה תרבוחמ תורישי תשרל לכו םיבשחמה וא תוחוקלה םיסיפדמ
תורישי תספדמל.
תוחוקל
IPאיה 0.0.0.0 וא
IPדומעהמ ינשה לש ףד
IPתחת ינשה דומעב "TCP/IP" .
הרוצתה ףד תספדה ןפוא תודוא תויחנהל , ןייעשמתשמל ךירדמב לש
IPתספדמל .הצקמ הניא םא ,
תבותכ תוצקהל הכירצ תשרה תנכות
IPתמיוסמ ,הז ךמסמ ףוסב תויחנהל רובע.
תבותכ תוצקהל ךנוצרב םא וא
תספדמ
תוחוקל
רשפאמ להנמל טולשל לע תורדגה להנמ ןקתה תספדמ חוקל.
• שורד רוביח תשר תספדמל וא תרש הספדה ימינפ וא ינוציח .םא תספדמל
• ץלמומ תוצובקל הדובע תולודג תיסחי - לעמ 30 םישמתשמ .
ןיא רוביח תשר ,שמתשה הרוצתב ג ,ןלהל.
• תריקס הנקתהה:
• תנקתה הרמוח–רבח תא תספדמה תורישי תשרל ,תועצמאב
לבכ תשר.
• לעפה תא רוטילקתה ףרוצמה תספדמל ,לע-יבג בשחמ תרשה ,ידכ
רשפאל הספדה.
• הנכותה תנקתה ךלהמב ץוחנה עדימ:
הרוצתה לש תספדמה .
192.0.0.192 , ןיב ןתמה5ל -10תינש הרוצתה ףד תא ספדהו תוקד .
• רתא תא תבותכ הרמוחה וא תבותכ ה- ,
• רחב םש ףותיש תספדמל.
יבלש הנקתהה:
1. ה תבותכל בל םישו הרוצת ףד ספדה-
תספדמה ,לע אצמנה-רוטילקת יבג .ה תבותכ םא-
IP איה 0.0.0.0 וא
IPתחת ינשה דומעב "TCP/IP" .
הרוצתה ףד תספדה ןפוא תודוא תויחנהל , ןייעשמתשמל ךירדמב לש
IPתספדמל .הצקמ הניא םא ,
תבותכ תוצקהל הכירצ תשרה תנכות
תבותכ תוצקהל ךנוצרב םא ואIPתמיוסמ ,הז ךמסמ ףוסב תויחנהל רובע.
setup.exe רוטילקתה לש סיסבה תייקיתב
לבכ תשר.
רובע לכ בשחמ ,ידכ רשפאל הספדה.
IPדומעמ 2 ףדב הרוצתה לש תספדמה.
תספדמה ,לע אצמנה-רוטילקת יבג .ה תבותכ םא-
192.0.0.192 , ןיב ןתמה5ל -10ינש הרוצתה ףד תא ספדהו תוקד ת .
םיימעפ וילע ץחלו;ןכמ רחאל , לע ץחלתספדמ ןקתה.
• ץלמומ תוצובקל תונב 10 דע 20 םישמתשמ וא םידרשמל םינטק.
• שורד רוביח תשר תספדמל וא תרש הספדה ימינפ וא ינוציח .םא תספדמל
ןיא דחא הלאמ ,שמתשה הרוצתב ג ,ןלהל.
• תריקס הנקתהה:
• תנקתה הרמוח–רבח תא תספדמה תורישי תשרל ,תועצמאב
• לעפה תא רוטילקתה ףרוצמה תספדמל לעפו לע-יפ םיבלשה ןלהל ,
• עדימ ץוחנה ךלהמב תנקתה הנכותה–תרמוח תספדמה וא תבותכ
ה- ,
יבלש הנקתהה:
1. ה תבותכל בל םישו הרוצת ףד ספדה-
2. סנכה תא רוטילקתה ףרוצמה תספדמל .ןיקתמ הנכותה רומא ליחתהל
לועפל ןפואב יאמצע . לע ץחלהנכות ןקתה . ליחתמ וניא הנכותה ןיקתמ םא
לועפל ,א ץבוקה תא רת
HEWW 1
Page 32

© 2004 Hewlett-Packard Development Company, L.P.
*5851-2343*
*5851-2343*
www.hp.com
5851-2343
 Loading...