

Page 1
software
technical
reference
hp color LaserJet 5500
Page 2

Page 3

hp color LaserJet 5500
software technical reference
Page 4

(c) Copyright Hewlett-Packard Company,
2002
All Rights Reserved. Reproduction,
adaptation, or translation without prior written
permission is prohibited, except as allowed
under the copyright laws.
Edition 1, 09/2002
Warranty
The information contained in this document
is subject to change without notice.
Hewlett-Packard makes no warranty of any
kind with respect to this information.
HEWLETT-PACKARD SPECIFICALLY
DISCLAIMS THE IMPLIED WARRANTY OF
MERCHANTABILITY AND FITNESS FOR A
PARTICULAR PURPOSE.
Hewlett-Packard shall not be liable for any
direct, indirect, incidental, consequential, or
other damage alleged in connection with the
furnishing or use of this information.
Trademark Credits
Adobe, Adobe Photoshop, Acrobat,
PostScript, and the Acrobat logo are either
registered trademarks or trademarks of
Adobe Systems Incorporated in the United
States and/or other countries/regions.
Arial is a U.S. registered trademark of the
Monotype Corporation.
AutoCAD (TM) is a U.S. trademark of
Autodesk, Inc.
CorelDraw (TM) is a trademark of Corel
Corporation or Corel Corporation Ltd.
Helvetica and Times are treadmarks of
Linotype-Hell AG and/or its subsidiaries in
the U.S. and other countries/regions.
Intel (R) is a U.S. trademark of Intel
Corporation.
Java (TM) is a U.S. trademark of Sun
Microsystems, Inc.
HP-UX Release 10.20 and later and P-UX
RElease 11.00 and later (in both 32- and 64bit configurations) on all HP 9000 computers
are Open Group UNIX 95 branded products.
Microsoft (R), MS-DOS (R), Windows (R),
and Windows NT (R) are U.S. registered
trademarks of Microsoft Corporation.
Netscape and Netscape Navigator are
trademarks or registered trademarks of
Netscape Communications, Inc.
PANTONE (R)* is Pantone, Inc.’s checkstandard trademark for color.
Pentium (R) is a registered trademark of Intel
Corporation.
TrueType (TM) is a U.S. trademar k of Apple
Computer, Inc.
UNIX (R) is a registered trademark of the
Open Group.
Hewlett-Packard Company
11311 Chinden Boulevard
Boise, Idaho 83714 U.S.A.
Page 5

Table of Contents
List of tables
List of figures
1 Purpose and Scope
Introduction . . . . . . . . . . . . . . . . . . . . . . . . . . . . . . . . . . . . . . . . . . . . . . . . . . . . . . . . . . . . . . . . . . . 13
HP Color LaserJet 5500 . . . . . . . . . . . . . . . . . . . . . . . . . . . . . . . . . . . . . . . . . . . . . . . . . . . . . . . . . 14
2 Software Description
Introduction . . . . . . . . . . . . . . . . . . . . . . . . . . . . . . . . . . . . . . . . . . . . . . . . . . . . . . . . . . . . . . . . . . . 15
Supported operating systems . . . . . . . . . . . . . . . . . . . . . . . . . . . . . . . . . . . . . . . . . . . . . . . . . . . . . 15
Technology background information . . . . . . . . . . . . . . . . . . . . . . . . . . . . . . . . . . . . . . . . . . . . . . . . 16
HP LaserJet user documentation . . . . . . . . . . . . . . . . . . . . . . . . . . . . . . . . . . . . . . . . . . . . . . . 16
Adobe Acrobat Reader . . . . . . . . . . . . . . . . . . . . . . . . . . . . . . . . . . . . . . . . . . . . . . . . . . . . . 16
HP LaserJet guides. . . . . . . . . . . . . . . . . . . . . . . . . . . . . . . . . . . . . . . . . . . . . . . . . . . . . . . . 16
HP LaserJet product printing-system installation notes . . . . . . . . . . . . . . . . . . . . . . . . . . . . 17
HP LaserJet product printing-system release notes . . . . . . . . . . . . . . . . . . . . . . . . . . . . . . . 17
Other HP LaserJet documents . . . . . . . . . . . . . . . . . . . . . . . . . . . . . . . . . . . . . . . . . . . . . . . 17
Bidirectional communication. . . . . . . . . . . . . . . . . . . . . . . . . . . . . . . . . . . . . . . . . . . . . . . . . . . 17
Driver Autoconfiguration . . . . . . . . . . . . . . . . . . . . . . . . . . . . . . . . . . . . . . . . . . . . . . . . . . . . . . 18
HP Web Access . . . . . . . . . . . . . . . . . . . . . . . . . . . . . . . . . . . . . . . . . . . . . . . . . . . . . . . . . . . . 20
Information tab . . . . . . . . . . . . . . . . . . . . . . . . . . . . . . . . . . . . . . . . . . . . . . . . . . . . . . . . . . . 20
Device status . . . . . . . . . . . . . . . . . . . . . . . . . . . . . . . . . . . . . . . . . . . . . . . . . . . . . . . . . . . . 21
Configuration information . . . . . . . . . . . . . . . . . . . . . . . . . . . . . . . . . . . . . . . . . . . . . . . . . . . 22
Links to off-printer solutions . . . . . . . . . . . . . . . . . . . . . . . . . . . . . . . . . . . . . . . . . . . . . . . . . 22
Settings tab. . . . . . . . . . . . . . . . . . . . . . . . . . . . . . . . . . . . . . . . . . . . . . . . . . . . . . . . . . . . . . 22
Remote printer configuration. . . . . . . . . . . . . . . . . . . . . . . . . . . . . . . . . . . . . . . . . . . . . . . . . 23
Networking tab . . . . . . . . . . . . . . . . . . . . . . . . . . . . . . . . . . . . . . . . . . . . . . . . . . . . . . . . . . . 23
Configuration . . . . . . . . . . . . . . . . . . . . . . . . . . . . . . . . . . . . . . . . . . . . . . . . . . . . . . . . . . . 23
Security . . . . . . . . . . . . . . . . . . . . . . . . . . . . . . . . . . . . . . . . . . . . . . . . . . . . . . . . . . . . . . . 24
Diagnostics. . . . . . . . . . . . . . . . . . . . . . . . . . . . . . . . . . . . . . . . . . . . . . . . . . . . . . . . . . . . . 24
Network settings. . . . . . . . . . . . . . . . . . . . . . . . . . . . . . . . . . . . . . . . . . . . . . . . . . . . . . . . . 24
Configurable e-mail alerts. . . . . . . . . . . . . . . . . . . . . . . . . . . . . . . . . . . . . . . . . . . . . . . . . . . 25
Printer Status and Alerts. . . . . . . . . . . . . . . . . . . . . . . . . . . . . . . . . . . . . . . . . . . . . . . . . . . . . . 25
Remote firmware update. . . . . . . . . . . . . . . . . . . . . . . . . . . . . . . . . . . . . . . . . . . . . . . . . . . . . . 30
Determining the current level of firmware . . . . . . . . . . . . . . . . . . . . . . . . . . . . . . . . . . . . . . . 30
Downloading the new firmware from the HP Web site . . . . . . . . . . . . . . . . . . . . . . . . . . . . . 31
Downloading the new firmware to the product . . . . . . . . . . . . . . . . . . . . . . . . . . . . . . . . . . . 31
Remote firmware update through a local Windows port. . . . . . . . . . . . . . . . . . . . . . . . . . . 31
Windows 95, Windows 98, and Windows Me . . . . . . . . . . . . . . . . . . . . . . . . . . . . . . . . . 31
Windows 95, 98, Me, NT 4.0, 2000, and XP . . . . . . . . . . . . . . . . . . . . . . . . . . . . . . . . . . 32
Remote firmware update through a Windows network. . . . . . . . . . . . . . . . . . . . . . . . . . . . 32
Remote firmware update for UNIX systems. . . . . . . . . . . . . . . . . . . . . . . . . . . . . . . . . . . . 32
Remote firmware update using FTP on a direct network connection. . . . . . . . . . . . . . . . . 32
Remote firmware update using FTP and a browser . . . . . . . . . . . . . . . . . . . . . . . . . . . . . 33
Using HP Web JetAdmin to download the firmware to the product . . . . . . . . . . . . . . . . . . . 33
Printer messages during firmware upgrade . . . . . . . . . . . . . . . . . . . . . . . . . . . . . . . . . . . . . 34
Software Technical Reference 3
Page 6

E-mail command and response . . . . . . . . . . . . . . . . . . . . . . . . . . . . . . . . . . . . . . . . . . . . . . . . .35
Euro character . . . . . . . . . . . . . . . . . . . . . . . . . . . . . . . . . . . . . . . . . . . . . . . . . . . . . . . . . . . . . . 35
International Color Consortium profiles . . . . . . . . . . . . . . . . . . . . . . . . . . . . . . . . . . . . . . . . . . .36
PANTONE (R)* color profiles. . . . . . . . . . . . . . . . . . . . . . . . . . . . . . . . . . . . . . . . . . . . . . . . . . .36
Printing-system components . . . . . . . . . . . . . . . . . . . . . . . . . . . . . . . . . . . . . . . . . . . . . . . . . . . . . .37
Printing system and installer . . . . . . . . . . . . . . . . . . . . . . . . . . . . . . . . . . . . . . . . . . . . . . . . . . . 37
CD browser for Windows systems . . . . . . . . . . . . . . . . . . . . . . . . . . . . . . . . . . . . . . . . . . . . . 37
Installer features. . . . . . . . . . . . . . . . . . . . . . . . . . . . . . . . . . . . . . . . . . . . . . . . . . . . . . . . . . . 39
Installable components . . . . . . . . . . . . . . . . . . . . . . . . . . . . . . . . . . . . . . . . . . . . . . . . . . . . . . .40
Printer drivers. . . . . . . . . . . . . . . . . . . . . . . . . . . . . . . . . . . . . . . . . . . . . . . . . . . . . . . . . . . . .40
PCL 5c, PCL 6, and PS drivers . . . . . . . . . . . . . . . . . . . . . . . . . . . . . . . . . . . . . . . . . . . . .40
Windows 95, 98, Me, NT 4.0, 2000, and XP driver versions. . . . . . . . . . . . . . . . . . . . . . . .40
Macintosh and Macintosh-comp atib le system driver versions. . . . . . . . . . . . . . . . . . . . . . . .41
Additional driver availability . . . . . . . . . . . . . . . . . . . . . . . . . . . . . . . . . . . . . . . . . . . . . . . . . .41
Macintosh components . . . . . . . . . . . . . . . . . . . . . . . . . . . . . . . . . . . . . . . . . . . . . . . . . . . . .41
Additional productivity tools . . . . . . . . . . . . . . . . . . . . . . . . . . . . . . . . . . . . . . . . . . . . . . . . . .42
HP Web Regis trati on . . . . . . . . . . . . . . . . . . . . . . . . . . . . . . . . . . . . . . . . . . . . . . . . . . . . . .4 2
Optional software. . . . . . . . . . . . . . . . . . . . . . . . . . . . . . . . . . . . . . . . . . . . . . . . . . . . . . . . .42
HP Web JetAdmin. . . . . . . . . . . . . . . . . . . . . . . . . . . . . . . . . . . . . . . . . . . . . . . . . . . . . . .4 2
3 Driver features
Introduction. . . . . . . . . . . . . . . . . . . . . . . . . . . . . . . . . . . . . . . . . . . . . . . . . . . . . . . . . . . . . . . . . . . .45
PCL 5c and PCL 6 driver features . . . . . . . . . . . . . . . . . . . . . . . . . . . . . . . . . . . . . . . . . . . . . . . . . .45
Help system . . . . . . . . . . . . . . . . . . . . . . . . . . . . . . . . . . . . . . . . . . . . . . . . . . . . . . . . . . . . . . .4 5
What's this? Help . . . . . . . . . . . . . . . . . . . . . . . . . . . . . . . . . . . . . . . . . . . . . . . . . . . . . . . . . .45
Context-sensitive Help . . . . . . . . . . . . . . . . . . . . . . . . . . . . . . . . . . . . . . . . . . . . . . . . . . . . . .45
Constraint messages . . . . . . . . . . . . . . . . . . . . . . . . . . . . . . . . . . . . . . . . . . . . . . . . . . . . . . .46
Bubble Help . . . . . . . . . . . . . . . . . . . . . . . . . . . . . . . . . . . . . . . . . . . . . . . . . . . . . . . . . . . . . . . .47
Finishing tab features. . . . . . . . . . . . . . . . . . . . . . . . . . . . . . . . . . . . . . . . . . . . . . . . . . . . . . . . .50
Document preview image. . . . . . . . . . . . . . . . . . . . . . . . . . . . . . . . . . . . . . . . . . . . . . . . . . . . 50
Quick Sets . . . . . . . . . . . . . . . . . . . . . . . . . . . . . . . . . . . . . . . . . . . . . . . . . . . . . . . . . . . . . . . 51
Defaults . . . . . . . . . . . . . . . . . . . . . . . . . . . . . . . . . . . . . . . . . . . . . . . . . . . . . . . . . . . . . . . . 51
User’s Manual . . . . . . . . . . . . . . . . . . . . . . . . . . . . . . . . . . . . . . . . . . . . . . . . . . . . . . . . . . .52
Custom Quick Sets . . . . . . . . . . . . . . . . . . . . . . . . . . . . . . . . . . . . . . . . . . . . . . . . . . . . . . . 52
Document Options . . . . . . . . . . . . . . . . . . . . . . . . . . . . . . . . . . . . . . . . . . . . . . . . . . . . . . . . .52
Print on Both Sides option. . . . . . . . . . . . . . . . . . . . . . . . . . . . . . . . . . . . . . . . . . . . . . . . . .52
Flip Pages Up . . . . . . . . . . . . . . . . . . . . . . . . . . . . . . . . . . . . . . . . . . . . . . . . . . . . . . . . . . .53
Booklet Printing . . . . . . . . . . . . . . . . . . . . . . . . . . . . . . . . . . . . . . . . . . . . . . . . . . . . . . . . . .53
Activating booklet printing. . . . . . . . . . . . . . . . . . . . . . . . . . . . . . . . . . . . . . . . . . . . . . . . .55
Selecting a booklet cover . . . . . . . . . . . . . . . . . . . . . . . . . . . . . . . . . . . . . . . . . . . . . . . . . 56
Pages per Sheet . . . . . . . . . . . . . . . . . . . . . . . . . . . . . . . . . . . . . . . . . . . . . . . . . . . . . . . . . 57
Print Quality . . . . . . . . . . . . . . . . . . . . . . . . . . . . . . . . . . . . . . . . . . . . . . . . . . . . . . . . . . . . . .57
Default . . . . . . . . . . . . . . . . . . . . . . . . . . . . . . . . . . . . . . . . . . . . . . . . . . . . . . . . . . . . . . . . .58
Graphics Settings group box . . . . . . . . . . . . . . . . . . . . . . . . . . . . . . . . . . . . . . . . . . . . . . . . 59
Output Settings group box. . . . . . . . . . . . . . . . . . . . . . . . . . . . . . . . . . . . . . . . . . . . . . . . . .59
Resolution. . . . . . . . . . . . . . . . . . . . . . . . . . . . . . . . . . . . . . . . . . . . . . . . . . . . . . . . . . . . .59
Manually printing on the second side . . . . . . . . . . . . . . . . . . . . . . . . . . . . . . . . . . . . . . . .59
Scale Patterns (WYSIWYG) . . . . . . . . . . . . . . . . . . . . . . . . . . . . . . . . . . . . . . . . . . . . . . .61
Print all Text as Black . . . . . . . . . . . . . . . . . . . . . . . . . . . . . . . . . . . . . . . . . . . . . . . . . . . . 61
Font Settings group box . . . . . . . . . . . . . . . . . . . . . . . . . . . . . . . . . . . . . . . . . . . . . . . . . . . 61
Effects tab features . . . . . . . . . . . . . . . . . . . . . . . . . . . . . . . . . . . . . . . . . . . . . . . . . . . . . . . . . . 62
Print Document On setting . . . . . . . . . . . . . . . . . . . . . . . . . . . . . . . . . . . . . . . . . . . . . . . . . 62
Scale to Fit option . . . . . . . . . . . . . . . . . . . . . . . . . . . . . . . . . . . . . . . . . . . . . . . . . . . . . . . . 63
% of Normal Size option . . . . . . . . . . . . . . . . . . . . . . . . . . . . . . . . . . . . . . . . . . . . . . . . . . .63
Watermarks . . . . . . . . . . . . . . . . . . . . . . . . . . . . . . . . . . . . . . . . . . . . . . . . . . . . . . . . . . . . . . 64
Current Watermarks . . . . . . . . . . . . . . . . . . . . . . . . . . . . . . . . . . . . . . . . . . . . . . . . . . . . . .65
Watermark Message . . . . . . . . . . . . . . . . . . . . . . . . . . . . . . . . . . . . . . . . . . . . . . . . . . . . . . 65
Message Angle . . . . . . . . . . . . . . . . . . . . . . . . . . . . . . . . . . . . . . . . . . . . . . . . . . . . . . . . . . 65
4 Software Technical Reference
Page 7

Font Attributes . . . . . . . . . . . . . . . . . . . . . . . . . . . . . . . . . . . . . . . . . . . . . . . . . . . . . . . . . . 65
Name . . . . . . . . . . . . . . . . . . . . . . . . . . . . . . . . . . . . . . . . . . . . . . . . . . . . . . . . . . . . . . . . 65
Color . . . . . . . . . . . . . . . . . . . . . . . . . . . . . . . . . . . . . . . . . . . . . . . . . . . . . . . . . . . . . . . . 66
Shading . . . . . . . . . . . . . . . . . . . . . . . . . . . . . . . . . . . . . . . . . . . . . . . . . . . . . . . . . . . . . . 66
Size . . . . . . . . . . . . . . . . . . . . . . . . . . . . . . . . . . . . . . . . . . . . . . . . . . . . . . . . . . . . . . . . . 67
Default settings . . . . . . . . . . . . . . . . . . . . . . . . . . . . . . . . . . . . . . . . . . . . . . . . . . . . . . . . 67
Paper tab features . . . . . . . . . . . . . . . . . . . . . . . . . . . . . . . . . . . . . . . . . . . . . . . . . . . . . . . . . . 67
Printer image. . . . . . . . . . . . . . . . . . . . . . . . . . . . . . . . . . . . . . . . . . . . . . . . . . . . . . . . . . . . . 67
All Pages. . . . . . . . . . . . . . . . . . . . . . . . . . . . . . . . . . . . . . . . . . . . . . . . . . . . . . . . . . . . . . . . 68
Other Pages . . . . . . . . . . . . . . . . . . . . . . . . . . . . . . . . . . . . . . . . . . . . . . . . . . . . . . . . . . . . . 69
Back Cover . . . . . . . . . . . . . . . . . . . . . . . . . . . . . . . . . . . . . . . . . . . . . . . . . . . . . . . . . . . . . . 69
Size is . . . . . . . . . . . . . . . . . . . . . . . . . . . . . . . . . . . . . . . . . . . . . . . . . . . . . . . . . . . . . . . . . . 70
Custom . . . . . . . . . . . . . . . . . . . . . . . . . . . . . . . . . . . . . . . . . . . . . . . . . . . . . . . . . . . . . . . . . 71
Name drop-down menu . . . . . . . . . . . . . . . . . . . . . . . . . . . . . . . . . . . . . . . . . . . . . . . . . . . . 72
Dynamic command button . . . . . . . . . . . . . . . . . . . . . . . . . . . . . . . . . . . . . . . . . . . . . . . . . . 72
Width and height controls . . . . . . . . . . . . . . . . . . . . . . . . . . . . . . . . . . . . . . . . . . . . . . . . . . . 73
Custom width and height control limits . . . . . . . . . . . . . . . . . . . . . . . . . . . . . . . . . . . . . . . . . 74
Paper and envelope icons . . . . . . . . . . . . . . . . . . . . . . . . . . . . . . . . . . . . . . . . . . . . . . . . . 74
Measurement Units button . . . . . . . . . . . . . . . . . . . . . . . . . . . . . . . . . . . . . . . . . . . . . . . . . . 74
Close button . . . . . . . . . . . . . . . . . . . . . . . . . . . . . . . . . . . . . . . . . . . . . . . . . . . . . . . . . . . . . 74
Source Is. . . . . . . . . . . . . . . . . . . . . . . . . . . . . . . . . . . . . . . . . . . . . . . . . . . . . . . . . . . . . . . . 75
Type Is . . . . . . . . . . . . . . . . . . . . . . . . . . . . . . . . . . . . . . . . . . . . . . . . . . . . . . . . . . . . . . . . . 75
Printer image. . . . . . . . . . . . . . . . . . . . . . . . . . . . . . . . . . . . . . . . . . . . . . . . . . . . . . . . . . . . . 76
Destination tab features . . . . . . . . . . . . . . . . . . . . . . . . . . . . . . . . . . . . . . . . . . . . . . . . . . . . . . 76
Destination Features. . . . . . . . . . . . . . . . . . . . . . . . . . . . . . . . . . . . . . . . . . . . . . . . . . . . . . . 77
Hardware configuration and availability of Job Storage options . . . . . . . . . . . . . . . . . . . . . . 77
Configuring the printer driver for a printer hard disk . . . . . . . . . . . . . . . . . . . . . . . . . . . . . . . 78
Job storage modes . . . . . . . . . . . . . . . . . . . . . . . . . . . . . . . . . . . . . . . . . . . . . . . . . . . . . . . . 78
Off. . . . . . . . . . . . . . . . . . . . . . . . . . . . . . . . . . . . . . . . . . . . . . . . . . . . . . . . . . . . . . . . . . . . 78
Quick Copy. . . . . . . . . . . . . . . . . . . . . . . . . . . . . . . . . . . . . . . . . . . . . . . . . . . . . . . . . . . . . 78
Proof and Hold . . . . . . . . . . . . . . . . . . . . . . . . . . . . . . . . . . . . . . . . . . . . . . . . . . . . . . . . . . 79
Using a PIN for Private Job and Stored Job. . . . . . . . . . . . . . . . . . . . . . . . . . . . . . . . . . . . 79
Private Job . . . . . . . . . . . . . . . . . . . . . . . . . . . . . . . . . . . . . . . . . . . . . . . . . . . . . . . . . . . . . 79
Stored Job . . . . . . . . . . . . . . . . . . . . . . . . . . . . . . . . . . . . . . . . . . . . . . . . . . . . . . . . . . . . . 79
Document identifiers used in Job Storage . . . . . . . . . . . . . . . . . . . . . . . . . . . . . . . . . . . . . . 80
User Name . . . . . . . . . . . . . . . . . . . . . . . . . . . . . . . . . . . . . . . . . . . . . . . . . . . . . . . . . . . . . 80
Job Name. . . . . . . . . . . . . . . . . . . . . . . . . . . . . . . . . . . . . . . . . . . . . . . . . . . . . . . . . . . . . . 80
Using Job Storage options when printing . . . . . . . . . . . . . . . . . . . . . . . . . . . . . . . . . . . . . . . 81
Releasing stored jobs at the printer . . . . . . . . . . . . . . . . . . . . . . . . . . . . . . . . . . . . . . . . . . . 81
Deleting a print job . . . . . . . . . . . . . . . . . . . . . . . . . . . . . . . . . . . . . . . . . . . . . . . . . . . . . . . . 81
Output Bin Options . . . . . . . . . . . . . . . . . . . . . . . . . . . . . . . . . . . . . . . . . . . . . . . . . . . . . . . . 82
Options . . . . . . . . . . . . . . . . . . . . . . . . . . . . . . . . . . . . . . . . . . . . . . . . . . . . . . . . . . . . . . . . . 82
Printer image. . . . . . . . . . . . . . . . . . . . . . . . . . . . . . . . . . . . . . . . . . . . . . . . . . . . . . . . . . . . . 82
Basics tab features . . . . . . . . . . . . . . . . . . . . . . . . . . . . . . . . . . . . . . . . . . . . . . . . . . . . . . . . . 83
Copies. . . . . . . . . . . . . . . . . . . . . . . . . . . . . . . . . . . . . . . . . . . . . . . . . . . . . . . . . . . . . . . . . . 83
Orientation . . . . . . . . . . . . . . . . . . . . . . . . . . . . . . . . . . . . . . . . . . . . . . . . . . . . . . . . . . . . . . 84
About. . . . . . . . . . . . . . . . . . . . . . . . . . . . . . . . . . . . . . . . . . . . . . . . . . . . . . . . . . . . . . . . . . . 85
Driver extensions . . . . . . . . . . . . . . . . . . . . . . . . . . . . . . . . . . . . . . . . . . . . . . . . . . . . . . . . . 85
Color tab features . . . . . . . . . . . . . . . . . . . . . . . . . . . . . . . . . . . . . . . . . . . . . . . . . . . . . . . . . . . 86
Color options. . . . . . . . . . . . . . . . . . . . . . . . . . . . . . . . . . . . . . . . . . . . . . . . . . . . . . . . . . . . . 86
Manual color settings . . . . . . . . . . . . . . . . . . . . . . . . . . . . . . . . . . . . . . . . . . . . . . . . . . . . . . 87
Configure tab features . . . . . . . . . . . . . . . . . . . . . . . . . . . . . . . . . . . . . . . . . . . . . . . . . . . . . . . 88
Printer Model group box . . . . . . . . . . . . . . . . . . . . . . . . . . . . . . . . . . . . . . . . . . . . . . . . . . . . 89
Paper-handling options. . . . . . . . . . . . . . . . . . . . . . . . . . . . . . . . . . . . . . . . . . . . . . . . . . . . . 90
Duplexing unit . . . . . . . . . . . . . . . . . . . . . . . . . . . . . . . . . . . . . . . . . . . . . . . . . . . . . . . . . . . . 90
Mopier enabled . . . . . . . . . . . . . . . . . . . . . . . . . . . . . . . . . . . . . . . . . . . . . . . . . . . . . . . . . . . 91
Optional Paper Destinations. . . . . . . . . . . . . . . . . . . . . . . . . . . . . . . . . . . . . . . . . . . . . . . . . 91
Optional Paper Sources . . . . . . . . . . . . . . . . . . . . . . . . . . . . . . . . . . . . . . . . . . . . . . . . . . . . 91
Other Options . . . . . . . . . . . . . . . . . . . . . . . . . . . . . . . . . . . . . . . . . . . . . . . . . . . . . . . . . . . . 92
Software Technical Reference 5
Page 8

Storage. . . . . . . . . . . . . . . . . . . . . . . . . . . . . . . . . . . . . . . . . . . . . . . . . . . . . . . . . . . . . . . . . .92
Printer Memory. . . . . . . . . . . . . . . . . . . . . . . . . . . . . . . . . . . . . . . . . . . . . . . . . . . . . . . . . . . .92
Include types in application source list. . . . . . . . . . . . . . . . . . . . . . . . . . . . . . . . . . . . . . . . . . 93
Fonts . . . . . . . . . . . . . . . . . . . . . . . . . . . . . . . . . . . . . . . . . . . . . . . . . . . . . . . . . . . . . . . . . . .94
Ignore Application Collation . . . . . . . . . . . . . . . . . . . . . . . . . . . . . . . . . . . . . . . . . . . . . . . . . .95
Automatic Configuration. . . . . . . . . . . . . . . . . . . . . . . . . . . . . . . . . . . . . . . . . . . . . . . . . . . . .96
Printer image . . . . . . . . . . . . . . . . . . . . . . . . . . . . . . . . . . . . . . . . . . . . . . . . . . . . . . . . . . . . . 96
NT Forms tab features . . . . . . . . . . . . . . . . . . . . . . . . . . . . . . . . . . . . . . . . . . . . . . . . . . . . . . .97
Configuring the trays . . . . . . . . . . . . . . . . . . . . . . . . . . . . . . . . . . . . . . . . . . . . . . . . . . . . . . .97
Windows PS driver features . . . . . . . . . . . . . . . . . . . . . . . . . . . . . . . . . . . . . . . . . . . . . . . . . . . . . .98
PS 3 Emulation support for the HP LaserJet product . . . . . . . . . . . . . . . . . . . . . . . . . . . . . . . .98
Page Setup tab features . . . . . . . . . . . . . . . . . . . . . . . . . . . . . . . . . . . . . . . . . . . . . . . . . . . . 99
Advanced tab features . . . . . . . . . . . . . . . . . . . . . . . . . . . . . . . . . . . . . . . . . . . . . . . . . . . .100
Job Storage tab features . . . . . . . . . . . . . . . . . . . . . . . . . . . . . . . . . . . . . . . . . . . . . . . . . . .101
Off . . . . . . . . . . . . . . . . . . . . . . . . . . . . . . . . . . . . . . . . . . . . . . . . . . . . . . . . . . . . . . . . . . .101
Quick Copy . . . . . . . . . . . . . . . . . . . . . . . . . . . . . . . . . . . . . . . . . . . . . . . . . . . . . . . . . . . .101
Proof and Hold. . . . . . . . . . . . . . . . . . . . . . . . . . . . . . . . . . . . . . . . . . . . . . . . . . . . . . . . . . 102
Private Job and Stored Job. . . . . . . . . . . . . . . . . . . . . . . . . . . . . . . . . . . . . . . . . . . . . . . . 102
PIN . . . . . . . . . . . . . . . . . . . . . . . . . . . . . . . . . . . . . . . . . . . . . . . . . . . . . . . . . . . . . . . . .102
Private Job . . . . . . . . . . . . . . . . . . . . . . . . . . . . . . . . . . . . . . . . . . . . . . . . . . . . . . . . . . .102
Stored Job. . . . . . . . . . . . . . . . . . . . . . . . . . . . . . . . . . . . . . . . . . . . . . . . . . . . . . . . . . . .102
Device Settings tab features . . . . . . . . . . . . . . . . . . . . . . . . . . . . . . . . . . . . . . . . . . . . . . . . 104
HP LaserJet software CD-ROM . . . . . . . . . . . . . . . . . . . . . . . . . . . . . . . . . . . . . . . . . . . . . . . . . . .105
In-box file layout. . . . . . . . . . . . . . . . . . . . . . . . . . . . . . . . . . . . . . . . . . . . . . . . . . . . . . . . . . . .105
HP LaserJet software CD-ROM, Windows partition. . . . . . . . . . . . . . . . . . . . . . . . . . . . . . .105
Directory structure . . . . . . . . . . . . . . . . . . . . . . . . . . . . . . . . . . . . . . . . . . . . . . . . . . . . . . .105
HP LaserJet software CD-ROM, Macintosh Partition. . . . . . . . . . . . . . . . . . . . . . . . . . . . . . 105
Availability and fulfillment. . . . . . . . . . . . . . . . . . . . . . . . . . . . . . . . . . . . . . . . . . . . . . . . . . . . .105
In-box CD-ROMs . . . . . . . . . . . . . . . . . . . . . . . . . . . . . . . . . . . . . . . . . . . . . . . . . . . . . . . . .106
Web ordering. . . . . . . . . . . . . . . . . . . . . . . . . . . . . . . . . . . . . . . . . . . . . . . . . . . . . . . . . . .106
Web deployment . . . . . . . . . . . . . . . . . . . . . . . . . . . . . . . . . . . . . . . . . . . . . . . . . . . . . . . . .107
Printing-system software . . . . . . . . . . . . . . . . . . . . . . . . . . . . . . . . . . . . . . . . . . . . . . . . . .107
Printer firmware . . . . . . . . . . . . . . . . . . . . . . . . . . . . . . . . . . . . . . . . . . . . . . . . . . . . . . . . .107
Standalone drivers. . . . . . . . . . . . . . . . . . . . . . . . . . . . . . . . . . . . . . . . . . . . . . . . . . . . . . .107
Operating system driver bundles. . . . . . . . . . . . . . . . . . . . . . . . . . . . . . . . . . . . . . . . . . . .107
Point-and-print bundles . . . . . . . . . . . . . . . . . . . . . . . . . . . . . . . . . . . . . . . . . . . . . . . . . . . 107
Other operating systems . . . . . . . . . . . . . . . . . . . . . . . . . . . . . . . . . . . . . . . . . . . . . . . . . . 108
Software component availability. . . . . . . . . . . . . . . . . . . . . . . . . . . . . . . . . . . . . . . . . . . . . .108
Software component localization . . . . . . . . . . . . . . . . . . . . . . . . . . . . . . . . . . . . . . . . . . . . . 109
4 Installing Windows printing system components
Introduction. . . . . . . . . . . . . . . . . . . . . . . . . . . . . . . . . . . . . . . . . . . . . . . . . . . . . . . . . . . . . . . . . . . 113
System Requirements . . . . . . . . . . . . . . . . . . . . . . . . . . . . . . . . . . . . . . . . . . . . . . . . . . . . . . . . . .113
Windows 95, 98, Me, NT 4.0, 2000, and XP . . . . . . . . . . . . . . . . . . . . . . . . . . . . . . . . . . . . . .113
Windows 95, 98, Me, NT 4.0, 2000, and XP . . . . . . . . . . . . . . . . . . . . . . . . . . . . . . . . . . . . . . . . .113
Font support. . . . . . . . . . . . . . . . . . . . . . . . . . . . . . . . . . . . . . . . . . . . . . . . . . . . . . . . . . . . . . .114
Basic fonts . . . . . . . . . . . . . . . . . . . . . . . . . . . . . . . . . . . . . . . . . . . . . . . . . . . . . . . . . . . . . .114
Default fonts. . . . . . . . . . . . . . . . . . . . . . . . . . . . . . . . . . . . . . . . . . . . . . . . . . . . . . . . . . . . .114
Installation instructions. . . . . . . . . . . . . . . . . . . . . . . . . . . . . . . . . . . . . . . . . . . . . . . . . . . . . . .118
General installation for Windows 95, 98, Me, NT 4.0, 2000, and XP OSs . . . . . . . . . . . . . .118
Installing from the printing system CD-ROM . . . . . . . . . . . . . . . . . . . . . . . . . . . . . . . . . . .119
Installing from a network or from downloaded files . . . . . . . . . . . . . . . . . . . . . . . . . . . . . .119
Detailed Windows installation . . . . . . . . . . . . . . . . . . . . . . . . . . . . . . . . . . . . . . . . . . . . . . . . . 119
Typical Installation dialog box sequence . . . . . . . . . . . . . . . . . . . . . . . . . . . . . . . . . . . . . . .119
Custom installation. . . . . . . . . . . . . . . . . . . . . . . . . . . . . . . . . . . . . . . . . . . . . . . . . . . . . . . . 14 4
Product registration (HP WebReg) . . . . . . . . . . . . . . . . . . . . . . . . . . . . . . . . . . . . . . . . . . .146
6 Software Technical Reference
Page 9

Customization Utility for Windows. . . . . . . . . . . . . . . . . . . . . . . . . . . . . . . . . . . . . . . . . . . . 156
Silent installer. . . . . . . . . . . . . . . . . . . . . . . . . . . . . . . . . . . . . . . . . . . . . . . . . . . . . . . . . . 156
Customized silent installer . . . . . . . . . . . . . . . . . . . . . . . . . . . . . . . . . . . . . . . . . . . . . . . . 156
Driver Management and Configuration Utility (Internal). . . . . . . . . . . . . . . . . . . . . . . . . . 157
Command-line silent install . . . . . . . . . . . . . . . . . . . . . . . . . . . . . . . . . . . . . . . . . . . . . . . 157
Method 1: Command line. . . . . . . . . . . . . . . . . . . . . . . . . . . . . . . . . . . . . . . . . . . . . . . . 157
Method 2: SETUP.LST . . . . . . . . . . . . . . . . . . . . . . . . . . . . . . . . . . . . . . . . . . . . . . . . . 157
Driver-only installation. . . . . . . . . . . . . . . . . . . . . . . . . . . . . . . . . . . . . . . . . . . . . . . . . . . . . 158
Point and Print installation for Windows 95, 98, Me, NT 4.0, 2000, and XP . . . . . . . . . . . . 158
Setting a default printer. . . . . . . . . . . . . . . . . . . . . . . . . . . . . . . . . . . . . . . . . . . . . . . . . . . . . . 160
Windows 3.1x . . . . . . . . . . . . . . . . . . . . . . . . . . . . . . . . . . . . . . . . . . . . . . . . . . . . . . . . . . . . . . . . 160
Printer support . . . . . . . . . . . . . . . . . . . . . . . . . . . . . . . . . . . . . . . . . . . . . . . . . . . . . . . . . . . . 160
5 Installation for
Macintosh, IBM OS/2, and Linux operating systems
Introduction . . . . . . . . . . . . . . . . . . . . . . . . . . . . . . . . . . . . . . . . . . . . . . . . . . . . . . . . . . . . . . . . . . 161
System Requirements. . . . . . . . . . . . . . . . . . . . . . . . . . . . . . . . . . . . . . . . . . . . . . . . . . . . . . . . . . 161
Macintosh . . . . . . . . . . . . . . . . . . . . . . . . . . . . . . . . . . . . . . . . . . . . . . . . . . . . . . . . . . . . . . . . 161
IBM OS/2 . . . . . . . . . . . . . . . . . . . . . . . . . . . . . . . . . . . . . . . . . . . . . . . . . . . . . . . . . . . . . . . . 161
Linux . . . . . . . . . . . . . . . . . . . . . . . . . . . . . . . . . . . . . . . . . . . . . . . . . . . . . . . . . . . . . . . . . . . . 161
Macintosh . . . . . . . . . . . . . . . . . . . . . . . . . . . . . . . . . . . . . . . . . . . . . . . . . . . . . . . . . . . . . . . . . . . 162
Macintosh component descriptions. . . . . . . . . . . . . . . . . . . . . . . . . . . . . . . . . . . . . . . . . . . . . 162
HP LaserJet PPDs . . . . . . . . . . . . . . . . . . . . . . . . . . . . . . . . . . . . . . . . . . . . . . . . . . . . . . . 162
PDEs (Mac OS X). . . . . . . . . . . . . . . . . . . . . . . . . . . . . . . . . . . . . . . . . . . . . . . . . . . . . . . . 162
HP LaserJet Utility . . . . . . . . . . . . . . . . . . . . . . . . . . . . . . . . . . . . . . . . . . . . . . . . . . . . . . . 162
Installation notes. . . . . . . . . . . . . . . . . . . . . . . . . . . . . . . . . . . . . . . . . . . . . . . . . . . . . . . . . 162
ColorSync profiles. . . . . . . . . . . . . . . . . . . . . . . . . . . . . . . . . . . . . . . . . . . . . . . . . . . . . . . . 162
Online Help . . . . . . . . . . . . . . . . . . . . . . . . . . . . . . . . . . . . . . . . . . . . . . . . . . . . . . . . . . . . . 163
HP Auto Setup Utility . . . . . . . . . . . . . . . . . . . . . . . . . . . . . . . . . . . . . . . . . . . . . . . . . . . . . 163
Screen fonts . . . . . . . . . . . . . . . . . . . . . . . . . . . . . . . . . . . . . . . . . . . . . . . . . . . . . . . . . . . . 163
Font support . . . . . . . . . . . . . . . . . . . . . . . . . . . . . . . . . . . . . . . . . . . . . . . . . . . . . . . . . . . 163
Installing the Macintosh printing system . . . . . . . . . . . . . . . . . . . . . . . . . . . . . . . . . . . . . . . . . 166
To install the HP LaserJet printer software for Macintosh OS . . . . . . . . . . . . . . . . . . . . . . . . 166
Uninstalling the Macintosh printing system. . . . . . . . . . . . . . . . . . . . . . . . . . . . . . . . . . . . . . . 167
In-box disk layout . . . . . . . . . . . . . . . . . . . . . . . . . . . . . . . . . . . . . . . . . . . . . . . . . . . . . . . . 167
Folders and files added through installation of the HP LaserJet software (Macintosh OS) . . 167
Macintosh (Macintosh OS) installation . . . . . . . . . . . . . . . . . . . . . . . . . . . . . . . . . . . . . . . . . . 167
Main Install dialog box sequence . . . . . . . . . . . . . . . . . . . . . . . . . . . . . . . . . . . . . . . . . . . . 167
Printer setup using AppleTalk Chooser . . . . . . . . . . . . . . . . . . . . . . . . . . . . . . . . . . . . . . . 173
HP LaserJet Screen Fonts Installer dialog box sequence . . . . . . . . . . . . . . . . . . . . . . . . . 174
IBM OS/2 Warp 3.0 and later . . . . . . . . . . . . . . . . . . . . . . . . . . . . . . . . . . . . . . . . . . . . . . . . . . . . 176
OS/2 installation instructions. . . . . . . . . . . . . . . . . . . . . . . . . . . . . . . . . . . . . . . . . . . . . . . . . . 176
Installing a printer in OS/2 when printer object is missing . . . . . . . . . . . . . . . . . . . . . . . . . 176
Installing a printer in OS/2 with pre-existing printer object on desktop . . . . . . . . . . . . . . . . 177
Font support . . . . . . . . . . . . . . . . . . . . . . . . . . . . . . . . . . . . . . . . . . . . . . . . . . . . . . . . . . . . . . 178
Changing a printer driver in the printer object. . . . . . . . . . . . . . . . . . . . . . . . . . . . . . . . . . . . . 179
Changing the printer properties . . . . . . . . . . . . . . . . . . . . . . . . . . . . . . . . . . . . . . . . . . . . . . . 179
Changing the job properties . . . . . . . . . . . . . . . . . . . . . . . . . . . . . . . . . . . . . . . . . . . . . . . . . . 179
6 Engineering Detail
Introduction . . . . . . . . . . . . . . . . . . . . . . . . . . . . . . . . . . . . . . . . . . . . . . . . . . . . . . . . . . . . . . . . . . 181
Media attributes. . . . . . . . . . . . . . . . . . . . . . . . . . . . . . . . . . . . . . . . . . . . . . . . . . . . . . . . . . . . . . . 181
Paper-source commands . . . . . . . . . . . . . . . . . . . . . . . . . . . . . . . . . . . . . . . . . . . . . . . . . . . . 181
Media types and sizes . . . . . . . . . . . . . . . . . . . . . . . . . . . . . . . . . . . . . . . . . . . . . . . . . . . . . . 182
Paper Type commands. . . . . . . . . . . . . . . . . . . . . . . . . . . . . . . . . . . . . . . . . . . . . . . . . . . . . . 185
Index
Software Technical Reference 7
Page 10

8 Software Technical Reference
Page 11

List of tables
Table 1. Bidirectional communication support in various operating systems . . . . . . . . . . . . . . . . 18
Table 2. Default alerts selection state for connection type . . . . . . . . . . . . . . . . . . . . . . . . . . . . . . . 29
Table 3. Update messages . . . . . . . . . . . . . . . . . . . . . . . . . . . . . . . . . . . . . . . . . . . . . . . . . . . . . . 34
Table 4. Bubble Help messages . . . . . . . . . . . . . . . . . . . . . . . . . . . . . . . . . . . . . . . . . . . . . . . . . . 48
Table 5. Page orientation . . . . . . . . . . . . . . . . . . . . . . . . . . . . . . . . . . . . . . . . . . . . . . . . . . . . . . . . 53
Table 6. Selected paper size . . . . . . . . . . . . . . . . . . . . . . . . . . . . . . . . . . . . . . . . . . . . . . . . . . . . . 54
Table 7. Watermark color values . . . . . . . . . . . . . . . . . . . . . . . . . . . . . . . . . . . . . . . . . . . . . . . . . . 66
Table 8. Name drop-down menu text strings . . . . . . . . . . . . . . . . . . . . . . . . . . . . . . . . . . . . . . . . 73
Table 9. Custom width and height limits for the HP Color LaserJet 5500 . . . . . . . . . . . . . . . . . . . 74
Table 10. Close dialog box text strings . . . . . . . . . . . . . . . . . . . . . . . . . . . . . . . . . . . . . . . . . . . . . 74
Table 11. Printer behavior with Ignore Application Collation settings . . . . . . . . . . . . . . . . . . . . . . 95
Table 12. CD-ROM versions . . . . . . . . . . . . . . . . . . . . . . . . . . . . . . . . . . . . . . . . . . . . . . . . . . . . 106
Table 13. Software component availability for HP Color LaserJet 5500 product . . . . . . . . . . . . 108
Table 14. Software component localization for the HP Color LaserJet 5500 product . . . . . . . . . 109
Table 15. Default fonts . . . . . . . . . . . . . . . . . . . . . . . . . . . . . . . . . . . . . . . . . . . . . . . . . . . . . . . . . 114
Table 16. Additional PS 3 fonts . . . . . . . . . . . . . . . . . . . . . . . . . . . . . . . . . . . . . . . . . . . . . . . . . . 116
Table 17. Choose Setup Language dialog box text strings . . . . . . . . . . . . . . . . . . . . . . . . . . . . . 120
Table 18. Setup dialog box text strings . . . . . . . . . . . . . . . . . . . . . . . . . . . . . . . . . . . . . . . . . . . . 121
Table 19. Welcome dialog box text strings . . . . . . . . . . . . . . . . . . . . . . . . . . . . . . . . . . . . . . . . . . 122
Table 20. HP Software License Agreement dialog box text strings . . . . . . . . . . . . . . . . . . . . . . . 123
Table 21. Web Update dialog box text strings . . . . . . . . . . . . . . . . . . . . . . . . . . . . . . . . . . . . . . . 125
Table 22. Type of Connection dialog box text strings . . . . . . . . . . . . . . . . . . . . . . . . . . . . . . . . . 126
Table 23. Select Port dialog box text strings . . . . . . . . . . . . . . . . . . . . . . . . . . . . . . . . . . . . . . . . 128
Table 24. Network Setup dialog box text strings . . . . . . . . . . . . . . . . . . . . . . . . . . . . . . . . . . . . . 130
Table 25. Network Printer Configuration dialog box text strings . . . . . . . . . . . . . . . . . . . . . . . . . 131
Table 26. Identify Printer dialog box text strings . . . . . . . . . . . . . . . . . . . . . . . . . . . . . . . . . . . . . 133
Table 27. Specify Network Path dialog box text strings . . . . . . . . . . . . . . . . . . . . . . . . . . . . . . . . 134
Table 28. Set Network Communication Mode dialog box text strings . . . . . . . . . . . . . . . . . . . . . 135
Table 29. Printer Model dialog box text strings . . . . . . . . . . . . . . . . . . . . . . . . . . . . . . . . . . . . . . 136
Table 30. Installation Type dialog box text strings . . . . . . . . . . . . . . . . . . . . . . . . . . . . . . . . . . . . 138
Table 31. Printer Name dialog box text strings . . . . . . . . . . . . . . . . . . . . . . . . . . . . . . . . . . . . . . 139
Table 32. Printer Sharing dialog box text strings . . . . . . . . . . . . . . . . . . . . . . . . . . . . . . . . . . . . . 141
Table 33. Finish dialog box text strings . . . . . . . . . . . . . . . . . . . . . . . . . . . . . . . . . . . . . . . . . . . . 143
Table 34. Exit Setup dialog box text strings . . . . . . . . . . . . . . . . . . . . . . . . . . . . . . . . . . . . . . . . . 144
Table 35. Custom Installation dialog box text strings . . . . . . . . . . . . . . . . . . . . . . . . . . . . . . . . . . 146
Table 36. Hewlett-Packard’s Electro nic Regis tr ation text strings . . . . . . . . . . . . . . . . . . . . . . . . . 148
Table 37. Welcome to Hewlett-Packard’s Regi strat ion dialo g box text string s . . . . . . . . . . . . . . 149
Table 38. Hewlett-Packard’s Electronic Registration dialog box text strings (1 of 3) . . . . . . . . . . 151
Table 39. Hewlett-Packard’s Electronic Registration dialog box text strings (2 of 3) . . . . . . . . . . 153
Table 40. Hewlett-Packard’s Elect ronic Regis trati on dialo g box text string s (3 of 3) . . . . . . . . . . 15 4
Table 41. Exiting registration text strings . . . . . . . . . . . . . . . . . . . . . . . . . . . . . . . . . . . . . . . . . . . 155
Table 42. Windows servers with Windows clients . . . . . . . . . . . . . . . . . . . . . . . . . . . . . . . . . . . . 159
Table 43. HP LaserJet for Macintosh installer spla sh screen dialo g box text string s . . . . . . . . . . 16 8
Table 44. HP LaserJet Installer dialog text strings (easy instal l) . . . . . . . . . . . . . . . . . . . . . . . . . 169
Table 45. HP LaserJet Installer dialog text strings (custom inst all ) . . . . . . . . . . . . . . . . . . . . . . . 171
Table 46. Installing dialog text strings . . . . . . . . . . . . . . . . . . . . . . . . . . . . . . . . . . . . . . . . . . . . . 172
Table 47. Installation successful dialog text strin gs . . . . . . . . . . . . . . . . . . . . . . . . . . . . . . . . . . . 172
Table 48. Important! dialog box text strings . . . . . . . . . . . . . . . . . . . . . . . . . . . . . . . . . . . . . . . . . 173
Table 49. How do I select my printer? dialog text strings . . . . . . . . . . . . . . . . . . . . . . . . . . . . . . . 174
Software Technical Reference 9
Page 12

Table 50. HP LaserJet Screen Fonts splash screen dialog text strings . . . . . . . . . . . . . . . . . . . .174
Table 51. HP LaserJet Screen Fonts installer dialog text strings (1 of 2) . . . . . . . . . . . . . . . . . . .175
Table 52. HP LaserJet Screen Fonts installer dialog text strings (2 of 2) . . . . . . . . . . . . . . . . . . .175
Table 53. Installation was successful dialog text strings . . . . . . . . . . . . . . . . . . . . . . . . . . . . . . . .176
Table 54. Paper-source commands for the HP LaserJet 5500 product . . . . . . . . . . . . . . . . . . . . 181
Table 55. Supported features and attributes . . . . . . . . . . . . . . . . . . . . . . . . . . . . . . . . . . . . . . . . 182
Table 56. Input-device supported sizes for the HP Color LaserJet 5500 product . . . . . . . . . . . . . 183
Table 57. Input-device supported media types for the HP Color LaserJet 5500 product . . . . . . .184
Table 58. PCL 5e and PCL 6 custom paper sizes for the HP Color LaserJet 5500 product . . . . .185
Table 59. Paper-type commands . . . . . . . . . . . . . . . . . . . . . . . . . . . . . . . . . . . . . . . . . . . . . . . . .185
10 List of tables Software Technical Reference
Page 13

List of figures
Figure 1. Device Status. . . . . . . . . . . . . . . . . . . . . . . . . . . . . . . . . . . . . . . . . . . . . . . . . . . . . . . . . 21
Figure 2. Configuration page. . . . . . . . . . . . . . . . . . . . . . . . . . . . . . . . . . . . . . . . . . . . . . . . . . . . . 22
Figure 3. Configure Device . . . . . . . . . . . . . . . . . . . . . . . . . . . . . . . . . . . . . . . . . . . . . . . . . . . . . . 23
Figure 4. Networking tab . . . . . . . . . . . . . . . . . . . . . . . . . . . . . . . . . . . . . . . . . . . . . . . . . . . . . . . . 24
Figure 5. Configurable Alerts. . . . . . . . . . . . . . . . . . . . . . . . . . . . . . . . . . . . . . . . . . . . . . . . . . . . . 25
Figure 6. Printer Status and Alerts icons. . . . . . . . . . . . . . . . . . . . . . . . . . . . . . . . . . . . . . . . . . . . 27
Figure 7. Refresh Rate option . . . . . . . . . . . . . . . . . . . . . . . . . . . . . . . . . . . . . . . . . . . . . . . . . . . . 28
Figure 8. Printer Status and Alerts options . . . . . . . . . . . . . . . . . . . . . . . . . . . . . . . . . . . . . . . . . . 30
Figure 9. Installation CD browser main screen . . . . . . . . . . . . . . . . . . . . . . . . . . . . . . . . . . . . . . . 38
Figure 10. A typical constraint message with an OK button . . . . . . . . . . . . . . . . . . . . . . . . . . . . . 46
Figure 11. A property page with Bubble Help icons . . . . . . . . . . . . . . . . . . . . . . . . . . . . . . . . . . . 47
Figure 12. The default appearance of the Finishing tab . . . . . . . . . . . . . . . . . . . . . . . . . . . . . . . . 50
Figure 13. Finishing tab - User’s Manual Quick Set . . . . . . . . . . . . . . . . . . . . . . . . . . . . . . . . . . . 52
Figure 14. Activating booklet printing . . . . . . . . . . . . . . . . . . . . . . . . . . . . . . . . . . . . . . . . . . . . . . 55
Figure 15. Selecting booklet printing type . . . . . . . . . . . . . . . . . . . . . . . . . . . . . . . . . . . . . . . . . . . 56
Figure 16. Page-order preview images. . . . . . . . . . . . . . . . . . . . . . . . . . . . . . . . . . . . . . . . . . . . . 57
Figure 17. Print Quality Details dialog box showing HP Color LaserJet Default setting . . . . . . . . 58
Figure 18. Effects tab . . . . . . . . . . . . . . . . . . . . . . . . . . . . . . . . . . . . . . . . . . . . . . . . . . . . . . . . . . 62
Figure 19. Preview images - Legal on Letter; Scale to Fit off (left) and on (right). . . . . . . . . . . . . 63
Figure 20. Watermark Details dialog box . . . . . . . . . . . . . . . . . . . . . . . . . . . . . . . . . . . . . . . . . . . 64
Figure 21. Paper tab . . . . . . . . . . . . . . . . . . . . . . . . . . . . . . . . . . . . . . . . . . . . . . . . . . . . . . . . . . . 68
Figure 22. Other Pages mini-tab . . . . . . . . . . . . . . . . . . . . . . . . . . . . . . . . . . . . . . . . . . . . . . . . . . 69
Figure 23. Back Cover mini-tab. . . . . . . . . . . . . . . . . . . . . . . . . . . . . . . . . . . . . . . . . . . . . . . . . . . 70
Figure 24. Custom Paper Size dialog box. . . . . . . . . . . . . . . . . . . . . . . . . . . . . . . . . . . . . . . . . . . 71
Figure 25. Destination tab . . . . . . . . . . . . . . . . . . . . . . . . . . . . . . . . . . . . . . . . . . . . . . . . . . . . . . . 77
Figure 26. Basics tab. . . . . . . . . . . . . . . . . . . . . . . . . . . . . . . . . . . . . . . . . . . . . . . . . . . . . . . . . . . 83
Figure 27. About This Driver dialog box . . . . . . . . . . . . . . . . . . . . . . . . . . . . . . . . . . . . . . . . . . . . 85
Figure 28. Color tab. . . . . . . . . . . . . . . . . . . . . . . . . . . . . . . . . . . . . . . . . . . . . . . . . . . . . . . . . . . . 86
Figure 29. Manual Color Options dialog box. . . . . . . . . . . . . . . . . . . . . . . . . . . . . . . . . . . . . . . . . 87
Figure 30. Configure tab . . . . . . . . . . . . . . . . . . . . . . . . . . . . . . . . . . . . . . . . . . . . . . . . . . . . . . . . 89
Figure 31. More Configuration Options dialog box . . . . . . . . . . . . . . . . . . . . . . . . . . . . . . . . . . . . 92
Figure 32. Configure Font DIMMs dialog box . . . . . . . . . . . . . . . . . . . . . . . . . . . . . . . . . . . . . . . . 94
Figure 33. Driver NT Forms tab. . . . . . . . . . . . . . . . . . . . . . . . . . . . . . . . . . . . . . . . . . . . . . . . . . . 97
Figure 34. Page Setup tab . . . . . . . . . . . . . . . . . . . . . . . . . . . . . . . . . . . . . . . . . . . . . . . . . . . . . . 99
Figure 35. Advanced tab . . . . . . . . . . . . . . . . . . . . . . . . . . . . . . . . . . . . . . . . . . . . . . . . . . . . . . . 100
Figure 36. Job Storage tab . . . . . . . . . . . . . . . . . . . . . . . . . . . . . . . . . . . . . . . . . . . . . . . . . . . . . 101
Figure 37. Device Settings tab . . . . . . . . . . . . . . . . . . . . . . . . . . . . . . . . . . . . . . . . . . . . . . . . . . 104
Figure 38. Choose Setup Language dialog box . . . . . . . . . . . . . . . . . . . . . . . . . . . . . . . . . . . . . 120
Figure 39. Setup dialog box . . . . . . . . . . . . . . . . . . . . . . . . . . . . . . . . . . . . . . . . . . . . . . . . . . . . 120
Figure 40. Welcome dialog box. . . . . . . . . . . . . . . . . . . . . . . . . . . . . . . . . . . . . . . . . . . . . . . . . . 122
Figure 41. HP Software License Agreement dialog box . . . . . . . . . . . . . . . . . . . . . . . . . . . . . . . 123
Figure 42. Web Update dialog box . . . . . . . . . . . . . . . . . . . . . . . . . . . . . . . . . . . . . . . . . . . . . . . 124
Figure 43. Type of Connection dialog box. . . . . . . . . . . . . . . . . . . . . . . . . . . . . . . . . . . . . . . . . . 126
Figure 44. Select Port dialog box . . . . . . . . . . . . . . . . . . . . . . . . . . . . . . . . . . . . . . . . . . . . . . . . 127
Figure 45. Select Port dialog box . . . . . . . . . . . . . . . . . . . . . . . . . . . . . . . . . . . . . . . . . . . . . . . . 127
Figure 46. Network Setup dialog box . . . . . . . . . . . . . . . . . . . . . . . . . . . . . . . . . . . . . . . . . . . . . 129
Figure 47. Network Setup dialog box . . . . . . . . . . . . . . . . . . . . . . . . . . . . . . . . . . . . . . . . . . . . . 129
Figure 48. Identify Printer dialog box (1 of 2) . . . . . . . . . . . . . . . . . . . . . . . . . . . . . . . . . . . . . . . 132
Figure 49. Identify Printer dialog box (2 of 2) . . . . . . . . . . . . . . . . . . . . . . . . . . . . . . . . . . . . . . . 132
Software Technical Reference 11
Page 14

Figure 50. Specify Network Path dialog box. . . . . . . . . . . . . . . . . . . . . . . . . . . . . . . . . . . . . . . . . 134
Figure 51. Set Network Communication Mode dialog box . . . . . . . . . . . . . . . . . . . . . . . . . . . . . . 135
Figure 52. Printer Model dialog box . . . . . . . . . . . . . . . . . . . . . . . . . . . . . . . . . . . . . . . . . . . . . . .136
Figure 53. Installation Type dialog box. . . . . . . . . . . . . . . . . . . . . . . . . . . . . . . . . . . . . . . . . . . . .137
Figure 54. Printer Name dialog box . . . . . . . . . . . . . . . . . . . . . . . . . . . . . . . . . . . . . . . . . . . . . . .139
Figure 55. Printer Sharing dialog box. . . . . . . . . . . . . . . . . . . . . . . . . . . . . . . . . . . . . . . . . . . . . .140
Figure 56. Finish dialog box . . . . . . . . . . . . . . . . . . . . . . . . . . . . . . . . . . . . . . . . . . . . . . . . . . . . .142
Figure 57. Finish dialog box . . . . . . . . . . . . . . . . . . . . . . . . . . . . . . . . . . . . . . . . . . . . . . . . . . . . .142
Figure 58. Exit Setup dialog box. . . . . . . . . . . . . . . . . . . . . . . . . . . . . . . . . . . . . . . . . . . . . . . . . .143
Figure 59. Exit Setup dialog box. . . . . . . . . . . . . . . . . . . . . . . . . . . . . . . . . . . . . . . . . . . . . . . . . .143
Figure 60. Components dialog box, Custom Installat ion . . . . . . . . . . . . . . . . . . . . . . . . . . . . . . .145
Figure 61. Hewlett-Packard’s Electronic Registration dialog box. . . . . . . . . . . . . . . . . . . . . . . . .147
Figure 62. Welcome to Hewlett-Packard’s Registrat ion dialo g box . . . . . . . . . . . . . . . . . . . . . . .149
Figure 63. Hewlett-Packard’s Electronic Registration dialog box (1 of 3). . . . . . . . . . . . . . . . . . . 150
Figure 64. Hewlett-Packard’s Electro nic Regi stration dialog box (2 of 3). . . . . . . . . . . . . . . . . . . 152
Figure 65. Hewlett-Packard’s Electronic Registration dialog box (3 of 3). . . . . . . . . . . . . . . . . . . 154
Figure 66. Exiting registration! dialog box . . . . . . . . . . . . . . . . . . . . . . . . . . . . . . . . . . . . . . . . . . 155
Figure 67. HP LaserJet for Macintosh installer splash screen dialog box . . . . . . . . . . . . . . . . . .167
Figure 68. HP LaserJet Installer dialog box (easy install) . . . . . . . . . . . . . . . . . . . . . . . . . . . . . . 168
Figure 69. HP LaserJet Installer dialog box (custom install) . . . . . . . . . . . . . . . . . . . . . . . . . . . . 170
Figure 70. Installing dialog box. . . . . . . . . . . . . . . . . . . . . . . . . . . . . . . . . . . . . . . . . . . . . . . . . . .172
Figure 71. Installation was successful dialog box. . . . . . . . . . . . . . . . . . . . . . . . . . . . . . . . . . . . . 172
Figure 72. Important! dialog box. . . . . . . . . . . . . . . . . . . . . . . . . . . . . . . . . . . . . . . . . . . . . . . . . .173
Figure 73. How do I select my printer? dialog box . . . . . . . . . . . . . . . . . . . . . . . . . . . . . . . . . . . .173
Figure 74. HP LaserJet Screen Fonts splash screen dialog box . . . . . . . . . . . . . . . . . . . . . . . . .174
Figure 75. HP LaserJet Screen Fonts installer dialog box . . . . . . . . . . . . . . . . . . . . . . . . . . . . . . 175
Figure 76. Installation was successful dialog box. . . . . . . . . . . . . . . . . . . . . . . . . . . . . . . . . . . . . 176
12 List of figures Software Technical Reference
Page 15

Purpose and Scope
1
Introduction
This Software Technical Reference (STR) provides information and troubleshooting tips
for the printing system software for the HP Color LaserJet 5500 product.
This document is prepared in an electronic format to serve as a quick-reference tool for
Customer Care Center (CCC) agents, support engineers, system administrators,
management information systems (MIS) personnel, and HP LaserJet product end-users,
as appropriate.
The following information is included in this technical reference:
z descriptions of drivers and platforms with system modifications
z procedures for installing and uninstalling software components
z descriptions of problems that can arise while using the product, and known solutions
to those problems
z descriptions of known software issues and workarounds
A description of the product model or models described in this STR is provided below.
The printing system software for each product model accommodates the differences
between models.
Note Bundle configurations might vary among geographic regions.
Software Technical Reference Introduction 13
Page 16

HP Color LaserJet 5500
The HP Color LaserJet 4600 product is available in five bundle configurations.
z HP Color LaserJet 5500. This model includes a total of 96 megabytes (MB) of
synchronous dynamic random access memory (SDRAM), expandable to 384 MB
SDRAM (maximum); a multipur pose tray (tray 1); and a 500-sheet XY tray (tray 2).
z HP Color LaserJet 5500n. This model includes a total of 96 megabytes (MB) of
synchronous dynamic random access memory (SDRAM), expandable to 384 MB
SDRAM (maximum); a multipurpose tray (tray 1); a 500-sheet XY tray (tray 2); and a
Jetdirect print server enhanced input/output (EIO) network card.
z HP Color LaserJet 5500dn. This model includes a total of 96 megabytes (MB) of
synchronous dynamic random access memory (SDRAM), expandable to 384 MB
SDRAM (maximum); a multipurpose tray (tray 1); a 500-sheet XY tray (tray 2); a
Jetdirect print server enhanced input/output (EIO) network card; and a duplexing unit.
z HP Color LaserJet 5500dtn. This model includes a total of 160 megabytes (MB) of
synchronous dynamic random access memory (SDRAM), expandable to 384 MB
SDRAM (maximum); a multipurpose tray (tray 1); two 500-sheet XY trays (trays 2 and
3); a Jetdirect print server enhanced input/output (EIO) network card; a duplexing unit,
and a stand.
z HP Color LaserJet 5500hdn. This model includes a total of 160 megabytes (MB) of
synchronous dynamic random access memory (SDRAM), expandable to 384 MB
SDRAM (maximum); a 10-gigabyte (GB) hard disk; multipurpose tray 1; three 500sheet XY trays (trays 2, 3, and 4); a Jetdirect pr int server enhanced input/output (EIO)
network card; a duplexing unit, and a stand.
The use guide might include memor y that is found on the formatter called "Pageframe
Memory" (32 MB) that can be used/allocated by the printer, for a print job along with the
memory found on the 96-MB or 160-MB RAM dual in-line memory module (DIMM) in the
printer. The driver and the configuration page show only the total memory found on the
RAM DIMM(s).
14 1 Purpose and Scope Software Technical Reference
Page 17

Software Description
2
Introduction
The product comes with software and installers for Microsoft (R) Windows (R) and Apple
Computer, Inc., Macintosh systems. UNIX (R) and OS/2 systems are suppor ted, and
software is available on the Web. For specific information about a system's installer,
drivers, and components, locate the section that corresponds to that system.
Supported operating systems
The following operating systems (OSs) support the HP LaserJet printing-system software,
including standard printer command language (PCL) drivers and PostScript (R) (PS)
emulation drivers. Windows OSs support a full-featured configuration of the HP LaserJet
product; other OSs support varying levels of functionality.
z Windows 95.
z Windows 98.
z Windows Millennium Edition (Me).
z Windows NT (R) 4.0 (Service packs 3 through 6).
z Windows 2000 (Service packs 1 and 2).
z Windows XP Professional and Windows XP Home Edition (Windows XP)
z IBM OS/2 2.0 or later (available on the IBM Web site at http://www.ibm.com).
z Mac OS 8.6 to 9.x and Mac OS X Classic.
Windows Terminal Server, Windows Cluster Server, and Citrix Terminal server
technology allows as many as 128 devices or terminals to share the resources
dynamically on a terminal server. A terminal server eliminates the need for modems,
network interface cards, applications, or complete operating systems on the terminals.
Terminals can include personal computers, so-called dumb terminals, printers, and other
devices. Ter minal clients connect to the terminal server through Transmission Control
Protocol/Internet Protocol (TCP/IP). Citrix Metaframe supports connection through TCP/
IP, NETBIOS Extended User Interface (NetBEUI), Internetwork Packet Exchange/
Sequenced Packet Exchange (IPX/SPX), and asynchronous modem connections. In turn,
the terminal server connects to a local area network (LAN) through a network interface
card. For infor mation (including a list of supported printers, recommendations for installing
printer drivers, a description of terminal server configurations, differences between
terminal server versions, and differences between remote client operating systems) about
supported printers and driver versions, visit the Web site at the following URL:
http://www.hp.com/cposupport/printers/support_doc/bpl10248.html
Software Technical Reference Introduction 15
Page 18

Technology background information
This section addresses the following topics:
z "HP LaserJet user documentation" in HP LaserJet user documentation
z "Bidirectional communication" in Bidirectional communication
z "Driver Autoconfiguration" in Driver Autoconfiguration
z "HP Web Access" in HP Web Access
z "Printer Status and Alerts" in Printer Status and Alerts
z "Remote firmware update" in Remote fir mware update
z "Euro character" in Euro character
z "International Color Consortium profiles" in International Color Consortium profiles
z "PANTONE (R)* color profiles" in PANTONE (R)* color profiles
HP LaserJet user documentation
Adobe Acrobat Reader
The HP LaserJet software compact disk - read-only memory (CD-ROM) includes
Adobe (R) Acrobat (R) Reader version 5.0 (version 4.05c for Russian) for viewing
online documentation. When you click any of the documentation links in the HP
LaserJet software CD browser, the installer scans the system for an installed Portable
Document Format (PDF) reader. If the installer cannot find a reader, the installer
presents the option to install the Adobe Acrobat Reader.
Note Adobe Acrobat Reader 4.0 or later is required to view the documents on the HP LaserJet software CD
browser.
HP LaserJet guides
On the CD-ROM that came with the product, the HP LaserJet 5500 use guide is
supplied in Adobe Acrobat Reader PDF files for viewing on your computer.
You can either view the guide from the HP LaserJet CD browser or install it on your
system. To install the online use guide, select the User Guide check box during a
Custom Installation. The guide is installed in the Manuals folder on the target system.
You can also choose to install the guides later, or read the guide on the printing
system software CD-ROM by navigating to <language>/Manuals.
In accordance with the Americans with Disabilities Act (ADA), Hewlett-Packard
provides a readable, onscreen version of the HP LaserJet 5500 use guide at the
following HP Web site:
http://www.hp.com/support/lj5500.
A hyperlinked, screen-readable version of the HP Color LaserJet 5500 use guide is
available on the printer software CD-ROM. To view the use guide, navigate to the
"English" folder, and then to the "Manuals" folder. There, open HP5500EN.CHM.
16 2 Software Description Software Technical Reference
Page 19

HP LaserJet product printing-system installation notes
The HP LaserJet 5500 Series Printing System Installation Notes are available on the
HP LaserJet software CD-ROM. The installation notes (filename READ5500.RTF for
the HP Color LaserJet 5500 product) contain important information about product
features, instructions for installing the printing-system software, and technical
assistance.
To view this text file from the HP Color LaserJet 5500 software CD browser, click
View Documentation, and then click Readme.
You can also gain access to the file by inserting the CD-ROM, navigating to
<LANGUAGE>, and then clicking the filename, READ5500.RTF. When you have the
file open in Notepad, you can click File, and then click Save As to save a copy of the
file to another location.
HP LaserJet product printing-system release notes
The Hewlett-Packard LaserJet 5500 Printing System Release notes, late-breaking
information, and other technical assistance, are available on the Web at the following
URL:
http://www.hp.com/support/lj5500
Other HP LaserJet documents
Guides for accessories and Jetdirect networking are also available as Adobe Acrobat
PDF files. You can view these documents from the HP LaserJet software CD browser
by clicking View Documentation and then clicking the name of the guide you want to
view. To install the file, select the printer documentation check box during a Custom
Installation.
The following guides are available:
• HP Jetdirect Administrator's Guide (click
• HP Fast InfraRed Receiver for HP LaserJet Printers (click
HP Jetdirect Guide)
hp FIR Guide)
Bidirectional communication
Bidirectional communication is the product’s ability to respond to data inquiries from the
computer and report back information, such as what type of print media is available or
what accessories are connected to the printer. If a product does not have this capability
(that is, if it has no bidirectional mode), it can only accept commands from the host and
cannot report information back.
Driver Autoconfiguration and Printer Status and Alerts use bidirectional communications
software. The Typical Installation installs Driver Autoconfiguration in supported
environments that contain the bidirectional communication software. Use Custom
Installation when you do not want these features.
Bidirectional communication depends upon the type of connection between your
computer to your printer and your network operating system.
The following table provides inform ation about the operating systems and networ k
environments that support bidirectional communication.
Software Technical Reference Technology background information 17
Page 20

Connection
type
Direct
Connect
Network
Port
Table 1. Bidirectional communication support in various operating systems
Jetdirect TCP/IP
IPX/SPX
Windows 95Windows 98Windows MeWindows
NT 4.0
XXXX
2
XXXXXXX
3
XXXXXX
1
Windows
2000
Windows
XP (32-bit
only)
XX
Macintosh
4
Novell
Microsoft
Share
Standard TCP/IP
XXXXXX
(HP)
TCP/IP
4
)
(MS
IPX/SPX
XXXXXX
XXX
(HP)
LPR X X X X
AppleTalk X
NetWare
4.x
Bindery
queue
NDS5
XXXXXX
XXXXXX
queue
NetWare
5.x
Bindery
queue
NDS
XXXXXX
XXXXXX
queue
Windows
95, 98, or
Me host
Windows
NT 4.0,
2000, or
6
host
XP
TCP/IPXXXXXXX
IPX/SPX X X X X X X
TCP/IPXXXXXXX
IPX/SPX X X X X X X
LPRXXXXXX
1
Windows NT 4.0 supports parallel but not universal serial bus (USB) connections.
2
Transmission control protocol/Internet protocol.
3
Internet packet exchange/sequences packet excha nge.
4
Bidirectional functionality is supported only with the client software from Novell. It is not supported with Microsoft Client
Service for Netware.
5
Novell Directory Services.
6
Printer Status and Alerts is not installed when the share computer is running Terminal Server.
Driver Autoconfiguration
The HP LaserJet PCL 6 and PCL 5c dr ivers for Windows feature bidirectional
communication technology which, in supported environments, provides automatic
discovery and driver configuration for printer accessories at the time of installation or later,
if needed. Some accessories that are supported by Driver Autoconfiguration are the
duplexing unit, optional paper trays, font dual inline memory modules (DIMMs), and the
hard drive.
18 2 Software Description Software Technical Reference
Page 21

If the environment supports bidirectional communication, the installer presents Driver
Autoconfiguration as an installable component by default for a Typical Installation, and as
an optional installable component for a Custom Installation. The Driver Autoconfiguration
component installs the bidirectional communication software. If the installation
environment does not support bidirectional communication, the Driver Autoconfiguration
option does not appear during installation. However, installed drivers will be configured
automatically in accordance with the HP printer bundle selected during installation of the
printing-system software.
Driver Autoconfiguration works in four ways:
z In environments that support bidirectional communication, the computer
communicates with the product, determines the physical configuration, and then
configures the driver accordingly.
z If the configuration of the HP LaserJet product changes after installation, the driver
can be automatically updated with the new configuration in environments that support
bidirectional communication. For example, if the base printer model is installed and an
optional duplexing unit is added later, you can automatically configure the duplexing
unit in the dr iver by clicking the Update Now button on the driver's Configuration tab.
The Update Now button activates the HP Network Registry Agent (HPNRA) and
triggers the driver to recheck the registry for new information. The HPNRA
automatically updates the registry and changes the configuration information that
appears on the Configuration tab in the Printer folder.
Note The bidirectional communication software necessary for the two methods of Driver Autoconfiguration
described above is included in a Typical Installation when installing a network printer in supported
environments. The feature is also a selectable option for a Custom Installation.
z In environments that do not support bidirectional communication, the driver
automatically configures options based on the HP LaserJet product bundle selected
during the installation of the printing-system software. For example, if the HP Color
LaserJet 5500dn is selected, the driver automatically configures the duplexing unit
and the correct amount of RAM. Configuration is based solely on the definition of the
printer bundle.
z Enterprise AutoConfiguration (EAC) is a version of bidirectional communication that
provides autoconfiguration functionality for an Add Pr inter Wizard installation (when
you do not use autoselect). An Add Printer Wizard installation that includes EAC is
identical to other Add Printer installations, except that when installation is complete,
the driver for the supported product is configured with the same settings as the
physical configuration of the device. Configuration occurs without user interaction.
If bidirectional communication software has been installed previously, EAC will not be
activated, and the Add Printer Wizard uses the pre-existing bidirectional
communication to configure the printer. If bidirectional communication software has
not been installed, EAC configures the driver to match the device configuration, which
it detects automatically. EAC is active only as needed to use the autoconfiguration
utility, and is then shut off. The files required to install EAC remain on your system.
Software Technical Reference Technology background information 19
Page 22

HP Web Access
The HP Web Access feature, also known as the embedded Web server (EWS), contains
the following components:
z Embedded virtual machine for Java (TM) applications
z Web pages
z storage space
HP Web Access provides a simple, easy-to-use solution for one-to-one printer
management. In offices with a limited number of printers, remote management of printing
devices can be accomplished without installing any management software, such as
HP Web JetAdmin. The only requirement is that the management console have a
supported Web browser.
In environments with a larger number of printers, where one-to-one management is
impractical, HP Web Access and HP Web JetAdmin work together to provide scalable
remote printer management. HP Web JetAdmin is used for consolidated management
tasks, where operations are performed on a selected set of printers instead of on
individual printers. For such environments, HP has provided hooks between HP Web
Access and HP Web JetAdmin so that Web Access features can be configured on
multiple printers in one operation. For example, the security password for HP Web
Access can be set on a population of printers simultaneously.
For additional information and a copy of the HP Embedded Web Server for HP LaserJet
Printers guide, go to the Web site at the following URL:
http://www.hp.com/support/lj5500
To view information about the printer using HP Web Access, open a supported Web
browser and type in the printer TCP/IP address or host name. To find the TCP/IP address,
look for "IP Address" on the EIO Jetdirect page, in the "TCP/IP" section under "Protocol
Information". To find the host name of the printer, look for "Host Name" in the "TCP/IP"
section. To pr int a copy of the EIO Jetdirect page from the printer control-panel display,
see the instructions for printing a configuration page in the “Determining the current level
of firmware” section. You also can view information about an installed HP Jetdirect print
server by clicking the Networking tab in the HP Web Access window.
Information tab
HP Web Access offers the following additional features. To view the information, click
the items on the menu that is on the left side of the HP Web Access Information tab:
• Device Status. This page provides current status information about your product.
• Configuration Page . This page provides information about the configuration for
your product.
• Supplies Status. This page provides information about the print cartridge and the
total pages printed, and the serial number of the product.
• Event Log. This page provides information about reported printer errors.
• Usage Page. This page provides information about product usage.
• Device Information. This page shows device information, such as the product
TCP/IP address and serial number.
• Control Panel. This page shows the layout of the control panel.
20 2 Software Description Software Technical Reference
Page 23
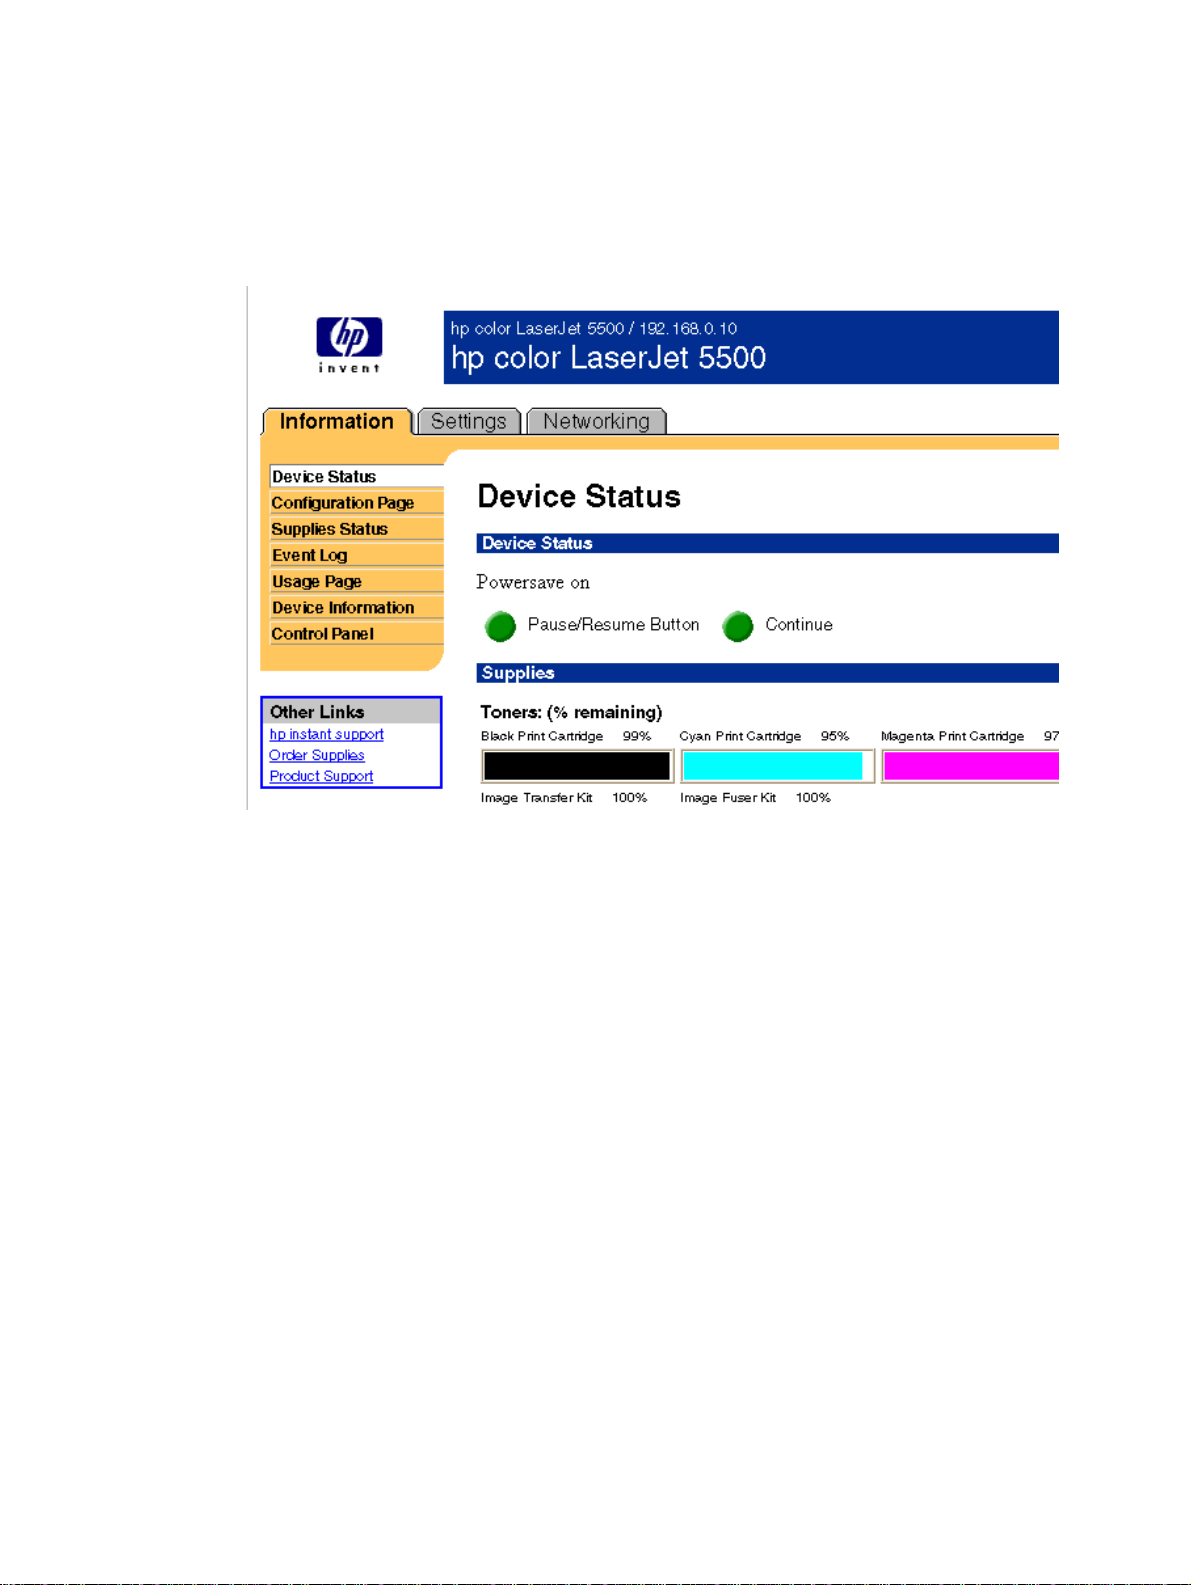
Device status
If a printer problem exists, status information (such as whether the printer is online or
the toner is low) is available through your Web browser linked directly to the printer.
You can view this information without physically going to the printer to identify the
status. The following illustration shows how this information is presented on the
printer's Web page.
Figure 1. Device Status
Software Technical Reference Technology background information 21
Page 24
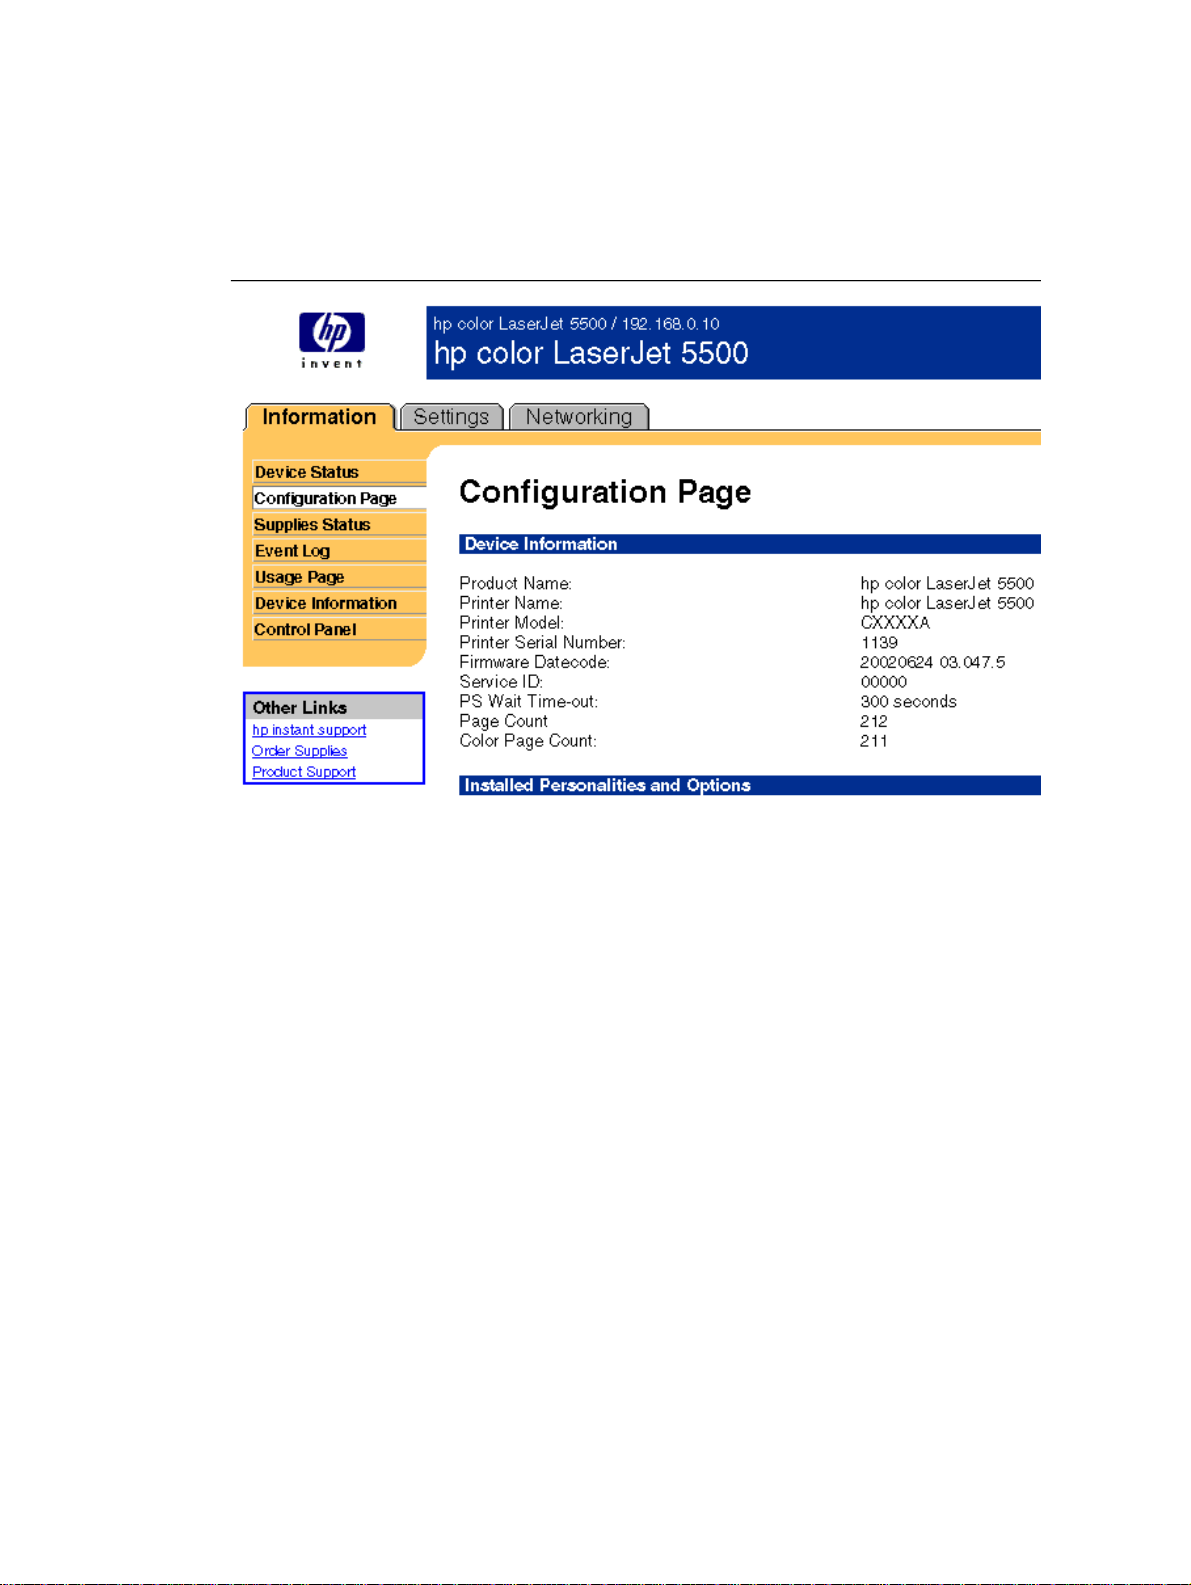
Configuration information
The HP LaserJet printer configuration page is available remotely through HP Web
Access. The HP Web Access configuration page provides configuration information
about the product in the same way as the configuration page printed from the printer.
The following illustration shows an example of a configuration page viewed remotely
through HP Web Access.
Figure 2. Configuration page
Links to off-printer solutions
Links within the home page of HP Web Access provide an easy way to locate
information or complete tasks.
• HP Instant Support (TM). This link connects you to a set of dynamic Web
resources that will help you solve specific problems and determine additional
services that might be available for your device. Specific status and configuration
information about the product is retained and directed to the “Solve a Problem”
Web site. This site offers targeted support content and messages to help resolve
problems as quickly as possible.
• Order Supplies. Click this link to connect to an ordering page where you can order
genuine HP supplies, such as print car tridges and paper.
• Product Support. This link connects you with an HP product support page from
which you can search for information, contact the HP customer care home page, or
find additional resources for your product.
Settings tab
The options on the left of the Settings tab are as follows:
• Configure Device
•Alerts
•Email
22 2 Software Description Software Technical Reference
Page 25
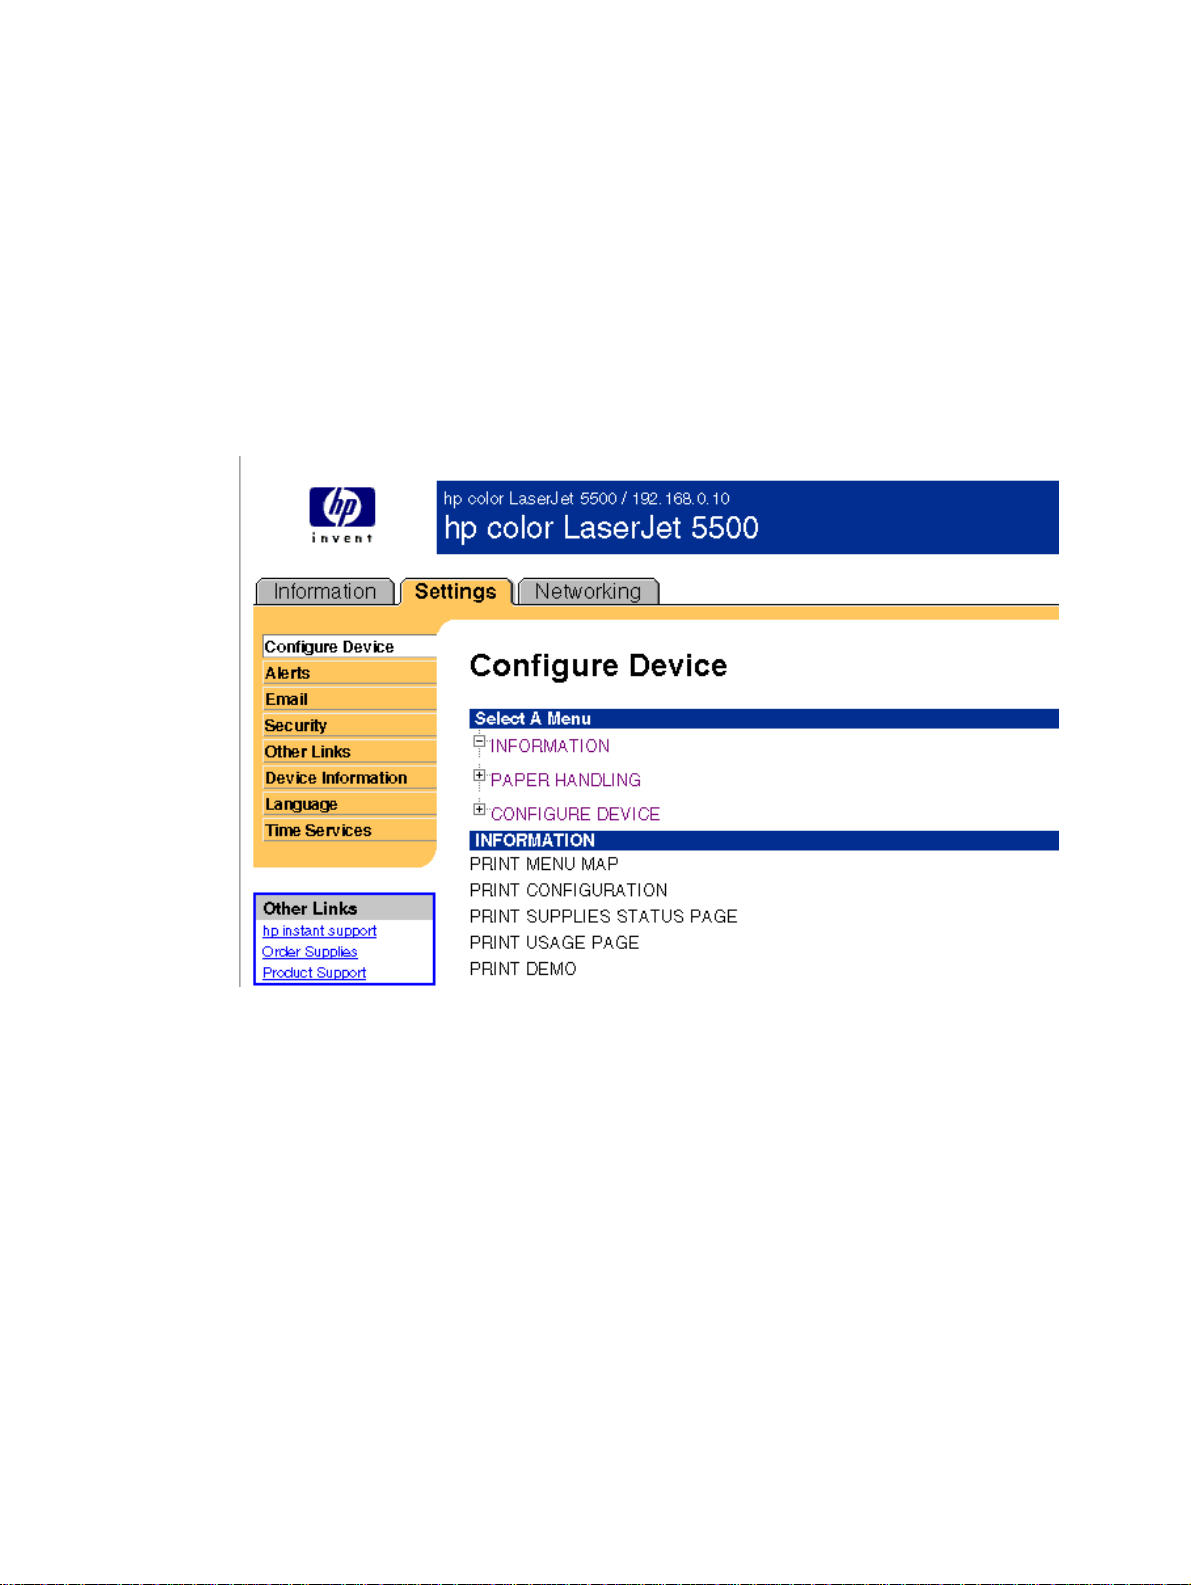
• Security
• Other Links
• Device Information
• Language
Remote printer configuration
Printer configuration information can be obtained through a Web browser by opening
the printer HP Web Access page and changing any of the basic configuration
information on the Settings tab. Security and password controls provide management
information system managers with the level of control required within their
environments. The following illustration shows an example of printer options that can
be configured remotely.
Figure 3. Configure Device
Some configuration tasks cannot be performed remotely because printed pages must
be examined.
Networking tab
The menu on the left of the screen contains other networking options under three
categories: configuration, security, and diagnostics.
Configuration
• Network Settings
• Other Settings
• Support Info
• Select Language
Software Technical Reference Technology background information 23
Page 26
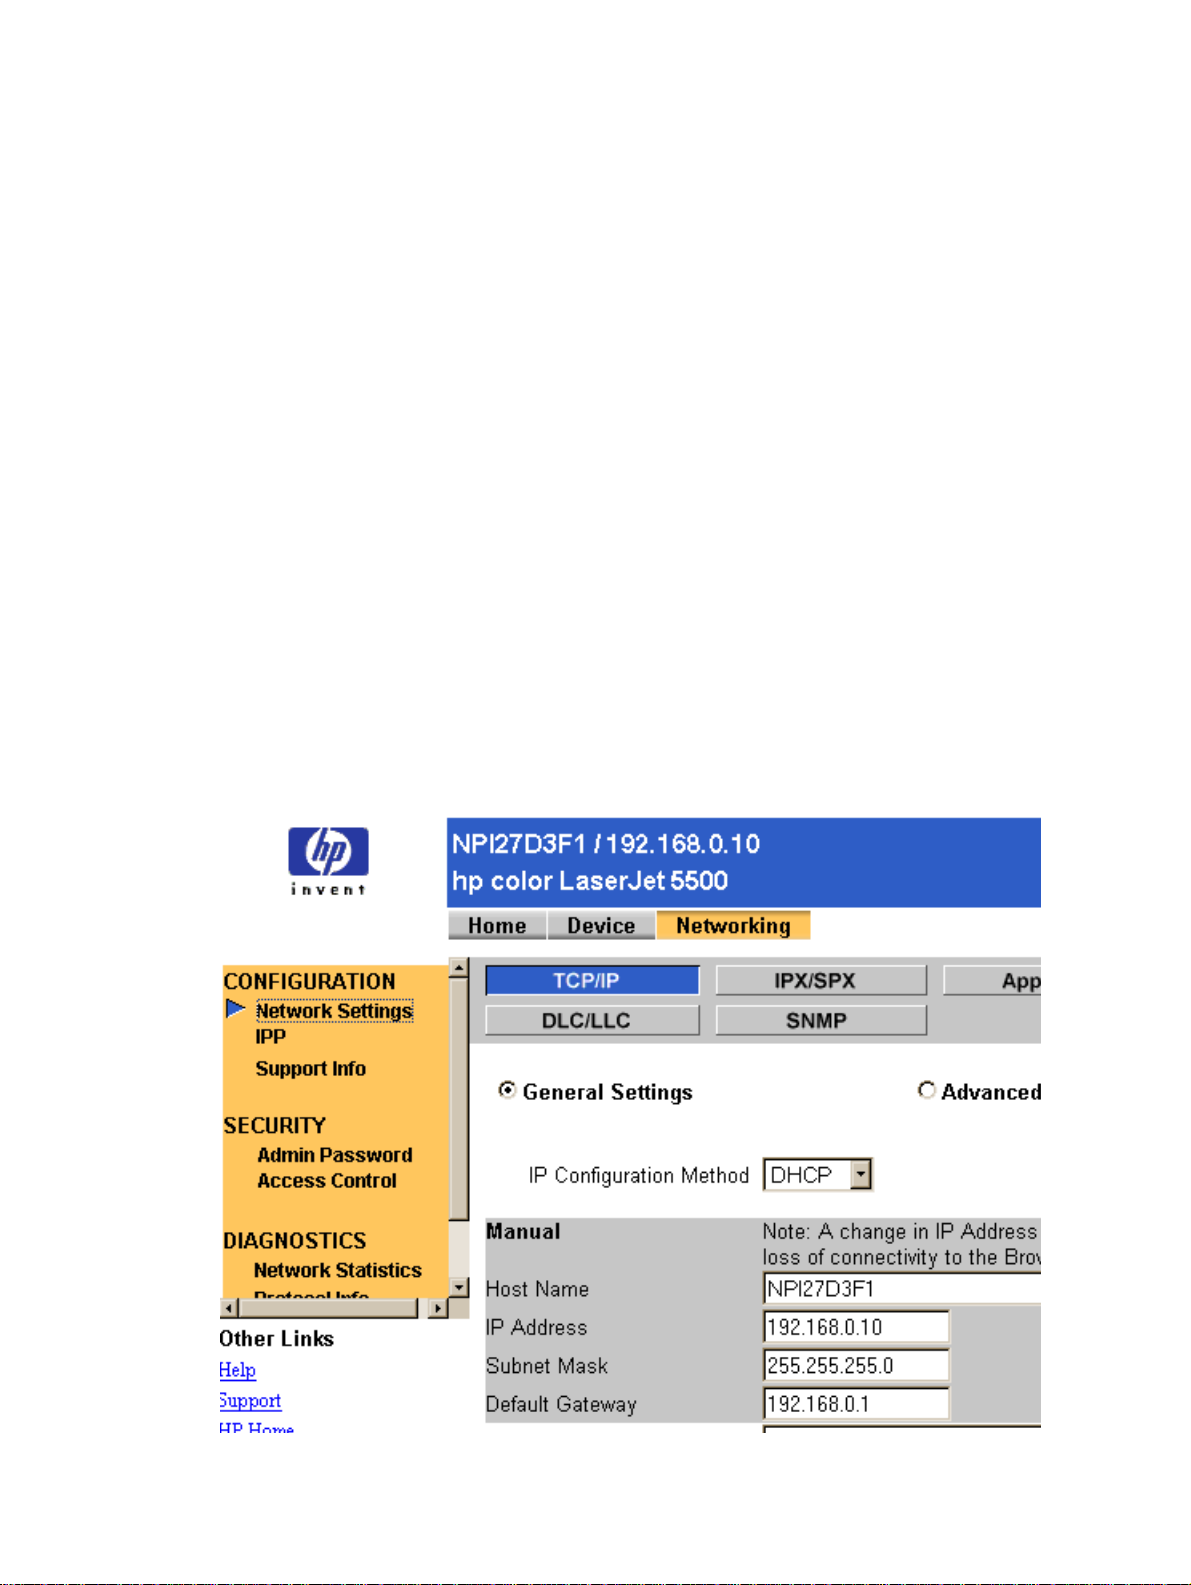
Security
• Admin Password
• SSL/TLS
•SNMPv3
• Telnet
• Access Control
Diagnostics
• Network Statistics
• Protocol Info
• Configuration Page
• Refresh Rate
Network settings
The following illustration shows the Network Settings option on the HP Web
Access Networking tab. From this screen, you can enable and configure the
following network services:
•TCP/IP
• IPX/SPX
• AppleTalk
• Data Link Control/Logical Link Control (DLC/LLC)
• Simple Network Management Protocol (SNMP)
Figure 4. Networking tab
24 2 Software Description Software Technical Reference
Page 27
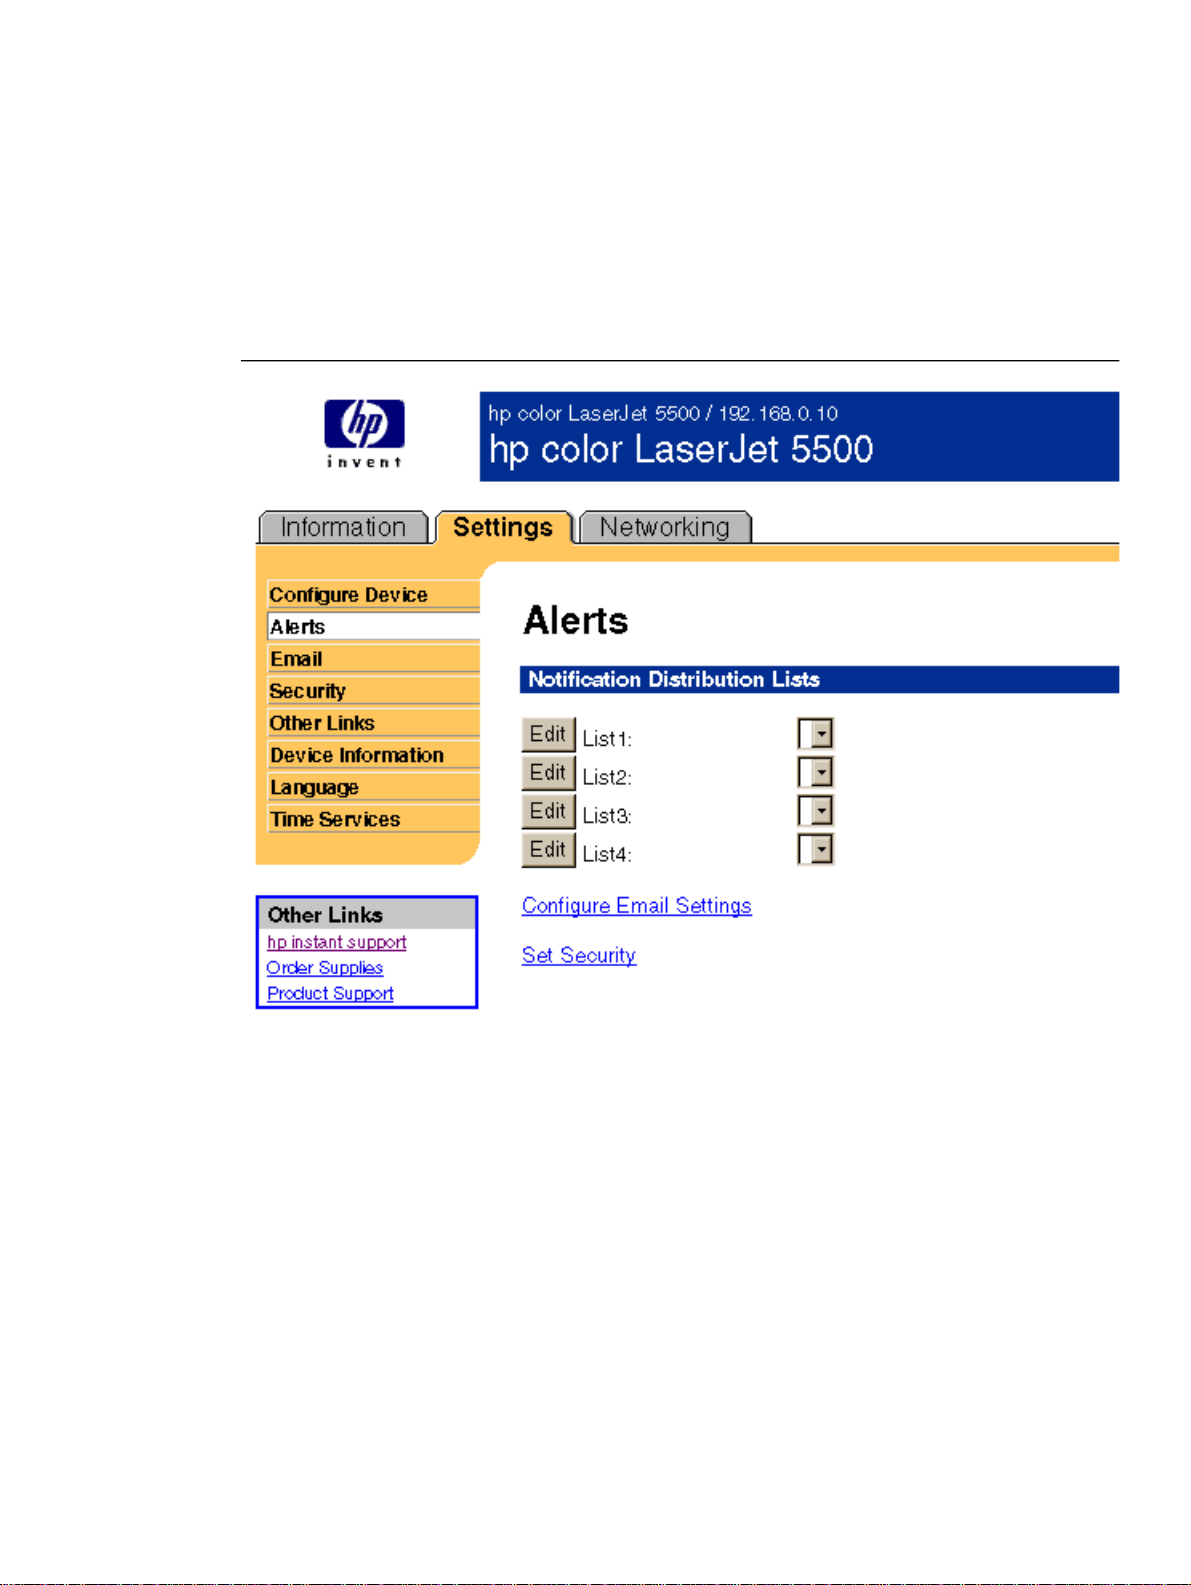
Configurable e-mail alerts
The printer can automatically send e-mail alerts about printer problems or job status to
specified e-mail addresses. For example, if toner is low, the printer can notify the
person responsible for ordering or changing the cartridge. If there is a printer failure,
an e-mail alert can be sent directly to the person responsible for fixing the problem.
These e-mail alerts can be configured to be sent to any device that can accept e-mail,
such as digital phones, pagers, and personal digital assistants. In large environments,
administrators can route e-mail addresses to list-servers or URLs for expanded
notification.
Figure 5. Configurable Alerts
Printer Status and Alerts
The HP LaserJet printing-system software includes a utility called Pr inter Status and
Alerts that you can use to monitor print jobs and printer status from the desktop. The
Printer Status and Alerts feature provides printer and job status infor mation such as
printing history, job progress, toner and paper levels, and consumables and supplies
reorder information, and presents a simulated view of the product control panel. This
utility offers several options for configuring pop-up windows to view the status of the
printer and of individual print jobs.
Printer Status and Alerts is a selectable component of Custom Installation. To install
Printer Status and Alerts, choose
box.
Software Technical Reference Technology background information 25
Custom Installation and select the appropriate check
Page 28

Printer Status and Alerts features are available for printers connected by means of a
connection, whether direct or over a network, that supports bidirectional functionality. The
Printer Status and Alerts feature cannot be installed over infrared (IR) or serial ports. See
“Bidirectional communication.”
For Windows 95, the Microsoft Winsock2 patch must first be installed. To download the
Microsoft Winsock2 patch, go to http://www.microsoft.com/windows95/downloads/
contents/WUAdminTools/S_WUNetworkingTools/W95Sockets2/Default.asp.
For all operating systems, the computer must have Internet Explorer version 4.72 or later
installed; version 5.0 or later is recommended.
HP Printer Status and Alerts communicates with the printer only during an active print job
to minimize network traffic.
The following restrictions apply to HP products that use Pr inter Status and Alerts:
z Windows NT 4.0, Windows 2000, and Windows XP do not support Printer Status and
Alerts with terminal servers.
z For Device Status (printer icons in the status window), the computer must have
Internet Explorer version 4.72. x or later installed. To find the version number, open
Internet Explorer, click Help, and then click About Internet Explorer. Netscape
browsers do not support Printer Status and Alerts. No Inter net Explorer is necessary
for getting status about jobs. Internet Explorer can be installed after installing Printer
Status and Alerts.
z Netscape browsers do not support HP Printer Status and Alerts.
z On a few applications, such as Microsoft Excel and Seagate Crystal Reports, multiple
copies of the same document show up in the Printer Status and Alerts window as
separate jobs. This is because these applications actually send each copy as a
separate job.
z For Windows screen reader applications, such as Job Access With Speech from
Freedom S cientific, the computer must have Internet Explorer version 5.0 or later
installed. To find the version number, open Internet Explorer and click Help, and then
click About Internet Explorer. Version 5.0 is reported as Version 5.00.x or later. No
Internet Explorer is necessary for getting status about jobs for network-connected
printers. Internet Explorer can be installed after installing Printer Status and Alerts.
z When renaming a driver, job and device status will not be tracked until the computer is
restarted.
z Drivers added after Printer Status and Alerts is installed are not recognized until the
computer is restarted.
z Clicking the Cancel button in the Printer Status and Alerts window will not always
cancel a job. This button sends a cancel request to the printer, but if the job has
already been processed, it might not be possible to cancel the job (this is commonly
the case with smaller jobs).
z When using Printer Status and Alerts with Microsoft printer sharing, the following
items apply:
• The Microsoft patch “Vredir” is required if you want to use Printer Status and Alerts
on a Windows 98 or Windows Me computer for a printer that has been shared
directly from a computer with Windows NT 4.0, Windows 2000, or Windows XP
installed. Failure to install the patch could cause an intermittent blue screen to
appear on the client computer.
26 2 Software Description Software Technical Reference
Page 29
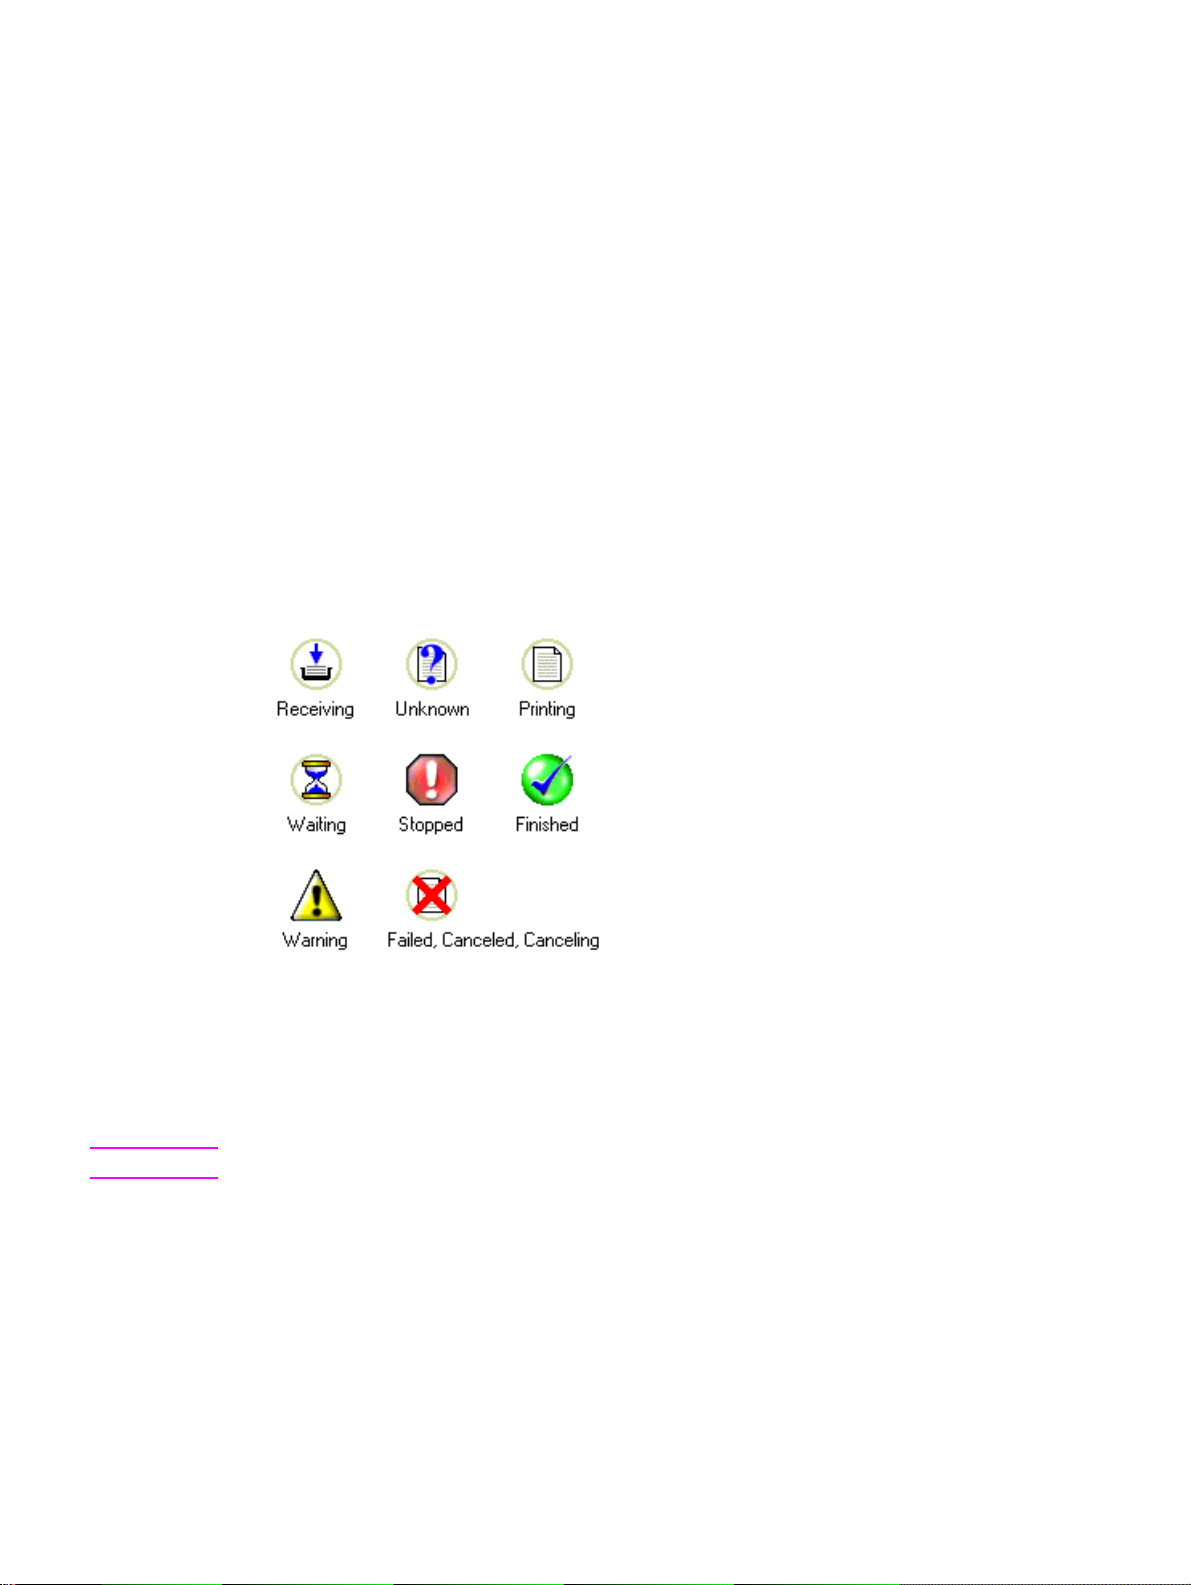
• For Microsoft shared products, the host system must have either Printer Status
and Alerts
or the HP Driver Autoconfiguration option from the HP installer on the
computer. Load Printer Status and Alerts on the computer sharing the printer
before loading Pr inter Status and Alerts on the client computer.
• For Windows 95, Windows 98, and Windows Me client computers that have Printer
Status and Alerts installed, installing a printer using the Point and Print method will
not activate Printer Status and Alerts.
When the Printer Status and Alerts feature is installed, a status icon in the form of a
printer is included in the Windows system tray in the lower-right corner of the screen. The
printer icon remains unchanged until you send a print job to the HP LaserJet product.
When you send a print job, the icon changes to alert you to the status of the print job.
Eight icons exist in this feature. The eight icons in the following illustration show current
job status. Neither the
When the print job is in a receiving or waiting state, the
Receiving nor the Waiting icon ever shows up in the Systray.
Printing icon appears in the
Systray.
The icons behave differently, depending on whether the printer is connected through a
direct connection (USB or parallel) or through a network.
Figure 6. Printer Status and Alerts icons
Double-click the status icon to open the Printer Status and Alerts window, shown in the
following illustration.
Note The appearance on the screen varies according to the HP LaserJet product and its configuration.
The Printer Status and Alerts window consists of two panes. The left pane shows icons for
the available products, an icon for each current print job in progress, and an
Options
icon. The right pane provides information based on what is selected in the left pane. The
buttons at the top can be used to perform the following functions:
z Left arrow: Return to the previous pane.
z Right arrow: Go to the next pane.
z Circular arrows: Refresh the pane.
z Home: Return to the device status.
z Clock face: Show pr int job history.
Software Technical Reference Technology background information 27
Page 30
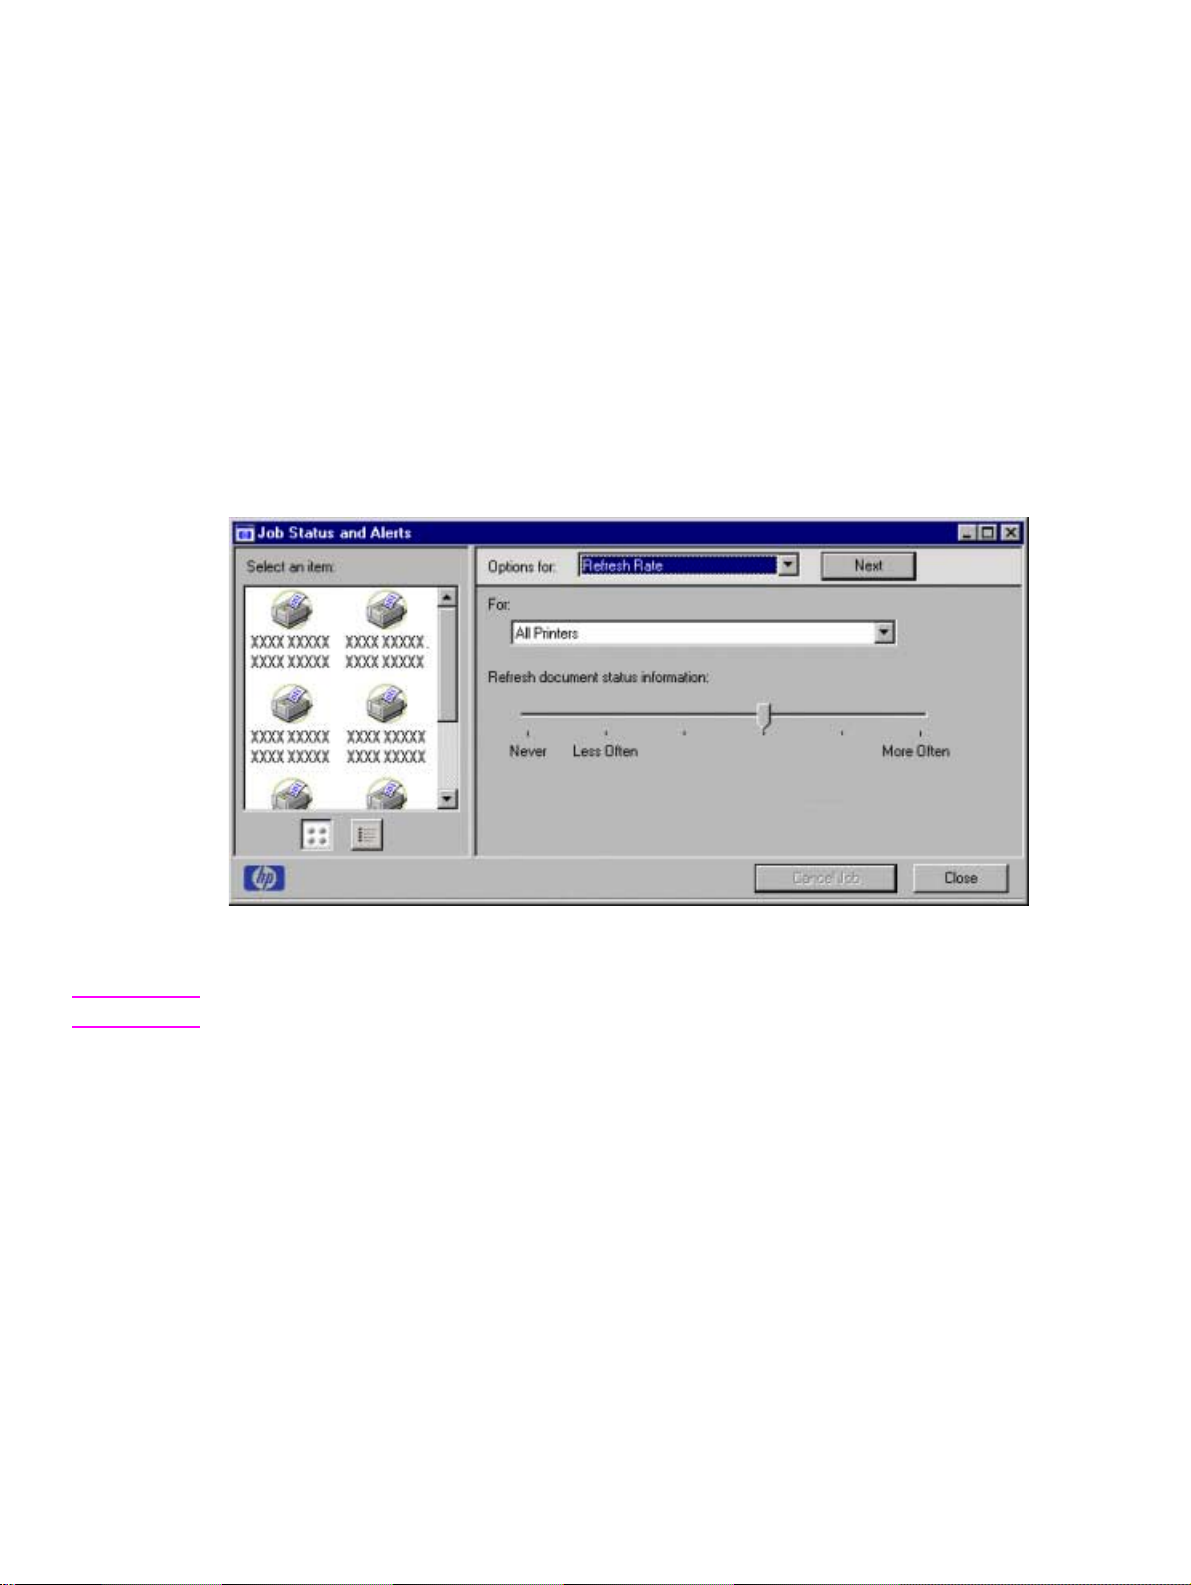
Click a product icon in the left pane to view information about the product and supplies or
to view a history of recent print jobs. The following product information is available:
z Device Status indicates the current status of the HP LaserJet product.
z Supplies shows information about the percentage of print-cartridge life remaining.
z Media provides information about paper-handling devices and the status of each
device. For example, this section of the window shows the level of media present in
each input device, as well as the status of output devices. This section also provides
information about the type and size of media loaded in each input device.
z Capabilities provides information about such things as installed trays, paper-handling
devices, and disk storage. Also listed are DIMM slots, the printer serial number, and
the firmware date code. Click a print job icon to see information about the progress
and status of the print job. Click the Options icon to select options for configuring popup status windows that contain document alerts and to set the refresh rate for showing
printer status inform ation.
Figure 7. Refresh Rate option
Note The appearance of the screen varies according to the HP LaserJet product and its configuration.
There are six settings for the refresh rate. The default setting is halfway between Less
Often
and More Often.
The
Less Often setting specifies the least frequent update intervals, which have minimal
impact on network traffic. The
also has the most impact on traffic. The
mechanism for the selected printer. If the refresh rate for a given printer is set to
More Often setting updates the status more frequently, but
Never setting disables the job-status monitoring
Never,
then subsequent jobs sent to that printer will not appear in the Printer Status and Aler ts
window. If the
Never setting is selected when the scope control is set to All Printers, then
all job-status monitoring will be disabled. However, even when job-status monitoring is
disabled, you can still open the status window and view the product status panels.
Changes to the refresh rate settings affect any subsequent jobs submitted to the affected
printer. Existing jobs that are already being processed have a fixed refresh rate which was
determined (according to the setting in the Refresh Rate panel) when the job was
submitted.
28 2 Software Description Software Technical Reference
Page 31

Refresh-rate intervals for direct-connect printers are:
z Less Often setting: 5 minutes
z One setting to the right of Less Often: 2 minutes
z Two settings to the r ight of Less Often: 1 minute
z Three settings to the right of Less Often: 30 seconds
z More Often setting: 10 seconds
On network printers, the refresh-rate interval changes, depending on the stage of the print
job.
The Alerts options panel has controls to determine when the Printer Status and Alerts
window automatically appears for each printer that has an icon in the left pane. The dropdown menu provides a list of available printers for which to make the selection. An option
for all printers is included as the default selection. Each of the three, four, or five available
selections, depending on the printer connection type, causes the Pri nter Status and Alerts
window to automatically appear when that alert condition arises.
The availability of each alert option and the default selection varies depending on
connection type. The following table shows the default state of the aler ts panel as it
relates to connection type.
Table 2. Default alerts selection state for connection type
Connection type Alerts (first two
options)
All printers Selected and activated1Selected and activated Selected and activated Selected and activated
Direct connect Selected and activated Selected and activated Selected and activated Selected and activated
Network Selected and activated Selected and activated Unselected and grayed
1
"Activated" means that the option is available; "selected" means that the option is selected by default.
Printer warning
condition
Toner low Printer error condition
Selected and activated
out
Printers that are involved with at least one active print job are queried for job status
periodically according to the Status Check Rate setting. If an error or a warning condition
is detected, the Printer Status and Aler t s window will automatically appear according to
the Alerts options.
Software Technical Reference Technology background information 29
Page 32

Note Depending upon the options you select, information in the status window changes for each job printed,
each job completed, and each warning condition detected.
Figure 8. Printer Status and Alerts options
Note The appearance of the screen varies according to the HP LaserJet product and its configuration.
Remote firmware update
The HP LaserJet product features a remote firmware update capability. The method for
downloading remote fir mware updates from the http://www.hp.com/support/
lj5500_firmware Web site is similar to that used to download the latest printing-system
software and printer drivers.
The process for remotely upgrading printer firmware involves three steps:
Step 1 Deter mine the current level of firmware installed on the HP Color LaserJet
5500 printer.
Step 2 Go to the http://www.hp.com/support/lj5500_firmware Web site and download
the latest firmware.
Step 3 Download the new firmware to the product.
Determining the current level of firmware
To determine the current level of firmware, view the configuration page.
Step 1 Press the select button (the one with the check mark) to open the menus.
Step 2 Press the up and down buttons to scroll to INFORMATION.
Step 3 Press the select button.
Step 4 Press the up and down buttons to scroll to PRINT CONFIGURATION.
Step 5 Press the select button to print the configuration page.
30 2 Software Description Software Technical Reference
Page 33

Step 6 Look in the configuration page section marked "Printer Information" for
the Firmware Datecode. The firmware date code will look something like
this:
03/14/2002 03.002.0
Downloading the new firmware from the HP Web site
The remote firmware update (.RFU) file and an associated readme file are packaged
together as a self-extracting .EXE file. For detailed instructions about how to
download the .EXE file, go to the following URL:
http://www.hp.com/support/lj5500_firmware
The .EXE file consists of a readme file and the .RFU file.
Downloading the new firmware to the product
You can send an .RFU update to a printer as long as the printer is in “ready” state; the
printer will wait for all input/output (I/O) channels to become idle before performing the
update.
Note If the firmware update involves a change in the format of nonvolatile random-access memory (NVRAM),
any menu settings changed from the default settings will return to default settings, and must be changed
again if you want settings diff erent from the defaults. Examples of settings affected in this way are tray
types, default symbol sets, and HP Web Access alerts.
The elapsed time for an update depends on the I/O transfer time, as well as the time
that it takes for the printer to reinitialize. The I/O transfer time depends on a number of
things, including the speed of the host computer sending the update, the I/O method
(Fast InfraRed Connect [FIR], parallel, or network). The reinitialization time will
depend on the specific hardware configuration of the printer, such as the number of
EIO devices installed, the presence of external paper- handling devices, and the
amount of memory installed.
CAUTION If a remote firmware update is interrupted before the firmware is downloaded, the firmware file must
be resent. If the update is interrupted during the actual upgrade process, the firmware must be resent
over a parallel port connection.
Finally, any print jobs ahead of the .RFU job in the queue will be printed before the
update is processed.
Note The printer automatically power cycles after processing the update.
Use one of the following m ethods to update your printer.
Remote firmware update through a local Windows port
Windows 95, Windows 98, and Windows Me
If the pr inter is connected through a local port (USB or parallel), then the .RFU
file can be sent directly to the printer with a COPY command from a command
prompt or MS-DOS window. At the command prompt, follow the steps below
for your operating system.
From a command prompt or MS-DOS window type the following command:
Mode lpt1:,,p
Then press ENTER on the keyboard.
Software Technical Reference Technology background information 31
Page 34

Note If the printer is attached to a parallel port other than LPT1, then substitute the proper LPT port number
in the Mode command.
The response you receive should be similar to these examples:
> LPT1 Not Rerouted
> Infinite retry on parallel printer time-out
Windows 95, 98, Me, NT 4.0, 2000, and XP
The .RFU file can be sent directly to the printer with a CO PY command from a
command prompt or MS-DOS window:
copy /b FILENAME PORTNAME
where FILENAME is the name of the .RFU file and PORTNAME is the name of
the appropriate printer port (such as LPT 1).
Remote firmware update through a Windows network
If the printer is shared on a Windows network, then the following command can be
issued from a command prompt or MS-DOS (R) window:
copy /b FILENAME \\<COMPUTERNAME>\<SHARENAME>
where FILENAME is the name of the .RFU file, <COMPUTERNAME> is the name
of the computer from which the printer is being shared, and <SHARENAME> is
the printer share name (do not type the angle brackets).
The message ONE FILE COPIED SUCCESSFULLY appears on the computer
screen.
Remote firmware update for UNIX systems
Any method that delivers the .RFU file to the printer will work, including:
$cp /home/yourmachine/FILENAME/dev/parallel
where /home/yourmachine/FILENAME contains the .RFU file.
Remote firmware update using FTP on a direct network connection
If your HP LaserJet product uses a direct network connection, you can use file
transfer protocol (FTP) to update your HP LaserJet fir mware. Complete the
following steps.
Step 1 Take note of the TCP/IP address on the EIO JetDirect page (this is the
second page of the Configuration Page printout. To print a configuration
page, see “Determining the current level of firmware”).
Note Before connecting to the printer, make sure that the printer is not in PowerSave Mode. Also make sure
that any error messages are cleared from the control-panel display.
Step 2 Open a MS-DOS command window on your computer.
Step 3 Type
FTP <TCP/IP PRINTER ADDRESS> (for example, if the TCP/IP
address is 192.168.0.90, type
FTP 192.168.0.90).
Step 4 Press ENTER on the keyboard.
Step 5 When prompted for user name and password, press ENTER for each.
32 2 Software Description Software Technical Reference
Page 35

Step 6 Type BIN at the > prompt.
Step 7 Press ENTER.
Step 8 Type:
put <path>
where <path> is the location where the .RFU file was downloaded from
the Web. For example, type:
PUT C:\CLJ5500\CLJ5500FW.RFU
and then press ENTER.
The download process begins and the fir mware is updated on the printer. This can
take about five minutes. Let the process finish without further interaction with the
printer or computer.
The printer automatically power cycles off and on again to activate the update.
Remote firmware update using FTP and a browser
Step 1 Open a browser window.
Step 2 In the address line of the browser, type (without the arrow brackets [< >]):
ftp://<IPaddress>
where "<IPaddress>" is the TCP/IP address of your pr inter.
Step 3 Open a Windows Explorer window and locate the .rfu file for your printer.
Step 4 Drag and drop the .RFU file onto the
PORT1 icon in the browser window.
Using HP Web JetAdmin to download the firmware to the product
This procedure requires that HP Web JetAdmin version 6.5 or later be installed.
Complete the following steps to update a single printer through HP Web JetAdmin
after downloading the .RFU file from the HP Web site.
Step 1 Start HP Web JetAdmin.
Step 2 Type the TCP/IP address or IP hostname of the printer in the
Device Find
Step 3 Locate the
field, and then click Go. The pr inter Status window appears.
Update button. You might need to click the right arrow on the
toolbar to locate this button.
Step 4 Click Update.
Step 5 When prompted for the type of update to perform, click Update Printers,
and then click Continue.
Step 6 Under
Upload new firmware image:, click Browse to locate the .RFU
file you downloaded from the http://www.hp.com/support/
lj5500_firmware Web site, depending on the product.
Step 7 Click Upload to move the .RFU file from your hard drive to the HP Web
JetAdmin server.
Quick
Step 8 Refresh the browser.
Step 9 Select the .RFU file from the
Select new firmware version: drop-down
menu.
Step 10 Click Update Firmware. HP Web JetAdmin sends the selected .RFU file
to the printer.
Also, HP Web JetAdmin 6.5 can be used to perform multiple or unattended
installations.
Software Technical Reference Technology background information 33
Page 36

Step 1 Start HP Web JetAdmin.
Step 2 Create a device group. A simple way to do this is:
a. Click Devices on the
b. Click Device Model from the
c. In the
3. Criteria (Optional): field, type your model number
1. Choose: drop-down menu.
2. Filter: drop-down menu.
(for example, "5500" [without quotation marks]).
d. Click Go.
Step 3 In the
Device List, select the printers you want to include in the group,
and then click Create Group.
Step 4 When prompted, type a name for the new device group, and then click
OK.
Step 5 Click Update.
Step 6 When prompted for the type of update to perform, click Update Printers,
and then click Continue.
Step 7 From the list of HP Devices, select the printers to be updated, or click
Select All.
Step 8 Click Update to install the new firmware.
Printer messages during firmware upgrade
The printer shows three messages during a normal update process:
Table 3. Update messages
Printer message Explanation
RECEIVING UPGRADE This message appears from the
time the printer recognizes the
beginning of an .RFU update until
the time the printer has verified the
validity and integrity of the .RFU
update.
UPGRADING PRINTER This message appears while the
printer is actually reprogramming
the firmware.
WAIT FOR PRINTER TO
REINITIALIZE
Note To verify that the firmware update succeeded, print a new configuration page from the product control
panel and verify that the firmware datecode shown on the configuration page has changed.
Note All HP LaserJet products leave the factory with the latest available firmware version installed. If a
remote firmware update fails, the .RFU file must be sent over a parallel port connection.
This message appears from the
time the printer has finished
reprogramming the DIMM until the
printer reinitializes.
34 2 Software Description Software Technical Reference
Page 37

E-mail command and response
The HP LaserJet product can send e-mail messages directly. However, you must
configure e-mail information to initiate this capability. One use for this feature is to send
diagnostic infor mation to solve a printer problem. An e-mail sent to the printer requests
configuration information. The printer automatically sends that information back to the
service provider. In many cases, the problem can be identified quickly and solved
remotely. For more information about e-mail command and response, see the HP
Embedded Web Server for HP LaserJet Printers guide.
To configure your product to send e-mails, follow these steps:
Step 1 Take note of your product’s TCP/IP address on the EIO X JetDirect page (this
is the second page of the Configuration Page printout. To print a configuration
page, see “Determining the current level of firmware”.)
Step 2 Launch your Web browser.
Step 3 In the Address: or Go to: field, type the TCP/IP address assigned to the
product (for example, 192.168.0.20) or the host name (for example, http://
myprinter). The HP Web Access home page appears.
Step 4 From the top of the HP Web Access screen, click Device.
Step 5 On the navigational bar on the left, click Alerts.
Step 6 Under Notification Recipients, type your e-mail address (for example,
"name@company.com".)
Step 7 Click Apply.
Step 8 Under Select Events, click Media Path.
Step 9 Select the List1 check box next to CLOSE DRAWERS/DOORS/COVERS.
Step 10 Click Apply. A screen stating that your selections have been accepted should
appear. Click OK.
Step 11 In the SMTP Server: field under Outgoing Mail, type the TCP/IP address for
the Simple Mail Transfer Protocol (SMTP) server (for example, 192.168.0.201).
Step 12 In the Domain Name: field under Outgoing Mail, type the domain name.
Step 13 Click Apply.
Step 14 Click Security.
Step 15 Under Security, select the Outgoing Mail check box.
Step 16 Click Apply.
Step 17 To test the configuration, open the top cover of the product, then go to your
computer and verify that you have received an e-mail message from the
product.
Euro character
The euro is the name for the currency of the European Union (EU). Use of this unit was
launched on January 1, 1999. The euro has changed the way business is conducted in
Europe and has affected every company and industry in the world. It is vital that
companies understand and prepare for the changes the euro brings.
Software Technical Reference Technology background information 35
Page 38

This HP LaserJet product includes euro characters for each of the internal fonts. The
printer can print the euro character in the Windows 95, Windows 98, W indows Me,
Windows NT 4.0, Windows 2000, and Windows XP operating systems. Hewlett-Packard
is committed to maximizing document portability through supporting and promoting eurosymbol standards.
International Color Consortium profiles
HP provides cyan-magenta-yellow-black (CMYK) (HP5500C.ICM) and sustained redgreen-blue (sRGB) (HP5500R.ICM) International Color Consortium (ICC) profiles with its
HP Color LaserJet 5500 printers. The CMYK profile can only be used with the PostScript
driver; the sRGB profile can be used with any of the HP Color LaserJet 5500 dr ivers. The
profiles are available on the HP Web site at the following URL:
(http://www.hp.com/support/lj5500)
ICC profiles describe the way color will be interpreted in the default CMYK and RGB
modes. The sRGB profile matches the default RGB mode (sRGB), which is enabled with
the Screen Match or Automatic Color Smart II setting in either the PCL or PostScript
driver. The CMYK profile is based on the default mode, which is a Specifications for Web
Offset Publications (SWOP) simulation with a CMYK Inkset setting of FAST in the
PostScr ipt driver. These profiles can be used for color conversions in a color-managed
workflow.
P ANTONE (R)* color profiles
Automatic PANTONE (R)* Calibration is the default setting for HP Color LaserJet printers.
This feature automatically converts PANTONE (R)* colors to optimal color values for the
printer by recognizing the PANTONE (R)* color name or number in the data stream sent
to the printer. The feature is activated when printing colors that were chosen using the
PANTONE (R)* Color picker in supported graphics applications.
Applications known to generate PostScript files with graphic objects preserving the
PANTONE (R)* name are listed below:
z Adobe Illustrator
z Adobe Photoshop (R)
z Adobe PageMaker
z Adobe InDesign
z CorelDRAW (TM)
z Macromedia Freehand
z QuarkXPress
Some applications substitute CMYK values to the printer if they cannot provide
PANTONE (R)* names. If your application does not pass the PANTONE (R)* names to
the printer, the application will substitute default CMYK values to be printed for each color.
In this case, the accuracy of color matching will depend on the ink emulation selected FAST, SWOP, Euro standard, or DIC (Dainippon). If your application does not pass the
PANTONE (R)* names to the printer, the custom CMYK values created by PANTONE
(R)* for this printer are available in the manual PANTONE (R)* palettes.
PANTONE (R)* Application Palettes might be available on the Web at the following URL:
http://www.hp.com/support/lj5500
36 2 Software Description Software Technical Reference
Page 39

Vector graphics such as company logos created in PANTONE (R)* Application Palettes
can be imported into Microsoft Word, PowerPoint, or other MS Office applications. To do
this, the color application must create an Encapsulated PostScript (EPS) file of the image
for insertion as a file into the Office document (using the insert file function).
Note Cutting and pasting from the clipboard does not work. These tasks do not preserve the PANTONE (R)*
name or the CMYK palette value.
Printing-system components
Printing system and installer
CD browser for Windows systems
In previous versions of the printing-system software, the installer was started by
locating and running the SETUP.EXE file. For the Microsoft Windows environment
(Windows 95, Windows 98, Windows Me, Windows NT 4.0, Windows 2000, and
Windows XP), the HP LaserJet software CD-ROM provides an interactive CD browser
that you can use not only to install the printer drivers and related components, but also
to gain access to online product registration, user documentation, a customization
utility, Adobe Acrobat Reader software, and optional HP software.
Software Technical Reference Printing-system components 37
Page 40

The following illustration shows the main screen of the printing system software CD
browser, which appears when you insert the printing software CD-ROM in your CDROM drive. If the screen does not appear when you insert the CD-ROM, click Start,
click Run, click Browse..., navigate to the root directory of the CD-ROM, and then
double-click the SETUP.EXE file to start the browser.
Figure 9. Installation CD browser main screen
The product software CD browser contains the following options for the HP LaserJet
product. The text that follows each option listed below is approximately the same text
that appears when you put the cursor on the option button.
Note The options on your product might vary from the illustration.
Install Printer - This wizard guides you through the installation of your HP LaserJet
printing system. You are given the choice of performing a Typical Installation or a
Custom Installation. If you select Typical Installation, only the necessary software will
be installed. If you select Custom Installation, you can select the components you
want to install.
Register Product - This option can be used to register your HP LaserJet product now
and to receive the following information at no cost:
• notification of driver updates
• technical support updates
• news about emerging technologies
View Documentation - This option can be used to view the HP LaserJet product
documentation. The following document options are available:
• Readme
38 2 Software Description Software Technical Reference
Page 41

•User Guide
• HP Jetdirect Guide
• hp FIR Guide (the HP Fast Infrared Receiver Guide)
• Release Notes
Note For systems that do not have Adobe Acrobat Reader 4.0 (or later) installed, you will be given the option
to download that software. Clicking any of the links to documentation that is provided in the Adobe
Acrobat PDF file format opens a dialog box from which you can install Adobe Acrobat Reader software
from the HP LaserJet software CD browser.
— This utility can be used to create a custom software installer for the HP LaserJet
product that can then be copied to other media, such as a local hard drive or a
network drive.
Optional Software — To increase productivity and get the most out of your HP
LaserJet product, view a list of optional software available for installation. The
following options for the HP Color LaserJet 5500 product are available as Web links:
• HP Web Jetadmin
• Color Matching Information
Installer features
The common installer is designed to provide a simple and consistent installation
method for the product line. The common installer is available for the Windows 95,
Windows 98, Windows Me, Windows NT 4.0, Windows 2000, and Windows XP
operating systems.
The common installer offers the following features:
• The HP Color LaserJet 5500 software CD-ROM features a CD browser. See "CD
browser for Windows systems."
• Acrobat Reader 5.0 is automatically installed (Acrobat Reader 4.05 is installed for
languages that read from right to left).
• The installer is Web-enabled, providing access to the HP Web site for the latest
software components and drivers.
• Network connection is integrated so that you can install drivers and connect to a
network printer in a single process.
• The selection dialog box sets the operating-system language as the default
language (for Windows 95, Windows 98, Windows Me, Windows NT 4.0, Windows
2000, and Windows XP only). You can use the installer to select any of the
languages on the HP LaserJet software CD.
• The installer includes the HP LaserJet Uninstaller Utility.
• Product registration is available using the Web and e-mail.
• The Customization Utility is available on the CD browser.
All of the Windows system components are installed by using the HP LaserJet
printing-system installer. The installer automatically senses your language of choice
and your operating system . It offers selections for each printer model. You can select
the type of installation you prefer: Typical Installation or Custom Installation.
The installer compares the versions of the software components on the HP LaserJet
software CD-ROM to those on the HP Web site. If newer versions are on the HP Web
site, the installer downloads them.
Software Technical Reference Printing-system components 39
Page 42

Installable components
This section provides information about the various installable components available
either with the HP LaserJet software CD-ROM or from the HP Web site.
Printer drivers
HP supports the use of older drivers with new printers. Because earlier HP LaserJet
printers might have different versions of the PCL language, new drivers are not
supported with earlier printers. The drivers associated with each printer use the
version of PCL language that is installed in the printer.
The printing system for the HP LaserJet product includes the following printer drivers.
PCL 5c, PCL 6, and PS drivers
The PCL 5c, PCL 6, and PS drivers are included with the HP LaserJet software
CD-ROM. The PCL 5c and PCL 6 drivers feature a graphical user interface that
has a shared look and feel.
Note PCL 5c is not supported in Asian languages.
If a Typical Installation is chosen during installation of the printing system
software, the PCL 6 driver is set as the default driver.
Windows 95, 98, Me, NT 4.0, 2000, and XP driver versions
PCL 5c and PCL 6 support for Windows 95, Windows 98, Windows Me, Windows
NT 4.0, Windows 2000, and Windows XP operating systems is provided by using
the HP LaserJet 5500 printer drivers for the HP LaserJet 5500 product. The HP
LaserJet 5500 PS printer description (PPD) provides PS support for the HP
LaserJet 5500 product.
Printer driver version numbers can be found by clicking the HP logo found in the
lower-left corner of the following HP PCL 5c and PCL 6 printer driver tabs:
• Configure
•NT Forms
• Finishing
• Effects
• Paper
• Destination
• Color
•Basics
Printer driver version numbers can be found on the PS driver by clicking on
HP Color LaserJet 5500 PS at the top of the Advanced tab, and then clicking on
About PostScript Printer Driver.
For the latest printer driver version numbers, go to the following URL:
http://www.hp.com/support/lj5500_software
40 2 Software Description Software Technical Reference
Page 43

Macintosh and Macintosh-compatible system driver versions
The HP LaserJet printing solution for Macintosh is composed of the Apple LaserWriter
driver, which is provided with the operating system, and HP-created PPD files. The
driver uses these files to determine the features and PS commands that the printer
supports. Bidirectional support in AppleTalk and universal serial bus (USB)
connections allows autoconfiguration of the software. The installable components are:
• the HP LaserJet Installer for Mac OS 8 and Mac OS 9.
• the HP LaserJet Installer for Mac OS X.
• the HP LaserJet Screen Fonts Installer.
• SYSTEM/EXTENSIONS/PRINTER DESCRIPTIONS (for Mac OS 8 and Mac OS
9).
• LIBRARY/PRINTERS/PPDS/CONTENTS/RESOURCES/LANGUAGE.LPROJ (for
Mac OS X).
• the HP LaserJet Utility, an HP printer utility installed in the HP LaserJet folder of
Macintosh operating systems 8 and 9. It provides configuration and management
support for PS and PCL printers.
• online Help, an HTML-based printer and utility help that can be viewed through a
browser or the Macintosh OS Help Center.
• the HP Auto Setup Utility, installed in the Startup Items folder of Mac OS 8 and later
versions. It provides assistance to set up the new printer, then moves itself to
Trash.
• installation notes.
Additional driver availability
Additional drivers are available from your Hewlett-Packard distributor or from the http:/
/www.hp.com/support/lj5500_software Web site.
These drivers are:
• OS/2 PCL 5c, OS/2 PS, and OS/2 PCL 6 pr i nter drivers. The OS/2 drivers are
available from IBM and are packaged with OS/2.
• UNIX model scripts. Go to http://www.hp.com/support/net_printing, then select
printer installation software
• Linux drivers. Go to http://www.hp.com/go/linux for further information about Linux
drivers for HP LaserJet products, or to http://hp.sourceforge.net (HP Linux support
home page).
for further information about UNIX drivers.
Macintosh components
• HP LaserJet PPDs for past projects
• ColorSync profiles
• Screen fonts
hp
Software Technical Reference Printing-system components 41
Page 44

Additional productivity tools
HP Web Registration
You can use this component to register your HP LaserJet product on the HP Web
site or through e-mail. After you have successfully installed the software, the
installer prompts you to register your HP LaserJet product. Also, you can gain
access to HP Web Registration from the HP LaserJet software CD browser by
clicking Register Product. You can choose to complete the online registration at
that time or later. If you want to register your product later, click Register Product
from the HP LaserJet 5500 program group when you decide to complete your
registration.
Optional software
The HP LaserJet software CD browser provides links to download and install HP
Web JetAdmin as optional software.
HP Web JetAdmin
Use HP Web JetAdmin to manage HP Jetdirect connected printers within your
intranet by using a browser. HP Web JetAdmin is a browser-based
management tool and should be installed only on the network administrator’s
computer.
When installed on a host server, any client can use HP Web JetAdmin through
a supported Web browser (such as Microsoft Internet Explorer 4.x or later, or
Netscape Navigator 4.x or later) by browsing to the HP Web JetAdmin host.
HP Web JetAdmin 6.2 and later have the following features:
• task-oriented user interface, providing configurable views for network
managers
• customizable user profiles that can be customized to let network
administrators include only the function viewed or used
• routing of instant e-mail notification of hardware failure, low supplies, and
other printer problems to different people
• remote installation and management from anywhere by using only a
standard Web browser
• advanced automatic discovery of peripherals on the networ k without
manually typing information about each printer into a database
• simple integration into enterprise-management packages
• capacity to find peripherals based on parameters such as Internet Protocol
(IP) address, color capability, and model name
• capacity to organize peripherals into logical groups, with an option that
provides virtual office maps for easy navigation
HP WebJet Admin can be used for access to HP Web Access (the embedded
Web server), ordering supplies, and remote firmware update.
The HP LaserJet software CD browser provides a link to the HP Web site
(http://www.hp.com/go/webjetadmin) to download the latest version of the
HP Web JetAdmin software. Click Optional Software from the CD-ROM
browser, and then click . HP Web JetAdmin is available for the following
network operating environments:
• Microsoft Windows 2000
42 2 Software Description Software Technical Reference
Page 45

• Microsoft Windo ws NT 4.0
• Red Hat Linux 7.1
• SuSE Linux 7.1
Software Technical Reference Printing-system components 43
Page 46

44 2 Software Description Software Technical Reference
Page 47

Driver features
3
Introduction
This chapter describes the features of the PCL 5c and PCL 6 printing system drivers in
one section, and the Windows PS driver in another. The third section describes the
structure and availability of the printing-system software CD-ROM.
PCL 5c and PCL 6 driver features
This section describes the options available on each tab of the PCL 6 and PCL 5c driver
interfaces.
Help system
The HP LaserJet PCL 6 and PCL 5c drivers include a full-featured Help system to provide
assistance with printing and configuration options.
What's this? Help
In Windows 95, Windows 98, Windows Me, Windows NT 4.0, Windows 2000, and
Windows XP, "What's this?" Help is supported. You can gain access to "What's this?"
Help messages in any of the following ways:
• Right-click a control and click What's this?, and a pop-up Help window appears.
•Click the ? button at the upper-right corner of the frame, next to the X, to change
the cursor to an arrow with a question mark. Use this special cursor to select a
control, and the pop-up Help window for that feature appears.
• Press the
Context-sensitive Help
Press the Help button on a driver tab or in a dialog box, and context-sensitive Help
appears.
F1 key, and the Help window for the currently selected control appears.
Software Technical Reference Introduction 45
Page 48

Constraint messages
Constraint messages are unsolicited messages that appear in response to specific
actions you take. These messages alert you to selections that are illogical or
impossible given the capabilities of the product or the current settings of other
controls. For example, if you click Print on Both Sides and then change the paper
type to transparencies, a message appears asking you to resolve this conflict.
Figure 10. A typical constraint message with an OK button
Whenever a constraint message appears with OK or Cancel buttons, the
interpretation of the buttons is as follows:
• Clicking OK accepts the change that was just made, and the driver then resets the
conflicting control to a setting that is compatible with the new value.
• Clicking Cancel rejects the change that was just made, setting the control back to
its previous value.
46 3 Driver features Software Technical Reference
Page 49

Bubble Help
Bubble Help features a graphical icon resembling a cartoon speech bubble with a small i
in it, representing the international symbol for information. The following illustration shows
Bubble Help icons on a driver tab.
Figure 11. A property page with Bubble Help icons
The bubble typically appears next to a disabled control, although it can also accompany
an enabled control if there is an important note concerning its use. Moving the pointer
over the bubble changes the arrow to a gloved hand, which indicates that the area
underneath the pointer is selectable. When the bubble is selected by using either the
mouse or the keyboard, a message box appears with a brief explanation about why the
control is disabled and what can be done to enable it. If the control is not disabled, the
message is a tip or a precaution to be aware of when using that particular feature.
The following table lists Bubble Help messages and the conditions that cause them to
appear.
Software Technical Reference PCL 5c and PCL 6 driver features 47
Page 50

Table 4. Bubble Help messages
Condition Effect Message
Finishing tab:
Pages per Sheet is greater
than 1
Finishing tab:
Pages per Sheet is greater
than 1
Finishing tab:
Pages per Sheet is greater
than 1
Finishing tab:
Booklet Printing setting is any
setting except Off.
Finishing tab:
Booklet Printing setting is any
setting except Off.
Finishing tab:
Booklet Printing setting is any
setting except Off.
Effects tab:
The Print Document On check
box is selected.
Effects tab:
The Print Document On check
box is selected.
Finishing tab:
Booklet Printing is not available if
Print on Both Sides check box is
selected.
Effects tab:
Print Document On is not available.
Effects tab:
% of Normal Size is not available.
Finishing tab:
Pages per Sheet is not available.
Effects tab:
Print Document On is not available.
Effects tab:
% of Normal Size is not available.
Effects tab:
% of Normal Size is not available.
Paper tab:
a Help bubble points to Size Is.
To use this feature, set "Pages per
Sheet" to 1 (see "Finishing" tab).
To use this feature, set "Pages per
Sheet" to 1 (see "Finishing" tab ).
To use this feature, set "Pages per
Sheet" to 1 (see "Finishing" tab ).
To use this feature, set the "Booklet
Printing" option to Off (see "Finishing"
tab).
To use this feature, set the "Booklet
Printing" option to Off (see "Finishing"
tab).
To use this feature, set the "Booklet
Printing" option to Off (see "Finishing"
tab).
To use this feature, turn off the "Print
Document On:" option (see "Effects"
tab).
Although your document will be
formatted for the paper size indicated,
it will be printed on the paper size
specified on the "Effects" tab.
Effects tab:
The Print Document On check
box is selected.
Effects tab:
The % of Normal Size setting is
any value except 100%.
Effects tab:
The % of Normal Size setting is
any value except 100%.
Effects tab:
The % of Normal Size setting is
any value except 100%.
Paper tab:
Type Is setting is Transparency,
Labels, or Envelope.
Paper tab:
The Size Is setting is for any
envelope.
Paper tab:
The Size Is setting is for
anything except Letter, Legal, or
A4.
Finishing tab:
Pages per Sheet is not available.
Effects tab:
Print Document On is not available.
Finishing tab:
Booklet Printing is not available.
Finishing tab:
Pages per Sheet is not available.
Finishing tab:
Bubble Help points to the Print on
Both Sides check box.
Finishing tab:
Bubble Help points to the Print on
Both Sides check box.
Finishing tab:
Bubble Help points to the Booklet
Printing drop-down menu, which is
not available.
To use this feature, turn off the "Print
Document On:" option (see "Effects"
tab).
To use this feature, set "% of Normal
Size" to 100 (see "Effects" tab ).
To use this feature, set "% of Normal
Size" to 100 (see "Effects" tab ).
To use this feature, set "% of Normal
Size" to 100 (see "Effects" tab ).
This feature is not available with the
currently selected paper type. (see
Paper tab )
This feature is not available with the
currently selected paper size (see
"Paper" tab).
To use this feature, set the paper size
to Letter, Legal or A4 (see "Paper"
tab).
48 3 Driver features Software Technical Reference
Page 51

Table 4. Bubble Help messages (continued)
Condition Effect Message
Paper tab:
The Source Is tray in the Other
Pages mini-tab is the same as
the one defined in the First
Page mini-tab.
Effects tab:
Watermarks exceed 30.
Bidirectional communication is
not installed.
Finishing tab:
The Print on Both Sides check
box is selected, and the Allow
Manual Duplexing check box
(on the Configure tab) is also
selected.
Paper tab:
Bubble Help points to Type Is dropdown menu.
Effects tab:
Bubble Help points to Watermarks.
Configure tab:
Update Now button is not available.
Basics tab:
Bubble Help points to the Copies
option.
In order to use this feature, choose a
source tray different from the first
page.
You cannot add a new watermark
because the list is full. You may edit
existing watermarks, or you may delete
unused ones to make more room.
The configuration settings cannot be
updated automatically because
bi-directional communication is not
available.
Only 1 copy allowed per job for
manually duplexed printing. To
change, first disable "Print On Both
Sides" option.
Software Technical Reference PCL 5c and PCL 6 driver features 49
Page 52

Finishing tab features
The Finishing tab is the default tab that appears when you click Document Defaults...
(or Printing Preferences..., depending on your operating system) for the driver or for a
software application.
Figure 12. The default appearance of the Finishing tab
The options in the Print Quality group box might vary, depending on your HP LaserJet
product. The
z Quick Sets
z Document Options
z Print Quality
Finishing tab contains a document preview image and three group boxes:
Document preview image
The preview image is a line-drawn image of a page that represents graphics and text.
For color printers the bitmap contents appear in color, while for monochrome printers
the contents appear in tones of gray. The image is always oriented so that the
contents of the page are right side up. The preview image appears in the upper right
corner of all properties tabs except for the Configure tab.
50 3 Driver features Software Technical Reference
Page 53

Switching between tabs does not change the location or appearance of the preview
image. When you move the mouse over the preview image, the mouse cursor will
change from an arrow to a gloved hand. You can toggle between portrait and
landscape page orientation by clicking on the image. The light-yellow dimensions
label that appears below the preview image reflects the selected page size. The
horizontal dimension is always first, so the order of the numbers will reverse when the
orientation changes. Click on the label to toggle between English and metric units.
Quick Sets
This group box is present on each tab for the driver. Quick sets are either preset or
user-defined printing specifications (such as paper size, pages per sheet, and so on).
Defaults
The default setting is Defaults. Other settings are User’s Manual and Untitled.
When
existed after the driver was installed. However, if the attribute combinations
associated with watermark definitions, custom paper sizes, or the User’s Manual
quick set have been changed or deleted, the original settings are not restored.
The Defaults setting appears automatically if no other driver settings have been
changed since the driver was installed, or if all dr iver settings match the original
settings. Otherwise, the setting in the Quick Sets menu will be the same label that
appeared when you last closed the printing Properties dialog box by clicking OK.
Defaults is selected, nearly all settings are restored to the combination that
Software Technical Reference PCL 5c and PCL 6 driver features 51
Page 54

User’s Manual
This setting provides a quick set for optimal printing of the use guide (User’s
Manual), as shown in the following illustration.
Figure 13. Finishing tab - User’s Manual Quick Set
Custom Quick Sets
When you change any of the default settings on the Finishing tab or any of the
other tabs, the name in the
Untitled. If you want to save this configuration as a quick set, highlight the word
Untitled, type the name you want for your new quick set, and click Save. Quick
sets are saved in the system registry. To delete a quick set, select it from the dropdown menu and click Delete.
You can store a maximum of ten user-defined Quick Sets on a particular system. If
you attempt to save too many, a message box appears that reads, "There are too
many Quick Sets defined. Please delete some before adding new ones."
Quick Set drop-down menu dynamically changes to
Document Options
Print on Both Sides option
The default setting for the Print on Both Sides option is OFF (not selected). Print
on Both Sides
52 3 Driver features Software Technical Reference
is not available when:
Page 55

• Type is on the Paper tab is set to Transparency, Cardstock, or Labels.
•
Size is is anything except Letter, Legal, A3, A4, A5, B4, B5 (Japanese Industry
Standard, or JIS), Executive, 11 x 17, or custom sizes greater than or equal to
148 mm by 210 mm (5.8 inches by 8.3 inches) and less than or equal to 312
mm by 470 mm (12.3 inches by 18.5 inches).
When
Paper Size is set to Letter, Legal, or A4, clicking Print on Both Sides
makes the Flip Pages Up and Booklet Printing options available. The default for
both of these options is OFF.
Flip Pages Up
The Flip Pages Up check box, enabled only when Print on Both Sides is
selected, is used to specify the duplex-binding option. The following table
demonstrates the results of selecting this box, depending upon the paper
orientation selected on the Basics tab.
T able 5. Page orientation
Orientation (Basics tab) Flip Pages Up selected Flip Pages Up not selected
Portrait Short-edge binding Long-edge binding
Landscape Long-edge binding Short-edge binding
When Print on Bo th Sides is selected, the document preview image changes to
show a spiral binding along either the left or the top edge of the page. In addition,
a folded-over corner appears in the lower-right portion of the preview image,
indicating that printing will occur on the back side. An arrow on the folded-over
corner points in the direction that the pages would be flipped if they were bound
together.
Booklet Printing
The Booklet Printing drop-down menu, visible when Print on Both Sides is
selected, offers eight choices, two of which are based on the current paper size.
The list contains the items like the following examples:
•Off
• [paper size] (Left Binding)
• [paper size] (Right Binding)
where [paper size] depends on the paper size set on the Paper tab. The following
table shows the appropriate entries in the Booklet Printing drop-down menu for
each selected paper size.
Software Technical Reference PCL 5c and PCL 6 driver features 53
Page 56

Table 6. Selected paper size
Paper size selected Entries in Booklet Printing
Drop-down menu
Letter Off
Letter (Left Binding)
Letter (Right Binding)
Legal (Left Binding)
Legal (Right Binding)
11 x 17 (Left Binding)
11 x 17 (Right Binding)
B4 (JIS) (Left Binding)
B4 (JIS) (Right Binding)
Legal Off
Legal (Left Binding)
Legal (Right Binding)
A4 Off
A4 (Left Binding)
A4 (Right Binding)
A3 (Left Binding)
A3 (Right Binding)
B4 (JIS) B4 (JIS) (Left Binding)
B4 (JIS) (Right Binding)
Booklet printing is disabled when the following paper sizes are selected:
Executive, A3, A5, B5, and envelopes and postcards of any size.
The Booklet Printing drop-down menu appears only when:
• Print on Both Sides is selected.
• % of Normal Size (on the Effects tab) is 100.
• Pages per Sheet is 1.
• Size Is (on the P aper tab) is set to Letter, Legal, A4, or B4 (JIS).
• Print Document On (on the Effects tab) is not selected.
54 3 Driver features Software Technical Reference
Page 57

If any except the first of these conditions is not met, a Bubble Help appears next to
Booklet Printing to tell you why it is disabled.
Activating booklet printing
Note The following instructions apply only to PCL drivers. Booklet Printing is supported by the
HP PS (PostScript) driver through Windows applications that provide booklet-printing configuration
settings.
Step 1 Click File, click Print, and then click Properties.
Figure 14. Activating booklet printing
Step 2 Click the Finishing tab. On the drop-down menu, select Print on
Both Sides.
Software Technical Reference PCL 5c and PCL 6 driver features 55
Page 58

Step 3 In the Booklet Printing drop-down menu, select the type of booklet
printing you want. The booklet printing type consists of the media size
and the location of the binding. For example, Letter (Left binding).
Figure 15. Selecting booklet printing type
Note The appearance of the screen might vary from product to product. Print Quality settings, for instance,
can be "600 dpi", or "Faster Printing", or "Default".
Selecting a booklet cover
The booklet cover must be the same size as the inside sheets.
Step 1 Click File, click Print, and then click Properties.
Step 2 Click the Paper tab, and then select the Use different paper for first
page check box.
Step 3 Click the First Page tab. On the Size is, Source is, and Type is
menus, select the size, source, and type settings for your cover.
Step 4 Click the Other Pa ges tab. On the Size is, Source is, and Type is
menus, select the size, source, and type settings for the inside sheets
of your print job.
Step 5 Click the Back Cover tab. The back cover, if there is one, must be the
same size as the booklet cover and the inside sheets. The No back
cover is the default setting. If your print job has a back cover that
uses the same source and type settings you selected in the First
Page tab, select Use the first page source. If not, select Use an
alternate source, and then select the back-cover settings in the
Source is and Type is menus.
56 3 Driver features Software Technical Reference
Page 59

Pages per Sheet
The Pages per Sheet drop-down menu provides six settings: 1 (default), 2, 4, 6,
9, and 16. If you type another value into the box (for example, 3), the control will
round the value entered to the nearest valid value (in this example , 4).
Related controls indented beneath the Pages per Sheet edit box are Print Page
Borders and P age Order, which become active when Pages Per Sheet is
greater than 1.
Print Page Borders sets a line around each page image on a printed sheet to
help visually define the borders of each logical page.
The Page Order drop-down menu contains four selections:
• Right, then Down
• Down, then Right
• Left, then Down
• Down, then Left
The preview document image changes to reflect alterations in these settings, as
shown by the examples in the following illustration.
Figure 16. Page-order preview images
1 2 pages per sheet
2 4 pages per sheet
3 6 pages per sheet
4 9 pages per sheet, with Print Page Borders selected
5 9 pages per sheet, with Down, then Right page order selected
6 16 pages per sheet
Print Quality
The HP LaserJet printer driver Prin t Qu alit y group box provides options that control
resolution, graphics settings, and font settings. The group box includes the following
options:
• Default
•Custom
The Print Quality group box also includes a Details button. Clicking this button opens
the dialog box. The Print Quality Detai ls dialog box provides options for various
print-quality settings.
Software Technical Reference PCL 5c and PCL 6 driver features 57
Page 60

The following illustration shows default Print Quality Details settings for the HP Color
LaserJet 5500 product. The menu on your HP LaserJet product might vary.
Figure 17. Print Quality Details dialog box showing HP Color LaserJet Default setting
Default
For the HP Color LaserJet PCL 6 and PCL 5c drivers, the Default mode contains
the following options:
• Resolution is 600 dpi
• Rendering mode is automatic (PCL 5c only)
• Manually Print on 2nd Side is
• Scale Patterns (WYSIWYG) is selected
• Print all Text as Black is not selected
• Raster Compression is Automatic
• Send TrueType as Bitmaps is
not selected
not selected
58 3 Driver features Software Technical Reference
Page 61

Graphics Settings group box
The Raster Compression settings under the Graphics Settings group box,
available on the PCL 6 driver only, support adaptive compression modes for Joint
Photographic Experts Group (JPEG) data. These settings are available:
• Automatic: (default). When this setting is used, the printer driver determines
and applies the best compression method.
• Best Quality: This setting forces the driver to use a compression method that
results in no loss of data.
• Maximum Compression: Where applicable, this setting requires the printer
driver to use JPEG compression.
Output Settings group box
The Output Settings group box contains controls for selecting resolution and
other print-job settings, including pattern scaling, printing all text as black, and
manually printing on second side.
Resolution
The resolution setting for the HP Color LaserJet 5500 is 600 dpi.
Manually printing on the second side
Use the duplexing unit in the printer to automatically pr int on two sides of the
paper when that option is specified in the job.To achieve the best print quality
when printing on the second side of the page, the printer needs to make
adjustments to its print modes. These adjustments are automatic when the
duplexing unit is used.
Media sizes supported by the duplexing unit are Letter, A4, and Legal only. All
other media sizes must be duplexed manually.
The following media types cannot be automatically duplexed:
• Transparencies
• Labels
•Heavy
• Cardstock
The following media types have a different print mode when you manually print
on the second side:
• Plain
• Preprinted
• Letterhead
• Prepunched
• Bond
•Recycled
• Colored
• Light
• Glossy
• Glossy film
Software Technical Reference PCL 5c and PCL 6 driver features 59
Page 62

Heavy and Cardstock media can be manually printed on the second side, but
there is no change to the print mode. Transparencies and labels should not be
manually printed on the second side.
Manually pr i nting on the second side of a page is available when you are using
the PCL 6 or PS driver (the PCL 5c driver does not support the feature).
Select the Manually Print on 2nd Side check box to print on the second side
of the paper for the base HP Color LaserJet model printers. Also select
Manually Print on 2nd Side on the other HP LaserJet models for media sizes
that are not available when using the automatic duplexing unit, such as card
stock, glossy paper, labels, and thick media.
To print a multiple-page document, follow these steps:
Step 1 Pr int all even-number pages. Some applications have a selection in
the file print window that specifies printing even or odd pages.
Step 2 If your finished document has an odd number of pages, add a blank
page to the bottom of the stack of even-number pages (behind the
last even-number page).
Step 3 Select MANUAL FEED as the paper source in your application (often
found under page setup) or in the printer driver (click Document
Defaults, click the Paper tab, and then select Manual Feed in the
Source Is drop-down menu).
Step 4 If you are using the PCL 6 driver, click Document Defaults, click the
Finishing tab, click Details, and then select the Manually Print on
2nd Side check box. If you are using the PS driver, click Document
Defaults, click the Advanced tab, select Manual Print on 2nd Side
under Printer Features, and then click On. Manual Print on 2nd Side
is not an option for the PCL 5c driver.
Step 5 Pr int all odd number pages by completing the following procedure.
When the printer's control panel shows the MANUALLY FEED
message, insert the stack of paper (on which the even-number pages
have been printed) into tray 1 in one of the following orientations:
a. For portrait-orientation, long-edge binding (flips like a book), place
the stack with the already-printed side facing up and the top of the
pages toward the printer.
b. For portrait-orientation, short-edge binding (flips like a note pad),
place the stack with the already-printed side facing up and the top of
the pages away from the printer.
c. For landscape-orientation, long-edge binding (flips like a calendar),
place the stack with the already-printed side facing up and the top of
the pages to the left.
d. For landscape-orientation, shor t-edge binding (flips like a wide
book), place the stack with the already-printed side facing up and the
top of the page to the ri ght. (The top page should have page 2 facing
downward.)
60 3 Driver features Software Technical Reference
Page 63

Scale Patterns (WYSIWYG)
The Scale Patter ns (WYS IWYG) feature is implemented to address the moiré
effect created when certain applications encounter certain patterns. Use this
feature to tur n off the pattern scaling. What you lose is WYSIWYG with
patterns, but the printed result might look better. The feature works only with
programs that use vector hatch patterns. This option is on by default.
Print all Text as Black
Print all Text as Black is off by default. When selected, this option causes the
driver to print all text as black regardless of the original document text color. By
design, however, white text remains white, as a fail-safe method of printing
reverse typeface against a dark background. This setting does not affect
graphic images on the page.
the current print job. When the current print job is completed,
Black
is automatically turned off.
Print all Text as Black remains selected only for
Print all Text as
Use the
gray rather than color.
Print in Grayscale option on the Color tab to print graphic images in
Font Settings group box
In the Font Settings group box, the only available option is Send TrueType as
Bitmaps
TrueType fonts for special graphic purposes, such as shading, rotation, or
slanting.
, which provides a safety net for applications that cannot easily use
Software Technical Reference PCL 5c and PCL 6 driver features 61
Page 64

Effects tab features
The Effects tab is used to create unique paper effects such as scaling and watermarks.
Figure 18. Effects tab
Print Document On setting
Use Print Document On to format the document for one paper size and then print
the document on a different paper size, with or without scaling the page image to
fit the new paper size.
The Print Document On control is disabled by any of the following conditions:
• Percent of Normal Size is not 100.
• Pages per Sheet (on the Finishing tab) is not 1.
When Print Document On is selected, the drop-down menu shows the media
sizes on which you can print. The list contains all standard media sizes supported
by the selected media source and any custom sizes that you have created (if the
currently selected media source is manual, auto, or any tray). When Print
Document On is selected, Scale to Fit is automatically selected.
62 3 Driver features Software Technical Reference
Page 65

Scale to Fit option
The Scale to Fit option specifies whether each formatted document page image is
scaled to fit the target paper size. By default, Scale to Fit is selected when Prin t
Document On is selected. If the setting is turned off, then the document page
images will not be scaled, and are instead centered at full size on the target paper.
If the document size is larger than the target paper size, then the document image
is clipped. If it is smaller, then it is centered within the target paper. The following
illustration shows preview images for a document formatted for Legal paper with
the Print Document On option selected, and the target size specified as Letter.
Figure 19. Preview images - Legal on Letter; Scale to Fit off (left) and on (right)
When the size for which the document is formatted (that is, the logical size) differs
from the target size, the preview image uses a dashed gray line to show the
boundaries of the logical page in relation to the target page size.
% of Normal Size option
The % of Normal Size option provides a slider bar for scaling the percentage
setting. The default setting in the entry box is 100 percent of normal size. Normal
size is defined as the paper size selected within the driver or what the driver
receives from the application (if the application does not negotiate paper size with
the driver). The dr iver will scale the page by the appropriate factor and send it to
the printer.
The limits of the range are from 25 percent to 400 percent, and any values outside
the range are clipped to those limits as soon as the focus is removed from the
control (that is, when the TAB key is pressed or another control is selected).
Any change to the scale also changes the page preview, which increases or
decreases from the top-left corner of the preview.
The slider bar controls the scale directly. The value in the edit box changes as the
scroll bar indicator is dragged, and the preview image is updated to the new image
scale. Each click on the scroll bar arrows increases or decreases the scale by one
percent. Each click on the slider bar affects the scale by 10 percent.
You cannot achieve an exact value by dragging the scroll bar indicator at the
default Windows resolution; use the scroll bar indicator to approximate the desired
value, and then use the scroll bar arrows to refine the value.
The following settings disable
% of Normal Size:
•
Print Document On is selected.
•
Pages per Sheet is not 1.
Booklet Printing is ON.
•
Software Technical Reference PCL 5c and PCL 6 driver features 63
Page 66

Watermarks
Use the Watermarks feature to choose a watermark, create your own custom
watermarks (text only), or edit an existing watermark. The follow ing watermarks are
preset in the driver:
• (none)
• Confidential
• Draft
• SAMPLE
The drop-down menu shows alphabetically sorted watermarks that are currently
available on the system, plus the string "(none)", which indicates that no watermark is
selected. This is the default setting. Any watermark selected from this list appears in
the preview image.
When First Page Only is selected, the watermark is printed only on the first page of
the document. The
watermark selection is "(none)".
Watermarks are applied to logical pages. For example, when Pages per Sheet is set
to “4” and First Page Only is turned off, four watermarks appear on the physical page
(one on each logical page).
Click Edit, and the Watermark Details dialog box appears.
First Page Only check box is disabled when the current
Figure 20. Watermark Details dialog box
64 3 Driver features Software Technical Reference
Page 67

The dialog box shows a preview image and provides options for creating a new
watermark and controlling the message angle and font attributes.
Click OK to accept all changes made in the Watermark Details dialog box. However,
clicking Cancel does not cancel all changes. If you make changes to a watermark,
and then select a different watermark or click New, all changes made to the previous
watermark are saved, and only the current, unsaved changes can be canceled.
Current Watermarks
The Current Watermarks group box contains a list of available watermarks, both
predefined watermarks made available in the driver and any new watermarks you
have created. To create a new watermark, click New. The new watermark
appears in the Current Watermarks list and in the Watermark Message edit box
as “Untitled” until you name it. To name the new watermark, type the selected
watermark text in the
select the watermark in the
Note You can have no more that 30 watermarks in the Current Watermarks list at one time. When the limit
of 30 watermarks is reached, the
why the button is disabled and how to enable it.
To edit an existing watermark, select the watermark in the Current Watermarks
list. If you change the Watermark Message for that watermark, you are, in effect,
creating a new watermark.
Watermark Message edit box. To delete a watermark,
Current Watermarks list and click Delete.
New button is disabled, and a Bubble Help appears that explains
Watermark Message
The Watermark Message is also the name that identifies the waterm ark in the
Current Water marks list, except when more than one watermark has the same
message. For example, you might want several different watermarks with the
message DRAFT, each with a different font or size. When this occurs, the string is
appended with a space, a pound sign, and a number (for example, Draft #2).
When a number is added, the number two is used first, but if the resulting name is
also in the list, then the number increases until the name is unique.
Message Angle
Use the controls in the Message Angle group box to print the watermark in a
diagonal, hor i zontal, or angle (custom) orientation to the page's text. The default is
Diagonal. All three settings automatically center the watermark string within the
page; the selection of a particular setting affects only the angle of the string
placement. Diagonal places the text along a line that spans the lower-left to
upper-right corners of the page.
Font Attributes
Use controls in the Font Attributes group box to change the font and the color,
shading, size, and style of the font.
Name
The Name drop-down menu lists TrueType (TM) fonts that are currently
installed on the system.
Software Technical Reference PCL 5c and PCL 6 driver features 65
Page 68

Color
The color selection com bo box provides a fixed, unalterable set of color
choices, in palette/color name-pair form, for the watermark. The triplet values
for these colors are shown in the following table.
T able 7. Watermark color values
Setting Gray Red Yellow Green Cyan Blue Magenta
Lightest 255
255
255
Very Light 224
224
224
Light 192
192
192
Med Light 160
160
160
Medium 128
128
128
Med Dark 96
96
96
255
232
232
255
224
224
255
192
192
255
160
160
255
128
128
255
96
96
255
255
232
255
255
224
255
255
192
255
255
160
255
255
128
255
255
96
232
255
232
224
255
224
192
255
192
160
255
160
128
255
128
96
255
96
232
255
255
224
255
255
192
255
255
160
255
255
128
255
255
96
255
255
232
232
255
224
224
255
192
192
255
160
160
255
128
128
255
96
96
255
255
232
255
255
224
255
255
192
255
255
160
255
255
128
255
255
96
255
Dark 64
64
64
Very Dark 32
32
32
Darkest 0
0
0
Shading
255
64
64
255
32
32
255
0
0
255
255
64
255
255
32
255
255
0
64
255
64
32
255
32
0
255
0
64
255
255
32
255
255
0
255
255
64
64
255
32
32
255
0
0
255
255
64
255
255
32
255
255
0
255
The following range of shades is available from the Shading drop-down menu:
• Lightest
• Very Light
• Light
• Medium Light
66 3 Driver features Software Technical Reference
Page 69

•Medium
•Medium Dark
•Dark
• Very Dark
• Darkest
These values represent the intensity of the color selected in the Color attribute.
Size
Font sizes from 1 to 999 points are available from the Size menu. The default
point size is language-dependent. The choice of regular, bold, italic, and bold
italic is available from the
Style drop-down menu.
Default settings
The default settings for new watermarks are Arial (R) font, Gray color, Very
Light
shading, 150 points, and Regular style. The default settings for preset
watermarks are
The default point size for preset watermarks is language-dependent, and
varies.
Arial font, Gray color, Very Light shading, and Bold style.
Paper tab features
Use the Paper tab to specify the size, type, and source of the media, as well as to define
a custom paper size. If you want to, you can indicate different paper-selection choices for
the first page and back cover of the document.
The first group box in the upper-left portion of the
feature is described in the “Finishing tab features” section. Any change to the Quick Sets
group box that is made on the Paper tab affects the group box on the Finishing tab and
on the Destination tab, and vice versa—they are all one and the same control.
Paper tab view is Quick Sets. This
Printer image
The bitmap image in the lower-right portion of the Paper tab represents the current
physical configuration of the printer and corresponds to its configuration data, either
obtained automatically through bidirectional communication or configured manually. It
should look the same as the image that appears in the same location on the
Destination tab and the Configure tab.
On the Paper tab, the printer image contains hot spots where you can select a paper
source. When the pointer moves over a hot spot, the arrow reverts to the gloved hand
used in the Bubble Help, the preview image, and other areas. The current paper
source, whether selected from the drop-down menu or from a printer-image hot spot,
is highlighted in bright green on the printer bitmap. The following points are worth
noting:
• Auto Select does not have a corresponding area to highlight in the printer image.
• Selecting
highlights the corresponding part in the printer image.
• Selecting the area that represents tray in the bitmap always selects the
corresponding tray in the Source Is option. Manual Feed, which is available from
the Source is option, cannot be selected by selecting the bitmap.
• On the Paper tab, only input trays have printer-image hot spots and can be
highlighted. Output bins must be selected from the Destination tab.
Manual Feed, Tray 1, Tray 2, Tray 3, or Tray 4 in the drop-down menu
Software Technical Reference PCL 5c and PCL 6 driver features 67
Page 70

Note The printer image shown in the following illustration might differ from your HP LaserJet product,
depending on the model number and accessory devices.
Figure 21. Paper tab
All Pages
The controls on this mini-tab are contained in an All Pages mini-tab. As the name
implies, this means that the settings specified on that mini-tab apply to all pages of the
document. However, when you select the Use different paper for first page check
box, the All Pages mini-tab is replaced by three mini-tabs. These three mini-tabs are:
• First Page, which contains the same controls as
• Other Pages, which contains different controls, as noted in the following sections
• Back Cover, which also contains different controls, as noted in the following
All Pages
sections
68 3 Driver features Software Technical Reference
Page 71

Other Pages
Use the Other Pages mini-tab to select an alternative media type or source for the
pages that follow the first page of a document. The choices and defaults for Source is
and Type is are the same as for First Page.
Figure 22. Other Pages mini-tab
Back Cover
Use this feature to include a blank back cover on a document, or include a back cover
from a paper source different from that used for the remainder of the document. Use
the Back Cover mini-tab allows to select an alternative media source (or the same
source as
page of the body of the document. The mini-tab contains three option buttons and two
drop-down menus. The three option buttons are:
• No back cover
• Use the first page source
• Use an alternate source
The two drop-down menus, which become available when Use an alternate source
is selected, are:
• Source is
•Type is
No back cover is selected as the default, with the drop-down Source is and Type is
selection boxes disabled. Clicking Use an alternate source activates the drop-down
menus. The drop-down menu value defaults to the same source as that chosen for the
First Page mini-tab. Clicking Use the first page source changes the drop-down
value to match the first page, if necessary, but the drop-down menus remain inactive.
First Page) from which a blank page is drawn and placed after the final
Software Technical Reference PCL 5c and PCL 6 driver features 69
Page 72

When the Back Cover mini-tab is active, clicking No back cover deactivates the
drop-down menus, but does not change their value. No Bubble Help is available for
the inactive drop-down menus. The settings revert to defaults when
paper for first page
Figure 23. Back Cover mini-tab
Use different
is selected again.
Size is
This feature actually functions as two controls: a drop-down menu that contains all the
supported media sizes (including any user-defined custom sizes) and a text label that
indicates the dimensions of the selected size.
Moving the pointer over the text label causes the arrow to change to a gloved hand,
which indicates that the area beneath the pointer is selectable. Clicking here toggles
the units of measure between inches and millimeters, offering the same options on the
dimensions label in the preview image. Selecting a new size from the drop-down
menu updates the media-dimensions text label as well as the preview image.
Changing the orientation (on the Basics tab) also updates the dimensions text label.
Size can be specified only for the first page or for all pages. On the
Back Cover mini-tabs, the Size is drop-down menu does not appear because the
media size must be consistent for all pages of the job. Certain applications can
override this command and specify different media sizes within a single document.
Any change in the media size selection causes the Booklet Printing feature to be
turned off.
Other Pages and
70 3 Driver features Software Technical Reference
Page 73

Custom
The Custom Paper Size dialog box appears when you click the Custom button on
Paper tab. The following illustration shows the initial appearance of the Custom
the
Paper Size dialog box.
Figure 24. Custom Paper Size dialog box
When the Custom Paper Size dialog box appears, the drop-down m enu in the Name
group contains one of two things, depending upon the current paper size selection in
the Paper tab:
• If the paper size selection is a previously defined custom size, then the drop-down
menu contains the name of that custom size.
• If the paper size selection is a standard paper size, then the drop-down menu
shows the default name Untitled for a custom paper size.
Note In Windows 95, Windows 98 and Windows Me, two names for the same size media can coexist (for
example, "big" and "BIG" can both be used as names for custom-size paper measuring 8.4 inches by
11 inches). In Windows NT 4.0, Windows 2000, and Windows XP, both upper and lower-case names
can be used, but they cannot be used to name the same paper size.
The new name is compared only against the list of user-defined custom paper-size
names, and not against the standard paper-size names.
The complete set of titles for this button and the specific characteristics that determine
its title and capabilities are discussed in the dynamic command button section.
Software Technical Reference PCL 5c and PCL 6 driver features 71
Page 74

Name drop-down menu
The Name drop-down menu displays the name of the last selected custom paper size.
Use the Name drop-down menu to type new names for custom paper sizes and to
select from the list of currently defined custom paper sizes.
The name displayed in the
upon the following conditions:
• If a saved custom paper size has been selected from the drop-down menu and the
other controls in the dialog box have not been changed since then, the
down menu displays the name of the last selected custom paper size.
• If the width or height controls have been changed since a custom size was selected
or saved, or if a saved paper size has just been deleted, then the
menu displays the default name of Untitled.
• If a new name has been typed into the
saving a new size or renaming an existing size, then that new name will remain in
the drop-down menu display until a saved custom paper size has been selected
from the drop-down menu.
If you type a new name into the
Save button, you should be able to change the width and height values without losing
the name. However, if a saved paper-size name is selected from the drop-down
menu, any unsaved name or size values are lost without warning, and replaced by the
values of the selected custom paper size.
Name drop-down menu is one of three things, depending
Name drop-
Name drop-down
Name drop-down menu for the purpose of
Name drop-down menu, but then do not click the
Dynamic command button
The button located to the right of the Name drop-down menu has three possible
labels: Save, Delete, and Rename.
•
Save is the button title whenever the height and width values have been changed
since the last save or since the selection of an existing custom paper size. Clicking
the button causes the name in the
each of the saved names. If a duplicate is found, a dialog box appears, asking if it is
okay to replace the existing item. If you click
new values. If you click
box, where you can type a different name.The new name is compared only against
the list of user-defined custom paper names, and not against the standard papersize names. Whenever the command button has the
button.
Delete is the button title whenever the name of an existing (previously saved)
•
custom paper size appears in the
after selecting an item from the drop-down menu or clicking the Save button.
Clicking the Delete button causes the saved custom paper size to be deleted, after
which the Name drop-down menu changes to Untitled, the height and width
controls are unchanged, and the button title changes to Save.
Rename is the button title when you type something into the Name drop-down
•
menu after selecting an existing custom paper size from the drop-down menu. If no
duplicate is found, the name of the stored custom paper size changes to match the
contents of the
Rename title, it is also the default button.
Name drop-down menu. Whenever the command button has the
No, the driver returns to the Custom Paper Size dialog
Name drop-down menu to be compared against
Yes, the old item is updated with the
Save title, it is the default
Name drop-down menu, such as immediately
72 3 Driver features Software Technical Reference
Page 75

The following table illustrates the relationships between the Name drop-down menu,
the command button, and the actions that take users from one state to another.
Table 8. Name drop-down menu text strings
State Drop-down
menu contents
1 Untitled Save Click Save 3
2 <user-typed text> Save Click Save 3
3 <name of saved
item>
4 <user-typed text> Rename Click Rename (when the name is unique) 3
Button
label
Delete Click Delete 1
Action Next
Type something into the Name drop-down menu 2
Change the width or height values 1
Select a saved item from the drop-down menu 3
Type something into the Name drop-down menu 2
Change the width or height values 2
Select a saved item from the drop-down menu 3
Type something into the Name drop-down menu 4
Change the width or height values 1
Select a saved item from the drop-down menu 3
Click Rename (when the name is a duplicate) 4
Type something into the Name drop-down menu 4
Change the width or height values 2
state
Select a saved item from the drop-down menu 3
Width and height controls
The width and height values can be changed either by typing numeric strings into the
edit boxes, or by selecting the up and down arrows.
Any entry that is greater than the maximum limits of the width and height control is
rounded down to the maximum valid entry, while any entry that is smaller than the
minimum limits of the width and height control is rounded up to the minimum valid
entry. See “Custom width and height control limits.”
If units are in millimeters, the custom paper-size range minimum is the limit rounded
up to the nearest whole millimeter. The custom paper-size range maximum is the limit
rounded down to the nearest whole millimeter. Any non-numerical entry reverts to the
last valid entry. Width and height entries are validated when the focus has changed.
The resolution of each control is one millimeter or one-tenth of an inch, depending
upon the current measurement units. Clicking the up and down arrows increases or
decreases the current value by the increment amount (within the allowed range of
values). The computer determines the rate at which the values change.
Unit indicator labels change dynamically to indicate inches or millimeters, depending
upon the measurement units the driver is currently using. To change measurement
units, click the Measurement Units button.
Software Technical Reference PCL 5c and PCL 6 driver features 73
Page 76

Custom width and height control limits
The minimum paper size for the HP Color LaserJet 5500 product is 76 mm by 127 mm
(3.0 inches by 5.0 inches) and the maximum is 297 mm by 470 mm (12.05 inches by
18.5 inches). The following table summarizes paper size limits for each paper-
handling device.
Table 9. Custom width and height limits for the HP Color LaserJet 5500
Media source or paper
handling accessory
Tray 1 (multi-purpose) 76 mm by 127 mm
Tray 2 148 mm by 210 mm
Tray 3 148 mm by 210 mm
Tray 4 148 mm by 210 mm
Minimum size width by height
(3.0 inches by 5.0 inches)
(5.83 inches by 8.27 inches)
(5.83 inches by 8.27 inches)
(5.83 inches by 8.27 inches)
Maximum size width by height
306 mm by 470 mm
(12.05 inches by 18.50 inches)
297 mm by 432 mm
(11.69 inches by 17.00 inches)
297 mm by 432 mm
(11.69 inches by 17.00 inches)
297 mm by 432 mm
(11.69 inches by 17.00 inches)
Paper and envelope icons
The paper and envelope icons visually define width and height.
Measurement Units button
Like the dynamic command button previously described, the Measurement Units
button is also multi-titled, although its function is always to toggle the unit of
measurement between standard (inches) and metric (millimeters) units of
measurement.
Close button
The Close button closes the Custom Paper Size dialog box according to the logic in
the table below. In all cases, any custom paper sizes successfully saved (and not
renamed or deleted) while the dialog box is open will remain in the paper size list in
the Paper tab. The following table lists options that appear when you click the Close
button.
Table 10. Close dialog box text strings
If the drop-down menu
contains …
Untitled Save The dialog box closes, but you lose
74 3 Driver features Software Technical Reference
And the button says … Then this happens when the
Close button is clicked
the changes that were not saved.
The current paper size remains the
same as it was when the Custom
button was selected.
Page 77

Table 10. Close dialog box text strings (continued)
If the drop-down menu
contains …
<user-typed text> Save The dialog box closes, but you lose
<name of saved item> Delete The dialog box closes, and the
<user-typed text> Rename The dialog box closes, but you lose
And the button says … Then this happens when the
Close button is clicked
the changes that were not saved.
The current paper size remains the
same as it was when the Custom
button was selected.
current paper size is set to that
which was last displayed in the
drop-down menu.
the changes that were not saved.
The current paper size remains the
same as it was when the Custom
button was selected.
Source Is
The Source Is drop-down menu shows the input trays available according to
Configure tab settings. The list contains:
• Auto Select
• Manual Feed
•Tray 1
•Tray 2
• Tray 3 (if installed)
• Tray 4 (if ins talled)
The default setting is Auto Select, which allows the printer firmware to select the
media source. Any optional paper trays that are installed through the Configure tab
are also shown here.
If a conflict exists among paper source, size, or type, and you choose to keep the
conflicting settings, the settings are processed in the following order: paper size,
paper type, and paper source.
For information about m edia types and sizes, see "Media attributes".
Type Is
The Type Is drop-down menu shows all the paper types supported by the
HP LaserJet product, as well as any user-defined types created by a printer
administrator. The default setting is Auto Select, which allows the application to
select the paper type.
Software Technical Reference PCL 5c and PCL 6 driver features 75
Page 78

No mechanism exists for manually adding custom paper types from the driver.
Custom sizes can be added only by using the bidirectional communication
mechanism, so they must already exist in the printer when the bidirectional query
occurs. If bidirectional communication is enabled, then the information returned is an
updated list of paper types. If bidirectional communication is not enabled, then the
driver looks for custom paper types saved from a previous bidirectional
communication query, and uses those. Otherwise, no custom paper types are
available through the driver.
The standard types that appear in the lists are:
• Bond
• Cardstock
• Color
• Envelope
•Glossy
• Heavy Glossy
•Heavy
• Labels
• Letterhead
• Light
• Plain
• Preprinted
• Prepunched
• Recycled
• Tough Paper
• Transparency
• Unspecified
For more information about media types and sizes, see “Media attributes”.
Printer image
The bitmap image in the lower-right portion of the Paper tab screen represents the
current physical configuration of the printer according to the driver configuration data
(obtained automatically through bidirectional communication, or configured manually
through the driver). It should have the same appearance as the image in the same
location on the Destination tab and the Configure tab.
On the Paper tab, the printer image contains hot spots for selecting a media source.
When the pointer moves over a hot spot, the arrow reverts to the gloved hand used in
the Bubble Help, the preview image, and other areas. The current media source is
highlighted in a bright green color on the printer bitmap.
Destination tab features
The Destination tab provides options for job storage and output bins.
Note The Destination tab appears only if the Printer Hard Disk and Job Storage Enabled check boxes
are selected. To select these options, click More... on the Configure tab.
76 3 Driver features Software Technical Reference
Page 79

The printer image in the lower-right portion of the Destination tab represents the current
physical configuration of the printer and corresponds to its configuration data, either
obtained automatically through bidirectional communication or configured manually. It
should look the same as the image that appears in the same location on the P aper tab
and the Configure tab.
Note The printer image shown in the illustration might differ from your HP LaserJet product, depending on
the model number and accessory devices.
Figure 25. Destination tab
Destination Features
The Destination Features group box provides controls for Job Storage. This group
box is only visible if the Printer Hard Disk and Job Storage Enabled check boxes
are selected in the More Configuration Options dialog box available on the
Configure tab.
Hardware configuration and availability of Job Storage options
The Job Storage options available to you depends upon whether your printer has an
optional hard disk installed. Job Storage options require a printer hard disk (an
optional HP EIO disk drive).
Software Technical Reference PCL 5c and PCL 6 driver features 77
Page 80

To use the Job Storage and Job Storage Enabled options, the printer must have the
optional hard disk installed, the Printer Hard Disk selected in the More... dialog box
of the Configure tab, and the print driver configured to use hard-disk storage.
Configuring the printer driver for a printer hard disk
If the print driver on your computer is not yet configured to use the hard disk, follow
these steps:
Note These steps must be completed for each driver.
Step 1 Double-click the My Computer icon. This opens the My Computer window.
Step 2 Open the Printers window.
Step 3 Right-click the printer icon. This opens a drop-down menu. Click Properties.
The
Properties dialog box appears.
Step 4 Click the Configure tab.
Step 5 Under Other Options, click More.
Step 6 Under
Storage Enabled)
Storage, click the Printer Hard Disk check box. (This also selects Job
.
Step 7 Close all of the dialog boxes by clicking OK.
Your PCL printer driver is now configured to use the hard-disk and Job Storage
features of your HP LaserJet product.
Job storage modes
Using the HP LaserJet product's Job Storage feature, you can store documents at the
printer and then control the printing of these documents using the printer control
panel. This feature is intended to provide greater flexibility, convenience, security, and
cost savings.
Once the Job Storage feature has been enabled, you have access to its features in
Destination tab of the printer driver.
the
The HP LaserJet product offers the following
Job Storage options.
Off
This option turns the Job Storage feature off (it is disabled), which means the print
job will not be stored in the printer.
Quick Copy
Quick Copy stores a copy of a printed job on the hard disk, and allows you to print
additional copies of a pr int job using the control panel. The number of quick-copy
print jobs that can be stored in the printer is set from the printer control panel.
Note The printer configuration can be set to hold a maximum of 50 quick-copy or proof-and-hold jobs. The
number is set on the printer control panel in the
preset limit is reached, a newer document will overwrite the oldest. Also, a document that has the
same user and job name as one already stored on the hard disk will overwrite the existing document.
Quick-copy jobs are deleted if the printer's power is removed.
78 3 Driver features Software Technical Reference
Configuration menu, and the default is 32. When this
Page 81

Proof and Hold
This option stores the print job on the printer hard disk, and prints only the first
copy of the job, allowing you to check the first copy. If the document prints
correctly, you can print the remaining copies of the print job from the printer control
panel. The number of proof-and-hold print jobs that can be stored in the printer is
set from the printer control panel.
Using a PIN for Private Job and Stored Job
The Private Job and Stored Job options can be secured by a four-digit personal
identification number (PIN). This number must be typed in the pr inter control panel
before the pr inter prints the job.
The box labeled
along with
coupling has a PIN restr iction of four ASCII numeric characters (ASCII 0-30
through 0-39). If you enter non-numeric characters, they are removed
immediately. If you enter more than four characters, the characters past the fourth
are truncated. The field temporarily allows fewer than four digits in the string, but
when the edit field loses focus, the zeroes pad the left end until there are exactly
four digits. The default initialized value for the PIN is 0000 for
Stored Job with Require PIN to Print selected.
PIN is usually inactive. Selecting Private Job or Stored Job
Require PIN to Print activates the PIN box. The Stored Job/PIN
Private Job and
Private Job
This option allows you to send a print job directly to the printer memory. Selection
Private Job activates the PIN field. The print job can be printed only after you
of
type a PIN in the pr inter control panel. After the job is printed, the printer removes
the job from the printer memory. This feature is useful when you are printing
sensitive or confidential documents that you do not want to leave in an output bin
after printing.
Once released for print, the private job is immediately deleted from the printer. If
more copies are needed, it will be necessary to reprint the job from the application.
If you send a second private job to the printer with the same user name and job
name as an existing private job (and you have not released the original job for
printing), the second job will overwrite the older job, regardless of the PIN. Private
jobs are deleted if power to the printer is removed.
Private Job stores the print job on the hard disk.
Stored Job
The Stored Job option allows you to send a print job directly to the printer hard
disk. The print job will be stored in the printer as if it is an electronic file cabinet.
After the print job is stored in the printer's hard disk, you can print the job from the
printer control panel.
The job remains stored on the printer until it is deleted or overwritten by a
document with the same user and job names. Stored jobs remain on the printer
hard disk when power is interrupted. Use this feature for forms and other common
or shared documents.
Software Technical Reference PCL 5c and PCL 6 driver features 79
Page 82

A stored job can be handled in two ways, as either a private or a public job. A
private stored job allows you to send a print job directly to the printer memory and
can be printed only after you type a PIN in the printer control panel. (You can set
the PIN in the
Print dialog box.) After the job is printed, the job remains in the
printer memory and can be printed again from the printer control panel. This
feature is useful when you are printing sensitive or confidential documents you do
not want to leave in an output bin after printing. Private mode is initiated by clicking
the Require PIN to Print check box. In this mode, a PIN entry at the control panel
is required to release the job.
The box labeled PIN is usually inactive. The
Require PIN to Print option is
activated if you click Stored Job. If selected, you must enter a PIN to make the
stored job private.
Note A private stored job is not the same as a private job (see above). Private jobs are deleted from the
printer memory after they are printed. Private stored jobs are retained in the printer memory after
printing, but require that a PIN be typed each time they are printed.
Document identifiers used in Job Storage
When you use a Job Storage feature, your document is identified in the printer control
panel by user name and job name.
User Name
The User Name edit box allows you to identify the job at the printer control panel.
When the driver is first installed (or when Factory Defaults
selected), this str ing initializes to the empty string (““), but the dialog box detects
this condition and replaces the string with your login name in Windows 95,
Windows 98, Windows Me, Windows NT 4.0, Windows 2000, and Windows XP. It
replaces it with “Untitled” in Windows 3.1x. Restrictions for the User Name field
are described below.
Quick Set is
Job Name
The Job Name is used for specifying a name to identify the job on the printer
control panel. When the driver is installed, or when the
Set
is selected, this str ing is initialized to the empty str i ng (" "), but the dialog box
will detect this condition and replace the string with "Untitled". Restrictions for the
Job Name field are described below.
The Job Name and the User Name fields can contain no more than 16 characters
each, and are limited to A through Z and 0 through 9, because the name is
displayed on the printer control panel. If you try to enter a lowercase character, it
automatically shifts to uppercase. If you try to enter a character with an ASCII
code of less than 32 or greater than 126 characters, the character is removed from
the edit field, along with all characters that follow it. If you try to enter more than 16
characters, any character beyond 16 is truncated. When the dialog box is closed,
or the edit box loses focus, an empty string is replaced with “Untitled”. In those
languages for which “Untitled” cannot be translated without the use of invalid
characters, the driver uses a string of three dashes. The acceptable characters for
job name and user name vary for each operating system. The string must be
displayable on the printer control panel.
Factory Defaults Quick
80 3 Driver features Software Technical Reference
Page 83

Using Job Storage options when printing
You can use Job Storage options in the Destination tab of the printer driver.
Note The printer driver installed on your computer must be configured to use the Job Storage features. See
the "Configuring the printer driver for a printer hard disk" section.
Step 1 Click Print from the software application. The Print dialog box appears.
Step 2 Click Properties. The
Properties dialog box appears.
Step 3 Click the Destination tab to display the destination options.
Step 4 Click Job Storag e on the drop-down menu under
Features
Step 5 Click Settings. The
.
Job Storage Settings dialog box appears.
Destination
You can then select one of the Job Storage options described above by clicking the
appropriate option button.
Note These instructions are specific to the Windows 95, Windows 98, Windows Me, Windows NT 4.0,
Windows 2000, and Windows XP environments using the latest available PCL 5 and PCL 6 drivers.
While the basic concepts of Job Storage are the same for PS print jobs, there are significant differences
in the driver user interface. Also, there are some limitations in naming and PIN selection.
Releasing stored jobs at the printer
Once you send a print job using Job Storage, you can release the job to print using
the printer control panel.
Step 1 Press the select button (the one with the check mark) to enter MENUS.
RETRIEVE JOB is highlighted.
Step 2 Press the select button to select
RETRIEVE JOB.
Step 3 Press the down arrow to highlight your
Step 4 Press the select button to select your
Step 5 Press the down arrow to highlight a
Step 6 Press the select button to select the
Step 7 Press the select button to select
PRINT.
USER NAME.
USER NAME .
JOB NAME.
JOB NAME. PRINT is highlighted.
Step 8 If you assigned a PIN number to the job, press the up or down arrow to
select the first digit of the PIN.
Step 9 Press the select button to select the digit. The number changes to an
asterisk.
Step 10 Repeat the last two steps for each of the remaining three digits of the
PIN.
Step 11 Press the select button when finished entering PIN.
Step 12 Press the up or down arrow to select the number of copies needed.
Step 13 Press the select button to print the job.
Deleting a print job
Sometimes it is necessary to delete a print job from the printer memory or hard disk.
This can be done from the printer control panel.
Software Technical Reference PCL 5c and PCL 6 driver features 81
Page 84

Step 1 Press the select button (the one with the check mark) to enter MENUS.
Step 2
Step 3 Press the select button to select
Step 4 Press the down arrow to highlight your
Step 5 Press the select button to select your
Step 6 Press the down arrow to highlight a
Step 7 Press the select button to select the
Step 8 Press the down arrow to highlight
Step 9 Press the select button to select
Step 10 If you assigned a PIN number to the job, press the up or down arrow to
Step 11 Press the select button to select the digit. The number changes to an
Step 12 Repeat the last two steps for each of the remaining three digits of the
Step 13 Press the select button when finished entering PIN.
Step 14 Press the select button to delete the job.
RETRIEVE JOB is highlighted.
RETRIEVE JOB.
USER NAME.
USER NAME.
JOB NAME.
JOB NAME.
DELETE.
DELETE.
select the first digit of the PIN.
asterisk.
PIN.
Output Bin Options
The HP Color LaserJet 5500 product has one output bin that can be selected in the
driver, so one item appears in the Bin list: Top Bin (Face-Down).
Top Bin (Face-Down) refers to the main output bin at the top of the printer and is the
only setting for the HP Color LaserJet 4600 printer driver. Jobs sent to this bin are
delivered face-down. This option is always available and has no paper size or type
constraints beyond those determined by the printer hardware.
Options
The Options drop-down menu is inactive. This setting can be used to enable
non-HP paper-handling devices.
Printer image
The bitmap image in the lower-right portion of the Destination tab screen represents
the current physical configuration of the printer according to the driver configuration
data (obtained automatically through bidirectional communication, or configured
manually through the driver). It should have the same appearance as the image in the
same location on the Paper tab and the Configure tab.
On the Destination tab, the printer image contains hot spots for selecting an output
bin. When the pointer moves over a hot spot, the arrow reverts to the gloved hand
used in the Bubble Help, the preview image, and other areas. The current output bin is
highlighted in a bright green color on the printer bitmap.
Note On the Destination tab, only output bins have hot spots and can be highlighted; source trays must be
selected from the Paper tab.
82 3 Driver features Software Technical Reference
Page 85

Basics tab features
The Basics tab provides options for setting the number of copies to be pr inted and for the
orientation of the print job. It also lets you retrieve inform ation about the driver.
Figure 26. Basics tab
Copies
The Copies feature allows you to specify the number of copies to print.
The number of copies you request appears in the Copies box. You can select the
number by typing in the box or by using the up and down arrows to the right of the edit
box. Valid entries are numbers from 1 to 9999 for the HP Color LaserJet 5500
product. The copies value will not advance from the maximum number (9999) to 1
when the up arrow is used, or change from 1 to the maximum number (9999) when
the down arrow is used. Invalid entries into the edit box (such as non-numerical input,
numbers less than 1 or greater than the maximum allowed) are changed to the last
valid value entered when you click on another group box or leave the Basics tab. The
default number of copies is 1.
Software Technical Reference PCL 5c and PCL 6 driver features 83
Page 86

Because applications can also be used to set the desired number of copies, conflicts
between the application and the driver can arise. In most cases, the application and
the driver communicate, so that the number of copies set in one location (such as the
application) will appear in the other (such as the driver). For some applications, this
communication does not take place, and the copies values are treated independently.
For these applications, setting 10 copies in the application and then setting 10 copies
in the driver will result in 100 copies (10 x 10) being printed. It is recommended to set
the number of copies in the application, wherever possible.
Orientation
Orientation refers to the layout of the image on the page, and does not affect the
manner in which media is fed into the printer. You can specify the orientation of the
print job. The three available orientations are portrait, landscape, and rotated. The
default orientation is portrait.
The three orientation options have these configurations:
• Portrait. The top edge of the docum ent is the shorter edge of the paper.
• Landscape. The top edge of the document is the longer edge of the paper.
• Rotated. Rotated is a form of landscape or portrait in which the image is rotated
180 degrees. This setting is useful for printing envelopes and when using some
third-party paper-handling devices.
Orientation can toggle between portrait and landscape by left-clicking the preview
image. If you select the
preview image.
Rotate by 180 degrees check box, there is no change in the
84 3 Driver features Software Technical Reference
Page 87

About
By clicking the About button on the Basics tab or selecting the HP logo on any of the
driver property pages, the
press ESC, press ALT + F4, or press ENTER. The figure below shows the
The information varies according to HP LaserJet model number, driver, date, and
versions.
About box appears. To close the About box, click OK,
About box.
Figure 27. About This Driver dialog box
Driver extensions
The Driver Extensions text box provides you with some visibility of any extended
driver functionality. It can contain a brief description of the driver extension and a
version number.
Software Technical Reference PCL 5c and PCL 6 driver features 85
Page 88

Color tab features
Use the Color tab to specify predefined color-option settings or to fine-tune the color
treatments and half-toning. Color output can also be converted to grayscale. The Color
tab is shown in the following illustration.
Figure 28. Color tab
Color options
Use the Color Options group box to adjust the independent color controls. The
settings affect the print job's color rendering and print quality.
To use default coloration settings, click the Automatic option button. To change the
default coloration settings, click the Manual option button and then click the Settings
button. To convert color information to grayscale and print the document in black and
white, select the Print in Grayscale check box.
86 3 Driver features Software Technical Reference
Page 89

Manual color settings
When you click the Settings... option button, the Color Settings dialog box appears.
The default settings are shown in the following illustration. To change the settings,
make your selections using the drop-down menus in the Color Settings dialog box,
and then click OK. You are then prompted to save your selections as a Custom , or
manual, setting.
Figure 29. Manual Color Options dialog box
The Manual Color Options dialog box gives you independent control of neutral grays
and halftone for the three major page components: text, graphics, and photographs.
The Neutral Grays: drop-down menu controls the selection of a device-dependent
color table that is embedded in the printer firmware. The options are Black Only or
4-Color. You can adjust the Neutral Grays: setting independently for text, graphics,
or photographs.
• Black Only. This option generates neutral colors (grays and blacks) using only
black toner which ensures that neutral colors do not have a color cast.
• 4-Color. This option generates neutral colors by combining all four colors of toner,
which produces smoother gradients and transitions to non-neutral colors. It also
produces the darkest possible black.
Software Technical Reference PCL 5c and PCL 6 driver features 87
Page 90

The Halftone setting controls the selection of a device-dependent halftone algorithm
that is embedded in the printer firmware. The Halftone options, Detail and Smooth,
affect the resolution and clarity of your color output. You can independently adjust
halftone settings for text, graphics, and photos.
• Smooth. This option provides better results for large, solid-filled print areas. It also
enhances photographs by smoothing out fine color gradations. Choose this option
for uniform and smooth area fills.
• Detail. This option is useful for text and graphics that require sharp distinctions
among lines or colors, or for images that contain a pattern or a high level of detail.
Choose this option for sharp edges and detail.
General Color Options settings are Edge Control and RGB Color. Edge
The
control, which determines how edges are rendered, consists of two components:
adaptive halftoning and trapping. Adaptive halftoning increases the edge sharpness of
text and graphics while maintaining the quality of area fills. Trapping reduces the
effect of color plane misregistration by slightly overlapping the edges of adjacent
objects. The following options are available:
•Off, which sets Trapping and Adaptive Halftoning to Off.
•Light, which provides minimal trapping. Adaptive Halftoning is set to On.
•Normal, which provides the default Trapping setting. Adaptive Halftoning is set to
On.
• Maximum, which provides the most trapping. Adaptive Halftoning is set to On.
Settings under RGB Color affect the color treatment for all objects and determines
how colors are rendered. The options are Default (sRGB) and Device.
Default. This option interprets RGB color as standard default RGB color space
(sRGB), which is the accepted standard for many software companies and
organizations, such as Microsoft and the Worldwide Web Consortium.
Device (sRGB). This option sets the printer to print RGB data in raw device mode. To
render photographs properly when this option is selected, you must manage color in
the application in which you are working or in the operating system.
Note If your software application converts text and graphics to raster, the Photographs settings also control
the Text and Graphics settings.
Configure tab features
Use the Configure tab to tell the driver about the hardware configuration of the printer. If
bidirectional communication is enabled in a supported environm ent, set up this tab by
clicking the Update Now button. If your environment does not support bidirectional
communication, the
configure the options on this tab.
Update Now button will be unavailable, so you must manually
88 3 Driver features Software Technical Reference
Page 91

The Configure tab is available when the driver is opened from the Printers folder by
clicking Properties. When you open the driver from within an application, the Configure
tab will not be visible, with a few exceptions, such as when using Excel 5.0 or Corel (R)
Chart 4.0. When opened from the Pr inter s folder, the Configure tab looks like the
following illustration.
Figure 30. Configure tab
The printer image in the lower-right portion of the Configure tab represents the current
physical configuration of the printer and corresponds to its configuration data, either
obtained automatically through bidirectional communication or configured manually. It
should look the same as the image that appears in the same location on the P aper tab
and the
Note The printer image shown in the illustration might differ from your HP LaserJet product, depending on
the model number and accessory devices.
Destination tab. For more information, see “Paper tab features.”
Printer Model group box
In the Printer Model group box, the driver title remains HP Color LaserJet 5500 for all
models. Selection of another printer bundle makes the appropriate changes to other
configuration options on the tab. The list of models and the changes they produce are
described below.
Software Technical Reference PCL 5c and PCL 6 driver features 89
Page 92

When the HP Color LaserJet 5500 or the HP Color LaserJet 5500n is selected, the
following settings apply:
• The Driver Work Space (DWS) value shown in the Other Options dialog box is
6.0 MB.
• The Total Printer Memory value is 96 MB.
• No optional paper destinations, paper sources, duplexing unit, or hard disk are
selected.
HP Color LaserJet 5500dn resets all configuration settings to match the capabilities of
the 5500dn model. Settings affected are:
• The
•
• No optional paper destinations, paper sources, or hard disk are selected.
When the HP LaserJet 5500dtn is selected, the following changes are made to the
default settings:
• The
•
• HP 500-Sheet Input Tray is selected in Optional Paper Sources .
• No optional paper destinations are selected.
When the HP Color LaserJet 5500hdn is selected, the following changes are made to
the default settings:
• The
•
•
•
• 2 x 500-Sheet Input Tray is selected.
If it is installed and working, the bidirectional mechanism will detect the correct m odel
and update the configuration accordingly, either during installation or when you select
Update Now on the Configure tab. However, the printer model name shown in the
Printer Model text box does not change.
Total Prin ter Memory value is 96 MB.
Duplexing Unit is selected.
Total Prin ter Memory value is 160 MB.
Duplexing Unit is selected.
Total Prin ter Memory value is 160 MB.
Duplexing Unit is selected.
Mopier Enabled is selected.
Printer Hard Disk and Job Storage Enabled are selected.
Paper-handling options
The Paper Handling Options group box provides options for configuring most of the
paper-handling device features.
Duplexing unit
Select this option if a duplexing unit is installed in the printer. When it is selected,
additional controls appear in the Document Options group box in the Finishing tab.
Unlike most options in this group box, the Duplexing Unit option does not affect the
printer image because the duplexing unit is contained within the printer. To print on
both sides, click Print from the application, click the Properties button, click the
Finishing tab, and then click Print on Both Sides.
90 3 Driver features Software Technical Reference
Page 93

Mopier enabled
A mopier is an HP-designed printer that produces multiple, collated copies from a
single print job. Multiple-original printing (mopying) increases printer performance and
reduces network traffic by sending the job to the printer once, then storing it on the
hard disk. The remainder of the copies are printed at the printer’s fastest speed. All
documents can be created, controlled, managed, and finished from the desktop,
which eliminates the extra step of using a photocopier.
The HP Color LaserJet 5500 product supports the Transmit Once mopying feature,
and the Mopier Enabled option is selected by default, if a hard disk is installed and
Printer Hard Disk is selected in the driver software.
Mopier Enabled is enabled only when the Configure tab settings indicate (whether
set manually or with Auto Configure) that the printer has a hard disk and at least 64
MB of RAM installed. When the Mopier Enabled check box is disabled, a Bubble Help
appears next to it, explaining that a printer hard disk and or at least 64 MB of Total
Printer Memory is required to enable this feature.
All models of the HP Color LaserJet 5500 product come with 96 MB or more memory
installed.
Optional Paper Destinations
The Optional Paper Destinations drop-down menu contains the following options:
• (None)
The Optional Paper Destinations drop-down list setting is (None) because no
optional paper devices exist for the HP Color LaserJet 5500 product.
Optional Paper Sources
The Optional Paper Sources drop-down menu lists optional paper sources for the
HP Color LaserJet 5500. The list of available paper sources varies, depending on
your product, its input accessories, and the product configuration settings on the
Configure tab.
For the HP Color LaserJet 5500 product, two optional paper sources are available.
The settings in the Optional Paper Sources drop-down menu are as followings:
• (None) (the default setting for the HP Color LaserJet 5500, 5500n, and 5500dn
models)
• 2 x HP 500-Sheet Input Tray (the default setting for the HP Color LaserJet
5500hdn model)
• HP 500-Sheet Input Tray (the default setting for the HP Color LaserJet 5500dtn
model)
Software Technical Reference PCL 5c and PCL 6 driver features 91
Page 94

Other Options
The Other Options group box contains a single More command button. Clicking the
More button opens the More Configuration Options dialog box.
Figure 31. More Configuration Options dialog box
Storage
In Storage, you can specify whether a printer hard disk is installed and whether Job
Storage is enabled. Job Storage is enabled by default. The printer hard disk control
can be set manually or updated by a successful bidirectional communication query
using the Update Now button in environments supporting bidirectional
communication. Job Storage Enabled determines whether Job Storage appears as
a feature on the Destination tab. Because this is the only possible Destination
Feature for the HP LaserJet product, this also determines whether the Destination
tab appears.
When the Printer Hard Disk check box is disabled, a Bubble Help message appears
next to the
a printer hard disk and at least 96 MB of Total Printer Memory are required to enable
these features.
Mopier Enabled and Job Storage Enabled check boxes, explaining that
Printer Memory
Total Memory. This shows the total amount of memory physically installed in the
printer. The default values for Total Printer Memory are specified in the Printer Model
section of the Configuration tab and are based on the printer model.
92 3 Driver features Software Technical Reference
Page 95

Selecting Printer Hard Disk enables the Job Storage check box and selects it as the
default. Selecting Printer Hard Disk also enables and selects the Mopier Enabled
check box by default for all HP Color LaserJet 5500 models except the HP Color
LaserJet 5500hdn model, for which
Enabled
are preselected default settings. Total Printer Memory updates from a
Printer Hard Disk, Job Storage, and Mopier
successful bidirectional query, or can be set manually.
Driver Work Space. Use the Driver Work Space (
DWS) option to specify the amount
of work-space memory available to the printer. In environments that support
bidirectional communication, this option is configured automatically. To manually set
DWS, print a configuration page and find the
DWS value in the Memory section of the
configuration page. The DWS value might change if you switch printer model settings.
Then, type that value in the DWS box in the More Configuration Options dialog box.
An accurate DWS value optimizes driver performance.
Include types in application source list
When the Include types in application source list check box is selected, all paper
types (such as envelopes and transparencies) are available from the
on the
clicking
Paper tab. When you are in an application, you can open the Paper tab by
Print from the File menu, and then clicking Properties.
Source is: list
Software Technical Reference PCL 5c and PCL 6 driver features 93
Page 96

Fonts
The Fonts group box contains a Font DIMM check box and a corresponding
Configure button. Selecting the Font DIMM check box tells the driver that a Font
DIMM is installed, and that stored data regarding the fonts on the DIMM is available.
When the check box is selected, the Configure button is enabled. Click the
Configure button to open the Configure Font DIMMs dialog box. If the Font DIMM
check box was not selected when you entered the More Configuration Options
dialog box, selecting that check box automatically opens the Configure Font DIMMs
dialog box.
Figure 32. Configure Font DIMMs dialog box
Use the Configure Font DIMMs dialog box to perform the following tasks:
• Add up to two font DIMMs by clicking the Add button.
• Specify a unique font DIMM name.
• Select specific font DIMM data files that contain lists of fonts on specified DIMMs.
• Select one or more installed DIMMs in the Installed DIMM list, and based on the
selected DIMM(s). The list to the right (Fonts on DIMM) will display all of the fonts
available on the selected DIMM(s).
• Enable or disable one or more of the selected font(s).
Use the following procedure to configure a font DIMM.
Step 1 Make sure that the font DIMM is properly installed.
Step 2 Click Add. The
Step 3 Click Browse. The
Add Font DIMM dialog box appears.
Font DIMM Files dialog box appears.
Step 4 Find and select the appropriate Printer Cartridge Metrics (PCM) file that
came with the font DIMM.
94 3 Driver features Software Technical Reference
Page 97

Step 5 Click Open.
Step 6 If you want, specify a Font DIMM Name in the
Add Font DIMM dialog
box.
Step 7 Click OK. The selected printer cartridge metrics (.PCM) file appears in
Installed DIMMs list. Select the .PCM file to display a list of available
the
fonts in the
Step 8 Click OK to close the
Fonts on DIMM list.
Add Font DIMM dialog box. The fonts on the
DIMM should now be available on the system.
Note When using font DIMMs with the PCL 5c and PCL 6 drivers: To install screen fonts that match the font
DIMM, use the .HPB file specifically designed to work with that DIMM. If there are no screen fonts for
the DIMM, use the .PCM file specifically designed to work with that DIMM.
Ignore Application Collation
The Ignore Application Collation check box is disabled and set to OFF when the
Mopier Enabled check box is clear (not selected).
The table below shows the expected behavior for a two-page print job when the
number of copies is three.
Table 11. Printer behavior with Ignore Application Collation settings
Hard disk
on printer
YesOnOnOn
Yes On On On QTY=3 1,2 1,2,1,2,1,2
Yes On Off Off Copies=3 1,2 1,1,1,2,2,2
Yes/No Off Off On Copies=1 1,2,1,2,1,2 1,2,1,2,1,2
Yes/No Off Off Off Copies=3 1,2 1,1,1,2,2,2
Yes/No Off Off None Copies=1 1,2,1,2,1,2 1,2,1,2,1,2
Yes/No Off Off None Copies=3 1,2 1,1,1,2,2,2
No On On On
No On Off On
Mopier
Enabled
check box
Ignore
Application
Collation
check box
Application
Collation
check box
in Print
dialog box
Off
None
Off
None
Off
None
Commands
sent by
printer
QTY=3 1,2 1,2,1,2,1,2
QTY=3 1,2 1, 2
QTY=3 1,2 1, 2
Pages sent
to printer
Pages
output from
printer
Placing the Ignore Application Collation setting in the printer properties means that,
on a Windows NT network, clients connecting to the printer through a network share
cannot change its value; only the print queue administrator has the power to decide
how the printer driver is set up.
Software Technical Reference PCL 5c and PCL 6 driver features 95
Page 98

The Ignore Application Collation setting is not a means to print non-collated copies.
If you want to print non-collated copies, disable mopying.
Automatic Configuration
If you have modified the configuration of the HP LaserJet product since installation,
click the Update Now button to automatically reflect the new configuration in the
driver. For more information about the Driver Automatic Configuration feature, see
“Driver Autoconfiguration.”
Printer image
The bitmap image in the lower-right portion of the Configure tab screen represents
the current physical configuration of the printer according to the driver configuration
data (obtained automatically through bidirectional communication, or configured
manually in the Paper-Handling Options group box). It should have the same
appearance as the image in the same location on the Paper tab and the Destination
tab.
96 3 Driver features Software Technical Reference
Page 99

NT Forms tab features
The NT Forms tab appears only in the Microsoft Windows NT 4.0, Windows 2000, and
Windows XP operating environments. The NT Forms tab (like the Configure tab) can be
viewed only from the Proper ties window.
Figure 33. Driver NT Forms tab
The NT Forms tab lets you specify which media sizes and types are loaded in each of the
available paper trays. The advantage is that it constrains the choices available in the
and Type lists on the Paper tab. This constraint prevents information overload when you
request unavailable sizes or types.
Available Trays is a drop-down menu containing all product trays specified on the
Configure tab. The This Tray Contains/Size (Forms) drop-down menu contains a list of
standard paper sizes supported by the HP LaserJet product, as well as any custom forms
defined in the
media types supported by the HP LaserJet product. The
and type constraints on the
Forms tab. The This Tray Contains/Type drop-down menu lists all of the
Clear All button removes all size
Paper tab.
Size
Configuring the trays
Step 1 Select the appropriate tray from the Available Trays list.
Step 2 Use the
the paper size (or form) loaded in that tray.
Software Technical Reference PCL 5c and PCL 6 driver features 97
This Tray Contains/Size (Forms) drop-down menu to select
Page 100

Step 3 Use the This Tray Contains/Type drop-down menu to select the paper
type that is configured for the tray.
Step 4 Repeat steps 1 through 3 for the remaining trays.
Step 5 If necessary, click the Clear All button to reconfigure all the trays, and
remove the size and type constraints imposed on the
Windows PS driver features
This section provides information about the features of the Windows PS printer driver.
PS 3 Emulation support for the H P LaserJet product
The PS Level 3 Emulation maintains full compatibility with Adobe PS Level 3 when PS
Level 3 soft fonts are purchased from Adobe.
A set of 92 PS Level 3 soft fonts is included with the printing-system software. If you want
to permanently install the fonts in the printer, PS Level 3 emulation fonts are also
available from HP in an optional font DIMM.
Users of Adobe-licensed applications might also have the right to use the Adobe PS level
3 printer drivers from Adobe with the HP LaserJet printer PS Level 3 emulation PPD,
available on the HP LaserJet printer software CD-ROM or from the HP Web site. When
using the Adobe PS Level 3 printer driver, users must comply with all Adobe licensing
agreements, as stated on the Adobe Web site at http://www.adobe.com/support/
downloads/license.html. See “Font support” for a list of the additional fonts.
Paper tab.
Note The driver interface shown in this section is for Windows NT 4.0. The order and appearance of tabs
can vary among operating systems.
98 3 Driver features Software Technical Reference
 Loading...