


BH70700 Series |
BH70800 Series |
Instruction Manual |
IMPORTANT: Read carefully before assembly and use. |
©2016 Techtronic Floor Care Technology Limited. All Rights Reserved. Distributed by Royal Appliance Mfg. Co. Glenwillow, Oh 44139 #961152028 ID118167
Welcome to Hoover® ownership.
Make it official.
http://hoover.com/. |
(888) 679-2121 |
It’s Guaranteed.
Hoover will replace your batteries under our 1 year warranty.
See Warranty for complete details.

Your Guide:
Safety Instructions |
1 How to schedule |
14 |
Getting started with your QuestTM Robotic Vacuum |
4 |
|
|
Get to know your QuestTM Robotic Vacuum |
5 |
|
|
Docking station and invisible wall station |
7 |
|
|
Getting started with your docking station |
8 |
|
|
Charging your QuestTM Robotic Vacuum |
9 |
|
|
Before using your QuestTM 700/800 Robotic Vacuum |
10 |
|
|
QuestTM remote control |
12 |
Emptying the dirt cup |
15 |
|
|
Troubleshooting |
17 |
|
|
Warranty |
20 |
|
|
Declaration of Conformity |
21 |
Invisible wall |
13 |
|
This Owner’s Manual applies to the following Quest™ Robotic Vacuum models: |
|
BH70700, BH70800 Series |
IMPORTANT SAFETY INSTRUCTIONS
SAVE THESE INSTRUCTIONS
When using an electrical appliance, basic precautions should always be followed, including the following:
READ ALL INSTRUCTIONS BEFORE USING THIS APPLIANCE. THIS PRODUCT IS INTENDED FOR HOUSEHOLD USE ONLY.
IF USED COMMERCIALLY WARRANTY IS VOID.
WARNING:
ELECTRIC SHOCK, DAMAGE OR INJURY:
•Fully assemble before operating. •The charger is for indoor use only.
•Do not allow to be used as a toy. Not intended for use by children age 12 and under. Close supervision is necessary when used near children. To avoid injury or damage, keep children away from product, and do not allow children to place fingers or other objects into any openings.
•Use only as described in this manual. Use only Hoover ®recommended attachments and products.
•Do not use charger with damaged cord or plug. If appliance or charger is not working as it should, has been dropped, damaged, left outdoors, or dropped into water, take it to a service center prior to continuing use.
•Do not pull or carry charger by cord, use cord as a handle, close a door
on cord, or pull cord around sharp edges or corners. Do not place product on cord. Do not run appliance over cord. Keep cord away from heated surfaces.
•Do not unplug charger by pulling on cord. To unplug charger, grasp the plug, not the cord.
•Do not handle charger including charger plug and charger terminals, or appliance with wet hands.
•Do not put any object into openings. Do not use with any opening blocked; keep free of dust, lint, hair, and anything that may reduce air flow.
•Keep hair, loose clothing, fingers, and all parts of body away from openings and moving parts.
•Use extra care when cleaning on stairs. Do not place cleaner on stairs or furniture, as it may result in injury or damage.
•Do not use to pick up flammable or combustible liquids, such as gasoline, or fine wood shavings, or use in areas where they may be present.
•Do not pick up anything that is burning or smoking, such as cigarettes, matches, or hot ashes.
•Do not use without Dirt Cup and/or Filters in place.
•Turn power switch off and remove battery before removing or installing brush roll.
•Do not incinerate the charger, battery, or appliance even if it is severely damaged. The batteries can explode in a fire.
•This product includes rechargeable nickel metal hydride batteries. Do not expose batteries to high temperatures, as they may catch fire and/or explode.
1
•Do not dispose of battery in a fire or trash compactor. See battery disposal section for directions.
•Do not attempt to disassemble battery.
•Unplug the charger from the outlet before any routine cleaning or maintenance.
•Leaks from battery cells can occur under extreme conditions. If any liquid gets on the skin wash quickly with soap and water. If any liquid gets into the eyes, do not rub eyes, immediately flush them with clean water continuously for a minimum of 15 minutes. Seek medical attention immediately.
•Use only the charger (part # 440009842) supplied by Hoover®to recharge. •Do not touch or insert objects into battery pack or charger terminals.
•Do not attempt to short circuit the battery or charger terminals. •Place the cords from other appliances out of the area to be cleaned.
•Do not operate the vacuum in a room where an infant or child is sleeping.
•Do not operate the vacuum in an area where there are lit candles or fragile objects on the floor to be cleaned.
•Do not operate the vacuum in a room that has lit candles on furniture that the vacuum may accidentally hit or bump into.
•Do not allow children to sit on vacuum.
•For use only with Hoover (Part# 440009842) docking station.
WARNING: This product may contain chemicals known to the State of California to cause cancer, birth defects or reproductive harm.
WASH HANDS AFTER HANDLING.
WARNING: TO REDUCE THE RISK OF ELECTRIC SHOCK, THE CHARGER HAS A POLARIZED PLUG (ONE BLADE IS WIDER THAN THE OTHER). THIS PLUG WILL FIT IN A POLARIZED OUTLET ONLY ONE WAY. IF THE PLUG DOES NOT FIT FULLY IN THE OUTLET, REVERSE THE PLUG. IF IT STILL DOES NOT FIT, CONTACT A QUALIFIED ELECTRICIAN TO INSTALL THE PROPER OUTLET. DO NOT CHANGE THE PLUG IN ANY WAY.
2

CAUTION: TO REDUCE THE RISK OF DAMAGE:
•Avoid picking up hard, sharp objects with this product, as they may cause damage.
•Store appropriately indoors in a dry place. Do not expose machine to freezing temperatures. This product includes rechargeable NiMH (Nickle Metal Hydride) batteries. Do not expose batteries to high temperatures,as they may catch fire and/or explode.
•With brush roll on, do not allow cleaner to sit in one location for an extended period of time, as damage to floor can result.
BEFORE USE
WARNING: Ensure that no children or pets are in the room or have access to the room to be cleaned to avoid risk of injury.
CAUTION: To avoid risk of damage, put away fragile objects, loose cords and small objects that could topple over.
•To avoid damage to the floor, put away any pointed or sharp objects that could get under the robot and scratch the floor surface.
•Your robot is designed to take up small quantity of dirt and does not replace a classic vacuum cleaner. Use your Quest regularly to help reduce your weekly vacuuming time.
•Quest cleans Hard floor and low pile carpet upto 1 cm. It is not recommend for use on longer pile carpet.
•Dark colored carpets or objects may contribute to Quest's cliff sensors so it may not vacuum on or around them.
ROBOT BATTERY |
|
DISPOSAL |
Ni MH |
•To preserve natural resources please recycle or dispose of
expired battery pack properly. This product contains NiMH battery must be disposed of properly. Local, state, or federal law may prohibit disposal of nickle metal hydride batteries in ordinary trash.
•Consult your local waste authority for information regarding available recycling and/or disposal options. For disposal information, call The Rechargeable Recycling Corporation at 1-800-3-BATTERY.
WARNING: Upon removal of cover battery pack terminals with heavy duty adhesive tape. Do not attempt to destroy or disassemble battery pack or remove any of its components. Nickle Metal Hydride batteries must be recycled or disposed of properly. Also, never touch both terminals with metal objects or body parts a short circuit may result. Keep body parts away from children. Failure to comply with these warnings
could result in fire and/or serious injury.
REMOTE TRANSMITTER BATTERY:
The battery must be collected, recycled or disposed of in an enviromentally sound manner. Dispose of used batteries promptly according to local recycling or waste regulations. Please visit www.Earth911.com for information on Lithium Metal and Alkaline battery recycling and disposal bans/restrictions in your area.
3
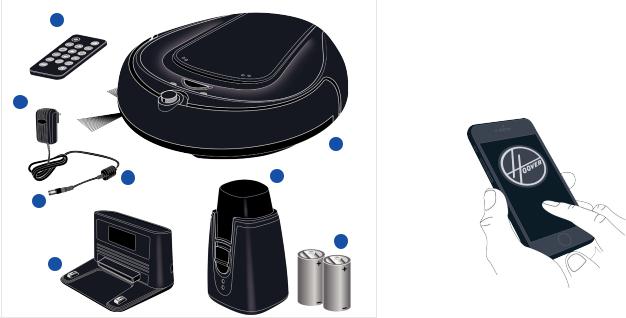
Getting started with your QuestTM Robotic Vaccum
|
1. Remote Control |
5. AC adapter plug |
|
||
1 |
2. Robot Vaccum Cleaner |
6. Docking Station |
|
3. AC adapter |
7. Invisible Wall Station* |
|
4. AC adapter cord |
8. Batteries (2x type C, 1.5 V) |
|
NOTE: Quantity may vary.* |
|
3
2
4 |
7 |
5
8
6
Download Hoover Mobile App from iTunes store or Google play.
4
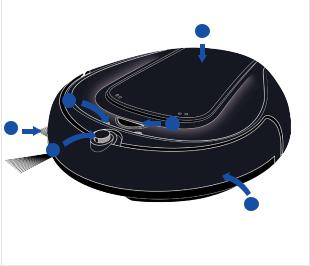
Get to know your QuestTM Robotic Vaccum
|
|
1. Side brush: |
|
|
|
||
|
5 |
- conveys dirt to the main brush |
|
|
- may be pulled off for short pile carpet |
||
|
|
cleaning |
|
|
|
2. IR sensor: |
|
|
|
- guides Quest™ back to its docking |
|
|
3 |
station as soon as the battery capacity |
|
|
becomes low or it receives the |
||
|
4 |
respective command from the remote |
|
1 |
control |
||
|
|||
|
2 |
3. LED indicators |
|
|
* See Trouble Shooting (page 16 )for |
||
|
|
||
|
|
information on LED functionality |
6
4. "On/Off"( ) button:
- Press & hold for 2 seconds to start/stop your robot
5. Top panel
-provides access to dirt cup & filter 6. Bumper:
-senses impact and causes the robot to bounce backwards
-if triggered constantly for 5 seconds or longer the robot will stop automatically
5
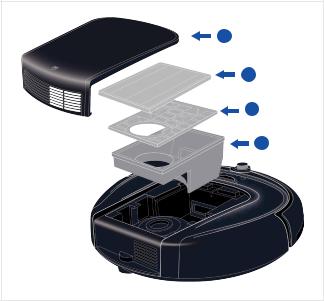
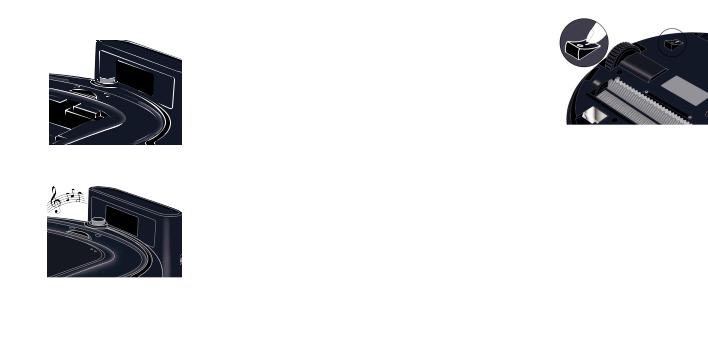
Get to know your QuestTM Robotic Vacuum
Dirt Cup
1. Top panel
1 2. Dirt cup lid
3. Filter
4. Dirt cup
2
3
4
6
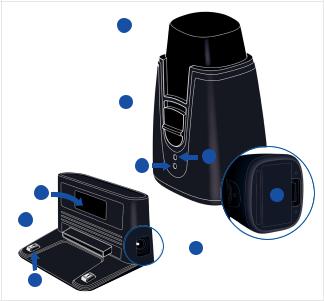
Docking station and invisible wall station
5 
6 
8
7
1 |
9 |
2 
 4
4
3
Docking Station |
Invisible Wall Station |
|
1. Transmitter window |
5. Transmitter |
|
- lights up when plugged in |
6. Power switch |
|
- flashes during charging process |
7. LED ( flashes when switched on) |
|
2. Front button |
||
8. Receiver |
||
3. Charging pins |
9. Battery cover |
|
4. Socket for AC adapter plug |
|
7
Getting started with your docking station
Choose a hard level surface against a wall for your docking station.
There should be at least 4 feet of clear path on all directions.
Remove clear films from the rubber feet underneath the docking station and position it in a stable manner.
Always keep the docking station plugged in.
! CAUTION !
Rubber may cause unwanted stains or discolouring on certain surfaces such as wood. Check the manufacturer's recommendations to avoid damage.
NOTE: Do not place invisible wall near the docking station. Otherwise your robot may be impeded from docking to the station.
8
Charging your QuestTM Robotic Vaccum
Charging your Robot before first use will extend it's battery life.
To charge your Quest™, manually place it on the docking station making sure the charging pins are aligned. A short beep and flashing blue LED confirm that Quest™ in properly docked for charging.
When Quest™ is fully charged (4.5 - 5.5 hours charging time), it will beep and turn off the blue LED.
Ambient Charging temperature range: 32°F to 113°F (0°C to 45°C)
IMPORTANT: Battery pack can only be charged if toggle switch is put into "I" position.
! WARNING !
Danger of injury! Only use the AC adapter and docking station supplied with the appliance to charge this equipment.
NOTE: To maintain best battery performance, charge your robot every 3 months. After 3 consecutive uses, battery will resume its best performance.
9
Before using your QuestTM 700/800 Robotic Vaccum
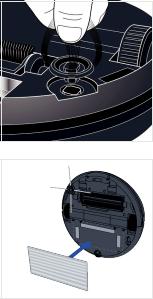
Attaching Side brush
Locate the side brush post on the bottom of the robot. Place the side brush on the post and press firmly until it snaps into position.
Dust Pad (for BH70800 Series only)
Locate Velcro tape underneath your Quest™800. Align the
Dusting pad and press firmly.
NOTE: Dust pad is machine washable. Do not use
Fabric softener.
10
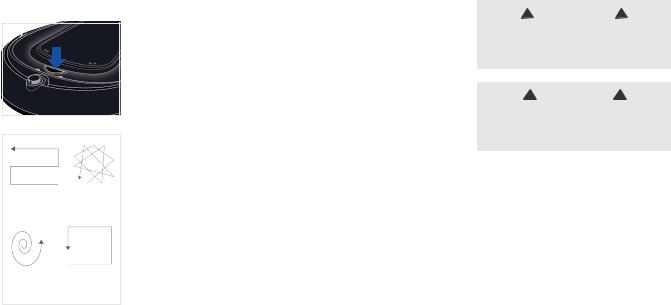
Using your QuestTM 700/800 Robotic Vaccum
Quest™ automatically adapts to room type and obstacles to achieve optimal cleaning efficiency.
SQUARE RANDOM WAVE
SPOT |
ALONG |
CLEAN |
THE WALL |
Simply press the power button on the Robot and let your Quest™ get the cleaning done. Press & hold the power button to turn off at any time.
As it cleans, it switches between the 4 cleaning modes shown to achieve the best results.
Ambient Operating temperature range: 32°F to 104°F (0°C to 40°C)
! WARNING !
Danger of injury! You can let your robot run unsupervised, however always be careful not to step on it, this could cause you to fall.
! CAUTION !
Although your robot recognises drop-offs, we strongly advise against using it on furniture. It is not suitable for this type of use.
11

QuestTM remote control
Pull the tab to activate your Remote control.
( |
) - Turn on/off |
2X - Quest will |
Directional buttons. Quiet Mode: |
|
( |
) - Start Cleaning |
complete 2 cleaning |
( Low ) - to enable/ |
|
cycles including one |
||||
|
|
disable Quiet Mode. |
||
|
|
charging cycle. |
||
|
|
|
NOTE: Quest™ automatically returns to the docking station and docks itself when its running low on battery power. If it fails to dock after a few attempts, you may manually position it correctly on the docking station. After fully charged (4.5- 5.5) hours, Quest™ turns all the LEDs off and is ready to use.
IMPORTANT:
During Quiet operation mode, suction rate and speed of your Quest™ maybe lower.
( ) activates smart fence where your invisible wall is placed. After Quest™ cleans the current room (approx 30 min), smart fence will deactivate and allows Quest™ to pass through. To
manually deactivate smart |
||
fence at any time, |
12 |
|
press the key again. |
||
|
||
Invisible Wall
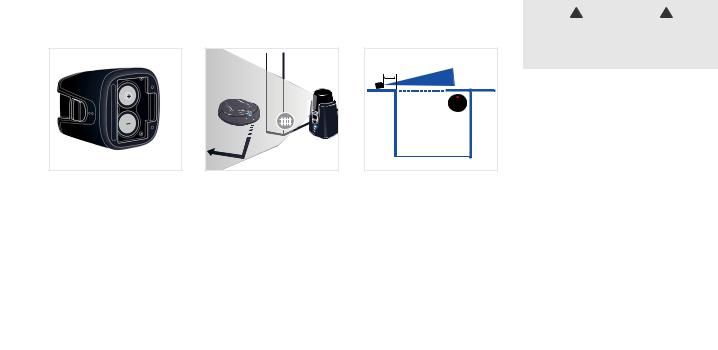
Invisible wall allows you to confine Quest™ cleaning to the rooms you want or out of those you dont want. It creates an invisible barrier that Quest™ won't pass through.
1.5 Ft |
Open the battery compartment cover. Insert the 2 supplied batteries (type C, 1.5 V) as indicated.
To set up invisible wall, power the invisible station on and set it at the room entry way or area you do not want Quest™ to pass. The LED on the wall
station blinks to indicate the invisible barrier is active.
Position the Invisible wall station at 45° to the entrance of the room to
create a straight line barrier pararell to the room.
NOTE: Ensure that there are no reflective surfaces around the invisible wall.
! CAUTION !
When charging batteries, be sure not mix batteries with different types or those that are partly charged.
13
How to schedule
Delay |
Press the |
|
timer key |
||
|
||
|
|
|
1 HR |
Once |
|
|
|
|
2 HR |
Twice |
|
|
|
|
4 HR |
Thrice |
|
|
|
|
8 HR |
4 times |
|
|
|
Press the ( 24h ) key on |
Delay Start. |
To deactivate this timer, |
the remote control. |
|
press and hold the key. |
Your robot will start |
|
|
cleaning immediately |
|
|
and schedules to |
|
|
clean at the same time |
|
|
every 24 hours. To |
|
|
deactivate the 24 HR |
|
|
repeat cycle, press |
|
|
the button again. |
|
|
NOTE: Quest™ automatically returns to the docking station and docks itself whe its running low on battery power. If it fails to dock after a few attempts, you may manually position it correctly on the docking station. After fully charged (4.5 - 5.5) hours, Quest™ turns all the LEDs off and is ready to use.
NOTE: For more and easier shceduling options, download Hoover Mobile App from iTunes store or Google play.
14
 Loading...