


2 EN
Contents
Safety and warning information_ __ _ _ _ _ 2 Description of the appliance!_ _ _ _ _ _ _ _ 4 Control panel _ _ _ _ _ _ _ _ _ __ _ _ _ _ _ 5 First use and installation_ _ _ _ _ _ _ _ _ _ 6 Daily use __ _ _ _ _ _ _ _ _ _ __ _ _ _ _ _ 6
Helpful hints and tips _ _ _ _ _ _ _ _ _ _ _ |
7 |
Cleaning and care _ _ _ _ _ _ _ _ _ _ _ _ |
8 |
What to do if_ _ _ _ _ _ _ _ _ _ _ _ _ _ _ _ 9 Reversing the door _ _ _ _ _ _ _ _ _ _ _ 10 Disposal of the appliance _ _ _ _ _ _ _ _ 12
This appliance is in accordance with the following EU guidelines: 2006/95/EC and 2004/108/EC and 2009/125/EC and EC.643/2009.
Safety and warning information
For your safety and correct usage, before installing and first using the appliance, read this user manual carefully, including its hints and warnings. To avoid unnecessary mistakes and accidents, it is important to make sure that all people using the appliance are thoroughly familiar with its operation and safety features. Save these instructions and be sure that they remain
with the appliance if it is moved or sold, so that a using it throughout its life will be
properly informed on its correct appliance usage and safety.
For the safety of life and property, keep the precautions of these user's instructions as the manufacturer is not responsible for damages caused by omission.
S afety f or c hildren a nd others w ho a re vulnerable p eople
 This appliance is not intended for use by persons (including children) with reduced physical, sensory or mental capabilities, or a lack of experience and knowledge, unless they have been given supervision or instruction concerning the use of the appliance by a person responsible for their safety. Children should be supervised to ensure that they do not play with the appliance.
 Keep all packaging away from children as there is risk of suffocation.
 If you are discarding the appliance, pull the plug out of the socket, cut the
connection cable (as close to the appliance as you can) and remove the door to prevent children playing from suffering an electric shock or from closing themselves inside it.
If this appliance, featuring a magnetic door seals, is to replace an older appliance having a spring lock (latch) on the door or lid, be sure to make the spring lock unusable before you discard the old appliance. This will prevent it from becoming a death trap for a child.
General s afety
Caution! Keep ventilation openings clear of obstructions.
 The appliance is intended for keeping food and/or beverages in a normal
household as explained in this instruction manual.
 Do not use a mechanical device or any artificial means to speed up the thawing process.
 Do not use other electrical appliances (such as ice cream makers) on the inside of refrigerating appliances, unless they are approved for this purpose by the manufacturer.
 Do not damage the refrigerant circuit. The refrigerant isobutane (R600a) is contained within the refrigerant circuit of the appliance. It is a natural gas with a high level of environmental compatibility, which is nevertheless flammable.
Caution: Risk of fire!
During the transportation and installation of the appliance, make certain that none of the components of the refrigerant circuit become damaged.
-avoid open flames and sources of ignition. -thoroughly ventilate the room in which the appliance is located.
 It is dangerous to alter the specifications or modify this product in any way. Any damage to the cord may cause a shortcircuit, fire, and/or electric shock.
Warning! Any electrical component (power cord, plug, compressor) must be replaced by a certified service agent or qualified service personnel.
1.The power cord must not be lengthened.
2.Make sure that the power plug is not crushed or damaged. A crushed or damaged power plug may overheat and cause a fire.
3.Make sure that you can access the main plug of the appliance.
4.Do not pull the main cable.
5.If the power plug socket is loose, do not
insert the power plug. There is a risk of electric shock or fire.
6. You must not operate the appliance without the interior lighting lamp cover.
Daily use
 Do not remove nor touch items from the freezer compartment if your hands are damp/wet, as this could cause skin abrasions or frost/freezer burns.
 Do not place the appliance in direct sunlight.
 Do not store flammable gases or liquids inside the appliance. There is a risk of an explosion.
 Do not operate any electrical appliances within the appliance (e.g. electric ice cream makers, mixers, etc.).
 When unplugging, always pull the plug from the main outlet. Do not pull on the cord.
 Do not place hot items near the plastic components of this appliance.
 Do not place food products directly against the air outlet on the rear wall. 1)
  Frozen food must not be refrozen once it has been thawed out. 2)
EN 3
 Store pre-packaged frozen food in accordance with the frozen food manufacturer's instructions. 2)
 The appliance's manufacturing storage recommendations should be strictly adhered to. Refer to the relevant instructions for storage.
 Do not place carbonated or fizzy drinks in the freezer compartment as it creates pressure on the container, which may cause it to explode, resulting in damage to the appliance. 2)
 Ice lollies (popsicles) can cause frost burns if consumed straight from the refrigerated compartment. 2)
 Do not store explosive substances such as aerosol cans with a flammable propellant in this appliance.
 This appliance is intended to be used in household and similar applications such as
-staff kitchen areas in shops, offices and other working environments;
-farm houses and by clients in hotels, motels and other residential type environments;
-bed and breakfast type environments; -catering and similar non-retail applications
 Keep burning candles,lamps and other items with naked flames away from the appliance so that do not set the appliance on fire.
Warning!
Care and cleaning
 Before maintenance, switch off the appliance and disconnect the mains plug from the mains socket.
 Do not clean the appliance with metal objects, steam cleaner, ethereal oils, organic solvents or abrasive cleansers.
 Do not use sharp objects to remove frost from the appliance. Use a plastic scraper.
Installation
Important!
For electrical connection carefully, follow the instructions given in this manual.
 Unpack the appliance and check if there are damages on it. Do not connect the appliance if it is damaged. Report possible damages immediately to the place you bought it. In this case retain packing.
 It is advisable to wait at least four hours before connecting the appliance to allow the oil to flow back in the compressor.
4 EN
 Adequate air circulation should be around the appliance, lacking this leads to overheating. To achieve sufficient ventilation, follow the instructions relevant to installation.
 Wherever possible the back of the product should be against a wall to avoid touching or catching warm parts (compressor, condenser) to prevent the risk of a fire, follow the instructions relevant to installation.
 The appliance must not be locate close to radiators or cookers.
Make sure that the mains plug is accessible after the installation of the appliance.
S ervice
 Any electrical work required to do the servicing of the appliance should be carried out by qualified electrician or competent person.
 This product must be serviced by an authorized Service Center, and only genuine spare parts must be used.
1)If the appliance is Frost Free.
2)If the appliance contains freezer compartment.
Description of the appliance
View o f the a ppliance |
1 |
|
2 |
|
|
|
11 |
|
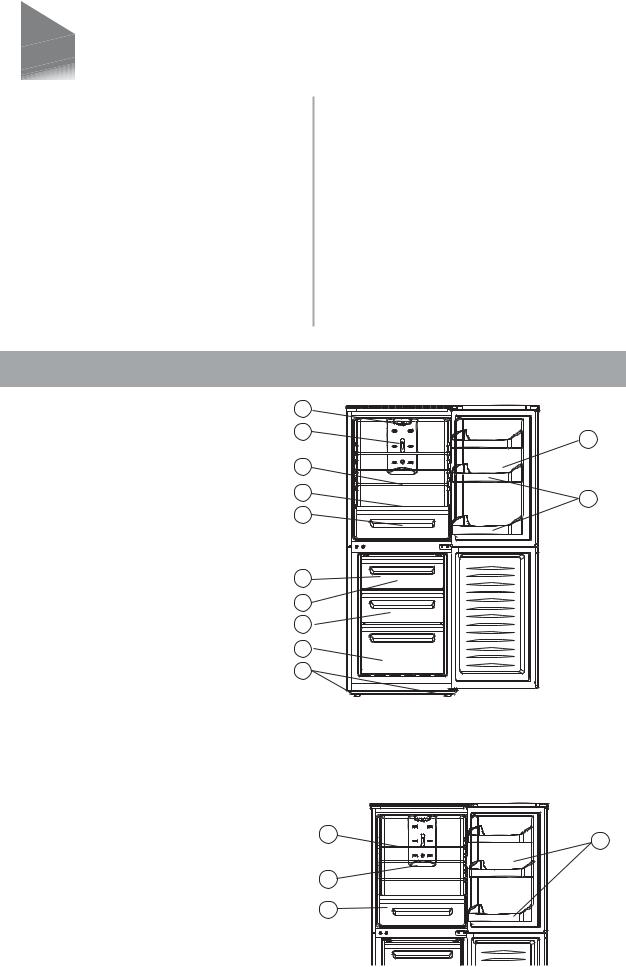
1.Refrigerator lamp |
|
|
3 |
|
|
2.Wind path parts in refrigerator |
|
|
4 |
|
|
3.Shelf |
12 |
|
4.Vegetable drawer cover |
5 |
|
5.Vegetable drawer |
|
|
6.Ice tray(inside) |
|
|
7.Freezer upper drawer |
6 |
|
8.Freezer middle drawer |
7 |
|
9.Freezer lower drawer |
|
|
8 |
|
|
10.Adjustable foot |
|
|
9 |
|
|
11.Egg rack(inside) |
|
|
10 |
|
|
12.Door rack |
|
Note: Due to unceasing modification of our products your refrigerator may be slightly different from this Instruction Manual, but its functions and using methods remain the same.
1Part:It is suitable for storing cake, cookedfoods, sweetmeats, canned foods, meat and dairy products, etc.
2Part: It is Refrigerate Compartment Cooling Air Inlet.Cool air is evenly blown from the inlet into the refrigerator compartment .Storing food at the outlet many block the air path and cause insufficient refrigeration.
3Part: It is suitable for storing fruits, vegetables and salad, etc.
4Part: It is suitable for the storage of egg ,cannel liquid ,bottle liquid and packet food etc
.Before you take the food out ,please lift up the door rack vertically, and do not place too many heavy th-ings in the rack.
1 |
4 |
|
2
3
EN 5
Control panel
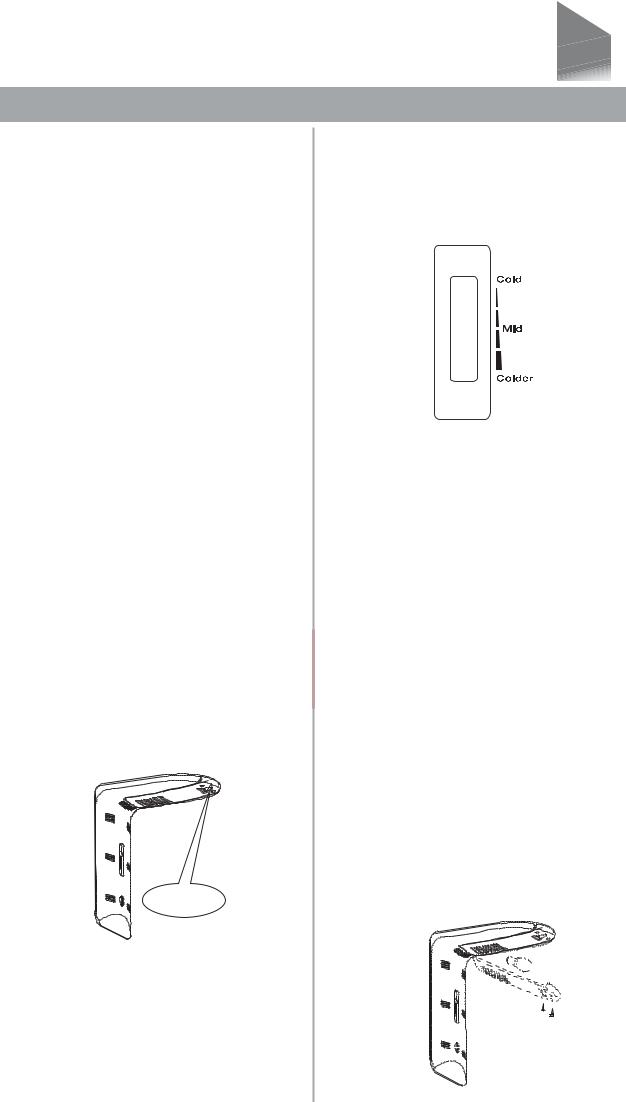
Temperature Control S liderin r efrigerator chamber
The temperature control slider is used to adjust the refrigerator and freezer temeperature,the slide on the thermostat is used to balance the distribution of air flow volume of each compartment. With the slider turns down,which will cause more air flow in refri-gerator and less air flow in freezer ,so the refrigerator will be cool faster.For normal operating use,keep the slider in the centre normal position. You should not need to adjust the temperature control dial if the slider is kept at the normal setting.
Turning on the appliance and setting the thermostat
You switch on you appliance by connecting it to you mains sup-ply and setting the thermostat,the thermostat control knob is located at the top .Wind path parts in refrigerator.The thermostat automatically regulates the temperature interior refrigerator chamber and freezer chamber ,depending on what number you have turned the thermostat control knob to:
1.If the ambient temperature is higher
temperature(in |
summer),please set the |
|
control knob |
at“5 |
6 or 7”positing. |
2. If the ambient temperature is lower temperature(in winter),please set the c o n t r o l k n o b a t “ 1 o r 2 ” p o s i t i n g . 3. please set the control knob at“3 or 4”positing in usual condition.
Knob
Important!
Normally we advise you select setting of 2 or 3 or 4, if you want the temperature warmer or colder please turn the knob to lower or higher setting accordingly.When you turn the knob to lower which can lead to the more energy efficiency. Otherwise, it would result the energy-consuming.
If it gets too cold in the chilled chamber with the switch on “Cold”, just turn the switch back to“Mid”,if the temperature gets higher in the chilled chamber with the switch on“Colder”,just turn the switch to“Mid”.
Important!
High ambient temperatures (e.g. on hot summer days) and a cold setting on the temperature re-gulator (position 6 to 7) can cause the compressor to run continuously or even non-stop!Reason: when the ambient temperature is high, the compressor must run continuously to maintain the low temperature in the appliance..
Changing the l ight bulb
WARNINGS!!!
Before removing the light bulb,cither the refrigerator or disconnect the electricity leading into the refrigerator at the main power supply. Failure to do so could result inelectrical shockor personal injury.
1.Use the cross screw driver to take the screws out.
2.Remove the light cover .
3.Light Bulb-screw out the bulb according to the direction shown in the picture
4.Replace with a 10 watt-refrigerator bulb that is of the same shape and size. 5.Replace the light cover.
6 EN
First use and installation
Cleaning b efore u s e
 Before using the appliance for the first time, wash the interior and all internal accessories with lukewarm water and some neutral soap in order to remove the typical smell of a brand new product, then dry thoroughly.
Ins tallation P os itioning
W arning! Before installing, read the instructions carefully for your safety
and the correct operation of the appliance.
 Position the appliance away from sources
of heat such as stoves, radiators, direct sunlight, etc.
 Maximum performance and safety are guaranteed by maintaining the correct indoor temperature for the class of unit concerned, as specified on the rating plate.
 This appliance performs well from N to ST. The appliance may not work properly if it is left for a longer period at a temperature above or below the indicated range.
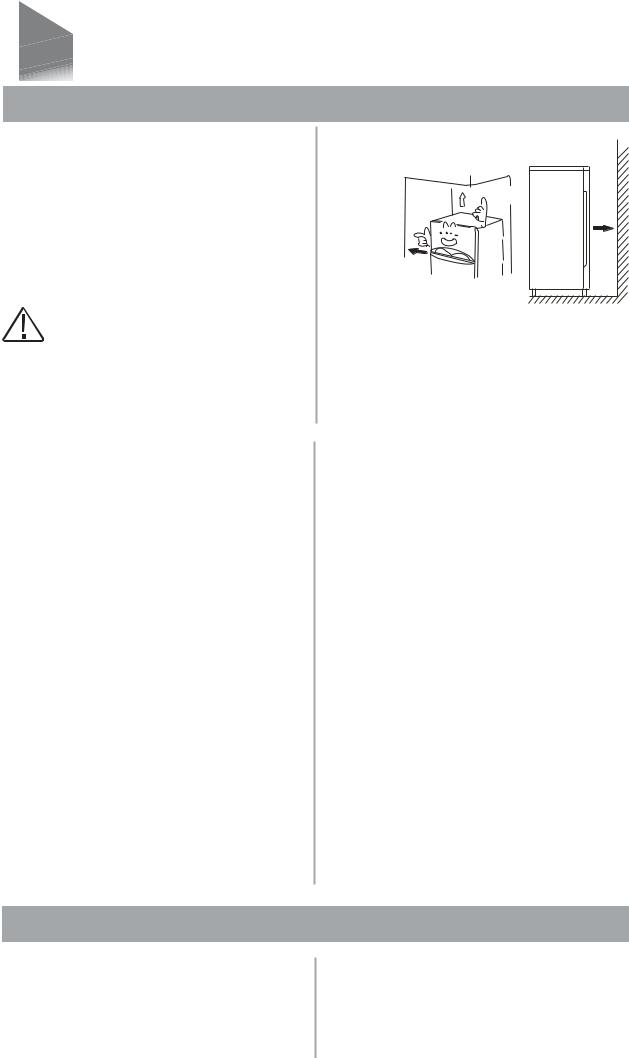
Important! It is necessary to have good ventilation around the refrigerator to allow for the dissipation of heat, high efficiency and low power consumption. For this reason, a sufficiently cleared space should be available around the refrigerator. It is advisable for there to be 75mm separating the back of the refrigerator to the wall at least 100mm of space on its two sides, a height of over 100mm from its top and a clear space in front to allow the doors to open 160°.
 100mm
100mm
75mm
100mm
Climate class |
Ambient temperature |
|
|
SN |
+10°C to +32°C |
|
|
N |
+16°C to +32°C |
|
|
ST |
+16°C to +38°C |
|
|
T |
+16°C to +43°C |
 Appliances must not be exposed to rain. Sufficient air must be allowed to circulate in the lower rear section of the appliance, as poor air circulation can affect performance. Built-in appliances should be positioned away from heat sources such as heaters and direct sunlight.
Leveling
 The appliance should be level in order to eliminate vibration. To make the appliance level, it should be upright and both adjusters should be in stable contact with the floor. You can also adjust the level by unscrewing the appropriate level adjustment in the front (use your fingers or a suitable spanner).
E lectrical c onnection
C aution! Any electrical work required to install this appliance should be carried out by a qualified or authorized personnel.
Warning! This appliance must be grounded. The manufacturer declines any liability should these safety measures not be observed.
Daily use
Acces s ories 1 )
Movable s helves /trays
 Various glass, plastic storage shelves or wire trays are included with your appliancedifferent models have different combinations and different models have different features.
 The walls of the refrigerator are equipped with a series of runners so that the shelves can be positioned as desired.

Pos itioning the d oor s helves
 To permit the storage of food packages of various sizes, the door shelves can be placed at different heights.
 To adjust, gradually pull the shelf in the direction of the arrows until it comes free, then reposition as required.
Vegetable Drawer
 For storing fruit and vegetables.
Freezer D rawer
 For storing frozen food.
Ice-cube tray
 For making ice and storing ice-cubes.
Refrigerator compartment |
2) |
 For storing food that does not need to be
EN 7
frozen and different sections suitable for different kinds of food.
Freezer food compartment |
2) |
 For freezing fresh food and storing frozen and deep-frozen food for long periods of time.
Thawing f ood 2)
 In the refrigerator compartment.
 At room temperature.
 In a microwave oven.
 In a conventional or convection oven.
  Food once thawed should be re-frozen with the exception of special cases.
1)If the appliance contains related accessories and functions.
2)If the appliance contains a freezer compartment.
Helpful hints and tips
Nois es d uring o peration
Clicks- Whenever the compressor switches on or off, a click can be heard.
Humming- As soon as the compressor is in operation, you can hear it humming. Bubbling- When refrigerant flows into thin tubes, you can hear bubbling or splashing noises.
Splashing- Even after the compressor has been switched off, this noise can be heard for a short time.
E nergy s aving tips
 Do not install the appliance near stoves, radiators or other sources of warmth.
 Keep the time the appliance is open to a minimum.
 Do not set the temperature colder than necessary.
 Make sure the side plates and back plate of the appliance are at some distance from the wall, and follow the instructions relevant to installation.
 If the diagram shows the correct combination for the drawers, crisper and shelves, do not adjust the combination as it would produce an effect on energy consumption.
Hints f or f res h f ood r efrigeration
 Do not store warm foods or evaporating liquids in the appliance.
 Do cover or wrap the food, particularly if it
has a strong flavor or odor.
 Position food so that air can circulate freely around it.
Hints f or r efrigeration
 Meat (all types): wrap in polyethylene (plastic) bags and place on the glass shelf above the vegetable drawer. For safety, store in this way only one or two days at the most.
 Cooked foods, cold dishes, etc…: these should be covered and may be placed on any shelf.
 Fruit and vegetables: these should be thoroughly cleaned and placed in the special drawer provided.
 Butter and cheese: these should be placed in aluminum foil or polyethylene (plastic) bags while removing as much air as possible.
 Milk bottles: these should have a cap and should be stored in the bottle rack on the door.
Hints f or f reezing
 When first starting-up or after a period out of use. Before putting the food in the compartment, let the appliance run at least 2 hours on the higher settings.

8 EN
 Prepare food in small portions to enable it to be rapidly and completely frozen and to make it possible to subsequently thaw only the quantity required.
 Wrap up the food in aluminum foil or polyethylene (plastic) and make sure that the packages are airtight.
 Do not allow fresh, unfrozen food to touch food that is already frozen, thus avoiding a
rise in the temperature of the latter.
 Iced products, if consumed immediately after removal from the freezer compartment,
can possibly cause skin to become freezer burnt.
 It is recommended to label and date each frozen package in order to keep track of the storage time.
IMPORT ANT! – If large quantities of food are to be stored in the freezer, all the freezer drawers (except the freezer lower drawer) can be taken out of the appliance and the food stacked directly on the freezer shelves or in the freezer.
Hints f or the s torage o f frozen f ood
 Make sure that commercially frozen food was stored by the retailer.
 Once defrosted, foods deteriorate rapidly and can not be re-frozen.
 Do not exceed the storage period indicated by the food manufacturer.
Note: If the appliance contains related accessories and functions.
Cleaning and Care
Cleaning a nd c are
For hygienic reasons, the appliance interior, including interior accessories, should be cleaned regularly.
The appliance should be cleaned and maintained at least every two months.
Warning! Danger of electrical shock!
 The appliance should not be connected to the main power supply during cleaning. Before cleaning, switch the appliance off and remove the plug from the main power supply, switch off, or shut off the circuit breaker or fuse.
Notice!
 Remove the food from the appliance before cleaning. Store them in a cool place and keep well covered.
 Never clean the appliance with a steam cleaner. Moisture could accumulate in electrical components.
 Hot vapors can lead to the damage of plastic parts.
 Ethereal oils and organic solvents can attack plastic parts, e.g. lemon juice or the juice from an orange peel, butyric acid,or cleansers that contain acetic acid. Do not allow such substances to come into contact with appliance parts.
 Do not use any abrasive cleansers.
 Clean the appliance and the interior accessories with a cloth and lukewarm
water. Commercially available dish washing detergents may also be used.
 After cleaning, wipe with fresh water and a clean dish cloth.
 Accumulation of dust at the condenser increases energy consumption; clean the condenser at the back of the appliance once a year with a soft brush or a vacuum cleaner.(Only for the outside-condenser product)
 Check the water drain hole on the rear wall of the refrigerator compartment.
 Clear a blocked drain hole with the aid of something like soft green peg, an be careful not to create any damage to the cabinet by sharp objects.
 After everything is dry, the appliance back into service.
Defrosting with NoFrost
 The NoFrost system automatically defrosts the appliance.
 The moisture condenses on the evaporator, is periodically defrosted and evaporates.
  The appliance does not have to be manually defrosted.
Taking the a ppliance o ut of s ervice
 Empty the appliance.
 Pull out the power plug.
 Clean thoroughly (see section: Cleaning and Care).
 Leave the door open to prevent odours.

EN 9
What to do if…
Warning! Before trouble-shooting, disconnect the power supply. Only a qualified electrician or other
personnel must carry out the troubleshooting that is not in the manual.
Important!
Repairs to the appliance may only be performed by competent service engineers. Improper repairs can give rise to significant hazards for the user. If your appliance needs repairing, please contact your specialist dealer or your local Customer Service Center.
Problem |
|
Possible cause |
Solution |
|
|
|
Appliance is not switched on. |
Switch on the appliance. |
|
|
|
Main plug is not plugged in or |
Plug the appliance into the |
|
Appliance does not |
is loose. |
electrical socket. |
|
|
Fuse has blown or is defective. |
Check fuse, replace if necessary. |
|
||
work. |
|
|
||
|
Outlet is defective. |
Defective parts need to be |
|
|
|
|
|
||
|
|
repaired by an electrician. |
|
|
|
|
|
|
|
Appliance cools too |
Temperature is set too cold. |
Turn the temperature regulator to |
|
|
much. |
|
a warmer setting temporarily. |
|
|
|
|
|
||
|
|
Temperature is not properly |
Please refer to the “Initial Start Up” |
|
|
|
adjusted. |
section. |
|
|
|
Door was open for an |
Open the door only as long as |
|
|
|
extended period. |
necessary. |
|
The food is too warm. |
A large quantity of warm food |
Turn the temperature regulator |
|
|
|
|
|
||
|
|
was placed in the appliance |
|
|
|
|
to a colder setting temporarily. |
|
|
|
|
within the last 24 hours. |
|
|
|
|
|
|
|
|
|
The appliance is near a heat |
Please refer to the “Installation |
|
|
|
source. |
Location” section. |
|
Interior lighting does |
Light bulb is defective. |
Please look in the “Changing the |
|
|
not work. |
|
Light Bulb “section. |
|
|
|
|
|
||
|
|
|
Carefully warm the leaking |
|
Heavy build-up |
of |
Door seal is not air-tight |
sections of the door seal with a |
|
hair dryer (on a cool setting). At |
|
|||
frost, possibly also on |
(possibly after reversing the |
|
||
the same time, shape the warmed |
|
|||
the door seal. |
|
door). |
|
|
|
door seal by hand so that it sits |
|
||
|
|
|
|
|
|
|
|
correctly. |
|
|
|
Appliance is not level. |
Readjust the feet. |
|
|
|
The appliance is touching the |
Move the appliance slightly. |
|
|
|
wall or other objects. |
|
|
Unusual noises. |
|
|
|
|
|
A component, e.g. a pipe, on |
|
|
|
|
|
the rear of the appliance is |
If necessary, carefully bend the |
|
|
|
touching another part of the |
component out of the way. |
|
|
|
appliance or the wall. |
|
|
The compressor does |
|
|
|
|
|
|
|
||
not start immediately |
This is normal, no error has |
The compressor starts after a |
|
|
after changing |
the |
occurred. |
period of time. |
|
temperature setting. |
|
|
|
|
Water on the floor or |
Water drain hole is blocked. |
Refer to the “Cleaning and Care” |
|
|
storage shelves. |
|
section. |
|
|
|
|
|
||

10 EN
Reverse the door
The side in which the door opens can be
changed from the right side (as supplied) to
the left side, if the installation site allows for it.
Tools you will need:
1.8mm socket driver
2.Cross-shaped screwdriver
3.Putty knife or thin-blade screwdriver
Before you begin, place the refrigerator on it’s back in order to gain access to the base, you should rest it on soft foam packaging or similar material to avoid damaging the cooling pipes at the rear of the refrigerator.
1.Stand the refrigerator, use a flat bladed screw driver to remove the 4 screw covers at the rear of the refrigerator lid.
2. Unscrew and lift the lid from the rear and remove it,then lift the upper door and place it on a padded surface to prevent it scratched.
3. First remove the three bolts,then remove the upper hinge that hold the door in place.Lift the upper door and place it on a padded surface to prevent it from scratching.
4.Remove the two flange screw, then remove the middle hinge that hold the lower door in place. Lift the lower door and place it on a padded surface to prevent scratching it.
5.Remove the hinge hole cover from the right holes as illustrated and transfer them to the uncover hole at the left side.

6. Remove both adjustable feet and remove the bottom hinge bracket by unscrewing the bolts.
7. Unscrew and remove the bottom hinge pin, turn the bracket over and replace it. Refit the bracket fitting the bottom hinge pin. Replace both adjustable feet.Transfer the lower door to the property position.Secure the door's level, make the bottom hinge pin into the lower hole of the door, then tight the bolts.
8. Make the middle hinge reverse the direction 180 degree, then transfer it to the left property position.Make the middle hinge pin in the upper hole of the lower door, then tight the bolts. Transfer the upper door to the property position. Secure the door's level; make the middle hinge pin into the lower hole of the upper door.
EN 11
9. With the reassembled top hinge located in the hole in the top inside left corner of the upper door,fix the top hinge using the 3 screws. Remove the decorative block of top cover to the other side.Replace the top cover using screws ,replace the circular hole plugs.
When y ou r evers e the d oor, Pleas e d o this f irs t:
Move the accessory B from the upper cover of upper door and fit the accessory A that is a small detachable part from a small bag.
1.Remove the screw(1) that hold the door stopper(3),then remove the door stopper(3).
2
3
1
Warning!
When changing the side at which the door opens, the appliance must not be connected to the mains. Remove plug from the mains beforehand.
 Loading...