


HSL2629HDI

Instruction Manual
HSL2629HDI
HSL8129HDI
26 INCH LCD
32 INCH LCD
Part No:IES080713

1. HISENSE Australia will provide parts and labour to you the Customer as
set out herein.
2. Nothing in the warranty, limits any rights you may have under the trade
practices act or any other Commonwealth or State Legislation. Such
rights cannot be changed by the conditions in this warranty. Subject to
the conditions below this appliance is warranted by Hisense and/or its
Agents to be free from defects in materials and workmanship for a
period of 36 months from the date of purchase (the “Warranty period”)
3. This warranty: a. covers products purchased as NEW, manufactured for use in
Mainland Australia and Tasmania;
b. commences from the date of purchase as listed on the Customers
invoice;
c. provides for the labour and replacement parts necessary to maintain
your product in good operating condition as specified in this warranty
however, if repair is needed because of product failure during normal
usage, Hisense has the option to repair or replace the defective
product or part of the product with a product or part of the product of
like kind and quality and a replacement part may be ne or
reconditioned of like kind and quality and may cost less than the
original product purchased and no charges or refunds will be made
based on the replacement product cost difference;
d. applies only to the original purchaser and cannot be transferred;
e. is only applicable when your appliance is used in a domestic
environment;
f. covers products for commercial purposes for a period of 90 Days from
the date of purchase.
4. Product Identification
a. Hisense reserves the right to reject claims for any services or work
where the Customer requesting such work or services from Hisense
and/or its agents cannot produce for verification the serial number
and the proof of purchase as per original purchase invoice.
b. The warranty will be voided if any Serial Number sticker provided to
be placed on the equipment is damaged, modified or removed.
c. In the event that a request for repair is made against a warranty
where the Serial Number sticker is not attached to the product or the
customer cannot produce for verification the original invoice, the
repairer will not affect any repairs on the product and the Customer
will be charged a service call-out fee.
5. What is covered by this warranty
a. The equipment is covered for faulty workmanship on parts that have
failed under normal use which are contained within the product.
b. Hisense and/or its Agents will decide if there are any defects in the
material and/or workmanship
c. This warranty is only applicable for repairs on declared equipment
carried out within Mainland Australia and Tasmania
6. What is not Covered by this warranty (excluded): a. any damage or failure:
I. of equipment due to the product being inadequately serviced to
manufacturer’s recommendations;
ii. resulting from environmental conditions including and not limited
to dirt, dust, rodents, insects, rust, corrosion, salt built-up, of any
part of the product including its parts; or
iii. resulting from excessive use “fair wear and tear”;
iv. resulting from poor installation including and not limited to
positioning and externally fitted equipment such as plumbing
and drainage, cabling, antennae or due to Incompatibility of
connected equipment;
v. to the product caused by overheating as a result of siting or
positioning of the equipment, where there is not provision for
adequate ventilation or a dust free environment;
vi. caused if your appliance has been dismantled, repaired or
serviced by any person other than someone authorised by
Hisense;
vii. to a product or components, caused by power surges or spikes,
in c l u d i n g a n d n o t l i m i t e d t o , m a in s p o w e r a n d
telecommunications connections, or to other unspecified
sources, incorrect power current, voltage fluctuation, amperage
fluctuation, rust or corrosion;
viii. due to a dropped product; collision with another object, use of
which is not designed, negligence, accident or deliberate
misuse, theft, abuse, vandalism, flood, fire, earthquake, electrical
storms or any other act of God or any war related events;
b. costs of attendance and testing where no mechanical or electrical
failure is identified;
c. initial setup and installation of the product;
d. Normal maintenance costs and costs incurred through the
installation of items listed as requiring periodic replacement;
e. products with removed or altered serial numbers;
f. consumables such as but not limited to bulbs/globes, batteries,
remote controls;
g. removal and reinstallation of an internal component not performed
by a factory authorised service centre;
h. cosmetic or structural items;
I. Any failures due to the interference from or to other products and/or
sources;
7. The Warranty Ceases if: a. The product ceases to carry the original manufacturer’s serial
number or is sold at an auction;
b. The product is rented;
c. Damage to the product has occurred as listed in point 6b.
8. Neither Hisense nor its representatives provide loan equipment under
the terms of this warranty.
9. Any unauthorised access to the internal hardware of the product will
void this warranty.
10. Replacement items are “Like for like” and is not “new for old” and does
not indicate in any way that a faulty product will be replaced with a
new part or unit.
11. If you reside outside of the service coverage area of your nearest
authorised service agent, this warranty does not cover the costs of
transportation or travel expenses to and from your home.
12. Hisense accepts no liability for items that are lost, damaged, or stolen
as a result of freight, transport or storage. If you are required to
transport the appliance to an authorised service centre, you must
ensure that it is securely packed and insured.
13. On Public Holidays or other periods when regular business and
wholesale operations are temporarily ceased, repairer availability and
warranty response times may extend beyond the standard response
times due to the availability of repairers and parts.
14. Special Conditions relating to Plasma TV’s, LCD TV’s, Panels,
Projection Television and Projections Equipment
a. All LCD and Plasma Panels exhibit some bright, dark or partially lit
pixels, a normal limitation of these technologies, and the
manufacturing processes involved and are usually not noticeable
when viewing normal screen images and defective pixels are not a
wa rr an ty is su e unless they exceed th e m an uf ac turer ’s
specifications for pixel defects. Where there are no manufacturer
specifications, Hisense covers the screen provided for 12 or more
pixels that are failing to display.
b. Image retention or burn-in can be a problem for all phosphor based
displays. In extreme cases, permanent phosphor burn can occur if
still/repetitive images are left on the screen for extended periods of
time. Such damage to the screen is not covered by the warranty.
Please ensure that the precautions in any documentation supplied
with your product are followed in order to avoid permanent damage
to your display.
c. Where a product is positioned higher than 1.2m from the lowest
mount point, is wall/ceiling mounted or where aftermarket mounts
and/or stands are used, or where the unit has not been installed by
a professional installer, an extra service charge will apply to unfix
and refix this product.
15. Any repair performed on a product under the warranty where no fault
can be found, or the item is deemed by Hisense, or an authorised
Hisense agent, to be not faulty under this warranty, or the repair or
fault is not covered under the warranty, a No Fault Found fee is
payable by the warranty holder of a minimum of $125 inc GST.
16. Any repairs or services required that are outside of the terms and
conditions of the warranty can be carried out at the request of the
customer or due to site attendance were fault is not covered under
warranty as the product not been installed or setup correctly; a credit
card may be required prior to the commencement of such services.
2

WARRANTY CLAIMS PROCEDURE
Please retain this portion for your records
36 MONTHS IN HOME REPLACEMENT WARRANTY
Hisense Australia will provide its nearest service centre for repairs under warranty. You will need to
ensure that you have already called Hisense Warranty Centre and received a JOB NUMBER.
Before making a claim, please make sure that you understand the terms and conditions of the warranty
Check and ensure the installation of all power cables to the power point are secure and power is turned on, all
cables leads and connectors are connected properly and that all switches are turned on and functioning
Check that there is power at the power point by using a small appliance
Check that all settings are set according to the instruction manual
Please keep this certificate in a safe place together with your product receipt. Should you need to make a
claim, the responsibility of proof of ownership of the equipment is on you. If a claim is made that is found not to
be covered under this warranty, or no faulty hardware components are found, you will be charged at Hisense or
Hisense Authorised Service Center's standard service charge plus an administration fee.
PLEASE REFER TO THE TROUBLESHOOTING GUIDE
AT THE END OF THIS MANUAL
Service Procedure
Please have your original invoice, model, and serial number ready. To receive service, you are required to:
Call 1800 447 367. Service claims may be made between 9:00am and 5:00pm AEST weekdays
excluding public holidays where a call representative will log your claim for processing.
You will be provided a JOB NUMBER
Normally under 2 hours of logging and receiving your proof of purchase for your claim, an Authorised
Service Agent will contact you to proceed with claim.
WARRANTY REGISTRATION REGISTRATION
In order to register your warranty, please fill out and return with a copy of your invoice to:
Hisense Warranty Registration
PO BOX 2268 Seaford Victoria 3198 Australia
Congratulations on your purchase, This Document sets out terms
and conditions of your product warranty. Please Keep it with your
proof of purchase information in a safe place for future reference
should you require service to your product.
NAME OF PURCHASER _______________________________________________
ADDRESS __________________________________________________________
___________________________________________________________________
CITY ______________________________ STATE _______ POSTCODE ________
PHONE (_____)_____________________
MOBILE (_____)_____________________
FAX (_____) ________________________
The Undersigned hereby acknowledges receipt of the Hisense
warranty service provided. I have read and understand the
conditions and terms of the warranty in its entirety.
SERIAL NUMBER
_____________________________________________________________
STORE PURCHASED FROM
_____________________________________________________________
CITY _______________________ STATE _______ POSTCODE _________
INVOICE NO. __________________________________________________
MODEL NO. ___________________________________________________
DATE OF PURCHASE _________/___________/______________________
SIGNATURE ___________________________________________________
3

This page has been left blank intentionally.
4
Dear customer,
Thank you for choosing this LCD color TV. We expect our product and service will deliver many years of visual
enjoyment. This manual is to guide you to set up and operate your TV as quickly as possible. Please read all the
safety and operation instructions carefully before you begin, then follow the instructions carefully.
Important safeguard.............................................6
Preparation for using your new TV........................7
Selecting a location for the TV.......................7
Learning about your TV................................7
Connecting Your TV.....................................9
Using the remote control.................................... 12
Preparing the remote control ......................12
Learning the remote control.........................13
Using the TV .......................................................14
Turning your TV on and off
Selecting the video source
Adjusting the volume
...........................14
...........................14
...................................14
Freezing a picture
Setting the sleep timer
Display channel information
Selecting Subtitle Languages
Selecting your favorite programs
Menu System
Using the on-screen display (OSD) ..............16
Adjusting the SOUND Menu
Adjusting the PICTURE Menu
Adjusting the CHANNEL Menu
Adjusting the OPTION Menu
Adjusting the LOCK Menu.
Adjusting the SCREEN Menu
.......................................15
.................................15
.........................15
.......................16
..................16
............................................16
.........................16
.......................17
......................17
.........................19
............................20
........................21
Changing channels
.....................................14
Displaying channel lists...........................14
Selecting the sound mode
Selecting the picture mode
Selecting the aspect ratio
Selecting the audio mode
...........................15
..........................15
............................15
............................15
Appendix..
5
PC Setting
Using TELETEXT........................................22
Cleaning and care.......................................23
Troubleshooting..........................................23
Specifications.............................................24
..................................................21
...........................................................23

IMPORTANT SAFEGUARD
FIRE AND SHOCK PRECAUTIONS
Adequate ventilation must be provided to prevent heat build up inside the unit. Keep the inside of unit free from
foreign objects, such as hairpins, nails, paper, etc. Do not put the set into a bookcase or other enclosures in which
it would be poorly ventilated. Do not place it on carpet or a bed as low ventilation holes could become obstructed.
Do not set liquids, including flower vases and vessels filled with chemicals or water etc, on top of the unit as liquid
could get inside the unit. If a hazardous object falls inside the TV set, unplug immediately and call 1800HISENSE
for further instruction. When placing or moving the TV set, take care to insure that the power cord is disconnected.
To avoid damage to the power cord, never allow heavy objects such as the TV set itself to be placed on the power
cord. Keep cord away from radiating appliances. Do not allow cord to become knotted or tangled. Do not lengthen
the cord. When removing the power plug from the socket, always hold onto the plug, never pull by the cord.
This TV set must be connected to a mains power outlet with a protective earth connection. The MAINS plug or an
appliance coupler is used as the disconnect device, they shall remain readily operable. Naked flamed sources,
such as lighted candles are never to be placed on or around the TV.
A minimum distance around the TV for sufficient ventilation. (150mm recommended minimum)
WARNING
Do not remove the back cover of the TV set. Accidental contact with high voltage components could result in
electric shock.
If your set emits smoke or produces a strange sound or smell, immediately turn off your TV.
During vacation or other occasions when you will not be using the set for an extended period, remove the power
plug from the socket.
IMPORTANT INFORMATION
If a television is not positioned in a sufficiently stable location, it can be potentially hazardous due to falling. Many
injuries, particularly to children, can be avoided by taking simple precautions such as:
Only using furniture that can safely support the television.
Ensuring the television is not overhanging the edge of the supporting furniture.
Not placing the television on tall furniture (for example, cupboards or bookcases) without anchoring both the
furniture and the television to a suitable support.
Not standing the televisions on cloth or other materials placed between the television and supporting furniture.
Educating children about the dangers of climbing on furniture to reach the television or its controls.
Selecting a location for the TV
1. Place the TV on a sturdy platform (away from direct sunlight for optimal viewing).
2. Place the TV far enough from the walls to allow proper ventilation. Inadequate ventilation may cause overheating which may
damage the TV.(150mm minimum recommended distance around covered enclosure)
Note: Please contact retail dealer for wall mounting.
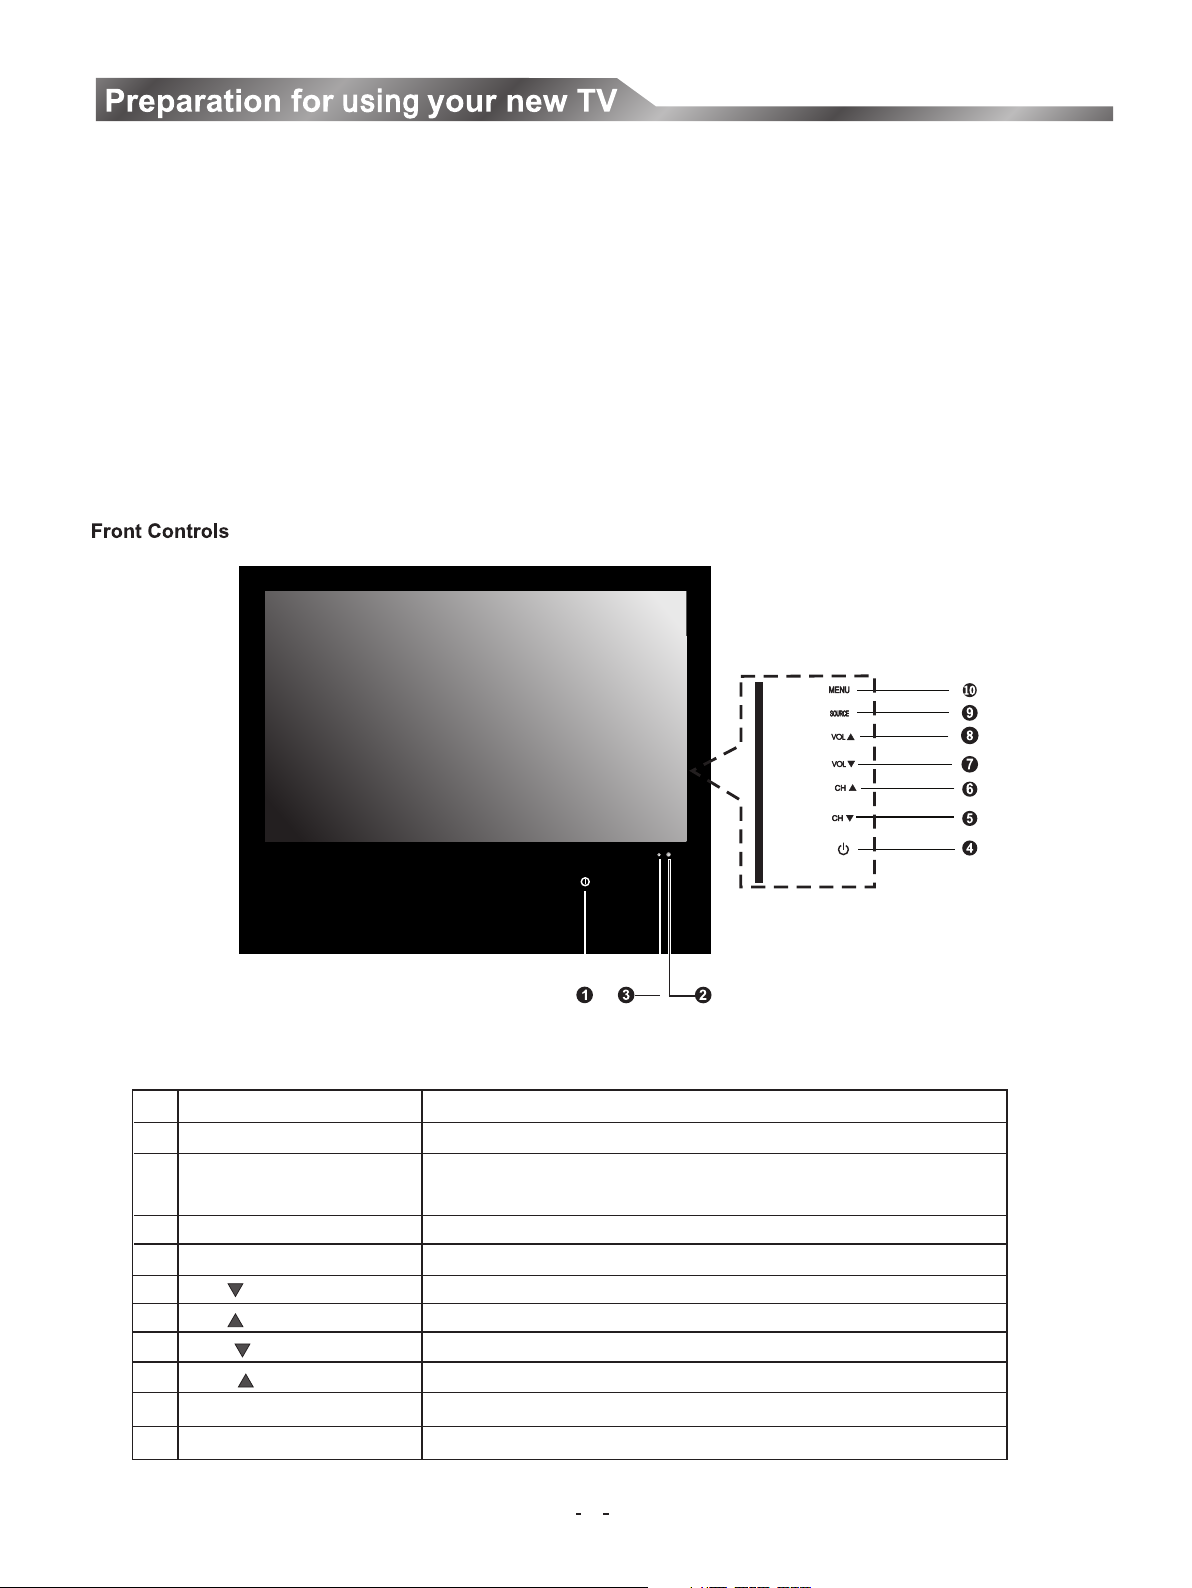
Learning about your TV
You can operate your TV by using the buttons on the front panel or on the remote control. The terminals on the backside provide all
the connections you will need to connect other equipment to your TV.
(NOTE: POWER Button switch location on bottom of front cabinet.)
Comp onent
NO.
POWER Switch
1
POWER Indicator
2
Remote sensor
3
(power standby ) button
4
CH button
5
CH button
6
VOL button
7
VOL button
8
SOURCE button
9
MENU button
10
Comp onent Description
Press to turn the main power ON or O FF.
Red in dicates standby mode . Blue shows that the unit is on.
There will be no light when the po wer switc h is in the off posit ion.
Rece ives signals from the re mote control. Do not block.
Press to turn your TV on or o ff (standby mod e).
Press to change the channel up .
Press to change the channel do wn.
Press to decrease the volume .
Press to increase the volume .
Press to select the signal sou rce for your TV.
Press to activate the on-scr een display (OSD).
7
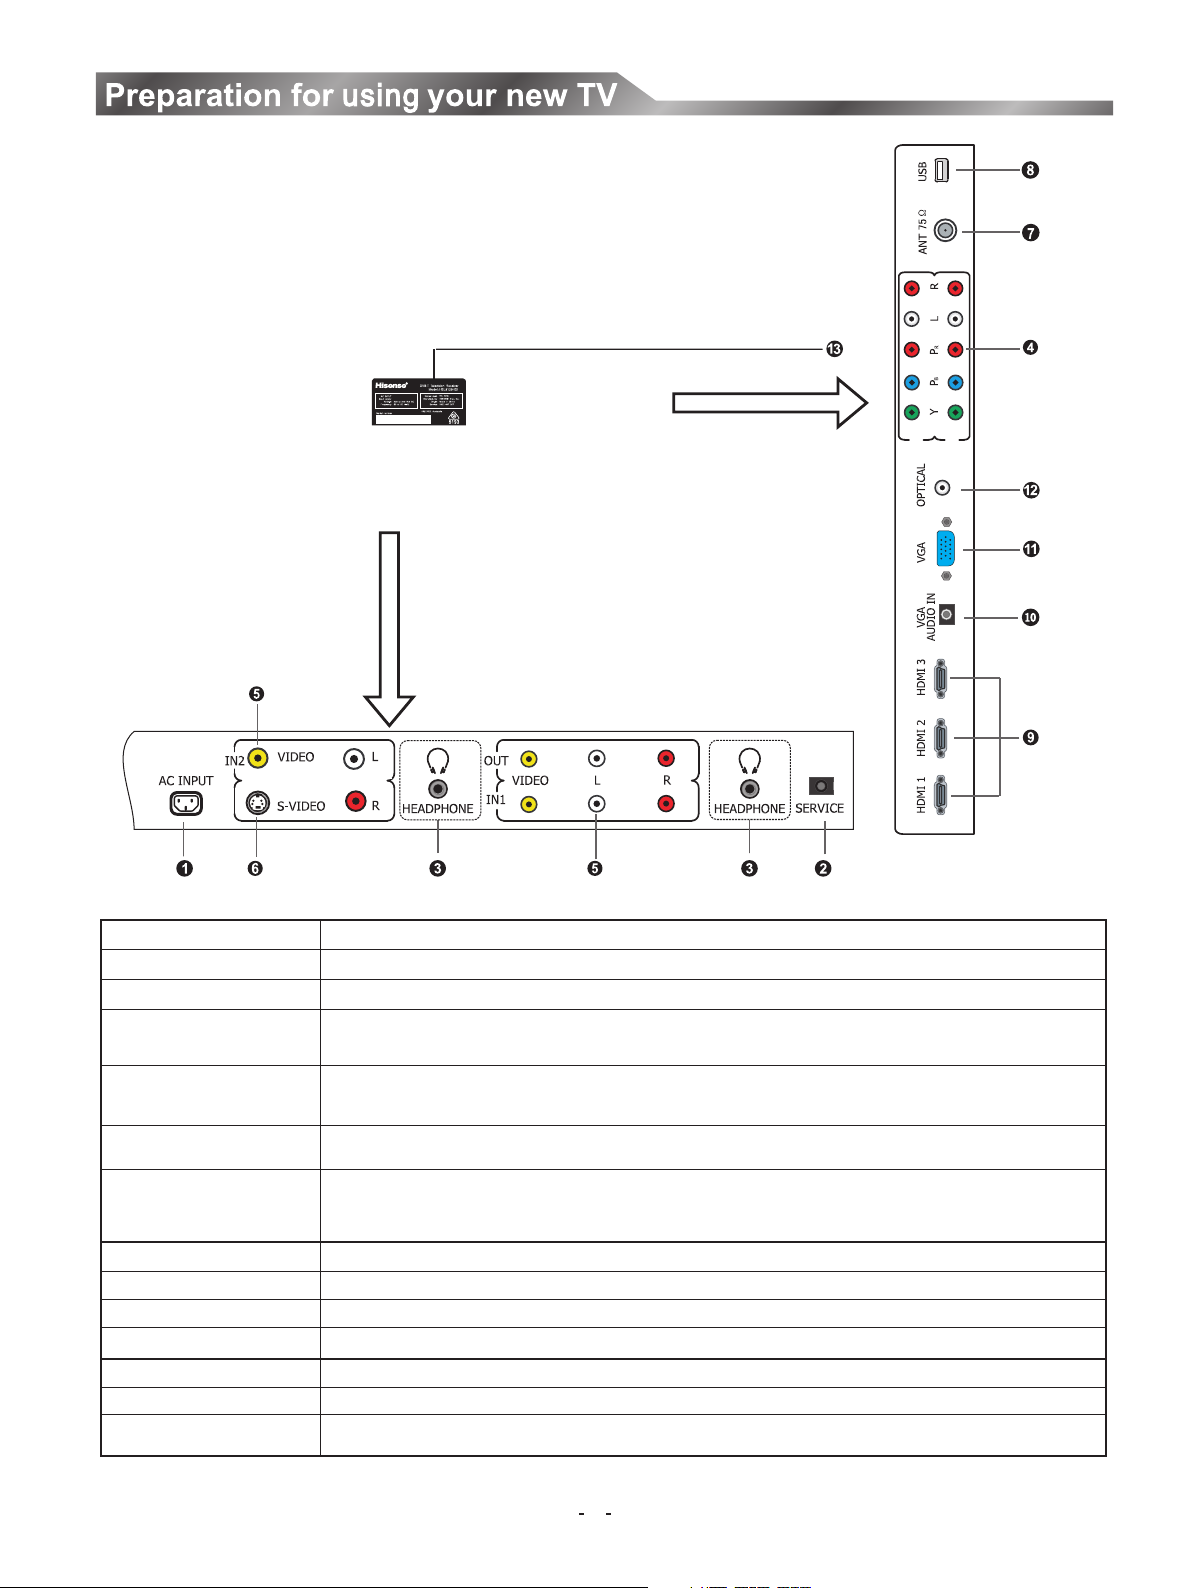
Back Connections
165Watt
HI7600501-L3205
COM P2
COM P1
L R
(For HSL2629 HDI) (For HSL8129 HDI)
NO. Connector Description
1 AC INPUT Connect the power cord to this connector.
2 SERVICE jack For service p urposes ONLY (will not support consumer produc ts)
Plug headphone into this jack. W hen headphones are plugged in, no sound
3 Headphone jack
comes from the loudspeakers.
4 Component Video Connec t Component video devices, such as a DVD player / PVR / HDDVD
input (2) /BluRay to these jacks . (Recommended for superior picture quality)
5 A/V input (2)/output (1) Connec t standard video/audio cables to these jacks.
6 S-Video (1) Connect an S-Video device to this jack, inserting the left and right au dio leads
into S-VIDEO/L and S-VIDEO/R
7 Antenna input Connection for th e Aerial/Antenna.
8 USB Connector For service purp oses ONLY. (Will not support consumer products)
9 HDMI (3) Connect a HDMI device to th is jack.
10 VGA Audio input Connect audio fro m a computer to this jack.
11 VGA video input Connect the v ideo from a computer to this jack.
12 Optical audio output Connec t an optical audio device to this jack. (onl y available in Digital TV or HDMI modes)
13 Rating Label Model number and s erial number found here
The above picture is for reference only, please refer to the actual TV to determine their appearance.
NOTE:
8
 Loading...