


HR6FDFF701SW

MODEL:HR6FDFF701SW
2
Contents
Brief introduction2
Important safety instructions3
Installing your new appliance 5
Description of the appliance11
Display controls12
Using your appliance 16
Cleaning and care22
Helpful hints and tips24
Troubleshooting26
Disposal of the appliance28
Brief introduction
Thank you for your choosing our products.
We are sure you will find your new
appliance a pleasure to use. Before you
use the appliance, we recommend that
you read through these instructions
carefully, which provides details about its
usage and functions.
Please ensure that all people using this
appliance are familiar with its operations
and safety features. It is important that you
install the appliance correctly and pay
attention to the safety instructions
carefully.
We recommend that you keep this user’s
manual with the appliance for future
reference and retain it to any future users.
This appliance is intended to be used in
household and similar applications such
as:
-Staff kitchen-areas in shops, offices and
other working environments;
-Farmhouses by clients in hotels, motels
and other residential types of environment;
-Bed and breakfast type of environments;
-Catering and similar non-retail
applications.
This appliance is not intended for use by
persons (including children) with reduced
physical, sensory or mental capabilities, or
lack of experience and knowledge, unless
they have been given supervision or
instruction concerning use of the
appliance by a person responsible for their
safety.
Children should be supervised to ensure
that they do not play with the appliance.
Do not store explosive substances such
as aerosol cans with a flammable
propellant in this appliance.
WARNING
—
Do not use mechanical
devices or other means to accelerate the
defrosting process, other than those
recommended by the manufacturer.
WARNING
—
Do not damage the
refrigerant circuit.
WARNING
—
Do not use electrical
appliances inside the food storage
compartments of the appliance, unless
they are of the type recommended by the
manufacturer.
WARNING
—
When disposing of the
appliance do so only at an authorized
waste disposal centre. Do not expose to
flame.
WARNING
—
If the supply cord is damaged,
it must be replaced by the manufacturer,
its service agent or similarly qualified
persons in order to avoid a hazard.
3
Important safety instructions
General safety and daily use
It is important to use your
appliance safely. We
recommend that you follow the
guidelines below.
Store any food in accordance with the
storage instructions from the
manufacturer.
Don't try to repair the appliance yourself.
It is dangerous to alter the specifications
or modify this product in any way. Any
damage to the power cord may cause
short circuit, fire or electric shock.
Don’t place too much food directly
against the air outlet on the rear wall of
both the refrigerator and freezer
compartment, as it affects sufficient air
circulation.
Don’t place hot items near the plastic
components of this appliance.
Frozen food must not be refrozen once it
has been thawed out.
Don’t store bottled or canned drinks
(especially carbonated drinks) in the
freezer compartment. Bottles and cans
may explode.
Do not consume ice popsicles or ice
cubes straight from the freezer as this can
cause freezer burn to the mouth and lips.
Safety for children and infirm persons
Keep all packaging away from children
to avoid risk of suffocation.
Protect children from being scalded by
touching the very hot compressor at the
rear bottom of appliance
Don’t place items on top of the appliance
as this could cause injury should they fall
off.
Never allow children to play with the
appliance by hanging or standing over or
on the doors, racks, shelves and drawers
etc.
Safety about electricity
To avoid the risks that are
always present when using an
electric appliance, we
recommend that you pay more attention to
the instructions about electricity below.
Unpack the appliance and check through
the appliance. Should any damage be
evident, don’t plug in the appliance but
contact the shop immediately from which
you purchased it. Keep all packing
materials in this case.
We recommend that you wait for 4 hours
before connecting the appliance to allow
the refrigerant to flow back into the
compressor.
The appliance must be applied with
single phase alternating current of
220~240V/50Hz. If the voltage fluctuates
exceeding the upper limit, A.C. automatic
voltage regulator of more than 350W
should be applied to the refrigerator for
safety use.
The mains plug must be accessible
when the appliance is installed.
This appliance must be earthed.
-This appliance is fitted with a plug in
accordance with local standard. The plug
should be suitable for use in all houses
fitted with sockets in accordance with
current specifications.
-If the fitted plug is not suitable for your
socket outlets, it should be cut off and
carefully disposed of. To avoid a possible
shock hazard, do not insert the discarded
plug into a socket. If in doubt contact a
qualified, registered electrician.
Do not use extension cords or multiple
sockets which could cause overloading of
wiring circuits and could cause a fire.
Always plug your appliance into its own
individual electrical socket which has a
Avoid open flames (candles, l amps etc.)
and sources of ignition.
Thoroughly ventilate the room in which
the appliance is situated.
5
Installing your new appliance
Before using the appliance for the first
time, you should be informed of the
following tips.
Warning!
For proper installation, this refrigerator
must be placed on a level surface of hard
material that is the same height as the rest
of the flooring. This surface should be
strong enough to support a fully loaded
refrigerator.
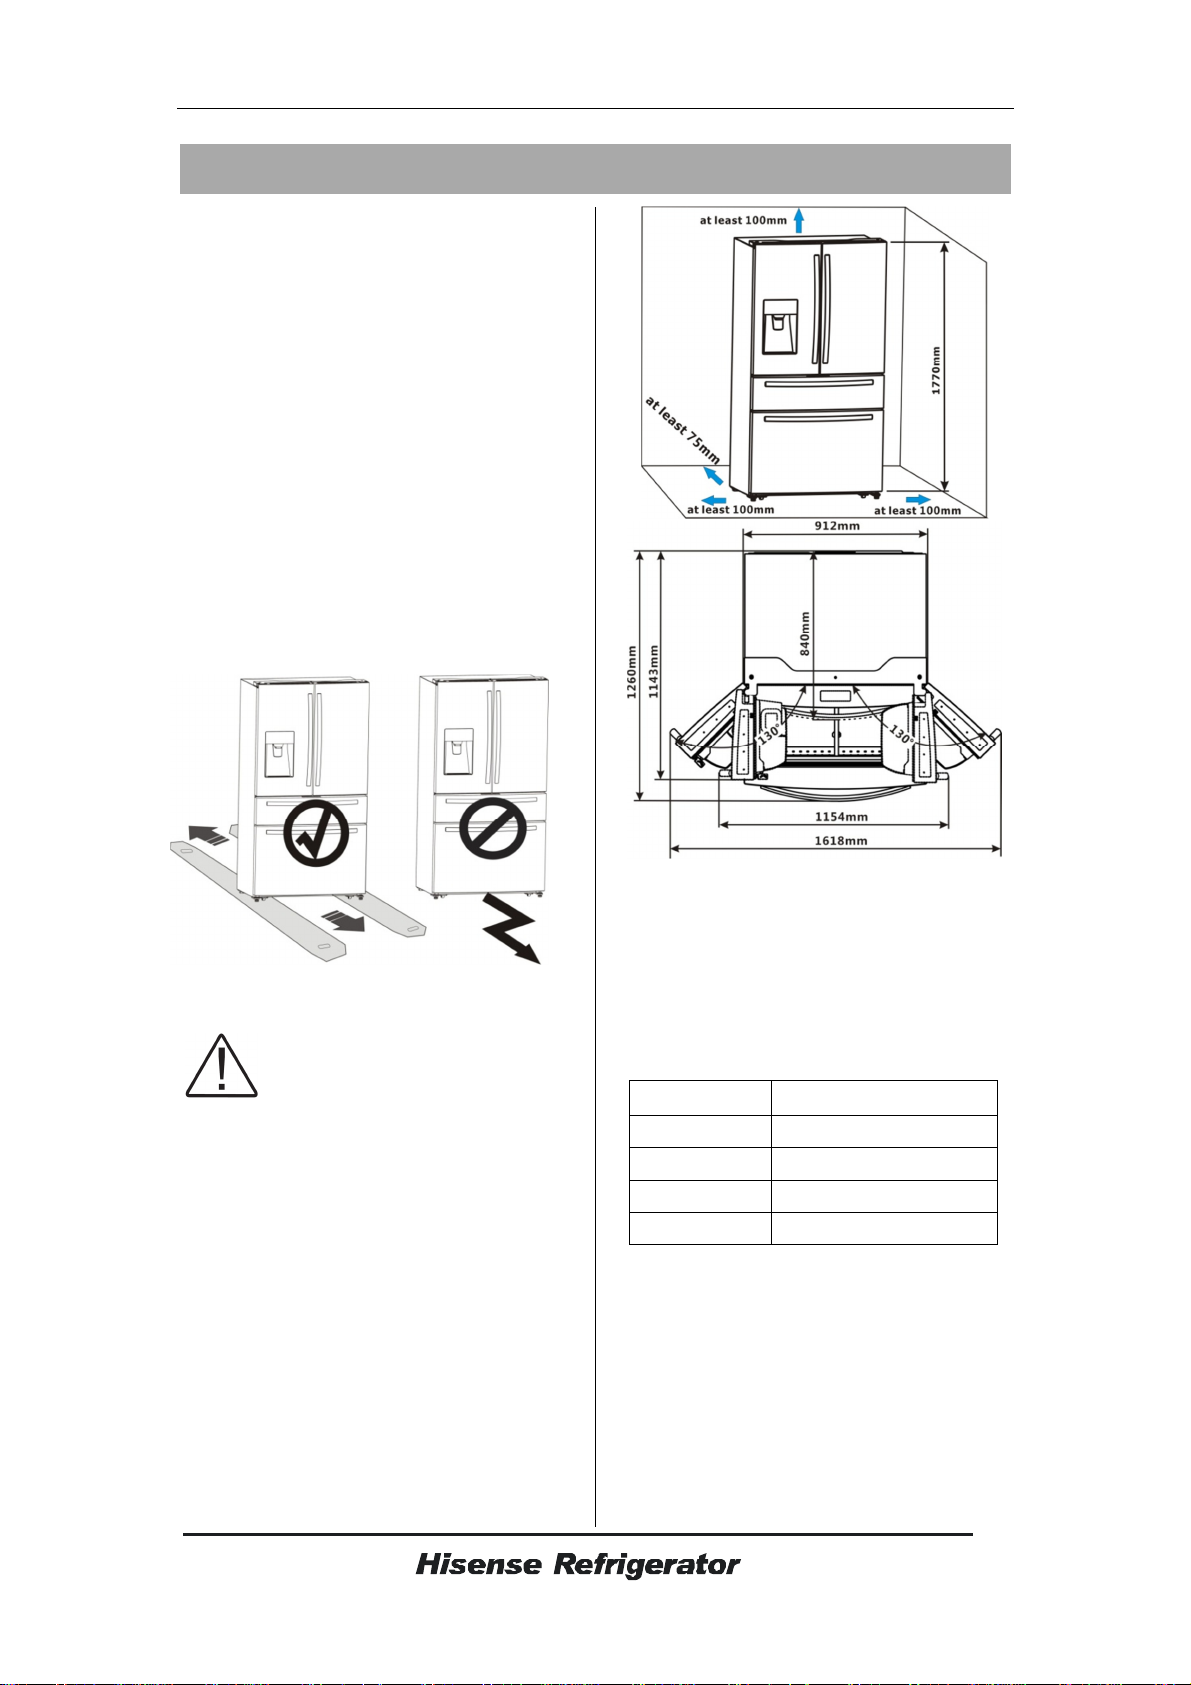
The rollers, which are not castors, should
be only used for forward or backward
movement. Moving the refrigerator
sideways may damage your floor and the
rollers.
Ventilation of appliance
In order to improve efficiency of
the cooling system and save
energy, it is necessary to
maintain good ventilation around the
appliance for the dissipation of heat. For
this reason, sufficient clear space should
be available around the refrigerator.
Suggest: It is advisable for there to be at
least 75mm of space from the back to the
wall, at least 100mm from its top, at least
100mm from its side to the wall and a clear
space in front to allow the doors to open
130°. As shown in follow diagrams.
Note:
This appliance performs well within the
climate class from N to T showed in the
table below. It may not work properly if
being left at a temperature above or below
the indicated range for a long period.
Climate class
Ambient temperature
SN +10°C to +32°C
N +16°C to +32°C
ST +16°C to +38°C
T +16°C to +43°C
Stand your appliance in a dry place to
avoid high moisture.
Keep the appliance out of direct sunlight,
rain or frost. Stand the appliance away
from heat sources such as stoves, fires or
heaters.
Leveling of appliance
For sufficient leveling and air circulating
in the lower rear section of the appliance,
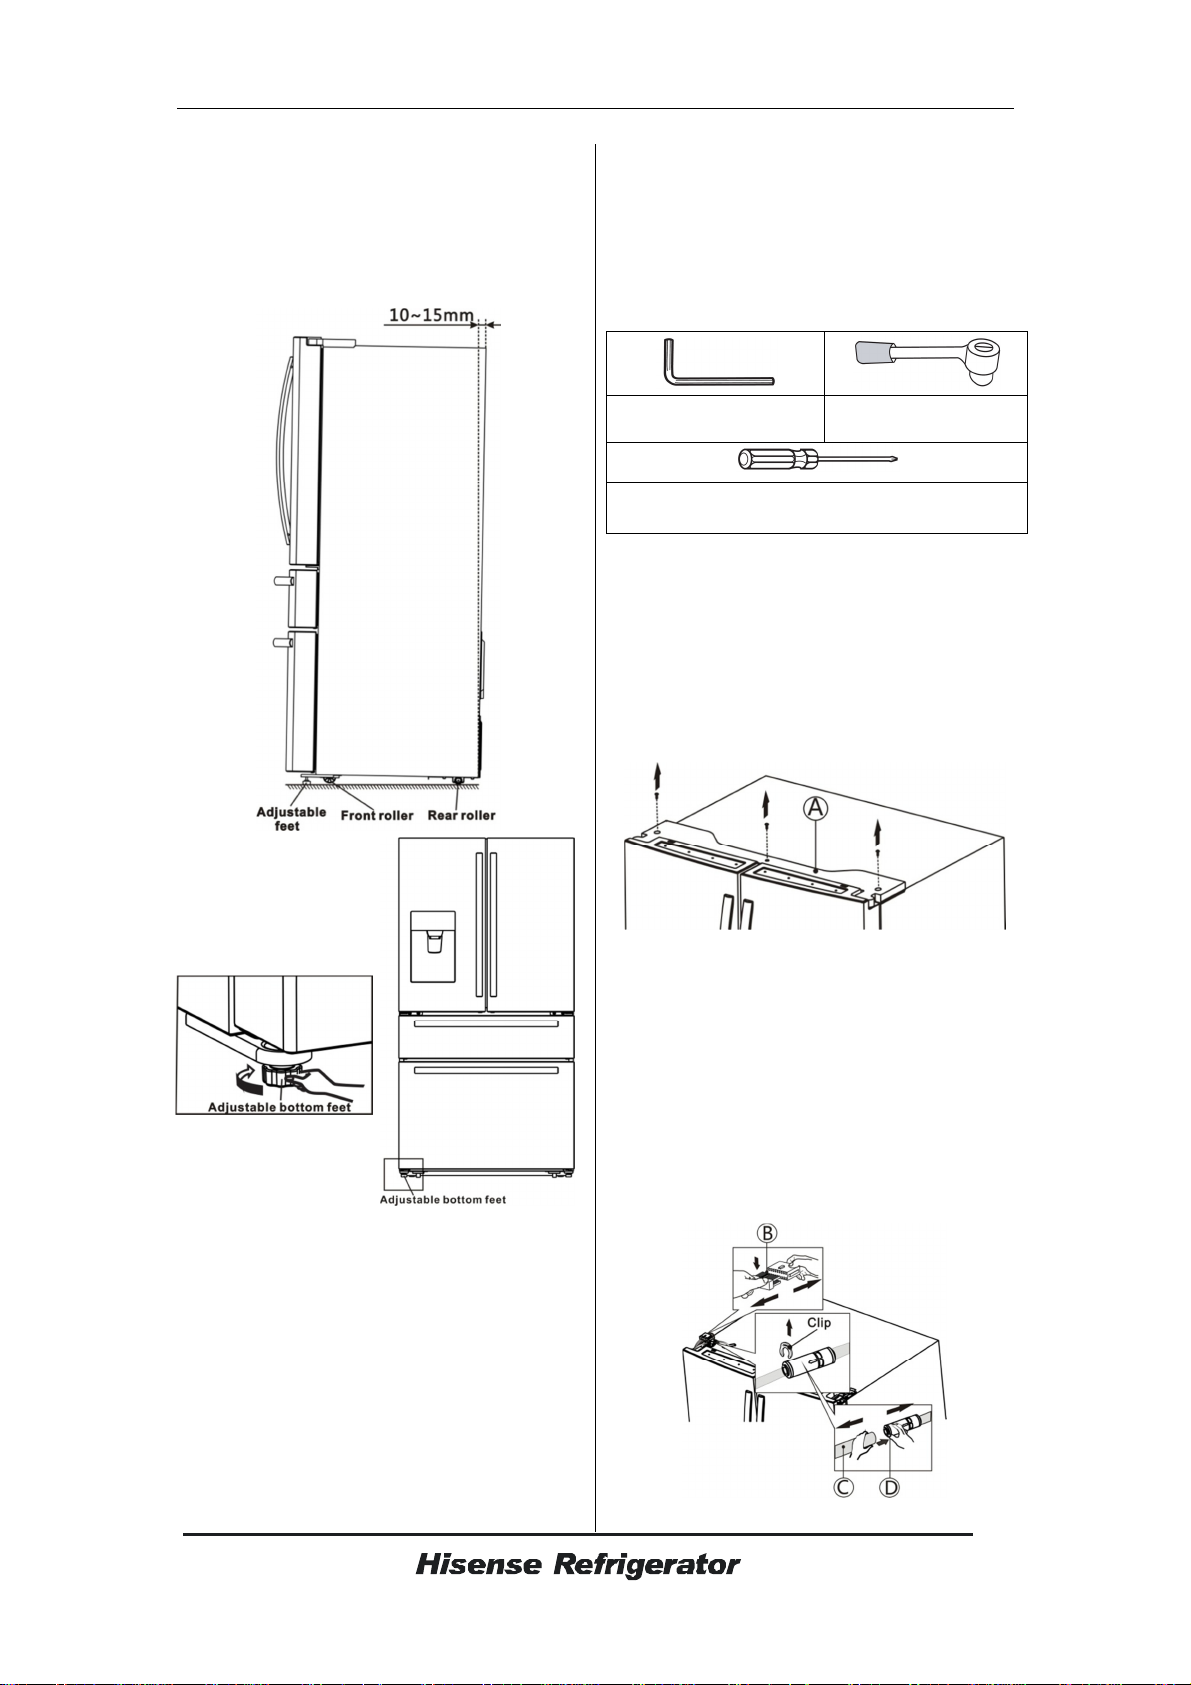
6
the bottom feet may need to be adjusted.
You can adjust them manually by hand or
by using a suitable spanner.
To allow the doors to self-close, tilt the
top backwards by 10-15
mm.
Doors removal
In case when your access door is too
narrow for the refrigerator to pass through,
remove the refrigerator door and drawers.
Then pass the refrigerator laterally. If you
do not need to remove the appliance
doors, go to ‘Installing the water lines’ on
page 8.If you need to remove the doors,
continue below.
water supply to the fridge before removing
the door or drawer. Failure to do so could
result in death or serious injury.
The tools you will need (Not provided):
Allen Wrench(5mm)
Wrench(8mm)
Philips screwdriver
With the fridge doors opened
1. With the door closed, remove the 3
screws holding the top cover (A) with
Philips (+) screwdriver, and then remove
the top cover with the entire-harnesses
attached.
2. Separate the two connectors on the left
side door. To remove the wire connector,
press the top of the connector (B) and
separate it from the other one .To remove
the water coupler from the hinge, twist and
pull the clips from the coupler. Remove the
water line (C) while pressing the movable
part (D) of the water line coupler.
3. Remove the 3 screws (E) fixed on the
Warning! Disconnect power and shut off
7
hinges with a Wrench (8mm) and 1 ground
screws (F) attached to the hinge with
Philips (+) screwdriver. Remove the upper
left and right door hinges (G).
4. Use your both hands to open the door
more than 90
°
.Lift it up and take it off.
5. Remove the 4 hex head bolts hinges (I)
with an Allen wrench (5 mm).Remove the
lower left and right door hinges (J).
Re-attaching the fridge doors
To reattach the fridge doors after you have
moved the appliance to its final location,
assemble the parts in reverse order.
1. To prevent water leaks, the water line
should be fully inserted into the center of
the coupler. The guide lines should be
coincided exactly with the head of the
movable part.
2. Make sure the clips are properly
connected to the coupler.
Caution!
In case the fridge doors can’t be
self-closed, please make sure the door
opened more than 90
°
when you remove
or re-attaching the fridge doors.
Disassembling My Fresh Choice door
1. Take out My Fresh Choice drawer (A) in
the direction of the arrow.
2. Remove the 2 screws (B) holding the
wire nails with a Philips screwdriver (+).
3. Take off the wire nails (C). To remove
the wire connector, press the top of the
connector (D) and separate it from the
other one.
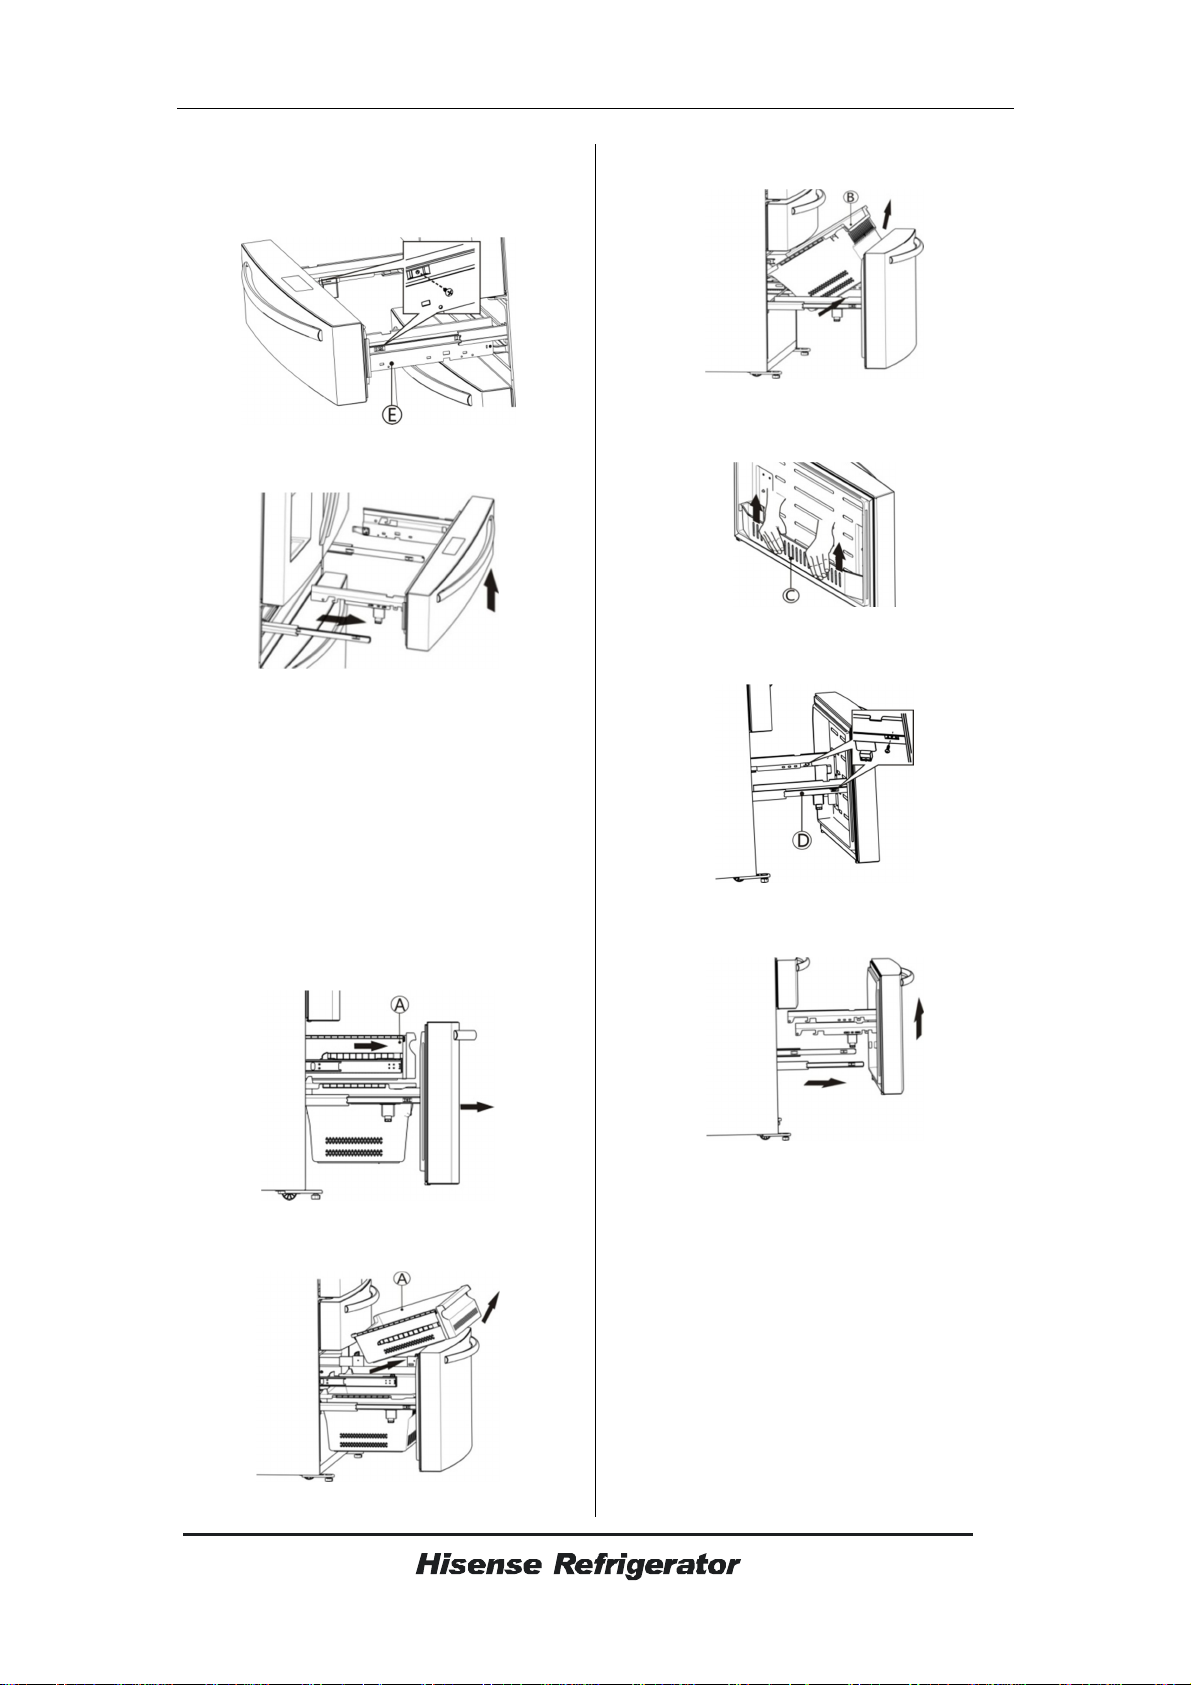
8
4. Remove the 2 screws attached to the
supporting frame (E) with a Philips
screwdriver (+).
5. Pull out the My Fresh Choice door and
lift it up in the direction of the arrow.
Re-assembling My Fresh Choice door
To reattach My Fresh Choice door,
assemble parts in reverse order.
Note:
Be sure to connect the variation door
wire connector (E). If it is not connected,
My Fresh Choice room does not work.
Disassembling the freezer door
1. Pull out the freezer door and the upper
freezer drawer (A) to the final position.
2. Take out the upper freezer drawer (A)
by lifting it up in the direction of the arrow.
3. Take out the lower freezer drawer (B) by
lifting it up from the rail system.
4. Remove the Pizza basket (C) by lifting it
up.
5. Remove the 2 screws attached to the
supporting frame (D).
6. Pull out the freezer door and lift it up in
the direction of the arrow.
Re-assembling the freezer door
To reattach the drawer after you moved
the appliance to its final location,
assembling the parts in reverse order.
Installing the water lines
A water dispenser with a filter is one of the
helpful features on your new appliance. To
help promote better health, the water filter
removes unwanted particles from your
water. However, it does not sterilize or
destroy microorganisms. You may need to
9
purchase a water purifying system to do
that.
In order for the
water dispenser/ice maker
to
operate properly, a water pressure of
207-862 kPa
is required.
Warning:
The water connection must be made by a
qualified plumber. Operation outside the
water pressure range may cause
malfunction, severe and damaging water
leaks.
Under normal conditions, a 200ml (5.75
oz.) cup can be fill in about 10 seconds.
If the refrigerator is installed in an area
with low water pressure (blow
207kPa),you can install a booster pump to
compensate for the low pressure.
After you have connected the water line,
make sure the water storage tank inside
the refrigerator is properly filled. To do this,
press the water dispenser lever until the
water runs from the water outlet.
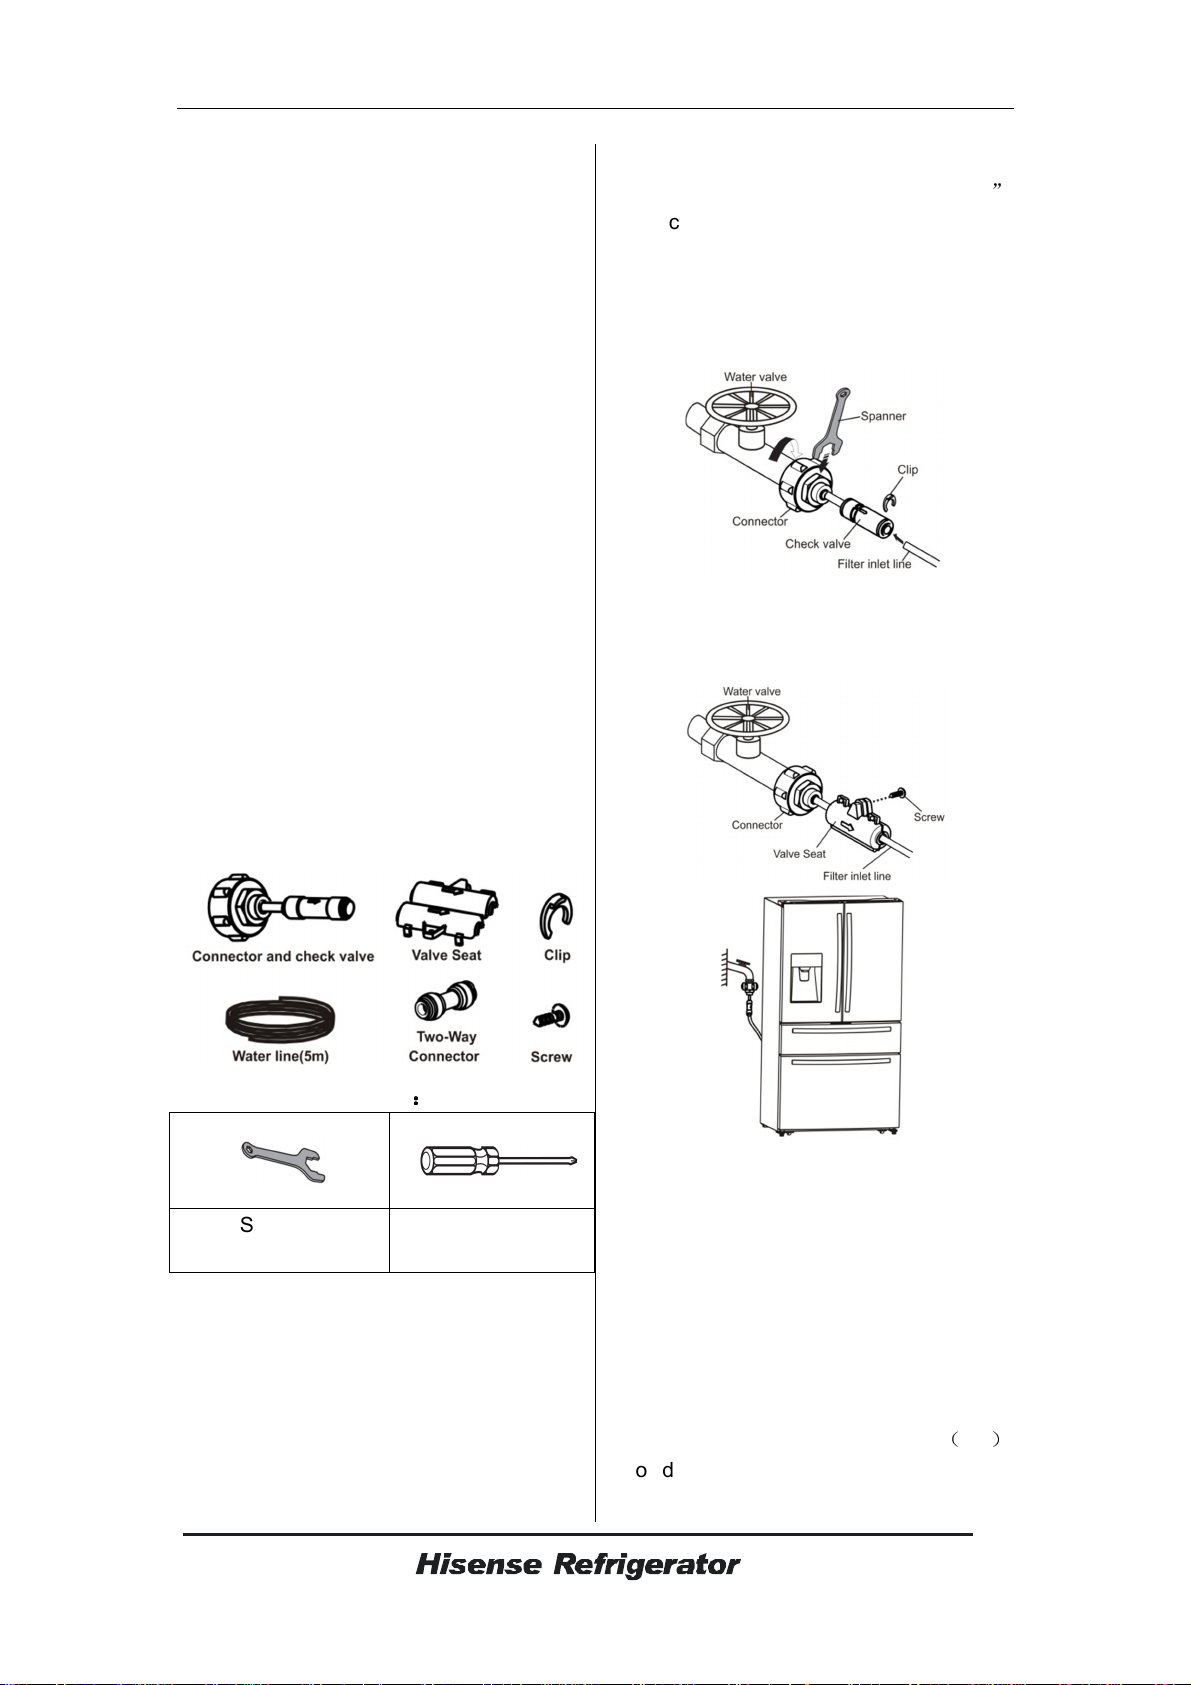
Parts for water line installation
The tools you will need
:
::
:
Spanner
(Provided)
Philips screwdriver
(Not provided)
Connecting to the water supply line
The connector and the check valve are
provided as one part. You should use the
new connector incidentally but not the old
one you have.
Caution! The water line must be
connected to the cold water pipe.
First, turn off the main water supply line.
Screw the adaptor onto a suitable 3/4
”
BSP connector water outlet and use the
spanner to tighten it. Fully insert the water
line into the check valve. Then insert the
clip in the install pack as the figure shown
below.
To prevent the clips loose, use the valve
seat to hold it. Then use the screw to hold
the valve seat with Philips (+) screwdriver.
Note:
Use only the new tubings supplied with
the refrigerator. Old tubings should not be
used.
After connected to the water supply line,
please open the water valve to flush the
filter for 5 minutes before use.
If the main supply line is too far away
from the refrigerator to be connected to
the filter inlet line, the water line
(
5m
)
provided may be helpful. The outlet line of
the water filter should be connected with
 Loading...