

Face Recognition Terminal
Quick Start Guide
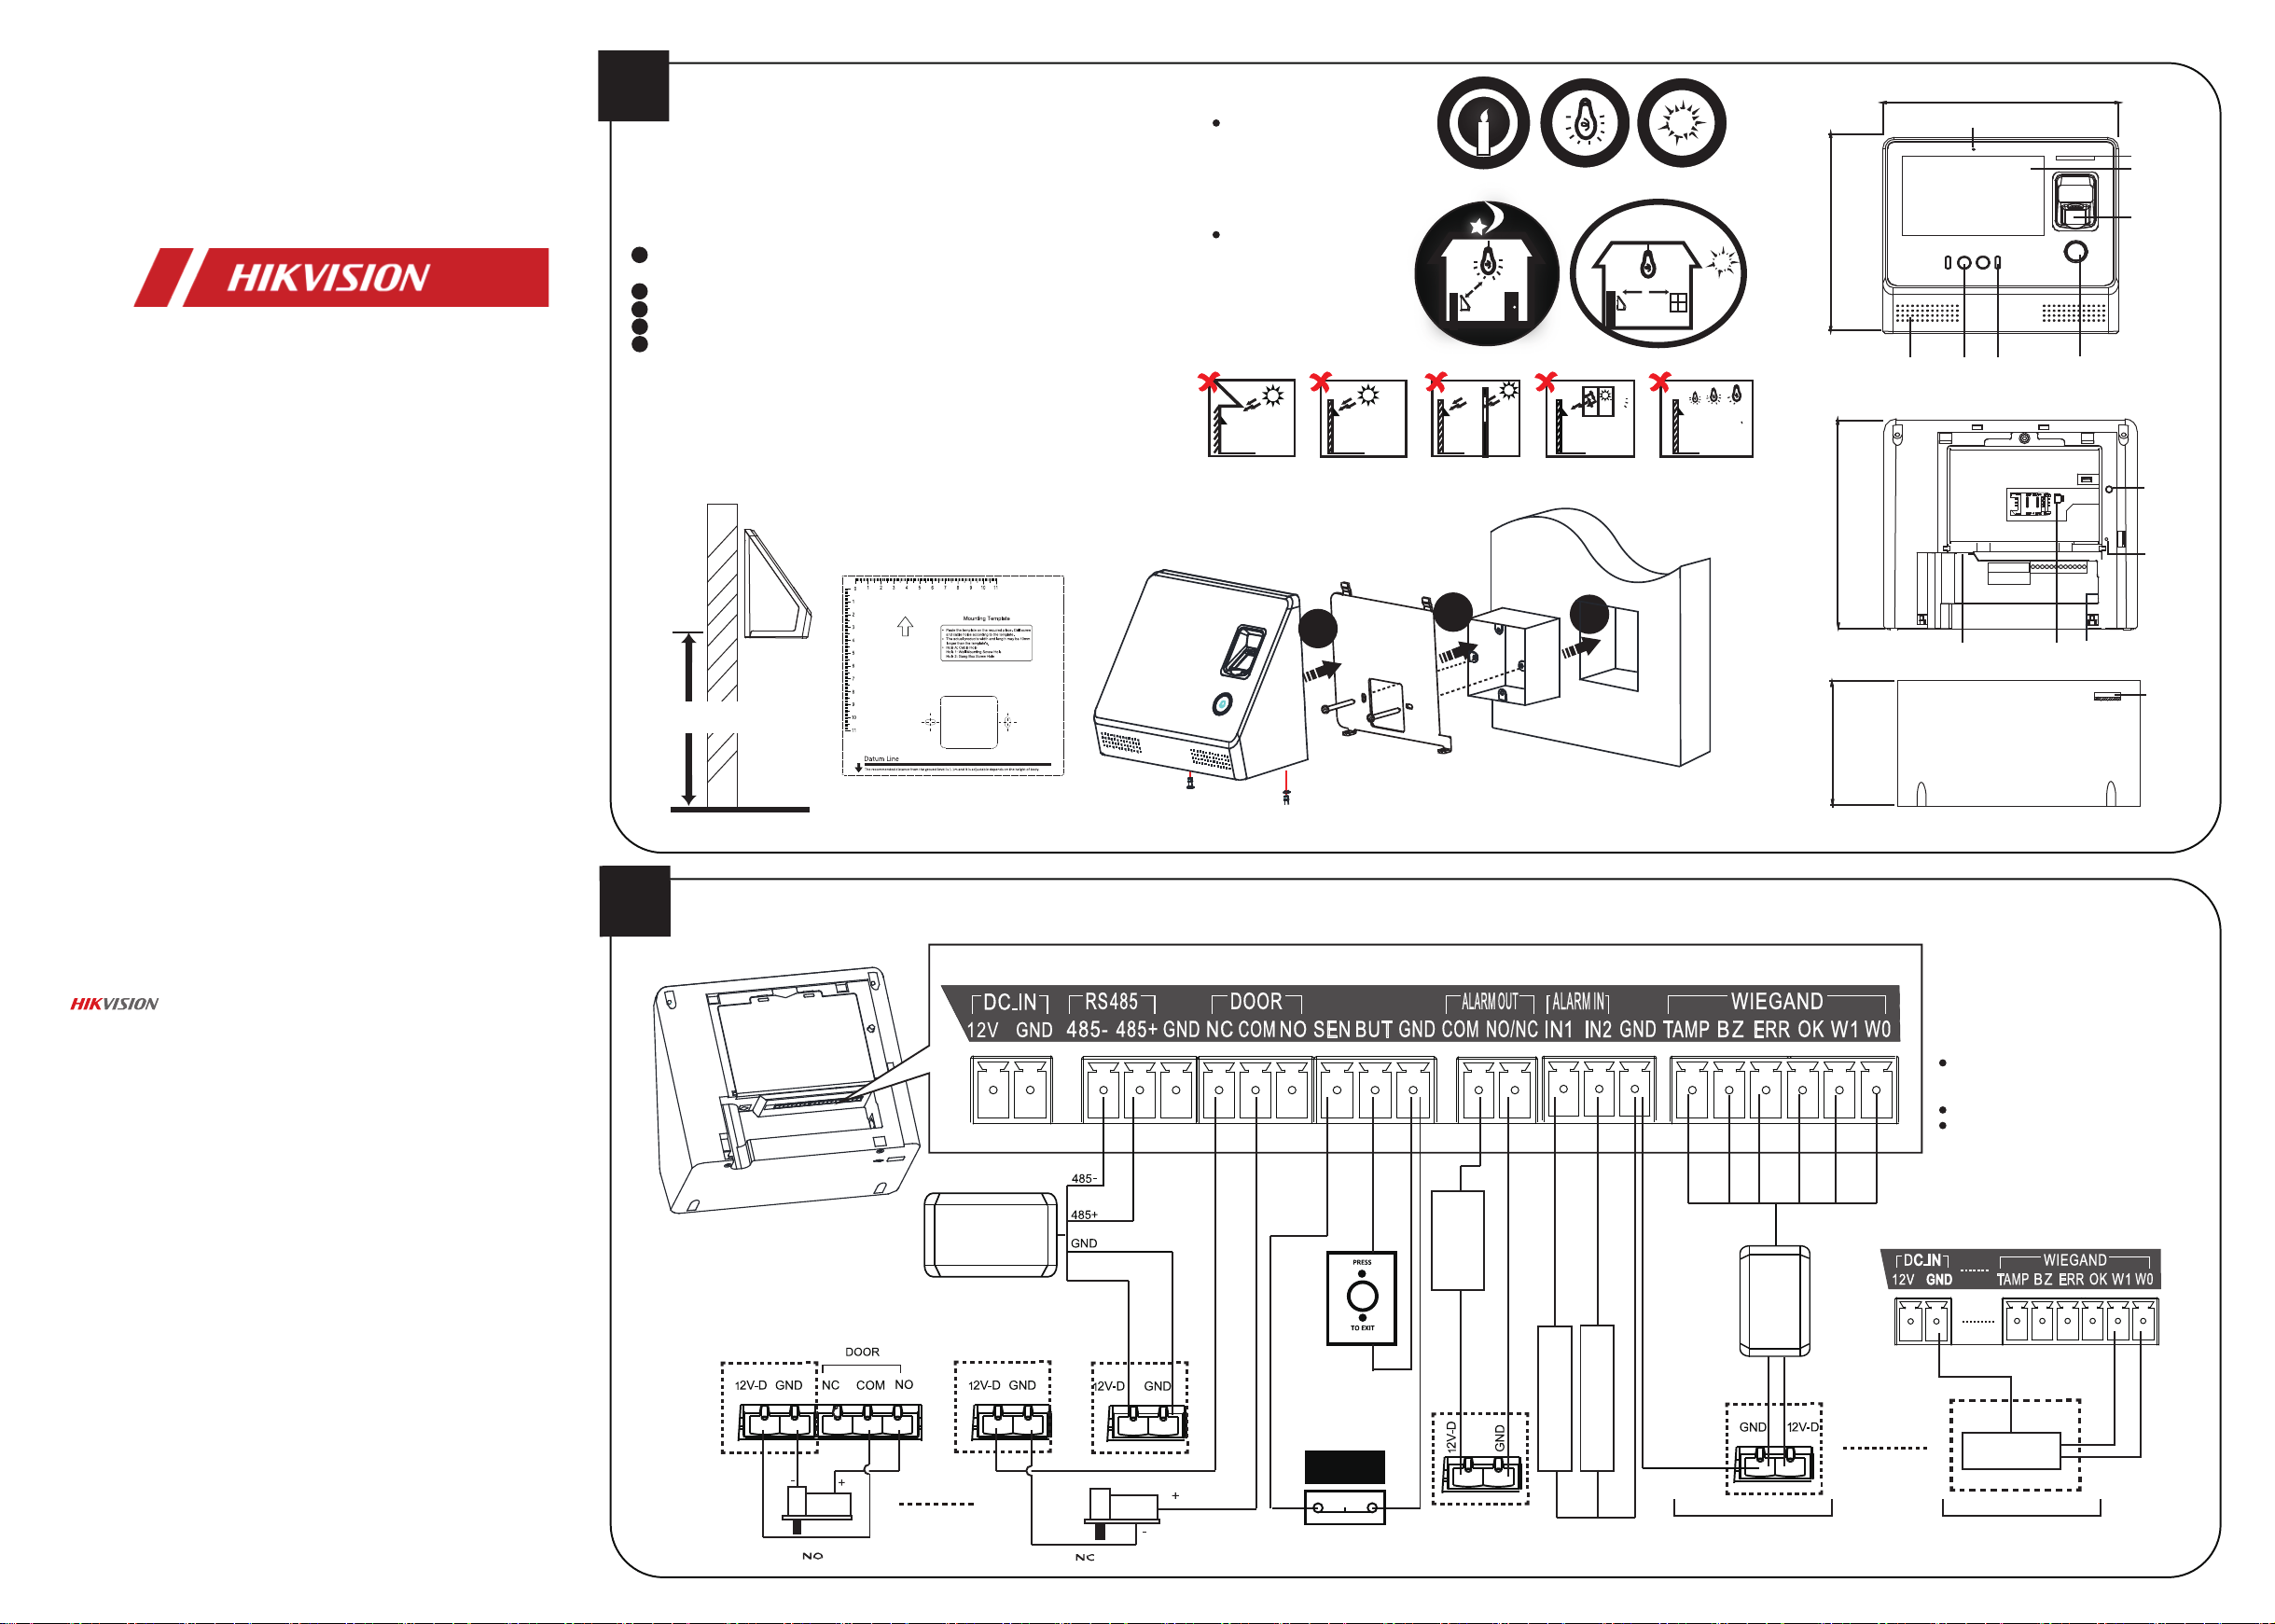
1
Type: Wall Mounting and Base Mounting
Before you start:
According to the baseline on the mounting template, stick the mounting
template on the wall or other surface, 1.1 meters higher than the ground.
Steps:
Installation
1
Drill holes on the wall or other surface according to the supplied
mounting template and install the gang box (80mm×80mm).
2
Use two supplied screws to secure the mounting plate on the gang box.
3
Remove the two screws at the bottom of the device.
4
Align the terminal with the mounting plate and buckle them together.
5
Use a hex wrench to fasten the two screws at the bottom.
Notes:
1. The installation height here is the recommended height. You can change it
according to your actual needs.
2. You can also install the device on the wall or other places without the gang box. For
details, refer to the User Manual.
3. For easy installation, drill holes on mounting surface according to the supplied
mounting template.
Installation Environment:
Install the device at least
2 meters away from the
light, and at least 3
meters away from the
window or door.
Avoid backlight, direct
and indirect sunlight.
Backlight
Direct Sunlight Direct Sunlight
10Lux
2m
through Window
3m
Indirect Sunlight
through Window
>1200Lux100~850Lux
Close to Light
Dimensions:
157.8mm
CameraLoudspeaker
Sensor
190mm
Supplement
Light
Doorbell
Button
Indicator
Display
Screen
Fingerprint
Module or
Card Swiping
Area
Tamper
UD07929B-E
©2019 Hangzhou Hikvision Digital Technology Co., Ltd.
It includes instrucons on how to use the Product. The soware embodied in the
Product is governed by the user license agreement covering that Product.
About this Manual
This Manual is subject to domesc and internaonal copyright protecon.
Hangzhou Hikvision Digital Technology Co., Ltd. (“Hikvision”) reserves all rights to
this manual. This manual cannot be reproduced, changed, translated, or distributed,
parally or wholly, by any means, without the prior wrien permission of Hikvision.
Trademarks
and other Hikvision marks are the property of Hikvision and are
registered trademarks or the subject of applicaons for the same by Hikvision
and/or its affiliates. Other trademarks menoned in this manual are the properes
of their respecve owners. No right of license is given to use such trademarks
without express permission.
Legal Disclaimer
TO THE MAXIMUM EXTENT PERMITTED BY APPLICABLE LAW, THE PRODUCT
DESCRIBED, WITH ITS HARDWARE, SOFTWARE AND FIRMWARE, IS PROVIDED “AS
IS”, WITH ALL FAULTS AND ERRORS, AND HIKVISION MAKES NO WARRANTIES,
EXPRESS OR IMPLIED, INCLUDING WITHOUT LIMITATION, MERCHANTABILITY,
SATISFACTORY QUALITY, FITNESS FOR A PARTICULAR PURPOSE, AND NON-INFRINGEMENT OF THIRD PARTY. IN NO EVENT WILL HIKVISION, ITS DIRECTORS, OFFICERS,
EMPLOYEES, OR AGENTS BE LIABLE TO YOU FOR ANY SPECIAL, CONSEQUENTIAL,
INCIDENTAL, OR INDIRECT DAMAGES, INCLUDING, AMONG OTHERS, DAMAGES FOR
LOSS OF BUSINESS PROFITS, BUSINESS INTERRUPTION, OR LOSS OF DATA OR
DOCUMENTATION, IN CONNECTION WITH THE USE OF THIS PRODUCT, EVEN IF
HIKVISION HAS BEEN ADVISED OF THE POSSIBILITY OF SUCH DAMAGES.
REGARDING TO THE PRODUCT WITH INTERNET ACCESS, THE USE OF PRODUCT
SHALL BE WHOLLY AT YOUR OWN RISKS. HIKVISION SHALL NOT TAKE ANY
RESPONSIBILITIES FOR ABNORMAL OPERATION, PRIVACY LEAKAGE OR OTHER
DAMAGES RESULTING FROM CYBER ATTACK, HACKER ATTACK, VIRUS INSPECTION,
OR OTHER INTERNET SECURITY RISKS; HOWEVER, HIKVISION WILL PROVIDE TIMELY
TECHNICAL SUPPORT IF REQUIRED.
SURVEILLANCE LAWS VARY BY JURISDICTION. PLEASE CHECK ALL RELEVANT LAWS IN
YOUR JURISDICTION BEFORE USING THIS PRODUCT IN ORDER TO ENSURE THAT
YOUR USE CONFORMS THE APPLICABLE LAW. HIKVISION SHALL NOT BE LIABLE IN
THE EVENT THAT THIS PRODUCT IS USED WITH ILLEGITIMATE PURPOSES.
IN THE EVENT OF ANY CONFLICTS BETWEEN THIS MANUAL AND THE APPLICABLE
LAW, THE LATER PREVAILS.
Data Protecon
During the use of device, personal data will be collected, stored and processed. To
protect data, the development of Hikvision devices incorporates privacy by design
principles. For example, for device with facial recognion features, biometrics data
is stored in your device with encrypon method; for fingerprint device, only
fingerprint template will be saved, which is impossible to reconstruct a fingerprint
image.
As data controller, you are advised to collect, store, process and transfer data in
accordance with the applicable data protecon laws and regulaons, including
without limitaon, conducng security controls to safeguard personal data, such as,
implemenng reasonable administrave and physical security controls, conduct
periodic reviews and assessments of the effecveness of your security controls.
1.1m
(Recommended)
2
2.1
UP
Hole A
Hole 1/2 Hole 1/2
Mounting Template
3
Device Wiring (Without Secure Door Control Unit)
Device Wiring Terminals
RS-485
Card Reader
PWR
External
Power Supply
External Power Supply
OR
External Power Supply
Exit Button
Door Magnetic Sensor
2
Gang Box WallMounting PlateDevice
Alarm
Device
External
Power Supply
1
Alarm Input Device
Alarm Input Device
TAMP ERR OK W1 W0BZ
Wiegand
Card Reader
External
Power Supply
133.8mm
Power Interface Ethernet Port
97.6mm
Note: The figures are for reference only.
Notes:
The device can transmit the authentication
information to the access controller via
this mode.
The Min. power cable's diameter: 18 AWG.
The power cable's rated current is 3 A,
while other cable's rated current is 1 A.
Device Wiring Terminals
PWR
OR
Wiegand Output ModeWiegand Input Mode
Battery
Connector
Access
Controller
Reset
USB
Interface
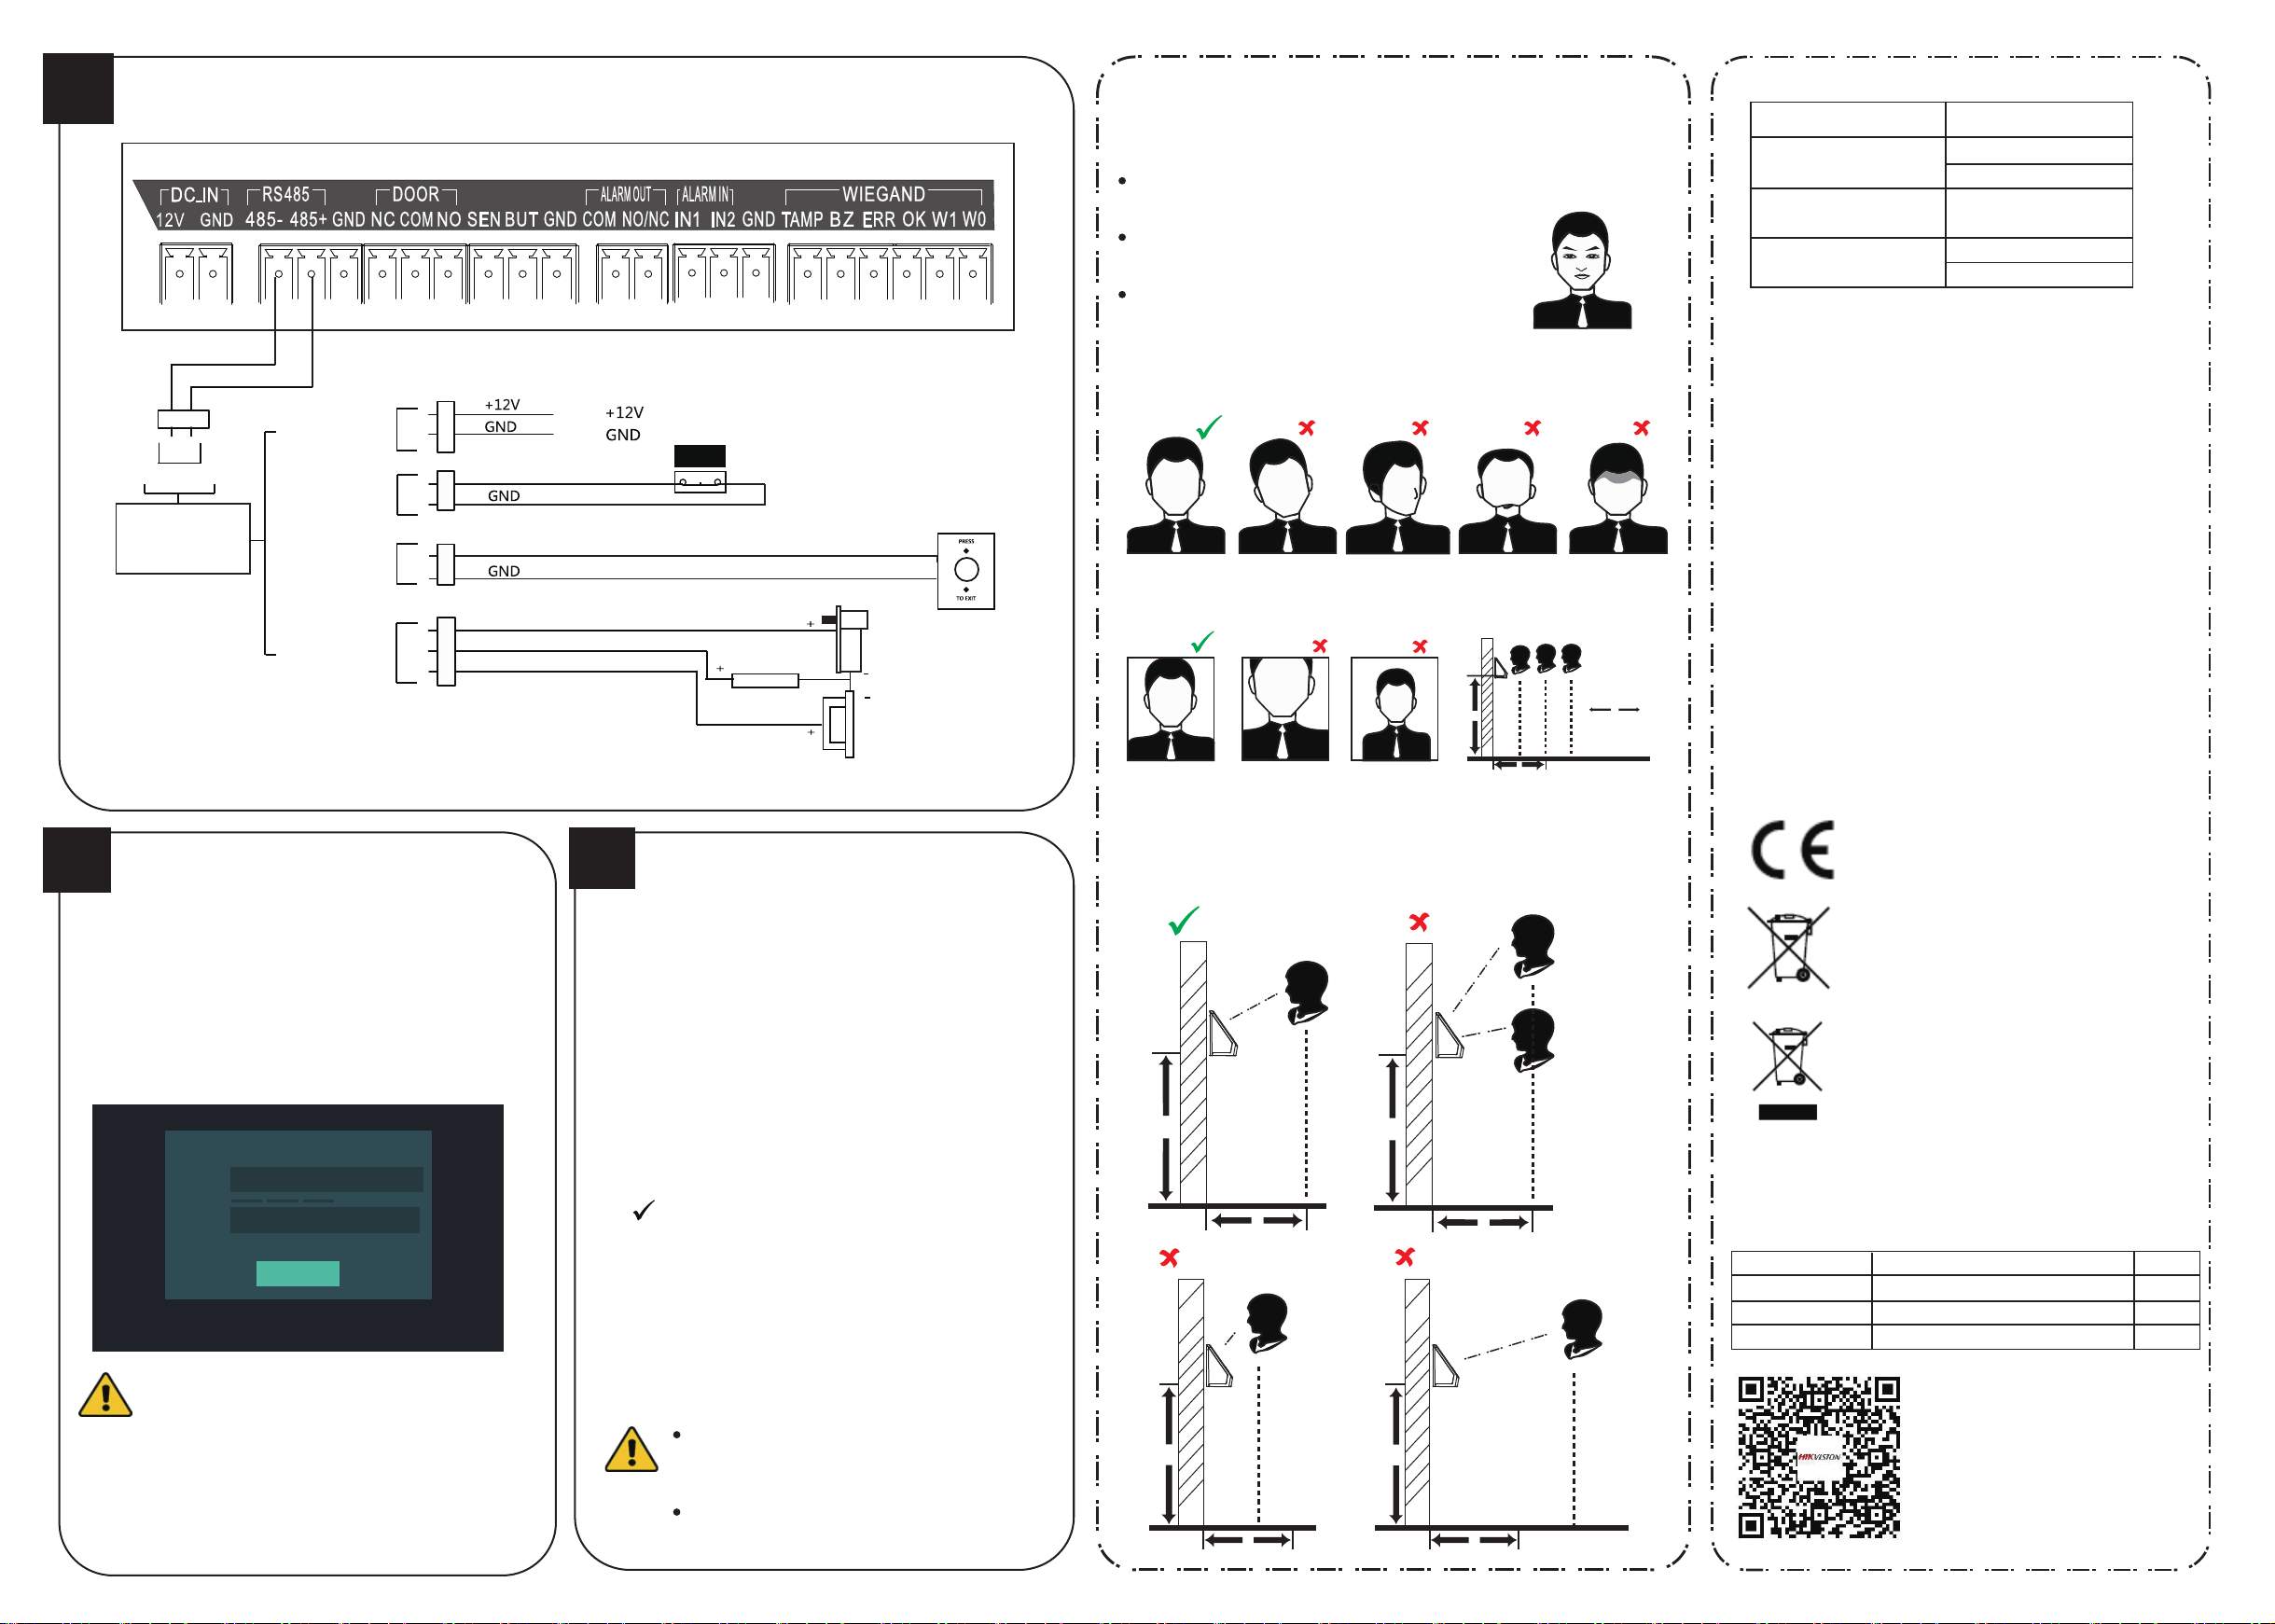
2.2
Device Wiring (With Secure Door Control Unit)
RS485+
Blue
Yellow
Power Input
Door Magnetic
Sensor Input
RS485-
RS-485
Secure Door
Control Unit
Door Magnetic
Sensor Input
Lock Output
Note: The secure door control unit should connect to an external power supply seperately.
3
Activation
Power on the deviceand wire the network cable after
installation. You should activate the device before the first
Activating via Device
If the device is not activated yet, it will enter the Activate Device
page after powered on.
1. Create a password and confirm the password.
2. Tap Activate to activate the device.
For other activation methods, see the device user manual.
Note:
激活设备
Activate Device
Password
Confirm
Note: Two or more of the following characters
are allowed: digit, number, and symbol.
STRONG PASSWORD RECOMMENDED–
We highly recommend you create a strong password of
your own choosing (using a minimum of 8 characters, including
upper case leers, lower case leers, numbers, and special
characters) in order to increase the security of your product. And we
recommend you reset your password regularly, especially in the high
security system, reseng the password monthly or weekly can
beer protect your product.
8 to 16 characters.
Passwords should be the same.
Activate
Device Wiring Terminals
Red
Black
SENSOR
BUTTON
NC
COM
NO
Green/Brown
Black
Green/Black
Black
White/Purple
White/Black
White/Red
4
1. Tap the settings icon at the lower right corner of the initial
page and input the activation password to enter the main page.
2. Enter the User Management page, tap + to enter the Add User
page.
Note: Some device models do not support the fingerprint
recording function.
4. Tap Face and collect the face information according to the
instructions.
You can view the captured picture at the upper right corner of
the page. Make sure the face picture is in good quality and size.
For details about the tips and positions when collecting or
comparing the face picture, see the contents on the right.
5. If the picture is in good condition, tap Save to save the picture.
Or tap Try Again to take another face picture.
6. Tap to save the settings.
Go back to the initial page to start authentication.
For other authentication methods, see the device user manual.
Recommended:
Use 1:1 Face Matching when the face is hard to recognize.
Use other authentication methods if the device if affected by
the light or other items.
1:1 Matching: The device will compare the captured face
picture with the ones in the database.
1:N Matching: The device will compare the captured face
picture with the input employee ID linked face picture.
Door Magnetic Sensor
Exit Button
(NC)
Electric Dropbolt/
Power Supply
Magnetic Lock
(NO)
Electric Strike
Adding Face Information
Biometric recognition products are not 100%
applicable to anti-spoofing environments. If you
require a higher security level, use multiple
authentication modes.
If you adopt multiple authentication modes, you
should authenticate other methods before
authenticating face.
Tips When Collecting/
Comparing Face Picture
Expression
Keep your expression naturally when collecting or comparing face pictures,
just like the expression in the picture on the right.
Do not wear hat, sunglasses, or other accessories
that can affect the facial recognition function.
Do not make your hair cover your eyes, ears, etc.
and heavy makeup is not allowed.
Posture
In order to get a good quality and accurate face picture, position your face
looking at the camera when collecting or comparing face pictures.
Correct Tilt RaiseSide Bow
Size
Make sure your face is in the middle of the collecting window.
Correct
Too Close Too Far
1.1m
1.1m
Too
Close
0.5m
Correct
Too
Far
Height:
1.43m to 1.90m
Move
Back and Forth
Positions When Collecting/
Comparing Face Picture
(Recommended Distance: 0.5m)
Too High
Too Low
1.1m
1.1m
Recommended Height:
1.43m to 1.90m
1.1m
0.5m 0.5m
Too Close Too Far
1.1m
0.5m
0.5m
This manual is applied for face recognion terminal.
Series Models
Face Recognion Terminal
(Without Fingerprint Module)
Face Recognion Terminal
(With Baery)
Face Recognion Terminal
(With Fingerprint Module)
DS-K1T605M
DS-K1T605E
DS-K1T605MF-B
DS-K1T605MF
DS-K1T605EF
Regulatory Information
FCC Information
Please take aenon that changes or modificaon not expressly approved by the party
responsible for compliance could void the user’s authority to operate the equipment.
FCC compliance: This equipment has been tested and found to comply with the
limits for a Class B digital device, pursuant to part 15 of the FCC Rules. These limits are
designed to provide reasonable protecon against harmful interference in a residenal
installaon. This equipment generates, uses and can radiate radio frequency energy
and, if not installed and used in accordance with the instrucons, may cause harmful
interference to radio communicaons. However, there is no guarantee that interference
will not occur in a parcular installaon. If this equipment does cause harmful
interference to radio or television recepon, which can be determined by turning the
equipment off and on, the user is encouraged to try to correct the interference by one
or more of the following measures:
—Reorient or relocate the receiving antenna.
—Increase the separaon between the equipment and receiver.
—Connect the equipment into an outlet on a circuit different from that to which the
receiver is connected.
—Consult the dealer or an experienced radio/TV technician for help.
This equipment should be installed and operated with a minimum distance 20cm
between the radiator and your body.
FCC Conditions
This device complies with part 15 of the FCC Rules. Operaon is subject to the
following two condions:
1. This device may not cause harmful interference.
2. This device must accept any interference received, including interference that may
cause undesired operaon.
EU Conformity Statement
(1) 이 기기는 가정용으로 전자파적합등록을 한 기기로서 주거지역에서는 물론
모든 지역에서 사용할 수 있습니다.
(2) 당해 무선설비는 전파혼신 가능성이 있으므로 인명안전과 관련된 서비스는
할 수 없음。
Use only power supplies listed in the user instrucons:
Model Manufacturer Standard
C2000IC12.0-24P-DE
C2000IC12.0-24P-GB
ADS-24S-12 1224GPG Shenzhen Honor Electronic Co., Ltd. CEE
This product and - if applicable - the supplied accessories too are
marked with "CE" and comply therefore with the applicable
harmonized European standards listed under the RE Direcve
2014/53/EU, the EMC Direcve 2014/30/EU, the RoHS Direcve
2011/65/EU.
2006/66/EC (baery direcve): This product contains a baery
that cannot be disposed of as unsorted municipal waste in the
European Union. See the product documentaon for specific
baery informaon. The baery is marked with this symbol,
which may include leering to indicate cadmium (Cd), lead (Pb),
or mercury (Hg). For proper recycling, return the baery to your
supplier or to a designated collecon point. For more
informaon see: www.recyclethis.info
2012/19/EU (WEEE direcve): Products marked with this
symbol cannot be disposed of as unsorted municipal waste in
the European Union. For proper recycling, return this product to
your local supplier upon the purchase of equivalent new
equipment, or dispose of it at designated collecon points. For
more informaon see: www.recyclethis.info
MOSO Power Supply Technology Co., Ltd.
MOSO Power Supply Technology Co., Ltd.
Scan the QR code to get the user manual
for detailed informaon.
Note that mobile data charges may apply
if Wi-Fi is unavailable.
CEE
BS
 Loading...