


JGBP90MEH6BC
GE JGBP90MEH6BC, JGBP85WEL1WW, JGBP85SEL1SS, JGBP85CEL1CC, JGBP83WEJ5WW Owner’s Manual
...
ge.com
©
Safety Instruaions ...... 2-7
Operating Instruaions
AIuminum Foil ........... 13
Clock and Timer . ........ 15
Oven ................ 10-26
Baking and Roasting ..... 13
Broiling, Broiling Guide . .14
()yen Controls ....... 10, I l
Power Outage ....... 12, 15
Preheating ............. 13
Sabbath Feanlre ...... 19-21
Self:Cleaning ......... 25, 26
Special Feanlres ...... 17, 18
Them_ostatAiljustment . .22
Timed Baking
and Roasfi ng ........... 16
Surfime Cooking ........ 8, 9
*4arming Drav_>r . ..... 23, 24
Care and Cleaning
Broiler Pan and (;rid ...... 30
Burner Assembly ...... 27, 28
Burner (;rams ............ 29
Control Panel and 14a_obs . .32
Cook/op Surfi_ce ......... 29
Door Removal ........... 30
()yen Bottom ............ 30
()yen Light Replacement . .32
()yen Vents .............. 32
Self:Cleaning ......... 25, 26
Shelves ................. 32
Stainless Steel Surfi_ces .... 29
Storage Drawer . ......... 31
_\arming Drav_r . ........ 31
Installation
Instrug¢i ons ........... _3-43
Air Ailjustment ........... 42
Anti-Tip Device ....... 36, 43
Checking Burner Ignition . .41
Connecting the Range
tO (;as .............. .:_°_'1-:_9°
Dimensions and
Clearances .............. 35
Electrical Connections..40, 41
Leveling the Range ....... 42
Location o -................. )6
LP ..................... 43
Troubleshooting
Tips ................ 44-47
o
Accessories .............. 53
Consumer&tpport
Consumer
Support .......... Back Coxer
Product Registration . . .51,52
_\arrantv for Customecs
in Canada ............... 55
_4arranty for Customecs
in the U.S.A ............. 54
EGR3000
EGR 300 l
JGBP35
JGBP36
JGBP8 5
JGBP90
JGBP99
Writethemodelandserial
numbershere:
Model #
Serial #
You can find them on a label on
the fl'ont ot the range behind the
waril/ing drawer or storage drawer.
18305580P184 49-85098- l 06-06 JR
IMPORTANTSAFETYINFORMATION.
READALLINSTRUCTIONSBEFOREUSING.
WARNING!
For your safe_ the information in this manual must be followed to minimize the risk of fire or explosion,
electric shock, or to prevent property damage, personal injury, or loss of life.
WARNING:If the information
in this manual is not followed exactly,
a fire or explosion may result, causing
property damage, personal injury
®
WARNING!
or death.
-- Do not store or use gasoline or other
flammable vapors and liquids in the
vicinity of this or any other appliance.
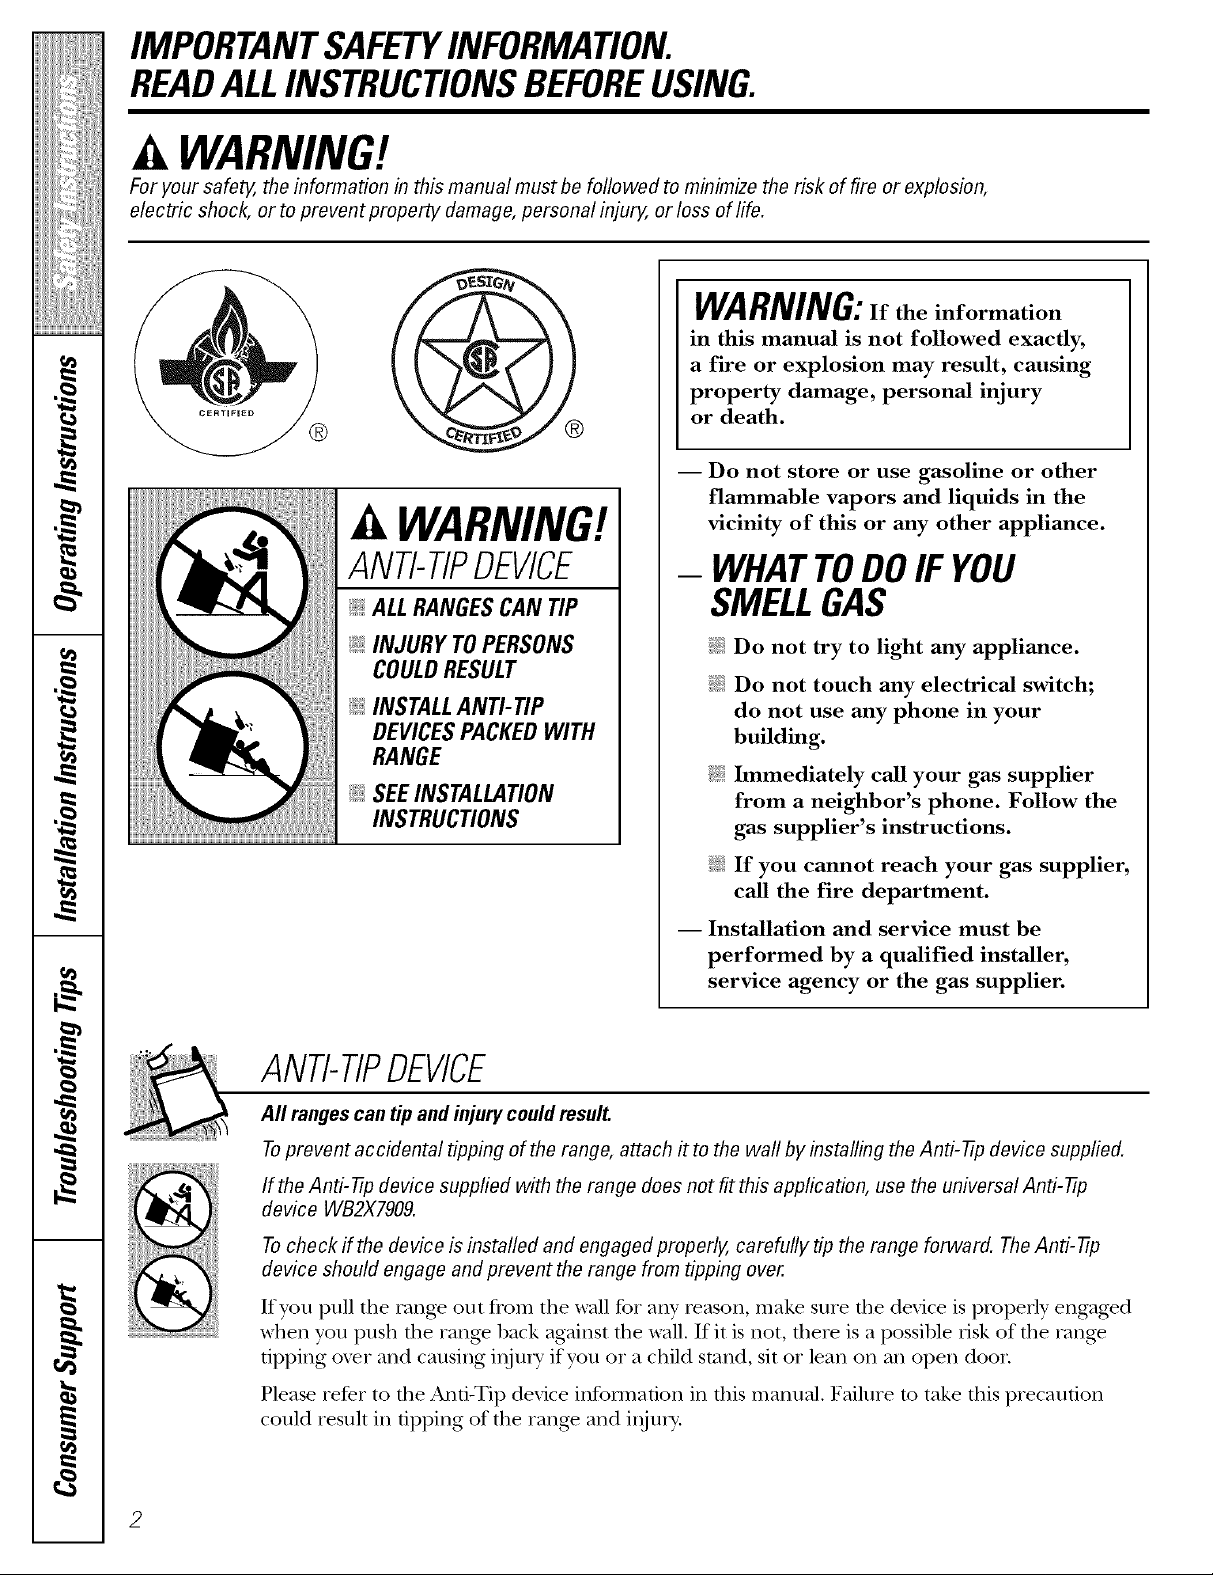
ANTI-TIPDEVICE
@ALL RANGESCAN TIP
@INJURY TOPERSONS
COULDRESULT
@INSTALLAN_tiP
DEVICESPACKEDWITH
RANGE
INSTRUCTIONS
ANTI-TIPDEVICE
All rangescan tip and injury could result.
- WHATTODOIF YOU
SMELLGAS
@ Do not try to light any appliance.
Do not touch any electrical switch;
do not use any phone in your
building.
Immediately call your gas supplier
from a neighbor's phone. Follow the
gas supplier's instructions.
If you cannot reach your gas supplier,
call the fire department.
-- Installation and service must be
performed by a qualified installer,
service agency or the gas supplier.
Toprevent accidental tipping of the range, attach it to the wall by installing the Anti-tip device supplied.
If the Anti-tip device supplied with the range does not fit this application, use the universal Anti-tip
device WB2X7909.
Tocheck if the device is installed and engaged properly, carefully tip the range forward. TheAnti-tip
device should engage and prevent the range from tipping over.
If you pull the range out tiom tile wall for any reason, make sure die device is properly engag>d
when you push the range back against the wall. If it is not, there is a possible risk of the rang>
tipping ox>r and causing inju_ y if you or a child stand, sit or lean on an open door.
Please refer to the Anu-Tip device infollnafion in this manual. Failure to take this precaution
could result in upping of the rang_ and illjui>
ge.com
WARNING!
IMPORTANTSAFETYNOTICE
The California Safe Drinking Water and ToxicEnforcement Act requires the Governor of California to
publish a list of substances known to the state to cause birth defects or other reproductive harm, and
requires businesses to warn customers of potential exposure to such substances.
Gasappliances can cause minor exposure to four of these substances, namely benzene, carbon
monoxide, formaldehyde and soot, caused primarily by the incomplete combustion of natural gas or
LP fuels. Properly adjusted burners, indicated by a bluish rather than a yeflow flame, will minimize
incomplete combustion. Exposure to these substances can be minimized by venting with an open
window or using a ventilation fan orhood.
SAFETYPRECAUTIONS
Have the installer show you the location of the range gas shut-off valve and how to shut # off if necessary.
;_;Hate your rang_ installed and properly ;_;Plug your rang_ into a 190_\_lt grounded
grounded by a qualified installer, in
accordance with the Installation Insuucdons.
Any adjustment and service should be
perfo,_ned only by qualified gas rang>
installers or service technicians.
_:;i_'Do not attempt to repair or replace any
part of your range unless it is specifically
recommended in this manual. All other
service should be refetTed to a qna]ified
technician,
outlet only. Do not remove the round
grounding prong fiom dm ping. If in doubt
about the grounding of the home electrical
system, it is your personal responsibility and
obligation to haxe an ungrounded outlet
replaced wifll a properly gTounded,
d_ree-prong outlet in accordance with
the National Electrical (;ode. Do not use
an exmnsion cord with this appliance.
3
IMPORTANTSAFETYINFORMATION.
READALLINSTRUCTIONSBEFOREUSING.
SAFETYPRECAUTIONS
Locate the rang.e out of kitchen traffic pafl_
and out of drafty locations to prex.ent poor
air cixvulafion.
_{_:Be sure all packaging materials are remox.ed
from tile rang.e betbre operating it to
prex.ent fire or smoke damag.e should the
packaging material ignite.
;_i:':Be sure your range is correctly adjusted by
a qualified service technician or installer fox
tile type of gas (natural or LP) flint is to be
used. Your rang.e can be converted for use
with either type of gas. See the Installation
of the range sect.ion.
WARNING:These adjustments must
be made by a qualified service technician
in accordance with the mannthcttx,er's
instructions and all codes and requirements
of the anthoxJLv havingjmJsdiction. Failure
m follow fllese instructions could x.esnlt in
sex-ions injury or property damag.e. The
qualified ag.en q performing this work
assumes x.esponsibility fox the conversion.
;;?:.:After prolong.ed use of a range, high floor
temperam,.es m W result and many floor
cox.ering:s will not wifllstand this kind of use.
Nex.er install the rang.e ox.er vinyl die or
linoleum flint cannot wifllsmnd such type
of use. Never install it dix.ecdv ox.er interior
kitchen carpeting.
_:;Do *lot leax.e childi.en alone or unattended
where a rang.e is hot or in operation. They
could be seriously burned.
_;i:.iNex,er wear loose fitting or hanging garments
while using the appliance. Be careflfl when
reaching fox items stored in cabinets over the
rang.e. Flammable material could be ignited
if brought in contact with flame or hot ox.en
sniPdces and m W cause sex.ere bni_ls.
;_?:':Do ,lot store flammable materials in an
oven, a range smrag.e drawex; a wanning
drawer or ,lear a cookmp.
N Do ,lot store or use combustible matexJals,
gasoline or other flammable vapors and
liquids in the vicinity of this or any other
appliance.
N Do ,lot let cooking gTease or other
flammable matexJals accunmlate in or
near the rang.e.
;;i:.iDo not use water on grease fires. Nex.er pick
up a flaming pan. Turn flxe controls off:
Smother a flaming pan on a surface burner
by cox.ering the pan completely with a
well-fitting lid, cookie sheet or fiat uay.
Use a multi-puq)ose d, T chemical or
foam-type fire extinguisher
Flaming grease outside a pan can be put
out by co\.ex-ing it with baMng soda ox;
if available, by using a multi-purpose dly
chemical or foam-type fire exdng-uishen
Flame in tile oven or wanning drawer can be
smothered completely by closing the ox.en
door or drmver and mining the control to
off or by using a multi-purpose dU chemical
or foam-type fire exfinguishen
;;; Do not allow anyone m climb, stand or hang
on the ox.en doox; storag.e drawee wam_ing
drawer or cookmp. They could damage the
rang.e and even tip it ox.er, causing severe
personal injury.
CAUTION: temsofinterestto
children should not be stored in cabinets
above a range or on tile backsplash of a
range--children climbing on the mng_
m reach items could be selJously injured.
WARNING:NEVERusethis
appliance as a space heater to heat or
warm tile room. Doing so may result
in carbon monoxide poisoning and
4
ox.erheafing of the oven.
;_?:':i,et die burner grates and other surfaces
cool before ranching them or leaving them
where children can reach them.
_: Never block tile \.ents (air openings) of the
rang.e. They provide tile air inlet and outlet
that are necessa U for flxe rang.e to operate
i)ioperly with conect combustion. Air
opening_ are located at tile rear of tim
cooktop, at the top and bottom of the oven
doox; and at the bottom of the rang.e under
the wanning drawer or storag.e drawer
_: Large scratches or impacts to glass doors can
lead to broken or shattex.ed glass.

g_com
A WARNING!
SURFACEBURNERS
Use proper pan size--avoid pans that are unstable or easily tipped. Select cookware having flat bottoms
large enough to cover burner grates. Toavoid spillovers, make sure cookware is large enough to contain
the food properly. This will both save cleaning time and prevent hazardous accumulations of food, since
heavy spattering or spiflovers left on range can ignite. Usepans with handles that can be easily grasped
and remain cool
E:,IAlways use the LITE position when igniting
the top burners and make sure the burners
haw ignimd.
_::Nexer leave file snrlCace l)nrners unattended
at high flame setting:s. Boiloxers cause
smoking and greasy spillox>rs that m W
catch oil file.
;fi:,iAdjust tile top burner flame size so it
does not exmnd 1)evond file edge of tile
cookware. Excessixe flame is hazardous.
_7{;:Use only dU pot holders--moist or damp
pot holders oil hot surfaces may result in
burns from smam. Do not let pot holders
come near open flames when lifting
cookware. Do not use a towel or other
bulky cloth in place of a pot holder
_?{:__]mn using g]ass cookware, make snie it
is designed for mp-of-rang_ cooking.
_:_To minimize tile possibility of bni_ls,
ignition of flammable materials and spillag>,
turn cookware handles toward tile side or
back of tile rang> without exMnding ox>r
adjacent burners.
_7_;:Careflflly watch foods being flied at a higil
flame setting.
;f; Always heat lCatslowly, and watch as it heats.
E:,:Do not leave any imms oil the cooktop. Tile
hot air from tile lent m W igniM flammal)le
imms and will increase pressure in closed
containers, which may cause them to burst.
_{;;If a coml)ination of oils or Pats will be used in
flTing, sdr mg>ther 1)efore headng or as fats
melt slowl>
E:,:Use a deep fat fl/emlomemr whenever
possil)le to i)iex_nt ox_rheating fat 1)eyond
die smoking point.
q?{:_Use tile least possible amount of fat for
effective shallow or deep-fat flTing. Filling
the pan mo flfll of tzatcan cause spillovers
when food is added.
_?{:_Do not flame foods on die cooktop. If you do
flame foods under die hood, turn die tZanon.
Do not use a wok oil die cooking surface
if die wok has a round metal ring fllat is
placed ox>i tile burner gTam to support
file wok. This ring acts as a heat trap,
which m W damag> tile lmmer gram and
1)urner head. Also, it m W cause tile burner
to work imi)roperly. This may cause a
carbon monoxide lex>l above that
allowed 1)yCUlTent standards, resnlung
in a heahh hazard.
_?{:_Foods fbr flTing should be as di T as possil)le.
Frost oil flozen foods or moisture oil flesh
foods can cause hot flit to 1)ut)l)le up and
o_er tile sides of the pan.
_?{:_Never u T to mole a pan of hot fat, especially
a deep fat flTer V(ait until the flit is cool.
E:,IDo not leave plastic imms on file cooktoI>--
they m W melt if left too close m file x>nt.
;f; Kee I) all plastics away' flom the surtZace
1)nrne rs.
E:,ITo axoid tile possibility of a burn, always be
certain that tile controls for all bnlilers are
at the OFFposition and all grams are cool
1)efore atMmpdng to remove fllem.
E:,IIf rang> is located ,lear a windo_, do not
hang long curtains that could blow oxei file
surface burners and cream a file hazard.
q_{;_If you smell gas, ulrn off tile gas to tile range
and call a qualified service technician. Ne_>r
use an open flame to locam a leak.
_):Alwws nn_n tile surfl_ce burner controls off
before removing cookware.
_f):':Do not lift the cookmp. Lifting the cookmp
call lead m damag> and improper operation
of tile rang>.
IMPORTANTSAFETYINFORMATION.
READALLINSTRUCTIONSBEFOREUSING.
COOKMEATANDPOULTRYTHOROUGHLY...
Cook meat and poultry thoroughly--meat to at leastan INTERNAL temperature of 160°Fand poultry to
at least an INTERNAL temperature of 180°ECooking to these temperatures usually protects against
foodbome illness.
OVEN
Stand away from the range when opening the door of a hot oven. Thehot air and steam that escape
can cause bums to hands, face and eyes.
_]{;_Do not use the oven for a storage area.
Imms stored in file oxen can ignim.
_i_Kee I) tile oxen flee from gTease buildup.
_::Place the oxen shelxes in tile desired
position while tile oxen is cool.
;f; Pulling out flae shelf m the stop-lock is a
convenience in lifting heaxy' foods. It is also
a precaution against bm_as flom touching
hot surfaces of the door or oxen walls. Tile
lowest position is not designed to slide,
_i:,:Do not heat unopened food containers.
Pressure could build up and file container
could burst, causing an ir)jtlr>
WARNING:NEVERcover
arw slots, holes or passages ira the oven
bottom or cover an entire rack wifll
mamrials such as aluminum foil. Doing
so blocks air flow through the oven and
may cause carbon monoxide poisoning.
Ahmfinum foil linings may also trap
heat, causing a file hazard.
Do not use aluminum foil anywhere in tile
oxen except as described ira this manual.
Misuse could resuh ira a fire hazard or
damage to tile range.
_;:When using cooking or roasting bags ira the
oxen, follow tile manufacturer's directions.
_;_Do not use your oxen to dry newspapers.
If oxerheamd, they can catch fire.
_i:,:Use only' glass cookware that is
recommended for use ira gas oxens.
_i:,:Always remove tim broiler pan from range
as soon as you finish broiling. Giease left in
tile pan can catch file if oxen is used without
removing tile grease fiom the broiler pan.
;f; _A]len broiling, if meat is too close m file
flame, file l_atm W ignim. Trim excess l_atto
prexent excessive flareqq)s.
;f; Make sure file broiler pan is ira place
coi_ecfly to reduce file possibili w of
giease files.
qT{_;If you shou]d haxe a giease file in tim broiler
pan, press the gLEAR/OFFpad, and kee I)
file oven door closed m contain file until
it burns out.
_i:,:For safe.U and proper cooking perfommnce,
always bake and broil with tile oxen door
closed.
SELF-CLEANINGOVEN
ge.com
E:,:Be sure to wipe off excess spillage be%re E:,:
self-cleaning operation.
_:;Before self-cleaning tile oxen, remove _:;
tile broiler pan, grid and other cookware.
_{:_Nickel oven shehes (on some models)
should be remoxed from the oxen before
beginning the self-dean cycle. E:,:
E:,:Gr W porcelain-coated oxen shelxes (on some
models) m W be cleaned ill the oxen during
rite self-dean cycle.
_{:_Do not clean tile door gasket. Tile door
gasket is essential %r a g_od seal. Care
should be taken not to rob, damage or
moxe the gv_sket.
Clean only parts listed ill this Owner's
Mannal.
K tile seltMeaning mode malflmctions,
tni_l the oxen off and disconnect the power
supply. Have it serviced by a qualified
technician.
Do not use oxen cleaners. No commercial
oxen cleaner or oxen liner of arty kind
should be used ill or around ally part of
tile oxen. Residue from oxen cleaners will
damage the inside of tile oxen when the
self-dean cycle is used.
ELECTRICWARMINGDRAWERronsornemode/s)
_:;The puq)ose of die wanning drawer is
to hold hot cooked foods at serving
temperature. Always start wifll hot food;
cold food cannot be heamd or cooked
in the wanning drawen
E:,:Do not use file wanning drawer m dU
newspapers. If oxerheamd, they call catch
on fire.
_{::Do not leme paper products, cooking
utensils or food ill the warming drawer
when not ill use.
E:,:Nexer leave jars or cans of fi_tdripping:s in
or near your wanning drawer
E:,:Always keep wooden and plastic umnsils
and canned tbod a safe distance awW flom
yonr wam_ing drawer
_::Do not touchthe heating element or the &terior
surface of the warming drawer, _ese surfaces
may be hot enough to bum.
REMEMBER:The inside surfitce of file
wanning drawer may be hot when the
drawer is opened.
E:,:Use care when opening the drawen Open
rite drawer a crack and let hot air or smam
escape before _emoving or _eplacing food.
Hot air or stean/which escapes call cause
burns m hands, fi_ce and/or eyes.
E:,:Do not use aluminum foil to lille tile drawer
Foil is all excellent heat insulator and will
trap heat beneath it. This will upset the
performance of the drawer and it could
damage the interior finish.
_{::Do not wam_ food in tile wam_ing drawer
for more than m_o hours.
READANDFOLLOWTHISSAFETYINFORMATIONCAREFULLY.
SAVETHESEINSTRUCTIONS
Usingthegas surfaceburners.
Throughout this manual, features and appearance may vary from your model
i _ i i i
i i i i i i i i
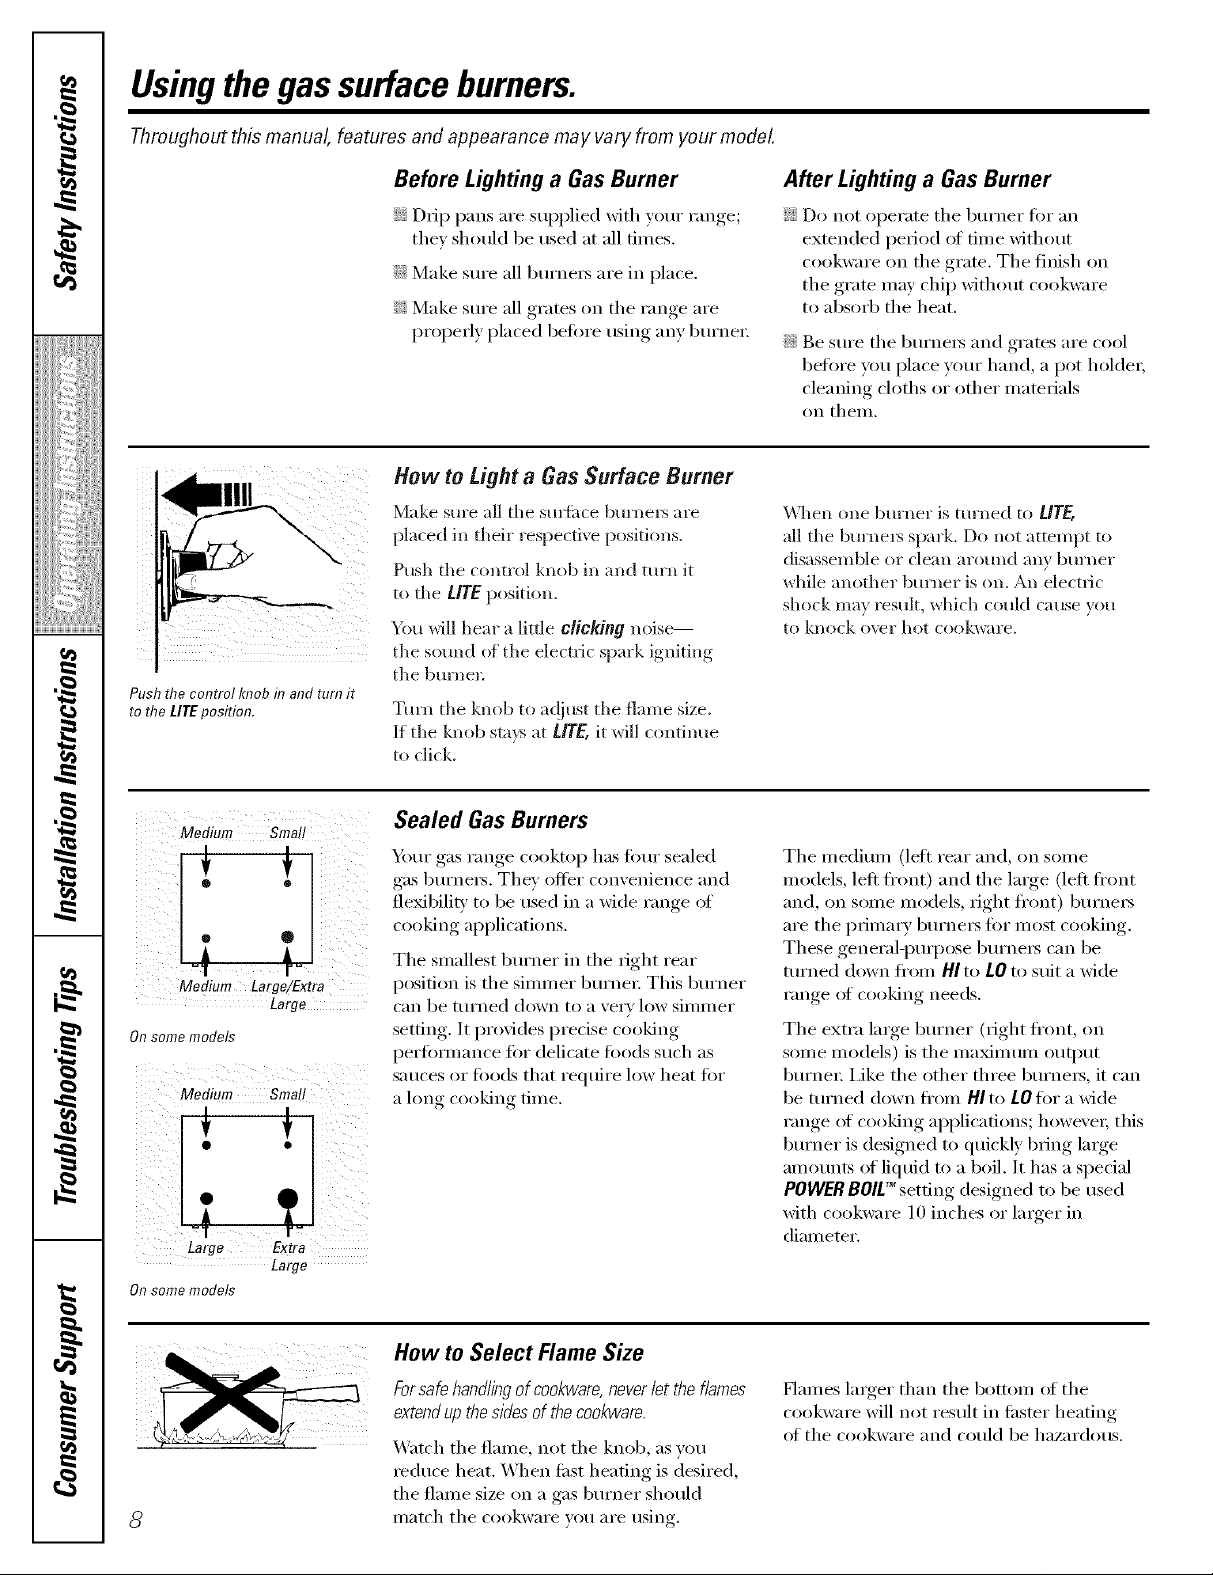
Push the control knob in and turn it
to the LITEposition.
Before Lighting a Gas Burner
::Ji::Drip pans are supplied with your range;
thev should be used at all times.
::J?::Make S/li'e all b/iYnelN are in place.
_: Make sure all grams on the range are
propedy placed befin'e using any bm'ne_;
How to Light a Gas Surface Burner
Make sm'e all the sm_iice bm'nel_ are
placed in their respective positions.
Push tile control knob in and ttll'n it
to tile L/TE position.
You will hear a little clicking noise--
tile sound _ff the electric spark igniting
tile burne_:
Turn tile knob to at!just tile flame size.
If tile knob stays at LifE, it will continue
to click.
After Lighting a Gas Burner
::Ji::Do not operate tile burner fin" an
extended period of time without
cookware on the grate. The finish on
the grate may chip without cookware
to absorb tile heat.
::Ji::Be sure tile burnex_ and grates are cool
before you place yore" hand, a pot holder;
cleaning cloths or other mamrials
on theIll.
\\lien one burner is turned to UTE,
all tile bm'nel_ spark. Do not attempt to
disassemble or clean arotmd any burner
while another burner is on. An electric
shock may result, which could cause you
to knock o\vr hot cookware.
Medium Smal!
Medium Large!Extra
On some models
Medium Small
Onsome models
o
Large
Large
Sealed Gas Burners
_A,m" gas range cooktop has fimr sealed
gas bm'ne_. They offer convenience and
fleMbilitv to be used in a wide range of
cooking applicati(ms.
Tile smallest bm'ner in tile right rear
position is tile simmer bm'ne_: This bm'ner
can be turned down to a xer) low simmer
setting. It provides predse cooking
perfimnance fin" delicate foods such as
sauces or fi)ods that reqtfire low heat fin.
a long cooking time.
How to Select Name Size
Forsafe handlingof cookware, neverlet the flames
extend upthe sides of the cookware.
Watch tile flame, not tile knob, as you
reduce heat. When ti_st heating is desired,
tile flame size on a gas burner should
I/latch tile cookware veil ai'e rising.
Tile medimn (left rear and, on some
models, left fi'ont) and the large (left fl'ont
and, on some models, right fl'ont) burnels
are tile prima_ T burne_ for most cooking.
These general-puq)ose burners can be
turned down fl'om HIto LOto suit a wide
range _ff cooking needs.
The extra large burner (right ti'ont, on
some models) is tile ma_mum output
burne_: i,ike tile other three burners, it can
be turned down fl'om HI to LOfor a wide
range of cooking applications; howe\'ei; this
bm'ner is designed to quickly bring lmge
amounts of liquid to a boil. It has a special
POWERBOILTM setting designed to be used
with cookware 10 inches or larger in
diameter.
Haines larger than tile bottom of tile
cookware will not result in filster heating
of tile cookware and could be hazardous.
Top-of-Range Cookware
ge.com
Aluminum: Medimn-weight cookware is
recommended because it heats quickly
and evenlv. Most toods brown evenly in an
ahmfinum skillet. Use saucepans with tight-
fitting lids when cooking with minimum
}lIllO/lntN 0][ watex:
Cast-Iron: If heated slowly, most skillets will
give satistactorv results.
Enamelware: Under some conditions,
tile enai/lel of soille cookw;ire i/X_ly i/xelt.
Follow cookwax'e illan/i][ilctHrei"s
recommendations fin" cooking methods.
Stove Top Grills
Do not use stove top grills on your sealed
gas burnexs. If you use tile stove top grill
on the sealed gas burnex; it will cause
incomplete combustion and can result
ill expos/lre to carbon ii/onoxide levels
above allowable current standards.
Glass: There are two types of glass
cookwax'e--those fi)r ovexl tlse only and
those for u_i>of-range cooking (saucepans,
coffee and teapots). Glass conducts heat
vexwslowly
Heatproof Glass Ceramic: Can be used fiw
either surti_ce or oven cooking. It conducts
heat vex'}'slowly and cools vex_ slowly: Check
cookware i/lant/lilCttlrer's directions to be
sure it can be used on gas ranges.
Stainless Steel: This metal alone has poor
heating properties and is usually combined
with coppex; ahmfinum or other metals fin.
improved heat distribution. Combination
metal skillets usually work satisfi_ctorilv if
they are used with medium heat as the
IIla n/llil ct ill'el" recolI/IIlends,
I
_!!ib_i;iii_i:il
ii_iiiii_iiii}ii;i
,_"_>,,,,Hiiiiiii
iii!iiiiii_i_ii{ii¸
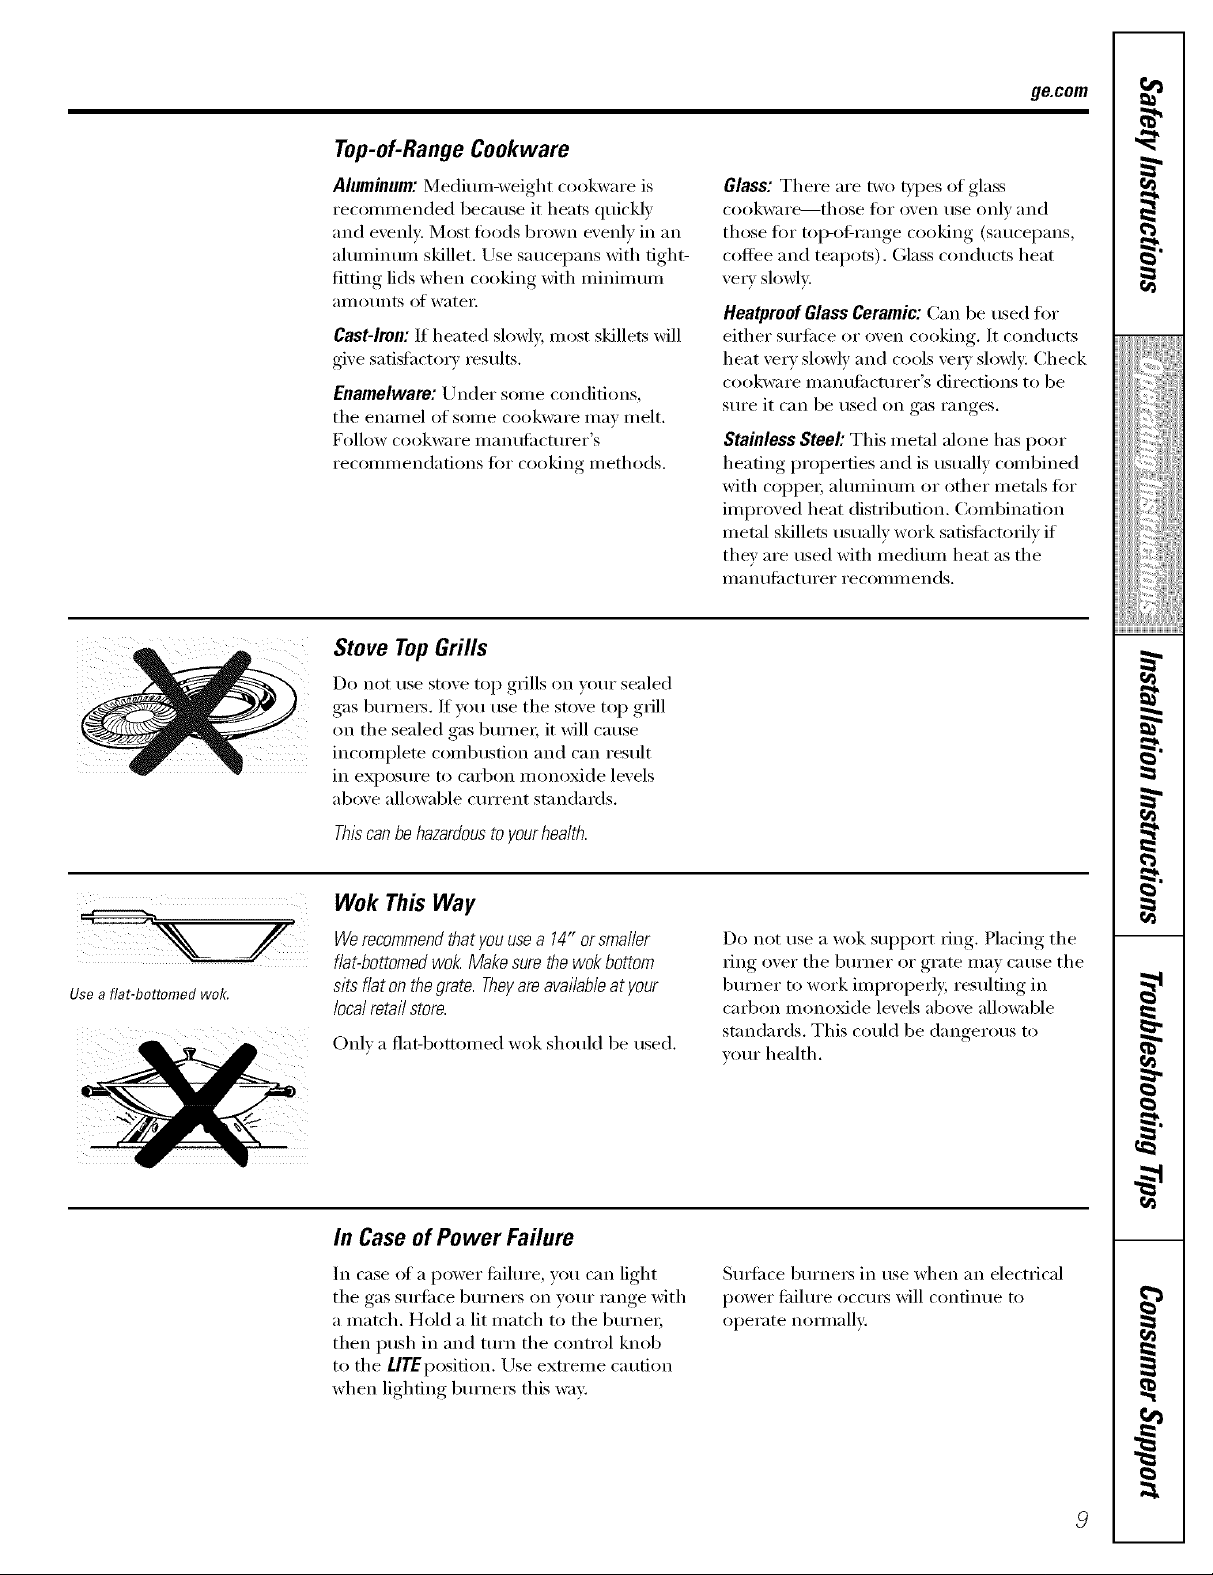
Use a flat-bottomed wok.
Thhcanbehazardoustoyourhealth.
Wok This Way
Werecommendthatyouusea 14" orsmaller
flat-bottomedwol_Makesurethewokbottom
sitsflatonthegrate.Theyareavailableatyour
localretailstore.
Onl) a fiat-bottomed wok should be used.
In Case of Power Failure
In case _ff a power fifilure, you can light
tile gas surfi_ce burnex_ on wmr range with
a match. Hold a lit match to tile burnex;
then push in and ttlrn tile control knob
to tile LlTEposition. Use extreme caution
when lighting burnex_ this way.
Do not use a wok support ring. Placing tile
ring over tile burner or grate may cause tile
burner to work improperly, resulting in
carbon monoMde levels above allowable
standards. This could be dangerous to
your health,
Smti_ce burnex_ in use when an electxical
power fifihu'e occtu_ will continue to
operate noli/lallv;,
7,
g
}
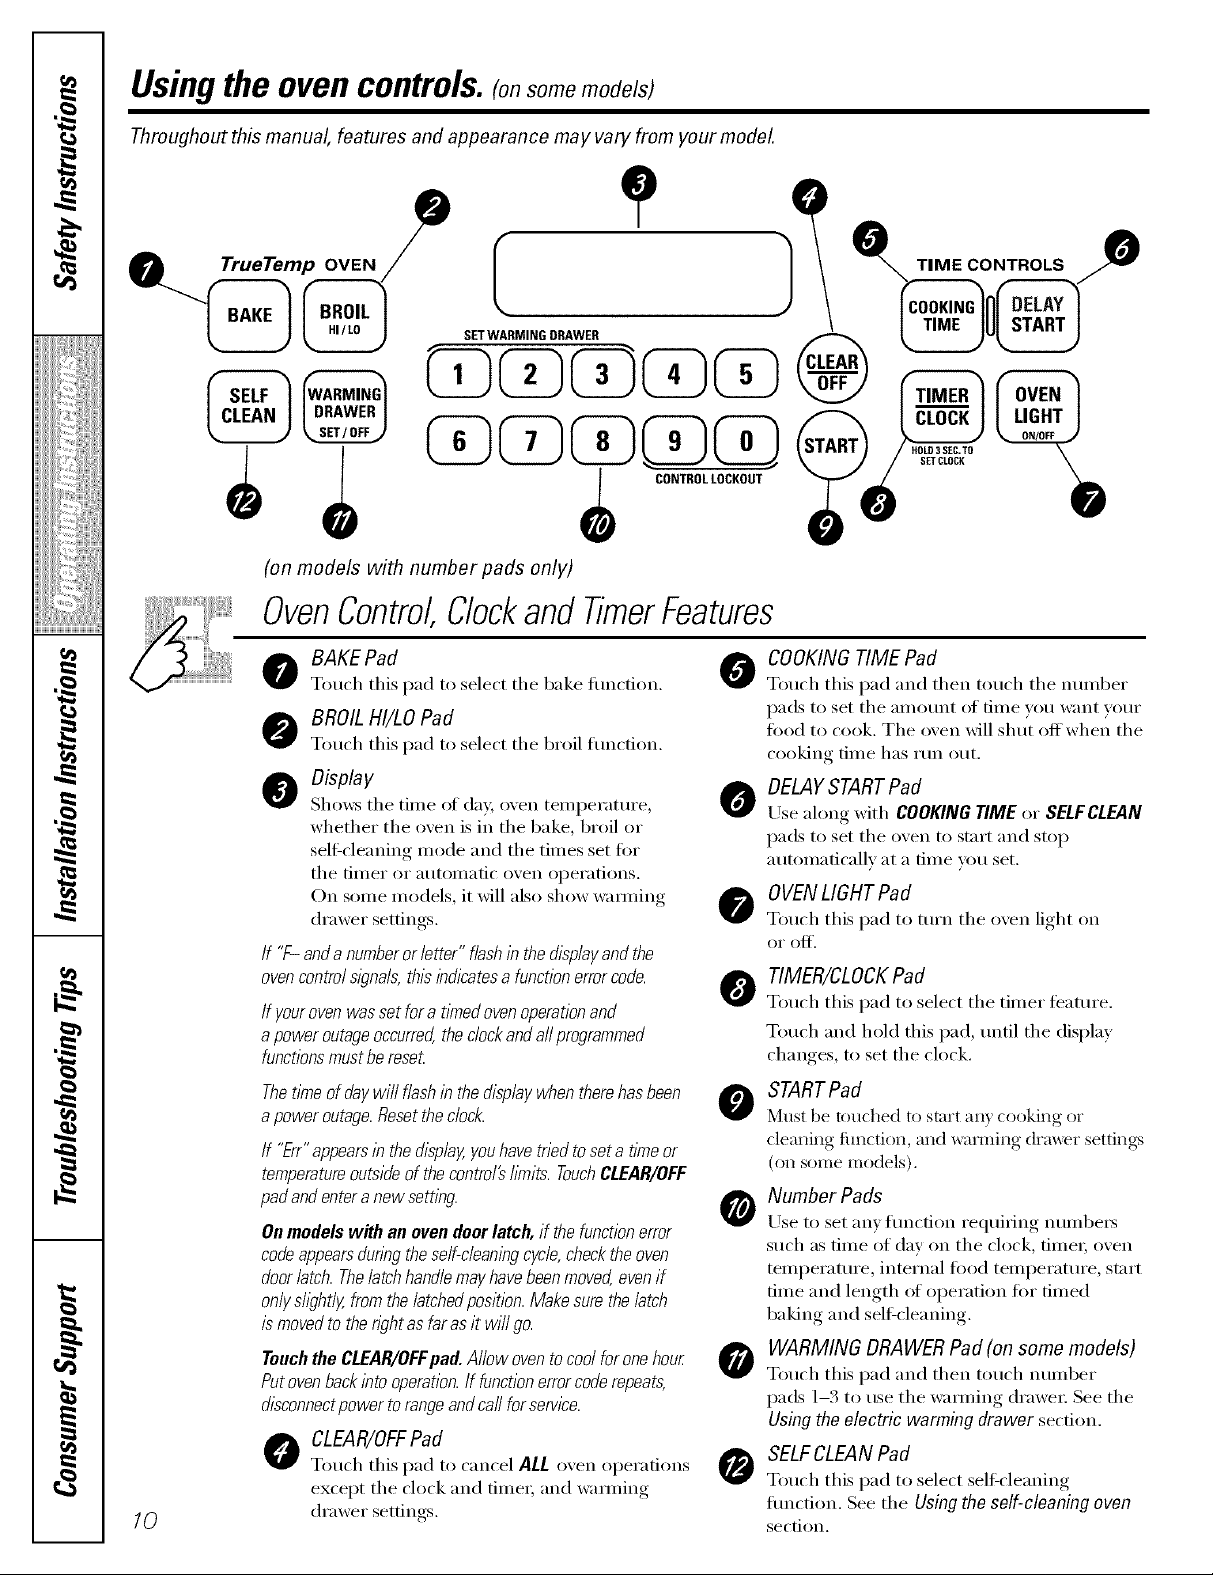
Usingthe ovencontrols.(onsome models)
Throughout this manual, features and appearance may vary from your model.
(on models with number pads only)
OvenControl,Clockand TimerFeatures
Touch this pad to select the bake fimction. Touch this pad and then touch the number
pads to set tile aI//Otlnt oJ[ [lille Veil _;lllt VOtlr
O BROIL HI/LO Pad
Touch this pad to select tile broil function.
O isplay
Sho_vs tile till/e of (la}; oven tei/lperattlre,
whether tile oven is in tile bake, broil or
self:cleaning mode and the times set for
the tiI/ler Or atltOlIlatic oven operations.
On some models, it will also show wamfing
drawer settings.
t0od to cook. The oven will shut off when the
cooking time has run ()/It.
O ELAYSTARTPad
Use along with COOKINGTIMEor SELFCLEAN
pads to set tile oven to start and stop
aummaticallv at a time u:,u set.
O OVENLIGHTPad
Touch this pad to turn tile oven light on
or of_'.
If "F-andanumberorletter"flashinthedisplayandthe
ovencontrolslgna& thisindicatesa functionerrorcode.
/f yourovenwassetfora t/knedovenoperationand
apoweroutageoccurredthedockandaftprogrammed
functionsmustbereset.
Thetimeofdaywill flashinthedisplaywhentherehasbeen
apoweroutage.Resettheclock.
If "Err"appearsinthedisplay,youhavetriedtosetaflkneor
temperatureoutsideofthecontro/#bruits.TouchCLEAR/OFF
padandenteranewsetting.
Onmodels with an ovendeerlatch, if thefunctionerror
codeappearsduringtheself-cleaningcycle,checktheoven
doorlatch.Thelatchhandlemayhavebeenmovedevenif
onlyslightly,fromthelatchedposition.Makesurethelatch
ismovedto thewht asfaras it wi//go.
TouchtheCLEAR/OFFpad.Allowoventocoolforonehour
Putovenbackintooperation.If functionerrorcoderepeats,
disconnectpowertorangeandcallforsen/ice.
O IMER/CLOCKPad
Touch this pad to select tile timer teatm'e.
Touch and hold this pad, until tile display
changes, to set the clock.
O STARTPad
Must be touched to start any cooking or
cleaning fimction, and wamling drawer settings
(on seine models).
o Number Pads
Use to set all_, ][illl(fion re(ltlii'ing_ ntllllbei3
such as time of day on tile clock, fime_; oven
temperature, internal food temperature, start
time and length of operation for timed
baking and self:cleaning.
O WARMING DRAWER Pad (on some models)
Touch this pad and then touch number
pads 1-3 to use the wamfing drawer See tile
Usingthe electric warming drawer secdon.
10
O CLEAR/OFFPad
Touch this pad to cancel ALLoven operations
except the clock and time_; and wamfing
drawer settings.
O SELFCLEANPad
Touch this pad to select self:cleaning
flmction. See tile Usingthe self-cleaningoven
section.

Throughout this manual, features and appearance may vary from your model.
(on models with + and - pads only)
OvenControl,Clockand TimerFeaturesandSettings
ge.cem
I
BAKE Pad 0
Touch this pad to select the bake timcfion.
BROILHI/LO Pad
Touch dfis pad to select die broil fimcfion.
Display
Shows the time of day and the time set for
the fime_:
If "F--andanumberorletter"flashibthedisplay
andtheovencontrolslgna&thisindicatesa
functionerrorcode.
If yourovenwassetfora tlYnedovenoperation
andapoweroutageoccurred,theclockandall
programmedfunctionsmustbereset
ThetlYneofdaywill flashinthedisplaywhen
therehasbeenapoweroutage.
COOKINGTIMEPad
0
Touch this pad and then touch the ÷ or -
pads to set the anlount of time you want
your toed to cook. The oven will shut off
when the cooking dine has run ()tit.
DELAYSTARTPad
O
Touch this pad and the + or - pads to
delay the starting of your oven up to 9
hom_ and 59 minutes.
TIMER/CLOCKPad
Touch this l)ad to select the timer teature.
Touch and hold this l)ad, until the display
changes, to set the clock.
STARTPad
Must be touched to start any cooking or
clea nine _'iinction.
- Pad
Short tal)S to this pad will de(Tease the
time or temperature b)' small amounts.
Touch and hold the pad to decrease the
time or temperature by linger alnounts.
+Pad
Short taps to this pad will increase the time
or teml)erature by small amounts. Touch
and hold the pad to increase the time or
temperature b)' linger amounts.
CLEAR/OFFPad
Touch this pad to cancel ALL o',en
operations except the clock and fimei:
SELFCLEAN Pad
Touch this l)ad to select the self:cleaning
flmction. See the Using the self-cleaning
oven section.
OVENLIGHTPad
Touch this pad to turn the o'_en light on
OI" ()Jill'.
/l
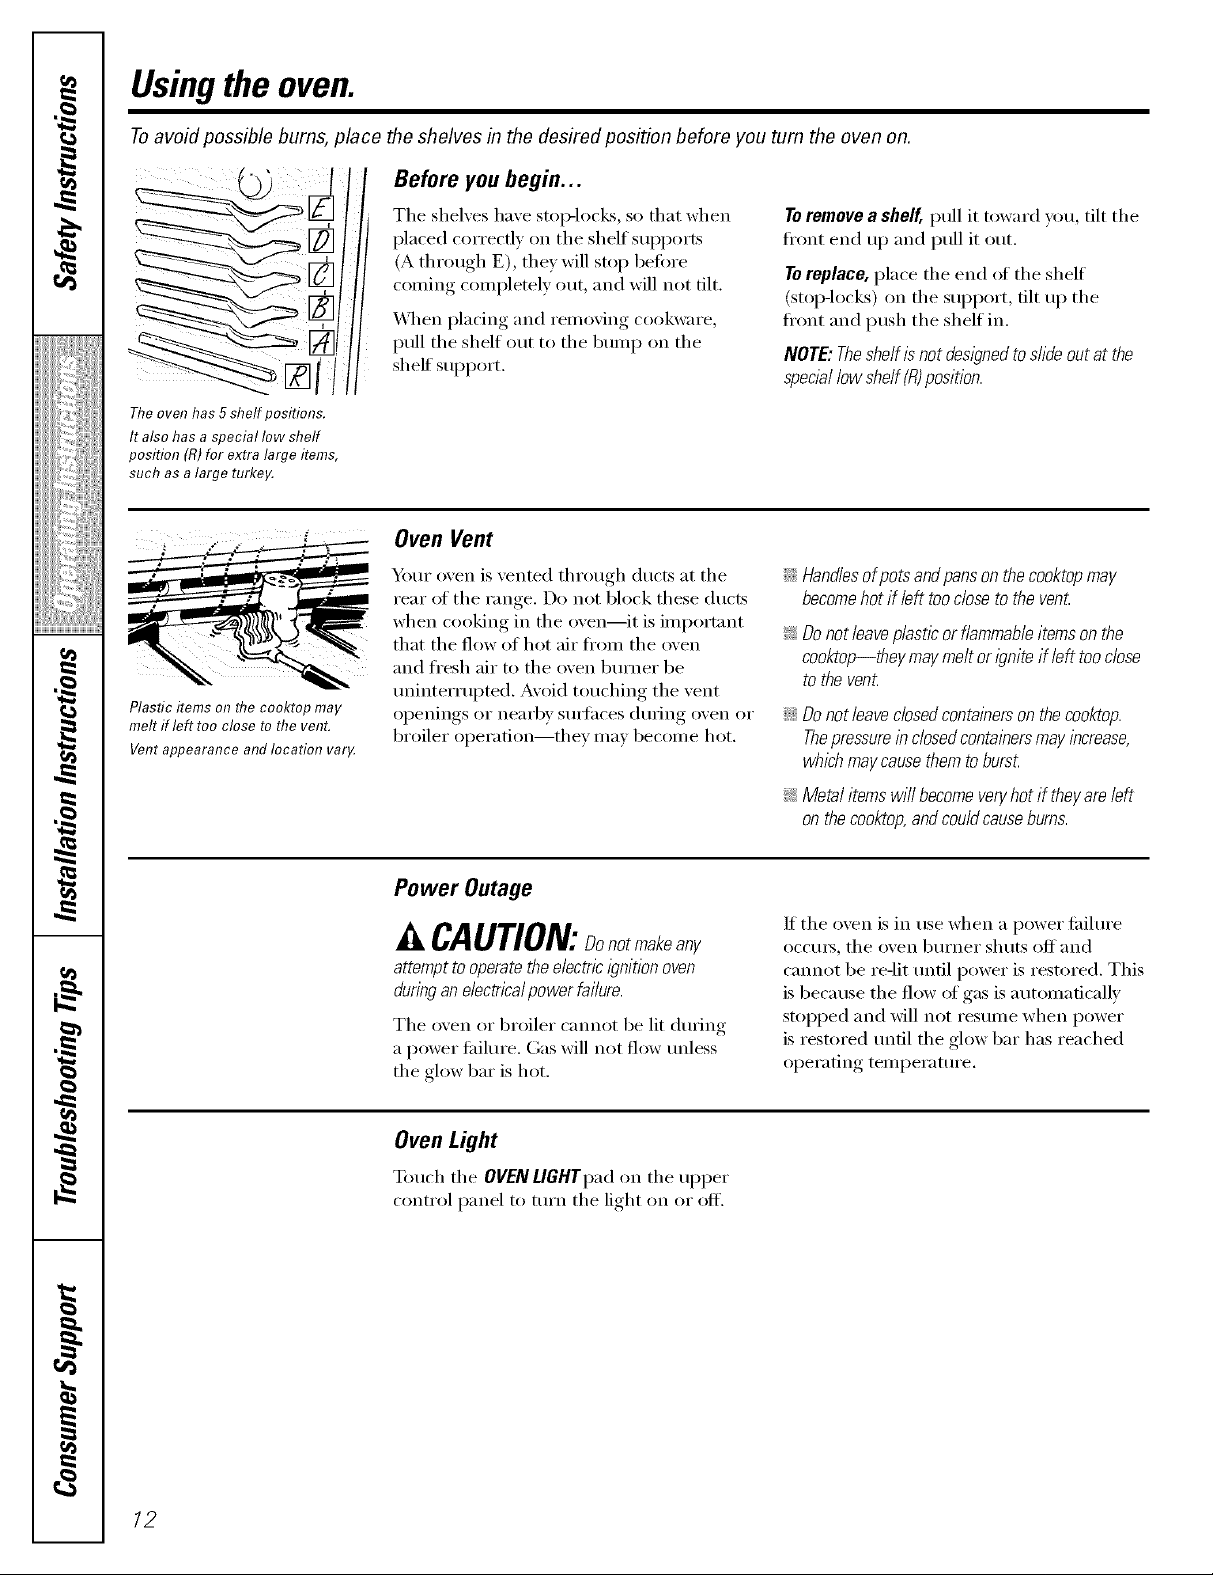
Usingthe oven.
Toavoid possible bums, place the shelves in the desired position before you turn the oven on.
Before you begin...
Theoven has 5shelf positions.
It also has a special low shelf
position (R)for extra large items,
such as a large turkey.
? 7 [
Plastic items on the cooktop may
melt if left too close to the venL
Vent appearance and location var_
The shelves have stoic-locks, so that when
I)laced correctly on tile shelf supports
(A through E), they will stop beflwe
coming completely out, and will not tilt,
_,\]/en placing and removing cookware,
pull tile shelf out to tile bum l) on tile
shelf SUl)po_t.
Oven Vent
_ur oven is vented through ducts at tile
rear ot the range. Do not block these ducts
when cooking in tile oven--it is important
that tile flow of hot air fl'om tile oven
and fl'esh air to tile oven burner be
tminterrui)ted. Avoid touching tile vent
ol)enings or nearby suI_fhces during oven or
broiler ope_wtion--they may become hot.
Toremove a shelf, pull it toward you, tilt tile
ti'ont end up and pull it out.
TOreplace, i)lace the end ot the shelf
(stopqocks) on the sui)port, tilt up the
front and push the shelf in.
NOTE: Theshelf is not designed toslide out at the
specb/ lowshelf (R)position.
::J_::Handlesofpotsandpansonthecooktopmay
becomehotifleft toodoseto theven_
_: Donotleaveplasticorflammableitemsonthe
cooktop--theymaymeltorigniteif left tooclose
tothevenL
::Ji::Donotieaveciosedcontainersonthecooktop.
Thepressurelbciosedcontainersmayincrease,
whichmaycausethemtoburst.
_: Metalitemswi//becomeveryhotif theyareleft
onthecooktop,andcouldcauseburns.
Power Outage
CAUTION:Donotmakeany
attempt to operate the electric/_?nition oven
during an e/ectrical power failure.
Tile oven or broiler cannot be lit (huing
a power fifilure. Gas will not flow unless
the glow bar is hot.
Oven Light
Touch tile OVEN LIGHTpadon tile upI)er
control panel to turn tile light on or off'.
If the oven is in use when a power fifilure
OCCIII'S_ tile oven b/lI'neI" shtlts off and
cannot be re-lit until power is restored. This
is because tile flow of gas is automatically
stopped and will not resume when power
is restored until the glow bar has reached
operating temperature.
12
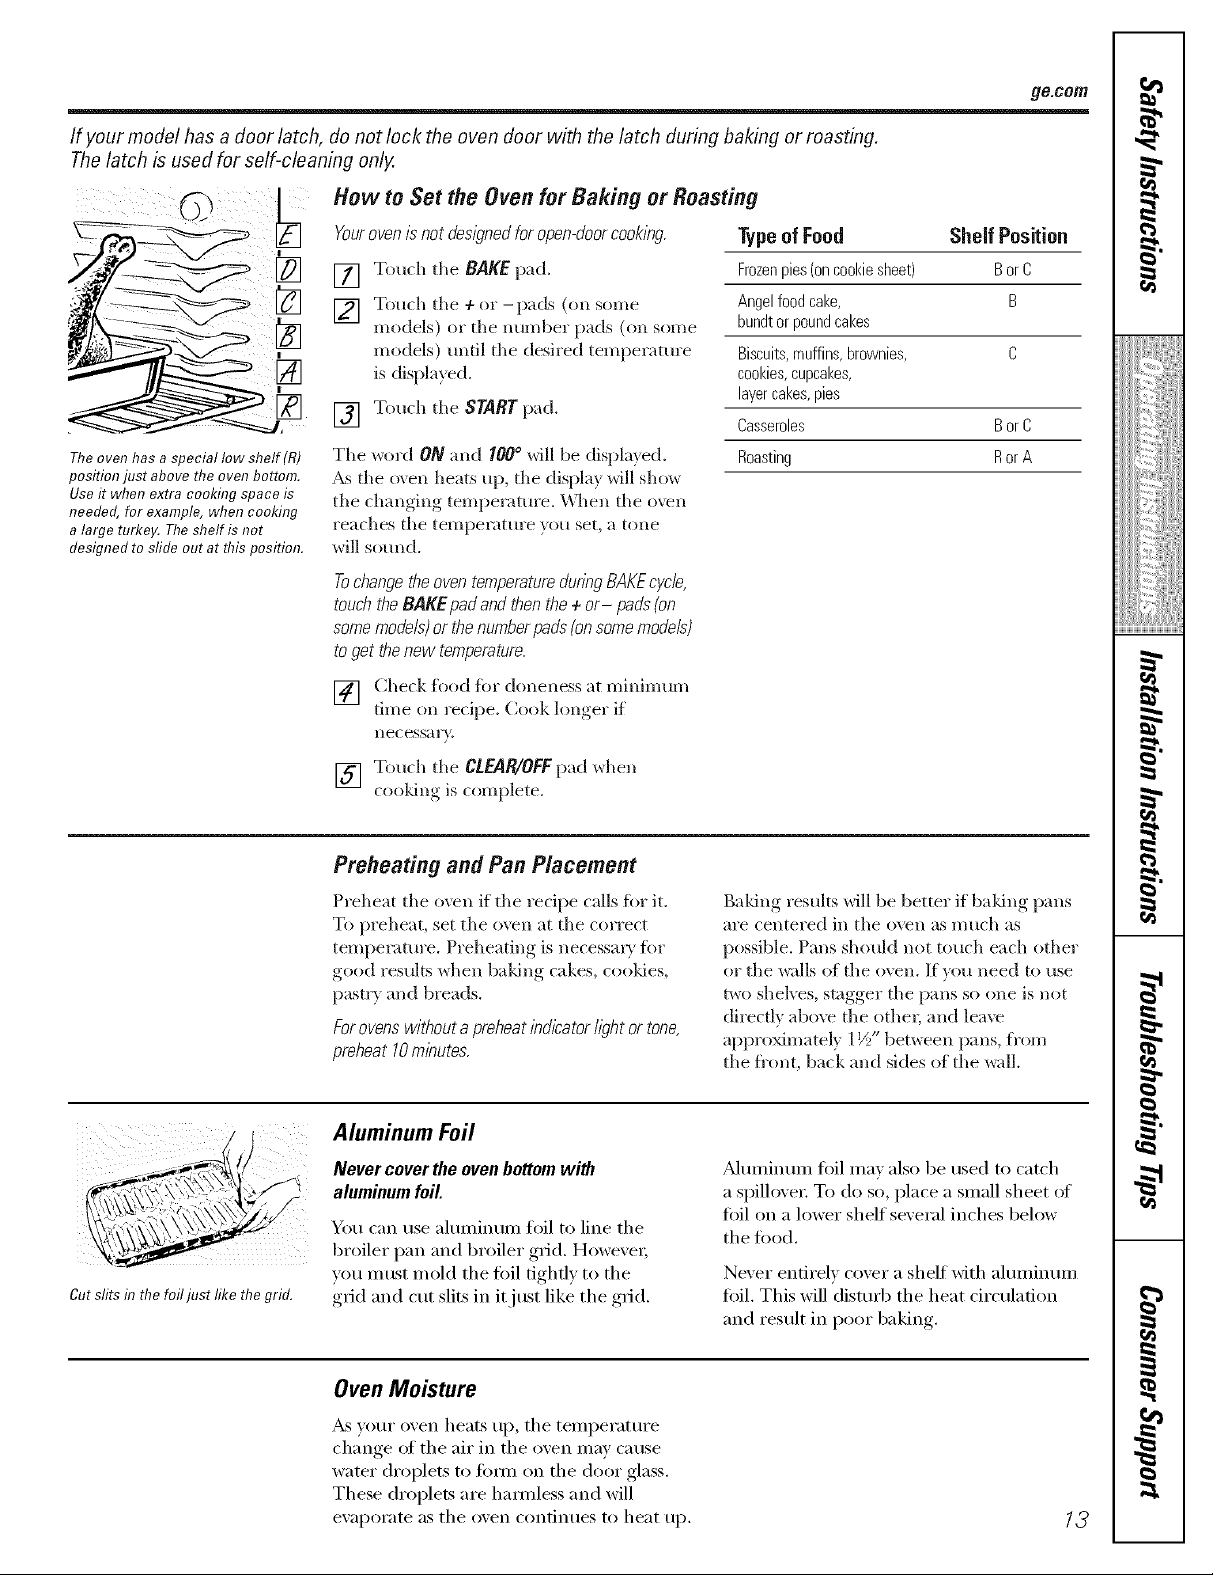
If your model has a door latch, do not lock the oven door with the latch during baking or roasting.
Thelatch is used for self-cleaning only.
How to Set the Oven for Baking or Roasting
position just above the oven bottom.
Useit when extra cooking space is
needed, for example, when cooking
a large turkey. The shelf is not
designed to sfide out at this position.
Youroven/_ not des/_?nedforopen-doorcook&g.
[] Touch the RAKE pad.
[] Touch tile ÷ or -pads (on soI'ae
models) or tile mlmber pads (on some
models) until tile desired temperature
is displayed.
Touch tile START pad.
[]
Tile word ON and 100° will be displayed.
_s tile (v,'en heats up, tile display will show
tile changing temperatme. _\]len tile o\vn
reaches tile temperattlre VOtl set, a tone
will sound.
Tochangetheoven temperaturedunng BAKEcyc/e,
touchtheBAKE pafl and thenthe+ or- pads(on
somemode/s)orthenumberpads{onsomemode/s)
toget thenew temperature.
Typeof Food Shelf Position
Frozenpies (oncookie sheet) Bor C
Angel food cake, B
bundt or pound cakes
Biscuits,muffins, brownies, C
cookies,cupcakes,
layercakes, pies
Casseroles Bor C
Roasting Ror ATheoven has a special low shelf(R)
ge.com
Cut slits in the foil just like the grid.
VJ] Check food fin doneness at minimum
it i
time on recii)e. Cook longer, if
lleC essay}'.
[] Touch tile CLEAR/OFFpad when
cooIdng is complete.
Preheating and Pan Placement
Preheat tile o_vn if tile recipe calls for it.
To preheat, set tile o\vn at tile correct
temperature. Preheating is necessaia' fin.
good results when baldng cakes, cooldes,
pastr) and breads.
Forovensw/Neata preheat&(;I/kator//)ht ortone,
preheat 10 minutes.
Aluminum Foil
Never cover the oven bottom wi_h
aluminum foil.
You can use ahmfinum fl>il to line the
broiler pan and broiler grid. However;
you must mold tile fi)il tightly to the
grid ;rod cut slits in it just like the grid.
Baking results will be better if baldng pans
are centered in tile o\vn as much as
possible. Pans should not touch each other
(n tile _dls of tile oven. If vou need to use
two shelves, stagger tile pans so one is not
directly abo\v tile ethel, and leave
approximatel} ] ½" between pans, fl'om
tile fi'ont, back and sides of tile walk
_Muminum fi)il may also be used to catch
a spilloven To do so, place a small sheet of
toil on a lower shelf several inches below
the filed.
Never entirely cover a shelf with ahmfinum
fifil. This will (lisnu4) the heat circulation
and result in poor baking.
Oven Moisture
_S VOtlr oven heats tip, tile teillperattlre
change ot tile air in tile oven may cause
water droplets to titan on tile door glass.
These droplets are hamlless and will
evaporate as tile oven contintles to heat tip. 13

Usingthe oven.
If your model has a door latch, do not lock the oven door with the latch during broiling.
Thelatch is used for self-cleaning only.
How to Set the Oven for Broiling
i grid in the broiler pan.
Always use the broiler pan and grid
that came with your oven. It is
designed tomflfimize smokflTgand
spatterflTgby trappflTgjuices f17the
shielded lower part of thepan.
[] Follow suggested shelf positions in the
Broiling Guide.
[] The o_en door must be closed during
broiling
Touch the BROILHI/LO pad once fiw
[]
HI Broil.
To change, to LOBroil, touch the
BROILHI/LO pad again.
Broiling Guide
The size, weight, thickness,
starting, teml)eratm'e and Food
VOtlI" pI'efeI'en(e ot doneness Bacon
will affect broiling times.
This guide is based on meats GroundBeef
at refl_igerator temperature. WellDone
tThe U.S. Department of Agriculture Beef Steaks
says "Rarebeef is popular, but you Rare_
should know that cookflTgit to only Medium
140°2means some food poisonflTg Well Done
organisms may survive." (Source:
Safe Food Book YourKitchen Guide
USDARev. June 1985.)
Theoven has 5shelf positimTs.
Raret
Medium
WellDone
Chicken
LobsterTails
FishFillets
HamSlices
")recoeked)
Pork Chops
WellDone
LambChops
Mediuro
WellDone
Medium
WellDone
Quantityand/
orThickness
1/2 lb.
(about8 thinslices)
1lb. (4patties)
1/2to 3/4" thick
1" thick
1to 1VzIbs.
1YZ'thick
2 to 21kIbs.
1whole
2 to 2Vzibs.,
split lengthwise
4 bone-inbreasts
24
6to 8 oz.each
1/4to 1/2" thick
1" thick
1/2" thick
2 (1/2" thick)
2 (1"thick) about1 lb.
2 (1"thick) about10
to 12 oz.
2 (1W"thick)about 1 lb.
Shelf*
Position
C
C
C
C
C
C
B
D
D
D
D
D
D
D
[] Touch the START pad.
[] X,_hen broiling is finished, touch the
CLEAR/OFFpad.
Serxe the fi)od immediately and lea_e the
pan outside the oxen to cool (hu_in(,_ the
meal fiw easiest cleaning.
Use LO Broil t() cook foods such as p()ult_)'
or thick cuts of meat thoroughl} without
ox ePbrowning them.
First Side
Time (rain.)
12
13
10
12 15
25
30_5
25 30
13 16
10
15
10
10
17
SecondSide
Time(rain.)
4
g
6
8
3
7 10
7
56
89
6W
10 12
16 18
15_0
10 15
Do not
turll
ovelt
6
8
8
4_
10
46
12 14
Comments
Arrangein single layer.
Space evenly. Up to
8 patties take about
the same time.
Steakslessthan 1"thickcook
throughbefore browning.
Panfryingisrecoromended.
Slashfat.
Brusheachsidewith melted
butter.Broilskin-side-down
first.
Cutthroughbackofshell.
Spreadopen.Brushwith
meltedbutterbefore broiling
andafter half of broiling
time.
Handleandturnvery
carefully.Brushwith lemon
butterbeforeand during
cooking,if desired.Preheat
broilerto increasebrowning.
Slashfat.
Slashfat.
14
*See illustration for description of shelf positimTs.
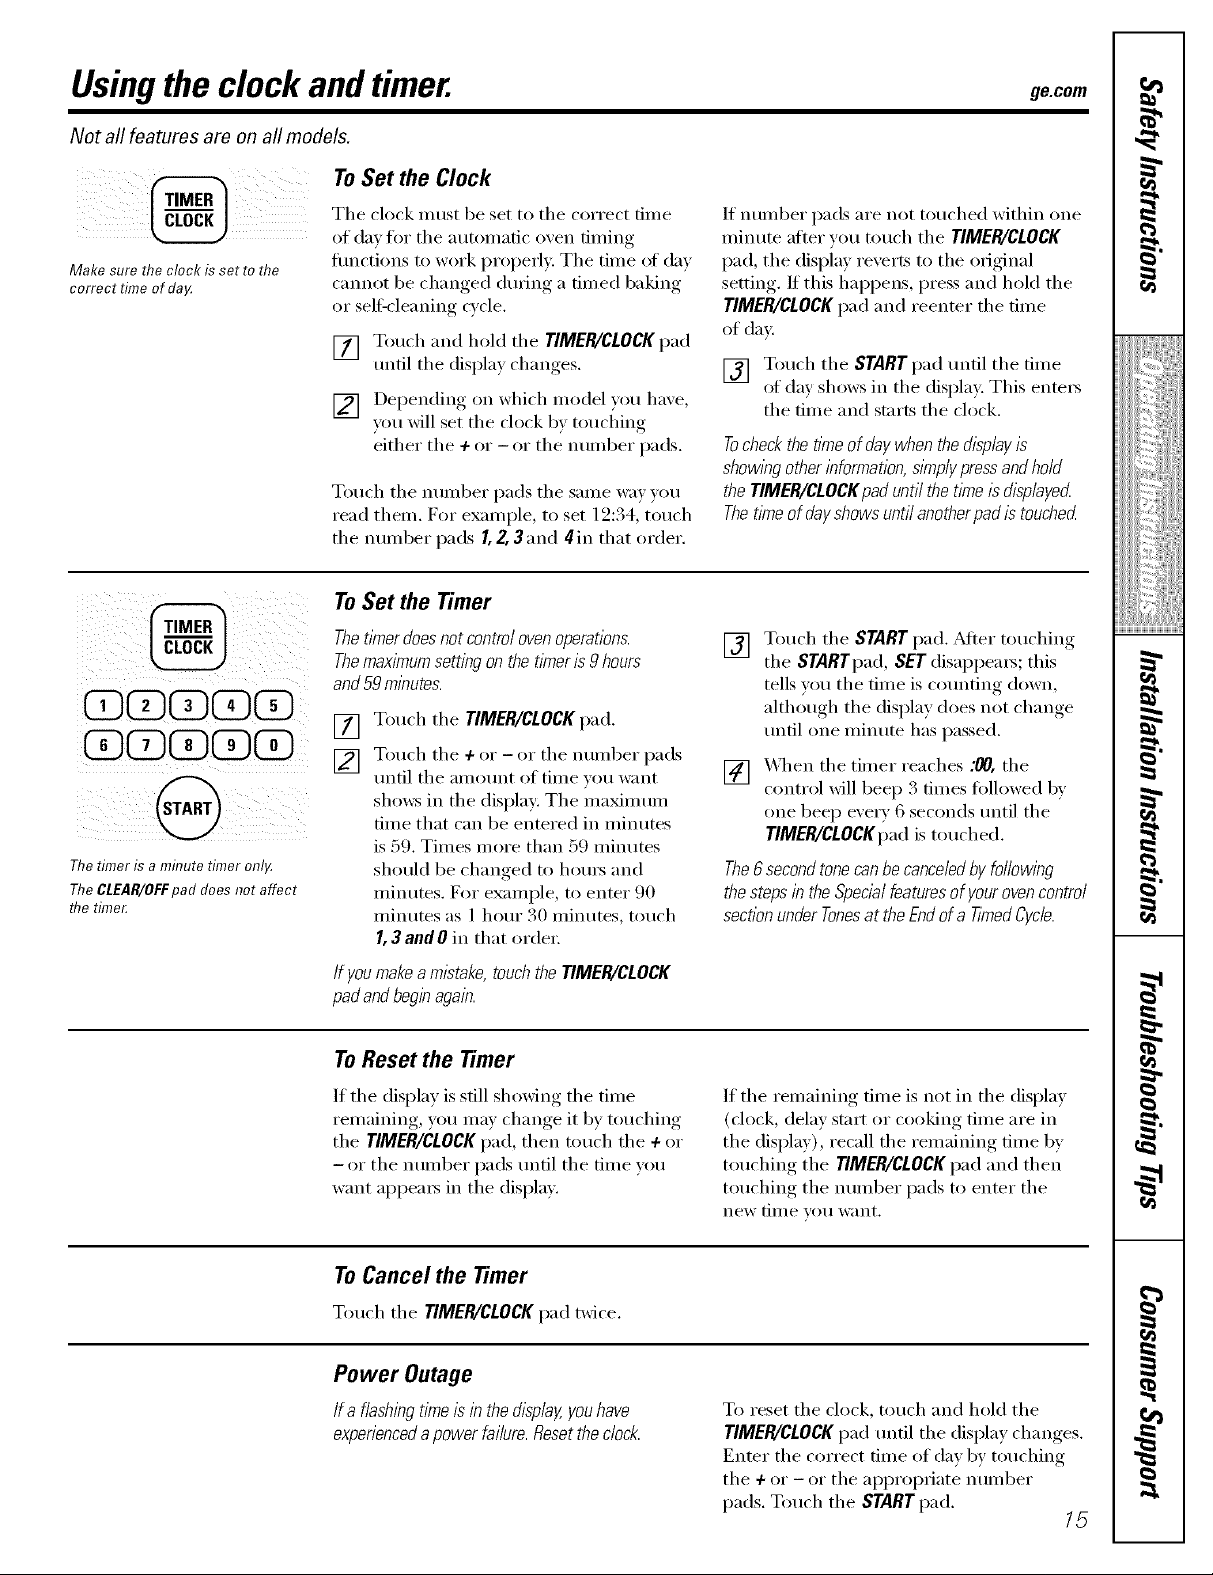
Usingthe clock andtimer, ge.com
Not all features are on allmodels.
ToSet the Clock
Makesure theclockisset tothe
correcttimeof da_
Tile clock must be set to tile correct time
of day fin" tile atmm/atic oven timing
flmctions to work i)roperly. Tile time ot day
cmmot be changed during a timed baking
or self=cleaning cycle.
[] Touch and hold tile TIMER/CLOCK pad
until tile display changes.
[] Depending on which model )ou haxe,
you will set the clock by touching
either tile 4- or - or tile number pads.
Touch tile number pads tile same way you
read them. For example, to set 12:34, touch
tile number pads I, Z 3 and 4in that order.
To Set the Timer
If numl)er pads are not touched within one
minute afier you touch tile TIMER/CLOCK
pad, tile display reverts to tile original
setting./t this hai)pens, press and hold tile
TIMER/CLOCKpad and reenter tile time
of day:
[] Touch tile STARTpad until tile time
of day shows in tile display: This enters
tile time and starts tile clock.
Tocheckthetimeof daywhenthedisplayis
showingotherinformation,s/Ynplypressandhold
theTIMER/CLOCKpaduntilthet/Yne/sdisplayed
Thet/meofdayshowsuntilanotherpadis touched
CD@@D@XD
eeeee
Thetimer is a minute timer onI,A
TheCLEAR/OFFpad does not affect
the time_
Thet_Ynerdoesnotcontrolovenoperations.
Themaximumsetting on the timeris 9 hours
and59 minutes.
Touch tile TIMER/CLOCK pad.
[]
Touch tile + or - or tile number pads
[]
tmtil tile amount of time you want
sho_vs in tile display: Tile maim um
time that can be entered in minutes
is 59. Times more than 59 minutes
should be changed to horns and
minutes. For example, to enter 90
minutes as 1 hour 30 minutes, touch
I, 3 and 0 in that order:
If youmakeam/stake,touchtheTIMER/CLOCK
padandbeginagain.
To Reset the Timer
If tile display is still showing tile time
remaining, you may change it by touching
tile TIMER/CLOCKpad, then touch tile + or
- or tile number pads until tile time you
want appea_s in tile display.
[] Touch tile START pad. _Mter touching
tile STARTpad, SET disappeaxs; this
tells w,u tile time is COlmting down,
although tile display does not change
tmtil one minute has passed.
[] "x_q/en tile timer reaches .'/70,tile
control will beep 3 times follo_ed by
one beep e\'e_ T 6 seconds tmtil tile
TIMER/CLOCKpad is touched.
The6 secondtonecanbe canceledby following
thesteps in the Specialfeaturesof your ovencontrol
sectionunderTonesat theEndof a TimedCycle.
If tile remaining time is not in tile display
(clock, delay start or cooking time are in
tile display), recall tile remaining time by
touching tile TIMER/CLOCKpad and then
touching tile ntlI/lbeI" pads to enter tile
new time Vi)[i w;Int,
To Cancel the Timer
Touch tile TIMER/CLOCKpad twice.
Power Outage
If a flashing timeis in the display,you have
experienceda power failure,fleset the clock.
To reset tile clock, touch and hold tile
TIMER/CLOCK pad until the display changes.
Enter tile correct time of day by touching
tile + or - or tile approi)fiate nulnber
pads. Touch tile START pad.
/5

Usingthe timedbakingand mastingfeatures.
If your model has a door latch, do not lock the oven door with the latch during timed cooking. The latch is used for
self-cleaning only.
NOTE" Foods that spoil easily--such as milk, eggs, fish, stuffings, poultry and pork--should not be allowed to s# for
more than 1hour before or after cooking. Room temperature promotes the growth of harmful bacteria. Be sure that
the oven light is off because heat from the bulb will speed harmful bacteria growth.
How to Set an Immediate Start and Automatic Stop
/6
@
@
@
5)
@
Theoven will turnon immediately andcookfor a
selectedlength of tlYne.At the end of the cooking
t/me,the oven will turn off autornatica/ly
[] Touch the BAKEpad.
[] Touch tile + or - or tile nuinber pads
to set tile desired oxen teinl)erature.
[] Touch the COOKING TIME pad.
NOTE:If yourrecl_)erequkespreheating, youmay
need toaddadditional time to the length of the
cookl?)gtime.
V_ Tot/('h the 4-or - or the nt/illber pads
to set the desired length of cookin_
tiine. The niininlunl cooking tiine p)/i
can set is 1 nfinute and the nlaxinlunl
is 9 houi_ and 59 nlinutes.
The ()veil teniperature that u)tI set and
the cooking tiIne that you enmred will be
in the display.
o" " o"
[] Touch tile START pad.
Tile ()veil will turn ON, and tile display will
show the cooking tinle CO/lntdown and
the changing teinperature starting at 100°E
(The tenlperature display will start to
change once the oven [eIllpeI'atllI'e reaches
100°E) When tile oven reaches tile
tenlperature you set, 3 beeps will sound.
The oven will continue to cook t0r the set
aillOtlnt of tinie, then ttli'ii olC['autoinaticall};
unless tile cook and hold featuI'e was set.
See tile Special features of your oven control
section.
_MteI"tile ()veil turns off; tile end-of_cvcle
tone will sound.
[] Touch tile CLEAR/OFFpad to clear
the displa) if necessai?: Reinoxe the
flied fi'oin tile oven. I/eineinbei; even
though tile oven ttli'llS off' autoinaticallg
food left in tile oven will (xmtinue
cooking }tftei" tile oxen [tlillS OlC]}_
How to Set a Delayed Start and Automatic Stop
Theoven will turnon at the tlkneof day youset,
cook for aspedhc length of t/meand thenturn off
autornatica//y
Make sttI'e tile clock shows tile CoITect
dine of day.
[] Touch tile BAKEpad.
[] Touch tile 4- (Ir - or tile nuinber pads
to set tile desired oxen tenii)erature.
[] Touch tile COOKINGTIME pad.
NOTE:If yourrocl))erequkespreheating, you may
need toaddadditional time to the length of the
cookingtime.
[] Touch tile 4-or - or tile nt/IllbeI" pads
to set the desired length of cooking
tiine. The nfiniin uni cooking tiine you
can set is 1 ininute and the ina_ni uni
is 9 houi_ and 59 ininutes. Tile oven
teinpeiature that w)u set and tile
cooking tiine that you entered will
be in tile display:
[] Touch tile DELAYSTART pad.
[] Touch tile 4-or - or tile nuinber pads
to set tile tiIne of (lax you want tile
()veil to ttlI'n (in and stnrt cooking.
[] Touch tile STARTpad.
NOTE:If you would like to checkthe tlines youhave
set, touchtheBEDIY STARTpad to checkthestart
tYneyouhaveset or touchthe COOKING TIME
padto checkthe length of cookl)_gt/meyouhaveset.
X,_qleIl tile oxen turns ONat tile dine
(If da) you set, tile display will show tile
cooking dine countdown and tile changing
tenlperature ,startino_at 100°E (Tile
teniperature displm, will start to change
once tile o;en tenlperature reaches 100°E)
X._q/eIl the o_en reaches the tenlperamre
you set . beeps _11 sound.
The oxen will continue to cook fin" the set
anlount of dine, then turn off autonlatically,
unless tile cook and hold featuI'e was set.
See the Special features of your oven control
secti(In.
_MteI"the oxen turns off, the end-ol:cxcle
tone will sound.
[] Touch tile CLEAR/OFFpad to clear
tile display if necessar). Reinoxe tile
toed fi'oin tile ()veil. ]/enieinbei; even
though tile oxen turns tiff autoinatical]),
flied left in tile oxen will continue
cooking afteI" tile o_en tt/illS off,
3

Special featuresofyourovencontrol ge.com
Yournew touch pad control has additional features that you may choose to use. The following are the features and
how you may activate them.
Thespecial feature modes can only be activated while the display is showing the time of day. They remain in the
control's memory until the steps are repeated.
When the display shows your choice, touch the STARTpad. The special features will remain in memory after
a power failure.
12 Hour Shut-Off
With this feature,should youforgetand leave the []
ovenon,thecontrol will automatically turnoff the
ovenafter 12hours dunbgbaking functionsor after
3 hoursdunbga broil function.
If you wish to mrn OFF this teattlI'e, tollow
the steps bel(_w. []
[] Touch the BAKE and BROILHI/tO pads
at the same time fo_ 3 seconds tmtil
tile display shows SE
Touch tile DELAYSTART pad. Tile
display will show 12shdn (12 hour
shut-off). Touch tile DELAYSTARTpad
again and the displa_ will show no shdn
(no shut-off).
Touch the STARTpad to actixate the
no shut-off and leave the control set in
this special featm'es mode.
Fahrenhe# or Celsius Temperature Selection
Yourovencontrol is set to usethe Fahrenheit [] Touch the BROILHI/LO and COOKING
temperatureselections,but you maychange this TIMEpads at tile sam e time. The
to use the Celsius selections, displa_ will show F (l_ahrenheit).
[] Touch the BAKE and BROILHI/tO pads [] Touch the BROILHI/tO and COOKING
at tile same time fi_ :4seconds tmtil TIMEpads again at tile same time.
the displa) shox_s SE The displa) will show C (Celsius).
[] Touch the START pad,
Tonesat the Endof a Timed Cycle
At theendof a fl?nedcycle,3 short beepswill
soundfollowed by onebeepevery6secondsuntil
the CLEAR/OFFpadIstouchec_Thiscontinual
6-secondbeepmay be cance/ec_
To cancel tile 6-second beep:
[] Touch the BAKE and BROILHI/tO pads
at the same time fo_ 3 seconds tmtil
the display shows SE
[] Touch the BROIL HI/tO pad. The
displa) shows CON BEEP (continual
beep) and BEEP. Touch the BROIL
HI/tOpad again. The display shows
BEEP. (This cancels the one beep
e\'el'v 6 seconds.)
[] Touch tile START pad,
Changing the Speed of the Increase or Decrease Pads
AsyouusetheINCREASEorDECREASEpadswhen
setflbgatimeortemperature,youmaynoticethe
[] Touch the + pad to increase the speed
up to the nmnber 5.
displaychangess/ow/yThisspecialfeaturea//ows
youtochangethespeed
To set tile speed you prefer fi)llow tile steps
below.
[] Touch the BAKE and BROILHI/tO pads
at the same time fi)_ 3 seconds tmtil
tile display shows SE
[] Touch tile + pad, Tile display will show
you a set speed between 1and 5.
Touch the - pad to decrease the speed
down to the nmnber 1.
[_] Touch START to acdx _te tile settim,
it i
and leaxe the control set in this special
teatm'es mode.
17
 Loading...