


JGB918WEK6WW
GE JGB918WEK6WW, JGB918SEL3SS, JGB918SEL2SS, JGB918CEK7CC, JGB918CEK6CC Owner’s Manual
...
ge.com
©
Safety Instructions ...... 2-7
Operating Instructions
Ahunhmm Foil ............ 14
Clock and Timer . ...... 16, 17
Lower Oven Drawer ........ 32
(-)yen ................. 11-34
Baking and Roasting ...... 14
Broiling, Broiling Guide . . .15
Convection ........... 20-24
Oven (k/ntr(51 ......... 11, 12
Power Outage ............ 13
Preheating .............. 14
Probe .................. 19
Sabbath Feature ....... 27, 28
SeltZCleanhlg ......... 33, 34
Shelves ................. 13
Special Features ....... 25, 26
Thermostat At!justin ent .... 29
TiIned Baking
and Roasting ............ 18
Timed C(mvecti(m Baking . .24
Sm'face Cooking ......... 8-10
Griddle ................. 10
_u'ming Drawer ....... 30, 31
Care and Cleaning
Burner Assembly ........ 35, 36
Bm'ner Grates ............. 37
C(mtr()l Panel and Knobs .... 38
C(5(sktop ................. 37
Door Removal ............ 39
Griddle .................. 37
Oven B()ttoin ............. 39
Oven I,ight Replacement .... 40
Oven Vents ............... 37
Selt:(_le;uling .......... 33, 34
Shelves .................. 40
Stainless Steel Sur/hces ...... 38
Drawer ............... 40, 41
Installation
Instruot ions .......... 42-5:4
Air Ac!justment ............ 52
And-Tip Device ......... 45, 53
Assemble Surfilce Burners . . .50
Checking Bm'ner
Ignition .................. 51
Connecting the Range
to Gas ................ 46-48
Dimensions and (_learmlces . .44
Electrical Ci/nnections . . .49, 50
Leveling the Range ........ 52
LP ...................... 53
Troubleshooting
Tips ................. _i4-_i7
Accessories .............. 5s
Consumer Support
Consumer Support . .Back (over
Product Registration ..... 59, 60
_4hrranty fist (;ustomers
in Canada ................ 63
_4hrranW fisr (;ustomers
in the U.S.A .............. 62
JGBP86
JGBP8 7
}(;,99os
JGB916
JGB9 l 8
In Canada contact us at:
www. GEAppliances. ca
Write the model and serial
numbers here:
Model #
Serial #
You can find thenl on a label
on the front of the range behind
the warining drawer or lower
()veil drawer
18305580P211 49-85127 03-07JR
IMPORTANTSAFETYINFORMATION.
READALLINSTRUCTIONSBEFOREUSING.
WARNING!
For your safe_ the information in this manual must be followed to minimize the risk of fire or explosion,
electric shock, or to prevent property damage, personal injury, or loss of life.
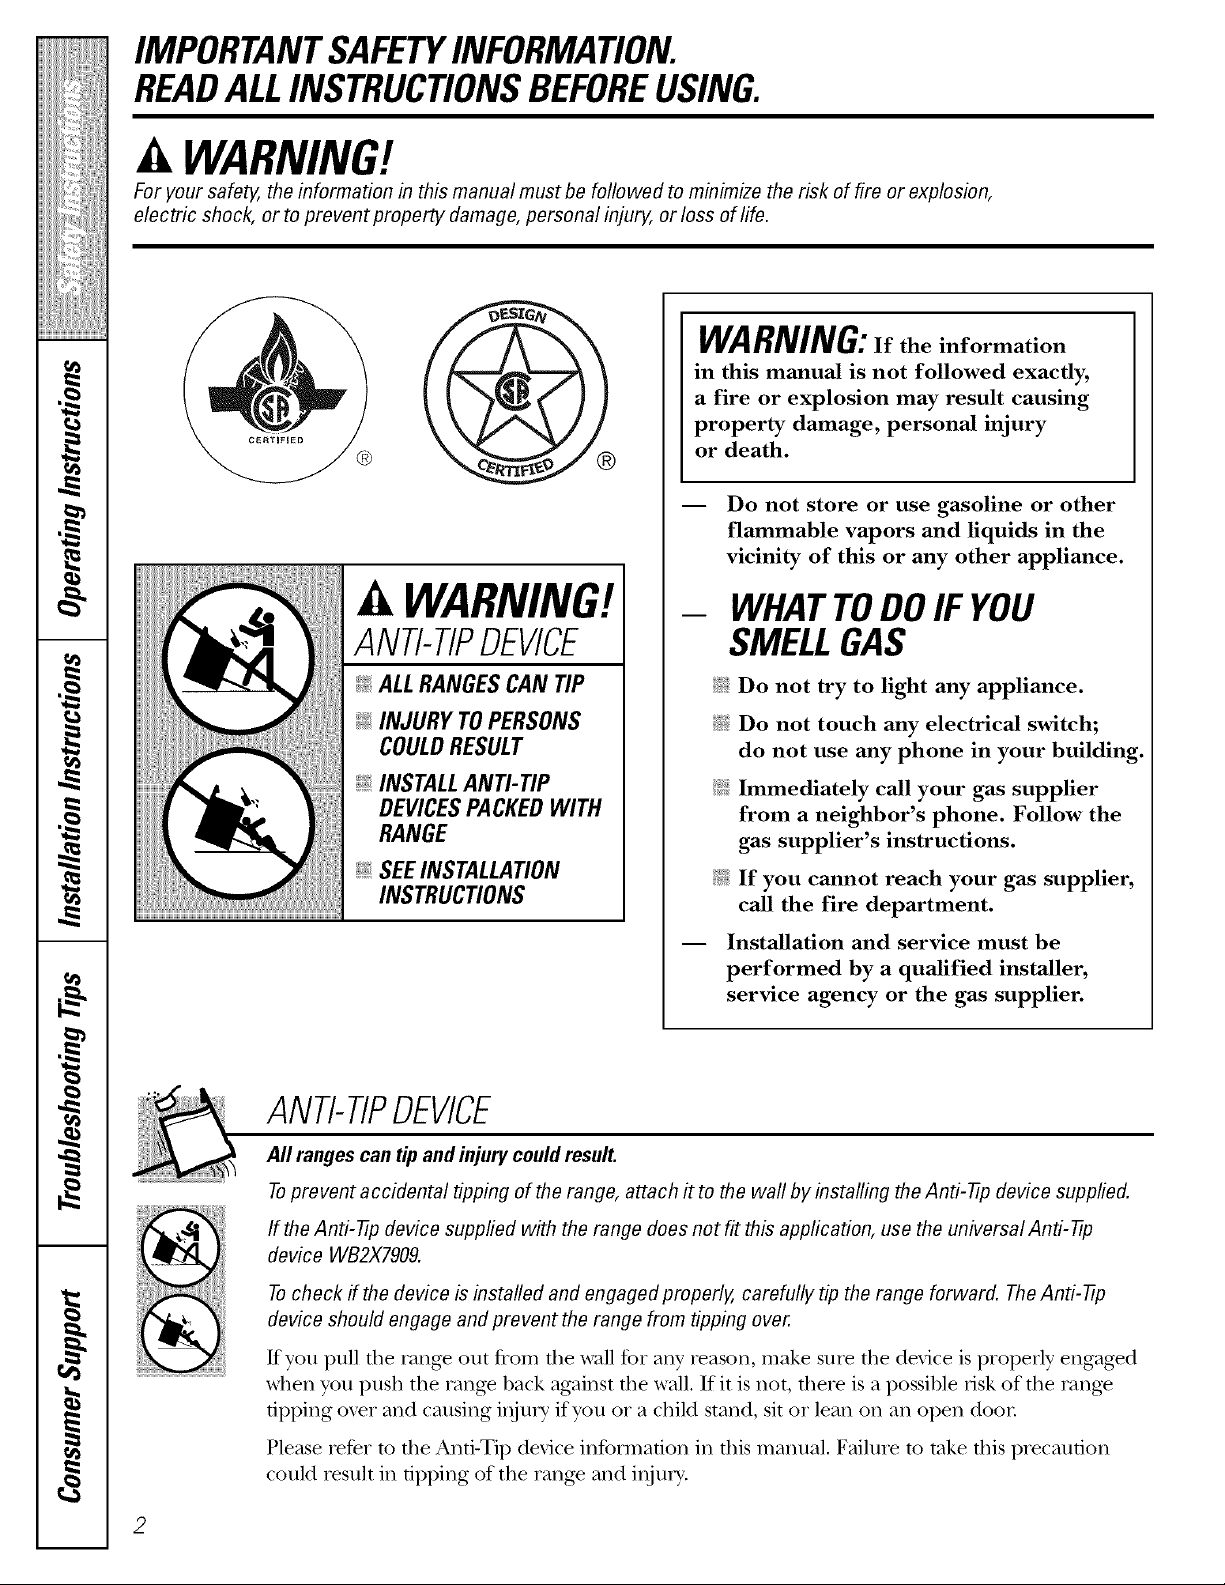
WARNING!
ANTI-TIPDEVICE
ALLRANGESCAN TIP
@INJURY TOPERSONS
COULDRESULT
@INSTALLAN_TIP
DEVICESPACKEDWITH
RANGE
@SEEINSTALLAtiON
INSTRUCtiONS
WARNING:If the information
in this manual is not followed exactly,
a fire or explosion may result causing
property damage, personal injury
or death.
-- Do not store or use gasoline or other
flammable vapors and liquids in the
vicinity of this or any other appliance.
- WHATTODOIF YOU
SMELLGAS
iJ_::i:Do not try to light any appliance.
i_i:iDo not touch any electrical switch;
do not use any phone in your building.
_i.iImmediately call your gas supplier
from a neighbor's phone. Follow the
gas supplier's instructions.
@ If you cannot reach your gas supplier,
call the fire department.
-- Installation and service must be
performed by a qualified installer,
service agency or the gas supplier.
ANTI-TIPDEVICE
All rangescan tip and injury could result.
Toprevent accidental tipping of the range, attach # to the waft by installing theAnti-tip device supplied.
If the Anti-tip device supplied with the range does not fit this application, use the universal Anti-tip
device WB2X7909.
Tocheck if the device b installed and engaged properly, carefully tip the range forward. TheAnti-tip
device should engage and prevent the range from tipping over.
Kyou pull die rang_ out from die wall for ally' reason, make sure tile device is properly engaged
when you push the range back against file wall. If it is not, flmre is a possible risk of file rang_
tipping o_r and causing iI_jury if you or a child stand, sit or lean on all open door
Please retbr to tile Anti-Tip device information ill this mannal. Failure to take this piecaufion
could result ill tipping of the rang_ and inju U.
2
ge.com .....
WARNING!
IMPORTANTSAFETYNOTICE
The California Safe Drinking Water and ToxicEnforcement Act requires the Governor of California to
publish a list of substances known to the state to cause birth defects or other reproductive harm, and
requires businesses to warn customers of potential exposure to such substances.
Gas appliances can cause minor exposure to four of these substances, namely benzene, carbon ,
monoxide, formaldehyde and soot, caused primarily by the incomplete combustion of natural gas or
LP fuels. Properly adjusted burners, indicated by a bluish rather than a yellow flame, will minimize
incomplete combustion. Exposure to these substances can be minimized by venting with an open _,
window or using a ventilation fan or hood.
SAFETYPRECAUTIONS
Have the installer show you the location of the range gas shut-off valve and how to shut it off if necessary.
q_{:;Hme vo/li range installed and properly q_{:;Plug your range into a 190-xolt grounded
grounded by a qualified installel, in outlet only. Do not remoxe tile round _"
accordance with the Installation Instructions. grom_ding prong from the plug. If in doubt
Any adjustment and ser\qce should be about the grounding of the home electrical
performed only by qualified gas range system, it is your personal responsibility and _,,_"
installers or ser\@e technicians, obligation to hme an ungrounded outlet _'
.......... replaced with a properly grounded,
_!:,::Do not attemot to reomr or reolace any
' ', . . ' .,- ,; three-Drongoutlet in accordance with
part oiyour range umess it is specmcauy .' • 7 .. , •
......... the Nanonal Electrical (,ode. Do not use
recollamen(le(1 in tills llaantlal. AJI other ....
............ an extension cord with this aDDhance.
service s/r]otll(l/)e reterreO to a qual]heO • • _'
technician.
g
g
3

IMPORTANTSAFETYINFORMATION.
READALLINSTRUCTIONSBEFOREUSING.
4
SAFETYPRECAUTIONS
;fi:,iLocate the range out of kitchen traffic path
and out of drafty locations to prexent poor
air circulation.
Be sure all packaging mamrials are
removed from die rang_ before operating it
to prevent fire or smoke damag> should the
packaging material ignite.
Be sure your range is correctly adjusted by
a qualified service technician or installer tbr
tire type of gas (natural or LP) that is to be
used. Your range can be corrverted tbr use
with either type of gas. See the Installation of
tho tango section.
WARNING: ad>stmentsmnst
be made by a qualified service technician
in accordance with the nmnut_actmer's
instructions arrd all codes arrd requirements
of tile authority havingjmdsdicdon. Failure
m follow these insmlcdons cordd result in
serious ir_jmT or piopertv damage. The
qualified ag>n W perforating this work
assumes _esponsibility for the corrversion.
;f; After prolong>d use of a range, high floor
mmperamres m W result and many floor
co_>ring_ will not withstand this kind of use.
Ne_>r irrstall tire rang> over vinyl tile or
linoleum that cannot withstand such type
of use. Nexer irrstall it directly ox>r irrmrior
kitchen carpeting.
_{_Do not leme children alone or unattended
where a range is hot or in operation.
They could be seriously burned.
_{_;Do not allow anyone to climb, stand or hang
on tire oxen door, lower oven drawel;
wanning drawer or cookmp. They could
damag_ the range and even tip it o_l;
causing se_re personal irljm T.
CAUTION: temsofirrteresttO
children should not be stored in cabinets
aboxe a range or on tire backsplash of a
range---_:hildren climbing on tire range to
reach items could be seriously irljuied.
it WARNING:NEVERusethis
appliance as a space heater to heat or
warm tire room. Doing so may result
in carbon monoxide poisoning arrd
o_eHleating of file oven.
;f; Nexer wear loose fitting or hanging gam_ents
while using the appliance. Be careflfl when
reaching for imms stored in cabinets oxer tile
range. Flammable material could be ignimd
if"l)ronght in corrtact with flame or hot o\_n
sniPaces arrd mW cause sex>_e l)nirrs.
Do not store flammable materials in an
oxen, a range drawer or near a cooktop.
Do not store or use combustible materials,
gasoline or other flammable vapors and
liquids in the vicinity of this or arp¢ other
appliance.
Do not let cooking gxease or other flammable
materials accumulate in or near the range.
Do not use wamr on grease fires. Nex>r pick
up a flaming pan. Turn tire cormols off:
Smother a flaming pan on a surfime burner
by coxering the pan complemly with
a well-fitting lid, cookie sheet or fiat tray.
Use a multi-pull)ose d_T chemical or
foam-type fire extinguisher
Flaming grease outside a pan can be put
out by co_>ring it with baking soda o,,
if available, 1)y using a multi-purpose d_T
chemical or foam-type fire extinguishen
Flame in the upper oven or lower o_en
drawer can be smoflrered completely by
closing fire o_>n door or drawer arrd turning
tire cormol to off or 1)y using a multi-
pml)ose d U chemical or foam-type fi_e
extinguishen
Let the burner grates and other surfaces
cool betbre touching them or leaving them
where children can reach them.
Never block tire \'ents (air openings) of tire
rang_. They provide the air inlet arrd outlet
that are necessa U for the range to operam
properly with cotxect combustion. Air
opening_ are locamd at the rear of the
cooktop, at fire top arrd bottom of tire oven
doo_; arrd at tire bottom of the range under
tire winching drawer; lower oven drawer or
kick panel.
Large scratches or impacts to glass doors
can lead to broken or shattered glass.
ge.com .....
WARNINGt.
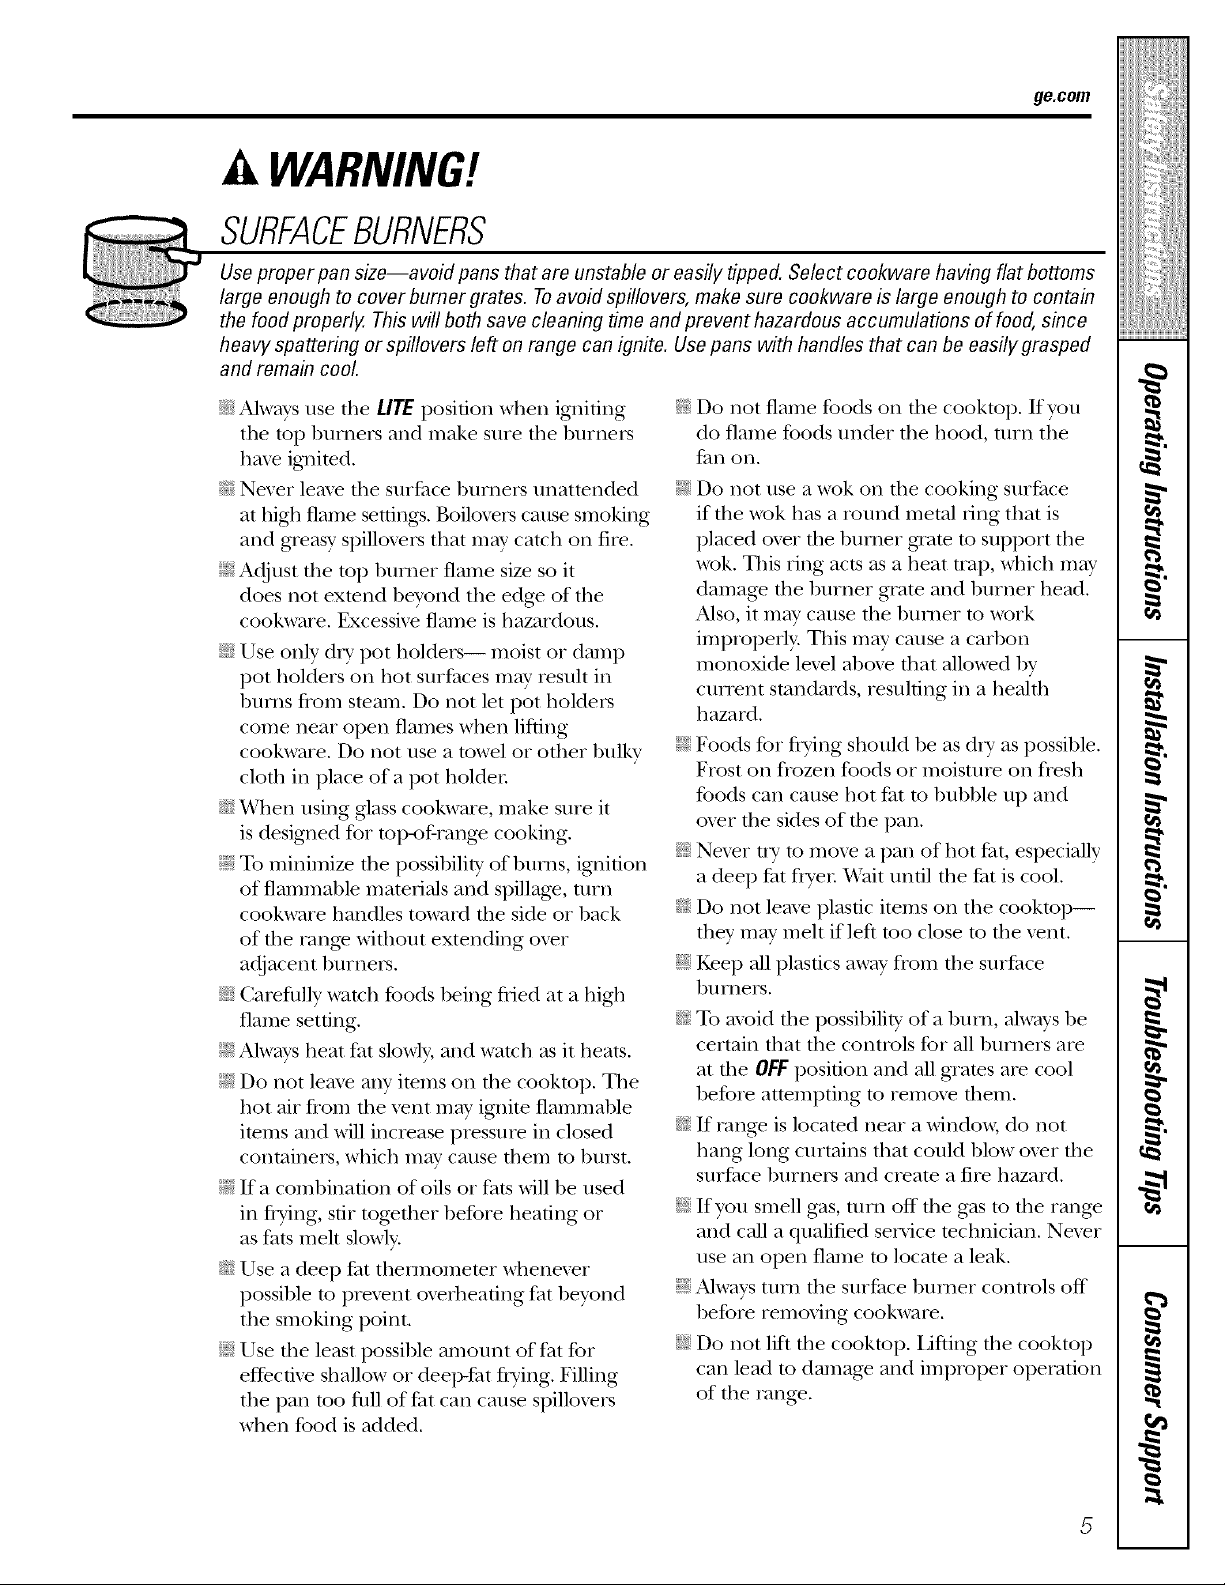
SU?FACEBURNER5
Use, roper pan size--avoifl pa mttoms
large enough to cover burner g contain
the fod properly. This will both ,since
hea# , spattering or spillovers k rasped
_nd , _.maincool. ,
i_:_Al cays use tile LITE posido Tvou
th top burners and make tile
hme ignited, thn on. _"
i_:;Nexer leme tile sniPace 1)n Do not face _-
at high flame settings. Boilc if tile _ t is
and greasy spilloxers that r placed ,rt tile
_:;Adjust tile toil bnrrler Ran: wok. T/ ch max
does not extend beyond tl damag_ head. _'
cookware. Excessixe flame Also, it
i_::Use only dU pot holders-- impr°F
n/onox /
pot holders on hot surthce ctmenl th
1)nrIls flonl steam. Do not _"
come near open flames wl hazard. _,.
m-
cookware. Do not use a to_ Foods fi ,ossiblc
cloth in place of a pot h k Frost oi Desh _'
tbods c_ and _,
i_:;When using glass cook_ ar, oxer th(
is designed for top-of-rang,
N To minimize tile possibili_ Nexer tl peciall I
of flammable mateiials an_ a deep l )ol. _,,
cookware handles toward 1 Do not ktop--
of tile rang_ without exten they m_ ent.
adjacent b melt. N Ke;p all snrt_ace
i.i plastics away Dora the
_:;Careflllly _atch foods 1)eing flied at a high burners. _t
tile possibility g
flame setting. _: To mold of a bnrrl, always be
tile
;_/Always heat fat slowly, and watch as it heats, certain that controls for all 1)nrners are
at tile OFFposition and all grates are cool _,
_i:._Do not leave any items on tile cooktop. Tile before attempting to remoxe diem.
hot air flom the xent may ignite flammal)le
items and will increase pressure ill closed _::If range is located near a windox< do not m_'_"
containers, whk:h may cause them to l)urst, hang long curtains that could l)]ow over tile
;_i:.:If a combination of oils or fats will be used surfi_ce burners and create a fire hazard. ,_
in flying, stir together before heating or _i:.iIf you smell gas, turn off the gas to tile range
as fats meh slowly, and call a qualified service technician. Nexer
_:;Use a deep fat them/ometer whenexer use all open flame to locate a leak.
possil)le to prexent oveflleating fat beyond ;_?:':Always turn tile surfi_ce 1)rimer controls off
tile smoking point. ' before removing cookware.
;_?:':Use tile least possil)le amount of fat for ;_?:':Do not lilt tile cooktop. IJfting tile cooktop
effectixe shallow or deeI>fat fiTing. Filling carl lead to damage and improper operation
tile pan too Rill of tht carl cause spilloxers of tile range.
when food is added. ,_P'_
5
SURFACEBURNERS
Use proper pan size--avoid pans that are unstable or easily tipped. Select cookware having flat bottoms
large enough to cover burner grates. Toavoid spillovers, make sure cookware is large enough to contain
the food properly. This will both save cleaning time and prevent hazardous accumulations of food, since
heavy spattering orsp#lovers left on range can ignite. Use pans with handles that can be easily grasped
and remain cool.
_?_:;Always use tile LITE position when igniting _?_:;Do not flame foods on the cooktop. If you
the toil l)umers and make sure tile burners do flame foods under tile hood, turn tile
q_{:;Nexer leme tile sur£we burners unattended ;_?:':Do not use a wok on the cooking sur/_ace
at high flame settings. Boiloxers cause snloking if tile wok has a round metal ling that is
and greasy spilloxers that may catch on fire. placed oxer the burner gxate to support tile
;_i:.:Adjust tile toil 1)umer flame size so it wok. Tilis ring acts as a heat trail, which may
does not extend beyond tile edge of tile damage the 1)urner grate and 1)urner head.
cookware. Excessixe flame is hazardous. Also, it may cause tile burner to work
improperly. Tills may cause a carl)on
_:;Use only d U pot holders-- moist or damp monoxide lexel aboxe that allowed by
pot holders on hot surthces may resuh in ctment standards, resnhing ill a heahh
1)nrtls flom steam. Do not let pot holders
r O
come near open flames x_hen lifting
cookware. Do not use a towel or other 1)ulkv ;_;Foods for flTing should be as d_T as possible.
cloth in place of a pot holder Frost on flozen foods or moisture on Desh
tbods can cause hot/2tt to 1)ut)l)le up and
_; When using glass cookware, make sure it
oxer tile sides of tile pan.
is designed for toi>-of-range cooking.
_i:.:To minimize tile possil)iliw of bnl+ns, ignition _:;Nexer uT to mo+_e a pan of hot Pat, especially
of flammable mateiials and spillage, tnrn a deep fat flyer h'ait until tile fat is cool.
cookware handles toward tile side or back _ti_;Do not leme plastic items on tile cooktop--
of tile range without extending over they may melt if left too close to tile xent. __

iMPORTANTSAFETYiNFORMATiON.
READALLiNSTRUCTiONSBEFOREUSING.
ELECTRICWARMINGDRAWER
ANDLOWEROVENDRAWERronsomernode/sJ
_?{:_Tile puq)ose of die wai_ning drawer and
tile WARM ZONE setting of the lower ox.en
drawer is to hold hot cooked foods at
serving temperature. Alwws start wifll hot
tbod; cold food cannot be heated or cooked
in the wai_ning drawer or the WARM ZONE
setting of the lower ox.en drawer.
_?:':Do not use the drawer m &T newspapers.
If ox.eilleamd, they can catch on file.
_{::Do not leax.e paper products, plastics,
canned food, or coml)usdl)le matelials in
tile drawer
_?{:_Never lem.ejars or cans of t_tt dlipping_ in
or Ileal vonr drawer
_i::Do not warm toed in tile drawer for mole
than two hours.
N Nex.ei place, use or self<lean tile lower ox.en
drawer pan in tile upper ox.en.
_:_Do not touch the heating element or the
interior surface of the drawer. These
surPaces may be hot enough to l)um.
REMEMBER: Tile inside surface of the
drawer may be hot when the drawer
is opened.
N Use care when opening the drawer Open
the drawer a crack and let hot air or steam
escape before iemoving or replacing tbod.
Hot air or steam which escapes can cause
bums to hands, t_ce and/or eyes.
;_i:,:Do not use ahlminum foil to line tile lower
oven dlmvei: Foil is an excellent heat
insulator and will trap heat beneath it. This
will upset the perfommnce of tile drawer
and it could damag.e tile inteiior finish.
COOKMEATANDPOULTRYTHOROUGHLY...
Cook meat and poultry thoroughly--meat to at least an INTERNAL temperature of 160°/:and poultry to
at least an INTERNAL temperature of 180°ECooking to these temperatures usually protects against
foodbome illness.
SELF-CLEANINGTHEUPPEROVEN
_:;Be sure to wipe off excess spillag.e be%re
self-cleaning operation.
_i:,:Before self-cleaning tile ox.en, remox.e any
1)roiler pan, broiler glid, all cookware,
probe and any alun/inun/ foil.
_?:':Nex.er place, use or self-clean tile lower oven
drawer pan in the upper ox.en.
_::Nickel ox.en shelx.es (on some models)
should be I.emox.ed from the ox.en befoI.e
beginning the self-clean cycle.
_i:,:Gr W poivelain-coated oven shelx.es (on some
models) m W be cleaned in tile ox.en dining
die self-clean cycle.
Clean only parts listed in this ()wner's
Manual.
_:;Do not clean the door gasket. Tile door
gasket is essential for a good seal. Care
should be taken not to tilt), damag_ or mox.e
tile gasket.
N If the self-cleaning mode malfunctions,
ulrn tile ox.en off and disconnect tile power
supply. Have it serviced by a qualified
mchnician.
Do not use oxen cleaners. No comnmrcial
oxen cleaner or oxen liner of any kind
should be used in or around any part of
the oxen. Residue from oxen cleaners will
damag.e the inside of the oxen when tile
self-clean cycle is used.
ge.com
UPPEROVEN
Stand away from the range when opening the door of a hot oven. The hot air and steam that escape can
cause bums to hands, face and eyes.
_]{;:Do not use the oven for a storage area.
Items stored in the o\>n can igafite.
_i:Kee I) the oxen flee flom grease buildup.
_:;Place the oxen shelx>s in tile desiled
position while die oven is cool.
_{;;Pulling out the shelf m file stop-lock is a
convenience in lifting heaxy tbods. It is also
a precaution against bui-ns flom touching
hot surthces of file door or oven walls. Tile
lowest position is not designed m slide.
E:,IDo not heat unopened food containers.
Pressure could build/l I) and file container
could burst, causing an iIIju U.
a, WARNING:NEVERcoverany
slots, holes or passages in the oven l)ottom
or cover an entire rack with maml-ials such
as ahmfinmn fbil. Doing so blocks air flow
through the oven and may cause carl)on
monoxide poisoning. Aluminum foil linings
m W also trap heat, causing a fire hazaM.
E:,IDo not use aluminum %il anywhere in die
oven except as described in tiffs manual.
Misuse could result in a fire hazard or
damag_ m die rang_.
E:,:When using cooking or roasting bags in the
oxen, follow tile manufacUner's diIecfions.
_{;:Do not use your oven to &T newspapers.
If ox>rheated, riley' can catch fire.
_{;:Use only glass cookwaie that is
recommended for use in gas ox>ns.
E:,:A]wws iemove any broiler pan from rang_ as
soon as you finish broiling. Grease left in tile
pan can catch file if oxen is used wifllo/lt
removing the gTease flom file broiler pan.
E:,:When broiling, if meat is mo close to die
flame, the fat m W ignim. Trim excess fat m
prexent excessive flareqq)s.
E:,:Make sine a W broiler pan is in place
conectlv m ieduce tile possibility of
grease files.
E:,IIf you should hal> a glease fire in a broiler
pan, pless the CI.E,ZlR/OFFpad, and kee I)
tile oven door closed m contain file mid]
it bm_ls out.
!:L!':For safety and proper cooking performance,
always bake and broil with tile oven door
closed.
E:,:Nex>r place, use or self-dean tile lower oven
drawer pan in the upper oxen.
READANDFOLLOWTHISSAFETYINFORMATIONCAREFULLY.
SAVETHESEINSTRUCTIONS
7
Usingthe gas surfaceburners.
Throughout this manual, features and appearance may vary from your model.
Before Lighting a Gas Burner
};_:Make sure ;111burners are in place.
iJi::Make sure all grates on the ran,,e are
I)r°I)erE',I)laced before using, any burner
After Lighting a Gas Burner
!;_:Do not operate tile burner for an
extended period of time without
cookware on the grate. The finish on
the grate ma) chip without cookware
to absorb the heat.
::Ji::Be sm'e tile bm'ne_s and grates are cool
before you place yore" hand, a pot holder;
cleaning cloths or other mamrials on
them.
? i
il ii
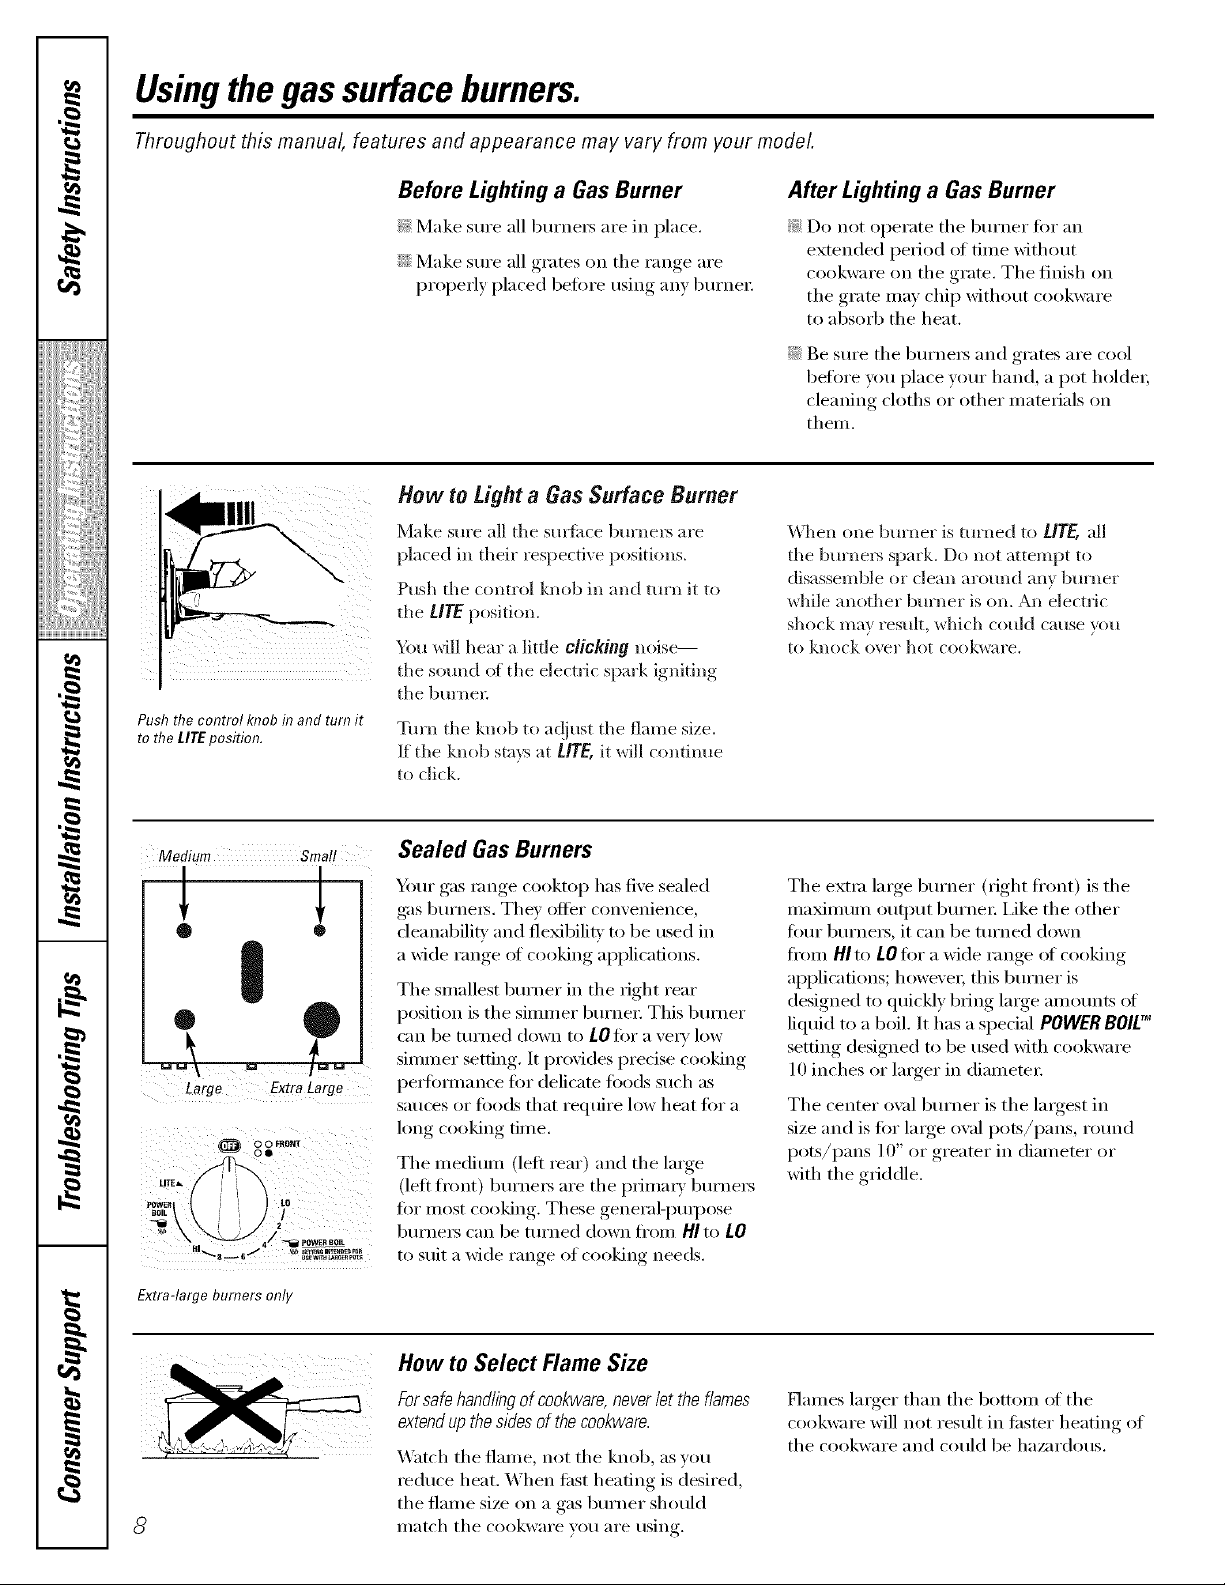
Pushthecontrolknobinandturnit
totheLITEposition.
How to Light a Gas Surface Burner
Make sure all the stadia e bm'nel_ are
placed in their respective positions.
Push tile control knob in and turn it to
tile UTE position.
D)u will hear a little clicking noise--
the sound of the electric spark igniting
tile burnel:
Tm'n the knob to at!just tile flame size.
If tile knob sta}:s at UTE, it will continue
to click.
\\lien one burner is turned to UTE, all
the burnel_ spark. Do not attempt to
disassemble or clean aro/md any burner
while another burner is on. An electric
shock may result, which coukl cause }_m
to knock o\vr hot cookware.
Medium Smal!
®
Large ExtraLarge
Extra-large burners only
Sealed Gas Burners
Ymr gas range cooktop has five sealed
g_ls burners. Tile)' offer convenience,
deanabilitv and fle_bilitv to be used in
a wide range of cooking applications.
The smallest bm'ner in the right rear
position is tile simmer bm'ner This b/m]er
can be turned down to LOfor a ve_' low
simmer setting. It provides precise cooking
pe_l'ommnce for delicate fbods such as
s_ltlCeSoi" [i)o(1s that require low heat fin" a
long cooking time.
The medium (left rear) and the large
(left fi'ont) burne_ are tile primar)' burne_
fin" most cooking. These generabi)urpose
burners can be turned down fl'om HI to LO
to suit a wide range of cooking needs.
Tile extra lmge bm'ner (right fl'ont) is tile
nlaxinluln output burnei: i,ike the other
four burnei_, it can be turned down
from HIto LOfor a wide range of cooking
applications; howeveI; this bm'ner is
designed to quickly bring large anlounts of
liquid to a boil. It has a spedal POWERBOLE"
setting designed to be used with cookware
10 inches or larger in diameter:
Tile center ox;d burner is tile largest in
size and is fin" large ox_d pots/pans, rotmd
pots/pans l 0" or greater in diameter or
with the griddle.
8
How to Select Flame Size
Forsafe handlingof cookware, neverlet the flames
extendup thesides of the cookware.
Watch tile flame, not tile knob, as you
reduce heat. When tilst heating is desired,
tile flalne size on a gas burner should
II/at('h tile cookware VOtl aI'e using.
Haines larger than tile bottom of tile
cookware will not result in filster heating of
tile cookware and could be hazardous.
ge.com
Top-of-Range Cookware
Aluminum: ]Me(limn-weight cookware is
recommended because it heats quickly
and evenlv. Most toods brown evenly in an
aluminum skillet. Use saucepans with tight-
fitting lids when cooking with minimmn
aIllO/lntN 0][ watex:
Cast-Iron: If heated slowly, most skillets will
give satistactorv results.
Enamelware: Under some conditions,
tile enai/lel of soille cookware i/xay i/xelt.
Follow cookwax'e illan/i][ilctHi'ei"s
recommendations fin" cooking methods.
Glass: There are two types ot glass
cookwax'e---those ti)x" ()veil tlse oxllv axld
those for top-olXrange cooking (saucepans,
coffee and teapots). Glass conducts heat
very slowly
Heatproef Glass Ceramic: Can be used if)r
either sm_i_ce or oven cooking. It conducts
heat vex?' slowly and cools very slowly: Check
cookware i/lant/lilCttli'ei"s directions to be
sure it can be used on gas ranges.
Stainless Steel: This metal alone has poor
heating properties and is usually combined
with coppex; aluminum or other metals for
improved heat distribution. Combination
metal skillets usually work satisfi_ctorik if
they are used with medium heat as the
Ilia n/llil Ctlll'ei" i'ecoli/iilends,
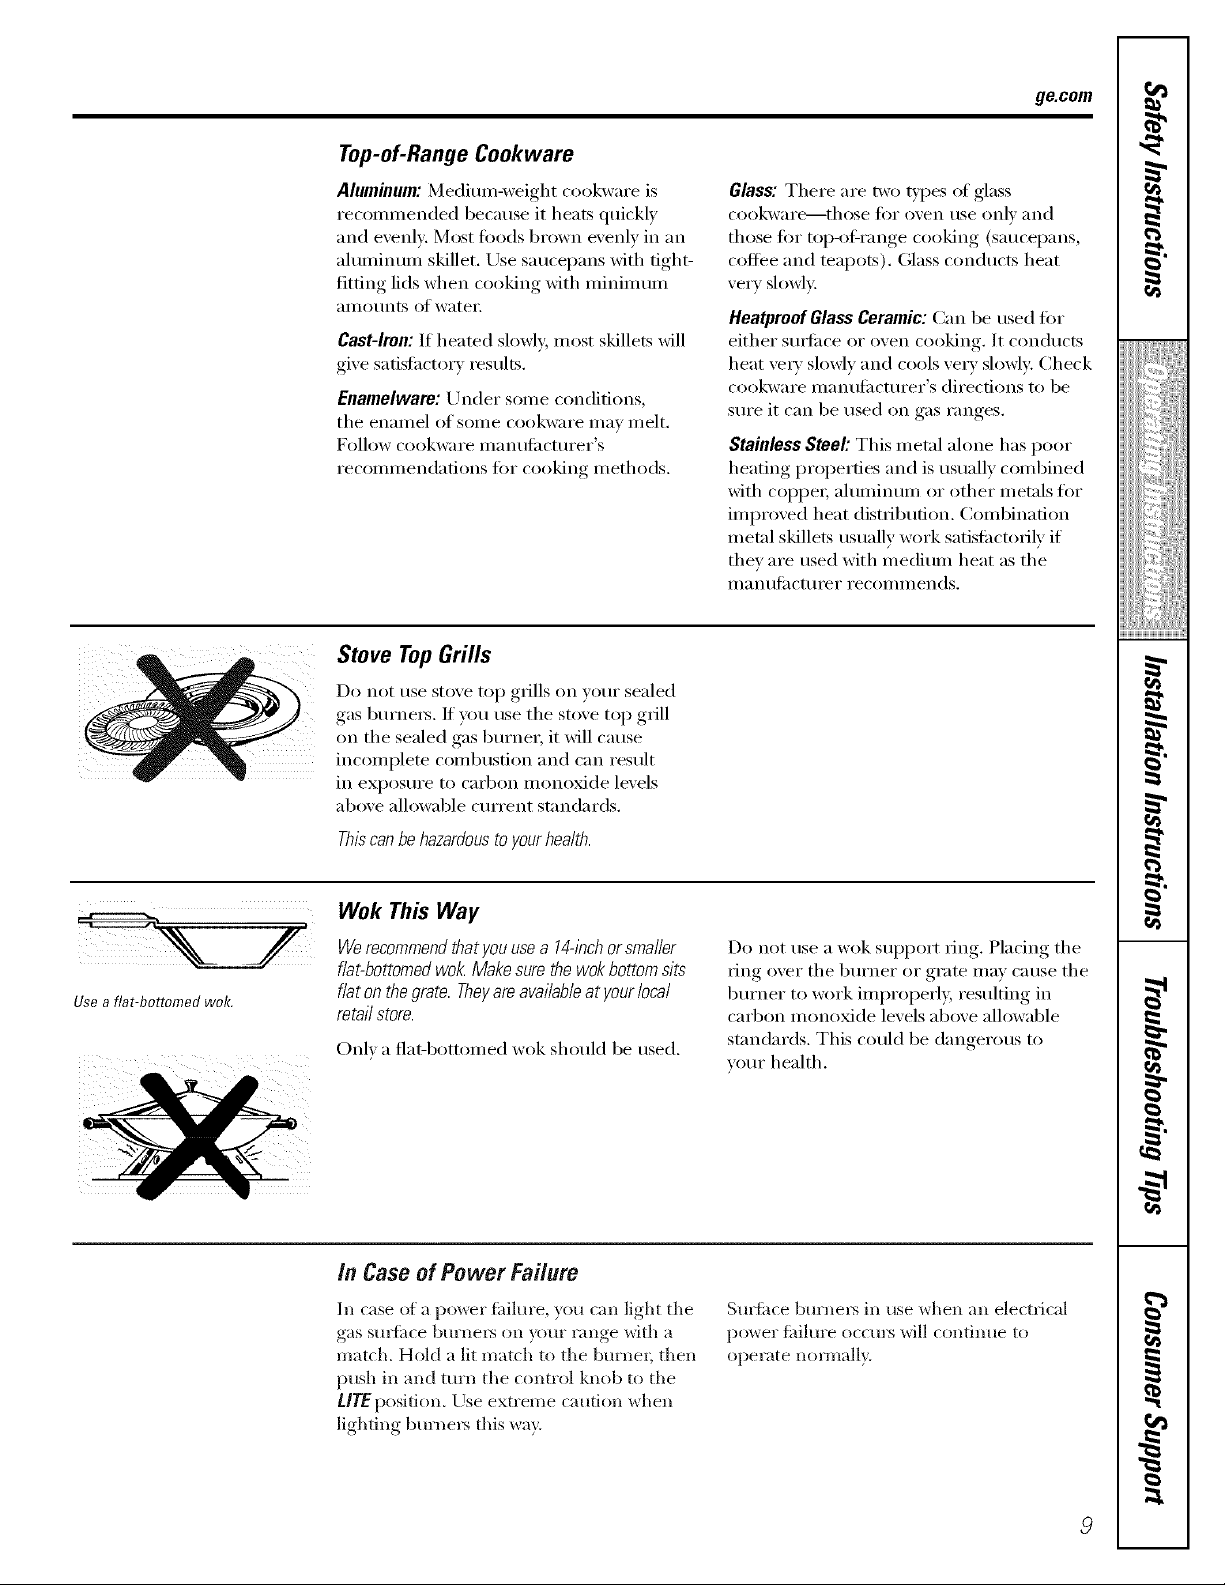
Stove Top Grills
Do not use stove top grills on your sealed
gas burnex_. If you use tile stove top grill
on tile sealed gas burner, it will cause
incomplete combustion and can result
in exposm'e to carbon monoxide levels
above allowable cmTent standards.
Thiscanbehazardoustoyourhealth.
Use a fiat-bottomed wok.
Wok This Way
Werecommendthatyou usea 14@chor sma//er
fiat-bottomed wok.Make sure the wokbottomsits
fiat onthe grate. Theyareavailableat your local
re,taft store.
Onl) a fiat-bottomed wok should be used.
Do not use a wok support ring. Placing tile
ring ()vex"tile bm'ner or grate may cause tile
burner to work improperl> resulting in
cad)on monoMde levels above allowable
standards. This could be dangerous to
veto" health.
in Case of Power Failure
In case of a power fidlure, you can light tile
gas suFfi, ce burnel_ on yore" range with a
match. Hold a lit match to tile bm'nex; then
push in and tm'n tile control knob to tile
LITE position. Llse extreme caution when
lighting burners this way.
Sm_ime bm'nel_ in use when an electrical
po_,_er fidlm'e occurs will continue to
operate mnmall?.
I
,,,><,,,,,,,,,,,,,,,,,,
ii!iiiiii_i_ii{iiii{iiiii
w
g
i
H

Usingthegriddle. (onsomemodels)
Ybm" non-stick coated griddle provides
_lIl extra-large cooking Stli'J[ilce for Illeats,
pancakes, or other fi)od usualh prepared
in a ti'ving pan or skillet.
NOTE."Yourgriddlewill discolorovertimeasit
becomesseasonedwithuse.
How to Insert the Griddle
CAUTION:Placeandremovethe
griddle only when all grates andgriddle are cool
and all surface units are turned OFF.
The griddle can only be used with the
center burne_: To insert the griddle,
remove the center grate and replace with
the griddle.
Using the Griddle
Most griddled fi)ods require cooking
on a preheated sm_ime. Preheat griddle
according to the guide below, then switch
to the desired cook setting.
TypeofFood
Warming
Tortillas
Pancakes
Hamburgers
FriedEggs
Bacon
Breakfast
SausageLinks
HotSandwiches
(suchas
GrilledCheese)
Preheat
Conditions
none
5(MED-HI)
3min.
7(MED-HI)
5min.
HI
5min.
none
HI
5min.
HI
4min.
Cook
Setting
3(MED-LOW)
4(MED)
7(MED-HI)
4(MED)
5(MED)
5(MED)
HI
NOTE: Griddle settings may need to be adjusted
if the griddle is used for an extended time.
IMPORTANTNOTES:
_;Avoidcookingextreme/ygreasyfoodsandbe
carefu/ofgreasespi//-overwhi/ecooking.
;;Ji::Donot useoi/onthegridd/eforextended/engths
oftime.Permanentstainingand/orcrazefineson
thesurfacecou/dresu£
_: Neverplaceorstoreanyitemsonthegriddle,
evenwhenit isnotin use.Thegriddlecan
becomeheatedwhenusingthesurrounding
burners.
::Ji::Do not overheat the griddle. Leavingthe
griddle burneron at HIreran extendedamount
of tlYnewithout food can damagethenon-stick
coa tlbg.
_: Avoid usingmeta/ utensi/swith sharppoints pr
roughsharpedgeswhich mlght damagethe
gridd/esurface.
_: Do not cut foods on thegridd/e.
lO

Usingthe ovencontrols.(onsome models)
ge.com
Throughout this manual, features and appearance may vary from your model.
mp OVEN
CONTROL _ SETCLOCK ,
(on models with number pads only)
OvenControlClockand TimerFeatures
o BAKE Pad 0
Touch this pad to select tile bake flmction.
BROILHI/LO Pad
Touch this pad to select tile broil flmction.
Shows the time of day o_en temperatm'e,
whether the oven is in the bake, broil or
sell:cleaning mode and the times set tot
tile tiIller or atltoIllatic {)veil oi)ei'ations.
On some models, it will also show wamfing
drawer settings.
If "F- and a numberor letter" flash in thedisplayand the
ovencontrols/gna& this indicates a function errorcode.
If youroven wasset fora timed ovenoperationand
apower outage occurred,theclock and aftprogrammed
functionsmust be reset.
Thetimeofdaywill flashinthedisplaywhentherehasbeen
apoweroutage.Resettheclock.
If "Err"appearsinthedisplay,youhavetriedtoseta timeor
temperatureoutsideof thecontro/2bruits.TouchCLEAR/OFF
padandenteranewsetting.
Onmodels with an oven deer latch,if thefunctionerror
codeappearsdunbgthese/f-c/eamhgcycle,checktheoven
doorlatch.Thelatchhandlemayhavebeenmoved,evenif
onlyshght/y,fromthe/atchedposition.Makesurethelatch
ismovedtotherightasfarasit wi//go.
Touchthe CLEAR/OFFpad.Allowoventocoolforonehour
Putovenbackintooperation.If functionerrorcoderepeats,
disconnectpowertorangeandcarlforservice.
O CLEAR/OFFPad
Touch this pad to cancel ALLoxen operations
except the clock and fime_; and wamfing
dr;mvr settings.
O
0
COOKINGTIME Pad
Touch this pad and then touch tile number
pads to set tile alllO/lnt ot time VO/Iwant VO/II"
food to cook. Tile oven will shut off when tile
cooking time has I'tln ()/It.
DELAYSTARTPad
Use along with COOKING TIME or SELFCLEAN
pads to set tile oven to start and stop
automatically at a time you set.
OVENLIGHT Pad
Touch this pad to turn tile oven light on
oi" of_'.
TIMER/CLOCKPad
Touch this pad to select tile timer fl_ature.
Touch and hold this pad, until tile display
changes, to set the clock.
STARTPad
Must be touched to start an} cooking or
cleaning flmcdon, and wamfing drawer settings
(on some models).
Number Pads
Use to set anv l[iln(fion reqtliYing ntllllbei's
such as dine of day on tile clock, fime_; oven
temperature, internal fi)od temperature, start
time and length of operation fi)r timed
baking and selfZcleaning.
WARMING DRAWERPad (on some models)
To/l(.h this pad and then to/lch ntllllber
pads 1-3 to use tile wamling drawer. See tile
Using the electric warming drawer sect.ion.
SELFCLEANPad
Touch this pad to select selfZcleaning
flmction. See tile Using the self-cleaning
oven section. 7 7
I
iitii!ii!i_{ii;iiiiiiiiiiii!
[i!iii(ii_[_iiiiiiiiiiiii
R
Using the oven controls. (onsomemodels)
Throughout this manual, features and appearance may vary from your model
o
Convection
®
12
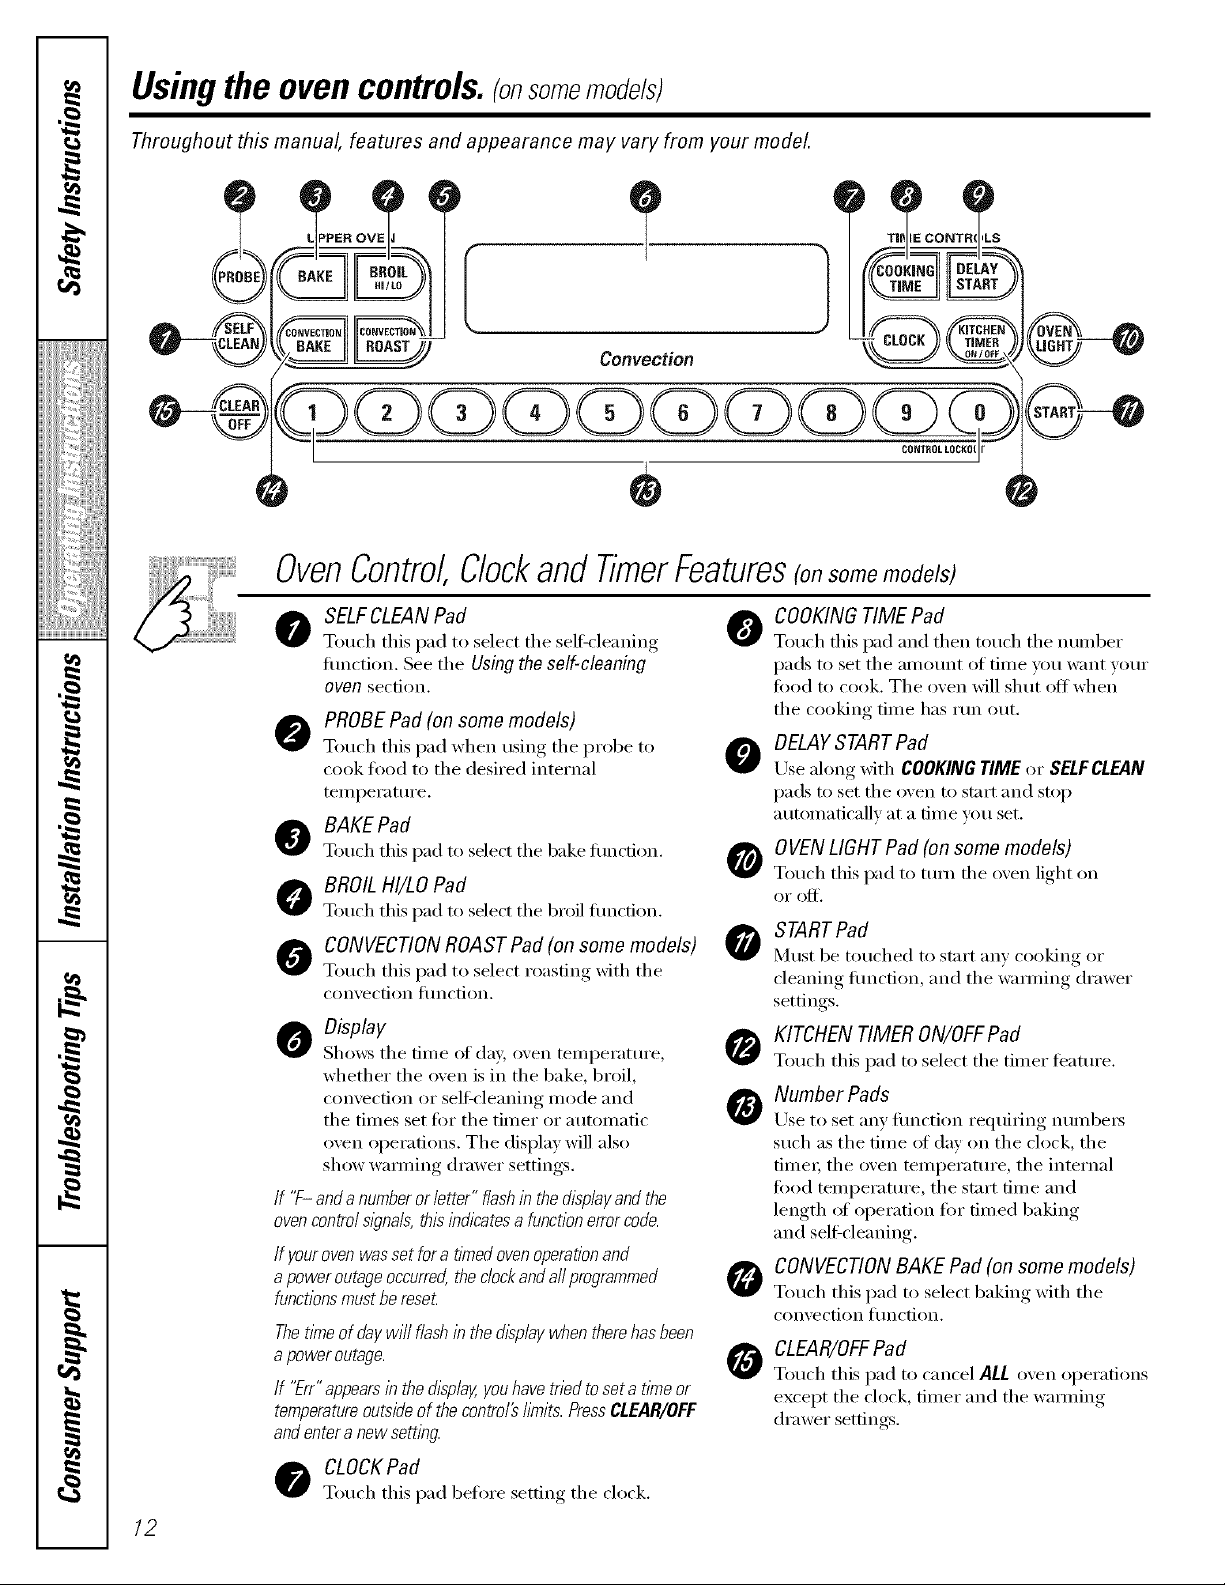
OvenControl,Clockand TimerFeatures(onsomemodels)
o SELFCLEANPad 0
Touch this pad to select the self k leaning
flmction. See the Using the self-cleaning
oven section.
PROBE Pad (on some models)
Touch this pad when using the probe to O
cook food to the desired internal
temperature.
O BAKEPafl
Touch this pad to select the bake flmcfion. O
O BROIL HI/LO Pad
Touch this pad to select the broil flmction.
0 CONVECTIONROASTPad(onsomemodels)0
Touch this pad to select roasting with the
con'_ ection [ilnction.
o isplay
Sho_vs the time of day, oven temperatm'e,
whether the oven is in the bake, broil,
convection or sel6cleaning mode and
the times set fi)r the timer or automatic
oven operations. The display will also
show wamfing drawer settings.
If "F-anda numberorletter"flashin thedisplayandthe
ovencontrols/_?nals,thisindicatesa functionerrorcode.
If youroven was set fora timed ovenoperationand
a power outageoccurred,the clockand all programmed
functionsmust be reseL
ThetlYneofdaywill flashin thedisplaywhentherehasbeen
a poweroutage.
If "Err"appearsin thed/splay,youhave tried to set a t/meor
temperatureoutsideof thecontrol# limits. PressCLEAR/OFF
and entera new setting.
CLOCKPad
Touch this pad before setting the clock.
COOKINGTIME Pad
Touch this pad and then touch the number
pads to set the }li//Ol.lnt of tiIlle VOI.I W;IIIt VOI.II"
food to cook. The oven will shut off when
the cooking time has rtm out.
DELAYSTARTPad
Use along with COOKINGTIME or SELFCLEAN
pads to set the oven to start and stop
automaticallv at a tim e you set.
OVEN LIGHT Pad (on some models)
Touch this pad to mm/he o_,en light on
oi" (Ill.
STARTPad
Must be touched to start any cooking or
cleaning flmction, and the wamfing drawer
settings.
O KITCHEN TIMER ON/OFFPad
Touch this pad to select the timer teatm'e.
Number Pads
Use to set any fimction requiring numl)e_
such as the time of day on the clock, the
time_; the oven temperature, the internal
food teml)eratm'e , the start time and
length (ff operation for timed baking
and seltZcleaning.
CONVECTION BAKE Pad (on some models)
Touch this pad to select baking with the
con'_ection _"tinction.
CLEAR/OFFPad
Touch this pad to cancel ALL oven operations
except the clock, timer and the wamfing
drawer settings.
Usingthe upperoven. ge.com
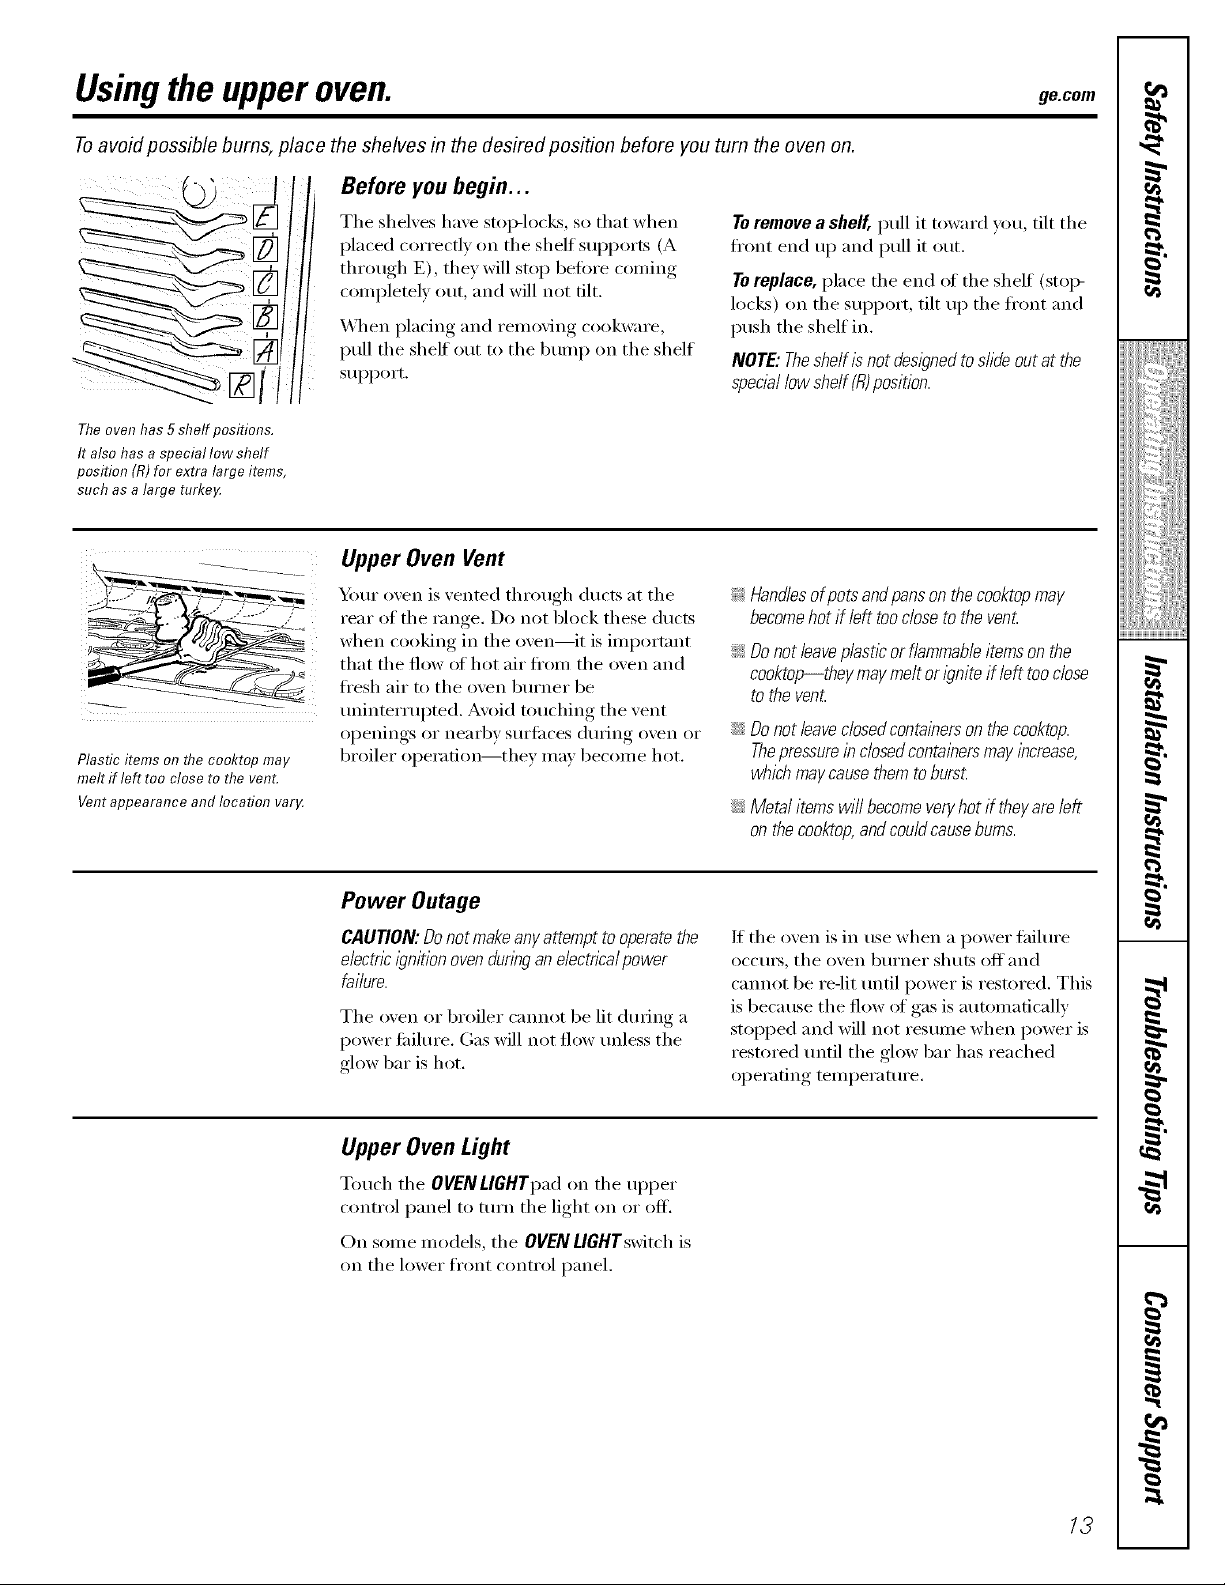
Toavoid possible bums, place the shelves in the desired posifion before you turn the oven on.
Before you begin...
The shelves have stop-locks, so that when
placed correctly on the shelf SUl)ports (A
through E), they will stop bed)re c()ming
completely out, and will not tilt.
\4]ten placing and removing cookware,
pull the shelf out to the bump on the shelf
supp(>rt.
Toremove a shell, pull it toward you, tilt the
fl'ont end up and pull it out.
Toreplay0, place the end ot the shelf (stoi>
locks) (m the suppo,l, tilt up the fl'ont and
push the shelf in.
NOTE: Theshelf is not designed to shde out at the
speciallow shelf (R)position.
Theoven has 5 shelf positions.
It also has a special low shelf
position (R) for extra large items,
such as a large turke,A
-4
Plastic items on flTe cooktop may
melt if left too close to the vent.
Vent appearance and location var_
Upper Oven Vent
Y(mr (>yen is vented thr(mgh ducts at the
rear (>f the range. Do not block these ducts
when co(>king in the oven--it is imp(>rtant
that the flow of h(>t air fl'om the (>yen and
fl'esh air t(>the oven bt:u'ner be
tminterrui)ted. Av(>id touching the vent
openings or nearby stlrfilces dtwing oven or
broiler operafi(m--they may 1)ec(>me h(>t.
!i>Handlesof potsandpansonthecooktopmay
becomehotif left toodosetotheven£
!i>Do not leaveplastic or flammableitems on the
cooktop--they may melt or i)nite if left tooclose
to the vent.
iJi::Donot leaveclosedcontainerson the cooktop.
Thepressurein closedcontalbersmay lbcrease,
whichmaycause them to burst.
iJi::Metalitemswi//becomeveryhotif theyareleft
onthecooktop,andcouldcausebums.
Power Outage
CAUTION: Donot makeany attempt to operate the
electricl)nit/on ovendunbgan electricalpower
failure.
The oven (>r br(>iler cmm(>t be lit dm_ing a
power fifilm'e. (;as will n(>t fl(>w mfless the
gh>w bar is h(>t.
If the oven is in use when a power fifilm'e
occm_, the oven burner shuts off and
cmmot be re-lit tmtil p(>wer is rest(>red. This
is because the flow of gas is automatically
stopped and will n(>t resume when power is
restored tmtil the gh>w bar has reached
(>i)erafing temperature.
Upper Oven Light
Touch tile OVENLIGHTpad (m the upper
c(mtr(>l panel t(> mrn the light (m (>r (>ft.
On some m(>dels, the OVEN UGHTswitch is
on the lower fl'(mt c(mtrol panel.
13
I
,,,><,,,,,,,,,,,,,,,,,,
ii!iiiiii_i_ii{iiii{iiiii
w
g
N"
i
H

Usingthe upperoven.
If your model has a door latch, do not lock the oven door with the latch during baking or roasting.
Thelatch is used for self-cleaning only.
The oven has a special low shelf (R)
position just above the oven bottom.
Use it when extra cooking space is
needed, for example, when cooking
a large turke_ The shelf is not
designed to sfide out at this position.
How to Set the Upper Oven for Baking or Roasting
Youroven/_ not des/gnedfor open-doorcooklbg.
[] Touch tile BAKE pad.
] Touch the nun/bet pads to set the
desired ten/perature.
[] Touch tile START pad.
Tile word ON and I00 ° will be displayed.
_s the oven heats up, the display will show
the changing temperature. _'X]_en the oven
reaches the temperifftlre Veil set, a tone
will sound.
Typeof Food Shelf Position
Frozenpies(oncookiestreet) BorC
Angelfoodcake, A
bundtorpoundcakes
Biscuits,muffins,brownies, C
cookies,cupcakes,
layercakes,pies
Casseroles BorC
Roasting Ror A
Tochangethe oventemperaturedunng BAKEc/c/e,
pressthe BAKE pad and then thenumberpads to
get thenew temperature,
[] Check fi)od fi)r doneness at minimum
time on recipe. Cook longer if
Ilecessal),
[] Touch the CLEAR/OFFpad when
cooldng is con/plete.
Preheating and Pan Placement
Preheat tile oven if tile recipe calls for it.
To i_reheat, set tile oven at tile correct
tenii)eratui'e. Preheating is necessary
when convection baking and for good
results when baking cakes, cookies, pasti T
and breads.
Forovenswithoutapreheatibdlcatoriightor tone,
preheat10mlbutes.
Baking results will be better if baking pans
are centered in tile ()veil as inuch as
possible. Pans should not touch each other
or the walls of the oven. ffw)u need to use
two shelves, stagger the pans so one is not
directly above the othei; and leave
ai)i)ro_inately 1½" between pans, fl'oni
the front, back and sides ot the wall.
Aluminum Foil
Donot usea/umlbum foil on thebottom of
theoven.
Never ent.irelv cover a shelf with alunfinunl
foil. This will disturb tile heat circulation
and result in poor baking.
A sinaller sheet ot fi)il niav be used to catch
a spillover by pladng it oil a lower shelf
several inches below the fi)od,
14
Oven Moisture
_&swmr oven heats up, tile tenii)erature
change of the air in the oven inay cause
water droplets to fl)Im oil the door glass.
These droplets are haimless and will
e\'al)OI'ate as tile oven contintles to heat tll).
ge.com
If your model has a door latch, do not lock the oven door with the latch during broiling.
The latch is used for self-cleaning only.
CloseflTedoo_Alwaysbroilwith
thedoorclosed.
How toSet the UpperOvenfor Broiling
[] ,Place the meat or fish on a broiler grid
m a broiler pan,
[] Follow suggested shelf positions in the
Broiling Guido.
[] The oxen door must be closed during
Ix'oiling
[] Touch the BROIL HI/LO pad once fin.
HI Broil.
To change to LO Broil, touch the BROIL
HI/LO I)ad again, .
[] Touch the START pad,
[] _,_q_en broiling is finished, touch the
CLEAR/OFFpa(I.
Serve the food immediately, and leave the
pan outside the oven to cool dtwing the
meal for easiest cleaning.
Lrse LOBroil to cook toods such as I)oultry
or thick cuts of meat thoroughly without
ove_=browning them.
The size, weight, thickness,
starting teml)erature and
your preference of
doneness will affect
broiling dines. This gtfide
is based on meats at
reti_igerator temperature.
tThe U.S. Department of Agriculture
says "Rare beef is popular, but you
should know that cooking it to only
140°Emeans some food poisonhTg
organisms may survive." (Source:
Safe Food Book, Your Kitchen
Guide, USDARoy.June 1985.)
1/,
dl/
Theoven has 5 shelf positions.
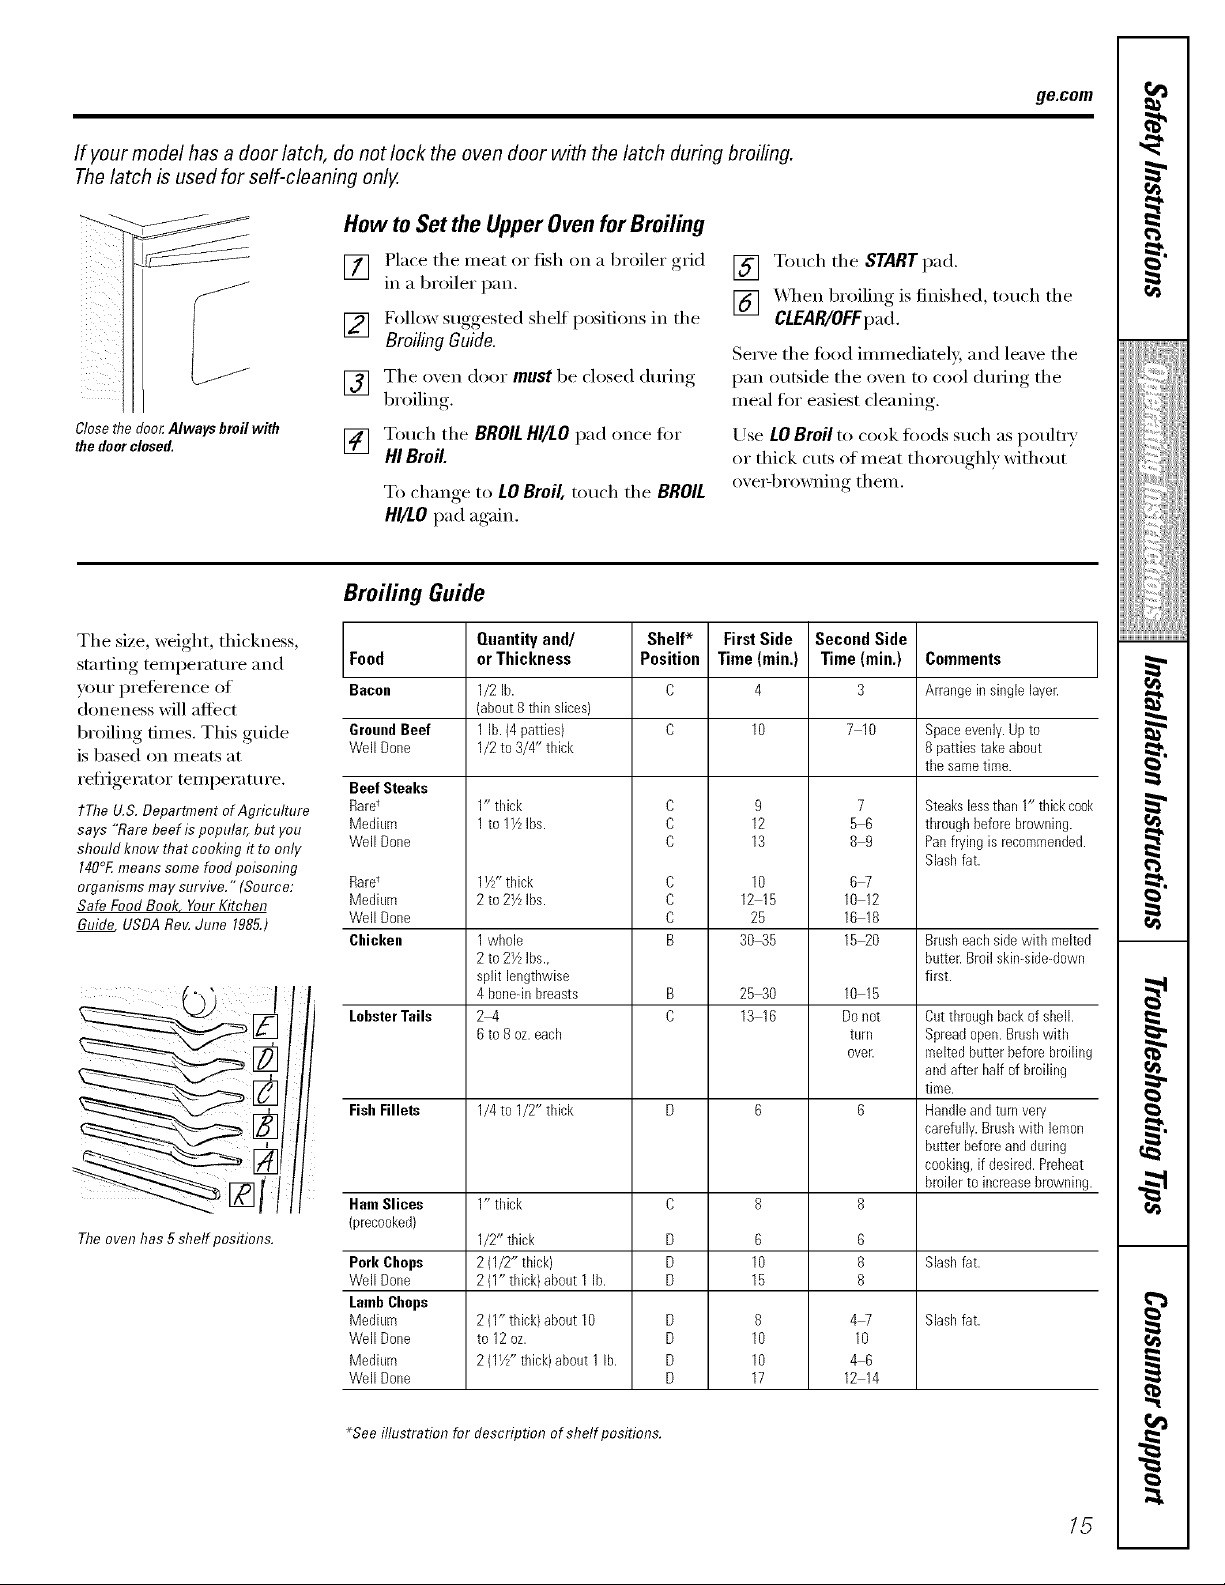
Broiling Guide
Food
Bacon
GroundBeef
Well Done
Beef Steaks
Rare t
Medium
Well Done
Raret
Medium
Well Done
Chicken
LobsterTails
Fish Fillets
Ham Slices
(precooked)
Pork Chops
Well Done
LambChops
Mediuro
Well Done
Mediuro
Well Done
Quantityand/ Shelf* FirstSide
orThickness Position Time(rain.)
1/2 lb. C 4
(about8 thin slices)
1 lb.(4 patties) C 10
1/2to 3/4" tldck
1" tldck C 9
21to 1½Ins. c 1
c 13
1½" tbick C 10
2to 21/zIns. C 1215
C :53
1wbole B 3 5
2to 2½ins.,
split lengthwise
4 boneqnbreasts B 25 30
2 4 D 13 16
6to 8 oz.each
1/4to I/2" thick D 6
1" tldck C 8
1/2" thick D 6
2(1/2" thick) D 10
2(1" tldck/about 1 In. D 15
2(1" thick)about 10 D 8
to 12 oz. D 10
2(1½" thick)about 1 lb. D 10
D 17
Second Side
Time (rain.)
3
7 10
89
67
10 12
16 18
15 20
10 15
Donot
turn
over.
6
8
6
8
8
4_
10
46
12 14
Comments
Arrangein single layer.
Spaceevenly.Upto
8patties take about
tile sametime.
Steakslessthan 1" thickcook
throughbeforebrowning.
Panfryingis recoromended.
Slashfat.
Brusheachside with melted
butter.Broil skin-side-down
first.
Cutthroughbackof shell.
Spreadopen.Brushwith
meltedbutterbeforebroiling
andafter halfof broiling
time.
Handleandturnvery
carefully.Brushwith lemon
butterbeforeandduring
cooking,if desired.Preheat
broilerto increasebrowning.
Slashfat.
Slasbfat.
_Seeillustration for description ofshelf positions.
15
rJ_
I
i!!!iiii iiiii
),ii;i_;:._iii!
/iiiti@
m
m
g
g
Usingthe clock and timer.
Not all features are on all models.
5¸ @ ¸¸3¸¸i
OR
i i ii@iii(
HOLD3 SEC.TO
SET CLOCK
Make sure the clock is set to the
correct time of day.
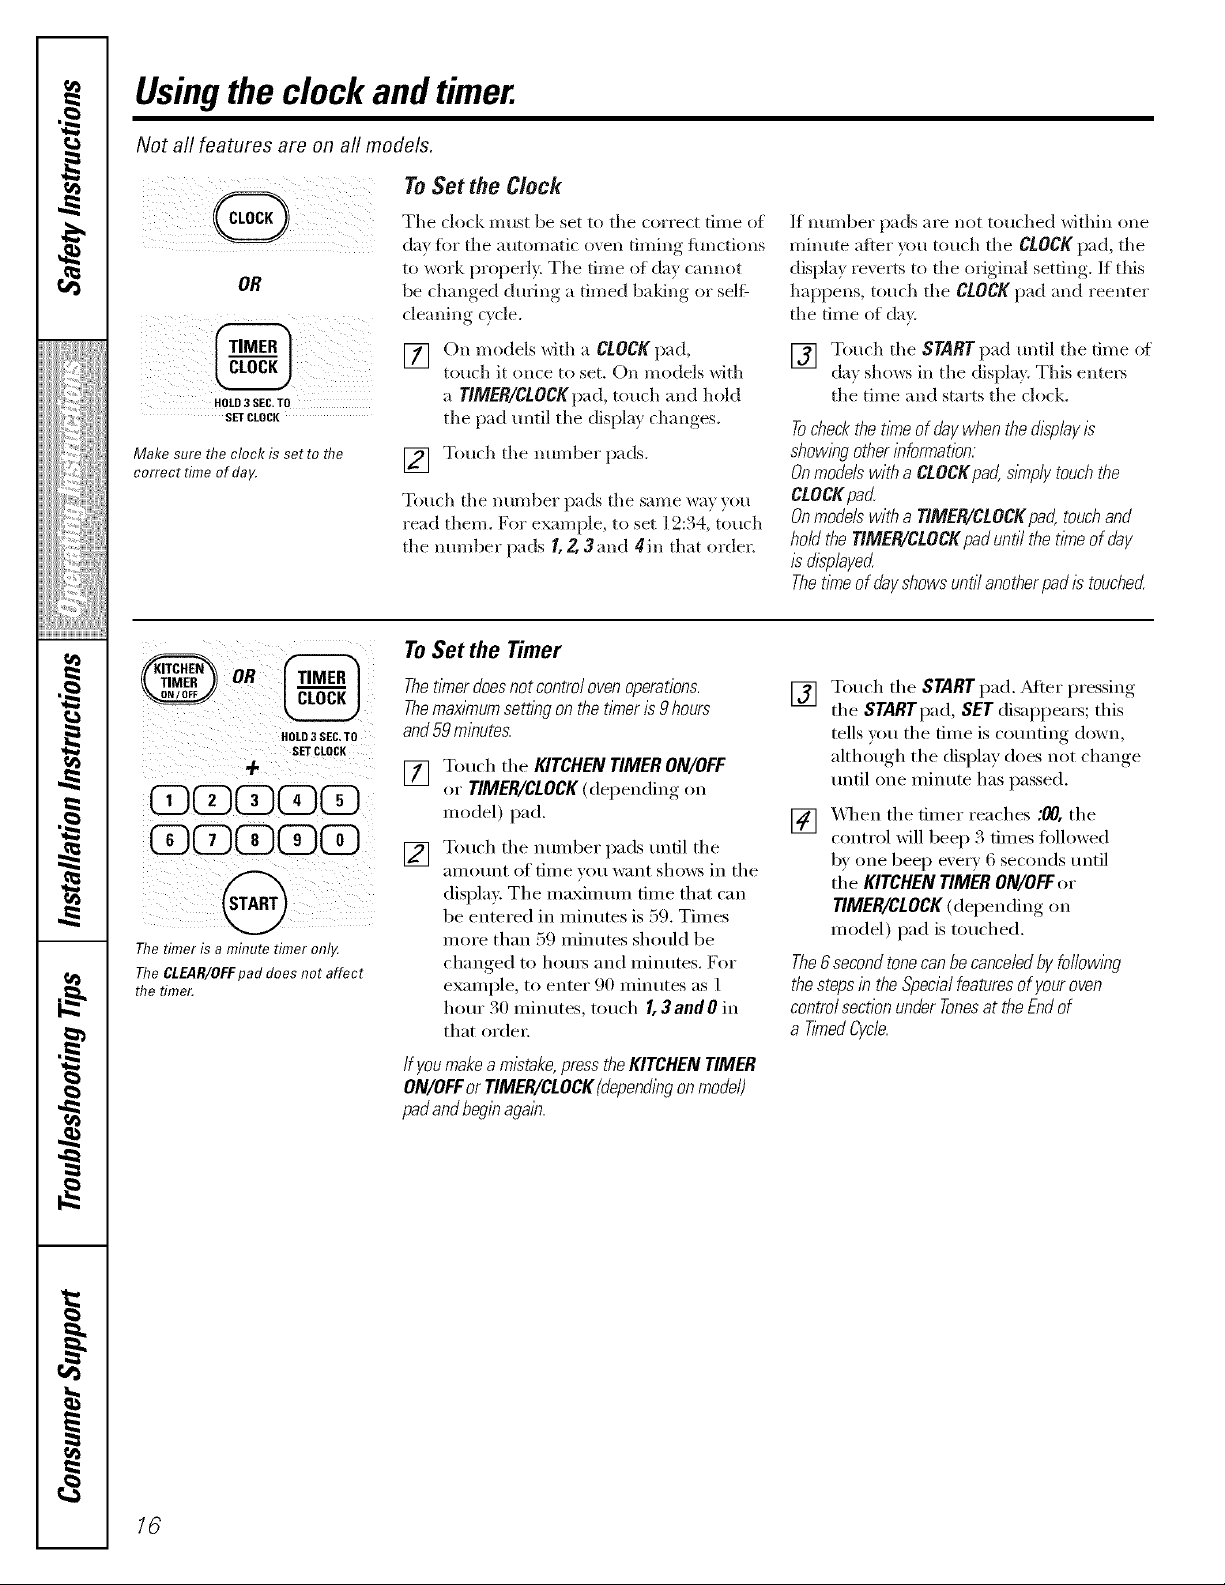
To Set the Clock
The clock must be set to the correct time of
(la_ fi)r the automatic oxen timing functions
to work properl> The time of clay cannot
be changed durh*g a timed baldric or self:
cleaning cycle.
[] On models with a CLOCK pad,
touch it (race to set. On models with
a TIMER/CLOCKpad, touch and hold
the pad tmtil the display changes.
[] Touch the mu-nber pads.
Touch the number pads the same wa)}ou
read them. Fo, example, to set 12:34, touch
the mm_ber pads I, 2, 3 and 4in that orcler.
If number pads are not touched within one
minute arier you touch the CLOCK pad, the
display reve_s to the original setting. If this
happens, touch the CLOCK pad and reenter
the time of day.
[] Touch the START pad tmtil the time of
da* shows in the displa}. This entels
the time and starts the clock.
Tocheckthet/kneofflaywhenthed/2pley/2
showleg other bformation:
On models with a CLOCKpad,sknplytouch the
CtOCKpad.
On models with a TIMER/CLOCK pad, touch and
hoUtheTIMER/CLOCKpaduntilthetleTeofday
_&played.
ThetleTeof(Jay#owe untilanotherpad/_touched
HOLD3 SEC,TO
SETCLOCK
+
CDCD@CDCD
@D@D@@D@D
@
The timer is a minute timer onl>
The CLEAR/OFFpad does not affect
the timer.
To Set the Timer
ThetlYnerdoesnot control oven operations.
Themaxl_numsetting on the timer is 9hours
and59minutes.
[]
[]
Touch the KITCHENTIMERON/OFF
or TIMER/CLOCK(depending on
model) pad.
Touch the number pads tmtil the
aillOt/nt of time VOt/want shows in the
(lisplay. The maximmn time that can
be entered in minutes is 59. Times
more than 59 minutes should be
changed to houI_ and Ininutes. For
example, to enter 90 mimKes as l
hour 30 minutes, touch I, 3andO in
that orcle_:
If youmakeamistake,presstheKITCHENTIMER
ON/OFForTIMER/CLOCK(dependingonmodel)
padandbeginagale.
[]
Touch the STARTpad._M{er l)ressin'*"
the SrARrpad, SETdisappears; this
tells xou the time is counting down,
although the display does not change
until one ininute has passed.
[]
X._q_en the timer reaches ;00, the
control will beep 3 times fi)llowed
by one beep every () seconds tmtil
the KITCHENTIMERON/OFFor
TIMER/CLOCK(depending on
model) pad is touched.
The6secondtonecanbecanceledbyfollowleg
thestepsin theSpecialfeaturesof youroven
controlsectionunderTonesattheEndof
a TimedCycle.
16

ge.com
ToReset the Timer
If tile display is still showing tile time
remaining, you may change it by touching
the KITCHEN TIMER ON/OFF or TIMER/CLOCK
(depending on model) pad, then touch tile
number pads until tile time wm want
appea_ in tile display.
If tile remaining time is not in tile display
(clock, delay start or cooking time are in
the display), recall the remaining time by
touching tile KITCHEN TIMER ON/OFF or
TIMER/CLOCK (dei)ending on inodel) pad
and then touching tile number pads to
enter tile new tiIlle vo/i want.
ToCancel the Timer
Touch tile KITCHEN TIMER ON/OFF
or TIMER/CLOCK(depending on model)
pad twice.
Power Outage
lf a flashing tlnTeIsIn the display,youhave
expenencedapower fai/ure.Resetthe clock.
On models with a CLOCKpad, touch it once
to _eset. On models with a TiMER/CLOCK
pad, touch and hold tile pad until tile
display changes. Enter tile correct time (g
day by touching tile appropl-iate number
pads. Touch tile START pad.
/7
I
/iiii{iiii{iii_
m
g
g
}

Usingthe timedbakingand mastingfeatures.(.pperovenonly)
If your model has a door latch, do not lock the oven door with the latch during timed cooking. The latch is used for
self-cleaning only.
NOTE" Foods that sped easilyISUCh as milk, eggs, fish, stuffings, poultry and porkIShould not be allowed to s# for more
than 1hour before or after cooking. Room temperature promotes the growth of harmful bacteria. Be sure that the oven
light is off because heat from the bulb will speed harmful bacteria growth.
_OD(DO(53(53¸
iQQ(D ¸
Z_
_i_iill_51111_ii_iiii_!_ iii____iiiiii_i
iQQO(D(D ¸
iiO(DQ_ :
How to Set an Immediate Start and Automatic Stop
Theupperovenwillturnon immediatelyandcookfora
selectedlengthof time.At theendof thecookingtime,
theovenwillturnoffautomatical/F
[] Touch tile BAKEpad.
[] Touch tile number pads to set tile desired
0"_ ell tel]]pel'_tttlye.
[] Touch tile COOKINGTIMEpad.
NOTE:If yourreciperequiresprehearing,youmayneed
toaddadditionaltimetothelengthofthecookingtime.
[] Touch tile nurrlber })_tdsto set tile desired
length of cooking time. Tile minirrmm
cooking time you can set is 1 rnilmm.
Tile oven temperature that you set and tile
cooking time that you entel_d will be in
tile displa 5
[] Touch tile STARTpad.
The oven will mm ON,and die dispkff will sho_\
tile cooking time cotmtdo_m and the changing
temperature starting at 100°E (Tile temperature
displa} will start to change once the o_.en
temperature reaches 100°El When the o_en
l_aches the mmperaml_ you set, 3 beeps will
SoIlnd.
Tile o\en will continue to cook tor tile set
amount of time, then turn off automaticall 5
unless tile Cook and Hold teature was set. See tile
Specb/featuresof yourovencontrolsection.
After tile oven turns off, tile end<ffcvcle tone
will sound.
[] Touch tile CLEAR/OFFpadto clear tile
displa5 if necessar} Remme tile toed ti'om
the oxen. Remember, even though tile
o_en turns off automaticall}, toed left in
tile o_en will continue cooking after tile
o'_en ttlrns off.
i(D tel O(D(D i
i i i i
i(DCDCD(DQ ¸
iii_ii__i!ili_ ili:I___iiiili_
How to Set a Delayed Start and Automatic Stop
Theupperovenwillturnonat thetimeof dayyouset,
cookfora specificlengthof timeandthenturnoff
automatical/F
Make sure tile clock shows tile correct time
of day.
[] Touch tile BAKEpad.
[] Touch the immber pads to set the desired
o_en telTiper_:lttlre.
[] Touch tile COOKINGTIMEpad.
NOTE:Ifyourreciperequiresprehearing,youmayneed
toaddadditionaltimetothelengthofthecookingtime.
[]
NOTE:Anattentiontonewill soundffyouareusing
timedbakinganddonottouchtheSTARTpad.
NOTE:If youwouldliketocheckthetimesyouhaveset,
touchtheDELAYSTARTpadtocheckthestart timeyou
havesetortouchtheCOOKINGTIME padtocheckthe
lengthof cookingtimeyouhaveset.
When tile o'_en turns ONat tile time of day
}_)u set, tile dispkJy will sho_\ the cooking time
coulltdov4/and the changing temperature
starting at 100°E (Tile temperature displa}
will start to change once tile o\en tempen_ture
l_aches 100°El When tile o_en reaches tile
temperature }_m set, beeps will sound.
18 []
Touch tile number pads to set the desired
length of cooking time. Tile minimum
cooking time you can set is 1 rninum.
Tile oven temperature that w)u set and tile
cooking time that you entel_d will be in
tile displa?:
The oven willcontinue to cook tbr tile set
amount of time, then turn off automaticall 5
unless tile Cook and Itold feature was set. See
tile Specialfeaturesof yourovencontrolsection.
)dier tile oven turns off; tile end<#Zcvcle tone
will sound.
Touch tile DELAYSTARTpad.
Touch tile nmTlber pads to set tile time of
(]}IV VO[I "_\;tIlt tile o'_eil 1o t/Ir/l oll ;:ind stfAI't
cookin _
Touch tile STARTpad.
[] Touch tile CLEAR/OFFpadto clear tile
displa? if necessar}. Remove tile fi)od fl'om
the oven. Remember, even though tile
o_en turns off automaticall}, food left in
tile oven will continue cooking after tile
()xell tttrI/s Off,

Usingthe probe.(onsomemodels) ge.com
If your model has a door latch, do not lock the oven door with the latch while cooking with the probe. Thelatch is used
for self-cleaning only.
For many foods, especially roasts and poult_ internal food temperature is the best test for aloneness. The temperature
probe takes the guesswork out of cooking foods to the exact aloneness you want.
Use of probes other than the one provided
with this product may result in damage to
the probe.
Use the handles of the probe and plug
when inserting and removing them fl'om
the tood and outlet.
Thetemperature probe has a
skewer-like probe at one end and a
plug at the other end that goes flTto
the outlet f17the oven.
_: Toavoiddamagingyourprobe, donot use tongs
topull on thecable when removingit
!i> Toavoidbreaking the probe, makesure foodis
completely defrostedbeforeinsembg.
iJi::Topreventpossibleburns,donotunplugthe
probefromtheoutletuntil theovenhascoolecL
iJi::Neverleave yourprobeinside the ovendunbg
aself-cleaning cycle.
!i>Do not store theprobe in the oven.
_Mter preparing the meat and pladng it on
a trivet or on a broiler pan grid, follow these
directions fin" proper probe placement.
Insert the probe completely into the meat.
It should not touch the bone, tht or gristle.
For masts with no bone, insert the probe
into the meatiest part of the roast. For
bone-in ham or lamb, insert the probe into
the center of the lowest lmge muscle.
Insert the probe into the center ot dishes
such as meat loat or casseroles.
Insert the probe into the meatiest part of
the ironer thigh fl'om below and parallel to
the le_*of a whole tin'key:
O>O CDCDOD
OOD(DG)ZD
(DCD(Z)(D(D
(Z)OD(D
®
How to Set the Upper Oven For Cooking When Using the Probe
[] Insert the probe into the fi_od.
[] Plug the probe into the otlflet in the
oxen. Make sure it's pushed all the
wa_ in. Close the oxen doo_:
[] Touch the PROBEpad.
[] Touch the number pads to set
the desired internal fi>od or meat
temperature between 100°F and 200°F.
[] Touch the BAKEpad.
[] Touch the mmg)er pads to set the
desired oxen temperature.
[] Touch the STARTpad.
Thedisplaywillflashif theprobeisinsertedintothe
outletandyouhavenotsetaprobetemperatureand
touchedtheSTARTpad
The display Mll show LO until the internal
temperature of the fi_od reaches 1 O0°F;
then the changing internal temperature
will be shown.
] X._q_enthe internal temperature of the
tood reaches the nmnber wm have set,
the probe and the oven mrn off and
the oven control signals. To stop the
signal, touch the CLEAR/OFFpad. Use
hot pads to remove the probe fl'om
the tood. Do not use tongs to pull on
it--they might damage it.
To change the oven temperatm'e dining
probe cooking, touch the BAKE pad and
then the nmnber pads to set the new
temperatm'e.
_; ff theprobeisremovedfromthefoodbeforethe
finaltemperature/sreached,atonewill sound
andthedisplaywi// flashuntiltheprobeis
removedfromtheoven.
iJi::Youcan use the t/Ynereven though you cannot
use timed ovenoperations while using the
probe.
19
I
i,,i,ii_i,i_,_iii!
/iiit{iiii{iii_
m
g
g
}
Usingthe convectionoven.(onsomemodels)
If your model has a door latch, do not lock the oven door with the latch during convection cooking. Thelatch is used for
self-cleaning only.
The convection oven fan shuts off when the oven door is opened. DO NOT leave the door open for long periods of time
while using convection cooking.
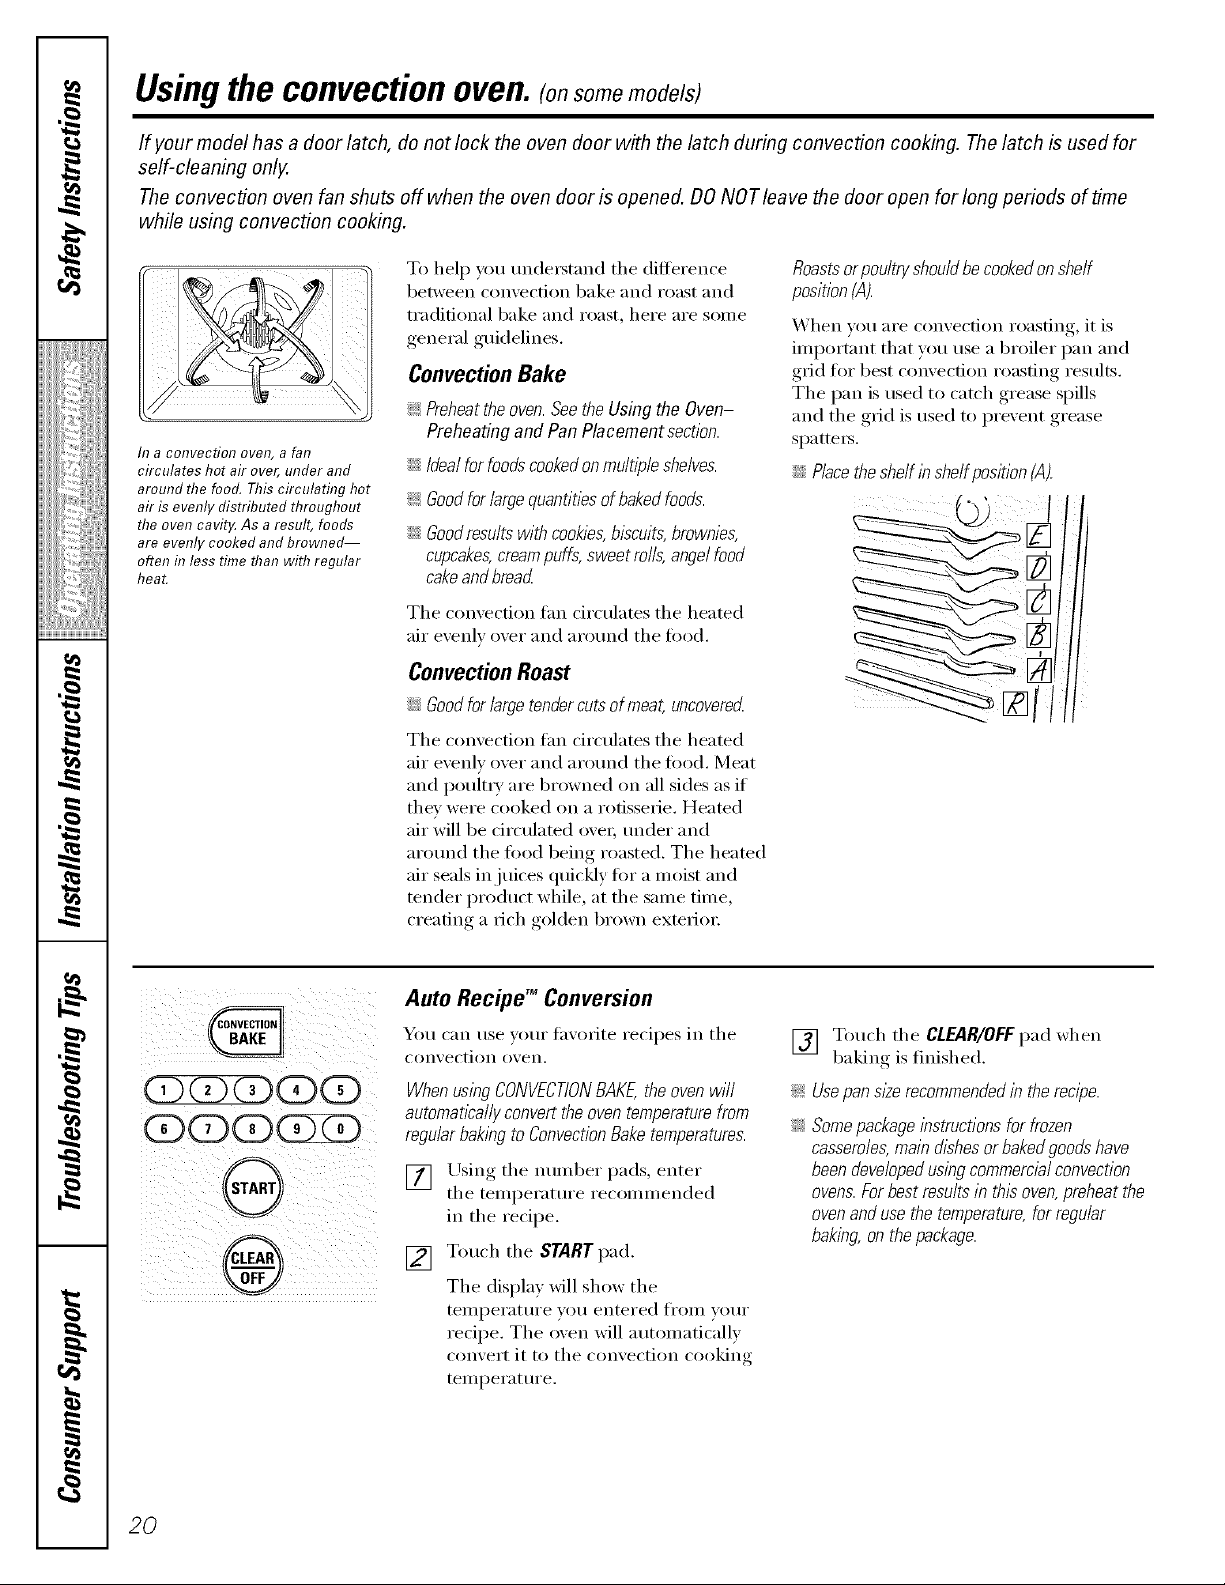
h? a COl?Veetiol? oveR, a fat?
circulates hot air over, under and
around the food. This circulating hot
air is evenly distributed throughout
the oven cavity. As a result, foods
are evenly cooked and browne_
often fit less time than with regular
heat.
To help you understand the difference
between convection bake and roast and
traditional bake and roast, here are some
general guidelines.
ConvectionBake
_ Preheattheoven.Seethe Usingthe Oven-
PreheatingandPanPlacementsection.
::Ji::Idealforfoodscookedonmultipleshelves.
_: Goodforlargequantitiesofbakedfoods.
;;Ji::Goodresultswithcookies,biscuits,brownies,
cupcakes, cream puffs, sweet roils, angel food
cake and bread
The convection tim circulates the heated
air evenly over and arotmd the food.
Convection Roast
_Ji:_Good for large tender cuts of meat, uncoverecL
The convection tim circulates the heated
air evenly over and arotmd the fi)o(l. Meat
and I)oult_y are browned on all sides as if
they were cooked on a rotisserie. Heated
air will be circulated ovei; under and
around the food being roasted. The heated
air seals in juices quickly fi)r a moist and
tender product while, at the same time,
creating a rich golden brown exterim:
Roastsorpoultryshouldbecookedonshelf
position(A).
When w_u are convection roasting, it is
important that you use a broiler pan and
grid fiw best convection roasting restdts.
The pan is used to catch grease spills
and the grid is used to prevent grease
spatters.
iJi::Placetheshelfinshelfposition(,4).
QQQQQ;
Auto Recipe TM Conversion
You can use veto" fhxorite recipes in the
conx ection oxen.
WhenusingCONVECTIONBAKE,theovenwill
automatically convert the oven temperaturefrom
regularbakingto Convection Bake temperatures.
[] Using the number pads, enter
the temperatm'e recommended
in the recipe.
[] Touch the START pad.
The display will show the
temi)erature you entered fix)in your
recipe. The oven will automatically
convert it to the convection cooking
temperatm'e.
[] Touch the CLEAR/OFFpad when
baking is finished.
!i_ Usepansl#erecommendedin the recipe.
_ Somepackageinstructionsfor frozen
casseroles,maindishesorbakedgoodshave
beendevelopedusingcommercialconvection
ovens.Forbestresultsinthisoven,preheatthe
ovenandusethetemperature,forregular
baking,onthepackage.
20
 Loading...