

Page 1

Gateway DC-T23 digital camera
user'sguide
Customizing
Troubleshooting
Page 2

Page 3

Contents
Using the Gateway DC-T23 . . . . . . . . . . . . . . . . . . . . . . . . . . . . . . . . . . . . . . . . . 1
Warnings and precautions . . . . . . . . . . . . . . . . . . . . . . . . . . . . . . . . . . . . . . . . . . . . . 2
Getting started . . . . . . . . . . . . . . . . . . . . . . . . . . . . . . . . . . . . . . . . . . . . . . . . . . . . . . 3
Identifying camera components . . . . . . . . . . . . . . . . . . . . . . . . . . . . . . . . . . . . . 3
Loading the batteries . . . . . . . . . . . . . . . . . . . . . . . . . . . . . . . . . . . . . . . . . . . . . 4
Inserting and removing the SD/MMC card (Optional) . . . . . . . . . . . . . . . . . . . . 5
Attaching the strap (optional) . . . . . . . . . . . . . . . . . . . . . . . . . . . . . . . . . . . . . . . 6
Using a tripod (optional) . . . . . . . . . . . . . . . . . . . . . . . . . . . . . . . . . . . . . . . . . . . 7
Basic operation . . . . . . . . . . . . . . . . . . . . . . . . . . . . . . . . . . . . . . . . . . . . . . . . . . . . . 8
Powering on and off . . . . . . . . . . . . . . . . . . . . . . . . . . . . . . . . . . . . . . . . . . . . . . 8
Setting the Mode switch . . . . . . . . . . . . . . . . . . . . . . . . . . . . . . . . . . . . . . . . . . . 9
Taking still pictures . . . . . . . . . . . . . . . . . . . . . . . . . . . . . . . . . . . . . . . . . . . . . . 10
Recording movies . . . . . . . . . . . . . . . . . . . . . . . . . . . . . . . . . . . . . . . . . . . . . . . 12
Viewing your images on the LCD . . . . . . . . . . . . . . . . . . . . . . . . . . . . . . . . . . . . . . 14
Viewing pictures and movies . . . . . . . . . . . . . . . . . . . . . . . . . . . . . . . . . . . . . . 14
Deleting pictures and movies . . . . . . . . . . . . . . . . . . . . . . . . . . . . . . . . . . . . . . 16
Advanced Operations and Settings . . . . . . . . . . . . . . . . . . . . . . . . . . . . . . . . . . . . . 18
Using the MENU button . . . . . . . . . . . . . . . . . . . . . . . . . . . . . . . . . . . . . . . . . . 18
Configuring settings . . . . . . . . . . . . . . . . . . . . . . . . . . . . . . . . . . . . . . . . . . . . . 22
Viewing images on your computer . . . . . . . . . . . . . . . . . . . . . . . . . . . . . . . . . . . . . 24
Installing the camera software . . . . . . . . . . . . . . . . . . . . . . . . . . . . . . . . . . . . . 24
Connecting the camera to your computer . . . . . . . . . . . . . . . . . . . . . . . . . . . . 25
Copying pictures and movies to your computer . . . . . . . . . . . . . . . . . . . . . . . . 26
Viewing pictures and movies on your computer . . . . . . . . . . . . . . . . . . . . . . . 28
Using PC Camera or Web Cam . . . . . . . . . . . . . . . . . . . . . . . . . . . . . . . . . . . . . . . 29
Format settings . . . . . . . . . . . . . . . . . . . . . . . . . . . . . . . . . . . . . . . . . . . . . . . . . 31
Video settings . . . . . . . . . . . . . . . . . . . . . . . . . . . . . . . . . . . . . . . . . . . . . . . . . . 32
Troubleshooting . . . . . . . . . . . . . . . . . . . . . . . . . . . . . . . . . . . . . . . . . . . . . . . . . . . . 33
Using the camera . . . . . . . . . . . . . . . . . . . . . . . . . . . . . . . . . . . . . . . . . . . . . . . 33
Connecting the camera to your computer . . . . . . . . . . . . . . . . . . . . . . . . . . . . 34
Getting Help . . . . . . . . . . . . . . . . . . . . . . . . . . . . . . . . . . . . . . . . . . . . . . . . . . . . . . . 34
Appendix . . . . . . . . . . . . . . . . . . . . . . . . . . . . . . . . . . . . . . . . . . . . . . . . . . . . . . . . . 35
Battery life . . . . . . . . . . . . . . . . . . . . . . . . . . . . . . . . . . . . . . . . . . . . . . . . . . . . . 35
LED indicator events . . . . . . . . . . . . . . . . . . . . . . . . . . . . . . . . . . . . . . . . . . . . . 35
Storage capacity . . . . . . . . . . . . . . . . . . . . . . . . . . . . . . . . . . . . . . . . . . . . . . . . 36
Specifications . . . . . . . . . . . . . . . . . . . . . . . . . . . . . . . . . . . . . . . . . . . . . . . . . . 36
Regulatory compliance statements . . . . . . . . . . . . . . . . . . . . . . . . . . . . . . . . . . 38
Notices . . . . . . . . . . . . . . . . . . . . . . . . . . . . . . . . . . . . . . . . . . . . . . . . . . . . . . . 40
i
Page 4

ii
Page 5

Using the
Gateway DC-T23
Thank you for purchasing the Gateway DC-T23 digital
camera. Your camera features:
■ Effective sensor resolution of 2 Megapixels
■ 16 MB internal memory
■ Support for SD/MMC (Secure Digital/MultiMedia
Card) memory up to 512 MB
■ 4× digital zoom
■ Video mode
1
Page 6

Using the Gateway DC-T23
Warnings and precautions
■ Do not drop, puncture or disassemble the camera.
■ Avoid all contact with water. Be sure to have dry hands before using.
■ Do not expose the camera to high temperature or leave it in direct sunlight.
■ Use the camera with care. Avoid pressing hard on the camera body.
■ For your own safety, avoid using the camera when there is a storm or
lightning.
■ Avoid using batteries of different brands or types at the same time.
■ Remove batteries during long periods between usage, as deteriorated
batteries may affect the functionality of the camera.
■ Remove batteries if they show signs of leaking or distortion.
■ We suggest using only the accessories supplied by Gateway.
2
www.gateway.com
Page 7
Getting started
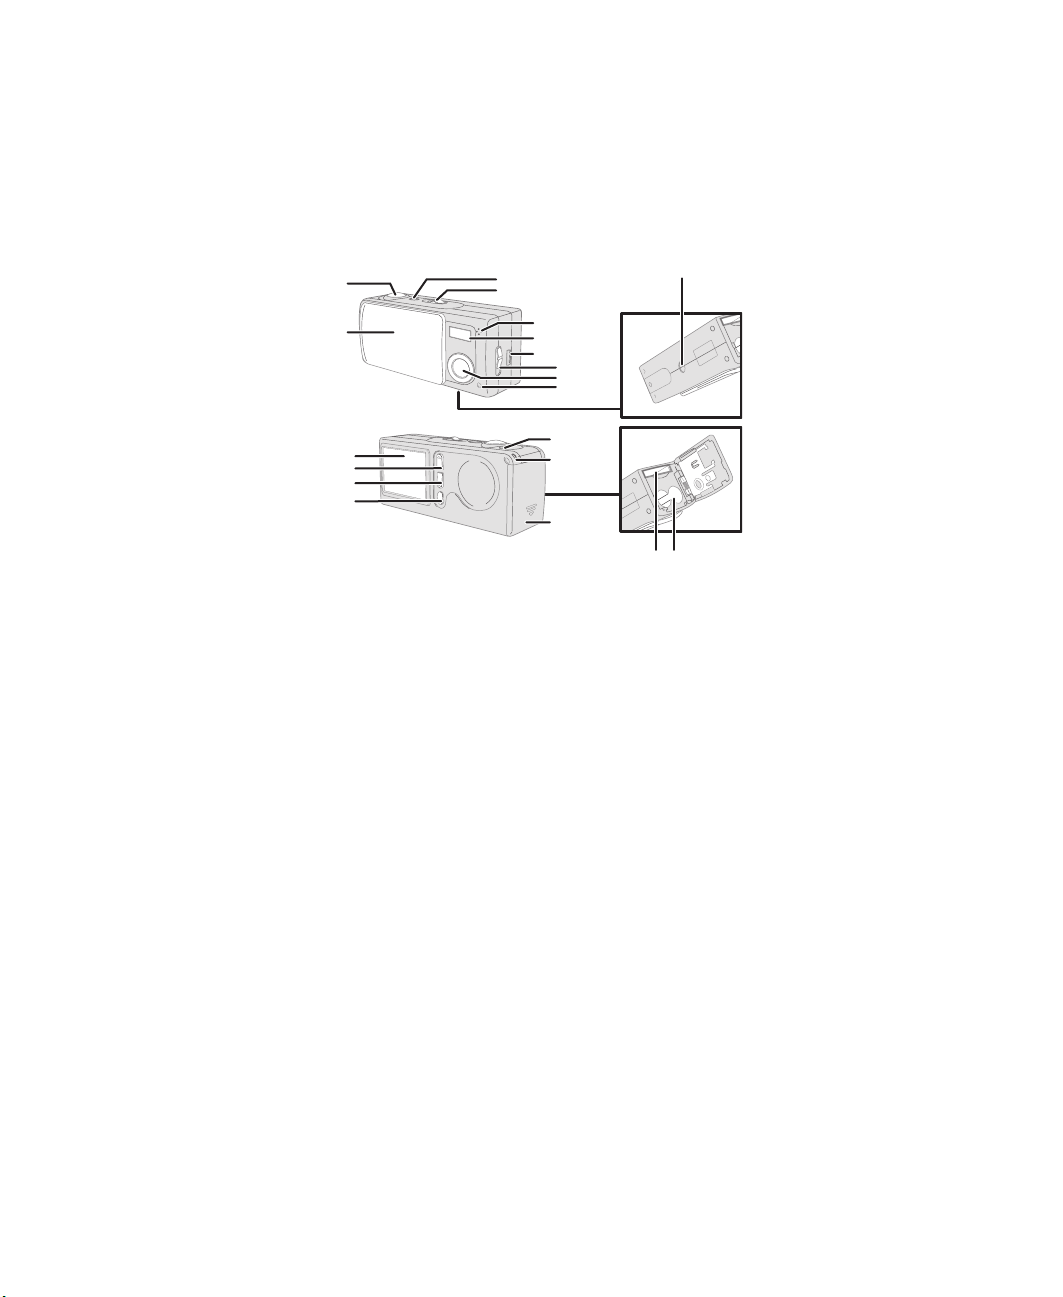
Identifying camera components
Getting started
1
2
11
12
13
14
1 Shutter/Quick Exit button
2 Lens cover
3 Power button
4 Mode switch
5 Microphone
6 Flash
3
4
5
6
7
8
9
10
15
16
17
18
19
20
11 LCD display
12 Up control button (Zoom in)
13 Down control button (Zoom out)
14 MENU/OK button
15 LED indicator
16 Strap holder
7 USB port
8 Focus switch
9 Lens
10 Self-timer LED indicator
www.gateway.com
17 Battery/SD/MMC card cover
18 Tripod port
19 SD/MMC card slot
20 Battery section
3
Page 8
Using the Gateway DC-T23
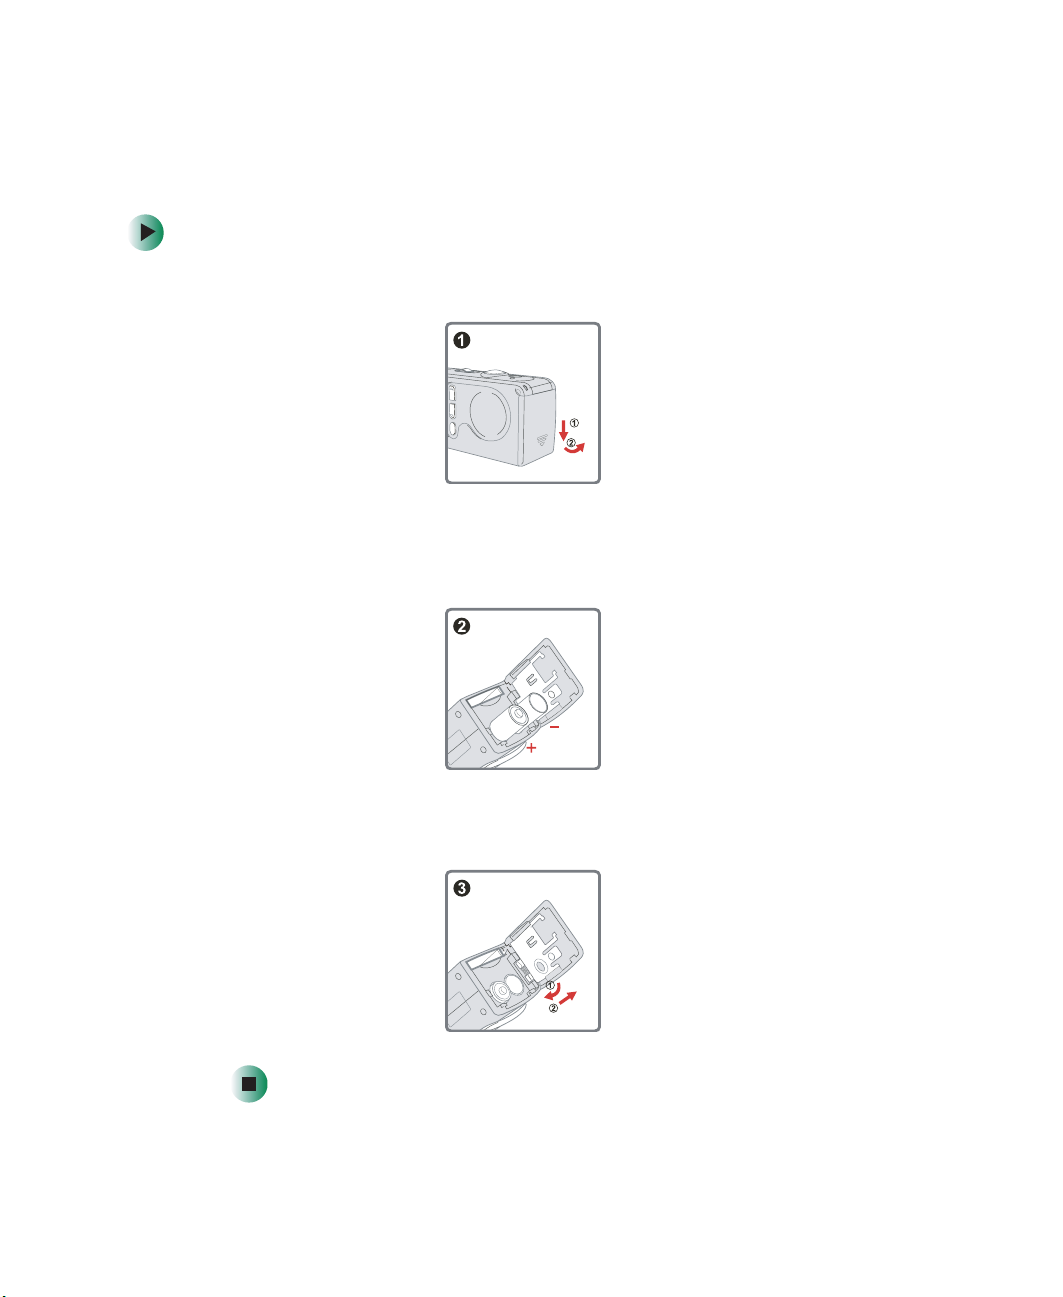
Loading the batteries
Use two AAA 1.5V alkaline batteries.
To load the batteries:
1 Slide the battery/card cover down, then rotate it outward.
2 Load two AAA alkaline batteries, taking care to match the + and – symbols
on the batteries.
3 Rotate the battery/card inward, then slide it upward to lock it.
For information on battery life, see “Battery life” on page 35.
4
www.gateway.com
Page 9
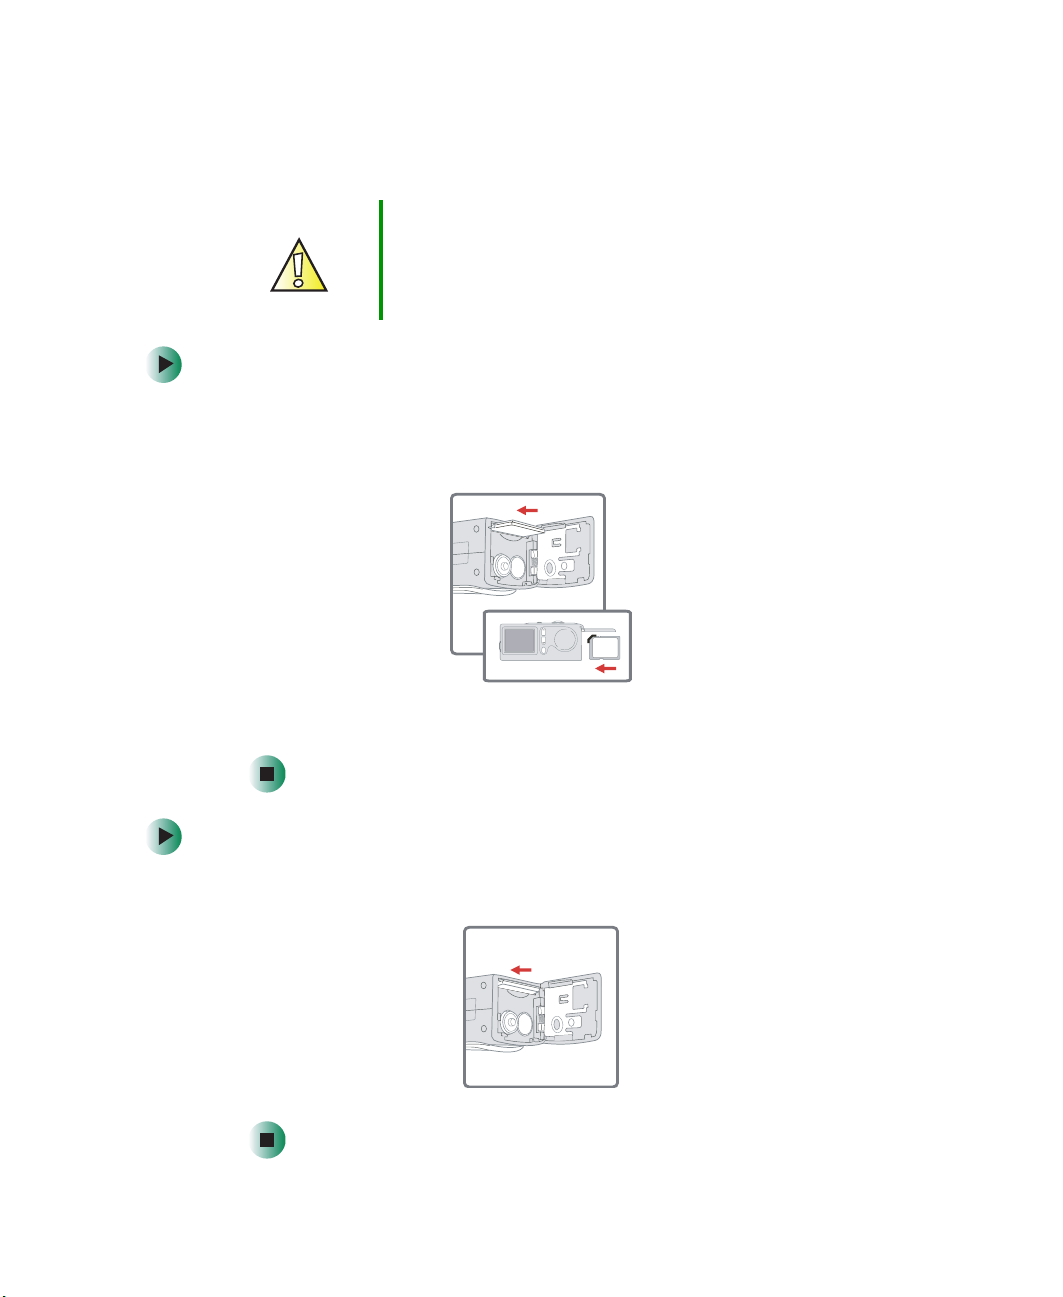
Inserting and removing the SD/MMC card (Optional)
Getting started
Caution
Never eject the SD/MMC card while the LED
indicator is red (the camera is processing data).
For more information on the LED messages, see
“LED indicator events” on page 35.
To insert the SD/MMC card:
1 Open the battery/card cover.
2 Insert the card in the direction indicated, then push it in.
MENU/OK
3 Close the battery/card cover.
To remove the card:
■ Push the card in, then release the card.
www.gateway.com
5
Page 10
Using the Gateway DC-T23
Tips & Tricks The camera comes with 16 MB internal Flash memory for
storage. If you do not insert a SD/MMC card, data is saved
in the built-in Flash memory.
For details on the storage capacity of the SD/MMC card and internal memory
(16 MB Flash memory), see “Storage capacity” on page 36.
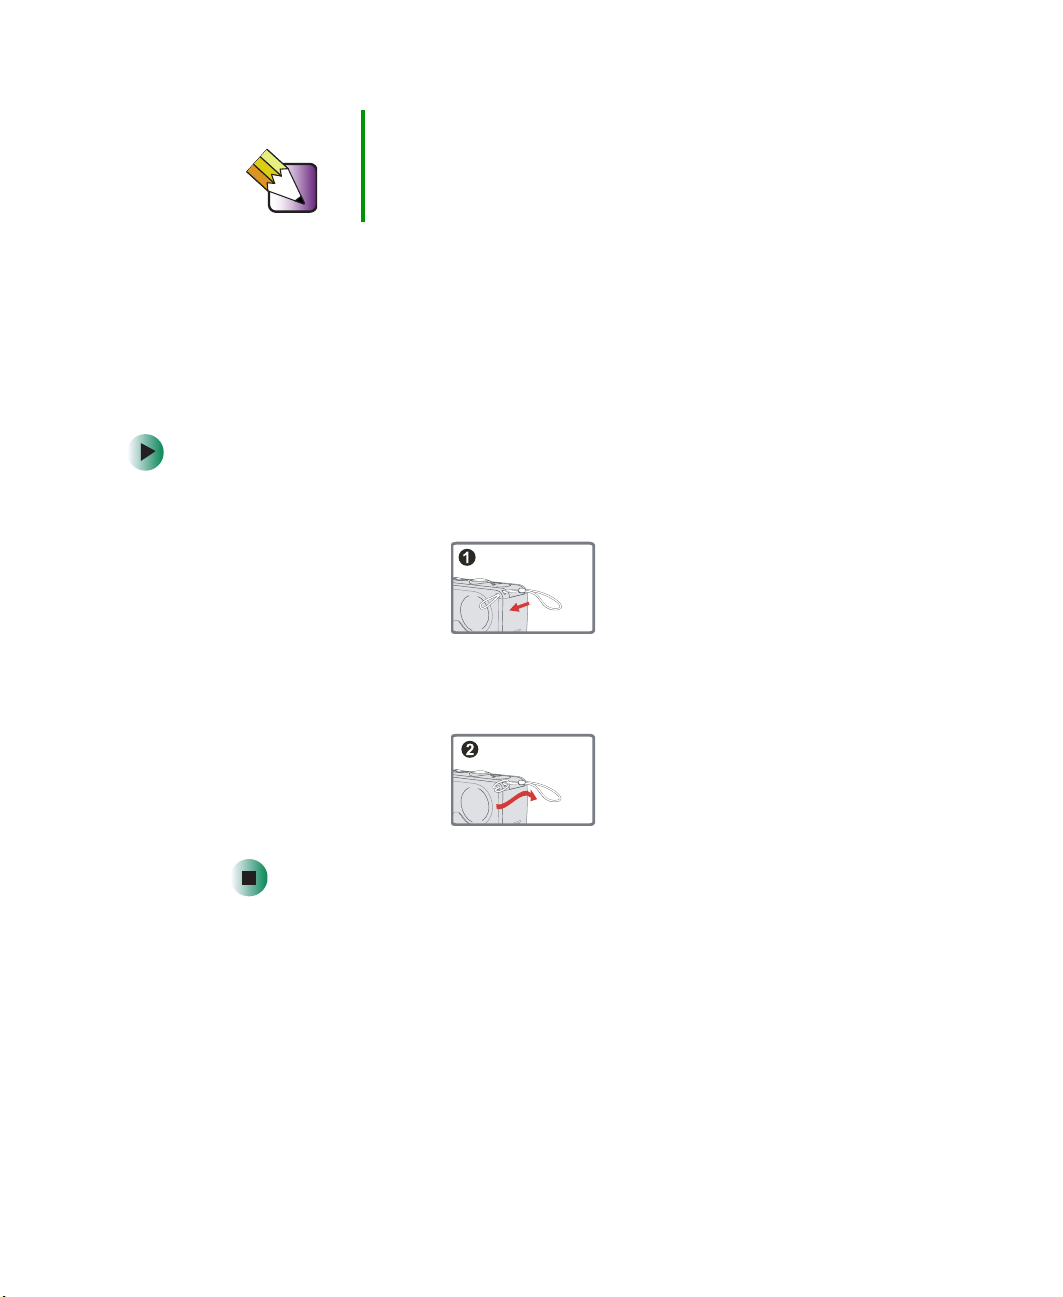
Attaching the strap (optional)
For convenience and safety, attach the carrying strap.
To attach the strap:
1 Thread the strap loop through the holder in the direction indicated.
2 Fasten the strap as indicated.
6
www.gateway.com
Page 11
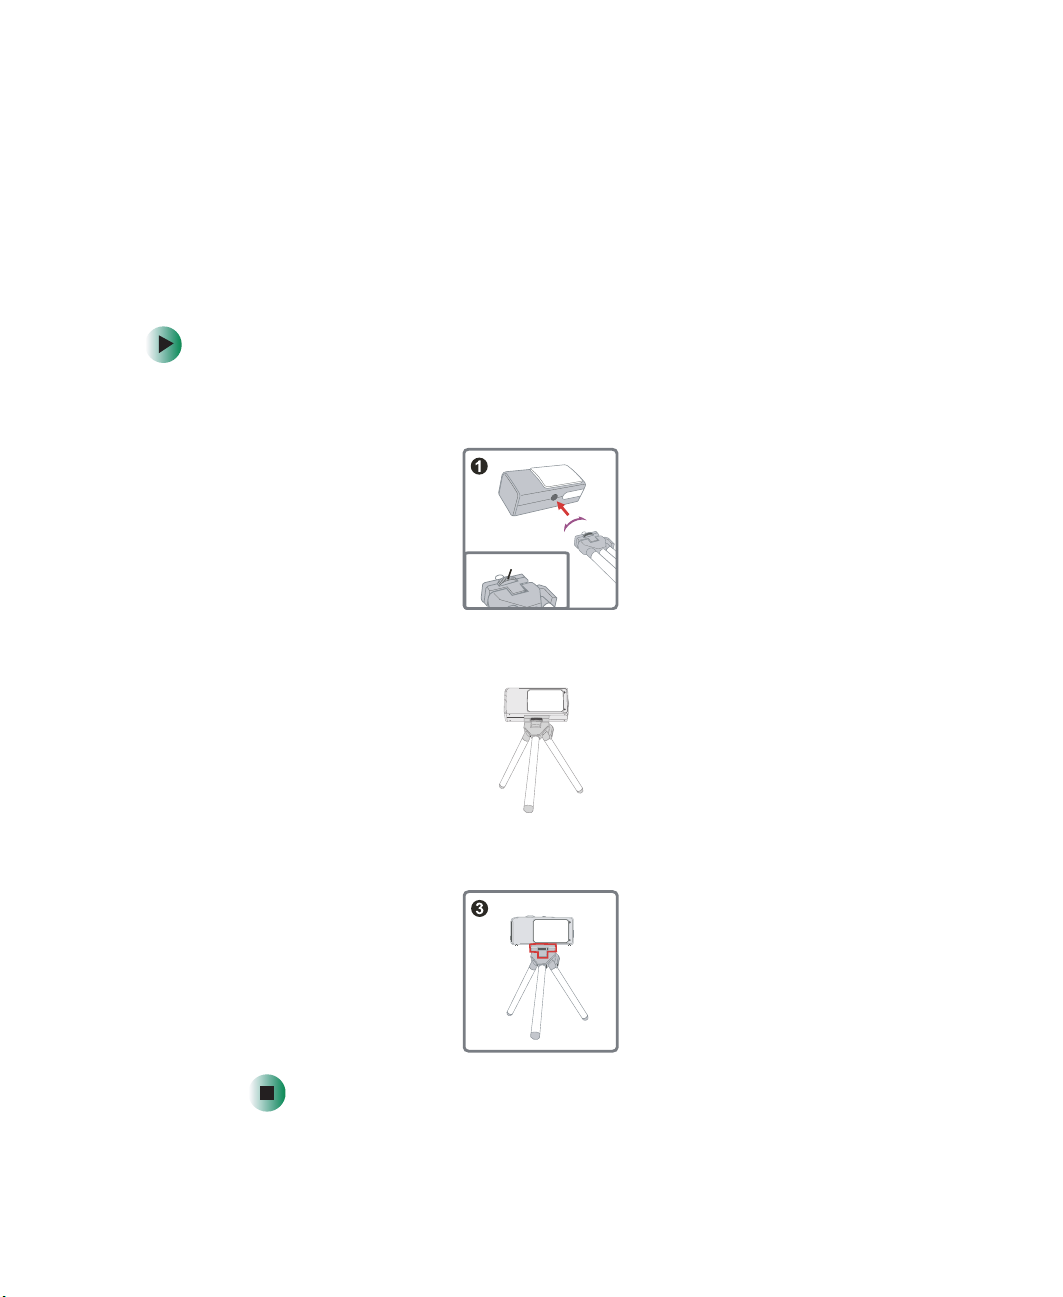
Using a tripod (optional)
Tight
Loose
You can use a tripod to minimize camera movement and ensure optimal image
quality, particularly while taking self-portraits, longer movies or in macro mode.
Tripod “heads” (the part that attaches to the camera) vary. See your tripod user’s
guide for detailed information on attaching your tripod to the Gateway DC-T23
digital camera.
To use a tripod:
1 Attach the tripod to the port on the bottom of the camera and rotate the
wheel to lock it.
Wheel
Getting started
2 Unfold the legs to set up.
3 Adjust the alignment to the desired position.
www.gateway.com
7
Page 12
Using the Gateway DC-T23
Basic operation
Powering on and off
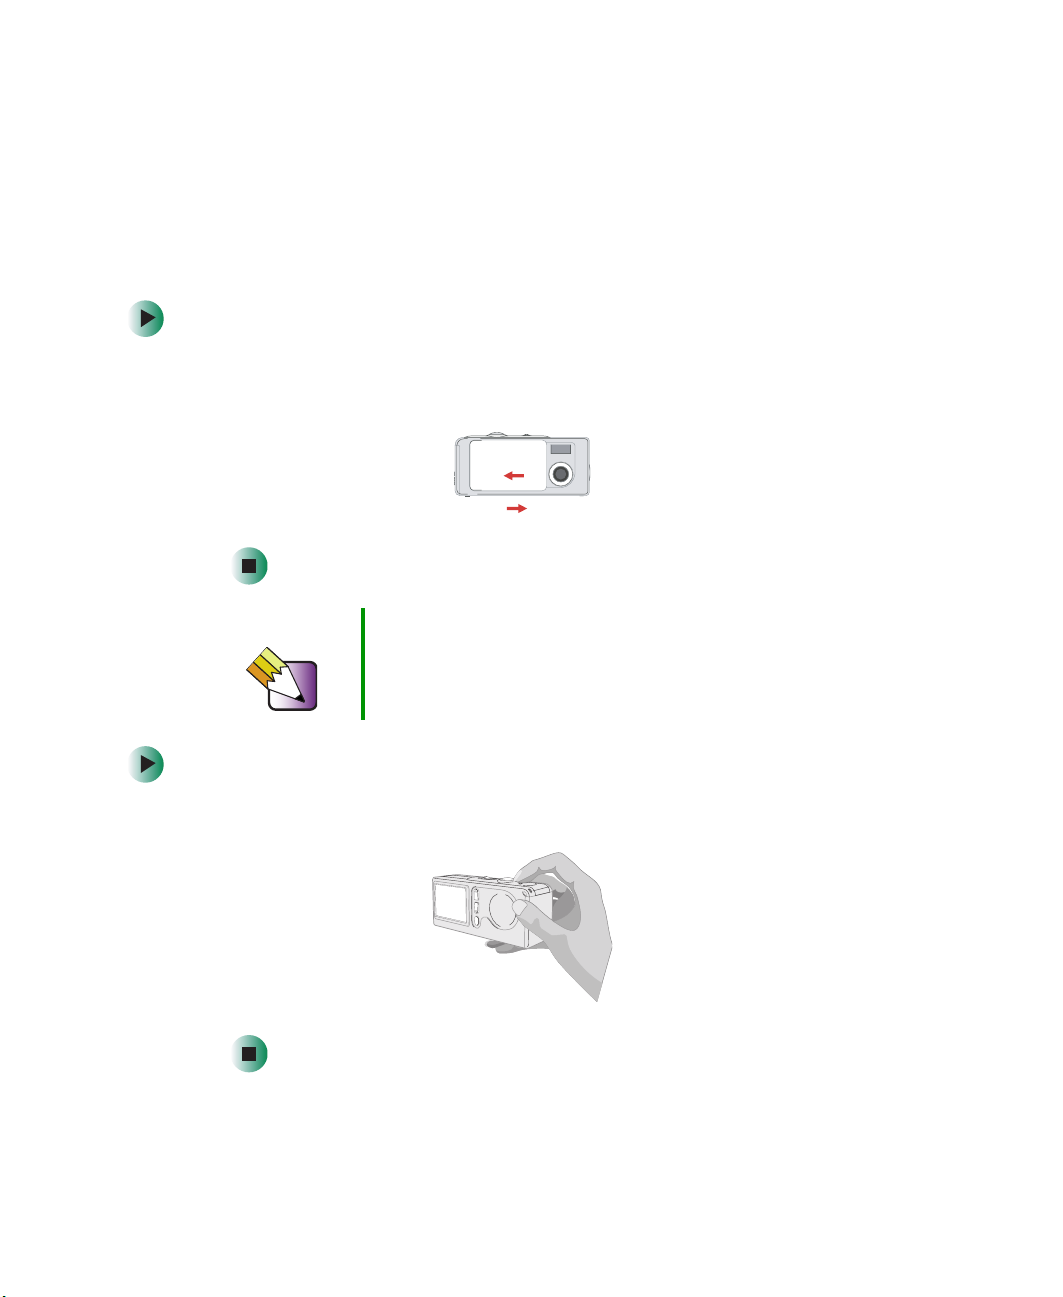
Slide the Lens cover or press the Power button to power the camera on or off.
To use the lens cover:
■ Slide the Lens cover in the direction of the arrow to turn the power on or
off.
Tips & Tricks While the Lens cover is open, you can also press the
ON
OFF
Power button to turn off your camera.
To use the power button:
■ Press the Power button to turn the power on or off.
8
www.gateway.com
Page 13
If the camera is idle for over 60 seconds, the LCD display turns off to conserve
battery power. Press any key to wake up the camera. If the camera is idle for
over 3 minutes, the camera automatically powers down.
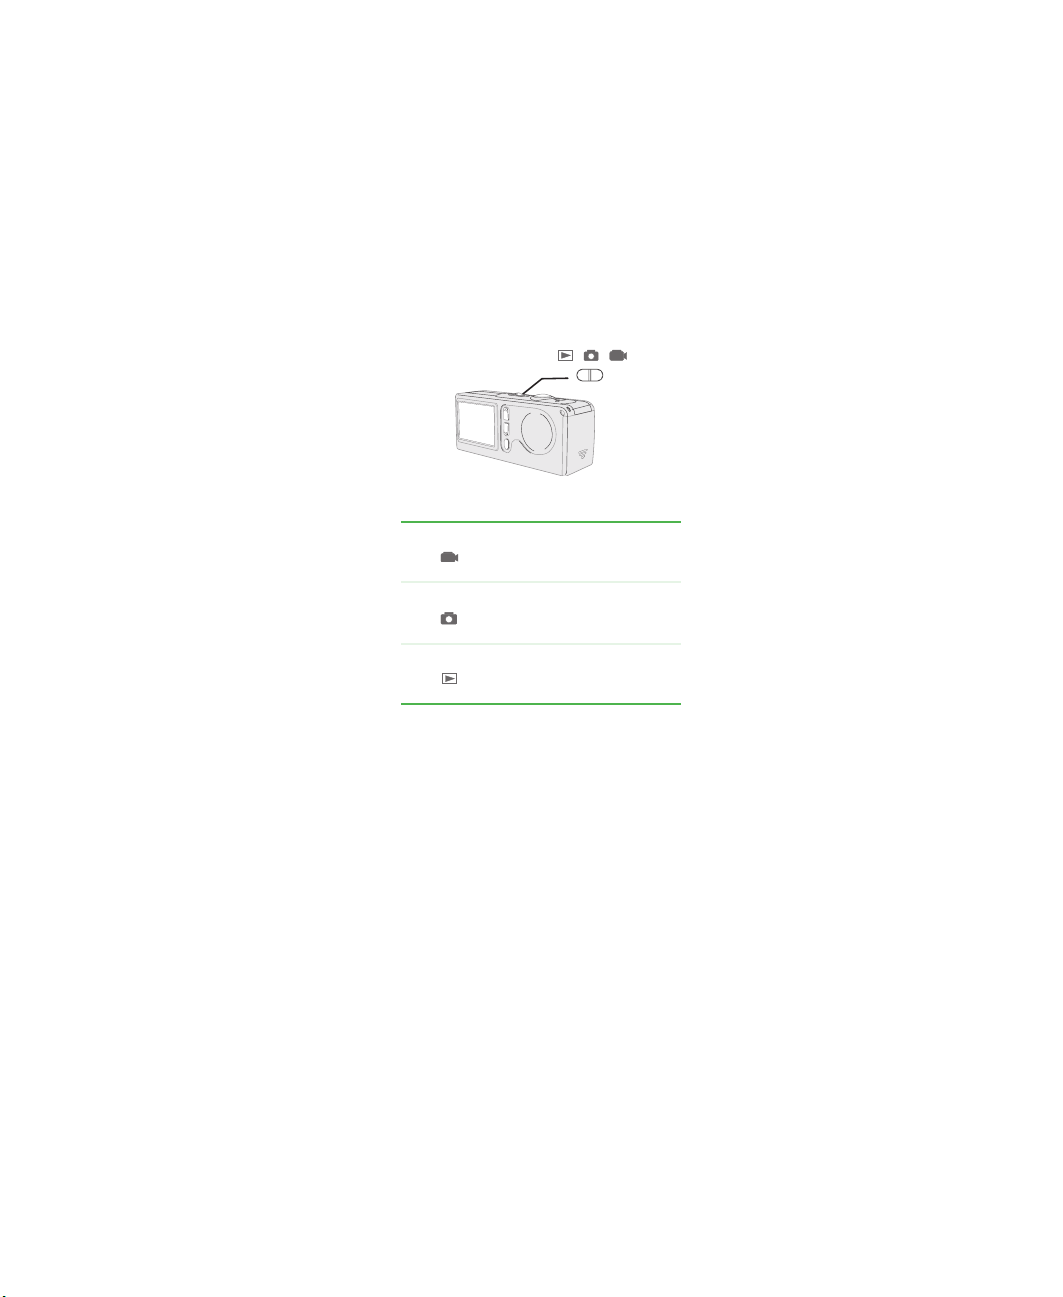
Setting the Mode switch
This camera operates in three modes. Push the Mode switch to select the mode
that you want to use.
Movie mode
Still Picture mode
Basic operation
Playback mode
www.gateway.com
9
Page 14
Using the Gateway DC-T23
Taking still pictures
Follow these steps to take still pictures. For best results, use the Focus switch
to set the focus and use the up and down Control buttons to zoom in and out.
Taking a still picture
To take a still picture:
1 Set the Mode switch to .
2 Press the Shutter button to take pictures.
10
Tips & Tricks While the LED indicator is flashing red, the image is being
captured. When the LED turns green, the picture
processing is done and ready to take another picture. For
more information on LED messages, see “LED indicator
events” on page 35
www.gateway.com
Page 15

Adjusting the focus
To adjust the focus:
■ Push the Focus switch, then select the best mode for your picture.
USB
The following table tells you which focus mode you may choose based on the
distance to your subject.
Basic operation
Using Zoom
To Zoom in and out:
■ Press the up Control button to zoom in or the down Control button to
zoom out.
Macro
Micro
12 inches ~ 24 inches (30 cm ~ 60 cm)
24 inches ~ ∞ (60 inches ~ ∞)
www.gateway.com
11
Page 16

Using the Gateway DC-T23
Using the flash and self-timer
The flash and self-timer are convenient utilities you can use when taking still
image pictures. Use the flash if lighting is not adequate and the self-timer
function for taking self-portrait photos. There are other settings in the MENU
under mode that also affect your images, including size, exposure, white
balance, and effect. For details on operation and information, see “Using the
MENU button” on page 18.
Using the LCD under mode
Zoom
Still pictures mode
Focus mode
1.0X 20
Resolution
Flash status
Number of pictures and
movies taken
Life of battery
Storage mode:
- SD/MMC card:
- Internal Flash memory: no icon
Recording movies
You can use your camera to record movies at a resolution of 320×240 pixels.
To record movies:
1 Set the Mode switch to .
12
www.gateway.com
Page 17

2 Press the Shutter button to start recording.
3 Press the Shutter button again to stop the recording.
Tips & Tricks You can also adjust the Focus switch under mode. For
more information on the Focus switch, see “Adjusting the
focus” on page 11.
Using the LCD under mode
Number of pictures and
20
movies taken
Basic operation
Movie mode
Focus mode
Life of battery
Storage mode:
- SD/MMC card:
- Internal Flash memory: no icon
www.gateway.com
13
Page 18

Using the Gateway DC-T23
Viewing your images on the LCD
Viewing pictures and movies
To view pictures and movies:
1 Set the Mode switch to .
2 The last image taken is displayed on the LCD.
3 Press the up and down Control buttons to select the previous or the next
image and view it on the LCD display.
Control buttons
While playing a movie on the camera, sound playback is not available. To view
the movie with sound, copy the movie to your computer (for details, see
“Viewing images on your computer” on page 24).
14
www.gateway.com
Page 19

Using the LCD under mode
The type you are
viewing:
- Picture:
- Movie:
Playback mode
Viewing your images on the LCD
Picture and movie number
1/20
Number of pictures and
movies taken
Life of battery
Storage mode:
- SD/MMC card:
- Internal Flash memory: no icon
www.gateway.com
15
Page 20

Using the Gateway DC-T23
Deleting pictures and movies
Follow these steps if you want to delete a picture or movie.
To delete pictures and movies:
1 Push the Mode switch to , then press the up and down Control buttons
to pick the image you want to delete.
2 Press the MENU/OK button to enter the Menu.
16
3 Press the up and down Control buttons to choose Delete One, then press
the MENU/OK button.
www.gateway.com
Page 21

Viewing your images on the LCD
4 Use the up and down Control buttons to select Yes, then press the
MENU/OK button to complete the deletion.
Tips & Tricks You can press the Shutter/Quick Exit button at anytime to
exit the Menu.
www.gateway.com
17
Page 22

Using the Gateway DC-T23
Advanced Operations and Settings
Using the MENU button
You can fine-tune the camera using advanced features in the Menu. Use the
MENU/OK button to enter the Menu. Press the up and down Control buttons
( ) to highlight the item. Use the MENU/OK button to confirm. To exit, use
the Shutter/Quick Exit button.
Menu under () mode
■ The MENU/OK button is used to enter the Menu or execute an action.
■ Select the icon or press the Shutter/Quick Exit button to exit.
Item Option Icon Description
Menu LCD
Display
1. Size 2048×1536
1600×1200
1280×960
2. Flash Auto
Off
18
www.gateway.com
Size lets you change the resolution of the picture.
Select 1600×1200 or 2048×1536 when you want
to print 4×6 photos; select 1280×960 when you
want to print 3×5 photos.
Flash lets you set the flash. When you are not sure
if the light is adequate, select the Auto mode. The
flash will fire automatically if more light is needed.
If you have problems when using the flash, see
“Troubleshooting” on page 33.
Page 23

Advanced Operations and Settings
Item Option Icon Description
Menu LCD
Display
3. SelfTimer
4. Exposure Auto
5. White
Balance
(WB)
On
Off
Back Light
Auto
Sunny
Cloudy
Fluorescent
Tungsten
Self-Timer lets you specify a delay of 10 seconds
before the shutter fires. If you want to use the
N/A
N/A Exposure lets you set the exposure- metering
N/A White Balance lets you set the camera’s color
self-timer, set the On mode, press the Shutter
button, then wait for 10 seconds with Self-Timer
LED indicator flashing red.
mode. When you are not sure about your light
source or when your subject is facing the light,
select Auto. When your subject is against the light,
select the Back Light mode.
temperature based on your lighting environment.
If you know the color conditions of your shooting
environment, such as the Sunny (bright), Cloudy
(dim), Fluorescent (high color condition) and
Tungsten (low color condition) situations, select
the mode you consider most appropriate. Select
the Auto mode if you are not sure about the color
condition of your environment.
www.gateway.com
19
Page 24

Using the Gateway DC-T23
Menu under () mode
Item Option Icon Description
Menu LCD
Display
1. Effect Normal
N/A
B&W
2. Setting See “Configuring settings” on page 22 for details.
Effect lets you set the effect of the image, such
as Normal (no effect) and B&W (black and white)
effects.
20
www.gateway.com
Page 25

Advanced Operations and Settings
Menu under () mode
Item Option Icon Description
Menu LCD
Display
1. Delete One Yes
N/A
No
2. Delete All Yes
N/A
No
3. Format Yes
N/A
No
4. Setting See “Configuring settings” on page 22 for details.
Delete One deletes a picture or a movie stored
in your built-in Flash memory or SD/MMC card.
Delete All deletes all files stored in your built-in
Flash memory or SD/MMC card.
Format deletes all files stored in your internal
Flash memory or SD/MMC card and the memory
is formatted. All stored files will be deleted and
cannot be restored.
www.gateway.com
21
Page 26

Using the Gateway DC-T23
Configuring settings
Highlight the icon with the up and down Control buttons ( ) in the Menu
to configure settings.
The following illustrations are the
Setting displays under the three modes.
Setting under ( ) mode Setting under ( ) mode Setting under ( ) mode
The following table describes all items in the
Setting menu:
Item Option Icon Function
1. Time Year
Month
Day
Hour
Minute
2. Beep On
Off
Time lets you set the time of the camera. Use the up and down
Control buttons ( ) to change the number of settings. Press the
MENU/OK button to confirm.
N/A
Beep determines whether the beep is active when operating the
camera.
3. Display On
4. Date
Stamp
22
Off
On
Off
Display determines if the small icons appear on the LCD screen.
Date stamp determines if a date stamp appears on the pictures
taken.
www.gateway.com
Page 27

Item Option Icon Function
Advanced Operations and Settings
5. Flicker 50 HZ
60 HZ
6. Language English
German
7. Default Yes
No
Flicker lets you set the flicker to prevent noise and get the best
image. The default flicker value of 60 HZ is best for most lighting
conditions. If you experience issues, try another setting.
Language lets you set the camera’s displayed language.
Default lets you set the camera settings back to the original factory
default.
www.gateway.com
23
Page 28

Using the Gateway DC-T23
Viewing images on your computer
Install the camera software before connecting the camera to your computer for
the first time. Use the following steps to complete the installation.
Installing the camera software
To install the camera software:
1 Turn on your computer.
Important
■
Do not connect the USB cable to your computer.
■
Close other applications that are running on your
computer.
2 Place the camera software CD into the CD or DVD drive. If the program
starts automatically, go to Step 4.
- OR -
If the program does not start automatically, go to Step 3.
3 Click Start, My Computer (or double-click the My Computer icon on your
desktop), then double-click your CD or DVD drive letter.
4 Click USB Driver. The driver installation begins.
5 Complete the driver installation by following the on-screen instructions.
24
www.gateway.com
Page 29

Viewing images on your computer
Connecting the camera to your computer
To connect the camera to your computer:
1 Turn on your computer.
2 Set the Mode switch on the camera to or .
3 Insert the USB cable to the USB port on your computer.
4 Insert the other end of the USB cable to the USB port on your camera.
Important Disconnecting the camera from the computer in
Windows 2000 or Windows ME
To disconnect the camera from the computer, double-click
the icon on the Task Bar, click (USB Disk), then
click Stop. Follow the on-screen instructions.
www.gateway.com
25
Page 30

Using the Gateway DC-T23
Copying pictures and movies to your computer
To copy pictures and movies to your computer:
1 If you are using Windows XP, after you connect your camera to the
computer, the Removable Disk window opens. Click
using Windows Explorer
- OR -
, click OK, then go to Step 3.
Open folder to view files
26
If you are using Windows 2000 or Windows ME, go to the next step.
2 Double-click My Computer, then double-click the Removable Disk icon.
3 Double-click the DCIM folder.
www.gateway.com
Page 31

Viewing images on your computer
4 Double-click the 100MEDIA folder.
5 To copy the pictures or movies from your camera, drag the files from the
camera’s folder to the
Tips & Tricks The following illustration shows the storage position of your
camera’s pictures and movies.
My Documents folder on your computer.
www.gateway.com
27
Page 32

Using the Gateway DC-T23
Viewing pictures and movies on your computer
To view pictures and movies on your computer:
1 Double-click the My Documents folder.
2 Double-click the file you want to view.
Tips & Tricks You must have DirectX 8.0 or higher to view movies.
28
www.gateway.com
Page 33

Using PC Camera or Web Cam
Using PC Camera or Web Cam
The PC Camera or Web Cam software lets you record still images and video
while the camera is connected to the computer. When using your camera in
this mode the camera receives power from your computer and will not consume
battery life.
You can also use your camera with other video conferencing applications, such
as Microsoft Messenger with video chat, or Netmeeting.
Important You need to install the DC-T23 camera software before
you can use PC Camera. For instructions on installing your
camera software, see “Installing the camera software” on
page 24.
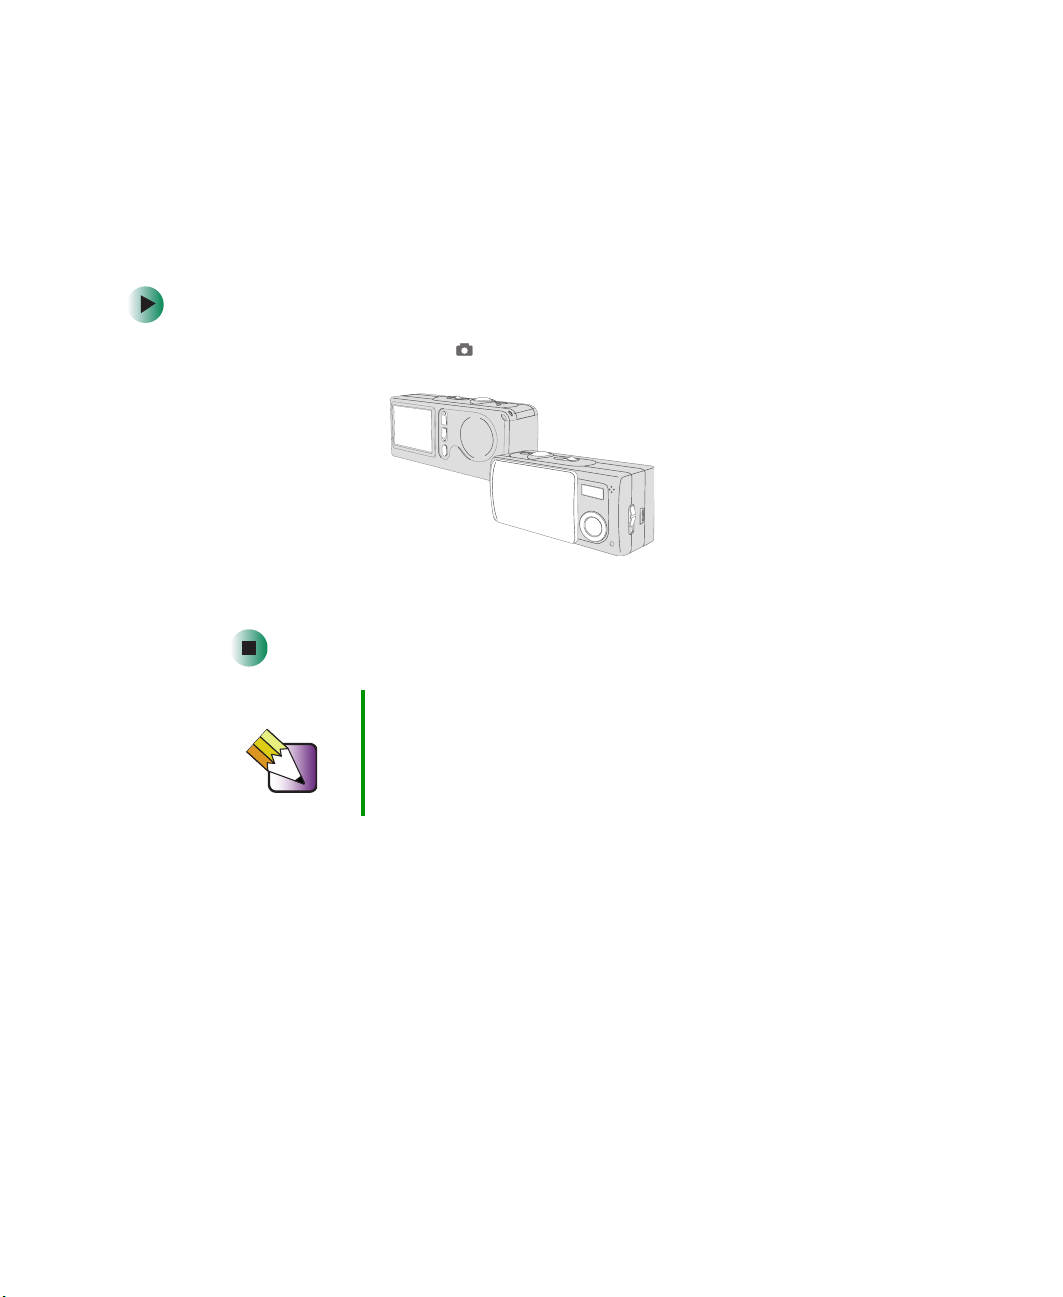
To use PC Camera:
1 Set the Mode switch on your camera to and slide the lens cover open.
2 Connect the camera to your computer. For instructions on connecting your
camera, see “Connecting the camera to your computer” on page 25.
3 Click Start, All Programs, DC-T23, then click DC-T23. The PC Camera window
opens.
www.gateway.com
29
Page 34

Using the Gateway DC-T23
4 Click the icons at the bottom of the PC Camera window to use the
functions.
* For detailed information on the Format and Video settings, see “Format
settings” on page 31 or “Video settings” on page 32.
Preview Window
Record
Stop Recording
Snapshot
Format settings*
Video settings*
Preview or Stop Preview
Open Album
Video Source
30
Tips & Tricks To view your pictures and movies using the PC Camera
interface, click Open Album, then browse to the following
folder: C:\Program Files\DC-T23\Work Temp
www.gateway.com
Page 35

Using PC Camera or Web Cam
Format settings
Click the Format settings icon on the PC Camera window to bring up advanced
settings.
Color Space/Compression
Select one of the following settings:
■ RGB 24 – Lower compression with better image quality. Files are larger and
take longer to send to others.
■ I420 – Higher compression with lower image quality. Files are smaller and
can be sent to others much more quickly.
Output size
Set the output size to change the size of the preview window. The default size
320×240. Select larger pixels when you need a larger preview window.
is
www.gateway.com
31
Page 36

Using the Gateway DC-T23
Video settings
Click the Video settings icon on the PC Camera window to bring up advanced
settings.
Banding Filter
If your computer screen flickers when using the PC Camera function, change
Banding Filter item on the Video Setting tab. Select 50 Hz or 60 Hz until the
the
screen stops flickering. If you want to restore the default setting, select
.
AE
Bandwidth
If the controller does not have enough bandwidth available for the camera, set
Bandwidth item on the Video Setting tab. The camera uses less bandwidth
the
as you decrease the bandwidth value.
Normal
Custom settings
You can use the default settings or change the settings for brightness, contrast,
saturation, sharpness, and hue manually.
32
www.gateway.com
Page 37

Troubleshooting
Troubleshooting
Using the camera
Problem Solution
The camera has no power. 1 The batteries may be out of power. Replace
the batteries.
2 Make sure that the batteries are installed
correctly.
Cannot power on my camera even though
batteries are installed.
Cannot take pictures and movies when pressing
the Shutter button.
I did not delete the picture and movie, but cannot
find the data in the SD/MMC card.
Cannot set the flash to the On mode. Charging the flash requires more battery power.
1 Make sure that the batteries are installed
correctly.
2 After 3 minutes of camera idle, the camera
shuts down automatically. Press the Power
button or slide the Lens cover to power on the
camera.
1 Make sure that the Lens cover is open.
2 The storage is full. Free some space of the
SD/MMC card or internal Flash memory.
3 Check the write-protect switch on the
SD/MMC card and make sure it is not set to
LOCK.
4If the MEMORY ERROR message shows on
the LCD display, format the card.
Check if your files are stored in the camera’s
internal Flash memory. If there is a icon at the
right bottom section on the LCD display, you are
using the camera with a SD/MMC card. Remove
the card to find the data in the internal Flash
memory. For details, see “Inserting and removing
the SD/MMC card (Optional)” on page 5.
When the batteries are low, the flash cannot be
set to On. Change the batteries.
The image is too blurred. Adjust the focus. See “Adjusting the focus” on
page 11.
The image is too dark. You may need to take pictures or movies in a
place with adequate light or use the flash.
www.gateway.com
33
Page 38

Using the Gateway DC-T23
Problem Solution
Sound playback is not available when viewing the
movie on the LCD display.
Noise occurs on my camera when viewing the
image on the LCD display or on the computer.
This situation is normal. If you want to view the
movie with sound, copy the movie to your
computer, then view it on the computer.
Change the Flicker setting. See “Configuring
settings” on page 22.
Connecting the camera to your computer
Problem Solution
The driver installation failed. 1 Remove the driver and other related
programs. Follow the installation steps in this
manual to reinstall.
2 Install the driver before inserting the USB
cable.
A conflict with another installed camera or
capture device.
The movie cannot be played on my computer. Install DirectX 8.0 or higher.
Noise occurs on my computer when using Video
Conferencing.
If you have another camera or capture device
installed, completely remove the camera and its
driver form the computer to avoid a driver conflict.
Adjust the Banding Filter. See “Banding Filter” on
page 32.
Getting Help
To get support for your camera:
■ Visit www.gateway.com/support for online and chat support
■ Call 1-888-737-6949 Monday-Friday 7 a.m. to 9 p.m. (CST) for telephone
support
34
www.gateway.com
Page 39

Appendix
Battery life
Condition Number of Images Battery life (minutes)
Appendix
Taking 1600×1200 still pictures
(without flash)
*Using alkaline batteries in 25 C, with pictures taken every four seconds.
■ Battery life is shortened when taking snapshots at low temperatures, or
turning the power on and off repeatedly.
This table is for reference only. Using the flash decreases the number of pictures
you can take.
650 45*
LED indicator events
Condition LED color Status
Status
(LED indicator)
Flash
(LED indicator)
Data transformation
(LED indicator)
Red Busy (mode change, storage, or capture)
Green Ready (waiting for command)
Red Charging flash
Green Ready (waiting for command)
Red Data transformation
Green Ready (waiting for command)
Self-Timer
(Self-Timer indicator)
Caution Never eject the memory card or remove the batteries while
Red (regularly) Counting
Red (rapidly) Capturing the picture
the LED indicator is red.
www.gateway.com
35
Page 40

Using the Gateway DC-T23
Storage capacity
Memory Still picture Movie
Internal Flash memory (16 MB) 20 30 48 2
SD/MMC card (32 MB) 40 60 96 4
SD/MMC card (64 MB) 80 120 192 8
SD/MMC card (128 MB) 160 240 384 16
SD/MMC card (256 MB) 320 480 768 32
SD/MMC card (512 MB) 640 960 1536 64
This table is for reference only. The actual number of pictures stored may vary
up to 30% depending on their resolution and color saturation.
Specifications
2048×1536 1600×1200 1280×960 Maximum recording
time
Sensor effective resolution
Internal memory
External memory
Digital still camera
Digital video camcorder
Video conferencing
LCD Display
Digital zoom
Exposure
36
1600×1200 (2 Megapixels)
Built-in 16 MB SDRAM (buffer)
16 MB Flash memory (storage)
Built-in SD/MMC slot (maximum: 512 MB)
JPEG Format
2048×1536 (hardware enhanced), 1600×1200, or 1280×960
Motion JPEG (AVI) Format
QVGA (320×240 pixels) / up to 20 fps
VGA (640×480 pixels) / up to 10 fps
QVGA (320×240 pixels) / up to 20 fps
1.5 in. Color TFT LCD
4× (for still pictures only)
Auto/Back light
www.gateway.com
Page 41

Appendix
White balance
Image effect
Lens
Self Timer
Interface
Power saving
Built-in microphone
Built-in speakers
Built-in flash
Battery
Dimensions
Supported Operating Systems
Auto/Sunny/Cloudy/Fluorescent/Tungsten
4 modes for still pictures
2 modes for videos
F=3.5, 8.5mm
10 seconds
USB 1.1 (USB 2.0 compatible)
Auto power-off if idle for over 3 minutes
Yes
No
Yes
2× AAA (alkaline recommended)
3.4 × 1.6 × 1.2 in. (86.36 × 40.64 × 30.48 mm)
Windows XP, Windows ME, Windows 2000
(Windows 98SE driver supplied but not supported.)
www.gateway.com
37
Page 42

Using the Gateway DC-T23
Regulatory compliance statements
United States of America
Unintentional emitter per FCC Part 15
This device has been tested and found to comply with the limits for a Class B digital device,
pursuant to Part 15 of the FCC rules. These limits are designed to provide reasonable protection
against harmful interference in a residential installation. This equipment generates, uses, and can
radiate radio frequency energy and, if not installed and used in accordance with the instructions,
may cause harmful interference to radio or television reception. However, there is no guarantee
that interference will not occur in a particular installation. If this equipment does cause
interference to radio and television reception, which can be determined by turning the equipment
off and on, the user is encouraged to try to correct the interference by one or more of the following
measures:
■
Reorient or relocate the receiving antenna
■
Increase the separation between the equipment and receiver
■
Connect the equipment to an outlet on a different circuit from that to which the receiver is
connected
■
Consult the dealer or an experienced radio/TV technician for help.
Compliance Accessories: The accessories associated with this equipment are: shielded interface
cables that came with your camera or equivalent to those that came with your camera. These
accessories are required to be used in order to ensure compliance with FCC rules.
FCC declaration of conformity
Responsible party:
Gateway Companies, Inc.
610 Gateway Drive, North Sioux City, SD 57049
(605) 232-2000 Fax: (605) 232-2023
Product: Gateway DC-T23
This device complies with Part 15 of the FCC Rules. Operation of this product is subject to the
following two conditions: (1) this device may not cause harmful interference, and (2) this device
must accept any interference received, including interference that may cause undesired operation.
Caution Changes or modifications not expressly approved by
Gateway could void the FCC compliance and negate your
authority to operate the product.
38
www.gateway.com
Page 43

Canada
Industry Canada (IC)
Unintentional emitter per ICES-003
This digital apparatus does not exceed the Class B limits for radio noise emissions from digital
apparatus as set out in the radio interference regulations of Industry Canada.
Le présent appareil numérique n’émet pas de bruits radioélectriques dépassant les limites
applicables aux appareils numériques de Classe B prescrites dans le règlement sur le brouillage
radioélectrique édicté par Industrie Canada.
Mexico
Unintentional emitter
At this time there are no mandatory requirements for Unintentional Emitters. However, this device
does comply with multiple requirements for other countries and regions as listed on the system
label and in the user’s manual.
California Proposition 65 Warning
Warning This product contains chemicals, including lead, known to
the State of California to cause cancer and/or birth defects
or reproductive harm.
Appendix
www.gateway.com
39
Page 44

Using the Gateway DC-T23
Notices
Copyright © 2003 Gateway, Inc.
All Rights Reserved
14303 Gateway Place
Poway, CA 92064 USA
All Rights Reserved
This publication is protected by copyright and all rights are reserved. No part of it may be reproduced or
transmitted by any means or in any form, without prior consent in writing from Gateway.
The information in this manual has been carefully checked and is believed to be accurate. However, changes are
made periodically. These changes are incorporated in newer publication editions. Gateway may improve and/or
change products described in this publication at any time. Due to continuing system improvements, Gateway is
not responsible for inaccurate information which may appear in this manual. For the latest product updates,
consult the Gateway Web site at www.gateway.com
special, exemplary, incidental, or consequential damages resulting from any defect or omission in this manual,
even if advised of the possibility of such damages.
In the interest of continued product development, Gateway reserves the right to make improvements in this
manual and the products it describes at any time, without notices or obligation.
Trademark Acknowledgments
1-800-GATEWAY, ActiveCPR, ALR, AnyKey, black-and-white spot design, CrystalScan, Destination, DestiVu, EZ
Pad, EZ Point, Field Mouse, Gateway 2000, Gateway Country, gateway.net, Gateway stylized logo, Perfect
Scholar, Solo, TelePath, Vivitron, stylized “G” design, and “You’ve got a friend in the business” slogan are
registered trademarks and black-and-white spotted box logo, GATEWAY, Gateway Astro, Gateway@Work,
Gateway Connected touch pad, Gateway Connected music player, Gateway Cyber:)Ware, Gateway
Education:)Ware, Gateway Flex Case, Gateway Gaming:)Ware, Gateway GoBack, Gateway Gold, Gateway
Learning:)Ware, Gateway Magazine, Gateway Micro Server, Gateway Money:)Ware, Gateway Music:)Ware,
Gateway Networking Solutions, Gateway Online Network (O.N.) solution, Gateway Photo:)Ware, Gateway
Professional PCs, Gateway Profile, Gateway Solo, green stylized GATEWAY, green stylized Gateway logo,
Gateway Teacher:)Ware, Gateway Video:)Ware, HelpSpot, InforManager, Just click it!, Learn@Gateway, Kids
BackPack, SERVE-TO-ORDER, Server Watchdog, the Spotted G Gateway Logo and the Spotted G Logo,
SpotShop, Spotshop.com, and Your:)Ware are trademarks of Gateway, Inc. Intel, Intel Inside logo, and Pentium
are registered trademarks and MMX is a trademark of Intel Corporation. Microsoft, MS, MS-DOS, and Windows
are trademarks or registered trademarks of Microsoft Corporation. All other product names mentioned herein are
used for identification purposes only, and may be the trademarks or registered trademarks of their respective
companies.
. In no event will Gateway be liable for direct, indirect,
40
www.gateway.com
Page 45

Page 46

MAN DC-T23 DIG CAM GDE R0 10/03
 Loading...