

PORTABLE ICE FISHING KIT
INSTALLATION
• When storing the battery for an extended time, store within
the following temperature range: from 5° F to 104°F (from
-15° C to 40° C).
• Do not operate the battery outside of the following
temperature range: from 5° F to 122° F (from -15° C to 50°
C).
INSTRUCTIONS
Important Safety Information
WARNING
See the Important Safety and Product Information guide in the
chartplotter or fishfinder product box for product warnings and
other important information.
To obtain the best performance, you must install the Garmin
device according to these instructions.
Read all installation instructions before proceeding with the
installation. If you experience difficulty during the installation, go
to support.garmin.com for more information.
Battery Information
Battery Warnings
WARNING
The Garmin device uses a user-replaceable, sealed, lead-acid
battery. If these guidelines are not followed, the battery may
experience a shortened life span or may present a risk of
damage to the device, fire, chemical burn, electrolyte leak,
and/or bodily injury.
• Do not place the battery near objects that may cause sparks,
flames, or heat.
• Do not incinerate the battery.
• Do not use a sharp object to remove the battery.
• Do not disassemble, puncture, or damage the battery.
• Do not swallow, touch, or inhale the contents of an open
battery. Avoid contact with internal acid. Contact with internal
acid may cause irritation or severe burns. Irritation may occur
to the eyes, respiratory system, and skin. Flush with water at
once if contact is made with acid.
• Do not submerge the battery and avoid contact with water.
• Do not short the battery terminals.
• Do not drop or throw the battery.
• Keep the battery away from children.
• Only replace the battery with the correct replacement battery.
Using another battery presents a risk of fire or explosion of
the device or charger.
• Only charge the battery with the included charger.
• Do not charge the battery in an unventilated area.
• Store in a cool, dry, and well-ventilated area.
• Do not charge the battery in a gas-tight container.
• Do not leave the device exposed to a heat source or in a
high-temperature location, such as in the sun in an
unattended vehicle. To prevent damage, remove the device
from the vehicle or store it out of direct sunlight.
• Do not use organic solvents or other cleaners other than
recommended chemical cleaners on the battery.
• Contact your local waste disposal department to dispose of
the battery in accordance with applicable local laws and
regulations.
®
Battery Tips
• The length of time a fully charged battery will last before fully
discharging varies based on many factors, such as device
backlight brightness, the temperature, and the age of the
battery.
• You can lower the backlight brightness level to help extend
the battery life.
• The life expectancy of a sealed, lead-acid battery can be
extended by frequently recharging and not completely
discharging the battery.
• Sealed, lead-acid batteries slowly lose their charge while in
storage. For best results, charge the battery prior to use.
• When used in cold temperatures, sealed, lead-acid batteries
do not hold the charge as long as in warmer temperatures.
• Sealed, lead-acid batteries are completely recyclable.
Portable Ice Fishing Kit Specifications
echoMAP™ 7
battery
discharge
Battery type Sealed, lead acid, 12 Ah
Battery life Up to 11 hr.
Battery shelf life
after charging
Battery operating
temperature
range
Battery charging
temperature
range
Battery storage
temperature
range
Physical size,
assembled kit
with device (L ×
W × H)
Weight without
device
GT10HN Ice
fishing transducer frequencies
Temperature Screen bright-
ness
At -20°C (-4°F) 100%
50%
At 0°C (32°F) 100%
50%
At 20°C (68°) 100%
50%
NOTE: The actual battery life of a fully charged
battery can vary based on the device used, backlight
brightness, temperature the battery is operated and
stored in, age of the battery, and depth of the water.
1 mo.: 92%
3 mo.: 90%
6 mo.: 80%
From 5° to 122°F (from -15° to 50°C)
From 5° to 104°F (from -15° to 40°C)
From 5° to 104°F (from -15° to 40°C)
12.25 in. × 14.45 in. × 10 in. (311 mm × 367 mm ×
254 mm)
15 lb. (6.65 kg)
Traditional: 130 to 300 kHz (High Frequency, Narrow
Beam, CHIRP)
Time
7.4 hr.
9.75 hr.
9.83 hr.
10.2 hr.
10.3 hr.
11.1 hr.
GUID-3DD38350-7642-4ADE-BB26-F8F54FB8401D v3March 2021
GT10HN Ice
fishing transducer transmit
power (RMS)
GT10HN Ice
fishing transducer beam
width
500 W
User adjustable, from 8 to 16°, in 1° steps
Panoptix™ PS22 Specifications
Dimensions (W x H x L) 32 x 118 x 96 mm (1.3 x 4.6 x
Transducer weight 380 g (0.84 lb.)
Total weight (transducer, mount,
and cable)
Max. continuous power usage 8 W
Peak transmit power 48 W
Operating voltage From 10 to 35 Vdc
Operating temperature range* From -10 to 40°C (from 14 to
Storage temperature range From -40 to 70°C (from -40 to
Material ASA plastic
Maximum range** 91.4 m (300 ft.)
Frequency 417 kHz
Fuse rating 4.0 A mini 32 Vdc
3.8 in.)
840 g (1.85 lb.)
104°F)
158°F)
*When the transducer is used out of the water, the transducer
monitors the internal temperature and suspends operation until
the temperature returns to the operating range.
**Dependent upon transducer placement, water salinity, bottom
type, and other water conditions.
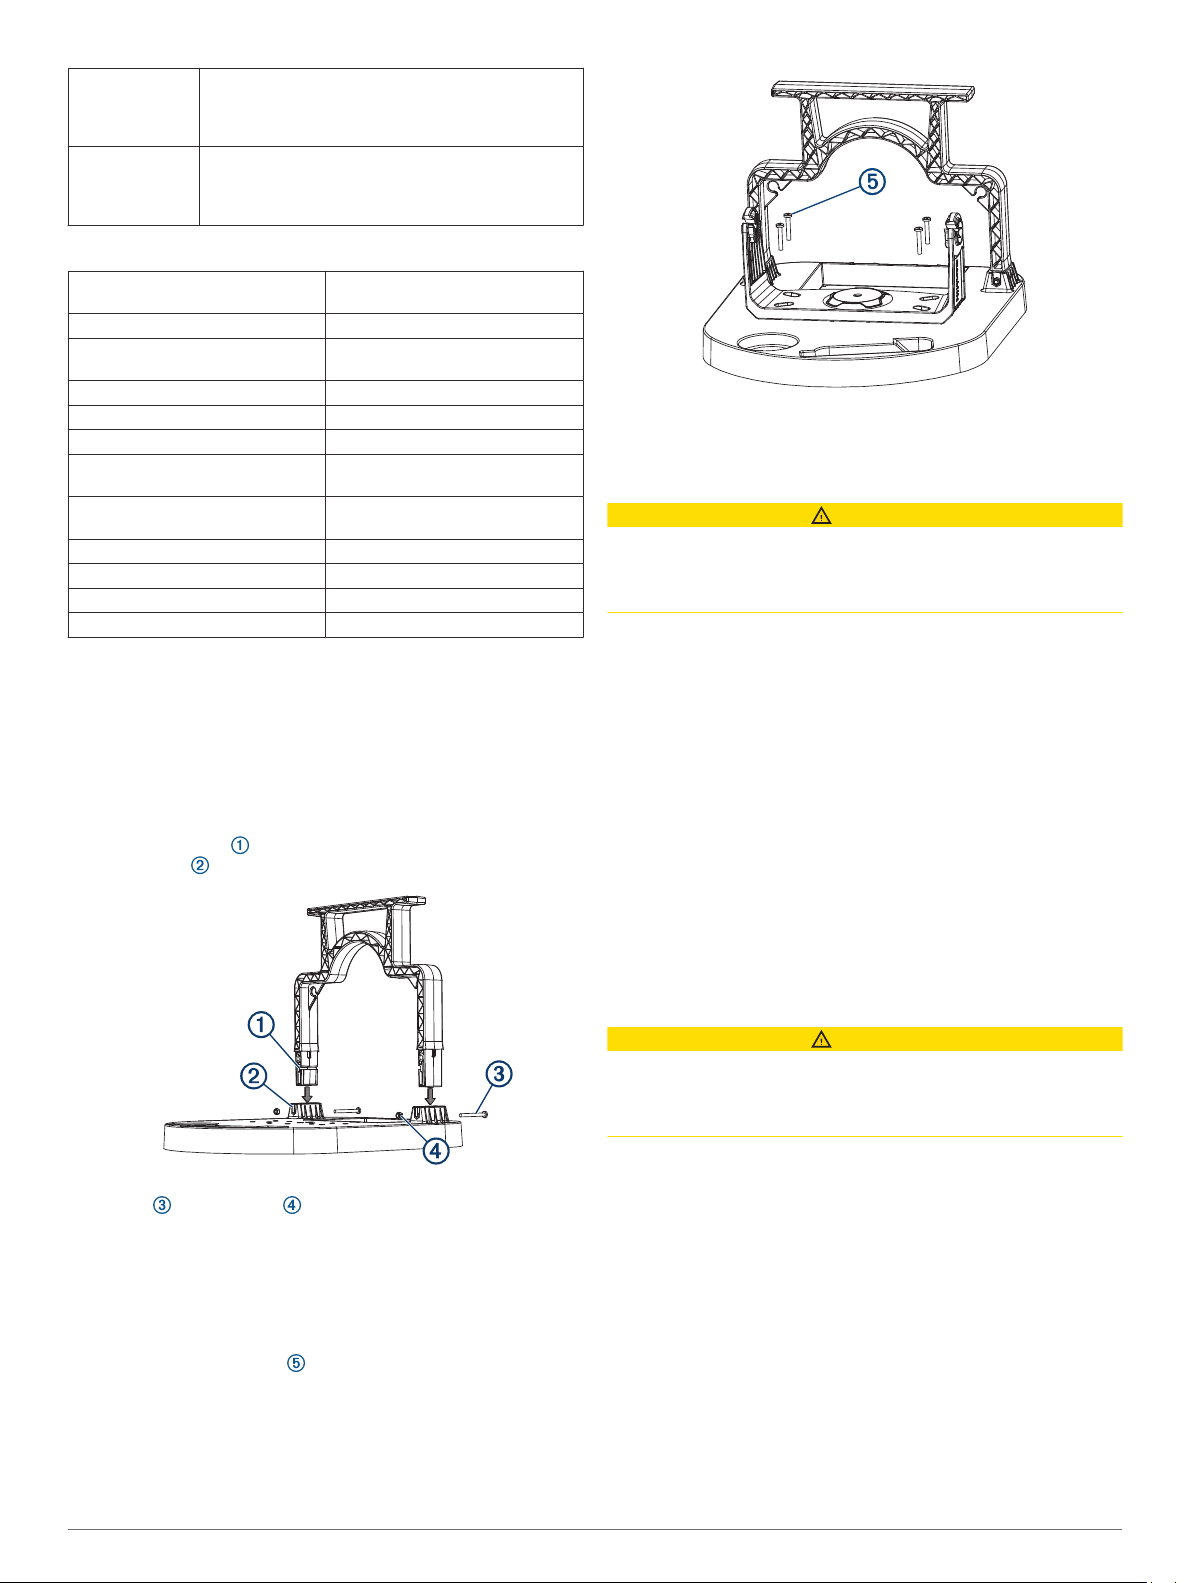
Assembling the Portable Mount
You need a Phillips screwdriver to assemble the portable mount.
Insert the handle into the two openings on the portable
1
mount base .
Screw the bail-mount knobs into the sides of the cradle.
5
Place the cradle into the bail mount and tighten the knobs.
6
Connecting the Cables
CAUTION
Ensure that you connect the correct spade connector to the
correct battery terminal. Damage to the battery or device, or
bodily harm may occur if the device is improperly connected to
the battery.
Select the appropriate power cable and transducer cable to
1
use with your device and transducer.
Connect the power cable and transducer cables to the
2
device.
Connect the Panoptix PS22 transducer to the gray bare wire
3
connectors on the power cable.
NOTE: If you have a compatible unit and connect a Panoptix
PS22, you must purchase a power cable (GPN
010-12676-35) and connect it to the gray connector.
Connect the red wire on the power cable to the red wire on
4
the device, and connect the black wire on the power cable to
the black wire on the device.
Slide the red spade connector onto the positive (red) terminal
5
on the battery.
Slide the black spade connector onto the negative (black)
6
terminal on the battery.
Charging the Battery
Secure the handle to the base using the two longer machine
2
screws and two nuts .
Align the device mount over the hole pattern that matches
3
your device mount.
NOTE: A bail mount is included in some packages. If a
mount is not included, use the mount from your chartplotter
or fishfinder and the screws included in this package.
Secure the device mount to the base using the included
4
shorter machine screws .
NOTE: Do not use the self-threading screws included with
the chartplotter. Only use the machine-threaded screws
included with this portable kit.
2
CAUTION
Ensure that you connect the correct spade connector to the
correct battery terminal. Damage to the battery or device, or
bodily harm may occur if the device is improperly connected to
the battery.
You should always use the all-in-one cable to charge the
battery.
Connect the red and black spade connectors from the all-in-
1
one cable onto the corresponding battery terminals.
Connect the all-in-one cable to the wall charger.
2
Connect the wall charger to the wall outlet.
3
The light on the wall charger is solid orange when the battery is
charging. It takes about 8 to 10 hours in a room-temperature
environment to fully charge a fully discharged battery. When the
light is solid green, the battery is fully charged.
Placing the Portable Mount in the Bag
After you have assembled the portable mount, you can place it
in the bag, which makes it easier to carry and protects it from
the elements. The bag contains loops that allow you to tether
the bag as needed.

Slide two of the included hook and loop straps through the
1
narrow slots beside the battery compartment.
Place the battery into the battery compartment under the
2
handle.
Pull the straps under and around the bottom of the portable
3
mount, and wrap them tightly around the battery.
Place the transducers into the recessed spaces in front of the
4
bail mount.
Place the portable mount into the bag.
5
If necessary, wrap the excess power cable and transducer
6
cables around the handle.
Close all of the zippers.
7
You can use the zipper at the back of the bag for quick access
to charge the battery. You can store the wall charger in the
interior zippered pocket.
Installing the Transducer
The portable ice fishing kit may include one or two transducers
and mounting options. Follow the instructions applicable to your
hardware.
Installing the Ice Fishing Transducer
Insert the transducer cable through the float.
1
Snap the float stop onto the transducer cable, on the top
2
of the float.
Screw together the needed segments, with the shortest
5
segment on the bottom of the pole.
Using a 5 mm hex wrench, attach the transducer bracket
6
to the bottom pole using the hex head screws .
Use the included knob or mounting bolt to attach the
7
transducer to the bracket.
TIP: Use the optional included rubber washer for faster
and easier transducer angle adjustment.
You can align the transducer parallel to the pole mount
handle to provide a direction indicator.
Adjust the float and float stop so the transducer is hanging
3
beneath the ice.
With the transducer cable connected to the back of the
4
device, drop the transducer into the water.
Panoptix Ice Fishing Mount Installation
Assembling the Panoptix Ice Fishing Mount
You need a Phillips screwdriver and a 5 mm hex wrench to
assemble the ice fishing mount and attach the transducer.
Insert the sheet metal screws into the four corners of the ice
1
mount base.
The screws protrude from the bottom of the base to help
stabilize the mount when it is on the ice.
Locate the handle and the top pole segment.
2
Place the base between the handle and the top pole ,
3
and screw them together.
Determine how many of the three middle pole segments you
4
need to use, based on the thickness of the ice.
TIP: The top of the Panoptix PS22 transducer needs to be
below the bottom of the ice for best performance.
Use the hook and loop straps to secure the transducer cable
8
to the pole.
Place the mount base around the hole in the ice.
9
Rotate the handle to aim the transducer.
10
Adjusting the Transducer Angle
The transducer should be angled properly for optimal imagery in
each mode.
With the transducer mounted, angle the transducer according
1
to the mode you will use:
• For LiveVü Forward mode, angle the transducer forward
and slightly downward .
• For LiveVü Down mode, angle the transducer down .
3

TIP: You may want to experiment to find the best angle for
your sonar needs.
TIP: For LiveVü Forward mode, adjust the angle 1 or 2 clicks
downward in shallow water (less than 4.6 m/15 feet) and 2 or
3 clicks downward in deeper water (more than 4.6 m/15 feet).
Tighten the knob or mounting bolt so the device does not
2
move during use.
On the chartplotter, select Sonar, and select LiveVü Down
3
or LiveVü Forward.
Effective Forward and Down Range
CAUTION
Water conditions and bottom conditions affect the depth and
range performance of the transducer. You should use caution
and observe the water depth and range, especially when your
unit is operating in manual range or depth mode.
Length of beam at the bottom
Width of beam at the bottom
Depth
100° length cone angle
20° width cone angle
© 2018 Garmin Ltd. or its subsidiaries
Garmin® and the Garmin logo are trademarks of Garmin Ltd. or its subsidiaries,
registered in the USA and other countries. These trademarks may not be used without
the express permission of Garmin.
When operating in LiveVü Forward mode, the transducer has an
effective forward range of between five and eight times the
depth of the water. For example, in 3 m (10 ft.) of water, the
effective forward range is between 15 and 24 m (between 50
and 80 ft.). Water conditions and bottom conditions affect the
actual range.
When operating in LiveVü Down mode, the fore/aft range is
equal to the depth of the water. For example, in 10 m (33 ft.)
water depth, the screen will display 5 m (16 ft.) fore and 5 m
(16 ft.) aft of the transducer. Deeper water provides a greater
fore and aft range.
Beam width
When you point the transducer away from the bottom, the
integrated stabilization system automatically aligns the beam
vertical to the bottom. Regardless of the transducer orientation,
the length cone angle is always 100°, and the width cone
angle is always 20°.
© 2018 Garmin Ltd. or its subsidiaries
support.garmin.com
 Loading...