

Garmin GDL 30, GDL 30A owner’s manual
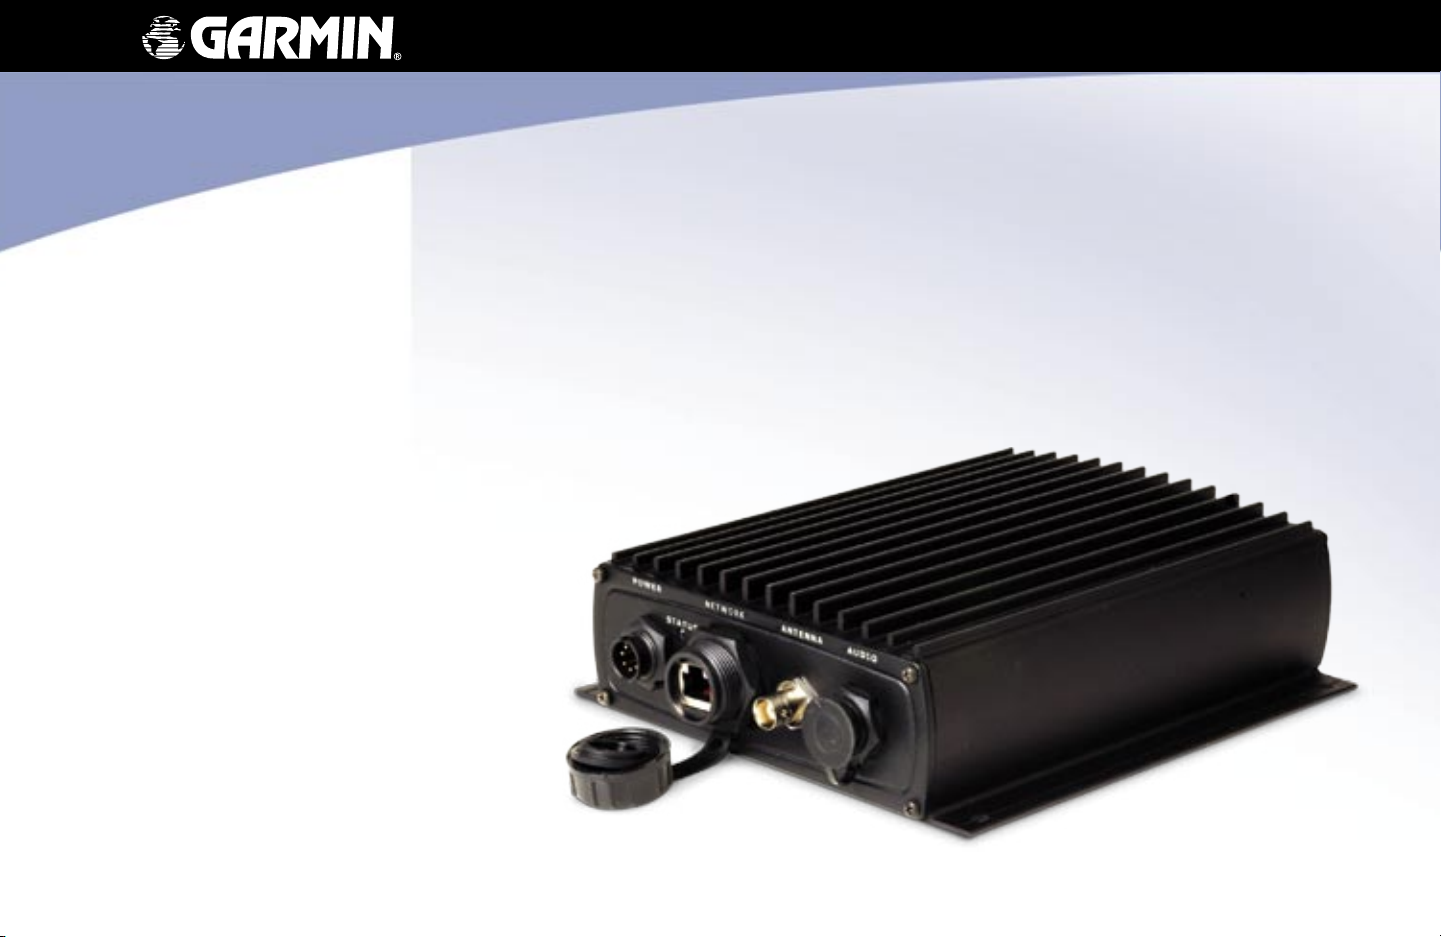
GDL 30/30A
marine weather satellite receiver
owner’s manual

© Copyright 2005 Garmin Ltd. or its subsidiaries
Garmin International, Inc.
1200 East 151st Street,
Olathe, Kansas 66062, U.S.A.
Tel. 913/397.8200 or 800/800.1020
Fax 913/397.8282
All rights reserved. Except as expressly provided herein, no part of this manual may be reproduced, copied, transmitted, disseminated, downloaded or stored in any storage medium, for any
purpose without the express prior written consent of Garmin. Garmin hereby grants permission to download a single copy of this manual onto a hard drive or other electronic storage medium to
be viewed and to print one copy of this manual or of any revision hereto, provided that such electronic or printed copy of this manual must contain the complete text of this copyright notice and
provided further that any unauthorized commercial distribution of this manual or any revision hereto is strictly prohibited.
Information in this document is subject to change without notice. Garmin reserves the right to change or improve its products and to make changes in the content without obligation to notify any
person or organization of such changes or improvements. Visit the Garmin Web site (www.garmin.com) for current updates and supplemental information concerning the use and operation of this
and other Garmin products.
Garmin®, and GPSMAP® are registered trademarks of Garmin Ltd. or its subsidiaries and may not be used without the express permission of Garmin.
Unit 5, The Quadrangle, Abbey Park Industrial Estate, Romsey,
Garmin (Europe) Ltd.
SO51 9DL, U.K.
Tel. 44/0870.8501241
Fax 44/0870.8501251
Garmin Corporation
No. 68, Jangshu 2nd Road, Shijr, Taipei County, Taiwan
Tel. 886/2.2642.9199
Fax 886/2.2642.9099
July 2005 Part Number 190-00336-00 Rev D Printed in Taiwan

INTRODUCTION
Product Registration
Help us better support your equipment purchase by completing our
Preface
Congratulations on choosing one of the most advanced marine weather systems
available! The GDL 30/30A Marine Weather/Audio Satellite Receiver provides
graphical and textual marine XM WX weather information that can be viewed on
your Garmin Marine Network chartplotters. Operation of the GDL30 does require
a subscription to the XM WX Satellite Weather service. Additionally, the GDL
30A offers music, news, and talk programming capability with a subscription to
the XM Radio service.
This manual covers the XM weather and audio features of the GDL 30/30A when
viewed on the Garmin Marine Network chartplotters. To get the most out of your
new system, take the time to go through this manual and learn the operating
procedures. This manual discusses in detail how to install the GDL 30/30A and
how to subscribe to XM WX Weather and Radio services. Detailed information
about the GDL’s Weather and Audio features and operation is also provided. For
all other unit operating instructions, refer to your Garmin Chartplotter’s Owner’s
Manual and Quick Reference Guide.
online registration today!
connect to our Web site (www.garmin.com) and click the Product Registration
link on the Home page. Record your serial number below for a quick reference.
Product terminology used throughout this manual
• This manual refers to the GDL 30 Marine Weather Satellite Receiver as
GDL 30 and the GDL 30A Marine Weather/Audio Satellite Receiver as
GDL 30A. It covers instructions for both units (GDL 30/30A). Unless
otherwise specified, unit operations are the same on both models.
• Garmin Marine Network Chartplotters are Multi-Function Display units
such as the GPSMAP 3005C, and GPSMAP 3006C/3010C. They are
referred to as chartplotters throughout this manual.
INTRODUCTION > PREFACE
Have the serial number of your GDL 30/30A ready,
Serial Number for GDL 30/30A
Use this area to record the serial number (8-digit
number located on the bottom of your unit) in
case it is lost, stolen, or needs service. Be sure to
keep your original sales receipt in a safe place or
attach a photocopy inside the manual.
Serial Number:
www.garmin.com
XM WX Weather and XM Radio IDs
Use this area to record the ID numbers (8-digit
number located on the Information sub tab of your
unit--see page 6 of this manual) in case your unit
is lost or stolen. XM Satellite Radio can deactivate
these radio codes when you call.
XM WX Weather ID Number:
XM Radio ID Number (GDL 30A only):
www.xmwxweather.com
800-985-9200
GDL 30/30A Owner’s Manual i

INTRODUCTION > TABLE OF CONTENTS
Introduction ...........................................................................i
Preface ...................................................................................... i
Product terminology used throughout this manual ......................... i
Product Registration ........................................................................ i
Unit Overview ......................................................................1
Packing List and Accessories ................................................ 1
Installing the GDL 30/30A ...................................................2
Mounting the GDL 30/30A ............................................................. 2
Connecting the Power Cable ..........................................................2
Connecting the GDL 30/30A to a Chartplotter .............................. 3
Connecting the Audio Cable (GA 30A only) .................................. 3
Mounting the GA 31 Antenna ......................................................... 3
Turn on the GDL 30/30A ................................................................ 4
Subscribing to XM WX Weather and XM Radio ........................... 4
Displaying Weather and Sea Surface information .......................... 5
Preset Weather Displays .....................................................6
Selecting a preset weather display ........................................ 6
To select a preset weather display: ................................................6
Customizing the Preset Weather Displays ........................... 7
The Weather Features .........................................................8
Precipitation ............................................................................. 8
NEXRAD ........................................................................................ 8
Cloud Tops ...................................................................................... 9
Storm Cells ................................................................................... 10
Lightning ...................................................................................... 11
Hurricanes ..................................................................................... 12
Atmosphere ........................................................................... 13
Wind .............................................................................................13
Pressure ......................................................................................... 14
Fronts ............................................................................................ 16
Sea Surface ............................................................................ 18
Temperature .................................................................................. 18
Wave Height .................................................................................18
Wave Period .................................................................................. 19
Wave Direction ............................................................................. 19
Main Menu ..........................................................................20
Weather Tab ........................................................................... 20
Current .......................................................................................... 20
Forecast ......................................................................................... 21
Sea Surface ................................................................................... 22
Forecast Map ................................................................................23
Setup ............................................................................................. 24
XM Tab .................................................................................... 25
Information ................................................................................... 26
Blink Codes ............................................................................ 27
Weather-Related Broadcast Rates ....................................... 28
GDL 30/30A Specifications .......................................................... 29
GA 31 Antenna Specifications ...................................................... 29
Software ................................................................................. 30
Software Versions ......................................................................... 30
Software License Agreement ............................................... 30
FCC Compliance .................................................................... 31
Product Safety and Regulatory Information ....................... 31
Caution ................................................................................... 31
Limited Warranty ................................................................... 32
Index ...................................................................................33
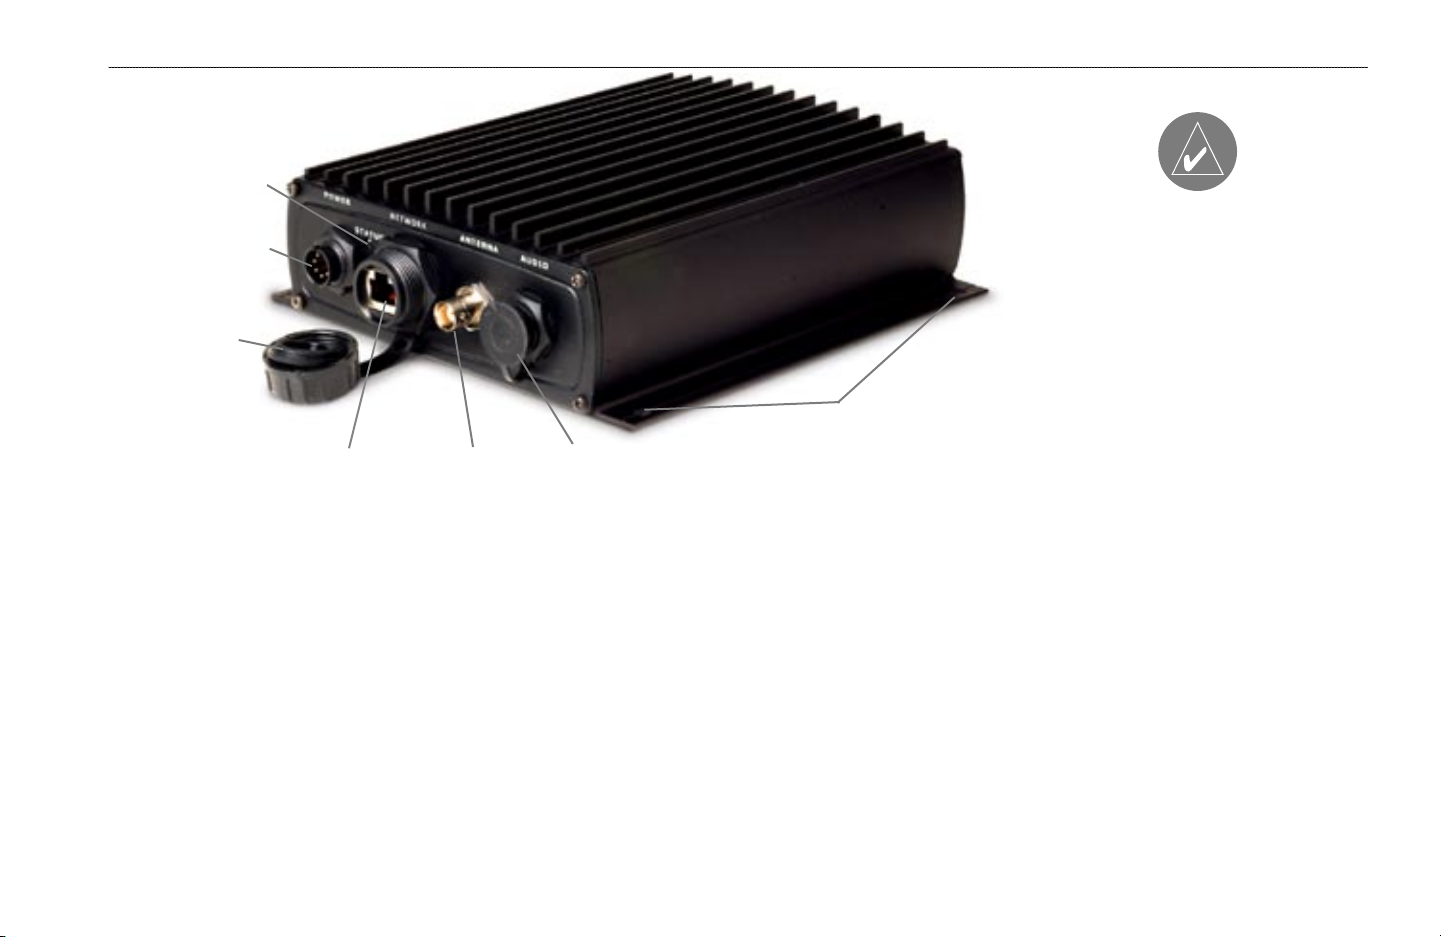
LED Status Indicator
UNIT OVERVIEW
UNIT OVERVIEW > PACKING LIST AND ACCESSORIES
Power/Data Connector
Weather Cap
Mounting Holes
Network Port Antenna Connector Audio Connector
Cleaning - The unit’s case is constructed of
high quality material and does not require user
maintenance other than cleaning. Clean the unit
housing using a lightly-dampened cloth with a
mild detergent solution and then wipe dry. Avoid
chemical cleaners and solvents that may damage
plastic components. Do not apply cleaner to the
electrical contacts on the front of the unit.
Storage - Do not store the unit where exposure to
temperature extremes may occur, as permanent
damage may result.
Packing List and Accessories
Before installing your unit, please check to see that your package includes the following items. If any parts are
missing, contact your Garmin dealer immediately.
Standard Package
• GDL 30 or 30A unit
• 7-pin power cable
• Garmin marine network cable (6 ft)
• Owner’s Manual
• GA 31 Antenna with cable
• Audio cable (GDL 30A only)
• Grommet
Optional Accessories
• GMS 10 Network Port Expander
• Garmin marine network cables (20 ft and 40 ft)
The Garmin GDL 30/30A has no user-serviceable
parts. Should you ever encounter a problem with
your unit, take it to an authorized Garmin dealer
for repairs.
The GDL 30/30A is fastened shut with screws.
Any attempt to open the case to change or modify
the unit in any way voids your warranty and may
result in permanent damage to the equipment.
UNIT CARE
SERVICING YOUR UNIT
GDL 30/30A Owner’s Manual 1
GETTING STARTED > INSTALLING THE GDL 30/30A
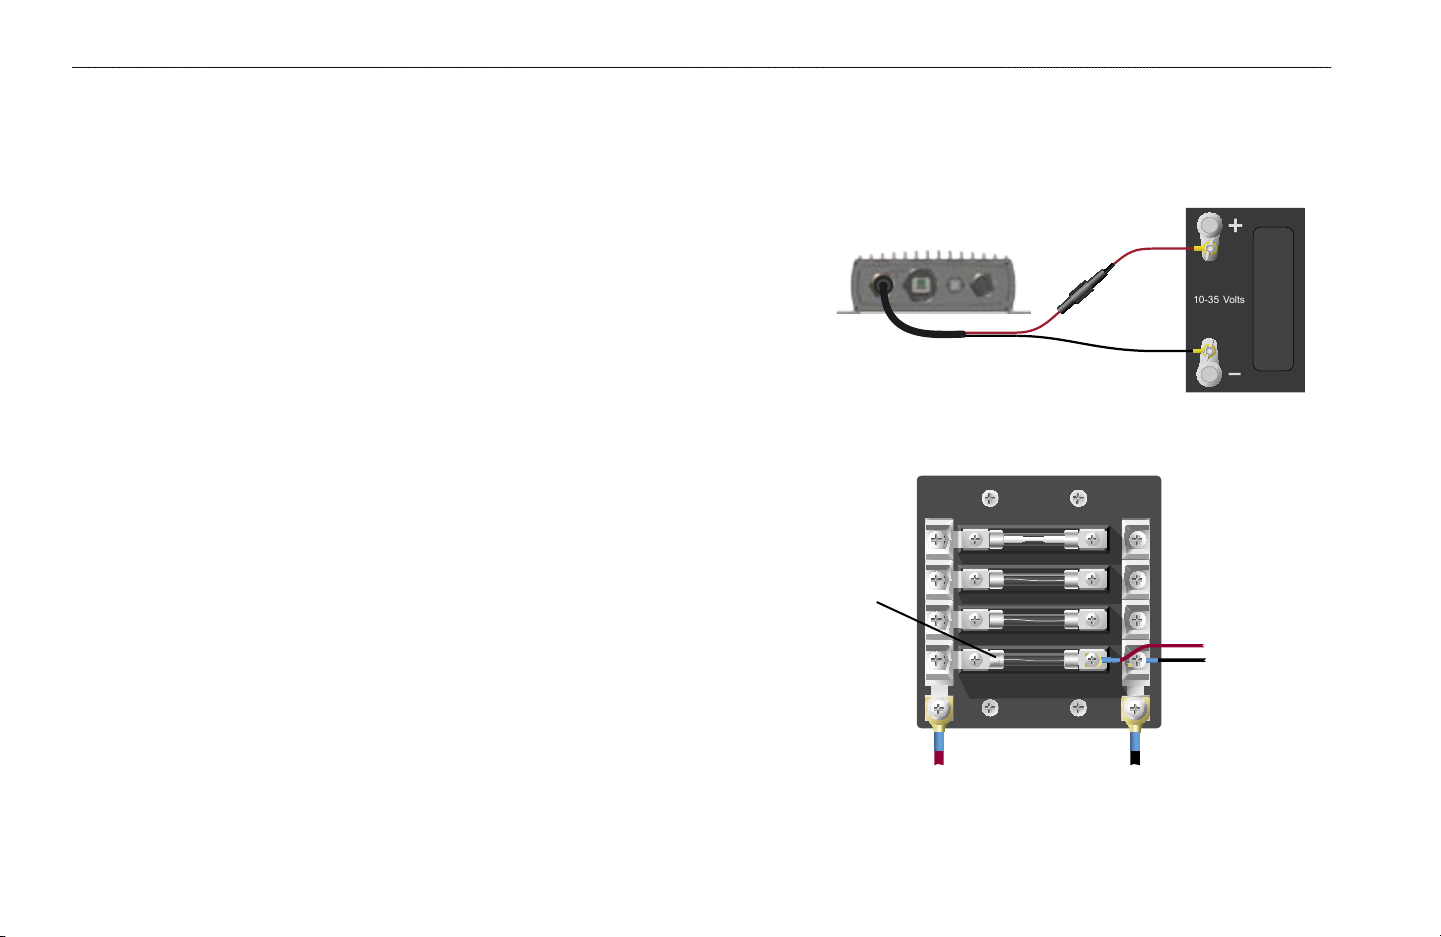
10-35 Volts
INSTALLING THE GDL 30/30A
To obtain the best possible performance, install the GDL 30/30A according to the following
instructions. If you experience difficulty during the installation, contact Garmin Product Support or
seek the advice or a professional installer.
Mounting the GDL 30/30A
Mount the GDL 30/30A in a location that is dry and well-ventilated. Avoid mounting the unit
where it may become submerged or exposed to extreme temperatures. Verify there is enough
clearance to attach the cables to the unit. If you want to view the blink codes, make sure the
Status LED is visible.
To mount the GDL 30/30A:
1. Using the unit as a template, mark the location of the mounting holes. If needed, additional
holes can be drilled in the side mounting flanges.
2. Secure the GDL 30/30A using the appropriate fasteners.
Connecting the Power Cable
The Power Cable can be connected directly to the vessel’s battery or through an open
connector on the fuse block.
To connect the power cable to a battery:
1. Connect the Red wire to the positive (+) terminal of the battery. Do not remove the
AGC/3AG 2.0 amp fuse holder from the Red wire.
2. Connect the Black wire to the negative (-) terminal of the battery.
3. Connect the power cable to the GDL 30/30A 7-pin connector labeled
POWER.
To connect the power cable to a fuse block:
1. Remove the AGC/3AG 2.0 amp fuse holder from the Red wire.
2. Connect the Red wire to an open fuse holder in the fuse block. Make sure that the
Red wire is connected to the positive side of the fuse block.
3. Connect the Black wire to the negative side of the fuse block.
4. Install a 2.0 amp fuse in the fuse holder.
5. Connect the power cable to the GDL 30/30A 7-pin connector labeled
2 GDL 30/30A Owner’s Manual
POWER.
2 amp fuse
Connecting to a battery
Connecting to a fuse block
To GDL 30/30A
Battery + Battery -
GETTING STARTED > CONNECTING TO A CHARTPLOTTER
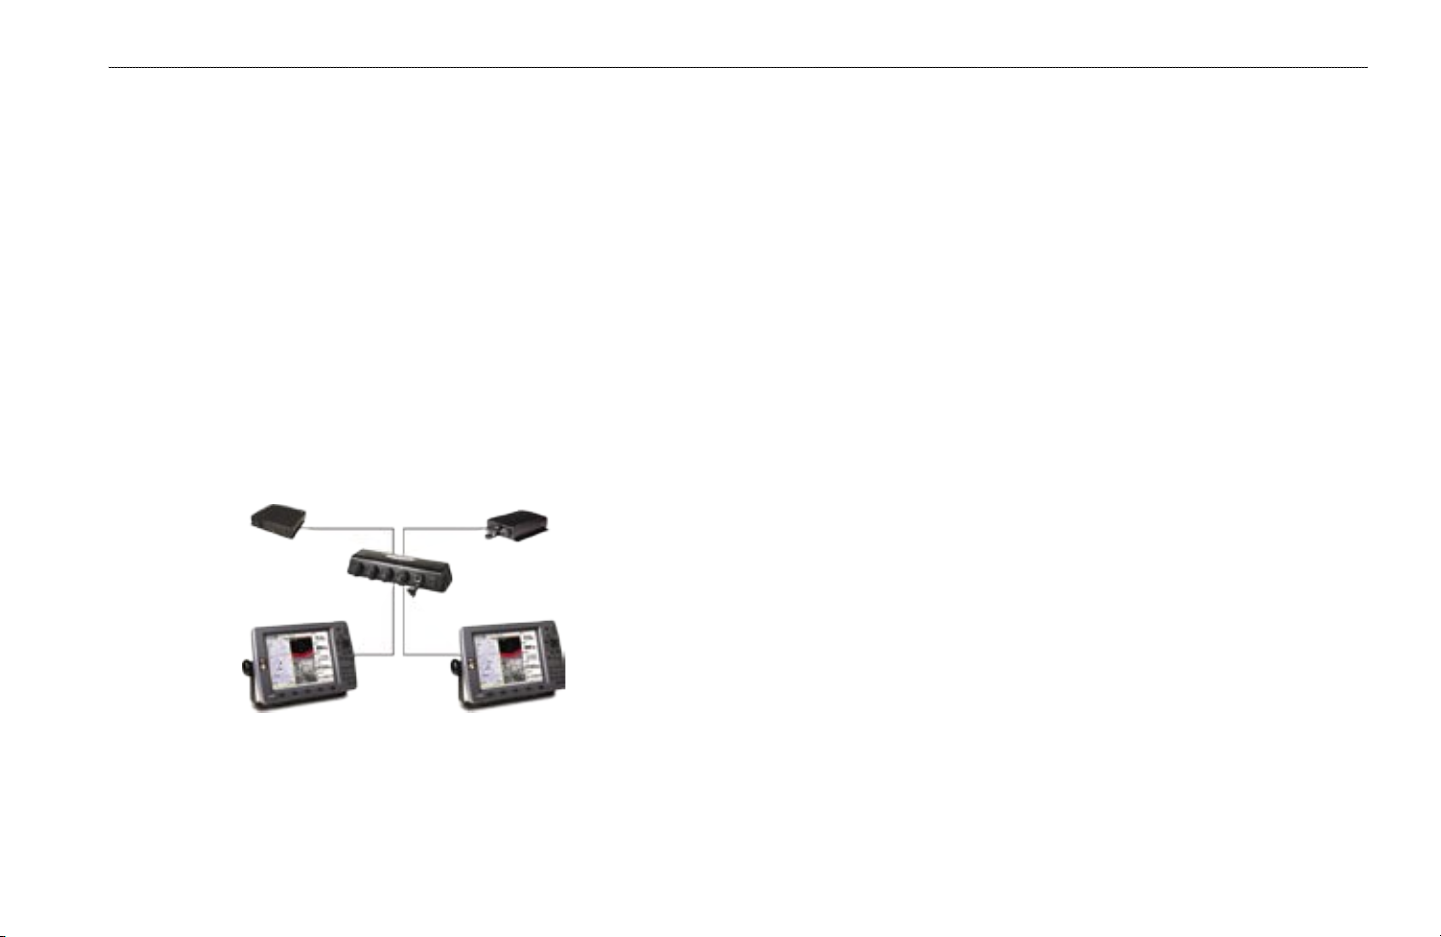
Connecting the GDL 30/30A to a Chartplotter
Connect the GDL 30/30A to one chartplotter by using the Garmin Marine
Network Cable (included). If you need to connect the GDL to multiple
chartplotters, a GMS 10 Network Port Expander is required.
Do not cut the Garmin marine network cable if you need to drill a hole in your
boat; use the included grommet that is specifically designed to cover holes that
are drilled for the Garmin Marine Network Cable. If a longer cable is needed,
contact Garmin or your Garmin dealer. To ensure safety, use tie-wraps, fasteners,
and sealant to secure the cable along a route and through any bulkhead or deck.
To connect the GDL 30/30A to a chartplotter:
Plug the Marine Network Cable into the NETWORK connector on the GDL
30/30A and the back of the chartplotter.
Connecting the Audio Cable (GA 30A only)
Connect the Audio cable (included) to the GDL 30/30A AUDIO connector and
to the audio inputs on your stereo receiver.
Mounting the GA 31 Antenna
The GA 31 is designed to fit a standard 1-inch, 14 threads-per-inch marine
antenna mount. Since mounting locations and methods vary, determine the best
mounting location for the GA 31 then obtain a suitable mount from your Garmin
dealer or a marine supply retailer.
When selecting a mounting location keep these factors in mind:
• The GA 31 works best with an unobstructed view of the sky and horizon.
• Avoid routing the antenna cable near ignition wires and along the same
path as power wires.
Use a Network Port Expander to connect the
GDL 30/30A to multiple chartplotters
• Do not cut or shorten the antenna cable. The length of the antenna cable
is set to provide optimal performance. Shortening the cable adversely
effects the GA31’s performance.
• If additional antenna cable is needed, Garmin recommends a 50 foot cable
from Delphi, part #SA10006. The following adapters are required; BNC
plug to SMB jack - available from Newark, part #92C7329, BNC jack to
SMB plug - available from Newark, part #92C7330
To connect the GA31 to the GDL 30/30A:
Place the GA 31 connector onto the GDL 30/30A ANTENNA connector
and twist clockwise to secure.
Connecting the GDL 30/30A to more than one chartplotter requires a Garmin GMS 10
Network Port Expander (not included). The GMS 10 provides additional network ports,
allowing the use of multiple chartplotters and additional sensors.
Check the antennas performance with potential interfering equipment turned
on and off before permanently mounting the antenna. Perform this test after the
XM WX Weather service is activated. Following is a list of items that could
potentially cause interference: other electronic equipment, fan motors, the engine
ignition system, alternators, generators, radar, and VHF radio transmissions. After
proper operation is verified, permanently install the antenna.
GDL 30/30A Owner’s Manual 3
Turn on the GDL 30/30A
The GDL30/30A turns on and off automatically with the chartplotter that it is
connected to. To verify proper operation, turn on the chartplotter and verify that
the Status LED on the front of the GDL30/30A is Green and blinking. For more
detail on the Blink Codes, see Appendix A.
Subscribing to XM WX Weather and XM Radio
With the GDL30/30A installed, contact XM Satellite Radio to activate your
XM WX weather and audio (GDL30A only) subscription service. Follow the
instructions below. Complete Steps 1-3 BEFORE calling XM Satellite Radio:
Step 1: Check the System Setup
Make certain the GDL 30/30A is fully wired and is connected to a chartplotter.
Verify that the GA 31 antenna has been properly installed. If you own a GDL
30A, verify that the audio cable is connected to your GDL 30A and to your
stereo receiver.
Step 2: Turn on your System
Turn on your chartplotter. This automatically turns on the GDL 30/30A.
Step 3: Identify Radio ID(s)
Press and hold down the ADJ/MENU key on your chartplotter. The Main Menu
page appears. A list of tabs appear down the left-hand side of the Menu page.
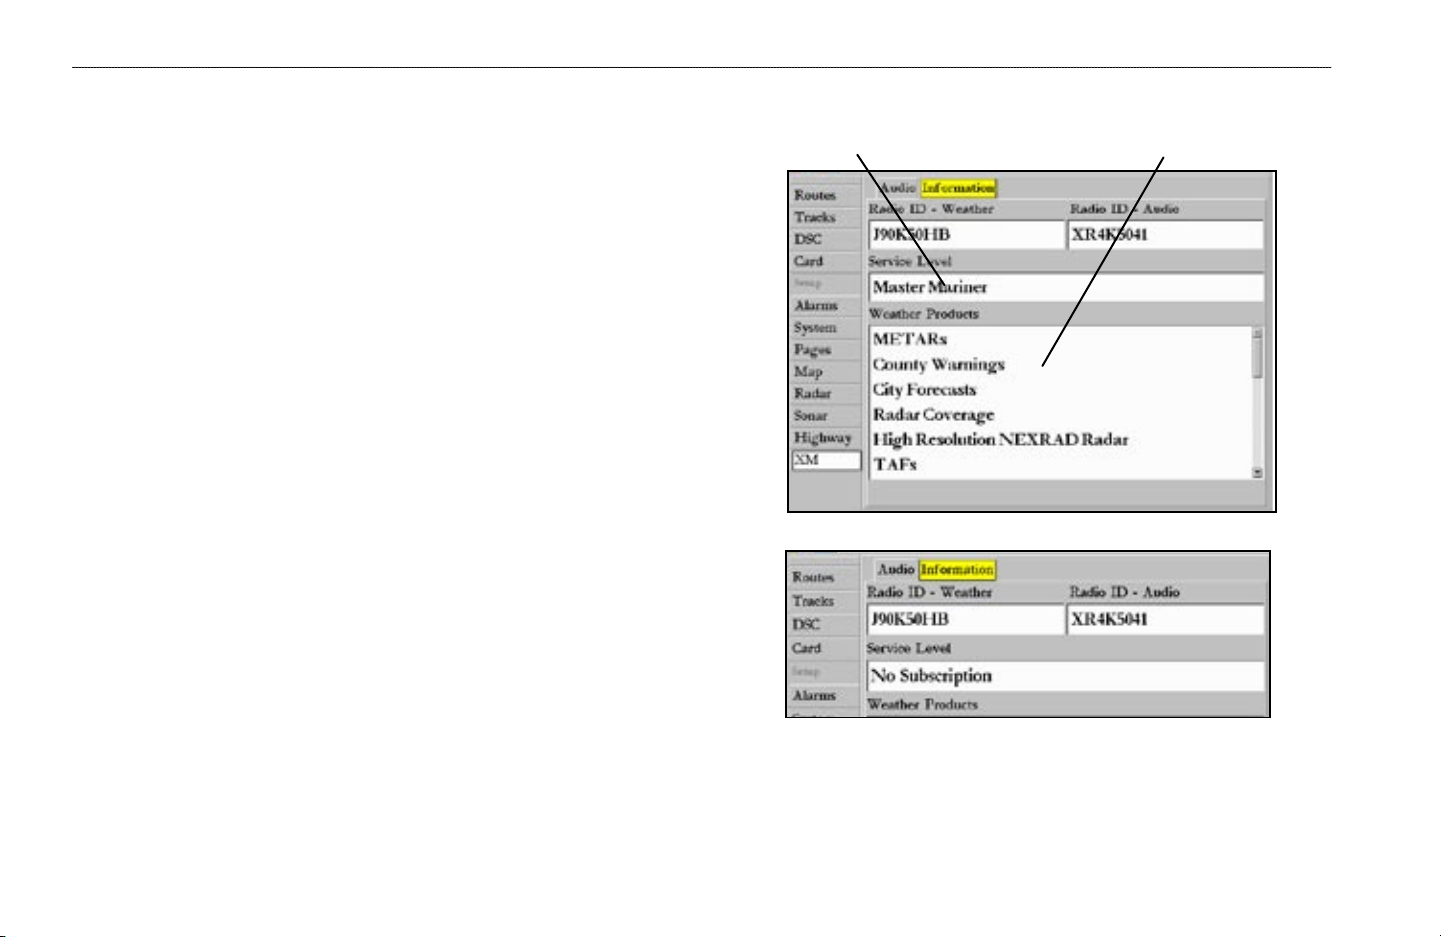
Using the ROCKER key, highlight the XM tab and select the Information sub
tab.
Write down the Radio ID - Weather and Radio ID - Audio (GDL 30A only).
Have the ID number, your billing address and other billing information ready
when you contact XM Satellite Radio.
(GDL 30A only) Select the Audio sub tab (it is next to the Information sub
tab). Verify that XM Preview appears in the Radio Tuning box.
GETTING STARTED > TURNING ON THE GDL
Service Level field Weather Products list
For future reference, record the Radio ID(s) in the space provided on
page 1 of this manual. Note: If you have a GDL 30, the Audio sub tab
is not available.
30/30
A
4 GDL 30/30A Owner’s Manual

Step 4: Set up the XM Account
Contact XM Satellite Radio by phone at 800-985-9200. After providing the
required information, the XM representative activates the account and sends
out an XM signal to activate the GDL 30/30A.
For answers to other XM questions you can call the above number or visit
www.xmwxweather.com.
Step 5: Confirm all Components of your Service Package
XM WX Weather: Keep your chartplotter turned on to ensure you receive
the XM signal. The XM signal is being received when the components of the
selected service package are displayed in the Weather Products list. Do
not turn off the chartplotter until the name of the selected service package is
displayed in the Service Level field (see Step 6).
XM Radio: Highlight the Audio sub tab and verify that channels 7, 9, 47, and
122 are being received (see page 24). This indicates that all channels on XM’s
basic radio service are being received. If within an hour the XM WX Weather
and/or the XM Radio service has not activated, call XM customer care at 800-
985-9200 to refresh the signal.
Displaying Weather and Sea Surface information
The GDL 30/30A receives XM Weather Radio data and displays it on the
chartplotters Map Page. The weather data for each feature comes from
reputable weather data centers such as the National Weather Service and the
Hydrometerological Prediction Center. (See the XM WX Satellite Weather Web
site at http://weather.xmradio.com/weather for more information.) Any weather
feature can change in appearance or interpretation if the source that provides
the information changes. XM Weather Radio data is broadcast at set rates (see
Appendix B for all weather-related broadcast rates). For example, NEXRAD
Radar data is broadcast at five minute intervals. When the marine network is
turned on or when a new feature is selected, the GDL30/30A has to receive new
data before it can be displayed. For this reason you may experience a delay before
weather data or a new feature appears on the map.
To display weather features on the chartplotter Map Page:
Press the Show Weather soft key.
Step 6: Save the service package
After the service package name displayed in the Service Level field, turn off
the entire marine network using the chartplotter’s power key.
Step 7: Add Features to your Chartplotter
When you turn on the GDL 30/30A after completing Step 6, you are ready to
add weather features to the Chartplotter’s Map Page and customize the new
radio stations (GDL 30A only).
GETTING STARTED > SET UP THE XM ACCOUNT
GDL 30/30A Owner’s Manual 5
GETTING STARTED > PRESET WEATHER DISPLAYS
PRESET WEATHER DISPLAYS
Selecting a preset weather display
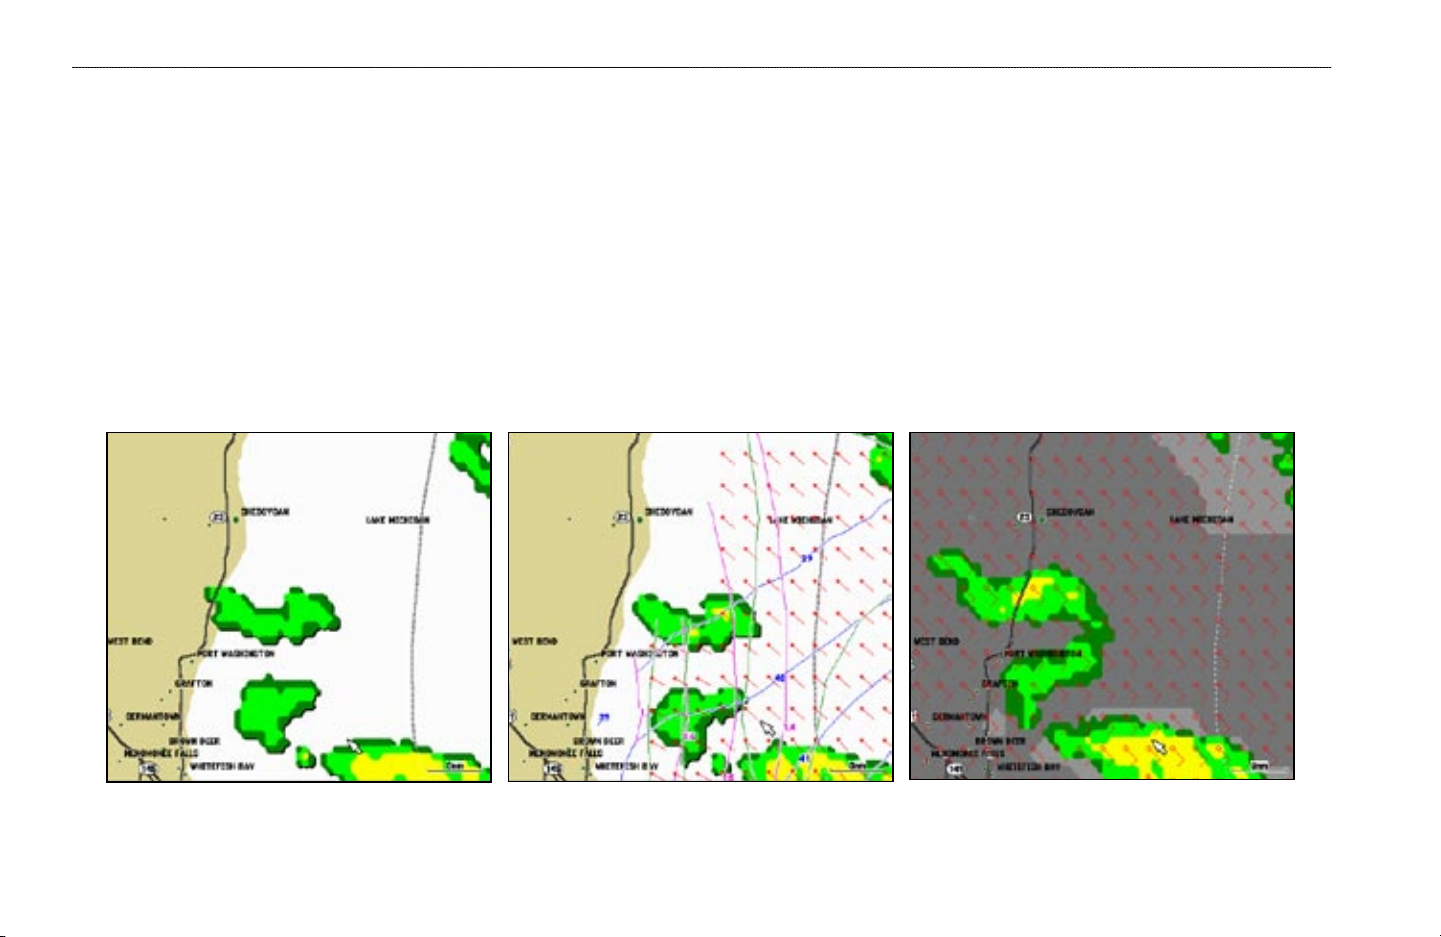
There are three preset weather displays, General, Sea State, and Storms. The name of the currently displayed preset is shown in the lower left corner of the screen.
Using presets allows different types of weather information to be quickly displayed.
To
select a preset weather display:
1. Press the Wthr Options soft key.
2. Press the
Next Preset soft key to cycle through the three presets.
General Sea State Storms
6 GDL 30/30A Owner’s Manual
GETTING STARTED > CUSTOMIZING THE PRESET WEATHER DISPLAYS
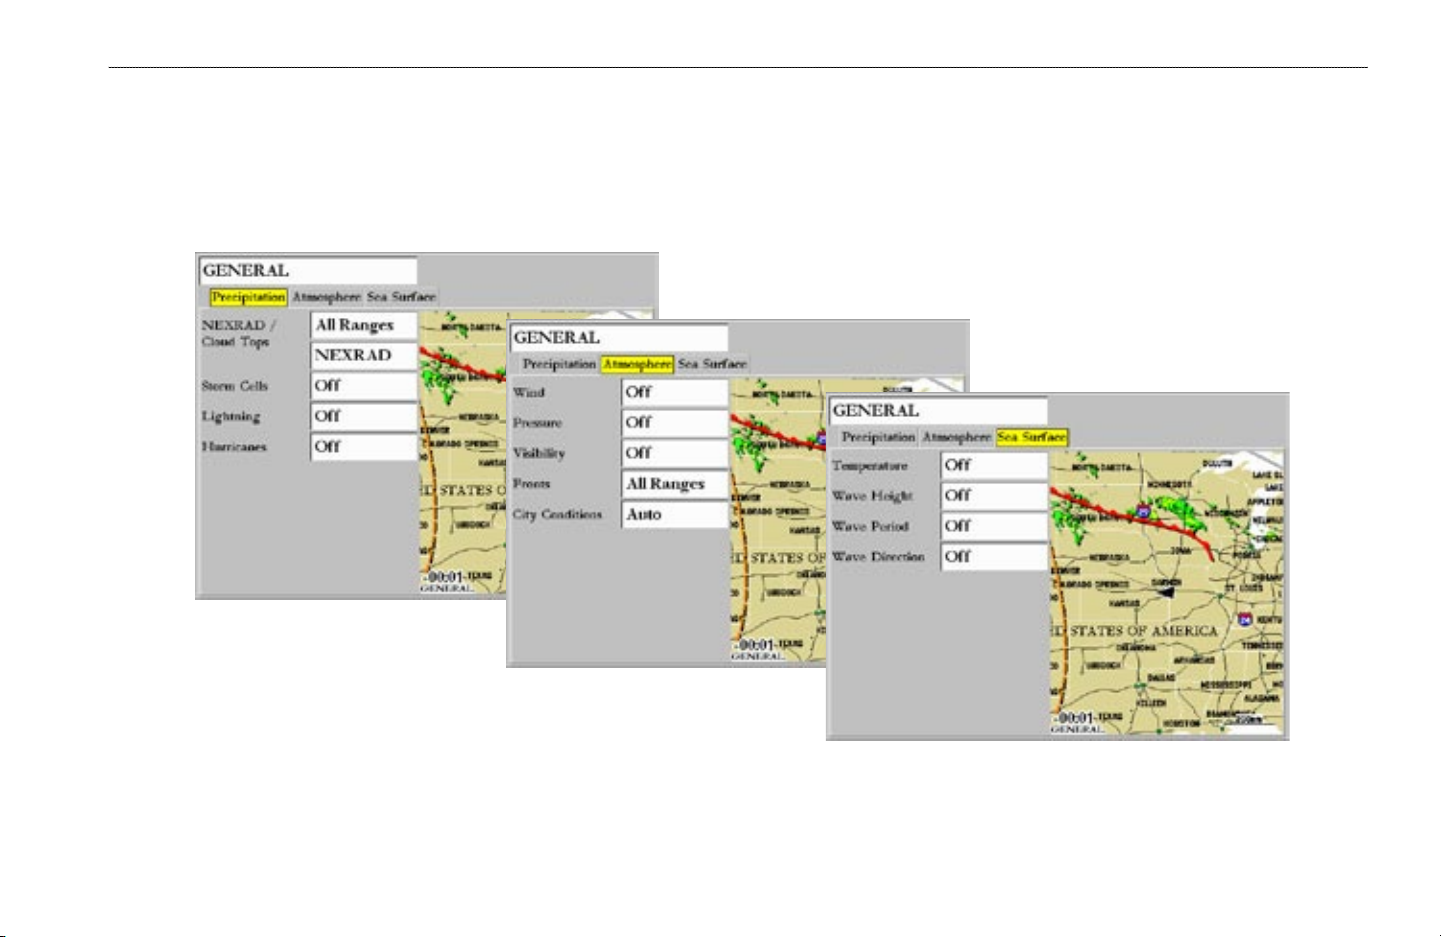
Customizing the Preset Weather Displays
The preset weather displays can be customized. Each preset has three subcategories: Precipitation, Atmosphere, and Sea Surface. Each category contains display
settings for that topic.The name of the preset can be changed and any of the weather features can be selected for display. For detailed information on customizing the
preset weather displays, please see the chartplotter’s Owner’s Manual.
Precipitation
Atmosphere
Sea Surface
GDL 30/30A Owner’s Manual 7
WEATHER FEATURES > PRECIPITATION—NEXRAD
THE WEATHER FEATURES
Following is a brief description of each weather feature. The weather features are divided into three sub categories, Precipitation, Atmosphere, and Sea State.
Precipitation
The Precipitation category contains NEXRAD/Cloud Tops, Storm Cells, Lightning, and Hurricanes. Each feature can be turned on, off or set to display at a selected
zoom range.
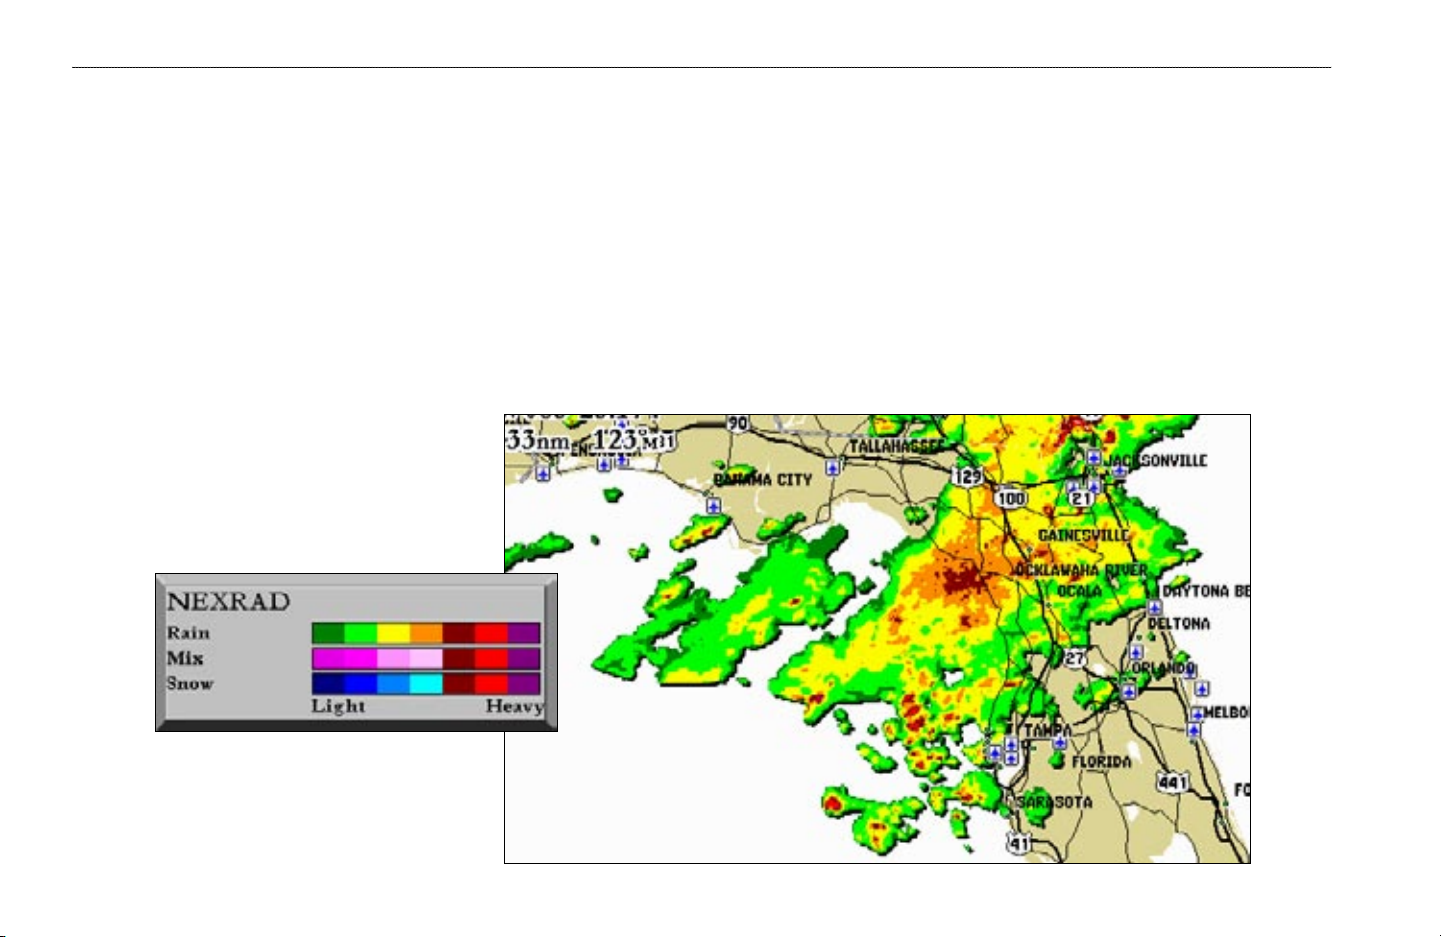
NEXRAD
NEXRAD is an acronym for NEXt Generation Weather RADar. The NEXRAD feature displays precipitation from very light rain and snow up to strong thunderstorms in varying
shades and colors.
displayed independently or with Cloud Tops.
A legend showing the colors for Rain, Mix, and Snow can be displayed by pressing the ADJ key and selecting Weather Legend. NEXRAD can be
NEXRAD
NEXRAD Legend
8 GDL 30/30A Owner’s Manual
 Loading...