

Page 1
APPROACH® G80
Owner’s Manual
Page 2

© 2019 Garmin Ltd. or its subsidiaries
All rights reserved. Under the copyright laws, this manual may not be copied, in whole or in part, without the written consent of Garmin. Garmin reserves the right to change or improve its
products and to make changes in the content of this manual without obligation to notify any person or organization of such changes or improvements. Go to www.garmin.com for current updates
and supplemental information concerning the use of this product.
Garmin®, the Garmin logo, and Approach® are trademarks of Garmin Ltd. or its subsidiaries, registered in the USA and other countries. Garmin Connect™, Garmin Express™, Garmin Golf™, and
TruSwing™ are trademarks of Garmin Ltd. or its subsidiaries. These trademarks may not be used without the express permission of Garmin.
The BLUETOOTH® word mark and logos are owned by Bluetooth SIG, Inc. and any use of such marks by Garmin is under license. iOS® is a registered trademark of Cisco Systems, Inc. used
under license by Apple Inc. Other trademarks and trade names are those of their respective owners.
Page 3

Table of Contents
Introduction.....................................................................1
Device Overview......................................................................... 1
Charging the Device................................................................... 1
Turning On the Device................................................................ 1
Product Updates......................................................................... 1
Setting Up Garmin Express................................................... 1
Software and Course Updates............................................... 1
Garmin Golf App............................................................. 1
Pairing Your Smartphone........................................................... 1
Connecting to a Paired Smartphone...................................... 1
Playing Golf.................................................................... 1
Hole View....................................................................................1
Locking and Unlocking the Touchscreen.................................... 2
Big Numbers Mode..................................................................... 2
Viewing the Green...................................................................... 2
Changing Holes.......................................................................... 2
Measuring Distance with Touch Targeting................................. 2
Measuring a Shot........................................................................2
Viewing the Direction to the Pin.................................................. 2
Saving a Location....................................................................... 3
Clearing Saved Locations...................................................... 3
Viewing PlaysLike Distance........................................................ 3
Enabling Tournament Mode....................................................... 3
Keeping Score............................................................................ 3
About the Scorecard.............................................................. 3
Viewing Individual Scorecards and Round Statistics........ 3
Setting the Scoring Method....................................................3
About Stableford Scoring.................................................. 3
About Match Scoring......................................................... 4
About Skins Scoring.......................................................... 4
Enabling Handicap Scoring................................................... 4
Setting a Player Handicap.................................................4
Enabling Statistics Tracking................................................... 4
History.................................................................................... 4
Ending a Round.......................................................................... 4
Radar Features............................................................... 4
Using the Radar Features...........................................................4
Setting the Roll Factor........................................................... 5
Warm-Up Mode.......................................................................... 5
Tempo Training Mode.................................................................5
About Tempo Tones.............................................................. 5
The Ideal Swing Tempo......................................................... 5
Starting Target Practice.............................................................. 5
Target Practice Mode.............................................................5
Target Practice Scoring......................................................... 6
Playing a Virtual Course............................................................. 6
Virtual Round Hole View........................................................ 6
Virtual Round Scoring............................................................ 6
Playing a Virtual Tournament..................................................... 6
Finding Courses............................................................. 6
About Course Preview................................................................ 7
TruSwing™......................................................................7
TruSwing Metrics........................................................................ 7
Recording and Viewing TruSwing Metrics on Your Approach
Device......................................................................................... 7
Changing Your Club................................................................... 7
Changing Handedness............................................................... 7
Disconnecting Your TruSwing Device........................................ 7
Customizing Your Device.............................................. 7
Settings....................................................................................... 7
Showing or Hiding Phone Notifications.................................. 7
Calibrating the Compass........................................................7
Resetting Data and Settings
Viewing E-label Regulatory and Compliance Information...... 7
.................................................. 7
Appendix......................................................................... 7
Using the Holder......................................................................... 7
Installing the Cart Mount............................................................. 8
Replacement O-rings............................................................. 8
Attaching the Lanyard Carabiner................................................ 8
Using the Clip............................................................................. 8
Device Care................................................................................ 8
Cleaning the Touchscreen..................................................... 9
Cleaning the Device............................................................... 9
Using the Backlight................................................................ 9
Specifications..............................................................................9
Saving Energy While Charging the Device................................. 9
Index.............................................................................. 10
Table of Contents i
Page 4

Page 5
Introduction
WARNING
See the Important Safety and Product Information guide in the
product box for product warnings and other important
information.
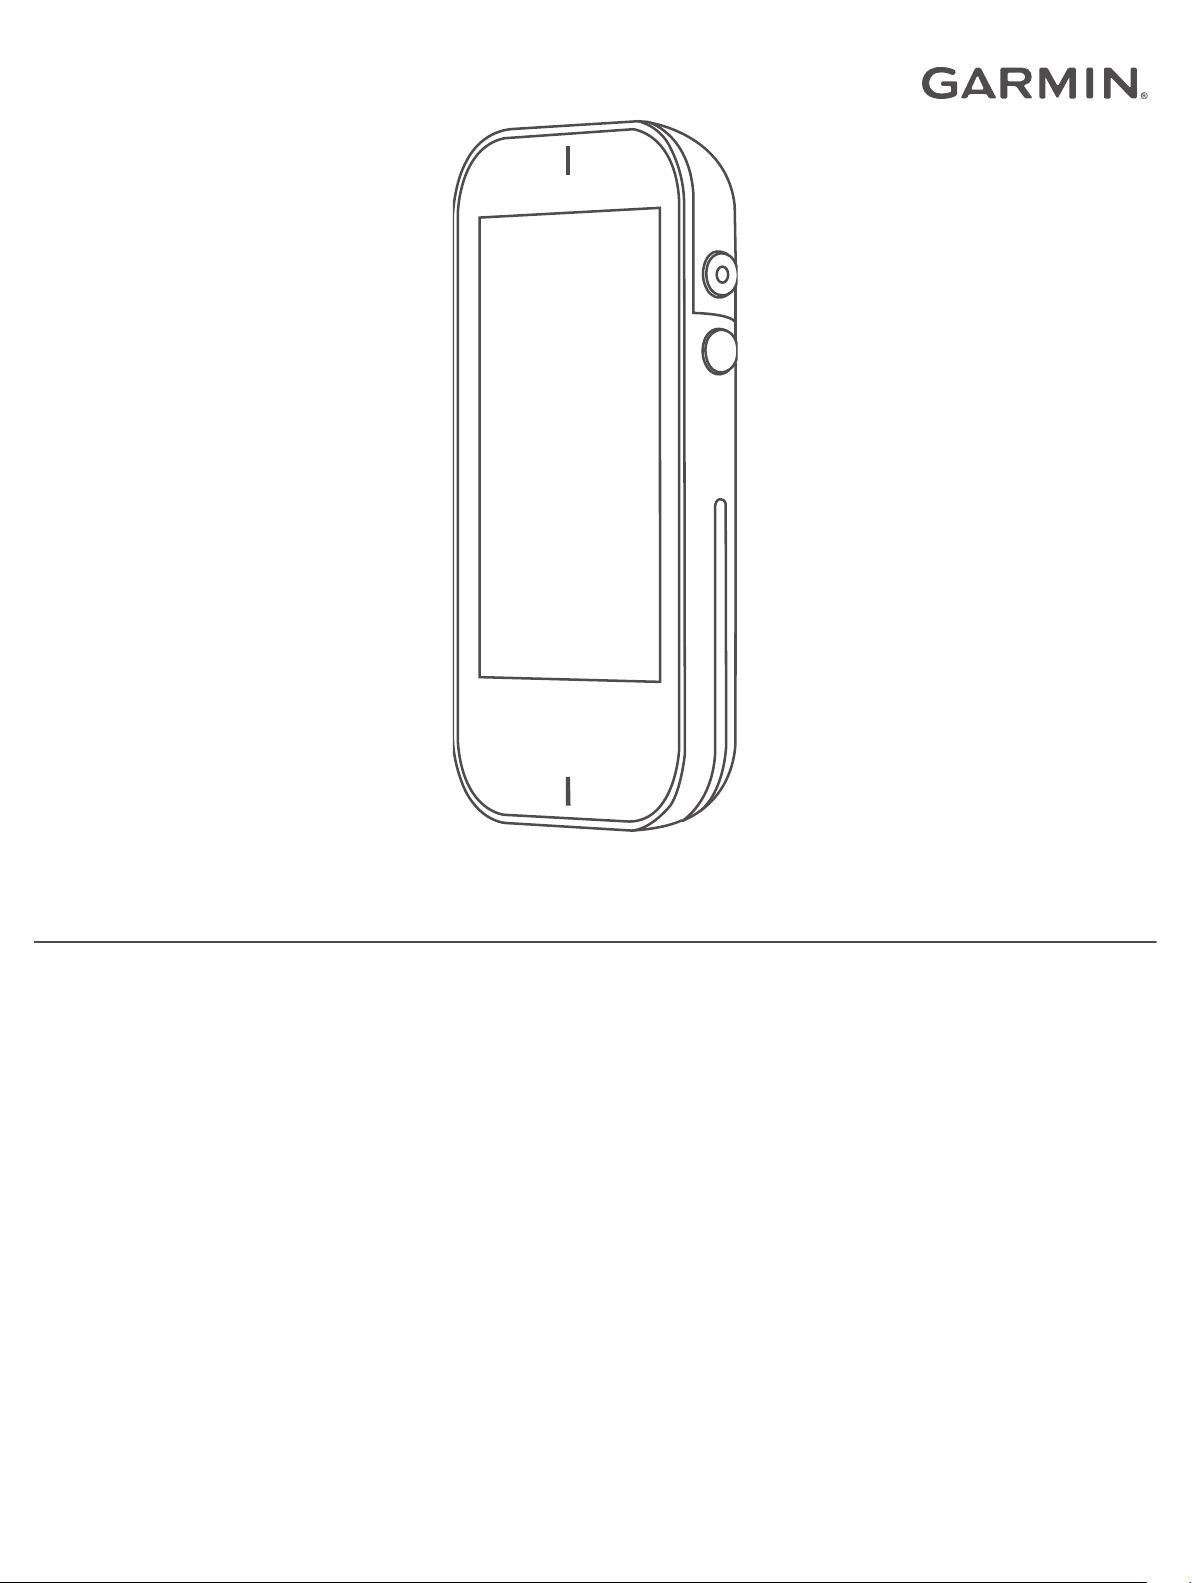
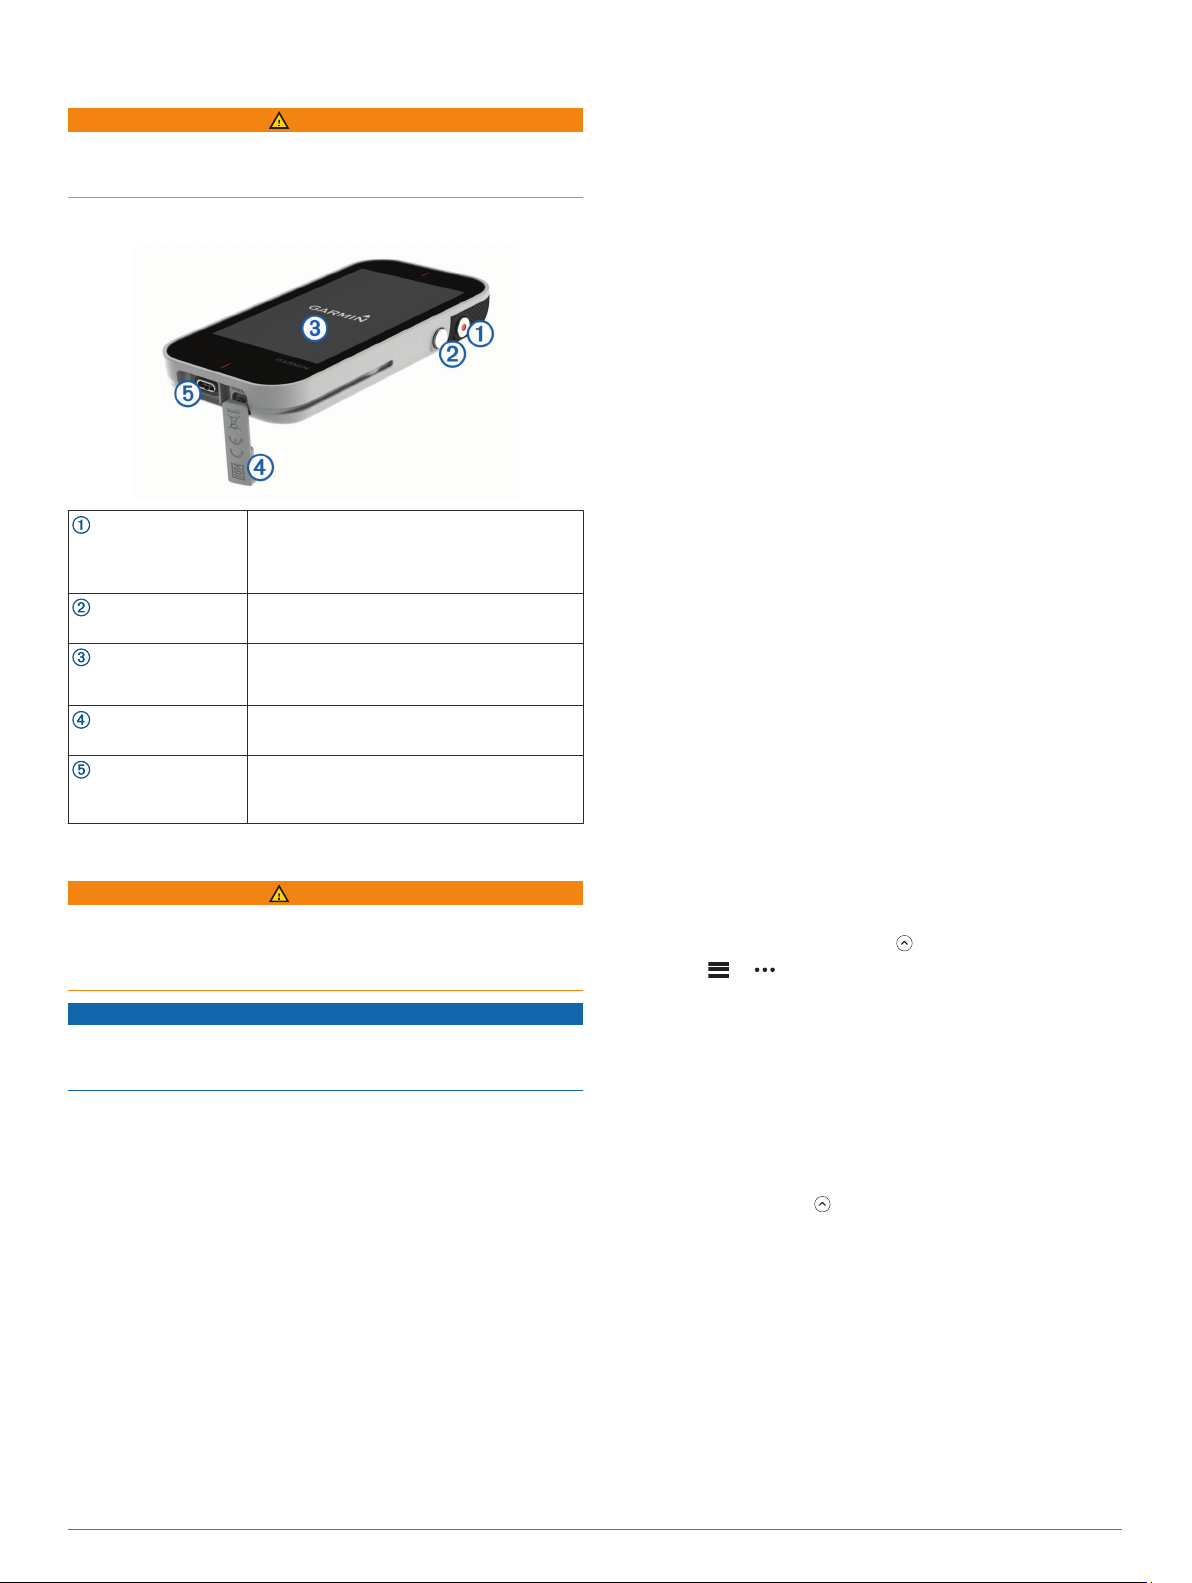
Device Overview
Product Updates
On your computer, install Garmin Express™ (www.garmin.com
/express). On your smartphone, install the Garmin Golf™ app.
This provides easy access to these services for Garmin
devices:
• Software updates
• Course updates
• Data uploads to Garmin Golf
• Product registration
Setting Up Garmin Express
Connect the device to your computer using a USB cable.
1
Go to www.garmin.com/express.
2
Follow the on-screen instructions.
3
Software and Course Updates
This device is eligible for free course map updates. To update
your device, download the free Garmin Express software from
www.garmin.com/express.
®
Press to turn on the device.
Power button
Radar button
Touchscreen
Weather cap
Micro-USB power and
data port
Press to lock or unlock the screen during a
round.
Hold to turn off the device.
Press to turn the radar on and off.
Swipe to scroll through features, data
screens, and menus.
Tap to select.
Pull up to access the micro-USB power and
data port.
Connect a compatible USB cable to charge
the device or transfer data using your
computer.
Charging the Device
WARNING
This product contains a lithium-ion battery. To prevent the
possibility of personal injury or product damage caused by
battery exposure to extreme heat, store the device out of direct
sunlight.
NOTICE
To prevent corrosion, thoroughly dry the USB port, the weather
cap, and the surrounding area before charging or connecting to
a computer.
The device is powered by a built-in lithium-ion battery that you
can charge using a standard wall outlet or a USB port on your
computer.
NOTE: The device will not charge when outside the approved
temperature range (Specifications, page 9).
Pull up the weather cap from the USB port.
1
Plug the small end of the USB cable into the USB port on the
2
device.
Plug the large end of the USB cable into an external power
3
source, such as an AC adapter or a USB port on your
computer.
Charge the device completely.
4
TIP: You can turn off the device to charge it faster.
Turning On the Device
The first time you use the device, you are prompted to choose a
language, select a unit of measure, and set your driver distance.
Press the power button.
Garmin Golf App
The Garmin Golf app allows you to upload scorecards from your
compatible Garmin device to view detailed statistics and shot
analyses. Golfers can compete with each other at different
courses using the Garmin Golf app. More than 41,000 courses
have leaderboards that anyone can join. You can set up a
tournament event and invite players to compete.
The Garmin Golf app syncs your data with your Garmin
Connect™ account. You can download the Garmin Golf app from
the app store on your smartphone.
Pairing Your Smartphone
To use the connected features of the Approach device, it must
be paired directly through the Garmin Golf app, instead of from
the Bluetooth® settings on your smartphone.
From the app store on your smartphone, install and open the
1
Garmin Golf app.
Bring your smartphone within 10 m (33 ft.) of your device.
2
On your Approach device, select > Settings > Bluetooth.
3
From the or menu in the app, select Garmin Devices
4
> Add Device, and follow the on-screen instructions.
Connecting to a Paired Smartphone
Before you can connect to your smartphone, you must pair your
smartphone to your device.
When you connect to your smartphone using Bluetooth
technology, you can share scores and other data with the
Garmin Golf app. You can also view phone notifications from
your compatible iOS® device.
On your smartphone, enable Bluetooth technology.
1
On your device, select > Settings > Bluetooth >
2
Connection > On to enable Bluetooth technology.
Playing Golf
Select Start New Round.
1
Select a course.
2
Select a tee box.
3
Hole View
The device shows the current hole you are playing.
Introduction 1
Page 6

Displays the current hole number.
Changes the hole number when selected.
Displays the par for the current hole.
Displays the distance to the middle of the green or selected pin
position.
Displays the distance to the back of the green.
Displays the distance to the front of the green.
Displays a map of the hole.
Displays a close view of the fairway when selected, for measuring
distance with touch targeting.
Displays layup distances to the pin.
The colors indicate distance in meters or yards: red is 100,
white is 150, blue is 200, and yellow is 250.
Displays your driver distance when you are on the tee box.
Displays a menu of in-round features when selected.
Displays a close view of the green for adjusting the pin location.
Displays the distance to the middle of the green or selected pin
position.
Displays the distance to the front of the green.
Displays a menu of in-round features when selected.
Displays a close view of the fairway when selected, for measuring
distance with touch targeting.
Displays a close view of the green for adjusting the pin location.
Viewing the Green
While playing a round, you can take a closer look at the green
and move the pin location.
Begin playing a round (Playing Golf, page 1).
1
Select .
2
Drag the flag to move the pin location.
3
The distances on the hole view screen are updated to show
the new pin location. The pin location is saved for only the
current round.
Changing Holes
You can change holes manually from the hole view screen.
While viewing hole information, tap the current hole number.
1
Select a hole.
2
Measuring Distance with Touch Targeting
While previewing a course or playing a round, you can use
touch targeting to measure the distance to any point on the map.
Begin playing a round (Playing Golf, page 1) or previewing a
1
course (Finding Courses, page 6).
Tap anywhere on the map.
2
Tap or drag your finger to position the target circle .
3
Locking and Unlocking the Touchscreen
You can lock the touchscreen while playing a round to prevent
inadvertent screen touches.
Press the power button.
1
Press the power button again to unlock the touchscreen.
2
Big Numbers Mode
You can change the size of the numbers on the hole view
screen.
During a round, select > Big Numbers.
Displays the current hole number.
Changes the hole number when selected.
Displays the par for the current hole.
Displays the distance to the back of the green.
Displays the distance to the flag location from the target circle.
Displays the distance from your current position to the target
circle. If you are previewing the course, is the distance from
the furthest back tee to the target circle.
If necessary, select or to zoom in or out.
4
Select to return to the map of the hole.
5
Measuring a Shot
Take a shot, and watch where your ball lands.
1
Select > Measure Shot.
2
Walk or drive to your ball.
3
If necessary, select Reset to reset the distance at any time.
4
Viewing the Direction to the Pin
The PinPointer feature is a compass that provides directional
assistance when you are unable to see the green. For example,
2 Playing Golf
Page 7

this feature can help you line up a shot if you are in the woods or
in a deep sand trap.
NOTE: Do not use the PinPointer feature while in a golf cart.
Interference from the golf cart can affect the accuracy of the
compass.
Select > PinPointer.
1
Rotate the device until the cone on the map points toward
2
your target.
The red line at the top of your device points in the direction of
your target.
Saving a Location
You can mark a location on a hole using your current location or
touch targeting.
While playing a game, select > Save Location.
1
Select an option:
2
• Select Use Current Location to place a marker at your
current location on the hole.
• Select Use Touch Targeting to select a location on the
map.
Clearing Saved Locations
You can clear all saved locations for the current hole.
Select > Locations > Clear Locations.
Viewing PlaysLike Distance
The "plays like" distance feature accounts for elevation changes
on the course by showing the adjusted distance to the green.
Select > PlaysLike.
An icon appears next to each distance.
Distance plays longer than expected due to a change in elevation.
Distance plays as expected.
Distance plays shorter than expected due to a change in elevation.
Enabling Tournament Mode
The tournament mode setting disables the PinPointer and
PlaysLike distance features. These features are not allowed
during sanctioned tournaments or handicap calculation rounds.
During a round, select > Tournament Mode.
Keeping Score
You can keep score for up to four players.
Begin playing a round (Playing Golf, page 1).
1
Select > Scorecard.
2
Select an option:
3
• Select a player's name to edit it.
• Select to enter the number of strokes for the selected
hole.
• Select or to change holes.
About the Scorecard
You can view and change each player's name and score during
a round using the scorecard.
Displays the current hole number.
Displays the par for the current hole.
Displays the player name.
Changes the player name when selected.
Displays the current total score.
Displays the individual scorecard when selected.
Displays the strokes for the hole.
Allows you to enter the number of strokes for the hole when
selected.
Viewing Individual Scorecards and Round Statistics
While playing a round, select > Scorecard.
1
Tap a player's total score.
2
The player's individual scorecard appears. It displays a holeby-hole overview and statistics for the player's round.
Setting the Scoring Method
You can change the method the device uses to keep score.
Select an option:
1
• If you are currently playing a round, select > Setup >
Scoring > Method.
• If you are not currently playing a round, select >
Settings > Scoring > Method.
Select a scoring method.
2
About Stableford Scoring
When you select the Stableford scoring method (Setting the
Scoring Method, page 3), points are awarded based on the
number of strokes taken relative to par. At the end of a round,
the highest score wins. The device awards points as specified
by the United States Golf Association.
The scorecard for a Stableford scored game shows points
instead of strokes.
Points Strokes Taken Relative to Par
0 2 or more over
1 1 over
2 Par
3 1 under
4 2 under
5 3 under
Playing Golf 3
Page 8

About Match Scoring
When you select the match scoring method (Setting the Scoring
Method, page 3), one point is awarded at each hole to the player
who has the fewest strokes. At the end of a round, the player
who won the most holes wins.
NOTE: Match scoring is available only for two players.
When you set the device to count strokes, the device
determines the winner of each round. Otherwise, at the end of
each hole, select the player who had the fewest strokes, or if the
number of strokes was equal, select Halved.
About Skins Scoring
When you select the skins scoring method (Setting the Scoring
Method, page 3), players compete for a prize on each hole.
When you set the device to count strokes, the device
determines the winner of each hole. Otherwise, at the end of
each hole, select the player who had the fewest strokes. You
can select multiple players if there is a tie for the win.
Enabling Handicap Scoring
Select > Settings > Scoring > Scoring Handicap.
1
Select On.
2
Setting a Player Handicap
Before you can score using handicaps, you must enable
handicap scoring (Enabling Handicap Scoring, page 4).
While playing a game, select > Scorecard.
1
Select for the player whose handicap you want to enter or
2
change.
Select an option:
3
• To enter the number of strokes that will be subtracted from
the player's total score, select Local Handicap.
• To enter the player's handicap index and the course slope
rating to calculate a course handicap for the player, select
Index/Slope Method.
About the Handicap Scorecard
You can view and change each player's name, score, and
handicap during a round using the scorecard.
Enabling Statistics Tracking
Select > Settings > Scoring > Stat Tracking.
1
Select On.
2
History
You can use your paired smartphone to upload scorecards to
the Garmin Golf app. You can use the app to view saved rounds
and player statistics.
Ending a Round
Select > End Round.
1
Select an option:
2
• To view your statistics and round information, tap your
score.
• To save the round, select Save.
• To discard the round, select Discard.
Radar Features
The device provides practice modes and games to test your
skills and help you have fun on the driving range. These
features use the internal device radar to take measurements
that help you analyze your practice.
Warm Up: Provides radar swing metrics, including estimated
carry and roll, club head speed, ball speed, smash factor,
and swing tempo.
Tempo Training: Evaluates your backswing and downswing
timing to help you achieve the ideal swing tempo.
Target Practice: Lets one or two players earn points by hitting
the ball toward distance targets.
Virtual Round: Simulates playing a round of golf on any of the
41,000 preloaded courses. You can compete against your
personal best, compete against another player, or participate
in a virtual tournament.
NOTE: You must connect to the Garmin Golf app to
participate in a virtual tournament.
Displays the current hole number.
Displays the par for the current hole.
Displays the player name.
Changes the player name or player handicap when selected.
Displays the local handicap.
Displays the individual scorecard when selected.
Displays the current total score.
Displays the individual scorecard when selected.
Displays the actual strokes for the hole.
Allows you to enter the number of strokes for the hole when
selected.
Displays the adjusted strokes for the hole.
Using the Radar Features
Select an option:
1
• From the home screen, select a practice mode or game.
• Press the radar button.
The radar turns on.
Place the device on the ground within 0.3 m (1 ft.) of the ball,
2
in line with and on the same level as you and the ball.
TIP: For a better screen viewing angle, you can rest the
device on a golf ball using the divot in the rear case.
Follow the on-screen instructions.
3
Press the radar button to turn off the radar.
4
This helps conserve battery life.
4 Radar Features
Page 9

Setting the Roll Factor
The device calculates your shot distance using carry plus roll.
The roll factor varies due to differences in balls, clubs, and
surface conditions, as well as ball spin and launch angle. These
factors cannot be detected by the device. If you are not getting
the distance result you expect, you can adjust the roll factor.
Select an option:
1
• From the home screen, select a radar practice mode or
game.
NOTE: This setting is not available for all practice modes.
• Press the radar button.
Select > Set Roll Factor.
2
Use the slider to increase or decrease your roll.
3
Warm-Up Mode
Press the radar button, or select Warm Up from the home
screen.
Displays the estimated carry or estimated carry plus roll.
Changes the swing metric when selected.
Displays the club head speed.
Displays the ball speed.
Displays the smash factor.
NOTE: The smash factor is the ball speed divided by the club head
speed, and is used to indicate the efficiency of the club hitting the
ball. A higher number is more efficient.
Displays the swing tempo.
NOTE: The swing tempo is the backswing time divided by the
downswing time, expressed in a ratio. For more information, see
Tempo Training Mode, page 5.
Displays a menu of warm-up mode features, such as instructional
tips, and allows you to end the warm up when selected.
Tempo Training Mode
The device measures and displays your backswing time and
downswing time. The device also displays your swing tempo.
Swing tempo is the backswing time divided by the downswing
time, expressed in a ratio. A 3 to 1 ratio, or 3.0, is the ideal
swing tempo based on studies of professional golfers (The Ideal
Swing Tempo, page 5).
From the home screen, select Tempo Training.
Displays the tempo timing (backswing to downswing time ratio).
Changes the tempo timing when selected.
Displays your swing tempo.
NOTE: Your swing tempo and swing times are highlighted in
different colors to indicate how close you are to the target timing.
Green: Within 25% of the target time
Red: Faster than the target time
Blue: Slower than the target time
Displays your backswing time.
Displays your downswing time.
Displays a menu of tempo training features, such as turning off
audible tempo tones, and allows you to end the training mode when
selected.
About Tempo Tones
During tempo training, the device sounds audible tones to help
you achieve the ideal swing tempo. Three beeps repeat
continuously. The first beep indicates when you should start
your backswing. The second beep indicates when you should
start your downswing. The third beep indicates when you should
hit the ball.
The Ideal Swing Tempo
You can achieve the ideal 3.0 swing tempo by using different
swing timings. For example, 0.7 sec./0.23 sec. or 1.2 sec./0.4
sec. Each golfer may have a unique swing tempo based on their
ability and experience.
To find your ideal swing tempo, you should start with the slowest
timing and try it for a few swings. When your swing tempo is
consistent with the tempo goal, you can move up to the next
timing. When you find a timing that is comfortable, you can use it
to achieve more consistent swings and performance.
Starting Target Practice
From the home screen, select Target Practice.
1
Select the number of players.
2
Select one or more distance targets.
3
TIP: To enter custom targets, you can select . To delete
targets, you can select targets, and select .
Take a shot.
4
The device awards points based on the calculated shot
distance (Target Practice Scoring, page 6). You can take 5
shots at each target.
Target Practice Mode
From the home screen, select Target Practice.
Radar Features 5
Page 10

Displays the current player number.
Displays the current total points for all targets played.
Displays the number of shots taken.
Displays the distance target.
Displays a menu of target practice features, such as instructional
tips, and allows you to end target practice when selected.
Target Practice Scoring
During target practice, the device calculates your shot distance
and awards points based on how close your shot is to the target.
Yards to Target Points Awarded
Less than 1 25
1 to 9 10
10 to 19 5
20 to 29 1
30 to 39 0
40 or more -1
Displays the current hole number.
Displays the distance to the middle of the green.
Displays the par for the current hole.
Displays the current location and last shot distance for player 2.
Displays the current location and last shot distance for player 1.
Displays a map of the hole.
Displays a menu of virtual round settings, such as disabling audible
tones, and allows you to end the round when selected.
Virtual Round Scoring
During a virtual round, the device calculates your score using a
method similar to stroke play. Each shot you take counts as one
stroke. Hitting the ball into the water adds a penalty stroke.
Because there is no putting in a virtual round, additional strokes
are added based on how accurate you are with your approach
shot. You can receive 0 to 3 additional strokes depending on
how close your approach shot is to the tee.
NOTE: A 2x multiplier is applied for each shot that is in the
same range as the previous shot.
Playing a Virtual Course
From the home screen, select Virtual Round > Course.
1
Select the number of players.
2
Select an option:
3
• Select Search Near You to find a course near your
current location.
• Select Spell City to find a course in a specific city.
• Select Spell Course to find a course by name.
Select a tee box for each player.
4
Take a shot.
5
The device displays your shot distance, where you are on the
course, and how far you have left to get on the green.
Virtual Round Hole View
The device shows the current hole you are virtually playing.
Playing a Virtual Tournament
Before you can participate in a virtual tournament, you must
connect to the Garmin Golf app (Pairing Your Smartphone,
page 1). Before your standings can be posted on the virtual
tournament leaderboard, you must set your privacy setting in the
app to share your scorecard.
You can compete in a virtual tournament against other golfers
around the world on different courses each week. You can play
in each weekly tournament as many times as you want. All
scores will be posted on the leaderboard.
From the home screen, select Virtual Round > Tournament.
1
The course selected for the weekly tournament by the
Garmin Golf app loads.
Take a shot.
2
The device displays your shot distance, where you are on the
course, and the distance you have left to get on the green.
Finding Courses
You can use the device to locate a golf course that is nearby or
in a specific city. You can also locate a golf course by name.
Select > Preview.
1
Select an option:
2
• Select Search Near You to find courses closest to your
current location.
• Select Spell City to find courses in a specific city.
• Select Spell Course to find a course by name.
6 Finding Courses
Page 11

About Course Preview
When you find a course, the device provides a hole-by-hole
overview of the selected course. You can view a close up of the
green (Viewing the Green, page 2) or measure distances
(Measuring Distance with Touch Targeting, page 2).
TruSwing
The TruSwing feature allows you to view swing metrics recorded
from your TruSwing device. Go to www.garmin.com/golf to
purchase a TruSwing device.
™
TruSwing Metrics
You can view swing metrics on your Approach device and in
your Garmin Connect account. See the owner's manual for your
TruSwing device for more information.
Recording and Viewing TruSwing Metrics on Your Approach Device
Before you can view TruSwing metrics on your Approach G80
device, you may need to update the software (Product Updates,
page 1).
Verify your TruSwing device is securely mounted to your
1
club.
See the owner's manual for your TruSwing device for more
information.
Turn on your TruSwing device.
2
On your Approach G80 device, select TruSwing.
3
Your Approach G80 device pairs with the TruSwing device.
Select a club.
4
Hit a shot.
5
Your Approach G80 device displays swing measurements after
each swing.
You can select or to scroll through the recorded swing
metrics.
Changing Your Club
From the TruSwing screen, select > Change Club.
1
Select a club.
2
Changing Handedness
From the TruSwing screen, select > Handedness.
1
Select an option.
2
Disconnecting Your TruSwing Device
From the TruSwing screen, select .
Customizing Your Device
Gender: Sets the user gender. This is used for gender-specific
course ratings for select tees when calculating handicaps,
and for gender-specific par values (where available).
Calibrate: Allows you to manually calibrate the compass sensor
(Calibrating the Compass, page 7).
Reset Settings and Data: Removes all saved user data and
resets all settings on the device (Resetting Data and
Settings, page 7).
Language: Sets the text language on the device.
NOTE: Changing the text language does not change the
language of user-entered data or map data.
About: Displays device information, such as the unit ID,
software version, regulatory information, and license
agreement (Viewing E-label Regulatory and Compliance
Information, page 7).
Showing or Hiding Phone Notifications
NOTE: Phone notifications require a compatible iOS device.
When your phone receives messages, it sends notifications to
your device.
Select > Settings > Bluetooth > Notifications.
1
Select an option.
2
Calibrating the Compass
NOTE: You must calibrate the electronic compass outdoors. Do
not stand near objects that influence magnetic fields, such as
cars, buildings, or overhead power lines.
Your device was already calibrated at the factory, and the
device uses automatic calibration by default. If the PinPointer
feature is not working properly, for example, after moving long
distances or after extreme temperature changes, you can
manually calibrate the compass.
Select > Settings > Calibrate.
1
Follow the on-screen instructions.
2
Resetting Data and Settings
You can remove all saved user data and reset all settings on the
device to the factory default values.
Select > Settings > Reset Settings and Data.
This removes your personal data, including customized clubs
and any scorecards from the device.
Viewing E-label Regulatory and Compliance Information
The label for this device is provided electronically. The e-label
may provide regulatory information, such as identification
numbers provided by the FCC or regional compliance markings,
as well as applicable product and licensing information.
Select .
1
Select Settings.
2
Select About.
3
Settings
Select > Settings to customize device settings and features.
Scoring: Sets the scoring method (Setting the Scoring Method,
page 3), enables handicap scoring (Enabling Handicap
Scoring, page 4), and enables statistics tracking (Enabling
Statistics Tracking, page 4).
Driver Distance: Sets the average distance the ball travels on
your drive. This distance appears as an arc on the hole view
screen when you are on the tee box.
Bluetooth: Enables Bluetooth technology, and sets notification
options (Showing or Hiding Phone Notifications, page 7).
Display: Sets the backlight timeout and the screen brightness.
Units of Distance: Sets the unit of measurement for distance.
TruSwing
™
Appendix
Using the Holder
You can use the holder to attach the device to the accessory
mount.
Slide the bottom of the device into the holder until it clicks.
1
7
Page 12

To remove the device, slide the device out of the holder.
2
Installing the Cart Mount
For the best GPS reception, position the mount so the front of
the device is oriented toward the sky. You can install the mount
on any bar that is approximately 19 mm to 38 mm (0.75 in. to
1.5 in.).
Select a secure location to mount the device where it does
1
not interfere with the safe operation of your vehicle.
Place the rubber disk on the back of the mount.
2
The rubber tabs align with the back of the mount so it stays in
place.
Replacement O-rings
Replacement bands (O-rings) are available for the mounts.
NOTE: Use Ethylene Propylene Diene Monomer (EPDM)
replacement bands only. Go to http://buy.garmin.com, or contact
your Garmin dealer.
Attaching the Lanyard Carabiner
You can use the lanyard carabiner to attach the device to a bag
or belt loop.
Thread the fabric end of the lanyard through the slots on
1
the back of the clip or holder.
Thread the fabric end of the lanyard through the plastic loop
2
on the opposite end of the lanyard.
Insert the carabiner through the fabric loop on the end of
3
the lanyard.
Place the mount on the bar.
3
Attach the mount securely using the two bands .
4
Align the tabs on the back of the holder with the mount
5
notches .
Press down slightly and turn the holder clockwise until it locks
6
into place.
Using the Clip
You can use the clip to attach the device to your belt, pocket, or
bag. Go to www.garmin.com/golf to purchase accessories for
your device.
Slide the bottom of the device into the clip until it clicks.
1
To remove the device, slide the device out of the clip.
2
Device Care
NOTICE
Do not store the device where prolonged exposure to extreme
temperatures can occur, because it can cause permanent
damage.
8 Appendix
Page 13

Never use a hard or sharp object to operate the touchscreen, or
damage may result.
Avoid chemical cleaners, solvents, and insect repellents that can
damage plastic components and finishes.
Secure the weather cap tightly to prevent damage to the USB
port.
Cleaning the Touchscreen
Use a soft, clean, lint-free cloth.
1
If necessary, lightly dampen the cloth with water.
2
If using a dampened cloth, turn off the device and disconnect
3
the device from power.
Gently wipe the screen with the cloth.
4
Cleaning the Device
Wipe the device using a cloth dampened with a mild
1
detergent solution.
Wipe it dry.
2
After cleaning, allow the device to dry completely.
Using the Backlight
• At any time, tap the touchscreen to turn on the backlight.
NOTE: Alerts and messages also activate the backlight.
• Change the backlight timeout and brightness (Settings,
page 7).
Specifications
Battery type Rechargeable, built-in lithium-ion battery
Battery life Up to 15 hr.
Operating temperature range From -20º to 60ºC (from -4º to 140ºF)
Charging temperature range From 7º to 43ºC (from 45º to 109ºF)
Wireless frequency/protocol 2.4 GHz @ 2.3 dBm nominal
24 GHz @ 1.77 dBm nominal
Water rating IEC 60529 IPX7*
*The device withstands incidental exposure to water of up to 1 m
for up to 30 min. For more information, go to www.garmin.com
/waterrating.
Saving Energy While Charging the Device
You can turn off device features while charging.
Connect your device to an external power source.
1
Hold the power button until the screen turns off.
2
The device goes into a low power, battery charging mode.
Charge the device completely.
3
Appendix 9
Page 14

Index
A
applications 1
apps, smartphone 1
B
bands 8
battery, charging 1, 9
belt clip 8
Bluetooth technology 1, 7
brightness 9
C
charging 9
cleaning the device 9
cleaning the touchscreen 9
clip 8
compass 2
calibrating 7
courses
playing 1
preview 6, 7
saving locations 3
D
data
storing 1
transferring 1
device, care 8
display settings 7
distance, measuring 2, 3
G
Garmin Express 1
updating software 1
golf round, ending 4
green view, pin location 2
H
handedness 7
handicap 4
handicap scoring, player 4
history 4
sending to computer 1
holes, changing 2
I
installing 8
K
keys 1
L
locations, deleting 3
locking, screen 2
M
maps
symbols 1, 6
updates 1
measurements 7
measuring a shot 2
menu 1
mounting the device 7, 8
mounts 8
optional 7
N
notifications 7
O
O-rings. See bands
P
pairing, smartphone 1
pin location, green view 2
power key 1
R
radar 5, 6
resetting the device 7
S
saving locations 3
scorecard 3, 4
scoring 3, 6
match 4
skins 4
screen, brightness 9
settings 2, 3, 7
smartphone 1
pairing 1
software, updating 1
specifications 9
statistics 3, 4
storing data 1
swing analysis 4, 5, 7
T
target practice 5, 6
tempo training 4, 5
tones 5
touchscreen 1, 2
training 5
troubleshooting 7
U
updates
course maps 1
software 1
user data, deleting 7
V
virtual course 6
virtual tournament 6
10 Index
Page 15

Page 16

support.garmin.com
January 2019
190-02353-00_0A
 Loading...