


GPSMAP® 66
Owner’s Manual

© 2018 Garmin Ltd. or its subsidiaries
All rights reserved. Under the copyright laws, this manual may not be copied, in whole or in part, without the written consent of Garmin. Garmin reserves the right to change or improve its
products and to make changes in the content of this manual without obligation to notify any person or organization of such changes or improvements. Go to www.garmin.com for current updates
and supplemental information concerning the use of this product.
ANT+®, Garmin®, the Garmin logo, and GPSMAP® are trademarks of Garmin Ltd. or its subsidiaries, registered in the USA and other countries. Garmin Connect™ and Garmin Express™ are
trademarks of Garmin Ltd. or its subsidiaries. These trademarks may not be used without the express permission of Garmin.The Bluetooth® word mark and logos are owned by the Bluetooth SIG,
Inc. and any use of such marks by Garmin is under license. microSD® and the microSDHC logo are trademarks of SD-3C, LLC. Other trademarks and trade names are those of their respective
owners.

Table of Contents
Introduction.....................................................................1
Device Overview......................................................................... 1
Installing Batteries..................................................................1
Battery Information..................................................................... 1
Maximizing Battery Life.......................................................... 1
Turning On Battery Save Mode............................................. 1
Long-Term Storage................................................................ 1
Installing Batteries...................................................................... 1
Turning On the Device................................................................ 1
Keys............................................................................................ 1
Acquiring Satellite Signals.......................................................... 2
Using the Main Pages.................................................... 2
Opening the Main Menu............................................................. 2
Map............................................................................................. 2
Changing the Map Orientation............................................... 2
Measuring Distance on the Map............................................ 2
Map Settings.......................................................................... 2
Compass.....................................................................................2
Calibrating the Compass........................................................2
Using the Compass................................................................2
Course Pointer....................................................................... 2
Navigating with Sight 'N Go................................................... 3
Navigating with Sight 'N Go................................................... 3
Trip Computer............................................................................. 3
Trip Computer Settings.......................................................... 3
Elevation Plot.............................................................................. 3
Elevation Plot Settings........................................................... 3
Calibrating the Barometric Altimeter...................................... 3
Restoring Default Page Settings................................................ 3
Waypoints, Routes, and Tracks.................................... 3
Waypoints................................................................................... 3
Creating a Waypoint.............................................................. 3
Projecting a Waypoint............................................................ 3
Navigating to a Waypoint....................................................... 4
Editing a Waypoint................................................................. 4
Deleting a Waypoint............................................................... 4
Routes........................................................................................ 4
Creating a Route Using Route Planner................................. 4
Editing the Name of a Route.................................................. 4
Editing a Route...................................................................... 4
Viewing a Route on the Map.................................................. 4
Deleting a Route.................................................................... 4
Navigating a Saved Route..................................................... 4
Viewing the Active Route....................................................... 4
Stopping Navigation............................................................... 4
Reversing a Route................................................................. 4
Recording................................................................................... 4
Recording Controls................................................................ 4
Tracks Settings...................................................................... 4
Viewing the Current Activity................................................... 5
Saving the Current Activity.....................................................5
Clearing the Current Track.....................................................5
Deleting an Activity History.................................................... 5
Navigating a Saved Activity................................................... 5
Purchasing Additional Maps....................................................... 5
Finding an Address................................................................ 5
Main Menu Features and Settings................................ 5
Using the Flashlight.................................................................... 5
Geocaches..................................................................................5
Downloading Geocaches Using a Computer......................... 5
Navigating to a Geocache......................................................5
chirp™....................................................................................5
Sending and Receiving Data Wirelessly..................................... 5
Setting a Proximity Alarm........................................................... 6
Selecting a Profile....................................................................... 6
Area Calculation......................................................................... 6
Calculating the Size of an Area............................................. 6
Satellite Page..............................................................................6
GPS Satellite Settings............................................................6
Garmin Adventures..................................................................... 6
Sending Files to BaseCamp.................................................. 6
Creating an Adventure........................................................... 6
Starting an Adventure............................................................ 6
VIRB® Remote........................................................................... 6
Waypoint Averaging....................................................................7
Bluetooth Connected Features................................................... 7
Pairing a Smartphone with Your Device................................ 7
Phone Notifications................................................................ 7
Additional Main Menu Tools....................................................... 7
Customizing the Device................................................. 7
Customizing the Data Fields....................................................... 7
Data Fields............................................................................. 7
System Settings.......................................................................... 8
GPS and GLONASS.............................................................. 9
Serial Interface Settings......................................................... 9
Display Settings.......................................................................... 9
Adjusting the Backlight............................................................... 9
Setting the Device Tones............................................................9
Marine Settings........................................................................... 9
Setting Up Marine Alarms...................................................... 9
Resetting Data and Settings....................................................... 9
Changing the Page Sequence.................................................... 9
Adding a Page....................................................................... 9
Removing a Page................................................................ 10
Customizing the Main Menu..................................................... 10
Changing the Units of Measure................................................ 10
Time Settings............................................................................ 10
Position Format Settings...........................................................10
Altimeter Settings......................................................................10
Routing Settings....................................................................... 10
Profiles...................................................................................... 10
Creating a Custom Profile.................................................... 10
Editing a Profile Name......................................................... 10
Deleting a Profile..................................................................10
Device Information....................................................... 10
Product Updates....................................................................... 10
Setting Up Garmin Express................................................. 11
Registering Your Device...................................................... 11
Attaching the Carabiner Clip..................................................... 11
Removing the Carabiner Clip............................................... 11
Attaching the Wrist Strap.......................................................... 11
Device Care.............................................................................. 11
Cleaning the Device............................................................. 11
Data Management.................................................................... 11
File Types............................................................................ 11
Installing a Memory Card..................................................... 11
Connecting the Device to Your Computer........................... 11
Transferring Files to Your Device........................................ 12
Deleting Files....................................................................... 12
Disconnecting the USB Cable..............................................12
Specifications............................................................................12
Appendix....................................................................... 12
Contacting Garmin Support...................................................... 12
Turning On the Backlight.......................................................... 12
Optional Accessories................................................................ 12
tempe™............................................................................... 12
Using Optional Fitness Accessories.................................... 12
Tips for Pairing ANT+ Accessories with Your Garmin Device.. 12
Table of Contents i

Troubleshooting........................................................................ 12
Resetting the Device............................................................ 12
Viewing Device Information................................................. 13
Restoring All Default Settings.............................................. 13
Index.............................................................................. 14
ii Table of Contents
Introduction
WARNING
See the Important Safety and Product Information guide in the
product box for product warnings and other important
information.
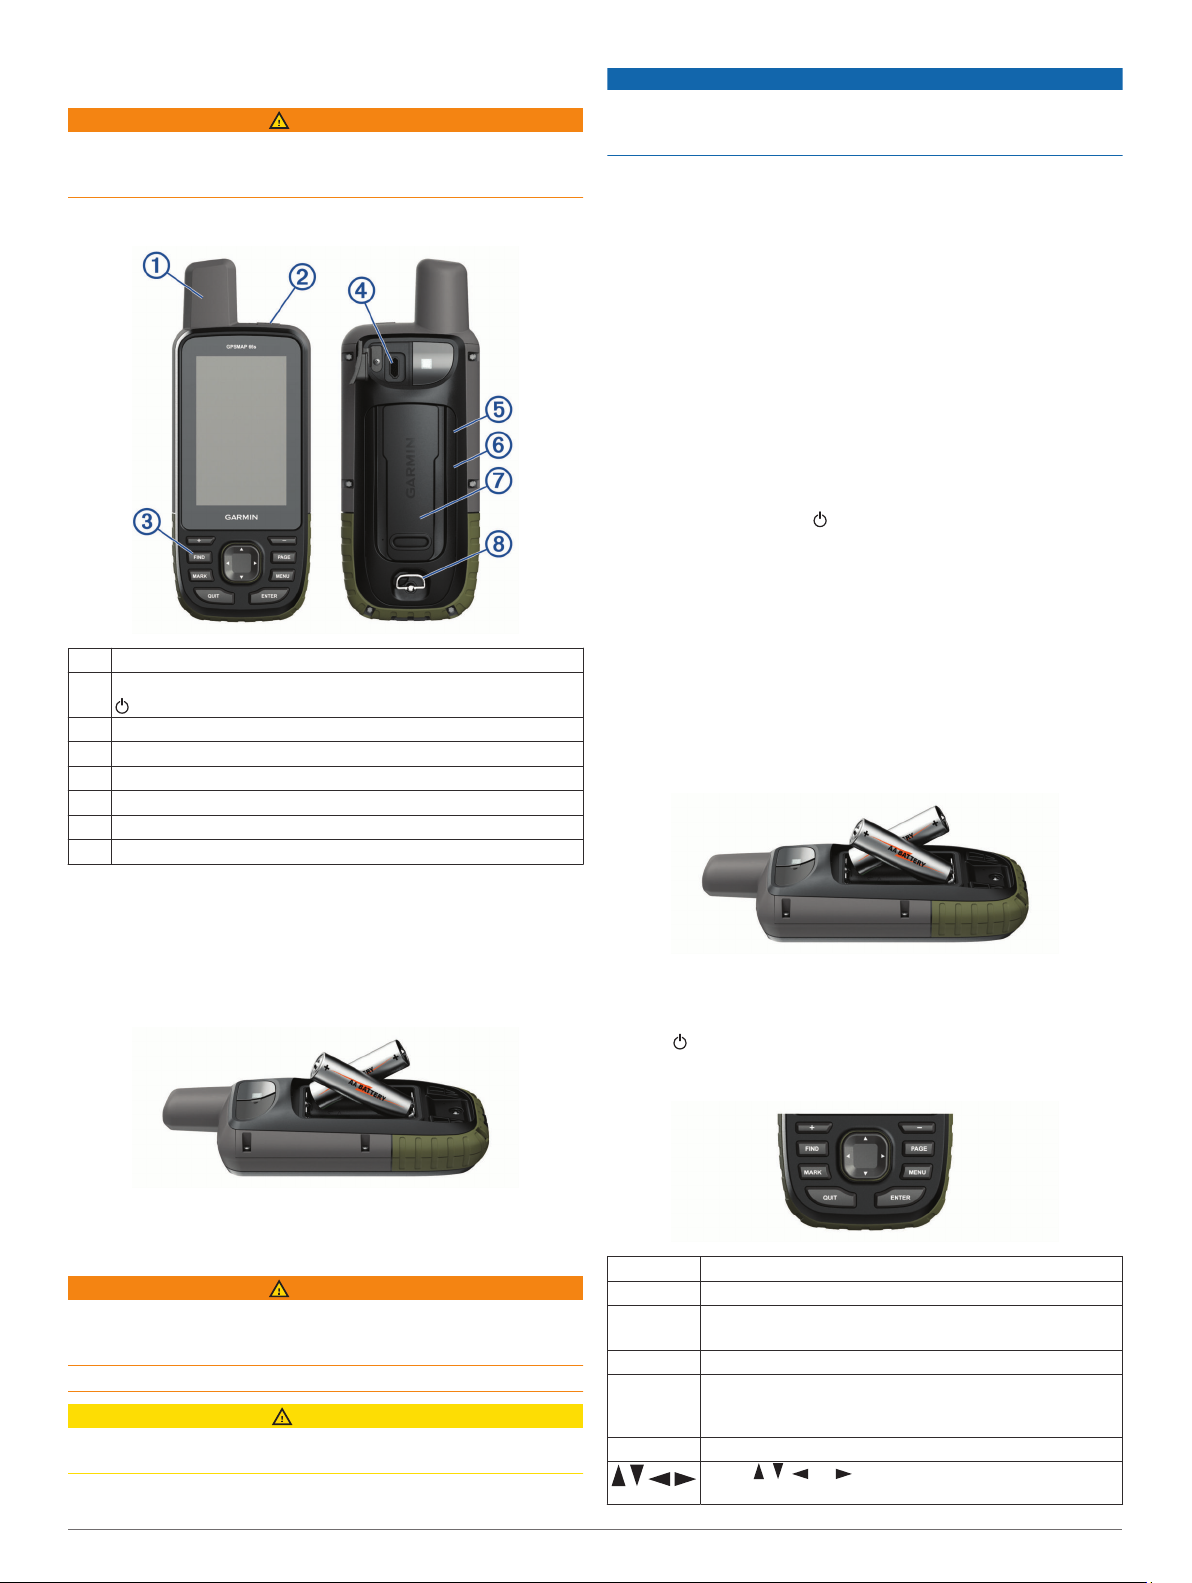
Device Overview
Internal satellite antenna
À
Power key
Á
Keys
Â
Micro-USB port (under weather cap)
Ã
microSD® card slot (under batteries)
Ä
Battery compartment
Å
Mounting spine
Æ
Battery cover D-ring
Ç
NOTICE
Alkaline batteries lose a significant amount of their capacity as
the temperature decreases. Use lithium batteries when
operating the device in below freezing conditions.
Maximizing Battery Life
You can do several things to extend the life of the batteries.
• Reduce the backlight brightness (Adjusting the Backlight,
page 9).
• Reduce the backlight timeout (Display Settings, page 9).
• Use battery save mode (Turning On Battery Save Mode,
page 1).
• Decrease the map drawing speed (Map Settings,
• Turn off GLONASS (GPS and GLONASS,
page
page
9).
2).
Turning On Battery Save Mode
You can use battery save mode to prolong the battery life.
From the app drawer, select Setup > Display > Battery
Save
In battery save mode, the screen shuts off when the backlight
times out. You can select to turn on the screen.
> On
.
Long-Term Storage
When you do not plan to use the device for several months,
remove the batteries. Stored data is not lost when batteries are
removed.
Installing Batteries
The handheld device operates using two AA batteries (not
included). Use NiMH or lithium batteries for best results.
Turn the D-ring counter-clockwise, and pull up to remove the
1
cover.
Insert two AA batteries, observing polarity.
2
Installing Batteries
The handheld device operates using two AA batteries (not
included). Use NiMH or lithium batteries for best results.
Turn the D-ring counter-clockwise, and pull up to remove the
1
cover.
Insert two AA batteries, observing polarity.
2
Replace the battery cover, and turn the D-ring clockwise.
3
Battery Information
WARNING
The temperature rating for the device may exceed the usable
range of some batteries. Alkaline batteries can rupture at high
temperatures.
Do not use a sharp object to remove batteries.
CAUTION
Contact your local waste disposal department to properly
recycle the batteries.
Replace the battery cover, and turn the D-ring clockwise.
3
Turning On the Device
Hold .
Keys
FIND Select to open the search menu.
MARK Select to save your current location as a waypoint.
QUIT Select to cancel or return to the previous menu or page.
Select to scroll through the main pages.
ENTER Select to select options and acknowledge messages.
MENU Select to open the options menu for the page that is
PAGE Select to scroll through the main pages.
currently open.
Select twice to open the main menu (from any page).
Select , , , or to select menu options and move the
map cursor.
Introduction 1
Select to zoom in on the map.
Select to zoom out on the map.
Acquiring Satellite Signals
It may take 30 to 60 seconds to acquire satellite signals.
Go outdoors to an open area.
1
If necessary, turn on the device.
2
Wait while the device searches for satellites.
3
A question mark flashes while the device determines your
location.
In the status bar, shows the satellite signal strength.
When the bars are full, the device has acquired satellite
signals.
Using the Main Pages
The information needed to operate this device is found on the
main menu, map, compass, and trip computer pages.
Select PAGE.
1
Select the active main page.
2
Opening the Main Menu
The main menu gives you access to setup screens including
waypoints, tracks, and routes. See Main Menu Features and
Settings, page 5 for main menu settings pages.
From any page, select MENU twice.
Map
represents your location on the map. As you travel, moves
and leaves a track log (trail). Waypoint names and symbols
appear on the map. When you are navigating to a destination,
your route is marked with a colored line on the map.
Changing the Map Orientation
From the map, select MENU.
1
Select Setup Map > Orientation.
2
Select an option:
3
• Select North Up to show north at the top of the page.
• Select Track Up to show your current direction of travel at
the top of the page.
• Select Automotive Mode to show an automotive
perspective with the direction of travel at the top.
Measuring Distance on the Map
You can measure the distance between two locations.
From the map, select a location.
1
Select MENU > Measure Distance > Use.
2
Select MENU > Measure Distance.
3
Move the pin to another location on the map.
4
Map Settings
Select Setup > Map.
Orientation: Adjusts how the map is shown on the page. North
Up shows north at the top of the page. Track Up shows a topdown view with your current direction of travel toward the top
of the page. Automotive Mode shows an 3D automotive view
with the direction of travel at the top.
Guidance Text: Sets when the guidance text appears on the
map.
Data Fields: Customizes the data fields and dashboards of the
map, compass, elevation plot, and trip computer.
Map Information: Enables or disables the maps currently
loaded on the device.
Advanced Map Settings
Select Setup >
Auto Zoom: Automatically selects the appropriate zoom level
for optimal use on your map. When Off is selected, you must
zoom in or out manually.
Zoom Levels: Adjusts the zoom level at which map items will
appear. The map items will not appear when the map zoom
level is higher than the selected level.
Text Size: Selects the text size for map items.
Detail: Selects the amount of detail shown on the map. Showing
more detail may cause the map to redraw more slowly.
Shaded Relief: Shows detail relief on the map (if available) or
turns off shading.
Map > Advanced Map Setup
.
Compass
When navigating,
direction you are moving. When points toward the top of the
electronic compass, you are traveling directly toward your
destination. If points any other direction, turn until it points
toward the top of the compass.
Calibrating the Compass
Before you can calibrate the electronic compass, you must be
outdoors, away from objects that influence magnetic fields, such
as cars, buildings, or overhead power lines.
The device has a 3-axis electronic compass (GPSMAP 66
series
devices only). You should calibrate the compass after
moving long distances, experiencing temperature changes, or
changing the batteries.
From the compass, select MENU.
1
Select Calibrate Compass > Start.
2
Follow the on-screen instructions.
3
Using the Compass
You can use the compass to navigate an active route.
Select PAGE
1
Hold the device level.
2
Follow to your destination.
3
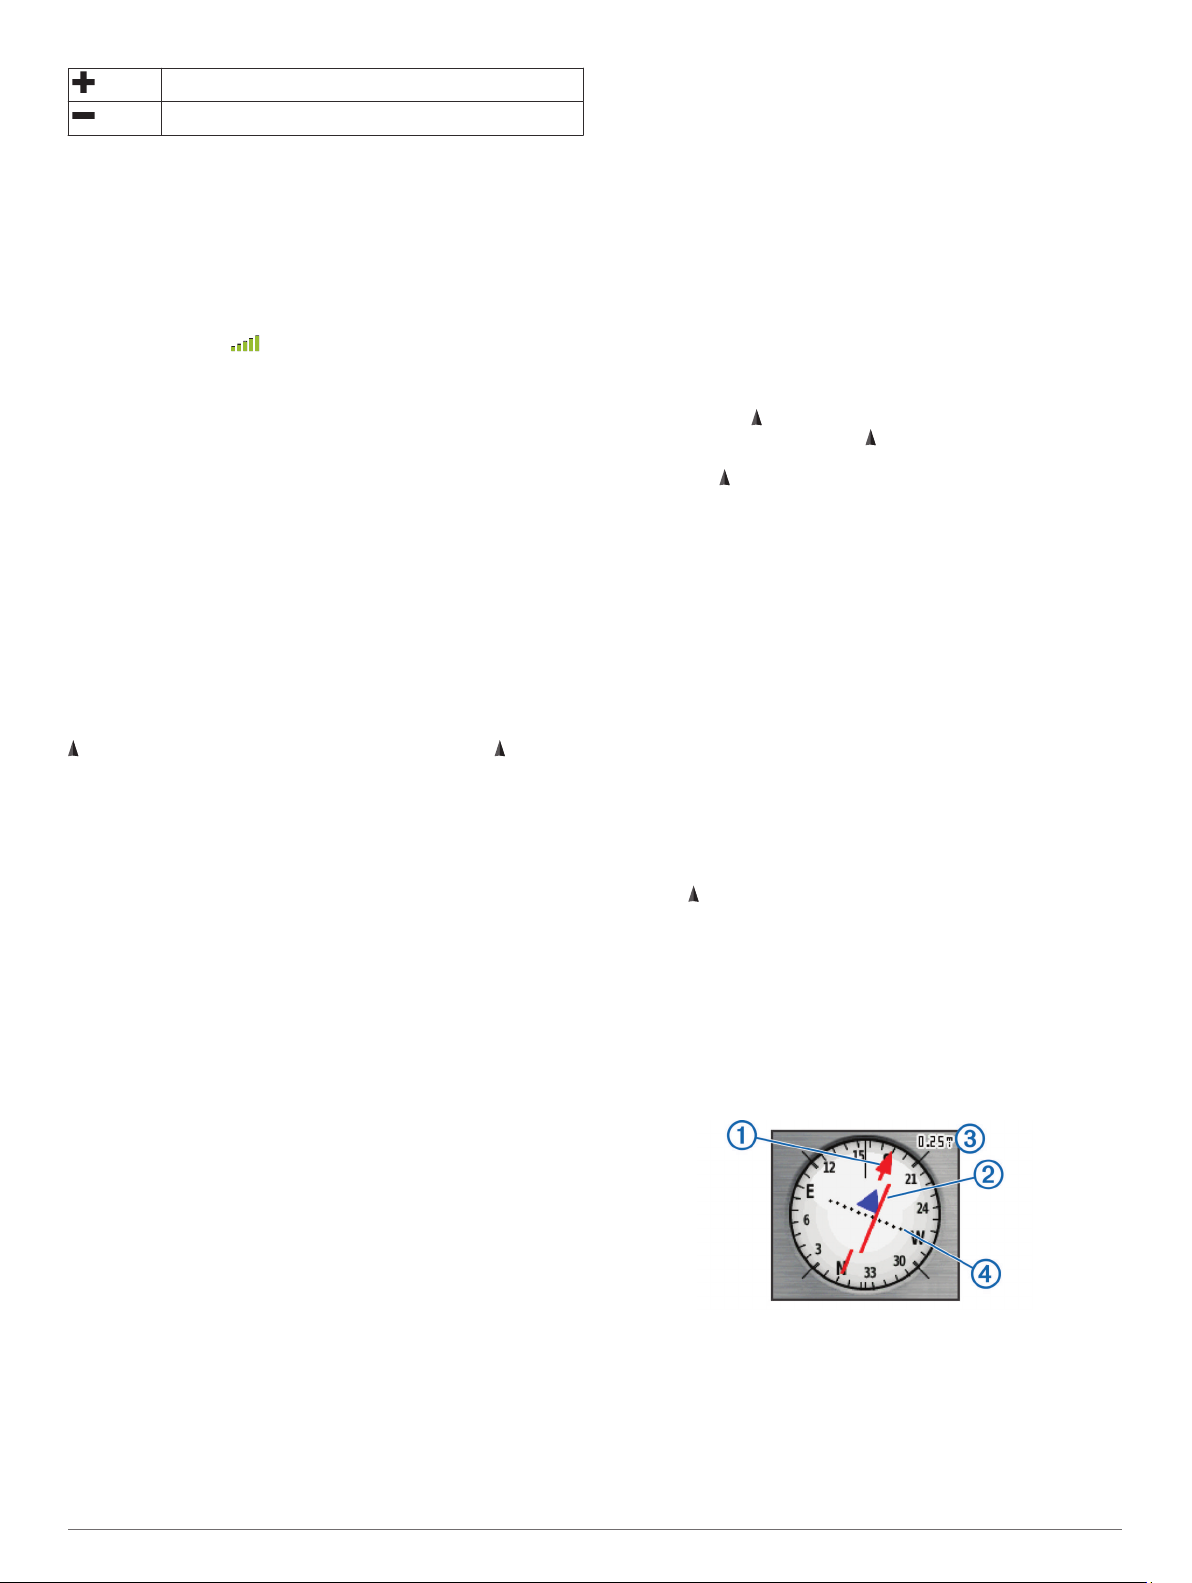
Course Pointer
The course pointer is most useful when you are navigating on
water or where there are no major obstacles in your path. It can
also help you avoid hazards near the course, such as shoals or
submerged rocks.
To enable the course pointer, from the compass, select MENU >
Setup Heading >
To enable the course pointer, from the compass, select MENU >
Setup Heading >
The course pointer À indicates your relationship to the course
line leading to the destination. The course deviation indicator
(CDI) Á provides the indication of drift (right or left) from the
course. The scale  refers to the distance between dots à on
the course deviation indicator, which tell you how far off course
you are.
points to your destination, regardless of the
.
Go To Line/Pointer > Course
Go To Line/Pointer > Course (CDI)
.
.
2 Using the Main Pages
 Loading...