

Page 1
Page 2

© 2018 Garmin Ltd. or its subsidiaries
All rights reserved. Under the copyright laws, this manual may not be copied, in whole or in part, without the written consent of Garmin. Garmin reserves the right to change or improve its
products and to make changes in the content of this manual without obligation to notify any person or organization of such changes or improvements. Go to www.garmin.com for current updates
and supplemental information concerning the use of this product.
Garmin®, the Garmin logo, ANT+®, Auto Lap®, Auto Pause®, Edge®, Forerunner®, and Virtual Partner® are trademarks of Garmin Ltd. or its subsidiaries, registered in the USA and other countries.
Connect IQ™, Garmin Connect™, Garmin Express™, Varia™, Varia Vision™, and Vector™ are trademarks of Garmin Ltd. or its subsidiaries. These trademarks may not be used without the express
permission of Garmin.
The Bluetooth® word mark and logos are owned by the Bluetooth SIG, Inc. and any use of such marks by Garmin is under license. The Cooper Institute®, as well as any related trademarks, are
the property of The Cooper Institute. Advanced heartbeat analytics by Firstbeat. Apple® and Mac® are trademarks of Apple, Inc., registered in the U.S. and other countries. STRAVA and Strava
are trademarks of Strava, Inc. Wi‑Fi® is a registered trademark of Wi-Fi Alliance Corporation. Windows® is a registered trademark of Microsoft Corporation in the United States and other
countries. Other trademarks and trade names are those of their respective owners.
This product is ANT+® certified. Visit www.thisisant.com/directory for a list of compatible products and apps.
M/N: A03402
™
Page 3

Table of Contents
Introduction.....................................................................1
Keys............................................................................................ 1
Status Icons........................................................................... 1
Pairing Your Smartphone........................................................... 1
Installing the Standard Mount..................................................... 1
Releasing the Edge................................................................1
Charging the Device................................................................... 1
About the Battery................................................................... 2
Acquiring Satellite Signals.......................................................... 2
Viewing Widgets......................................................................... 2
Using the Backlight..................................................................... 2
Training........................................................................... 2
Going for a Ride..........................................................................2
Following a Saved Ride.............................................................. 2
Segments....................................................................................2
Strava™ Segments................................................................ 3
Following a Segment From Garmin Connect......................... 3
Racing a Segment................................................................. 3
Setting a Segment to Adjust Automatically............................ 3
Viewing Segment Details....................................................... 3
Deleting a Segment............................................................... 3
Courses...................................................................................... 3
Following a Course From Garmin Connect............................3
Tips for Training with Courses............................................... 3
Viewing Course Details.......................................................... 4
Deleting a Course.................................................................. 4
Training Indoors.......................................................................... 4
Marking Laps.............................................................................. 4
Using Auto Pause®.................................................................... 4
Using Auto Scroll........................................................................ 4
Changing Data Fields................................................................. 4
My Stats........................................................................... 4
Setting Up Your User Profile.......................................................4
Personal Records....................................................................... 4
Viewing Your Personal Records............................................ 4
Reverting a Personal Record................................................. 4
Deleting a Personal Record................................................... 4
Navigation....................................................................... 4
Locations.................................................................................... 4
Marking Your Location........................................................... 4
Navigating to a Saved Location............................................. 5
Navigating Back to Start........................................................ 5
Viewing Saved Locations....................................................... 5
Viewing User Locations on the Map...................................... 5
Customizing the Map Icons....................................................5
Repositioning Your Location.................................................. 5
Deleting a Saved Location..................................................... 5
Bluetooth Connected Features..................................... 5
Garmin Connect..........................................................................5
Sending Your Ride to Garmin Connect................................. 5
Assistance.................................................................................. 6
Setting Up the Assistance Feature........................................ 6
Requesting Assistance.......................................................... 6
Cancelling an Assistance Message....................................... 6
Connect IQ™ Downloadable Features....................................... 6
Wireless Sensors........................................................... 6
Installing the Speed Sensor........................................................ 6
Installing the Cadence Sensor.................................................... 6
About the Speed and Cadence Sensors............................... 7
Putting On the Heart Rate Monitor............................................. 7
Tips for Erratic Heart Rate Data.............................................7
Fitness Goals......................................................................... 7
Recovery Advisor................................................................... 7
About VO2 Max. Estimates.................................................... 7
Pairing Your Wireless Sensors................................................... 8
Training with Power Meters........................................................ 8
Calibrating Your Power Meter................................................ 8
Pedal-Based Power............................................................... 8
Situational Awareness................................................................ 8
History............................................................................. 8
Viewing Ride Details................................................................... 8
Deleting a Ride........................................................................... 9
Data Management...................................................................... 9
Connecting the Device to Your Computer............................. 9
Transferring Files to Your Device.......................................... 9
Deleting Files......................................................................... 9
Disconnecting the USB Cable................................................9
Viewing Data Totals.................................................................... 9
Customizing Your Device.............................................. 9
System Settings.......................................................................... 9
Changing the Device Language............................................ 9
Changing the Units of Measure............................................. 9
Turning the Device Tones On and Off................................... 9
Ride Settings.............................................................................. 9
Changing the Satellite Setting............................................. 10
Alerts.................................................................................... 10
Phone Settings......................................................................... 10
Setting Up Remote Display Mode.............................................10
Exiting Remote Display Mode...................................................10
Device Information....................................................... 10
Specifications............................................................................10
Edge Specifications............................................................. 10
Heart Rate Monitor Specifications....................................... 10
Speed Sensor and Cadence Sensor Specifications............ 10
Viewing E-label Regulatory and Compliance Information........ 10
Device Care.............................................................................. 10
Cleaning the Device............................................................. 11
Caring for the Heart Rate Monitor........................................ 11
User Replaceable Batteries...................................................... 11
Replacing the Heart Rate Monitor Battery........................... 11
Replacing the Speed Sensor or Cadence Sensor Battery... 11
Troubleshooting........................................................... 11
Resetting the Device.................................................................11
Restoring All Default Settings................................................... 11
Maximizing Battery Life.............................................................11
Improving GPS Satellite Reception.......................................... 11
My Device is in the Wrong Language....................................... 12
Replacement O-rings................................................................ 12
Updating the Software Using Garmin Connect Mobile............. 12
Updating the Software Using Garmin Express......................... 12
Product Updates....................................................................... 12
Getting More Information.......................................................... 12
Appendix....................................................................... 12
Data Fields................................................................................12
VO2 Max. Standard Ratings..................................................... 13
Heart Rate Zone Calculations...................................................13
Wheel Size and Circumference................................................ 13
Index.............................................................................. 15
Table of Contents i
Page 4

Page 5
Page 6
Page 7
Page 8
Page 9
Page 10
Page 11
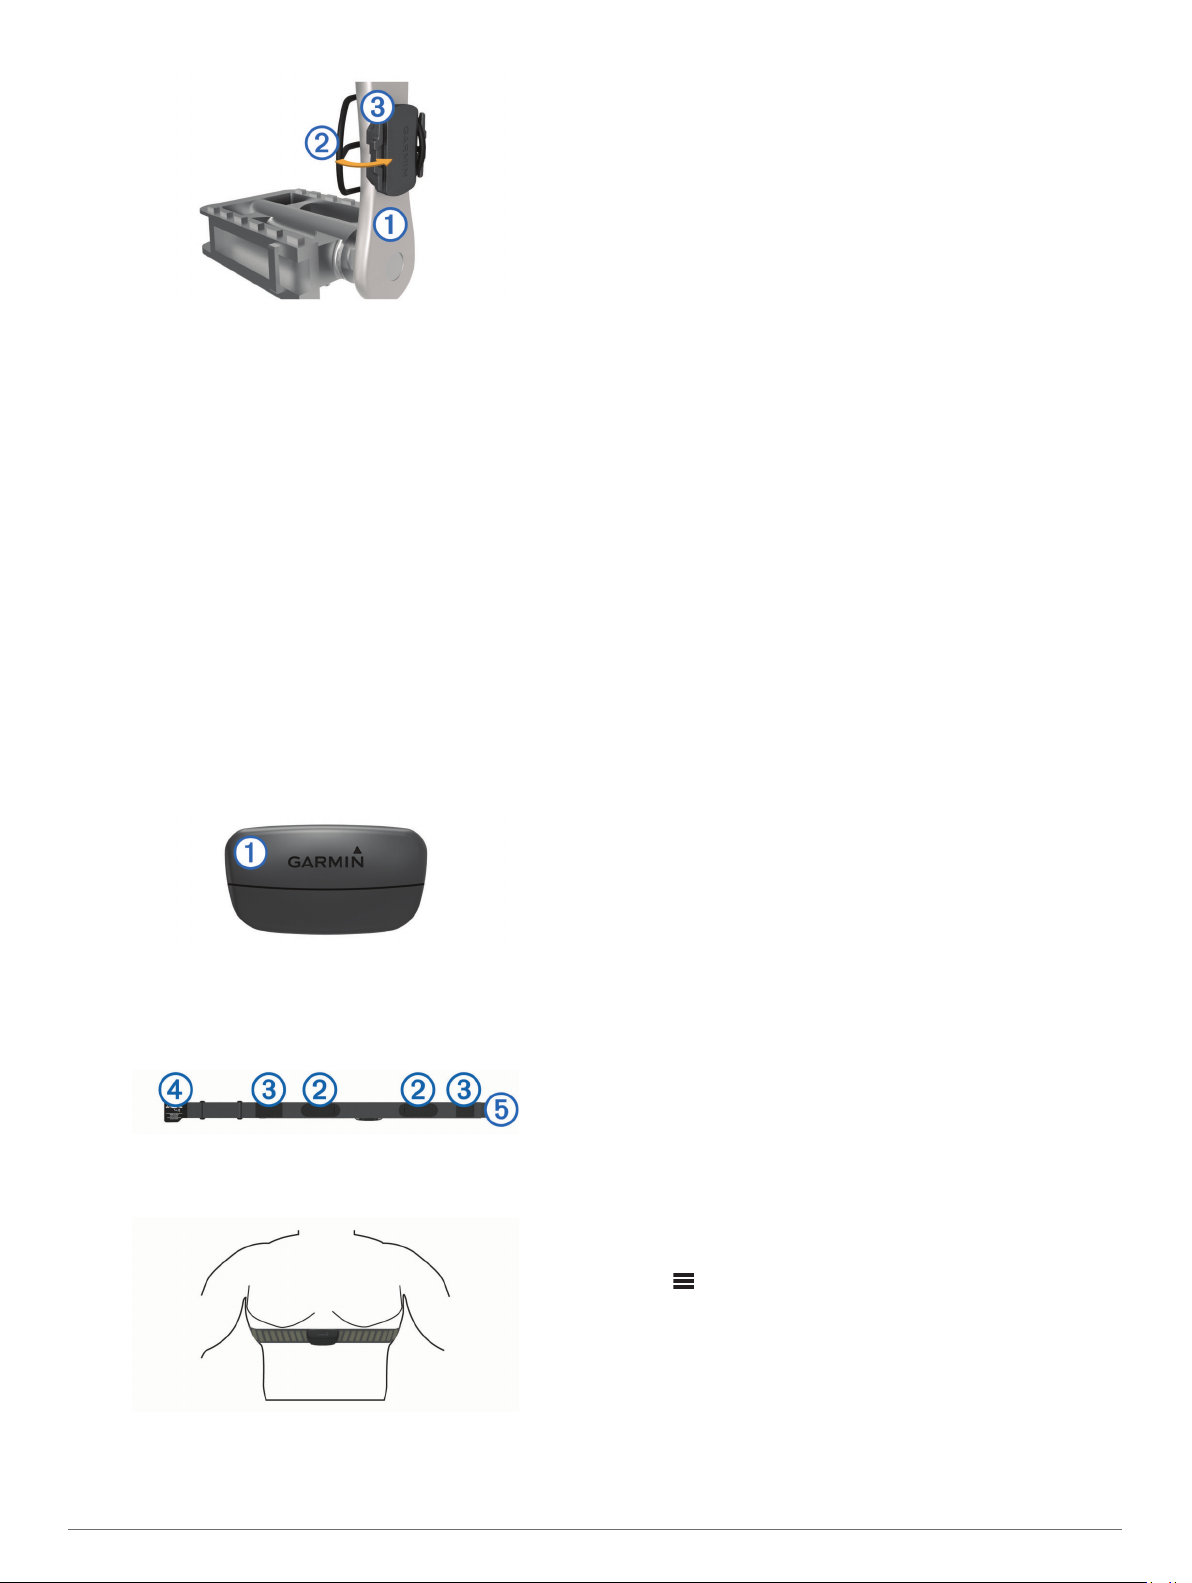
Rotate the crank arm to check for clearance.
4
The sensor and bands should not contact any part of your
bike or shoe.
NOTE: The LED flashes green for five seconds to indicate
activity after two revolutions.
Take a 15 minute test ride and inspect the sensor and bands
5
to ensure there is no evidence of damage.
About the Speed and Cadence Sensors
Cadence data from the cadence sensor is always recorded. If no
speed and cadence sensors are paired with the device, GPS
data is used to calculate the speed and distance.
Cadence is your rate of pedaling or “spinning” measured by the
number of revolutions of the crank arm per minute (rpm).
Putting On the Heart Rate Monitor
NOTE: If you do not have a heart rate monitor, you can skip this
task.
You should wear the heart rate monitor directly on your skin, just
below your sternum. It should be snug enough to stay in place
during your activity.
Snap the heart rate monitor module À onto the strap.
1
The Garmin logos on the module and the strap should be
right-side up.
Wet the electrodes Á and the contact patches  on the back
2
of the strap to create a strong connection between your chest
and the transmitter.
Wrap the strap around your chest, and connect the strap
3
hook à to the loop Ä.
NOTE: The care tag should not fold over.
The Garmin
Bring the device within 3 m (10 ft.) of the heart rate monitor.
4
logos should be right-side up.
After you put on the heart rate monitor, it is active and sending
data.
TIP: If the heart rate data is erratic or does not appear, see the
troubleshooting tips (Tips for Erratic Heart Rate Data,
page 7).
Tips for Erratic Heart Rate Data
If the heart rate data is erratic or does not appear, you can try
these tips.
• Reapply water to the electrodes and contact patches (if
applicable).
• Tighten the strap on your chest.
• Warm up for 5 to 10 minutes.
• Follow the care instructions (Caring for the Heart Rate
Monitor,
• Wear a cotton shirt or thoroughly wet both sides of the strap.
Synthetic fabrics that rub or flap against the heart rate
monitor can create static electricity that interferes with heart
rate signals.
• Move away from sources that can interfere with your heart
rate monitor.
Sources of interference may include strong electromagnetic
fields, some 2.4 GHz wireless sensors, high-voltage power
lines, electric motors, ovens, microwave ovens, 2.4 GHz
cordless phones, and wireless LAN access points.
page
11).
Fitness Goals
Knowing your heart rate zones can help you measure and
improve your fitness by understanding and applying these
principles.
• Your heart rate is a good measure of exercise intensity.
• Training in certain heart rate zones can help you improve
cardiovascular capacity and strength.
If you know your maximum heart rate, you can use the table
(Heart Rate Zone Calculations, page 13) to determine the best
heart rate zone for your fitness objectives.
If you do not know your maximum heart rate, use one of the
calculators available on the Internet. Some gyms and health
centers can provide a test that measures maximum heart rate.
The default maximum heart rate is 220 minus your age.
Recovery Advisor
You can use your Garmin device with a heart rate monitor to
display how much time remains before you are fully recovered
and ready for the next hard workout.
Recovery time: The recovery time appears immediately
following an activity. The time counts down until it is optimal
for you to attempt another hard workout.
Viewing Your Recovery Time
Before you can use the recovery time feature, you must put on
the heart rate monitor, and pair it with your device (Pairing Your
Wireless Sensors, page 8). If your device was packaged with
a heart rate monitor, the device and sensor are already paired.
For the most accurate estimate, complete the user profile setup,
and set your maximum heart rate (Setting Up Your User Profile,
page 4).
Hold .
1
Select My Stats > Recovery Advisor.
2
Go for a ride.
3
After your ride, select Save Ride.
4
The recovery time appears. The maximum time is 4 days,
and the minimum time is 6 hours.
About VO2 Max. Estimates
VO2 max. is the maximum volume of oxygen (in milliliters) you
can consume per minute per kilogram of body weight at your
maximum performance. In simple terms, VO2 max. is an
Wireless Sensors 7
Page 12
indication of athletic performance and should increase as your
level of fitness improves. VO2 max. estimates are provided and
supported by Firstbeat. You can use your Garmin
with a compatible heart rate monitor and power meter to display
your cycling VO2 max. estimate.
Getting Your VO2 Max. Estimate
Before you can view your VO2 max. estimate, you must put on
the heart rate monitor, install the power meter, and pair them
with your device (Pairing Your Wireless Sensors, page 8). If
your device was packaged with a heart rate monitor, the device
and sensor are already paired. For the most accurate estimate,
complete the user profile setup, and set your maximum heart
rate (Setting Up Your User Profile, page 4).
NOTE: The estimate may seem inaccurate at first. The device
requires a few rides to learn about your cycling performance.
Ride at a steady, high intensity for at least 20 minutes
1
outdoors.
After your ride, select Save Ride.
2
Hold .
3
Select My Stats > VO2 Max.
4
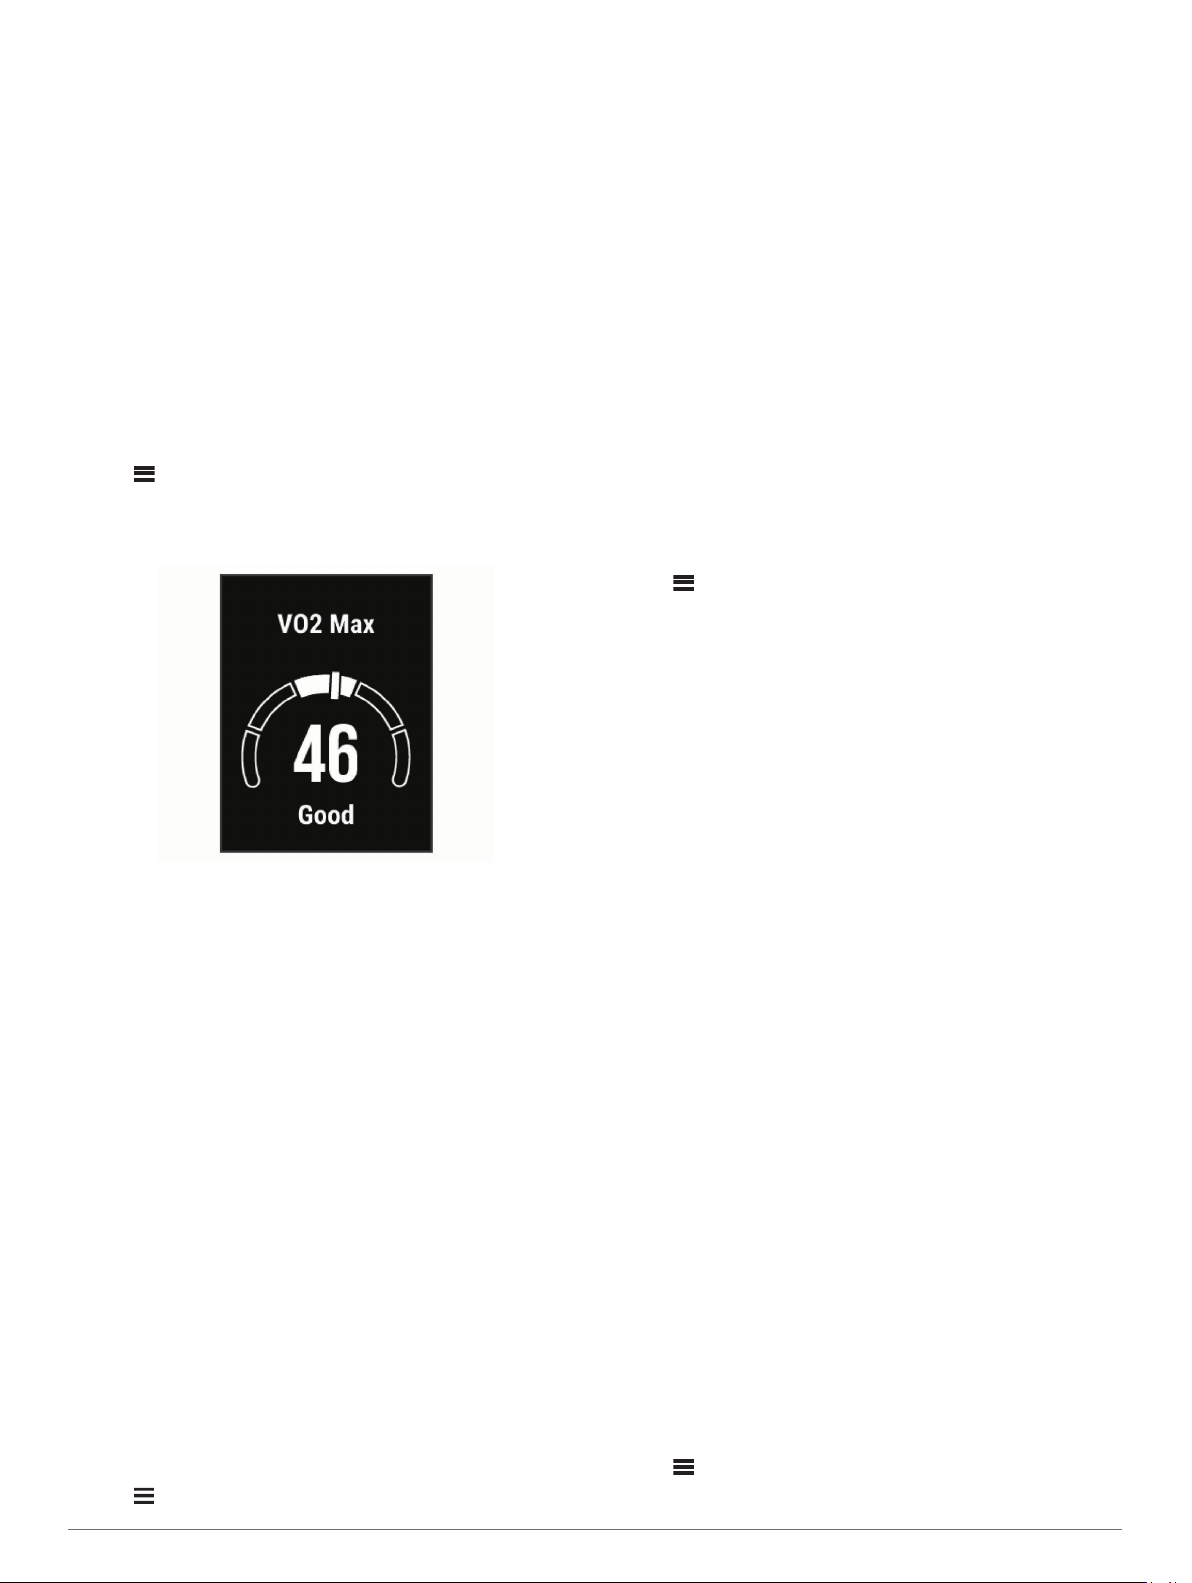
Your VO2 max. estimate appears as a number and position
on the gauge.
VO2 max. data and analysis is provided with permission from
The Cooper Institute®. For more information, see the
appendix (VO2 Max. Standard Ratings,
www.CooperInstitute.org.
Tips for Cycling VO2 Max. Estimates
The success and accuracy of the VO2 max. calculation
improves when your ride is a sustained and moderately hard
effort, and where heart rate and power are not highly variable.
• Before your ride, check that your device, heart rate monitor,
and power meter are functioning properly, paired, and have
good battery life.
• During your 20 minute ride, maintain your heart rate at
greater than 70% of your maximum heart rate.
• During your 20 minute ride, maintain a fairly constant power
output.
• Avoid rolling terrain.
• Avoid riding in groups where there is a lot of drafting.
device paired
page
13), and go to
Pairing Your Wireless Sensors
Before you can pair, you must put on the heart rate monitor or
install the sensor.
Pairing is the connecting of ANT+ or Bluetooth
For example, connecting a heart rate monitor with your Garmin
device.
Bring the device within 3 m (10 ft.) of the sensor.
1
NOTE: Stay 10 m (33 ft.) away from other riders' sensors
while pairing.
Hold .
2
wireless sensors.
Select Sensors >
3
Select an option:
4
• Select a sensor type.
• Select Search All
A list of available sensors appears.
Select one or more sensors to pair with your device.
5
Select Add Sensor.
6
When the sensor is paired with your device, the sensor status is
Connected. You can customize a data field to display sensor
data.
Add Sensor
to search for all nearby sensors.
.
Training with Power Meters
• Go to www.garmin.com/intosports for a list of ANT+ sensors
that are compatible with your device (such as Vector™).
• For more information, see the owner's manual for your power
meter.
Calibrating Your Power Meter
Before you can calibrate your power meter, you must install it,
pair it with your device, and begin actively recording data with it.
For calibration instructions specific to your power meter, see the
manufacturer's instructions.
Hold .
1
Select Sensors.
2
Select your power meter.
3
Select Calibrate.
4
Keep your power meter active by pedaling until the message
5
appears.
Follow the on-screen instructions.
6
Pedal-Based Power
Vector measures pedal-based power.
Vector measures the force you apply a few hundred times every
second.
pedaling speed. By measuring the force, the direction of force,
the rotation of the crank arm, and time, Vector can determine
power (watts). Because Vector independently measures left and
right leg power, it reports your left-right power balance.
NOTE: The
balance.
Vector also measures your cadence or rotational
Vector S system does not provide left-right power
Situational Awareness
Edge device can be used with the Varia Vision™ device,
Your
Varia™ smart bike lights, and rearview radar to improve
situational awareness. See the owner's manual for your Varia
device for more information.
NOTE: You may need to update the Edge software before
pairing Varia devices (Updating the Software Using Garmin
Express, page 12).
History
History includes time, distance, calories, speed, lap data,
elevation, and optional ANT+
NOTE: History is not recorded while the timer is stopped or
paused.
When the device memory is full, a message appears. The
device does not automatically delete or overwrite your history.
Upload your history to Garmin Connect periodically to keep track
of all your ride data.
Viewing Ride Details
Hold .
1
Select History > Rides.
2
sensor information.
8 History
Page 13
Select a ride.
3
Select an option.
4
Deleting a Ride
Hold .
1
Select History > Rides.
2
Select a ride to delete.
3
Select Delete > Yes.
4
Data Management
NOTE: The device is not compatible with Windows® 95, 98, Me,
Windows NT®, and Mac® OS 10.3 and earlier.
Connecting the Device to Your Computer
NOTICE
To prevent corrosion, thoroughly dry the USB port, the weather
cap, and the surrounding area before charging or connecting to
a computer.
Pull up the weather cap from the USB port.
1
Plug the small end of the USB cable into the USB port.
2
Plug the large end of the USB cable into a computer USB
3
port.
Your device appears as a removable drive in My Computer
on Windows computers and as a mounted volume on Mac
computers.
Transferring Files to Your Device
Connect the device to your computer.
1
On Windows
drive or a portable device. On Mac computers, the device
appears as a mounted volume.
NOTE: Some computers with multiple network drives may not
display device drives properly. See your operating system
documentation to learn how to map the drive.
On your computer, open the file browser.
2
Select a file.
3
Select Edit > Copy.
4
Open the portable device, drive, or volume for the device.
5
Browse to a folder.
6
Select Edit > Paste.
7
The file appears in the list of files in the device memory.
Deleting Files
If you do not know the purpose of a file, do not delete it. Your
device memory contains important system files that should not
be deleted.
Open the Garmin
1
If necessary, open a folder or volume.
2
Select a file.
3
Press the Delete key on your keyboard.
4
NOTE: If you are using an Apple® computer, you must empty
the Trash folder to completely remove the files.
Disconnecting the USB Cable
If your device is connected to your computer as a removable
drive or volume, you must safely disconnect your device from
your computer to avoid data loss. If your device is connected to
your Windows computer as a portable device, it is not necessary
to safely disconnect the device.
Complete an action:
1
computers, the device appears as a removable
NOTICE
drive or volume.
• For Windows computers, select the Safely Remove
Hardware icon in the system tray, and select your device.
• For Apple computers, select the device, and select File >
Eject.
Disconnect the cable from your computer.
2
Viewing Data Totals
You can view the accumulated data you have saved to the
device, including the number of rides, time, distance, and
calories.
Hold .
1
Select History >
2
Totals
.
Customizing Your Device
System Settings
Hold
Language: Sets the language displayed on the device
Backlight Timeout: Sets the length of time before the backlight
Sounds: Turns audible tones on or off for keys and alert
Units: Sets the units of measure used on the device.
Time: Sets the time settings.
Position Format: Allows you to set the format for viewing
Reset: Allows you to reset the system settings or delete all user
About: Displays the software version and unit ID, and allows
, and select System
(Changing the Device Language, page 9).
turns off.
messages (Turning the Device Tones On and Off, page 9).
geographical coordinate position details.
data (Restoring All Default Settings, page 11).
you to check for software updates (Viewing E-label
Regulatory and Compliance Information, page 10).
Changing the Device Language
Hold .
1
Select System > Language.
2
Changing the Units of Measure
You can customize units of measure for distance and speed.
Hold .
1
Select System > Units.
2
Turning the Device Tones On and Off
Hold .
1
Select System > Sounds.
2
Ride Settings
Hold
Data Pages: Enables you to customize data screens and add
Alerts: Sets the training alerts for your ride (Alerts, page 10).
Laps: Sets the options for the Auto Lap
Auto Pause: Sets the device to stop recording data when you
Auto Scroll: Enables you to move through all of the data
Segment Alerts: Enables prompts that alert you to approaching
Nav. Prompts: Enables or disables turn-by-turn navigation
, and select Ride Settings.
new data screens for your ride (Changing Data Fields,
page 4).
page 4).
stop moving (Using Auto Pause®, page 4).
screens automatically while the timer is running (Using Auto
Scroll,
segments (Segments,
prompts and off course warnings.
page
4).
.
page
2).
feature (
Marking Laps,
Customizing Your Device 9
Page 14
Page 15
Page 16
My Device is in the Wrong Language
Hold .
1
Scroll down to the last item in the list, and select it.
2
Select the first item in the list.
3
Use and to select your language.
4
Replacement O-rings
Replacement bands (O-rings) are available for the mounts.
NOTE: Use Ethylene Propylene Diene Monomer (EPDM)
replacement bands only. Go to http://buy.garmin.com, or contact
your Garmin dealer.
Updating the Software Using Garmin
Connect Mobile
Before you can update your device software using the Garmin
Connect Mobile app, you must have a Garmin Connect
and you must pair the device with a compatible smartphone
Pairing Your Smartphone, page 1).
(
Synchronize your device with the Garmin Connect Mobile
app.
When new software is available, the Garmin Connect Mobile
app automatically sends the update to your device.
account,
Updating the Software Using Garmin
Express
Before you can update your device software, you must have a
Garmin Connect account, and you must download the Garmin
Express application.
Connect the device to your computer using the USB cable.
1
When new software is available, Garmin Express sends it to
your device.
Follow the on-screen instructions.
2
Do not disconnect your device from the computer during the
3
update process.
Product Updates
On your computer, install Garmin Express (
/express). On your smartphone, install the Garmin Connect
Mobile app.
This provides easy access to these services for Garmin devices:
• Software updates
• Data uploads to Garmin Connect
• Product registration
www.garmin.com
Getting More Information
• Go to support.garmin.com for additional manuals, articles,
and software updates.
• Go to www.garmin.com/intosports.
• Go to www.garmin.com/learningcenter.
• Go to buy.garmin.com, or contact your Garmin
information about optional accessories and replacement
parts.
dealer for
Appendix
Data Fields
Some data fields require optional accessories to display data.
Average HR: The average heart rate for the current activity.
Avg. Cadence: Cycling. The average cadence for the current
activity.
Avg. Lap Time: The average lap time for the current activity.
Avg. Speed: The average speed for the current activity.
Battery Level: The remaining battery power.
Battery Status: The remaining battery power of a bike light
accessory.
Beam Ang. Status: The headlight beam mode.
Cadence: Cycling. The number of revolutions of the crank arm.
Your device must be connected to a cadence accessory for
this data to appear.
Calories: The amount of total calories burned.
Distance: The distance traveled for the current track or activity.
Distance to Dest.: The remaining distance to the final
destination. You must be navigating for this data to appear.
Distance to Next: The remaining distance to the next waypoint
on the route. You must be navigating for this data to appear.
Elapsed Time: The total time recorded. For example, if you start
the timer and run for 10 minutes, then stop the timer for 5
minutes, then start the timer and run for 20 minutes, your
elapsed time is 35 minutes.
Elevation: The altitude of your current location above or below
sea level.
ETA at Dest.: The estimated time of day when you will reach
the final destination (adjusted to the local time of the
destination). You must be navigating for this data to appear.
ETA at Next: The estimated time of day when you will reach the
next waypoint on the route (adjusted to the local time of the
waypoint). You must be navigating for this data to appear.
Grade: The calculation of rise (elevation) over run (distance).
For example, if for every 3 m (10 ft.) you climb you travel
60 m (200 ft.), the grade is 5%.
Heading: The direction you are moving.
Heart Rate: Your heart rate in beats per minute (bpm). Your
device must be connected to a compatible heart rate monitor.
HR %Max.: The percentage of maximum heart rate.
HR Zone: The current range of your heart rate (1 to 5). The
default zones are based on your user profile and maximum
heart rate (220 minus your age).
Lap Cadence: Cycling. The average cadence for the current
lap.
Lap Distance: The distance traveled for the current lap.
Lap HR: The average heart rate for the current lap.
Laps: The number of laps completed for the current activity.
Lap Speed: The average speed for the current lap.
Lap Time: The stopwatch time for the current lap.
Location at Dest.: The last point on the route or course.
Location at Next: The next point on the route or course.
Maximum Speed: The top speed for the current activity.
Odometer: A running tally of distance traveled for all trips. This
total does not clear when resetting the trip data.
Power - 3s Avg.: The 3-second moving average of power
output.
Power - Avg.: The average power output for the current activity.
Power - kJ: The accumulated work performed (power output) in
kilojoules.
Power - Lap: The average power output for the current lap.
Power - Max.: The top power output for the current activity.
Power Zone: The current range of power output (1 to 7) based
on your custom settings.
Speed: The current rate of travel.
Sunrise: The time of sunrise based on your GPS position.
Sunset: The time of sunset based on your GPS position.
Time: The stopwatch time for the current activity.
12 Appendix
Page 17
Time of Day: The time of day based on your current location
and time settings (format, time zone, daylight saving time).
Time to Dest.: The estimated time remaining before you reach
the destination. You must be navigating for this data to
Total Ascent: The total elevation distance ascended since the
last reset.
Total Descent: The total elevation distance descended since
the last reset.
appear.
Time to Next: The estimated time remaining before you reach
the next waypoint in the route. You must be navigating for
this data to appear.
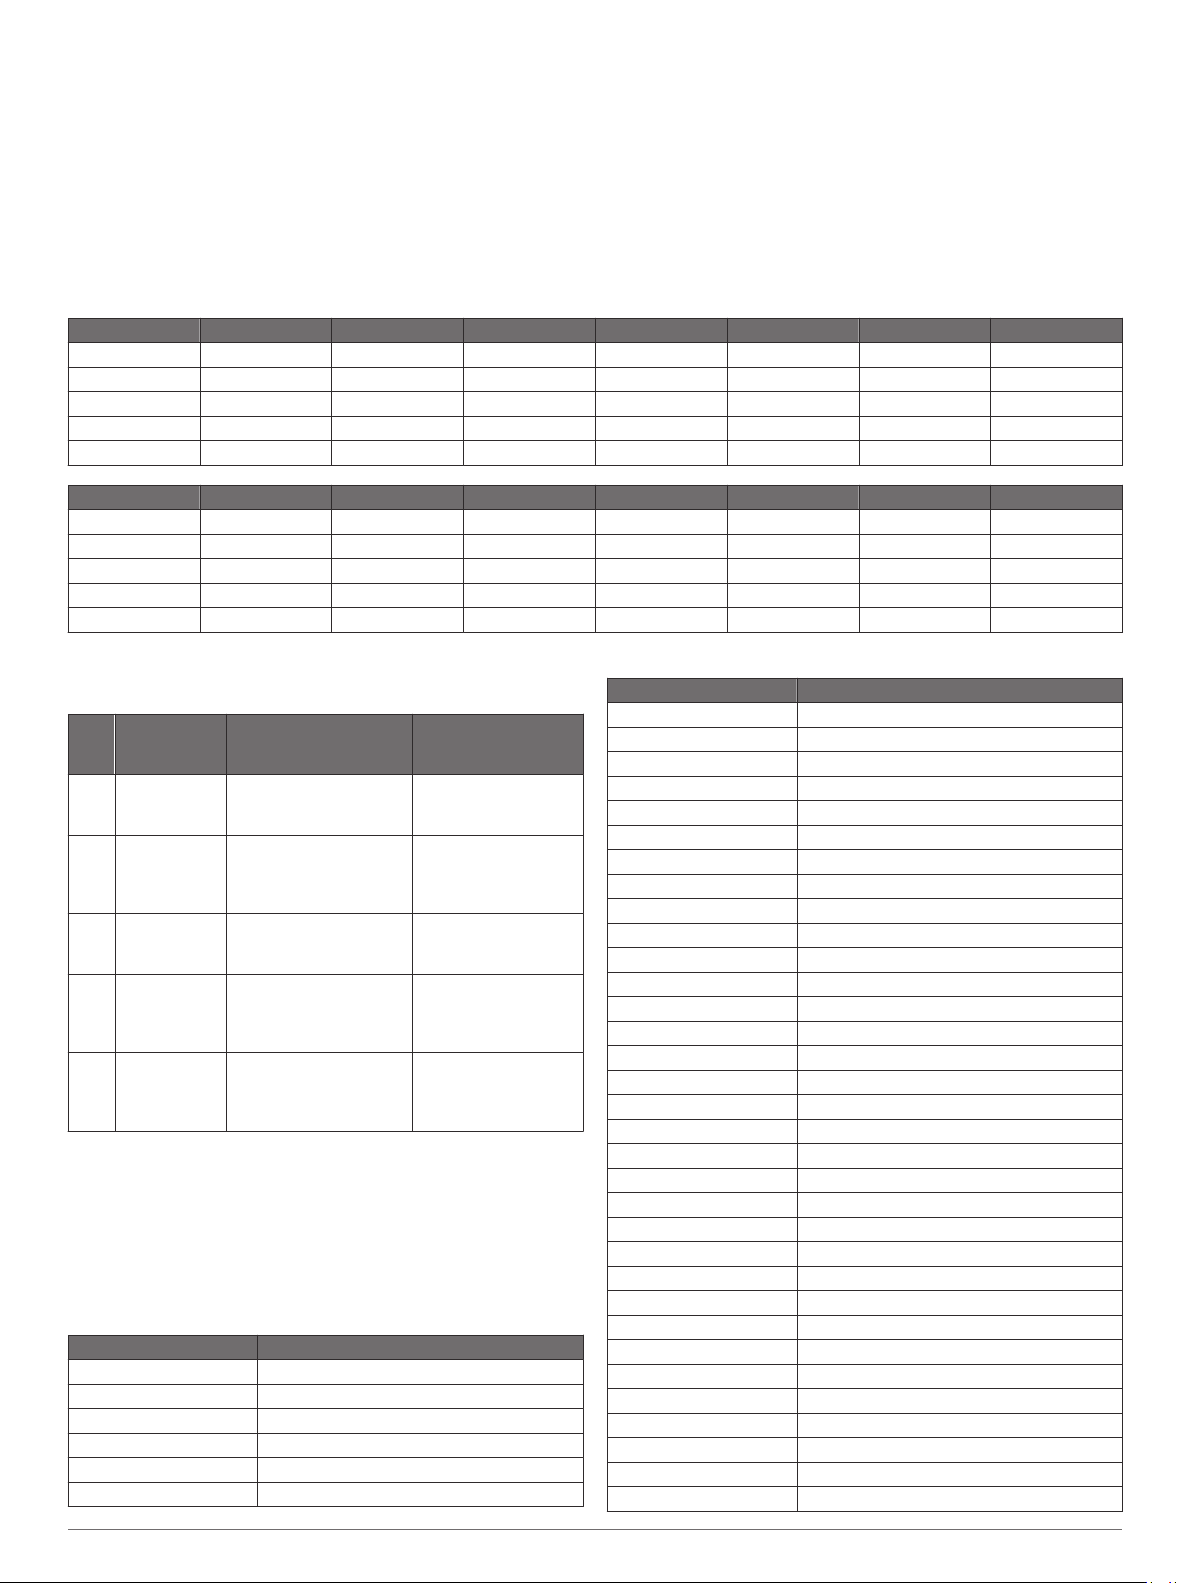
VO2 Max. Standard Ratings
These tables include standardized classifications for VO2 max. estimates by age and gender.
Males Percentile 20–29 30–39 40–49 50–59 60–69 70–79
Superior 95 55.4 54 52.5 48.9 45.7 42.1
Excellent 80 51.1 48.3 46.4 43.4 39.5 36.7
Good 60 45.4 44 42.4 39.2 35.5 32.3
Fair 40 41.7 40.5 38.5 35.6 32.3 29.4
Poor 0–40 <41.7 <40.5 <38.5 <35.6 <32.3 <29.4
Females Percentile 20–29 30–39 40–49 50–59 60–69 70–79
Superior 95 49.6 47.4 45.3 41.1 37.8 36.7
Excellent 80 43.9 42.4 39.7 36.7 33 30.9
Good 60 39.5 37.8 36.3 33 30 28.1
Fair 40 36.1 34.4 33 30.1 27.5 25.9
Poor 0–40 <36.1 <34.4 <33 <30.1 <27.5 <25.9
Data reprinted with permission from The Cooper Institute. For more information, go to www.CooperInstitute.org.
Heart Rate Zone Calculations
Zone % of
Maximum
Heart Rate
1 50–60% Relaxed, easy pace,
2 60–70% Comfortable pace,
3 70–80% Moderate pace, more
4 80–90% Fast pace and a bit
5 90–100% Sprinting pace,
Perceived Exertion Benefits
rhythmic breathing
slightly deeper
breathing, conversation
possible
difficult to hold
conversation
uncomfortable, breathing
forceful
unsustainable for long
period of time, labored
breathing
Beginning-level
aerobic training,
reduces stress
Basic cardiovascular
training, good
recovery pace
Improved aerobic
capacity, optimal
cardiovascular training
Improved anaerobic
capacity and
threshold, improved
speed
Anaerobic and
muscular endurance,
increased power
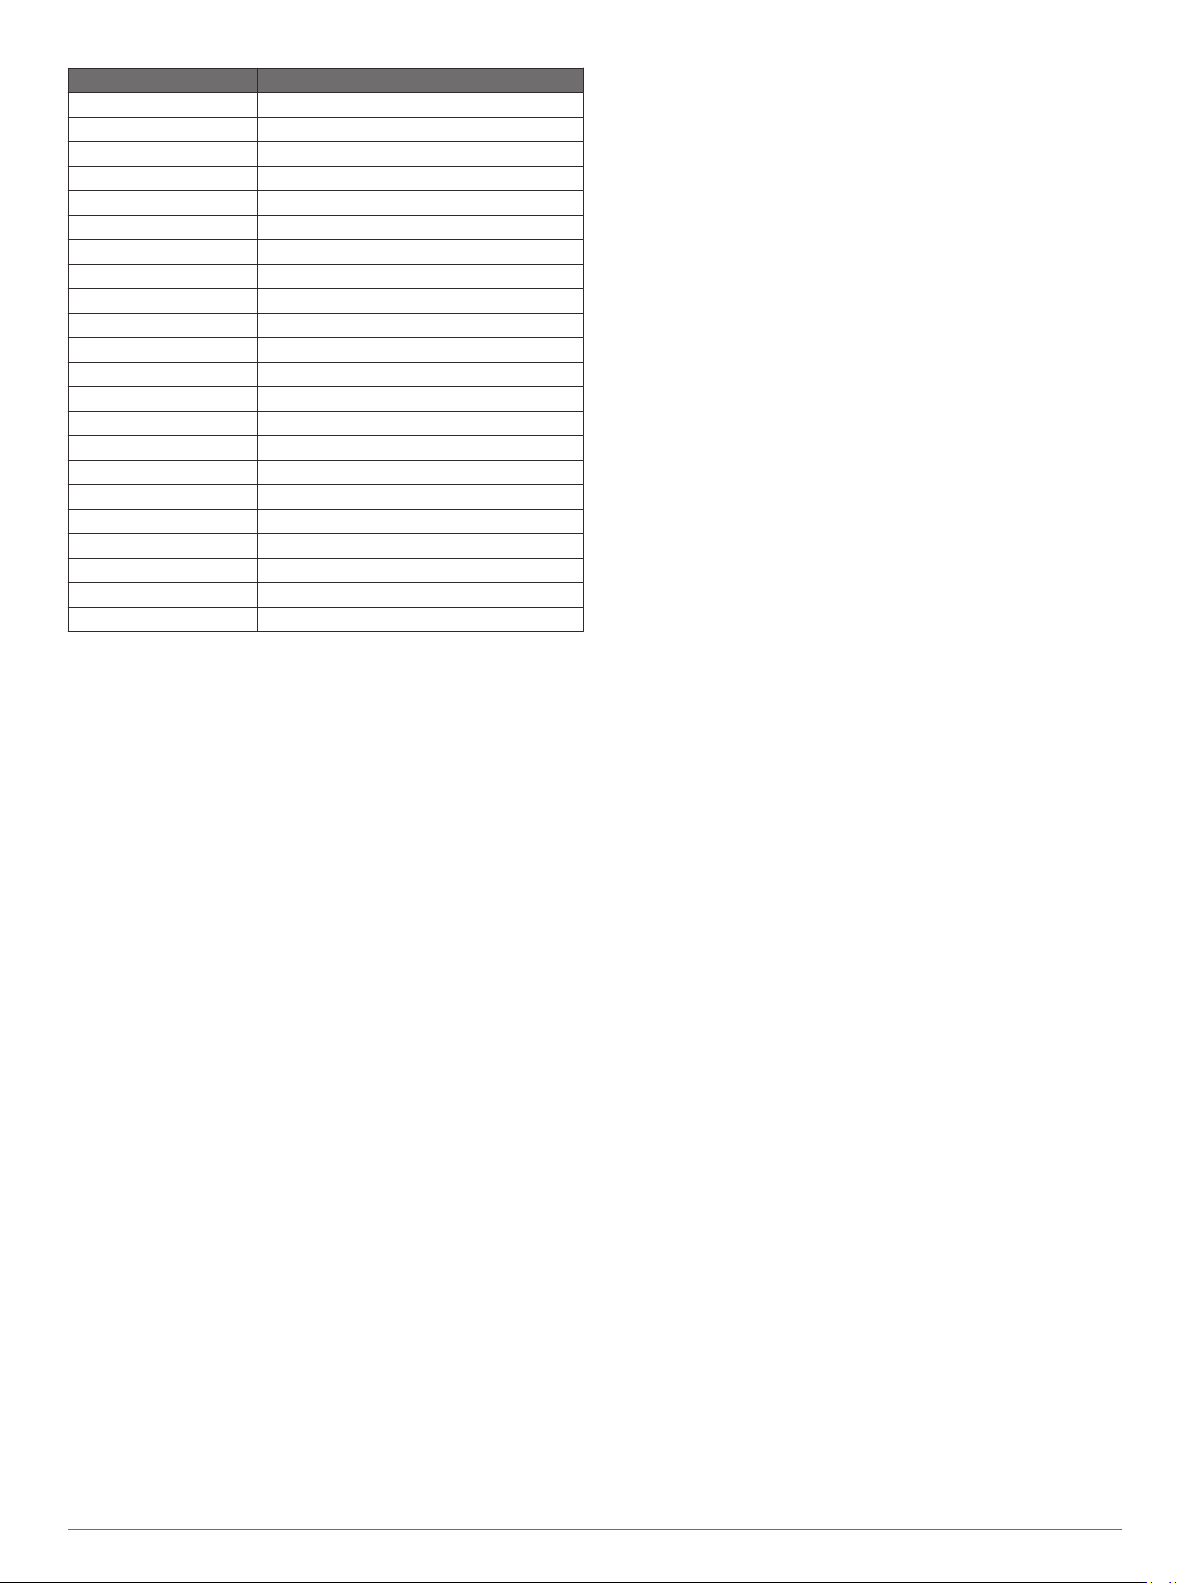
Wheel Size and Circumference
Your speed sensor automatically detects your wheel size. If
necessary, you can manually enter your wheel circumference in
the speed sensor settings.
The tire size is marked on both sides of the tire. This is not a
comprehensive list. You can also measure the circumference of
your wheel or use one of the calculators available on the
internet.
Tire Size Wheel Circumference (mm)
12 × 1.75 935
14 × 1.5 1020
14 × 1.75 1055
16 × 1.5 1185
16 × 1.75 1195
18 × 1.5 1340
Tire Size Wheel Circumference (mm)
18 × 1.75 1350
20 × 1.75 1515
20 × 1-3/8 1615
22 × 1-3/8 1770
22 × 1-1/2 1785
24 × 1 1753
24 × 3/4 Tubular 1785
24 × 1-1/8 1795
24 × 1.75 1890
24 × 1-1/4 1905
24 × 2.00 1925
24 × 2.125 1965
26 × 7/8 1920
26 × 1(59) 1913
26 × 1(65) 1952
26 × 1.25 1953
26 × 1-1/8 1970
26 × 1.40 2005
26 × 1.50 2010
26 × 1.75 2023
26 × 1.95 2050
26 × 2.00 2055
26 × 1-3/8 2068
26 × 2.10 2068
26 × 2.125 2070
26 × 2.35 2083
26 × 1-1/2 2100
26 × 3.00 2170
27 × 1 2145
27 × 1-1/8 2155
27 × 1-1/4 2161
27 × 1-3/8 2169
29 x 2.1 2288
Appendix 13
Page 18
Tire Size Wheel Circumference (mm)
29 x 2.2 2298
29 x 2.3 2326
650 × 35A 2090
650 × 38A 2125
650 × 38B 2105
650 x 20C 1938
650 x 23C 1944
700 × 18C 2070
700 × 19C 2080
700 × 20C 2086
700 × 23C 2096
700 × 25C 2105
700C Tubular 2130
700 × 28C 2136
700 × 30C 2146
700 × 32C 2155
700 × 35C 2168
700 × 38C 2180
700 × 40C 2200
700 × 44C 2235
700 × 45C 2242
700 × 47C 2268
14 Appendix
Page 19

Index
A
accessories 6, 8, 12
activities, starting 2
alerts
10
ANT+ sensors 4, 6, 8
pairing 8
power meters 8
applications 5
smartphone 1
assistance 6
Auto Lap 4
Auto Pause 4
Auto Scroll 4
B
back to start
backlight 2
bands 12
battery
charging 1
maximizing 9, 11
replacing 11
type
bike sensors 8
Bluetooth sensors 4, 6
Bluetooth technology 1, 5, 10
C
cadence 7
calibrating, power meter
calorie, alerts 10
cleaning the device 11
clearing data 11
computer, connecting 9
Connect IQ
courses 3, 4
deleting 4
loading 3
customizing the device 5
cycling 8
D
data
sharing 10
storing
transferring 5, 9
data fields 4, 6, 12
deleting, all user data 9
device
care
resetting
distance, alerts 10
E
emergency contacts 6
F
files, transferring 9
G
Garmin Connect 1, 3, 5, 6, 12
Garmin Express, updating software 12
GLONASS
GPS 1, 4, 10
signal 2, 11
H
heart rate 1, 4
monitor 4, 7, 8, 11
zones 7, 13
history 2, 4, 8, 9, 11
deleting 9
sending to computer 5
viewing 8
I
icons 1, 5
incident detection 6
indoor training 4
5
2
8
6
5
10
11
10
installing 1, 6
K
keys
1
L
language 9, 12
laps 1, 4
locations 4, 5
categories 5
deleting 5
finding with the map 5
map options 5
saving 4
searching for 5
sending 6
M
maps 4, 5
mounting the device 1
N
navigation 4, 5
back to start
5
O
O-rings. See bands
P
pairing
ANT+ sensors
smartphone 1
pedals 8
personal records 4
deleting 4
power 8
power (force), meters 7, 8
profiles, user 4
8
R
recovery 7
remote display 10
replacing the battery 11
resetting the device 11
ride options 2
S
satellite signals 2, 11
saving activities 2
segments 2, 3
deleting 3
settings 1, 9–11
device 9
sharing data 10
smartphone 5, 6, 10
pairing 1
software, updating 12
specifications 10
speed and cadence sensors 1, 6, 7, 11
storing data 5, 9
system settings
9
T
time, alerts 10
timer 1, 2, 8
tones
9
training 2
plans 2
troubleshooting 7, 11, 12
U
units of measure
updates, software 9, 12
USB
12
disconnecting 9
user data, deleting 9
user profile 4
9
V
VO2 max. 7, 8, 13
W
wheel sizes 13
widgets 2
Index 15
Page 20
 Loading...