

Page 1
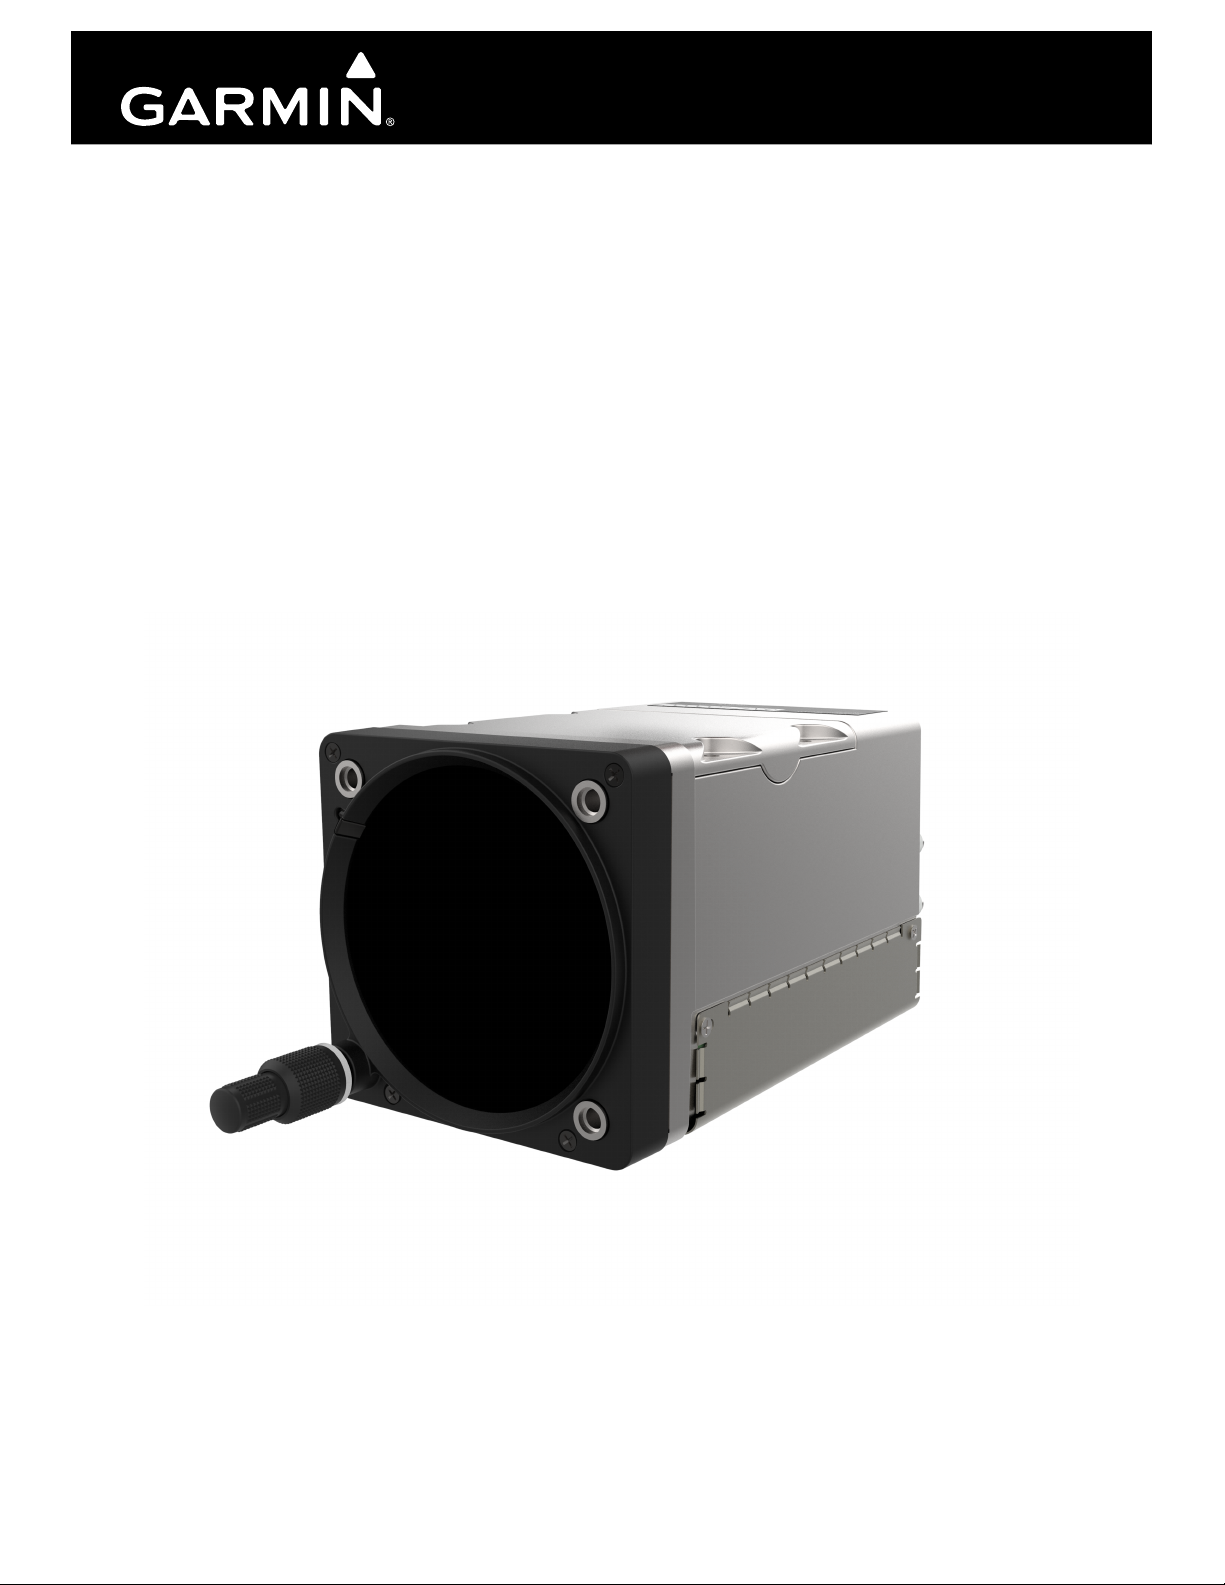
GI 275
Multi-Function Instrument
Installation Manual
190-02246-00 November, 2019 Revision 1
Page 2
© 2019
Garmin Ltd. or its subsidiaries
All Rights Reserved
Except as expressly provided herein, no part of this manual may be reproduced, copied,
transmitted, disseminated, downloaded or stored in any storage medium, for any purpose without
the express prior written consent of Garmin. Garmin hereby grants permission to download a single
copy of this manual and of any revision to this manual onto a hard drive or other electronic storage
medium to be viewed and to print one copy of this manual or of any revision hereto, provided that
such electronic or printed copy of this manual or revision must contain the complete text of this
copyright notice and provided further that any unauthorized commercial distribution of this manual
or any revision hereto is strictly prohibited.
Garmin International, Inc.
1200 E. 151st Street
Olathe, KS 66062 USA
Garmin (Europe) Ltd.
Liberty House, Hounsdown Business Park
Southampton, Hampshire SO40 9LR U.K.
Garmin aviation support and warranty information is available at garmin.com/aviationwarranty.
Revision
1 11/06/19 Initial release
Revision
Date
RECORD OF REVISIONS
Description
190-02246-00 GI 275 Installation Manual
Rev. 1 Page A
Page 3
INFORMATION SUBJECT TO EXPORT CONTROL LAWS
This document may contain information which is subject to the Export Administration Regulations
("EAR") issued by the United States Department of Commerce (15 CFR, Chapter VII, Subchapter C) and
which may not be exported, released, or disclosed to foreign nationals inside or outside of the United States
without first obtaining an export license. The preceding statement is required to be included on any and all
reproductions in whole or in part of this manual.
CURRENT REVISION DESCRIPTION
Revision
1 All All Initial release
Page
Number(s)
DEFINITIONS OF WARNINGS, CAUTIONS, AND NOTES
Section
Number
Description of Change
WARNING
This product, its packaging, and its components contain chemicals known to the State of
California to cause cancer, birth defects, or reproductive harm. This Notice is being
provided in accordance with California's Proposition 65. If you have any questions or
would like additional information, please refer to our web site at www.garmin.com/prop65.
WARNING
Perchlorate material – Special handling may apply. Refer to www.dtsc.ca.gov/
hazardouswaste/perchlorate.
WARNING
Failure to properly configure the EIS gauges per the POH/AFM and other approved data
could result in serious injury, damage to equipment, or death.
190-02246-00 GI 275 Installation Manual
Rev. 1 Page i
Page 4
CAUTION
To avoid damage to the GI 275, take precautions to prevent electrostatic discharge (ESD)
when handling the unit, connectors, and associated wiring. ESD damage can be prevented
by touching an object of the same electrical potential as the unit before handling the unit
itself.
CAUTION
The GI 275 lens is coated with a special anti-reflective coating which is very sensitive to
skin oils, waxes and abrasive cleaners. CLEANERS CONTAINING AMMONIA WILL
HARM THE ANTI-REFLECTIVE COATING. It is very important to clean the lens using a
clean, lint-free cloth and an eyeglass lens cleaner that is specified as safe for antireflective coatings.
NOTE
All screen shots used in this document are current at the time of publication. Screen shots
are intended to provide visual reference only. All information depicted in screen shots,
including software file names, versions, and part numbers, is subject to change and may
not be up to date.
NOTE
The GI 275 has a plastic film on the display glass to protect from scratches during
shipping and installation. The film should be removed and discarded prior to flight.
NOTE
This device does not contain any user-serviceable parts. Repairs should only be made by
an authorized Garmin service center. The battery pack may be replaced or serviced by a
licensed A&P technician. Unauthorized repairs or modifications could result in
permanent damage to the equipment, and void your warranty and your authority to
operate this device under Part 15 regulations.
190-02246-00 GI 275 Installation Manual
Rev. 1 Page ii
Page 5

SOFTWARE LICENSE AGREEMENT
BY USING THE DEVICE, COMPONENT OR SYSTEM MANUFACTURED OR SOLD BY GARMIN
(“THE GARMIN PRODUCT”), YOU AGREE TO BE BOUND BY THE TERMS AND CONDITIONS
OF THE FOLLOWING SOFTWARE LICENSE AGREEMENT. PLEASE READ THIS AGREEMENT
CAREFULLY. Garmin Ltd. and its subsidiaries (“Garmin”) grants you a limited license to use the
software embedded in the Garmin Product (the “Software”) in binary executable form in the normal
operation of the Garmin Product. Title, ownership rights, and intellectual property rights in and to the
Software remain with Garmin and/or its third-party providers. You acknowledge that the Software is the
property of Garmin and/or its third-party providers and is protected under the United States of America
copyright laws and international copyright treaties. You further acknowledge that the structure,
organization, and code of the Software are valuable trade secrets of Garmin and/or its third-party providers
and that the Software in source code form remains a valuable trade secret of Garmin and/or its third-party
providers. You agree not to reproduce, decompile, disassemble, modify, reverse assemble, reverse
engineer, or reduce to human readable form the Software or any part thereof or create any derivative works
based on the Software. You agree not to export or re-export the Software to any country in violation of the
export control laws of the United States of America.
190-02246-00 GI 275 Installation Manual
Rev. 1 Page iii
Page 6

Skywatch® and Stormscope® are registered trademarks of L-3 Communications. Ryan®, TCAD®, and
Avidyne® are registered trademarks of Avidyne Corporation. AC-U-KWIK® is a registered trademark of
Penton Business Media Inc. Bendix/King® and Honeywell® are registered trademarks of Honeywell
International, Inc.
© 2019 SiriusXM Radio Inc. Sirius, XM and all related marks and logos are trademarks of SiriusXM
Radio Inc. All other marks and logos are property of their respective owners. All rights reserved.
Garmin®, FliteCharts®, and SafeTaxi® are registered trademarks of Garmin International or its
subsidiaries. Connext™, GDU™, GTN™, SVT™, Garmin Pilot™, and Telligence™ are trademarks of
Garmin International or its subsidiaries. These trademarks may not be used without the express permission
of Garmin.
The Bluetooth® word mark and logos are registered trademarks owned by Bluetooth SIG, Inc. and any use
of such marks by Garmin is under license. Other trademarks and trade names are those of their respective
owners.
ChartView™ is a trademark of Jeppesen, Inc.
Windows® is a registered trademark of Microsoft Corporation in the United States and other countries.
© 2019 SD® is a registered trademark of SD-3C, LLC. All rights reserved.
Iridium® is a registered trademark of Iridium Communications, Inc. All rights reserved.
The term Wi-Fi® is a registered trademark of the Wi-Fi Alliance®.
All other product or company names mentioned in this manual are trade names, trademarks, or registered
trademarks of their respective owners.
AOPA Membership Publications, Inc. and its related organizations (hereinafter collectively “AOPA”)
expressly disclaim all warranties, with respect to the AOPA information included in this data, express or
implied, including, but not limited to, the implied warranties of merchantability and fitness for a particular
purpose. The information is provided “as is” and AOPA does not warrant or make any representations
regarding its accuracy, reliability, or otherwise. Under no circumstances including negligence, shall AOPA
be liable for any incidental, special or consequential damages that result from the use or inability to use the
software or related documentation, even if AOPA or an AOPA authorized representative has been advised
of the possibility of such damages. User agrees not to sue AOPA and, to the maximum extent allowed by
law, to release and hold harmless AOPA from any causes of action, claims or losses related to any actual or
alleged inaccuracies in the information. Some jurisdictions do not allow the limitation or exclusion of
implied warranties or liability for incidental or consequential damages so the above limitations or
exclusions may not apply to you.
190-02246-00 GI 275 Installation Manual
Rev. 1 Page iv
Page 7

NOTE
Access to additional operation, installation and safety information can
be obtained at www.garmin.com.
Users should obtain the most recent copy of the product manuals prior
to equipment, configuration, installation and/or use.
Page 8
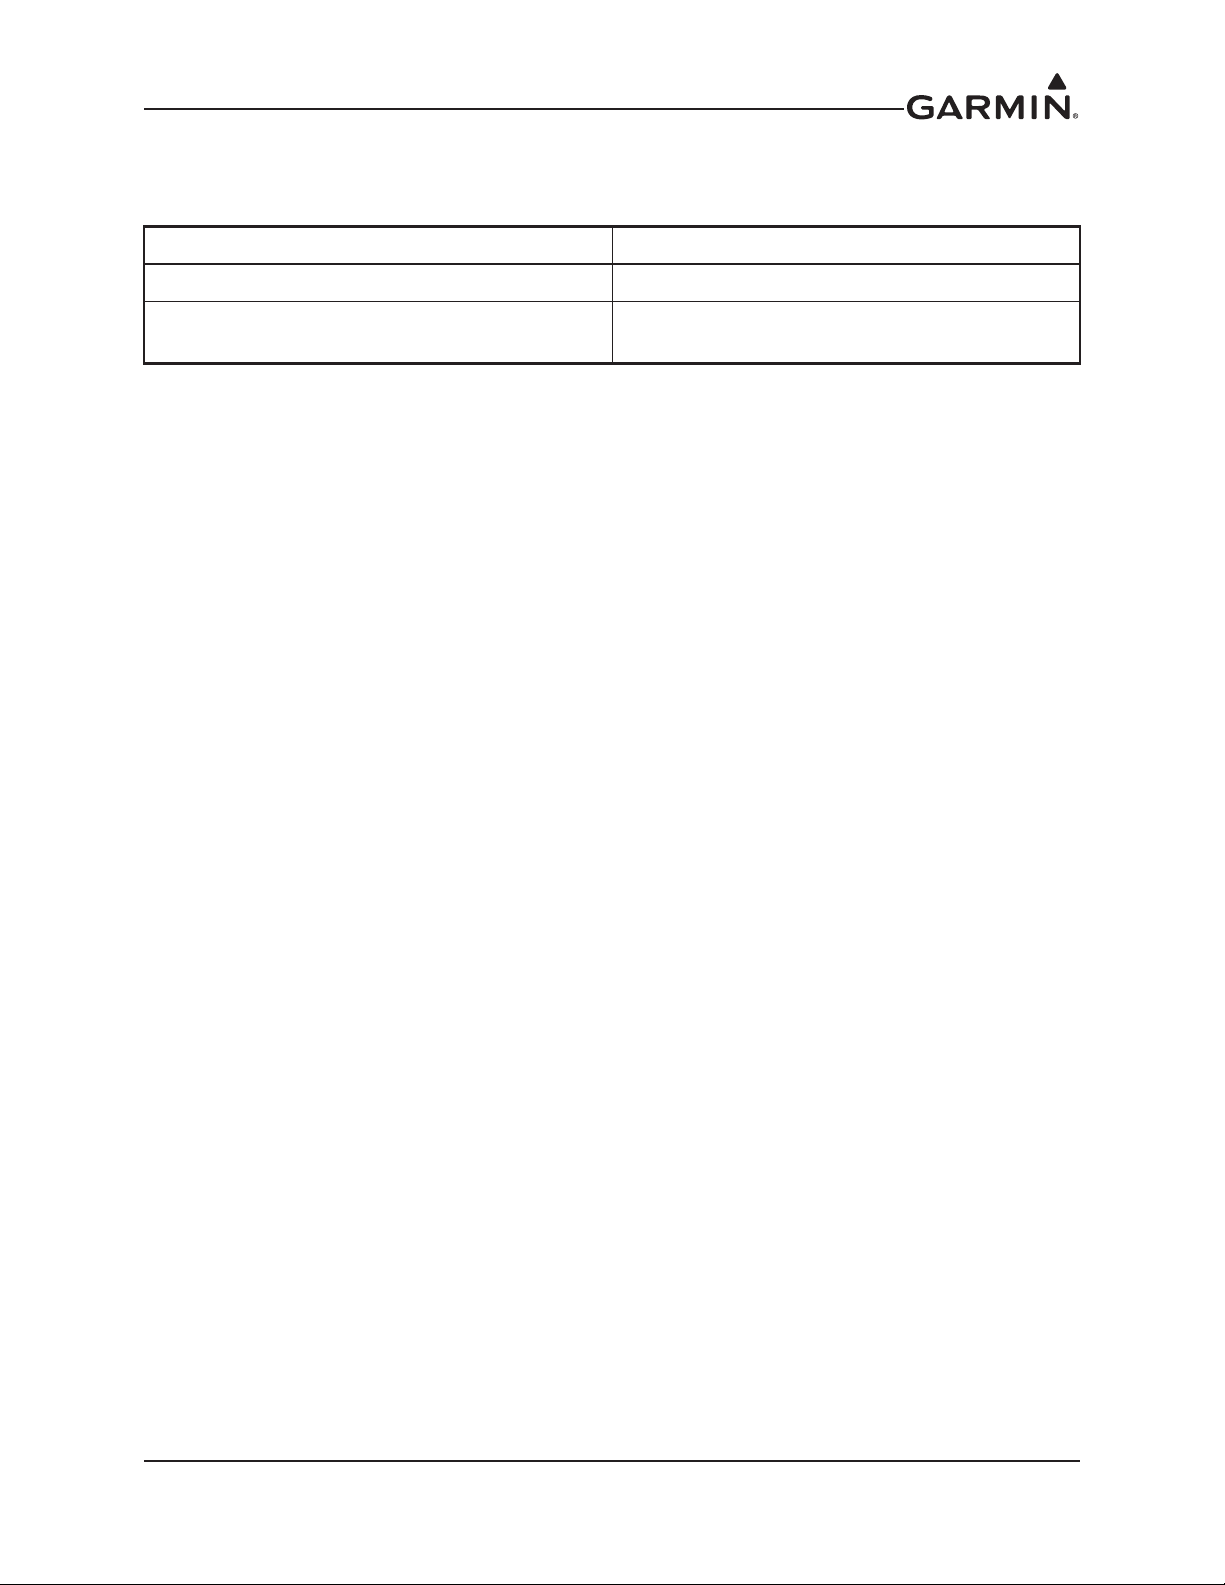
7UDQVPLWWHU *UDQW RI (TXLSPHQW $XWKRUL]DWLRQ
7DEOH (TXLSPHQW $XWKRUL]DWLRQ
&RXQWU\ 7HOHFRPPXQLFDWLRQV $XWKRULW\ $XWKRUL]DWLRQ
8QLWHG 6WDWH )&& )&& ,' ,3+
&DQDGD ,6('
,& $
,& 01 *01
7KLV GHYLFH FRPSOLHV ZLWK SDUW RI WKH )&& 5XOHV 2SHUDWLRQ LV VXEMHFW WR WKH IROORZLQJ WZR FRQGLWLRQV
7KLV GHYLFH PD\ QRW FDXVH KDUPIXO LQWHUIHUHQFH DQG WKLV GHYLFH PXVW DFFHSW DQ\ LQWHUIHUHQFH
UHFHLYHG LQFOXGLQJ LQWHUIHUHQFH WKDW PD\ FDXVH XQGHVLUHG RSHUDWLRQ
,QQRYDWLRQ 6FLHQFH DQG (FRQRPLF 'HYHORSPHQW &DQDGD &RPSOLDQFH
7KLV GHYLFH FRPSOLHV ZLWK ,QQRYDWLRQ 6FLHQFH DQG (FRQRPLF 'HYHORSPHQW &DQDGD OLFHQVHH[HPSW 566
VWDQGDUGV 2SHUDWLRQ LV VXEMHFW WR WKH IROORZLQJ WZR FRQGLWLRQV WKLV GHYLFH PD\ QRW FDXVH
LQWHUIHUHQFH DQG WKLV GHYLFH PXVW DFFHSW DQ\ LQWHUIHUHQFH LQFOXGLQJ LQWHUIHUHQFH WKDW PD\ FDXVH
XQGHVLUHG RSHUDWLRQ RI WKH GHYLFH
&HW DSSDUHLO HVW FRQIRUPH DX[ QRUPHV 566 VDQV OLFHQFH GX PLQLVWqUH ,QQRYDWLRQ 6FLHQFHV HW
'pYHORSSHPHQW pFRQRPLTXH &DQDGD 6RQ IRQFWLRQQHPHQW HVW VRXPLV DX[ GHX[ FRQGLWLRQV VXLYDQWHV FH
SpULSKpULTXH QH GRLW SDV FDXVHU GLQWHUIpUHQFHV HW GRLW DFFHSWHU WRXWH LQWHUIpUHQFH \ FRPSULV OHV
LQWHUIpUHQFHV SRXYDQW HQWUDvQHU XQ IRQFWLRQQHPHQW LQGpVLUDEOH GH ODSSDUHLO
5) ([SRVXUH &RPSOLDQFH 6WDWHPHQW
7KLV HTXLSPHQW FRPSOLHV ZLWK )&& UDGLDWLRQ H[SRVXUH OLPLWV VHW IRUWK IRU DQ XQFRQWUROOHG HQYLURQPHQW
7KLV HTXLSPHQW VKRXOG EH LQVWDOOHG DQG RSHUDWHG ZLWK PLQLPXP GLVWDQFH FP EHWZHHQ WKH UDGLDWRU DQG
\RXU ERG\ 7KLV WUDQVPLWWHU PXVW QRW EH FRORFDWHG RU RSHUDWLQJ LQ FRQMXQFWLRQ ZLWK DQ\ RWKHU DQWHQQD RU
WUDQVPLWWHU
&HW DSSDUHLO HVW FRQIRUPH j OD UpJOHPHQWDWLRQ )&& UHODWLYH DX[ OLPLWHV GH[SRVLWLRQ DX[ UDGLDWLRQV
DSSOLFDEOHV HQ HQYLURQQHPHQW QRQ FRQWU{Op &HW DSSDUHLO GRLW rWUH LQVWDOOp HW XWLOLVp j XQH GLVWDQFH PLQLPDOH
GH FP HQWUH OH UDGLDWHXU HW OH FRUSV &HW pPHWWHXU QH GRLW SDV rWUH SODFp RX XWLOLVp HQ FRQMRQFWLRQ DYHF
GDXWUHV DQWHQQHV RX pPHWWHXUV
*, ,QVWDOODWLRQ 0DQXDO
Page 9

NOTE
Access to additional operation, installation and safety information can
be obtained at www.garmin.com.
Users should obtain the most recent copy of the product manuals prior
to equipment, configuration, installation and/or use.
Page 10
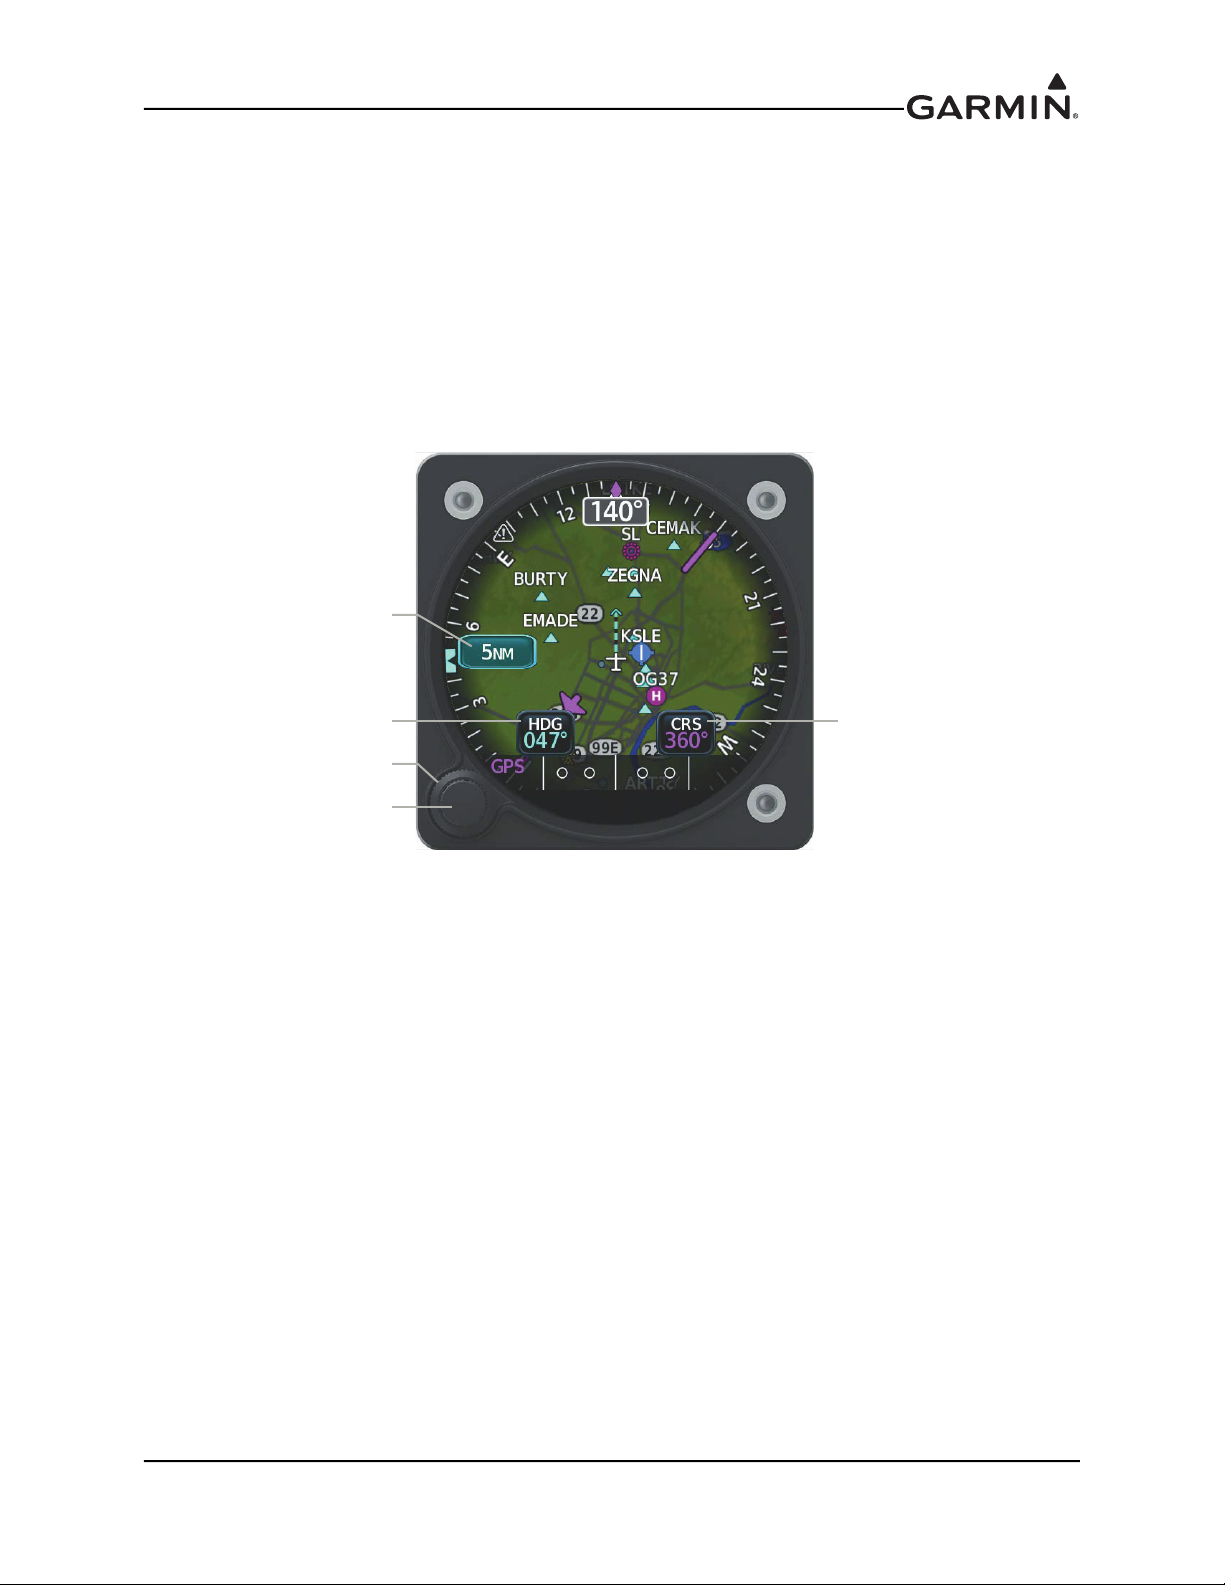
1.7 Operating Instructions
Outer
Knob
Inner
Knob
Range
Button
(Active)
HDG
Button
CRS
Button
This section contains generic operating instructions for TSO purposes only and is not to be used in place of
field operating instructions. Upon system power up, the absence of system messages indicates that the
GI 275 is fully operational.
For detailed operating instructions, please refer to the GI 275 Pilot’s Guide, Part Number 190-02246-01.
1.7.1 Controls
The GI 275 features a 2.69" circular capacitive touchscreen and an Outer and Inner Knob in the lower left
corner. The Inner Knob can be pushed. All operations are done with the Knobs or touchscreen. The touchscreen
can be operated with bare fingers or gloves made for capacitive touchscreens.
Figure 1-2 GI 275 Controls (HSI Map Page)
190-02246-00 GI 275 Installation Manual
Rev. 1 Page 1-26
Page 11
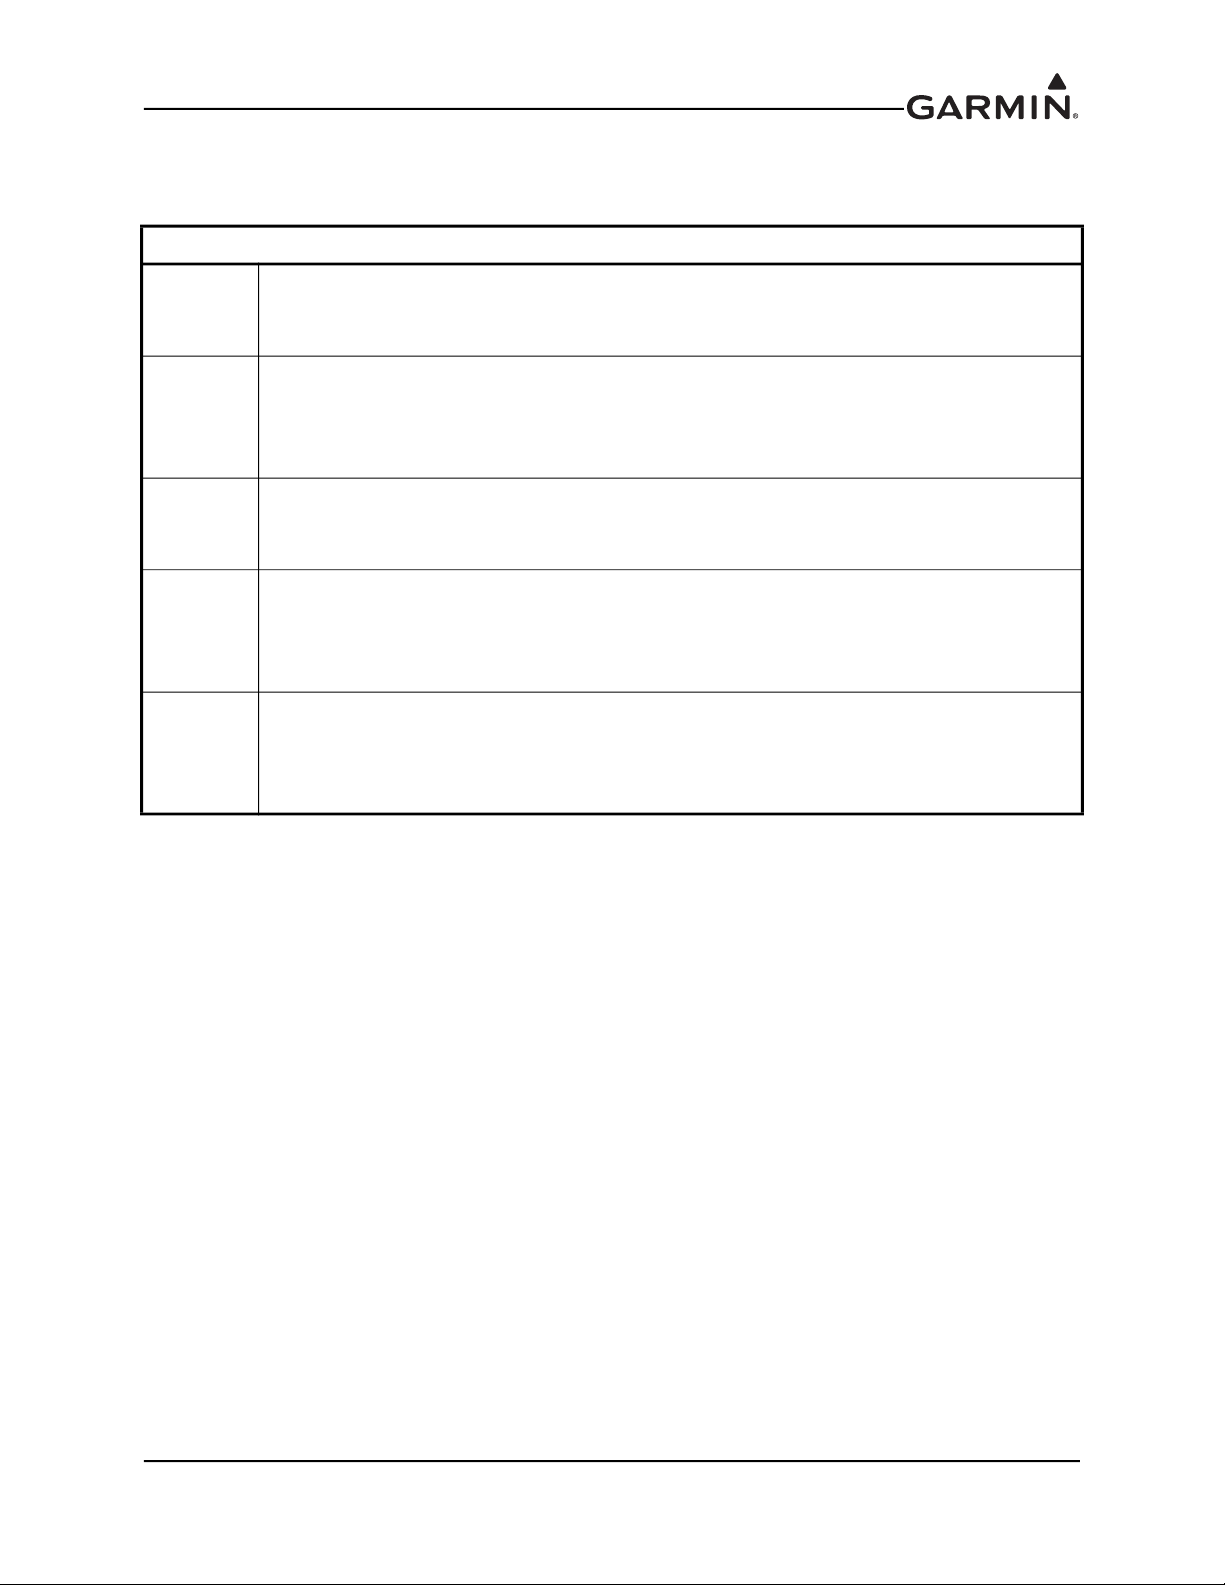
1.7.2 Touchscreen
Touch is touching the screen briefly with a single finger.
Touch
Touch
and Hold
Swipe
Scroll
Pinch &
Stretch
A touch can select a menu, activate a command key or data entry field, display map feature
information, or select a button.
Certain momentary controls (e.g., directional arrow keys, CRS Button, HDG Button)
provide a secondary touch and hold function.
Touch key and hold finger in place. Lift up once the desired action occurs.
Use this gesture for scrolling and increasing/decreasing values continuously.
Touch object with finger, slide finger across screen, then lift up.
A swipe is a smooth motion used for viewing and scrolling lists, panning across a map, or
opening the menu.
This is similar to a swipe, except the finger leaves the screen after a quick upward or
downward motion.
Screen information moves at a fast speed, then slows down as it stops.
Scrolls through an item list faster than by pressing the scroll arrow buttons.
Touch any map or chart with two fingers at the same time. Then, bring fingers together
(pinch) or apart (stretch).
Stretch to zoom in and pinch to zoom out.
Use these gestures to magnify map features or identify multiple objects in close proximity.
Table 1-31 Touchscreen Gestures
Gestures
190-02246-00 GI 275 Installation Manual
Rev. 1 Page 1-27
Page 12
1.7.3 Page Navigation
On units not configured as a Primary ADI, a page navigation bar is displayed on the top portion of pages/
indicators when the Outer Knob is adjusted. The text shows the name of the active page, and the circles on
the bottom of the bar indicate where in the list the current page is located. Additionally, a Knob function
legend is displayed.
Changing pages:
Turn the Outer Knob clockwise to navigate to a page on the right or counterclockwise to navigate to a
page on the left. For units with an ADI Page, a rapid Outer Knob counterclockwise turn will
immediately navigate to the ADI Page.
1.7.4 Control Types
Annunciator Buttons
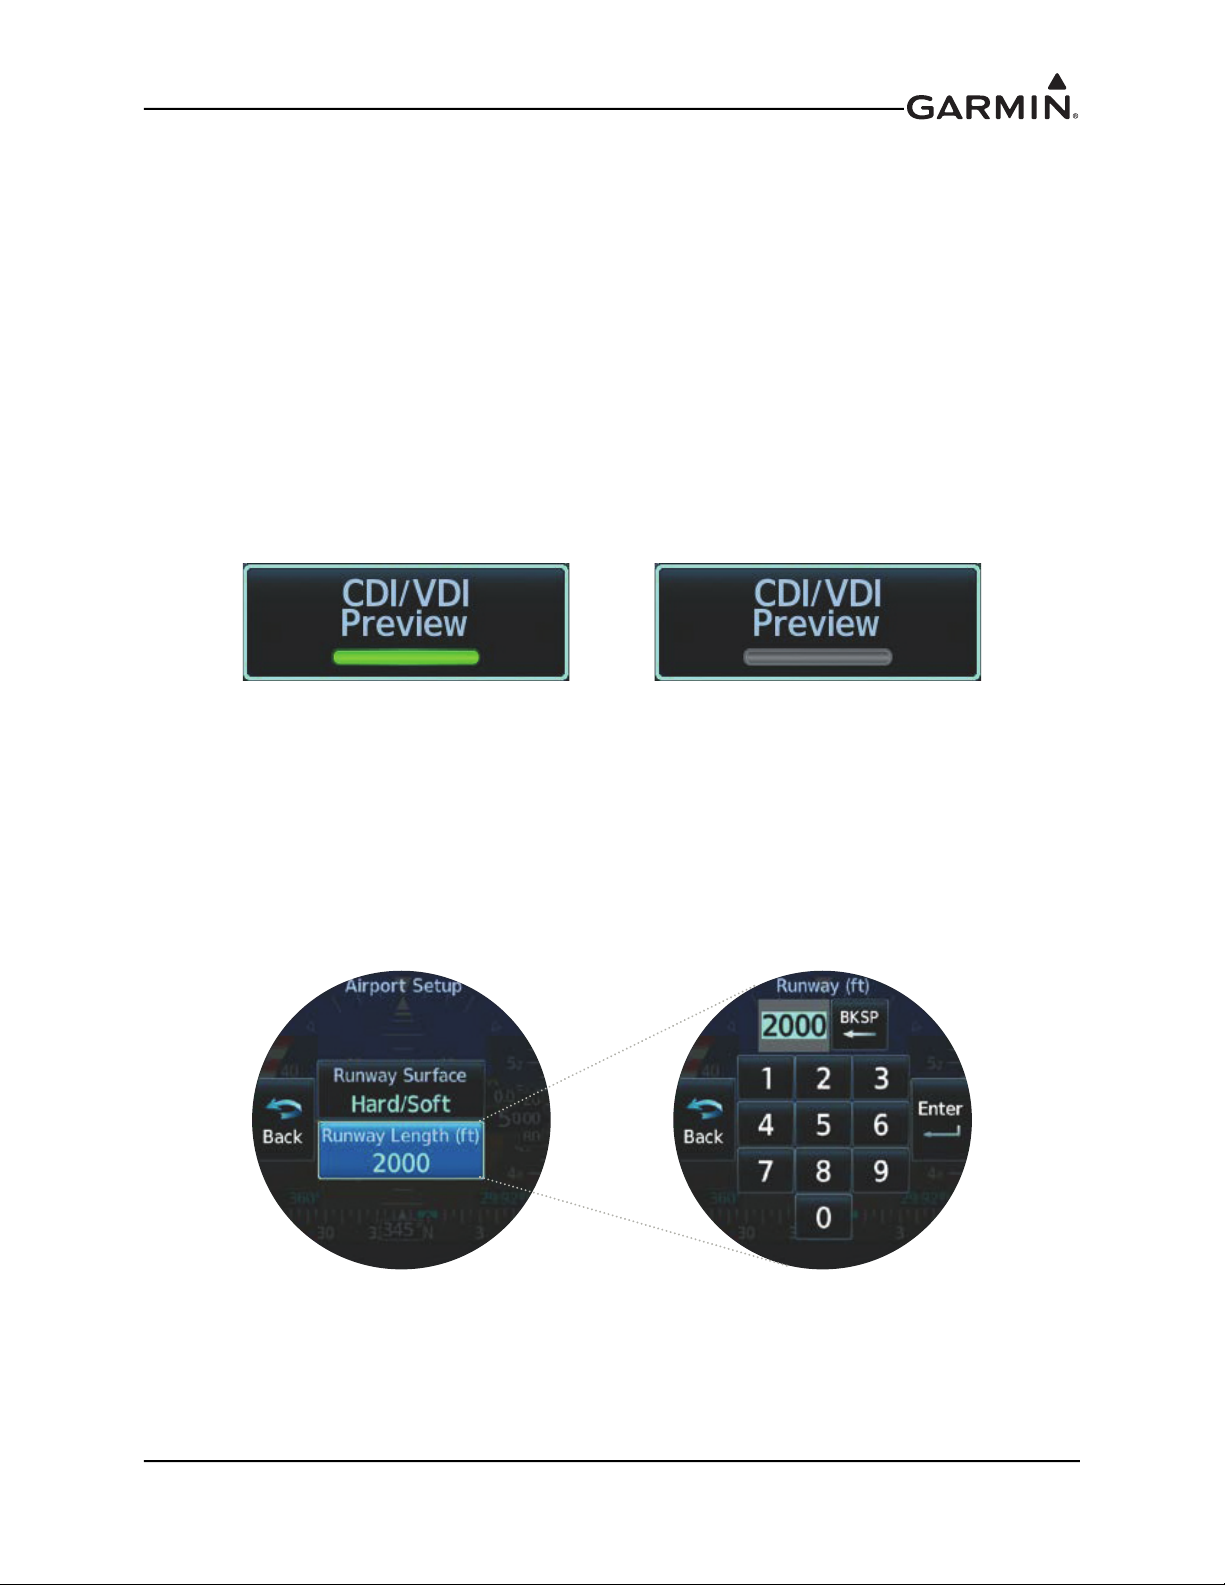
Annunciator buttons operate in an on/off state. An ‘on’ or enabled button displays a green annunciator; an
‘off’ or disabled button displays a gray annunciator. Touch the annunciator button to change its state.
On or Enabled Off or Disabled
Figure 1-3 Annunciator Buttons
Datafield Buttons
Datafield buttons can be modified based on information the pilot can enter or change, and often contain
cyan alphanumeric text. Touching datafield buttons will either display a pop-up window from which a
selection can be made, or display a keypad to supply the data. See the Data Entry discussion in this section
for more information.
Figure 1-4 Datafield Button
190-02246-00 GI 275 Installation Manual
Rev. 1 Page 1-28
Page 13
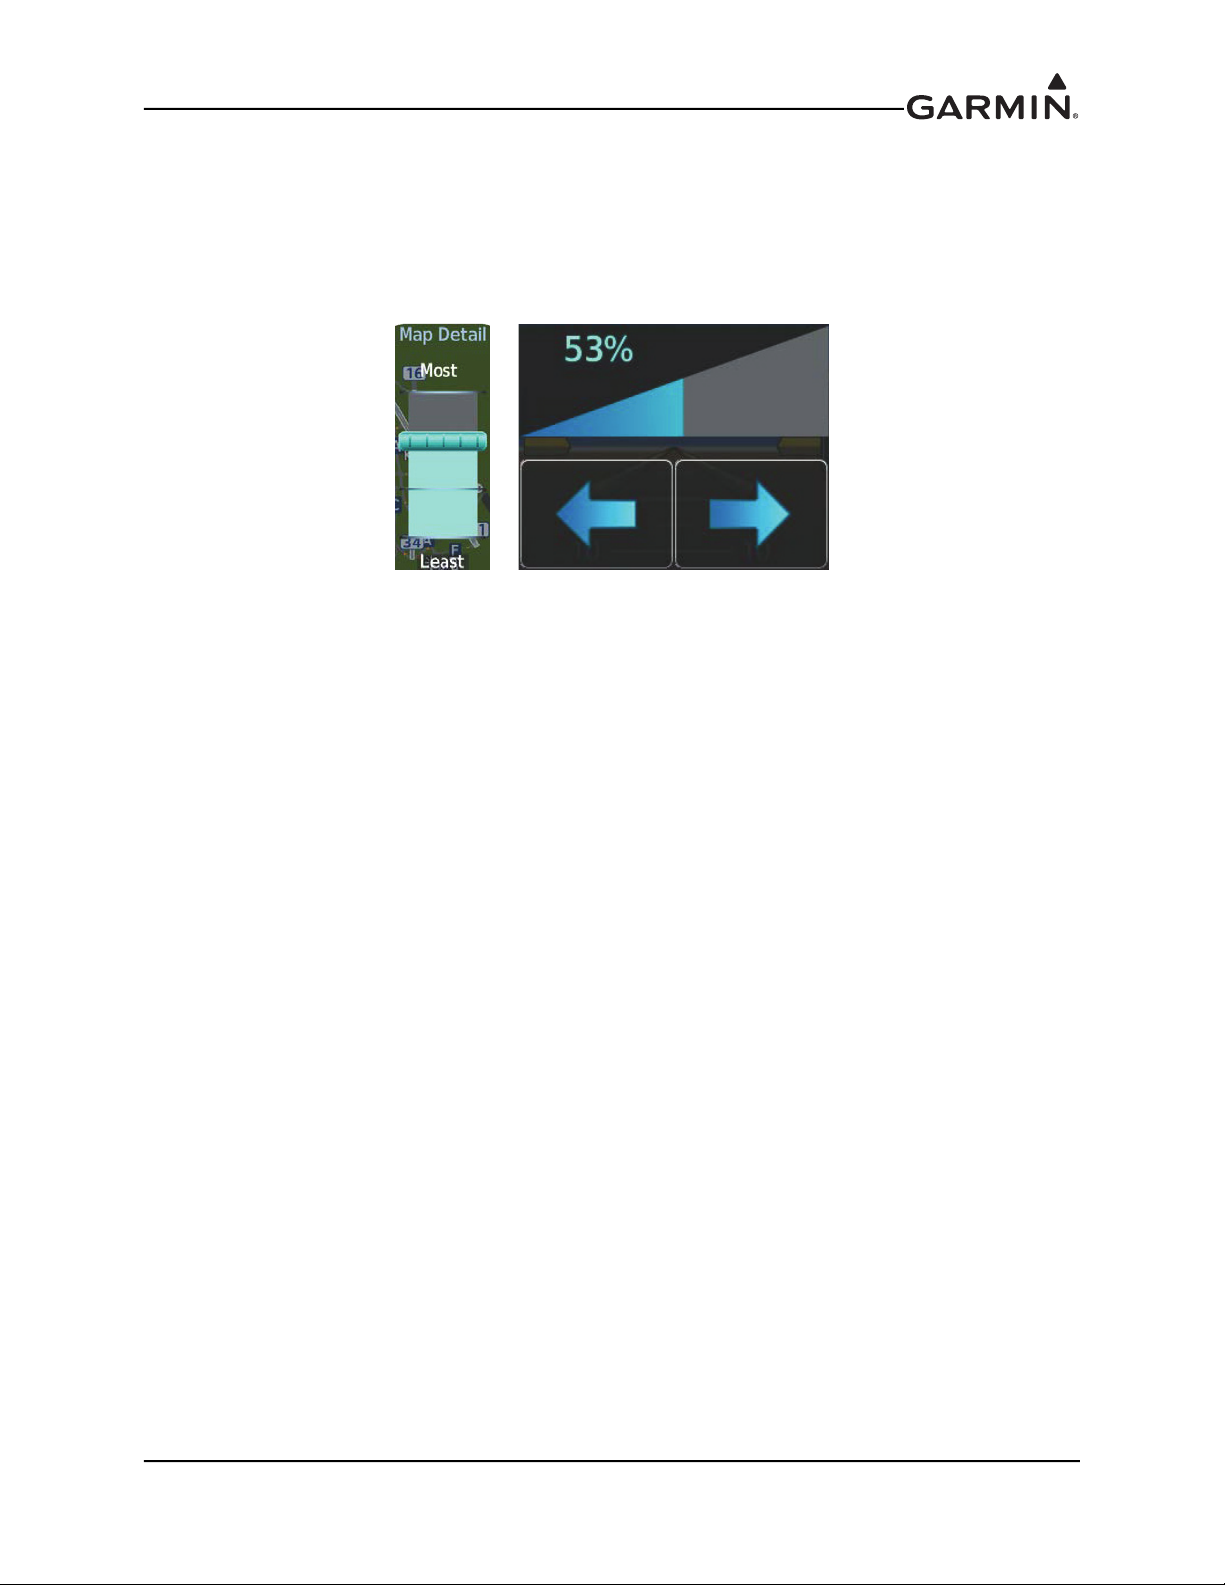
Sliders
Some adjustments are made using horizontal or vertical sliders. To use, touch within the
the finger in the desired slider bar direction, then release the finger; or, turn the Inner Knob. The finger may
move outside of the slider box during adjustment; slider movement stops when either the finger is released or
the slider has reached its maximum travel. Some adjustments can be done using the arrow keys underneath or
next to the slider.
slider box and slide
Figure 1-5 Map Detail and Click Volume Slider
1.7.5 PAGE MENUS
It may be necessary to open menus to access specific features.
Opening the menu:
With any page displayed, swipe up starting at the bottom of the screen.
Or:
With any page displayed, push and hold the Inner Knob.
Closing the menu:
From the menu, repeatedly touch the Back Button until the original page is displayed
Or:
From the menu, touch and hold the Back Button.
Or:
From the menu, push and hold the Inner Knob.
Or:
On ADI, HSI, and EIS units with a half-screen menu, touch the screen anywhere off the menu.
190-02246-00 GI 275 Installation Manual
Rev. 1 Page 1-29
Page 14
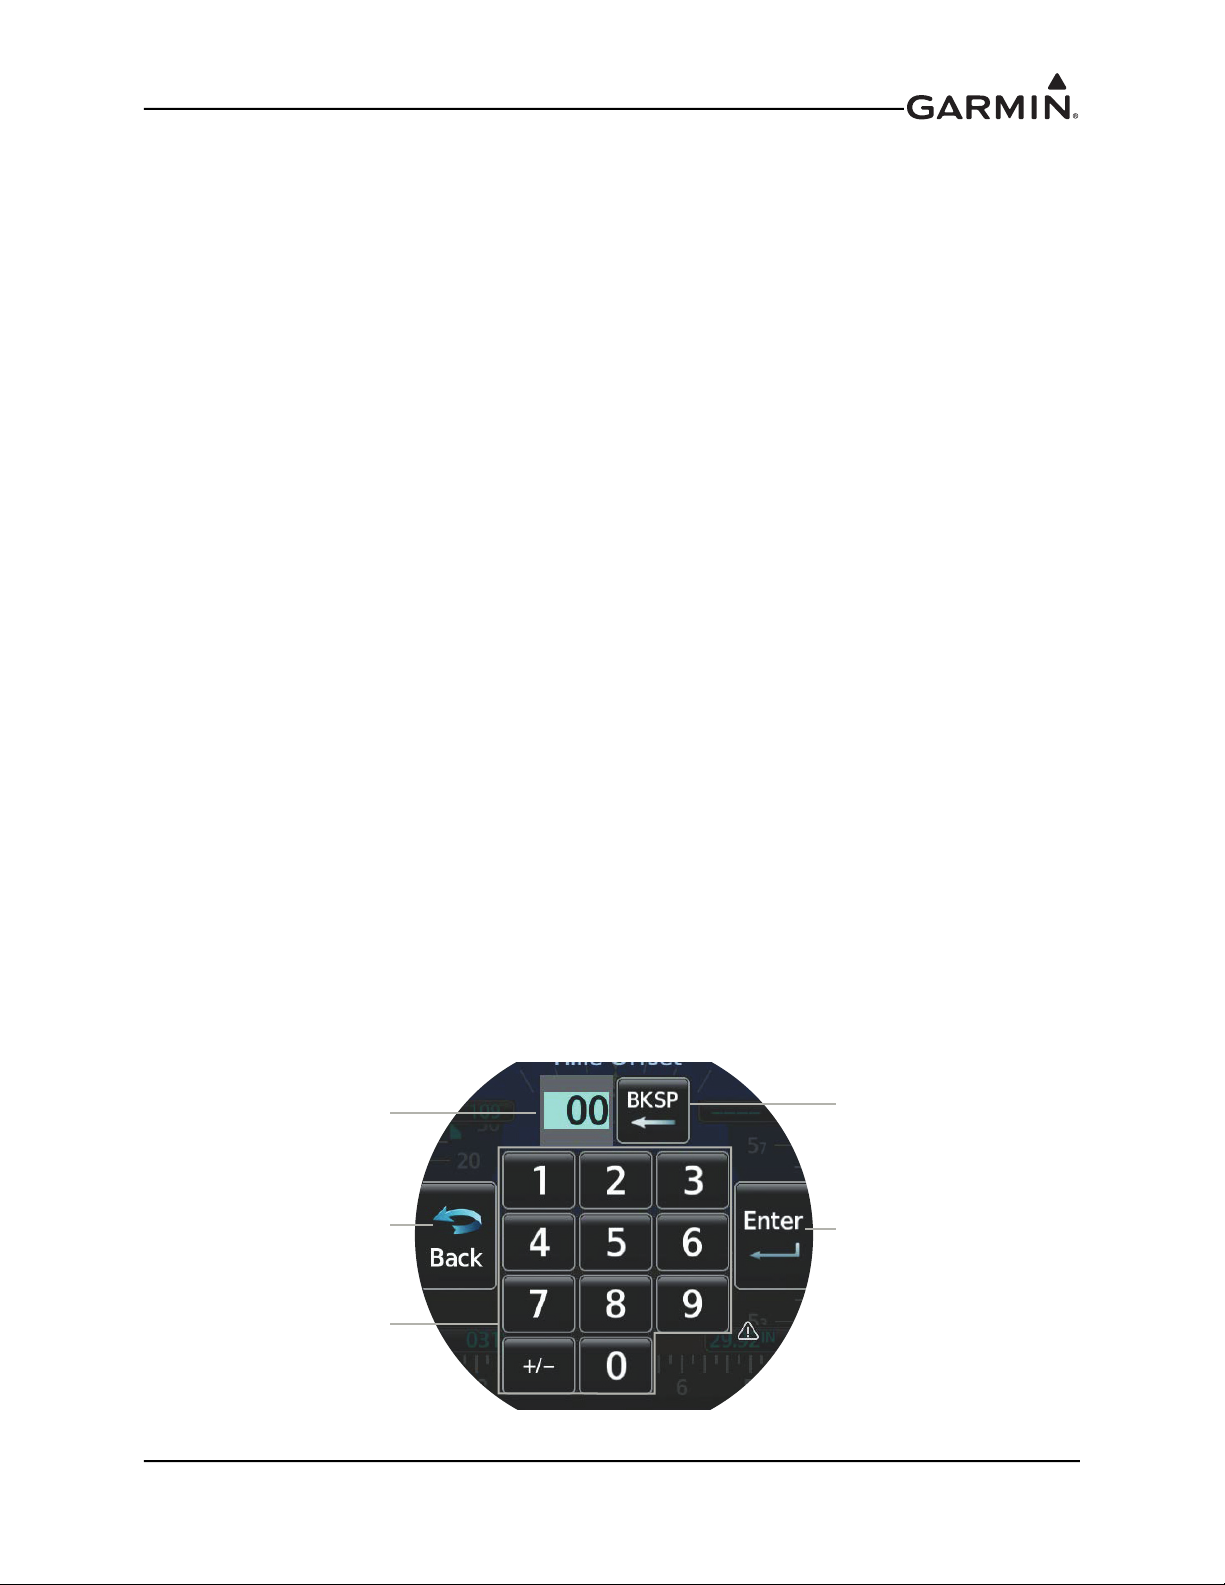
1.7.6 MENU NAVIGATION
Entered
data
Back
Button
Enter
Button
Backspace
Button
Keypad
Various menu items may be located under other menu items. It may be necessary to go through a few
levels of intuitively organized menus to access desired functionality.
Selecting a menu item:
1. From the menu, scroll (up and down on most configurations, side-to-side on units configured as
primary ADI, HSI, or EIS) to find the desired button.
2. Touch the desired button to select or toggle the highlighted item.
Or:
1. Turn the Outer Knob to move the selection highlight and scroll through the menu.
2. Push the Inner Knob to select or toggle the highlighted item.
1.7.7 DATA ENTRY
Data can be entered by using the touchscreen or knobs.
Entering data:
1. Select a Datafield Button. The keypad is displayed.
2. Touch the desired letters and/or numbers.
3. To enter a negative number, first input the positive value. Then, touch the +/- Button to toggle the
negative sign.
4. Touch the Enter Button to save input.
Or:
1. With the keypad displayed, turn the Inner Knob to activate the cursor and enter the first letter and/
or number. Turn the Inner Knob clockwise to increase and counterclockwise to decrease.
2. Turn the Outer Knob to move the cursor to the next character position (if applicable).
3. Repeat steps as necessary.
4. Push the Inner Knob to save input.
Or:
1. Highlight a numerical Datafield with the Outer Knob.
2. Turn the Inner Knob clockwise to increase the numerical value, or counterclockwise to decrease
the numerical value.
Figure 1-6 Data Entry
190-02246-00 GI 275 Installation Manual
Rev. 1 Page 1-30
 Loading...