

Page 1
EDITORIAL NOTES
"This simulator was in development for more than 3 years. It was the serious and
hard work of aviation engineers, designers, programmers and real pilots - the staff
of 1C:Maddox Games. We were in constant contact with the players community
during the development period and tried to implement as many player's suggestions
as possible to try to satisfy all user groups. The work is now finally complete. We
would like to express our thanks to the thousands of players who helped and
supported us during those years. We are also very grateful to all the pilots that were
involved in the long tests of the flight models. Finally, we would like to say many
thanks to our beta testers, who helped us to eliminate any bugs."
Oleg Maddox, Lead Designer of IL-2 Sturmovik.
"I was a pilot at the 'Bundeswehr' and had the opportunity to fly a rebuilt variant of
the ME-109. After testing IL-2 for many hours I have to say that a new generation
of flight simulators is born. IL-2 has the best flight models that I have ever seen in a
flight simulator. It is not only the best, it is very close to the real thing. Also the
graphics and the damage model are amazing...with IL-2 you feel like you are flying
in a real WWII surrounding. I say such words about a flight Simulator for the first
time, IL-2 is really fantastic."
Andreas Preusse, Pilot, Germany.
"It has been an honour for me to be involved in testing this product. I am one of the
few people in the world who realises the amount of effort and dedication that went
into this sim - and I'm nevertheless amazed by the results. I think a combination of
the IL-2 team's engineering knowledge, real-world flying experience, passion for
history and most of all complete devotion to perfection have created something
more than a sum of all the parts. IL-2 takes flight simulators to a whole new level.
It's the first sim that I enjoy flying more than real planes."
Ilya Shevchenko, Private Pilot, USA.
"For me, IL-2 is a very impressive flight simulator. It brings the feeling of aerial
combat very close to real life, as opposed to other sims I've played. It is almost
frightening how real the graphics and the flight models are. I also admire how one
can now experience everything in front of the computer, fr om air combat to bomber
escort. I almost feel like I'm an active fighter pilot with the German Luftwaffe again.
For me, IL-2 represents the most realistic flight simulator ever made, mostly because
of the German fighters and the feeling of air combat."
Georg Adam, Lieutenant in the German Luftwaffe, WWII.
“Every WWII computer flight simulator I've seen or flown has been more game than
simulator. Il-2 is the first one that looks, feels and sounds like the real thing.I've never
seen a flight simulator that made you feel like you were really a ground
attack/fighter pilot till I flew IL-2. Now when my Grandsons ask what I did in WWII
I'll just sit them down in front of the computer and let them see for themselves.”
LT. Chuck Walters. P-47 pilot E.T.O 1943/44
1
Page 2
CONTENTS
EDITORIAL NOTES 1
GENERAL FEATURES 3
INSTALLATION 4
HARDWARE SETTINGS 4
TUTORIAL 14
BEFORE YOU START 40
PILOT ROSTER 41
CONTROLS 42
VIEW OBJECTS 43
PLAY TRACK 44
TRAINING 45
SINGLE PLAYER 45
PILOT CAREER 46
QUICK MISSION BUILDER 63
MULTIPLAY 65
FULL MISSION BUILDER 70
GAME GLOSSARY 81
List of Reference and
Recommended Literature 83
CREDITS 84
SPECIAL THANKS 86
TECHNICAL SUPPORT 87
1 GENERAL FEATURES:
1. Fly 31 types of Russian, German and American aircraft. See them in different
camouflage and paint schemes for different times of the year.
2. Fly as pilot or rear gunner.
3. Choose between realistic and simple flight models with many adjustments to various
realism settings.
4. See 40 other types of aircraft engaged in large-scale air battles (with camouflage paint
schemes changing from summer to winter).
5. Engage in air-to-air and air-to-ground battles.
6. Destroy any ground object, such as buildings, bridges, airfields, etc.
7. Play quick missions using full mission parameter settings.
8. Play different types of single missions.
9. Play campaign missions and track your career (with ranks and awards).
10.Fight against intelligent AI opponents.
11.Play two different multiplayer modes: dog-fighting or cooperative missions across a
LAN or the Internet with dedicated servers for online play.
12.Multiplay: up to 32 players in dogfight and 16 players in cooperative missions. Use
custom paint schemes, squadron nose art, numbering on wings and national
markings for each single plane.
13.Record a flight track of your flights and edit these tracks. Then play and enjoy your track
files or send them to others (the Internet sim community can use these to confirm their
online wins/kills).
14.Use network and Internet voice communications for multiplayer sessions.
15.Build new missions and scenarios with an easy-to-use mission builder. Create missions
for single or multiplayer sessions.
16.Play new scenarios designed by other players.
17.Use new plane sets and new scenarios from free and/or commercial add-ons,
designed by original developers after the release of the sim.
18.See aircraft and ground unit graphics of an exceptionally high quality.
19.See massive air and ground battles between German and Russian airplanes and tanks.
20.See realistic dynamic damage modeling.
21.See realistic 3D environments, including terrain, sky, unique clouds and
weather conditions.
22.See realistic smoke, explosions, fire and other special effects.
23.Hear absorbing radio exchanges.
24.Compatible with a wide variety of 3D sound cards or drivers (Aureal 3D 3.0 or EAX 1.0,
EAX 2.0).
2
3
Page 3
Minimum system requirements:
VIDEO
PII 400, 128 Mb RAM, 3D Accelerator.
Recommended system:
PIII 600 or faster, 256 Mb RAM, 32-bit 3D accelerator with 32 Mb RAM or higher.
Overall quality will depend directly on the user’s processor speed and
3D graphics accelerator.
2 INSTALLATION
1. Insert the IL-2 CD in your CD-ROM drive. The Autorun menu should start
automatically. If you disabled Autorun for your CD-ROM, you may need to run the
Install procedure manually (using the Windows Explorer) from the CD.
2. Left-click the "Install" button on the displayed Autorun menu.
3. Follow the installation program's instructions to complete the setup. In case of any
problems, the installation will stop and notify you of the nature of the matter.
Y ou can also r emove (uninstall) the game fr om your har d drive either fr om the
Autorun menu, or by clicking the Start button, and selecting Programs / Ubi
Soft / IL-2 Sturmovik / Uninstall.
3 HARDWARE SETTINGS
Once the installation is complete, the Setup program starts automatically. The
program enables you to select the correct settings for your video driver, video
card, sound and input devices. In order to do this, you need to know at least
the basic hardware types of the devices installed on your PC.
1. Driver - Driver and video mode setup.
These settings are similar to the internal Il-2 Video Modes dialog.
See the corresponding section concerning in-game menus below for a description.
2. Video - Video driver adjustment.
Used to adjust the game for correct operation with the appropriate driver.
OpenGL/DirectX settings are defined separately.
It is recommended that the latest video card drivers be installed.
If you should have any problems, check your driver settings in Windows. These can be
found in Control Panel/Display Properties/Advanced.
If the game locks up or if the screen refreshes very slowly, check that other 3D applications
or games (OpenGL/DirectX) start up and function properly. We advise against overclocking
your video card or processor, or using non-standard settings for them. Otherwise,
uninterrupted game functioning is not guaranteed!
Settings – Drop-down menu for video card selection and setup.
Special options in the Settings menu for detailed video driver adjustment.
Safe - operating mode with minimum demand on the driver (the lowest quality and
speed).
Default - operating mode with average demand on the driver.
Custom - detailed adjustment (at your own risk).
54
Page 4
Texture quality - Texture resolution
(see below).
Texture mipmap filter - Quality of texture
filtering.
Texture Compression - Saves on memory
considerably (the highest quality is obtained
with S3TC).
Detailed land textures - Use highresolution textures for landscapes
(large amount of video memory and texture
compression required).
Use Alpha / Use Index - Use additional
texture formats.
Polygon Stipple - Emulate shadow
transparency in the absence of a Stencil Buffer.
Dither - Controls dither mode for 16-bit modes.
Use Clamped Sprite - Cuts down the number of polygons on sprite objects and effects.
Draw Land by Triangles - Displays landscapes with simple triangles.
Use Vertex Arrays - Reproduces geometry via vertex arrays.
Disable API Extensions - Forbids the use of video driver extensions.
Multitexture - For multitextures.
Combine - Improved texture combining.
Secondary Color - Used for fog and lighting.
Texture Anisotropic Extensions - enables anisotropic texture filtering.
Texture Compress ARB Extension - enables S3TC compression.
3. Video Modes - Choosing video modes
Driver - Choosing between DirectX8/OpenGL drivers.
Choose the driver that best suits your
video card in terms of rendering speed
and quality.
Resolution - Choosing the screen
resolution and color depth.
Low resolution, e.g. 800x600x16 is
recommended for earlier video cards,
1024x768x32 and higher should only
be used on newer cards.
This setting has the greatest effect on
quality and frame rate.
Windowed/Full Screen - Switches the main game display between windowed or full
screen mode.
Only full-screen mode is currently recommended.
Attempt Stencil Buffer - Utilize stencil buffer.
The Stencil Buffer is used to switch over to translucent shadows, etc.
It mostly works in 32-bit modes. It usually produces a dramatic drop in the frame rate on a
number of older video cards.Recommended for GF3.
Apply - Apply new settings and return to the previous menu.
Back - Return to the previous menu.
4. Video Settings – Graphic Settings.
This dialog box is used to define quality
and efficiency. The result of the settings
depends on the video settings in the IL2
Setup (i.e., maximum quality is achieved
with maximum video settings and when
your video card supports a maximum
number of options).
Simple – Move to simplified settings
Very Low/Low/Medium/ High/
Excellent Settings – Choose between
overall quality: minimum to maximum.
Apply – Apply new settings.
Back – Return to previous menu.
Custom – Go to detailed settings.
Texture Quality – Texture resolution.
Influences the amount of memory taken
up by textures and the game in general.
You can also use texture compression to
reduce the memory used.
Visibility Distance – Visibility distance
for objects.
Objects Lighting – Quality of object
lighting.
Objects Detail – Detail of object
geometry.
Landscape Lighting – Landscape lighting and shadows from objects.
Landscape Detail – Landscape detail (forest/trees/terrain/geometry).
Cloud Detail – Cloud visualization distance (their complete shutoff can be blocked in
network play).
6
76
Page 5
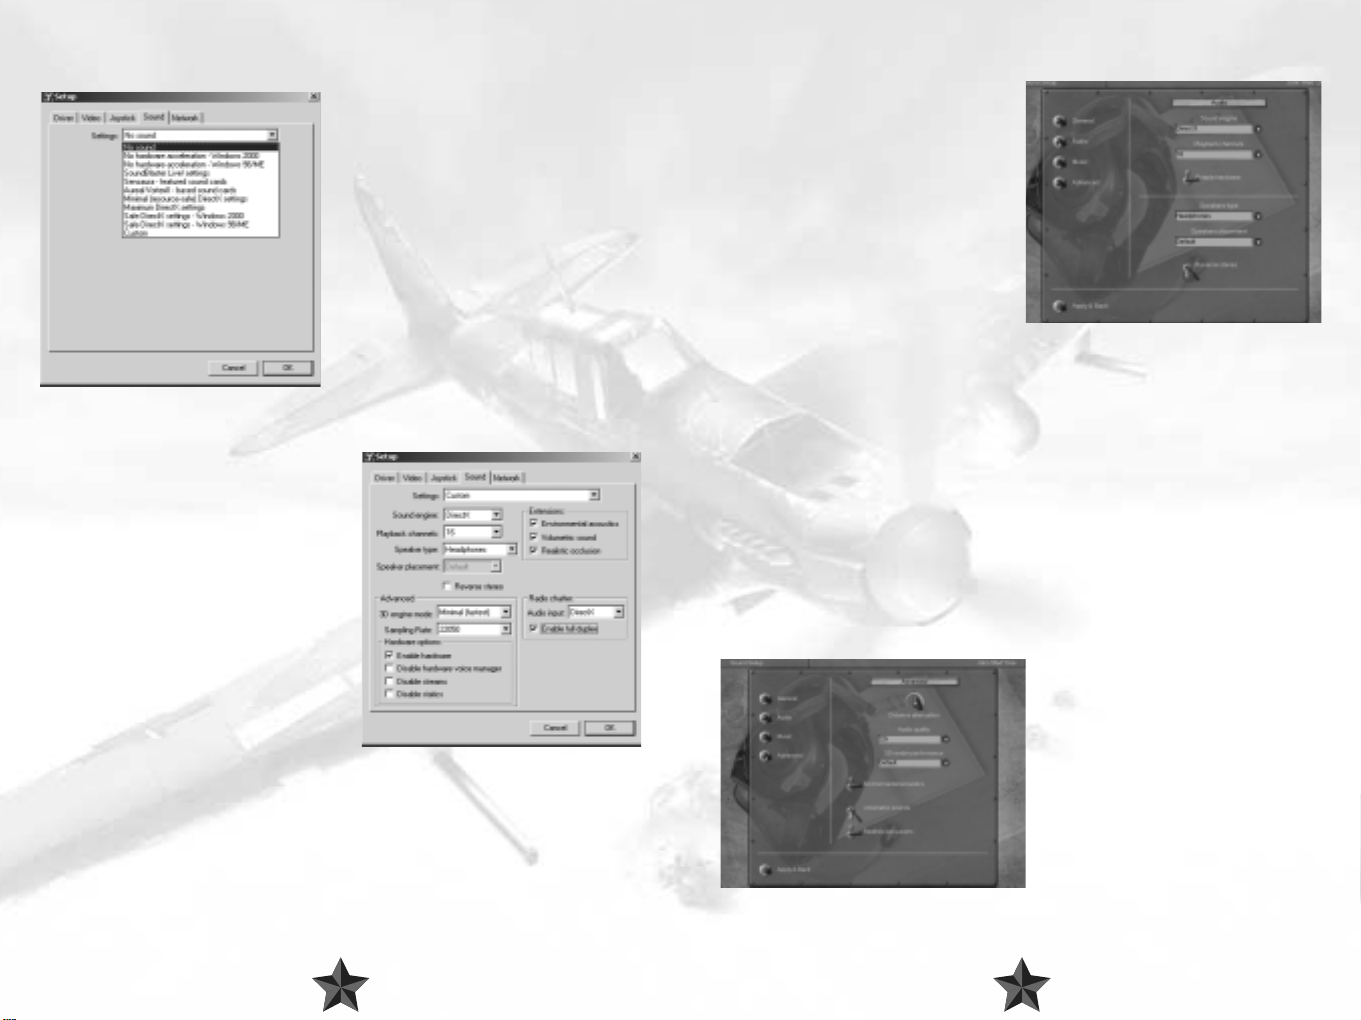
SOUND SETUP
MAIN IN-GAME SETTINGS
Once the installation is completed, a separate
IL2Setup configuration program will start up.
You can also use this program for a more
detailed adjustment of hardware settings
(at your own risk).
The easiest way to adjust the sound is to
choose from existing configurations.
Please choose your sound card from the list. If
it does not figure in the list, follow the
instructions below:
If your card supports 3D sound hardware
acceleration or you are unsure about it, choose
Minimal or Maximal settings.
If your card does not support 3D sound
hardware acceleration or you experience
sound-related problems, choose No hardware acceleration in accordance with the OS
you are using.
If you want to adjust all the settings yourself,
choose Custom settings.
The options in this dialog box reuse those in
the game's sound menu (see below) with the
exception of:
Disable hardware voice manager - select
this option if you have an accelerated sound
card and the sound occasionally fades away
and disappears.
Disable streams - select this option if there
are gaps in the sound. However, you will not
be able to use the network telephone or listen
to music.
Disable statics - select this option if the sound
effects are out of sync with the image.
Audio input - devices used for the input of signals from the network telephone mike.
DirectX required. "None" switches the telephone off.
Enable full duplex - this option should be selected.
Adjusted in the Sound Setup->Audio
menu. This menu is used to adjust the main
sound settings.
“Sound engine" switch
If you have a sound card based on Aureal
Vortex chips, use Aureal3D. In all other
cases, use DirectX. To switch off the sound,
use Disable sound.
Caution! If you have switched on the
A3D mode and your card uses a chip
other than Aureal, the game will most
probably hang up.
"Enable hardware" switch
If your sound card has hardware acceleration, flick the switch on. This enhances the
sound quality considerably and reduces CPU load. If there is no acceleration, the position
of the switch is irrelevant. Should any sound-related problems occur, the switch must be
turned off.
"Playback channels" switch
If your sound card has no hardware acceleration or if the hardware acceleration has been
switched off with the Enable Hardware switch, the parameter has a great effect on the
CPU load. Use the Default or 16 values. We recommend that you use value 8 for
Windows 2000 and NT.
"Speakers type" and "Reverse stereo" switches
Specify the type of audio device you are using: headphones, desktop speakers or system
5.1 (surround).
If the stereo channels seem to be reversed, use the Reverse Stereo switch.
Advanced Menu
This menu is used to adjust additional
settings. The Audio quality and 3D
rendering performance settings
determine the ratio of sound quality to the
rate of CPU load; the other settings affect
the sound.
The Audio quality and 3D Rendering
performance switches affect the sound
quality and for the most part the CPU load.
The optimal Audio quality value is
22kHz.
98
Page 6
The value of the 3D Rendering performance only applies if your sound card has no
hardware acceleration or if the hardware acceleration has been switched off with the
Enable Hardware switch. In this case, CPU operation is fast when the switch is at the
Minimum position; CPU operation is correspondingly slow if the switch is at Maximum. It
is recommended that you use the Default or Minimum values.
The Distance attenuation regulator sets the rate at which the sound volume decreases,
if the distance to its source is increased.
The Environmental acoustics switch enables the use of EAX or A3D virtual acoustics
interfaces, if they are supported by your sound card.
The Volumetric soundsswitch activates 3D sound sources using Sensaura technology (it
should be mentioned that with the current Sensaura driver version - 2101 - this technology
does not work very well).
The Realistic occlusions switch determines whether the obstacles (for example the hull
of the aircraft) will reduce the sound volume. If it is switched on and you are inside the
aircraft, it becomes more difficult to distinguish the sounds from the outside. If your card
supports EAX or A3D, you should flick the Environmental acoustics switch on. You can
use the other two switches at your discretion.
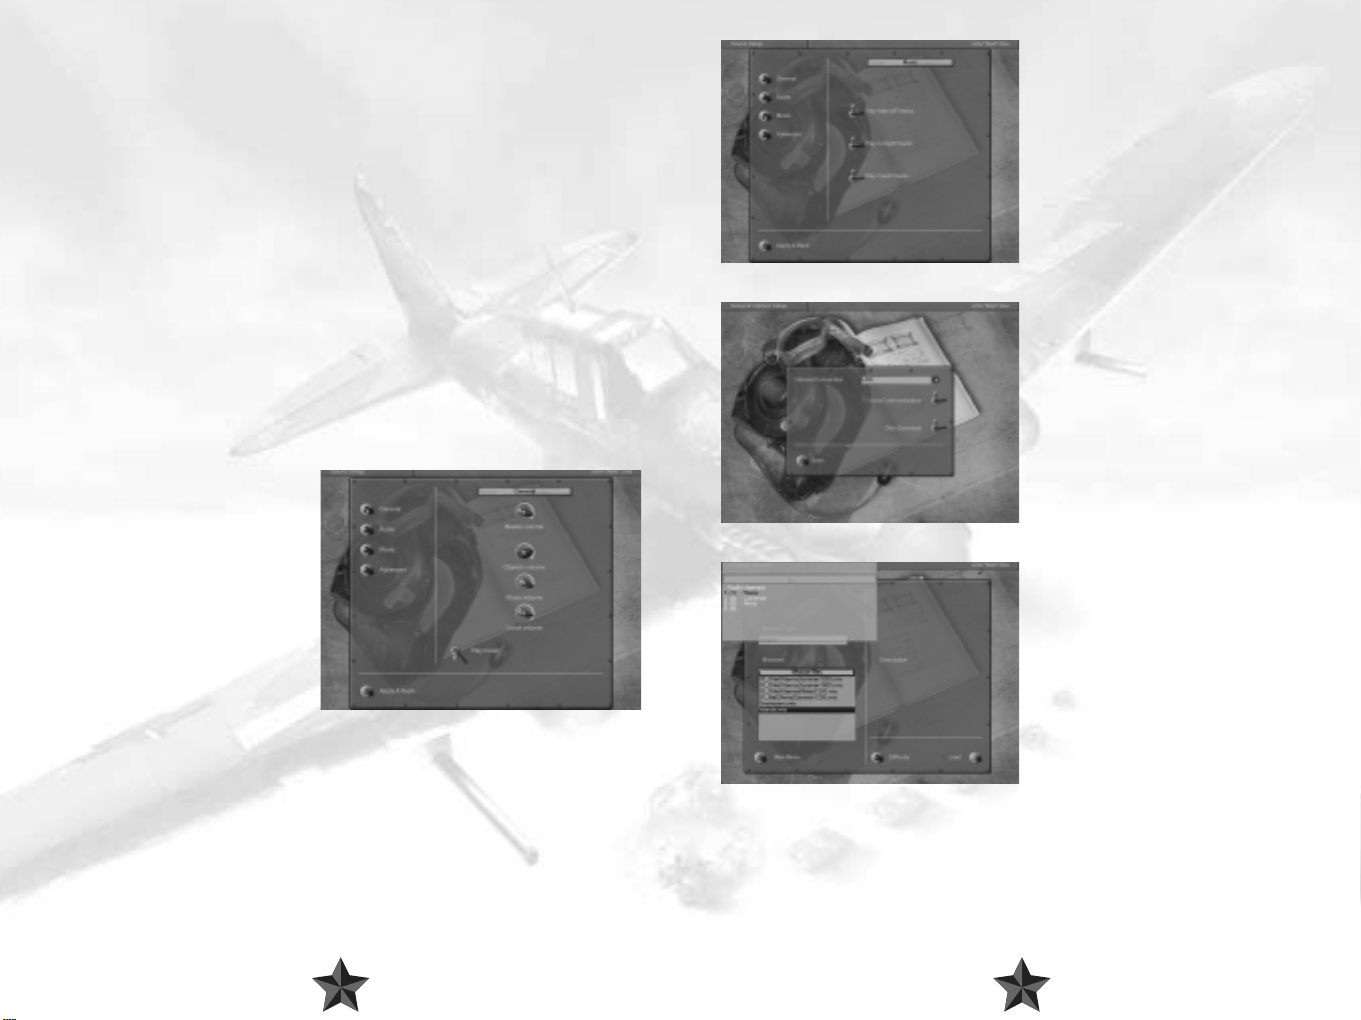
Adjusting sound volume
Sound volume is adjusted using the corresponding controls in the
Sound Setup->General menu:
Master volume - general level of
volume for all sources.
Objects volume - relative effects
volume.
Music volume - relative music volume.
Voice volume- relative volume of voice
messages and network telephone.
Music playback
Music in the game is activated via the
Play music switch in the Sound
Setup->General menu.
The music volume is adjusted using the Music Volume control in the General menu.
Whether the music is to be switched on or off in a given gameplay episode is defined in
Sound Setup->Music menu.
Play take-off tracks - play music during
take-off.
Play in-flight tracks - play music in flight.
Play crash tracks - play music when
damaged.
You can add music files at your own
discretion via Samples/Music/directory. The
music should be in Windows WAVE-file,
MPEG 1.3 format. The files for playback are
chosen at random.
Network voice communication is activated
using the Voice Communications switch
in the Network menu. It starts working
when you subsequently enter the next LAN
or Internet game. The volume is adjusted
using the Voice volume switch in the
Sound Setup->General menu.
The channel for communication is chosen
in the chat window. Only players using the
same channel can hear each other. If you
enter "." (dot) in the text box window, a list
of channels will appear at the bottom of the
screen. You can use this list to select the
working channel by pressing the UP and
DOWN arrows or by entering its number.
The list gives the channel number and
name. The number of players switched on
to the channel is indicated in brackets. The
current working channel is highlighted in a
different color, and has a "*" symbol.
1110
Page 7
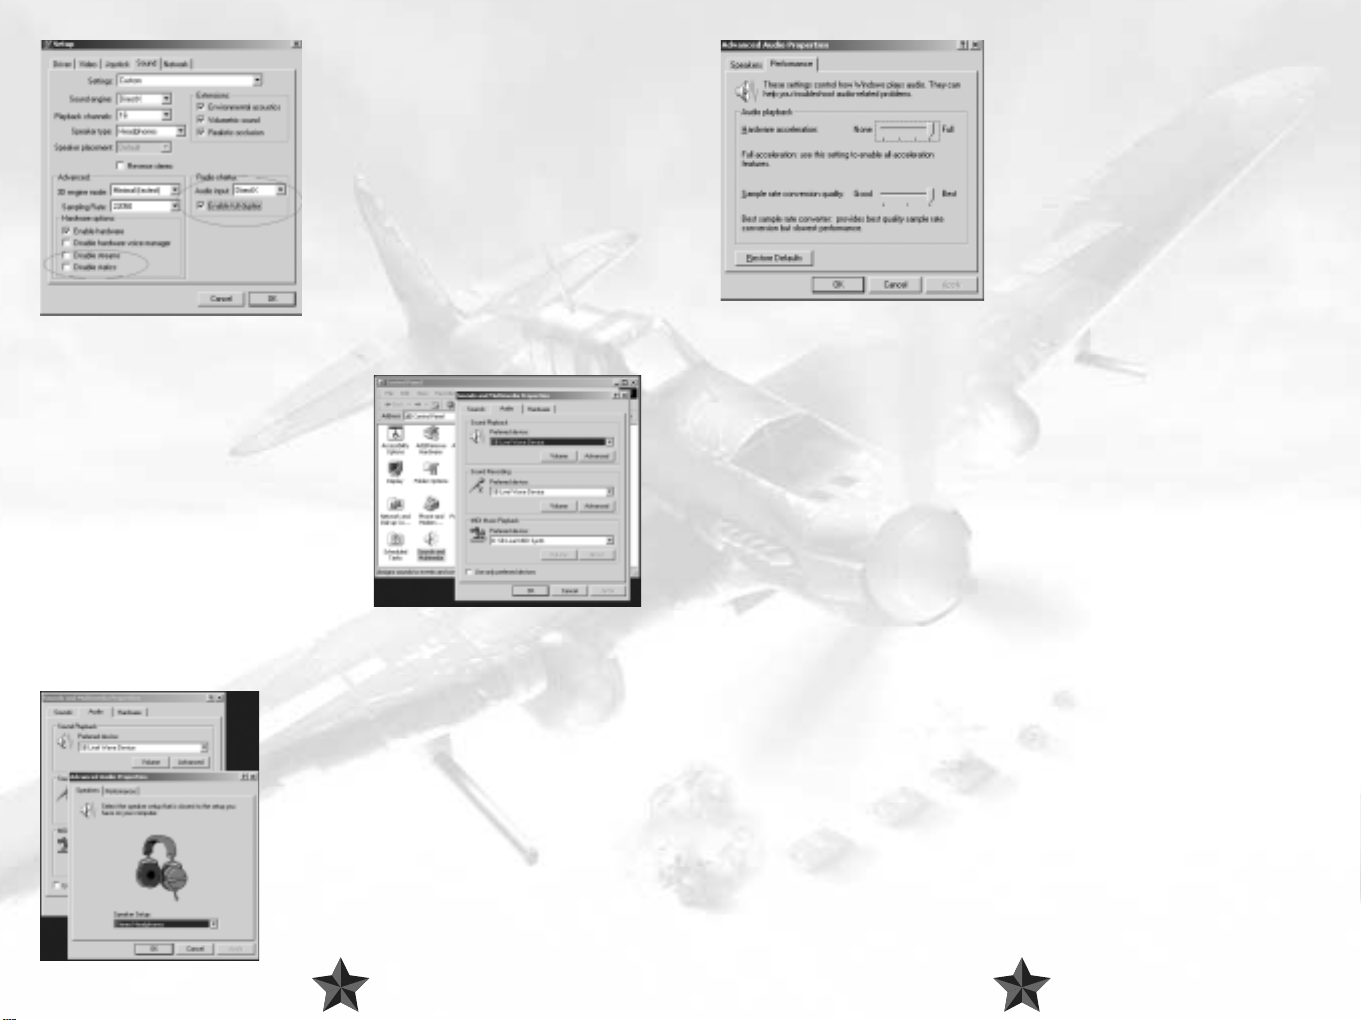
If you are experiencing problems of any kind
related to network voice communication, make sure
the following settings are chosen in the separate
il2setup.exe program, Sound Setup section:
Choose the Hardware acceleration->Full position
of the switch in the Performance dialog box. If
this creates problems with the sound, select Basic
acceleration or, as a last resort, Emulation only.
"Advanced" group
Disable streams - deselected.
Disable static - deselected.
"Radio chatter" group
Audio input - "DirectX".
Enable full duplex - selected.
If the game does not run well with active voice
comms, these can be switched off by choosing
Audio input -> None in the il2setup.
Adjusting the sound in Windows
DirectX sound settings in Windows can be found
in the Control Panel->Sounds and
Multimedia->Audio dialog box. Sounds and
Multimedia may simply be called Sounds in some
versions of Windows
To adjust the sound hardware acceleration,
choose Sound Playback->Advanced (see
below).
If you have several sound devices installed (for
example, a chip on the motherboard and a
separate card), choose the one you prefer in the
Preferred devices list and select the Use only preferred devices option.
In addition to this dialog box, your sound card may have additional adjustment options.
Choose the sound device you are using in the
Speakers dialog box.
Troubleshooting
No sound.
Make sure the sound is not switched off in the
Sound Setup->Audio menu.
Make sure the volume is not muted in the Sound
Setup->General menu.
No music.
Make sure the volume is not muted in the Sound
Setup->General menu and that the music is selected in the menu.
Make sure, using the il2setup program, that the Disable Streams option on the Sound
page is not switched on (to see all the components on the page, you should install
Settings->Custom).
No network voice comms
You can hear messages of other players in Windows NT4.0, but you cannot talk yourself in
most cases. This does not hold for Windows 2000.
Make sure your telephone is switched on (see above).
Go through all the options in the No music paragraph.
JOYSTICK SETUP
The game generally supports a vast range of basic joysticks by different manufacturers.
Select Use Joystick in the setup program. Press the Properties button and make sure
that the Joystick drivers have been installed and work correctly with your Joystick. If the
setup program detected your joystick's Force Feedback feature and displays it, you can
enable or disable this feature. Read about other features and the control settings in the
CONTROLS section of this manual.
1312
Page 8
4 TUTORIAL
If you are already familiar with the basics of flight – either from real life experience, or from
playing other sims, you can skip this chapter completely. However, don’t subsequently
complain that you haven’t been informed about something particularly crucial! And as for
the rest of you, just read on to find out what this flying business is all about!
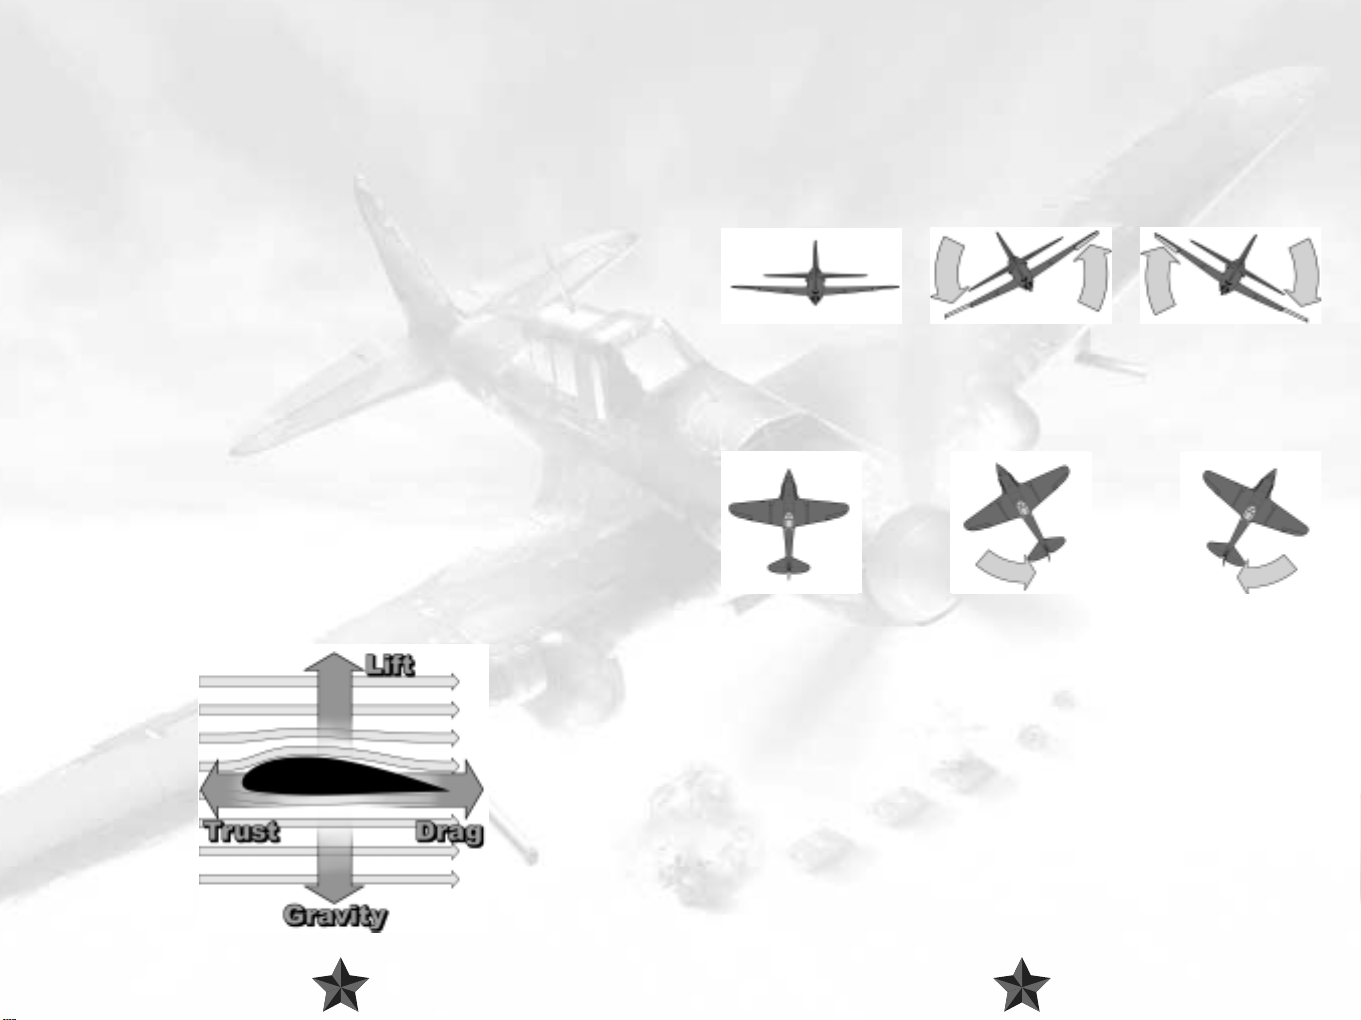
1. Flying Essentials
At this stage in history we are all used to the sight of planes soaring above us. But do you
actually know how aircraft manage to get up in the air and stay there? Well, if you’re not
entirely sure about the answer to that one, there’s no need to panic - we won’t be
smothering you with a load of old formulas from physics classes, which by now you’ve
probably forgotten anyway. What you should know, however, is that the interaction of a
number of forces has a key part to play in the whole wonderful business of flying. These
forces are as follows:
Thrust – the force that pulls an aircraft forward.
Drag – the resistance of the environment that has to be overcome by thrust, befor e a body
can engage in any sort of movement (sound familiar at all?).
Gravity – the force which would just love to keep every single object on this earth (plane
or no plane!) fixed very firmly to the ground; and, finally,
Lift – This is generated when the air pushes the plane upwards because of the specially
formed wings.
If a plane has enough thrust, it can overcome drag and start moving. Once sufficient speed
has been attained, enough lift will build up at the wings to defy gravity and allow the plane
to take off. Simple, isn’t it? In reality things ar e a little mor e complex than that, but we’ll leave
it there for the moment.
2. A Plane’s Axes of Movement
Unlike ground vehicles, a plane can move in an extra direction, or, if you prefer, an up and
down dimension. It can even be argued that a plane can move in TWO extra directions,
even though both types of movement concern the same direction. These additional
movements are pitch and roll – more on them later.
Movement along a plane’s three different axes are made possible via special flight control
surfaces, which a pilot operates via the stick and the rudder pedals. There are different
names for the various movement options, and you should make sure that you take careful
note of these, as they are extremely important for making sense of the chapters that follow.
Movements around the plane’s roll axis are carried out with the so-called ailerons. They
cause the plane to revolve around the direction where its nose is pointing, and allow it to
perform turns. This movement is known as ‘rolling’ (not to be confused with the ‘taxiing’
the plane on the ground). To move the plane around the roll axis, the pilot moves the stick
in the desired turn direction, which can be either left or right.
Turning movements around the yaw axis are known as ‘yawing’ and are carried out with
the rudder. A plane responds tio this exactly like a car responds to the steering wheel. Even
more like a car, a plane is also steered via the rudder when it is on the ground; on modern
planes the rudder is connected to the steerable landing gear, for example. Left rudder
allows the plane to be ‘yawed’ (turned) to the left, and, logically enough, right rudder
enables yawing to the right.
1514
Page 9
Movements around the pitch axis allow the plane to ascend or descend. This is known as
‘pitching’. You pull the stick back to pitch the plane upwards, and push the stick forward
to carry out a downward pitching movement.
Positive and Negative G-Forces
G-forces start to take their toll as soon as you start to carry out maneuvers at high speed
and with quick direction changes. The ‘G’ stands for gravitational and ‘1G’ is the basic force
of attraction exerted by the earth. If you fly a tight high-speed turn, the drag involved
means that your body cannot keep up with the rapid movement, and you will be forced
into the other direction by a multiple of the force of attraction. If the level of G-forces
becomes excessive, you can even experience a blackout, which will eventually lead to loss
of consciousness. Trained jet pilots can put up with 9G for short periods of time with special
equipment, but it’s not exactly their idea of fun!
You can experience the effects of negative G-forces if you force your aircraft downwards at
high speed out of level flight. You will be practically lifted out of your seat and will be
weightless for a short while. If you take things too far, you will have a (literal!) rush of blood
to the head and become rather red in the face, to say the least. Your body can deal with
positive G-forces better than with negative ones.
When playing IL-2, if your screen goes black in mid-flight, this probably has nothing to do
with your graphics card, but with the effects of excessively high positive G-forces. G-forces
can be turned off in the “Difficulty/Realism’ menu.
3. Basic Flying Maneuvers
Takeoff
Now that you know which instruments are really important (please take a look at the
reference card - the main indicators are Altimeter, Climb, Artificial Horizon, Turn, Course),
you could start thinking about getting your plane into the air! And while you’re at it you
can ponder over the fact that the planes of this era were, for the most part, equipped with
a small wheel at the rear - the tail wheel. Unfortunately, this meant that the plane’s nose
was raised in front of your cockpit, and therefor e these planes had a very poor view (if any!)
of the ground in front when taxiing and in the first part of take off. Try to compensate for
this by looking out of the side of the cockpit and using the edge of the runway for
orientation. And there’s no point in moaning either - that’s just how it’s done, ok! Of course,
you could always make things nice and simple and switch to one of the external views
using either the F2 or the F7 keys.
Once you have lined up on the runway you should proceed as follows: extend the flaps
to Takeoff level (F key twice). Start to accelerate slowly and check the tachometer to see
whether or not the engine is reacting to your movements on the throttle. Now push the
throttle lever all the way forward. As your aircraft gains speed, you may have to
compensate for the engine’s torque by gently applying the rudder. Make sure you keep a
close eye on the turn indicator during this process! To begin with, you should keep the
stick held towards you in order to exert pressure on the tail wheel and thus prevent a
premature takeoff. Once you have attained sufficient speed, press on the stick slightly so
as to lift the tail wheel off the ground. Don’t press too hard or the propeller may touch the
ground (if you are flying the P-39 Airacobra, forget everything we said about the tail
wheel: the P-39 already had the tricycle landing gear which is standard nowadays).
The aircraft should now build up speed
quickly. Once you have reached an
adequate speed, draw back the stick
gently. Make sure you don’t pull too
strongly and do not try to make a sharp
turn straight away. This could result in
the plane stalling and you will not have
enough space beneath you to put this
right in time. First retract the landing gear
(G key) and then the flaps (V). Monitor
your speed closely, and do not pull your
nose too sharply right away. Let your
airspeed get at least above 180-200
km/h, then start climbing and make sure that you keep gaining speed and altitude. Once
you have reached your desired height, throttle back so as not to overburden the engine
and adopt a level flight attitude. Many congratulations - you’re flying!
1716
Page 10
Climbing
To get the aircraft to climb, simply increase the throttle! You will start moving more quickly
and thanks to the increased flow speed of the air moving over the wings, more lift is
generated. The more impatient flight simmers amongst you may be tempted to simply pull
the stick back. The more you pull, the steeper the plane will climb upwards. A glance at the
airspeed indicator will suffice to confirm that you are losing speed at the same time. Lower
the nose a little so as not to slow down too much, but make sure that it remains above the
horizon. If you are lucky enough to be sitting in a luxury cockpit, you may find an artificial
horizon with which you can control your angle of ascent. An incline of about 20° generally
represents a good compromise between your climb rate and your airspeed.
Once you have determined the direction of the spin, you can try your luck and have a
go at the rescue operation. Move the stick into a neutral position. Under no
circumstances should you operate the ailerons, that’s to say by moving the stick to one
side or the other - this would only make the spin worse! Instead you should step on the
rudder in the opposite direction to the one in which the plane is spinning. After that it’s
just a question of waiting until the plane stops spinning. If you can’t see any
improvement, your best bet is just to try again. If the plane has actually stopped spinning
then your battle is almost over: all you have to do then is to wait until the plane has
picked up sufficient speed for the control surfaces to start reacting again. Then you can
put an end to the dive and return to normality! Well, it’s certainly worked before….
Stalling
If you get carried away with pulling back the stick,
your speed will ultimately drop to an unacceptable
level: the airflow over the wings will reduce and
you will soon find your plane lacking the necessary
lift to keep you in the air. You have stalled the
aircraft, gravity has regained its grip on you and the next stop will be a rather premature
reunion with mother earth. In a situation like this, though, panicking is the very last thing
you should do: simply center the stick and let the plane go. Don’t carry out any steering
operations at all - these are pointless in a situation like this anyway. The nose should be
pointing down towards the ground and the air craft will be dropping rapidly in much the
same direction. As this happens, the plane will regain speed, causing the contr ol surfaces
to react again. Once you have reached sufficient airspeed, bring the plane out of its fall
and return it to level flight. Do try this maneuver out, as you will probably find that you
stall at inconvenient moments (like in the heat of battle, for example) and so a certain
amount of practice in a non-critical situation will pay off. But do please make sure that
you always have a sufficient amount of space between your plane and the ground
before you embark on a training session…
Spins
If you are really unlucky, you may find that your
plane doesn’t just stall, but also goes into a spin.
Spinning means (amongst other things) that your
plane keeps rotating uncontrollably around its roll
axis. A spin occurs when a stall has affected only one
wing, in an excessively tight turn for example.
Rescuing a plane that has gone into a spin is
considerably more difficult than righting an aircraft
that has merely stalled, and sometimes this is simply
not possible. The first thing you have to establish is
the direction in which the plane is rotating around
the roll axis. If you can’t identify this, you should
have no reservations about switching to an external
view via F2 or F7.
We hope that you will notice to your dismay just how much height you have lost. If you
do happen to fall into a spin at low altitude, time really is of the essence and you should
bail out without further ado (CTRL + E). Then again, you may find that the maneuver
described above doesn’t actually achieve anything. In some cases you may even have
fallen into a flat spin, a particularly unpleasant variety in which you find yourself spinning
around your yaw axis. Rescuing an aircraft which has fallen into a flat spin is very nearly
impossible, and abandoning the plane to its fate via CTRL + E is by far your best option.
Level Flight
Sounds wonderfully simple, doesn’t it? Which is true for the most part, at least once you
have grasped the basics of this skill. Level flight involves flying straight ahead without
changing altitude, with all the forces which act upon the plane in balance. This balance
means that the plane can fly in a straight line more or less of its own accord, without too
much intervention from the pilot. Ok, we said this is relatively simple, but that doesn’t
mean that an aircraft can just adopt this mode without any help on your part!
Depending on the load on board (weapons, fuel, personnel etc.) the plane’s center of
gravity changes, which in turn has an effect on the flight attitude.
You can, and indeed should, counter these factors by adjusting your aircraft’s trimming.
This involves fine-tuning the control surfaces to enable a constant, balanced flight
attitude. If your plane is dipping to the left slightly, for example, this is not necessarily due
to any movement of the stick. Instead, trim the plane to make it lean to the right by
holding down the ‘CTRL’ key and pressing the right arrow key until you have fully
countered the lean to the left. If, on the other hand, the plane is inclining upwards, you
can try to counter this tendency by simply easing off the gas slightly. Less thrust = less
speed = less lift - remember? If that doesn’t work, trim your plane by using the CTRL and
down arrow keys to make it slightly nose-heavy. Feel free to experiment a little with the
trimming and do make sure that you are familiar with the key commands involved
(chapter 6).
1918
Page 11
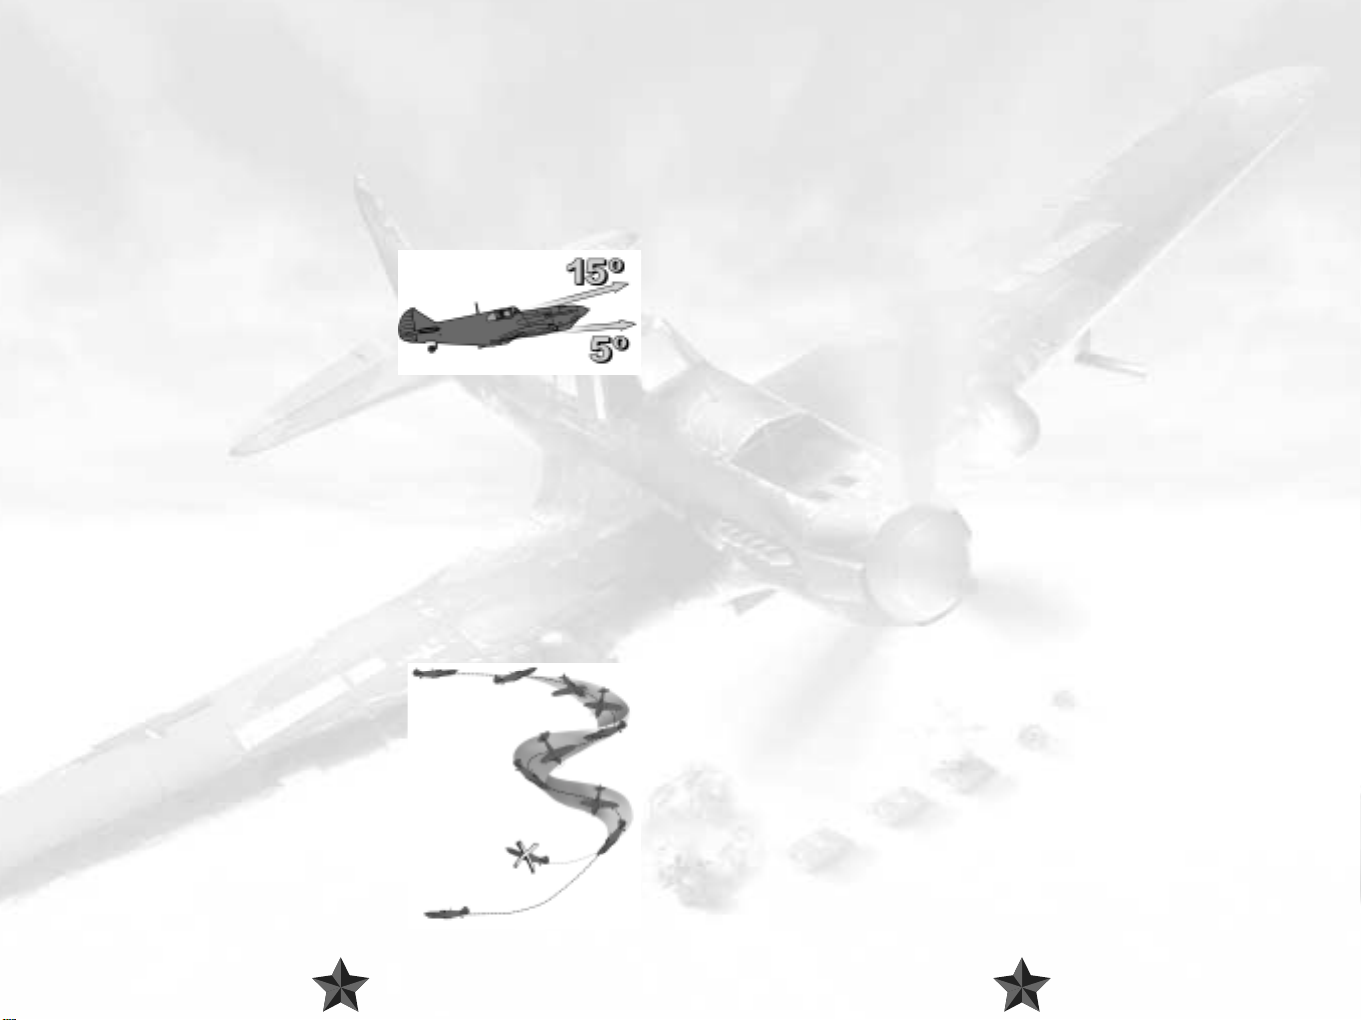
Turns
To turn the aircraft, you first have to bank it around the roll axis - in the direction in which
you wish to turn, logically enough. To do this, gently move the stick in your chosen
direction until you have reached an angle of about 20 - 25°. And that’s enough for the
moment. The plane will describe a gentle curve, moving the nose down slightly in doing
so. You should therefore gently move the stick back so as not to lose too much height.
Gently use the rudder and keep a very close eye on the turn indicator: if you want to
become a really good pilot, your operation of the rudder should cause the ball in the
indicator’s spirit level to move as little as possible, remaining in the center of the display. This
sort of a turn is known as a coordinated turn: the plane is not forced to one side but follows
the radius of the curve without
lurching to the side. And do
bear in mind that although your
stick may return to a central
position of its own accord, in
order to return to level flight you
will have to steer it into the
opposite direction yourself.
Controlled Descent
‘You always get down
eventually,’ so the saying goes.
Which is true enough in itself,
but you have to remember that there are all sorts of ways of getting your feet, and your
plane, firmly back on the ground, some of which are a good deal safer than others. If you
just point your plane’s nose at the ground, you will gain speed - an awful lot of speed. You
will certainly be traveling too fast for the majority of planes from the Second World War
period. On your way down you are likely to feel a little bit shaky, and then it won’t be long
at all until the first parts are doing their own flying around you. Try explaining that particular
strategy to your mechanic if you are still able to!
You should always ensure that you prepare for
your descent and landing carefully. The first
thing you should do is to decelerate. The plane
will embark on a gentle descent due to the
reduction in thrust resulting fr om its lower speed.
Check this by taking a look at your rate of climb
indicator. Then press the stick forward slightly, all
the time keeping the airspeed indicator in view.
Depending on the type of plane you are flying,
there is a varying range of speeds which can be
flown safely at this stage. If you are flying too fast,
simply reduce your angle of descent and gently pull the stick towards you.
If your cockpit has an artificial horizon, check your flight attitude if you’re not totally sure
that you can rely on your instincts.
You can also try flying broad descending curves, as you automatically slow down when
banking. You should always watch your speed very carefully during this procedure, or you
could run the risk of stalling.
There is one handy trick which can help you to
lose altitude without speeding up: gently roll the
plane to one side and at the same time counter
this movement with the rudder so that you don’t
actually turn. This will mean that you are flying at
a slant, but this will be useful in your descent.
This maneuver is known as a ‘slip’ or ‘side-slip’,
and was invented by WW1 pilots to compensate
for the fact that their planes were a good deal
more fragile than the ones you will meet in IL-2
Sturmovik.
If you and your plane are of a robust constitution, you can use the so-called ‘Split-S figure’
explained in section 5.4.3. This will expose you to high levels of G-forces, so don’t say you
haven’t been warned!
If you need to get down to the ground fast, like in case of crash-landing after battle
damage, chop your throttle to idle and drop full flaps. Point your nose downwards, which
will take more strength than usual as the flaps will generate excessive lift. Keep your nose
down to still allow for your airspeed to drop. Once at speeds below 300 km/h, drop your
gear – then level out as close to the ground as you can and continue flying forward at a
very shallow angle until you touch down.
4. Key Air Combat Maneuvers
If you have studiously digested the previous sections and taken the advice contained there
to heart, you should be in a good position to perform clean takeoffs and landings and to
squeeze in a few nice, coordinated turns in between. All this is, of course, admirable, and
we are extremely pr oud of you! But we trust that you won’t be too crestfallen when we tell
you that these skills alone are not enough to make you into a flying ace. It may be of some
comfort to hear that you are not alone in this regar d. Many of the world’s most famous aces
had to put in many a long hour of practice, learning from their mistakes all along before
they were able to acquire the talents which set them apart from less successful or merely
average pilots. And then there are just some things which can probably never be learnt;
abilities which you either have or have not got. For more on this topic, take a look at
section 5.5. Don’t start turning the pages just yet, though – first of all we’re going to
introduce you to the key maneuvers of air combat.
2120
Page 12
4.1. Offensive Maneuvers
".you have to get up to a distance of about 70 meters from the target before you
can open fire. A big mistake which is often made lies in losing speed when you
move up to shoot at the last minute. This doesn’t work - the distance simply gets
bigger and bigger and you can even lose touch with the target completely. If you
shoot from too great a distance away, you just let the enemy know where you are
because of the trail your shots leave, and the enemy can frequently get away.
Another frequent error lies in gaining ground on the enemy too quickly and then
not being able to brake in time, which means that you end up in front of the target.
John Cunningham, R.A.F. night fighter pilot.
Quote from: Sims, Edward H.: Fighter Tactics And Strategy 1914 – 1970.
If you will permit us to make a very broad
generalization, air combat maneuvers can be
divided into two categories: offensive and
defensive maneuvers. An offensive maneuver, in
a one on one air battle (also known as a
dogfight), for instance, focuses on shooting
down the enemy as quickly as possible. This
generally involves taking an opposing pilot
completely by surprise (the ideal situation!) or
outmaneuvering him to such a degree that you a) get into a good firing position and b)
stay out of trouble as much as you can. As is often the case, theory is considerably easier
than practice here. But with a little of the latter you should be able to achieve a certain
amount of success before too long.
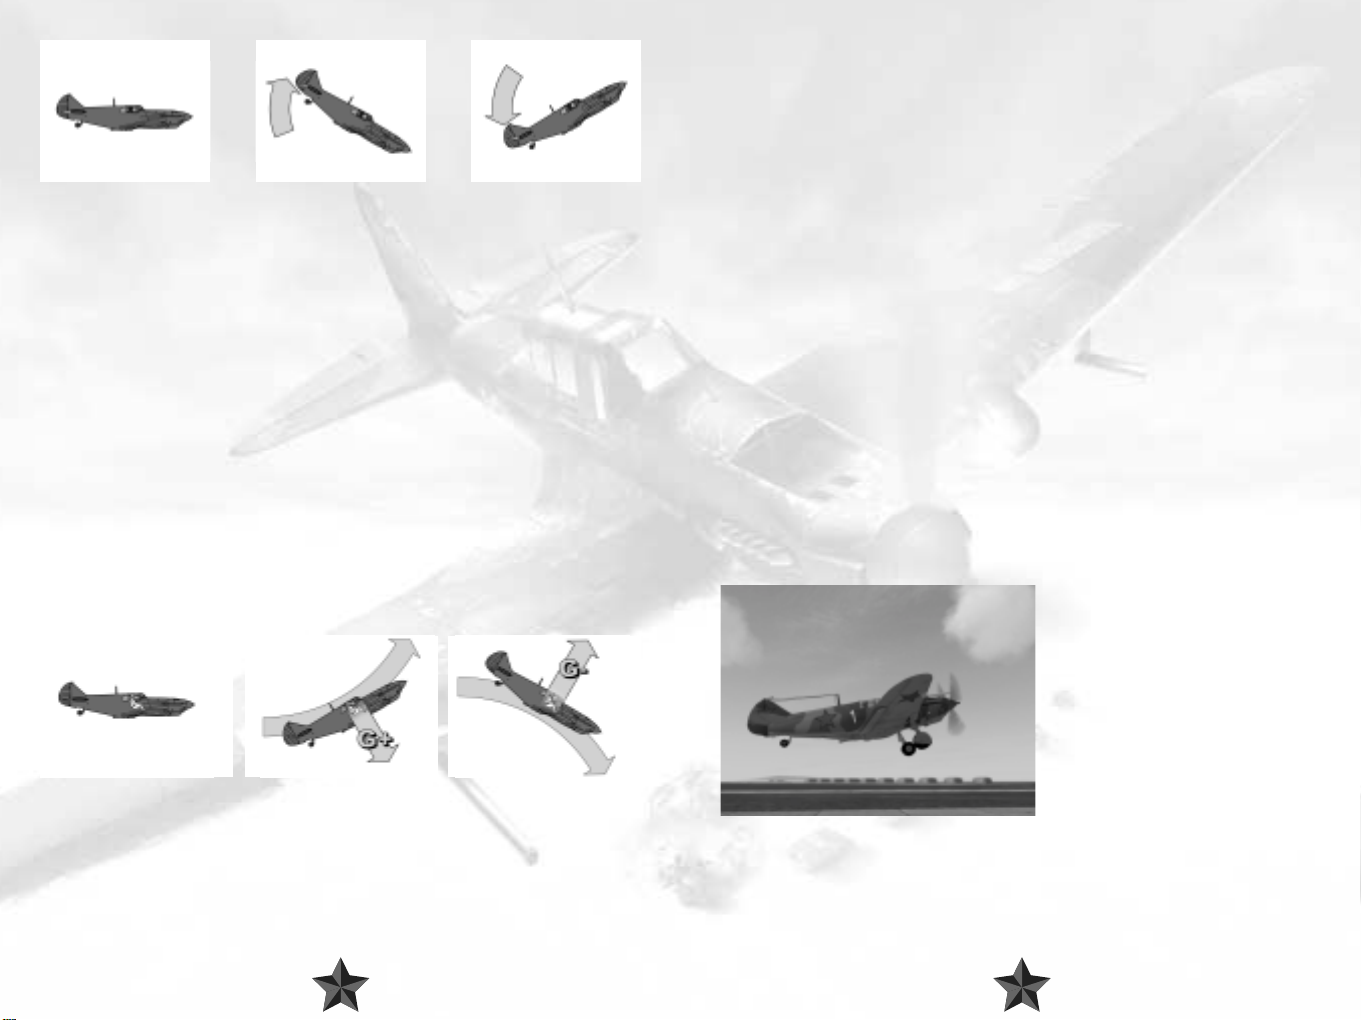
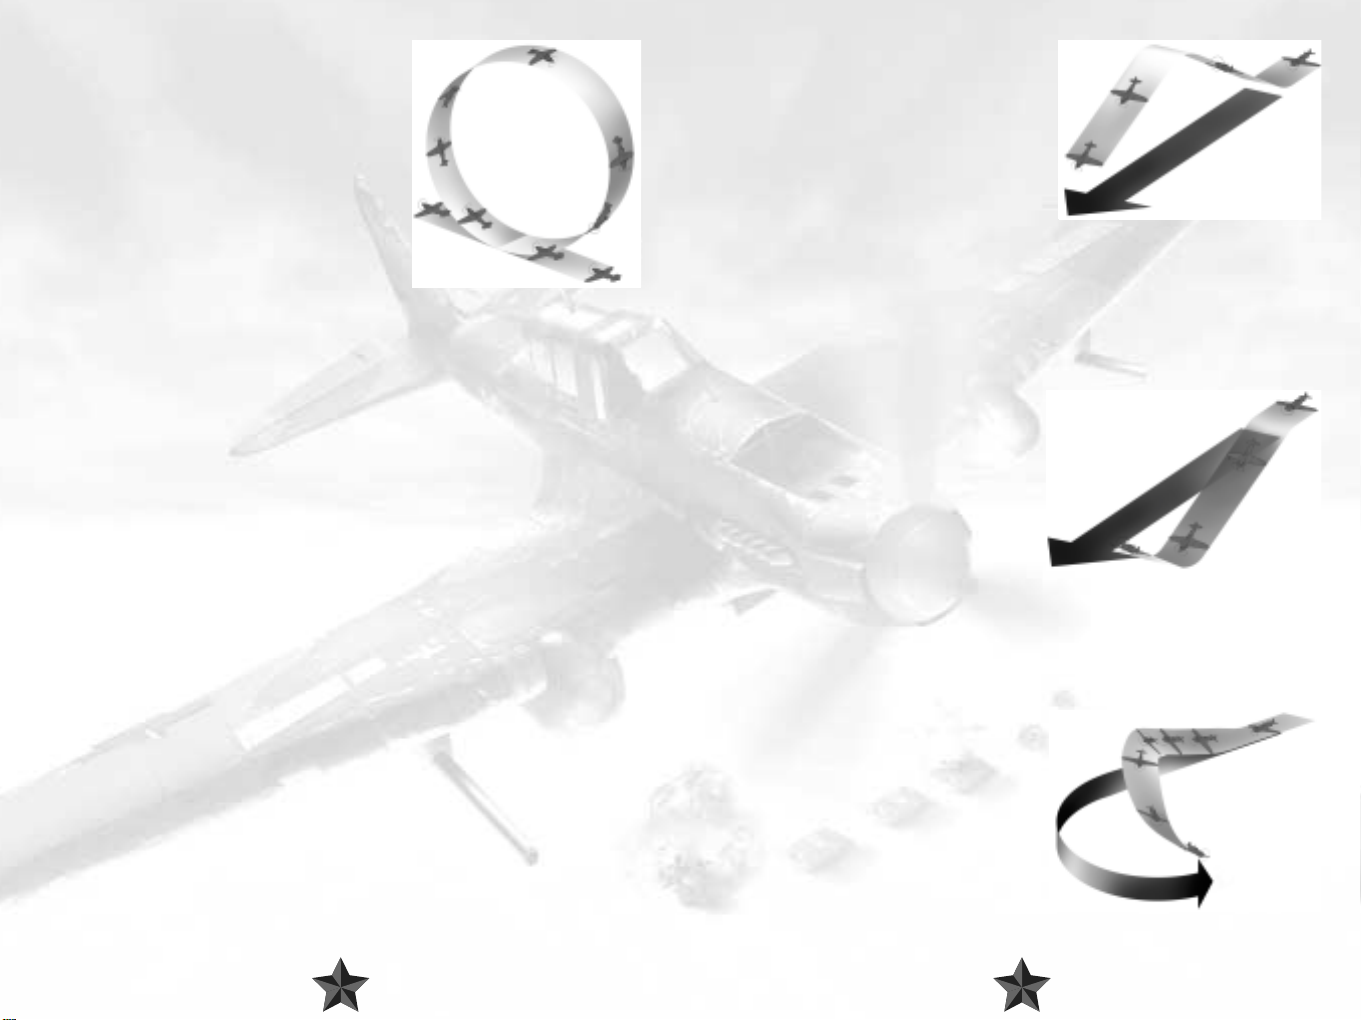
Hammerhead
This maneuver was known as “Immelmann” in WW-I,
named so after a famous German ace Max Immelmann.
Whether he was really the first pilot to carry out this
maneuver is open to question, but what is beyond doubt is
that he could perform it to perfection. However, since then
the terms changed and Immelman in WW-II is something
completely different.
A typical hammerhead involves flying the plane straight up
in the sky until shortly before a stall, then using full rudder
to carry out a 180° turn about the yaw axis and
subsequently going into a dive. The point of this piece of
aerial acrobatics is to enable you to tuck yourself in behind
an aircraft which was flying in the opposite direction to you
before you carried out the maneuver. To execute it to
perfection you will need good timing and a good reserve
of speed to be able to carry out the steep climb at the
beginning.
Make sure you are flying at an adequate speed to begin with. If need be, lower the plane’s
nose to pick up a little extra speed. Gently but firmly, pull your plane around so that it is
climbing straight up. Don’t lose sight of your airspeed indicator! Before you lose too much
speed and therefore stall, step on the rudder pedals. Do we really need to mention that
you should by now have decided which way you’re planning to turn? Good, we knew
that wouldn’t be necessary. Then turn the plane through 180° so that the nose is pointing
down to the ground, gently using the ailerons as you do so. Pay careful attention to your
course indicator or a compass – if everything has gone according to plan you should now
be pointing in exactly the opposite direction from the one in which you started. At the same
time you should also pick up speed. Recover the plane from the dive once you have
reached your desired altitude. In combat situations you should aim to end up slightly
beneath the enemy aircraft, thus putting you out of the range of any gunners on board
and with any luck you won’t be detected by enemy pilots.
Immelmann
These days the term ‘Immelmann’ is
generally used to refer to a maneuver
also known as a ‘half-loop’. This also
involves trying to change the plane’s
direction by 180 degrees in as little time
as possible, but the pilot achieves this in
a different way, flying an upwards half
loop instead of the maneuver described
above.
Before you begin an Immelmann, you
should again make sure that you are
traveling at sufficient speed, as you will
need to be moving fast to accomplish
the maneuver that follows. Keep the
wings nice and level, pull back on the
stick and move your plane upwards. While you are climbing you should roll to one side
slightly – again, you choose which side. Keep pulling back on the stick until your plane is
flying in the opposite direction to the one in which you started. While you’re doing this you
should keep a close eye on the course indicator or the compass. Using the ailerons, turn
the plane around the roll axis until you ar e flying in a normal flight attitude once again. You
will now have gained altitude and will gradually be picking up speed again, flying in the
opposite direction to the one in which you started.
2322
Page 13
Loop
This well-known maneuver is perhaps the least useful
of all in combat – at least that’s probably the answer
you would get if you could still ask Manfred von
Richthofen, the famous ‘Red Baron’, for his esteemed
opinion of looping. Some pilots, however, just cannot
get enough of this tactic. There are indeed good
reasons not to carry out this maneuver during an air
battle, particularly because it takes a good deal of time
and also requires sufficient speed and altitude to
complete a loop fully. However, you should certainly
be acquainted with this particular trick, if only so that
you know how to react should an opponent in front
of you decide to try it out himself.
Sufficient speed is essential before you can think about attempting a loop. If requir ed, lower
your plane’s nose a little to gain speed. Pull the plane up into the sky with its wings level.
Keep the stick pulled towards you and just wait until you are traveling in your original
direction again. That’s it – it’s as simple as that! Oh yes, to be on the safe side and make sure
that you describe as good a loop as you can, you may find the following trick useful: look
out of the cockpit to one side and keep your eye on the wing tip. If you get everything
right, the tip will describe a perfect circle. Then again, beauty alone doesn’t count for all
that much up in the sky…but it won’t be long before you find that out for yourself anyway!
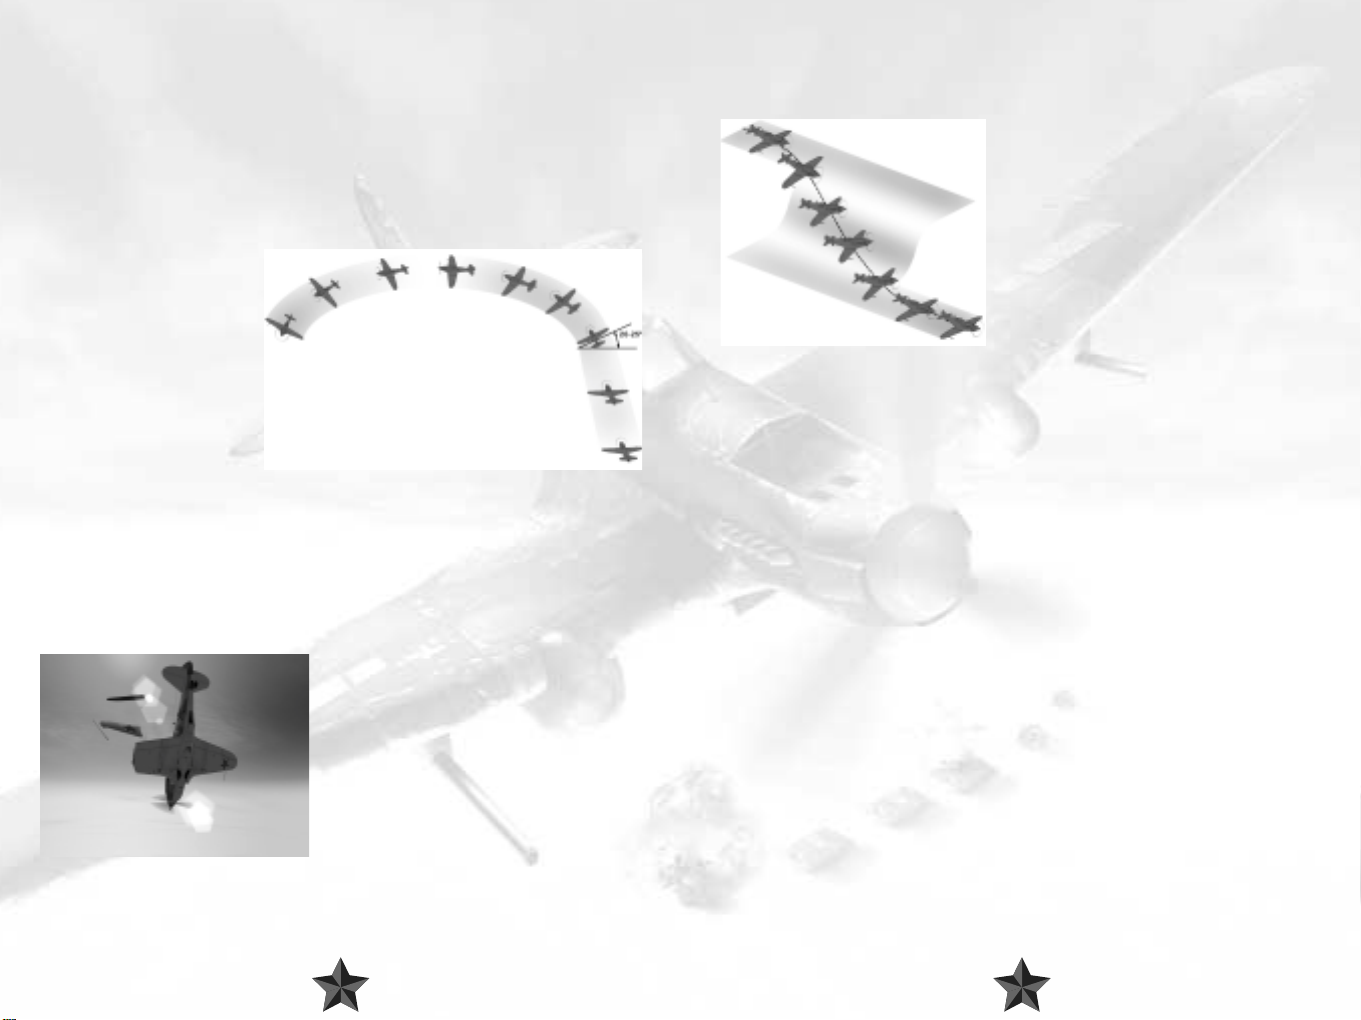
Yo-Yos 1: High and Low Yo-Yos
“The Y o-Yo is very difficult to explain. It was first perfected by the well-known Chinese
fighter pilot Yo-Yo Noritake, He also found it difficult to explain, being quite devoid
of English”
Squadron Leader K.G. Holland, RAF. Quote from L. Shaw's "Fighter Tactics".
These flying configurations may well have
amusing names, but the idea behind them is
deadly serious. They are offensive maneuvers
which are geared towards the fact that in air
combat it is only very rarely the case that you will
be up against an equivalent opponent in terms
of identical performance data. To put it simply,
never expect to be able to just fly behind your
adversary and thus automatically find yourself in
a good firing position.
He could well have a much more easily maneuverable, quicker plane. Or it could be the
other way round and the (apparent) advantages could be on your side, which
unfortunately doesn’t necessarily make things easier. If you perform a yo-yo maneuver
correctly, you can manage to sneak in behind the enemy directly despite the difference in
speed or turn performance. And that in itself is very often half the battle!
A low yo-yo is a suitable option if the opponent
flying in front of you is quicker than you are, as
it may enable you to catch up with him and
attack him.
Gain speed by allowing your plane to descend.
This also takes you underneath your adversary,
whose view of you will then be impaired or
even obscured completely. Once you have
been able to get close enough and the enemy
is almost directly above you, pull your aircraft
right up. You should have enough surplus
speed to be able to get into a firing position
before your plane slows down too much and
perhaps even stalls.
Yo-yos 2: High and Low Yo-yos: Banking
A yo-yo maneuver can also be deployed
during banking in order to stay behind an
adversary whose plane is more maneuverable
than yours. Again, the trick here lies in using
space as efficiently as you can in order to make
up for any comparative disadvantages which
your plane may have.
2524
Page 14
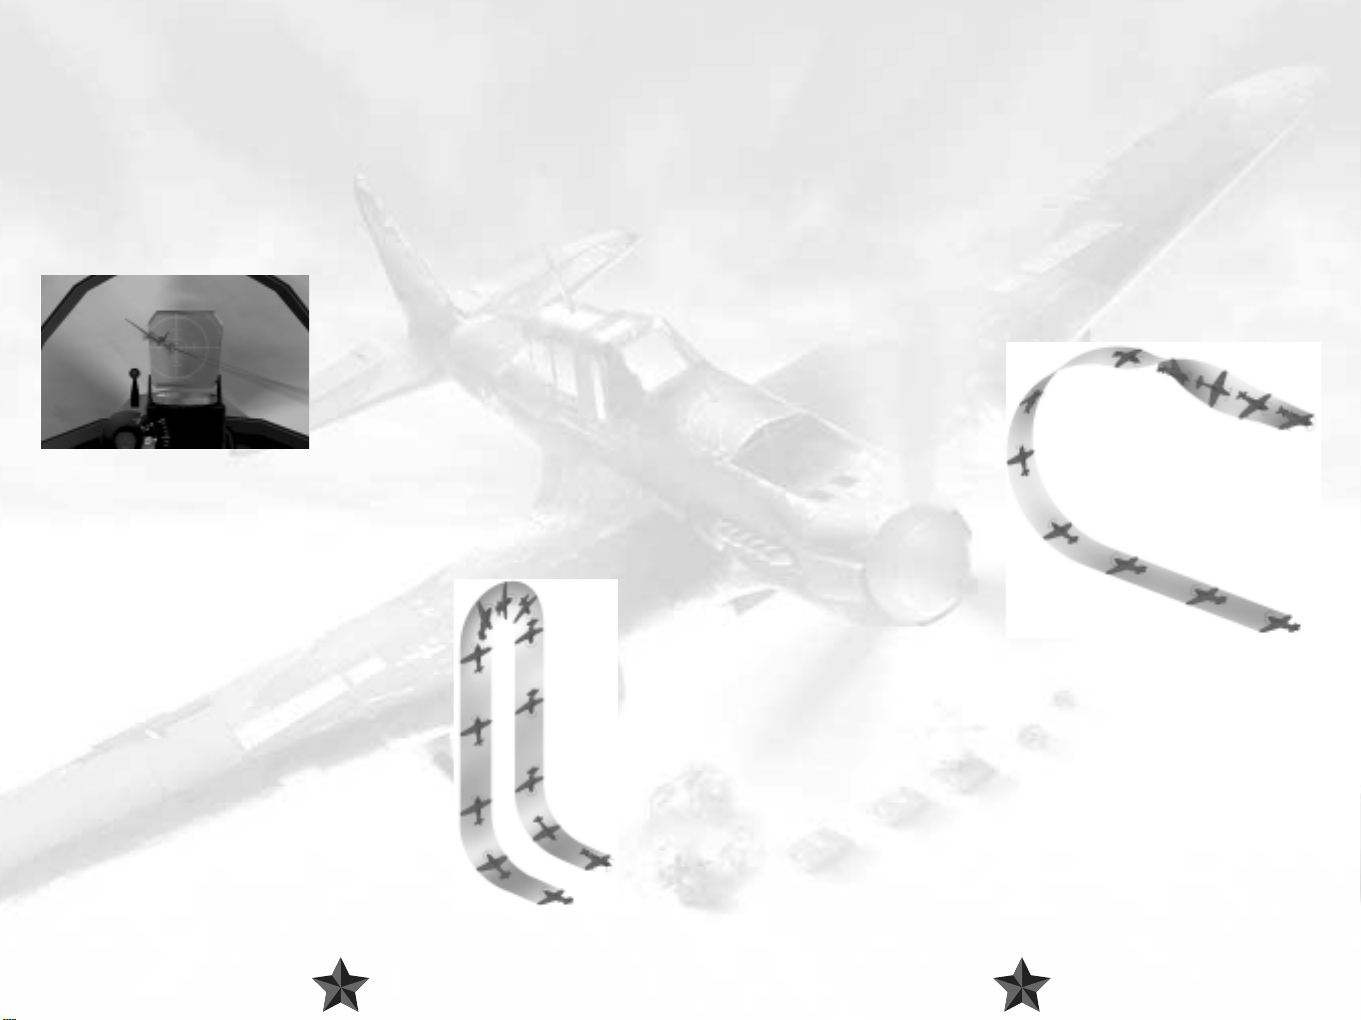
Pursue an adversary flying ahead of you and turn at the same time as he does. But instead
of trying to follow him directly, pull back on the stick, thus lifting you above your target
for a moment. Watch out though: you will probably lose sight of him temporarily. Now
roll your plane into a slightly
tighter turn, thus moving yourself
more sharply into the radius of
your opponent’s turn. When he
has turned a bit further, you will
be able to use your height
advantage to pounce on him
from above and should land right
behind him – if you’ve got all your
sums right, that is!
Follow the opponent ahead of
you into the turn, and push
forward on the stick to make your
plane descend. Cut back on the throttle so as not to gain too much speed. Then fly a
longer distance before cutting into your enemy’s tighter turn radius. Pull back on the stick
as you are doing this, lifting your plane straight up. With a little practice you should land
right behind your enemy and thus in a good firing position.
The thing is, there’s no real difference between low and high yo-yos that can be easily
explained. Both can be used in the same situation, often with the exact same end result.
In both you dive and climb, just in different order. It can be argued that you turn better in
a high yo-yo as your plane spends more time at lower speeds – but this is all a matter of
individual plane’s characteristics. The truth is, turns are almost never perfectly horizontal in
combat. If their opponent is climbing, pilots tend to counter with high yo-yos. If an
opponent is diving or is generally below, a low yo-yo is recommended.
4.2 Attacks on Ground Targets
Right, that’s enough about dogfights. In IL-2 Sturmovik, attacks on ground targets play a
particularly important role, and the rules for this type of combat are somewhat different.
Attacking ground targets is all about trying to score a direct hit in as few attempts as
possible whilst remaining in one piece. As you can no doubt imagine, the enemy won’t
exactly welcome your attacks with open arms, and being able to counter his defenses is
of prime importance.
Bombing from High Altitudes
To try and escape fire from ground objects such as tanks, artillery and flak, you can opt to
release your bombs from high altitudes. This strategy certainly helps to protect you, but is,
unfortunately, relatively imprecise, requiring a high degree of skill and practice to be truly
successful. What makes dropping bombs from such great heights so difficult is the speed
which also has to be considered: your bombs won’t just drop to the ground in a straight
line, but will cover a certain distance in flight depending on the speed at which you were
flying when they were released. Large bombers have a bombardier to direct the bombs
and release them, but in an IL-2, for instance, you have to take on these duties yourself.
Why not try this out for yourself? Once
you have identified a target , fly towards it
at high altitude. As you’re making your
way towards your goal, you may wish to
switch to an external view using the F2 or
F7 keys. To hit the target you will have to
release the bombs a long way before the
point at which you actually fly over it.
Have fun practicing!
Dive-Bombing
To improve the accuracy of bombing
missions, dive-bombing tactics were
developed after the First World War. The
idea behind this strategy is to plunge
down on to the target in nearly a straight
line, so that there is almost no horizontal distance between the target and the plane when
the bomb is released. This release technique was developed by the US Air Force and
adopted by the German Luftwaffe, which ultimately led to the development of notorious
aircraft such as the Junkers Ju-87 and Ju-88, which were specially adapted for this type of
bombing. But that’s another story…
2726
Page 15

To release a bomb in a dive maneuver, approach your target at an adequate altitude.
Once you are almost directly above the target, embark on a sharp descent (a dive) and
speed towards your target as directly as you can. You are vertically above your target if it
remains in the center of your sights and simply seems to rotate even when you are
moving your ailerons. As for when you actually release the bomb, you should ensure that
you give yourself enough time to fly to
safety. Be prepared for defensive fire and
take care, as by no means every pilot
(nor every plane, for that matter) can
withstand such high speeds for long.
It is a good idea to use anything you can
to slow your plane down during a dive
attack – flaps, dive brakes, anything you
may be equipped with. Don’t forget to
idle your engine when diving, too!
Pick out a target and get it into view. Try
to fly as quickly as possible to make
yourself as hard a target for enemy fir e as
you can. Unfortunately you can’t swerve
or dodge around that much, as your weapons are simply not modern enough to seek the
target themselves. When choosing the moment to drop the bombs, bear in mind the
distance which they will travel after being released. Then climb up and away from the
target without delay to avoid falling victim to your own bomb. Now focus on continually
changing your height and direction to make it as difficult as you can for the enemy to shoot
you down. An IL-2 is, admittedly, well armored, but is by no means indestructible! Switch
to an external view to take a look at the effects of your handiwork or fly a course which
enables you to look out of one side of the cockpit down to where your bombs landed.
Don’t be at all surprised if the first attempt was a failure – you will almost certainly have to
make a few practice runs before you score a direct hit.
Rocket Attacks on Ground Targets
Almost all versions of the IL-2 are equipped with suspension rails for unguided rockets as
standard. What unguided means in practice is that, as we saw above with bombing
tactics, you have to direct the plane towards the target directly if you want to achieve a hit
with your rockets. And, of course, in doing this you provide the enemy’s ground forces with
another wonderful opportunity to get in some target practice. So when mounting rocket
attacks you should again try to move as quickly as you can with an approach at low or
medium altitude. Train your sights on the tar get and r elease the r ockets from an appr opriate
distance (not too far away). Bear in mind that your rockets are positioned to the left and
right of you underneath the wings and that they
will not necessarily land right in the center of your
sights. Once you have fired off the rockets or the
rocket salvos, start climbing again and turn away,
swerving and changing your altitude as much as
you can so as to escape enemy fire.
Using On-Board Weapons
The IL-2 has impressive canon and machine gun
capabilities fitted as standard, and so does the
German FW-190. But the Messerschmitt Bf-109
can also be equipped with powerful additional weapons (which can also affect the plane’s
mobility). Attacking ground targets with on-board weapons is basically very similar to using
unguided rockets. Set your sights on the target and fly towar ds it at high speed. Given that
the shots from your on-board weapons are not nearly as destructive as rockets, for
example, you will probably have to land a
number of hits to destroy or perhaps even just
damage a target. Take a ver y close look at what
sort of target you have in mind. You can possibly
finish off a truck or a locomotive with just a few
hits on target, but if you have set your sights on
a heavy tank, you will have to be pretty accurate
with your aim and score a direct hit! The colored
tracer bullets can help you with your aim –
adjust the direction you choose accordingly. In
later models of the IL-2 the machine guns were,
curiously enough, only included for the purpose of making targeting easier for the far more
effective machine cannons! If you move the rudder slightly to the left or right while firing
and turn gently around the yaw axis, you will manage to spread out your shots more
effectively and raise your chances of a hit.
2928
Page 16

Deflection Shooting
If you try to shoot at a moving target, you will probably notice the following: let’s say that
you approach a truck - which is traveling in front of you - from behind and slightly to the
side. You’ve got him right in the center of your sights and pr ess the trigger, but you still don’t
hit the target. The reason for this is simple – even
though your bullets are extremely quick, they still
have a certain distance to travel before they arrive
at their destination. They will actually hit the place
that you have lined up for them, but by the time
they make impact the truck will have traveled a
little further itself – to cut a long story short: you
missed! Of course, you may actually end up hitting
the target, but if this is the case then you have
probably aimed at a particularly slow specimen of
the truck species!
The bottom line is that you should always consider the distance which the target is likely to
cover before the bullets arrive and bear this in mind when taking aim. So it is wise not to
train your sights on the target itself, but on a point slightly in front of it. To summarize, the
faster the target is moving, the further you have to aim in front of it. This is known as
deflection shooting. As you can imagine, this is by no means a technique specially
developed for attacking ground targets. In truth, you’re not likely to score many hits at all
in any sort of battle if you don’t start putting these principles into practice. Even top aces
can be driven to despair by this fact, if that’s any consolation. But once you have grasped
the underlying principle, a little practice should help you to put this technique to good use.
4.3. Defensive Maneuvers
“...by the way, did you know that the Russian Rata could outmaneuver the Me 109?”
Joseph Jacobs, Commander of the Jasta7 in Flanders in the First World War.
Quote from: Sims, Edward H.: Fighter Tactics And Strategy 1914 – 1970.
Now that you’ve read so much about all the lovely damage you can do, it’s about time we
told you that you’re likely to find yourself in at least as many situations in IL-2 Sturmovik in
which the enemy has got his sights trained on you! All is not lost, however - read on to find
out how you can get yourself out of the tightest of corners and maybe even turn things to
your advantage!
Break
Quite apart from the fact that it’s always better to avoid getting into risky situations in the
first place, any self-respecting pilot should be able to carry out this maneuver in his or her
sleep. Fortunately it is really quite
simple to perform, as a break is
basically just a very tight turn. Use
this maneuver if you’ve got the
sneaky feeling (or if you’re
absolutely sure, for that matter) that
the enemy is right behind you.
To perform this maneuver, roll your plane through 90 degrees to whichever side you
choose and pull the stick towards you. You can also gently use the rudder and cut back
the throttle to make the turn even tighter. If your plane is particularly maneuverable, this
may well be enough to shake off your pursuer, as he will have to be at the controls of an
even more nimble aircraft to get himself into a good shooting position. But be prepared to
carry out a series of maneuvers to shake off
your would-be assailant, as one simple
break alone is generally not enough. Only
the most suicidal pilot would perform a
series of breaks in alternating directions.
Rolling from one direction to the other may
take a few seconds, during which your
plane will be flying almost straight and level
– enough for the attacker to regain any
positional advantage he may have lost
during your first break turn.
Barrel Roll
You can use this maneuver to help you
confuse an enemy who is following you by
flying in a tight spiral. If he wants to score a hit against you, your pursuer will have to follow
you in this maneuver, otherwise he will fly past you or above you. A barrel roll may enable
you to tuck in behind him and turn the tables!
Move the stick to whichever side you choose and pull back on it slightly. Your plane will
start flying a long, narrow spiral. Keep following this route until your opponent flies past
you. Of course, that’s what we hope he’ll do. If he manages to stick on your tail you’ll have
to think of another defensive maneuver to help you get rid of all that unwanted attention.
Try using full rudder, in the same or opposite direction, during a barrel roll to make it even
more unpredictable.
3130
Page 17

Dive
For this maneuver, it pays to have a
thorough knowledge of your own and, if
possible, also your opponent’s machine. Let’ s
say you’re flying a Messerschmitt Bf-109 and
you come under attack from a MiG-3 which
is in hot pursuit of you …
Placing all your trust in your own plane’s
robust stability and the correspondingly
fragile nature of the Soviet pursuer, you
simply point your aircraft’s nose straight
down towards the ground. You will pick up
an awful lot of speed, as will your enemy if
he decides to stick with you. You will be able
to put up with this for quite some time
before you really start to suffer, whereas your adversary will probably start to feel the effects
much more quickly. If he has any sense he will abandon his attack completely or hang
around for a better opportunity. Which means that you’re in the clear…for the moment,
anyway.
The Split-S
The Split-S is a downwards half-loop. This means that
you gain speed while losing height. Ideally, of course,
you will have plenty of altitude before attempting this
maneuver, which also involves you adjusting your
course by 180 degrees.
Quickly roll to one side until you are upside down
and then pull back hard on the stick. Once you have
completed a half loop you will have attained
enough speed to make an attempt at flying away
from the enemy.
We hope you appreciate that these are merely the most
basic defensive maneuvers and that none of them offer a fail-safe method of saving your
skin. But if you practice them and acquire a certain amount of proficiency in their
execution, you will give yourself a good chance of holding your own in airborne combat.
You should also try to combine several maneuvers, flying a Split-S straight after a break, for
instance. Have a go at confusing your enemy or enticing him into a maneuver from which
he will find it difficult to escape by using your aircraft’s special characteristics to your
advantage. Look and learn: watch your opponents in action and take note of their
strategies for getting out of trouble.
In additional we strongly recommend you read the Introduction to Combat
Air Tactics below.
It doesn’t matter whether if you’re a new pilot who has never pressed a gun trigger on a
plane, or a seasoned ace with many kills in another flight simulator. If you follow these tips,
you will achieve much better results in combat.
Introduction to Combat Air Tactics
A fighter pilot’s goal is rather simple, and can be expressed by this short phrase:
To find enemy planes and to destroy them before they can do any damage
However, once you look deeper into air combat, you will realize that it’s not that simple.
The short phrase above actually assumes four things:
1. You notice the enemy in time
2. You can get into firing range
3. The enemy is destroyed by your gunfire
4. You live to tell about it
Each one of these tasks is a very complicated matter on it’s own, and all of them combined
together make success in air combat a questionable matter, at best.
Now let’s look at each one of them in a little more detail.
Finding the Enemy
This is difficult, as your only instrument in finding the
enemy is your own eyes. You have to be on a
constant lookout for enemy planes, from the
moment you take off to the moment you land.
"...we found ourselves in position behind and
above the enemy. We split the schwarm up into
two groups of two and dived down to attack.
We shot through the fighters and then started
to make life unpleasant for the schlachtflieger. I attacked the plane which was flying
furthest to the left, moved in quickly and opened fire from 70 to 100 meters. I
managed to score quite a few hits, but my shots just cannoned off the IL-2. Its
heavily-armored body was even able to withstand 2cm cannon projectiles!"
Erich Hartmann
Quote from: Jäger, Manfred (1995),
Erich Hartmann – The Most Successful Fighter Pilot in the World, Motorbuch.
3332
Page 18

If you are going against enemy bombers, you must trade off surprise for speed. What
good is coming in unnoticed when you gave the enemy time to drop bombs on their
primary objective?
If you are thinking of attacking enemy fighters, or other planes that present no
immediate danger to friendly forces, you can take your time and position yourself for
attack as you please.
Destroying your Target
This is the most difficult part of air combat. Even the
most qualified marksmen can miss a fixed target,
lying on a ground with a scoped rifle. Now
imagine firing at a small maneuvering target
hundreds of meters away, while both you and a
target are flying at 400 kilometers per hour. It’s not
impossible, but this is very hard.
Many young pilots return from their first missions
with empty ammo stores, but never claim a kill.
Only constant practice, and utmost confidence can help you score your first combat kill.
Getting Out
The success of this task largely depends on how well
you fared in the previous three.
If you missed some enemy targets in the first stage, you
risk getting shot out of the sky by an unseen
opponent. If you came in clumsily and ended up in a
middle of enemy formation, you’re as good as dead.
And, well, if you missed your target when you fired at
it – you have one more angry pilot to run away from.
Summary:
There is no skill more important to a pilot than gunnery.
All the aerobatic wonder moves in the world are of no use if you can’t get a kill when
the time comes. All that matters in combat is being able to get in quickly, shoot, and
get out even more quickly.
If you can’t destroy your target, you’re no good as a fighter pilot.
Always look for the enemy!
Most pilots shot down never saw their victor! Whether you’re by yourself or with a
hundred others, never stop looking around!
Protect your Mates!
Whatever you do, destruction of enemy aircraft is always secondary to protecting
friends. No enemy target is as important as the life of your mate!
Destroying your Target
There are two main segments within this task: maneuvering for the kill, and actually
shooting the enemy down.
Maneuvering for the kill has been a subject of a great many thick books; we
cannot possibly explain it in sufficient detail within this manual. However, the main
principles remain simple: you must bear your guns on your target long enough to
allow for it’s total destruction.
Remember, in actual combat, everything goes and you should never hesitate to act
on your hunch, however unconventional it may be.
All tactics were invented by the pilots in the heat of the dogfight. A fighter pilot who
does everything by the book becomes
predictable, and therefore vulnerable. Fight
using your brains, and always improvise!
Aerial Gunnery
There are many factors that work against you
when you fire. First of all, your bullets don’t fly
in a perfect straight line. Your plane is shaking in
the air, your guns recoil and twist, Earth’s gravity
pulls the bullets toward the ground, and the
thick air slows them down. All of those things
combine to create something called “bullet dispersion”.
A bullet stream from one machine gun at 50 meters will fit into an ar ea fifty times as small
as the same bullet stream at 500 meters. This makes long range fire extremely difficult.
Keep in mind that bullets lose power over distance. Using the same example, a bullet
at 50 meters can puncture light to medium armor, but at 500 meters it may even
bounce off human skin.
3534
Page 19

Most targets you encounter will be armored. Some planes have armor strong enough to
reflect any bullets or shells you fire; your ammunition will harmlessly bounce off your tar get
without doing any damage.
However, no airplane has the same thick armor all over. Even the heaviest
armored airplane has some weak spots, where just a few hits ar e often enough
to bring it down.
As we said above, it’s impossible to cover all aspects of aerial combat in a book, however
large it may be. We will not attempt to do that; rather, we’ll show some common situations
and try to illustrate the most fundamental principles of fighter vs. fighter combat.
We will only cover 1 vs. 1 scenarios here. Multiple aircraft engagements are extremely
complicated, and success in them is directly based on your ability to win 1 vs. 1 engagements.
Gunnery Practice Suggestions
Set up flights of friendly bombers in the Quick
Mission Builder. The larger your target, the
better. The Pe-8 from the Soviet side is a great
gunnery target, and the He-111 or Ju-52 make
great German targets.
Slow the game down with the [ key when
you’re getting ready to fir e. This is very helpful in
learning to aim and maneuver.
After you find yourself hitting your targets easily in the exercise above, set up the same
large targets as Hostile. Try shooting them down as they take defensive actions and fire
back at you.
Only after you’re sure to destroy an enemy bomber, should you try to go against
fighters. It takes a great deal of skill, patience and determination to shoot down an
enemy fighter.
Review the track of your flight afterwards. Analyze your performance, find mistakes and
correct them in your next mission.
Know your Enemy’s Weak Spots
Learn about the capabilities of all enemy planes: blind spots, defensive fire arcs, and
performance relative to your aircraft. Only by smartly positioning yourself to set your
strengths against enemy’s weaknesses can you be most effective in combat.
When you Think you’re too Close – Get Even Closer!
Bullet dispersion and power loss mean that long-range shots are ineffective, unless
you’re very lucky. Press the trigger only when sure to hit your target with every bullet
in the burst! Since that is only possible from point-blank range, open fire when your
target fills your whole windscreen.
The most important thing to a pilot is his airspeed. If you’re slow , you can’ t maneuver
well and you can’t escape enemy attacks. The worst position for a fighter is low and
slow, chugging along at tree-top level. When you’re there, your only hope is that
luck will be on your side.
So, at all times during an engagement, climb! This should become your strongest instinct,
to gain altitude whenever you have a chance. Stay above your opponent, and you
will hold the initiative.
We will assume the most common scenario: both you and the enemy notice each other
at the same time from a distance, and are going straight for each other’s throats.
Correctly approaching during this stage is key in your future success or failure. No amount
of skill can guarantee you a kill in a pure head-on pass, and we would not recommend
leaving this to your luck. Committing to a head-on attack is like tossing a coin in the air to
determine who gets shot down.
However, you can largely increase your odds even before the initial pass is completed.
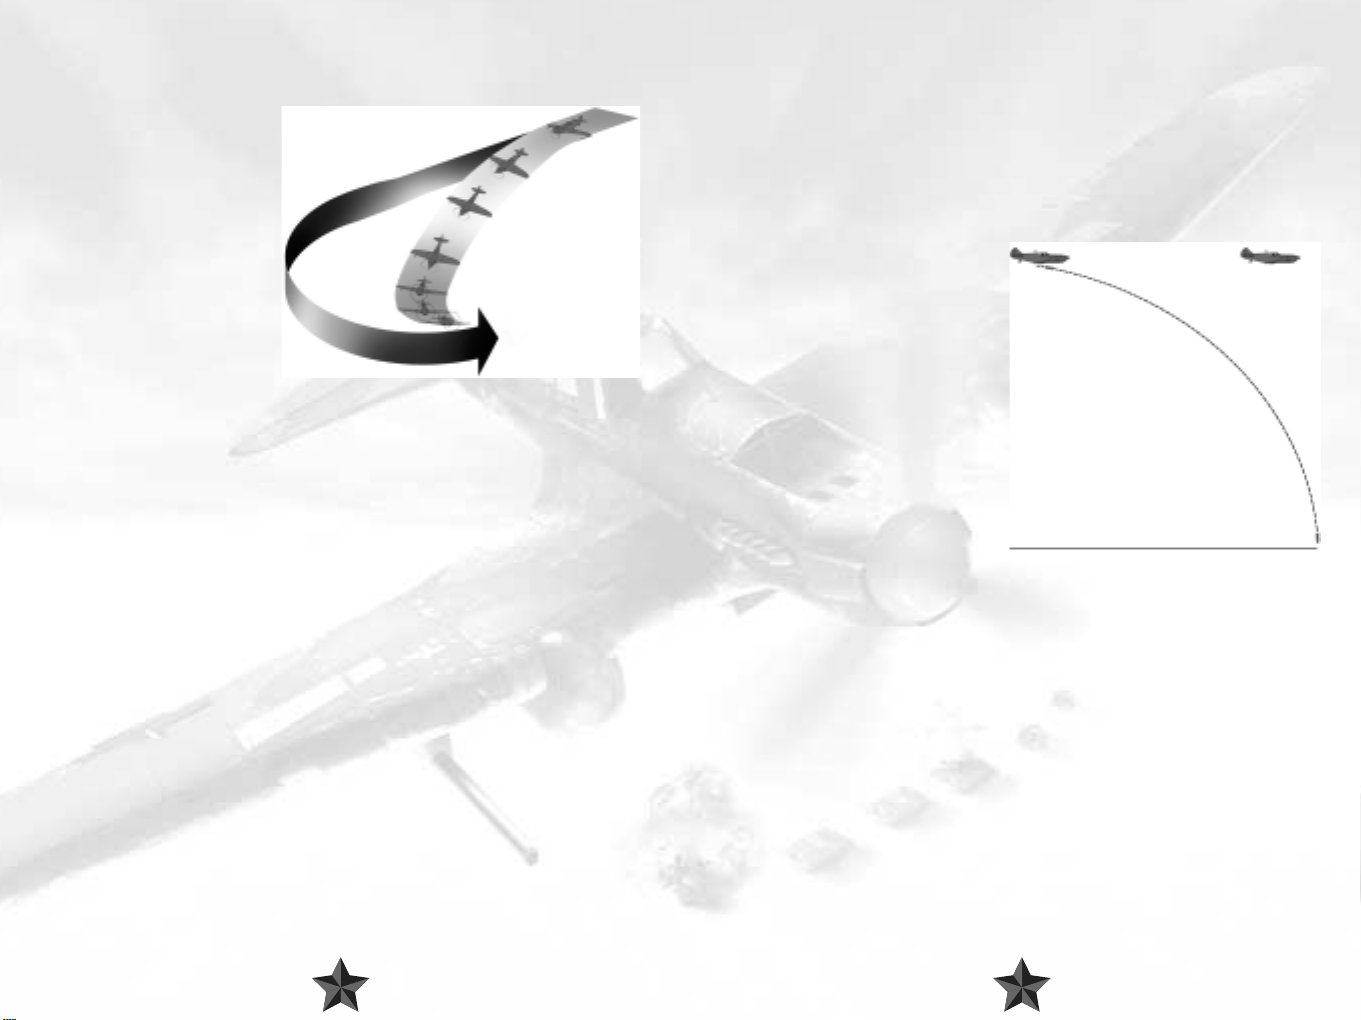
Look at this diagram, illustrating the importance of separation between your flight paths.
In case 1, the two fighters approach head-on, and both choose to turn left. It will be at
least two full turns before one can possibly get his guns on his target.
In the second case, the fighters pass each other at exactly one turn circle diameter. This
brings them on each other’s tails very rapidly.
Practice!
I wish that following these principles could guarantee you a kill every time you press
the trigger. Unfortunately, it isn’t so. Prepare to miss a lot.
Only by dedication and taking a steady, structured approach to training can you
become a true ace.
3736
Page 20

We therefore recommend the following approach path: fly straight towards your enemy.
When you’re about three or four firing ranges away, quickly break away until you’re almost
in range, and then turn back on a path parallel to your enemy’s. Of course, the flight path
separation does not only need to be horizontal; it can be in altitude as well, or both.
You can increase your odds even better by executing something called a lead turn. Unlike
in the first diagram above, a lead turn has you turning before you pass your opponent. If
executed correctly, this can get you on your opponent’s tail in as little as half a turn circle.
After the first pass, everything’s up to your and your
opponent’s skill! Know your plane’s capabilities, and
respect your adversary. If your plane turns better than
the enemy, follow him in a turn and try to catch up with
him as soon as you can. Everything goes: chop your
throttle, drop your flaps, even your gear!
Sooner or later, it’s bound to happen – unless, of course, you’ve activated the invincibility
option in the Difficulty settings menu – you will be hit by enemy fire, by flak, machine guns
or canons and your plane will be damaged. You will notice that maybe the steering isn’t
really working properly, that the engine sounds strange or maybe you’ll even see black
marks on the armor plating in front of you. There is quite a high probability that that really
is your oil. At any moment, your engine could stop, burst into flames or even explode.
What can you do? Well, that depends…
The first thing you should do is to get a clear idea of how serious the damage actually is
and who it was who perpetrated this awful deed. It goes without saying that this analysis
has to take place quickly, as an enemy fighter may be right behind you and moving itself
into position. If this is the case then you have, unfortunately, already made the serious
mistake of not paying attention! Try to escape your pursuer with defensive maneuvers if the
damage to your plane allows. Perhaps you can swerve your way out of danger or even
shoot your opponent down.
If your plane is faster than the enemy, climb away from
him to where he can’t follow you, and then dive down
with your guns blazing!
Speed is life.
There is no more important principle in combat than this one.
Your first burst should be your only burst.
“Spray and pray”, will only amuse your opponent. Make every shot count!
Always Watch Out!
Where there’s one enemy, there’s always more nearby! When you’re lining up on that
perfect pass, look behind you and check for your target’s wingman!
Do you think you’re getting there? Great – it’s not all that complicated, is it?
What to Do in the Case of Damage
“The anti-aircraft guns fired at us fiercely from all directions, and suddenly I felt our
aircraft hit. My left foot slipped down into an empty space below me, the bottom of
the cockpit had been shot away. I felt something hot streaming down my left arm
and leg – I was wounded. Blinded by the searchlights, I could discern nothing in the
cockpit. I could feel moisture spraying inside the cockpit; the fuel tank had been hit.
I was completely disorientated; the sky and earth were indistinguishable to my vision.
But far in the distance I could see the sparkle of our regimental runway floodlight,
and it helped restore my orientation. An air wave lifted us, and I managed to glide
back over the river to the neutral zone, where I landed the aircraft in darkness.”
Nina Raspopova, 46th guards bomber regiment.
in: Noggle, Anne (1994): A Dance With Death. Texas A&M University Press.
Whatever action you take, you should make certain that you pay close attention to your
instruments, in particular to the displays for oil pressure, engine temperature and coolant.
What do these displays tell you? Is the engine temperature rising? If so, the engine could
give up the ghost at any moment. Hopefully you are still flying at an adequate height. Cut
back on the throttle to take the pressure off the engine a little and make a flat descent in
order to maintain speed. It won’t do any harm to keep an eye out for a suitable place to
make an emergency landing or to make preparations for bailing out. Pull out all the stops
in trying to get back to base. Good luck!
If the plane can only be controlled with difficulty, this suggests a hit in the hydraulics
system or possibly that the wires of the steering mechanisms have been damaged. The
control surfaces themselves may also be damaged. Try setting course for your home
airfield – you can forget about combat for the time being, but you might just make it back
to base. Steer carefully, because if you end up stalling you may not be in a position to do
anything about it.
“I bailed out with a parachute on two occasions, once during training, and I made
fourteen emergency landings, but not once was I hit by an enemy fighter in battle.”
Erich Hartmann
Quote from: Sims, Edward H.: Fighter Tactics And
Strategy 1914 – 1970.
3938
Page 21

If you have managed to make it back in a plane which has taken something of a bruising,
you must make sure that your landing gear is still working before making an attempt to
land. Pay attention to the monitoring lights and switch to an external view via F2 if
necessary. If the landing gear cannot be lowered automatically, you may be able to do
this manually. Make sure that you are familiar with the appropriate keys (see chapter 6).
The landing flaps may also be damaged. If this is the case you will touch down at higher
speed – be careful! And pay more attention next time, ok?
5 BEFORE YOU START
Here you will find a brief list of options in the main menu. The most important of these are:
Pilot Roster – here you can create (or choose) your pilot for further use in
different modes of the game.
Single Mission – this is "single mission" mode for a mission that does not imply
career growth.
Pilot Career – campaign mode. In this mode your hero accomplishes one task
after another, keeps his battle statistics, regularly changes over
to new equipment, receives ranks and awards after a while, in
a word – he fights.
Multiplay – multiplay mode
Quick Mission Builder –“quick” generator of random missions. We shall take a closer
look at the way it operates below.
Full Mission Builder – mission editor. It creates missions as well, just like the quick
generator, but here the user controls the entire process of
creation. It is a more complicated instrument, but also a more
powerful one. Please see special section explaining how to use it.
Training – missions for beginners.
Play Track – "Il-2" enables you to create tracks. In other words, everything
that you accomplished while fulfilling your task is fully recorded.
This menu option correspondingly plays back these tracks.
View Objects – here you can take a close look at all 3D objects modeled for the
game and find detailed information on the fighting abilities of
military equipment.
Controls – here you can reassign control buttons and create your own
configuration.
Credits – it would be very nice of you if you pressed the button at least
once, just out of curiosity.
Hardware Setup – here you can adjust the settings pertaining to your hardware.
This option is also used for choosing the optimal solution while
determining the rate of program operation and detail of the
reproduced 3D image.
Difficulty – includes various realism-related settings. It should be pointed
out that the level of complete realism in this flight sim can
become a problem for beginners. Even the fans are divided on
the item – what some of them think quite appropriate is
deemed downright unfair and unrealistic by the others.
Exit – quitting the game; sometimes it is necessary.
Now we can consider each
menu item in more detail.
6 PILOT ROSTER
"IL-2" can simultaneously store information on several virtual pilots. The process starts by
pressing the Create button, which results in a new entry in the list of personal files. All you
have to do is enter a full name and call-sign by clicking in the corresponding fields. The
process is completed when you have chosen one pilot out of all those recor ded. To do this
click on the corresponding entry and press the "Select" button. After that, you will be
returned to the main menu where the pilot chosen has already appeared in a special
indicator. In doing this, all individual control settings are preserved.
4140
Page 22

7 CONTROLS
Key control panels available in
a seperate document.
As was already mentioned, this is
a reassignment of the controls.
Having chosen the "Controls"
item, you access a long menu
that can be scrolled through
using the slider on the right. The
left of the menu is taken up by a
list of actions you perform (e.g.
"release the chassis"); the button
initiating the action is indicated on
the right (in this case it is "G"). If,
for some reason, you find that
you are not satisfied with the default settings, you should click on the field where the
button is indicated. The field will subsequently be surrounded by a gray frame and you will
only have to press the hotkey (or alternatively a mouse/joystick button), which you want
to see in this place.
You might decide that the previous settings were better. We have devised a special "reset
to default" button for this purpose, which immediately returns the configuration to the "by
default" status.
To adjust HOTAS controls, perform the actions described above with only one difference:
after you have clicked on the axis you want to assign for your HOTAS, move the device
meant for it slightly in the corresponding direction.
1. Dead Band used to set a dead zone where any small movements of stick will have a
reaction almost equaling zero. This feature can be helpful if you are playing a flight
simulator for the first time or have the old type of joystick. If you are an experienced
flight simmer, we strongly recommend that you set Dead Band in the left position or
very close to the left position.
2. Filtering allows you to set a digitized filter if your joystick has problems with inadequate
reaction.
3. You can select basic joystick axes and change their profiles by fine-tuning in the special
table used to adjust the stick reaction curve. Some joysticks need fine-tuning, but most
work correctly with our default settings. You can select the axis for fine-tuning in the
left combo-box.
4. To enable or disable the Force Feedback feature, set the Force Feedback switch to On
or Off.
5. If you find that our initial settings were more appropriate before your changes, press
the Default button. All the settings will subsequently be set back to default.
6. Press Back to quit this menu. In this case any changes made will be applied
automatically.
8 VIEW OBJECTS
There are a lot of 3D objects in the
game. When you choose this menu,
you immediately access the next one
where all the objects are divided into
classes.
If you want to quit the menu, press the "Apply" button. All changes made will be activated
immediately.
Additional in-game Joystick Settings.
Find and press the Hardware setup button in the game's Main Menu. You are now in the
hardware setup menu. Pr ess the Inputbutton. Here you can set up the following features
for your joystick:
Aircraft – all aircraft
Tanks – not tanks alone, but with self-propelled artillery mountings or
SAU included.
Ships – hips, cutters and submarines placed above the water.
Vehicles & Artillery – towed vehicles and artillery. The list includes mobile rocket
launchers – our "Katushas".
4342
Page 23

Having chosen any of the above-mentioned objects, you directly access the viewing mode.
Here the list of objects falls into two categories, in terms of nationality – Soviet and German
military equipment. You make your choice via the "Select Country" drop-down menu.
Now you have only to choose what you want in the left part of the menu. Once you have
done so, a description of the object appears in a large window. By pressing the "View"
button in the lower right corner, you can display its 3D image. You can zoom in or out on
this image by pressing the left button of the mouse and moving it forwards or backwards.
You can also rotate the image by pressing the right mouse button and moving the mouse
in any direction.
After examining the object, you can return to its text description using the same button (the
inscription under the button will change to "Text").
To quit view mode, press the "Back" button.
Once you have chosen the track and pressed the "Play T rack" button, the program will load
it and start playback. You can interrupt the process at any time by pressing Esc; you will
subsequently be returned to the menu described above. The only difference lies in the
buttons – the left button will be called "Stop Playing Track", and the right one – "Continue".
They will either resume playback or stop it completely.
If you press the "Stop" button, the buttons will retrieve their original commands – "Main
Menu" and "Play Track".
10 TRAINING
This section is intended for beginners who are getting acquainted with flight simulators for
the first time. We advise you to start with simple flying.
9 PLAY TRACK
Tracks recorded in the course of the
mission and are saved as special files
with the .trk extension in the
"Records" directory. The "Play
Track" option in the main menu is
used to play them back.
Once you have chosen the option,
you access a menu controlling the
playback of the tracks. Above, there
is a window in which you choose
the appropriate track. Below, there
are three toggles that switch on/off
the options listed below. When a
toggle is switched on, it is in the upper position.
Loop – used to switch off the loop playback, which is
convenient for editing.
Manual Time Compression – enables/disables time compression during track playback.
Manual View Control – enables/disables switching over the views.
In-Flight Messages – determines whether the messages received by the pilot
during his mission should be displayed on-screen.
There are two buttons below these options:
Main Menu – returns to the main menu
Play Track – begins track playback
Each mission is built in such a way that during the flight demonstration, a text explaining
the actions of the pilot appears on-screen. You can take up control of the flight at any time
and continue on your own. However we recommend that you view each demonstration
for the first time to remember the basic skills for combat aircraft control.
11 SINGLE PLAY
With "IL-2 Sturmovik", you can
play virtual combats on the side of
the USSR or Germany. Consequently,
single missions and campaigns are
both divided into Soviet and German.
Single Missions
You can accomplish one task of your
choice in this mission. Your
performance will have no effect on
your pilot's status and private account.
When you activate this mode, you
access the mission menu, which
contains the following items:
Select Country – here you choose the country you will be fighting for. As
mentioned above, there are two possible options – the USSR
and Germany.
Mission Type – dogfight or bomb run.
Mission Files – each mission is stored in a special file. You can find the list of files
below and load any of them. To make things clear, we have
placed a short mission brief to the right of the list.
4544
Page 24

12 PILOT CAREER (Campaign mode)
Before you embark on your pilot career, here is a historical overview of the
main great battles modeled in the game.
On 18 December 1940, Hitler ordered that preparations be made for the so-called
‘Operation Barbarossa’, as the battle for ‘lebensraum’ (living space) in Eastern Europe
came to be known. After the lightning victory (‘Blitzsieg’) over France, there was
enormous euphoria in Germany over the “greatest warlord of all time”. The German Reich
was now in control of the continent from the North Pole to the Spanish bor der. Hitler was
not to be halted, and in future he was to become more and more involved in the
operational leadership of the ‘Wehrmacht’ (German armed forces). The battle with Russia
was planned as a war of annihilation from the very beginning. As Hitler explained in a
discussion with the Chief of Staff of the
Wehrmacht High Command, Alfred
Jodl, “The coming campaign is more
than merely a battle of arms; it will
become a conflict between two
different philosophies”. Hitler also stated
that the war was to be waged with
uncompromising severity - according to
one order, Soviet volunteers were to be
liquidated “mercilessly”, regardless of
whether they were in combat or trying
to run away.
On 22 June 1941, the German armed forces entered the Soviet Union, thus breaking the
German-Soviet non-aggression pact which Hitler and Stalin had signed on August 23
1939. National Socialist propaganda declared that the Russian campaign was “in defense
of Europe against Bolshevism” and hoped for another lightning victory – Hitler planned
to conquer Russia in its entirety in only eight weeks. The army was divided into three
groups – one to conquer Leningrad, which would then in turn join forces with the
second group in the assault on Moscow. The third group was to march towards Kiev in
order to gain control of the oil fields in the south. Many historians consider Hitler’s
insistence on splitting his forces into three relatively weak army groups a first step to
Germany’s ultimate defeat.
The German Luftwaffe had a decisive part to play in this plan, destroying many Soviet aircraft
before they even got off the ground. Nevertheless, the initial successes of the Luftwaffe
could not hide the fact that it was not equipped for a long-running battle. Over-hasty mass
production of machines that had hardly been tested and the adaptation and misuse of
proven models meant that many promising aircraft were not used to their full potential.
The German army marched in with over three million soldiers, including 75 percent of the
field troops and 61 percent of the Luftwaffe. The invading for ces counted no less than 153
divisions among their number, including 19 of the total 21 tank divisions. Altogether there
were 600,000 vehicles, 3,580 tanks, 7,184 guns and 1,830 aircraft involved in the Russian
campaign. The Soviet forces were r epresented at the Eur opean front by 4.7 million soldiers.
Stalin was unprepared for the German assault and had played down all the obvious signs
which suggested that an attack was likely, treating them as “mere provocation”. The
announcement that the Fascist “monstrous cannibal” had attacked caught him unawares.
It was however not a surprise for many Soviet commanders, including some generals of
the high command. An order was issued just a few hours before the invasion, warning
front-line commanders about imminent “provocation attempts”. It didn’t reach its recipients
in time.
Nevertheless, although the Germans soon captured Smolensk and Kiev , attacked Leningrad
and took 1.5 million prisoners of war, the Soviet Union as a whole refused to fall in with
Hitler’s plans and capitulate by the time winter arrived. The non-aggression pact between
the Soviet Union and Japan enabled Stalin to call on reinforcements fr om the east. Not only
that, but the Soviets succeeded in evacuating over 1,500 production centers and around
10 million civilians to the east. Hitler had not expected an operation of this scale at all.
Moreover, the German troops, ill-equipped for the harshness of winter at the Eastern Front
and stretched to their limits, were finding it more and more difficult to organize supplies.
Hitler had completely underestimated the determination and might of the Soviet forces,
their strength in numbers and the potential of their armaments.
Hitler ignored the advice of his army’s High Command to pool the German forces and
finally press on towards Moscow. Instead he ordered the capture of Leningrad and the
occupation of the Ukraine. The first German troops did not reach the outskirts of Moscow
until 2 October 1941, and Hitler instructed them to hold position. His Chief of Command
Walther von Brauchitsch advised the withdrawal of troops to more favorable winter
positions, but Hitler again remained firm, showing no hesitation in taking overall control of
the army himself. The notion of a speedy victory was thus dispelled.
Admittedly, the Germans succeeded in capturing parts of the Soviet supply areas, but this
did not lead to a decision in the Caucasus or in Stalingrad during the offensive mounted
in summer 1942. The German sixth army was surrounded on 10 November 1942 at
Stalingrad and surrendered on 31 January 1943. Between 1942 and 1943, the German
Wehrmacht lost almost a million soldiers. Stalin, Roosevelt and Churchill held a summit in
Yalta to discuss their post-war policies and strategies for achieving a “just and lasting peace”.
The Red Army captured Berlin and Hitler committed suicide. On May 8 1945, Germany
capitulated, thus putting an end to the war in Europe.
4746
Page 25

1941: Smolensk
The First German Victories –The Battles of Smolensk and Kiev
“The Russians didn’t show the same amount of initiative as the enemy pilots at the
Western Front. But the elite units of the Red Guard really were very good. Their
aircraft were painted in red right up to the cockpit and their pilots had a real taste
for battles on the turn. Our Me 109s were better at high altitudes, especially at the
beginning of the campaign. We could maybe shoot down five planes in one day but by the next day there were just as many there again…”
Günther Rall
Quote from: Sims, Edward H., Fighter Tactics And Strategy 1914 - 1970.
The first major encirclement of Soviet forces
took place in the area of Bialystok-Minsk.
But Hitler already feared that the ring with
which the Soviet troops had been
surrounded could be too large and
therefore wanted to stop the tank groups
earlier than planned. At this stage, his
general staff were still able to get their way ,
however. Their tactics proved to be
successful, as once Minsk had been
captured on 26 June 1941, the
Wehrmacht’s High Command were able to
register the following successes: 400,000 prisoners of war and 600 guns had been captured,
2,233 tanks and 4,107 planes had been destroyed, all at a cost of only 150 German aircraft
losses. The sheer numbers given here should have provided clear indication of the enormous
military strength in the Soviet Union as a whole, but Colonel-General Franz Halder was already
predicting that the campaign would be won in two weeks’ time.
After the first major battle of encirclement at Bialystok and Minsk, the central army group
advanced from the north towards Smolensk, ‘the gateway to Russia', and the Second
Panzer Group made its way from the south in an attempt to encircle the Soviet troops at
the city’s western front in a pincer movement. The troops then planned to advance towards
Moscow in a concentric tank wedge. Meanwhile, the Soviet High Command in the
Smolensk area was pulling 42 divisions together to prevent the German tr oops from getting
any further towards Moscow, which was around 400 kilometers away. This defensive
maneuver ended in failure as the mobile German troops succeeded in evading the Red
Army’s defensive strongholds of the Dniepr crossings Mogilev and Orsha south-west of
Moscow. After heavy street battles, the city fell into German hands on 16 July 1941.
In spite of the baking summer sun and the huge dust clouds which hampered their
armored vehicles, the 2nd and 3rd Panzer Groups and the infantry divisions of the Second
Army managed to trap 15 Soviet divisions of the Second Army by 24 July. Between
Smolensk and Orscha, the Red Army lost around 3,000 tanks and over 300,000 soldiers,
who then became prisoners of war after the battle came to an end on 5 August.
Despite the triumph at Smolensk, the German military leadership found itself in a severe
crisis. Walther von Brauchitsch, commander-in-chief of the army, and Chief of the Army
General Staff Halder pleaded for a swift advance by the central army group towards
Moscow. Hitler, on the other hand, favored conquering the Ukraine first, pointing to the
fact that its oil and raw material deposits were of immense strategic importance for Russia.
Hitler got his way and ordered units of the Second Army to proceed to the south for the
battle of Kiev.
The Second Army of the central army group first succeeded in capturing Gomel and then
managed to create a cohesive front at the Dniepr with the southern army gr oup. The 17th
army of the southern group captured the bridgehead at Krementchug, creating a base
from which to advance northwards to Kiev, 250 kilometers away. Together they encircled
five armies of the Soviet southern front in a pincer movement. At the same time, the Sixth
Army under the command of Field Marshal Walter von Reichenau was attacking from the
west. The ring was closed and Kiev was brought under German control. On September 8
the fighter squadron 51(JG 51) commanded by Werner Mölders announced air victory
number 2000. The battle of encirclement in the east of Kiev was to continue until 26
September and led to the surrender of 665,000 Soviet soldiers. The Germans also seized
over 880 tanks and 3,700 guns. The morale in the army was high and the Wehrmacht’s
High Command had every hope that they would be able to advance into the Caucasus
before the onset of winter.
1941: Moscow
‘Operation Typhoon’: The March to Moscow
“To fly a combat mission is not a trip under the moon. Every attack, every bombing
is a dance with death.”
Serafima Amsova-Taranenko
in: Noggle, Ann (1994): A Dance with Death. Texas A&M University Press
2 October 1941: the mild Autumn weather was still kind to the German troops – ‘Operation
Typhoon’ could begin. On the evening of 3 October the tanks of GeneralOberst Heinz
Guderian surprisingly took control of Orel at the Oka River, thus cutting off the rail
connection between Moscow and Kharkov. At the same time, the Sixth Army under Field
Marshal Walter von Reichenau was marching on Kharkov. In the Vyasma-Bryansk area,
German troops trapped Moscow’s defenders in their pincer attack - yet another battle of
encirclement was underway.
4948
Page 26

With the support of the dive bombers, the
units of the 4th Panzer Group broke thr ough
the great Moscow defenses between Tver
and Kaluga, overcoming concrete bunkers,
anti-tank barriers, minefields and stationary
flamethrower batteries – not to mention the
first Siberian troops from Vladivostok.
German troops also succeeded in breaking
through Soviet defenses in Mozhaisk and
Volokolamsk and at the river Nara to the east
of Mozhaisk, destroying enemy rocket
launcher batteries en route.
So far so good, as far as the German troops were concerned – until the first snowfalls
came, that is. These first signs of the bitterly cold Russian winter were followed by another
natural obstacle in the shape of mud. The German advance soon ran into difficulties, not
only due to the absence of warm winter clothing, but also because the supply of fuel fell
victim to the elements, plunging the campaign into a transport crisis. The Soviet rail system
provided an additional burden – the Germans first had to adapt the width of the tracks to
German standards – Russian tracks were too narrow for German trains.
On 16 October the Germans, now with help from the fourth Rumanian Army, encircled
four Soviet infantry armies and took 100,000 Red Army soldiers prisoner. Just one day later,
the battle of encirclement at Vyasma-Bryansk came to an end. The Wehrmacht’s High
Command was able to declare the following as either destroyed or vanquished: 67 artillery
divisions, six cavalry, seven tank divisions and six tank brigades! To the south, the Germans
captured Stalino in the Donez basin, taking the number of Soviet divisions destroyed up to
300. Nevertheless, the Russians kept on coming back with stronger guns – as well as the
superb T-34 tank and the Katyusha rocket launcher known to the Germans as the ‘Stalin’s
organ’ were being used more and more frequently.
29 October 1941: The attempt to capture Tula, approximately 80 km outside of Moscow,
ended in failure. The German tanks came under heavy fire fr om the anti-tank defenses and
flak guns around four kilometers away from the city boundary. Capturing the city from the
other direction also failed, which was no wonder given the fact the 4th Panzer Group was
literally stuck in the mud at the Moscow marshes and at the Smolensk-Moscow ridge.
Between 6 and 12 November 1941, the muddy period was drawing to an end and being
replaced by frost on all fronts. To begin with, this allowed the German troops to resume
their assault, but it was only a matter of time until the merciless Russian winter seized the
Germans in its icy grip.
Stalin now made the decision to send Siberian and Cossack divisions into battle, using the
fact that these troops were more than prepared for the harshness of the elements to his
advantage. The scene was now set for the final battle for the second Moscow defense
position.
The German plan was as follows: to start off by capturing Klin, then turn to the south-east,
cut off Moscow from the north and then cut through the connection between Moscow
and Leningrad.
The German troops were gradually moving forward. Meanwhile, the members of the
Antikomintern Pact held a summit in Berlin on 25 November. The German Reich, Italy,
Japan, Spain and Manchuria extended their pact for an additional five years; Bulgaria,
Denmark, Finland, Croatia, Rumania, Slovakia and China also joined the pact, giving Hitler’s
advisor Joachim von Ribbentrop the confidence to declare the “bolshevist colossus” to be
already in ruins. At this stage, the German troops were still about 30 kilometers away from
the Russian capital.
A day later, the Red Army launched its first major counter-offensive at Rostov. The German
troops evacuated the town and General Field Marshal Gerd von Rundstedt asked that they
should be allowed to retreat, but Hitler had no intention of agreeing to his request. This
spelled Von Rundstedt’s departure, and Hitler replaced him with Field Marshal Hermann
von Reichenau.
At temperatures of minus 38 degrees Celsius and with only their summer uniforms to keep
out the cold, the troops’ morale was sinking by the day . Many tr oops fr oze to death, starved
or slaughtered their own horses in order to stay alive. Fuel was becoming scar ce and tanks
were getting stuck as a matter of course. Not only that, but many engines were giving up
the ghost in any case due to the lack of anti-freeze.
By the middle of December many units had switched from attack to defense. There were
loud cries for a retreat to winter positions – positions which, in fact, did not exist. But Hitler
had no time for any signs of weakness or surrender. Instead of sending winter equipment
to the front, he sent his soldiers ammunition. By this stage Hitler had assumed overall
command of the army himself, trying to combine running the state and the military whilst
refusing to take any advice whatsoever. Hitler was more committed than ever to holding
on, in spite of the phenomenal drain on his men and their resources and in apparent
denial of the failure of the Blitzkrieg strategy.
Back home, winter clothing was being donated and collected for the troops in the east,
but the transport crisis meant that it was impossible to get these supplies to where they
were needed. T ank pr oduction was incr eased fr om 125 to 600 units a month, but this extra
production was at the expense of the air armaments program. The fact that the air
armaments industry had also been dragged into the crisis put a seal on this disastrous state
of affairs for the German forces.
The German advance finally came to a standstill 30 kilometers outside Moscow. Chaotic
planning, diverging strategic concepts and inadequate preparation were now taking their
toll. ‘All or nothing’ was now Hitler’s war cry, with which he hoped to force a swift
conclusion after the failure of his overall war plan in the Autumn of 1940. The next step
was clear - Stalingrad or bust.
5150
Page 27

1942: Stalingrad
Bitter hand-to-hand fighting in a city under siege
If there was one thing that the two arch
enemies agreed upon, it was that the
winners of the battle of Stalingrad would
also emerge victorious in the battle for
Russia. The battle of encirclement at
Stalingrad, logistically the most important
center in the Caucasus and, with its tank
factories, the industrial heart of Russia, was
a human and material battle the like of
which had never been seen before. The
trench and positional warfare that marked
the battle of Stalingrad led Russian
propaganda of the time to speak of the
conflict as a ‘Russian Verdun’.
The Sixth Army, Hitler’s elite troops under the leadership of General Friedrich Paulus (who
was eventually promoted to Field Marshal later), were the main combatants in this, the
biggest battle of the Eastern campaign. They were supported by sections of the 4th Panzer
Army who had arrived from the south.
10 August 1942: The first waves of German troops broke through as far as the outlying
districts of Stalingrad. Nine days later, Paulus ordered the attack. On 23 August, the first
German attack troops reached the banks of the Volga, supported in their quest by the aircraft
of the VIII Air Corps of General Martin Fiebig. By October, they had managed to capture 90%
of the city. The battle was by no means over, though - the ruins of the city provided an ideal
hiding place for Soviet sharp-shooters, and many machine gun positions were tucked away
in its dark alleys. The conflict was becoming more and more gruesome, the soldiers battling
it out with bayonets, rifle butts and even spades as attack followed attack.
The enormous psychological burden was compounded by worries over reinforcements
and the cruel Russian winter. As early as September, General Paulus tried to persuade Hitler
that Stalingrad could not be conquered. “I cannot change this, it goes beyond the means
of human strength,” yet Hitler stuck to his guns and his officers refused to give up. They
motivated their men to their limits – and beyond. By the middle of October, the German
troops had occupied the whole of north Stalingrad.
Nevertheless, fresh waves of Soviet troops were already preparing themselves for
‘Operation Uranus’. Paulus pleaded with Hitler to allow the German troops to retreat, but
to no avail. On 19 November 1942, the Red Army attacked as anticipated. Soviet soldiers
encircled the German troops from the north and the south, absolutely determined to force
the Germans to surrender. 300,000 men were thus trapped in Stalingrad. Hitler ordered
them to hold position and promised sufficient help from the air and General Paulus happily
agreed, his faith in the Fuhrer’s promise not faltering for a moment.
This was a promise which Hitler had great difficulty in keeping, as not only did the German
Luftwaffe have an insufficient number of planes, the aircraft which they did have were
weakened by the strength of Russian anti-aircraft defenses. Air fleet 4 did what it could,
however. Transport planes from Tunis and Sicily were called up and adapted from summer
to winter conditions as quickly as possible. By December, about 200 Ju-52 aircraft and 100
He-111 bombers with empty bomb compartments had been organized as transports, and
by January 1943 the number had grown to 467 aircraft in all. Sixth Army demanded 700
tons of supply per day, every day. The Luftwaffe at this stage was barely capable of
delivering 350 tons, and only for a short period of time – even that estimate completely
discounting any Soviet opposition.
The Russians were tightening their grip on the city and the German troops were fast
running out of food and ammunition. At temperatures of up to 40 degrees below zero,
they stuck out the siege as best they could. In the words of one officer: “At the end we
were so exhausted that we did not even have the strength to stand at our machine guns.
We tied shoelaces and pieces of string to the trigger and hung on to them with all our
might whenever we had to shoot. In any case, we only fired if we really had to, as we
were afraid of blowing our cover.”
On 12 December, German LVII Panzer Corps set off towards Stalingrad to liberate their
besieged comrades. But ‘Operation Winter Storm’ was a failure and the tank units gave up
two weeks later, leaving the Sixth Army under siege and without reinforcements. The
situation was becoming more and more hopeless, and the German troops froze to death,
starved or died in battle. The troops in the Kette were not made aware of the rescue
operation’s failure. Besieged Germans kept listening for distant engine sounds hoping they
were of the liberating SS Panzers for many months to come.
On January 21, Paulus radioed the Führer’s headquarters with the following message:
“Troops without ammunition or food. Signs of disintegration on the southern,
northern and western fronts. 18,000 wounded without the most basic dressings or
medicine. Front broken up in many places due to major setbacks. Further defense
pointless. Army requests permission to surrender in order to save lives.” A little later,
the Gumrak airfield also fell into Russian hands and with it any hope of supplies. On 31
January, Paulus and his officers surrendered to the Russian forces.
5352
Page 28

Between 24 November 1942 and 31 January 1943, 488 aircraft along with 1,000 men
were lost in supplying Stalingrad alone. This amounted to five squadrons – more than an
entire flying corps. Of the 300,000 German soldiers who had set off to capture Stalingrad,
145,000 died. 45,000 troops, some wounded, some essential specialists, were flown out
in time. 90,000 more were taken prisoner by the Russians. Years later only 6,000 of these
returned home.
1943: Kursk
‘Operation Citadel’ – the tank battles at Kursk
“I came up against the IL-2 at the Eastern Front. We got a message that low-flying
fighters were in the area. Our squadr on leader led the way, and I then saw the slowmoving IL-2s. I was flying a Bf-109 G. My squadron leader gave me a target
instruction with the words “I hope your teeth are still in good condition!” As for what
he meant by that exactly - well, I soon found out, because I used up half my cannon
ammo. All the IL-2 planes were destroyed, a total of about eight planes.”
Georg Adam
(Interview, November 2000)
On 15 April 1943, Hitler gave the order for
‘Operation Citadel’, the pincer attack on
the Kursk bulge (also referred to as the
Kursk salient), which was to become the
biggest tank battle of the Second World
War. The Russian front in the Kursk area
which had advanced 100 kilometers to the
west was to be encircled by the central
and southern army groups and the Red
Army troops there destroyed. In a second
stage of the operation, it was planned that the army groups should then advance into the
depths of Russia.
The Soviet High Command had got wind of Hitler’s plans and had decided as early as
March to fend off the German attack and then to go on the offensive. Within three months
the Red Army set up eight strongly consolidated and mined lines of defense, running to a
total depth of no less than 300 kilometers. In the main defense strip alone, 434,667 tank
mines and 7,000 kilometers of wire obstacles were laid.
900,000 soldiers of the German Wehrmacht were faced with 1,337,000 Red Army troops.
10,000 German guns were up against 19,300 on the other side. The Germans had 2,700
tanks and submachine guns at their desposal, the Russians 3,300. And as far as fighter
planes were concerned, the Germans were again outnumbered 2,650 to 2,000. The
Messerschmitt Bf-109 G fighter plane was one of the improved models now available, with
its new, powerful 1,700 hp Daimler-Benz engine.
The Focke-Wulf FW-190 was also a major presence at Kursk. The eighth flying corps
included 68 ground attack aircraft of the Hs 129 model, whose weaponry was most useful
for anti-tank combat – hence their nickname ‘flying can openers’.
It was plain to see that the Russian side was far stronger, even disregarding the 573,000
soldiers, 7,401 guns and 1,551 tanks and self-propelled weapons at the Steppe Front. In
addition, the German panzer division had already incurred serious losses in terms of men
and materials. Hitler put his trust in the introduction of new tank models such as the
‘Panther’, ‘Tiger’ and ‘Elefant’. Yet his favorite, the ‘Panther’ was not yet considered ready
for action as it had not been tested adequately. So the German position coming into
‘Operation Citadel’ could hardly have been worse. In spite of this, early in the morning of
5 July 1943, panzer, panzer grenadier and infantry divisions of the Central and Southern
army groups embarked on the operation, which was fought out bitterly on both sides.
The German air fleets 4 and 6 started off by attacking the hinterland and then focused on
ground combat to clear a path for their tanks. The Germans were to have control of the
Kursk bulge for only a matter of days, as it was no time at all before they were complaining
of fuel shortages. They succeeded in taking a heavily fortified key position at Oboyan in the
south, but their assaults on the heights of Ponyri and Teploye ended in failure. The Red
Army reacted extremely quickly, leading to fierce tank battles in the rolling steppes of the
south in particular. The number of German tanks was decreasing by the day, and General
Model was wavering. As early as 9 July he spoke of a war of attrition, saying that the
massive deployment of tanks was of little real use. To top it all, the Red Army drew on its
reserves and the news of the Soviets’ partial attacks in the Orel bulge reached Model on 11
July. One day later, the Soviets went on to the offensive and plunged the second Panzer
army into a deep crisis. Model had to put a stop to his attacks in order to bolster German
defenses in the Orel bulge and to prevent the worst from happening.
This was typical of the whole operation – the Wehrmacht was only able to form attack
groups at narrow sections of the front and in brief bursts, whilst at the same time other
areas suffered. What made life difficult for the German troops was not only that they were
outnumbered by the Soviets, the means at their disposal were inadequate and they were
fighting on unknown terrain with poor roads. Under these circumstances it was little
wonder that morale was slipping by the day.
The battles continued nevertheless. The tank battle at Prochorovka on 12 July 1943 was
undoubtedly the most significant of the Kursk battles. 850 Russian and 500 German tanks
met, quite unexpectedly for both sides, on the narrowest of battlefields. A second Russian
counteroffensive began at Belgorod and Kharkov, the double battle of Donetz and Mius to
win back the Donetz basin began on 17 July. On 3 August, Orel was surrendered by the
Germans. Three days later Belgorod, the second prong of the German offensive, was lost.
As the battles mounted up, the might of the Red Army grew, whilst at the same time the
German tanks and weapons grew weaker and weaker. The withdrawal began at the
beginning of September – the Soviet troops had emerged victorious.
5554
Page 29

Looking back, the battle in the Kursk bulge is often seen as one huge tank conflict, but this
was not the case. The conflict should, instead, be seen as a series of individual battles and
operations. Opinions also differ strongly over the length of the battle. The Russians speak
of 50 days, the Germans on the other hand talk of no more than nine. The numbers of
losses on both sides are also a matter of debate. The Russians lay claim to having destroyed
4,605 German armored vehicles and to having captured 521, but the Russian figure of
‘Tigers’ destroyed in the Kursk bulge (146) greatly exceeds the number of these tanks
actually deployed by the Germans. Germany reported a total loss of 33 ‘Tiger 1’ tanks. It is
extremely difficult, if not impossible to track down reliable figures on Soviet losses, as the
USSR was always extremely reluctant to have its military strength questioned. One thing is
for sure, however, the personnel and also material losses of the Red Army far exceeded
those of the Germans.
1944: The Crimea
From the War in the Crimea to the Red Army’s March into Berlin
The Ukraine had already been lost. The 17th Army, which had been completely cut off
since 1 November 1943 and supplied via the sea route, was alone in defending the
isolated bastion of the Crimea. Hitler was furious and blamed the two army High
Commanders General Field Marshal Erich von Manstein and General Field Marshal Ewald
von Kleist, who were promptly dismissed to the ‘second division’ of German military leaders.
The 4th Ukrainian Front commenced its dual offensive in April 1944 with the aim of
liquidating this German outpost. On 9 May, the Russians regained Sebastopol. ‘Admiral
Black Sea’ Vice Admiral Brinkmann and ‘Sea Commander Crimea’ Rear Admiral Schulz
ordered the evacuation far too late, and coastal batteries blew up their guns on the sea
voyage to Rumania.
This was followed by a break in fighting.
On 22 June 1944, the skies were filled with
a mighty cacophony: hundreds of
bombers and fighter planes were
pounding the German artillery positions,
and thousands of ‘Stalin’s Organs’ filled the
air with their wailing. The Red Army’s
breakthrough at Vitebsk split apart the 3rd
Army Front and divided it into two parts,
making all attempts at escape futile.
The Russian tank units continued with their
advance and the gateway on onto Belarus was wide open as vast gaps in the Front
appeared. Once the Fronts had been penetrated, the Russian advance came up against
very little opposition. Nevertheless, Hitler clung on to his insistence on defending German
lines even though he had already long lost his overview of what was happening. Yet even
he soon realized that he was no longer in a position to lead, but instead merely to patch
things up at the edges.
To add insult to injury, in July 1944, 50,000 German prisoners of war were marched
though the streets of Moscow as evidence of the victory over the ‘fascist German forces of
occupation’.
By July 1944, the Soviet troops had advanced as far as the Vistula. Despite this, Hitler took
additional defense measures in September, calling on all men between 16 and 60 to join
the so-called ‘Volkssturm’, or German Territorial Army. They were given a crash course in
operating bazookas as German cities were fortified. Every man available had to join up or
face the death penalty. Meanwhile, the Soviet advance continued relentlessly, and the first
Soviet troops made it into East Prussia in October.
Both German and Soviet high command regarded the Crimean peninsula as an important
tactical objective, while in reality it may not have been. In his decision to defend Crimea,
Hitler pointed out it’s importance as a potential staging point of air attacks against Romanian
oil fields – but Soviet tanks were already advancing towards those fields in Romania itself!
The main objectives of the war lay far away from Crimea. It was nevertheless a sore spot
on both sides’ maps, and both committed to full-out war there with tremendous personnel
losses. The gain to these losses is questionable at best, especially for the Germans.
1945: Berlin
When Soviet and American soldiers shook hands at Torgau on the river Elbe on 25 April
1945, the symbolic effect was clear - it was only a matter of time until the end of the war
in Europe. The Red Army had already made it as far as the center of Berlin, and Adolf Hitler
committed suicide on 30 April. He had nominated Grand Admiral Karl Dönitz as his
successor, who planned to offer a partial surrender to the western forces. Dönitz hoped
that the Germans would then be able to continue the battle against the Red Army if the
Western powers allied themselves with the
Germans against the Soviet Union. His
hope was in vain. At midnight On 8 May
1945, a ceasefire was declared. Germany
capitulated unconditionally to the allied
forces. The German Reich lay in ruins, the
terrible nightmare of world domination
had been brought to an end after 12
years of the most appalling human rights
abuses perpetrated by the National
Socialist regime. Putting an end to the
terror had, however, involved an
enormous cost to the whole of the world.
A VERY IMPORTANT NOTICE ABOUT THE GAME:
We do not claim to have given absolutely accurate coverage of the history of
a pilot career or any subdivision in all the battles of the war. However have
done our best to keep our scenarios in line with the events that occurred in
real life.
5756
Page 30

The first thing you do after entering campaign mode is choose your country and the level
of difficulty. Note that you cannot change the settings later on; you can only view them.
When you choose the "Pilot Career" option in the main menu, you access the campaign
manager (provided that you have saved campaigns – if these are not available you should
create a new one; we will explain below how to do this).
For each campaign, you will immediately see on whose side and on which class of aircraft
the campaign will be flown through (you are r eminded that it is possible to fly for the USSR
both on ground attack planes and some fighters, while German pilots have only fighters
at their disposal), the military rank of the main character (from junior lieutenant to colonel
and correspondingly from sergeant-major to oberst), the number of awards and
completed missions as well as the level of difficulty.
You can access mor e detailed information about the level of difficulty by pr essing the "View
Difficulty" button.
The "View Career Statistics" button provides detailed information on how the campaign
proceeds – how many and which enemy targets wer e destr oyed, the awar ds received and
how many aircraft the player lost in fighting.
The lower panel has four buttons:
Back – return to main menu;
Delete – delete selected campaign;
New – begin new campaign;
Load – load selected campaign.
Starting a new campaign.
If you enter a new campaign, you should indicate:
Country – the country you will be fighting for.
Rank – depending on your rank, you will receive more/less planes under your
command. Further promotion and demotion are possible (albeit without
the possibility of being sentenced to be shot or sent to a penal battalion).
Career – this is where you choose what to become – ground assault pilot or fighter
pilot. Again, you can only choose between the two if you are playing for
the Soviet Union.
Difficulty – adjust the level of difficulty once and for the whole campaign.
After you have adjust the settings, click the "Start" button – and rush forward. This is more
than combat. This is war.
Receiving the task (mission briefings)
Here you will get to know your route and the object of your flight, as well as choose
the weapons for your plane. You are advised to read the text concerning the task right
away – it is placed on the right.
The Map
Your route is indicated on a map.
The map can be scrolled in any
direction by moving the mouse
without releasing the left button.
The map has several scales. You can
switch between them by pressing
the right mouse button; the scale
increases up to the highest value,
before scaling back down.
The route is determined by a series
of waypoints. There are several types:
Take-off – a square with a picture of a plane taking off. It determines the air drome
from which your aircraft will start the flight.
Turn – a circle with a point in the middle. Here your aircraft will have to set a
new course.
Attack – a triangle with a picture of a bomb. This point is set on target; this is
where you perform your task.
Landing – a rectangle with a picture of a diving plane. In reality it does not dive,
but prepares for landing. The point of landing is set on the airdrome
where, providing everything is fine, you will conclude the task.
From here, you can adjust the following settings:
Difficulty – pressing this button activates a menu with different options for realism.
We shall deal with these settings in more detail a bit later.
Arming – choosing the guns for your combat task.
After you have read the task and gone through the corresponding preparations, you
can press either/or:
Fly – and proceed directly to fulfilling the task;
Back – and return to the choice of mission menu.
TIP: Before embarking on your Pilot Career, please read items “Receiving the
task”, “Arming your plane” and “USING COMMANDS TO GIVE ORDERS TO AIPILOTS (COMMS)”
5958
Page 31

Arming your plane
Or planes, to be more precise. In most
cases, you will have to command
someone – and correspondingly
determine the loadout of your
subordinates.
There are four parameters, which can
be defined during armament:
Convergence. Generally speaking,
gun and machine-gun shots are not
directed parallel to the axis of shooting
aircraft at all. This convergence can be
modified; here everything depends on your preferences. It should be pointed out that no
matter whom you command, this operation can only be performed on your aircraft.
Rocket delay. All rockets (except armor-piercing) have two fuses – a contact and a time
fuse. Here you can set the time when the fuse will snap into action; possible delay can be
of up to ten seconds.
Bombs delay. Sometimes you have to bomb at very low altitude. In this case you run the
danger of being hit by the blast of your own bombs. To prevent this you can adjust their
fuses in such a way that they will explode with a small delay; meanwhile you will have just
enough time to leave the zone of destruction. The delay is set within the limits of 0
(instantaneous explosion) to 10 seconds.
Fuel Quantity. If the flight is going to be short, but you want to load up to the full, you
can save on fuel. It goes without saying that too much economy of this kind can lead to
sad consequences.
Further on, in case you are or have become a commanding officer while going through
the Campaign, you can change your Flight loadout (the name of the aircraft or a group
of aircraft is emphasized with red) or the whole Squadron. It is easy to find out whether
you can or cannot do it at the moment – just click on the Weapons window in each of the
aircraft groups (each Flight has a corresponding window). If you are offered to choose
something else, you are free to do so. However, we offer optimal armament and loadout
for this mission by default.
USING COMMANDS TO GIVE ORDERS
TO AI-PILOTS (COMMS)
In all cases - Single Missions, Pilot Career and Quick Mission Builder, you can and sometimes
should use an opportunity to command from Wingman to Squadron.
To quickly master the basic commands, you should train in the Quick Mission Builder and
create different mission variants with varying quantity of friendly aircraft (from 2 to 16) and
a small amount of enemy aircraft. Although not all opportunities of such command can be
checked in the Quick Mission Builder, the skills you can acquire here will can come in handy
when you play Pilot Career.
By default, the Tab control settings button activates communication (comms) between player
and AI-pilots. The principle is very simple: After pressing the Tab button, the list of commands
corresponding to buttons 1-0 on the keyboard appears on the screen. Most of the orders or
requests have additional submenus, where the list of or ders or r equests corr esponds to actual
tasks. They too correspond to buttons 1-0 on the keyboard; by selecting and pressing them,
you will get an equal reaction from AI-pilots.
If you have no reaction, this may be a result of an incorrect order or an incorrect time of
order. For example, if the friendly planes do not belong to your flight, group or squadron,
they will never follow your order. Another example of an incorrect order is when you try to
issue an order for bombers to attack fighters… They may try to do it, but with an awful
result for the bombers (you will usually get such a situation only in Quick Mission Builder or
if a user designs an incorrect mission). The third example of an incorr ect order is if the player
tries to give an order to rejoin, when some of the planes are currently very busy with the
enemy. Their reaction to your order may cost the life of AI-pilots….
So, good training on the subject of orders for AI-pilots and their groups is necessary! Good
training will bring you great success in Pilot Career.
Realism settings
Bear in mind the following: if the switch is On, a red bulb lights up on its left.
Wind & Turbulence. Selecting the
option somewhat complicates the
conditions you will face while flying
your plane. Side wind influences the
technique of taking off and landing,
and turbulence prevents smooth flying.
You will find the list of weapons with a brief description of the features in the GAME
GLOSSARY section.
6160
Page 32

Flutter Effect. Flutter is a complicated aerodynamic phenomenon, which shows at high
speed when the construction of the plane experiences increasing vibration. If you fail to
quickly bring the plane out of the flight mode in which the flutter started, the aircraft will
most probably disintegrate
Stalls & Spins. We shall only say here that these situations are extremely dangerous and
an inexperienced person might not cope with them.
Blackouts & Redouts. With high positive overloads, blood rushes away from your head
and everything goes dark before your eyes. This is called the "blackout effect". If you do not
use an anti-overload suit (which is not very likely to be honest), this effect starts
approximately at +5G. Blackout can considerably reduce your field of vision or overlap it
altogether.
Redout appears with negative overloads (starting at approximately -2G). In this case, blood
rushes to the head and a red screen appears before your eyes. It should be pointed out
that both man and aircraft endure negative overload much worse than positive.
The option in question enables you to switch off these unpleasant physiological
reactions. Naturally if you do so, the level of realism lowers considerably.
Engine Overheat. If this option is selected, you run the risk of overheating your engine
if you force it or fly at full speed. The same happens in real life. The consequences can be
disastrous.
Torque & Gyro Effects. Torque appears as a result of pr opeller r otation. The aircraft leans
over to the side opposite to that of propeller rotation. To fly evenly you should parry such
movements.
Gyro effect. When the engine operates, you have a rather large mass on the side of the
aircraft. This mass rotates at high speed and very much resembles a gyroscope rotor. This
results in the following: when you try to turn the gyroscope axis in space, additional torque
perpendicular to your effort occurs. To put it bluntly, when you do a turn to the right the
bow dives, and vice versa.
Realistic Landings. If this option is selected, you might break the chassis on rough
landings.
Takeoff & Landing. The necessity to take off and land. These two elements of flying are
not very easy. Especially landing. This is why you have the opportunity to get rid of the
necessity to bother with it. You will start and finish your task in the air. Explanations on how
the level of realism changes if you do without these two elements seem to be superfluous.
Cockpit Always On. When this option is selected, you cannot make your cockpit
invisible. Flying with an invisible cockpit is nice and easy because your field of vision
becomes ideal. In real life it is naturally practically impossible. This option is designed for
those who enjoy full realism.
External Views. Some people think that taking a detached view at oneself is cheating
because a real pilot has no such opportunity. This opinion is not universal, however in "IL-2",
we offer you the possibility of deselecting this option, which naturally adds realism.
.
No Padlock. Padlock is a mode of vision at which the direction of your glance changes
constantly to follow the chosen target. There have been a lot of discussions about the r ealism
of such an approach, this is why padlock can also be switched off here if you want to.
Head Shake. It often occurs that the aircraft experiences intense shake, which obviously
means the head of the pilot also shakes, hindering your field of vision. If you deselect this
option, you will alleviate fulfillment of the task, but lose in realism.
No Icons. If this option is deselected, each object in the air bears a special icon. First of all,
an icon immediately makes the object much more noticeable; second, its color indicates
the nationality of the object at any distance, and third there is a special inscription on the
icon giving the type of aircraft and the distance to it. Strictly speaking, one cannot call it
entirely unrealistic. The real picture of our environment is far ahead of its virtual analogue
in terms of resolution and the field of vision of a virtual pilot is more restricted than that of
a real pilot, even if all other conditions are similar. However in real life there were no icons
on targets and you can deselect the option off if you feel like it.
Realistic Gunnery. Deselecting this option produces two effects. First, gun and
machine-gun bullets start going strictly straightforward. Second, the hit effect of bullets
and shells triples.
Limited Ammo. A standard thing. If you deselect this option, your ammo will never end.
Limited Fuel. Another standard thing. If deselected, you get endless fuel supplies.
Vulnerability. This one could not be more standard. Invulnerability. If the option is
deselected, you become invulnerable. Congratulations! The invulnerability option only
works if enemy shells and shots hit your aircraft. However if you knock against the earth
your aircraft will still come to pieces.
13 QUICK MISSION BUILDER
This is not an editor, but a generator, to
be exact. You feed in necessary
parameters and get a ready mission on
output, which you carry out
immediately. This mode can be extr emely
useful for preparing for online combat
because losing to a computer is not
shameful. This is how this part of the
game works.
When you choose the "Quick Mission
Builder" option from the main menu,
you access a new menu with the
following items:
6362
Page 33

Select: – for choosing the country you will be playing for. Click the button to
switch over from red star to black cross – these symbols speak for
themselves in our opinion;
Your Flight – Number and characteristics of wingmen to be indicated;
Friendly – here you enter information on other flights, which will be fighting on
your side;
Hostile – the same, but for your air enemy.
You can set the following parameters for each flight:
Num – number of aircraft in the flight, ranging from zero to three with
your own flight as the only exception. Fighting without having
oneself close at hand is rather difficult. This is why your own flight
should have at least one unit. This unit is you yourself.
Skill – class of pilots;
Aircraft – planes constituting the flight;
Loadout – battle armament for mission.
Map – the map where the action will take place;
Altitude – altitude at which the action will kick off;
Weather – weather;
Time – time of the day. These last two factors – weather and time of the
day - can exert considerable influence on the development of
your operation.
Situation – here you indicate which of the parties will have a tactical edge
over the other
Disadvantage – you start at a lower altitude than the enemy
Advantage – you start at a higher altitude than the enemy.
None – you and your enemy are at the same altitude.
Target – type of ground target. It can be left out if you want to;
Defence – here, ground anti-aircraft defence is involved. It can be either
included or left out. You can save the settings you have chosen and
load them later using the "Save" and "Load" buttons respectively.
Lastly, after you have tuned the generator to your liking, press the "Fly" button – and start
your flight.
If your intentions change, you can hit the "Back" button and return to the main menu.
14 MULTIPLAY
"IL-2 Sturmovik" offers two main
options for working on live targets
– via Internet or through a LAN.
The choice is made in the multiplay
mode settings (accessed via the
"Hardware Setup" item in the main
menu).
Hitting live targets is not necessary
though. "IL-2" offers two
multiplayer types:
Dogfight – fight between live opponents;
Cooperative – cooperative fulfillment of a mission where the part of opponent
or ally can also be played by AI (computer controlled aircraft or
vehicles and other ground objects).
Having chosen the "Multiplay" item in the main menu, you access a new menu with the
following main options:
Join Server – log on to the existing server;
Create New Server – create a new server yourself;
Main Menu – return to the main menu.
Logging on to the existing server.
After choosing the "Join Server"
option, you have two possibilities:
1. Enter the server address in the
"Server Address" field.
2. Search for all servers available
using the "Search for Local
Servers" command (for more
information, read the IL-2
README file in Windows:
Start Menu > Programs >
Ubi Soft > IL-2 Sturmovik >
Read me 1st).
6564
Page 34

The result of the search is a list of servers with the following parameters:
Address – server address
Name – server name (if it was set on the server)
Ping – indicator of each server's connection speed. The lower the value, the
higher the speed (and this is exactly what you need)
Users – the number of players logged on to the server
Type – type of the game (already mentioned: Dogfight and Cooperative)
You should choose a server fr om the list and pr ess the "Join" button. You can also interrupt
the process and return to the main menu with the help of the "Back" button.
NOTE: You can only join an existing Cooperative server BEFORE THE GAME
STARTS. However you can connect to Dogfight server at any time.
Creating a server
The minimum speed connection for acceptable Internet play performance is a 28.8K
modem connection to your Internet Service Provider.
You need to detect your server IP.
Do this by running command
IPCONFIG on the ser ver machine.
- Win98 > run Programs > Dos
prompt > type IPCONFIG and
read the IP ADDRESS.
- Win2000 > run Programs >
Accessories > Command
Prompt > type IPCONFIG and
read the IP ADDRESS.
Send this IP ADDRESS to your friends.
For network play, launch the IL-2 integrated server. You must choose the Multiplayitem
in the main menu, then Create new server. After that you can proceed to the
following items:
Name – the name of your server.
Description – here you can explain the map, time, weather and other conditions
and settings you wish to use. Clients will see this string before the
connection and decide which server to choose.
Game Type – as mentioned previously. Dogfight is air combat between live
enemies. Cooperative stands for cooperative mission fulfillment
depending on the offered scenario.
Max. Players – the maximum amount of players on a server. Ranges fr om 2 to 32 (up
to 16 in Cooperative). Naturally a larger amount of players translates
into more serious demands on your hardware.
Password – use this item if you want to you can create a game only for the
people you know. Multiplayer sessions can be locked with a
password to keep stray gamers away. You can set a password; those
who want to log on to your server must know it. To change your
password, press the Change button.
Once you have set the above parameters accordingly, click the Create button and server
will be created. The next step is choosing your mission. You can load any standard mission
or a mission you created with the built-in mission editor. In either case, all mission data will
be sent to all the clients.
After the mission has loaded, you can change the Difficulty settings. This can only be
done on the server. Clients get these settings from the server so all they all have the same
Difficulty settings.
You then have to make the common choice of Born Placeand Arming for the integrated
server and client.
Press the Fly button and play.
After connection
DOGFIGHT:Before you press the "Fly" button, you should choose the aircraft you wish to
fly (press ‘Arming’), set "Convergence", "Delay", "Fuel Quantity" just like in Single Play
section. The difference lies in the fact that here you can take a look at everything, change
the aircraft's camouflage (if other skin variants are available), the face of the pilot, nationality,
regiment, number of your plane, etc. See additional features in the IL-2 README file In
Windows: Start Menu > Programs > Ubi Soft > IL-2 Sturmovik > Read me.
When you are through with these operations, go back to the previous menu and choose
home base on the map, from or above which you prefer to start playing (whether you start
from home base or in the air above depends on the server's Difficulty settings).
COOPERATIVE: Here you are taken to the "waiting hall". This is where everyone gathers
and waits for the mission.
The mission is then chosen (this is done from the server) and all agreements between the
players are set. For these purposes, you can use a built-in chat or voice chat.
You should choose an aircraft or gunner seat (if available) that has been previously agreed
on with other players. The gunner/pilot seat you have chosen will be indicated/shown to
the other players awaiting the beginning of the mission. You will also see all free or
occupied aircraft before the onset of the mission.
6766
Page 35

When everything is settled and chosen, press the Fly button. The mission starts from this
point for all players connected to your server.
NOTICE: All the Difficulty settings can only be set on the server. Other players
can only read them by pressing the "Difficulty" button, but cannot change
them. Thus, the same level of difficulty is set for all players.
Chat in Multiplay
Chat works all the time and in
all the Multiplay menus,
except when you just begin
to set the server or just begin
to connect :).
In any multiplay menu, after
connection you can activate
chat by pressing the
corresponding button which
you defined in “Controls”. In
flight – by pressing this button
or by pressing “M” (displays
map by default settings in
“Controls”), click the mouse
button on the chat window.
The chat has the following features:
You can type messages
• to all players
• to your ‘army’ (army defined by color of airfields and icons, if the icons used in the
difficulty settings)
• to any single online player
To send a message to all players, type the message, then press Enter. The program
subsequently prompts you to select a recipient of the message. Select ALLand press Enter.
To send a message to your army, type the message and then press Enter. Then, as above, the
program prompts you to select the r ecipient of the message. Select MY_ARMYand press Enter.
You can also send messages to any of the players. To do so, you need to know the player's
correct nickname. Type the message, select the free text line and type the player's correct
nickname (call sign) before pressing Enter.
To find out the nicknames of all the players, type the following in the line for
the special message special:
>user
then press Enter. You will see the nicknames of all players currently playing the game.
UBI.COM GAME SERVICE
Get ready to experience IL-2
Sturmovik on ubi.com’s new
Game Service, the quickest
and easiest way to find your
friends and play with them
over the Internet. This free
service is easy to setup and is
included on your game CD. If
you have not installed it yet, go
right ahead. Other players are
waiting for you on-line.
1.How do I join in?
Once IL-2 Sturmovik and the ubi.com Game Service are installed on your
system, you can join the Game Service community in three different ways :
1. Simply go to http://gamingzone.ubisoft.com. From there, select IL-2 Sturmovik.
2. On your desktop you will find the “Play it on ubi.com” icon. Click on it.
3. Start the game and go to the Multiplayer menu. Press the “Play it on
ubi.com !” button.
Both ways will take you to the IL-2 Sturmovik Gaming Zone page. From here you will have
to create a FREE user account. To do this, click the “Create Account” button and enter your
information. If you are already registered to ubi.com, simply click the Game Lobby you
want to join and you’ll be taken to it.
2. How does the Game Lobby work?
The game lobby is pretty straightforward. You can chat with other players, join IL-2
Sturmovik game sessions or create your own.
To create your own game session, click the “Create Session” icon and enter your preferred
session parameters, then click the “OK” button. Once in your session, you can always go
back to the main lobby to invite players to your session by using the upper-right tabs just
beside the player list. Once you are ready to start your game, click the “Start Game” icon.
You and your friends will jump right into the game.
To join a session, click the session icon you want to join and you’ll be in before you know
it. You will have to wait for the session master or host to start the game in order to start
playing. Note that you can sort the game sessions by selecting either Dog Fight or Co-Op
sessions using the dropdown list found over the session tabs.
3. What else does the G.S. offer?
The ubi.com Game Service also offers a special Friends List for you to keep in touch with
your friends. Experiment with it a bit and you’ll quickly notice that it has a lot of useful
features like in-game voice chat, a Pager, File Transfer and many other features.
The Friends List even tells you which game your friends are playing and it lets you join
them with just one click.
6968
Page 36

Another important feature of chat that you can use is to preset certain messages which
you may use often. This really saves time since you no longer have to repeatedly type the
same messages.
Activate the chat window, select – using the cursor keys - the line below the chat line and
type your message, for example Check you Six, Break Left, Break Right, etc. To use
this message whenever you want without having to type it out again: Activate chat, select
the message using the cursor keys and press Enter. Then select to whom you want to
send this message (see above). If you need to make corrections or replace the old preset
message with a new one, use the Delete and Backspace buttons.
One more important feature: you can resize the window or move it using the mouse.
15 FULL MISSION BUILDER
It is high time to talk about the mission editor. This editor provides for fully manual creation
of missions with thorough development of all possible nuances. Its interface differs
considerably from the game's general interface, and is based on pull-down menus for the
most part.
Remember that the editor can work both in 2D and 3D modes. 3D mode can be very
useful for indicating exact positions of ground objects. For instance, it allows the tanks in
defence to use natural shelters most effectively.
Description of pull-down menus
File menu
Used for loading necessary and input data, testing the results of your work and saving. It
contains the following options:
Load Map – loads the map where the mission will unfold;
Load – loads a mission that was saved earlier with the purpose of doing more
work on it;
Save As – saves a created mission;
Play – launches a created mission for testing. The mission has to be saved on
your disk beforehand;
Exit – quits the editor.
Edit menu
Judging by the title, this menu is designed for editing different mission parameters. It
consists of:
Conditions – this option activates a dialog box where overall conditions for the mission
are set. These include time of the day, weather conditions and clouds;
Description – activates a dialog box where all text information related to the mission is
edited: its brief and full description and the text corresponding to the combat task;
Delete All – this command deletes all objects you have created. It is very convenient when
you have just finished creating a mission and want to start creating another one. If you use
this option it saves you the necessity of reloading the same map.
View menu
This menu is intended for different operations with objects. It contains the following
menu items;
Landscape – viewing the landscape with different lighting. Having set the optimal level,
you can achieve a sharper contrast of all mission-related signs against the landscape; you
can also display/hide the landscape.
Destruction – used to set the initial level of building destruction in towns, cities and
settlements. Brightness adjusts color brightness in the area allowed for the given operation.
Brush Size adjusts the thickness of the "brush" determining the zone of destruction.
Destruction Level – sets the level of destruction within the zone colored with a brush.
The left position represents no destruction and bright green color (if restored after invalid
actions beforehand); the right position represents maximum destruction. The color in this
case will be red. All operations related to the Destruction level settings on the map are
performed using the mouse cursor while pressing the F key at the same time. In
Destruction mode, you can also destroy – using the mouse - any bridge in that area. Just
click on the left or right mouse button on the bridge to destroy or recover that bridge. This
function only works only in 2D mode with the zoom to object in the center of the screen.
Display Filter – this menu item enables/disables the display of the types of objects
indicated. This is required to prevent a complicated picture from becoming overloaded
with unnecessary icons;
Icon Size – size of conventional icons. It can be modified to reach an optimal correlation
between their readability and picture readability in general at different resolutions;
Hover Camera – sets a fixed camera height in 3D mode. This simplifies shifting objects
already set;
Show Grid – shows/hides the reference grid;
Smooth Transitions – if the option is switched on, the transition from the 2D to 3D
image is performed smoothly.
Operations in the editor
Working with the map and 3D landscape
To switch between 2D and 3D modes.
Press Enter. It works when the scale of enlargement has practically reached its
maximum value.
To scroll the map in 2D mode.
Map scrolling can be done in two ways.
1. Using the vertical and horizontal scrollbars – the same way as any other scrolling
in Windows interface.
7170
Page 37

2. Using the cursor of the mouse with the left button pressed.
Landscape navigation in 3D mode
The cursor is the center of all movements; it is constantly depicted in the center of the
screen. Changing the direction of your glance against the cursor is performed with the
help of the mouse. Approaching/moving away is done by moving the mouse up and
down without releasing the pressed left button. The cursor itself can be moved using the
mouse with the right button pressed (here the cursor does not change its position, but the
landscape under it starts moving).
Changing the scale
If the scale constitutes 0.3 of the minimum, the map mode switches off and the editor turns
to 3D relief representation mode.
Here two means are used.
1. The scale can be changed using a vertical scrollbar at the left of the screen. To scale
up, drag the scrollbar down.
2. When you move the mouse with the left button pressed and press SHIFT at the same
time, a small frame appears on the screen. As soon as the button and the key are
released the editor will switch over to the scale at which the field available will be
depicted in the frame.
W orking with objects on the map/landscape
Setting the chosen object.
First of all you should choose the object. Then move the cursor to a point on the landscape
and press the left button simultaneously with CTRL (or just press Ins). The object will
subsequently appear in the designated place.
Editing the route of an object.
Once you have set the object, you can choose a route for it using turning points.
A new turning point is set in the same way as the object itself.
To choose a turning point, click on it; the turning point will become yellow.
To set an interim turning pointyou should choose one of the ready points on the route
and press "Ins", or while holding down the CTRL key, press the left button of the mouse. In
this case the new point will appear on the ready route in the middle of the segment
between the chosen point and the one after it.
To cancel a choice, press the right button of the mouse. A menu will then appear right
under the cursor. Choose "Unselect"; the yellow marks subsequently disappear and all
points of the route become red.
You can delete a chosen turning point by pressing the right button of the mouse and
choosing "Delete" in the menu. The chosen point will be deleted. Deleting point number
0 annihilates the object.
Object parameter setting window
These parameters are divided into three main groups:
Type
All available objects are divided into categories. We
provide a more detailed account of this division below.
After you have set the object category, you can choose it
from the list and, if necessary, see its 3D picture (for this
press the "View" button). You can revolve it by clicking on
it with left mouse button.
When the picture appears on the screen, the View button
changes to Hide. If you press it again, the 3D image will
be deleted.
Properties
Here you set the parameters directly related to the object.
They depend on its category as follows.
Category Aircraft (air objects). The list of parameters includes:
Army. Here you set the side for which the selected object will fight. There ar e two variants:
Red (the Soviet Union) and Blue (Germany). The choice is not bound to any specific type
of object; you can make “Messerschmitt” carry red stars in your mission if you want to and
vice versa.
Regiment. Here you choose the regiment, squadron and flight.
Each squadron can have up to four flights. The choice influences the corresponding
markings on the aircraft.
Moreover, the same subdivision cannot be employed twice as two different objects.
Weapons. The list of possible weapons the aircraft can carry depends on their type. The
By Default variant means that only guns and machine-guns are included. The None
variant means that all weapons have been removed.
Fuel. Fuel amount carried by each aircraft at the onset of the mission, in percent.
Planes. Number of planes in a flight. Ranges from 1 to 4.
Skill. Skill level of the flight pilots. Ranges from 0 (beginner) to 3 (ace).
Player. To be selected if you are going to lead the flight yourself. To be able to do so,
you must make sure that the planes in the flight are in the flyable list, i.e. can be piloted
by the player.
In Single Missions where ranks are not envisaged, you are automatically appointed
commanding officer. If the mission is created for Campaign mode, your rank and your
career results directly influence which plane in the flight you will fly.
7372
Page 38

CAUTION: to prevent situations involving incorrect behavior of AI-led aircraft,
always comply with one rule: the aircraft led by the player should always be
in the first flight. It is also important to stay away from tasks that cannot be
fulfilled (for example confront bombers with fighters task).
Target. Here you set the target for attack. If you press the Set button the cursor will switch
into choose mode (you can cancel it by pressing the right mouse button). You can set the
target in this mode; when the flight reaches the waypoint it will try to attack the target. If
you choose ground target the type of activity will change into GATTACK.
TIP: You can create a mission in which you are not going to participate directly at all. In
other words you are not using the Player option – the Player option wasn’t selected. In this
case, at the beginning of the mission you will find yourself in observer position and will be
able to switch between views of different objects. To do this press "P" right after such a
mission starts to pause the game, and then find the appropriate position for action viewing
in the mission by switching between the different views (using a combination of buttons:
Next Enemy Chase View, Next Friend Chase View, Chase View, External View on Ground
Target, External Padlock To Closest Ground Target, External Padlock on Air Target, External
Padlock To Closest Air Target, Fly-by View , Next Enemy View, Next Friendly View, Wide View,
Normal View, Zoom View in combination with the mouse). You can also switch between
views over and over again choosing the most interesting moments of fighting both in the
air and on ground. After that you can also record a track file and edit it later.
Armor, Vehicles, Trains, Ships, Artillery Categories. For these you set the Army and
enter markings, which carry no functional meaning in mission structure and serve for
explanation alone.
Waypoints
Here you set the parameters of a selected waypoint. As in the Chief Actor section, they
depend to a large extent on the category of the object.
To make the choice of waypoints more convenient, we have placed Prev and Next buttons
on the Waypoints panel. If pressed, they activate the corresponding previous or next
waypoint on the route. On their right there is a sign, which looks like A(B), where A is the
number of the current point and B the overall number of waypoints.
Waypoint numbering starts from 0.
Waypoint parameters for category AIR
Height. Waypoint height above the earth; in meters.
Speed. The speed at which the flight of planes should pass the point.
Time. The time at which the flight should arrive at the point. Changing the Time parameter
affects the Speed parameter along the whole route and vice versa.
Type (type of activity). What the aircraft will be doing at the designated point. There
are four options:
NORMFLY – by default. Usual flight.
TAKEOFF – if you select this option, the waypoint will be moved to the nearest
airdrome.
LANDING – in this case the waypoint will also be moved to the nearest airdrome. If
you place it manually to some point in the field, the aircraft will land there.
GATTACK – ground attack.
NOTE:
1. For dive bombers, fighters with bombs and IL-2s, you have to set target objects for the
GATTACK point. Otherwise they will attack the nearest enemy object closest to the
waypoint, if only they can find it.
2. For transports with bombs and level bombers: Set waypoint DIRECTLY over the object
which you would like to destroy, then set GATTACK for that waypoint . Planes will drop
the bombs in that area (you must set the GATTACK waypoint WITHOUT target object!).
Do the same if you use the planes with paratroopers as loadout.
3. For dive bombers and fighters-bombers (IAR-81, some of FW-190s) with bombs the
altitude has to be MORE THAN 1300m for dive bombing. Otherwise they drop bombs
as level bombers.
4. If you want any of selected groups of planes with bombs to do level bombing, go to
item 2 above.
5. Don't set an altitude that is too low in bomb target areas for level bombers. They may
be destroyed by their own bomb explosion...
6. Don’t set the previous waypoint too close to the point of GATTACK. Planes don’t get
time to rejoin the right formation for the attack. Usually it is enough to set 7-10 km
between these waypoints.
TIP: If you have difficulty setting GATTACK on a bridge or other objects/units, you need to
center them on the map and make zoom.
SPECIAL FEATURE
How to make air trains of He-111z with glider Me-321 or Li-2 with glider G-11.
1. Set all waypoints for the flight of He-111z (or Li-2).
2. Set ONLY ONE waypoint for glider Me-321 (or G-11) and locate the waypoint close to
the FIRST waypoint of He-111z (or Li-2).
3. Set target object of that Me-321(G-11) first waypoint to the first He-111z(Li-2) waypoint.
4. Don’t set any waypoints other than the first for the glider (Me-321 or G-11). The glider
will follow the plane automatically.
5. You can set these first waypoints for both planes and gliders in the air or on the gr ound
(Take Off)
NOTE: These trains can’t land. If you set the landing waypoint for the plane, the glider
will disconnect and try to find an area for landing. When you carry out such missions, you
should remember that only in the test flights can you get the right result and the glider will
make the right landing (not in a forest or a city for example). The glider does not use the
engine and will merely glide to the closest free area, if there is one.
7574
Page 39

Waypoint parameters for Armor, Vehicles, Ships:
Time. Here everything is much the same as in the AIR category with just one exception –
you cannot vary the object's speed. The object will do its best to arrive on time, but in the
end everything will depend on its maximum speed and the type of landscape.
Timeout. You can make a ground or sea object stop and wait for some time before it
resumes movement.
NOTE: setting objects for Armor and Vehicles categories by roads or directly on roads
which run in the direction of your next Waypoints forces these objects to automatically
continue their movement along these roads (except the main roads branching into smaller
ones in towns and settlements where the correct movement of objects can only be set with
a large number of waypoints, placed on the curves and turns of the streets).
NOTE: Units in the Ships category have simplified AI. They fully interact with the
environment in modeled battles, but will never do AI-controlled maneuvers. So, you need
to set all their waypoints manually in order to avoid collisions between ships and the beach.
For example, if you model the attack of a torpedo boat you should create the right
trajectory of waypoints on the map to get the correct final picture of sea battle. For this
purpose, use several static cameras placed in the battle area to watch the interaction
between the ships running in the scenario in FMB, and then correct if necessary.
Waypoint parameters for Train categor y:
Everything is much the same as in the previous cases, except for the fact that the trains do
not stop on the route. There is no Timeout parameter for them naturally.
Stationary Armor, Stationary Objects, Stationary Aircraft, Stationary Ships
Categories. These objects are stationary. Waypoints are not set for them. All
stationary objects placed on the map and equipped with arming (except
planes) will also take an active part in military operations.
NOTE: After you have set a Stationary Object you should define its correct position to other
objects, for example correct direction of gun fir e against advancing enemy or correct placing
of the aircraft on the airdr ome. To do this click on the object with the maximum zoom in 2D
mode and orient it in the right direction using the Right (Grey) Num Pad buttons.
Type section.
Below is the list of possible purposes:
Destroy. The object nearest to the designated waypoint receives the “destruction” icon.
The task is considered fulfilled if the marked object has been destroyed.
Destroy Bridge. The same as Destroy, only in this case the icon is put exclusively on
bridge type targets.
Destroy Ground. An area of a set radius is marked around the designated point. To fulfill
the task, you must destroy at least half of the enemy objects within the radius. The size of
the zone of destruction and the time interval are set in the Target section.
Escort. The aim is a group of planes; you should escort them and protect them from air
attacks. The time interval within which you should escort them is set in the Target section.
Defense. The aim is a ground object. You have to protect it from being destroyed by
enemy forces.
Defense Bridge. The same as Defense, but here only a bridge can be the aim.
Defense Ground. As with Destroy Ground, an area is marked around the designated
point. To fulfill the task, you must preser ve at least half of your ground objects in the area.
The time interval within which you should defend the area is set in the Target section.
Recon. You have to fly above the waypoint at a distance not exceeding the set parameter
and stay there for the set time period. The size of the area and time interval are set in the
Target section.
Target section
In this section you set parameters of the task.
Priority
PRIMARY – main task. You must fulfill it for the overall success of the mission.
SECONDARY – additional task. Fulfilling it is not compulsory, but if you do you will be
rewarded later when the regular awards and promotions come about.
HIDDEN – a "secret" task. The task says nothing about it, but you can discover them yourself
in the course of the mission – and this means that you have another chance to excel.
Setting mission purposes
This is also done using the window for setting
object parameters. Choose Target categor y in the
Type section. During task editing, the parameter
window consists of two sections: Type and Target.
The purpose of the mission is put on the map (or
landscape) just like any other object.
NOTE: You cannot set Destroy and Defense purposes as the Target for static and
artillery units. You only can set for them Destroy Ground and Defense Ground.
Timeout
Some tasks have to be fulfilled before a set time. If you do not fulfill the task within the
assigned period it is automatically considered that you have failed. The "Timeout" field is
used to indicate the time before which you should fulfill the task. This condition is activated
when you choose "Timeout".
In a number of cases, it is impossible to set the time limit. This concerns Defence Ground,
Defence Bridge and Recon tasks.
7776
Page 40

Distance Bar. If the task involves an area, the parameter sets its radius.
Landing. This option only concerns the tasks of Recon type. If placed, you have to land
in the area indicated in addition to simply flying along this point.
NOTE: When you design your own missions the following two points become very
important:
1. If you create a mission where you start on an airfield and plan to achieve high altitude,
you should set enough waypoints with the right trajectory or spiral curve where the
climb corresponds to the right digits of the planes. It is also very important to make the
right settings for AI planes. Use climb rate data for each plane from the View Object
menu. To make sure that AI planes will achieve the given altitude, set the correct time
between each waypoint where planes make a climb to the next altitude. We
recommend that you set a realistic data climb rate on the low altitudes and 2-3 times
less at altitudes higher than 4,000 meters. It is also very important to know that the first
waypoint with the takeoff on the airfield shows the direction of the takeoff – the icon
on the runway border shows the direction.
2. If the last waypoint of the aircraft flight is landing on an airfield, make sure that the
previous waypoint was set at an altitude of not more than 200-250m and at least 1.5
km before the final landing point and in direction of the landing glissade to the closest
runway border (the icon shows the side from which the plane will land). If your flight
was at high altitude, make sure you establish as many waypoints as are needed for a
smooth dive to the point of the final approach. If you ignore this advice, we cannot
ensure that your plane or the AI plane will have no damage when diving from high
altitudes at critical speeds. Especially important for bombers!
Static Camera category. Static cameras are placed in the same way as Static Objects.
The difference between the two lies in the fact that you can vary camera height against
landscape surface, which gives you the possibility for further observation of both ground
and sea objects and targets. The Static Camera option enables you to create missions that
are beautiful and interesting for observation. It is specifically recommended that you use it
in the following cases:
1. If you have created an extremely interesting mission and are willing to record it to a
track file to subsequently show it to your friends as a film, or to place such a track
on the Internet so that other owners of the game can have a look at it.
2. For controlling your mission creation where a rather large-scale ground battle is taking
place according to your scenario. Place enough Static Cameras without placing
them over the whole battlefield. You should bear in mind that the Static Camera is
also an object that reduces the overall Frame Rate.
We recommend that you immediately place ALL CREATED MISSIONS into corresponding
directories. For example, if you have created a mission which you are going to fly through
only as a Single Mission, you should save it in a Single directory. The folder corresponding
to the country and type of the mission can be chosen in the same folder . If you have cr eated
a mission for Multiplay, save it in a corresponding directory for Dogfight or Cooperative.
HOW TO COMBINE THE CREATED MISSIONS IN A CAMPAIGN:
All missions created for Campaign mode are combined by name or number in a special
file. You can do this in one of two ways:
1. Linear. In this case you will proceed linearly through all the missions present in a list.
2. Random. In this case the scenario for the mission will be randomly built, i.e., a
randomly branched scenario.
Example of a file for a linear scenario:
[Main]
Class il2.game.campaign.CampaignBlue
awards Class il2.game.campaign.AwardsDEfighter
[list]
BF109_1_1.mis
BF109_2_1.mis
BF109_3_1.mis
BF109_4_1.mis
BF109_5_1.mis
Example of a file for a randomly branched scenario:
[Main]
Class il2.game.campaign.CampaignBlue
awards Class il2.game.campaign.AwardsRUbomber
[list]
IL-2M_1_1.mis IL-2M_1_2.mis IL-2M_1_3.mis
IL-2M_2_1.mis IL-2M_2_2.mis
IL-2M_3_1.mis IL-2M_3_2.mis IL-2M_3_3.mis
IL-2M_4_1.mis IL-2M_4_2.mis IL-2M_4_3.mis IL-2M_5_3.mis
IL-2M_5_1.mis IL-2M_5_2.mis IL-2M_5_3.mis
NOTE:
6. For randomly branched scenarios, you can set as many single scenarios as you want.
It may be one or 100. In the last case the program will randomly select one of 100…
7. Do not forget that for each scenario you would like to make randomly starting, you
need to use only one map for all scenarios starting at that point. This is necessary that
to keep all your successful destruction of ground objects such as buildings and bridges
recorded in the next mission scenario. Otherwise the program will automatically skip
these battle changes of landscape.
7978
Page 41

The file is created using the Windows Notepad and is saved in the same directory as the
missions. For example, folder Campaign > RU (or DE) > Fighter (If folder Fighter was
created earlier you should manually create - in the same dir ectory and in good time - a new
folder so as not to delete a previously-created campaign. This can be for instance
“Fighter2”, “Bomber2”, “Fighter-Bomber”, etc. Use Windows Explorer for this purpose. All
single missions or campaign missions with all subdirectories should be stored in the
Missions directory of the game root directory). The file should be named campaign.ini
and should not take any other name, otherwise it will be useless. In addition, using the
Windows Notepad, in folder RU (or DE) you need to create/edit the all.ini file where you
create/add the name of the new folder with missions for your own campaign.
Example of file all.ini
[list]
Fighter
Bomber
Fighter-Bomber
We do not want you to restrict you to a set number of AI-objects. The main rule says the
less the better. A huge amount of objects can be set at your own discretion and risk. You
yourself should determine the possibilities of your communication channel and those of
your friends for gaming in COOPERATIVE mode via the Internet. However, we highly
recommend that you familiarize yourself with similar missions shipped together with the
game. For this purpose, load our missions in the Full Mission Builder and see how they are
done.
NOTE: We do not recommend using the maps with a large amount of buildings in the
cities (for example, Berlin where over 500,000 houses are displayed on the map; the status
of each house is regularly checked by the program and sent via Internet to other players).
This can lead to noticeable online game freezes. Recommended cards include special car ds
for Online Play as well as Prokhorovka, which was initially modeled for not only Single
Play, but for COOPERATIVE as well.
Once everything has been done correctly, you start playing the new campaign you have
created by yourself; all actions are performed in the standard way. Simply choose the
country for which you have created your pilot's career version and for whom you have
created a new career in the Pilot Career Menu. You will find campaign you have just
created in the Career window.
HOW TO CREATE MISSIONS FOR MULTIPLAY.
1. DOGFIGHT
For this Multiplay mode you should create born places and choose a corresponding
color for them. Born places should only be located on airdromes. The chosen color will
later be detected on the icon indicating that it belongs to an army or airdrome.
CAUTION: You can only set stationary anti-aircraft mountings from ground objects and
stationary ships from sea objects. If you ignore our recommendations and set something
else, these will be automatically withdrawn from the scenario. We also advise you to steer
clear of this to prevent lock-up or crashing of the program.
2. COOPERATIVE
Here everything is done in conformity with Single Missions requirements: all AI-objects
available for Single Play can be used in COOPERATIVE as well.
Nevertheless, you must bear in mind the restrictions imposed by data transfer speeds
via the Internet:
• The number of planes led by players including gunner seats if the planes are equipped
with these should not exceed 16.
• Do not overload your mission with a large number of AI objects because the
communication channel may not be able to cope with it, causing the game to
periodically hang up for a long time, thus preventing you and your friends from
enjoying the fun.
16 GAME GLOSSARY
Common:
AI – Artificial Intelligence. In the game industry, this term is
used to define computer-controlled units.
FM – flight model
DM – Damage model
QMB – Quick Mission Builder
FMB – Full Mission Builder
Recon – reconnaissance
For the View Object Menu:
VVS or VVS RKKA – Soviet Air Force
Luftwaffe – German Air force
NII VVS – Military research institute, where all Soviet,
Lend-lease or captured aircraft were tested during or after
the war. When we were developing our simulator we
used a lot of this data together with original sources from
aircraft manufacturers.
Combat Turn – maneuver in which a plane reverses
flight direction and gains altitude without losing a great
deal of airspeed. In general, a climbing 180-degree turn.
For the Full Mission Builder:
Flak – Anti-aircraft artillery and machine guns.
AA – Anti-aircraft artillery and machine guns.
AAA – Anti-aircraft artillery.
Glissade – Landing trajectory of aircraft.
Born Place – home base where your aircraft will be
“born” in a multiplay session.
Russian car column designations:
Rus. Supply Car Column Type I
GAZ-67
2 x ZIS-5 Medical
5 x ZIS-5
Rus. Supply Car Column Type II
Willis MB
6 x Studebecker Truck
3 x ZIS-6 Fuel
Rus. Command Staff Car Column
GAZ-67t
GAZ M1
ZIS-5 AA
2 x ZIS-5
ZIS-5 Radio
Rus. Katyusha Car Column
GAZ-67t
6 x Katyusha
2 x ZIS-5
ZIS-6 Fuel
Rus. Studebecker RL Column
Willis MBt
6 x Studebecker Rocket Launcher
ZIS-5 AA
2 x Studebecker Truck
8180
Page 42

German car column
designations:
Ger. Supply Car Column Type I
BMW Bike
Sd.Kfz.251
5 x Opel Blitz 6700A
Opel Blitz 6700A Medical
Opel Blitz 6700A Radio
Opel Blitz Maultier AA
Ger. Supply Car Column Type II
Kuebelwagen VW82t
Opel Blitz 36S
Opel Blitz Maultier AA
2 x Opel Blitz Maultier
Opel Blitz 6700A Fuel
2 x Opel Blitz 36S
Ger. Command Staff Car
Column
Pz.IIF
Sd.Kfz.251
Opel Kadett
Opel Blitz Maultier AA
Opel Blitz Maultier
Sd.Kfz.251
Ger. Motorcycle Column
6 x BMW Bike
Opel Blitz 6700A Fuel
2 x Opel Blitz 36S
Sd.Kfz.251
2 x RSO
Ger. Fuel Supply Car Column
Kuebelwagen VW82
6 x Opel Blitz 6700A Fuel
Opel Blitz Maultier AA
Russian and German train
designations:
Fuel Train/AA
Steam engine
Coal Tender
Flat car/AA
8 x Tank car
Freight Train
Steam engine
Coal tender
8 x Box car
Freight Train/AA
Steam engine
Coal Tender
Flat car/AA
8 x Box car
Ammunition Train
Steam engine
Coal tender
8 x Box car/Explosives
Ammunition Train/AA
Steam engine
Coal Tender
Flat car/AA
8 x Box car/Explosives
Freight & Fuel Train
Steam engine
Coal Tender
4 x Box car
4 x Tank car
Equipment Type I Train/AA
Steam engine
Coal Tender
Flat car/AA
7 x Flat car/Equipment Type I
Flat car/AA
Equipment Type II Train/AA
Steam engine
Coal Tender
Flat car/AA
7 x Flat car/Equipment Type II
Flat car/AA
Equipment Type III Train/AA
Steam engine
Coal Tender
Flat car/AA
7 x Flat car/Equipment Type III
Flat car/AA
Passenger Train
Steam engine
Coal Tender
8 x Passenger car
Command Staff Train/AA
Steam engine
Coal Tender
Flat car/AA
4 x Passenger car
Flat car/AA
WEAPON loadout comment
(bombs and rockets):
SC 50
Type: General purpose bomb
Weight: 55.5 kg
SC 70
Type: General purpose bomb
Weight: 72 kg
SC 250
Type: General purpose bomb
Weight: 229 kg
SC 500
Type: General purpose bomb
Weight: 500 kg
SD 500
Type: Fragmentation bomb
Weight: 535 kg
PTAB-2,5
Type: Anti-tank bomb
Wight: 1.5 kg
AO-25
Type: General purpose bomb
Wight: 25 kg
FAB-50
Type: General purpose bomb
Wight: 50 kg
FAB-100
Type: General purpose bomb
Wight: 100 kg
FAB-250
Type: General purpose bomb
Wight: 250 kg
AJ-2 Ampoules
Type: Like napalm
Weight: 2 Kg
VAP-250
Type: Like napalm (phosphorus)
Weight: 250 Kg
RS-82, RS-132, M-13 - Rockets
with demolition warhead.
BRS-82, BRS-132 – anti-armor
rockets
17 List of Reference and
Recommended Literature
1 "Short-range bomber Su-2" – Gordukov N.T., Khazanov
D.B. – M.: "Technika – Molodezhi", 2000.
2 "Armored ground assault aircraft IL-2" in "ARMADA" series –
Chernikov Ye. – M.: M – Hobby, 1997.
3 "Your wings" – A. Jordanov – M., Voyenizdat, 1939.
4 "Notes about weapons mastery" – A.Vorozheykin – M.:
Voyenizdat, 1945.
5 "From the history of Soviet aviation: Aircraft of Experimental
Design Office named after S.V. Iliushin" – G.V. Novozhilov,
D.V. Leschiner, V.M. Sheinin and others / edited by G.V.
Novozhilov. – M.: Mashinostroyeniye, 1990.
6 "Pilot instructions on exploitation of IL-2 aircraft with AM-38
engine" – M., Voyenizdat, 1942.
7 "The history of aviation armament. Brief studies" –
Shirikopad A.B. / edited by A.E. Taras. Mn.: Harvest, 1999.
8 "The history of aircraft construction in the USSR until 1938",
4th edition, revised. – Shavrov V.B. – M.:
Mashinostroyeniye, 1994.
9. "The history of aircraft construction in the USSR from 1938
to 1950", 4th edition, revised. – Shavrov V.B. – M.:
Mashinostroyeniye, 1994.
10 "The history of planes. Early period" – Sobolev D.A. – M.:
ROSSPEN, 1995.
11 "Fighters change tactics" – Babich V.K. – M.: – M.:
Voyenizdat, 1983.
12 "Winged tanks" – Alexandrov.
13 "Wings of victory", 3rd edition, complemented. –
Shakhurin A.I. – M.: Politizdat, 1990.
14 "Instructions on ground assault aircraft operations (NshA-
44) – M.: Voyenizdat, 1944.
15 "From low altitudes" – N.A. Shmelev, Voyenizdat, 1962.
16 "Aircraft construction in the USSR in 1917 – 1945". Book I
– M.: Publishing department of TsAGI, 1992.
17 "Aircraft construction in the USSR in 1917 – 1945". Book II
- I – M.: Publishing department of TsAGI, 1994.
18 "Tactics in combat examples: bombardment regiment" –
Skomorokhov N.M., Chernetsky V.N. – M.: Voyenizdat, 1985.
19 "Tactics in combat examples: fighting aviation division" –
Zimin G.V. – M.: Voyenizdat, 1982.
20 "Construction and design of aircraft" – Golubev I.S.,
Samarin A.B., Novoseltsev V .I. – M.: Mashinostr oyeniye, 1995.
21 "The Basics of Aviation Simulators Theory" . – M.:
Mashinostroyeniye, 1995.
22 "Practical Aerodynamics. For official use" – P.P. Vdovin – M.:
Military Publishing House of the USSR Ministry of Armed
Forces, 1946
23 "Ground assault aircraft above the Dnieper" – Palmov V.V.
– K.: Politizdat of the Ukraine, 1984.
24 "Fighter Combat: Tactics and Maneuvering" - R.L. Shaw -
Maryland, Naval Institute Press, 1985.
25 "Jane's Encyclopedia of Aviation" - London: Studio Edition,
1993
26 "Jane's Fighting Aircraft of World War II" - London: Studio
Edition, 1995
27 "Warplanes of the Luftwaffe" – editor David Donald -
Aerospace Publishing London, AIRtime Publishing USA, 1994.
28 "Soviet Combat Aircraft of the Second World War. Volume
One: Single-Engined Fighters" – Y. Gordon, D. Khazanov –
Midland Publishing Limited, 1998.
29 "Soviet Combat Aircraft of the Second World War. Volume
Two: Twin-Engined Fighters, Attack Aircraft and Bombers"
– Y. Gordon, D. Khazanov, A. Medved' – Midland
Publishing Limited, 1999.
30 "Black Cross – Red Star. The Air War Over the Eastern Fr ont.
VOLUME I. Operation Barbarossa, 1941 – Ch. Bergstrom,
A. Mikhailov – Pacifica Military History, 2000.
31 "Luftwaffe Codes, Markings and Units 1939 – 1945. A
Schiffer Military History Book" – Barry C. Rosch – Schiffer
Publishing Ltd., 1995.
32 "Luftwaffe at War. Fighters over Russia" – M. Griehl –
Greenhill Books London, Stackpole Books Pennsylvania,
1997.
33 "Les Chtourmovik" – H.Leonard – Docavia Editions
Lariviere
34 "Macchi MC 202 Folgore – Maurizio Di Terlizzi – IBN
Editore, 1999
35 "Ali d'Italia Aer. Macchi C.202" – La Bancarella Aeronautica
– Torino, 1995
36 Ahnert, R.; Galland, A.; Ries, K.: Die deutsche Luftwaffe
1939-1945; Karl Müller Verlag, Erlangen.
37 Bergius, C. C. (1967): Die Straße der Piloten im Bild.
Sigbert Mohn Verlag, Gütersloh.
38 Brennecke, Jochen; Dürk, Dieter; Färber, Matthias e.a.
(1996): Der Zweite Weltkrieg. Russlandfeldzug. Von Brest
bis Stalingrad. Moewig, Rastatt.
39 Brennecke, Jochen; Dürk, Dieter; Färber, Matthias e.a.
(1996): Der Zweite Weltkrieg. Kampf ums Reich. Krieg an
allen Fronten. Moewig, Rastatt.
40 Constable, Trevor J.; Toliver, Raymond F (1971).: Holt
Hartmann vom Himmel! Die Geschichte des
erfolgreichsten Jagdfliegers der Welt. Motorbuch Verlag,
Stuttgart.
41 Fleischer, Wolfgang (1997): Die größte Panzerschlacht des
Zweiten Weltkrieges. Operation Zitadelle. Podzun-Pallas,
Wölfersheim-Berstadt.
42 Jäger, Manfred (1995): Erich Hartmann - Der erfolgr eichste
Jagdflieger der Welt. Motorbuch, Stuttgart.
43 Kopenhagen, Wilfried, e.a. (1978): Lexikon der Luftfahrt.
Transpress, Berlin.
44 Morgan, Hugh (1997): Soviet Aces of Word War 2.
Osprey, London.
45 Noggle, Anne (1994): A Dance with Death. Soviet
Airwomen in World War II. Texas A&M University Press.
46 Nowarra, Heinz J. (1991): Die 109. Gesamtentwicklung
eines legendären Flugzeugs. Motorbuch Verlag, Stuttgart.
8382
Page 43

47 Piekalkiewicz, Janusz (1998): Luftkrieg 1939-1945.
Südwest Verlag, München.
48 Rendall, Ivan (1992): Der Griff nach dem Himmel. Das
Abenteuer der Fliegerei. vgs Verlagsgesellschaft Köln.
49 Sobolew, Dimitri Alexejewitsch (2000): Deutsche Spuren in
der sowjetischen Luftfahrtgeschichte. E.S. Mittler & Sohn,
Hamburg, Berlin, Bonn.
50 Stapfer, Hans-Heiri (1995): Il-2 Stormovik in action.
Squadron/signal publications, Carrollton, Texas.
51 Steinhoff, Johannes (1974): In letzter Stunde. List,
München.
52 von Richthofen, Manfred (1917): Der rote Kampfflieger.
Neuauflage 1990 Germa Press, Hamburg.
In addition, our development team used the following sources:
• Flight manuals of the Yak-3, IL-2(1941), Tu-2, Pe-2, I-153, I-16, P-39 Airacobra, P-63
Kingcobra, Ju-88, Bf-109G-2, Bf-109G-6, Bf-109K-4, FW-190A and many others.
• Considerable technical data on the trials of the NII VVS. These cannot all be listed here.
• Original manufacturing data.
• Complete technical descriptions and blueprints for most modeled aircraft.
Note: We strongly recommend that you read the book series: “Black Cross – Red Star. The
Air War Over the Eastern Front”.
18 CREDITS
1C:Maddox Games
Oleg Maddox
Head of 1C:Maddox Games. Lead designer. Head of
Games Development Department of 1C Company.
Yuri Miroshnikov
Head of Games Division of 1C Company.
Igor Egorov
Lead programmer.
Yuri Antonov
Aircraft FM and AI programmer
Dmitri Soldatenkov
Aircraft FM and AI programmer
Sergei Sokov
Ground AI and 3D programmer
Roman Deniskin
Lead 3D Designer, Cockpits and all aircraft features
programmer.
Yuri Kryachko
Visual effects and 3D graphics programmer.
Rudolf Heiter
Programmer and sound engineer.
Sergey Shaykin
Programmer.
Kirill Ivanov
Programmer.
Kuzma Lykov
3D modeler. Aircraft cockpits modeler. Missions designer.
Vladimir Kuznetsov
3D modeler. Aircraft FM and AI Programmer.
Vladimir Veruygin
3D Modeler. Missions designer.
Eugene Inozemtcev
3D Artist
Mikhael Starchenko
Artist. Skin maker.
Ilya Shevchenko
Lead tester. Designer of training missions.
Staff who worked on the initial or other stages of the
IL-2 Sturmovik project:
Ilya Mikhalkov Programmer
Oleg Rogentsov 3D modeler.
Dmitry Azadov 3D modeler
Ronald Engelhardt 3D Modeler.
Ubi Soft
Production team.
Alexis Godard
Director of development
Anne Blondel
European Director of development
Fabrice Pierre-Elien
International Content Manager
Matthieu Boulard
Producer
Marc Blondeau
Lead Designer
Eric Tremblay
Worlwide test manager
Emmanuel-Yvan Ofoé
Lead Tester
Alain Bouliane Tester
David Goyette Tester
Denis Côté Tester
Marc-Alexandre Plouffe Tester
Marc-André Proulx Tester
Pierre Boyers Tester
Game Service Team
Fabien Senneron Project manager
Luc Bouchard Lead programmer
Philippe Lalande Programmer
Pierre-Beausoleil Programmer
Louis Lamarche Design
Tanguy "Darkam" Imbert Community Manager
Sam Copur Community Manager
Localization Team
Loïc Jacolin Localisation Project Manager
Anne Perreau Localisation Project Manager
Oliver Jorg Localisation Coordinator Germany
Xavier Kemmlein French Linguistic Coordinator
Georges Brize French Translator
Partnertrans German In-game Texts Translation
Guy Parker UK Proofreading
Adrian Matthews UK Proofreading
Marketing Team
EMEA Vincent Munoz
USA John Cooglan
UK Nick Segger
Germany Andreas Balfanz
France Clémence de Bailliencourt
Italy Valeria Lodeserto
Brazil Milena Barreto
Export territories Rebecca Molloy
The Netherlands Michiel Verheijdt
Belgium Evelyn Devooght
Australia Michael Gale
Canada Steve Gagne
Brand Manager Europe
Brand Manager
Brand Manager
Brand Manager
Brand Manager
Brand Manager
Brand Manager
Brand Manager
Brand Manager
Brand Manager
Brand Manager
Brand Manager
Press Relations Team
USA Marcus Beer PR
UK Manab Roy PR
Germany Karsten Lehman PR
France Delphine Platten PR
Italy Andrea Cordara PR
The Netherlands Michiel Verheijdt
Belgium Evelyn Devooght
Australia Michael Gale
Canada Steve Gagne
Internet Team
Pierre Lutic Web Designer
Christian Luminh Web Developer
Xavier Fauthoux Project Manager
Laetitia Grégoire Online Studio Manager
Special thanks
Yannick Rollot (Assistant), the BBGC Team, Sylvain
Fraysse (FKGB), Laetitia Bornot (Thrusmaster),
International Sales Team, Manufacturing Team, and the
IL-2 Sturmovik fans!
Niels Bogdan PR
Brand Manager / PR
Brand Manager / PR
Brand Manager / PR
Brand Manager / PR
8584
Page 44

19 SPECIAL THANKS
UBI SOFT UK TECHNICAL SUPPORT
We wish to acknowledge the Ilyushin Aviation Complex for agreement to use
the “IL-2” and “IL-2 Sturmovik” trademarks.
Special thanks
WWII veterans (consulting and tests)
Viktor A. Kumskov (IL-2 ace), Juergen Gabriel (Eastern Front Stuka-Ace ), Georg Adam
(Bf-109E, Bf-109G-2, Bf-109G-6, Bf-110, FW-190A-3, FW-190D-9, Me-262), Wilhelm
Rosenbaum (rear gunner/radio-operator on Arado 196 and other models), Monroe Q.
Williams (P-47 and P-51), Chuck Walters (P-47).
For their help, testing and great support
Viktor Kabanov,
Thomas Herzler,
Robert Murphy,
Thomas Spann,
Len Hjalmarson,
Peter Robbins,
Ilya Shevchenko,
Andreas Preuße,
Dietger Pohl,
Ulrich Kenter,
Jörgen Torgersson,
James R. Campisi,
Manuela Raudasch,
Martin Naß,
Steffen Trombke,
Philippe Willaume,
Andrej Tscheprassow,
Guillaume Lelevé,
Christoph Lemke,
Dan Crenshaw,
Olivier Lefebvre,
Waldemar Lindemann,
Gian Vitzthum,
Ferdinando D'Amico,
Bernhard Kast,
Ronald Engelhardt,
Attilio Guzzeloni,
Oleg Kirillov,
Christer Bergström,
Andrey Mikhailov,
Yakov Filatoff,
Frank Morrisette,
Victoria Avalon,
Jerry Boucher,
Greg Leon Guerrero,
Volker Alperstädt,
Peter Webber,
Debbie McDowell,
Sami Kukkonen,
Ville Pitkanen,
Stefan Overgaard Kristensen,
Jari Vnttinen,
Martin Ilg,
Demian Souza,
Frank Moellenhof,
Franck Le Roux,
Jennifer Mitchell,
Kaj Laaksonen,
Stefan Rubner,
Michael Domke,
Jukka Kauppinen,
Douglas Helmer,
Rick Martinez,
Mark Bush,
Pete Hawk,
David Carmeli,
Ken Cook,
James Ulrich,
David Zurawski,
Phil Worthen,
Richard D.Goldblatt,
David Wheeler,
Philippe Gensou,
Nick Schreger,
Brian Yeates,
Tom Cofield,
Christian Richter,
Dalibor Jovanovic,
Theo Braat.
Great thanks to MeatWater™ - Nick Schreger and co-producer Detlef Piepke definitely
deserve the reputation as flight-simulators and sound-specialists!
On-line Support Options
Ubi Soft offers several on-line support options for their software products. One of these is
our website at: http://www.ubisoft.co.uk/support/
If you have a specific problem that is not addressed on our site, you can send your
question to us via e-mail at: techsupport@ubisoft.co.uk
Please be as specific as you can be about the problem you are experiencing. Also include
in the body of your e-mail: the name of the manufacturer of your computer system; the
brand and speed of the processor; how much RAM you have, the version number of
Windows you are using (if you aren’t sure, right-click on the My Computer icon on your
desktop and select ‘Properties’), and the manufacturer name and model number of your
video card, modem, and sound card.
Other Support Options
You can also contact Ubi Soft Customer Support by phone and fax. When you call,
please have all of the above mentioned information ready.
Technical Support: 0870 800 6160 - National Rate Call - Open from 8 a.m. - 11 pm
Hintline: 0906 466 5200 - Premium Rate Call - open from 8am-11pm
Lines are open 7 days a week
Hours: Monday through Friday 8.00am – 11.00pm GMT
Mailing Address: Ubi Soft Entertainment,
Chantrey Court,
Minorca Road,
Weybridge,
Surrey.
KT13 8DU.
Separate thanks: Denis Gusakov of Russian GAME.EXE game magazine (creator of IL-2
Sturmovik logo for Russian market), and the staff of virtual LLv34, JG26 and others for their
great help in online testing.
© 2001 Developed by 1C:Maddox Games. All Rights Reserved.
© 2001 Ubi Soft Entertainment
86
87
Page 45

NOTES
88
 Loading...