

®
i

Heroes of Might and Magic II Gold
©1996 The 3DO Company
All Rights Reserved
First Edition
The enclosed manual and program are copyrighted. All rights are reserved. This manual may not be copied, photographed, reproduced, or reduced to any electronic medium or
machine readable form, in whole or in part, without prior written consent of The 3DO
Company. Portions of the program accompanying this book may be copied, by the original purchaser only, as necessary for use on the computer for which it was purchased.
ii

Special Thanks
Thanks to the following for their contributions to Heroes of Might and Magic II Gold.
Clouds of Xeen
Great War II
Wizard’s Land 1
Wizard’s Land 2
Wizard’s Land 3
Ghost Planet
Colossal Cavern
Betrayal
Gates of Hell
Plains of Aekon
Slayer Legacy
The Road Home
Grim Reaper
Dead Dragons
Alteris 1
Alteris 2
Roc ‘Round the Clock
Leopoldville
Merry Men
Dungeon Below
Go Ask Alice
Mire Straights
Riddle Me This
Sudden Siege
Black Forest
Last Hope
Ludicrosity
Quadruplets
Threedom
Thunk
Family Reunion
Aleksei Andrievski
Aleksei Andrievski
Aleksei Andrievski
Aleksei Andrievski
Aleksei Andrievski
Charles Watkins
Charles Watkins
Grayson Towler
Grayson Towler
Grayson Towler
Grayson Towler
Grayson Towler
Greg Schneider
Greg Schneider
Jonathan Watters
Jonathan Watters
Julia Skipper
Lance Wood
Peter Mayewski
Phil McCrum
Phil McCrum
Phil McCrum
Phil McCrum
Phil McCrum
Rich West
Timothy Duncan
Timothy Duncan
Timothy Duncan
Timothy Duncan
Timothy Duncan
WongSui Jau
iii

Table of Contents
Introduction
What’s New
Basic Operations
Tutorial
Main Menu
Standard Game
Campaign Game
Multiplayer Game
Adventure Screen
Adventure Window
Adventure Buttons
Options
Game Play
Town Screen
Castle Screen
Hero Screen
Movement
Secondary Skills
Skill Advancement
Hero Trading
Kingdom Overview
Combat
General Options
Combat Options
Siege Combat
Spells
Creatures
Structures
Editor
Keyboard Shortcuts
Technical Support
Hints on the New Maps
v
vi
8
9
18
18
21
21
25
25
27
28
32
36
38
42
47
48
50
52
53
54
55
58
59
61
74
95
118
122
124
125
iv
Introduction
Heroes of Might and Magic II Gold combines fantasy and strategy in a battle for territory and resources. Players must fight between one and five enemy warlords to conquer
new lands, collect resources and artifacts, and capture towns. These towns need to be
fortified and upgraded to produce and supply new armies. Strategic planning and tactical cunning need to be combined and balanced for victory.
v

What’s New
Heroes of Might and Magic II, the sequel to the first Heroes of Might and Magic, has
many new features and improvements. If you have played the first Heroes, here is a list
of the major changes in Heroes II. Elements in the manual that refer to changes in
Heroes of Might and Magic II: The Price of Loyalty are labeled (PoL). You can find
more detailed information on each item in the appropriate section of the manual.
Spells: The spell system now uses a spell points instead of spell memorization. You
permanently learn spells from the Mage Guilds, but have a finite number of spell points
to cast those spells. Many new spells have been added, and the spells are now categorized in five levels, as opposed to four.
Combat: The battlefield has been enlarged, and new creatures have been added.
Creatures can now be affected by more than one non-contradictory spell at the same
time (Curse, Slow, and Protection can all be affecting a single creature).
Heroes: Two new hero types are available, the Wizard and the Necromancer. The
Wizard is a powerful spellcaster with an army of magical creatures, and the
Necromancer is a spellcaster that commands the undead.
Heroes now learn secondary skills, such as Archery and Leadership. Some of these
skills duplicate the innate abilities of the hero types in the first Heroes (Pathfinding for
the Barbarian, Navigation for the Sorceress). Heroes can know a maximum of eight
secondary skills, and there are 14 skills to choose from. These skills are learned when a
hero advances in level.
Towns: Towns have new defensive improvements, and some completely brand new
buildings, like the statue and the marketplace. Some creature dwellings can be upgraded
to produce new, upgraded creatures.
Creatures: Certain creatures can be upgraded, generally becoming faster and tougher,
though some creatures aquire special abilities when upgraded. Two new groups of crea-
vi
tures have been added, one for the Wizard and one for the Necromancer.
Adventure: The size of the maps can be smaller or larger than before (up to 1/4 the
area to 4 times the area). Many scenarios will now have different victory or loss conditions instead of the standard ‘Kill ‘em all.’ These special circumstances will be explained
when you start the scenario. Two new terrain types, cracked wasteland and beach, and
many new adventure objects have been added.
Campaign: The primary campaign of Heroes II allows you to choose which of Lord
Ironfist’s sons you will aid in succeeding to the throne, Roland or Archibald. Each side
has a different set of elaborate and interesting scenarios, so be sure to try them both.
If you are not sure what something does, R-clicking on it will give quick information.
This works on buttons, skills, artifacts, creatures, spells, buildings, heroes, objects on
the map– almost anything you can find.
Have fun, and watch out for the Black Dragons!
vii

Basic Operations
Mouse
When you are instructed to click on something, point to the object and click with the left
mouse button. ‘R-click’ means click with the right mouse button.
You can get information on most things in the game by R-clicking on them. Most Rclick information requires that you hold down the mouse key to read the information.
File Selector
When loading or saving a games, you will be presented with a standard File Selector
window. To select a file, click on the name to highlight it. The name will now appear in
the red bar at the botton of the list. Click on OKAY. Click on the CANCEL to exit the
menu without making a selection, or press the ESC key.
If the list is longer than the display, you can scroll through the list in two ways. Along
the right side of the list is the slider bar and two arrow buttons. Click on either arrow
button to scroll in the direction indicated by the arrow. To get to a selection quickly on a
long list, drag the slider bar in the direction you want.
8

Tutorial
Don't have the patience to explore rulebooks? Want to learn the basics quickly so you can
dive into the game? This is where you want to start. This tutorial will walk you through a
few turns of the Tutorial scenario.
From the Main Menu, click on Load. Then click on Standard Game from the next menu.
That menu will be replaced by the File Selector. Click on the file name, Tutorial, to highlight it. The name of the file will also appear in the dark brown bar just above the two buttons at the bottom of the File Selector. Click on Okay.
After the game loads, you will find yourself on the Adventure Screen. The big window on
the left is the Adventure Map. That's your castle in the middle with your starting hero sitting astride a horse at its entrance. On the right are a variety of controls and indicators.
Let's explore these for a moment.
In the upper right is the
World Map. There's a pink
box around the area of the
map that is displayed in the
Adventure Map window. You
start off only knowing a short
distance beyond your own
castle. As you move your
heroes about, more of the
map becomes visible. Yo u
can scroll the Adventure
Map in a number of ways.
Move the cursor to the
extreme edge of the screen
and the Adventure Map will
9

scroll in that direction. Give it a try. If you scroll too far and can no longer tell where you
are, look up in the World Map. Place the cursor over the green blob that represents known
terrain and click. The castle and the surrounding environs are displayed again in the
Adventure Map window.
Below the World Map is a display showing your heroes and castles. This is the hero and
castle locator. The blue-eyed woman is the hero you happened to start with. There is a
light blue outline around her box, indicating she is the "active" hero. Place the cursor over
her picture and R-click and hold the button down. A window will come up displaying her
name, stats, and the type and number of troops that are accompanying her. Release the
mouse button and the display disappears (you can R-click on many things in the game to
get this kind of quick information). The blank boxes below Gwenneth (your hero) and your
castle are for future heroes and castles.
Beneath the hero and castle selectors are eight buttons that will aid in playing the game.
We'll discuss these as we go through the tutorial.
The bottom display is the Information Window. It currently shows the active hero’s army.
Place the cursor over this window and click. It now shows the amount of resources, towns,
and castles you control. It will automatically return to the army display after a few seconds.
Click on it again a couple of times. It will now show you the month, week, and day. New
recruits become available at the start of each week, so it's wise to keep track of the time.
This tutorial begins a few days into the week so that several buildings could be added to
your castle to get you into the thick of things faster.
Place the cursor over the castle next to your hero's icon in the castle selector and click (but
not on the monochromatic castle in the group of eight buttons). The castle now has the blue
box around it, indicating it is active. The Status Window also changes to display your
resources, since your hero is no longer active. Click on the castle a second time to bring
up the castle display.
Along the top of the castle window are the dwelling places of your potential recruits and
the exterior of the castle. Place the cursor over any of the structures and R-click (holding
10
the button down) to see a
description of it. Three of the
s t r u c t u res are dwellings
where you can recruit troops.
The troop type, cost per unit,
and the number available are
listed. You will notice that
nobody seems to be home at
the moment (we already hired
them into your army).
Along the bottom of the
screen is your hero's portrait,
indicating she is in the castle.
Her accompanying tro o p s
are displayed in the row of
boxes to her right. You can have up to five different troop types in any hero's army. Note
that there are two spaces available in Gwenneth's army, indicated by the horse's head. Let's
fill those up.
Click on the castle near the top of the screen. The entire display now shows the various
dwellings that can be purchased. You already have the Thatched Hut, Archery Range,
Blacksmith, Tavern and Well structures (marked by the yellow check). The Archery
Range and Blacksmith each have a red X. Though you have the dwellings, you have not
as yet purchased the upgrades, nor can you until specific prerequisites are met. Upgrades
improve the quality of troops these dwellings normally provide. The Shipyard, Jousting
Arena, and Cathedral have prerequisites you don't currently have and are also marked
with a red X. The two portraits near the right side of the screen are the heroes that are
available for hire this week. You can only have one hero in a castle at a time, so these
heroes are also marked with an X. You can R-click on any on the buildings to get more
information about them. For now, place the cursor over the Armory and click.
11

A window comes up telling
you that the Armory produces Swordsmen. It also
re q u i res the Tavern and
Thatched Hut to be present
in the town (which we built
for you already). It will take
10 ore, 10 wood, and 2000
gold to build. A quick
glance to the re s o u rc e s
that are displayed on the
lower right of the screen
reveals you have the necessities. Click on Okay.
The display shows the
castle exterior again, and the Armory is the red-roofed building near the middle of your
screen. Let's recruit some Swordsmen to fill out our army. Click on the Armory and a window entitled Recruit Swordsman comes up. There are four available at 250 gold each. You
can click on the up and down arrows to select the number of troops you want to recruit,
but in this case, it is easier to just click on the Max button. That will automatically choose
the maximum that you can afford, up the limits of how many are available. Click on Max
if you haven't already done so, and then click on Okay.
Four Swordsmen have been added to your castle garrison. The garrison occupies the five
boxes above the hero's army. They will defend your castle if a hero isn't there, but might
not be involved if a hero and accompanying army is in the castle. To transfer the troops
from the garrison to your army, first click on the Swordsmen. This highlights them with a
red outline. Now place the cursor over the empty space of the hero's army at the lower
right and click. The Swordsmen are now part of Gwenneth's army. You can transfer troops
from box to box by clicking on one troop, and then clicking on the troop that you want
them to exchange places with. You may also do partial troop transfers if the need should
12

arise by holding down the Shift key when transferring troops.
There are no more troops available for now, and you can only make one improvement in
your castle per turn– it's time for Gwenneth to go adventuring. Click on the Exit button on
the lower right.
We are back to the Adventure Window. Note that Gwenneth has the blue border around
her box indicating she is the active hero. Move the cursor around a bit in the Adventure
Map. The cursor will change depending on what it is over. Move the cursor over the treasure chest that is sparkling just below and to the left of the castle entrance. As you move
the cursor it will change from either a spear or a horse to a rearing horse as it is placed
over the chest. The rearing horse indicates that there is an event there that the hero can
interact with. Once the horse is in the rearing position, click. A green path of arrows is now
displayed. This indicates the path the hero will take. She'll avoid all events, encounters and
obstacles to get to the destination you clicked on, now marked by a green X. Your hero
can reach anywhere along the path this turn where it is green. When the path or destination turns red, the hero won't reach there until subsequent turns. Once the path is set, click
on the destination a second time and the hero will move along the path towards the destination. Do that now.
You found some gold! You can either keep the gold or distribute it to the peasants for experience. At the start of each turn, you accumulate 1000 gold for each castle you own, 250
for each town, and 1000 for each gold mine. Building up your castle and army is an expensive proposition, so the gold is needed there. At the same time, if you take the experience,
your hero's stats will eventually improve, becoming better in combat or spellcasting, and
will also gain new skills. For the purposes of this tutorial, click on Yes, but learning when
to choose one or the other is something your own experience and style will dictate.
Look next to your hero's portrait and you'll see a yellow bar indicating the amount of
movement she has left this turn. Be aware that it doesn't start at the top of the bar– there
are items that can improve her movement beyond the normal. Gwenneth still has some
movement left, so let's set a new destination. Click on the sparkling fountain below and
13

slightly to the right of your castle, making sure you have the rearing horse symbol. Note
the numeral 2 on the right of the horse. That means it will take all of Gwenneth's movement this turn, and at least part of her movement next turn to reach there. Click to set the
path. The destination is marked with a red X this time, indicating you can't reach there this
turn. Move the cursor over to the button with the horse icon near the right side of the
screen and click. This is the Move button, an alternate command that tells your hero to
move along the path once it is set.
That's all for this turn. Click on the hourglass button. The Status Window will show the
computer players thinking and the cursor will become a sundial. Once the cursor changes
back and the Status Window reverts to Gwenneth's army, you can continue.
The red X is now green. Click on the Move button and Gwenneth continues along the path
you set last turn. A message box pops up and informs you that by drinking from the fountain you will gain luck for your next battle. Good luck allows your troops to do double
damage for an attack in combat– watch the rainbow arch towards your warriors when it
happens.
Click on the pile of wood neatly stacked to the left of the road leading towards the bottom
of the screen and move your hero there. Roads are easier to move along than other types
of terrain. Don't worry about trying to precisely move along the road; your hero will do
that automatically if it is to your advantage. A message will appear briefly in the Status
Window saying that you have found a small amount of wood and will give the exact
amount.
As you moved towards the woodpile, more of the Adventure Map was revealed to you.
The hero unveils the map a set distance away as she moves about. Just to the left of where
the woodpile used to be is a wooden shack and wagon. R-click on it and you can see that
it is a sawmill. The sawmill produces two units of wood each turn as long as you own it.
Place the cursor over the front of the sawmill (be sure you have the rearing horse cursor
icon) and click twice. Read the text then click on Okay. Note that there is now a blue flag
flying over the sawmill, indicating that you own it. It will continue to add two units of wood
14

to your resources at the start of each turn until some other faction's hero captures it.
Below the sawmill and to the right there's a wooden signpost. Move to that. You'll run out
of movement before you get there. Click on the hour glass and when it is your turn again,
click on the move icon. Read the message and than click on Okay. Messages may give
important clues and it might be wise to stop and read them along the way.
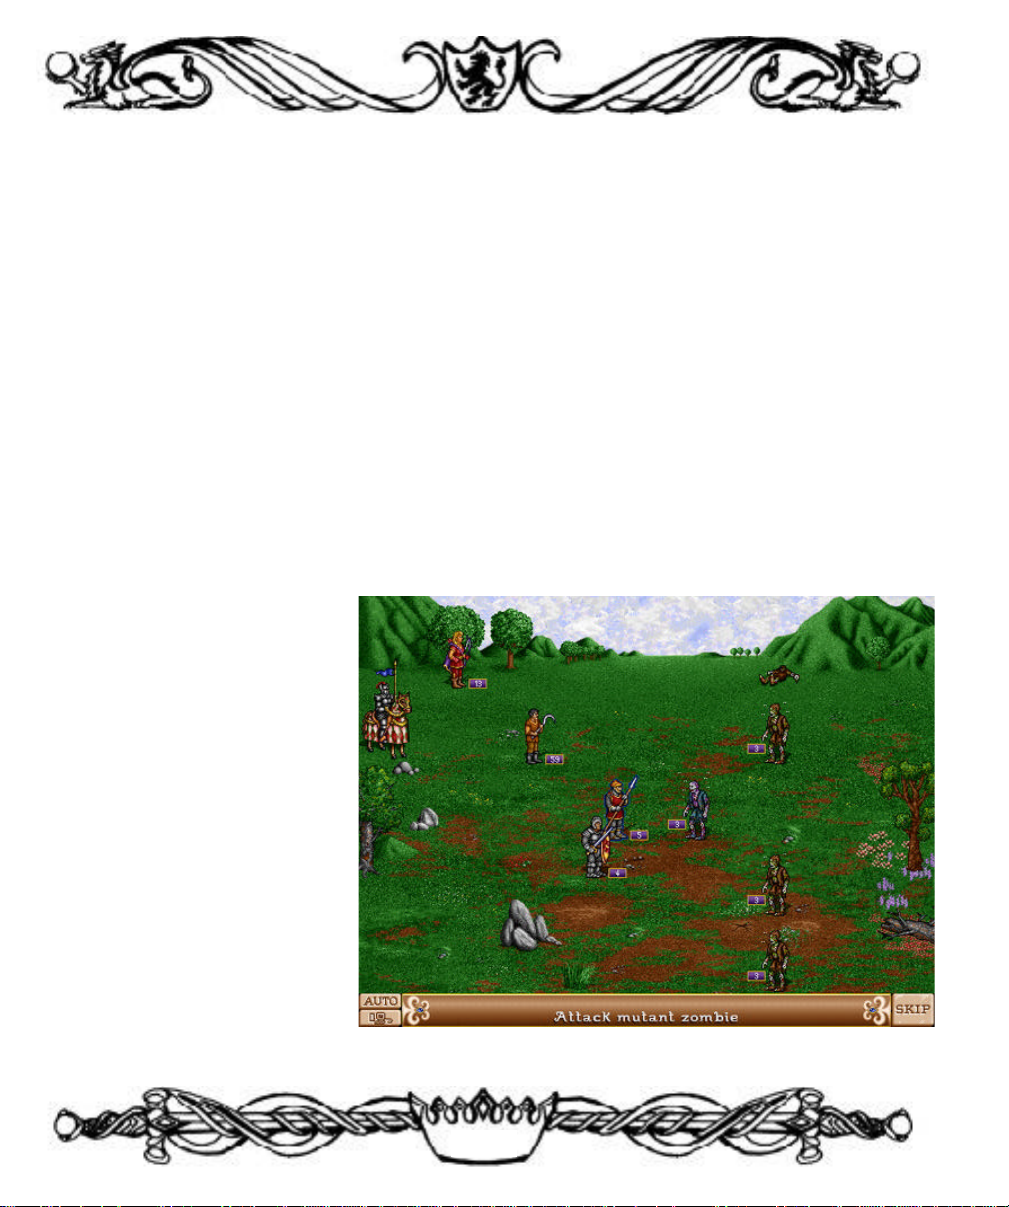
The putrid green zombies on the right side of the map are guarding a small treasure cache,
daring Gwenneth to try and defeat them. No self-respecting hero can pass up the challenge like that, so place the cursor over the zombies. Note that the cursor becomes a
sword. This indicates if you move there, a battle will take place. Go ahead and move to
the zombies.
The combat screen shows terrain similar to the type the combat started on in the
Adventure Map. On the left side of the screen is the moving player's troops (the Attacker),
and on the right is the encountered group (the Defender). Thus, your troops will be lined
up on the left in any combat during your turn, and on the right in any combat during another player's turn. Your troops are lined up from top to bottom in the same order that they
were lined up from left to right in your hero's display back at the castle.
Combat is fought in a series of rounds, with each unit getting to move and possibly attack
once each round. The faster the unit's Speed, the sooner it moves in the combat round.
The computer will determine which unit gets to move first. Your Pikemen are your fastest
unit and will have a glowing yellow outline when they are ready to be moved. R-click on
them to see their statistics. Now move the cursor around the field. You can move the
Pikemen to any position on the field where you see the Running Man icon. All you need
to do is click on the spot you want them to move to. An X with a circle behind it indicates
a spot they can't move to. Some terrain may be impassable (usually marked by a tree, pit,
bush, the odd flow of lava, etc.).
On the extreme left is your hero, mounted on a horse with your banner waving in the
breeze. Place the cursor over the hero– when the cursor changes to a helmet, click. A
window will pop up with Gwenneth's picture, her stats, and a group of four buttons.
15
These are the General's Options. Starting on the left is the Cast Spell button (the gesturing hand). The Cast Spell button is darkened and can't be selected because Gwenneth
doesn't have any spells. The next button to the right is the Retreat button (the running
knight). Retreating loses all of your hero's troops, but she'll make her way back to any of
your castles with her experience and artifacts intact and can be recruited again. The next
button is the Surrender option (the white flag). This is similar to the Retreat option
except all your troops stay with your hero , but you must pay a penalty to the opposing
General. The more troops, the bigger the payment. To surrender, there must be an
opposing player's General to surrender to, and these zombies don't have one. Heroes
are your commanders: they direct your units (through you) on the battlefield, add their
offensive and defensive bonuses, and cast spells, but do not move about like their
troops. Click on the last button (four arrows) to exit the General's Options.
Your Pikemen are still waiting patiently for orders. Move the cursor straight to the right of
the Pikemen until you get the X symbol. Now back it up just a little until you get the
Running Man back. That's the limit of how far they can move. Go ahead and click. One
of the zombie groups will
come charging forward, but
won't be able to reach you.
Your Swordsmen's turn is
next– move them forward the
same as you did the Pikemen
(you might have to move the
cursor up or down a bit to get
around a big rock). Time to
soften them up a bit. After
some more zombies shamble
up, your archers should be
glowing. They are armed
with arrows that can strike at
a distance. Place the cursor
16

over the nearest zombie. The cursor becomes an arrow, indicating you can fire at the
group without moving. Go ahead and click. The arrow is fired (R-click on the archer to
see how many shots she has left) and the zombie group is greatly diminished or wiped out.
Troops with distance weapons have their attack damage halved if an enemy group is next
to them, so it is best to guard them and not advance. Your Peasant group is the slowest,
and can't get close enough to attack. Have them timidly creep forward as best they can.
Just to throw a monkey wrench into this tutorial some of your troops may, due to high
morale, get another move (it'll be obvious: a big golden bird appears above the inspired
troop's head). Just click the Skip button in the lower right for now, but normally this is a
great time to sneak in an extra attack.
All the units have moved and a new round starts. Your Pikemen will move first. There
should be one or more zombie groups within range of your Pikemen. Place the cursor near
the closest zombie pack. It should change to a sword. The direction the sword is pointing
from indicates where the Pikemen will be when they attack. There's definite tactical considerations, but for the purposes of this tutorial, it doesn't matter which direction. Choose
one and click. Your Pikemen will lower their weapon and attack. Any zombies that survive
will then strike back.
Be aware that a group only gets a strike back against a unit next to them, and will only do
so against the first unit to attack them that round. Ganging up on one target can save wear
and tear on your army.
With the basics of combat under your belt, this tutorial now abandons you to your fate (no
whining- you should be able to obliterate those zombies with Gwenneth's army). Feel free
to continue on with the scenario, referring to the manual as questions arise. New recruits
will be available at your castle next turn. It might be wise to recruit a second hero, build
up another army (while staying put to guard the castle), while Gwenneth explores the countryside. Don't forget to build up the structures in your castle to get new types of units.
Happy adventuring!
17
Main Menu
Five options are presented in the Main Menu, each of these in detail are:
New Game
This option begins a new game of Heroes II. After selecting New Game, a second window will appear offering three different types of game to play:
Standard Game: A single scenario played by a single player.
Campaign Game: Multiple scenarios played by a single player.
Multiplayer Game: A single scenario played by multiple players.
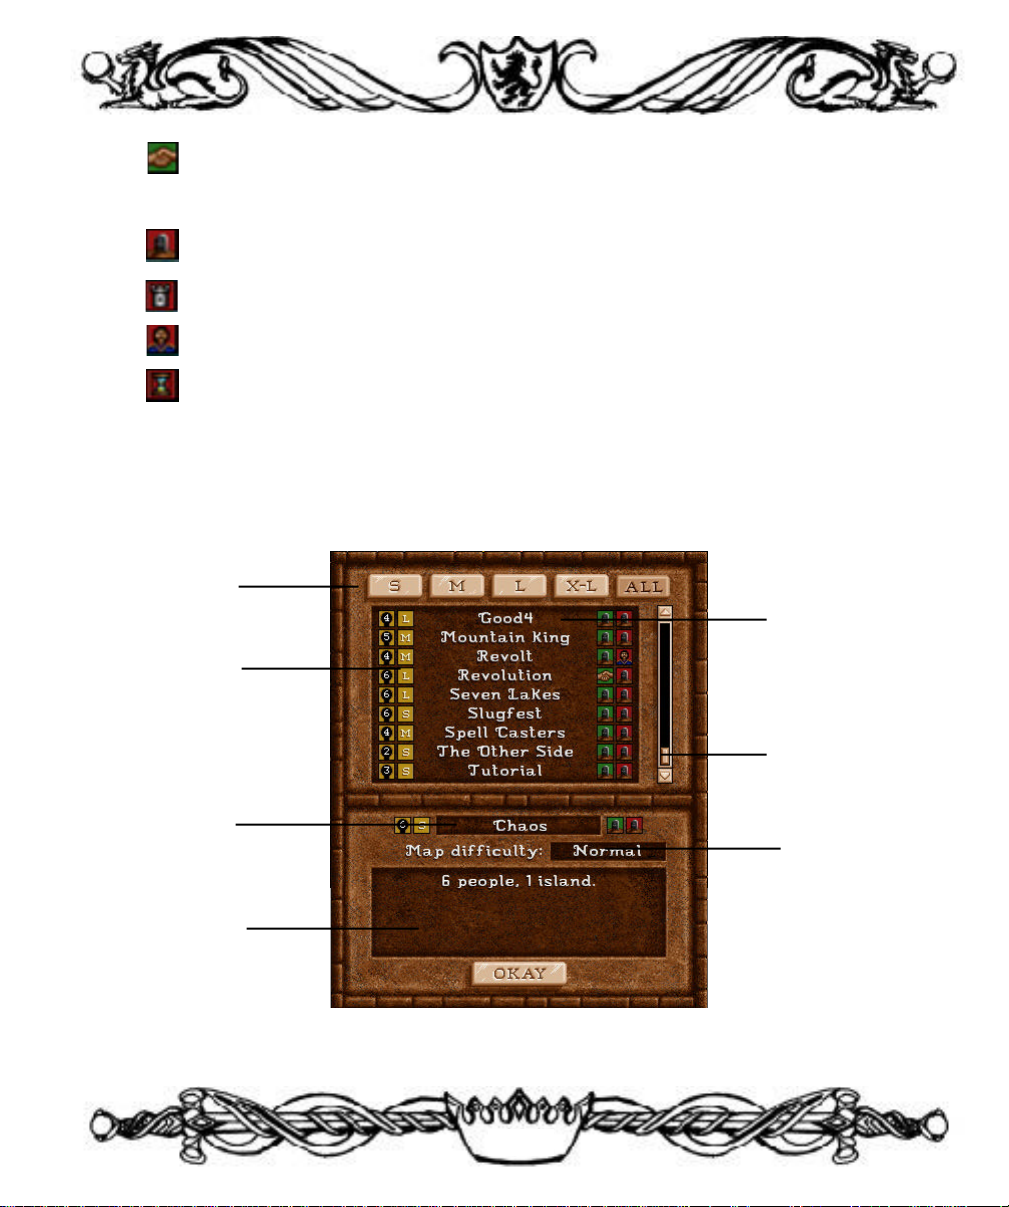
Standard Game: After selecting Standard Game, you must choose which scenario you
wish to play. Clicking on the red bar labeled Scenario opens the scenario selection window. The buttons at the top of the scenario selection window will show only the scenarios
of the size you select e.g. Clicking the S button shows only the small maps.
Each scenario is labeled by:
Size: The dimensions of the map: Small, Medium, Large, and Extra-Large.
Number of Players: From two through six.
Win Conditions: How you win the scenario.
Standard: Capture all opposing castles and defeat all opposing heroes.
Capture Castle: Capture a specific castle.
Defeat Hero: Defeat a particular enemy hero.
Find Artifact: Find a particular artifact.
Wealth: Accumulate a specific amount of gold in your treasury.
18
Team: Your team must defeat the opposing team (1 to 5 other players).
Loss Conditions: How you lose the scenario.
Standard: Lose all your heroes and castles.
Lose Castle: Lose a particular castle.
Lose Hero: Lose a particular hero.
Time Limit: Fail to complete objectives before time runs out.
Each scenario has a small description displayed at the bottom of the scenario selection
window. Included in this section is the difficulty rating of the map, harder difficulties generally indicate the human player is penalized– either by fewer resources, tougher creatures
near the starting castle, or the computer players starting with a distinct advantage.
Size Selector
Scenario Name
# Players and
Map Size
Selected
Scenario
Description
Victory & Loss
Conditions
Map Difficulty
19
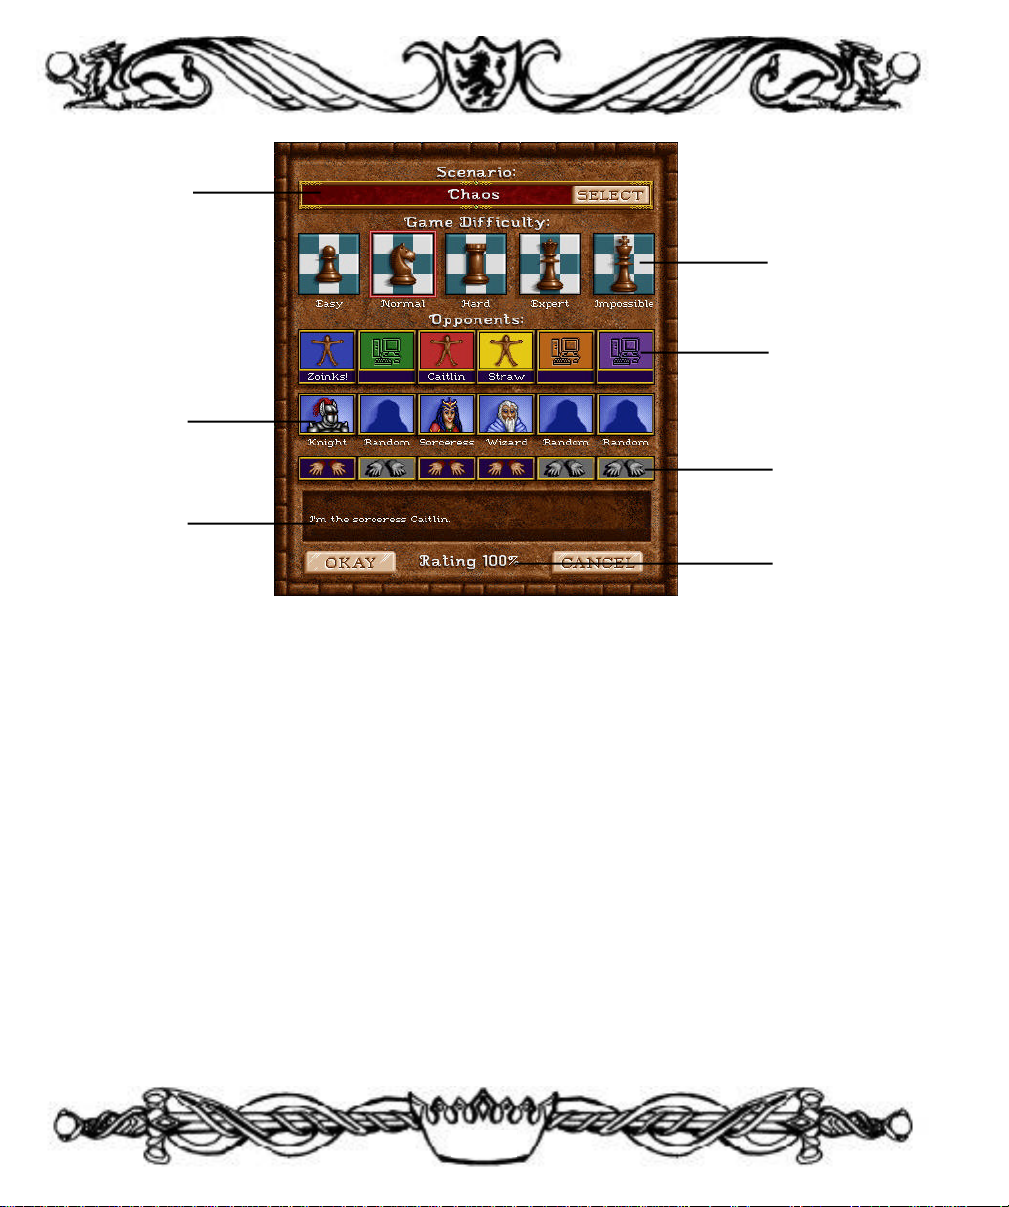
Scenario
Name
Game
Difficulty
Players
Starting
Hero
Chat
(multplayer)
After selecting the scenario, you must choose which game difficulty level to play at. The
difficulty is changed by selecting from the ratings at the top of the screen– Easy, Normal,
Hard, Expert, or Impossible. Game difficulty affects the resources you begin with, the
resources the computer players begin with, and the intelligence of the computer opponents.
Next, you need to determine which color you will be. The color you select determines
where you start on the map– if you select the same color on the same scenario, you will
always begin in the same place. To change colors, click on the color you wish to be. If
the color you wish to switch to is grayed out, then that color cannot be chosen by a human
player.
Handicap
(multiplayer)
Rating
If the hero picture below your color has a blue background, then you are able to select
which hero type you wish to begin the scenario with. Click on the picture to cycle through
the hero types. If the background is gray, then that color is always that hero type– it can
never change. If the picture is a silhouette of multiple people, then that position begins with
different types of heroes and towns.
20

Campaign Game: Selecting this option begins the Campaign Game. After the introduction, you must choose which lord to serve– the noble Roland or the treacherous
Archibald. This is the only option you have in the Campaign Game.
Multiplayer Game: This option allows you to play Heroes II with other humans.
Selecting this option brings up a second window which allows you to determine which
communications device you will use to play multiplayer. In each multiplayer mode, you
must select a Player Name, which is used to identify you throughout the game.
Hotseat: In the Hotseat Window you need to select the number of players and
whether you wish to enter the players’ names.
Network: In the Network Window you select the type of network you will be
playing over. You can play over IPX and NetBios networks, or over the Internet
using TCP/IP. IPX and TCP/IP are only available in the Windows 95 version.
After selecting the type of network, you need to select whether you are the host
or the guest. Each game has only one Host, and the Host sets up the game. All
other players are Guests in the game. If the game was set up using TCP/IP, then
each Guest must input the Host’s IP address to connect.
Note: To use TCP/IP you must have Internet access, usually through an Internet
Service Provider (ISP). All guests must know the host’s IP address. For some
ISP’s, your IP address is always the same, otherwise it changes each time you
access the Internet. To determine your IP address, type WINIPCFG at a DOS
prompt.
Modem: In the Modem Window, you select whether you are the Host (Dials) or
Guest (Answers). Both players must then select the Modem Config button (only
the first time you play a modem game) to select the COM port their modem is
located at and the desired speed of the connection. The Host then inputs the
phone number of the Guest.
Direct Connect: In the Direct Connect Window, you select whether you are Host
21

or Guest. Select the COM port you are connecting from, and the desired speed
of the connection.
Multiplayer Scenario Select Window: From this window, the Host of the game selects
the scenario that will be played. Each player selects what color they will play, and which
hero type they will be (if that option is available). The game Difficulty for all players is set
by the Host, but any player may opt to take a mild or severe handicap. Severe handicap,
represented by the chained hands, means that you start with 30% fewer resources and you
generate 30% less gold and resources per turn. Mild handicap, represented by roped
hands, is 15% fewer resources. The area at the bottom is a chat window, just type in your
message and hit the enter key.
Load Game
This option loads a previously saved game, either Standard, Campaign, or Multiplayer.
Select the type of saved game you wish to load. All options will bring up a standard File
Select window. Simply click on the name of the scenario you wish to load, then click Okay
to load the game.
Credits
This option brings up the names of all the people who contributed to the creation of
Heroes of Might and Magic II: The Succession Wars.
High Scores
This option brings up the list of the High Scores achieved in Heroes II. The Campaign
button displays the best Campaign scores.
Quit
This option closes the program and returns you to your operating system.
22

Campaign Games
The Price of Loyalty includes four entirely separate campaigns. These are accessed by
selecting the existing campaign button from the main menu, and then selecting the
Expansion button. If you would like to play the original Archibald vs. Roland conflict,
select the Original button.
After selecting the Expansion button, a screen will come up prompting a choice of which
of the new campaigns you desire to play:
The Price of Loyalty (Long Campaign)
On orders from your Emperor, you attempt to claim an ancient artifact of great power.
Unfortunately, an old friend has become a powerful rival, and is attempting to claim the
artifact before you. The fate of the empire balances on who retrieves the artifact first.
23
Descendants (Long Campaign)
You must guide a royal family as it passes from generation to generation. Your kingdom
develops over time, gaining allies and enemies. Defend against internal and external
threats to preserve your kingdom and grow in power. You must defeat the nearby rival
kingdom!
The Wizard’s Isle (Short Campaign)
A mysterious chain of islands has risen from the sea, and are rich with powerful magic.
You, as well as many other eager mages, seek to control this mighty force. Whomever can
control these islands will shape the destiny of the next age.
The Voyage Home (Short Campaign)
After voyaging to the outer islands of the kingdom, your ship has been wrecked by a mas-
sive storm. You must find a way to journey back to the mainland. On your return, you
find a civil war has started, and you must choose which side to join.
24
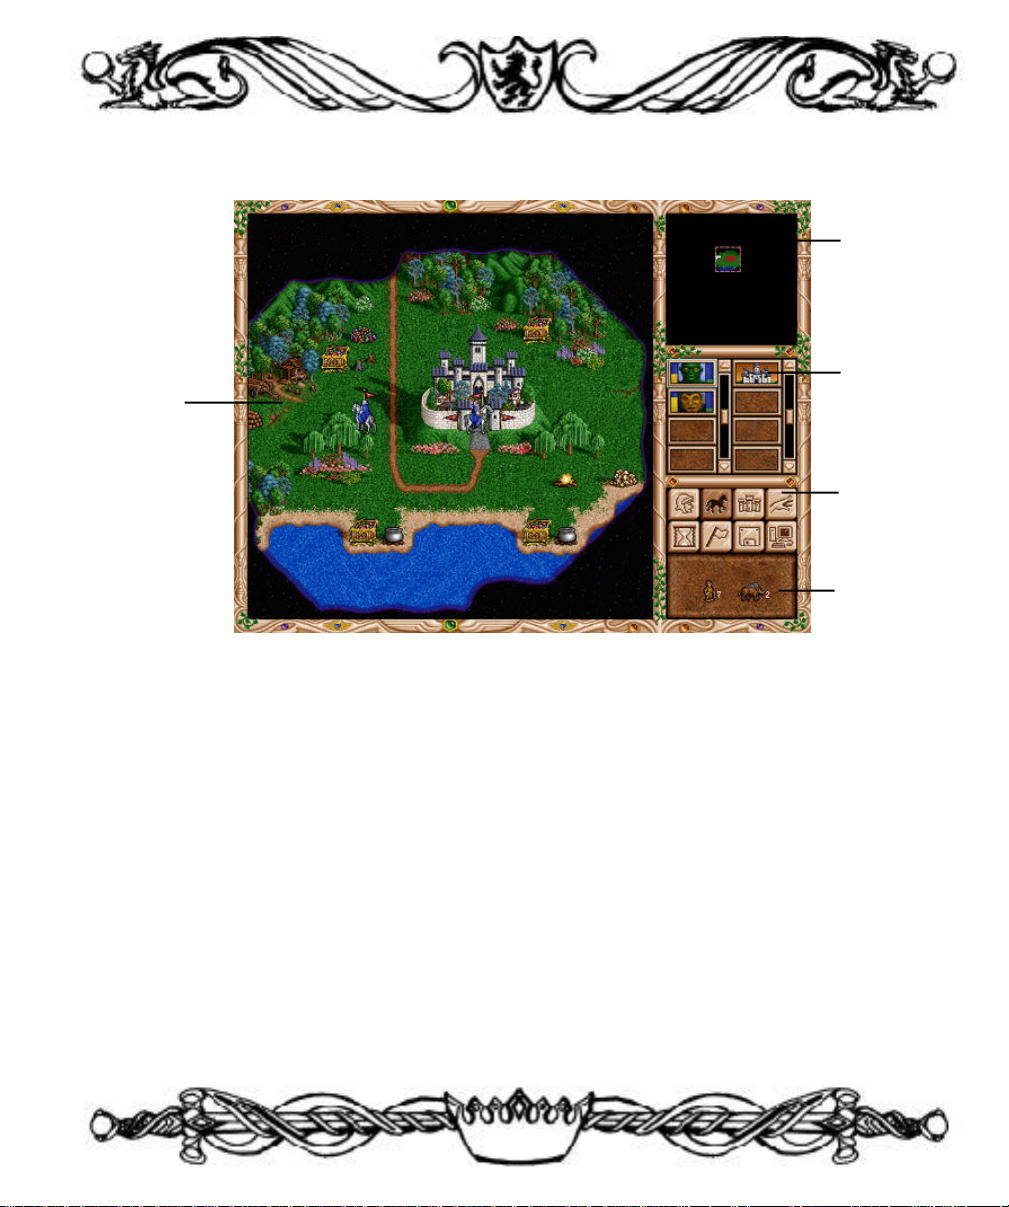
Adventure Screen
World Map
Locator
Adventure
Screen
Adventure Window
All game actions take place on the Adventure Window. From here you can examine the
surrounding countryside and move your heroes. The black areas on the Adventure
Window are the areas that you have not explored. Each town and hero you control will
“light up” the black areas of the map around them. To scroll the Adventure Window, move
the cursor to an edge of the screen– the cursor will change to an arrow, indicating the
direction of the scrolling.
Buttons
Adventure
Buttons
Information
Window
World Map
The upper right section of the Adventure Screen is the World Map, which shows the
world as you know it. Explored sections are lit up, and unexplored areas are blacked out.
25

The pink rectangle within this map shows the portion of the world currently visible in the
Adventure Window. Clicking within this rectangle and dragging it around the World Map
will scroll the view in the Adventure Window. Clicking in the World Map, but outside the
pink rectangle, will instantly reposition the view in the Adventure Window to correspond
to the point clicked in the World Map.
Locator Buttons
These buttons represent the heroes and castles you own. The left section is reserved for
heroes, and the right section is reserved for castles and towns. Both sections display only
four heroes or castles at a time, but have scroll bars to scroll through all the heroes or castles you own.
Hero Locators: Portraits of your heroes are located in the left column. On either side of
the portrait are two vertical bars. The yellow bar on the left of the portrait represents how
much movement your hero has remaining. The green bar on the right represents how
many spell points your hero has remaining. One or more “+” symbols appear on the bar
if you have a large number of spell points or movement.
Clicking on the portrait will make that hero active and center the Adventure Window on
that hero. A light blue border surrounds the portrait of the active hero. By R-clicking on
the hero’s portrait you receive quick information on that hero. By double-clicking on the
portrait, or pressing the ENTER key, you receive more detailed information on the hero
(see also- Hero Screen). You can change the active hero and scroll through the hero locators by pressing the “H” key.
Town Locators: Towns and castles you own are represented in the right column of buttons. The activated town is highlighted by a light blue border. Clicking on a town locator
button will activate that town and center the Adventure Window on that town. R-clicking
on a town locator you receive quick information on the town. By double clicking on a town
button or pressing the ENTER key, you enter the Town Screen. After building a structure in a town, a symbol will appear in the upper right corner of that town’s button. You
can scroll through the town locators by pressing the “T” key.
26
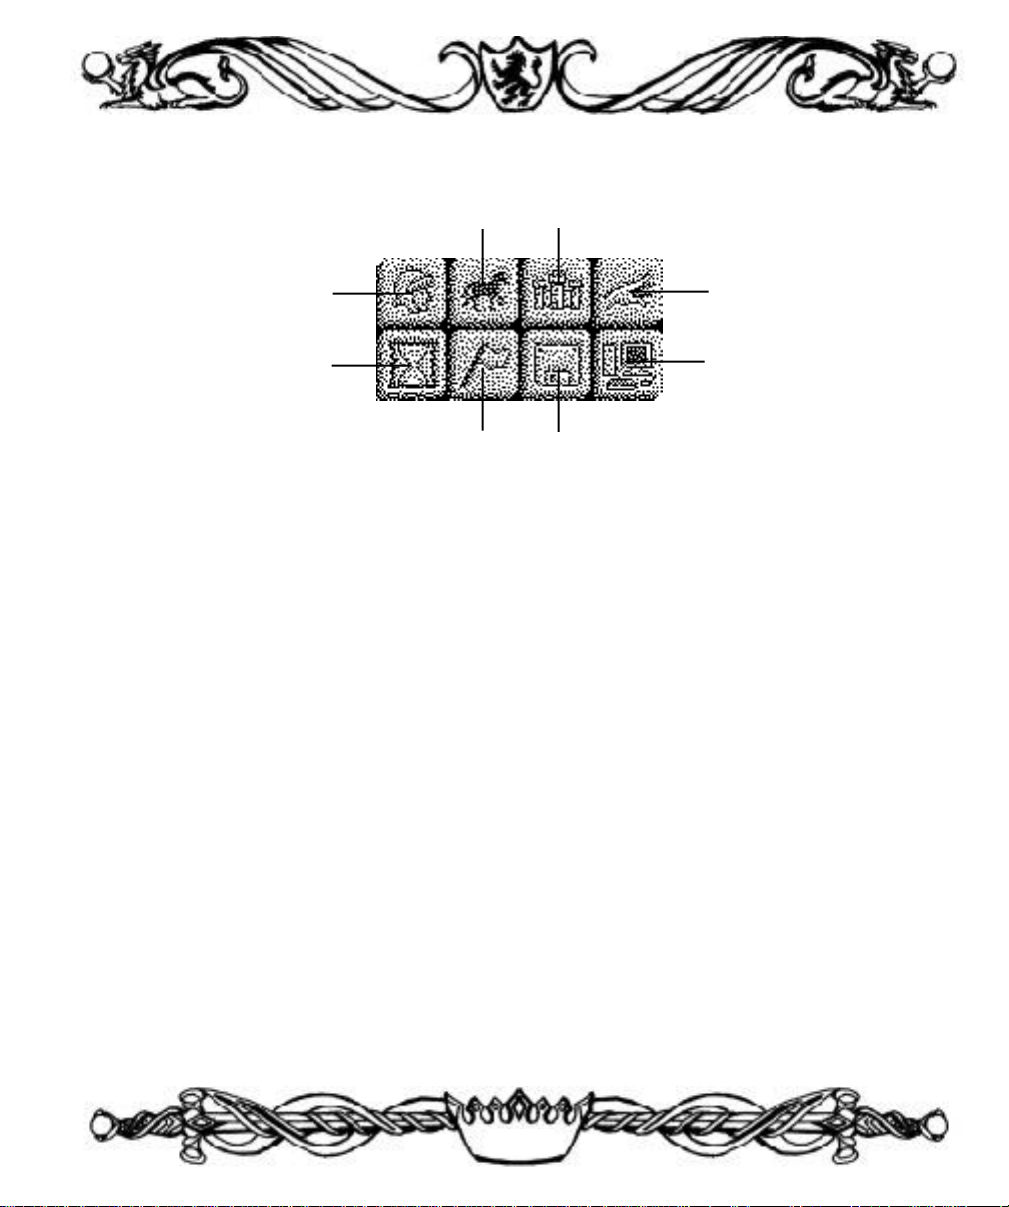
Adventure Buttons
Move
Next Hero
End Turn
Adventure Options
Next Hero: Activates the next hero you have with movement points remaining,
centering the Adventure Window on that hero.
Move: Moves the active hero if that hero has a movement path plotted (represented by
green arrows on the Adventure Window).
Kingdom Overview: Displays the Kingdom Overview Screen. This screen lists
everything you own, towns, heroes, mines, and resources as well as showing your income
per day (see also– Kingdom Overview Screen).
Cast Spell: Brings up the active hero’s spellbook (if he has one) and displays the
Adventure spells known by that hero. The number below each spell is the cost in spell
points to cast the spell. Clicking on the upper right and left corners of the spellbook turn
the pages in the book. Clicking on a spell icon casts that spell and R-clicking on a spell
icon gives quick information about that spell. The bookmark on the lower left shows how
many spell points the hero has remaining, and the EXIT bookmark exits the spellbook
without casting any spells
Kingdom Overview
Cast Spell
System Options
Disk Options
End Turn: Ends your current turn and allows the next player to begin his turn.
27
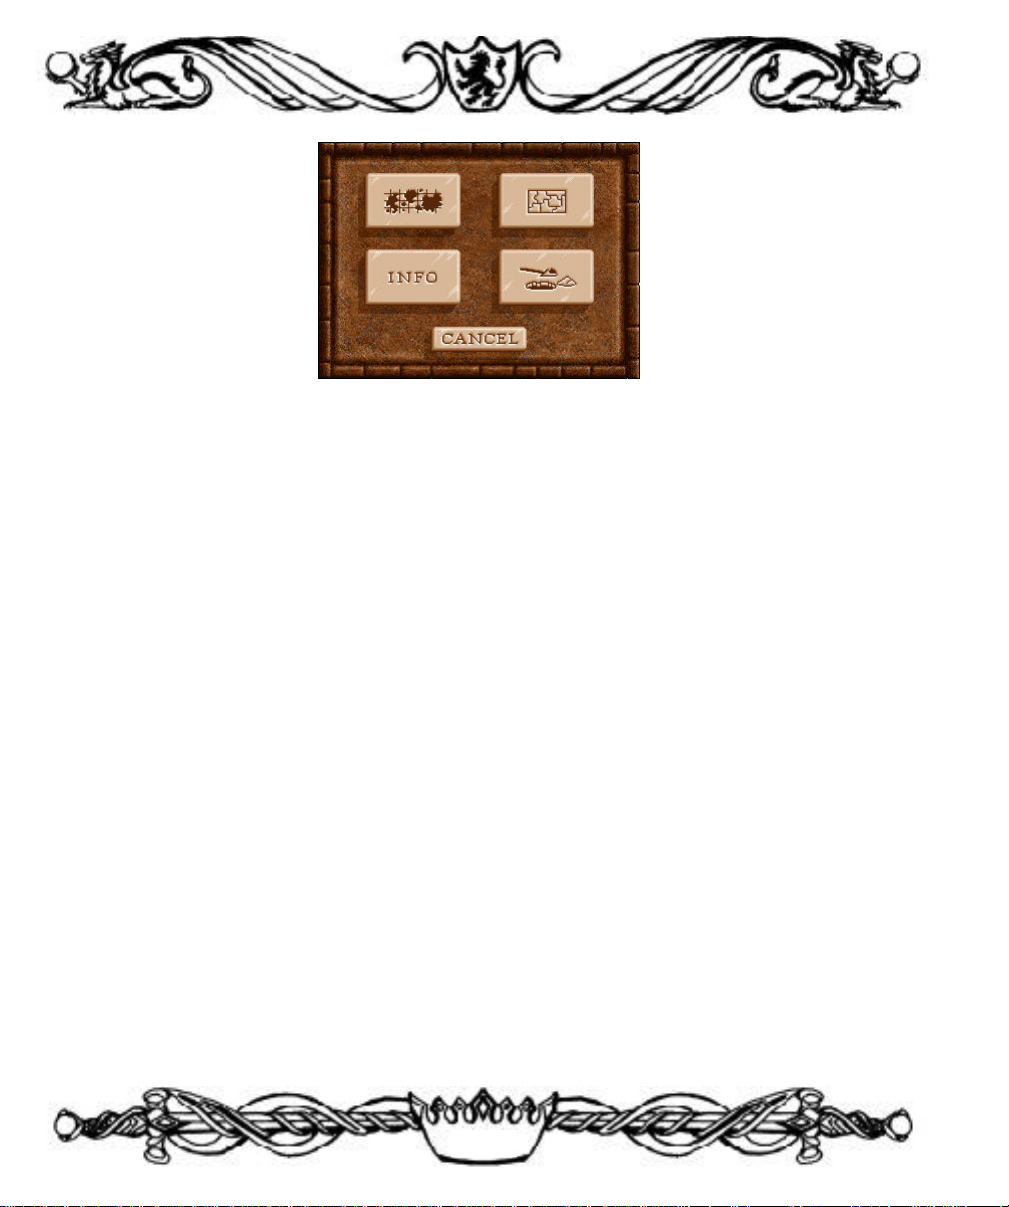
Adventure Options: Brings up a menu of actions for the Adventure Window.
View World: Shows the world as you know it, with only explored areas visible.
This view shows all towns, mines, and heroes (color coded to indicate which
player owns them), as well as showing visible resources and artifacts still
unclaimed.
View Puzzle: Displays the puzzle map that leads your hero to the Ultimate
Artifact. As you uncover pieces of the puzzle, more of the map is represented on
this screen. When you have uncovered enough pieces, the exact location of the
Ultimate Artifact is shown by an “X.” To uncover pieces of the puzzle, you must
find obelisks. Click on the EXIT in the upper right corner to return to the
Adventure Screen.
Dig/Search: The active hero spends his entire movement to search the position
he is at for the Ultimate Artifact. This action requires all the hero’s movement, so
he cannot move prior to attempting this.
Info: Shows the scenario information window. In Standard and Multiplayer
games, this gives the scenario’s name, description, difficulty, and victory and loss
conditions.
28
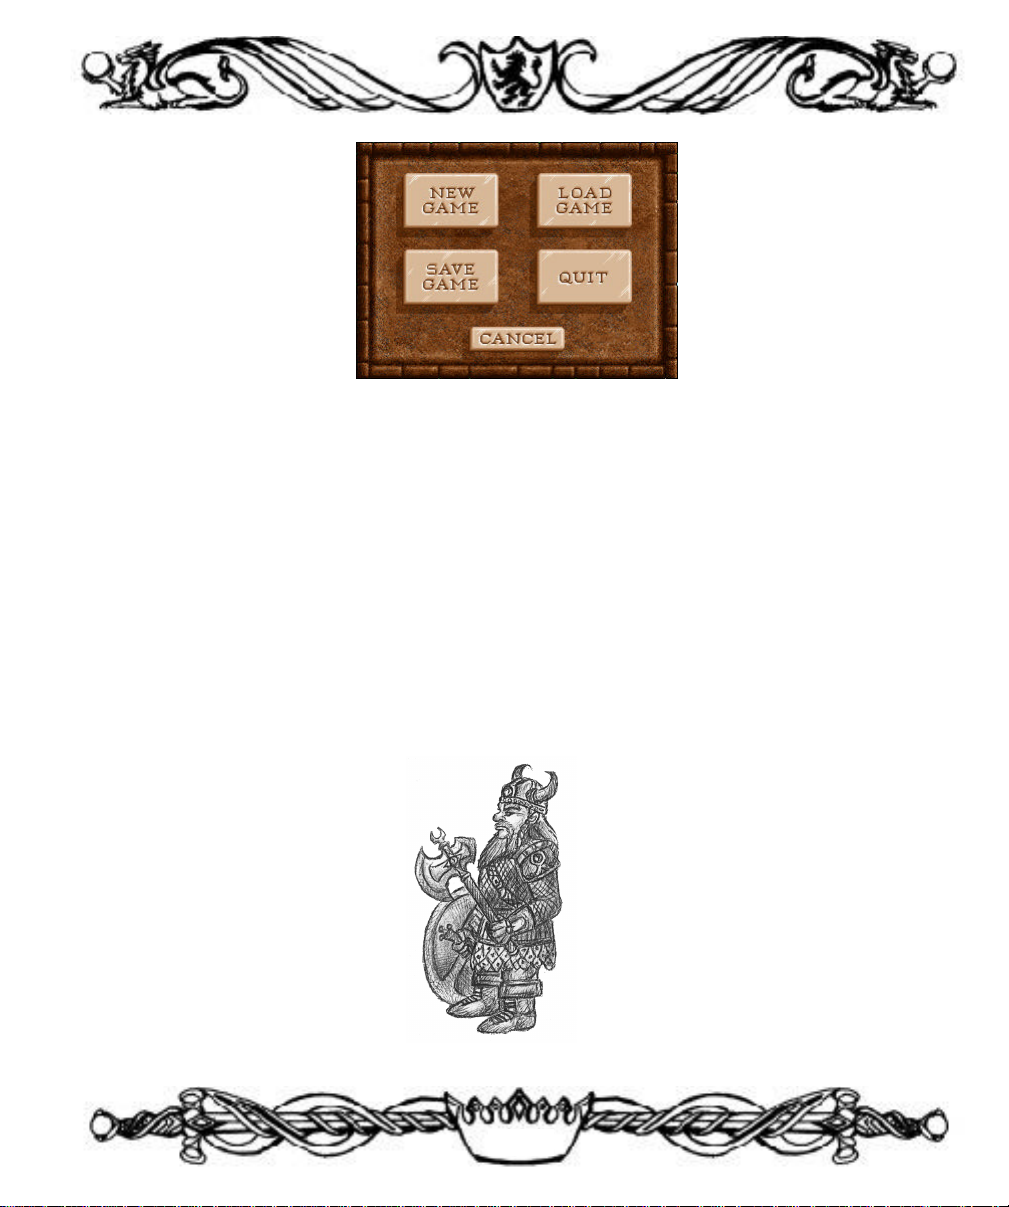
Disk Options: Brings up menu options for saving and loading games.
New Game: Exits your current game and returns you to the New Game menu.
Load Game: Allows you to load a previously saved game. Click on the name of
the game you wish to load, then click OKAY.
Save Game: Allows you to save your current game. Click on the colored bar to
enter in a name of your choice for the saved game, or click on a previously saved
game and click OKAY.
Quit: Ends your game and returns you to your operating system. All previously
unsaved actions are lost.
29

System Options: Brings up the System Options menu.
Music: Adjusts the music volume level.
Effects: Adjusts the effects volume level.
Sound Type: Changes the quality of the sound from MIDI to CD Stereo (Redbook).
Speed: Allows you to set your hero’s movement speed to Walk, Trot, Canter,
Gallop, or Jump.
Enemy Speed: Allows you to set the movement speed of the enemy heroes.
Show Path: Toggles the Show Path feature on and off. When Show Path is
turned off, your hero’s path is not shown. Clicking on an area of the Adventure
Window immediately moves the hero to that location. If the hero does not have
enough points to get there he will move as far as possible, leaving a path shown
in red for the following turn’s movement. If the Show Path feature is turned off,
30

you can still see the path a hero will take by holding down the CTRL key and
clicking on a location. If you like the path shown, release the CTRL key and
click again, or use the Move Button.
Borders: Toggles the interface borders between Good, Evil, and Dynamic (good
border when you start with a good hero, evil border when you start with an evil
hero).
Cursors: Toggles black and white or color mouse cursors. On some systems,
black and white cursors can speed up game play.
Information Box
The Information Box is located in the lower right corner. Clicking on this will toggle
between the active hero’s army, your resource summary, and the date.
31

Game Play
Hero Movement
Clicking on any area of the Adventure Window causes a path to appear for the active
hero. Green arrows show the path the hero will take with longer arrows representing
terrain that requires more movement points (snow, desert, swamp, etc.). A green “X”
shows a location that can be reached this turn. Red arrows indicate destinations that will
be reached in subsequent turns, with a red “X” appearing at the final destination, but not
necessarily meaning that the hero will have used all his movement points when he reaches the end of his path.
Once a path has been marked, click on the destination again, or click the Move button,
to cause the hero to begin moving along the path. If the destination is not reached that
turn, then on subsequent turns the hero’s path will be shown. To clear a hero’s path,
click on the hero. The hero will automatically take the most direct route to the destination you select, bypassing all obstacles and monsters during movement. If you want to
capture a mine, visit a location, fight an enemy, or anything else, you need to make that
your destination.
As your hero moves about, the cursor can change to any one of ten different icons on
the Adventure Window. If a number appears next to any of these icons, that is how
many turns it will take to reach the location.
Horse: This icon appears when the cursor is over terrain that the active hero
can move to. Clicking causes a movement path to be plotted to the location
of the click.
Rearing Horse: This icon appears when the cursor is over an event location
that the active hero can move to. Clicking will cause a path to be plotted to
the location of the click. Moving the hero to this location will activate the
event.
32

Sword: This icon appears when the cursor is over an enemy hero or army
camp that the active hero can move to. Clicking causes a path to be plotted
to the location of the click. Moving the hero to this location will cause him to
battle the hero or army.
Arrows: This icon appears when the cursor is over a friendly hero that the
active hero can move to. Clicking plots a path to the friendly hero. Moving
the hero will allow the heroes to trade (see also– Hero Trading Screen).
Castle: This icon appears over castles and towns. Clicking selects the castle
as the active castle, or bring up the Town Screen if that castle was already
active. R-clicking will bring up quick information on the castle.
Helm: This icon appears when placed over the active hero, or when placed
over any of your heroes when a castle is active. Clicking selects the hero as
the active hero, or bring up the Hero Screen if that hero was already active.
Ship: This icon appears when the cursor is placed over an unoccupied ship
that is adjacent to land that the active hero can move to. Clicking plots a path
to the ship. Moving the hero will have him board the ship- boarding a ship
takes the rest of the hero’s movement for that turn. His horse icon will disappear, and the ship icon will represent the hero. This icon also appears for
ship movement when the destination is a water space.
Anchor: This icon appears when the cursor is placed over land adjacent to
water when the active hero is aboard a ship. Clicking moves the hero to the
point clicked, and the hero will disembark from the ship. The horse icon will
reappear on the space clicked. Disembarking takes the rest of the hero’s
movement for that turn.
Arrow: This icon appears when the cursor is moved to the edges of the
screen. The direction of the arrow indicates the direction that the Adventure
Window is scrolling.
33

Pointer: This icon appears when the cursor is anywhere on the map that the
active hero cannot reach by normal movement. Clicking will not do anything.
Information on almost anything in the Adventure Screen can be obtained by R-clicking
on it. When a hero comes into contact with something, he initiates an event. These may
be fights, rewards, information, or nuisances. Mines and towns are events that can be
taken over. When a mine or town is captured, a flag of the player’s color appears above
the mine or in front of the town.
Army camps are represented on the combat screen by creatures. All army camps have a
one space zone-of-control, which means that you interact with them if you move next to
them. Your movements will frequently be blocked by army camps.
Heroes move at the speed of the slowest unit in their army. Certain terrain types, such
as desert or snow, will penalize your heroes’ movement, though the pathfinding skill will
reduce that penalty.
Objects and Locations
As you explore, you will find a number of objects to collect. These disappear when a
hero takes them, so you want to get to them as fast as possible. Some of the most common objects are:
Resources: Various resources are strewn across the land: gold, ore, wood,
crystal, sulfur, gems, and mercury. Each supplies a small, random amount of
the appropriate resource.
Chests: Gold or a minor artifact can be found in treasure chests. You can
keep the gold you get, or convert the gold to experience points. Using chests
to get experience is a quick way to raise a hero in levels.
Artifacts: Lucky heroes will find artifacts to claim. Some artifacts are guarded
by creatures, some you must pay for, and others may require special talents to
retrieve.
34

Adventurous heroes will find many special locations to visit. Locations stay on the map,
offering their benefits to whomever reaches them.
Terrain Objects: These objects cannot be interacted with, instead they serve to
impede your progress (mountains and trees, for example).
Single Visit Sites: These sites can be visited once. Depending on the site, that
means one visit per hero (gazebo), one visit per player (obelisk), or one visit
per game.
Multiple Visit Sites: These sites can be visited multiple times, and never go
away. Some of these sites can be visited only once per week (windmill), some
offer creatures which replenish after the first day of the week (huts), and some
can be visited multiple times with no restrictions.
Continual Sites: These sites become flagged when you control them, and will
offer their bonus to you continually. Sawmills, mines, and the lighthouse are
examples of continual sites.
Creature Interaction and Diplomacy
When your hero encounters an army camp, that camp will sometimes join the hero if the
hero has a large enough army, and room for the creatures to join (an open space, or a
group of the same creatures as the army camp). If the hero has the Diplomacy secondary skill, however, and his army is strong enough, then creatures will offer to join the
hero’s army for an amount of gold based on the strength of the army camp. The level of
diplomacy the hero has determines how many creatures in the army camp will join up
with the hero– either 25%, 50%, or 100%– but the cost is always based on the total
number of creatures in the army camp. If the hero is overwhelmingly powerful, the army
camps will attempt to flee from the hero, and you have the option of fighting them before
they run.
35

Town Screen
Towns and castles supply you with your armies, spells, and gold. Towns and castles provide the main objective in most scenarios, for if you lose all your castles and towns, you
have only seven days to capture one, or you lose the scenario. Six types of towns and castles can be found, one to match each of the six hero types: Barbarian, Knight,
Necromancer, Sorceress, Warlock, and Wizard. Towns provide you with 250 gold per
day, and castles provide you with 1000 gold per day.
Castle
Crest
Hero
Portrait
Town Window: The Town Window displays your castle and all structures and upgrades
built at the castle. Clicking on any structure will bring up that structure’s window. R-clicking on a structure will give information on that structure’s use. In a town, the castle is
replaced by a tent. Clicking on the tent gives you the option of upgrading the town to a
castle for 5000 gold and 20 wood and ore.
36
Garrison
Resource
Summary

Crest: Brings up the Kingdom Overview screen.
Arrow Buttons: These buttons will switch the Town Screen to another castle or town you
own, in the order they appear on the Town Locator Buttons. The Arrow Buttons allow
you to quickly page through all of your towns without returning to the Adventure Screen.
Hero Portrait: This only appears if a hero is in the town. Clicking on the portrait brings
up the Hero Screen.
Garrison Army: The row adjacent to the Crest is reserved for the town’s Garrison Army
(the troops that guard the town). The town garrison can have a maximum of five different
types of creatures. When a hero is in town, you can trade creatures between the town and
the hero.
Moving units: To move a creature, click on it, then click where you want it to go.
To swap creatures, click on a creature, then click on the creature you want to
swap with. To split an army, click on the creature, then Shift-click on an empty
space, then enter the number of creatures to split.
Resource Summary: The lower right corner is the Resource Summary, which displays
the amount of gold and resources available to you to build structures and buy creatures.
Town Name: The name of the town is displayed centered above the Garrison Army.
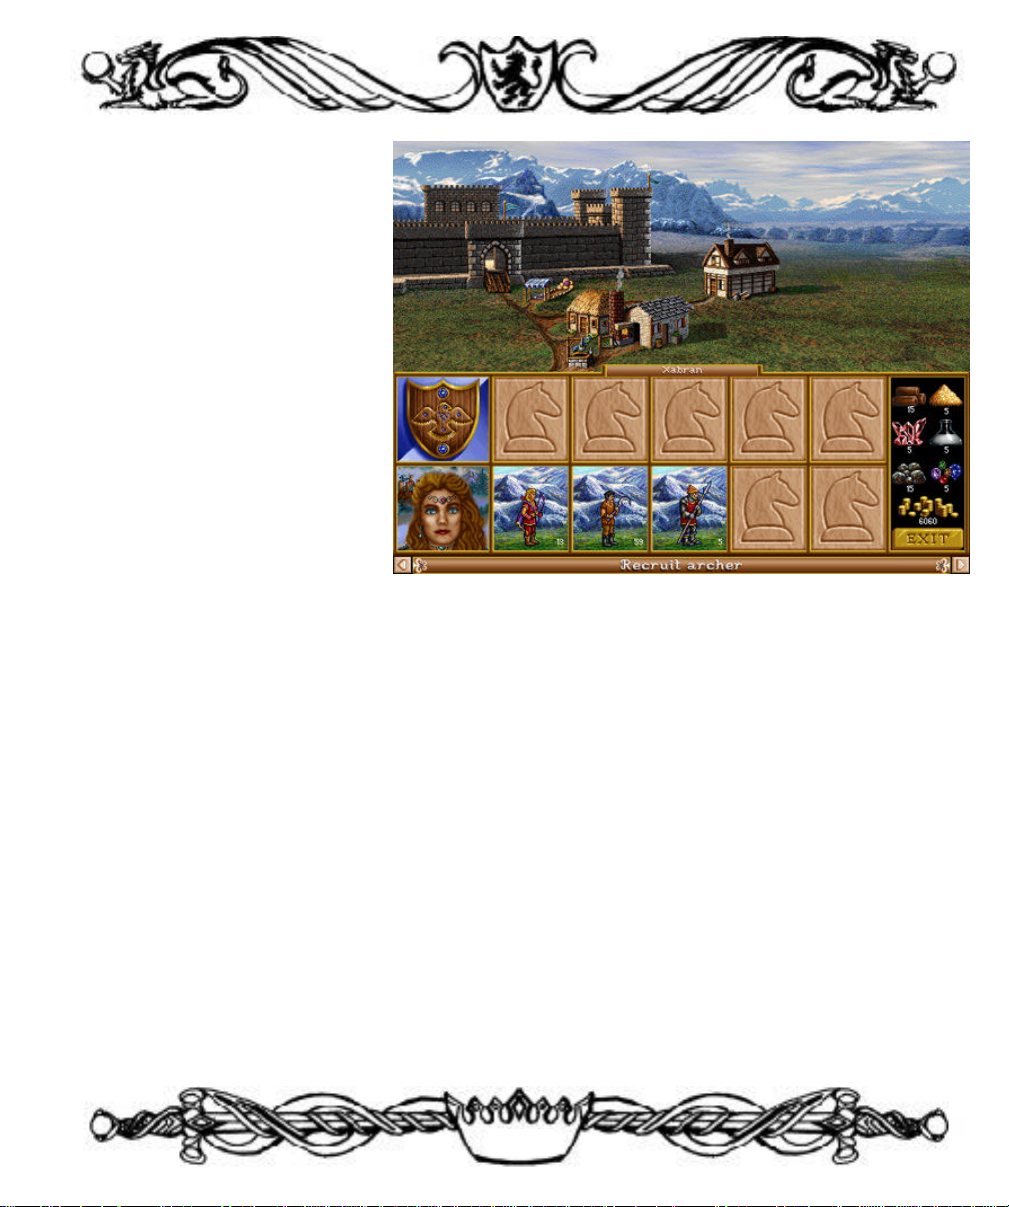
37

Castle
Picture
Captain of
Structures
the Guard
Recruit
Hero
Resource
Summary
Castle Screen
Once you own a castle, you can expand the town by building structures. You may only
build one structure or upgrade per turn in each castle. To build a structure, click on the
castle to bring up the Castle Screen. The Castle Screen is broken into sections:
Structures: The left side of the Castle Screen is dedicated to the structures that can be
built in each town. The backgrounds of the names of the structures in the town can have
different colors: Green indicates a structure that can be built this turn, red for a structure
that cannot be built this turn, and brown for a structure that has been previously built. Any
structure with a red “X” in the lower right corner is currently unavailable for selection
because a pre-requisite structure has not yet been built, or because you have built a structure in this castle already this turn. A red slash with coins underneath means that you do
not currently have the required resources to build the structure. A yellow check mark indicates a structure that is present in the town. Every town can build the following structures:
Six Dwellings: These house the creatures that make up your heroes’ armies.
Dwellings offer creatures to purchase when built, and replenish at the beginning
38

of each week (Day 1). The availability of creatures varies from creature to creature (more halflings will be available per week than titans).
Dwelling Upgrades: Certain dwellings in each castle can be upgraded, allowing the
purchase of upgraded units. The upgrade must be purchased separately, and
may require different resources or have different prerequisites than the structure it
upgrades. When a structure is upgraded, all unpurchased creatures in the
dwelling are automatically upgraded to the newer version, but creatures previously
purchased remain the same. If you have non-upgraded units in a town with the
upgraded dwelling for those units, you can upgrade your units by going into the
creature screen and clicking the Upgrade button. The cost is double the difference
in price between the upgraded and non-upgraded version, per creature to be
upgraded.
Mage Guild: Building the Mage Guild will give your heroes the chance to purchase a spellbook for 500 gold if they do not currently possess one (Knight and
Barbarian heroes). The Mage Guild can be upgraded four times, to a maximum
of a fifth level Mage Guild. When a Mage Guild is purchased, you receive 3 first
level spells. The first upgrade adds 3 second level spells, the second upgrade
adds 2 third level spells, the third upgrade adds 2 fourth level spells, and the
fourth and final upgrade adds 1 fifth level spell. Any hero that visits a castle with
a Mage Guild automatically learns all the spells available at that Mage Guild
(provided he has the required level of the Wisdom secondary skill). Clicking on
the Guild will show which spells are available in the Guild. A hero beginning his
turn in a town with a Mage Guild will regain all his spell points.
Tavern: Gives the defenders of the town a bonus to their morale when defending
the town. The tavern is also a center for gossip and rumors– each week a rumor
will be available in the Tavern. Occasionally valuable information can be learned
from these rumors. The Tavern is not available in the Necromancer castle–
undead don’t get thirsty.
Thieves’ Guild: Establishes contact with spies allowing you to gain information on
39

the other players and on the defending units of castles and towns. The more
Thieves’ Guilds you own, the more information you receive. Clicking on the
Thieves’ Guild structure from the Castle Screen brings up the Player Ranking
Screen, which ranks the players in ten statistics. Each player is symbolized by a
flag of their color. At the bottom of the screen are four statistics that shows the
portrait of each players most powerful hero, the statistics of that best hero, the
personality of the opponent, and the best creature being used by each opponent.
Remember that the more Thieves’ Guilds you own, the more complete the information– five Thieves’ Guilds will give you complete information.
Shipyard: If the entrance of a town borders water, then you can build a Shipyard
in that town. Building a ship costs 10 wood and 1000 gold. If a ship is adjacent
to the entrance to town, then a ship will appear in the Town Screen, and you will
be unable to build a ship.
Statue: The statue increases the income of a castle by 250 gold.
Marketplace: Allows you to convert resources you have into other resources.
The more Marketplaces you own, the better the exchange rate. It is possible to
convert any resource– wood, ore, crystal, mercury, sulfur, gems, and even gold–
into another, but the exchange is never one for one, and the rate plateaus when
you control nine Marketplaces.
Well: The Well adds two to the growth rate of all creatures produced in the
dwellings in the town. Clicking on the well brings up a window displaying the
growth per week of each creature in town, and the number currently available to
purchase.
Horde Building: Each castle has a Horde Building associated with it. This structure increases the growth rate of the weakest creature by eight per week (goblins,
peasants, skeletons, sprites, centaurs, and halflings).
Special Building: Each castle has a special building or effect that can be built in
the town. The Knight adds Fortifications to his castle walls (strengthening the wall
40

against enemy catapult attacks), the Barbarian can build an Arena (giving the garrison troops higher morale), the Sorceress can create a Rainbow over the town
(adding luck to the defenders), the Warlock builds a Dungeon (generates 500 gold
more income in the castle), the Necromancer summons a powerful Storm over his
castle (giving defending spell casters +2 spell power), and the Wizard constructs a
Library to aid his research (adding an extra spell per level of the Mage Guild).
Right and Left Turrets: The Right and Left Turrets augment the firepower of the
primary Ballista, allowing an extra shot per turret.
Moat: The Moat stops ground creatures’ movement, and makes them more vulnerable while they are crossing the Moat.
Castle Picture: The upper right corner of the Castle Screen contains a picture of the castle, indicating what defense upgrades have been purchased (left and right turrets and/or
moat).
Captain of the Guard: Below the Castle Picture is the Captain of the Guard. You may
hire a Captain to help defend the town. The Captain comes with a spellbook c o n t a i n i n g
all the spells available in the town’s Mage Guild. The left box shows his portrait, the right
box gives the Captain’s statistics. In the Captain’s information boxes you can choose
whether the garrison troops are in spread (a space between each creature in combat) or
group (no spaces between creatures) formation, this option is only available in towns with
a Captain. The Captain swears his allegiance to the town he is stationed in, not to any lord.
If the town is captured, he will function for the new owner of the town.
Recruit Hero: Below the Captain of the Guard are two portraits- these are the heroes
available for hire. All heroes cost 2500 gold to hire. Clicking on a portrait brings up a
window asking if you want to hire that hero. R-clicking on a portrait brings up that hero’s
Hero Screen. If a hero is currently in the town, you will not be able to hire a hero at that
town (until you move the hero out of the town).
Resource Summary: In the lower right is the Summary of all your resources and gold.
41

Hero Screen
Hero Window
This window is opened by clicking on the active hero on the Adventure Window, clicking on the active hero’s portrait on the Hero Locator Buttons, or by clicking on the
hero’s portrait from the Town Screen or Kingdom Overview.
Hero
Portrait
Secondary
Skills
Hero Name: The hero’s name is centered at the top of the window.
Hero Portrait: The hero’s portrait is displayed in the upper left of the window.
Hero Statistics: To the right of the Hero’s Portrait are the Hero Statistics. These can
be modified by events and artifacts and increase as the hero advances in levels.
Hero
Statistics
Hero’s
Army
Artifacts
Attack: This ability effects how much damage your creatures inflict in combat.
The hero’s attack skill is added to each of the creatures’ attack skills in his army.
For more information on the Attack Skill, see Combat.
42

Defense: This ability effects how much damage your creatures take in combat.
The hero’s defense skill is added to each of the creatures’ defense skills in his
army. For more information on the Defense Skill, see Combat.
Spell Power: This ability represents the spell casting skill of a hero. Spell Power
determines the duration and damage of spells cast by the hero.
Knowledge: This ability determines the hero’s maximum number of spell points.
Each point of Knowledge gives the hero 10 spell points.
Morale Detail: Shows the total bonus or penalty to the armies’ morale. Clicking
on this brings up the morale modifiers.
Luck Detail: Shows the total bonus or penalty to the armies’ luck. Clicking on
this brings up the luck modifiers.
Experience Detail: Shows the experience earned by the hero. Clicking on this
brings up what level the hero is, and the experience needed to advance to the
next level. Each time the hero wins a battle, he is awarded experience based on
the power of the creatures defeated.
Spell Points Detail: Shows maximum and remaining spell points.
Open or Close Formation: These buttons determine whether your army will be
lined up adjacent to each other (Group) or lined up with a space between each
creature (Spread) in combat.
Crest: Below the hero’s portrait is the hero’s Crest.
Army: To the right of the Crest is the hero’s army. A hero can have a maximum of
five different types of creatures in his army at one time (one for each of the five boxes).
The order that you place the creatures, from left to right, will be the order they appear in
combat, from top to bottom.
Moving units: To move a creature, click on it, then click where you want it to go.
43

To swap creatures, click on a creature, then click on the creature you want to
swap with. To split an army, click on the creature, then Shift-click on an empty
space, then enter the number of creatures to split.
Double clicking on a creature brings up an information window showing that creature’s
statistics. Creatures that are no longer needed can be dismissed by clicking the Dismiss
button. Each creature has the following statistics:
Attack: The higher the Attack rating, the more damage the creature inflicts in
combat. The number in parentheses is the Attack skill of the creature with the
hero’s Defense skill added in. For more information on the Attack Skill, see
Combat.
Defense: The higher the Defense skill, the less damage the creature takes in combat. The number in parentheses is the Defense skill of the creature with the
hero’s Defense rating added in. For more information on the Defense Skill, see
Combat.
Shots: The number of shots a unit with range strike ability has remaining.
Damage: The base range of damage the creature inflicts in combat.
Hit Points: The amount of damage each creature in that unit can take before
dying.
44

Speed: Refers to the order in which creatures move– faster creatures move before
slower ones– and also how far a creature can move in combat.
Morale: High morale can enable a unit to take an extra action in combat, whereas
poor morale can freeze the unit in a state of panic.
Luck: Good luck can grant a unit double damage for an attack in combat, where
as bad luck can force a unit to do half damage for an attack in combat.
Secondary Skills: Below the Army are the secondary skills. Each hero can learn a
maximum of eight secondary skills, with a maximum of three levels of expertise in each
skill. Clicking on any skill brings up a window which informs you of the effects of the
skill.
Artifacts: Fourteen slots are available for holding the artifacts you discover. All artifacts owned by a hero are displayed in this section. Clicking on any artifact will bring up
a description of the artifact’s powers.
Dismiss: This button, located on the left side of the screen, allows you to dismiss the
current hero. Because you have a maximum of eight heroes, you may wish to dismiss a
weak, poorly placed hero to replace him with a stronger or better positioned hero.
Heroes who are dismissed or defeated go back to the hero pool and can be recruited
again. Heroes keep their artifacts (unless defeated by another hero) and experience
when they are defeated or dismissed. Be aware that heroes never die– they go back to
the hero pool and can then be recruited by any warlord.
Arrow Buttons: These buttons will switch the Hero Screen to another hero you own, in
the order they appear on the Hero Locator Buttons. The Arrow Buttons allow you to
quickly page through all of your heroes without returning to the Adventure Screen.
45

Types
Each hero will have different attributes and skills. Heroes start with a few experience
points, a small number of creatures, and the following statistics:
Barbarian: Attack skill of 3 and Defense skill of 1
Spell power of 1 and Knowledge of 1
Advanced Pathfinding skill
Knight: Attack skill of 2 and Defense skill of 2
Spell power of 1 and Knowledge of 1
Basic Ballistics skill and Basic Leadership skill
‘
Necromancer: Attack skill of 1 and Defense skill of 0
Spell power of 2 and Knowledge of 2
Basic Wisdom skill and Basic Necromancy skill
Spellbook with the Haste spell
Sorceress: Attack skill of 0 and Defense skill of 0
Spell power of 2 and Knowledge of 3
Basic Wisdom skill and Advanced Navigation skill
Spellbook with the Bless spell
Warlock: Attack skill of 0 and Defense skill of 0
Spell power of 3 and Knowledge of 2
Basic Wisdom skill and Advanced Scouting skill
Spellbook with the Curse spell
Wizard: Attack skill of 0 and Defense skill of 1
Spell power of 2 and Knowledge of 2
Advanced Wisdom skill
Spellbook with the Stoneskin spell
46

Movement
Heroes move at the speed of the slowest unit in their army unless they are in a ship, in
which case they move at the same speed. The Logistics secondary skill increases the
heroes’ land movement, and the Navigation secondary skill increases the heroes’ water
movement. Heroes have a penalty to their movement when on rough terrains, but this
penalty can be offset by having the Pathfinding secondary skill. The effects of terrain
and Pathfinding are expressed in the chart below by percent of the penalties to normal
movement (200% means you move at half speed).
No
Terrain
Desert
Swamp
Snow
Cracked
Beach
Lava
Water
Dirt
Grass
Road
Notice that you get a 25% bonus to movement while traveling on a road. Moving on a
road is faster than moving on grass or dirt, and the roads make travel over rough terrains very easy. Pathfinding becomes one of the most useful skills on a map with large
areas of rough terrain.
Pathfinding
200%
175%
175%
125%
125%
100%
100%
100%
100%
75%
Basic
Pathfinding
175%
150%
150%
100%
100%
100%
100%
100%
100%
75%
Advanced
Pathfinding
150%
125%
100%
100%
100%
100%
100%
100%
100%
75%
Expert
Pathfinding
100%
100%
100%
100%
100%
100%
100%
100%
100%
75%
47

Hero Secondary Skills
Archery
Increases the damage done by
the hero’s range strike units.
Diplomacy
Allows the hero to bribe army camps.
The higher the skill, the more that join.
Ballistics
In a siege, the catapult’s shots, damage,
and accuracy are increased.
Eagle Eye
Gives the hero a chance to learn a
spell cast by an enemy spellcaster.
Estates
The hero begins to generate money
as if he were a small town.
Leadership
Grant’s the hero a bonus to morale.
Necromancers cannot learn Leadership.
Besides the four basic hero statistics, a hero can learn and advance in secondary skills.
These skills give the hero abilities like farther movement over land or sea, learning high
level spells, or improving his skill with the catapult in castle sieges. A hero can learn at
maximum eight secondary skills and all skills are known at three levels– Basic (level 1),
Advanced (level 2), and Expert (level 3).
Basic: +10% damage
Advanced: +25% damage
Expert: +50% damage
Basic: 1 shot + extra dam.
Advanced: 2 shots + extra dam.
Expert: 2 shots + max dam.
Basic: 25% join
Advanced: 50% join
Expert: 100% join
Basic: 20% 2nd level max
Advanced: 30% 3rd level max
Expert: 40% 4th level max
Basic: 100 gold/day
Advanced: 250 gold/day
Expert: 500 gold/day
Basic: +1 morale
Advanced: +2 morale
Expert: +3 morale
48

Logistics
Gives the hero extra land movement.
Basic: +10% movement
Advanced: +20% movement
Expert: +30% movement
Luck
Grants the hero’s army a
bonus to luck in combat.
Mysticism
Increases the rate per turn that
a hero regains spell points.
Navigation
Increases the hero’s movement on water.
Necromancy
Animates a portion of the units killed in
battle into skeletons when you win.
Pathfinding
Reduces the movement penalty
of the hero over rough terrain.
Scouting
Increases the visibilty radius of the
hero in the Adventure Window.
Basic: +1 luck
Advanced: +2 luck
Expert: +3 luck
Basic: 2 spell point/turn
Advanced: 3 spell points/turn
Expert: 4 spell points/turn
Basic: +50% movement
Advanced: +100% movement
Expert: +150% movement
Basic: 10% of killed units
Advanced: 20% of killed units
Expert: 30% of killed units
Basic: Reduces penalty 25
Advanced: Reduces penalty 50
Expert: Reduces penalty 100
Basic: +1 square
Advanced: +2 squares
Expert: +3 squares
Wisdom
Allows the hero to learn higher
than 2nd level spells.
Basic: 3rd level spells
Advanced: 4th level spells
Expert: 5th level spells
49

Skill Advancement
Type
Barbarian 2-9
Barbarian 10+
Knight 2-9
Knight 10+
Necromancer 2-9
Necromancer 10+
Sorceress 2-9
Sorceress 10+
Warlock 2-9
Warlock 10+
Wizard 2-9
Wizard 10+
Defense
35%
30%
45%
25%
15%
25%
10%
20%
10%
20%
10%
20%
Attack
55%
30%
35%
25%
15%
25%
10%
20%
10%
20%
10%
20%
Power
5%
20%
10%
25%
35%
25%
30%
30%
50%
30%
40%
30%
Knowledge
5%
20%
10%
25%
35%
25%
50%
30%
30%
30%
40%
30%
Skills are improved by advancing in levels. When a hero advances a level, a screen will
appear giving the hero a bonus to a primary skill (Attack, Defense, Spell Power, or
Knowledge), and the choice between two secondary skills. One or both may be skills
already known by the hero which the hero can then advance in, otherwise the skill(s) are
new to the hero and are learned at the Basic level. The skills a hero has to choose from
are randomly selected, weighted by the class of hero.
Primary Skill Advancement: The table below gives the percentage chance of learning a
primary skill when going up each level. For the first nine levels heroes tend to be specialized in one or two skills, but at tenth level and beyond they generalize much more.
50

Secondary Skill Advancement: Each secondary skill has a different chance to be learned
by each hero type. The table below lists the secondary skills and the hero types with an
indication of how often a skill will be learned. The higher the number, the higher the
chance that the skill will be available to learn; the lower the number, the lower the chance
that the skill will be available (a 0 means no chance)
Skill
Archery
Ballistics
Diplomacy
Eagle Eye
Estates
Leadership
Logistics
Luck
Mysticism
Navigation
Necromancy
Pathfinding
Scouting
Wisdom
Barbarian
3
3
2
1
2
3
3
2
1
3
0
4
4
1
Knight
2
4
3
1
3
5
3
1
1
2
0
3
2
2
Necromancer
1
3
2
3
2
0
2
1
3
2
5
3
1
4
Sorceress
3
3
2
2
2
1
2
3
3
4
0
2
1
4
Warlock
1
3
2
3
2
1
2
1
3
2
1
2
4
5
Wizard
1
3
2
3
2
2
2
2
4
2
0
2
2
5
51

Hero Trading Screen
A hero can trade creatures and artifacts with another hero you control by plotting a path
to the friendly hero. The Hero Trading Screen is broken into three areas.
Primary
Skills
Armies
Hero Information Area: The heroes’ portraits, names, statistics, and skills are located
here. This information is provided for your convenience, these items cannot be swapped
between heroes.
Armies: To swap creatures between heroes, click on the creature, then click on the creature’s destination. If the destination is occupied by a creature, the two creatures exchange
places. Shift-click will move only the number of creatures you specify. Remember that a
hero must have at least one creature in his army.
Portraits
Secondary
Skills
Artifacts
Artifacts: To trade artifacts between heroes, click on the artifact you wish to move, then
click on its destination. If the destination is another artifact, then the artifacts are swapped.
Spellbooks and cursed artifacts cannot be traded.
52

Kingdom Overview Screen
Hero/Town
Portraits
Garrison
Mine
Summary
The Kingdom Overview Screen can be reached by clicking the Kingdom Overview
Adventure Button or clicking on the Crest in any town or castle you control. At the bottom of this screen is a listing of the types and quantities of mines you control. Below this
is a resource summary showing the total amounts of each resource you possess. At the
bottom of the screen is your daily income in gold. Also appearing at the bottom are any
“global effects” you control, like the lighthouse.
Creatures
Available
Hero/Town
Buttons
Two buttons marked Hero and Town are to the right of the mines. Clicking on these buttons will show your heroes or towns, respectively. The Hero display shows each hero,
their mini-portrait and crest, skills, artifacts, and creatures. The Town display shows each
town, defensive upgrades (turrets/moat), mini-picture, garrison forces, and creatures available. If you have more than four heroes or towns, scroll through the list using the scroll
bars. Clicking on the hero or town portrait will bring up that hero or town’s Hero or Town
Screen (whichever applies).
53

Combat
When your hero encounters an enemy hero or town, or a hostile army camp, he enters
combat. If your hero is attacking an enemy castle he enters siege combat, otherwise he
engages in field combat. The screen will change to the Combat Screen, showing your hero
and the enemy hero (if present) on horseback, your units in the order you have placed
them, and the enemy units. The attacker is always on the left side, and the defender is
always on the right.
Every hero is represented by a rider on horseback. No creature can attack the hero, nor
can the hero directly attack any creature. Clicking on your hero will give information and
options for the hero during the combat.
54

General Options Window: From this window your hero has the following options:
Cast Spell: This will open up the hero’s spellbook and display only the hero’s combat spells. The number below each spell is the cost in spell points to cast the spell.
Click on a spell to cast it, R-click on a spell for quick information on the spell.
Click on the upper right and left page corners to turn the pages of the book. The
bookmark on the lower right shows the hero’s remaining spell points, and the book
mark labeled EXIT allows you to leave the screen without casting a spell. Pressing
“C” on the keyboard will also open the spellbook.
Retreat: This causes the hero to flee combat- he loses his army but retains his skills,
experience, and artifacts. It is better to save a hero you have invested time and
money in rather than let him be defeated. The hero disappears from the Adventure
Window, but reappears for hire in your castles.
Surrender: This option is similar to retreat, but can only be performed in combat
against an opposing hero. Surrender will allow you to keep your army by payi n g
55

a ransom to the opposing hero based on the power of your army. The hero
again disappears from the Adventure Window and appears for hire in your castles,
with his army intact. The payment will be reduced by 20% per level of the
Diplomacy secondary skill.
Exit: This option returns you to the Combat Screen.
Heroes never die. If you defeat a hero, you claim any artifacts that hero had (except the
enemy hero’s spellbook). The defeated hero goes back into the hero pool and can be
recruited by anyone.
Creatures
In combat, the fastest creature present is allowed to act first, with a tie in speed going to
the attacker, starting from the top unit and going to the bottom unit. If multiple creatures
have the same speed, then the order alternates between attacker and defender– if the
attacker and defender both have two speed four units, then the attacker’s top speed four
unit moves, then the defender’s top speed four unit, then back to the attacker’s remaining
unit, then the defender’s remaining unit.
A variety of icons replace the standard cursor in combat:
Running Man: Indicates that the location on the Combat Screen is a valid move
for the active creature.
Flying Man: Indicates that the location on the Combat Screen is a valid move
for the active flying creature.
Sword: Indicates that the active creature can move and attack the enemy creature from the direction indicated by the sword.
Arrow: Indicates that the active creature has a clear shot at the enemy the cursor is over. This symbol only appears for units with a range attack.
56

Broken Arrow: Indicates that the active range strike creature will do half damage
to the enemy the cursor is over- this penalty is negated by having the Archery
secondary skill. This cursor only appears on a creature behind castle walls.
Red “X” with Circle: Indicates that the location on the Combat Screen is an
invalid move for the active creature.
Question Mark: Appears over any unit and shows the creature statistic window
for that creature.
Helmet: Opens the General’s Options Window. If used over an enemy hero, it
gives the statistics of the enemy hero.
The highlighted creature is the one currently taking action. Each creature may move
and/or attack or SKIP its action for the turn (pressing the space bar will also SKIP the
creature. To move a creature, place the running or flying man cursor over the location you
wish to move the creature to and click. To attack an enemy, place the cursor over an
enemy (it will become a sword or an arrow if you are capable of attacking this turn) and
click. The direction of the sword defines from where you will attack the enemy. After a
creature attacks, the defending creature retaliates against the attacker (provided the defender is still alive). A creature may only retaliate against one attack per turn.
The total damage a creature inflicts is the base damage of the creature multiplied by the
number of creatures attacking. This is modified by the difference between the attacking
creature’s Attack skill and the defending creature’s Defense skill. Each point of Attack
over Defense gives an additional 10% extra damage (1 over 110%, 5 over 150%) to a
maximum of three times the damage. Each point of Defense over Attack reduces the damage taken by 5% (1 over gives 95%, 5 over 75%) to a minimum of 30%. The final damage is subtracted from the defender’s hit points, resulting in the number of creatures killed.
Damage carries over from turn to turn.
As an example, if 3 Rocs (Attack 7 / Defense 7 / Damage 4-8 / Hit Points 40) were attacking 5 Pikemen (Attack 5 / Defense 9 / Damage 3-4 / Hit Points 15), the Rocs do an aver-
57

age of 6 points of damage each (on average) multiplied by 3 (the number of Rocs attacking) for a total of 18 points. The Defense of the Pikemen, however, is two above the
Attack of the Rocs (9 as compared to 7), so the damage is lessened 10% (2 difference in
Defense favor) to a total of 16, which kills one Pikeman (Pikemen have 15 Hit Points),
and damages a Pikeman for 1 point.
The Pikemen retaliate doing 3.5 points of damage each (on average) multiplied by 4 (the
number of Pikemen retaliating) for a total of 14 points. Because the Attack of the Pikemen
(5) is two less than the Defense of the Rocs (7) , the Pikemen do 14 to the Rocs, which is
lessened by 10%, and becomes 12– not enough to kill one Roc (40 Hit Points).
Other effects and spells can modify the Attack and Defense skill of the creatures, or how
much damage the creatures do.
Creatures that have high morale are sometimes able to make a second move and/or attack
immediately after their first. Creatures that have poor morale are sometimes frozen, unable
to perform any action for that round.
Creatures that receive good luck for an attack do double damage, and creatures that
receive bad luck for an attack do half damage.
The AUTO button will have the computer take over fighting the battle for you. Remember
that the computer does not necessarily fight battles the same way you do, but has the same
desire to win. The computer will cast spells when on AUTO combat.
The OPTS button brings up a window of Combat System Options.
Animation Speed: Cycles between Normal, Fast, and Very Fast.
View Grid: Displays the grid that determines exact creature and cursor locations.
Mini Information Window: Gives information on your currently active stack, and
on any stack the cursor is over– useful if the number of creatures in a stack is
partially hidden. This will show all spells affecting the creatures as well.
58

Shadow Mouse: Shadows the hex the cursor is over, giving finer control over
creature movement and spell aiming.
Shadow Grid: Shadows any valid movement locations for the currently active
units, and deepens the shadows for any enemy the active unit can attack this turn.
Auto Combat Spells: Prevents the computer from casting spells for you when
you use the AUTO feature.
Siege Combat
Siege combat is identical to field combat with one major exception– the defender is inside
a castle. To attack the defending units, the attacker needs to bypass the walls, either by
knocking them down, by shooting over them with range attacks, or by flying over them
with flying creatures.
59

The attacker has a special weapon to attack the castle– a catapult. The catapult fires once
per turn before the first attacking creature moves. The catapult will damage a random section of the castle walls, and will eventually destroy the turrets. When all wall segments and
turrets have been destroyed, the catapult will destroy the main ballista. If the attacking hero
has the Ballistics skill, the catapult will be more accurate and can do more damage to the
walls. It may take multiple shots to breach a wall segment of the castle. Until a wall segment is breached, ground creatures may not enter the castle.
The defender has quite a few special weapons during a siege. Most important are the castle walls, which partially shield the defending creatures from range attacks, and keep all
enemy ground units out of the castle. The defender’s ground troops may exit the castle at
any time through the drawbridge.
The defender is aided by the castle ballista which fires a shot at an enemy unit once per
turn before the first defending unit moves. The damage of the ballista is determined by the
number of structures built in the town, and the level of the Mage Guild. R-clicking on the
ballista will give information on it. The ballista will cease firing when there are no defenders behind the castle walls. A defender’s castle may also be upgraded with two turrets that
perform as the ballista in all respects, though each doing about half the damage as the ballista.
The defender’s castle may also have a moat, which stops ground movement and leaves any
unit in the moat more vulnerable to attacks. The defending castle may also have a Captain,
which acts as a hero in the town, adding his skills to the defending creatures and casting
any spells available at the town’s Mage Guild.
60

Spells
Spells, and a particular hero’s ability to cast them, are a major part of Heroes II. Before
you can cast any spell, your hero needs a spellbook and a Mage Guild to learn the spells
from (he may need the Mage Guild to get a spellbook). To learn spells above 2nd level,
the hero must also possess the Wisdom skill.
Casting spells costs spell points– the cost of each spell is listed below the spell in your
spellbook. To cast a spell, click on the spell you wish to cast from the spellbook. R-clicking gives quick information on the spell. To turn the pages, click on the upper right and
left corners of the book. The EXIT bookmark will exit you from the spellbook. The
Horse and Sword bookmarks show you the Adventure and Combat spells you know,
respectively.
Combat spells may only be cast in combat, and Adventure spells may only be cast from
the Adventure Window. You can determine how many spell points a hero has remaining
by looking at the green bar to the right of the hero’s portrait in the Hero Locator Buttons,
from the Hero Screen, or by the bookmark on the lower left of the spellbook. Spell points
are regained by starting a turn in a castle with a Mage Guild, or slowly over time (at the
rate of one per day).
61

Level One Spells
Bless
Cost: 3
Type: Combat
Target: 1 ally
Duration: 1 rnd / Power
Blessed creatures inflict maximum
damage.
Cure
Cost: 6
Type: Combat
Target: 1 ally
Duration: Instant
Removes all negative spells and heals
5x Power in hit points.
Dispel Magic
Cost: 5
Type: Combat
Target: 1 creature
Duration: Instant
Bloodlust
Cost: 3
Type: Combat
Target: 1 ally
Duration: 1 rnd / Power
Adds +3 to the creature’s Attack
skill.
Curse
Cost: 3
Type: Combat
Target: 1 enemy
Duration: 1 rnd / Power
Cursed creatures inflict minimum
damage.
Haste
Cost: 3
Type: Combat
Target: 1 ally
Duration: 1 rnd / Power
Removes all spells on a creature.
Adds +2 to the creature’s Speed.
62

Magic Arrow
Cost: 3
Type: Combat
Target: 1 enemy
Duration: Instant
Shield
Cost: 3
Type: Combat
Target: 1 ally
Duration: 1 rnd / Power
Inflicts 10x Power in damage to a
single enemy creature.
Slow
Cost: 3
Type: Combat
Target: 1 enemy
Duration: 1 rnd / Power
Slowed creatures are reduced to half
their normal speeds.
View Mines
Cost: 1
Type: Adventure
Target: na
Duration: na
Shows the location of all mines, and
their controllers, on World View.
Shielded creatures take half damage
from range strike attacks.
Stoneskin
Cost: 3
Type: Combat
Target: 1 ally
Duration: 1 rnd / Power
Adds +3 to the creature’s Defense
Skill.
View Resources
Cost: 1
Type: Adventure
Target: na
Duration: na
Shows the location of all remaining
resources on the map in World View.
63

Level Two Spells
Blind
Cost: 6
Type: Combat
Target: 1 enemy
Duration: 1 rnd / Power
Blind creatures cannot take action
until attacked and retaliate with half
strength.
Death Ripple
Cost: 6
Type: Combat
Target: All living creatures
Duration: Instant
Inflicts 5x Power in death magic to
all non-undead creatures.
Dragon Slayer
Cost: 6
Type: Combat
Target: 1 ally
Duration: 1 rnd / Power
Cold Ray
Cost: 6
Type: Combat
Target: 1 enemy
Duration: Instant
Inflicts 20x Power in cold damage to
a single enemy creature.
Disrupting Ray
Cost: 7
Type: Combat
Target: 1 enemy
Duration: Combat
Reduces Defense of target by 3. A
creature can be affected multiple
times by this spell.
Haunt
Cost: 8
Type: Adventure
Target: 1 mine
Duration: Until defeated
Creature gains +5 to Attack skill
against Dragons.
Deflags a mine and sets 4x Power
ghosts to guard it.
64

Lightning Bolt
Cost: 7
Type: Combat
Target: 1 enemy
Duration: Instant
Inflicts 25x Power in electricity dam-
age to a single enemy creature.
Steelskin
Cost: 6
Type: Combat
Target: 1 ally
Duration: 1 rnd / Power
Adds +5 to the creature’s Defense
Skill.
Summon Boat
Cost: 5
Type: Adventure
Target: na
Duration: na
Summons nearest friendly, empty
boat to caster’s location.
Visions
Cost: 6
Type: Adventure
Target: 1 Army camp
Duration: Instant
Gives relative strength of an army
camp, and whether that camp will
offer to join the hero.
View Artifacts
Cost: 2
Type: Adventure
Target: na
Duration: na
Shows the location of all remaining
artifacts on the World View.
65

Level Three Spells
Animate Dead
Cost: 10
Type: Combat
Target: Killed undead
Duration: Permanent
Regrows 50x Spell Power in hit
points of killed undead.
Cold Ring
Cost: 9
Type: Combat
Target: 6 hexes
Duration: Instant
Inflicts 10x Power in cold damage to
the adjacent hexes of the target hex.
Earthquake
Cost: 15
Type: Combat
Target: na
Duration: Instant
Anti-Magic
Cost: 7
Type: Combat
Target: 1 ally
Duration: 1 rnd / Power
Creature gains immunity to all magic.
Death Wave
Cost: 10
Type: Combat
Target: All living creatures
Duration: Instant
Inflicts 10x Power in death magic to
all non-undead creatures.
Fireball
Cost: 9
Type: Combat
Target: 7 hexes
Duration: Instant
Damages all castle walls during siege
combat.
Inflicts 10x Power in fire damage to
the target hex and each adjacent hex.
66

Holy Word
Cost: 9
Type: Combat
Target: All undead creatures
Duration: Instant
Inflicts 10x Power in holy damage to
all undead creatures.
Identify Hero
Cost: 3
Type: Adventure
Target: 1 enemy hero
Duration: 1 day
Allows you to view an enemy hero’s
statistics and army size.
Mass Bless
Cost: 12
Type: Combat
Target: All allies
Duration: 1 rnd / Power
Blessed creatures inflict maximum
damage.
Mass Dispel
Cost: 12
Type: Combat
Target: All creatures
Duration: Instant
Removes all spells from all creatures.
Mass Curse
Cost: 12
Type: Combat
Target: All enemies
Duration: 1 rnd / Level
Cursed creatures inflict minimum
damage in combat.
Mass Haste
Cost: 10
Type: Combat
Target: All allies
Duration: 1 rnd / level
Adds +2 to creatures’ Speed.
67

Paralyze
Cost: 9
Type: Combat
Target: 1 enemy
Duration: 1 rnd / level
Teleport
Cost: 9
Type: Combat
Target: 1 ally
Duration: Instant
Paralyzed creatures cannot take
action until attacked, and cannot
retaliate.
View Heroes
Cost: 2
Type: Adventure
Target: na
Duration: na
Shows the location and color of all
heroes in the World View.
Instantly moves any friendly creature
to any unoccupied hex.
View Towns
Cost: 2
Type: Adventure
Target: na
Duration: na
Shows the location and color of all
towns in the World View.
68

Level Four Spells
Berserk
Cost: 12
Type: Combat
Target: 1 enemy
Duration: 1 attack
Berserk creatures will randomly
attack the nearest stack.
Fireblast
Cost: 15
Type: Combat
Target: 19 hexes
Duration: Instant
Inflicts 10x Power in fire damage to
the target hex, and to the 18 adjacent
hexes.
Mass Cure
Cost: 15
Type: Combat
Target: All allies
Duration: Instant
Chain Lightning
Cost: 15
Type: Combat
Target: Special
Duration: Instant
Inflicts 40x Power in electricity dam-
age, then half that damage to nearest
creature, until four creatures are hit.
Holy Shout
Cost: 12
Type: Combat
Target: All undead creatures
Duration: Instant
Inflicts 20x Power in holy damage to
all undead creatures.
Mass Shield
Cost: 7
Type: Combat
Target: All allies
Duration: 1 rnd / level
Removes all negative spells and heals
5x Power in hit points.
Shielded creatures take half damage
from range strike attacks.
69

Mass Slow
Cost: 15
Type: Combat
Target: All enemies
Duration: 1 rnd / level
Meteor Shower
Cost: 15
Type: Combat
Target: 7 hexes
Duration: Instant
Slowed creatures are reduced to half
their normal Speed.
Resurrection
Cost: 12
Type: Combat
Target: Killed creature
Duration: Combat
Regrows 50x Power in hit points of
killed units.
Set Earth Guardian
Cost: 15
Type: Adventure
Target: 1 mine
Duration: Until defeated
Sets 4x Power in Earth Elementals
to guard the mine.
Inflicts 25x power in damage to the
target hex, and each adjacent hex.
Set Air Guardian
Cost: 15
Type: Adventure
Target: 1 mine
Duration: Until defeated
Sets 4x Power in Air Elementals to
guard the mine.
Set Fire Guardian
Cost: 15
Type: Adventure
Target: 1 mine
Duration: Until defeated
Sets 4x Power in Fire Elementals to
guard the mine.
70

Set Water Guardian
Cost: 15
Type: Adventure
Target: 1 mine
Duration: Until defeated
Sets 4x Power in Water Elementals
to guard the mine.
Storm
Cost: 15
Type: Combat
Target: All creatures
Duration: Instant
Inflicts 25x Power in damage to all
creatures.
Town Gate
Cost: 10
Type: Adventure
Target: Hero
Duration: Instant
Teleports hero to nearest friendly
town.
View All
Cost: 3
Type: Adventure
Target: na
Duration: na
Combines all the previous View
spells, and shows the entire map in
the World View.
71

Level Five Spells
Armageddon
Cost: 20
Type: Combat
Target: All creatures
Duration: Instant
Inflicts 50x Power in damage to all
creatures.
Hypnotize
Cost: 15
Type: Combat
Target: 1 enemy
Duration: 1 rnd
Takes control of the creature if the
hit points of the stack are less than
25x Power.
Resurrection True
Cost: 15
Type: Combat
Target: Killed creature
Duration: Permanent
Dimension Door
Cost: 10
Type: Adventure
Target: na
Duration: na
Teleports the hero to an unoccupied,
visible location.
Mirror Image
Cost: 25
Type: Combat
Target: 1 ally
Duration: Combat
Duplicates one of your creature
stacks. The image is dispelled if it
takes any damage.
Summon Air Elemental
Cost: 30
Type: Combat
Target: na
Duration: Combat
Regrows 50x Power in hit points of
killed units.
Summons 3x Power in Air
Elementals.
72

Summon Earth Elemental
Cost: 30
Type: Combat
Target: na
Duration: Combat
Summons 3x Power in Earth
Elementals.
Summon Fire Elemental
Cost: 30
Type: Combat
Target: na
Duration: Combat
Summons 3x Power in Fire
Elementals.
Summon Water Elemental
Cost: 30
Type: Combat
Target: na
Duration: Combat
Summons 3x Power in Water
Elementals.
Town Portal
Cost: 20
Type: Adventure
Target: Hero
Duration: na
Teleports the hero to any friendly
town.
73

Creatures
Barbarian
Barbarian creatures are generally slow, but have high Attack skills and hit points. While
excellent in the early and midgame, the Barbarian creatures begin to falter towards the
endgame. The early game advantage is accented in small and medium maps.
Goblin
Attack: 3 Hits: 3
Defense: 1 Speed: Average
Damage: 1-2 Shots: 0
A solid low level creature, packs of Goblins are a match for most level
two creatures.
Orc
Attack: 3 Hits: 10
Defense: 4 Speed: Very Slow
Damage: 2-3 Shots: 8
Though slow, Orcs provide range attack until Trolls can be recruited.
Orc Chieftan
Attack: 3 Hits: 15
Defense: 4 Speed: Slow
Damage: 3-4 Shots: 16
40Cost:
140Cost:
175Cost:
The upgrade to the Orcs gives them longer durabilty in combat.
74

Wolf
Attack: 6 Hits: 20
Defense: 2 Speed: Very Fast
Damage: 3-5 Shots: 0
2 Attacks. Wolves are incredible offensive units, but they need to be
used carefully because they cannot take damage well.
200Cost:
Ogre
Attack: 9 Hits: 40
Defense: 5 Speed: Very Slow
Damage: 4-6 Shots: 0
Ogres are the anchor of the Barbarian units. Though tough, Ogres
are very slow on the battlefield, making it difficult for them to attack.
Ogre Lord
Attack: 9 Hits: 60
Defense: 5 Speed: Average
Damage: 5-7 Shots: 0
The upgrade to the Ogre not only adds speed, but a sizeable increase
in hit points.
Troll
Attack: 10 Hits: 40
Defense: 5 Speed: Average
Damage: 5-7 Shots: 8
300Cost:
500Cost:
600Cost:
Regenerates. The ability to regenerate and strike at range makes trolls
incredibly useful in castle sieges.
75

War Troll
Attack: 10 Hits: 40
Defense: 5 Speed: Fast
Damage: 7-9 Shots: 16
Regenerates. The Troll upgrade increases in damage and speed, while
keeping the ability to regenerate.
700Cost:
Cyclops
Attack: 12 Hits: 80
Defense: 9 Speed: Fast
Damage: 12-24 Shots: 0
Attack affects 2 spaces, 20% chance to Paralyze creatures. Cyclopes
are powerful ground combatants.
750 + 1Cost:
76

Knight
Knight creatures have high defense skills, and at the upper levels are fairly fast. Like
the Barbarian, however, the Knight creatures are best in the early and midgame. In the
endgame, the best success will be fighting against the Sorceress or Neromancer. Small
and medium maps allow the Knight to press his early game advantage.
Peasant
Attack: 1 Hits: 1
Defense: 1 Speed: Very Slow
Damage: 1-1 Shots: 0
The weakest creature, their only redeeming quality is numbers- they
are cheap and plentiful.
Archer
Attack: 5 Hits: 10
Defense: 3 Speed: Very Slow
Damage: 2-3 Shots: 12
The only range strike unit for the Knight, the slow speed of the
Archers can be a setback.
Ranger
Attack: 5 Hits: 10
Defense: 3 Speed: Average
Damage: 2-3 Shots: 24
20Cost:
150Cost:
200Cost:
Fires 2 shots per turn. The best low level upgrade available, the
Ranger is almost twice as good as an Archer on offense.
77

Pikeman
Attack: 5 Hits: 15
Defense: 9 Speed: Average
Damage: 3-4 Shots: 0
Pikemen compose half of the standard units of the Knight. Though
weak on offense, the Pikemen’s Defense allows them to last in battle.
200Cost:
Veteran Pikeman
Attack: 5 Hits: 20
Defense: 9 Speed: Fast
Damage: 3-4 Shots: 0
The upgrade of the Pikeman gives increased speed and hit points.
Swordsman
Attack: 7 Hits: 25
Defense: 9 Speed: Average
Damage: 4-6 Shots: 0
The other half of the standard Knight units, Swordsmen are tougher
than Pikemen, and do considerably more damage.
Master Swordsman
Attack: 7 Hits: 30
Defense: 9 Speed: Fast
Damage: 4-6 Shots: 0
250Cost:
250Cost:
300Cost:
The Swordsman upgrade gives increased speed and hit points.
78

Cavalry
Attack: 10 Hits: 30
Defense: 9 Speed: Very Fast
Damage: 5-10 Shots: 0
Cavalry deal considerable damage, and their high speed allows them to
manuever easily around the battlefield.
300Cost:
Champion
Attack: 10 Hits: 40
Defense: 9 Speed: Ultra Fast
Damage: 5-10 Shots: 0
One of the fastest units, the Cavalry upgrade can move around almost
at will on the battlefield.
Paladin
Attack: 11 Hits: 50
Defense: 12 Speed: Fast
Damage: 10-20 Shots: 0
2 attacks. Expert warriors, Paladins are best suited on offense, where
their ability to strike twice gives them the biggest advantage.
Crusader
Attack: 11 Hits: 65
Defense: 12 Speed: Very Fast
Damage: 10-20 Shots: 0
375Cost:
600Cost:
1000Cost:
2 attacks. Immune to curse. x2 damage vs. undead. The Paladin
upgrade becomes a nightmare for the unwary Necromancer.
79

Necromancer
The Necromancer creatures, while weak at the low levels, become much more powerful
at the high levels. The Necromancer is weak in the early game, but strong in the mid
and endgame. Larger maps give the Necromancer time to develop the higher level creatures.
All Necromancer units (and ghosts) are undead, and are therefore immune to mind
affecting spells, Bless and Curse, and are always at neutral morale.
Skeleton
Attack: 4 Hits: 4
Defense: 3 Speed: Average
Damage: 2-3 Shots: 0
The best level one creature, Skeletons should be hoarded by
Necromancers, as they provide easily available power early on.
Zombie
Attack: 5 Hits: 15
Defense: 2 Speed: Very Slow
Damage: 2-3 Shots: 0
Though having more hits than Skeletons, Zombies have a low
Defense and speed.
Mutant Zombie
Attack: 5 Hits: 20
Defense: 2 Speed: Average
Damage: 2-3 Shots: 0
75Cost:
150Cost:
200Cost:
The zombie upgrade increases the speed of the Zombies. Mutant
Zombies are worthwhile additions to any fledgling undead army.
80

Mummy
Attack: 6 Hits: 25
Defense: 6 Speed: Average
Damage: 3-4 Shots: 0
20% chance to curse enemy creatures. The best ground creature
available for the Necromancer.
250Cost:
Royal Mummy
Attack: 6 Hits: 30
Defense: 6 Speed: Fast
Damage: 3-4 Shots: 0
30% chance to Curse enemy creatures. The upgrade of the Mummy
has improved speed and toughness.
Vampire
Attack: 8 Hits: 30
Defense: 6 Speed: Average
Damage: 5-7 Shots: 0
Flies. Creatures attacked by Vampires cannot retaliate. Vampires are
necessary for the success of the Necromancer.
Vampire Lord
Attack: 8 Hits: 40
Defense: 6 Speed: Fast
Damage: 5-7 Shots: 0
300Cost:
500Cost:
650Cost:
Flies. Creatures attacked by Vampire Lords cannot retaliate. Vampire
Lords gain some back some of the damage they do as hit points
81

Lich
Attack: 7 Hits: 25
Defense: 12 Speed: Fast
Damage: 8-10 Shots: 12
Range attack affects adjacent hexes. Liches are the only range strike
unit available to the Necromancer.
750Cost:
Power Lich
Attack: 7 Hits: 35
Defense: 13 Speed: Very Fast
Damage: 8-10 Shots: 24
Range attack affects adjacent hexes. This upgrade of the Lich
improves the durability of the Lich in combat.
Bone Dragon
Attack: 11 Hits: 150
Defense: 9 Speed: Average
Damage: 25-45 Shots: 0
Flies. Lowers the morale of opposing creatures. Bone Dragons are
fierce creatures, second only to the Warlock Dragons in raw damage.
900Cost:
1500Cost:
82

Sorceress
Sorceress creatures are generally very fast, but have low hit points. Weak in the early
game, and moderate at best in the endgame, the Sorceress creatures are the best in the
midgame. The combination of speed, flying, and range attack becomes incredibly
potent. Medium maps are perfect for Sorceress creatures.
Sprite
Attack: 4 Hits: 2
Defense: 2 Speed: Average
Damage: 1-2 Shots: 0
Flies. Creatures attacked by Sprites cannot retaliate. Sprites are powerful in large numbers.
Dwarf
Attack: 6 Hits: 20
Defense: 5 Speed: Very Slow
Damage: 2-4 Shots: 0
25% Magic resistance. Dwarves make excellent garrison units
because of their toughness and magic resistance.
Battle Dwarf
Attack: 6 Hits: 20
Defense: 6 Speed: Average
Damage: 2-4 Shots: 0
50Cost:
200Cost:
250Cost:
25% Magic resistance. The upgrade of the Dwarf is faster and
tougher.
83

Elf
Attack: 4 Hits: 15
Defense: 3 Speed: Average
Damage: 2-3 Shots: 24
Fires 2 shots per turn. Elves are incredible offensive units, able to
deal large amounts of damage at range.
250Cost:
Grand Elf
Attack: 5 Hits: 15
Defense: 5 Speed: Very Fast
Damage: 2-3 Shots: 24
Fires 2 shots per turn. The Elf upgrade becomes faster and more
skilled. Grand Elves are able to whittle down enemy forces quickly.
Druid
Attack: 7 Hits: 25
Defense: 5 Speed: Fast
Damage: 5-8 Shots: 8
Druids are one of the best range strike units available. Though weak,
few units can close to melee range on the Druid without dying.
Greater Druid
Attack: 7 Hits: 25
Defense: 7 Speed: Very Fast
Damage: 5-8 Shots: 16
300Cost:
350Cost:
400Cost:
The Druid upgrade is faster and tougher. Greater Druids and Grand
Elves complement each other well.
84

Unicorn
Attack: 10 Hits: 40
Defense: 9 Speed: Fast
Damage: 7-14 Shots: 0
20% chance to Blind enemy creature. Unicorns are solid ground
creatures. They are tough, fast, and deal good damage.
500Cost:
Phoenix
Attack: 12 Hits: 100
Defense: 10 Speed: Ultra Fast
Damage: 20-40 Shots: 0
Flies. Attack affects two hexes. Immune to elemental spells.
Extremely fast and powerful, Phoenixes can be formidable opponents.
1500 + 1Cost:
85

Warlock
The Warlock units are slow and expensive, but have high hit points and good Attack
and Defense skills. Poor in the midgame, Warlock creaturesare effective in the early
game, and show their true colors in the endgame, where Dragons rule the battlefield.
Warlocks can have success on small maps, but generally do better on larger maps where
they have time to develop Dragons.
Centaur
Attack: 3 Hits: 5
Defense: 1 Speed: Average
Damage: 1-2 Shots: 8
Centaurs are the only range strike creature available to the Warlock,
and are valuable for that reason.
Gargoyle
Attack: 4 Hits: 15
Defense: 7 Speed: Very Fast
Damage: 2-3 Shots: 0
Flies. Due to their speed and toughness, Gargoyles are one of the
most useful Warlock creatures.
Griffin
Attack: 6 Hits: 25
Defense: 6 Speed: Average
Damage: 3-5 Shots: 0
60Cost:
200Cost:
300Cost:
Flies. May retaliate against any number of attackers. Griffins are able
to fight large numbers of creatures and prove victorious.
86

Minotaur
Attack: 9 Hits: 35
Defense: 8 Speed: Average
Damage: 5-10 Shots: 0
Minotaurs are good offensive creatures, but are slow compared to the
earlier Warlock creatures.
400Cost:
Minotaur King
Attack: 9 Hits: 45
Defense: 8 Speed: Very Fast
Damage: 5-10 Shots: 0
The Minotaur upgrade saves the Warlock in the midgame because of
the increased speed and toughness.
Hydra
Attack: 8 Hits: 75
Defense: 9 Speed: Very Slow
Damage: 6-12 Shots: 0
Attacks all adjacent enemies. Though powerful, their slow speed
makes the Hydra most useful as a garrison creature.
Green Dragon
Attack: 12 Hits: 200
Defense: 12 Speed: Average
Damage: 25-50 Shots: 0
500Cost:
800Cost:
3000 + 1Cost:
Flies. Attack affects two hexes. Immune to spells. The Dragon easily
reigns as the best sixth level creature, and can fight small armies itself.
87

Red Dragon
Attack: 13 Hits: 250
Defense: 13 Speed: Fast
Damage: 25-50 Shots: 0
Flies. Attack affects two hexes. Immune to spells. The first upgrade
to the Dragon improves in speed, toughness, and skill.
3500 + 1Cost:
Black Dragon
Attack: 14 Hits: 300
Defense: 14 Speed: Very Fast
Damage: 25-50 Shots: 0
Flies. Attack affects two hexes. Immune to spells. The second
upgrade to the Dragon improves again in speed, toughness, and skill.
4000 + 2Cost:
88

Wizard
Wizard creatures have a little of everything, some toughness, some speed, some range
strike ability. Like the Necromancer, the Wizard is weak in the early game, strong in the
midgame, and challenges the Warlock for endgame power. Titans and Archmages are
the best range strike creatures around, and Titans match up to Dragons in power.
Halfling
Attack: 2 Hits: 3
Defense: 1 Speed: Slow
Damage: 1-3 Shots: 12
Halflings provide solid, early range strike ability for the Wizard.
Boar
Attack: 5 Hits: 15
Defense: 4 Speed: Very Fast
Damage: 2-3 Shots: 0
Boars are fast and strong, and make excellent units for exploring.
Iron Golem
Attack: 5 Hits: 30
Defense: 10 Speed: Very Slow
Damage: 4-5 Shots: 0
50Cost:
150Cost:
300Cost:
1/2 damage from elemental spells. The high defense, partial magic
resistance, and slow speed make Golems excellent garrison creatures.
89

Steel Golem
Attack: 7 Hits: 35
Defense: 10 Speed: Slow
Damage: 4-5 Shots: 0
1/2 damage from elemental spells. The Golem upgrade is faster,
tougher, and stronger.
350Cost:
Roc
Attack: 7 Hits: 40
Defense: 7 Speed: Average
Damage: 4-8 Shots: 0
Flies. The only flying creature available to the Wizard, the Roc offers
solid offense and defense.
Mage
Attack: 11 Hits: 30
Defense: 7 Speed: Fast
Damage: 7-9 Shots: 12
No penalty for attacking adjacent units. Though weak, Mages provide
incredible offensive power.
Archmage
Attack: 12 Hits: 35
Defense: 8 Speed: Very Fast
Damage: 7-9 Shots: 24
400Cost:
600Cost:
700Cost:
No adjacent penalty. 20% chance to dispel beneficial spells on their
target. Archmages are second only to Titans in range strike ability.
90

Giant
Attack: 13 Hits: 150
Defense: 10 Speed: Average
Damage: 20-30 Shots: 0
Immune to mind affecting spells. Giants do good damage and have
enormous hit points, making them the scariest creature on the ground.
1250 + 1Cost:
Titan
Attack: 15 Hits: 300
Defense: 15 Speed: Very Fast
Damage: 20-30 Shots: 16
Immune to mind affecting spells. No penalty for attacking adjacent
units. Titans are capable of defeating Dragons in one on one combat.
5000 + 2Cost:
91

Neutral
These creatures do not belong under any hero type, and range from ghosts to rogues to
elementals. Any of these creatures can end up in a heroes army (except ghosts), and
using them can sometimes make the difference between victory and defeat. Recruiting
these creatures becomes a necessity on higher game difficulties, where you need to fill
your armies with whatever you can find, but on the lower difficulties they are more of a
bonus.
Rogue
Attack: 6 Hits: 4
Defense: 1 Speed: Fast
Damage: 1-2 Shots: 0
Creatures attacked by Rogues cannot retaliate. Rogues are useful
early in the game, providing extra offense to any hero’s army.
Nomad
Attack: 7 Hits: 20
Defense: 6 Speed: Very Fast
Damage: 2-5 Shots: 0
Nomads provide inexpensive fast creatures that can deal and take
damage reasonably well.
50Cost:
200Cost:
Ghost
Attack: 8 Hits: 20
Defense: 7 Speed: Fast
Damage: 4-6 Shots: 0
Flies. Undead. Creatures killed by ghosts become ghosts. Ghosts
are fearsome opponents. Never attack ghosts with level one creatures!
92

Genie
Attack: 10 Hits: 50
Defense: 9 Speed: Very Fast
Damage: 20-30 Shots: 0
Flies. 10% halve enemy unit. Between Paladin and Phoenix in power,
the Genies low cost and awesome special ability are always useful.
650 + 1Cost:
Medusa
Attack: 8 Hits: 35
Defense: 9 Speed: Average
Damage: 6-10 Shots: 0
20% chance to turn victim to stone for the combat. Medusas make a
welcome addition to any army or garrison force.
500Cost:
Air Elemental
Attack: 7 Hits: 35
Defense: 7 Speed: Very Fast
Damage: 2-8 Shots: 0
Neutral morale. Immune to mind spells and Meteor Swarm. Storm
and Lightning Bolt do x2 damage.
Earth Elemental
Attack: 8 Hits: 50
Defense: 8 Speed: Slow
Damage: 4-5 Shots: 0
Neutral morale. Immune to mind spells, Lightning Bolt, and Storm.
Meteor Swarm does x2 damage.
93

Fire Elemental
Attack: 8 Hits: 40
Defense: 6 Speed: Fast
Damage: 4-6 Shots: 0
Neutral morale. Immune to mind and fire spells. Cold spells do x2
damage.
Water Elemental
Attack: 6 Hits: 45
Defense: 8 Speed: Average
Damage: 3-7 Shots: 0
Neutral morale. Immune to mind and cold spells. Fire spells do x2
damage.
94

Structures
All the structures available are listed below, arranged by town.
Common
The following structures are available in all towns. The Wizard town versions are
shown– they may look different in the other towns.
Mage Guild
Tavern
Thieves’ Guild
2000 5 5+ +Cost:
Effect: Allows spellbook purchase and teaches spells.
Additional levels become increasingly more expensive.
500 5+Cost:
Effect: Gives defenders a bonus to morale and offers
rumors. Not available in Necromancer towns.
750 5+Cost:
Effect: Gives information comparing the players.
Additional Guilds give more information.
95

Shipyard
2000
20+Cost:
Statue
1250
Marketplace
500
Well
500
Effect: Allows construction of ships.
Ships cost:
Effect: Increases income of town by 250
Effect: Allows trading of resources. Additional
Marketplaces give a better exchange rate.
1000 +
5+Cost:
5+Cost:
10
Cost:
Effect: Increases creature production of each dwelling
by two per week.
96

Horde Building
1000Cost:
Effect: Increases creature production of the lowest
dwelling by eight per week.
Left Turret
Right Turret
Moat
1500 5+Cost:
Effect: Adds a smaller ballista in the castle walls.
1500 5+Cost:
Effect: Adds a smaller ballista in the castle walls.
750Cost:
Effect: Entering moat stops ground movement, and
units have -3 Defense while in the moat.
97

Hut
300
Stick Hut
800
Stick Hut Upgrade
1200
Barbarian
The total cost for all the Barbarian structures is the least of all the hero types, but they
require an enormous amount of ore. A small amount of wood is needed, and crystals
only at the highest level.
Cost:
Requires: Nothing
Effect: Generates 10 Goblins per week.
5+Cost:
Requires: Hut
Effect: Generates 8 Orcs per week.
5+Cost:
Requires: Adobe, Den, Stick Hut
Effect: Upgrades Orcs to Orc Chieftans.
98

Den
1000Cost:
Requires: Hut
Effect: Generates 5 Wolves per week.
Adobe
Adobe Upgrade
Bridge
2000 10 10+ +Cost:
Requires: Hut
Effect: Generates 4 Ogres per week.
3000 5 5+ +Cost:
Requires: Adobe, Den, Stick Hut
Effect: Upgrades Ogres to Ogre Lords.
4000 20+Cost:
Requires: Adobe
Effect: Generates 3 Trolls per week.
99

Bridge Upgrade
2000
10+Cost:
Pyramid
6000
Coliseum
2000
Requires: Bridge
Effect: Upgrades Trolls to War Trolls.
20 20+ +Cost:
Requires: Bridge
Effect: Generates 2 Cyclops per week.
10 10+ +Cost:
Requires: Nothing
Effect: Gives defenders +2 Morale
100
 Loading...