

Page 1
Player Manual
®
Page 2

2
Section I
Table of Contents
Section I Introduction......................................................................................................................................................................3
Section II Interface Reference ..............................................................................................................................................7
Main Menu ................................................................................................................................................................................8
Adventure Map ....................................................................................................................................................................13
H
eroes and the
H
ero Screen ................................................................................................................................23
Skills ..................................................................................................................................................................................................33
Combat ............................................................................................................................................................................................40
Towns ...............................................................................................................................................................................................49
Magic System .........................................................................................................................................................................55
Kingdom Overview ................................................................................................................................................................57
Multiplayer .............................................................................................................................................................................59
Section III World Reference ............................................................................................................................................63
Spell Reference ....................................................................................................................................................................63
Town and Creature Reference
............................................................................................................................81
Individual
H
eroes ..............................................................................................................................................................118
Section IV Appendices ..........................................................................................................................................................134
Keyboard Shortcuts ......................................................................................................................................................134
Mplayer.com ........................................................................................................................................................................135
H
EAT ...........................................................................................................................................................................................137
Troubleshooting ..................................................................................................................................................................138
Customer Support ..........................................................................................................................................................141
Index ................................................................................................................................................................................................142
90-Day Limited Warranty ..................................................................................................................................144
Edwin E. Steussy, Publisher.
Tom Ono, Author. Amy Yancey, Coordinator.
©
1999 The 3DO Company. All Rights Reserved. Heroes of Might and Magic, Heroes, Might and Magic, New World Computing,
3DO, and their respective logos, are trademarks and/or service marks of The 3DO Company in the U.S. and other countries. All
other trademarks belong to their respective owners. New World Computing is a division of The 3DO Company.
The software and related manual for this 3DO product are copyrighted. No portion of this product may be photocopied, scanned,
translated, reproduced, copied or reduced to any tangible or electronic medium or machine-readable form, or publicly performed
or displayed, without the prior written consent of The 3DO Company. The owner of this product is entitled to use the software
and related manual for his or her own use, but is not entitled to reproduce and distribute any copies of the software or manual
to any other individual or entity; nor to rent or lease this product or any copy thereof to any third party.
Uses Bink Video Technology.
©
1997-1998 by RAD Game Tools, Inc.
Uses Miles Sound System.
©
1991-1998 by RAD Game Tools, Inc.
Windows, the Windows logo and DirectX are trademarks and/or registered trademarks of the Microsoft Corporation.
Page 3

3
Introduction
Dear Heroes of Might and Magic®fans,
When I sat down to create King’s Bounty®, the precursor to Heroes of Might and Magic,
never in my wildest dreams did I imagine it would grow into the phenomenon the series has
become. I had just finished Might and Magic
®
II. At the time, King’s Bounty was state of
the art: 16 colors and used up both sides of the floppy disk. I had one programmer and one
artist to make my design real, and it took us about a year to finish.
Nine years later, the Heroes™ III game is state of the art. The Heroes III game has 65,000
colors and fills an entire CD. I had over 30 people work on the project: programmers, artists,
voice actors, and level designers, and it took us about 18 months to finish.
King’s Bounty, although crude by today’s standards, was a lot of fun to play. Players
recruited troops, maintained armies, and fought battles on tactical maps with a variety of
fantastic monsters. The Heroes III game does the same, only the graphics are much fancier
and the animations are far smoother. In addition, some fundamental game play changes have
happened since then, giving the player options and tactics magnifying the scope of the game
tremendously.
The leap from King’s Bounty to the Heroes I game was the single largest change, both in
terms of technology and game play. I looked at what I thought had gone right with King’s
Bounty, mixed in our fans’ wish lists and the capabilities of more modern computers, and got
down to work. After a seemingly endless series of false starts, dead ends, and programming
troubles, we shipped the game and held our breath.
The Heroes I game shipped quietly enough, but enthusiasm for the game was strong and grew
stronger as time passed. It took us a while to realize we had a genuine hit on our hands, but
when we did, we started work on the Heroes II game immediately. This time, we were armed
with a ton of fan mail suggestions and an existing game that we could build from.
Nevertheless, what seemed to be a simple improvement to a finished game was fraught with
complications, and I agonized over design decisions and game balance considerations.
After a year’s worth of design wrangling, we got down to business and the Heroes II game
shipped in time for Christmas. I noticed that everyone in the office was playing the game even people working on different projects - and knew from past experience what a good sign
this was. The Heroes II game turned out to be one of our most popular games ever.
Now we’ve shipped the Heroes III game. We’ve had a lot of fun designing and making this game,
and once again, everyone in the office is playing it. I’m confident the Heroes III game is going
to be a smashing success! We hope you have as much fun playing it as we’ve had making it!
Sincerely,
Jon Van Caneghem
Creator and Designer
Heroes of Might and Magic I-III
Might and Magic I-VII
King’s Bounty
Page 4
4
Section I
Commander,
I hope this letter finds you well and has reached you before you
set sail with Queen Catherine to Erathia. I regret these trying
times. The duties forced upon me have made it impossible for me
to see you off in person.
First, let me congratulate you on your commission. I am glad
— no, thankful — Catherine has someone of your character
and abilities among her entourage. I do not hold such an
unqualified opinion of some who travel with you. I know you are
more at home on the battlefield than in the company of the
royal court, but let me remind you, the strategies and tactics
employed there are every bit as complex and potentially
deadly, as any found in military conflict. No, I don’t have any
real proof of any particular disloyalty or treachery — just
a feeling.
It is unfortunate your first visit to Erathia could not be made
in happier times — it is a land of beauty and stability. Or at
least it has been, under Nicolas Gryphonheart’s rule. He was a
great king and a dedicated ally. I will remember him best as a
man of strength and fairness, both qualities have bred
Page 5
5
Introduction
true in our dear Catherine. You know she has not ruled out the
possibility foul play was involved in his death. Do not be too quick
to dismiss her thoughts as those of a grieving daughter. True, she
is saddened but has not lost hold of her wisdom.
Hah! Listen to me and my gloominess! Just watch your back as
a favor to a friend made cynical and suspicious by age. I’m sure
I’m just seeing things in the worst possible light. A
vocational habit. Perhaps I have been at this job too long.
Farewell, friend. I look forward to your return, to a good cup
of tea by the fire, and to the recounting of your journey’s tale.
May the seas be calm and the wind steady in your sails.
Best Regards,
Wilbur Humphrey, Regent of Enroth
Page 6

6
Section I
How to Use this Manual
This manual is divided into three main sections. This section, the Introduction, contains the background
story, features information, installation instructions, and “getting started” hints. The second section,
Interface Reference, details the workings of the game’s various interfaces. The third section, World
Reference, is full of descriptive and statistical information about the locations, creatures, heroes, and
spells you will encounter as you play. The Appendices contain additional information about Internet
gaming services, Troubleshooting, 3DO Customer Support, The 3DO Company 90-Day Warranty, and
an extensive index.
If you are new to the world of Heroes of Might and Magic, fear not! The game is rich in detail, true,
but it belongs to a series long applauded for ease of use. Furthermore, you can play the in-game tutorial
specifically designed to introduce you to the basic concepts of the Heroes III game gameplay. Refer to
the Interface Reference and World Reference for more detailed information as you play.
If you are familiar with the Heroes II game, you may feel comfortable diving right into the game. In the
Interface Reference, discussion of each of the game’s major interfaces (for example, the Adventure Map)
begins with an overview. Read each overview, then the following sections for a more detailed explanation
about particular features. You will find the World Reference helpful as you encounter new spells, town
features, and creatures.
Manual Conventions
This manual assumes you are using a standard keyboard and two-button mouse, and you are familiar with
their use. It will also assume you have a minimal understanding of the Microsoft Windows
®
95/98
operating systems. If you don’t understand any of the following terms, you may want to take a few
minutes and run through the tutorial materials that come with Windows 95/98:
mouse pointer
left-click
right-click
double-click
pull-down menu
dialog box
The manual will use the term “click” to replace “left-click.”
Page 7
Interface Reference
Section II
Interface Reference
File
Quit: Closes the program
Display
Full Screen (F4): Switches
the display to full screen mode
Help
On Line Manual: Starts the help
system
About: Displays copyright
information about the game
Starting Play
Before you begin a Heroes III gaming session, you must choose what type of game you want to play.
The New Game Menu allows you to choose between single, campaign, and multiplayer scenarios. You
may also choose to resume a previously saved game or play the tutorial.
Launching Heroes of Might and Magic III
Once the program is installed you may start the game by inserting the Heroes III game CD into your
CD-ROM drive and clicking the Play button on the following screen. When you do this, the company
credit animations and introductory movie will play. You may bypass these by clicking the mouse button
at any time. You may also start the game by choosing the Heroes III game shortcut created in your Start
Menu.
Full Screen Vs. Windowed Display
During your gaming session, you may hit the F4 key to switch between full screen and windowed display
modes. In full screen mode, the Heroes III game fills your entire video display at 800 x 600 pixel resolution. In this mode, you may press Alt-TAB to minimize the game screen and display the Windows
Desktop. To return to the game from the Desktop, select it from your Taskbar.
In windowed display mode, the game appears in a standard Desktop window. Since the game displays at
800 x 600 resolution, it is recommended this mode only be used when running Windows at 1024 x 768
or higher resolution. In windowed display mode, you gain the following pull-down menu commands:
7
Page 8

Section II
Main Menu New Game Menu
The Main Menu displays after the introductory
animations play. To choose an option from the menu,
move the mouse cursor over a button and click.
New Game: Choose this to start a game from the
beginning. Clicking this button sends you to the New
Game Menu, where you can select between single
player scenario, multiplayer, or campaign games.
Load Game: While you are playing the Heroes III
game, you can save games in progress. Choose this
option to resume a previously saved game.
High Score: When you complete a single scenario or
campaign, you receive a score based on your
performance. Click this button to display a list of the
top scores.
Credits: Click this button to see the list of people
responsible for bringing you the Heroes III game.
Quit: Click this button to close the program and
return to Windows.
The New Game Menu appears when you click the
New Game button on the Main Menu. From this
menu you can start a single, multiplayer, or
campaign scenario from the beginning.
Single Scenario: Click this button to start a single
scenario. Single scenarios are played on one map
against the computer and are completed by meeting
a set of mission conditions.
Multiplayer: You may play the Heroes III game against
other human players across the Internet, other network connections, or on a single computer. Press this
button to display the Multiplayer Game Type
Selector. For more information about multiplayer
games, see Multiplayer (pg. 59).
Campaign: Choose this button to display the selection
of campaign games. Campaign games are linked
scenarios marking climactic events in longer stories.
They are played against the computer.
Tutorial: A special tutorial scenario has been created to
help you learn the game. To play it, click this button.
You will need to consult the online tutorial guide as
you play.
Back: Click this button to return to the Main Menu.
8
Page 9
Interface Reference
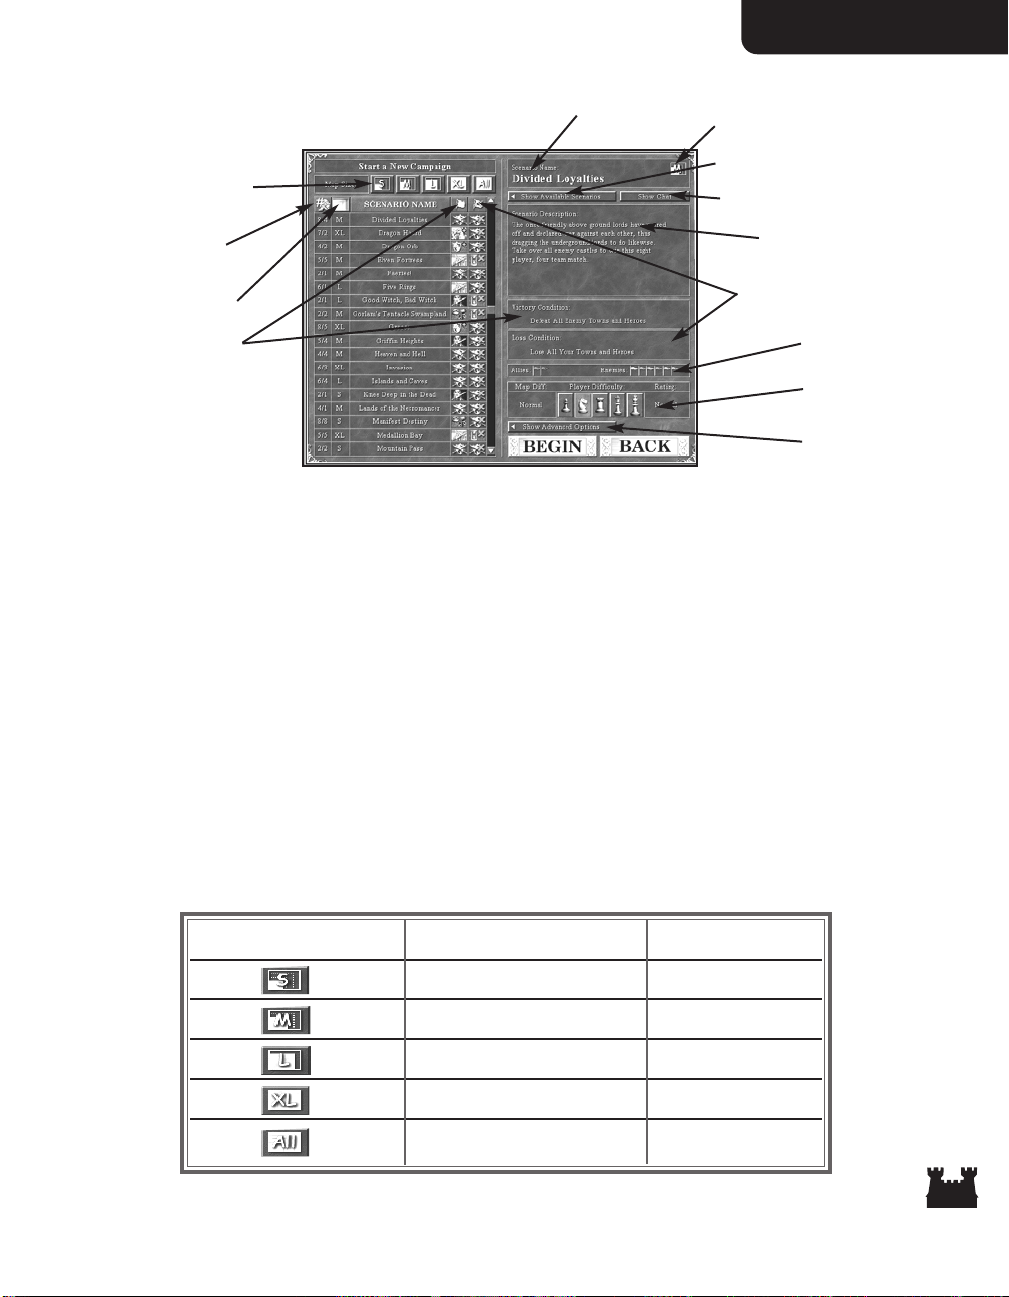
Scenario Selector
Before you can start a single player or multiplayer game, you must choose which scenario you want to
play. This is done using the Scenario Selector. Here you may also set the game difficulty and choose
which forces you want to control in a single player game. In a multiplayer game, the host assigns players
to their forces (see Multiplayer, pg. 59).
You may toggle the display of available scenarios by clicking the Show Available Scenarios button. You can
move the list up and down using the scroll bar along the right side of the list. When you click on a scenario’s
name, it becomes highlighted and its scenario description and win/loss conditions are displayed. The
difficulty settings control the strength of the computer opponent’s starting resources and artificial intelligence.
To start the highlighted scenario, click the Begin button. Click the Back button to return to the Main Menu.
Size of Map
Maps may be small, medium, large, or extra large in size. Size refers to the tile dimension of the
Adventure Map a scenario is played on. While many factors affect length of play, this can be used as a
rough gauge of how long it will take to complete a scenario, with larger maps taking more time. The Map
List Box’s display may be constrained to a list of maps of a certain size by using the Size Filter buttons
located directly above it.
Size Filter Button Map Size Displayed Tile Dimension
S (small) 36 x 36
M (medium) 72 x 72
L (large) 108 x 108
XL (extra large) 144 x 144
All of the Above All of the Above
Map Size
Show Advanced Options
# of Total Players/
Human Players
Enemy/Ally Display
Victory Conditions
Size Filter Buttons
Difficulty Settings
Loss Conditions
Show Available Scenarios
Show/Hide Chat (Multiplayer Only)
Scenario Description
Show Available Scenarios
Current Map
Current Map Size
9
Page 10
Section II
Victory/Loss Conditions
Usually, you can win a scenario by taking all enemy castles and defeating all enemy heroes. Some
scenarios have special victory conditions you can complete to win. You lose a scenario if you control no
towns when your last hero is defeated. Some scenarios have additional loss conditions.
Special Victory Conditions
Special Loss Conditions
Acquire a Specific Artifact You must find a specific artifact. Win by placing the
artifact in one of your heroes’ backpacks.
Accumulate Creatures Your kingdom must acquire X number of creatures.
Accumulate Resources Your kingdom must acquire X amount of a specific resource.
Upgrade a Specific Town The hall and castle of a given town must be upgraded to a
specified level.
Build a Grail Building You must find the Grail and build a grail building in one of
your towns.
Defeat a Specific Hero You must defeat a specified hero.
Capture a Specific Town You must occupy a specified town.
Defeat a Specific Creature You must defeat a specified wandering monster.
Flag All Creature Generators You must control all the creature generators on the map.
Flag All Mines You must control all the mines on the map.
Transport a Specific Artifact You must acquire a specific artifact and transport it to a
specified town.
Lose a Specific Hero You lose if the specified hero is defeated.
Lose a Specific Town You lose if the specified town is occupied by an enemy.
Time Limit You lose if you have not won the scenario within the
specified number of days.
10
Page 11
Interface Reference
Chatting
If you are participating in a multiplayer game, you can turn on and off the display of network chat by
pressing the Show/Hide Chat button. When Chat is on, chat messages are shown in the Scenario
Description box. You can send a chat message by typing it in the box directly below this button.
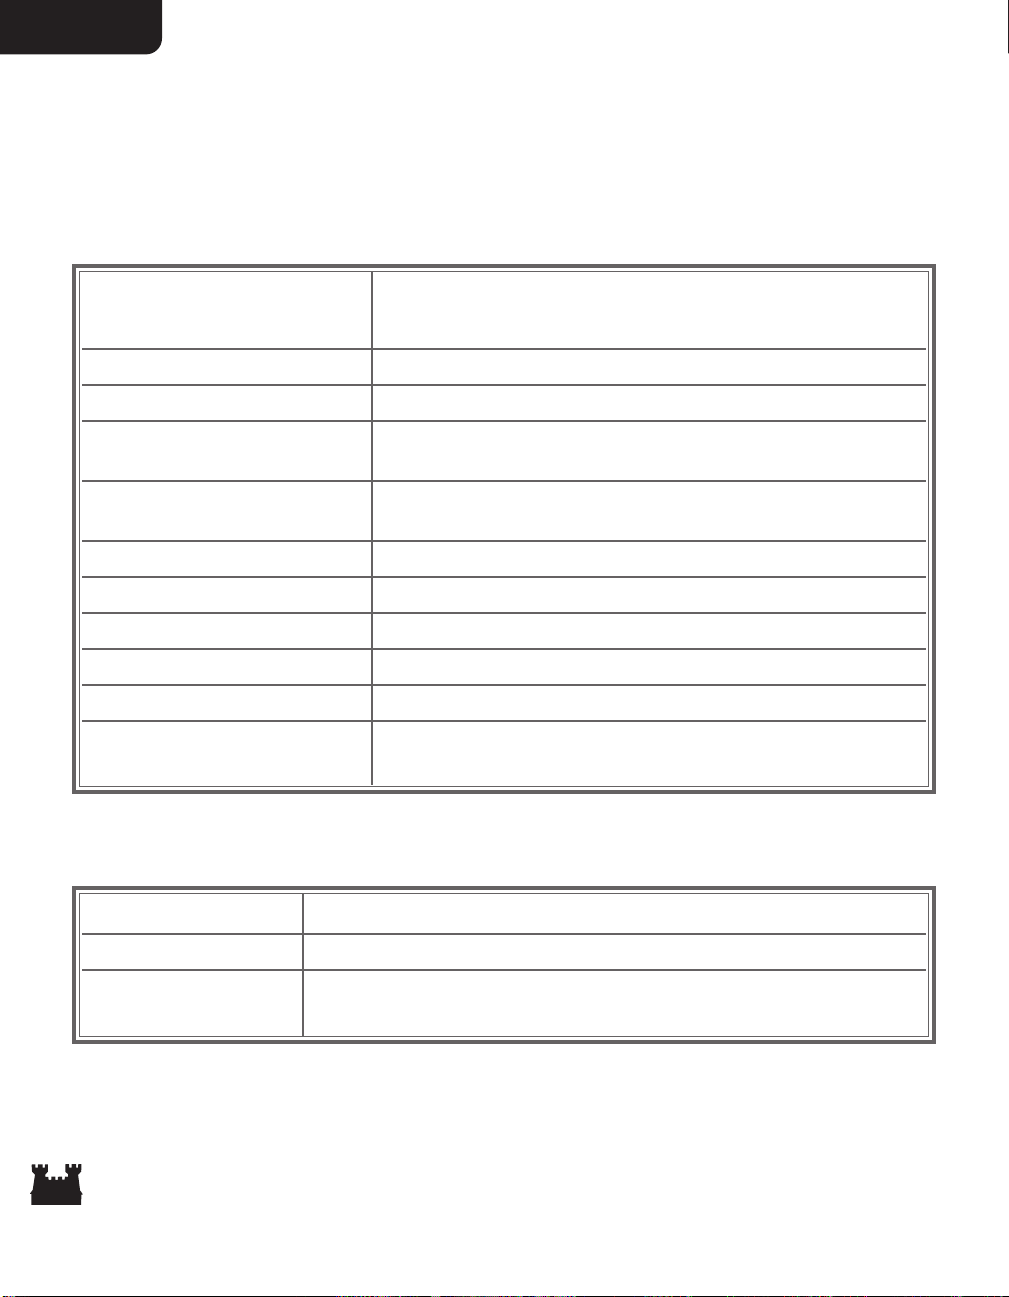
Advanced Options
To display the Advanced Options, click the Show Advanced Options button. This will display the
available options for each opponent in the currently selected scenario. For each game, the scenario’s
designer defines each opponent as playable by a human or the computer (CPU). Slots displaying
“Human or CPU” may be played by either. Any available human slot has a Player Flag button
adjacent to the associated slot, on the far left of the window. In a multiplayer game, the host assigns
players to each available slot by repeatedly clicking the Player Flag button, cycling through the available
players. At the start of the scenario, any player not assigned to a slot is dropped from the game. All
unassigned slots will be played by the computer.
Often, you can choose an opponent’s starting town type, starting hero, and/or starting bonus. If you can,
arrows appear on the sides of the town, hero, and starting bonus pictures. If you can set the starting town
type, which town you choose will affect what heroes and starting bonuses are available. Click on the
Handicap button to cycle through player handicap settings. Handicap will affect a player’s starting
resources.
You may also set the Player Turn Duration limit by moving the slider at the bottom of the Advanced
Options display. This controls how long human player turns can last (when not in combat).
Player Name
Starting Town
Starting Hero
Starting Bonus
Legal Player
Handicap
Player Flag Button
Player Turn Duration
11
Page 12
Section II
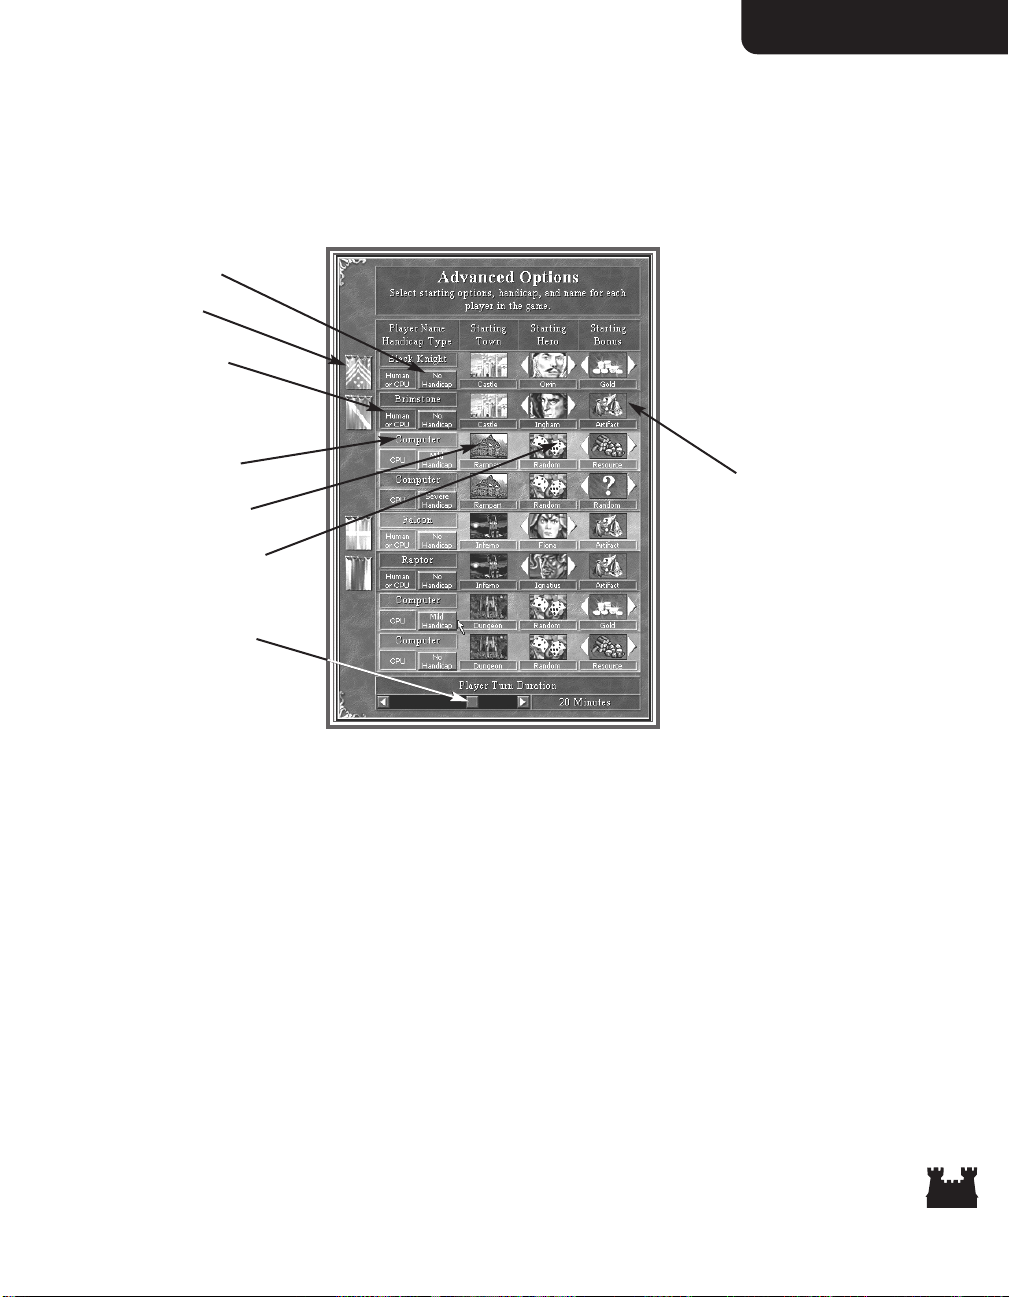
Campaign Games
Campaign games are scenarios linked together by a story line told from either a good, neutral, or evil
perspective. To start a campaign, click the Campaign button on the Main Menu and then select from
the available campaigns displayed on the following screen. When you complete all of the initially displayed
campaigns, new campaign choices appear. After you choose a campaign, the Campaign Scenario Startup
Screen displays.
Campaign Scenario Startup Screen
At various points in campaign story lines, you may choose which conflict you want to involve yourself in.
If this is the case, more than one territory on the invasion map will be highlighted. Click on a highlighted
area to choose a scenario. Information about the chosen scenario will be displayed in the Scenario
Information box.
In most scenarios, you will be able to select starting bonus options. Once you are satisfied with your
scenario and bonus selections, click the Begin button to start the campaign scenario. In order to advance
the story of the campaign, you must win the scenario. If you lose, you can replay the scenario.
Invasion Map
Scenario Information
Starting Bonus
Options
Legal Territory
Campaign Information
12
Section II
Page 13

Interface Reference
Adventure Map
Each Heroes III game scenario takes place in a part of Erathia. The relevant portion of the land is
represented on the Adventure Map. At the beginning of each scenario, you can only see the areas of the
land within view of your towns and heroes; the rest is shrouded from you. As you send your heroes
exploring, the map is revealed along their path of travel. Subterranean gates act as passages to the
subterranean level. This underground territory is displayed on its own map, which is also revealed as your
heroes travel.
As you explore the map, you will discover treasures, wandering creatures, valuable resources, and a wide
variety of permanent locations. While there are a multitude of different types of permanent locations,
among those you encounter will be mines, which can provide you with steady streams of resources;
abandoned ruins to explore; and creature dwellings where you may recruit troops for your heroes’ armies.
You will also encounter heroes and towns belonging to opponents - either human or computer. More
often than not, your scenario mission objectives will require you to make war with other heroes. Combat
between your heroes and other heroes, wandering monsters, and town garrisons takes place on the
Combat Screen (see Combat, pg. 40). When you conquer enemy towns, they become part of your
territorial holdings, adding their many benefits to your cause (see Towns, pg. 49).
This section describes the Adventure Map screen interface for campaign and single-player games. For
explanations of the particular interface differences encountered in multiplayer games see Multiplayer
(pg. 59).
Game Play
On each Erathian day, players can move their forces and manage their territories in turns. This does not
happen simultaneously—rather, each player, starting with you (the human player) takes a turn, and then
passes on play to the next player. Once all players have had their turn, the current day ends and a new
day begins.
At the beginning of each day, mines and cities you control add to your resources. Resources represent
gold and raw materials you may spend to improve your towns, recruit troops, and perform other actions.
Town buildings producing creatures do so on the first day of the week (see Towns, pg. 49). The current
date appears at the lower right corner of the Adventure Map screen.
13
Interface Reference
Page 14
Section IISection II
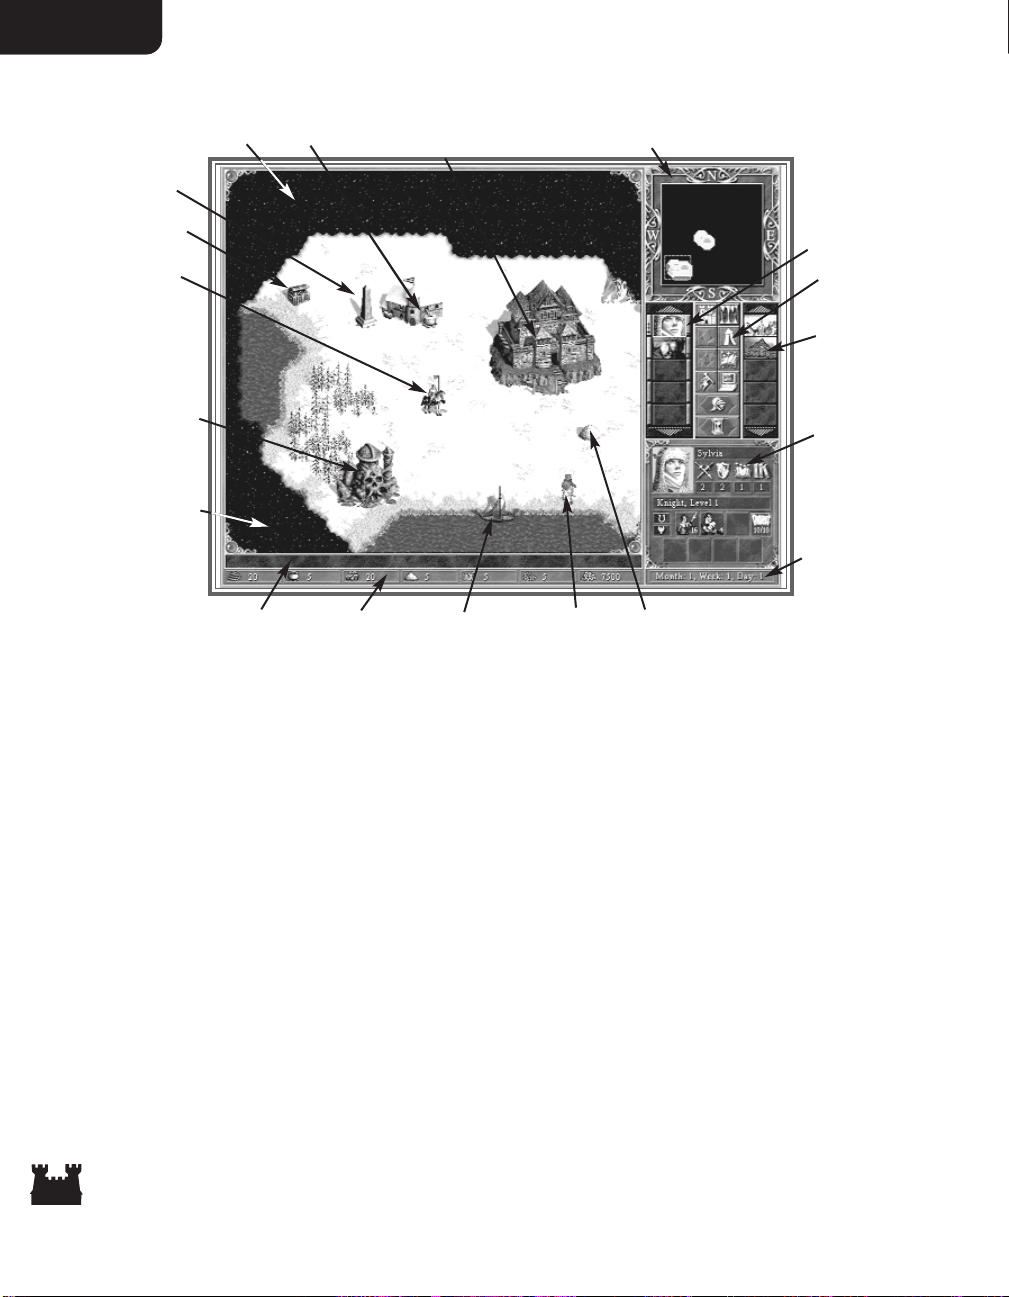
Adventure Map View
Adventure Map
World Map
Hero Selector Buttons
Town Selector Buttons
Control Buttons
Date
Rollover Bar
Resource Bar
Status Window
To wn
Hero
Wandering Monsters
Ship
Subterranean Gate
Resource Mine
Treasure
Obelisk
Shroud
Loose Resource
The Adventure Map
You may scroll the Adventure Map in the direction you want by moving the cursor to the screen’s edges
and corners (diagonal scrolling). The red box displayed in the World Map indicates what portion of the
map is shown in the Adventure Map display. Clicking in the World Map centers this box at the cursor.
You may also drag the box around the World Map.
Identifying text appears in the Rollover Bar as you move the cursor over map features. You may rightclick on anything appearing on the Adventure Map to display further information.
Heroes
You may have up to eight heroes on the Adventure Map at any given time; if you have more than eight
heroes in the field, any extras must be commanding town garrisons (see Towns, pg. 49). Heroes on the
Adventure Map carry their player’s flag color.
Heroes travel with their armies, made up of creatures arranged in groups called troops. Each troop can
hold one or more creatures, but all the creatures in the troop must be of the same creature type. A hero’s
army must have at least one troop and can include up to seven. In battle, a hero leads the battle by
commanding their army rather than fighting directly.
Resource Bar
14
Page 15

Interface ReferenceInterface Reference
Selecting a Hero
The Hero Selector buttons on the right side of the Adventure Screen are used to select your
individual heroes. Clicking a hero’s button selects the hero and centers the Adventure Map display on
that hero. If you have more than five heroes, you may need to click the scroll buttons to display a hero’s
selector button. Double-clicking on a Hero Selector button brings up a hero’s Hero Screen (see
Heroes and the Hero Screen, pg. 23).
On the left side of each Hero Selector button is a green bar which shrinks as the hero’s movement
allowance is used up. The blue bar on the right side of each button measures what percentage of the hero’s
spell points he or she has left. Spell points are spent when a hero casts spells. For more information, see
Magic System (pg. 55).
Moving Your Hero
When you click on the Adventure Map at a location the currently selected hero can move to, a line of
arrows, indicating the path the hero must follow, is drawn from the hero to that location now marked by
an X. If the location is within the hero’s movement limit for the current day, then the arrows and X
appear in green. If the hero cannot reach the location in one move, brown arrows indicate the length that
must be traveled in the next or subsequent turns. You may change the destination by clicking a
different spot on the map.
Click the X to move the currently selected hero along the path. You may also click on the Move Hero
control button to move the currently selected hero down the path. If you want to halt a moving hero in
mid-movement, click on the Adventure Map. The current path will remain, but the hero will stop
moving. You may resume the hero’s movement or select a new destination.
Movement Allowance
How far a given hero can move is determined by the speed of the slowest creature in their army. Creature
speed statistics are listed in the Town and Creature Reference (pg. 81). Distances on the Adventure Map
are measured in tiles.
Movement Allowance Table
Slowest Creature Speed Movement Allowance
Super Slow - Extra Slow 15 tiles
Slow 16 tiles
Swift - Extra Swift 17 tiles
Very Swift 18 tiles
Ultra Swift - Super Swift 19 tiles
Quick - Super Fast 20 tiles
15
Page 16
Section II
Terrain and Roads
Some terrain is difficult to travel across and reduces the distance a hero can move. Roads increase this
distance. A hero with the Pathfinding secondary skill (see Secondary Skills, pg. 35) is able to reduce the
effects of difficult terrain. This chart explains the effects of terrain on movement:
Terrain Movement Costs
Larger numbers mean slower travel.
Terrain Type Normal Basic Pathfinding Advanced Pathfinding Expert Pathfinding
Dirt 100% 100% 100% 100%
Grass 100% 100% 100% 100%
Lava 100% 100% 100% 100%
Subterranean 100% 100% 100% 100%
Cobblestone Road 50% 50% 50% 50%
Dirt Road 75% 75% 75% 75%
Gravel Road 65% 65% 65% 65%
Rough 125% 100% 100% 100%
Sand 150% 125% 100% 100%
Snow 150% 125% 100% 100%
Swamp 175% 150% 125% 100%
Example: A hero with Pikemen (Extra Slow) would have a starting movement allowance of 15 tiles.
However, over the difficult terrain of snow, this hero would only move 10 tiles. With Basic Pathfinding,
the movement allowance of this hero would increase to 12 tiles over snow, and with Advanced
Pathfinding, 15 tiles over snow.
Boats
Heroes need boats to move on water. Boats may be: built in Castle, Necropolis, and Fortress towns
located on shores, with shipyards; summoned using the Summon Boat spell; built at Adventure Map
shipyards; or found elsewhere on the Adventure Map—perhaps abandoned by another hero.
Boarding or disembarking from a boat takes the remainder of a hero’s movement allowance for the
current day. To put a hero on a boat, click on an unoccupied boat. To disembark a hero, move the boat
carrying that hero to a valid shore location, indicated by the anchor icon. Boat movement is made at a
hero’s full movement allowance. A boat can only carry one hero and their army at a time.
The Subterranean Level
Some maps contain a subterranean level. Heroes may enter subterranean gates to pass between the
surface and the underground. Pressing the Elevation Toggle control button switches the Adventure
Map’s view between the two levels.
16
Page 17

Interface Reference
Adventure Locations
Towns
Towns provide many benefits to the player in control of them. The
town hall for each town you control adds a quantity of gold to
your daily resource pool. At your towns, your heroes may
recruit troops, replenish their spell points, and learn new spells.
For more information, see Towns (pg. 49) and the Town and
Creature Reference section (pg. 81).
Your Towns
You may select any of your towns by clicking its Town Selector button. When a town is selected, it is
centered in the Adventure Map and its Town Selector button is highlighted. Clicking on a town or its
highlighted Town Selector button a second time displays the town’s Town Screen (see Towns, pg. 49).
Your heroes may visit towns you control. To direct a hero to do this, move your hero to a town’s front
gate and the cursor will change to a rearing horse. Click, and the hero will enter the town, and the town’s
Town Screen will be displayed. If the town has a Mage Guild, the hero will learn any new spells
available that he is able to learn, and his spell points will be replenished after staying for one day (see
Magic System, pg. 55). Only one hero at a time may visit a given town.
Enemy and Neutral Towns
Towns controlled by other players appear on the Adventure Map with that player’s flag colors and are
identified in the same color on the World Map. Neutral towns, those not controlled by any player, appear
gray on the World Map. Right-clicking on these towns will display limited information on that town.
When you move the cursor over the front gates of enemy and neutral towns, the sword icon appears
indicating they will be defended by any garrison forces present (see Towns, pg. 49). When you defeat a
town’s defenses, the town flies your flag color and becomes part of your territory. You can immediately
make use of the town and draw from its benefits. If no defenders are present, you may simply take the
town by having a hero enter it.
Resource Mines and Loose Resources
When you build structures in your towns or recruit creatures, you use resources—gold, wood, ore,
crystal, gems, mercury, and sulfur. Many other game situations also use them. While there are many ways
to collect resources, the main means of acquiring them is to control resource mines and find loose
resources. When a hero visits a mine, it becomes flagged with the hero’s color and begins
producing resources for the hero’s player, adding to the player’s resource pool on a daily basis. Loose
resources are “picked up” by the hero who visits them. They disappear from the map and are
immediately added to the controlling player’s resource pool.
17
Page 18

Section II
Treasure Chests and Artifacts
Heroes may also pick up treasure chests and artifacts. Artifacts are items, usually magical, that provide
their owner with special powers and abilities. When a hero visits an artifact, it disappears from the map
and is added to their inventory (see Heroes, pg. 23). Treasure chests are surprise boxes containing gold,
minor artifacts, or experience.
Other Structures
There are many different types of Adventure Map structures you will encounter. Some of these will
convey special benefits to the heroes who visit them. Some will be places to explore, full of danger and/or
hidden rewards. Others will provide resources, useful information, or artifacts. While you will need to
discover the individual qualities of many of these buildings, some of the buildings you are most likely to
encounter are listed here.
Border Guards and Gates: Border Guard Towers occasionally appear at borders. In order to pass by a Guard
Tower, you will need to visit a local Keymaster’s Tent of the same color.
Creature Dwellings: Some structures are the living places of creatures you may recruit to your cause. Their
dwellings may be found on the Adventure Map. Before the creatures serve your cause, you may need to
prove your worthiness by facing them in combat. Once you succeed, the dwelling will fly your flag,
associated towns may receive a creature bonus, and you can recruit troops there. The supply of available
recruits will be replenished once a week.
Obelisks: On some maps, the Grail is hidden. Clues to its location can be found at obelisks.
Wandering Creatures: You may find your hero’s way blocked by wandering creatures allied to no particular
player. In order to pass by them, you will need to deal with them. Usually, this means defeating them in
combat. Sometimes the creatures will be favorable to
your cause and will offer to join you, or they may do so
because they are awed by your power. Others, realizing
they have no chance of defeating you, may flee.
Right-clicking on a wandering creature graphic will tell
you the type of creatures camped at the spot and a
rough estimate of their numbers.
Wandering monster troops are randomly assigned a
hostility value from one to ten. Monsters with
higher hostility values are more likely to attack. A
wandering monster troop will be more likely to avoid
combat with hero armies stronger than they or composed of the same creature types. Heroes with the
Diplomacy secondary skill will be attacked less often.
Wandering Creature Population Labels
Label Population
Few 1-4
Several 5-9
Pack 10-19
Lots 20-49
Horde 50-99
Throng 100-249
Swarm 250-499
Zounds 500-999
Legion 1000+
18
Section II
Page 19
Interface Reference
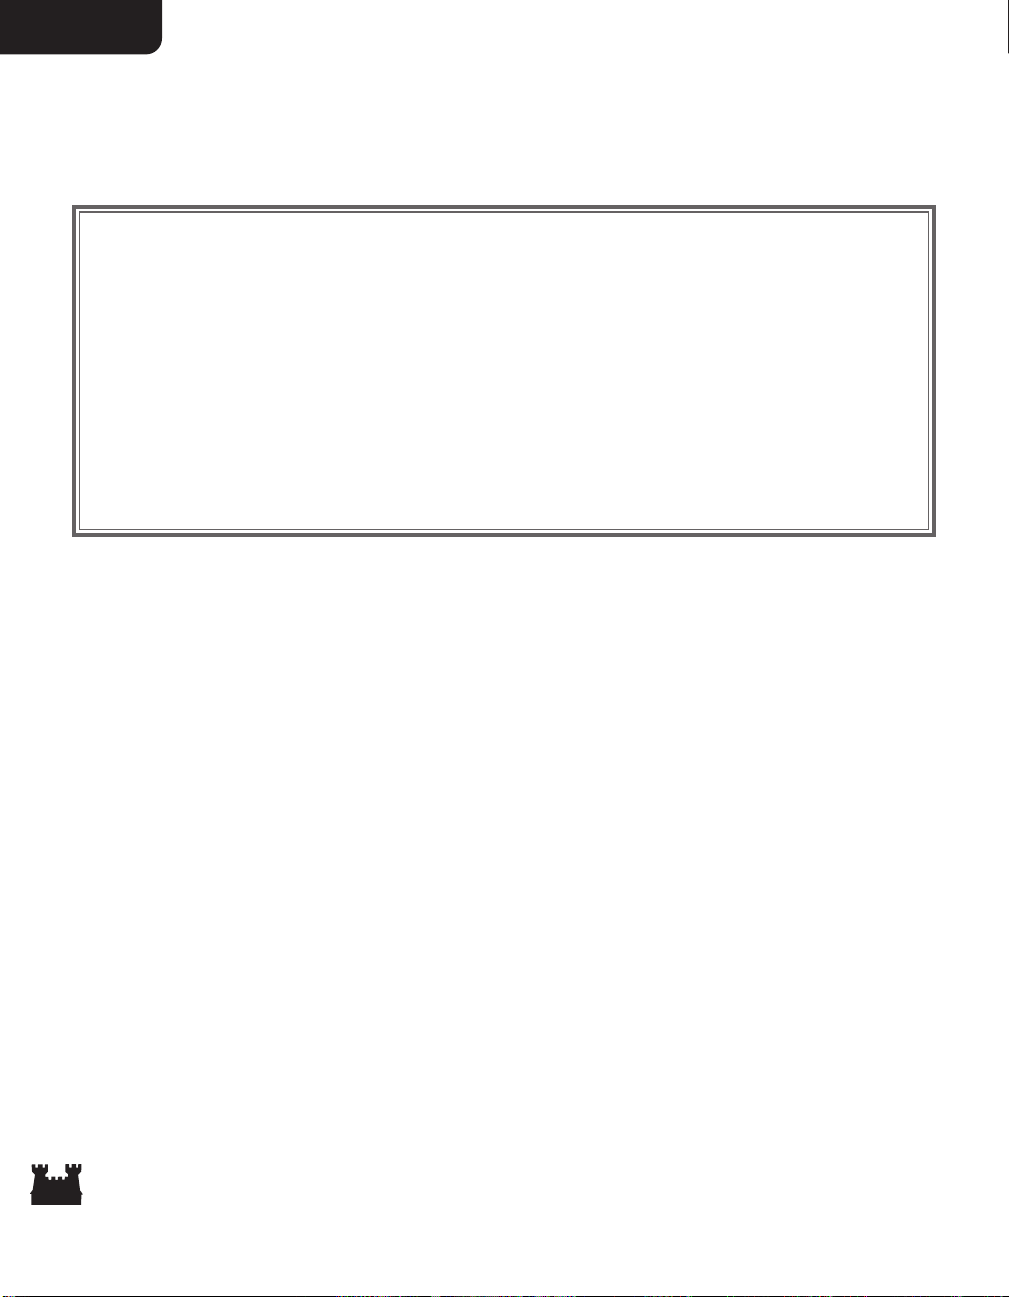
The current hero can move to this spot in the number of turns indicated in the lower right. (If no
number appears on a movement cursors, the hero can move to the target spot during the current turn.)
Appears when the cursor moves over an adventure location, like a building or mine, the current hero can
visit.
If the current hero is on land, and this cursor appears over a boat, then the hero may enter the boat.
Appears over a water location a hero on a boat may visit.
Indicates a shore location where a hero may land a boat and disembark.
Indicates wandering monsters, enemy towns, enemy garrisons, and enemy heroes a hero may attack.
Appears over heroes the current hero may trade with. When the hero is reached, the Hero Trading screen
is displayed (see Hero Trading, pg. 32)
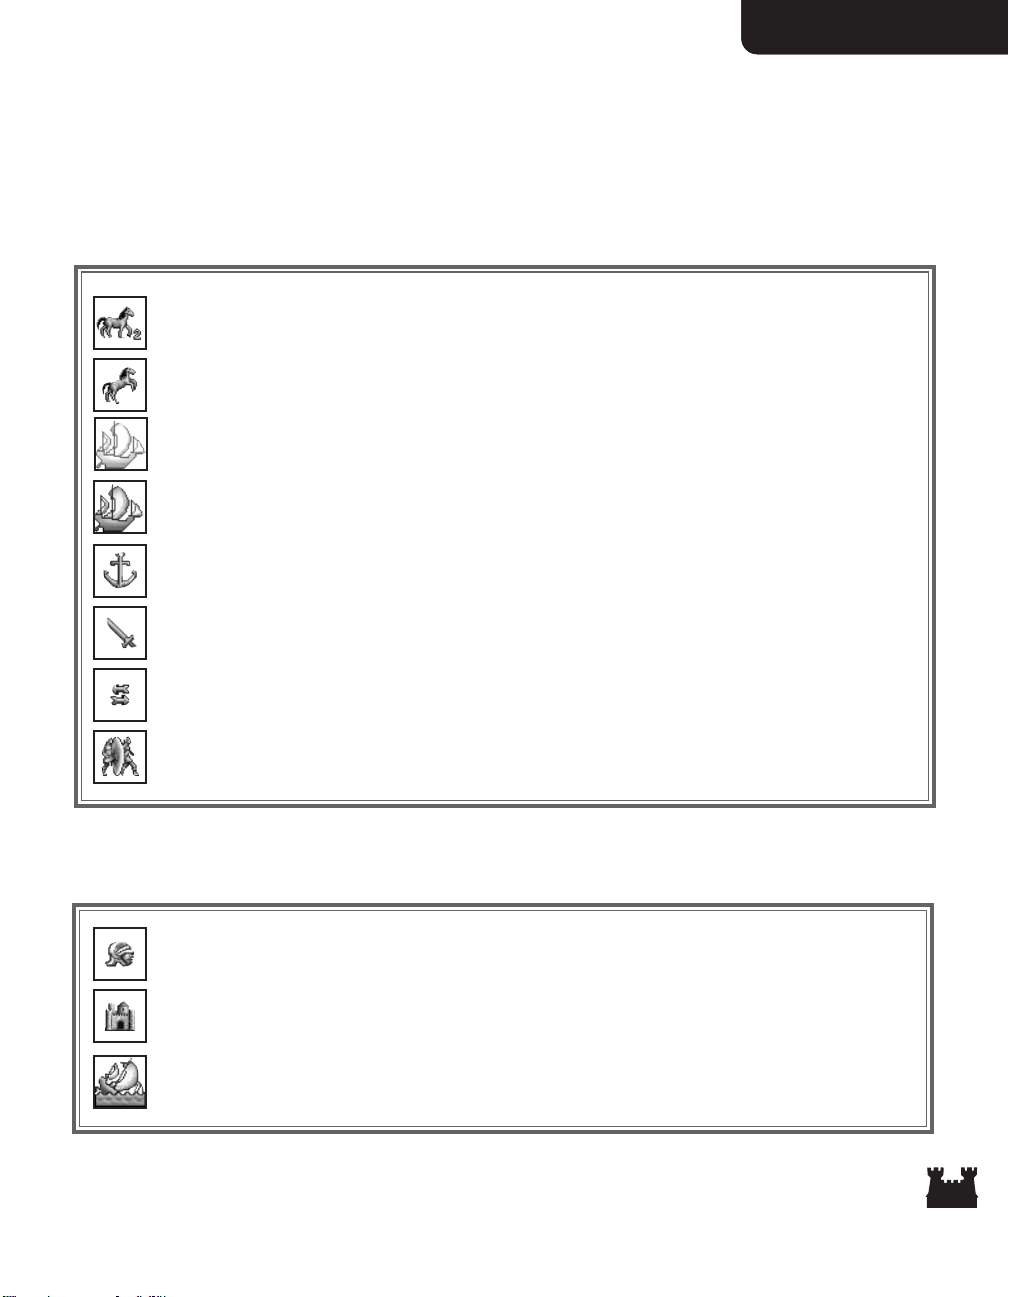
Appears over the current hero or over any of your heroes when a town is selected. Clicking selects the
current hero, or displays the Hero Screen if the hero is already selected.
Appears over your towns. Clicking selects the current town or, if the town is already selected, displays the
Town Screen.
Adventure Map Cursors
Movement Cursors
Clicking on the map where these icons appear will draw a movement path from the current hero to the
desired location.
Selection Cursors
These icons are used to select the current town or hero.
Appears when you cast the Dimension Door spell. To teleport the casting hero to the new location, click
the destination in the Adventure Map Window.
Appears when you cast the Scuttle Boat spell. Click on the boat you wish to cast the spell on.
19
Interface Reference
Page 20
Section IISection II
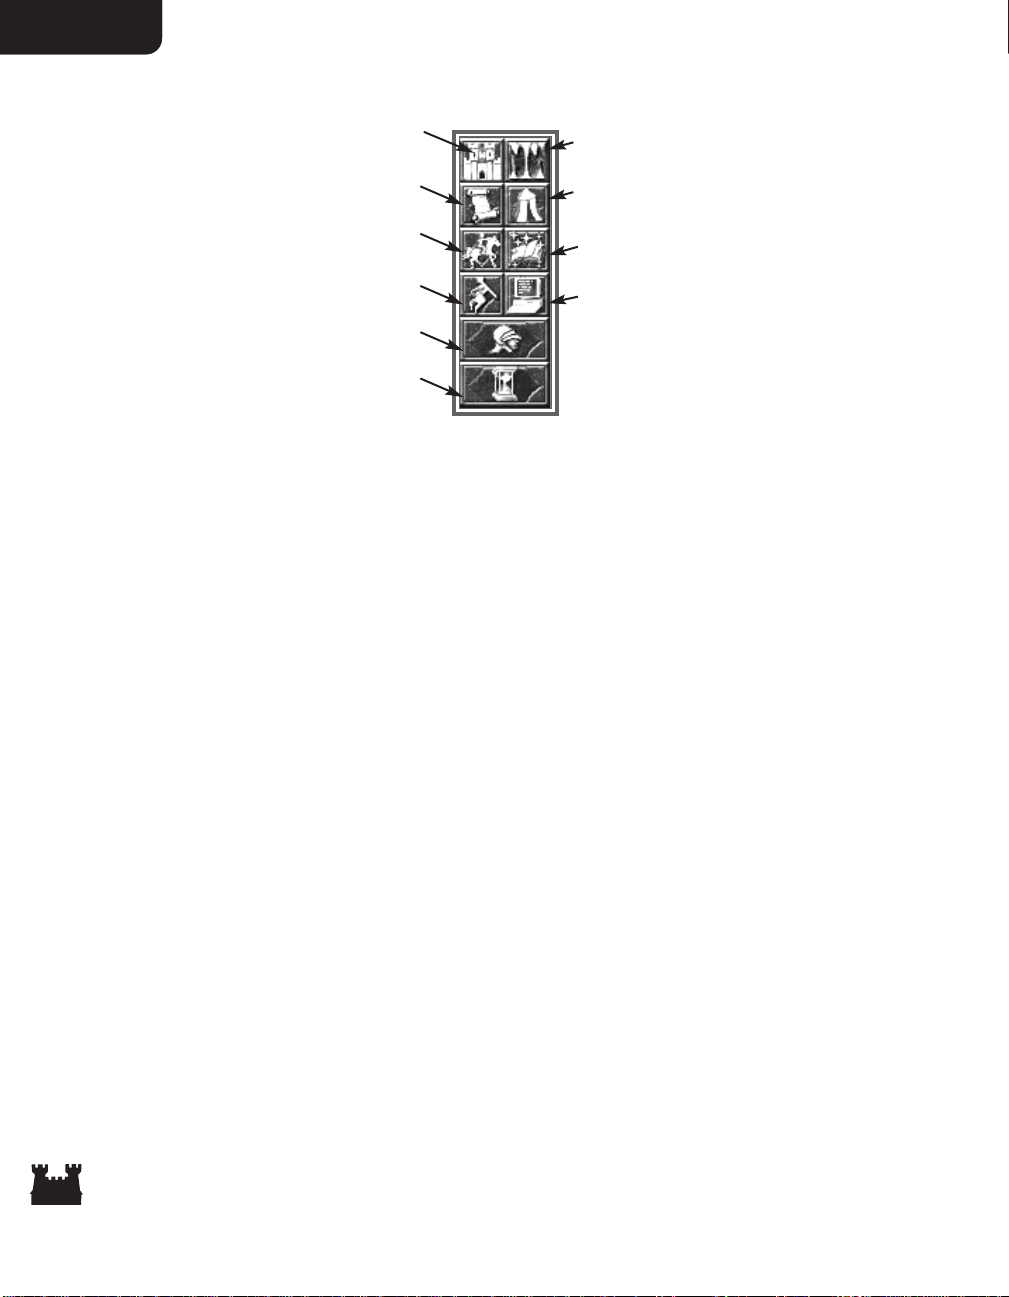
Control Buttons
Kingdom Overview
Elevation Toggle
Move Hero
Cast Spell
Sleep/Wake Hero
Adventure Options
Next Hero
End Turn
Quest Log
System Options
Kingdom Overview: This button displays the Kingdom Overview (see Kingdom Overview, pg. 57).
Elevation Toggle: This button toggles the Adventure Map display between the surface and subterranean
levels.
Quest Log: Click this button to display the Quest Log.
Sleep/Wake Hero: This button puts the current hero in sleep mode. A sleeping hero is passed over
during the Next Hero selection. Wake heroes by selecting them (on the Adventure Map or with their
Hero Selector button) and clicking this button.
Move Hero: If the current hero has a movement path laid, pressing this button will move them along
their path to the extent of their movement allowance.
Cast Spell: If the current hero has a spell book, this button will display their spell book so they can cast
Adventure Spells (see Magic System, pg. 55).
Adventure Options: Click this button to display the Adventure Options (pg. 21). You may click the
✔ button to close this display.
System Options: Click this button to display the System Options menu. You can close the menu by
clicking the Return To Game button.
Next Hero: Clicking this button will select the next awake hero with any movement points down the list.
End Turn: Click this button to end your turn and allow your opponents to take theirs.
20
Page 21
Interface ReferenceInterface Reference
Adventure Options
View World: This button displays a large scale view of the map in the Adventure Map display. Click on the
Zoom buttons to change the view scale. Click the Puzzle Map button to switch to a view of the Puzzle
Map, or ✔ to exit the display.
Puzzle Map: This button displays the Puzzle Map, which shows the location of the Grail. When your heroes
visit Obelisks, parts of the map are revealed. When the map is fully displayed, you will see an X marking
the spot where the Grail is buried.
Dig: In order to recover the Grail, a hero must dig it out of the ground. Click this button to direct the
current hero to dig at their location. Digging takes a full day, so the hero must not yet have moved
during the current turn.
Scenario Information: Click this button to display information about the current scenario.
Replay Opponent Turn: If you press this button, you can see a replay of your opponents’ last turns.
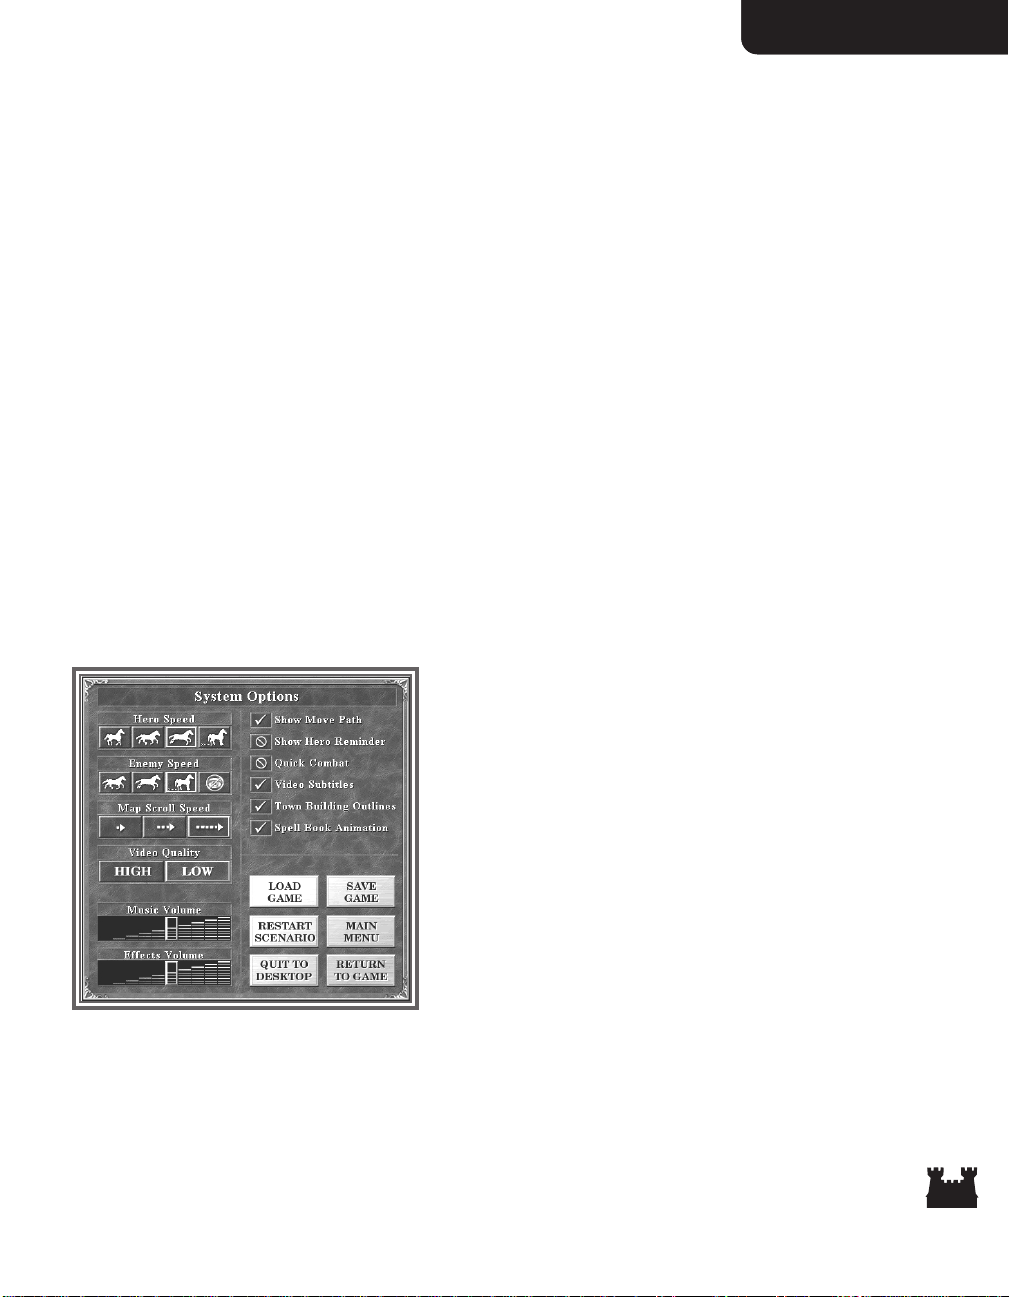
System Options
Hero Speed: Select one of these buttons to set the
movement animation speed of your heroes.
Enemy Speed: These buttons control the movement
animation speed of your enemies. You may also choose to
hide your enemies’ movements from you.
Map Scroll Speed: These buttons control how fast the map
view scrolls.
Video Quality: Selects high or low quality video playback.
Show Move Path: Toggles display of hero movement paths.
If you turn the paths off, your heroes will move immediately
towards any destination you click on.
Move Hero Reminder: This toggles on and off the Move Hero Reminder which normally displays at the
end of a turn, if you have any sleeping heroes or heroes with movement points left.
Quick Combat: When this option is on, the game resolves combat for you without displaying the
Combat Screen.
21
Page 22

Section II
Video Subtitles: Toggles subtitles for videos on and off.
Town Building Outlines: When the cursor moves over buildings in the Town Screen, buildings you
can click on may be outlined. These buttons turn on and off the outline display.
Spellbook Animation: Turns on and off the page turn animations in the spell book display.
Disk Options
Load Game: This button displays the Load Game menu. Loading a new game will end the current game.
Save Game: This button displays the Save Game menu to save your current game.
Restart Scenario: Click this button to start the current scenario from the beginning.
Main Menu: Click this button to return to the Main Menu. This will end the current game.
Quit to Desktop: Click this button to close Heroes III and return to Windows.
Return to Game: Click this button to close the System Options menu and return to play.
Sound Options
Music Volume: This control sets the game’s music playback volume. Clicking the volume controls to the
left reduces the volume, clicking to the right increases it.
Effects Volume: This control allows you to set the game’s sound effect playback volume.
Informational Displays
The Resource Bar
The Resource Bar shows how much of each of the game’s resources you currently have.
Rollover Bar
A Rollover Bar is at the bottom of most game menus and interface displays. As you move the cursor over
the screen, displayed text identifies what the cursor is currently over.
Right-Click Information
You may right-click on most game or interface items to display further information about the item. These
displays remain in view as long as you hold down the right mouse button.
Status Window Information
Information about the currently selected hero, town, or resource, as well as number of towns and allies,
appears in the box at the lower right corner. You may click on this box to toggle between the various
displays available.
22
Section II
Page 23
Interface Reference
Heroes and the
Hero Screen
Actions in the Heroes III game are performed by heroes. Heroes explore the land, sea, and underground.
They gather treasures, resources, and other artifacts. They secure towns and Adventure Map structures,
adding them to your territory. Heroes travel with troops recruited at towns and other locations. With these
armies they can engage in battles against your enemies or lead the defense of your towns. As heroes
explore and battle, they gain experience points. When they have enough experience points, they go up a
level. At each level, heroes gain new skills and increase their abilities at skills they already possess.
In most scenarios, you start with at least one hero under your command. You can gather more heroes to
your cause by recruiting them in your town taverns. Heroes may be stationed in your town garrisons or
may roam the lands of Erathia. Garrisoned heroes lead troops stationed in a town’s garrison if the town
is attacked by an enemy hero. You can have one garrisoned hero per town and up to eight roaming heroes
at any one time.
Hero Types
There are sixteen different types of heroes—two for each
of the eight town types. One type specializes in the use
of magic, the other is more battle-oriented. Heroes of all
types may be recruited in any town.
23
Interface Reference
Page 24

Section II
Castle Heroes
Knight: Knights are brave and noble warriors dedicated to good and righteousness. While they can learn
magic skills, they are by far more dedicated to the pursuit of martial knowledge.
Cleric: Clerics are members of the fighting forces of their holy orders. They pursue a range of knowledge,
both martial and mystical.
Dungeon Heroes
Overlord: Overlords build dungeon lairs to protect their gains acquired through conquest. Ruling
through intimidation, they tend to be warriors who know the value of magic. They often wear armor
designed to enhance the ferocity of their appearance.
Warlock: Warlocks learn magic for the power it gives them to achieve dark and selfish goals. More than
any other hero, they focus on the pursuit of magical knowledge over other values. Warlocks often flaunt
their power, using magic to alter their features.
Fortress Heroes
Beastmaster: Through physical force and intimidation, Beastmasters build their realms by subjugating
those dwelling nearby,. As a consequence, they are little interested in the pursuit of mystical knowledge.
Beastmasters often costume themselves in the likeness of vicious swamp creatures.
Witch: Witches are adept at the use of magic powered by rare ingredients gathered from swamplands.
Learning this knowledge takes a focus that allows for little advancement of military knowledge.
Inferno Heroes
Demoniac: Demoniacs are people (often ex-Heretics) who have been completely possessed by one or
more demons. Though they have a natural predisposition to gaining magical power, Demoniacs also
acquire balancing military skills as well.
Heretic: Heretics aim to harness demonic forces to their bidding. While they tend to train themselves
with warrior skills, they must also know enough magic to control their infernal allies. Heretics can often
be recognized by the number of protective wards and markings they wear to ward off demonic attacks.
24
Section II
Page 25

Interface Reference
Necropolis Heroes
Death Knight: Death Knights are knights resurrected as liches. While they maintain their former
martial learnings, their new forms open them more freely to the learning of magic.
Necromancer: Necromancers are magic users seduced by the easy power of death magic. The price of
their art is its practice slowly drains life from its wielders—eventually transforming them into liches.
Rampart Heroes
Ranger: Rangers are warriors born of the woods, skilled at hunting and tracking. Their dedication to
the protection of the wilderness leads them to pursue a wide range of knowledge, concentrating on
martial and outdoor skills.
Druid: Druids are mystics who draw their power from a harmonic relationship with the land. While they
pursue their mystical knowledge, their outdoor living causes them to acquire a balance of physical skills.
Stronghold Heroes
Barbarian: Barbarians are little concerned with anything outside the pursuit of military might.
Consequently, they advance most quickly in attack based skills and slowly in all others. Barbarians wield
massive weapons and wear little armor.
Battle Mage: Battle Mages are Barbarians with limited spellcasting abilities. While they advance their
ability at magic, they also study the arts of war. Battle Mages often wear trophies, gathered from slain
foes, from which they derive additional power.
Tower Heroes
Alchemist: Alchemists are skilled in physical and chemical magic, particularly so in the building and
animation of golems. Working their craft builds muscular strength, which makes Alchemists ready
learners of military skills as well. Their armor is composed of rare metal alloys created through their skill
in alchemy.
Wizard: Wizards are dedicated pursuers of mystical and magical knowledge. While they may lend little
to the direct military aspect of a battle, they are likely to turn the tide in their favor with use of mighty
arcane forces. Wizards seldom wear any armor, relying on their control of magic to protect them.
25
Interface Reference
Page 26
Section II
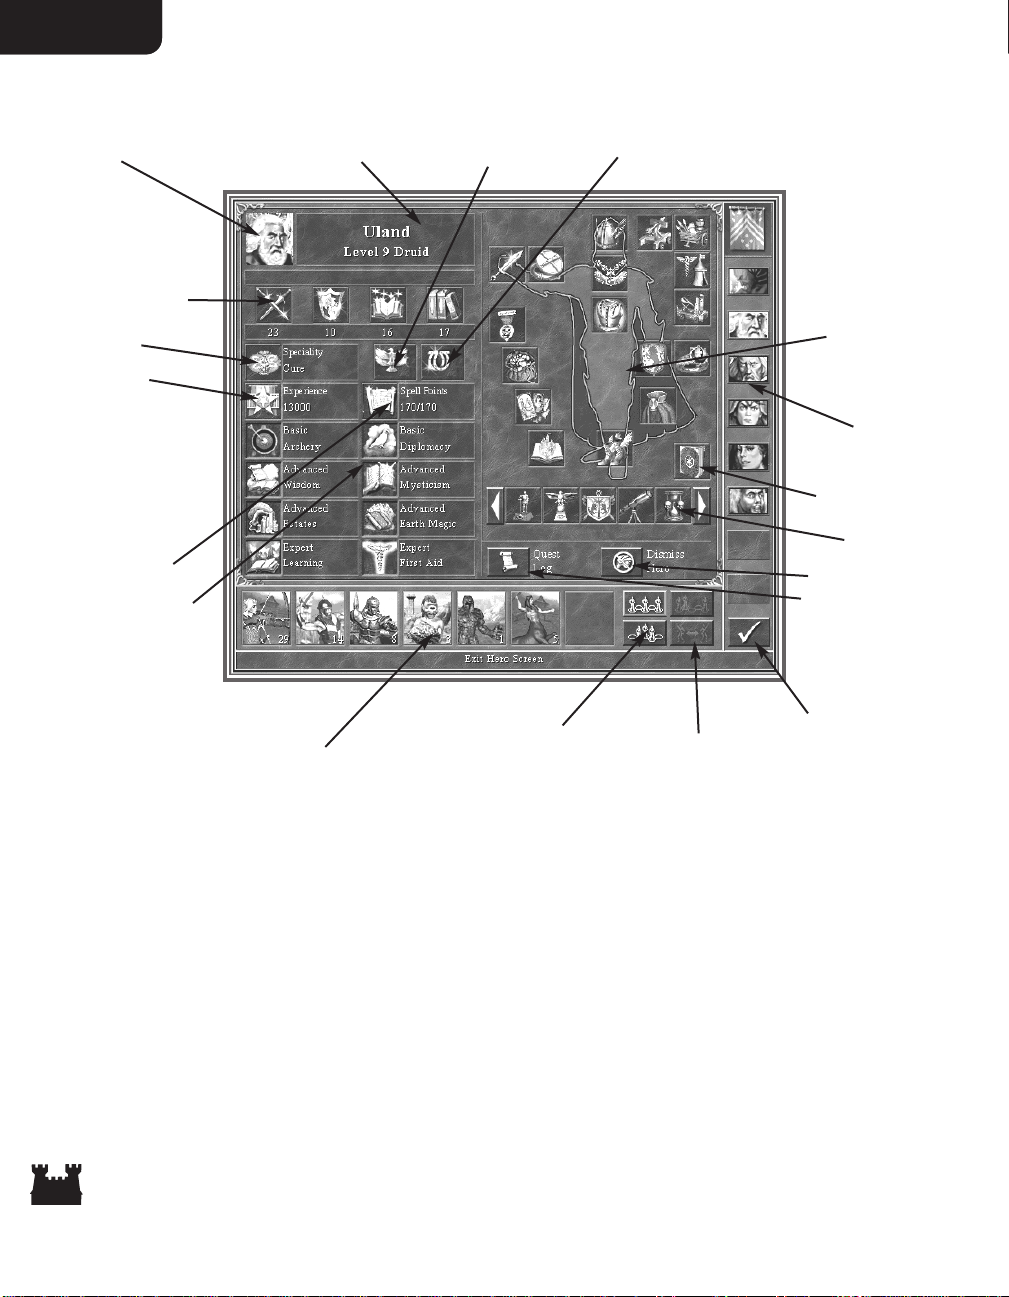
The Hero Screen
Spell Points
Primary Skills
Secondary Skills
Hero Name, Level, Class
Hero Portrait
Army Formation Selector
Split Army
Dismiss Hero
Hero’s Army
Hero Selector
View Spell Book
Paper Doll
Backpack
Exit
Experience
Specialty
Luck
Morale
View Quest Log
Information about each hero you control can be viewed on their individual Hero Screen. The Hero
Screen can be displayed from the Adventure Map screen by double-clicking on a hero’s Hero Selector
button or by double-clicking on the hero directly on the map. The Hero Screen is also used to
organize the hero’s items and armies.
26
Section II
Page 27
Interface Reference
Morale
This icon represents the basic morale rating of the
hero’s army. In combat, low morale can cause
creatures to freeze. High morale can allow them
extra attacks (see Combat, pg 40). Click on the
icon to display a list of morale-affecting factors.
Luck
This icon represents the current basic luck rating
of the hero’s army. Good luck increases a
creature’s chance to do maximum damage (see
Combat, pg. 40). Click on the icon to display a
list of factors modifying the army’s luck.
Specialty
Each hero has a special ability. Click on this icon to display information about it.
Experience
Displays the hero’s current experience points. Click the icon to display the hero’s current level and the
experience points needed to reach the next level (see Skills, pg. 33).
Spell Points
This displays the hero’s current and maximum spell points. (For example, “15/20” means that the hero
currently has 15 spell points out of a maximum of 20). Click the icon for a more verbose display (see
Magic System, pg. 55).
Primary Skills
These icons display your hero’s four primary skills—Attack, Defense, Power, and Knowledge (see Skills pg. 33).
Secondary Skills
Each hero can have up to eight different secondary skills. Icons representing these skills are displayed in
these slots. Each skill can be performed at a basic, advanced, or expert level (see Skills, pg. 33). Click on
each icon to display information about the skill.
High Morale
Normal Morale
Low Morale
Excellent Luck
Good Luck
Positive Luck
Neutral Luck
27
Interface Reference
Page 28
Section II
Hero’s Army
These seven slots display the troop stacks in the hero’s army. Each troop stack portrait has a number
indicating how many creatures are in each slot. The slot a troop stack occupies affects where the troop
appears on the battlefield (see Combat, pg. 40). There are several things you can do with this display to
manage your hero’s army.
Displaying Creature Information
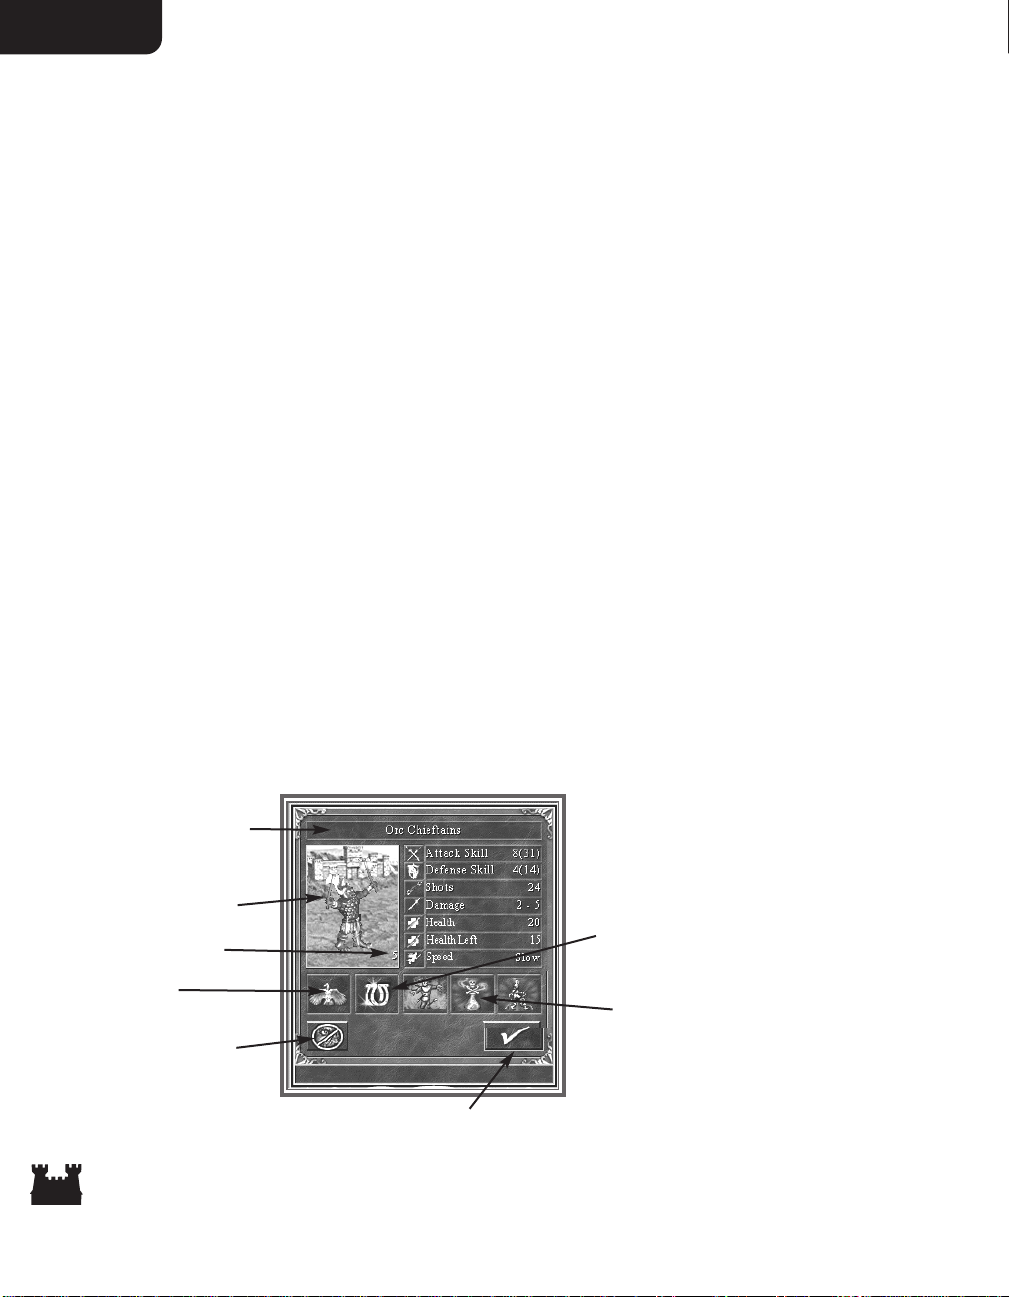
Clicking on a highlighted troop stack displays its creature information as follows.
Portrait: This is a picture of the creature as it will appear on the battlefield. The number in the
lower right corner is the number of creatures in the troop. Above the portrait is the creature’s name.
Attack: This is the creature’s attack rating. The number in parenthesis represents the rating as affected
by the hero’s Attack skill and other factors.
Defense: This is the creature’s defense rating. In parenthesis is its rating as affected by modifying factors.
Shots: Creatures with ranged attacks have a limited number of shots. This displays how many are left.
If there is no number here, then the creature has no ranged attack.
Damage: This shows the range of damage the creature does when it attacks.
Health: This shows the creature’s maximum health points.
Health Left: This shows how many health points the top creature in the troop has left.
Speed: This is the creature’s speed rating.
Morale: This shows the creature’s current, individual morale rating.
Luck: This is the creature’s current, individual luck rating.
Affecting Spells: Spells currently cast on the creature are shown here.
Portrait
Number of Creatures
Name
Morale
Luck
Affecting Spells
Dismiss Army
Close
28
Page 29
Interface Reference
Dismissing a Troop
If you wish to remove a troop from the hero’s army, display the troop’s Creature Information window and
then click the Dismiss Troop button. All heroes in the field must have at least one troop, so you
cannot dismiss a hero’s last troop.
Upgrading a Troop
Each creature is available in a basic and upgraded version. If a hero visits a town capable of generating a
creature’s upgraded version, you may upgrade any basic level creatures by pressing the Upgrade Troop
button.
Combining Two Troops of Like Creatures
If you have two troops containing identical creatures, you can combine them into one troop. Do this by
highlighting one troop, then clicking on the second one. The creatures in the first troop will be absorbed
into the second.
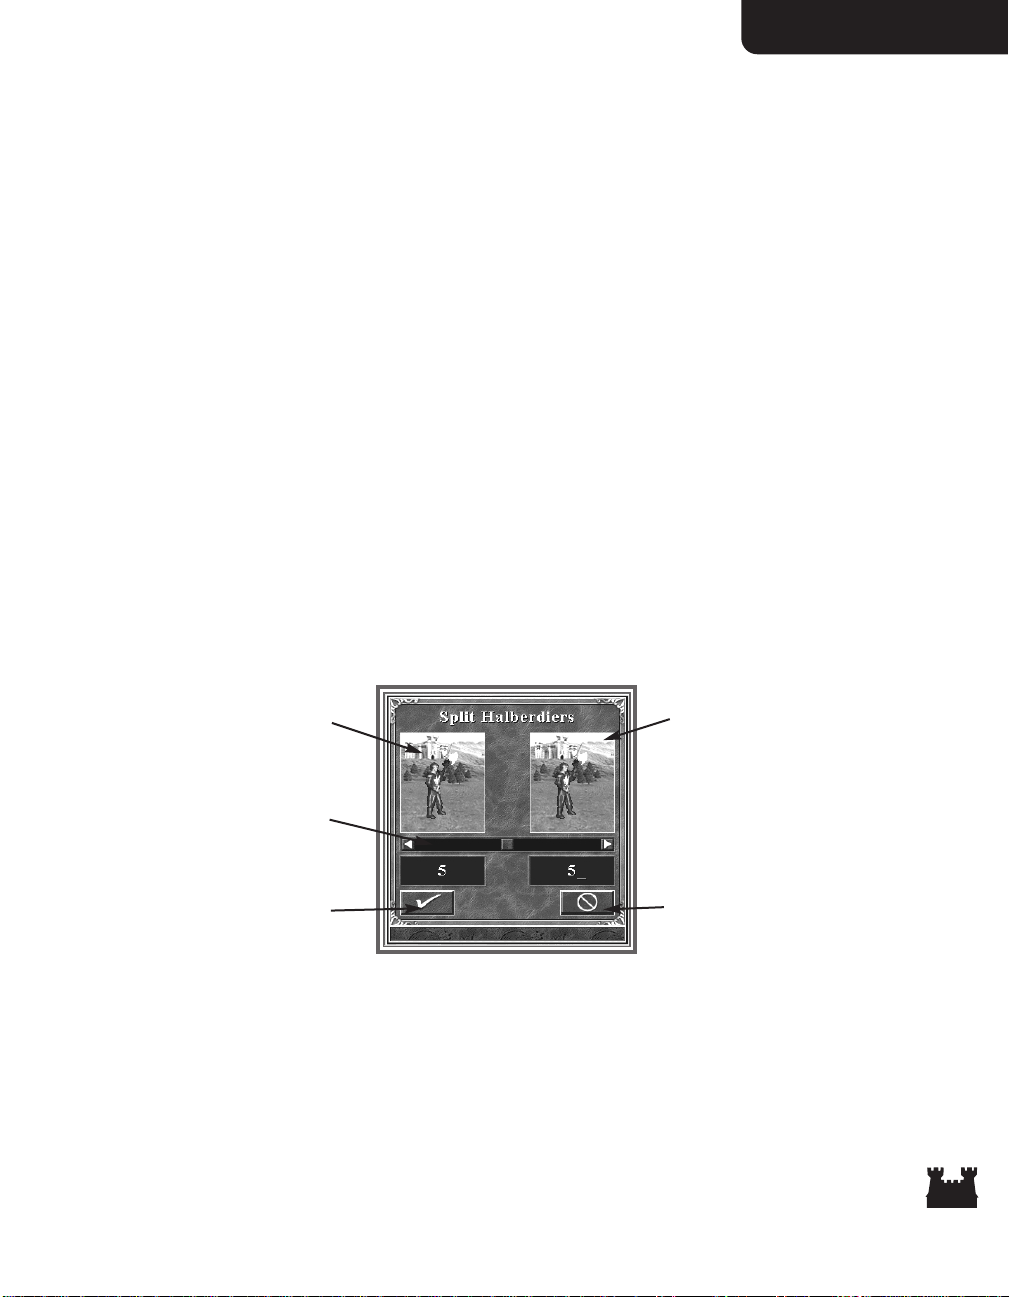
Splitting Troops
You can take a troop with two or more creatures in it, and split it into two troops. To do this, highlight
the troop, click the Split Troop button, and then click on an empty troop slot or troop of like creatures.
The Split Troop control will appear.
To split the current troop, move the slider control to the right. As you do so, creatures will be transferred
from the originating troop. Click
✔
when you are satisfied, or click the Cancel button to cancel the
operation.
Originating Troop
New Troop
Slider
Split
Cancel
Move a Troop to an Empty Troop Slot
To move a troop from its current troop slot to an empty one, click on the troop to highlight it, and then
click on the slot you want to move it to.
29
Page 30
Section II
Switch the Positions of Two Troops
To have two different troops trade their troop slot
positions, click on one of the troops to highlight it, and
then click on the second troop.
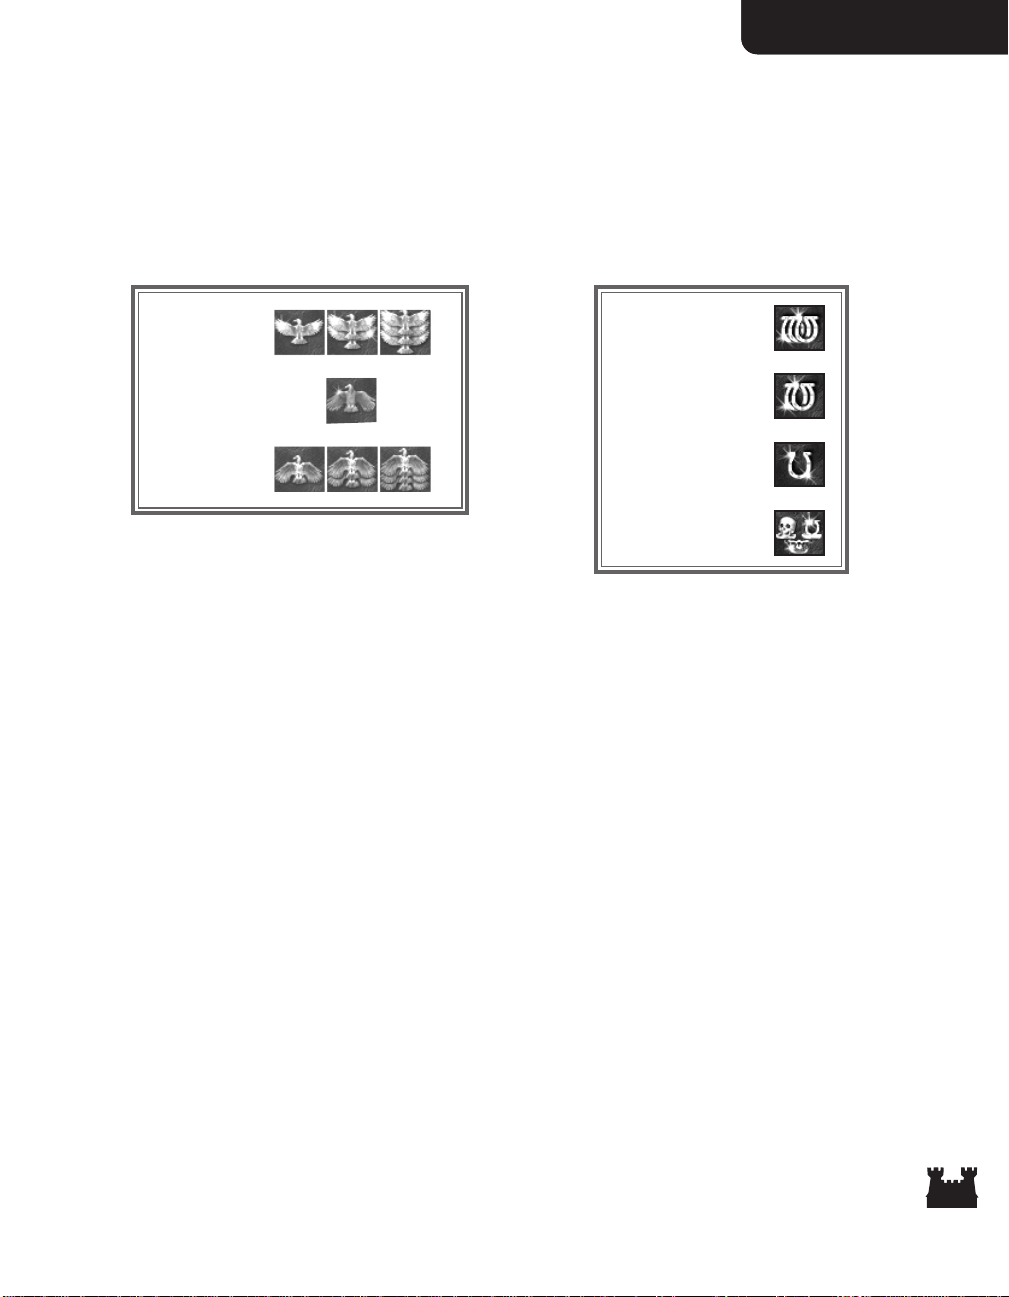
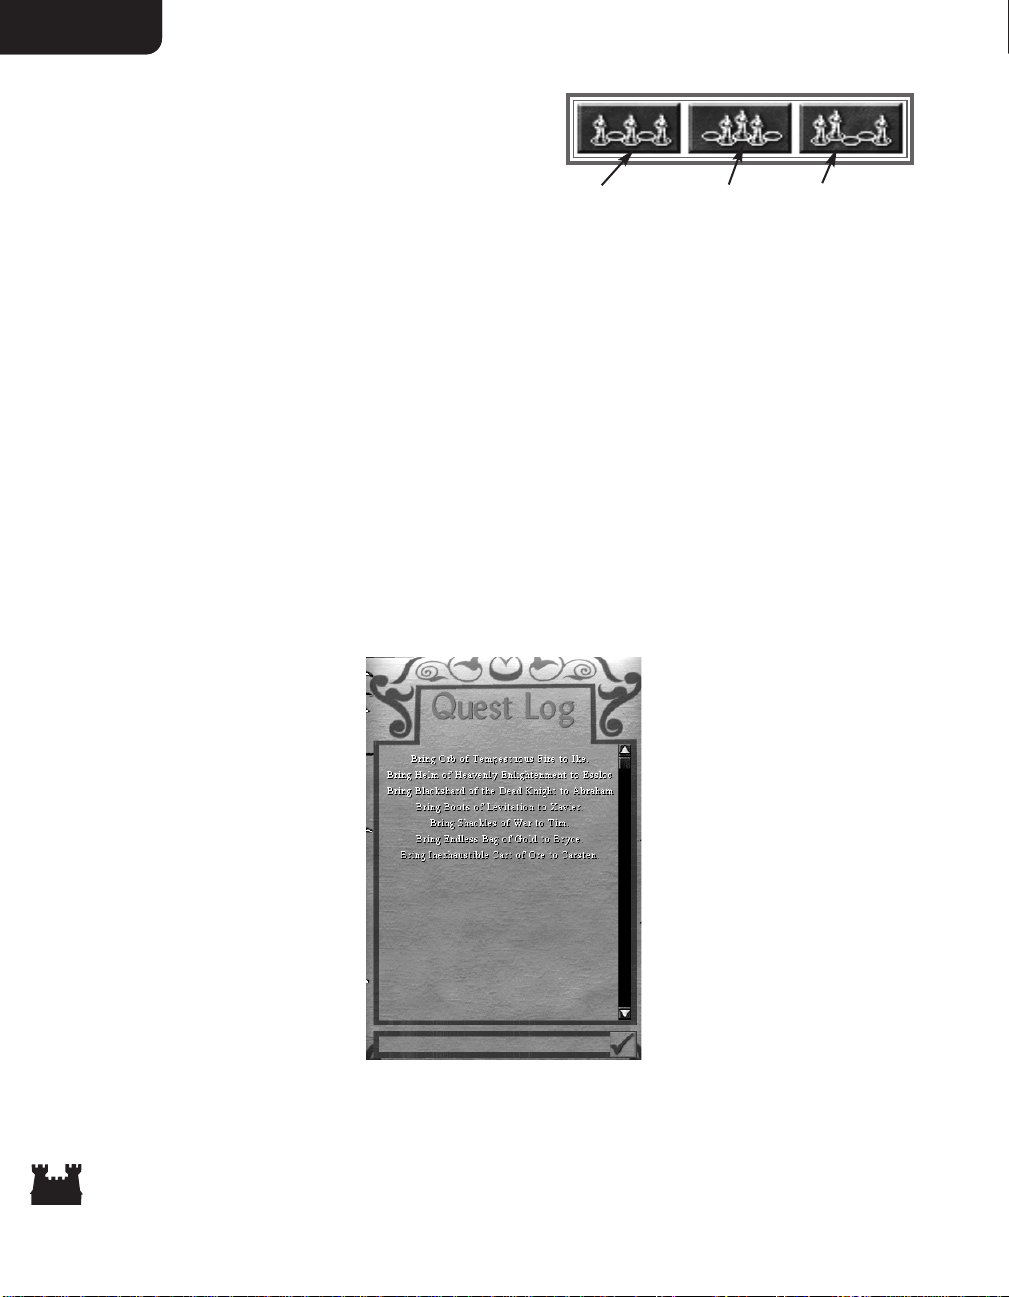
Army Formation Selector
You may choose how a hero’s troops are arrayed on the battlefield using the Army Formation Selection
buttons. Choosing Loose Formation will cause the troops to be arrayed in a loose line, while choosing
Tight Formation will array them in a tight line. If a hero has the Tactics secondary skill, the Tactics
Formation button turns on and off the Tactics formation option. When Tactics formation is on, the
hero’s armies can be moved about the battlefield prior to the beginning of a battle (see Combat, pg. 40).
Dismiss Hero
Click this button if you wish to dismiss the displayed hero. If you do this, the hero will leave your
service. He or she may later appear for hire in one of your town taverns, or may end up in the service of
one of your enemies.
View Quest Log
Click on this icon to display the Quest Log. The text displayed lists quests your heroes have
accepted. The quest log scrolls up/down using a scroll bar.
Loose Formation Tight Formation Tactics Formation
30
Section II
Page 31

Interface Reference
View Spell Book
Click on this icon to display the spell book (see Magic System, pg. 55).
Hero Inventory
As heroes collect artifact items and war machines, they appear in their inventory. To display information
about an inventory item, right-click on its icon.
In order to gain the benefits of these items, the hero must equip them. Many items must be worn or held
by the hero. In order to equip a worn item, drag its icon from the hero’s backpack to the appropriate slot
on the hero’s body diagram. Note this means a hero can only wear one helmet, one set of boots, etc. at a
time. Some items are not worn but must still be equipped. Up to four of these may be equipped at one
time by placing them in the miscellaneous equipment slots. Sixty-four non-equipped items may be carried
by a hero in their backpack. Click the scroll arrows to scroll the backpack contents display.
There are four equipment slots reserved for any war machines the hero may be carrying. Only the
Catapult, Ballista, Ammo Cart, and First Aid tent may be placed in these slots. A hero may only carry
one of each war machine type at any one time.
Necklace
Helmet
Cape
Right Hand (Offensive)
Right Hand Ring
Left Hand (Defensive)
Left Hand Ring
Torso
Feet
Miscellaneous
Catapult
Ballista
Ammo Cart
First Aid Tent
Backpack
Spell Book
31
Interface Reference
Page 32

Section II
Hero Trading
When two, allied heroes meet on the Adventure Map, they may trade inventory items and troops. To
initiate a trading session between two of your heroes, make one of them the current hero and then click
on the second hero to move them together. When you do this, the Hero Trade Screen appears.
The Hero Trade Screen displays each hero’s basic statistics, their troop slots, and their inventories. You
may perform the following actions on the Hero Screen:
Hero One Hero TwoPrimary Skills
Secondary Skills
Hero One’s Army
Hero Two’s Army
Hero One’s Inventory
Hero Two’s
Inventory
Quest Log
Split Stack
Exit
Spell Book
Adjust Inventory Items and Trade Them Between the Heroes
You can adjust the placement of inventory items for allied heroes, or trade items between them. To move
an item, drag it to an empty backpack or hero equipment slot. Inventory items may only be placed in
hero backpacks or in their appropriate equipment slots as described in Hero Inventory, above.
Adjust Troops and Trade Them Between the Heroes
You may move, split, combine, swap, and dismiss troops as described in Hero Army, above. These actions
may also be performed between the two heroes’ troop slots. Since each hero must always have at least one
troop, you will not be allowed to trade away or dismiss a hero’s last troop.
Note: Trades between different players with allied heroes is “one-way.” You may give, but not take.
32
Section II
Page 33

Interface Reference
Display Information about a Hero
You may click on the icons representing the heroes’ skills, experience and specialty to display
information about them. Click on a hero’s portrait to display the hero’s Hero Screen. To display a hero’s
Quest Log, click on their View Quest Log button.
Level Advancement
When a hero wins a battle, he or she gains experience points. Experience points may also be gained at
various Adventure Map locations or by picking up treasure chests. When treasure chests contain gold,
you are offered the choice of keeping the gold or giving it to the local peasants. If you give up the gold,
the hero gains experience points.
Once a hero gains a certain amount of experience points, he or she goes up a level. At each level, the
hero advances one primary skill and one secondary skill.
Skill Advancement
Each time a hero reaches a new level, one of their primary skills is advanced by one point. Each hero may
also gain expertise in up to eight secondary skills. When a hero gains a level, the Skill Advancement
Screen appears. You will be offered two secondary skill advancements to choose from. Making the choice
will either advance the hero’s expertise in a secondary skill he or she already knows, or give the hero an
entirely new skill at a basic level of expertise. Right-click on a skill icon to display information about the
skill. Click on an icon to choose the skill advancement for your hero.
Skills
Primary Skills
All heroes attain ability in the four primary skills—Attack, Defense, Power, and Knowledge. Martially
oriented heroes, like Knights and Rangers, will have their Attack and Defense skills advance more
rapidly. Heroes studying magic, like Wizards and Necromancers, will more often gain Power and
Knowledge. The Primary Skill Advancement by Class table displays the chance a particular primary skill
will advance when a hero reaches a new level. After a hero reaches level 9, their advancement
generally becomes more balanced.
Attack A hero’s Attack skill number is added to each of their creature’s attack rating,
increasing the amount of damage they do in combat.
Defense A hero’s Defense skill is added to each of their army creature’s defense rating, which
decreases the amount of damage they take from enemy attacks.
Power When a hero casts a spell, their Power skill number determines how powerfully a spell
is cast. While this effect will vary from spell to spell, the Power skill number most
often determines how long a spell’s effect lasts or how much damage it does.
Knowledge Each point of Knowledge a hero possesses adds ten points to their maximum spell
point total. Spell points are spent when spells are cast (see Magic System, pg. 55).
33
Interface Reference
Page 34

Section II
Primary Skill Advancement by Class
Hero Class and Level Attack Defense Power Knowledge
Alchemist 2-9 30% 30% 20% 20%
Alchemist 10+ 30% 30% 20% 20%
Barbarian 2-9 55% 35% 5% 5%
Barbarian 10+ 30% 30% 20% 20%
Battle Mage 2-9 30% 20% 25% 25%
Battle Mage 10+ 25% 25% 25% 25%
Beastmaster 2-9 30% 50% 10% 10%
Beastmaster 10+ 30% 30% 20% 20%
Cleric 2-9 20% 15% 30% 35%
Cleric 10+ 20% 20% 30% 30%
Death Knight 2-9 30% 25% 20% 25%
Death Knight 10+ 25% 25% 25% 25%
Demoniac 2-9 35% 35% 15% 15%
Demoniac 10+ 30% 30% 20% 20%
Druid 2-9 10% 20% 35% 35%
Druid 10+ 20% 20% 30% 30%
Heretic 2-9 15% 15% 35% 35%
Heretic 10+ 20% 20% 30% 30%
Knight 2-9 35% 45% 10% 10%
Knight 10+ 30% 30% 20% 20%
Necromancer 2-9 15% 15% 35% 35%
Necromancer 10+ 25% 25% 25% 25%
Overlord 2-9 35% 35% 15% 15%
Overlord 10+ 30% 30% 20% 20%
Ranger 2-9 35% 45% 10% 10%
Ranger 10+ 30% 30% 20% 20%
Warlock 2-9 10% 10% 50% 30%
Warlock 10+ 20% 20% 30% 30%
Witch 2-9 5% 15% 40% 40%
Witch 10+ 20% 20% 30% 30%
Wizard 2-9 10% 10% 40% 40%
Wizard 10+ 30% 20% 20% 30%
34
Page 35

35
Interface Reference
Secondary Skills
There are twenty-eight different secondary skills in the game. Each may by held at a basic, advanced, or
expert level of ability. Each hero can learn up to eight different secondary skills.
Secondary Skill Descriptions
Description Increases the effectiveness of Air Magic spells cast by the hero.
Basic Air Magic spells are cast at the basic level (see Spell Reference, pg. 64).
Advanced Air Magic spells are cast at the advanced level.
Expert Air Magic spells are cast at the expert level.
Air Magic
Description Gives the hero manual control over the Catapult and increases its number of
shots, accuracy, and damage.
Basic A Catapult lobs one shot with a 60% chance to hit the intended target wall.
Chances to inflict maximum damage are 50%. Until all siege walls are destroyed,
chances to hit arrow towers or the drawbridge is less than 60%.
Advanced Same as basic, except the Catapult can lob two shots.
Expert A Catapult can lob two shots for maximum damage, each with a 75% chance to
hit the intended target wall. Until all siege walls are destroyed, chances to hit
arrow towers or the drawbridge is less than 75%.
Ballistics
Description Increases the damage done by ranged attackers in the hero’s army.
Basic Ranged attack damage is increased by 10%.
Advanced Ranged attack damage is increased by 25%.
Expert Ranged attack damage is increased by 50%.
Archery
Description Gives the hero manual control over their ballista, increases its number of
shots per round to two, and increases the ballista’s chance for dealing double damage.
Basic Ballista shots have a 50% chance of dealing double damage.
Advanced Ballista shots have a 75% chance of dealing double damage.
Expert Ballista shots deal double damage.
Artillery
Description Reduces the amount of damage received by the hero’s troops in combat.
Basic Damage inflicted on troops is reduced by 5%.
Advanced Damage inflicted on troops is reduced by 10%.
Expert Damage inflicted on troops is reduced by 15%.
Armorer
Page 36

Section II
Description Increases the chance wandering creatures will offer to join the hero’s
army and lowers the cost of surrendering to another hero.
Basic 25% of creatures normally fleeing from your army offer to join. Cost of surrender-
ing is reduced by 20%.
Advanced 50% of creatures normally fleeing from your army offer to join. Cost of surrender-
ing is reduced by 40%.
Expert All creatures normally fleeing from your army offer to join. Cost of
surrendering is reduced by 60%.
Diplomacy
Description Gives the hero a chance to learn spells cast by enemy spellcasters in battles.
Basic The hero has a 40% chance to learn spells of second level or below.
Advanced The hero has a 50% chance to learn spells of third level or below.
Expert The hero has a 60% chance to learn spells of fourth level or below.
Eagle Eye
Description Increases the effectiveness of Earth Magic spells cast by the hero.
Basic Earth Magic spells are cast at the basic level (see Spell Reference, pg. 68).
Advanced Earth Magic spells are cast at the advanced level.
Expert Earth Magic spells are cast at the expert level.
Earth Magic
Description The hero produces gold for their player’s resource pool.
Basic 125 gold per day is generated.
Advanced 250 gold per day is generated.
Expert 500 gold per day is generated.
Estates
Description Increases the effectiveness of Fire Magic spells cast by the hero.
Basic Fire Magic spells are cast at the basic level (see Spell Reference, pg. 72).
Advanced Fire Magic spells are cast at the advanced level.
Expert Fire Magic spells are cast at the expert level.
Fire Magic
Description Increases the effectiveness of the First Aid Tent war machine and gives the
player manual control over what troop the First Aid Tent targets. The
First Aid Tent regenerates damage done to the first creature in a target troop.
Basic Regenerates up to 50 health points of the top creature in a troop.
Advanced Regenerates up to 75 health points of the top creature in a troop.
Expert Regenerates up to 100 health points of the top creature in a troop.
First Aid
36
Section II
Page 37

Interface Reference
Description Adds a bonus to the hero’s maximum spell points.
Basic Maximum spell points is increased by 25%.
Advanced Maximum spell points is increased by 50%.
Expert Maximum spell points is doubled.
Intelligence
Description The hero’s troops gain a morale rating bonus. Necromancers and
Death Knights cannot learn this skill.
Basic Morale is increased by one.
Advanced Morale is increased by two.
Expert Morale is increased by three.
Leadership
Description Increases the amount of experience the hero gains from combat.
Basic Earned experience is increased by 5%.
Advanced Earned experience is increased by 10%.
Expert Earned experience is increased by 15%.
Learning
Description Hero’s land movement range is increased.
Basic Range is increased by 10%.
Advanced Range is increased by 20%.
Expert Range is increased by 30%.
Logistics
Description The hero’s troops gain a bonus to their luck rating.
Basic Luck is increased by one.
Advanced Luck is increased by two.
Expert Luck is increased by three.
Luck
Description Increases the number of spell points the hero regenerates each day.
Basic Spell point regeneration is increased to two points per day.
Advanced Spell point regeneration is increased to three points per day.
Expert Spell point regeneration is increased to four points per day.
Mysticism
Description Increases the hero’s movement range over water in boats.
Basic Water range is increased by 50%.
Advanced Water range is increased by 100%.
Expert Water range is increased by 150%.
Navigation
37
Interface Reference
Page 38

Section II
Description When the hero wins in battle, a portion of the opposition killed is resurrected
as skeletons and added to the hero’s army.
Basic 10% of enemy creatures killed are resurrected.
Advanced 20% of enemy creatures killed are resurrected.
Expert 30% of enemy creatures killed are resurrected.
Necromancy
Description Increases the amount of hand-to-hand damage the hero’s troops inflict in
combat.
Basic Inflicted damage is increased by 10%.
Advanced Inflicted damage is increased by 20%.
Expert Inflicted damage is increased by 30%.
Offense
Description Reduces the movement penalty suffered by the hero when moving over
rough terrain.
Basic
Advanced See Terrain Movement Costs, pg. 16.
Expert
Pathfinding
Description Creates a chance enemy spells cast on the hero’s troops will fail and have
no effect.
Basic 5% chance of spell failure.
Advanced 10% chance of spell failure.
Expert 20% chance of spell failure.
Resistance
Description Allows the hero to exchange spells with other heroes during trading sessions. Spell
exchange occurs automatically when the Hero Trade Screen appears. The hero
learns spells he or she doesn’t know and teaches spells unknown to the hero traded with.
Basic Teach and learn spells second level and below.
Advanced Teach and learn spells of third level and below.
Expert Teach and learn spells of fourth level and below.
Scholar
Description Increases the hero’s view radius, which expands the area of the Adventure
Map revealed as the hero travels into unknown territory.
Basic Hero’s view radius is increased by one square.
Advanced Hero’s view radius is increased by two squares.
Expert Hero’s view radius is increased by three squares.
Scouting
Description Increases the damaging effect of spells cast by the hero. Effect varies
depending on the spell cast.
Basic Effectiveness of cast spells is increased by 5%.
Advanced Effectiveness of cast spells is increased by 10%.
Expert Effectiveness of cast spells is increased by 15%.
Sorcery
38
Section II
Page 39

Interface Reference
Description Increases the effectiveness of Water Magic spells cast by the hero.
Basic Water Magic spells are cast at the basic level (see Spell Reference, pg. 76).
Advanced Water Magic spells are cast at the advanced level.
Expert Water Magic spells are cast at the expert level.
Water Magic
Description Allows the hero to learn spells beyond the second level.
Basic The hero can learn third level spells and below.
Advanced The hero can learn fourth level spells and below.
Expert The hero can learn all spells.
Wisdom
Description Enables you to arrange the hero’s troops on the battlefield prior to the
start of combat.
Basic See Combat (pg. 42).
Advanced See Combat (pg. 42).
Expert See Combat (pg. 42).
Tactics
39
Interface Reference
Page 40

Section II
Combat
Whenever you come into direct conflict with an enemy hero, wandering creature, enemy town, or
creatures guarding a structure on the Adventure Map, the ensuing battle is resolved on the Combat
Screen. The Combat Screen displays a detailed map of the battlefield.
The terrain you fight on depends on where the conflict takes place on the Adventure Map. If you fight
the enemy at a fortified town, you fight in siege combat. Ship-to-ship combat occurs when one boat
attacks another. If a battle takes place on open terrain or at an unfortified town, it is fought in field
combat. In field combat, the attacking forces are arrayed on the left side of the screen, while the
defenders appear on the right side. In siege combat, the attackers are on the left, while the defenders are
arrayed on the right, behind protective walls. In the case of ship-to-ship combat, both sides are
protected by their ship’s gunwales.
Combat takes place between creatures. If a hero is present on either side, he or she does not directly
engage in attack or defense. Heroes lead the battle and may cast combat spells (see Magic System,
pg. 55) if they are able. Individual creatures are part of troops which may contain more than one
member, but are represented on the battlefield as a single unit. Each side may have as many as seven
troops. Each troop can only contain creatures of the same type. If a hero is equipped with war machines,
these appear on their side of the battlefield.
Combat sequence is broken into rounds. Each troop or war machine can perform one action per round.
All combat units take turns completing their actions. Which unit goes first is determined by the unit’s
speed rating, with faster units going before slower ones. If there are two creatures of equal speed, the
attacker will go first. Actions can consist of moving, engaging in hand-to-hand or ranged attacks,
casting spells, using special abilities, waiting or defending.
Combat ends when one side retreats, surrenders, or is completely eliminated. Heroes who win the battle
receive experience points, and collect the artifacts of defeated enemy heroes. If a player’s hero defeats the
forces guarding a town, the town becomes part of that player’s territory.
40
Section II
Page 41

Interface Reference
Combat Screen
Defensive Side
Combat Options
Obstacle
Auto Combat Message Window
Hero
Message Scroll
Arrows
Troop Stack
Cast Spell
Ammo
Cart
Defend
Surrender
Wa i t
Retreat
Offensive Side
Conducting Combat
Arraying Your Forces
On each hero’s Hero Screen are Formation buttons used to set the manner in which their forces are
initially placed on the battlefield (see Hero Screen, pg. 23). The formation options available are loose
and tight.
Distances on the battlefield are measured in hexes. The easiest way to understand this is to turn on the
grid overlay. To do this, click on the Combat Options button to display the Combat Options Menu,
then click the View Hex Grid button. Close the menu by clicking the Return to Game button. Now
the battlefield should be overlaid with a pattern of hexagons.
In loose and tight formations, a given hero’s forces will appear on his battlefield side’s back hex row. Where a
given troop will appear depends on which Troop Slot they occupy on the hero’s Hero Screen.
First Aid
Tent
Ballista
41
Interface Reference
Page 42

Section II
Tactics Formation
If you have heroes with the Tactics secondary skill, you can click the Tactics Formation button on their Hero
Screen. Then, if they do battle with forces lead by a Hero with no Tactics skill, or have the skill at a lesser
level, or if they meet a force not lead by a hero, you have the opportunity to arrange your hero’s forces on the
battlefield prior to the beginning of combat. During this special tactics phase, you may move the highlighted
troop where you please, according to the following table. Click the Next Creature button to highlight a
different creature. Click the Start Combat button to start the battle when you are done.
Tactics Formation Table
Troop Actions
Once combat begins, each troop can perform one action per combat round. Each troop takes its turn
according to its speed rating. When a troop’s turn arrives, it becomes highlighted. Troops can perform
the following actions:
Moving
The highlighted troop can move to a new hex. How far the troop can travel depends on its speed rating.
Flying creatures move in a straight line to their destination and can surmount obstacles, including walls.
Ground walking creatures must move around objects they encounter. To move a troop, click on a
battlefield location within its movement range.
Make a Hand-to-Hand Attack
All creatures can approach enemy troops and attack them to inflict damage. Damage reduces creature
health points, killing them if their health points are reduced to zero. To perform a hand-to-hand attack,
click on the enemy troop within the highlighted creature’s movement range. Your creature will approach
the enemy and strike it. Creatures possessing ranged attack capabilities will only perform hand-to-hand
attacks on adjacent enemies.
Perform a Ranged Attack
Many creatures can perform ranged attacks by firing a projectile at an enemy target. To do this, click on
the enemy you wish to shoot. Creatures with ranged attacks have a limited number of shots and can fire
only when there are no adjacent enemies.
Tactics Advantage Placement Allowed
Three degrees higher Within the first seven hex columns
Two degrees higher than enemy Within the first five hex columns
One degree higher than enemy Within the first three hex columns
Equal or lesser skill level Troops are placed according to selected loose or tight formation
42
Section II
Page 43

Interface Reference
Casting a Spell
Some creatures can cast spells on friendly units (see Magic System, pg. 55). To cast a spell, click on the
appropriate target troop.
Wait
If you want a troop to delay its action, click the Wait button. Play will pass on to the next creature and return
to the waiting creature at the end of the first phase, after all other creatures have had a chance to move.
Defend
If you want to skip a creature’s action phase entirely, click the Defend button. The creature will be in
defense mode for the remainder of the round and will gain a bonus of 20% to their defense rating.
Make a Special Attack
Many creatures have special attacks. Usually these take place when the creature makes a particular attack,
either hand-to-hand or ranged. Depending on the circumstances, the player may or may not have
control over special attacks. For specifics, consult your creatures’ information in Town and Creature
Reference (pg. 81).
Counterattacks
When one troop strikes another in a hand-to-hand attack, the defending troop can deliver a
counterattack. Counterattacks are made automatically against the first troop attacking a troop in a given
round. While some creatures have special abilities allowing them to make multiple counterattacks, most
creatures can make only one counterattack per round. The defending troop must survive the attack to
deliver a counterattack.
Damage Calculation
When one troop strikes another, the damage inflicted is determined by this formula:
1. Each creature has a damage range. A random number is chosen within this range for the attacking
creature type.
2. This number is multiplied by the number of creatures in the attacking troop.
3. A damage bonus is added/subtracted depending on the difference between the attacker’s Attack skill
and the defender’s Defense skill. If the attacker’s Attack skill is higher, then damage is increased by
5% per point of difference (up to a maximum of 400%). If the Attack skill is lower, then damage is
reduced by 2% per point of difference (to a minimum of 30%). The resulting number is the amount
of inflicted damage.
4. Inflicted damage is subtracted from the health points of the creatures in the defending troop, one at
a time. If a creature’s health points are reduced to zero, the creature dies. Damage is carried over
round-to-round in combat, and healed completely at the end of combat.
43
Interface Reference
Page 44

Section II
Morale
Each army has a morale rating which acts as a bonus to the individual morale of its troops. Troops in an
army with positive morale have a chance for a second action during their action phase. Troops with
negative morale have a chance of freezing each round. The morale rating for an army is normally zero
but is affected thusly:
-1 if undead creatures are mixed with living creatures
+1 if all creatures are of the same town type (except Necropolis)
-1 for each town type mixed beyond two town types
Undead creatures and elementals have a morale of zero, independent of their army’s morale rating.
Various creatures, spells, hero skills, town buildings, adventure sites, and artifacts can permanently, or
temporarily affect morale.
Morale Effects
Troop Morale Effect on Troop
3 12.5% chance of acting again
2 8.3% chance of acting again
1 4.2% chance of acting again
0 Nothing
-1 4.2% chance of freezing
-2 8.3% chance of freezing
-3 12.5% chance of freezing
Luck
Each army has a luck rating. Troops in armies with good luck (a positive luck rating) have a chance to
inflict double damage when they strike. Various spells, hero skills, town buildings, adventure sites, and
artifacts can permanently or temporarily affect the luck of armies or individual creatures.
Luck Effects
Troop Luck Chance for Double Damage
3 12.5%
28.3%
14.2%
44
Section II
Page 45

Interface Reference
Effects of Native Terrain
Any army composed entirely of creatures native to the same
terrain suffers NO movement penalty when traversing its native
terrain (example – a Wizard leading all Tower troops has no
movement penalty on Snow). The army would spend movement
points as though it was traveling on open grass terrain.
Town Native Terrain
Town Type Native Terrain
Castle Grass
Rampart Grass
Tower Snow
Inferno Lava
Necropolis Dirt
Dungeon Subterranean
Stronghold Rough
Fortress Swamp
Heroes in Combat
Heroes do not engage directly in fighting. However, sides led by a hero can enjoy many benefits. A hero’s
Attack and Defense skills are applied as bonuses to their troops’ attack and defense ratings. Other skills
possessed by heroes, such as the Archery and Leadership secondary skills, can add further benefits. They
can also be equipped with war machines and artifacts to aid their army’s strength.
Heroes meeting the proper requirements (see Magic System, pg. 55) can cast combat spells once per round.
To have your hero cast a spell, click the Cast Spell button. This will display your hero’s spell book with only
combat spells displayed. To cast a spell, choose it from the book and then select a target, if appropriate.
Ending Combat
Combat continues—round after round—until one or both sides lose all of their troops, one side retreats,
or one side surrenders.
Loss of Troops
If a side has troops remaining after all opponent troops are lost, then that side wins. If a hero leads the
winning side, then the hero gains additional experience points. More experience points are gained for
defeating tougher opponents. The winning hero also gains any artifacts carried by the opponent hero.
Losing heroes don’t die, but they do disappear from the Adventure Map. Later, they may be available for
recruitment in taverns (see Towns, pg. 49).
Surrender
If both sides are lead by heroes, one hero may surrender to the other. The surrendering hero must pay a
fee to the other hero in exchange for safe passage. To surrender, click the Surrender button. You will be
offered surrender terms, which you may either accept or decline. If you decline the terms, combat
continues. If you accept, your hero gets to keep their artifacts and troops but disappears from the
Adventure Map. Immediately after, the hero reappears in one of your town taverns for
possible re-enlistment.
Retreat
A side lead by a hero may choose to retreat. The retreating hero loses all troops but keeps all carried
artifacts. To retreat, click the Retreat button. Your hero will disappear from the Adventure Map, and
reappears in your town taverns.
45
Interface Reference
Page 46

Section II
Siege Combat
When a hero attacks a fortified town, siege combat ensues. The attacking forces are placed outside the
town walls, and the defending forces stationed in the town’s garrison (see Towns, pg. 49) are placed
within. Town walls block the movement of ground walking creatures and hamper the attacks of ranged
attackers. Ground walkers can pass through breaches in the walls caused by Catapult damage or the
drawbridge—which can be opened by the town defenders. The drawbridge cannot be opened by
attackers; however, a Catapult can knock it down.
Town walls are created when a fort is built in a town. A moat and an arrow tower appear when a fort is
upgraded to a citadel. When the citadel is upgraded to a castle, two more arrow towers are added and the
town walls are fortified. Arrow towers fire once a turn, targeting an attacking troop. The rear arrow tower
fires with twice the strength of the forward two arrow towers.
Drawbridge
Arrow Towers
Walls
Attacking Hero
Catapult
Each town type has a unique moat. Each are described in the Town and Creature Reference section
(pg. 81). When a unit enters a moat, its movement ends for that round, though it will be able to move
out of the moat on its next move. As long as a unit remains in the moat, its defense is reduced.
Each hero is equipped with a Catapult, which is a war machine used only during siege combat. A Catapult
can only target walls and arrow towers. If the attacking hero has the Ballistics secondary skill, he or she
can manually target Catapult shots, otherwise the Catapult operates automatically, firing on a random
target, once per turn.
If the attacking hero wins the battle—in addition to all other victory benefits—the town becomes part of
the controlling player’s territory.
Moat
46
Section II
Page 47

Interface Reference
Ship-to-Ship Combat
Ship-to-ship combat occurs when one ship
attacks another at sea. The battlefield
represents the two ships, side-by-side.
Gangplanks cross the gap between them and
can be used by troops to cross to the opposing
ship. The ship gunwales block the movement of
ground walking troops.
Click to move the highlighted walking troop
to this location.
Click to move the highlighted flying troop to
this location.
Click on this enemy troop to have the
highlighted troop perform a hand-to-hand
attack. Note: as you move the cursor around
the enemy, the sword points towards the
enemy. The sword’s pommel sits in the hex
where the attacker will stand as it attacks.
Click on this enemy troop to have the
highlighted troop perform a ranged attack.
Click on this enemy troop to have the
highlighted troop perform a hampered ranged
attack. Attacks are hampered by intervening
walls and do half damage.
Click to cast a selected spell at this target.
Indicates an invalid target for a spell, or the
highlighted creature cannot move to the
desired location.
Gunwale
Gangplank
Gap
Combat Screen Cursors
If you have control of the Catapult during
siege combat, this cursor appears over valid
Catapult targets.
If you have control of the First Aid Tent,
choose its target with this icon.
Appears when the cursor passes over a hero.
Appears over a creature troop to get more
information about the troop.
When you cast the Sacrifice spell, this cursor
appears over a valid target troop.
47
Interface Reference
Page 48

Section II
Combat Options
Click the Combat Options button to display the Combat
Options menu. Here you can change sound and combat
options. The sound options are the same as those described in
the Adventure Map Interface section. Combat options are
detailed below. To close the menu, click the Return to Game
button.
Auto Combat Options
The Auto Combat button appears on the Combat Screen.
Pressing it turns auto combat on and off. What exactly happens
when you do this depends on your Auto Combat Options
setting. Checkmark the options to turn them on.
Creatures: The computer makes decisions for your creature troops.
Spells: The computer automatically casts spells for your heroes.
Catapult: The computer operates your Catapult during siege combat.
Ballista: The computer operates your Ballista.
First Aid Tent: The computer operates your First Aid Tent.
Animation Speed
These buttons control how fast the combat animations play.
Creature Info Radio Buttons
All Statistics: When you roll the cursor over creatures, all information about them is displayed.
Spells Only: When the cursor is rolled over creatures, only spells affecting them are displayed.
View Hex Grid
Distance on the Combat Screen is measured in hexes. This checkbox turns on and off the display of the
hexagon grid overlay.
Movement Shadow
This checkbox turns on and off the show movement range option. The place where the highlighted
creature can move is outlined when this option is on.
Cursor Shadow
This checkbox turns the mouse cursor shadow on and off. When the option is on, it highlights the hex
the mouse is currently in.
Spell Book Animation
Turns the spell book page turning animation on or off.
48
Section II
Page 49

Interface Reference
Towns
Hall
Tavern
Castle
Marketplace
Creature Dwelling
Garrison Hero
Town Garrison Troop Slots
Visiting Hero Portrait
Split Troop
Town Selector
Hall Level
Castle Level
Town Portrait
Town Name
Income
Creature Generation
Exit Town
Visiting Hero’s Army
The Town Screen is displayed when one of your heroes enters one of your towns. You may also doubleclick on a town’s Town Selector button on the Adventure Map to display its Town Screen. Towns serve
your cause in several ways. Towns act as recruitment centers for heroes and the troops making up your
heroes’ armies. After one day, your heroes replenish their spell points and learn new spells from towns
with mage guilds. At towns with marketplaces, you can trade surplus resources for resources in short
supply. Town halls provide you with daily gold income. Buildings unique to each of the Heroes III game’s
eight town types can provide your forces with additional strengths and abilities. Over time, you may spend
resources to build new structures in your towns and upgrade existing ones to increase the benefits the
towns provide you.
Because they are so useful to players, the conquest and defense of towns plays a major role in any
successful game strategy. Towns can be defended through the building of fortifications—walls, arrow
towers, and a moat—and by filling their garrisons with defending troops, which may be lead by garrison
stationed heroes. Additionally, a hero visiting a town will lend their army to the town’s defense, forcing
an attacker to fight the visiting hero’s army before facing the town’s garrison forces.
Information about the Town Screen, and descriptions of the interface components associated with
buildings common to all towns, are in this section. For details about buildings specific to each town type,
see Town and Creature Reference (page 81).
49
Interface Reference
Page 50

Section II
Town View
All of the buildings currently built in a town are displayed in the Town View. As you move the cursor
around the Town View, individual buildings are highlighted (if Town Building Outlines is turned on in
the Adventure Map System Options). Buildings are identified by text appearing in the Rollover Bar.
Right-clicking on a highlighted building displays text describing the building’s benefits. Clicking on a
highlighted building displays a menu appropriate to each building as described below. You may switch the
view to a different town by clicking on the town’s portrait in the Town Selector.
Hall
Building description
Resource Cost
Pay Cost
Exit
Each town has a hall. Starting with a village hall, you may upgrade this building to a town hall, then a
city hall, then finally, a capitol. Each version provides you with a daily gold income and the ability to
order the construction of other town buildings. When you click on a hall, the Hall Screen appears. On
it you can order the construction of new town structures or upgrade existing structures.
If you can build or upgrade a given structure, its name appears in a green box. If the structure is not yet
built, and you are unable to construct it for some reason, then a red X appears in the lower right corner of
its picture, and its name box is red. Structures you have already built, and cannot be upgraded further, have
a gold
✔
in their pictures and a gold name box.
You may right-click a building’s picture to display the information found in that structure’s Build
Confirmation Window. Text describes what benefits your town gains when the structure is built, along
with a list of structures you must build in the town before you will be allowed to construct it. The resource
cost of the structure is displayed below this text.
To construct a building, click on its picture. Its Build Confirmation Window will be displayed. You may
click the Don’t Build button to cancel, or the Build button to order the building’s
construction. When you build a structure, the Hall Screen closes and you are returned to the Town
Screen, where you see your new structure being built. Your town immediately benefits from it. Only one
structure per day may be built in each of your towns.
Cancel
Building Portrait
Required Structures
50
Section II
Page 51

Interface Reference
Tavern
Rumor
Heroes for Hire
Hero Info
Hero Hiring Price
Hire Hero
Thieves’ Guild
Exit Tavern
Click on a town’s tavern to display the Tavern Window. In the tavern you can hear rumors, recruit heroes,
and view intelligence on your enemies gathered by your Thieves’ Guild. Close the Tavern Window by
clicking the Exit Tavern button.
Hear Rumors: A new rumor is displayed in your taverns once per week. This rumor is identical in all of
your town taverns.
Hiring Heroes: Two heroes can be found in each tavern, ready for you to hire. The heroes found in a
given tavern change each week. To view either of the hero’s Hero Screens, right-click on their portrait.
When you click on a hero’s portrait, it becomes highlighted. To hire the highlighted hero, click on the
Hire Hero button. You cannot hire a hero if you currently have another hero visiting the town.
View Intelligence: Click on the Thieves’ Guild button to display a report which compares your
performance against those of your opponents.
Creature Dwelling
Creature Portrait
Creature Name
Cost per Troop
Available Troops
Number of Recruits
Total Cost
Slider
Recruit Max Pay Cost Exit
51
Interface Reference
Page 52

Section II
Creatures who live in towns live in creature dwellings. Each week, the population of these dwellings grows,
increasing the number of creatures available at the dwelling which you may recruit into the town’s
garrison. Click on a creature dwelling to display the dwelling’s Creature Recruitment Box. The name of
the dwelling’s creatures, a portrait of the troop type available, and the number of troops available are
shown. As you move the slider to the right, the number of recruits increases, and the cost to recruit them
is tallied. You may click the Maximum button to recruit all of the available troops or the maximum
number of troops you can currently afford. Click the Recruit button to add the recruits to your
town garrison.
Fort
A fort may be built in a town, which adds to the town’s siege defenses. The fort may be upgraded to a
citadel, and then to a castle. Click on this structure to display a summary of the town’s troop recruitment
availability for all creatures.
Mage Guild
Heroes learn new spells from towns with mage guilds. You may build a first level mage guild in each of
your towns. Mage guilds may be upgraded, level-by-level, up to fifth level in some towns. As you build
each level, a random selection of spells becomes available at the guild. Clicking on a mage guild displays
the spells available. If the visiting hero doesn’t own a spell book, you may purchase one for him or her by
clicking on the mage guild. For more information, see Magic System (pg. 55).
First Level Spells
Second Level Spells
Fourth Level Spells
Third Level Spells
Fifth Level Spells
Close
52
Section II
Page 53

Interface Reference
Marketplace
You can trade surplus resources for needed ones at marketplaces. Clicking on a town’s marketplace brings
up the Marketplace Window. One side displays your kingdom’s resources. On the other side, are the
resources available at the market. Highlight the resource you want to trade, and the resource you want
to trade for. When two resources are highlighted, you may move the slider to the right to increase the
quantity of the resource to be traded. You may trade the maximum amount of your selected resource by
clicking the Maximum button. To complete the transaction, click the Trade button. Each marketplace
you control reduces the costs of trading.
Kingdom Resources
Market Resources
Slider
Tr ad e
Trade With Player
Exit
Amount to Give
Amount to Receive
Maximum
When a scenario map is created, the map maker can create alliances between players. Using the
Marketplace, you can give resources to your enemies or allies. To do this, click on the Trade With Player
button. When you do this, a display of colored flags replaces the Market Resources portion of the
Marketplace Trade Window. Choose which resource you want to give, and set the amount using the
slider. Click the flag of the player you want to give the resources to, and then click the Trade button to
confirm the gift.
In Tower and Dungeon town types, the marketplace can be upgraded by building an artifact merchant.
When you build this upgrade, you can trade artifacts for resources, and resources for artifacts. To do this,
click the Trade Artifacts button. A selection of artifacts will be displayed—this selection will be the same
for all of your artifact merchants. Click the artifact you want to purchase. The cost for the artifact will
appear under all of the Kingdom Resources icons. Choose which resource you wish to trade, and then
click the Trade button to complete the purchase. Click the Sell Artifact button to sell artifacts carried
by the visiting hero. The hero’s inventory will appear. Click the artifact you want to trade, select the
resource you want to trade for, and then click the Trade button.
In Stronghold towns, you can build a Freelancer’s Guild as a marketplace upgrade. When it is built, you
can trade the visiting hero’s armies for resources. To do so, click the Sell Creature button. The Kingdom
Resources icons will be replaced by a display of the visiting hero’s troops. Click the troop containing
creatures you want to sell, then click the resource you want to trade for. Set the number of creatures you
want to sell using the slider, and then click the Trade button to make the sale.
Buy Artifacts
Sell Creatures
53
Interface Reference
Page 54

Section II
Town Garrison
Each town can have an army stationed in its town garrison. This army can be composed of up to seven
troops, which may be moved, split, combined, or dismissed. When you recruit troops from a creature
dwelling, they appear as a troop in an empty garrison troop slot.
When a hero visits a town, their troops may be traded with those found in the town’s garrison. You can
make the visiting hero the leader of a town’s garrison by moving the hero into the garrison. To do this,
click on the hero’s portrait to highlight it, and then click on the banner to the left of the first
garrison troop slot. The hero’s army will be combined with the garrison army, and the hero will now lead
the army in defense of the city. You may swap the visiting and garrisoned heroes, and their armies, by
highlighting either hero and clicking the other.
Garrison troops and troops belonging to a visiting hero can be upgraded. If a town contains an
upgraded creature dwelling, the lesser creature troop of the same creature type provided by the dwelling,
may be upgraded for a price. To do this, double-click on the troop you wish to upgrade. This will bring
up that creature's information display. Click on the Upgrade button to show the upgrade cost for the
troop. This cost will equal the difference between the recruitment costs of the lesser and higher creatures, multiplied by the number of creatures in the troop. Click ✔ to pay the cost, or the Cancel but-
ton to cancel.
54
Section II
Page 55

Interface Reference
Magic System
Spell Icon
Spell Cost
Air Spells
Earth Spells
Fire Spells
Water Spells
Combat Spells
Adventure Spells
Spell Points
Heroes are able to use the forces of magic in the form of spells. Heroes can use spells to aid their
travels, reveal hidden knowledge about their surroundings, and in combat, help their troops or bring harm
to their adversaries. When all other things are equal, magic can provide the necessary edge to assure
victory in a campaign.
Before they can cast spells, heroes must possess a spell book. The spell book is where a hero records the
spells he or she has learned. Some heroes will already have a spell book when they are recruited. Others
may purchase theirs from the mage guilds located in towns. A hero’s spell book is kept in their item
inventory but may not be traded like other items.
Each spell has a level which represents how difficult it is to cast. Higher level spells are only obtainable
by heroes with higher Wisdom skill ratings (see Secondary Skills, pg. 35). When heroes visit a town with
a mage guild, they automatically learn any new spells the guild has to offer and their Wisdom rating allows
them to cast. Heroes may also learn spells as they explore map locations.
Each spell belongs to one of the four schools of magic—air, earth, fire, or water. Heroes may learn the
Air Magic, Earth Magic, Fire Magic, and Water Magic secondary skills to increase the strength at which
they cast the spells of each school.
Spells cost spell points to cast. A hero’s maximum spell points is equal to 10x their Knowledge skill. As
a hero casts spells, their spell points are diminished. A hero cannot cast a spell costing more spell points
than he or she has available. Each hero regains one spell point per day, or can be completely
replenished when he or she starts a new day in a town with a mage guild. Heroes with the Mysticism skill
regain spell points more rapidly (see Secondary Skills, pg. 35).
Close Book
All Spells
55
Interface Reference
Page 56

Section IISection II
Spell Book
A hero’s spell book may be viewed by clicking on the spell book’s icon in the inventory portion of their
Hero Screen. In a hero’s spell book, spells known to the hero are listed by school and divided into
combat spells and adventure spells. Adventure spells may be cast while a hero is travelling around the
Adventure Map. Combat spells may be cast when a hero is in combat. To display adventure and combat
spells, click the combat spell and adventure spell bookmarks sticking out of the bottom of the book. To
display spells of a particular school, click the school’s bookmark on the right side of the book. If the hero
knows more spells in a given category than can be displayed on one page, pages may be turned by clicking on the page curls.
Next to each spell’s name is a number representing the number of spell points it costs to cast the spell.
You may view information about a spell by right-clicking on its icon.
Casting Spells
To cast an adventure spell, click the Cast Spell button found in the control buttons on the right side of
the Adventure Map display. The current hero’s spell book will be displayed as described above, but the
combat spells bookmark will be deactivated. To cast a spell, find it, then click on the spell’s icon.
You may have your hero cast a combat spell by clicking the Cast Spell button located at the lower right corner of the Combat Screen. The hero’s spell book appears. During combat, only combat spells are
displayed. Find the spell you want to cast, then click on its icon. When you do so, the spell book will vanish,
returning you to the Combat Screen. If the spell needs a target, you choose the target by clicking on it.
You may cancel the casting of combat and adventure spells by closing the spell book without selecting a
spell icon. If a spell is already selected, right-click to avoid casting the spell.
56
Page 57

57
Interface ReferenceInterface Reference
Kingdom Overview
When you click on the Kingdom Overview button found on the right side of the Adventure Map display, the Kingdom Overview screen appears. On it you can see information about all your towns, heroes,
resources, and controlled locations. While resource and controlled location information is always shown,
you press the Hero Information and Town Information buttons located at the bottom right corner of
the screen to toggle between hero and town information displays.
Hero Information
Crystal Caverns
Gem Ponds
Gold Mines
Alchemist’s Lab
Ore Pits
Sulfur Dunes
Sawmills
Scroll Bar
Controlled Adventure
Locations
Scroll Down
Scroll to Bottom
Scroll to Top
Scroll Up
Town Information
Resource Information
The Resource Bar located at the bottom of the screen shows you how much gold, wood, mercury, ore,
sulfur, crystal, and gem units you currently have along with the current date. This is the same display
appearing at the bottom of the Town Screen and Adventure Map displays.
Above the Resource Bar is a row showing how many of each mine type you currently have under
territorial control.
Controlled Locations
As your heroes visit locations on the map, many of those locations become part of your territory and fly
your flag color. Icons representing these locations appear along the right side of the Kingdom Overview.
You may use the scroll arrows to cycle through the controlled location icons.
Daily Income
Resource Bar
Page 58

Section II
Individual Hero Information: When you click the Hero Information button, the main part of the display
shows information about each of your heroes.
Portrait
Attack Defense Power Knowledge
Luck
Troop Slots
Specialty
Experience
Spell Points
Secondary Skills
Hero Items
In Backpack
Morale
Hero/Stats: This portion of the Hero Information section displays the hero’s name, portrait, morale, luck,
troop slots, and primary skills. You can click on the hero’s portrait to bring up that hero’s full Hero Screen.
Hero Skills: This section displays the hero’s secondary skills, experience points, spell points and other information.
Hero Artifacts: This section displays the hero’s inventory. Clicking the Equipped, Miscellaneous, or In
Backpack buttons will allow you to view the items the hero is currently using or carrying.
Individual Town Information: Click the Town Information button to display information about each of
your towns in the main section of the screen. If you have more than four towns, you may use the scroll
bar on the left side of the screen to bring your other towns into view.
Town: This section displays the town’s name, portrait, village hall level, castle level, and daily gold income.
Click on the town portrait to display that town’s Town Screen. The Creature Generation section displays
any creature population you are receiving from Adventure Map creature dwellings under your territorial
control.
Garrison Hero: This section shows information about the town’s garrison forces. If a garrison hero leads those
forces, their name and portrait appear. Click on the hero’s portrait to switch to the hero’s Hero Screen.
Visiting Hero Section: If a hero is visiting the town, then their portrait, name, and army are shown here.
You can click on the hero’s portrait to bring up the hero’s Hero Screen.
Scroll Inventory
Scroll Inventory
Town Portrait
Town Name
Hall Level
Town Castle
Hero Portraits
Garrison Army
Visiting Army
Available Creatures
Income
Creature Generation
Equipped
Miscellaneous
58
Section II
Page 59

Multiplayer
In many of the scenarios supplied with Heroes of Might and Magic III, between two and eight of the
opposing forces may be played by a human players. These scenarios may be played as multiplayer games,
either on a single computer (a hotseat game), with each player taking turns at the computer’s controls,
or as a network game, with each player sitting at a separate computer connected via network, Internet,
modem, or serial cable. This section describes how these games are started and played.
Multiplayer Game Type Selector
Hotseat
IPX
TCP/IP
Modem
Direct Connection
Cancel
Player Name Field
Starting a Multiplayer Game
From the Main Menu, click the New Game button to bring up the New Game Menu. There, click the
Multiplayer button to display the Multiplayer Game Type Selector pictured above. From there you may
choose the type of multiplayer game you want to begin—Hotseat, IPX, TCP/IP, Modem, or Direct
Connection. Click on the Online Services button to connect to available Internet opponent
matching services. You can click in the player name field to activate its text cursor and type in your name.
This will be the name other players see you as. Click the Cancel button to return to the Main Menu.
Online Services
Interface Reference
59
Interface Reference
Page 60

Hotseat Games
Starting a Hotseat Game
Hotseat Opponent Setup Menu
Start a hotseat game by clicking the Hotseat button on the Multiplayer Game Type Selector. The
Hotseat Multiplayer Opponent Setup menu appears. To add a player to the game, type a player’s name
into one of the eight Name Boxes. Erasing a name from a box will remove a player. Once you have
entered a name for all the players who are going to participate in the hotseat game, you can click the ✔
button to go to the Scenario Selector (see Scenario Selector, pg. 9).
Playing a Hotseat Game
Hotseat games proceed like single player games except as each player’s turn comes up, he or she takes
over control of the computer—sitting in the “hotseat,” so to speak. Players can normally see opponent
movements in areas of the Adventure Map they have uncovered, however this is not possible in a hotseat
game. To see such opponent movements you may press the Replay Opponents’ Turns button on the
Adventure Options menu.
Okay
Cancel
Player Name Box
Section II
60
Section II
Page 61

Network, Modem, and Direct Connection Games
Starting an IPX or TCP/IP Network Game
Host
Search
Cancel
Network Game Setup
Network games may be played between
computers communicating over a Local
Area Network (LAN) or over the Internet.
LAN connected computers must be able to
use the IPX or TCP/IP protocols, while
Internet connected computers must
communicate via TCP/IP. Before you can
play a network game, the appropriate
protocol must be properly configured in
your Windows Network Control Panel.
Additionally, all involved computers must
have a copy of the Heroes III games
installed. To begin setting up a game, click
on the IPX or TCP/IP button to display the
Network Game Setup Menu.
Hosting a Game
Each multiplayer game requires a host computer. The hosting player controls scenario selection and
chooses which forces each player will lead. To host a game, press the Host button in the Network Game
Setup Menu. A box will appear which will allow you to name the network game and choose a password
for the game. If you choose a password, only players that know it will be able to join your game. If you
leave the password field empty, anyone can join. Click the ✔ button to accept your settings. Your game
will appear on the Game Lists of other players. Password protected games appear with a lock icon.
Unprotected games appear with an open door icon. Games in progress appear with a closed door icon.
Your screen will advance to the Scenario Selector (see Scenario Selector, pg. 9). There you must choose
a scenario and assign players to their forces. All players not assigned to a force are dropped from the game
when you start.
Joining a Game
To join a game hosted by another player, fill your name in the Name Box, and then click on a name in the
Game List and press the Join button. If the game is password protected, a box will appear asking you for
the password. When you join a game, your display will switch to the Scenario Selector. You will not be able
to select scenarios or make player assignments. Rather, you will see these actions as performed by the game’s
host. Pressing the Cancel button will drop you from the game and return you to the Main Menu.
# of Players
Availability Icon
Join
Interface Reference
Session Owner
Session Name
61
Interface Reference
Page 62

Finding a TCP/IP Host
To connect to a game over the Internet, you must know the IP address of the computer hosting the game.
To search for that computer, press the Search button. A box will appear where you may enter the
computer’s eleven number TCP/IP address (example 123.21.123.123). The host player will need to supply this address.
Starting a Modem Game
Modem games are played between two players sitting at computers communicating via modems with one
computer acting as the host. To start a modem game, click the Modem button on the Multiplayer Game
Type Selector. If you are going to host the game, click on the Host button. Choose which modem you
want to use (if you have more than one installed), then click the Answer button. Your computer will now
wait for a call from the other computer.
To join a game, press the Join button. After the host computer is setup and ready to answer, enter the
host computer’s phone number in the indicated box, then press the Connect button. After the two
computers negotiate the connection, the host player can assign players in the Scenario Selector.
Starting a Direct Connection Game
Two players may play a game between computers connected via a null-modem cable run between serial
ports on each computer. To start such a game, one of the computers must be set up as the host. To do
this, click on the Direct Connection button on the Multiplayer Game Type Selector. A box will appear
with a place to type in your game name, and buttons marked Host and Join. Fill in your player name
and click the Host button. The other player should click Direct Connection, and then the Join button.
Playing a Network, Modem, or Direct Connection Game
Each player, computer or human, gets one turn per Erathian day. As in a single player game, only one
player directs their forces at a time. While waiting for your turn, you may explore the Adventure Map
and view any informational display available during your turn. You may not move heroes, build towns,
adjust heroes’ inventories, or make any other changes to the game environment. It is your turn when the
screen border turns to your kingdom’s flag color. You are also prompted with a window and a sound.
Chatting
During multiplayer games, you may send text messages to the other players. To do this, press the Ta b
key when any screen containing a Rollover Bar is displayed. A text cursor will appear in the Rollover Bar,
type your message, then press the Return key to send the message. Your message, with your name
attached to it, will be displayed to all other players. If you want to send a secret message to a
specific player, press an F1-F8 key instead of the Return key. F1-F8 represents players 1-8.
In the course of playing a multiplayer game, you may check to see if another player is still connected by
typing the chat message “ping” and pressing the Return key. This command will tell you who is still
connected to the game and at what speed. In place of the Return key, you may press the F1-F8 keys
to ping a specific player. Every ten minutes, the game automatically pings all existing players.
Section II
62
Section II
Page 63

63
Spell Listing Legend
Name What the spell is called.
Type Indicates whether the spell may be cast in combat or on the Adventure Map.
Cost How many spell points a hero must have to cast the spell.
Duration How long the spell lasts.
Basic Effect Effect of the spell cast at Normal or Basic Expertise.
Advanced Effect Effect of the spell cast at Advanced Expertise.
Expert Effect Effect of the spell cast at Expert Expertise.
Section III
World Reference
Spell Reference
Here you will find descriptive listings for all spells in the Heroes III game. Each spell is from one of four
schools of magic—Air, Earth, Fire, or Water. Your heroes’ expertise in a spell increases as he gains the
secondary skill for the appropriate school of magic (see Secondary Skills, pg. 45). Heroes without such
expertise may cast a school’s spells at Normal level (resulting in the same effect as the Basic level spell).
Increased expertise allows for spells to be cast at the Basic, Advanced and Expert Levels.
Heroes holding expertise in a school’s secondary skill cast spells from a school at a reduced cost. This cost
reduction is the same regardless of whether a hero holds the skill at basic, advanced, or expert level.
Effects of School Expertise on Casting Cost
Spell Level I Spell Level II Spell Level III Spell Level IV Spell Level V
-1 -2 -3 -4 -5
Some spells are more difficult to cast than others. A spell’s difficulty is reflected by its level. All heroes
are capable of learning and casting first and second level spells. Heroes with the secondary skill Wisdom
can cast higher level spells. A hero with Basic Wisdom can cast third level spells, one with Advanced
Wisdom can cast fourth level spells, and one with Expert Wisdom can cast fifth level spells—the highest
level spells in the game.
Spells are listed here by school and level.
World Reference
Page 64

Section III
Haste
Magic Arrow
View Air
School of Air Magic
Type Combat
Cost 6
Duration 1 Round/Power
Basic Effect Target, allied troop’s speed is increased by three hexes/turn.
Advanced Effect Target, allied troop’s speed is increased by five hexes/turn.
Expert Effect All allied troops’ speed is increased by five hexes/turn.
Type Combat
Cost 5
Duration Instant
Basic Effect Target, enemy troop receives ((Power x 10) + 10) damage.
Advanced Effect Target, enemy troop receives ((Power x 10) + 20) damage.
Expert Effect Target, enemy troop receives ((Power x 10) + 30) damage.
Type Adventure
Cost 2
Duration Instant
Basic Effect Displays the location of all artifacts on the View World Screen.
Advanced Effect Displays the location of all artifacts and heroes on the View World Screen.
Expert Effect Displays the location of all artifacts, heroes and towns.
Disguise
Type Adventure
Cost 4
Duration 1 Day
Basic Effect When the casting hero is right-clicked by opponents, all of the hero’s creature
troops are displayed as if they were composed of the most powerful creatures
in the hero’s army. Troop population numbers are represented normally.
Advanced Effect Same as Basic Effect except troop population quantities are represented as
“0.”
Expert Effect Same as Advanced Effect except all troops are represented as if populated
by the most powerful creature in hero’s longest owned town.
Level II
Level I
Section III
64
Page 65

World Reference
65
World Reference
Disrupting Ray
Type Combat
Cost 10
Duration Current Battle
Basic Effect Reduces target, enemy troop’s defense rating by three. Spell may be cast on
same troop repeatedly.
Advanced Effect Same as Basic Effect except defense rating is reduced by four.
Expert Effect Same as Basic Effect except defense rating is reduced by five.
Fortune
Type Combat
Cost 7
Duration 1 Round/Power
Basic Effect Increases Luck of target, allied troop by one.
Advanced Effect Increases Luck of target, allied troop by two.
Expert Effect Increases Luck of all allied troops by two.
Lightning Bolt
Type Combat
Cost 10
Duration Instant
Basic Effect Target, enemy creature receives ((Power x 25) + 10) damage.
Advanced Effect Target, enemy creature receives ((Power x 25) + 20) damage.
Expert Effect Target, enemy creature receives ((Power x 25) + 50) damage.
Precision
Type Combat
Cost 8
Duration 1 Round/Power
Basic Effect Target, allied troop with ranged attack has its attack rating increased by
three when making ranged attacks.
Advanced Effect Same as Basic Effect, except attack rating is increased by six.
Expert Effect Same as Advanced Effect, except all allied troops with ranged attacks are
affected.
Protection from Air
Type Combat
Cost 7
Duration 1 Round/Power
Basic Effect Damage from Air Magic spells is reduced by 30% for target, allied troop.
Advanced Effect Damage from Air Magic spells is reduced by 50% for target, allied troop.
Expert Effect Damage from Air Magic spells is reduced by 50% for all allied troops.
Page 66

66
Air Shield
Type Combat
Cost 12
Duration 1 Round/Power
Basic Effect Target, allied troop takes 25% less damage from ranged attacks.
Advanced Effect Target, allied troop takes 50% less damage from ranged attacks.
Expert Effect All allied troops take 50% less damage from ranged attacks.
Destroy Undead
Type Combat
Cost 15
Duration Instant
Basic Effect All undead creature troops receive ((Power x 10) +10) damage.
Advanced Effect All undead creature troops receive ((Power x 10) +20) damage.
Expert Effect All undead creature troops receive ((Power x 10) + 50) damage.
Level III
Hypnotize
Type Combat
Cost 18
Duration Special
Basic Effect Target, enemy troop of less than ((Power x 25) + 10) Health is put under
your control. Allied troops may attack hypnotized troop without fear of
retaliation.
Advanced Effect Same as Basic Effect, except that Health of target must be less than
((Power x 25) + 20).
Expert Effect Same as Basic Effect, except that Health of target must be less than
((Power x 25) + 50).
Section III
Visions
Type Adventure
Cost 4
Duration 1 Day
Basic Effect Displays number of monsters in a wandering monster troop and whether or
not the troop will offer to join the casting hero’s army. Range is equal to
Power or three, whichever is greater.
Advanced Effect Same as Basic Effect, except an enemy hero’s primary skill stats, and the
composition and quantity of the hero’s army can be viewed. Range is
(Power x 2) or three, whichever is greater.
Expert Effect Same as Advanced Effect, except an enemy town’s statistics and
garrison composition and quantity may be viewed. Range is (Power x 3)
or three, whichever is greater.
Page 67

World Reference
67
Counterstrike
Type Combat
Cost 24
Duration 1 Round/Power
Basic Effect Target, allied troop can retaliate against one additional attack per round.
Advanced Effect Target, allied troop can retaliate against two additional attacks per round.
Expert Effect All allied troops can retaliate against two additional attacks per round.
Dimension Door
Type Adventure
Cost 25
Duration Instant
Basic Effect Teleports hero to target, unoccupied, visible location on the Adventure Map.
Spell may be cast twice per day and reduces the hero’s movement by three tiles
for each casting. If movement is reduced to zero, the spell may not be cast.
Advanced Effect Same as Basic Effect, except the spell may be cast three times in a day.
Expert Effect Same as Advanced Effect, except the spell may be cast four times in
a day, and movement allowance is reduced by two tiles.
Level V
Type Adventure
Cost 20
Duration 1 Day
Basic Effect Casting hero can fly over terrain obstacles to an unoccupied map location.
Distance traveled may be up to 60% of normal movement.
Advanced Effect Same as Basic Effect, except the hero may fly up to 80% of normal
movement.
Expert Effect Same as Basic Effect, except the hero may fly up to 100% of normal
movement.
Magic Mirror
Type Combat
Cost 25
Duration 1 Round/Power
Basic Effect Enemy spells cast on targeted, allied troop has a 20% chance of being
redirected to a random enemy troop.
Advanced Effect Enemy spells cast on targeted, allied troop has a 30% chance of being
redirected to a random enemy troop.
Expert Effect Enemy spells cast on targeted, allied troop has a 40% chance of being
redirected to a random enemy troop.
Fly
Level IV
Chain Lightning
Type Combat
Cost 24
Duration Instant
Basic Effect
Lightning bolt strikes target troop for ((Power x 40) + 25) damage. Bolt then
strikes closest troop for half the damage. Effect continues until 4 troops are hit.
Advanced Effect Like Basic Effect except that initial strike does ((Power x 40) + 50)
damage, and bolt strikes five troops.
Expert Effect
Like Advanced Effect except that initial strike does ((Power x 40) +100) damage.
Page 68

Section III
68
Magic Arrow
Type Combat
Cost 5
Duration Instant
Basic Effect Target, enemy troop receives ((Power x 10) + 10) damage.
Advanced Effect Target, enemy troop receives ((Power x 10) + 20) damage.
Expert Effect Target, enemy troop receives ((Power x 10) + 30) damage.
School of Earth Magic
Level I
Shield
Type Combat
Cost 5
Duration 1 Round/Power
Basic Effect Hand-to-hand damage delivered to target, allied troop is reduced by 15%.
Advanced Effect Hand-to-hand damage delivered to target, allied troop is reduced by 30%.
Expert Effect Hand-to-hand damage delivered to all allied troops is reduced by 30%.
Slow
Type Combat
Cost 6
Duration 1 Round/Power
Basic Effect Target, enemy troop’s speed is reduced to 25% of normal.
Advanced Effect Target, enemy troop’s speed is reduced to 50% of normal.
Expert Effect All enemy troops’ speed ratings are reduced to 50% of normal.
Stone Skin
Type Combat
Cost 5
Duration 1 Round/Power
Basic Effect Target, allied troop’s defense rating is increased by three.
Advanced Effect Target, allied troop’s defense rating is increased by six.
Expert Effect All allied troops’ defense ratings are increased by six.
Summon Air
Elemental
Type Combat
Cost 25
Duration Combat
Basic Effect A troop containing (Power x 2) air elementals appears on the side of the casting
player. Only one type of elemental can be summoned.
Advanced Effect Same as Basic Effect, except that (Power x 3) air elementals are summoned.
Expert Effect Same as Basic Effect, except that (Power x 4) air elementals are summoned.
Page 69

World Reference
69
Level II
Death Ripple
Type Combat
Cost 10
Duration Instant
Basic Effect All creatures (except undead) troops take ((Power x 5) + 10) damage.
Advanced Effect All creatures (except undead) troops take ((Power x 5) + 20) damage.
Expert Effect All creatures (except undead) troops take ((Power x 5) + 30) damage.
Quicksand
Type Combat
Cost 8
Duration Until Touched
Basic Effect Quicksand pits are placed in four random hexes. They are invisible to
creatures unless they are on native terrain (see Combat, pg. 47). Troops
stepping on pit hexes have their movement halted for the current round.
Once a pit is stepped on, it is revealed to all.
Advanced Effect Same as Basic Effect, except that six pits are placed.
Expert Effect Same as Basic Effect, except that eight pits are placed.
Visions
Type Adventure
Cost 4
Duration 1 Day
Basic Effect Displays number of monsters in a wandering monster troop and whether or
not the troop will offer to join the casting hero’s army. Range is equal to
Power or three, whichever is greater.
Advanced Effect Same as Basic Effect, except an enemy hero’s primary skill stats, and the
composition and quantity of that hero’s army can be viewed. Range is
(Power x 2) or three, whichever is greater.
Expert Effect Same as Advanced Effect, except an enemy town’s statistics and
garrison composition and quantity may be viewed. Range is (Power x 3)
or three, whichever is greater.
View Earth
Type Adventure
Cost 2
Duration Instant
Basic Effect Displays the location of all loose resources on the View World Screen.
Advanced Effect
Displays the location of all mines and loose resources on the View World Screen.
Expert Effect Displays the entire terrain, all mines and loose resources on the View
World Screen.
Page 70

70
Section III
Level III
Anti-Magic
Type Combat
Cost 15
Duration 1 Round/Power
Basic Effect Target, allied troop can only be affected by level 4 or 5 spells.
Advanced Effect Target, allied troop can only be affected by level 5 spells.
Expert Effect Target, allied troop is immune to spell effects.
Earthquake
Type Combat (Siege)
Cost 20
Duration Instant
Basic Effect Does one point of damage to two, random castle walls during siege combat.
Advanced Effect Does one point of damage to three, random castle walls during siege combat.
Expert Effect
Does one point of damage to four, random castle walls during siege combat.
Force Field
Type Combat
Cost 12
Duration 2 Rounds
Basic Effect A two hex-wide force wall is created at target hex. Movement through these
hexes is blocked.
Advanced Effect Same as Basic Effect, except the force wall is three hexes wide.
Expert Effect Same as Advanced Effect.
Section III
Protection from Earth
Type Combat
Cost 12
Duration 1 Round/Power
Basic Effect Damage from Earth Magic spells is reduced by 30% for target, allied troop.
Advanced Effect Damage from Earth Magic spells is reduced by 50% for target, allied troop.
Expert Effect Damage from Earth Magic spells is reduced by 50% for all allied troops.
Animate Dead
Type Combat
Cost 15
Duration Permanent
Basic Effect Reanimates ((Power x 50) + 30) health points worth of killed undead
creatures in target, allied troop.
Advanced Effect Reanimates ((Power x 50) + 60) health points worth of killed undead
creatures in target, allied troop.
Expert Effect Reanimates ((Power x 50) + 160) health points worth of killed undead
creatures in target, allied troop.
Page 71

World Reference
71
World Reference
Resurrection
Type Combat
Cost 20
Duration Combat/Permanent
Basic Effect Target, allied troop with dead creatures has ((Power x 50) + 40) health
worth of creatures restored to life for the duration of the current battle.
Advanced Effect Same as Basic Effect, except that ((Power x 50) +80) health worth of
creatures are restored permanently.
Expert Effect Same as Advanced Effect, except that ((Power x 50 + 160) health worth
of creatures are restored.
Sorrow
Type Combat
Cost 16
Duration 1 Round/Power
Basic Effect Target, enemy troop’s morale rating is reduced by one.
Advanced Effect Target, enemy troop’s morale rating is reduced by two.
Expert Effect All enemy troop’s morale ratings are reduced by two.
Level V
Implosion
Type Combat
Cost 30
Duration Instant
Basic Effect Target, enemy troop receives ((Power x 75) + 100) damage.
Advanced Effect Target, enemy troop receives ((Power x 75) + 200) damage.
Expert Effect Target, enemy troop receives ((Power x 75) + 300) damage.
Town Portal
Type Adventure
Cost 16
Duration Instant
Basic Effect Casting hero is teleported to the nearest allied town. 300 movement points
are expended when the spell is cast.
Advanced Effect Casting hero may teleport to any allied town with no visiting hero. 300
movement points are expended when the spell is cast.
Expert Effect Same as Advanced Effect, except that movement point cost is 200.
Level IV
Meteor Shower
Type Combat
Cost 16
Duration Instant
Basic Effect Troops in target hex and adjacent hexes take ((Power x 25) + 25) damage.
Advanced Effect Troops in target hex and adjacent hexes take ((Power x 25) + 50) damage.
Expert Effect
Troops in target hex and adjacent hexes take ((Power x 25) + 100) damage.
Page 72

Section III
72
Level I
Bloodlust
Type Combat
Cost 5
Duration 1 Round/Power
Basic Effect
Target, allied troop receives a +3 attack rating bonus for hand-to-hand attacks.
Advanced Effect
Target, allied troop receives a +6 attack
rating
bonus for hand-to-hand attacks.
Expert Effect
All allied troops receive a +6 attack rating bonus for hand-to-hand attacks.
Magic Arrow
Type Combat
Cost 5
Duration Instant
Basic Effect Target, enemy troop receives ((Power x 10) + 10) damage.
Advanced Effect Target, enemy troop receives ((Power x 10) + 20) damage.
Expert Effect Target, enemy troop receives ((Power x 10) + 30) damage.
School of Fire Magic
Curse
Type Combat
Cost 6
Duration 1 Round/Power
Basic Effect
Enemy, target troop creatures deliver minimum damage when attacking.
Advanced Effect Enemy, target troop creatures delivers ((80% of their minimum damage)
– 1) when they attack.
Expert Effect All enemy creatures deliver ((80% of their minimum damage) – 1) when
they attack.
Protection from
Fire
Type Combat
Cost 5
Duration 1 Round/Power
Basic Effect Damage from Fire Magic spells is reduced by 30% for target, allied troop.
Advanced Effect Damage from Fire Magic spells is reduced by 50% for target, allied troop.
Expert Effect Damage from Fire Magic spells is reduced by 50% for all allied troops.
Summon Earth
Elemental
Type Combat
Cost 25
Duration Combat
Basic Effect A troop containing (Power x 2) Earth Elementals appears on the side of the
casting player. Only one type of elemental can be summoned.
Advanced Effect
Same as Basic Effect, except that (Power x 3) earth elementals are summoned.
Expert Effect
Same as Basic Effect, except that (Power x 4) earth elementals are summoned.
Page 73

World Reference
73
Fire Wall
Type Combat
Cost 8
Duration 2 Rounds
Basic Effect A two hex-wide wall of fire is produced at target hex. A troop passing
through these hexes takes ((Power x 10) + 10) damage.
Advanced Effect Same as Basic Effect, except that wall of fire is three hexes wide and
damage is ((Power x 10) +20).
Expert Effect Same as Advanced Effect, except that damage is ((Power x 10) + 50).
Visions
Type Adventure
Cost 4
Duration 1 Day
Basic Effect Displays number of monsters in a wandering monster troop and whether or
not the troop will offer to join the casting hero’s army. Range is equal to
Power or three, whichever is greater.
Advanced Effect Same as Basic Effect, except an enemy hero’s primary skill stats, and the
composition and quantity of that hero’s army can be viewed. Range is
(Power x 2) or three, whichever is greater.
Expert Effect Same as Advanced Effect, except an enemy town’s statistics and
garrison composition and quantity may be viewed. Range is (Power x 3)
or three, whichever is greater.
Fireball
Type Combat
Cost 15
Duration Instant
Basic Effect Troops in target hex and its surrounding hexes take ((Power x 10) + 15)
damage.
Advanced Effect Same as Basic Effect, except that damage is ((Power x 10) + 30).
Expert Effect Same as Basic Effect, except that damage is ((Power x 10) + 60).
Level III
Level II
Blind
Type Combat
Cost 10
Duration 1 Round/Power
Basic Effect Target, enemy troop is frozen until attacked, dispelled or effect wears off.
Deactivating attack is retaliated at 50% of base attack rating.
Advanced Effect Same as Basic Effect, except that deactivating attack is retaliated at 25%
of base attack rating.
Expert Effect Same as Basic Effect, except that deactivating attack is not retaliated.
Page 74

74
Armageddon
Type Combat
Cost 24
Duration Instant
Basic Effect All troops take ((Power x 50) + 30) points of damage.
Advanced Effect All troops take ((Power x 50) + 60) points of damage.
Expert Effect All troops take ((Power x 50) + 120) points of damage.
Level IV
Berserk
Type Combat
Cost 20
Duration 1 Attack
Basic Effect
Target attacks nearest troop. All creatures in a 1 hex radius affected.
Advanced Effect
Target attacks nearest troop. All creatures in a 7 hex radius affected.
Expert Effect
Target attacks nearest troop. All creatures in a 19 hex radius affected.
Fire Shield
Type Combat
Cost 16
Duration 1 Round/Power
Basic Effect 20% of hand-to-hand damage inflicted on target, allied troop is
counter-inflicted on attackers of the troop.
Advanced Effect Same as Basic Effect except that 25% of damage is counter-inflicted.
Expert Effect Same as Basic Effect, except that 30% of damage is counter-inflicted.
Misfortune
Type Combat
Cost 12
Duration 1 Round/Power
Basic Effect Luck of target, enemy troop is reduced by one.
Advanced Effect Luck of target, enemy troop is reduced by two.
Expert Effect Luck of all enemy troops is reduced by two.
Section III
Land Mine
Type Combat
Cost 18
Duration Until Touched
Basic Effect Landmines are placed in four random hexes on the battlefield. A troop
stepping on a mine takes ((Power x 10) + 25) damage. Enemy creatures
battling on their native terrain (see Combat, pg. 47) can see the mines and
can cross them safely. To all others they are invisible.
Advanced Effect Same as Basic Effect, except that six mines are placed, and damage is
((Power x 10) + 50).
Expert Effect Same as Basic Effect, except that eight mines are placed, and damage is
((Power x 10) + 100).
Page 75

World Reference
75
Level V
Sacrifice
Type Combat
Cost 25
Duration Permanent
Basic Effect Target, non-undead troop is sacrificed (destroyed). Then another target
dead troop has ((Power + Destroyed Troop’s Creature Base Health + 3)
x # of Creatures Sacrificed) in health total of creatures returned to life.
Advanced Effect Same as Basic Effect, except that health total of creatures resurrected is
((Power + Destroyed Troop’s Creature Base Health + 6) x # of Creatures
Sacrificed).
Expert Effect Same as Basic Effect, except that health total of creatures resurrected is
((Power + Destroyed Troop’s Creature Base Health + 10) x # of
Creatures Sacrificed).
Slayer
Type Combat
Cost 16
Duration 1 Round/Power
Basic Effect Target, allied troop’s attack rating is increased by eight against behemoths,
dragons, and hydras.
Advanced Effect Same as Basic Effect, except that attack bonus also affects devils and angels.
Expert Effect Same as Advanced Effect, except attack bonus also affects titans.
Inferno
Type Combat
Cost 16
Duration Instant
Basic Effect
Strikes target hex, and all hexes within two hexes for ((Power x 10) + 20) damage.
Advanced Effect Same as Basic Effect, except that damage is ((Power x 10) + 40).
Expert Effect Same as Basic Effect, except that damage is ((Power x10) + 80).
Frenzy
Type Combat
Cost 16
Duration Until target troop’s next action
Basic Effect Target troop’s attack rating is increased by 100% of the troop’s defense
rating, and its defense rating is reduced to zero.
Advanced Effect Same as Basic Effect, except attack rating is increased to 150% of the
troop’s defense rating.
Expert Effect Same as Advanced Effect, except attack rating is increased to 200%
of the troop’s defense rating.
Page 76

76
School of Water Magic
Bless
Type Combat
Cost 5
Duration 1 Round/Power
Basic Effect
Creatures in target, allied troop inflict maximum damage when they attack.
Advanced Effect
Creatures in target, allied troop inflict maximum damage + 1 when they attack.
Expert Effect All allied creatures inflict maximum damage + 1 when they attack.
Level I
Cure
Type Combat
Cost 6
Duration Instant
Basic Effect Removes all negative spell effects from target, allied troop and heals it for
((Power x 5) + 10) health points.
Advanced Effect Removes all negative spell effects from target, allied troop and heals it for
((Power x 5) +20) health points.
Expert Effect Removes all negative spell effects from all allied troops and heals each for
((Power x 5) + 30) health points.
Dispel
Type Combat
Cost 5
Duration Instant
Basic Effect Removes all spell effects from target, allied creature troop.
Advanced Effect Removes all spell effects from target allied or enemy creature troop.
Expert Effect Removes all spell effects from all creatures and the battlefield.
Section III
Magic Arrow
Type Combat
Cost 5
Duration Instant
Basic Effect Target, enemy troop receives ((Power x 10) + 10) damage.
Advanced Effect Target, enemy troop receives ((Power x 10) + 20) damage.
Expert Effect Target, enemy troop receives ((Power x 10) + 30) damage.
Summon Fire
Elemental
Type Combat
Cost 25
Duration Combat
Basic Effect A troop containing (Power x 2) fire elementals appears on the side of the
casting player. Only one type of elemental can be summoned.
Advanced Effect
Same as Basic Effect, except that (Power x 3) fire elementals are summoned.
Expert Effect
Same as Basic Effect, except that (Power x 4) fire elementals are summoned.
Page 77

World Reference
77
Summon Boat
Type Adventure
Cost 8
Duration Instant
Basic Effect
Summons one of your hero’s boats to their current location. If none of those boats are
available, then one of your other heroes’ boats is summoned. Spell has a 50% chance of
working. The spell fails if there are no unoccupied boats available.
Advanced Effect
Same as Basic Effect, except that if no boats are available, a new one is created.
The spell has a 75% chance of working. There are a maximum of sixty-four boats
allowed on the Adventure Map at one time. The spell fails if all are occupied.
Expert Effect Same as Advanced Effect, except that the spell has a 100% chance of
working (unless all sixty-four boats are occupied).
Level II
Ice Bolt
Type Combat
Cost 8
Duration Instant
Basic Effect Target, enemy troop receives ((Power x 20) + 10) damage.
Advanced Effect Target, enemy troop receives ((Power x 20) + 20) damage.
Expert Effect Target, enemy troop receives ((Power x 20) + 50) damage.
Remove Obstacle
Type Combat
Cost 7
Duration Instant
Basic Effect Removes one, non-magic obstacle from the battlefield. Integrated obstacles,
such as cliffs are not affected.
Advanced Effect Same as Basic Effect, except Fire Walls may also be removed.
Expert Effect Same as Advanced Effect, except all, non-integrated obstacles can
be removed.
Scuttle Boat
Type Adventure
Cost 8
Duration Instant
Basic Effect Spell has 50% chance of destroying a boat, unless occupied.
Advanced Effect Spell has a 75% chance of destroying a boat, unless occupied.
Expert Effect Spell destroys a boat, unless occupied.
Protection from Water
Type Combat
Cost 5
Duration 1 Round/Power
Basic Effect Damage from Water Magic spells is reduced by 30% for target, allied troop.
Advanced Effect Damage from Water Magic spells is reduced by 50% for target, allied troop.
Expert Effect Damage from Water Magic spells is reduced by 50% for all allied troops.
Page 78

78
Section III
Visions
Type Adventure
Cost 4
Duration 1 Day
Basic Effect Displays number of monsters in a wandering monster troop and whether or
not the troop will offer to join the casting hero’s army. Range is equal to
Power or three, whichever is greater.
Advanced Effect Same as Basic Effect, except an enemy hero’s primary skill stats, and the
composition and quantity of that hero’s army can be viewed. Range is
(Power x 2) or three, whichever is greater.
Expert Effect Same as Advanced Effect, except an enemy town’s statistics and
garrison composition and quantity may be viewed. Range is (Power x 3) or
three, whichever is greater.
Weakness
Type Combat
Cost 8
Duration 1 Round/Power
Basic Effect Target, enemy troop’s attack rating is reduced by three.
Advanced Effect Target, enemy troop’s attack rating is reduced by six.
Expert Effect All enemy troops’ attack ratings are reduced by six.
Level III
Forgetfulness
Type Combat
Cost 12
Duration 1 Round/Power
Basic Effect Half of the creatures in target, enemy troop, with ranged attack forget to
shoot.
Advanced Effect Target, enemy troop with ranged attack cannot use its ranged attack.
Expert Effect All enemy troops with ranged attacks cannot use their ranged attacks.
Frost Ring
Type Combat
Cost 12
Duration Instant
Basic Effect Troops in hexes surrounding target hex receive ((Power x 10) + 15) in
damage. Target hex is unaffected.
Advanced Effect Same as Basic Effect, except damage is ((Power x 10) + 30).
Expert Effect Same as Basic Effect, except damage is ((Power x 10) + 60).
Mirth
Type Combat
Cost 12
Duration 1 Round/Power
Basic Effect Morale of target, allied troop is increased by one.
Advanced Effect Morale of target, allied troop is increased by two.
Expert Effect Morale of all allied troops is increased by two.
Section III
Page 79

World Reference
79
World Reference
Teleport
Type Combat
Cost 15
Duration Instant
Basic Effect Target, allied troop instantly moves to an unoccupied target hex. Troop
cannot teleport over walls or moats.
Advanced Effect Same as Basic Effect, except troop cannot teleport over walls.
Expert Effect
Troop can move to any unoccupied hex.
Level IV
Clone
Type Combat
Cost 24
Duration Current Battle
Basic Effect Creates a duplicate of target, allied troop level 1-5. The duplicate can
attack but is dispelled if it receives any damage. Creatures from a given
town are rated 1 - 7 based on their relative combat effectiveness. Thus, for
the Castle town, pikemen and halberdiers are level 1 creatures, while angels
and archangels are level 7.
Advanced Effect
Same as Basic Effect, except the duplicate may be of a level 1-6 troop.
Expert Effect
Same as Basic Effect, except the duplicate may be of a level 1-7 troop.
Prayer
Type Combat
Cost 16
Duration 1 Round/Power
Basic Effect Target, allied troop’s attack, defense, and speed (hexes per turn) ratings are
increased by two.
Advanced Effect
Target, allied troop’s attack, defense, and speed ratings are increased by four.
Expert Effect All allied troop’s attack, defense, and speed ratings are increased by four.
Water Walk
Type Adventure
Cost 12
Duration 1 Day
Basic Effect The casting hero may follow a movement path across water, provided the
end destination is an unoccupied location on land. Water movement may be
up to 60% of the hero’s normal movement.
Advanced Effect Same as Basic Effect, except that water movement may be up to 80% of
the hero’s normal movement.
Expert Effect Same as Basic Effect, except that water movement may be made at the
hero’s full, normal movement.
Page 80

80
Level V
Summon Water
Elemental
Type Combat
Cost 25
Duration Combat
Basic Effect A troop containing (Power x 2) water elementals appears on the side of the
casting player. Only one type of elemental can be summoned.
Advanced Effect
Same as Basic Effect, except that (Power x 3) water elementals are summoned.
Expert Effect
Same as Basic Effect, except that (Power x 4) water elementals are summoned.
Section III
Page 81

World Reference
81
Town and Creature
Reference
Here you will find descriptions for all of the buildings found in the Heroes III game’s eight town types.
The first section deals with buildings common to all town types. This is followed by individual sections
to cover buildings unique to each town. Creature statistics are listed with statistics for the buildings
producing them. The individual town sections are followed by information about creatures not
associated with any particular town type and then stats for war machines and siege battlefield features.
Creature Table Field Legend
Name Creature’s name.
Cost How much it costs to recruit one creature of this type.
Building The type of building the creature may be recruited at.
Attack Creature’s attack strength.
Defense Creature’s defensive ability.
Health How many points of damage the creature can take before dying.
Damage How much damage the creature’s attack does.
Shots How many ranged shots the creature can perform in one battle.
“None” indicates the creature has no ranged attack.
Movement How the creature moves.
Speed How fast the creature moves.
Building Statistics Legend
Structure Name of Building type.
Cost What it costs to build the structure.
Requirements Building(s) that must be built before this one.
Creatures/Week
Type and number of creatures produced by this building per week.
Resources
Wood Mercury Ore Sulfur Crystals Gems Gold
Page 82

82
Buildings Common to All Towns
Halls
A town’s hall is its center of leadership. Your halls provide you with income in the form of gold. You may
order the construction of new structures and structure upgrades at the hall. For more information on
constructing other buildings, see Towns (pg. 49).
Castles
A castle provides a town with increased security. Because castles add walls and other defensive features to
the town, enemy forces must lay siege to the town when they attack it (see Combat, pg. 40). Presence of
a castle also increases town creature production. Clicking on a castle will provide information about the
towns current population.
Structure Cost Requirements Benefits
Village Hall N/A N/A
Town Hall 2500 Gold Village Hall, Tavern
City Hall 5000 Gold Town Hall, Blacksmith, Mage Guild
Level I, Marketplace
Capitol 10,000 Gold City Hall, Castle
The village hall, being the minimum defining
building of a town, is automatically a part of all
towns. It provides an income of 500 Gold per day.
This upgrade to the village hall provides 1000 Gold
per day.
This upgrade to the town hall provides 2000 Gold
per day.
This upgrade to the city hall provides 4000 Gold per
day. You may only build a capitol if you don’t already
have one.
Structure Cost Requirements Benefits
Fort 5000 Gold Village Hall
+ 20 Wood
+ 20 Ore
Citadel 2500 Gold Fort
+ 5 Ore
Castle 5000 Gold Citadel
+ 10 Wood
+ 10 Ore
Building a fort adds walls to a town.
This upgrade to the fort adds a moat and the
primary arrow tower to a town. Presence of a citadel
increases the production of creature dwellings by
50%.
When a castle is built, it adds two arrow towers at
half strength of the primary tower, and the standard
walls are strengthened to fortified walls. Further,
production of creature dwellings is increased by
100%.
Section III
Page 83

World Reference
83
Mage Guilds
Mage guilds are centers for spell research and provide spells for heroes to learn. Heroes possessing spell
books—which are available for purchase at mage guilds—automatically learn all spells known to mage
guilds of allied towns they visit, as long as they have the appropriate level of Wisdom (see Secondary
Skills, pg. 35). Each upgrade of a town’s mage guild increases the number of spells available.
Additionally, heroes who spend one day in a town with a mage guild have their spell points replenished.
Structure Cost Requirements Benefits
Mage Guild 2000 Gold Village Hall
Level I + 5 Wood + 5 Ore
Mage Guild 1000 Gold + 5 Wood Mage Guild Level I
Level II + 5 Ore + 4 Crystal
+ 4 Gem + 4 Mercury
+ 4 Sulfur
Mage Guild 1000 Gold + 5 Wood Mage Guild Level II
Level III + 5 Ore + 6 Crystal
+ 6 Gem + 6 Mercury
+ 6 Sulfur
Mage Guild 1000 Gold + 5 Wood Mage Guild Level III
Level IV + 5 Ore + 8 Crystal
+ 8 Gem + 8 Mercury
+ 8 Sulfur
Mage Guild 1000 Gold + 5 Wood Mage Guild Level IV
Level V + 5 Ore + 10 Crystal
+ 10 Gem + 10
Mercury + 10 Sulfur
When the level I mage guild is built, five level I
spells become available for heroes to learn. Heroes
are able to purchase a spell book from the guild for
500 Gold.
When the level II mage build is built, an additional
four level II spells become available for heroes to
learn.
When the level III mage guild is built, an additional
three level III spells become available for heroes to learn.
This is the highest level mage guild you can
construct in Stronghold and Fortress towns.
When the level IV mage guild is built, an additional
two level IV spells become available for heroes to
learn. This is the highest level of the mage guild you
can construct in Castle towns.
When the level V mage guild is built, one level V
spell becomes available for heroes to learn.
Structure Cost Requirements Benefits
Marketplace 500 Gold Village Hall Allows resources to be traded.
+ 5 Wood
Tavern
At the town tavern you may hear rumors, check how you are doing compared to your opponents, and
hire new heroes for field or garrison duty. For more information, see Towns (pg. 49).
Structure Cost Requirements Benefits
Tavern 500 Gold Village Hall Provides the ability to recruit heroes,
+ 5 Wood hear rumors, and visit the Thieves’ Guild.
Marketplace
Resources may be traded for other resources at town marketplaces. While the marketplace traders will
always seek to make a profit, the more marketplaces you have under your control, the better the exchange
rate. In multiplayer games, the marketplace allows you to trade resources with other players. For more
information, see Towns (pg. 49).
Page 84

Castle Towns
Castles are home to the Cleric and Knight hero classes. Castle armies are primarily composed of human
men-at-arms, though these towns have also formed an alliance with the griffins and are under the
protection of angels. With two types of ranged attack units and two flying unit types available,
Castle-based armies are well equipped to quickly engage and defeat their enemies.
Castle Specific Buildings
Structure Cost Requirements Benefits
Blacksmith 1000 Gold + 5 Wood Village Hall
Brotherhood of the Sword 500 Gold + 5 Wood Tavern
Resource Silo 5000 Gold + 5 Ore Marketplace
Shipyard 2000 Gold + 20 Wood Village Hall
Lighthouse 2000 Gold + 10 Ore Shipyard
Stables 2000 Gold + 10 Wood Barracks
Section III
Griffin Tower
Hall
Tavern/Brotherhood
of the Sword
Barracks Guardhouse Archers’ Tower Portal of Glory Shipyard/Lighthouse
Castle
Mage Guild
MarketplaceStablesBlacksmithTraining Grounds
Monastery
Produces the Ballista war machine (see Wa r
Machines, pg. 117).
This Tavern upgrade gives a +2 morale bonus
to all garrisoned creatures during a siege.
This upgrade to the marketplace provides 1
Wood and 1 Ore per day.
Allows ships to be built. Ships cost 1000 Gold
+ 10 Wood.
Each lighthouse you build will increase the
movement allowance of your ships.
Visiting heroes departing from Castle towns
with stables have their movement allowance
increased.
Note: Information on creature dwellings unique to each town type can
be found in their corresponding sections, within the creature tables
.
Section III
84
Page 85

World Reference
85
Structure Requirements
Pikemen & Halberdiers
Pikemen and halberdiers are among
the strongest basic foot soldiers
available to any army. While
somewhat slow, they have respectable
combat ratings.
Structure Requirements
Archers & Marksmen
Archers and marksmen are lightly
armored troops armed with crossbows
for ranged attacks and daggers for light
hand-to-hand fighting. Marksmen can
get off two shots in each ranged attack.
Castle Creature Dwellings and Hordes
Structure
Requirements
Griffins & Royal Griffins
Griffins roost in special towers built
for them on the Castle grounds.
Standard griffins are able to
counterstrike against two attackers per
turn. Royal griffins can counterstrike
an unlimited number of attackers.
Structure Griffin Tower Upgraded Griffin Tower Griffin Bastion
Cost 1000 Gold + 5 Ore 1000 Gold + 5 Ore 1000 Gold
Requirements Barracks Griffin Tower Griffin Tower
Creatures/Week
7 Griffins 7 Royal Griffins
+3 Griffin Tower Production
World Reference
Name Pikeman Halberdier
Cost 60 Gold 75 Gold
Damage 1-3 2-3
Shots None None
Attack 46
Defense 55
Health 10 10
Movement Ground Ground
Speed Extra Slow (4 hexes/turn) Slow (5 hexes/turn)
Structure Guardhouse Upgraded Guardhouse
Cost 500 Gold + 10 Ore 1000 Gold + 5 Ore
Requirements Fort Guardhouse
Creatures/Week
14 Pikemen 14 Halberdiers
Name Archer Marksman
Cost 100 Gold 150 Gold
Attack 66
Defense 33
Health 10 10
Damage 2-3 2-3
Shots 12 24
Movement Ground Ground
Speed Extra Slow (4 hexes/turn) Swift (6 hexes/turn)
Structure Archers’ Tower Upgraded Archers’ Tower
Cost 1000 Gold + 5 Wood + 5 Ore
1000 Gold+5 Wood +5 Ore
Requirements Guardhouse Archers’ Tower
Creatures/Week
9 Archers 9 Marksmen
Name Griffin Royal Griffin
Cost 200 Gold 240 Gold
Attack 89
Defense 89
Health 25 25
Damage 3-6 3-6
Shots None None
Movement Flying Flying
Speed Very Swift (6 hexes/turn) Ultra Swift (9 hexes/turn)
Page 86

86
Structure Requirements
Swordsmen & Crusaders
Well armed and armored, swordsmen
and crusaders are better all-around
foot soldiers than their pikemen
companions. Crusaders deliver two
blows per attack.
Structure Requirements
Monks & Zealots
Monks and zealots train themselves to
control and project their personal
energistic forces, which they deliver as
ranged blasts. While monks suffer the
normal penalty for ranged unit handto-hand attack damage (50%), the
better trained zealots do not.
Structure Requirements
Cavaliers & Champions
The horse-mounted cavalier and
champion deal extra impact damage
(+5% per hex traveled to creature
attacked) when charging into battle.
Section III
Name Swordsman Crusader
Cost 300 Gold 400 Gold
Attack 10 12
Defense 12 12
Health 35 35
Damage 6-9 7-10
Shots None None
Movement Ground Ground
Speed Slow (5 hexes/turn) Swift (6 hexes/turn)
Structure Barracks Upgraded Barracks
Cost 2000 Gold + 5 Ore
2000 Gold +5 Ore +5 Crystal
Requirements Guardhouse, Blacksmith Barracks
Creatures/Week
4 Swordsmen 4 Crusaders
Name Monk Zealot
Cost 400 Gold 450 Gold
Attack 12 12
Defense 710
Health 30 30
Damage 10-12 10-12
Shots 12 24
Movement Ground Ground
Speed Slow (5 hexes/turn) Extra Swift (7 hexes/turn)
Structure Monastery Upgraded Monastery
Cost
3000 Gold+5 Wood+5 Ore+2 1000 Gold+2 Wood+2 Ore+2
Crystal+2 Gem+2 Mercury+2 Sulfur
Crystal+2 Gem+2 Mercury+2 Sulfur
Requirements Mage Guild Level I, Barracks Monastery
Creatures/Week
3 Monks 3 Zealots
Name Cavalier Champion
Cost 1000 Gold 1200 Gold
Attack 15 16
Defense 15 16
Health 100 100
Damage 15-25 20-25
Shots None None
Movement Ground Ground
Speed Extra Swift (7 hexes/turn) Ultra Swift (9 hexes/turn)
Structure Training Grounds Upgraded Training Grounds
Cost 5000 Gold + 20 Wood 3000 Gold + 10 Wood
Requirements Stables Training Grounds
Creatures/Week
2 Cavaliers 2 Champions
Page 87

World Reference
87
Structure Requirements
Angels & Archangels
With their great offensive and defensive
power and flying ability, angels and
archangels are among the mightiest
creatures in the game. Both do 150%
damage when attacking devils.
Additionally, the archangel is able to
resurrect dead allied troops once per
combat.
Name Angel Archangel
Cost 3000 Gold 5000 Gold
Attack 20 30
Defense 20 30
Health 200 250
Damage 50 50
Shots None None
Movement Flying Flying
Speed Extra Quick (12 hexes/turn) Very Fast (18 hexes/turn)
Structure Portal of Glory Upgraded Portal of Glory
Cost 20000 Gold+10 Crystal 20000 Gold+10 Crystal
+10 Gem+10 Mercury +10 Gem+10 Mercury
+10 Sulfur +10 Sulfur
Requirements Monastery Portal of Glory
Creatures/Week
1 Angel 1 Archangel
Page 88

88
Structure Cost Requirements Benefits
Academy of 1000 Gold + 5 Wood Village Hall
Battle Scholars + 5 Ore
Artifact Merchants 10,000 Gold Marketplace
Blacksmith 1000 Gold + 5 Wood Village Hall
Mana Vortex 1000 Gold Mage Guild Level I
Portal of Summoning 2500 Gold + 5 Ore Village Hall
Resource Silo 5000 Gold + 5 Ore Marketplace
Presence of a mana vortex doubles the spell
points available for visiting heroes.
Visiting heroes gain 1000 experience points
from the academy. This effect is applied only
once per hero for each Academy of Battle
Scholars visited
You may visit the Artifact Merchants building to
trade resources for artifacts.
The Ballista war machine (see War Machines
and Siege Features, pg. 126) may be
purchased from the Dungeon blacksmith.
On Day 1 of each week, a random creature
type from a creature dwelling flagged on the
Adventure Map, becomes available for
recruitment at the Portal of Summoning.
This marketplace upgrade provides 1 Sulfur per
day.
Dungeon Towns
Dungeons towns are built by Warlock and Overlord hero types to act as bases from which to wage
campaigns of conquest for wealth and power. Similarly minded creatures are attracted as allies. Other
Dungeon creatures are in thrall to their masters. Dungeon armies are possessed of a variety of long range
attacks, have effective damage dealing troops, and have the ability to greatly disrupt the strategies of their enemies.
Dungeon Specific Buildings
Castle
Hall
Mage Guild
Artifact Merchants
Tavern MarketplaceBlacksmith
Portal of Summoning
Academy of
Battle Scholars
Warren
Harpy Loft
Pillar of Eyes
Chapel of Stilled Voices
Labyrinth
Manticore Lair
Dragon Cave
Mama Vortex
Section III
Page 89

World Reference
89
Dungeon Creature Generators and Hordes
Troglodytes & Infernal Troglodytes
Troglodytes are immune to blinding
effects since they don’t have eyes and
‘see’ their surroundings through
infrared senses.
Structure
Requirements
Structure Warren Upgraded Warren Mushroom Rings
Cost 400 Gold + 10 Wood 1000 Gold + 5 Wood 1000 Gold
Requirements Fort Warren Warren
Creatures/Week
14 Troglodytes 14 Infernal Troglodytes +7 Warren Production
Structure Requirements
Harpies & Harpy Hags
Harpies—half-women/half-vulture in
appearance—have a swooping attack
that returns them to the hex they
started from. Harpy hags attack with
such violence their attacks cannot be
countered.
Structure Requirements
Beholders & Evil Eyes
Beholders and evil eyes can attack at
range with rays projected from their
eyes. At close range they attack with
equal damage using their multiple
tentacles.
Name Troglodyte Infernal Troglodyte
Cost 50 Gold 65 Gold
Attack 45
Defense 34
Health 56
Damage 1-3 1-3
Shots None None
Movement Ground Ground
Speed Extra Slow (4 hexes/turn) Slow (5 hexes/turn)
Name Harpy Harpy Hag
Cost 130 Gold 170 Gold
Attack 66
Defense 56
Health 14 14
Damage 1-4 1-4
Shots None None
Movement Flying Flying
Speed Swift (6 hexes/turn) Ultra Swift (9 hexes/turn)
Structure Harpy Loft Upgraded Harpy Loft
Cost 1000 Gold
1000 Gold + 2 Crystal +2 Sulfur
Requirements Warren Harpy Loft
Creatures/Week
8 Harpies 8 Harpy Hags
Name Beholder Evil Eye
Cost 250 Gold 280 Gold
Attack 910
Defense 78
Health 22 22
Damage 3-5 3-5
Shots 12 24
Movement Ground Ground
Speed Slow (5 hexes/turn) Extra Swift (7 hexes/turn)
Structure Pillar of Eyes Upgraded Pillar of Eyes
Cost
1000 Gold +1 Wood +1 Ore +1 1000 Gold +1 Wood +1 Ore +1
Crystal +1 Gem +1 Mercury Crystal +1 Gem +1 Mercury
+1 Sulfur +1 Sulfur
Requirements Warren Pillar of Eyes
Creatures/Week
7 Beholders 7 Evil Eyes
Page 90

90
Structure Requirements
Medusas & Medusa Queens
Armed with bows, medusas and
medusa queens can attack at range to
good effect. Their hand-to-hand
attacks do the same damage and also
have a 20% chance of petrifying their
targets for three rounds. Petrified
creatures cannot move, take 50%
damage, and become unfrozen when
attacked.
Structure Requirements
Minotaurs & Minotaur Kings
Minotaurs and minotaur kings live in
labyrinths and devour all who enter.
These bull-like humanoids are sure of
their ability to dominate in battle and
have good morale. This self image is
well-founded as they are durable and
have a very damaging axe attack.
Structure Requirements
Manticores & Scorpicores
Manticores and their venomous
cousins, the scorpicores, have features
combined of bat, lion and scorpion.
They attack with stabs from their
stinging tails. Scorpicore attacks have
a 20% chance of paralyzing an
opponent. Creatures thus petrified
take 50% damage and are unfrozen
when attacked or after three rounds.
Section III
Name Medusa Medusa Queen
Cost 300 Gold 330 Gold
Attack 910
Defense 910
Health 25 30
Damage 6-8 6-8
Shots 48
Movement Ground Ground
Speed Slow (5 hexes/turn) Swift (6 hexes/turn)
Structure Chapel of Stilled Voices
Upgraded Chapel of Stilled Voices
Cost 2000 Gold +5 Wood +10 Ore 1500 Gold +5 Wood
Requirements Harpy Loft, Pillar of Eyes Chapel of Stilled Voices
Creatures/Week
4 Medusas 4 Medusa Queens
Name Minotaur Minotaur King
Cost 500 Gold 575 Gold
Attack 14 15
Defense 12 15
Health 50 50
Damage 12-20 12-20
Shots None None
Movement Ground Ground
Speed Swift (6 hexes/turn) Very Swift (8 hexes/turn)
Structure Labyrinth Upgraded Labyrinth
Cost 4000 Gold + 10 Ore + 10 Gem 3000 Gold +5 Ore +5 Gem
Requirements Chapel of Stilled Voices Labyrinth
Creatures/Week
3 Minotaurs 3 Minotaur Kings
Name Manticore Scorpicore
Cost 850 Gold 1050 Gold
Attack 15 16
Defense 13 14
Health 80 80
Damage 14-20 14-20
Shots None None
Movement Flying Flying
Speed Extra Swift (7 hexes/turn) Quick (11 hexes/turn)
Structure Manticore Lair Upgraded Manticore Lair
Cost
5000 Gold +5 Wood +5 Ore +5 3000 Gold +5 Wood +5 Ore
Mercury +5 Sulfur +5 Mercury +5 Sulfur
Requirements Chapel of Stilled Voices Manticore Lair
Creatures/Week
2 Manticores 2 Scorpicore
Page 91

World Reference
91
Structure Requirements
Red & Black Dragons
Red and black dragons with their great
mobility, flying ability, and powerful
breath weapons are among the most
effective units in the game. Red
dragons are immune to spells below
level four. Black dragons are twice as
durable, do 150% damage to giants and
titans, and are immune to all spells.
Name Red Dragon Black Dragon
Cost 2500 Gold + 1 Sulfur 4000 Gold + 2 Sulfur
Attack 19 25
Defense 19 25
Health 180 300
Damage 40-50 40-50
Shots None None
Movement Flying Flying
Speed Quick (11 hexes/turn) Super Quick (15 hexes/turn)
Structure Dragon Cave Upgraded Dragon Cave
Cost
15000 Gold +15 Wood +15 Ore 15000 Gold +15 Wood +15
+20 Sulfur Ore +20 Sulfur
Requirements Mage Guild Level II, Labyrinth, Mage Guild Level III,
Manticore Lair Dragon Cave
Creatures/Week
1 Red Dragons 1 Black Dragons
Page 92

92
Structure Cost Requirements Benefits
Blacksmith 1000 Gold + 5 Wood Village Hall
Blood Obelisk 1000 Gold Glyphs of Fear
Glyphs of Fear 1000 Gold Fort
Cage of Warlords 1000 Gold Town Hall,
Resource Silo 5000 Gold + 5 Ore Marketplace
Shipyard 2000 Gold + 20 Wood Village Hall
Fortress Towns
Fortress towns are built at the edge of swamps and are often used as bases by the Beastmaster and Witch
hero classes. Their armies are primarily made up of deadly creatures—born of the swamps, and then
subdued and trained for warfare. While among them there is only one ranged attack creature, Fortress
units are possessed of many special abilities to offset this deficiency.
Fortress Specific Buildings
You may purchase the First Aid Tent (see Wa r
Machines and Siege Features, pg. 126) from
the Fortress blacksmith.
The Blood Obelisk gives heroes a +2 to their
Attack skill during siege battles.
The Glyph of Fear gives heroes a +2 to their
Defense skill during sieges.
The Cage of Warlords gives visiting heroes a
permanent +1 to their Defense skill.
This upgrade to the marketplace provides 1
Wood and 1 Ore per day.
Ships may be purchased from the shipyard for
1000 Gold + 10 Wood.
Basilisk Pit
Blacksmith Castle Blood Obelisk
Shipyard
Marketplace
Wyvern Nest
Lizard Den
Mage Guild
Hydra Pond
Serpent Fly HiveGorgon Lair Hall
Tavern
Glyphs of Fear
Gnoll Hut/Captains
Quarters
Cage of Warlords
Glyphs of Fear
Section III
Page 93

World Reference
93
Fortress Creature Generators and Hordes
Gnolls & Gnoll Marauders
Armed with morning stars, gnolls and
gnoll marauders are above average foot
soldier units.
Structure
Requirements
Structure
Gnoll Hut Upgraded Gnoll Hut Captain’s Quarters
Cost 400 Gold + 10 Wood 1000 Gold + 10 Wood 1000 Gold
Requirements Fort Tavern, Gnoll Hut Gnoll Hut
Creatures/Week
12 Gnolls 12 Gnoll Marauders +6 Gnoll Hut
Structure Requirements
Lizardmen & Lizard Warriors
Lizardmen and lizard warriors are
armed with bows for ranged attacks
and daggers for hand-to-hand fighting.
Structure Requirements
Serpent Flies & Dragon Flies
These giant, flying insects attack by
striking with their tail stingers. Their
attacks dispel any beneficial spells
affecting their target.
Name Gnoll Gnoll Marauder
Cost 50 Gold 70 Gold
Attack 34
Defense 56
Health 66
Damage 2-3 2-3
Shots None None
Movement Ground Ground
Speed Extra Slow (4 hexes/turn) Slow (5 hexes/turn)
Name Lizardman Lizard Warriors
Cost 110 Gold 130 Gold
Attack 55
Defense 67
Health 12 12
Damage 1-3 2-3
Shots 12 24
Movement Ground Ground
Speed Extra Slow (4 hexes/turn) Slow (5 hexes/turn)
Structure Lizard Den Upgraded Lizard Den
Cost 1000 Gold + 5 Wood 1000 Gold + 5 Wood
Requirements Gnoll Hut Lizard Den
Creatures/Week
8 Lizardmen 8 Lizard Warriors
Name Serpent Fly Dragon Fly
Cost 220 Gold 240 Gold
Attack 66
Defense 88
Health 20 20
Damage 2-5 2-5
Shots None None
Movement Flying Flying
Speed Ultra Swift (9 hexes/turn) Very Quick (13 hexes/turn)
Structure Serpent Fly Hive Upgraded Serpent Fly Hive
Cost
1000 Gold + 5 Wood + 2 1000 Gold + 2 Mercury + 2 Sulfur
Mercury + 2 Sulfur
Requirements Gnoll Hut Serpent Fly Hive
Creatures/Week
8 Serpent Flies 8 Dragon Flies
Page 94

94
Structure Requirements
Basilisks & Greater Basilisks
The basilisk and greater basilisk have
developed the ability to petrify their
prey for three rounds. Their attacks
have a 20% chance of making this
occur. Petrified creatures take 50%
damage from attacks and are unfrozen
when struck.
Structure Requirements
Gorgons & Mighty Gorgons
The sturdy gorgons attack with their
acidic breath. The Mighty Gorgon has
a Death Stare with a 10% chance per
attack of killing the top creature of a
troop outright per 10 Mighty
Gorgons.
Structure Requirements
Wyverns & Wyvern Monarchs
Wyverns and wyvern monarchs attack
with swipes of their stinging tails. The
wyvern monarch’s stinger has a chance
of poisoning its target for three
rounds. The top creature of a poisoned
troop loses 50% of its health each
round. Poisoning can only be removed
by the Cure spell.
Section III
Name Basilisk Greater Basilisk
Cost 325 Gold 400 Gold
Attack 11 12
Defense 11 12
Health 35 40
Damage 6-10 6-10
Shots None None
Movement Ground Ground
Speed Slow (5 hexes/turn) Extra Swift (7 hexes/turn)
Structure Basilisk Pit Upgraded Basilisk Pit
Cost
2000 Gold + 5 Wood + 10 Ore 2000 Gold +5 Wood +5 Ore
Requirements Serpent Fly Hive Basilisk Pit
Creatures/Week
4 Basilisks 4 Greater Basilisks
Name Gorgon Mighty Gorgon
Cost 525 Gold 600 Gold
Attack 10 11
Defense 14 16
Health 70 70
Damage 12-16 12-16
Shots None None
Movement Ground Ground
Speed Slow (5 hexes/turn) Swift (6 hexes/turn)
Structure Gorgon Lair Upgrade Gorgon Lair
Cost 2500 Gold +10 Wood +10
2000 Gold + 5 Wood + 5 Ore
Ore +5 Mercury +5 Sulfur
Requirements Serpent Fly Hive, Lizard Den Gorgon Lair, Resource Silo
Creatures/Week
3 Gorgons 3 Mighty Gorgons
Name Wyvern Wyvern Monarch
Cost 800 Gold 1100 Gold
Attack 14 14
Defense 14 14
Health 70 70
Damage 14-18 18-22
Shots None None
Movement Flying Flying
Speed Extra Swift (7 hexes/turn) Quick (11 hexes/turn)
Structure Wyvern Nest Upgraded Wyvern Nest
Cost 3500 Gold + 15 Wood
3000 Gold +10 Wood +10 Mercury
Requirements Lizard Den Wyvern Nest
Creatures/Week
2 Wyverns 2 Wyvern Monarchs
Page 95

World Reference
95
Structure Requirements
Hydras & Chaos Hydras
Hydras and chaos hydras are
multiheaded serpents attacking with
vicious bites. When they attack, they
attack all adjacent enemy troops.
This attack is so overwhelming no
counterstrike is possible.
Name Hydra Chaos Hydra
Cost 2200 Gold 3500 Gold + 1 Sulfur
Attack 16 18
Defense 18 20
Health 175 250
Damage 25-45 25-45
Shots None None
Movement Ground Ground
Speed Slow (5 hexes/turn) Extra Swift (7 hexes/turn)
Structure Hydra Pond Upgraded Hydra Pond
Cost 10000 Gold +10 Wood 15000 Gold +10 Wood
+10 Ore +10 Sulfur +10 Ore +20 Sulfur
Requirements Basalisk Pit, Wyvern Lair Hydra Pond
Creatures/Week
1 Hydras 1 Chaos Hydras
Page 96

96
Structure Cost Requirements Benefits
Blacksmith 1000 Gold+ 5 Wood Village Hall
Brimstone Stormclouds 1000 Gold + 5 Sulfur Fort
Castle Gate 10000 Gold +5 Wood Citadel
+5 Ore
Order of Fire 1000 Gold + 5 Wood Mage Guild Level I
Resource Silo 5000 Gold + 5 Ore Marketplace
Inferno Towns
Inferno towns can be found in Erathian regions blighted by the emergence of the underworld on the
surface. Demoniac and Heretic heroes stand in uneasy alliance with these towns. Inferno armies have
great hand-to-hand attack units and are only slightly hampered at the lower levels by a lack of flying units
until the awesome, teleporting devil and arch devil units can be brought into play.
Inferno Specific Buildings
The Ammo Cart war machine (see Wa r
Machines and Siege Features, pg. 126) can
be purchased from the Inferno blacksmith.
During a siege, the Brimstone Stormclouds
increase the Power skill of a hero by two
.
The Order of Fire permanently adds one to a
visiting hero’s Power skill. This effect is applied
only once per scenario for each Order of
Fire visited.
A visiting hero can pass through the Castle
Gate building to any other allied Inferno town
with a castle gate as long as that town does not
have a visiting hero present.
This upgrade to the marketplace provides 1
Mercury per day.
Town Hall
Demon GateCastle Brimstone
Stormclouds
Forsaken
Palace
Order of Fire
Mage Guild
Imp Crucible
Blacksmith
MarketplaceHell HoleFire LakeHall of Sins
Kennels
Tavern
Castle Gate
Section III
Page 97

World Reference
97
Inferno Creature Generators and Hordes
Imps & Familiars
Small, frail, and armed only with their
natural scratching claws, imps and
familiars are among the weakest units
in the game. They are, however,
produced in great numbers. When
familiars are on the battlefield, they
channel 20% of spell points spent by
enemy spellcasters directly into their
hero’s spell point pool.
Structure
Requirements
Structure Imp Crucible Upgraded Imp Crucible Birthing Pool
Cost 300 Gold + 5 Wood + 5 Ore 1000 Gold 1000 Gold
Requirements Fort Imp Crucible Imp Crucible
Creatures/Week
15 Imps 15 Familiars
+8 Crucible Production
Structure Requirements
Gogs & Magogs
Gogs and magogs hurl fireballs and
attack with their claws at close range.
Magog fireblasts affect the target hex
and its surrounding hexes like a
Fireball spell.
Structure
Requirements
Hell Hounds & Cerberi
These demon canines have a fearsome
bite and good mobility. Cereberi have
three heads and can attack three
adjacent enemies in a single attack.
Structure Kennels Upgraded Kennels Cages
Cost 1500 Gold + 10 Wood 1500 Gold + 5 Sulfur 1000 Gold
Requirements Imp Crucible Kennels Kennels
Creatures/Week
5 Hell Hounds 5 Cerberi +3 Kennel Production
Name Imp Familiar
Cost 50 Gold 60 Gold
Attack 24
Defense 34
Health 44
Damage 1-2 1-2
Shots None None
Movement Ground Ground
Speed Slow (5 hexes/turn) Extra Swift (7 hexes/turn)
Name Gog Magog
Cost 125 Gold 175 Gold
Attack 67
Defense 44
Health 13 13
Damage 2-4 2-4
Shots 12 24
Movement Ground Ground
Speed Extra Slow (4 hexes/turn) Swift (6 hexes/turn)
Structure Hall of Sins Upgraded Hall of Sins
Cost 1000 Gold + 5 Ore 1000 Gold + 5 Mercury
Requirements Imp Crucible Hall of Sins
Creatures/Week
8 Gogs 8 Magogs
Name Hell Hound Cerberus
Cost 200 Gold 250 Gold
Attack 10 10
Defense 68
Health 25 25
Damage 2-7 2-5
Shots None None
Movement Ground Ground
Speed Extra Swift (7 hexes/turn) Very Swift (8 hexes/turn)
Page 98

98
Structure Requirements
Demons & Horned Demons
Both types of demons are capable
hand-to-hand attack units.
Structure Requirements
Pit Fiends & Pit Lords
Pit fiends and pit lords attack with
tormenting whip blows. Once per
combat, pit lords are able to resurrect
dead allied troops as demons in place
of another action. The number raised
cannot be higher than the number of
pit lords performing the resurrection.
Structure Requirements
Efreet & Efreet Sultans
Efreet and efreet sultans are recruited into
Inferno forces from the realm of fire magic,
and are, consequently, immune to Fire
School spells. They are natural enemies of
genies and do 150% damage against them.
Section III
Name Demon Horned Demon
Cost 250 Gold 270 Gold
Attack 10 10
Defense 10 10
Health 35 40
Damage 7-9 7-9
Shots None None
Movement Ground Ground
Speed Slow (5 hexes/turn) Swift (6 hexes/turn)
Structure Demon Gate Upgraded Demon Gate
Cost 2000 Gold +5 Wood +5 Ore
2000 Gold +5 Wood +5 Ore
Requirements Hall of Sins Demon Gate
Creatures/Week
4 Demons 4 Horned Demons
Name Pit Fiend Pit Lord
Cost 500 Gold 700 Gold
Attack 13 13
Defense 13 13
Health 45 45
Damage 13-17 13-17
Shots None None
Movement Ground Ground
Speed Swift (6 hexes/turn) Extra Swift (7 hexes/turn)
Structure Hell Hole Upgraded Hell Hole
Cost 3000 Gold
3000 Gold + 5 Mercury +5 Sulfur
Requirements Demon Gate Mage Guild Level II, Hell Hole
Creatures/Week
3 Pit Fiends 3 Pit Lords
Name Efreet Efreet Sultan
Cost 900 Gold 1100 Gold
Attack 16 16
Defense 12 14
Health 90 90
Damage 16-24 16-24
Shots None None
Movement Fly Fly
Speed Ultra Swift (9 hexes/turn) Very Quick (13 hexes/turn)
Structure Fire Lake Upgraded Fire Lake
Cost
4000 Gold +10 Ore +3 Gems 3000 Gold + 5 Ore + 5 Gems
+3 Mercury +3 Sulfur +5 Mercury +5 Sulfur
Requirements Mage Guild Level I, Demon Gate Fire Lake
Creatures/Week
2 Efreet 2 Efreet Sultans
Page 99

World Reference
99
Structure Requirements
Devils & Arch Devils
Devils and arch devils can teleport to
any hex on the battlefield. Their
overwhelming attack leaves no
possibility for a retaliatory strike. They
also do 150% damage to angels and
reduce enemy Luck by one when they
appear on the battlefield.
Name Devil Arch Devil
Cost 2700 Gold + 1 Mercury 4500 Gold + 2 Mercury
Attack 19 26
Defense 21 28
Health 160 200
Damage 30-40 30-40
Shots None None
Movement Teleport Teleport
Speed Quick (11 hexes/turn) Extra Fast (17 hexes/turn)
Structure Forsaken Palace Upgraded Forsaken Palace
Cost
15000 Gold +10 Wood +10 Ore 20000 Gold +5 Wood
+20 Mercury +5 Ore + 20 Mercury
Requirements Hell Hole, Fire Lake Forsaken Palace
Creatures/Week
1 Devil 1 Arch Devil
Page 100

100
Necropolis Towns
Necropolis towns are overrun and ruled by undead creatures. They are the natural bases for the Necromancer
and Death Knight hero types. Necropolis armies have many units with abilities to weaken their opponents.
This quickly gives them an edge over equal or even more powerful enemy armies.
Necropolis Specific Buildings
Structure Cost Requirements Benefits
Blacksmith 1000 Gold+ 5 Wood Village Hall
Cover of Darkness 1000 Gold Fort
Necromancy Amplifier 1000 Gold Mage Guild Level I
Resource Silo 5000 Gold +5 Ore Marketplace
Skeleton Transformer 1000 Gold Cursed Temple
Shipyard 2000 Gold + 20 Wood Village Hall
The First Aid Tent war machine (see Wa r
Machines and Siege Features, pg. 126) can
be purchased from the Necropolis blacksmith.
The Cover of Darkness creates a permanent
shroud over the town for enemy heroes. While
heroes moving through the shroud remove it as
normal, it is regenerated each day.
The Necromancy Amplifier adds 10% to the
Necromancy skill of all Necromancers under
your command.
This upgrade to the marketplace provides
+1 Wood, +1 Ore per day.
Creatures brought to a town with a Skeleton
Transformer may be turned into skeletons by
putting them through a skeleton transformer.
The shipyard allows ships to be built. Ships cost
1000 Gold + 10 Wood.
CastleCover of Darkness Mage Guild
Necromancy
Amplifier
Marketplace Blacksmith
Shipyard
Cursed Temple
Skeleton
Transformer
Graveyard
Tomb of Souls
Estate
Mausoleum
Hall of Darkness
Dragon Vault
Town Hall
Tavern
Unearthed
Graves
Section III
 Loading...