

Fritz! FRITZ!Box 6890 LTE Quick Manual
PEFC
Service
Service
Serwis
Servicio de asistencia
Assistenza
Quick Guide
Kurzanleitung
Korte handleiding
Skrócona instrukcja obsługi
Notice abrégée
Guida rapida
e
a
Buttons
Taster
Toetsen
Przyciski
Touches
Tasti
Register Cordless Telephones
Schnurlostelefone anmelden
Draadloze telefoons aanmelden
Rejestracja telefonów bezprzewodowych
Enregistrement des téléphones sans fi l
Registrazione di cordless
• Put your telephone in registration mode.
• Enter the PIN of the FRITZ!Box on the telephone (the preset value is
“0000”).
• Press the “Connect/WPS” button until the LED begins fl ashing. Your
telephone is registered.
The FRITZ!Box uses the DECT standard to support up to six cordless
telephones, up to ten switchable FRITZ!DECT200/210 sockets, and up to
twelve FRITZ!DECT301/300/Comet DECT radiator controls at the same
time.
• Bringen Sie Ihr Telefon in den Anmeldemodus.
• Geben Sie die PIN der FRITZ!Box am Telefon ein (der voreingestellte Wert
ist „0000“).
• Drücken Sie die „Connect/WPS“-Taste bis die Leuchtdiode blinkt. Ihr
Telefon wird angemeldet.
Die FRITZ!Box unterstützt per DECT-Funk gleichzeitig bis zu sechs
Schnurlostelefone, bis zu zehn schaltbare Steckdosen
FRITZ!DECT200/210 und bis zu zwölf Heizkörperregler
FRITZ!DECT301/300/Comet DECT.
• Zet uw telefoon in de registratiemodus.
• Voer op de telefoon de PIN van de FRITZ!Box in (de vooraf ingestelde
waarde is „0000“).
• Houd de „Connect/WPS“-knop ingedrukt tot de led knippert. Uw telefoon
wordt nu aangemeld.
De FRITZ!Box ondersteunt via het DECT-signaal gelijktijdig tot zes
draadloze telefoons, tot tien schakelbare contactdozen
FRITZ!DECT200/210 en tot twaalf radiatorthermostaten
FRITZ!DECT301/300/Comet DECT.
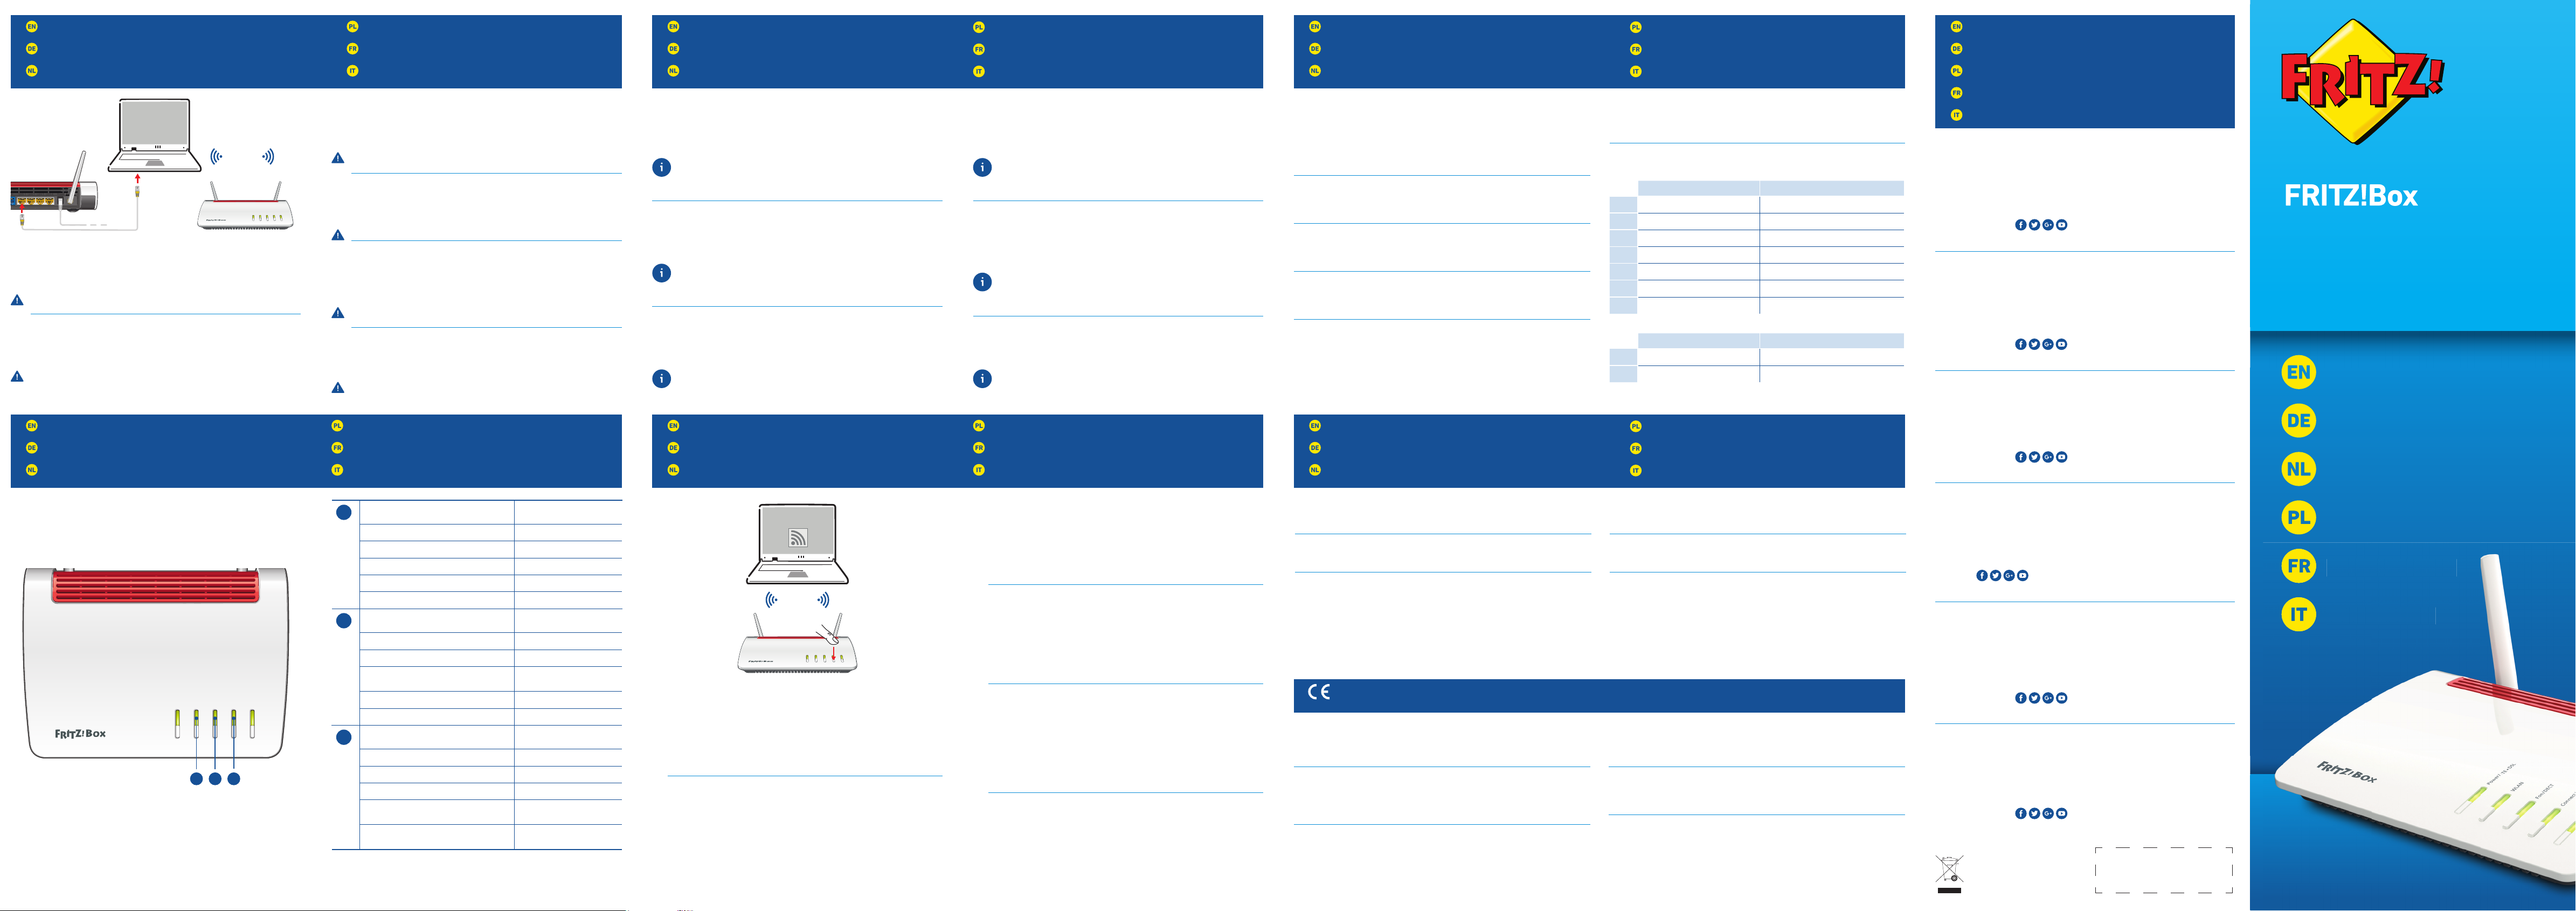
Wireless LAN Quick Connection (WPS)
WLAN-Schnellverbindung (WPS)
WiFi-snelverbinding (WPS)
Devices with wireless LAN can be connected with the FRITZ!Box using WPS
(for Android we recommend FRITZ!AppWLAN from Google Play):
• Click the wireless network icon in the task bar.
• A list appears on the screen showing all wireless networks.
• Select the wireless network of your FRITZ!Box and click “Connect”.
• Press the “Connect/WPS” button on the FRITZ!Box6890LTE until the
“WLAN” LED begins fl ashing.
Sie können WLAN-Geräte per WPS mit der FRITZ!Box verbinden (für Android
empfehlen wir die FRITZ!AppWLAN bei Google Play):
• Klicken Sie in der Taskleiste auf das WLAN-Symbol.
• Auf dem Bildschirm erscheint eine Liste mit Drahtlosnetzwerken.
• Wählen Sie das Drahtlosnetzwerk Ihrer FRITZ!Box aus und klicken Sie
„Verbinden“.
• Drücken Sie den Connect/WPS-Taste der FRITZ!Box6890LTE bis die
Leuchtdiode „WLAN“ blinkt.
Szybkie połączenie z siecią WLAN (WPS)
Connexion sans fi l rapide (WPS)
Connessione rapida wireless (WPS)
• Ustaw telefon w tryb rejestracji.
• Wpisz w telefonie kod PIN urządzenia FRITZ!Box (ustawiona domyślnie
wartość to „0000“).
• Naciśnij i przytrzymaj przycisk „Connect/WPS”, aż zacznie migać dioda.
Telefon jest rejestrowany.
Router FRITZ!Box obsługuje przez standard radiowy DECT jednocześnie
nawet sześć telefonów bezprzewodowych, dziesięć przełączanych
gniazdek FRITZ!DECT200/210 oraz dwanaście termostatów
FRITZ!DECT301/300/Comet DECT.
• Faites passer votre téléphoneDECT sur le mode destiné à
l’enregistrement.
• Saisissez le code PIN de votre FRITZ!Box sur le téléphone (code par
défaut: «0000»).
• Enfoncez la touche «Connect/WPS» jusqu’à ce que le voyant clignote.
Votre téléphone est en cours d’enregistrement.
FRITZ!Box prend simultanément en charge à l’aide de signaux DECT
jusqu’à six téléphones sans fi l, jusqu’à dix prises (dés)activables
FRITZ!DECT 200/210 et jusqu’à douze thermostats
FRITZ!DECT301/300/Comet DECT.
• Impostate il telefono nella modalità registrazione.
• Digitate nel telefono il PIN del FRITZ!Box (il valore predefi nito è “0000”).
• Premete il tasto “Connect/WPS” fi nché il LED non lampeggia. Il telefono
viene registrato.
Il FRITZ!Box supporta contemporaneamente via DECT fi no a sei telefoni
cordless, a dieci prese commutabili FRITZ!DECT200/210 e fi no a dodici
regolatori di radiatori FRITZ!DECT301/300/Comet DECT.
U kunt WiFi-apparaten via WPS met de FRITZ!Box verbinden (voor Android
raden we de FRITZ!AppWLAN bij Google Play aan):
• Klik in de taakbalk op het WiFi-symbool.
• Op het beeldscherm verschijnt een lijst met draadloze netwerken.
• Selecteer het draadloze netwerk van de FRITZ!Box en klik op „Verbinden“.
• Houd de „Connect/WPS“ knop op de FRITZ!Box6890LTE ingedrukt totdat
de led „WLAN“ knippert.
Urządzenia obsługujące WLAN można połączyć zurządzeniem FRITZ!Box
za pomocą WPS (wprzypadku systemu Android zalecamy skorzystanie
zaplikacji FRITZ!AppWLAN z Google Play):
• Kliknij na symbol WLAN na pasku zadań.
• Na ekranie wyświetla się lista sieci bezprzewodowych.
• Wybierz sieć bezprzewodową urządzenia FRITZ!Box ikliknij „Połącz“.
• Naciskaj przycisk Connect/WPS na urządzeniu FRITZ!Box6890LTE, aż
zacznie migać dioda „WLAN”.
Vous pouvez connecter des périphériques sans fi l à votre FRITZ!Box via le
WPS (pour Android, nous recommandons l’appli FRITZ!AppWLAN sur Google
Play):
• Cliquez sur l’icône de réseau sans fi l dans la barre des tâches.
• Une liste de réseaux sans fi l s’affi che sur votre écran.
• Sélectionnez le réseau sans fi l de votre FRITZ!Box, puis cliquez sur
«Connecter».
• Enfoncez la touche «Connect/WPS» de votre FRITZ!Box6890
LTE jusqu’à
ce que le voyant lumineux «WLAN» clignote.
Potete collegare al FRITZ!Box i dispositivi wireless via WPS (per Android
consigliamo la FRITZ!AppWLAN da Google Play):
• Nella barra delle applicazioni cliccate l’icona della rete wireless.
• Sullo schermo compare una lista delle reti wireless.
• Selezionate la rete wireless del FRITZ!Box e cliccate “Connetti”.
• Premete il tasto “Connect/WPS” del FRITZ!Box6890LTE fi nché il LED
“WLAN” non lampeggia.
Radio Frequencies and Transmitter Power
Funkfrequenzen und Sendeleistung
Draadloze frequenties en zendvermogen
Częstotliwości radiowe i moc nadawania
Fréquences radio et puissance de transmission
Frequenze wireless e potenza di trasmissione
Legal Notice
Rechtliches
Juridische informatie
Informacje prawne
Volet juridique
Aspetti giuridici
© AVM Computersysteme Vertriebs GmbH • Documentation release 07/2018 • 521566001
AVM declares herewith that the device is compliant with the basic requirements
and the relevant rules in directives 2014/53/EU, 2009/125/EC and 2011/65/EU.
The long version of the declaration of CE conformity is available at
en.avm.de/ce.
Hiermit erklärt AVM, dass sich das Gerät in Übereinstimmung mit den
grundlegenden Anforderungen und den anderen relevanten Vorschriften
der Richtlinien 2014/53/EU, 2009/125/EG sowie 2011/65/EU befi ndet. Die
Langfassung der CE-Konformitätserklärung fi nden Sie in englischer Sprache
unter
en.avm.de/ce.
Hiermee verklaart AVM dat het apparaat overeenstemt met de fundamentele
vereisten en de andere relevante voorschriften van de richtlijnen 2014/53/EU,
2009/125/EG en 2011/65/EU. De EG-verklaring van overeenstemming vindt u
in het Engels op
en.avm.de/ce.
Firma AVM oświadcza niniejszym, że urządzenie jest zgodne zpodstawowymi
wymogami iinnymi obowiązującymi przepisami dyrektyw 2014/53/UE,
2009/125/WE oraz 2011/65/UE. Deklaracja zgodności CE wpełnej wersji jest
dostępna pod adresem en.avm.de/ce.
AVM déclare par la présente que l’appareil est conforme aux exigences
essentielles et aux instructions pertinentes des directives 2014/53/UE,
2009/125/CE et 2011/65/UE. Vous trouverez la version longue de la déclaration
de conformité CE à l’adresse
en.avm.de/ce (en langue anglaise).
AVM dichiara che il dispositivo è conforme ai requisiti fondamentali e alle
disposizioni inerenti delle direttive 2014/53/UE, 2009/125/CE e 2011/65/UE.
Il testo integrale della dichiarazione di conformità CE è disponibile in lingua
inglese all’indirizzo
en.avm.de/ce.
Service information and help can be found on our website and in the social
networks:
Service
en.avm.de/service
Manual en.avm.de/service/manuals
Guide en.avm.de/guide
Downloads en.avm.de/nc/service/downloads
Support request en.avm.de/service/support-request/your-support-request
Social networks
Technical specifi cations are presented in the manual.
Service und Hilfe fi nden Sie auf unseren Internetseiten und in den sozialen
Netzwerken:
Service
avm.de/service
Handbuch avm.de/handbuecher
Ratgeber avm.de/ratgeber
Updates avm.de/download
Support avm.de/support
Netzwerke
Ausführliche technische Daten fi nden Sie im Handbuch.
Service en hulp vindt u op onze website en in de sociale netwerken:
Service
be.avm.de/service
Handboek be.avm.de/service/handboeken
Vraagbaak be.avm.de/vraagbaak
Downloads be.avm.de/nc/service/downloads
Ondersteuning be.avm.de/service/ondersteuning/productkeuze
Netwerken
Technische gegevens vindt u in het handboek.
Wsparcie i pomoc można znaleźć na naszych stronach internetowych oraz w
serwisach społecznościowych:
Serwis
pl.avm.de/serwis
Instrukcja obsługi pl.avm.de/serwis/podreczniki
Poradnik pl.avm.de/poradnik
Aktualizacje pl.avm.de/nc/serwis/strefa-pobierania
Pomoc techniczna pl.avm.de/serwis/support-request-poland/wybor-produktu
Sieci
Wszystkie dane techniczne są podane winstrukcji obsługi.
Vous trouverez nos services et notre aide sur notre site et dans les réseaux
sociaux :
Service
be.avm.de/fr/service
Manuel be.avm.de/fr/service/manuels/
Conseils be.avm.de/fr/conseils
Téléchargements be.avm.de/fr/nc/service/telechargements
Support technique be.avm.de/fr/service/ondersteuning/selection-de-produit
Réseaux sociaux
Vous trouverez nos spécifi cations techniques dans le manuel.
Sul nostro sito web e sui social network potete trovare aiuto e assistenza:
Assistenza
it.avm.de/assistenza
Manual it.avm.de/assistenza/manuali
Guida it.avm.de/guida
Download it.avm.de/nc/assistenza/download
Assistenza it.avm.de/assistenza/richiesta-di-assistenza/selezione-
prodotti
Social networks
Nel manuale potete trovare li dati tecnici.
1
Switch wireless LAN on/off Press briefl y
WLAN an/ausschalten Kurz drücken
WiFi in- en uitschakelen Kort indrukken
Włączanie iwyłączanie WLAN Krótkie wciśnięcie
(Dés)activer le réseau sans fi l Appuyer brièvement
Attivare/disattivare la rete wireless Premere brevemente
2
Search for telephones Press briefl y
Telefone wiederfi nden Kurz drücken
Telefoons zoeken Kort indrukken
Odszukanie odłożonych słuchawek
telefonów
Krótkie wciśnięcie
Retrouver un téléphone Appuyer brièvement
Trovare i telefoni Premere brevemente
3
Register wireless or DECT device Press briefl y
WLAN- und DECT-Gerät anmelden Kurz drücken
WiFi- en DECT-apparaat aanmelden Kort indrukken
Rejestracja urządzenia WLAN iDECT Krótkie wciśnięcie
Enregistrer un périphérique sans fi l
et DECT
Appuyer brièvement
Registrare un dispositivo wireless e
DECT
Premere brevemente
Connect Computers
Computer anschließen
Computer aansluiten
Podłączanie komputera
Comment connecter vos ordinateurs
Collegamento del computer
Computers with wireless LAN and the operating system MACOS or others
can be connected with the FRITZ!Box using the network key. The network
key is printed on your FRITZ!Notice service card and on the bottom of
the FRITZ!Box. You can also connect computers to the FRITZ!Box using the
network cable.
A computer can be connected with the FRITZ!Box using only one of these
methods.
Computer mit WLAN und dem Betriebssystem MACOS oder anderen können
Sie mit dem WLAN-Netzwerkschlüssel an der FRITZ!Box anschließen. Sie
fi nden den WLAN-Netzwerkschlüssel auf Ihrer Servicekarte FRITZ!Notiz
und auf der Unterseite der FRITZ!Box. Sie können auch Computer mit dem
Netzwerkkabel an der FRITZ!Box anschließen.
Ein Computer kann nur auf eine Art mit der FRITZ!Box verbunden
werden.
Computers met WiFi en het besturingssysteem MACOS of anders kunt u
met de WiFi-netwerksleutel aansluiten op de FRITZ!Box. U vindt de WiFi-
netwerksleutel op uw servicekaart FRITZ!Notice en op de onderzijde
van de FRITZ!Box. U kunt uw computer met de LAN-kabel op de FRITZ!Box
aansluiten.
Een computer kan slechts op een manier met de FRITZ!Box worden
verbonden.
Komputery obsługujące WLAN zsystemem operacyjnym Windows MACOS
lub innym można podłączyć do urządzenia FRITZ!Box za pomocą klucza
sieciowego WLAN. Klucz sieciowy WLAN jest podany wkarcie serwisowej
FRITZ!Notatka oraz na spodzie urządzenia FRITZ!Box. Komputer można
również podłączyć do urządzenia FRITZ!Box za pomocą kabla sieciowego.
Komputer można połączyć z FRITZ!Box tylko jednym sposobem.
Vous pouvez connecter vos ordinateurs dotés d’une fonction sans fi l et du
système d’exploitation MACOS ou autres à FRITZ!Box à l’aide de la clé réseau
sans fi l. Vous trouverez la clé réseau sans fi l sur votre fi che d’information
«FRITZ!Notice» ainsi que sur la partie inférieure de votre FRITZ!Box. Vous
pouvez également raccorder votre ordinateur à FRITZ!Box à l’aide du câble
réseau.
Un ordinateur ne peut être connecté à FRITZ!Box que d’une seule
manière.
Potete collegare al FRITZ!Box i computer dotati di funzione wireless e del
sistema operativo MACOS o di altri sistemi, usando la chiave di rete wireless.
La chiave di rete wireless si trova sulla scheda di servizio FRITZ!Notice e
alla base del FRITZ!Box. Potete anche collegare i computer al FRITZ!Box con
il cavo di rete.
Un computer si può collegare al FRITZ!Box in un solo modo.
WiFi
Licensing conditions and legal information are presented in the FRITZ!Box help.
The help is opened in the FRITZ!Box user interface by clicking on the question
mark button.
Lizenzbestimmungen und rechtliche Hinweise fi nden Sie in der FRITZ!Box-Hilfe.
Die Hilfe wird in der Benutzeroberfl äche der FRITZ!Box über die Fragezeichen-
Schaltfl äche aufgerufen.
De licentiebepalingen en juridische informatie vindt u in de FRITZ!Box-help.
U kunt de help openen in de gebruikersinterface van de FRITZ!Box door op de
knop met het vraagteken te klikken.
Warunki licencji oraz informacje prawne znajdują się wpomocy urządzenia
FRITZ!Box. Pomoc można wyświetlić na interfejsie użytkownika urządzenia
FRITZ!Box, naciskając przycisk ze znakiem zapytania.
Les dispositions de la licence et les mentions légales fi gurent dans l’aide de
votre FRITZ!Box. Vous pouvez ouvrir l’aide de la FRITZ!Box en cliquant sur le
bouton avec le point d’interrogation dans l’interface utilisateur de la FRITZ!Box.
Le condizioni di licenza e le note legali si trovano nella guida del FRITZ!Box. Si
accede alla guida dall’interfaccia utente del FRITZ!Box cliccando il pulsante con
il punto di domanda.
Nella banda a 5GHz il campo compreso tra 5,15GHz e 5,35GHz è adatto solo
per l’utilizzo in ambienti chiusi. Questa restrizione o requisito si applica negli
stati membri dell’UE: AT, BE, BG, CY, CZ, DE, DK, EE, EL, ES, FI, FR, HR, HU, IE, IT,
LT, LU, LV, MT, NL, PL, PT, RO, SE, SI, SK, UK.
DECT
1880 MHz – 1900 MHz, maximal 250 mW
LT E
Downlink Uplink
1
2110MHz – 2170MHz 1920 MHz – 1980 MHz, 200 mW
3 1805 MHz – 1880 MHz 1710 MHz – 1785 MHz, 200 mW
7 2620 MHz – 2690 MHz 2500 MHz – 2570 MHz, 200 mW
8 925 MHz – 960 MHz 880 MHz – 915 MHz, 200 mW
20 791 MHz – 821 MHz 832 MHz – 862 MHz, 200 mW
28 758 MHz – 803 MHz 703 MHz – 748 MHz, 200 mW
32 1452 MHz – 1496 MHz –
UMTS
Downlink Uplink
1
2110 MHz – 2170 MHz 1920 MHz – 1980 MHz, 250 mW
8 925 MHz – 960 MHz 880 MHz – 915 MHz, 250 mW
WLAN /WiFi
2,4-GHz: 2,4 GHz – 2,483 GHz, max. 100 mW
5-GHz: 5,15 GHz – 5,35 GHz, max. 200 mW, 5,47 GHz – 5,725 GHz, max. 1000 mW
In the 5-GHz band for wireless LAN, the range from 5.15GHz to 5.35GHz is
intended only for indoor use. This restriction or requirement is eff ective in the
EU member states AT, BE, BG, CY, CZ, DE, DK, EE, EL, ES, FI, FR, HR, HU, IE, IT, LT,
LU, LV, MT, NL, PL, PT, RO, SE, SI, SK, UK
Der Bereich von 5,15GHz bis 5,35GHz ist nur für den Betrieb in geschlossenen
Räumen bestimmt. Diese Beschränkung oder Anforderung gilt in den EUMitgliedsstaaten AT, BE, BG, CY, CZ, DE, DK, EE, EL, ES, FI, FR, HR, HU, IE, IT, LT,
LU, LV, MT, NL, PL, PT, RO, SE, SI, SK, UK.
Op de 5GHz-band voor WLAN is de reikwijdte van 5,15GHz tot 5,35GHz
uitsluitend bestemd voor gebruik binnenshuis. Deze beperking of verplichting
geldt in de EU-lidstaten AT, BE, BG, CY, CZ, DE, DK, EE, EL, ES, FI, FR, HR, HU, IE,
IT, LT, LU, LV, MT, NL, PL, PT, RO, SE, SI, SK, UK.
Zakres od 5,15GHz do 5,35GHz jest przeznaczony tylko do użytku w
zamkniętych pomieszczeniach. To ograniczenie lub wymóg obowiązuje w
krajach członkowskich UE: AT, BE, BG, CY, CZ, DE, DK, EE, EL, ES, FI, FR, HR, HU,
IE, IT, LT, LU, LV, MT, NL, PL, PT, RO, SE, SI, SK, UK.
Dans la bande des 5GHz destinée aux réseaux sans fi l, la plage comprise entre
5,15GHz et 5,35GHz est réservée à une utilisation à l’intérieur. Cette restriction
ou exigence s’applique dans les États membres de l’UE suivants: AT, BE, BG, CY,
CZ, DE, DK, EE, EL, ES, FI, FR, HR, HU, IE, IT, LT, LU, LV, MT, NL, PL, PT, RO, SE, SI,
SK, UK.
Info
Connect/ WPS
Fon/ DECT
WLAN
Power/ LTE • DSL
PowerLAN 4LAN 3
LAN 2
LAN 1AN
Starting the wireless LAN
function and
entering
the network key
WiFi
Connect/WPS
Power/LTE • DSL
Fon/DECT
WLAN
1 2 3
Info
Start wireless LAN function
Connect/WPS
Fon/DECT
Power/LTE • DSL
Info
WLAN
6890
LT E
Notice abrégé
Guida rapid

Package Contents
Lieferumfang
Omvang van de levering
Connect to Electrical Power
Am Strom anschließen
Op het stroomnet aansluiten
Connect to the DSL network
Am DSL anschließen
Aansluiten op DSL
Select the Line Type
Anschlussart festlegen
Type aansluiting instellen
Zawartość opakowania
Contenu de la livraison
Contenuto
Safety Instructions
Sicherheitshinweise
Veiligheidsinstructies
• Do not install the FRITZ!Box during an electrical storm.
• During a storm, disconnect the FRITZ!Box from the power supply and
from the internet.
• The ventilation slits of the FRITZ!Box must never be obstructed.
• Do not place the FRITZ!Box on excessively heat-sensitive surfaces.
• Connect the FRITZ!Box to an easily accessible outlet.
• The FRITZ!Box is intended only for indoor operation.
See the security instructions in the FRITZ!Box manual.
• Installieren Sie die FRITZ!Box nicht bei Gewitter.
• Trennen Sie die FRITZ!Box bei Gewitter vom Strom und vom Internet.
• Die Lüftungsschlitze der FRITZ!Box müssen immer frei sein.
• Stellen Sie die FRITZ!Box nicht auf wärmeempfi ndliche Flächen.
• Schließen Sie die FRITZ!Box an eine leicht erreichbare Steckdose an.
• Die FRITZ!Box darf nur innerhalb von Gebäuden verwendet werden.
Beachten Sie die Sicherheitshinweise im FRITZ!Box-Handbuch.
• Installeer de FRITZ!Box niet tijdens onweer.
• Koppel de FRITZ!Box tijdens onweer los van het stroomnet en van het
internet.
• De luchtroosters van de FRITZ!Box moeten altijd vrij zijn.
• Plaats de FRITZ!Box niet op warmtegevoelige oppervlakken.
• Sluit de FRITZ!Box aan op een goed bereikbare contactdoos.
• De FRITZ!Box mag alleen in gebouwen worden gebruikt.
Let op de veiligheidsinstructies in het handboek van de FRITZ!Box.
Wskazówki dotyczące bezpieczeństwa
Consignes de sécurité
Indicazioni di sicurezza
• Nie instaluj urządzenia FRITZ!Box podczas burzy.
• W razie burzy odłącz urządzenie FRITZ!Box od sieci elektrycznej i Internetu.
• Szczeliny wentylacyjne urządzenia FRITZ!Box nie mogą być zasłonięte.
• Nie należy ustawiać urządzenia FRITZ!Box na powierzchniach wrażliwych na
działanie temperatury.
• Podłącz urządzenie FRITZ!Box do łatwo dostępnego gniazdka.
• Z urządzenia FRITZ!Box można korzystać tylko wewnątrz budynków.
Przestrzegaj wskazówek bezpieczeństwa zawartych w instrukcji obsługi
urządzenia FRITZ!Box.
• N’installez pas votre FRITZ!Box pendant un orage.
• En cas d’orage, débranchez FRITZ!Box du réseau d’alimentation électrique et
interrompez sa connexion à Internet.
• Les fentes d’aération de votre FRITZ!Box doivent toujours être bien
dégagées.
• Ne posez pas votre FRITZ!Box sur des surfaces sensibles à la chaleur.
• Branchez votre FRITZ!Box sur une prise facile d’accès.
• FRITZ!Box doit être utilisée uniquement à l’intérieur d’un bâtiment.
Tenez également compte des consignes de sécurité fournies dans le
manuel de votre FRITZ!Box.
• Non installate il FRITZ!Box durante un temporale.
• Durante i temporali scollegate il FRITZ!Box dall‘alimentazione elettrica e da
Internet.
• Le fessure di ventilazione del FRITZ!Box devono restare sempre libere.
• Non collocate il FRITZ!Box su superfi ci sensibili al calore.
• Collegate il FRITZ!Box ad una presa di corrente facilmente accessibile.
• Il FRITZ!Box va utilizzato esclusivamente all‘interno degli edifi ci.
Osservate le indicazioni di sicurezza riportate nel manuale del FRITZ!Box.
Podłączanie do prądu
Raccordement au réseau électrique
Collegamento alla rete elettrica
Określanie rodzaju łącza
Seleccionar el tipo de línea
Defi nizione del tipo di connessione
Podłączanie do DSL
Raccorder au DSL
Collegamento alla presa DSL
Connect Telephones by Cable
Telefone per Kabel anschließen
Telefoons per kabel aansluiten
Podłączanie telefonów przewodem
Raccordement de téléphones à l’aide d’un câble
Collegamento di telefoni via cavo
You can confi gure the FRITZ!Box with a SIM card for mobile networks via LTE
or UMTS, or use a cable to connect it to your DSL line. The FRITZ!Box can be
connected with both kinds of connections simultaneously, so that it can switch
to the mobile network whenever the DSL network is down.
Sie können die FRITZ!Box mit einer Mobilfunk-SIM-Karte für LTE oder
UMTS einrichten oder per Kabel an Ihrem DSL-Anschluss anschließen. Die
FRITZ!Box kann mit beiden Anschlussarten gleichzeitig verbunden sein,
so dass bei Ausfall des DSL-Anschlusses auf den Mobilfunkanschluss
umgeschaltet werden kann.
U kunt de FRITZ!Box ook met een simkaart voor mobiel internet via LTE
of UMTS inrichten of via een kabel aansluiten op uw DSL-aansluiting. De
FRITZ!Box kan tegelijkertijd met beide verbindingstypen verbonden zijn, zodat
bij uitval van de DSL-verbinding naar de mobiele verbinding overgeschakeld
kan worden.
Use the DSL cable to connect the FRITZ!Box to your All-IP or direct access line.
If you have a DSL line and also an analog or ISDN telephone line with a
DSL splitter, connect the FRITZ!Box with the DSL/telephone cable and
the telephone adapter included in the package. For more instructions,
read the PDF manual available at en/avm.de/service.
Schließen Sie die FRITZ!Box an Ihrem All-IP- oder Komplettanschluss mit dem
DSL-Kabel an.
Wenn Sie einen DSL-Anschluss und zusätzlich einen analogen oder
einen ISDN-Telefonanschluss mit einem DSL-Splitter haben, schließen
Sie die FRITZ!Box mit dem DSL-/Telefonkabel und dem Telefonadapter
aus dem Lieferumfang an. Wie Sie dafür vorgehen, lesen Sie im
PDF-Handbuch auf avm.de/service.
Connect the FRITZ!Box to electrical power. The “Power / LTE • DSL” LED begins fl ashing quickly.
Schließen Sie die FRITZ!Box am Strom an. Die Leuchtdiode „Power / LTE • DSL“ beginnt zu blinken.
Sluit de FRITZ!Box op het stroomnet aan. De led „Power / LTE • DSL“ begint te knipperen.
Podłącz urządzenie FRITZ!Box do prądu. Dioda „Power/LTE • DSL“ zaczyna migać.
Raccordez FRITZ!Box au réseau électrique. Le voyant lumineux «Power / LTE • DSL» commence à clignoter.
Collegate il FRITZ!Box alla rete elettrica. Il LED “Power / LTE • DSL“ inizia a lampeggiare.
Router FRITZ!Box można skonfi gurować przy użyciu karty SIM do obsługi sieci
komórkowej LTE lub UMTS, albo podłączyć kablem do łącza DSL. Urządzenie
FRITZ!Box może być podłączone jednocześnie na dwa sposoby, tak by wrazie
awarii łącza DSL mogło się przełączyć na łącze sieci komórkowej.
Vous pouvez confi gurer votre FRITZ!Box à l’aide d’une carte SIM de téléphonie
mobile pour une connexion via LTE ou UMTS ou encore la raccorder par câble
à la ligne DSL. Votre FRITZ!Box peut être raccordée simultanément aux deux
types de connexion afi n de pouvoir basculer sur la téléphonie mobile en cas
de défaillance du DSL.
Potete confi gurare il FRITZ!Box con una scheda SIM di rete mobile per LTE o
UMTS oppure collegarlo per cavo alla vostra connessione DSL. Il FRITZ!Box
può essere collegato contemporaneamente a entrambi i tipi di connessione,
in modo che possa passare alla connessione di rete mobile nel caso in cui si
interrompa la connessione DSL.
Sluit de FRITZ!Box met de DSL-kabel aan op uw All-IP- of alles-in-1aansluiting.
Wanneer u naast uw DSL-aansluiting ook nog een analoge of ISDNtelefoonaansluiting met een DSL-splitter heeft, sluit u de FRITZ!Box aan
met de DSL/telefoonkabel en de telefoonadapter die zijn meegeleverd.
Hoe u hierbij te werk gaat, leest u in het PDF-handboek op
nl.avm.de/service.
Podłącz FRITZ!Box do łącza All-IP lub łącza komunikacyjnego iinternetowego
za pomocą kabla DSL.
Jeśli oprócz łącza DSL posiadasz dodatkowo łącze analogowej linii
telefonicznej lub ISDN ze splitterem DSL, podłącz router FRITZ!Box
przy użyciu kabla DSL/telefonicznego idostarczonego adaptera
telefonicznego. Sposób postępowania jest opisany winstrukcji obsługi
wpliku PDF dostępnym na stronie pl.avm.de/erwis.
Raccordez FRITZ!Box à votre ligne tout IP ou à votre ligne d’accès complet à
l’aide du câble DSL.
Si vous disposez d’une ligne DSL et d’une ligne téléphonique analogue
ou RNIS supplémentaire avec un séparateur DSL, raccordez votre
FRITZ!Box à l’aide du câble DSL/téléphonique et de l’adaptateur
téléphonique inclus dans la livraison. Vous trouverez la marche à
suivre pour cette opération dans le PDF du manuel sur
be.avm.de/fr/service.
Collegate il FRITZ!Box alla vostra connessione completa o All-IP con il cavo
DSL.
Se disponete di una connessione DSL e, inoltre, di una linea telefonica
analogica o ISDN con un fi ltro DSL, collegate il FRITZ!Box con il cavo
DSL/telefono e l’adattatore telefonico forniti in dotazione. Per sapere
come procedere, consultate il manuale PDF su it.avm.de/assistenza.
• Connect analog telephones to the “FON1” and “FON2” sockets. Use
“FON1” for telephones with a TAE plug, and via TAE/RJ11 adapter, for
telephones with a RJ11 plug. Use “FON2” for telephones with an RJ11
plug.
• Connect ISDN telephones to the “FONS0” socket.
• Schließen Sie analoge Telefone an die Buchsen „FON1“ und „FON2“ an.
Nutzen Sie „FON1“ für Telefone mit TAE-Stecker bzw. via beiliegendem
TAE/RJ11-Adapter für Telefone mit RJ11-Stecker. Nutzen Sie „FON2“ für
Telefone mit RJ11-Stecker.
• Schließen Sie ISDN-Telefone an die Buchse „FONS0“ an.
• Sluit de analoge telefoons aan op de bussen „FON1“ en „FON2“. Gebruik
„FON1“ voor telefoons met een TAE-stekker en via een meegeleverde
TAE/RJ11-adapter voor telefoons met een RJ11-stekker. Gebrauik
„FON2“ voor telefoons met een RJ11-stekker.
• Sluit ISDN-telefoons aan op de bus „FONS0“.
• Podłącz telefony analogowe do gniazd „FON1“ i „FON2“. Użyj gniazda
„FON1“ wprzypadku telefonów zwtykiem TAE lub, przy użyciu
dołączonego adaptera TAE/RJ11, w przypadku telefonów zwtykiem RJ11.
Użyj gniazda „FON2“ wprzypadku telefonów zwtykiem RJ11.
• Podłącz telefony ISDN do gniazda „FONS0“.
• Raccordez vos téléphones analogiques aux prises «FON1» et «FON2».
Utilisez «FON1» pour les téléphones avec une prise TAE et pour les
téléphones avec une prise RJ11 avec l’adaptateur TAE/RJ11 fourni à la
livraison. Utilisez «FON2» pour les téléphones avec une prise RJ11.
• Raccordez vos téléphones numériques (RNIS) à la prise «FONS0».
• Collegate i telefoni analogici alle prese “FON1” e “FON2”. Utilizza “FON1”
per telefoni con connettore RJ11 e, con l’adattatore TAE/RJ11 fornito in
dotazione, per telefoni con connettore RJ11. Utilizza “FON2” per telefoni
con connettore RJ11.
• Collega i telefoni ISDN all’ingresso “FONS0”.
• Plug the mobile network antennas into the antenna connectors of the
FRITZ!Box.
• Schließen Sie die Mobilfunkantennen an die FRITZ!Box an.
• Sluit de antennes voor het mobiele netwerk op de FRITZ!Box aan.
• Podłącz anteny sieci komórkowej do routera FRITZ!Box.
• Raccordez les antennes de téléphonie mobileaux ports de FRITZ!Box.
• Collegate le antenne per rete mobile al FRITZ!Box.
Insert the mini SIM card as shown until the card snaps in place. Press the card
again to release it.
Use only original mini SIM cards. Do not use any cut-out micro or nano
SIM cards in mini SIM card holders. Card holders and adapters can get
jammed and do permanent damage to the SIM slot.
Schieben Sie die Mini-SIM-Karte wie abgebildet ein bis die Karte einrastet.
Drücken Sie die Karte erneut um sie zu lösen.
Verwenden Sie nur original Mini-SIM-Karten. Verwenden Sie keine
bereits herausgebrochenen Micro- oder Nano-SIM-Karten in Mini-SIMKartenträgern. Kartenträger und -adapter können verklemmen und den
SIM-Steckplatz dauerhaft beschädigen.
Minisimkaart plaatsen zoals afgebeeld, tot de kaart vastklikt. Opnieuw
drukken verwijdert de kaart.
Gebruik alleen originele minisimkaarten. Gebruik in de houder voor de
minisimkaart geen micro- of nanosimkaarten die al uit de triosimkaart
gedrukt zijn. De kaarthouder en -adapter kunnen klem gaan zitten en de
simkaartsleuf permanent beschadigen.
Wsuń kartę mini-SIM zgodnie z ilustracją aż do zatrzaśnięcia. Ponownie
naciśnij kartę w celu poluzowania.
Stosuj wyłącznie oryginalne karty mini-SIM. Nie używaj już wyłamanych
kart micro-SIM ani nano-SIM w nośnikach kart mini-SIM. Nośniki i
adaptery kart mogą się zakleszczyć i trwale uszkodzić miejsce na kartę
SIM.
Insérez la carte mini SIM comme indiqué jusqu’à ce qu’elle s’encliquette.
Appuyez de nouveau pour libérer la carte de son logement.
N’utilisez que les cartes SIM d’origine. N’utilisez pas de cartes micro ou
nano SIM déjà détachées dans des porte-cartes mini SIM. Les portecartes et les adaptateurs de cartes peuvent se bloquer et endommager
durablement le logement de la carte SIM.
Inserire la vostra scheda Mini SIM nell’apposita fessura fi no a quando non
scatta un clic. Premendo nuovamente, si estrae la scheda.
Utilizzate solo schede Mini SIM originali. Non inserite nel portaschede
Mini SIM schede Micro SIM o Nano SIM rovinate. Il portaschede e
l’adattatore possono incastrarsi e danneggiare permanentemente lo
slot della scheda SIM.
ée
Insert the Mini SIM Card
Mini-SIM-Karte einstecken
Minisimkaart plaatsen
Wkładanie karty SIM
Insertion d’une carte mini SIM
Inserimento della scheda Mini SIM
Plug in the Antennas
Antennen anschließen
Antennes aansluiten
Podłączenie anten
Connecter les antennes
Collegamento delle antenne
S
S
0
W
AN
ANANAN
A
A
A
N
N
A
333
o
e
USUSUS
Mini SIM
Micro SIM
Nano SIM
Fon S
0
LAN 1
WAN
Fon 2
DSL
LTE
Power/LTE • DSL
WLAN
Fon/DECT
Connect/WPS
Info
FON 1
LTE
Fon 2DSL
0
LAN 1WANFon S
LAN 2
PowerLAN 4LAN 3
LAN 2
LAN 1
LAN 3
LAN 4
Power
LTE
LAN 1WANFon S0Fon 2DSL
LAN 2
PowerLAN 4LAN 3
6890
LT E
Quick Guide
Kurzanleitung
Korte handleiding
Skrócona instrukcja obsługi
Notice abrégée
Notice abrég
Guida rapida
Guida rapida
Power / LTE • DSL
• lights up for LTE or
DSL connection
• fl ashes when LTE and DSL connection
are interrupted
WLAN
• press for WiFi on/off
• lights up when WiFi is on
Fon/DECT
• press for telephone search
• lights up during a telephone call
• fl ashes when voice messages are waiting in
the network
Connect/WPS
• press to register wireless or DECT device
• fl ashes while wireless or DECT device is registering
Info
• fl ashes when messages are waiting on the FRITZ!Box answering machine
(confi gurable)
• lights red for important notifi cation on http://fritz.box
Eigene Einstellungen
Own settings
WLAN-Funknetz (SSID) Wireless radio network (SSID)
WLAN-Netzwerkschlüssel Network key
FRITZ!Box-Kennwort FRITZ!Box password
Notice
07/2017 • 521494001
Fon 1
B
S
U
er
w
Po
LAN 4
N 3
LA
N 2
A
L
1
LAN
FON 1
Power
LAN 4
LAN 3
LAN 2
LAN 1
WAN
0
Fon S
Fon 2
DSL
LTE
WAN
0
FON S
FON 2
FON 1
DSL
LTE
LAN 1WANFon S0Fon 2DSL
LAN 2
PowerLAN 4LAN 3
 Loading...