

Page 1
PEFC
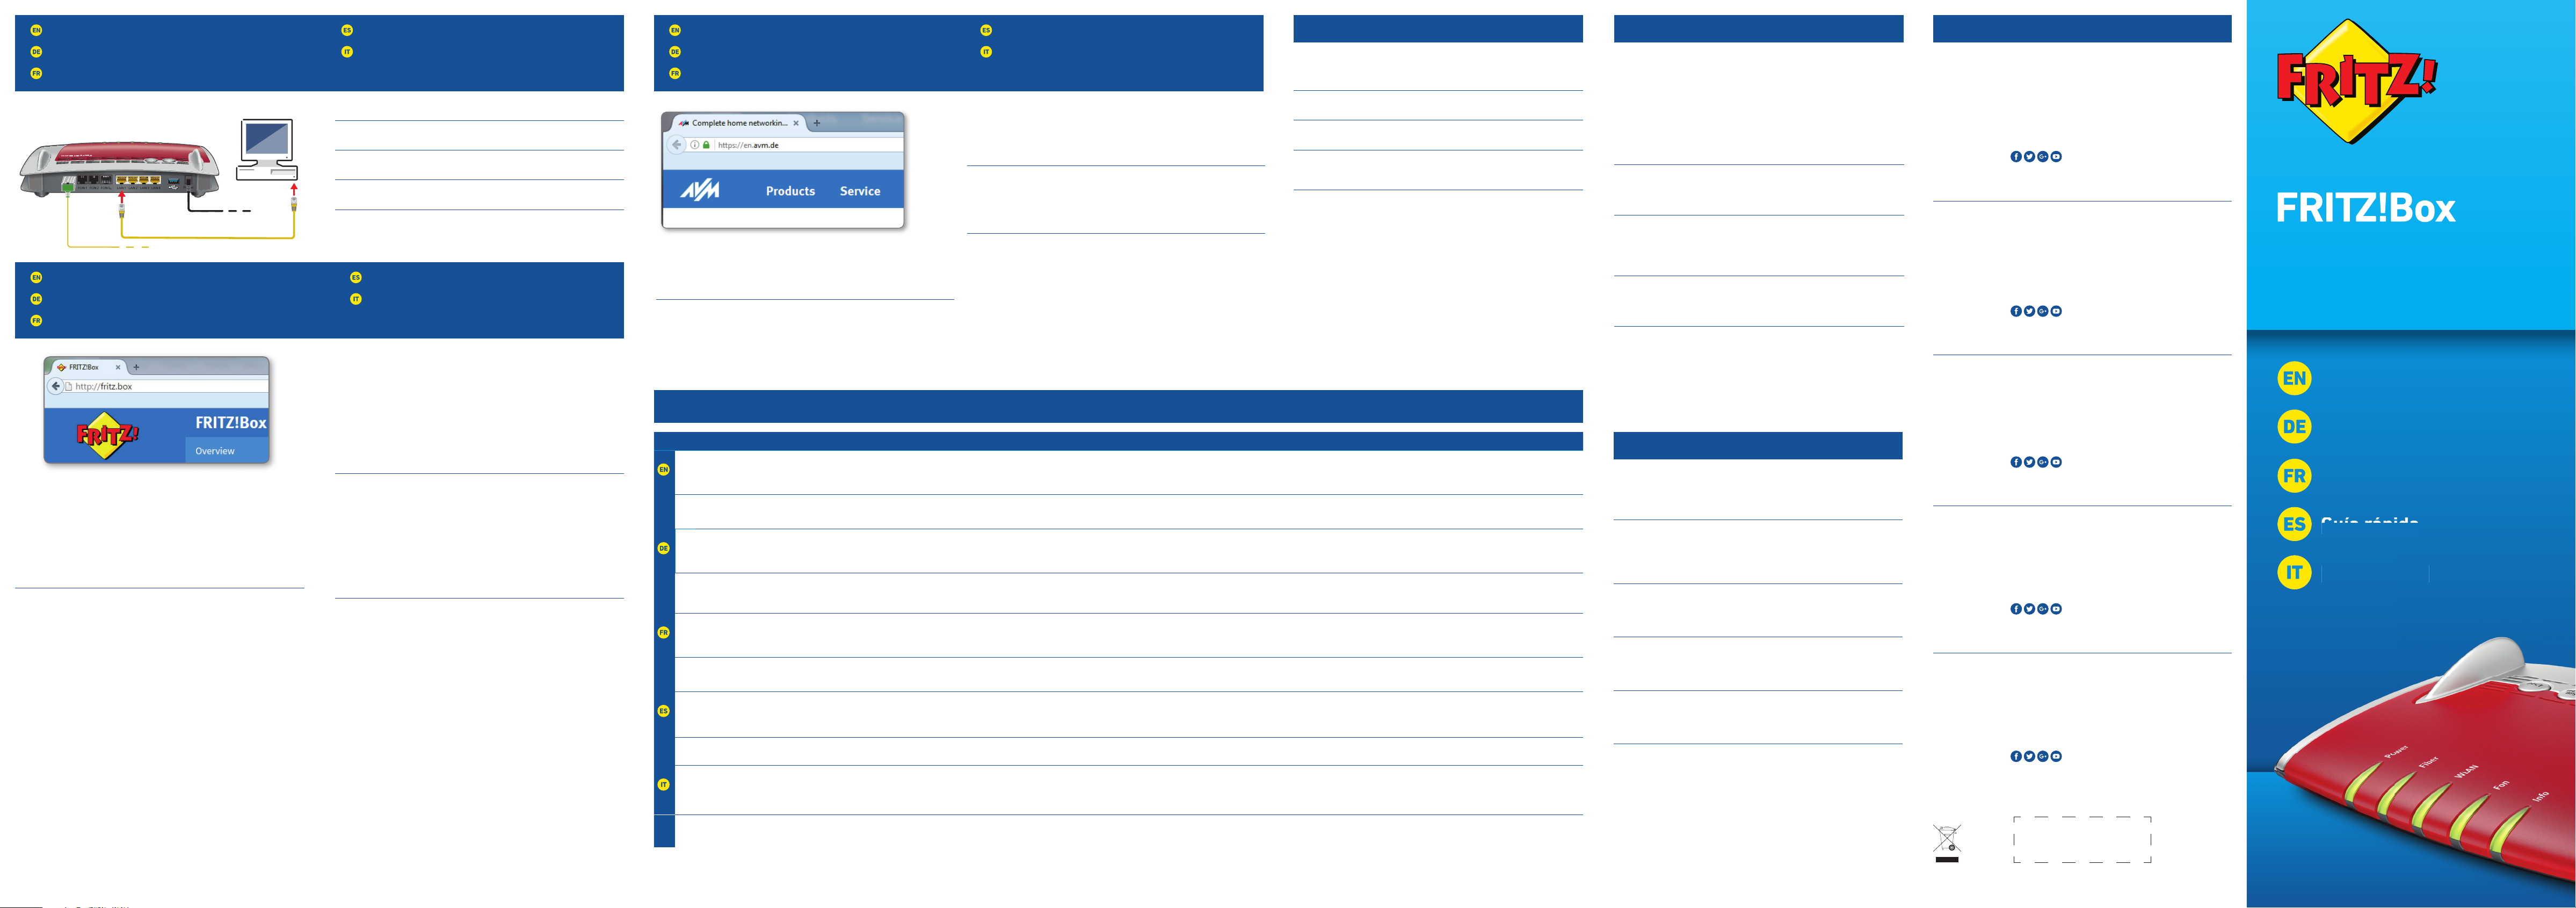
Connecting a Computer to the LAN Port
Computer an LAN anschließen
Connexion d’un ordinateur au réseau local
Conexión a través de LAN
Collegamento di un computer alla rete LAN
LED
USB
Quick Guide
Kurzanleitung
Notice abrégée
Guía rápida
Guida rapida
rápida
a
Confi guration with http://fritz.box
Einrichten mit http://fritz.box
Confi gurer avec http://fritz.box
Confi gurar en la interfaz web http://fritz.box
Confi gurazione con http://fritz.box
Surfi ng the Net
Im Internet surfen
Naviguer sur Internet
Navegar en Internet
Navigazione su Internet
© AVM Computersysteme Vertriebs GmbH • Documentation release 08/2018 • 521546002
You can connect computers to the FRITZ!Box using the yellow network cable.
Sie können Ihren Computer mit einem LAN-Kabel mit der FRITZ!Box
verbinden.
Vous pouvez raccorder votre ordinateur à FRITZ!Box à l’aide du câble réseau
jaune.
A su FRITZ!Box podrá conectar ordenadores con la ayuda del cable de red
amarillo.
Potete collegare i computer al FRITZ!Box con il cavo di rete giallo.
As soon as the FRITZ!Box has been confi gured with your account information,
you can surf the web using all connected computers.
• Start a web browser.
• Enter a web address.
Sobald die FRITZ!Box mit Ihren Zugangsdaten eingerichtet ist, können Sie mit
allen angeschlossenen Computern im Internet surfen.
• Starten Sie einen Internetbrowser.
• Geben Sie eine Internetadresse ein.
Dès que votre FRITZ!Box est confi gurée avec vos données d’accès, vous pouvez
commencer à naviguer sur Internet avec tous les ordinateurs connectés.
• Lancez un navigateur Internet.
• Saisissez une adresse Internet.
Una vez haya instalado e indicado en su FRITZ!Box los datos de acceso podrá
navegar de inmediato desde cualquiera de los ordenadores conectados.
• Inicie un navegador de Internet.
• Indique una dirección de Internet.
Non appena avete terminato la confi gurazione del FRITZ!Box con i vostri dati di
accesso, potete navigare in Internet con tutti i computer collegati.
• Avviate un browser web.
• Immettete un indirizzo Internet.
The FRITZ!Box has two USB ports to which you can connect various USB
devices. All computers in the network can use the USB devices that you
connect to these ports.
Die FRITZ!Box hat zwei USB-Anschlüsse. Alle Computer im Netzwerk können
die USB-Geräte verwenden, die Sie an diesen Anschlüssen anschließen.
FRITZ!Box a deux ports USB. Les périphériques USB reliés à ces deux ports
peuvent être utilisés par tous les ordinateurs connectés au sein du réseau.
Su FRITZ!Box tiene dos puertos de conexión USB. Los dispositivos USB que
conecte a estos puertos podrán ser utilizados por todos ordenadores que se
encuentren en su red.
Il FRITZ!Box è dotato di due porte USB. Tutti i computer della rete possono
usare i dispositivi USB collegati a queste porte.
Power Fiber WLAN Fon Info
fl ashing
Adopting the wireless LAN
settings, switching the radio
network on or off , performing
WPS
Flashes when voice messages are waiting in
the network
green: Updating FRITZ!OS, Stick&Surf procedure in progress, freely
confi gurable
red: An error occurred, open a web browser and enter http://fritz.box
on
FRITZ!Box is ready for operation An internet connection is active Wireless LAN functionality active A telephone connection is active green: The Stick&Surf procedure has been concluded, freely confi gurable
red: An error occurred, open a web browser and enter http://fritz.box
blinkt
WLAN-Einstellungen werden
übernommen, Funknetz wird einoder ausgeschaltet, WPS wird
ausgeführt
Blinkt bei Sprachnachrichten im Netz grün: FRITZ!OS wird aktualisiert, Stick&Surf läuft,
frei einstellbar
rot: Es ist ein Fehler aufgetreten: Öff nen Sie http://fritz.box im Browser
leuchtet
FRITZ!Box ist betriebsbereit Eine Internetverbindung besteht WLAN-Funktion ist aktiv Eine Telefonverbindung besteht grün: Stick&Surf ist abgeschlossen, frei einstellbar
rot: Es ist ein Fehler aufgetreten: Öff nen Sie http://fritz.box im Browser
clignote
Les paramètres sans fi l vont être
acceptés, le réseau sans fi l est en
cours de (dés)activation, le WPS
est en cours d’exécution
Clignote en cas de messages vocaux au sein
du réseau
vert: FRITZ!OS est en cours de mise à jour, l’opération Stick&Surf est en cours,
réglage libre
rouge : une erreur s’est produite. Ouvrez un navigateur Internet puis saisissez
l’adresse http://fritz.box
allumé
FRITZ!Box est en état de
fonctionner
Une liaison Internet est en cours La fonction sans fi l est active Une communication téléphonique est en
cours
vert : l’opération Stick&Surf est terminée, réglage libre
rouge : une erreur s’est produite. Ouvrez un navigateur Internet puis saisissez
l’adresse http://fritz.box
parpadea
Se está ajustando la
confi guración WiFi. Se está
activando/desactivando WiFi. Se
está ejecutando WPS
Parpadea si hay un mensaje de voz en la red verde: se está actualizando el FRITZ!OS, se está ejecutando Stick & Surf,
confi gurable
rojo: error. Abra http://fritz.box en el navegador
brilla
FRITZ!Box está funcionando Existe una conexión a Internet La red inalámbrica se encuentra
activa
Se está realizando una
conexión telefónica
verde: se ha concluido Stick & Surf, confi gurable
rojo: error. Abra http://fritz.box en el navegador
lampeggia
Le impostazioni wireless vengono
applicate. La rete wireless viene
attivata o disattivata. È in corso
l’esecuzione di WPS
Lampeggia per i messaggi vocali in rete verde: l’aggiornamento di FRITZ!OS è in corso, il procedimento Stick&Surf è in
corso, impostabile
rosso: si è verifi cato un errore. Aprite un browser web e digitate http://fritz.box
acceso
Disponibilità del FRITZ!Box È attiva una connessione Internet La funzione wireless è attiva È attiva una connessione telefonica verde: il procedimento Stick&Surf è concluso, impostabile
rosso: si è verifi cato un errore. Aprite un browser web e digitate http://fritz.box
Service
CE
Radio Frequency Specifi cations
AVM declares herewith that the device is compliant with the basic
requirements and the relevant rules in directives 2014/53/EU,
2009/125/EC and 2011/65/EU. The long version of the declaration of CE
conformity is available at http://en.avm.de/ce.
Hiermit erklärt AVM, dass sich das Gerät in Übereinstimmung mit den
grundlegenden Anforderungen und den anderen relevanten Vorschriften der
Richtlinien 2014/53/EU, 2009/125/EG sowie 2011/65/EU befi ndet.
Die Langfassung der CE-Konformitätserklärung fi nden Sie in englischer
Sprache unter
http://en.avm.de/ce.
Hiermee verklaart AVM dat het apparaat overeenstemt met de fundamentele
vereisten en de andere relevante voorschriften van de richtlijnen 2014/53/EU,
2009/125/EG en 2011/65/EU. De EG-verklaring van overeenstemming vindt u
in het Engels op
http://en.avm.de/ce.
AVM déclare par la présente que l’appareil est conforme aux exigences
essentielles et aux instructions pertinentes des directives 2014/53/UE,
2009/125/CE et 2011/65/UE. Vous trouverez la version longue de la déclaration
de conformité CE à l’adresse http://en.avm.de/ce (en langue anglaise).
Por la presente declara AVM, que el dispositivo cumple con los requisitos
esenciales y las disposiciones pertinentes de las Directivas 2014/53/UE,
2009/125/EC y 2011/65/UE. Podrá descargar la versión completa de la
declaración CE (en idioma inglés) en la página
http://en.avm.de/ce.
AVM dichiara che il dispositivo è conforme ai requisiti fondamentali e alle
disposizioni inerenti delle direttive 2014/53/UE, 2009/125/CE e 2011/65/UE.
Il testo integrale della dichiarazione di conformità CE è disponibile in lingua
inglese all’indirizzo
http://en.avm.de/ce.
WLAN /WiFi
2,4-GHz: 2,4 GHz – 2,483 GHz, max. 100 mW
5-GHz: 5,15 GHz – 5,35 GHz, max. 200 mW, 5,47 GHz – 5,725 GHz,
max. 1000mW
In the 5-GHz band for wireless LAN, the range from 5.15GHz to 5.35GHz is
intended only for indoor use. This restriction or requirement is eff ective in the
EU member states AT, BE, BG, CY, CZ, DE, DK, EE, EL, ES, FI, FR, HR, HU, IE, IT,
LT, LU, LV, MT, NL, PL, PT, RO, SE, SI, SK, UK
Der Bereich von 5,15GHz bis 5,35GHz ist nur für den Betrieb in
geschlossenen Räumen bestimmt. Diese Beschränkung oder Anforderung gilt
in den EU-Mitgliedsstaaten AT, BE, BG, CY, CZ, DE, DK, EE, EL, ES, FI, FR, HR, HU,
IE, IT, LT, LU, LV, MT, NL, PL, PT, RO, SE, SI, SK, UK.
Dans la bande des 5GHz destinée aux réseaux sans fi l, la plage comprise
entre 5,15GHz et 5,35GHz est réservée à une utilisation à l’intérieur. Cette
restriction ou exigence s’applique dans les États membres de l’UE suivants:
AT, BE, BG, CY, CZ, DE, DK, EE, EL, ES, FI, FR, HR, HU, IE, IT, LT, LU, LV, MT, NL, PL,
PT, RO, SE, SI, SK, UK.
En la banda de 5GHz para la red inalámbrica, el rango de 5,15GHz a 5,35GHz
está destinado solo para uso en interiores. Esta restricción o requisito se
aplica en los estados miembros de la Unión Europea: AT, BE, BG, CY, CZ, DE,
DK, EE, EL, ES, FI, FR, HR, HU, IE, IT, LT, LU, LV, MT, NL, PL, PT, RO, SE, SI, SK, UK.
Nella banda a 5GHz il campo compreso tra 5,15GHz e 5,35GHz è adatto solo
per l’utilizzo in ambienti chiusi. Questa restrizione o requisito si applica negli
stati membri dell’UE: AT, BE, BG, CY, CZ, DE, DK, EE, EL, ES, FI, FR, HR, HU, IE, IT,
LT, LU, LV, MT, NL, PL, PT, RO, SE, SI, SK, UK.
DECT
1880MHz – 1900MHz, max. 250mW
• Set up the FRITZ!Box for internet connections in the user interface. Open
an internet browser and enter http://fritz.box.
• Follow the instructions on the screen and enter your FRITZ!Box
password. Your FRITZ!Box password is printed on a sticker on the base of
the FRITZ!Box and on your “FRITZ!Notice” service card.
• Follow the further instructions on the screen and enter your internet
account information that you received from your internet service provider
in a separate mailing.
Have fun surfi ng with your FRITZ!Box!
• Die FRITZ!Box hat eine Benutzeroberfl äche, in der Sie die Verbindung zum
Internet einrichten. Geben Sie dazu in einem Internetbrowser http://fritz.
box ein.
• Folgen Sie den Anweisungen auf dem Bildschirm und geben Sie
Ihr FRITZ!Box-Kennwort ein. Ihr FRITZ!Box-Kennwort steht auf der
Unterseite der FRITZ!Box und auf Ihrer Servicekarte „FRITZ!Notiz“.
• Folgen Sie weiter den Anweisungen auf dem Bildschirm und geben Sie
Ihre Internetzugangsdaten ein, die Sie in einem separaten Schreiben von
Ihrem Internetanbieter erhalten haben.
Wir wünschen Ihnen viel Spaß beim Surfen mit Ihrer FRITZ!Box.
• Confi gurez les connexions Internet de FRITZ!Box sur l’interface utili-
sateur. Lancez un navigateur Internet puis saisissez http://fritz.box.
• Suivez les instructions qui apparaissent sur votre écran, et saisissez votre
mot de passe FRITZ!Box. Celui-ci fi gure sur la partie inférieure de votre
FRITZ!Box et sur la fi che d’information «FRITZ!Notice » .
• Continuez à suivre les instructions qui apparaissent sur votre écran,
et saisissez vos données d’accès à Internet qui vous ont été envoyées
séparément par votre fournisseur d’accès à Internet.
Désormais, vous pourrez profi ter pleinement de la navigation avec votre
FRITZ!Box.
• En la interfaz de usuario podrá confi gurar su FRITZ!Box para las
conexiones a Internet. Abra su navegador web e indique
http://fritz.box.
• Siga las instrucciones e indique la contraseña de su FRITZ!Box. La
contraseña se encuentra en la parte inferior de su FRITZ!Box y en la
tarjeta de servicio “FRITZ!Notice”.
• Continúe e indique los datos de acceso a Internet que habrá recibido en
una carta especial de su proveedor de Internet.
¡Esperamos que aproveche al máximo y disfrute todas las ventajas que le
ofrece su FRITZ!Box!
• Nell’interfaccia utente si confi gura il FRITZ!Box per le connessioni
Internet. Avviate un browser web e digitate http://fritz.box.
• Seguite le istruzioni dello schermo e immettete la vostra password per il
FRITZ!Box che si trova alla base del FRITZ!Box e nella scheda di servizio
„FRITZ!Notiz“.
• Seguite le istruzioni dello schermo e immettete i dati di accesso a
Internet, qui vi sono stati forniti in un’apposita lettera del vostro provider
di Internet.
Vi auguriamo buona navigazione con il FRITZ!Box!
Service information and help can be found on our website and in the social
networks:
Service en.avm.de/service
Manual en.avm.de/service/manuals
Guide en.avm.de/guide
Download en.avm.de/nc/service/downloads
Support request en.avm.de/service/support-request/your-support-request
Social networks
Legal notices and technical specifi cations are presented in the FRITZ!Box help
and in the manual.
Service und Hilfe fi nden Sie auf unseren Internetseiten und in den sozialen
Netzwerken:
Service
avm.de/service
Handbuch avm.de/handbuecher
Ratgeber avm.de/ratgeber
Updates avm.de/download
Support avm.de/support
Netzwerke
Rechtliche Hinweise und technische Daten fi nden Sie in der FRITZ!Box-Hilfe und
im Handbuch.
Vous trouverez nos services et notre aide sur notre site et dans les réseaux
sociaux:
Service
be.avm.de/fr/service
Manuel be.avm.de/fr/service/manuels
Conseils be.avm.de/fr/conseils
Téléchargements be.avm.de/fr/nc/service/telechargements
Support technique be.avm.de/fr/service/ondersteuning/selection-de-produit
Réseaux sociaux
Vous trouverez nos mentions légales et spécifi cations techniques dans l’aide de
la FRITZ!Box et dans le manuel.
En nuestro sitio web y en las redes sociales podrá encontrar ayuda y asistencia:
Servicio es.avm.de/servicio
Manual es.avm.de/servicio/manuales-de-usuario
Consejos útiles es.avm.de/consejos-utiles
Descargas es.avm.de/nc/servicio/descargas
Soporte técnico es.avm.de/servicio/solicitud-de-soporte-tecnico/seleccion-
de-productos
Redes sociales
La información legal y los datos técnicos de su FRITZ!Box se encuentran en la
ayuda y en el manual de usuario.
Sul nostro sito web e sui social network potete trovare aiuto e assistenza:
Assistenza
it.avm.de/assistenza
Manual it.avm.de/assistenza/manuali
Guida it.avm.de/guida
Download it.avm.de/nc/assistenza/download
Support request it.avm.de/assistenza/richiesta-di-assistenza/selezione-
prodotti
Social networks
Nella guida del FRITZ!Box e nel manuale potete trovare le informazioni legali e i
dati tecnici.
WLAN
FON
Info
Fiber FON 1 FON 2 FON S0LAN 1 LAN 2 LAN 3 LAN 4
Fiber
Power
S
P
W
WLAN
DECT
Power
5491
Guida rapid
Page 2

Connect to Electrical Power
Am Strom anschließen
Raccordement au réseau électrique
Conectar a la alimentación eléctrica
Collegamento alla rete elettrica
Connect Telephones by Cable
Telefone per Kabel anschließen
Raccordement de téléphones par câble
Conectar los teléfonos con cable
Collegamento di telefoni via cavo
Register Cordless Telephones
Schnurlostelefone anmelden
Enregistrement des téléphones sans fi l
Conectar teléfonos inalámbricos
Registrazione di cordless
Wireless LAN Quick Connection (WPS)
WLAN-Schnellverbindung (WPS)
Connexion sans fi l rapide (WPS)
Conexión inalámbrica rápida (WPS)
Connessione rapida wireless (WPS)
Connect to the Fiber Optic Port
Mit dem Fiber-Anschluss verbinden
Raccordement à l’accès en fi bre optique
Conectar a la conexión de fi bra óptica
Collegamento alla connecssione in fi bra ottica
Package Contents
Lieferumfang
Contenu de la livraison
Contenido del paquete
Contenuto
Safety Instructions
Sicherheitshinweise
Consignes de sécurité
Consejos de seguridad
Indicazioni di sicurezza
Connecting a Computer via Wireless LAN
Computer per WLAN anschließen
Connexion sans fi l d’un ordinateur
Conexión a través de la red inalámbrica
Collegamento di un computer via wireless
WiFi
Connect the FRITZ!Box to electrical power. The “Power” LED begins fl ashing
quickly.
Schließen Sie die FRITZ!Box an den Strom an. Die Leuchtdiode „Power“
beginnt zu blinken.
Raccordez FRITZ!Box au réseau électrique. Le voyant lumineux «Power»
commence à clignoter.
Conecte su FRITZ!Box a la alimentación eléctrica. El díodo “Power” comenzará
a parpadear.
Collegate il FRITZ!Box alla rete elettrica. Il LED “Power” inizia a lampeggiare.
SC connector, for connecting to the FRITZ!Box and the
fi ber socket.
SC-Stecker, zum Anschluss an die FRITZ!Box und die
Fiber-Buchse.
Connecteur SC, pour le raccordement à FRITZ!Box et
la prise optiqu.
Conector SC, para la conexión al FRITZ!Box y la toma
Fiber.
Spina SC per il collegamento al FRITZ!Box e alla presa
per fi bra ottica.
LC connector, supplied by various providers for
connecting to the fi ber socket.
LC-Stecker, bei verschiedenen Anbietern zum
Anschluss an die Fiber-Buchse.
Connecteur LC, pour le raccordement à la prise
optique chez de nombreux fournisseurs.
Conector LC, que diferentes proveedores utilizan para
la conexión a la toma Fiber.
Spina LC, vari provider la off rono per il collegamento
alla presa per fi bra ottica.
• Connect analog telephones to the “FON1” and “FON2” sockets. The
FRITZ!Box is equipped with two diff erent types of sockets: one on the back
for RJ11 connectors, and one on the side for TAE connectors.
• Connect ISDN telephones to the “FONS
0
” socket.
• Schließen Sie analoge Telefone an die Buchsen „FON1“ und „FON2“ an.
Die FRITZ!Box hat diese Buchsen in zwei Ausführungen: hinten für RJ11und seitlich für TAE-Stecker.
• Schließen Sie ISDN-Telefone an die Buchse „FONS
0
“ an.
• Raccordez vos téléphones analogiques aux prises «FON1» et «FON2».
FRITZ!Box est dotée de deux types de prises diff érents (RJ11 au dos, TAE
sur le côté).
• Raccordez vos téléphones RNIS à la prise «FONS
0
».
• Conecte teléfonos analógicos a los puertos “FON1” y “FON2” que se
encuentran al respaldo de su FRITZ!Box. Su FRITZ!Box tiene dos tipos de
puertos de conexión: RJ11, en el panel de conexión y puertos TAE en la
parte lateral.
• Podrá conectar teléfonos RDSI al puerto “FONS
0
”.
• Collegate i telefoni analogici alle prese “FON1” e “FON2”. Il FRITZ!Box
dispone di due versioni di queste prese: sul retro per RJ11 e lateralmente
per connettori TAE.
• Collegate i telefoni ISDN alla presa “FONS
0
”.
2
Computers with wireless LAN can be connected with the FRITZ!Box using
WPS:
• Click the WLAN icon in the notifi cation area of the Windows task bar.
• A list appears on the screen showing all wireless networks.
• Select the wireless network of your FRITZ!Box and click “Connect”.
• Press the “WPS” button on the FRITZ!Box5491 until the “WLAN” LED
begins fl ashing.
Sie können WLAN-Geräte per WPS mit der FRITZ!Box verbinden:
• Klicken Sie in der Windows-Taskleiste auf das WLAN-Symbol.
• Auf dem Bildschirm erscheint eine Liste mit Drahtlosnetzwerken.
• Wählen Sie das Drahlosnetzwerk Ihrer FRITZ!Box5491 aus und klicken
Sie auf „Verbinden“.
• Drücken Sie den WPS-Taster der FRITZ!Box5491 so lange, bis die
Leuchtdiode „WLAN“ blinkt.
Vous pouvez connecter vos périphériques sans fi l à FRITZ!Box par WPS:
• Cliquez sur l’icône de réseau sans fi l dans la barre des tâchesWindows.
• Une liste de réseaux sans fi l s’affi che sur votre écran.
• Sélectionnez le réseau sans fi l de votre FRITZ!Box5491, puis cliquez sur
«Connecter».
• Enfoncez la toucheWPS de votre FRITZ!Box5491 jusqu’à ce que la diode
électroluminescente «WLAN» clignote.
Podrá conectar dispositivos inalámbricos a FRITZ!Box a través de WPS:
• Haga clic en la barra de tareas de Windows sobre el símbolo de la red
inalámbrica.
• En la pantalla aparecerá una lista de las redes inalámbricas en su
entorno.
• Seleccione la red de su FRITZ!Box5491 y haga clic sobre “Conectar”.
• Presione el botón “WPS” en su FRITZ!Box5491 hasta que el indicador
“WLAN” parpadee.
Tramite WPS potete collegare al FRITZ!Box i dispositivi wireless:
• Nella barra delle applicazioni di Windows cliccate l’icona della rete
wireless.
• Sullo schermo compare una lista delle reti wireless.
• Selezionate la rete wireless del FRITZ!Box5491 e cliccate “Collega”.
• Premete il tasto WPS del FRITZ!Box5491 fi nché il LED “WLAN” non
lampeggia.
Computers with wireless LAN and the operating system MACOS or others can
be connected with the FRITZ!Box using the network key. The network key is
printed on your FRITZ!Notice service card and on the bottom of the FRITZ!Box.
Computer mit WLAN und dem Betriebssystem MACOS oder anderen können
Sie mit dem WLAN-Netzwerkschlüssel an der FRITZ!Box anschließen. Sie
fi nden den WLAN-Netzwerkschlüssel auf Ihrer Servicekarte FRITZ!Notiz und
auf der Unterseite der FRITZ!Box.
Vous pouvez connecter vos ordinateurs dotés d’une fonction sans fi l et du
système d’exploitation MACOS ou autres à FRITZ!Box à l’aide de la clé réseau
sans fi l. Vous trouverez la clé réseau sans fi l sur votre fi che d’information
«FRITZ!Notice» ainsi que sur la partie inférieure de votre FRITZ!Box.
Ordenadores con conexión WiFi y el sistema operativo MACOS u otro
pueden conectarse a su FRITZ!Box indicando la clave de la red inalámbrica.
Encontrará la clave de red en la tarjeta FRITZ!Notice y en la parte inferior del
FRITZ!Box.
Potete collegare al FRITZ!Box i computer dotati di funzione wireless e del
sistema operativo MACOS o di altri sistemi, usando la chiave di rete wireless.
La chiave di rete wireless si trova sulla scheda di servizio FRITZ!Notice e alla
base del FRITZ!Box.
Connect the fi ber optic cable to the socket on the FRITZ!Box labeled „Fiber“,
and to the socket on the fi ber outlet designated for internet access. The fi ber
optic cable is not included with delivery of the FRITZ!Box 5491. It is supplied
by your internet provider.
• Do not hold the ends of the fi ber optic cable in front of your
eyes (laser).
• Do not touch or contaminate the ends of the fi ber optic cable.
• Do not bend the fi ber optic cable.
Schließen Sie das Glasfaserkabel an die Buchse „Fiber“ der FRITZ!Box und
an die für den Internetzugang vorgesehene Buchse der Fiber-Dose an. Das
Glasfaserkabel gehört nicht zum Lieferumfang der FRITZ!Box 5491. Es wird
von Ihrem Internetanbieter bereitgestellt.
• Halten Sie die Enden das Glasfaserkabels nicht vor die Augen
(Laser).
• Berühren oder verschmutzen Sie nicht die Enden des
Glasfaserkabels.
• Knicken Sie das Glasfaserkabel nicht!
Insérez le câble à fi bre optique dans la prise «Fiber» de FRITZ!Box et la prise
prévue pour l’accès Internet sur le boîtier optique. Le câble à fi bre optique
n’est pas livré avec FRITZ!Box 5491. Il vous est fourni par votre fournisseur
d’accès.
• Ne tenez pas les extrémités du câble à fi bre optique devant
vos yeux (laser).
• Ne touchez pas, ne salissez pas les extrémités du câble à
fi bre optique.
• Ne pliez pas le câble à fi bre optique.
Conecte el cable de fi bra óptica al puerto “Fiber” de su FRITZ!Box y a la toma
de fi bra (Fiber) destinada para la conexión a Internet. El cable de fi bra óptica
no se suministra con su FRITZ!Box 5491. Es proporcionado por su proveedor
de Internet.
• No sostenga los extremos del cable de fi bra óptica en frente
de sus ojos (Laser).
• No toque ni contamine los extremos del cable de fi bra óptica.
• No doble el cable de fi bra óptica.
Collegate il cavo in fi bra ottica alla porta “Fiber” del FRITZ!Box e all’apposita
presa per l’accesso a Internet della presa per la fi bra ottica. Il cavo in fi bra
ottica non viene fornito insieme al FRITZ!Box 5491. Lo mette a disposizione il
vostro provider di Internet.
• Non tenete le estremità del cavo in fi bra ottica davanti agli
occhi (laser).
• Evitate di toccare o sporcare le estremità del cavo in fi bra
ottica.
• Non piegate il cavo in fi bra ottica.
• Do not install the FRITZ!Box during an electrical storm.
• During a storm, disconnect the FRITZ!Box from the power supply and from
the fi ber optic connection.
• The ventilation slits of the FRITZ!Box must never be obstructed.
• Do not place the FRITZ!Box on excessively heat-sensitive surfaces.
• Insert the FRITZ!Box into an outlet that is easy to reach.
• The FRITZ!Box is intended only for indoor operation.
See also the security instructions in your FRITZ!Box manual.
• Installieren Sie die FRITZ!Box nicht bei Gewitter.
• Trennen Sie die FRITZ!Box bei Gewitter vom Strom und vom FiberAnschluss.
• Die Lüftungsschlitze der FRITZ!Box müssen immer frei sein.
• Stellen Sie die FRITZ!Box nicht auf wärmeempfi ndliche Flächen.
• Schließen Sie die FRITZ!Box an eine leicht erreichbare Steckdose an.
• Die FRITZ!Box darf nur innerhalb von Gebäuden verwendet werden.
Beachten Sie auch die Sicherheitshinweise in Ihrem FRITZ!Box-Handbuch.
• N’installez pas votre FRITZ!Box pendant un orage.
• En cas d’orage, débranchez votre FRITZ!Box du réseau d’alimentation
électrique et de l’accès en fi bre optique.
• Les fentes d’aération de votre FRITZ!Box ne doivent pas être obstruées.
• Ne posez pas votre FRITZ!Box sur des surfaces sensibles à la chaleur.
• Branchez FRITZ!Box sur une prise facile d’accès.
• FRITZ!Box doit être utilisée uniquement à l’intérieur d’un bâtiment.
Tenez également compte des consignes de sécurité fournies dans le
manuel de votre FRITZ!Box
.
• No instale su FRITZ!Box durante una tormenta eléctrica.
• Desconecte su FRITZ!Box durante una tormenta eléctrica tanto de la
corriente, como de la conexión Fiber.
• No se debe bloquear la rejilla de ventilación de su FRITZ!Box.
• No coloque su FRITZ!Box sobre una superfi cie que no resista el calor,
ya que el router se calienta durante el uso normal.
• Conecte su FRITZ!Box a una toma eléctrica de fácil acceso.
• Su FRITZ!Box sólo debe ser utilizado en interiores.
¡Tenga en cuenta las indicaciones de seguridad que encontrará en el
manual de usuario de FRITZ!Box!
• Non installate il FRITZ!Box durante un temporale.
• Durante i temporali scollegate il FRITZ!Box dall’alimentazione elettrica e
dalla connessione in fi bra ottica.
• Le fessure di ventilazione del router devono restare sempre libere.
• Non collocate il FRITZ!Box su superfi ci sensibili al calore.
• Collegate il FRITZ!Box ad una presa di corrente facilmente accessibile.
• Il FRITZ!Box va utilizzato esclusivamente all’interno degli edifi ci.
Osservate anche le indicazioni di sicurezza riportate nel manuale del
FRITZ!Box.
Start your telephone.
• If you have a FRITZ!Fon, press the “DECT” button on the FRITZ!Box. The
“Fon” LED fl ashes and the FRITZ!Fon is registered immediately.
• Telephones from other manufacturers must fi rst be made ready for
registration; then enter the PIN of the FRITZ!Box on the telephone (a value
of “0000” is preconfi gured) before concluding registration with the “DECT”
button.
Starten Sie Ihr Telefon.
• Wenn Sie ein FRITZ!Fon haben, drücken Sie die „DECT“-Taste der
FRITZ!Box. Die Leuchtdiode „Fon“ blinkt und das FRITZ!Fon wird sofort
angemeldet.
• Telefone anderer Hersteller bringen Sie zunächst in Anmelde bereitschaft
und geben die PIN der FRITZ!Box am Telefon ein (voreingestellter Wert
„0000“), bevor Sie die Anmeldung mit
der „DECT“-Taste abschließen.
Allumez votre téléphone.
• Si vous avez un FRITZ!Fon, appuyez sur la touche «DECT» de votre
FRITZ!Box. Le voyant «Fon» clignote et le FRITZ!Fon est enregistré
immédiatement.
• Si vous avez un téléphone d’un autre fabricant, mettez-le en mode
d’attente d’enregistrement, puis saisissez le code PIN de la FRITZ!Box
sur le téléphone (code par défaut: «0000») et terminez l’enregistrement
avec la touche «DECT».
Inicie su teléfono.
• Si tiene un FRITZ!Fon, pulse el botón “DECT” en su FRITZ!Box. El led “Fon”
parpadea y el FRITZ!Fon se conecta de inmediato.
• Con teléfonos de otros fabricantes: ponga primero el teléfono en modo
de espera e ingrese el PIN del FRITZ!Box (valor predeterminado “0000”)
antes de completar la conexión pulsando el botón “DECT”.
Avviate il vostro telefono.
• Se avete un FRITZ!Fon, premete il tasto “DECT” del FRITZ!Box. Il LED “Fon”
lampeggia e il FRITZ!Fon viene subito registrato.
• Per i telefoni di altri produttori dovete innanzitutto avviare la modalità
di registrazione e digitare sul telefono il PIN del FRITZ!Box (valore
preimpostato “0000”) prima di poter completare la registrazione
premendo il tasto “DECT”.
FON 1
FON 2
Power
Fiber
WLAN
Fon
Info
WLAN
WPS
DECT
Quick Guide
Kurzanleitung
Notice abrégée
Guía rápida
Guida rapida
Guía r
ápida
G
rapida
Notice
Factory settings Einstellungen ab Werk
WLAN WPS button
•switch wireless LAN on/oı
» press brieĭ y
•Register wireless LAN device (WPS)
» press longer
Power
•lights up when FRITZ!Box
has electrical power
Fiber
•lights up when Internet
connection is active
WLAN
• lights up when wireless LAN is on
• ĭ ashes during WPS registration
Fon
•lights up during a telephone call
•ĭ ashes when voice messages are
waiting in the network
Info
•ĭ ashes when messages are waiting on the FRITZ!Box
answering machine (conĬ gurable)
DECT button
•page (all telephone handsets ring)
» press brieĭ y
•Register a telephone
» press longer
Power
Fiber
WLAN
Fon
I
nf
o
D
E
C
T
WLAN
W
P
S
DECT
1
2
FON
FON
2
N
2
0
3
4
1
WiFi
Starting the wireless LAN
function and
entering
the network key
Power
F
ib
er
WLAN
F
on
Info
DECT
WL
A
N
WPS
5491
uida
WLAN
FON
Info
Fiber FON 1 FON 2 FON S0LAN 1 LAN 2 LAN 3 LAN 4
Fiber
Power
PS
W
WLAN
DECT
Power
WLAN
FON
Info
Fiber FON 1 FON 2 FON S0LAN 1 LAN 2 LAN 3 LAN 4
Fiber
Power
WPS
WLAN
DECT
Power
o
FON 2
FON 1
Fiber FON 1 FON 2 FON S0LAN 1 LAN 2 LAN 3 LAN 4
Fiber
FON
Info
FON 1
FON 2
WLAN
FON S
DECT
W
P
W
S
LAN
Power
LAN 4
LAN 3
LAN 2
LAN 1
0
Fiber
Power
WPS
WLAN
DECT
Power
P
ow
e
r
F
i
b
er
WLAN
Fon
In
f
Start wireless LAN function
N
A
L
W
DECT
S
P
W
Fiber
WLAN
Power
Info
Fon
 Loading...