


Frigidaire FFRA2822R2, FFRA2922Q2, FFRE1833Q2, FFRE2233Q2, FFRE2533Q2 Installation Instructions
...Installation Instructions
)RU 0edium%78 + Heavy duty %78 $LU &RQGLWLRQHU
READ BEFORE INSTALLING UNIT
INSTALLATION WARNINGS AND CAUTION
 Carefully read the installation manual before beginning.
 )ROORZ HDFK VWHS DV VKRZQ
 2EVHUYH DOO ORFDO VWDWH DQG QDWLRQDO HOHFWULFDO FRGHV DQG E\ TXDOLILHG OLFHQVHG DXWKRUL]HG SHUVRQQHO RQO\
 Pay attention to danger and safety notices.
7R DYRLG ULVN RI SHUVRQDO LQMXU\ SURSHUW\ GDPDJH RU SURGXFW GDPDJH GXH WR WKH ZHLJKW RI WKLV GHYLFH DQG VKDUS HGJHV WKDW PD\ be exposed:
 $LU FRQGLWLRQHUV FRYHUHG LQ WKLV PDQXDO SRVH DQ H[FHVVLYH ZHLJKW KD]DUG 7ZR RU PRUH SHRSOH DUH QHHGHG WR PRYH DQG LQVWDOO WKH XQLW :HDU SURWHFWLYH JORYHV ZKHQHYHU OLIWLQJ RU FDUU\LQJ WKH XQLW $92,' WKH VKDUS PHWDO ILQV RI IURQW DQG UHDU FRLOV 7R SUHYHQW LQMXU\ RU VWUDLQ XVH SURSHU OLIWLQJ DQG FDUU\LQJ WHFKQLTXHV ZKHQ PRYLQJ XQLW
 Carefully inspect location where air conditioner will be instDOOHG %H VXUH LW ZLOO VXSSRUW WKH ZHLJKW RI WKH XQLW RYHUDQ H[WHQGHG period of time.
 Handle air conditioner with care.
 0DNH VXUH DLU FRQGLWLRQHU GRHV QRW IDOO GXULQJ LQVWDOODWLRQ
  ,I D QHZ HOHFWULFDO RXWOHW LV UHTXLUHG KDYH WKH RXWOHW LQVWDOOHG E\ D TXDOLILHG HOHFWULFLDQ EHIRUH LQVWDOOLQJ XQLW
NOTE: DO NOT USE ANY SCREWS OTHER THAN THOSE SPECIFIED HERE.
Preliminary instructions:
window sash seal
Do the following before starting to install unit. See illustrations below. Check dimensions of your unit to determine model type:
Heavy duty |
Medium |
Capacity: a %78 a %78
Unit Height: |
Ǝ |
Ǝ |
Unit Width: |
Ǝ |
Ǝ |
Min. Window Opening: |
Ǝ |
Ǝ |
Min. Window Width: |
Ǝ |
Ǝ |
Max. Window Width: |
Ǝ |
Ǝ |
VDIHW\ ORFN DQGƎ long hex head screw
IRDP JDVNHW top angle
washer head
ORFNLQJ VFUHZ
frame assembly
OHIW
1.Check window opening size: the mounting parts furnished with this air conditioner are made to install in a wooden sill double-hung window. The standard parts are for window dimensions listed above. Open sash to
D PLQLPXP RI Ǝ PP ),*
2.Check condition of window: all wood parts of window must be in good shape and able to firmly hold the needed
VFUHZV ,I QRW PDNH UHSDLUV EHIRUH LQVWDOOLQJ XQLW
3.Check your storm windows: ,I \RXU VWRUP ZLQGRZ IUDPH GRHV QRW DOORZ WKH FOHDUDQFH UHTXLUHG FRUUHFW E\ DGGLQJ D SLHFH RI ZRRG DV VKRZQ ),* RU E\ UHPRYLQJ storm window while room air conditioner is being installed.
FIG.1
side retainer 
|
Ǝ long |
|
screws and |
bottom rail |
ORFNQXWV |
seal to unit |
|
|
ORFNQXW Ǝ |
|
long flat |
|
head bolt |
|
sill angle |
|
EUDFNHW |
window frame
VXSSRUW EUDFNHW assemblyULJKW
FIG.2
sash
sash
Ǝ PLQ |
|
Ǝ PLQ |
||||||
inner sill |
|
|
||||||
|
|
|
|
|
|
|
|
|
|
|
|
|
|
|
|
|
|
|
|
|
|
|
|
|
|
|
outer sill
storm window frame or other obstruction
Ǝ PLQƎ PLQ Ǝ PLQ
outer sill
storm window frame or other obstruction
inner sill
ERDUG WKLFNQHVV DV UHTXLUHG DORQJ HQWLUH LQQHU window sill; fasten to inner sill with two nails or screws.
$

Installation Instructions
4. Check for anything that could block airflow |
|
|
|
|
|
|
|
|
|
|
|
|
|
|
|
|
|
|
|
||
&KHFN DUHD RXWVLGH RI ZLQGRZ IRU WKLQJV VXFK DV VKUXEV WUHHV RU DZQLQJV ,QVLGH EH VXUH IXUQLWXUH GUDSHV RU EOLQGV |
|||||||||||||||||||||
will not stop proper air flow. |
|
|
|
|
|
|
|
|
|
|
|
|
|
|
|
|
|
|
|
|
|
5. Check the available electrical service |
|
|
|
|
|
|
|
|
|
|
|
|
|
|
|
|
|
|
|
||
|
|
|
|
|
|
WARNING |
$YRLG ILUH KD]DUG RU HOHFWULF |
||||||||||||||
Power supply must be the same as that shown on the unit serial |
|
|
VKRFN 'R QRW XVH DQ H[WHQVLRQ FRUG RU DQ |
||||||||||||||||||
nameplate. (See Use & Care Guide for serial plate location.) Power |
|
|
|||||||||||||||||||
|
|
DGDSWRU SOXJ 'R QRW UHPRYH DQ\ SURQJ |
|||||||||||||||||||
FRUG LV Ǝ ORQJ %H VXUH \RX KDYH DQ RXWOHW QHDU |
|
|
|
|
|||||||||||||||||
|
|
|
|
from the power cord. |
|
|
|||||||||||||||
$OO PRGHOV KDYH D SURQJ VHUYLFH SOXJ WR SURYLGH SURSHU VHUYLFH DQG |
|
|
|
||||||||||||||||||
|
|
|
|
|
|
|
|
|
|
|
|
|
|
|
|
||||||
VDIH SRVLWLYH JURXGLQJ 'R QRW FKDQJH SOXJ LQ DQ\ ZD\ 'R QRW XVH DQ |
|
|
|
|
|
|
|
|
|
|
|
|
|
|
|
|
|||||
DGDSWHU SOXJ ,I \RXU SUHVHQW ZDOO RXWOHW GRHV QRW PDWFK \RXU SOXJ FDOO |
|
|
|
|
|
|
|
|
|
|
|
|
|
|
|
|
|||||
D TXDOLILHG HOHFWULFLDQ WR PDNH WKH QHHGHG FKDQJH |
|
|
|
|
|
|
|
|
|
|
|
|
|
|
|
|
|
|
|
||
6. Carefully unpack air conditioner |
|
|
|
|
|
|
115V |
|
|
|
|
|
|
|
|
|
|||||
5HPRYH DOO SDFNLQJ PDWHULDO 3URWHFW IORRU RU RWKHU VWDEOH IODW VXUIDFH |
|
|
|
230V |
230V |
||||||||||||||||
|
|
|
15A |
||||||||||||||||||
ZLWK FRYHULQJ WR SUHYHQW VFUDWFKHV IURP XQLW :LWK WKH DLG RI DQ |
|
|
|
|
|||||||||||||||||
|
|
|
|
|
|
|
|
|
|
15A |
20A |
||||||||||
DVVLVWDQW UHPRYH XQLW IURP VW\URIRDP EDVH DQG UHVW RQ SURWHFWHG |
|
|
|
|
|
|
|
|
|
|
|
|
|
|
|
|
|
||||
VXUIDFH 0RYH DQG LQVWDOO XQLW ZLWK WKH DLG RI DQ DVVLVWDQW 6DYH |
|
|
|
|
|
|
|
|
|
|
|
|
|
|
|
|
|
||||
SDFNLQJ DQG VKLSSLQJ ER[ IRU IXWXUH XQLW VWRUDJH |
|
|
|
|
|
|
|
|
|
|
|
|
|
|
*URXQGLQJ 3URQJ |
||||||
$FFHVVRU\ .LW LQFOXGHV |
|
|
|
|
|
|
|
|
|
|
Do not, under any |
||||||||||
|
|
|
|
|
|
|
|
|
|
|
|
|
|||||||||
+DUGZDUH EDJ VKLSSHG LQVLGH |
|
)RDP JDVNHW |
|
|
|
|
|
|
|
230V |
|
circumstances, cut, |
|||||||||
window support brackets) |
|
|
|
|
|
|
|
|
|
30A |
|
remove or bypass the |
|||||||||
|
|
|
|
|
|
|
|
|
|
|
|
||||||||||
|
|
|
|
|
|
|
|
|
|
|
|
|
grounding prong. |
||||||||
:LQGRZ VXSSRUW EUDFNHW |
|
:LQGRZ VDVK VHDO |
|
|
|
|
|
|
|
|
|
||||||||||
|
|
|
|
|
|
|
|
|
|
|
|
|
|
|
|
|
|
||||
6LGH UHWDLQHU |
|
%RWWRP UDLO VHDO |
|
HEAVY DUTY |
|
|
|
|
|
|
|
|
|
||||||||
|
|
|
|
|
|
|
|
|
|
|
|
|
|
|
|||||||
:LQGRZ )LOOHU 3DQHO |
|
7RS DQJOH UDLO |
|
|
|
|
|
|
|
|
|
|
FIG.3 |
||||||||
|
|
|
(22,000~28,500BTU) |
|
|
|
|
|
|
|
|||||||||||
|
|
|
|
|
|
|
|
|
|
|
|
|
|
|
|
|
|
|
|
|
|
0(',80 PRGHOV RQO\ |
|
|
|
|
|
|
|
|
|
|
|
|
|
|
|
|
|
|
|
|
|
+($9< '87< WRS DQJOH UDLO FDQ EH IRXQG LQ FDUWRQ EDVH |
|
|
|
|
|
|
|
|
|
|
|
|
|
|
|
|
|
||||
SDFNDJLQJ ),* |
|
|
|
723 $1*/( 5$,/ |
|
|
|
|
|
|
|
|
|
|
|
||||||
Tools Required |
|
|
|
|
|
|
|
|
|
|
|
|
|
|
|
|
|
|
|
||
|
|
|
|
|
|
|
|
|
|
|
|
|
|
|
|
|
|
|
|
|
|
D ODUJH IODW EODGH VFUHZGULYHU |
|
tape measure |
|
|
|
|
|
|
|
|
|
|
|
|
|
|
|
|
|
||
|
|
|
|
|
|
|
|
|
|
|
|
|
|
|
|
|
|
|
|
|
|
adjustable wrench or pliers |
|
pencil |
|
|
|
|
|
|
|
|
|
|
|
|
|
|
|
|
|
|
|
|
|
|
|
|
|
|
|
|
|
|
|
|
|
|
|
|
|
|
|
|
|
OHYHO |
|
Socket wrenches |
|
|
|
|
|
|
|
|
|
|
|
|
|
|
|
|
|
||
|
|
|
|
|
|
|
|
|
|
|
|
|
|
|
|
|
|
|
|
|
|
3KLOOLSV VFUHZGULYHU |
|
|
|
|
|
|
|
|
|
|
|
|
|
|
|
|
|
|
|
|
|
|
|
|
4W\ |
+DUGZDUH LQ SODVWLF EDJ |
|
|
|
|
|
|
|
|
|
||||||||
+DUGZDUH LQ SODVWLF EDJ |
|
|
|
|
|
|
|
|
4W\ |
||||||||||||
|
|
|
|
|
|
|
|
|
|
|
|
|
|
|
|||||||
Ǝ /RFNLQJ 6FUHZ DQG )ODW |
HD |
|
6LOO $QJOH %UDFNHW |
|
|
|
|
|
|
|
|
|
|||||||||
:DVKHU IRU ZLQGRZ ILOOHU SDQHOV |
|
|
|
|
|
|
|
|
|
|
|
|
|
|
|
|
|
|
|
||
Ǝ /RQJ KH[ KHDG VFUHZ |
7 |
|
|
/RQJ KH[ KHDG ORFNLQJ VFUHZ IRU WRS |
10 |
|
|||||||||||||||
|
|
DQJOH UDLO VLGH UHWDLQHU Ǝ ORQJ |
|
||||||||||||||||||
|
|
|
|
|
|
|
|
||||||||||||||
6DIHW\ /RFN |
1 |
|
Ǝ /RQJ 6FUHZ |
4 ea |
|
and locknut |
||
|
||
Ǝ /RQJ )ODW +HDG %ROW |
HD |
|
and Locknut |
|
6DIHW\ /RFNIRU 9LQ\O &ODG ZLQGRZ
/RFNLQJ VFUHZ ; Ǝ panhead 3KLOOLSV VFUHZV IRU 9LQ\O &ODG ZLQGRZ
weather seals
Ǝ; Ǝ; Ǝ
foam insert |
|
2
Installation Instructions
Window Mounting
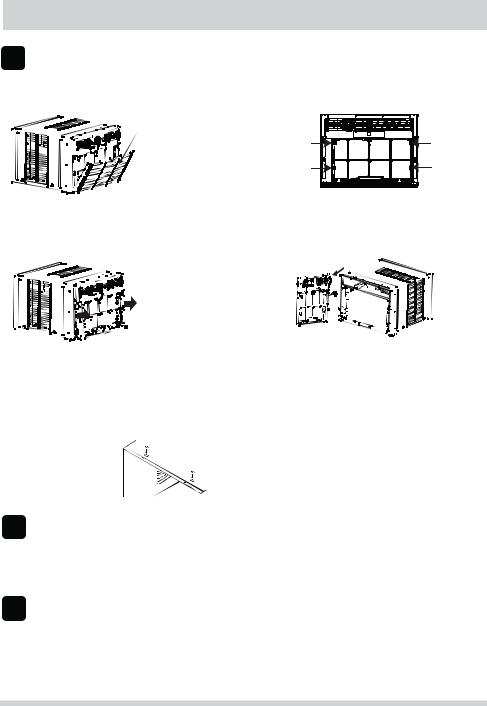
1Remove Air Conditioner from Cabinet
NOTE: Remove any packaging material from cabinet exterior.
1.Pull down on front grille from upper edge. Lift front grille upwards and place to one side. (See FIG.1)
2.Remove filter. To remove, grasp in the middle on each side. Bow filter out to detach top edge from tabs. Once top
is free, lift filter up and out.
FIG.1
Front Grille
FIG.2 |
3.Locate the four Front Panel screws and remove. These screws will be needed to re-install the Front Panel later (See FIG.2).
4.Push metal cabinet side inward to release plastic tabs on each side of Front Panel (see Fig. 3).
5.Rotate Front Panel up until top tabs are free. Pull panel straight out. When pulling out, front panel will also pull free from vent control lever. Depress latch on electronics plug (on some models) to disconnect.
6.Remove Front Panel from unit (see Fig. 4).
FIG.3 |
FIG.4 |
base pan handle


7.Remove shipping screws from top of unit and also on both sides by the base if installed. (See FIG.5)
8.With the aid of an assistant, hold the cabinet while pulling on the base pan handle (see FIG. 4), and carefully remove the air conditioner from cabinet.
9.Add two foam inserts to holes in top of cabinet where shipping screws were removed from. (See FIG.6)
10.Except 22,000BTU model, other heavy duty models (24,000~28,500BTU) come with internal shipping packaging. THIS PACKAGING AND PLASTIC TIES MUST BE REMOVED PRIOR TO INSTALLING THE AIR CONDITIONER BACK INTO THE CABINET. (See FIG.7)
11.Remove plastic wrapping from all points on power cord.
FIG.7
FIG.5 |
shipping |
|
|
Shipping Packaging |
|
|
screws |
|
|
FIG.6 |
Plastic tie |
2Install Top Angle Rail and Side Retainers
1.Remove adhesive strip coating from foam gasket. Attach adhesive side of gasket to bottom of top angle rail. Insert 4
screws from inside of cabinet and secure to top angle rail. |
FIG.8 |
Top angle rail |
2. From inside of cabinet insert 3 screws to attach each side retainer as shown |
|
|
in Fig. 8. Attach side retainers with flat side against cabinet and angled edge toward |
|
|
rear of cabinet. |
|
|
3Assemble Window Filler Panels
1.Place cabinet on floor, a bench, or a table.
2.Slide "I" section at end of window filler panel into side retainer on each side of the cabinet (see FIG. 9 and FIG.10).
3. On each side of cabinet, insert top and bottom legs of window filler panel frame into channel in the top and bottom angle rails.
4. Insert a 7/16" locking screw and flat washer into hole on top leg of each window filler panel (see section 6). Do not
totally tighten. Allow leg to slide freely. Screws will be tightened after Section 6.
3
 Loading...