


P08S/P10S Owner’s Manual
Table of Contents
Important Safety Guidelines………….………. 2 |
|
Introduction …………………………………………….3 |
|
Unpacking Instructions & Contents .………. 4 |
|
Parts ……………............................................ |
5 |
Display Functions …………………………………… 6
Remote Control Functions ………..…..……….9
Drain Pipe ………………………….……..…..………. 12
Maintenance & Cleaning………………………... 13
Installation …………………………………………….. 14
Troubleshooting…………………………………….. 16
98081002_02
Downloaded from www.Manualslib.com manuals search engine

IMPORTANT SAFETY GUIDELINES
IMPORTANT
Do not install and use your portable air conditioner unit before carefully reading this instruction guide.
Please retain this manual brochure for product warranty and future reference
CAUTION
Operate this unit in an ambient of 89°F or less.
The heating function of the unit should be operated in an indoor ambient temperature between 44°F and 73°F.
Clean air filter periodically to enjoy the most efficient cooling.
When the unit is shut off, please wait at least 3.5 minutes before restarting;this is to prevent the compressor from being damaged.
This unit is for indoor cooling, heating and dehumidifying.
When turning on the unit, the fan will operate but the compressor will start up after the cooling alarm flashes for three minutes.
In heating function, the heating alarm will flash for 3.5 minutes before the compressor and fan start up.
If you have fuses , they should be of the time delay type. Before you install or relocate this unit, be sure that the amperage rating of the circuit breaker or time delay fuse does not exceed the amp rating listed in Table 1.
Table1. |
|
|
|
|
|
CIRCUI T |
REQUIRED |
||
|
RATING OR |
WALL |
||
MODEL |
TIME DELAY |
RECEPTACLE |
||
|
FUSE |
|
|
|
|
AMP |
VOLT |
NEMA |
|
|
|
|
NO. |
|
P08S,P10S |
15 |
125 |
5-15P |
|
|
|
|
|
|
2
Downloaded from www.Manualslib.com manuals search engine

INTRODUCTION
Congratulations on your purchase and welcome to Friedrich!
ZoneAire Compact: PORTABLE AIR CONDITIONER
The Air Conditioner has been designed and manufactured to the highest standards of modern engineering.
Our product not only provides you a remote control to help user operate all the functions easily and conveniently but also includes the following benefits:
•3-IN-1 SYSTEM: Offers cooling, dehumidification and bonus heat for year-round conditioning and comfort.
•Innovative design: One side offers cooling, simply turn the unit around and apply the exclusive “heat clip“ for bonus heat option.
•Super portability with built in hose storage compartment underneath unit.
•Dual, easy-access antimicrobial nylon filters
•4-Speed fan with “Auto” setting for ultimate comfort
•24-hour timer for both cooling and dehumidification
•Unique Sleep Control function – Increases temperature 2 degrees every 4 hours
•LCD remote control
•Moves easily from room to room on easy glide castors.
3
Downloaded from www.Manualslib.com manuals search engine

UNPACKING INSTRUCTIONS & CONTENTS
UNPACKING INSTRUCTIONS
1. Place the unit in the correct upright position before unpacking |
. |
2.Cut the two packing straps.
3.Slide the carton in an upward motion and it will release from the base.
4. |
Grip the carry handles located on either sides of the unit and carefully lift until it slides out of |
||
|
thefoam base. |
|
|
5. |
Lift and lean the unit slightly to take out exhaust hose from unit’s bottom as picture |
. |
|
6. |
Install the exhaust hose on the unit before operating the unit |
. |
|
CONTENTS |
Heat Clip |
|
1.Air conditioner unit
2.Exhaust Hose
3.Remote control
4.Batteries
5. |
Window Kit |
Window Kit |
6. |
Heat Clip Connector |
|
Exhaust Hose
4
Downloaded from www.Manualslib.com manuals search engine
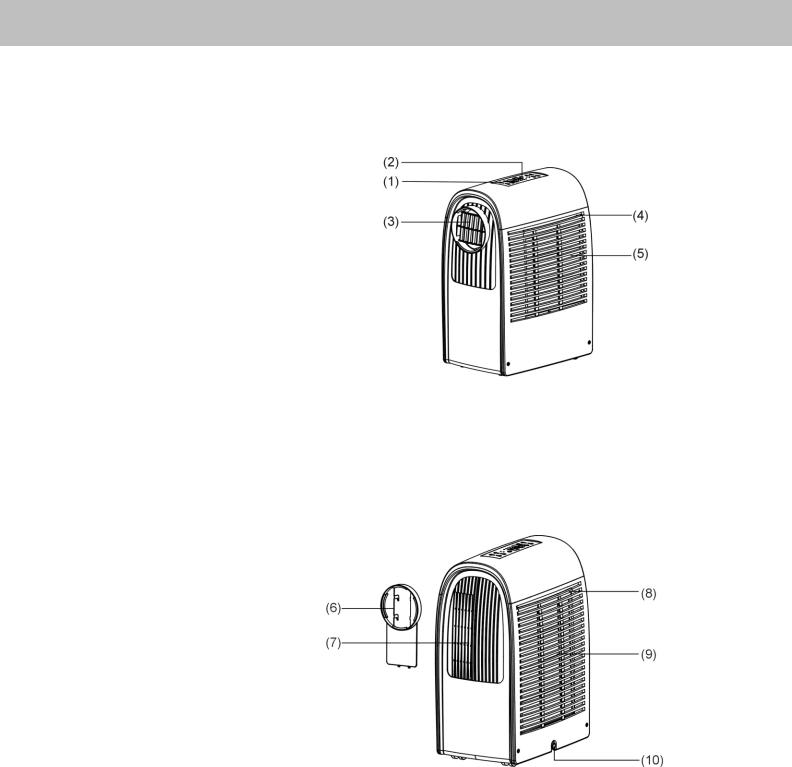
PARTS
1.Control panel
2.Remote control receiver
3.Hot air outlet-
4.Evaporator’s filter
5.Cool air-inlet
6.Air-outlet’s joint part
7.Cool air outlet-
8.Condenser’ s filter
9.Hot air inlet-
10. Drain hole
5
Downloaded from www.Manualslib.com manuals search engine

DISPLAY FUNCTIONS
1. ON/OFF KEY
Press to turn unit "ON" or "OFF".
2. MODE
Press this key to select cooling, heating, or dehumidifying.
when the unit is not working, hold the function button for 10 seconds to change the temperature scale °C/°F.
3.TEMPERATURE REGULATION KEY (UP)
-During cooling function This key raises the preset temperature by 1°F each time it is pressed and the maximum limit is 86°F.
-During heating function This key raises the preset temperature by 1°F each time it is pressed and the maximum limit is 77°F.
4.TEMPERATURE REGULATION KEY (DOWN)
-During cooling function This key lowers the preset temperature by 1°F each time it is pressed and the minimum limit is 63°F.
-During heating function This key lowers the preset temperature by 1°F each time it is pressed and the minimum limit is 59°F.
5.L.E.D. DISPLAY
The display indicates the current setting temperature or the timer setting. When the set temperature or the timer is adjusted, the new setting is shown then the display returns the current set temperature.
The display is also used to show error codes should a fault occur, see TROUBLE SHOOTING.
6
Downloaded from www.Manualslib.com manuals search engine
 Loading...