


CP18C30
Operating Guide
Compact Programmable
Room Air Conditioner with remote control
CP18C30
66121417 (4-06)
Please register
your air conditioner
Whenever you call to request service
on your appliance, you will need to
provide your complete model number
and serial number. You can find this
information on the model and serial
number label.
Please record model and serial
number information below:
MODEL NUMBER
SERIAL
NUMBER
PURCHASE
DATE

Table of Contents
You can be killed or seriously injured if you don't immediately
You
can be killed or seriously injured if you don't
follow
All safety messages will tell you what the potential hazard is, tell you how to reduce the chance of injury, and tell you what can
happen if the instructions are not followed.
Your safety and the safety of others are very important.
We have provided many important safety messages in this manual and on your appliance. Always read and obey all safety
messages.
This is the safety alert symbol.
This symbol alerts you to potential hazards that can kill or hurt you and others.
All safety messages will follow the safety alert symbol and either the word “DANGER” or “WARNING.”
These words mean:
follow instructions.
instructions.
DANGER
WARNING
Air Conditioner Safety ......................................................................................................................................................2
Installation Requirements ...............................................................................................................................................
Tools and Parts ....................................................................................................................................................................
Location Requirements .......................................................................................................................................................
Electrical Requirements ......................................................................................................................................................
Installation Instructions ..................................................................................................................................................
Unpacking ...........................................................................................................................................................................
Window Installation (on some models) ..............................................................................................................................
Through-the-Wall Cabinet Installation ...............................................................................................................................
Complete Installation ........................................................................................................................................................ 10
Air Conditioner Use ......................................................................................................................................................... 11
Starting Your Air Conditioner—Digital Control .............................................................................................................. 12
Remote Control Operation ................................................................................................................................................ 13
Normal Sounds .................................................................................................................................................................13
Air Conditioner Care ........................................................................................................................................................ 14
Cleaning the Air Filter ...................................................................................................................................................... 14
Cleaning the Front Panel ...................................................................................................................................................14
Repairing Paint Damage ................................................................................................................................................... 14
Annual Maintenance ......................................................................................................................................................... 14
3
3
3
4
6
6
7
9
Troubleshooting ............................................................................................................................................................... 14
Assistance or Service ...................................................................................................................................................... 15
Warranty ........................................................................................................................................................................... 16
Air Conditioner Safety
2
Installation Requirements
Tools and Parts
Gather the required tools and parts before starting installation.
Read and follow the instructions provided with any tools listed
here.
Tools Needed
Through-the-wall installation:
In addition to the tools listed above, the following tools are
needed for though-the-wall installation.
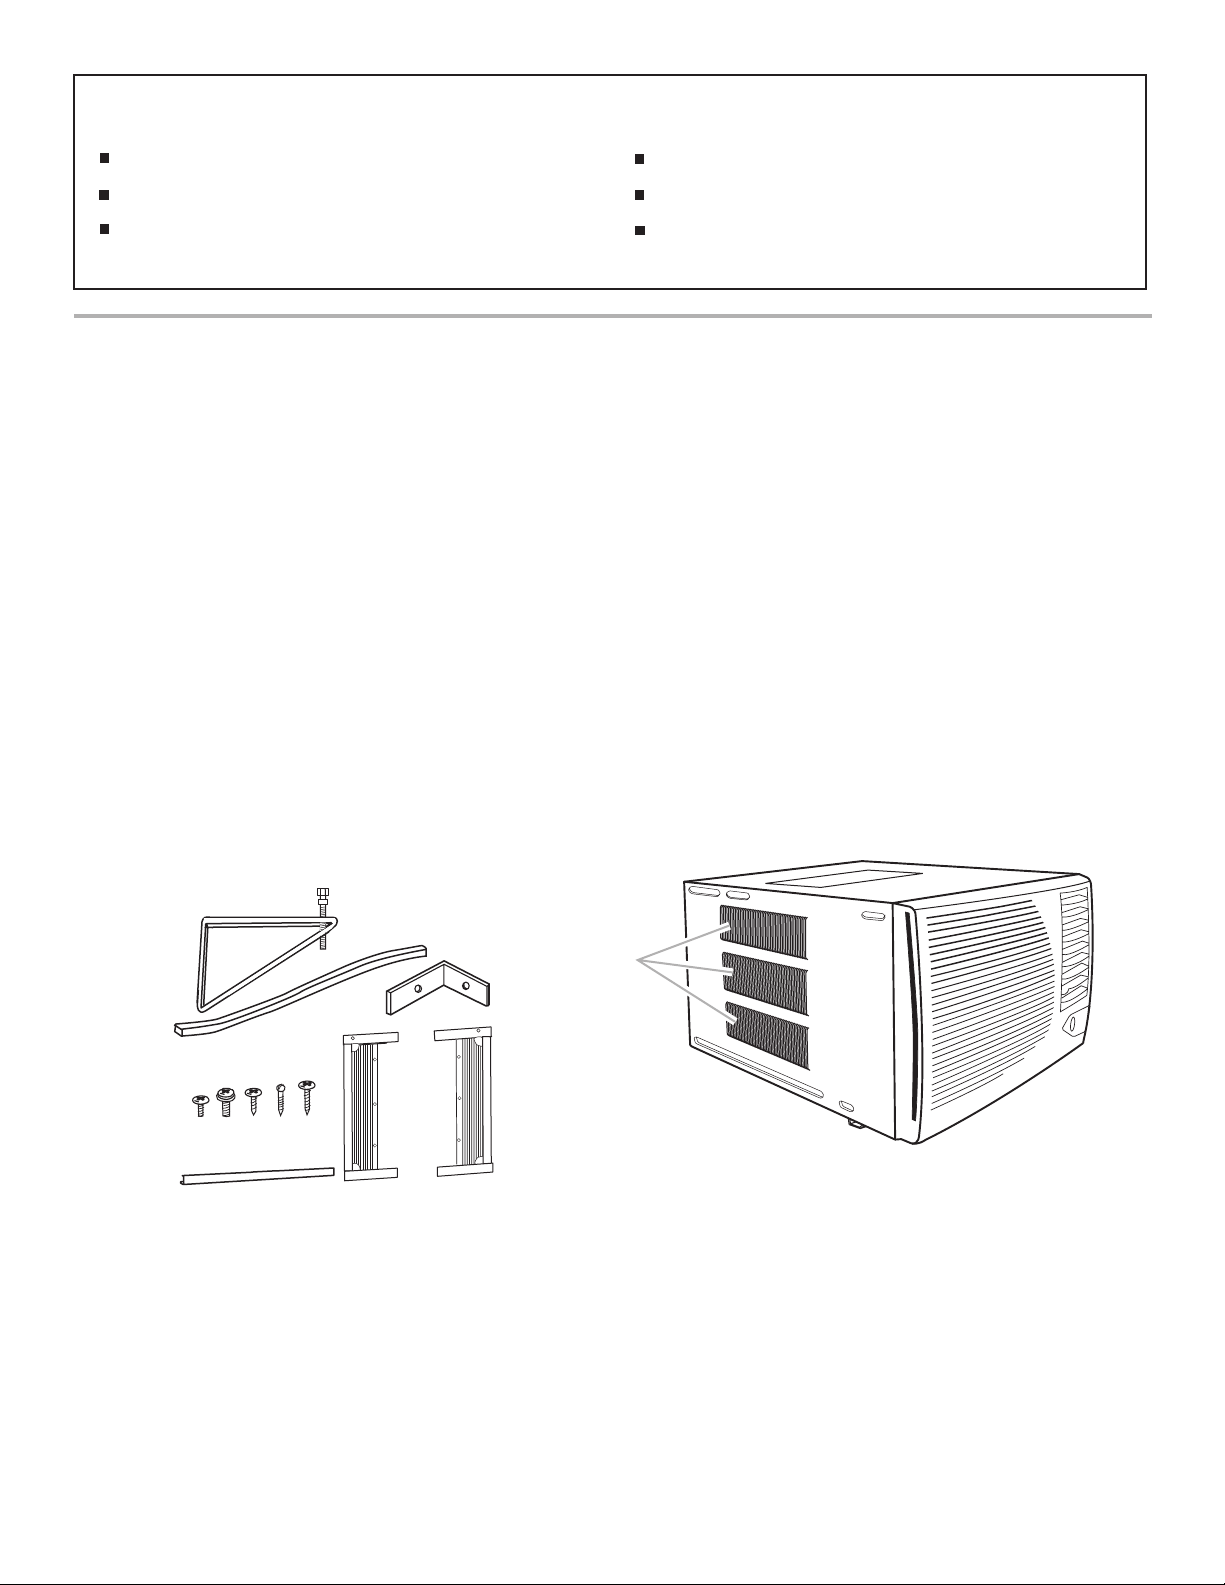
Parts supplied (on some models)
Check that all parts are included in parts package.
NOTE: Installation parts are supplied for double-hung windows
up to 40" (101.6 cm) wide. A special Wide Window Kit is available
from your dealer or service center. See “Accessories.”
Location Requirements
IMPORTANT: Observe all governing codes and ordinances.
Check the location where air conditioner will be installed. Proper
installation is your responsibility. Make sure you have everything
necessary for correct installation.
The location should provide:
� Grounded electrical outlet within 4 ft (122 cm) of where the
power cord exits the air conditioner.
NOTE: Do not use an extension cord.
� Free movement of air in room to be cooled.
� A large enough opening for the air conditioner.
� Adequate wall support for weight of air conditioner. Air
conditioner weighs between 145 and 200 lbs (65 to 96 kg).
NOTE: Cabinet louvers must not be obstructed. Air must be able
to pass freely through the cabinet louvers.
IMPORTANT SAFETY INSTRUCTIONS
WARNING:
To reduce the risk of fire, electrical shock or injury when using your air conditioner, follow these basic precautions:
SAVE THESE INSTRUCTIONS
Unplug air conditioner before servicing.
Use two or more people to move and install air conditioner.
Plug into a grounded 3 prong outlet.
Do not remove ground prong.
Do not use an adapter.
Do not use an extension cord.
� Flat-blade and Phillips
screwdrivers
� Level
� Tape measure
� Drill and ³⁄₁₆" or smaller bit
� Saw
� Wood preservative
� Caulk
� 1" (2.5 cm) or thicker
lumber
� 7 - #10 x 1" wood screws
A. Support brackets with
adjustment bolts (2)
B. Foam seals (2)
C. Window lock bracket (2)
D. #10 x
¹⁄₄
" pan-head Phillips
screws (6)
E. #10 x
³⁄₈
" washer-head
Phillips screws (4)
F. #10 x
¹⁄₂
" pan-head Phillips
screws (4)
G. #10 x
³⁄₄
" round-head screws (6)
H. #10 x
⁷⁄₈
" pan-head Phillips
screws (4)
I. Top channel
J. Side curtains (2)
B
C
D
H
G
E
F
A
I
J
A
A. Cabinet louvers
3
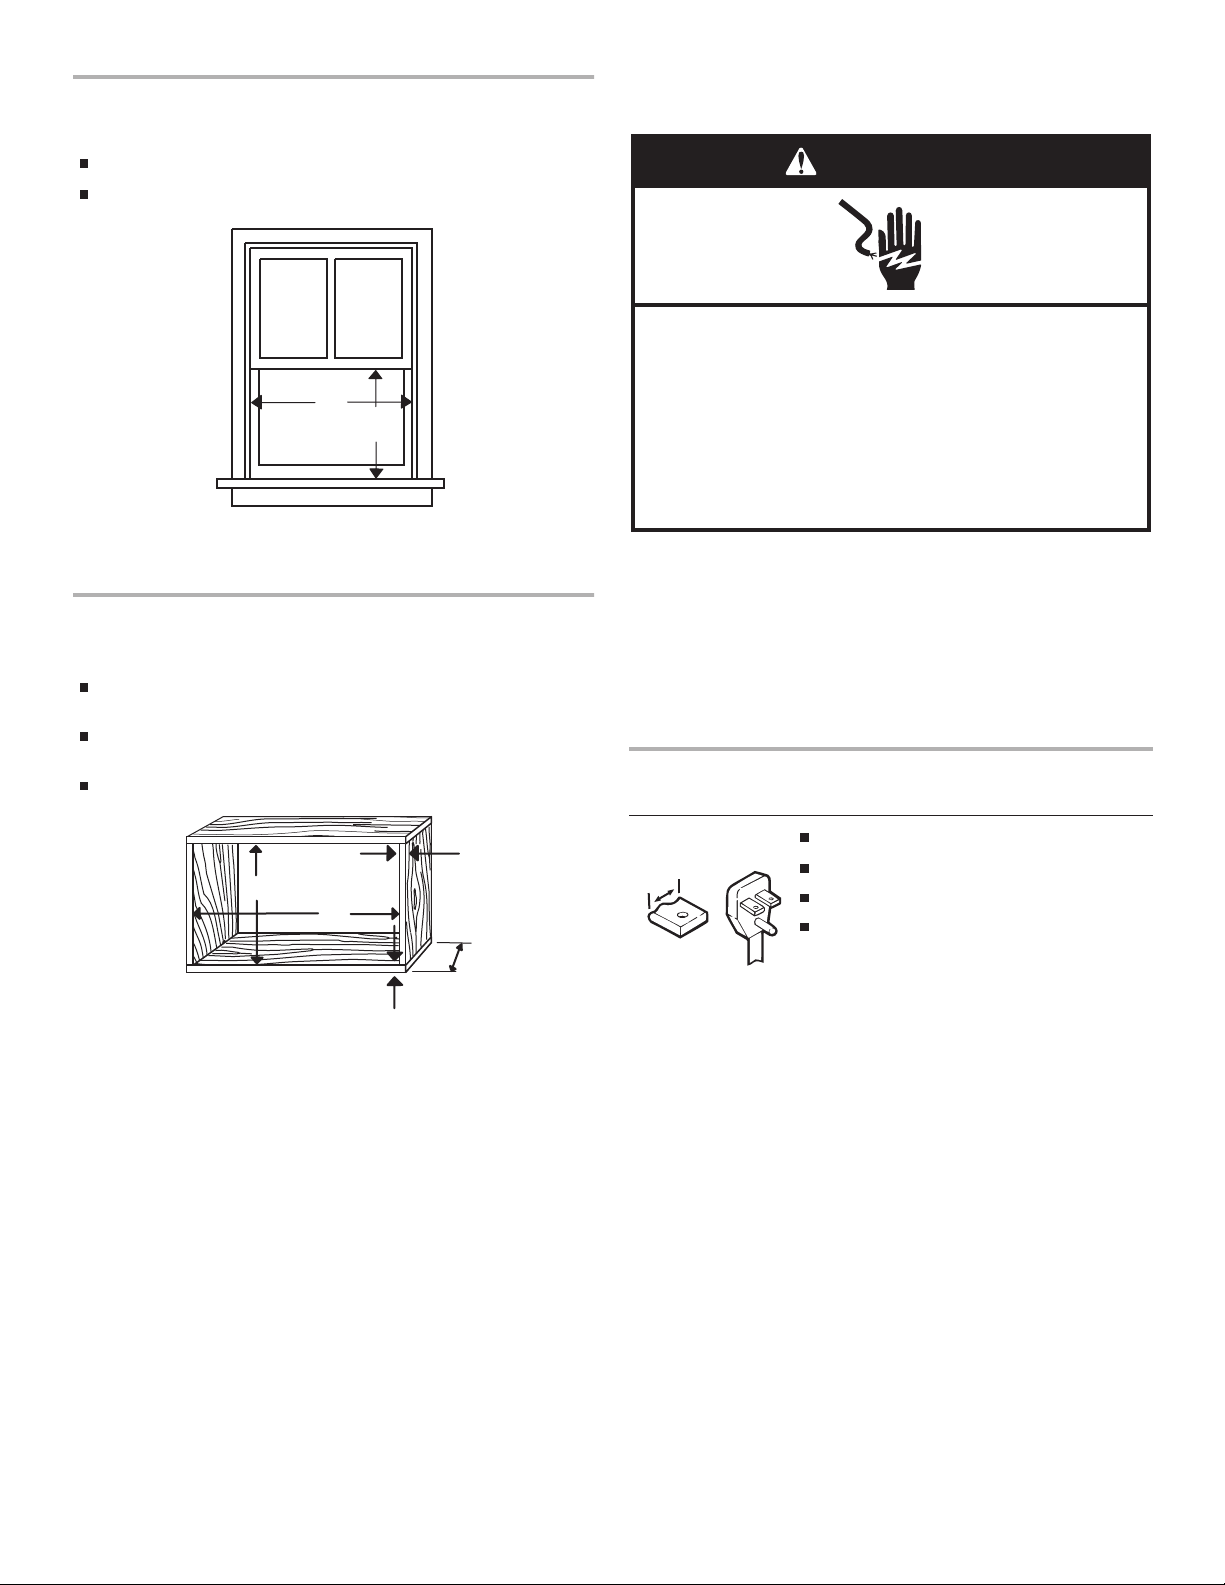
Window installation
Window op ening measurements:
30"min. to 40" ma x. (76.2 cm to 101.6 cm) opening widt h.
20" min. (50.8 cm) opening height.
Through-the-wall installation
The wall opening measurements should be:
Width: 30" (76.2 cm) plus twice thickness of wood used to
build fr
ame.
Hei
ght: 19ı ˇ� " (50.2 cm) plus twice thickness of wood used to
build fr
ame.
Depth: 2
� ˇ�" (6.4 cm) minimum to 8" (20.3 cm) maximum.
Electrical Requirements
Ground wire must be connected to ground screw located in lower
righ
t corner of air conditioner when air conditioner is in cabinet.
Th
e electrical ratings for your air conditioner are listed on the
mod
el and serial number label. The model and serial number
label is lo
cated behind the front panel on the flange below the
control panel area.
Specific electrical r
equirements are listed in the chart below.
Follow the requirements for the type of plug on the power supply
cor
d.
A. 3 0" min. (7 6. 2 cm)
B . 2 0" min. (5 0. 8 cm)
A. 19
� � �
" (50.2 cm )
B.
26
� �
" (66.1 cm )
C. Wood t
hickness
D.
2
� �
" (6.4 cm) minimum to
8" (20.3 cm) maximum
A
B
B
C
C
A
D
Power supply
co
rd Wiring requirements
230-volt (207 min. - 253 max.)
0-12 a
mps
15-amp time-delay fuse or circuit breaker
Us
e on single outlet circuit only.
Electrical Shock Hazard
Plug into a grounded 3 prong outlet.
Do not remove ground prong.
Do not use an adapter.
Do not use an extension cord.
Failure to follow these instructions can result in death,
fire, or electrical shock.
WARNING
��
(0.6 cm)
1
/2"
3
/4
1
/2
1
/2
3
/4
1
/2
4
Recommended grounding method
This air cond itioner must be grounded. This air conditioner is
equipped with a power supply cord having a grounded 3 prong
plug. To minimize possible shock hazard, the cord must be
plugged into a mating, grounded 3 prong outlet, grounded in
accordance with all local cod es and ordinances. If a mating outlet
is not available, it is the customer' s responsibility to have a
properly grounded 3 prong outlet installed by a qualified electrical
installer.
It is the customer' s responsibility:
� To contact a qualified electrical installer.
� To assure that the electrical installation is adequate and in
conformance with National Electrical Code, ANSI/NFPA 70 latest edition, and all local codes and ordinances.
Copies of the standards listed may be obtained from:
National Fire Protection Association
One Batterymarch Park
Quincy, MA 02269
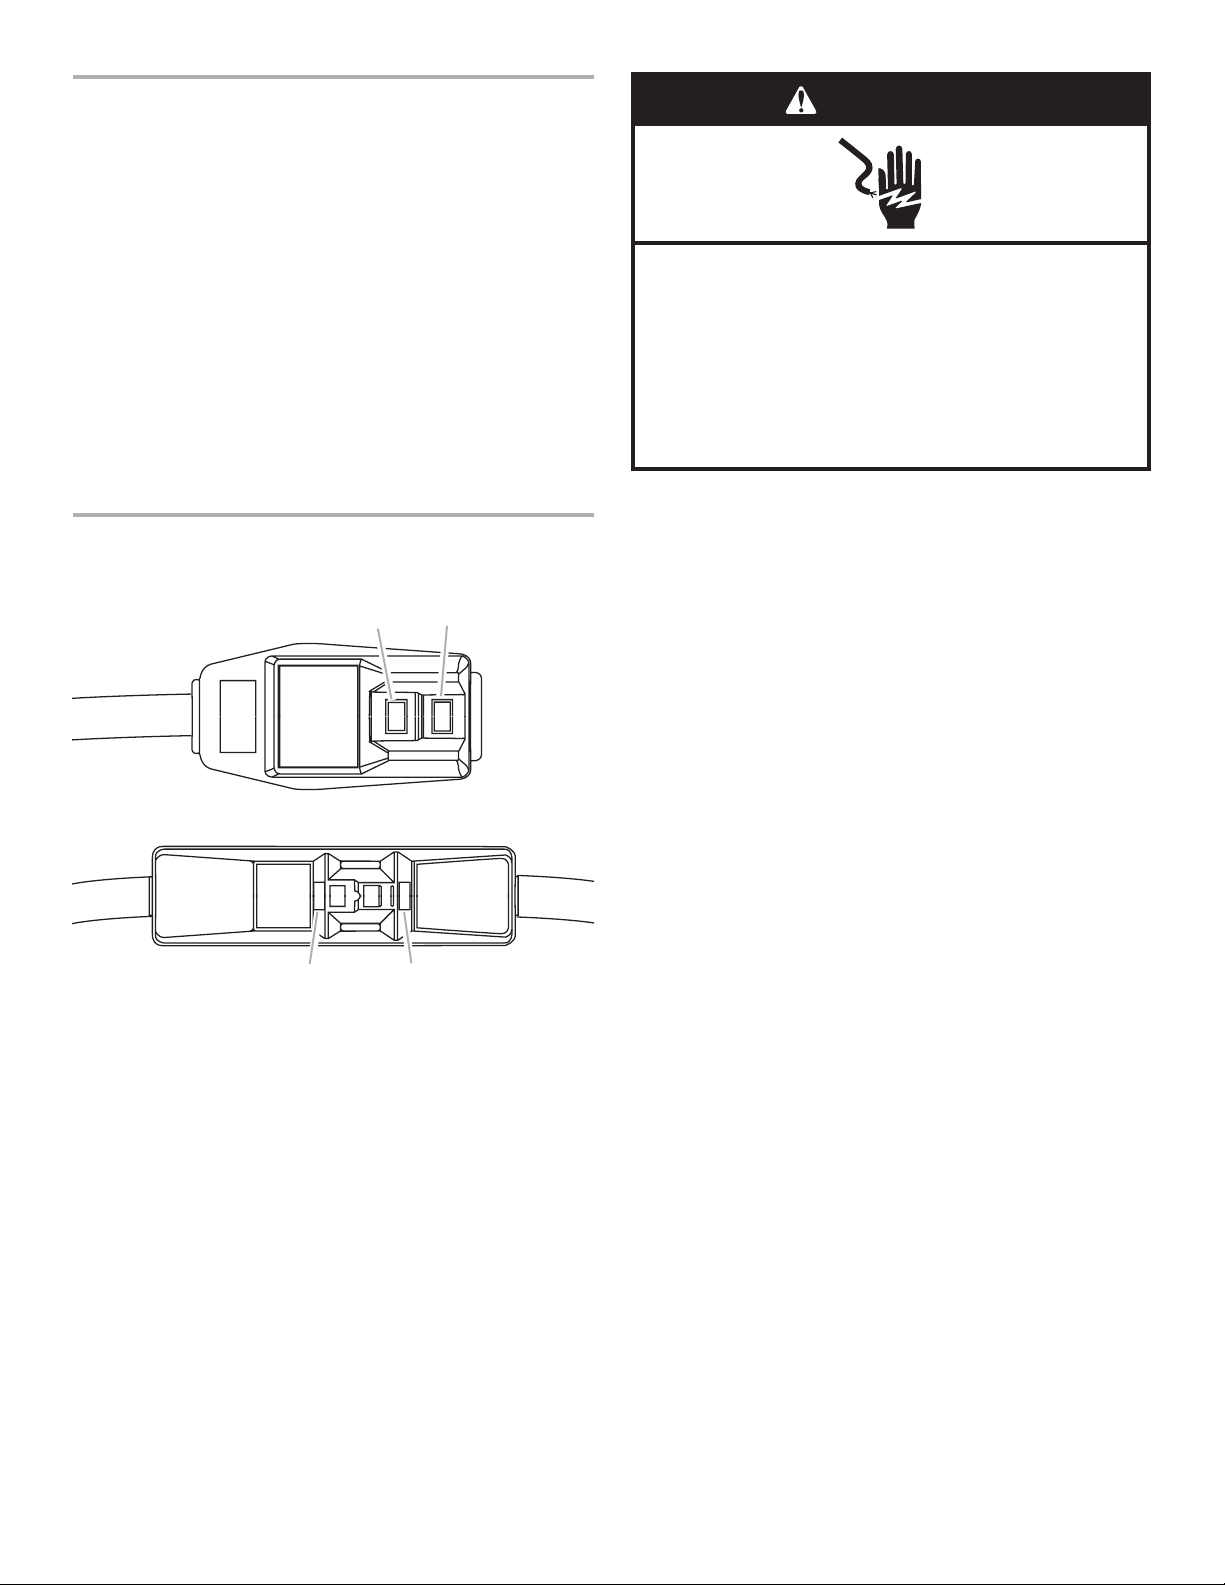
Power Supply Cord
NOTE: Your unit’s device may differ from the ones shown.
This room air conditioner is equipped with a power supp ly cord
required by UL. This power suppl y cord contains state-of-t he-art
electronics that sense leakage current. If the cord is crushed, the
electronics detect leakage current and pow er will be
disconnected in a fraction of a second.
To test your power supply cord:
1. Plug powe r supply cord into a grounded 3 prong outlet.
2. Press RESET.
3. Press TEST (listen for click; Reset button will trip and pop
out).
4. Press and release RESET (listen for click; Reset button will
latch and remain in). The power supply cord
is ready for
operation.
NOTES:
� The Reset button must be pushed in for proper operation.
� The power supply cord must be replaced if it fails to trip when
the test button is pressed or fails to reset.
� Do not use the pow er supply cord as an off/on switch. The
power supply cord is designed as a protective device.
� A damaged powe r supply cord must be replaced with a new
power supply cord obtained from the product manufacturer
and must not be repaired.
� The power supp ly cord contains no user serviceable parts.
Opening the tamper-resistant case voids all warranty and
performance claims.
A. Reset b utton
B. Test button
TEST
TEST
RESET
RESET
A
A
B
B
Electrical Shock Hazard
Plug into a grounded 3 prong outlet.
Do not remove ground prong.
Do not use an adapter.
Do not use an extension cord.
Failure to follow these instructions can result in death,
fire, or electrical shock.
WARNING
5
 Loading...