


TA100 DIY SERIES
FINGERPRINT TIME
ATTENDANCE SYSTEM
&
USER GUIDE

COPYRIGHT NOTICE
All rights reserved. No part of this book may be reproduced or transmitted in any form or by any
means, electronic or mechanical, including photocopying, recording, or by any information storage and retrieval system, without written permission from FingerTec Worldwide Ltd. Every precaution has been made to supply complete and accurate information. Information in this document is
subject to change without prior notice.
DISCLAIMER
No person should rely on the contents of this publication without first obtaining advice from a
qualified professional person. The company expressly disclaims all and any liability and responsibility to any reader or user of this book, in respect of anything, and of the consequences of
anything, done by any such person in reliance, whether wholly or partially, upon the whole or any
part of the contents of this book.
FINGERTEC WORLDWIDE SDN BHD
For enquiries on technical matters, please forward the email to
support@fingertec.com

CONTENTS
1
• GETTING STARTED 1-7
INTRODUCTION TO FINGERPRINT READER
• Complete Package
• Materials Provided
• Basic Features
• Keypad Functions
POWER SUPPLY CONNECTION
2 • USING THE FINGERPRINT READER 8-17
USING THE FINGERPRINT READER
TIPS FOR BEST FINGERPRINT ENROLLMENT
INITIAL SET UP OF THE FINGERPRINT READER
• Date / Time Adjustment
• Enrollment
• Enrollment of Administrator
• Enrollment of Normal User
• Fingerprint Verification
1 To many (1:n) fingerprint matching
1 To 1 (1:1) fingerprint matching
• Enrollment of Password
• Password Verification
• Deleting Users
3 • DEFINITION OF COMPANY AND 18-21
DEPARTMENT
TO INSERT NAME OF COMPANY
TO INSERT NAME OF DEPARTMENT
TO ASSIGN USERS INTO DEPARTMENT
TO SHIFT USERS INTO DIFFERENT DEPARTMENT
III

CONTENTS
• CONFIGURATION OF WORKING 22-29
4
SHIFT& ATTENDANCE RULES
CONFIGURATION OF WOR-KING SHIFT
TO ASSIGN WORKING SHIFT
• To assign working shifts to all users
• To assign working shift to department
• To assign working shifts to individual users
TO SHIFT USERS INTO DIFFERENT WORKING SHIFT
CONFIGURATION OF ATTENDANCE RULES
5 • DATA TRACKING AND REPORT 30-39
PREPARATION
ATTENDANCE TRACKING
EXCUSES TRACKING
TO GENERATE AND SAVE REPORT
USB PEN DRIVE MANAGEMENT
• To download/upload users
(Skip this if only 1 unit of TA100 DIY was installed)
• To download/upload attendance data
(Skip if only one unit of TA100 DIY was installed)
6 • MISCELLANEOUS 40-44
CONFIGURATION OF SCHEDULED BELLS
OTHER OPTIONS
TO VIEW INFORMATION OF DEVICE
7 • OPTIONAL 45-48
APPENDIX 49-52
TROUBLESHOOTING
SAMPLE REPORT
IV

GETTING STARTED
•
1
INTRODUCTION TO FINGERPRINT READER
A brand new FingerTec® TA100 DIY – Do It Yourself Time Attendance System is a product that combines management software in a fingerprint reader. Connection between fingerprint reader and computer will no longer be
an issue along with lost of transaction logs.
Using the latest concept, all the clocking schedule settings and user management configurations are managed from the reader itself. The attendance report in HTML format will be generated into USB flash disk directly
from the fingerprint reader with only a few presses on the keypad. Reader
installation can be performed easily minus installation cost or the need for
network cable extension.
The simplified FingerTec® TA100 DIY works efficiently in providing vital
attendance reports including information on tardiness, short hours and overtime.
TA100 DIY reader is suitable for SME in office environment with basic working schedule which includes normal working hour with not more than 24
hours, breaks & overtime.
1

SPECIFICATIONS MODEL
TA100 DIY
Surface finishing Acrylonitrile Butadiene Styrene (ABS)
Functions Time Attendance
FP template capacity 800
Transaction log 30000
Connections USB
TCP/IP
TA100 series and worked with FingerTec TCMS V2 software)
(Only applicable if the TA100 DIY was upgraded to
Subnet mask & Gateway Available
Scheduled bell 25 schedule everyday per week
Sensor Optical sensor with silicon coating
2

COMPLETE PACKAGE
ITEM TA100 DIY
Fingerprint Reader √
DC 5V Power Adapter √
Screwdriver
USB Extension
USB Flash Disk
*OPTIONAL
MATERIALS PROVIDED
ITEM TA100 DIY
Quick Start Guide
User Manual
Video Guide
Sample of Enrollment Form
√
√
√
√
√
√
3

BASIC FEATURES
LCD SCREEN
Screen that displays
instructions and
status of reader.
L.E.D DISPLAY
Green - Standby/ User is verified
Red - Signal failed verification
SPEAKER
Emit verification
result.
FINGERPRINT
SENSOR
For user
to place
fingerprint for
identification/
verification.
KEYPAD FUNCTIONS
Definition of attendance status
Definition of attendance status can be done using keypads. Users can define their clocking status before fingerprint or password verification is done. Definition of the clocking
status is very important for the system to allocate the time a user verified into the corresponding clocking slots. Improper clocking definitions could affect the work time, overtime and short time calculations.
It is important to define the correct clocking status when using TA100 DIY reader.
4

Specific button is assigned for a specific clocking status. Please view the diagram given below:
ESC/CHECK-IN
To define check in.
MENU/
CHECK-OUT
To define lunch
break.
Alphanumeric
keypad
SCROLL UP/
BREAK
To define
resume from
lunch break.
POWER / OT-OUT
To define check out
for overtime.
NOTE
* If a user had to work for an OT, a user must follow these steps:
1. Press “Scroll Down” button and verify a fingerprint or a password.
2 Wait for a minute.
Press “OK” button and verify a fingerprint or a password.
OK / OT-IN
To define check in for
overtime.
SCROLL DOWN/ CHECK OUT
To define check out or break
time before overtime.
5

The standard verification procedures are shown below. Follow the given steps CAREFULLY to avoid any wrongly inputted data for a user.
1
Welcome Check-In
09:00
01.01.09
2
NOTE
Before attempting to do fingerprint or password verification, please make sure
that your clocking status is CORRECT.
Pay attention to the right
upper corner of the
screen.
Example, if you were
going to have lunch,
press the UP button to
define the clocking status as “Break”
Welcome Break
3
09:00
01.01.09
4
Welcome Break
09:00
01.01.09
Notice the right upper corner of screen changing to
“Break” and you are having
the right clocking status.
Now you can verify your
fingerprint or password.
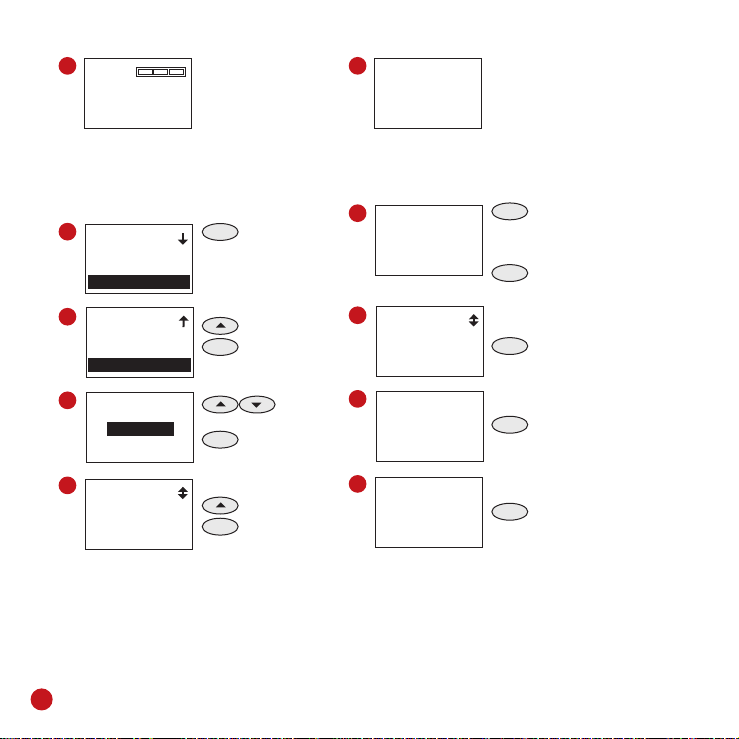
T9 INPUT METHOD
The TA100 DIY offers T9 input method. Administrator can insert the name of users, departments, working shifts and companies to the terminal. The names are important in the report
for user to identify who is who. For example, to insert a company FingerTec, please follow
the steps below:
1
Welcome Check-In
09:00
01.01.09
2
Settings
MENU
OK
Press & Hold
Press Once
Press Once
3
Settings
Shift
Att. Rule
Company Name
4
Input
ESC OK
Press twice
Press Once
OK
The “F” is represented by
numeric keypad no 3.
Press once
3
6

5
D d E e F f
6
Input
F
OK ESC
Press to move
to
select.
The F is inserted.
The i is represented
by numeric pad no 4.
Press once to
OK
Press once
4
F
9
Input
FingerTec
OK ESC
10
Company Name
ESC OK(Save)
Save ?
Press once after
OK
finished inserting
the characters.
Press once to
OK
save settings.
7
G g H h I i
Fi
OK ESC
8
Input
FingerTec
OK ESC
Press once to
move to
Press once to
OK
select.
Press once
0
to delete any
wrong character
inserted.
11
Settings
i
Shift
Att. Rule
Company Name
Press twice to
ESC
return to the main
menu.
Administrator can use the same method to insert the names of users, departments, working shifts and company directly into TA100 DIY.
POWER SUPPLY CONNECTION
1 2 3
DC 5V POWER ADAPTER TA100 DIY READER POWER BUTTON
1. Connect DC 5V power adapter to the reader.
2. Turn on the power supply.
3. Press the power button to switch on or shutdown the reader.
7

USING THE FINGERPRINT READER
•
2
Fingerprint reader provides 3 types of enrollment method:
• FINGERPRINT ENROLLMENT
• PASSWORD ENROLLMENT
• FINGERPRINT AND PASSWORD ENROLLMENT
User enrolls his fingerprint template into a reader and the template will be used for
future verifications.
For user who has difficulty to enroll his fingerprint due to poor fingerprint quality, he
is recommended to enroll password. Password enrollment is also suitable for visitors
and temporary workers.
Under this option, a user can enroll both fingerprint and password at the same time.
The user can either use fingerprint or password to report attendance or to gain access.
USING THE FINGERPRINT
READER
This chapter will guide on how to use the
reader fingerprint reader effectively. To
get a good reading every time, a fingerprint enrollment for the first time must be
done properly.
• CENTER POINTS
8
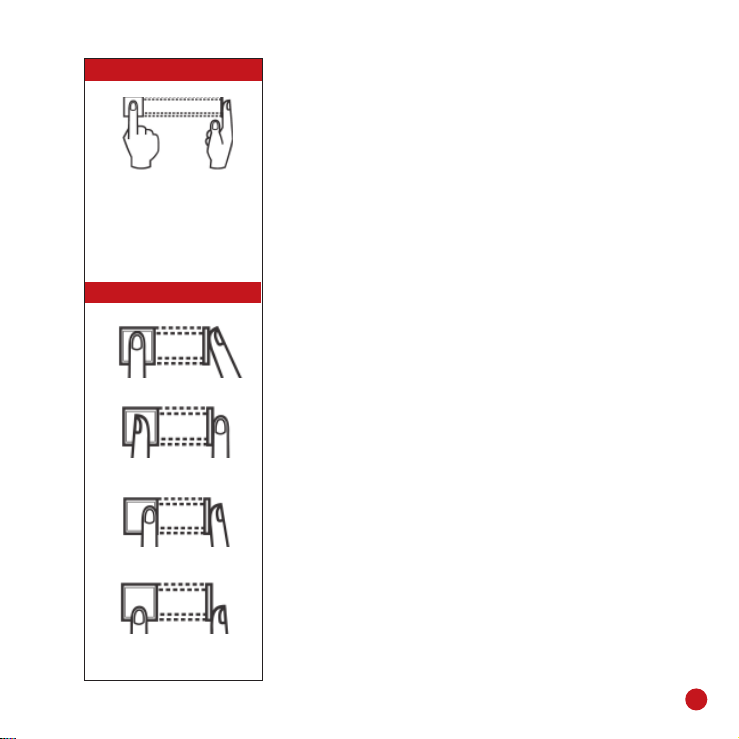
WHAT YOU SHOULD DO
Place finger flat on the fingerprint sensor. Make sure the
finger’s midpoint is placed at
the center of the fingerprint
sensor.
WHAT YOU SHOULD NOT DO
UPRIGHT
ASKEW
OFF CENTER
PART
TIPS FOR BEST FINGERPRINT
ENROLLMENT
There are 5 tips to get good fingerprint enrollment:
• USE INDEX FINGER
Index finger is smaller than thumb and it can be comfortably placed on the sensor. The use of thumb is not recommended because the center points might not be placed
properly on the sensor, hence cannot be read by the sensor due to its larger size.
• MAKE SURE THE FINGER IS NOT WET, TOO DRY, INJURED OR
DIRTY
The finger needs to be slightly moist to enable the sensor
to read the minutiae points on the fingerprint.
• PLACE THE CENTER POINTS OF YOUR FINGER AT THE CENTER
OF THE SENSOR
The center points of a finger is an area where there is a
swirl and the center points must be properly placed on the
sensor during enrollment.
• DON’T PRESS HARD AT THE SENSOR, JUST PLACE YOUR FINGER
ON THE SENSOR
The sensor is reading minutiae points of your finger and
placing a finger properly on the sensor will prompt the
sensor to read those points. Pressing your finger hard on
the sensor is not necessary.
• DON’T DO ENROLLMENT UNDER BRIGHT LIGHT OR DIRECT
SUNLIGHT
It is important to note that bright light or sunlight could
interfere with the reading of the sensor. Avoid placing the
reader under direct sunlight or bright light to avoid difficulty in enrollment and future verification.
9

INITIAL SET UP OF THE FINGERPRINT READER
DATE / TIME ADJUSTMENT
When first installing the fingerprint reader, it is important to set the correct date & time.
Follow the steps below to access the Date & Time adjustment menu:
1
Welcome Check-In
09:00
01.01.09
2
Settings
3
Settings
Company Name
Other Options
Auto Test
4
Other Options
Date Time
Fmt DD.MM.YY
Comm Opt
5
YYYY-MM-DD 24H
2008 - 10 - 12
21:46:28
ESC OK
Press & Hold
MENU
Press Once
Press Once
OK
Press 3 times
Press Once
OK
Press Once
OK
Use the keypad to key in the year, month & date.
Scroll down futher to change the day, hour,
minute & second.
OK
Press once to save settings.
ESC
Press 3 times to return to main menu.
10

ENROLLMENT
To assist in fingerprint enrollment, we have designed a form for the administrator to use
to keep track of the enrollment detail or you can design your own form to suit to your
company’s requirements.
SAMPLE
User Enrollment Template Form Reader ID:____________________
No. of Fingers Date
No. User ID Employee No. Name Department IC No. Note Signature
Enrolled Registered
ENROLLMENT OF ADMINISTRATOR
When the fingerprint reader is switched on, a display on the screen will appear. To enroll a supervisor or an administrator, the in-charge person to administer the fingerprint
templates and transaction data in the reader, follow the steps shown below: Choose
trustworthy person for this particular role.
1
Welcome Check-In
09:00
01.01.09
2
User Mng
3
User Mng
New User
Viewing User
Dept Mng
MENU
OK
OK
Press & Hold
Press Once
Press Once
4
New User
AC.No:
Name:
Finger
5
New User
000000001
ESC OK
6
New User
000000001
Name:
Finger
Press once to
OK
assign user ID.
Enter user ID by pressing
numeric keypad.
Example 000001
Press once to
OK
confirm
Press twice
Press Once
OK
11
7
Place Finger
8
New User
000000001
Name:
Finger 1
9
New User
Shift NO
Pwd:
Privi: user
00000000-0
ESC/Exit
Place center of finger
properly at the sensor.
Place finger 3 times in
...
order for the reader to
capture the fingerprint
templates.
Read page 9 for tips
on fingerprint scanning
technique.
Press once to
OK
enroll backup
Fingerprint
Repeat the same
steps as above.
Press 4 times
Press Once
OK
12
Input
OK ESC
* Please ignore this step if name was not
required in the report. If it was mandatory,
please continue.
13
Input
John
OK ESC
14
New User
Name: John
Finger 2
Dept NO
Input the names of Administrator.
Input the names of company.
Please refer to page 6 for
T9 input method.
Press once to return
ESC
to the previous page.
Continue with the next
steps.
Press once to save
OK
the name.
Press Once
ESC
12
10
Admin Accredit
ESC OK
11
New User
Name:
Finger 2
Dept NO
Admin
select Admin
Press once to
OK
confirm.
Press 5 times
Press Once
OK
Press to
15
Save ?
000000001
ESC OK(Save)
16
User Mng
Name User
Viewing User
Dept Mng
Press once to save
OK
settings
Press twice to return
ESC
to the main menu.

ENROLLMENT OF NORMAL USER
A normal user is only permitted to use the reader for identity verification, and he does
not have authority to access the system. To add a normal user, follow the steps below:
1
Welcome Check-In
09:00
01.01.09
2
User Mng
3
User Mng
New User
Viewing User
Dept Mng
4
New User
AC.No:
Name:
Finger
5
New User
000000002
ESC OK
6
New User
000000002
Name:
Finger
Press & Hold
MENU
Press Once
OK
Press Once
OK
Press once to
OK
assign user ID.
Enter user ID by pressing numeric keypad.
Example 000001
Press once to
OK
confirm
Press twice
Press Once
OK
7
00000002-0
Place Finger
8
New User
000000002
Name:
Finger 1
9
New User
Shift NO
Pwd:
Privi: user
10
Admin Accredit
ESC OK
11
New User
Name:
Finger 2
Dept NO
ESC/Exit
User
Place fingerprint center
point properly at the
sensor. Place finger 3
...
times in order for the
reader to capture the
fingerprint templates.
Read page 9 for tips
on fingerprint scanning
technique.
Press once to
OK
enroll backup
fingerprint
Repeat the same
steps as above
Press 4 times
Press Once
OK
select Admin
Press once to
OK
confirm.
Press 5 times
Press Once
OK
Press to
13

12
Input
OK ESC
Input the names of
Administrator.
Please refer to page 6
for T9 input method.
14
New User
Name: Mary
Finger 2
Dept NO
ESC
Press Once
* Please ignore this step if name was not
required in the report. If it was mandatory,
please continue.
13
Input
Mary
OK ESC
Press once to
OK
save the name.
15
Save ?
000000002
ESC OK(Save)
16
User Mng
Name User
Viewing User
Dept Mng
Press once to
OK
save settings
Press twice to
ESC
return to the main
menu.
Repeat the above steps to enroll more users into the reader.
FINGERPRINT VERIFICATION
Reader supports 2 types of fingerprint verification method. User can choose either method
to verify his fingerprint at the reader. 2 types of fingerprint verification methods are:
• 1 to Many (1:N) fingerprint matching
• 1 to 1 (1:1) fingerprint matching
1 TO MANY (1:N) FINGERPRINT MATCHING
1
Welcome Check-In
09:00
01.01.09
2
FP Verify
Remove fi nger
Place the enrolled finger
properly on the fingerprint sensor.
Wait a second before
removing the finger from
the fingerprint sensor.
3
FP Verify
User ID 00001
Verifi ed
4
FP Verify
Please Try Agn.
Reader verifies that the
User ID is 00001.
If a finger failed to be
verified by the reader, it
will prompt the user to try
again.
14

1 TO 1 (1:1) FINGERPRINT MATCHING
1
Welcome Check-In
09:00
01.01.08
2
1:1 FP Verify
User ID 00001
ESC OK[Pwd]
Key in the user ID as defined when enrolling a
finger on the fingerprint
reader. For example 1
for 00001.
Place the enrolled finger
properly on the fingerprint sensor.
3
1:1 FP Verify
User ID 00001
Verifi ed
4
1:1 FP Verify
User ID 00001
Please Try Agn.
The fingerprint sensor
verifies that the user ID is
00001.
If a finger failed to be
verified by the reader, it
will prompt the user to try
again.
ENROLLMENT OF PASSWORD
For user who cannot enroll his/her fingerprint due to certain circumstances, he/she can
choose to use passwords. Follow the steps shown below to enroll users with password:
1
Welcome Check-In
09:00
01.01.09
2
User Mng
3
User Mng
New User
Viewing User
Dept Mng
4
New User
AC.No:
Name:
Finger
Press & Hold
MENU
Press Once
OK
Press Once
OK
Press once to
OK
assign user ID.
5
New User
000000003
ESC OK
6
New User
Dept NO
Shift NO
Pwd:
7
New Enroll
Password ********
ESC OK
8
New Enroll
Password ********
Pwd Affi
********
Enter user ID by pressing
numeric keypad.
Example 000003
Press once to
OK
confirm
Press 5 time
Press Once
OK
Insert password via the
keypad.
The maximum length for
the password is 8 digit.
Press once to
OK
confirm
Re-enter the password to
confirm.
Press once to
OK
confirm
15

9
New User
Shift NO
Pwd:
Privi: user
Press 5 time
Press Once
OK
13
Input
Helen
OK ESC
Press once to save
OK
the name.
10
Admin Accredit
User
ESC OK
11
New User
Name:
Finger
Dept NO
12
Input
OK ESC
* Please ignore this step if name was not
required in the report. If it was mandatory,
please continue.
select Admin
Press once to
OK
confirm.
Press 5 times
Press Once
OK
Input the names of
Administrator.
Please refer to page 6
for T9 input method.
Press to
14
New User
Name: Helen
Finger 2
Dept NO
15
Save ?
000000003
ESC OK(Save)
16
User Mng
Name User
Viewing User
Dept Mng
save settings
return to the main
menu.
PASSWORD VERIFICATION
User with password enrollment has to use password to report attendance. 1
1
1:1 FP Match
000000003
ESC OK
2
Pwd Affi rm
Pwd: ********
Enter user ID.
Example 000003.
Press Once
OK
confirm
Enter password.
Example 12345678.
Press Once
OK
confirm
3
4
Verify
Helen
000000003
Verifi ed
Pwd Affi rm
Pwd:
The reader verifies user
successfully.
Verification fails because
of wrongly entered user
ID or password.
Please input the details
again.
16
Press Once
OK
Press once to
OK
Press twice to
ESC

DELETING USERS
You can delete the user from the system if he/she has left the organization or no longer
use the system.
1
Welcome Check-In
09:00
01.01.09
2
User Mng
3
User Mng
New User
Viewing User
Dept Mng
4
Viewing User
FingerTec
000000003
NOTE
Remember to select
the correct user ID for
deletion.
Press & Hold
MENU
Press Once
OK
Press Once
OK
Press Once
Use scroll button to select the user
OK
Press Once
5
Option
Reassign to Dep
Newly Add
Delete User
6
Del Fingerprint
000001111-0
ESC OK
7
Del User
000001111
ESC OK
8
Del User
ESC OK
Delete ?
User will be deleted from the reader following the above steps.
Press 6 times
OK
Press once to
confirm
ESC
Press once to
cancel operation
OK
Press once to
confirm
ESC
Press once to
cancel operation
OK
Press once to
confirm or
ESC
Press once to
cancel operation
ESC
Press 3 time to
return to main menu
17

DEFINITION OF COMPANY AND DEPARTMENT
•
3
The names of company and departments must be defined correctly because these name
inserts will be printed on the reports. Any false definition would cause wrong information
on the reports.
TO INSERT NAME OF COMPANY
1
Welcome Check-In
09:00
01.01.09
2
Setting
3
Setting
Shift
Att. Rule
Company name
4
Input
OK ESC
Press & Hold
MENU
Press Once
Press Once
OK
Press Once
OK
Input the names of
company
Please refer to page 6
for T9 input method.
5
Input
FingerTec
OK ESC
6
Company Name
Save ?
ESC OK(Save)
7
Setting
Shift
Att. Rule
Company name
Press once to
OK
confirm.
Press once to
OK
save settings
Press twice to
ESC
return to the main
menu
All enrolled users in one terminal will be placed under the same company. Assignment of
users into “Company” is not necessary.
18

TO INSERT NAME OF DEPARTMENT
Define the departments in your company for example administration, workshop, and security etc. Sorting by department is possible during exportation of reports. Ignore this steps
if your company did not practice staff departmentalization.
1
Welcome Check-In
09:00
01.01.09
2
User Mng
3
User Mng
New User
Viewing User
Dept Mng
4
Dept Mng
QC 0
RD 0
SALE 0
5
QC 0
Viewing User
Revise name
Shift
Press & Hold
MENU
Press Once
OK
Press twice
OK
Press Once
Select a name slot by
pressing
OK
Press once to
start to insert
name
Press Once
OK
Press Once
6
Input
OK ESC
7
Input
Production
OK ESC
8
QC 0
Viewing User
Revise name
Shift
9
Dept Mng
ESC OK(Save)
10
Dept Mng
Production 0
RD 0
SALE 0
Save ?
Input the names of department
Please refer to page 6
T9 input method for the
details.
OK
Press Once to
save settings
ESC
Press Once
OK
Press Once to
save settings
ESC
Press 3 time to
return to main
menu
19

TO ASSIGN USERS INTO DEPARTMENT
By default, all enrolled users are not assigned to any departments. Users must be assigned into their corresponding departments (if any) once the department definition process is done. If users were not assigned into any departments, his/her attendance data
cannot be calculated according to the predefined working schedules. Follow the steps
below for assignment of users into their corresponding departments.
1
Welcome Check-In
09:00
01.01.09
2
User Mng
3
User Mng
New User
Viewing User
Dept Mng
4
Viewing User
John
Mary
Helen
5
Option
Examine
Edit
View Logs
Press & Hold
MENU
Press Once
OK
Press Once
OK
Press Once
Select a user ID by
pressing
OK
Press Once
Press Once
OK
Press Once
6
Edit
Name: John
Finger 2
Dept NO
7
Dept Mng
Production 0
RD 0
Sales 0
8
Edit
Name: John
Finger 2
Dept Product
9
Edit
000000001
ESC OK(Save)
10
Option
Examine
Edit
View Logs
Select a department by
pressing
save settings
return to main
menu
Repeat the steps above to assign users into their corresponding department.
20
Press 3 times
OK
Press Once
OK
Press Once
ESC
Press Once
OK
Press Once to
ESC
Press 4 time to

TO SHIFT USERS INTO DIFFERENT DEPARTMENT
Users can be shifted into different department to enable them to can carry out specific
jobs. For example, a user can be shifted from Production department into QC department. Follow the steps shown below:
1
Welcome Check-In
09:00
01.01.09
2
User Mng
3
User Mng
New User
Viewing User
Dept Mng
4
Viewing User
John
Mary
Helen
Press & Hold
MENU
Press Once
OK
Press Once
OK
Press Once
Select a user ID by
pressing
OK
Press Once
5
Option
View Logs
Shift
Reassign to Dept
6
Dept Mng
Production 1
RD 0
Sales 0
7
Option
View Logs
Shift
Reassign to Dept
Press 4 times
OK
Press Once
Select department by
pressing
OK
Press Once
ESC
Press 4 times to
return to the main
menu.
21

CONFIGURATION OF WORKING SHIFT & ATTENDANCE RULES
•
4
The TA100 DIY calculates attendance according to the preset working shifts and attendance rules. Configuration of the working shifts and attendance rules must be done correctly
to ensure accurate attendance calculations. There are a total of 10 working shifts ready
for configuration.
Follow the sequence below:
Step 1 • to configure working shift
Step 2 • to assign working shift to each user, department or all users.
Stpe 3 • to configure the attendance rules.
CONFIGURATION OF WORKING SHIFT
You must preset ON and OFF time during working shift configurations.
• ON TIME: the time for users to start to work
• OFF TIME: time for users to leave
1
Welcome Check-In
09:00
01.01.09
2
Setting
3
Setting
Shift
Att. Rule
Company name
22
MENU
OK
OK
Press & Hold
Press Once
Press Once
Press Once
4
Shift
New shift
5
New Shift
Name
On time 00:00
Off time 00:00
6
Input
OK ESC
Select NEW SHIFT by
pressing
Press Once
OK
Press once to
OK
name the shift.
Example Administration
Please refer to page 6
for T9 input method

7
Input
Morning
OK ESC
OK
Press Once
11
New Shift
Name Morning
On time 09:00
Off time 15:00
Insert the time
For example 15:00
Press Once
OK
8
New Shift
Name Morning
On time 00:00
Off time 00:00
9
New Shift
Name Morning
On time 09:00
Off time 00:00
10
New Shift
Name Morning
On time 09:00
Off time 00:00
Press Once
Press Once
OK
Insert the time.
For example 9:00
Press Once
OK
Press Once
Press Once
OK
12
Shift
ESC OK(Save)
13
Shift
New Shift
Save ?
Press once once
OK
to save settings.
Press 3 times to
ESC
return to the
main menu
Repeat the above steps to configure more working shifts, for example morning shift, night
shift etc. Always select NEW SHIFT to configure a new working shift.
Follow the steps to change settings in each shift to fit your working environment:
1
Welcome Check-In
09:00
01.01.09
2
Setting
MENU
OK
Press & Hold
Press Once
Press Once
3
Setting
Shift
Att. Rule
Company name
4
Shift
Name
Morning
Press Once
OK
Select working shift by
pressing
09:00
15:00
Press Once
OK
23

5
Option
Edit
To Dept.
To Personal
Press Once
OK
8
Shift
ESC OK(Save)
Save ?
Press once to
OK
confirm
6
Edit
Name Morning
On time 09:00
Off time 15:00
7
Edit
Name Morning
On time 09:00
Off time 16:00
Now you can change
the name, ON time and
OFF time as show in
page 22.
Press Once
ESC
9
Option
Edit
To Dept.
To Personal
4 times to return
ESC
to the main menu.
TO ASSIGN WORKING SHIFT
The configured working shift must be assigned to individual users, or department or all
users. Without assigning working shift prior to use, TA100 DIY cannot calculate the attendance data for users. Assignment of preset working shift can be done either to:
• All users, or
• Department, or
• Individual users
24

TO ASSIGN WORKING SHIFTS TO ALL USERS
Choose “All Users” in situation where all users in your company were working according
to the same working shift, meaning that the attendance data of all users will be calculated
based on the same working shift. If there were a few departments running on the same
working shifts, you can choose to assign to all users as well.
To assign working shift to all users, follow the steps below:
1
Welcome Check-In
09:00
01.01.09
2
Setting
3
Setting
Shift
Att. Rule
Company name
Shift
4
Name Shift
Morning
Night
MENU
OK
OK
Select preset working
shift by pressing
09:00
16:00
16:00
OK
23:00
Press & Hold
Press Once
Press Once
Press Once
Press Once
4
Option
To Dept
To Personal
To All
5
Apply to
All (Whole)
ESC OK
6
Option
To Dept
To Personal
To All
Press 3 times
Press Once
OK
Press once to
OK
confirm
Press 4 times to
ESC
return to the main
menu.
25

TO ASSIGN WORKING SHIFT TO DEPARTMENT
Assignment of working shift to department is suitable for a company where the staff
are divided into several departments and all users are working according to different
working shifts. Assignment of the preset working shift to each department is a must. It is
possible for few departments to run on the same working shift and in some company,
there is a requirement where each department is running on different working shifts.
Therefore, configuration of each working shift for each department is necessary to ensure correct reporting.
1
Welcome Check-In
09:00
01.01.09
2
Setting
3
Setting
Shift
Att. Rule
Company name
Shift
4
Name Shift
Morning
Night
MENU
OK
OK
Select preset working
shift by pressing
09:00
16:00
16:00
OK
23:00
Press & Hold
Press Once
Press Once
Press Once
Press Once
5
Option
Edit
To Dept.
To Personal
6
Dept Mng
Production
RD
Sales
7
Dept to
ESC OK
8
Option
Edit
To Dept.
To Personal
Sales
Repeat the steps above to assign working shift to other departments.
26
Press Once
Press Once
OK
Select Department by
pressing
Press Once
OK
Press once to
OK
confirm
Press 4 times to
ESC
return to the main
menu.

TO ASSIGN WORKING SHIFTS TO INDIVIDUAL USERS
Assignment of working shift to individual user is suitable for employees whose working
times were different from the other staff, or departments, for example the boss, security
guards, cleaning workers etc. To configure individual user working shifts, follow the
steps below:
1
Welcome Check-In
09:00
01.01.09
2
Setting
3
Setting
Shift
Att. Rule
Company name
Shift
4
Name Shift
Morning
Night
MENU
OK
OK
Select preset working
shift by pressing
09:00
16:00
16:00
OK
23:00
Press & Hold
Press Once
Press Once
Press Once
Press Once
5
Option
Edit
To Dept.
To Personal
6
Viewing User
John
Mary
Helen
7
Apply to
0003 Helen
ESC OK
8
Option
Edit
To Dept.
To Personal
Press twice
Press Once
OK
Select User ID by
pressing
Press Once
OK
Press once to
OK
confirm
Press 4 times to
ESC
return to the main
menu.
27

TO SHIFT USERS INTO DIFFERENT WORKING SHIFT
Changing of users from one shift to another is possible with TA100 DIY. For example, a
production worker’s shift needs to be changed from morning shift to night shift. Follow
the steps below to configure the shift change:
1
Welcome Check-In
09:00
01.01.09
2
User Mng
3
User Mng
New User
Viewing User
Dept
4
Viewing User
John
Mary
Helen
5
Option
Edit
View Logs
Shift
28
Press & Hold
MENU
Press Once
OK
Press Once
Press Once
OK
Select a user ID by
pressing
Press Once
OK
Press 3 times
Press Once
OK
6
Shift
Shift Morning
7
Shift
Name Shift
Morning
Night
8
Shift
Shift Night
9
Shift
ESC OKT
10
Option
Edit
View Logs
Shift
Save ?
Press Once
OK
Select a new working
shift by pressing
09:00
16:00
16:00
23:00
Press Once
OK
Press Once
ESC
Press once to
OK
save settings
Press 4 times to
ESC
return to the main
menu.

CONFIGURATION OF ATTENDANCE RULES
The attendance rules are applied to all working shifts in the same TA100 DIY reader. You
can configure the following attendance rules to affect the attendance data calculations.
ATTENDANCE RULES DEFAULT VALUE FUNCTIONS
Late Time 5 Do not deduct user’s working time if he/she was late
within less than 5 minutes from the actual IN time
Maximum 60 minutes
Early Time 5 Do not deduct user’s working time if he/she left
early within less than 5 minutes from the actual
OUT time.Maximum 60 minutes
OT TOL Time 60 Only calculate OT time if a user worked more
than 60 minutes. Ignore OT time if user worked
less than 60 minutes. Maximum 999 minutes.
To configure, please follow steps below:
1
Welcome Check-In
09:00
01.01.09
2
Setting
3
Setting
Shift
Att. Rule
Company name
Att. Rule
4
Late Time 10
Early Time 10
OT TOL Time 30
Press & Hold
MENU
Press Once
Press Once
OK
Press Once
Press Once
OK
Select the attendance rules
by pressing
For example Late time
Press Once
OK
5
Att. Rule
6
7
Setting
Late Time 5
Early Time 10
OT TOL Time 30
Att. Rule
Save ?
ESC OK
Shift
Att. Rule
Company name
Insert value by pressing
keypad
For example 5.
Press once to
OK
confirm
Press once to
OK
confirm
Press 2 times to
ESC
return to the main
menu.
Repeat the above steps to edit or update attendance rules for your company.
29

DATA TRACKING AND REPORT PREPARATION
•
5
ATTENDANCE TRACKING
TA100 DIY allows administrator to track user’s clocking activities with raw clocking data
for fast checking but not for attendance viewing. You may use these steps to track the
clocking activities of users, to confirm that he/she reports attendance during a specific time
period. Administrator can skip these steps and print report directly for evaluation.
Follow the steps below to track clocking activities.
1
Welcome Check-In
09:00
01.01.09
2
Information
3
Information
Att. Tracking
Exc. Tracking
View Dev. Info
4
Att. Tracking
000000002
ESC OK
Press & Hold
MENU
Press twice
Press Once
OK
Press Once
OK
Enter User ID by pressing keypad.
Example 000002
Press Once
OK
5
Setting Time Ter
Start : 01-00
End : 00-00
Export
6
Setting Time Ter
Start : 01-01
End : 01-11
Export
7
Setting Time Ter
Start : 01-01
End : 01-11
Export
Press once to
OK
define the starting dates
to track.
Enter month by pressing
keypad.
Press Once
OK
Press Once
Press Once
OK
Now enter the end date by
pressing keypad.
For example 11 of January
is 11
Press Once
OK
Press Once
Press Once
Press Once
OK
30

8
00000002 2009 - 10 1/2
02 09 : 15
To understand the information display
0000000002 - user ID
2009-1 - date in yyyy/m format, 2009-January
1/2 - Total 2 pages of date, and now 1st page is viewing
02 - day of the month, 2nd of January
09:15 - the attendance time
Another option to do checking on clocking activities is shown below:
1
Welcome Check-In
09:00
01.01.09
2
User Mng
3
User Mng
New User
Viewing User
Dept Mng
MENU
OK
OK
Press & Hold
Press Once
Press Onece
Press Once
4
Viewing User
John
Mary
Helen
5
Option
Examine
Edit
View Logs
6
00000002 2009 - 1 1/2
02 09 : 15
Select User ID by pressing
Press Once
OK
Press twice
Press Once
OK
All clocking activities of
the user for the specific
date range are displayed
on screen.
Press 4 times to
ESC
return to the main
menu.
31

EXCUSES TRACKING
Under some circumstances, the clocking data will be considered as exceptions such as
late in, early out, wrong clocking status and etc. These data can be viewed in a special
page named Excuses Tracking. All improper clocking data is displayed in this page for
easy checking. You can check for the late time, early time, absent from work etc from this
page.
To check excuse tracking, follow these steps:
1
Welcome Check-In
09:00
01.01.09
2
Information
3
Information
Att. Tracking
Exc. Tracking
View Dev. Info
4
Att. Tracking
000000002
ESC OK
Press & Hold
MENU
Press twice
Press Once
OK
Press Once
Press Once
OK
Enter User ID by
pressing keypad.
Example 000002
Press Once
OK
5
00000002 2009 - 1
07 - - : - - A - - : - - A
06 07:50L 16:00
05 08:50 16:00
04 09:05L 15:45E
03 - - : - - A - - : - - A
02 - - : - - A - - : - - A
01 - - : - - A - - : - - A
All improper clocking times
are displayed on screen.
Press
If the clocking time was
empty and ended with
“A”, it means the user was
absent from work.
If the clocking time is
displayed but ended with
“L”, it means user was late
to work.
If the clocking time is
displayed but ended with
“E”, it means the user left
work earlier.
Press 3 times to
ESC
return to the main
menu.
to view
32

TO GENERATE AND SAVE REPORT
FingerTec® TA100 DIY prepares time attendance reports directly.
There are 3 reports available as explained below:
ELECTRONIC TIME CARD
Electronic Time Card is a complete attendance report for each user. All Check Ins, Breaks,
Resumes and Out times are displayed in this time card. If there were OT works involved, OT
and Done time would be printed too. The data displays day-by-day and normally presented
in a month format. Important information can be found printed in the report, including work
time, OT time, Late time and etc.
DAILY ATTENDANCE LISTING
Daily Attendance Listing report is intended to show all clocking activities of users for each
day. The data will be arranged and displayed by date and time.
STAFF MOVEMENT ANALYSIS
Staff Movement Analysis is to show users’ clocking data by terminals. Ignore this report if
you only installed one terminal. Installation of multiple terminals to capture clocking activities enables you to download clocking data from each terminal and upload them into a
master terminal. With all clocking activities from all terminals, you can print this report to
check terminals which were used for verifications. Please refer to page 38 to see download
and upload attendance data.
You can export and save these reports into a USB flash disk. Plug the USB flash disk into
a computer to view these reports. Reports can be viewed via Internet browser (Internet Explorer or Mozilla Firefox). You can print these reports directly.
33

Reports can be saved and sorted by all users, departments or selected users only.
To prepare and save report of All Users into a USB flash disk, follow these steps:
1
Welcome Check-In
09:00
01.01.09
2
Report
3
Report
Electronic Time Card
Daily Att.
Staff Movement
4
Filtering Data
All (Whole)
Dept
Personal
5
Setting Time Ter
Start : 01- 01
End : 00-00
Export
Press & Hold
MENU
Press 3 times
Press Once
OK
Select the report by
pressing
For example Electronic
Time Card
press Once
OK
Select All pressing
Press Once
OK
Press Once
OK
Start to insert the start
date of the report by
pressing keypad. For
example 1st January.
Press once to
OK
confirm
Press Once
6
Setting Time Ter
Start : 01- 01
End : 01-31
Export
7
Setting Time Ter
Start : 01- 01
End : 01-31
Export
8
Report
Exp. to U disk
ESC OK
9
Copy Data Suc
Report Time Card
ESC OK
10
Setting Time Ter
Start : 01- 01
End : 01-31
Export
Press Once
OK
Start to insert the end date
of the report by pressing
keypad. For example 31st
January.
Press once to
OK
confirm
Press Once
Press Once
OK
Press Once
OK
Press Once
OK
Press 4 times to
ESC
return to the main
menu.
Now unplug the USB flash disk from TA100 DIY. Plug the USB flash disk into a computer and
you can start to view and print the reports.
34

For Department • To prepare and save report into USB pen drive, follow these steps:
1
Welcome Check-In
09:00
01.01.09
2
Report
3
Report
Electronic Time Card
Daily Att.
Staff Movement
4
Filtering Data
All (Whole)
Dept
Personal
5
Dept Mng
Production 10
RD 5
Sales 6
6
Setting Time Ter
Start : 01- 01
End : 00-00
Export
Press & Hold
MENU
Press 3 times
Press Once
OK
Select the report by
pressing
For example Electronic
Time Card
press Once
OK
Select Department by
pressing
Press Once
OK
Select the report by
pressing
For example Production
Press Once
OK
Press Once
OK
Start to insert the start
date of the report by
pressing keypad. For
example 1st January.
Press once to
OK
confirm
Press Once
10
11
7
Setting Time Ter
Start : 01- 01
End : 01-31
Export
8
Setting Time Ter
Start : 01- 01
End : 01-31
Export
9
Report
Exp. to U disk
ESC OK
Copy Data Suc
Report Time Card
ESC OK
Setting Time Ter
Start : 01- 01
End : 01-31
Export
Press Once
OK
Start to insert the end date
of the report by pressing
keypad. For example 31st
January.
Press once to
OK
confirm
Press Once
Press Once
OK
Press Once
OK
Press Once
OK
Press 4 times to
ESC
return to the main
menu.
Now unplug the USB flash disk from TA100 DIY. Plug the USB flash disk into a computer
and you can start to view and print the reports.
35

For Selected Users • To prepare and save report for selected users into a USB flash disk,
follow these steps:
1
Welcome Check-In
09:00
01.01.09
2
Report
3
Report
Electronic Time Card
Daily Att.
Staff Movement
4
Filtering Data
All (Whole)
Dept
Personal
5
Viewing User
John
Mary
Helen
6
Setting Time Ter
Start : 01- 01
End : 00-00
Export
Press & Hold
MENU
Press 3 times
Press Once
OK
Select the report by
pressing
For example Electronic
Time Card
press Once
OK
Select Personal pressing
Press Once
OK
Select user ID by
pressing
Press once to
OK
confirm
Press Once
OK
Start to insert the start date
of the report by pressing
keypad. For example 1st
January.
Press once to confirm
OK
Press Once
7
Setting Time Ter
Start : 01- 01
End : 01-31
Export
8
Setting Time Ter
Start : 01- 01
End : 01-31
Export
9
Report
Exp. to U disk
ESC OK
10
Copy Data Suc
Report Time Card
ESC OK
11
Setting Time Ter
Start : 01- 01
End : 01-31
Export
Press Once
OK
Start to insert the end date
of the report by pressing
keypad. For example 31st
January.
Press once to
OK
confirm
Press Once
Press Once
OK
Press Once
OK
Press Once
OK
Press 4 times to
ESC
return to the main
menu.
Now unplug the USB flash disk from TA100 DIY. Plug the USB flash disk into a computer
and you can start to view and print the reports.
36

USB PEN DRIVE MANAGEMENT
The USB pen drive or flash disk is an important tool for TA100 DIY. You can download/upload users between all TA100 DIY by using USB pen drive. You can download and upload
attendance data into a TA100 DIY to centralize the attendance data.
TO DOWNLOAD/UPLOAD USERS
(Skip this if only 1 unit of TA100DIY was installed)
You can enroll all users into a TA100 DIY and download their fingerprints or passwords
into a USB pen drive. Now, plug the USB pen drive to another TA100 DIY to upload the
user fingerprints and passwords. You can avoid re-enrollment of the same users in the other
TA100 DIY. To download users, follow these steps:
1
Welcome Check-In
09:00
01.01.09
2
Report
3
Report
Staff Movement
DwnLoad Attlog
DwnLoad User
Plug USB pen drive to
the terminal.
Press & Hold
MENU
Press 3 times
Press Once
OK
Press 4 times
Press Once
OK
4
Copy Data Suc
ESC OK
5
Report
Staff Movement
DwnLoad Attlog
DwnLoad User
Wait until process is
completed.
Press Once
OK
Press twice to return
ESC
to the main menu.
Unplug the USB pen drive.
37

To upload users into TA100 DIY, follow steps:
1
Welcome Check-In
09:00
01.01.09
2
Report
3
Report
DwnLoad Attlog
DwnLoad User
UpLoad User
Plug USB pen drive to
the terminal.
Press & Hold
MENU
Press 3 times
Press Once
OK
Press 5 times
Press Once
OK
4
Copy Data Suc
ESC OK
5
Report
DwnLoad Attlog
DwnLoad User
UpLoad User
Wait until process is
completed.
Press Once
OK
Press twice to return
ESC
to the main menu.
Unplug the USB pen drive.
TO DOWNLOAD/UPLOAD ATTENDANCE DATA
(Skip if only one unit of TA100DIY was instal)
If multiple TA100 DIY terminals were installed in a same working environment, users can report attendance at any terminals. Under this scenario, the attendance data in each terminal
might not be complete and this could affect the quality of the reports.
It is advisable to download attendance data from all terminals into a USB pen drive. All of
these attendance data then will be uploaded into a TA100 DIY to centralize the attendance
data. Now you can prepare complete reports of all users without any doubt.
38

To download attendance data into a USB pen drive, follow these steps:
1
Welcome Check-In
09:00
01.01.09
Plug USB pen drive to
the terminal.
Press & Hold
MENU
2
Press 3 times
Press Once
Report
3
Report
Daily
Staff Movement
DwnLoad Attlog
OK
Press 3 times
Press Once
OK
To upload attendance data into a TA100 DIY.
1
Welcome Check-In
09:00
01.01.09
Plug USB pen drive to
the terminal.
Press & Hold
MENU
2
Press 3 times
Press Once
OK
Press 6 times
Press Once
OK
3
Report
Report
DwnLoad User
UpLoad User
UpLoad Attlog
4
Copy Data Suc
ESC OK
5
Report
Daily
Staff Movement
DwnLoad Attlog
NOTE
4
Copy Data Suc
ESC OK
5
Report
DwnLoad User
UpLoad User
UpLoad Attlog
Wait until process is
completed.
Press Once
OK
Press twice to return
ESC
to the main menu.
Unplug the USB pen drive.
You must select a TA100 DIY as
a master unit to centralize the
attendance data
Wait until process is
completed.
Press Once
OK
Press twice to return
ESC
to the main menu.
Unplug the USB pen drive.
39

MISCELLANEOUS
•
6
CONFIGURATION OF SCHEDULED BELLS
TA100 DIY is integrated with a scheduled bell function. The TA100 DIY can be configured
to ring and alert users during specific time period, for example during lunch and after
lunch to resume work etc. There are 25 schedules available per day. The cycle is running
7 days a week.
To configure the scheduled bells, follow the steps below:
1
Welcome Check-In
09:00
01.01.09
2
Setting
3
Setting
Att. Rule
Company Name
Other Option
4
Other Option
Date Time
Fmt YY-MM-DD
Power Mng
40
MENU
OK
OK
OK
Press & Hold
Press Once
Press Once
Press 3 times
Press Once
Press twice
Press Once
5
Power Mng
Idle Min 0
Bell Delay 30
Scheduled Bell
6
Scheduled Bell
SUN
MON
TUE
7
MON
No. 1 N
No. 2 N
No. 3 N
8
Shutdown
Set Sch. Fun ?
ESC OK
Press 6 times
Press Once
OK
Select day by pressing
Press Once
OK
Select a schedule to
configure
Press Once
OK
Press Once
OK

9
MON
No. 1 08:00
No. 2 N
No. 3 N
10
MON
08:00
No. 2 N
No. 3 N
11
Scheduled Bell
ESC OK(Save)
12
Scheduled Bell
SUN
MON
TUE
13
Power Mng
Idle Min 0
Bell Delay 30
Scheduled Bell
Save ?
Insert the time by pressing keypad.
Example 08:00
Press Once
OK
Press Once
ESC
Press Once
OK
Press Once
ESC
Press Once
Press Once
OK
14
Power Mng
Idle Min 0
Bell Delay 30
Scheduled Bell
15
Power Mng
Idle Min 0
Bell Delay 30
Scheduled Bell
16
Power Mng
ESC OK(Save)
17
Other Option
Date Time
Fmt YY-MM-DD
Power Mng
Save ?
Insert the time interval
to ring
For example 30 to indicate 30sec.
Maximum is 999 sec.
Press Once
OK
Press Once
ESC
Press Once
OK
Press 3 times to
ESC
return to the main
menu.
Repeat the above steps to configure more schedules. Please take note that the Bell Delay
(time interval to ring) is applied to all schedules. Skip this step if you had configured it
earlier.
41

OTHER OPTIONS
Setting
Att. Rule
Company Name
Other Option
There are many other powerful functions available in TA100 DIY. You
can use them if necessary. To check these available options, follow the
steps below:
Press
OPTIONS FUNCTIONS
Date Time To configure display date and time
Fmt To change the display date format
Power Mng Shutdown To configure automatic turn off time
Power On To configure automatic turn on time
Sleep To configure automatic sleep time
Idle To configure idle action (SLP – to go into sleep mode;
OFF to turn off reader)
Idle Min To configure time interval for reader to become idle
Bell Delay To configure the time period to ring bell (siren)
Scheduled Bell To configure schedules for bell (siren) ringing
Lock Power To lock power button to avoid shutting off of a reader
accidentally or intentionally by unauthorized person.
Comm Opt IP addr To configure the IP address of a reader.
NetMask To configure the same net mask as environment, and
reader can suit into the same network.
Gateway To configure same Gateway as environment, and reader
can suit into same environment.
NetSpeed To configure network connection speed.
COMM key Communication key between reader and software, al
ways set to “0”
to view the available options and their functions are as below:
42

Show Score To show the quality of captured fingerprint image
during capturing process. Maximum is 50.
Match Thr To configure the sensitivity of the sensor during 1:N matching.
1:1 Thr To configure the sensitivity of the sensor during 1:1 matching.
Voice To enable/disable greeting voice.
PINWIDTH To configure the length of user ID
Pre Fill Zero To fill the empty space of user ID by number 0 to satisfy
the preset user ID length.
Example, length of user ID is 9 digits.
Input user ID 1888.
System will fill number 0 to the ID to become 000001888.
Language To select the display and greeting language of the reader
Del AttLogs To delete all attendance logs stored in reader
Clear All User To delete all enrolled users in the reader
Clear All Data To delete all data (user ID, fingerprint, password,
attendance logs) stored in the reader.
Upd Firmware To update firmware of the reader.
43

TO VIEW INFORMATION OF DEVICE
Information
Att. Tracking
Exc. Tracking
View Dev. Info
To access into the Device information menu, follow the steps below:
Now you can press
below:
INFORMATION MEANINGS
User Cnt To show total of users in reader
FP Cnt To show total of fingerprint templates in reader
Att Log To show total of attendance logs in reader
Admin Cnt To show total of administrator enrolled in reader
Pwd Usr To show total of password users in reader
S Logs For testing purpose.
Free Space Info To show total memory available in reader
Dev Info FPCnt (100) – 8 To show total of fingerprint supported by reader, 800
AttLog (10k) – 3 To show total of attendance logs can stored in reader,
30000
S Logs – 4096 For testing purpose
Manu Time Manufacturing date and time of reader
Serial number Serial number of reader
Manufacturer Name of manufacturer
Device name The name of Device
Alg version To show the algorithm version used by the reader
Firmware version To show the firmware version used by the reader.
Viewing of device information is possible to know its status. Basic information such as serial number, firmware version etc and data storage information which include total numbers of fingerprints, transaction logs etc), and available empty space, can be obtained from the
device information.
to view the information and their meanings are as
44

7
OPTIONAL
•
NOTE
The TA100 DIY does not require any software to manipulate and analyze its data. Therefore, TA100 DIY does not come with any software CD and does not communicate with
PC.
If you feel that the features of TA100 DIY is no longer suffice to support your company’s
requirements, and wish to upgrade to FingerTec® software, TCMS V2, the TA100 DIY could
be changed to adopt the software with an upgrade of the firmware and you can connect
the reader to PC via LAN CAT 5 cable. Once the upgrade process is done, all features of
TA100 DIY will be erased completely and you must refer to the TA100 User Manual for
more details in functions and operations. Please refer to your local reseller for more details
or email us at info@fingertec.com.
This Chapter is meant for qualified installer only.
The installation of reader shall be handled by a
well-trained installer. If you are not a qualified installer, you can ignore this Chapter or this Chapter
serves as a reference for all types of connections
available for the reader only.
45

TCP/IP is only applicable if the TA100 DIY was upgraded
to TA100 series and worked with FingerTec® TCMS V2
NOTE
software)
TCP/IP PORT
This port is for connection in LAN environment. A straight RJ45/cat. 5E cable should
be plugged here to connect to a network
switch/hub. A crossover RJ45 cable is for
direct connection to a PC’s network port.
1 2 3
DC 5V POWER ADAPTER TA100 DIY READER POWER BUTTON
1. Connect DC 5V power adapter to the reader.
2. Turn on the power supply.
3. Press the power button to switch on or shutdown the reader.
46
RJ45/cat. 5E cable
is not included in the
reader package.

IP Addr
192. 168. 1.201
ESC OK
Comm Opt u
4Ethernet Yes
RS232 No
RS485 No
NOTE
When RS232/RS485/Ethernet is enabled, only the Ethernet function will
be enabled while the RS232/RS485
will be disabled.
1. Setup the IP address by network configuration
The machine default IP address is 192.168.1.201; this is a legal and available IP address in
many LAN environment. If the host IP address is 192.168.1.X and it is in the same network
region, then this IP can be used directly. If not, please make sure that you have changed
the IP address accordingly.
2. Setup of Ethernet.
Access Menu select “Options” > “Comm. Opt” > “Ethernet”, select “Yes” to enable Ethernet
function.
3. Turn the power off.
4. Plug the network plug to the Ethernet interface.
5. Turn the power on.
47

Ethernet 10/100Base-T Crossover Cable
1 8
This cable can be used to cascade hubs, or for connecting two Ethernet stations back-to-back without a hub. It works with both 10Base-T
and 100Base-TX.
TOP
FRONT
1 8
JOINT 1 PIN JOINT 2 PIN
TX + 1 • • 3 RX +
TX - 2 • • 6 RX -
RX + 3 • • 1 TX +
RX - 6 • • 2 TX -
Ethernet 10/100Base-T Straight Thru Cable
This cable will work with both 10Base-T and 100Base-TX and is used to connect a network
interface card to a hub or network outlet. These cables are sometimes called “whips”.
CONNECTOR PIN CABLE COLOR CONNECTOR
TX + 1 • White/Orange • 1 TX +
TX - 2 • Orange • 2 TX -
RX + 3 • White/Green • 3 RX +
4 • Blue • 4
5 • White/Blue • 5
RX - 6 • Green • 6 RX -
7 • White/Brown • 7
8 • Brown • 8
48

TROUBLESHOOTING
•
APPENDIX
Q: What is the difference between FingerTec® TA100 & TA100 DIY Fingerprint
Time Attendance System?
A: FingerTec® TA100 DIY reader has combined the management software into
the reader’s firmware. TA100 reader is operating with the bundled TCMS software.
Q: How can I generate attendance report without attendance software?
A: Attendance reports are generated in the reader itself and can be downloaded
using USB flash disk.
Q: What is the format of the attendance report?
A: The attendance report is in HTML format, which can be viewed by using Inter-
net browser.
Q: Will the system purge the transaction logs if I downloaded the data?
A: The transaction logs will remain in the reader until you perform manual dele-
tion.
Q: Can I use TA100 DIY as a door access system?
A: FingerTec® TA100 DIY is a time attendance system only which does not have
access control function.
Q: How many siren schedules are in TA100 DIY?
A: TA100 DIY is not equipped with siren schedule feature.
Q: How many languages are available in FingerTec® TA100 DIY?
A: Currently we have English & Indonesian language available in FingerTec®
TA100 DIY, other languages will be added in future.
Q: What is the use of the TCP/IP port on FingerTec® TA100 DIY reader?
A: The TCP/IP port allows user to download the transaction data through Ether-
net connection if they used the reader with their own developed time management software.
49

APPENDIX
•
Q: How can I enter the user name directly into reader?
A: Please use the alphanumeric keypad and you can edit the user name in “User
TROUBLESHOOTING
Management” setting.
Q: How long does it take to generate the attendance report into USB Flash Disk?
A: It will take around 30-40 second to generate all attendance logs.
Q: Where is the power off button of the reader?
A: The power off button is used as OT-Out as well. Simply press & hold the
button on the keypad for a few seconds to shut down the reader.
Q: Can I use any USB Flash Disk to download & generate attendance report?
A: Any USB Flash Disk with version 2.0 can be used to download & generate at-
tendance report from TA100 DIY.
Q: Would the reader provide any indication about the reader memory’s status?
A: To avoid the lost of the earlier data please make sure to download the required
data into USB Flash Disk.
50

APPENDIX
SAMPLE REPORT
•
Daily Attendance Listing
Electronic Time Card
51

APPENDIX
•
SAMPLE REPORT
Staff Movement Analysis
52
 Loading...