

Page 1
10/01/01 Friday
MENU
Switch to Fingerprint Mode (F6
09:00
/00
Check-In
F1 F2 F3 F4 F5 F6
We Ma ke Th in gs Eas y
ESC
1
3
2
4
6
5
7
9
8
O
K
MEN
U
0
WelcomeCheck-In
01-01 09:00
Fri
1:1/1:N
)
F1
F5
F2
F6
F3
F4
1 2
DEF
3
JKL6MN
5
PQRS
7
OK
F7
F8
WXYZ
9
0
ABC
#
I
GH
4
*
O
M/
ESC
TUV
8
i-Kiosk 100
FRIS II
F i n g e r T e c R e m o t e I d e n t i f i c a t i o n S y s t e m
Operation User Guide
Version 1.0
Page 2

CONTENTS
4
Chapter 1 • OVERVIEW
4 Major Components
FRIS Server (Data Server)
FingerTec Model /OFIS Scanner
Computer installed with FingerTec TCMS V2
5 The Basic Structure
FRIS server with FingerTec Terminal
FRIS server with FingerTec TCMS V2
6 Multi Servers Structures
Multi FRIS Server with FingerTec TCMS V2
Multi FRIS Server with Multiple FingerTec
with TCMS V2
OFIS Scanner with FRIS Servers
8 Data Management
Management of FRIS Server
Management of FingerTec TCMS V2
10 Chapter 2 • INSTALLATION
10 Installation of MySQL Server (Database Server)
12 Installation of FRIS Server
14 Installation of OFIS Scanner Driver
15 Installation of FRIS Client
16 Chapter 3 • CONFIGURATIONS
OF FINGERTEC TERMINAL
18 Add New FingerTec Terminal
18 Removal of FingerTec Terminal
19 Chapter 4 • USER MANAGEMENT
20 Enrollment and Verification of Users Via
FingerTec Terminal
22 Enrollment Via FRIS Client
23 Chapter 5 • CONFIGURATIONS
OF FRIS SERVER
23 Setup of Zone
Add in New Zone
Delete a Zone
26 Setup of Servers
Add in Server
Delete Server
Zone-Server Management
28 Setup of Departments
Add in Department
Delete Department
User Management in Departments
Zone-Department Management
31 Setup of Sections
Add in Section Delete Sections
32 System Settings
33 Chapter 6 •
CONFIGURATIONS
OF TIME ZONES
34 Setup of Time Zones
Add in a New Time Zone
Delete Time Zone
35 Time Zone Group
Add in New Time Zone Group
Delete Time Zone Group
37 User Time Zones
38 Chapter 7 • FRIS SERVER
AND TRANSACTIONS
MANAGEMENT
38 Start and Stop FRIS Services
39 Transactions Management
40 Data Analysis by FingerTec TCMS v2
46 Chapter 8 • FRIS 2 SERVER AS
DATA STORAGE SERVER
(No online verification)
46 To Use FRIS 2 with Normal Fingertec
Terminals
Online fingerprint enrollment and
verification
Download, view and edit transaction logs
Group time zone and time zone
47 Start to Use FRIS 2
47 Terminal Users
Download Users
Upload Users
Delete User (Terminal)
Delete Users (PC)
50 Transaction Management
51 Time Zones, Group Time Zones and Types
of Verification Management
Time Zone Management
Group Time Zone Management
User Access Control Management
Check Users
55 INFORMATION ABOUT
FINGERTEC
55 COPYRIGHT NOTICE &
DISCLAIMER
3
Page 3

1• OVERVIEW
Before using your FingerTec models to connect to FRIS 2 server, please check
1. For black and white screen display model : Menu > Option > System option >
Advance Option. Make sure you see Auth Server IP and Auth Mode.
2. For color screen display model: Menu > Communication. Make sure you see Auth
Server IP and Auth Mode.
Auth Server IP the IP address of the PC working as FRIS 2 server
Auth mode
LO (reader only search into local memory to match users’ fingerprints)
NO (terminal will only search the FRIS 2 server to match users’ fingerprints)
NL (terminal searches into FRIS 2 server to match users’ fingerprint. If failed, terminal
will searches into its local memory)
Major Components
FingerTec Remote Identification System (FRIS) consists of:
FRIS Server (Data Server)
FingerTec Model /OFIS Scanner
Computer installed with FingerTec TCMS V2
FRIS SERVER DATA SERVER
FRIS Server refers to a computer with FRIS installed. FRIS Server stores user’s fingerprints
templates and user’s transaction logs and it also serves as a platform for fingerprint verification. A computer with TCMS V2 has access into the FRIS server to pull transaction
logs. All transaction logs, that are pulled into TCMS, will be checked by clocking rules of
the TCMS and can be viewed in Attendance Sheet for analysis.
FINGERTEC MODEL / OFIS SCANNER
FingerTec Models, can link to a FRIS server and support FRIS. The functions of these readers are:
to enroll and register user fingerprint templates;
to capture users fingerprints;
to transfer fingerprint templates to the FRIS server for verification;
to prompt user with the result of verification.
The FingerTec OFIS scanner is a UrU4000 fingerprint scanner without any LCD or keypad.
The functions of the OFIS scanner include:
enrolling and registering user fingerprint templates;
capturing fingerprints of users;
transfering of templates to the FRIS server for verification.
The FingerTec OFIS scanner must be connected to a computer that is linked to the FRIS
server to perform the above operations. The FRIS server will return the result of the verifi-
4
Page 4
cation process to the computer as the FingerTec OFIS scanner cannot prompt users with
the result of verification. The OFIS scanner can only be used as an enrollment station for
the FRIS server.
COMPUTER INSTALLED WITH FINGERTEC TCMS V2
A computer installed with FingerTec TCMS V2 is a must for FRIS to function properly and
the TCMS V2 installed must have accessibility to the FRIS server. TCMS V2 functions to
pull user information such as user ID fingerprint templates as well as the transaction logs
from the FRIS server. The data pulling process is done only one way from FRIS to TCMS
and it is strictly irreversible. This is important to avoid any unauthorized edits in user
transaction logs inside the FRIS server.
Definitions of clocking rules and group scheduling have to be properly set in the TCMS
V2 because these rules will be applied to arrange user attendance data in proper format
for easy viewing.
The TCMS V2 has various reports for time attendance and access control. These reports
can be saved into .PDF, .JPEG, .HTML, .RTF, .XLS and .DOC formats.
TCMS V2 can export attendance data into .TXT, .XLS or ODBC manager for 3rd party soft
ware configuration such as payroll.
The Basic Structure
FRIS SERVER WITH FINGERTEC TERMINALS
-
User ngerprint
S
C
E
1
3
2
4
6
5
7
9
8
O
K
M
E
N
U
0
Transaction log
TA200 Plus FRIS SERVER R2
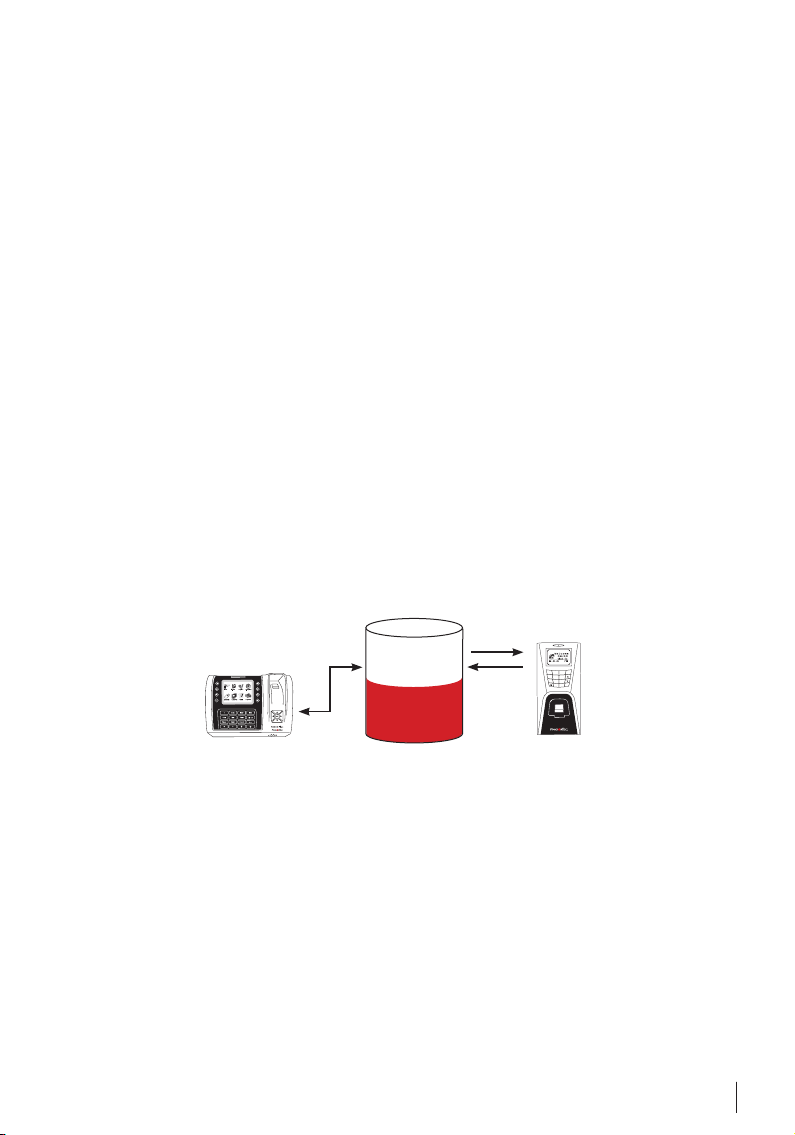
This is the simplest implementation structure of FRIS. FingerTec terminals are used for
user fingerprint enrollments only. The templates will be stored inside FRIS server and not
inside the terminals.
The devices are for users to report attendance or to request door accessibility by presenting their fingerprints at the terminals. The fingerprints of users will be captured and sent
to the FRIS server for verification. FRIS server will then perform a fingerprint verification
and will send the result, (either fail or successful), back to terminals.
If a fingerprint was successfully verified, the user ID will be displayed on the reader to inform users that the transaction is accepted and saved into the FRIS server. For FingerTec
terminals that are supporting a door lock system, user will gain access from the successful verification. Transaction data stored inside the FRIS server includes user ID, date and
time, terminal ID, and transaction code.
5
Page 5
If the fingerprint fails to be verifed, the FRIS server will return a message to the FingerTec
terminals to alert the user to try again.
FRIS SERVER WITH FINGERTEC TCMS V2
User ngerprint
2
V
S
M
C
2
V
S
M
C
T
Transaction log
PC FRIS SERVER PC
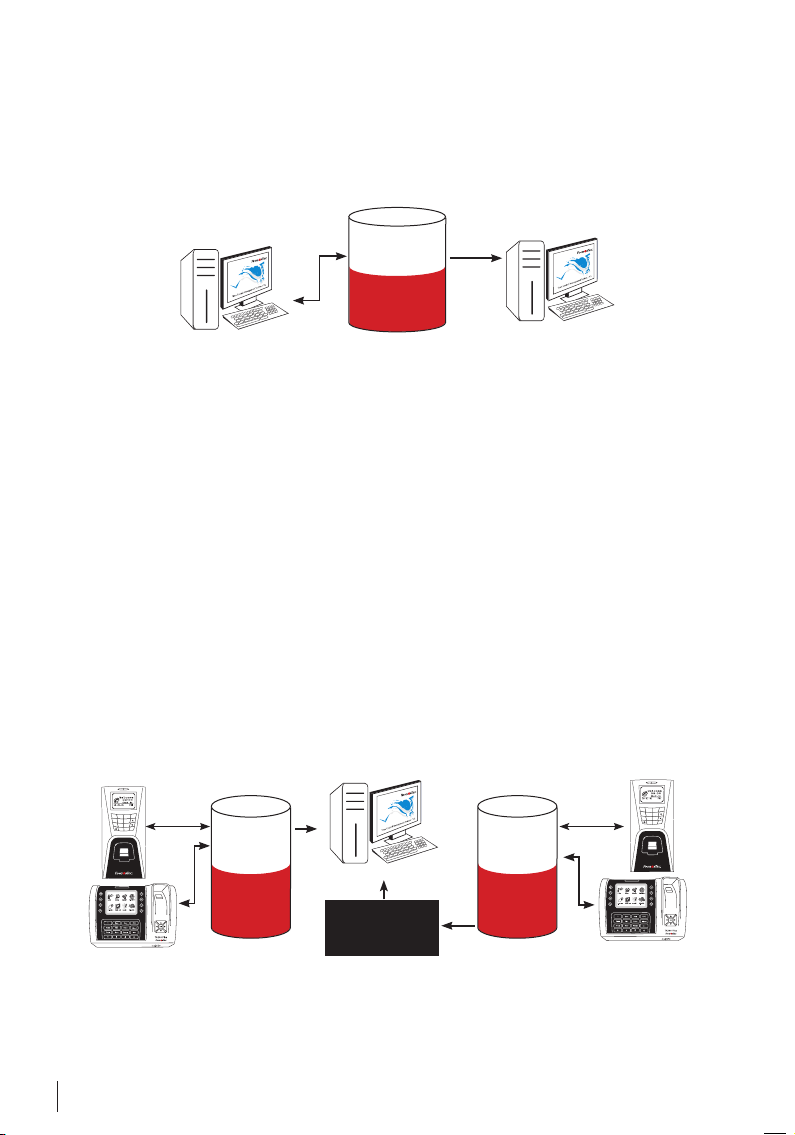
Computers with FingerTec TCMS V2 installed can access into the FRIS server to pull transaction logs of all users. These transaction logs will be arranged according to the clocking
rules, which have been predefined in TCMS V2.
TCMS V2 can produce user reports and the attendance data can be exported into various
formats (.txt, .xls or ODBC manager) for payroll calculation.
The transaction log pulling process is from FRIS to a computer and it is irreversible. This is
to ensure that the transaction data stored in FRIS server is original; therefore the transaction logs pulled into any computer with the TCMS will always be correct and complete.
The FRIS server can support transaction logs of more than one computer with TCMS V2
installed. Another computer with TCMS V2 can access the FRIS server to pull transaction
data, even if the first computer has pulled the data before. FRIS can share its transaction
database with all computers installed with TCMS V2 and have accessibility to FRIS server.
This structure is suitable for an installation site, where there are several people who have
the authority to pull transaction logs and view the attendance data.
T
Multi Server Structures
MULTI FRIS SERVER WITH FINGERTEC TCMS V2
ESC
1
3
2
4
6
5
7
9
8
O
K
MEN
U
0
R2
TA200 Plus
User
ngerprint
Transaction
log
FRIS SERVER 1
TCMS in HQ Centralization
Station
It is recommended to use different FRIS servers for different zones. The logic behind this
is to allow both FRIS servers to be independent during the fingerprint verification process
and transaction log storing process.
6
2
V
S
M
C
T
I NT ER NE T
O R
WA N
User
ngerprint
Transaction
log
FRIS SERVER 1
R2
1
3
2
4
6
5
7
9
8
MEN
0
TA200 Plus
ESC
O
K
U
Page 6
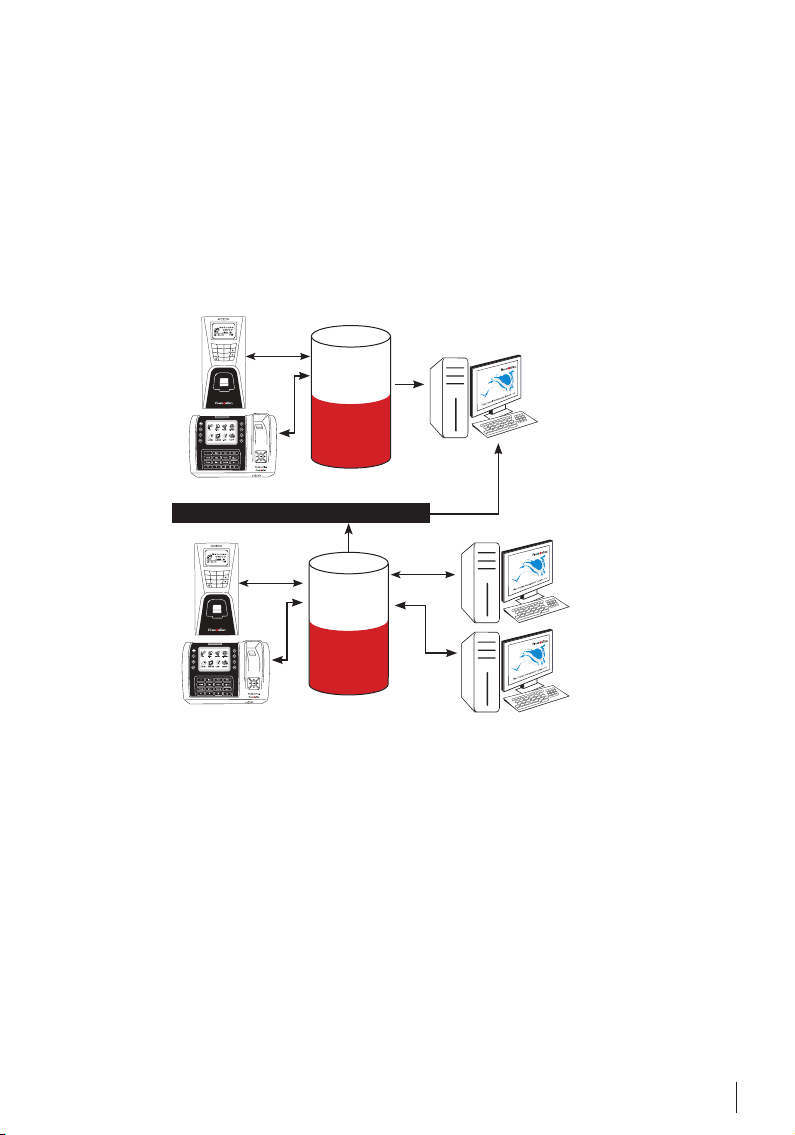
For example, as shown in this diagram, FRIS Server 1 is located in a HQ (zone 1) while FRIS
Server 2 is located in a branch or in a remote site (zone 2). FingerTec TCMS in HQ has to pull
transaction logs from FRIS Server 1 to generate reports through the LAN network.
FingerTec TCMS in HQ is able to access FRIS Server 2 in the branch, by Internet or WAN, to
pull the transaction data. FingerTec TCMS in HQ is a central system to collect all user attendance from both HQ and the branch, and to prepare centralized reports for evaluation
or for auditing.
MULTI FRIS SERVER WITH MULTIPLE FINGERTEC WITH TCMS V2
ESC
1
3
2
4
6
5
7
9
8
O
K
MEN
U
0
R2
User
ngerprint
Transaction
log
2
V
S
M
C
T
TCMS in HQ
Centralization
Station
TA200 Plus
FRIS SERVER 1
I NT ER NE T O R WA N
ESC
1
3
2
4
6
5
7
9
8
O
K
MEN
U
0
TA200 Plus
User
R2
ngerprint
Transaction
log
FRIS SERVER 1
2
V
S
M
C
T
2
V
S
M
C
T
TCMS in Branch
For Administration
Department
TCMS in Branch
For HR Department
In the diagram above, FRIS Server 2 that is located in a branch or in a remote site is an
independent unit. It stores user fingerprints and transaction logs. TCMS V2 can be installed either in a branch or in a remote site to pull data from FRIS Server 2 for evaluation
or checking.
Multiple copies of the TCMS can be installed in different departments within a branch, for
example administration department and human resource department. This would allow
head of these departments to access into FRIS Server 2 (server in branches) to view user’s
attendance and movements in the branch.
OFIS SCANNER WITH FRIS SERVERS
FRIS Server supports OFIS scanner for time attendance system. The OFIS scanner can be
plugged into any computer that has a LAN connection connected to FRIS Server, to capture fingerprint templates which is then sent to the FRIS server for verification. The results
7
Page 7
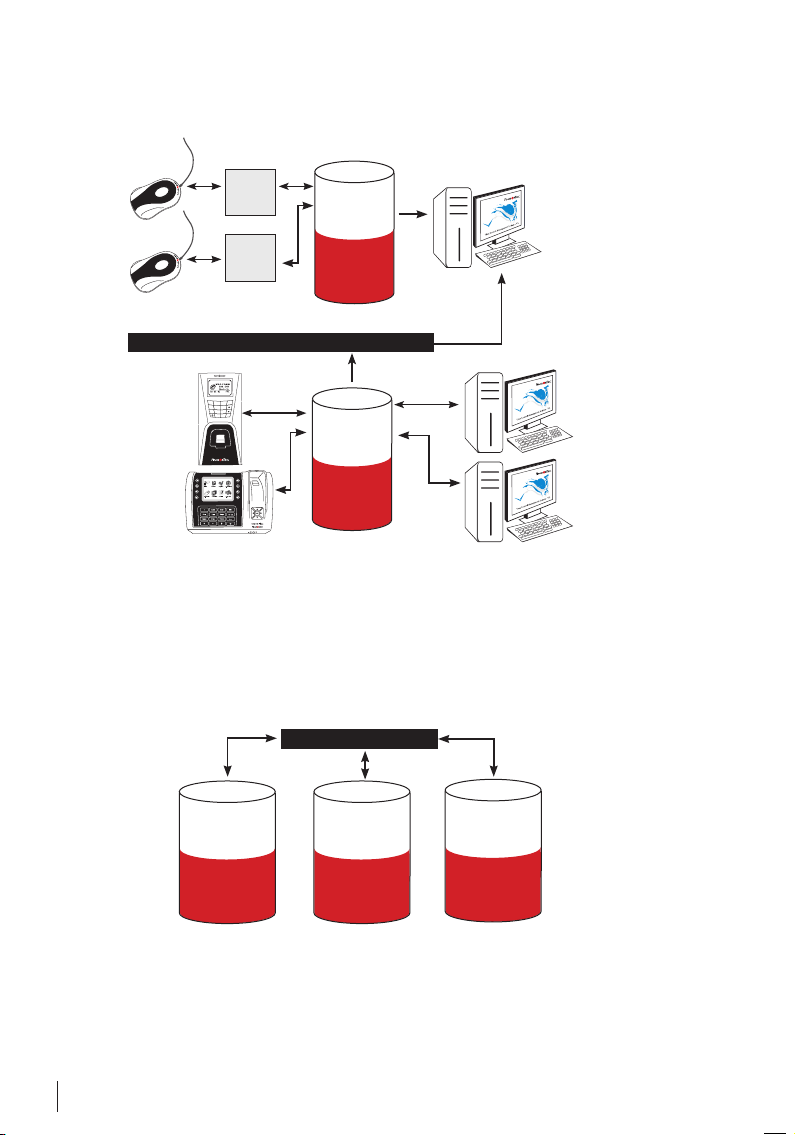
of the verification will be displayed on the computer connected to the OFIS scanner. The
transaction log will stay inside the FRIS Server and can be pulled via the TCMS for further
analysis.
Computer
with LAN
OFIS Scanner
Connection
Computer
with LAN
Connection
User
ngerprint
Transaction
log
2
V
S
M
C
T
TCMS in HQ
Centralization
Station
OFIS Scanner
FRIS SERVER 1 (Zone 1)
I NT ER NE T O R WA N
ESC
1
3
2
4
6
5
7
9
8
O
K
MEN
U
0
TA200 Plus
R2
User
ngerprint
Transaction
log
FRIS SERVER 1 (Zone 2)
2
V
S
M
C
T
2
V
S
M
C
T
TCMS in Branch
For Administration
Department
TCMS in Branch
For HR Department
Users can report time attendance with OFIS scanner via Internet. The computer connected with on OFIS scanner must have an Internet connection and access to this FRIS server,
to allow users to send his/her fingerprint templates for verification.
Data Management
MANAGEMENT OF FRIS SERVER
ADMINI STRATOR LOGIN
User ngerprint
User ngerprint
User ngerprint
Transaction log
FRIS SERVER 1
Transaction log
FRIS SERVER 2
Transaction log
FRIS SERVER 3
Administrators can manage FRIS server by configuring the server with a user name and
password.
Each FRIS server is independent, handled only by authorized administrators. No administrator is allowed to cross-link to another FRIS server without having a authorized pass-
8
Page 8
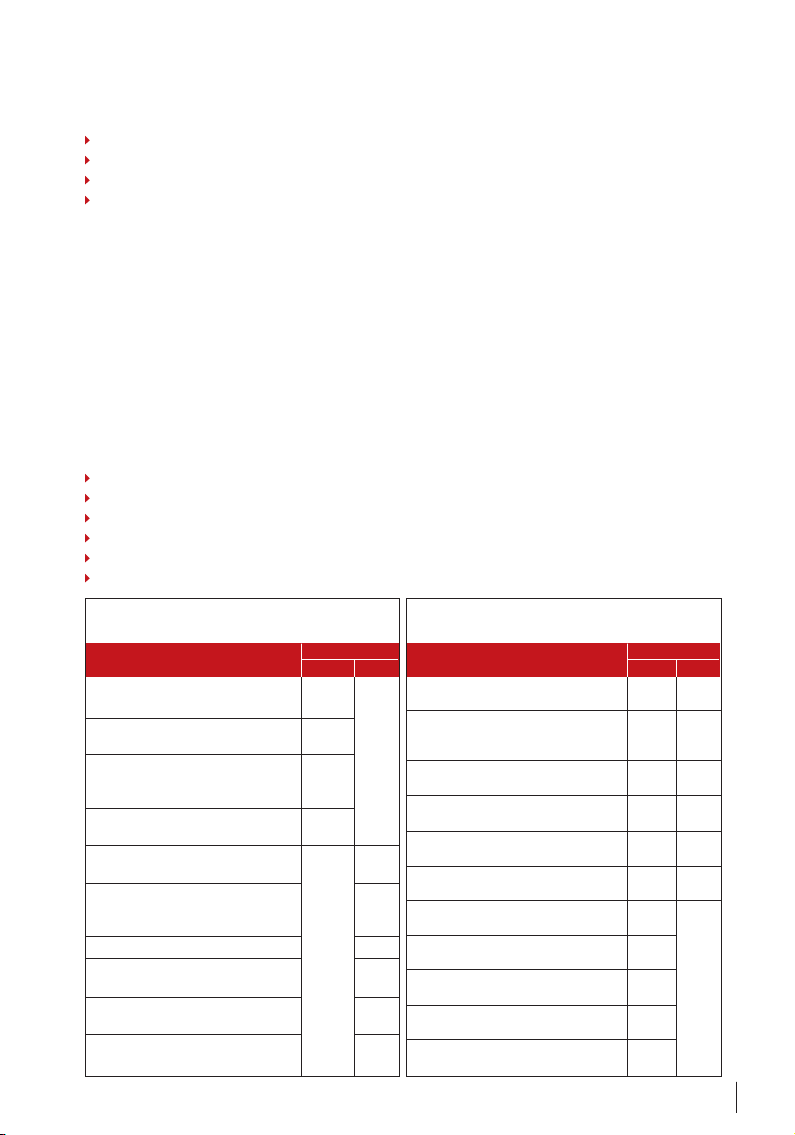
word. Administrator are given the authority to configure and to manage FRIS server for
these functions:
Add or remove any FingerTec terminals that are linked to the FRIS server;
Add or remove users into the FRIS server;
Check user information, fingerprint templates, times zones, and transaction logs; and
Perform housekeeping of database.
FingerTec TCMS V2 must be linked to a FRIS to be able to pull data for analysis, but not to
delete or to edit this database. Administrators of FRIS are responsible to perform regular
housekeeping of database, which includes deletion or backing up of the database, and
configuration of automatic backup/delete timing.
MANAGEMENT OF FINGERTEC TCMS V2
FingerTec TCMS V2 must be installed in a computer that is linked to the FRIS Server. FingerTec TCMS V2 only stores user information (User ID, Name, and employee number etc)
but not user fingerprint templates.
Select an employee to be an administrator of the TCMS V2. The administrator can do the
following tasks:
Pull transaction data from FRIS server into TCMS V2
Assign users into different clocking schedules and group duty rosters.
Edit attendance data of users.
Print various time attendance and door access reports.
Export attendance data for payroll calculation.
Backup database for standby purpose.
Com pariso n bet ween A dmini strato r Pri vilege for
FRI S Ser ver a nd TCM S V2
Administrator
Privilege
FRIS server TCMS V2
Add or remo ve any FingerTec
terminals l inked to FRIS server
Add or remo ve any new users into
the FRIS se rver
Check user information, fingerprint
templates, times zones, and
transaction logs
Do housekee ping of database of
FRIS server
Pull transa ction data from FRIS
Server into TCMS V2
Assign user s into different clocking
schedules, group duty rosters and Yes
time zones
Edit users’ attendance data Yes
Print vario us time attendance and
door access reports
Export atte ndance data for payroll
calculation
Backup data base for standby
purpose
Yes
Yes
Yes
Yes
Yes
Yes
Yes
Yes
Com pariso n bet ween A dmini strato rs of
TCMS V2 i n HQ a nd br anche s
Administrator
Privilege
HQ Branches
Pull transa ction data from single
FRIS server
Assign user s into different clocking
schedules, group duty rosters and Yes Yes
time zones of single FRIS server
Edit attend ance data of users of
single FRIS server
Print various time attendance and door
access repo rt of single FRIS server
Export atte ndance data for payroll
calculation of single FRIS server
Backup data base for standby purpose
of single F RIS server
Pull all tr ansaction logs from all
connected F RIS servers
View and ma nage users attendance
data from a ll FRIS servers
Print vario us useful reports for
centralized evaluations
Backup data base coming from all
FRIS server s
Transfer us ers’ fingerprint templates
among all F RIS servers.
Yes Yes
Yes Yes
Yes Yes
Yes Yes
Yes Yes
Yes
Yes
Yes
Yes
Yes
9
Page 9
2 • INSTALLATION
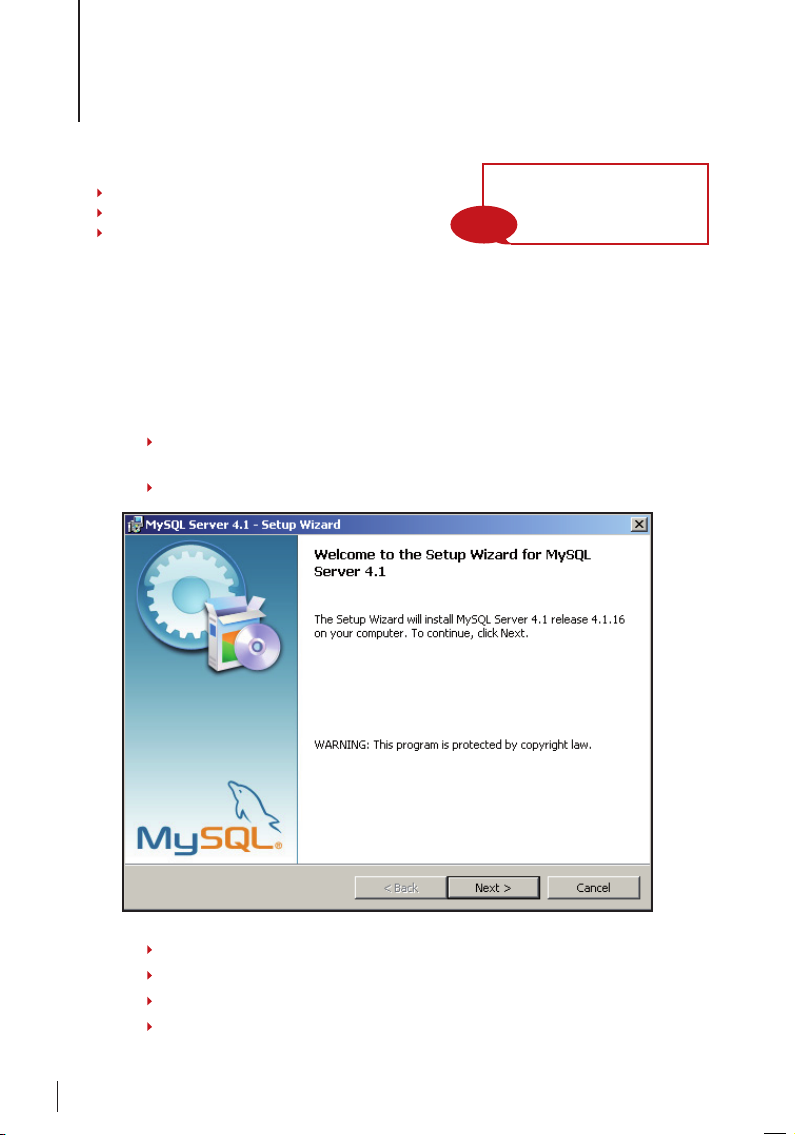
There are 3 steps of FRIS installation:
Installation of MySQL server (database server)
Installation of FRIS server
Installation of FRIS client at any computer
equipped with OFIS scanner.
Ignore this installation if you
are not using FRIS client
NOTE
Installation of MySQL Server
(Database Server)
MySQL server is suggested to be installed into a database server (or computer storing database). The server must be protected to avoid any interruption to the database.
Therefore, it is should be password protected.
Step 1 Open folder mysql_4.1 from the CD. Click “MySQL 4.1 Setup.exe” icon to start the
installation process.
Step 2 Click “Next” to start the installation process.
10
Step 3 Choose “Typical” for most common installation. Click “Next” to proceed.
Step 4 Installation starts. Please wait until process is complete.
Step 5 Click “Skip Sign-Up” and then “Next” to proceed.
Step 6 Tick “Configure the MySQL Server now” to proceed to configure your MySQL
server. Click “Finish” to complete the installation process.
Page 10
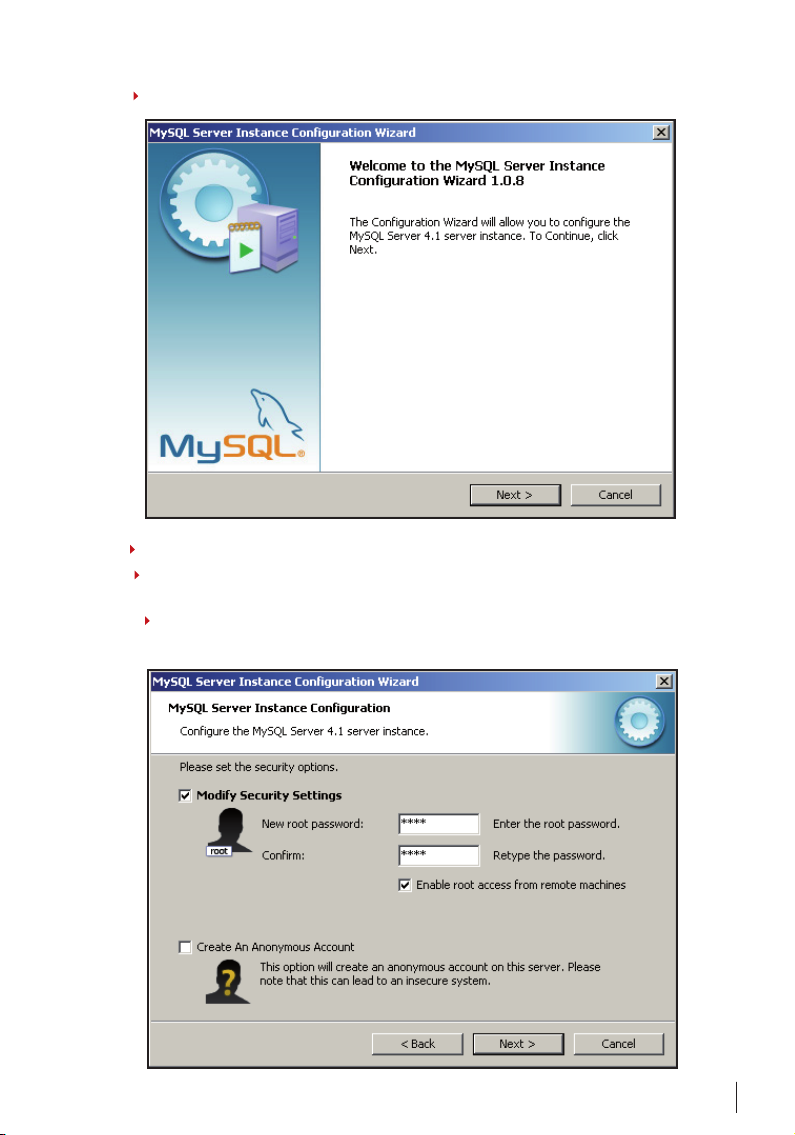
Step 7 Click “Next” to start to configure your MySQL server.
Step 8 Choose “Standard Configuration” . Click “Next” button.
Step 9 Tick “Install as Windows Service” and “Launch the MySQL server automatically”.
Click “Next” button to proceed.
Step 10 Tick “Modify Security Settings” and predefine your root password to login to
MySQL. Tick “Enable root access from remote machines”. Click “Next” to proceed.
11
Page 11
Step 11 Click “Execute” to start the configuration process.
Step 12 Click “Finish” to complete configuration of MySQL server.
Congratulations!
You have completed the MySQL server installation and conguration. Please continue with your FRIS server congurations.
Installation of FRIS Server
The FRIS server’s function is to connect to all FingerTec terminals, to carry out verification
process done at FingerTec terminals. You can install both MySQL database server and
FRIS server into the same server, to ease system handling.
We recommend 1 FRIS 2 server to support 5 FingerTec terminals.
If you are using more than 5 FingerTec terminals in a location, you need to have more
than 1 FRIS server to carry out operations. This is recommended to speed up the operation of the FRIS server. In this condition, it is good to install MySQL databases and FRIS
servers separately to ease the load of the servers.
To install a FRIS Server, follow the steps below,
Step 1 Open the folder SERVER from the CD. Click “FRIS v2.0.6 Setup.exe” icon to start
installation the process.
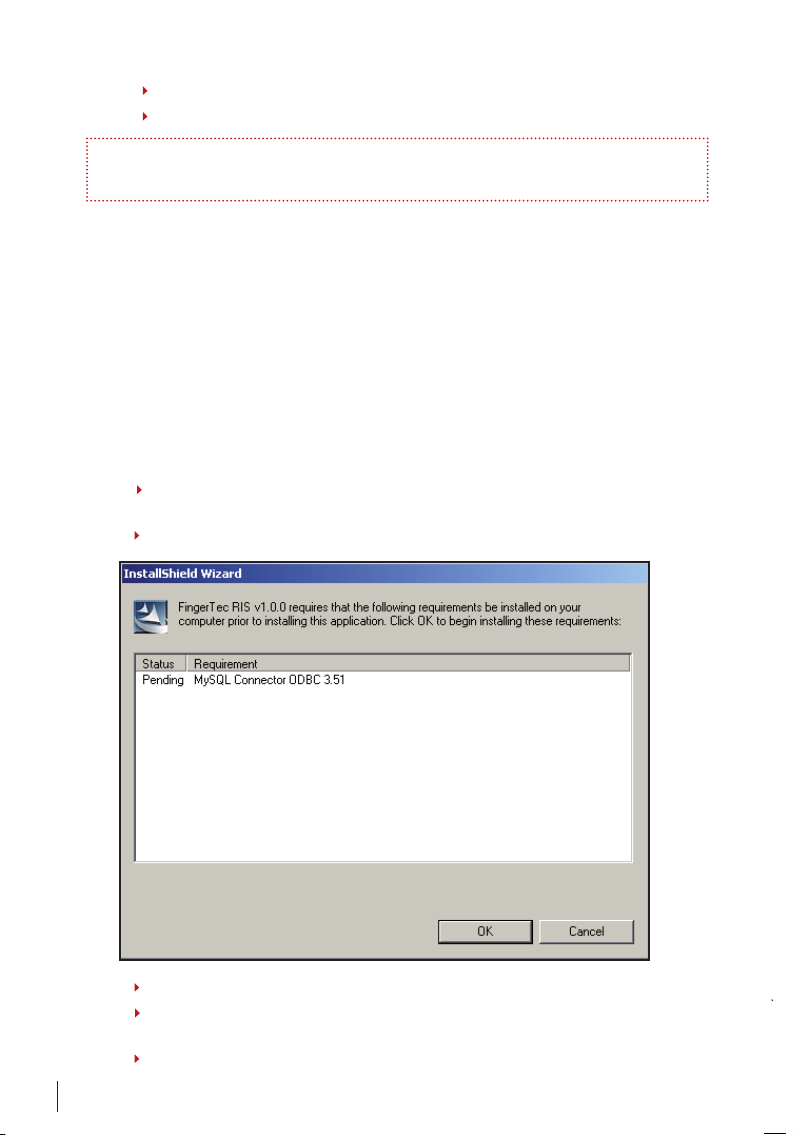
Step 2 Click “OK” to start the installation process for MySQL Connector ODBC 3.51
Step 3 Process starts. Please wait for it to complete.
Step 4 Click “Next” to start to install the MySQL connector/ ODBC 3.51. This is to link up
your FRIS server to MySQL server.
Step 5 Choose “Typical” for most widely used installation. Click “Next” to proceed.
12
Page 12
Step 6 Click “Install” to start the installation.
Step 7 Please wait for the installation to complete.
Step 8 Click “Finish” to complete installation.
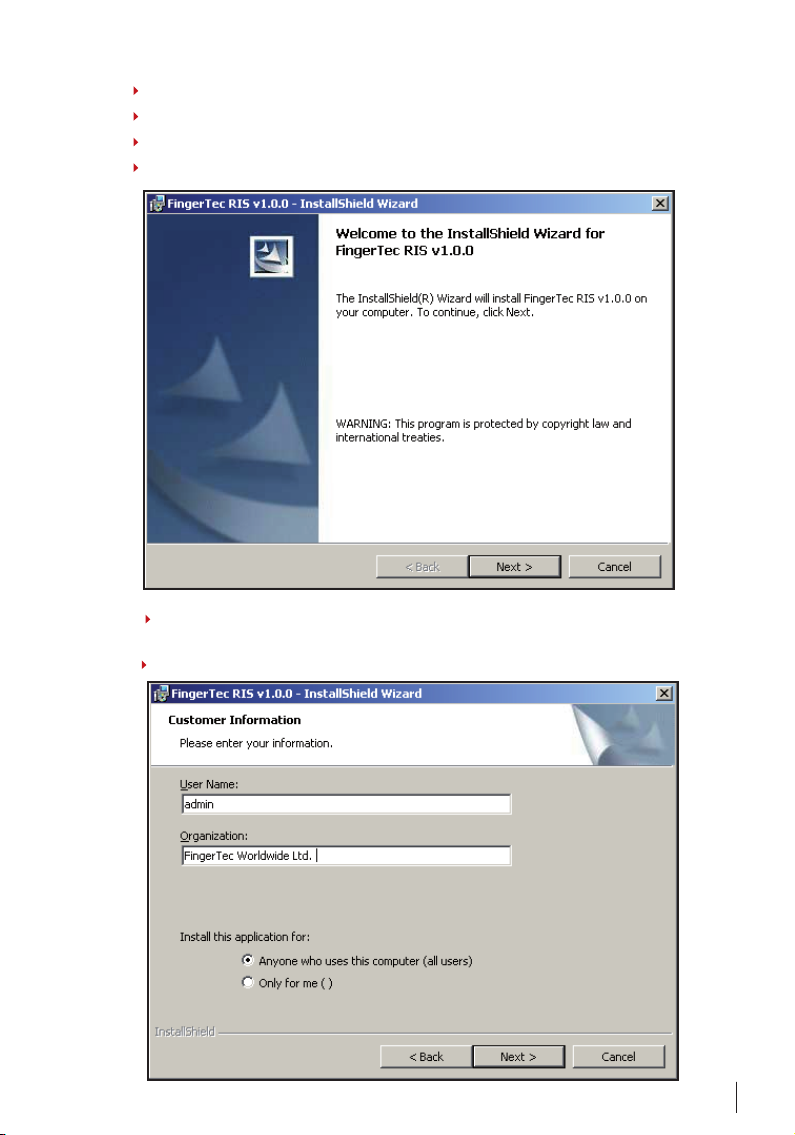
Step 9 Click “Next” to continue installing the FingerTec RIS v1.0.0 (FRIS server)
Step 10 Please read the License Agreement. Choose “I accept the terms in the license
agreement”. Click “Next” to proceed.
Step 11 Please enter the user name of this server (or computer). Click “Next” to proceed.
13
Page 13
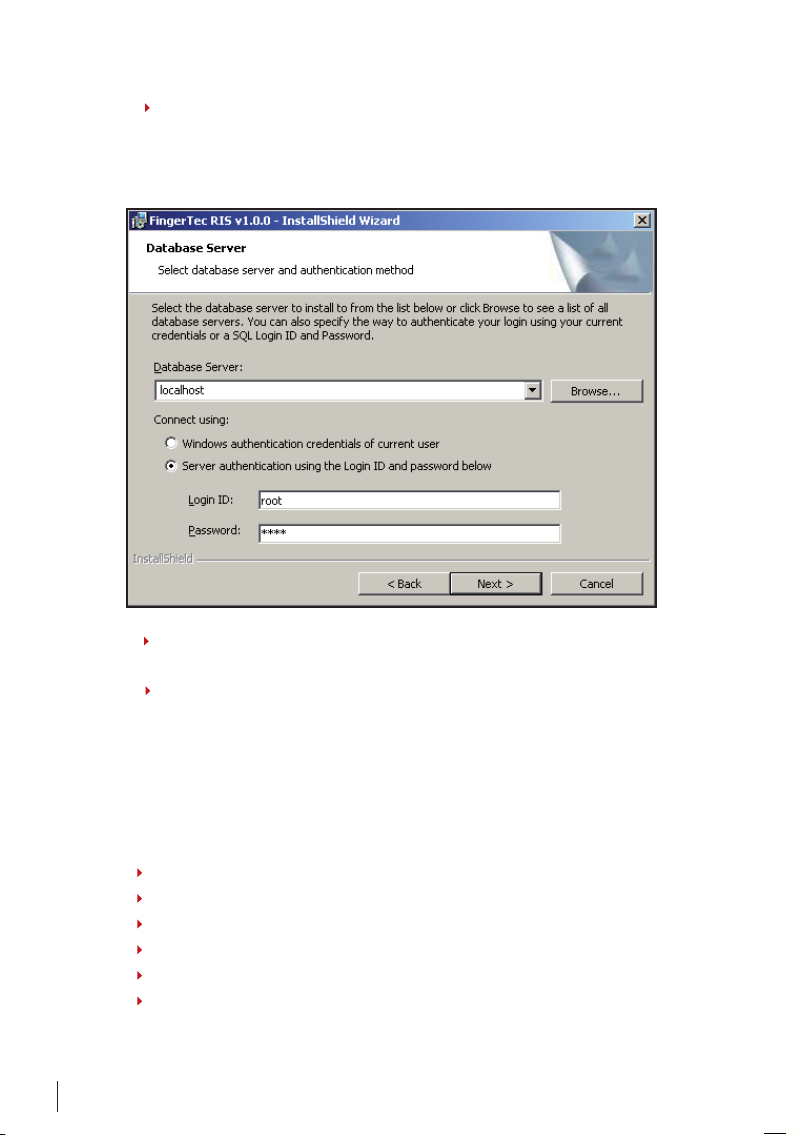
Step 12 Enter the name of database server (with MySQL installed previously) or you can
browse to find it.
Choose “Server authentication using the login and password below”.
And enter Login ID and password of your MySQL database server.
Step 13 Click “Install” to start the installation process of FRIS server. Wait for the process
to complete.
Step 14 Click “Finish” to complete the installation.
Installation of OFIS Scanner Driver
You must install the FingerTec OFIS scanner driver into the FRIS 2 server. However do not
plug the OFIS scanner driver into the FRIS 2 server. To install, do the following:
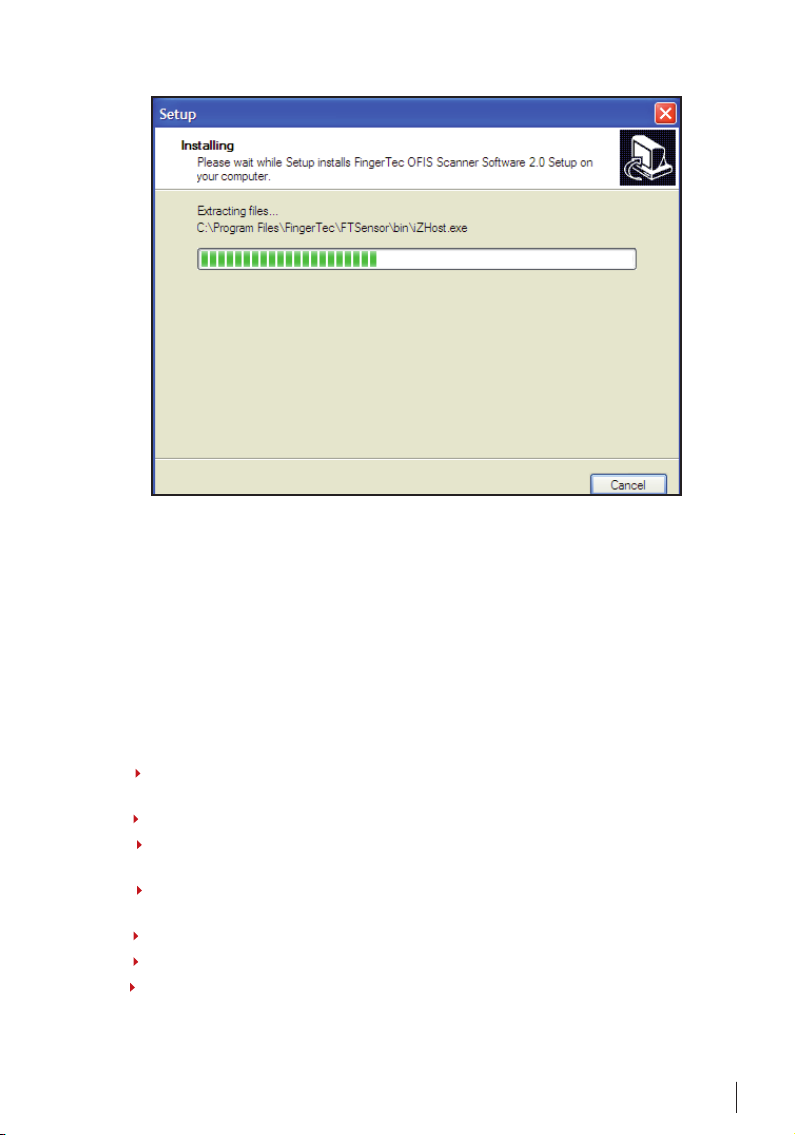
Step 1 Double click the icon to initialize the installation of OFIS scanner.
Step 2 Select your language preference. Click OK to proceed.
Step 3 Click Next.
Step 4 Tick the check box and click Next.
Step 5 Click Install to start.
Step 6 Wait until the process is complete. You will need to restart PC to take effect.
14
Page 14
Installation of FRIS Client
Please do not install this FRIS client, if you are not using the FRIS client an any other computer for time attendance reporting.
You only need to install FRIS client on a computer with an OFIS scanner attached. Users
can use the computer with the OFIS scanner attached to report time attendance to the
FRIS server.
Follow the steps below to install,
Step 1 Open the folder CLIENT from the CD. Click “FRIS Client v1.0.0 Setup.exe” icon to
start installation process.
Step 2 Wait for the preparation to complete.
Step 3 Read the License Agreement. Choose “I accept the terms in the license agree-
ment”. Click “Next” to proceed.
Step 4 Now please enter the name of user for the computer that has an OFIS scanner
attached. Click “Next” to proceed.
Step 5 Click “Install” to start the process.
Step 6 Please wait for a moment for the installation to complete.
Step 7 Installation is done.
I
15
Page 15
3 • CONFIGURATIONS OF FINGERTEC TERMINALS
FRIS 2 requires an administrator to insert a password before access is granted. The default password is 123. You can change the password after you login. Go to “System
Option” to change it.
FingerTec terminals must be added into FRIS server during the first run. FingerTec
terminals are important to capture users’ fingerprints, to prompt users with the result
of the verifications, and to control the door locks.
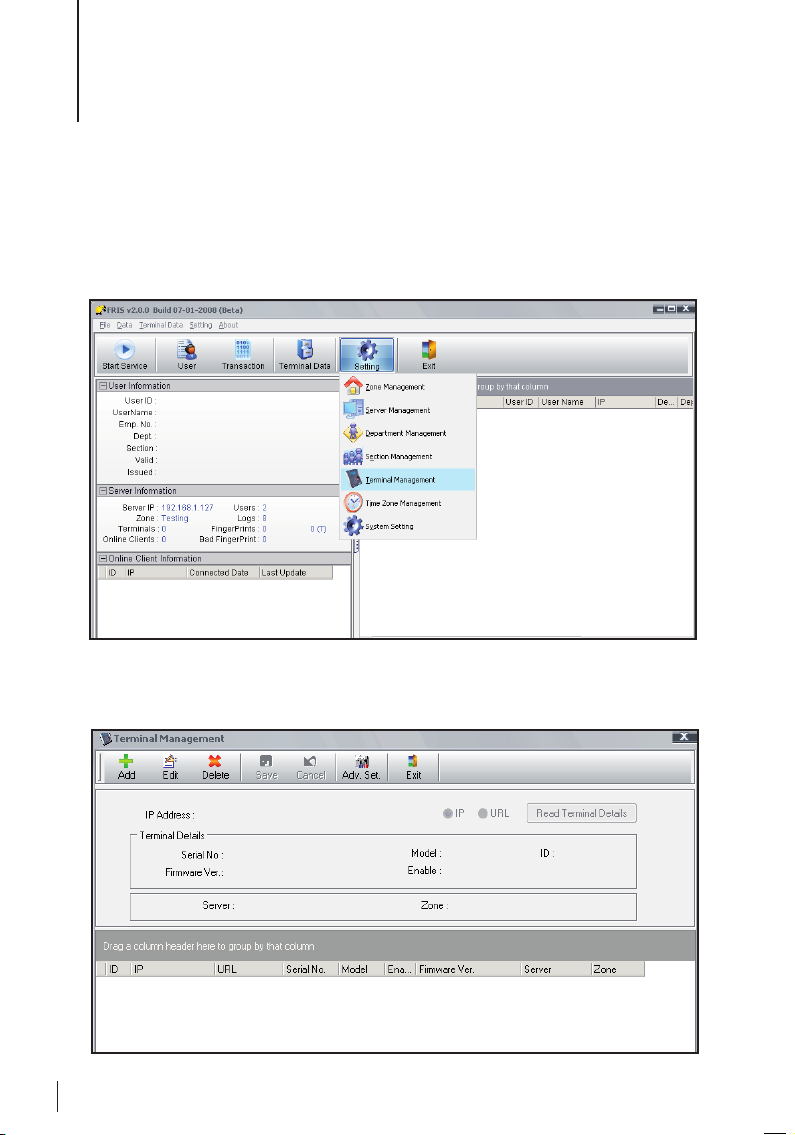
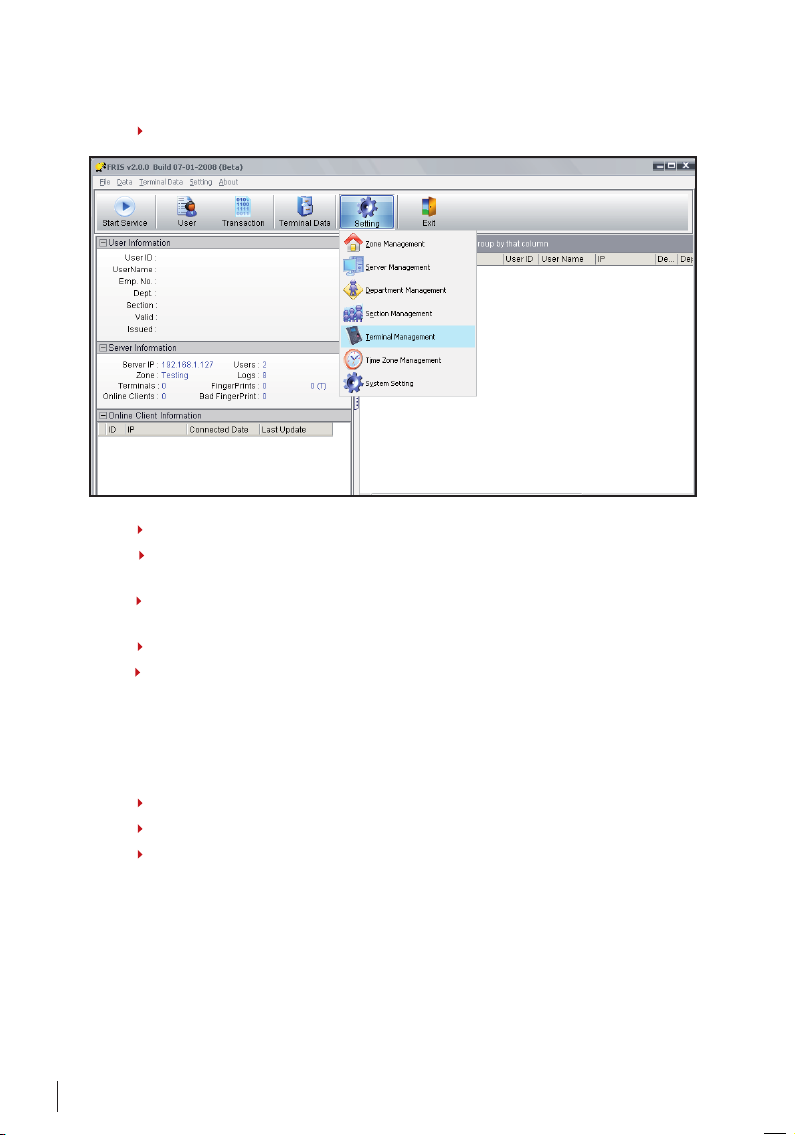
This is the Main control panel of the FRIS server. A click on each icon will start different
configurations of FRIS server. To add FingerTec terminal(s) into the FRIS server, click
“Terminal” to start. A new window will pop up:
16
Page 16
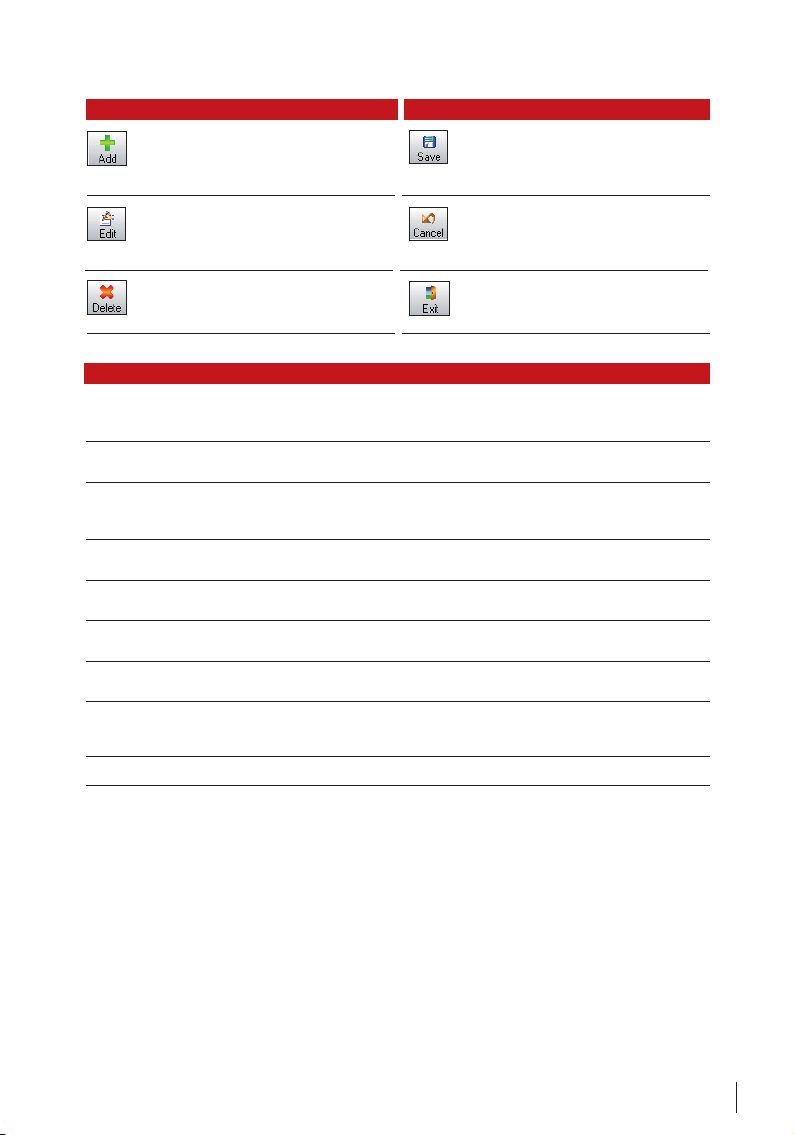
Opt ion Fun ction
To add FingerTec terminal(s) into FRIS. A
click on this function will prompt a new
popup WIndow to set configuration for a
new FingerTec terminals.
To edit the existing FingerTec terminal
in FRIS server. You must choose the FingerTec terminal before you click on this
function.
To delete FingerTec terminals from FRIS
server. You must choose the FingerTec
terminal before clicking on this function.
Opt ion Fun ction
To save settings or changes.
To cancel any settings or changes.
To leave the page and return to the
Main Menu.
Opt ion Fun ction
IP address Enter the IP address of the FingerTec terminal which is being used with FRIS
server. Wrong IP address or improper connection will cause connection failure.
ID Enter the Device number of the FingerTec terminal. Each FingerTec terminal is
Read Terminal Details Click here after entering an IP address and the ID. FRIS will try to connect to the
Serial No The serial number of connected FingerTec terminal. The serial number is read
Firmware Ver The firmware version applied in the connected FingerTec terminal. This is read
Model The model of the FingerTec terminal in use with FRIS. The model is read by FRIS
Enable To enable the FingerTec terminal to work together with FRIS. Changing it to
Server The name of FRIS server in use with the connected FingerTec terminal can be
Zone Choose the Zone name where the FRIS server belongs.
user different Device ID.
FingerTec terminal to get the terminal details. Terminal details will be shown on
the screen if connection is established.
by FRIS and cannot be changed manually.
by FRIS and cannot be changed manually.
and cannot be changed manually.
“no” will stop the connection between FingerTec terminal and FRIS.
renamed here. This is to lead the FingerTec terminal to a server where the users
fingerprint and transaction log are stored in.
This is to display all the connected FingerTec terminals, FRIS server and the Zone they
belong to. You can drag any of the items and re-group them.
17
Page 17
Add New FingerTec Terminals
Step 1 Click on “Terminal Management” in the Main control panel.
Step 2 A new window will pop up. Click “Add” to start.
Step 3 Enter an IP address and the ID of FingerTec terminal, and click Read Terminal
Details to connect to the FingerTec terminal.
Step 4 Terminal details are read from the terminal. Choose “Enable” to “Yes” to start to
use the FingerTec terminals. Ignore the “Server” and the “Zone” columns.
Step 5 Click “Save” to keep all settings.
Step 6 The FingerTec terminal is added into the FRIS server, and you can continue to
add, remove, or edit the information of the FingerTec terminal.
Removal of FingerTec Terminal
Step 1 Click on “Terminal Management” in the Main control panel.
Step 2 Select the FingerTec terminal to delete.
Step 3 Click “Delete” to proceed.
18
Page 18
4 • USER MANAGEMENT
All the fingerprint templates are stored in the FRIS server, but not in the FingerTec
terminals. Enrollment of users can be done using 3 ways:
Via an OFIS scanner
Via FingerTec terminals
Via theFRIS client
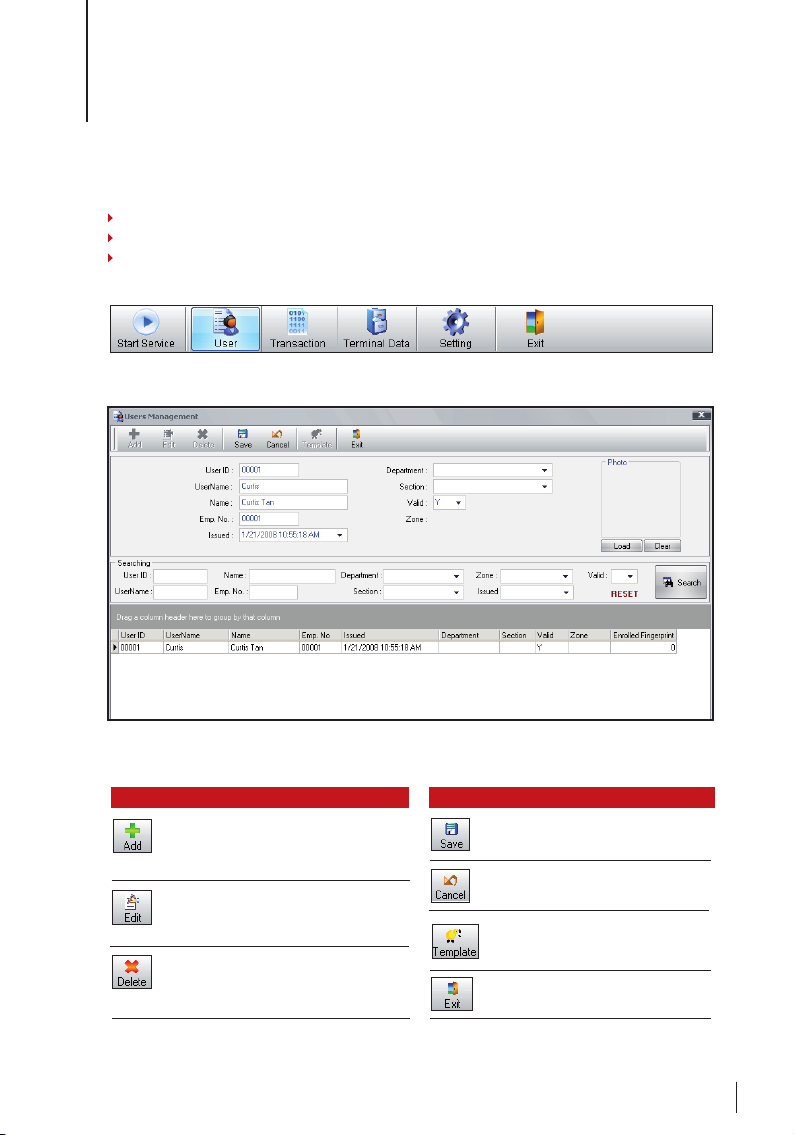
To enter User Management, click “User” at the Main control panel.
A new window will pop up.
Here are the details for each portion.
Opt ion Fun ction
To add a user into FRIS, click on this
function. A window will pop up to enable administrators to add new user.
To edit the existing users available in
the FRIS server. You must choose a user
ID before editing.
To remove or delete users from the FRIS
server. You must choose the user ID before deleteing.
Opt ion Fun ction
To save settings or changes.
To cancel any settings or changes.
To enroll fingerprint for selected users
using an OFIS scanner. You must select a
user before performing any enrollment.
To leave the page and return to the
Main Menu.
19
Page 19
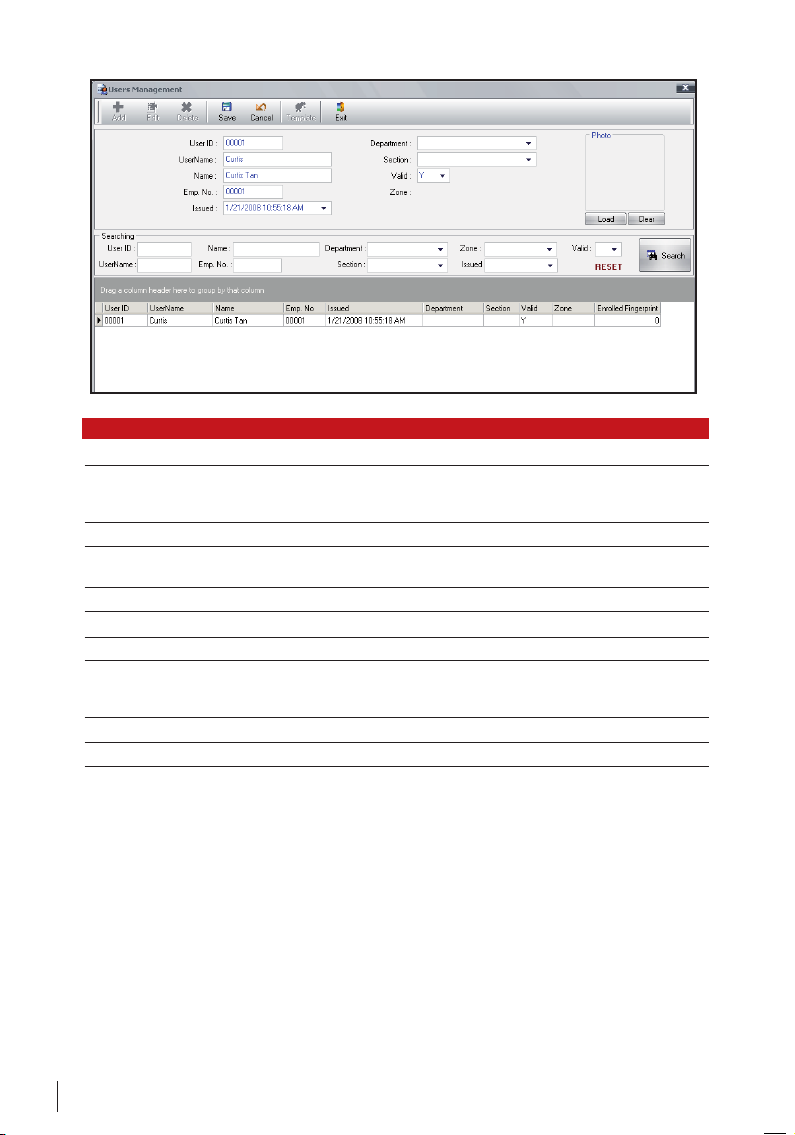
Opt ion Fun ction
User ID The ID assigned to FRIS user and the user ID is a 5-digit number.
User Name The name of the user which will be displayed on the screen of a FingerTec ter
minal. The user name will only be displayed if the user is verified by FRIS. The
user name cannot exceed 9 characters.
Name The full name of the user.
Emp. No The employee number of user. You can ignore this if your users do not have
any employee number.
Issued The date when the user is added into the system.
Department The department of the user.
Section The section of the user.
Valid Y - Yes, to indicate user is activated in FRIS. N – No, to indicate user is de-acti
vated in FRIS. User is not allowed verification at any connected FingerTec terminals.
Zone The Zone of the user.
Photo To load and view the photo of the user.
-
-
You can search for users from FRIS server by entering specific information. You can enter
multiple information to return specific result. The result is shown in the lower column.
You can also drag and drop any items to rearrange the result.
Enrollment and Verication of Users Via
FingerTec Terminals
Check your FingerTec terminal before you start the service with FRIS 2 server. To check:
1. For black and white screen display model: Press Menu > Option > System option >
Advance Option. Make sure you see Auth Server IP and Auth Mode.
2. For color screen display model: Press Menu > Communication. Make sure you see Auth
Server IP and Auth Mode.
20
Page 20
Auth Server IP: the IP address of the PC working as FRIS 2 server
Auth mode
LO (the terminal will only search local memory to match users’ fingerprints)
NO (the terminal will only search FRIS 2 server to match users’ fingerprints)
NL (terminal searches FRIS 2 server to match users’ fingerprint. upon failure,
terminal will search in its local memory)
ENROLLMENT OF USERS
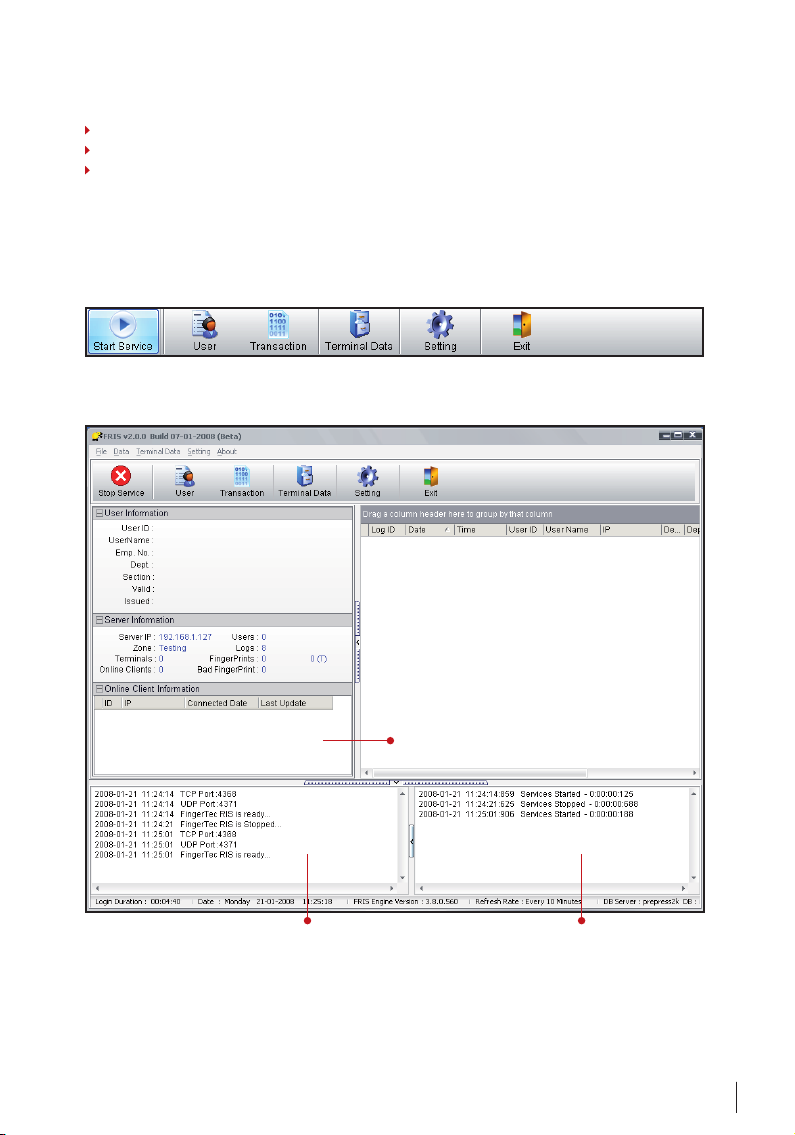
You must activate FRIS to allow enrollment to be done via FingerTec terminals. Follow the
steps below: Click “Start Service” on the Main control panel.
Check connected FingerTec terminals. You can check on the highlighted portion.
To list all connected and activated FingerTec
terminals to the FRIS server. If FingerTec terminals are connected and activated, their IP
addresses will be shown here.
To show the connection status of FingerTec terminals and FRIS server. You can see that the FingerTec
terminals are sending signals to FRIS server every 4
seconds.
To show the operations done at the FingerTec terminals. Every operation done at
the FingerTec terminals or FRIS will be displayed here.
You must configure the connected FingerTec terminals before users can enroll via the
terminals. To do this, follow the steps below.
21
Page 21

Enrollment Via FRIS Client
You can enroll new users via an OFIS scanner at any computer. The computer must be
connected to the FRIS server, which has the FRIS client(s) installed in it. You can enroll a
new user via the FRIS client via the following steps.
The FRIS 2 client requires an administrator to insert a password before access can be
granted. The default password is 123456. You can change the password after you login.
Go to System Settings to change it.
Step 1 Run FRIS client.exe at any computer connected to the FRIS server. Click “Register”
to start enrolling new user. You must enter the administrator password to start process.
(Default password: 123456)
Step 2 Enter the user ID and press the “OK” button.
Step 3 Select a finger to enroll and place it on the scanner for 4 times. Follow the instruc-
tion onscreen.
Step 4 Click “OK” to save the fingerprint.
Step 5 Click “ESC” button to return to the main menu. You can choose to click “OK” but-
ton if you would like to continue enrolling another user.
VERIFICATION OF USERS
FRIS client can be connected to the FRIS server to verify fingerprints. Follow the steps
below:
Step 1 Run FRIS client.exe on any computer connected to the FRIS server.
Step 2 Place finger on the scanner to capture fingerprint. Image will be sent to FRIS
server for verification.
Step 3 FRIS server will return result to FRIS client, either a success or failure.
Computer will say “Thank you” if verification is successful; or “Please try agian” when it
fails to verify.
22
Page 22
5 • CONFIGURATION OF FRIS SERVER
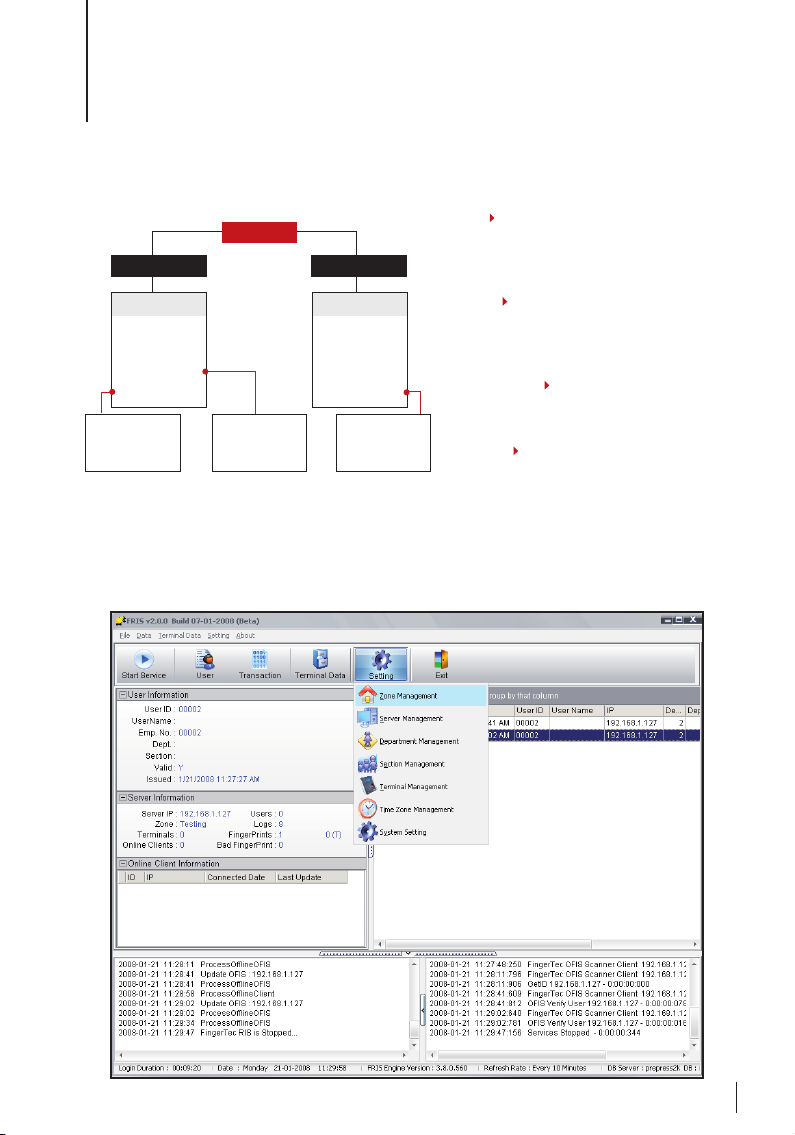
In FRIS, you can manage the structure of a company easily by dividing the staff into
several levels. In FRIS, four levels are catered for:
Zone
Server 1 Server 2
Departments
Administration
Finance
Sales & Marketing
Customer Service
Sections
Oversea
Local
Sections
Oversea
Local
Departments
Engineering
R & D
Productions
Technical Support
Sections
Team 1
Team 2
Zone The companies (or branches)
applied with FRIS. For example FingerTec Malaysia, FingerTec Indonesia,
FingerTec South Africa etc.
Servers The servers that are running in
the Zone. You can install more than one
server in a zone, to ease the load of the
server and to speed up the process.
Departments The departments avail-
able in the Zone for example Administration, Finance etc.
Sections Division of departments for
example overseas, local etc.
Setup of Zones
Click on “Zone” in the Main control panel to enter Zone Management. The complete
view of Zone Management is as shown below:
23
Page 23
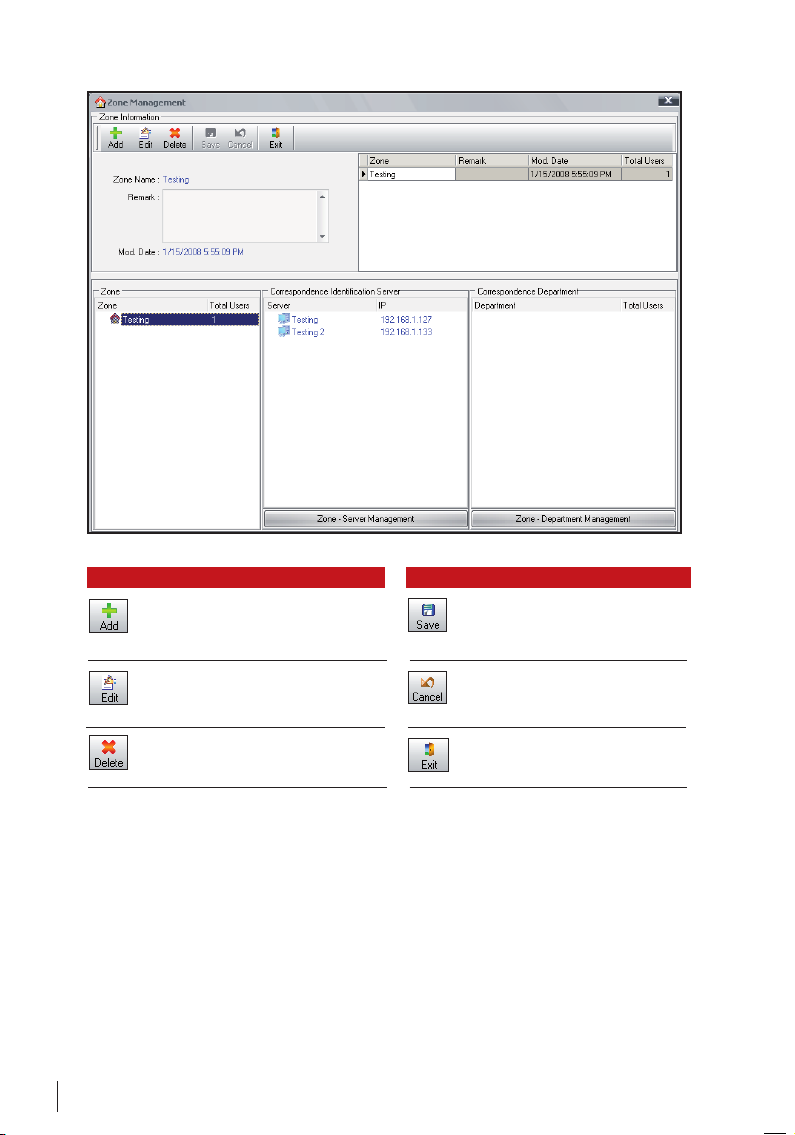
Opt ion Fun ction
To add a zone into FRIS. A click on this
prompts a popup window, enabling administrators to configure a zone.
To edit existing zone available in a FRIS
server. Please choose a zone before proceeding to edit.
To remove or delete zone from FRIS
server. You must choose a zone before
clicking on this function.
Opt ion Fun ction
To save settings or changes.
To cancel any settings or changes.
To leave the page and return to the
Main Menu.
To display information of the selected zone; the name of the Zone and the date when
it is being modified.
To show all Zones connected to FRIS. This is commonly applied if you have more than
one zone connected.
To show the total users stored in the selected zone.
24
Page 24
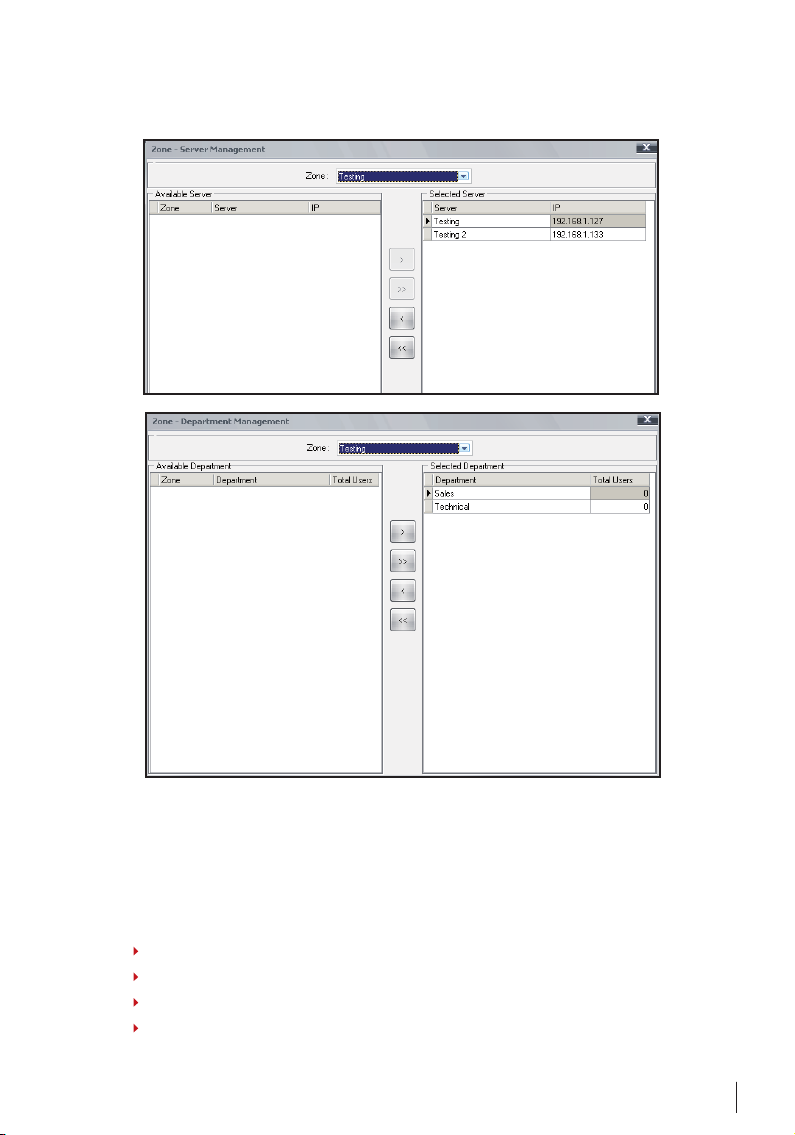
To show the total servers stored in the selected zone.A click on the button “Zone – Server
Management” will lead to another window. Please see setup of server for more details.
To show the departments stored in the selected zone. A click on the button “Zone – Department Management” will lead to another window. Please see Setup of Department for
more details.
ADD IN NEW ZONE
Step 1 Click on “Zone” in the Main control panel. A new window will pop up.
Step 2 Click “add” to start configuration of Zones. Fill in the required information.
Step 3 Enter Zone name & Remark. Click “Save” to save settings.
Step 4 You can check the information of the added Zone.
25
Page 25
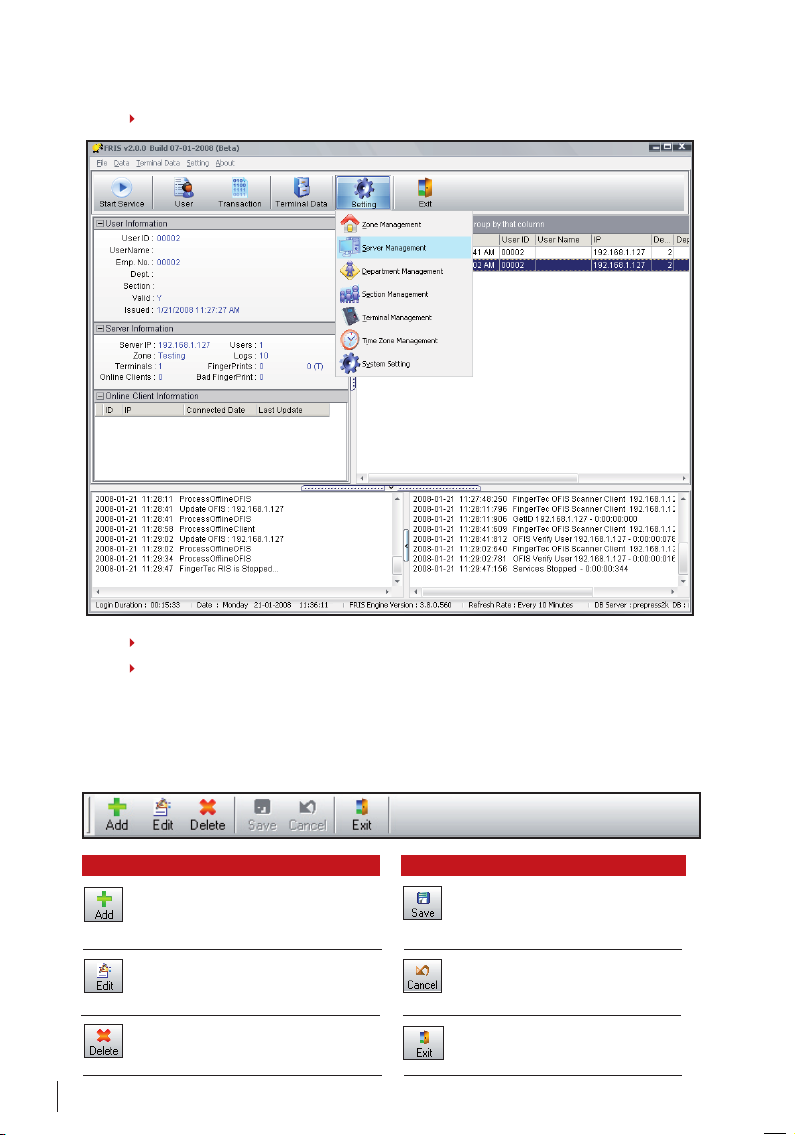
DELETE A ZONE
Step 1 Click “Zone” on the main control bar. A new window will pop up.
Step 2 Select a zone to delete.
Step 3 Click “Delete” to delete the selected zone.
Setup of Servers
Click on “Server” in the Main control panel to enter the Server Management. The complete view of Server Management is as shown below:
26
Opt ion Fun ction
To add a server into FRIS. A click on this
will lead to a new pop up window to
configure for a server.
To edit the existing server in FRIS server.
You must choose the server before clicking on this.
To remove or delete server from FRIS
server. You must choose the server be-
fore clicking on this button. Opt ion
Fun ction
To save settings or changes done to
the system.
To cancel any settings or changes
done to the system.
To leave the page and continue to
Main Menu.
Page 26
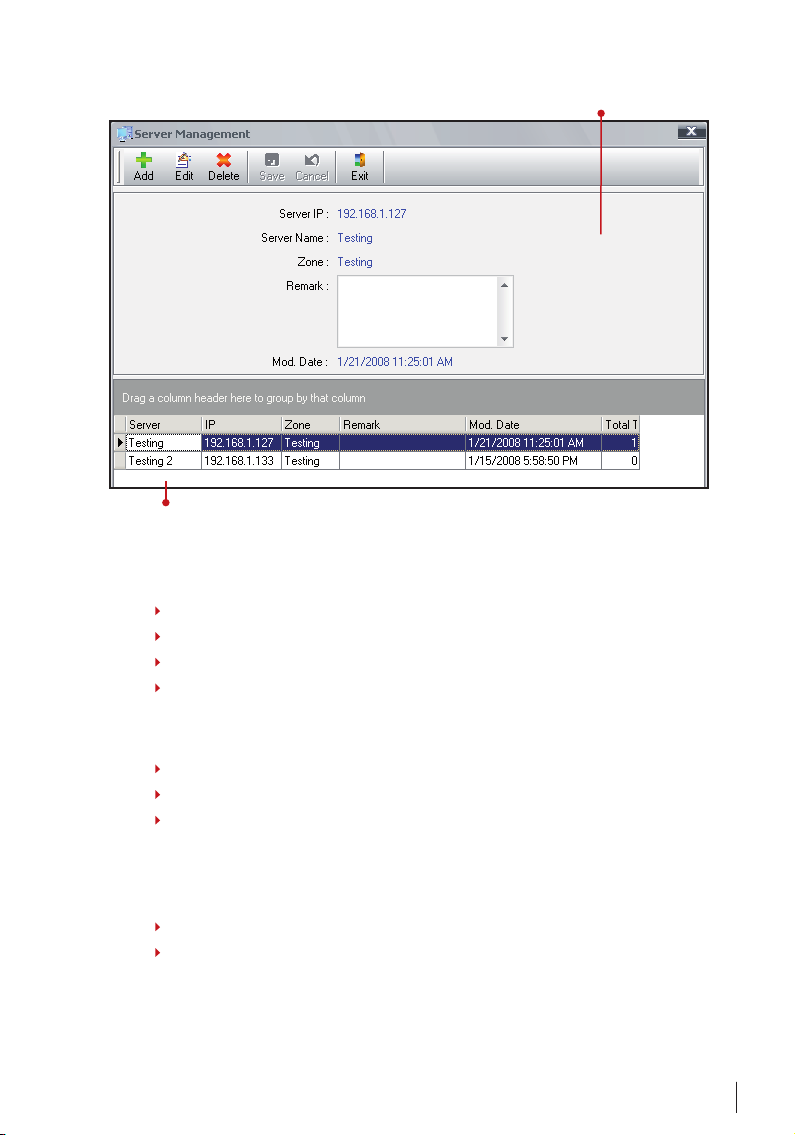
To show the information
of the selected server.
To show the information of the
connected server.
ADDING A SERVER
Step 1 Click on “Server” in the Main control panel. A new window will pop up.
Step 2 Click “Add” .
Step 3 Fill in the required information of the server.
Step 4 Click “Save” to save changes and settings.
DELETE A SERVER
Step 1 Click “Server” on the Main control panel. A new window will pop up.
Step 2 Select the server you wish to delete.
Step 3 Click “ Delete” to delete the server.
ZONESERVER MANAGEMENT
You can assign any server to any zone, to ease the operation of FRIS.
Step 1 Click on “Zone” in Main control panel. A new page will pop up.
Step 2 Click on “Zone-Server Management” to view a new page.
27
Page 27
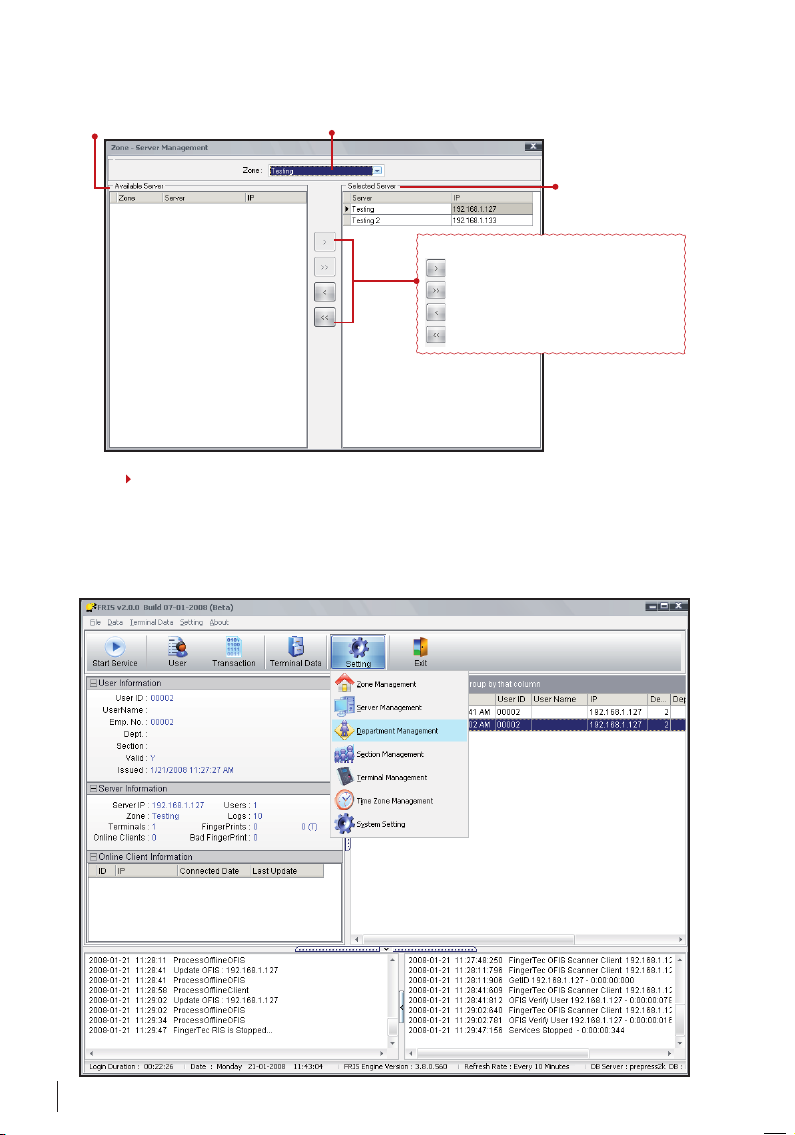
The list of connected servers, ready
to use in FRIS. The servers appear in
this column is not assigned under
the selected Zone.
To display the name of the selected Zone.
You can choose any Zone before you start
to assign servers into the zone.
Control pane
To move the selected server into selected zone.
To move all servers into selected zone.
To remove selected server from the selected zone.
To remove all servers from the selected zone.
The list of connected
servers, already assigned
under the selected zone.
Step 3 This page allows you to assign any connected servers to any connected Zone.
Setup of Departments
Click on“Department” in the Main control panel to enter Server Management. A new window will pop up.
28
Page 28
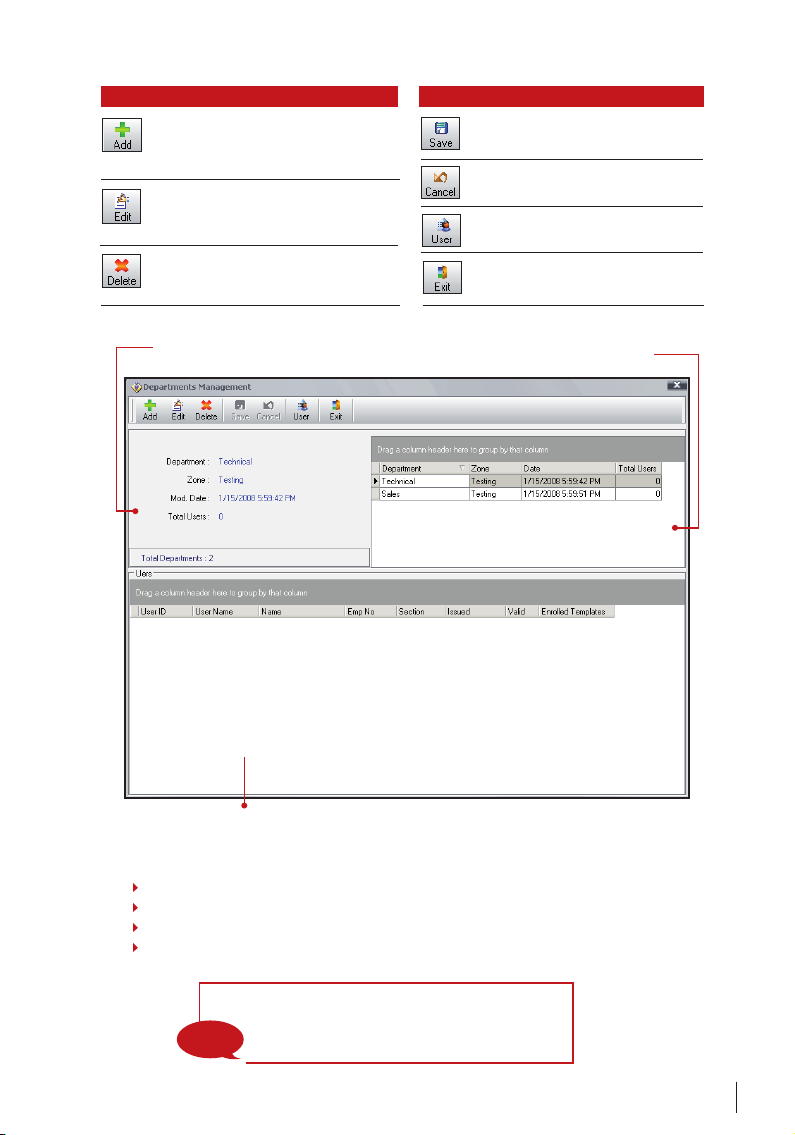
Opt ion Fun ction
To add in a department into FRIS. Clicking on this will lead to a new pop up
window to configure for a department.
To edit the existing department in FRIS
server. You must choose the department before clicking on this button.
To remove or delete department from
FRIS server. You must choose the department before clicking on this button.
Opt ion Fun ction
To save settings or changes done to
the system.
To cancel any settings or changes
done to the system.
To assign users into department.
To leave the page and continue to
Main Menu.
To show the information of
the selected department.
To list the users assigned in the selected department.
To list all created departments in system. You need to
choose the department before any congurations.
ADDING A DEPARTMENT
Step 1 Click on “Department” in the Main control panel. A new window will pop up.
Step 2 Click “Add” to add a new department.
Step 3 Fill in the required information to configure the new department
Step 4 Click “Save” to save all changes and settings.
NOTE
The password column is optional. Please see more
explanation in USING FINGERTEC TCMS v2.
29
Page 29
DELETE DEPARTMENT
Step 1 Click on “Department” in the Main control panel. A new window will pop up.
Step 2 Select the department to delete.
Step 3 Click “Delete” to delete the department.
USER MANAGEMENT IN DEPARTMENTS
Step 1 Click on “Department” in the Main control panel. A new window will pop up.
Step 2 Click “User” to assign users into departments.
Step 3 A new window will pop up to allow you to assign or remove users from any
department
Step 4 Close the window and the system will automatically save your changes and set-
tings.
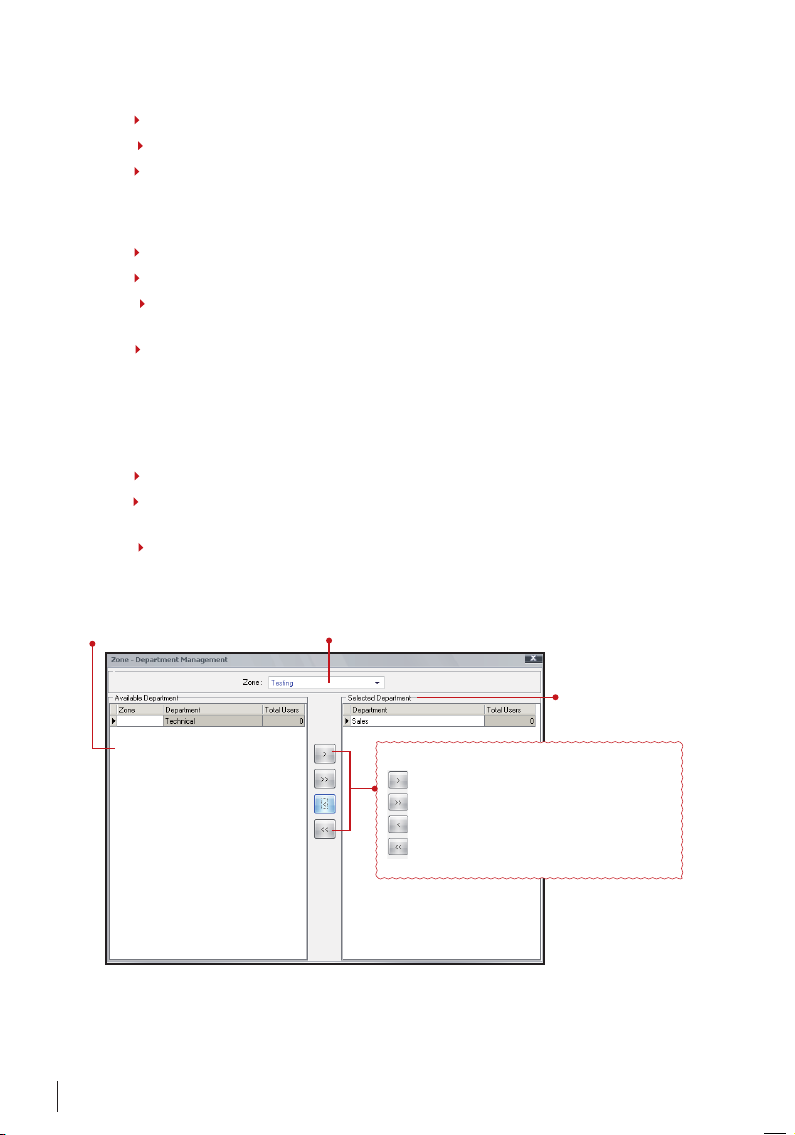
ZONEDEPARTMENT MANAGEMENT
You can assign departments to any zone to ease FRIS operation.
Step 1 Click on “Zone” in the Main control panel.
Step 2 A new page will pop up. Click the “Zone-department Management” to see a new
page.
Step 3 This page allows you to assign any connected departments to any connected
Zone.
The list of departments, ready to use in
FRIS. The departments appear in this
column are not assigned under the selected Zone.
To display the name of the selected Zone. You
must choose any Zone before you start to assign servers into the zone.
30
The list of departments,
already assigned under
the selected zone.
Control pane
To move the selected department into selected zone.
To move all departments into selected zone.
To remove selected department to the selected zone.
To remove all departments from the selected zone.
Page 30
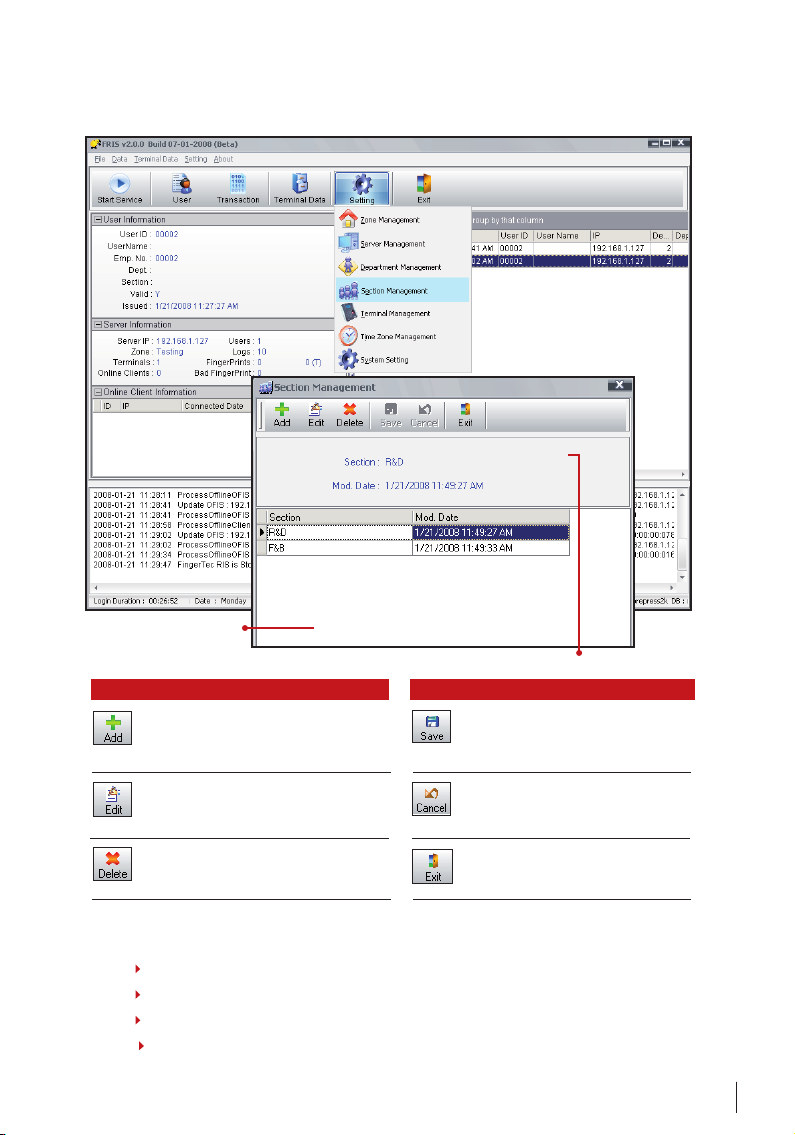
Setup of Sections
Click the “Section” on the Main control panel. A new window will pop up.
To list all created section in
system. You need to cho ose
the section before any congurations.
Opt ion Fun ction
To add in a section into FRIS. Click on
this will lead to a new pop up window
to configure for a section.
To edit the existing section in FRIS server. You must choose the section before
clicking on this button.
To remove or delete section from FRIS
server. You must choose the section before clicking on this button button.
To show the information of the selected section.
Opt ion Fun ction
To save settings or changes
To cancel any settings or changes.
To leave the page and continue to
the Main Menu.
ADD IN SECTION
Step 1 Click on “Section” in the Main control . A new window will pop up.
Step 2 Click “Add” to start configuration of Section.
Step 3 Fill in the required information.
Step 4 Click “Save” to save settings. Now you can check the information of the added
section.
31
Page 31
DELETE SECTIONS
Step 1 Click on “Section” in the Main control .
Step 2 A new window will pop up. Select the section to delete.
Step 3 Click “Delete” to delete the selected section.
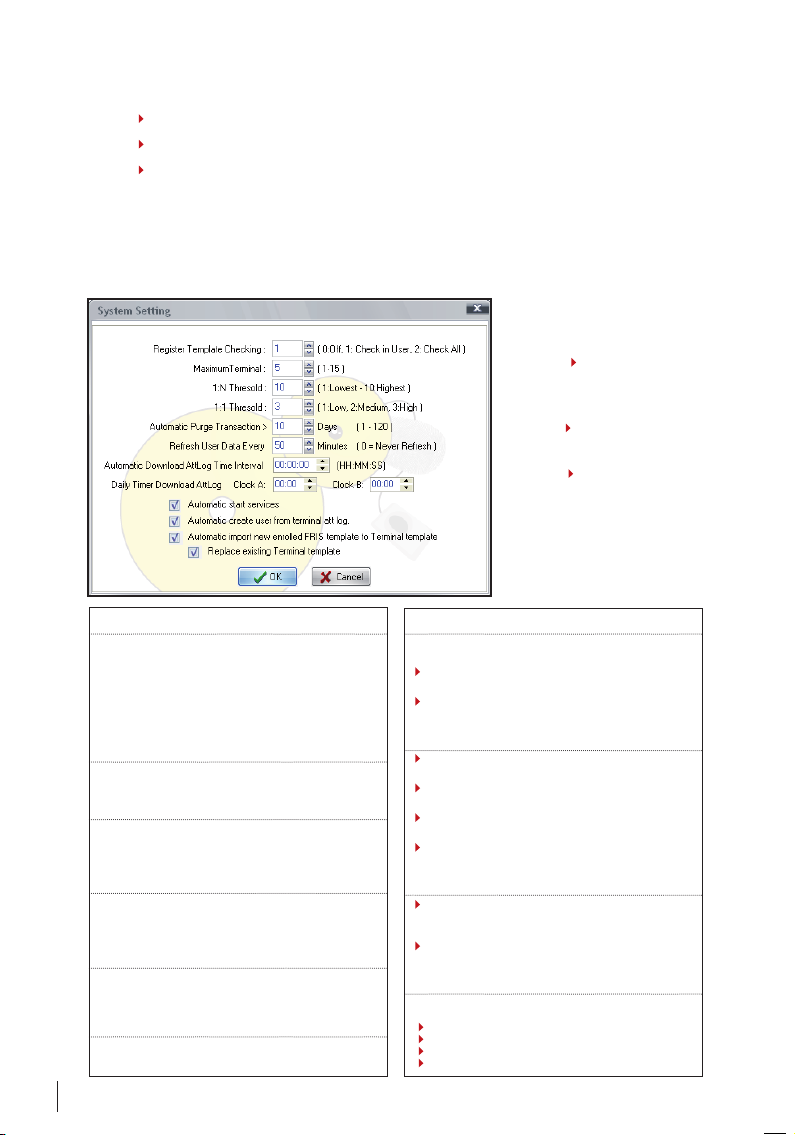
System Settings
You can configure the FRIS system to suit your requirements. You must make sure all
settings are done properly to avoid any interruption to the FRIS system. To configure
settings in the FRIS system, perform do the following,
Step 1 Click on “Sys Set-
tings” in the Main control
panel.
Step 2 A new window will
pop up.
Step 3 Press “OK” to save
all changes and settings.
32
Register Template Checking
0:O - To order FRIS to not check into database during a
new ngerprint enrollment
1: Check in User - To order FRIS to check only in the data-
base of the selected user during ngerprint enrollment of
this user.
2: Check All - To order FRIS to check in the entire database
during a new ngerprint enrollment
Maximum terminals
1 to 15 - The total FingerTec terminals allowed to connect
to the FRIS servers.
1:N Threshold
1 to 10 (1 as lowest and 10 as highest)
The threshold value for FRIS to verify users’ ngerprints during 1 to Many verication.
1:1 Threshold
1 to 3 (1 as low, 2 as medium and 3 as high)
The threshold value for FRIS to verify users’ ngerprints during 1 to 1 verication.
Automatic Purge transaction
1 to 120 days - To order FRIS to purge the attendance data
automatically after a time period. This can avoid the server
overload with old attendance data.
Refresh user data every
Any value in minutes.0 as never refresh - To order FRIS to
refresh or update users’ attendance data in system.
Automatic Download AttgLog Time Interval
To congure time interval for FRIS server to download attendance log from connected FingerTec Terminals.
Only working when connected to non-FRIS reader, where
it stores attendance logs
Congure this and FRIS 2 always downloads attendance
logs automatically.
Daily Timer Download AttLog
To congure timer for FRIS 2 to start to download attend-
ance log from connected FingerTec terminals.
Maximum 2 dierent download timer for a particular
day.
Only working when connected to non-FRIS reader, where
it stores attendance logs.
Congure this and FRIS 2 always download attendance
log at the right time.
Automatic create user from terminal att log.
To enable FRIS 2 to create a new user account automati-
cally right after attendance log download from connected
FingerTec terminal.
Enable this and administrator does not need to create a
new user account before attendance log download.
Automatic start service
Yes or No - To order FRIS to start automatically once server
is powered on.
Automatic Download AttLog Time Interval.
D aily Timer Download AttLog.
Automatic create user from terminal AttLog.
Automatic impo.
Page 32
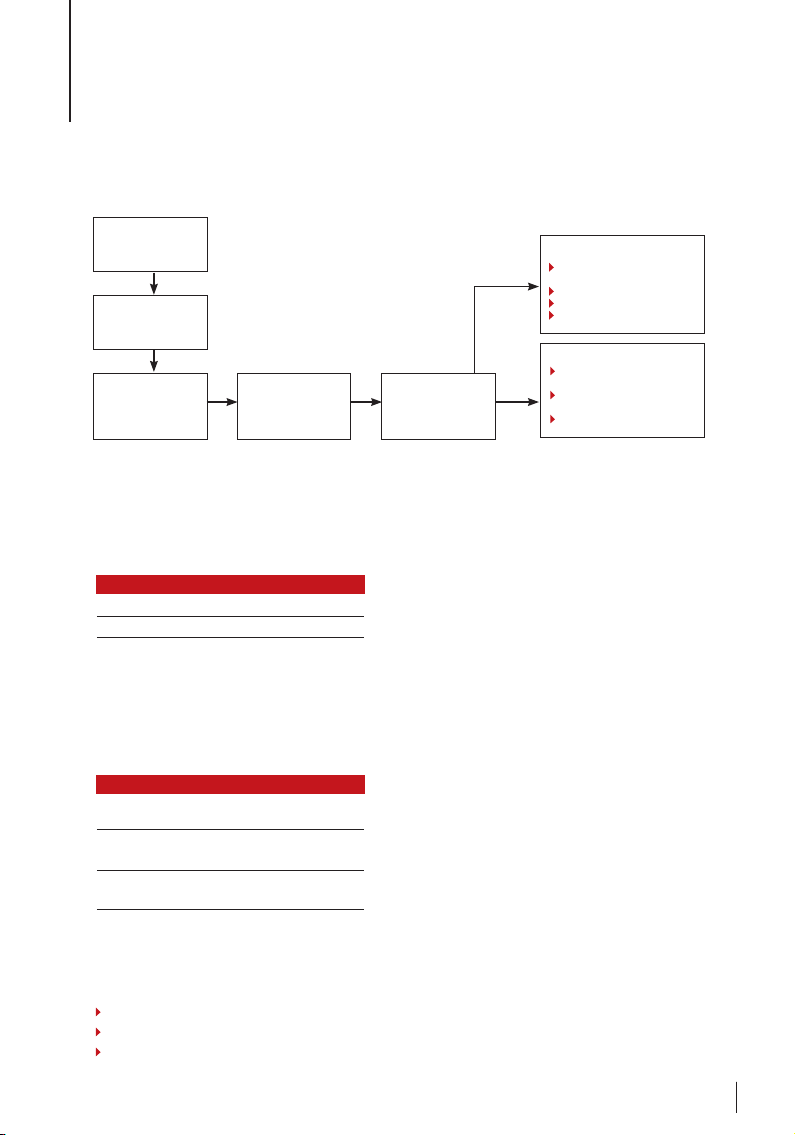
6 • CONFIGURATIONS OF TIME ZONES
Every time a fingerprint is captured and sent to FRIS for verification, the process occurs
as below,
Fingerprint
captured by AC800
Plus
Fingerprint sent
FRIS server
Verification is done
and transact ion is
recorded int o FRIS
database
RFIS checks time
zone group o f the
user
Result retur ned to
AC800 Plus a nd
message prom pt
to user
A time zone consists of a Start time and an End time. If the user’s clocking time falls in
between the Start time and End time, FRIS considers this is as a “valid time period”.
Example, time zone 1 = 08:00 – 20:00, any time that fall between 8:00am and 8:00pm
is consider as a valid time period. Other than that, it is considered as an“invalid time
period”
Funct ions Time range
Free access 00:00 to 23:59
Forbidden 23:59 to 00:00
If you would like to allow all day access to your
users, you must use a free access time zone,
which is 00:00 to 23:59.
If you would like to block a user from accessing all days, you must use the forbidden
time zone, which is 23:59 to 00:00.
FRIS, offers a total of 50 time zones. The default time zone is 00:00 to 23:59
After configuring time zones, a time zone group is required. A time zone group can support up to 3 time zones. This is applicable if users have multiple time zones.
Funct ions Time range
1 08:00 to 12:00 (8:00am
to 12:00pm)
2
to 5:00pm)
3 18:00 to 20:00 (6:00pm
to 8:00pm)
14:00 to 17:00 (2:00pm
For example, a cleaner can enter a premise to
do cleaning during office hours, but she is not
allowed to enter before or after working hours
and lunch break. Therefore there are 3 time
zones assigned,
Therefore time zone group = (Time zone 1,
Time zone 2, Time zone 3)
FRIS, offers a total of 5 time zones groups. Each new enrolled user is added into Default
Time Zone 1 by default, Time Zone Group 1 = free access time zone, time zone 1.
In short, if you would like to use time zones, you need to perform the following
Configure time zone
Assign time zone into time zone group
Assign users into time zone group.
If time zone group is valid,
User ID and user name
are show ed
“Verified” is sh owed
Terminal says “T hank you”
Door is unlocked
If time zone group is valid,
User ID and us er name are
sho wed
“Time period d eny” is
sho wed
Door is closed
33
Page 33
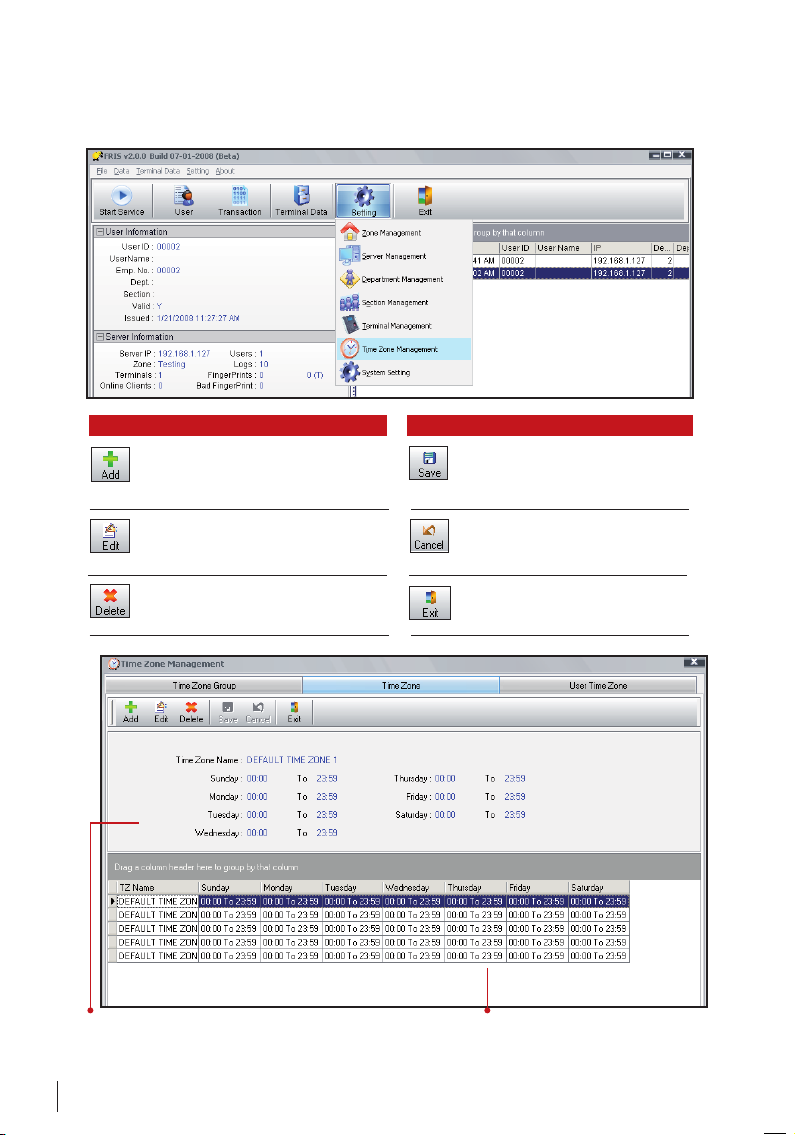
Setup of Time Zones
Click on “Time Zone” at the Main control panel. A new window will pop up
Opt ion Fun ction
To add in a new time zone into FRIS.
Click on this to start to configure for a
time zone.
To edit the existing time zone in FRIS
server. You must choose the time zone
before clicking on this button.
To delete time zone from FRIS server.
You must choose the time zone before
clicking on this button.
Opt ion Fun ction
To save settings or changes
To cancel any settings or changes.
To leave the page and continue to
the Main Menu.
To show the information of
the selected time zone.
34
To list all created time zone in system. You
need to choose the time zone before any
congurations.
Page 34
ADD IN A NEW TIME ZONE
Step 1 Click on “Time Zone” in the Main control panel. A new window will pop up.
Step 2 Click “Add” to add a new time zone.
Step 3 Fill in the name and time zone for each day.
Step 4 Click “Exit” to save changes and settings.
DELETE TIME ZONE
Step 1 Click on “Time Zone” in the Main control panel. A new window will pop up.
Step 2 Select a time zone to delete
Step 3 Click “Delete” to delete time zone.
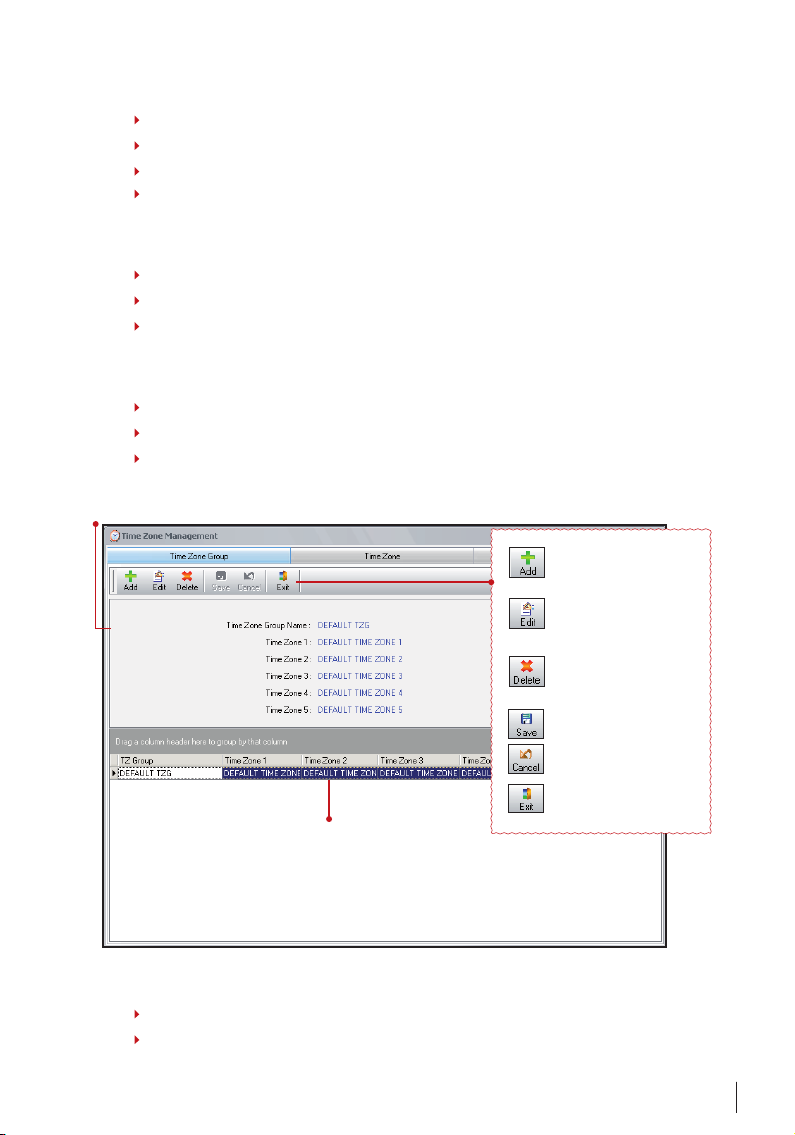
Time Zone Group
Step 1 Click on “Time Zone” in the Main control panel. A new window will pop up:
Step 2 Click Time Zone Group page.
Step 3 The window will turn into a new page,
To show the information of the selected
time zone group.
To add in a new time zone
group into FRIS. Click on this to
start to congure a time zone
group.
To edit the existing time zone
group in FRIS server. You must
choose the time zone group
before clicking on this button.
To delete time zone group from
FRIS server. You must choose
the time zone group before
clicking on this button.
To save settings or changes.
To cancel any settings or
changes.
To leave the page and continue
to Main Menu.
To list all created time zone group in system. You
need to choose the group time zone before you
do any congurations.
ADD IN NEW TIME ZONE GROUP
Step 1 Click on “Time Zone” in the Main control panel. A new window will pop up.
Step 2 Click Time Zone Group page.
35
Page 35
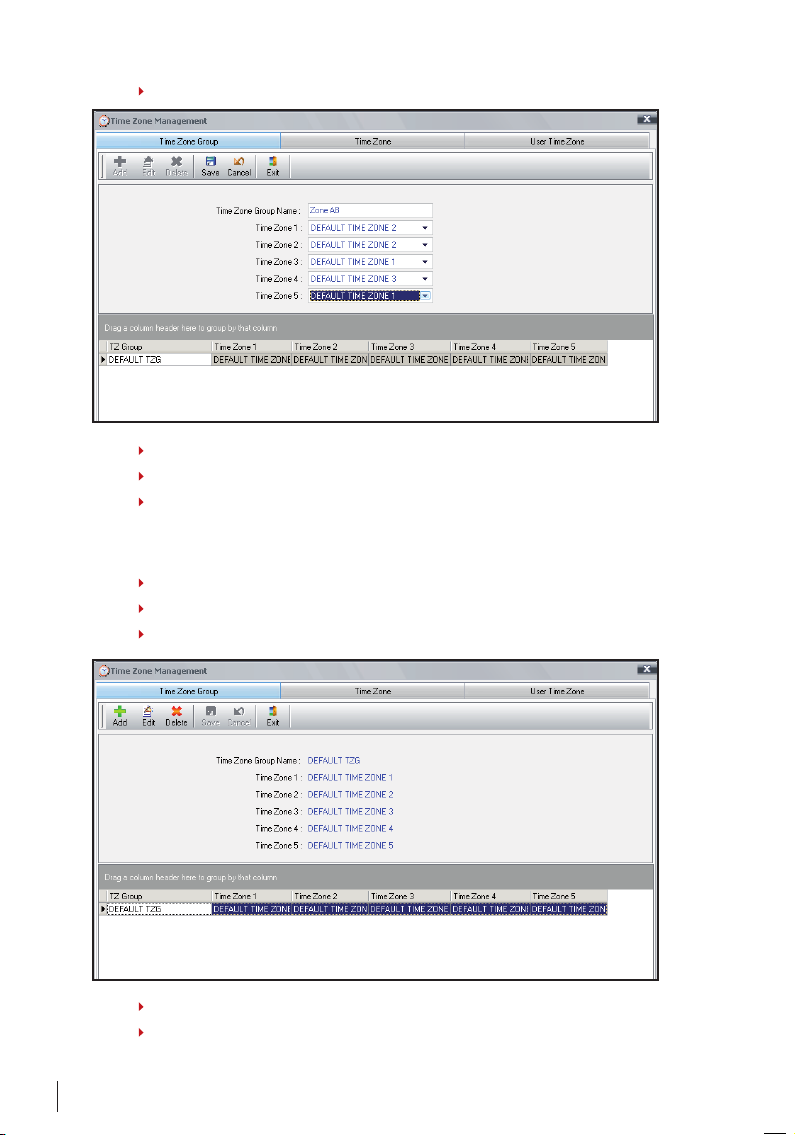
Step 3 A new page will appear.
Step 4 Click “Add” to add a new time zone group.
Step 5 Fill in the name and time zones of the group.
Step 6 Click “Save” to save changes and settings
DELETE TIME ZONE GROUP
Step 1 Click on “Time Zone” in the Main control panel. A new window will pop up.
Step 2 Click the Time Zone Group page.
Step 3 A new page will appear.
Step 4 Select a time zone group to delete.
Step 5 Click “Delete” to delete time zone group.
36
Page 36
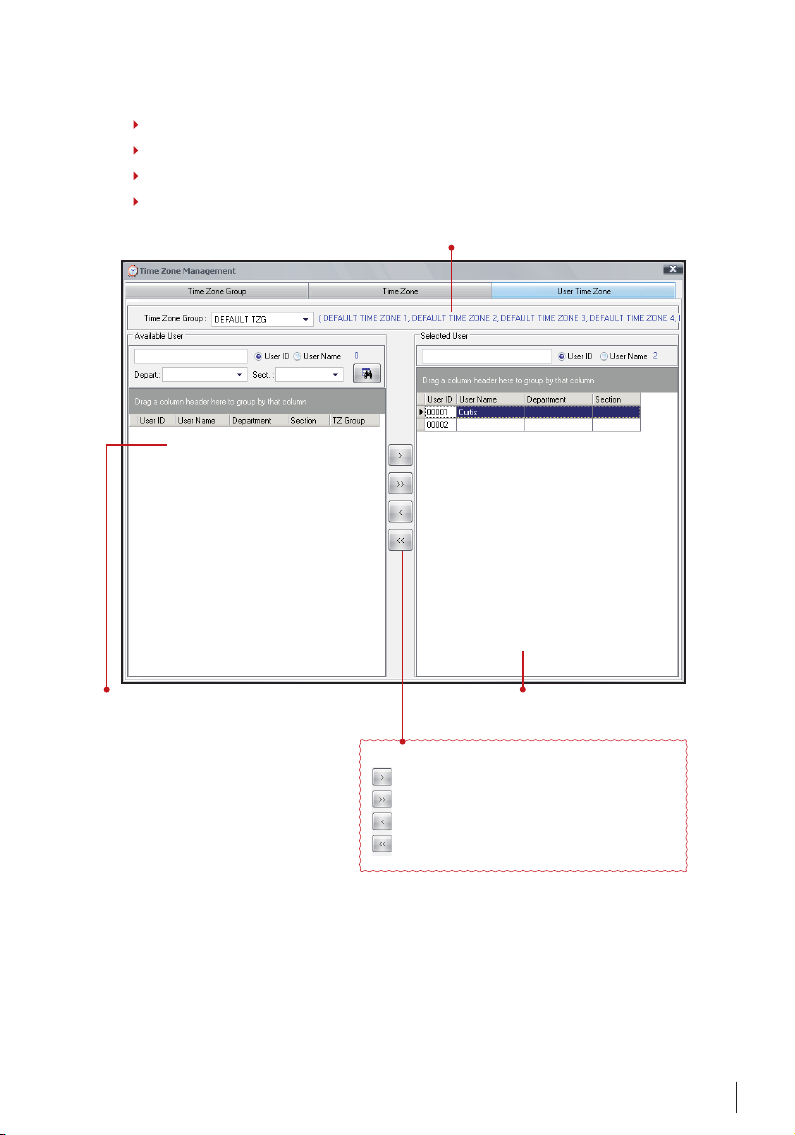
User Time Zones
Step 1 Click on “Time Zone” in the Main control panel. A new window will pop up.
Step 2 Click User Time Zone page. A new window, will pop up.
Step 3 Adjust your settings
Step 4 Click to close the page to save changes and settings.
To display the name of the selected Time Zone Group. You must choose to
any Time Zone Group before you start to assign servers into the zone.
Available Users- The list of users available
in the FRIS system, but not assigned into
the selected Time Zone Group.
The list of users already in the selected
Time Zone Group.
Control pane
To move the selected user into selected Time Zone Group.
To move all users into selected Time Zone Group.
To remove selected user to the selected Time Zone Group.
To remove all users from the selected Time Zone Group.
37
Page 37
7 • FRIS SERVER AND TRANSACTIONS MANAGEMENT
Start and Stop FRIS Services
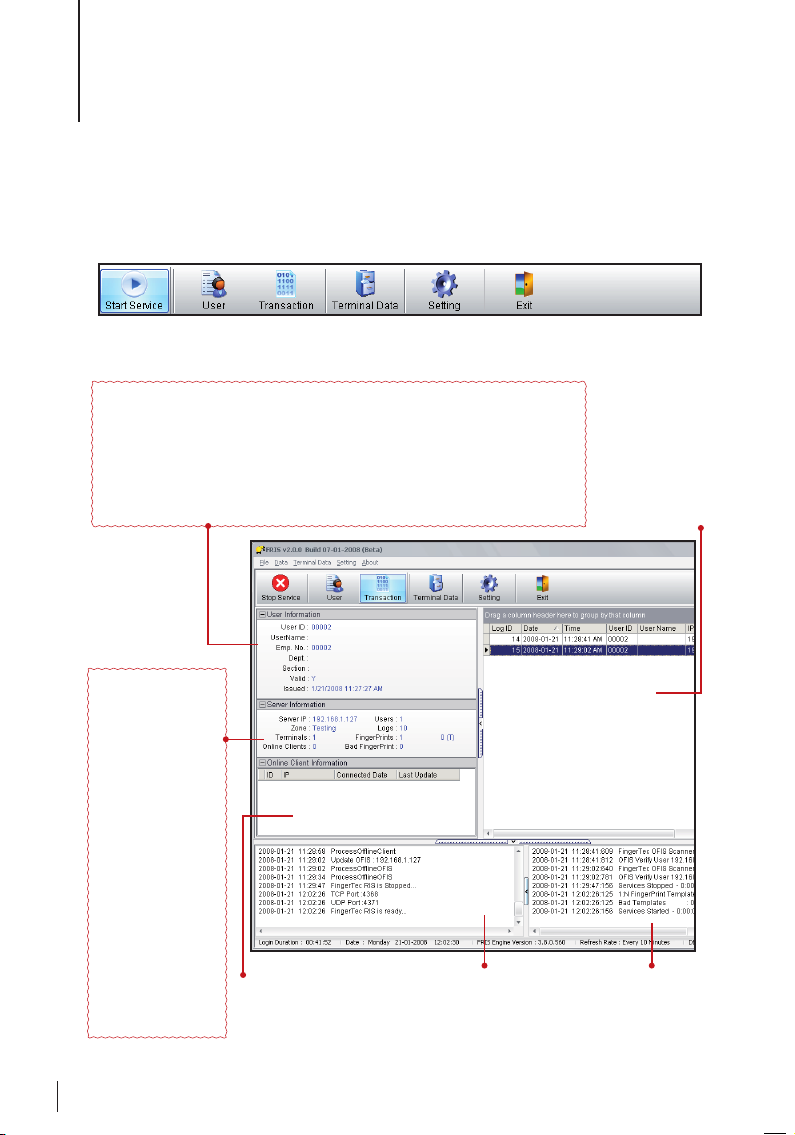
When the FRIS server starts, it will not run automatically. You must order the FRIS server
to start the service before all connected FingerTec terminals can interact with it.
Click “Start service” to order the FRIS server to start its operations:
When the service starts, you will see the window change as shown below:
Here are the details of each portion,
User Information – Prompt to show information of user, during FRIS is verifying user’s ngerprints.
User ID: The user ID assigned to the user.
User Name: Name display on FingerTec terminals during verication.
Emp No: Employee ID of the user.
Dept: The department which user belongs to.
Section: The section which user belongs to.
Valid: Y – Yes, user is activated in FRIS server and ready to verify by FRIS server.N – No, user is de-acti-
vated in FRIS server and user cannot verify his ngerprint at any connected FingerTec terminals.
Issued: The date when user was added into FRIS server.
Server Information
– To show the information of the FRIS in use.
Server IP: The IP address
of the FRIS server in use.
Zone: The zone, which
FRIS server belongs to.
Terminals: The total of
connected FingerTec terminals to FRIS server.
Online Client: The total
of connected FRIS client
to FRIS server
Users: The total of users
inside FRIS server.
Logs : The total of trans-
action logs stored inside
FRIS server.
Fingerprints: The total
of ngerprint templates
stored in FRIS server.
Bad fingerprints: T h e
total of bad ngerprint
templates stored in FRIS
server.
Online Client Information to
show information of all connected FingerTec terminals
To show the connection
status between FRIS server
and all connected FingerTec
terminals.
To show all captured
transaction logs of
all users.
To show all operations
done in FRIS server.
38
Page 38
On with this page, you can find and read important information of FRIS server and FingerTec terminals. Furthermore you can view the operation
of FRIS and its operation status, to make sure the
system is running properly.
Reminder
FRIS server only operates when service starts and
running. Closing the application will cause interruption to all connected FingerTec terminals. You
can minimize the window so you can run other
applications at the same computer or server.
Transactions Management
All transaction logs are captured and saved in the FRIS server. These will be the user raw
clocking data. You can choose to view, edit or delete these transaction logs.
Use FingerTec TCMS V2 to download these transaction logs, and to generate reports.
These transaction logs are important and should be secured from any interruption.
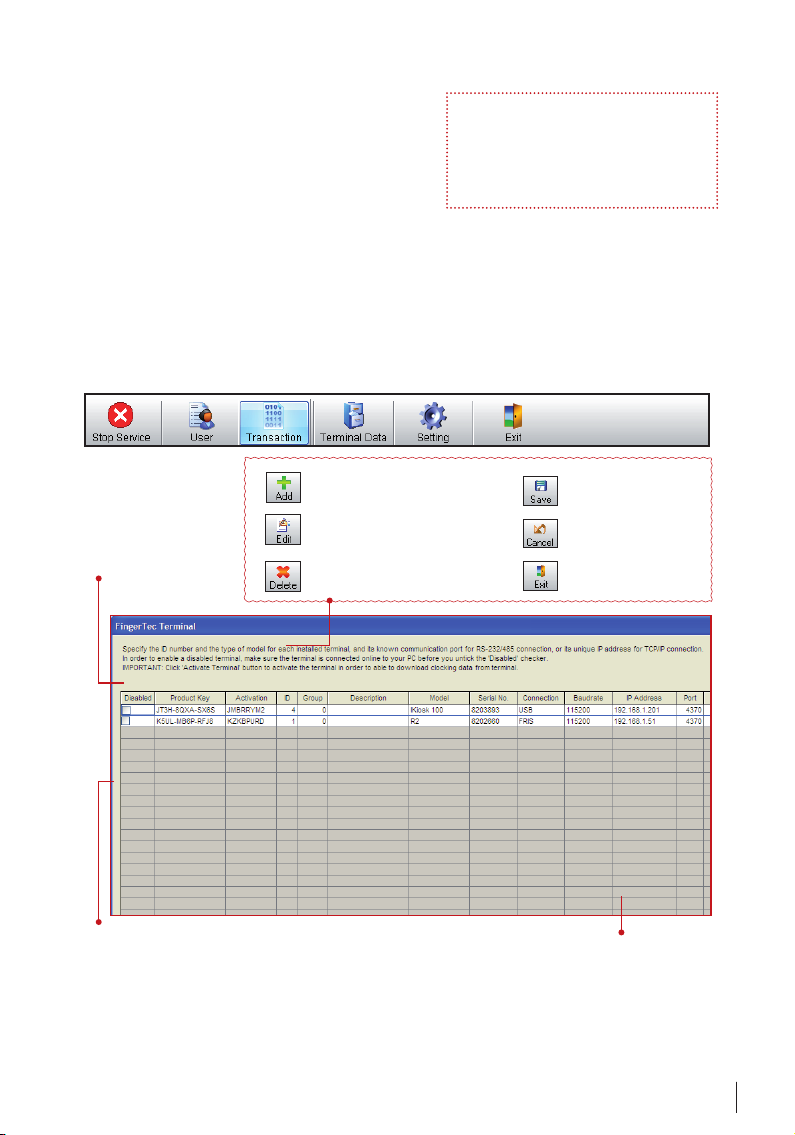
Click on“Transaction” in the Main control panel, A new window will pop up.
To add in a new transaction log of user
into FRIS server.
To show the information of
the selected transaction log
of a user for specic date.You
can choose the date at the
calendar display.
To allow administrator to search a specic transaction log of user.
Fill in the eld and click “Search” to star t the operation. Related
transaction logs showed at the column below.
To edit the existing transaction log in FRIS
server. You must choose the transaction
log before clicking on this button.
To delete transaction log from FRIS server.
You must choose the transaction log before clicking on this button.
To save settings or
changes.
To cancel any settings or
changes.
To leave the page and
continue to Main Menu.
To list all transaction logs
stored in FRIS server.
With a complete view of the page, you can handle all transaction logs easily. Please handle these transaction logs with care; to make sure all transaction logs are not interrupted.
These transaction logs are used for further analysis and evaluation.
39
Page 39
Data Analysis by FingerTec TCMS V2
FRIS 2 server only stores all transaction logs, it is not able to provide any reports. Therefore, use the FingerTec TCMS V2 to download transaction logs from FRIS 2 server. Follow
the steps below to connect FingerTec TCMS V2 into FRIS 2 server.
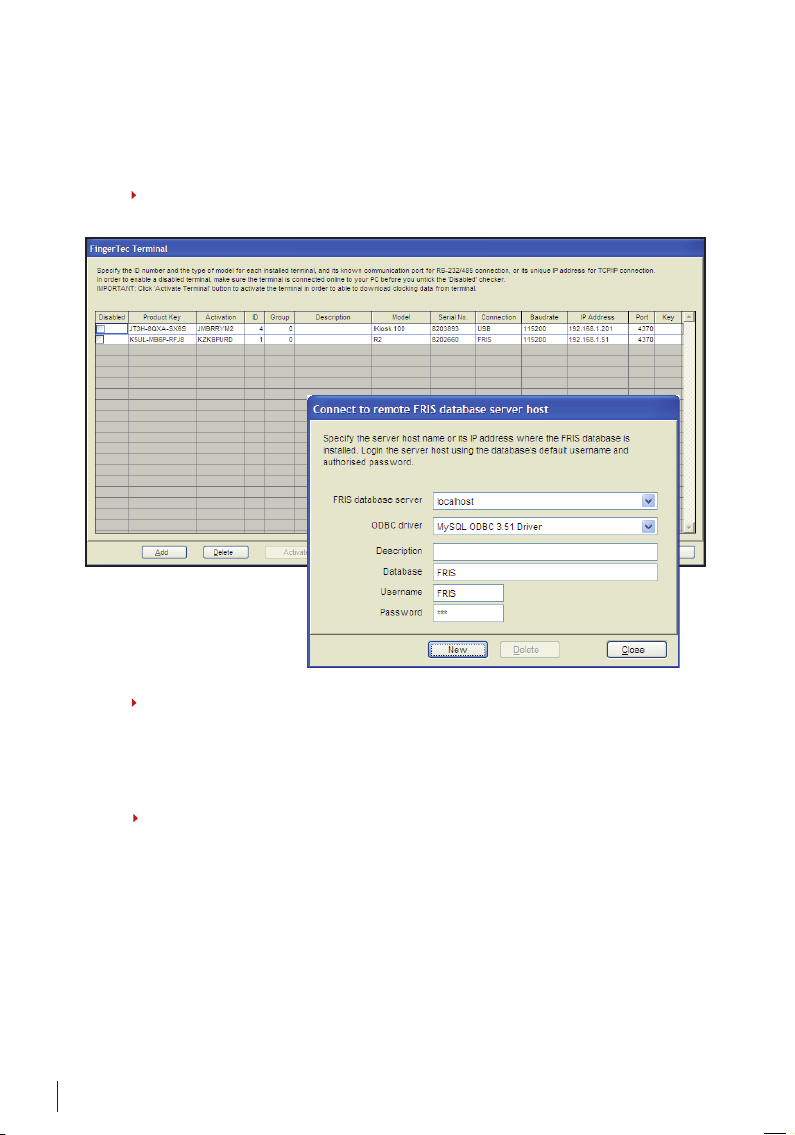
Step 1 Add in the product key and activation key of FingerTec terminals connected with
FRIS 2 server. Activate the terminals.
Step 2 Click Device > FRIS database server management.
FRIS datab ase server – the I P address of FRIS 2 server
ODBC drive r – default MySQL ODBC 3.51 Driver
Database – The name of datab ase table, default as FRIS
Username – The login usernam e of the database table, default as F RIS
Password – The login passwor d of the database table, default as 1 23 (same as login password of FRIS 2 server)
Step 3 Under the FingerTec Terminals tab, select the FRIS 2 server to connect to down-
load data. Click the Connect button to proceed.
The TCMS V2 then connects to the FRIS 2 server to display all connected FingerTec
terminals. Click “Synchronise Terminal” to download information into the FingerTec
TCMS V2.
Click at Advance Settings, and a new window pops up as below. You can configure the
settings of a FingerTec terminal in this page.
40
Page 40
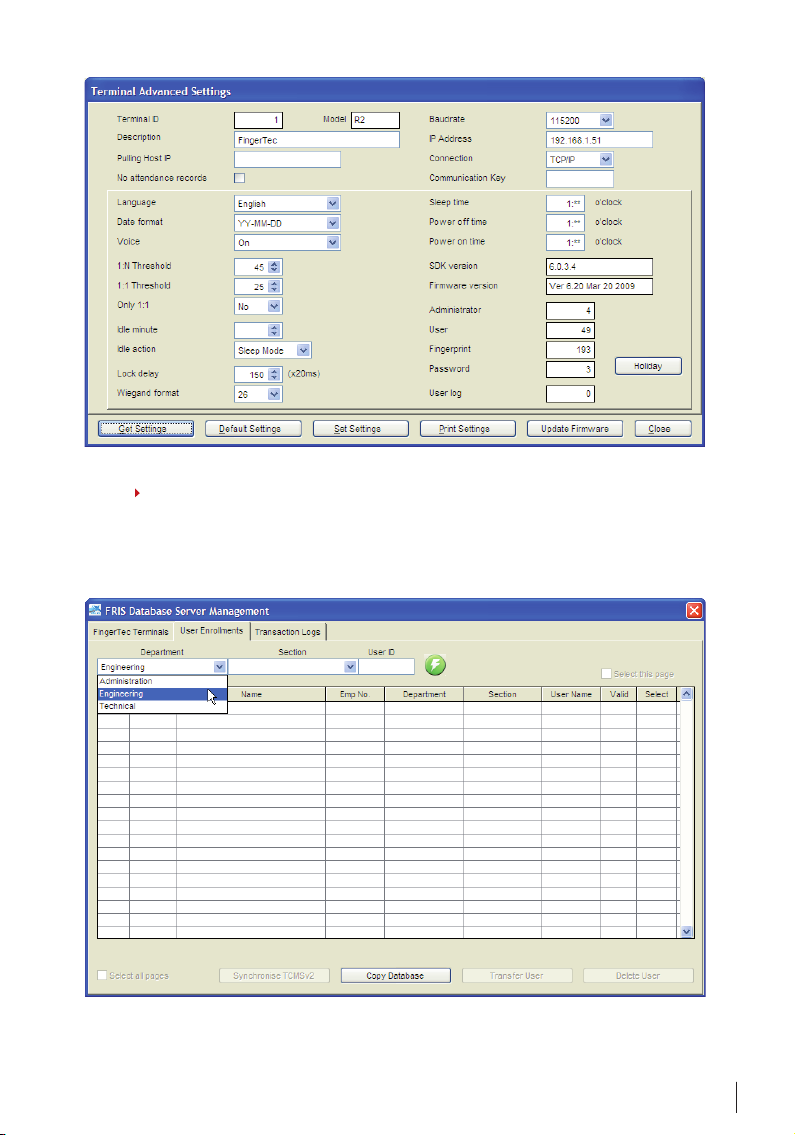
Step 4 Under the tab User Enrolments, you can download users from the FRIS 2 server
into the FingerTec TCMS V2. Leave the column Department (or Section) blank, and the
software will download all users from the FRIS 2 server.
However you can choose to define either the department or section to download. Click
the Connect button to start.
41
Page 41
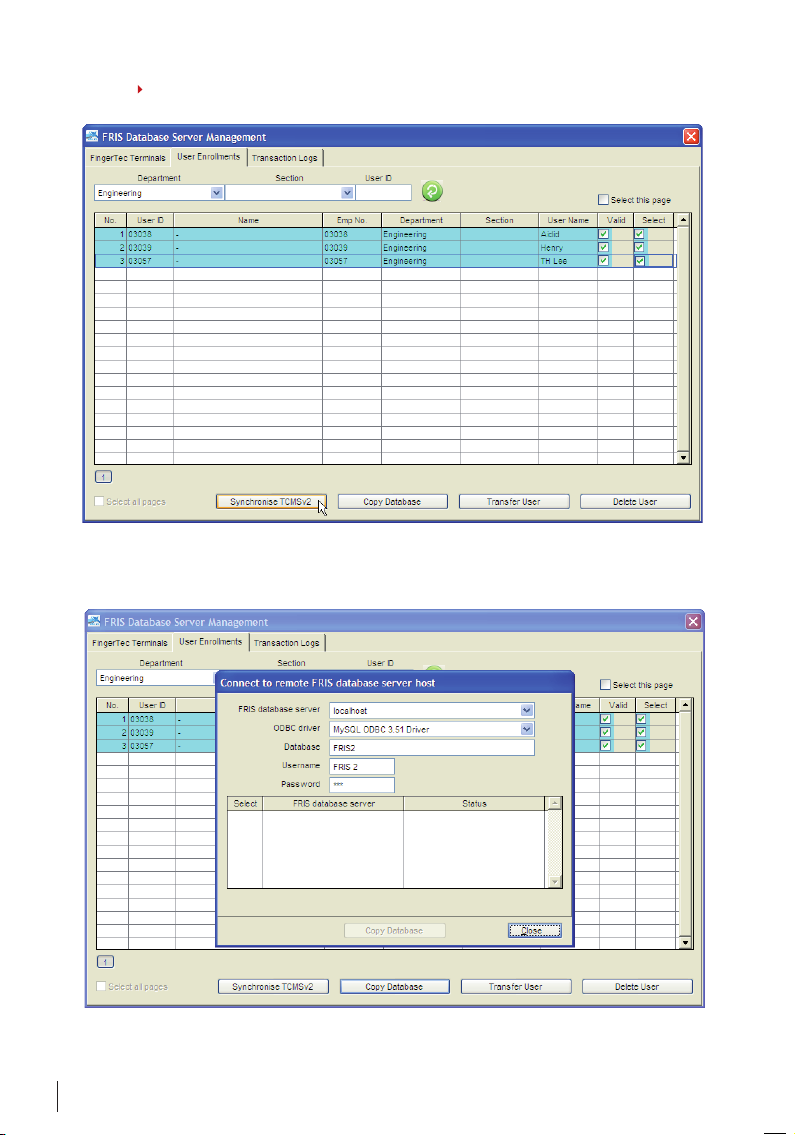
Step 5 Tick the column “Select” to include the users to download. Click Synchronise
TCMS v2” to download users.
In case you have multiple FRIS 2 servers to manage, and you would like to copy users
among the servers, click Copy Database.
Fill in the information and select the FRIS 2 server to copy to.
In case you have multiple FRIS 2 servers to manage, and you would like to transfer users
among the servers, click Transfer User.
42
Page 42
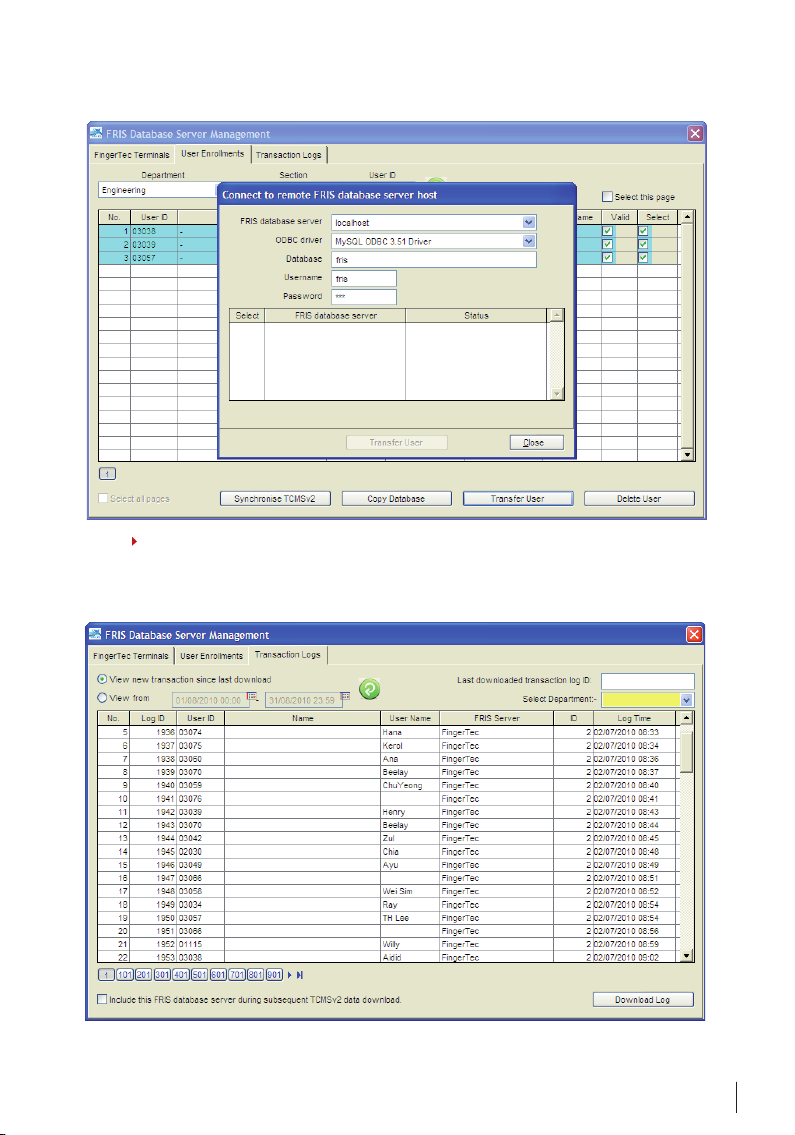
Select the users to transfer. Fill in the information and select the FRIS 2 server to transfer
to.
Step 6 Under the tab Transaction logs, you can download transaction logs from the FRIS
2 server into the TCMS v2. You can either
View and download new transaction since last download
View and download from a specic time period
43
Page 43
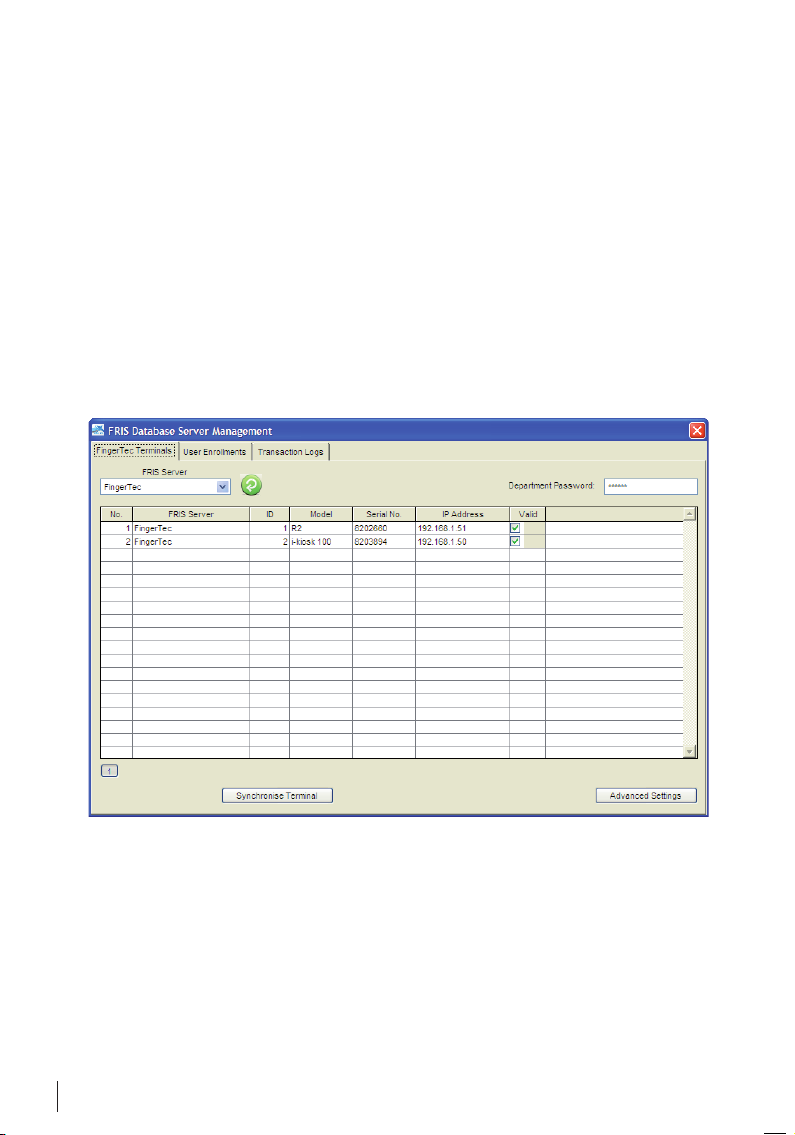
Define the method and click the Connect button. You can check and view the transaction
logs one by one. Click “Download Log” to save all into the TCMS V2.
Now you can generate reports as you want to. However, make sure you already configured your clocking schedules and group duty rosters properly so you can view and print
reports.
THE “PASSOWRD” CONTROL
In the FRIS 2 server, you can define a password for each department. The password is to
limit the administrator from downloading data from the FRIS 2 server. Administrator can
only download data from the FRIS 2 server for a specific department, if he/she has the
department password from the FRIS 2 server.
Example: In the FRIS 2 server, the Engineering department is assigned with a password
“engine”. Now in the TCMS v2, the administrator must insert the password into the column Password.
Now click “Connect”.
44
Page 44
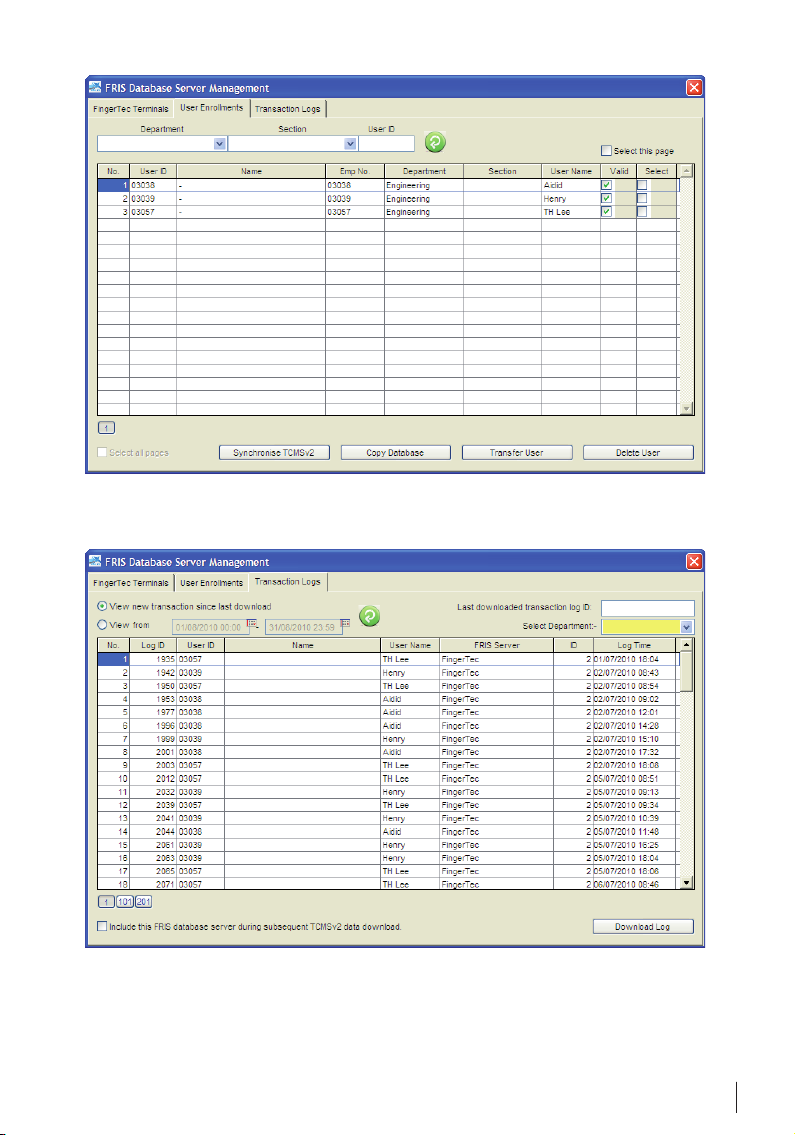
Under User Enrollments, click “Connect “. TCMS v2 will only download users assigned to
the Engineering department.
Under the Transaction Logs tab, click the “Connect” button and the TCMS V2 will only
download transaction logs of the users assigned under the Engineering department.
45
Page 45

8 • FRIS 2 SERVER AS DATA STORAGE SERVER
(NO ONLINE VERIFICATION)
To Use FRIS 2 with Normal Fingertec Terminals
These FingerTec terminals stores all user data in the FingerTec terminals. User data
are transfered to all connected FingerTec terminals such as fingerprint, password, time
zones etc. In this design, FRIS II acts as a control station to interact with all connected
FingerTec terminals for user data modification transferring. Kindly take note, FRIS II will
not conduct any online verification with connected FingerTec terminals. All verification process are done locally in the FingerTec terminal itself.
Transaction logs are stored in the FingerTec terminals. FRIS II can be used to download
transaction logs from connected FingerTec terminals, and store them in the MySQL
database. Administrators are able to view the downloaded transaction logs in FRIS II.
FRIS II does not integrate with any clocking rules, and therefore it cannot generate any
attendance for users. Administrators only can view raw clocking data of users in FRIS II.
Administrators will need to use the TCMS V2 if the administrator would like to generate
attendance data and reports for users.
Administrators can choose to use other time attendance software to generate attendance data and reports. The FRIS II stores transaction logs in a MySQL database, to ease
software developers access into the database to gather the required clocking data. In
this design, FRIS II stores transaction logs in a MySQL database, and is ready to be used
by any other software for further processing.
ONLINE FINGERPRINT ENROLLMENT AND VERIFICATION
This operation is only available when FRIS II works with FingerTec terminals with a FRIS
function. All fingerprints captured in readers are forwarded to the server for enrollment and verification. Normal readers without FRIS function cannot support this.
46
DOWNLOAD, VIEW AND EDIT TRANSACTION LOGS
When FRIS II works with FingerTec terminals with a FRIS function, all transaction logs
are stored inside the server once the verification process is done. Administrator can
view and edit transaction logs in the page Transaction from main menu.
While the FRIS II can work with normal FingerTec terminals without FRIS function administrators must download transaction logs stored in readers from the page Terminal
Data > Terminal Transaction. Storage inside readers are cleared after the download
process. The administrator can view and edit the transaction logs in the page Transaction in main menu.
GROUP TIME ZONE AND TIME ZONE
When the FRIS II works with FingerTec terminals with a FRIS function, all group time
zones and time zones are defined locally in the server. Administrators are not required
to upload the settings to the terminals.
Page 46
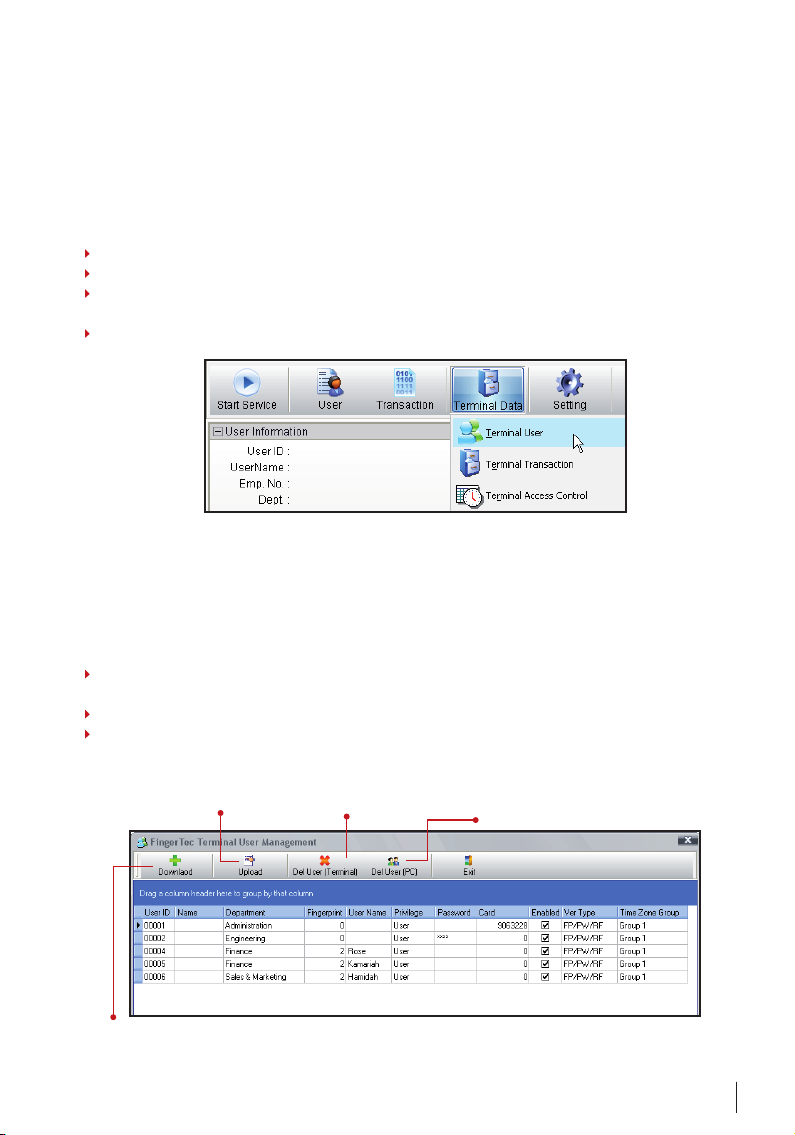
For FRIS II with normal FingerTec terminals, group time zones and time zones are defined
locally in a server, and uploaded to the readers to take effect.
Start to Use FRIS 2
FRIS II can act as a data management center for normal FingerTec terminals. FRIS can be
used to,
Store user data (user names, fingerprints, passwords, RFID cards etc)
Transfer user data between all connected FingerTec terminals
Configure time zones to control user accessibilities to all connected FingerTec termi-
nals.
Download transaction logs from all connected FingerTec terminals for viewing purpos-
es.
Now FRIS II is storing all user data and transaction logs in a MySQL server as a centralization database. Administrators can access the MySQL server to gather the required data
for any further software processing.
Terminal Users
This section teaches users to:
Edit the users data (user names, passwords, RFID cards, verification types, time zones
etc)
Transfer users among all connected FingerTec terminals.
View all users available in FRIS II and in FingerTec terminals, as a quick check.
To upload all users data to connected FingerTec terminals, including usernames, ngerprints,
passwords, RFID cards etc from
FRIS II.
To delete user data connected to
FingerTec terminals, including
usernames, ngerprints, passwords, RFID cards etc.
To delete users data in
FRIS, including usernames,
ngerprints, passwords,
RFID cards etc.
To download all users data from connected FingerTec
terminals, including usernames, ngerprints, passwords, RFID cards etc to FRIS II.
47
Page 47
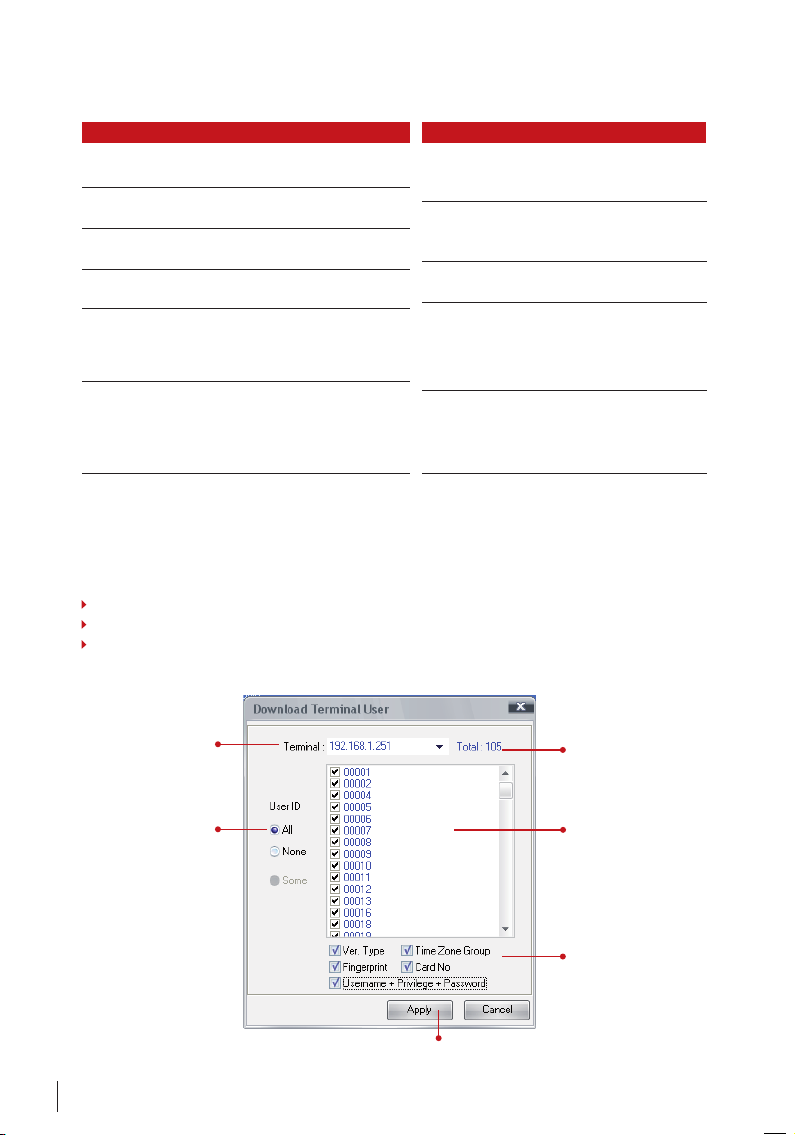
In this page, administrators can modify user data and upload them to connected FingerTec terminals.
Fun ction
User ID: The user ID assigned to users during first enroll-
ment. Not allowed to change.
Name: The official names of users. Not displaying in Fin-
gerTec terminals.
Department: Department which users are assigned to.
Not displaying in FingerTec terminals.
Fingerprint: Total fingerprints enrolled by the users.
Maximum is 10.
User Name: Nicknames of users to display on FingerTec
terminals during verification. Maximum is 9 characters.
Allowed to change and upload to connected FingerTec
terminals.
Privilege: The level of accessibilities of users to Fin-
gerTec terminals. Users, enrollers, administrators or
supervisors. Please see details in FingerTec hardware
manual for more details of levels. Allowed to change
and upload to connected FingerTec terminals.
Fun ction
Password: Password for users verifications. Max-
imum is 5 digits. Allowed to change and upload
to connected FingerTec terminals.
Card: Number RFID card of users. Maximum is
9 digits. Allowed to change and upload to connected FingerTec terminals.
Enabled: To show users are allowed to verify at
FingerTec terminals.
Ver Type: Types of verification for users. Total of
15 types. Allowed to change and upload to connected FingerTec terminals. Please see more
details of types of verifications in FingerTec
hardware manual.
Time Zone Group: Group time zone of users, to
control accessibilities to connected FingerTec
terminals. Allowed to change and upload to
connected FingerTec terminals.
DOWNLOAD USERS
User data stored in FingerTec terminals can be downloaded and saved into the FRIS II. The
user data can also be uploaded to other FingerTec terminals, to ease the operation.
Kindly take note of the following during download process,
Select the correct FingerTec terminal to the download from.
Select the correct users to download.
Include the desired data field before download starts.
48
Choose the IP address of
the connected FingerTec
terminals.
Tick “ALL” to select all
users display in the right
column. Ignore this if
you want to choose the
users manually.
Click “APPLY” to start the download process.
Total users stored in
the connected FingerTec terminal
Users stored in FingerTec terminals
are display. Tick to
choose the users to
download.
Tick the data field
to download. Suggested to select all
fields to gather all
users data during
first download.
Page 48
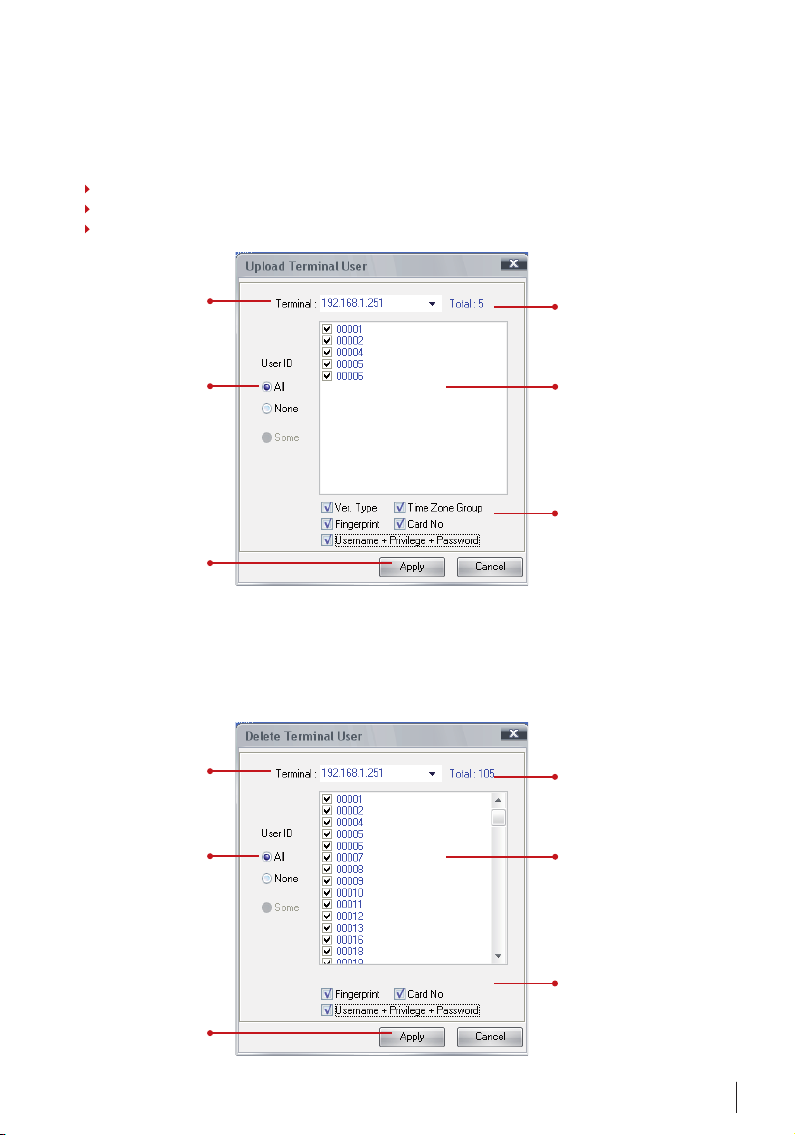
UPLOAD USERS
User data stored in the FRIS II can be uploaded to all connected FingerTec terminals. This
is to avoid users repeating the enrollment or registration.
Kindly take note of the following during the upload process,
Select the correct FingerTec terminal to upload to.
Select the correct users to upload.
Include the desired data field before upload starts.
Choose the IP address of
the connected FingerTec
terminals.
Tick “ALL” to select all
users display in the right
column. Ignore this if
you want to choose the
users manually.
Click “APPLY” to start the
upload process.
Total users stored in
FRIS II.
Users stored in FRIS
server are display.
Tick to choose the users to upload.
Tick the data eld to
upload.
Suggested to select
all elds to upload
all users data during
rst upload.
DELETE USER TERMINAL
Administrators can directly access the connected FingerTec terminals to delete the user
data. The user data are still available in the FRIS II. This is to allow administrators to delete
the users in selected FingerTec terminals.
Choose the IP address of
the connected FingerTec
terminals.
Tick “ALL” to select all
users display in the right
column.
Ignore this if you want to
choose the users manually.
Total users stored in
the connected FingerTec terminals.
Users stored in FingerTec terminals are
display.
Tick to choose the users to delete.
Click “APPLY” to start the
delete process.
Tick the data eld to
delete.
Suggested to select
all elds to delete all
users data during delete download.
49
Page 49
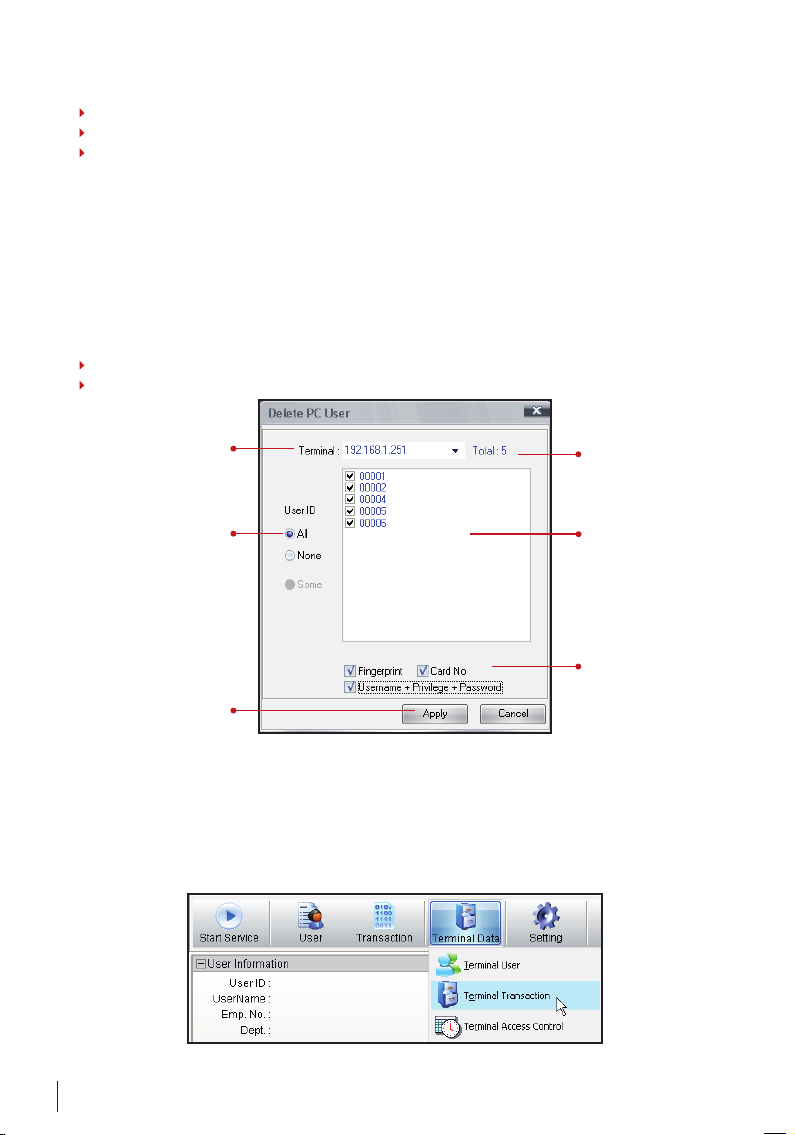
Kindly take note of the following during delete process,
Select the correct FingerTec terminal.
Select the correct users to delete.
Include the desired data field before the delete process starts.
We suggest to select all data fields during the delete process from the FingerTec terminals.
DELETE USERS PC
Administrators can delete the user data stored in FRIS II. The users deleted in FRIS II are still
available in FingerTec terminals. We suggest to repeat the delete process in the FingerTec
terminals to completely remove the users.
Kindly take note of the following during a delete process,
Select the correct users to delete.
Include the desired data field before delete process starts.
Choose the IP address of
the connected FingerTec
terminals.
Tick “ALL” to select all
users display in the right
column.
Ignore this if you want to
choose the users manually.
Click “APPLY” to start the
delete process.
Total users stored in
the FRIS II
Users stored in FRIS
server are display.
Tick to choose the users to delete.
Tick the data eld to
delete.
Suggested to select
all elds to delete all
users data during delete download.
Transaction Management
Administrators can download all transaction logs from connected FingerTec terminals
and view them. To start to download transaction logs from connected FingerTec terminals, select Terminal Transaction from the main menu and a new window will pop up.
50
Page 50
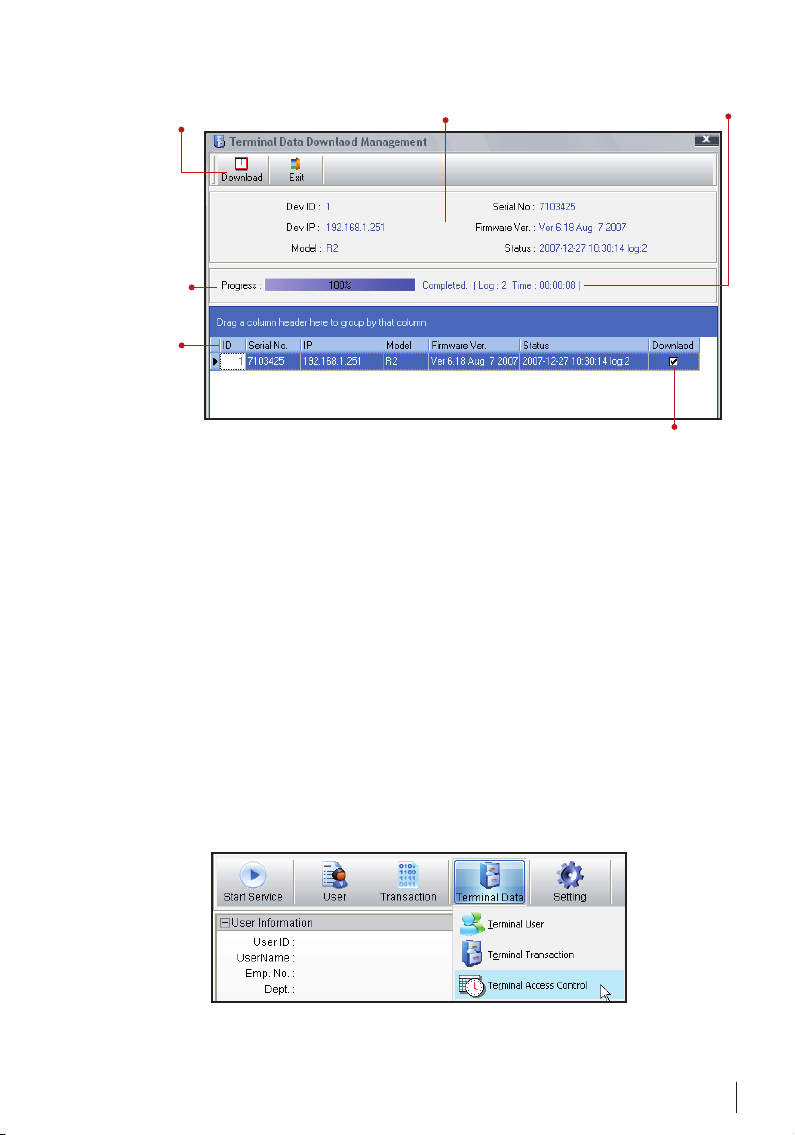
Click here to start download process
To display the
progress of
download
process.
To display all
connected
FingerTec
terminals.
To display the information
of the selected FingerTec
terminal
Tick this column to include the FingerTec terminals in the download process. Download
process will run for multi terminals.
To display the total of transaction logs downloaded.
Duration of download process also display.
All downloaded transaction logs are stored inside FRIS II, and ready for viewing. Please
see chapter 6, FRIS Management and Transaction Management for more details in transaction log viewing. The transaction logs are in MySQL database so other softwares can
make use of these data.
Time Zones, Group Time Zones and Types of
Verication Management
Time zone and group time zones are used to control the users accessibilities. Only users
with valid time zones are granted access during verification. Please ignore this section if
you are not using the system for access control.
Some models of FingerTec terminals are equipped with 15 types of verification methods. Please check the FingerTec hardware manual. Administrators can assign users with
different verification methods to increase the security during verification, such as fingerprint with password, fingerprint with password together with RFID card etc. Please
ignore this section if your FingerTec terminals do not come with this function.
Administrator can select Terminal Access Control to start and configure this page.
51
Page 51
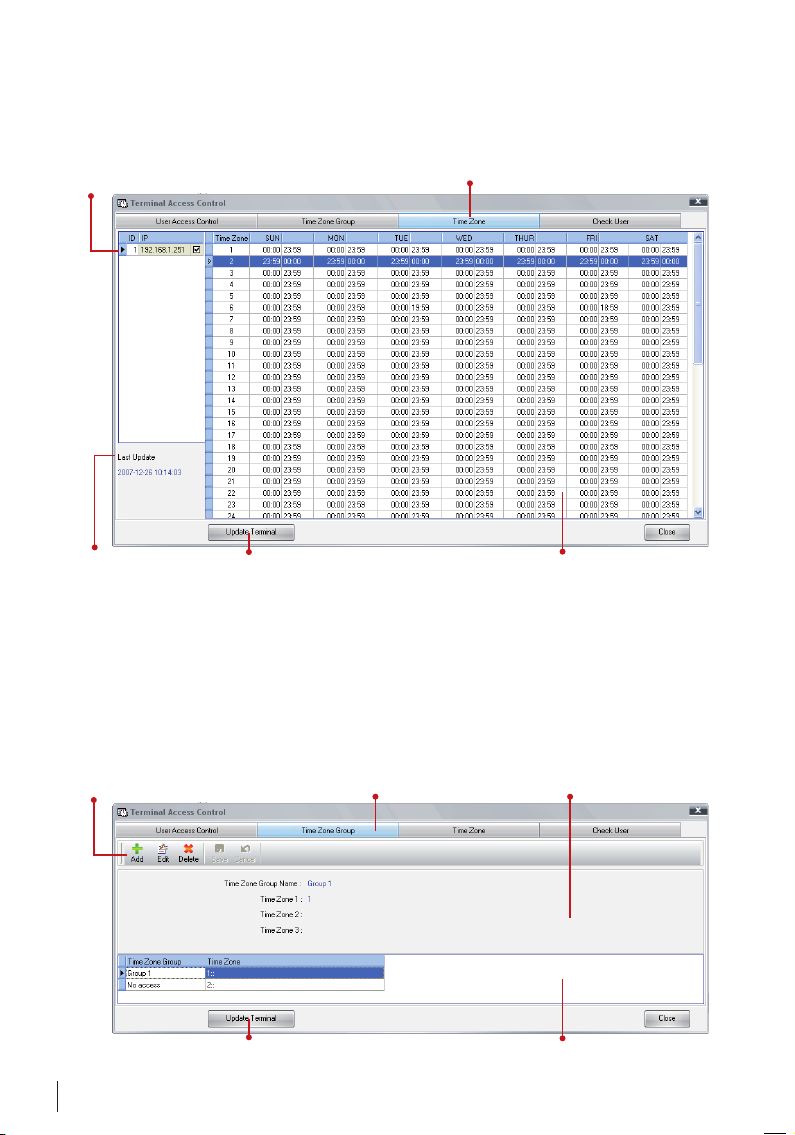
TIME ZONE MANAGEMENT
FRIS II allows administrators to configure the time zones for users. There are total of 50 sets
of time zones ready for configuration.
To show all connected FingerTec terminals. Please tick
the terminals before updating changes to them.
Time Zone Page
To display date and
time of last update to
FingerTec terminals.
Click here to update time zones to FingerTec
terminals. Update must be done to send
changes of time zones to FingerTec terminals.
A total of 50 sets time zone. Each set apply to a
week. Choose a set and manually enter the access
time period. 23:59 – 00:00 is representing no access for whole day.
GROUP TIME ZONE MANAGEMENT
FRIS II provides group time zones, each group can support up to 3 different time zones. In
some cases, a group of users will have several access time periods in a day, and therefore
several time zones are included. With Group Time Zones, administrators can group the
time zones into a same group. The default time zone is 1. All new enrolled users are automatically assigned to this time zone.
Control panel to start to congure group time
zone. To add, edit or delete a group time zone
The changes must update to terminals to take eect.
52
Group time zone page
To display all created group time zones.
Select one before start congurations.
To add, edit a group time zone by changing
the names, and time zones included. Maximum 3 time zones into a group time zone.
Page 52
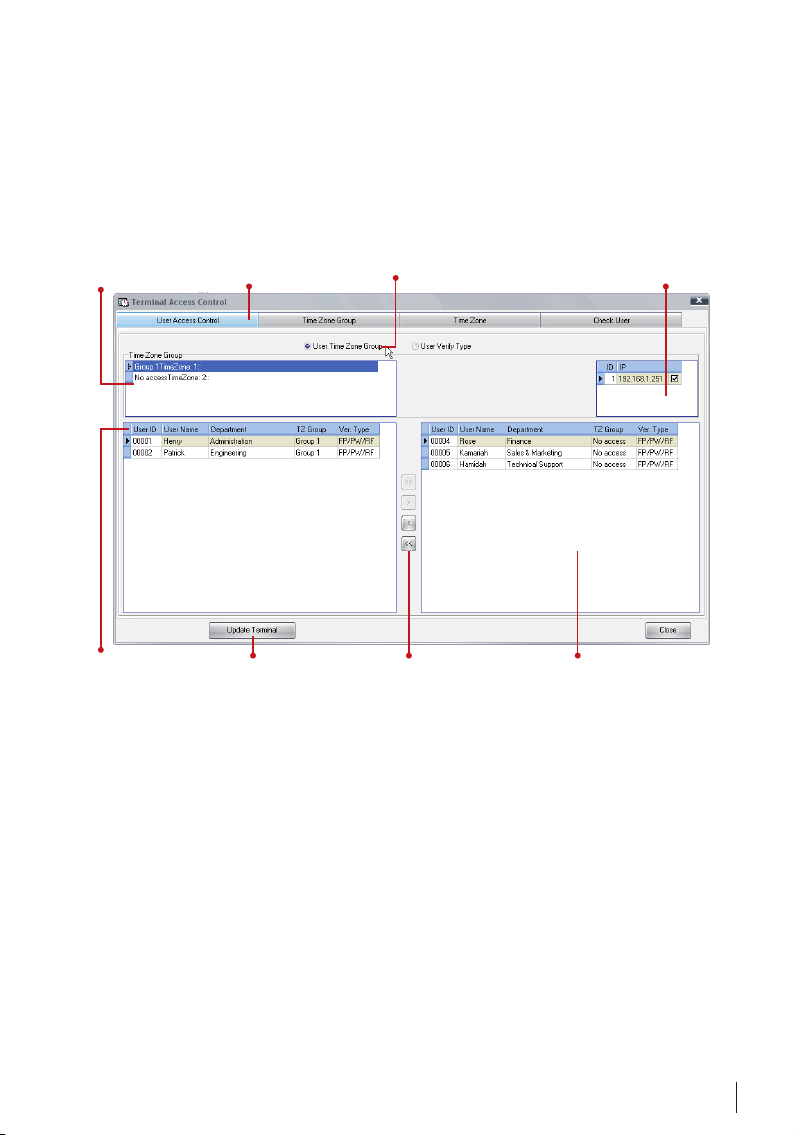
USER ACCESS CONTROL MANAGEMENT
User Time Zone Group: After time zone and group time zone configuration, administra-
tors must include the users with same access time period into groups, and then update
them to the connected FingerTec terminals.
The default time zone group is 1. All new enrolled users are automatically assigned to
this group.
To display all created group
time zones. Select the group
before start to assign users.
User Access
Control page
Make sure you choose for
User Time Zone Group before
conguration.
To display all connected FingerTec terminals. Choose for the
terminals before update starts.
Users assigned under
the selected group
time zone.
Click here to update
changes to FingerTec
terminals.
To include or exclude
users into then selected
group time zones
Users not assigned
under the selected
group time zone.
User Verify Group: This page also can be used to configure the types of verification for
users. Please check your FingerTec terminals and make sure they can support different
verification methods before upload. There are a total of 15 types of verification methods
available and users can be assigned to any of them. Administrators can directly assign the
users into the types of verification in this page, and then upload changes to connected
FingerTec terminals. Please see details of types of verifications in your FingerTec hardware manual.
The default verification method is FP/PW/RF. All new enrolled users are automatically assigned to this type.
53
Page 53
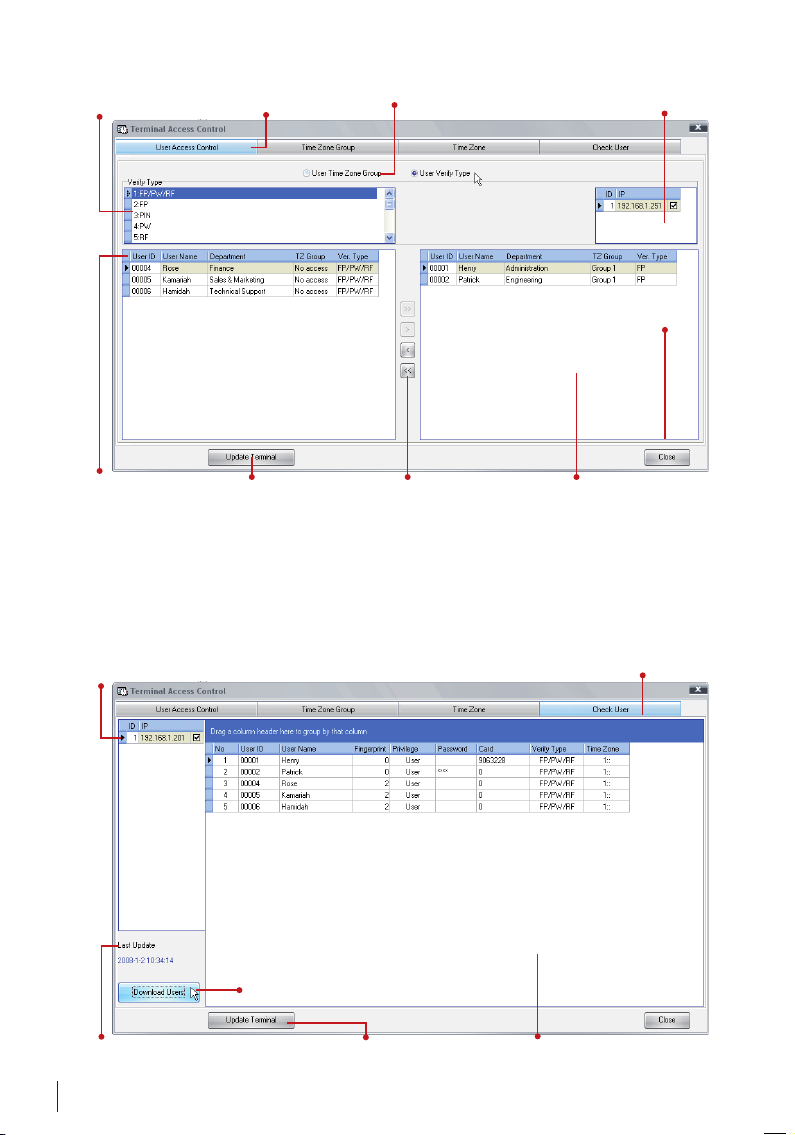
To display all 15 verication
methods available. Refer to the
hardware manual for details.
User Access
Control page
Make sure you choose for User Time
Zone Group before conguration.
To display all connected FingerTec terminals. Choose for the
terminals before update starts.
Users assigned under
the selected verication method.
Click here to update changes
to FingerTec terminals.
To include or exclude users into
then selected verication method.
Users not assigned to the
selected verication method.
CHECK USERS
In this page, administrators can view all users enrolled in connected FingerTec terminals.
Administrators can also check the group time zones, time zones and types of verification
methods assigned to each user. Administrators are able to transfer the users to another
connected FingerTec terminal by choosing and uploading users to the selected terminals.
To display all connected FingerTec terminals.
Choose for the terminals before update starts.
Click here to download users from
To display the date and time for latest
update to the selected terminals.
selected terminal.
Click here to upload users
to the selected terminal.
To display all users enrolled in the
selected FingerTec terminals.
Check User page
54
Page 54

INFORMATION ABOUT FINGERTEC
TO LEARN ABOUT VISIT
Company and the products www.fingertec.com
The latest updates Facebook Fan Page: FingerTec Worldwide
Twitter: FingerTec Worldwide
To subscribe for FingerTec newsletter:
fingertec.com/subscribe/newsletter/subscribe_newsletter.html
Technical Tips and Latest user.fingertec.com
Product Updates and
Upgrades
Email
[email protected] (Technical)
Register for Warranty
FingerTec Accessory accessory.fingertec.com
[email protected](Sales)
fingertec.com/ver2/english/e_warranty.htm
COPYRIGHT NOTICE & DISCLAIMER
COPYRIGHT NOTICE
All rights reserved. No part of this book may be reproduced or transmitted in any form or
by any means, electronic or mechanical, including photocopying, recording, or by any information storage and retrieval system, without written permission from FingerTec Worldwide Sdn Bhd. Every precaution has been made to supply complete and accurate information. Information in this document is subject to change without prior notice.
DISCLAIMER
No person should rely on the contents of this publication without first obtaining advice
from a qualified professional person. The company expressly disclaims all and any liability
and responsibility to any terminal or user of this book, in respect of anything, and of the
consequences of anything, done by any such person in reliance, whether wholly or partially, upon the whole or any part of the contents of this book.
FINGERTEC WORLDWIDE SDN BHD
55
Page 55

For technical tips and manuals in o ther languages, refer to http://u ser.finger tec.com
w w w . f i n g e r t e c . c o m
© 2010 FingerT ec Worldwide Sdn. Bhd . All rights reserved . • 032011
 Loading...