

Page 1

Secure Single Sign On with FingerTec OFIS
User Guide
Page 2

CONTENTS
3 1 • INTRODUCTION
Welcome to OFIS Gateway
4-11 2 • INSTALLATION & SETUP
Registering Your OFIS Gateway
Installing & Setting Up Your OFIS Gateway
Enrolling a Fingerprint for Windows Login
Logging in to Windows with Fingerprint
12-29 3 • CONFIGURING SETTINGS IN
OFIS GATEWAY
Operation Panel overview
Starting the OFIS Operation Panel
Logging in to the Operation Panel
Configuring Host Lock Setting
Configuring Web Account Setting
Configuring File Encryption
Windows Login Setting
Managing System Settings
30-31 4 • UNINSTALLATING
OFIS GATEWAY
Uninstalling the OFIS Gateway
32-34 5 • FREQUENTLY ASKED
QUESTIONS
35 6 • OTHER RESOURCES
Page 3

1
Introduction
•
Welcome to OFIS Gateway
OFIS Gateway is a program that enables FingerTec OFIS devices to be used as a fingerprint login option for Windows operating systems. With OFIS Gateway in place, you will
not need to worry about remembering passwords again! A simple scan of your fingerprint will suffice.
To setup the OFIS Gateway, it is recommended that you follow the steps provided by this
manual closely. Before beginning, you should make sure that your computer has the following system requirements:
Microsoft Windows 2000 / Windows XP / Vista 32-bits / Vista 64-bits/ Windows 7 32-
•
bits/ Windows 7 64-bits
Intel Pentium 100MHz or higher
•
64MB RAM or higher
•
Hard disk space requirement of at least 60 MB
•
Built-in USB port
•
If your computer matches all the minimum requirements stated above, it is time to begin
your setup!
CONTENTS
3
Page 4

2
Installation & Setup
•
Registering Your OFIS Gateway
Registration is an important step to obtaining a valid and genuine license. Your OFIS
scanner comes with an activation key. This activation key will be needed to register the
OFIS Gateway effectively. Alternatively, you can opt for the 30-day free trial offered by
OFIS Gateway, which does not need an activation key.
1. Insert the CD included with your OFIS Scanner hardware.
2. Double click on the file labelled OFIS_Login.exe and click Next to launch the license
agreement. You will need to accept the license agreement to proceed by clicking
Yes.
Note: If you have
any antivirus software
running in the background, you may have
to temporarily disable
it before proceeding as
the antivirus software
may interrupt installation, and result in
the software not being
completely installed.
CONTENTS
4
Page 5
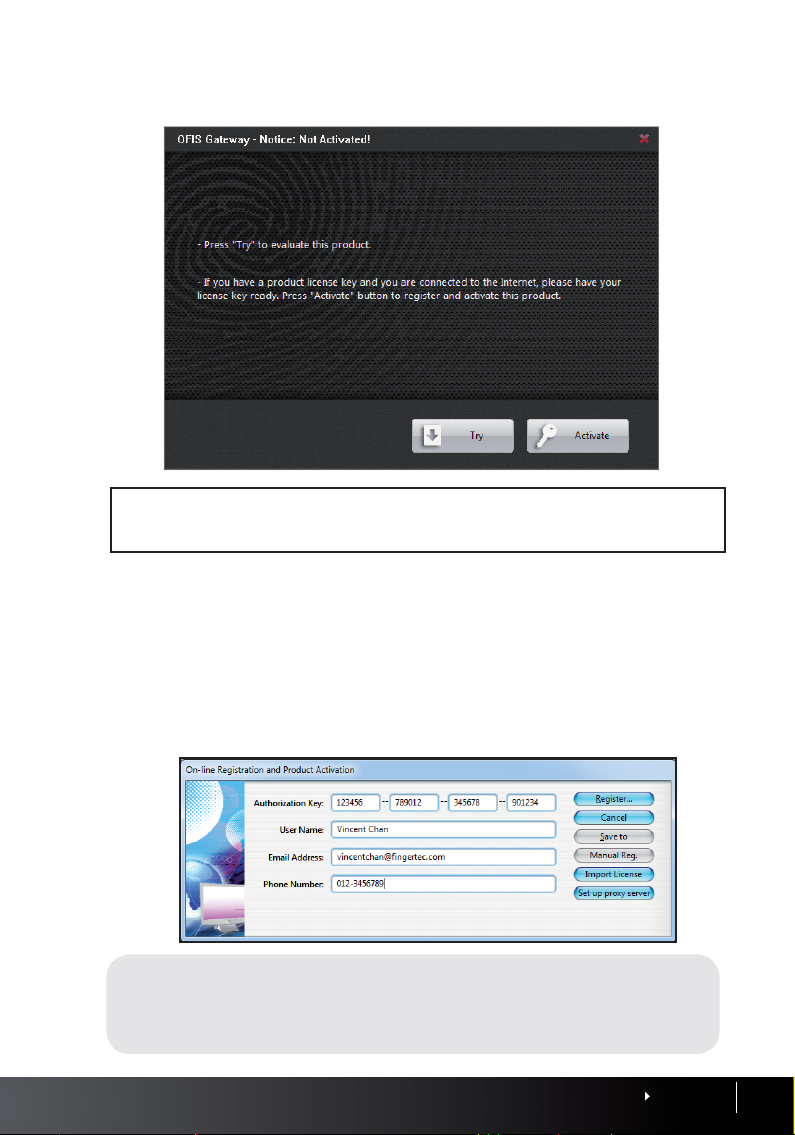
3. After accepting the agreement, you will need to choose to install a trial version of the
software by selecting Try, or the full licensed version by selecting Activate.
If you want to evaluate this product for a short period or are unable to get Internet access for the
Note:
moment, you can opt to install the Trial version rst. Note that the trial version lasts for 30 days; a license has
to be purchased to use the full version of the OFIS Gateway.
Before proceeding with the full license Registration, make sure you’ve done the following:
Make sure your PC is connecting to the Internet. If you choose Registration, you will need
•
an Internet connection to connected the license registration.
Prepare a username and a valid email address for Registration. A username and a valid
•
email address will be needed for future upgrades, and technical support authentication.
4. Upon clicking registration, you’ll be asked to insert a Product Authorization Code, User-
name, E-mail Address and Phone Number. After you input the directory, please click
Register to complete online registration.
Manual Registration
Due to some restriction, such as firewalls and absence of a stable Internet connection, you can opt
to use the Manual Registration instead. Manual Reg will redirect you to send our support team an
email. Our support team will register your license for you and revert back to you with a registration
attachment, for which all you have to do is click Import License, select the file and click OK.
CONTENTS
5
Page 6
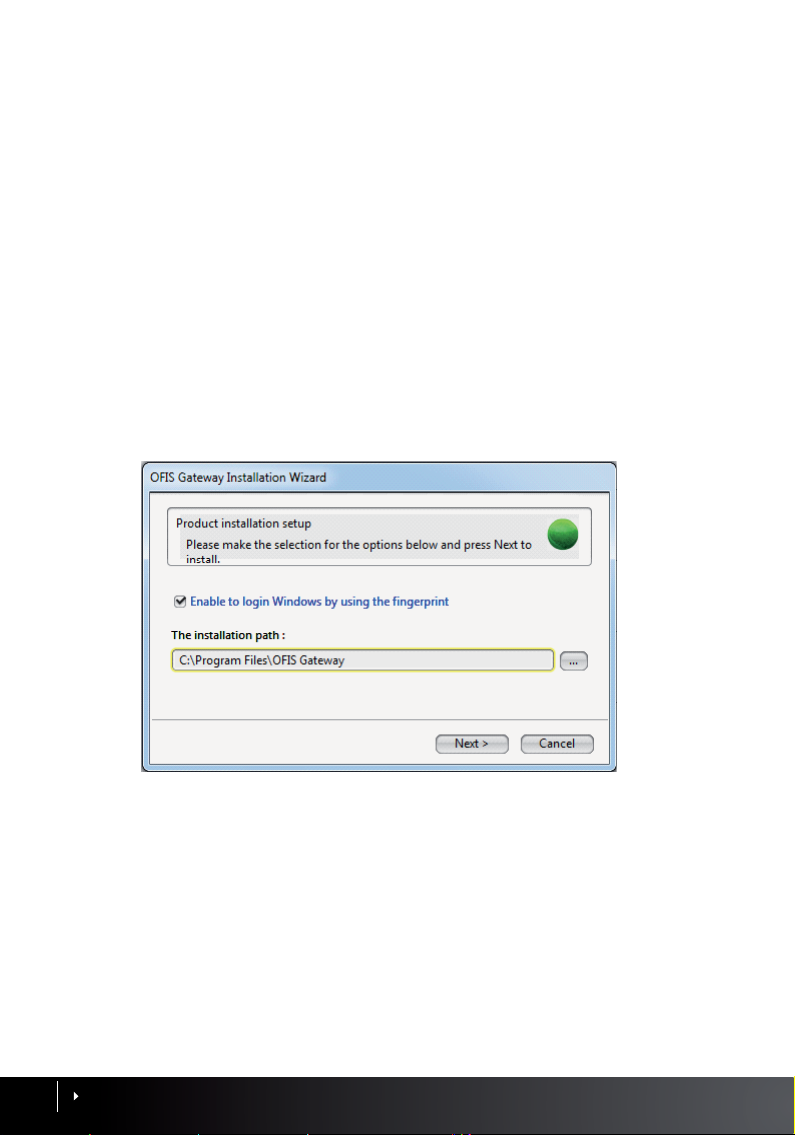
5. After successfully completing the registration, the Save To button will be activated.
Click the button to save your registration information for future reference.
6. OFIS Gateway will select a default proxy setting for the computer’s Internet browser.
If you wish set it up yourself, click on Set up proxy server.
You have now successfully installed the OFIS Gateway program! Proceed to the next
section for steps on setting up your PC with fingerprint security.
Installing & Setting Up Your OFIS Gateway
After the registration step, an Installation Wizard for the OFIS Gateway will pop up. Follow the steps below to install and setup the OFIS Gateway successfully.
1. Clicking the Enable Windows login using fingerprint checkbox will turn on the function, which requires you to scan your fingerprint to login to Windows during each
startup. Unclicking this will maintain the usual password login for Windows. This setting can be altered later on if you wish (See Page 24).
2. Define the installation path by clicking on “….”, or leave it blank to use the default
path. Click Next to proceed.
If you chose to login to Windows using fingerprint, please follow the process of fin-
3.
gerprint enrollment in the next section to complete the installation.
CONTENTS
6
Page 7
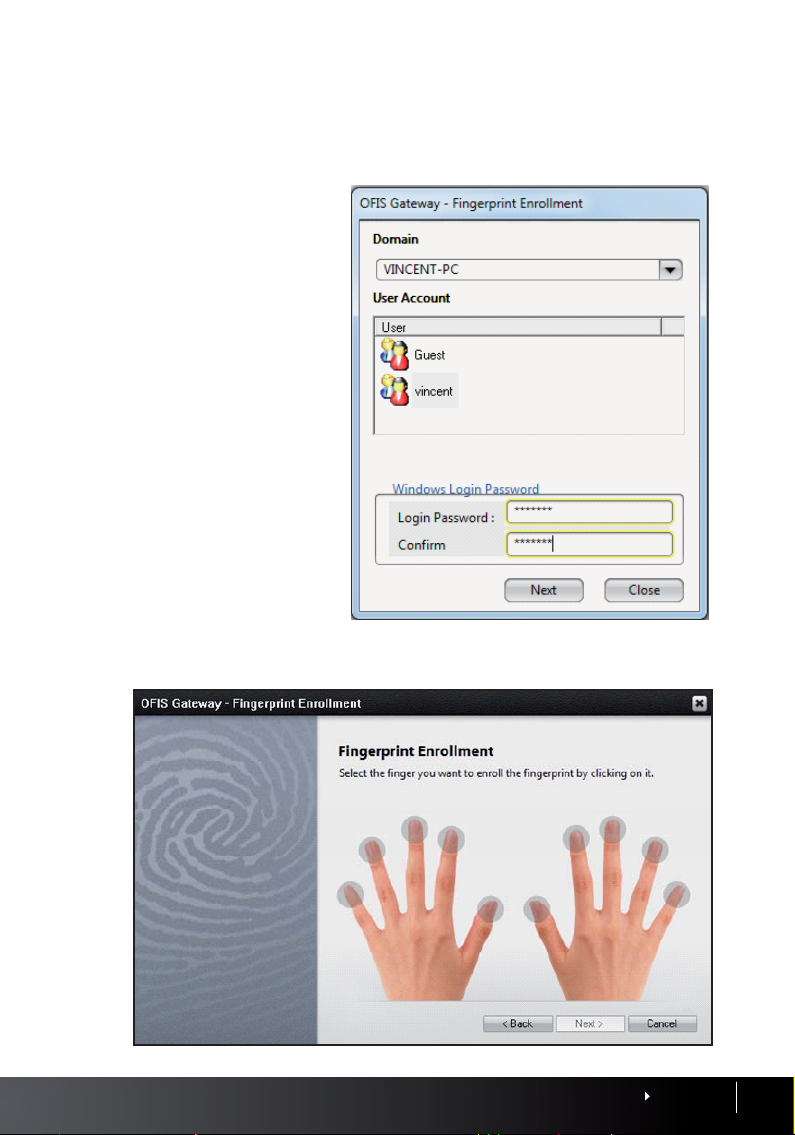
Enrolling a Fingerprint for Windows Login
Fingerprint login for Windows are setup according to each account available on the PC.
Follow the steps below to enroll a fingerprint for each of the Windows users.
1. Select from the dropdown
menu the user account
which you wish to setup
fingerprint login.
2. Click Enable Windows login
using fingerprint, and in-
sert the login password for
the selected account. Click
Next to continue.
3. Choose the fingers that you wish to enroll for the selected account. Up to 10 fingerprints can be enrolled in one account. Select the finger and click Next.
CONTENTS
7
Page 8
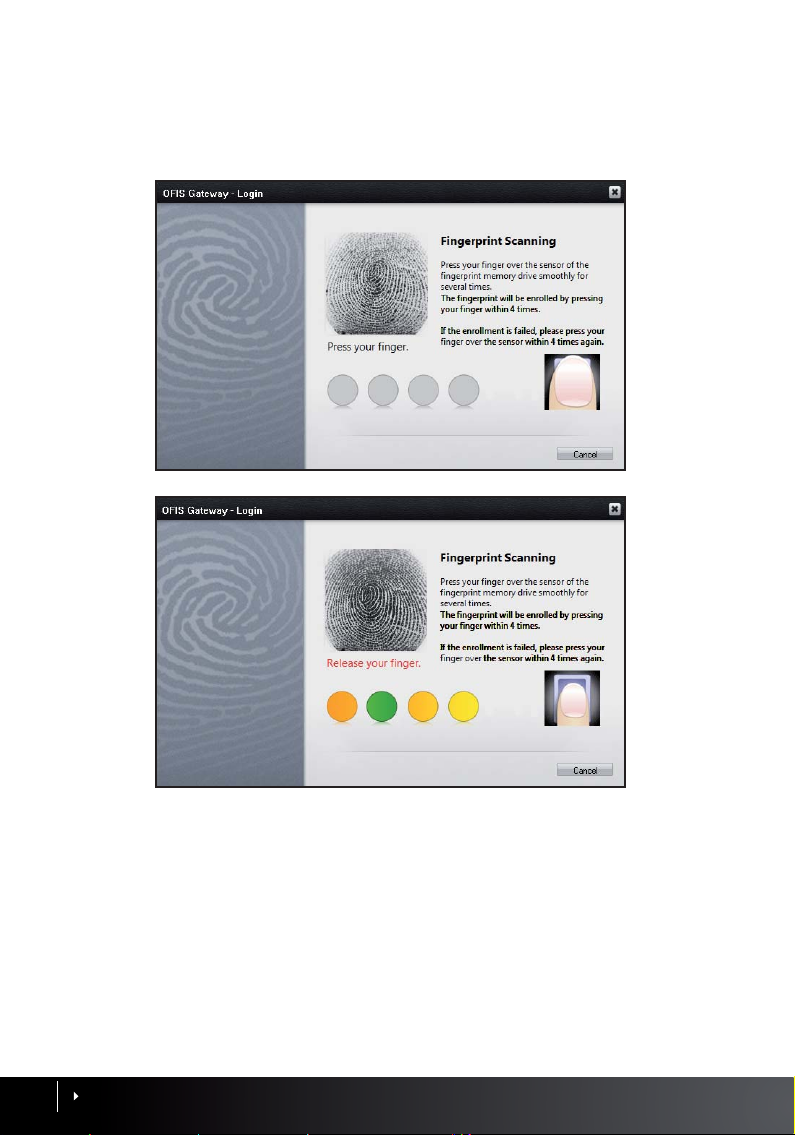
4. Plug in your OFIS scanner device and scan your finger 4 times according to the instructions on-screen.
5. After successfully scanning your fingerprint, the window will return to the previous
page for you to enroll another fingerprint. Repeat step 3-4 to enroll another fingerprint. Click Finish to end the process.
6.
The window will return to the initial stage, should you want to setup enrollment for
another login account. Repeat steps 1-5 to enroll a fingerprint for another account.
Click Close to end the whole process. It is recommended that you restart your PC to
complete the configuration.
CONTENTS
8
Page 9
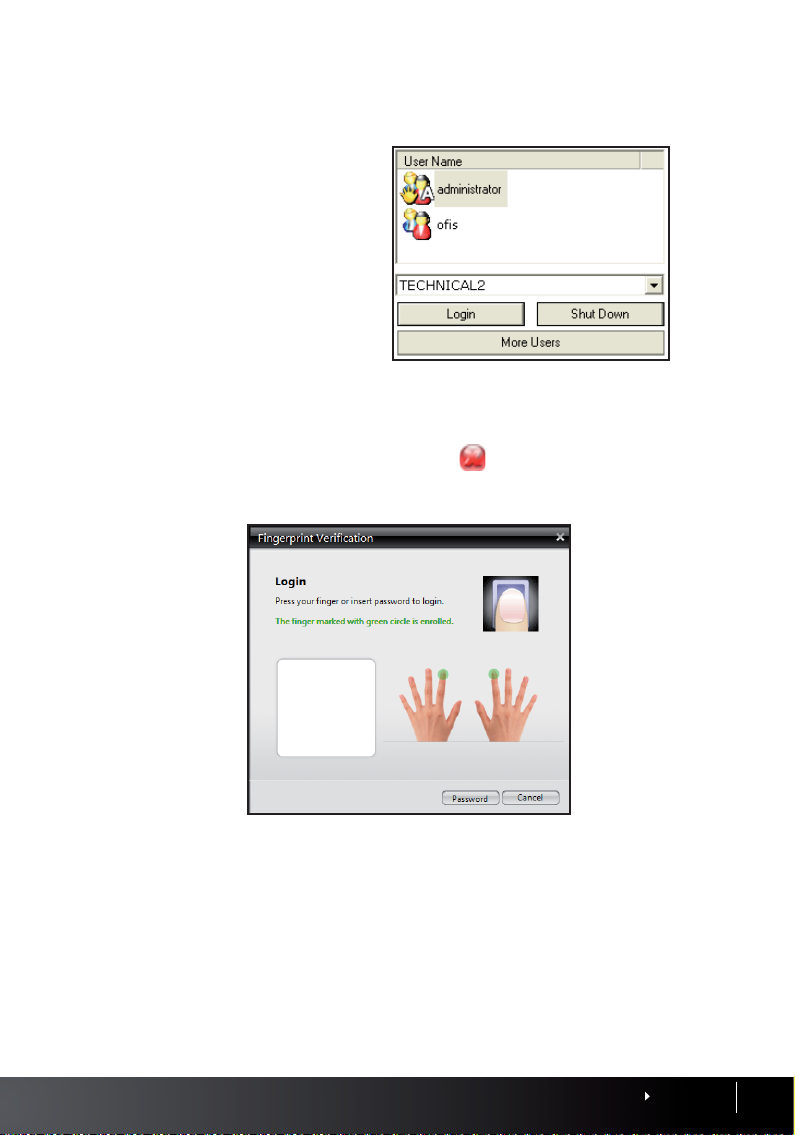
Logging in to Windows with Fingerprint
WINDOWS 2000/XP
1. Once the PC has reached the
login page, choose the user account you wish to login to. Click
More Users, to view all account
users. Please choose the account you wish to login and click
Login. You can also select other
domains to login from the drop
down menu.
2.
Plug in your OFIS scanner. Once the OFIS scanner is detected, the fingerprint login
window will pop up. Scan your fingerprint that was enrolled earlier. If the fingerprint
authentication fails, the indicator will appear as
successful.
. Retry until the authentication is
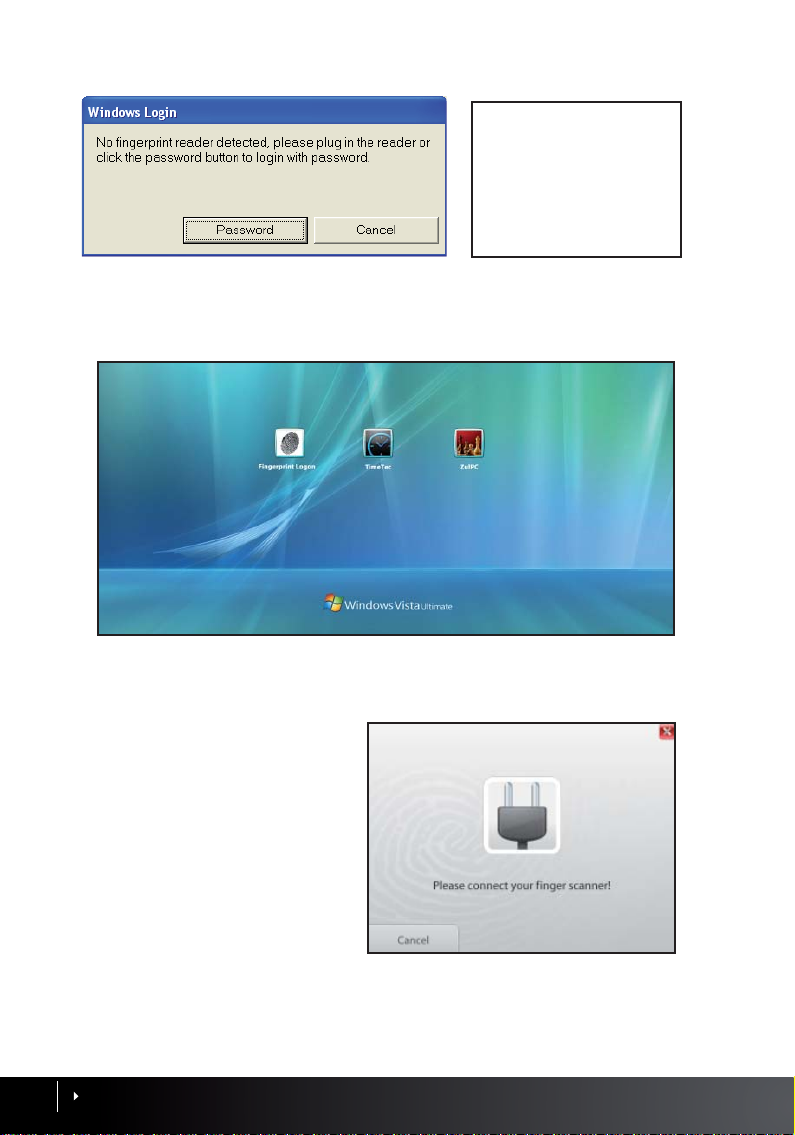
If your OFIS scanner device is not detected, a warning window will popup. Please plug
in or remove and re-plug in your OFIS scanner. If your scanner still fails to be detected
after several tries, you can always log in alternatively by clicking on Password. Contact
[email protected] or your local reseller for OFIS scanner repairs.
CONTENTS
9
Page 10
Note: Make sure that center-
point of your ngerprint is
placed properly on the scanner. Refer to Page __ for more
details.
WINDOWS VISTA / 7
1. Once Windows Vista / 7 has reached the login page, click Finger Login to enter the
window.
2. Plug in your OFIS scanner and scan your fingerprint that was enrolled earlier. If the
fingerprint authentication fails, a notification window will pop up. Retry until the authentication is successful.
If your OFIS scanner device is not
detected, a warning window will
popup. Please plug in or remove and
re-plug in your OFIS scanner. If your
scanner still fails to be detected after
several tries, you can always log in
alternatively by clicking a normal account and entering your password.
Contact [email protected] or
your local reseller for OFIS scanner
repairs.
3. Once the authentication succeeds, all the accounts matched to this fingerprint will be
listed. Please choose the account your wish to login to.
CONTENTS
10
Page 11
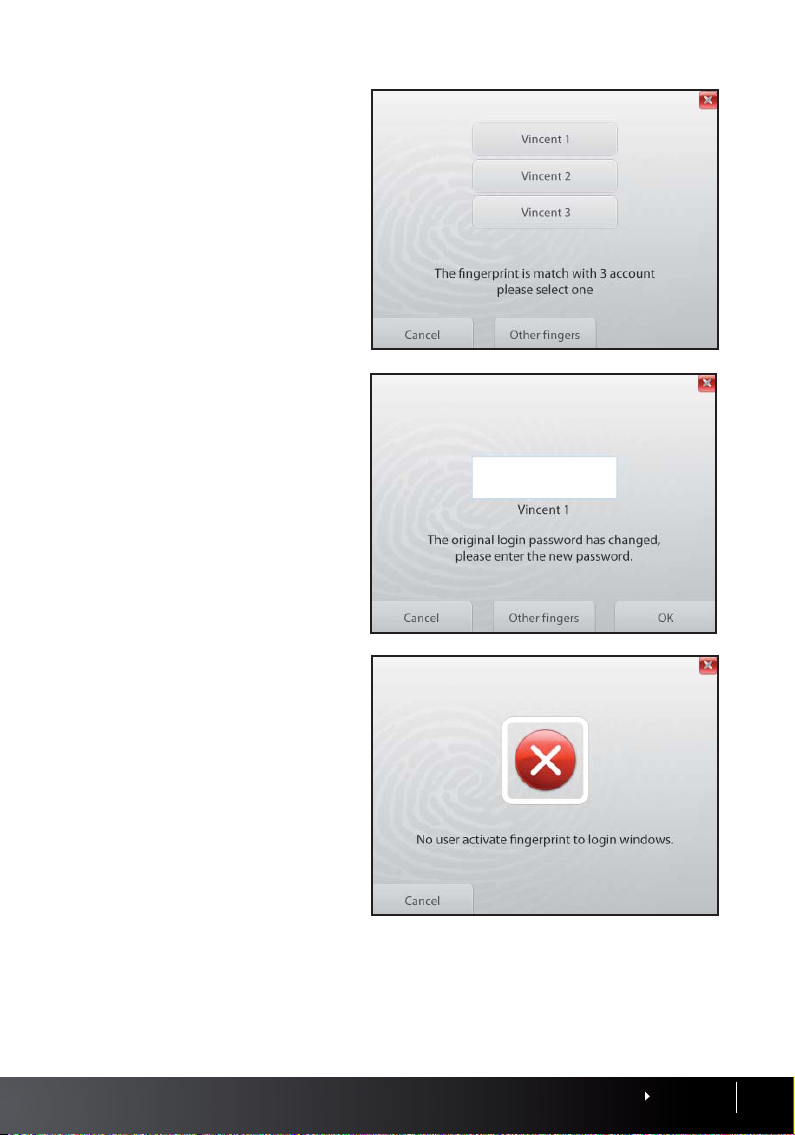
4. If you want to abandon the user
account currently in use, you
can scan other enrolled fingerprints to login to other domains
and user accounts. Click Cancel
to return to Windows Vista / 7
Login.
5. If you recently changed your
User password from the Windows Control Panel, a window
will pop up to remind you that
you have changed your password. Insert your new password
to proceed. This only applies for
the first login after the change
of password.
6. If you have turned off the Login
with Fingerprint function but
click Finger Login anyway, a
popup will notify you that the
fingerprint login is deactivated.
Click Cancel and proceed to
login with your normal user account with a password. You can
enable and disable the fingerprint login function as you wish
form the Windows Login Set-
ting function (See Page 24).
CONTENTS
11
Page 12
3
Configuring Settings in OFIS Gateway
•
Operation Panel overview
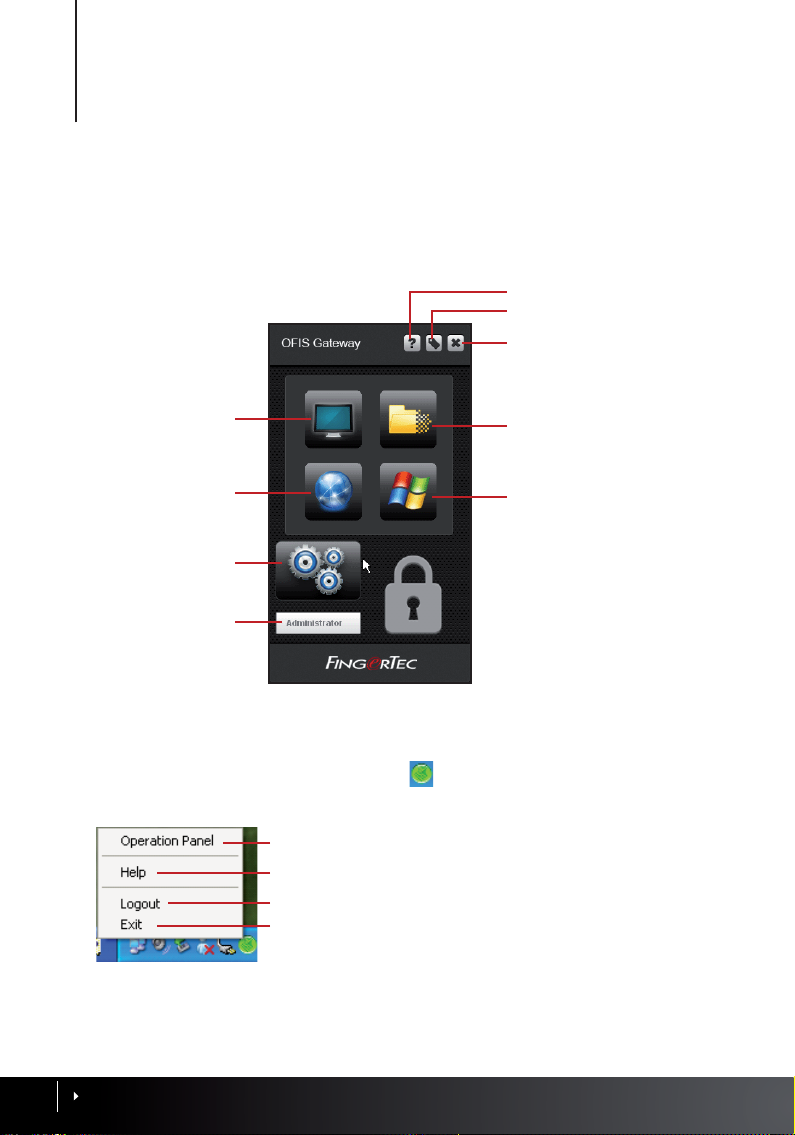
The OFIS Gateway settings can be configured via the OFIS Gateway Operational Panel.
From the panel, you can easily perform functions such as.
Help
Top Most
Close Operation Panel
Host Lock
Web Account
System Settings
Current User Account
File Encryption Box
Windows Login Setting
Starting the OFIS Operation Panel
To view the Operation Panel, right-click on the icon on the Windows task bar.
Operation Panel: Starts up the OFIS Gateway Operation Panel.
Help: Diverts user to FingerTec online help resources.
Logout: Logs out from the current user account
Exit: Exits the program.
12
CONTENTS
Page 13
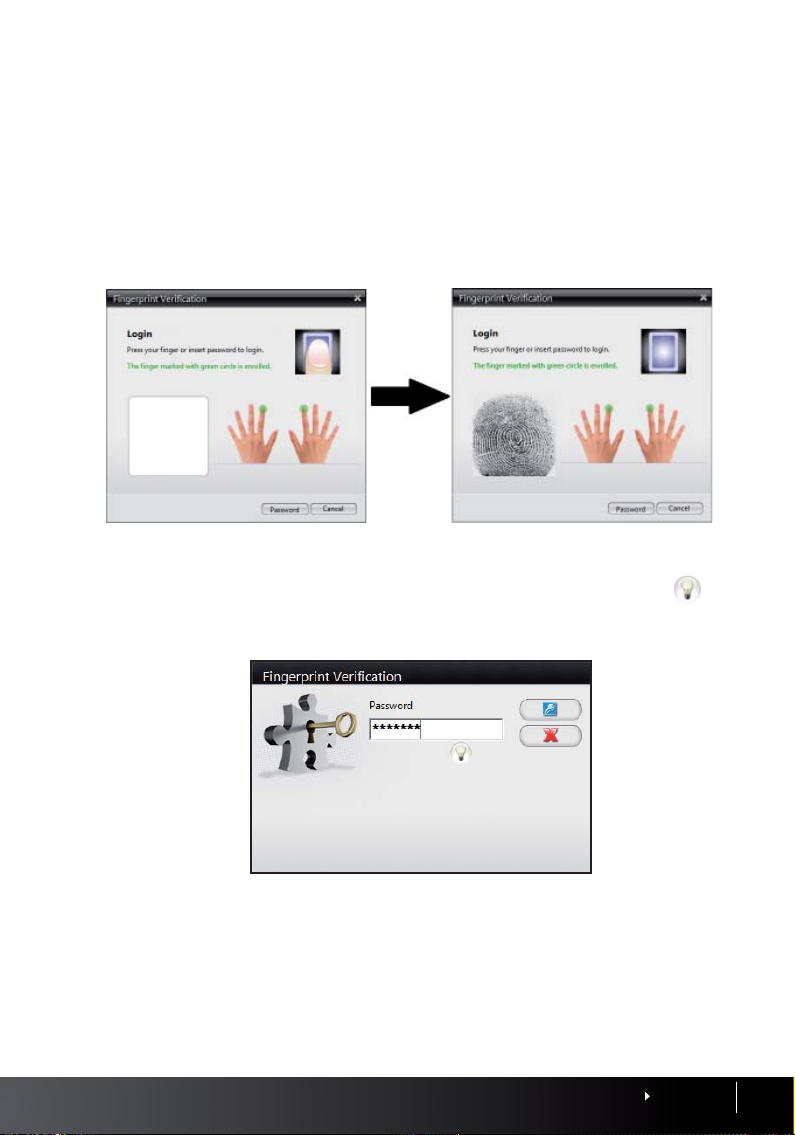
Logging in to the Operation Panel
To enhance the security of your data, you have to login first before being able to perform
any configurations on the Operation Panel. The login window will automatically pop up
when you start up the Operation Panel. You can login using your fingerprint authentication
or with your password.
1. Plug in your OFIS scanner and scan the fingerprint that was enrolled under your account.
Once the fingerprint is authenticated, the Operation Panel will pop up.
2. You can also login by entering your password. Click Password, enter your password and
click OK. If you forgot your password and have set’s password hint previously, click
display the password hint. Once the password is approved, the Operation Panel will pop
up.
to
CONTENTS
13
Page 14
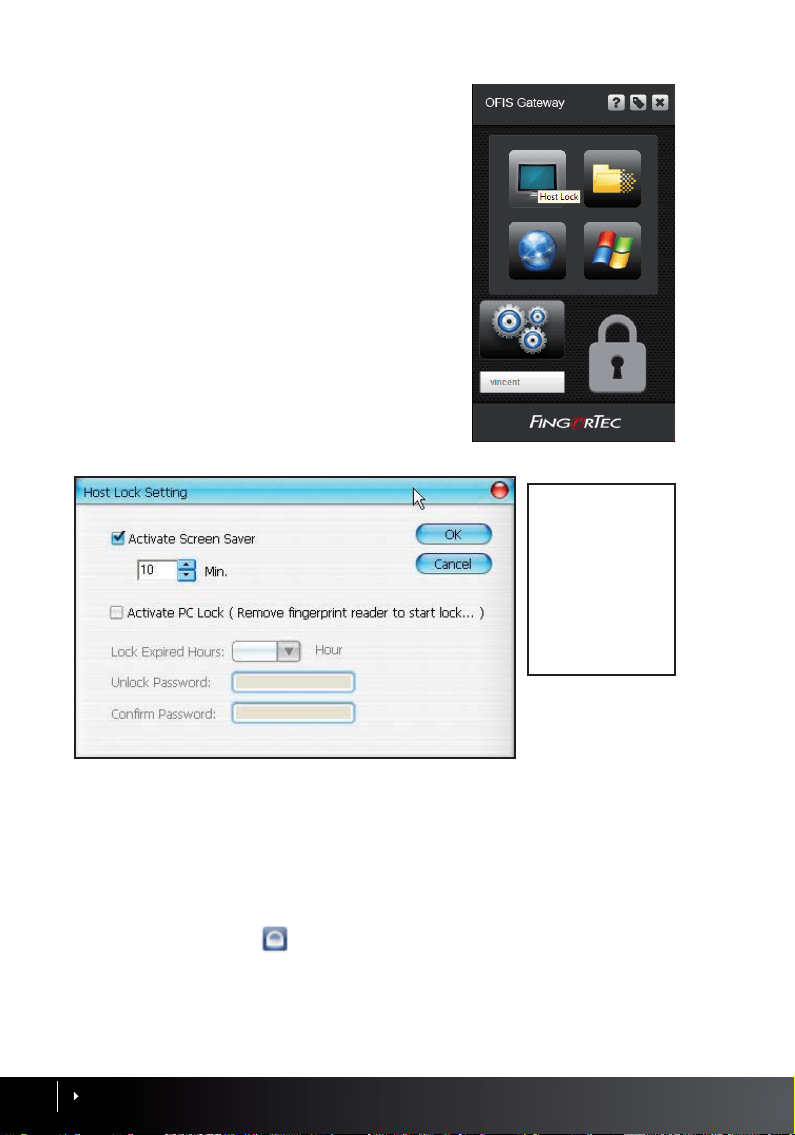
Con guring Host Lock Setting
Host lock setting allows you to configure the use
of fingerprint as a login after the PC has gone
into sleep mode, or screen saver mode, or after
the OFIS scanner has been unplugged, much
like using a password to login after resuming a
PC from the screensaver. Follow the instructions
below for configuration.
1. Click the Host Lock Setting icon.
2. Select Activate Screen Saver to enable screen
saver.
3.
Use the arrows to set the amount of
idle minutes before the PC launches
into the screen saver.
Note: This function
is not available unless
you enable options
under “Windows Login
Maintenance” of OFIS
Gateway and Screen
Saver of Windows.
4. Check the Activate PC Lock option. Enabling this option locks the PC with a password if
the OFIS scanner has been unplugged.
5.
Specify the idle hours in the Lock Expired Hours column after which you would like the
PC to unlock, should you be unable to find the OFIS scanner and if you forget the unlocking password. Define an Unlock Password to unlock the PC after the OFIS scanner has
been unplugged.
6. After Host Lock is enabled, you will notice that the icon on the Quick Launch area of the
desktop has changed to
CONTENTS
14
.
Page 15
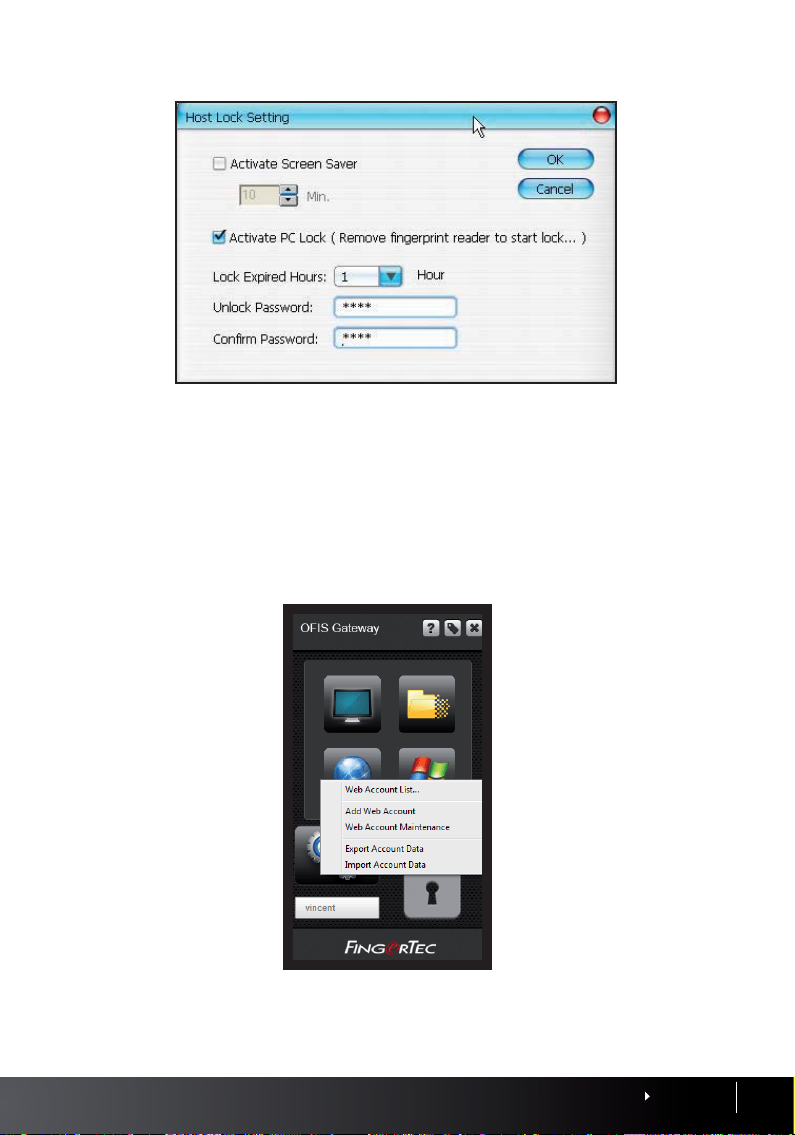
Con guring Web Account Setting
Web Account Setting allows you to configure your web accounts, such as Emails, online
shopping accounts, and other accounts that require a username and password, to use a
fingerprint as a password instead. You can view your web accounts, add web accounts,
maintain your web accounts, and export/import your web account data from here.
Click on the Web Account icon, then select a command.
CONTENTS
15
Page 16
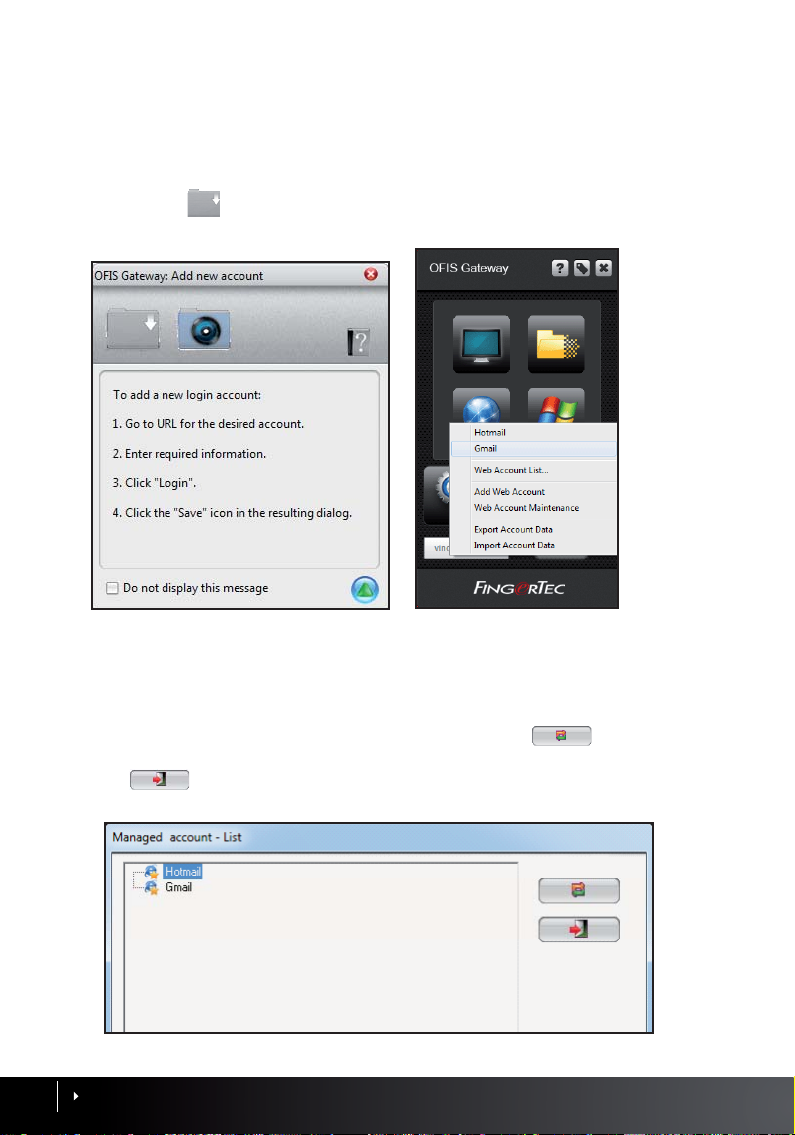
ADDING A WEB ACCOUNT
From here you may add web accounts that will automatically login after you have authenticated your identity via fingerprint.
1. After selecting Add Web Account, the Web browser will launched automatically.
2.
Follow the instruction on the dialogue box.
3. After clicking
command. The web account will login automatically after you click on this command.
, your web account will be saved and displayed in the submenu as a
VIEWING WEB ACCOUNT LIST
A Web Account List allows you to view all your saved Web Accounts easily in one small
window.
1. Select a web account that you have saved previously, and click
web browser and login to your account.
16
2. Click
CONTENTS
to close the dialogue box.
to launch the
Page 17
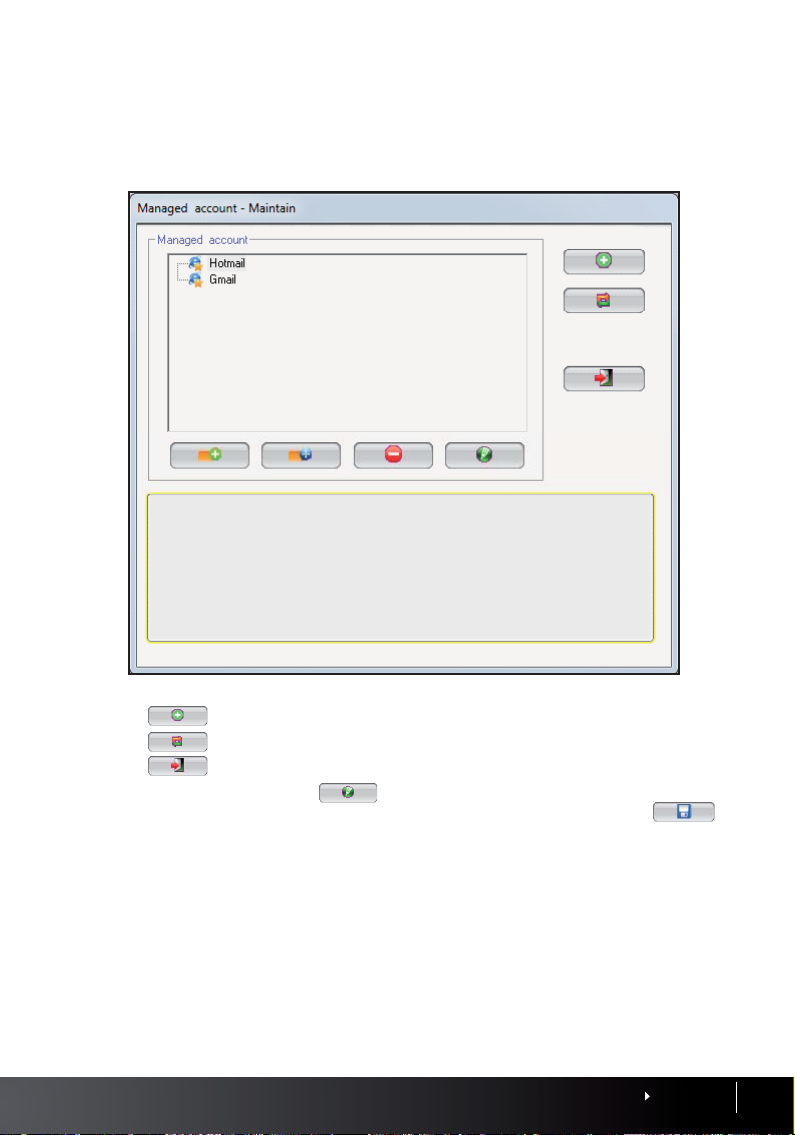
WEB ACCOUNT MAINTENANCE
The Web Account Maintenance option allows you to arrange and organize your web accounts according to folders and lists, just like how you would organize your Internet bookmarks. You may also configure the settings of each web account from here.
1. Click
2. Click
3. Click
4. Select a web account and click
age the properties of each web account. Edit the relevant fields above and click
to save.
to create an account.
to test an account login.
to close the window.
to open Web Account Properties Editor and man-
CONTENTS
17
Page 18
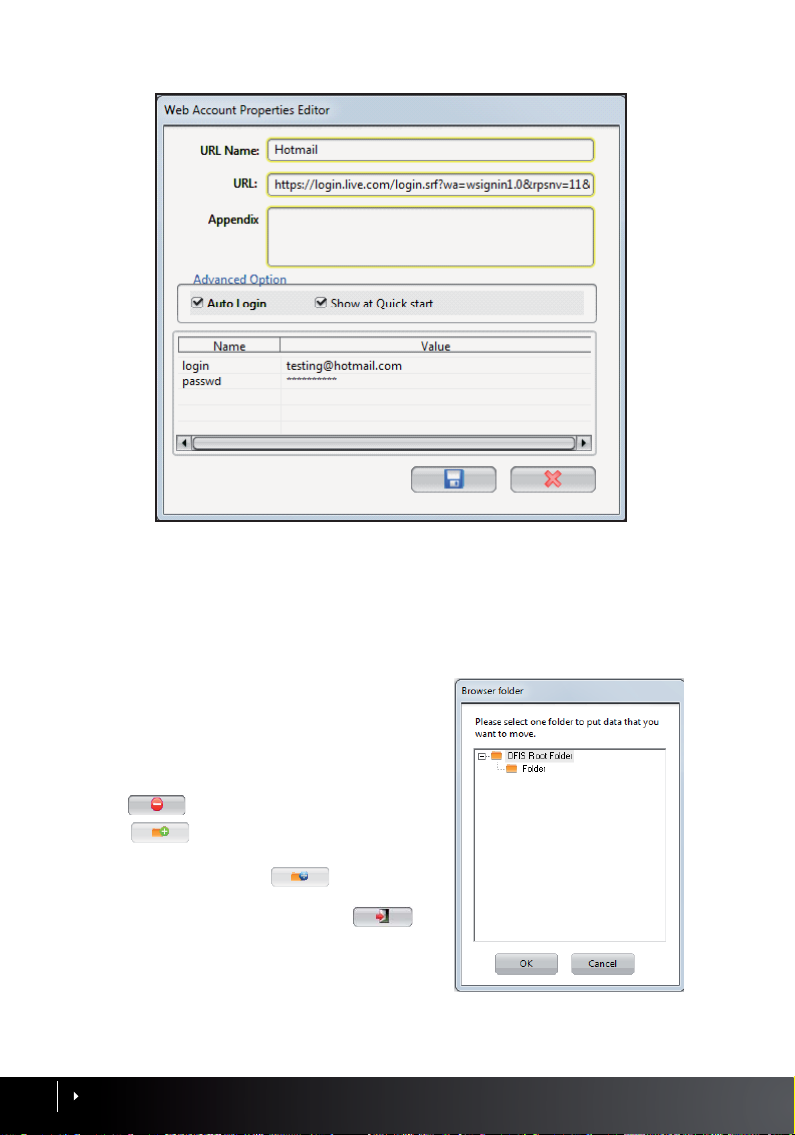
URL Name: Edit the label for this web account here.
URL: Edit the URL Address of the web account from here. (We do not recommend to edit this in case of a
login error)
Appendix: Add any notes to the web account here for reference.
Auto Login: Select this check box to login to the selected account automatically.
Show at Quick start: Select this check box to login to this web account automatically when the OFIS Gate-
way is launched.
Name: Edit the name of the information field here (eg:
Username/Password)
Value: Edit the matching value for the field here.
5. Click to delete an accounts.
6. Click
to create folders for organiza-
tion.
7. To move an account, click
to open the
Browser Folder dialogue box. Then select the
destination folder, click OK and click
to close the dialogue box.
CONTENTS
18
Page 19
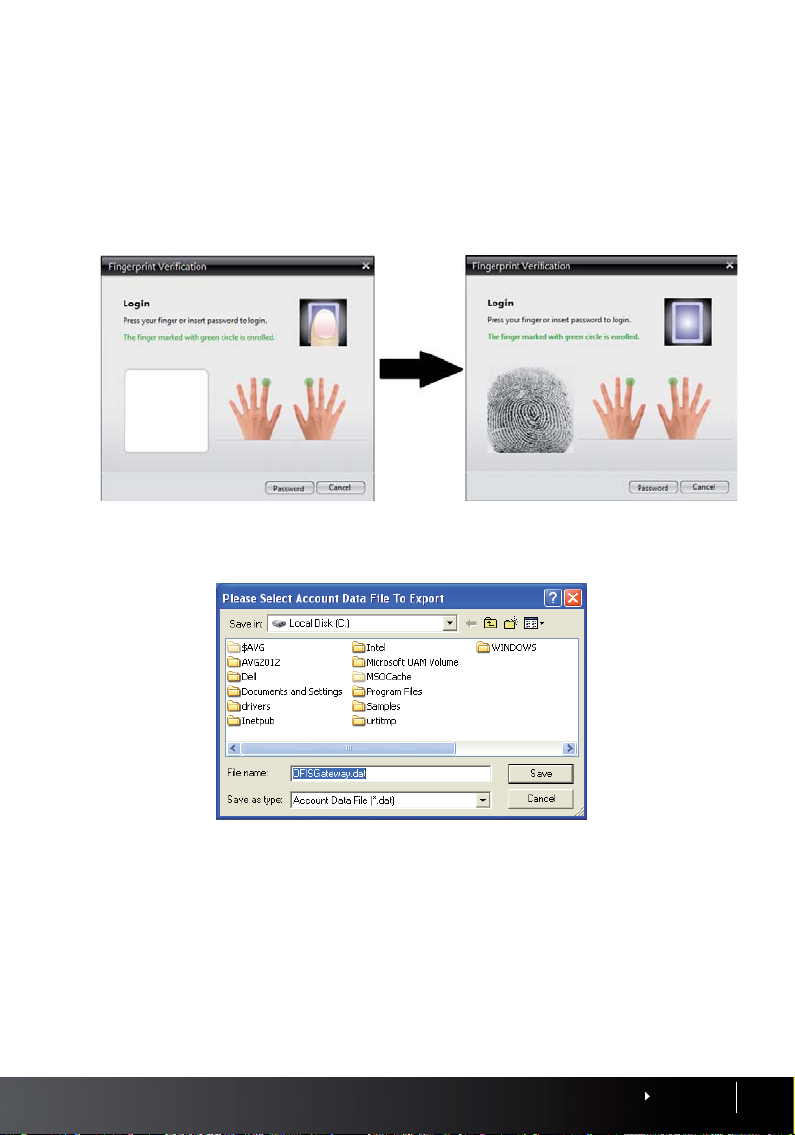
Exporting Account Data
You can export all the information from your web account data and save to a memory drive
for a backup or for use with other OFIS Gateway programs.
1. Select Export Account Data command.
2.
Scan your finger on the OFIS scanner to verify your identity.
3. Define the location path for saving the web account data.
IMPORTING ACCOUNT DATA
You can import your web account data details from a previously exported file, and use it
with other OFIS Gateway programs.
1. Select Import Account Data command.
2.
Scan your finger on the OFIS scanner to verify your identity.
CONTENTS
19
Page 20
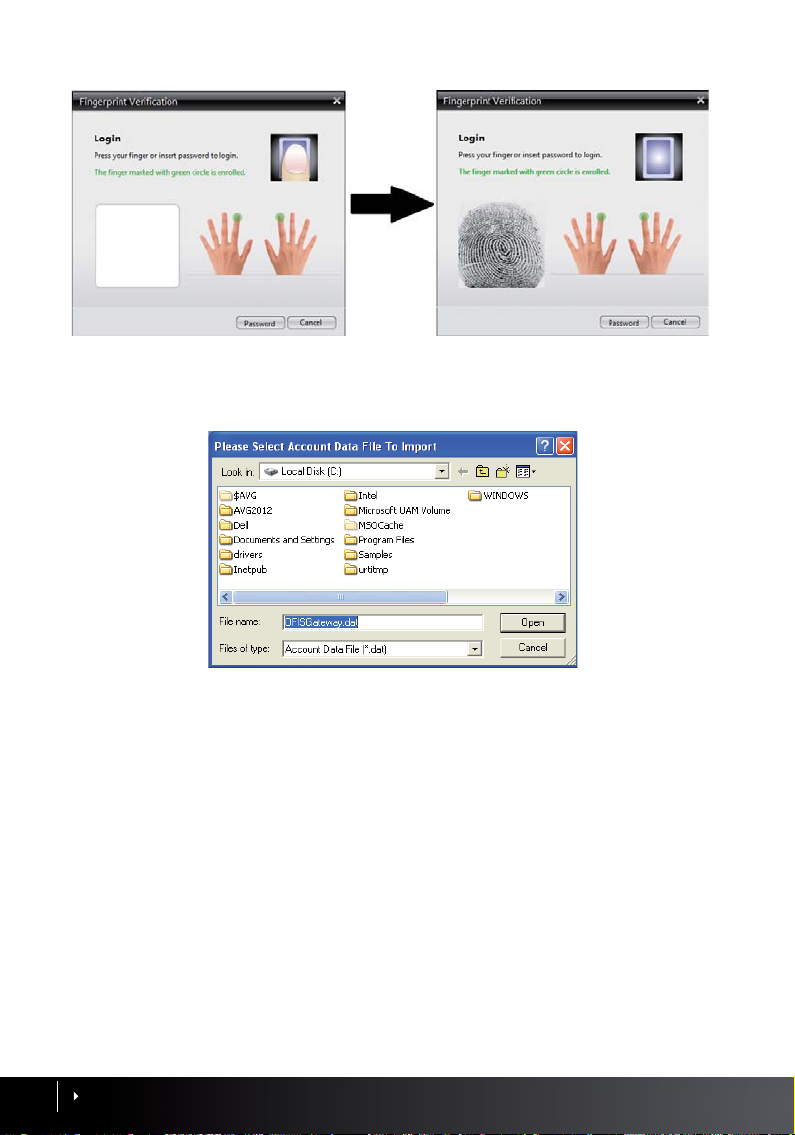
3. Select the data file which you would like to import.
Con guring File Encryption
The OFIS Gateway program not only protects your login accounts with fingerprint, but also
lets you encrypt your selected files with fingerprint verification. This is useful for especially
confidential documents in a PC, for example an employee history database file or any classified documents.
Click File Encryption Box icon on the control panel to open OFIS Gateway encryption Box
in the Windows Browser.
20
CONTENTS
Page 21
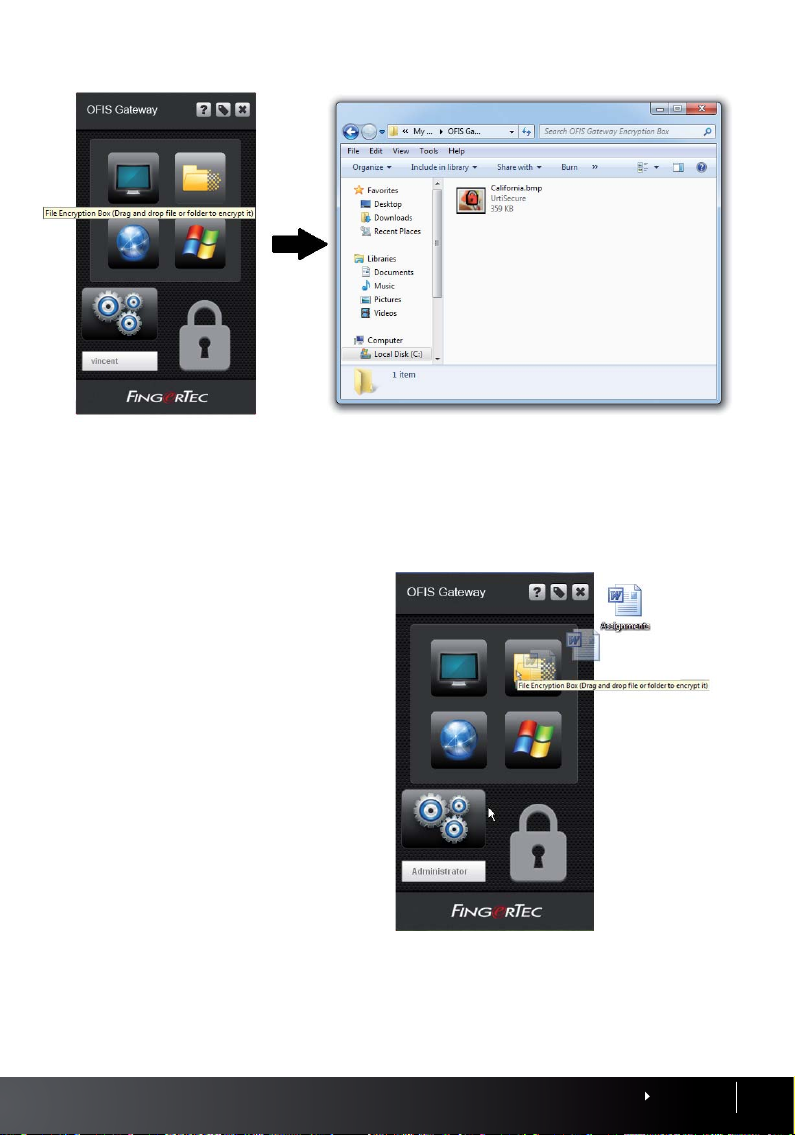
ENCRYPTING A FILE
Drag a file/folder into the File Encryption Box icon, the file/folder will be encrypted and
moved to the OFIS Gateway encryption Box.
Files and folders can also be encrypted either one-by-one or many at a go by the following
method:
1. Select files/folders.
2. Right click and select File Encryption.
3.
Scan your finger on the OFIS scanner.
CONTENTS
21
Page 22
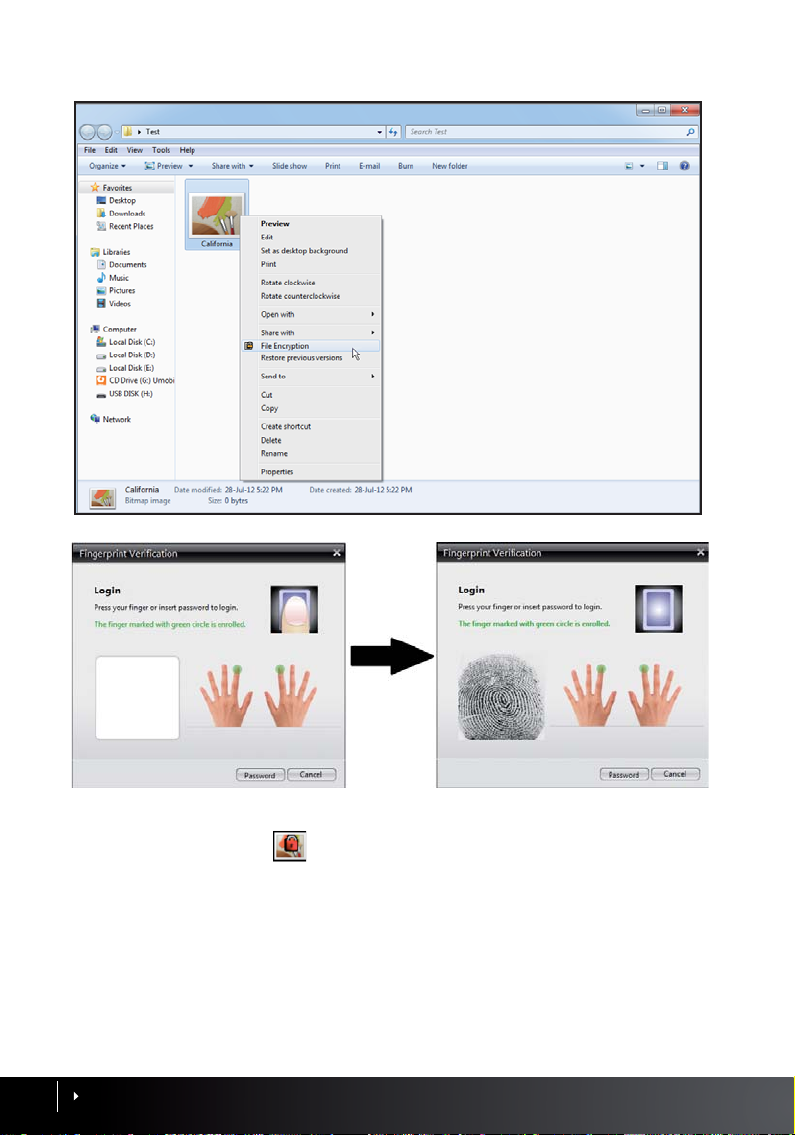
Once encrypted, the symbol will be shown on the encrypted file.
CONTENTS
22
Page 23
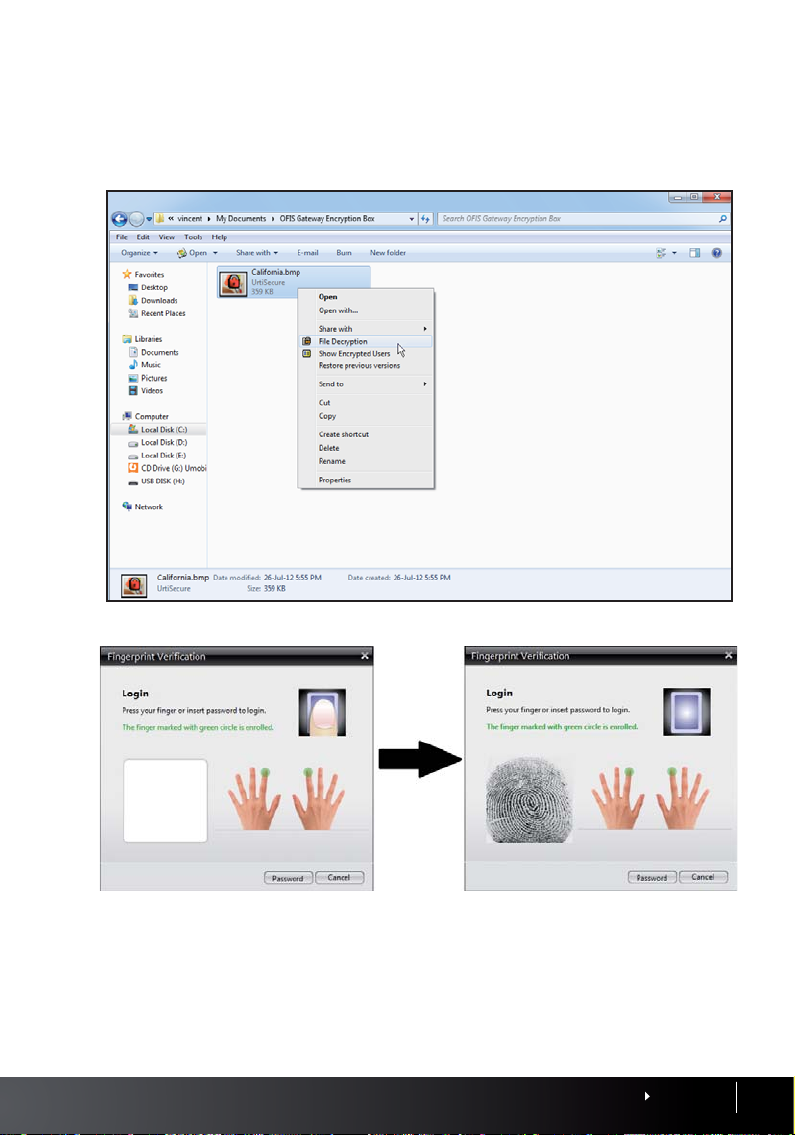
FILE DECRYPTION
Select an encrypted file/folder, right click and select File Decryption, and then scan your
finger on the OFIS scanner for verification. The file(s)/folder(s) will then be decrypted.
CONTENTS
23
Page 24
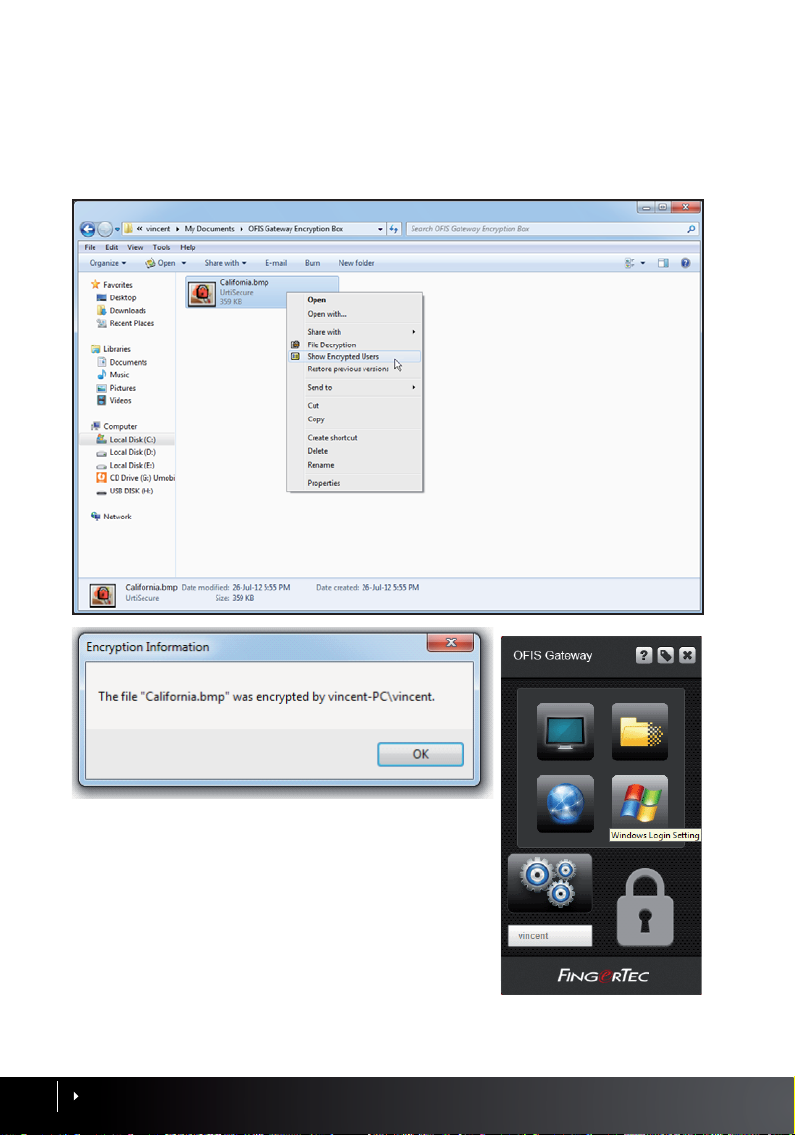
ENCRYPTION USER INFORMATION
This function allows you to find out which user has encrypted the file. The encrypted file can
ONLY be decrypted by the user who encrypted the file.
Right-click on the encrypted file/folder and select Show Encryption User.
Windows Login Setting
This function allows you to edit and manage the settings
of the Windows fingerprint login.
Click on Windows Login Setting.
CONTENTS
24
Page 25
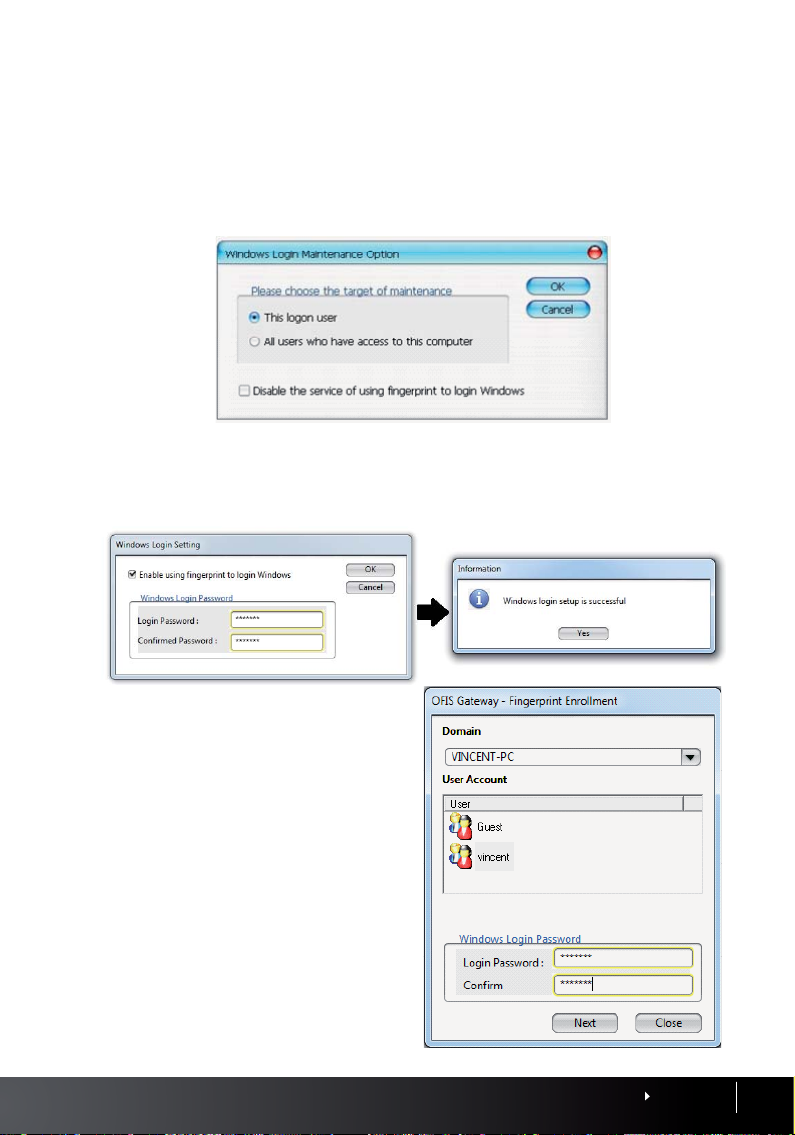
LOGIN AUTHORIZATION: ADMINISTRATOR
If you have logged in as an administrator, you will also be able to configure settings for
other users from the Windows Login Setting.
1. When clicking on Windows Login Setting, you will see the options This logon user
and All Users who access to this computer available at the start.
Choose to select or unselect the Enable Windows login using fingerprint option, in-
2.
sert your Windows Login Password.
3.
If you selected to configure only This logon user, click Yes to finish.
4.
If you selected to configure All Users
who access to this computer, you will
then need to select a user account, enter the password, then click Next.
CONTENTS
25
Page 26
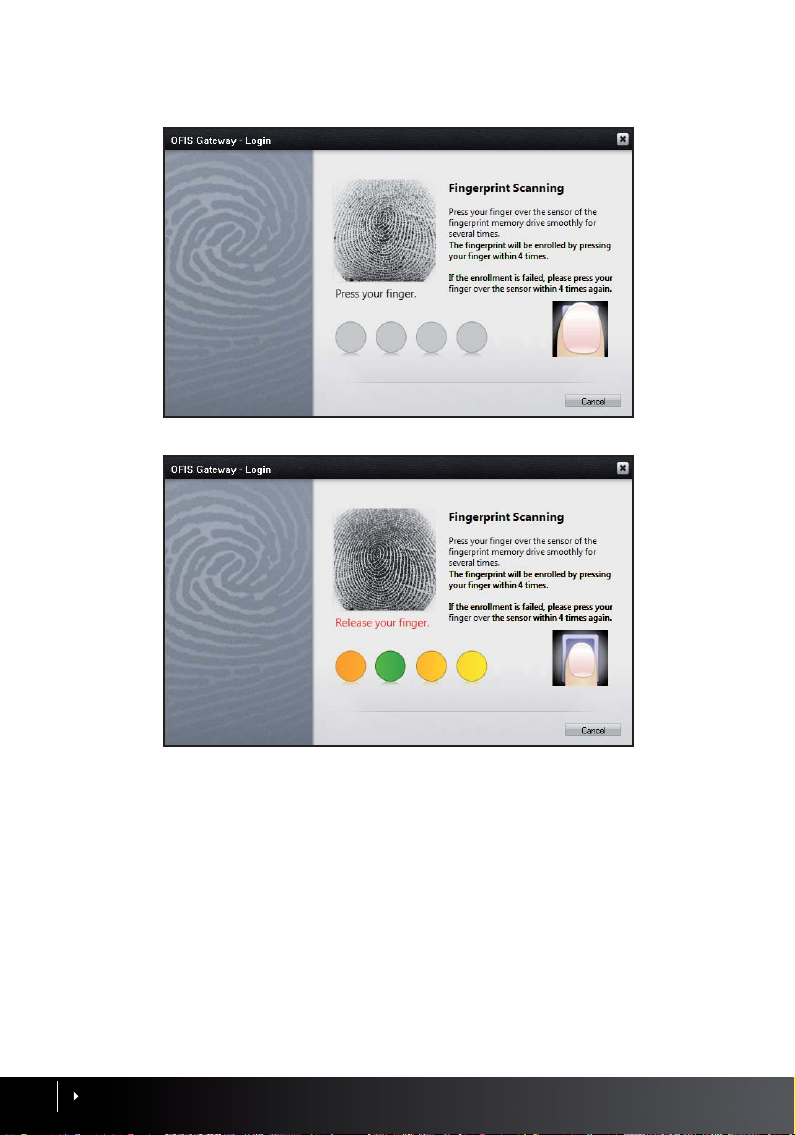
The Windows Logging Setting is now completed.
LOGIN AUTHORIZATION: LIMIT USER
If you have logged in as a limited user, you will only be able to configure settings for your
current login account..
1. Check Enable Windows login using fingerprint and click OK.
CONTENTS
26
Page 27
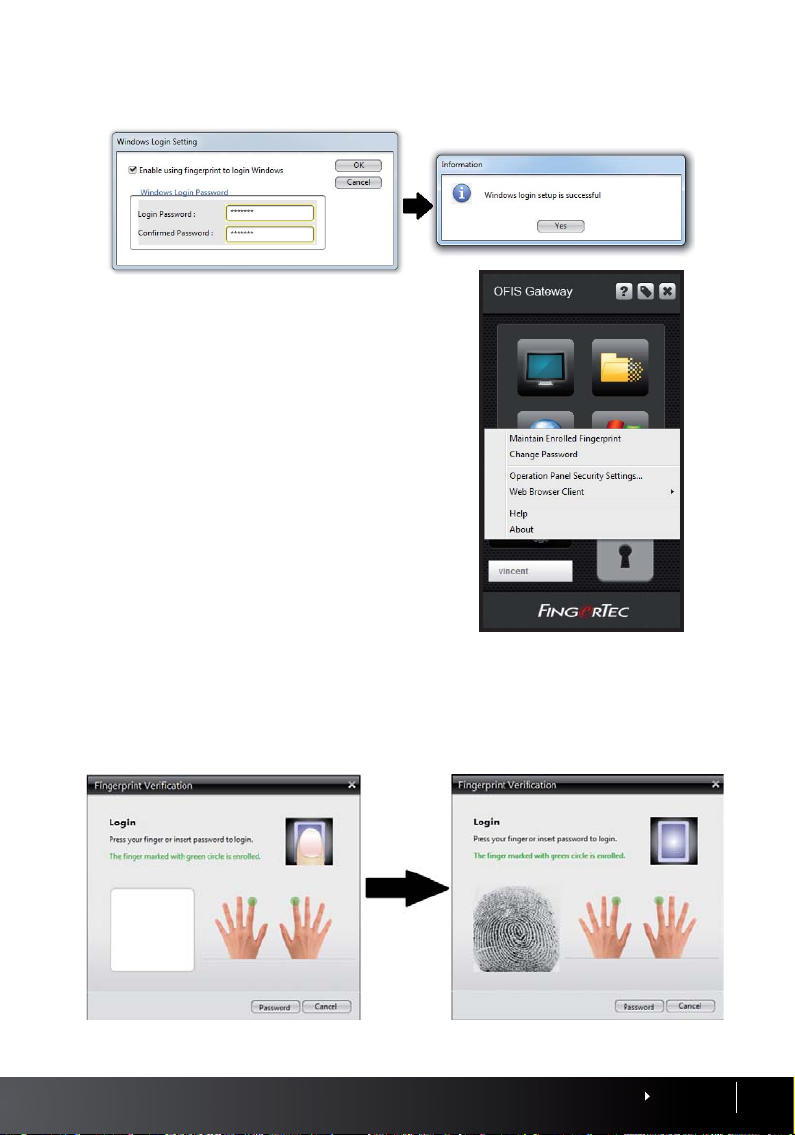
The Windows Logging Setting is now completed.
Managing System Settings
This feature allows you to manage the various settings available in the OFIS Gateway program, such
as enrolling an additional fingerprint, activating
web account and file encryptions, as well as change
your login password.
Click on the System Setting icon, and select a command:
MAINTAIN ENROLLED FINGERPRINT
This feature allows you to enroll an additional fingerprint under your account. You will
then be able to login, encrypt files, and login to web accounts using this newly enrolled
fingerprint.
1. Scan your fingerprint or insert your password for verification before proceeding.
CONTENTS
27
Page 28
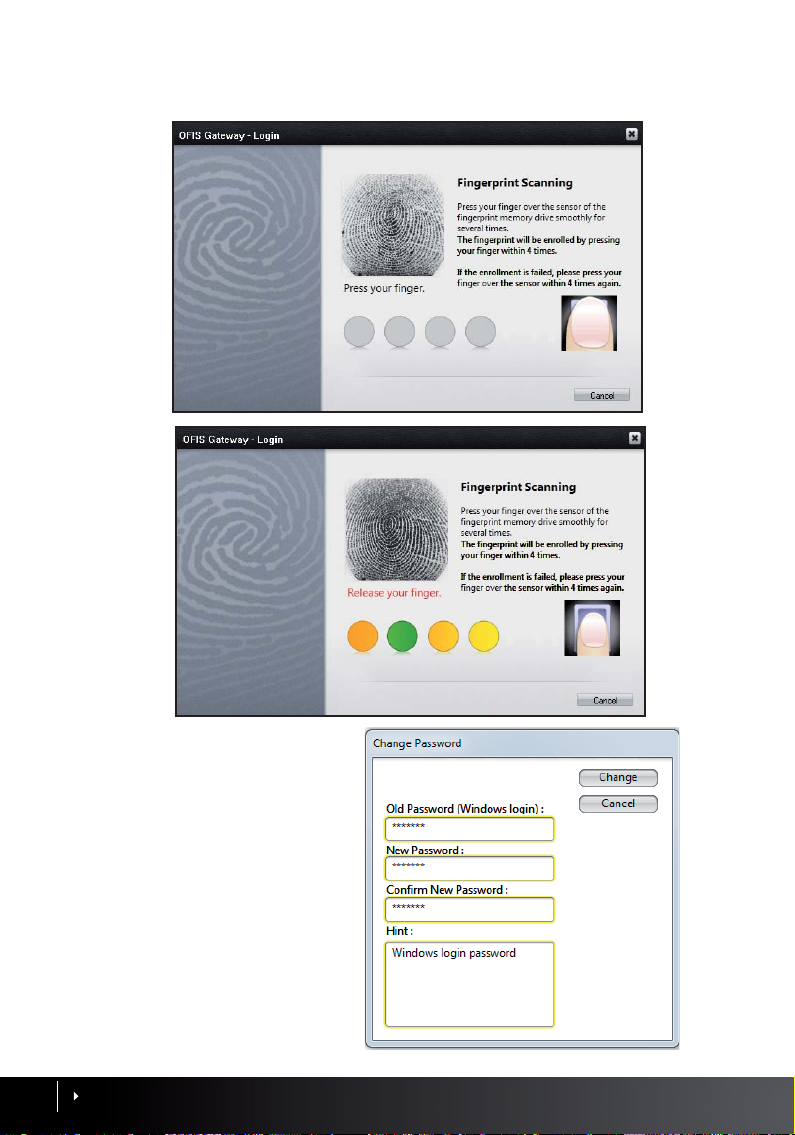
2. Select a finger to enroll, and follow the instructions on screen to scan the fingerprint 3
times.
CHANGE PASSWORD
This feature allows you to change your
Windows login password.
1. Fill in all fields and click Change.
CONTENTS
28
Page 29
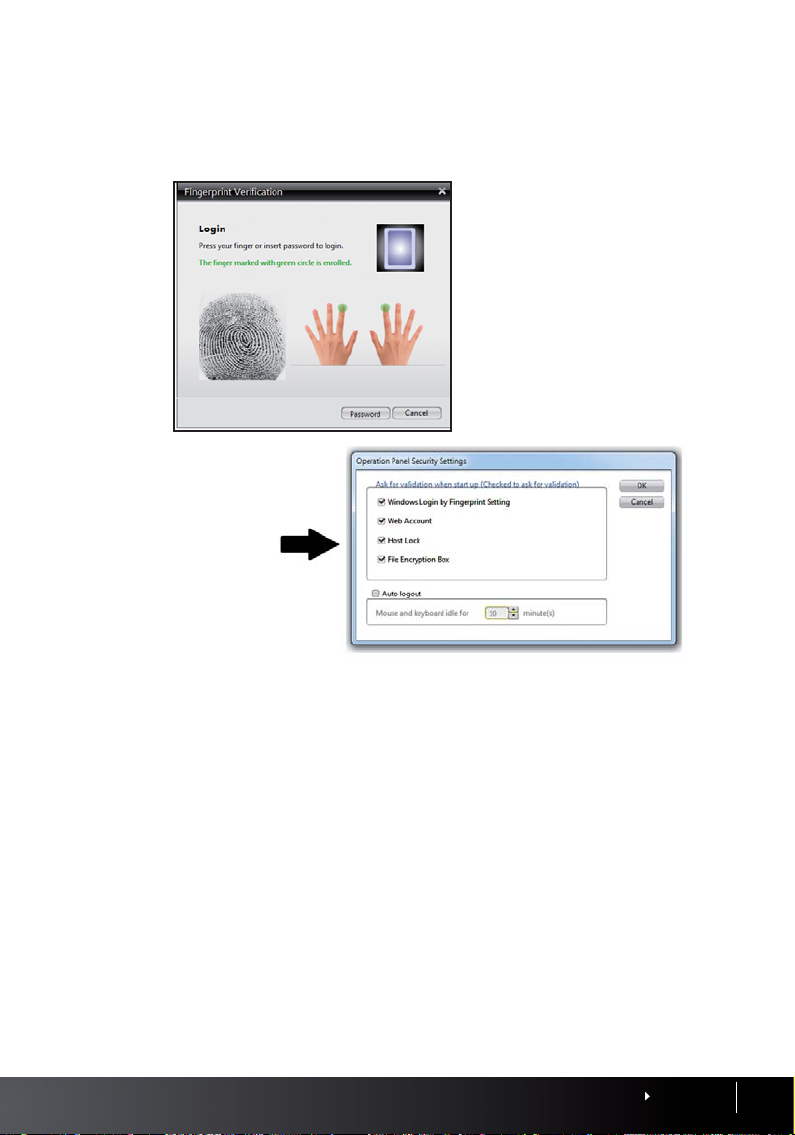
OPERATION PANEL SECURITY SETTINGS
1. Scan your fingerprint or insert your password for verification before proceeding.
2. Select the options that you wish to apply, and click OK.
There are also some additional options that should be taken note of in the window:
Ask for validation when start up – If this option is checked, fingerprint verification will
be needed every time you open the selected features. A green indicator will then appear on
the corresponding features to indicate that fingerprint verification is needed.
Auto Logout – Check this option and input a specified duration (in minutes) to automati-
cally log out of the OFIS Gateway Operation Panel after the PC is idle for the specified time
CONTENTS
29
Page 30
4
Uninstallating OFIS Gateway
•
Uninstalling the OFIS Gateway
You can easily uninstall the OFIS Gateway anytime, if you do not wish to use it any longer
by following the instructions below. However, you will first need to have exported all
your Web Account data (See page19), and decrypted all your encrypted files before uninstalling the OFIS Gateway. This is an important step as all OFIS Gateway associated data will
not function properly after the uninstallation.
The OFIS Gateway will be removed after you complete this process. Please restart your
computer after the OFIS Gateway is removed.
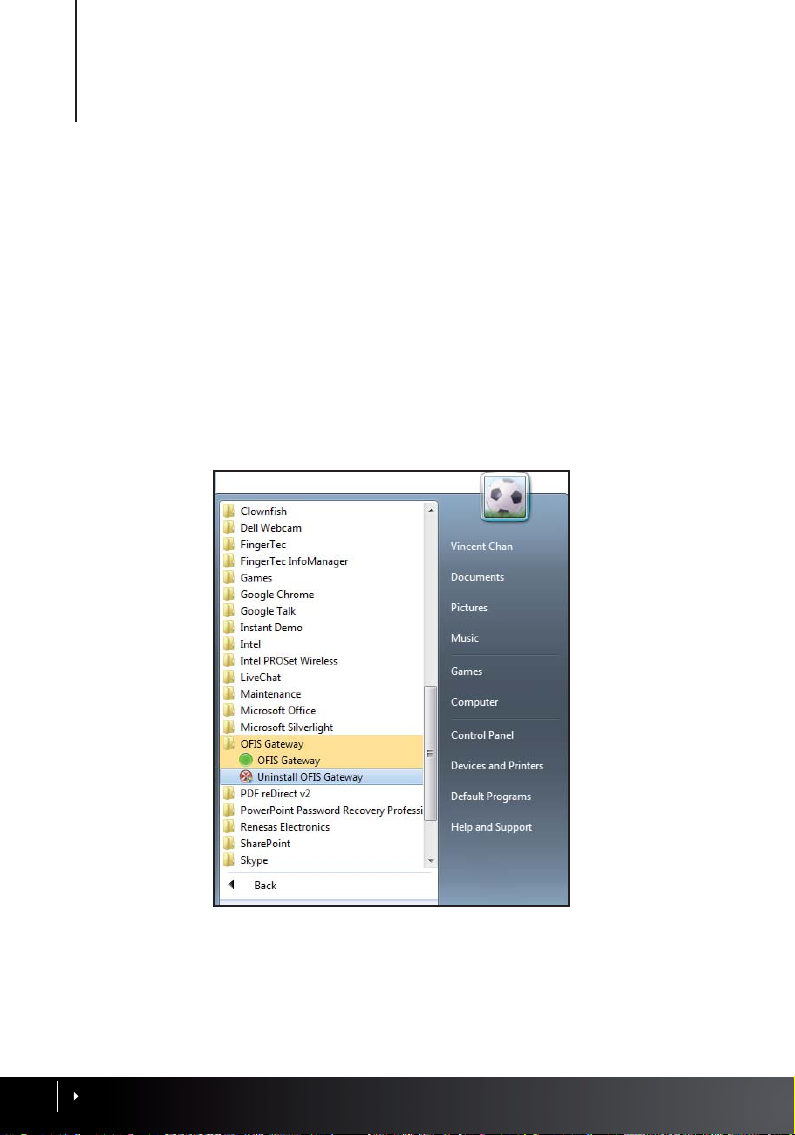
1. Click Start, go to Programs, select OFIS Gateway, and then select Uninstall OFIS Gate-
way.
30
CONTENTS
Page 31
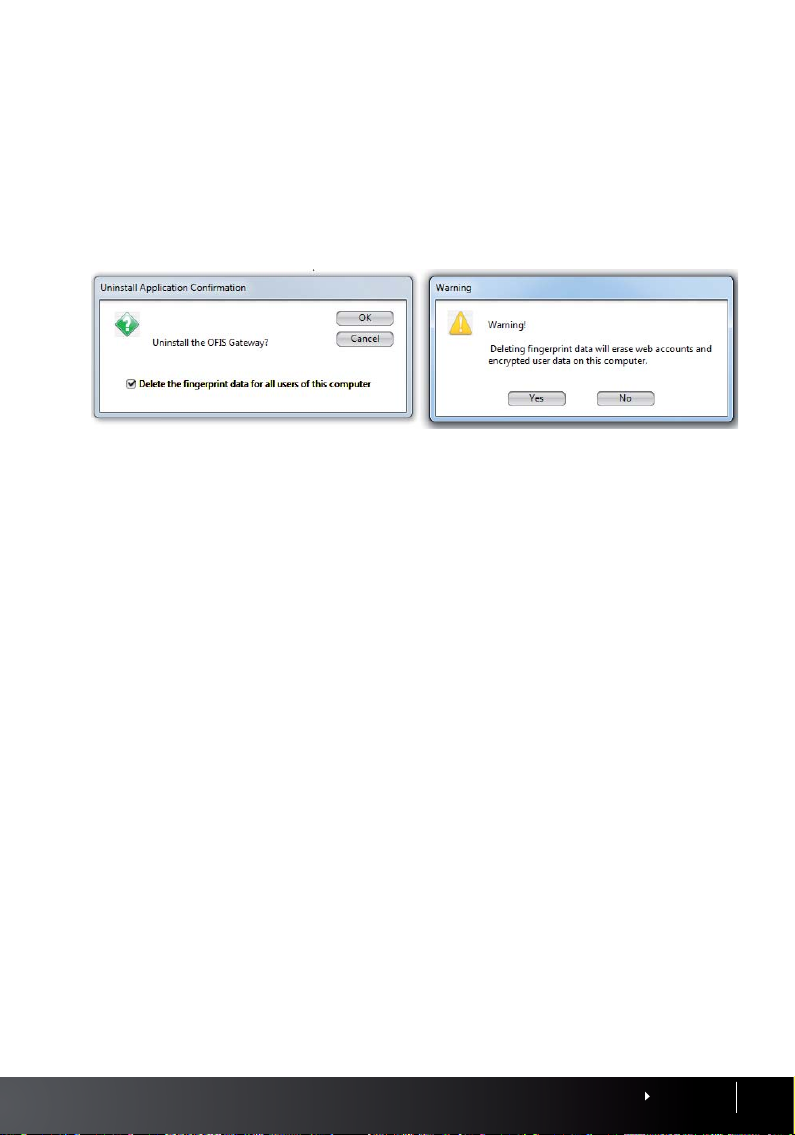
2. A window labeled Uninstall Application Confirmation will pop up. Click OK.
IMPORTANT: Make sure that you have exported all your Web Account data (See page xx), and de-
crypted all your encrypted files (See page xx) before uninstalling the OFIS Gateway.
3. The program will be removed from your computer after you verify your identity by fingerprint or password. Please restart your computer to complete the uninstallation.
CONTENTS
31
Page 32
5
Frequently Asked Questions
•
Q
I am unable to execute file encryption when I drag files to the OFIS Gateway Operation
panel using Windows Vista. Why is this so?
A
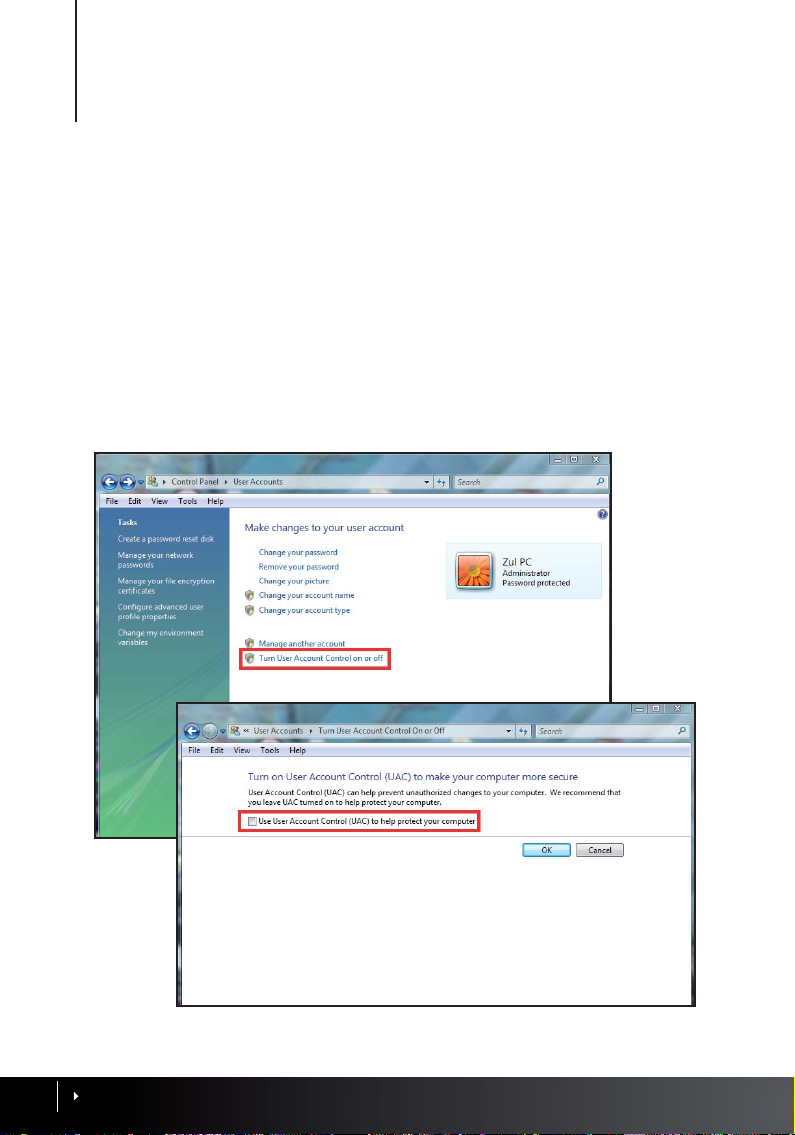
This is because the User Account Control (UAC) has been enabled. When applying the
UAC, a user will have to open the control panel using limited privilege as encrypting Limited Privilege files under an Administrator account is not permitted in Windows Vista.
To disable the UAC, go to your Windows Control Panel, choose User Accounts and unselect the Use User Account Control (UAC) to help protect your computer.
32
CONTENTS
Page 33
Q
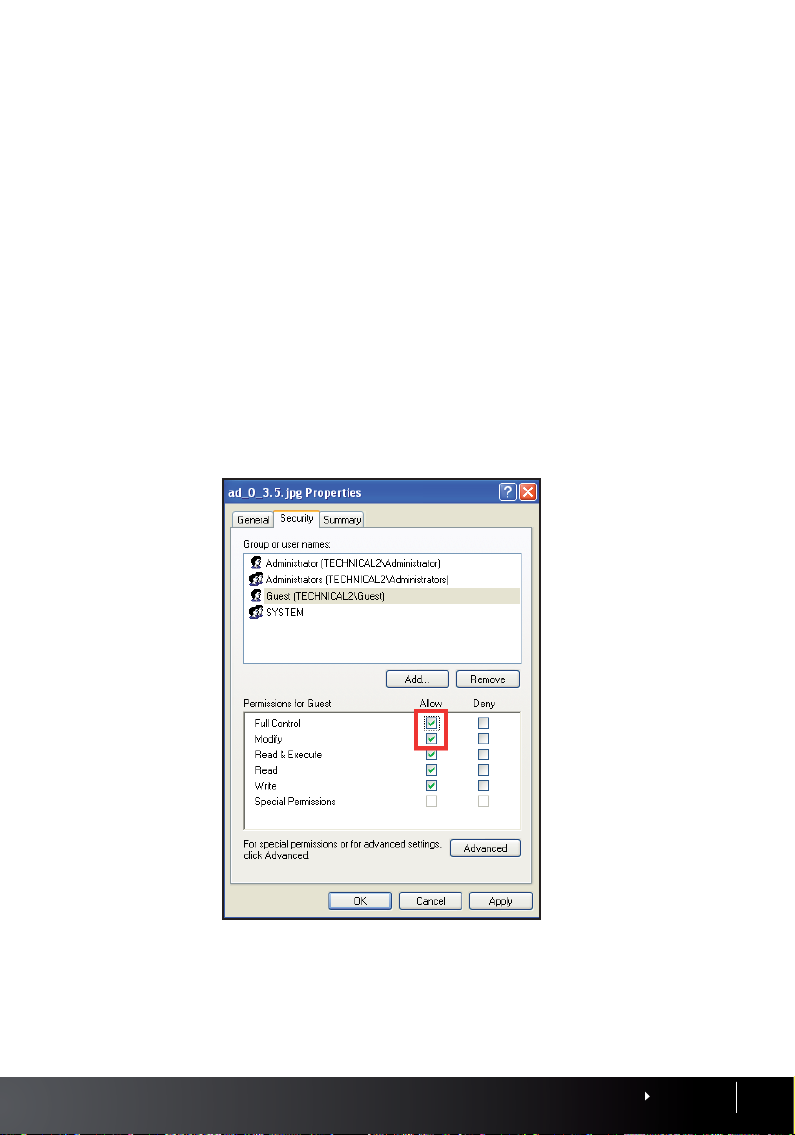
Why should a user under a non-administrative privilege keep the original files when undergoing file encryption in NTFS format?
A
NTFS format emphasizes strongly on the file privilege strictly, therefore a User must have the
privilege to delete files before being able to delete files in NTFS format.
To set the privilege, right click on the file or folder which you wish to delete, choose Prior-
ity, and click on Security. Select the privilege of Full Control and Modify to execute the file
encryption. Now the user will be able to delete the original files.
CONTENTS
33
Page 34
Q
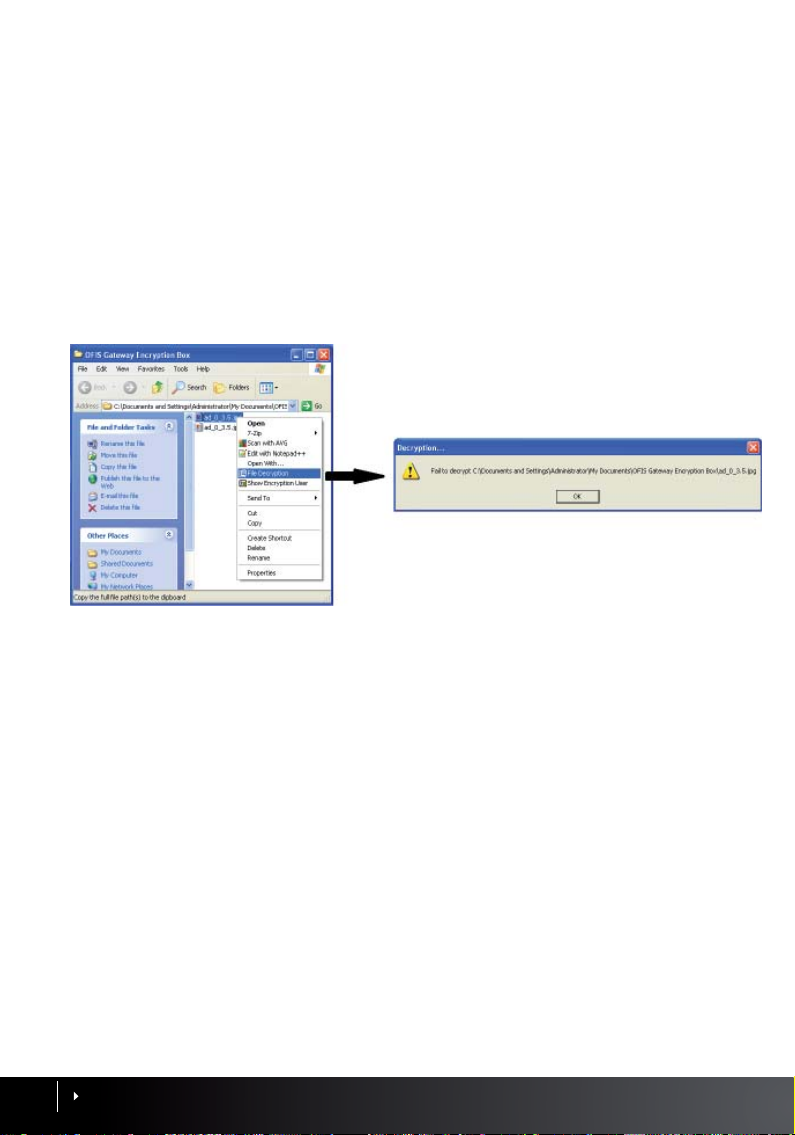
Why does the user of an Administrator privilege fail to execute file decryption in NTFS
format although the original files and the encrypted files are saved in the same folder?
A
When you execute file decryption where the original files and encrypted files are saved
in the same folder, decrypting the encrypted file will mean that the original file will have
to be overwritten, which is not permitted by the program. To be able to decrypt the encrypted file, simply rename the encrypted file and proceed.
Q
I can’t seem to encrypt files with a “~” mark. How do I do this?
A
Files with a “~” mark can’t be encrypted. To be able to encrypt it, simply rename the file
and remove the symbol from the filename.
CONTENTS
34
Page 35

6
Other Resources
•
Copyright Notice & Disclaimer
COPYRIGHT NOTICE
All rights reserved. No part of this book may be reproduced or transmitted in any form or
by any means, electronic or mechanical, including photocopying, recording, or by any information storage and retrieval system, without written permission from FingerTec Worldwide Sdn Bhd. Every precaution has been made to supply complete and accurate information. Information in this document is subject to change without prior notice.
DISCLAIMER
No person should rely on the contents of this publication without first obtaining advice
from a qualified professional person. The company expressly disclaims all and any liability
and responsibility to any terminal or user of this book, in respect of anything, and of the
consequences of anything, done by any such person in reliance, whether wholly or partially, upon the whole or any part of the contents of this book.
FINGERTEC WORLDWIDE SDN BHD
CONTENTS
35
Page 36

© 2012 FingerTec Worldwide Sdn. Bhd. All rights reserved. • 082012
 Loading...