

Page 1
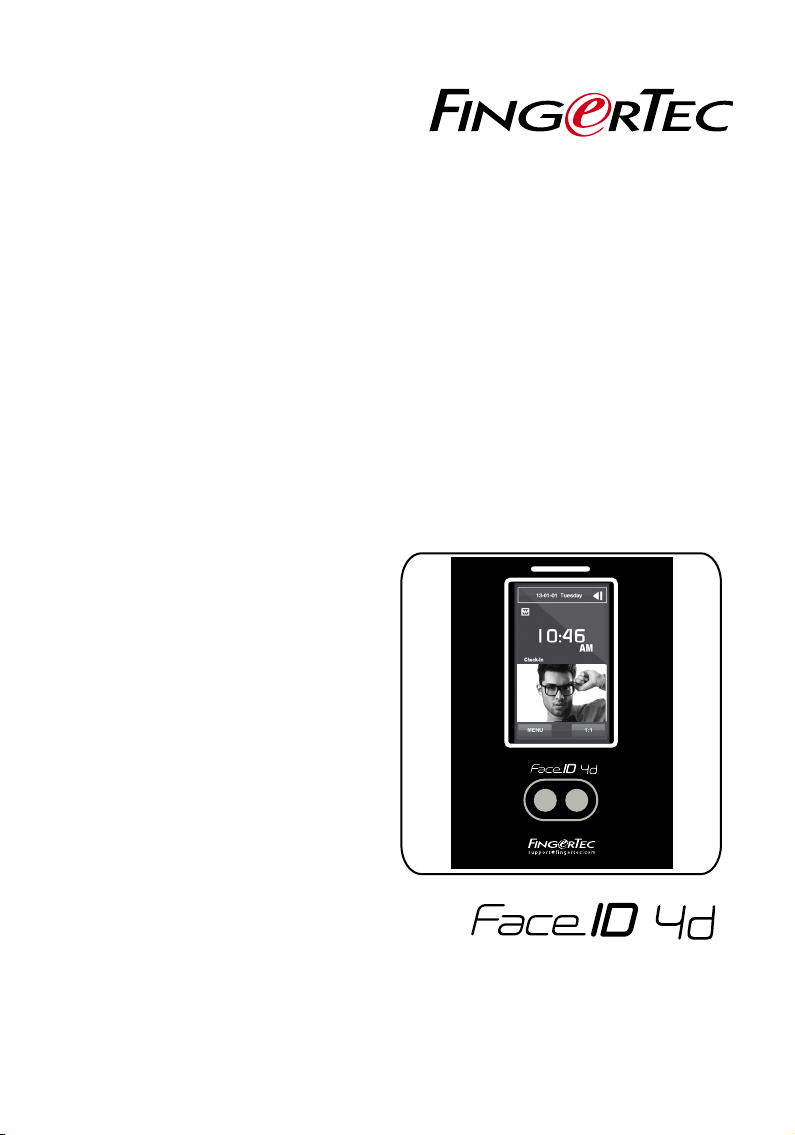
Face Recognition System for
Door Access & Time Attendance
User Guide
Page 2

CONTENTS
3-4 CHAPTER 1 •
GETTING STARTED
Viewing the User Guide on the Internet
Included Accessories
Included Printed Materials
Installation Tips
Activating Terminal
Registering Warranty
58 CHAPTER 2 • BASICS
Introduction
Overview
The Display of LCD Panel
Main Menu
Touch Keypad
Keyboard
Date/Time
Voice Control
Security Features
Cleaning
Restarting and Resetting
913 CHAPTER 3 • CONNECTION
SYNCING TERMINALS
Installation
Mount on Wall
Communication Diagrams
Description of Available Connections
Ingress Online Activation
Installation and Setup of Ingress
Connecting Terminals to Ingress
Using USB to Download/Upload Data
Communication Key
1416 CHAPTER 4 • USER
Enrolling Users
Voice / Message
Face Verification
Adding User Information
Deleting User
Access Level/Privilege
1719 CHAPTER 5 • SYSTEM
General Settings
Display Settings
Face Settings
Log Settings
System Information
2021 CHAPTER 6 • DATA
Deleting Transaction Logs
Deleting All Data
22 CHAPTER 7 • USB
Understanding the Need for USB Flash Disk
Type of USB
Downloading Attendance Logs
Downloading User Data
Uploading User Data from USB to Terminal
Uploading User Photo
23 CHAPTER 8 • SHORTCUT KEY
Shortcut Keys in Short
Configuring Shortcut Keys
24 CHAPTER 9 • AUTO TEST
Who should do the Auto Test?
Is the Screen OK?
Checking the Voice Message
Checking the Infrared Camera
Is the Time Accurate?
25 CHAPTER 10 • CALIBRATION
Calibrating Screen Sensitivity to Default Level
26 CHAPTER 11 • BELL
Definition of Schedule Bell
Inserting Day and Time to Trigger Schedule Bell
Determining the Ring Type of Schedule Bell
Repetition
State
27 CHAPTER 12 • ACCESS
Most Commonly Used Access Features
28 TROUBLESHOOTING
Page 3
1 • GETTING STARTED
Viewing the User Guide on the Internet
The User Guide is available in the package when you purchase the product. The User
Guide is also published online at fingertec.com and user.fingertec.com. Choose the
language you prefer to view the User Guide in.
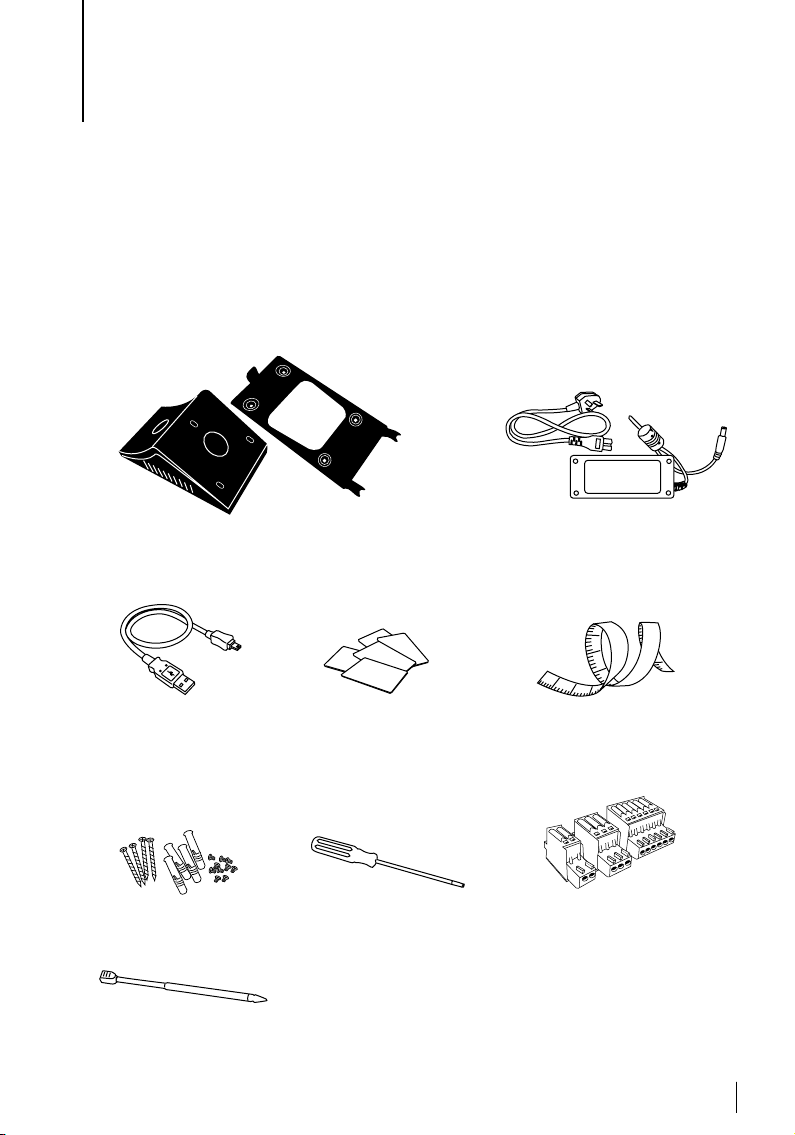
Included Accessories
Metal Back Plate
Secure this plate on top of the rubber cushion and place the terminal onto it.
USB Extension
To connect to the USB port
of a computer for upload-
RFID Cards (5 pcs)
FingerTec provides extra cards for
RFID (5pcs) and Mifare Card, (1pc).
ing and downloading of
data.
A Packet of Bolts
Use the bolts to mount the back
plate of the terminal on the wall.
T10 Screwdriver
T10 screwdriver to open the
back plate of the terminal for
installation.
Stylus
For easy navigation on the
touch screen LCD panel.
DC 12V Power Adaptor
Connect the power adapter to
the terminal and plug it into
a standard power outlet to
charge the terminal.
1
0
1
1
1
2
3
2
5
1
2
Measurement Tape
To measure the installation
height to achieve optimum
performance for terminal.
Connectors
To connect the wires to a door
lock or a doorbell if required.
3
Page 4
Included Printed Materials
• FingerTec Comprehensive DVD
• Quick Start Guide
• User Enrollment Template Form
• Warranty Card
Installation Tips
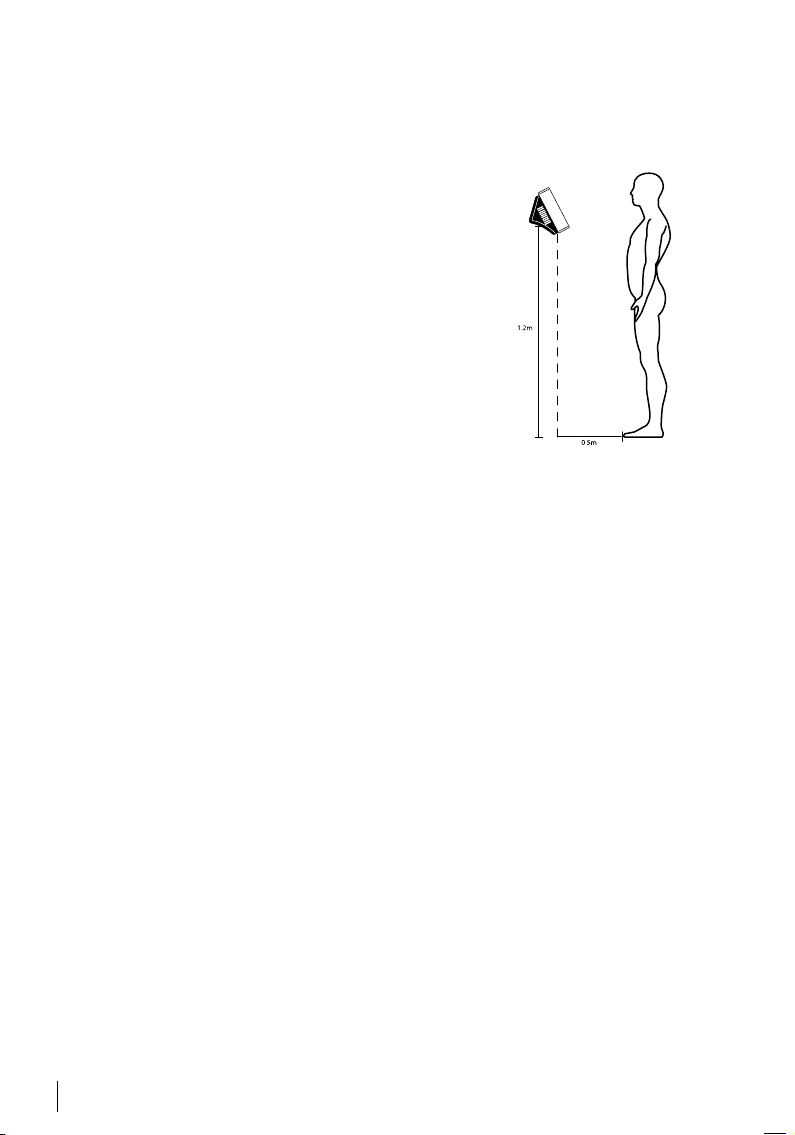
Best installation location for Face ID 4d:
1. Avoid facing strong sunlight.
2. Must be at least 2 meters away from any strong
light source e.g. fluorescent ceiling light
3. The height must be at least 1.2m from the ground
level to the Face ID 4d camera.
Activating Terminal
Every FingerTec access control model comes bundled with a unique license key. To start
using the terminal with Ingress, you must connect the terminal to Ingress and perform
online activation. Ingress reads the serial number of your terminal and sends it for verification at the FingerTec server via Internet.
In case you do not have an Internet connection, you would need to do offline activation.
Please send the serial number and models of your terminals to your local resellers or sup-
[email protected] to request for a product key and activation key.
Registering Warranty
Make sure that you register your Face ID 4d warranty with us at fingertec.com/ver2/
english/e_main.html#.
4
Page 5
2 • BASICS
Introduction
Introducing Face ID 4d, the new facial recognition technology product combined
with card technology. Face ID 4d can identify an identity in split seconds without
any contact or hassle. It only requires a user to look at the machine to get verified.
Face ID 4d is loaded with powerful microprocessor that can process facial authentica
tion method for accurate personal identification and for collection of precise data for
time attendance and door access. In addition, the Face ID 4d terminal accepts card veri
fication as an added security measure. If you are looking for a contactless, hassle free
biometrics product, choose Face ID 4d. With one look you are good to go!
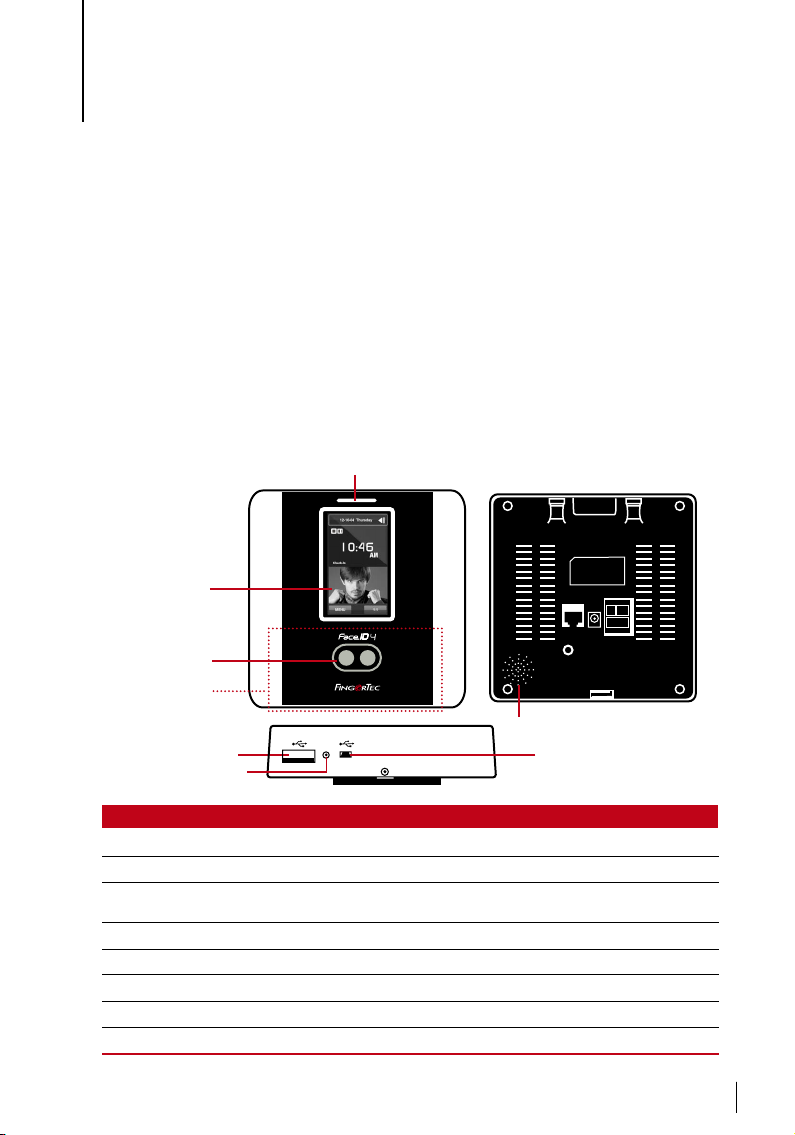
Overview
LED Light Indicator
-
-
Restart
w
sup po rt@ fin ge rte c.c om
Speaker
Micro USB port
Touch Screen
LCD
Twin Face Camera
Card Induction
Area
USB Port
Restart Button
Item Function
Card Induction Area Read the card information based on the card system of Face ID 4d.
Touch Screen LCD Touch to access into Face ID 4d system to do configuration.
LED Light Indicator Indicate the status of reader. Green indicates standby mode or verification is suc-
cessful. Red indicates problem or verification has failed.
Speaker Emit instructions from Face ID 4d.
Twin Face Camera Capture face images in a few directions.
Reset Button To restart the machine.
USB Port Connect the USB flash disk to download/upload data from/to Face ID 4d.
Micro USB Port Connect Face ID 4d directly to pc/laptop to download/upload data with software.
5
Page 6
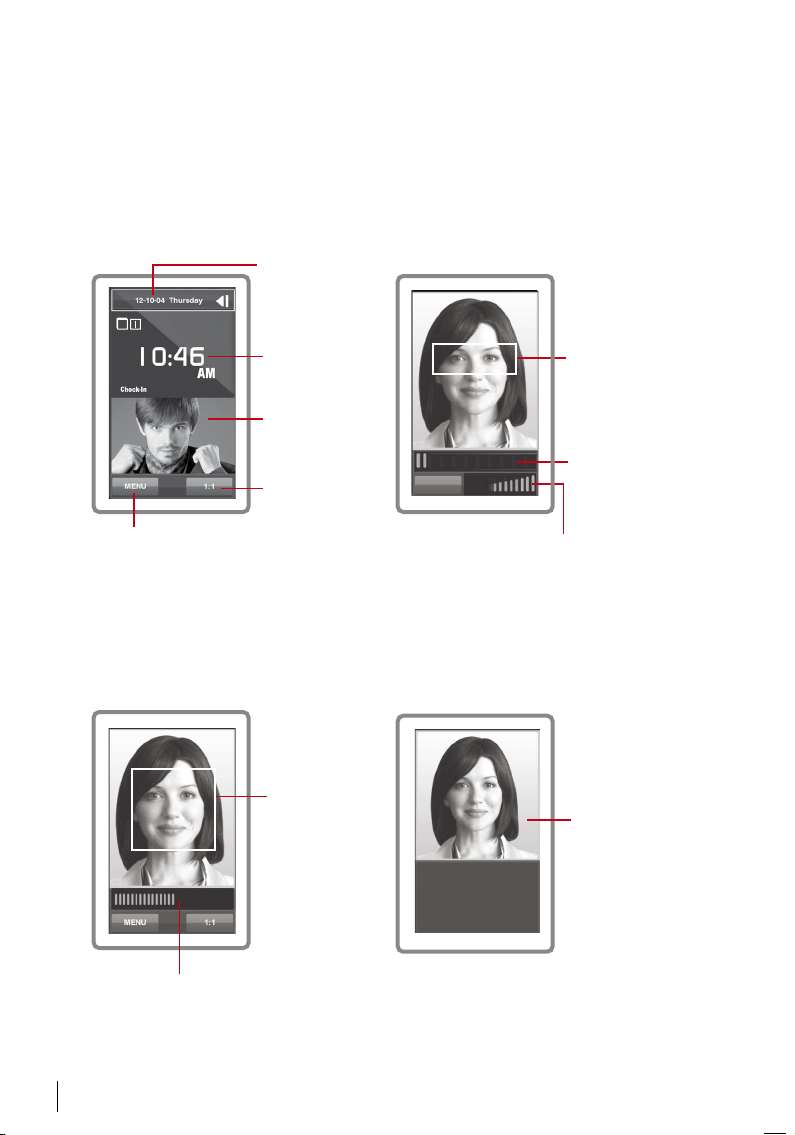
The Display of LCD Panel
Take a closer look at the touch screen LCD panel for some basic and important
information. Press moderately on the LCD when input commands to maintain a
longer lifespan of the terminal. Clean the camera area with a microfiber cloth to
maintain the performance of face scanning.
STANDBY MODE ENROLLMENT MODE
Date/Day
w
Menu button to access
into the system.
Time
Terminal is
in standby
mode, ready
for scanning.
Tap to view
the keypad.
159
Exit
Status bar to indicate the quality of the captured
image; the higher the number, the better the image.
Displays image
of user captured
during enrollment.
Position your eye
to appear in this
area.
Progress bar to
indicate progress of
facial enrollment.
VERIFICATION MODE SUCCESSFUL VERIFICATION MODE
Display image
142
of user during
enrollment.
Adjust your
position so your
face appears in
this area.
User ID: 3
Rose phillip
Name:
[16 : 55] Verified.
The system will
display your photo,
user ID and name
after verifying your
identity.
Status bar to indicate the quality of
the captured image; the higher the
number, the better the image.
6
Page 7
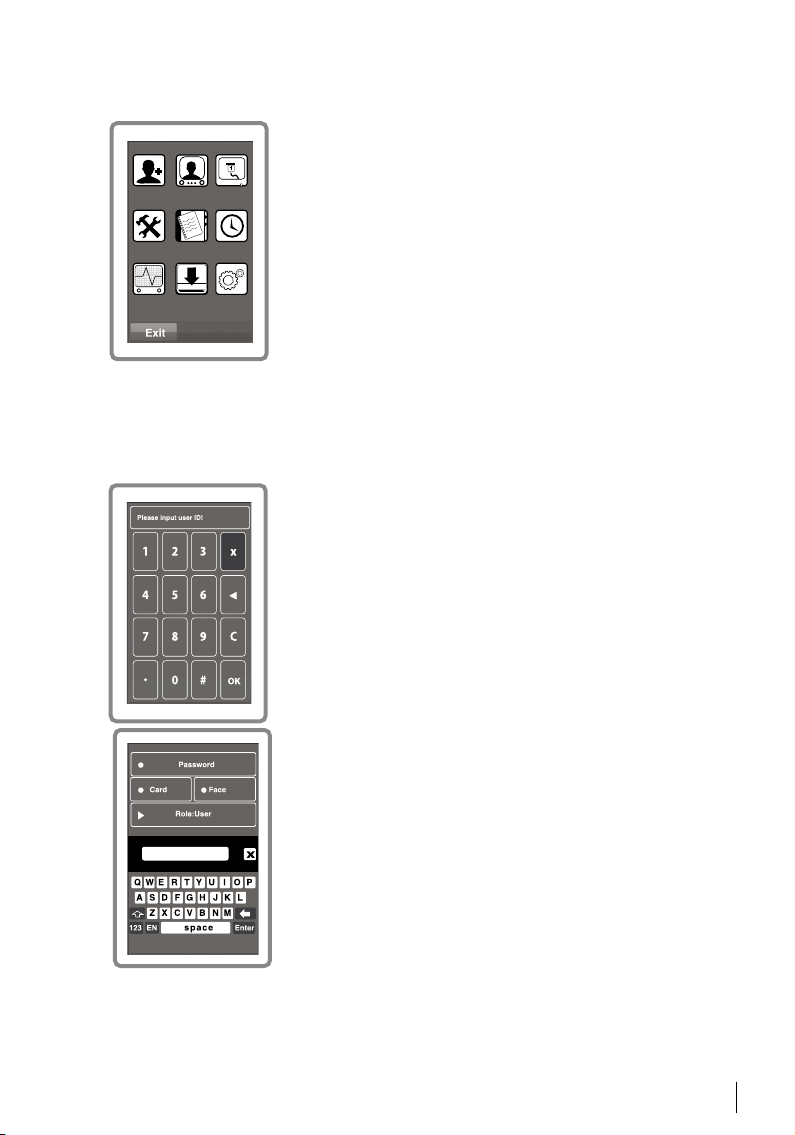
Main Menu
New User: Add new user to the Face ID 4d.
User: Enroll, edit, delete and insert user information from
User icon. The Face ID 4d allows storage of 400 facial im-
New User User Connection
ages.
Connection: Setup the Face ID 4d communication with
computer through LAN. Set communication with a compu-
System Data Date/Time
ter for a secure data transfer.
System: Configure the settings of the Face ID 4d including
Auto Test USB Sys Info
attendance and update settings.
Data: Check user attendance and transaction logs that are
available in the Face ID 4d and perform housekeeping of
the terminal.
Date/Time: Shortcut to set date/time into the Face ID 4d.
Auto Test: Run tests on the Face ID 4d to diagnose the terminal on various aspects.
USB: Transfer data to and from the Face ID 4d using a USB flash disk.
Sys Info: Show basic information of the Face ID 4d and its storage status.
Touch Keypad
Press 1:1 to view the touch keypad. You can input information into the Face ID 4d through the touch keypad. It contains numbers from 0-9, Cancel, and Backspace buttons.
Keyboard
Use the onscreen QWERTY keyboard to type in alphabet
and number input into the Face ID 4d.
Type Upper Case: Tap the arrow pointing up on the left
corner of the keyboard to change the lowercase to upper
case.
Type Number: Tap the 123 key to change the keyboard to
display numbers.
Return: Tap Enter to return. Tap X on the keyboard top right
corner when you are done using the onscreen keyboard.
7
Page 8

Date/Time
The Face ID 4d displays date and time at the home screen. Choose a date and time
format based on your preference. Press Menu > Date/Time > Select value > Save. You
can select the time format to be either the 12-hour format or the 24-hour format.
Voice Control
Voice Control lets you control the level of volume emitted by the Face ID 4d.
Turn On/Off – The Face ID 4d lets you to turn on/off the voice based on your prefer
ence.Press Menu > System > General > Voice Prompts > On/Off >Save.
Adjust Volume: The default volume of the Face ID 4d voice is Mid (medium). To sustain
the performance of speaker in Face ID, the volume is recommended to remain at Mid
value. To adjust the volume Press Menu > System > General > Volume > Select Low |
Mid |High
Security Features
Security features help protect the information in the Face ID 4d from being accessed
by others.
Admin Affirm: Register an administrator into the system by enrolling a face or pass-
word to a user ID. Press Menu > New User > Privilege: Administrator > Choose enrollment method > Save.
After enrolling an administrator, the main menu can only be accessed by administrator.
Tamper Switch: The Face ID 4d comes with a tamper switch located at the rear of the
terminal. During installation, the tamper switch is compressed against the back plate.
Any attempt to dismantle the Face ID 4d will trigger the internal alarm and the LCD
panel will display “System Broken” to notify users.
-
Cleaning
Please turn off the terminal before cleaning it.
Clean Touch Panel: Use a microfiber cloth to clean the Face ID 4d. Do not use any
liquids, household cleaners, aerosol spray, solvents, alcohol, ammonia and abrasive
solutions to clean the touch screen panel of the Face ID 4d because it could damage
the panel.
Restarting and Resetting
If something isn’t working right, try restarting or resetting the Face ID 4d.
Restarting the Terminal: At the botton of Face ID4, look for the Restart button use a
pin, press the button once to restart the terminal.
Resetting the Terminal: Go to Menu > Data and click on Restore to Factory Settings.
Press Yes to confirm. Resetting of Face ID 4d will cause all your settings to return to
the original factory settings.
8
Page 9
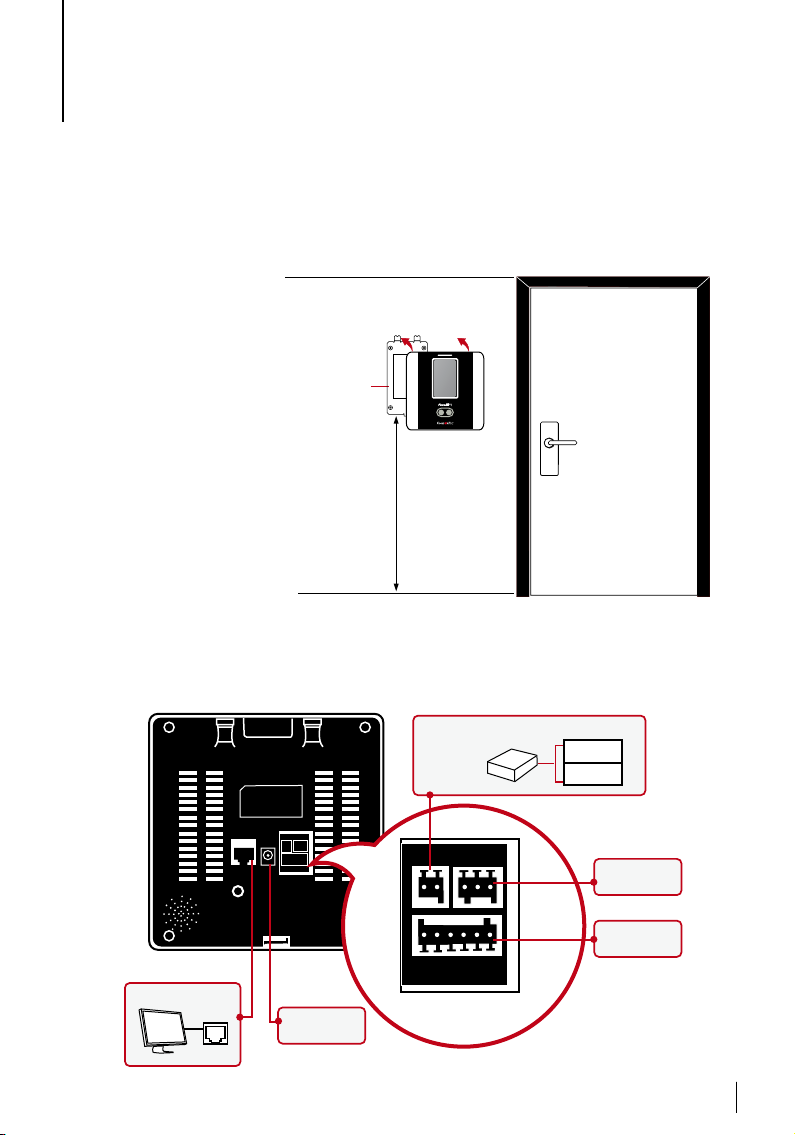
3 • CONNECTION – SYNCING TERMINALS
Installation
FingerTec terminals offer several connections for power and communications. To install the Face ID 4d, follow the instructions below.
Mount On Wall
Attach the back plate
on to the wall securely
and attach the terminal on to the back
plate when mounting
it on the wall.
Back Plate
4 feet / 1.2 meter
(recommended)
support @finger tec.com
Communication Diagrams
Connection points for power and communication are available at the back of the
terminal. Refer to the following diagrams for the correct installations.
TCP/IP Port
TCP/IP
DC12V 3A
Power Supply
POWER SUPPLY (A)
DC12V 3 A
Power S upply
CONNECTOR PINS
This is only available
for Face ID 4d
GND
+12V
Alarm output
Door Lock
System
9
Page 10
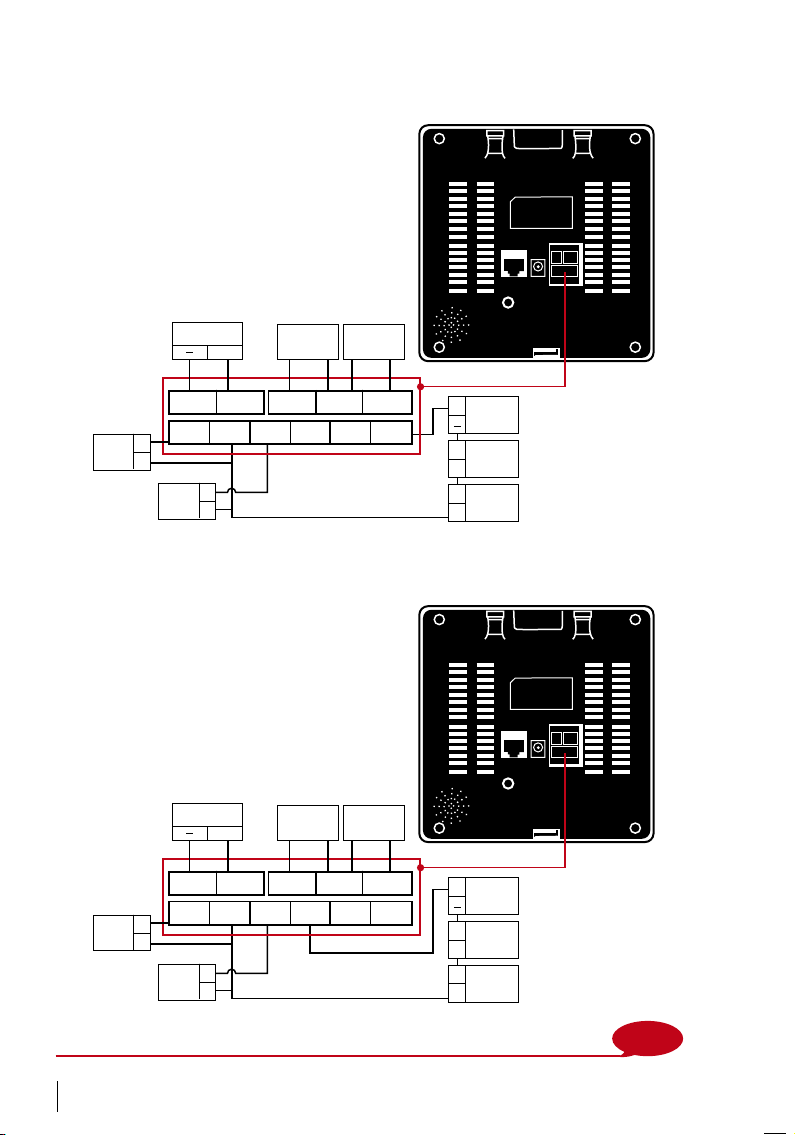
\
FOR NC NORMALLY CLOSE DOOR LOCK SYSTEM
Door
Sensor
DC12V 3 A
G ND 12V NC1 COM1 NO1
SEN GND BUT NO2 COM2 NC2
Release
Button
Alarm Device
+
(NC)
Alarm Device
(NO)
+
EM Lock
Emergen cy
2
Break G lass
3
A
Overrid e
Key Swi tch
C
(NC)
(NC)
(NC)
FOR NO NORMALLY OPEN DOOR LOCK SYSTEM
Door
Sensor
DC12V 3 A
G ND 12V NC1 COM1 NO1
SEN GND BUT NO2 COM2 NC2
Release
Button
Alarm Device
+
(NC)
Alarm Device
(NO)
+
EM Lock
Emergen cy
2
Break G lass
3
A
Overrid e
Key Swi tch
C
(NO)
(NO)
(NO)
10
Please refer to the AdapTec Plus Installer Manual if you are using AdapTec
NOTE
Page 11
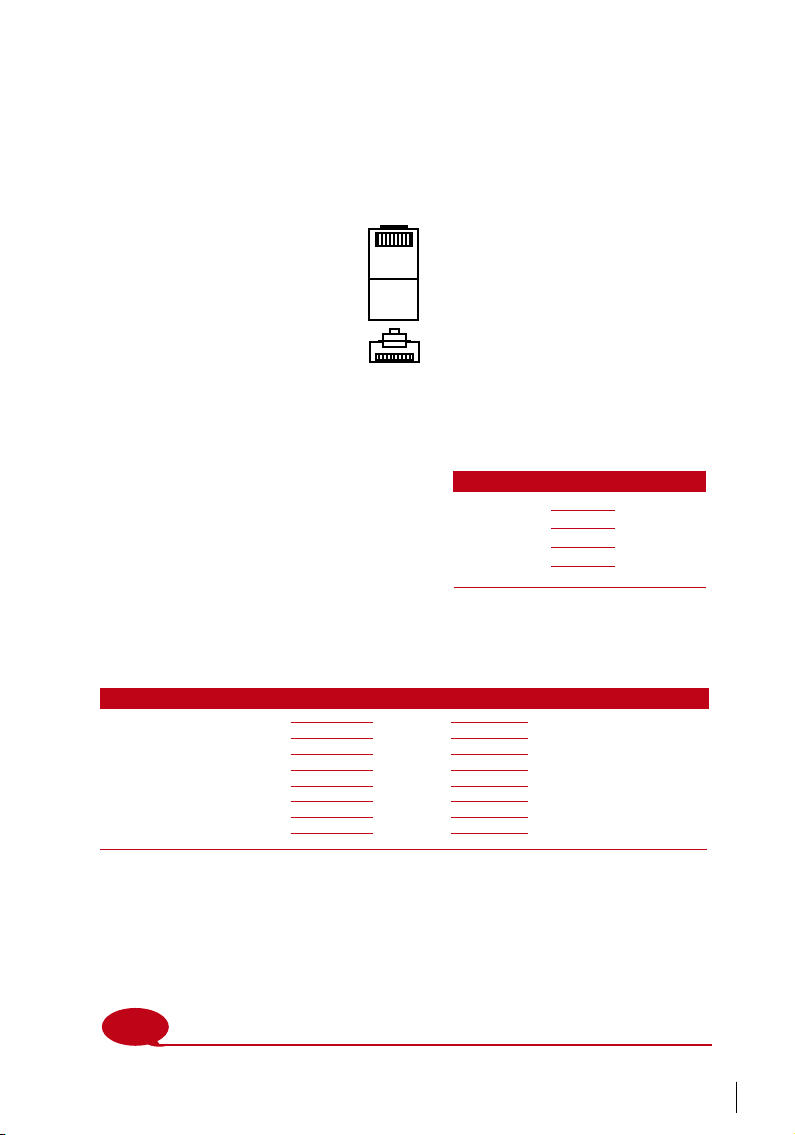
Descriptions of Available Connections
USB PORT
Linking with USB flash disk for remote data transfer.
1 8
TOP
FRONT
1 8
TCP/IP PORT
Connect with a CAT 5 cable for LAN connection, one end to terminal’s port and
another end to the computer’s TCP/IP Port.
TCP/IP for Single Connection
Linking the terminal to a single computer using TCP/IP
requires Ethernet 10/100Base-T Crossover Cable. The
cable can be used to cascade hubs or to connect Ethernet stations back-to-back without a hub. It works with
both 10Base-T and 100Base-TX.
TCP/IP for Network Connection
Linking the terminals to multiple computers using TCP/IP requires Ethernet 10/100Base-T Straight Thru
Cable or “whips”. The cable works with both 10Base-T and 100Base-TX, connecting a network interface
card to a hub or network outlet.
JOINT 1 PIN JOINT 2 PIN
TX+ 1
TX- 2
RX+ 3
RX- 6
• •
• •
• •
• •
3 RX+
6 RX-
1 TX+
2 TX-
CONNECTOR PIN CABLE COLOR CONNECTOR
TX+ 1• White/ Orange
TX- 2
RX+ 3
4• Blue
5
RX- 6
7
8
Orange
•
White/Gre en
•
White/Blue
•
Green
•
White/ Brown
•
Brown
•
POWER SUPPLY PORT
Insert the Power Adapter point to this port for power.
ACCESS CONNECTION
Links the terminal to a door lock system.
NOTE
Link all cables to the correct connection point(s) before attempting to connect the
terminals to the software.
1 TX+
•
2 TX-
•
3 RX+
•
4
•
5
•
6 RX-
•
7
•
8
•
11
Page 12

Ingress Online Activation
Ingress is a genuine software by FingerTec. Every FingerTec access control model
comes bundled with a unique license key. To start using the terminal with Ingress,
you must connect the terminal to Ingress and perform online activation. Ingress
reads the serial number of your terminal and sends it for verification at the FingerTec server via Internet.
In case you do not have an Internet connection, you would need to do offline activation. Please send the serial number and models of your terminals to your local resellers or [email protected] to request for a product key and activation key.
Installation and Setup of Ingress
Install Ingress in a PC that fulifills Ingress’ minimum requirements. Refer to http://
www.fingertec.com/customer/download/postsales/SUM-Ingress-E.pdf for the In-
gress user guide online. Setup Wizard will require you to do online activation before connection establish between Ingress and terminals.
Connecting the Terminals to Ingress
DETERMINING TERMINAL NUMBER
Identify the number of your terminals to differentiate them between one another.
Ingress can connect up to 999 units of terminal. Press Menu > Options > Comm Opt
> Dev Num > Select the number.
USING TCP/IP
IP address is important, as it is a unique address of the terminal in LAN. Without
the IP address, locating the specific terminal is not possible. To input the IP ad-
dress of the terminal:
address.
Press Menu > Options > Comm Opt > IP Addr > Key in IP
USING TCP/IP
It is important to setup the Ethernet to connect the terminals using TCP/IP connection. Setting up the Ethernet is done by enabling the Ethernet function: Press
Menu > Options > Comm Opt > Ethernet > Yes.
Turn off the terminal after you have set the Ethernet setting to Yes. Now, plug-in
the network plug to the Ethernet interface and turn the power on.
Determining the Netmask, Gateway and NetSpeed: For TCP/IP connection,
please configure the netmask, gateway and netspeed for the terminal.
Press Menu > Options > Comm Opt > NetMask > Insert the numbers.
Press Menu > Options > Comm Opt > Gateway > Insert the numbers.
Press Menu > Options > Comm Opt > NetSpeed > Choose the speed of your Ethernet connection.
12
Page 13

USING RS232 CONNECTION
For connection via RS232,baudrate is the determinant of communication speed between the terminal and the software. The higher the baudrate, the faster the speed is.
To turn on RS232 connection and set the baudrate: Press Menu > Options >
Comm Opt > RS232 > Change the RS232 connection to Y.
To change baudrate: Press Menu > Options > Comm Opt > Baudrate > Change the
Baudrate accordingly.
USING RS485 CONNECTION
For connection via RS485, baudrate is also the determinant of communication
speed between the terminal and the software but the speed must be according to
the speed of the converter. Check your converter for the speed.
To turn on RS485 connection and set the baudrate: Press Menu > Options >
Comm Opt > RS232 > Change the RS485 connection to Y.
To change baudrate: Press Menu > Options > Comm Opt > Baudrate > Change the
Baudrate accordingly.
Using USB to Download/Upload Data
A USB flash disk is useful in cases where the terminal is installed far from a PC or
there is a connection problem. To determine the type of USB flash disks compatible
with the terminal, please refer to this link at fingertec.com/newsletter/HL_74.html
using USB
Press Menu > PenDrive Mgmt > Choose the operation that you want to carry out
via USB flash disk.
Communication Key
Since the software is controlled by an activation code and a product key, set the
COMM key to zero. Press Menu > Options > Comm Opt > COMM Key > Set to 0.
13
Page 14

4 • USER
Enrolling Users
The Face ID 4d can contain up to 400 face templates and 10,000 card users.
FACE ENROLLMENT
One face registration would take approximately 30 sec to complete. The terminal
snaps images of your face and generates a 3 dimensional template for storage. Dur
ing enrollment on the Face ID 4d, please stand straight and do not move your face
or body, and make sure that your face is calm with no extreme expression. For height
between 150cm to 180cm, recommended distance between the Face ID 4d and user
is 0.5m.
To enroll face: Press Menu > New User > User ID > Insert User ID > Select Face > A
green rectangular box will be displayed on the screen > Align your eye position into
the green box > Adjust your head position to align your eyes into the green box >repeat 2 times > Face enrollment is complete > Select Privilege > User > Save
CARD ENROLLMENT
The default card for the Face ID 4d is RFID. MiFare card system available upon requests.
To enroll card: Press Menu > New User > User ID > Insert User ID > Select Card >
Wave the card at the scanning area until the screen displays the Card ID > Select
Privilege > User > Save
PASSWORD ENROLLMENT
The Face ID 4d offers different enrollment methods and password can be used alone
or in combination with the face recognition methods. The maximum length of a
password is 8 digits.
To enroll password: Press Menu > New User > User ID > Insert User ID > Select
Password > Input password using the touch keypad > OK > Reconfirm password >
OK > Select Privilege > User > Save
-
14
Voice / Message
Voice / Message What Does It Mean?
“Verified” Identity verification is successful, the Face ID 4d stores the trans-
action logs and opens the door (if connected to door access)
“Try again please” Identity verification failed because the face is not properly po-
sitioned, the template is not available in the Face ID 4d or the
password is incorrect.
Page 15

Voice / Message What Does It Mean?
“Admin Affirm” You are not the administrator of the system and you cannot ac-
“Invalid ID” For 1:1 verification, User ID entered does not match the face.
cess Menu page.
Face Verication
1:N – 1:N verification does not require any input of your user ID. Stand in front of the
Face ID 4d until you can see the reflection of your face on the panel and look at the
cameras. The Face ID 4d takes a second to verify your face.
1:1 – 1:1 requires input of User ID before the Face ID 4d reads and verifies. Press 1:1
> Input ID on the screen > Press face icon > the Face ID 4d reads and verifies. Some
precautions have to be taken to get a good read everytime.
· Stand firm, do not move your head
· Do not cover your face
· Stay calm, do not make extreme facial expressions like sticking your tongue out or
cringing your face
· Do not stand too close or too far from the Face ID 4d.
Adding User Information
User information can be added into the Face ID 4d via two ways. One is through the
terminal and another is through the Software. To add/change user information via
the Face ID 4d, press Menu > User > Select Employee ID > Edit/Add > Save. To search
for users by name, click on the alphabets at the bottom of the screen.
Field What can you do?
USER ID Edit user ID based on your company’s employee numbering system. Max-
NAME Edit/Add name of in this field. Maximum number of characters is 24
FACE To show quantity of face templates store.
CARD Delete/Add Card
PASSWORD Delete/Add Password
PRIVILEGE Change privilege of users
imum length of user ID is 9 digit
It is recommended that the updating of user information be done through the Software. After the information is updated, sync the Software and the Face ID 4d to dis
play the information.
-
15
Page 16

Deleting User
Only an administrator can perform user deletion at the Face ID 4d. To delete certain
user(s), press Menu > User > Select User ID to delete > Press Delete > Press Yes to
confirm > Press Delete another time for confirmation.
Access Level/Privilege
The Face ID 4d offers four types of access level or privilege.
PRIVILEGE USER ROLES
Normal User Only use the terminal to verify your identity. You cannot access into the
Enroller You are allowed to access into the menu to enroll user only.
Administrator You are allowed to access into the menu to enroll users only and edit sim-
Supervisor You are allowed to access into the menu to enroll users and edit settings
Menu and make changes on settings and system.
ple settings and system excluding access options and advanced options.
and system.
16
Page 17

5 • SYSTEM
General Settings
ADJUSTING DATE/TIME
The Face ID 4d is a terminal that records time attendance and door access* activities (*Face ID 4dd only) of employees. Precision in time and date cannot be compromised for the system to work efficiently. Adjust Date/Time according to your time
zone. Press Menu > Date/Time > Select Value >Save
DATE FORMAT
Date format can differ based on countries for example in America, month-date-year
format is used while in Asian countries the month comes first. Choose your date
format according to your preference. The default format is dd-mm-yy. Press Menu
> Date/Time > Select Format > Save
SOUND OF KEYBOARD
The Face ID 4d emits a sound when you press any of its buttons. To turn on/off the
keypad sound: Press Menu > System > General > Keyboard beep > On/Off > Save
VOICE
The Face ID 4d has certain voice commands to guide users, during enrollment and
to notify users during verification. Press Menu > System > General > Voice > On/Off
> Save
VOLUME LOW/MID/HIGH
Voice Control lets you control the level of volume emitted by Face ID 4d. The default volume of the Face ID 4d is Mid. To sustain the performance of speaker in Face
ID 4d, it’s recommended to stay at Mid. To adjust the volume, press Menu > System
> General > Volume > Low/Mid/High > Save
Display Settings
Customize the Face ID 4d display to your preference and requirements.
SYSTEM LANGUAGE
The Face ID 4d offers various languages to match your local requirements. A maximum of 3 language packs are available in the Face ID 4d and it is set according to
your request during purchase. The default language is English. Press Menu > System > Display > Language > Choose your language > Save
17
Page 18

VIEW TOOLBAR
You can choose to either hide or display the toolbar on
the screen.
Always Display: The toolbar will always be displayed at
the side of the screen.
Auto Hide: The toolbar is hidden and will reappear
when you touch the soft touch panel. Menu > System >
Display >Toolbar > Choose your style > Save
SLEEP TIME
Sleep time is a period before the Face ID 4d goes into
sleep mode. This setting is available as a power saving
feature of Face ID 4d. The time range is from 0-99 min
utes. Menu > System > Display > Sleep Time > Determine your time > Save
Face Settings
SETTING THRESHOLD
Threshold is a level of infrared scanner’s sensitivity. Threshold determines how
many percent of your face is being read by the system. The higher the threshold
level, the more percentage is being read, the more restricted the system. Configure
the threshold for 1:1 and 1:N methods.
For 1:1, the range is from 0-99 and the recommended value is 70.
For 1:N, the range is from 0-99 and the recommended value is 80.
Menu > System > Face > 1:1 Threshold/1:N Threshold > Input your value > Save
-
CAMERA EXPOSURE
You can adjust the light exposure level of infrared cameras in the Face ID 4d. Improper value to the settings could affect the performance of the camera. The recommended value is 320. Menu > System > Face > Exposure > Input your value >
Save
ADJUSTING IMAGE QUALITY
To determine the quality of face images captured by the Face ID 4d cameras during
enrollment and verification, you can adjust the quality - the recommended value is
80. Press Menu > System > Face > Quality > Input your value > Save
18
Page 19
Log Settings
Every time the Face ID 4d is being used, transaction logs are kept in the memory.
These settings are for the Face ID 4d to regulate housekeeping of logs.
LOG ALERT
When log storage is at a certain level, users/administrator need to be alerted to
avoid underperformance of the terminal. The recommended value is 99. Menu >
System icon > Log Settings> Log Alert > Input your value > Save
• Dup Punch Period > 0 min
• Work code mode > None
• Card only > No
• Face detect interval > 2s
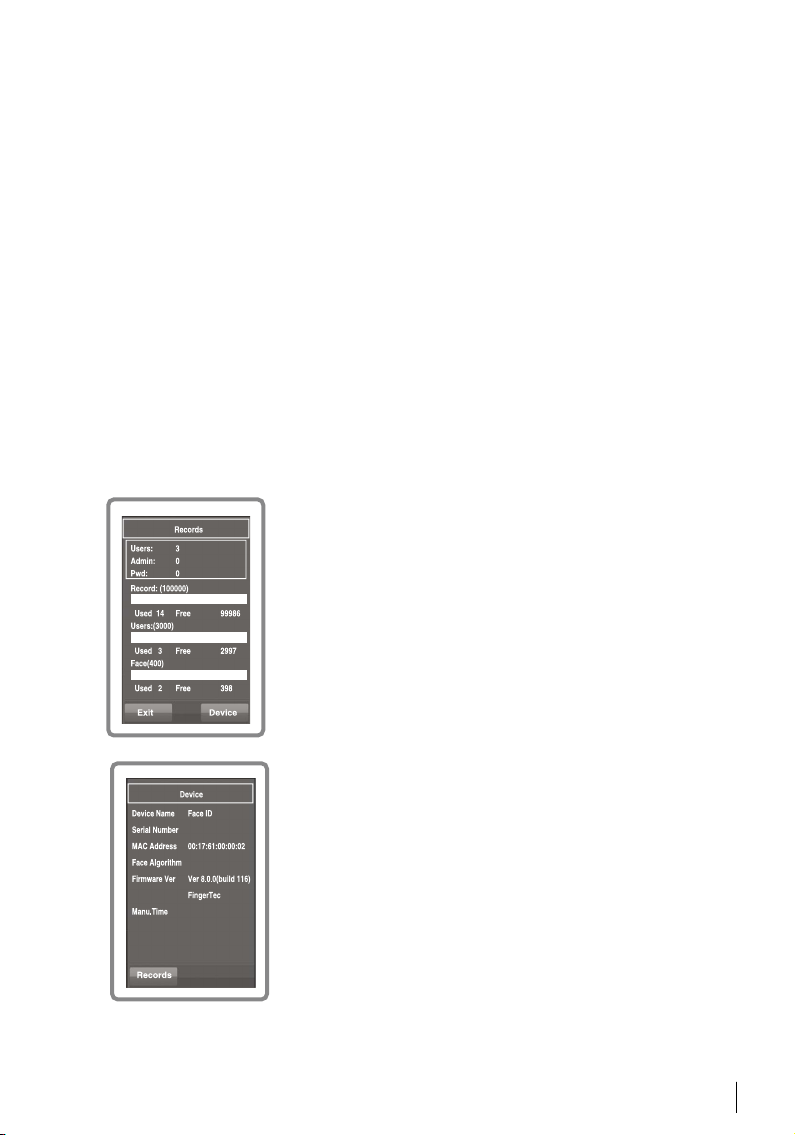
System Information
This option allows installers to check the information of the terminal including
storage, firmware, algorithm, etc. To retrieve the Face ID 4d’s System Information.
Press Menu > Sys Info > Record/Device
RECORD
Shows free storage and used storage of the Face ID 4d
detailing user count, admin count and password user. It
also displays other information such as face templates,
logs templates that been used and available.
Manufacturer
4
Face VX8.0
DEVICE
A tap on device displays Device Name, Serial Number of
the terminal, MAC Address, Face Algorithm, Firmware
Version, Manufacturer and Manufactured time.
19
Page 20

6 • DATA
Every time an enrollment is performed
or verification is done, a transaction log
is stored inside the Face ID 4d. The data
contains Terminal ID, date, time, user ID
and transaction activities. For example,
0105021009000000000010000:
These logs need to be managed to maintain the effectiveness of the terminal. It is
recommended to do the housekeeping of data from the software but there are 5 functions available in Data icon to enable you to manage your data in Face ID 4d.
Description Code
Terminal ID 01
Date (ddmmyy) 050210
Time (hhmm) 0900
User ID 000000001
Transaction Code 00
Terminal Activity 00
Deleting Transaction Logs
Please make sure that you are certain when you want to do this operation. The logs
that are stored inside the terminal are the ones that have not been downloaded into
Software. Deleting the logs means that no backup data available.
If you are not using software but a 3rd party software, make sure that you have already
downloaded the transactions before you proceed to delete.
Menu > Data > Delete Transactions > Confirmation is required (Yes/No)
Deleting All Data
This function allows you to delete all attendance data and user information in the terminal. Make sure that all user information has been backed up in Software before performing this task. Menu > Data > Delete All Data > Confirmation is required (Yes/No)
MANAGING USER PRIVILEGE
There are 4 administrator privileges in the Face ID 4d, supervisor, administrator enroller, user. You can delete the administrator and supervisor privilege but without an
administrator, normal users can access the menu easily and interrupt the settings.
Menu > Data > Clear Administrator > Confirmation is required (Yes/No)
RESETTING TO FACTORY SETTINGS
There are some instances, which require you to restore the Face ID 4d to original factory settings. Upon completion of this task, the Face ID 4d will no longer keep your
settings in all functions. Please redo all the settings to suit to your company’s requirements.
Menu > Data > Restore to Factory Settings > Confirmation is required (Yes/No)
20
Page 21

DELETE RECORDS
In the event where you will not be using the software to download records or you
do not need the transaction records, you may delete the records manually. This is
to avoid the records from exceeding the storage limit of the Face ID 4d. Besides
that, you will also need to delete the records if you are using a USB flash disk to
download transaction records from the Face ID 4d to avoid hang issue.
To delete the records: Press Menu > Data > Delete Transaction > OK to confirm.
21
Page 22

7 • USB
Understanding the Need for USB Flash Disk
Communication between the Face ID 4d and a PC is very important to upload and
download transaction data for time attendance and door access reports. The Face
ID 4d offers communication options such as LAN and USB (Universal Serial Bus)
connectivity. USB can connect Face ID with a computer for download and upload
of user information and transaction logs.
Type of USB
There are various types of USB flashdisks available in the market. The Face ID 4d
can only work with USB flash disks that supports minimum Linux Kernel 2.4.x,
works fine with Imation, Transcend and Pen Drive (minimum support Linux Kernel 2.4.x) To determine the type of USB compatible by FingerTec terminal, please
refer to this link at fingertec.com/newsletter/HL_74.html
Downloading Attendance Logs
To download attendance logs from the Face ID 4d to the computer: Menu > USB >
Download Transactions. After the download process is complete, eject USB flask
disk from the Face ID 4d and connect it to your PC that has been installed with the
Software. Upload the data from the USB into the Software for further processing.
Downloading User Data
Enrollment of user must be done at the Face ID 4d and during enrollment user
data such as name and user ID are inputted. To sync the data in the Face ID 4d and
computer: Menu > USB > Download User
Uploading User Data from USB to Terminal
While an administrator can input user data into the Face ID 4d, the rest of the user
information is completed in Software. Get the latest updates of user information
from Software to the Face ID 4d terminal using USB Flash Disk. Menu > USB >
Upload User
Uploading User Photo
User photo can be included in user information in Software. To get the same photos being displayed when users gets verified, upload the user photo from the
Software to Face ID. The size of each photo must be 320 x 240 resolution. To do it
using USB Flash Disk: Menu > USB > Upload User photo
22
Page 23

8 • SHORTCUT KEY
Shortcut Keys in Short
Shortcut keys give you quick access to your most used functions. A total of 6
shortcut keys are an available for you to configure. They are labeled with defined
names and displayed on side of the screen.
Conguring Shortcut Keys
Menu > System > Shortcut Definition > Tap on the key one at a time and select the
function you want for the specific key > Save
Some of the functions you can configure for your shortcut keys include status key,
work code, viewing of sms.
23
Page 24

9 • AUTO TEST
Who should do the Auto Test?
Auto Test page is to diagnose or analyze the conditions in the Face ID 4d. There
are several tests available in the Auto Test page and only an administrator is allowed to perform the tests. Before running any tests, kindly contact your reseller
for advice or you could email [email protected].
Is the Screen OK?
Test Screen determines the quality and sensitivity of the Face ID 4d touch screen
panel. You will see lines of different colors; click the screen to continue testing. If
there’s a broken line or distorted colors on the screen, kindly send your Face ID 4d
for repair. Menu > Auto Test > TFT Test
Checking the Voice Message
Test Voice determines the quality of the Face ID 4d’s audio. Every click on the
screen will emit different voice message. If you find any distorted sound in any of
the voice message or instruction, kindly send your Face ID 4d for checking. Menu
> Auto Test > Test Voice
Checking the Infrared Camera
To know the condition of the infrared face scanner, you need to run face test. The
Face ID 4d will display 2 images of your face: color display and infrared. Make sure
both cameras capture and show your face image. Look at the infrared camera
capture image, make sure it is a square in the middle of the screen; you have to
look into the camera. If you can see your image in the square, the camera is working fine. Check the quality status bar to adjust to the best capture image. Otherwise, kindly send your Face ID 4d for checking. Menu > Auto Test > Test Face
Is the Time Accurate?
Time is an essence in the Face ID 4d and it can’t be compromised. The Test Time
will display date, time, 0 (s): 0 (ms). Tap the screen to start the test. The 0 (s): 0
(ms) will start to run and every 10ms change the second to 1. If it doesn’t run well,
kindly send your Face ID 3 for checking. Menu > Auto Test > RTC Test
24
Page 25

10 • CALIBRATION
Calibrating Screen Sensitivity to Default Level
Menu > Auto Test > Calibration
The screen will display five dots, one at a time in all corners of the screen and one at
the center. You need to touch the center of the dot for the system to calibrate the
screen automatically. When the process is done, the screen will return to the main
menu.
25
Page 26

11 • BELL
Denition of Schedule Bell
Schedule bell is a function to alert employees or users at a certain time based on
your company’s scheduling and preference. For example, a group of employee’s
lunch time is at 10:30a.m while the other group is at 2:00p.m. The Face ID 4d offers
up to 15 schedules you can define.
Menu > Date/Time > Bell > Choose the options that you want to change and change
the value accordingly > Save
Inserting Day and Time to Trigger Schedule Bell
The screen displays 00:00 as default time. A tap on the selected bell will bring you
to another setting page. Input the day/time you want the bell to ring, day. The time
format is 24:00 hours.
Determining the Ring Type of Schedule Bell
The Face ID 4d offers various type of ringtones to choose from. A tap on the ringtone will change the sound of the bell. Select the one you prefer.
Repetition
How many times do you want the bell to ring? A tap on the value will prompt the
keypad. Input the numbers and the bell will ring according to your settings.
State
You can enable or disable the schedule bell with a tap on Enable/Disable bar.
26
Page 27

12 • ACCESS (Face ID 4dd only)
Most Commonly Used Access Features
The Face ID 4dd can be connected to door access accessories like electromagnetic
lock and doorbolt to control access to doors. FingerTec provides all kinds of doorlock
accessories which can be viewed at accessory.fingertec.com. Under Access Control
Parameter In Access icon, you can configure 4 most common used functions, which
are explained below. To access to Access Control Parameter: Menu > System > Access
Control Settings > Access Control Parameter
HOW LONG IT TAKES BEFORE THE DOOR LOCKS AGAIN (Lock Delay)
This value is the time period for the door to lock again after it unlocks on a successful
verification. The default value is 10 seconds and the range is between 1 to 10. A tap
on the value will prompt a keypad. Input the value in seconds.
DELAYING DOOR SENSOR (Door Sensor Delay)
This function only works if a door sensor is available. When a door does not close for
a specified time, the sensor will trigger alarm system. Specify the time of the delay.
Default value is 10s, the range is 0-99 s. A tap on the value will prompt a keypad. Input
the value in seconds.
CHOOSING DOOR SENSOR TYPE (Door Sensor Mode)
There are two types of door sensors available for door access which are Normally Open
(NO) and Normally Close (NC). Once a door sensor is available, you have to choose the
door sensor type. Default is None.
DELAYING ALARM (Alarm Delay)
This function only works when there is alarm system installed with Face ID 4d. You can
adjust the time before Face ID 4d triggering an alarm system if the door is not closed.
A tap on the value will prompt a keypad. Input the value in seconds. The default value
is 5s.
27
Page 28

TROUBLESHOOTING
“UNABLE TO CONNECT” APPEARS
When this message appears, it means that the settings for the Face ID 4d and the
computer are not properly done. Find out which method you are using to connect.
The Face ID 4d offers LAN and USB communication methods. Refer to Chapter 3 to
further understand the topic.
“ADMIN AFFIRM” APPEARS
You are not the administrator of this Face ID 4d terminal. Only an authorized administrator of the system is allowed to access the Menu. Any attempt from a normal
user to access the Menu will prompt “Admin Affirm” message on the screen. In case
the administrator has resigned from the company, kindly contact your FingerTec
authorized reseller to access the terminal.
THE TERMINAL DOESN’T READ YOUR FACE
Have you stood properly with out making any facial expressions? Your position
from the camera must be in a proper distance from the camera. If you see your
reflection at the camera, you are at the right position. Now, were you making facial
expression during verification? Stay calm and look at the camera, and please do not
cover your face with anything. Have you tested the camera of the Face ID 4d? The
camera might not be working properly. Test your camera’s performance. Refer to
Chapter 9 to Test the Face Camera.
THE LED IS BLINKING ALL THE TIME
You have nothing to worry about unless the blinking light is red. The green blinking
light is indicating that the terminal is in the standby mode. Red blinking light may
signal a problem in the Face ID 4d. Contact your reseller for consultation.
28
RFID CARD DOESN’T RESPOND
Have you registered the card to the terminal? The card must be registered to the
Face ID 4d before the terminal could read the information in the card. Refer to
chapter 4 User for card enrollment.
NO SOUND
Two possible causes for this problem: The Face ID 4d voice mode is silent. Perhaps
someone has turned off the voice in your Face ID 4d or reduced its volume to 0%.
Speaker is damaged. Once you have rectified the voice mode and the problem persists, proceed to test the voice (Chapter 9). If no voice is emitted, contact your local
reseller for support.
Page 29

OTHER RESOURCES
Information About FingerTec
TO LEARN ABOUT GO TO?
Company and the products www.fingertec.com
The latest updates Facebook Fan Page: FingerTec Worldwide
Twitter: FingerTec
To subscribe for FingerTec newsletter:
info.fingertec.com/subscribenewsletter
Technical Tips and Latest user.fingertec.com
Product Updates and
Upgrades
Email
[email protected] (Technical)
Register for Warranty
FingerTec Accessory accessory.fingertec.com
[email protected] (Sales)
info.fingertec.com/productwarranty
Copyright Notice & Disclaimer
COPYRIGHT NOTICE
All rights reserved. No part of this book may be reproduced or transmitted in any form or
by any means, electronic or mechanical, including photocopying, recording, or by any
information storage and retrieval system, without written permission from FingerTec
Worldwide Sdn Bhd. Every precaution has been made to supply complete and accurate
information. Information in this document is subject to change without prior notice.
DISCLAIMER
No person should rely on the contents of this publication without first obtaining advice
from a qualified professional person. The company expressly disclaims all and any liability and responsibility to any terminal or user of this book, in respect of anything, and of
the consequences of anything, done by any such person in reliance, whether wholly or
partially, upon the whole or any part of the contents of this book.
FIN GERTE C WOR LDWID E SDN BHD
29
Page 30

© 2014 Timetec Computing Sdn Bhd. A ll rights reserved. • 102014
 Loading...