


R3
R3
Fingerprint Color Door Access & Time Attendance
User Guide

CONTENTS
3-4 CHAPTER 1 •
GETTING STARTED
Viewing the User Guide in the Internet
Terminal Included Accessories
Included Printed Materials
Activating Terminal
Registering Terminal
17-20 Chapter 5 • SYSTEM
System Settings
Data Management
Data Update Using USB Flash Disk
Display Settings
Reset
Misc Settings
5-7 CHAPTER 2 • BASICS
Introduction to Terminal
Terminal Overview
Main Menu
Battery
Date/Time
Voice Control
Security Features
Cleaning Terminal
Restarting and Resetting Terminal
8-11 CHAPTER 3 • USER
Enrolling User
Verifying User
Adding User Information
Deleting User
Access Level/Privilege
RFID Card Function
12-16 CHAPTER 4 •
INSTALLATIONS &
CONNECTION
Installations
Communications
Security
Installation and Setup of Ingress
Ingress Online Activation
Connecting Terminals to Ingress
Using USB to Download/Upload Data
Communication Key
21 CHAPTER 6 • DATE/TIME
Setting Date/Time
Daylight Saving Time
22 CHAPTER 7 • USB
Understanding the Need for USB
23 CHAPTER 8 • AUTO TEST
Who should do the Auto Test?
24 CHAPTER 9 • RECORD
Checking Records of Users in the
Terminal
25 CHAPTER 10 •
SYSTEM INFORMATION
Records
Device
26-27 TROUBLESHOOTING
2
1• GETTING STARTED
Viewing the User Guide in the Internet
The User Guide is available in the package when you purchased the terminal. The User
Guide is also available online at:
http://www.fingertec.com & http://user.fingertec.com
Choose the language that you prefer for your User Guide.
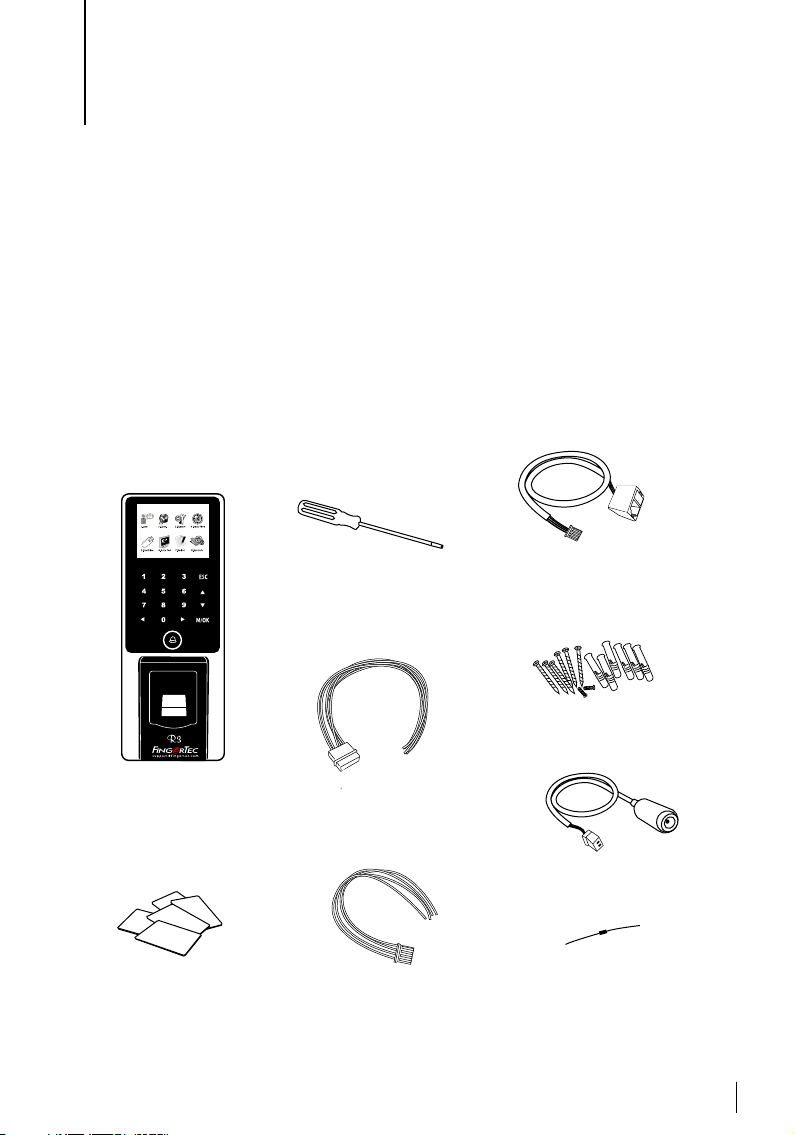
Terminal Included Accessories
Do not abuse the fingerprint sensor by scratching the surface, contacting the sensor’s surface with heat, pressing hard during placement of fingerprint for verification. Clean the sensor occasionally with microfiber cloth to maintain the performance of the sensor.
RFID Cards (5 pieces)
For card enrollment and
verication.
Screwdriver
Use the screwdriver to open
the back plate of ngerprint
terminal and to install the
back plate against a wall.
Door Accessories Cable
Cables for 12V door lock, push
button, 12V alarm, door sensor and
12V door bell, for door access.
RS232/RS485/Wiegand Output
Cable
For serial cable connection and
Wiegand output connection.
TCP/IP Connector
Connect the network cable from
a PC or Network switch to a TCP/
IP connector at the terminal.
A Packet of Bolts
Use the screws to hold the back
plate of the terminal against a wall.
Power Connector
To connect the terminal to a
12V power supply.
Diode
A diode allows electricity to ow in
one direction only and blocks the
ow in the opposite direction. This
is known as a one -way valve on EM
Lock power for protection.
3

Included Printed Materials
• FingerTec Comprehensive DVD
• Quick Start Guide
• Pamphlet
• User Enrollment Template Form
• Warranty Card
Activating Terminal
Every FingerTec access control model is paired with a unique license key. To start using the terminal with Ingress, you must connect the terminal to Ingress and perform
an online activation. Ingress reads the serial number of your terminal and sends it for
verification at the FingerTec server via the Internet.
In case you do not have an Internet connection, you would need to do an offline activation. Please send the serial number and model of your terminals to your local reseller or support@fingertec.com to request for a product key and activation key.
Registering Terminal
Make sure that you register your terminal’s warranty with us at:
http://www.fingertec.com/ver2/english/e_warranty.htm
for a 36 month warranty protection.
4
2 • BASICS
Introduction to Terminal
FingerTec is a renowned brand name for commercial products for door access and time attendance systems. FingerTec offers a wide range of products to cater to the growing needs
for biometrics products in office/home automation as well as in security industry.
FingerTec terminals are loaded with powerful microprocessor that can process biometrics
authentication methods for accurate personal identifications and for collection of precise
data for door access and time attendance activities. In addition, some fingerprint terminals
are designed to accept card verification as an added security measure.
FingerTec R3 is a master terminal designed for door access and time attendance purposes.
It comes with a touch panel keypad and a 2.5’ 65k color display screen, providing conven
ience and visual appeal to users. R3 is bundled with Ingress software for data manage
ment.
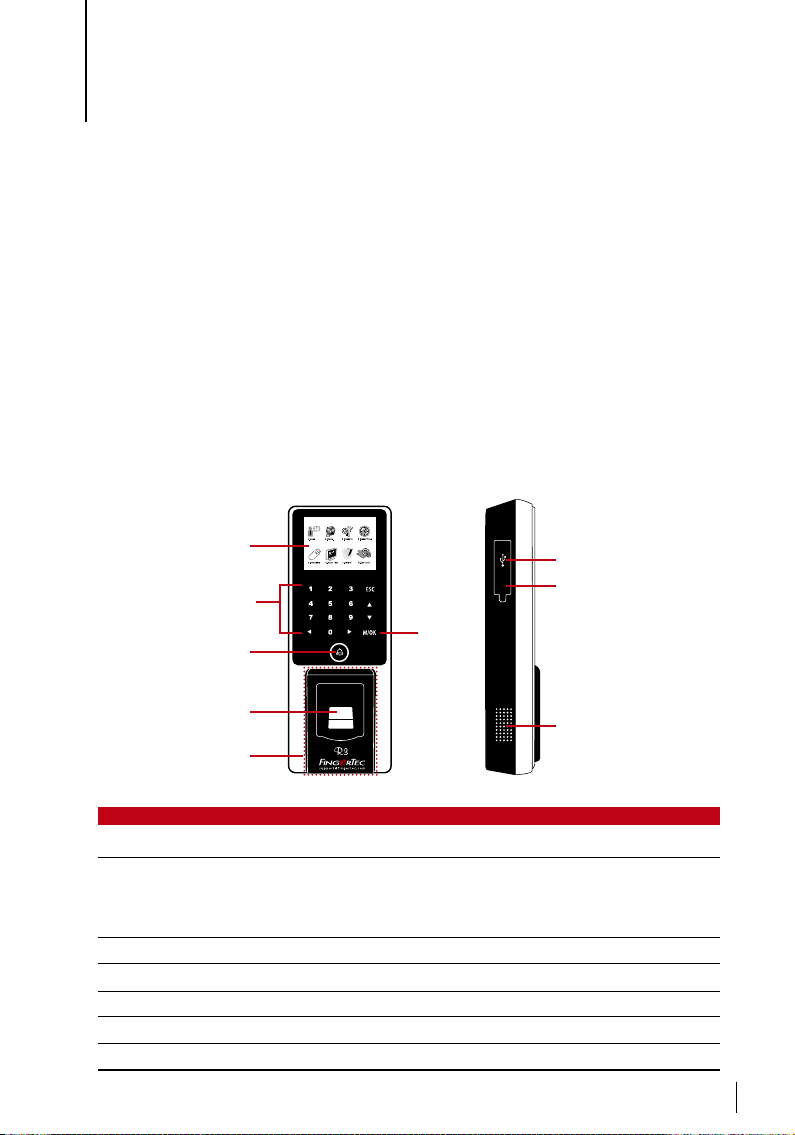
Terminal Overview
-
-
LCD Screen
Keypad
M/OK
L.E.D Display
Fingerprint
Sensor
RFID Card
Induction Area
ITEM FUNCTION
LCD Screen
LED Display Green LED – The terminal is working fine and it is in standby mode.
Red LED – There is an error at the terminal that requires checking. For
Keypad To input instructions into the terminal and to allow configuration.
RFID Card Induction Area Area that reads RFID cards.
Speaker For terminal voice emission.
Reset Button To restart the terminal as and when required.
M/OK Button Press and hold the M/OK button to enter the menu.
Displaying status of terminal, day, date and time.
first time use, the terminals need to be charged fully to avoid having the
red light blinking.
Button
RESET
USB Port
Reset Button
Speaker
5
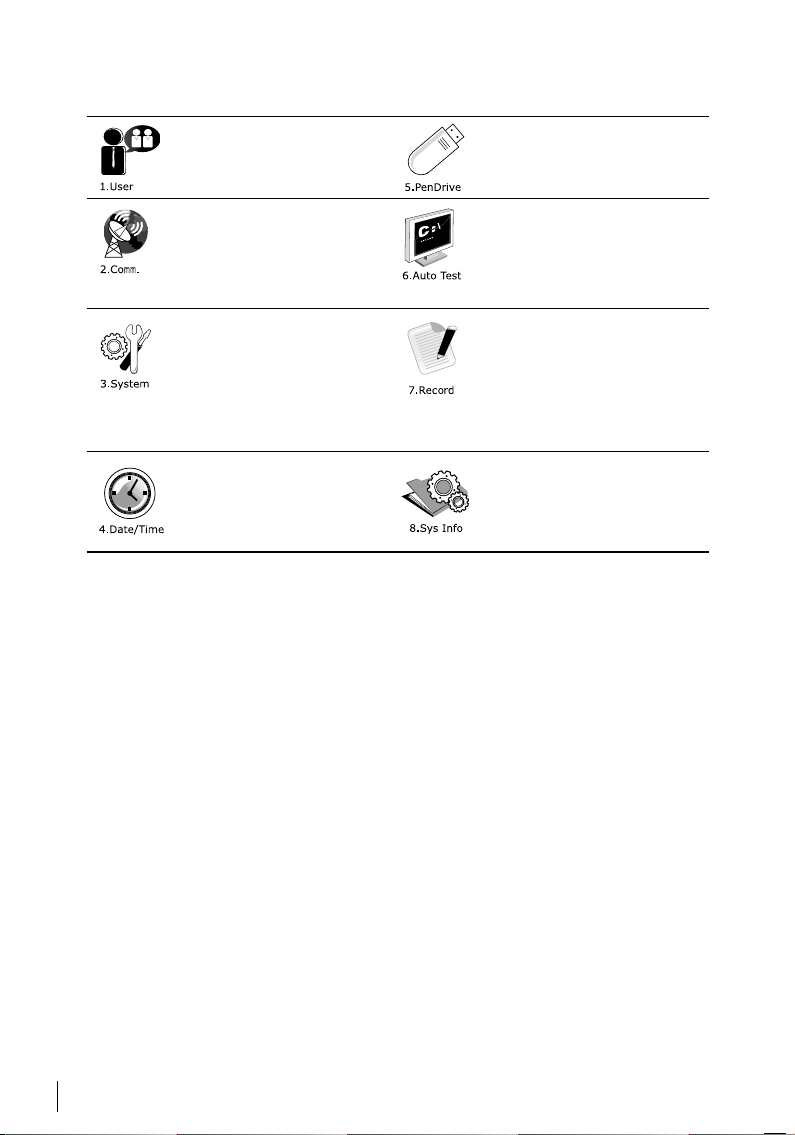
Main Menu
Enroll users, manage user data
and input workcode.
Upload and download data and
information to and from the
FingerTec terminal using a USB
flash disk.
Setup FingerTec terminal’s
communication with computer
through LAN, RS232 and RS485.
Set security password of the device for a secure data transfer.
Configure the settings of the FingerTec terminals from general
to display setting to fingerprint.
Data management, update via
USB flash disk, keyboard functions, reset and other terminal
settings can be done here.
Adjust the date and time settings of the terminal.
Run tests on the FingerTec terminal to diagnose the terminal
on various aspects.
Check user attendance and
transaction logs that are available in FingerTec terminals and
perform housekeeping of the
machine.
View free and used memory of
the terminal as well as the terminal’s details in system infor-
mation.
Battery
FingerTec terminals operate using power supply from a standard power outlet. Inside each terminal, there is an RTC battery to keep the clock of the terminal running.
When there is a serious delay in time or the clock of the terminal reverts to 00:00 after
restarting, this indicates that the RTC needs to be replaced.
External p ower supply: Mini UPS (uninterrupted power supply) 12V provides mobile
power supply to the terminals. Charge the mini UPS sufficiently for optimum performance.
Refer to http://accessory.fingertec.com for more information about accessories.
Date/Time
The terminals display the date and time at the home screen. Choose the date and
time format based on your preference. Press Menu > Date/Time > Select Value > OK
to save.
Voice Control
Voice Control lets you control the level of volume emitted by the terminal.
TURN ON/OFF
The system lets you to turn on/off the voice based on your preference. Press Menu >
System > System > Voice > On/Off .
6

Security Features
Security features help protect the information in the terminal from being accessed by
unauthorized individuals.
ADMIN AFFIRM
Register an administrator to the system by enrolling a fingerprint or a password to a
user ID. Press Menu > User Mgmt > New User > Admin: Admin > Choose enrollment
method > OK to Save. After enrolling an administrator, the main menu can only be
accessed by the administrator. The terminal will display “Admin Affirm” when an unauthorized individual tries to access the Menu.
COM KEY
Create password for a specific terminal here. Press Menu > Comm. Icon > Security >
Insert Terminal ID No and Password > Ok to save. The security password known as
COM Key is intended for extra security. To connect the terminal with the software, the
COM key inserted in the Software must be the same as the one inserted in the terminal or else the connection will not be established even though the activation key and
product key are correctly inserted.
Cleaning Terminal
CLEANING THE BODY
Use a dry cloth to clean the terminal’s body. Do not use any liquids, household cleaners, aerosol spray, solvents, alcohol, ammonia and abrasive solutions to clean the body
of the terminal because it could damage it.
CLEANING THE FINGERPRINT PRISM
Clean the fingerprint prism with a cellophane tape for silicon coated prism.
View the video on how to clean the fingerprint prism at this link:
http://www.fingertec.com/newsletter/enduser/cleanfinger.html
For the non-coated prism, please use microfiber cloth.
Restarting and Resetting Terminal
If a feature isn’t functioning as it should, try restarting or resetting the terminal.
RESTARTING THE TERMINAL
Push the On/Off button on the terminal to restart it. If you can’t restart it or if the problem persists, you might want to reset.
RESETTING THE TERMINAL
Go to Menu, press the System icon and click on Reset. Choose to Reset All Default Settings, Reset Keyboard Settings or Reset Other Parameters. Resetting the terminal will
cause all your settings to return to the original factory settings.
7

3 • USER
Enrolling User
The FingerTec terminals can enroll fingerprint templates, passwords and card information. This chapter covers all possible user enrollments in the terminals.
FINGERPRINT ENROLLMENT
It is recommended to enroll two fingerprints for one user ID. One template is the default fingerprint and another is used as for backup. You need to check the quality of
the fingerprint before doing any fingerprint enrollment. It is important to locate the
center points of the finger because the center points has to be placed in the middle of
the scanner during enrollment to get a good reading. You also have to make sure that
the fingers are not too wet or too dry for enrollment.
To enroll ngerprint: Press Menu > User Mgmt icon > New User > ID. No: (insert value)
> Select “Enroll FP” > Select Privilege > Place your fingerprint 3 times following instruc
tions given by the terminal > OK to save.
CARD ENROLLMENT
For terminals that are using card system, the default card technology for the terminal
is RFID. MiFare and HID card modules are available upon request.
To enroll card: Press Menu > User Mgmt icon > New User > ID No: > Insert User ID >
Select “Enroll Card” > Wave the card at the scanning area until the screen displays the
Card ID > OK to save.
PASSwORD ENROLLMENT
The terminal offers different enrolment methods, and passwords can be used alone or
in combination with other verification methods. The maximum length of a password
is 8 digits.
To enroll password: Press Menu > User Mgmt icon > New User > ID No: (insert value)
> Select “Enroll Pwd” > Input password using the keypad > Reconfirm password > OK
> OK to save.
-
Verifying User
1:1 (ONE TO ONE) / 1:N (ONE TO MANY)
VERIFICATION METHOD PROCESS
1:1 (One to One) You have to identify your User ID before inputting any biometrics
1:N (One to Many) You don’t need to identify your User ID before inputting any bio-
8
feature for verification. For example, your user ID is 1008. One to
one method requires you to key in user ID followed by your fingerprint to get verified.
metrics feature for verification. Simply place your finger on the
scanner for verification.
VOICE MESSAGE
VOICE / MESSAGE wHAT DOES IT MEAN?
“Verified” Identity verification is successful, the terminal stores the transaction
“Try again please” Identity verification is failed because the finger is not properly posi-
“Admin Affirm” You are not an administrator of the system and you cannot access
“Duplicate Finger” This message only appears during registration when the finger that
“Invalid ID” For 1:1 verification, User ID entered does not match with fingerprint.
logs and opens the door (if connected to door access)
tioned, the template is not available in the terminal or the password
is incorrect.
Menu page
you want to enroll has been enrolled before. “FP Enrolled Alrd” will be
displayed on the LCD screen.
FINGERPRINT VERIFICATION
1:N – 1:N verification does not require any input of your user ID. Place your finger properly on
the scanner and the terminal will take a second to verify your identity.
1:1 – 1:1 requires input of User ID before the terminal reads and verifies your identity. Press
1:1/1:N > Input ID on the screen > Press fingerprint icon > terminal will read and verify.
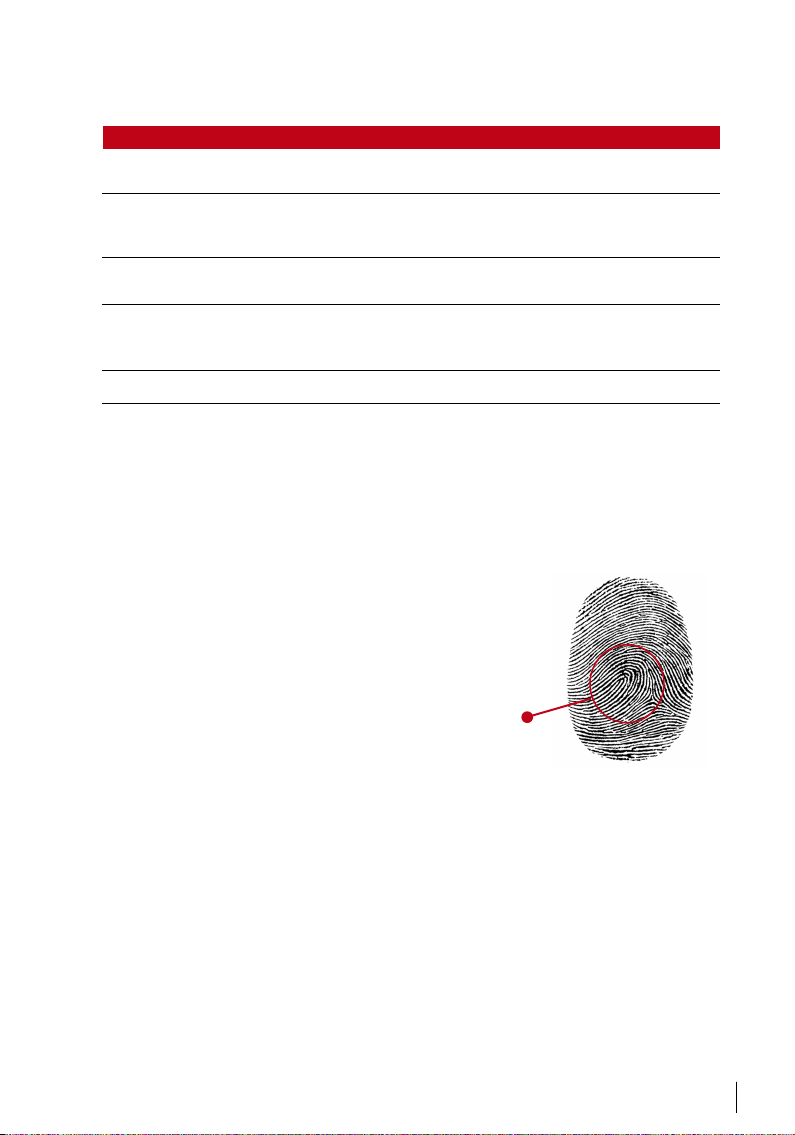
Some precautions have to be taken to get a good read every time.
Make sure the center point of your finger is
·
placed in the middle of the scanner for a good read.
Recommended to use index finger. The terminal
·
accepts other fingers but index is the most convenient.
Make sure the finger is not wet, too dry, injured or dirty
·
Do not press hard on the sensor, just place it
·
comfortably
Avoid direct sunlight or bright light
·
Center point s
PASSwORD VERIFICATION
Password can be an option for those who do not prefer to use other verification methods. To
verify using password, press 1:1/1:N > insert User ID and press key button > insert password
and press OK.
CARD VERIFICATION
Place the card on the card scanning area and the terminal will read and verify the card.
9
 Loading...