

Page 1

We Ma ke Th in gs Eas y
TA300
Desktop Time and Attendance
Fingerprint Terminal
User Guide
Page 2

CONTENTS
2-4 CHAPTER 1 • GETTING STARTED
Viewing the User Guide in the Internet
Terminal Included Accessories
Included Printed Materials
Using Terminal
Activating Terminal
Connecting Terminal to Computer
Registering Terminal
57 CHAPTER 2 • BASICS
Introduction to Terminal
Overview
Keypad
Setting of Date and Time
Changing Display Language and Greeting Voice
To Clean Fingerprint Sensor
811 CHAPTER 3 • MANAGING USERS
Enrolling Users
Fingerprint Enrolments
Enrolling Administrator
Enrolling Fingerprint
Enrolling Password
Enrolling RFID cards
Enrolling Mifare cards (TA300-MC only)
Verification of Users
Results of Verifications
Deleting Users
Access Level/Privilege
(TA300-R only)
12 CHAPTER 4 • OTHER RESOURCES
Information About Fingertec
Copyright Notice & Disclaimer
Page 3

1• GETTING STARTED
Viewing the User Guide in the Internet
The User Guide is available in the package when you purchase the terminal. The User Guide
is also available online at ngertec.com and user.ngertec.com. Choose the language that
you prefer for your online User Guide.
Terminal Included Accessories
USB cable
TA300 ngerprint terminal
DC 5V power Adaptor
Included Printed Materials
• FingerTec Comprehensive DVD
• Quick Start Guide
• Pamphlet
• User Enrollment Template Form
• Warranty Card
Using Terminal
View the video guide of Terminal operations at this link http://user.ngertec.com/user-vd-
TA300.htm.
CONTENTS
2
Page 4

Activating Terminal
The Terminal supports 3 types of power input.
DC5V POWER ADAPTER
Connect DC5V power adapter directly at a power source to power on terminal and to
charge the internal battery. Removal of the internal battery will not jeopardize the performance of the terminal as long as the terminal is linked to a DC5V power adapter.
PC USB PORT
You can connect a USB cable provided to a PC USB port to charge the internal battery
and to power on terminal. You can remove the internal battery and terminal will keep
working from power received from a PC USB port.
INTERNAL BATTERY
Charge the internal battery using either DC5V power adapter or PC USB port. After the
battery has been fully charged, you can unplug all the other power supplies. Refer to the
battery icon on terminal LCD for the status of the remaining power. Charge whenever
necessary.
3
Page 5
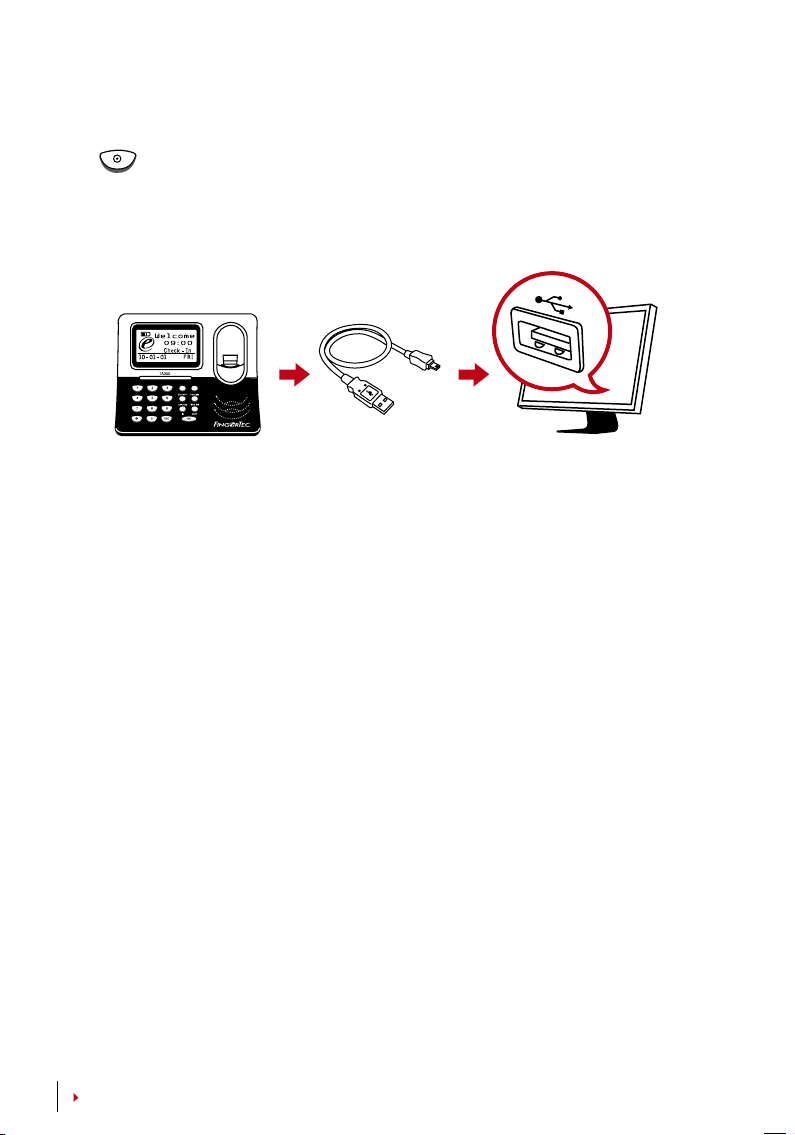
TURNING OFF/ON TERMINAL
Turning OFF press and hold the button for 3 sec.
Turning ON press once.
Connecting Terminal To A Computer
Connect terminal to PC USB port using the USB cable. If you are using more than one
unit of Terminal, you can only connect one unit of Terminal to PC USB at a time. Unplug
terminal from the PC after data transfer is done, and then plug another unit to repeat
the process.
Registering Terminal
Make sure that you register your terminal’s warranty with us at fingertec.com/ver2/eng-
lish/e_warranty.htm.
CONTENTS CONTENTS
4
Page 6
2• BASICS
Introduction to Terminal
TA300 is the latest time attendance machine from FingerTec that works like a mobile
gadget, a desktop standalone fingerprint reader that does not require installation. The
simplicity and mobility of TA300 makes it suitable for tasks that require attendance on
the go such as training centers, tuition centers, construction workers, etc. Having an
internal battery that can last up to 5 hours of normal usage, TA300 is not only competitively priced, it is also providing extra convenience to users.
TA300 model as well is ideal for small and medium companies that are looking for cost
effective time clocking system that can increase efficiency in managing human resources. Employees checks in and out using TA300, and by the end of the day, all you need to
do
to plug the USB cable into your PC and download the data into powerful TCMS V2
is
software for attendance reports.
TA300 can contain up to 500 fingerprint templates and 30000 transactions per terminal.
TA300 really gives you value for you money! Choose TA300 for simple attendance and
attendance on-the-go!
Default TA300 does not emb edded wi th any card reader but th e termin al could accept three
NOTE
types of c ard technology, RF ID, HID and MiFare upon your special request.
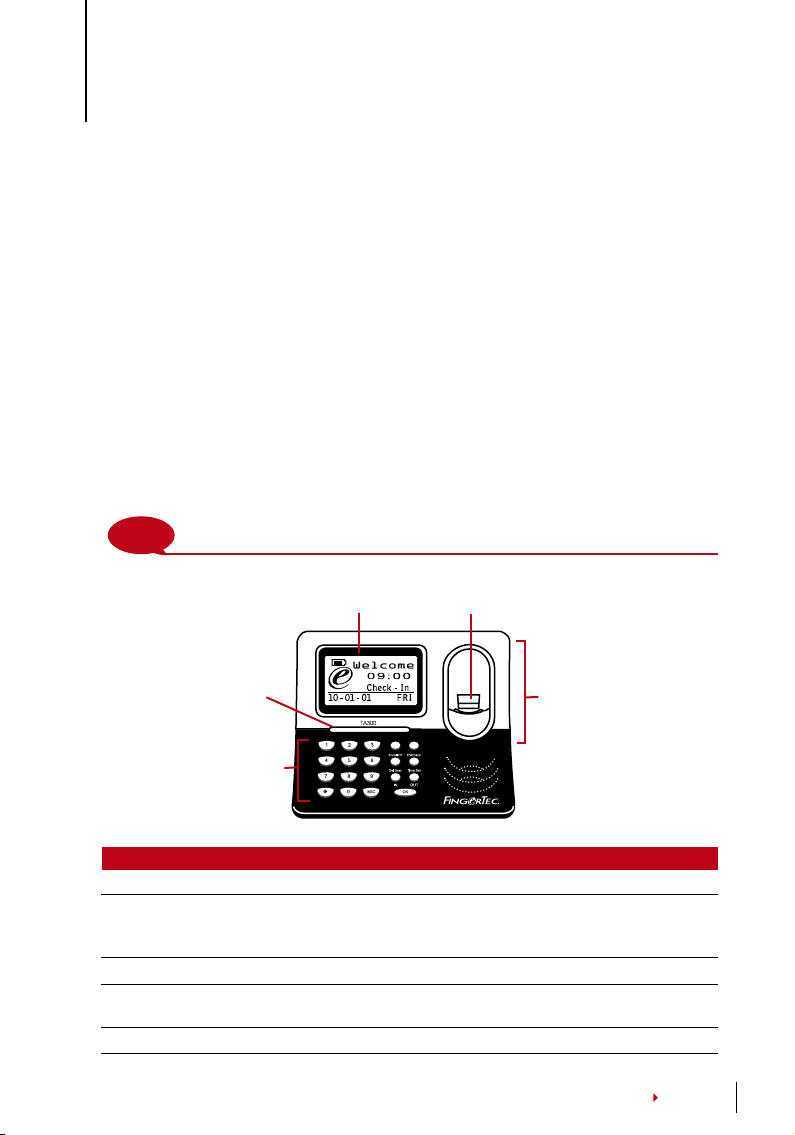
Overview
LCD Screen
Fingerprint Sensor
LED Display
Keypad
ITEM FUNCTION
LCD Screen Displaying status of terminal, day, date and time.
LED Display Green LED – indicating that TA300 is in standby mode and ready to
Red LED – indicating that a user has failed to be verified at TA300.
Keypad
Card Induction Area Read the card information based on the card system of
(TA300-R only) TA300-R.
Fingerprint Sensor Scanning finger for confirmation of identity.
verify users, or user is verified successfully.
To input instructions into the terminal and to allow configuration.
Card Induction
Area (TA300-R only)
5
Page 7
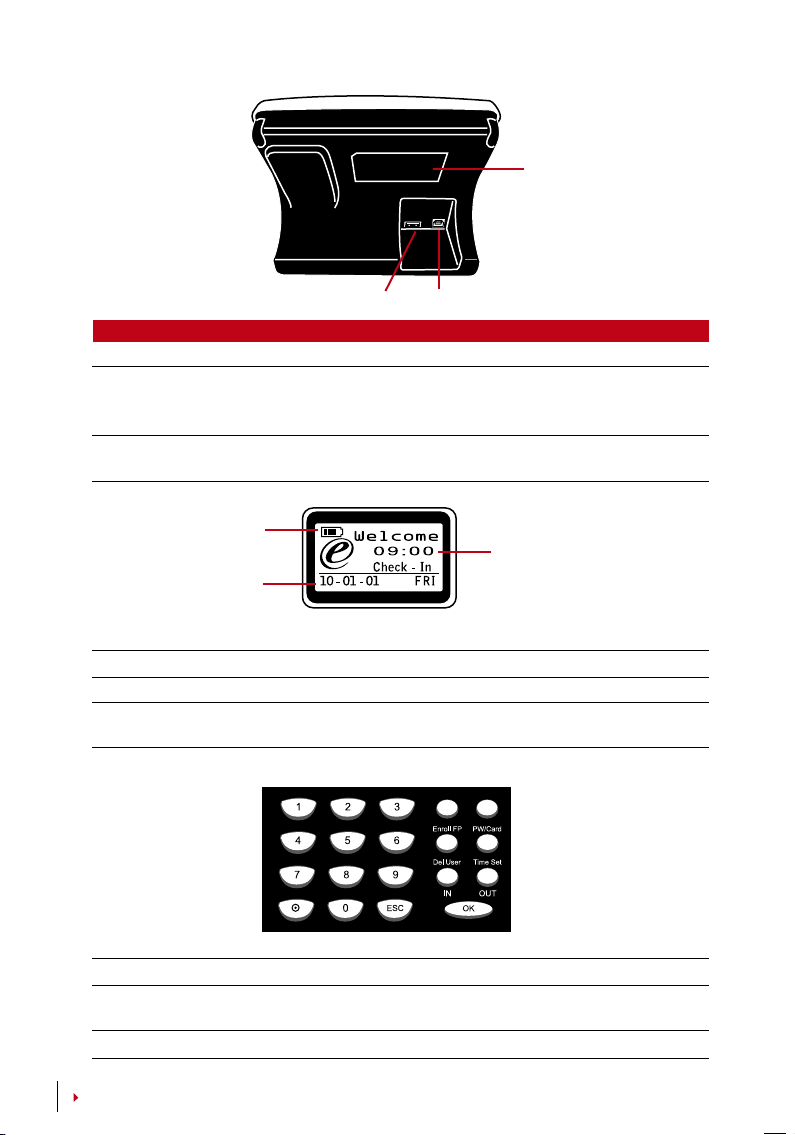
Battery Slot
USB Port 2
USB Port 1
ITEM FUNCTION
Battery Slot Insert the FingerTec backup battery to power on the terminal.
USB Port 1 Connect the USB extension provided here to download/upload data
USB Port 2 Connect
Day / Date
Time Showing the time set for the terminal
Day / Date Showing the day and date set for terminal
Battery Showing the status of internal battery (this icon will only be dis-
from/to the terminal. Connect the USB extension to the power adapter
provided to the terminal to power on and to charge the battery.
the USB extension provided to receipt printer to print receipt
after verification.
Battery
Time
played after inserting the internal battery).
Keypad
0 to 9 To insert user ID or password into the terminal.
On-Off Press and
ESC To cancel ongoing operation
CONTENTS CONTENTS
6
on the terminal
hold for 3 sec to power off the terminal. Press once to power
Page 8

ITEM FUNCTION
OK To confirm operation
Enrol FP To start fingerprint enrolment process.
PW/Card To start
(TA300-R only)
Del User To delete users from the terminal.
Time Set To change date and time for the terminal
IN To define the time you start working, or return from break.
Out To define the time you finish working or take a break.
password enrolment or card registration process.
Setting of Date And Time
TA300 is designed exclusively for time attendance, which makes time and date crucial
to the system.
TO SET DATE AND TIME FOR THE TERMINAL
Time Set > Press IN or OUT to select date or time to change > Press number 0 to 9 to
insert input > OK
Changing Greeting Voice & Display Language
You can change the greeting voice and display language of TA300 to your local language.
TO CHANGE
Insert 5555 > Time Set > Select language by pressing IN or OUT > OK (save) > ESC to
return to the main menu.
To Clean Fingerprint Sensor
Clean the fingerprint scanner with microfiber cloth.
7
Page 9
3 • MANAGING USERS
Enrolling User
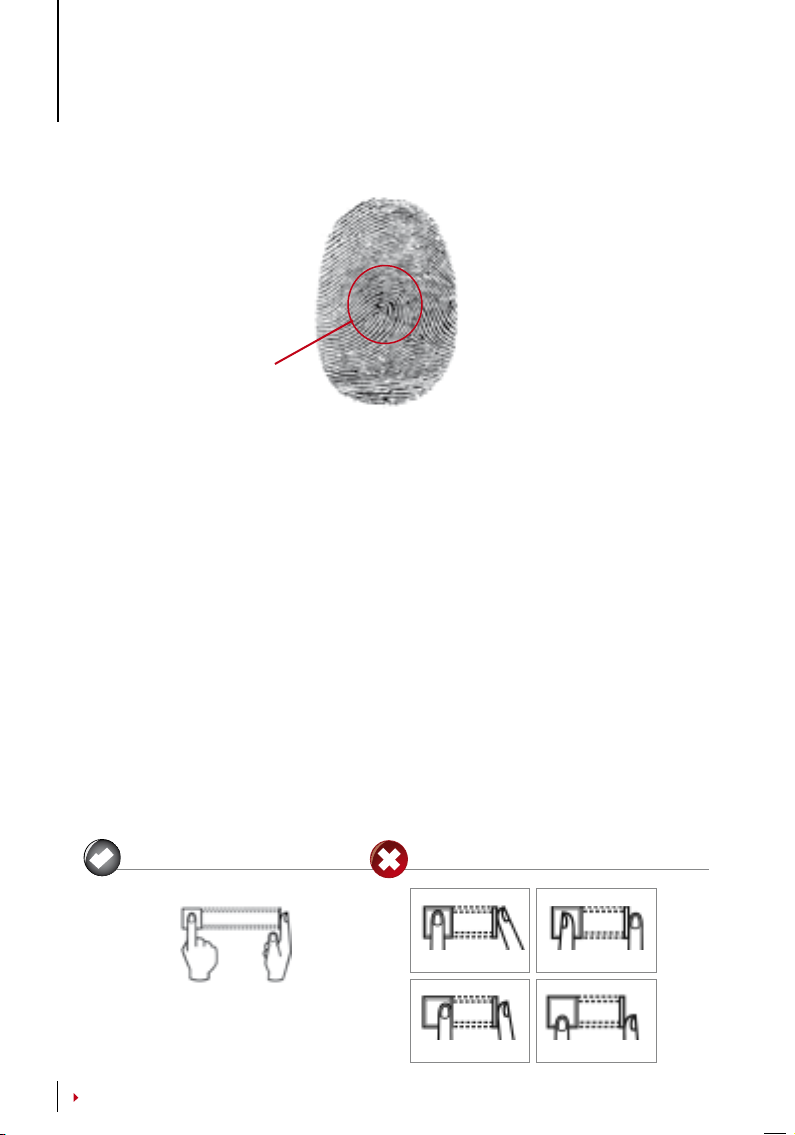
Center point
TA300 can contain up to 500 fingerprints and 30000 logs transaction. Administrator is required before any other users are enrolled inside the TA300 Once an administrator is enrolled in the TA300, any attempt to access into the users enrolment or deletion will prompt
the terminal to display “Admin Affirm”. The administrator’s fingerprint or password is required to access to other features.
The
served for an Administrator. Normal user enrolment is not allowed to carry user ID
of User ID offered in TA300 is from 00001 to 65534. However, user ID 8888 is re-
range
8888.
Enrolling Enrolments
It is recommended to enroll two fingers for one user ID. One template is default and another one is used for backup. You need to check the quality of the fingerprint before doing
any fingerprint enrolment. It is important to locate the centerpoints of the finger because
the centerpoints have to be placed in the middle of the scanner during enrolment to get
a good reading. You also have to make sure that the fingers are not too wet or too dry for
enrolment. During enrolment or verification, do not press hard at the sensor, just place
your finger on the sensor. Never enroll or verify your fingerprint under bright light or direct
sunlight.
What you should do
Place finger flat on the fingerprint sensor. Make
sure the finger’s midpoint is placed at the center
of the fingerprint sensor.
CONTENTS CONTENTS
8
What you should Not do
UPRIGHT ASKEW
OFF CENTER PART
Page 10

Enrolling Administrator
Administrator must enroll with ID 8888.
To enroll administrator with fingerprint: Press Enroll FP > New enroll? > OK > insert 8888
OK > Place finger on sensor to capture fingerprint for 3 times > OK (Save) > New enroll?
>
> ESC > Backup Enroll? > OK > Place another finger on sensor to capture fingerprint for 3
times > OK (Save) > ESC to return to the main menu.
It is recommended to enroll anot her finger as backup finge rprint during the enrolment process. How ever this is
an opt ion. To on ly enroll with one fingerprint, p ress ESC t o return t o the main menu aft er you hav e saved yo ur
first fing erprint enrolment.
After administrator has been enrolled into TA300, normal users can no longer access into
the TA300 to do any settings. Any pressi on the buttons would prompt TA300 to show
“Admin Affirm” requesting administrator verification to access the main menu.
Enrolling of Fingerprint
To enroll with fingerprints: Press Enroll FP > New enroll? > OK > insert user ID > OK > Place
finger on sensor to capture fingerprint for 3 times > OK (Save) > New enroll, Continue? >
ESC > Backup Enroll? > OK > Place another finger on the sensor to capture fingerprint for 3
times > OK (Save) > ESC to return to the main menu.
It is recommended to enroll another finger as backup fingerprint during the enrolment
process. To only enroll with 1 fingerprint, press ESC to return to the main menu after you
have saved your first fingerprint enrolment.
Enrolling Password
To enroll with password: Press PW/Card > New enroll? > OK > insert user ID > OK > Insert
password (maximum 5-digit) > OK > Re-insert password to confirm > OK (Save) > OK > ESC
to return to the main menu.
Enrolling RFID Cards (TA300-R only)
The default TA300 does not come with RFID card reading module. You can order TA300
with the card feature with us at [email protected]
To enroll with RFID card: Press PW/Card > Reg RFID > New enroll? > OK > insert user ID
> OK > Wave the RFID card to the induction area > OK (Save) > OK > ESC to return to the
main menu.
Enrolling Mifare Cards (TA300-MC only)
Enrolment of Mifare card is to save fingerprint of users into the Mifare card. The default
TA300 does not come with Mifare card reading module. You can order TA300 with the card
feature with us at [email protected]
9
Page 11

There are 7 different operations of Mifare cards in TA300.
Create PIN card: Creating identification card without storing any fingerprint into the card.
The card user must do prior enrolment into TA300 with either fingerprint or password.
Press PW/Card > FP Card Mng > Create PIN Card > Insert User ID > Wave the card at the
induction area > Write Suc > OK (save) > ESC to return to the main menu.
Enroll FP Card: Enrolling a new user and writing his fingerprint directly into the Mifare
card. A fingerprint is not stored inside the TA300.
Press PW/Card > FP Card Mng > Enroll FP card > Insert User ID > Place your finger on the
sensor to capture fingerprint for 3 times > OK > Wave the card at the induction area >
Write Suc > OK (Save) > ESC to return to the main menu.
Create FP Card: Copying a fingerprint of a user from a TA300 into a Mifare card.
Press PW/Card > FP Card Mng > Create FP Card > Insert User ID > Wave the card at the
induction area > Write Suc > OK (Save) > ESC to return to the main menu.
Reg FP Card: Registering a Mifare card that has been enrolled in another FingerTec® termi-
nal to a TA300. TA300 can only read a particular Mifare card after this operation.
Press PW/Card > FP Card Mng > Reg FP Card > Wave the card to the induction area > Write
Suc > OK (Save) > ESC to return to the main menu.
Unreg FPCard: Deregister a particular Mifare card from TA300. TA300 stops to read the
card after this operation.
Press PW/Card > FP Card Mng > Unreg FP Card > Wave the card at the induction area >
Write Suc > OK (Save) > ESC to return to the main menu.
Empty Card: This feature is to clear the contents of Mifare card.
Press PW/Card > FP Card Mng > Empty Card > Wave the card to the induction area > Write
Suc > OK (Save) > ESC to return to main menu.
Dup FP Card: Copying a fingerprint from a Mifare card into TA300. The user can verify
fingerprint directly at the TA300.
Press PW/Card > FP Card Mng > Dup FP Card > Wave the card at the induction area > Write
Suc > OK (Save) > ESC to return to the main menu.
Move to FP Card: Copying fingerprint from TA300 into a Mifare card. A fingerprint in
TA300 would be deleted after the operation.
Press PW/Card > FP Card Mng > Move to FP Card > Insert User ID > Wave the card to the
induction area > Write Suc > OK (Save) > ESC to return to the main menu.
Card only: Press PW/Card > FP Card Mng > Card Only > Set Yes or No by pressing IN or OUT
button > OK (Save) > ESC to return to the main menu.
Yes – TA300 will only read the Mifare card for user verification without asking for finger-
print verification.
NO – TA300 will only read the Mifare card and will request user for fingerprint verification.
Verication of Users
Fingerprint users can choose to use either “1 to 1” or “1 to Many” methods.
1 to 1 fingerprint verification: Insert user ID > OK > Place finger on sensor to capture
fingerprint > Result of verification.
CONTENTS CONTENTS
10
Page 12

1 to Many fingerprint verification: Place finger to sensor to capture fingerprint > Result of
verification.
to use 1 t o 1 method.
Note: For u sers who are always f ail to verify fingerp rint by 1 to Many met hod, it is recommende d
Password verification: Insert User ID > OK > Insert password > OK > Result of verification
Verification of RFID card users: Wave RFID card to the induction area > Result of verification.
Verification of Mifare card users: Wave Mifare card to the induction area > Place finger to
sensor to capture fingerprint > Result of verification
Some precautions have to be taken to get a good read every time.
· Make
sure the centerpoints of your finger is placed in the middle of the scanner for a
good read.
· Recommended
to use index finger. TA300 accepts other fingers but index is the most
convenient.
· Make sure the finger is not wet, too dry, injured or dirty
Do not press hard on the sensor, just place it comfortably
·
· Avoid direct sunlight or bright light during verification process
Results of Verications
Voice / Message What does it mean?
“User ID XXXXX” Identity verification
“Please Try Agn” Identity verification is failed because the finger is not properly positioned
“Admin Affirm” You
“Error Pwd” Identity
“Invalid Card” The card you are using is not enrolled or the card is damaged.
cate presence.
or the template is not available in TA300.
are not administrator of the system and you cannot access Menu
page
verification is failed because you have entered the wrong pass-
word into TA300
is successful, TA300 stores the transactionlogs to indi-
Deleting User
Only an administrator can do user deletion at TA300.
To delete certain user(s), press Del > Insert User ID to delete > OK > ESC to return to the
main menu.
Access Level/Privilege
TA300 offers two types of access level or privilege.
Privilege What can you do?
Normal User Only use
Administrator You are allowed to access into menu to enroll users and edit settings and
TA300 to verify your identity. You cannot access into Menu and
make changes into settings and system
system
11
Page 13

4 • OTHER RESOURCES
Information About Fingertec
TO LEARN ABOUT GO TO?
Company and the products
The latest updates
Twitter: FingerTec Worldwide
To subscribe for FingerTec newsletter:
www.fingertec.com/subscribe-R/newsletter.html
Technical Tips and Latest user.fingertec.com
Product Updates and
Upgrades
Email
[email protected] (Sales)
[email protected] (Technical)
Register for Warranty
FingerTec Accessory accessory.fingertec.com
www.fingertec.com
Facebook Fan Page: FingerTec Worldwide
www.fingertec.com/GPW/warranty.htm
Copyright Notice & Disclaimer
COPYRIGHT NOTICE
All rights reserved. No part of this book may be reproduced or transmitted in any form or by
any means, electronic or mechanical, including photocopying, recording, or by any information storage and retrieval system, without written permission from FingerTec Worldwide Sdn
Bhd. Every precaution has been made to supply complete and accurate information. Information in this document is subject to change without prior notice.
DISCLAIMER
No person should rely on the contents of this publication without first obtaining advice from
a qualified professional person. The company expressly disclaims all and any liability and responsibility to any terminal or user of this book, in respect of anything, and of the consequences of anything, done by any such person in reliance, whether wholly or partially, upon
the whole or any part of the contents of this book.
FINGERTEC WORLDWIDE SDN BHD
CONTENTS CONTENTS
12
Page 14

For technical tips and manuals in o ther languages, refer to http://u ser.finger tec.com
www. fingertec.c om
© 2010 FingerT ec Worldwide Sdn. Bhd . All rights reserved . • Printed in Malays ia. 112010
 Loading...