


DETERMINE THE LOCATION AND POSITIONING OF THE INSTALLATION
1
www.fingertec.comwww.fingertec.com
s-Kadex
Stand-alone Card & Password
Access Control System
Installation Guide
WIRING FOR POWER SUPPLY
3
The power input ports for these models are located at the rear of the terminals. There is no adapter plug
supplied with the models, instead you need to source for power cables (red and black cables) to connect
the power from the terminal to a power supply.
POWER SUPPLY PORT
+12V
DC12V
Power Supply
Alarm
device
Type NO
_
BELL
BELL+
GND
Door
bell
AL
AL+
.
.
.
.
.
_
.
.
.
.
.
.
.
Back of Terminal
BUT
GND
SEN
NO1
COM1
NO1
For NC or NO
door lock
system
• Avoid installing the terminals in locations with high moisture or condensation levels in the air.
• The recommended installation height of the terminal from the ground is 1.2 meter.
MOUNTING OF TERMINALS ON A WALL
2
After determining the height of the
terminal from the ground level and
making the relevant marks on the
wall, drill the screws into the wall to
hang the back plate.
Back Plate
4 feet / 1.2 meter
(recommended)
CONFIGURING THE SECURITY SETTINGS
4
ADJUST DOOR UNLOCK TIME
Adjust time for device to unlock according to your
preference.
Operation: Verify your Admin password > Press 4 >
Green LED blinks > Buzzer emits long beep > Insert time
in seconds, i.e. 10 > Green LED blinks > Buzzer emits long
beep > Timer adjusted successfully
Note: The maximum unlock time is 254s. If you want to insert values
less than 3-digits, hash (#) is required. E.g.: 10 will be keyed in as 10#.
SELECT DOOR SENSOR TYPE
Installing a door sensor is important to monitor door
activity. Select the type (NO or NC) before it starts to work.
Operation: Verify your Admin password > Press 0 >
Green LED blinks > Buzzer emits long beep > Press 5 >
Green LED blinks > Buzzer emits long beep > Press
number to select type of door sensor > Green LED blinks
> Buzzer emits long beep > Changes done successfully
Note:
NO Type 0
NC Type 1
Disable door sensor 2
ADJUST DOOR SENSOR DELAY TIME
Set time to allow door to remain open after unlocking.
The device alerts you with a buzzer sound when the
allowed time runs out.
Operation: Verify your Admin Password > Green LED
blinks > Buzzer emits long beep > Press 0 > Green LED
blinks > Buzzer emits long beep > Press 4 > Green LED
blinks > Buzzer emits long beep > Insert time in seconds,
i.e. 10 > Green LED blinks > Buzzer emits long beep >
Changes done successfully
Note: The maximum delay time is 254s. If you want to insert values
less than 3-digits, hash (#) is required. E.g.: 10 will be keyed in as 10#.
ENABLE ALARM OUTPUT FROM DEVICE
It is optional to link s-Kadex to an alarm or siren to
amplify its alerts. Make sure you enable the alarm
output feature after linking up with the siren or alarm
system.
Operation: Verify your Admin password > Press 0 >
Green LED blinks > Buzzer emits long beep > Press 1 >
Green LED blinks > Buzzer emits long beep > Press 0 to
enable > Green LED blinks > Buzzer emits long beep >
Changes done successfully
Refer to Appendix for dimensions
and measurements of installation.
Note: Press 1 to disable this feature if you do not want to link up
s-Kadexwith an alarm or siren system.
To turn off alarm output: Verify your Admin password > Press #
ENABLE ILLEGAL DISMANTLE ALARM
s-Kadex will trigger the alarm or siren system immediately if somebody tries to dismantle it.
Operation: Verify your Admin password > Green LED
blinks > Buzzer emits long beep > Press 7 > Green LED
blinks > Buzzer emits long beep > Press 0 > Green LED
blinks > Buzzer emits long beep > Changes done successfully
Note: Press 1 to disable this feature if you do not want to use it.
APPLY MULTI VERIFICATION METHOD
You can increase your access control’s security level by
applying multiple verification methods.
Operation: Verify your Admin password > Press 5 >
Green LED blinks > Buzzer emits long beep > Insert
number to represent the type of multi verification (as per
table shown) > Green LED blinks > Buzzer emits long
beep > Multi verification applied successfully
NUMBER MULTI VERIFICATION
1 Password only
2 Card only
3 Fingerprint only
4 Fingerprint/Card/Password
5 Card + Password
6 Fingerprint + Password
ENABLE FAIL VERIFICATION ALARM
Enable device to trigger alarm or siren system when a
user fails to verify more than 3 continuous times.
Operation: Verify your Admin password > Press 0 >
Green LED blinks > Buzzer emits long beep > Press 2 >
Green LED blinks > Buzzer emits long beep > Press 0 >
Green LED blinks > Buzzer emits long beep > Changes
done successfully
Note: Press 1 to disable this feature if you do not want to use it.
FINALIZING THE INSTALLATION
5
1. Check that all cable connections are done
correctly.
2. Attach the terminal to the corresponding back
DOOR LOCK ACCESSORIES
FingerTec offers various door lock accessories to
complement FingerTec door access products. For
more info, go to http://accessory.fingertec.com.
plates and tighten the screws to secure the
terminal on the wall.
3. Switch on the power to the terminal.
4. Start using the terminal.
APPENDIX • POWER SUPPLY & DOOR LOCK SYSTEM WIRING DIAGRAMS
Diagram1 • Normally Close (NC)
DC12V 3A
Power Supply
EM Lock (NC)
Emergency Break 2
Glass (Type NC)
Override Switch A
(Type NC)
Release button
--+
3
C
Door sensor
+12V
GND
BUT
GND
SEN
NO1
COM1
NC1
A L ---
AL+
BELL---
BELL+
Diagram 2 • Normally Open (NO)
DC12V 3A
Power Supply
Release button
EM Lock (NO)
Emergency Break 1
Glass (Type NO)
Override Switch B
(Type NO)
--+
3
D
Door sensor
+12V
GND
BUT
GND
SEN
NO1
COM1
NC1
A L ---
AL+
BELL---
BELL+
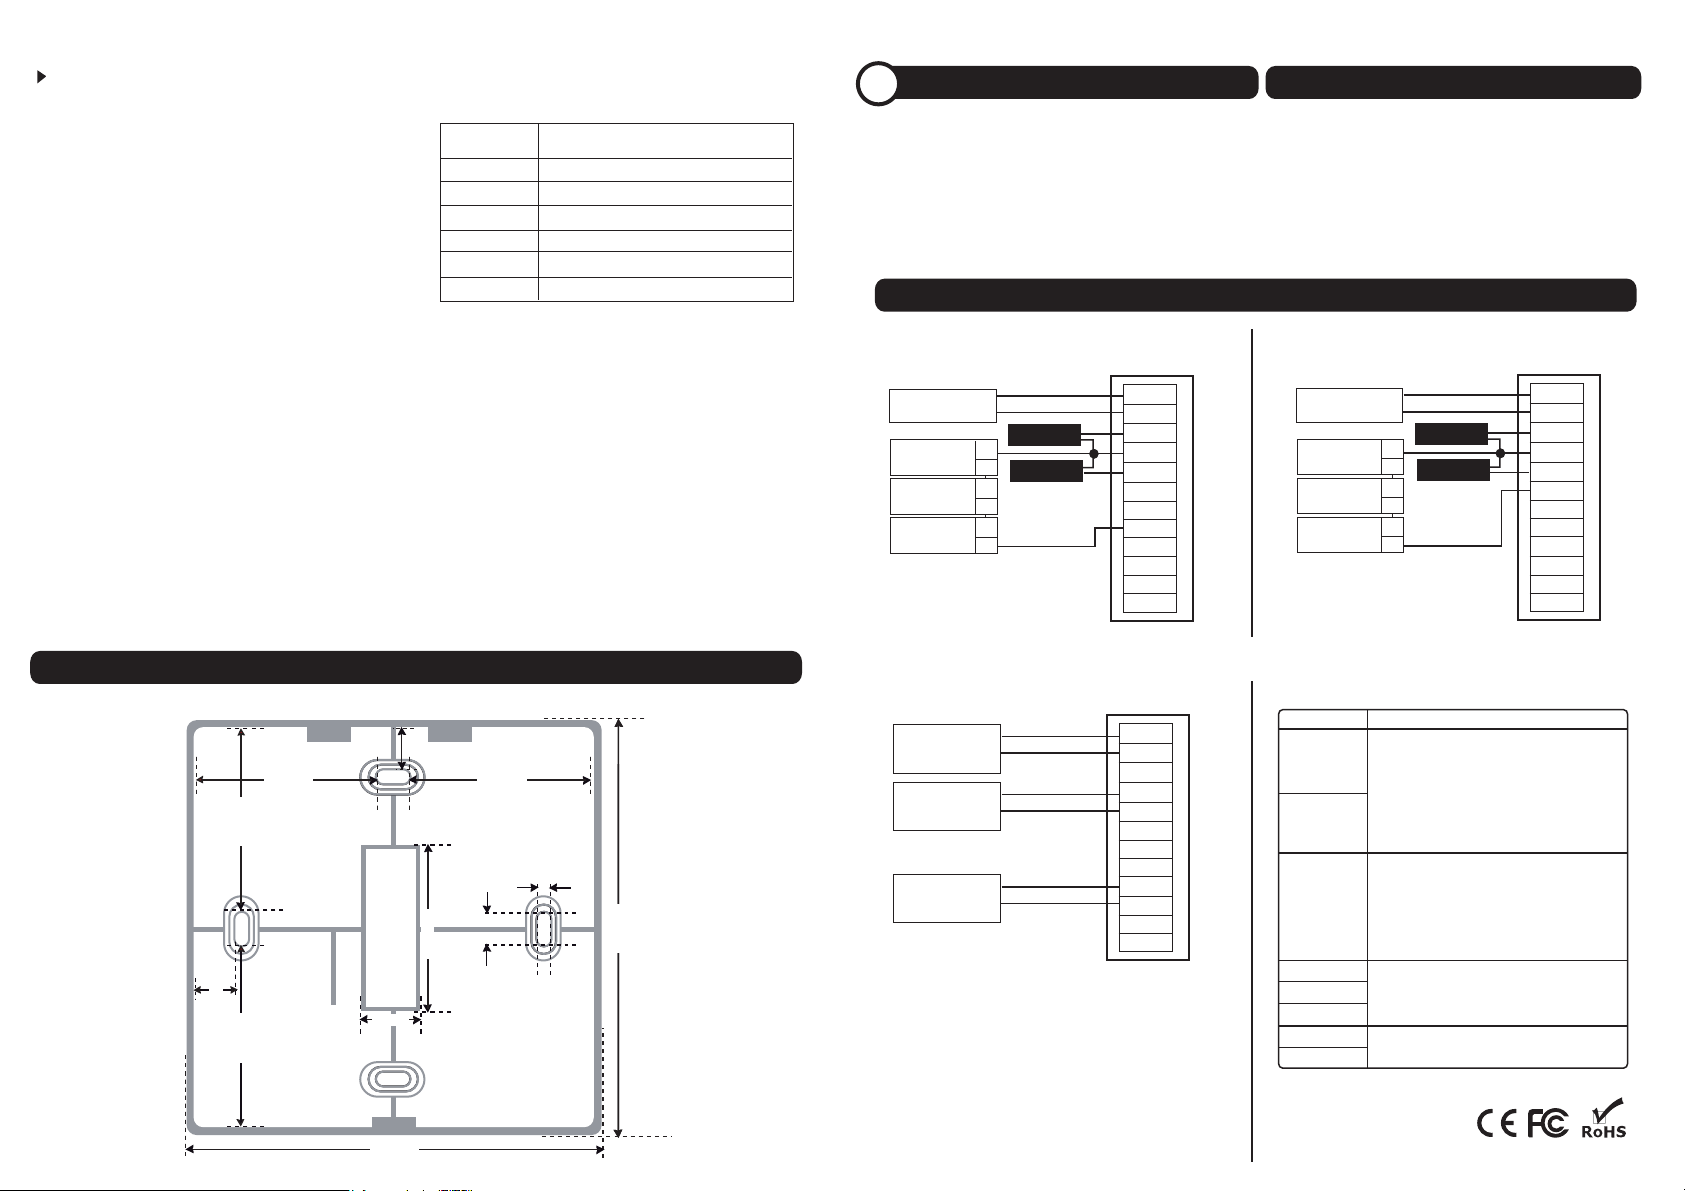
APPENDIX • TERMINAL DIMENSIONS AND MEASUREMENTS
Front View of Terminal Back Plate
10mm
38 mm38 mm
3mm
7mm
10mm
38 mm
38 mm
32 mm
10 mm
84 mm
84 mm
Diagram 3 • Other Accessories
DC12V 3A
Power Supply
Door Sensor
Alarm device Type NO
or NC Dry contact
+12V
GND
BUT
GND
SEN
NO1
COM1
NC1
A L ---
AL+
BELL---
BELL+
Door Lock Connectors
The terminal will trigger the alarm output (NO or NC)
for the following situations:
• Door forced open (a door sensor must first be
installed)
• Door open time out (a door sensor must first be
installed)
• Terminal has been illegally dismantled
WIRING PORT
NO
NC
COM
SEN
GND
BUT
AL+
AL-
2013 FingerTec Worldwide Sdn. Bhd. All rights reserved • 062013
©
USAGE
Dry Contact
(Independent power supply for door lock)
• NO type door lock (NO-COM)
• NC type door lock (NC-COM)
Power Contact
(Using power from terminal to power on door lock)
• NO type door lock (NO-GND)
• NC type door lock (NC-GND)
Dry Contact
(Independent power supply for door lock)
• NO type door lock (NO-COM)
• NC type door lock (NC-COM)
Power contact
(Using power from terminal to power on door lock)
• COM1 - +12V
Door Sensor
Release Button
Alarm System
NO or NC Type – Check in Advance Options
(SEN-GND)
(BUT-GND)
 Loading...