


Advanced Access Control System
User Guide

Copyright Notice
All rights reserved. No part of this book m ay
be reproduc ed or transmitted in any form
or by any m eans, electronic or mechanical,
including p hotocopying, recording, or
by any info rmation storage and retrieval
system, wit hout written permission from
FingerTec W orldwide Sdn Bhd. Every
precaution has been made to supply
complete an d accurate information.
Information in this document is subject
to change w ithout prior notice.
Disclaimer
No person s hould rely on the contents of th is
publication without first obtaining advice
from a qual ified professional person.
The company expressly disclaims all and any
liability a nd responsibility to any termina l or
user of thi s book, in respect of anything, and
of the cons equences of anything, done by
any such pe rson in reliance, whether wholly
or partiall y, upon the whole or any part of
the content s of this book.
FING ERTEC WORL DWIDE SDN B HD

Contents
5-6 Preface
EXPERIENCE ADVANCED ACCESS
CONTROL SYSTEM
Welcome to Ingress
10 Useful Features of Ingress
7-16 Chapter 1
INSTALLATION AND CONFIGURATION
Getting Started - Ingress Installation
• System Requirements
• Installing the System
Starting the Ingress Installation
Installing MySQL Server
Installing Microsoft .NET Framework 4.0
Installing OFIS Scanner Driver
Completing Ingress DB Installer
Ingress Startup
Quick Setup Wizard
17-29 Chapter 2
MANAGEMENT OF DEVICE AND DOOR
Devices
• Add Device Manually
• Add Device by Auto Scan
• Configuring Device
• Disable and Delete Device
Door
• Add Standalone Device to Door
• Add Ingressus to Door
• Add Keylock to Door
• Configuring Settings to Doors
• Delete Device/Doors
• Access Group of Door
• Events of Doors
Linkage with IP Camera
Permanent Door Open Close
Time Zone
Permanent Door Open Close
Holiday Time Zone (Ingressus only)
30-35 Chapter 3
SETUP OF ZONES
Antipassback
Fire Alarm
Interlocking
First Card Unlock
Multi Card Open
To Delete Zone/Device/User
Group/Multi Card
Combination Group
36-43 Chapter 4
MANAGEMENT OF USERS
Add Department
Add Users
• To Download Users from Devices
• To Download Users via USB Flash
Disk
• To Create Users Manually
Edit User Biodata
• To Edit Users’ Information Manually
• To Import Users’ Biodata from Other
System
Upload users to devices
• Upload users via TCP/IP or RS485
• Upload users via USB flash disk
Remove Users
• Remove Current Users
• Remove Device Users
Other Operation
• To export users biodata
• To import users’ biodata from Sage
UBS Payroll
(for Malaysia market only)
• To search users by keywords

46-50 Chapter 5
ACCESS LEVELS
Access Levels by Time
• Setup of Time Set
• Setup of Access Group
Access Levels by Holiday
• Setup of Holiday Time Set
• Create Holiday List to add Holiday
Time Set
Access Level by Verify Type
51-55 Chapter 6
MONITORING
Monitoring by Door or Zone
• Remote Settings
• Monitoring Settings
Real-time Monitoring
Log List
Visual Map
• Add Visual Map and Doors
• Start Monitoring Process
56-92 Chapter 7
ATTENDANCE
Setup of Clocking Schedules
Weekly Schedules
• Clocking Rules
• Range Rules
• General Rules
• Rounding Rules
• Break Rules
• Overtime Rules
The Daily schedule
• Clocking Rules
• Range Rules
• General Rules
• Rounding Rules
• Break Rules
• Overtime Rules
The Flexi Schedule
• Clocking Rules
• General Rules
• Rounding Rules
• Break Rules
• Overtime rules
Setup of Group Duty Roster
• Creating Weekly Group Duty Roster
• Creating Shift Group Duty Roster
• Assign users into group duty roster
• Special working rules
User Duty Planner
• Leaves and Remark
• To add types of leave
• To add Remark
Attendance Sheet
• View and Edit
• Download data from devices
• Generate attendance data
• Export Attendance Records
• Export to Sage UBS Payroll
(Malaysia market only)
Data Audit List
93-95 Chapter 8
REPORTS
Types of Reports and Usage
Preview, Print or Save Reports
96-103 Chapter 9
SETTINGS IN INGRESS
Database Configuration
System Parameters Settings
Field Customization Management
Company Info
System User
• To create User Roles
• To create login account and assign role
Event
• To configure notifications by alarm
and email
• To configure alarm alerts and color
• To configure email alerts
Network Camere Intergration
• Milestone server
• EpiCamera

Preface
Experience Advanced Access Control System
Welcome to Ingress
Ingress is an advanced access control software developed and designed specifically as a
complete solution to centralize, manage, and monitor FingerTec access control devices
directly, or by connecting them to the Ingressus access controller hardware. Along with
Ingress, you will experience the extensive and elaborate features for configuring access of
a door, as well as the ability to centralize and monitor access activity of an environment
in a real-time manner.
Ideally suited for self-managed organizations of below 100-door environment, Ingress is
also capable of seamlessly integrating its access control functions with alarm monitoring
and other intrusion detection devices. Ingress supports all standalone FingerTec access
control models that use card, fingerprint and face recognition verification, and multiple
devices can be centralized in the Ingressus Network Control Panel for multiple-door monitoring.
5

10 Useful Features of Ingress
Efficient Centralized Management
Ingress is a server-client based software that
supports surveillance from multiple PCs concurrently, while containing useful access monitoring features such as multi-level users, and
user group privileges.
Secure Architecture
The architecture of Ingress keeps data secure
and accessible, while providing you with activity logs, audit trails, and advanced devicesearching features in a LAN environment.
User-Friendly & Flexible
User-friendliness is emphasized in Ingress with
features such as the Quick-Setup Wizard, dragand-drop methods, and shortcut icons with
ribbon menus to make interaction with the
software effortless.
Enhanced Software Security Features
Ingress provides an optional fingerprint login
for system administrators. There is a screenlock function as well as an automatic logout
after timeout. The detailed history records and
audit trail functions for tracking past configuration changes. There is also a full backup and
restoral of system data.
Access Control Readily Available Reports
There are 13 types of listing & event reports
available. The report supports digital watermark imprint, comprehensive event filtering,
quick-print and email action. The reports can
be exported into 10 formats for example: .XLS,
.TXT, .CSV.
Powerful Access Control Settings
Get most Access Control features from Ingress
such as Interlocking, fire alarm linkage, Antipassback, multiple verification settings and
multi-card operation.
Integrated Monitoring
Ingress provides a real-time alarm or event
logs to ensure all events are completely documented (including messages and controls) for
the entire system. Doors can be controlled remotely, including unlocking doors and disarm-
ing alarms.
Pictorial Map for Instant Activity Visibility
Ingress can display up to a maximum of 9 floor
maps for real-time monitoring. The Graphic
map is displayed with animated icons for instant visibility of activity. Multiple work stations can be used concurrently to perform
monitoring.
Comprehensive Time Attendance
Functions
The weekly schedule comes with 3 pairs of
IN/OUT columns for attendance monitoring.
You can set up a group or personal duty roster
and assign it to the users. Ingress also supports
leave and holiday management. At the Attendance Sheet, you can instantly add, edit, or
delete attendance records. At the report section, there are 6 types of commonly used time
attendance reports, for example: Daily Attendance Listing, Tardiness Report, and On-Leave
Listing.
Useful Event Priority & Alerts
You can organize alarm alerts and set alarm
priorities to optimize response time into Ingress. There are 62 event types that can be
assigned according to the necessity of the
priority. Ingress will automatically send email
notifications to assigned recipients when an
event is detected in the system. You may also
customize the sound alert for every priority.
6

Chapter 1
Installation and Configuration
This chapter guides you on the installation and basic setup of the Ingress.
Before you start using Ingress, you will need to install the software successfully into your
computer. Installing the Ingress software is hassle-free as the Ingress installer contains an
installation wizard, to guide you step-by-step in setting up the software completely.
GETTING STARTED - Ingress Installation
System Requirements
Before installing Ingress, please make sure your client and server PCs are up to date with the
following requirements:
Feature
Operating
system
Processor
Memory
Hard drive
Resolution
Server
• Windows XP
• Windows Vista
• Windows 7,
• Windows Server 2003/2008
• (32 or 64 bits)
Intel® Core® 2 Duo 2.5 GHz or better
3 GB of RAM or better
80 GB
1024 x 768 or higher
Windows 8
Feature
Operating
system
Processor
Memory
Hard drive
Resolution
Client
• Windows XP
• Windows Vista
• Windows 7
• Windows Server 2003/2008
• (32 or 64 bits)
Intel® Core® 2 Duo 2.0 GHz or better
2 GB of RAM of better
50 GB
1366 x 768
Installing the System
For Ingress to function properly, you will need to install these components first:
MySQL Server
Microsoft .NET Framework 4.0 Full
FingerTec Ingress Software
OFIS Scanner Driver
STARTING THE INGRESS INSTALLATION
Right click the FingerTec Ingress setup file and select Run as administrator.
7

This will prompt the installer to start the Ingress Server – Install Shield Wizard. The Install
Shield Wizard will show the required components’ installation status. There are 3 components to be installed before we can proceed with Ingress installation.
MySQL Server
Microsoft .NET Framework 4.0
Click Install to initiate the installation.
INSTALLING MYSQL SERVER
The first component to be installed is the MySQL Server.
At the welcome page, click Next to proceed. At the End-User License Agreement window,
select I accept the terms in the License Agreement and click Next to proceed.
At the Choose Setup Type window,
choose Typical to proceed.
8

At the Ready to install MySQL Server 5.5 window, click Install to immediately start the
installation. When the progress bar completes, you will be prompted with MySQL Enter-
prise window.
At the MySQL Enterprise window, click
Next > Next and Finish to launch the
MySQL Instance Server Configuration
Wizard.
Once the installation of MySQL Server completes, the program will launch the MySQL
Server Instance Configuration Wizard. You need to click Next 9 times until you reach the
security options window. Make sure that on each page before you clicked next, the selec-
tions are as shown as the screenshots below.
9

10

At the Modify Security Settings, enter
your new Root Password and enter it
once again for reconfirmation. Click
Next > Execute to start the configura-
tion. Once done, click Finish.
INSTALLING MICROSOFT .NET FRAMEWORK 4.0
The next component that the installer needs to install is the Microsoft .NET Framework 4.0.
The FingerTec Ingress Setup will detect and determine if the computer has already been
installed with the Microsoft .NET Framework 4.0. It will skip the installation if it has been installed. If it has not been installed, the FingerTec Ingress Setup will install it automatically.
Upon completing the installation of the MySQL Server and Microsoft .NET Framework 4.0,
the next component to be installed is the Ingress Server. Click Next, select I accept the
terms in the license agreement and click Next to proceed. Choose the installation path
and click Next.
11

Select Complete and click Next. Click
Install to start the Installation and click
Finish when the process is complete.
INSTALLING OFIS SCANNER DRIVER
The last component to install is the OFIS Scanner Driver. The Ingress Setup will detect and
determine if the computer has already been installed with the OFIS Scanner Driver and
skip the installation if has. If it has not, the Ingress Setup will install it automatically.
12

Click Next and click Install to start the
installation. Upon completing the installation, you will need to restart the
computer for the changes to take effect.
Please select No, I will restart the com-
puter later and click Finish to proceed to
the next step.
COMPLETING INGRESS DB INSTALLER
The Ingress Setup will then prompt the In gress D B insta ller wi ndow. I t is very import ant to
test t he server and da tabase connection before you start using Ingress. If you do not perform
this step, you will not be able to log into Ingress. Insert the Password and click Test Con-
nection.
13

Once the server connection is established, it will open up the option for Database. Insert the User Name and Pass-
word for the Database and click Update
Connection.
After the Database connection is established, click New Database to create a
new database.
Click Finish to complete the installation.
14

Ingress Startup
Once the installation has completed, the
Ingress icon will be available at the desktop. Right click the icon and select Run as
administrator.
The Ingress client will validate the database connection from the server. Once
the validation has been obtained, insert
the Server IP Address and Server Port to
establish connection. Click Test to test
the connection. When the connection
has been established successfully, click
Save to save the Server IP Address and
Server Port into the computer for future
references.
Now you will reach the Ingress Login Window. Insert the User Name and Password
to log into Ingress. Default User Name:
admin , Password: 123. You can change
the User Name and Password under Ingress User Accounts. Click Login to log
into Ingress. If you wish to reconfigure
the server settings, click Server Setting.
You can also log into Ingress by using
your fingerprint instead of the username
login. You will need to enroll your fingerprint template(s) under User Account before you can login using this method.
Congratulations! Now you are about to experience INGRESS, the Advanced Access Control
Software, brought to you by FingerTec Worldwide.
15

Quick Setup Wizard
Ingress will start up Quick Setup Wizard during the first login
session. The wizard will guide you through all basic and useful
settings in Ingress software.
You can skip the wizard in order to configure Ingress software
by yourself. You can always run the wizard later from the Main
Menu button.
16

Chapter 2
Management of Device and Door
This chapter guides you on how to install and manage FingerTec devices into Ingress and
assigning them to doors.
Devices
Devices refer to the FingerTec physical terminals installed to guard every door/entrance.
There are 3 types of physical terminals:
Ingressus door controller
FingerTec standalone terminal
Keylock series (7700 and 8800)
Ingressus door controller can work with slave terminals. It is the master that will store &
transfer data, control door and alarm activities. Ingressus door controller can link up to a
maximum of 4 slave terminals (R2c, i-Kadex or k-Kadex). Slave terminals only work as capturing station for fingerprints, cards or password. The captured data is sent to Ingressus for
verification before Ingressus can grant access to users. Ingressus can work with AUX input
(e.g.: heat and smoke sensor, PIR motion detector) and output (e.g.: alarm siren, strobe light,
IP camera).
FingerTec standalone terminals refer to all FingerTec terminals, for example R2, AC900, Q2i,
Face ID series. The terminals have individual processors and memory, to verify and store users’ data. Standalone terminals can be paired with slave terminals as an entry-exit system.
Slave terminals capture fingerprints, card or password data then sends them to master for
verification.
Keylock series refer to FingerTec biometric mechanical door lock. The Keylock series has
integrated processor and memory, to verify/store users’ data. However, it does not communicate with Ingress directly as it only has a USB port for data transfer.
Add Device Manually
You must add each device into the list in Ingress before you can manage any of it. Adding
devices to Ingress requires the device to connect to Ingress via network (TCP/IP or RS 485).
However, standalone terminals and the Keylock series supports USB flash disk for transferring data and settings with Ingress.
Every device has a unique serial number, which is important for activation in Ingress. Contact your local resellers or support@ fingertec.com by providing the serial number of the device in case you fail to activate online.
17

1. Go to Device tab to select Add Device.
2. Select
Device Type and Communication
Mode then insert the information accord-
ingly.
Device Name: Name the device for easy future reference.
Communication Key: 5-digit numeric secret password to secure the connection between device and
Ingress. Ingress must pair this key with device (under Dev ID) before connection establishes.
Auto Synchronize Device Time: Activate this to allow Ingress to always synchronize the device with
the server date and time.
Settings for TCP/IP connection:
IP Address/URL: Insert the IP address of the device so Ingress can find it on the network to establish con-
nection.
For devices installed at remote site, you can insert the URL of the remote server into this column. Ingress can link up with the device via Internet.
Port: Default TCP port (4370) of Ingress server to link up with device via network.
Settings for RS485 connection
Serial port: Define the serial port of the server in use to connect to the RS232/485 data converter.
Baud rate: Select the baud rate of RS485 network.
Settings for USB flash disk
Serial number: Serial number of device.
Device ID: Make sure you insert the same ID as the one set in the device. Ranges from 1 to 999.
Settings for Keylock
UDisk Path: Define the USB flash disk drive to read the basic info of Keylock
3. Check the box Online next to Device Activation to add the device into Ingress.
If an Internet connection is unavailable, you can activate the device by selecting
Ingress accepts a 12-digits alphanumeric code for offline activation, but this code may onle
be retrieved from your local resellers or support@fingertec.com.
Enable Device to establish connection to the device.
4. Click
Note: You must plug in a USB ash disk to Keylock 7700/8800 to download a le name “X_udata”, where X is the Device
ID of the device used (e.g.: 1_udata). The le contains the serial number of the device and other important information.
Ingress can only add the Keylock 7700/8800 device into the list after it captures this le from the USB ash disk.
18
Offline.

Add Device by Auto Scan
In case you do not know the specific IP address of the standalone device or Ingress, you can
use the Auto Scan function to look for them on the network.
1. Click
Scan Device.
2. Select
Standalone device: Insert range of IP address.
Ingressus: Ignore IP address because Ingress can discover the IP address of Ingressus automatically.
Keylock: Ingress scans your USB drive which contains the “X_udata” file.
3. Click Scan to start.
4. Device is discovered and published on the list.
5.
6. Continue to activate the device
Device Type:
Select the devices to add into Ingress.
(refe r to Chapter 2 • Add Device Mon ually).
Conguring Device
Download all settings and info from devices when connection is established. You can start
to personalize the settings of each device and synchronize new settings and info to devices
by uploading them. Due to the different nature of all 3 types of devices, Ingress hides some
pages/options when not applicable with a device.
1. Click to select device.
Download Device Settings.
2. Click
3. Wait for the download process to finish.
4. Start to configure:
19

Information: This is the page to display all information of the device. No amendments are allowed. You
can know the storage status of the device at the Record section.
Network: You can change types of communication mode in this page, for example change from TCP/IP to
RS485. You can update the TCP/IP settings (e.g.: change to new IP address) or RS485 settings (e.g.: change
baud rate to 9600bps). All new settings will take effect after you upload the new settings to the device.
Biometric: This page is only effective when connecting to devices that support fingerprint or face recog-
nition. Amend these settings accordingly after you click the Edit button:
Only 1:1 verification: Set to No by default so users can gain access immediately after verifying their finger or
face. Change this to Yes if you want users to insert their ID before fingerprint/face verification.
Fingerprint algorithm: VX 10.0 is the latest fingerprint matching algorithm supported by the device. Only
change to VX 9.0 if your environment is using the older algorithm. This option is not applicable to Ingressus because it only supports VX 10.0.
Face/Fingerprint 1:1 Threshold: The level of matching security if you want users to insert user ID before fingerprint/face verification. For fingerprint, the range is from 0 to 50, where 50 is the highest. For face, it ranges
from 0 to 99 where 99 is the highest. The default values are 15 for fingerprint and 70 for face.
Face/Fingerprint 1:N Threshold: The level of matching security if you allow users to verify by fingerprint/face
without inserting user ID. The default values are 45 for fingerprint and 75 for face.
Power: You can configure the duration (in minutes) for device to wait before going into idle mode.
Idle time (in minutes): Time duration to wait before going into idle mode.
Idle action: Select either Sleep or Power Off.
Power on time: Check the box and insert time to turn on the device.
Power off time: Check the box and insert time to shut down the device.
Access control: You can configure the device for basic access control settings.
Save Transaction log: Set to Yes by default. The device saves IN-OUT records of users. In case you only want
the device to control access without referring to its records, select No. The device will not keep any INOUT records.
Save False Log: Set to Yes by default. The device saves records even though users fail to verify. You can as-
sess the level of fail verifications happening at this device and adjust the biometric settings to improve
the verification process. Select No and the device will not store this record.
Master Record State: You must define the device as Master or Slave If two standalone devices are installed to
control one door. Normally the standalone device controlling entry is set as Master, and at the exit is the
Slave. Ignore if you are installing slave device with a standalone device. This is important if you are using
Antipassback function. The Master device stores all entry-exit records to justify Antipassback status.
Antipassback: Feature that forces users to verify every time he/she comes in or leaves a zone. In case he/she
is tailgating another user without verification to access a zone, the device will block his/her verification to
gain access again. You can select any of the following settings to suit your environment.
20

In: Activate this to force users to verify when leaving a zone. Users can skip verification when coming
into the zone.
Out: Activate this to force users to verify when coming into a zone. Users can skip verification when
leaving the zone.
In/Out: Activate this to force users to verify both when coming in and leaving a zone.
None & Save: Select this setting so the device does not block users to access when Antipassback take
effect. Device will instead only keeps track of Antipassback records with the user ID, where you can
download the records into Ingress to view and analyze.
None: Disable Antipassback at the device.
Other settings:
Power off Device: To shutdown device remotely. All devices do not have a physical power off button to
avoid unauthorized shutdown. You can only shutdown the device by clicking this button.
Reboot Device: To restart device remotely. If the device is working abnormally, try to restart it.
Synchronize Date and Time: Synchronize date and time of device immediately. It is recommended to do this
during first installation.
Download Device Settings: Download all settings/parameters from device.
Activate Device: Activate device to be added into Ingress.
Clear All Device Data: To clear the storage of device back to initial stage. You cannot retrieve any data after
this.
Clear All Log: To delete the transaction logs stored in device. Recommended to do this after you finish
downloading logs from device.
Clear Admin Privilege: To clear admin lock in device. Any users can access into the Main Menu by pressing
the Menu button. Only do this before you want to assign a new administrator at the device.
Upload Device Settings: To upload all new settings/parameters device to start to take effect.
Operation logs: Device records every operation done by administrators into a log file. This is a hidden
file that you cannot view at the device. You must download the operation logs into Ingress to view it.
Press Download OP Log to download from device.
Insert the date range to narrow down your search.
Event: Device records abnormal activities (e.g.: door force open, alarm trigger, fail verification, etc.) as
events. These records are automatically downloaded into Ingress. You can narrow your search to view
by date and time.
5. Click Upload Device Settings to upload new settings to devices.
Disable and Delete Device
Delete or remove the device from list if it is no longer in use, or wrongly added to Ingress. In
case you want to suspend a device from Ingress (to stop data transfer with the device), disable it from the list.
To de lete a device:
1. Click to select the device from list.
2. Click Delete Device.
3. Click Yes to confirm to delete the device.
21

To di sable a device:
1. Click to select the device from list.
2. Click Disable Device.
3. Click Yes to confirm to suspend the device.
Doors
Adding devices into Ingress is to prepare the list of devices installed in the environment.
Now you can start to pair the devices to doors accordingly. You must assign devices to guard
every door. Pairing multiple devices to a specific door allows you to update the same access
settings (e.g.: door unlocks time) to both entry and exit devices.
For installations with Ingressus II (2-doors door controller), you can pair devices with 2 doors.
You can configure different access settings for each door even though they are connected to
the same Ingressus II controller.
Types of device
Standalone devices
Ingressus I
Ingressus II
Keylock
Quantities of devices/slaves
2 devices
2 slave terminals
4 slave terminals
1
Quantities of door
1
1
2
1
Ingress can work with video surveillance software. You can connect to Milestone server or
EpiCamera to stream video from your IP camera for live view or playback. It is recommended
to pair the IP camera with the door/entrance installed with device to monitor users’ movement. In case of abnormal door activities (e.g.: door force open, device dismantled illegally)
Ingress will trigger alarms to alert administrators. You can playback the video at that moment
to know what is going on at the door, or even export the photo or video easily for further
investigation.
Add Standalone Device to Door
1. Click Door at the left panel.
2. Click
Add Door.
3. Rename the door, for
example Main entrance.
4. Add description to the
door for easy reference.
22

5. Click Add Device.
6. Select
7. Select the device to be added to this door.
8. Repeat steps (5) to (7) to add 2nd standalone device to this door.
Note: Select Slave Device in the Add Device window if you are connecting a slave device (R2c, i-Kadex or k-Kadex) with
the standalone device. Name the slave device according to its model.
Standalone Device.
Add Ingressus to Door
Ingress automatically creates door(s) after you add Ingressus into
the system. System creates 1 door if Ingressus I is added as device,
2 doors if Ingressus II is added. You will find the IP address of Ingressus display at the left panel.
In Ingressus II, you will send 2 lines of the same IP address to indicate 2 doors. Under each door, there is an in and out device (slave
devices). Refer to Ingressus installation guide to understand how
to define door and IN-OUT slave devices. This is all controlled by
the wiring between Ingressus and slave devices.
Right click at the IP address of Ingress to rename, for example Ingressus II – R&D office. Rename the
slave device by their models for
easy reference.
23

Add Keylock to Door
Ingress automatically creates a door named Keylock 7700/8800 after you
add the device into the system. Ingress adds the device to the door immediately. You can rename the device for easy reference.
Conguring Settings to Doors
You can configure access settings in Ingress and upload to both devices paired with the
door. This ensures both standalone devices apply the same access settings during operation. If you are using a standalone device with a slave to guard the door, settings will only
be sent to the standalone device.
Ingress treats Ingressus II as 2 different doors even though it is from one device. You can
configure access settings for each door individually. Ingressus II can store and apply the
settings to doors accordingly.
Ignore this if you are installing with the Keylock series. Due to the lack of communication
cable, Ingress cannot upload any settings to Keylock. Thus you do not need to configure
anything in Ingress.
1. Click to select a
2. Press
Edit at the right panel.
door.
3. Change the settings accordingly.
General configuration for standalone device and Ingressus
Permanent Door Open/Close Time Zone: Select to follow time range settings to allow free access (without
verification at the device) to the zone. Only to be used for zones with open access to public during
specific time range. Requires setup of Permanent Door Open Close Time Zone. Leave this blank to
ignore this feature.
Lock Open Duration: Change to set duration for door lock and unlock during successful verification.
24

Door Sensor Type: Select the type of door sensor installed at the device. The most common type is NC (normally close). Door sensor is a must-have component if you want to monitor door activities. It responds to
standalone device or Ingress all the time to report door status.
Configurations to apply to door with standalone device only
Full Access Device: Important setup if you apply Time Zone settings to the door. Select exit device to become
full access device. Full access device ignores time zone settings. Users can verify at the device to leave
the zone anytime.
Entry Device: Defines if the device is used for In or Out transactions. For example, all records from an In device will be recorded as In while records from the other device at the same door will be recorded as Out.
Alarm Delay: Change to set the duration before triggering alarm during emergency. Set to 0 for the device
to trigger alarm immediately during emergency.
Error Times To Alarm: To set the maximum times of failed verification before device triggers alarm. This is to
alert the unauthorized person to not tamper with the device.
Duress Alarm 1:1 Trigger
Duress Alarm 1:N Trigger
Duress Alarm Password Trigger
During emergency users can verify at the device to trigger duress alarm to alert others. For example,
robbers force user to verify to unlock the door to access into the zone. User can verify at device to trigger
alarm to alert the users inside the zone.
Activate one of the above options as the duress alarm trigger method. If you are using fingerprint verification to gain access during normal days, activate Duress Alarm Password Trigger. The device will then
trigger the alarm when you insert your password. Refer to the device’s user guide for details on how to
enroll fingerprint or password to trigger duress alarm.
Duress Alarm Delay: Change to set duration before alarm is triggered during duress scenario. Set 0 and device
will trigger alarm immediately during duress scenario.
Door Sensor Type: Select the type of door sensor installed at the device. The most general type is NC. Door
sensor is an important component to monitor door activities. In case of door force open or door remain
open, the door sensor reports it to the device. You can see the status of door under the Monitoring page
in Ingress. Select None if you did not install door sensor, but you can no longer monitor the activities
from this door.
Configurations to apply to door with Ingress only
Permanent Door Open/Close Holiday Time Zone: Select to follow time range settings to allow free access (without
verification at the device) to the zone during holiday. Requires setup of Holiday list and Permanent Door
Open Close Holiday Time Zone. Leave this blank to ignore this feature.
Punch Interval: Set the time duration between 1st and 2nd verification from the same user, for example 10s.
Ingressus will not grant access to the user if he/she verifies twice within 10s from any slave devices.
Verify Mode: To select combination of verification to gain access.
Duress Password: Same as Duress Alarm Password Trigger.
Emergency Password: During emergency, users can enter an emergency password to unlock any door (con-
trolled by Ingressus) at anytime. Time zone or access control settings will not affect it. This is normally
done by the administrator.
Door sensor delay: Set the time duration before Ingressus triggers the alarm if door remains open.
Close and Reverse State: Activate this if you want EM lock or dropbolt to lock immediately once door closes.
You must install door sensor together with the door lock. When the door sensor touches each other, Ingressus receives the signal and activates the door lock system immediately. This overrides the Door Open
Duration settings and can avoid unauthorized access or tailgating incident.
4. Save settings.
5.
Upload new settings to devices.
25
Delete Device/Doors
You can delete the devices or doors in case any of them are no longer in use. Make sure you
identify the devices and doors before you proceed to delete them.
1. Click to select the device/door display at the left panel to delete.
2. Click
Delete Device or Remove Door to proceed.
3. Click
Yes to confirm to delete.
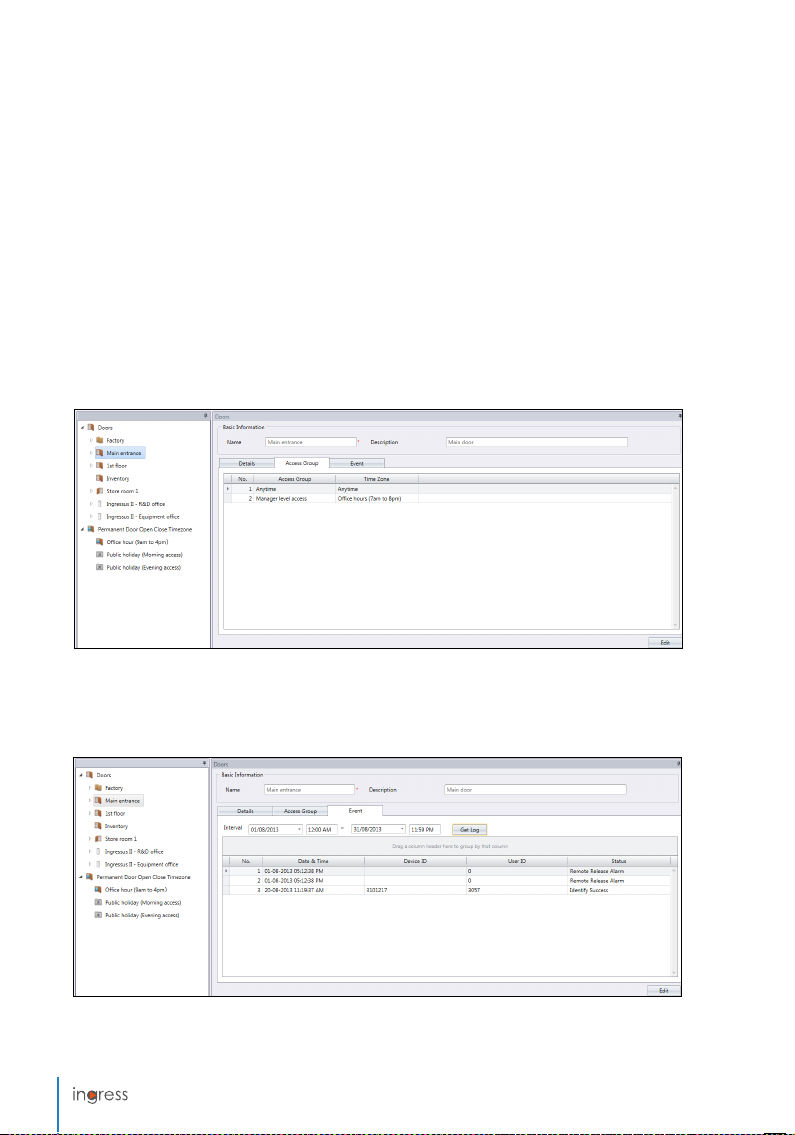
Access Group of Door
You can limit access according to time range of every user via each door. For example all
users can access via the main entrance but only Admin staff can access into the Admin
department during office hours. Refer to Access Level for more details.
Here, you can only view the access time range set to each door. You can only change them
under the Access Level tab.
Events of Doors
Each device uploads activities (e.g.: door force opened) to Ingress automatically. You can
view these records according to date and time.
26
1. Press Edit.
2. Define the date range/
3. Press
Get Log.
Interval.
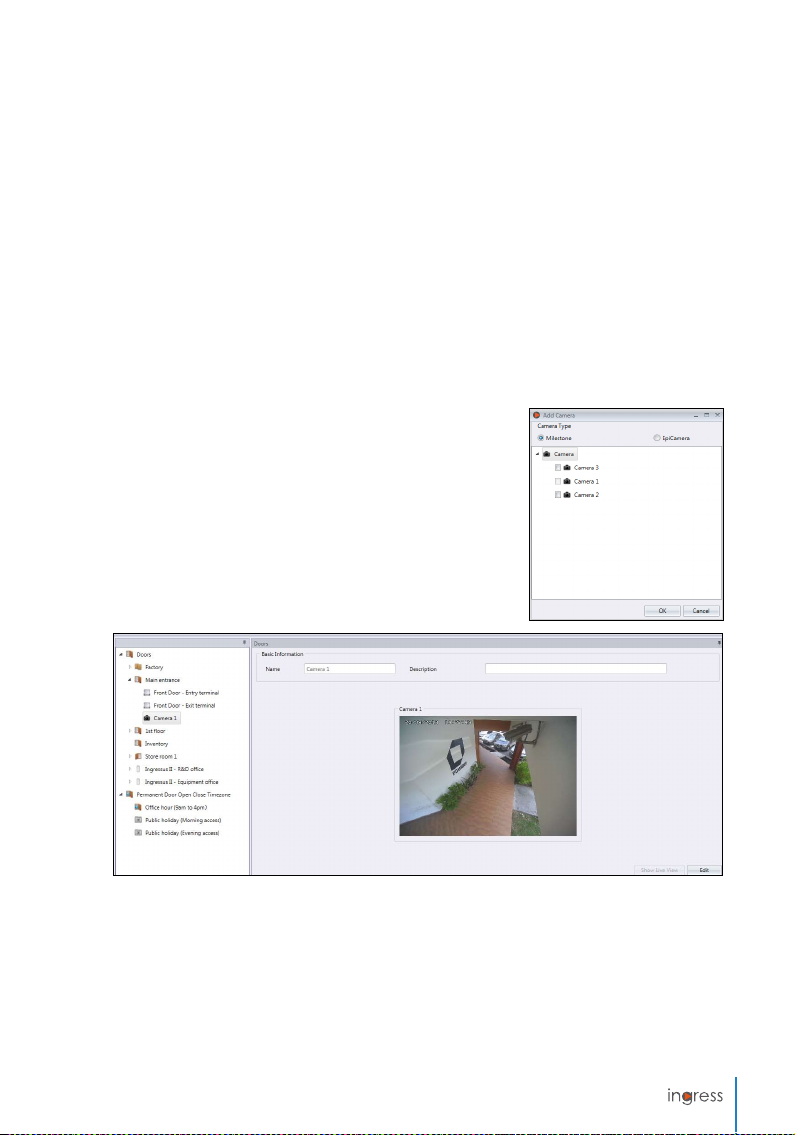
Linkage with IP Camera
Ingress can link up with the MileStone server or EpiCamera to stream the video. You can
have live view from your IP camera in Ingress without logging-in to MileStone or EpiCamera. You can pair the IP camera to relevant door(s) so you can monitor IN-OUT movement
easily.
Before you start to pair the IP camera to a door, go to System Settings to configure connection details of your Milestone server or EpiCamera under Network Camera Integration.
1. Select
2. Click
3. Select
4. Select the
5. The IP camera will be displayed at the left panel under
6. Select the
Door at the left panel.
Add Camera.
MileStone or EpiCamera.
IP camera to be paired with the door.
the selected door.
IP camera and click Show Live View to
stream video.
In case of abnormal door activities (e.g.: door force open), Ingress records the event immediately under Monitoring. You can playback the video during the abnormal door activities
by clicking at the alert message. More details under Monitoring.
1. Select the
2. Click
3. Yes to confirm to delete.
IP camera from left panel.
Remove Camera.
27
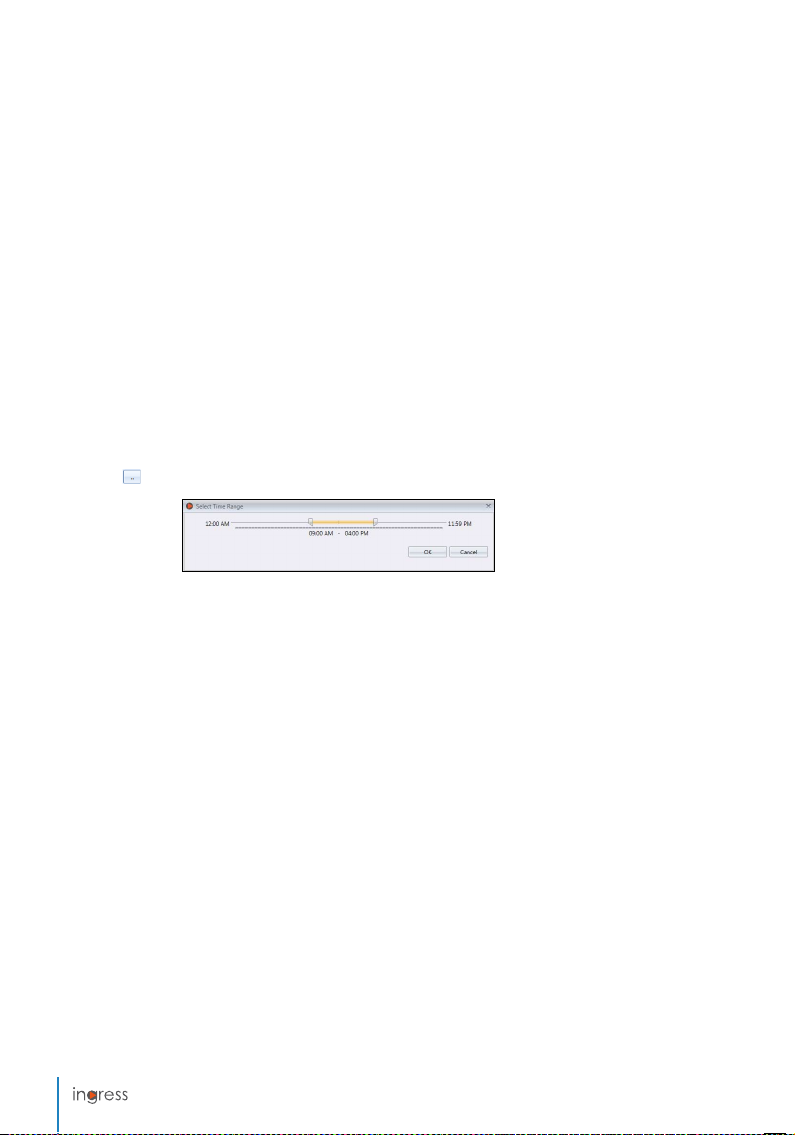
Permanent Door Open Close Time Zone
You can set a specific time range to allow free access for certain entrance. For example, sales
office is open for customers to visit during office hours (9am to 5pm). Users do not need
to verify to gain access from 9am to 5pm. This is called Permanent Door Open Close Time
Zone, designed to control access for zones with high traffic flow without compromising the
security purpose.
Steps to setup Permanent Door Open Close Time Zone:
1. Click Permanent Door Open Close Time Zone.
2. Click
Add Time Zone.
3.
Name the Time Zone, e.g.: Office hour – Free Access 9am to 4pm.
4. Press
Edit.
5. Define the
• You can click the Copy button to copy the settings from the previous day.
• Click
6. Press Save to save settings.
Steps to assign Permanent Door Open Close Time Zone to Door:
1. Select Door from the left panel.
2. Select
3. Press
4. Select the time zone under
5. Press
6.
Upload settings to devices.
Start and End time for each day.
to dene time range by scroll bar.
Details.
Edit.
Permanent Door Open Close Time Zone.
Save.
To remove the Permanent Door Close Time Zone from list:
1. Select the Time Zone from left panel.
2. Click
Remove Time Zone.
3.
Yes to confirm to delete.
28

Permanent Door Open Close Holiday Time Zone
(Ingressus only)
You can apply Permanent Door Close Time Zone during holidays. Ingress applies the
time zone settings to the date listed under Holiday Settings. This is only effective to
doors installed with Ingressus.
Steps to setup Permanent Door Open Close Time Zone:
1. Click Permanent Door Open Close Time Zone.
2. Click
Add Holiday Time Zone.
3.
Name the Time Zone, e.g.: Holiday Access – Morning only.
4. Press
Edit.
5. Define the
6. Press
Steps to assign Permanent Door Open Close Holiday Time Zone to Ingressus:
1. Select Ingressus from the left panel.
2. Select
3. Press
4. Select the time zone under
5. Press
6.
Upload settings to Ingressus.
To remove the Permanent Door Close Time Zone from list:
1. Select the Holiday Time Zone from left panel.
2. Click
3.
Yes to confirm to delete.
Start and End time.
Save to save settings.
Details.
Edit.
Permanent Door Open Close Holiday Time Zone.
Save.
Remove Holiday Time Zone.
29

Chapter 3
Setup of Zones
This chapter guides you on setting up zone installations using Ingressus.
This chapter is only applicable for Ingressus. Skip this chapter if you are not installing any
Ingressus controllers in your environment. You can set up zone installations with Ingressus
to perform more secure access control settings.
There are a total of 5 types of zones, which are:
Antipassback
Fire alarm
Interlocking
First Card Unlock
Multi Card Open
Antipassback
Apply Antipassback to force all users to verify every time when coming in or leaving the
work place. Ingressus blocks user access if the user missed his/her previous verification
record. This is an important feature to stop users from tailgating others during access. Ingress can collect the full IN-OUT records of every user.
Antipassback from the left panel.
1. Click
2. Click
Add Zone.
3.
Name the Zone, e.g.: Ground Floor.
4. Click
Add Device.
5.
Select Ingressus from the list.
6.
Name the Ingressus controller.
7. Press Edit at the Basic Information panel.
30

8. Select the nature of Antipassback by clicking at the radio button.
Antipassback between readers of Door 1: To activate feature at Door 1 only.
Antipassback between readers of Door 2: To activate feature at Door 2 only.
Antipassback between readers of Door 1 and between the readers of Door 2 respectively: To activate the
features at both Door 1 and Door 2 independently.
Antipassback between Door 1 and Door 2: To activate the feature between both Door 1 and Door 2. User
must have an Out record from Door 1, before granted access to Door 2.
9. Sync settings to the Ingressus controller.
Fire and Burglar Alarm
Apply fire alarm settings to Ingressus to alert users in case of fire emergency. You must install
AUX input component at Ingressus (e.g.: smoke/heat detector). The sensor sends signal to
Ingressus once it detects smoke/heat. You can configure in Ingress to force Ingressus to
unlock doors immediately.
Fire Alarm from the left panel.
1. Click
2. Click
Add Zone.
3.
Name the Zone, e.g.: All doors.
4. Click
Add Device.
5.
Select Ingressus from the list.
6.
Name the Ingressus controller.
7. Press
Edit at the Details panel.
8. Check the Fire Alarm box to start configurations.
Trigger condition: To define the action that will trigger the fire alarm in Ingressus. You can either use
sensors (connecting to AUX port at Ingressus) or key command from slave terminals (insert special
password, verification of duress finger). For example, select Auxiliary Input Shorted if you are using
smoke/heat sensor to detect fire. The sensor connects to Ingressus at its AUX Input port. It only send
signal to Ingressus in case it detects smoke or heat.
31

Input point address: To define the type of input to Ingressus to trigger fire alarm. Select Any if you are
using slave terminals as input, or Auxiliary Input Port 1 and 2. You will only find Auxiliary Input Port 1
if you are installing with Ingressus I.
9. Configure the output from Ingressus during fire alarm.
Output point address: To define the type of action given from Ingressus during fire alarm, either Lock or
Auxililary Output. Check the box LOCK 1 and 2 if you want to control door lock during fire alarm. Select
Auxiliary 1 and 2 if you are connecting to any sensor supporting auxiliary output.
Action Type: To define Close, Open or Normal Open as outputs from Ingressus.
Close – Ingressus outputs NC relay signal from the AUX por t. The NC relay signal can turn on the 3rd party circuit,
e.g.: turning on siren to alert users.
Open – Ingressus outputs NO relay signal from AUX port. The NO relay signal can turn o the 3rd par ty circuit, e.g.:
turning o power to door lock system.
If you have selected Lock 1 and 2 under Output point address, select Open to unlock doors during re alarm.
Delay – The time duration to wait before action happens.
10
. Sync settings to the Ingressus controller.
Ingressus can link with motion detectors to monitor zones after operation hours. In case
of break-ins, the motion detector senses the movements of the intruder, and proceeds to
trigger its alarm output. Unlike smoke/heat sensors, motion detectors must be shut down
when users are allowed to enter the zone. You can set a schedule to activate/de-activate the
motion detector instead of manual operation.
1. Check the
2. Select
3. Select
Burglar Alarm box to start configurations.
Auxiliary Input Disconnected under Trigger Condition.
Auxiliary Input 2 as Input Point Address (we recommend to connect motion detec-
tor to AUX IN 2 port).
4. Select
Auxiliary 2 under Output Point Address (we recommend to link AUX OUT 2 port to
alarm system or siren).
5. Select
Close under Action Type.
6. Sync settings to Ingress controller.
Interlocking
This is also known as a mantrap and is only applicable for installations of Ingressus II with 2
doors. With the setting, Ingressus will detect either door closed tightly before allowing user
to verify to unlock the other door. Door sensor must be installed at each door to monitor the
door open-close activities.
Interlocking from the left panel.
1. Click
2. Click
Add Zone.
3.
Name the Zone, e.g.: server rooms.
4. Click
Add Device.
32

5. Select Ingressus from the list.
6.
Name the Ingressus controller.
7. Press
Edit at the Details panel.
8. Check
9. Press
10.
Interlocking between Door 1 and Door 2 to activate the feature.
Save to save settings.
Sync settings to the Ingressus controller.
First card unlock
You can set one user/card as the ‘gatekeeper’, whereby the user/card must be verified first
before others are given access to a restricted area. If he/she is unavailable to verify, other
users cannot gain access. This is to ensure the person in charge is present to monitor the
restricted area before other users seek access.
1. Click
First Card Unlock from the left panel.
2. Click
Add Zone.
33
3. Name the Zone, e.g.: R&D office.
4. Click
Add Device.
5.
Select Ingressus from the list.
6.
Name the Ingressus controller.
7. Press
Edit at the Zone panel.
8. Select
Time Set to access for access. No access granted if time falls out of the boundary.
9. Click
Add Personnel to define the user as First Card Unlock person (he/she still can use
password or fingerprint to verify). It is optional to assign more than 1 user.
10.
Click Add Door to define which Ingressus to follow this rule.
11.
Press Save to save settings.
12.
Sync settings to the Ingressus controller.
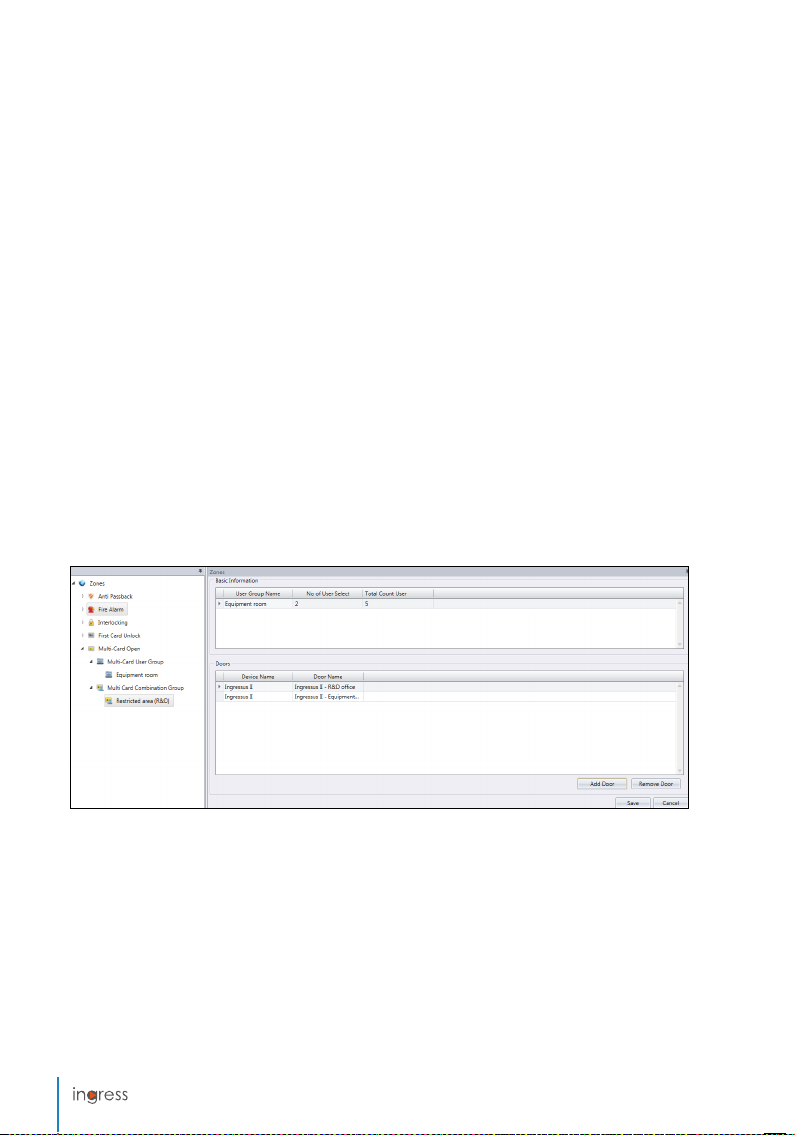
Multi card open
Multi card open is a security feature to unlock doors whereby at least 2 specified users must
verify themselves (fingerprint, password or card) at the same time at a door to gain access.
You can set up to a maximum of 5 users that must verify together to unlock a door.
1. Click Multi Card Open from the left panel.
2. Click
Add User Group.
3.
Name the User Group e.g.: R&D group.
4. Click
Edit at the right panel.
5.
Select the relevant users from the list.
6. Click
Save to save settings.
7. Click
Multi Card Combination Group from the left panel.
8. Click
Add Combination Group.
9.
Name the Combination Group e.g.: Restricted Area – Level 1.
34

10.
Press Edit to start to configure.
11.
Double click at the No. of User Select to be presented for verification in this group.
12.
Press Add Door to select the Ingressus controller to follow this rule.
13.
Press Save to save settings.
14.
Sync to the Ingressus controller.
To Delete Zone/Device/User Group/Multi card combination group
If any of the above is not applicable in your environment, or if you wrongly added configurations into the list, you can choose to delete them from the list as follows:
Select the required zone/device/user group/multi card combination group from the left
1.
panel to be deleted.
2. Click the button at the top menu bar
or Remove multi card combination group).
Yes to confirm delete.
3. Click
Alternatively:
1. Select the item to delete.
2. Right-click on the item to select
3. Click
Yes to confirm delete.
(Remove Zone, Delete Device, Remove User Group
Delete.
35

Chapter 4
Management of Users
This chapter guides you to manage users by synchronizing them from devices into Ingress
and filling in detailed user information for reporting purposes.
Synchronize all users from devices into Ingress for easy management. You can fill in important information of each user as reference and also transfer users’ info among all devices
to allow access accordingly. The transfer process requires TCP/IP or RS485 connection to
each device. If either communication method is not available, you can copy users’ info into
a USB flash disk to transfer information between Ingress and device. You can import users’
info from your current system, and transfer it into Ingress so you do not need to re-insert
the info again.
Add Department
Create list of departments in Ingress before you start to synchronize or create users. This is
a good practice to handle users by department.
User at the left panel.
1. Click
2. Click
Add Department.
3.
Name the Department.
Add Users
To download users from devices
The easiest way to add users is to synchronize users from the devices. To do so, enrollment of users with face, fingerprint, card and password must first be done at the device.
Then, run Ingress to download the users and assign under department accordingly. Refer
to Chapter 4 • T o import u sers’ biodata from other system to learn how to import user bio-
data from 3rd party system so you do not need to insert user biodata manually.
36

1. Click Download Users at the
Menu bar.
2.
Double-click to select the de-
vice from the left panel.
3.
Check the checkbox to select
users data to download.
Usernam e + Passw ord + Priv i-
lege (compulsory item. Ingress
ignores username and password
if the user does not enroll any of
them)
Fingerp rint (only select if you
want to download users’ fingerprint templates)
Face (only select if you want to
download users’ face templates)
Card (only select if you want to download users’ card ID)
4. Check “Do not overwrite PC user info if no terminal data is downloaded” to avoid accidentally downloading data from a device without any data. Ingress will delete all users’
data in its list if the connected terminal is empty. Ignore this if you do not have any data
stored in Ingress.
5.
Select the users to download from the right panel.
6. Click
Download to proceed.
To download users via USB ash disk
You can use USB flash disk to download users from all terminals and the Keylock series. However, the Ingressus controller does not have a USB port for data transfer.
Read User From USB.
1. Click
2. Click to select
USB drive
plugged with the USB flash
disk.
3. Click
From USB.
4.
Select users by checking the
user ID.
5. Click
Download to copy us-
ers’ data into Ingressus.
37

To create users manually
You must manually create users in Ingress if only the Ingressus controller is installed in the
environment because you cannot enroll users fingerprint, password or card ID directly to
Ingressus. Therefore, enroll them in Ingress by scanning fingerprint with OFIS-Y scanner (fingerprint), or insert password or card number of each user in Ingress.
You can create users by batch by assigning a running user ID for each user. In case you are
assigning RFID cards to every user, where the card numbers are in sequence, you can create
users by batch too.
To add users one-by-one:
1. Click
New User.
2. Fill in the user biodata.
3. Click
Add and continue to
continue to add next user.
4. Refer to
enroll fingerprint by using
OFIS-Y scanner.
To add users by batch:
1. Define the start and end
ID.
2. Provide the starting Card Num.
if users are using card in running sequence number.
3. Define a general
to attach with the user ID, for
example Staff1234. You can
amend the username accordingly afterwards.
4. Provide the
users share the same post. Ignore this if they have different
designations.
5. Press
4.3.1 to learn how to
User
Username
Designation if all
Execute to start to generate users.
38

Edit User Biodata
Assign users into department via drag-and-drop. Fill in the biodata of each user to ease
searching in future. You can also edit individual users manually or import the relevant information from your previous system into Ingress.
To edit users’ information manually
You can see all users displayed in the right panel. Double-click the user ID to start to edit
his/her biodata accordingly.
1. Press
Edit.
2. Double click at the
3. Fill in the details under the
4. Click each tab to view or configure under the Basic Information section.
• Details tab:
Username: Short name to be displayed to user during verification. Maximum 9 characters.
Password: Assign password for users’ verification at devices. Maximum 5-digits.
Issue date: To show the date the user created in Ingress.
Expiry date: Date to suspend users to display on Attendance Sheet.
Suspend: Block users to gain access at the device.
Privilege: To change the user’s privilege at the devices.
Card: To display the card number assign to the users.
Photo column to insert his/her photo.
Basic Information to describe the user.
39

Face: To indicate if a user is enrolled with face template.
Total FP VX 9: To display total number of VX 9.0 fingerprint template enrolled for the users.
Total FP VX 10: To display total number of VX 10.0 fingerprint templates enrolled for the users.
• Fingerprint tab: You can enroll new fingerprint for users by using the OFIS-Y scanner
under FP VX 9.0/VX 10.0. Follow steps below:
1. Plug OFIS-Y scanner to Ingress server/client.
2. Click the
3. Open the page
please open FP VX 9 before proceeding to the next step)
4. Press
5. Press
User ID to enroll fingerprint.
FP VX 10 (if you are using an older device supporting VX 9.0 fingerprint,
Edit.
Registration.
Follow the onscreen instruction to enroll fingerprint.
• Card tab: You can assign/update a new card number to the users as well as removing
a card number from the user.
1. Click Edit.
2. Click
3. Sync settings to terminal.
Add/Update/Delete.
• Access Control tab: This tab displays the list of terminals that this user is assigned to.
• Time Attendance tab: This tab displays the working calendar that this user is assigned
to.
• Event tab: You can view his/her access records at this tab. Define the start and end
date range to view the records.
To import users’ biodata from other system
You can import users’ biodata from other system so you do not need to re-insert details
again into Ingress. The import file can be in XLS, TXT or CSV format. The data includes:
• User ID
• Username
• First name
• Last name
• Card number
• Department
• Employee ID
It is recommended to prepare the
data according to the arrangement mentioned above. However
you can configure Ingress to read
the data from specific columns to
match the data via the following
steps:
40

1. Click Browse to find and open the file.
2. Select to
3. Click
4. Click
Match the column of import data with Ingress.
Populate User to see the data.
Read to start to import.
Upload users to devices
You can upload the users’ information to devices without re-enrollment of the users. You can
upload via TCP/IP, RS485 or USB flash disk.
Upload users via TCP/IP or RS485
1. Click
Upload User.
2. Select the devices in the left panel to upload the users’ information to.
3.
Check the checkbox to select users information to upload.
Username + Password + Privilege (compulsory item. Ingress ignores username and password if the user
does not enroll any of them)
Fingerprint (only select if you want to download users’ fingerprint templates)
Face (only select if you want to download users’ face templates)
Card (only select if you want to download users’ card ID)
4. Check “Do not overwrite terminal data if no PC user info is downloaded” to avoid accidentally uploading empty data to a device. Ingress will delete all users’ information in the
terminal if you forget to include the information mentioned in step 3. Ignore this if you are
sure the device is new and data is stored in it.
5.
Select the users to be uploaded from the right panel.
6. Click Upload to proceed.
41

Upload users via USB ash disk
1. Click
Export Users to USB.
2. Select users by department or individual users.
3. Click to select
4. Select types of users’ information to upload.
FP VX 9 –users’ fingerprint enrolled by algorithm VX 9.0 (old fingerprint templates)
FP VX 1 0 –users; fingerprint enrolled by algorithm VX 10.0 (new fingerprint templates)
Face – users’ face templates
Card – users’ card number
5. Select the types of devices to upload the data to.
6. Click
Export.
USB drive plugged with the USB flash disk.
Remove Users
When users no longer work in the environment, or transfer to another department/section,
you must delete his/her information from Ingress and devices. This is to ensure the user no
longer has access to selected doors.
Remove Current Users
This is to remove users when the users no longer work with the company. This process can
remove the users’ information from Ingress and all devices.
42

1. Click Remove Current Users.
2. Select the devices from the left panel to remove the users (recommended to select all).
3. Select all data to delete (fingerprint, face, card, all user info).
4. Select the user ID(s) to delete.
5. Click
Remove to proceed.
Remove Device Users
This is to remove the users from selected devices. The users’ information will still be kept in
Ingress and can be uploaded to devices again in the future.
43

1. Click Remove Device Users.
2. Select device (from left panel) to connect so you can seek for the users ID to delete.
3. Select the users ID to delete.
4. Select device (from right panel) to connect so you can delete the users from these de
vices.
5. Click
Remove to proceed.
Other Operation
To export users biodata
You can export the users’ biodata into other digital format (TXT, XLS, XLSX or CSV) for 3rd
party system to use with.
-
1. Click
Export User.
2. Select users by department or individual users.
3. Select the type of biodata to export.
4. Press right arrow include in the export process.
5. Click
Export to proceed.
6.
Name the output file.
7. Select the types of output.
44

To import users’ biodata from Sage UBS Payroll (fo r Malaysia market only)
You can import users’ biodata from Sage UBS Payroll.
1. Click
Import UBS.
2. Select users by department.
3. Browse to seek for the Sage UBS
Payroll path.
4. Insert the company name.
5. Select the users to import.
6. Select user ID format.
Running sequence number – select this if you want Ingress to create new user ID by running number
Numer ic us er ID – select this and system only accepts numbers as user ID. In case the user is using
alphanumeric for example AD3039 as user ID, enable this option and system only capture 3039 as ID
during import process.
7. Check “Replace username by user ID” – select this and system treats user ID as username
during export process.
8. Check “Separate Name become First Name and Last Name by space in between” – select
this and system justifies employee first name and last name by space in between employees’ name.
9. Click
Download to proceed.
To search users by keywords
You can search Ingress’ database to look for a user by keywords via the following steps:
Search User.
1. Click
2. Insert
3. Click
keywords into the relevant column.
Search to proceed.
45

Chapter 5
Access Levels
This chapter guides you on how to restrict access to created and assigned users in the workplace through several different methods.
You can limit access of every user by time range to any doors in the workplace by configuring its settings and uploading them to the devices. Devices justify the access by checking
his/her identity and effective time range. For example, you can allow access to all managers at all times but only allow access from 9am to 5pm for junior executive.
Each time range is separated into 3 intervals a day. You can set a maximum of 3 sets of access time ranges in a day. The users can only access the workplace during these 3 intervals.
For example, you can allow access for the production workers into the production area
from 7am to 10am, 11am to 1pm and 2pm to 6pm to carry out their duties. Therefore,
production workers cannot gain access into the factory while having their breaks between
the 3 time ranges.
You can also set the specific access time to apply to holidays. Ingress uploads the access
time together with date of holiday to devices. For example, you can allow access through
the main entrance from only 8am to 12pm during holidays. To fully utilize holiday time
zone, you must set the list of applicable holidays in Ingress before further configurations.
You can improve the security of access by using a combination of verification methods. To
do so, you can set different verification methods at individual doors. For example, R&D staff
can verify by fingerprint at the company’s main entrance, but must verify both fingerprint
and card when accessing to the R&D office.
Access Levels by Time
Firstly, you must configure the daily time set. Time set is the time where users are allowed
access into the door. The device blocks user access if his verification time is out of range.
You can apply up to 3 different time sets in a day.
Secondly, you must create an Access Group to define the time sets to follow and which
devices shall apply this time set.
Finally, you must add the users into the Access Group. Users must follow the time set settings at the specific devices to gain access.
Setup of Time Set
By default, Ingress provides 2 time sets which are Anytime (all time access) and No time
(no access anytime). You can create new time sets according to your company’s requirements.
46

1. Select Time Set from the left panel.
2. Click
Add Time Set.
3. Press
Edit.
4.
Name the time set, e.g.: Office hours.
5. Write a
6. Set the time range to allow access with a maximum of 3 sets of time per day. In case you
7. You can click
8. To use 2nd and 3rd interval, you must
9. Click
10.
11.
Description to remark the time set.
want to block access for the whole day, set 11:59PM as start time and 12:00AM as end
time.
to use the graphical
setup page as an alternative.
check the box to activate it.
Copy in the next line if you want
to duplicate the same time from the
above settings.
Click Save to save settings.
Click Transfer to Device to synchronize the settings to devices.
Setup of Access Group
47

1. Click Access Group from the left panel.
2. Click
Add Access Group.
3.
Name the access group, e.g.: Executive level.
4. Click
Edit at the Access Control tab.
5. Click
Add to add the device to use this access level.
6. Select
7. Check
8. Click
9. Click
10.
11.
13.
Time Set to follow (the time set must be
preset prior to this step).
Holiday if you want to apply Holiday
Time Zone (refer to Chapter 5 • Access Level by
Holid ay for more details).
OK to save settings.
Transfer to Device to synchronize settings
to device.
Click Edit at the User tab.
Click Add to include the users that will follow
this access group and time set.
12.
Click OK to save settings.
Click Transfer to Device to synchronize users to the device that will follow this access
group.
Access Levels by Holiday
You can control access of users during holiday, e.g.: users can only access company main
entrance from 9am to 12pm during holiday. Set the holiday time set to define the access time
applicable to holidays in Ingress. Ingress does not allow you to proceed if there is no holiday
time set defined. Define the start and end date for holidays under Holiday Settings. Assign
the holiday time set to the specific holiday to take effect.
Setup of Holiday Time Set
48

1. Click Time Set from the left panel.
2. Click
Add Holiday Time Set.
3. Describe the holiday time set, e.g.: Year End Holiday.
4. Click
Edit.
5.
Name the holiday time set, e.g.: Holiday access – Morning.
6. Define
If access is required during some part of the day, you can shorten the access deny time.
For example,
7. Click
8. Click
You can repeat the steps above to create additional holiday time sets to suit your workplace.
the start and end time to deny access. By default, Ingress does not allow any access
throughout the day if holiday settings are in use.
if access is required until 12:00pm, you may set the start time as 1:00pm and
end time as 11.59pm.
Save to save settings.
Transfer to device.
Create Holiday List to add Holiday Time Set
1. Click
Holiday Settings from the left panel.
2. Click
Edit.
3. Click
Add to add new holiday.
4. Name the holiday.
5. Select Holiday Time Zone to apply.
6. Define the start and end date.
7. Click OK to apply.
8. Click Save to save settings.
9. Click Transfer to Device to synchronize to devices.
49

Access Level by Verify Type
You can increase the security level of access by applying different verification types (combination of verification) at different time. With this setting, users must perform several verifications during specific time range at the device to gain access.
Verify Type from left panel.
1. Click
2. Click
Add Verify Type.
3. Name the
4. Select
5. Define the
6. Select
7. Click
8. Repeat steps above if you want to add new verification types into the group.
9. Click
10.
Click Transfer to Device to synchronize settings to terminals.
11.
Click Door tab.
12.
Click Add to select doors applicable for this verification method.
13.
Click Save to save settings.
14.
Click Transfer to Device to synchronize settings to device.
Verify Type, for example FP + Password.
Name (You can select from Time Range 1 to Time Range 50).
start and end time applicable for this verification method.
Verify Type.
Add.
Save to save settings.
50

Chapter 6
Monitoring
This chapter guides you to monitor door activities using Ingress via several methods.
Monitoring door activities is very important in access control software. Devices need to
send any abnormal door activities to Ingress immediately via TCP/IP or RS485 connection,
making it crucial to secure the network between Ingress and all devices. Door sensors must
also be installed to link up to all devices. The door sensor is a magnetic switch that works
as the ‘watchdog’ of every door. Monitoring cannot work without a door sensor installed
to the door and device.
Ingress offers 2 types of monitoring methods. You can either monitor activities door-bydoor or by visual floor map. It is recommended to import the floor plan of your workplace
into Ingress as a visual map. You can drag-and-drop every door on the visual map for easy
monitoring.
You can customize the types of events to be displayed on Ingress. There are a total of 48
types of event for Ingressus and 14 types for standalone device. Any abnormal incidents
reported to Ingress will be published onscreen in different colors. You can enable sound
alerts in Ingress to alert you when abnormal activities are detected.
Ingress can also send emails immediately to dedicated users to report any abnormal activity. Configure the SMTP email server settings to allow Ingress to send notification emails.
Furthermore, you can incorporate monitoring process with IP camera (Milestone or EpiCamera). Ingress can stream to playback the footage from your video surveillance software
to give you a visual of the scene.
Monitoring by Door or Zone
Open the Monitoring tab to see all doors displayed on screen. Ingress displays the details
of a door when you move your cursor on top of it. Click the door group at the left panel to
see doors assigned under this door group.
51

Each door icon represents the current status of the doors. See the details below:
Door icon Represents
Devices paired with door are working online. Everything is normal.
Connection to the devices of this door is lost. Requires immediate action to check the devices.
No devices were added to this door. Make sure you added devices into the list and add devices to the door.
Door is incorporated with IP camera. You can watch live view to monitor this door.
Door alarm trigger due to door force open or door not close. Requires immediate action to check the door.
The bottom of the screen displays all activities sent from all devices. You can see IN-OUT
records of all users, door activities and alarm trigger.
Remote Settings
You can control all doors remotely from Ingress. You can control door open/close or reset
the door alarm.
To open/close door remotely:
1. Select door from
2. Click
Open Door or Close Door.
Note: Click Close Door to force device/Ingressus to activate door lock system immediately.
To reset door alarm:
1. Select door from
2. Click
Door Alarm Reset.
Note: Door Alarm Reset only works when the door alarm is activated.
52
Door/Zone Monitoring.
Door/Zone Monitoring.

Monitoring Settings
Ingress starts monitoring processes automatically when you start this page. You can choose
to stop the process by clicking the Pause Monitoring button.
Ingress triggers your PC or laptop’s onboard speaker to alert you in case of abnormal activities. You can press Stop Alert Sound button to acknowledge the alert notification.
Real-time monitoring
The Realtime Monitoring page displays all records from all devices. You can see every record
line-by-line. You can pause the process if you want to focus on certain records. Click Start
button to resume the process.
You will find a camera icon attached with some records. This indicates the door is incorporated with an IP camera. Double-click the record to see live footage from the IP camera.
When the door alarm is triggered, Ingress marks the record in red color to alert you. Doubleclick at the record and Ingress will stream the video footage from the video surveillance
software for your reference.
Ingress always retrieves the video 5 minutes
before and after the door alarm trigger. You
can export the images into digital formats
(BMP, JPEG, PNG, GIF, TIFF). You can also export to AVI or MKV video formats too.
53

Log List
To search for previous IN-OUT records or alarm records in Ingress, you can check under the
Log List tab.
1. Define the
2.
Select type of records needed (event, user, or device).
3.
Specific type of event, user ID or device ID.
4. Click
start and end date to seek records.
Search.
Visual Map
You can import floor plans (in JPEG format) into Ingress to be used as visual map. You can
drag-and-drop doors into the map for a complete view during monitoring. In case of abnormal door activities, the door will blink together with an alert sound from your PC. You can
reset the door alarm as shown in Chapter 6 • Remote Settings. You can open/close each door
by selecting the door from map, and pressing the Open Door or Close Door buttons.
Add Visual Map and Doors
54

1. Click Visual Map from the left panel.
2. Click
Add Visual Map to create a new floor plan.
3.
Name the floor plan, e.g.: 3rd floor.
4. Press
Edit to start to configure
S et Backgr ound – To select the floor plan to be used as visual map.
Add Doo r – Select door to be added into the visual map. Drag the door to the correct location on map.
Remov e door – Select door icon from map and click Remove Door if the door in no longer in use.
5. Click Save to save settings.
Start monitoring process
You can start the monitoring process by clicking Start Monitoring on the top menu. Click
Pause Monitoring if you want to stop the process.
Click Visual Maps from the left panel and Ingress will display all maps on the right panel. Click
any visual map if you want to have a detailed view to the floor.
Click Show Map in New Window and Ingress will display the selected map in an individual
window. You can drag the individual map to another display monitor/LCD for all-time monitoring.
55

Chapter 7
Attendance
This chapter guides you on setting up clocking schedules for the purpose of recording
and monitoring attendance and generate an attendance sheet.
Ingress is loaded with comprehensive time and attendance features applicable to different industries. To utilize Ingress’ time attendance features efficiently, first is to set
up the clocking schedules, which consist of the weekly working timetables, calculation
rules for work time and OT. The process is simple, users report attendance at any devices, Ingress downloads records from devices and it processes attendance according
to the clocking schedules being set. Maximum number of clocking schedules allowed
in Ingress is 999.
3 important schedule types readily available to be used in Ingress
WEEKLY - Working schedule that rotates weekly
This schedule is the most commonly used working schedule worldwide where work-
ing days fall on weekdays and offdays fall on weekends.
DAILY - Working schedule that rotates daily
This schedule is suitable for multiple shifts, overnight shifts, open shifts, rotational
shifts, where the work schedules change daily.
FLEXI - Working schedule that does not include any late ins, early outs or overtime.
This schedule is suitable for groups of workers having flexible working time.
The next important configuration is the group duty roster, also known as the annual
working calendar. For a group of users that follow the same working rules, they can
be grouped into one single group. Alternatively, you can customize independent calendars to match specific users under User Duty Planner. Each group of duty roster
follows one clocking schedule only and Ingress offers a total of 999 group duty rosters
to configure.
Configure various types of leave in Ingress. The leaves will be recorded in Attendance
Sheet and a remark column is available for administrator to flag irregular records. A
user can also notify the management of any irregularity in attendance by the use of
work codes. During verification of attendance at any device, users can insert work
codes as an explanation for his/her irregular attendance records.
56

Weekly Schedules
Clocking Rules
Clocking refers to an activity of someone clocking in or clocking out from a timeclock terminal. Ingress offers 6 attendance clocking columns in 3 pairs.
Clocking Schedule under the left panel.
1. Click
Add Clocking Schedule.
2. Click
Insert ID to represent the schedule (range from 1 to 999).
3.
Name the schedule, e.g.: Normal hours from 9am to 6pm.
4.
5. Select Weekly under
6. Fill in description to remark the schedule, e.g.: Applicable to all executive level.
OK.
7. Click
Work Schedule.
In-Ou t
Break -Resume
This pair is very important as it displays the first record of a user in the IN column and
the last record in the Out column.
This column records the start of the first break time in the Break column and the end
time of the first break in the Resume column. This column is not compulsory; leave
it if you don’t wish to view the break-resume records.
57

OT-Do ne
This column records the start time for overtime in OT column and the end time
of overtime in Done column.
This column is also not compulsory. Leave these columns if your company does
not require users to start and end OT at specific times. Leave these column blanks
and Ingress will automatically calculate overtime if an employee logged out after
the standard Out time.
In case your company takes 2 breaks a day, you can treat Out time as the start
of the second break and OT time as the end time of the second break. This way,
overtime will only be calculated if an employee logged out after the standard
Done time.
8. Define standard time to report
Learn about clocking pairs in the table below.
1. Rounding & Round to the Nearest Minute - At every clocking column, you can set the
“Round to the Nearest Minutes” according to your company’s policy. Refer to the table
below as your guide to Round times.
Rou nd up: If you choose to round up 15 minutes, when an employee clocks in at 9:06am, his IN time
will be recorded as 9:15am
Rou nd down: If you choose to round down 15 minutes, when an employee clocks in at 9:06am, his IN
time will be recorded as 9:00am.
Round mid- point:If you choose to take a midpoint of 15 minutes, when an employee clocks in at
9:06am, his IN time will be recorded as 9:07am
2. Allow Grace Period in minutes - This also depends on your company’s policy, whether it
allows attendance late in or early out? You can set the duration of grace period in minutes in the given columns under each slot, if you want to define the grace period or you
can leave them blank if the company does not allow any grace period.
Flexible break time - This feature allows a company to set a certain duration allowed for
3.
breaks for example from 12:30pm to 2:30pm. During this break time, employees are free
to take their break hour but they have to be mindful of the preset limit. If the company
set the break duration to 1 hour only, an employee who takes a break at 1:00pm must
be back at the office by 2:00pm and those who take a break at 12:45pm, their break ends
at 1:45pm. If an employee exceeds the given time, Ingress will leave a remark on the attendance data. Disregard this feature if it is not applicable to your company.
Exclude break time from working hour - Check the box if your company deducts break
4.
time from the total work time. Ignore this feature if it is not applicable.
5. Click
OK to save settings.
58

Range Rules
Range is to determine the maximum time that one slot could record before it is considered
as the time for the corresponding slot. For example, if a value for IN is 12:00 and when a staff
clocks in at 12:01, the time will be recorded in Break column instead of in the IN column.
When you set the range for OUT is at 6:00, any time that falls after 6:00 will be recorded on
the next column which is OT column. You need to set the time for the clocking range of the
clocking columns.
Replace with the latest clocking –When you click this checker, Ingress will replace the clock-
ing data with the latest clocking data after the download process is done. It is recommended
that you select this checker for OUT and DONE columns only because software will always
check the latest OUT time of the users and will publish it on the Attendance Sheet.
1. Click
Clocking Range.
2. Click
Edit.
3. Configure time into the
4. Check the box
Replace with latest clocking for Out and Done columns.
Range columns.
General Rules
General is to determine whether you want to consider the times that are recorded in OT
and DONE columns to be considered as overtime or as normal working time. Click the appropriate radio button to determine your choice. If you choose as OT, the extra time will be
calculated in the overall time of the staff that is using this clocking schedule.
59

You can also determine whether an employee needs to press a key button to define his/her
status during clocking. Click the checker if you want to.
Rounding Rules
Rounding is to determine the “rounding of minutes” rules allowed in the clocking schedule
and the rules will determine the presentation of time in the attendance sheet.
Learn about it in the table below:
Round the work time to the nearest (minutes)
Round Up Work hour is rounded up to the nearest minute and is set to 15, hence all minutes
will be rounded up as per below:
1-15 minutes = 15
16-30 minutes = 30
31-45 minutes = 45
46-59 minutes = 1 hour
Round Down Work hour is rounded down to the nearest minute and is set to 15, all minutes will be
1-15 minutes = 0
16-30 minutes = 15
31-45 minutes = 30
46-59 minutes = 45
Roun d Midpoin t Once you insert a value here, the software will calculate the value’s midpoint. For
If the user verifies in less than 7 minutes after the IN time, for example 9.07 a.m., the
rounded down as per below:
example if you set the value at 15 min, the midpoint would be at 7 min. The clocking
schedule’s IN time is 9.00am and the midpoint is 7 min.
software will round down the transaction data to be displayed as 9.00am. If the user
verifi es more than 7 minutes after the IN time, the software will round up the transaction data to be displayed as 9.15 a.m.
60

Round up or round down the OT time to the nearest (minutes)
Roun d Up OT is rounded up to the nearest minute and is set to 15, all minutes will be rounded
up as per below:
1-15 minutes = 15
16-30 minutes = 30
31-45 minutes = 45
46-59 minutes = 1 hour
Round Down OT is round down to the nearest minute and is set to 15, all minutes will be rounded
down as per below:
1-15 minutes = 0
16-30 minutes = 15
31-45 minutes = 30
46-59 minutes = 45
Roun d Midpoin t Once you insert a value here, the software will calculate the value’s midpoint. For ex-
If the user verifies in less than 15 minutes after the OT time, for example 6.15pm, the
ample if you set the value at 30 min, the midpoint would be 15 min. The clocking
schedule’s OT time is 6.00pm and the midpoint is 15 min.
software will round down the transaction data to be displayed as 6.00pm. If the user
verifies more than 15 minutes after the IN time, the software will round up the transaction data to be displayed as 6.30pm.
First rounding time range - This function is entitled for the In time only. You can round the
In time into your preferred time. For example: any transaction between 9:01 am – 9:15am
will be rounded as 9:00am
Last rounding time range - This function is entitled for the Out time only. You can round the
Out time into your preferred time. For example: any transaction between 5:01pm to 5:15pm
will be rounded as 5:00pm
Break Rules
61

Break is to determine the rules for break time allowed in the clocking schedule and the rules
will determine the presentation of time in the attendance sheet.
Learn the break rules from the table below:
Do not deduct any lunch time if
employee works half day only
Do you want to Apply Auto
Add Break Rule when you
include lunch/dinner break?
Do you want to include lunch/
dinner time into overtime
hours?
Do you want to deduct extra
lunch/dinner time from working hour?
Deduct no. of hours for break
time from overtime hour
Overtime Rules
If this is the rule of your company, please click on the checker.
Leave it if it’s not applicable to your company.
Tick the checker if you want to apply the rule. It means that the
remaining lunch/dinner time will be added into the work time.
This is to add the work time for the users who work during their
lunch/dinner break.
Tick the checker if you want to include the unfinished break time
into overtime hours. This is to add overtime for the employee who
work during their lunch/dinner break
Tick the checker if you want to limit the break time to only the
permitted hour by the company; any extra minutes taken will be
deducted from the total work hours.
If you want to deduct the break time from the overtime, define
number of hours that should be deducted if the overtime hour
taken exceeds a certain value.
Overtime is to determine the rules for overtime in the weekly clocking schedule you define
here. Learn about the rules in the table below:
Early time for work
before In time
Overtime Differential
Rate Interval
Sometimes employees come early for overtime for example the overtime
starts at 8pm and they arrive at 7pm. If they logged in at 7pm, would you
like to count the extra one-hour as overtime? Tick the checker if your company allows this rule.
There is some overtime sessions required by a company on as-and when
basis. Define the IN and OUT time for this specific overtime sessions.
62

Minimum minutes
must work to qualify for
overtime
Maximum numbers of
hours allowed to claim
for overtime
Deduct short time
from OT
Sometimes a staff would work only for a few minutes and considered it as
an OT; define the minimum minutes required by the company for a staff to
work in order for him/her to qualify for an OT claim.
Put a limit to a number of hour a staff could claim for overtime and the
default maximum is 24 hours.
There are cases where an employee has short time in his/her total work
hour and he/she is taking overtime. If the company wants to replace the
short time on his/her total work hour from the OT taken, tick the checker.
The Daily schedule
The Daily Clocking Schedule is only available when you add new schedule and select “Daily”
from Work Schedule type. Daily clocking schedule is applicable for daily basis schedule.
This is suitable for multiple shifts, overnight shifts, open shifts, rotational shifts, etc where
the work schedule changes everyday. There are 6 tabs that you set for weekly clocking
schedules.
1. Click
Clocking Schedule under the left panel.
2. Click
Add Clocking Schedule.
3.
Insert ID to represent the schedule (range from 1 to 999)
4.
Name the schedule, e.g.: Normal hours 9am to 6pm.
5. Select Daily under
6. Fill in description to remark the schedule, e.g.: apply to all facotyr workers.
7. Click
OK.
Work Schedule .
Clocking Rules
Clocking refers to the time someone clocks in and clocks out from timeclock terminals.
Ingress offers 6 attendance columns in 3 pairs. There are 6 clocking columns to be defined
63

in the Daily Clocking Schedule. When you define the clocking time(s) in the clocking slots,
Ingress would accept the time and place them into the appropriate clocking columns. For
example, if you put 9:00 a.m. as the IN time, whoever that clocks in at 9:00a.m., the clocking
time will be in IN column.
Define standard time to report:
In-Ou t
Break -Resume
OT-Do ne
This pair is very important as it shows the first (In column) and last records (Out
column)
This column records the start of the first break time in the Break column and the end
time of the first break in the Resume column. This column is not compulsory; leave
it if you don’t wish to view the break-resume records.
This column records the start time for overtime in OT column and the end time
of overtime in Done column.
This column is also not compulsory. Leave these columns if your company does not
require users to start and end OT at specific times. Leave these column blanks and
Ingress will automatically calculate overtime if an employee logged out after the
standard Out time.
In case your company takes 2 breaks a day, you can treat Out time as the start of the
second break and OT time as the end time of the second break. This way, overtime
will only be calculated if an employee logged out after the standard Done time.
1. Rounding & Round to the Nearest Minute - At every clocking column, you can set the
“Round to the Nearest Minutes” according to your company’s policy. Refer to the table
below as your guide to Round times.
Rou nd up: If you choose to round up 15 minutes, when an employee clocks in at 9:06am, his IN time
will be recorded as 9:15am
Rou nd down: If you choose to round down 15 minutes, when an employee clocks in at 9:06am, his IN
time will be recorded as 9:00am.
Round mid-p oint: If you choose to take a midpoint of 15 minutes, when an employee clocks in at
9:06am, his IN time will be recorded as 9:07am
2. Allow Grace Period in minutes - This also depends on your company’s policy, whether it
allows attendance late in or early out? You can set the duration of grace period in minutes in the given columns under each slot, if you want to define the grace period or you
can leave them blank if the company does not allow any grace period.
3. Flexible break time - This feature allows a company to set a certain duration allowed for
breaks for example from 12:30pm to 2:30pm. During this break time, employees are free
to take their break hour but they have to be mindful of the preset limit. If the company
set the break duration to 1 hour only, an employee who takes a break at 1:00pm must
be back at the office by 2:00pm and those who take a break at 12:45pm, their break ends
at 1:45pm. If an employee exceeds the given time, Ingress will leave a remark on the attendance data. Disregard this feature if it is not applicable to your company.
64

4. Exclude break time from working hour - Check the box if your company deducts break
time from the total work time. Ignore this feature if it is not applicable.
OK to save settings.
5. Click
Range Rules
Clocking Range
Specify the time to be considered as a certain clocking time before it is recorded as the corresponding clocking time. For example, if you specify the clocking range for IN as 12:00 p.m.,
any clocking activities that fall before 12:00 p.m. will be recorded as IN and the clocking after
12:00 will be recorded as Break.
Latest Clocking
Clicking on this checker will configure the system to record only the most recent clocking
transaction within a clocking range. For example, if your official OUT time is at 6:00 p.m. and
you leave at 6:05 p.m., comes in again at 6:10 p.m. and checks out again at 6:15 p.m., as long
as the time falls under the clocking range of that time slot, the software will take the most
recent clocking time to be recorded in your attendance record which is 6:15 p.m. However, it
is NOT recommended to click on the checker on the first four columns of IN, BREAK, RESUME,
and OT.
NOTE: It is recommended that you only apply this rule for OUT and DONE only because these two clockingcolumns
should be recording your latest time for the clocking activities.
Daily clocking schedule could be used as schedules for rotational shifts. You can specify the
qualified minutes before the shift starts. Rotational shift means that a work schedule with
hours that change at prescribed intervals.
For example a person may work for four days from 8:00 a.m. to 4:00 p.m., continued with four days
from 4:00 p.m., to midnight, and followed by four days from midnight to 8:00 a.m. The cycle is then
repeated.
65

General Rules
General is to determine whether you want to consider the times that are recorded in OT
and DONE column to be considered as overtime or as normal working time. Click the appropriate button. If you click as OT, the time will be calculated in the overall time of the
staff that is using this clocking schedule. If you click Normal work time, the OT will not be
calculated even though the staff works passed that time.
You can also determine whether an employee needs to press a key button to define his/her
status during clocking. Click Yes if you want to.
Rounding Rules
Rounding is to determine the “rounding of minutes” rules allowed in the clocking schedule
and the rules will determine the presentation of time in the attendance sheet. Learn about
it in the table below.
Round the work time to the nearest (minutes)
Roun d Up Work hour is rounded up to the nearest minute and is set to 15, hence all minutes will
be rounded up as per below:
1-15 minutes = 15
16-30 minutes = 30
31-45 minutes = 45
46-59 minutes = 1 hour
66

Roun d Down Work hour is rounded down to the nearest minute and is set to 15, all minutes will be
rounded down as per below:
1-15 minutes = 0
16-30 minutes = 15
31-45 minutes = 30
46-59 minutes = 45
Roun d Midpoin t Once you insert a value here, the software will calculate the value’s midpoint. For
If the user verifies in less than 7 minutes after the IN time, for example 9.07 a.m., the
example if you set the value at 15 min, the midpoint would be at 7 min. The clocking
schedule’s IN time is 9.00am and the midpoint is 7 min.
software will round down the transaction data to be displayed as 9.00am. If the user
verifi es more than 7 minutes after the IN time, the software will round up the transaction data to be displayed as 9.15 a.m.
Round up or round down the OT time to the nearest (minutes)
Roun d Up OT is rounded up to the nearest minute and is set to 15, all minutes will be rounded
up as per below:
1-15 minutes = 15
16-30 minutes = 30
31-45 minutes = 45
46-59 minutes = 1 hour
Round Down OT is round down to the nearest minute and is set to 15, all minutes will be rounded
down as per below:
1-15 minutes = 0
16-30 minutes = 15
31-45 minutes = 30
46-59 minutes = 45
Roun d Midpoin t Once you insert a value here, the software will calculate the value’s midpoint. For
If the user verifies in less than 15 minutes after the OT time, for example 6.15pm, the
example if you set the value at 30 min, the midpoint would be 15 min. The clocking
schedule’s OT time is 6.00pm and the midpoint is 15 min.
software will round down the transaction data to be displayed as 6.00pm. If the user
verifies more than 15 minutes after the IN time, the software will round up the transaction data to be displayed as 6.30pm.
First rounding time range - This function is entitled for the In time only. You can round the
In time into your preferred time. For example: any transaction between 9:01 am – 9:15am
will be rounded as 9:00am
Last rounding time range - This function is entitled for the Out time only. You can round the
Out time into your preferred time. For example: any transaction between 5:01pm to 5:15pm
will be rounded as 5:00pm
67

Break Rules
Break is to determine the rules for break time allowed in the clocking schedule and the rules
will determine the presentation of time in the attendance sheet.
Learn about it in the table below.
Do not deduct any lunch
time if employee works
half day only
Do you want to Apply Auto
Add Break Time when include lunch/dinner break?
Do you want to deduct extra lunch/dinner time from
working hour?
Do you want to include
lunch/dinner time into
overtime hour?
Deduct no. of hours for
break time from overtime
hour
Note: Specify the rules based on your company’s policy. Leave them blank if it’s not applicable to your environment.
If this is the rule of your company, please click on the checker. Leave
it if it’s not.
Click Yes if you want to apply the rule, which means that the remaining lunch/dinner time will be added into work time. This is to add the
work time for the users who work during their lunch/dinner break.
Click Yes if you want to limit the break time to only the permitted
hour by the company; any extra minutes taken will be deducted from
the total work hours.
Since dinner usually exceeds OUT time, click Yes if you want to include the dinner time into the overtime hour. Leave it if the company’s policy does not allow that.
If you want to deduct the break time from the overtime, define
number of hours that should be deducted if the overtime hour taken
exceeds a certain value.
68

Overtime Rules
Overtime is to determine the rules for overtime in the weekly clocking schedule you define
here.
Learn about the rules in the table below.
Early time for work before
In time
Overtime Differential Rate
Interval
Minimum minutes must
work to qualify for overtime
Maximum numbers of hours
allowed to claim for overtime
Deduct short time from OT
Sometimes employees come early for overtime for example the overtime starts at 8pm and they arrive at 7pm. If they logged in at 7pm,
would you like to count the extra one-hour as overtime? Tick the
checker if your company allows this rule.
There is some overtime sessions required by a company on as-and
when basis. Define the IN and OUT time for this specific overtime sessions.
Sometimes a staff would work only for a few minutes and considered
it as an OT; define the minimum minutes required by the company for
a staff to work in order for him/her to qualify for an OT claim.
Put a limit to a number of hour a staff could claim for overtime and the
default maximum is 24 hours.
There are cases where an employee has short time in his/her total
work hour and he/she is taking overtime. If the company wants to
replace the short time on his/her total work hour from the OT taken,
tick the checker.
The overtime rules set in the schedule will be applied to any group
that is under this schedule. All rules and calculations will reflect in the
attendance sheet of the staff involved in this clocking schedule.
69

The Flexi Schedule
Flexi Clocking Schedule is a working schedule that does not include any late-ins, early outs
or overtime. This is suitable for groups of workers where their working time is not fixed.
1. Click
Clocking Schedule under the left panel.
2. Click
Add Clocking Schedule.
3.
Insert ID to represent the schedule (range from 1 to 999)
4.
Name the schedule, e.g.: Normal hours 9am to 6pm.
5. Select Flexi under
6. Fill in description to remark the schedule, e.g.: apply to all executive level.
7. Click
OK.
Work Schedule
Clocking Rules
Clocking refers to the time someone clocks in and clocks out from a terminal. However flexi
schedule does not apply any fix time to report attendance. You can ignore the 6 clocking
slots.
1. Define the day type for every row.
Rounding & Round to nearest minute: At every clocking column, you can determine the
2.
Round to nearest minutes which means that the attendance recorded will be rounded to
the nearest minutes as specified in the field. Examples of Rounding:
Round up : If you choose to round up 15 minutes, when an employee clocks in at 9:06am, his IN time will
be recorded as 9:15am
Round down: If you choose to round down 15 minutes, when an employee clocks in at 9:06am, his IN
time will be recorded as 9:00am.
Round mid -point: If you choose to take a midpoint of 15 minutes, when an employee clocks in at
9:06am, his IN time will be recorded as 9:07am
70

3. Flexible break time
4. This feature allows a company to set a certain duration allowed for breaks for example
from 12:30pm to 2:30pm. During this break time, employees are free to take their break
hour but they have to be mindful of the preset limit. If the company set the break duration
to 1 hour only, an employee who takes a break at 1:00pm must be back at the office by
2:00pm and those who take a break at 12:45pm, their break ends at 1:45pm. If an employee exceeds the given time, Ingress will leave a remark on the attendance data. Disregard
this feature if it is not applicable to your company.
5. There is a button where you can choose to apply Rounding for first-in and last-out for the
purpose of job costing. Leave it blank if you do not wish to use this rule in your attendance
data.
6. Click
OK to save settings.
General Rules
There are general rules that you need to set to flexi clocking schedules because the employee who are going to use this schedule will not adhere to the normal working schedules
like weekly and daily schedules.
Learn about the rules of flexi schedule in the table below:
Rules
Please specify the maximum number of in-out
clocking pairs for this
flexi-hour schedule
Enable/Disable User
Define In/Out records
Descriptions
The maximum pairing of clocking time in TCMS V2 is 3 (IN-OUT, BreakResume, OT-DONE). Since flexi-clocking is flexible as the name suggests,
you can choose to use only one pairing only or a few. Select your preference accordingly.
Click Yes if you want the user to press the relevant key button to define
status during attendance reporting. Leaving this checker unchecked will
prompt the system to accept the clocking times of the user and slot them
into the appropriate clocking slots.Click Yes if you want the user to enter
his/her workcode to specify his/her tasks in attendance report.
71

Rules
Enable/Disable User
Define work code for job
costing records.
Maximum work hours
to consider as same
work day
Descriptions
Click Yes if you want the user to enter his/her workcode to specify his/her
tasks in attendance report
There are cases where an employee reports to work late at night and the
working hours are extended until the next day. To avoid this confusion,
you need to specify the maximum work hours of an employee for him/her
work time to be considered as the same workday.
For example if you start work at 10:00 p.m., you can work only 8 hours for
the work time to be considered on the same day. Hence, you’ll have to
clock out at 6a.m.
Separation hours
between an out clocking and subsequent in
clocking to qualify for
next day
Last log out time to consider as same work day
Double punch for consecutive clocking in a
clocking slot if it’s within
minutes of
Rounding Rules
Following the rule above, you need to specify the duration in between a
clock out and a clock in to qualify an employee for the next day pay.
For example, the employee who checks out at 6a.m just now must not
check in again immediately and consider it the next day work time.The
hour specified here will determine the duration of ‘rest’ required before
the same employee could clock in to work and qualify for the next day
work time.
As being mentioned in the column above, if an employee checks inlate
at night and the work hour extends to the next day but still isconsidered
the same work day, you need to specify the last log out time that the company allows to consider as the same work day. Forexample, if you put 9am
as the last log out time, the clock in after 9:00 will not be considered as
the same day clocking.
All clocking activities within this predefined time interval will be considered for one time only. For example if the IN time is 9:00am and the time
interval is 15 min, any verification done by the same ID within the 15 minutes will be considered as IN time, taking the first time he clocks in.
Rounding is to determine the “rounding of minutes” rules allowed in the clocking schedule and the rules will determine the presentation of time in the attendance sheet.
72

Learn about it in the table below.
Round the work time to the nearest (minutes)
Roun d Up Work hour is rounded up to the nearest minute and is set to 15, hence all minutes will
1-15 minutes = 15
16-30 minutes = 30
31-45 minutes = 45
46-59 minutes = 1 hour
Round Down Work hour is rounded down to the nearest minute and is set to 15, all minutes will be
1-15 minutes = 0
16-30 minutes = 15
31-45 minutes = 30
46-59 minutes = 45
Round Midpoint Once you insert a value here, the software will calculate the value’s midpoint. For
If the user verifies in less than 7 minutes after the IN time, for example 9.07 a.m., the
be rounded up as per below:
rounded down as per below:
example if you set the value at 15 min, the midpoint would be at 7 min. The clocking
schedule’s IN time is 9.00am and the midpoint is 7 min.
software will round down the transaction data to be displayed as 9.00am. If the user
verifi es more than 7 minutes after the IN time, the software will round up the transaction data to be displayed as 9.15 a.m.
Round up or round down the OT time to the nearest (minutes)
Roun d Up OT is rounded up to the nearest minute and is set to 15, all minutes will be rounded
1-15 minutes = 15
16-30 minutes = 30
31-45 minutes = 45
46-59 minutes = 1 hour
Round Down OT is round down to the nearest minute and is set to 15, all minutes will be rounded
1-15 minutes = 0
16-30 minutes = 15
31-45 minutes = 30
46-59 minutes = 45
Round Midpoint Once you insert a value here, the software will calculate the value’s midpoint. For
If the user verifies in less than 15 minutes after the OT time, for example 6.15pm,
up as per below:
down as per below:
example if you set the value at 30 min, the midpoint would be 15 min. The clocking
schedule’s OT time is 6.00pm and the midpoint is 15 min.
the software will round down the transaction data to be displayed as 6.00pm. If the
user verifies more than 15 minutes after the IN time, the software will round up the
transaction data to be displayed as 6.30pm.
73

First rounding time range - This function is entitled for the In time only. You can round the
In time into your preferred time. For example: any transaction between 9:01 am – 9:15am
will be rounded as 9:00am
Last rounding time range - This function is entitled for the Out time only. You can round
the Out time into your preferred time. For example: any transaction between 5:01pm to
5:15pm will be rounded as 5:00pm
Break Rules
Break is to determine the rules for break time allowed in the clocking schedule and the
rules will determine the presentation of time in the attendance sheet. Learn about it in
the table below.
Ignore break time
Do you want to Apply Auto
Add Break Time when include lunch/dinner break?
Is the break paid? Deduct
the whole break after time in
minutes
74
Click Yes if you want to deduct break time from the total work time. If
you don’t click on the checker, the time will be calculated in this formula, the last clocking - the first clocking = work time.
Click Yes if you want to apply the rule it means that the remaining
lunch/dinner time will be added into work time. This is to add the work
time for the users who work during their lunch/dinner break.
Click Yes to include the time taken for lunch/dinner into the total working hour. Leaving it uncheck will deduct the break time from the total
working hour. However, you need to specify the maximum break time
that an employee can take for his/her break.
If it exceeds the break time duration, the additional minutes will be
deducted from the total work hours.

Do you want to include
lunch/dinner time into
overtime?
Click Yes to include break time into overtime.
Do you want to exclude full
lunch/dinner if it’s greater
than allowed?
Do you want the automatic
deduction to apply on total
hours exceeds per day
Deduct no. of hours for break
time from overtime hour …
if overtime exceeded …
Deduct no. of hours for break
time from flexi hour… if flexi
hour exceeded…
Do you want the automatic
addition to apply on total
hours exceeds per day?
Auto add time (in hour format) if flexi work surpasses
…
If you click Yes for this function, when an employee takes a break
i.e. lunch or dinner more than the allowed minutes, the whole break
minutes will be deducted from the total work time. For example, if
the total work time is 8 hours and an employee takes a lunch for 1 hr
30minutes, exceeding 30 minutes from the allowed break time of 1
hour. By doing this, the software will deduct 1 hour from the total work
hour of the staff.
Specify the hour of break time from overtime hour if the overtime hour
exceeded the value specified in this column. If you put 1 hour and 8
hours, it means that if an employee takes an overtime of 9 hours, the
overtime will be deducted by 1 hour of break time. Therefore, the total
overtime is 8 hours.
Specify the hour of break time from flexi hour if the flexi hour exceeded the value specified in this column. If you put 1 hour and 8 hours, it
means that if an employee takes flexi hour of 9 hours, the total time
will be deducted by 1 hour of break time. Therefore, the total flexi hour
is 8 hours.
Specify the hour of break time from flexi hour if the flexi hour exceeded the value specified in this column. If you put 1 hour and 8 hours, it
means that if an employee takes flexi hour of 9 hours, the total time
will be added by 1 hour of break time. Therefore, the total flexi hour
is 10 hours.
Note: Specify the rules based on your company’s policy. Leave them blank if it’s not applicable to your environment.
75
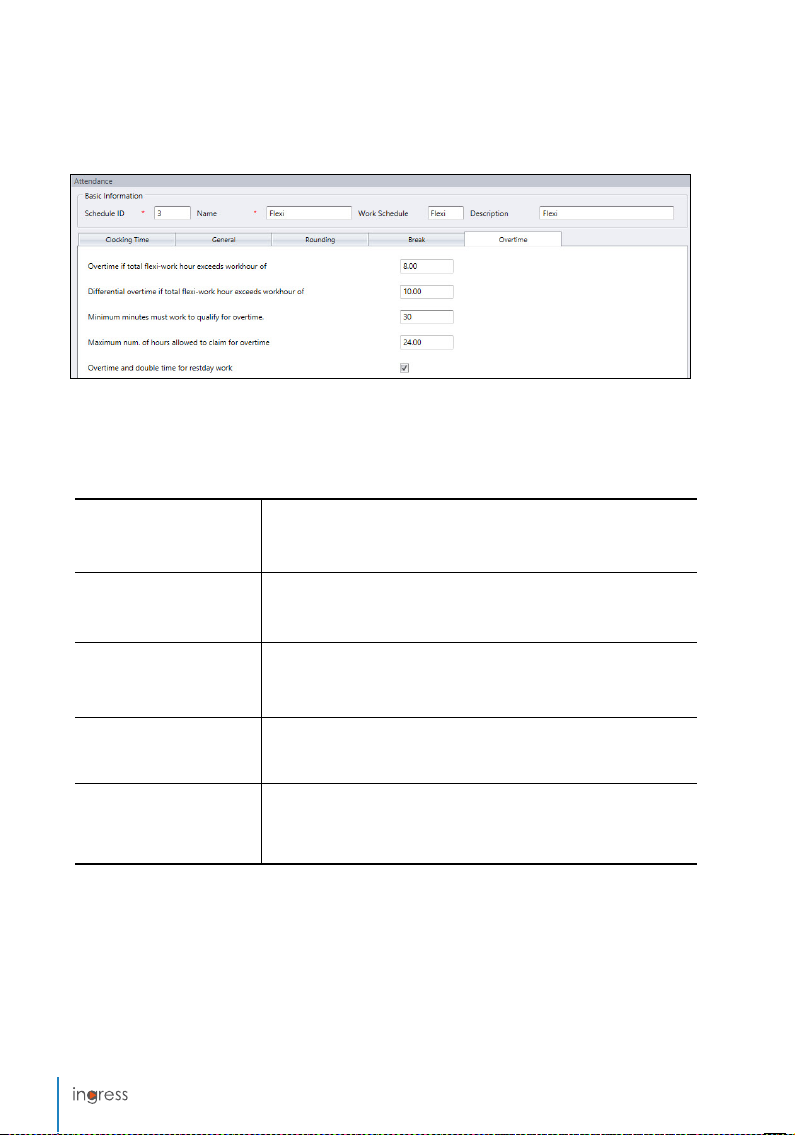
Overtime Rules
Break is to determine the rules for break time allowed in the clocking schedule and the rules
will determine the presentation of time in the attendance sheet.
Learn about it in the table below.
Overtime if total flexi work
hour exceeds work hour of
Differential overtime if total
flexi-work hour exceeds work
hour of
Minimum minutes to work to
claim OT
Maximum hours to allow to
claim OT
Overtime & double time for
restday work
Note: The over time rules set in the schedule will be applied to any group that is under this schedule. All rules and cal-
culations will reect in the attendance sheet of the sta involved in this clocking schedule.
Define the number of hour considered ‘normal’ working hour for flexiwork for example 8 hours. If an employee exceeds that 8 hours, the
next hour and after are considered as overtime.
In some companies, their employees are given a different overtime
rate after a certain work period. Define how many hours the employee
is required to work before he/she is entitled for different overtime.
Sometimes a staff would work only for a few minutes and considered
it as OT; define the minimum minutes required by the company for a
staff to work in order to qualify for an OT claim.
Put a limit to a number of hour a staff could claim for overtime and the
default maximum is 24 hours.
In some companies, employees are entitled for overtime and double
time if they work on a rest day. Tick the checker to enable the employee for the overtime & double time.
76

Setup of Group Duty Roster
Assign clocking schedules into group duty roster to generate a complete working calendar.
Users are assigned into the same group duty roster if they are following the same clocking
schedules.
There are 2 types of group duty rosters:
WEEKLY - Group duty roster for weekly basis. This is the most commonly used working
rosters worldwide where working days fall on weekdays and offdays fall on weekends.
SHIFT - Working schedule for daily basis. This is suitable for multiple shifts, overnight
shifts, open shifts, rotational shifts, etc. where the work schedules change every day.
Creating Weekly Group Duty Roster
1. Click
Group Duty Roster from the left panel.
2. Click
Add Duty Roster.
3.
Select a number to represent the group duty roster
77
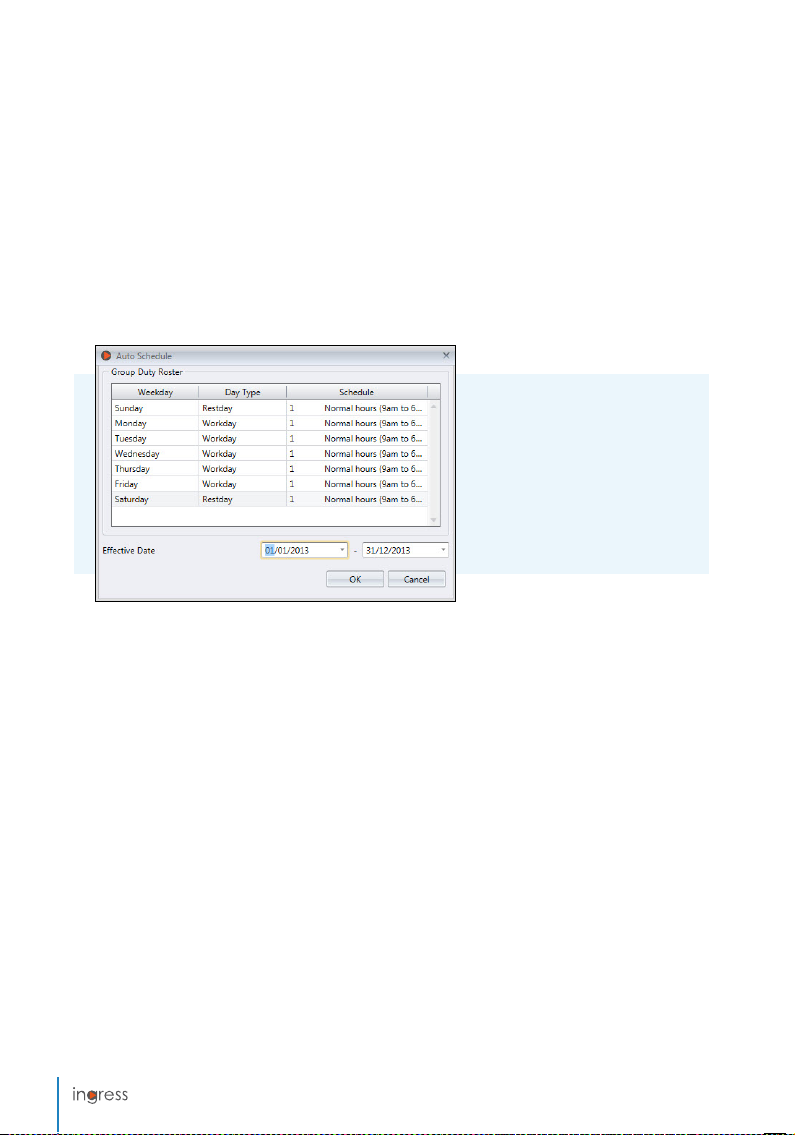
4. Name the group duty roster, e.g.: 9:00am to 6:00pm.
5. Click
Edit under Group Duty Roster tab.
6. Select
Weekly under Roster
7. Click OK to proceed
8. Click
Edit.
9. Click
Add Schedule.
Now you can start to select the clocking schedule to use this roster.
1. Define Day Ty pe.
2. Select the clocking sched ule to
follow.
3. Define the
to apply the calendar.
4. Click
effective date rang e
OK to save settings.
Now you have the group duty roster ready to use. The next step is to assign users, who
follow the same working rules into the same group.
Creating Shift Group Duty Roster
1. Click Group Duty Roster from the left panel.
2. Click
Add Duty Roster.
3.
Select a number to represent the group duty roster
4.
Name the group duty roster, e.g.: 9:00am to 6:00pm.
5. Click
Edit under Group Duty Roster tab.
6. Select
7. Click OK to proceed.
8. Click
9. Click
Now you can start to select the clocking schedule to use this roster.
Shift under Roster
Edit.
Add Schedule.
78

1. Define Day Type according to the
shift sequences, for example 3
work day followed by 1 rest days
2. Select the
low (must use Daily Schedule)
3. Define the
apply the calendar.
4. Click
clocking schedule to fol-
effective date range to
OK to save settings.
Software can support multiple shifts per day, maximum 3 shifts per day. To increase shift
per day:
1. Click Edit
2. Change the value from 1 to 2 or under Shift /Day section
Auto Sched ule and you will see additional columns to assign schedule code for every work day
3. Click
Now you have the group duty roster ready to use. The next step is to assign users, who follow the same working rules into the same group.
79

Assign Users Into Group Duty Roster
You can now assign users into a group duty roster. You can select individual users or all users
under a department.
1. Click
Edit under the Users tab.
2. Click
Add to start to add users into the group duty roster.
Select users to add into this group duty roster. You can select users individually or by
3.
department.
4. Click
OK to save settings.
80

Special Working Rules
You can configure 5 special working rules under group duty roster to fit into your working
environment.
Overtime only after - Software accumulates work time of employees every day before
employee can claim overtime during predefined time period (weekly, bi-weekly, semimonthly or monthly).
F or example: If a predefined working hours a week is 40 hours per week and an employee
works a total of 45 hours for that particular week, she would get 40 hours of work time
and a 5 hours to be considered as OT.
You can apply additional option to view the work time and overtime accordingly.
D aily Tota ls: Software display additional columns under Attendance Sheet when this option enabled.
The columns display individual work time and overtime done by the employees every day. However
the actual work time and overtime calculation still follow Overtime only after.
Auto C alc OT: This option is similar to Daily Totals however the software will sum up daily work time
and over time to as Total Work Time and Total OT. This is only for display and the actual work time and
overtime will still follow the Overtime only after
7th da y OT: This option only works if you select Overtime only after Weekly. The software only calcu-
lates overtime if employees work 7-days continuously. In case the employee takes a rest day in that
7-days working schedule, the software will not calculate any overtime even though the total work
time exceeds the predefined value.
Open schedule -Open schedule is when a factory or a company does not determine spe-
cific type of roster for the employee and they can attend any shifts as they please. With
the open schedule, software will allocate user’s clocking time into corresponding working shift by referring to the clocking time. The working shift in open schedule cannot be
overlapped and must be clearly defined. Software will not be able to allocate users into
their correct shift if the IN time and OUT time of the shift overlaps.
81

Set the schedule code under Auto Schedule when you are configuring group duty roster.
User Duty Planner
1. Click Auto Sc hedule
2. Define Day Ty pe
3. Leave the Sched ule code columns blank
4. Define the
ter to take effect
5. Select the
imum 3) under option Possible
option of schedule code for
open schedule attendance
that has no pre-determined
schedule code
6. Click
date range for ros-
schedule codes (max-
OK to save settings
You can change the working calendar of a user without creating a new group duty roster for
her/him. You can change the effective clocking schedules for this user under the same group
duty roster.
1. Click U
2. Double-click the
3. Refer to
ser Duty Planner from the left panel.
user ID to customize group duty roster.
7.2.1 Creating Group Duty Roster to build individual working calendar.
82

Leaves and Remark
To Add Types of Leave
You can create a list of leave types into Ingress. You can remark his/her attendance by displaying leave at Attendance Sheet.
1. Select
2. Click
3. Click
Leave Type from the left panel.
Edit.
Add.
4. Name the
5. Add
6. Click
7. Click
Leave Type.
Description for this leave type.
OK to insert the new leave type into list.
Save to save settings.
83

To Add Remark
During verification, employee can input a specific number at a device to represent a reason
for abnormal attendance records. For example, a user inputs a 10 when he reports to work
to indicate that he was late to work because he attended a sales meeting away from the office. You can create the list of work codes under the Remark column and also put a remark
into users’ attendance in Attendance Sheet to describe his/her attendance records.
Remark from the left panel.
1. Click
2. Click
Edit.
3. Click
Add.
4. Insert the number under
5. Give the work code a short description under
6. Click
OK to save new work code into list.
7. Click
Save to save settings.
84
Work Code (to be used at device during verification), e.g.: 15.
Remark, e.g.: Outstation.

Attendance Sheet
View and Edit
Attendance Sheet displays all users’ attendance records. You see the IN-OUT records, work
time, short time, overtime and leave taken. You can select to view by:
Date range Absent
Department Overtime
Late in On leave
Early out Miss punch
Extended break
Ingress provides flexibility for administrators to amend the attendance records. Records
displayed in bold indicates that amendments were done. You can insert the leave taken
by the users (under Leave Type column) or put a remark to his/her records (under Remark
column).
Edit.
1. Click
2. Insert time into relevant columns.
3. Work time, Short time and Overtime are calculated automatically based on clocking
schedule settings.
4. Click Save to
save settings.
85

1. Click Edit.
2. Move to the
3. Select leave type or remark.
4. Click
Leave Type or Remark column.
Save to save settings.
Download Data from Devices
Before you can view attendance data, it is advisable to download data from all devices.
Attendance Sheet updates the records when there are any new data downloaded into the
database.
Download in Attendance Sheet.
1. Click
2. Select devices to download data from.
3. Recommended to check
in devices after finishing the download from devices. This operation can avoid data overflow in the log storage of the device.
OK to proceed.
4. Click
If the TCP/IP or RS485 connection is unavailable, you can download transaction logs from
devices by using a USB flash disk. Plug the USB flash disk into Ingress and do the following
steps:
Remove transaction logs after download. Ingress deletes all logs
86

1. Click Import Transaction logs.
2. Specify the drive location of the USB flash disk.
From USB.
3. Click
4. Define the
5. Select user ID.
6. Click
Date Range of data to be imported into Ingress.
Download to proceed.
Generate Attendance Data
Run Generate Attendance Data to force
Ingress to repopulate and recalculate attendance records. You must generate attendance data after making changes to
the clocking schedule or group duty roster. Changes will only take effect after this
process.
Generate in Attendance Sheet.
1. Click
2. Select
3. Select
4. Only select schedule ID if you want In
user ID.
Date Range.
gress to generate attendance records
according to a new clocking schedule
setup.
87

5. Check Convert from Data Audit List so Ingress checks into database for any new records.
6. Check
7. Click
Keep User Changed Data so Ingress will not erase any edit records done before
this.
OK to proceed.
Export Attendance Recordss
You can export attendance records for use with payroll software. The exported records can
be detailed (day-by-day) or summarized records. You can choose to save the output file in
XLS or TXT format to be used by the payroll software.
Before you can export attendance records, you must configure a template for the export
format by determining the exported data fields and adjust their length. You can configure
multiple templates if you are exporting attendance records to be used in more than one
software. Make sure you select the correct template during export process.
Templates Configuration.
1. Click
2. Select
3. Name the template, e.g.: Payroll use – Details.
4. Click
88
Templates details (to export day-by-day attendance records) or Templates Sum-
mary (to export summary of attendance records for specific time period).
Edit.

5. Click Browse to determine the path location to save the output file. You can select to save
in XLS or TXT.
6. Select the separators to use when exporting in TXT file. Ignore if you are exporting to
XLS.
7.
Select data fields from left panel. Double click data field to include into the right panel.
8.
Arrange data fields in right panel to export.
9.
Adjust the length of data field by changing value under Size column.
10.
Click Save to save settings.
During the export process:
Export Attendance
1. Click
Sheet.
2. Select users individually
or by department.
3. Select the
4. Determine path/location
to save the output file.
5. Define the
range of records to ex-
port.
6. Click
template.
effective date
Export.
89

Export to Sage UBS Payroll (Malaysia ma rket only)
Ingress is customized to export attendance records into Sage UBS Payroll, whereby the arrangement of attendance records are fixed to fit the software. You must know the basic usages of Sage UBS Payroll before proceeding to the steps below.
To export to Sage UBS Payroll:
Export Payroll.
1. Click
2. Select
Sage UBS template.
3.
Select users individually or by department.
4. Define the
5. Select
6. Select
7.
Configuration of data field.
8. Click
effective date range.
payroll path to save the output file.
company name.
Export.
90
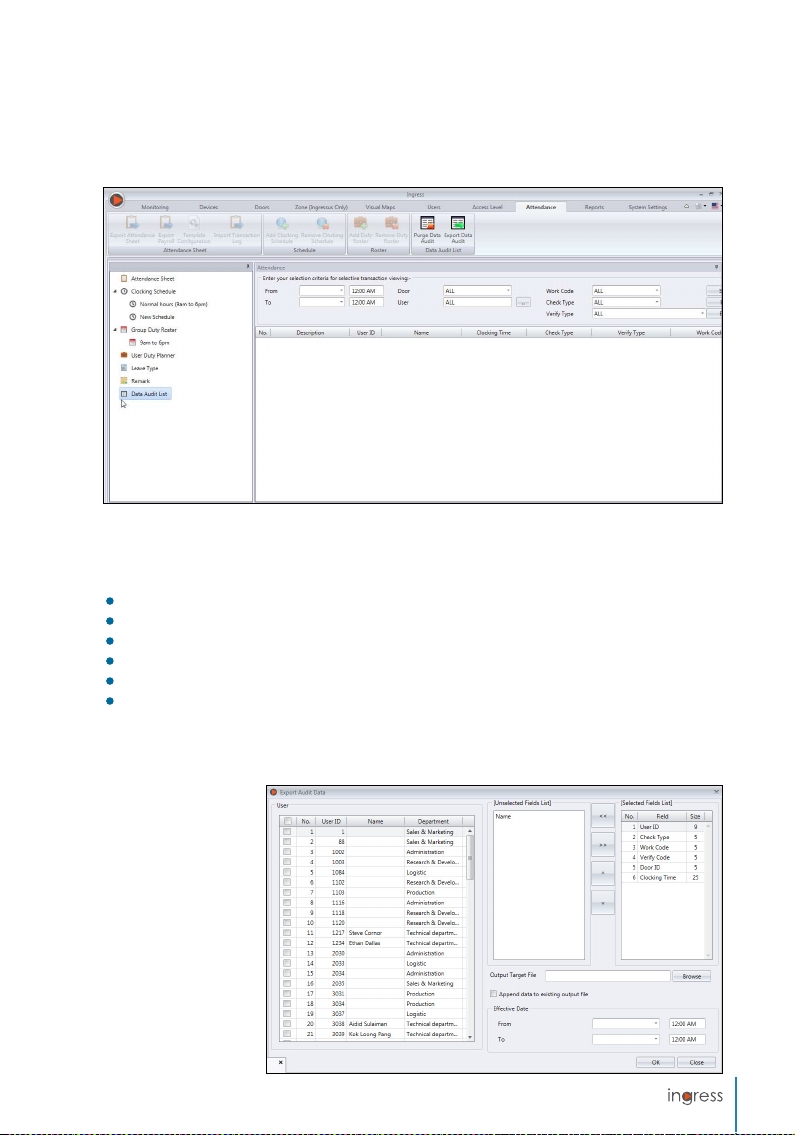
Data Audit List
Data audit list is the database that stores all transaction logs downloaded from devices. Ingress provides an easy interface to check transaction logs. All IN-OUT records are published
in this page. You can choose to view transaction logs by:
Date range
Doors
Users
Work Code
Check Type
Verify Type
These are raw data that can be exported in XLS, XLSX, TXT or CSV format. The output file can
be imported into 3rd party software for further processing or evaluation.
To export raw data:
1. Click Data
List from left
panel.
2. Click
Audit.
Select users’
3.
raw data to be
exported.
Audit
Export Data
91

4. Double-click to select the data fields to be exported.
5.
Arrange the data fields to be exported.
6.
Adjust the length of the data fields by changing their value under the Size column.
7. Click Browse to define path location to save the file.
8. Define the effective date range to export raw data.
9. Click OK to export.
92

Chapter 8
Report
This chapter guides you on the types of reports provided by Ingress for housekeeping purposes and how to generate them.
Ingress provides you 8 types of commonly used reports to understand all IN-OUT and
attendance records. You can have reports to display lists of users, devices and doors that
are useful for housekeeping in the future.
You can print the reports to keep as records or save them in a digital format (PDF, HTML,
MHT, RTF, XLS, XLSX, CSV, TXT, XPS and JPEG). You can send emails together with the
digital reports to others for viewing and analysis.
Types of reports and usage
DEVICES
Device Listing: This report records all transaction data downloaded from every device.
Device Activity: This report details the transaction record of the users by device ID.
USERS
Department Listing: A list of all department names and its corresponding amount of users.
User Listing: This report shows the users’ information in detail.
User Movement Analysis: This report lists the details of the users’ movement from all devices.
DOORS
Door Listing: This report will compile and show a complete list of all created doors/door groups
with a connected device.
ZONES
Zone Listing: This report shows the list of the devices and its assigned zone mode and type.
ACCESS LEVEL
Access Level Listing: This report shows the list of doors with its assigned access level.
Time Set Listing: This report shows the daily time period for the Timeset configurations.
Holiday Listing: This is a list of holidays created at the Holiday Settings as well as the Holiday Time
zone assigned to it.
ACCESS CONTROL
Event Log Report: This report is applicable to all FingerTec door access devices that are connected to
a door sensor. The report will display detailed information for door events.
Transaction Listing: This report records all transaction data downloaded from every device.
ATTENDANCE
Clocking Schedule: This is a checklist showing detailed configurations and settings of the clocking
schedule.
93

Duty Calendar: This is a working calendar checklist for all or a particular work group.
Remark Listing: A list of all work codes and its remarks (names).
Electronic Time Card: The most general employee attendance record comprises of detailed clocking
activities of an employee in a month including calculated work time, overtime and short time. The summary of attendance, tardiness and leave taken is also available in this report.
Daily Attendance Listing: This report details the daily work rate, tardiness, total work time, OT and
shortages for workdays/rest day and off day for each employee.
Weekly Attendance Listing: This report will generate the employee’s weekly attendance into a page
with its summary of attendance at the bottom of the report.
Attendance Sheet: This report is almost the same as the attendance summary but it is without the work
rate, work time, OT and short hours. With this report, the employer can have an overview of how many
times the staff is late to work or clocks out early.
Correction Report: This report shows employees that have irregular clocking activities, e.g.: extended
break times, early clock-outs, late clock-ins, etc. The Administrator can choose to amend these irregular clocking activities suggested by the software to match the activities of the affected employees, if
necessary.
Tardiness Report: This report shows employees with tardiness e.g.: late in, early out, and etc. The time
of tardiness and the total short minutes will be shown in red.
On Leave Listing: This report shows the list of employees who have taken leave and the particulars of
their leaves for references.
Overtime Approval Worksheet: This is an overtime worksheet report showing the list of employees
who are taking overtime and the amount of hours that he/she is entitled for. This report is important
for the management to enable them to check the details of the overtime taken before approving the
claims.
Attendance Summary: This report details the work rate, tardiness, total work time, OT and work hour
shortage time for workdays/rest day and off day for each employee. Analysis of each employee’s working performance can be viewed using this report.
Attendance Analysis: This report is similar to the attendance summary but it does not include the work
rate, work time, OT and work shortage time. The employer can have an overview of how many times
the staff is late to work or clocks out early with this report.
Day by Day Analysis: This report details the daily work rate, tardiness, total work time, OT and work
hour shortages for workdays/rest day and off day for each employee.
Month by Month Analysis: This report details the monthly work rate, tardiness, total work time, OT and
work hour shortages for workdays/rest day and off day for each employee.
AUDIT TRAIL
Audit Trail: This report will show all configurations performed in the software according to the user
that made the edit.
Error Log: This report will show all the errors which occurred in the software.
94

Preview, Print or Save Reports
1. Select report to preview or print.
2. Select the
panel.
3. Click
4.
Report preview at the right panel.
5. Other operations
P rint repo rts – click .
S ave in ot her digital format:
• Click .
• Select file format.
• Configure the output file.
• Click OK to proceed.
S end via e mail:
• Click .
• Select file format.
• Configure the output file.
• Click OK to save into digital file.
• New email created automatically from email provider.
• Insert recipients’ email address to be sent to.
filter options from the left
Generate.
95

Chapter 9
Settings in Ingress
This chapter guides you in configuring the settings of Ingress for your own preference.
This chapter will guide you in configuring Ingress to operate according to your preference.
You can configure settings for:
• Database configuration: You can initialize, backup or restore MySQL database of In-
gress.
• System Parameters settings: This page allows you to configure date/time and other dis-
play settings in Ingress.
• Field customization management: You can add additional data fields to use in User bio-
data (under Other tab).
• Company info: Fill in information of your company and local reseller. You can also place
a special watermark on every report created by Ingress.
• System User: You can create/delete multi-levels account with different authorities to
login to use your copy of Ingress.
• Event: You can configure the types of events that will trigger alarm in Ingress. You can
select the sound to represent different events and link up the SMTP email server to send
notifications from Ingress to specific recipients. For Ingress Mobile users, you can also
send push notifications.
• Network camera integration: Before you can connect a network camera to stream video
footage, you must configure the login details to Milestones or Epicamera accordingly in
Ingress.
96

Database Conguration
1. Fill in the database information by:
Server: IP address where MySQL database install. By default, MySQL installs into the
server together with Ingress server.
Username: Login username of MySQL database.
Password: Login password of MySQL database.
Port: Set at 3306 by default. Change if you are using a different network port to com-
municate with the MySQL database.
2. Click
Test Connection to try to connect to the MySQL database. Change the settings
mentioned in (1) if connection fails.
3. Click
Save to save settings.
If you want to initialize the MySQL database (to clear all data stored in the specific table),
follow the steps below.
1. Select the data filed from the column Database Initialization.
2. Click
Initialize Database.
To backup data stored in the MySQL database, follow the steps below:
1. Click
Browse to set the location path to save the output file.
2. Click
Backup to proceed.
To restore data into MySQL, follow the steps below:
1. Click
Browse to seek for the file to be restored into MySQL.
2. Click
Restore to proceed.
97

System Parameters Settings
Date, Time and Hour format: Select the format to display date, time and hour in Ingress
1.
and reports.
2.
Mini Visual Map Display Number: Select to display 6, 9, or 12 visual maps onscreen during
monitoring.
3.
Auto Log Off: Set the maximum idle time before the system automatically logs off.
4.
Server Download Transaction Log Interval: Set time interval to download transaction
logs from devices automatically. Set 00:00 to disable this option if unnecessary.
5.
Remove transaction logs after download: Check the box if you want to clear all transac-
tion logs from devices after complete download.
6.
Specify daily download timer for system to activate the automatic download process
every day: Set up to a maximum of 2 daily timers to run auto download transaction logs
from devices.
7.
Perform daily download when computer is power on: Check the box so Ingress activates
the daily download timer when server is power on.
8.
Server Generate Audit Data Interval: Set time interval so Ingress generates raw data to
be updated into Attendance Sheet accordingly. Ignore this if you are using attendance
features in Ingress.
9.
Device Connection Timeout: Devices disconnect and reconnect to Ingress frequently if
the network is unstable. Set maximum waiting time for Ingress to justify device in offline
mode.
10.
Check Synchronize users in the device: Enable this option and Ingress always clear all
employees’ data in device or Ingressus before upload new users. This is to make sure you
always update fresh copy of employees’ data to devices or Ingressus.
Disable this option and Ingress only update particular employees’ data in device or Ingres
sus during upload process.
-
98

Field Customization Management
1. Click Edit.
2. Click
Add to add a new field.
3. Insert the
4. Select type of data
T ext box – column to fill in text freely.
Combo b ox – drop down to select description (require data from Item Data).
Check b ox – box for check and uncheck.
DateCom bo box – column to display calendar for date selection.
5. Insert description into Item Data for Combo box to select.
6. Click
7. Click
Repeat steps above to create new data fields. All newly created data fields are displayed
under Other tab in User’s Biodata.
Click Update if you want to edit the data field or Remove to delete from the list.
name of information, e.g.: Valid driving license.
Add to save into the list.
Save to save settings.
Company Info
1. Insert your company information in the left panel.
2. Fill in the contact information of your local reseller in the right panel.
99

Follow the steps below to insert watermark to your reports:
1. Click
2. Select
C enter – watermark display at the center of page
Stretch – watermark stretch to cover the whole page
Zoom – watermark zoom to bigger size located at the center
3. Check Show Watermark in Report to activate watermark in reports.
to select the image file (in JPEG format).
Display Mode:
System User
To create User Roles
You must create roles to edit or view data in
Ingress. To do this, follow the steps below:
1. Click
User Roles under System User.
2. Click
Add Role.
3.
Name the role, e.g.: System Operator.
4. Select
5. Select
6. Click
Repeat steps above to create new user role.
You can select to update existing roles by selecting them from the list, followed by Edit Role.
Select existing role and click Remove Role to remove it if it is no longer in use.
modules to allow for viewing under
View column.
modules to allow for editing under
Edit column.
OK to save settings.
To create login account and assign role
Now, you can create new login username and
password for new users to handle Ingress.
Steps as below:
1. Click
User Account under System User.
2. Click
Add Account.
3. Insert
username and login password.
4. Assign role (as preset under User Role) to
this account, e.g.: System Operator.
5. Check Activate to grant access to this ac
count user.
6. It is optional to enroll fingerprints from this user. He/she can verify fingerprint to access
into Ingress instead of using a password. You must plug in the OFIS-Y scanner into the PC
before clicking the Register button. Follow the onscreen instructions to enroll fingerprints
from the user.
100
-
 Loading...