


H2i
support@fingertec.com
H2i
Simple Fingerprint Door Access &
Time Attendance System
User Guide

CONTENTS
3-4 CHAPTER 1 • GETTING STARTED
Viewing the User Guide in the Internet
Included Accessories
Included Printed Materials
Activating H2i
Registering H2i
CHAPTER 2 • BASICS
57
Introduction to H2i
H2i Overview
Security Features
Restarting and Resetting H2i
818 CHAPTER 3 • CONNECTION SYNCING
Installation
Mount on Well
Communication
Description of Available Connections
Ingress Online Activation
Installation and Setup of Ingress
Connecting Terminals to Ingress
Using USB to Download/Upload Data
Communication Key
1822 CHAPTER 4 • MANAGING USER
Enrolling Administrator Card
Registration of Administrator Card
Enrolling User Cards
Verifying Card for Attendance or Access
Deleting Card User or Fingerprint User
Operations with USB Numeric Keyboard
Using the UBS Numeric Keybord
Enrolling Users
Deleting Users
Configuring IP address, Subnet Mask and Gateway by using USB numeric keypad
Restoring The Terminal to Default Factory Setting
1 • GETTING STARTED
Viewing the User Guide in the Internet
The User Guide is available in the package when you purchase FingerTec H2i. The
user guide is also published online at fingertec.com and user.fingertec.com. Choose
the language you prefer to view the User Guide.
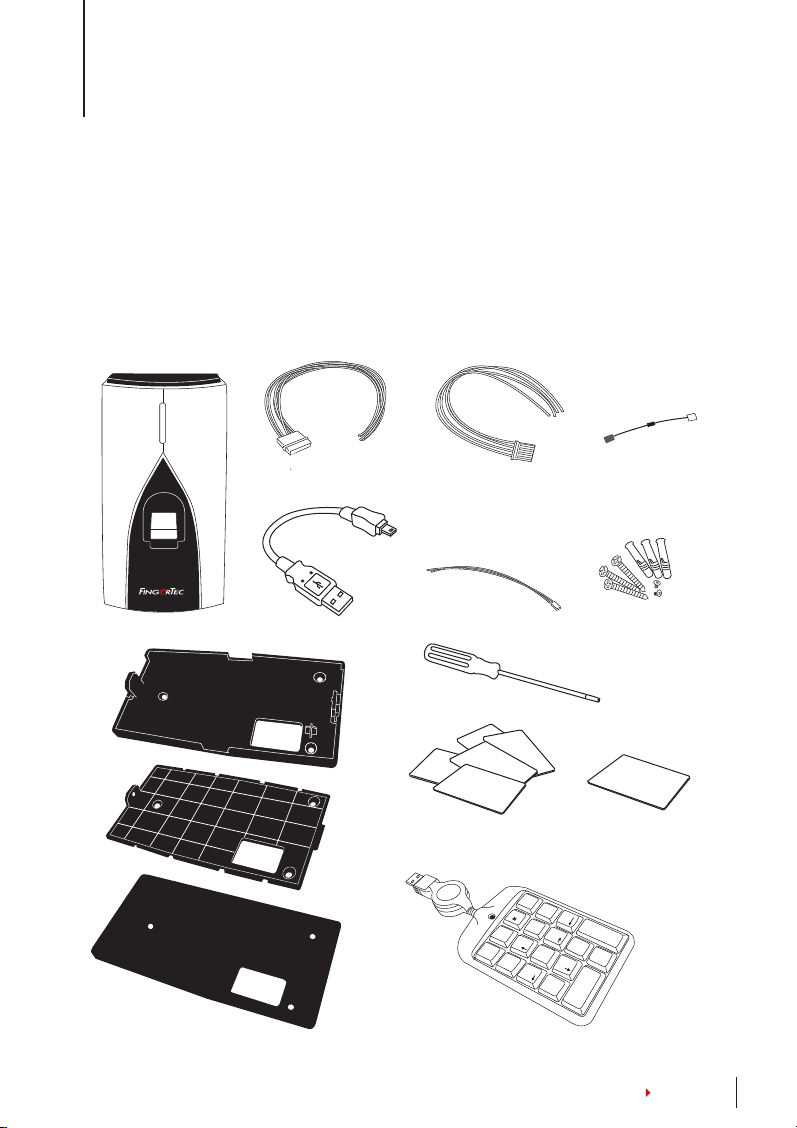
Included Accessories
H2i
support@fingertec.com
H2i terminal
Door Accessories
Cable
USB Extension
Back Plate
(Thick)
Back Plate
(Thin)
Rubber
Padding
RS485 Wiegand
Output Cable
Power Supply Cable
Screwdriver
RFID Card (5 pieces)
*for H2i RFID
-
/
8
k
um
N
oc
L
7
Home
4
A Packet of Bolts
MIFARE Card (1 pieces)
*for H2i MIFARE
+
k
e
c
c
a
a
p
B
s
Up
9
Pg
5
r
e
t
n
E
6
n
D
3
g
P
.
l
e
D
2
d
1
n
E
0
Ins
Keypad
Diod
CONTENTS
3

Included Printed Materials
• FingerTec Comprehensive DVD
• Quick Start Guide
• Pamphlet
• User Enrollment Template Form
• Warranty Card
Activating H2i
Connect all the cables correctly at their specific points and turn on the power supply. The H2i terminal does not have an on/off button.
Registering H2i
Make sure that you register your H2i’s warranty with us at www.fingertec.com/
ver2/english/e_main.html#
CONTENTS
4
2 • BASICS
Introduction to H2i
FingerTec H2i is a simple master terminal, functioning as a time attendance and
door access device and it can be used as a time attendance recorder as well. The H2i
has a simple and sleek design as it comes without a keypad or any form of a display
screen. It communicates with its users mainly through its voice commands, as well
as its dual color LED light. To perform administrative functions on the terminal, an
administrator card is needed. However, the H2i also has the option of using a numeric USB keypad as an administrative tool. As usual, more advanced management
of FingerTec H2i can be done via the included software in the package.
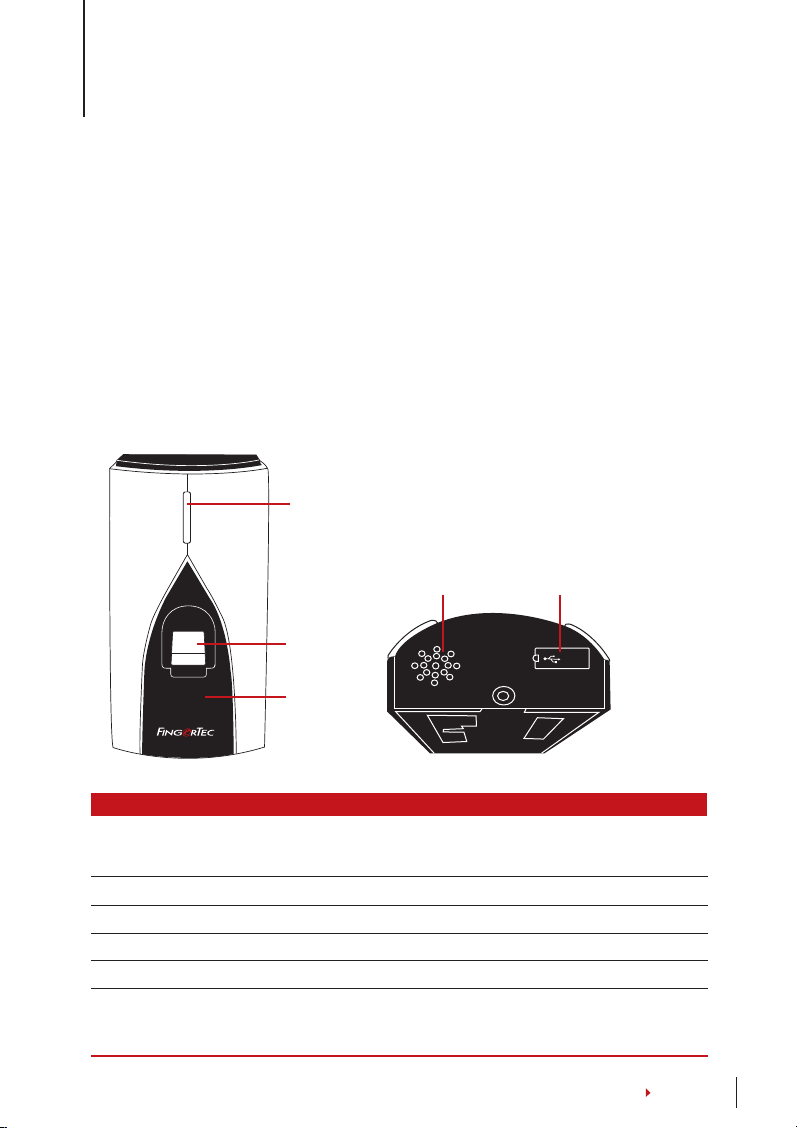
H2i Overview
LED
Speaker
Fingerprint
Scanner
Card
H2i
support@fingertec.com
Front of Terminal Bottom of Terminal
Induction
Area
USB Port &
Reset button
Reset
Item Function
LED Indicating status of terminal and result of verification
Green
– Terminal is in standby mode, or verify users successfully.
Red – Terminal has failed to verify user.
Fingerprint sensor To scan finger for confirmation of identity.
Card induction area Area that reads cards.
Speaker For terminal voice emission.
Reset button To restart the terminal as and when required.
USB port To connect a USB extension for data download into a USB flash
disk (pen drive). To connect a USB Keypad to input numerical
commands into the terminal (optional).
CONTENTS
5
Reset
-
+
k
e
c
c
a
a
p
B
s
p
Bottom of Terminal
Keypad
9
PgU
/
8
m
k
u
c
N
Lo
5
e
7
Hom
4
r
e
t
n
E
6
n
D
3
g
P
.
l
e
D
2
d
1
n
E
0
Ins
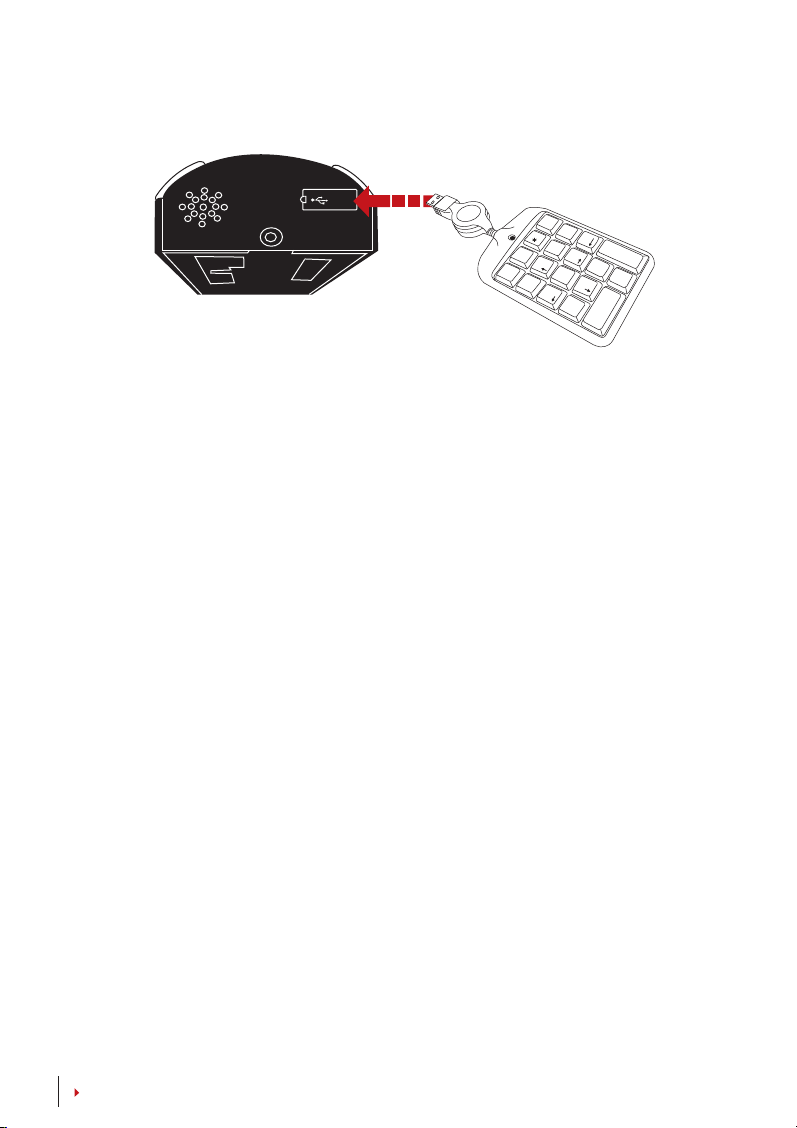
Connect the external USB keypad to the bottom (USB port) of the H2i to insert a
specific user ID number during enrollment or deletion. You can also use the keypad to input commands to reset settings of the H2i back to its default factory settings. Refer to page 19 for details.
The external USB keypad is an optional item, and is included in the package.
Security Features
Security features help protect the information in the H2i from being accessed by
unauthorized individual(s).
ADMINISTRATOR CARD
Registration of an administrator card to the system is important to control access
into H2i. After registration of the administration card is done, nobody can do enrollment, deletion or resetting on the H2i without the administration card.
TAMPER SWITCH
H2i comes with a tamper switch located at the rear of the terminal. During installation, the tamper switch is compressed against a wall. Any attempt to dismantle
the H2i will trigger an alarm
Restarting and Resetting H2i
If something isn’t working right, try to restart or reset the terminal.
RESTARTING H2i
Use a thin probe to push the reset button hidden at the bottom of the terminal. The terminal will restart by itself and all the memory is retained during this
operation.
CONTENTS
6

RESETTING TO DEFAULT FACTORY SETTINGS WITH AN
ADMINISTRATOR CARD
To reset the H2i back to its default factory settings, you must first have the administrator card with you.
Green LED light blinks > Wave Administrator card 5 times at the induction area >
“Restore to default settings. Please wave your administrator card to confirm” >
Wave the administrator card to induction area to confirm >
“The operation is
successful”. The system will return to verification mode.
Remarks:
192.168.1.1, and the terminal ID will be reset to 1 after the process. The administrator card information
will be deleted from the memory and you will need to reenroll it. However, user information and trans-
action logs will still remain in the memory.
All settings of the H2i will be reset to the default settings. The IP address will be reset to
RESETTING TO DEFAULT FACTORY SETTINGS WITHOUT AN
ADMINISTRATOR CARD
Green LED light blinks > Detach the terminal from the wall > Release tamper switch
> This might trigger a connected alarm > Wait 30 sec > press and release the tamper
switch 3 times > The terminal will emit 3 beep sounds > the terminal will then reset
to its default factory settings
Remarks:
tion and transaction logs. All settings will return to the default settings. The IP address will return to
192.168.1.1, and terminal ID will return to 1 after the process.
All contents of the terminal will be deleted including the administrator card, user informa-
CONTENTS
7
3 • CONNECTION – SYNCING TERMINALS
Installations
FingerTec terminals offer several connections for power and communications. Installations of FingerTec time attendance terminals are simple than installation for
door access functions.
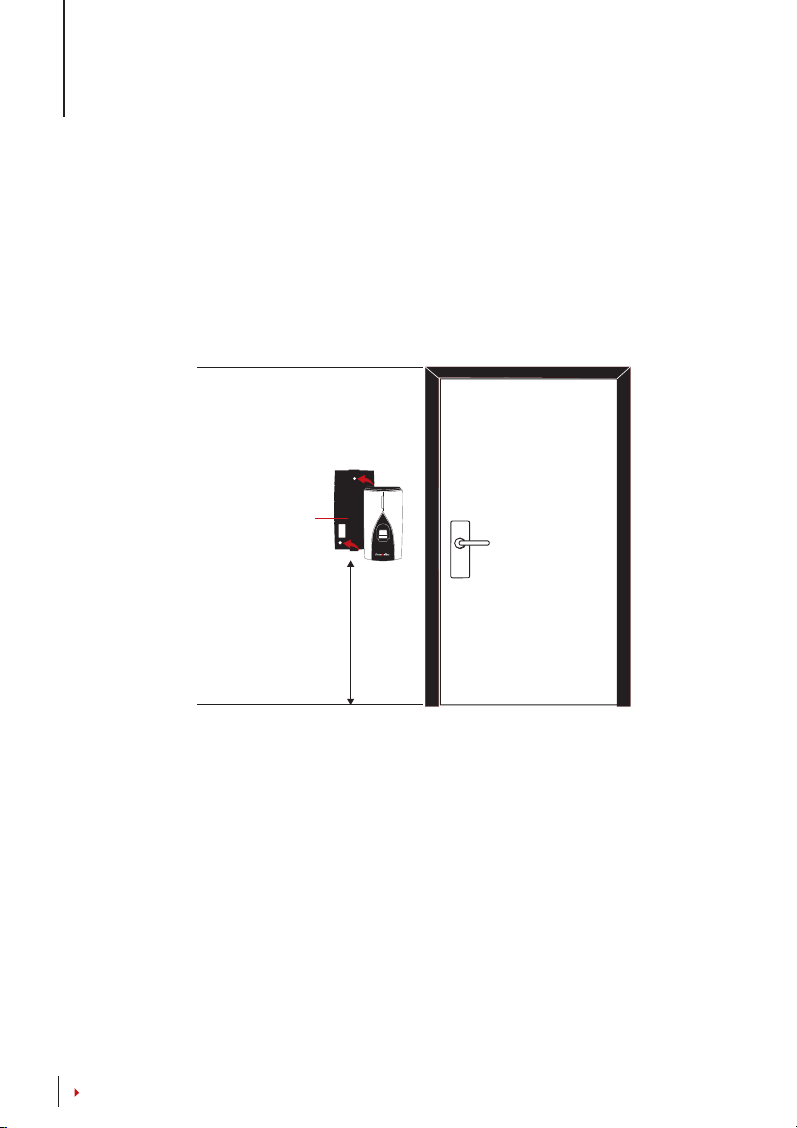
Mount On Wall
Back Plate
H2i
support@fingertec.com
4 feet / 1.2 meter
(recommended)
Attach the back plate on the wall securely and attach the terminal to the back plate
when mounting it on the wall.
CONTENTS
8

Communications
Connection points for power and communication are available on top of the terminals. Refer to the following diagrams for the terminals you require.
POWER SUPPLYPORT
+12V
RX+
RX-
RX+
RX-
GND
485A
485B
485A
485B
485A
DC12V
Power Supply
RS485 CONNECTION PORT
1. RS485 Single Connection
RS485 Data
Converter
2. RS485 Network Connection
RS485 Data
Converter
485B
ACCESS CONNECTION PORT
GND
BUT
For NC or NO
door lock
system
SEN
NO
COM
NC
Back of Terminal
WIEGAND INPUT
CONNECTION PORT
+12V
IWD1
IWD0
RLED
GLED
BEEP
GND
3rd party
controller with
26 bits wiegand
output
WIEGAND OUTPUT
CONNECTION PORT
WD0
WD1
3rd party
controller with
26 bits wiegand
intput
TCP/IP PORT
(Ethernet Connection)
TCP/IP
-
CONTENTS
9

FOR NC NORMALLY CLOSE DOOR LOCK SYSTEM
POWER SUPPLY PORT
DC12V
Power Supply
ACCESS CONNECTION PORT
+12V
GND
485-
485+
+
EM lock
(NC)
Emergency
break glass
(NC)
Key switch
(NC)
-
Release
button
2
Door
sensor
3
A
C
GND
BUT
SEN
NO
COM
NC
AL-
AL+
FOR NO NORMALLY OPENDOOR LOCK SYSTEM
POWER SUPPLY PORT
DC12V
Power Supply
ACCESS CONNECTION PORT
+
EM lock
(NO)
Emergency
break glass
(NO)
Key switch
(NO)
Release
button
-
Door
sensor
1
3
B
D
+12V
GND
485-
485+
GND
BUT
SEN
NO
COM
NC
AL-
AL+
Optional to use
with Diode
GND
BUT
NO1
COM1
NC1
Optional to use
with Diode
GND
BUT
NO1
COM1
NC1
Door
lock
system
Door
lock
system
10
Please refer to AdapTec AC Installer Manual if you are using AdapTec AC.
CONTENTS
NOTE

Descriptions of Available Connections
USB PORT
Linking with USB flash disk for remote data transfer.
1 8
TOP
FRONT
1 8
TCP/IP PORT
Connect with a CAT 5 cable for LAN connection, one end to terminal’s port and
another end to the computer’s TCP/IP Port.
TCP/IP for Single Connection
Linking the terminal to a single computer using TCP/IP
requires Ethernet 10/100Base-T Crossover Cable. The
cable can be used to cascade hubs or to connect Ethernet stations back-to-back without a hub. It works with
both 10Base-T and 100Base-TX.
TCP/IP for Network Connection
Linking the terminals to multiple computers using TCP/IP requires Ethernet 10/100Base-T Straight Thru
Cable or “whips”. The cable works with both 10Base-T and 100Base-TX, connecting a network interface
card to a hub or network outlet.
JOINT 1 PIN JOINT 2 PIN
TX+ 1
TX- 2
RX+ 3
RX- 6
• •
• •
• •
• •
3 RX+
6 RX-
1 TX+
2 TX-
CONNECTOR PIN CABLE COLOR CONNECTOR
TX+ 1• White/Orange •1 TX+
TX- 2
RX+ 3
4
5
RX- 6
7
8
Orange •2 TX-
•
White/Green •3 RX+
•
Blue •4
•
White/Blue •5
•
Green •6 RX-
•
White/Brown •7
•
Brown •8
•
POWER SUPPLY PORT
Insert the Power Adapter point to this port for power.
RS485/WIEGAND INPUT CONNECTION PORT
RS485 Single Connection:
RS485 Network Connection: Connection to multiple computers using Daisy Chain connection.
Wiegand Output: Connecting with third party connector or terminal(s).
Connection to a single computer using RS485 wire.
CONTENTS
11

ACCESS CONNECTION
Linking the terminal to door lock system.
BELL PORT
Linking the terminal to doorbell.
NOTE
Link all cables to the correct connection point(s) before attempting to connect the
terminals to software.
Ingress Online Activation
Ingress is a genuine software by FingerTec. Every FingerTec access control model
comes bundled with a unique license key. To start using the terminal with Ingress,
you must connect the terminal to Ingress and perform online activation. Ingress
reads the serial number of your terminal and sends it for verification at the FingerTec server via Internet.
In case you do not have an Internet connection, you would need to do offline activation. Please send the serial number and models of your terminals to your local resellers or support@fingertec.com to request for a product key and activation key.
Installation and Setup of Ingress
Install Ingress in a PC that fulifills Ingress’ minimum requirements. Refer to http://
www.fingertec.com/customer/download/postsales/SUM-Ingress-E.pdf for the In-
gress user guide online. Setup Wizard will require you to do online activation before connection establish between Ingress and terminals.
Connecting Terminal to Ingress
THE FIRST TIME CONNECTION
When connecting the Terminal to the Ingress for the first time, you must use TCP/IP
to form the connection. The Ingress allows you to configure the communication
settings and the door lock settings. An IP address is important, as it is a unique
address of the terminal in the LAN network. Without an IP address, locating the
specific terminal is not possible.
Identify the number of your terminal to differentiate between one another. The
default IP address of the Terminal is 192.168.1.201, with the default terminal ID
number being 1. The terminal ID can only be changed after you connect it to the
Ingress. Remember, each Device ID must be paired with different IP addresses, to
indicate that it is different terminal.
CONTENTS
12

At the Devices Tab, user can
either choose to add device
via Add Device (to individu-
ally add) or Scan Device to
add multiple terminals at one
go. For single terminal, after
filling in the relevant information, click Add and Continue
to proceed by adding another
terminal or Add to add only
one terminal.
To add multiple devices at one go, click Scan Device and Scan. IP Address range
can be set to search for devices. The bigger the range of IP address, the longer time
needed to scan for devices. Devices found will be displayed on the screen. Select the
preferred devices and click Add Selected Device to add them and a window containing the settings of the terminals will pop up. Click Add to proceed.
CONTENTS
13

Once the device has been added, a pop up window will appear indicating that the
device has been successfully added. Click Ok to proceed.
CONTENTS
14

HOW TO CHANGE IP ADDRESS
Terminal does not have a keypad thus to change the IP address users can do it via
Ingress software. Steps to change IP address via Ingress are as below. Go to Doors
tab and click on Add Door.
Once the door is added, click on Add Device at the Doors tab. Check/Tick the
terminal(s) to be added to the specific door. Click OK. Double click on the device.
At the Network tab, click Edit. Change the desired IP address at the IP Address / URL
column. When done, click Save to confirm the changes made.
CONTENTS
15

Once done, a popup window will appear indicating the update is successful. Click OK
to proceed. The Ingress software has to be synced with all relevant devices in order
for the changes to take effect. A small window will appear at the bottom left corner of
the screen once any changes are made.
Click on the underlined blue sentence to sync the terminals. Any changes made will
appear in the Synchronize Device Settings window. Check/Tick the changes needed
to be synced to the terminals. Click Start Synchronize once the selections are made.
Another popup window will appear, displaying the changes made at the particular
doors affected. Click Start Synchronize once everything is confirmed.
Once synchronization is complete, click Close to proceed. Go to Other tab and click on
Reboot Device. A window will pop up, seeking confirmation on whether to restart the
device. Click Yes and the IP address for the terminal has been successfully changed.
CONTENTS
16

Using USB to Download Data
The USB flash disk feafure is useful in cases where the terminal is installed far from a
PC or there is a connection problem. To determine the type of USB compatible with
the terminal, please refer to this link at fingertec.com/newsletter/HL_74.html.
USING USB FLASH DISK PEN DRIVE
USB flash disk can be used in the H2i for these operations:
• Downloading/uploading user information (user ID, fingerprints, cards etc)
• Downloading transaction logs
• Updating firmware
The H2i comes with a USB extension. This extension is intended for security purpose,
for without it, no USB flash disk can be inserted into the terminal to access its data.
To carry out any of the above operations, you must first plug the USB extension into
the port in the terminal and then insert the USB flash disk into the other end of the
extension. Listen to the command from the terminal. The terminal will name each
operation in sequence as shown below. You need to wave administrator card at the
induction area to confirm the relevant command.
1. To download transaction logs from terminal to USB flash disk
Green LED blinks > “Download transaction logs”. Please wave your adminis-
trator card for confirmation > Wave administrator card at the card induction area
to confirm >
“The operation is successful”
2. To download users from terminal into USB flash disk
Green LED blinks > “Download users”. Please wave your administrator card
for confirmation > Wave administrator card at the card induction area to confirm
“The operation is successful”
>
We highly recommend you to contact
support@fingertec.com for this operation
NOTE
3. To upload users from USB flash disk into terminal
Green LED blinks >
confirmation. Wave administrator card at the card induction area to confirm >
“The operation is successful”
“Upload users”. Please wave your administrator card for
4. To upload firmware from USB flash disk into terminal
Green LED blinks > “Upload firmware”. Please wave your administrator card
for confirmation > Wave administrator card at the card induction area to confirm
“The operation is successful”
>
CONTENTS
17

4 • MANAGING USER
Administrator and Administrator Card
Enrollment of an Administrator Card is required before any other operations could
take place in a terminal. Once an Administrator Card is available, an administrator
can perform these 3 major functions.
1. Unlock a terminal for enrollment or/and deletion of users with fingerprints or
cards
2. Download data from a terminal with a USB flash disk
3. Reset the terminal to its default factory settings
An administrator card cannot be used to report attendance or gain access; it is solely
used for the above operations. To gain access or to report attendance, an administrator must enroll his/her fingerprint into a terminal.
“The terminal is providing users with vocal instructions”. Follow the instructions
carefully.
Registration of Administrator Card
Power up terminal > Red LED blinks > “Please register the administrator card”
> Wave card at the card induction area > Terminal reads card and beeps once >
“Registration is successfu” > System returns to verification mode > The Green
LED blinks > Terminal is in stand by mode.
Remark: If the green LED blinks when you power on the terminal, it means that the terminal has already
been enrolled with an Administrator card. Find the administrator card to proceed or you need to reset
the terminal in order to enroll with a new administrator card.
Enrolling Cards Users
Green LED blinks > Wave administrator card at the card induction area > “Register
user”. Please press your finger or wave your card > Wave card at the card induction
area > Terminal reads card and creates a new user ID >
“Registration is successful”. Register, Please press your finger
instruction if you do not intend to register a fingerprint in the terminal)
an to induction area to end process >
Remarks:
1. Repeat steps above to enroll new card users. The system will automatically assign a user ID starting
from number 2. By default, User ID 1 is for an administrator card.
2. If you would like to enroll fingerprint for the user after card registration, continue with the steps below
after you hear
“Registration is successful”. Register, please press your finger > Press finger on scanner for first
capture >
capture >
third capture >
CONTENTS
18
“Registration is successful”. Register, please press your finger
“Please press your finger again” > Lift the finger and press again on scanner for second
“Please press your finger for the last time” > Lift the finger and press again on scanner for
“Registration is successful”. Register, please press your finger > Repeat enrollment
“System returns to verification mode”.
e.g: “User number 2”
(Remark: Ignore this voice
> Wave administrator card

with other fingerprint if you want to enroll more fingerprint for the same user > Wave the administrator card at the induction area to end process >
It is recommended to enroll 2 fingerprints for each user but the system allows you to enroll up to 10
fingerprints for a user.
“System returns to verification mode”
Enrolling Fingerprint Users
Green LED blinks > Wave the administrator card at the card induction area >
“Register user”. Please press your finger or wave your card > Press finger on scanner
for first capture
on scanner for second capture >
the finger and press again on scanner for third capture >
“Registration is successful. Register, please press your finger or wave your card”
> Repeat enrollment with other fingerprint if you want to enroll more fingerprint
for the same user > Wave a new card to the induction area if you want to enroll card
for the same user > Wave administrator card to induction area to end process >
“System returns to verification mode”
“Please press your finger again” > Lift the finger and press again
“Please press your finger for the last time” > Lift
e.g: “User Number 3” >
Verifying Card, Fingerprint or Both for
Attendance or Access
Please check that you have configured the correct verification method(s) i.e. Fingerprint only, Card only, Fingerprint or Card, Fingerprint and Card in the terminal
through the TCMS V2 software.
FINGERPRINT ONLY
Green LED blinks > Press your finger on scanner > “Beep once” > “Thank you”
> Green LED blinks > Verification is successful > Attendance record is captured and
access is granted
Remark: If the terminal’s red LED blinks with an instruction that says “Please press your finger again”, it
could mean two things. The fingerprint might not be registered with the system yet or you did not place
the fingerprint properly on the scanner. Please place your finger carefully on the sensor with the center
points positioned at the center of the scanner. If the terminal consistently does not verify you, it probably
means that your finger has not been enrolled yet. Contact the administrator to enroll.
CARD ONLY
Green LED blinks > Wave card at the card induction area > “Beep once” >
“Thank you” > Green LED blinks > Verification is successful > Attendance record is
captured and access is granted.
Remark: If the terminal’s red LED blinking coupled with two short beeps ,the card you are using has not
been registered to the system yet. Please contact an administrator for card enrollment.
CONTENTS
19

FINGERPRINT OR CARD
Refer to the above explanation.
FINGERPRINT AND CARD
Green LED blinks > Wave card at the card induction area > Terminal reads card and
beeps once >
“Beep once” >
tendance record is captured and access is granted.
Remark: If the terminal’s red LED blinking coupled with two short beeps, neither the card nor the finger
that you are using been registered to the system yet. Please contact an administrator for card enrollment.
“Please press your finger” > Press finger to scan fingerprint >
“Thank you” > Green LED blinks > Verification is successful > At-
Deleting Card User or Fingerprint User
Green LED blinks > Wave administrator card 3 times to the card induction area >
“Delete User. Please press your finger or wave your card” > To delete a card, you
need to wave the card at the induction area and to delete a fingerprint, please place
the particular fingerprint on the scanner >
card or the fingerprint, for example user ID 2” >
finger or wave your card“ > The user has been deleted > Repeat steps above to delete the other users > Wave administrator card to end process >
to verification mode”
Remark:
1. Each user is entitled to have one card only. Therefore, when the card user is deleted, the user ID is
completely deleted from the terminal.
2. Each user can enroll a maximum of 10 fingerprints under one user ID. A user has an option either to
delete particular fingerprints or all fingerprints from a terminal. Place the particular finger you want to
delete on the scanner for the system to delete it. Repeat the steps to delete all fingerprints.
“Beeps once” > “The user ID of the
“Delete User. Please press your
“System returns
Operations with USB Numeric Keyboard
H2i terminal is packaged with a USB Numeric keyboard to manage users. Plug one
end of the USB numeric keyboard to the USB extension and another end into the H2i
for activation.
The following commands can be programmed into the terminal via the USB keyboard:
1. Enrolling new user by user ID
2. Deleting user by user ID
3. Resetting the terminal to default factory settings
4. Deleting all users in the terminal
5. Changing keyboard activation password
6. Configuring TCP/IP setting
CONTENTS
20

Using the USB Numeric Keyboard
ASSIGNING KEYBOARD PASSWORD
Assign a password when you are using the keyboard for the first time. This is important to avoid unauthorized access into the terminal via keyboard.
Plug keyboard to H2i > The LED of keyboard lit up > The Green LED of H2i blinks >
Wave administrator card to the card induction area>
> Press button 8 > Press ENTER > Press button 8 > Press ENTER >
password” > Press keyboard to insert a new password, 4 to 6 digits, for example
123456 > Press ENTER >
tion mode”
Once the password has been created, use the keyboard to control H2i. With the
keyboard, you do not need to use the administrator card to control H2i. Keep the
password secure.
“The operation is successful. System returns to verifica-
“Please press the keyboard”
“Please set
TO CHANGE THE KEYBOARD PASSWORD
Plug keyboard to H2i > The LED of keyboard lit up > The Green LED of H2i blinks >
Insert your password >
Press ENTER > Press button 8 > Press ENTER >
new password, 4 to 6 digits, for example 456789 > Press ENTER >
is successful. System returns to verification mode”
“Password confirmation is successful” > Press button 8 >
“Please set password” > Insert a
“The operation
Enrolling Users
You can enroll users with fingerprints or cards without using an administrator card.
Use the keyboard to carry out enrollment operation in the terminal.
Plug keyboard to the terminal > The LED of keyboard lit up > The Green LED blinks
> Insert password via keyboard >
button 1 > Press ENTER >
user ID using keyboard > System repeats the number inserted for example,
number 12345. Register User. Please press your finger or wave your card” > Refer
Enrolling Card User Or Enrolling Fingerprint User for details of enrollment
to
steps.
“Password confirmation is successful” > Press
“Register User. Please input user number” > Insert
“User
Deleting Users
You can delete users from terminal without using an administrator card, but by using a keyboard. You can delete users by inserting their user IDs, or delete all users
in the system.
To delete particular user: Plug keyboard to terminal > The LED of keyboard lit up
> The Green LED blinks > Insert keyboard password >
is successful” > Press button 2 > Press ENTER > Delete User. Please input User ID >
Insert user number using keyboard> Press ENTER >
“Password confirmation
“System repeats the number
CONTENTS
21

inserted for example user ID 12345” > “Deletion is successful. Delete User. Please
input user number” > Repeat to insert user ID to delete > (undetermined steps ) >
“The system returns to verification mode”
To delete all users including the user for an administrator card: Plug keyboard to
terminal > The LED of keyboard lit up > Insert keyboard password >
confirmation is successful” > Press button 9 > Press ENTER > Press button 9 > Press
ENTER >
verification stage. Please register the administrator card”.
After the operation, the H2i will be completely empty. You must re-enroll administrator card into the terminal to start over.
“Delete All Users. The operation is successful. The system returns to
“Password
Con guring IP address, Subnet Mask and Gateway
by using USB numeric keypad
In case you are going to install multiple H2i in an environment, setting up IP address to every H2i becomes troublesome. Now you may consider using the USB
numeric keypad to ease the job.
Plug keyboard to the terminal > The LED of keyboard lit up > The Green LED blinks
> Insert password via keyboard >
button 4 > Press ENTER >
keyboard, example 198.168.1.2 > Press ENTER>
“Please enter the Subnet Mask” > Insert Subnet mask using keyboard, example
255.255.255.0 > Press ENTER > * “key operation is successful >
Gateway” > Insert Gateway using keyboard, example 192.168.1.1 > Press ENTER >
“key operation is successful” > “Please enter the Device ID > Insert Device ID
using keyboard, example 2 > Press ENTER >
“System returns to verification mode”
“Password confirmation is successful” > Press
“Please enter the IP address” > Insert IP address using
“key operation is successful >
“Please enter the
“key operation is successful” >
Restoring The Terminal to Default Factory Setting
Plug keyboard to terminal> The LED of keyboard lit up > insert keyboard password
“Password confirmation is successful” > Press button 3 > Press ENTER > Press
>
button 3 > Press ENTER >
ful” > The system returns to verification mode.
CONTENTS
22
“Restore to default settings. The operation is success-

5 • OTHER RESOURCES
COPYRIGHT NOTICE
All rights reserved. No part of this book may be reproduced or transmitted in any
form or by any means, electronic or mechanical, including photocopying, recording, or by any information storage and retrieval system, without written permission
from FingerTec Worldwide Sdn Bhd. Every precaution has been made to supply
complete and accurate information. Information in this document is subject to
change without prior notice.
DISCLAIMER
No person should rely on the contents of this publication without first obtaining
advice from a qualified professional person. The company expressly disclaims all
and any liability and responsibility to any terminal or user of this book, in respect
of anything, and of the consequences of anything, done by any such person in
reliance, whether wholly or partially, upon the whole or any part of the contents
of this book.
FINGERTEC WORLDWIDE SDN BHD
CONTENTS
23

© 2013 FingerTec Worldwide Sdn. Bhd. All rights reserved. • 072013
 Loading...