


Software
USER GUIDE

COPYRIGHT NOTICE
All rights reserved. No part of
this book may be reproduced or
transmitted in any form or by any
means, electronic or mechanical,
including photocopying, recording,
or by any information storage and
retrieval system. Every precaution
has been made to supply complete
and accurate information. Information in this document is subject to
change without prior notice.
DISCLAIMER
No person should rely on the
contents of this publication without first obtaining advice from a
qualified professional person. The
company expressly disclaims all
and any liability and responsibility to any terminal or user of this
book, in respect of anything, and
of the consequences of anything,
done by any such person in reliance, whether wholly or partially,
upon the whole or any part of the
contents of this book.
Chapter 1
INSTALLATION AND ACTIVATION
CONTENTS
INSTALLATION AND SET UP
CONNECTING AND ACTIVATING TERMINALS IN
SOFTWARE
By Using TCP/IP, RS232 or RS485 Connection
Connection by USB Flash Disk
ADDING OR DELETING TERMINALS
Adding New Terminals into the Software
Deleting Terminals from the Software
INTERACTING WITH TERMINALS
ASSIGNING TERMINALS INTO GROUPS
Chapter 2
BASIC OPERATIONS
DEPARTMENT DEFINITION
SECTION DEFINITION
REMARK DEFINITION
USER MANAGEMENT
Downloading Users from Terminals
Uploading Users to Terminals
Deleting Users for Terminals
Deleting Users from Computer
USER RECORDS
SETTING TERMINAL DATE AND TIME
DOWNLOADING DATA FROM TERMINALS
Manual Downloads
Automatic Downloads
CLEARING DATA IN TERMINAL
BACKUPING UP/RESTORING
Chapter 3
SETTING UP CLOCKING
SCHEDULES AND GROUP
DUTY ROSTER
SETTING UP OF CLOCKING SCHEDULES
Clocking Page / Range Page / Settings Page
SETTINGS OF GROUP DUTY ROSTER
SAMPLE OF CONFIGURATION
Normal Working Roster
Flexi-working Roster
Multi-shift Working Roster
Rotational Working Roster
Open Working Roster
ASSIGNING USERS INTO GROUP DUTY ROSTER
Chapter 4
ATTENDANCE SHEET
VIEWING DATA
By Date / User ID / By Tardiness
By Schedule or Department
MANIPULATING ATTENDANCE SHEET
Editing the Attendance Data
Applying Leave to Users
3-12
13-24
25-51
52-62

CONTENTS
Applying Remark to Users
GENERATING ATTENDANCE
EXPORTING ATTENDANCE DATA
Exporting Details / Exporting Summary
HOUSEKEEPING
Chapter 5
ACCESS CONTROL SETTINGS
THE RELATIONS BETWEEN TIME ZONE, GROUP TIME ZONE
AND ACCESS CODE
The Settings of Time Zone
The Settings of Access Code and Group Time Zone
Grouping Users into Access Code
DIFFERENT VERIFICATION METHODS
The Settings of Different Verification Method
Group Users into Access Code with Different Verification Method
CONFIGURING ACCESS ZONE
Chapter 6
ONLINE DATA MONITORING
TERMINAL DATA AUDIT LIST
Start/ Stop Online Monitoring on Terminal Data Audit List
Select Terminal for Monitoring the Terminal Data Audit List
Export Raw Clocking Data
Purge Clocking Data from Terminal Data Audit List
MONITORING TERMINAL ACTIVITY
Chapter 7
USB Pen Drive Management and
Instant Messages Display (SMS)
USB PEN DRIVE MANAGEMENT
Download Users from USB Pen Drive
Uploading Users through USB Pen Drive
Downloading Clocking Data from USB Pen Drive
INSTANT MESSAGES DISPLAY
Writing Public Messages to the Terminal
Deleting Public Messages from the Terminal
Writing Personal Messages to the Terminal
Deleting Personal Messages from the Terminal
63-76
77-82
83-89
Chapter 8
Appendix: SAMPLE REPORTS
TIME AND ATTENDANCE REPORTS
Attendance Sheet / E-time Card / On Leave Report / Daily Attendance
Listing / Tardiness Report / OT Approval Worksheet / Attendance Summary /
Gross Wages Report / Duty Calendar / Day By Day Analysis / Month By
Month Analysis / Correction Report / Staff Movement Analysis / Terminal
Activity Report / Terminal Transaction Listing
90-96
INSTALLATION AND ACTIVATION
C H A P T E R
Installation And Set Up
To install the software, you need to insert the software installation CD into a CD-ROM or a
DVD-ROM.Browse the CD and run the installation file. If your computer has an AUTORUN
feature, it will be initiated automatically.
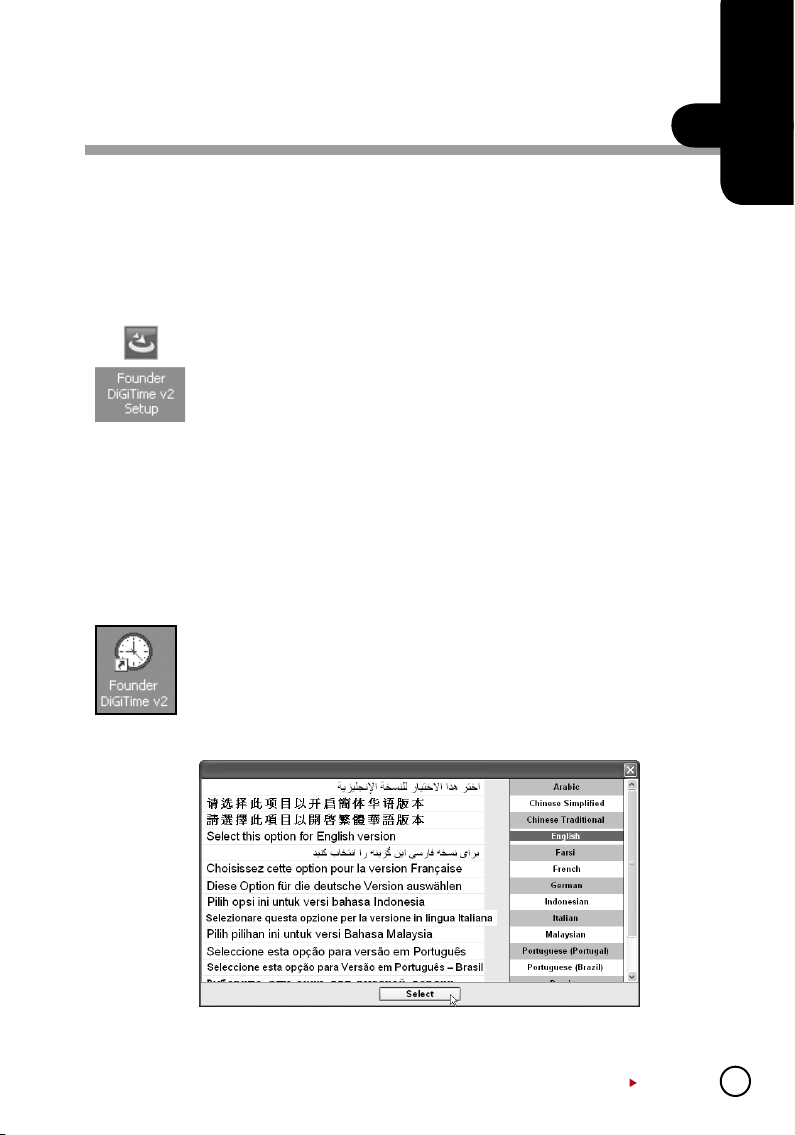
Step 1: Double click the icon to initiate the installation process. For PC with
AUTORUN feature, the installation process will be initiated automatically.
Step 2: Click “Next” to proceed.
Step 3: Check “I accept the terms in the license agreement” after you have
read the license agreement. Click “Next” to proceed.
Step 4: Click “Next” to install the software to default installation folder at
C:\Program Files\Founder\DiGiTime. Click “Change” if you want to specify a
different location to install the software.
Step 5: Click “Install” to start the installation, which takes a few minutes and
varies with performance of computer.
Step 6: Click “Finish” after the installation is completed. A new icon is cre-
ated on the desktop. Click the icon as shown below to start the software.
1
Step 7: Choose a language and click “Select” for your the preferred lan-
guage.
CONTENTS
3
Certificate of Authenticity
2008-2009 HRM System All right reserved.
c
Product Key:
YTR1-4AWE-9899
S/N: 8203602 Activation Key: K2EWF5SZ
001010
4
CONTENTS
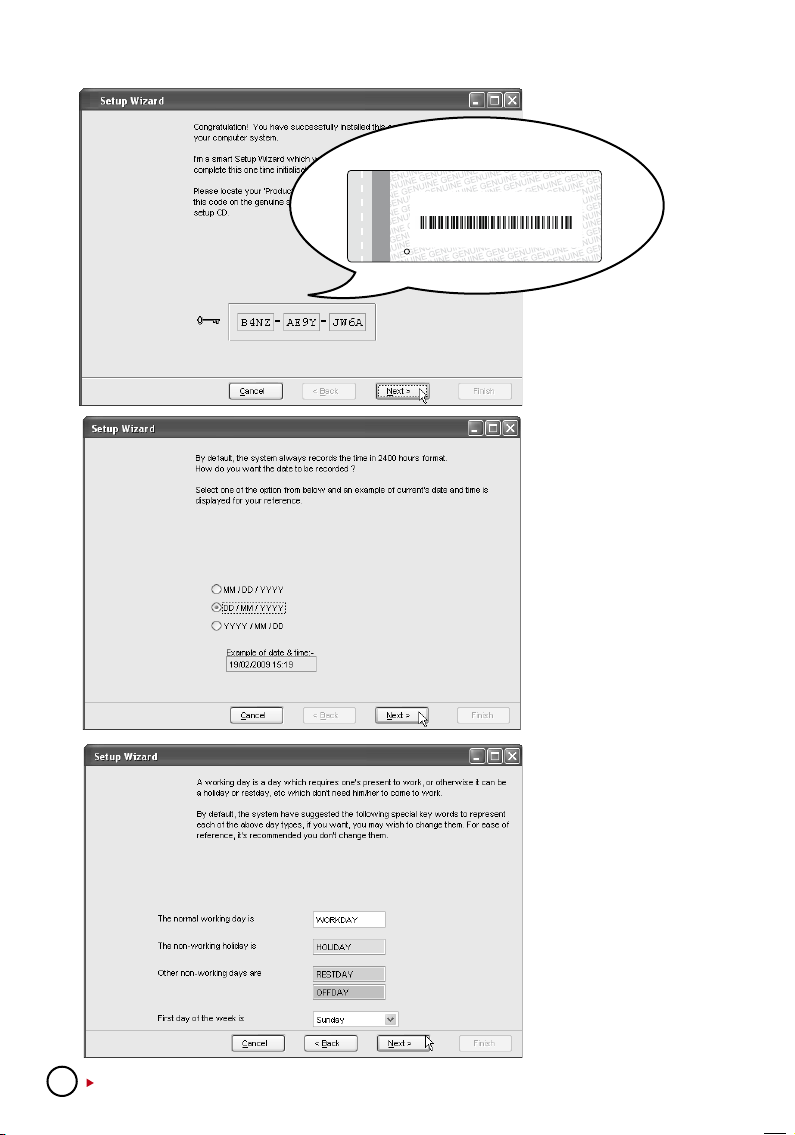
Note: The product key and the software
activation key can be found on the sticker.
B4NZ-AE9Y-JW6A
Step 8: You can find the
product key, activation key
and serial number of the
terminal printed on a genuine sticker.
Step 9: Select the date
display format to be used
in the software and reports.
Click “Next” to proceed.
Step 10: By default, the
software displays the name
of working and non-working day and they can be
changed according to your
preference. All these information will be displayed in
the software and reports.
By default, the first day of a
week is Sunday, and it can
be changed accordingly.
However, the software
always defines the first
day of the week when you
choose the display language for the software. For
example, the first day of a
week is defined as Friday if
you choose Arabic or Farsi
as display language. Click
“Next” to proceed.
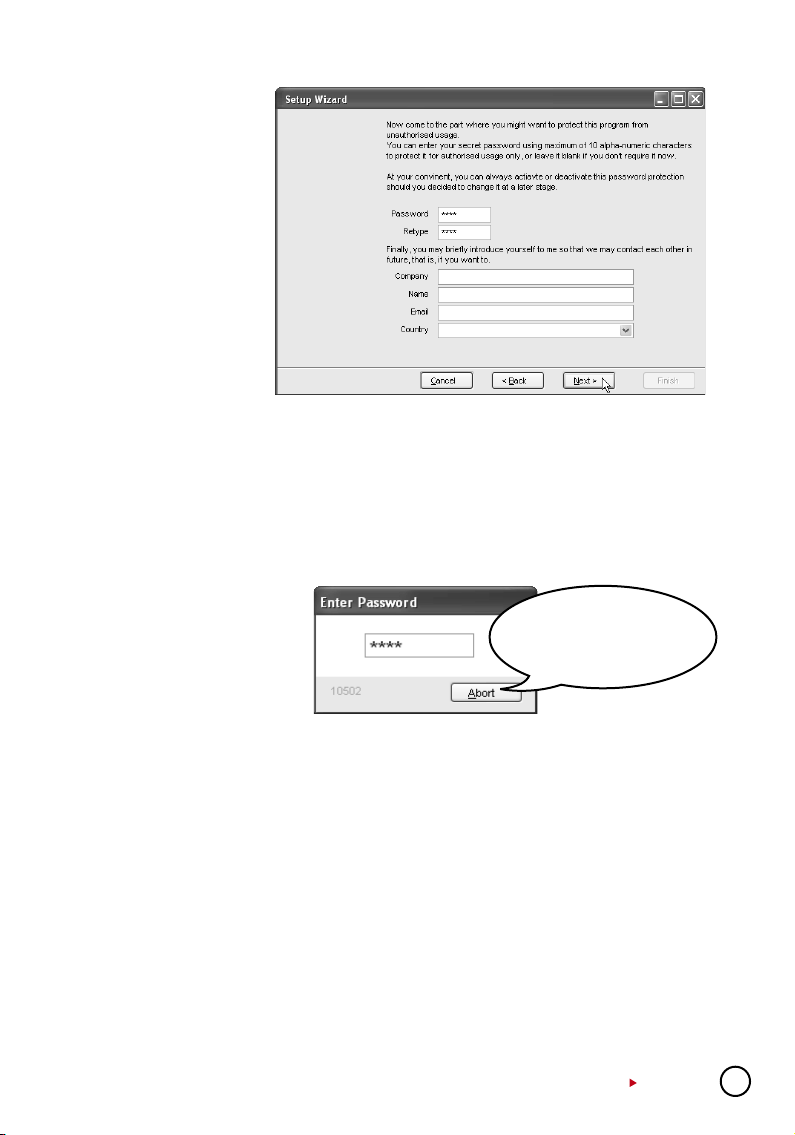
Step 11: In “Password”
column, insert the ad-
ministrator’s password
to protect access to the
software.
In “Retype” column, type
again the same password
to reconfirm.
Password is an optional
field. You can ignore it if
you have any other facilities to guard your computer.
In the “Company” column, insert the company name, which will be published in all reports. You
may fill in the name of the administrator and his email address.
Please select the country where your company is located. Click “Next” to proceed. This is an
optional page and you can ignore all information by clicking “Next”.
Step 12: Click “Finish” to end the software setup. A welcome message will prompt to inform
you that the setup is completed. Click “OK” to accept.
Step 13: Software will start
automatically. Insert the ad-
ministrator’s password to
login into the software.
Note: The password box
will not pop up if you did
not insert any password
during the setup process.
Connecting and Activating Terminals in Software
USING TCP/IP, RS232 OR RS485 CONNECTION
The connection between the software and terminals is crucial to make the software works. If the
connection failed, the software cannot be initiated. You must have software product key, software activation key and serial number of the terminal to connect the software to the terminals.
Information is printed on the genuine sticker.
Step 1: When the software is initiated for the first time, a page will pop up.
Follow the steps below:
[1] Insert the ID
• Each terminal ID must be unique for the software to accept new terminal.
• The numbers must be between 1-999 and it must match the number in the Communica
tion Option in the terminal.
CONTENTS
-
5
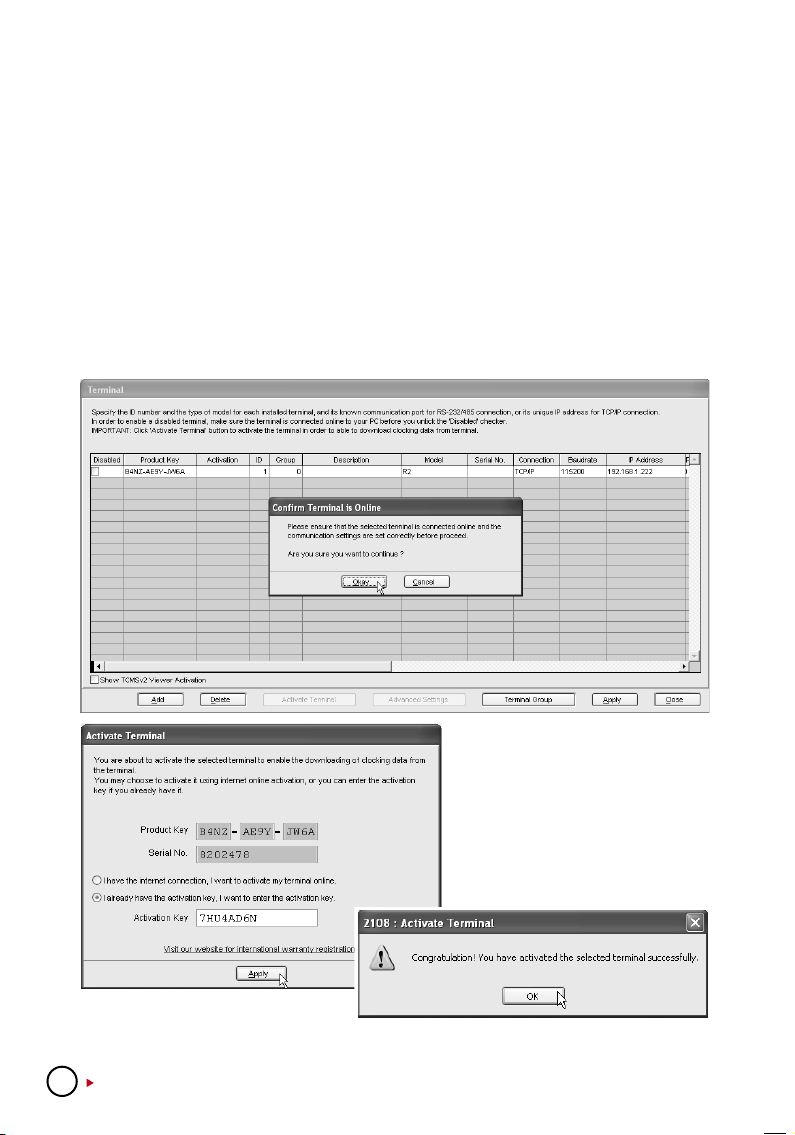
[2] Select the model of the terminal.
[3] Select Type of Connection
• TCP/IP if using LAN connection.
• COM1~6 if using RS232 or RS485 connection.
• USB if using USB flash disk to transfer data
[4] Select the baud rate if COM1~6 is selected as Types of Connection. Ignore if TCP/IP or USB
is selected as Types of Connection.
[5] Insert the IP address of the terminals. Ignore if COM1~6 or USB is selected as Types of
Connection (same settings in Communication Option in the terminals).
[6] Uncheck the Disable column to connect the software to the terminals.
.
Step 2: A message will pop up and request you to confirm that the terminal has been con-
nected properly. Click “Okay” after you have checked the connection.
Step 3: A new window will pop up to
indicate that connection is established.
The software will connect to the terminal to read the serial number. Insert the
Activation Key into the column. Click
“Apply” to save settings.
The software has been activated and it is ready to run. Click “OK” to accept the message.
6
CONTENTS
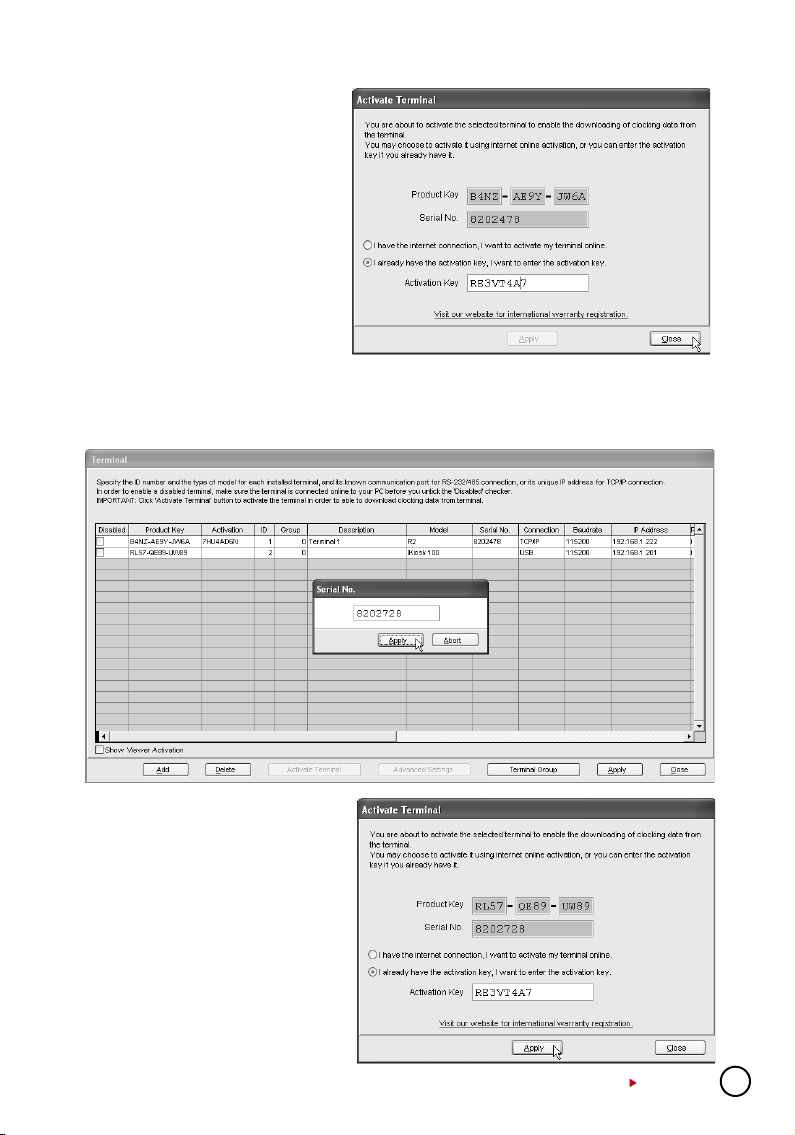
If “Apply” button is deactivated after
you inserted Activation Key, please
check the genuine sticker. Make
sure that the key numbers shown on
the screen are the same as the ones
printed on the sticker.
USING USB FLASH DISK
Step 1: Uncheck the Disable column to activate the terminal.
Step 2: Insert the Serial number of the terminal into the column.Click “Apply” to proceed.
Step 3: Insert Activation Key into
the column. Click “Apply” to proceed.
CONTENTS
7
Step 4: Software will be acti-
vated. Click “OK” to accept the
message. If “Apply” button is
deactivated after insertion of Activation Key. Make sure the key
numbers shown on the screen are
the same as the ones printed on
the sticker.
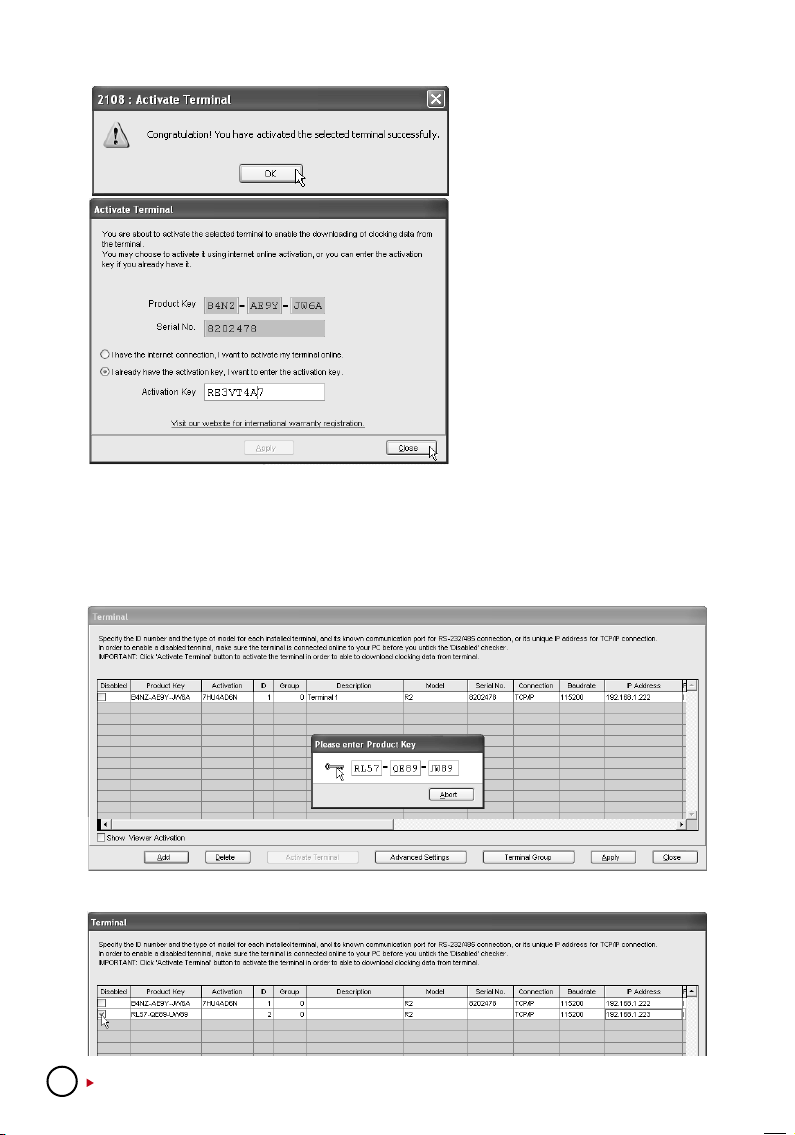
Adding or Deleting Terminals
ADDING NEW TERMINALS INTO THE SOFTWARE
Step 1: Click “Add” to add a new terminal into the software.
Step 2: Insert the Software Product Key. Click the “key” icon to confirm.
Step 3: Repeat steps as mentioned in page 16.
8
CONTENTS
DELETING TERMINALS FROM THE SOFTWARE
Check the box to select terminal you want to delete and click “Delete” to proceed.
Interacting With Terminals
Information from connected terminals can be retrieved to check on settings and contents. The
settings can be changed and uploaded to the terminals as and when required.
Step 1: Check the terminal ID to connect to the terminal and to retrieve settings. Click “Ad-
vance Settings” to proceed.
Step 2: Click “Get Settings” and the software will retrieve information from the selected termi-
nal. Once information is retrieved, click “OK” to save the settings.
CONTENTS
9
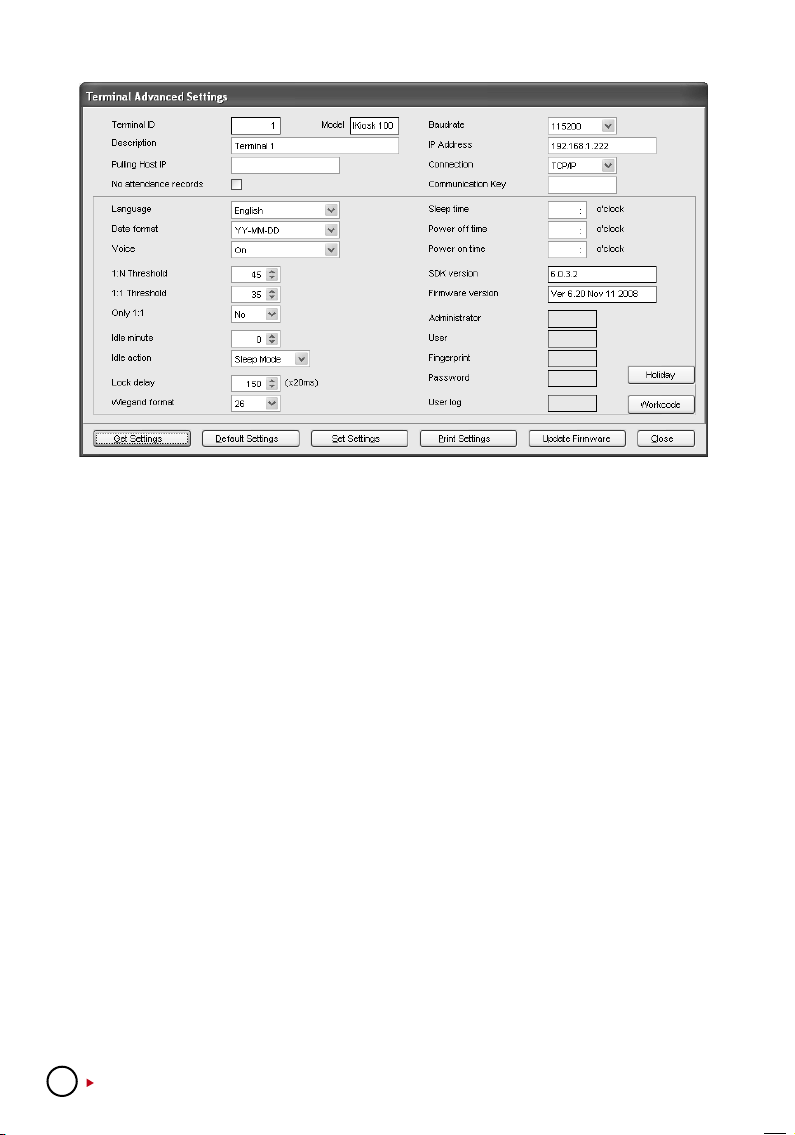
Step 3: Descriptions of Terminal Advanced Settings are explained below:
• TerminalID: Specify the terminal identification number.
• Model: Choose from a list of the terminal models.
• Description: Describe the terminal’s details for example terminal 1 location is at the front
entrance.
• PollingHostIP: Retrieve and display the host IP. (Only a computer with this IP address can
download the data from the terminal.)
• NoAttendanceRecords: A check on this box will provide no attendance records at all. This
function is suitable for terminal for door access only.
• Language:Choose the language for the terminal.
• Dateformat:Choose the date format from the list for on the terminal.
• Voice; Enable or disable voice emission in the terminal.
• 1:NThreshold: Specify the value for 1:N matching threshold in the terminal, which means the
amount of total minutiae points that will be read by the scanner during verification. The valid
range of the threshold should be between 0-50; recommended range is 45-50.
• 1:1Threshold: specify the value for 1:1 matching threshold in the terminal. The valid range
should be between 0-50. Recommended range is 35-50.
• Only1:1: to specify the verification method for the terminal. If “No” is chosen, the terminal
will work on 1:N as well as 1:1 methods. If “Yes” is chosen, the scanner will not respond to a
fingerprint input unless the user inputs his/her ID.
• IdleMinute: Specify the number of minutes to trigger the idle action with either power off or
sleep mode. Choose value “0” to disable this function.
• IdleAction: Specify the idle action with either power off or sleep mode.
• Lockdelay: Specify the timer of the door after verification is done and before the door is shut
again. This function is for door access only.
• Wiegandformat: Specify the Wiegand format used. This is only used when you are using a
WG model. Wiegand format is another communication interface besides ethernet, RS232
10
CONTENTS

or RS485. Wiegand format normally is integrated with a third party software or a controller.
• Baudrate: Specify the Baudrate of the terminal, which is the data transmission speed for
device to computer. This is only effective when the RS232/RS485 communication methods
are bering used, ignore this if using TCP/IP. Leave the value as 115200 as default.
• IPAddress:Specify the IP Address of the terminal. This is only effective when the TCP/IP
communication method is bering used.
• Connection: Choose from the list of connection types available. Ethernet, RS232 or RS485.
Choose only one method.
• CommunicationKey: Specify the communication key, which is a password for software to
communicate with device; the default value is 0.
• SleepTime: Specify the time for the terminal to rest.
• PowerOffTime: Specify the time to turn off the terminal automatically.
• PowerOnTime: Specify the time to power on the terminal automatically.
• SDKVersion: Displaying the SDK version of the terminal.
• Firmwareversion: Displaying the Firmware version of the terminal.
• Administrator: Displaying the number of administrators available in the terminal.
• User: Displaying the total number of users available in the terminal.
• Fingerprint:Displaying the total number of fingerprint templates available in the terminal.
• Password:Displaying the total number of password users available in the terminal.
• UserLog:Displaying the number of transactions being done in the terminal.
• GetSettings: Click to get the current settings of the terminal.
• DefaultSettings: Click to get the default settings of the terminal.
• SetSettings:After changes have been made, a click on this button will update settings to the
terminal.
• UpdateFirmware: Update to the latest terminal firmware.
You may obtain this firmware update file from resellers.
Note: Firmware file is
always in .cfg formats.
• Close: Close the terminal Advanced Settings window.
Assigning Terminals Into Groups
When multiple terminals are installed within an environment, we recommend you to assign the
terminals into groups to ease data downloading/uploading tasks. For example, you can assign
all terminals installed at ground floor into a group labeled Ground Floor, and those on 1st floor
labeled as 1st Floor. During data downloading/uploading, you choose terminals by choosing
group(s). This is an option to facilitate the software operation in an environment with multiple
terminals. Please follow the steps below:
Step 1: Click “Terminal Group” to define group name.
Step 2: Insert number to represent Group ID into Group column.
Insert group name into Description column. Click “Close”
to save settings.
Caution: A check on Disable will stop the software
from connecting to the
terminals in the group.
CONTENTS
11
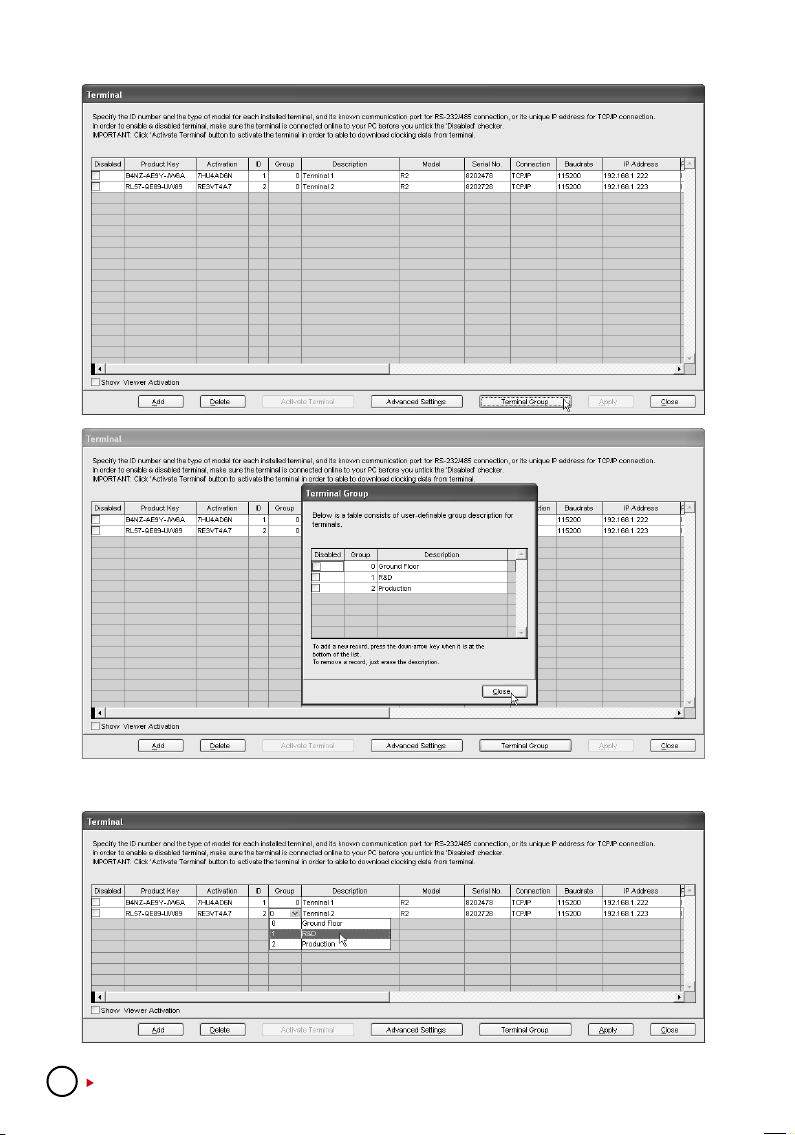
Step 3: Assign terminals into the corresponding group. Click “Apply” to save settings.
12
CONTENTS
BASIC OPERATIONS
This software is designed for time attendance and door access control function. This chapter
covers basic operations and its communication with the terminals.
C H A P T E R
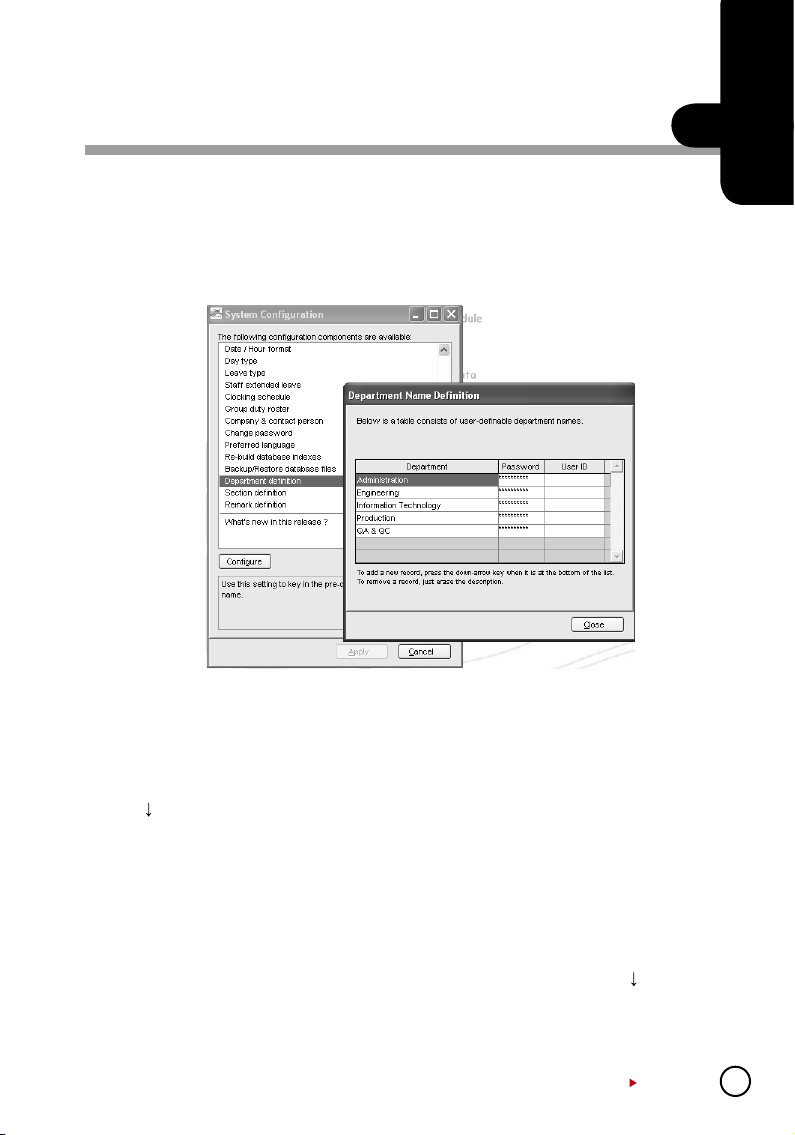
Department Denition
2
DEPARTMENT
You can create departments and assign users into any of the department. You can filter data
viewing or reports by department.
Ignore this step if the Company does not have department categorization.
• To add a new department, insert the name of the department.
Press
• To delete a department, select a department and press DEL on keyboard.
PASSWORD
You can assign department password to each department’s manager. With the password,
department manager can login into the software to view and print reports for users assigned
under his department only. Ignore this step if department manager(s) were not granted any
rights to access the software.
To add new department password, insert password next to the department. Press to insert
the next department password. To delete a department password, select a department password and press DEL on keyboard.
to insert the next department.
CONTENTS
13
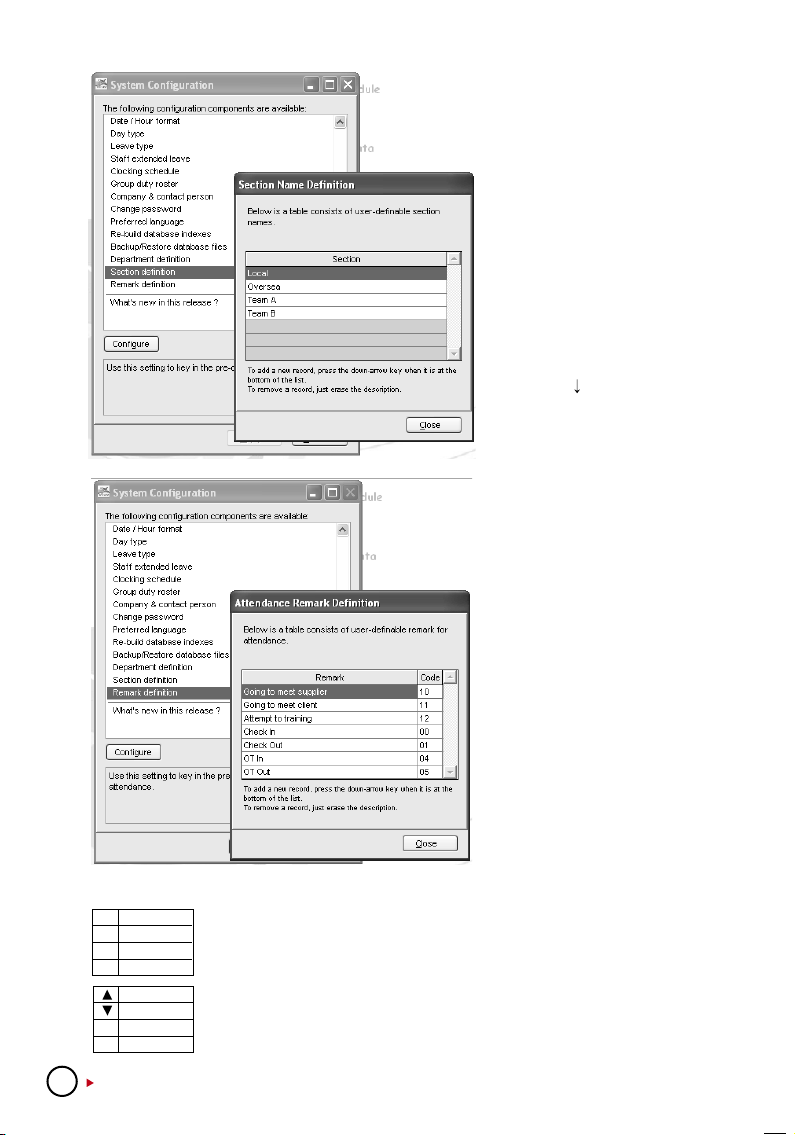
Section Denition
Section can be either above or
under a particular department. For
example, if a section is defined by
using categories such as “Local”
or “Overseas”, it means that Local
or Overseas can be placed higher
than a Department, thus contain
the departments mentioned in the
Department Definition.
Ignore this step if the Company
does not require any section.
• To add a new Section, insert the
name of the section into the column. Press to insert the next
section.
• To delete, select a Section and
press DEL on keyboard.
Click “Close” to save changes.
Remark Denition
Remark is a tag to explain user’s
clocking activities. It is in combination with the work codes used
by a terminal. A user can insert a
predefined work code during his
fingerprint verification at the terminal. The inserted code is meant
to identify activities, for example
code “20” represents “Emergency
Leave”, code “10” represents
“Meeting Supplier” and etc. The
clocking time will come with work
code explanation in the software,
published in Attendance Sheet,
Terminal Data Audit List and Monitor Terminal Activity.
Ignore this step if the Company does not require work codes or reasons for clocking data.
00 Check In
01 Check Out
04 OT In
05 OT Out
Check In
Check Out
ESC
OT in
OK OT Out
If you are not using work code at the terminal, you can check the clocking
data. By default, these are the basic codes of all terminals.
User can press the keypad buttons to define their clocking status during veri
fication.
These codes are downloaded into the software without affecting time attendance calculation. They are useful only when you export clocking data to any
3rd party software.
-
14
CONTENTS
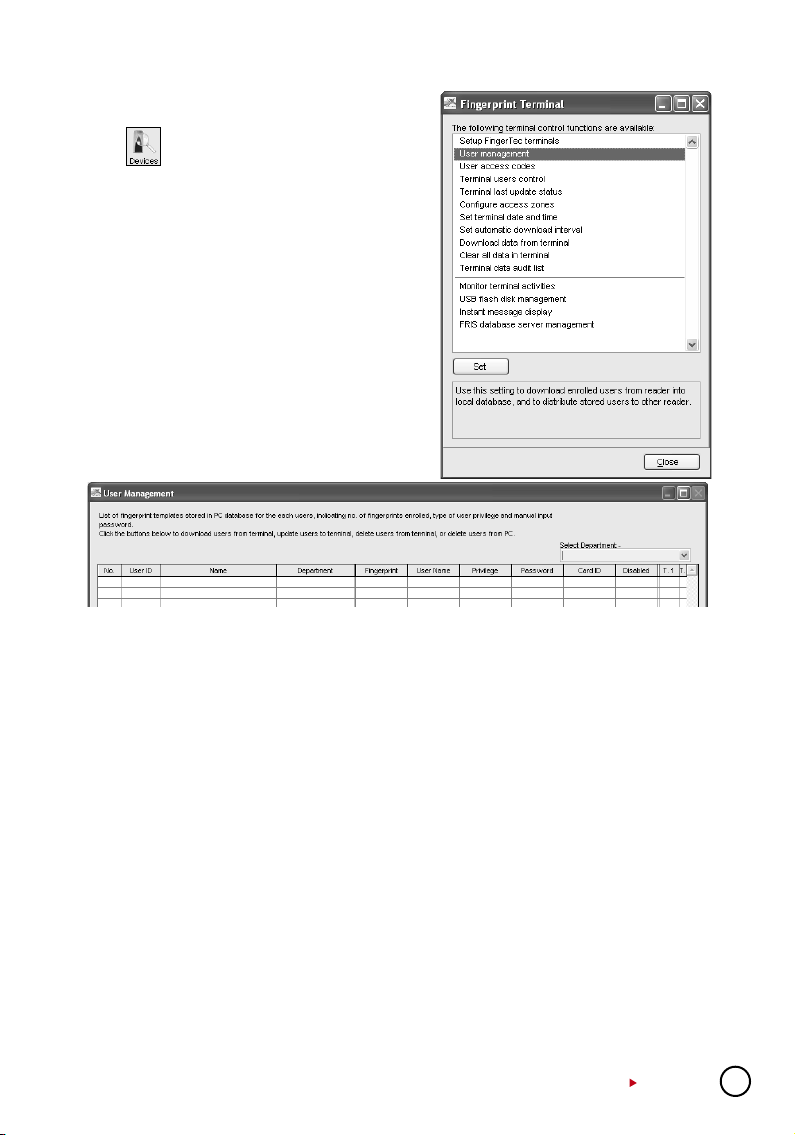
User Management
Click to go to User Management.
Click “User management” to open the page and you
will see the following window.
User Fingerprint Management is a page to interact
with all connected terminals in handling transfers
of users. The details of each column are explained
below.
UserID: The number to identify every user enrolled in a terminal, maximum ID is 9 digits.
Name: The full name of every users for example Tony Michael.
Department: The department that the user belongs to.
Fingerprint: Total fingerprint templates user enrolled in the terminal
UserName: The display name on the terminal during verification, maximum is 8 characters.
For example Tony.
Privilege: The system offers 4 levels of authority to the terminal. • User – Normal user who is
not given any permission to access any settings of a terminal. • Enroller – A person who is given
permission to only enroll new users into a terminal. • Admin – A person who is allowed to access
all settings of a terminal except Advance Settings. • Supervisor – A person who has the highest
authority to access all settings in a terminal.
Password: The password enrolled at the terminal. Current password can be edited or it can be
replaced with a totally new password. A user can also add a password to the User ID to enhance
security. However, any changes made must be uploaded to select terminal(s) before it could
take effect. Ignore this step if a user is not using any password.
CardID: The Card ID enrolled at the terminal. Current card can be edited or it can be replaced
with a totally new card. A user can also add a card to the User ID to enhance security. However,
any changes made must be uploaded to select terminals before it could take effect. Ignore this
step if a user is not using any card.
Disabled: This function is to disallow certain users from getting verification at certain
terminal(s).
CONTENTS
15
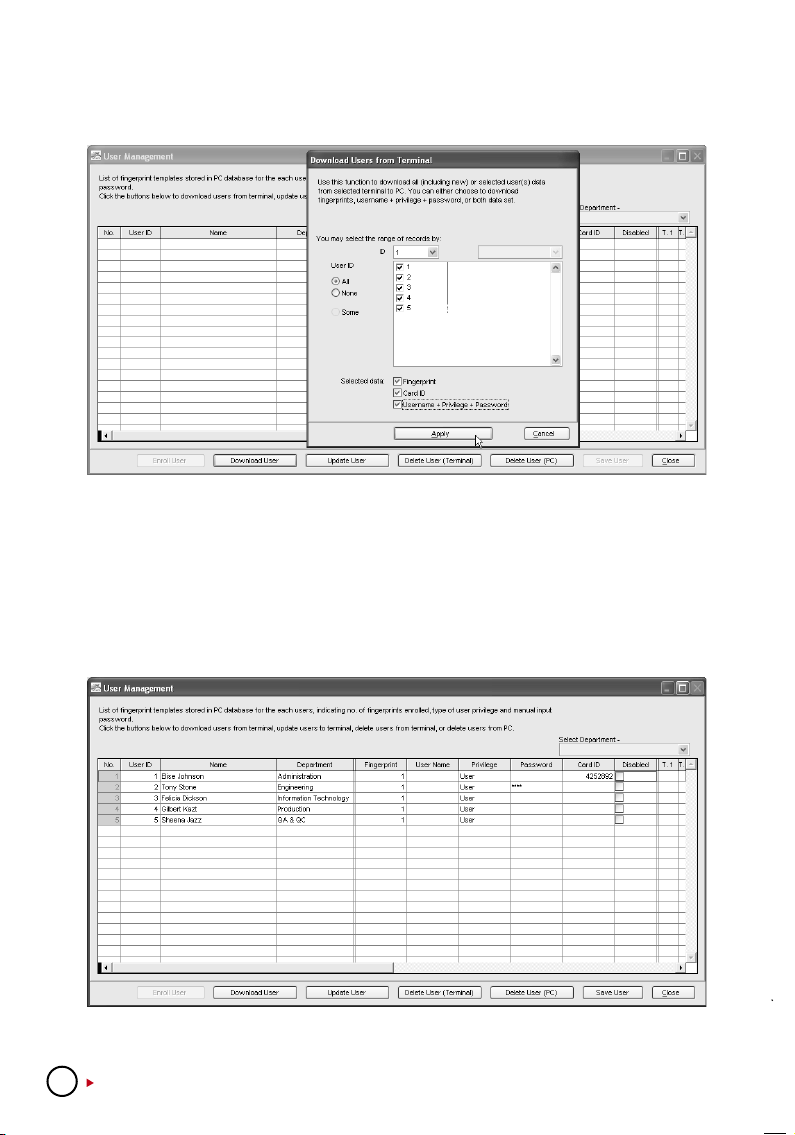
DOWNLOADING USERS FROM TERMINALS
After users are enrolled at a terminal, the data must be downloaded into the software before
using any other features in the software.
[1] Click “Download User”.
[2] In “Download Users from Terminal” window, select the terminal’s ID number from the drop
down menu. As soon as the selection is made, the software will connect to the terminal and
all available users ID will be displayed onscreen.
[3] Click “All” to select all users to download or you can choose to download a particular user
by clicking his user ID.
[4] In “Selected Data” section, please select all (Fingerprint, Card ID, User Name + Privilege +
Password) to download.
[5] Click “Apply” to start downloading.
Users will be downloaded into the software and basic information such as Name, Department,
and User Name can be inputted into the table.
16
CONTENTS
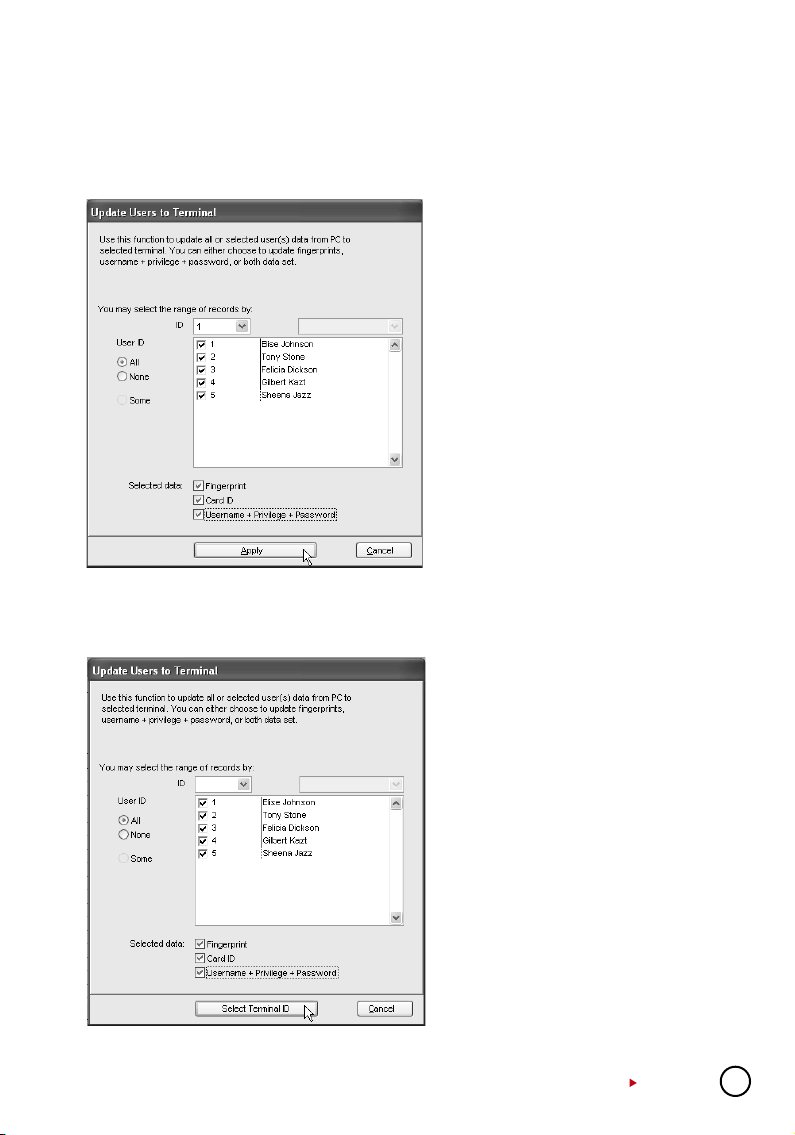
UPLOADING USERS TO TERMINALS
All users stored in the software can be uploaded to other terminals without re-enrollment. You
can upload any changes of the users to the terminals too.
On User Fingerprint Management page, follow the steps below to upload users into terminal.
[1] Click “Upload User”.
[2] In the “Upload Users to Terminal” win
dow, select terminal ID.
[3] Click “All” to select all users in the ter
minal for upload or you can choose to
upload a particular user by clicking his
user ID.
[4] In “Selected Data” section, please
select all (Fingerprint, Card ID, User
Name + Privilege + Password) to upload.
[5] Click “Apply” to upload.
You can upload users to multiple terminals without repeating the above steps. Follow the steps
below to upload users to multiple terminals.
[1] Click “Upload User”.
[2] In the “Upload Users to Terminal” win
dow, ignore the ID column.
[3] Click “All” to select all users to upload
or you can choose to upload a particular user by clicking his user ID.
[4] In “Selected Data”, please select all
(Fingerprint, Card ID, User Name +
Privilege + Password) to upload.
[5] Click “Select Terminal ID”.
[6] A new window with all terminal IDs will
be displayed. Uncheck irrelevant terminals.
[7] Click “OK” to proceed.
-
-
-
CONTENTS
17
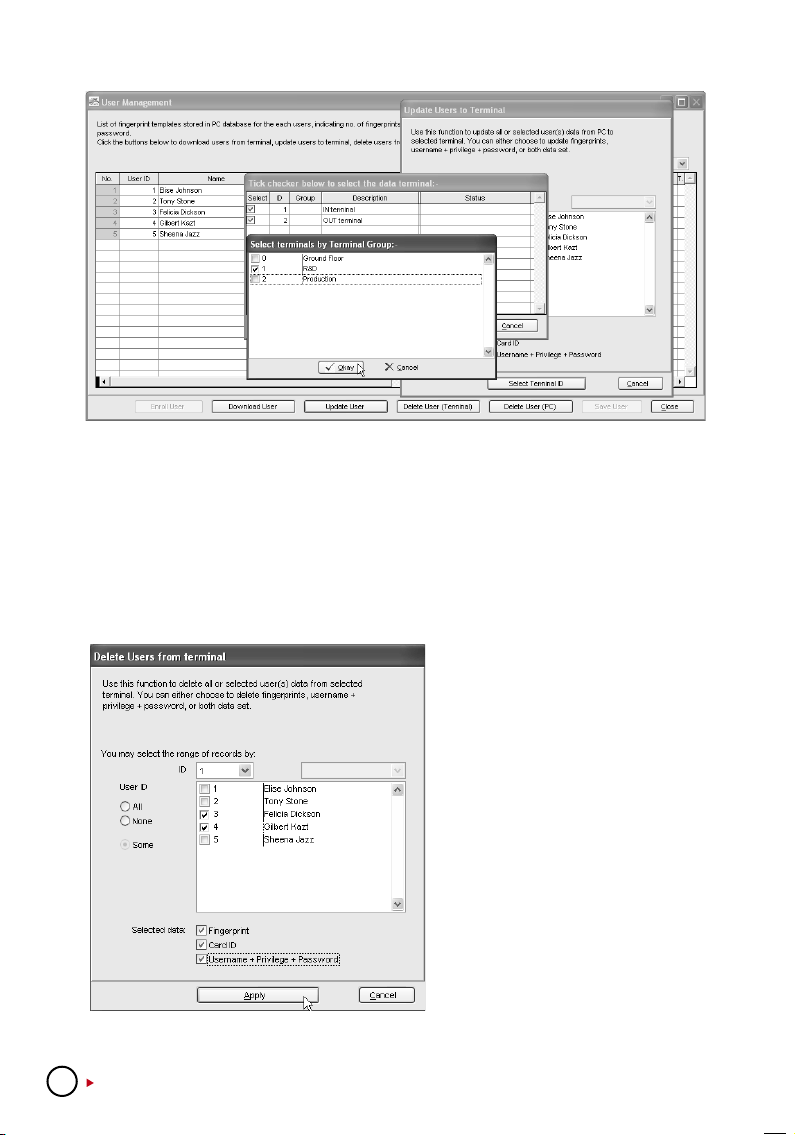
[8] If you want to sort the terminal by group, select Group by the Terminal Group column.
[9] Select the Group and Click “OK” to proceed.
DELETING USERS FROM TERMINAL
In some circumstances, the Company needs to delete some users from the terminal(s) for
examples if a staff resigned or he is blocked from using a certain terminal, please follow the
steps below.
[1] Click “Delete User (Terminal)”.
[2] In the “Delete Users from Terminal”
window, click “All” to select all users
or you can select particular users to
delete from terminal.
[3] In “Selected Data”, please select all
(Fingerprint, Card ID, User Name +
Privilege + Password) to delete.
[4] Click “Apply” to proceed.
Deletion of the same user from multiple terminals can be done without
repeating the above steps. Follow the
steps in the next page to delete users
from multiple terminals.
18
CONTENTS
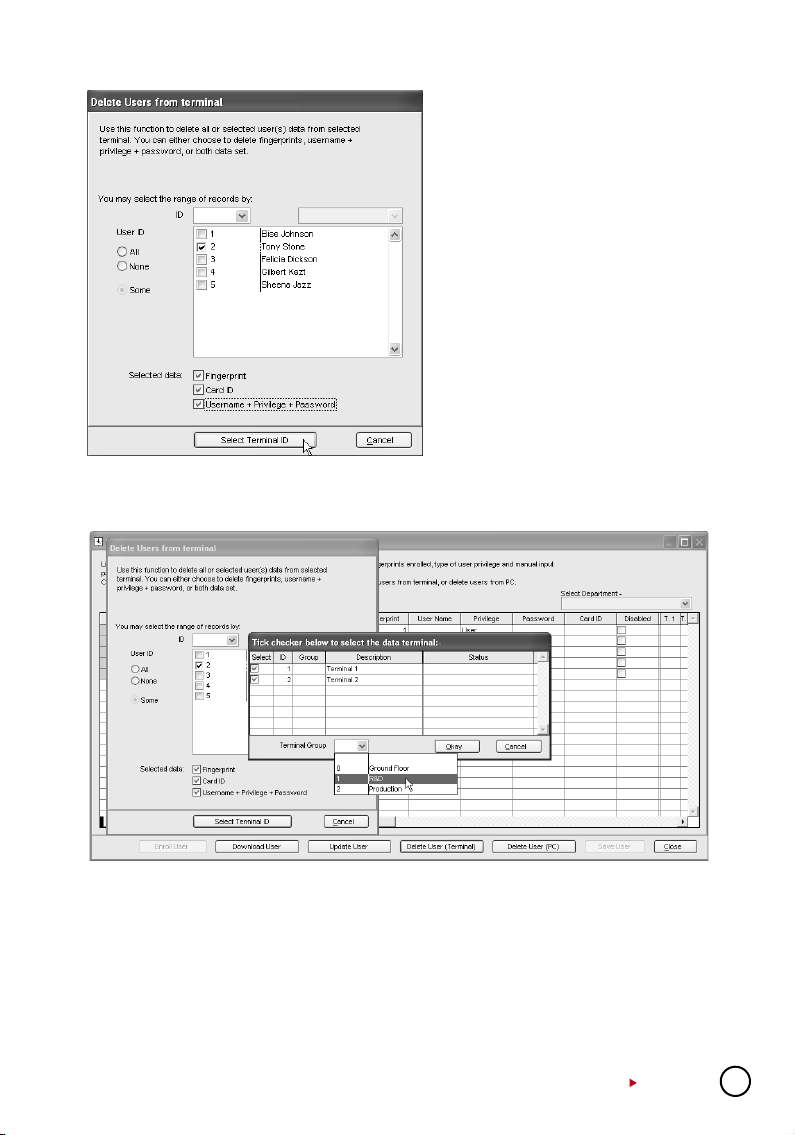
[1] Click “Delete User (Terminal)”.
[2] In the “Delete Users from Terminal”
window, ignore the column ID of terminal.
[3] Click “All” to select all users to upload
or you can choose to upload particular
users by clicking their user ID.
[4] In “Selected Data”, please select all
(Fingerprint, Card ID, User Name +
Privilege + Password) to upload.
[5] Click “Select Terminal ID”.
[6] A new window with all terminal IDs will
be displayed. Uncheck irrelevant terminal ID.
[7] Click “OK” to proceed.
[8] If you want to sort the terminal by
group, select Group by the Terminal
Group column.
[9] Select the Group and Click “OK” to
proceed.
DELETING USERS FROM COMPUTER
Once user information is deleted from a terminal, the particular user will not be allowed access
anymore. However, his information is still available in the software. To remove a user from the
software, please follow the steps below.
CONTENTS
19
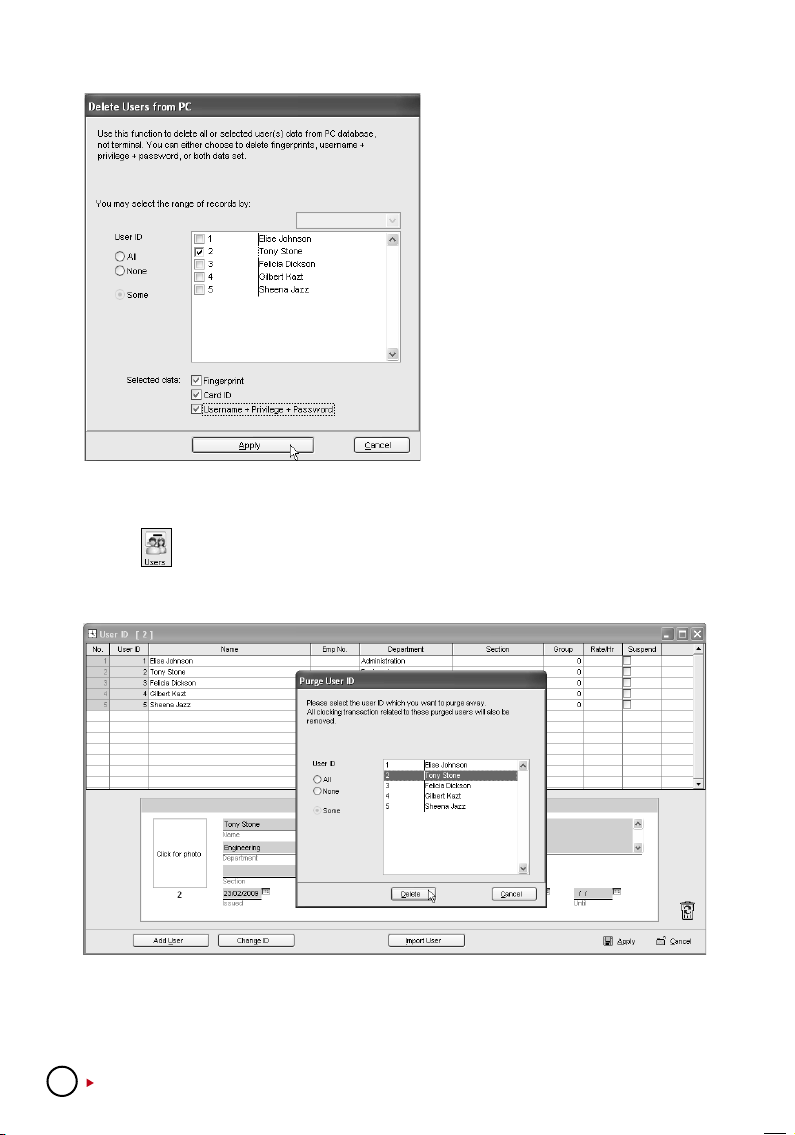
[1] Click “Delete User (PC)”.
[2] Click “All” to select all users to delete
from the software or you can choose
to delete particular user by clicking his/
her user IDs.
[3] In “Selected Data”, please select all
(Fingerprint, Card ID, User Name +
Privilege + Password) to delete.
[4] Click “Apply” to upload.
The user information will be cleared and
highlighted in grey. However, his User
ID, name and department will still be in
the software. It is recommended that the
Company keeps the information for future
reference.
If the Company wants to delete the user from the software, please follow the steps below.
[1] Click
to open User Record page.
[2] Double click the “Dustbin” icon.
[3] Select the User ID to delete.
[4] Click “Delete” to proceed.
20
CONTENTS
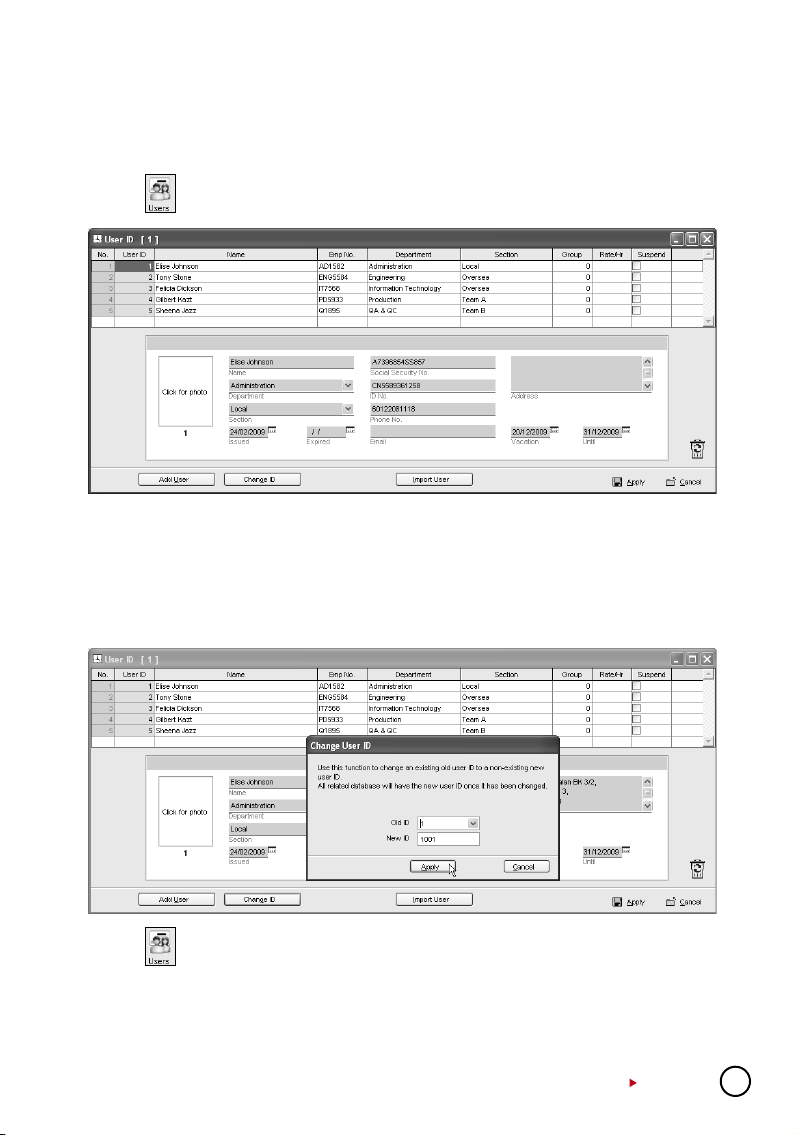
User Records
User details and photo can be inserted in User Records.
Ignore this step if the Company does not want to insert details or photo of users.
[1] Click
[2] Select the user ID and insert information into the corresponding field.
[3] Click the “Click for photo” column to find photo of the user.
[4] Repeat the same steps for other users.
[5] Click “Apply” to save settings.
In case you wish to change the User ID to another new User ID, follow the steps below.
to open User Records.
[1] Click
[2] Click “Change ID”.
[3] Select the user ID that you want to change.
[4] Insert the new user ID.
[5] Click Apply to save settings.
to open User Records.
CONTENTS
21
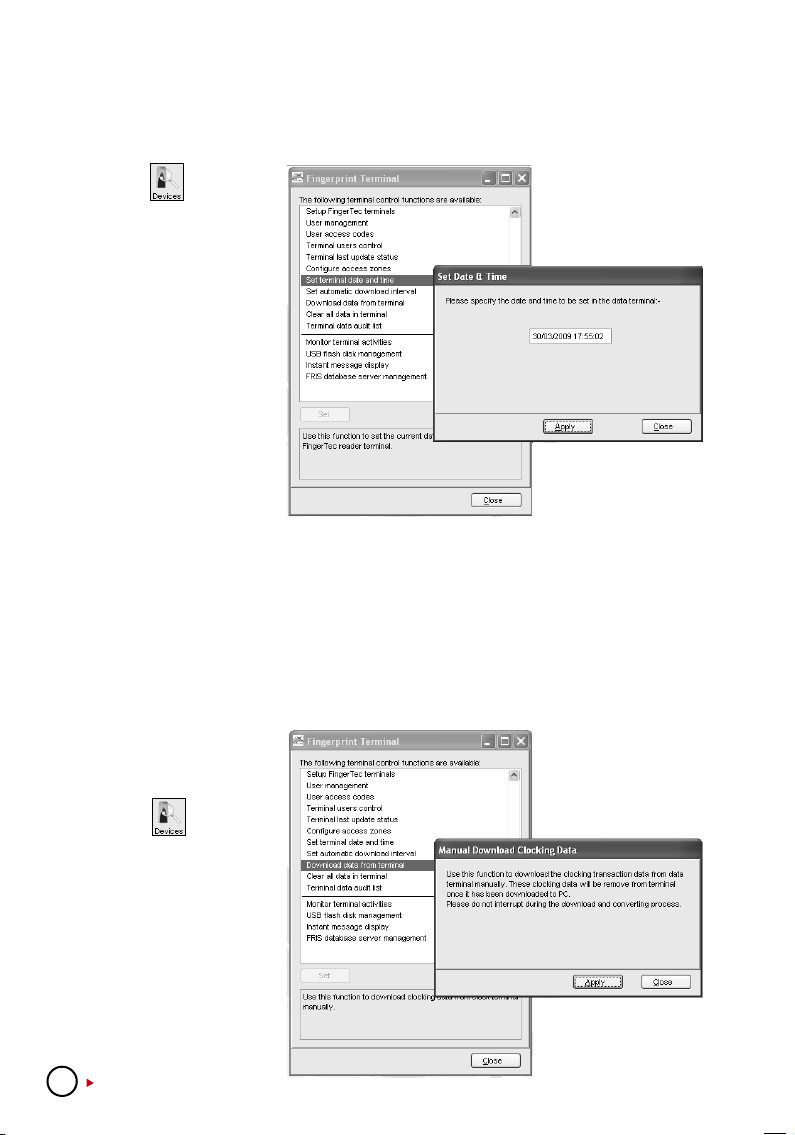
Setting Terminal Date and Time
When you run the software for the first time, synchronization of date and time of terminals with
the computer is crucial.
[1] Click
“Set terminal date and
time”.
[2] The date and time of the
terminals must always
be the same as the
computer’s.
[3] Click “Apply” to synchro
nize with the terminal.
If you noticed that the date
and time of any terminals
are not the same as the
time in the computer which
collects all the data, please
follow the steps above to
synchronize.
Ignore this step if the date and time of terminals are in sync with the date and time of the
computer.
and select
-
Downloading Data from Terminals
Users verify their fingerprints, passwords or cards at a terminal to report attendance or gain access. The date and time of verification is captured as clocking data and saved into local memory of terminals. To enable viewing of these clocking data, the data needs to be downloaded into
the software to generate attendance data, in-out records and reports. It can be done manually
or automatically. Failure to download data from terminals to computer, no records could be
viewed in the software.
MANUAL DOWNLOADS
[1] Click and select
“Download data from
terminals”
[2] Click “Apply” to start
downloading process.
[3] If you are connecting
to multiple terminals, a
new window will pop up
after you clicked Apply.
22
CONTENTS
[4] Uncheck irrelevant termi-
nal IDs.
[5] Click “OK” to proceed.
Note: Please do not quit the software,
or disconnet terminal from the software during the downloading process.
Interruptions will cause the incomplete
download process and data loss.
Data in the terminal will be cleared after downloading process is complete. The process is automatic to avoid data loss and overflowing of data.
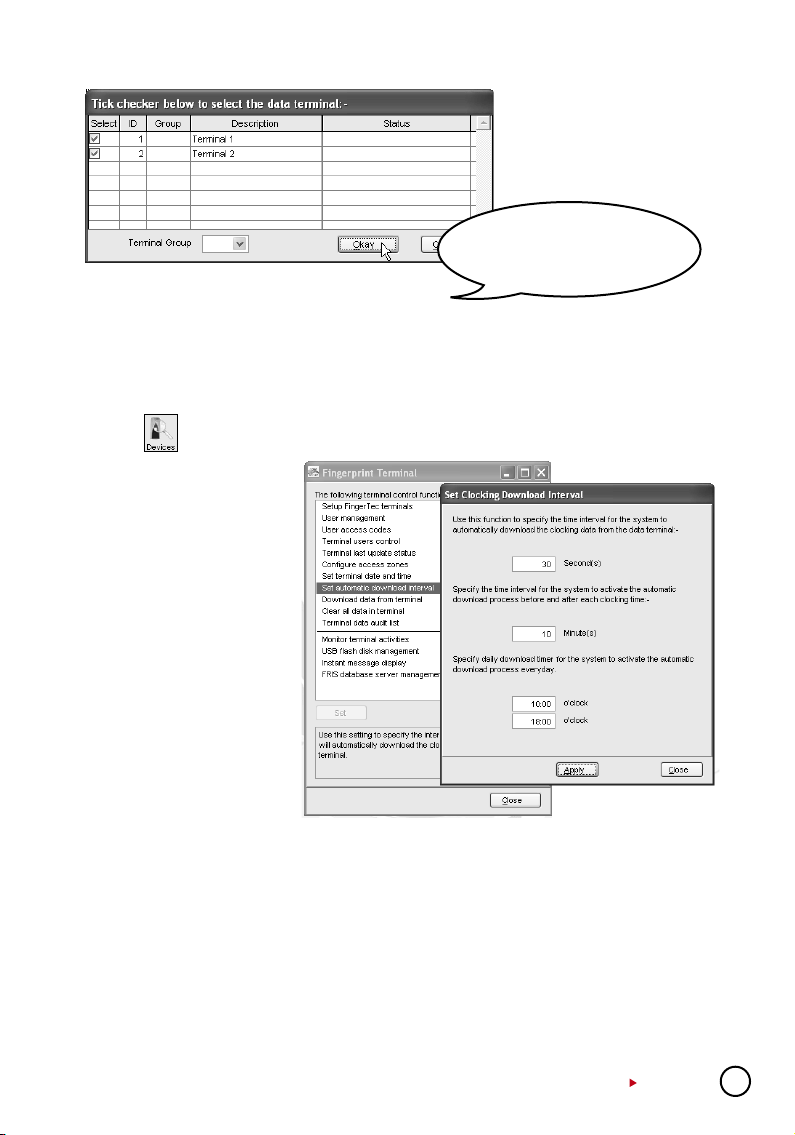
AUTOMATIC DOWNLOADS
[1] Click and select “Set Automatic Download interval”
[2] The automatic download
interval can be predefined
by:
Seconds
Minutes (Download process
will only start when it is ap-
proaching the pre-defined
clocking time. In case of
10 minutes, if the pre-de-
fined IN time is 9:00am,
download process will start
10 minutes before 9:00am
which is at 8:50am and 10
minutes after 9:00am which
is at 9:10am. This is differ-
ent with normal minute in-
terval.)
Specific timer
[3] Click “Apply” to save settings.
You can select to use all 3 types of download intervals at the same time. All 3 download intervals
will not interrupt each other during download process.
Clearing Data in Terminal
If you want to use the terminals for access control only without checking any access details of
users, choose to clear logs from the terminal. You do not need to download logs into the software, instead delete logs directly from the terminal. However, it is important to take note that the
deleted transaction logs cannot be retrieved by all means.
Ignore this step if the Company wants clocking data of all users of the terminals.
CONTENTS
23
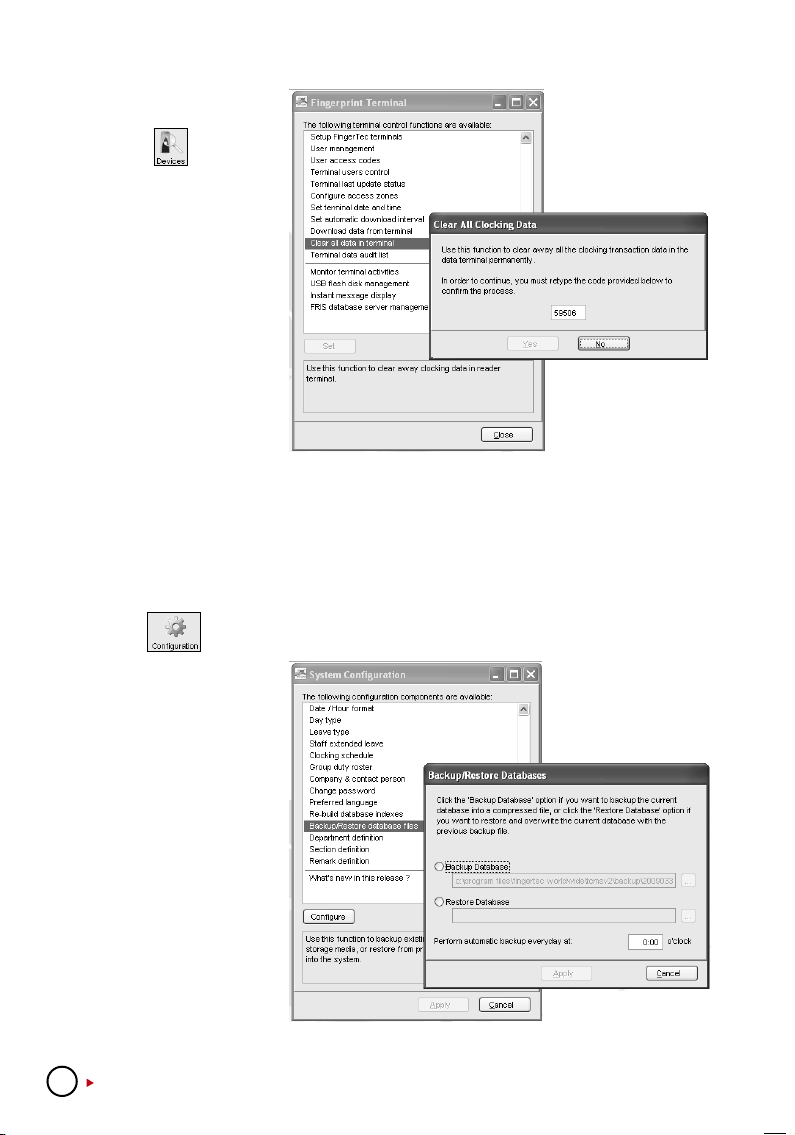
[1] Click and select
“Clear all data in terminal”.
[2] Please remember the
random number given in
the box.
[3] Click at the random
number column and the
number will disappear.
[4] You need to insert the
same number into the
column again.
[5] Click “Yes” to proceed.
Backing Up/Restoring
It is advisable to backup your database periodically. You can clear the transaction logs of the
software after you have done the backup process. This operation can reduce the burden of
database and to maintain the efficient processing time of the software. Restoration of the old
database is possible for future reference.
[1] Click
[2] To backup database, se
lect “Backup Database”
and select a location to
save the database .ZIP
file.
[3] To restore database, se
lect “Restore Database”
and locate the database
.ZIP file to restore.
[4] If you want the software
to backup database
daily at a fixed time,
insert the time into the
column.
[5] Click “Apply” to save
settings.
24
CONTENTS
to select “Backup/Restore database files”.
-
-
SETTING UP CLOCKING SCHEDULES
AND GROUP DUTY ROSTER
Ignore this chapter if the Company does not use this software for time attendance.
Clocking schedules and group duty roster are important configurations to calculate attendance
of users correctly. Every setting in the clocking schedules and in the group duty roster will affect
the outcome of time attendance and its corresponding reports.
Once the configurations are done, users do not need to define their clocking status (check-in,
check-out, lunch etc) at terminals. When they verify at the terminals and their clocking captured,
the software will check all the downloaded clocking data from the terminals and justify it against
the predefined schedules and group duty rosters.
C H A P T E R
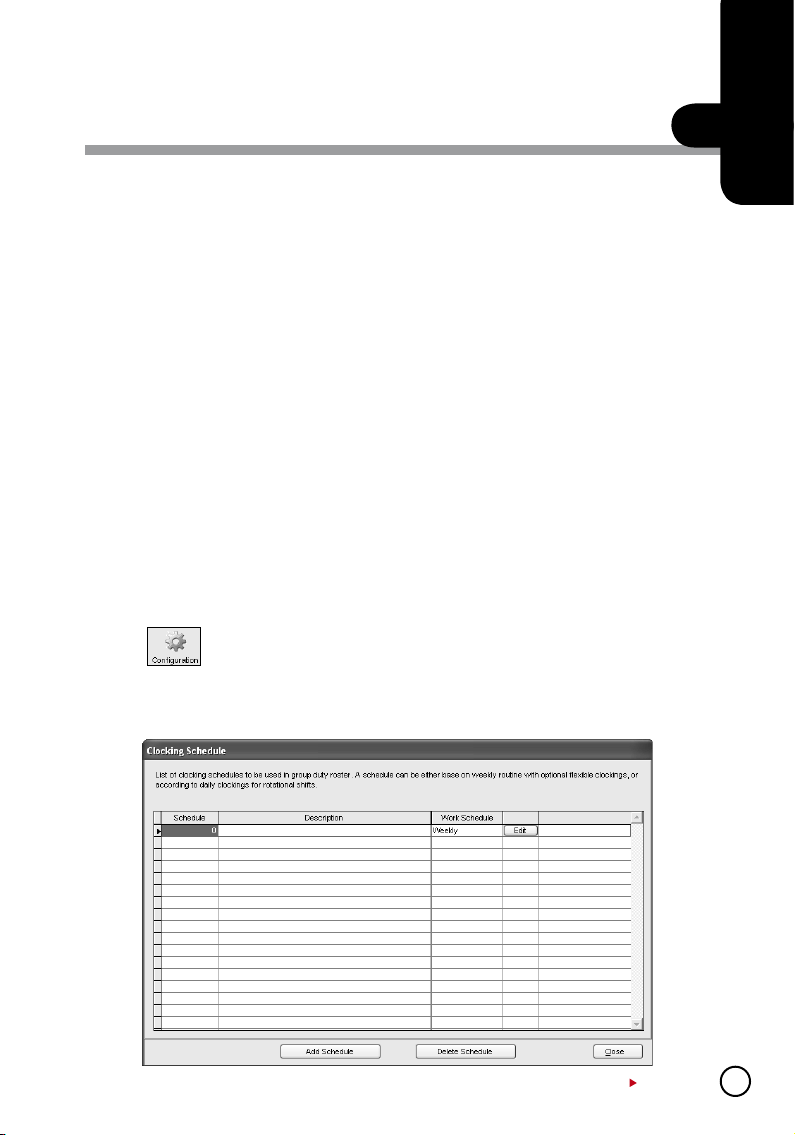
Setting Up Clocking Schedules
Different clocking schedules can be created to support users with different working times or
working rules. The software provides a maximum of 1,000 clocking schedules for definition and
3 types of clocking schedules to configure.
a. Weekly schedules are working schedules that apply for one week. Most of the general work
ing schedules are based on weekdays and weekends.
b. Daily schedules are working schedules that apply for a day. This is an application for multi
ple shifts, overnight shifts, open shifts, rotational shifts etc.
c. Flexi schedules are weekly working schedules without considering any late in, early out or
OT. Mostly apply to flexi-working hours.
3
-
-
[1] Click
Schedule: Schedule is identified by code ranging from 0 to 999.
Description: Description of the schedule.
WorkSchedule:3 types of the work schedules (Weekly / Daily / Flexi)
and select “Clocking Schedule”.
CONTENTS
25
[2] To edit a schedule, click “Edit” to
start.
[3] To delete a schedule, select the
schedule code and Click “Delete
Schedule”.
[4] To add a new schedule, click “Add
Schedule”.
[5] Select a schedule code and name
the schedule.
[6] Define the “Work Schedule”. Click “Okay” and start to configure settings.
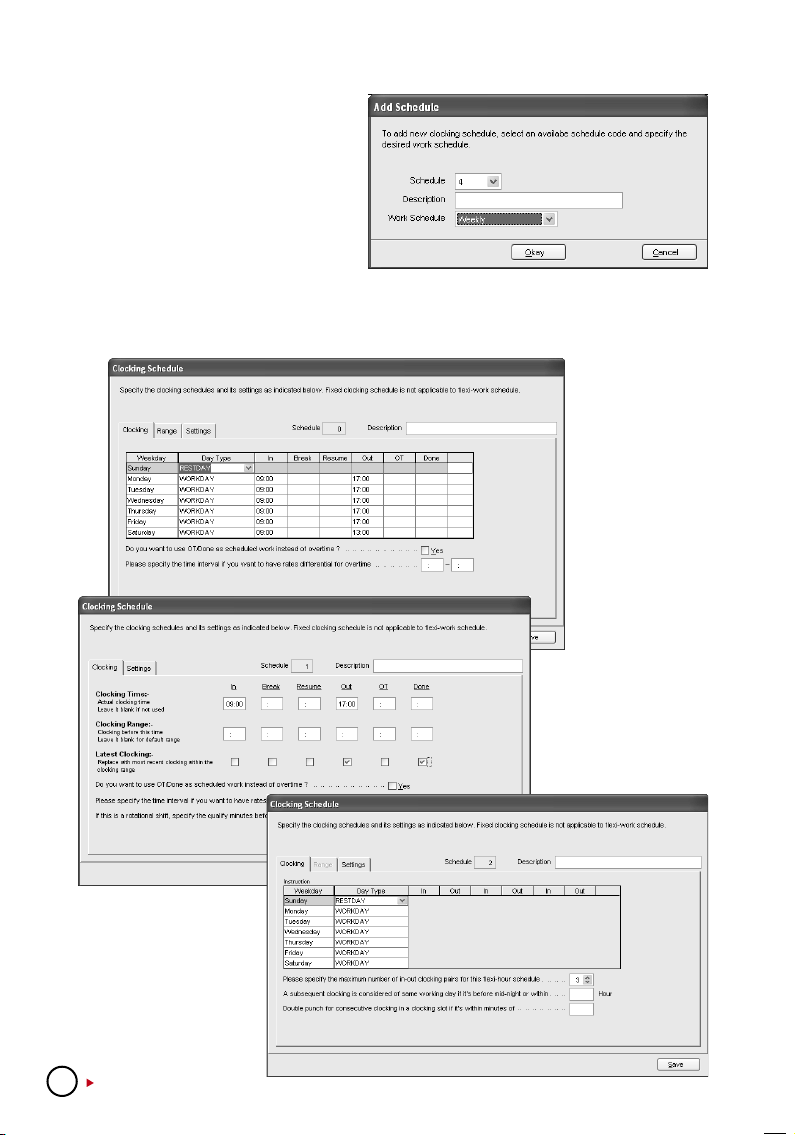
CLOCKING PAGE
If you select
“Weekly” schedule
type, the clocking
schedule as below
will be displayed.
If you select “Daily”
schedule type, the
clocking schedule
as below will be
displayed.
If you select “Flexi”
schedule type, the
clocking schedule
as below will be
displayed.
26
CONTENTS

In “Clocking” tab, do the followings.
[1] Definethe“DayType”(OnlyapplicabletoWeeklyandFlexiSchedules)
• Normal working day for the schedule is identified as “Workday”.
• Off day for the schedule is identified as “Restday”.
[2] Definetimeintothecorrespondingtimeslots.Theymustbedefinedinpairsasbelow.(Onlyapplica-
bletoWeeklyandDailySchedules)
• In-Out refers to time when work starts and ends. The time that falls in between is the total
working time. Any working time that exceeds the Out time is treated as OT time. In-Out pair
is a compulsory pair.
• Break-Resume refers to the time that a break starts such as lunch, tea, dinner etc, and the
time that a break ends. The time falls in between is called break time. It is optional to deduct
break time from the total working time. The Break-Resume Column is not compulsory, as
this is an optional pair.
• OT-Done refers to the time that an OT starts and the time it finishes. The time that falls in
between are considered as OT time. It is not recommended to use the pair if overtime is
optional during the scheduled time period.
[3] “Do youwant touseOT/Done asscheduled workinstead ofovertime” (Onlyapplicable onWeekly
andDailySchedules)
• Enable it only if users are having 2 breaks during one working day, for example: In - Lunch
Break – Resume - Tea Break – Resume - Done. Working time is calculated based on In time
and Done time. Any time over Done time is treated as OT. Time falls between 2 breaks are
optional to be deducted from the total working hours.
• Disable it if you are not using the above function.
[4] “Pleasespecifythetimeintervalifyouwanttohaveratedifferentiateforovertime”.(Onlyapplicable
onWeeklyandDailySchedules)
• Only insert the time interval if your company applies a different OT rate for overtime. For
example: Normal OT rate is from 6pm to 8pm, and a different OT rate is for OT time from
8pm to 12am. Please insert 20:00 to 00:00.
• Ignore it if your company does not apply different OT rates to different working time.
[5] “Ifthisisarotationalshift,specifythequantityminutesbeforeshiftstarts.”(OnlyapplicableonDaily
Schedules)
• The number in the column refers to the delay time in minutes before a shift rotates. This
enables users to have enough time to clock in or clock out without causing huge traffic flow
at the terminal.
• Only insert the number for a rotational working roster or to open working roster.
[6] “Pleasespecifythemaximumnumberofin-outclockingforthisflexihoursschedule.”(Onlyapplica-
bleonFlexiSchedules)
• By default, flexi schedule always display 3 pairs clocking (6 time slots, In – Break – Resume
– Out – OT – Done).
• If 2 pairs clocking, the software will display In – Break –Resume – Out (4 time slots).
• If 1 pair clocking, the software will display only In–Out (2 time slots).
[7] “A subsequent clocking is considered if it’s the same working day if it is before mid-night within”
(Only applicable on Flexi Schedules)
By default, all clocking within the same day is cut-off at
midnight (12:00am) to be considered as the same workday clocking. If the Company wants
to extend the cut-off pass midnight, the new cut-off time needs to be specified, for example:
03:00am.
[8] “Doublepunchforconsecutiveclockinginaclockingslotifitiswithinminutesof”(Onlyapplicableon
FlexiSchedules)
All clocking within this predefine time interval will be considered for one time slot
only, for example if IN time is 9:00am and the time interval is 15 min, any clocking by the same
person within that 15 min will be considered as IN time, taking the first time he clocks in.
CONTENTS
27
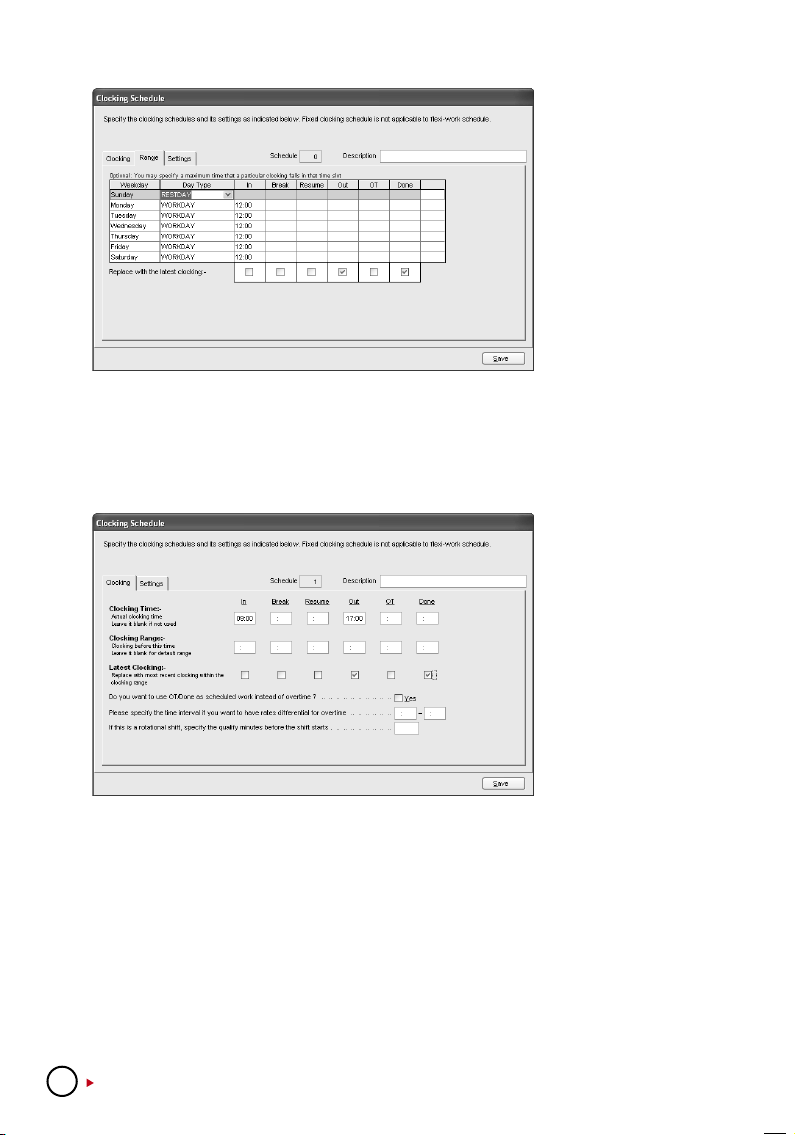
RANGE PAGE
Click “Range” tab to
determine the presentation of clocking data
into corresponding
time slots. Range only
applies to Weekly and
Daily schedules.
Do this, if you select
“Weekly” schedule:
Do this, if you select “Daily” schedule”.
[1] You may specify a maximum time that a particular clocking falls in the time slot.
For example, to allocate all clocking time before 12:00pm into IN column, any clocking time
after 12:00pm into the Break column, you need to insert 12:00 into the IN column in the
clocking schedules.
You also can choose
to ignore the above
and let the software
decides on the allocation of time slots for
you. By default, the
software will refer to
the mean time between
2 time slots to allocate
the clocking data. For
example, if the IN time
is 9am and Break time
is 12:00pm, the Mean
time is at 10:00am.
Any clocking time before 10:00am is allocated automatically into the IN column, after
10:00am is allocated into the Break column. The same concept applies to all the other 5
columns.
It is recommended to let the software justifies the allocation of time slots.
[2] Replace with latest clocking
You can configure the clocking schedule to update clocking data for every time slot. The
clocking data in time slots is always replaced with the latest clocking time after download
process. However, it is recommended to apply “replace with latest clocking” to the Out and
Done columns only. The software will always check the latest “Out” time of the users and
will publish them in Attendance Sheet.
28
CONTENTS
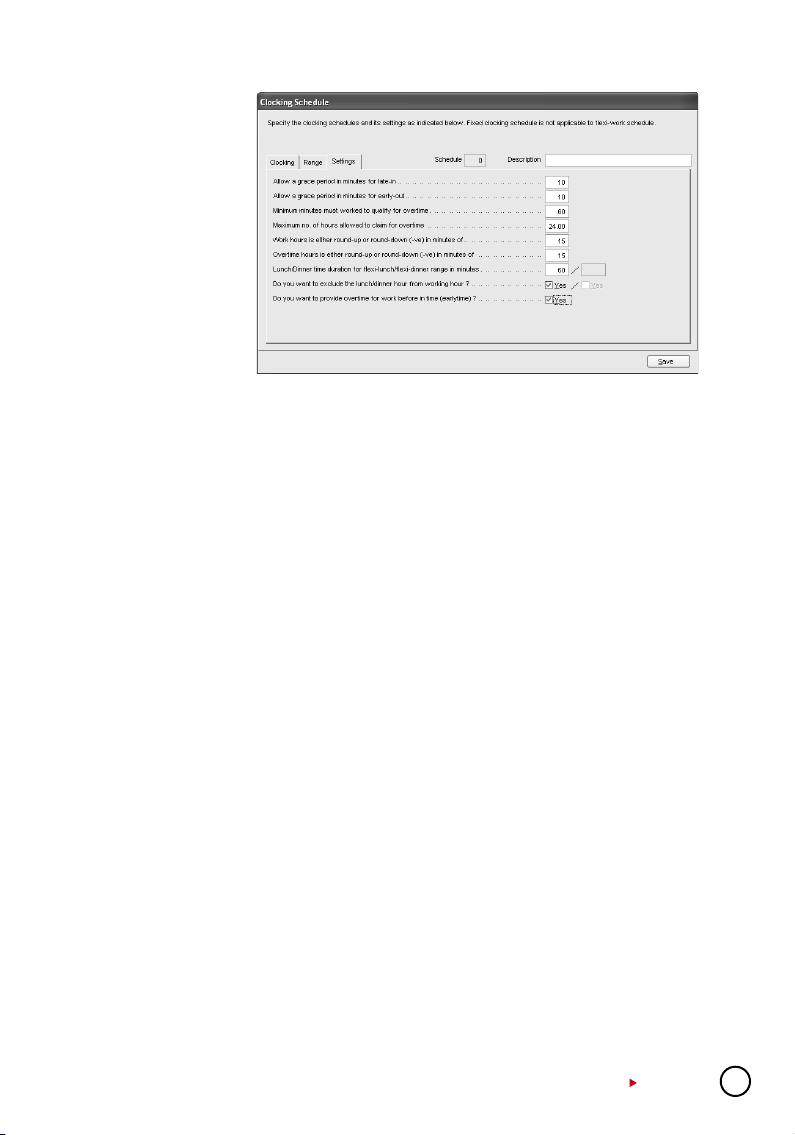
SETTINGS PAGE
Click “Settings” tab
to define the clocking rules for clocking
schedules. If you se-
lect “Weekly” or “Daily”
schedule:
• At the “Settings” tab specify the necessary settings applicable for attendance calculation.
• This allows you to specify the time policy to calculate late in, early out, overtime & working
hour.
Allowagraceperiodinminutesforlate-in=15
This means LATE IN will only be calculated if you come to work after 9:15am, assuming that
your IN time is 9:00am.
Allowagraceperiodinminutesforearly-out=15
This means EARLY OUT will only be calculated if you go home before 4:45pm assuming
that your OUT time is 5:00am.
Minimumminutesmustworkedtoqualifyforovertime=60
This means if an employee overtime work is 45 minutes, she/he will not be entitled for over-
time claim. He/she only can claim for the overtime if his/her overtime work is more or equal
to 1 hour.
Maximumnoofhoursallowedtoclaimforovertime=24
By default, this will be set as 24. This means that the maximum number of hours an am-
ployee is eligible to claim for OT hours in a day is 24 hour. You will need to leave the space
blank if the users are not entitled to any OT claimed. You will not see any OT time displayed
in Attendance Sheet or reports.
Workhoursiseitherround-uporround-down(-ve)inminutesof=15
All minutes will be rounded up as below:
1 - 15 minutes = 15
16 - 30 minutes = 30
31 - 45 minutes = 45
46 - 59 minutes = 1 hour
Overtimehoursiseitherround-uporround-down(-ve)inminutesof=-15
All minutes will be rounded down as below:
1 - 15 minutes = 0
16 - 30 minutes = 15
31 - 45 minutes = 30
46 - 59 minutes = 45
Lunch/Dinnertimedurationforflexi-lunch/flexi-dinnerrangeinminutes
• Specify duration of lunch if flexi-hour is implemented.
• Specify duration of dinner if “OT/Done schedule work instead of overtime” is implemented.
CONTENTS
29

Doyouwanttoexcludethelunch/dinnerhourfromWorkingHour?
If “YES” is selected for in the lunch column, the working hour will deduct lunch hour.
Working hour = 8 hours - lunch 1 hour
= 7 hours
If “YES” is selected for in the dinner column, the working hour will deduct dinner hour.
Working hour = 7 hours - dinner 1 hour
= 6 hours
Doyouwanttoprovideovertimeforworkbeforeintime(earlytime)?
If “YES” is selected, early overtime will be calculated if you come to work before IN time.
• Click “Close” to save the records.
If you select “Flexi” schedule:
[1] “Overtime if total flexi-
work hour exceeds
work hour of”
(Applicable on Flexi-
Schedule only)
The software only
treats extra time as
OT if the total working
hour exceeds the predefined value (Only
applicable to flexi
schedule).
[2] “Do you want to exclude the lunch/dinner hour from working hour? If yes,
flexi-work hour is calculated based on last clocking minus first clocking.”
(Applicable on Flexi-Schedule only)
The settings are same but with extra option as below.
If you wish to deduct lunch/dinner time from total working hours, you must define the lunch/
dinner time duration to deduct.
Insert time duration for lunch/dinner in the option “Lunch/Dinner time duration for flexi-lunch/
flexi dinner range in minutes”, example 60 minutes for lunch time. Software automatically
deducts 60 minutes from total working hours as lunch time.
However if user returns earlier than predefined time duration, example 30 minutes, software
still deduct 60 minutes (as predefined).
Forexample,Intime10:00,Breaktime=13:00,Resumetime=13:30,andOuttime=20:30.
Calculation as below,
Total working hours = Out time – In time – Predefined Lunch/Dinner duration.
Total working hours = 20:30 – 10: 00 – 1:00 (60 minutes)
Total working hours = 9 hours 30 minutes
30
CONTENTS

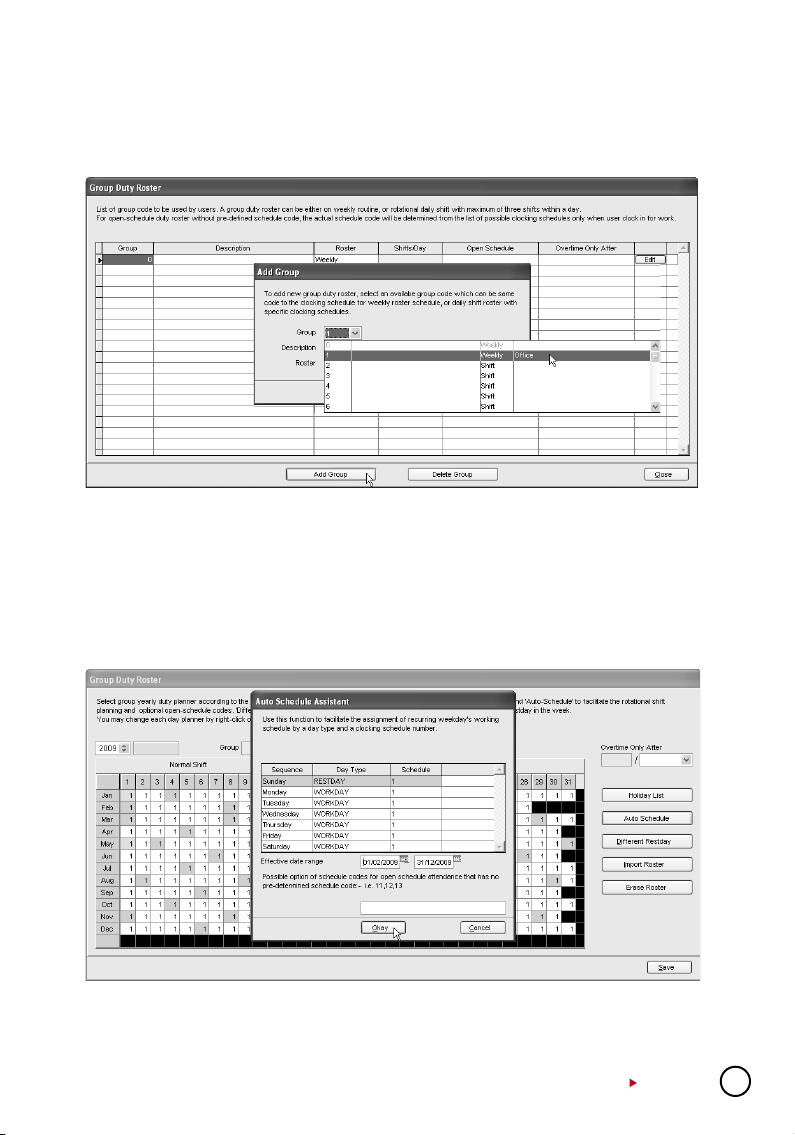
Settings of Group Duty Roster
After you have configured clocking schedules, next is to configure group duty roster. Group
duty roster refers to working calendar for a year.
[1] Click
and select “Group Duty Roster”.
Group: Group can be represented by code ranging from 0 to 999.
Description: Name of the group.
Roster: 2 types of roster. (Weekly and Shift)
Shift/Day: Represent total shifts available in a day for the group. This is applicable to mul-
tiple working shifts only.
OpenSchedule: Represent the schedules available in the group. Applicable to open sched-
ules only.
Overtimeonly after:Show the quantity of working time for overtime claim. This is an op-
tional calculation for Weekly or Monthly calculation. Ignore this feature if your Company does
not apply this OT scenario.
[2] To edit a group, click “Edit” to start.
[3] To delete a group, select the group and click “Delete Group”.
[4] To add a new group, click “Add Group” to start.
Toaddnewgroupdutyroster,pleasefollowthestepsbelow:
[1] Click “Add Group”.
[2] A new window will pop up. Select Group code and type of Group whether Weekly or Shift.
• Weekly is applicable to working hours running by week, including flexi-working hours.
• Shift is applicable to multiple shifts, open schedules, rotational shifts etc.
CONTENTS
31

[3] Click “Okay” to start configura
tion.
[4] You can see a calendar displayed
in the middle of the page if the
roster type selected is Weekly.
It displays all working days, rest days, and holidays. You can observe the working schedule
pattern by studying the group duty roster. The pattern is varied by type of working schedules.
On the right panel, you can find the followings.
OvertimeOnlyAfter: The software treats extra working time as OT when it exceeds the pre-
defined value. You can choose to accumulate extra time either by week or by month.
For example, a predefined working hours is 40 hours per week. If a user works for a total of 45
hours in a particular week, the software will calculate 40 hours as the working time and another
5 hours as OT. If the total working hours of the user does not exceed 40 hours, the software
will treat it as normal working time.
-
32
CONTENTS

HolidayList: You can define the holidays ap-
plied in your company. Follow the steps below
to add in a new holiday.
• Insert the date and holiday name into the
column.
• To delete, select the holiday’s date and
name, press DEL on keyboard to delete the
holiday.
• Click “Close” to save settings.
AutoScheduleAssistant: You can
arrange the schedule to be applied
for the group within a week. To configure:
• Define the Day type as Restday or
Workday.
• Define the clocking schedule to
follow by particular day.
• Define the date range to take effect.
• Click “Okay” to save settings.
DifferentHoliday: You
can assign a specific
user from a group for a
different rest day or off
day. Follow the steps
below to configure.
• Select the User ID.
• Define the day as
rest day or off day.
• Click “Okay” to
save settings.
CONTENTS
33

Import Roster: If your
company has a ready-made
group duty roster, you can
choose to insert them into
the software, without having to redo the roster.
You can choose either to
import EXCEL file or ASCII
file and click “View Sample” to see the correspond-
ing format.
EraseRoster: If you have wrongly defined
a group duty roster, or the duty rosters are
no longer in use, you can delete it from the
software.
In the middle of group duty roster, the working schedules pattern does not exceed 7 days a
week. You can configure the cycle of the working schedules pattern, for example 9 days per
cycle. Extra information can be added on the page as below:
Shift/Day: You can configure total shifts available for a working day for example, 3 working
shifts per day. However, you cannot define different rest days under this scenario, because
there is no more weekday or weekend. You will only find work day, rest day or holiday.
34
CONTENTS

Sample of Conguration
NORMAL WORKING ROSTER
Most offices and factories apply working
hours similar as the onesshown below:
Follow the steps below to start the configuration of the working hours in the Software.
Step 1:
In Clocking
Schedules, click
“Add Schedule”
to start.
Step 2: Select a schedule code
for example “1” and name it as
“Office”. Select the Work Schedule
as “Weekly”.
Step 3: Define the day type with
Rest Day and Work Day. Insert the
time into each corresponding column, please use 24-hours format
for example (13:00 for
1:00pm).
If you want the
software to treat
any working time
as OT during
rest day, please
define clocking
slots for rest day
as other.
Ignore the OT and
Done columns.
Click “Range” to
continue.
In Break Resume Out
Time (Monday to Friday) 9:00am 12:30pm 1:30pm 6:00pm
Time (Sat) 10:00am 1:30pm
CONTENTS
35

Step 4: Check to
enable the option
“Replace with the
latest clocking”
for Out column.
Click Settings to
continue to the
next page.
Step 5: Define
the working rules
by inserting value
to each setting.
Ignore the setting
if it does not apply
to your Company.
Click “Save” to
save setting.
36
Step 6: The soft-
ware will return to
the main page and
you can see a new
schedule is creat-
ed. Click “Close”
to save settings.
CONTENTS
Step 7: In “Group Duty Roster”, click “Add Group” to add a new roster.
Step 8: Select a group from the checklist. It is recommended that you use a group that is at-
tached with the name of the predefined clocking schedule. Click “Okay” to continue.
Step 9: In the new roster, click “Add Schedule” to start.
The software will automatically arrange the predefined weekly working schedule for example:
clocking schedule 1. Check the date range. By default clocking schedules always start on Sunday. Please make sure you always select Sunday as starting date in the Date Range column.
If Friday is selected as first day of a week, you must define Friday as a starting date in Date
Range column.
Click “Okay” to save settings. Click “Save” to save settings.
Step 10: A new group is created. You can click “Edit” to change any settings in the created
group duty roster if there are any changes required.
Click “Close” to end process.
CONTENTS
37

If you are entitled to 2 breaks per
day, and you wish the software
captures both break times,
forexample: Lunch and Dinner, you can refer to the steps above, but you have to do a different
Time (Monday In Lunch Resume Dinner Resume Out
to Friday) 9:00am 12:30pm 1:30pm 6:00pm 7:30pm 10:30pm
Time (Saturday) 10:00am 1:30pm
setting in step 3. Check the following steps.
Configure the
time into the
co r r es p o nd i n g
time slots.Enable the option
“Do you want
to use OT/Done
as scheduled
work instead of
overtime”. All OT
calculation only
starts after Done
time (10:30pm).
If you would like to configure overnight working hours similar to below:
In Break Resume Out
Time (Monday to Saturday) 11:00pm 3:00am 4:00am 6:00am
You can refer to the steps above, but
you have to do a different setting in
step 3. Please see below.
FLEXI-WORKING ROSTER
Some companies apply flexi-working hours. There are no fixed times for checking in or checking out, going for lunch or resume working. Users can come to work anytime or leave any time.
To configure flexi-schedule, check the following steps.
38
CONTENTS

Step 1:
In “Clocking
Schedules”, click
“Add Schedule”.
Step 2: Select a schedule code
and name it, for example sched-
ule code 2 for R&D. Select Work
Schedule as “Flexi”.
Step 3: Define the day type to the schedule. You do not need to define any time into the time
slots, as this is a flexi-working schedule.
Click “Settings” to continue.
CONTENTS
39

Step 4: Define
the clocking rules
by inserting value
into each column.
Ignore the setting
if it does not apply
to your Company.
Click “Save” to
save settings.
Step 5: The soft-
ware will return
to the main page
and you can see
a new schedule
is created. Click
“Close” to save
settings.
Step 6: In Group Duty Roster, click “Add Group” to add a new group. Select a group from
the checklist. It is recommended to use Group that is attached with the name of a predefined
clocking schedule. Click “Okay” to continue.
40
CONTENTS

Step 7: In the new roster, click “Add Schedule” to start.
The Software automatically arranges the predefined weekly working schedule, example: clock-
ing schedule 2. Check the date range for the schedule. Click “Okay” to save settings. You may
insert other information such as Holiday List, Different Reset Day, if there is any.
Step 8: A new group duty roster will be created. Click “Edit” to change any settings in the cre-
ated group duty roster if there are any changes required. Click “Close” to end process.
MULTI-SHIFT WORKING ROSTER
In Break Resume Out
Morning shift 8:00am 12:00pm 1:00pm 4:00pm
Evening shift 4:00pm 8:00pm 9:00pm 12:00am
Night shift 12:00am 4:00am 5:00am 8:00am
However, a user must complete their first shift (primary shift) before they can continue to other
shifts. Please see the example below.
For factories that are running on shifts, some
of them apply multi-shift working schedules.
Users can work for more than one shift if they
want to.
CONTENTS
41

Step 1: In Clock-
ing Schedule, click
“Add Schedule” to
start.
Step 2: Select a
schedule code and
name it “Morning Shift”. Select
Work Schedule
as “Daily”. Click
“Okay” to con-
tinue.
Step 3: Insert
the time into each
time slot. Enable
“Latest Clocking”
option for Out col-
umn. Click “Settings” to continue.
42
Step 4: Define
clocking rules by
inserting value
into the columns.
Ignore the setting
if it does not apply
to your Company.
Click “Save” to
save settings.
CONTENTS

Step 5: Repeat
Step 1 to 4 to
create another 2
clocking schedules
for evening shift
and night shift.
Step 6: All 3
clocking schedules
are created. Click
“Close” to save
settings.
Step 7: In Group Duty Roster, click “Add Group” to start.
Step 8: Select a group duty roster with “Shift” for example “6” and name it as “Factory”. Click
“Okay” to continue.
CONTENTS
43

Step 9: Define the total working shift for 1 day. The software supports a maximum of 3 shifts
per day.
Step 10: Click “Auto Schedule” to define the working schedules. Define the Day Type. As-
sume the first day of a week is Sunday and it is a rest day. Other days are defined as workday.
Select the corresponding clocking schedule to apply for the shift.
Step 11: Define the date range. If you treat the first
day of a week as Sunday, always choose Sunday
as the starting date. Click “Okay” to continue.
Step 12: The software arranges the roster in 3
pages. Click to see them. Click “Save” to save settings.
44
CONTENTS

Step 13: The software will return to the main page. You can see a new group duty roster is
configured. The Shift/Day column is displaying 3, to indicate that this roster is a multi-shift roster
with 3 shifts in a day.
ROTATIONAL WORKING ROSTER
Some factories apply rotational working roster, where users are always rotate to another working shift periodically. The roster normally is not circulated
weekly, but the management defines it,
for example, 12 days cycle.
To configure the above working roster,
follow the steps below.
The available shifts.
Clocking
schedule
Morning shift 3 8:00am 12:00pm 1:00pm 4:00pm
Evening shift 4 4:00pm 8:00pm 9:00pm 12:00am
Night shift 5 12:00am 4:00am 5:00am 8:00am
In Break Resume Out
The sequence of rotation is as below.
Day 1 2 3 4 5 6 7 8 9 10 11 12
Shift 3 3 3 R 4 4 4 R 5 5 5 R
R=Restday
Step 1: As de-
scribed in MultiShift Working
Roster, configure
3 clocking schedules by the same
method.
CONTENTS
45

Step 2: In each
clocking schedule, insert a
value for “If this
is a rotational
shift, specify the
quantity minutes
before the shift
starts”, for example: 10 minutes.
Please locate
the details of
this option in
page 33.
Step 3: In Group Duty Roster, click “Add Group” to continue.
Step 4: Select a group duty roster with “Shift” for example group number “7” and name it as
“Factory 2”. Click “Okay” to continue.
Step 5: Click “Auto Schedules” and define the day type according to the schedule. Define
clocking schedules for each of the day according to the schedule. Define the date range for
the roster. Click “Okay” to continue.
46
CONTENTS

Step 6: The software automatically arranges the roster according to your settings. Click
“Save” to save settings.
Step 7: A new group is created. Click “Close” to save settings.
OPEN WORKING ROSTER
Some factories apply open working roster. There are various shifts in a day, and users are
free to attend to any shift. The software will allocate users into corresponding working shift
by checking into their clocking time.
However, the working time of every
shift should not be overlapped and
must be clearly defined. The software cannot allocate users into the
correct shift if the In time and Out
time of the shift are overlapping.
Forexample:
A factory provides 3 working shifts as below:
Clocking
schedule
Morning shift 3 8:00am 12:00pm 1:00pm 4:00pm
Evening shift 4 4:00pm 8:00pm 9:00pm 12:00am
Night shift 5 12:00am 4:00am 5:00am 8:00am
In Break Resume Out
Step 1: As de-
scribed in Chapter Multi-Shift
Working Roster,
you can configure 3 clocking
schedules by
the same method.
CONTENTS
47

In each clocking schedule,
insert a value
for “If this is a
rotational shift,
specify the
quantity minutes
before the shift
start starts”,
for example: 10
minutes. Please
locate details of
this option on
page 33.
Step 2: In Group Duty Roster, click “Add Group” to continue. Select a group duty roster with
“Shift” for example group number “8” and name it as “Factory 2”. Click “Okay” to continue.
Step 3: Click “Auto Schedules” and define the day type according to the schedule. Define
the Date Range for roster to start with. Insert code of the in-use clocking schedules into the
column, example 3 – clocking schedule 3, 4 – clocking schedule 4, and 5 – clocking schedule
5. Click “Okay” to continue.
48
CONTENTS

Step 4: Roster is ready as displayed above. Due to open working schedule, clocking sched-
ules are not displayed on the screen. The software will allocate users into the shift by checking
their clocking time. Click “Save” to save settings.
Step 5: A new roster is created. Click “Close” to save settings.
Assigning Users Into Group Duty Roster
You must assign users into the corresponding group duty roster before you can view their attendance. Once you have assigned a user into a group duty roster, the software will maintain
the user in the same roster in the future. If you wish to switch users into another group, you
can follow the steps below.
Step 1: Click to open the User Record page.
Step 2: In the Group column, click to select the assigned users into the corresponding group
duty roster. Repeat the step to all users.
CONTENTS
49

Step 3: Click “Apply” to save settings.
Step 4: A message will pop up to remind you that you must generate the data in Attendance
Sheet before your new settings could take any effect. Click “Okay” to accept the message.
Step 5: Click to open Attendance Sheet.
Step 6: Click “Generate” button and a new window will pop up. Select the users assigned
with new group duty roster. Define the date range for the new settings to take effects. Click
“Generate” to continue.
50
CONTENTS

Step 7: A message pops up to inform that generating process is about to start.Click “Okay”
to start. Window will close automatically after the process is completed.
Step 8: Click to open Attendance Sheet to see the details.
CONTENTS
51

4
C H A P T E R
Ignore this chapter if you are not using the software for time attendance function.
Attendance Sheet displays all attendance data as In time, Out time, Work time, Overtime,
Leave taken, and etc, in a same page. You can check attendance data by date or by user
ID. Given acceptable circumstances, their attendance data can be edited. However, all the
changes are recorded for future reference.
Viewing Data
Click to open attendance sheet. There are a total of 15 columns in Attendance Sheet.
The function of each column is given below:
UserID: Refers to ID of each user. The length of user ID varying from 1 ~ 9 digits, as enrolled
in terminal.
Name:The full name of each user.
DayType: Day type of the particular day.
Schedule: Schedule to apply to a user for the particular day.
In: Refers to the time an user starts working.
Break: Refers to break such as lunch, tea-time etc.
Resume: Refers to the time a user returns from a break.
Out: Refers to the time an user finished working.
OT: Refers to the time overtime starts.
Done: Refers to the time work finishes.
Work: Total work time for a day.
Overtime: Total overtime claimed by a user in a day.
Short: Total short time of a user in a day.
LeaveTaken: Leave applied by a user in a day.
Remark: To notify unusual scenario (or reason) to a user’s attendance in a day.
If “Overtime per week (or month)” is applied to a group duty roster, there will be 3 extra columns appearing on the Attendance Sheet.
ATTENDANCE SHEET
You can choose to view Attendance Sheet in various formats such as:
• By Date • By User ID • By Tardiness• By schedule of department
52
CONTENTS
TotalHr.: Total working
hours in a week or a month.
TotalOT:Total overtime
claim in a week or a month.
Short: Total short time in a
week or a month.

BY DATE Click to open attendance sheet.
By default, attendance sheet will display information by date format. It will show all attendance
of the same day on a same page.
BY USER ID
To change the display to a user ID format, click the “User” ID button. You can check the attendance data of a particular user on a same page. The information will be arranged according
to the date. When there are a lot of users in the software, you can insert a particular user ID
to find the user.
Move the cursor to the user ID column and it will turn into an arrow icon as displayed above.
Right click and insert a user ID.
BY TARDINESS
“Show Tardiness” is located on the top middle of Attendance Sheet. You can select to view
attendance data sorted by tardiness.
• Late in is to show attendance data of users who come late to work.
• Early Out is to show attendance data of users who leave office earlier than predefined Out
time.
• Extended Break is to show attendance data of users in which his rest time exceeds the
predefined Break-Resume time.
CONTENTS
53

• Miss Punch is to show attendance data of users who fail to clock in or out for any time
slots.
• Overtime is to show attendance data of users who work overtime.
• On Leave is to show attendance data of users who are on leave.
• Absent is to show attendance data of users that are absent from work and do not apply for
a leave at the same time.
BY SCHEDULE OR DEPARTMENT
You can also choose to sort data by schedule or department.
• Schedule is to show users who are assigned to a predefined clocking schedule.
• Department is to show attendance data of users who are assigned to a predefined depart-
ment.
Manipulating Attendance Sheet
EDITING ATTENDANCE DATA
Under a certain acceptable circumstances, the Company can edit attendance data of a user.
For example: If a user left early because he needs to go for a training, an administrator can edit
his attendance data so that he will not be considered as “Early Out”.
54
CONTENTS

Step 1: Click “Edit” to start.
Step 2: Point to the time slot and delete the data.
Step 3: Insert a new value. Click “Apply” to save settings. The result is on the next page.
The corrected time slot will be displayed in bold font to indicate that the data has been inputted
manually. You can view the original data for the time slot displayed in “Drag/Drop Clocking” column.
If you want to undo the changes, you can reallocate the original attendance into the column.
Follow the steps below to reallocate the original attendance data into its original position. Click
“Edit” button at the bottom of the Attendance Sheet. Drag the attendance data into the “Drag/
Drop Clocking” column. Drop the attendance data into its original column. Click “Apply” to save
settings.
CONTENTS
55

APPLYING LEAVE TO USERS
You can insert leave days of users in the Attendance Sheet. Follow the steps below to assign
leave days to users.
Step 1: Click “Edit”.
Step 2: Point to the “Leave Taken” column and click to open a drop box. Select the leave type
applied to the user. Click “Apply” to save settings.
Alternatives:Click to open “Staff Extended Leave”.
56
CONTENTS
Select “User ID”
and user “Leave
taken type”.
Define the duration of the leave.
Insert the same
date in “From”
and “To” columns,
if user only takes a
one day leave.

APPLYING REMARK TO USERS
Remark can be added to attendance data to notify unusual record. For example, a user came
in at 1200pm even though his IN time should be at 900am. He was late for meeting a supplier,
therefore remark can be added to explain the tardiness.
Step 1: Click “Edit” to start.
Step 2: Click the “Remark” column to select the remark for user’s attendance data for example
“Going to meet supplier”. Click “Apply” to save settings.
Generating Attendance
You MUST generate attendance data in the Attendance
Sheet if you have done the followings:
1 • Change any settings in clocking schedules
2 • Change any settings in group duty rosters
3 • Assign users into a group duty roster
4 • Change users into a new group duty roster
Any of the above settings will affect time attendance calculation in the software. The software
must publish the most updated attendance data on the Attendance Sheet. To get updated data
that complies with the new settings, the software requires you to perform “Generate” process to
refresh the Attendance Sheet. Else, the new settings or changes will not be applied.
Forexample:
A new setting is done in
clocking schedule 1. All
users in this schedule
must work at least 30
minutes to entitle them
for an overtime claim.
Any users with overtime
period less than 30 minutes will not be entitled
for an overtime claim.
Click “Save” to save
settings.
Note: This process will erase any of
the manually inserted information/
attendance data from the records.
Therefore, please include the relevant
user IDs and date range to generate
accurate attendance data.
CONTENTS
57

Step 1: Before generating any attendance data, all users are entitled to overtime after a pre-
defined working time. With the new setting done in clocking schedule, users with overtime less
than 30 minutes will be ignored. Click “Generate”.
Step 2: Select the users and define
the date range.Click “Generate” to
start the process.
Step 3: Click “Okay” to accept the
message.
Step 4: After the generate process is done, the new setting will take effect. Any user with
overtime for less than 30 minutes will be ignored.
58
CONTENTS

Exporting Attendance Data
Attendance data from the software can be exported for payroll or to be used in other software. However, it is important to make sure that the exported attendance data can fit into the
targeted software. The exported attendance data is available in text (.txt), Microsoft® Excel
worksheet (.xls) or ODBC manager.
There are two types of data exportation.
A• ExportDetailsistoexportattendancedataonadailybasisforacertaintimeperiod.
B• ExportSummaryistoexportasummaryofattendancedataforacertaintimeperiod.
The type of exported data depends on the requirements of payroll, HR software or other software.
EXPORT DETAILS
Step 1: In Attendance Sheet, click “Export” to start.
Step 2: Select users to export (by user
ID, All users or by Department). Define
the date range of attendance data to
export. Click “Export Detail”.
Step 3: Define the sequence of ex-
ported data by labeling the Position
column (column 1 – User ID, column
2 – Employee No., column 3 – Depart-
ment etc). Define the length of each
data field to fit the maximum charac-
ters for each column. Click “Apply” to
save settings.
Step 4: Select the type of file for
exported attendance data. If EXCEL
format is selected, continue to define
the path to save the file. Click “Export
Detail” to start the process.
CONTENTS
59

If ASCII format (.txt) is selected, please check the 3 extra options at the bottom. These 3 options only work if the date is exported into ASCII format. Ignore this step if you do not need
them. Define the path to save the exported attendance data.Click “Export Details” to start the
export.
EXPORT SUMMARY
60
Step 1: In Attendance Sheet, click “Export”
to start.
Step 2: Select users to export either by user
ID, All users or by Department. Define the date
range of attendance data to export. Click “Export Summary”.
CONTENTS

Step 3:Define the sequence of exported data by labeling the Position column (column 1
– User ID, column 2 – Employee No., column 3 – Department etc). Define the length of each
data field to fit the maximum characters. Click “Apply” to save settings.
Step 4: Select the file type of exported attendance data. If EXCEL format is selected, con-
tinue to define the path to save the file. Click “Export Summary” to start to export.
If ASCII format (.txt) is selected, please check the 3 extra options at the bottom. These 3 options only work if exported into ASCII format. Ignore this step if it is not required.
Define the path to save the exported attendance data. Click “Export Details” to start to export.
CONTENTS
61

Housekeeping
It is advisable to carry out housekeeping periodically to maintain the software. The software
might response slower (especially in Attendance Sheet or Generate process) if it is approaching
the storage limit. It is recommended to keep all previous attendance data into the history folder
once a year. To do the housekeeping, follow the steps below.
Step 1: In Attendance Sheet, click “To History” to start sending the previous attendance to
the history folder.
Step 2: Select the users involved, it is rec-
ommended to select all. Define the date
range of previous attendance data. Click “To
History” to start.
Step 3: Check in Attendance Sheet. The
starting date of history is 1st of May instead
of 1st of February. This date indicates that the
Attendance Sheet will run from 1st of May,
instead of 1st of February. If you would like
to recheck the history attendance, follow the
steps below.
62
Click to open the History folder. All history attendances are saved in this page.
CONTENTS

ACCESS CONTROL SETTINGS
Ignore this chapter if you are not using the software for access control function.
C H A P T E R
The Relations between Time Zone,
Group Time Zone and Access Code
TimeZones: Time zone can be defined in the software to control access time of users. Time
zone consists of a pair of access time (starting time and ending time), for example: 08:00 ~
18:00. A terminal treats the time in between the time zone as the valid time. The terminal opens
the door if a user is verified during the valid time. To block access for the entire day, please
define the time zone as 23:59 ~ 00:00. The terminal will not open the door to users if this time
zone is applied.
Time Zone 2
Sunday 23:59 ~ 0000
Monday 08:00 ~ 18:0 0
Tuesday 08:00 ~ 18:00
Wednesday 08:00 ~ 18:00
Thursday 08:00 ~ 18:00
Friday 08:00 ~ 18:0 0
Saturday 23:59 ~ 0000
GroupTimeZone: All defined time zones must be assigned under a group called Group Time
Zone.
A Group Time Zone can support a maximum of 3 different time zones, for example: TZ1, TZ5
and TZ6. In some scenario, users can apply multiple time zones.
For example, a cleaning
worker can only access
into an office during office
hours, but not during lunch
hour and teatime. Therefore, the 3 time zones set
for the cleaning lady will apply as below,
For example: All users can access an area from 8:00am to
6:00pm (Monday to Friday) and no access is allowed during Saturday and Sunday.
The software provides 50 different time zones for configuration,
from TZ1 to TZ50.
Time Zone 3 4 5
Sunday 23:59 ~ 00:00 23:59 ~ 00:00 23:59 ~ 00:00
Monday 09:00 ~ 12:0 0 13:30 ~ 16:30 17:00 ~ 18:00
Tuesday 09:00 ~ 12:00 13:30 ~ 16:30 17:00 ~ 18:00
Wednesday 09:00 ~ 12:00 13:30 ~ 16:30 17:00 ~ 18:00
Thursday 09:00 ~ 12:00 13:3 0 ~ 16:30 17:00 ~ 18:00
Friday 09:00 ~ 12:00 13:30 ~ 16:30 17:00 ~ 18:00
Saturday 23:59 ~ 00:0 0 23:59 ~ 00:00 2 3:59 ~ 00:00
5
Group Time Zone Time Zones
1 2
2 3 : 4 : 5
3
4
5
All 3 time zones (TZ2, TZ3 and TZ4) are grouped into the Group
Duty Roster 2 as shown in the table below.
There are a total of 50 Group Duty Roster available in the soft
ware for definition. However, only the first 5 groups are marked
as Group 1, Group 2, Group 3, Group 4 and Group 5. Another
45 group time zones are considered as free groups, where they
are attached with an Access Code only.
CONTENTS
-
63

AccessCode: All defined group duty rosters are linked to a code number for easy handling.
These code numbers are known as Access Code. By default, there are 50 Access Codes (from
0 ~ 49) and by default as well, Access Codes 0 to 4 are applied to Group Time Zone 1 to 5. Any
other “free group time zone” are assigned with Access Codes 5 to 49.
You can arrange the level of accessibility by Access Code, for example:
• Access Code 0 – Full access
• Access Code 1 – Only access during office hour
• Access Code 2 – Access in the morning only
• Access Code 3 – Access after working hour
• Access Code 4 – Access after 8pm only
• Access Code 5 – Part time workers (midnight)
• Access Code 6 – Contractors (Morning before 10am)
Furthermore, you can name the Access Code so that you can refer them easily.
Forexample:
AccessCode Name GroupTimeZone TimeZone
0 Access from 8am to 8pm 1 2
1 Only access during office hour 2 3: 4: 5
2 Access in the morning only 3 6
3 Access only after working hour 4 7
4 Access only after 8pm 5 8
5 Part time workers Free group 11 : 12 : 13
6 Contractors Free group 18: 20
Note:
All new enro lled users
are automati cally assigned into
Group Time Z one 1. Please
assign the n ew users into the
correspondin g group time zone
after the en rollment is done.
THE SETTINGS OF TIME ZONE
Step 1: Click to open Terminal User Control.
Step 2: Select a Terminal ID to configure, for example Terminal 1. Click Time Zone tab.
Step 3: Forexample:User can access from 8:00am to 8:00pm (Monday to Friday), but are denied
access during Saturdays and Sundays. The time zone settings will be configured as below:
64
CONTENTS

Insert the time zone settings into the corresponding time zone, for example, Time Zone 2. If
you would like to duplicate the same settings to other terminals, click “Duplicate Settings”.
In a new window, select the terminal where settings are duplicated to. Click “Copy” to apply.
Ignore this step if you do not wish to duplicate settings to another terminals.
Step 4: Click to select Terminal ID to update time zone settings. Click “Update Terminal” to
start.
Step 5: Click “Apply” to start updating settings to the selected terminal.
Step 6: Click “Close” to end process.
CONTENTS
65

Step 7: Repeat Step 4 to 6 to update settings to another terminal.
THE SETTINGS OF ACCESS CODE AND GROUP TIME ZONE
Step 1: Select Terminal ID to configure, for example, Terminal 1. You can do different settings
for different terminals.
Select an Access Code to use, for example, Access Code 1.
Check “Allowed” column in same row with Access Code 1.
Assign a group time zone into the TZ Group column in the same row as the selected access
code. Click to add a new Group Time Zone into TZ Group column, for example 2.
Ignore Overwrite TZ columns.
66
CONTENTS

Step 2: Now you can insert the predefined time zone to the newly-added group time zone 2.
Click “Update Terminal” to update settings to the terminal.
Step 3: A new window will pop up to indicate that a terminal has been updated. Click “Apply”
to update settings.
Step 4: Click “Close” to end update process.
Repeat Step 1 to 4 to configure and update settings to any other terminals, if required. There
are a total of 50 access codes ready to be used.
Reminder: To assign
free group time zone
with Access Code
CONTENTS
67

Select an Access Code for example Access Code 5. Check the “Allowed” column; do not insert
any value into the TZ Group column. Insert the time zones into the Overwrite TZ column, for example TZ11, TZ17 and TZ18. Continue the above steps to update the settings to the terminal.
GROUPING USERS INTO ACCESS CODE
Now all information for time zones, group time zones and access codes are updated to terminals. Next group corresponding users into the access code to control their access rights.
Step 1: Click and open the User Access Code.
Step 2: Click the number button on the left top to select an Access Code, for example 1.
The left panel displays all users who are assigned under the selected access code. The right
panel displays all users who are not assigned under the selected access code.
68
CONTENTS

Step 3: Name the Access Code, for example, access during office hours. Select the users
from the right panel to include them into the access code. Click the button to move users into
the access code.
Step 4: Click “Update User” to update settings to the terminal.
Step 5: A new window will pop up and you can define information to be updated to the ter-
minal. It is recommended to select “Users with access code changed”. Click “Apply” to start
updating the terminal.
Step 6: Click “Close” to end the process.
Step 7: Click “Save Changes” to end the process.
Repeat the steps above to configure other access codes for users. Always name the access
code to avoid wrong settings.
CONTENTS
69

Different Verication Methods
By default, all models support one of these verification methods, fingerprint, password, card
or fingerprint with card. However, some of the models support two verification methods for
one user, for example, a user enrolls with both fingerprint and password. During verification, the user must provide his fingerprint followed by his password to gain a successful
verification.
There are a total of 15 verification types available:
Each terminal can support 15 groups for different verification method. Configurations can
be done as below:
Typeofverifications Operations
FP / PW / RF Terminal verifies users with fingerprint, password OR RFID card.
FP Terminal verifies users with fingerprint only.
PIN Terminal verifies users with User ID only.
PW Terminal verifies users with password only.
RF Terminal verifies users with RFID card only.
FP / PW Terminal verifies users with fingerprint OR password.
FP / RF Terminal verifies users with fingerprint OR RFID card.
PW / RF Terminal verifies users with via password OR RFID card.
PIN & FP Terminal verifies users with 1:1 fingerprint matching only.
FP & PW Terminal verifies users with fingerprint AND password only.
FP & RF Terminal verifies users with fingerprint AND RFID card only.
PW & RF Terminal verifies users with password AND RFID card only.
FP & PW & RF Terminal verifies users with fingerprint AND password AND RFID card.
PIN & FP & PW Terminal verifies users with User ID AND fingerprint AND password.
FP & RF / PIN
Terminal verifies users with fingerprint AND RFID card OR 1:1 fingerprint matching.
Now you can assign users into the groups so that they can comply with the verification
methods.
Group TypesofVerification
method
1 FP / P
2 FP
3 PIN
4 PW
5 RF
6 FP / PW
7 FP / RF
8 PW / RF
9 PIN & FP
10 FP & PW
11 FP & RF
12 PW & RF
13 FP & PW & RF
15 FP & RF / PIN
W / RF
14 PIN & FP & PW
70
CONTENTS

THE SETTINGS OF DIFFERENT VERIFICATION METHOD
Step 1: Click to open Terminal User Control.
Step 2: Click Terminal ID to configure settings, for example Terminal 1. Select an Access
Code to use, for example Access Code 2. Select a group time zone, for example Group Time
Zone 3.
Step 3: Select a verification method to apply to this group, for example: FP&PW.
Step 4: Insert a time zone to apply to this group, for example, TZ1. Without assigning a time
zone, the group will not have time zone and terminal will not verify the user.
Step 5: Click “Duplicate Settings” to copy the settings to apply to other terminals.
Select the terminal to copy to. Click “Copy” to start copying the settings. Ignore this step if you
do not wish to copy settings to other terminals.
CONTENTS
71

Step 6: Click “Update Terminal” to update settings to the terminal.
72
CONTENTS

Step 7: A new window will pop up. Click “Apply” to start updating the settings.
Step 8: Click “Close” to end process. Repeat Step 6 to 8 to upload settings to other terminals.
Remember to select the correct terminal ID before updating it.
Step 9: Click “Close” to end the process.
GROUP USERS INTO ACCESS CODE WITH DIFFERENT
VERIFICATION METHOD
Step 1: Click to open User Access Code.
Step 2: Select Access Code as configured in Terminal User Control, for example, Access
Code 2.
CONTENTS
73

Step 3: Name the Access Code 2, for example, Fingerprint and Password Verification. Se-
lect users from the left panel to be included into the Access Code 2. Click the arrow button
to place users into the Access Code 2.
Step 4: Click “Update User” to update settings to all terminals.
74
CONTENTS

Step 5: A new window will pop up and you
can define information to be updated to the
terminal. It is recommended to select “Users
with access code changed”. Click “Apply” to
start updating data to the terminal.
Step 6: Click “Close” to end the process.
Step 7: Click “Close” to end the process.
Repeat the steps above to group users into
Access Code and update the settings to the
terminal.
Reminder: To assign
a free group time
zone for a different
verification method.
Select a new Access Code, for example, Access Code 5. Check the Allowed column. Do not
insert any value into the TZ Group column. Insert time zone into the Overwrite TZ column, for
example, TZ 1. Select the types of verification method to be applied. Continue with the steps
above to update the settings to the terminal.
CONTENTS
75

Conguring Access Zone
Ignore this step if you do not install 2 terminals to control an entrance. In some scenario, two
terminals are installed in and out to control accessibility of a door. User must verify whenever
he enters or leaves the zone. The record will be captured and you can always refer to EntryExit report to check for the details. All IN and OUT records are arranged in pair to ease the
checking. You need to define the IN and OUT terminals for a zone before you can start using
it. Follow the steps below to configure.
Step 1: Click to open Configure Access Zone.
Step 2: Define the name of the zone, for example, R&D. All connected terminals will be dis-
played on the left panel for reference.
Step 3: Name the door location to ease checking process. Select the terminal as ENTRY
Terminal and EXIT terminal. Repeat the steps above to add in more Entry-Exit terminals. Click
“Apply” to save the settings.
76
CONTENTS

ONLINE DATA MONITORING
Skip this chapter if you do not wish to monitor clocking activities or door accessibilities online
The software can be connected to terminals to monitor all activities. All verification results
including failed or successful verification are uploaded to the software directly. Monitoring of
all clocking activities or door activities is possible from a computer monitor.
C H A P T E R
Terminal Data Audit List
This is the main database of the software. All downloaded clocking activities are stored in this
page. Filtering of data can be done with user ID and date range to look for a particular clocking
activity, if required. If you activate online function on this page, the software will connect to all
terminals (or selected terminals) to download all of the stored clocking data, in order to make
the software “online” with all the connected terminals. Any clocking activities at any terminals
will be downloaded into the software immediately. Therefore, you can monitor all activities at
all connected terminals.
6
Data field Functions
ID ID of the connected terminal.
Description
Name of the connected terminal.
User ID User ID verified at the terminal. 0 refers to a failed verification at the terminal.
Name The full name of a user verified at the terminal.
Clocking The date and time of clocking activity at the terminal.
Transaction The transaction code from the terminal. Ignore it if you do not use Work Code.
Date The date of the clocking activity downloaded to the software
I/O Slot The software allocates the type of clocking activity in Attendance Sheet.
There are 6 buttons at the bottom of Terminal Data Audit List.
Buttons Functions
Select Terminal ID To select for a terminal to be connected during online status.
Online / Pause
Export To export clocking activities into .TXT file.
Purge To delete clocking activities from the database.
Close To close the page.
To start or pause the online process.
CONTENTS
77

START/STOP ONLINE MONITORING ON TERMINAL DATA AUDIT LIST
Follow the steps below to monitor activities by using Terminal Data Audit List.
Step 1: Click to open the Terminal Data Audit List.
Step 2: Click “Online” to connect to terminals.
Step 3: Every time a user verifies at any connected terminals, the clocking activities will be
downloaded into the software immediately. All clocking activities are available on screen. Click
“Pause” if you wish to stop the monitoring process.
SELECT TERMINAL FOR MONITORING THE TERMINALDATA AUDIT LIST
If you wish to monitor a few terminals in a multiple terminal environment select the relevant
terminal in the terminal data audit list, follow the steps below.
78
CONTENTS

Step 1: Click to open the Terminal Data Audit List.
Step 2: Click “Select Terminal ID”.
Step 3: If you group termi-
nals into the Terminal Group,
you can select by using the
Terminal Group. Click “Select Terminal Group”.
Check the Terminal Group
to start the monitoring. Click
“Okay” to start.
Step 4: If you do not group any Terminal Group, you can select the terminals to monitor.
Check the terminals and click “Okay” to start.
CONTENTS
79

EXPORT RAW CLOCKING DATA
Raw clocking data can be exported into .txt file, where it can be imported into the 3rd party
software for further analysis, for example, into a HR software. Arrange the data field of the
clocking data before the exportation process, so it matches the requirement of your 3rd party
software. Follow the steps in the following pages to export.
Step 1: In Terminal Data Audit List, click “Export”. A new window will pop up. Click to select
user ID to export. Define the date range of data to export. Click “Next” to go to the next
step.
Step 2: You must arrange the data field and the length of the data field in the column.
Example, the target software needs to import terminal ID (2 digits), User ID (9 digits), date
format dd-mm-yy, hour format hh:mm. Therefore, you need to configure the data field as
shown as above.
80
CONTENTS

Enable “Automatic append data to output file during data download” if you would like the
Software to append new downloaded clocking data into the same file during each of the
downloading. Click “Verify” to save settings.
Step 3: Click to define path to save the exported
file. Only enable “Append data to existing output
file” if you had enabled “Automatic append data to
output file during data download” in the previous
step. Click “Export” to start.
Step 4: You can check the contents of the export-
ed raw clocking data. Sample is shown above.
PURGE CLOCKING DATA FROM TERMINAL DATA AUDIT LIST
If you discovered that there are strange or improper clocking activities (wrong date, wrong
user ID etc), you can delete them. However, we strongly recommend you not to delete any
contents in the Terminal Data Audit List, as it is the main database of the software.
To delete clocking data, follow the steps below.
Step 1: Click to open Terminal Data Audit List.
Step 2: Click “Purge” to start deletion of clocking data.
Step 3: A new window will pop up. Select the user ID and define the date range to delete.
Click “Delete” to start.
CONTENTS
81

Monitoring Terminal Activity
This is a special function to monitor door accessibilities. Unlike Terminal Data Audit List, this
page does not show previous clocking activities but it shows only the current clocking activi-
ties. The same concept applies to the Terminal Data Audit List, where user’s clocking data is
downloaded immediately to the software for viewing.
Synchronization of the date and time of the terminals can be done from this page. It can also
be used to open door(s) for users. You can upload photo of users into the software, and these
photos will be shown on the screen if user is verified at the connected terminal.
Step 1: Click to open Monitor Terminal Activity.
Step 2: Click “Online” to connect to all terminals. Click “Select Terminal ID” if you wish to se-
lect terminals for viewing. The same methods for the Terminal Data Audit List is applied here.
Step 3: During online status, all verified user IDs at the connected terminals will be down-
loaded into the software. The user ID and its verified time will be published on the screen. Click
“Open” button to request a particular terminal to open door and this application is invalid if you
are using AdapTec AC to control the door. Click “Sync” button to synchronize date and time of
the connected terminals to the computer’s time. You can click “Show Photo” and the software
will show the photo of the verified users. Click “Pause” if you want to stop the Online status.
82
CONTENTS

USB PEN DRIVE MANAGEMENT AND
INSTANT MESSAGES DISPLAY (SMS)
USB Pen Drive Management
You can use USB pen drive to download or upload users and download clocking data from
terminals. Downloaded data will be copied into the software for further analysis.
Before you start using this function, you must do the followings:
[1] Select Type of Connection USB in Terminal Setting page. The sample is shown below.
7
C H A P T E R
[2] Make sure the ID assigned is the same as Dev ID in the terminal.
[3] Activate the product key and activation in the software.
Missing any of the above information will result in no data being displayed when you try to
read data from the USB pen drive.
DOWNLOAD USERS FROM USB PEN DRIVE
Plug a USB pen drive to a terminal to download user information (user ID, fingerprint, password, card ID etc). The information can be copied and saved in the software. To download
users from terminal, follow the steps below.
Step 1: Click to open USB Pen Drive Management.
Step 2: Select “Read user info from USB disk downloaded from remote terminal”. Click
“Next” to continue.
CONTENTS
83

Step 3: Click to select the drive of USB pen drive, for example: G. Click “From USB” to start
reading users from the USB pen drive.
Step 4: You can select users to download by checking the column next to the User ID, and
you can also select “All” to download. Click “Save to PC” to download users into the software.
UPLOADING USERS THROUGH USB PEN DRIVE
You can copy users into a USB pen drive and upload them to any terminals. To do this, follow
the steps below.
Step 1: Click to open USB Pen Drive Management.
Step 2: Click “Write user into an USB disk to be uploaded into remote terminal”. Click “Next”
to continue.
84
CONTENTS

Step 3: Click to select the drive of the USB pen drive, for example: G.
You can select the range of users by using Terminal ID or Department. Select either one to
continue. Click “From PC” to continue.
Step 4: You can select users to upload by selecting the column next to the User ID. However,
you can select “All” to upload. Click “Save to USB” to upload users into Software.
DOWNLOADING CLOCKING DATA FROM USB PEN DRIVE
You can plug a USB pen drive into the terminal to download the clocking data. The downloaded clocking data is read by the software to do further analysis. Please always delete clocking
data manually at the terminals after you have finished downloading all clocking data into a
USB pen drive. To read clocking data from a USB pen drive, follow the steps below.
Step 1: Click to open USB Pen Drive Management.
CONTENTS
85
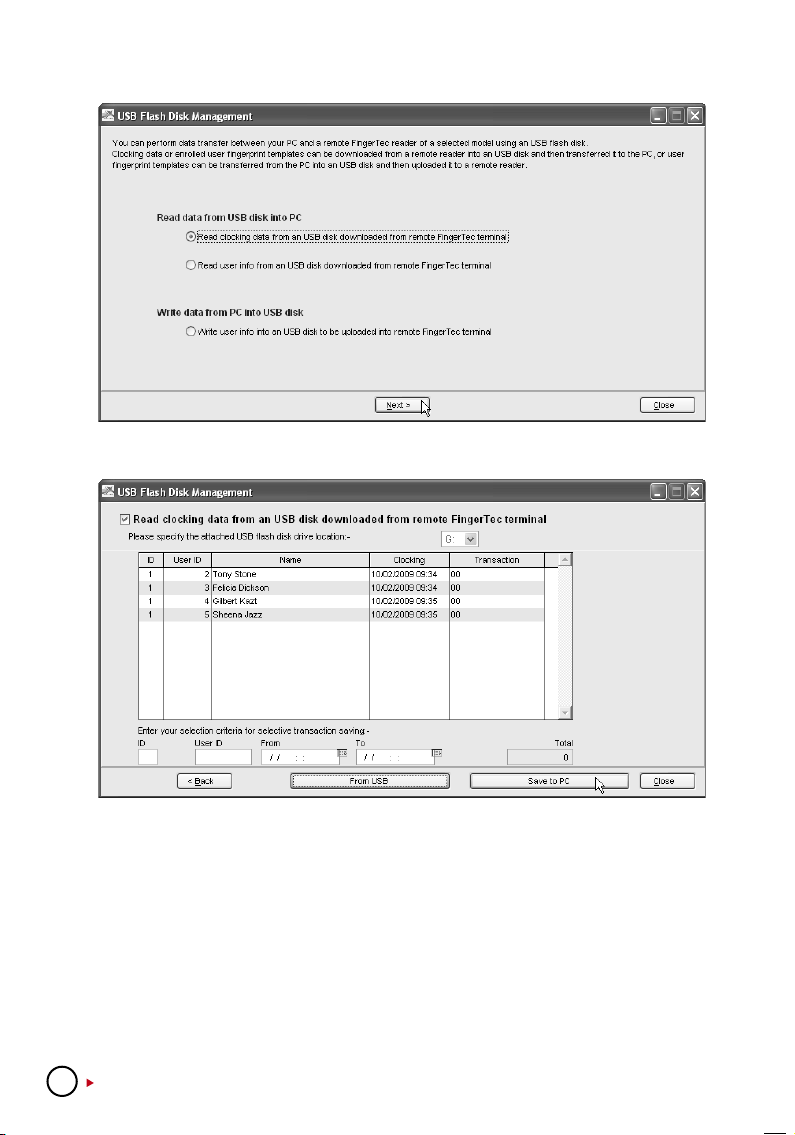
Step 2: Click “Read clocking data from USB disk downloaded from remote terminal”. Click
“Next” to continue.
Step 3: Click to select the drive of the USB pen drive, for example: G. Click “From USB” to
download clocking data from a USB pen drive.
Step 4: All clocking data is displayed on screen. Click “Save to PC” to download into the
software.
Instant Messages Display
You can configure messages and upload them to terminals. There are 2 types of messages,
Public and Personal. Public messages always pop up after user is verified at the terminal. Personal messages are only assigned to some particular users. The message will be shown only
after the dedicated user is verified. All messages uploaded into a terminal come with a valid
date range, for example: 1/3/2009 to 15/3/2009. The message in the terminal will be deleted
automatically come the expiry date. However you can choose to delete them manually.
86
CONTENTS

WRITING PUBLIC MESSAGES TO TERMINAL
Step 1: Click to open Instant Message Display.
Step 2: Assign a number as SMS ID, for example: 10 (varying from 0 to 99999). Insert the
short message into the column, for example: “Please use 2nd floor exit during lunch time”.
Define the start date and time, for example: 1/3/2009, 00:00. Define the end date and time,
for example: 31/3/2009, 23:59. Click “Write Terminal Message” to continue.
Step 3: Select the SMS ID to upload. Se-
lect the terminal(s) to upload the message to.
Click “Apply”.
Step 4: Click “Apply” to end process.
DELETING PUBLIC MESSAGES FROM THE TERMINAL
Step 1: Click to open Instant Message Display.
Step 2: Click “Erase Terminal Message”.
CONTENTS
87

Step 3: Select terminal ID to delete
message. Click “Apply” to continue.
Step 4: Click “Apply” to end the proc-
ess.
WRITING PERSONAL MESSAGE TO THE TERMINAL
Step 1: Click to open Instant Message Display.
Step 2: Click “User Message” tab. Assign a number as SMS ID, for example: 31 (varying
from 0 to 99999). Insert the short message into the column, for example: “Managers, Operation Meeting, 16/3/2009, 10am, Room Alpha”. Define the start date and time, for example:
16/3/2009, 00:00. Define the end date and time, for example: 16/3/2009, 10:30. Click “Write
User Message” to continue.
Step 3: Select the SMS ID to upload.
Select the terminal to upload the mes-
sages to. Click “Apply” to continue.
88
CONTENTS

Step 4: Select users whom this mes-
sage is intended for. Click “Apply” to
upload.
Step 5: Click “Apply” to end the proc-
ess.
DELETING PERSONAL MESSAGE FROM TERMINAL
Step 1: Click to open Instant Message Display.
Step 2: Click “User Manage” tab. Click “Erase User Message”.
Step 3: Select to delete messages from
the terminal. Click “Apply” to continue.
Step 4: Click “Apply” to end the proc-
ess.
CONTENTS
89

8
C H A P T E R
APPENDIX •SAMPLE REPORTS
TIME AND ATTENDANCE REPORTS
ATTENDANCE SHEET
Attendance Sheet is a comprehensive report detailing activities of all staff in a month.
E-TIME CARD
Electronic Time Card comprises of detailed activities of an employee in a month.
90
CONTENTS

ON LEAVE REPORT
On Leave Report is a report showing leaves taken by staff based on specified dates.
DAILY ATTENDANCE LISTING
Daily Attendance Listing is the listing of staff attendance based on the date required.
CONTENTS
91

TARDINESS REPORT
Tardiness Report is a report showing daily activities of a staff such as In, Out, Overtime, etc.
OT APPROVAL WORKSHEET
Overtime Approval Worksheet reveals a worksheet of a user and approval given for that particular person for working overtime.
92
CONTENTS

ATTENDANCE SUMMARY
Attendance Summary is a summarized report of staff attendance which comprises of overall
performance in work rate, absents, leaves, late in, early out, missed punch, etc.
GROSS WAGES REPORT
Gross Wages Report is the gross calculation of worked hours of all staff based on their rate per
hour for a specified period.
CONTENTS
93

DUTY CALENDAR
Duty Calendar is a calendar consists of workdays holidays, restdays and offdays based on a
specified group.
DAY BY DAY ANALYSIS
Day by Day Analysis is a report of attendance summarized daily in terms of overall performance
and number of absents, leaves, late in, early put, missed punch, etc.
MONTH BY MONTH ANALYSIS
Month by Month Analysis is a report of attendance summarized by month in terms overall performance and number of absents, leaves, late in, early put, missed punch, etc.
94
CONTENTS

CORRECTION REPORT
Correction Report is a report to indicate if there is any outstanding clocking activity for administrative personnel to take corrective measures.
STAFF MOVEMENT ANALYSIS
Staff Movement Analysis is the transaction records of individual staff by user ID.
CONTENTS
95

TERMINAL ACTIVITY REPORT
Terminal Activity Report is the transactions record of staff by terminal.
TERMINAL TRANSACTION LISTING
Terminal Transaction Listing is the record of all transaction data downloaded from every terminal.
96
CONTENTS

 Loading...