


M A N U A L P E N G G U N A

COPYRIGHT NOTICE
All rights reserved. N o pa rt o f this
book may b e reproduced or transmitted in any form or by any means,
electr onic or mechanical, including
photoc opying, recording, or by any
inform ation storag e and r etrieval
system , without wri tten permission
from PUC Founder (MSC) Bhd. Every
precau tion has been made to supply
comple te and accurate info rmation.
Inform ation in this docum ent is subject t o change without prior notice.
DISCLAIMER
No person should rely on the cont ents
of this p ublication without firs t obtainin g advice from a qualified professional person. The company expressly
discla ims all and any l iability and
respon sibility to any reader or user
of this book, in respect of anything,
and of the consequences of anything,
done by any such person in reliance,
whethe r wholly or partially, upon the
whole or any part of the contents of
this b ook.
PUC FO UNDER (MSC) BHD
For enquiri es on technical matters,
please forward the emai l to
suppor t@fingertec.com
CHP 1 • BASIC SETUP 1-14
Minimu m System Requirem ents
CONTENTS
Instal lation
Gettin g Started
Login and Quitting
New Co mpany and Setup W izard
Main M enu
Payrol l Advisor
Update Service
User A ccess and Passwor d
Toolba r
CHP 2 • SYSTEM CONFIGURATION 15-25
Payrol l Settings
Prefer red Language
Re-bui ld Database Index
Backup /Restore Database Files
Day Ty pe
Leave Type
Allowa nce/Deduction Cod e
Nation ality/Ethnic/Reli gion/Education
Positi on/Branch/Departm ent/Cost Center/
Job Gr ade/Category
Branch Address Book
Earnin gs Subject to Sta tutory
CHP 3 • EMPLOYEE MASTER 26-31
To Add a New Staff
To Att ach/Remove Photog raph
To Cha nge Staff Informa tion
To Rem ove a Staff
Payrol l Policy
Resign ation
Payrol l Summary & Misce llaneous

CHP 4 • PAYROLL OPERATIONS 32-46
Activa te Program
Loan R epayment Entry
Tax Sc hedule Entry
Advanc e Payment Entry
Leave Taken Entry
Attend ance Sheet
Create Journal Entry
Bonus
Report Printing
Bank A uto-Pay System
Fulfil ling Statutory Re quirements
Backup
Payrol l Closing
To Shu tdown from DiGiPA Y
CHP 5 • OTHER OPERATIONS 47-57
Leave Entitlement Setti ng
Histor y Files
Year E nd Tax Return
• Tax CP8A (EA Form)
• How to assign accumula tion into CP8A
• Tax CP159/Receipt
Runnin g DiGiPAY in the Network
APPENDIX A •
FLOW CHART 58-59
Settin g-up
Payrol l Operations
APPENDIX B •
SAMPLE REPORTS 60-65
Paysli p
Pay Sh eet
Pay Ch eque
Coinag e Analysis
Bank O rder
Payrol l Journal
Journa l Summary
Employ ee Personal Record
Leave Taken List
Loan R epayment List
APPENDIX C •
FREQUENTLY ASKED
QUESTIONS 66-70

CHAPTER 1
BASIC SETUP
This chapter gives you quick and simple instructions to get you up and running.
MINIMUM SYSTEMS REQUIREMENTS
• Pentium
• 32 MB of memory
• Windows 95 or higher
• At least 8 MB free disk space for oftware
• VGA monitor or higher
• Hard Disk Drive, CD ROM Drive
• Mouse or other pointing device
• Laser Printer (optional)
INSTALLATION
DiGiPAY files are shipped in a compressed format and automatically decompressed during the installation process. Therefore, to install and run software
on your computer, you must first run the setup program. Do not just copy DiGiPAY files into a directory on your hard disk.
There are 2 ways to run the setup program:
I) AU
TOOPEN
In
sert the DiGiPAY CD into your computer’s CD-ROM drive, the system will
automatically run the Setup program.
II)
ALLY (In case your CD drive doesn’t support AutoOpen feature)
MANU
• Insert the software CD into your computer’s CD-ROM drive.
• Make sure the Windows 95 or higher program is running on your compu
ter.
ose RUN from the Windows 95 or higher program - Start Menu and type
• Cho
D:\Setup in the Open text box, click “OK”.
NOTE
Recomm ended
alloca tion of 30MB
or hig her for company d atabas e
CONTENTS
-
1
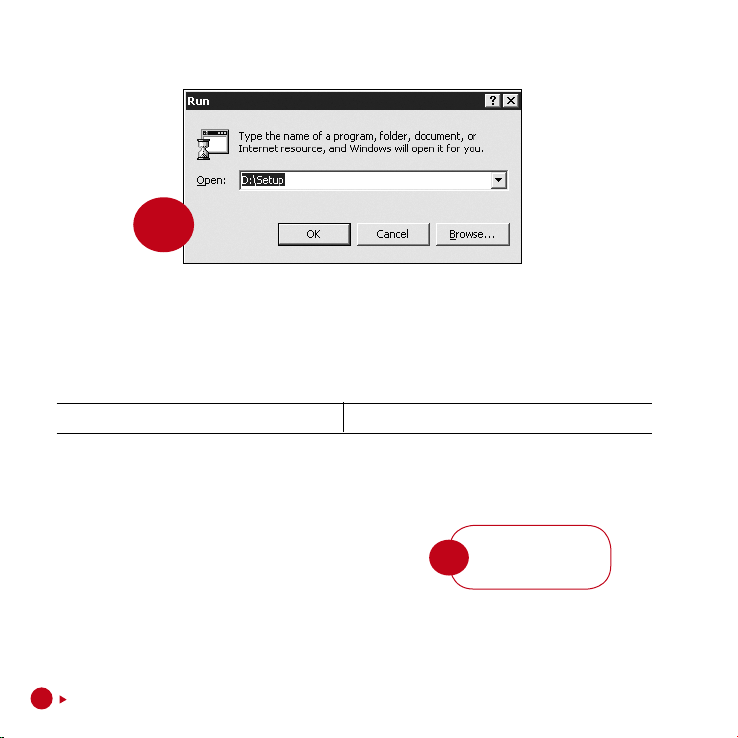
For example: D:\SETUP
Figure
1.1
For AutoOpen and manually run setup program, please follow the on screen instruction. We recommend you to accept all the preset options for the most completed installation.
QUESTIO
N ASKE
D WHEN INSTALLING
What are the choices? Wha
Sel
ect Directory for DiGiPAY Accept the preset choice: C:\DiGiPAY
t should you do?
At the end of the installation, a shortcut will be created on the desktop. If it is not created, please
follow the following steps.
TO CRE
ATE A SHO
RTCUT ON THE DESKTOP
• Move the mouse or pointing device to the Start Menu at the bottom left of the screen.
• Cl
ick on the right mouse button, and a menu will appear.
• Click Explore, and a Windows Explorer will appear with
contents of Start Menu folder shown.
• Double click the Programs folder.
Do not maximize the
NOTE
Window s Explorer.
• Look for DiGiPAY.
• Use the right mouse button to click on the DiGiPAY and drag it to the desktop.
Release the mouse button, and a menu will appear.
• Click Create Shortcut(s) Here.
• The Shortcut will be shown on your desktop.
2
CONTENTS

GETTING STARTED
Once installation is completed, you may start to run DiGiPAY as shown in the following steps:
Figure
1.2
• Click on the Start Menu bar and choose PROGRAMS. Point to Founder Applications group icon
and double click DiGiPAY as shown in Figure 1.2
Figure
• Fro
m the Windows desktop, double click the DiGiPAY icon as shown in Figure 1.3
1.3
CONTENTS
3

LOGIN AND QUITTING
TO LOGGING ON TO DiGiPAY
Figure
1.4
When you start DiGiPAY, you may choose the directory that you want to log in by highlighting it and
entering your User ID and Password. Refer to Figure 1.4 above.
• Sin
gle click on the desired directory.
• In the User ID box, type your name. For first time usage, leave it blank.
• In the Password box, type a password. For first time usage, leave it blank.
• Click Login button to proceed.
TO QUIT FROM DiGiPAY
hen login window is prompted, click the Shut Down button to exit completely from DiGiPAY.
W
NEW COMPANY AND SETUP WIZARD
TO SETUP A NEW COMPANY/DIRECTORY
When the login window is prompted (refer to Figure 1.4.), click on the New button. The Setup
Wizard will be launched.
4
CONTENTS

Figure
1.5
• Language selection for the new company.
Figure
1.6
• Wel
come message for the Setup Wizard. Key in the CD key and click Next button to proceed.
You may find your CD key on the genuine hologram security sticker on your software setup
CD.
CONTENTS
5

Figure
1.7
ine the company profile. Click Next button to proceed.
• Def
Figure
1.8
ine payroll settings. Click Next button to proceed.
• Def
6
CONTENTS

Figure
1.9
• The setting up of employees particulars. Click Next button to proceed.
ADD - Add a new employee.
D
elete - Delete a current employee.
Auto no. -
Generate employee number based on 1st character of the employee name.
For example, J001 is generated for John Doe.
UPGRADE OT
HERS - This function will scan your hard drive for known payroll packages. If the
system discovered any, click on the entry and you will have the option to overwrite the existing
data entry with upgraded data or to include the upgraded data as part of the existing data.
CO
NTINUE NEXT T
IME - This will terminate the Setup Wizard and end the session for this newly
setup company/directory. Save the changes done to ensure that Setup Wizard will be launched
during next login session.
CONTENTS
7

Figure
1.10
• Assign fixed allowances for each employee. Click Next button to proceed.
Figure
1.11
• The
end of Setup Wizard. Click Finish button to save all settings.
8
CONTENTS

Figure
1.12
Once the Setup Wizard is completed, you will be presented with the Welcome window as per Figure 1.12. The Welcome window will be displayed every time you login to this company unless the
“Don’t show this message again” box is checked.
CONTENTS
9

MAIN MENU
PAYROLL TRANSA
end month journal, advance, bonus and
closin g.
NOTE
Figure
1.13
TDOWN
SHU
P
ROGRAM
allows you to quit
from D iGiPAY.
CTIONS conta in mid/
This portion will only be available
for registered company.
STER
E MA
EMPLOYE
contai ns detail s for each employee’s payroll package.
ORT GENERA
REP
list of report s provi ded
in the system.
TION a
HISTO
contai ns resigned
employ ees and
histor y payroll
journa ls.
RY FILE
INTERNET SERVER
CT TO
CONNE
allows you to register online and to
downlo ad the latest update . CD-RO M
update is also accessible here.
SPOT HELP allows you to view the
short note for items on the screen
select ed. Just drag the icon to the
item to seek sho rt note, th en th e
short note will a ppear in a popup
window .
TEM
SYS
NFIGURATION
CO
tells the company’s
payrol l requirements.
S
ROLL ADVISO
PAY
task. By selecting the task you want to learn,
the system will show you how to perform the
partic ular task.
Select ed payroll
month and year.
F-HEL
P provides you with
SEL
link to t he on line help and the
troubl eshooting gui de.
R prese nts a set of guided
10
CONTENTS
PAYROLL ADVISOR
By double clicking the option, the system
will guide you until the task is completed.
Figure
1.14
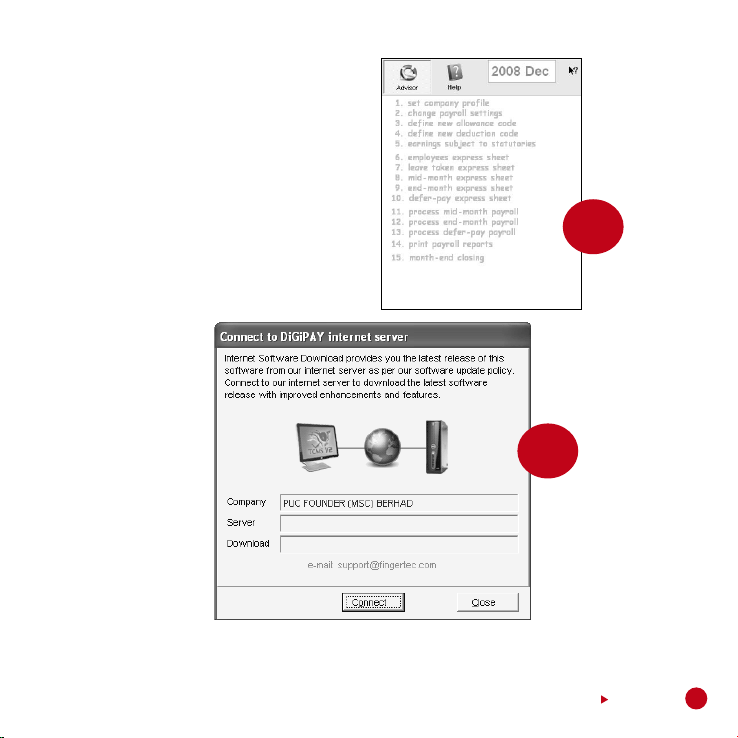
UPDATE SERVICE
Figure
1.15
As and when an update is available, it will be uploaded into the DiGiPAY Internet Server. If you do
not have an internet access for the DiGiPAY computer, you may request your vendor to send you
the latest updated CD.
CONTENTS
11

To retrieve the latest update from the Internet, make sure, that the computer is connected to the
Internet via modem, then click on the Connect to DiGiPAY Internet Server icon and click Connect
button to start the process.
To retrieve the latest update from the CD,
and click CD-ROM button. You will be presented with a select directory dialog. Point the directory
to your CD-ROM drive and click Select button to start the process.
As a new user of DiGiPAY, you are entitled to a free 12 months update service. Upon expiry of
the 12 months period, you are advised to extend the update service for another 12 months with
a minimal update fee. Print out the update service license from Company Profile/License within
System Configuration, fill it up and send it together with your payment to us.
click on the Connect to DiGiPAY Internet Server icon
USER ACCESS AND PASSWORD
Figure
1.16
1. Determine the access right for 9 user groups. Click on the icon and double click “Access
permission”. Put a check into menu option where the particular user group will have no access
to it. Click Apply button to save the changes.
12
CONTENTS

Figure
1.17
2. Determine the number of users allowed access to the system. Among all the users, only one of
them is allowed to be granted with administrator right. For each user, assign a password with
a maximum of 10 alphanumeric characters and his/her user group.
3
lect Company Profile/License. Put a check for option “requires password” and click Apply
. Se
button to activate the user login.
CONTENTS
13

TOOLBAR
VIEWING TOOLBAR
Go to last record
Add a new record.
Go to previous reco rd Editing toolba r will appear Copy i nto Clipboard
Figure
1.18
Go to fir st rec ord Search Cut/De lete
Dup licate from Clipbo ard
Go to next reco rd Edit t he selected record
Editing toolba r will appea r
Close this window
EDITING TOOLBAR
Refresh the record
Figure
1.19
Save the changes
Cancel all changes
Toolbar guides you in viewing and maintaining the records.
14
CONTENTS

CHAPTER 2
SYSTEM CONFIGURATION
This chapter guides you in setting up the system configuration based on your
company’s payroll requirements.
Figure
2.1
1. Pa yroll settings
2. Pr eferred language
3. Re -built database
indexe s
4. Ba ckup/R estore
databa se files
5. Da
y type
6. Le ave ty pe
7. Al lowanc e/ Deduction
code
tional ity/Et hnic/Re-
8. Na
ligion /Education
. Po
sition /Branch/
9
Depart ment/Cost
Center /Job Grade/
Catego ry
ranch address book
10. B
11. Earning subjec t to
statut ory
This function will be activated with a click on the icon
.
It tells the whole company’s payroll requirements. It consists of the following
topics as shown in Figure 2.1.
Please refer to individual topic for elaboration.
CONTENTS
15

PAYROLL SETTINGS
Figure
2.2
This function allows you to define basic payroll information for your company.
1. Double click “Payroll Settings” and define the settings available.
2. Three types of payroll journal calculation mode are available :-
•Calculate instantly •Calculate when save •Calculate on demand
3. For payments separated from mid-month and end-month, such as commission, overtime or
hers, deferred pay is introduced. You may conduct deferred pay before closing – after end-
ot
month payment. You may also opt to conduct deferred pay after closing – before next month
end-month payment.
4
r DiGiTime/TCMS V2 software users, attendance sheet will be utilized when you post your
. Fo
attendance records within DiGiTime/TCMS V2 software into DiGiPAY.
5. Up
on selection, click “Apply” to confirm the changes.
16
CONTENTS

PREFERRED LANGUAGE
Figure
2.3
This system is capable of displaying multi languages. Three languages are provided by default
and these are English, Bahasa Malaysia and Chinese. For other languages please check with your
nearest distributor or vendor.
Once activated, you will be presented with the various language options.
• Double click “Preferred language” and click on your preferred language.
• Cl
ick “Apply” to confirm.
The la nguage select ed wil l be u sed th e next time you log in.
NOTE
To dis play i n Chin ese, y ou mus t be running Windo ws operating syste m Chinese version.
If you are run ning a Windows operating syst em Englis h version , you may util ize a Chinese
Langua ge Input System suc h as C hinese Star o r NJSt ar.
RE-BUILD DATABASE INDEXES
This function is to rebuild all the database indexes. Normally, this is not required unless your
indexes are not up-to-date or corrupted.
• Double click “Re-build database indexes”, all the indexes will be re-built in a matter of sec-
ds.
on
CONTENTS
17

BACKUP/RESTORE DATABASE FILES
Figure
2.4
This function is to backup existing database to another storage media or restore database from
previous back-uped database into system.
SELECT BA
CKUP COMMAND RADIO BUTTON
If you are using ARJ command, your command will be similar to below:
arj a –va –i2 -y a:\DiGiPAY sample\*.dbf
SELE
CT RESTO
RE COMMAND RADIO BUTTON
If you are using ARJ command, your command will be similar to below:
arj x –va –y a:\DiGiPAY sample\*.dbf
NOTE
Substi tute the sample
direct ory wi th actual d irector y name. Yo u will
find the actual direct ory
being displa yed inside
the Pa th heading.
18
CONTENTS

DAY TYPE
Figure
2.5
This function is to specify the keywords that represent the day type for each day of the week. We
recommend you to maintain the default system setting.
1. Do
uble click “Day type” and specify the keyword that represent the day type for :-
• Normal Working Day (system default setting - WORKDAY)
on-working Holiday (system default setting - HOLIDAY)
• N
• Other non-working Days (system default setting - RESTDAY or OFFDAY)
2. Click “Close” to confirm day type keyword.
CONTENTS
19

LEAVE TYPE
Figure
2.6
This function is to specify the type of leave allowed in the system. A total of 8 leave types are made
available for your convenience. Feel free to change the default description.
1. Double click “Leave type” and specify the leave type that is implemented by your company.
lick “Close” to confirm leave type keyword.
2. C
20
CONTENTS

ALLOWANCE/DEDUCTION CODE
Setting up of both allowances and deductions are similar. In order to cut the explanation short,
information presented below is also applicable to deduction.
ALLOWANCE C
You can use this function to define your allowances. You can define unlimited numbers of allowances (constrained by hard disk size).
1. D
ouble click “Allowance Code”
2. Use the viewing toolbar & editing toolbar to work with its content.
3. Assign the standard rate, if applicable.
3. Click “Listing” to view the available allowances.
ODE
Figure
2.7
Figure
2.8
CONTENTS
21

NATIONALITY/ETHNIC/RELIGION/EDUCATION
Setting up of nationality, ethnic, religion and education are similar. In order to cut the explanation
short, information presented below is also applicable to other settings.
NATIONALITY
Figure
2.9
Y
ou can use this function to define a list of nationality for your employees. You can define unlim-
ited numbers of nationality (constrained by hard disk size).
1. Double click “Nationality”.
2. U
se the viewing toolbar & editing toolbar to work with its content.
3. You may also view and assign the employees to this nationality, during data entry.
4. Click “Listing” to view the available allowances.
22
CONTENTS

POSITION/BRANCH/DEPARTMENT/COST CENTER/
JOB GRADE/CATEGORY
Setting up of position, branch, department, cost center, job grade and category are similar. In
order to cut the explanation short, information presented below is also applicable to other settings.
POSITION
Figure
2.10
Y
ou can use this function to define a list of positions for your employees. You can define unlimited
numbers of position (constrained by hard disk size).
1. D
ouble click “Position”.
se the viewing toolbar & editing toolbar to work with its content.
2. U
3. You may also view and assign the employees to this position, during data entry.
4. Click “Listing” to view the available allowances.
CONTENTS
23

BRANCH ADDRESS BOOK
Figure
2.11
This function is used to specify banks and statutory bodies related information. You can define
unlimited numbers of branch addresses (constrained by hard disk size).
1. D
ouble click “Branch Address Book”.
se the viewing toolbar & editing toolbar to work with its content.
2. U
3. You will need to assign each address code to a specialised body.
4. For statutory bodies, Ref. No. will refer to company reference number for the said body.
5. For banks, Ref. No. will refer to company bank account number, while BNM # will refer to Bank
Negara Malaysia No.
6. Cl
ick “Listing” to view the available allowances.
24
CONTENTS

EARNINGS SUBJECT TO STATUTORY
Figure
2.12
This function specifies the construction of earnings for statutory deductions’ calculation.
1. D
ouble click “Earning Subject to Statutory”.
or each statutory body, assign the earning components that make up for its calculation by
2. F
passing the earning components from box on the right into the box on the left.
ick “Listing” to view the available allowances.
3. Cl
CONTENTS
25

CHAPTER 3
EMPLOYEE MASTER
Figure
3.1
A click on the people icon will activate this function. It consists of the following
topics as shown in Figure 3.1.
This chapter emphasizes on Employee Particulars. The other five topics are
covered in Chapter 4 & 5.
The function of Employee Particulars is to store the necessary payroll information of your staff. It also displays your staff’s photograph.
26
CONTENTS

There are four things you can do here.
1. Add a new staff.
2. A
ttach or change photograph of a particular staff.
3. Change staff information.
4. Remove a staff or photograph.
TO ADD A NEW STAFF
• Use Add Record button on the viewing toolbar to add a record.
• To save, click on the Save Record button on the editing toolbar.
TO ATTACH /REMOVE PHOTOGRAPH
Figure
3.2
• Use Edit Record button on the viewing toolbar to start this process.
• Click on the box with an up arrow and assign the scanned photo (JPEG, BMP, etc). The photo-
graph will be displayed immediately.
• T
change a photograph, you must first remove the current photograph by clicking on the box
o
with down arrow and then attach a new photograph.
confirm the changes, click on the Save Record button on the editing toolbar.
• To
CONTENTS
27

TO CHANGE STAFF INFORMATION
Figure
3.3
Figure
3.4
• Use Edit Record button on the viewing toolbar to start this process.
• Make the necessary changes on the staff information.
• To confirm the changes, click on the Save Record button on the editing toolbar.
28
CONTENTS

TO REMOVE A STAFF
• Use Delete Record button on the viewing toolbar.
• When prompted, click on Yes button to confirm deletion.
PAYROLL POLICY
Figure
3.5
In order to process for payroll, it is necessary to define the payroll policy. In DiGiPAY, payroll policy
is defined on page 3 of Employee Particulars.
• D
ine the information as per the payroll remuneration package offered to each of the em-
ef
ployee.
• A
er Edit Record button of the viewing toolbar is clicked, compulsory item will be shown with
ft
an asterisk (*).
allowances and deductions, a total of defer 8 codes are available. In the Per column, there
• For
are 7 choices: unit, month, mid/end, mid only, day and overtime. Unit will activate unit x rate
calculation. Month will activate payment of rate in End Month. Mid/end will activate payment
of rate in both Mid and End Month. Mid only will activate payment of rate in Mid Monthly only.
User will trigger the calculation based on an external function with the same name as per the
code. Day will use total working days in attendance sheet as units, whereas overtime will use
number of hours in attendance sheet as units.
CONTENTS
29

• For leave, as monthly rated staff, the first 7 types of leave is included as part of the salary.
Thus, they are checked to show its inclusion in the salary. For daily rated staff and hourly rated
staff, these leaves will not be checked to calculate their payments.
RESIGNATION
When an employee resigned, all you need to do is to update his/her resignation date and last date
on the job into Employee Particulars.
Execute the payroll process as usual and his/her payroll will be calculated with the resignation
date taken into consideration.
PAYROLL SUMMARY & MISCELLANEOUS
Figure
3.6
30
CONTENTS

Figure
3.7
In addition to personal information and payroll policy, Employee Particulars also provides a page
to view the payroll summary and a page to update other necessary information for statutory purpose.
CONTENTS
31

CHAPTER 4
PAYROLL OPERATIONS
This chapter covers the simple procedures to run the DiGiPAY. Follow the steps
below for the most efficient operations.
ASSUMPT
ION: Sys tem co nfigur ations and e mployee particulars have been s etup.
ACTIVATE DiGiPAY PROGRAM
• Click on the Start Menu bar and choose PROGRAMS.
• Double click on DiGiPAY.
OR
• D
ble click the DiGiPAY icon on the desktop.
ou
WHAT’S NEXT?
L
oan Repayment Entry, Tax Schedule Entry, Advance Payment Entry, Leave Taken Entry and Attendance Sheet are optional modules provided in the DiGiPAY
program. The purpose of incorporating these modules is to ease the operation
work needed to conduct the monthly payroll processing. The following pages
will show you how to utilize these modules.
32
CONTENTS

LOAN REPAYMENT ENTRY
Figure
4.1
Loan repayment allows you to specify deductions that will be effective for selective months. It is
useful for short-term loan, for example festival advance.
This function is available in Employee Master.
ick on the icon
1. Cl
2. Double click “Loan Management”.
3. To add record, click on the Add Record button on the viewing toolbar.
4. Assign a unique loan code for each loan taken by each employee. Update with the loan taken
date and total amount.
5. To
simplify the loan payment schedule, look for Generate button on the editing toolbar. Click
on it and you will be presented with a simple tool for schedule generation. Complete the data
entry.
confirm changes, click on Save Record button.
6. To
.
CONTENTS
33

TAX SCHEDULE ENTRY
Figure
4.2
Upon approval by income tax authority, some employees would be granted permission to pay the
monthly tax based on a fixed schedule by the body. There are two types of fixed schedule, PCB
and CP38. PCB is deducted based on current month income, whereas CP38 is deducted based
on last year income.
This function is available in Employee Master.
1. Cl
ick on the icon
2. Double click “Tax Schedule PCB/CP38”.
3. To add record, click on the Add Record button on the viewing toolbar.
4. As the records are stored in a yearly basis, you must assign the specific year before updating
the employee list at the bottom.
5. To
confirm changes, click on Save Record button.
.
34
CONTENTS

ADVANCE PAYMENT ENTRY
Figure
4.3
Advance payment refers to salary payment paid prior to month-end payroll processing. Thus, during month-end payroll processing, this amount will be deducted from the monthly salary.
This function is available in Payroll Transactions.
ick on the icon
1. Cl
2. Double click “Advance”.
3. To add record, click on the Add Record button on the viewing toolbar.
4. Assign a unique batch description, its payment year and month, before updating the employee
list at the bottom.
5. To
confirm changes, click on Save Record button.
.
CONTENTS
35

LEAVE TAKEN ENTRY
Figure
4.4
By utilizing the leave taken entry, leave taken will be updated into payroll journal and ease the
calculation of leave payment/deduction.
This function is available in Employee Master.
ick on the icon
1. Cl
2. Double click “Roster/Leave Management”.
3. Use the listing page to look for the employee.
4. To update leave taken, go to page and click on Edit Record button on the viewing toolbar.
5. Change the year accordingly and click on the month of leave taken.
6. To add in new leave taken, click on the leave type needed. The mouse pointer will change to a
hand pointing to the leave type. Click and drag the mouse pointer to the day on leave.
default, the leave taken will be 1 day. To change the leave taken or to add a remark line,
7. By
double click on the day on leave and make the necessary adjustment.
confirm changes, click on Save Record button.
8. To
36
CONTENTS
.

ATTENDANCE SHEET
Figure
4.5
Attendance sheet is available to help customers with DiGiTime/TCMS V2 program to speed up the
payroll calculation process. Data will be posted from DiGiTime/TCMS V2 into this screen.
This function is available in Payroll Transactions. This function can also be utilized as a data entry
screen.
1. Cl
ick on the icon
2. Double click “Daily Attendance”.
3. Use listing page to look for the employee. If he/she is not available, add a record for him/her
by clicking the Add Record button on the viewing toolbar.
date the attendance record as shown in his/her attendance sheet.
4. Up
5. To confirm changes, click on Save Record button.
.
CONTENTS
37

CREATE JOURNAL ENTRY
There are three types of journal, namely Mid-month, End-month and Deferred Pay. To create journal entry, you need to double click on the journal you plan to process.
If you had defined in Payroll Settings to automatically generate the journal records, the records
will be created immediately. If generation is not automated, click on the Generate Record button
on the viewing toolbar to start the process.
The generation process will retrieve its data from Employee
Particulars, Loan Repayment Entry, Tax Schedule Entry, Advance Payment Entry, Leave Taken Entry and Attendance
Sheet to create the unit payable/deduct. Once the generation is done, payroll calculation will take place.
After the journal is calculated, you may make additional
changes to the journal such as ad-hoc allowances, deductions and overtime.
In Payroll Settings, it is stated that there are three types of payroll journal calculation mode, they
are:
• Calculate instantly
• Calculate when save
• Calculate on demand
By setting payroll journal calculation mode to “Calculate instantly”, payroll calculation will be carried out during generation and changes on the journal contents. Setting to “Calculate when save”
will allow calculation to be carried out during generation and saving record. By setting payroll
journal calculation mode to “Calculate on demand”, you must click on the Calculate button on the
viewing toolbar in order to carry out the calculation process.
NOTE
If you make any changes
to any da ta after the generatio n, the journal wil l
NOT be updated with the
change s. You must run the
calcul ate function in the
journa l.
38
CONTENTS

In the next three pages, the 6 pages of the journal are presented.
Figure
4.6
Figure
4.7
CONTENTS
39

40
Figure
4.8
Figure
4.9
CONTENTS

Figure
4.10
Figure
4.11
CONTENTS
41

BONUS
Figure
4.12
This function is available in Payroll Transactions.
1. Click on the icon
2. Double click “Bonus”.
3. To add record, click on the Add Record button on the viewing toolbar.
4. Assign a unique batch description, its payment year and month. Set the payment to either
combine with End-month payment or separately.
5. Fo
r tax calculation, you have a choice of This-Month, Last-Month and Last December.
6. You can update the bonus records manually. You may also use the Generate Record button on
the editing toolbar to reduce the data entry.
confirm changes, click on Save Record button.
7. To
42
CONTENTS
.

REPORT PRINTING
Figure
4.13
Click icon , a Report Generation pop up screen will be displayed as shown in Figure 4.13.
All the reports available will be listed. Click on the report you want. You may shortlist your report
with selected group of employees. You may also change the sorting order based on selected
grouping. The groupings available are Employee No., Branch Code, Department Code, Cost Center
Code, Job Grade Code and Category Code.
• TO PRINT ON HARD COPY - Click “Print” button to have a hardcopy printed.
• TO VIEW ON S
• TO QUIT FROM REP
CREEN - Click “Preview” button for an on-screen view only
ORT - Click “Cancel” button to quit from report.
CONTENTS
43

BANK AUTO-PAY SYSTEM
Bank auto-pay system is provided by some of the banks in Malaysia in order to allow the salary
transfer to be done electronically. Currently, WinCom DiGiPAY program provides the interface for
a total of five different bank auto-pay systems.
The banks available are Bumiputra Commerce Bank (BCB), Hong Leong Bank Berhad (HLBB),
Maybank (MBB), Public Bank Berhad (PBB) and RHB. Additional banks will be included should
there is a demand for it.
This function is available in Report Generation.
FULFILLING STATUTORY REQUIREMENTS
The monthly contribution reports are available for EPF, SOCSO, income tax, ASB, Baitulmal,
Tabung Haji and Tabung Zakat.
In line with Malaysia government’s E-Government initiative, disk submission is included for EPF,
SOCSO and Income Tax.
This function is available in Report Generation.
BACKUP
It is important to make backup of existing database to prevent lost of data for future reference.
This function is available in System Configuration.
44
CONTENTS

PAYROLL CLOSING
Figure
4.14
Once you have completed the Monthly Payroll Operation, you are already at the last step of the
Payroll Operation – Payroll Closing.
This function is available in Payroll Transactions. It will transfer all journals to the history files and
move the date indicator at the toolbar to the next month pay period. Once it is completed, you are
ready for the next month payroll process.
1. Cl
ick on the icon
2. Double click “Payroll Closing”.
3. Type in the numeric of the month to confirm the payroll closing.
4. Once the numeric is entered correctly and Enter key is pressed, the Apply button will be acti
vated.
5. Cl
ick on Apply button to proceed.
Remember to backup BEFORE payroll closing and not after.
.
CONTENTS
-
45

TO SHUTDOWN FROM DiGiPAY
1. Click icon to exit from DiGiPAY.
2. At login screen, click “Shutdown” button.
CONGRATULA
Y ou hav e successfully comp leted the se ttings process of DiGiPAY .
46
CONTENTS
TION!

CHAPTER 5
OTHERS
LEAVE ENTITLEMENT SETTING
Figure
5.1
This function is available in Employee Master. It is made available to run and
setup the leave entitlement and taken.
You are required to specify each employee’s leave entitlement calculation
method based on length of service.
Leave entitlement is calculated during Payroll Closing. You may also use the
Generate button on the viewing toolbar to execute the leave entitlement process.
1. Cl
ick on the icon
2. Double click “Roster/Leave Management”.
3. Use the listing page to look for the employee.
.
CONTENTS
47

4. To configure the leave entitlement calculation method, go to Balance page and click on Edit
Record button on the viewing toolbar.
5. I
n the Automatic annual entitlement column, there are five choices. Namely: not applicable,
anniversaries of serviced, calendar with new join prorata, calendar without new join prorata
and 1st year anniversary than calendar.
ANNIVERS
L
ARY
eave entitlement is calculated upon anniversary of joining.
Calendar with new join prorata
Leave entitlement will be calculated in payroll closing of December and pro rata entitlement
for newly join employee within the year.
Calendar without new join prorata
Leave entitlement will be calculated in payroll closing of December. No pro rata entitlement
will be calculated for newl join employee within the year.
ST
1
ANNIVERSARY THAN CALENDAR
Leave entitlement is calculated 1st year upon anniversary of joining and subsequent year
entitlement will be calculated by the end of December each year.
6
the Year of Serviced column, enter the year of completed service ranges and the number
. In
of paid annual leave and sick leave eligible.
the Max. Untaken Annual Leave Can Be Reimbursed items; the maximum number of un-
7. In
taken annual leave to pay back to the employee is entered. The actual days to pay back in the
next payroll period will be shown in the Number of Untaken Annual Leave To Be Paid As Allowance item after the closing payroll. The allowance code used for the payment is assigned
in Reimburse Allowance item in Allowance Code.
8
Forfeit annual leave if absenteeism exceeds item, the percentage of forfeiture for annual
. In
leave is specified.
Untaken annual leave allow to C/F to next year item, the maximum number of untaken
9. In
annual leave that are allow to carry forward to next year is specified.
o change the leave entitlement, change at the left-hand portion.
10. T
11. To confirm changes, click on Save Record button.
48
CONTENTS

HISTORY FILES
Figure
5.2
Click on the icon on the main toolbar. As you can see in Figure 5.2, there are 4 options.
However, only the first 3 options are permanent.
RESIGNED EM
This function is available to maintain the employee particulars for those who had resigned prior
to January this year.
CREATE BLANK
To create new history journal, double click on “Create blank journal” and proceed with the process
as prompted. Once it is completed, a new history journal option will be created in History Files.
PLOYEES
JOURNAL
CONTENTS
49

DELETE HISTORY JOURNAL
To delete history journal, double click on “Delete history journal” and proceed as prompted. Once
it is completed, the deleted history journal will be removed from History Files.
YEAR END TAX RETURN
In DiGiPAY, there are two year-end tax return forms, namely: CP8A (EA Form) and CP159.
TAX CP8
A (EA FORM)
Figure
5.3
CP8A (EA Form) is printed for each employee for individual yearly income tax submission purpose.
This function is available in Employee Master.
ick on the icon
1. Cl
2. Double click “Tax return CP8A”.
50
CONTENTS
.

3. To generate the list of active employees, click on Generate button on the viewing toolbar and
generate accordingly.
4. On
ce generation is completed, review and make sure accumulation is accurate. Make neces-
sary changes by using Edit Record button and save the changes.
5
ick on the Sort button on the viewing toolbar to generate a No. Siri for each employee.
. Cl
Figure
5.4
CONTENTS
51

52
Figure
5.5
Figure
5.6
CONTENTS

HOW TO ASSIGN ACCUMULATION INTO CP8A (EA FORM)?
Figure
5.7
As you may have noticed on Page 3 & 4 of CP8A (EA Form), there are a number of triangular placed
in front of the amount box.
Double click on the triangular and below screen will appear. You are allowed to assign the earnings to be accumulated into each tax column.
CONTENTS
53

TAX CP159 / RECEIPTS
Figure
5.8
Form CP159 must be submitted by the company to IRB every year.
This function is available in Employee Master.
. Cl
ick on the icon
1
.
2. Double click “Tax CP159 / receipts”.
3. To generate the accumulation amount on Saraan page, click on Generate button on the viewing
toolbar.
date the tax receipts numbers and dates on Saraan page.
4. Up
5. Complete the other pages and clicks on Apply button to save the changes.
54
CONTENTS

Figure
5.9
Figure
5.10
CONTENTS
55

RUNNING DiGiPAY IN A NETWORK
This part is provided as a guideline for those who are planning to use a single copy of installed
DiGiPAY from a few workstations within the same network. You must assign a particular computer
as a Server.
SER
1. Install the DiGiPAY software in the Server as usual.
2. P
3. At Desktop, double click My Computer. Look for DiGiPAY directory and double click on it.
56
ETTING UP A SERVER:
VER S
Figure
5.11
Figure
5.12
lug in the Network Control Device at the Printer Port.
CONTENTS

4. In DiGiPAY directory, you will find a file called NETCFG.EXE.
5. Double click the NETCFG.EXE and the program will execute.
6. Click on Yes button to enable the network detection.
7. You will hear a beep sound and a new icon will be created at the taskbar.
8. Go back to My Computer. Right click on the DiGiPAY directory. Select Sharing and share the
directory as DiGiPAY.
SETTING UP A WO
1. At Desktop, double click My Network or Network Neighborhood.
2. L
ook for the Server’s computer name and double click on it.
3. You will find DiGiPAY directory in it. Right click on it. Select Map Network Drive and set it to
Drive F (You may change it to others).
Desktop, double click My Computer and look for Drive F and double click on it.
4. At
5. In Drive F, you will discover DiGiPAY programs.
6. Use the right mouse button to click on the DiGiPAY.E XE and drag it to the Desktop. Release the
mouse button, and a menu will appear.
ick Create Shortcut(s) Here.
7. Cl
8. The Shortcut is now created on your desktop.
9. From the Desktop, you may now utilize the shortcut to access the DiGiPAY software through
your network.
RKSTATION:
CONTENTS
57

APPENDIX A
FLOW CHART
SETTING-UP
Company Profile
Payroll Setting
Day Type
Leave Type
Allowance
Deduction
Earnings Subject To
Statutories
CONFIGURE CLASSIFICATION
- Nationality
- Ethnic
- Religion
- Education
Branch Address Book
Employee Master
Leave Management
(Optional: Entitlement)
This flow chart shows you how to set up the DiGiPAY software without the use
of Setup Wizard.
58
CONTENTS
CONFIGURE ORGANIZATION
HIERARCHY
- Branch
- Department
- Cost Center
- Job Grade
- Category

PAYROLL OPERATIONS
Employee Master
- Add new employee
- Update payroll settings
- Update resignation
- Increment
Advance
Bonus
(Before End-month)
Leave Management
(Optional: Leave Taken)
Loan Management (Optional)
Tax Schedule (Optional)
Deferred Pay (After Closing)
Mid-month Processing
Bonus (End-month)
End-month Processing
Bonus (After End-month)
Deferred Pay
(Before Closing)
Reports Printing
Backup
Closing
CONTENTS
59

APPENDIX B
SAMPLE REPORTS
All sample reports are for reference only. The fonts and layout may deter slightly from the original printouts.
PAYSLIP
60
CONTENTS

PAY SHEET
PAY CHEQUE
CONTENTS
61

COINAGE ANALYSIS
BANK ORDER
62
CONTENTS

PAYROLL JOURNAL
JOURNAL SUMMARY
CONTENTS
63

EMPLOYEE PERSONAL RECORD
LEAVE TAKEN LIST
64
CONTENTS

LOAN REPAYMENT LIST
CONTENTS
65

APPENDIX C
FREQUENTLY ASKED QUESTIONS
Q1. I realized that I had missed out some of the settings during the Setup Wizard session. How
can I update the information?
A. B
asically, each step in the Setup Wizard will help you to complete the setting up for a par-
cular entry. The linkage from Setup Wizard with the DiGiPAY software is shown in the table
ti
below.
SETUP WIZARD INFORMATION LINK TO
Step 1 Co
Step 2 Payroll settings System Configuration → Payroll Settings
Days working Employee Master → Roster/Leave Management
Step 3 Employee details Employee Master → Employee Particulars
Step 4 Allowance subject to statutory System Configuration → Earnings Subject to Statutories
Employee fixed allowances assignment Emp
Q2. I am planning to use loan repayment entry, tax schedule entry, advance payment entry, leave
aken entry and attendance sheet for my monthly transactions. During payroll processing,
t
how does DiGiPAY software make use of the information?
A. I
n DiGiPAY software, payroll processing is split to 2 portions. Namely: journal generation and
lculation.
ca
Whe
n the journal is accessed, there are 4 additional buttons in the viewing toolbar. The
Generate button is used to execute journal generation, whereas the Calculate button is for
journal calculation.
rnal generation is needed when deferred pay is used. For mid-month or end-month payroll
Jou
processing, journal generation is automatically executed when the journal is accessed for the
first time. Once generation is completed, journal calculation will be executed.
le below is showing the sequence of the journal generation.
Tab
mpany profile System Configuration → Company Profile
loyee Master → Employee Particulars
66
CONTENTS

STEPS DESC RIPTION
1 Based on
2 From Employee Particulars, select fixed allowances and deductions.
3 From Attendance Sheet, select actual working days, overtime hours and leave taken. (Optional: Refer
4 From Leave Management, select working days of the month and leave taken for the month.
From Advance, select advance payment transaction.
5
6 From Bonus, select bonus payment. (Optional: End-month)
7 From Mid-month journal, select mid-month statutory transaction. (Only during End-month)
8 From Deferred pay journal, select deferred pay statutory transaction. (Only during End-month, with
9 For new staff and resigning employee, calculate pro rata rate.
settings in Employee Particulars, select basic information, daily rate and hourly rate will be
calculated.
to Payroll Settings)
deferred pay done after closing)
Table below is showing the sequence of journal calculation.
STEPS DESCRIPTION
1 From Employee Particulars, select additional fixed allowances and deductions.
2 Repeat steps 3 & 4 in journal generation.
Calculate basic wages.
3
4 Calculate leave payment.
5 Calculate allowances payment.
6 Calculate deductions.
7 Calculate overtime payment.
8 Calculate loan repayments.
9 Calculate EPF contributions.
10 Calculate SOCSO contributions.
11 Calculate Zakat contributions. (Optional: Refer to Employee Particulars, References page)
12 Calculate income tax amount.
13 Calculate foreign levy. (Optional: Refer to Employee Particulars, References page)
14 Calculate Human Resource Development Fund contribution base on each employee’s gross income.
Q3. I made payroll adjustment within Employee Particulars. But, when I checked in journal, it was
not updated with the new adjustments. What should I do to update the information?
A. T
o refresh the journal with new adjustment, it is necessary to execute the journal calculation
ocess. Click on the Calculate button in the viewing toolbar, select the affected employees
pr
and click Apply button to complete the process.
CONTENTS
67

Q4. I understand mid-month and end-month. But, why there is an additional deferred pay?
A. In normal practice, salary would be paid either twice a month or once a month. Thus, twice
month payment will require the use of mid-month journal. However, some payroll transac-
a
tions, which require management approval such as overtime, commission and claims, may
be delayed due to unforeseen circumstances. As these transactions are needed in statutory
contribution calculations, deferred pay journal is introduced.
n
DiGiPAY software, there is a necessary setting for deferred pay behavior stored in Payroll
I
Settings: “Deferred pay after end-month processing is”. The options available are Before
Closing and After Closing.
Before Closing is chosen, the sequence of processing will be Mid-month, End-month and
If
finally Deferred Pay. If After Closing is chosen, the sequence of processing will be Deferred
pay, Mid-month and finally End-month. Failure to follow the sequence of processing will
cause the statutory contributions being calculated wrongly.
utilize the deferred pay journal, just access the Deferred Pay journal, add or look for the
To
employee and make the necessary transactions. Save it and click on the Calculate button to
complete it with the journal calculation.
Q5. I need to make bonus payment. What are the options available?
. Bonus transactions will be paid in one of the 3 methods offered: Before End-month, End-
A
nth or After End-month. By choosing Before end-month or After end-month, bonus trans-
mo
actions will be monitored separately from the monthly salary transactions. Thus, statutory
contributions will be calculated. By choosing End-month, bonus transactions will be added
into End-month journal and statutory contributions will include bonus amount.
or
the bonus amount, you may opt to make the bonus transaction entry manually. However,
F
if the bonus is calculated based on X months of basic, you may make use of the Calculate
button in the Editing toolbar.
As
bonus income tax calculation will require a monthly remuneration amount as the starting point, 3 options are available: This-month, Last-month and Last December. By choosing
This-month, current month salary tax remuneration will be used. By choosing Last-month,
last month salary tax remuneration will be used. By choosing Last December, last December
salary tax remuneration will be used.
. I am trying to add a new allowance where it should be included in EPF and income tax cal-
Q6
c
ulation. But, I cannot find the necessary setting in Allowance codes. Where can I make the
definition?
A. Go to System Configuration → Earnings Subject to Statutories. For EPF and Tax pages, move
e new allowance from box in the right to the box in the left. If journal processing was done,
th
run the journal calculation process to refresh the statutory contributions.
68
CONTENTS

Q7. Every transaction in the DiGiPAY software yields the same amount as my manual calculation.
But, why my manually calculated EPF contributions are higher than the result calculated by
DiGiPAY?
A. This scenario would happen, when multiple journals are in use in the same month. In manual
lculation, it is common that EPF contributions will be calculated separately from each
ca
journal and add up to show the full amount of the month.
iPAY software calculates its statutory amount in a slightly different manner. As journals
DiG
must be processed in sequence, the statutory calculation amount will be accumulated in
each journal. Each journal will calculate the EPF contributions based on the total accumulated amount. By deducting the EPF contributions paid in the previous journal(s), the balance
will be the actual EPF contributions payable from the current journal.
n
short, DiGiPAY software is using the total accumulated amount for the month to calculate
I
its statutory contributions.
. I noticed that EPF, SOCSO and income tax are providing diskette submission service and this
Q8
i
s available in the DiGiPAY software. What should I do to make use of this feature?
A. In order to utilize this feature, you must request approval from the relevant authority.
r example, lets discuss the procedure to request approval from EPF.
Fo
First, you must print the report. You should ask the EPF officer of your submission branch on
the type of report they need for diskette submission.
ond, generate the data into the diskette.
Sec
Third, write a letter to the relevant department to request approval for diskette submission.
Finally, send the letter together with the report and diskette to the diskette submission cent
er.
e the request is reviewed, EPF officer will send a letter to your company stating the status
Onc
of your request. If it was not approved, make the necessary adjustment as suggested in the
report attached and submit the newly-generated diskette and report for second review.
If
it was approved, every month EPF officer will send you a diskette. You should generate the
data into the EPF diskette and send it back to EPF diskette submission center together with
the report.
Q9. I noticed there is a zakat contribution in Employee Particulars, References page. How can I
tilize it?
u
A. Zakat contribution is available to allow Muslim employees to give authorization to the com-
ny to make monthly deduction from his/her salary. The payable amount will be determined
pa
by the employee himself/herself.
-
CONTENTS
69

Inland Revenue Department made a provision in its income tax regulation in 2000. The provi-
si
on says that Muslim employees who make zakat contribution for the month are entitled to
a rebate of the zakat amount from his/her income tax.
1. Fixed zakat contribution with fixed rebate.
Ke
2. Pay income tax to zakat authority.
Pu
3. Za
Key in the paid zakat amount into the RM box and put a tick in the box in front of Rebate.
Q10
A. E
The
• P
• Use the previous compatible version of this software.
• Key in the new Update Service license no.
Option 1 will print out the application form and you are required to make the necessary pay-
Option 2 allows you to ignore the latest update and execute the last workable software.
Option 3 allows you key in the new Update Service license no. and once it is validated, the
For
y in the zakat contribution amount into the RM box. Leave the boxes for From PCB and
bate empty.
Re
t a tick in the box in front of From PCB. Leave the RM box and Rebate box empty.
kat is already paid personally, but rebate is requested from the employee to the current
nth payroll.
mo
ave the box for From PCB empty.
Le
. I had downloaded the latest update from the Internet via the Connect to DiGiPAY Internet.
But, when I run the DiGiPAY software, it showed a message stating that “The installed dongle
control device is not longer compatible with this new version of DiGiPAY software”. What
should I do to continue using this software?
ach copy of installed DiGiPAY software is entitled to a free 12-month update service. Upon
ex
piry of the 12-month update service, you are required to renew the 12-month update service with a minimal fee. Although you are still allowed to download the latest update. But, you
are not allowed to use it until the update service license is renewed.
above mentioned message will appear when your update service is already expired and
you are trying to run the latest update of the software. You are presented with 3 options:
rint application form for new Update Service license no.
ment and fax the application form to us for processing. Once the form is received, the new
Update Service license no. will be faxed to you within 2 working days.
latest update will be executed.
the latest series of Frequently Asked Questions, refer to DiGiPAY web site.
http://user.fingertec.com.
70
CONTENTS

Sila daftarkan perisian DiGiPAY anda di http://user.fingertec.com
Untuk tip teknikal dan manual dalam bahasa lain, sila rujuk http://user.fingertec.com
c 2009 PUC FOUNDER (MSC) BHD. Semua Hak Cipta terpelihara
 Loading...