


OIL FREE COMPRESSOR
EN |
Original instructions |
05 |
DE |
Übersetzung der Originalbetriebsanleitung |
08 |
NL |
Vertaling van de oorspronkelijke gebruiksaanwijzing 13 |
|
FR |
Traduction de la notice originale |
17 |
ES |
Traducción del manual original |
21 |
HU |
Eredeti használati utasítás fordítása |
25 |
CRM1036
WWW.FERM.COM
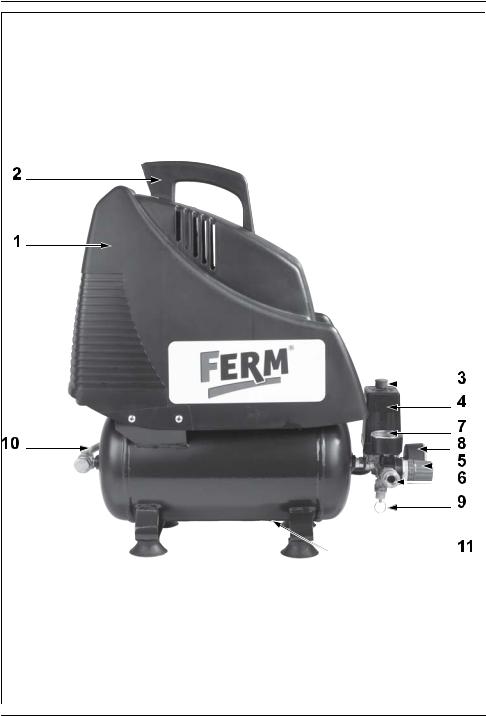
Fig. A
2 |
Ferm |

|
|
|
|
|
|
Ferm |
3 |
|

|
|
|
|
|
|
|
|
|
|
|
|
|
|
|
|
4 |
|
Ferm |
|

COMPRESSOR
The numbers in the following text correspond with the pitcures at page 2 - 4.
Read the operating instructions carefully before using this device. Familiarise yourself with its functions and basic operation. Service the device as per the instructions to ensure that it always functions properly. The operating instructions and the accompanying documentation must be kept in the vicinity of the device.
Contents
1.Machine details
2.Safety instructions
3.Use
4.Maintenance
EN
2.Safety instructions
Explanation of symbols
Denotes risk of personal injury, loss of life or damage to the tool in case of nonobservance of the instructions in this manual.
Risk of electric shock.
Caution: the compressor could start automatically in case of a black-out and subsequent reset
Wear ear protection.
1. Machine details
Technical specifications
Voltage |
220-240 V~ |
Frequency |
50 Hz |
Capacity |
1.5 hp (1200 W) |
Idling speed |
3450 /min |
IP Class |
IP 20 |
Tank contents |
6 litre |
Air intake |
153 l/min |
Max. outlet pressure |
8.0 Bar |
Weight |
11 kg |
Sound power level |
96 +3 dB (A) |
The value of the noise level may rise from 1 to 10 dB(A) as a function of the environment in which the compressor will be installed.
Product information
Fig. A
1 Cover
2.Handle
3.Switch
4.Automatic stop
5.Pressure regulator
6.Quick coupler (outlet)
7.Pressure gauge (pressure regulator)
8.Pressure gauge (tank)
9.Safety valve
10.Pressure pipe
11.Drain cock
Sound power level
Special safety instructions
•Warning! The compressor may only be used in suitable rooms (with good ventilation and an ambient temperature from +5°C to +40°C).
•It is recommended to use the compressor with a maximum operation of 70% in one hour under full load, to allow for proper operation of the product over time.
•Check that the tank is fully decompressed before connections with the tank are unscrewed.
•It is prohibited to make holes in, or welds to, or purposely to distort the compressed air tank.
•Do not perform any actions on the compressor without first having taken the plug out of the plug socket.
•Do not aim water jets or jets of flammable liquids at the compressor.
•Do not place flammable objects near the compressor.
•Switch the pressure regulator to the “0” position (OFF = uit) during dwell time.
•Never aim the air jet at persons or animals (fig.
20).
•Do not transport the compressor with the tank pressurised.
•N.B.: some parts of the compressor such as the head and the feed-through pipes may
Ferm |
5 |

EN
reach high temperatures. Do not touch these parts to avoid burns (fig. 12-13).
•Transport the compressor by lifting it or by using the special grips or handles (fig. 5-6).
•Children and animals should be kept far away from the area of operation of the machine.
•If you use the compressor to spray paint:
a)Do not work in enclosed spaces or near naked flames.
b)Make sure that the environment in which you will be working has dedicated ventilation.
c)Protect your nose and mouth with a dedicated mask (fig. 21).
•Do not use the compressor when the electrical cable or the plug is damaged, and instruct an authorised Support Service to replace them with an original part.
•When the compressor is placed on a surface higher than the floor, it should be secured to prevent it from falling down during operation.
•Do not put objects or your hands in the protective covers to avoid physical damage and damage to the compressor.
•Do not use the compressor as a blunt instrument against persons, objects or animals in order to prevent serious damage.
•If the compressor is no longer in use, always take the plug out of the plug socket.
Before replacing the plug of the feed, make sure that the earth cable is connected. If in doubt, please call in a qualified electrician and have the earthing checked.
Electrical connection
Always check whether the input voltage of the motor corresponds to the mains voltage indicated on the specification plate. The compressors are supplied with an electrical cable and a two-pole plug + earth. It is important to connect the compressor with an earthed plug socket. (fig. 9)
Never use the earth-wire instead of the neutral (0-wire). The earthing should take place in accordance with accident prevention regulations.
3. Use
For homehold use only
NB: The information you will find in this manual has been written to assist the operator in the use and maintenance of the compressor. Some
•Always make sure that compressed-air hoses illustrations in this manual show details which may
are used for compressed air and which are characterised by a maximum pressure adjusted to that of the compressor. Do not try to repair the hose if it is damaged.
Electrical safety
Earthing regulations
This compressor has to be earthed while in use in order to protect the operator against electrical shocks. The compressor is provided with a twocore cable plus an earth. The electrical connection has to be made by a qualified technician. We recommend never disassembling the compressor and neither making any other connections into the pressure regulator. Repairs should be carried out by authorised Support Services or by other qualified centres.
Never forget that the earthing core is the green or the yellow/green wire. Never connect this green wire to a terminal under load.
differ from those of your compressor.
Installation
After having taken the compressor out of its packaging (fig. 1) and having checked that it is in perfect condition, and having noted that no damage occurred during transport, the following acts should be performed. If not yet fitted, fit the rubber feet and the wheels on the tank according to the instructions represented in fig. 2. Place the compressor on a flat surface or at a maximum slope of 10° (fig.3), in a well ventilated area, protected against atmospheric factors and not in explosive surroundings. If the surface area is sloping and smooth, make sure that the compressor will not move when in operation. If the surface area is a board or a shelf of a bookcase, just make sure that they cannot fall down by securing them properly. For proper ventilation and effective cooling, it is important that the compressor is positioned at least 100 cm from the wall (fig. 4).
6 |
Ferm |

Make sure that the compressor is transported in the right way, do not turn it upside down and don’t lift it with hooks or ropes (fig. 5-6).
Starting up
•Check whether the mains voltage corresponds to that indicated on the electrical specification plate (fig. 10), the permitted tolerance range should be within 5%.
•Press the switch situated on the upper part into the “0” position according to the pressure regulator type fitted on the device (fig. 11).
•Put the plug in the plug socket (fig. 9) and start the compressor up by putting the switch of the pressure regulator in the “I” position. The operation of the compressor is fully automatic. The pressure regulator will stop the compressor when the maximum value has been reached and start it up when the pressure drops below the minimum value. Normally the difference in pressure is approx. 2 Bar/29 psi between the maximum and the minimum value. For instance - The compressor will stop when it reaches 8 Bar
(116 psi) (this is the maximum operating pressure) and will start up automatically when the pressure within the tank has dropped to 6 Bar (87 psi).
The head/cylinder/transmission pipe assembly may reach high temperatures, so take care when working close to these parts and do not touch them to avoid burns (fig. 12 - 13).
Adjusting the operating pressure
Fig. 14
It is not necessary continuously to use the maximum operating pressure, the compressed-air tools often require less pressure. With regard to compressors supplied with a pressure reduction valve it is necessary to set the operating pressure properly.
It is possible to set the operating pressure by using the turning knob on the reduction valve.
•By turning clockwise, the pressure will be increased.
•By turning anti-clockwise, the pressure will be reduced.
The set pressure can be locked by turning the ring under the turning knob in the opposite direction from the turning knob thereby fixing the turning
EN
knob. The set pressure is visible on the manometer of the reduction valve.
4.Maintenance
Make sure that the plug is removed from the mains when carrying out maintenance work on the motor.
The machines have been designed to operate over a long period of time with a minimum of maintenance. Continuous satisfactory operation depends upon proper machine care and regular cleaning. Before interfering in any way whatsoever with the compressor, please make sure that:
•The general line switch is in the “0” position.
•The pressure regulator and the switches on the switch board are switched off in the “0” position.
•The air tank is fully decompressed.
Malfunction
Should the machine fail to function correctly, a number of possible causes and the appropriate solutions are given below:
Air loss
•May be caused by a poor seal of a connection.
•Check all connections by wetting them with soap and water.
The compressor runs but does not compress
Fig. 19
•May be caused by the valves (C-C2) or a gasket (B1-B2) being broken.
•Replace the damaged part.
The compressor will not start
•If the compressor is difficult to start, check:
•whether the voltage of the mains corresponds to that on the specification plate (fig. 10)
•whether electrical extension cables are being used with a faulty core or length.
•whether the operating environment is too cold
(below 0°C).
•whether there is electricity supply (plug properly connected, magneto-thermal fuses not broken).
The compressor does not shut off
If the compressor does not shut off when the maximum pressure has been reached, the safety valve of the tank will be activated. It is necessary
Ferm |
7 |

DE
to contact the nearest authorised Support Service for the repair.
Repairs and servicing should only be carried out by a qualified technician or service firm.
Cleaning
Regularly clean the machine housing with a soft cloth, preferably after each use. Keep the ventilation slots free from dust and dirt. If the dirt does not come off use a soft cloth moistened with soapy water. Never use solvents such as petrol, alcohol, ammonia water, etc. These solvents may damage the plastic parts.
Lubrication
It is recommended to disassemble the suction filter every 50 operating hours and to clean the filter element by blowing it with compressed air (fig. 15).
It is recommended that the filter element is replaced at least once a year if the compressor is working in a clean environment; more often if the environment in which the compressor is situated is dusty. The compressor makes condensed water which collects in the tank. It is necessary to remove the condensed water in the tank at least once a week by opening the drain cock (fig. 16) under the tank. Take care when compressed air is in the bottle because the water can come out with some force. Recommended pressure max. 1-2 Bar.
Faults
Should a fault occur, e.g. after wear of a part, please contact the service address on the warranty card. In the back of this manual you find an exploded view showing the parts that can be ordered.
Environment
To prevent damage during transport, the appliance is delivered in a solid packaging which consists largely of reusable material. Therefore please make use of options for recycling the packaging.
Faulty and/or discarded electrical or electronic apparatus have to be collected at the appropriate recycling locations.
Warranty
The warranty conditions can be found on the separately enclosed warranty card.
KOMPRESSOR
Die Nummern im nachfolgenden text korrespondieren mit den Abbildungen auf Seite 2 - 4.
Lesen Sie diese Bedienungsanleitung aufmerksam, bevor Sie die Maschine in Betrieb nehmen. Machen Sie sich mit der
Funktionsweise und der Bedienung vertraut. Warten Sie die Maschine entsprechend der Anweisungen, damit sie immer einwandfrei funktioniert. Die Betriebsanleitung und die dazugehörige
Dokumentation müssen in der Nähe der
Maschine aufbewahrt werden.
Inhalt |
|
1. |
Gerätedaten |
2. |
Sicherheitsvorschriften |
3. |
Benutzung |
4. |
Wartung |
1.Gerätedaten
Technische Daten
Spannung |
220-240 V~ |
Frequenz |
50 Hz |
Leistung |
1.5 PS (1200 W) |
Leerlaufdrehzahl |
3450 /min |
IP Klasse |
IP 20 |
Kesselinhalt |
6 Liter |
Ansaugleistung |
153 l/min |
Maximaldruck |
8.0 bar |
Gewicht |
11 kg |
Außengeräusch |
96+3 dB (A) |
Die Kessel der Kompressoren sind für den europäischen Markt in Übereinstimmung mit
Richtlinie 87/404/EWG hergestellt. Die
Kompressoren sind für den europäischen Markt in Übereinstimmung mit Richtlinie 2006/42/EWG hergestellt. Der Geräuschpegel kann abhängig von der Umgebung, in der der Kompressor aufgestellt wird, von 1 bis 10 dB (A) ansteigen.
Product information
Abb. A
1.Abdeckung
2.Griff
3.Schalter
4.Druckwächter
5.Druckregler
8 |
Ferm |

6.Schnellkopplung (Auslass)
7.Manometer (Druckregler)
8.Manometer (Kessel)
9.Sicherheitsventil
10.Druckleitung
11.Ablasshahn
2. Sicherheitsvorschriften
Erklärung der Symbole
Lebensund Verletzungsgefahr und Gefahr von Beschädigungen am Gerät bei Nichteinhaltung der
Sicherheitsvorschriften in dieser Anleitung.
Deutet das Vorhandensein elektrischer
Spannung an.
Achtung! Der Kompressor könnte bei einem Stromausfall nach rückkehr des
Stroms automatisch neustarten
Gehörschutz tragen.
Außengeräusch
Spezielle Sicherheitsvorschriften
•Warnung! Der Kompressor darf nur in entsprechenden Räumen verwendet werden (mit einer guten Belüftung und einer
Raumtemperatur von +5°C bis +40°C).
•Es empfiehlt sich, den Kompressor in einer
Stunde bei maximaler Füllung mit einer maximalen Leistung von 70 % zu verwenden, um eine gute Funktion des Geräts innerhalb dieser Zeit zu gewährleisten.
•Es dürfen keine Verbindungen losgeschraubt werden, wenn der Kessel unter Druck steht. Immer sicherstellen, dass der Kessel geleert ist.
•Niemals Löcher oder Schweißnähte am
Kessel anbringen oder den Druckluftkessel verformen.
•Vor dem Ausführen von Handlungen am Kompressor immer erst den Stecker aus der
Steckdose ziehen.
DE
•Kein Wasser oder entflammbare Flüssigkeiten auf den Kompressor sprühen.
•In der Nähe des Kompressors dürfen sich keine entflammbaren Objekte befinden.
•Wenn der Kompressor angehalten ist, den
Druckwächter auf die Stellung „0”(OFF) schalten.
•Den Luftstrahl nicht auf Personen oder Tiere richten (Abb. 20).
•Den Kompressor nicht transportieren, wenn der Kessel unter Druck steht.
•Vorsicht: Einige Kompressorteile, wie z. B. der Kopf und die Leitungen, können hohe Temperaturen erreichen. Um Brandwunden zu vermeiden, diese Teile nicht berühren (Abb.
12 und 13).
•Zum Transport des Kompressors das Gerät anheben oder die speziellen Transportgriffe verwenden (Abb. 5 und 6).
•Kinder und Tiere weit vom Funktionsbereich des Geräts entfernt halten.
•Wenn Sie den Kompressor für Anstricharbeiten verwenden:
a)Nicht in geschlossenen Umgebungen oder in der Nähe von offenem Feuer arbeiten.
b)Sicherstellen, dass die Arbeitsumgebung mit entsprechender Ventilation ausgestattet ist.
c)Nase und Mund mit einer entsprechenden Maske schützen (Abb. 21).
•Wenn das Stromkabel oder der Stecker beschädigt ist, den Kompressor nicht gebrauchen und das beschädigte Teil bei einem autorisierten Servicezentrum gegen ein
Originalteil austauschen lassen.
•Wenn der Kompressor auf einer Fläche oberhalb des Fußbodens aufgestellt wird, muss er festgesetzt werden, damit er während des Betriebs nicht fallen kann.
•Keine Objekte oder Hände durch die
Schutzgitter stecken, um Verletzungen und
Schäden am Kompressor zu vermeiden.
•Den Kompressor und das Zubehör nicht gegen Personen, Dinge oder Tiere richten, um schwere Schäden zu vermeiden.
•Bei Nichtverwendung des Kompressors immer den Stecker aus der Steckdose ziehen.
•Sicherstellen, dass immer Pneumatikleitungen für Druckluft verwendet werden, die für einen mit dem Kompressor übereinstimmenden
Maximaldruck geeignet sind. Beschädigte
Leitungen nicht versuchen zu reparieren.
Ferm |
9 |

DE
Elektrische Sicherheit
Erdungsvorschriften
Um den Bediener vor Stromschlägen zu schützen, muss der Kompressor vor Verwendung geerdet sein. Der Kompressor ist mit einem zweipoligen Kabel plus Erdleiter ausgerüstet. Die elektrischen Verbindungen müssen von einem qualifizierten
Techniker hergestellt werden. Wir empfehlen, den
Kompressor nie zu demontieren und auch keine anderen Verbindungen im Druckwächter herzustellen. Alle Reparaturen dürfen ausschließlich von autorisierten Servicezentren oder anderen qualifizierten Reparaturzentren ausgeführt werden.
Vergessen Sie nicht, dass die grüne oder gelbgrüne Ader der Erdleiter ist. Diese grüne Ader darf nie an eine Strom führende Klemme angeschlossen werden.
Ehe der Stecker des Netzkabels ersetzt wird, muss sichergestellt sein, dass der Erdleiter angeschlossen ist. Wenden Sie sich bei Zweifeln an einen qualifizierten Elektriker und lassen Sie die Erdung überprüfen.
Elektrischer Anschluss
Die Eingangsspannung des Motors muss mit der auf dem Typenschild angegebenen Netzspannung übereinstimmen. Der Kompressor wird mit einem elektrischen Kabel und einem zweipoligen Stecker
+ Erdleiter geliefert.
Es ist wichtig, dass der Kompressor an eine geerdete Steckdose angeschlossen wird (Abb. 9).
Den Erdleiter nicht mit dem Nullleiter verwechseln. Die Erdung muss gemäß der Richtlinie zur Sicherheit von
Maschinen stattfinden.Der Stecker des
Stromkabels darf nicht als Schalter verwendet werden, sondern muss in eine
Steckdose gesteckt werden, die mit einem entsprechenden
Differenzialschalter (thermomagnetisch) funktioniert.
3.Benutzung
Nur für den Heimgebrauch.
Vermerk: Die Informationen in dieser Anleitung dienen dazu, dem Bediener beim Gebrauch und bei der Wartung des Kompressors zu helfen.
Manche Abbildungen in dieser Anleitung können in Einzelheiten von Ihrem Kompressor abweichen.
Aufstellung
Nachdem der Kompressor ausgepackt (Abb. 1) und auf einwandfreien Zustand sowie Transportschäden überprüft wurde, muss Folgendes ausgeführt werden. Wenn nicht bereits geschehen, bringen Sie die Gummifüße wie in
Abb. 2 dargestellt am Gerät an. Stellen Sie den
Kompressor an einem ausreichend gelüfteten, vor atmosphärischen Einflüssen geschützten Ort auf einem ebenen oder höchstens 10° abfallenden Untergrund (Abb. 3) auf. Bei einem abfallenden oder glatten Untergrund muss sichergestellt werden, dass der Kompressor sich während des Betriebs nicht von der Stelle bewegen kann. Wenn der Kompressor auf einem Ablagebord oder einem Regalbrett aufgestellt wird, muss dieses vorschriftsgemäß befestigt sein, um zu gewährleisten, dass es nicht herunterfallen kann. Um für eine ausreichende Lüftung und effektive Kühlung zu sorgen, muss der Abstand zwischen
Kompressor und Wänden mindestens 100 cm betragen (Abb. 4).
Um eine ausreichende Lüftung und effektive
Kühlung zu gewährleisten, muss der Abstand zwischen Kompressor und Wänden mindestens
100 cm betragen (Abb. 4).
Darauf achten, dass der Kompressor vorschriftsgemäß transportiert wird, nicht auf den Kopf drehen und nicht mit Hilfe von Haken oder Seilen heben (Abb. 5 und
6).
Inbetriebnahme
•Überprüfen, ob die Netzspannung mit den elektrischen Daten auf dem Typenschild
übereinstimmt (Abb. 10), die zulässige
Abweichung beträgt maximal 5 %.
•Den auf dem oberen Geräteteil angebrachten Hebelschalter in die Stellung „0” schalten, gemäß dem auf dem Gerät montierten
10 |
Ferm |
 Loading...