

Page 1

Home
Welcome to the Epson® WorkForce 435 User’s Guide.
5
Page 2

6
Page 3

WorkForce 435 User’s Guide
Home. . . . . . . . . . . . . . . . . . . . . . . . . . . . . . . . . . . . . . . . . . . . . . . . . . . . . . . . . . . . . . . . . . 5
Product Basics. . . . . . . . . . . . . . . . . . . . . . . . . . . . . . . . . . . . . . . . . . . . . . . . . . . . . . . . . . . 7
Use the Control Panel . . . . . . . . . . . . . . . . . . . . . . . . . . . . . . . . . . . . . . . . . . . . . . . . . 7
Use the Control Panel Buttons . . . . . . . . . . . . . . . . . . . . . . . . . . . . . . . . . . . . . . . . 7
Adjust the LCD Screen Brightness . . . . . . . . . . . . . . . . . . . . . . . . . . . . . . . . . . . . 7
Change the Control Panel Language . . . . . . . . . . . . . . . . . . . . . . . . . . . . . . . . . . . 8
Select Wireless Settings Using the Control Panel . . . . . . . . . . . . . . . . . . . . . . . . . 8
Identify Product Parts . . . . . . . . . . . . . . . . . . . . . . . . . . . . . . . . . . . . . . . . . . . . . . . . . 9
Load Paper . . . . . . . . . . . . . . . . . . . . . . . . . . . . . . . . . . . . . . . . . . . . . . . . . . . . . . . . . . . . 13
Load Paper for Documents . . . . . . . . . . . . . . . . . . . . . . . . . . . . . . . . . . . . . . . . . . . . 13
Load Paper for Photos . . . . . . . . . . . . . . . . . . . . . . . . . . . . . . . . . . . . . . . . . . . . . . . . 14
Load Envelopes . . . . . . . . . . . . . . . . . . . . . . . . . . . . . . . . . . . . . . . . . . . . . . . . . . . . . 16
General Paper Information . . . . . . . . . . . . . . . . . . . . . . . . . . . . . . . . . . . . . . . . . . . . . 17
Sheet Feeder Capacity . . . . . . . . . . . . . . . . . . . . . . . . . . . . . . . . . . . . . . . . . . . . . 18
Available Epson Papers . . . . . . . . . . . . . . . . . . . . . . . . . . . . . . . . . . . . . . . . . . . . 18
Borderless Paper Types and Sizes . . . . . . . . . . . . . . . . . . . . . . . . . . . . . . . . . . . . 20
Paper or Media Type Settings for Loaded Paper . . . . . . . . . . . . . . . . . . . . . . . . . 20
Place Originals for Copying, Faxing, or Scanning. . . . . . . . . . . . . . . . . . . . . . . . . . . . . . 23
Place Documents or Photos on the Scanner Glass . . . . . . . . . . . . . . . . . . . . . . . . . . . 23
Place Documents in the Automatic Document Feeder . . . . . . . . . . . . . . . . . . . . . . . 23
Copy a Document or Photo. . . . . . . . . . . . . . . . . . . . . . . . . . . . . . . . . . . . . . . . . . . . . . . . 27
Copy Documents . . . . . . . . . . . . . . . . . . . . . . . . . . . . . . . . . . . . . . . . . . . . . . . . . . . . 27
Copy Photos . . . . . . . . . . . . . . . . . . . . . . . . . . . . . . . . . . . . . . . . . . . . . . . . . . . . . . . . 28
Print From Your Computer. . . . . . . . . . . . . . . . . . . . . . . . . . . . . . . . . . . . . . . . . . . . . . . . 31
Windows Printing . . . . . . . . . . . . . . . . . . . . . . . . . . . . . . . . . . . . . . . . . . . . . . . . . . . 31
Print From a Program . . . . . . . . . . . . . . . . . . . . . . . . . . . . . . . . . . . . . . . . . . . . . 31
Select Basic Options . . . . . . . . . . . . . . . . . . . . . . . . . . . . . . . . . . . . . . . . . . . . . . 33
Change Print Layout . . . . . . . . . . . . . . . . . . . . . . . . . . . . . . . . . . . . . . . . . . . . . . 36
Select Advanced Options . . . . . . . . . . . . . . . . . . . . . . . . . . . . . . . . . . . . . . . . . . . 36
Print Your Document or Photo . . . . . . . . . . . . . . . . . . . . . . . . . . . . . . . . . . . . . . 38
Check Printing Status . . . . . . . . . . . . . . . . . . . . . . . . . . . . . . . . . . . . . . . . . . . . . . 38
Change Default Print Settings . . . . . . . . . . . . . . . . . . . . . . . . . . . . . . . . . . . . . . . 39
Change Auto Update Options . . . . . . . . . . . . . . . . . . . . . . . . . . . . . . . . . . . . . . . 39
Change the Language . . . . . . . . . . . . . . . . . . . . . . . . . . . . . . . . . . . . . . . . . . . . . . 40
Mac Printing (Mac OS X 10.5, 10.6, or 10.7) . . . . . . . . . . . . . . . . . . . . . . . . . . . . . . 41
Open Your File for Printing . . . . . . . . . . . . . . . . . . . . . . . . . . . . . . . . . . . . . . . . . 42
Select Print Options . . . . . . . . . . . . . . . . . . . . . . . . . . . . . . . . . . . . . . . . . . . . . . . 42
Select Page Setup Options . . . . . . . . . . . . . . . . . . . . . . . . . . . . . . . . . . . . . . . . . . 45
Change Print Layout . . . . . . . . . . . . . . . . . . . . . . . . . . . . . . . . . . . . . . . . . . . . . . 45
Manage Color . . . . . . . . . . . . . . . . . . . . . . . . . . . . . . . . . . . . . . . . . . . . . . . . . . . 46
Print Your Document or Photo . . . . . . . . . . . . . . . . . . . . . . . . . . . . . . . . . . . . . . 47
Check Printing Status . . . . . . . . . . . . . . . . . . . . . . . . . . . . . . . . . . . . . . . . . . . . . . 47
Mac Printing (Mac OS X 10.4) . . . . . . . . . . . . . . . . . . . . . . . . . . . . . . . . . . . . . . . . . 48
1
Page 4

Open Your File for Printing . . . . . . . . . . . . . . . . . . . . . . . . . . . . . . . . . . . . . . . . . 48
Select Page Options . . . . . . . . . . . . . . . . . . . . . . . . . . . . . . . . . . . . . . . . . . . . . . . 48
Select Basic Print Options . . . . . . . . . . . . . . . . . . . . . . . . . . . . . . . . . . . . . . . . . . 49
Change Print Layout . . . . . . . . . . . . . . . . . . . . . . . . . . . . . . . . . . . . . . . . . . . . . . 51
Manage Color . . . . . . . . . . . . . . . . . . . . . . . . . . . . . . . . . . . . . . . . . . . . . . . . . . . 51
Print Your Document or Photo . . . . . . . . . . . . . . . . . . . . . . . . . . . . . . . . . . . . . . 52
Check Printing Status . . . . . . . . . . . . . . . . . . . . . . . . . . . . . . . . . . . . . . . . . . . . . . 52
Fax a Document . . . . . . . . . . . . . . . . . . . . . . . . . . . . . . . . . . . . . . . . . . . . . . . . . . . . . . . . 55
Connect a Phone or Answering Machine . . . . . . . . . . . . . . . . . . . . . . . . . . . . . . . . . 55
Set Up Your Fax Features . . . . . . . . . . . . . . . . . . . . . . . . . . . . . . . . . . . . . . . . . . . . . 57
Set Up Your Fax Features from the Control Panel . . . . . . . . . . . . . . . . . . . . . . . 57
Change Your Country or Region . . . . . . . . . . . . . . . . . . . . . . . . . . . . . . . . . . . . . 57
Enter the Header Information . . . . . . . . . . . . . . . . . . . . . . . . . . . . . . . . . . . . . . . 58
Enter the Date and Time . . . . . . . . . . . . . . . . . . . . . . . . . . . . . . . . . . . . . . . . . . . 58
Select Send/Receive Settings . . . . . . . . . . . . . . . . . . . . . . . . . . . . . . . . . . . . . . . . 59
Select Communication Settings . . . . . . . . . . . . . . . . . . . . . . . . . . . . . . . . . . . . . . 60
Print Fax Reports . . . . . . . . . . . . . . . . . . . . . . . . . . . . . . . . . . . . . . . . . . . . . . . . . 61
Restore Fax Settings . . . . . . . . . . . . . . . . . . . . . . . . . . . . . . . . . . . . . . . . . . . . . . 61
Enter Numbers and Characters . . . . . . . . . . . . . . . . . . . . . . . . . . . . . . . . . . . . . . 62
Set up Your Fax Features in Windows . . . . . . . . . . . . . . . . . . . . . . . . . . . . . . . . 62
Set Up Your Fax Features in Mac OS X . . . . . . . . . . . . . . . . . . . . . . . . . . . . . . . 63
Set Up a Speed Dial and Group Dial List . . . . . . . . . . . . . . . . . . . . . . . . . . . . . . . . . 64
Set Up a Speed Dial and Group Dial List from the Control Panel . . . . . . . . . . . 64
Create a Speed Dial Entry . . . . . . . . . . . . . . . . . . . . . . . . . . . . . . . . . . . . . . . . . . 65
Edit a Speed Dial Entry . . . . . . . . . . . . . . . . . . . . . . . . . . . . . . . . . . . . . . . . . . . . 65
Delete a Speed Dial Entry . . . . . . . . . . . . . . . . . . . . . . . . . . . . . . . . . . . . . . . . . . 66
Print Your Speed Dial List . . . . . . . . . . . . . . . . . . . . . . . . . . . . . . . . . . . . . . . . . . 66
Set Up Your Group Dial List . . . . . . . . . . . . . . . . . . . . . . . . . . . . . . . . . . . . . . . . 67
Set Up a Speed Dial and Group Dial List in Windows . . . . . . . . . . . . . . . . . . . . 69
Set Up a Speed Dial and Group Dial List in Mac OS X . . . . . . . . . . . . . . . . . . . 70
Send a Fax . . . . . . . . . . . . . . . . . . . . . . . . . . . . . . . . . . . . . . . . . . . . . . . . . . . . . . . . . 72
Send a Fax from the Control Panel . . . . . . . . . . . . . . . . . . . . . . . . . . . . . . . . . . . 72
Send a Fax in Windows . . . . . . . . . . . . . . . . . . . . . . . . . . . . . . . . . . . . . . . . . . . . 76
Send a Fax in Mac OS X . . . . . . . . . . . . . . . . . . . . . . . . . . . . . . . . . . . . . . . . . . . 77
Receive Faxes . . . . . . . . . . . . . . . . . . . . . . . . . . . . . . . . . . . . . . . . . . . . . . . . . . . . . . 79
Automatically Receive a Fax . . . . . . . . . . . . . . . . . . . . . . . . . . . . . . . . . . . . . . . . 79
Manually Receive a Fax . . . . . . . . . . . . . . . . . . . . . . . . . . . . . . . . . . . . . . . . . . . 80
Transfer Photos To/From a Memory Card . . . . . . . . . . . . . . . . . . . . . . . . . . . . . . . . . . . . 81
Compatible Memory Cards . . . . . . . . . . . . . . . . . . . . . . . . . . . . . . . . . . . . . . . . . . . . 81
Insert a Memory Card . . . . . . . . . . . . . . . . . . . . . . . . . . . . . . . . . . . . . . . . . . . . . . . . 82
Transfer Photos Between a Memory Card and Your Computer . . . . . . . . . . . . . . . . 83
Remove a Memory Card . . . . . . . . . . . . . . . . . . . . . . . . . . . . . . . . . . . . . . . . . . . . . . 84
Scan to Your Computer . . . . . . . . . . . . . . . . . . . . . . . . . . . . . . . . . . . . . . . . . . . . . . . . . . 85
Scan From Your Computer . . . . . . . . . . . . . . . . . . . . . . . . . . . . . . . . . . . . . . . . . . . . 85
Start Epson Scan . . . . . . . . . . . . . . . . . . . . . . . . . . . . . . . . . . . . . . . . . . . . . . . . . 85
Select a Scan Mode . . . . . . . . . . . . . . . . . . . . . . . . . . . . . . . . . . . . . . . . . . . . . . . 86
2
Page 5

Scan in Office Mode . . . . . . . . . . . . . . . . . . . . . . . . . . . . . . . . . . . . . . . . . . . . . . 87
Scan in Home Mode (Semi-Automatic) . . . . . . . . . . . . . . . . . . . . . . . . . . . . . . . 91
Scan in Professional Mode (Fully Manual) . . . . . . . . . . . . . . . . . . . . . . . . . . . . 101
Restore Color as You Scan . . . . . . . . . . . . . . . . . . . . . . . . . . . . . . . . . . . . . . . . 111
Scan to a PDF File . . . . . . . . . . . . . . . . . . . . . . . . . . . . . . . . . . . . . . . . . . . . . . . 112
Choose Scan File Settings . . . . . . . . . . . . . . . . . . . . . . . . . . . . . . . . . . . . . . . . . 115
View and Print Scanned Images . . . . . . . . . . . . . . . . . . . . . . . . . . . . . . . . . . . . 116
Convert a Document to Editable Text (OCR) . . . . . . . . . . . . . . . . . . . . . . . . . . 117
Windows . . . . . . . . . . . . . . . . . . . . . . . . . . . . . . . . . . . . . . . . . . . . . . . . . . . . . . 117
Mac OS X 10.4 and 10.5 . . . . . . . . . . . . . . . . . . . . . . . . . . . . . . . . . . . . . . . . . . 118
Scanning With Mac OS X 10.6/10.7 . . . . . . . . . . . . . . . . . . . . . . . . . . . . . . . . . . . . 119
Replace Ink Cartridges . . . . . . . . . . . . . . . . . . . . . . . . . . . . . . . . . . . . . . . . . . . . . . . . . . 121
Check Ink Status From the LCD Screen . . . . . . . . . . . . . . . . . . . . . . . . . . . . . . . . . 121
Check Ink Status From Your Computer . . . . . . . . . . . . . . . . . . . . . . . . . . . . . . . . . 122
Windows . . . . . . . . . . . . . . . . . . . . . . . . . . . . . . . . . . . . . . . . . . . . . . . . . . . . . . 122
Mac OS X . . . . . . . . . . . . . . . . . . . . . . . . . . . . . . . . . . . . . . . . . . . . . . . . . . . . . 123
Conserve Black Ink When Black Ink Is Low . . . . . . . . . . . . . . . . . . . . . . . . . . . . . 124
Temporarily Print From Your Computer with Black Ink When Color Ink Cartridges are Ex-
pended . . . . . . . . . . . . . . . . . . . . . . . . . . . . . . . . . . . . . . . . . . . . . . . . . . . . . . . . . . . . . . 125
Windows . . . . . . . . . . . . . . . . . . . . . . . . . . . . . . . . . . . . . . . . . . . . . . . . . . . . . . 125
Mac OS X 10.5, 10.6, and 10.7 . . . . . . . . . . . . . . . . . . . . . . . . . . . . . . . . . . . . . 125
Purchase Epson Cartridges . . . . . . . . . . . . . . . . . . . . . . . . . . . . . . . . . . . . . . . . . . . 126
Remove and Install Cartridges . . . . . . . . . . . . . . . . . . . . . . . . . . . . . . . . . . . . . . . . . 127
Adjust Print Quality . . . . . . . . . . . . . . . . . . . . . . . . . . . . . . . . . . . . . . . . . . . . . . . . . . . . 131
Clean the Print Head . . . . . . . . . . . . . . . . . . . . . . . . . . . . . . . . . . . . . . . . . . . . . . . . 131
Check the Print Head Nozzles . . . . . . . . . . . . . . . . . . . . . . . . . . . . . . . . . . . . . . 131
Clean the Print Head . . . . . . . . . . . . . . . . . . . . . . . . . . . . . . . . . . . . . . . . . . . . . 133
Align the Print Head . . . . . . . . . . . . . . . . . . . . . . . . . . . . . . . . . . . . . . . . . . . . . . . . 135
Clean the Paper Path . . . . . . . . . . . . . . . . . . . . . . . . . . . . . . . . . . . . . . . . . . . . . . . . 137
Clean and Transport Your Product. . . . . . . . . . . . . . . . . . . . . . . . . . . . . . . . . . . . . . . . . 139
Cleaning . . . . . . . . . . . . . . . . . . . . . . . . . . . . . . . . . . . . . . . . . . . . . . . . . . . . . . . . . . 139
Transportation . . . . . . . . . . . . . . . . . . . . . . . . . . . . . . . . . . . . . . . . . . . . . . . . . . . . . 139
Solve Problems . . . . . . . . . . . . . . . . . . . . . . . . . . . . . . . . . . . . . . . . . . . . . . . . . . . . . . . . 141
Checking for Software Updates . . . . . . . . . . . . . . . . . . . . . . . . . . . . . . . . . . . . . . . . 141
Problem-solving Tools . . . . . . . . . . . . . . . . . . . . . . . . . . . . . . . . . . . . . . . . . . . . . . . 141
Check LCD Screen Messages . . . . . . . . . . . . . . . . . . . . . . . . . . . . . . . . . . . . . . 142
Run a Product Check . . . . . . . . . . . . . . . . . . . . . . . . . . . . . . . . . . . . . . . . . . . . . 142
Reset Control Panel Defaults . . . . . . . . . . . . . . . . . . . . . . . . . . . . . . . . . . . . . . . 143
Problems and Solutions . . . . . . . . . . . . . . . . . . . . . . . . . . . . . . . . . . . . . . . . . . . . . . 143
Setup Problems . . . . . . . . . . . . . . . . . . . . . . . . . . . . . . . . . . . . . . . . . . . . . . . . . 143
Copying Problems . . . . . . . . . . . . . . . . . . . . . . . . . . . . . . . . . . . . . . . . . . . . . . . 144
Paper Problems . . . . . . . . . . . . . . . . . . . . . . . . . . . . . . . . . . . . . . . . . . . . . . . . . 145
Problems Printing From a Computer . . . . . . . . . . . . . . . . . . . . . . . . . . . . . . . . . 147
Problems Scanning From a Computer . . . . . . . . . . . . . . . . . . . . . . . . . . . . . . . . 149
Page Layout and Content Problems . . . . . . . . . . . . . . . . . . . . . . . . . . . . . . . . . . 150
Print Quality Problems (quality is correct on screen) . . . . . . . . . . . . . . . . . . . . 151
3
Page 6

Image Quality Problems (quality problem appears on screen) . . . . . . . . . . . . . 153
Network Problems . . . . . . . . . . . . . . . . . . . . . . . . . . . . . . . . . . . . . . . . . . . . . . . 156
Faxing Problems . . . . . . . . . . . . . . . . . . . . . . . . . . . . . . . . . . . . . . . . . . . . . . . . 158
Re-installing Software . . . . . . . . . . . . . . . . . . . . . . . . . . . . . . . . . . . . . . . . . . . . . . . 158
Windows . . . . . . . . . . . . . . . . . . . . . . . . . . . . . . . . . . . . . . . . . . . . . . . . . . . . . . 158
Mac OS X . . . . . . . . . . . . . . . . . . . . . . . . . . . . . . . . . . . . . . . . . . . . . . . . . . . . . 159
Getting More Help . . . . . . . . . . . . . . . . . . . . . . . . . . . . . . . . . . . . . . . . . . . . . . . . . . 159
Epson Help . . . . . . . . . . . . . . . . . . . . . . . . . . . . . . . . . . . . . . . . . . . . . . . . . . . . . 159
Help With Other Software . . . . . . . . . . . . . . . . . . . . . . . . . . . . . . . . . . . . . . . . . 160
Specifications and Notices . . . . . . . . . . . . . . . . . . . . . . . . . . . . . . . . . . . . . . . . . . . . . . . 161
Computer System Requirements . . . . . . . . . . . . . . . . . . . . . . . . . . . . . . . . . . . . . . . 161
Windows Requirements . . . . . . . . . . . . . . . . . . . . . . . . . . . . . . . . . . . . . . . . . . . 161
Mac Requirements . . . . . . . . . . . . . . . . . . . . . . . . . . . . . . . . . . . . . . . . . . . . . . . 161
Product Specifications . . . . . . . . . . . . . . . . . . . . . . . . . . . . . . . . . . . . . . . . . . . . . . . 161
Printing . . . . . . . . . . . . . . . . . . . . . . . . . . . . . . . . . . . . . . . . . . . . . . . . . . . . . . . . 162
Scanning . . . . . . . . . . . . . . . . . . . . . . . . . . . . . . . . . . . . . . . . . . . . . . . . . . . . . . . 162
Automatic Document Feeder (ADF) . . . . . . . . . . . . . . . . . . . . . . . . . . . . . . . . . 163
Fax . . . . . . . . . . . . . . . . . . . . . . . . . . . . . . . . . . . . . . . . . . . . . . . . . . . . . . . . . . . 163
Network Interface . . . . . . . . . . . . . . . . . . . . . . . . . . . . . . . . . . . . . . . . . . . . . . . 164
Paper . . . . . . . . . . . . . . . . . . . . . . . . . . . . . . . . . . . . . . . . . . . . . . . . . . . . . . . . . 164
Ink Cartridges . . . . . . . . . . . . . . . . . . . . . . . . . . . . . . . . . . . . . . . . . . . . . . . . . . 166
Memory Card . . . . . . . . . . . . . . . . . . . . . . . . . . . . . . . . . . . . . . . . . . . . . . . . . . . 166
Size and Weight . . . . . . . . . . . . . . . . . . . . . . . . . . . . . . . . . . . . . . . . . . . . . . . . . 167
Electrical . . . . . . . . . . . . . . . . . . . . . . . . . . . . . . . . . . . . . . . . . . . . . . . . . . . . . . 168
Default Delay Times for Power Management for Epson Products . . . . . . . . . . 168
Environmental . . . . . . . . . . . . . . . . . . . . . . . . . . . . . . . . . . . . . . . . . . . . . . . . . . 168
Standards . . . . . . . . . . . . . . . . . . . . . . . . . . . . . . . . . . . . . . . . . . . . . . . . . . . . . . 169
Interface . . . . . . . . . . . . . . . . . . . . . . . . . . . . . . . . . . . . . . . . . . . . . . . . . . . . . . . 169
Software Notices . . . . . . . . . . . . . . . . . . . . . . . . . . . . . . . . . . . . . . . . . . . . . . . . . . . 169
OPEN SOURCE SOFTWARE LICENSE . . . . . . . . . . . . . . . . . . . . . . . . . . . . 169
Copyright and Trademarks . . . . . . . . . . . . . . . . . . . . . . . . . . . . . . . . . . . . . . . . . . . 172
4
Page 7

Product Basics
LCD
See these sections to learn more about using your product:
Use the Control Panel
Identify Product Parts
Use the Control Panel
See these sections:
Use the Control Panel Buttons
Adjust the LCD Screen Brightness
Change the Control Panel Language
Select Wireless Settings Using the Control Panel
Use the Control Panel Buttons
Turns product
on/off
Enter Copy,
Fax, and Scan
mode
Shows wireless
network status
Enters
menu
mode
screen
shows menus
and status
Returns to
previous
menu
Move the cursor and select
menu items
Cancels settings
Start copying/ faxing in
black-and-white or color
Adjust the LCD Screen Brightness
You can adjust the brightness of the LCD screen:
Enter numbers,
letters, and symbols
Turns Auto
Answer on/off
Selects last number
dialed and enters
pause character
One-touch dial
buttons for first
five speed dial/
group dial entries
Displays speed
dial/group dial lists
1. Press the On button.
2. Press the Menu button.
3. Press or to select Maintenance, then press OK.
4. Press or to select LCD Contrast, then press OK.
5. Press or to adjust the brightness of the screen, then press OK.
7
Page 8

6. Press Menu to exit. Change the Control Panel Language
You can choose the language used on the LCD screen:
Note:
If you’re using your product with a Windows
®
computer, you can also change the language of
your printer software screens.
1. Press the Menu button.
2. Press or to select Maintenance, and press OK.
3. Press or to select Language, and press OK.
4. Press or to select your language, and press OK.
5. Press Menu to exit.
Select Wireless Settings Using the Control Panel
You can select or change wireless network settings using the product’s control panel.
To install your product on a wireless network, follow the instructions on the Start Here sheet and
install the necessary software from the product CD. The installer program guides you through
network setup.
Note:
Breakdown or repair of this product may cause loss of network data and settings. Epson is not
responsible for backing up or recovering data and settings during or after the warranty period. We
recommend that you make your own backup or print out your network data and settings.
1. Press the Menu button.
2. Press or to select Wi-Fi Settings, and press OK.
1. Press or to select Wi-Fi Setup, and press OK.
2. Press or to select Wi-Fi Setup Wizard, and press OK.
3. Press or to select the name of your wireless network (SSID), and press OK. If you don’t
see your wireless network’s name, you can enter it manually.
Note:
To enter the wireless network name manually, scroll down to select Other SSIDs and press
OK. Continue as in the next step to use the numeric keypad buttons to enter your network
name.
4. Enter your wireless password (or network name and then password) using the numeric keypad
buttons.
8
Page 9
• Repeatedly press the numeric keypad buttons as necessary to select uppercase letters
(ABC), lowercase letters (abc), numbers (123), and symbols (@!#).
• Press to move to the next character.
• Press to delete a character.
• Press OK when you’re finished.
5. If you want to print a network setup report, press 2. (Otherwise, press 1.)
6. Press Menu to exit.
The WiFi light should be on, but not flashing.
Note:
If the WiFi light is off, you may have selected the wrong network name or entered the
password incorrectly. Repeat these steps to try again.
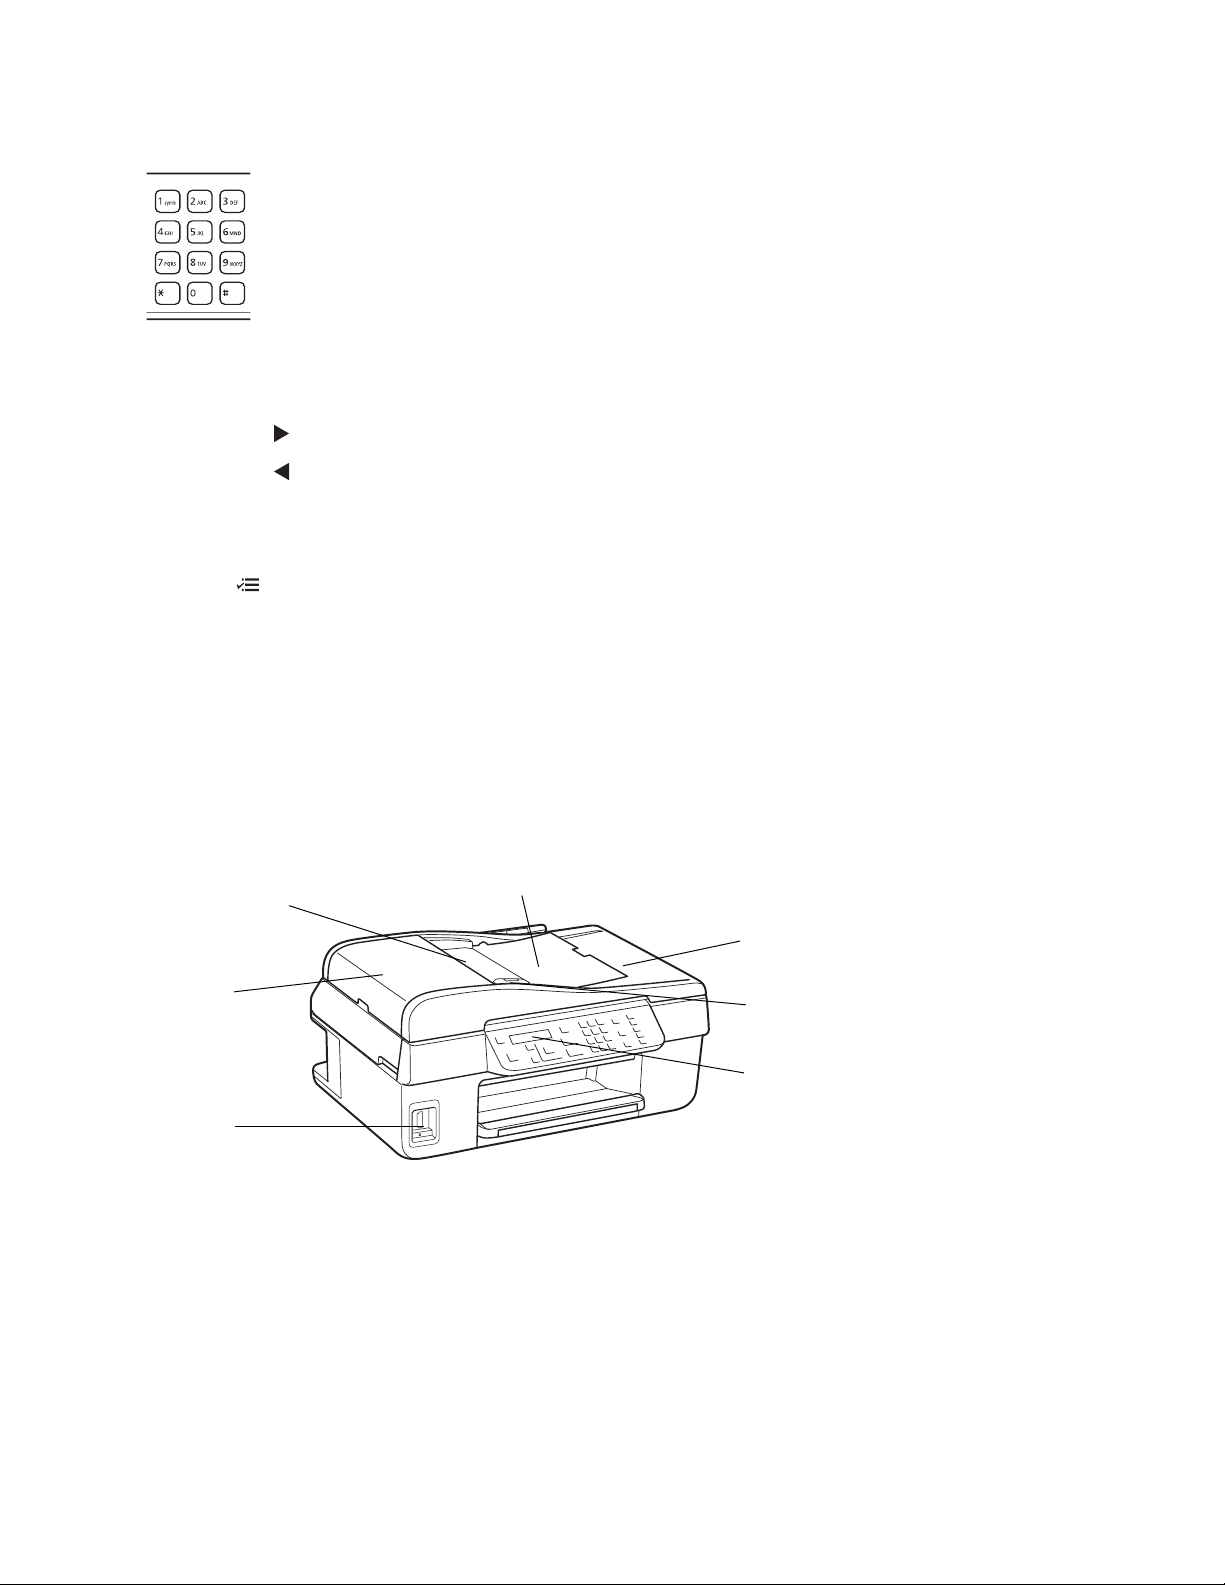
Identify Product Parts
Use these illustrations to identify the parts of your product.
Automatic document
feeder (ADF)
ADF cover
Memory
card slot
ADF paper support
ADF output tray
Edge guide
LCD screen
9
Page 10
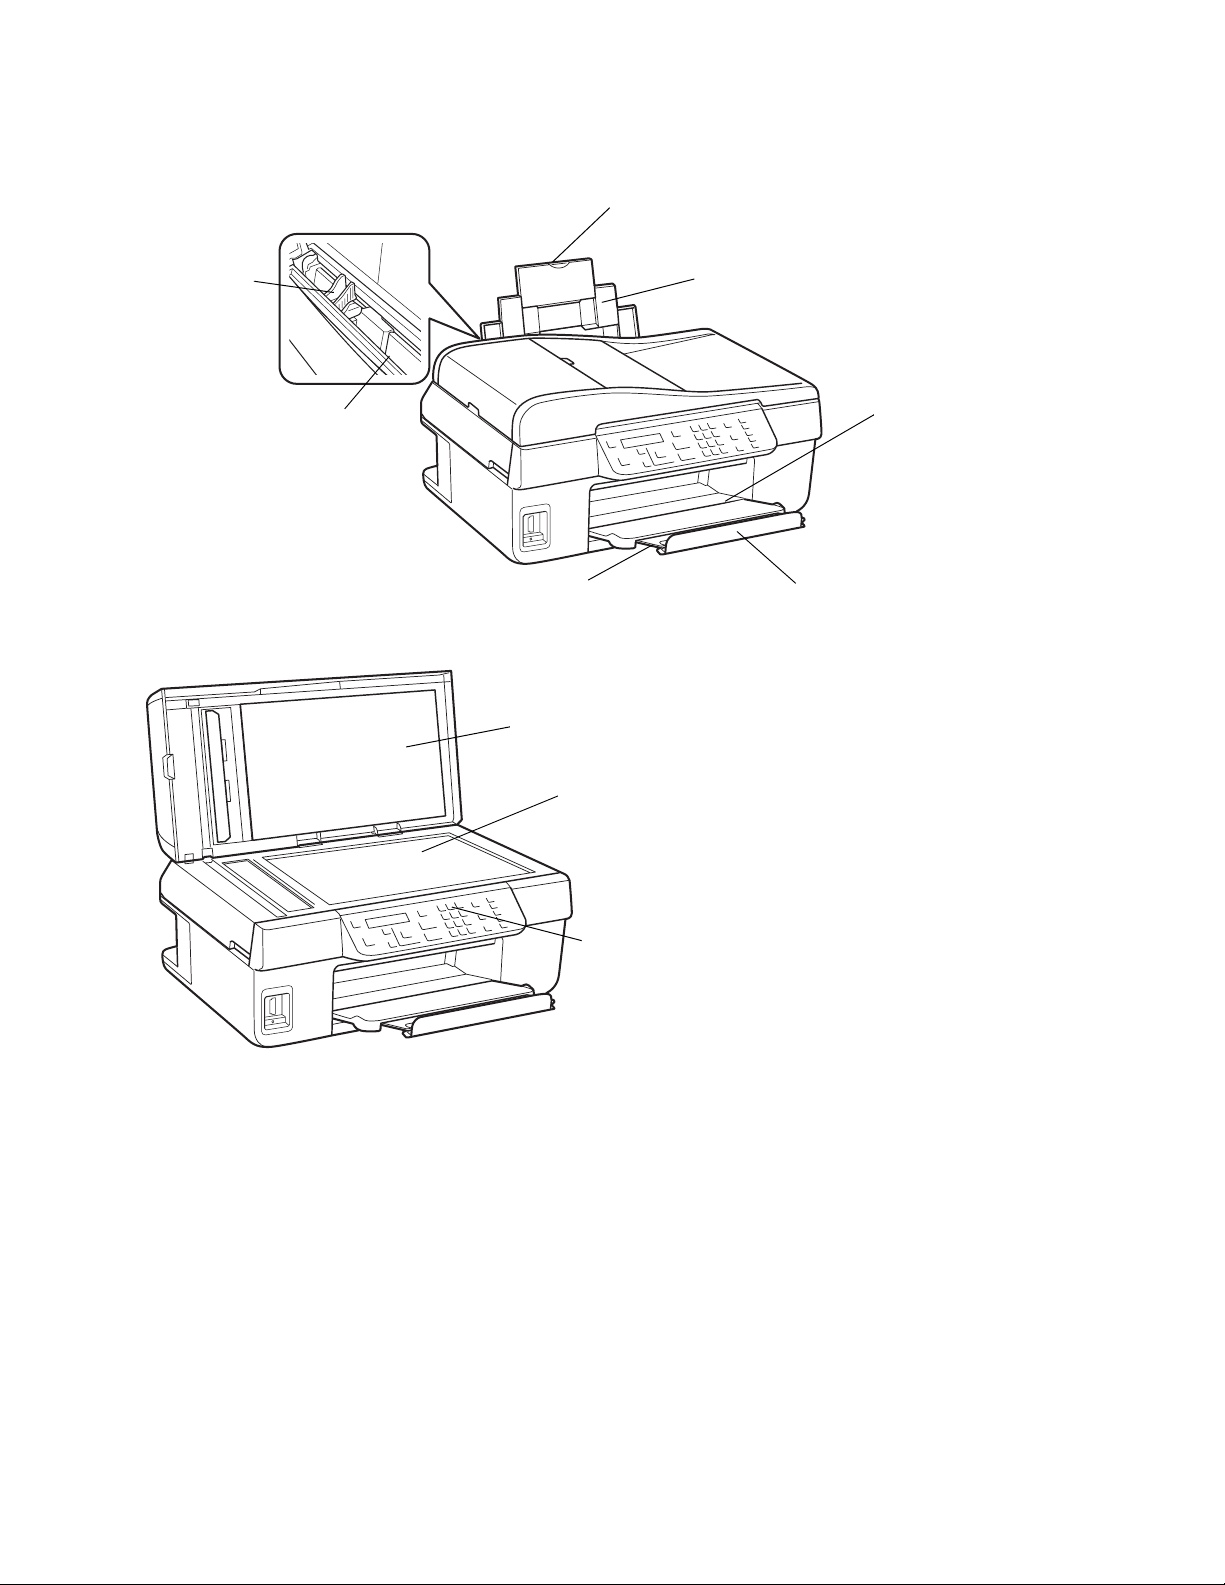
Paper support extension
Edge guide
Sheet feeder
Output tray extension
Document
cover
Scanner glass
Paper support
Output tray
Paper stopper
10
Control panel
Page 11
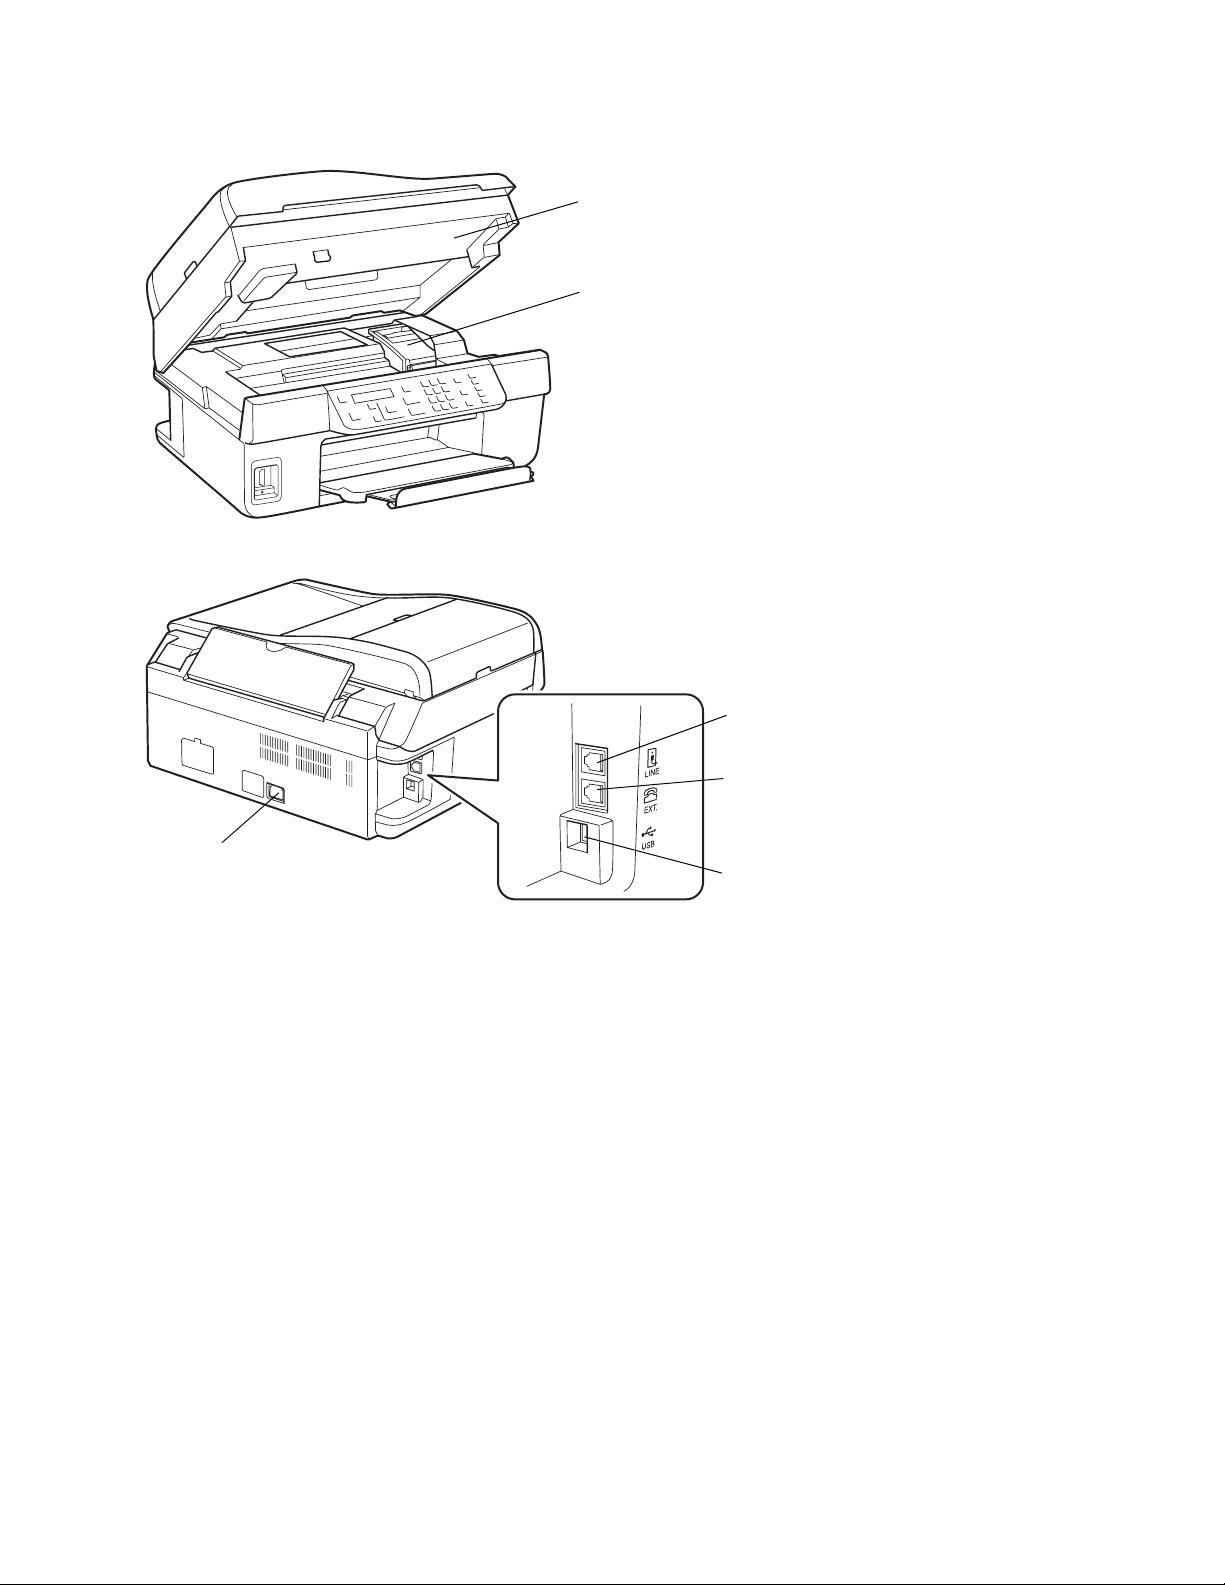
Scanner
Ink cartridge holder
(in home position)
LINE port
(to wall jack)
EXT. port
(to phone)
Power inlet
(for power cable)
USB port for
computer
11
Page 12

12
Page 13
Load Paper
Before you copy or print, load paper for the type of printing you will do.
Load Paper for Documents
Load Paper for Photos
Load Envelopes
General Paper Information
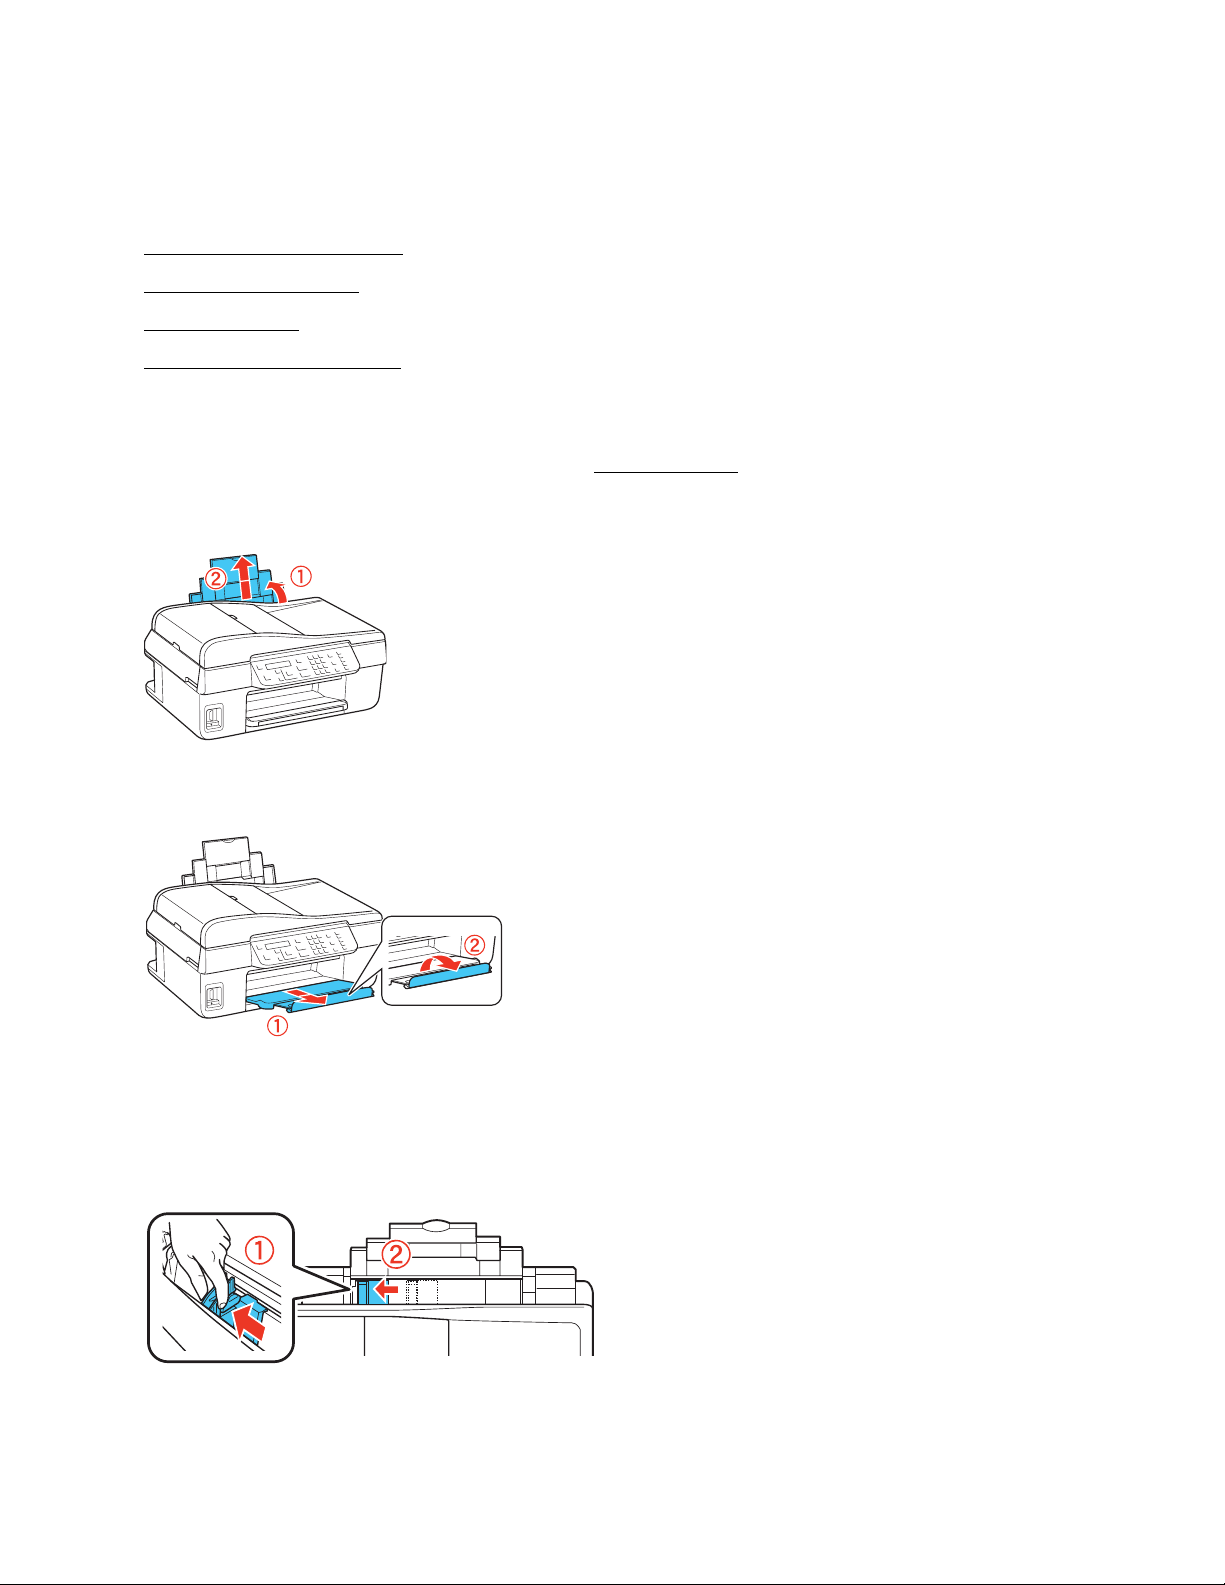
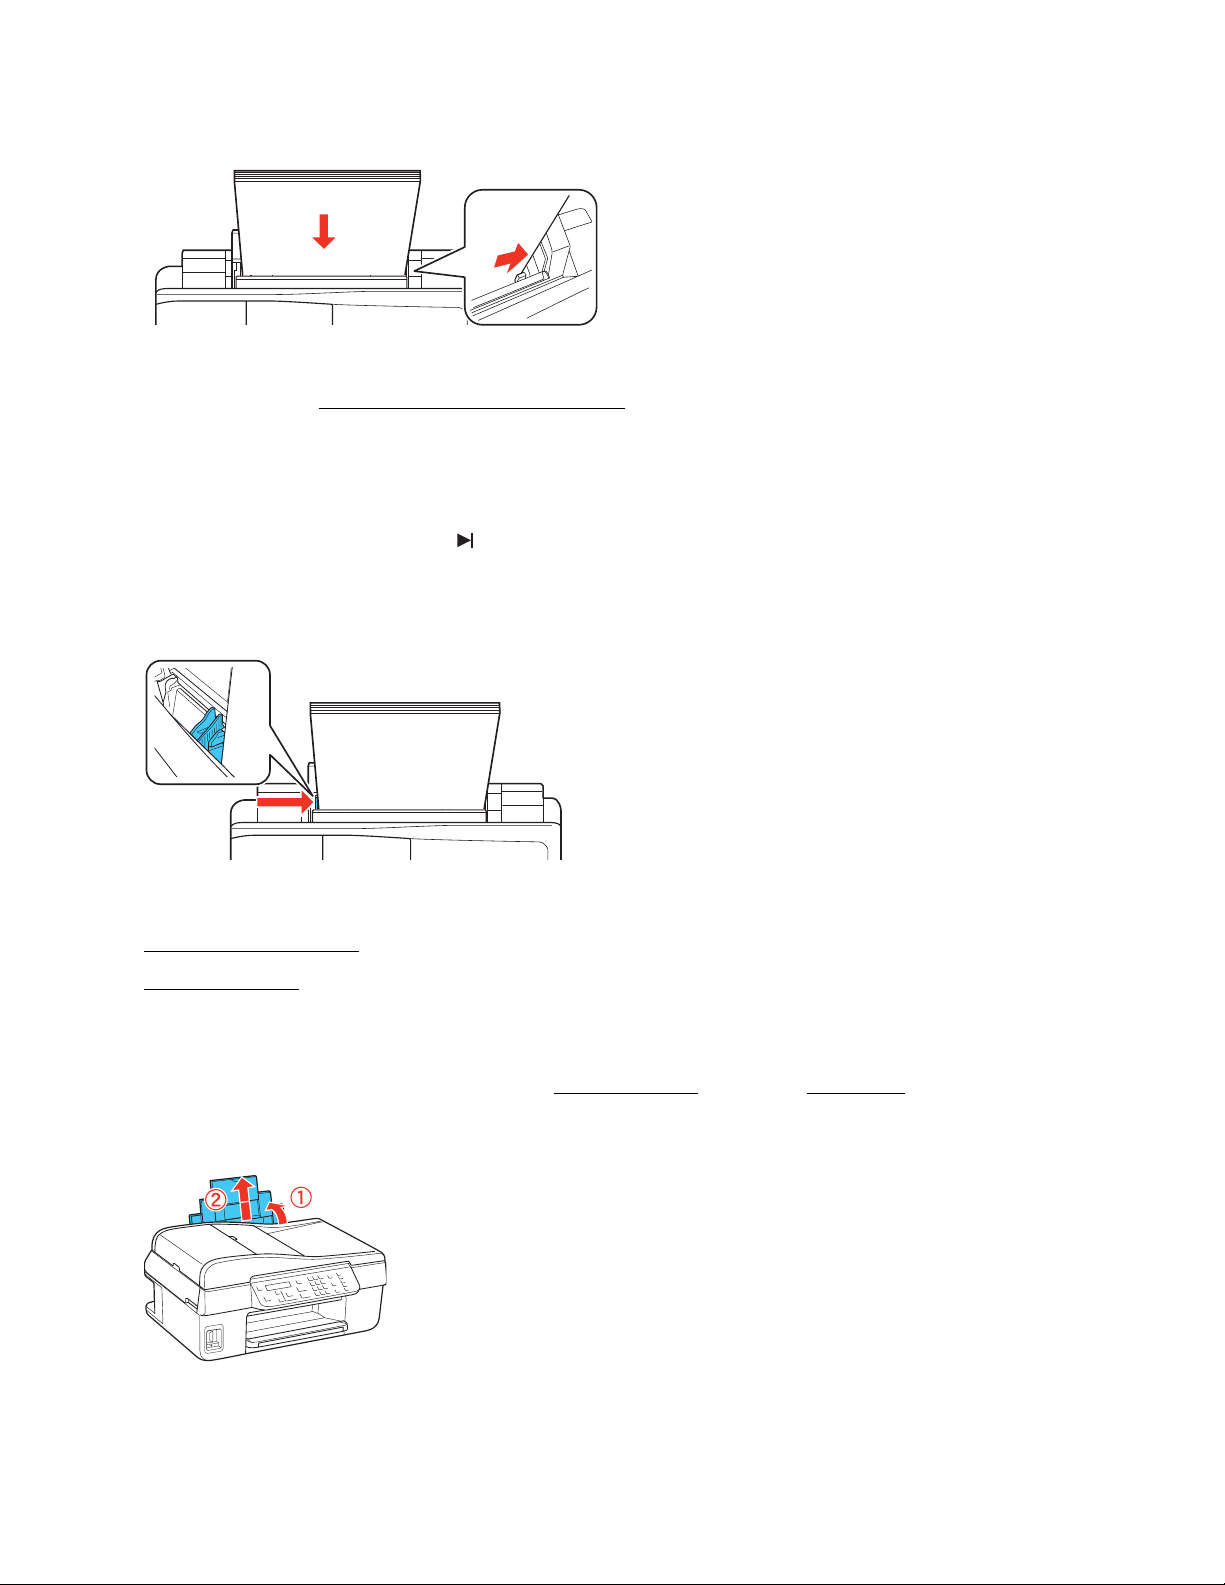
Load Paper for Documents
You can print documents on a variety of paper types and sizes.
1. Open the paper support and pull up the extensions.
2. Pull out the output tray extensions, and flip up the paper stopper.
Note:
If you are using legal-size paper, do not raise the paper stopper.
3. Squeeze the edge guide and slide it left.
4. Insert paper, printable side up, against the right side and behind the tab.
13
Page 14
Tip:
Load only the recommended number of sheets
Load paper short edge first, no matter which way your document faces.
Load letterhead or pre-printed paper top edge first.
Do not load paper with holes punched in it.
Do not load transparencies.
Do not load paper above the arrow on the edge guide.
Check the paper package for any additional loading instructions.
5. Squeeze the edge guide and slide it against the edge of the paper, but not too tightly.
See also:
Load Paper for Photos
.
Load Envelopes
Load Paper for Photos
You can print photos on a variety of paper types and sizes, including borderless photos.
1. Open the paper support and pull up the extensions.
2. Pull out the output tray extensions, and flip up the paper stopper.
14
Page 15
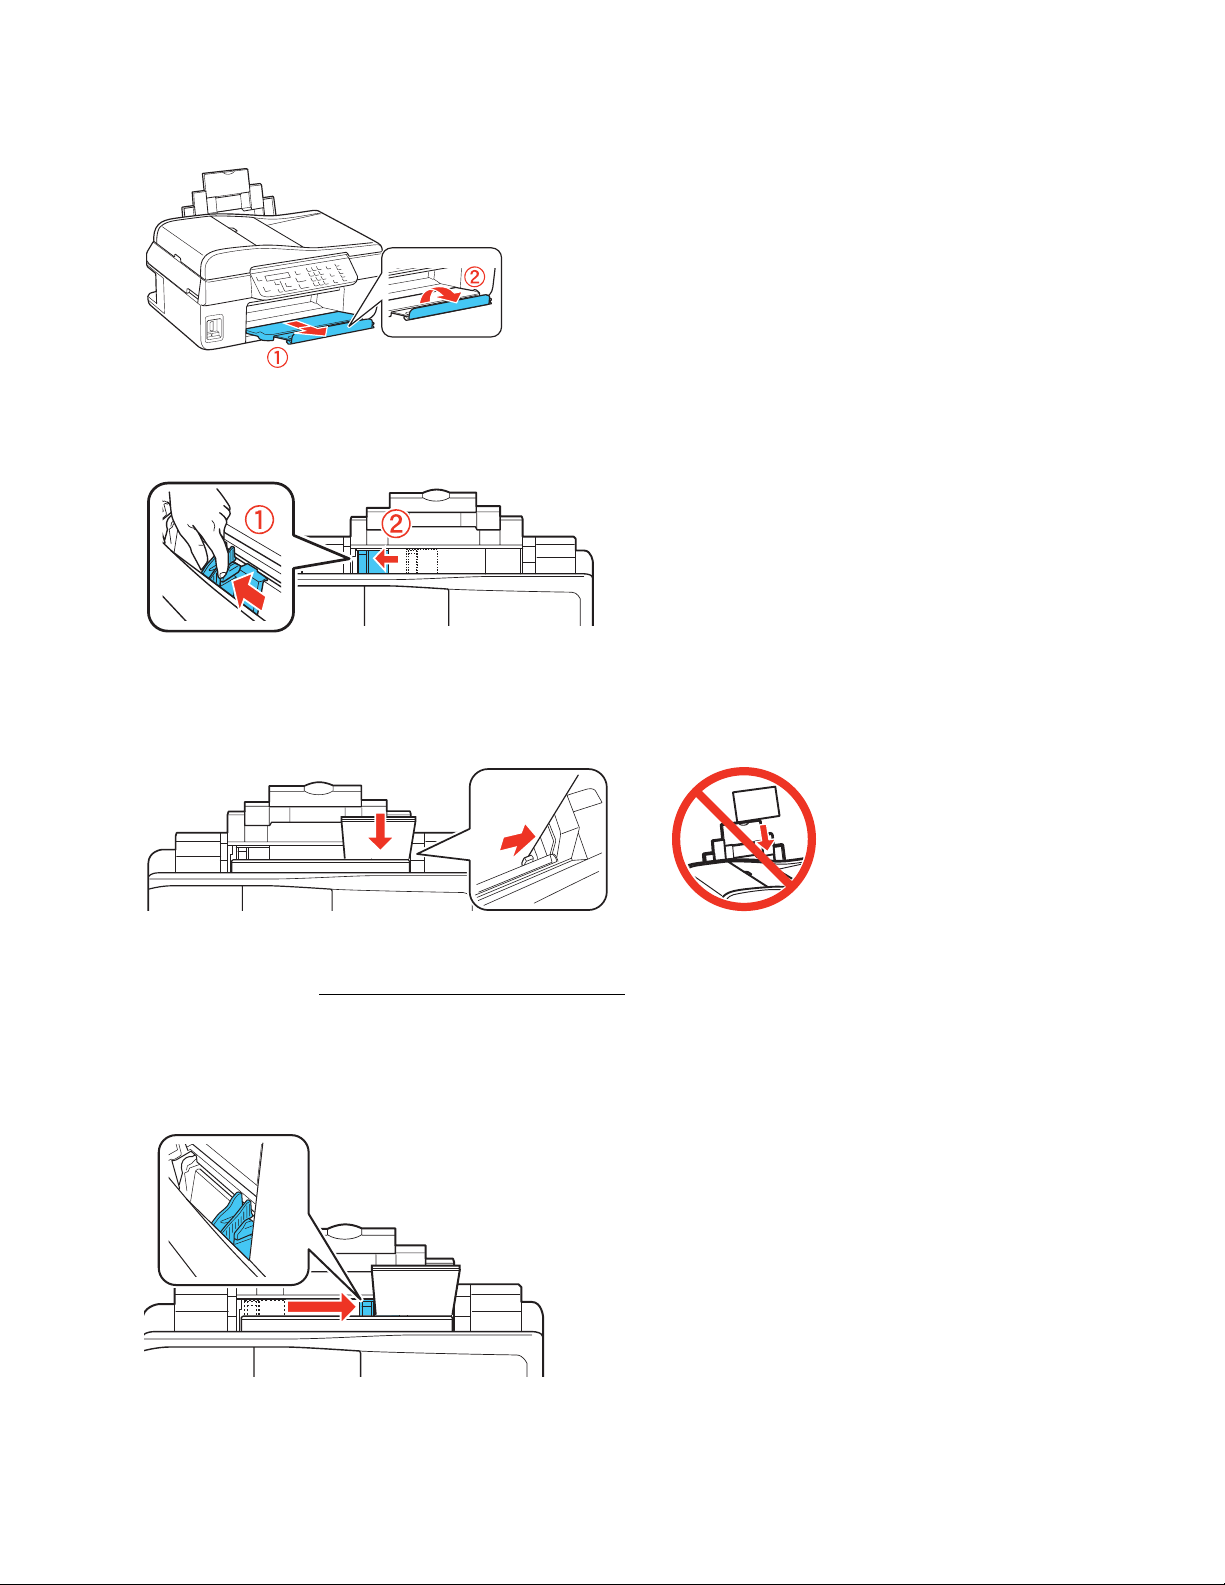
3. Squeeze the edge guide and slide it left.
4. Insert paper, glossy or printable side up, short edge first, against the right side and behind the
tab.
Tip:
Load only the recommended number of sheets
Load paper short edge first, no matter which way your photo faces.
Check the photo paper package for any additional loading instructions.
.
5. Squeeze the edge guide and slide it against the edge of the paper, but not too tightly.
See also:
15
Page 16
Load Paper for Documents
Load Envelopes
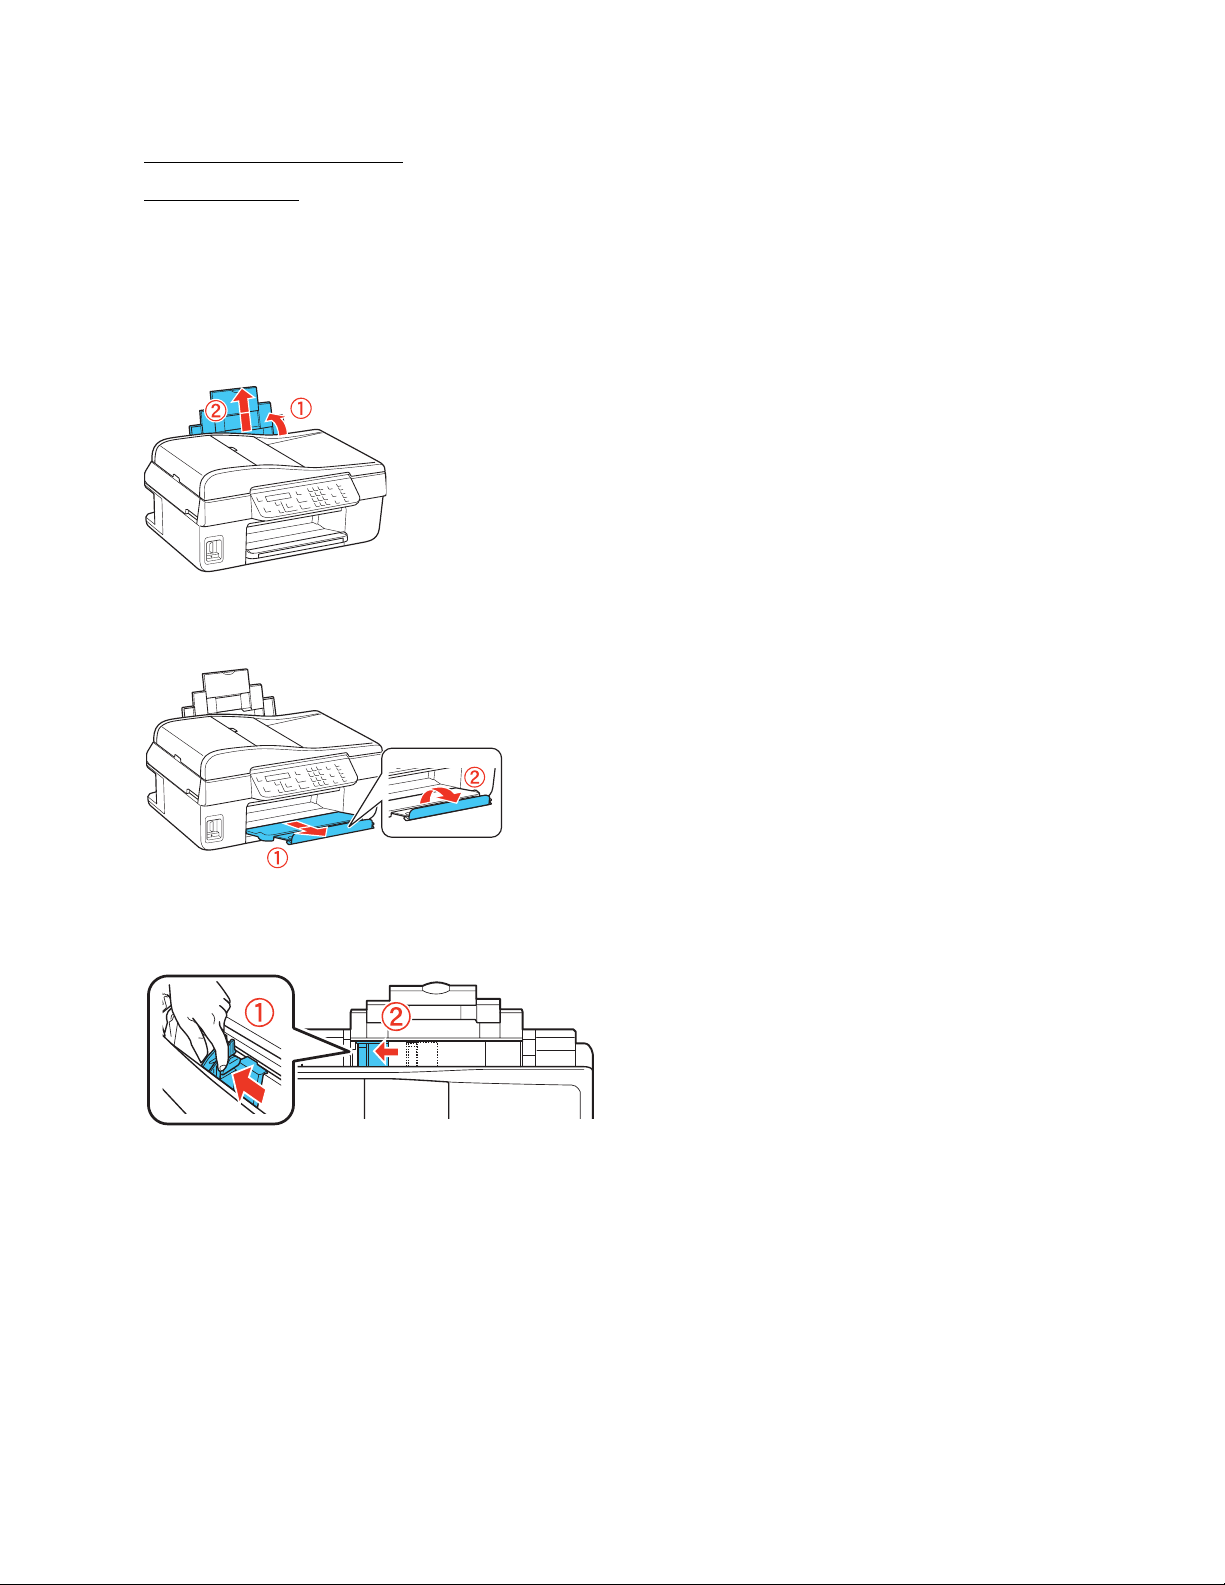
Load Envelopes
You can print on plain paper envelopes in 4 1/8 × 9 1/2 inch (#10) (105 × 241 mm) size.
1. Open the paper support and pull up the extensions.
2. Pull out the output tray extensions, and flip up the paper stopper.
3. Squeeze the edge guide and slide it left.
4. Load up to 10 envelopes against the right side and beneath the tab.
Load them printable side up and flap edge left.
16
Page 17
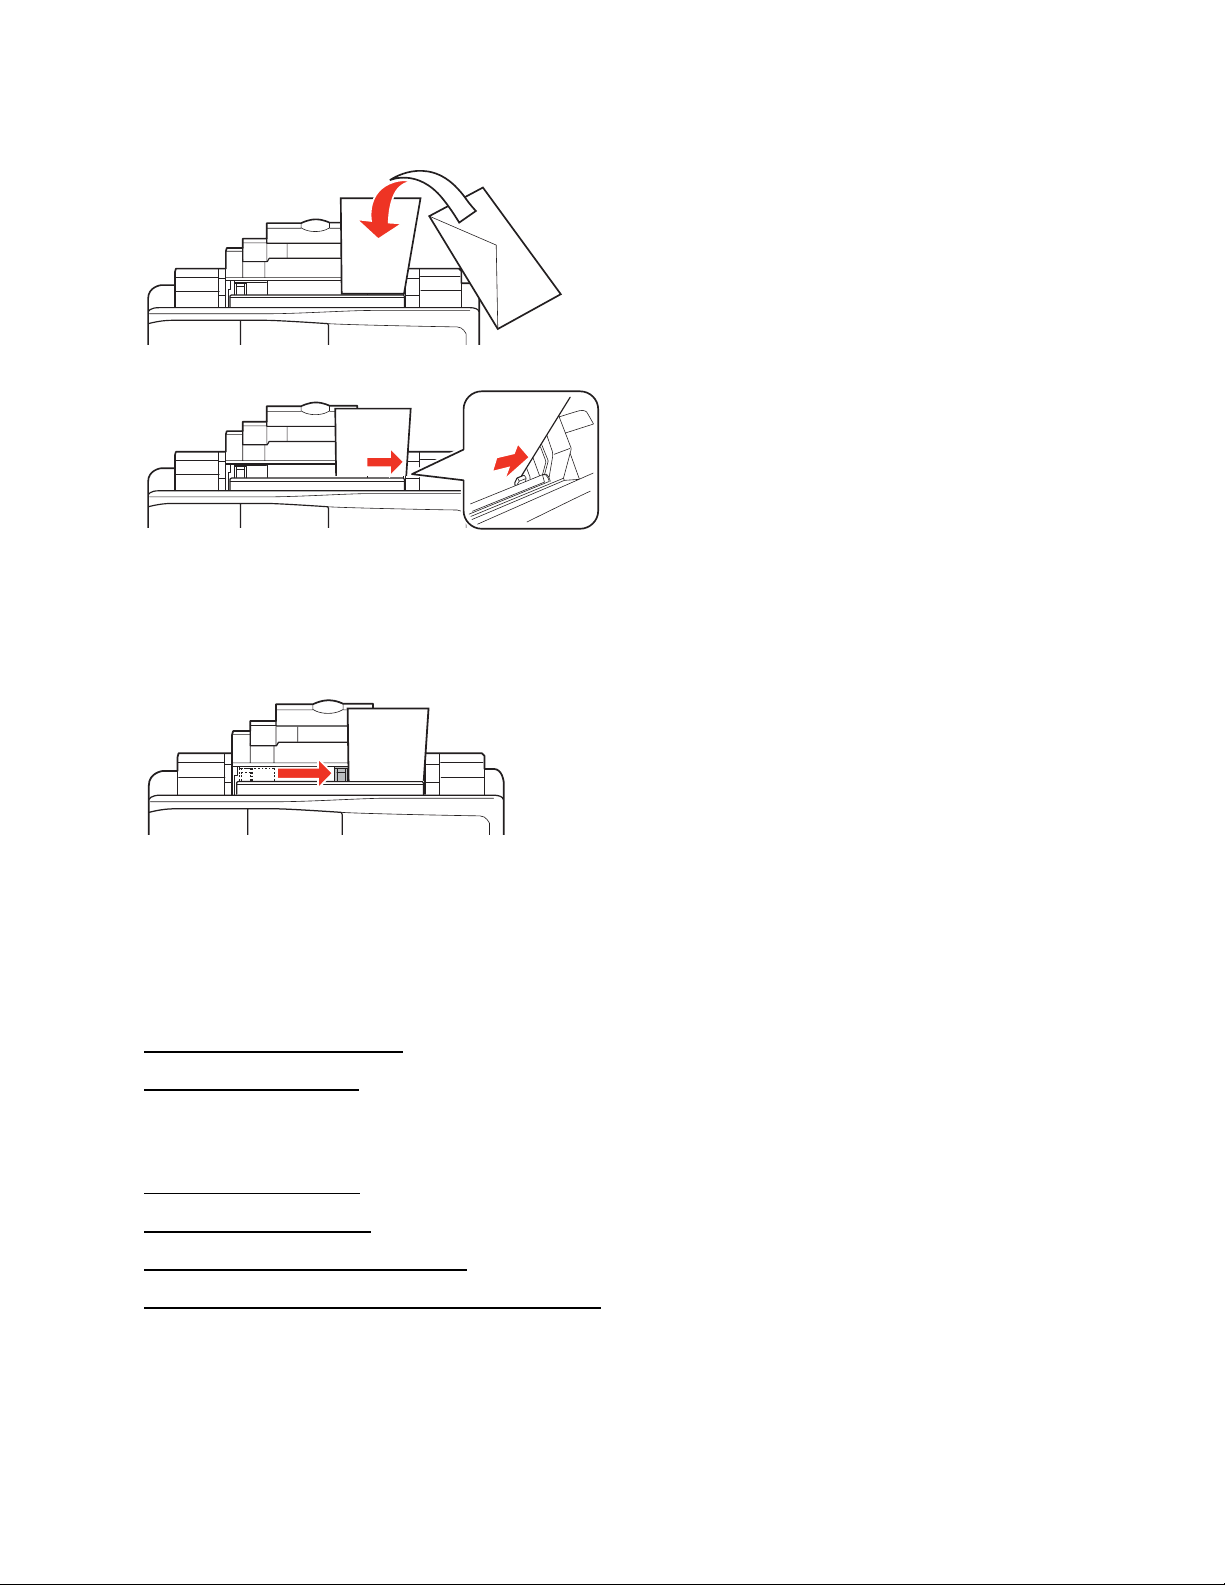
Tip:
Press each envelope flat before loading it or load one envelope at a time.
5. Squeeze the edge guide and slide it against the edge of the envelopes, but not too tightly.
Note:
Do not use envelopes that are curled or folded, and avoid using envelopes that are too thin
because they may curl during printing. Before printing, select Envelope as the paper type, select
Envelope #10 as the paper size, and Landscape as the orientation.
See also:
Load Paper for Documents
Load Paper for Photos
General Paper Information
Sheet Feeder Capacity
Available Epson Papers
Borderless Paper Types and Sizes
Paper or Media Type Settings for Loaded Paper
17
Page 18

Sheet Feeder Capacity
Paper type Load up to this many sheets
Plain paper—letter-size (8.5 × 11 inches [216 × 279 mm]) Approximately 100 sheets*
30 sheets for manual 2-sided
printing
Epson Bright White Paper
80 sheets
Epson Presentation Paper Matte
Epson Photo Paper Glossy
20 sheets
Epson Premium Photo Paper Glossy
Epson Ultra Premium Photo Paper Glossy
Epson Premium Photo Paper Semi-gloss
Epson Premium Presentation Paper Matte
Epson Ultra Premium Presentation Paper Matte
Plain paper—legal size (8.5 × 14 inches [216 × 356 mm])
1 sheet
Epson Premium Presentation Paper Matte Double-sided
Epson Photo Quality Self-adhesive Sheets
Epson Iron-on Cool Peel Transfer Paper
* Based on 20-lb [75 g/m2] paper weight. Do not load paper higher than the arrow mark on the left edge
guide. For legal-size paper and User Defined paper sizes, load one sheet at a time.
Available Epson Papers
You can purchase genuine Epson ink and paper.
Paper type Size Part number
Epson Presentation Paper Matte Letter (8.5 × 11 inches
S041062 100
[216 × 279 mm])
Legal (8.5 × 14 inches
S041067 100
[216 × 356 mm])
Epson Premium Presentation Paper Matte Borderless 8 × 10 inches
S041467 50
(203 × 254 mm)
Epson Premium Presentation Paper Matte
Double-sided
Letter (8.5 × 11 inches
[216 × 279 mm])
Letter (8.5 × 11 inches
[216 × 279 mm])
S041257 50
S042180 100
S041568 50
18
Sheet
count
Page 19

Paper type Size Part number
Sheet
count
Epson Ultra Premium Presentation Paper
Matte
Epson Ultra Premium Photo Paper
Glossy
Epson Premium Photo Paper Semi-gloss Borderless 4 × 6 inches
Epson Premium Photo Paper Glossy Borderless 4 × 6 inches
Letter (8.5 × 11 inches
[216 × 279 mm])
Borderless 4 × 6 inches
(102 × 152 mm)
Borderless 5 × 7 inches
(127 × 178 mm)
Borderless 8 × 10 inches
(203 × 254 mm)
Letter (8.5 × 11 inches
[216 × 279 mm])
(102 × 152 mm)
Letter (8.5 × 11 inches
[216 × 279 mm])
(102 × 152 mm)
Borderless 5 × 7 inches
(127 × 178 mm)
S041341 50
S042181
S042174
S041945 20
S041946 20
S042182
S042175
S041982 40
S041331 20
S041808
S041727
S041464 20
60
100
25
50
40
100
Borderless 8 × 10 inches
(203 × 254 mm)
Letter (8.5 × 11 inches
[216 × 279 mm])
Epson Photo Paper Glossy Borderless 4 × 6 inches
(102 × 152 mm)
Letter (8.5 × 11 inches
[216 × 279 mm])
Epson Bright White Paper Letter (8.5 × 11 inches
[216 × 279 mm])
Epson Photo Quality Self-adhesive
Sheets
Epson Iron-on Cool Peel Transfer Paper Letter (8.5 × 11 inches
A4 (8.3 × 11.7 inches
[210 × 297 mm])
[216 × 279 mm])
S041465 20
S042183
S041667
S041809
S042038
S041141
S041649
S041271
S041586 500
S041106 10
S041153 10
25
50
50
100
20
50
100
19
Page 20
Borderless Paper Types and Sizes
Borderless paper type Borderless paper sizes
Epson Premium Photo Paper Semi-gloss
Epson Photo Paper Glossy
Epson Premium Photo Paper Glossy
Epson Ultra Premium Photo Paper Glossy
Epson Premium Presentation Paper Matte 8 × 10 inches (203 × 254 mm)
Epson Ultra Premium Presentation Paper
Matte
Paper or Media Type Settings for Loaded Paper
For optimal image quality, it is important to choose the correct Type or Media Type setting in
your software. It tells your product what kind of paper you’re using and adjusts the ink coverage
accordingly.
Note:
The table below gives software settings, which apply when you are printing from a computer. If
you are using the product’s control panel to make copies, see Copy a Document or Photo
type settings.
4 × 6 inches (102 × 152 mm)
Letter (8.5 × 11 inches [216 × 279 mm])
4 × 6 inches (102 × 152 mm)
5 × 7 inches (127 × 178 mm)
8 × 10 inches (203 × 254 mm)
Letter (8.5 × 11 inches [216 × 279 mm])
Letter (8.5 × 11 inches [216 × 279 mm])
Letter (8.5 × 11 inches [216 × 279 mm])
for paper
For this paper
Plain paper
Epson Bright White Paper
Epson Presentation Paper Matte
Epson Iron-on Cool Peel Transfer Paper
Epson Photo Quality Self-adhesive Sheets
Epson Ultra Premium Photo Paper Glossy Ultra Premium Photo Paper Glossy
Epson Premium Photo Paper Glossy Premium Photo Paper Glossy
Epson Photo Paper Glossy Photo Paper Glossy
Epson Premium Photo Paper Semi-gloss Premium Photo Paper Semi-Gloss
Epson Premium Presentation Paper Matte
Epson Premium Presentation Paper Matte Doublesided
Epson Ultra Premium Presentation Paper Matte
Select this paper Type or Media Type
setting
Plain Paper/Bright White Paper
Premium Presentation Paper Matte
20
Page 21

For this paper
Envelopes Envelope
Select this paper Type or Media Type
setting
21
Page 22

22
Page 23
Place Originals for Copying, Faxing, or Scanning
Before you copy or scan, place your original documents or photos for scanning.
Place Documents or Photos on the Scanner Glass
Place Documents in the Automatic Document Feeder
Caution:
Do not place anything on top of the document cover or use the cover as a writing surface, or it
could get permanently scratched.
Place Documents or Photos on the Scanner Glass
You can place documents or photos up to letter- or A4-size on the scanner glass.
Note:
You can also copy a book or other thick document up to about 1/2-inch (12mm) thick.
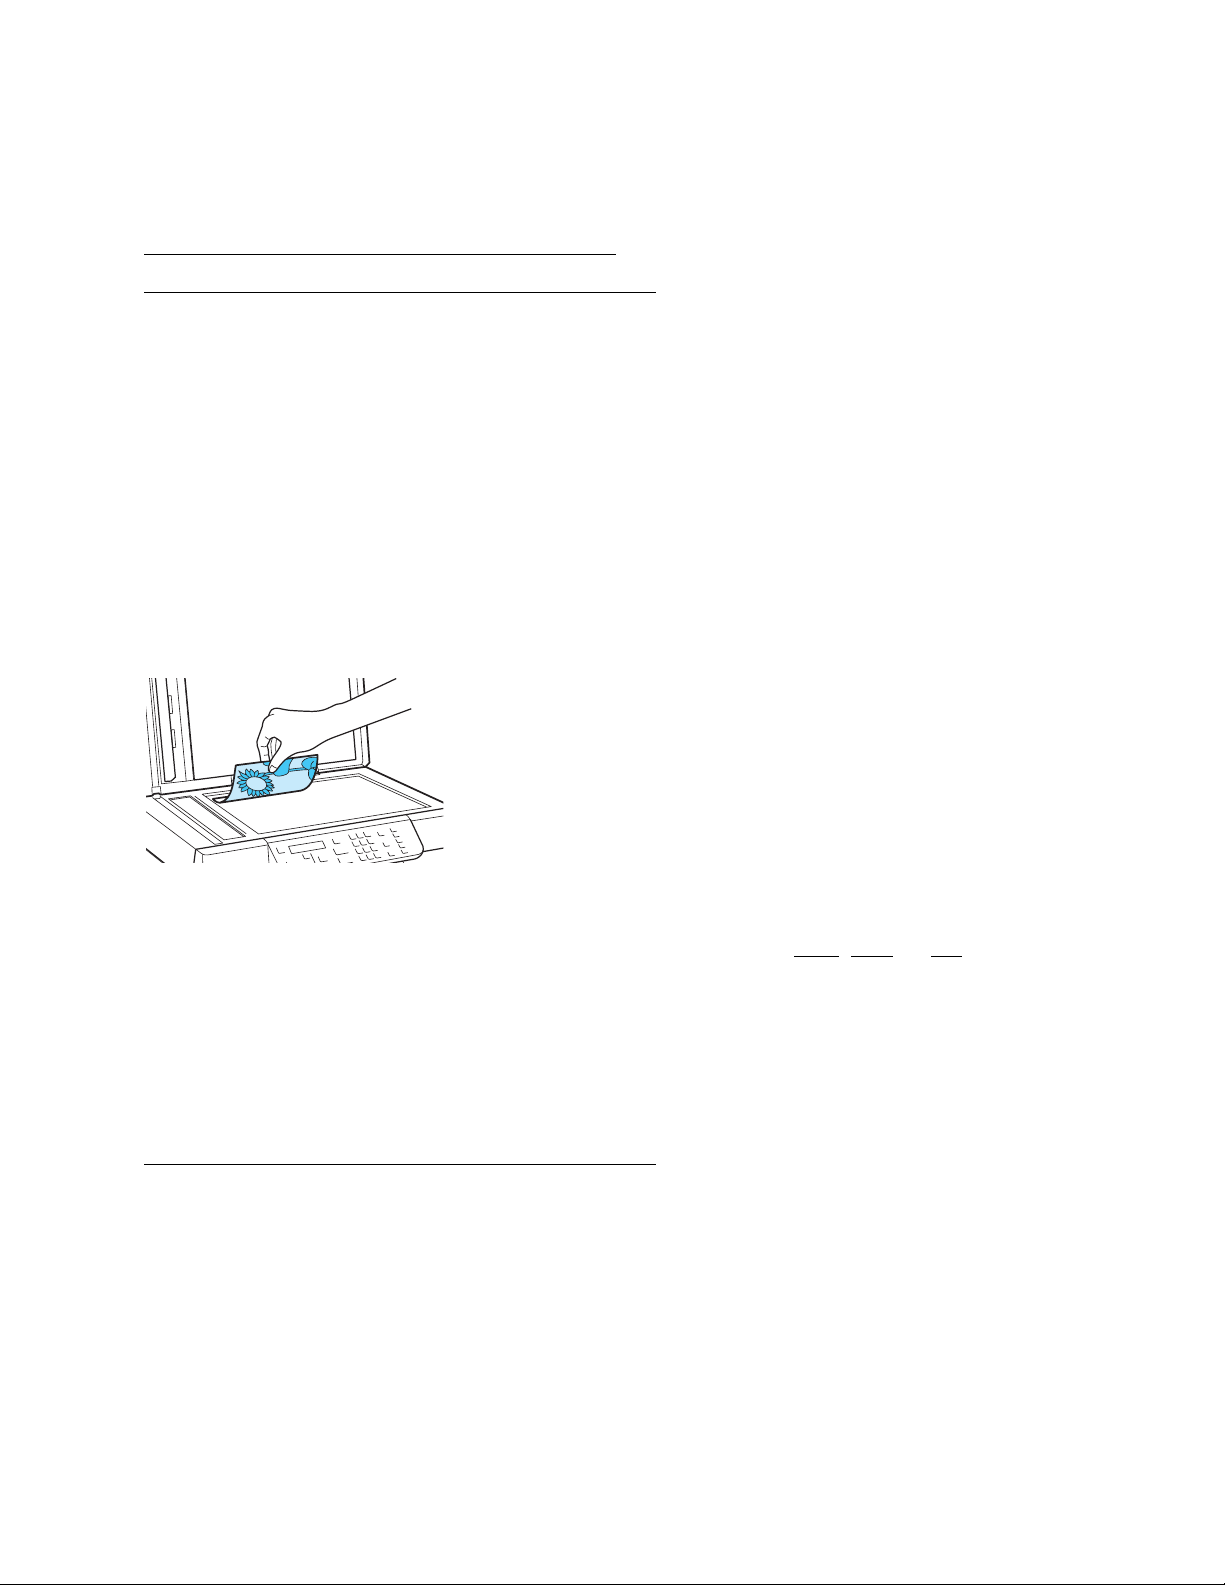
1. Open the document cover.
2. Place your original facedown on the scanner glass with the top against the back left corner.
3. Close the document cover gently to keep your original in place.
Once the original document is placed on the scanner glass, you can copy, scan, or fax.
Note:
When there is a document on the scanner glass and in the Auto Document Feeder (ADF), priority
is given to the document in the ADF.
See also:
Place Documents in the Automatic Document Feeder
Place Documents in the Automatic Document Feeder
You can copy, fax, or scan up to 30 letter- or A4-size sheets at a time using the Automatic
Document Feeder (ADF). When loading legal-size sheets, insert only 10 sheets at a time. Make
sure the originals are not creased or folded and do not have holes, tape, staples, or other materials
that could obstruct the feeder.
23
Page 24
Note:
When there is a document on the scanner glass and in the ADF priority is given to the document
in the ADF.
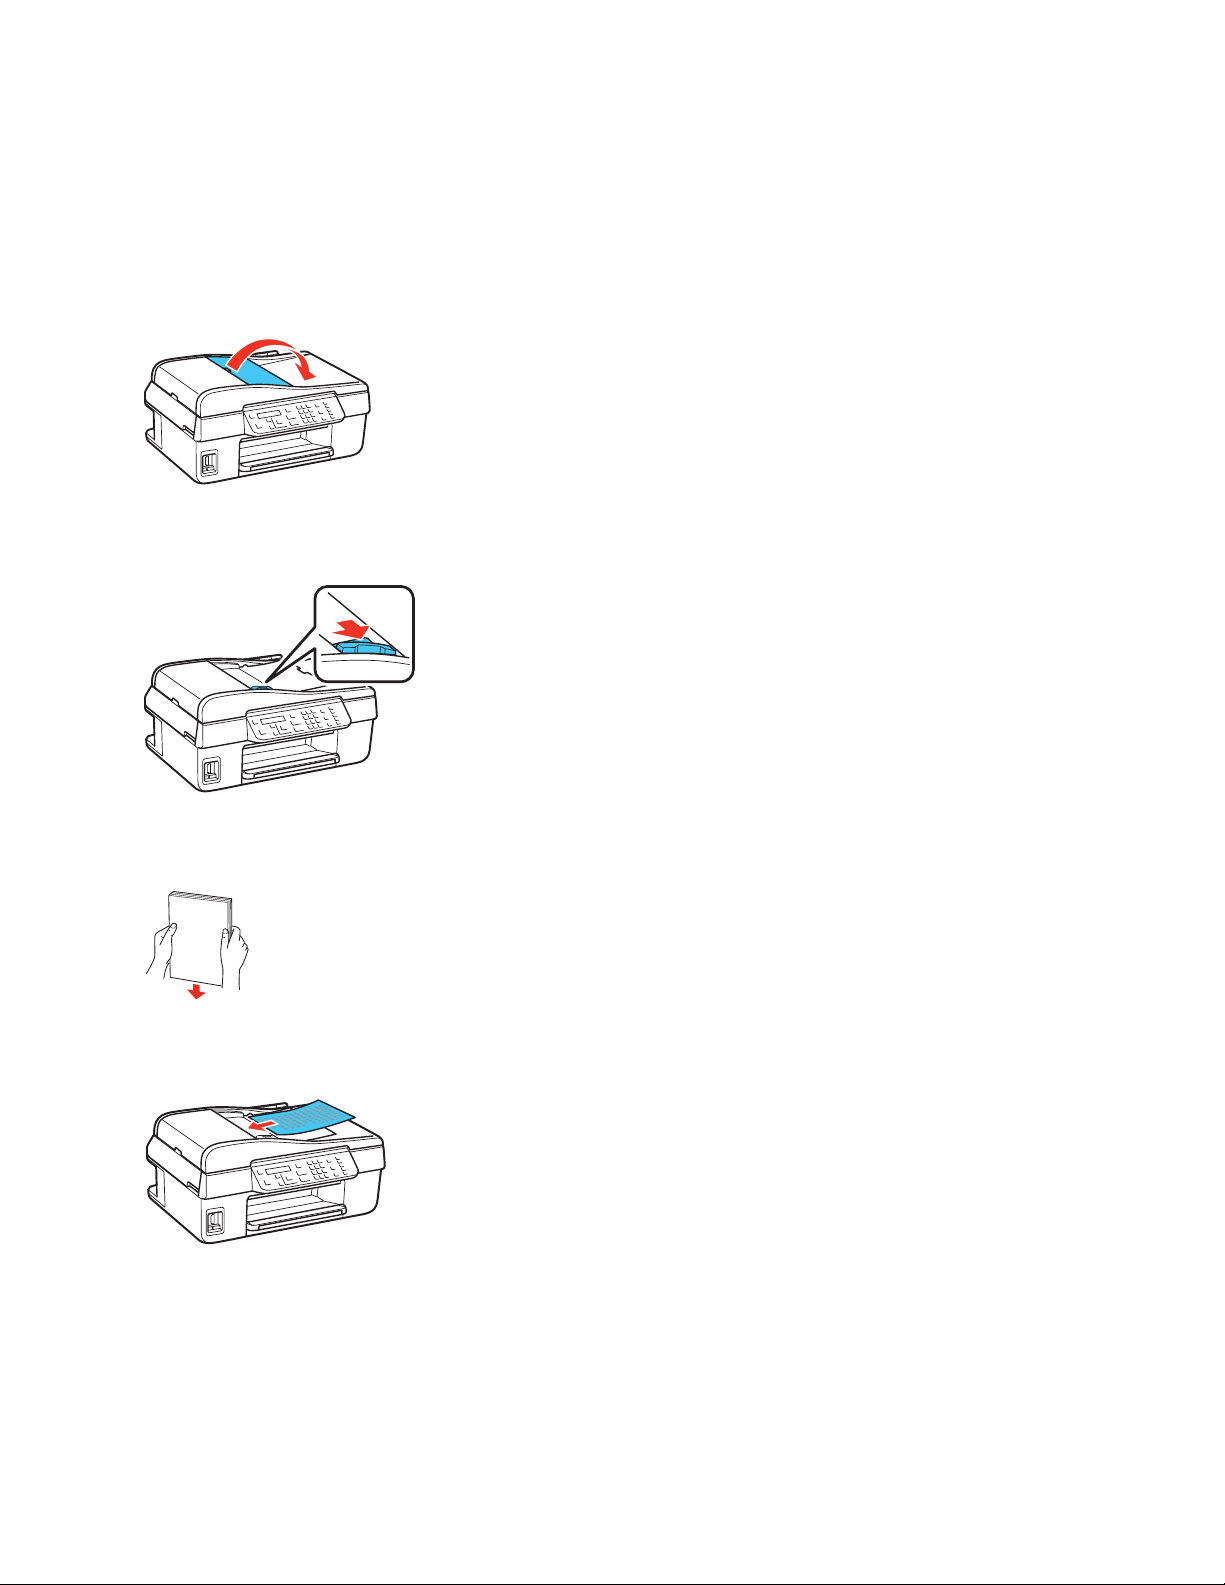
1. Open the ADF paper support.
2. Slide the edge guide outward.
3. Fan the originals, then tap them on a flat surface to even the edges.
4. Insert the originals face-up, short edge first.
5. Slide the edge guide against the originals, but not too tightly.
24
Page 25
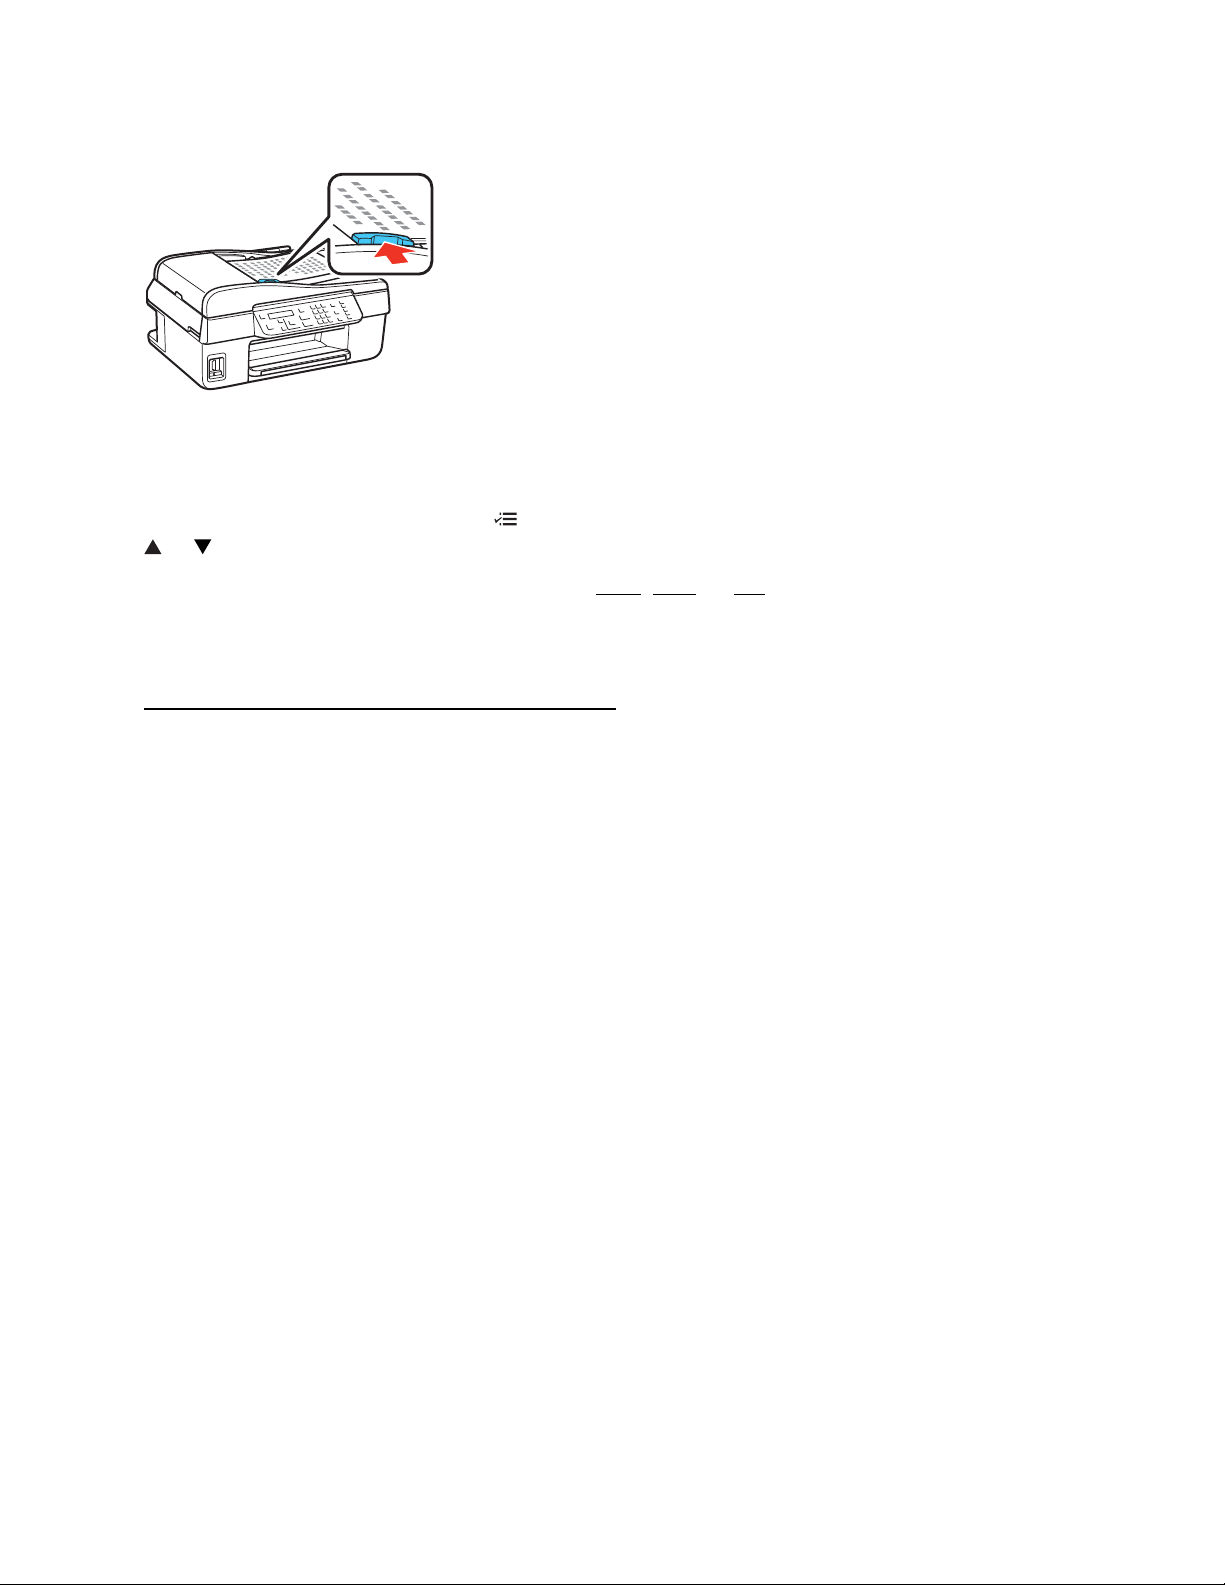
Note:
When you use the Copy function, letter-size paper is automatically selected for your printed
copies. If you copy a legal-size document, the image will be cropped to fit. To copy a legal-size
document on letter-size paper, press Menu, select Reduce/Enlarge, then press OK. Press
or to select Legal->Letter, then press OK.
Once the original document is loaded, you can copy
See also:
Place Documents or Photos on the Scanner Glass
, scan, or fax.
25
Page 26

26
Page 27

Copy a Document or Photo
You can copy documents or photos in color or black-and-white.
Copy Documents
Copy Photos
Note:
Copies may not be exactly the same size as your original document.
Copy Documents
You can copy documents onto letter- or A4-size plain paper or Epson special paper (various types
available). If you use the Automatic Document Feeder (ADF), you can copy up to 30 sheets at a
time onto letter- or A4-size plain paper.
1. Load letter- or A4-size plain paper or Epson special paper in the sheet feeder.
Note:
Load only the recommended number of sheets.
2. Place your original document(s) on the scanner glass or in the ADF.
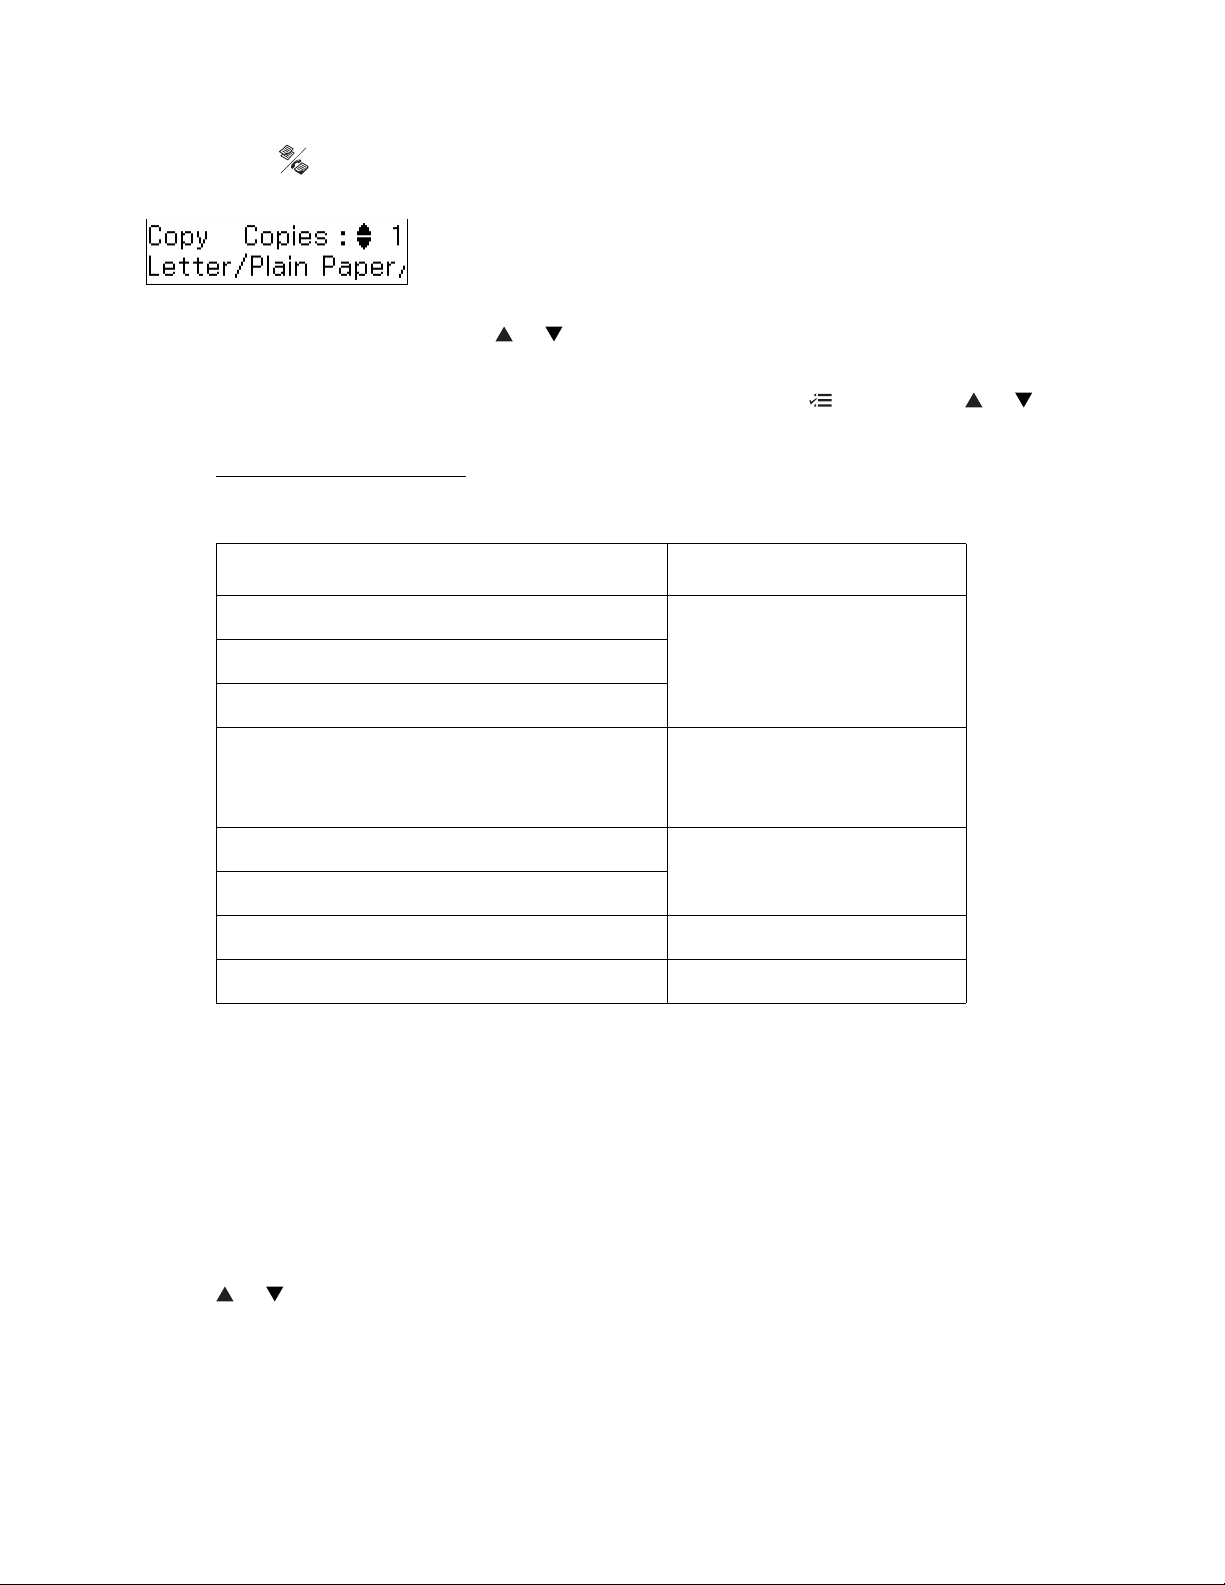
3. Press the Copy/Fax button, if necessary.
4. To print more than 1 copy, press or to select the number (up to 99) or use the numeric
keypad to enter the number.
5. To change any of the print settings displayed on the screen, press Menu, press or to
select an option, then press OK to change the setting.
Copy Mode Print Settings
• To change the paper type, select Paper Type and choose the type of paper you loaded.
Paper type Paper Type setting
Plain paper Plain Paper
Epson Bright White Paper
Epson Presentation Paper Matte
Epson Premium Presentation Paper Matte
Epson Ultra Premium Presentation Paper
Matte
Matte
27
Page 28

Paper type Paper Type setting
Epson Premium Photo Paper Glossy Prem. Glossy
Epson Premium Photo Paper Semi-gloss
Epson Ultra Premium Photo Paper Glossy Ultra Glossy
Epson Photo Paper Glossy Glossy
• To change the paper size, select Paper Size and choose the size of paper you loaded.
• To change the layout, select Layout and choose With Border to leave a small margin
around the image, or Borderless to expand the image all the way to the edge of the paper
(slight cropping may occur).
Note:
You cannot select Borderless when copying on plain paper.
• To adjust the copy size, select Reduce/Enlarge and choose either Actual, Auto Fit Page
(to automatically size the image to fit your paper), or Custom (to select a percentage using
or , or enter it on the numeric keypad).
Note:
If you placed legal-size originals in the ADF, select Legal->Letter to copy a legal-size
document on letter-size paper.
• If you chose Plain Paper as your Paper Type setting, you can change the copy quality.
Select Quality and choose Standard Quality, Best, or Draft.
• To adjust the darkness or lightness of the copy, select Copy Density and choose a higher
(darker) or lower (lighter) setting.
• To adjust the amount of image expansion when printing borderless photos, select
Expansion and choose Standard, Medium, or Minimum.
Note:
You may see white borders on your printed photo if you use the Minimum setting.
After you finish selecting your settings, press Menu.
6. Press the B&W or Color button to begin copying.
To cancel copying, press Stop/Clear Settings.
Copy Photos
You can copy photos onto 4 × 6-inch (102 × 152 mm), 5 × 7-inch (127 × 178 mm), letter-size, or
A4-size Epson special paper (various types available
1. Load Epson special paper in the sheet feeder.
Note:
Load only the recommended number of sheets.
) for instant photo reprints.
2. Place your original photo
28
on the scanner glass.
Page 29
3. Press the Copy/Fax button, if necessary.
4. To print more than 1 copy, press or to select the number (up to 99) or use the numeric
keypad to enter the number.
5. To change any of the print settings displayed on the screen, press Menu, press or to
select an option, then press OK to change the setting.
Copy Mode Print Settings
• To change the paper type, select Paper Type and choose the type of paper you loaded.
Paper type Paper Type setting
Plain paper Plain Paper
Epson Bright White Paper
Epson Presentation Paper Matte
Epson Premium Presentation Paper Matte
Epson Ultra Premium Presentation Paper
Matte
Epson Premium Photo Paper Glossy Prem. Glossy
Epson Premium Photo Paper Semi-gloss
Epson Ultra Premium Photo Paper Glossy Ultra Glossy
Epson Photo Paper Glossy Glossy
• To change the paper size, select Paper Size and choose the size of paper you loaded.
• To change the layout, select Layout and choose With Border to leave a small margin
around the image, or Borderless to expand the image all the way to the edge of the paper
(slight cropping may occur).
Note:
You cannot select Borderless when copying on plain paper.
• To adjust the copy size, select Reduce/Enlarge and choose either Actual, Auto Fit Page
(to automatically size the image to fit your paper), or Custom (to select a percentage using
or , or enter it on the numeric keypad).
Matte
• If you chose Plain Paper as your Paper Type setting, you can change the copy quality.
Select Quality and choose Standard Quality, Best, or Draft.
29
Page 30

• To adjust the darkness or lightness of the copy, select Copy Density and choose a higher
(darker) or lower (lighter) setting.
• To adjust the amount of image expansion when printing borderless photos, select
Expansion and choose Standard, Medium, or Minimum.
Note:
You may see white borders on your printed photo if you use the Minimum setting.
After you finish selecting your settings, press Menu.
6. Press the B&W or Color button to begin copying.
To cancel copying, press Stop/Clear Settings.
30
Page 31

Print From Your Computer
After you connect your product to your computer and install its software, you can print documents
and photos from your computer.
Follow the instructions in these sections for your computer type:
Windows Printing
Mac Printing (Mac OS X 10.5, 10.6, or 10.7)
Mac Printing (Mac OS X 10.4)
Before you print, make sure you installed your software and connected your product to your
computer or network; see the Start Here sheet for instructions.
Tip:
It’s a good idea to check for updates to your product software. See Checking for Software Updates
for instructions.
Also be sure to load paper in the sheet feeder.
Windows Printing
You can print on your product using any Windows printing program.
Note:
You can change the language of the Windows printer software screens, if desired.
Follow the steps in these sections:
Print From a Program
Select Basic Options
Change Print Layout
Select Advanced Options
Print Your Document or Photo
Check Printing Status
Change Default Print Settings
Change Auto Update Options
Change the Language
See also:
Mac Printing (Mac OS X 10.5, 10.6, or 10.7)
Mac Printing (Mac OS X 10.4)
Print From a Program
After you open a document or photo in a Windows program, follow these steps to access your
print settings:
1. Select the print option in your application.
31
Page 32

Note:
You may need to select a print icon on your screen, the Print option in the File menu, or
another command. See you application’s help utility for details.
2. Select your product, if necessary.
3. Click Properties or Preferences to view your print settings.
Note:
If you don’t have these buttons, click Setup, Printer, or Options, then click Properties or
Preferences on the next screen.
Your printer settings window opens:
32
Page 33

Follow the steps in these sections to select settings, print, and control printing:
Select Basic Options
Change Print Layout
Select Advanced Options
Print Your Document or Photo
Check Printing Status
Change Default Print Settings
Select Basic Options
There are two ways to select basic printing options:
• Select a printing preset to quickly select settings for common paper types, sizes, and print
qualities.
• Select individual settings on the Main tab.
Select a Printing Preset
For quick access to the most common settings, click the Shortcuts tab. Point to one of the
Printing Presets to view a list of the settings for it.
33
Page 34

If the settings are correct for your print job, click the preset and print
.
To create your own presets, click the Save Settings button on the Advanced tab.
T o delete a preset you created, click Add/Remove on the Shortcuts tab, select the preset, and click
Delete.
T o reorder the list, highlight one of the Printing Presets and click the up or down arrow to move it.
Or click Reset to return the list to its original order.
Select Basic Settings on the Main Tab
Click the Main tab on the top of the printer settings window to select your basic print options.
34
Page 35

Tip:
For information about an option, move the mouse over the setting or right-click it to access the
on-screen Help.
1. Select a Quality Option that matches your document or photo, and the print quality you want.
2. Select the paper
3. Select the paper Size setting for the paper you loaded. A User Defined option is also available
so you can create a custom size.
4. If you’re printing borderless photos, select Borderless. For documents or photos with borders,
select Borders.
Note:
For borderless photos, make sure you load a compatible borderless paper size and type
5. Select any of the Print Options you want for your document or photo, such as Fix Photo to
improve the color, contrast, and sharpness of flawed photos.
Note:
Fix Photo uses a sophisticated face recognition technology to optimize photos that include
faces. For this to work, both eyes and the nose must be visible in the subject’s face. If your
photo includes a face with an intentional color cast, such as a statue, you may want to turn off
Fix Photo to retain the special color effects.
6. Choose Portrait or Landscape orientation for your document or photo. (Choose Landscape
for printing envelopes.)
You can also:
Type setting that matches the paper you loaded.
.
35
Page 36

• Select different print layout settings
• Select advanced printing options.
• See a summary of your settings (click Show Settings).
• Return to the default settings (click Reset Defaults).
• Access the Epson product support website (click Online Support).
When you’re finished, you’re ready to print.
Change Print Layout
You can select a variety of sizing and layout options on the Page Layout tab.
.
For information on selecting settings, right-click the setting and click Help.
See also:
Select Basic Options
Select Advanced Options
Print Your Document or Photo
Select Advanced Options Click the Advanced tab on the top of the printer settings window to select Advanced options.
36
Page 37

1. Select the paper type setting
2. Select the print quality setting for your document or photo, such as Fast Economy for the
fastest printing or Best Photo or Photo RPM® (Max dpi) for the best print quality.
Note:
Available print quality settings depend on the selected paper type setting.
3. Select the paper size setting for the paper you loaded. User Defined and custom options are
also available so you can create a custom size.
4. If you’re printing borderless photos, select Borderless. For documents or photos with borders,
select Borders.
Note:
For borderless photos, make sure you loaded a compatible borderless paper size and type
5. Choose Portrait or Landscape orientation for your document or photo. (Choose Landscape
for printing envelopes.)
6. Select any of the Print Options you want for your document or photo.
7. Select Color Management options for finer control of the color in your document or photo.
You can also:
• Save all your selected settings for later use (click Save Settings and name the settings); to use
saved settings later, select them from the Custom Settings list or from the Shortcuts tab.
that matches the paper you loaded.
.
• Return to the default settings (click Reset Defaults).
• Select different print layout settings
.
37
Page 38

• Select basic printing options
• Access the Epson product support website (click Online Support).
When you’re finished, you’re ready to print.
Print Your Document or Photo
After selecting your print settings, click OK to save them and return to the Print window.
.
Click OK or Print to start printing.
During printing, you can check printing status.
Check Printing Status
During printing, you see this window showing the progress of your print job. It allows you to
control printing and check ink cartridge status.
• To cancel printing, click Stop.
• To see print jobs lined up for printing, click Print Queue.
38
Page 39

• To check ink status, click Check Ink Levels.
If you see an error during printing, see Solve Problems
Note:
You can also cancel printing by pressing the product’s Stop/Clear Settings button.
Change Default Print Settings
When you change your print settings from within a program, the changes apply only while you’re
printing at that time. If you want to select different settings to use in all your Windows programs,
you can change the default print settings.
1. Right-click the product icon in the Windows taskbar.
2. Select Printer Settings.
You see the printer settings window:
for solutions.
3. Select the print settings
You can still change the settings from within a program as needed.
Change Auto Update Options
Your printer software automatically checks for updates. You can use the Driver Update Setup
menu to change how often the software checks for updates or to completely disable this feature.
1. Right-click the product icon in the Windows taskbar and select Auto Update Settings.
you want to use as defaults in all your Windows programs.
39
Page 40

2. Select how often you want the software to check for updates or choose Never to completely
disable the automatic update feature.
Note:
If you choose to disable the automatic update feature, it’ s a good idea to periodically check for
product software updates.
3. Click Apply, then click OK to close the screen.
Change the Language
In Windows, you can choose English or French as the language of the printer software screens.
1. Right-click the product icon in the Windows taskbar and select Printer Settings.
2. Click the Maintenance tab.
You see the maintenance options.
40
Page 41

3. Select the Language you want to display.
4. Click OK to close the printer software screen. The language used on the printer software
screen changes to your selection the next time you access it.
Note:
You can also change the language
of the LCD display screen on your product.
Mac Printing (Mac OS X 10.5, 10.6, or 10.7)
You can print using any Mac OS®X printing program.
Follow the steps in these sections to print from your Mac:
Open Your File for Printing
Select Print Options
Select Page Setup Options
Change Print Layout
Manage Color
Print Your Document or Photo
Check Printing Status
See also:
Windows Printing
Mac Printing (Mac OS X 10.4)
41
Page 42

Open Your File for Printing
You can open a file for printing by either:
• Starting a printing program and opening the document or photo from it.
• Double-clicking the document or photo file icon on the screen.
When you’re ready to print, select print options
Select Print Options
After opening your file for printing, open the Print window to select your print options.
1. Open the File menu and select the print command in your application.
Note:
You may need to select a print icon on your screen, the Print option in the File menu, or
another command. See your application’s help utility for details.
2. Select your product as the Printer setting.
and then print.
3. Click the Show Details or arrow button to expand the Print window, if necessary.
You see the expanded printer settings window for your product.
42
Page 43

Note:
The Print window may look different depending on the version of Mac OS X you’re using.
4. Select the page setup options
Note:
If you don’t see these settings here, check for them in your application before printing. For
example, you may be able to select them by opening the File menu and selecting Page Setup.
5. Select any settings that are specific to the application you’re using. For example, if you’re
printing from Preview, you see the application settings shown above.
6. Select Print Settings from the pop-up menu.
.
43
Page 44

These settings appear on the screen:
7. Select the Media Type setting
Note:
The settings may not exactly match the name of your paper . See the paper type settings list for
details.
8. Select the Print Quality setting as necessary to select higher quality or faster print speed.
Available print quality settings depend on the selected Media Type setting.
9. Select Min, Mid, or Max to adjust the Expansion for borderless printouts.You may see white
borders on your printed photo if you use the Min setting.
44
that matches the paper you loaded.
Page 45

Note:
This option is available only when you choose a Paper Size setting of Sheet Feeder Borderless from the Print window
10. Select the Grayscale output checkbox to print using black ink only.
Note:
If you select Grayscale, some color ink will still be used for print head maintenance.
11. To flip the image you’re printing, click Mirror Image. (If you are printing on Epson Iron-on
Cool Peel Transfer paper, turn on Mirror Image.)
You can also:
• Select different print layout settings
• Select color management options
When you’re finished, you’re ready to print.
Select Page Setup Options
Depending on your application, you may be able to select the paper size and orientation settings
and adjust the size of your printed document or photo from the Print window.
.
Note:
If you don’t see these settings in the Print window, check for them in your application before
printing. For example, you may be able to select them by opening the File menu and selecting
Page Setup.
1. Select the Paper Size setting for the paper you loaded. A custom option is also available so
you can create a custom paper size.
If you want to print a borderless photo, select the paper size with a Sheet Feeder - Borderless
option.
Note:
For borderless photos, make sure you loaded a compatible borderless paper size and type.
2. Choose a portrait or landscape Orientation option for your document or photo. (Choose
landscape left for envelopes.)
Change Print Layout
You can select a variety of layout options from the Print window
1. Select Layout from the pop-up menu.
.
45
Page 46

2. Select the following as necessary:
• To print multiple pages on one sheet, select 2, 4, 6, 9, or 16 in the Pages per Sheet pop-up
menu.
• Select the order in which the multiple pages print on the sheet as the Layout Direction
setting.
• To print borders around each page, select one of the line settings in the Border pop-up
menu.
• To rotate the image you are printing 180°, click Reverse Page Orientation.
Manage Color
You can manage how colors are handled in your photos by selecting Color Options from the
Print window
Note:
If you want to use ColorSync to manage color, select Color Matching from the pop-up menu,
then select the profile for the paper you are using.
1. Select Color Options from the pop-up menu.
.
2. Select one of the following color options:
• Manual Settings lets you select a color Mode for printing the colors in photos and
graphics: EPSON Vivid or AdobeRGB.
46
Page 47

Expand Advanced Settings to remove red eyes (Fix Red Eye), adjust the midtone density
in the printout (Gamma) when using AdobeRGB, and to adjust Brightness, Contrast,
Saturation, and individual Cyan, Magenta, and Yellow color tones.
• Fix Photo automatically analyzes your photos and, if necessary, adjusts the brightness,
contrast, and saturation.
Expand Advanced Settings to select Scene Correction and choose Auto Correct, People,
Landscape, Night Scene, Sepia, or Gray. You can also select additional options for
Digital Camera Correction and Smooth Skin.
Note:
Fix Photo (or Auto Photo Correction) uses a sophisticated face recognition technology to
optimize photos that include faces. For this to work, both eyes and the nose must be
visible in the subject’s face. If your photo includes a face with an intentional color cast,
such as a statue, you may want to turn off Fix Photo to retain the special color effects.
• Off (No Color Adjustment) turns off printer software color adjustments so you can use
the color adjustments in your program only.
Print Your Document or Photo
After selecting your print settings
During printing, you can check printing status.
Check Printing Status
During printing, you can view the progress of your print job, control printing, and check ink
cartridge status.
1. Click your product icon when it appears in the Dock.
, click Print to start printing.
47
Page 48

2. Select from these options:
• To cancel printing, click the print job and click Delete.
• To pause printing for a specific print job, click the print job and click Hold. To resume
printing, click the print job marked “Hold” and click Resume.
• To pause printing for all print jobs, click Pause Printer.
• To check ink status, click Supply Levels.
Note:
You can also cancel printing by pressing the product’s Stop/Clear Settings button.
3. When you’re finished, close the window to exit the program.
If you see an error during printing, see Solve Problems
for solutions.
Mac Printing (Mac OS X 10.4)
You can print using any Mac OS X printing program.
Follow the steps in these sections to print from your Mac:
Open Your File for Printing
Select Page Options
Select Basic Print Options
Change Print Layout
Manage Color
Print Your Document or Photo
Check Printing Status
See also:
Windows Printing
Mac Printing (Mac OS X 10.5, 10.6, or 10.7)
Open Your File for Printing
You can open a file for printing by either:
• Starting a printing program and opening the document or photo from it.
• Double-clicking the document or photo file icon on the screen.
Note:
Before printing, make sure you added your product to the Printer Setup Utility.
When you’re ready to print, select the page options
Select Page Options
Open the Page Setup window to select your page options.
1. Open the File menu and select Page Setup.
48
and print options, and then print.
Page 49

2. Select your product as the Format for setting.
3. Select the Paper Size setting for the paper you loaded. A Custom option is also available so
you can create a custom size.
If you want to print a borderless photo, select the paper size with a Sheet Feeder - Borderless
option.
Note:
For borderless photos, make sure you loaded a compatible borderless paper size and type
4. Choose a portrait or landscape Orientation option for your document or photo. (Choose
landscape left for envelopes.)
5. Click OK to close the Page Setup window.
Now you can select your print settings and print.
Select Basic Print Options
After selecting your page options, open the Print window to select your print options.
1. Open the File menu and select Print.
.
49
Page 50

2. Select your product as the Printer setting.
3. Select Print Settings from the pop-up menu.
Note:
In certain programs, you may need to select Advanced before you can select Print Settings.
4. Select the Media Type setting
Note:
The settings may not exactly match the name of your paper . See the paper type settings list for
details.
5. Select the Print Quality setting as necessary to select higher quality or faster print speed.
Available print quality settings depend on the selected Media Type setting.
6. Select Min, Mid, or Max to adjust the Expansion for borderless printouts.You may see white
borders on your printed photo if you use the Min setting.
Note:
This option is available only when you chose a Paper Size setting of Sheet Feeder Borderless from the Print window
7. Select the Grayscale output checkbox to print using black ink only.
Note:
If you select Grayscale, some color ink will still be used for print head maintenance.
8. To flip the image you’re printing, click Mirror Image. (If you are printing on Epson Iron-on
Cool Peel Transfer paper, turn on Mirror Image.)
You can also:
• Select different print layout settings
that matches the paper you loaded.
.
• Select color management options
When you’re finished, you’re ready to print.
50
Page 51

Change Print Layout
You can select a variety of layout options from the Print window
1. Select Layout from the pop-up menu.
2. Select the following as necessary:
• To print multiple pages on one sheet, select 2, 4, 6, 9, or 16 in the Pages per Sheet pop-up
menu.
• Select the order in which the multiple pages print on the sheet as the Layout Direction
setting.
.
• To print borders around each page, select one of the line settings in the Border pop-up
menu.
Manage Color You can manage how colors are handled in your photos by selecting Color Management and
ColorSync options from the Print window
1. Select Color Options from the pop-up menu.
.
51
Page 52

2. Select one of the following color management methods:
• Manual Settings lets you select a color Mode for printing the colors in photos and
graphics: EPSON Vivid or Adobe RGB.
Expand Advanced Settings to remove red eyes (Fix Red Eye), adjust the midtone density
in the printout (Gamma) when using AdobeRGB, and to adjust Brightness, Contrast,
Saturation, and individual Cyan, Magenta, and Yellow color tones.
• ColorSync uses standard color profiles for your product and paper to help match image
colors. Select the ColorSync
®
conversion method and filters in the next step.
• Off (No Color Adjustment) turns off printer software color adjustments so you can use
the color adjustments in your program only.
3. If you selected ColorSync as the color management method, select ColorSync from the popup menu to continue customizing its use.
Print Your Document or Photo
After selecting your print settings, click Print to start printing.
During printing, you can check printing status.
Check Printing Status
During printing, you can view the progress of your print job, control printing, and check ink
cartridge status.
1. Click your product icon when it appears in the Dock.
2. Select from these options:
• To cancel printing, click the print job and click Delete.
• To pause printing, click the print job and click Hold.
52
Page 53

• To resume printing after pausing it, click a print job marked “Hold” and click Resume.
• To check ink status, click Supply Levels.
Note:
You can also cancel printing by pressing the product’s Stop/Clear Settings button.
3. When you’re finished, close the window to exit the program.
If you see an error during printing, see Solve Problems
for solutions.
53
Page 54

54
Page 55

Fax a Document
You can send faxes from the product’s control panel or from a Windows or Mac computer.
Before sending a fax, you should create a fax header and select your fax preferences. You can also
set up your product to automatically receive faxes or set it to ask for confirmation before
receiving a fax.
If you want to connect a telephone or answering machine to the same phone line as the product, be
sure to connect the phone and answering machine to the phone line first.
Note:
This product allows you to store names, telephone numbers, and fax data in its memory even
when the power is turned off. Make sure you restore all of the default settings if you give away or
dispose of the product. This will erase all of your network settings and fax data.
Connect a Phone or Answering Machine
Set Up Your Fax Features
Set Up a Speed Dial and Group Dial List
Send a Fax
Receive Faxes
Connect a Phone or Answering Machine
You can connect the product to a phone line, and connect a telephone or answering machine to the
same phone line so you can use it to make voice calls.
Note:
If you do not connect a telephone to your product, make sure to turn on Auto Answer . Otherwise,
you cannot receive faxes.
1. Connect the phone cable from the wall jack to the LINE port on the back of your product.
Telephone
wall jack
LINE cable
Note:
If you have a DSL Internet connection, you must plug a DSL filter into the wall jack or you
won’t be able to use the fax or telephone equipment as described below. Contact your DSL
provider for the necessary filter.
55
Page 56

Telephone
wall jack
DSL
modem
DSL filter
2. To use a telephone or answering machine, you need a second phone cable. Before connecting
the cable, remove the cap from the EXT. port on the back of your product, if present.
Cap
3. Connect one end of the cable to the telephone or answering machine, and connect the other
end to the EXT. port.
Telephone
wall jack
LINE cable
EXT. cable
Tip:
If you’ve connected an answering machine, you may need to adjust the number of rings
after
which the fax picks up. (The number of rings to answer must be one more than for the answering
machine.)
A phone or answering machine must be connected to the EXT. port on your product to detect an
incoming fax call when a phone is picked up. If a fax call comes in, and you pick up the phone
56
Page 57

without having a phone or answering machine connected to the EXT. port, the call will be
disconnected when you hang up and your product will not receive the fax.
In Auto Answer mode, if the incoming call is a fax and you pick up the phone or the answering
machine answers, the product automatically begins receiving the fax. If the other party is a caller ,
the phone can be used as normal or a message can be left on the answering machine.
Note:
Epson cannot guarantee compatibility with VoIP, cable phone systems, or fiber-optic digital
services such as FIOS.
Set Up Your Fax Features
Before sending or receiving faxes, you should create a fax header and select your fax preferences.
There are two ways to set up your fax features:
• Set up your fax features from the control panel.
• Set up your fax features from a Windows computer or a Mac computer.
Note:
If you leave the product unplugged for a long period of time, the date and time settings may get
lost and you must reset them.
Set Up Your Fax Features from the Control Panel
Change Your Country or Region
Enter the Header Information
Enter the Date and Time
Select Send/Receive Settings
Select Communication Settings
Print Fax Reports
Restore Fax Settings
Enter Numbers and Characters
Change Your Country or Region
Before using your product to fax documents, you need to select the region where you are using it.
1. Press the Menu button.
2. Press or to select Maintenance, then press OK.
3. Press or to select Country/Region, then press OK.
4. Press or to select your region, then press OK.
5. Press 1 to confirm your selection (or 2 to cancel).
Note:
When you change the region, the fax settings are restored to their defaults.
6. Press Menu to exit.
57
Page 58

Enter the Header Information
You should enter your name and phone number in the fax header before sending a fax so that
recipients can identify the origin of the fax.
Entering Your Sender Name
Enter Your Phone Number
Entering Your Sender Name
1. Press the Copy/Fax button, if necessary.
2. Press the Menu button.
3. Press or to select Fax Settings, then press OK.
4. Press or to select Header, then press OK.
5. Select Fax Header, then press OK. You see this screen:
6. Use the numeric keypad to enter your sender name or other header information. You can enter
up to 40 digits.
7. Press OK. You return to the Fax Header screen.
Enter Your Phone Number
1. From the Fax Header screen, press or to select Your Phone Number, then press OK.
You see this screen:
2. Use the numeric keypad to enter your phone number. You can enter up to 20 digits.
Note:
When entering a phone number, the * button does not work.
Use the # button to type the + symbol for an international number, such as +22 to dial a
number in India.
3. Press OK. You return to the Your Phone Number screen.
4. Press Menu to return to the Fax mode screen.
Enter the Date and Time
58
Page 59

1. Press the Menu button.
2. Press or to select Maintenance, then press OK.
3. Press or to select Daylight Saving Time, then press OK.
4. Select Summer if your region uses Daylight Saving Time (DST) and it’s currently in effect
(spring through summer). Otherwise select Winter.
Note:
When you change the setting from Winter to Summer, the clock is automatically set ahead
by one hour. When you change it from Summer to Winter, the clock is set back one hour.
5. Press OK.
6. Press or to select Date/Time, then press OK. You see this screen:
7. Press or to select the date display format, then press OK.
8. Use the numeric keypad
9. Press or to select a 12-hour or 24-hour display, then press OK.
10. Use the numeric keypad to set the time.
11. If you selected 12h, press or to select AM or PM.
12. Press OK.
13. Press Menu to return to the Fax mode screen.
Select Send/Receive Settings
You can select the paper, sizing, and quality settings for your incoming and outgoing faxes, and
choose the printed reports you want.
1. Press the Copy/Fax button, if necessary.
2. Press the Menu button.
3. Press or to select Fax Settings, then press OK.
to change the date, then press OK.
4. Press or to select Send/Receive Setup, then press OK.
5. To adjust any of the following settings, press OK:
• Quality: sets the scan resolution and print quality of incoming and outgoing faxes. Select
Fine for small print or detailed line art, Photo for pictures, or Standard for basic faxes.
• Contrast: sets the contrast when scanning and printing. Positive values make the image
darker, negative values make the image lighter.
59
Page 60

• Paper Size: indicates the size of paper loaded in the product for printing.
• Auto Reduction: indicates whether large incoming faxes are reduced to fit on the selected
Paper Size (On), or printed at their original size on multiple sheets (Off).
• Last Transmission Report: indicates when the product prints a report on the last
transmitted fax. Select Off to turn off report printing, On Err or to print reports only when
an error occurs, or On Send to print reports for every fax you send.
Press OK when you’re done.
6. When finished, press the Menu button to return to the Fax mode screen.
Select Communication Settings
Select these settings to customize how your product receives and transmits faxes.
1. Press the Copy/Fax button, if necessary.
2. Press the Menu button.
3. Press or to select Fax Settings, then press OK.
4. Press or to select Communication, then press OK.
5. To adjust any of the following settings, press OK:
• DRD: can be used with a “Distinctive Ring Service” provided by your phone company.
With this service, you can have two or more phone numbers assigned to the same line,
with each number given a distinctive ring. For example, if you have a phone number for
personal calls that’s set to ring normally (with a single ring) and a fax number set for a
double ring, select Double as the DRD setting. Then the fax system picks up only those
calls with a double ring. (All is the default setting.)
• ECM: indicates whether you use Error Correction Mode to automatically request
retransmission of fax data that is received with detected errors. (On is the default setting.)
• V.34: indicates the speed at which you transmit faxes. On is 33.6 Kbps and Off 14.4 Kbps.
• Rings to Answer: indicates the number of rings that must occur before the product
automatically receives a fax. You may want to change this setting if you have connected a
telephone or answering machine. (4 is the default setting.)
• Dial Tone Detection: when this setting is On, the product dials automatically when it
detects a dial tone. It may not be able to detect a dial tone when connected to a PBX
(Private Branch Exchange) or T A (Terminal Adapter) system. In that case, turn this setting
off.
Press OK when you’re done.
6. When finished, press the Menu button to return to the Fax mode screen.
Print Fax Reports
60
Page 61

You can print the following fax reports:
• Fax Log: prints a report of recent fax transmissions.
• Last Transmission: prints a report of your last fax transmission.
• Speed Dial List: prints a list of your speed dial entries.
• Group Dial List: prints a list of your group dial entries.
• Reprint Faxes: reprints your most recent incoming fax.
• Protocol Trace: prints a protocol trace of your last fax transmission.
Note:
You can have the product automatically print a fax report for the last transmitted fax. Select On
Send as the Last Transmission Report setting in the Send/Receive Setup
1. Press the Copy/Fax button, if necessary.
2. Press the Menu button.
3. Press or to select Fax Settings, then press OK.
menu.
4. Select Print Report, then press OK.
5. Select a report type and press OK.
Note:
Selecting Fax Log will give you the option to Print or View. Select Print, press , and press
the Color button to print the report.
6. Make sure letter-size paper is loaded in the product, then press the Color button to print the
report.
Restore Fax Settings
You can restore your fax settings to their original default options.
1. Press the Copy/Fax button, if necessary.
2. Press the Menu button.
3. Press or to select Restore Default Settings, then press OK.
4. Select one of these options and press OK to restore the default settings you selected:
• Reset Fax Send/Receive Settings: Restores the Send/Receive Setup and Communication
default settings.
• Reset Fax Data Settings: Restores the Speed Dial Setup, Group Dial Setup, Header, and
Fax Log default settings.
• Reset Wi-Fi Settings: Restores all wireless network default settings.
61
Page 62

• Reset All except Wi-Fi & Fax Settings: Restores all default settings except options for
the wireless network and fax settings.
• Reset All Settings: Restores all settings.
5. Press the 1 key to confirm your selection or the 2 key to cancel it.
6. Press the Menu button to return to the Fax mode screen.
Enter Numbers and Characters
When entering phone numbers and text in Fax mode, follow these guidelines:
• To enter phone numbers
Use the numeric keypad. Press Redial/Pause to insert a pause symbol (-) when a brief pause
is required during dialing.
• To enter text
Press a keypad button repeatedly to switch between the uppercase or lowercase letters, or
numbers available on it. Press 1 to enter these special characters: ! # % & ’ ( ) * + , - . / : ; = ?
@ ~.
• To move the cursor, add a space, or delete a character:
Button Function
or
Auto Answer Inserts a space and moves the cursor one
Speed Dial/Group Dial Deletes a character and moves the cursor
Set up Your Fax Features in Windows
Before sending or receiving faxes, you should create a fax header and select basic fax preferences.
1. Click or Start, > All Programs or Programs > Epson Software > FAX Utility.
2. Click the Fax Settings for Printer button.
Moves the cursor to the left or right.
character to the right.
one space to the left.
62
Page 63

3. Select your product in the Printer drop-down list, then click Fax Settings.
4. Follow the prompts on the screen to enter your fax header information and select basic fax
settings.
Note:
For detailed information on entering your fax header information or selecting settings, click
Help.
Set Up Your Fax Features in Mac OS X
Before sending or receiving faxes, you should create a fax header and select basic fax preferences.
1. Do one of the following:
63
Page 64

• Mac OS X 10.6/10.7: In the Apple menu or the Dock, select System Preferences. Select
Print & Scan or Print & Fax, select the FAX option for your product, and select Options
& Supplies. Select Utility and select Open Printer Utility.
• Mac OS X 10.4/10.5: In the Apple menu or the Dock, select System Preferences. Select
Print & Fax, select the FAX option for your product, and select Open Print Queue.
Select Utility.
2. Double-click FAX Utility.
3. Select your FAX product in the Printer pop-up menu, then click Fax Settings.
4. Follow the prompts on the screen to enter your fax header information and select basic fax
settings.
Note:
For detailed information on entering your fax header information or selecting settings, click
the ?.
Set Up a Speed Dial and Group Dial List
You can create a speed dial list of fax numbers so you can quickly select them for faxing. You can
also set up a group dial list to automatically send the same fax message to multiple speed dial
numbers.
There are two ways to set up a speed dial and group dial list:
• Set up a speed dial and group dial list from the control panel.
• From your W
Note:
In case the speed/group dial list is lost due to a product malfunction, we recommend that you back
up the data whenever you update the list.
Set Up a Speed Dial and Group Dial List from the Control Panel
indows or Mac computer.
64
Page 65

You can create up to 60 combined speed dial and group dial entries, add names to identify the
recipients, and print a speed dial or group dial list for easy reference.
Create a Speed Dial Entry
Edit a Speed Dial Entry
Delete a Speed Dial Entry
Print Your Speed Dial List
Set Up Your Group Dial List
Create a Speed Dial Entry
1. Press the Copy/Fax button, if necessary.
2. Press the Menu button.
3. Press or to select Fax Settings, then press OK.
4. Press or to select Speed Dial Setup, then press OK.
5. Press or to select Create, then press OK. You see the available entries.
6. Select or type the number of the entry you want to add, then press OK. You can have up to 60
entries.
7. Use the numeric keypad to enter the fax number (up to 64 digits), then press OK.
8. Use the numeric keypad
then press OK. You return to the Create menu.
To add another speed dial entry, press OK and repeat the steps above.
9. Press Menu to return to the Fax mode screen.
Edit a Speed Dial Entry
1. Press the Copy/Fax button, if necessary.
2. Press the Menu button.
3. Press or to select Fax Settings, then press OK.
to enter a name (up to 30 characters) to identify the speed dial entry,
65
Page 66

4. Press or to select Speed Dial Setup, then press OK.
5. Press or to select Edit, then press OK. You see your list of speed dial entries:
6. Select or type the number of the entry you want to edit, then press OK.
7. Use the numeric keypad
8. Use the numeric keypad to edit the name for the speed dial entry, then press OK.
To edit another speed dial entry, press OK and repeat the steps above.
Delete a Speed Dial Entry
1. Press the Copy/Fax button, if necessary.
2. Press the Menu button.
3. Press or to select Fax Settings, then press OK.
4. Press or to select Speed Dial Setup, then press OK.
5. Press or to select Delete, then press OK. You see your list of speed dial entries:
to edit the phone number, then press OK.
6. Select or type the number of the entry you want to delete, then press OK.
7. At the confirmation screen, press the 1 key to delete the entry or press the 2 key to cancel.
8. Press Menu to return to the Fax mode screen.
Print Your Speed Dial List
1. Press the Copy/Fax button, if necessary.
2. Press the Menu button.
3. Press or to select Fax Settings, then press OK.
4. Select Print Report, then press OK.
66
Page 67

5. Press or to select Speed Dial List.
6. Make sure letter-size paper is loaded in the product, then press the Color button to print the
list.
Set Up Your Group Dial List
The group dial list allows you to easily send the same fax message to many fax numbers in your
speed dial list. You can create
up to 60 entries (combined with speed dial entries), with up to 30
entries in a group. You can also edit or delete entries, and print the list for easy reference.
Note:
You can also set up a group dial list in Windows.
Create a Group Dial Entry
1. Press the Copy/Fax button, if necessary.
2. Press the Menu button.
3. Press or to select Fax Settings, then press OK.
4. Press or to select Group Dial Setup, then press OK.
5. Press or to select Create, then press OK. You see the available entries.
6. Select or type the number of the entry you want to add, then press OK.
7. Use the numeric keypad
to enter a name (up to 30 characters) to identify the group dial entry,
then press OK.
8. Select or type the number of a speed dial entry and press * to add the entry to the group dial
list.
Note:
Press * again to cancel adding the speed dial entry that you selected.
9. Repeat the steps above to add additional speed dial entries to the group.
10. When finished, press OK.
11. Press Menu to return to the Fax mode screen.
Edit a Group Dial Entry
1. Press the Copy/Fax button, if necessary.
2. Press the Menu button.
67
Page 68

3. Press or to select Fax Settings, then press OK.
4. Press or to select Group Dial Setup, then press OK.
5. Press or to select Edit, then press OK.
6. Select or type the number of the entry you want to edit, then press OK.
7. Follow the prompts on the screen to edit the group dial list.
8. When finished, press OK.
Delete a Group Dial Entry
1. Press the Copy/Fax button, if necessary.
2. Press the Menu button.
3. Press or to select Fax Settings, then press OK.
4. Press or to select Group Dial Setup, then press OK.
5. Press or to select Delete, then press OK.
6. Select or type the number of the entry you want to delete, then press OK.
7. At the confirmation screen, press the 1 key to delete the entry or press the 2 key to cancel.
8. Press Menu to return to the Fax mode screen.
Print Your Group Dial List
1. Press the Copy/Fax button, if necessary.
2. Press the Menu button.
3. Press or to select Fax Settings, then press OK.
4. Select Print Report, then press OK.
5. Press or to select Group Dial List.
6. Make sure letter-size paper is loaded in the product, then press the Color button to print the
list.
68
Page 69

Set Up a Speed Dial and Group Dial List in Windows
You can create up to 60 combined speed dial and group dial entries, import fax numbers from the
Windows Address Book, and back up fax numbers stored in the product’s phone book.
1. Click or Start, > All Programs or Programs > Epson Software > FAX Utility.
2. Click the Fax Settings for Printer button.
3. Select your product in the Printer drop-down list, then click Speed Dial/Group Dial List.
4. To add a new group dial or speed dial entry, select a blank entry and click .
69
Page 70

Note:
To edit an existing entry, select the entry and click . To delete an entry, select the entry and
click .
5. Do one of the following:
• To create a speed dial entry, select Speed Dial, enter a name and fax number for the
contact, then click OK.
• To create a group dial entry, select Group, enter a name for the group, select the
checkboxes for the numbers you want to add, then click OK.
6. When you’re done, click to save the speed and group dial entries to the product’s phone
book.
Set Up a Speed Dial and Group Dial List in Mac OS X
You can create up to 60 combined speed dial and group dial entries, import fax numbers from
your Mac OS X Address Book, and back up fax numbers stored in the product’s phone book.
1. Do one of the following:
• Mac OS X 10.6/10.7: In the Apple menu or the Dock, select System Preferences. Select
Print & Scan or Print & Fax, select the FAX option for your product, and select Options
& Supplies. Select Utility and select Open Printer Utility.
• Mac OS X 10.4/10.5: In the Apple menu or the Dock, select System Preferences. Select
Print & Fax, select the FAX option for your product, and select Open Print Queue.
Select Utility.
70
Page 71

2. Double-click Fax Utility, then select your FAX product in the Printer list.
3. To import from your address book, click the import icon.
To add a new group dial or speed dial entry, double-click a blank entry.
Note:
To edit an existing entry, select it and change the information as desired. To delete an entry,
select it and press the Delete key on your keyboard.
4. Do one of the following:
• To create a speed dial entry, select Speed Dial, enter a name and fax number for the
contact, then click OK.
• To create a group dial entry, select Group Dial, enter a name for the group, click the
checkboxes for the numbers you want to add, then click OK.
71
Page 72

5. When you’re done, click the Send Speed Dials icon to save the speed and group dial
entries to the product’s phone book.
Send a Fax
There are two ways to send a fax:
• From the product’s control panel
• From a Windows or Mac computer.
Send a Fax from the Control Panel
You can send your fax in the following ways:
• By manually
• By selecting an entry from your speed dial
• By using a connected telephone to dial the number.
Note:
If the recipient’s fax machine prints only in black and white, your fax data is automatically
sent in black and white even if you select color.
Manually Enter a Fax Number
1. Place your original on the scanner glass or in the Automatic Document Feeder.
2. Press the Copy/Fax button, if necessary.
entering a fax number or redialing the previous fax number.
.
or group dial list.
3. Do one of the following:
• Use the numeric keypad
• Press Redial/Pause to redial the last fax number you used. The last fax number is
displayed on the screen.
4. To change any of the fax settings, press Menu.
Fax Settings
• Quality: to increase the scanning resolution of the transmitted document.
• Contrast: to change the contrast of the transmitted document.
• Send Fax Later: to specify what time you want to send your fax. (You cannot send
another fax job until the delayed fax has been transmitted or cancelled.)
• Fax Mode: to select Sending or Poll to Receive mode. Use Poll to Receive mode to
receive a fax from another fax machine to which you have dialed (such as a fax
information service).
Press Menu when done selecting the settings.
72
to enter the fax number. You can enter up to 64 digits.
Page 73

5. Press the B&W or Color button to begin scanning your document.
To cancel faxing, press Stop/Clear Settings at any time.
6. Depending on where you placed your original, the following happens:
• If you are faxing with the Automatic Document Feeder, your document is automatically
scanned and faxed.
• If you are faxing from the scanner glass, you see this screen after the first page is scanned:
If you need to fax additional pages, place your original on the scanner glass or in the
Automatic Document Feeder. Then press 1 to continue.
If you do not need to fax another page, press 2. Your document is faxed.
Note:
If the fax number is busy or there is some other connection problem, you see a redialing
screen and the fax number is redialed after one minute. Wait for the redial, or press Redial/
Pause to redial immediately.
When faxing is complete, you see this screen again:
Select a Speed Dial/Group Dial Entry
1. Place your original on the scanner glass or in the Automatic Document Feeder.
2. Press the Copy/Fax button, if necessary.
3. Do one of the following to select a speed dial/group dial entry:
• Press the Speed Dial/Group Dial button. Select or type the number of the speed dial/
group dial entry you want to use, then press OK. You see the screen below:
Press the 1 key to enter another number, or press the 2 key to continue with the selection
made.
73
Page 74

• Press a one-touch dial button to select one of the first five speed dial/group dial entries,
then press OK. Press the 1 key to enter another number , or press the 2 key to continue with
the selection made.
4. To change any of the fax settings, press Menu.
Fax Settings
• Quality: to increase the scanning resolution of the transmitted document.
• Contrast: to change the contrast of the transmitted document.
• Send Fax Later: to specify what time you want to send your fax. (You cannot send
another fax job until the delayed fax has been transmitted or cancelled.)
• Fax Mode: to select Sending or Poll to Receive mode. Use Poll to Receive mode to
receive a fax from another fax machine to which you have dialed (such as a fax
information service).
Press Menu when done selecting the settings.
5. Press the B&W or Color button to begin scanning your document.
To cancel faxing, press Stop/Clear Settings at any time.
Note:
If you use the group dial list, only B&W is available.
6. Depending on where you placed your original, the following happens:
• If you are faxing with the Automatic Document Feeder, your document is automatically
scanned and faxed.
• If you are faxing from the scanner glass, you see this screen after the first page is scanned:
If you need to fax additional pages, place your original on the scanner glass or in the
Automatic Document Feeder. Then press 1 to continue.
If you do not need to fax another page, press 2. Your document is faxed.
Note:
If the fax number is busy or there is some other connection problem, you see a redialing
screen and the fax number is redialed after one minute. Wait for the redial, or press Redial/
Pause to redial immediately.
When faxing is complete, you see this screen again:
Use Your Telephone to Dial the Number
74
Page 75

1. Place your original on the scanner glass
2. Press the Copy/Fax button, if necessary.
If you’ve connected a telephone to the product, you can use it to dial the fax number.
3. Dial the number from the connected phone. You see this screen:
Press the 1 key to confirm communication with the receiving fax machine.
4. To change any of the fax settings, press Menu.
Fax Settings
• Quality: to increase the scanning resolution of the transmitted document.
• Contrast: to change the contrast of the transmitted document.
or in the Automatic Document Feeder.
• Send Fax Later: to specify what time you want to send your fax. (You cannot send
another fax job until the delayed fax has been transmitted or cancelled.)
• Fax Mode: to select Sending or Poll to Receive mode. Use Poll to Receive mode to
receive a fax from another fax machine to which you have dialed (such as a fax
information service).
Press Menu when done selecting the settings.
5. Press the B&W or Color button to begin scanning your document.
To cancel faxing, press Stop/Clear Settings at any time.
6. Depending on where you placed your original, the following happens:
• If you are faxing with the Automatic Document Feeder, your document is automatically
scanned and faxed.
• If you are faxing from the scanner glass, you see this screen after the first page is scanned:
If you need to fax additional pages, place your original on the scanner glass or in the
Automatic Document Feeder. Then press 1 to continue.
If you do not need to fax another page, press 2. Your document is faxed.
75
Page 76

Note:
If the fax number is busy or there is some other connection problem, you see a redialing
screen and the fax number is redialed after one minute. Wait for the redial, or press Redial/
Pause to redial immediately.
When faxing is complete, you see this screen again:
You can now hang up the phone.
Send a Fax in Windows
You can send a fax from a printing program in Windows.
1. Open the file you want to fax, and select the print command.
Note:
You may need to select a print icon on your screen, the Print option in the File menu, or
another command. See your application’s help utility for details.
2. Select your product with the (FAX) option.
3. To change the Paper Size, Orientation, Color, Image Quality, or Character Density settings,
click the Preferences or Properties button.
Note:
If you see a Setup, Printer, or Options button, click it. Then click Preferences or Properties
on the next screen.
For more information about selecting fax print settings, click Help.
76
Page 77

4. Select the Page Range as necessary. (Leave the Number of copies set to 1.)
5. Click Print.
If you’re faxing for the first time, you see a window like this one:
Enter your sender information so that recipients can identify the origin of the fax. Then click
OK to save the sender information.
6. Input a fax number or set up a phone book of numbers for future use, then click Next.
Note:
For detailed instructions on using the Epson FAX Utility, click Help.
7. Add a cover sheet, if desired. Select a cover sheet style, enter your subject and comment
information, then click Next.
8. Click Send to transmit your fax.
Send a Fax in Mac OS X
You can send a fax from a printing application on your Mac.
1. Open the file you want to fax and select the print command in your application.
Note:
You may need to select a print icon on your screen, the Print option in the File menu, or
another command. See your application’s help utility for details.
2. Select your FAX product as the printer.
77
Page 78

3. Select the pages you want to fax. (Leave the number of Copies set to 1.) You can fax up to 100
pages, including the cover sheet.
Note:
For more information about selecting fax print settings, click the ?.
4. Select Recipient Settings from the pop-up menu and do one of the following to choose your
recipient(s):
• Choose a name or group from the Recipient List
• Enter a new name and fax number and then click the + button.
• Click the Address icon and select a recipient from your address book.
5. Select Fax Settings from the pop-up menu and select the Color and Image Quality settings
you want for the fax.
78
Page 79

6. Click Fax.
Note:
For detailed instructions on using the Epson FAX Utility, click the ?.
If you need to cancel sending the fax, press Stop/Clear Settings on the product’s control
panel.
Receive Faxes
The product automatically receives and prints faxes when you turn on Auto Answer mode. You
can also set it to receive faxes manually if you connected the product and a phone or answering
machine to a phone line that also receives voice calls. Then you can check for a fax tone from the
sending fax machine and press a button on the product to receive the fax, or allow your answering
machine to determine if the call is an incoming fax.
Automatically Receive a Fax
Manually Receive a Fax
Note:
You can also use Poll to Receive mode to receive a fax from another fax machine to which you
have dialed (such as a fax information service).
Before receiving faxes, make sure you load plain paper
matches the size of paper you’ve loaded.
If the incoming fax pages are larger than the paper size you loaded, the fax size is reduced to fit or
printed on multiple pages, depending on the Auto Reduction setting you select.
Note:
If you run out of paper during printing, you see the error message Paper out. Load more paper
and press the OK button so printing can continue.
Automatically Receive a Fax
The product tells you whether Auto Answer mode is turned on by the light next to the
Auto Answer button:
and select the Paper Size setting that
79
Page 80

Auto Answer light
To change the answer mode, press the Auto Answer
button. The light stays on when Auto
Answer mode is turned on. Press the button again to manually receive faxes.
If you connected a telephone with an answering machine, you can set the number of rings before
the product picks up. For example, if your answering machine is set to pick up on the fourth ring,
you can set the product to pick up on the fifth ring. If the incoming call is a fax and you pick up
the phone or the answering machine answers, the product automatically begins receiving the
transmission. If the incoming call is a caller, the phone can be used as normal or a message can be
left on the answering machine.
If your phone company provides Distinctive Ring Service, you can also have a second phone
number dedicated to receiving faxes that’s on the same line as the one you use for making voice
calls. Then set the appropriate DRD setting (a double ring tone, for example).
Manually Receive a Fax
T o receive faxes manually, turn off Auto Answer mode. If you connected the product and a phone
or answering machine to a phone line that also receives voice calls, then you can press a button on
the product to receive the fax, or allow your answering machine to determine if a call is an
incoming fax.
1. When your telephone rings, lift the phone off the hook. You see this screen:
2. Press 2 to select receive mode.
3. To receive the fax transmission, press 1.
4. When the fax is done transmitting, you see the previous screen again. Replace the phone on
the hook.
5. Press OK to print the fax.
80
Page 81

Transfer Photos To/From a Memory Card
You can use the product to transfer photos between your memory card and computer. You can also
back up your memory card to an external storage device.
Follow the instructions in these sections to transfer photos to or from a memory card:
Insert a Memory Card
Transfer Photos Between a Memory Card and Your Computer
Remove a Memory Card
See also:
Compatible Memory Cards
Compatible Memory Cards
You can use the following types of memory cards:
xD-Picture Card
xD-Picture Card Type M
xD-Picture Card Type M+
xD-Picture Card Type H
TM
SD
SDHC
Memory Stick
TM
TM
Memory Stick PRO
MagicGateTM Memory
Stick
The following cards require an adapter. Consult your documentation for any special instructions
on using them.
miniSD
TM
miniSDHC
microSD
microSDHC
81
Page 82

Memory Stick Duo
Memory Stick PRO Duo
TM
TM
Memory Stick PRO-HG Duo
MagicGate Memory Stick Duo
TM
Memory Stick Micro
TM
Make sure the images stored on your card meet these requirements:
File format JPEG with the Exif version 2.3 standard
Image size 80 × 80 pixels to 9200 × 9200 pixels
Number of files Up to 999
Insert a Memory Card
Make sure your memory card and the files on it are compatible with your product.
1. Insert your card into the left or right slot as shown below. Insert only one card at a time.
Caution:
If your memory card requires an adapter, attach it before inserting the card into the slot;
otherwise, the card might get stuck.
Memory card
access light
2. The memory card access light flashes, then stays lit. Now you can transfer photos between
your memory card and your computer or print your photos.
Caution:
Do not remove a card or turn off the product when the memory card access light is flashing, or
you may lose photos on the card. See Remove a Memory Card
.
See also:
Transfer Photos Between a Memory Card and Your Computer
82
Page 83

Remove a Memory Card
Transfer Photos Between a Memory Card and Your Computer
Before you transfer photos, make sure you installed the software that came with your product and
connected it to your computer or network. See the Start Here sheet for instructions.
Note:
If you are going to transfer files from your computer to your memory card, make sure the write
protect switch on your memory card is set to allow writing to the card.
1. Insert a memory card in one of the memory card slots.
2. Access the memory card files from your computer:
Windows:
Click or Start, then click Computer or My Computer. Double-click the removable
disk icon for the memory card.
Mac OS X:
If your product is connected to your computer with a USB cable, your memory card opens as
a drive on your desktop. Double-click it and continue with step 3.
If you installed the product on a network, do one of the following:
Mac OS X 10.5/10.6/10.7:
Double-click the hard drive icon on your desktop or select Computer from the Go menu,
click your product in the Shared section of the sidebar (you may need to widen the
sidebar to see the name), then double-click the MEMORYCARD icon.
Mac OS X 10.4:
Double-click the hard drive icon on your desktop, click Network in the sidebar, then
double-click your product (it may be located within a folder with your network's name)
and click OK. Double-click the MEMORYCARD icon that appears on your desktop.
3. A folder opens on your computer, showing the contents of your memory card. Now you can
transfer your photos:
• To transfer photos to your computer, select them in your memory card folder and drag
them to the desired location on your computer, such as the desktop or a folder.
• To transfer photos from your computer to the memory card, select the photos on your
computer and drag them to the memory card folder.
4. Before you remove the memory card or turn off the product, make sure the memory card
access light is not flashing. If your product is connected to your computer by a USB cable,
prepare the card for removal (not necessary when accessing the memory card over a network).
Remove a Memory Card
Follow these steps to remove your card:
83
Page 84

Memory card
access light
Caution:
Do not remove a card or turn off your product when its access light is flashing, or you may lose
photos or files on the card.
1. Make sure the memory card access light is not flashing.
2. If the product is connected to your computer by a USB cable (not a network connection), do
one of the following:
• Windows:
Right-click the name of your card (removable disk) in Computer, My Computer, or
Windows Explorer, and select Eject.
• Mac OS X:
Drag the removable disk icon from your desktop into the trash.
3. Pull the memory card straight out of its slot.
84
Page 85

Scan to Your Computer
You can scan original documents and photos and save them as digital files on your computer.
Note:
Epson Scan is not available for Mac OS X 10.6 or OS X 10.7. See Scanning With Mac
OS X 10.6/10.7.
Scan From Your Computer
Your product allows you to scan an image to your computer. Before using this feature, make sure
you’ve installed the product software and connected the product to your computer or network.
Note:
Epson Scan is not available for Mac OS X 10.6 or OS X 10.7. For scanning instructions, see
Scanning With Mac OS X 10.6/10.7.
Follow the instructions in these sections to scan using Epson Scan:
Start Epson Scan
Select a Scan Mode
Scan in Office Mode
Scan in Home Mode (Semi-Automatic)
Scan in Professional Mode (Fully Manual)
You can also open a TW AIN-compatible scanning program and scan your images directly into the
program window for editing and printing.
Follow the instructions in these sections to perform special scanning tasks:
Restore Color as You Scan
Scan to a PDF File
View and Print Scanned Images
Convert a Document to Editable Text (OCR)
Start Epson Scan
Before you start Epson Scan, place your original
Document Feeder. Then start Epson Scan in one of the following ways:
• Windows:
Double-click the EPSON Scan icon on your Windows desktop.
• Mac OS X:
Open the Applications folder, then the Epson Software folder, and click the EPSON Scan
icon.
on the scanner glass or in the Automatic
85
Page 86

Note:
You can also launch Epson Scan
from any TWAIN-compliant application, such as Adobe®
Photoshop®.
Now you can select a scan mode.
Scan From Another Program
Before you start, place your original on the scanner glass or in the Automatic Document Feeder.
1. Start the program you want to use for scanning, and select its scanning option. (See your
scanning program help for instructions.)
Note:
In some programs, you must select your product as the “source” first. If you see a Select
Source option, choose it and select your product.
2. Select your product. Epson Scan starts automatically.
Note:
With Windows, do not choose a WIA option for your product; it will not work correctly.
Now you can select a scan mode
.
Select a Scan Mode
86
Page 87

Epson Scan provides a choice of scan modes with different levels of automatic settings. Select the
mode from the Mode box:
For instructions on scanning in a mode, click the mode name below:
Home Mode
Restoration, Dust Removal, and Backlight Correction options are available. You cannot scan with
the Automatic Document Feeder in this mode.
Office Mode lets you quickly scan text documents and adjust them on a preview screen. Unsharp
Mask, Text Enhancement, and Descreening options are available. Epson Scan opens in this mode
the first time you use it. You can use the Automatic Document Feeder when scanning in this
mode.
Professional Mode lets you manually customize all available settings, and preview and size your
scanned image. Unsharp Mask, Descreening, Color Restoration, Backlight Correction, Dust
Removal, and Auto Exposure options are available. You can use the Automatic Document Feeder
in this mode.
Scan in Office Mode
Use Office Mode to quickly select settings for scanning text documents.
1. Start Epson Scan and make sure Office Mode is selected as the Mode setting.
lets you select some settings, and preview and size your scanned image. Color
87
Page 88

2. Select whether your original is Color, Grayscale, or Black&White as the Image Type.
3. Select where you placed your originals as the Document Source setting. Select Auto Detect to
locate the originals automatically, ADF (Automatic Document Feeder), or Scanner Glass.
4. Select the Size of the originals and their Orientation.
5. Select the desired scanning Resolution.
Select a resolution
Resolution is indicated in dpi (dots per inch):
Select your Resolution based on how you will use the scanned image:
E-mail, view on a computer screen, or post on the web: 96 to 150 dpi
Print or convert to editable text (OCR): 300 dpi
Fax: 200 dpi
6. Click the Preview button. Epson Scan previews your document and displays it in the Preview
window.
88
Page 89

If you’re using the Automatic Document Feeder, the preview scans the first page and ejects it.
Place the page back on top of the other pages and reload
them in the feeder.
7. If desired, you can draw a marquee (or box) around the area you want to scan in the Preview
window.
8. Adjust the image quality, if necessary.
9. Click Scan to scan and view the image.
Your scanned image file is shown in Windows Explorer or Mac OS X Finder.
Now you can view and print the image.
Select Scanned Image Area
You can adjust the scanned image area by creating and/or moving the dotted line (marquee)
outlining the scan area:
1. Click the auto locate icon to create a marquee.
Marquee
2. To move a marquee, click inside the marquee and drag it where you want it.
3. To resize a marquee, place the cursor over a marquee edge or corner, then click and drag the
edges where you want them.
Tip:
To retain the marquee width/height proportions, hold the Shift key as you resize the marquee.
89
Page 90

4. You can create up to 50 marquees at a time. Click the copy marquee icon to copy existing
marquees or click the delete marquee icon to delete the selected marquee.
Adjust Image Quality
You can adjust exposure, brightness, and other image quality settings before you scan to improve
your results. Before making adjustments, be sure to click the image or marquee for the area you
want to adjust.
Setting Description
Unsharp Mask Turn on to make the edges in different areas of your image clearer. Turn
off to leave softer edges.
Descreening Removes the rippled pattern that can appear in subtly shaded image areas,
such as in skin tones. Also improves results when scanning magazine or
newspaper images. The results of descreening do not appear in the
preview image, only in your scanned image.
Text
Enhancement
Adjusts the level at which the black areas in text and line art are
delineated, improving text recognition in OCR programs. Check the
Image Option box and then select the setting.
Auto Area
Segmentation
Makes grayscale images clearer and text recognition more accurate by
separating the text from the graphics. (Available only when you select
Black&White as the Image T ype.) Check the Image Option box and then
select the setting.
Color Enhance Enhances red, green, or blue shades in the scan. (Available when you
select Grayscale or Black&White for the Image Type setting.) Check the
Image Option box and then select the setting.
Brightness Adjusts the overall image lightness and darkness.
Contrast Adjusts the difference between the light and dark areas of the overall
image.
Scan and View Image
After selecting your scan settings, you’re ready to scan and view your scanned images.
90
Page 91

1. Click Scan.
Note:
If you started your scan from within a TWAIN-compatible scanning program, your scanned
images open in the program window. Click Close to exit Epson Scan.
2. Select the scan file settings
3. Click OK.
4. Your scanned image file is shown in Windows Explorer or Mac OS X Finder.
5. Now you can view and print your scanned images
however you like.
Scan in Home Mode (Semi-Automatic)
Start Epson Scan
and make sure Home Mode is selected as the Mode setting.
you want to use from the window that appears.
, attach them to an e-mail, or use them
91
Page 92

Follow the instructions in these sections to select settings as necessary for your type of original:
Select Document or Image Type
Select Scan File Destination
Select Scan Quality (Resolution)
Preview
Select Scanned Image Area
Adjust Image Quality
Scan and View Image
See also:
Scan in Office Mode
Scan in Professional Mode (Fully Manual)
Select Document or Image Type
92
Page 93

1. Select the type of original you’re scanning as the Document Type, such as Photograph or
Text/Line Art.
2. Select whether your original is Color, Grayscale, or Black&White as the Image Type.
3. Now select the Destination setting
Select Scan File Destination
.
1. Select the way you plan to use your scanned image as the Destination. The Resolution setting
is selected based on the Destination you choose.
Screen/Web: For images you will e-mail, view on a computer screen, or post on the web.
Printer: For images you will print or documents you are converting to editable text (OCR).
Other: For images that you want to select a custom resolution
2. Now you can customize the resolution
Select Scan Quality (Resolution)
or preview your image.
for.
Resolution is indicated in dpi (dots per inch).
1. You can enter a custom Resolution only when you choose Other as the Destination setting:
93
Page 94

2. Select your Resolution based on how and when you will enlarge your image.
Determining a scan resolution
If you plan to enlarge the image so you can print it at a larger size, you may need to increase
the resolution. Follow these guidelines:
• You will enlarge the image as you scan it.
If you will enlarge the images in Epson Scan using the Target Size setting (Home and
Professional modes only) you don’t need to increase the Resolution setting.
• You will scan the image at its original size, but then enlarge it later in an image-
editing program.
If you will enlarge your images later in an image-editing program, you need to increase
the Resolution setting to retain a high image quality. Increase the resolution by the same
amount you will increase the image size. For example, if the resolution is 300 dpi (dots per
inch), and you will increase the image size by 200% later, change the Resolution setting
to 600 dpi.
If you are scanning at 100% or reducing the size, select your Resolution based on how you
will use the scanned image:
E-mail/view on a computer screen/post on the web: 96 to 150 dpi
Print/convert to editable text (OCR): 300 dpi
Fax: 200 dpi
3. Now you can preview your image.
Preview
There are two types of preview available:
Thumbnail displays your previewed images as thumbnails with the scanned image area and
exposure automatically selected. If the Thumbnail checkbox is checked, clicking the Preview
button opens a thumbnail preview.
Normal displays your previewed images in their entirety so you can select the scanned image
area and other settings manually . If the Thumbnail checkbox is unchecked, clicking the Preview
button opens a normal preview.
1. Click the Preview button to preview your images in a new Preview window.
94
Page 95

2. To rotate or flip the image (thumbnail preview only), click the thumbnail and click the
rotation or mirroring icon.
3. If desired, you can crop the area you want to scan
and select image quality settings.
4. When you’re finished, you can select your scan size and scan.
Select Scanned Image Area
In thumbnail preview, your scanned image area is selected automatically.
In normal preview, you create the scanned image area by clicking a button.
You can adjust the scanned image area by creating and/or moving the dotted line (marquee)
outlining the scan area:
1. Do one of the following:
• Thumbnail preview: Create a marquee by placing your cursor in one corner of the
desired scan area, clicking, and dragging the cursor to the opposite corner.
95
Page 96

Marquee
• Normal preview: Click the auto locate icon to create a marquee.
96
Page 97

Marquee
2. To move a marquee, click inside the marquee and drag it where you want it.
3. To resize a marquee, place the cursor over a marquee edge or corner, then click and drag the
edges where you want them.
Tip:
To retain the marquee width/height proportions, hold the Shift key as you resize the marquee.
4. In Normal Preview mode, you can create up to 50 marquees at a time. Click the copy
marquee icon to copy existing marquees, or click the delete marquee icon to delete the
selected marquee.
5. If desired, you can select image quality settings.
6. When you’re finished, you can select your scan size and scan.
Adjust Image Quality
You can adjust exposure, brightness, and other image quality settings before you scan to improve
your results.
97
Page 98

Setting Description
Descreening Removes the rippled pattern that can appear in subtly shaded image areas,
such as in skin tones. Also improves results when scanning magazine or
newspaper images. The results of descreening do not appear in the
preview image, only in your scanned image.
Color Restoration Restores the colors in faded photos automatically.
Backlight
Removes shadows from photos that have too much background light.
Correction
Dust Removal Removes dust marks from your originals automatically.
Text
Enhancement
Sharpens the appearance of letters in text documents. (Available only
when you select Text/Line Art, Newspaper, or Magazine as the
Document Type setting.) Check the Image Option box, then select the
setting.
Auto Area
Segmentation
Makes grayscale images clearer and text recognition more accurate by
separating the text from the graphics. (Available only when you select
Text/Line Art, Newspaper, or Magazine as the Document Type setting
and Black&White as the Image Type.) Check the Image Option box, then
select the setting.
Threshold Adjusts the level at which the black areas in text and line art are
delineated, improving text recognition in OCR programs. (Available only
when you select Black&White as the Image Type setting.) Click the
Brightness button to access the setting.
Brightness Adjusts the overall image lightness and darkness.
Contrast Adjusts the difference between the light and dark areas of the overall
image. Click the Brightness button to access the Contrast setting.
Select Scanned Image Size
You can scan images at their original size, or reduce or enlarge them as you scan them. You can
also select a specific scan size (such as 8 × 10 inch [203 × 254 mm] for photos) so you can crop
the image using the correct proportions.
98
Page 99

1. Preview
your original image.
2. Select the size you want your scanned image to be from the Target Size list.
Note:
If you need to rotate the orientation of the scan area marquee, click the orientation icon.
A dotted line (marquee) appears on your preview image proportioned for that size.
Marquee
3. If you need to create a scanned image size that is not in the Target Size list, select Customize.
99
Page 100

4. Name the custom size, enter the size, click Save, and click OK. Then create a marquee on the
preview image to define the scanned image area
. The size is automatically proportioned.
5. When you’re finished, you can scan and view your image.
Scan and View Image
After selecting your scan settings, you are ready to scan and view your scanned images.
1. Click Scan.
100
 Loading...