

Page 1

TM-P60
(Bluetooth® Interface Model)
Technical Reference Guide
English
Rev. A
M00035500
Page 2

Page 3

TM-P60 Technical Reference Guide
CAUTIONS
❏ This document shall apply only to the product(s) identified herein.
❏ No part of this document may be reproduced, stored in a retrieval system, or transmitted in any form or by any
means, electronic, mechanical, photocopying, recording, or otherwise, without the prior written permission of
Seiko Epson Corporation.
❏ The contents of this document are subject to change without notice. Please contact us for the latest information.
❏ While every precaution has been taken in the preparation of this document, Seiko Epson Corporation assumes no
responsibility for errors or omissions.
❏ Neither is any liability assumed for damages resulting from the use of the information contained herein.
❏ Neither Seiko Epson Corporation nor its affiliates shall be liable to the purchaser of this product or third parties
for damages, losses, costs, or expenses incurred by the purchaser or third parties as a result of: accident, misuse, or
abuse of this product or unauthorized modifications, repairs, or alterations to this product, or (excluding the U.S.)
failure to strictly comply with Seiko Epson Corporation's operating and maintenance instructions.
❏ Seiko Epson Corporation shall not be liable against any damages or problems arising from the use of any options
or any consumable products other than those designated as Original EPSON Products or EPSON Approved
Products by Seiko Epson Corporation.
TRADEMARKS
EPSON and ESC/POS are registered trademarks of Seiko Epson Corporation.
Microsoft, Windows, Windows NT, and Windows Vista are registered trademarks of Microsoft Corporation in the
United States and/or other countries.
General Notice: Other product and company names used herein are for identification purposes only and may be
trademarks of their respective companies.
ESC/POS® Proprietary Command System
EPSON took the initiative by introducing ESC/POS, a proprietary POS printer command system including patented
commands and enabling versatile POS system construction with high scalability. Compatible with all types of EPSON
POS printers and displays, this proprietary control system also offers the flexibility to easily make future upgrades. Its
popularity is worldwide.
Rev. A i
Page 4

The influence on the environment of radio wave radiation
❏ The Radio Frequency module that can be installed in this product radiates the same high
frequency energy as some other high frequency devices but the level of the energy radiated
from it is suppressed so that it is much lower than the electromagnetic energy radiated from
radio equipment like cell phones.
❏ Under some situations and in certain environments, the use of this equipment is sometimes
limited by the owner of the building or a representative with responsibility for the group.
For example, it may be restricted in the following case:
• Use in an environment where it may cause interference with other devices and services.
❏ If you do not understand the radio device usage policy in a specific group or environment,
such as an airport, ask permission before turning on the power of this product.
RF Module
This equipment contains the following wireless module.
Manufacturer: Seiko Epson Corporation
Model Name: M224B
Product Name: Bluetooth Interface board for printer
Note about interference
❏ The Radio Frequency module that can be installed in this product generates, uses, and can
radiate radio frequency energy and, if not installed and used in accordance with the
instruction manual, may cause harmful interference to radio communications.
❏ If this equipment does cause harmful interference to radio or television reception, which can
be determined by turning the equipment off and on, the user is encouraged to try to correct
the interference by one or more of the following measures:
• Reorient or relocate the receiving antenna.
• Increase the separation between the equipment and receiver.
• Connect the equipment into an outlet on a circuit different from that to which the
receiver is connected.
• Consult your dealer or an experienced radio/TV technician for help.
❏ Never disassemble or modify this product or the installed Radio Frequency module.
❏ Seiko Epson Corporation shall not be liable for interference to radio/TV resulting from
changes or modifications to this product or the installed Radio Frequency module not
expressly approved by Seiko Epson Corporation.
ii Rev. A
Page 5

TM-P60 Technical Reference Guide
❏ Other radio equipment sometimes uses the same frequency band that this unit uses. To
prevent radio wave interference with other radio equipment, pay attention to the following
matters when you use this product:
• The Radio Frequency module that can be installed in this product uses the Industrial
Scientific and Medical band (2.4 GHz), FH-SS modulation, and the interference distance
is 20 m.
• Other equipment that uses the same frequency band used by the Radio Frequency
module that can be installed in this product includes equipment for industry, science
and medical treatment, microwave ovens, HomeRF, and radio and other broadcasting
equipment (both ones that require a license and ones that do not require a license).
• Confirm that radio and other broadcasting equipment are not used nearby before using
this product.
• When trouble occurs, for example, if the Radio Frequency module causes problems such
as radio wave interference, consult your dealer.
Revision Information
Revision Page Altered Items and Contents
Rev. A All pages Newly authorized
About This Manual
Aim of the Manual
This manual was created to provide information on the TM-P60 printer for anyone who is
developing hardware, installations, or programs. Programmers will also want to consult other
documents.
Rev. A iii
Page 6

Contents of the Manual
Chapter 1, “General Information.” General description of features plus
specifications.
Chapter 2, “Setup.” Contains introduction of control methods and
each connection form.
Chapter 3, “Troubleshooting.” Contains troubleshooting information.
Chapter 4, “Application Development
Information.”
Contains information on such matters as DIP
switches, memory switches, error processing for
using TM-P60.
Appendix A, “About Bluetooth.” Contains information on Bluetooth.
Appendix B, “Character Code Tables.” Contains the supported character tables.
Appendix C, “FAQ.” This section provides answers to frequently
asked questions.
Related Software and Documents
Related software and documents
Software/document name Description
TM-P60 User’s Manual/ This provides basic handling procedures for the end user of the
printer
TM-P60 (Bluetooth Interface Model) Technical
Reference Guide
ESC/POS Application Programming Guide This provides descriptions in Acrobat format of the commands
EPSON OPOS ADK This is a OCX driver
EPSON OPOS ADK Manual This provides information for anyone who is programming using
EPSON Advanced Printer Driver This is a Windows driver
EPSON Advanced Printer Driver Manual This provides information for anyone who is programming using
This Manual
used by each TM printer, along with sample programs and other
information about the printers
OPOS. This is included in the EPSON OPOS ADK
the APD (EPSON Advanced Printer Driver)
iv Rev. A
Page 7

TM-P60 Technical Reference Guide
Safety Precautions
EMC and Safety Standards Applied
Product Name: TM-P60
Model Name: M196B
The following standards are applied only to the printers that are so labeled. (EMC is tested using the EPSON power
supplies.)
North America: EMI: FCC/ICES-003 Class B
Safety: UL 60950/CSA C22.2 No. 60950
WARNING
The connection of a non-shielded printer interface cable to this printer will invalidate the EMC standards of this
device.
You are cautioned that changes or modifications not expressly approved by Seiko Epson Corporation could void your
authority to operate the equipment.
FCC Compliance Statement For American Users
This equipment has been tested and found to comply with the limits for a Class B digital device, pursuant to Part 15 of
the FCC Rules. These limits are designed to provide reasonable protection against harmful interference in a residential
installation.
This equipment generates, uses, and can radiate radio frequency energy and, if not installed and used in accordance
with the instruction manual, may cause harmful interference to radio communications.
However, there is no guarantee that interference will not occur in a particular installation. If this equipment does cause
harmful interference to radio or television reception, which can be determined by turning the equipment off and on,
the user is encouraged to try to correct the interference by one or more of the following measures:
-Reorient or relocate the receiving antenna.
-Increase the separation between the equipment and receiver.
-Connect the equipment into an outlet on a circuit different from that to which the receiver is connected.
-Consult the dealer or an experienced radio/TV technician for help.
FCC Canadian Users
This Class B digital apparatus complies with Canadian ICES-003.
Rev. A v
Page 8

RF Module
This equipment contains the following wireless module.
Manufacturer: Seiko Epson Corporation
Model Name: M224B
Product Name: Bluetooth Interface board for printer
USA
NOTICE
This device has been tested and found to comply with the limits for a Class B digital device, pursuant to Part 15 of the
FCC Rules. These limits are designed to provide reasonable protection against harmful interference in a residential
installation. This equipment generates, uses, and can radiate radio frequency energy and, if not installed and used in
accordance with the instruction manual, may cause harmful interference to radio communications. However, there is
no guarantee that interference will not occur in a particular installation. If this equipment does cause harmful
interference to radio or television reception, which can be determined by turning the equipment off and on, the user is
encouraged to try to correct the interference by one or more of the following measures:
-Reorient or relocate the receiving antenna.
-Increase the separation between the equipment and receiver.
-Connect the equipment into an outlet on a circuit different from that to which the receiver is connected.
-Consult the dealer or an experienced radio/TV technician for help.
This transmitter must not be co-located or operated in conjunction with any other antenna or transmitter.
FCC WARNING
Changes or modifications not expressly approved by the party responsible for compliance could void the user's
authority to operate the equipment.
This device complies with Part 15 of the FCC Rules. Operation is subject to the following two conditions:
(1) this device may not cause harmful interference, and
(2) this device must accept any interference received, including interference that may cause undesired operation.
Canada
This device conforms to IC, Low Power License-Exempt Radio Communication Devices (RSS-210).
The information such as Certification No., Model Name, and Manufacturer Name are described on the surface of the
module.
Operation is subject to the following two conditions:
(1) this device may not cause interference, and
(2) this device must accept any interference, including interference that may cause undesired operation of this device.
L'utilisation de ce dispositif est autorisée seulement aux conditions suivantes:
(1) il ne doit pas produire de brouillage et
(2) l'utilisateur du dispositif doit être prêt à accepter tout brouillage radioélectrique reçu, même si ce brouillage est
susceptible de compromettre le fonctionnement du dispositif.
Caution: Exposure to Radio Frequency Radiation
To comply with IC RF exposure compliance requirements, this device must not be co-located or operating in
conjunction with any other antenna or transmitter.
vi Rev. A
Page 9
TM-P60 Technical Reference Guide
The TM-P60 can be Used Only in the Countries Listed Below:
USA, Canada
Key to Symbols
The following symbols are used in the documentation for this product. See the specific warnings
and cautions at appropriate points throughout this guide.
DANGER:
Dangers must be observed carefully to avoid serious injury or death.
WARNING:
Warnings must be followed carefully to avoid serious bodily injury.
CAUTION:
Cautions must be observed to avoid minor injury to yourself or damage to your
equipment.
Note:
Notes have important information and useful tips on the operation of your printer.
Safety Precautions
This section presents important information to ensure safe and effective use of this product.
Please read this section carefully and store it in an accessible location.
WARNING:
❏
Be sure not to use this product near medical equipment. Otherwise a cardiac
pacemaker or medical electrical equipment may be affected by radio waves.
❏
Be sure to use this product 22 cm or more away from the operation site of a cardiac
pacemaker. Otherwise the operation of the cardiac pacemaker may be affected.
❏
Do not use this product near automatically controlled devices such as automatic
doors or fire alarms. Radio waves can cause these devices to malfunction and may
result in injury.
❏
Shut down your equipment immediately if it produces smoke, a strange odor, or
unusual noise. Continued use may lead to fire or electric shock. Immediately unplug
the equipment and contact your dealer or a Seiko Epson service center for advice.
Rev. A vii
Page 10

❏
Never attempt to repair this product yourself. Improper repair work can be
dangerous.
❏
Never disassemble or modify this product. Tampering with this product may result in
injury, fire, or electric shock.
❏
Be sure to use the specified power source. Connection to an improper power source
may cause fire or shock.
❏
Never insert or disconnect the power plug with wet hands. Doing so may result in
severe shock.
❏
Do not allow foreign matter to fall into the equipment. Penetration of foreign objects
may lead to fire or shock.
❏
If water or other liquid spills into this equipment, unplug the power cord immediately,
and then contact your dealer or a Seiko Epson service center for advice.
Continued usage may lead to fire or shock.
❏
Do not place multiple loads on the power outlet (wall outlet). Overloading the outlet
may lead to fire.
❏
Always supply power directly from a standard domestic power outlet.
❏
Handle the power cord with care. Improper handling may lead to fire or shock.
• Do not modify or attempt to repair the cord.
• Do not place any object on top of the cord.
• Avoid excessive bending, twisting, and pulling.
• Do not place cord near heating equipment.
• Check that the plug is clean before plugging it in.
• Be sure to push the prongs all the way in.
❏
If the cord becomes damaged, obtain a replacement from your dealer or a Seiko
Epson service center.
CAUTION:
❏
Do not connect cables other than as described in this manual. Different
connections may cause equipment damage and burning.
❏
Be sure to set this equipment on a firm, stable, horizontal surface.
Product may break or cause injury if it falls.
❏
Do not use in locations subject to high humidity or dust levels.
Excessive humidity and dust may cause equipment damage, fire, or shock.
viii Rev. A
Page 11

❏
Do not place heavy objects on top of this product. Never stand or lean on this
product. Equipment may fall or collapse, causing breakage and possible injury.
❏
To ensure safety, please unplug this product and remove the battery pack prior to
leaving it unused for an extended period.
❏
When moving this product, be sure to unplug the power cable and any other cables
connected to the product.
❏
After printing, the print head can be very hot. Be careful not to touch it and to let it
cool before you clean it. Do not damage the print head by touching it with your
fingers or any hard object. Touching the hot print head may cause burns.
Safety Notes On Battery Pack
DANGER:
❏
If any liquid from the battery gets into your eyes, promptly wash it out with clean
water for more than 10 minutes and consult your doctor at once. If you do not, the
liquid may cause loss of eyesight.
TM-P60 Technical Reference Guide
❏
Do not disassemble or modify the battery pack. This may cause fire, explosion,
leakage, overheating, or damage.
❏
Do not expose the battery to fire or heat it. This may cause fire, explosion, leakage,
overheating ,or damage.
❏
Never leave the battery where the temperature may exceed 60°C (140°F) such as in
a car parked in the sun or under direct sunlight. This may cause fire, explosion,
leakage, overheating, or damage.
❏
Do not solder lead wires or terminals directly onto the battery, or disassemble or
modify it. This may cause fire, explosion, leakage, overheating or damage.
❏
Do not connect the plus and minus terminals together. This may cause fire,
overheating, or electric shock.
❏
Do not connect the battery directly to a power outlet or the cigarette lighter of an
automobile. This may cause fire, explosion, leakage, overheating, or damage.
❏
Do not insert the battery with its plus and minus terminals reversed. If you cannot
insert the battery smoothly, do not force it. This may cause fire, explosion, leakage,
overheating, or damage.
❏
Do not make a hole with a tool such as a screw in the battery pack. This may cause
leakage or fire caused by a battery short or heating.
WARNING:
❏
Keep the battery out of the reach of children to avoid harm to the children.
Rev. A ix
Page 12

❏
Charge the battery exclusively with the specified battery charger. Using a charger
other than the one specified may cause fire, explosion, leakage, overheating, or
other damage.
❏
Unplug the charger if charging is still incomplete after the specified time it should
take. Continuing to charge the battery may cause fire, explosion, or overheating.
❏
Do not expose the battery to water. Do not allow water to contact the terminals. This
may cause fire, overheating or electric shock.
❏
Do not hit or throw the battery. This may cause explosion or overheating.
❏
Do not use the battery if you find something wrong with it such as leakage, color
change, or deformity. Using it may cause fire, explosion or overheating.
❏
Keep the battery away from fire or flame if it produces a strange odor or leakage.
Otherwise fire or explosion may occur.
❏
Should any battery liquid get on skin or clothing, promptly wash it off with clean
water. If you do not, the liquid may damage your skin or clothing.
❏
Do not short the plus and minus terminals with any metal objects such as a necklace.
This may cause overheating or leakage, which can lead to burning or injury.
CAUTION:
❏
LIP-2500 lithium-ion batteries are exclusively for use with the specified printer. Do not
use them with other equipment.
❏
Before using the battery, make sure that its terminals are clean. Unclean terminals
may not allow current to flow.
❏
Do not touch the battery right after using it for a long time. It will be hot and may
burn you.
❏
When the battery will not be used for a long time, be sure to remove the battery
before storing.
Restriction of Use
When this product is used for applications requiring high reliability/safety such as
transportation devices related to aviation, rail, marine, automotive etc.; disaster prevention
devices; various safety devices etc.; or functional/precision devices etc., you should use this
product only after giving consideration to including failsafes and redundancies into your design
to maintain safety and total system reliability. Because this product was not intended for use in
applications requiring extremely high reliability/safety such as aerospace equipment, main
communication equipment, nuclear power control equipment, or medical equipment related to
direct medical care etc., please make your own judgment on this product’s suitability after a full
evaluation.
x Rev. A
Page 13

TM-P60 Technical Reference Guide
Recycling the Batteries
Contains a lithium-ion battery. Must be recycled or disposed of properly.
For American Users:
The lithium-ion battery is recyclable. At the end of its useful life, under various
state and local laws, it is illegal to dispose of this battery into your municipal
waste stream. Please call 1-800-8-BATTERY for information on how to recycle
this battery.
Rev. A xi
Page 14

xii Rev. A
Page 15

TM-P60 Technical Reference Guide
TM-P60 (Bluetooth® Interface Model)
Technical Reference Guide
The influence on the environment of radio wave radiation . . . . . . . . . . . . . . . . . . . . . . . . . . . . . . . . . . . . . .ii
RF Module . . . . . . . . . . . . . . . . . . . . . . . . . . . . . . . . . . . . . . . . . . . . . . . . . . . . . . . . . . . . . . . . . . . . . . . . . . . . . . .ii
Note about interference . . . . . . . . . . . . . . . . . . . . . . . . . . . . . . . . . . . . . . . . . . . . . . . . . . . . . . . . . . . . . . . . . . . .ii
Revision Information . . . . . . . . . . . . . . . . . . . . . . . . . . . . . . . . . . . . . . . . . . . . . . . . . . . . . . . . . . . . . . . . . . . . . . . . . .iii
About This Manual . . . . . . . . . . . . . . . . . . . . . . . . . . . . . . . . . . . . . . . . . . . . . . . . . . . . . . . . . . . . . . . . . . . . . . . . . . . .iii
Aim of the Manual . . . . . . . . . . . . . . . . . . . . . . . . . . . . . . . . . . . . . . . . . . . . . . . . . . . . . . . . . . . . . . . . . . . . . . . . .iii
Contents of the Manual . . . . . . . . . . . . . . . . . . . . . . . . . . . . . . . . . . . . . . . . . . . . . . . . . . . . . . . . . . . . . . . . . . . . .iv
Related Software and Documents . . . . . . . . . . . . . . . . . . . . . . . . . . . . . . . . . . . . . . . . . . . . . . . . . . . . . . . . . . . .iv
Safety Precautions
EMC and Safety Standards Applied . . . . . . . . . . . . . . . . . . . . . . . . . . . . . . . . . . . . . . . . . . . . . . . . . . . . . . . . . . . . . .v
FCC Compliance Statement For American Users . . . . . . . . . . . . . . . . . . . . . . . . . . . . . . . . . . . . . . . . . . . . . . .v
FCC Canadian Users . . . . . . . . . . . . . . . . . . . . . . . . . . . . . . . . . . . . . . . . . . . . . . . . . . . . . . . . . . . . . . . . . . . . . . .v
RF Module . . . . . . . . . . . . . . . . . . . . . . . . . . . . . . . . . . . . . . . . . . . . . . . . . . . . . . . . . . . . . . . . . . . . . . . . . . . . . . . . . . .vi
USA . . . . . . . . . . . . . . . . . . . . . . . . . . . . . . . . . . . . . . . . . . . . . . . . . . . . . . . . . . . . . . . . . . . . . . . . . . . . . . . . . . . . .vi
Canada . . . . . . . . . . . . . . . . . . . . . . . . . . . . . . . . . . . . . . . . . . . . . . . . . . . . . . . . . . . . . . . . . . . . . . . . . . . . . . . . . . .vi
The TM-P60 can be Used Only in the Countries Listed Below: . . . . . . . . . . . . . . . . . . . . . . . . . . . . . . . . . . . . . . .vii
Key to Symbols . . . . . . . . . . . . . . . . . . . . . . . . . . . . . . . . . . . . . . . . . . . . . . . . . . . . . . . . . . . . . . . . . . . . . . . . . . . . . . .vii
Safety Precautions . . . . . . . . . . . . . . . . . . . . . . . . . . . . . . . . . . . . . . . . . . . . . . . . . . . . . . . . . . . . . . . . . . . . . . . . . . . . .vii
Safety Notes On Battery Pack . . . . . . . . . . . . . . . . . . . . . . . . . . . . . . . . . . . . . . . . . . . . . . . . . . . . . . . . . . . . . . .ix
Restriction of Use . . . . . . . . . . . . . . . . . . . . . . . . . . . . . . . . . . . . . . . . . . . . . . . . . . . . . . . . . . . . . . . . . . . . . . . . . . . . . .x
Recycling the Batteries . . . . . . . . . . . . . . . . . . . . . . . . . . . . . . . . . . . . . . . . . . . . . . . . . . . . . . . . . . . . . . . . . . . . . . . . .xi
Chapter 1 General Information
Features . . . . . . . . . . . . . . . . . . . . . . . . . . . . . . . . . . . . . . . . . . . . . . . . . . . . . . . . . . . . . . . . . . . . . . . . . . . . . 1-1
General . . . . . . . . . . . . . . . . . . . . . . . . . . . . . . . . . . . . . . . . . . . . . . . . . . . . . . . . . . . . . . . . . . . . . . . . . 1-1
Printer handling . . . . . . . . . . . . . . . . . . . . . . . . . . . . . . . . . . . . . . . . . . . . . . . . . . . . . . . . . . . . . . . . . . . 1-1
Printing . . . . . . . . . . . . . . . . . . . . . . . . . . . . . . . . . . . . . . . . . . . . . . . . . . . . . . . . . . . . . . . . . . . . . . . . . .1-1
Software . . . . . . . . . . . . . . . . . . . . . . . . . . . . . . . . . . . . . . . . . . . . . . . . . . . . . . . . . . . . . . . . . . . . . . . . . 1-1
Product Structure . . . . . . . . . . . . . . . . . . . . . . . . . . . . . . . . . . . . . . . . . . . . . . . . . . . . . . . . . . . . . . . . . . . . . 1-2
Standard Parts Included with the Printer . . . . . . . . . . . . . . . . . . . . . . . . . . . . . . . . . . . . . . . . . . . . . . 1-2
Related materials for TM-P60 . . . . . . . . . . . . . . . . . . . . . . . . . . . . . . . . . . . . . . . . . . . . . . . . . . . . . . . . 1-3
Consumables . . . . . . . . . . . . . . . . . . . . . . . . . . . . . . . . . . . . . . . . . . . . . . . . . . . . . . . . . . . . . . . . . . . . . . . . 1-3
Roll paper . . . . . . . . . . . . . . . . . . . . . . . . . . . . . . . . . . . . . . . . . . . . . . . . . . . . . . . . . . . . . . . . . . . . . . .1-3
Product Specifications Overview . . . . . . . . . . . . . . . . . . . . . . . . . . . . . . . . . . . . . . . . . . . . . . . . . . . . . . . . . . 1-4
Using the TM-P60 . . . . . . . . . . . . . . . . . . . . . . . . . . . . . . . . . . . . . . . . . . . . . . . . . . . . . . . . . . . . . . . . . . . . .1-6
Bluetooth Protocol . . . . . . . . . . . . . . . . . . . . . . . . . . . . . . . . . . . . . . . . . . . . . . . . . . . . . . . . . . . . . . . . . . . . 1-7
Security . . . . . . . . . . . . . . . . . . . . . . . . . . . . . . . . . . . . . . . . . . . . . . . . . . . . . . . . . . . . . . . . . . . . . . . . . . 1-7
Chapter 2 Setup
Part Name and Basic Operation . . . . . . . . . . . . . . . . . . . . . . . . . . . . . . . . . . . . . . . . . . . . . . . . . . . . . . . . 2-1
Part names . . . . . . . . . . . . . . . . . . . . . . . . . . . . . . . . . . . . . . . . . . . . . . . . . . . . . . . . . . . . . . . . . . . . . .2-1
Control Panel . . . . . . . . . . . . . . . . . . . . . . . . . . . . . . . . . . . . . . . . . . . . . . . . . . . . . . . . . . . . . . . . . . . . 2-1
Beeper Function . . . . . . . . . . . . . . . . . . . . . . . . . . . . . . . . . . . . . . . . . . . . . . . . . . . . . . . . . . . . . . . . . . 2-3
Setup Flow . . . . . . . . . . . . . . . . . . . . . . . . . . . . . . . . . . . . . . . . . . . . . . . . . . . . . . . . . . . . . . . . . . . . . . . . . . . 2-4
Setting up the Printer . . . . . . . . . . . . . . . . . . . . . . . . . . . . . . . . . . . . . . . . . . . . . . . . . . . . . . . . . . . . . . . . . .2-5
Attaching the Shoulder Strap . . . . . . . . . . . . . . . . . . . . . . . . . . . . . . . . . . . . . . . . . . . . . . . . . . . . . . . 2-5
Setting Up on a Table . . . . . . . . . . . . . . . . . . . . . . . . . . . . . . . . . . . . . . . . . . . . . . . . . . . . . . . . . . . . . . 2-5
Installing/Replacing the Roll Paper . . . . . . . . . . . . . . . . . . . . . . . . . . . . . . . . . . . . . . . . . . . . . . . . . . . . . . 2-6
Installing or Replacing Roll Paper Vertically . . . . . . . . . . . . . . . . . . . . . . . . . . . . . . . . . . . . . . . . . . . 2-6
Providing power to the printer . . . . . . . . . . . . . . . . . . . . . . . . . . . . . . . . . . . . . . . . . . . . . . . . . . . . . . . . . . 2-8
Before Using the Battery Pack . . . . . . . . . . . . . . . . . . . . . . . . . . . . . . . . . . . . . . . . . . . . . . . . .
. . . . . . 2-8
Rev. A xiii
Page 16

Installing the battery . . . . . . . . . . . . . . . . . . . . . . . . . . . . . . . . . . . . . . . . . . . . . . . . . . . . . . . . . . . . . . 2-8
Charging the battery . . . . . . . . . . . . . . . . . . . . . . . . . . . . . . . . . . . . . . . . . . . . . . . . . . . . . . . . . . . . . . 2-9
Using with a Battery Pack . . . . . . . . . . . . . . . . . . . . . . . . . . . . . . . . . . . . . . . . . . . . . . . . . . . . . . . . . . 2-10
Providing power from the external power supply . . . . . . . . . . . . . . . . . . . . . . . . . . . . . . . . . . . . . . 2-10
Bluetooth Connection . . . . . . . . . . . . . . . . . . . . . . . . . . . . . . . . . . . . . . . . . . . . . . . . . . . . . . . . . . . . . . . . 2-12
Bluetooth Connection Overview . . . . . . . . . . . . . . . . . . . . . . . . . . . . . . . . . . . . . . . . . . . . . . . . . . . . 2-12
PDA Preparation . . . . . . . . . . . . . . . . . . . . . . . . . . . . . . . . . . . . . . . . . . . . . . . . . . . . . . . . . . . . . . . . . . 2-13
Turning printer power on . . . . . . . . . . . . . . . . . . . . . . . . . . . . . . . . . . . . . . . . . . . . . . . . . . . . . . . . . . . 2-13
Starting the Bluetooth Setup Tool . . . . . . . . . . . . . . . . . . . . . . . . . . . . . . . . . . . . . . . . . . . . . . . . . . . . 2-13
Detecting Communication-ready Bluetooth Devices . . . . . . . . . . . . . . . . . . . . . . . . . . . . . . . . . . . 2-13
Entering a Passkey . . . . . . . . . . . . . . . . . . . . . . . . . . . . . . . . . . . . . . . . . . . . . . . . . . . . . . . . . . . . . . . . 2-13
Confirming the profiles that can be used . . . . . . . . . . . . . . . . . . . . . . . . . . . . . . . . . . . . . . . . . . . . . 2-14
Completing the Bluetooth Connection . . . . . . . . . . . . . . . . . . . . . . . . . . . . . . . . . . . . . . . . . . . . . . .2-14
Adjusting Various Settings . . . . . . . . . . . . . . . . . . . . . . . . . . . . . . . . . . . . . . . . . . . . . . . . . . . . . . . . . . . . . . 2-14
How to Confirm Current Settings . . . . . . . . . . . . . . . . . . . . . . . . . . . . . . . . . . . . . . . . . . . . . . . . . . . . 2-14
DIP switch . . . . . . . . . . . . . . . . . . . . . . . . . . . . . . . . . . . . . . . . . . . . . . . . . . . . . . . . . . . . . . . . . . . . . . . 2-14
Memory Switches . . . . . . . . . . . . . . . . . . . . . . . . . . . . . . . . . . . . . . . . . . . . . . . . . . . . . . . . . . . . . . . . . 2-15
Changing the Bluetooth passkey and device name. . . . . . . . . . . . . . . . . . . . . . . . . . . . . . . . . . . . 2-22
Adjusting Roll paper width . . . . . . . . . . . . . . . . . . . . . . . . . . . . . . . . . . . . . . . . . . . . . . . . . . . . . . . . . 2-23
Connecting a serial interface cable . . . . . . . . . . . . . . . . . . . . . . . . . . . . . . . . . . . . . . . . . . . . . . . . . 2-23
Downloading Drivers, Utilities, and Manuals . . . . . . . . . . . . . . . . . . . . . . . . . . . . . . . . . . . . . . . . . . .2-25
Chapter 3 Troubleshooting
LED Blinking Pattern . . . . . . . . . . . . . . . . . . . . . . . . . . . . . . . . . . . . . . . . . . . . . . . . . . . . . . . . . . . . . . . . . . . 3-1
Error Types . . . . . . . . . . . . . . . . . . . . . . . . . . . . . . . . . . . . . . . . . . . . . . . . . . . . . . . . . . . . . . . . . . . . . . . 3-1
Printer Beeps . . . . . . . . . . . . . . . . . . . . . . . . . . . . . . . . . . . . . . . . . . . . . . . . . . . . . . . . . . . . . . . . . . . . . . . . . 3-2
Beeping Types . . . . . . . . . . . . . . . . . . . . . . . . . . . . . . . . . . . . . . . . . . . . . . . . . . . . . . . . . . . . . . . . . . . . 3-2
Printer Beeps When the Power is Turned on . . . . . . . . . . . . . . . . . . . . . . . . . . . . . . . . . . . . . . . . . . . . . . . 3-3
Paper Jam . . . . . . . . . . . . . . . . . . . . . . . . . . . . . . . . . . . . . . . . . . . . . . . . . . . . . . . . . . . . . . . . . . . . . . . . . . 3-3
To Confirm the Current Setting of the Printer . . . . . . . . . . . . . . . . . . . . . . . . . . . . . . . . . . . . . . . . . . . . . . 3-3
Self test mode . . . . . . . . . . . . . . . . . . . . . . . . . . . . . . . . . . . . . . . . . . . . . . . . . . . . . . . . . . . . . . . . . . . . 3-3
Resetting the Printer . . . . . . . . . . . . . . . . . . . . . . . . . . . . . . . . . . . . . . . . . . . . . . . . . . . . . . . . . . . . . . . 3-4
Hexadecimal Dump Mode . . . . . . . . . . . . . . . . . . . . . . . . . . . . . . . . . . . . . . . . . . . . . . . . . . . . . . . . . . . . 3-4
Chapter 4 Application Development Information
About wireless communication . . . . . . . . . . . . . . . . . . . . . . . . . . . . . . . . . . . . . . . . . . . . . . . . . . . . . . . . . 4-1
For Application developing . . . . . . . . . . . . . . . . . . . . . . . . . . . . . . . . . . . . . . . . . . . . . . . . . . . . . . . . 4-1
About the Battery Remaining Amount . . . . . . . . . . . . . . . . . . . . . . . . . . . . . . . . . . . . . . . . . . . . . . . . . . . 4-2
The battery remaining amount . . . . . . . . . . . . . . . . . . . . . . . . . . . . . . . . . . . . . . . . . . . . . . . . . . . . . . 4-2
The method to confirm the battery status . . . . . . . . . . . . . . . . . . . . . . . . . . . . . . . . . . . . . . . . . . . .4-2
Beeper function . . . . . . . . . . . . . . . . . . . . . . . . . . . . . . . . . . . . . . . . . . . . . . . . . . . . . . . . . . . . . . . . . . . . . . 4-2
ESC/POS command . . . . . . . . . . . . . . . . . . . . . . . . . . . . . . . . . . . . . . . . . . . . . . . . . . . . . . . . . . . . . . . 4-2
Various Status Categories . . . . . . . . . . . . . . . . . . . . . . . . . . . . . . . . . . . . . . . . . . . . . . . . . . . . . . . . . . . . . . 4-3
ESC/POS commands . . . . . . . . . . . . . . . . . . . . . . . . . . . . . . . . . . . . . . . . . . . . . . . . . . . . . . . . . . . . . . 4-3
NV memory . . . . . . . . . . . . . . . . . . . . . . . . . . . . . . . . . . . . . . . . . . . . . . . . . . . . . . . . . . . . . . . . . . . . . . . . . 4-3
NV Graphics Printing . . . . . . . . . . . . . . . . . . . . . . . . . . . . . . . . . . . . . . . . . . . . . . . . . . . . . . . . . . . . . . . . . . 4-4
ESC/POS command . . . . . . . . . . . . . . . . . . . . . . . . . . . . . . . . . . . . . . . . . . . . . . . . . . . . . . . . . . . . . . . 4-4
Tips for Visual Basic . . . . . . . . . . . . . . . . . . . . . . . . . . . . . . . . . . . . . . . . . . . . . . . . . . . . . . . . . . . . . . . . 4-4
Appendix A About Bluetooth
Bluetooth Overview . . . . . . . . . . . . . . . . . . . . . . . . . . . . . . . . . . . . . . . . . . . . . . . . . . . . . . . . . . . . . . . . . . . . . . . . . . . A-7
Bluetooth Specifications . . . . . . . . . . . . . . . . . . . . . . . . . . . . . . . . . . . . . . . . . . . . . . . . . . . . . . . . . . . . . . . . . . . . . . . A-7
Piconet . . . . . . . . . . . . . . . . . . . . . . . . . . . . . . . . . . . . . . . . . . . . . . . . . . . . . . . . . . . . . . . . . . . . . . . . . . . . . . . . . A-7
Communication Range . . . . . . . . . . . . . . . . . . . . . . . . . . . . . . . . . . . . . . . . . . . . . . . . . . . . . . . . . . . . . . . . . . . . A-8
Bluetooth Frequency . . . . . . . . . . . . . . . . . . . . . . . . . . . . . . . . . . . . . . . . . . . . . . . . . . . . . . . . . . . . . . . . . . . . . . A-8
xiv Rev. A
Page 17

TM-P60 Technical Reference Guide
Standby Mode . . . . . . . . . . . . . . . . . . . . . . . . . . . . . . . . . . . . . . . . . . . . . . . . . . . . . . . . . . . . . . . . . . . . . . . . . . . .A-8
Security . . . . . . . . . . . . . . . . . . . . . . . . . . . . . . . . . . . . . . . . . . . . . . . . . . . . . . . . . . . . . . . . . . . . . . . . . . . . . . . . . .A-8
Using Bluetooth Effectively . . . . . . . . . . . . . . . . . . . . . . . . . . . . . . . . . . . . . . . . . . . . . . . . . . . . . . . . . . . . . . . . . . . . .A-9
Appendix B Character Code Tables
Page 0 (PC437: USA, Standard Europe) . . . . . . . . . . . . . . . . . . . . . . . . . . . . . . . . . . . . . . . . . . . . . . . . . . B-1
Page 1 (Katakana) . . . . . . . . . . . . . . . . . . . . . . . . . . . . . . . . . . . . . . . . . . . . . . . . . . . . . . . . . . . . . . . . . . . B-2
Page 2 (PC850: Multilingual) . . . . . . . . . . . . . . . . . . . . . . . . . . . . . . . . . . . . . . . . . . . . . . . . . . . . . . . . . . . . B-3
Page 3 (PC860: Portuguese) . . . . . . . . . . . . . . . . . . . . . . . . . . . . . . . . . . . . . . . . . . . . . . . . . . . . . . . . . . . .B-4
Page 4 (PC863: Canadian-French) . . . . . . . . . . . . . . . . . . . . . . . . . . . . . . . . . . . . . . . . . . . . . . . . . . . . . .B-5
Page 5 (PC865: Nordic) . . . . . . . . . . . . . . . . . . . . . . . . . . . . . . . . . . . . . . . . . . . . . . . . . . . . . . . . . . . . . . . .B-6
Page 16 (WPC1252) . . . . . . . . . . . . . . . . . . . . . . . . . . . . . . . . . . . . . . . . . . . . . . . . . . . . . . . . . . . . . . . . . . .B-7
Page 17 (PC866: Cyrillic #2) . . . . . . . . . . . . . . . . . . . . . . . . . . . . . . . . . . . . . . . . . . . . . . . . . . . . . . . . . . . . B-8
Page 18 (PC852: Latin2) . . . . . . . . . . . . . . . . . . . . . . . . . . . . . . . . . . . . . . . . . . . . . . . . . . . . . . . . . . . . . . .B-9
Page 19 (PC858: Euro) . . . . . . . . . . . . . . . . . . . . . . . . . . . . . . . . . . . . . . . . . . . . . . . . . . . . . . . . . . . . . . . . .B-10
Page 255 (Blank page) . . . . . . . . . . . . . . . . . . . . . . . . . . . . . . . . . . . . . . . . . . . . . . . . . . . . . . . . . . . . . . . .B-11
International Character Sets . . . . . . . . . . . . . . . . . . . . . . . . . . . . . . . . . . . . . . . . . . . . . . . . . . . . . . . . . . . B-12
Appendix C FAQ
Q1. The buzzer rings when I turn the TM-P60 on. What should I do? . . . . . . . . . . . . . . . . . . . . . . . . . . . . .C-1
Q2. Can the buzzer be set not to sound? . . . . . . . . . . . . . . . . . . . . . . . . . . . . . . . . . . . . . . . . . . . . . . . . . . . . . .C-2
Q3. The battery LED is illuminated or blinking. What should I do? . . . . . . . . . . . . . . . . . . . . . . . . . . . . . . .C-2
Q4. The power LED is slowly blinking. What should I do? . . . . . . . . . . . . . . . . . . . . . . . . . . . . . . . . . . . . . .C-2
Q5. I cannot connect the TM-P60 to Bluetooth. What should I do? . . . . . . . . . . . . . . . . . . . . . . . . . . . . . . . .C-2
Q6. I cannot create a TM-P60 Bluetooth serial connection. . . . . . . . . . . . . . . . . . . . . . . . . . . . . . . . . . . . . . . .C-3
Q7. The device is disconnected from the network after connecting for several minutes. . . . . . . . . . . . . .C-3
Q8. Power to the TM-P60 shuts off after being on several minutes. . . . . . . . . . . . . . . . . . . . . . . . . . . . . . . .C-3
Q9. I cannot print. . . . . . . . . . . . . . . . . . . . . . . . . . . . . . . . . . . . . . . . . . . . . . . . . . . . . . . . . . . . . . . . . . . . . . . . . .C-3
Rev. A xv
Page 18

xvi Rev. A
Page 19

TM-P60 Technical Reference Guide
Chapter 1
General Information
1.1 Features
The TM-P60 is a POS printer designed to meet the needs of both retail and hospitality for highspeed, on-the-go thermal printing.
1.1.1 General
❏ Compact size with rugged design to ensure top reliablility.
❏ Support a bluetooth wireless interface.
❏ Belt clip for maximum mobility.
❏ Long term use is possible by using the battery.
❏ Printing various kinds of barcodes is possible..
1.1.2 Printer handling
❏ Drop-in paper loading and autocutter for easy use
1.1.3 Printing
❏ Clear, crisp high speed thermal receipt printing.
1.1.4 Software
❏ Command protocol is based on the ESC/POS proprietary command system
❏ Automatic status back (ASB) function that automatically transmits changes in printer status.
Rev. A General Information 1-1
Page 20

1.2 Product Structure
1.2.1 Standard Parts Included with the Printer
This printer is packed with the materials listed below.
❏ User’s Manual
❏ Roll paper: 1 roll
❏ Battery pack unit (LIP-2500)*: 1
* May not be included, depending on the model.
Note:
To charge the battery, you have to use “PS-10” (AC adapter) or “OT-CH60” (Rapid battery charger).
Both are options.
1-2 General Information Rev. A
Page 21

TM-P60 Technical Reference Guide
1.2.2 Related materials for TM-P60
TM-P60 has the related materials listed in the following table.
Category Name Description
Options PS-10 This is an exclusive AC adapter for battery charging. It is able to
connect to TM-P60 directly.
OT-CH60 This is an exclusive battery charger. To use it you must take the
battery out of the TM-P60.
The charging period: 2.5 hours.
OT-RS60 This is to connect TM-P60 and host PC with serial connection.
LIP-2500 This is a spare battery. It is the as same as the included one.
OT-ST60 This is a shoulder strap.
Consumables Roll Paper This is required to print.
Manuals User’s Manual This manual is packed in the carton box.
Technical Reference Guide This Manual.
Drivers
(WIndows
environment)
Utilities
(Windows
environment)
FAQ about ESC/POS
command
ESC/POS Application
Programming Guide
Command Comparison
between the TM-T88II/T88III
and the TM-P60
OPOS ADK This provides the OCX driver which is based upon OPOS. It has
Advanced Printer Driver This is a Windows Driver. This Driver has a manual, sample
Memory Switch setting
Utility
TMFlogo This is a utility to store “NV graphics“ into this printer. It helps
This Manual is Quick Reference of ESC/POS command with a
simple sample program & Tips.
This Manual is a Command Reference Guide of ESC/POS
command, including some sample programs & Tips.
This provides detailed command comparison information
among the printers.
manuals, sample programs, and TMFlogo utility.
programs, and utilities to use the driver.
This is a utility to adjust the setting (Memory Switch) of this printer.
See “2.7.3 Memory Switches” (page 2-15) for details.
printing “NV graphics.”
1.3 Consumables
1.3.1 Roll paper
Roll paper widths are 60 mm and 58 mm {2.36"/2.28"}.
Note:
When you use 60mm width roll paper, you have to change the printer setting. See “2.7.5 Adjusting Roll
paper width” (page 2-23)
Rev. A General Information 1-3
Page 22

1.4 Product Specifications Overview
Print method Thermal line printing
Print density 203 dpi × 203 dpi [dpi: dots per 25.4 mm (dots per inch)]
Printing width (default) 52.5 mm, 420 dot positions
Print font Font Font A: 12 × 24, Font B: 10 × 24, Font C: 8 × 16
Characters per
line (default)
Character size
(W × H)
Character set 95 Alphanumeric, 48 International, 128 × 11 Extended graphics
Paper Roll paper
dimensions
(default)
Paper thickness 50 µm ~ 80 µm
Paper roll spool
diameter
Specified
thermal paper
Print speed Maximum 70 mm/s *1), when number of dots per dot line is 64 dots or
Interface
Bluetooth specification
Receive buffer 128 bytes
Power
consumption
Life Mechanism 10,000,000 lines printing
Temperature
/humidity
Specified
battery
AC adapter
(option)
LPS power
supply
Print head 100,000,000 dots
Autocutter 500,000 cuts
Operation
(Printing quality
guaranteed)
Storage Abnormal operations not found when the printer is left under the
Font A: 35, Font B: 42, Font C: 52
Font A: 1.50 × 3.0, Font B: 1.25 × 3.0, Font C: 1.0 × 2.0
(including one space page), 13,535 Traditional Chinese (BIG-5)
57.5 ± 0.5 mm
(59.5 ± 0.5 mm by removing the spacer installed)
18 mm outside
Original: Kanzaki Specialty Paper (USA):
P350 (paper thickness: 62 µm)
P310 (paper thickness: 58 µm)
P300 (paper thickness: 56 µm)
less (printing with a fully charged battery, at 25°C, print density 100%)
Bluetooth, serial *2)
Ver. 2.1 compatible
Power class: Class 2
Profile: SPP (Serial Port Profile)
Lithium-ion battery: Product name: LIP-2500, Trade name: Seiko Epson
Corporation
Output: DC 7.4 V
Capacity: 2200 mAh
Output voltage: DC 12 V
Input voltage: AC 100 V ~ 240 V
Product name: PS-10, Trade name: Seiko Epson Corporation
Output voltage: DC 12 V
Output current: 0.06 A ~ 3.5 A
Note: Should be a listed Class 2 power unit or LPS power supply.
5 ~ 45°C, 10 ~ 90% RH
environment of 25°C, 60% RH for 2 hours after it was left in the
following conditions:
High temperature and humidity: 50°C, 90% RH for 120 hours
High temperature: 70°C for 120 hours
Low temperature: -25°C for 120 hours
1-4 General Information Rev. A
Page 23

TM-P60 Technical Reference Guide
Overall dimensions (mm) 103 × 159 × 65 (W × D × H)
Mass (approx.) 670 g (including LIP-2500 [battery pack] but not roll paper)
*1) The printing may be slower depending on the data transmission speed and the combination of control
commands.
*2) A serial interface is only used for setup.
Rev. A General Information 1-5
Page 24
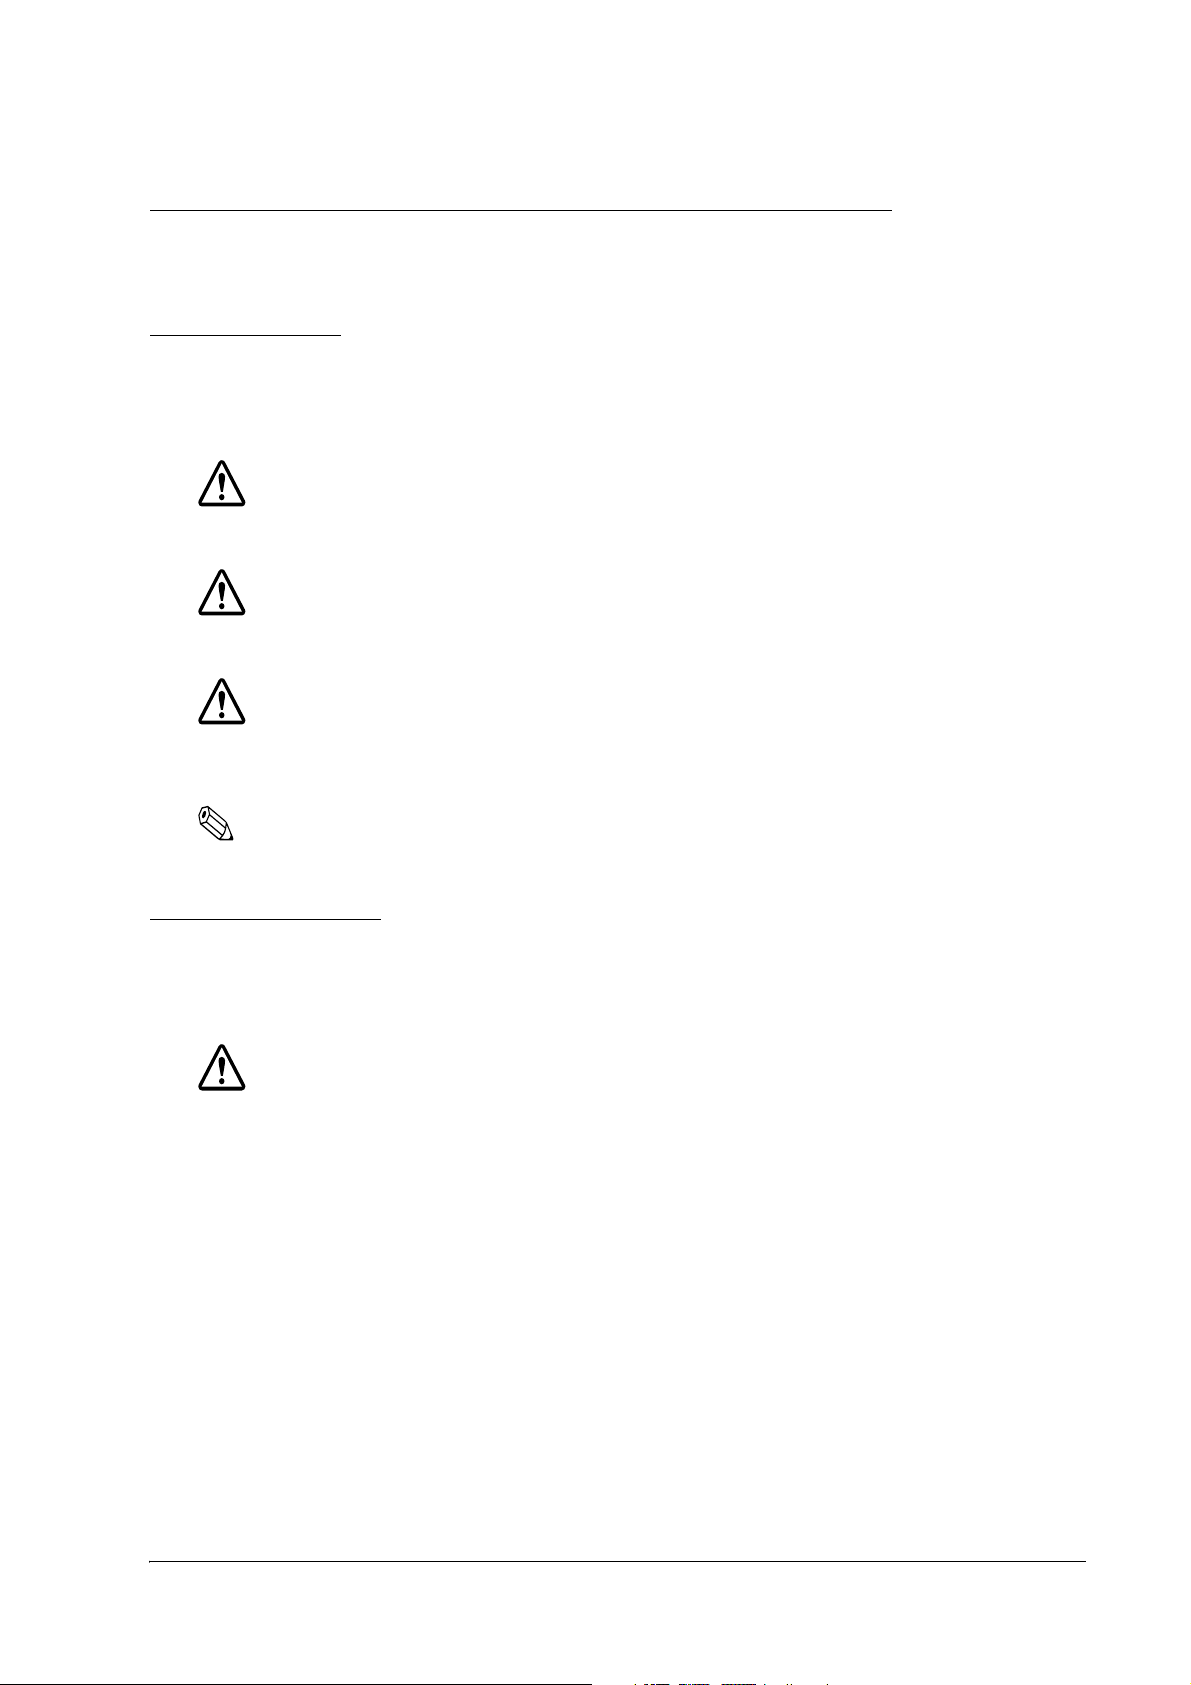
1.5 Using the TM-P60
The TM-P60 can be used in the following ways.
Bluetooth Connection
1-6 General Information Rev. A
Page 25
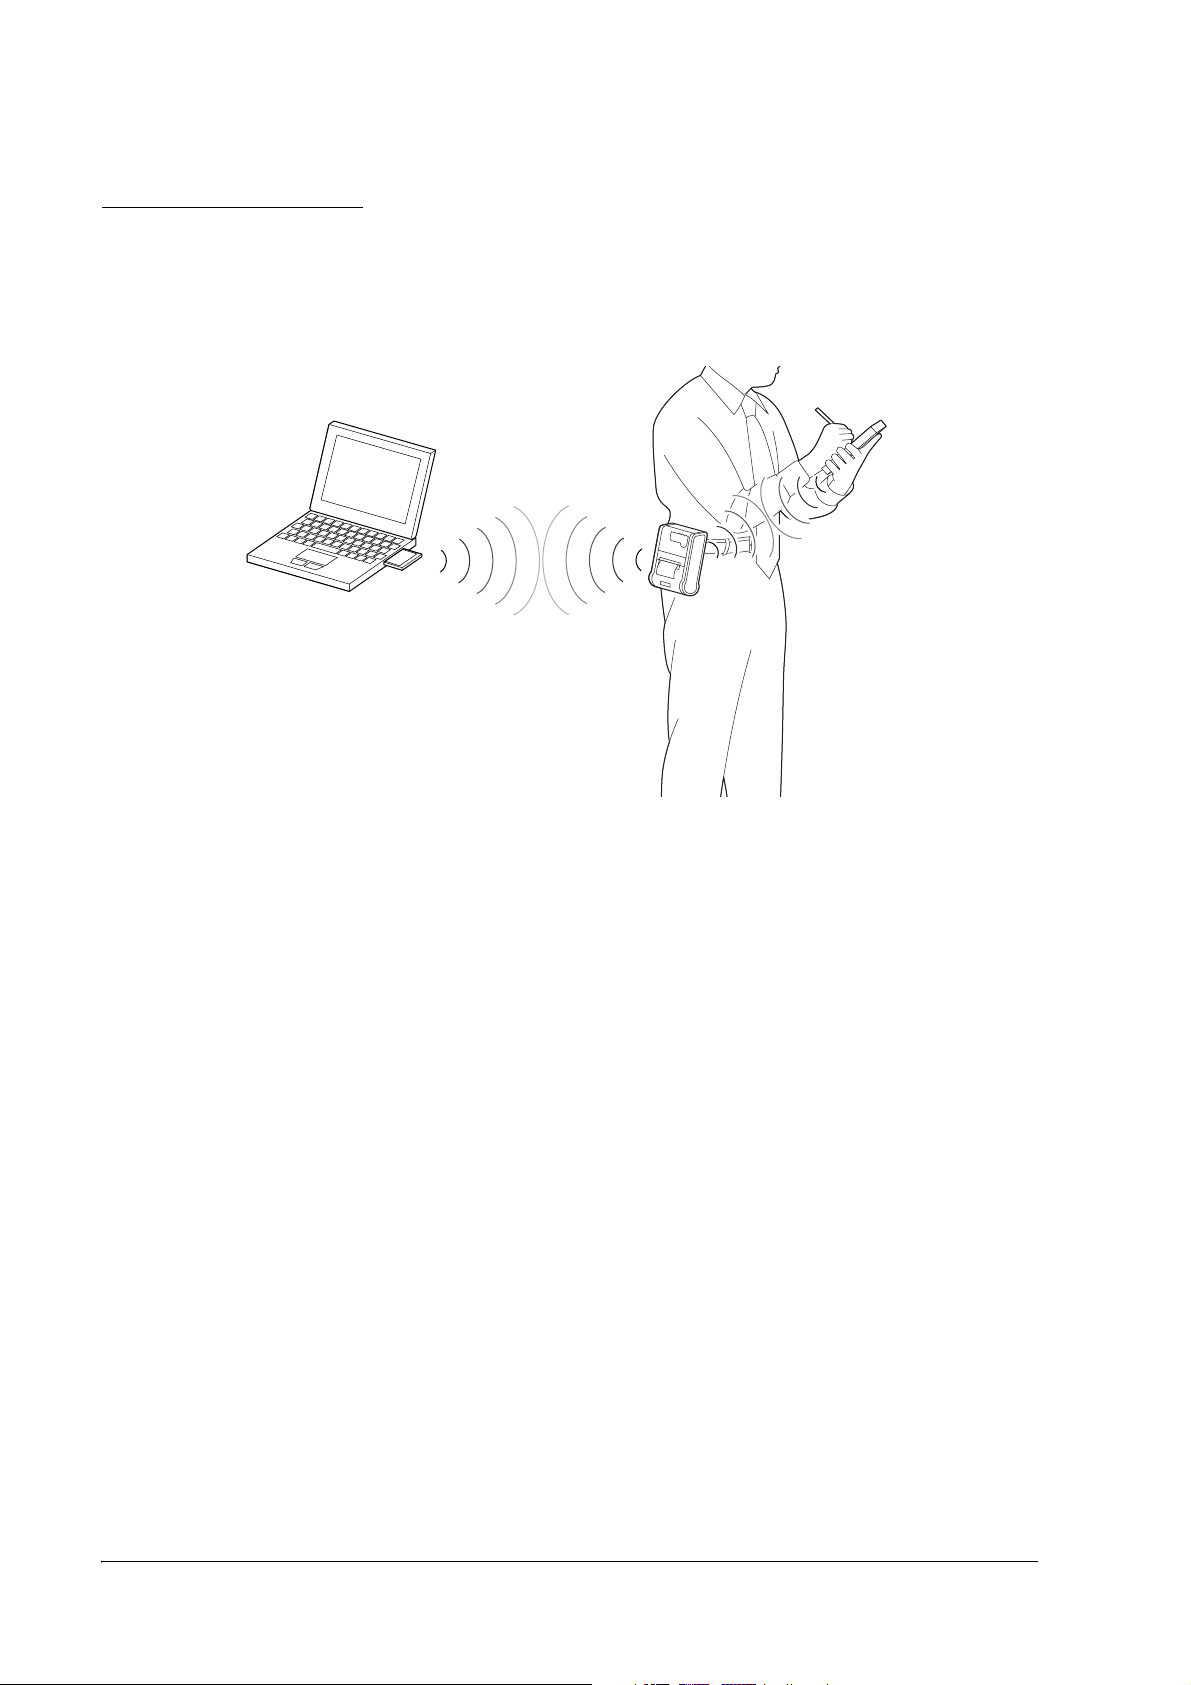
1.6 Bluetooth Protocol
The protocol for printing to the TM-P60 via Bluetooth is shown below.
TM-P60 Technical Reference Guide
Software
provided
by the
customer
Host Device
(Master)
Printing data
abcd
Printing application
SPP connection
Bluetooth connection
tool
Bluetooth module
Software
Hardware
TM-P60
(Slave)
Printing hardware
software
Bluetooth
host software
Bluetooth module
Software
Hardware
The TM-P60 operates as the slave device when Bluetooth is used. Communication settings etc.
are made on the master device.
The master Bluetooth device comes loaded with a mechanism to connect via the Bluetooth
protocol but is not loaded with a printing application. The user must therefore develop an
application for the master device for printing to the TM-P60.
Epson does not provide a driver for the master Bluetooth device. Use the “ESP/POS Application
Programming Guide” in order to develop a print application.
1.6.1 Security
Bluetooth uses a frequency hopping (FH) method that changes frequency quickly and often
when transmitting. This method makes transmitted data very difficult to intercept.
Bluetooth uses radio waves that have a smaller range compared with wireless LAN, which
limits the Bluetooth communication range. The limited range of the radio waves also makes data
interception difficult.
Bluetooth also uses a passkey authentication system when communicating between new
Bluetooth devices. An encryption function encrypts the communication data as well, making it
very difficult for data to be decrypted by an external device.
Rev. A General Information 1-7
Page 26

1-8 General Information Rev. A
Page 27

Chapter 2
Setup
2.1 Part Name and Basic Operation
2.1.1 Part names
RS232 I/F
connector cover
TM-P60 Technical Reference Guide
2.1.2 Control Panel
The control panel is shown below.
control
panel
roll paper
cover
battery cover
open
button
POWER
button
FEED
button
connector for
external power supply
clip
POWER
LED
ERROR
LED
BATT.
LED
Rev. A Setup 2-1
Page 28

❏ POWER LED
❏ ERROR LED
❏ BATT. LED
❏ FEED button
2.1.2.1 LED
POWER
POWER LED Meaning
On Power is on.
Off Power is off.
Flashing The printer is in power-off operation or is in an area where wireless communication is not possible.
ERROR
Printer Condition ERROR LED Meaning
Power On On Printer is offline (paper out, power-on initialization, roll paper
cover open, power-off operation, or the remaining battery
charge is not enough for printer operation when the battery is
used to supply the power.)
Off Printer is online.
Flashing It indicates an error. See “3.1 LED Blinking Pattern” (page 3-1) for
troubleshooting
Power Off, battery installed, and
external power supply connected
On Indicates that an abnormality occurred during battery
charging. The battery must be replaced with a new one.
Off No problem.
BATT.
Printer Condition BATT. LED Meaning
Power On without external power
supply
Power On and battery installed,
and external power supply
connected
Power Off and battery installed On The battery is being charged.
On Remaining battery charge is not enough. It must be charged.
Off Remaining battery charge is adequate.
Flashing Remaining battery charge is below half.
On The battery is being charged.
Off Standby: The battery is fully charged.
Operating: The battery is not being charged.
Off The battery is fully charged.
2.1.2.2 Control Panel Buttons
The control panel has a FEED button that you may have to use, although most paper handling
functions will be handled by your software.
2-2 Setup Rev. A
Page 29

TM-P60 Technical Reference Guide
FEED
Use this button to feed roll paper or to start a roll paper self test, or start printing status sheet.
( See “3.5.1 Self test mode” on page 3-3.)
Note:
The FEED button can be disabled by using an ESC/POS command. Refer to “ESC/POS Application
Programming Guide” for details.
2.1.3 Beeper Function
This printer has a “beeper“ function. This function causes beeping in specified situations. The
situations are the following:
❏ The remaining battery charge is low (Memory switch can enable/disable this function)
❏ Roll paper is out (Memory switch can enable/disable this function)
❏ A error has occurred except “printer temperature error.“ (Memory switch can enable/
disable this function)
❏ Start of status sheet printing
❏ The printer and host device are not connected (The default setting is for the buzzer not to
sound, but it can be set to sound using the memory switch.)
Note:
About memory switch, see “2.7.3 Memory Switches” (page 2-15).
About status sheet, see “3.5.1 Self test mode” (page 3-3).
The beeper can be beeped by a command from an application program.
See “4.3 Beeper function” (page 4-2)
Rev. A Setup 2-3
Page 30

2.2 Setup Flow
You have to set up your printer to use it. And you can adjust some features by customizing
them. This section describes the setup.
The setup flow of preparing to use printer is below.
1. Printer setup
❏ Set up the printer (set the strap and remove the belt clip)
See “2.3 Setting up the Printer” (page 2-5).
❏ Install Roll Paper
❏ Install the battery pack or connect the printer to the external power supply
(See “2.5 Providing power to the printer” (page 2-8))
❏ Self test printing (See “3.5.1 Self test mode” (page 3-3)
2. Bluetooth connection set by host computer. (See“2.6 Bluetooth
Connection” (page 2-12))
3. Adjust various settings (If you need to)
(Adjust settings such as paper roll width, print
density, Bluetooth pass key, device name, serial
communication setting)
4. Complete setup
2-4 Setup Rev. A
Page 31

TM-P60 Technical Reference Guide
2.3 Setting up the Printer
The TM-P60 can be set up as indicated below.
❏ Attached to a belt. If you do so, you don’t need to follow any further printer setup
instructions.
❏ Attached to a shoulder strap and carried on your shoulder.
❏ Set up on a table. Remove the belt clip if you do so.
2.3.1 Attaching the Shoulder Strap
Attach the shoulder strap by following the procedures
indicated on the right.
CAUTION:
Make sure to hang the shoulder strap only from
your shoulder. In order to prevent injury, never
hang it from your neck.
Make sure the paper roll side is facing down when
using the device vertically.
2.3.2 Setting Up on a Table
Remove the belt clip on the back when setting up on a
table. Remove the two screws shown in the diagram.
CAUTION:
Make sure to place the device on a horizontal
surface when setting up on a table.
screws
belt clip
Rev. A Setup 2-5
Page 32

2.4 Installing/Replacing the Roll Paper
1. Press the button to open the roll paper cover.
2. Remove the used roll paper core if there is one, and
insert the new roll paper.
Note:
Note the direction the paper comes off the roll.
Do not use paper rolls that have the paper glued to the core.
3. Pull out some paper, close the cover, and tear off the
paper with the manual cutter.
CAUTION:
Be sure to use roll paper that meets the specifications.
Be sure not to touch the manual cutter. Otherwise your fingers might be injured.
Note:
Do not open the roll paper cover during printing or paper feeding. It may cause to make damage for
printer.
2.4.1 Installing or Replacing Roll Paper Vertically
You can hang the printer vertically on a belt using a clip on the back of the printer or a neck strap
provided as an option. When you use the printer vertically, follow the steps below to install roll
paper.
1. Press the button to open the roll paper cover.
2. Remove the used roll paper core if there is one.
2-6 Setup Rev. A
Page 33

3. Set the new roll paper on the inside of the roll paper cover.
Note:
Note the direction the paper comes off the roll.
4. Pull the leading edge of the roll
paper.
TM-P60 Technical Reference Guide
5. Align the left edge of the roll paper
with the edge of the cover.
6. Close the cover and tear off the paper
with the manual cutter.
Since the Bluetooth radio wave output is relatively limited, communication can be affected by
the setup location, direction installed, other devices in the area, etc., which may disrupt or
decrease the speed of communication. As a result, make sure to thoroughly check device
operation prior to use.
Rev. A Setup 2-7
Page 34

2.5 Providing power to the printer
You can supply power through the battery pack or the external power supply as follows;
Battery: Lithium-ion battery LIP-2500 (packaged or optional)
Output: DC 7.4 V
Capacity: 2200 mAh
External power supply: • PS-10 (optional)
Rated voltage: DC 12 V
Input voltage: AC100 V to 240 V
• LPS power supply
Rated voltage: DC 12 V
Output current: 0.06 A to 3.5 A
2.5.1 Before Using the Battery Pack
Charge the battery pack prior to using the printer for the first time. Cautions relating to battery
pack safety are previously indicated in this manual. See the battery manual packaged with the
printer for further details.
WARNING:
Be sure to use the battery that came with the printer. Using a battery other than the one
specified may cause fire, explosion, leakage, overheating, or other damage.
2.5.2 Installing the battery
CAUTION:
There is a risk of explosion if the battery is replaced by an incorrect type. Dispose of used
batteries according to the instructions.
2-8 Setup Rev. A
Page 35

1. Slide the battery cover to open it.
2. Install the battery.
3. Close the cover.
TM-P60 Technical Reference Guide
2.5.3 Charging the battery
When you charge the battery, you have a choice of two methods.
❏ Charge the battery using the exclusive battery charger (option: OT-CH60).
In this method, remove the empty battery from printer; then put it onto a battery charger.
For the battery charger operation, see the user’s manual of the battery charger.
This method requires about 2.5 hours to charge the battery.
❏ Charge the battery from the external power supply.
For this method, connect the external power supply into the printer’s connector for the
external power supply. (For instructions, see “2.5.5.1 Connecting the external power supply”
(page 2-11).) During the charging, the BATT. LED comes on (color: red). When the charging
is completed, the BATT. LED goes off. You can charge the battery even if the printer is
turned on. However, the battery is not charged while the printer is operating.
This method requires about 4 hours to charge the battery.
Rev. A Setup 2-9
Page 36

CAUTION:
The battery LED may not illuminate if the battery is incorrectly inserted. If the LED fails to
illuminate, quickly correct the battery direction.
Quickly unplug the external power supply and battery pack if a battery charging error
occurs. This could indicate that the battery pack is malfunctioning and should not be
used.
Note:
If the battery temperature is
battery LED is illuminated. We recommend charging the battery at room temperature (
30 ºC).
Make sure to recharge the battery pack if it has not been used for a week or longer.
The battery charging time varies depending on the battery level and other individual variables.
2.5.4 Using with a Battery Pack
The battery LED indicates the battery level.
Printer Status Battery LED Explanation
Power ON, no external power
supply
0ºC or lower, or 40ºC or higher, the battery will not charge, even if the
10 ºC ~
Not
Illuminated
Flashing Battery level is half or less.
Illuminated Battery level is insufficient. Battery needs to be recharged.
Battery level is sufficient.
Note:
The battery level is only a general guide. Replace the battery as soon as possible once the battery level is
displayed as L.
If the battery level quickly returns to “Level L” even after recharging, the end of the battery life has
been reached. Replace with a new battery.
(Battery life: Approximately 500 charges)
Never remove the battery pack or disconnect the external power supply while printing.
The correct battery level will not be displayed if the battery pack temperature and ambient
temperature differ. If you require a relatively accurate battery level display, we recommend that you
wait until the battery pack has cooled down after charging before use.
The print density may vary depending on the user environment and battery level.
2.5.5 Providing power from the external power supply
When you would like to drive the printer with the external power supply, read following
section.
2-10 Setup Rev. A
Page 37

TM-P60 Technical Reference Guide
2.5.5.1 Connecting the external power supply
1. Turn off the printer.
2. Connect the external power supply into the connector as shown following figure.
connector for the external power supply
(It is covered by a cap)
Connect the external power supply here after opening the cap
WARNING:
Make sure you use the EPSON PS-10 AC adapter or LPS power supply.
Using an incorrect external power supply may cause fire or electrical shock.
Note:
Never disconnect the external power supply while printing, even if the battery pack is connected.
If the battery level quickly returns to “Level L” even after recharging, the end of the battery life has
been reached.
Replace with a new battery.
Never remove the battery pack or disconnect the external power supply while printing.
Rev. A Setup 2-11
Page 38
2.6 Bluetooth Connection
The procedures for connecting the host device to the TM-P60 using Bluetooth are indicated
below. The TM-P60 uses SSP (Serial Communication Protocol) to create the Bluetooth
connection. A Bluetooth-compatible PDA is used as an example for connecting via Bluetooth. In
order to print, you must install a PDA printer application on the PDA.
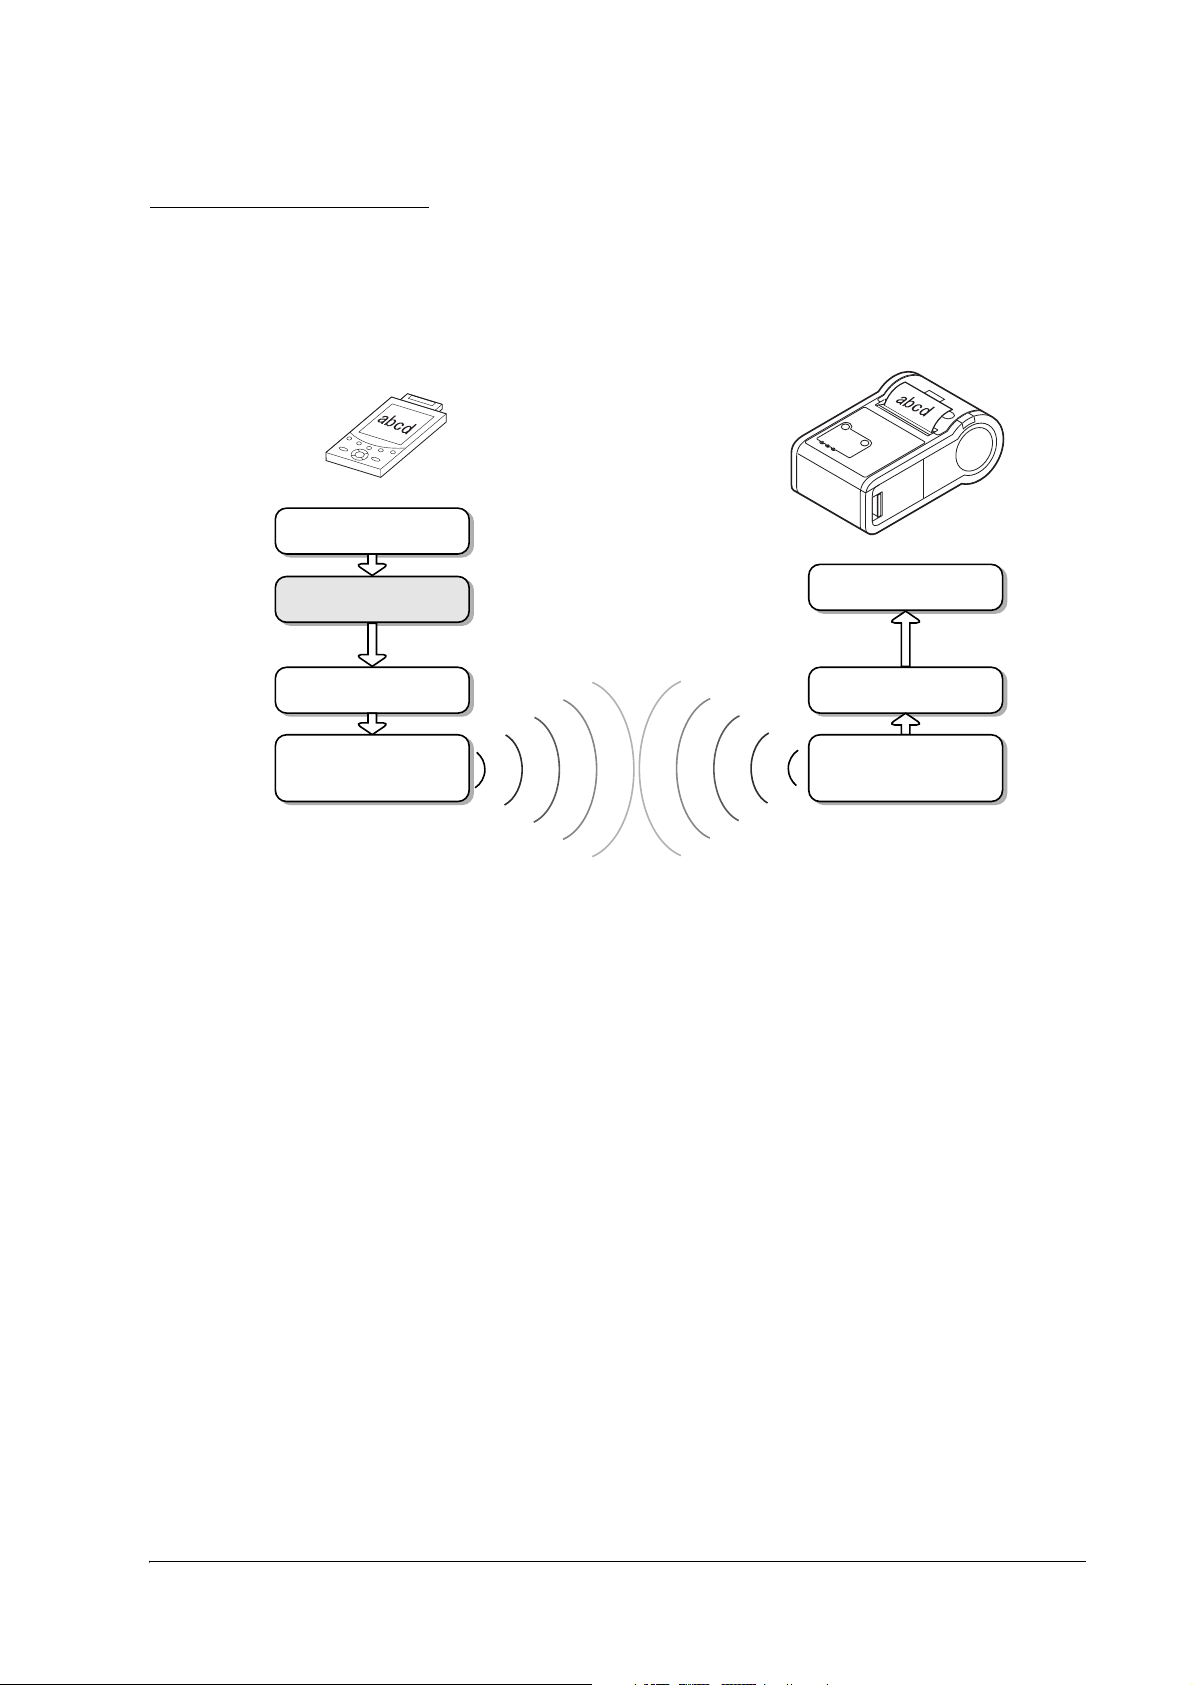
2.6.1 Bluetooth Connection Overview
Follow the PDA Bluetooth setup tool instructions for setup operations. One example is indicated
below. Use your host device manual for actual operations.
PDA Preparation
Confirm that your PDA is a Bluetooth-compatible device. Some devices may require installation
of a Bluetooth module and software.
Turn printer power on
Start the Bluetooth Setup Tool
Detect communication-ready Bluetooth devices
Select the TM printer from the list of communication-ready devices
Enter passkey
Confirm the profiles that can be used
Setup finished
Since the output of Bluetooth radio waves is limited, communication can be affected by the
setup location, direction installed, other devices in the area, etc., which may disrupt or decrease
the speed of communication. As a result, make sure to thoroughly check device operation prior
to using.
Establish the Bluetooth connection by using the PDA’s Bluetooth setup tool. Set up the
connection by following the direction indicated by this tool.
2-12 Setup Rev. A
Page 39

TM-P60 Technical Reference Guide
When setting up multiple TM-P60 devices, don’t turn on power to multiple devices at the same
time. Turn on power to and set up one device at a time.
2.6.2 PDA Preparation
Prepare a Bluetooth-compatible PDA. The required operating environment is indicated below.
❏ Compatible with Bluetooth Ver.2.1
❏ Compatible with SPP (virtual serial connection)
❏ The user must provide the print application.
2.6.3 Turning printer power on
Check that a paper roll is loaded and that power is being supplied to the device; then press the
power button.
Note:
If a serial cable (OT-RS60) is connected when the printer power is turned on, communication functions
will be disabled. Make sure to remove any serial cables before turning power on.
2.6.4 Starting the Bluetooth Setup Tool
Start up the Bluetooth setup tool from the PDA menu screen. Continue setup in accordance with
this tool’s instructions.
2.6.5 Detecting Communication-ready Bluetooth Devices
Use the Bluetooth setup tool to detect nearby devices. The PDA searches the immediate area for
other devices that can be connected via Bluetooth. If a communication-ready TM-P60 is
detected, the TM-P60 device name is displayed. The default setting is “BT304.”
Note:
The device name may differ. Refer to the self-test print results.
If multiple devices can be connected, those device names will be listed.
2.6.6 Entering a Passkey
Input a passkey when the Bluetooth setup tool displays an input screen. Refer to the self-test
print results for the passkey. The default setting is “4254.”
Note:
The device name may differ. Refer to the self-test print results.
Some devices may time out if you take too long to enter the passkey. If this occurs, enter the passkey and
return to the previous step to set up.
Rev. A Setup 2-13
Page 40

2.6.7 Confirming the profiles that can be used
Use the Bluetooth setup tool to confirm the Bluetooth profiles that can be used. The TM-P60
supports only “SPP” (virtual serial communication).
Note:
“Service” may be displayed as the profile.
2.6.8 Completing the Bluetooth Connection
The Bluetooth connection is complete once all setting are completed with the Bluetooth setup
tool.
Once communication with a device has been established, some PDAs add a connection icon to
their screen. This allows the user to re-establish connection by clicking the icon.
2.7 Adjusting Various Settings
This printer is able to be adjusted for the items below:
❏ DIP switch (handshake of serial communication conditions)
❏ Memory switch (buzzer on/off, status notification, serial communication conditions, paper
roll width, print density, Bluetooth passkey and device name, other)
❏ Roll paper width (58mm / 60mm)
Adjusting the spacer and memory switch
❏ Change the Bluetooth passkey and device name.
The current settings can be confirmed by a self test. (See “3.5.1 Self test mode” (page 3-3).)
Note:
When you adjust these items, we recommend you to confirm the new setting. You can confirm the settings
by running a self-test. See “3.5.1 Self test mode” (page 3-3) for detail.
2.7.1 How to Confirm Current Settings
You can use a self-test to confirm the current settings. See “3.5.1 Self test mode” (page 3-3).
2.7.2 DIP switch
This printer has DIP switches 1~4. These are located as shown in the figure below.
1. Make sure the printer is turned off.
2-14 Setup Rev. A
Page 41

TM-P60 Technical Reference Guide
2. To access the DIP switches, remove the DIP switch cover by hand (pull out the cover and
then pull it upward to release the projection.)
projection
DIP switch
DIP switch cover
DIP switch
Handshake DSW1 DSW2 DSW3 DSW4
DTR/DSR OFF ON OFF ON
RTS/CTS OFF OFF ON OFF
DSW 1 is fixed to OFF.
Note:
Serial communication setting is assigned to MemorySwitch (baud rate, parity). See the table “ Customize
values” (page 2-16) for details.
3. After set the DIP switch, attach the DIP switch cover.
2.7.3 Memory Switches
This printer has a set of software switches called “Memory switches“ . The memory switch set
has “Msw 8,” “Customize value,” “Serial communication condition.”
The “Memory switch setting utility” can change the Memory switch set to ON or OFF as shown
in the table below:
Note:
When you use this printer with RS-232 interface, you should adjust the “serial communication setting“
(see the table “ Serial communication” (page 2-17).)
Rev. A Setup 2-15
Page 42

The Memory switch can be changed by either one of two methods:
• Memory switch setting utility
• Control by an ESC/POS command
Settings of the memory switch are stored in the NV memory; therefore, even if the printer is turned off, the
settings are maintained. Excessive use of this function may destroy the NV memory. As a guideline, do
not use this function more than 10 times a day.
Memory Switch 8
SW Function On Off
1 Status notice *1 Transmit s* Doesn’t transmit
2 Beeper tone when the battery is low Beeps * Doesn’t beep
3 Beeper tone when this printer can’t
connect to any access point
4 Beeper tone when roll paper is out Beeps * Doesn’t beep
5 Beeper tone when an error occurs Beeps * Doesn’t beep
6 ~ 8 Reserved - Fixed to Off *
* : Default setting
Beeps * Doesn’t beep
Note:
Msw 8-1:
When On is selected, this printer transmits power-off notice, power-on notice, and battery status to a host
PC. When off is selected, this printer doesn’t transmit these.
Msw 8-2:
When On is selected, the printer beeps the buzzer for 10 seconds when the battery status enters “battery
level is L“ or “battery level is S.“
Msw 8-3, 8-4, 8-5:
When On is selected, the buzzer beeps for 10 seconds for each situation. For information on printer errors
(Msw 8-5), see “3.1.1 Error Types” (page 3-1).
Customize values
Function Selectable value
Roll paper width 58mm or 60 mm (Default: 58mm)
Time for auto power off Disable, or 1 ~ 60 minutes (Default: 20 minutes)
Print density 70%, 75%, 80%, 85%, 90%, 95%, 100%, 105%, 110%, 115%, 120%,
125%, 130%, (Default: 100%)
* “Time for auto power off”: When a printer isn’t received any data from host PC, and isn’t operated anything (ex.
opening the roll paper cover, pressing the FEED button) during the specified time, the printer turns off itself
automatically.
Note:
See “2.7.5 Adjusting Roll paper width” (page 2-23) also to adjust roll paper width.
2-16 Setup Rev. A
Page 43

TM-P60 Technical Reference Guide
Serial communication
Function Selectable value
Baud rate 9600 bps
19200 bps (default)
38400 bps
Parity None (default)
Odd
Even
Note:
When this printer connected with serial interface, the data length is always “8 bit.“ The handshake is
changed by a DIP switch; see “2.7.2 DIP switch” (page 2-14) for details.
2.7.3.1 Memory Switch Setting Utility
The following PC is required in order to use the memory switch setting utility.
Bluetooth Connection
❏ OS: Windows 2000 Professional, Windows XP Professional,
Windows Vista Business/Ultimate/Home Premium/Home Basic/Enterprise SP1
❏ Communication Port: Bluetooth is required
Download the memory switch setting utility and install on the setup PC. [See “2.7.7
Downloading Drivers, Utilities, and Manuals” (page 2-25)]
Serial Connection
❏ OS: Windows 2000 Professional, Windows XP Professional,
Windows Vista Business/Ultimate/Home Premium/Home Basic/Enterprise SP1
❏ Communication Port: Must have a serial port
Download the memory switch setting utility and install on the setup PC. [See “2.7.7
Downloading Drivers, Utilities, and Manuals” (page 2-25)]
Connect the serial cable. [See“2.7.6 Connecting a serial interface cable” (page 2-23)]
Rev. A Setup 2-17
Page 44
Starting the Memory Setup Utility
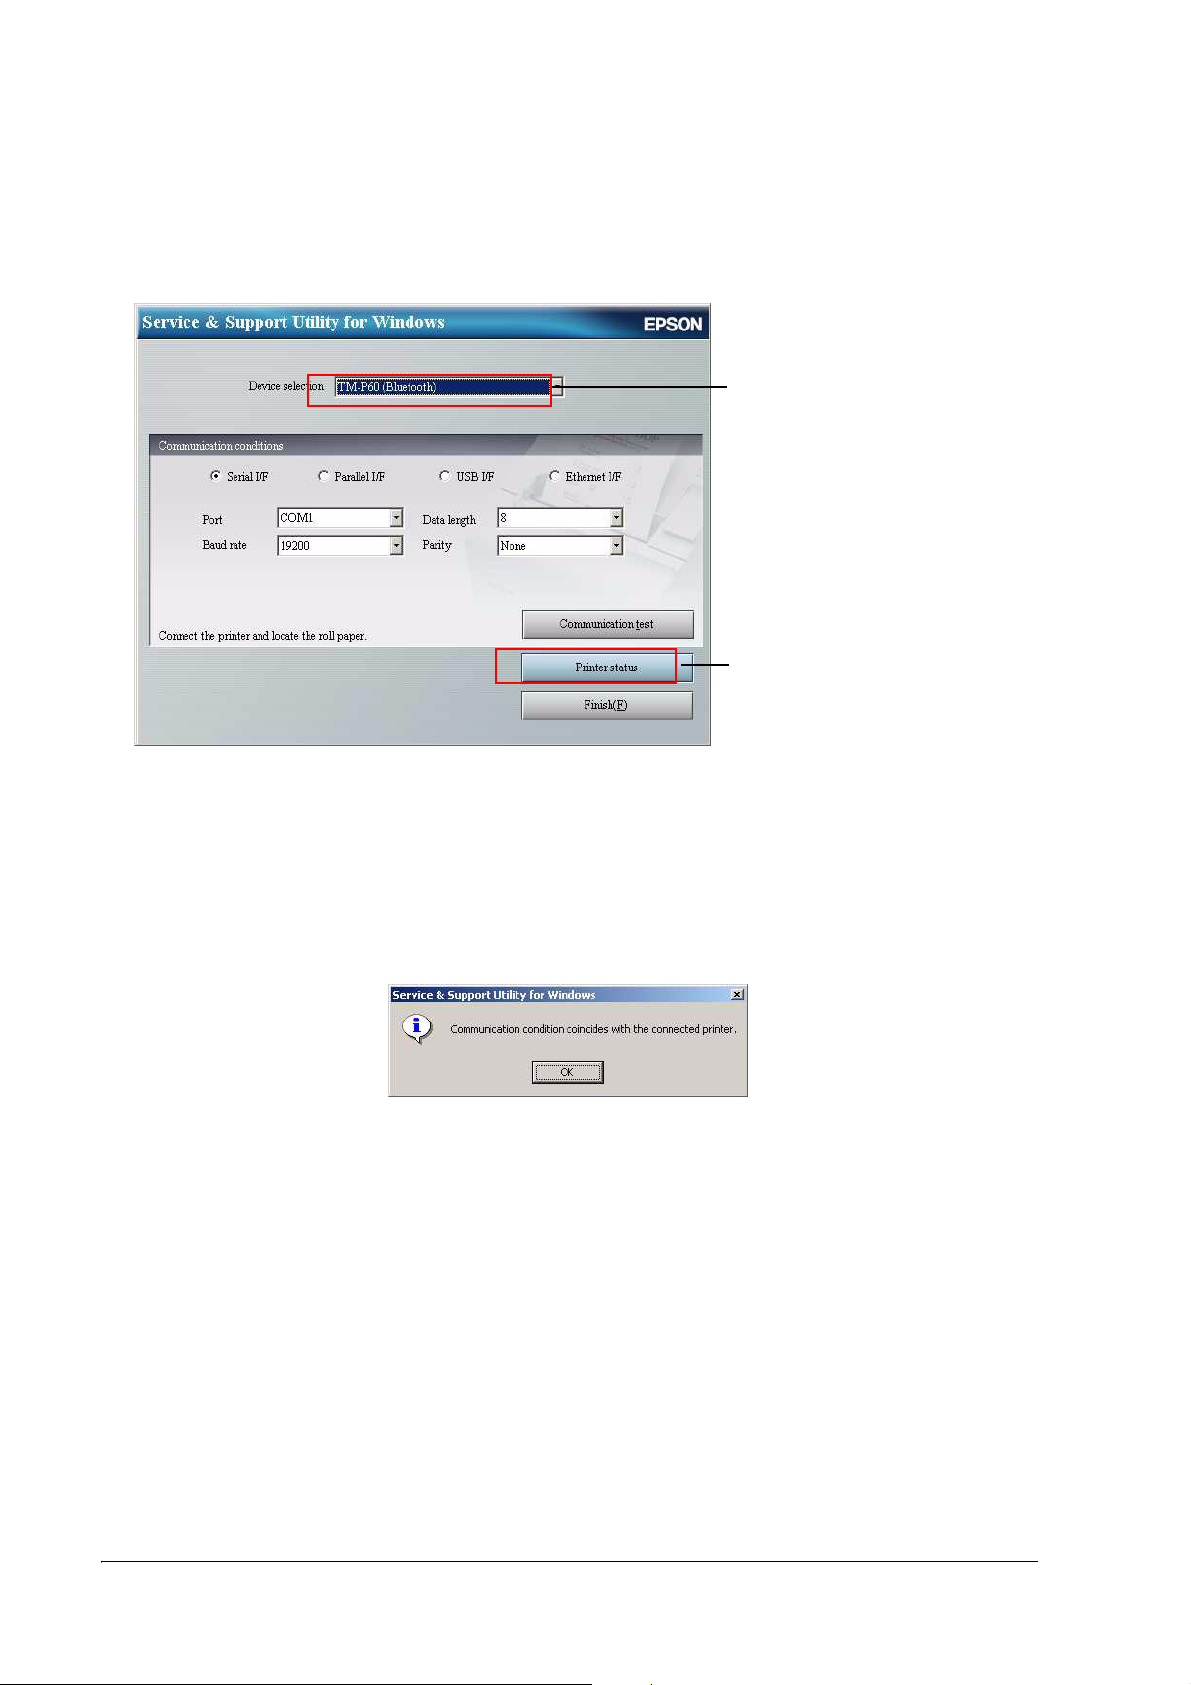
The following setup screen is displayed when you start the memory setup utility.
1. Select the model (TM-P60 Bluetooth)
2. Select the Printer Status
1. Select TM-P60 Bluetooth.
2. Press the “Printer Status” button.
Confirm the communication status of the connected printers. The following message is
displayed when connection with the printer has been properly established.
2-18 Setup Rev. A
Page 45

TM-P60 Technical Reference Guide
Memory Switch
Select the “Memory Switch” tab. Press the “Get Status” button to retrieve and display the
current settings.
Memory Switch 8
SW Function On Off
1 Status notification *1 Transmits* Does not transmit
2 Buzzer sound when battery is not charged Buzzer sounds * Buzzer does not sound
3 Buzzer sound when printer and host device
are not connected
4 Buzzer sound when roll paper roll is out Buzzer sounds * Buzzer does not sound
5 Buzzer sound if an error occurs Buzzer sounds * Buzzer does not sound
6 ~ 8 Reserved - Fixed to Off*
*: Default Setting
Buzzer sounds Buzzer does not sound *
• Msw 8-1 : If On is selected, the printer sends power off notifications, power on notifications,
and battery status to the host PC. If Off is selected, the printer does not send these
notifications.
• Msw 8-2 : If On is selected, and the battery status is “Level L” or “Level S,” the buzzer will
sound for 10 seconds.
• Msw 8-3, 8-4, 8-5 : If On is selected, the buzzer sounds in 10 seconds for these statuses. See
“3.1.1 Error Types” (page 3-1) “ for further details regarding printer errors (Msw 8-5).
After setup, press the [Refresh Status] button to write the settings to the printer.
Rev. A Setup 2-19
Page 46

Communication Conditions
Select the [Communication Conditions] tab. Press the “Get Status” button to retrieve and display
the current settings.
Communication Conditions
Function Selectable Values
Baud Rate 9600bps
19200bps (Default)
384000bps
Parity None (default)
Odd Number
Even Number
After setup, press the [Refresh Status] button to write the settings to the printer.
2-20 Setup Rev. A
Page 47

TM-P60 Technical Reference Guide
Customized Value
Select the [Customized Value] tab. Press the “Get Status” button to retrieve and display the
current settings.
Customized Value
Function Selectable Values
Roll Width 58mm or 60mm (Default: 58mm)
Auto Power Off Interval Deactivated, or 1~60 minutes (default:20 min)
Print Density 70%, 75%, 80%, 85%, 90%, 95% 100%, 105%, 110%, 115%, 120%, 125%, 130%
(Default: 100%)
* "Auto Power Off Interval”: If the printer does not receive data from the host PC within the specified amount of time
and no operations are executed (for example opening the paper roll cover and pressing the FEED button), then
the printer automatically shuts off.
Note:
See “2.7.5 Adjusting Roll paper width” (page 2-23) for details on how to adjust the paper roll width.
After setup, press the [Refresh Status] button to write the set content to the printer.
Rev. A Setup 2-21
Page 48

2.7.4 Changing the Bluetooth passkey and device name.
The Bluetooth passkey settings are the same as other memory switches. They can be set using
the memory switch setting utility or the ESC/POS command.
Follow the steps below to set using the memory setting utility.
1. Start up the memory switch setting utility.
2. Press the “Printer Status” button.
3. Select the [Bluetooth] tab. Press the “Get Status” button to retrieve and display the current
settings.
Bluetooth
Function Selectable Values
Bluetooth Device Address Cannot be changed
Passkey (Default: 4254)
Device Name (Default: BT304)
After setup, press the [Refresh Status] button to write the set content to the printer.
2-22 Setup Rev. A
Page 49

TM-P60 Technical Reference Guide
2.7.5 Adjusting Roll paper width
The TM-P60 accommodates 58 mm {2.28"}, and 60 mm {2.36"} wide paper rolls. The roll paper
guide is removed to change the roll paper width to 60mm. The method of removing the guide is
following below.
1. Make sure the power is turned off.
2. Open the roll paper cover.
3. Take the roll paper guide off of the printer.
4. Release th hook to the direction (1 in the illustration) by using a pointed tool, such as
tweezers or a small screwdriver, and lift up (2 in the illustration) the roll paper guide to
take the roll paper guide off.
roll paper guide
2
1
hook
5. Set the memory switch (customize value) for the paper width. (See “2.7.3 Memory Switches”
(page 2-15))
Note:
When this printer connected with serial interface, the data length is always “8 bit.“ The handshake is
changed by a DIP switch; see “2.7.2 DIP switch” (page 2-14) for details.
2.7.6 Connecting a serial interface cable
Use the following procedure.
1. Turn off the printer.
2. Open the “RS232 I/F connector cover.”
RS232 I/F connector
cover
Rev. A Setup 2-23
Page 50

3. Connect the serial interface cable (option) to the printer and the serial port of the host PC.
4. Turn on the printer while pressing the FEED button.
5. The printer prints the self test result, which is necessary for the next step.
Note:
If you connect the serial cable to the printer while turning it on, the printer doesn’t support serial
communication. Turn off the printer before connecting the cable.
When the serial cable is connected to the printer, do not stress the cable. Doing so may damage the serial
cable and the serial connector.
CAUTION:
Do not pull on the cable while a serial cable is connected.
Do not suspend the printer while a serial cable is connected.
2-24 Setup Rev. A
Page 51

TM-P60 Technical Reference Guide
2.7.7 Downloading Drivers, Utilities, and Manuals
Drivers, utilities, and manuals can be downloaded from one of the following URLs:
For customers from North America, go to the following web site: http://www.epsonexpert.com/
and follow the onscreen instructions.
For customers in other countries, go to the following web site: http://www.epson-pos.com/
Rev. A Setup 2-25
Page 52

2-26 Setup Rev. A
Page 53

TM-P60 Technical Reference Guide
Chapter 3
Troubleshooting
This section describes general troubleshooting.
3.1 LED Blinking Pattern
3.1.1 Error Types
The printer stops all printer operations, goes offline, and the ERROR LED blinks when an error
is detected.
ERROR LED Blinking Pattern
ERROR Description
Printer temperature
error (*1)
The internal temperature
of the printer is extremely
high
320 ms
Recovery
Recovers automatically
when the printer cools
Autocutter error The autocutter does not
work correctly
Circuit error The circuit board doesn’t
work
Memory error The printer does not work
Voltage error The power supply voltage
Software error The firmware does not
The radio unit error The IEEE802.11b radio
Overload error Temperature of thermal
Battery charging error
(*2)
correctly in R/W checking.
is extremely high or low
work correctly.
interface unit doesn’t
work.
head is abnormally high.
Battery voltage does not
reach the prescribed
voltage.
Battery charging is not
performed.
Recovers by error
recovery command.
(See “Paper Jam”
(page 3-3))
Impossible to recover
Impossible to recover
Impossible to recover
Impossible to recover.
Impossible to recover
Impossible to recover
Replace the battery
Rev. A Troubleshooting 3-1
Page 54

Note:
The ERROR LED is on when the printer is offline (paper out, power-on initialization, roll paper cover
open, power-off operation, or the remaining battery charge is not enough for printer operation when the
battery is used to supply the power.)
(* 1) Print temperature error is not an abnormality.
(*2) The battery charges when an external power supply is connected and the printer is Off.
When you see an error described as “Impossible to recover“ in the recovery column, turn off the printer as
soon as possible and consult your dealer.
When the printer beeps, see also “Beeping Types” (page 3-2).
3.2 Printer Beeps
3.2.1 Beeping Types
The printer beeps in some situations. The beeping patterns are as follows.
Beeping Pattern The beeping indicates mean
1000 ms ON
Other patterns • Application transmit
1000 ms OFF
100 ms ON
• Battery remaining amount is “L level”
or less
• The printer can’t find a device with
which Bluetooth connection possible
(the default is “disabled”)
point.
• Roll paper end
• An error has happened.
• A self-test printing (when you press
the FEED button)
“beeper command“to printer.
Beeping
times
5 times Memory switch specify
1 time This beeping is always
Depends
on the
application
Switch method to
Enable/disable
the beeping enable/
disable
• Battery remaining
amount [Msw 8-2]
• Roll paper end
[Msw 8-4]
• Error has happened
[Msw 8-5]
• Can’t find a device
with which Bluetooth
connection possible
[Msw 8-3]
enabled.
--
3-2 Troubleshooting Rev. A
Page 55

TM-P60 Technical Reference Guide
3.3 Printer Beeps When the Power is Turned on
When printer can’t find any access points with the current wireless LAN setting, the printer
beeps to warn you. [See “Printer Beeps” (page 3-2) for the beeping pattern.] In this case, you
should change the LAN setting of this printer or your access point.
3.4 Paper Jam
When there is a paper jam, follow the procedure below.
1. Open the roll paper cover.
2. Remove the jammed paper.
3. Close the roll paper cover.
4. Transmit the error recovery command.
Note:
For error recovery command information, see the manual for each control method (OPOS, Advanced
Printer Driver, ESC/POS command).
3.5 To Confirm the Current Setting of the Printer
This printer has two functions to confirm the current setting of the printer.
❏ Self test mode
This mode prints all settings of the printer and a character printing test on roll paper.
(Ex: serial communication condition, Bluetooth setting, memory switch setting, etc...)
3.5.1 Self test mode
The self test lets you know if your printer is operating properly. It checks the control circuits,
printer mechanisms, print quality, control software version, and DIP switch settings.
This test is independent of any other equipment or software, so it is a good idea that run it when
you first set up the printer and if you have any trouble. If the self test works correctly, the
problem is in the other equipment or the software, not the printer.
1. Make sure the printer is turned off and the roll paper cover is closed properly.
2. While holding down the FEED button, turn on the printer using the switch on the front of the
printer. The self test prints the printer settings and then prints the following, cuts the paper,
and pauses.
If you want to continue SELF-TEST printing, please press
FEED button.
Rev. A Troubleshooting 3-3
Page 56

3. Press the FEED button to continue printing. The printer prints a pattern using the built-in
character set.
Note:
If you would like to finish the test printing, turn off the power.
4. The self test automatically ends and cuts the paper after printing the following:
*** completed ***
The printer is ready to receive data as soon as it completes the self test.
Note:
If you want to pause the self test manually, press the FEED button. Press the FEED button again to
continue the self test.
3.5.2 Resetting the Printer
Reset to initialize the printer’s Bluetooth settings (passkey, device name).
1. Open the paper roll cover.
2. Turn the printer On while pressing the FEED button.
3. Press the FEED button 6 times.
4. Close the paper roll cover.
5. The reset procedures are printed. (Open the paper roll cover, press the FEED button, close
the paper roll cover.)
The reset begins after “Initialize” prints and the paper roll has been cut. The printer restarts
after initialization.
Note:
For the TM-P60, initialization completes several seconds after the paper roll is cut.
3.6 Hexadecimal Dump Mode
This feature allows experienced users to see exactly what data is coming to the printer. This can
be useful in finding software problems. When you turn on the hex dump function, the printer
prints all commands and other data in hexadecimal format, along with a guide section to help
you find specific commands.
To use the hex dump feature, follow these steps:
1. After you make sure the printer is off, open the roll paper cover.
2. While you hold down the FEED button, turn on the printer.
3-4 Troubleshooting Rev. A
Page 57

TM-P60 Technical Reference Guide
3. Close the cover.
4. Run any software program that sends data to the printer. The printer prints “Hexadecimal
Dump” and then all the codes it receives in a two-column format. The first column contains
the hexadecimal codes and the second column gives the ASCII characters that correspond to
the codes. Part of a hexadecimal dump is shown below:
Hexadecimal Dump
To terminate hexadecimal dump,press
FEED button three times.
1B 21 00 1B 26 02 40 40 40 40 . ! . . & . @ @ @ @
1B 25 01 1B 63 34 00 1B 00 1B . % . . c 4 . . . .
41 42 43 44 45 46 47 48 41 42 A B C D E F G H A B
• A period (.) is printed for each code that has no ASCII equivalent.
• In hex dump mode all commands except real time ESC/POS commands are disabled.
5. Press the FEED button twice to print the last line.
6. Pressing the FEED button two times turns off the hex dump mode and returns the printer to
the normal mode. Or, reset the printer to turn off the hex dump mode.
Rev. A Troubleshooting 3-5
Page 58

3-6 Troubleshooting Rev. A
Page 59

TM-P60 Technical Reference Guide
Chapter 4
Application Development Information
This section contains usable information to develop POS systems that use this printer.
4.1 About wireless communication
4.1.1 For Application developing
The TM-P60 uses wireless comunication technology; therefore temporary communication
breaks may occur when you move or are in an outside environment. When you develop
application software using wireless communication, you should consider this.
We recommend you confirm whether or not the printer printed after every print data
transmission unit. Detection of communication errors and recovering from such errors are also
important. Data communication without confirmation of printing and detection of
communication errors may cause data loss.
❏ Time until printing starts (Bluetooth specification)
A wireless connection is not constantly maintained between the host device and the printer.
When printing starts and the connection is reestablished, there may be a time lag between the
time that the host device commands the print job to start and the time that actual printing
begins. This is because some time is needed to manage the connection between the host device
and the printer. The time required depends upon the operating environment.
❏ Disconnection timing
When the wireless connection is ended while the printer is offline, reconnection may not be
possible. In such case, remove the cause of offline and reconnect it.
Rev. A Application Development Information 4-1
Page 60

4.2 About the Battery Remaining Amount
4.2.1 The battery remaining amount
This printer has a battery to supply power. The battery has four statuses:
Battery Status
Level H (High) Off The remaining battery charge is between 100% and approximately
Level M
(Medium)
Level L (low) On The battery needs to be replaced or recharged because the
Level S (Serious) On The printer will not operate because the remaining battery charge
The battery
LED condition Description
50% when the amount of difference between the full battery and
level L is 100%.
Flashing The remaining battery charge is between approximately 50% and
level L when the amount of difference between the full battery and
level L is 100%.
remaining battery charge is low.
is too low.
4.2.2 The method to confirm the battery status
The battery status can be confirmed by every control method.
4.2.2.1 ESC/POS command
The beeper function can be operated by commands. See the “ESC/POS Application
Programming Guide“ for details.
4.3 Beeper function
This printer has a beeper function. The beeper beeps automatically when the following
conditions occur. The automatic beeping enabled/disabled is switched by a memory switch. See
“Memory Switches” (page 2-15) for details.
❏ The remaining battery charge is low
❏ Roll paper is out
❏ Printer has an error
❏ An available host device cannot be found (default is set to disabled).
In addition, the buzzer can be turned on using commands from the application. The various
control methods are explained in the section below.
4.3.1 ESC/POS command
The beeper function is able to be operated by commands. See the “ESC/POS Application
Programming Guide“ for details.
4-2 Application Development Information Rev. A
Page 61

TM-P60 Technical Reference Guide
4.4 Various Status Categories
This printer is able to send various status reports to the host PC. This section describes the kind
of statuses and handling.
Status Categories Description
Roll Paper cover status Roll paper cover is open or closed
FEED button status Paper feed button is pressed or not
Error status Various error information (Off-line / On-line), (detail of the error;
Mechanical error, autocutter error, auto-recovery error,
unrecoverable error)
The statuses are useful for the following situations.
❏ When an error status is sent to the host PC, the host PC can display an error message or
solution message for operator (with beeping).
❏ When “Paper end“ status is sent to the host PC, the host PC can display a message for the
operator to replace roll paper.
4.4.1 ESC/POS commands
When you use ESC/POS commands to control the printer, you can get the status by using
“status command” including Auto Status Back command (ASB.) Please refer to “ESC/POS
APG.”
4.5 NV memory
This printer has NV memory (Non-volatile). The data of NV memory remains after you turn off
the power. The NV memory is available in two ways.
1. NV Graphics
Please refer “NV Graphics Printing” (page 4-4) for details of the function.
2. User NV memory
There is free area in the NV memory that the user can use. You can use this free area for
notations, to write other character information, or for many other purposes. The data
remains after you turn off the power. Use ESC/POS commands to read and write this data.
The following are examples of purposes.
• Date of the printer for maintenance
• ID definition for developer or POS system
Note the following when writing to and erasing NV memory.
Rev. A Application Development Information 4-3
Page 62

❏ The following restrictions apply when performing NV memory operations (including data
writing and erasing).
•The paper FEED button must not be used to feed paper.
• The real-time command must not be executed.
• The ASB status will not be sent, even when the ASB function is set to enabled.
❏ The printer sometimes enters the Busy state while data is written to NV memory. It is
important not to send data from the host computer while the printer is in the Busy state, as it
will be incapable of processing any received data.
❏ Frequent use of the functions for writing to and erasing data from NV memory can damage
the memory. As a rule in using the various commands, avoid writing to NV memory more
than 10 times per day.
4.6 NV Graphics Printing
This printer has an “NV Bit-Graphics“ Function. This function provides printing Graphics (e.g. a
shop logo.) This function is available for ESC/POS control method.
EPSON provides a utility, “TMFLogo,” that enables registration of a bitmap image in the NV
memory of an EPSON TM series printer. The bitmap image in the NV memory can be printed
with the printer by using each control method.
Printable Size Printing method
NV
Graphics
<width>
Paper width, or
less than paper width.
<height>
1200dot (normal mode)
2400dot (double-height mode)
Store
Store NV Graphics to NV memory by TMFLogo utility. If you store
the bitmap in NVRAM, it is not necessary to restore it unless the
NV memory is deleted.
Print
Depends on each control method.
Note
NV graphics data shares the domain used by user NV memory record data; therefore, the entire capacity of
the domain to which NV graphics data and user NV memory data are defined is targeted. The TM-P60’s
entire capacity is 384 KB.
Example: The NV memory can store 64 items graphics data when the file size of a graphic is 6 KB.
4.6.1 ESC/POS command
See “ESC/POS Application Programming Guide“ about the method.
4.6.2 Tips for Visual Basic
When programming with Visual Basic, limitations prevent data from 81h through 9Fh and from
E0h through FEh from being sent as characters. Therefore, you may be not able to print a part of
Page 0 (for example )in Visual Basic.
4-4 Application Development Information Rev. A
Page 63

TM-P60 Technical Reference Guide
However, you can use the following procedure to send this data.
Dim Send_ data(0) As Byte
Send_data(0) = &h81 ’1 byte of sending data
MSComm1.Output = Send_data
Rev. A Application Development Information 4-5
Page 64

4-6 Application Development Information Rev. A
Page 65

TM-P60 Technical Reference Guide
Appendix A
About Bluetooth
A general overview of Bluetooth, its specifications, and tips for using it effectively are explained
in this section.
A.1 Bluetooth Overview
Bluetooth is a standard for wirelessly connecting together peripheral devices such as personal
computers, printers, etc. It can be used to easily network together not only personal computers,
but a variety of devices as well.
Bluetooth also uses data encryption and random frequency switching technology to attain a
high level of security and prevent data interception.
A.2 Bluetooth Specifications
A.2.1 Piconet
Bluetooth uses a master/slave device relationship to create what is called a piconet. One device
within the piconet network is the master device that generates a frequency hopping pattern. A
maximum of seven slave devices can participate in a single network.
A slave device can also participate in another different piconet. In addition, the master device of
one piconet can act as a slave device for a different piconet.
The TM-P60 is a dedicated slave device.
Rev. A About Bluetooth A-7
Page 66

A.2.2 Communication Range
The Bluetooth communication range is approximately 10 meters.
The actual communication range differs depending on the surrounding radio wave
environment, objects of interference, and the setup location. Make sure to sufficiently test the
communication range when setting up a network.
A.2.3 Bluetooth Frequency
Bluetooth operates at a frequency of 2.4GHz. This frequency can also be used by IEEE802.11b/g
wireless LAN and microwave devices.
Bluetooth uses a frequency hopping method. If a specific frequency is being used by another
device and causing interference, Bluetooth technology will quickly move to a different
frequency to minimize cross-talk that could prevent communication.
The master device generates this frequency shifting pattern which is then followed by the slave
device.
A.2.4 Standby Mode
When Bluetooth communication is occurring, it is in “Active Mode”. It is in “Standby Mode”
when no communication is occurring. This standby mode consists of several patterns. The
master device sets which standby mode to move to and how long after communication has
ended to move to that mode.
A.2.5 Security
Bluetooth is able to secure high level security functions due to the following points.
❏ Frequency Hopping
• Bluetooth is constantly moving between frequencies. Since its pattern of frequency
shifting is known only by the master and slave devices, any devices that are attempting
to intercept communications cannot follow these changes.
❏ Authentication
• When Bluetooth is used, authentication occurs between the host and slave devices. Data
passing between authenticated devices is encrypted prior to transmission, making it
difficult to intercept and decrypt.
❏ Short communication range
• Bluetooth transmission strength is relatively weak and the radio wave dispersal distance
short. This reduces the danger of the radio waves traveling too far and being
intercepted.
A-8 About Bluetooth Rev. A
Page 67

TM-P60 Technical Reference Guide
A.3 Using Bluetooth Effectively
❏ See “Communication Range” on page A-8 for information about Bluetooth communication
range.
❏ Place Bluetooth compatible devices away from other electrical devices. Do not operate near
automatic doors, fire alarms, etc., as a malfunction could occur.
Using a device such as a microwave oven that emits strong high-frequency energy may
cause interference. If this occurs, relocate the Bluetooth device(s) to a location with less
interference.
❏ If a device that uses the same frequency range is located nearby, improper communication
may result. If this occurs, relocate the printer device(s) to a location with less interference.
❏ Bluetooth and wireless LAN use the same frequency range (2.4GHz). Using both types of
devices near each other can cause interference. Make sure to separate by 10 meters or more.
WARNING:
❏ Do not use near medical devices.
Bluetooth radio waves may interfere with heart pacemakers or other electrical medical
devices.
❏ Make sure to use at least 22cm or more away from any heart pacemakers.
Bluetooth radio waves could effect pacemaker operation.
❏ Do not use Bluetooth devices near automatically controlled devices such as automatic doors
or fire alarms.
Bluetooth radio waves can cause these devices to malfunction and may result in injury.
Rev. A About Bluetooth A-9
Page 68

A-10 About Bluetooth Rev. A
Page 69

Appendix B
Character Code Tables
B.1 Page 0 (PC437: USA, Standard Europe)
(International character set)
TM-P60 Technical Reference Guide
Rev. A Character Code Tables B-1
Page 70

B.2 Page 1 (Katakana)
B-2 Character Code Tables Rev. A
Page 71

B.3 Page 2 (PC850: Multilingual)
TM-P60 Technical Reference Guide
Rev. A Character Code Tables B-3
Page 72

B.4 Page 3 (PC860: Portuguese)
B-4 Character Code Tables Rev. A
Page 73

B.5 Page 4 (PC863: Canadian-French)
TM-P60 Technical Reference Guide
Rev. A Character Code Tables B-5
Page 74

B.6 Page 5 (PC865: Nordic)
B-6 Character Code Tables Rev. A
Page 75

B.7 Page 16 (WPC1252)
TM-P60 Technical Reference Guide
Rev. A Character Code Tables B-7
Page 76

B.8 Page 17 (PC866: Cyrillic #2)
B-8 Character Code Tables Rev. A
Page 77

B.9 Page 18 (PC852: Latin2)
TM-P60 Technical Reference Guide
Rev. A Character Code Tables B-9
Page 78

B.10 Page 19 (PC858: Euro)
B-10 Character Code Tables Rev. A
Page 79

B.11 Page 255 (Blank page)
TM-P60 Technical Reference Guide
Rev. A Character Code Tables B-11
Page 80

B.12 International Character Sets
ASCII code (hexadecimal number)
Country
U.S.
France
Germany
UK
Denmark I
Sweden
Italy
Spain I
Japan
Norway
Denmark II
Spain II
Latin America
Korea
B-12 Character Code Tables Rev. A
Page 81

TM-P60 Technical Reference Guide
Appendix C
FAQ
Q1. The buzzer rings when I turn the TM-P60 on. What should I do?
A1.1 Check to see if the power LED is slowly blinking.
When the TM-P60 is powered on, it searches for other available Bluetooth devices (host devices).
If it cannot find a host device, the power LED slowly blinks and the buzzer sounds. If this
occurs, follow the instructions below.
❏ Use a utility to confirm the host device’s Bluetooth settings. Print the TM-P60 self test to
confirm if the device is recognized. The passkey, device name, and Bluetooth address are
printed on the self test. See “To Confirm the Current Setting of the Printer” (page 3-3) for
details on how to print a self test.
❏ The host device may not be within communication range. If there are any objects between
the host device and the TM-P60, move the TM-P60 and check to see if the LED has stopped
blinking.
A1.2 Check to see if the error LED is illuminated or blinking.
If an error has occurred, the TM-P60 will cause the buzzer to sound due to the memory switch
settings. See “Beeping Types” (page 3-2) to check the error cause.
A1.3 Run a self test.
Various settings can be displayed by running a TM-P60 self test. See “To Confirm the Current
Setting of the Printer” (page 3-3) for self test procedures.
❏ Use a utility to confirm the host device’s Bluetooth settings. Print the TM-P60 self test to
confirm if the device is recognized. The passkey, device name, and Bluetooth address are
printed on the self test. See “To Confirm the Current Setting of the Printer” (page 3-3) for
details on how to print a self test.
❏ The host device may not be within communication range. If there are any objects between
the host device and the TM-P60, move the TM-P60 and check to see if the LED has stopped
blinking.
A1.4 Check the Battery Level
If the battery level is “L Level” or lower, the TM-P60 will cause the buzzer to sound in
accordance with the memory switch settings. Charge the battery. (See “About the Battery
Remaining Amount” (page 4-2).
See “Charging the battery” (page 2-9) for battery charging procedures.
Rev. A FAQ C-1
Page 82

Q2. Can the buzzer be set not to sound?
A2.1 Change the memory switch settings.
You can set the memory switch settings so that the buzzer does not sound. See “Memory
Switches” (page 2-15) for details regarding the memory switch.
Q3. The battery LED is illuminated or blinking. What should I do?
A 3.1 he battery doesn't have a charge.
Check the battery LED status to confirm the battery level. (See “About the Battery Remaining
Amount” (page 4-2)).
See “Charging the battery” (page 2-9) for battery charging procedures.
Q4. The power LED is slowly blinking. What should I do?
A 4.1 Check the TM-P60 and host device’s Bluetooth settings.
Use a utility to confirm the host device’s Bluetooth settings. Print the TM-P60 self test to confirm
if the device is recognized. The passkey, device name, and Bluetooth address are printed on the
self test. See “To Confirm the Current Setting of the Printer” (page 3-3) for details on how to
print a self test.
A 4.2 Check that the TM-P60 is within Bluetooth communication range.
The host device may not be within communication range. If there are any objects between the
host device and the TM-P60, move the TM-P60 and check to see if the LED has stopped blinking.
Q5. I cannot connect the TM-P60 to Bluetooth. What should I do?
A 5.1 Check the TM-P60 and host device’s Bluetooth settings.
Use a utility to confirm the host device’s Bluetooth settings. Print a TM-P60 self test to confirm if
the device is recognized. The passkey, device name, and Bluetooth address are printed on the
self test. See “To Confirm the Current Setting of the Printer” (page 3-3) for details on how to
print a self test.
A 5.2 Another network is causing radio wave interference.
Radio wave interference can occur if a wireless LAN network is operating in the same area.
Move the devices to a different area if this is the case.
A 5.3 There is a noise source near the TM-P60.
Communication may be impeded if a microwave oven or motor is operating in the same
vicinity. Move the host device or TM-P60 and check that communication is possible farther
away from the noise source.
A 5.4 Check that the TM-P60 power is On.
Turn on power to the TM-P60 device.
C-2 FAQ Rev. A
Page 83

TM-P60 Technical Reference Guide
A 5.5 Check if there is a cause of offline
Remove the cause of offline if there is any.
A 5.6 Reset the TM-P60 device to its default settings.
Reset the TM-P60 to its default settings. (See “Resetting the Printer” (page 3-4)). Reset all
communication settings after doing so. (See “Setup” (page 2-1).)
A 5.7 There is a problem with the host device.
If available, replace the host device with another functioning host device.
Q6. I cannot create a TM-P60 Bluetooth serial connection.
A 6.1 Match the host device and TM-P60 communication settings.
Run a TM-P60 self test to confirm the settings. Make sure that the TM-P60 and host device
settings match.
A 6.2 After checking that the serial cable (OT-RS60) is connected, turn on the TM-P60.
Check that the TM-P60 is connected to the PC with a serial cable (OT-RS60), and then turn on
TM-P60 power again.
A 6.3 The serial cable is not a type specified by EPSON.
Use a serial cable type specified by EPSON. We cannot guarantee communication when a cable
other than the one specified (OT-RS60) is used.
A 6.4 TM-P60 power is not on.
Turn on power to the TM-P60.
Q7. The device is disconnected from the network after connecting for several minutes.
A 7.1 The host device may be using a power management or suspend function.
Check that the power management and suspend functions on the host device are turned off.
Q8. Power to the TM-P60 shuts off after being on several minutes.
A 8.1 The TM-P60's automatic power off interval is incorrectly set.
If an “Automatic Power Off Interval” is set for the memory switch, the TM-P60 will
automatically shut off in no data is received during the specified interval. Check the TM-P60’s
power management function. (See “Memory Switches” (page 2-15).)
Q9. I cannot print.
A 9.1 TM-P60 power is off.
Turn on power to the TM-P60.
Rev. A FAQ C-3
Page 84

A 9.2 Power shuts off during printing.
The battery has no charge. Replace or charge the battery, or plug in the external power supply.
C-4 FAQ Rev. A
 Loading...