

Page 1

EPSON PRODUCT SUPPORT BULLETIN
Date: 3/25/04 Originator: rws
Bulletin #: PSB.2004.03.006 Authorization:
Reference: TE03-461 Rev.A, epson10997, TE03-620Rev.A, TE03-620 Rev.B Total Pages: 1
Product: Stylus Pro 5500, 7600DYE, 7600UCM, 9600DYE, 9600UCM, 10000DYE, 10000CF, 10600UCM
Subject: Driver Plug-in Up-Date v1.0cE for the Epson MAC OS-X Printer Driver
This bulletin was created to inform you of a Epson Driver Plug-in up-date for the Stylus Pro 5500, 7600DYE, 7600UCM, 9600DYE,
9600UCM, 10000DYE, 10000CF, 10600UCM standard Mac OS X Epson printer drivers released prior to January 01, 2004.
Description of Change:
This change updates the standard Epson driver interface plug-ins ONLY that were included as part of the Epson MAC OS X driver
released prior to January 01, 2004, and supersedes the epson10997 connectivity Plug-in up-date previously posted.
NOTE: Should you need to reinstall the Epson Printer Driver after this up-date, you will need to re-apply the update again
afterward to update the drivers standard plug-ins.
Reason:
This Update stabilizes Epson driver Interface communications during printing and corrects Epson Status Monitor functions for the
following Professional Graphics printer driver plug-ins and upgrades their versions to: FireWire v1.81, USB v1.81, TCPIP v1.81.
NOTE: In addition we recommend you upgrade your MAC OS-X operating system to the most current version.
How Do I Get The Up-Date?
The up-date is available for download on our WEB SIte: www.epson.com from the MAC Drivers & Downloads section for each of the
printers listed. The file name is epson11054.
EPSON Professional Graphics Group Page 1.
Page 2

EPSON PRODUCT SUPPORT BULLETIN
Date:
PSB #:
Reference:
Product(s):
11/8/04
PSB.2004.03.001C
PSB.2004.03.001A
Originator:
Authorization:
Total Pages:
EPSON Stylus Color 3000, Stylus Pro 4000, 5000, 5500, 7000 Series, 7600 Series, 9000 Series, 9600 Series,
RB, CH, JD, SA
19
10000 Series, and 10600 Series
Subject:
Maximum Printable Area Limits for the EPSON Professional Graphic Printer line.
This bulletin was created to inform you of the maximum custom page sizes allowable for EPSON Professional Graphic products.
The tables below show the maximum page sizes allowable for the EPSON Professional Graphics printer line (Desktop and Large
Format). Although this document is meant as a guideline for the maximum page size allowable for each printer, it does not include
printable area (margin) information. Please refer to your user guide for additional information regarding the printable area (margins)
for your particular printer. There are 3 aspects that effect how long of a page your printer can output. Those 3 items are:
1. Operating System.
2. Driver Specification.
3. Software application(s) being used.
Maximum custom page size allowable per operating system (for Epson standard driver):
Macintosh
OS
Macintosh
OS X*
Win 9x/Me
Stylus
Color 3000
44 in. 44 in. 44 in. 44 in. 90.5 in. 90.5 in. 90.5 in. 90.5 in. 90.5 in. 90.5 in. 90.5 in.
44 in. 44 in. N/A 44 in. N/A N/A 90.5 in. N/A N/A 90.5 in. 90.5 in.
44 in. 44 in. 44 in. 44 in. 90.5 in. 90.5 in. 90.5 in. 90.5 in. 90.5 in. 90.5 in. 90.5 in.
Stylus
Pro
4000
Stylus
Pro
5000
Stylus
Pro 5500
Stylus
Pro 7000
Stylus
Pro 7500
Stylus
Pro 7600
Stylus
Pro 9000
Stylus
Pro 9500
Stylus
Pro 9600
Stylus Pro
10000 Series
Win NT
44 in. 44 in. 44 in. 44 in. 90.5 in. 90.5 in. 90.5 in. 90.5 in. 90.5 in. 90.5 in. 90.5 in.
4.0/2000/XP
Print jobs being sent through the Epson standard print driver should be in the RGB format in order for color management to be
utilized properly.
* Macintosh OS X allows you to create any paper size regardless of printer driver’s limitations. Exceeding these limitations will result in your image being
cropped and printed at 8.5 x 11.
1
Page 3

Maximum custom page size allowable for EPSON PostScript options (PPD):
EPSON Stylus
Stylus Color
3000
44 in. N/A 44 in. N/A N/A N/A N/A N/A N/A N/A N/A
Stylus
Pro 4000
Stylus
Pro 5000
Stylus
Pro 5500
Stylus
Pro 7000
Stylus
Pro 7500
Stylus
Pro 7600
Stylus
Pro 9000
Stylus
Pro 9500
Stylus
Pro 9600
Stylus Pro
10000
Series
RIP
EPSON Fiery
RIP Station
EPSON Fiery
N/A
N/A N/A N/A 44 in. N/A N/A N/A N/A N/A N/A N/A
N/A
44 in. N/A
See
NOTE 1
See
NOTE 1
N/A See
NOTE 1
See
NOTE 1
N/A
N/A
Spark Designer
(Mac)
EPSON Fiery
Spark
N/A N/A N/A 44 in. N/A N/A See
NOTE1
N/A N/A See
NOTE1
See
NOTE 1
Professional
EPSON
ColorBurst RIP
N/A See
NOTE1
N/A 44 in. N/A N/A See
NOTE1
N/A N/A See
NOTE1
See
NOTE 1
Print jobs being sent through the Epson PostScript driver can be either RGB or CMYK format. Settings in the RIP will determine
how color management is used.
Maximum page size allowable from software applications:
Adobe Photoshop
5.x/6.x/7.x/
Adobe Photoshop
CS
*Adobe Illustrator
8.x/9.x
*Adobe Illustrator
CS
QuarkXPress
4.x/5.x/6
*CorelDRAW
8.x/9.x/10.x/11.x
Stylus
Color 3000
See
NOTE 2
See
NOTE 2
227 in. 227 in. 227 in. 227 in. 227 in. 227 in. 227 in. 227 in. 227 in. 227 in. 227 in.
227 in. 227 in. 227 in. 227 in. 227 in. 227 in. 227 in. 227 in. 227 in. 227 in. 227 in.
48 in. 48 in. 48 in. 48 in. 48 in. 48 in. 48 in. 48 in. 48 in. 48 in. 48 in.
1,800 in. 1,800 in. 1,800 in. 1,800 in. 1,800 in. 1,800 in. 1,800 in. 1,800 in. 1,800 in. 1,800 in. 1,800 in.
Stylus
Pro 4000
See
NOTE 2
See
NOTE 2
Stylus
Pro 5000
See
NOTE 2
See
NOTE 2
Stylus
Pro 5500
See
NOTE 2
See
NOTE 2
Stylus
Pro 7000
See
NOTE 2
See
NOTE 2
Stylus
Pro 7500
See
NOTE 2
See
NOTE 2
Stylus
Pro 7600
See
NOTE 2
See
NOTE 2
Stylus
Pro 9000
See
NOTE 2
See
NOTE 2
Stylus
Pro 9500
See
NOTE 2
See
NOTE 2
Stylus
Pro 9600
See
NOTE 2
See
NOTE 2
Stylus Pro
10000
Series
See
NOTE 2
See
NOTE 2
2
Page 4

* These applications allow for tiling of print pages, therefore allowing you to print beyond the printers maximum page length limit and print to the
applications limits. The printer driver must be set for Roll Paper (Banner) mode so that page breaks at the printer’s maximum page length do not o ccur (in
essence gives you a 0 margin for the bottom of the page). The Stylus Pro 5000/5500 however will give a slight page break at the 44 inch limit as these
printers do not support banner mode. Also, printing certain elements from these applications may not utilize color management correctly/properly and
may produce output color that is not expected.
NOTE 1:
a. Under Win 9x/Me, the PPD limit is 129 inches.
b. Under Windows NT, 2000 and XP, the PPD limit is 1771.6 inches (SP7000/9000 Series) and 1800 inches
(SP7600/9600/10000 Series).
c. Under Mac OSX/8.x/9.x, the PPD limit is 273.06 inches.
NOTE 2:
Adobe Photoshop has a pixel limitation of 30,000 pixels, which means that a document created @ 300ppi can only
reach a maximum page size of 100 inches (H and V). When sending jobs to the printer via the standard nonPostScript print driver, Photoshop looks at the input resolution of the printer driver and adjusts the page size
accordingly. All Epson large format printers use 360dpi as the input resolution (this is the resolution data is rasterized
at), therefore when printing from Photoshop, the maximum page length you will be able to output to any Epson large
format printer using the standard Epson print driver would be 83.33 inches (30,000 pixels / 360dpi). As for the Epson
desktop products, they rasterize data at 720dpi, therefore the maximum page length obtainable with the standard
print driver would be 41.67 inches (30,000 pixels / 720dpi).
Also, under Photoshop 5.x/6.x for the Macintosh and Photoshop 6.x for the PC, the job will end up clipped if it is over
the 83.3inch printer page limit. In Photoshop CS, the print job will end up clipped if it is over the 86inch printer page
limit; however it will allow you to create a custom paper size of 91inches max. If you are using Photoshop 5.x for the
PC, the print job will actually be truncated to fit within the printable area of the printer. Be advised that you may not get
a page size error. It may be useful to enable the “print preview’ function of your printer driver (if available) so that you
do not waste unnecessary media.
The only options for printing beyond the limitations is to save the file and print via an application that does not have
the 30,000 pixel limit (may lose color management functions) or print the file through a PostScript RIP (which will
allow for longer pages).
UPDATE: Photoshop CS allows for a maximum Pixel limit of 300,000 x 300,000 (this would create a 251.5 GB file!!)
This allows Photoshop to have a print dimension of 4166.666 x 4166.666 at 72 ppi (Pixels per Inch). At 360 ppi, your
max print size would be 833.333 x 833.333. You can still only print 44 x 90.5” Photoshop CS at this point exceeds
the capability of our printers.
3
Page 5

For Windows Users, if you encounter partial/incomeplete prints while having Finest Detail enabled, please disable this
setting. It is recommended for low resolution text and line art to sharpen their edges. For photos, this may create a
massive print file that is too large for the printer driver to process correctly.
The following examples show how to setup banner printing from Adobe Illustrator 8.x/9.x and CorelDRAW 9 from the
PC platform. The Macintosh versions of these applications should be very similar in function. Please refer to your
software documentation for additional assistance.
4
Page 6

Adobe Illustrator CS:
In this example, we are creating a banner, which is 227 inches (Illustrators max. page setup).
NOTE: Mac O/S 10.3.3 system is used in this example. Windows versions of this application should be very similar in
functionality. Please refer to your software documentation for additional assistance. In this example, a “20 inches
wide X 180 inches high” document is created.
1. Click on File and New, set up the width and height (sample shows 20 W x 180 H), then click OK.
2. Insert the image you want to print and stretch it until it covers the whole page.
5
Page 7

3. Click on File, Print, click Setup, under Tiling click on the drop down arrow, select Tile Full
4. Pages and click the Printer button.
5. When the printer setup window comes up, select your printer name and set the Roll Paper Options to:
Roll Paper Banner
Roll Paper Banner – No Margin ( if printing no margins)
6. In the Copies and Pages section, click on the drop down arrow, select Roll Paper Option. Uncheck Auto
Cut then check Save Roll Paper.
6
Page 8

7. Then click on Print. This will bring you back to the Print window.
8. This time click on Page Setup, you see the following screen, just click on Continue (If you don’t want to
see the window again, place a check mark on Don’t Show Again box).
7
Page 9

9. When Page Setup is open, click on the down arrow for Custom Paper Size.
NOTE: When creating the custom page size, divide the banner size by a value that will make it less than the printer
maximum custom page size (90.5 inches). In this example we take (180/2 = 90), therefore the custom page
size created would be 20x90 (inches).
10. Click on New, name the custom size (i.e. 20 x 180 in this example), under Paper Size type in 20 inches for
the width and 90 inches for the height, margins should be set to zero (0). Click on Save. Click on the down
arrow again in the Custom Paper Size and select Page Attributes.
8
Page 10

11. Under Paper Size, click on the drop down arrow and select the custom paper size you created
(i.e. 20 X 180) orientation is set to portrait mode. Then click OK.
12. In the Print windows the preview pane will show 2 grids or pages. This indicates that a full image is tiled.
9
Page 11

13. Click on General, then click the square on Reverse Order.
4. Click on Print.
10
Page 12

NOTE 1: When enabled, the first page will be printed first, instead of the last page first. Or Change the orientation to
“Reverse”, then you don’t have to check the “Reverse Order”.
NOTE 2: Always select the custom page size last, if not, it will default to other paper sizes.
NOTE 3: Before printing a large document, make sure you have enough ink to prevent getting an Ink Out message,
causing the print job to stop and not completing the entire print.
11
Page 13

Adobe Illustrator 8.x/9.x:
In this example, we are creating a banner, which is 227 inches (Illustrators max. page setup).
1. Launch Illustrator and open or place your file in the page layout.
2. Click on File, then Document Setup. The following screen appears.
3. Uncheck Use Print Setup, enable Tile Full Pages and create the page size (in our example we used 44x227
inches).
4. Click, Print Setup. This will bring up the print driver.
12
Page 14

5. Click on the Paper Tab. The following appears.
6. Set the Paper Source to Roll Paper (Banner) and also enable Save Roll Paper.
7. When creating the custom page size, divide the banner size by a value that will make it less than the printer
maximum custom page size. In this example we take (227/3 = 75.7), therefore the custom page size created
would be 44x75.7 inches. The reason for this is to save media.
13
Page 15

8. After setting the custom page size and other driver settings (media type, resolution, etc.), click OK. This will
bring you back to the document setup. Now double-click the “Page” tool.
9. The page should now show the following.
10. At this point you can and resize the image to fit within the printable area and print.
14
Page 16

CorelDRAW:
In this example, a banner is created at 227 inches.
1. Launch CorelDRAW and open or place an image in your page layout.
2. Adjust the page size and image for the document as shown in the following image.
3. Click on File and Print Setup.
15
Page 17

4. Click on the Paper Tab. The following appears.
5. Set the Paper Source to Roll Paper (Banner) and also enable Save Roll Paper.
16
Page 18

6. When creating the custom page size, divide the banner size by a value that will make it less than the printer
maximum custom page size. In this example we take (227/3 = 75.7), therefore the custom page size created
would be 44x75.7 inches. The reason for this is to save media.
7. After setting the custom page size and other driver settings (media type, resolution, etc.), click OK. This will bring
you back to the document.
17
Page 19

8. At this point, click File then Print. CorelDRAW will then run a pre-flight check and will show the following window.
18
Page 20

9. Click on the Layout Tab and enable Print Tiled Pages and set any additional parameters as you see fit.
10. At this point you could check other tab settings (if necessary) and click Print Preview (recommended) if you want
to see how the file will be printed or Print to output the file to your printer.
For all other applications, please refer to your software documentation for information on maximum custom page sizes for
documents, banners or tiling prints.
19
Page 21

EPSON PRODUCT SUPPORT BULLETIN
Date: 1/23/04 Originator: rws
Bulletin #: PSB.2004.01.001 Authorization:
Reference: TE03-461 Rev.A Total Pages: 1
Product: Stylus Pro 5500, 7600DYE, 7600UCM, 9600DYE, 9600UCM, 10000DYE, 10000CF, 10600UCM
Subject: Connectivity Plug-in Update v1.0bE for the Epson MAC OS X Printer Driver
A connectivity plug-in update is available for the standard Epson MAC OS X printer drivers released prior to January 1, 2004. This
update applies to these printers: Stylus Pro 5500, 7600DYE, 7600UCM, 9600DYE, 9600UCM, 10000DYE, 10000CF, 10600UCM
Reason For Update:
This update improves the stability of the drivers USB, Firewire and TCP/IP communication module plug-ins.
Note: If you reinstall the Epson printer driver after you have updated the plug-ins, you must apply this plug-in update again, as
reinstalling the driver overwrites and installs the older version plug-ins.
The version of the updated plug-ins installed in the Epson Printers folder can be verified using Get Info:
FireWire v1.72
USB v1.72
TCP/IP v1.75.
Note: In addition we recommend that your MAC OS X operating system be at the most current version.
How Do I Get The Update?
The update is available for download from www.epson.com. Select Drivers & Downloads, select your printer model, scroll to Macintosh
Operating Systems, and download the update (filename epson10997).
EPSON Professional Graphics Group Page 1.
Page 22

EPSON PRODUCT SUPPORT BULLETIN
Date: 07/03/03 Originator:
Bulletin #: PSB.2003.05.001B Authorization:
Reference: NA Total Pages: 12
Product: Stylus Pro 7600/9600/10000/10600
Subject: MAC OS X Driver Installation and Removal
INTRODUCTION:
This bulletin was created to inform you how to Install and or Remove the Epson Stylus Pro 7600, 9600, 10000 or 10600 inkjet printer
driver on a Macintosh OS X system.
If this is a fist time Epson Stylus Pro Macintosh OS X printer driver installation you will only need to follow the driver installation steps.
TIP
If you have previously installed the Epson Stylus Pro 7600, 9600, 10000 or 10600 inkjet printer driver on
your computer you must first Remove the driver from your system prior to performing the driver
installation, this insures a complete driver installation.
rws
NOTE: Although this document references the Epson Stylus Pro 7600/9600 ALL Epson Stylus Pro series Macintosh OS X
printer driver Installation and Removal steps follow the same instructions.
EPSON Professional Graphics Group Page 1.
Page 23

INSTALLING THE DRIVER
1. After the driver is downloaded to your desktop a new folder is created (example: epson10673). Please read the files in this folder
as they provide additional information for installing or using the driver.
2. Click on the file with the .DMG file extension (example: SP7600_1.6bE.dmg) to create the printer driver installation package.
3. The printer driver installation package installer has a .pkg extension (example: SPro7600_16b.pkg) double click on the file to start
the printer driver installation.
TIP
Prior to starting the installation it is recommended you copy the installation package (example:
SPro7600_16b.pkg)
to your hard drive. This will save you time should you wish to reinstall the driver in the future.
EPSON Professional Graphics Group Page 2.
Page 24

4. The installer requires your Macintosh password for Authentication. Enter your Password and click OK.
5. The Installer Introduction screen will be displayed, click CONTINUE.
6. Read the License Agreement and click CONTINUE. You are asked to Agree or Disagree to the License Agreement click AGREE to
continue the installation.
EPSON Professional Graphics Group Page 3.
Page 25

7. Select the Destination Disk (your OS X volume) to install the driver on by clicking on its icon, then click CONTINUE.
Installation Type is the next step "EASY INSTALL" is the default to perform the basic driver installation, to continue click INSTALL.
NOTE:
If you see Upgrade instead of
Install CANCEL the
installation and follow the
steps in “DRIVER REMOVAL”
8. Next you see a notification screen to Restart your computer after the installation is completed, to continue click CONTINUE
INSTALLATION. The Printer Driver will now be installed, a progress window is displayed during the installation.
9. The Printer Driver will now be installed, a progress window is displayed during the installation.
10. When the Printer Driver installation has completed the following window is displayed, click RESTART to Finish the installation.
EPSON Professional Graphics Group Page 4.
Page 26

ADDING THE PRINTER TO PRINT CENTER
1. After the printer driver is installed you first need to register it with Print Center.
2. The Print Center Utility is located on your hard drive at the following location:
/Applications/Utilities/Print Center.
TIP
Copy the Print Center to the Short Cut Task Bar for ease of access.
3. You have Two ways to Add a printer. You can use the Add button or you can select Add Printer from the Printers drop down menu,
click Add.
4. On the Add printer window you first need to select the Epson Interface Connection the printer is attached with:
Only choose an
Epson selection
EPSON Professional Graphics Group Page 5.
Page 27

5. After you choose the Epson Interface Connection, the Print Center automatically searches the connection for printers. When the
search completes:
5.1 Select your printer from the list by clicking on it.
5.2 Next select your Page Setup. Roll Paper is the default. If your work flow will include several of the choices they can be added
individually, or to save time you can add all the choices by selecting All. The choices you make are print queues for the
specific job types and will be listed in the Print Center.
5.3 When you have completed making your Paper Setup choices click Add.
1
3
6. The printer and queues will be added to the Print Center Printer List:
2
EPSON Professional Graphics Group Page 6.
Page 28

7. To add or remove information displayed about the printer go to the View Menu and select Columns the choose the information you
would like to display:
8. To make the printer the Default printer highlight the printer then go to the Printers Menu and select Make Default or click the Make
Default button.
9. The Default printer will be highlighted in the Printer List:
EPSON Professional Graphics Group Page 7.
Page 29
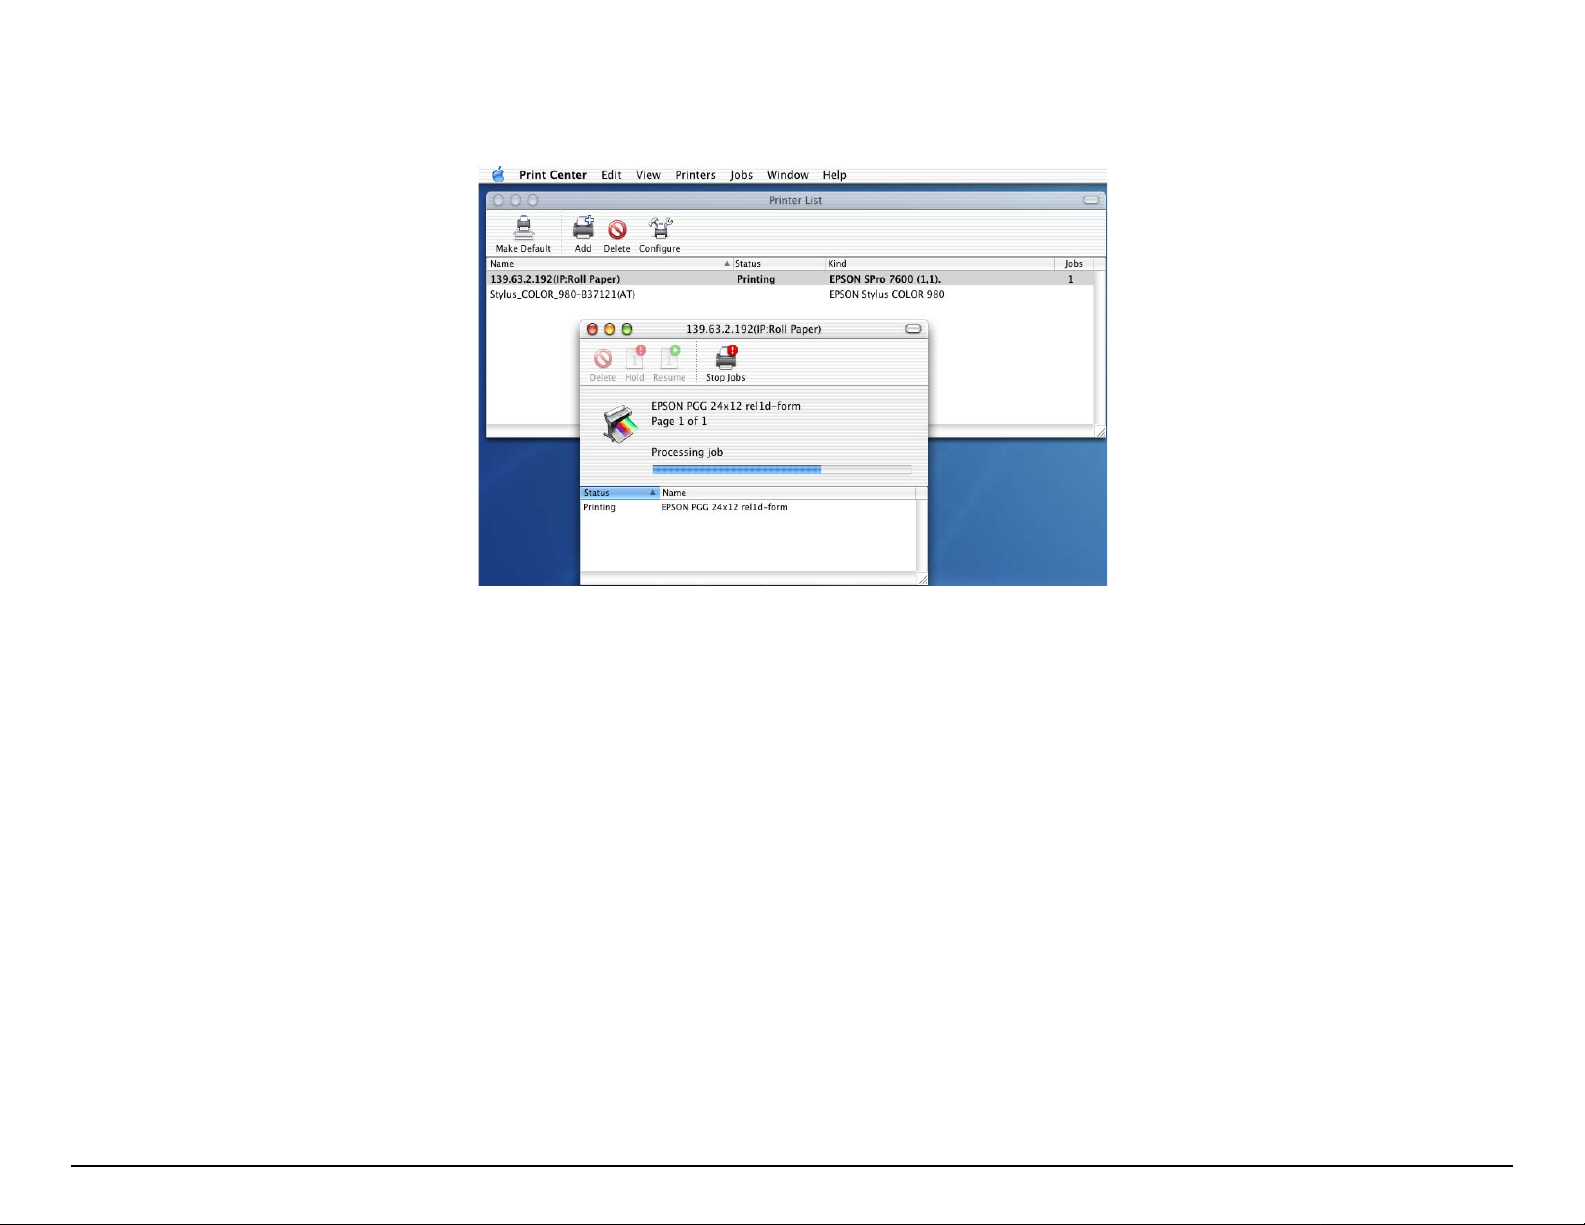
10. To view the Job Status of a printer double click on it in the Printer List to display its information and status:
EPSON Professional Graphics Group Page 8.
Page 30
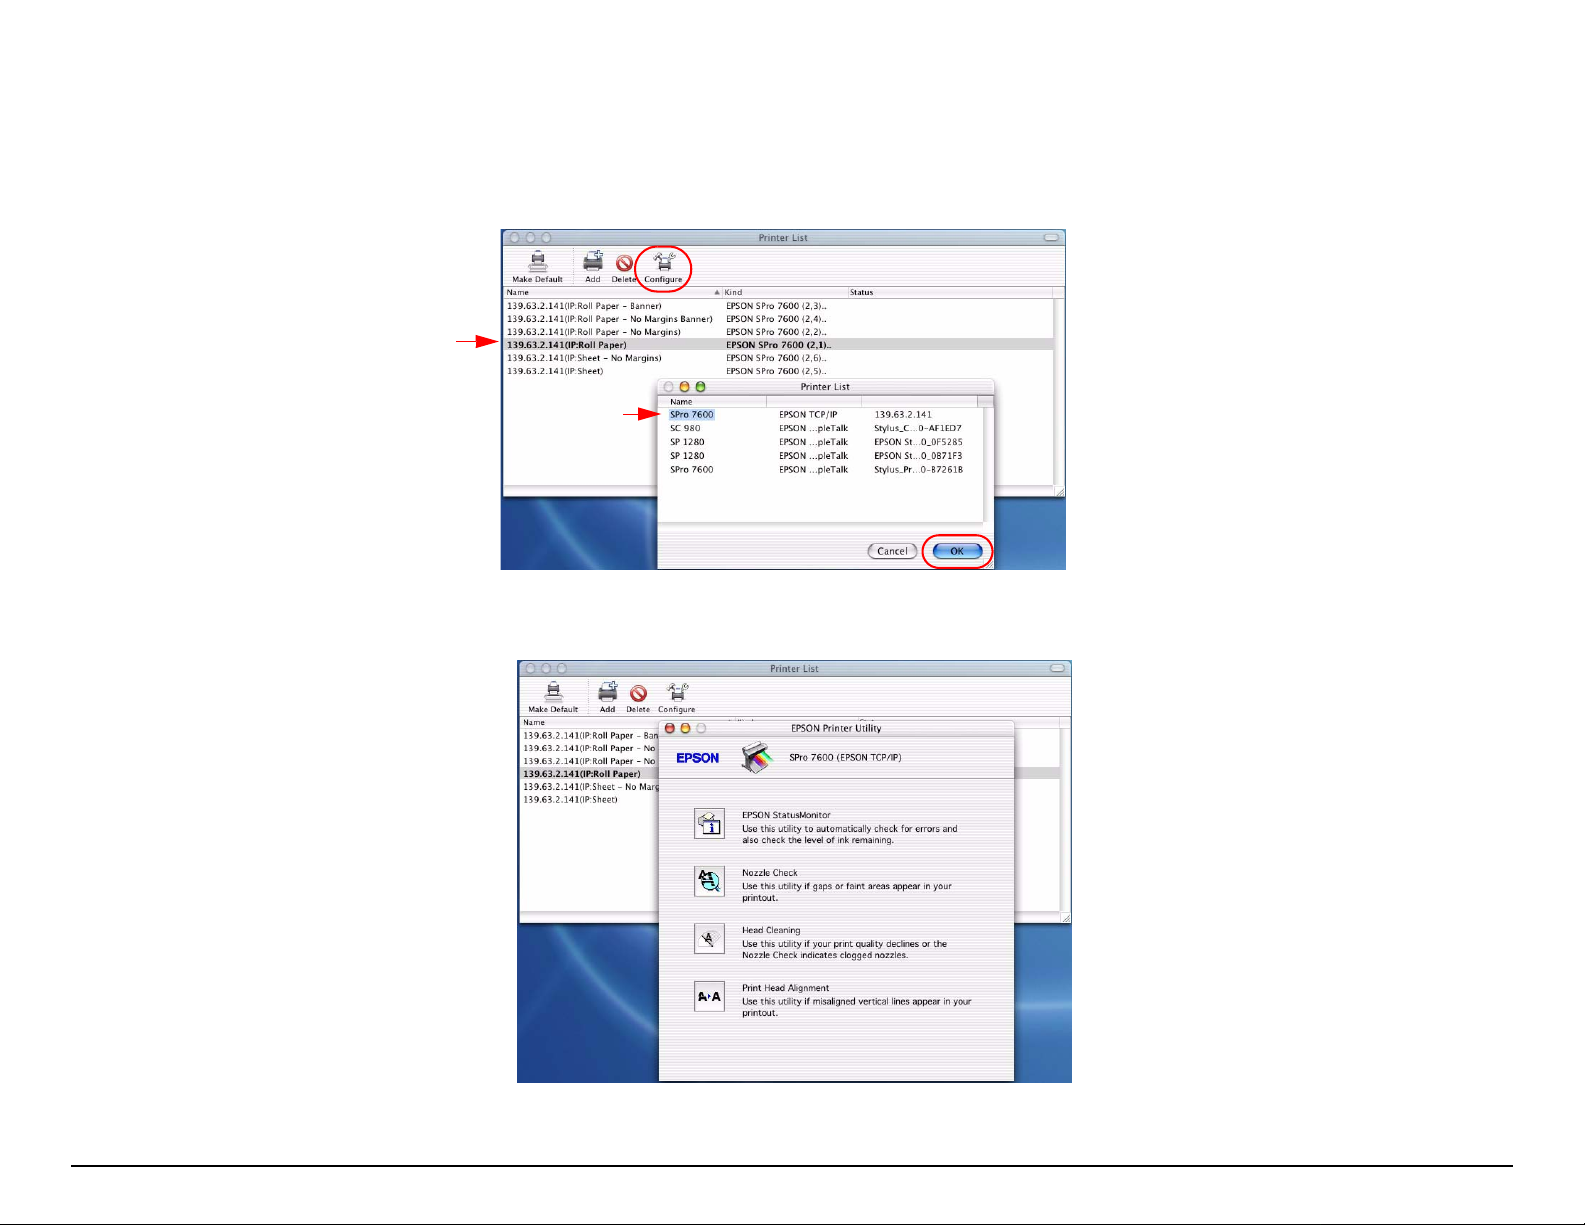
EPSON PRINTER UTILITY
1. You can access the Epson Printer Utility from the Print Center by:
1.1 First selecting your printer from the Print Center Printer List.
1.2 Next click Configure.
1.3 Then from the new Printer List window select your printer and click OK.
2
1
3
4
1.4 From the Epson Printer Utility you can Check the Status of Ink-Paper-and the printer itself, perform print head Nozzle
Checks, Clean the print head, or perform Print Head Alignments.
EPSON Professional Graphics Group Page 9.
Page 31

DRIVER REMOVAL
Before installing a New Driver you must first properly remove the existing Driver and all of its components.
1. Open the Epson Driver from any application and select print. Remove all user created “Presets” that were created for the printer
you are removing. From the Presets drop down menu select the Preset (example: MYPRESET) then select Delete..
2. Next open the Print Center and remove all the printers queue entries for the printer you wish to un-install. Highlight the Queues
and press the Delete button.
EPSON Professional Graphics Group Page 10.
Page 32

3. In the next steps you will be dragging Files or Folders to the Trash. OS X requires you to have proper “Ownership & Permissions”
to the Epson folder on your OS X hard drive. Highlight the Epson folder then GoTo File, Get Info and select “Ownership &
Permissions”. Click on the Pad Lock to unlock it, then from the Owner dropdown menu choose the User name that was used to
install OS X and/or the Printer Driver, in addition a password may be required if assigned for the user.
(Example Only)
4. You have TWO choices for removing files from the Epson Folder. The two choices are outlined below:
4.1 Removing ONLY the Stylus Pro 7600 or 9600 Plug-in and Preference from the Epson folder (Preferred).
4.1.1 Drag the Stylus Pro 7600/9600/10600 plug-in to the TRASH.
EPSON Professional Graphics Group Page 11.
Page 33

4.1.2 Drag the printers Preferences to the TRASH.
4.2 The second option is to drag the entire Epson folder to the Trash.
C A U T I O N
Dragging the entire Epson folder to the Trash Deletes ALL Epson Printers.
5. From the Receipts folder Drag the Printers Package information to the TRASH.
NOTE:
If you only removed the Stylus Pro 7600/9600/
10000/10600 files from the Epson folder, then
ONLY remove the Stylus Pro 7600/9600/10000/
10600.pkg file.
If the entire Epson folder was deleted then
remove ALL the Epson Printer.pkg files.
EPSON Professional Graphics Group Page 12.
Page 34

EPSON
Product Support Bulletin
Date:
PSB #:
Reference:
Product(s):
Subject:
09/25/2002
PSB.2002.09.004
N/A
EPSON Stylus Pro 9000, 9500, 9600, 7000, 7500, 7600, 10000, 10600, 5000,
5500 and Stylus Color 3000 P
PostScript Printing Support for Mac OS X Native Mode
rinters
Originator:
Authorization:
Total Pages:
This bulletin provides instructions for installing and configuring a Mac OS X Client with your
existing EPSON hardware or software RIP. If your EPSON Professional Wide Format printer was
bundled with one of the RIP packages listed below, or if you had purchased the RIP as an option,
then you can configure a Mac OS X Client with OS Version 10.2 and above for PostScript printing
by simply installing the appropriate RIP PPD.
• EFI RS 5000 LX Series – Stylus Pro 5000 printer
• EFI RS 5100 X2 Series - Stylus Pro 9000, 7000, 9500 and 7500 printers
• Fiery Spark Designer – Stylus Pro 5500 printer
• Fiery Spark Professional 1.0 – Stylus Pro 5500 and Stylus Pro 10000ARC/DYE printers
• Fiery Spark Professional 2.0 – Stylus Pro 9600UCM/7600UCM printers
• EPSON StylusRIP - Stylus Color 3000 and Stylus Pro 5000 printers
Installation Instructions:
Setup your existing RIP Server as per the instructions provided in the User’s Guide that came
with your RIP. To setup a Mac OS X Version 10.2 Client follow the instructions below. There are
two ways you can add a PPD and configure your printer in OS X,
AppleTalk Installation:
Open the
1.
Applications - Utilities
Print Center
, which can be found on your hard disk driver under
AppleTalk
or
IP Printing
.
MS
1
Page 35
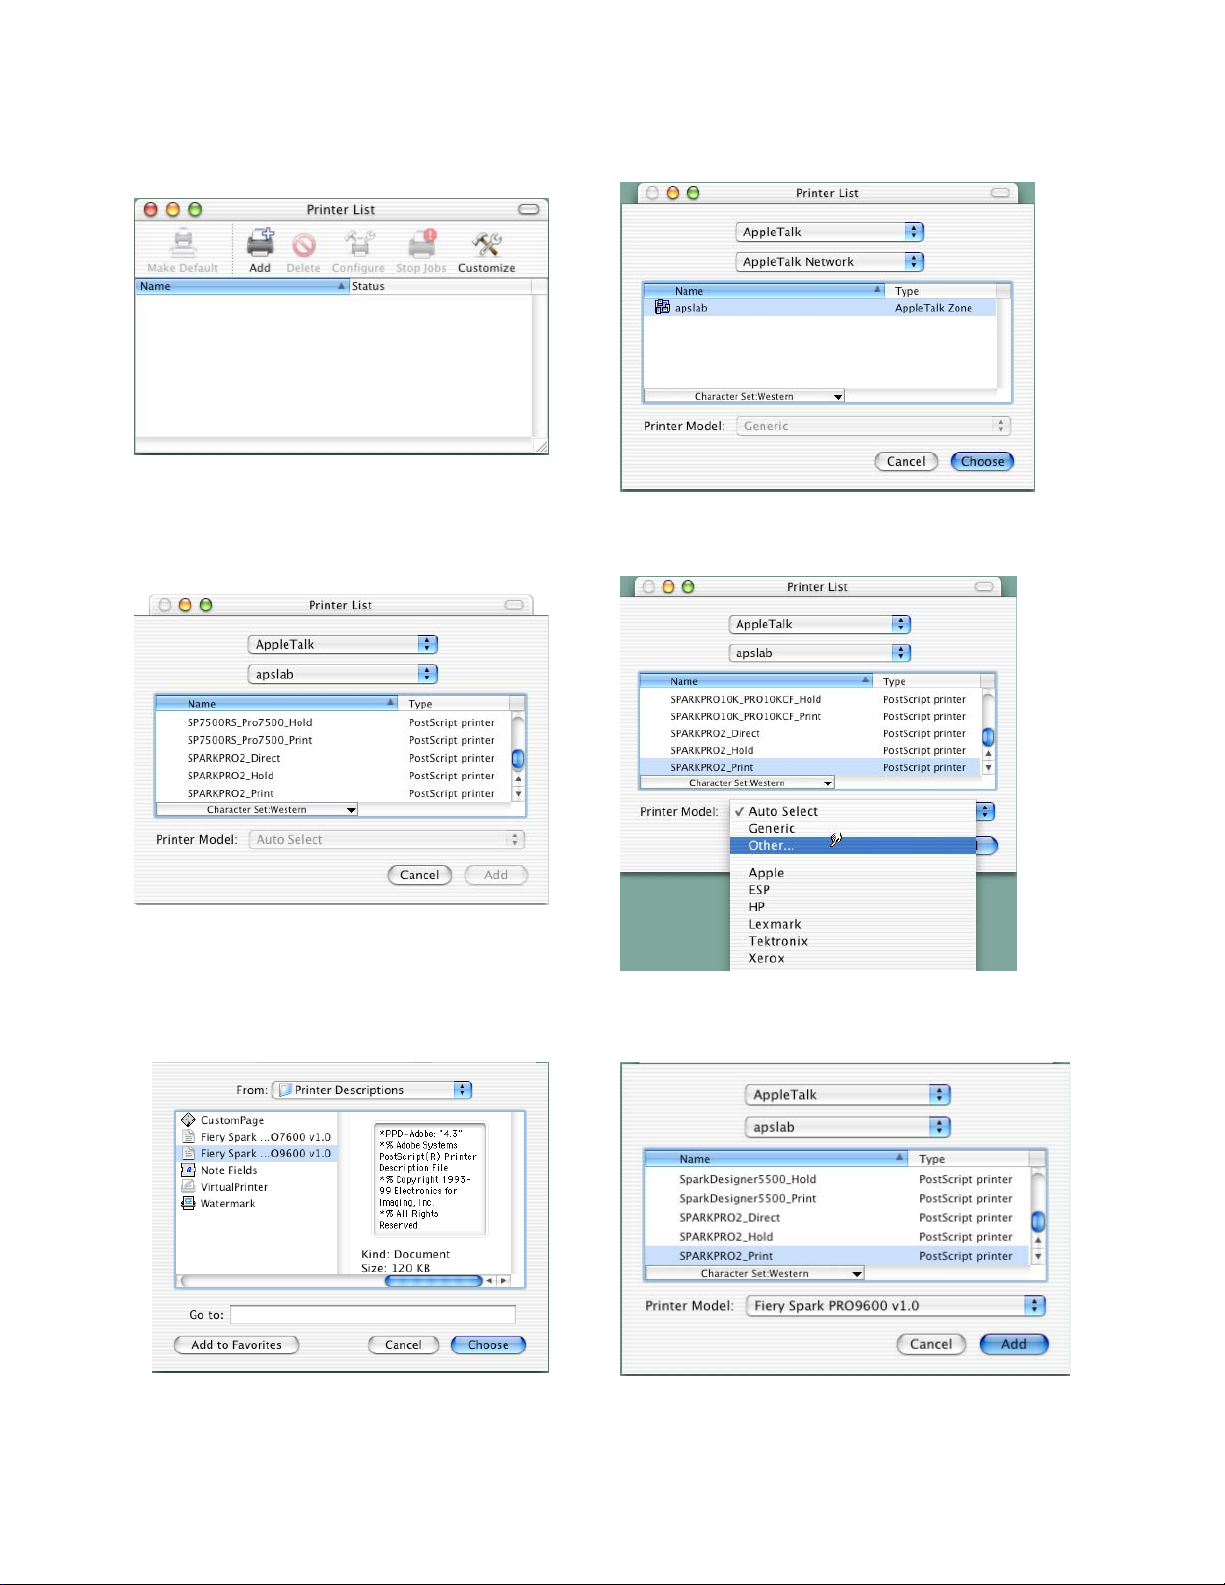
2. Click on the
AppleTalk
3. The
from the list and click on the
Add
zone if applicable.
Print Center
button. Then select
should scan the network and find all your devices. Select your printer
Printer Model
AppleTalk
sub-menu. Select
from the top sub-menu and your
Other
to continue.
4. Navigate to the location of your PPD file. After selecting the PPD file it should reflect the
name of the printer under the
5. Repeat the process to add your additional queues. Your Mac OS X Client should now be
ready to print.
Printer Model
section. Click on the
Add
button.
2
Page 36

IP Printing Installation:
1. Open the
Utilities
Print Center
2. Click on the
Add
, which can be found on your HDD under
button and select
IP Printing
from the sub-menu.
Applications -
3. Enter the IP Address of the Postscript Server under
Use default queue on server
Printer Model
sub-menu and select
and type in the queue you wish to add. Click on the
Other
Printer’s Address
.
. Uncheck the
3
Page 37

4. Navigate to the location of your PPD file. After selecting the PPD file it should reflect the
name of the printer under the
Printer Model
section. Click on the
Add
button.
5. The Print Center should now show the Queue that you typed along with the IP address.
6. Repeat the process to add your additional queues. Your Mac OS X Client should now be
ready to print.
Note: The StylusRIP does not have a separate folder on the CD to select the printer’s PPD. In
order to select the PPD it must be copied from another client’s
shown below (HDD - System folder - Extensions folder - Printer Description folder).
Printer Description folder
as
4
Page 38
EPSON PRODUCT SUPPORT BULLETIN
Date: 10/22/2003 Originator:RS
Bulletin #: PSB.2002.09.002A Authorization:
Reference: NA Total Pages: 7
Product: EPSON Stylus Pro 10600 UC (UltraChrome Only)
Subject: Printer Control Panel Paper Configuration
This bulletin was created to inform you of the use and functionality of the printer control panel Paper Configuration menu and options for
the EPSON Stylus Pro 10600 UC Inkjet printer.
PURPOSE:
The EPSON Stylus Pro 10600 UC Printer control panel Paper Configuration menu allows the user to make ten custom paper configurations that override the standard printer driver or 3rd. party RIP paper configuration. The custom paper configuration also allows the user
to use media other than EPSON genuine media or to customize Epson media settings. The settings you make using the printer control
panel paper configuration can be saved and recalled as required by your work flow.
TIP
C A U T I O N
EPSON Professional Graphics Group Page 1.
For best results familiarize yourself with all the information in this document prior to creating your first custom paper
configuration. Have your test image ready and the paper loaded you will be creating a custom configuration for. Some of
the configuration items may require you to repeat the adjustment with a different set of values until the best result is
achieved. Until you become familiar with the effects of each configuration selection, you may want to adjust them one at a
time. You may only need to adjust one or two of the configuration selections to obtain the best results for your media.
Remember when a Custom Paper Configuration is selected by a Paper Number of 1 - 10 on the printer control panel it
overrides the paper settings from the Epson Driver or 3rd party RIP. To restore normal paper settings from the Epson
Driver or 3rd party RIP set the Paper Number back to *STANDARD.
Page 39

Stylus Pro 10600 UC PSB.2002.09.002A 10/22/03
Printer Control Panel Paper Configuration
Epson always recommends performing a nozzle check prior to using the custom paper configuration to ensure that
the printer is functioning properly in order to obtain the best possible image quality and results.
The EPSON Stylus Pro 10600 UC Printer control panel Paper Configuration menu contains the following
features and functions:
1. Paper Configuration Number - *Standard with Custom Paper Configuration 1 - 10.
2. Paper Thickness - *AUTO with Custom Configuration Range 1 - 17.
3. Cut Pressure - *100% with Custom Configuration Range 0% - 110%.
4. Cut Method - *3 Step with Custom Configuration of 4 Step.
5. Paper Feed Adjustment - *0.00% with Custom Configuration Range -0.70% - +0.70%.
6. Drying Time - *0.00 Sec. with Custom Configuration Range 0.0 Sec. - 10.0Sec.
7. Suction - *Normal with Custom Configuration Range Weak and Weakest.
8. Print Adjustment - *5 with Custom Configuration Range 1 - 9.
* Denotes the default setting for the configuration item.
Printer Control Panel Paper Configuration Page 2.
Page 40

Stylus Pro 10600 UC PSB.2002.09.002A 10/22/03
Stylus Pro 10600 UC Paper Configuration
Power On Normaly
C A U T I O N
1. Check Nozzle Test Pattern.
2. Select a Paper Number 1st.
3. Record your Configurations.
Control Panel Navigation Map
START
Press SelcType
PRINTER SETTING MEN U
Press SelcType
TEST PRINT MENU
Press SelcType
PRINTER STATUS MENU
Press SelcType
PAPER CONFIG MENU
Press Item
PAPER NUMBER = STD *
Press Item
THICK. PAT.=PRINT *
Press Item
CUT PRESSURE=100% *
Press Item
CUT METHOD=3STEP *
Press Item
PPR FEED ADJ=0.00% *
Adj. PF+/PF- Enter
Enter
Adj. PF+/PF- Enter
Adj. PF+/PF- Enter
Adj. PF+/PF- Enter
Adj. PF+/PF- Enter
Paper Num 1 -10
PAT. PRINTING
Pattern
1 - 17
0% - 110%
3 Step -
4 Step
-0.70% - +0.70%
*
A D J U S T M E N T
R E Q U I R E D
THICK. PAT. PRINT
Press SelcType
MAINTENANCE MENU
Press SelcType
Press Item
DRYING TIME=0.0sec *
Press Item
SUCTION=NORMAL *
Adj. PF+/PF- Enter
Adj. PF+/PF- Enter
0.0sec - 10.0sec
Weak - Weakest
HEAD ALIGNMENT MENU
Press Item
Choose the best overlapping
pattern and enter its number
for the PA TTERN value.
Press SelcType
READY
PRINT ADJUSTMENT=5*
Press SelcType
Adj. PF+/PF- Enter
Print Adj
1 - 9
Printer Control Panel Paper Configuration Page 3.
Page 41

Stylus Pro 10600 UC PSB.2002.09.002A 10/22/03
PAPER CIONFIGURATION DESCRIPTION
This section describes each of the Custom Paper Configuration choices and how they can be used. In most cases
when the Epson driver and media are used all of these values are pre-configured and do not require a custom paper
configuration. You will find the Custom Paper Configuration useful when using third party media and RIP’s to obtain
the best possible image quality.
1. Paper Configuration Number:
The default is *Standard. When you are creating a New Custom Paper Configuration and want to override the
paper configuration from the Epson driver or 3Rd party RIP you must first select one of the ten custom paper configuration numbers (Range: 1 - 10) then press the Enter button to set and confirm your selection. By selecting a
paper configuration number allows you to save, further modify and recall your specific custom p aper configuration
by its number. To use the *Standard default or anyone of the ten custom paper configurations after you have created them, simply enter the Paper Configuration Paper Number selection for your current media by using the
Paper Feed +/- button to scroll the media number choices, press the Enter Button an * will appear to confirm your
selection.
2. Paper Thickness:
The default is *AUTO. This configuration value allows you configure the medias thickness value dynamically by
printing a test pattern of 17 vertical overlapping sets of lines and choosing which set of lines that overlaps the best.
Press the Enter button when THICK. PAT.=PRINT is displayed on the LCD display. Press the Enter button then
the display changes to PAT. PRINTING. The pattern that prints has 17 columns of vertical overlapping lines each
is numbered. You choose which set of vertical lines that overlaps the best (Straightest Vertical Line) and use the
Paper Feed +/- to enter the Custom Configuration value. (Range 1 - 17) then press the Enter button to confirm
and save the value.
Printer Control Panel Paper Configuration Page 4.
Page 42

Stylus Pro 10600 UC PSB.2002.09.002A 10/22/03
3. Cut Pressure:
The default is *100%. The Cut Pressure configuration setting is useful to insure good cuts with supported media
and to allow cutting of thinner media without snagging or tearing it. (Range 0% - 110%). For thinner media try a
value less then 100%. A dull or damaged cutter blade will cause improper cutting as well as cutting media that is
not supported for the built in automatic cutter.
Media that is NOT supported by the built in automatic cutter includes:
Smooth Fine Art - Textured Fine Art - Canvas - Enhanced Matte Posterboard - Somerset Velvet Fine Art Paper Backlight Film - Heavy Weight Polyester Banner - Adhesive Vinyl - DuPont Semi Gloss Proofing Paper and third
party medias that are similar to those mentioned or paper media greater than 10mil thickness. Damage to the cutter blade will occur by using the built in Auto Cutter to cut these medias. Epson has a manual cutter option that can
cut these medias.
4. Cut Method:
The Default is *3 Step. The Cut Method is useful for cutting thinner media to prevent snagging or tearing of the
media during cutting. For thinner media try the Custom Configuration of 4 Step. (Range 3 Step or 4 Step).
5. Paper Feed Adjustment:
The default is *0.00%. The Paper Feed Adjustment is very useful in removing Horizontal Banding using the standard Epson driver or a 3Rd party RIP and media. The horizontal banding will appear as thin light or dark lines that
repeat at the same distance. Make sure a nozzle check is performed prior to making this adjustment as missing or
deflected nozzles can also produce prints with horizontal banding. The banding this adjustment corrects is caused
by the media not being feed far enough (Dark Thin Lines) or the media is being feed to far (Light Thin Lines).
The distance between the horizontal banding depends on the print resolution. For example, the approximate distance between the lines for various resolutions are:
360dpi = 5mm, 720dpi = 3mm, 1440dpi = 1.8mm. To remove Dark Thin Lines the paper needs to feed further, try
a value in the + direction. To remove Light Thin Lines the paper needs to feed less, try a value in the - direction.
(Range -0.70% - +0.70%).
Printer Control Panel Paper Configuration Page 5.
Page 43

Stylus Pro 10600 UC PSB.2002.09.002A 10/22/03
6. Drying Time:
The default is *0.0 Sec. Setting a Dry Time is useful if the printer pauses during a print waiting for more data to
print from the computer . Ideally the print head of the printer should continue moving consistently from st art to finish
when printing an image. If the print head paused waiting for more data the ink it has already laid down dries, then
when more data arrives the printing continues however the new wetter ink cannot blend with the already dried ink
causing a Wide Horizontal Band in the image. One solution to a computer that cannot keep the printer running
consistently is to add a Dry Time or delay between each print head p ass this will cause each layer of ink the same
amount of time to dry and eliminate the wide horizontal bands in the images. The other solution is a faster computer. (Range 0.0 Sec. - 10.0Sec).
7. Suction:
The default is *Normal. The normal setting is the best selection for most media however if you are using thin or
very thin media you may want to try the optional settings of Weak or Weakest. (Range Weak and Weakest).
8. Print Adjustment:
The default is *5. This selection allows you to adjust the MicroWeave pattern. MicroWeave is the pattern of dots
the print head lays down. By adjusting this value a more uniform image can be produced and can also reduce or
remove minor banding. (Range 1 - 9).
TIP
Printer Control Panel Paper Configuration Page 6.
Keep a record of your custom paper configurations that includes the paper number, media type
and your custom setting values.
Page 44

Stylus Pro 10600 UC PSB.2002.09.002A 10/22/03
ISSUES AND SOLUTIONS
Below are some common issues you could experience and suggestions on how they may be corrected:
• General Print Quality: Head Cleaning, Paper Thickness Adj., Print Adj.
• Paper Cutting: Cut Pressure Adj., Cut Method Adj., Suction Adj.
• Vertical Banding: Head Cleaning, Paper Thickness Adj., Suction Adj., Print Adj., or try reducing the ink
saturation in the driver or RIP.
• Horizontal Banding: (Repeating evenly spaced Thin Light or Dark lines): Head Cleaning, Paper Thickness
Adj., Paper Feed Adj., Print Adj.
• Horizontal Banding: (Wide usually darker bands): Head Cleaning, Paper Thickness Adj., Dry Time Adj.,
Print Adj.
• Bi-Directional printing mis-registration: Head Cleaning, Paper Thickness Adj., Print Adj.
Printer Control Panel Paper Configuration Page 7.
 Loading...