


 Loading...
®
Color Laser product
No part of this publication may be reproduced, stored in a retrieval system, or transmitted in any form or by any means, mechanical, photocopying, recording, or otherwise, without the prior written permission of Seiko Epson Corporation. No patent liability is assumed with respect to the use of the information contained herein. Neither is any liability assumed for damages resulting from the use of the information contained herein.
Neither Seiko Epson Corporation nor its affiliates shall be liable to the purchaser of this product or third parties for damages, losses, costs, or expenses incurred by purchaser or third parties as a result of: accident, misuse, or abuse of this product or unauthorized modifications, repairs, or alterations to this product, or (excluding the U.S.) failure to strictly comply with Seiko Epson Corporation’s operating and maintenance instructions.
Seiko Epson Corporation and its affiliates shall not be liable against any damages or problems arising from the use of any options or any consumable products other than those designated as Original Epson Products or Epson Approved Products by Seiko Epson Corporation.
IBM and PS/2 are registered trademarks of International Business Machines Corporation. Microsoft and Windows are registered trademarks of Microsoft Corporation in the United States of America and other countries.
Apple and Macintosh are registered trademarks of Apple Computer, Inc.
EPSON is registered a trademark and EPSON AcuLaser is a trademark of Seiko Epson Corporation.
General Notice: Other product names used herein are for identification purposes only and may be trademarks of their respective owners. Epson disclaims any and all rights in those marks.
Copyright © 2005 Seiko Epson Corporation. All rights reserved.
1

Where to Find Information
Safety Instructions Sheet
Provides you with important safety information about this product. Read this sheet before assembling the product.
Setup Guide
Provides you with information on assembling the product, setting up the fax basic settings, and installing the software that came with the product.
User’s Guide (this manual)
Provides you with detailed information on the product’s functions, optional products, maintenance, troubleshooting, and technical specifications.
Network Guide
Provides network administrators with information on both the printer driver and network settings.You need to install this guide from Network software CD-ROM to your computer’s hard disk before referring to it.
Basic Operation Guide
Provides you with solutions for paper jam problems about your product, and information on the control panel, copy and fax operations you may need to refer to on a regular basis. We recommend printing this guide and keeping it near the product.
Online Help for product software
Click Help for detailed information and instructions on the software that controls your product. Online help is automatically installed when you have installed the software CD-ROM.
2

Note:
The illustrations in this guide are for EPSON AcuLaser CX11F unless otherwise indicated.
3

Contents
Safety Information . . . . . . . . . . . . . . . . . . . . . . . . . . . . . . . . . . . . . . . . 17 Warnings, cautions, and notes . . . . . . . . . . . . . . . . . . . . . . . . . 17 Safety precautions . . . . . . . . . . . . . . . . . . . . . . . . . . . . . . . . . . . . 18 Important safety instructions . . . . . . . . . . . . . . . . . . . . . . . . . . 21 Power on/off cautions . . . . . . . . . . . . . . . . . . . . . . . . . . . . . . . . 22
Chapter 1 Getting to Know Your Printer
Product Parts. . . . . . . . . . . . . . . . . . . . . . . . . . . . . . . . . . . . . . . . . . . . . 23 Front view. . . . . . . . . . . . . . . . . . . . . . . . . . . . . . . . . . . . . . . . . . . 23 Rear view . . . . . . . . . . . . . . . . . . . . . . . . . . . . . . . . . . . . . . . . . . . 24 Inside the product . . . . . . . . . . . . . . . . . . . . . . . . . . . . . . . . . . . . 25 Scanner parts . . . . . . . . . . . . . . . . . . . . . . . . . . . . . . . . . . . . . . . . 26 Control panel . . . . . . . . . . . . . . . . . . . . . . . . . . . . . . . . . . . . . . . . 27
Options and Consumable Products. . . . . . . . . . . . . . . . . . . . . . . . . . 31 Options . . . . . . . . . . . . . . . . . . . . . . . . . . . . . . . . . . . . . . . . . . . . . 31 Consumable products. . . . . . . . . . . . . . . . . . . . . . . . . . . . . . . . . 31 Product Features. . . . . . . . . . . . . . . . . . . . . . . . . . . . . . . . . . . . . . . . . . 32 About the EPSON AcuLaser CX11 series . . . . . . . . . . . . . . . . 32 High-quality printing . . . . . . . . . . . . . . . . . . . . . . . . . . . . . . . . . 32 Pre-defined color settings in the printer driver . . . . . . . . . . . 32 Toner save mode . . . . . . . . . . . . . . . . . . . . . . . . . . . . . . . . . . . . . 33
Resolution Improvement Technology and
Enhanced MicroGray technology. . . . . . . . . . . . . . . . . . . . . 33
Chapter 2 Printer Features and Various Printing Options
Various Options . . . . . . . . . . . . . . . . . . . . . . . . . . . . . . . . . . . . . . . . . . 34 Fit to page printing . . . . . . . . . . . . . . . . . . . . . . . . . . . . . . . . . . . 34 Pages per sheet printing . . . . . . . . . . . . . . . . . . . . . . . . . . . . . . . 35 Watermark printing . . . . . . . . . . . . . . . . . . . . . . . . . . . . . . . . . . 36
4

Chapter 3 Paper Handling
Paper Sources . . . . . . . . . . . . . . . . . . . . . . . . . . . . . . . . . . . . . . . . . . . . .37 MP tray. . . . . . . . . . . . . . . . . . . . . . . . . . . . . . . . . . . . . . . . . . . . . .37 Optional 500-Sheet Paper Cassette Unit . . . . . . . . . . . . . . . . . .38 Selecting a paper source . . . . . . . . . . . . . . . . . . . . . . . . . . . . . . .39 Loading Paper . . . . . . . . . . . . . . . . . . . . . . . . . . . . . . . . . . . . . . . . . . . .40 MP tray. . . . . . . . . . . . . . . . . . . . . . . . . . . . . . . . . . . . . . . . . . . . . .40 Optional Paper Cassette . . . . . . . . . . . . . . . . . . . . . . . . . . . . . . .43 Output tray . . . . . . . . . . . . . . . . . . . . . . . . . . . . . . . . . . . . . . . . . .46 Printing on Special Media . . . . . . . . . . . . . . . . . . . . . . . . . . . . . . . . . .47 EPSON Color Laser Paper. . . . . . . . . . . . . . . . . . . . . . . . . . . . . .48 EPSON Color Laser Transparencies . . . . . . . . . . . . . . . . . . . . .48 EPSON Color Laser Coated Paper . . . . . . . . . . . . . . . . . . . . . . .50 Envelopes. . . . . . . . . . . . . . . . . . . . . . . . . . . . . . . . . . . . . . . . . . . .51 Labels . . . . . . . . . . . . . . . . . . . . . . . . . . . . . . . . . . . . . . . . . . . . . . .53 Thick paper and extra thick paper . . . . . . . . . . . . . . . . . . . . . . .54 Loading a custom paper size . . . . . . . . . . . . . . . . . . . . . . . . . . .54
Chapter 4 Using the Printer Software with Windows
About the Printer Software . . . . . . . . . . . . . . . . . . . . . . . . . . . . . . . . .56 Accessing the printer driver . . . . . . . . . . . . . . . . . . . . . . . . . . . .56 Making Changes to Printer Settings . . . . . . . . . . . . . . . . . . . . . . . . . .58 Making the print quality setting. . . . . . . . . . . . . . . . . . . . . . . . .58 Duplex printing . . . . . . . . . . . . . . . . . . . . . . . . . . . . . . . . . . . . . .68 Resizing printouts . . . . . . . . . . . . . . . . . . . . . . . . . . . . . . . . . . . .72 Modifying the print layout . . . . . . . . . . . . . . . . . . . . . . . . . . . . .74 Using a watermark . . . . . . . . . . . . . . . . . . . . . . . . . . . . . . . . . . . .76 Making Extended Settings . . . . . . . . . . . . . . . . . . . . . . . . . . . . .79 Making Optional Settings . . . . . . . . . . . . . . . . . . . . . . . . . . . . . .81 Setting information about consumables . . . . . . . . . . . . . . . . . .82 Monitoring Your Printer Using EPSON Status Monitor 3 . . . . . . .83 Installing EPSON Status Monitor 3 . . . . . . . . . . . . . . . . . . . . . .83 Accessing EPSON Status Monitor 3. . . . . . . . . . . . . . . . . . . . . .87 Getting printer status details . . . . . . . . . . . . . . . . . . . . . . . . . . .88 Order Online . . . . . . . . . . . . . . . . . . . . . . . . . . . . . . . . . . . . . . . . .90 Setting Monitoring Preferences . . . . . . . . . . . . . . . . . . . . . . . . .92
5

Status Alert window . . . . . . . . . . . . . . . . . . . . . . . . . . . . . . . . . . 95 Job Management function . . . . . . . . . . . . . . . . . . . . . . . . . . . . . 96 Stopping monitoring. . . . . . . . . . . . . . . . . . . . . . . . . . . . . . . . . 100 Monitored Printers settings . . . . . . . . . . . . . . . . . . . . . . . . . . . 100 Setting Up the USB Connection . . . . . . . . . . . . . . . . . . . . . . . . . . . . 101 Canceling Printing . . . . . . . . . . . . . . . . . . . . . . . . . . . . . . . . . . . . . . . 103 Uninstalling the Printer Software . . . . . . . . . . . . . . . . . . . . . . . . . . 104 Uninstalling the printer driver . . . . . . . . . . . . . . . . . . . . . . . . 104 Uninstall the USB device driver . . . . . . . . . . . . . . . . . . . . . . . 107 Sharing the Printer on a Network . . . . . . . . . . . . . . . . . . . . . . . . . . 108 Sharing the printer . . . . . . . . . . . . . . . . . . . . . . . . . . . . . . . . . . 108 Setting up your printer as a shared printer . . . . . . . . . . . . . . 110 Using an additional driver. . . . . . . . . . . . . . . . . . . . . . . . . . . . 111 Setting up clients . . . . . . . . . . . . . . . . . . . . . . . . . . . . . . . . . . . . 116
Installing the printer driver from the software
CD-ROM . . . . . . . . . . . . . . . . . . . . . . . . . . . . . . . . . . . . . . . . 123
Chapter 5 Using the Printer Software with Macintosh
About the Printer Software . . . . . . . . . . . . . . . . . . . . . . . . . . . . . . . . 125 Accessing the printer driver . . . . . . . . . . . . . . . . . . . . . . . . . . 125 Making Changes to Printer Settings . . . . . . . . . . . . . . . . . . . . . . . . 126 Making the print quality settings . . . . . . . . . . . . . . . . . . . . . . 126 Modifying the print layout . . . . . . . . . . . . . . . . . . . . . . . . . . . 132 Duplex printing . . . . . . . . . . . . . . . . . . . . . . . . . . . . . . . . . . . . . 133 Making Extended Settings . . . . . . . . . . . . . . . . . . . . . . . . . . . . 136 Monitoring Your Printer using EPSON Status Monitor 3 . . . . . . 138 Accessing EPSON Status Monitor 3 . . . . . . . . . . . . . . . . . . . . 138 Getting printer status details . . . . . . . . . . . . . . . . . . . . . . . . . . 140 Setting Monitoring Preferences. . . . . . . . . . . . . . . . . . . . . . . . 142 Status Alert window . . . . . . . . . . . . . . . . . . . . . . . . . . . . . . . . . 144 Using the Job Management function . . . . . . . . . . . . . . . . . . . 145 Setting Up the USB Connection . . . . . . . . . . . . . . . . . . . . . . . . . . . . 147 Canceling Printing . . . . . . . . . . . . . . . . . . . . . . . . . . . . . . . . . . . . . . . 148 Uninstalling the Printer Software . . . . . . . . . . . . . . . . . . . . . . . . . . 148 Sharing the Printer on a Network . . . . . . . . . . . . . . . . . . . . . . . . . . 149 Sharing the printer . . . . . . . . . . . . . . . . . . . . . . . . . . . . . . . . . . 149
6

Chapter 6 Scanning
About the Scanner Software. . . . . . . . . . . . . . . . . . . . . . . . . . . . . . . .150 EPSON Scan . . . . . . . . . . . . . . . . . . . . . . . . . . . . . . . . . . . . . . . .150 TWAIN-compliant applications . . . . . . . . . . . . . . . . . . . . . . . .151 Accessing EPSON Scan . . . . . . . . . . . . . . . . . . . . . . . . . . . . . . .152 Setting Your Originals . . . . . . . . . . . . . . . . . . . . . . . . . . . . . . . . . . . .154 Document table. . . . . . . . . . . . . . . . . . . . . . . . . . . . . . . . . . . . . .154 Auto Document Feeder (fax model only) . . . . . . . . . . . . . . . .159 Scanning an Image . . . . . . . . . . . . . . . . . . . . . . . . . . . . . . . . . . . . . . .162 Saving a Scanned Image . . . . . . . . . . . . . . . . . . . . . . . . . . . . . . . . . . .164 From a TWAIN-compliant application . . . . . . . . . . . . . . . . . .164 Using EPSON Scan directly . . . . . . . . . . . . . . . . . . . . . . . . . . .166 Selecting the Scanning Mode . . . . . . . . . . . . . . . . . . . . . . . . . . . . . . .169 Choosing appropriate scanning mode . . . . . . . . . . . . . . . . . .169 Changing the scanning mode . . . . . . . . . . . . . . . . . . . . . . . . . .171 Making Changes to Scanner Settings . . . . . . . . . . . . . . . . . . . . . . . .171 Make suitable settings . . . . . . . . . . . . . . . . . . . . . . . . . . . . . . . .171 Create beautiful reproductions. . . . . . . . . . . . . . . . . . . . . . . . .183 Scan multiple images simultaneously . . . . . . . . . . . . . . . . . . .188 Using the Preview Window in EPSON Scan. . . . . . . . . . . . . . . . . .193 Preview images. . . . . . . . . . . . . . . . . . . . . . . . . . . . . . . . . . . . . .193 Using marquees . . . . . . . . . . . . . . . . . . . . . . . . . . . . . . . . . . . . .197 Uninstalling the Scanner Software . . . . . . . . . . . . . . . . . . . . . . . . . .199 Using the Start Button on the Control Panel . . . . . . . . . . . . . . . . . .202 Scanning to your computer. . . . . . . . . . . . . . . . . . . . . . . . . . . .202 Assigning a different application on Windows . . . . . . . . . . .205 Canceling Scanning . . . . . . . . . . . . . . . . . . . . . . . . . . . . . . . . . . . . . . .210 Scanning in a Network Environment . . . . . . . . . . . . . . . . . . . . . . . .210 Starting EPSON Scan settings. . . . . . . . . . . . . . . . . . . . . . . . . .210 Scanning an image . . . . . . . . . . . . . . . . . . . . . . . . . . . . . . . . . . .213 Setting up a client computer . . . . . . . . . . . . . . . . . . . . . . . . . . .214 Using the Application Software . . . . . . . . . . . . . . . . . . . . . . . . . . . .221 Software information . . . . . . . . . . . . . . . . . . . . . . . . . . . . . . . . .221 Accessing the software . . . . . . . . . . . . . . . . . . . . . . . . . . . . . . .227
7

Chapter 7 Copying
Setting Originals to Copy . . . . . . . . . . . . . . . . . . . . . . . . . . . . . . . . . 231 Basic Copying . . . . . . . . . . . . . . . . . . . . . . . . . . . . . . . . . . . . . . . . . . . 232 Canceling Copying. . . . . . . . . . . . . . . . . . . . . . . . . . . . . . . . . . . . . . . 234 Making Changes to Copy Settings. . . . . . . . . . . . . . . . . . . . . . . . . . 234 Changing the number of copies . . . . . . . . . . . . . . . . . . . . . . . 234 Selecting the paper . . . . . . . . . . . . . . . . . . . . . . . . . . . . . . . . . . 235 Adjusting the density . . . . . . . . . . . . . . . . . . . . . . . . . . . . . . . . 237 Adjusting the contrast. . . . . . . . . . . . . . . . . . . . . . . . . . . . . . . . 238 Adjusting the RGB color. . . . . . . . . . . . . . . . . . . . . . . . . . . . . . 238 Specifying the zoom ratio. . . . . . . . . . . . . . . . . . . . . . . . . . . . . 239 Making 2 pages per sheet copies. . . . . . . . . . . . . . . . . . . . . . . 241 Reset the copy settings . . . . . . . . . . . . . . . . . . . . . . . . . . . . . . . 243 Restrictions on Copying . . . . . . . . . . . . . . . . . . . . . . . . . . . . . . . . . . 244
Chapter 8 Faxing (Fax Model Only)
Setting Originals to Fax . . . . . . . . . . . . . . . . . . . . . . . . . . . . . . . . . . . 245 Sending Faxes . . . . . . . . . . . . . . . . . . . . . . . . . . . . . . . . . . . . . . . . . . . 245 Basics of sending faxes . . . . . . . . . . . . . . . . . . . . . . . . . . . . . . . 246 Sending faxes using the speed-dial function. . . . . . . . . . . . . 248 Sending faxes using the one-touch function . . . . . . . . . . . . . 250 Sending faxes using group-dial function. . . . . . . . . . . . . . . . 251 Receiving Faxes. . . . . . . . . . . . . . . . . . . . . . . . . . . . . . . . . . . . . . . . . . 253 Output paper size . . . . . . . . . . . . . . . . . . . . . . . . . . . . . . . . . . . 253 Basics of receiving faxes . . . . . . . . . . . . . . . . . . . . . . . . . . . . . . 254 Receiving faxes when you hear fax tones . . . . . . . . . . . . . . . 256 Receiving faxes using fax polling . . . . . . . . . . . . . . . . . . . . . . 256 Making Changes to Fax Settings . . . . . . . . . . . . . . . . . . . . . . . . . . . 257 Selecting the appropriate settings. . . . . . . . . . . . . . . . . . . . . . 257 Document size . . . . . . . . . . . . . . . . . . . . . . . . . . . . . . . . . . . . . . 257 Density . . . . . . . . . . . . . . . . . . . . . . . . . . . . . . . . . . . . . . . . . . . . 258 Image quality . . . . . . . . . . . . . . . . . . . . . . . . . . . . . . . . . . . . . . . 258 Polling Reception. . . . . . . . . . . . . . . . . . . . . . . . . . . . . . . . . . . . 259 Overseas transmission mode. . . . . . . . . . . . . . . . . . . . . . . . . . 259 Changing outgoing faxes settings. . . . . . . . . . . . . . . . . . . . . . 260 Changing incoming faxes settings . . . . . . . . . . . . . . . . . . . . . 262
8

Managing Communication Setup Function . . . . . . . . . . . . . . . . . .263 Printing report. . . . . . . . . . . . . . . . . . . . . . . . . . . . . . . . . . . . . . .263 Fax Job Information . . . . . . . . . . . . . . . . . . . . . . . . . . . . . . . . . .266 Canceling a fax job . . . . . . . . . . . . . . . . . . . . . . . . . . . . . . . . . . .266
Registering Recipients. . . . . . . . . . . . . . . . . . . . . . . . . . . . . . . . . . . . .267 Using the EPSON Speed Dial Utility
(for Windows only) . . . . . . . . . . . . . . . . . . . . . . . . . . . . . . . .267 Using the Setup menu on the control panel . . . . . . . . . . . . . .271
Chapter 9 Using the Control Panel
Selecting a Mode . . . . . . . . . . . . . . . . . . . . . . . . . . . . . . . . . . . . . . . . .282
Mode Menus. . . . . . . . . . . . . . . . . . . . . . . . . . . . . . . . . . . . . . . . . . . . .283
Print mode . . . . . . . . . . . . . . . . . . . . . . . . . . . . . . . . . . . . . . . . . .283
Copy mode . . . . . . . . . . . . . . . . . . . . . . . . . . . . . . . . . . . . . . . . .284
Fax mode (fax model only) . . . . . . . . . . . . . . . . . . . . . . . . . . . .285
Scan mode . . . . . . . . . . . . . . . . . . . . . . . . . . . . . . . . . . . . . . . . . .286
Using the Setup Menu . . . . . . . . . . . . . . . . . . . . . . . . . . . . . . . . . . . .287
When to make Setup menu settings . . . . . . . . . . . . . . . . . . . .287
How to access the Setup menu settings . . . . . . . . . . . . . . . . .288
Setting menus . . . . . . . . . . . . . . . . . . . . . . . . . . . . . . . . . . . . . . .290
Information Menu . . . . . . . . . . . . . . . . . . . . . . . . . . . . . . . . . . .290
Tray Menu . . . . . . . . . . . . . . . . . . . . . . . . . . . . . . . . . . . . . . . . . .292
Setup Menu . . . . . . . . . . . . . . . . . . . . . . . . . . . . . . . . . . . . . . . . .293
Reset Menu . . . . . . . . . . . . . . . . . . . . . . . . . . . . . . . . . . . . . . . . .295
Support Menu . . . . . . . . . . . . . . . . . . . . . . . . . . . . . . . . . . . . . . .296
Printer Adjust Menu . . . . . . . . . . . . . . . . . . . . . . . . . . . . . . . . .296
USB Menu . . . . . . . . . . . . . . . . . . . . . . . . . . . . . . . . . . . . . . . . . .298
Network Menu . . . . . . . . . . . . . . . . . . . . . . . . . . . . . . . . . . . . . .299
Basic Settings. . . . . . . . . . . . . . . . . . . . . . . . . . . . . . . . . . . . . . . .299
Transmission Settings . . . . . . . . . . . . . . . . . . . . . . . . . . . . . . . .300
Reception Settings . . . . . . . . . . . . . . . . . . . . . . . . . . . . . . . . . . .300
Speed Dial Settings. . . . . . . . . . . . . . . . . . . . . . . . . . . . . . . . . . .301
Communication Setup . . . . . . . . . . . . . . . . . . . . . . . . . . . . . . . .301
Factory Settings. . . . . . . . . . . . . . . . . . . . . . . . . . . . . . . . . . . . . .302
Copy Settings . . . . . . . . . . . . . . . . . . . . . . . . . . . . . . . . . . . . . . .302
Scan Settings . . . . . . . . . . . . . . . . . . . . . . . . . . . . . . . . . . . . . . . .302
9

Printing a Status Sheet . . . . . . . . . . . . . . . . . . . . . . . . . . . . . . . . . . . . 303 Canceling a Job . . . . . . . . . . . . . . . . . . . . . . . . . . . . . . . . . . . . . . . . . . 305 Canceling printing. . . . . . . . . . . . . . . . . . . . . . . . . . . . . . . . . . . 305 Canceling scanning . . . . . . . . . . . . . . . . . . . . . . . . . . . . . . . . . . 306 Canceling copying. . . . . . . . . . . . . . . . . . . . . . . . . . . . . . . . . . . 306 Canceling faxing . . . . . . . . . . . . . . . . . . . . . . . . . . . . . . . . . . . . 306 Status and Error Messages . . . . . . . . . . . . . . . . . . . . . . . . . . . . . . . . 308 Printer error messages . . . . . . . . . . . . . . . . . . . . . . . . . . . . . . . 308 Scanner error messages . . . . . . . . . . . . . . . . . . . . . . . . . . . . . . 319 Fax error messages . . . . . . . . . . . . . . . . . . . . . . . . . . . . . . . . . . 320 Copier error messages . . . . . . . . . . . . . . . . . . . . . . . . . . . . . . . 322 System error messages . . . . . . . . . . . . . . . . . . . . . . . . . . . . . . . 322
Chapter 10 Installing Options
Optional Paper Cassette Unit . . . . . . . . . . . . . . . . . . . . . . . . . . . . . . 324 Handling precautions . . . . . . . . . . . . . . . . . . . . . . . . . . . . . . . . 324 Installing the optional paper cassette unit. . . . . . . . . . . . . . . 325 Removing the optional paper cassette unit . . . . . . . . . . . . . . 329 Memory Module. . . . . . . . . . . . . . . . . . . . . . . . . . . . . . . . . . . . . . . . . 330 Installing a memory module . . . . . . . . . . . . . . . . . . . . . . . . . . 330 Removing a memory module . . . . . . . . . . . . . . . . . . . . . . . . . 334
Chapter 11 Maintenance and Transportation
Replacement Messages . . . . . . . . . . . . . . . . . . . . . . . . . . . . . . . . . . . 335 Toner Cartridge . . . . . . . . . . . . . . . . . . . . . . . . . . . . . . . . . . . . . . . . . 337 Handling precautions . . . . . . . . . . . . . . . . . . . . . . . . . . . . . . . . 337 Replacing a toner cartridge . . . . . . . . . . . . . . . . . . . . . . . . . . . 338 Photoconductor Unit . . . . . . . . . . . . . . . . . . . . . . . . . . . . . . . . . . . . . 341 Handling precautions . . . . . . . . . . . . . . . . . . . . . . . . . . . . . . . . 341 Replacing the photoconductor unit . . . . . . . . . . . . . . . . . . . . 342 Cleaning the Product . . . . . . . . . . . . . . . . . . . . . . . . . . . . . . . . . . . . . 349 Cleaning the pickup roller . . . . . . . . . . . . . . . . . . . . . . . . . . . . 350 Cleaning the print head . . . . . . . . . . . . . . . . . . . . . . . . . . . . . . 351 Cleaning the exposure window . . . . . . . . . . . . . . . . . . . . . . . 354 Cleaning the document table. . . . . . . . . . . . . . . . . . . . . . . . . . 354
10
Cleaning the ADF pickup roller . . . . . . . . . . . . . . . . . . . . . . . .355 Transporting the Product . . . . . . . . . . . . . . . . . . . . . . . . . . . . . . . . . .356 For long distances. . . . . . . . . . . . . . . . . . . . . . . . . . . . . . . . . . . .356 For short distances . . . . . . . . . . . . . . . . . . . . . . . . . . . . . . . . . . .357 Finding a place for the product . . . . . . . . . . . . . . . . . . . . . . . .360
Chapter 12 Other Problems
Clearing Jammed Paper . . . . . . . . . . . . . . . . . . . . . . . . . . . . . . . . . . .362 Precautions for clearing jammed paper . . . . . . . . . . . . . . . . .362 Jam C (cover C) . . . . . . . . . . . . . . . . . . . . . . . . . . . . . . . . . . . . . .363 Jam E (cover E) . . . . . . . . . . . . . . . . . . . . . . . . . . . . . . . . . . . . . .367 Jam F (cover F) . . . . . . . . . . . . . . . . . . . . . . . . . . . . . . . . . . . . . .368 Jam MP (MP tray). . . . . . . . . . . . . . . . . . . . . . . . . . . . . . . . . . . .373 Jam LC/G (optional paper cassette and cover G) . . . . . . . . .375 When transparencies are jammed at the MP tray . . . . . . . . .378 Paper jams in the Auto Document Feeder . . . . . . . . . . . . . . .380
Paper Handling Problems . . . . . . . . . . . . . . . . . . . . . . . . . . . . . . . . .382 Paper does not feed properly . . . . . . . . . . . . . . . . . . . . . . . . . .382 Problems Using Options. . . . . . . . . . . . . . . . . . . . . . . . . . . . . . . . . . .383 Paper does not feed from the optional paper cassette . . . . .384 Feed jam when using the optional paper cassette . . . . . . . . .384 An installed option cannot be used . . . . . . . . . . . . . . . . . . . . .385
Correcting USB Problems. . . . . . . . . . . . . . . . . . . . . . . . . . . . . . . . . .385 USB connections . . . . . . . . . . . . . . . . . . . . . . . . . . . . . . . . . . . . .385 Windows operating system . . . . . . . . . . . . . . . . . . . . . . . . . . .386 Printer software installation . . . . . . . . . . . . . . . . . . . . . . . . . . .386 Printing a Status Sheet . . . . . . . . . . . . . . . . . . . . . . . . . . . . . . . . . . . .392
Chapter 13 Printing Problems
Printer Operational Problems . . . . . . . . . . . . . . . . . . . . . . . . . . . . . .394 The Print light does not turn on . . . . . . . . . . . . . . . . . . . . . . . .394 The product does not print (Print light off) . . . . . . . . . . . . . .394 The Print light is on but nothing prints. . . . . . . . . . . . . . . . . .395 The Order Online function does not work . . . . . . . . . . . . . . .396
11

Information about consumables on the screen may differ slightly from the actual consumables . . . . . . . . . . . . . . . . 396
Printout Problems. . . . . . . . . . . . . . . . . . . . . . . . . . . . . . . . . . . . . . . . 397 Printout is garbled. . . . . . . . . . . . . . . . . . . . . . . . . . . . . . . . . . . 397 Color Printing Problems . . . . . . . . . . . . . . . . . . . . . . . . . . . . . . . . . . 397 Cannot print in color. . . . . . . . . . . . . . . . . . . . . . . . . . . . . . . . . 397
The printout color differs when printed from different printers . . . . . . . . . . . . . . . . . . . . . . . . . . . . . . . . . . . . . . . . . . 398
The color looks different from what you see on
the computer screen . . . . . . . . . . . . . . . . . . . . . . . . . . . . . . . 399 Print Quality Problems . . . . . . . . . . . . . . . . . . . . . . . . . . . . . . . . . . . 400 The background is dark or dirty . . . . . . . . . . . . . . . . . . . . . . . 400 White dots appear in the printout. . . . . . . . . . . . . . . . . . . . . . 400 Print quality or tone is uneven . . . . . . . . . . . . . . . . . . . . . . . . 401 Half-tone images print unevenly . . . . . . . . . . . . . . . . . . . . . . 401 Toner smudges . . . . . . . . . . . . . . . . . . . . . . . . . . . . . . . . . . . . . 402 Areas are missing in the printed image . . . . . . . . . . . . . . . . . 403 Completely blank pages are output . . . . . . . . . . . . . . . . . . . . 404 The printed image is light or faint . . . . . . . . . . . . . . . . . . . . . 405 The non-printed side of the page is dirty . . . . . . . . . . . . . . . 406
Memory Problems . . . . . . . . . . . . . . . . . . . . . . . . . . . . . . . . . . . . . . . 406 Print quality decreased. . . . . . . . . . . . . . . . . . . . . . . . . . . . . . . 406 Insufficient memory for current task . . . . . . . . . . . . . . . . . . . 407 Insufficient memory to print all copies . . . . . . . . . . . . . . . . . 407
Chapter 14 Scanning Problems
Scanner Operational Problems . . . . . . . . . . . . . . . . . . . . . . . . . . . . . 408 The Print light does not come on. . . . . . . . . . . . . . . . . . . . . . . 408 The product does not scan. . . . . . . . . . . . . . . . . . . . . . . . . . . . 408 Pressing the Start button does not start scanning. . . . . . . . . 409 Pressing the Start button in a Mac OS X environment
starts the Classic mode. . . . . . . . . . . . . . . . . . . . . . . . . . . . . 410 You cannot scan multiple images. . . . . . . . . . . . . . . . . . . . . . 410 Software Problems . . . . . . . . . . . . . . . . . . . . . . . . . . . . . . . . . . . . . . . 410 You cannot start EPSON Scan. . . . . . . . . . . . . . . . . . . . . . . . . 410 The scanner software does not work properly. . . . . . . . . . . 411
Scanned Image Problems . . . . . . . . . . . . . . . . . . . . . . . . . . . . . . . . . 412
12

The edges of a document are not scanned.. . . . . . . . . . . . . . .412 The scanned area is inappropriate. . . . . . . . . . . . . . . . . . . . . .412 Document is not scanned or only a few dots appear as
the scanned image.. . . . . . . . . . . . . . . . . . . . . . . . . . . . . . . . .413 A line of dots is always missing from the scanned
image.. . . . . . . . . . . . . . . . . . . . . . . . . . . . . . . . . . . . . . . . . . . .413 A line of dots always appears in the scanned image. . . . . . .413 Black vertical lines appear on the scanned image or
the image is all black.. . . . . . . . . . . . . . . . . . . . . . . . . . . . . . .413 When scanning an original, straight lines in the image
come out jagged. . . . . . . . . . . . . . . . . . . . . . . . . . . . . . . . . . .414 The image is distorted or blurred. . . . . . . . . . . . . . . . . . . . . . .414 Colors are patchy or distorted at the edges of the image. . .415 The image is dark. . . . . . . . . . . . . . . . . . . . . . . . . . . . . . . . . . . .415 Moiré (cross-hatch) patterns appear in the scanned
image.. . . . . . . . . . . . . . . . . . . . . . . . . . . . . . . . . . . . . . . . . . . .416 Poor character recognition during OCR scanning. . . . . . . . .417 The image is larger or smaller than the original. . . . . . . . . . .417 Scanned images cannot be printed or come out garbled
when printed. . . . . . . . . . . . . . . . . . . . . . . . . . . . . . . . . . . . . .417 Colors differ from the original.. . . . . . . . . . . . . . . . . . . . . . . . .418 Images cannot be located properly in the Thumbnail
preview.. . . . . . . . . . . . . . . . . . . . . . . . . . . . . . . . . . . . . . . . . .419 The scanned image differs from the original.. . . . . . . . . . . . .419 Color Matching Problems. . . . . . . . . . . . . . . . . . . . . . . . . . . . . . . . . .420
Colors on your monitor are different from those in
the original image. . . . . . . . . . . . . . . . . . . . . . . . . . . . . . . . . .420 Printed colors are different from those in the original
image.. . . . . . . . . . . . . . . . . . . . . . . . . . . . . . . . . . . . . . . . . . . .420 ADF Scanning Problems (Fax Model only) . . . . . . . . . . . . . . . . . . .421
A blank copy is output even though an original is set on
the Auto Document Feeder during scanning. . . . . . . . . . .421 You cannot scan using the Auto Document Feeder. . . . . . . .421 Paper jams in the Auto Document Feeder.. . . . . . . . . . . . . . .422 You cannot scan multiple documents. . . . . . . . . . . . . . . . . . .423
13

Chapter 15 Copying Problems
Copy Operational Problems . . . . . . . . . . . . . . . . . . . . . . . . . . . . . . . 424 The product does not copy . . . . . . . . . . . . . . . . . . . . . . . . . . . 424 Copy Quality Problems . . . . . . . . . . . . . . . . . . . . . . . . . . . . . . . . . . . 425 Printout is not fine enough . . . . . . . . . . . . . . . . . . . . . . . . . . . 425
The information on the back side or background color is printed on the copy. . . . . . . . . . . . . . . . . . . . . . . . . . . . . . . . 426
Copies are blank, or images are missing or faded . . . . . . . . 427 Improving copy quality . . . . . . . . . . . . . . . . . . . . . . . . . . . . . . 427 Completely blank pages are output . . . . . . . . . . . . . . . . . . . . 428 The background is dark and dirty . . . . . . . . . . . . . . . . . . . . . 428 Black vertical lines appear on the scanned image or
the image is all black. . . . . . . . . . . . . . . . . . . . . . . . . . . . . . . 429 The scanned area is inappropriate.. . . . . . . . . . . . . . . . . . . . . 429 A blank copy is output even though an original is set on
the Auto Document Feeder during scanning. . . . . . . . . . 429 ADF Copying Problems (Fax Model Only) . . . . . . . . . . . . . . . . . . 430 Paper jams in the Auto Document Feeder. . . . . . . . . . . . . . . 430 You cannot scan using the Auto Document Feeder. . . . . . . 432 High quality color copy stops halfway . . . . . . . . . . . . . . . . . 432
Chapter 16 Faxing Problems
Sending and Receiving Faxes Problems . . . . . . . . . . . . . . . . . . . . . 433 The document stops feeding during faxing . . . . . . . . . . . . . 433 The product is receiving faxes but not sending them . . . . . 434 Outgoing fax calls keep dialing. . . . . . . . . . . . . . . . . . . . . . . . 434 Faxes you send are not arriving . . . . . . . . . . . . . . . . . . . . . . . 434 Incoming fax calls are not being answered . . . . . . . . . . . . . . 435 Faxes are transmitting or being received very slowly . . . . . 435 A blank copy is output even though an original is set on
the Auto Document Feeder during scanning. . . . . . . . . . 436 Time setting is incorrect . . . . . . . . . . . . . . . . . . . . . . . . . . . . . . 436 Printout Problems. . . . . . . . . . . . . . . . . . . . . . . . . . . . . . . . . . . . . . . . 437
Black vertical lines appear on the scanned image or
the image is all black. . . . . . . . . . . . . . . . . . . . . . . . . . . . . . . 437 The scanned area is inappropriate.. . . . . . . . . . . . . . . . . . . . . 437
14

Faxes are not printing or are printing incorrectly . . . . . . . . .437 Received faxes are too light or are printing only on half
of the page. . . . . . . . . . . . . . . . . . . . . . . . . . . . . . . . . . . . . . . .437 Reports are not printing correctly . . . . . . . . . . . . . . . . . . . . . .438
Appendix A Customer Support
Contacting Customer Support. . . . . . . . . . . . . . . . . . . . . . . . . . . . . .439
Technical Support Web Site . . . . . . . . . . . . . . . . . . . . . . . . . . . . . . . .440
Appendix B Technical Specifications
Paper . . . . . . . . . . . . . . . . . . . . . . . . . . . . . . . . . . . . . . . . . . . . . . . . . . .441 Available paper types . . . . . . . . . . . . . . . . . . . . . . . . . . . . . . . .441 Paper that should not be used . . . . . . . . . . . . . . . . . . . . . . . . .442 Printable area . . . . . . . . . . . . . . . . . . . . . . . . . . . . . . . . . . . . . . .443 Product . . . . . . . . . . . . . . . . . . . . . . . . . . . . . . . . . . . . . . . . . . . . . . . . .443 General . . . . . . . . . . . . . . . . . . . . . . . . . . . . . . . . . . . . . . . . . . . . .443 Environmental . . . . . . . . . . . . . . . . . . . . . . . . . . . . . . . . . . . . . .447 Mechanical. . . . . . . . . . . . . . . . . . . . . . . . . . . . . . . . . . . . . . . . . .447 Electrical. . . . . . . . . . . . . . . . . . . . . . . . . . . . . . . . . . . . . . . . . . . .448 Standards and approvals. . . . . . . . . . . . . . . . . . . . . . . . . . . . . .449 Interfaces. . . . . . . . . . . . . . . . . . . . . . . . . . . . . . . . . . . . . . . . . . . . . . . .451 USB interface . . . . . . . . . . . . . . . . . . . . . . . . . . . . . . . . . . . . . . . .451 Ethernet interface . . . . . . . . . . . . . . . . . . . . . . . . . . . . . . . . . . . .452 Options and Consumables . . . . . . . . . . . . . . . . . . . . . . . . . . . . . . . . .453 Optional 500-Sheet Paper Cassette Unit . . . . . . . . . . . . . . . . .453 Memory modules . . . . . . . . . . . . . . . . . . . . . . . . . . . . . . . . . . . .454 Toner cartridge . . . . . . . . . . . . . . . . . . . . . . . . . . . . . . . . . . . . . .454 Photoconductor unit . . . . . . . . . . . . . . . . . . . . . . . . . . . . . . . . .455
Appendix C Working with Fonts
EPSON BarCode Fonts (Windows Only). . . . . . . . . . . . . . . . . . . . .457
System requirements . . . . . . . . . . . . . . . . . . . . . . . . . . . . . . . . .459
Installing EPSON BarCode Fonts. . . . . . . . . . . . . . . . . . . . . . .459
15

Printing with EPSON BarCode Fonts. . . . . . . . . . . . . . . . . . . 460 BarCode Font specifications. . . . . . . . . . . . . . . . . . . . . . . . . . . 465
Appendix D Notices
Notice for Windows XP Service Pack 2 Users . . . . . . . . . . . . . . . . 476 Unblocking EEventManager . . . . . . . . . . . . . . . . . . . . . . . . . . 476 Unblocking LicenseCheck . . . . . . . . . . . . . . . . . . . . . . . . . . . . 477
Notice for EPSON AcuLaser CX11NF or EPSON AcuLaser
CX11F Users . . . . . . . . . . . . . . . . . . . . . . . . . . . . . . . . . . . . . . . . . . 478 Sending Faxes by Dialing from a Telephone. . . . . . . . . . . . . 478 Receiving Faxes When You Hear Fax Tones . . . . . . . . . . . . . 478 Receiving Faxes Using Fax Polling . . . . . . . . . . . . . . . . . . . . . 478 Paper Sources When Receiving Faxes . . . . . . . . . . . . . . . . . . 479 Printing Fax Sender Information. . . . . . . . . . . . . . . . . . . . . . . 479
Glossary
Index
16

Safety Information
Warnings, cautions, and notes
wWarnings
must be followed carefully to avoid bodily injury.
cCautions
must be observed to avoid damage to your equipment.
Notes
contain important information and useful tips on the operation of your product.
17

Safety precautions
Be sure to follow the precautions carefully to ensure safe, efficient operation:
Because the product weighs approximately 33.1 kg (73 lb) for EPSON AcuLaser CX11NF/CX11F, and 30.9 kg (68.1 lb) for EPSON AcuLaser CX11N/CX11, excluding consumable products, one person should not lift or carry it. Two people should carry the product, lifting it by the correct positions as shown below.
wWarning:
Be very careful when lifting the product as the rear side is heavier than the front.
18
Be careful not to touch the fuser, which is marked CAUTION HIGH TEMPERATURE, or the surrounding areas. If the product has been in use, the fuser and the surrounding areas may be very hot.
b


 * a
* a 
 c
c
a
*
* CAUTION HIGH TEMPERATURE
19

a.fuser unit
b.cover B
c.cover C
Do not insert your hand deep into the fuser unit as some components are sharp and may cause injury.
Avoid touching the components inside the product unless instructed to do so in this guide.
Never force the product’s components into place. Although the product is designed to be sturdy, rough handling can damage it.
When handling a toner cartridge, always place them on a clean, smooth surface.
Do not attempt to modify a toner cartridge or take them apart. They cannot be refilled.
Do not touch the toner. Keep the toner away from your eyes.
Do not dispose of used toner cartridge, photoconductor units, or fuser units in fire, as they can explode and cause injury. Dispose of them according to local regulations.
If toner is spilled, use a broom and dustpan or a damp cloth with soap and water to clean it up. Because the fine particles can cause a fire or explosion if they come into contact with a spark, do not use a vacuum cleaner.
Wait at least one hour before using a toner cartridge after moving it from a cool to a warm environment to prevent damage from condensation.
20
When removing the photoconductor unit, avoid exposing it to room light for more than five minutes. The unit contains a blue-colored light-sensitive drum. Exposure to light can damage the drum, causing dark or light areas to appear on the printed page and reducing the service life of the drum. If you need to keep the unit out of the product for long periods, cover it with an opaque cloth.
Be careful not to scratch the surface of the drum and belt. When you remove the photoconductor unit from the product, always place the unit on a clean, smooth surface. Avoid touching the drum, since oil from your skin can permanently damage its surface and affect print quality.
To get the best print quality, do not store the photoconductor unit in an area subject to direct sunlight, dust, salty air, or corrosive gases (such as ammonia). Avoid locations subject to extreme or rapid changes in temperature or humidity.
Be sure to keep consumable components out of the reach of children.
Do not leave jammed paper inside the product. This can cause the product to overheat.
Avoid sharing outlets with other appliances.
Use only an outlet that meets the power requirements of this product.
Important safety instructions
Connect your product to an electrical outlet that meets the power requirements of this product. Your product’s power requirements are indicated on a label attached to the product. If you are not sure of the power supply specifications in your area, contact your local power company or consult your dealer.
21

If you are unable to insert the AC plug into the electrical outlet, contact an electrician.
Adjust only those controls that are covered by the operating instructions. Improper adjustment of other controls may result in damage that requires repair by a qualified service representative.
ENERGY STAR® Compliance
As an International ENERGY STAR® Partner, Epson has determined that this product meets the International ENERGY STAR® Program guidelines for energy efficiency.
The International ENERGY STAR® Office Equipment Program is a voluntary partnership with the computer and office equipment industry to promote the introduction of energy-efficient personal computers, monitors, printers, fax machines, copiers, scanners, and multifunction devices, and in an effort to reduce air pollution caused by power generation. Their standards and logos are uniform among participating nations.
Power on/off cautions
Do not turn off the product:
After turning on the product, wait until Ready appears in the LCD panel.
While the Print light is flashing.
While the Data light is on or flashing.
While printing.
22
Chapter 1
Getting to Know Your Printer
Product Parts
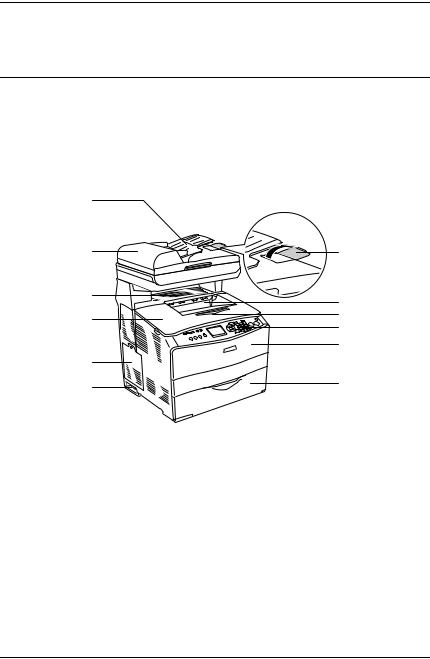
Front view
a |
|
|
l |
b |
|
k |
c |
|
j |
d |
|
|
e |
|
i |
f |
|
g |
||
h |
||
|
a.Auto Document Feeder (fax model only)
b.stopper (fax model only)
c.output tray
d.extension tray
e.control panel
f.cover A
g.MP tray
1
1
1
1
1
1
1
1
1
1
1
1
Getting to Know Your Printer |
23 |
h.power switch
i.option cover
j.cover B
k.cover C
l.ADF cover (fax model only)
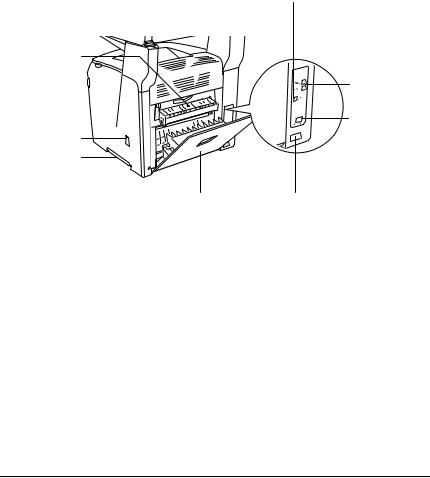
Rear view
a
h g
f
b
c
d
e
a.cover F
b.USB interface connector
c.telephone interface connectors (fax model only)
-LINE: Connects with the phone cord.
-EXT: Connects with an attached phone.
d.network interface connector
(EPSON AcuLaser CX11NF/CX11N only)
e.AC inlet
f.cover E
24 Getting to Know Your Printer

g.handle
h.cleaner cover
Inside the product
a
b c
d
f |
e |
a.fuser unit
b.photoconductor unit access lever
c.photoconductor unit
d.cleaning knob access lever
e.toner cartridge
f.paper guides (MP tray)
1
1
1
1
1
1
1
1
1
1
1
1
Getting to Know Your Printer |
25 |
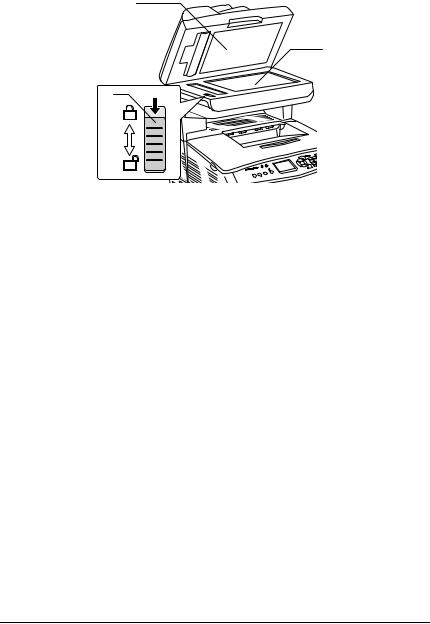
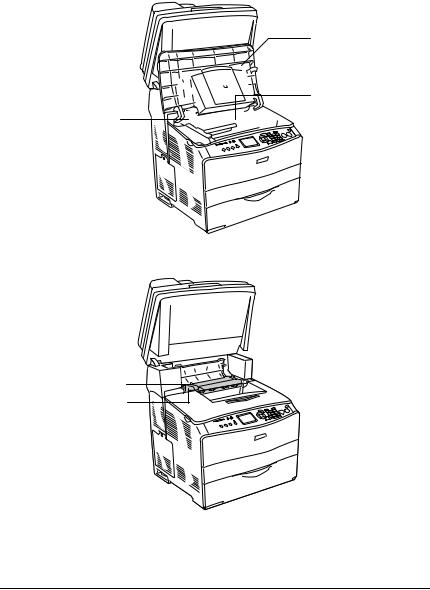
Scanner parts
a
b
c
a.document cover
b.document table
c.transportation lock
26 Getting to Know Your Printer
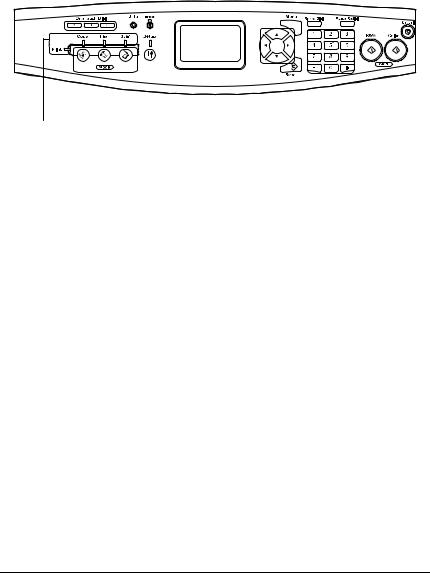
Control panel
a |
b c |
d |
e f g h i j |
|||||||||||||
|
|
|
|
|
|
|
|
|
|
|
|
|
|
|
|
|
|
|
|
|
|
|
|
|
|
|
|
|
|
|
|
|
|
|
|
|
|
|
|
|
|
|
|
|
|
|
|
|
|
|
|
|
|
|
|
|
|
|
|
|
|
|
|
|
|
|
|
|
|
|
|
|
|
|
|
|
|
|
|
|
|
|
|
|
|
|
|
|
|
|
|
|
|
|
|
|
|
|
|
|
|
|
|
|
|
|
|
|
|
|
|
|
|
|
|
|
|
|
|
|
|
|
|
|
|
|
|
|
|
|
|
|
|
|
|
p |
o n m |
l k |
a.One Touch Dial button A, B, C (fax model only)
b.Data light (Yellow)
Use these buttons to transmit a fax to a registered fax number assigned to the corresponding button. Available from any mode.
Flashes when the product is processing data.
1
1
1
1
1
1
1
1
1
1
1
1
Getting to Know Your Printer |
27 |

c.Error light (Red)
d.LCD panel
e.l Left/ r Right button
u Up/ d Down button
On or flashes when an error has occurred.
-On when an error has occurred that requires operator intervention. The product will automatically recover when the cause of the error is resolved.
-Flashing 1 (blinks at 0.3 second intervals)
Indicates an error has occurred that can be recovered by pressing either the
x B&W Start or x Color Start button.
-Flashing 2 (blinks at 0.6 second intervals)
Indicates an error has occurred that requires operator intervention and the x B&W Start or x Color Start button to be pressed after resolving the error.
Displays product status messages, guidance information, and various mode settings.
Use these buttons to sequentially display previous or next setting values. The r Right button is also used as the OK button to set and register a setting item. Also, the l Left button can be used to move the cursor one character left and overwrite mistakenly entered data.
Use these buttons to sequentially display previous or next menu items. For instructions on how to use these buttons, see “Using the Setup Menu” on page 287.
28 Getting to Know Your Printer

f.Advanced/Menu button
g.Speed dial button (fax model only)
h.Pause/Redial button (fax model only)
i.x B&W Start button, x Color Start button
Use this button to display the advanced menu for each mode.
Use this button to display a list of registered recipients in the LCD panel.
Use this button to insert a pause into fax dialing, or redial to the same fax number called previously.
Use these buttons to start a black-and-white or color copy, scan, or fax transmission.
When the error light is flashing, pressing this button clears the error and switches the product to ready status.
j. y Cancel button |
Use this button to stop scanning |
|
operation, or cancel copy, fax |
|
transmission and print job. |
|
Pressing it once cancels the current job. |
|
Pressing and holding it for more than |
|
three seconds in Print mode deletes all |
|
print jobs from the product memory. |
k. Numeric keypad |
Used to enter the number of copies or a |
|
zoom value in Copy mode. Also, enters |
|
numeric values, such as the Time Setting |
|
used in fax communications, in Setup |
|
mode. |
|
# hash and asterisk buttons can be |
|
used in Fax mode. |
1
1
1
1
1
1
1
1
1
1
1
1
Getting to Know Your Printer |
29 |

l. |
Reset button |
Use this button to reset the selected |
|
|
setting item or mistakenly entered |
|
|
values to the default value. Press and |
|
|
hold it for more than three seconds to |
|
|
delete all setting items to their default |
|
|
values. Also, used as a delete button to |
|
|
delete one character from the entered |
|
|
data when entering a recipient fax |
|
|
number in Fax mode. |
m. Setup light |
On when the product is in Setup mode. |
|
n. |
Setup button |
Use this button to switch to the Setup |
|
|
mode. |
o. Mode buttons |
Use these buttons to switch to the |
|
|
|
corresponding mode. |
p. Mode lights |
On when the corresponding mode |
|
|
|
(Print, Copy, Fax, or Scan) is selected. |
|
|
When the Print light is on, the product is |
|
|
in Print mode and ready to receive and |
|
|
print data. |
30 Getting to Know Your Printer
Loading...