

Page 1
INSTRUCTION
-elna
6004
MANUAL
Page 2

11
IMPORT
INSTRUCTIONS"
"Your
sewing machine IS designed
" Read all instruction before using this sewing machine
11
DANGER
1.
''An
appliance should never
electric
2. "Always unpluQ
3.
"Do
4.
"Do
into
outlet
not
not
water
immediately
reach
place
or
mher
before relamping. Replace
for
the
or
store appliance where 1L can fall
liquid."
and
-To
reduce the risk
after
appliance
constructed
be
left
using
that
has fallen
only
of
electric
unattended
and
before cleaning."
bulb With
ANT
for HOUSEHOLD
."
when plugged in. Always unplug this appliance from
into
water. Unplug immediately."
or
SAFE TY
shock
:"
same
type
rated
be
pulled
into a tub
use."
12.3
V d.c
or
sink. Do
.•
3 Watts."
not
place in
or
the
drop
''WARN
1.
''Do
not
2. "Use this appliance only
mended
3. "Never operate this appliance If
dropped
center for examination, repair. electrical or mechan
4.
"Never operate the appliance with any air opening blocked. Keep ventilation openings
machine
5. "Never
6.
"Do
not
7.
"Do
not
8.
"To
d1sconnecr.
9. "
Do
not
10. ''Keep fingers away from all moving parts. Special care
11
"Always use
12.
"Do
not
13.
"Do
not
It
may
14. "Switch
needle, changing needle,
15.
"A
lways unplug
mak
ing any
16. " Hold plug when rew1nding
Do
not
IN
G-
To
reduce
allow
to
be used as a
by
the
manufacturer
or
damaged,
and
foot
drop
or
use outdoors
operate where aerosol (spray)
unplug
the
use
bent
pull
or
deflect
the
sewing machine
other
allow
plug
or
controller free from accumulat i
insert
any
."
turn
all
by
pulling
proper needlt! plate. The wrong
needles
push fabric while stitching.
the
needle causing
the
sewing machine from t he electrical
user serv icing adjustments
to
whip when rewinding."
toy
for
1ts
as
dropped
object
controls
on
cord. To
."
off
threading
mro
conta
into
cord
the
risk
of
burns, fire. electric shock,
. Close attent1on is necessary when this appliance
mtended use as described in th1s manual.
ined in this manual."
it
has a damaged
into
water
any
opening."
products
to
the
off
unplug, grasp
it
to
break."
("0")
when
bobbin,
or
reel.
cord
or
plug, if it
. Return
("0")
changing presser foot, and
mentioned
the
appliance
ic
al
adjustment
on
of
lint,
are being used
position,
the
plug,
is
required
plate
can
cause
making any
outlet
in
the
dust,
and
or
where oxygen
then
remove plug from
not
the
adjustment
when rem oving covers, lubricating,
instruction manua
or
is
not
to
the neareSl
."
loose cloth."
the
cord
around
needle
in
the
injury
Use
working properly , if it has been
."
the
sewing
to
break."
the
needle area, such as threading
like
to
persons:''
is
used by
only
authorized
is
being
outlet
mach
."
l."
or
near
attachments
dealer
of
the sewing
adm
imstered
."
ine needle
children."
recom·
or
service
."
."
or
whe n
Be
sure
"SAVE
to
keep machine
away
THESE
IMPORTANT
from
static
electr
INSTRUCTIONS"
icitY,
heat
sources,
humidiry.
and
direct
sunlight
.
Page 3
Na
mes
of Parts
E
xtension Table
Connecting
•
Controlling
Main F
unct.on
To
Select Panerns
Winding
•
Set
the
• Removrng
• Windrng
• Inserting
Threading
•
To
Use Needle
•
Drawmg
Straight
•
Start
•
Changmg
• Finishing
•
Adjusting
. . . . . . . . . . . . . . . . . . . . . . . . . . . . . . . . . . . . . . . . . . . . . . . . . . . . . . . . . . .
and
the
Machme
Sewmg
of
Bunons
and
the
Bobbin
Spool
the
Bobbin
the
Bobbrn
the
Bobbin
the
Machme
Threader
Up
the
Bobbin T
Strtchrng . .
Sewing . . . . . . . . . . . . . . . . . . . . . . . . . . . . . . . . . . . . . . . . . . . . . . . . . . . . . . . . . . . .
the
Sewing Direct
Sewmg
Stitch
Len
• Varrable Needle Pos1
Variauon
To
•
•
Seam
\Vhen
Pressure
~o
To
To
Chang,ng
Proper
Zrgzag
of
Straight Stitchin
Set
Thread
Auto-tension
Manua
Gu
Se~
Rase
Snap
Remove
Tension
..........................................
Needle
Threa
de
Ltne . . . . . . . . . . . . . . . . . . . . . . . . . . . . . . . . . • . • . • . . . • • • . . . . . . . . . .
ng
Heavy
Fabrics
Adtustrng
or
the
Lever . .
Drop
the Feed
Presser Foot
and
Attach the Foot Hold
Needles . . . . . . . . . . . . . . . . . . . . . . . . . . . . . . . . . . . . . . . . . . . . . . . . . . . . . . . . . . . . . . 23
Your
Needle
and Thr
St
tchrng
. . . . . . . . . . . . . . . . . . . . . . . . . . . . . . . . . . . . . • . . . . . . . . . . . . . . . . . . . . . . . . . 24
• AdJUSting Strtch Wid
Overcasttng
• Overcasti
8tJ
non
•
Bunonhole
•
Sensor
•
To
•
To
•
Rounded
Automatrc
•
Corded
Sew a Bu
B
hnd
R
olled
Basting
ng
Vartations
hole
Vartauons
Bunonhole (BH 1)
Alter
the
St
tch
Alter
the
St
tch
and
Keyhole
Bunonhole
Buttonholes
non
St
tch
Hemmrng ••••....................................
Hem
. . •.•.
..
• • • . . . . • . . . . . . . . . . . . . . . . . . . . . . . . . . . . . . . . . . . . . . . . . . . . . . . . . . . . . 33
•••••
Accessory
Speed
to
the Power
Storage
. .
. .
Functron
of
. • • . . . .
TABLE
Box
Supp
ly
............................
.............................
the K
ey
Boa
....................
OF CONTENTS
.......
. . . . . . . . . . . . . . . . . . . . . . . . . . . . • . . . • • . . . . . . . . . . 6
rd
_
........................
. . ...•..••..
•..•••
.
.....
•......
. • ••••........
_ . _ . . . . 5
. . . . . . . . . . . . . . . . . . . . . . . . . . . . . • . . • . . . . .
•
.......
•
...••.•.•.
.
.......
_ . . . 6
11-12
. • . . . . . . . . . . . . . . . . . . . . . . . . . . . . . . . . . . . . . . . . . . . . . . . . . . . . . . . . .
. . . . . . . . . . . . . . . . . . . . . . . . . . . . . . . . . . . . . . . . . . . . • . • . . . . . . . . . .
.•..................................................
_ . . . . .
. . . . . . . . . . . . . . . . . . . . . . . . . . . . . . . . . . . . . . . . . . . . . . . . . . . . . . . . . .
..............
..
........
.
..............................
13-15
. . . . . . . . . . . . . . . . . . . . . . . . . . . . . . . . . . . . . . . . . . . . . . . . . . . . . . . .
hre
ad . . . . . . . . . . . . . . . . . . . . . . . . . . . . . . . . . . . . . . . . . . . . . . . . . . .
..............
ions
...........
.
.....
. . . . .
.................................
.
.....................
16-18
.
....
, . . . . . . . . . . . .
. . . . . . . . . . . . . . . . . . . . . . . . . . . . . . . . . . . . . . . . . . . . . . . . . . . . . . . . . .
gth Manu
tlon ........
ally . . . . . . . . . . . . . . . . . . . . . . . . . . . . . . . . . . . . . . . . . . . . . . . . .
....
......
__
. . . . . . . . . . . . . . . . . . . . . . . . . . . . . . . . . . .
g . . . . . . . . . . . . . . . . . . . . . . . . . . . . . . . . . . . . . . . . . . . . . . . . . . . . . 19
. . . . . . . . . . . . . . . . . . . . . . . . . . . . . . . . . . . . . . . . . . . . . . . . . . . . . . . . . 20
, . • . . . . . . . . . . . . . . . . 20
d Tensron
.......
.
........................
. . • •....•.....
_ . . . . 20
• • • . . . . . . . . . . . . . . . . . . . . . . . • • . . . . . . . . • . • • • . • • • • . . . . . . . . . 21
............•
_
..................
.
....
.•....
• .
__
.....
Dog . . . . . . . . . . . . . . . . . . . . . . . . . . . . . • . • • • . • • . . • . • • . . . . . . . . .
On
and
OH
. . . . . . . . . . . . . . . . . . . . . . . . . . . . . • . . . . • . . . • . . . . . . . . . .
er . . . . . . . . . . . . . . . . . . . . . . . . . . . . . • . . . . • . . . . . . . . . . . . 22
ead . . . . . . . . . . . . . . . . . . . . . . . . . . . . . . . . . • . . . . . . . . . . . . . . . . . . 23
th
Manually . . . . . . . . . . . . . . . . . . . . . . . . . . . . . . . . . . . . . . . . . . . . . . . . . .
............
.
.............................................
25-26
. . . . . . . . . . . . . . . . . . . . . . . . . . . . . . . . . . . . . . . . . . . . . . . . . . . . . . . . . 26
.......................................................
. . 27
. . . . . . . . . . . . . . . . . . . . . . . . . . . . . . . . . . . . . . . . . • . . . . . . . . . . . . . . . 27
....................................................
27-
Wid th . . . . . . . . . . . . . . . . . . . . . . . . . . . . . . . . . . . . . . . . . . . . . . . . . . . . . .
Density
(BH 1
...........................
Button
hol
).
.
_ . . . . . . . . . • . . . . . . . . . . . . . . . 29
es . . . . . . . . . . . . . . . . . . . . . . . . . . . . . . . . . . . . . . . . . . . . . . . .
...............................
•
..................
. . . . . . . . . . . . . . . . . . . . . . . . . . . . . . . . . . . . . . . • . . . . . . . . . . . . . . 32
•
...
o • •
••
0 • • • • • • • •
..
o • • • • • • • • • • • • • • • • • • • • • • • • • • • • • • • • • • • • • • • • • • • • • • • • • • • • •
• • •
••••
•...........•.................•........•...•........
3~4
7- 8
9-10
11
11
11
12
14
15
16
16
17
18
18
21
_ 21
21
22
24
-32
28
29
30
31
34
35
36
Page 4
Banacking . . . . . . . . . . . . . . . . . . . . . . . . . . . • . . . . . . . . . . . . . . . . . . . . . . . . . . . . . . . . . . . . . . . 37
Eyelets
Quick-darn . . . . . . . . . . . . . . . . . . . . . . . . . . . . . . . . . . . . . . . . . . . . . . . . . . . . . • . . . . . . . . . . . .
Zipper
Cording
Wide Cording . . . . . . . . . . . . . . . . . . . . . . . . . . . . . . . . . . . . . . . . . . . . . . . . . . . . . . . . . . . . . . . . . 42
Appliqu
Cut Wo
Patchw
Fag
Sc
Smocki
Shell Stitch . . . . . . . . . . . . . . . . . . . . . . . . . . . . . . . . . . . . . . . . . . . . . . . . . . . . . . . . . . . . . . . . . .
Sc
Sa
Saddl
Sh
Quil
Cross
P
Decorative Satin Stit
Twin Needle S
Ad
Programm
• O
• Combining Patterns. . . . . . . . . . . . . . . . . . . . . . . . . . . . . . . . . . . . . . . . . . . . . . . . . . . . . . . . . . . 53
• Cyc
•
• Memo
• Memo
• Combini
• Combini
• Combini
C
Un
Not
Cleaning the Machine ... . ........
Trouble Shooti
.•...................................................................
Sewi
ng
......
. .
...
e.
. . . . . . . . . . . . . . . . . . . . . . . . . . . • . . . . . . . . . . . . . . . . . . . . . . . . . . . . . . . . . . . . . . .
rk
. . .
...
ork
. . . . . . . . . . . . . . . . . . • . . . . . . . . . . . . . . . . . . . . . . . . . . . . . . . . . . . . . . . . . . . . . . . .
otin
g . . . . . . . . . . . . . . . . . . . • . . . . . . . . . . . . . . . . . . . . . . . . . . . . . . . . . . . . . . . . . . . . . . . .
allop H
ems
. . . . . . . . . . . . . . . . . . . . . . . . . . . . . . . . . . . . . . . . . . . . . . . . . . . . . . . . . . . . . . . . .
ng
. . . . . . . . . . . . . . . . . . . . . . . . . . . . . . . . . . . . . . . . . . . . . . . . . . . . . . . . . . . . . . . . . . .
ulpture Stitch
nd Stitch . . . . . . . . • . . . . . . . . . . . . . . . . . . . . . . . . . . . . . . . . . . . . . . . . . . . . . . . . . . . . . . . . . 47
e Stitch . . . . . . . . . . . . . . . . . . . . . . . . . . . . . . . . . . . . . . . . . . . . . . . . . . . . . . . . . . . . . . . . .
adi
ng
Stitches . . . . . . . . . . . . . . . . . . . . . . . . . . . . . . . . . . . . . . . . . . . . . . . . . . . . . . . . . . . . . . .
ting .. ..........
Stitch . . . . . . . . . . . . . . . . . . . . . . . . . . . . . . . . . . . . . . . . . . . . • . . . . . . . . . . . . . . . . . . . . .
int
uck
ing.
. . . . . . . . . . . . . . . . . • . . . . . . . . . . . . . . . . . . . . . . . . . . . . . . . . . . . . . . . . . . . . • . . . 50
tit
ching . . . . . . . . . . . . . . . . . . . . . . . . . . . . • . . . . . . . . . . . . . . . . . . . . . . . . . . . . . .
justing P
When you
he
it
e on 'Programming (In Ordinary Sewing Mode) . . . . . . . . . . . . . . . . . . . . . . . . . . . . . . . . . . . . . . . .
atterns
in
g Decorative Stitch Patte
ne
Cycle Stitching . . . . . . . . . . . . . . . . . . . . . . . . . . . . . . . . . . . . . . . . . . . . . . . . . . . . . . . . . . 53
le
Stitching
stop
ry
Lock Alphabet a
ry
Lock Patterns . . . . . . . . . . . . . . . . • . . . . . . . . . . . . . . . . . . . . . . . . . . • . . . . . . . . . . . . 55
ng
Lette
ng Lar
ng
Letters and Spaces. . . . . . . . . . . . . . . . . . . . . . . . . . . . . . . . . . . . . . . . . . . . . . . . . . . . 57
cki
ng
and. Editi
of
Pattern in Programmed
ng ... . . . . .
. . . .
.......
. . . . . . . . .
. . .
......
ch . . . . . . . . . . . . . . . . . . • . . . . . . . . . . . . . . . . . • . . . . . . . . . . . . . . . . . . . . . 50
. . . . . . . . . . . . . . . . . . . . . . . . . . . . . . . . . . . . . . . . . . . . . . . . . . . . . . . . . . . . . 52
by
Pressing
sewing
rs
in Block Style . . . . . . . . . . . . . . . . . . . . . . . . . . . . . . . . . . . . . • . . . . . . . . . . .
ge
and Small Letters . . . . . . . . . . . . . . . . • . . . . . . . . . . . . . . . . . . . . . . . . . . . . . . . 56
ng
your Program ..........
.......
...............
. . .
......
........
Mirror
in the Middle
nd
Numbers . . . . . . . . . . . . . . . . . . . . . . . . . . . . . . . . . . . . . . . . . . . . . . 55
Sewing
.............
......
.
......
.
....
. . .
rns
. . . . . . . . . . . . . . . . . . . . . . . . . . . . . . . . . . . . . . . . . . . . . . . 53
Image
of
a programmed combination . . . . . • . . . . . . . . . . . . . . . . . . . . . 54
. . . . . . . . . . . . . . . . . . . . . . . . . . . . . . . . . . . . . . . . . . . . . . . . 59
....
. . . . . .
.
....
. . . . .... . ....
...
........
Button .
: . . . . . . . . . . . . . . . . . . . . . . . . . . . . . . . . . . . . . . .
........
.... . .
....
. . . . .
...
. . .
.......
............
. . . . .... . . ....
..........
........
. .
.........
.
...•.......
.......
...
. . .
...
. . .
.......
. .
...
....
..
. .
...
.................
.....•..........
................
..
........
..
. .
......
. . . . ....
. .
..............
.......
.........
.....
. . . . .•.. . 47
......
.
...
39'-41
. .
..
... 43
.
...
.
...
. . . .
62-63
37
38
42
43
44
44
45
46
46
48
48
49
49
51
54
56
58
60
61
2
Page 5
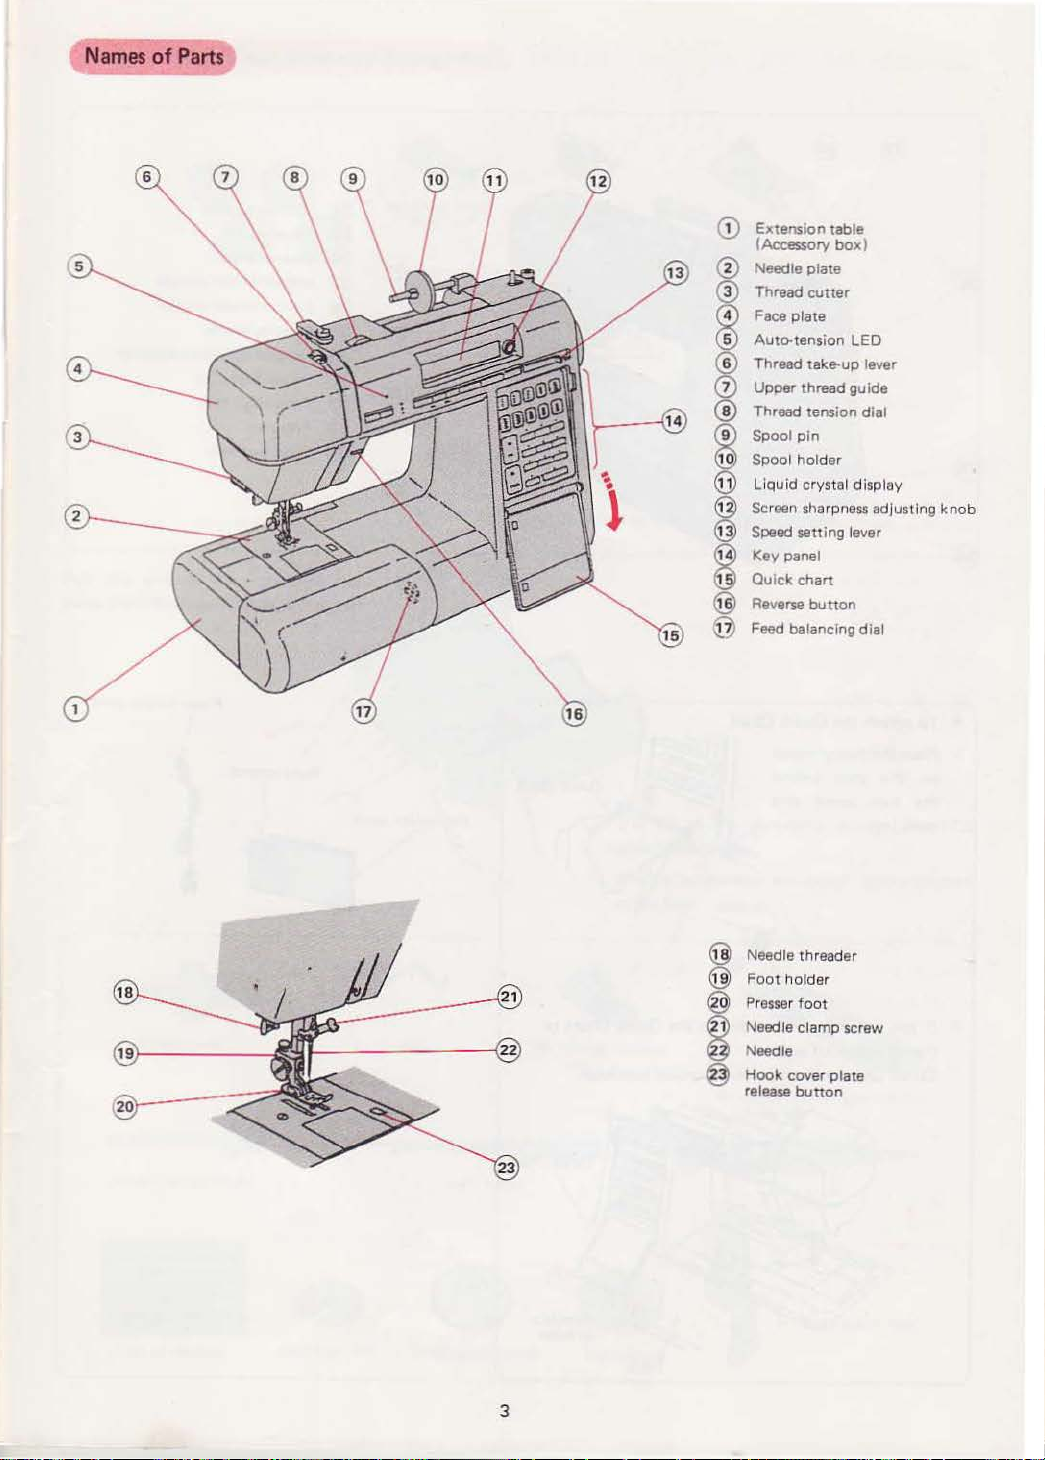
Names
of
Parts
~
r
I
I
Extension table
I'D
(Accessory box)
Needle
®
®
~
®
0
®
~
@
@
@
~
@
@
plate
Thread
cutter
Face plate
Auto-tension LED
Thread1ake-up lever
Upper thread guide
Thread tension dial
Spool pin
Spool holder
id
crystal display
Liqu
Screen sharpness adjusting
Speed
sening
Key panel
Quick
chan
Reverse
bunon
Feed balancing dial
lever
kno
b
Needle threader
Foot
holder
Presser fo
Needle clamp screw
"'eedle
Hook cover
release
3
ot
plate
bunon
Page 6
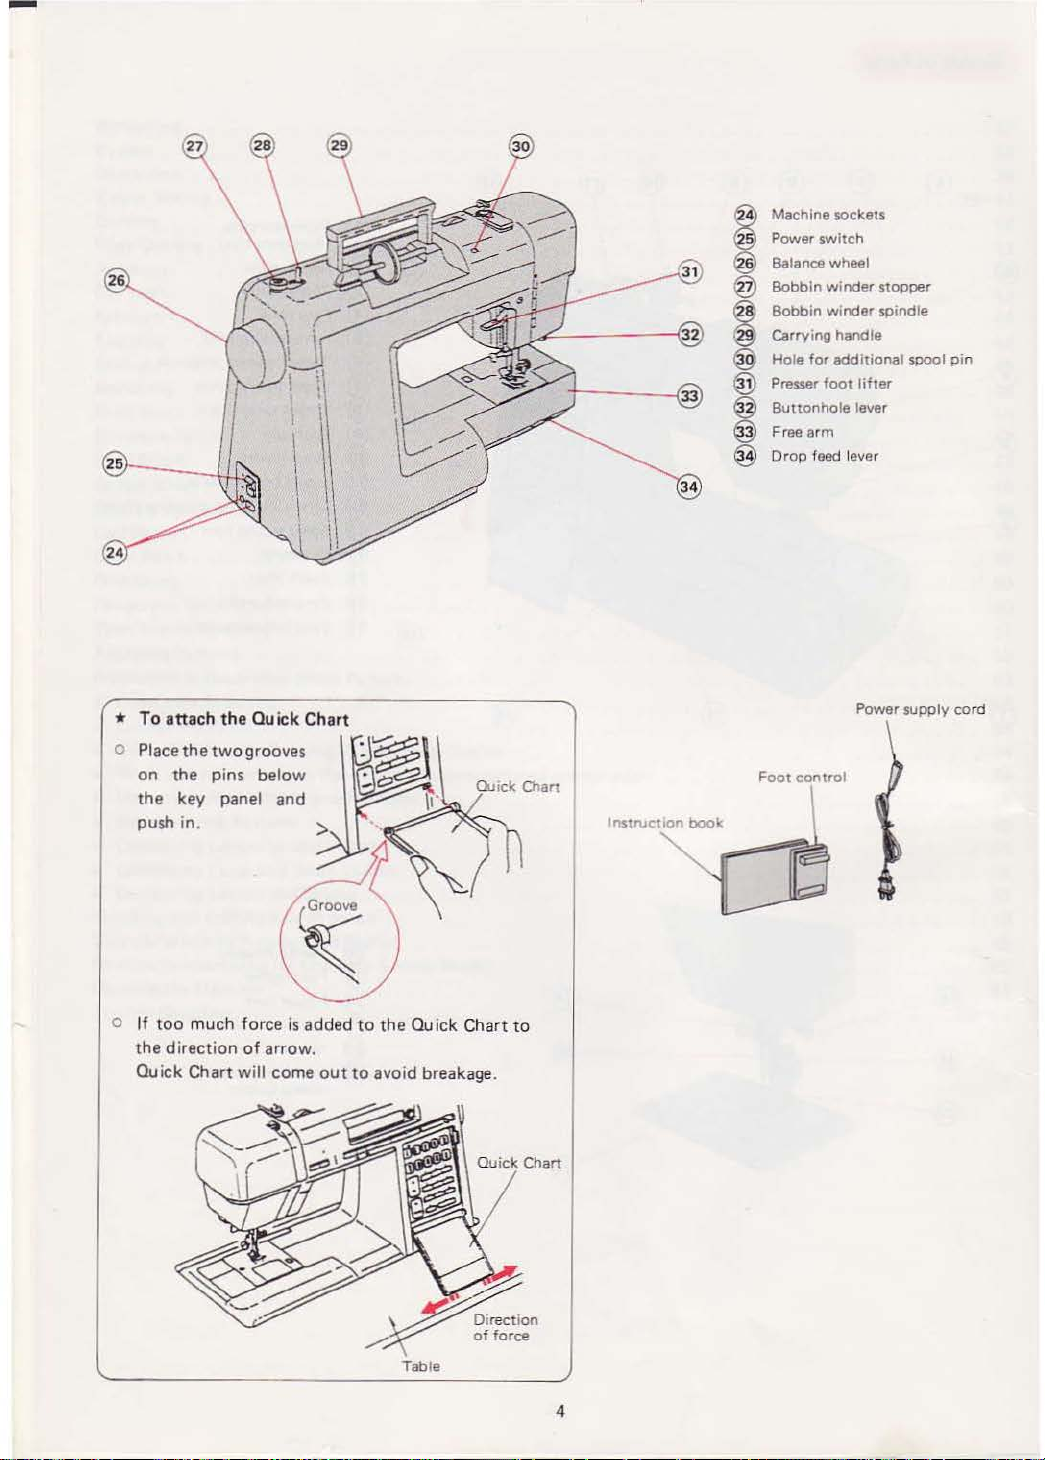
-
Machine sockets
Power s
witch
Balance wheel
!
Bobbin
@
I
@
@
s
@)
winder
Bobbin winder spindle
Carrying
Hole
for
addit•onal s
Presser
foot
Buuonhole
Fr
ee
arm
Dr
op
feed
handle
lifter
lever
lever
stopper
pool
pin
* To attach the Quick Chart
o
Place
the
two
grooves
on the pins below
the key panel and
push in.
If too much for
o
the direction
Ou
ick Chart will come
of
ce
Is adde
arrow.
out
d to the Quick Chart
to
avoid break
age
.
to
lns:NCIIOn
book
Foot
Power supply cord
control
Table
4
Page 7
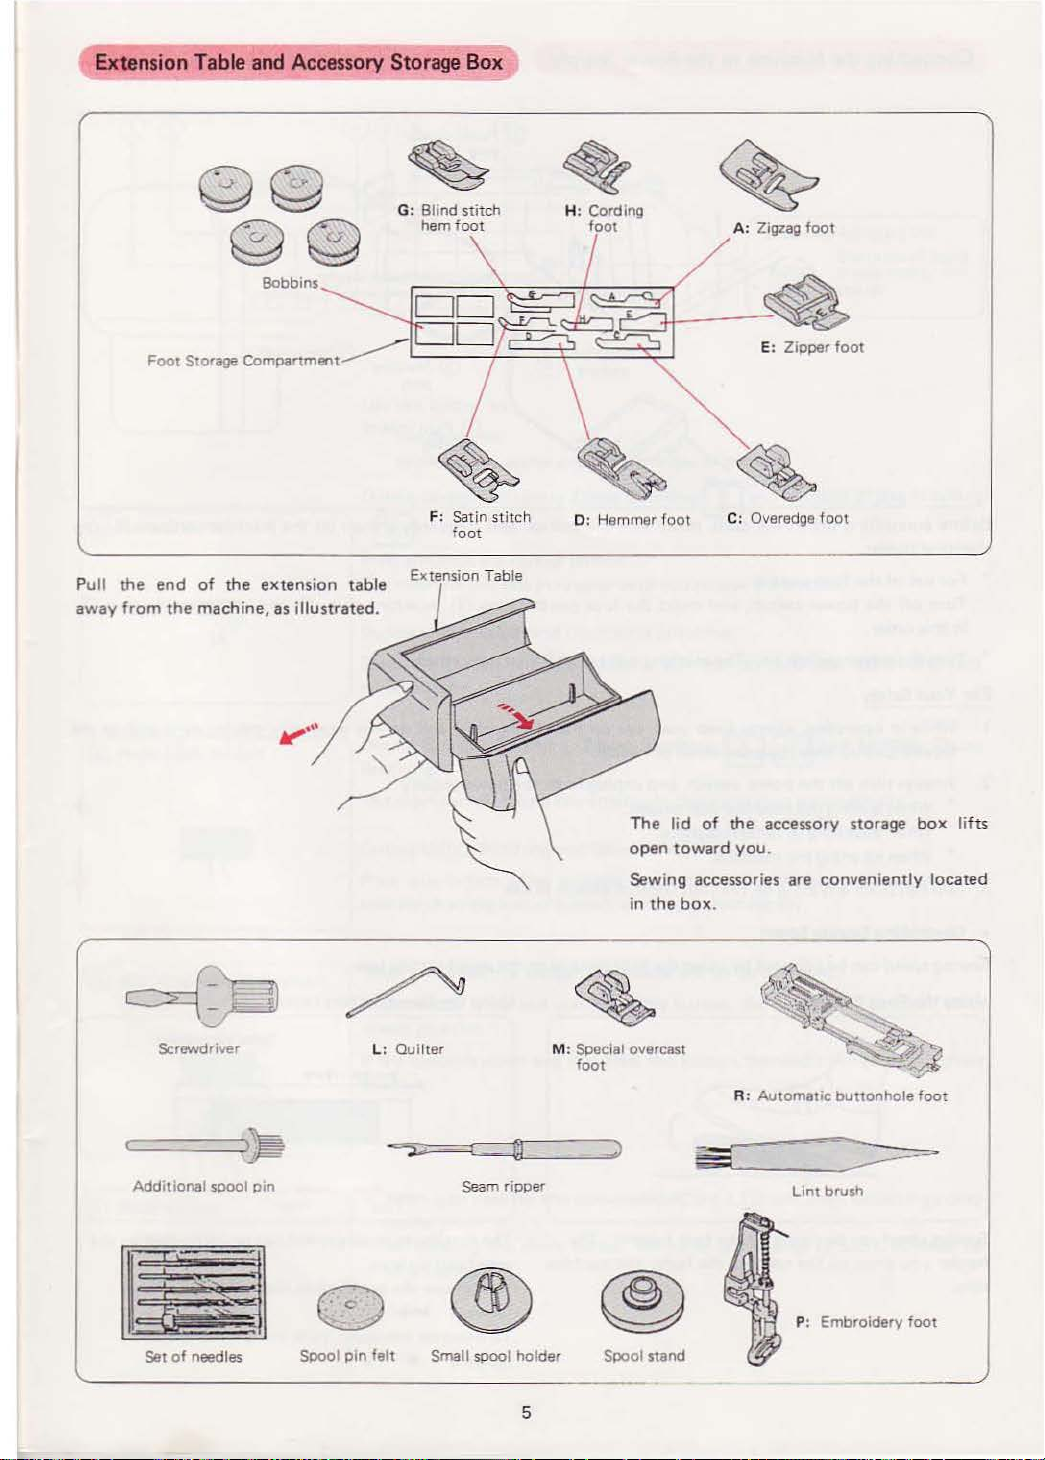
Extension
Table
and
Accessory
Storage
Box
Pull the end
a
way
from the mach ine,
of
the extens1
BobbinS
as
illustrated.
on
table
G: Blind stitc
foo
t
hem
F: Satin
f
oot
Extension Table
h
stitch
H: Cording
foo
t
0 : Hemmer f
oo
/
t
A: Zigzag
E: Zipper
C: Overedge
foot
too
foot
t
Screvvdriver l :
Additional
Set
of
spool
needles
pin
Spool
PIO
felt
Quil
ter
Small
Seam
spool
M: Special overcast
foot
ripp
er
holder
The lid
open
of
the accessory storage
toward
you
.
Sewing accessories are conveni
in
the
box
.
R:
Automatic
Lint
P: Embroidery
Spool stand
bunonhole
brusl1
ent
box lifts
ly
locat
foot
foot
ed
5
Page 8
-
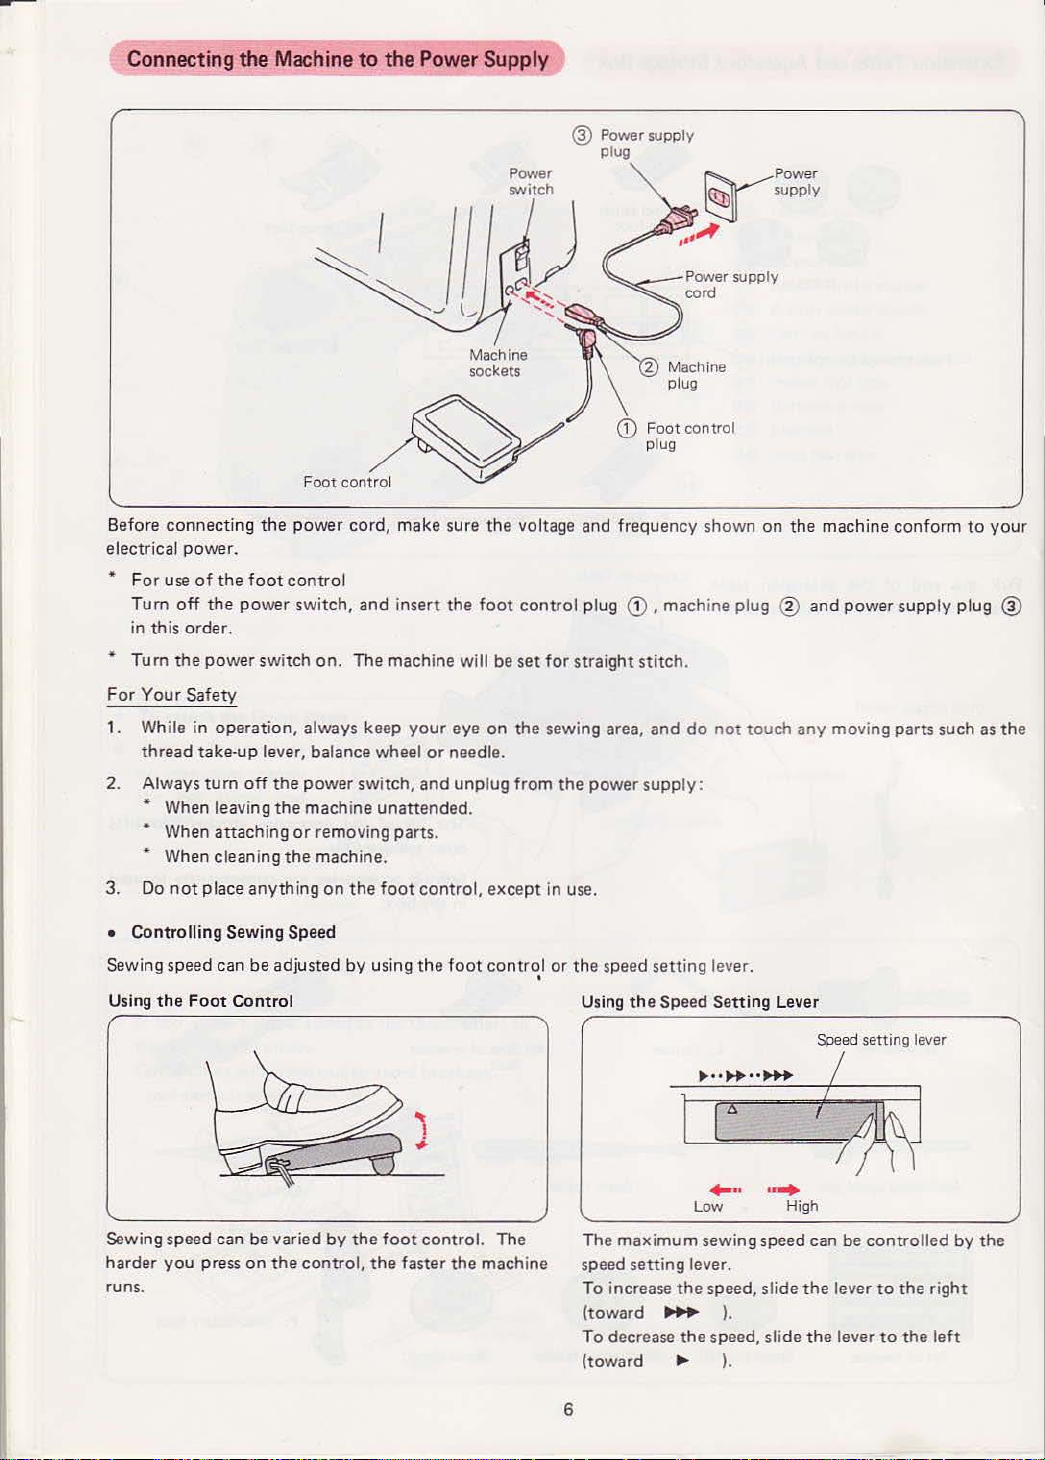
Connecting
Before
connec
electrical power.
* F
or
use
Tum
off
in this order.
* Turn
For
1. While in operation, always keep
2. Always
3.
the
Your Safety
thread
" When leaving
• When attaching
~
When cleaning
Do
not
the
Machine
ting
the
of
the
foot
control
the
power
power switch
take·up
lever, balance wheel
turn
off
the
the
the
place anything
to
the
Foot control
power cord, make sure
switch,
or
and
on.
The machine will
power
switch,
machine
removing parts.
machine.
on
the
unattended.
foot
Power
Supply
@ Power supply
plug
the
voltage and frequency shown
insert the foot control plug
be
set
for
straight stitch.
your
eye
on
the sewing area,
or
needle.
and
unplug from
control,
except
the
power supply:
in use.
~Power
~
supply
,,,A
on
the
machine conform
CD
, machine plug ® and power supply plug ®
and
do
not
touch any moving parts such as
to
your
the
• Controlling Sewing Speed
Sewing speed can
U
si
ng
the
Foot
Sewing speed can be varied
harder
you
runs.
press
be
adjusted by using
Control
on
the
control,
by
the
foot
the
faster
the
foot
contr~l
control. The
the
machine
or
the speed setting lever.
Using the Speed Se
ttin
g Lever
.........
Low High
The maximum sewing speed can
speed
setting
lever.
To increase
(toward
To
decrease
(toward
6
the
~
the
..,.
speed, slide
).
speed, slide
).
Speed setting lever
be
controlled
the
lever
to
the
the
lever
to
the
by
right
left
the
Page 9
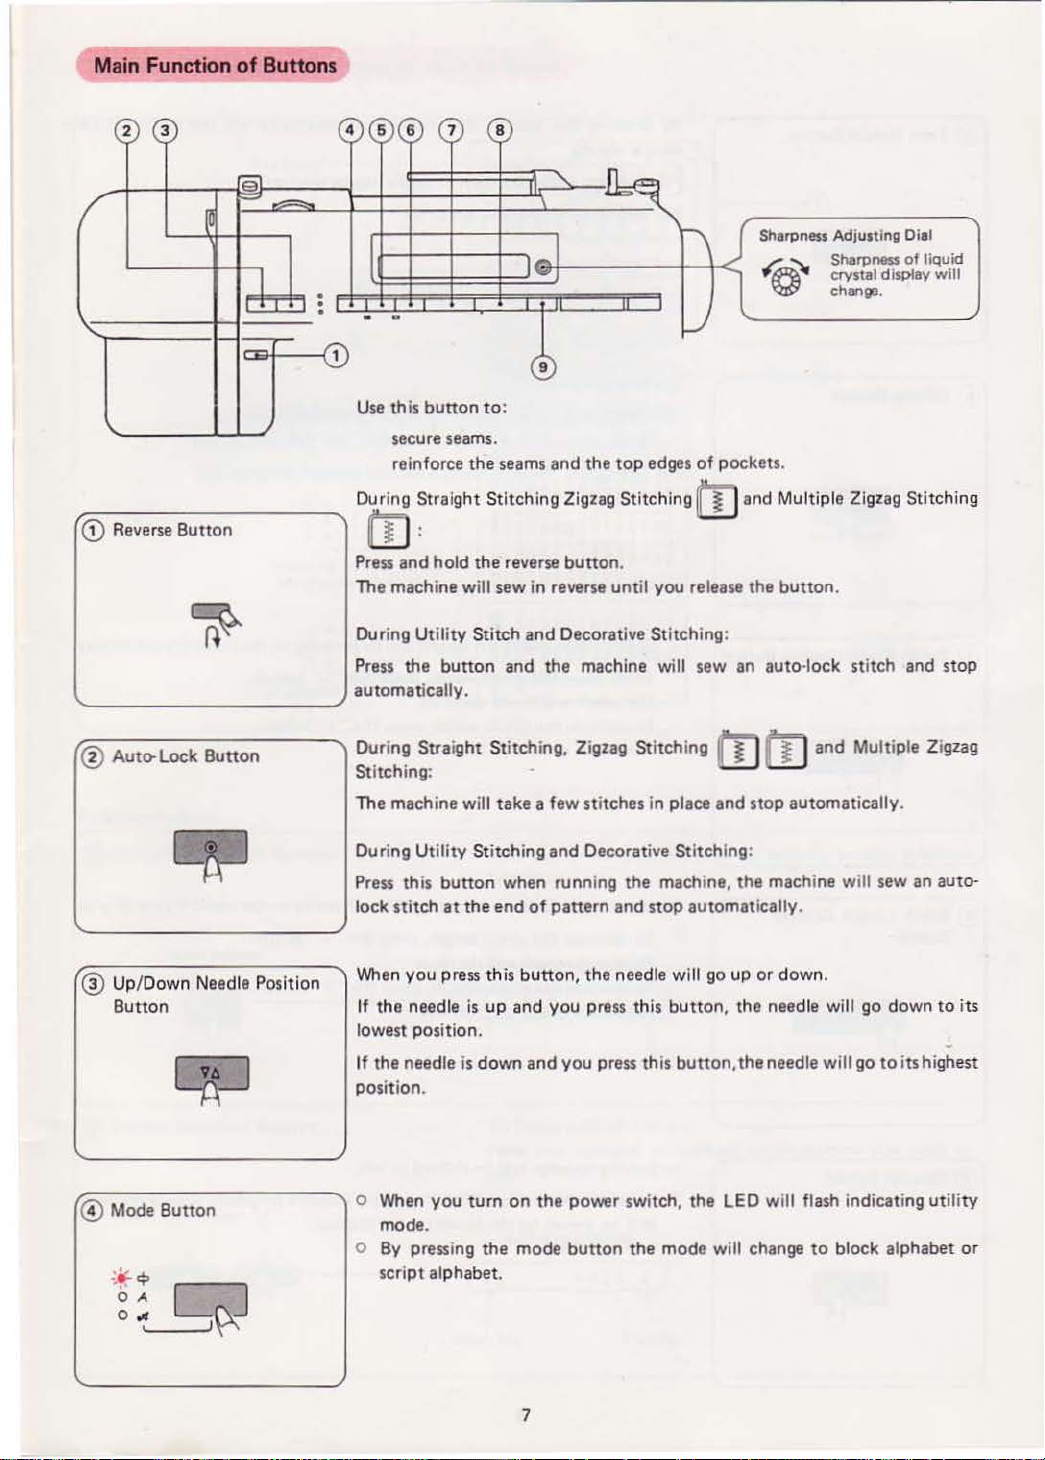
Main
Function
[)
Reverse Button
'-
--------------------/
of
Buttons
Use
this
button
secure seams.
reinforce
During
Strai
ght
l
Press
and
hold
The
machine will
During
Utility Stitch
the
Press
automatically.
button
8
Sharpness Adjusting Diet
,._
~
·
to:
the
seams
and
the
top
edges
of
pockets.
Stitching Zigzag Stitching J and Multiple Zigzag Stitching
the
reverse
button
.
sew
in reverse
and
and
the machine will sew an auto·lock stitch and
unt
il
you
release the
Decorative Stitching:
Sharpness of liquid
~
crystal display will
~
change.
button
.
stop
® Auto-Lock Button
@ Up/Down Needle Position
Button
@)
Mode Button
..
..
9
0
.A
O
t11
L~
During
Stitching:
The machine will
During
Press this
lock
When
lowest position.
If
position.
o When
o
Straight Stitching, Zigzag Stitching
Utility Stitching
button
stitch
at
the
you
press this
If
the
needle
is
the needle is down
you
tum
mode
.
By
pressing
script alphabet .
take
a few stitches
and
Decorative Stitching:
when running the machine,
end
of
pattern
up
the
button,
and
on
mode
the
you
press this
and
you
the
power switch, the
button
in
place
and
stop
needle will go
button.
press this
button,
the
mode will change
and
and
stop
automatically.
the
machine w
automat
ically.
up
or
down.
the needle will go down
the needle will go
LED will
flash indicating utility
to
Multiple Zigzag
ill
sew an auto-
to
to its
highest
block alphabet
its
or
7
Page 10
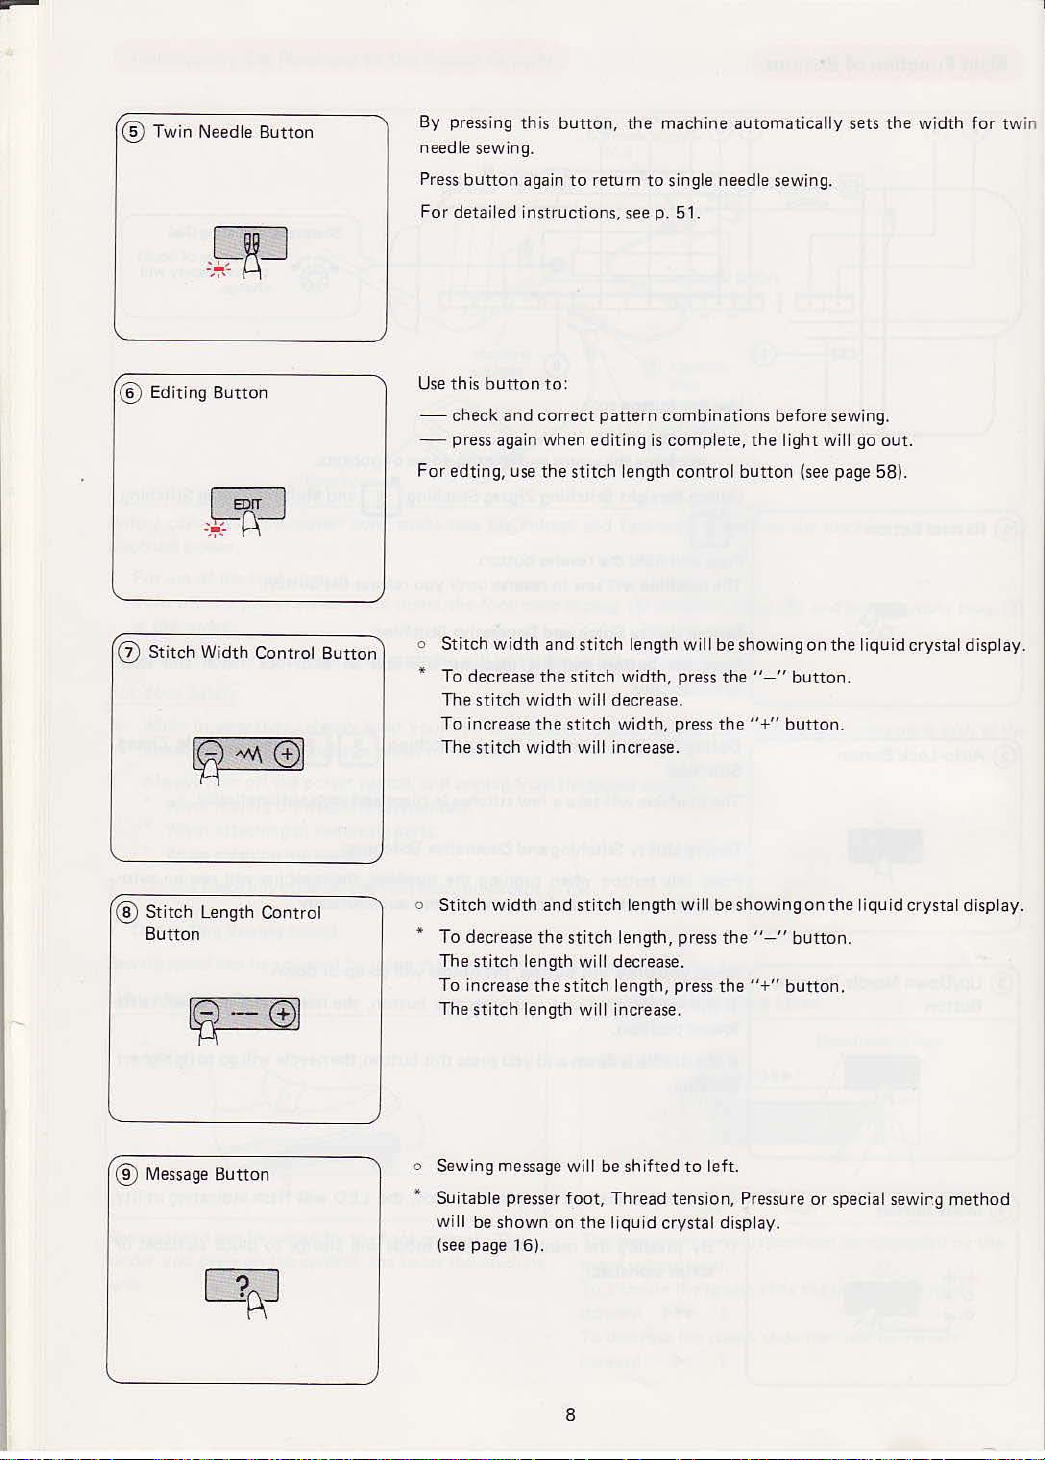
® Twin Needle B
utton
By pressing this
needle sewing.
Press
For
button
detailed
aga
instructio
button,
in
to
the machine
ret
urn
to sin
ns, see p .
automatically sets
gle
needle sewing.
51.
the width for twin
® Ed
0
@
St
Stitch
Button
it
ing
Butto
itch Width C
Length
n
ontrol
Contro
Button
l
Use this
- check and corr
-press
For
o
button
aga in
edt
ing, use
Stitch width
to:
when
the
and stitch length w
* To decrease t he
The stitch
To increase t he
The sti
o
Stitch wid
*
To
The
To increase the
The stitch length w
width
tch wid
th
and
dec
rease the stitch length,
stitc
h length will decrease.
ect
patt
ern
combinat
editing
stitch length con
stitch
will decrease.
stitch width,
th will increase.
stitc
st
itch length , press
is
widt
h, press
h length wi ll
ill
increase.
complete,
ions
the li
trol
but
ton
ill
be
showing
the "-"button.
press the"+"
be show
pre
ss
the
" - " bu
the"
+"
before
sewing.
ght will
(see page 58).
on
the
button.
ing
on
the
tton.
button.
go ou
t.
liquid crysta l display.
liqu id crysta l display.
® Message
Button
o Sewing message wi
" Suitable presser
will be
show
(see page
16)
n on
.
foot, Thread
8
ll
the
be shift
liquid
ed
to left.
tension, Pressure
crysta
l display.
or
special sew
ir.g method
Page 11
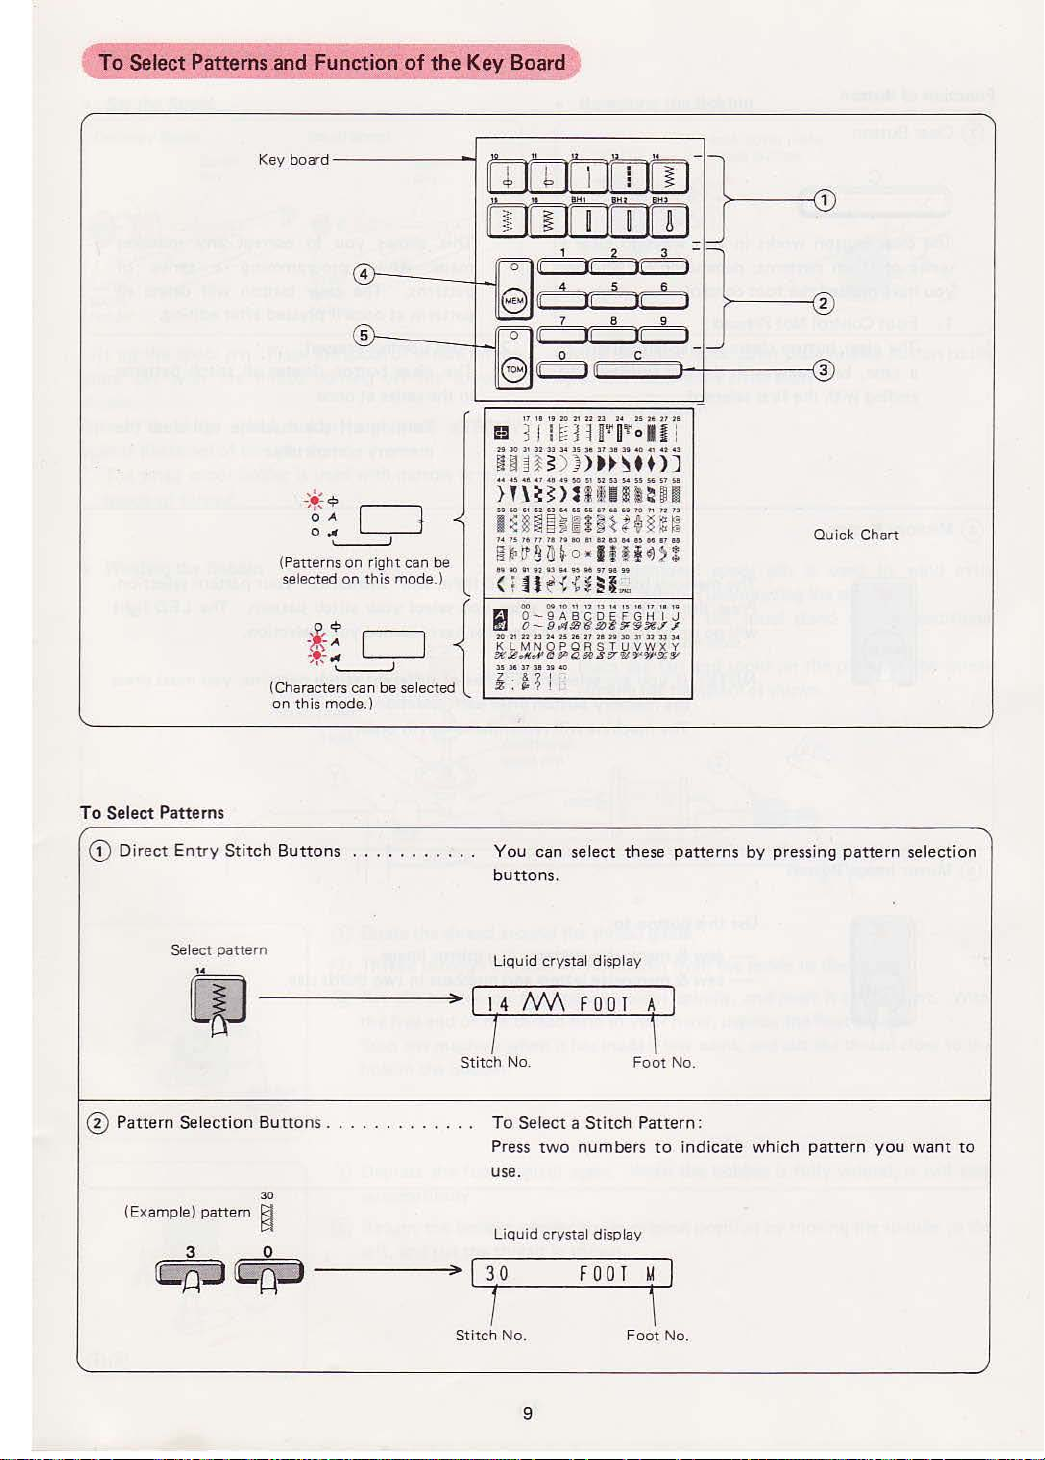
To Select Patterns and Function
Key board
4
5
I
o,_)
son right
atte
rn
se
lected
on
this
. {
A I I
,,
,
·•·
~
*
(Characte
on
rs can be select
this mode.)
of
j
can be (P
mode.)
the
Key Board
<
ed
II'
i 1
I
~
l
if"
~
m
~~
r=ou
8 «
...__
r=o
e
--
9
u.JO
UHs)
H d
}l\B)2
~
60
i~U!B~UH~U~
,
..
15
!!~tr&
t•aQtlUU~'»!IOS79!-9
<!H
il
20
~1!1:.'::.~
lS
lt
~: ~ ~
i'
I
f'
•l
QHO
II
17 11
3 J l U
lt
<1&
''
16
GO
&=~~i~£H~
21
22
l1
~
~
If
1
.,
4
Jl
7
«
Jl
0
~
,,
20
)1
22
H'·"O'~"oU
,,
l l
l4l5
~•
DH~t+)J
u
•11
.t'il
'-0
Sl
UUnn
, , &l-
6Cl5
&&
f1
1'1 ,
..
60
ll
~ ~·
o • u
~HiU~
09
10
11
1t
n
t•
:u.
''
21
;;.~~~
31
~~
40
J
r· l 1-
ILon
3
2
,,
5
!i
,,
8 9
Jl
c
It
lJ
,.
2S-U
11ts
n
!U S l
n
u"
·~
1.:)
'~
ta
)Q
.HJ
.se
1<1
i
u • .,
.,
• t
"''
S,.
55
s.6 n
51!
XI
?1
n n
..
, ,
..
~
u:
u~
~ z
9
I)
Ill
11'
II!
Ill
lU:J
» n
,,
~ )<~
'¥-'#&.l-
I
~
-
,
)
,
~
3
Ou1 'c
k Ch
art
To
Select Patterns
G)
Dire
ct Entry
Select
pattern
~
Stitch Buttons
------------~~14~AAA~~F~O~O~T-+A~
~~
® Pattern Selection Button
(Example) pattern
3 0
LQ:J
30
~
L~J
You can
buttons
Li
qui
d crystal display
1 '
Stitch No
s.
. . . . . . . . . . . . To Select a Stit
Press
.
two
use.
Liqu
id
crystal display
30
1
Stitch No.
select these patterns by pressing
.
Foot No
.
ch
Pattern:
numbers
FOOT
Fo
to
M
ot
No.
indicate which
'
pattern
pattern
selection
you want
to
9
Page 12
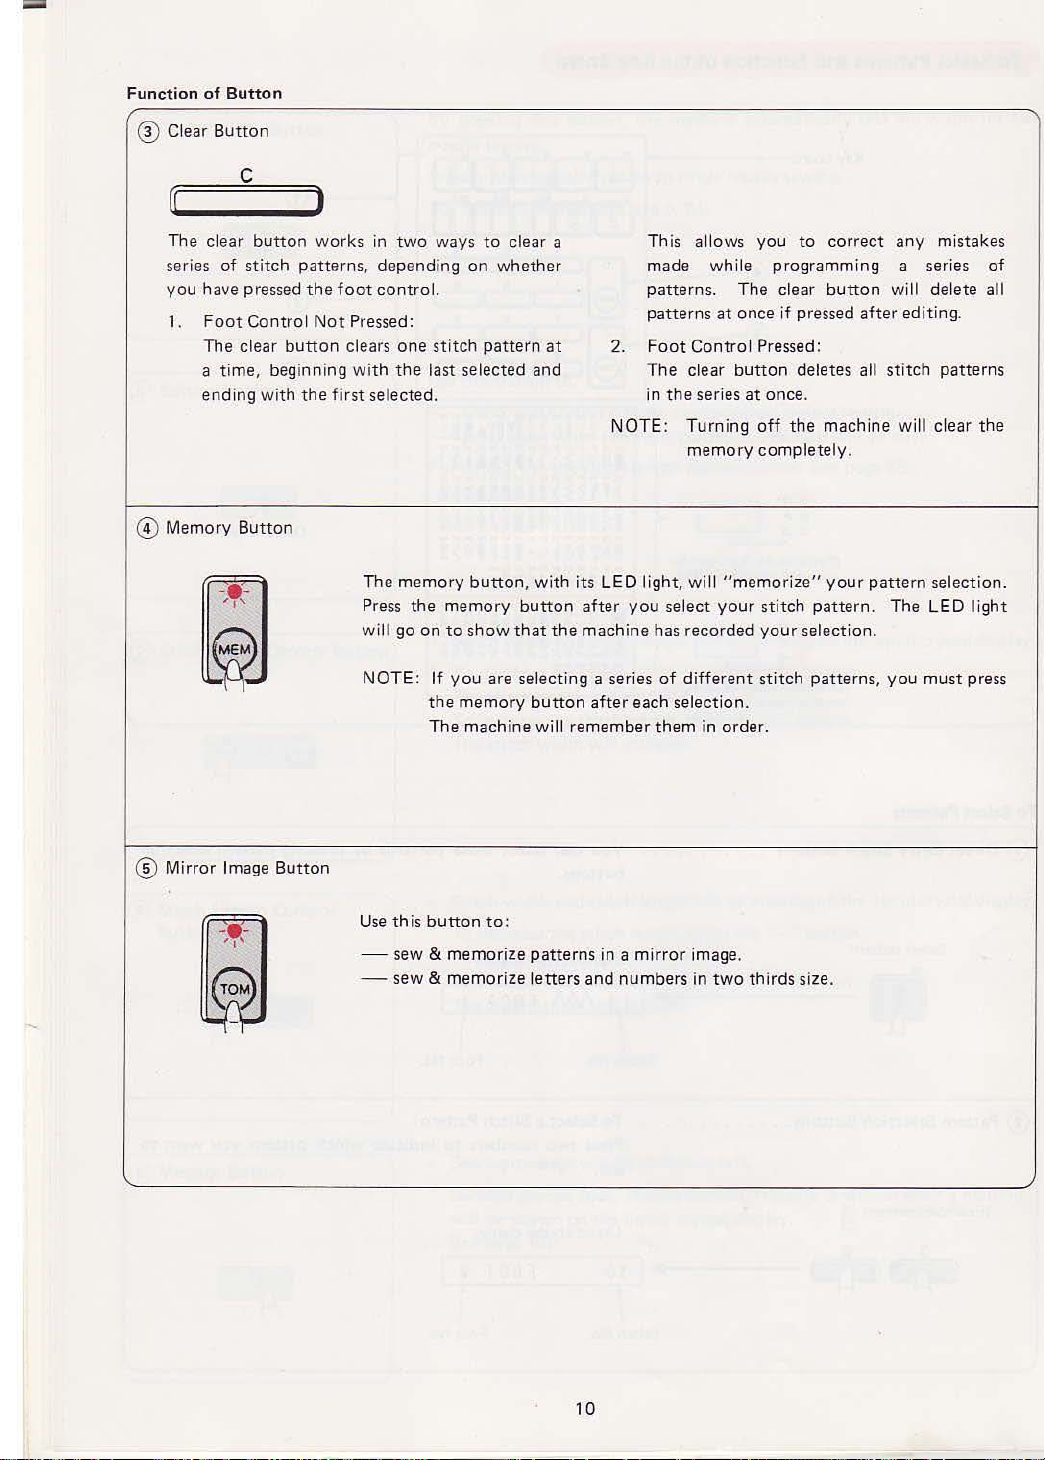
Function
of
Button
® Clear
The clear
series
you
1.
@)
Memory
Button
c
button
of
stitch
patterns,
have pressed
Foot
The clear
a time, begi
ending
Button
the
Control Not Pressed:
button
nning
with
the first
,
works
foot
clears
in
two
depending
control.
one
with
the
selected.
The
memory
Press th e
will go
NOTE: If
ways
to
on
whether
stitch
pattern
last selected
button, wit
memo
ry
on
to
show
you
are selecting a series
the
memory
The
machine
clear a
at
and
h its LED light, wi
button
that
the
button
will
remember
after
mach
Th is allows
made
patterns.
patterns
2.
Foot
Control
The
clear
in
the
NOTE: Turning
memory
you
select
ine has
rec
of different
after
each
selection.
them
wh
ile
The clear
at
once
button
series
ll
"memor
your stit
orded
in order.
you
to
correct
programming
button
if
pressed af
Pressed:
deletes
at
once.
off
the machine wi ll clear t he
complete
your
stitch
ly.
ize"
your
ch
pattern.
selection.
patterns, you
any
a
will delete all
ter
editing
all
stitch
pattern
The LED light
mistakes
series
.
pat
terns
selection .
must
press
of
@ Mirror Image
Button
Use
this
button
- sew &
-
memorize
sew & memorize
to:
patterns
letters
10
in a mirror
and
numbers
image.
in
two
thirds
size.
Page 13

Winding
the
Bobbin
• Set
the
Ordinary
Lift
up
the
spool
pin With
shown.
Attach
against the
• The sma
• Windi
spoo
the
ls
Spool
Spool
Spool
pin
spool
pin. Place
the
large
spool
spool
of
thread.
ll
spool holder
of
thread.
ng the Bobbin
Small Spool
the
spool
thread coming
holder.
is used
and
with
Spool
pin
of
thread
on
off
the
spool as
press it firmly
narrow
or
small
the
• Removi
Gently slide
right,
Lift
• The additional
bobbin
To
spool
Place
and
out
the
use,
pin in
the
ng
the
the
remove
bobbin.
without
insert
the
felt
Bobb
in
Hook
cover plate
button
release
hook
cover plate release
the
cover
plate
spool
pin
unthreading
the
spool
hole.
and
spool
on
.
is
the
stand
the
used
to
machine.
and
pin with
bunon
to
the
wind
extra
an additional
the
thread
®®
I
..
. .
J
0 ~
!f?®
.,.
.
CD
Guide
the thread
@ Thread through
@
Put
the
bobb
in on
the
free
end
of
Stop
the
machine when it has made a few turns,
hole
m the
bobbin.
® Depress
automatically.
@ Return
left,
and
the
the
cut the
foot
bobbin winder
around
the
the thread held
thread
hole in
the
control
1 1
the
thread
the
bobb
in winder s
again. When the
to
as shown .
guide.
bobbin
In
its original position by moving
from t
pind
your
hand, depress the f
bobbin
he
le,
ins ide
and
and
to
push it
cut
the
is
fully
the
oot
outside.
to
the right. With
contro
l.
thread close
wound,
the spin
it
dle
will
to the
stop
to
the
Page 14
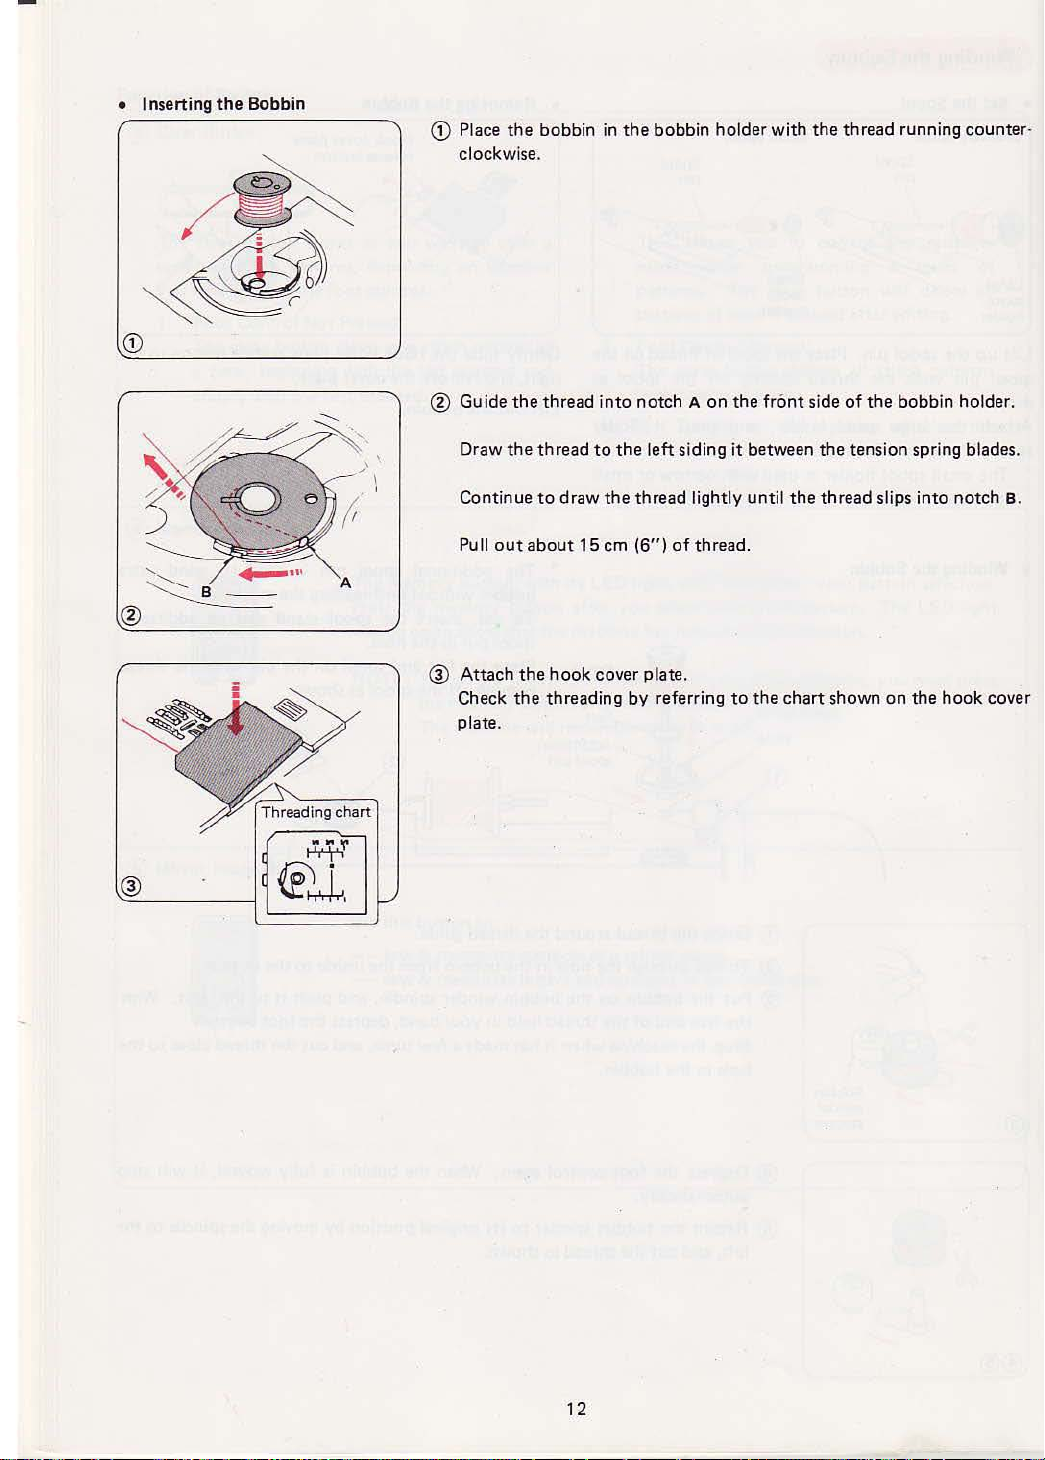
• Inserting
the
Bobbin
G)
Place
clockwise.
the
bobbin
in
the
bobbin holder with
the
thread
running
counter
-
® Guide
Draw
Continue
Pull
@
Attach
Check
plate.
the
out
the
about
the
the
thread
thread
to
into notch A
to
draw
the
15
em
hook
cover plate.
threading
the left
thread
(6")
by
referring
on
the
front
siding it between
lightly until
of
thread.
to
the
the
chart
side
of
the
bobbin holder.
the
tension spring blades.
thread
slips into notch B.
shown
on
the
hook cover
12
Page 15
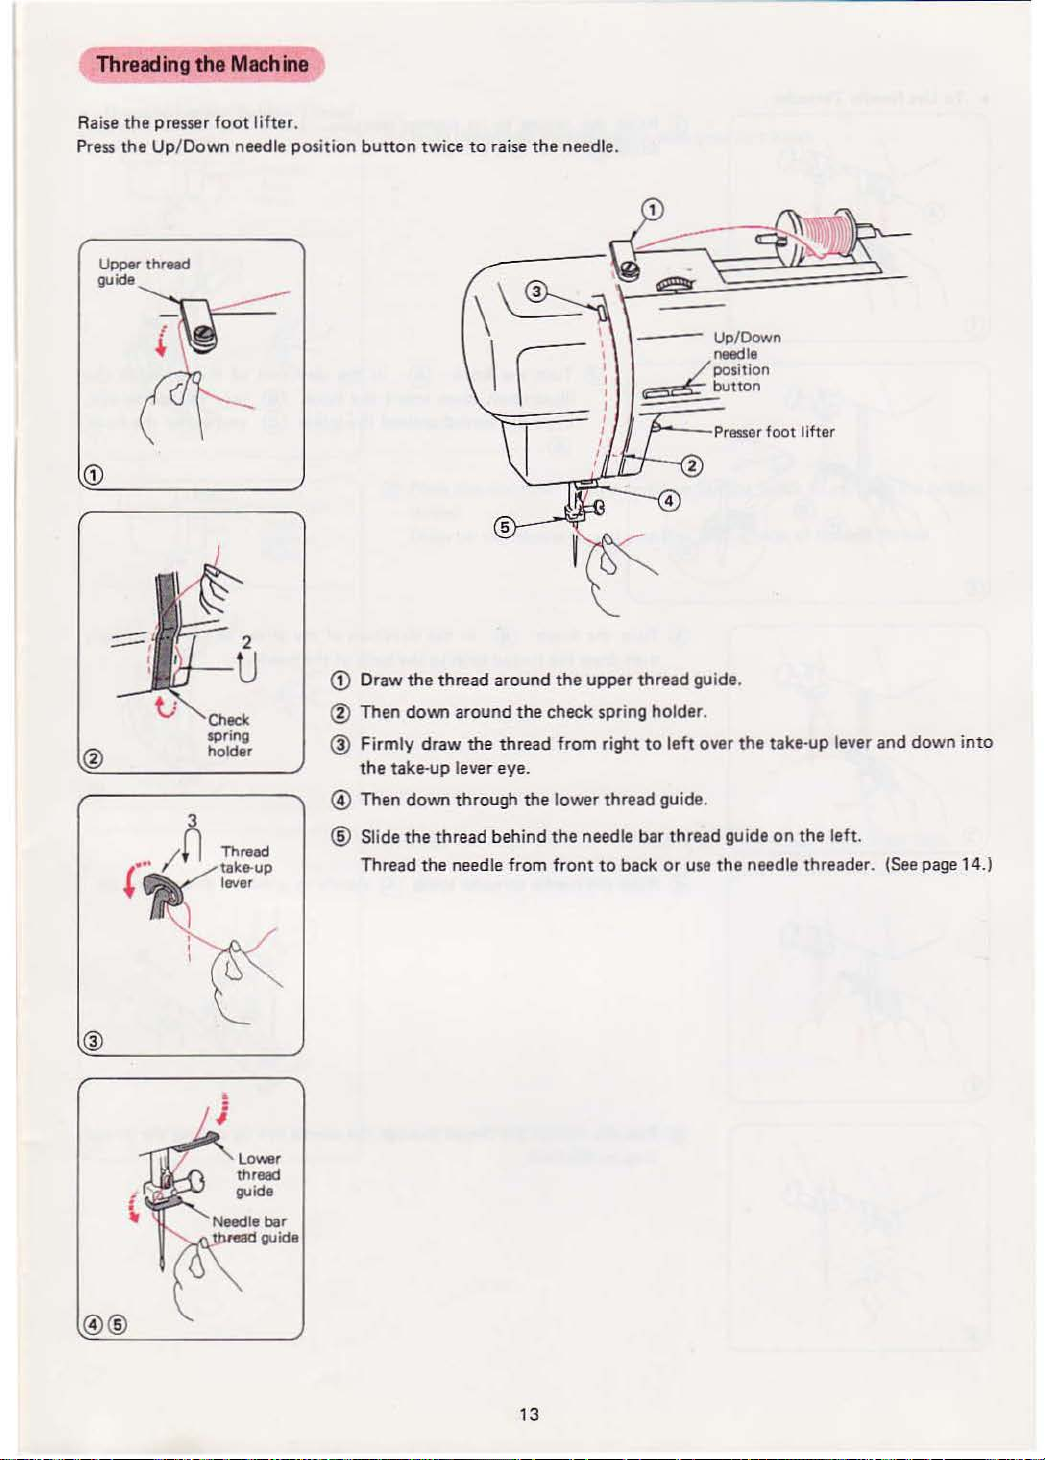
Threading
Raise
the
Press
the Up/Down needle position
Upper thread
guide
the
presser
Machine
foot
lifter.
button
twice
to
raise
the
needle.
n Thread
I
("'~
'
+ lever
take-up
)
i
~
CD
Draw
the
thread around
® Then down around
@ Firmly draw
the
take-up lever eye.
@)
Then down through
@ Slide
the
Thread
the
thread from right
thread
behind
the
needle from front
the
upper thread guide.
the
check spring holder.
the
lower thread guide .
the
needle bar thread guide
to
back
to
left over
or
use
the
take-up lever and down into
on
the left.
the
needle threader. (See page 14.)
@)@
13
Page 16
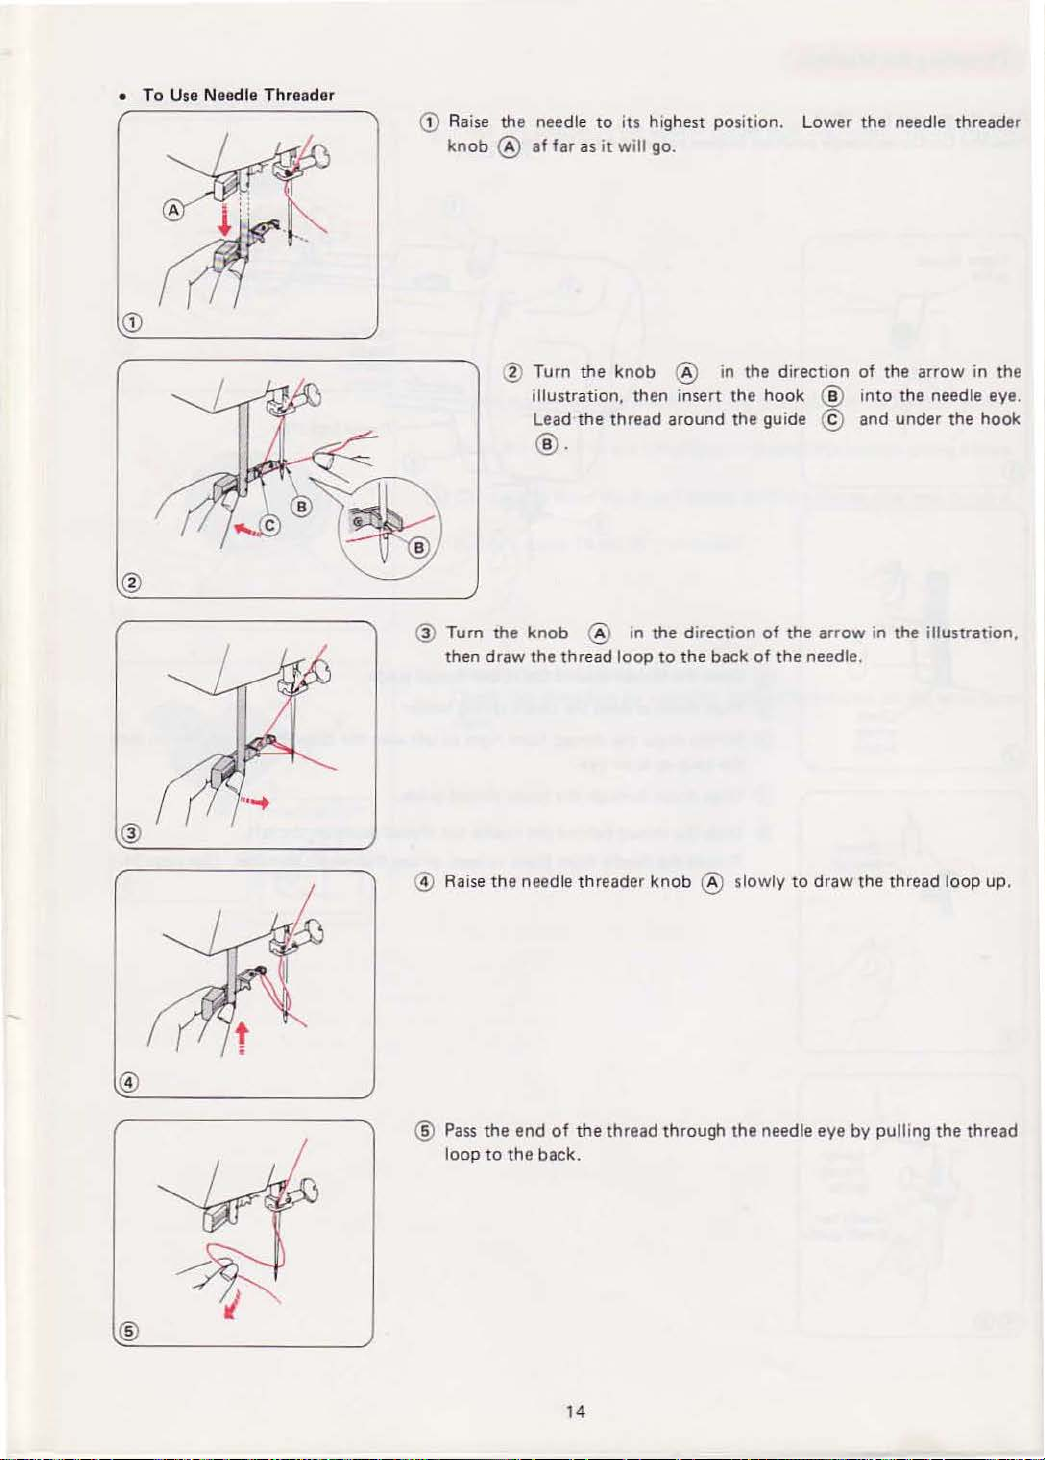
• To Use Needle
Thr
eader
(D
Raise the needle
knob
@ af far
to
its h1ghest position. Lower the needle threader
as
it will go.
® Turn
® Turn the
then
draw
.:1)
Raise
the
the
knob ® in the di
illustration. then insert the
Lead
the
thread
around
@.
knob
@
10
the directi
the
thre
ad
loop
to
the
back
nee d
le threader
knob
® slowly to
rection
hook
the guide @ and
on
of
the
of
the
@ i
arr
ow
needle .
draw
of
nto
in the
the
the arrow in
the needle eye.
under
the
hook
ill
ustration
thread loop up.
the
,
®
® Pass
loo p
the
to
end
the
of
back.
14
the
thread
through the needle eye
by
pull ing the thread
Page 17
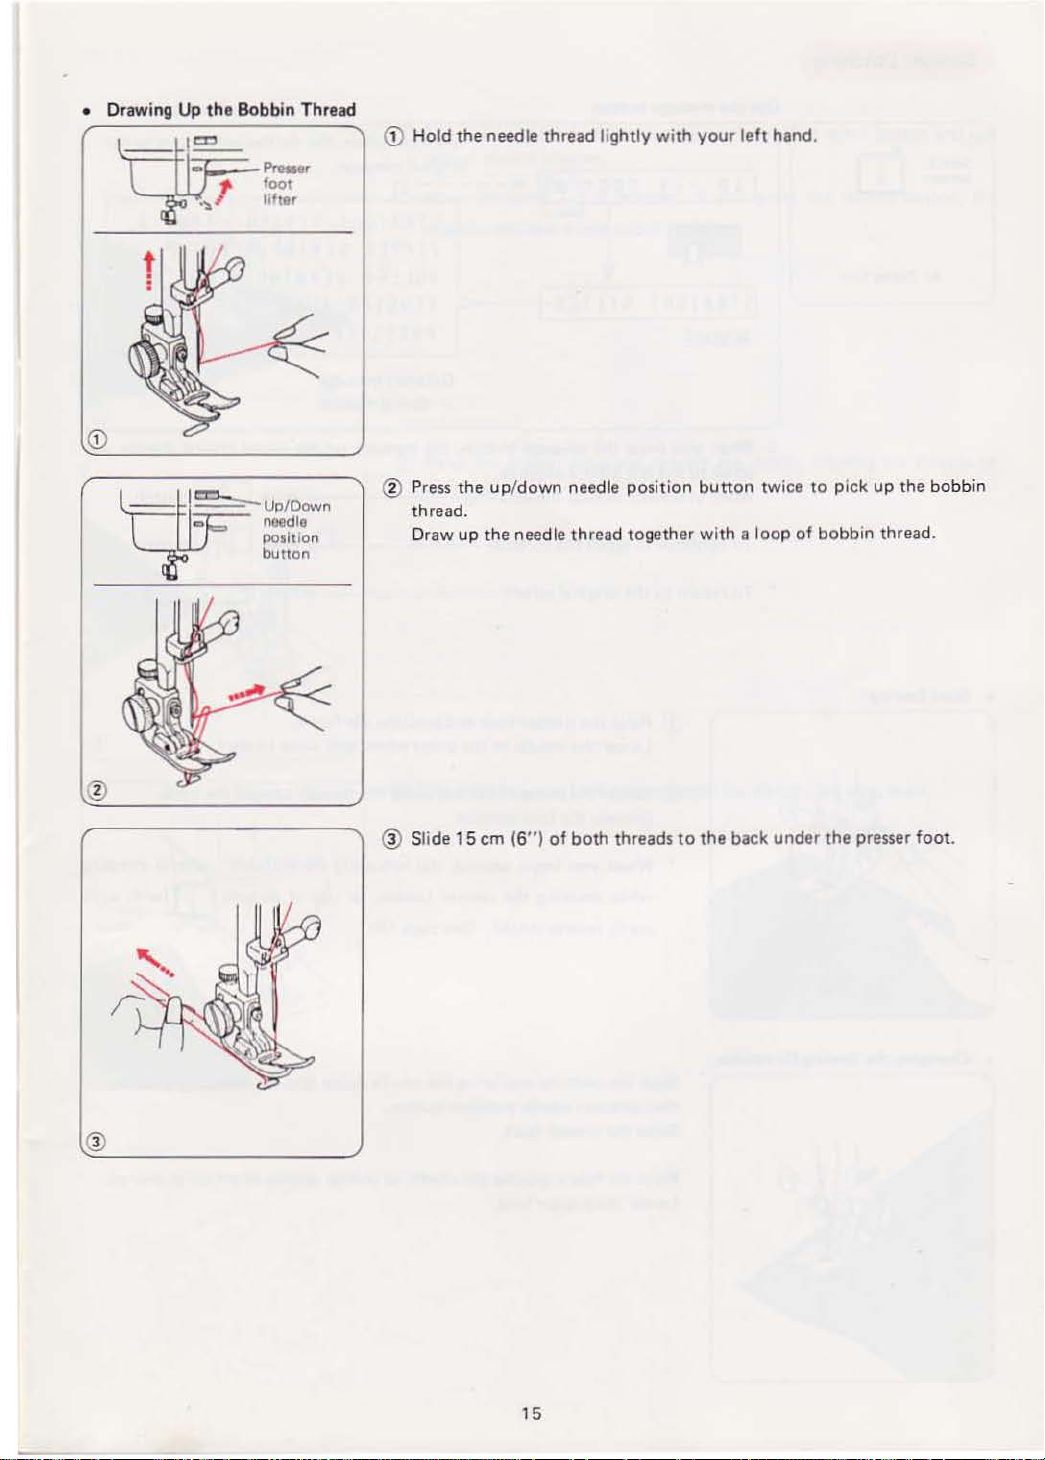
• Drawing
Up
the
Bobbin Thread
G) Hold
the
needle thread lightly
with
your
leh
hand.
® Press
thread.
Draw up
®
Slide
the up/down needle position
the
needle thread together with a l
15
em
(6")
of
both
threads
button
to
the
back
twice
oop
under
to
of
bobbin
pick
the
up
the
thread.
presser
bobbin
foot.
15
Page 18
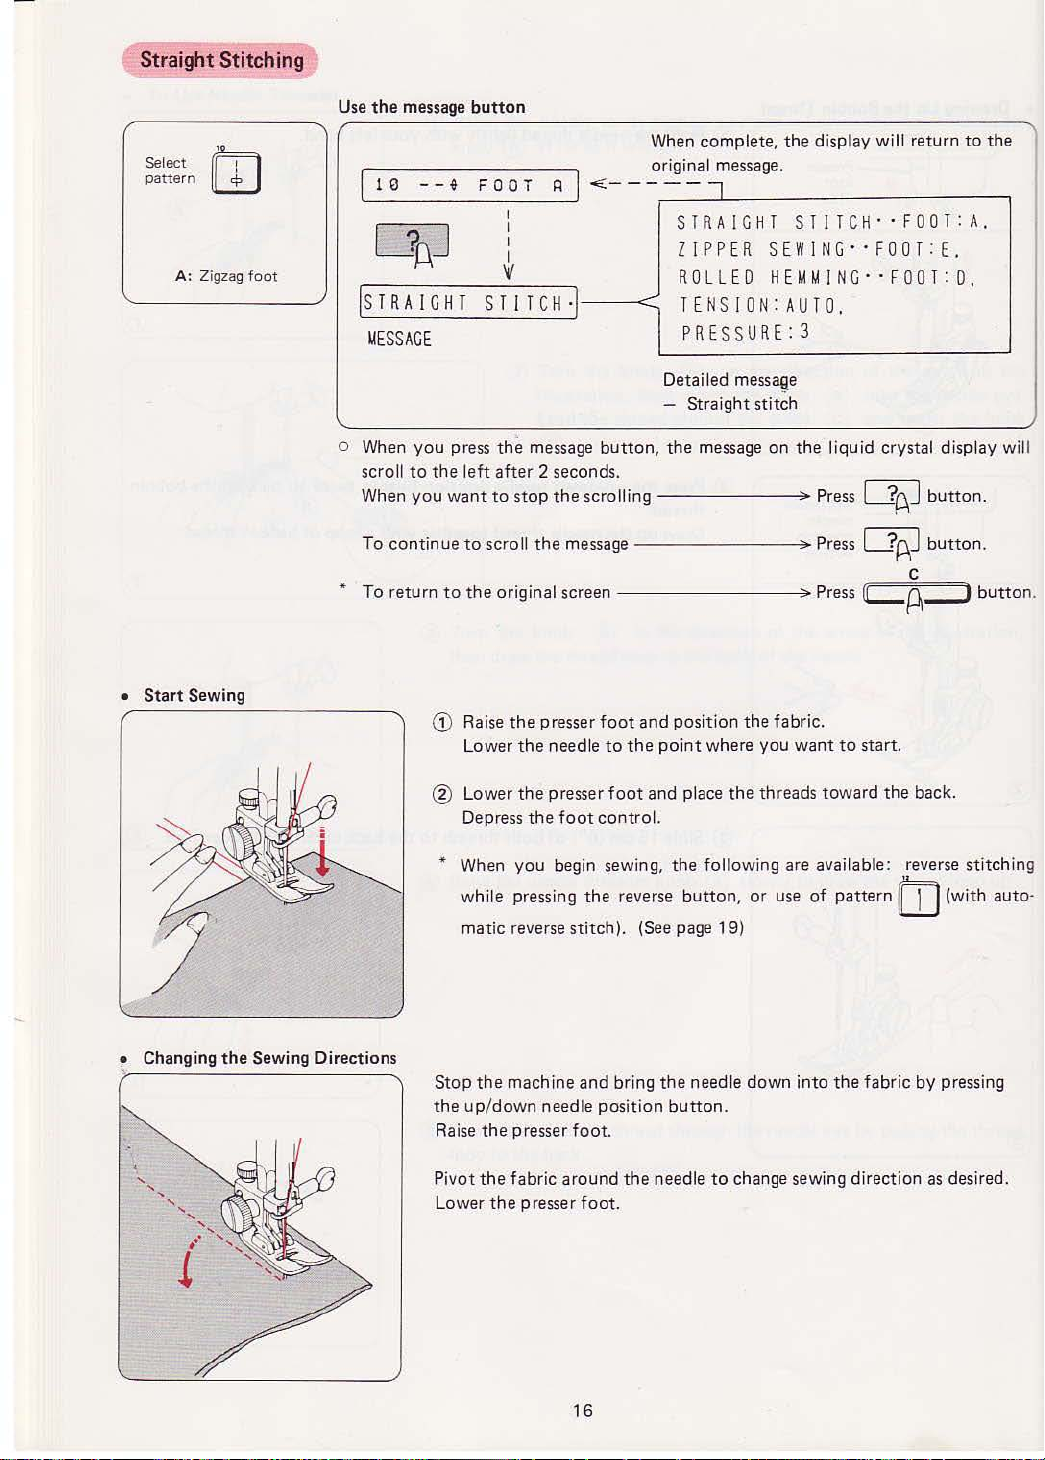
Straight Stitching
Select
pa
ttern
A: Z
ig
zag
foot
Use
the
10
Is
r R A 1 G H r
MESSAGE
message
--~
button
FOOT R
I
I
I
I
~----
v
T l T c H ·I- -<
s
When complete,
original message.
-,
STRAIG
the
display will return
HT STI
TCH· ·FOOT:
ZfPPER SEWING· ·FOOT:E.
ROLL
ED HEMMING··FOOT:
TENSION: AUTO.
PRES
SURE:
Detailed messaqe
-
Straight stitch
3
O,
to
A.
the
'
•
Start
Sewing
o When
scroll
When
To
continue
•
To
return
you
press
to
the
you
want
to
G)
@ Lower
* When
while pressing
mat
the
message
left
after
2 seconds.
to
stop
to
scroll
the
the
original screen
Raise
the
presser
Lo
wer
the
the
Depress
the
you
ic reverse stitch). (See page 19)
button,
the
scrolling--
message
foot
needle
to
presser
foot
control.
begin sewing,
the
the
-----
________
and
position
the
point
foot
and place
the
reverse
message
----~ Press
on
the
--~
Press
liquid crystal displ
4J
~
button.
button.
ay will
c
,..
Press
LA__,
the
fabric.
where you want
the
threads
following are available: reverse stitching
button,
or
use of
to
start.
toward
pattern
the
back.
m (with
butto
auto
n.
·
• Changing
..
i
the
Sewing Directions
Stop the
the up/down needle position
Ra
Pivot
Lower
machine and bring the needle down into
ise
the
presser
foot.
the
fabr
ic
the
around
presser
foot
16
the
.
button
need
.
le
to
change sewing direction
the
fabric
by
as
pressing
desired.
Page 19
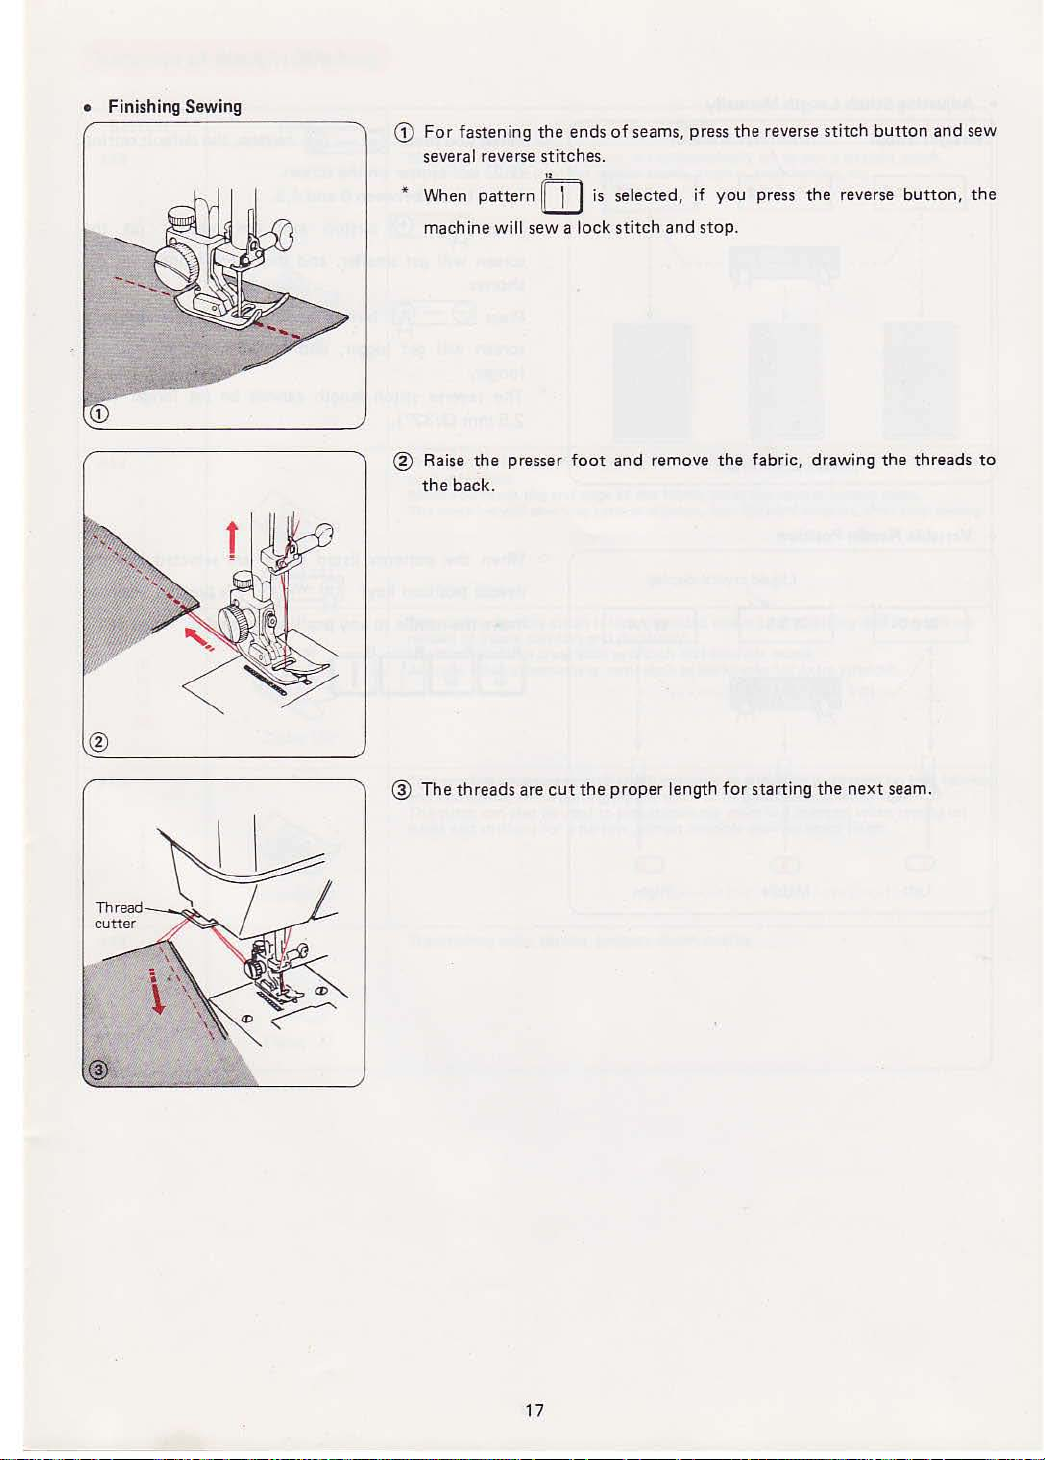
• Finishing Sewing
G)
For
fastening
several reverse stitches.
the
ends
of
seams, press
the
reverse
stitch
button
and
sew
* When
® Raise
pattern
machine will sew a l
the
the
back.
rto
presser
is
ock
foot
selected, if
stitch
and
and
remove
you
press
stop.
the
fabric, drawing
the
reverse
button, the
the
threads
to
@
The
threads
are
cut
the
proper
length
for
starting
the
next
seam.
17
Page 20
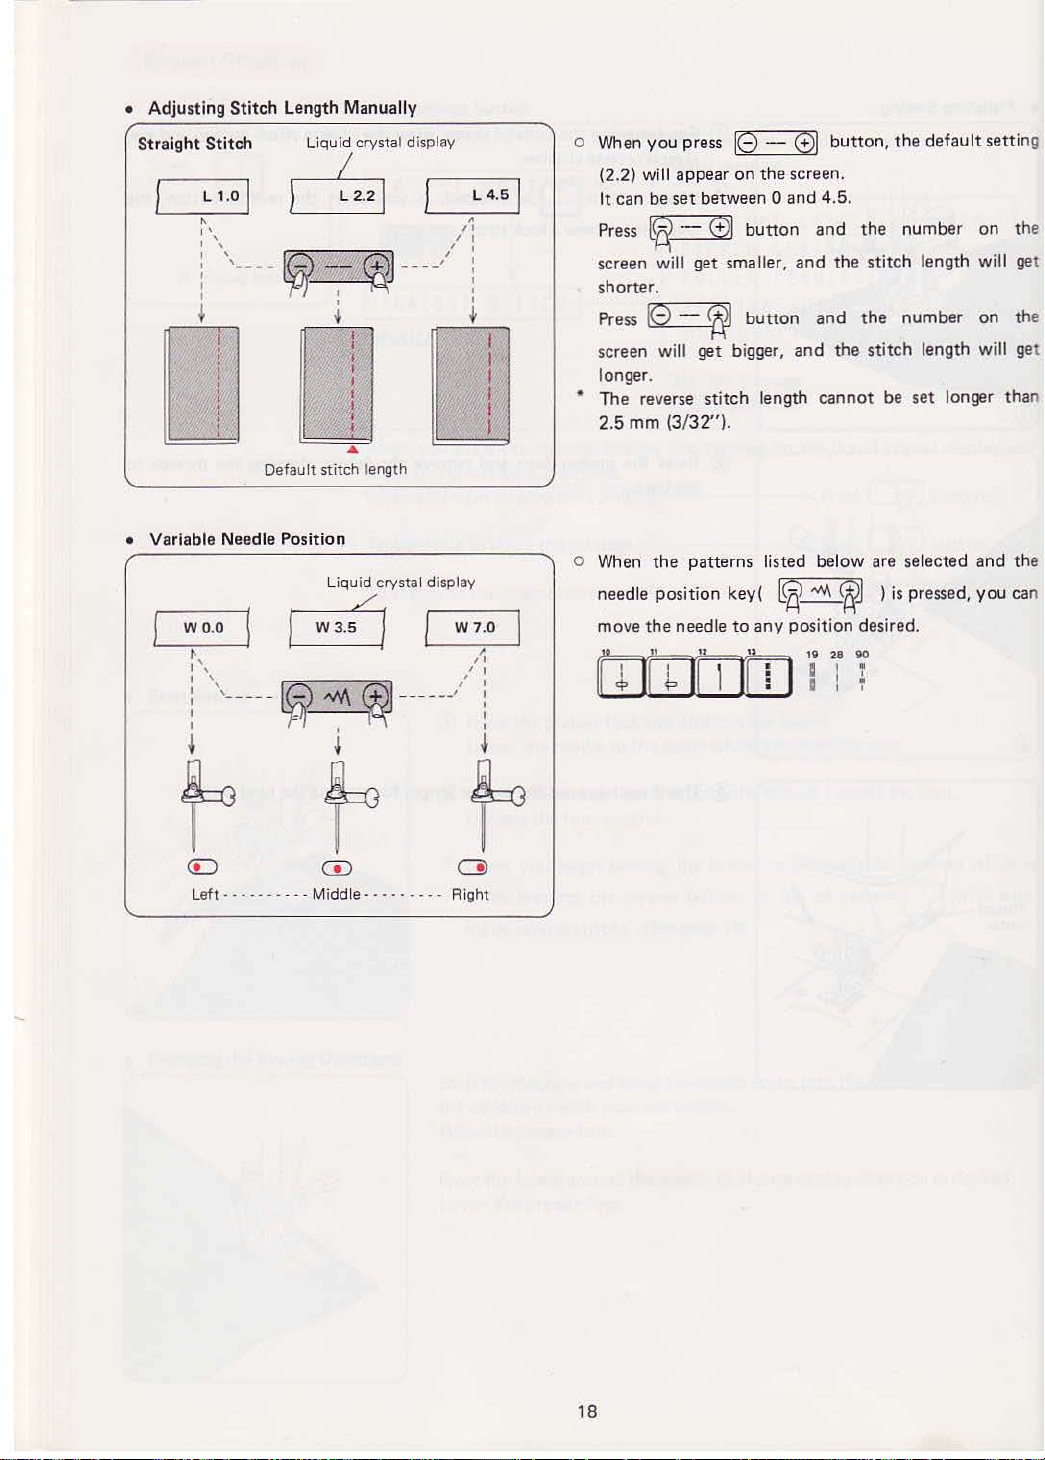
• Adjusting
Straight Stitch
1
L
~
I'
1 \
I
I
I
!
Stitch
1.0
'
'
----
Length Manually
Liqu
I
cfuJ
~ I
t
I
.
:
I
I
I
'
f'l
'
~
I
I
'
De
fault
stitch leng
• Variable Needle Position
Liquid crystal display
~
,
''
I \ 1 f
! \
___
I
~
_
,0
All\
'7=~
'-~~
•
id crystal display
1
~
----'
'
v
I
l
'
I
I
t
I
I
t
•
~
0
[]
th
____
/ I
I
I
w:
_
_/
"
L 4
..
'
I
'
'
'
'
...
;•
.51
!
I
t
o When
(2.2) will
It
can
Press
screen
shorter.
Pressl0
s
creen will
longer.
•
The
2.5
o When
needle
move
m
you
press
appear
be
set
between 0
~
--
01
will get smaller,
..,,.._
,....-_-
~-=--
get
reverse sti
mm
the
position
the
(3
/32").
patterns
needle
tch
IG -01
on
the
button
button
bigger,
length
listed below are selected
key(
to
any
button,
screen.
and
4.5.
and
the
and
the
stitch
and
the
and
the sti
tch
cannot
~
"""'-
position desired.
be set longer
W-1
)
iTT
t he
default
number
length will get
number
length will g
is
pressed,
setti
ng
on the
on the
et
tha
and the
you
can
n
t t t
Le
ft------
- -- - Mi
ddle-
-- ------
A ight
18
Page 21

Variation
of
Straight Stitching
STITCH
=
10
cp
or
~
11
<P
lf
12
# 13
=
18
I
I
I
I
1
Ill
Ill
Ill
Ill
Foot
~
Zigzag (A)
~
Zigzag
(A)
~
Zigzag IAI
When
the
This stitch can
T
sewing forward.
Wh
The
This strong, durable stitch
nee
Use
Also use
machine
he
machine will sew
en
you
machine will sew four reverse stit
ded
to
it
to
reinforce areas such as
when
be
used
reach the
insure
com
construct
is
turned
for
four
end
edge of the fabric, press the rovorso
fort
and
ing
I
Th
is
sth:ch is a narrow stretch stitch designed
and
bias seams, while permitting the seam
The stitch
tricot
and
can
also
chiffons
be
used
for
a narrow, almost invisible seam
USES
on,
it's automatically
regular seams, zippers, topnltchlng, etc.
stitches forward, four stitches In reverse, then cont
ches, four forward stitches, then
is
recommended where
durabilitY.
crotch
items such as backpacks f
to
simultaneously seam
and
set
to
sew a Straight Stitch.
both
elasticitY
armhole seams.
to
or
extra
to
eliminate puckering
be
pressed completely flat.
and
overcast when sewing
or
seam finish.
button
and
strength.
once.
stop
strength are
on
knit
inue
sewing.
fabrics
on
~
#
19
Ill
Ill
~
Zigzag (A)
Topstitching suits, blazers, jumpers denim outfits.
~
Zigzag (A)
19
Page 22

To
Set
Thread
• Auto-tension
Set
"auto"
for
Thread tension dial
Tension
ordinary
sewing
to
get
well-balanced
thread
tension.
For
The
between
Straight
ideal
straight
the
Stitch
two
stitch
layers
will have
of
fabric
.
Needle thread
threads
locke
d
'When set the
green
get
thread
flashed.
thread
proper
-
~
Autcrtension
• Manual Needle Thread Tension
Adjusting
used.
Set
the
the
manual
dial
from 0 to 9 to
*
The
is
too
The bobbin thread
ap
pe
upper surface of
the fabric.
needle
needle
tight.
ars on the
signal
will be
tenison
thread
Loosen
thread
moving
lower number
Under side
of fabr
tension
the
ic
Setting mark
"auto"
tension
the
dial
may
be
needle
by
to
.
.,.
~
Auto-tension
~
For
Zigzag
Stitch
In
the
correct
will
not
show
top
threads
required
balance
a
••• I .........
0
when
as
follows;
Tighten
thread
moving
higher
· · Right side
tension
the
number.
-
When
the green
go
some
the
dial
set from 0
out.
will
needle
to
sig
nal
zigzag
on
show
types
by
a
of fabric
to
wi
Bobbin thread
stitch,
the
s.lighly
of
*
The
is
,.-
------
The
appears on
underside
fabric
9
II
top
side
on
fabrics
needle
too
loose.
need le thre
the
of
the
and
the
bobbin
of
fabric
the
bottom
threads
thread
-...
ad
threads
and
the
side
are
.
bein~
20
Page 23

Seam
Guide
Line
When
Sewing
Heavy
Fabrlas
Edge
of
Normal
position
up
The seam guides
seam
width
Number
Distance
(em)
The
number ind
needle position and
o The Presser
foot.
You can raise it
up
positi
to help
foot
.
on
.
15 20
1.5 2.0 1.3 1.6
icates
Foot
on
for easy removal
you
place heavy fabrics
the
need
le plate help
4/8 5/8
the
distance between
the line
about
.
Lever raises and lower
1 /4" higher than
of
the
under
you
6/8
1.9
the
the
the
presser
the presser
measure
middle
presser
normal
foot
or
P....ure
Pressu
l
ave
To
Fe
Adjusting
~~
re
adjusti
or
....
.
dropped
ng
Drop
.-----
the
.
r l
Raise
ed
dog Is
Lever
!'
~
.
~
' p
•
3 (
Ord
inary
open
face
plate
Feed
Dog
tewlng
lever
The pressure adjusting
regular sewing. Reduce
applique,
embroidery.
Set
)
organdy
lot
a
o
For
o
After
The feed dog
cut
work, drawn
the
pressure
and
of
stretch
button
finished sewing, raise
to
other
fine fabrics. Velours
may also require a "1" setttng .
sewing,
must
always
"1" when sewing chiffon, lace,
should
the
etc
.•
drop
be
up for normal sewing.
be
pressure to
work
the
feed dog.
the
feed dog .
set
at
"3" for
"2"
for
, basting and
and
knits with
.
.....
Dr
op
lever
fe
ed
21
Page 24

To
Snap
Foot
Holder
the
Presser
Pr
lever
'
~
•
Foot
On
and
Off
G)
Press
the
red
button
will
drop
off
.
esser
foot
N~Io
on the back of the
foot
holde r. The presse
rfet.
Pr
®
To
<
esse
r
f'
Remove
To
Remove >
~
~
Gr~
~
Thumb
P
resser
foot
lever
---
Foot
holdo•
:
in
and
Attach
the Foot Holder
® Place
Remove
screwdriver.
of
the
place.
the
the
presser
foot
holder. Lower
thumb
foot
screw
so the pin
the
by
turning
on
the
presser
the
screw
foot lies just
foot
lever
to
counter
·clockwise wi
under
the gro
lock the foo t
th
a.
til
< To Attach >
Attach:
To
1. Match
presser bar.
2.
Fit
the
Tighten
3.
the
hole
thumb
the
screw
22
In
the
foot
screw
into
the hole .
by
turning it clockwise.
holder with
the
threaded hole in
ti'
Page 25

Changing
<(
To Remove >
Needles
Loosen
the
needle
clamp
screw by turning it
counter
·clockwise.
~
Turn
To
Attach >
Pin
off
the
power
switch.
Remove
Insert
the
needle from
the
new needle
the
into
clamp.
the
needle
clamp
you.
When inserting
tighten
the
* Bent
the
needle
clamp screw firmly.
or
blunt
needle
into
th e clamp, push it
may
cause skipped stitch
• Always purchase a good quality needle.
with
the
flat side away from
up
as
far as it wil l go
or
breaking
thread
and
.
Proper
Needle,
LIGHT
WEIGHT
MEDIUM
WEIGHT
HEAVY
WEIG
Thr
HT
Your
ead
Needle
and
and
Thread
Fabric Chart
FABRICS
Crepe de Chine, Voile,
Lawn, Organdy, Georgette,
Linens, Cotton, Pique,
Sergo, Double Knits, Percale
Denim, Tweed, Gabardine,
Coating, Drapery and Upholstery Fabric
Tricot
Fine Silk
Fine
Cotton
Fine Synthetic
Fine
Cotton
50 Silk
50
to
80
50
to
60
Cotton
Covered Polyester
50 Silk
40
to
50
40
to
50
Cotto
n Covered Polyester
NOTE:
• In general, fine threads
sewi
ng
heavy fabrics. Always
and
needles
test
are
used
thread
for
and
needle size
sewing
thin
fabrics,
on
a small piece
and thicker
sewing.
~
Use
the
same
thread
for needle and
bobb
in.
• When sewing stretch, very fine fabrics and synthetics, use a blue ti
effectively prevents skipped stitches.
THREADS
Covered Polyester
Cotton
synthetic
Cotton
Synthetic
threads and
of
fabric whi
pped
needle. The blue ti
needles are used
ch will
be used for actual
NEEDLE
S
IZE
9
or
11
1 1
or
14
14
or
16
pped
for
needle
23
Page 26

Zigzag
Select
14
Stitching
pattern
NV\
[I]
FOOT
A
A: Zigzag
Zigzag sewing
•
Adjusting
W3.5
J
r,
I '
: "\.
I
I
I
I
I
I
'+
foo
t
Stitch
Width Manually
W5.0
'
---
'
lG?~~
'
t
--_,
Simple zigzag
W7
.0
' • I
' '
,'
:
,
'
'
'I'
stitching
o
By
can
Default
and
To increase , press
The
width
is
pressing
be
adjusted.
setting
7.
number
will
widely used
the
~~
is
"5.0"
the
on
the
become
wider.
for
overcasting, appliqueing, etc
button,
and
can
10
"""'.
~
screen will
be
adjusted
button
get
the
.
bigger
stitch
wid th
betwee
n 0
and stitch
I
Default
I
•
Stit
ch wid
th
·I
To
decrease, press
The
number
become
will
Hold
down
setting you desire.
24
the
on
screen will
narrower.
the
8
lp;
or
"""'.
get
G
01
smaller
key
until
button
and
you
.
stitch
reach the
wid th
Page 27

Overcasting
Zigzag Overcast
[
t4
NV\
FO
OT
A
C: Overedge
Overlock
Stitch
jJO
Thread tension
M: Special overcast
foot
FOO
T U
3-7
~
loo
Black prong
t
Place
the
edge
of
the
fabric next
to
the
black
prong
of
foot
C.
Us
ing
foot
M, guide
The wire farthest
support
• Reduce
•
•
for
threads
Stretch
manually.
The STi
interlock
tch width
the
stitches
the
needle
fabrics may require
25
the
black
to
the
interlocking
thread
at
the
cannot
prong
next
right will lie
off
tension
fabric edge.
you
be
adjusted
to
the
fabric edge.
off
the
fabric edge providing
the
edge.
on
light-weight fabrics until
to
adjust
the
stitch
.
the
length
Page 28

•
1----
Overcas
Sewing
rn
Multiple
zigz
·
Knit stit.ch
ting
Variations
ag
11
~ ~
Slitch
Pan
em
15
_
,..
< _
-~
--
-c
_
_
...
__
>
·-
20
~~
14
Foot
~
Zigzag
~
Z
igz.ag
(A)
(AI
This stitch
and
Tho stitch
fabric.
This
swimwear
amount
A pressure
will retain shape as
This
fastest way
edge.
is
other
fabrics
Is
stitch
is recommended
and
of
elasticitY
of
stitch
can
used
excellent for darning
stretch velour as
''1"
be
to
ffnlsh and leaves
USES
to
finish seam allowance
that
tend
to
pucl<er,
for
sewing such fabrics as
11
and
strength.
is recommended
you
are sewing.
used
on
provides
most woven fabrics. It's the
you
end
mending tears
so
that
w1th a
on
synthetics
the
greatest
the
knit
nea~
.
In
flat
II
Zigzag stitch
overed
-
1
Overcast
I
Double overedge
uitc
h
1
Overlock
ge
~
16
~
29
~
30
~
Special overcast
I
~
Overedge (C)
~
Overedge (C)
~
Overedge (C)
~
(M)
This stitch can
overcast seams in
Use this stitch
flat.
Test the
Th1s
stitch
fray tXlOns
Two rows
ovor the edge
Th
is
stitch finishes the edges
commercial overlocking machine fo r a professional look.
sthch
is
ivel
of
be
used
to
simultaneously stitch
one
step.
when
you
do
not
need
on
the
actual fabric for the best results.
an
excellem
y such
z
i~g
to Insure
stitch
linens
your
for fabrics
and
seams will
of
your
gabardines.
seams similar
as
stitches are simulitaneously sewn
that
and
tO
press seams open
that
tend
not
revel.
to
to
a
J
26
Page 29

Buttonhole
• Buttonhole Variations (Choosing the suitable
Liquid
Pattern
BH1
( D
crystal display
SENSOR
8111-P
I
D
BH2
(D
I D
AUTO
Sll2
BHI-R
FOOT
R
I,
I
I
BH3
[
c()
BH3
FOO
T R
I
n
-
23
ns:
24
LJ::::l
--
EH4
FOOT
R
I
buttonhole from B
Uses
Thin, small
(shirt, blouses)
Thin
(blouses. shirt)
Thick, large
(suit, overcoat)
Stretch fabr
(jersey)
it)
(kn
butto
button
ics
H1
n
to
BH5)
• To select auto buttonhole.
press
~
.:IJ
button
twice.
II
B5H
I CJ
• Sensor Buttonhole (BH1)
Select
buttonhole
( c:J
SENSOR
R: Automatic buttonhole foot
BH5
[t)
BHI-R
FOOT
h
I
I
I
~
The
automatic buttonhole
hole length.
*
The
maximum diameter
' Before you
practice buttonholes.
sew a butto
foot
will automatically
of
button
nhole on the actual garment. make severa
which will
fit
In
gauge
this
the button-
foot
Is
2.5 em.
l
27
Page 30

Sewing
CD®
~
~
j
+••
CD
~
--
:J----
flo: ...
:.-=
-:JJL--_ _.. .....
Button
holder
-
L
_]
®
Press
the
Up / Down needle position
needle_ Raise
Attach
the
automatic
the
presser
buttonhole
foot
lever.
foot
button
R.
to
raise
ti'
Liquid crystal display
__J
........:=---=
I....-:[
STEP
--=-'---
::::J=-_S_TE_P _2 _
r-:[
Cl=--S-TE_P_3-
®
Buttonho
I
)-----
__J
le lever
__,I------
----,J-------[[
-t
: l
Touch
fl
l
L.
./
D t
e"-'"'
starting
point
® Pull
the
Remove
the
left_
@ Insert
needle
buttonhole
* There
holder
® Depress
itself.
* The
NOTE:
If
the
EXAMPLE:
If
(3/16")
buttonhole will
bartack
bartack
The
machine will
Before
make
several practice
the
thickness
thickness
the
button
in
buttonhole
the
fabric
the
garment
at
the
starting
foot.
should
of
the
foot
Button
the
foot
and
left
.
you
sew
of
and
is
thickness,
lever
to
under
be
no
gap between
as
shown
holder
control
be
row
first,
stop
buttonholes
buttonholes.
button
diameter
2 em (3/
set
downward
the
left
to
draw
the
foot,
point
. Then lower
the
below.
There should
be
no
gap
until
the
automatically
then
the right
automatically.
on
the
is
more
than 4 mm
then
set
the
4")
in
diameter
the
measure
as
far
as
both
and
the
slider and spr
Spri
holder
machine
sewn:
row
actual garmen
(3/16"}, a
button
and
at
2.5
em
it
will g
threads
lower the
automa
ng
stops
the
fro
and
back
holder.
0.5
(31
/32
o.
to
n.-
ini
b'l
m
t.
da
em
"1
28
Page 31

®
L
iquid
RAISE
PRESS
crystal
'
:
...
BHI
dlsplev
FOOT
KEY
® To sew
beg
depress the
When bu nonhole sewing
hole lever upward as far as
<2)
Remove the fabric and place a pin just before the
bartack
bartack
Cut
When sewing
After
"Step
To make the
fabnc
another
1n
mng of the
at
s.
the
opening with
sewmg BH4
1
".
and
step
foot
each
BH4
next
buttonhole
buttonhole
control
end
to prevent accidentally cutting
the
or
BH5
or
buttonhole, simply repositi
on
the
foot
or
press
is
finished , push the
it
will go.
seam ripper.
BH5, the screen will show
contro
l.
to
the
start
key
from the
BH
1, then
button-
on
the
Seam ripper
• To
Alt
er
the
Stitch Width
<
ForBH1
Uqo~
By
pressing the
buttonhole indicator shows 5.0.
To alter
The width can
When
the
width press 8
the
pattern
be
> I c::::::2
'"'"•'
"'"''"/
/
Narrow
2.5
fl
Width
l1
~-=$
or
altered between 2.5 and 7.0.
23
nrr
or
,.
oer
To reinforce the
10
WS.O
,.;..
@I
depress
hole
foot
foot.
• To Alter
l
1
~
Wide
7
.0
n
Width
u
button
G)
is
the
width
selected, density can be altered between 0.5
of
By
indicator shows
To alter the density press 8
The density can be altered between
Dense
pressing the
buttonhole
control aga in
the
Stitch Density
o.~
1
0.2
Stitch
length
~
0.4.
and
1 .0.
or
make
wirhout
Coarse
button,
or
G).
1t
denser simply
raising the button-
0.8
Stitch
length
the stitch length
0.2
and
0.8.
29
Page 32

• Rounded and
Select
buuonholt
[----
D_ B
_H_2
R:
Autom
atic
Keyhole Buttonholes
m
_FO_O
buttonhole
or
m
T_R___JJ[
foot.
c:)
BH3 F
OOT
R
Sewing
Adjust
(D
[
I:()
the
Stitch
W4
.0
I
~
W7.
I
n
The buttonho
sewn as
sh
own be low.
t :i
1f !
-
Width
and
L0.4
)It
0L0.4)
~
le will
' -
; :
[
'
•
\.
Density
be
auto
matically
-+
Starting
point
.....
St
arting
point
10
Ut
u·
"'-\
---.._..-
.
~
W2
.5
to
10
~
.........._,
8
.5
to
W5
.....
®J
u
W5.5
CNl
~
n
W7
ll
10-
10·--~
.0
Bar·tack
. @J
0
0
0
+
0.2-0.8
I
+
0.2 - 0.8
~
To
sew, follow
for
pattern
Adjust
to
the
(
See
0.2 . . . . Fi
0.4 ....
0.8
. .
the
same procedure a
BH
1.
the
stitch
density
material
page 23)
..
and
thread.
ne
density
(for lawn
Standard
(for gabardine, denim an d
other
material
Coarse seam
(for
knits)
and
georgette )
density
thick or hea
s)
thick
wool
accord
ir~
V'!I
and
jer
s',
30
Page 33

Automatic
Select
buttonho
le
Buttonhole
~~
D Press
LlJ
bunon
(BH 1)
twice
• To
•
If
of
alter
the
stitch
width
and
density, refer
there
is a difference m stitch dens.ry between
the
buttonhole,
refer
to
page 52.
to
page
29.
the
right and
leh
rows
D
R:
Sewing
Needle
AUTO
Automatic
thread
BHI-R
bononhole
I
Bobbin thread
foot
ID®®
Liquid
crystal
(To
be
_
®I
~~~~-----J.
display
disp'ayed when sewmgl
STEP
I
,
®
~
STEP
®l
c
'-=
=--=---=--.::.____J)
2
(i)
~
-----~,
SlEP
®(
D
COUPL:EO
BH
SIZE
' 3 seconds •ater
t'
I D
3
3 seconds
SA~~
Ia
ter
UELIORY
S!ZE
J
<D
Pull
the
button
Stanlng
point
______
m--m !
________
Displayed
l~isplayed
t
c
':~~Ed
:
~
~
n'
Same
1eng1h
n
Banucicmg
when complarel
when
memorized!
® Insert fabric
Remove
the left.
@ Insert the
needle
buttonhole
@ Sow desired length
stop
® Press
Depress
maucally bartack
buttonhole.
®
Stop
stitches
s1de.
(i) Press
Keep
bartack,
make
To
down
The
f1rst
To
depress
hole
the
at
the
"MEM"
the
the machane when
to
"MEM"
the
root
knot
the
the
next
on
the
foot
mach
me
will
each
ume
retnforce
foot
foot
holder
to
the
far back.
under
the
foot.
fabric to
garment
starting point. Then lower
foot.
button.
foot
opposite
button.
control
stitches
control.
sew
you
the
control
the
under
of
left
control.
and
sew
the
depressed. The machine will
and
buttonhole,
another
step
down
buttonhole
again
left
to
draw
the foot, and lower
s1de
of
The
up
the
you
are just over 2
first
stitch
stop
sewing
posit1on
buttonhole
on
the
or
make
withuut
both
thread
the
automatic
the
buttonhole
machme
nght
the
foot control.
raising
will auto-
side
on
the
left
by
itself.
fabric
Identical
it
denser s1mply,
the
of
or
hand
and
to
button-
to
the
and
the
3
step
the
31
Page 34

• Corded
Threading
Buttonholes
the
cord
.
Cord spur
Step 1 Stop 2 Step 3
Step
Pull
..
For
sewing, use
4
ITJ
*
Set
the
the
cord
Is
stitch
used.
the
selected.
width
same
procedure
In
accordance
as
with
when
the
the
pattern
thickness
of
<D
Select
panern
® With
®
@)
Bnng
Hook
the
the
the
@ Lower
® Depress
Each
side
(l) Remove
® Pull the
®
Thread
bunonhole
ends
filler
the
needle
the
foot
of
the
the
fabr
left
end
the
end
BH
1.
foot
raised,
toward
you
under
cord
into
the
forks
Into
the
garment
control
buttonhole
ic
of
through a darning
from
the
gently
the
filler
and
machine
cord
hook
the
on
and
the
to
needle,
the
bunonhole
the
front
where
the
sew
the
bartacks
and
cut
tighten
draw
filler
cord
foot
of
the R foot
buttonhole
buttonhole.
will be
the
sewing
it.
to
the
on
the
until
sewn
wrong
cord
they
to
will
ovor the
threads
side
clear
hold
start
.
spur
and
cord.
of
at
the
them
the
the
front
t1ght
lower
fabnc
back
end.
the
and
of
foot
cut
the
bunonhole
.
.
foot.
32
Page 35

S.lec:t
plnem
14
~
..
,~~'
NV\
m
FOOT
[
A
.P
l
•
Set
the
the
s:titch width in accordance with the position
bunon.
of
the holes
on
F: Satin
stitch
foot
1. Match the
presser foot.
2. Lower the
3.
Turn
just above
4. Press the
will
5. Turn
hole
necessary.
6.
Stitch several times.
7. After you finish sewing,
to
15
button
toot
the hand wheel by hand until the need le
the
smch
enter
the
the
hand wheel so
of
the
em
of
to
button.
left hole
button.
thread
holes
hold
width
at
of
the
to
the horizontal
the
button
1n
button
Readjust the
the
the
needle
cut
button.
(+or
button.
w1ll
the
thread
place.
-)
so
enter
stitch
but
slot
on
point
the
needle
the
right
width if
leave
the
is
10
Needle
\
~
~
Bobbin thread
thread
s
Y===
~
~
::.
Fabric
8. Draw the
knot
33
thread
the threads.
to
the reverse side
of
the fabric
and
Page 36

Blind Stitch Hemming
Sele
ct
panern
17
G: Blind stitch
hem
foot
To hold the edge
Heavy-Weight
(1
I
;wrong
Overcast
Sewing
17
)
FOOT
Fabnc
0.8-1
G
2cm
/j_
~
sid~01
fubric
/'
!
I
....
.
.:--,
Basting
• Use
On light-weight
On heavy·wei
Fold up t
the
pattern
fabrics.
ght
he
desired
fabric as illustrated.
121
I
17
for woven fabrics
3
fabrics
fabrics
amount
0.4-0.7
the
raw
edge
that
ravel,
and pin in place.
em
the
II
Wrong
side
of
fabric
Posi
tion
the fabr ic in such a way
comes
to
the
lett
side
L
ower
the
presser
foot.
Adjust the position
LENGTH key so
edge of the fabric when
side.
Sew
guiding
the
that
folded
and
pattern
can
be
turned
under
and
raw
edge should be overcast first.
Then
fold the hem und
Light•Walght
0.3
Wrong
sidaof
fabric
I
rhat
of
guide.
of
needle swing with
the
needle
the
edge along
just
pierces
needle comes
the
guide.
21
J
pressed.
Fabric
- 0\6 em
l-J
the
folded edge
the
over
tor
stretch
WIDTH/
the
folded
to
the
er
left
Variable Needle Position
Liqu id crysta
displ
ay
\,__
l-f
l
When the needle
comes
to th
e
___
• '
left.
_______,;
'0.6"
on
indicates
guide
and the needle point.
the
the
w 0.6
?
~
.c::::!
liquid
distance betwePn
When
comes to the rig
crystal display
the
the
needle
ht.
By
pre
ssing
the
!8
M/1.
0J
button, the
indicator
o How to
shows
adjust
0.6
as
default
setting.
1e~e1
~:~~~
moved
the right.
34
e
l
to
hemming
T
he
needle position l
moved to the left.
ij
width
r.
Page 37

Rolled
Hem
Select
p.nern
!10
-8
0 : Hemmer foot
m
FOOl
A
CD
Make a double 0.25
length.
(Y
Lower
the
needle rnto the fabric
begm, then lower the hemmer
Sew 3 or
4 stitches while holding the needle and bobbrn threads.
em
(1/8"1
foot.
fold
approxrmately 8
at
the pornt where sewing
em
(3")
is
in
to
@ Lower the needle
the folded
@ Lower
fabric
@
Trim
bulk
0.7 em !114"1
0 7
em
port
ion
the
hemmer foo t, then
to
keep
it
about
0.7
11/4")
35
into
the fabric and
of
the fabrrc
feeding smoothly and evenly.
ern
(1/4")
from
into
sew
lift
the curl
by
comers
the hemmer
lifting
as
of
the hemmer
up
the
tllustrated,
foot.
edge
to
Insert
foot.
of
reduce
the
Page 38

Select
pllttern
28 F
la
I
OOT
P
0 -
25
~
Drop feed lever
P:
Embroidery
PresstJre adjusting laver
foot
Foot control
(0]
r==:Jl
~
G) Draw both needle
® Depress
The machine
cally. Release
the
foot
will
the
® Hold the fabric
next sti
tch
. Depress
@
Continue m th
forward.
• When basting
replace
lever,
is manner sliding
is
foot
and
bobb
in threads
control.
take
one
stitch and
foot
control.
taut
and
slide It
the
foot
control.
completed, reset
holder,
and
raise
to
the back.
stop
to
where you want
the
fabrics sideways
the
pressure adjust "
the
feed dog .
autom
or
tr
36
Page 39

Seloct
panam
Z7
IIllO
F: Satin stitch
foot
27
i
FOOT
F
Rever10
button
~
Starting t
position--
Ending position
Starting position
!
/
I
Ending
I
L:J:
position
required
o De nsity
and
Stitch
Stitch
o When
sew
reverse
< Memory Bartacking >
o Press f!')
and
width
Stitch length
length
width
you
the
desired length
button. The
buttons
10 -01
10
Mil
make less than 1 .5 em
button,
can
~
same
length
of
bartack in g.
be
varied usi
.
.
01
·
of
fabnc will
and
start
ng
the
of
bar tacking, first
bartacking
move backward
sewing,
you
stitch
and
press
will obtain
width
the
s.
Select pattern
25
F: Satin sti
foot
tch
25
0
FOOT
F
Use underlay
of
tissue p
Press
eyelet
Remove
ripper
37
aper
.
down
and stop
the
or
a pair
the
foot
control.
automatically.
fabric
and
of poi
nted
The machine will sew
cut
the
small eye with
scissors.
the
an
seam
Page 40

Quick-Darn
Select pattern
26
§
R:
Automatic
B
utton
26
I
••
FOOT
buttonhole
holder
R
foot
llllllll
:,
..
1111
ll•ltiJIII
(
lll.tlillllllll
2
c\m
Ql'l
f
tiul!1.1
ilii
II!
'-./
0.7 em
size
of
The
cycle
However, the maxim
sti
tch
and the
width
one darn
is
variable.
length is 2 em
maximum
is
0.7
em
1~
1 I
um
(3/
stitch
(9/32")
(!)
Pull
@ Insert a fabric
Remove t he fabr ic
left.
@ I
nsert
Press
stitch,
matically .
To
sew
4")
the
the
down
button
garment
sew
from
16
holder
under
the
rows
the
to
under
foot
of
start.
the
the
to
the
far back.
foot.
left
to
draw
the
foot,
control.
darning, lock
select
pattern
both
threads
and
lower
The machine will lo
stitch
and
26
the
foot.
stop
to th£
aut
r.
ci
o
Re
verse but1on
(
~~\
ion
§ •
or
d2
IUUIH
1
Jll
l
11111111.
l1lJ
lu
mn~
1
11111111
)
When t he
is
lower
to
When
side
1
l
I required
l
Starting
(Left
need
the left
is
lower
Se
give
--r-
length
_L
po
int
le posit
26
lect d l
an even stitch.
d3
right side
Sele
ct
an
even
d4
or
stitch.
1•11111
•
r~
:
,.
:
..
......
..
·-·
~..
..:
d5
t o
give
@ F
or
darning in a l
machine
the
stops
Rea
reverse
aut
rran
ge
afte
r sewing
button
omatically.
the
fabric
@.
It
is
simp
le
to
make
one.
Press
the
memory
first darning, and depress
second
image
result
To
Adju
there
If
(l
eft
adjustment
Upon pressing
"d3" will
Press ~ -
darn
button instead
but
the
st
the Eve
is a differe n
side)
and
by
appear
~
ing is
automatically
darn
nness of
the
end
pressing
the
~
on
the
button, and
ength of
and
a darning
button
is
sewn in reverse.
ce
the
screen.
less
to
a required length
continue
and repeat
when
the
of
memory
Darning
in
height between
point
(right side)
8
or G button.
- -
~
]
adjust
than
2 em , first
sewing
the
procedures in
of
t he same size as
you
have
foot control.
made
. Pressing
button
button
the
between d 1
sto
p
and
then pres.
until
the
mach
G)
the
completed
Then th4
the
mirro
will g
ive
the
sam-
the
starting poin-
of darning, ma
defau lt settin
and
d5.
1P
in-
t
firs
th
ke
!.
38
Page 41

Zipper Sewing
Select
pattern
!10
--8 FOOl A
E:
Ztppe
r f
oot
~
<!
v ' '
T
op
side
ol
labt
lc:
rm
/ End a· ooenmg
'"
Top
edge of Iabrie
Prepare your fabrrc.
1.
Put
the
top
s1des
of
end
of
the Zt
ppe
r open ing.
lock the stttches.
2. Set the sti tch length
openning.
the fabric together
Use
the reverse
at "4.5"
and
and
sew
to
the
button
sew the zipper
to
To Snap
On
the
Zipper
Foot
:
To
sew right stde
To
t\
sew
l
eft
side
o Fit the
holder.
• To sew the
on
ptn
the left hand side.
on
the z1pper
nght
s1de
foot
of
the zipper,
into
the
groove
anach
on
the
the ztpper
foot
foot
39
Page 42

To
Sew:
CD
Fold back the left seam allowance. Turn
seam
allowance
Place the zipper
and
pan
m place .
to
teeth
form a
next
0.2
to
to
0.3
0.2
em
to
under
(1
/8"1 fold.
0.3
em
the
r
( 1/8"1 <
® Attach
@ Lower the zipper
the
the
zipper so that
zipper tape.
zipper
foot
foot
@ Sew through the fold
Stop just before
zipper tape.
the
Lower
Raise the zipper
foot
and
stitch the remainder
the
needle slightly
foot
with the pin
on
the
the
needle pierces
and
z1pper tape.
zipper
mto
and open the zipper. Lower
on
the
top
side
foot
reaches the slider
the fabric.
of
the
seam.
right hand
at
the
the
fold and
siO<
bottom
on
t~"
tr
®
® Close
side facmg up.
40
the
zipper
and
spread the fabric flat with
the
rigt-
Page 43

@<i)
@ Move
(j)
Guide
stitch
@
Stop
Lower
remove
the
zipper
the
edge
through
about 5 em
the
the
needle slightly
the
basting
foot
to
of
th e
garment
(2") from
stitches
the left
foot
and
the
into
and
pin.
along
the
zipper tape.
top
of
the
the
fabric, rasie
open the
zipper teeth and
zipper.
the
foot.
zipper.
®
®
® Then lower
making
sure
the
the
foot
fold
and
is
stitch
even.
the
remainder
of
the
seam
41
Page 44

Cording
Triple Cording
Select
pattern
48
H:
Cording
foot
48
~
FO
OT H
Single Cording
For single
Select
14
H:
Stitch widt
cor
din
pattern
f\M
Cording foot
h 3
.0
g
m
FOOT
G)
® The slots
o
o Fine wool, embroidery thre
A
Slide
the
sewing threads
strands
(2")
place while
Insert cording in
cording.
used
of
cording i
extending
on
foot
the
for
cord .
nto
the
behind
the
H will hold
stitches form over
the
center
to
the
slots
foot.
groove
ad
left and insert t
of
foot
the
lengths
the
cording.
of
~oot
or
lace thread can t:
hr
H with 5 e
of
cording
H for sing
Wide
Select
33
F: Satin stit
foot
COrding
pattern
ch
33
S
FOOT
F
Pass a cord, string
groove
of
presser
the
cord end before starting.
or
foot
42
blade
of
0.5
to
0.6
em (1/
4")
wide
into
, and sew along drawn lines. It is advisable
bott
o~
to
s
~
Page 45

Applique
Select
3 1
F: Satin stit
P
ressu
Cut
Work
pattern
ch foot
re a
dj
usting lover: 2
31
~
FOOT
F
Tape
the
F
next
applique
to
the
in place
finished edge
• When sewing curves
down
and move
*
Aft
button
er
finished sewing,
to bring
the material.
and
sew
, guiding
of
the
applique
or
changing directions, press
the
needle
set
the
pressure adjusting lever
.
to
its lowest position,
the
slot
on
foot
the up/
to
3.
Select p
31
F: Satin
Pressure
31
attern
~
F
OOT
F
stitch
foot
adjusting lever: 2
I
' I
I
I I
\..
______
_
___
____
Choose a
of
Place a piece
simp
the fabric.
le design and
of tulle or
trace
organdy
the
under
outline
the
on
the
design
right side
and
pin In
place.
Use a di
Baste t:he layers
Remove pins.
Stitch
satin
Remove basting
embroidery
4
_ J
fferent col
or
together
around
stitch
the
design in
.
and
scissors.
After finish sewing,
to
accent
cut
set
you
work
.
stitch
ing
just
inside
31
pattern
the
fabric close
the
pressure adjusting lever
~
to
the
outline
or
use a
the
stitching with
.
narrow
to
3.
43
Page 46

Patchwork
Select
!
32
A:
Zig.zag
pattern
foot
Right side
of
32
~
FOOT
or
fabric
A
F: Satin stitch
foot
Right side
of fabric
Sew seam
on
right side
and
press seam allowance open. Sew
of
garment centering stitches over the seam line.
pattern
stitch
Fagoting
Select
pattern
I 60
A: Zigzag
60
~
FOOT
foot
· foot
or
F:
A )
Satin
Right side
of
stitch
fabric
Paper
An
open worked sti
adding design interest
in
the
Fold
Pin
needle and
under
the
two
1.5
em
edges
bobbin give
(5/8")
to
Sew slowly guiding t
folded edge
on
each side.
tch
used
to
join
two
to
plain garments. Topstitching
s a hand-worked appearance.
on
each fabric edge
paper
0.3
em
(1/8")
apart.
he
fabric
so
the needle catches
pieces
and
of
press.
fabric
thread
the
44
Page 47

Scallop
Hems
Select
34
A:
Zigzag
pattern
foot
34
)
FOOT
A
Variations
Stitch
Wi
dth
Automat
Fold hem wi
ic
7.0
7.0 1.0
2.6
th right
Sew scallops 1
close
seams
the
to
as
hem
Tr im
Clip
Turn
of
stitch width, length using manual stitch
width key
Stitch
Length
Setting
2.5
and
~
stitch
Seam
length key
Variations
rv-v-v-v-
1.0
em
stitching leaving 0.3 em
shown
to
rig
~
sides togehte
(3/8")
from folded edge.
or
trim with pinking shears.
ht
side and press.
r.
(1/8")
seam allowance.
Edging
Select
A: Zigzag
35
plltUm
foot
35
J
FOOT
A )
(3/8")
Sew edging 1 em
from edge.
After stitching, trim fabr ic
to
cut
the
thread.
close
to stitching taking care
not
45
Page 48

Smocking
Select
pattern ~
58
A: Zigzag
sa
FOOT
foot
or F: Satin stitch
A
foot
The following
patterns
(j) With
® Pull
can be used.
the
manual stitch length
1
em
(3/8")
apart
needle thread tension
threads along
the
Secure
one
bobbin threads and distribute the gathers evenly.
the
threads
@ Reduce the tens
pattern
Pu
II
out
stitches
the
gathering
at
'4.5' sew strai
, acro
ss
the
area
to
be smocked. A looser
will m
ake
gathering easier.
edge.
at
the
other
end.
ion
and
pressure if necessary and sew
between the straight seams.
stitches.
ght
lines
Knot the
Shell Stitch
Select patte
rn
17
F: Satin stit
FOOT
ch
foot
------
17
3
G
-------..J
Thread
tension
4~9
~
'
; Woven Fabrics
'
p,.,,
Iii
b"ttoo
Pattern j can be also used.
Here's How
(j) Fold
set
-
-you
-allow
when
®
If
apart.
@ You can
any direction.
21
and
stitch
the
stitch
may
need
the
needle
it zigzags.
you sew rows
sew
to ohonge neodlo po,;t;on fo• •holltuok.
on
the
width
and
to tight
to
just clear
of
shell stitches, space t
she
ll
stitches
bias.
length as
en
the top thread slightly.
on
you
the
folded edge
knits
or
desire.
soft
of
the
he
rows 1.5 err
silky wovens
fabric
After
46
sewing,
set
the
thread
tensi
on
to
"AUTO".
Page 49

Saddle
Select
Stitch
pattern
19
~
19 F
A:
Zigzag foo t
Shading
Select
pattern
[.__
9_1
___
OOT
Stitches
F o_o
A
or
_r
_F__,J ( 92
92
l
F
OOT
Here's How
Sew
1.
2.
Taturn
a.
b. Raise
c. Lower
F
as
you would
corners:
Lower the needle
the
the
for
presser
presser
topst
itching.
into
the
fabric
foot
and
turn
the fabric.
foo
t and continue to sew.
on the
fourth st
itch.
F:
Press
Satin
stit
ch foot
ure
Adjusting lever 2 or 1
or
P: Embroidery
foot
Use
the
automatic
length and width t o achieve t
Reduce the
You may need
pressute
to
senings
to
pivot
facili
on
48
or
manually adjust
he
desir~d
tate
sewing curved areas.
sharp curves.
eff
ect
the
stit
ct
.
Page 50

Quilting
Select
pattern
Ito
--6
m
FOOT
A
A: Zigzag
L: Ouilter
Cr
oss Stitch
foot
The quilting guide will help
straight. Loosen
opening
Sew guiding
to
the
quilter screw. Slide the quilter in
the
desired width
the
quilter over the previous
and
to
keep the stitching lines
tighten
the
row
screw.
of
stitching.
the
Select
pattern
71
F: Satin stltch
foot
71
~
FOO
l F
This
button
49
pattern
.
can be reduced in size by pressing the
~
Page 51

Pintucking
Select p
attern
II
---0.
~
FO
OT A
G: Blind
hem
stitch
foot
Decorative Satin Stitch
J6
Select
pattern
)
Folded edge
Patterns
o
CD
Fold
Position
Lower
Sew the folded
® Press
No . 37
the
fabric wi
the
folded edge
the
presser
edge, guiding
the
pin
tucks
to
No . 50 can be used.
th
wrong sides
next
foot
.
to
one
together
to
the
it
along the guide.
side.;
guide .
on
the
foldline.
36
A: Zigzag foot.
F: Satin
stitch
F 0 0 T F
foot
Here's How
1. Adjust
2. Pract ice
3. Mark
4. L
5. Lower the presser
6.
7.
B.
the
stitch width
the
stitch
the
lines for decoration
washable fabric
ower
the
needle
lock
the
stitch
Gently guide
Use
the
end.
auto
the
·lock
50
and length
on a
scrap
marker
.
at
the
starting
foot
.
at
the
beginning {press
fabric along
to
secure
of
the
the
as
fabric.
on
point.
marked
row
you
desired.
the
fabric, using
auto
-lock).
line.
of
stitches
at
-
Page 52

Twin
Select
A: Zigzag
Tw1n
Needle
pattern
foot
needle
Stitching
69
'
tf
F 0
01
A
Twin needle
bun
on
The
following
31
32
34
J!i
patterns
ot
64 65
j~))~~
• When
• Insert
unplug
the
felt
spool
you
change
the
machine.
the
spool
and
spool
as shown.
can
be
used
~
the
needle, first
stand
and
an
add
it ional spool pi
on
it wi
th
the
When
thread
ing
follow
this
chart
placing
At
Partially raise the presser
fabric.
Threading
thread
one
in each thread guide
corners, raise the needles til l they clear
from
. Refer
to
tum
off
the
switch
or
n,
and
put
thread
com
ing
off
the
the
machine for twin needle sewing
mak ing
G)
sure
you
separate
on
foot
and
to
® is the same as
the
needle bar .
caref
ully pivot
the
page 13.
threads,
the
for
fabric.
the
single
@)
Draw
the
@
lowe r
Slide
thread
threads
thread
one
guide
guide.
of
on
the
down
th r
the
and
eads
left, and
right.
® Thread the needle fr
• When twin needle sewi
needle
and
res
et
om
tension
fron t
ng
.
To return to single needle sewi
Needle
button
or
NOTE: To avoid
to
thread
turn
off
the
the
threads twisting, it
the
machine
power
sli
de
through
the
to back.
is
completed
ng
switch.
one
by
them through
the
needle
other
one
on
, change
, press
one
the
is
advisable
.
the
bar
the
Twin
51
Page 53

Adjusting
Patterns
To
Adjust the Automatic Buttonhole Stitch
Balance
on
Stitches
be the same stitch density.
follows:
each side
If
the stitches
hand
tum
the
towards
of
the
on
side are
too
far apart,
feed balancing d ial
the
"+" sign.
buttonhole
If
not, adjust as
l e left
Setting
should -
mark
Feed balanci
dial
If decorative stitch patterns, letters /numbers
manual buttonholes are uneven when
particular fabric, adjust
dial.
ng
" After sewing with an altered dial setting,
reset the dial
to
If
the
hand side are
tum
towards
them
with
"
t>
"
stitches
the
on
too
far apart,
feed balancing dial
the"-"
sign.
~
you
the
feed balancing
e
right
sew
you
fY
on
must
a
To Adjust
If patterns are uneven when sewing with a
particular fabric, adjust them
feed balancing dial.
To Adjust Distorted L
If
letters
a particular fabric, select pattern 8
stitch
Di
storted Patte
When patterns are
sed.
Correct by turning
in
the
direction
or
numbers are uneven when sewn
then
tum
the
the
When
intersect,
rns
compres-
the
of"+".
etters
or Numbers
feed balancing dial.
letters
or
wm
the dial
by
turning
dial
to
numbers
to
test
the
on
the
When patterns are drawn
Correct
the
by turning
direction
When the letters
are drawn
dial
to"-"
of
out, turn
.
the
"- " .
or
numbers
out.
dial in
the
52
Page 54

Programming Decorative
• One Cycle Stitching
Stitch
Patterns
To program
pattern
selection
stitch
buttons
pattern
in
combinat
the
order
ions, press the
shown.
Step
G)
®
tj\
\:V
@)
®
®
You m
The patterns are showing in page
®
8
7 5
c=::J
8
®
I
c=:::J
-----[
--
-
--
-----
-----
8
ay
press Auto·lock before & after the
--
59
--
.
-(
Liquid crystal
display
8
0
0
75
75
0
OJrsor. (memorized
0
75
75
0
pattern
to lock
00
0
0
~
flesh
I
the
decorative stitches.
panern
76
and flash for
I
Auto-Lock.
Auto· lock.
next
selection)
~
Patt
• Combining
Step
CD
66
®
8
®
8
@)
®
• The memorized patterns will be sewn repeatedly.
4 1
(==:J
8
erns
c=:::J
-----
-----
-----
---
-----
- -
93
9 3
93 93
93
93
Liqu id
display
00
93
93
crystal
FOOT F
~
flash
DO-
4 1
....
4 l. 0 0
flash
flash
....
J
flash )
53
Page 55

Cycle S1itching
•
by
Pressing Mirror Image
Button
Step
0
®
0
®
8
7 5
c=J
@
8
®
8
®
(j)
After selecting p
• When you
Progr
pattern
®
8
stop
ammed
s
(==:J
atterns
sewing in
---
----
-----
----
-----(
-----
--
and
pressing
the
--
the
mid dle
0
-[
-[
0
[
8
- (
8
8
[
0
C::l
- [
"TOM"
of
a p rogrammed
75
75
QO-
7 S
75
75
75
button.
flash
00-
flash
flosh
0 -
7!5
75
0
the
same
number
combination
,---------------
Programmed
pauerns
]
)
)
)
)
)
of
Silwing
Sample
patterns
will be sewn in mi
--------------------
rro
image.
~
To
Start
Sew
Combination:
There may
pattern wit
Sew
button.
The machi
your
hout
as
much as necessary, then press the Mem
ne
pattern
ing
at
the
Beginning of
be
instances when you
sewing
the
whole thing.
will
now
start
sewing
combination
.
at
Your
want
the
beginning
Patt
to test
ern
ory
of
To
Start
Have Been Sewing:
a
If
you
the Mirror
press
Remove
L
ower
pattern
The mach i
pattern
and
continue
Sewing
run
out
the
stitching
the needle
.
ne
will
you
were sewing
sewing
at
of
thread in
Image
at
start
the
the
Beginning
Bu
of
the
the
sewing
remaining
non.
- ---- -)..
of
the
middle
last
pattern
end
of
the
at
the
when
you ran
pattern;.
~
/~
~
the
Pattern You
of a patte
only.
last
complet
beginning
out
of
of
thre
rn
ed
thr
ar
54
Page 56

• Memory l ock Alphabet and Numbers
machine
The
{letters, numbers punctuation marks,
Each Jener
s.
thread
• A
JJ
• Memory l
The patterns shown below are automatically locked
Use
them alone as a single design
w1ll
sew
:ne 26 letters
and
The
number
chan
s automatiCally locked
below shows where
3~Jl££
vV.-o
W
"'"X
...
'{
J_
ock
patterns:
of
the
alphabet
etc
.)
can
be
at
to
clip the extra threads. Each pattern starts
J2J-L.L~-f\_L
-e
on
·- 0&
a shirt
0?.
~
or
comb~ne
and
numbers
programmed
the
beginning and
M
L
_..0
..J.
at
the beginning and
them
with letters, numbers and
m block
JYQE
and
scnpt
atyles Up to
end
enabling you to remove the connecting
at
"o
" .
f)R
_2_j_4_5__6J
end
of
the pattern.
other
31
oSvi
-..8
-o9.
craft patterns.
patterns
78
77
~
~
v
79 80
~
0 *
81
55
Page 57

• Combining Letters in_ Block Style
•
Combining Large and Small Letters
<D
~
®
®
0
®
®
0
®
Step
09
f:.
A
0
~
6
8
66
8
6
8
66
!
6-
6-
)---(
R
--[
s
---[ S 0
---[ S M
"-
S M
--
-[
--(
SM
5 M I 0 - flash
---
[
_
__
(
SMI T
(
~f~~
cryml
FOOT F
FOOT
._
flesh
flesh (M - I )
0-
flesh
I
(I
flash
(T
-:.;
-1
"-flash
"-
J
] I
CD~~
F
®
)
I®
@
)
®
) ·®
)
)
0
Step
..
; [
._____;
66---(
8
66---[
8
66---(
8
l
1---( R
-
--(
---(
---
I
~;:,~:
c
rysta
l
J
FOOT
s
5 0 - flash )
SM
"-
flash ( M
S 110
..........___
____
S
t1
I
"-
5 M
10-
(
......__
_ _ _ )
~
flash
flash
(I
flash
FOOT
....
; )
-;
)
F
F
___,
) I
)
I
)®
)
66---(
5 t11 T
"-
flesh ( T
....
)
a )
®
@
8
66---
--
-[ S M I T 0 - flash
'----
(
5
MI
TH
_____
"-
1ITH0-
le
flash ( H
(/)
--
..._ _
-[ 5 t
I
sewing
Samp
$:
--
-i
:r:
---~]
....
; )
flash )
.®
___,)
•@
@ 6
8
a--[..__
8
--
-(
5
s
_t1_I_T
---
[ SMITH
[ Sewing J
Sample
t1
I T 0 - flash )
_H _ _ _ _
-t..
flesh ( H
0-
flash
.....
:;
)
(/)
~
--.
...,
l
~
56
Page 58

• Combining
Lett
S t
8P
ers
and
Sp~
(P._ SMITH)
l
iqu
id crystal
display
2
3
®
®
®
®
4 0
c::::J
c:::::J
2 8
c:::::::J
c:::J
1 9
c:::::J c:::::J
1 7
c:::::::J c:::::::J - - - M
e
e
e
e
e
EM
8
F001
P 0
...
flash
l P . 0
L£0:
...
flash
P •
c;
0
+-
flash
P •
[j
5 0
+-
flash
P • [ j S 1
P • 0 5
P • [} 5 11 l T H 0 - flash
CJ S
·1
0
11
l 0 - fl
1·11
T 0
<-
flash
....
F I
ash
flash
sewing
Samp
le
To make a space between letters, use pattern
A programmed space will be
thout
Wi
0.1
usin g memory , the space can be altered between
em and
0.25
57
em
by
set
to 0.45
using 10 -
em.
01
button
.
Page 59

Checking
and
Editing
Your
Program
(Example) When patterns
The liquid crystal display will shown [
* Check
G)
®
and
correct
[.
eoiT ] --
·,• :
!
0~01-
pattern
---
0 - - -
I
I
I
I
I
I
---
4>
o Press
*
G)
the
EDIT
To
Delete Patterns
l EDIT I -
~~-
button
Without
-----
"A
.•
8,
C,
D, E, F,
combination before sewing.
- - - [
-[
--
[
--
[~
I J I(LM~
again when editing is complete.
Adding: (Example: Delete
- [
G,
H. I, J, K, L, M,
Liqu
id
crystal
~
§(
BCDEFGH~)
..._
R'.'s
,, '
~
~~
C
t
~
-)B{e CD
~
flash
1=1
tlash
....
flash< ...
D E F G H I
I
I
I
I
I
I
-
N,
0"
are memorized.
B C D E F G H 1 J K L M N J ·
display
G)
The screen will move
when
<A-D>
CD
E F G
~)
m
~)
® Move
you
("
-+
u
patt
erns exist offscreen.)
the
width control
(Press
will move
+-
..
("
patterns
)
E F G H
( A *
0)
pattern
~
)
D)
to
the ri
press
the
EDIT
button.
means more memorized
cursor
to
right
by
pressing
button
button
e
to
left.)
means more memorized
exist
before
e.
and the cursor
pattern
1.
ght
)
®
®
* To Del
G)
J+~
®
®
@)
10
~
01---
c
ete
and Add Patterns:
DIT
, .
!0
]---
~
01------[
3 5
c::::J c::::J
8
--
-----[
----
- - - -
--I
-
--
A 8
c:
~·
[
ABC
{
0
Replace D
R a
®
Move
R B
®
Select
R 8
[
@ Press "MEM"
E
... flash
E F G H I J K L
~§(e
....
flssh ( A *
with
c~:E
~fl
ash
cursor
C:f~(E
....
flash ( Z
pattern
C
~:
E
...
flash
F G H I J K
co
CD
E F G H
Z
F e H 1 J K
( D ~
to
D ® Move cursor between D and E.
F G H I J K + )
35.
F G H I J K
(Z
button.
- m
0)
0)
..
1:
)
-
o>
~)
o Move cursor
o Press " EDIT"
~l
~)
~
I
-t)
o Add
R 8
I
R 8 C
I
® Press
R s c D z
I
@ Press "M
to
pattern
CD·~
pattern
D
button.
Z between D
:
E F G H I J
~
flash ( ; * 0 )
D
.~:
E
F G H I J
....
flash
CZ
35.
:¢
: E F G H 1 J
....
flash
EM" button.
(0
..
*I
and
~
+)
I )
E.
)
~
I
)
58
Page 60

Unit of
Pattern
in
Programmed
Sewing
o The patterns shown on the right hand side indicate the
pressed once.
10
,,
13
'i'
I'
'i'
'I
:
'
'
'
'
'
i
I
I "'
0
36
TI
"'
'"
'"
..
..
t)
'
: '
'
'
'
'
'
¢.;l
35
J)
~)
14 15
.
?.
~l
r
37 38 39
t~
~\
16
l
'
j:
lO>
40
io
i•
18 19
0
0
1:1
1:1
1
:1
r.t
I! I
r I
~
I
1.1
~~
41
42
))
) }
v
B)
••
51 52
J9ll
67
~
~
88
t*
i
-
53 54 55 56
~~
IYtw
~~
~
68
69
70
~
~
~~
t ~
89
90
91
~
l?r
((
e
I I
Ul
~~
I
IU
I
~
~~
71
~X
92 93
tt
~~
e
~
72 73
~)@
~
~
k3
0 0
{I
~
~
t
57
58
~~
74 75
§{d
~
94
95
~ ~
~
~~
~
~~
~
unit
of
each p
att
20
22
29
i"L3
r·
43
44 45 46
))
Tl
f
59
60
61
~~ ~X>
76
82
~
~
96 97
~~
~~
~
98
~~
ern sewn when
30
~
31
0
r
47
1\
r~
}
62 63
~b
~~
83
84
&~
~!
';i'
ji
f!3
~
the
memory key
32
33 34
5)
r
r
48
49
))
c
l>
64
k~
85 86 87
ii
!
••
)
•
c
65 66
~~
~~
~~
~~
@)
is
50
• The auto·lock stitch
*
All
patterns start
" The fo
•
' Tho follow;
ll
owing patterns J U 0
If
sewn using the zigzag f
ng
at
p.n
om• Q
is not
the
"0"
programmed
mar
k.
oot
, pattern i (blind
~
~
on
above patterns.
~
3 j
[~~
~
st
itch) will change
~ b ~
59
~
I cann
'"
one-po;nHow;ng.
to
ot
be used
§ .
in
programmed sewing.
Page 61

Not
es
1.
Prior
For
a long program,
2. Up
to
Note, however,
on
Programming
to
programming, delete
it
31
patterns or
that
the
(In Ordinary
the
is advisable
letters/
numbers can be programmed
following
previ
ously
to
write
patterns
Sewing
Mode)
programmed
down
the
cannot
be programmed:
patterns
programming procedure
in
the
memory.
by
pressing
the
in
order
clear key.
to
avoid
an
error.
3.
4.
5.
If
you
select
cleared.
In
the
following cases,
• When
•
If
you
pattern
If
an
incorrect
12
rnmrnm
the
wrong
pattern
the
the
power
switch
have been sewing a programmed
key
or
clear key.
operation
is
in
entire
program
is
turned
performed
the
off.
in
BH1
middle
of
is
cleared.
pattern
programming, the
BH2 BH3
programming, press
and
25 26
then
machine
27
you
28
I
l
the
stop
will
clear key.
the
machine.
beep
to
That
signal
pattern
If
you
an
error.
alone will be
then
press any
60
Page 62

Cleaning
To
insure
that
the
Machine
your
machine operates
at
its best,
you
need
to
keep
the
essential parts clean
at
all times.
Unplug
Cl
Cleaning
eaning
,
I ,...
·
the
machi
the
Bobbin Hold
the Hook
,~
·"'
ne
and
Race
<LV
Cl
ean
the Hook Race and Feed Dog.
remove
er
/
e-
the
presser
Turn
off
Remove
out
Take
out
Brush
~
~~
~
{~ ~
'=>"
~r
~
~
the
the
cover p l
the
dust
~I
foot
power
bobb
and
-
and needle.
switch
or
ate
by
sliding
in.
lint. (You
Remove
pl
ate
~
Remove
_;....:--
ake
T
remove it.
Clean
the lint
unplug the
may
with
out
the
mahcine.
the
hook
cover plate release
also use a vacuum cleaner.)
the
set screw
the
screwdriver
the
needle plate.
the
bobb
feed dogs,
brush and a
on
in.
hook
soft
button
to
the
the le
ft
hand side
supp
lied with
Lift
up
the
race and bobbin holder with
dry
cloth.
of
the
machine.
bobb
in holder and
the
right.
need
le
Assemble
the Hook
Race.
Insert
the
bobb
in holder so that
stopper
Attach needle plate with screw.
61
in
the
hook
race.
the
knob
fits
next
to
the
Page 63

Trouble
Shooting
Condintion
The
need
le thread
breaks. 2
The
bobbin
thr
ead 1 Th e bobbin
breaks.
The needle
bre
aks. 1 The needle is incorrectly inserted.
1
The
needle
The
needle
3
The
needle
4
The
needle
5
The
needle thr
set
properly
presser
foot
6 The fabric
7 The
thread
the
bobbin holder.
2
Li
nt has col l
3 The bobbin
2
T
he
needle
3
The
needle cl
4
The
tension
5
The
fabric
is
finished.
6
The need
le
Cause Reference
thread
is
not
thread
properly. Refer
thread
tension
is
bent
or blunt.
is
incorrectly inserted. Refer
ead
and
under
when sewing
is
not
drawn
is
too
heavy
thread
ected
in
is
damaged
is
bent
or
amp
screw
of
the
needle thr
is
not
drawn
is
too fine
is
too
tight
. Refer
the
bobbin
thread
are
not
(drawn
to
the
rear of)
is
starting.
to
the rear
for
the
needle. Refer
is not
threaded
the
bobbin holder. Refer
and
doesn't
the
when sewing Refer
properly
turn
in
smoothly.
blunt. Refer
is
loose.
ead
is
too
tight. Refer
to
the
rear when sewing
for
the
fabric being sewn. Refer
Refer
Refer
Refer
Change
Refer
Refer
Refer
to
page
to
page
to
page
to
page
to
page 1 5
to
page 17
to
page 23
to
page
to
page 61
the
to
page
to
page
to
page
to
page
to
page 1 7
to
page
13
20
23
23
11
bobb
23
23
23
20
23
in
Screen
Skipp
ed stitches.
Seam
pucker
The
cloth
feeding s
is
not
clear.
ing
is not 1
moo
thly.
1 The sharpness
of
adjusted properly.
1
The
needle is incorrectly inserted. Refer
2 The
3
4
6
7 The
1
2
3 The need le
4 The
5 The presser
2 The presser
3
4 The feed dog was
The
the
A
blue tipped
stretch,
5
The
The
The
The needle
The
The
ne
edle
is
bent
needle
and/or
work being
very fine fabrics
need
le thread
presser
wro
need
ng
le
foot
need
thread
thread
is
too
stitch
length
foot
feed
dog
is
foot
stitches are
sew
needle
was used.
the
liquid crystal display
or blunt
threads
. Refer
are
not
suit
able
is
for
not
Refer
Re
adjust
Refer
n.
is
not
is
not
pressure
le is used .
tension
is
not
heavy for
is
too long
pressure is
packed
pressure
being used
and
synthetics.
t hreaded properly. Refer
is
not
is
too
threaded
the
for
not
with lint.
is
too
for
sewing Refer
strong enough. Refer
Change
tight. Refer
correctly.
fabric
being sewn. Refer
the
fabric. Make stitch denser
correct
ly adjur.ted. Refer
Refer
Refer
weak.
Refer
too fine. Make
not
raised
after
"drop
feed"
Refer
to
page 7
to
page 23
to
page
to
page
to
page
to
page
to
page
the
to page
to
page
to
page
to
page 21
to
page 61
to
page
stitch
to
page 21
23
23
23
13
21
needle
20
11, 12,
23
21
coaser
13
62
Page 64

Condition
Cause
Reference
Gathering
Th
e machine
do
esn
't
work.
Pattern
s are
distorted.
The
automatic
buttonhole
are
not
working.
Noisy
operation
stitches
.
1
The needle thread tension
2
The needle
is
too
heavy
being sewn.
1
The machine is
2
A thread
3
The bobbin winder spindle
is
caught
not
plugged in.
in
position.
1
The bobbin winder spindle is
winding position.
1
The
stitch length
is
not
being sewn.
2
Interfacing is
1
There
2
Lint has
is
thread
built
not
used with stretch fabrics.
caugh in
up
in
the
or
the
suitable
the
bobbin
is
too
light
hook
is
hook
loose.
for
race.
kept
kept
for
holder
the
in
the
in the
the
race.
fabrics
winding
fabric
or
hook
race.
Refer
Refer
Refer
Refer
Refer
RefE
Refer
Refer
Refer
,r
to
page
to
page
to
page 6
to
pag.e
to
page
to
page
to
page
to
page 61
to
page 6 1
20
20
61
11
11
29
63
Page 65

OPERATING
"For appliances with a polarized plug (one blade wider than the other).
To
reduce the risk of electric shock, this plug is intended
one
only
not fit, contact a qualified electrician
in
plug
any
INSTRUCTIONS:
way. If the plug does not fit fully
to
way
."
to
fit
in
a polarized outlet
in
the outlet, reverse the plug. If it still does
install the proper outlet.
Do
not modify the
"Foot Controllar Model
21371
for
use
with sewing Machine Model 6004."
(For U.S.A. market onl
y)
Page 66

A-
3.96 English - 395720-42
PRINTED IN TAIWAN
829
-800-056
 Loading...