


EW30GS65GB8
Electrolux EW30GS65GB8, EW30GS65GB9, EW30GS6CGSC, EW30GS6CGSB, EW30GS6CGSA Owner’s Manual
...
Use [-t Care
Guide
Gas Slide--1 n
Range
i!i!i!i!i!i!i!i!i!i!i!i!i!i!i!i!i!i!i!i!i!i!i!i!i!i!i!i!i!i!i!i!i!i!i!i!i!i!i!i!i!i!i!i!i!i!i!i!i!i!i!i!i!i!i!i!i!i!i!i!i!i!i!i!i!i!i!i!i!i!i!i!i!i!i!i!i!i!i!i!i!i!i!i!i!i!i!i!i!i!i!i!i!i!i!i!i!i!i!i!i!i!i!i!i!i!i!i!i!i!i!i!i!i!i!i!i!i!i!i!i!i!i!i!i!i!i!i!i!i!i!i!i!i!i!i!i!i!i!i!i!i!i!i!i!i!i!i!i!i!i!i!i!i!i!i!i!i!i!i!i!i!i!i!i!i!i!i!i!i!i!i!i!i!i!i!i!i!i!i!i!i!i!i!i!i!i!i!i!i!i!i!i!i!i!i!i!i!i!i!i!i!i!i!i!i!i!i!i!i!i!i!i!i!i!i!i!i!i!i!i!i!i!i!i!i!i!i!i!i!i!i!i!i!i!i!i!i!i!i!i!i!i!i!i!i!i!i!i!i!i!i!i!i!i!i!i!i!i!i!i!i!i!i!i!i!i!i!i!i!i!i!i!i!i!i!i!i!i!i!i!i!i!i!_ii_i!_i!_ii!_i!_i!_i_i!_i!_i!_i!_i!_i_i!_i!__ i_!ii!_!_!iii!!iliiiii!!!!!!!!ii!_!_!!!i!!i!!i!i!_!,_!,_!,_!,_!,_!,_!,_!,_!,_!,_!,_!,_!,_!,_!,_!,_!,_!,_!,_!,_!,_!,_!,_!,_!,_!,_!,_!,_!,_!,_!,_!,_!,_!,_!,_!,_!,_!,_!,_!,_!,_!,_!,_!,_!,_!,_!,_!,_!,_!,_!,_!,_!,_!,_!,_!,_!,_!,_!,_!,_!,_!,_!,_!,_!,_!,_!,_!,_!,_!,_!,_!,_!,_!,_!,_!,_!,_!,_!,_!,_!,_!,_!,_!,_!,_!,_!,_!,_!,_!,_!,_!,_!,_!,_!,_!,_!,_!,_!,_!,_!,_!,_!,_!,_!,_!,_!,_!,_!,_!,_!,_!,_!,_!,_!,_!,_!,_!,_!,_!,_!,_!,_!,_!,_!,_!,_!,_!,_!,_!,_!,_!,_!,_!,_!,_!,_!,_!,_!,_!,_!,_!,_!,_!,_!,_!,_!,_!,_!,_!,_!,_!,_!,_!,_!,_!,_!,_!,_!,_!,_!,_!,_!,_!,_!,_!,_!,_!,_!,_!,_!,_!,_!,_!,_!,_!,_!,_!,_!,_!,_!,_!,_!,_!,_!,_!,_!,_!,_!,_!,_!,_!,_!,_!,_!,_!,_!,_!,_!,_!,_!,_!,_!,_!,_!,_!,_!,_!,_!,_!,_!,_!,_!,_!,_!,_!,_!,_!,_!,_!,_!,_!,_!,_!,_!,_!,_!,_!,_!,_!,_!,_!,_!,_!,_!,_!,_!,_!,_!,_!,_!,_!,_!,_!,_!,_!,_!,_!,_!,_!,_!,_!,_!,_!,_!,_!,_!,_!,_!,_!,_!,_!,_!,_!,_!,_!,_!,_!,_!,_!,_!,_!,_!,_!,_!,_!,_!,_!,_:_

L_
t Fin
ing information
[] [] [] [] []
Brand
Purchase Date
Model Number
Serial Number
[] [] [] [] [] [] [] [] [] [] [] [] [] [] [] [] [] [] [] [] [] []
The serialplateis located along the interiorsidetrim
of the oven and visible when the door is opened.
See picture below.
[] [] [] [] [] [] [] [] [] [] [] [] [] []
[] [] [] [] [] [] [] [] [] [] [] [] [] [] []
For toll=free telephone support in the U.S. and Canada:
1-877-4ELECTROLUX
(1-877-435-3287)
For online support and internet
product information:
www.electroluxappliances.com
@2010 Electrolux Home Products, Inc
Post Office Box 212378, Augusta, Georgia 30917, USA
All rights reserved Printed in the USA
[] [] [] [] [] [] []

Fin in information
FindingInformation..............................................2
Makea Recordfor FutureUse..........................2
ModelandSerialNumberLocation...................2
Questions?.........................................................2
Tableof Contents...............................................3
Safety.....................................................................4
ImportantSafetyInstructions..........................4-7
FeatureOverview..................................................8
YourSlide-InRange........................................8-9
OvenRackSupportsandOvenVents.............I0
RemovingandReplacingOvenRacks.............11
OvenControlPadFunctions.......................12-13
Getting Started....................................................14
SettingClockat PowerUp...............................14
ControlPanelDisplayModes..........................14
TemperatureVisualDisplay.............................14
OvenLight.......................................................15
ControlLock.....................................................15
Settingthe KitchenTimer.................................15
SurfaceCooking.................................................16
LocationoftheBurners....................................16
PlacementofBurnerHeadsandCaps............16
ProperBurnerAdjustment...............................16
SurfaceCookingUtensils................................17
Flamesize.......................................................17
SettingSurfaceControls..................................18
UsingtheGridd(e.............................................19
Setting the WarmerOven...................................20
WarmerOvenOperation..................................20
Cooking Modes...................................................21
Baking..............................................................21
CookTime........................................................22
EndTime..........................................................22
Broiiin(.............................................................23
ConvectionBaking...........................................24
ConvectionConvert.........................................25
RapidPreheat..................................................25
ConvectionRoasting........................................26
KeepWarm......................................................27
SlowCook........................................................28
Dehydrating.....................................................29
Defrosting........................................................29
BreadProofing.................................................30
PerfectTurkey..................................................31
TemperatureProbe..........................................32
MultiStage..................................................33-34
Electronic Control Settings ...............................35
UserPreferences.............................................35
UserPreferenceMenu.................................35
SettingtheClock-Timeof Day....................35
SettingClockDisp(ay-Onor Off..................36
SettingTimeofDayDisplay-12or 24hours,36
AdjustingOvenTemperature........................36
SettingTemperatureDisplay-Fahrenheit
or Celsius......................................................37
AudioControl................................................37
SettingContinuousBakeor
12HourEnergySaving................................37
ResettingtoDefaultFactorySettings...........37
OvenControls.....................................................38
MyFavorites....................................................38
SabbathFeature.........................................39-40
Care& Cleaning..................................................41
UsingtheSelf-CleanFeature..........................41
StartingtheSe(f-C(eanCycle...........................42
GeneralCleaning.............................................43
CareandCleaningof StainlessSteel..............44
ToRemoveandReplaceOvenDoor...............44
SpecialDoorCareInstructions........................44
OvenLight.......................................................45
BroilerPanCieaningTips................................45
CleaningCooktop,BurnerGrates,
BurnerCapsandBurnerHeads.................46-47
Solutions to Common Problems.......................48
BakingProblems..............................................48
Solutions.....................................................49-50
WarrantyInformation .........................................51

Safety
[] [] [] [] [] [] [] [] [] [] [] [] [] [] [] [] [] [] [] []
Please read all safety instructions before using your new Electrolux range.
Toreducethe riskoffire, electrical shock,or injury when usingyourappliance,follow basic
precautionsincluding the following:
If the information in this manual is not
followed exactly, a fire or explosion may result causing
property damage, personal injury or death.
FOR YOUR SAFETY:
Do not store or use gasoline or other flammable
vapors and liquids in the vicinity of this or any other
appliance.
WHAT TO DO IF YOU SMELL GAS:
• Do not try to light any appliance.
• Do not touch any electrical switch; do not use any
phone in your building.
• Immediately call your gas supplier from a neighbor's
phone. Follow the gas supplier's instructions.
• If you cannot reach your gas supplier, call the fire
department.
Installation and service must be performed by a
qualified installer, servicer or the gas supplier.
• All ranges can tip.
• Injury to persons could
result.
with range.
• See Installation instructions.
. Install anti-tip device packed
To reduce the risk of tipping of the range, the
range must be secured by properly installed
anti-tip bracket(s) provided with the range. To
check if the bracket (s) is installed properly,
remove the lower panel or storage drawer and
verify that the anti-tip bracket (s)is engaged.
Refer to the installation instructions for proper
anti-tip bracket(s).
Remove all tape and packaging wrap before using the appliance. Destroy the carton
and plastic bags after unpacking the appliance. Never allow children to play with
packaging material.
Proper Installation-Be sure your appliance _s properly installed and grounded
by a qualified technician in accordance in United States with the National Fuel
Gas Code ANSI Z223.1 latest edition, and National Electrical Code ANSI/NFPA
No. 70 latest edition, and local code requirements, and in Canada with Canadian
Standards CAN/CGA B149.1, and CAN/CGA B149.2 and Canadian Electrical Code,
CSA C22.1 part 1, and local requirements. Install only per installation instructions
provided in the literature package for this range.
Ask your dealer to recommend a qualified technician and an authorized repair service.
Know how to disconnect the electrical power to the range at the circuit breaker or fuse
box in case of an emergency.
• User Servicing=Do not repair or replace any part of the appliance unless specifically
recommended in the manuals. All other sepvicing should be done only by a qualified
technician to reduce the risk of personal injury and damage to the appliance.
• Never modify or alter the construction of a range by removing leveling legs, panels,
wire covers, anti-tip brackets/screws, or any other part of the product.
Safety
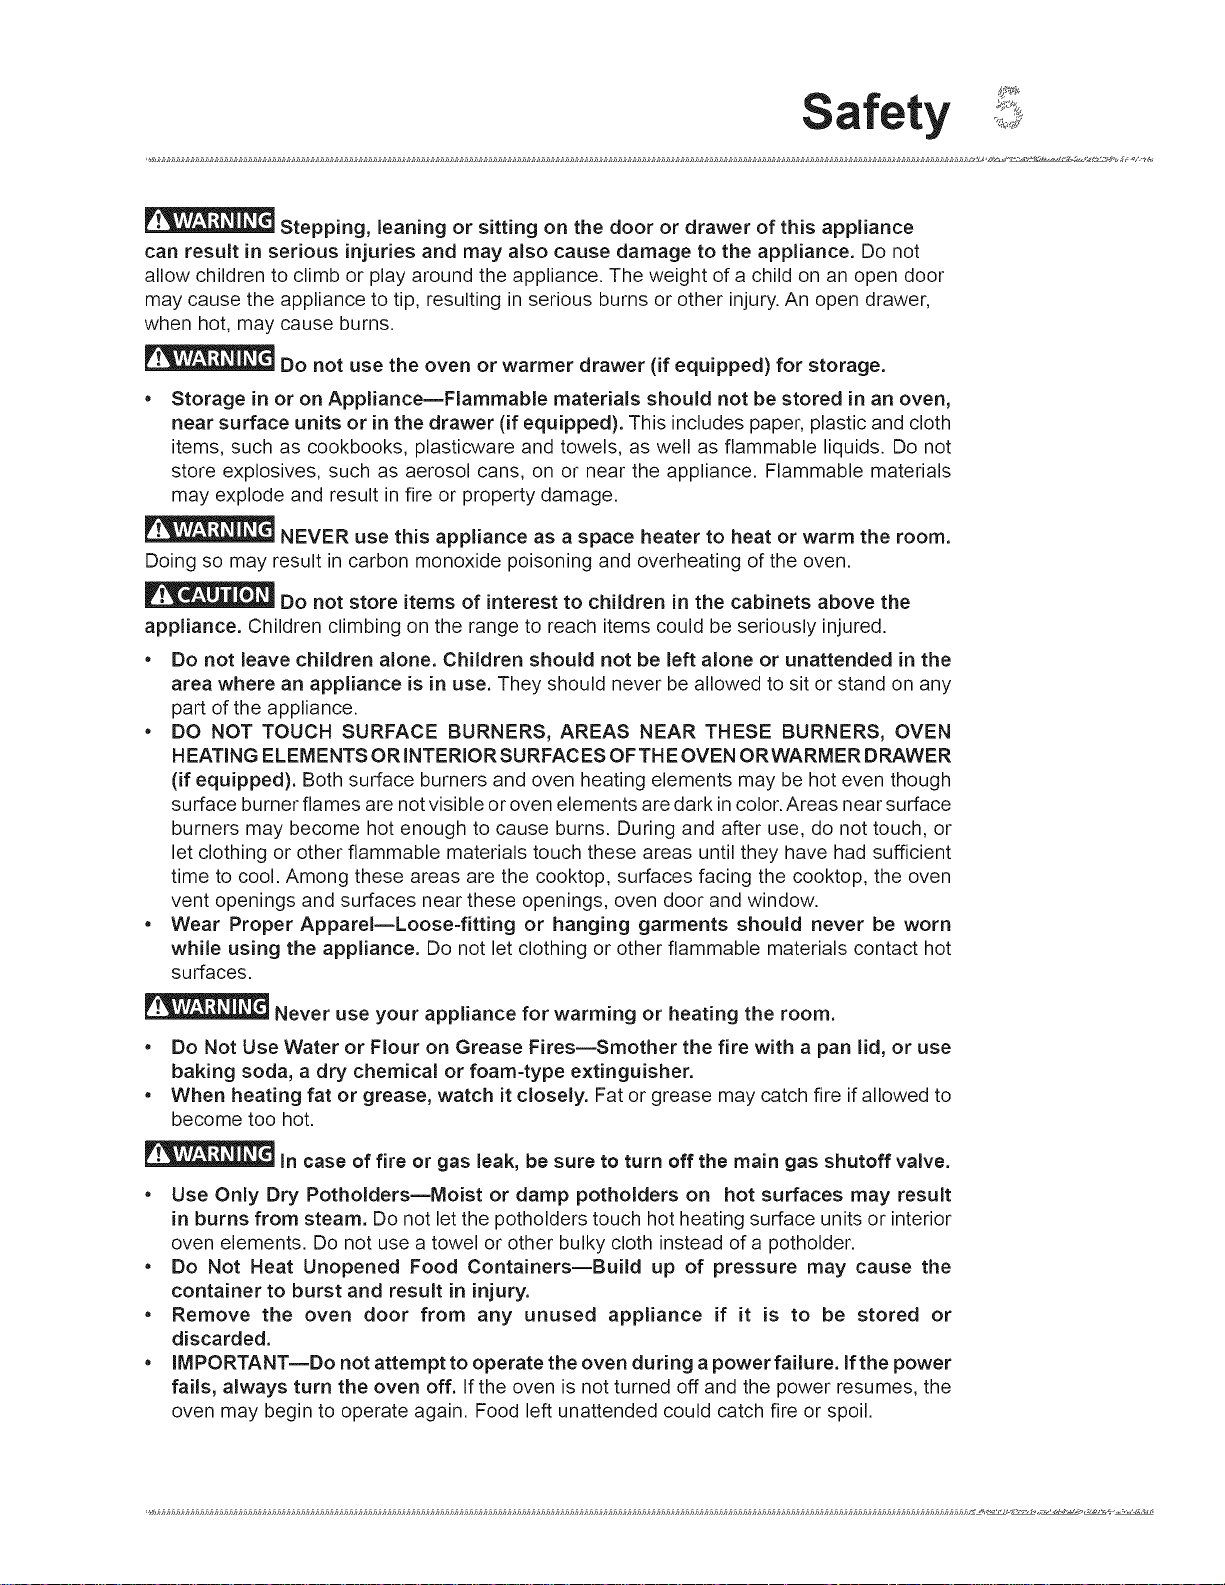
Stepping, leaning or sitting on the door or drawer of this appliance
can result in serious injuries and may also cause damage to the appliance. Do not
allow children to climb or play around the appliance. The weight of a child on an open door
may cause the appliance to tip, resulting in serious burns or other injury. An open drawer,
when hot, may cause burns.
Do not use the oven or warmer drawer (if equipped) for storage.
• Storage in or on AppliancemFlammable materials should not be stored in an oven,
near surface units or in the drawer (if equipped). This includes paper, plastic and cloth
items, such as cookbooks, plasticware and towels, as well as flammable liquids. Do not
store explosives, such as aerosol cans, on or near the appliance. Flammable materials
may explode and result in fire or property damage.
NEVER use this appliance as a space heater to heat or warm the room.
Doing so may result in carbon monoxide poisoning and overheating of the oven.
Do not store items of interest to children in the cabinets above the
appliance. Children climbing on the range to reach items could be seriously injured.
• Do not leave children alone. Children should not be left alone or unattended in the
area where an appliance is in use. They should never be allowed to sit or stand on any
part of the appliance.
• DO NOT TOUCH SURFACE BURNERS, AREAS NEAR THESE BURNERS, OVEN
HEATING ELEMENTS OR iNTERiOR SURFACES OF TH EOVEN OR WARMER DRAWER
(if equipped). Both surface burners and oven heating elements may be hot even though
surface burner flames are not visible or oven elements are dark in color. Areas near surface
burners may become hot enough to cause burns. During and after use, do not touch, or
let clothing or other flammable materials touch these areas until they have had sufficient
time to cool. Among these areas are the cooktop, surfaces facing the cooktop, the oven
vent openings and surfaces near these openings, oven door and window.
• Wear Proper ApparelmLoose-fitting or hanging garments should never be worn
while using the appliance. Do not let clothing or other flammable materials contact hot
surfaces.
Never use your appliance for warming or heating the room.
• Do Not Use Water or Flour on Grease Fires=Smother the fire with a pan lid, or use
baking soda, a dry chemical or foam-type extinguisher.
• When heating fat or grease, watch it closely. Fat or grease may catch fire if allowed to
become too hot.
in case of fire or gas leak, be sure to turn off the main gas shutoff valve.
• Use Only Dry Potholders=Moist or damp potholders on hot surfaces may result
in burns from steam. Do not let the potholders touch hot heating surface units or interior
oven elements. Do not use a towel or other bulky cloth instead of a potholder.
• Do Not Heat Unopened Food Containers=Build up of pressure may cause the
container to burst and result in injury.
• Remove the oven door from any unused appliance if it is to be stored or
discarded.
• IMPORTANT_Do not attempt to operate the oven during a power failure. If the power
fails, always turn the oven off. If the oven is not turned off and the power resumes, the
oven may begin to operate again. Food left unattended could catch fire or spoil.

Safety
Electronic controllers can be damaged by cold temperatures. When you
use your appliance for the first time, or if it has not been used for a long period of
time, make sure that it has been exposed to a temperature above 0°C/32°F for at least
3 hours before connecting it to the power supply.
iMPORTANTiNSTRUCTIONSFORUSINGYOURCOOKTOP
Use proper flame size--Adjust flame size so it does not extend beyond the
edge of the utensil. The use of undersized utensils will expose a portion of the burner flame
to direct contact and may result in ignition of clothing. Proper relationship of utensil to flame
will also improve efficiency.
Do not use stove top grills on the burner grates of sealed gas burners. If
you use a stove top grill on a sealed gas burner, it will cause incomplete combustion and
can result in exposure to carbon monoxide levels above allowable current standards. This
can be hazardous to your health.
Know which knob controls each surface burner. Place a pan of food on the burner
before turning it on, and turn the burner off before removing the pan.
Always turn the knob to the full LITE position when igniting top burners. Visually
check that burner has lit. Then adjust the flame so it does not extend beyond the edge of
the utensil.
Use Proper Pan Size--This appliance is equipped with one or more surface burners of
different sizes. Select utensils having flat bottoms large enough to cover the surface burner.
The use of undersized utensils will expose a portion of the surface heating unit to direct
contact and may result in ignition of clothing. Proper relationship of utensil to the surface
unit will also improve efficiency.
Utensil Handles Should Be Turned Inward and Should Not Extend Over Adjacent
Surface Burners--To reduce the risk of burns, ignition of flammable materials, and spillage
due to unintentional contact with the utensil. The handle of the utensil should be positioned
so that it is turned inward, and does not extend over adjacent surface burners.
Never Leave Surface Burners Unattended--Boilovers cause smoking and greasy
spillovers that may ignite, or a pan that has boiled dry may melt.
Protective liners--Do not use aluminum foil to line oven bottom or any other part of the
appliance. Only use aluminum foil as recommended for baking if used as a cover placed
on the food. Any other used of protective liners or aluminum foil may result in a risk of
electric shock or fire or a short circuit.
Glazed Cooking Utensils--Only certain types ofglass, glass/ceramic, ceramic, earthenware,
or other glazed utensils are suitable for cooktop service without breaking due to the sudden
change in temperature. Check the manufacturer's recommendations for cooktop use.
Air curtain or other overhead range hoods, which operate by blowing a downward
air flow on to a range, shall not be used in conjunction with gas ranges other than
when the hood and range have been designed, tested and listed by an independent
test laboratory for use in combination with each other.
Do not use Searing Grill on the cooktop. The searing grill is not designed for use on
the cooktop. Doing so may result in a fire.
Do Not Use Decorative Surface burner Covers. If a burner is accidentally turned
on, the decorative cover will become hot and possibly melt. Burns will occur if the hot
covers are touched. Damage may also be done to the cooktop or burners because
the covers may cause overheating. Air will be blocked from the burner and cause
combustion problems.
Save these important safety instructions for future reference.
Safety
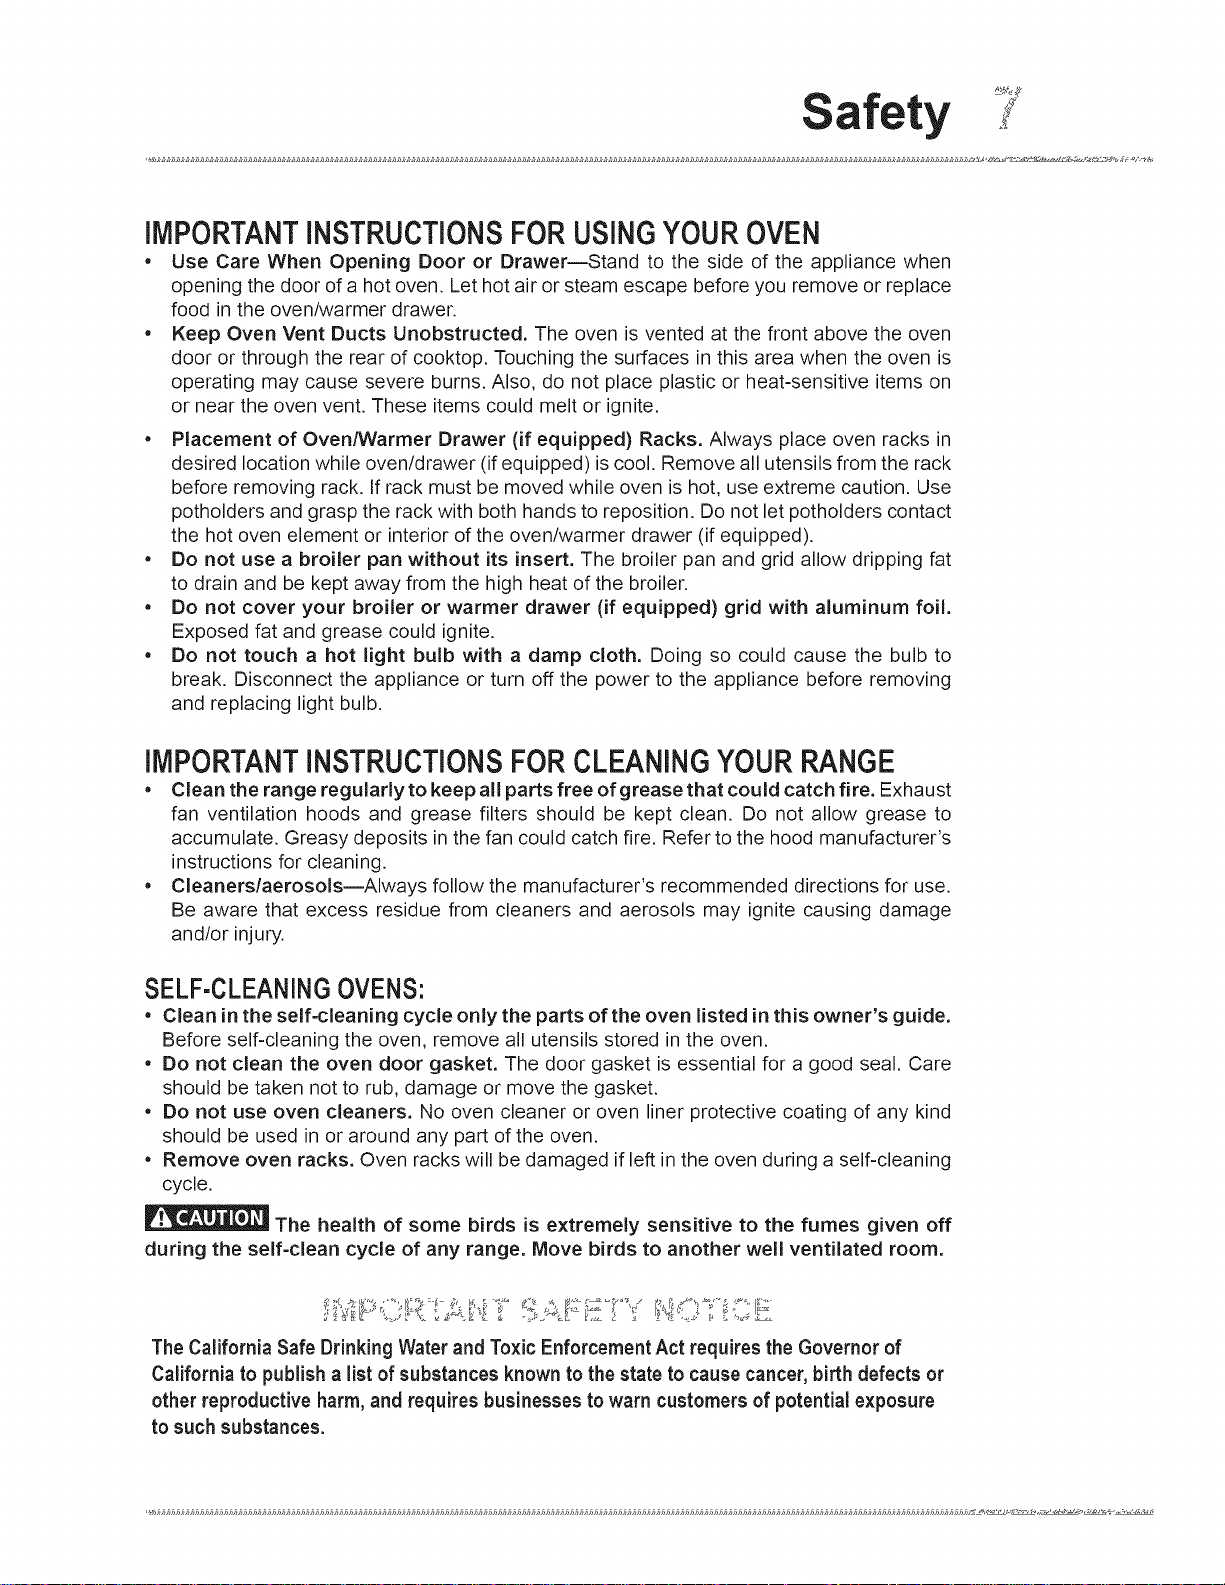
IMPORTANTINSTRUCTIONSFORUSINGYOUROVEN
• Use Care When Opening Door or Drawer--Stand to the side of the appliance when
opening the door of a hot oven. Let hot air or steam escape before you remove or replace
food in the oven/warmer drawer.
• Keep Oven Vent Ducts Unobstructed. The oven is vented at the front above the oven
door or through the rear of cooktop. Touching the surfaces in this area when the oven is
operating may cause severe burns. Also, do not place plastic or heat-sensitive items on
or near the oven vent. These items could melt or ignite.
• Placement of Oven/Warmer Drawer (if equipped) Racks. Always place oven racks in
desired location while oven/drawer (if equipped) is cool. Remove all utensils from the rack
before removing rack. If rack must be moved while oven is hot, use extreme caution. Use
potholders and grasp the rack with both hands to reposition. Do not let potholders contact
the hot oven element or interior of the oven/warmer drawer (if equipped).
• Do not use a broiler pan without its insert. The broiler pan and grid allow dripping fat
to drain and be kept away from the high heat of the broiler.
• Do not cover your broiler or warmer drawer (if equipped) grid with aluminum foil.
Exposed fat and grease could ignite.
• Do not touch a hot light bulb with a damp cloth. Doing so could cause the bulb to
break. Disconnect the appliance or turn off the power to the appliance before removing
and replacing light bulb.
iMPORTANTiNSTRUCTIONSFORCLEANINGYOURRANGE
• Clean the range regularly to keep all parts free of grease that could catch fire. Exhaust
fan ventilation hoods and grease filters should be kept clean. Do not allow grease to
accumulate. Greasy deposits in the fan could catch fire. Refer to the hood manufacturer's
instructions for cleaning.
• Cleaners/aerosols--Always follow the manufacturer's recommended directions for use.
Be aware that excess residue from cleaners and aerosols may ignite causing damage
and/or injury.
SELF-CLEANINGOVENS:
• Clean in the self=cleaning cycle only the parts of the oven listed in this owner's guide.
Before self-cleaning the oven, remove all utensils stored in the oven.
• Do not clean the oven door gasket. The door gasket is essential for a good seal. Care
should be taken not to rub, damage or move the gasket.
• Do not use oven cleaners. No oven cleaner or oven liner protective coating of any kind
should be used in or around any part of the oven.
• Remove oven racks. Oven racks will be damaged if left in the oven during a self-cleaning
cycle.
The health of some birds is extremely sensitive to the fumes given off
during the self=clean cycle of any range, Move birds to another well ventilated room,
The California Safe Drinking Water and Toxic Enforcement Act requires the Governor of
California to publish a list of substances known to the state to cause cancer, birth defects or
other reproductive harm, and requires businesses to warn customers of potential exposure
to such substances.
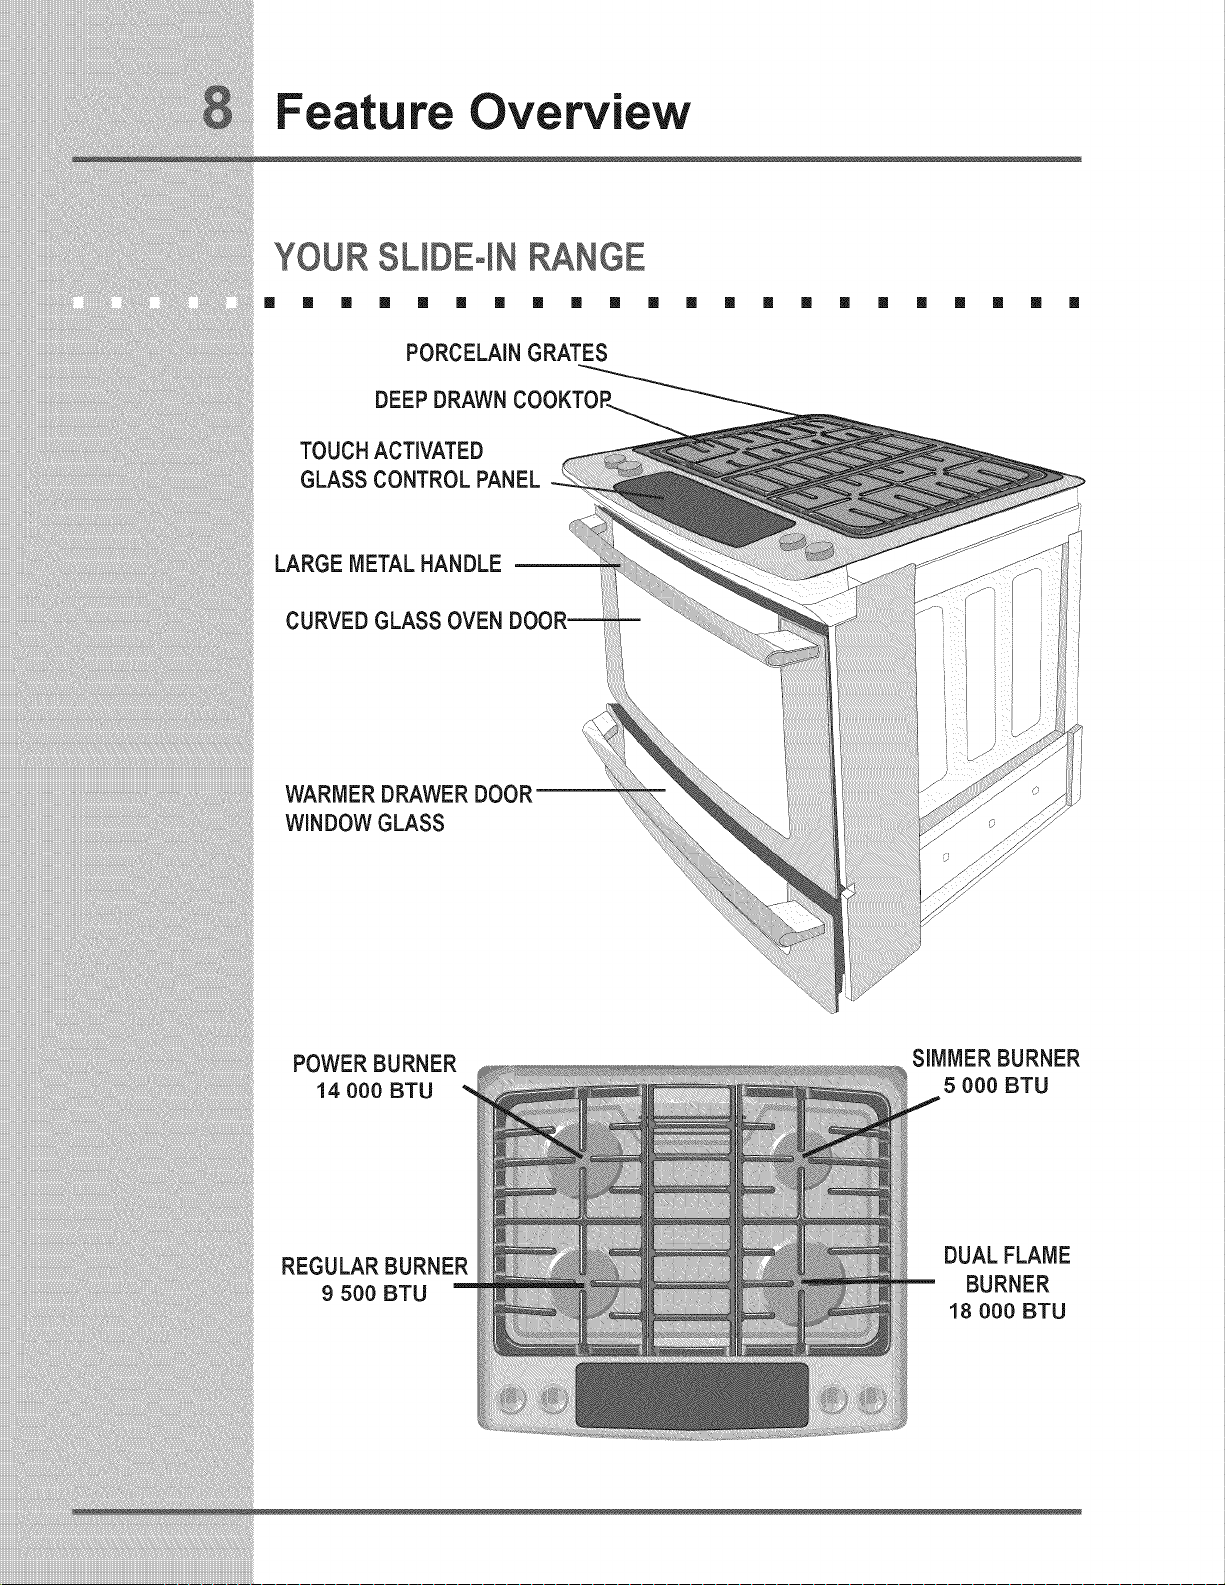
Feature Overview
YOUR SUDEqN RANGE
[] [] [] [] [] [] [] [] [] [] []
PORCELAIN GRATES
DEEPDRAWN
TOUCHACTIVATED
GLASS CONTROL PANEL
LARGE METAL HANDLE
CURVEDGLASS OVEN
WARMER DRAWERDOOR
WINDOW GLASS
[] [] [] [] [] [] [] [] []
POWER BURNER
14 000 BTU
REGULAR BURNER
9 500 BTU
SIMMERBURNER
5 000 BTU
DUAL FLAME
BURNER
18 000 BTU
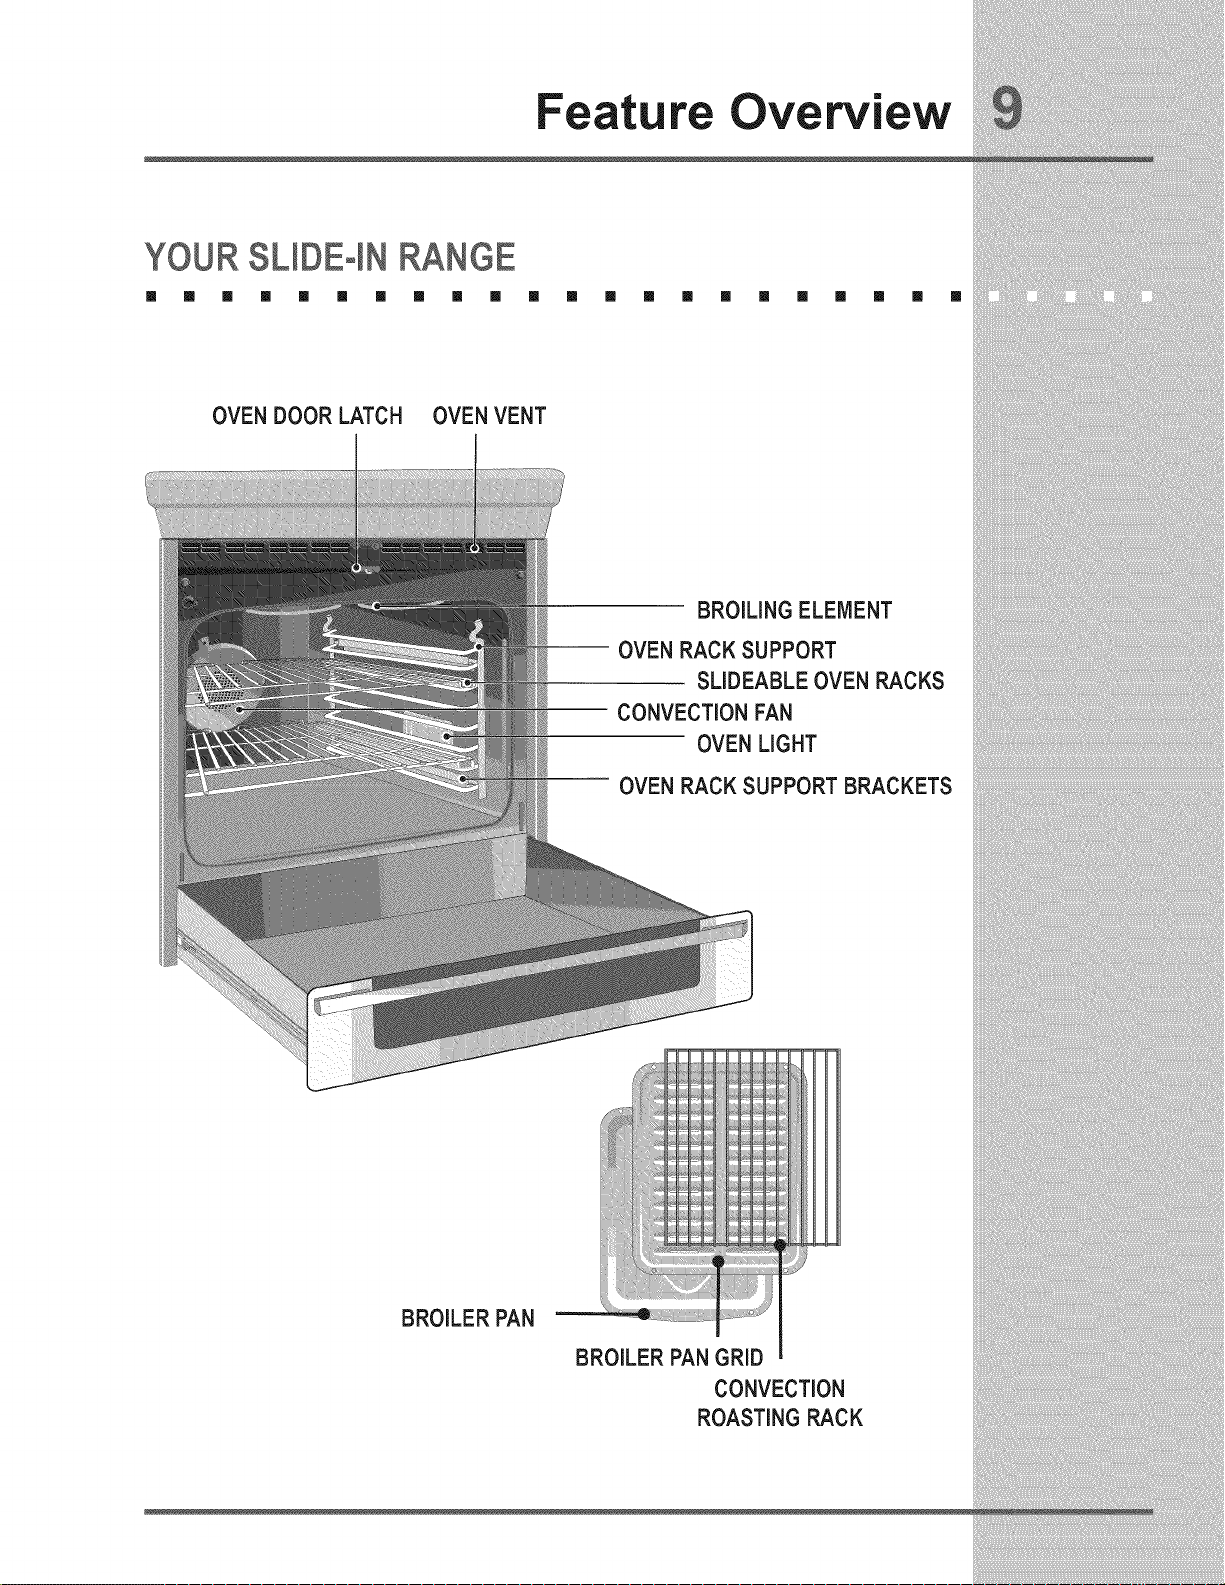
Feature Overview
YOUR SL(DEo(NRANGE
[] [] [] [] [] [] [] [] [] [] [] [] [] [] [] [] [] [] [] [] [] []
OVEN DOOR LATCH OVENVENT
BROILING ELEMENT
-- OVENRACK SUPPORT
SLIDEABLE OVEN RACKS
CONVECTION FAN
OVEN LIGHT
BROILER PAN
--OVEN RACK SUPPORTBRACKETS
i
i)_,)
_ N
BROILER PANGRID
CONVECTION
ROASTING RACK

Feature Overview
OVEN
[] [] []
i!i!i!i!i!i!i!i!i!i!i!i!i!i!Yii!i!i!iiii
RACKSUPPORTS& OVENVENTS
[] [] [] [] [] [] [] [] [] [] [] [] [] [] [] [] [] [] []
InstallingOven Rack Supports
ALWAYS INSTALL OVEN RACK
SUPPORT BEFORE TURNING ON
THE OVEN (WHEN THE OVEN IS
COOL).
To install oven rack support, insert the
supports by pushing them downward
into the two brackets on each side of
the oven interior, as shown below.
To remove the oven rack support for
a self-clean cycle, pull up the support
to disengage them from the brackets. If
the rack supports are not removed, the
self-clean cycle won't start.
Oven RackPositions
This oven is equipped with ladder rack supports with
7 positions to accomodate precisely every mode of
cooking.
Rack positions
NON-SLIDING
RACK ONLY)
Oven Vent Location
The oven is vented above each door. When
the oven is on, warm air is released through
the vents. This venting is necessary for proper
air circulation in the oven and good baking
results,
Oven Vent
Warm Air

Feature Overview
REMOVINGAND REPLACINGOVENRACKS
Ill Ill [] Ill [] Ill Ill Ill [] Ill Ill Ill Ill [] [] [] [] Ill
Removing Sliding Oven Racks
1. With the rack in its closed position; grasp the rack and the sliders at once.
2. Slightly lift the rack and sliders and pull it to clear the first bracket.
3. Pull the rack and sliders until the second bracket stops the rack.
4. Lift the rack and sliders and carefully remove them from the oven.
Refer to the care and cleaning section for directions on how to clean the racks.
Replacing Sliding Oven Racks
To replace the oven racks, follow the intructions above in reverse order.
Z
UJ
>
O
LL
O
I--
Z
O
ad
LD
d3
ad
1st Bracket
2nd Bracket
Oven Rack
m m
Oven Rack Slider
O
F=
Oven Rack Support
Removing Non-Sliding Oven Rack
Simply pull the rack and slightly tilt it upward when the rack hits its stop _osition.
Replacing Non-Sliding Oven Rack
Insert the rack into the oven rack supports by inserting the rack openings into the rack
supports. Be sure the rack is at the same position on each oven rack support on both sides.
Insert the openings
....... into the rack support .........
_ Always arrange the oven racks when the oven is cool (prior to operating
the oven). Always use oven mitts when using the oven.
Feature Overview
OVENCONTROLPADFUNCTIONS
[] [] [] [] [] [] [] [] [] [] [] [] [] [] [] [] [] [] [] [] [] []
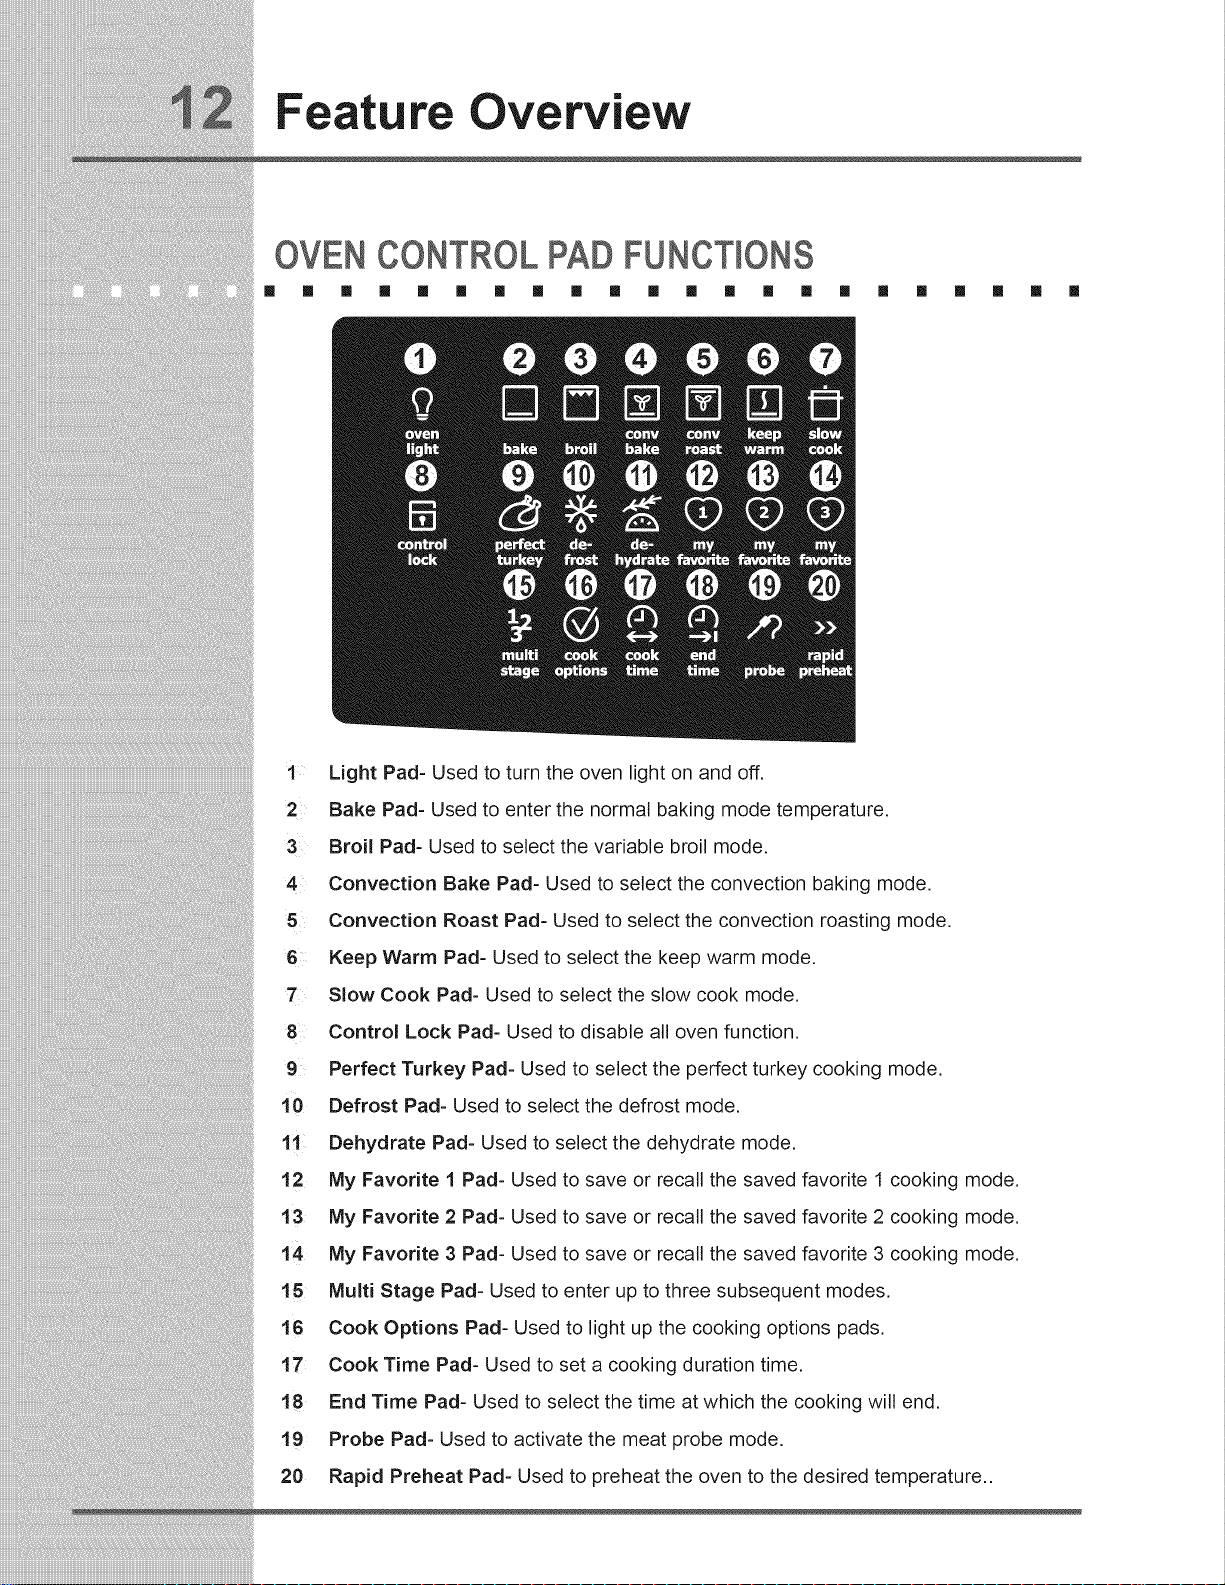
1 Light Pad- Used to turn the oven light on and off.
2 Bake Pad- Used to enter the normal baking mode temperature.
3 Broil Pad- Used to select the variable broil mode.
4 Convection Bake Pad- Used to select the convection baking mode.
5 Convection Roast Pad- Used to select the convection roasting mode.
6 Keep Warm Pad- Used to select the keep warm mode.
7 Slow Cook Pad- Used to select the slow cook mode.
8 Control Lock Pad- Used to disable all oven function.
9 Perfect Turkey Pad- Used to select the perfect turkey cooking mode.
10 Defrost Pad- Used to select the defrost mode.
11 Dehydrate Pad- Used to select the dehydrate mode.
12 My Favorite I Pad- Used to save or recall the saved favorite 1 cooking mode.
13 My Favorite 2 Pad- Used to save or recall the saved favorite 2 cooking mode.
14 My Favorite 3 Pad- Used to save or recall the saved favorite 3 cooking mode.
15 Multi Stage Pad- Used to enter up to three subsequent modes.
16 Cook Options Pad- Used to light up the cooking options pads.
17 Cook Time Pad- Used to set a cooking duration time.
18 End Time Pad- Used to select the time at which the cooking will end.
19 Probe Pad- Used to activate the meat probe mode.
20 Rapid Preheat Pad- Used to preheat the oven to the desired temperature..

Feature Overview
OVEN CONTROL PAD FUNCTIONS (CONT NUEm
[] [] [] [] [] [] [] [] [] [] [] [] [] [] [] [] [] [] [] [] [] []
21 Bread Proof Pad- Used to select the bread proof mode.
22 Clean Pad- Used to select the self-cleaning mode.
23 Upper Oven Pad- Used to activate the upper oven for cooking operation.
24 Warmer Oven Pad- Used to activate the warmer oven for warming operation.
25 Lite Pad- Used to start a 2 hours self-clean cycle.
26 Meal Pad- Used to start a 3 hours self-clean cycle.
27 Heavy Pad- Used to start a 4 hours self-clean cycle.
28 Cony. Convert Pad- Used to convert a standard temperature to a convection
temperature.
29 User Preference Pad- Used to bring the user preference menu in the display.
30 Cancel Pad- Used to cancel any function previously entered except the time of day
and minute timer. Push Cancel pad to stop cooking.
31 Timer Pads- Used to set or cancel the minute timer.
32 Start Pad- Used to start all oven functions.
33 0 Thru 9 Number Pads- Used to enter temperature and times.
34 - Io Pad- Used to lower the temperature and times.
35 + hi Pad- Used to raise the temperature and times.
Gettin Started
S T NGCLOCKAT POWERUP
[] [] [] [] [] [] [] [] [] [] [] [] [] [] [] [] [] [] [] [] [] []
When the unit is first plugged in, or when the power supply to the range has been interrupted,
the timer in the display will flash with "12:00". The clock cannot be set when the oven is on.
If an invalid time of day is entered, the control will triple beep to prompt you to re-enter a
valid time of day.
Toset the clock (examplefor 1:30):
1. Press pads to set the time of day to 1:30. The pads hi or Io can also be
pressed to raise or lower the actual time displayed.
2. Press START _ to accept the changes or CANCEL (_ to start with a time of 12:00.
CONTROLPANEL D SPLAYMODES
[] [] [] [] [] [] [] [] [] [] [] [] [] [] [] [] [] [] [] [] [] []
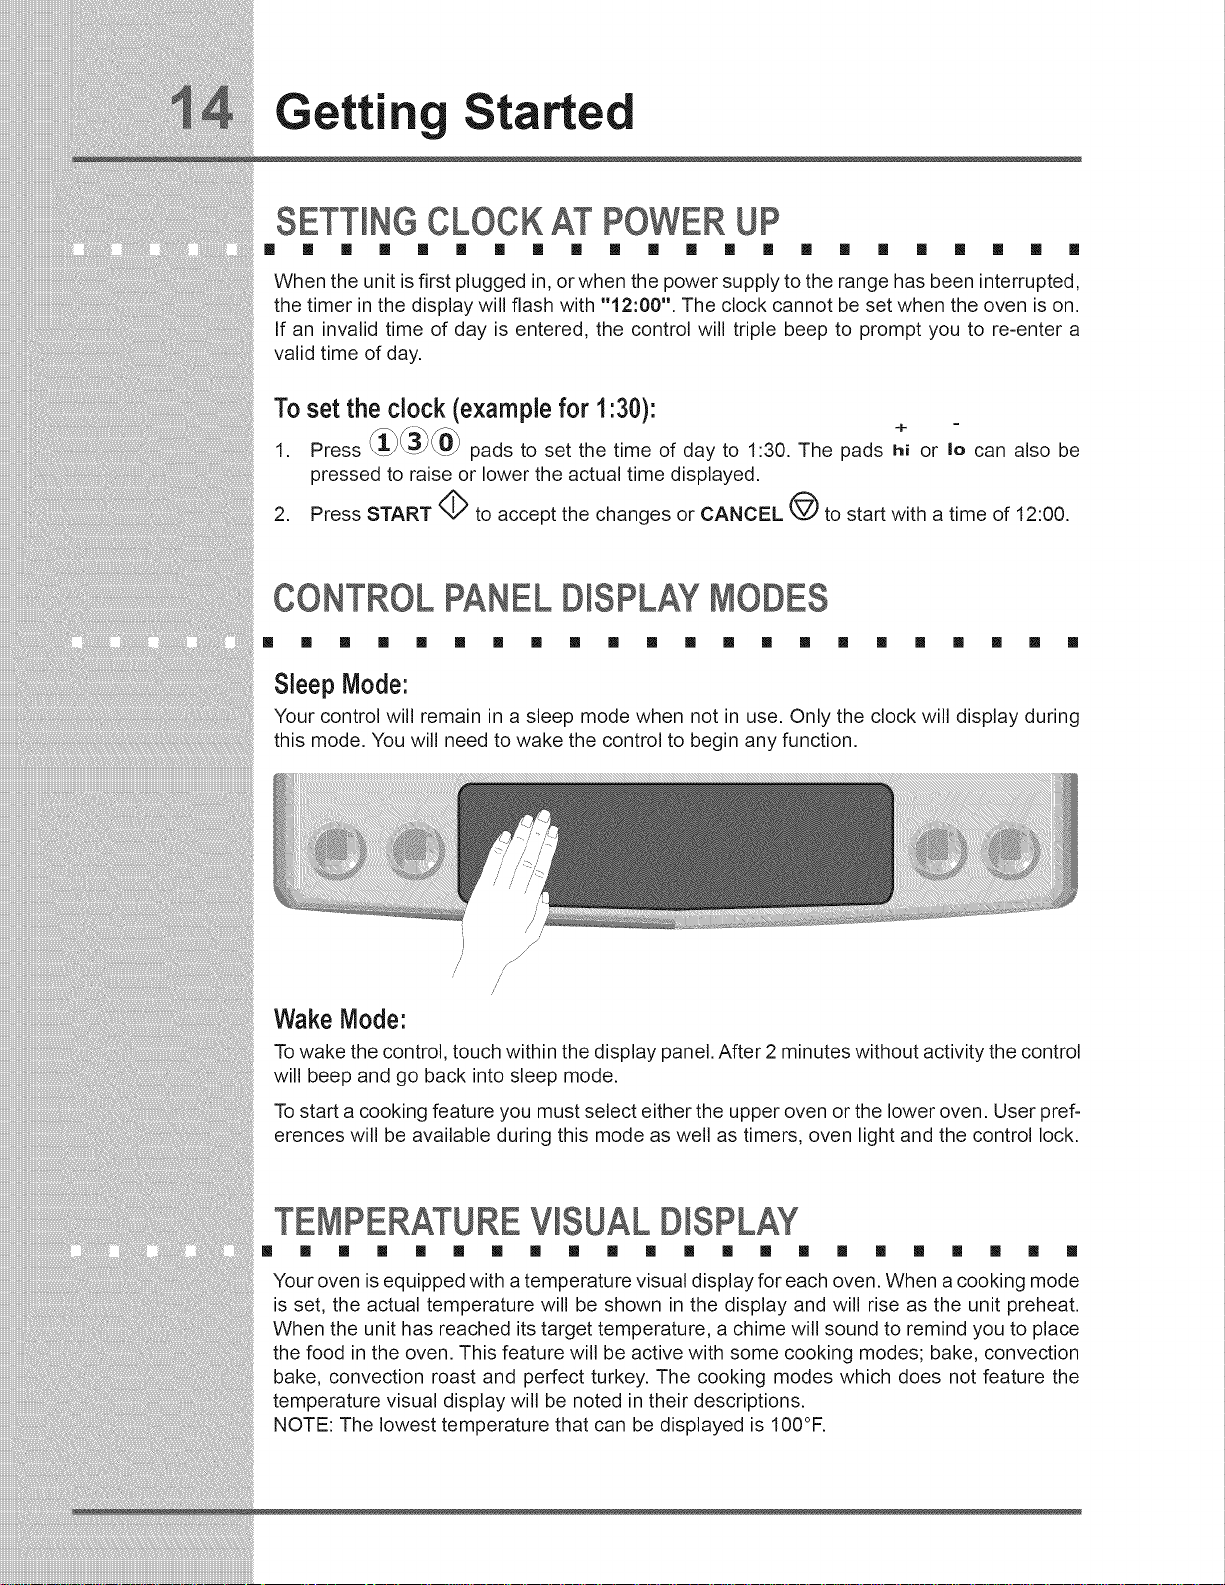
Sleep Mode:
Your control will remain in a sleep mode when not in use. Only the clock will display during
this mode. You will need to wake the control to begin any function.
Wake Mode:
Towake the control, touch within the display panel. After 2 minutes without activity the control
will beep and go back into sleep mode.
Tostart a cooking feature you must select either the upper oven or the lower oven. User pref-
erences will be available during this mode as well as timers, oven light and the control lock.
TEMPERATUREVISUAL D SPLAY
[] [] [] [] [] [] [] [] [] [] [] [] [] [] [] [] [] [] [] [] [] []
Your oven is equipped with a temperature visual display for each oven. When a cooking mode
is set, the actual temperature will be shown in the display and will rise as the unit preheat.
When the unit has reached its target temperature, a chime will sound to remind you to place
the food in the oven. This feature will be active with some cooking modes; bake, convection
bake, convection roast and perfect turkey. The cooking modes which does not feature the
temperature visual display will be noted in their descriptions.
NOTE: The lowest temperature that can be displayed is 100°F.
Getting Started
OVENUGHT
[] [] [] [] [] [] [] [] [] [] [] [] [] [] [] [] [] [] [] [] [] []
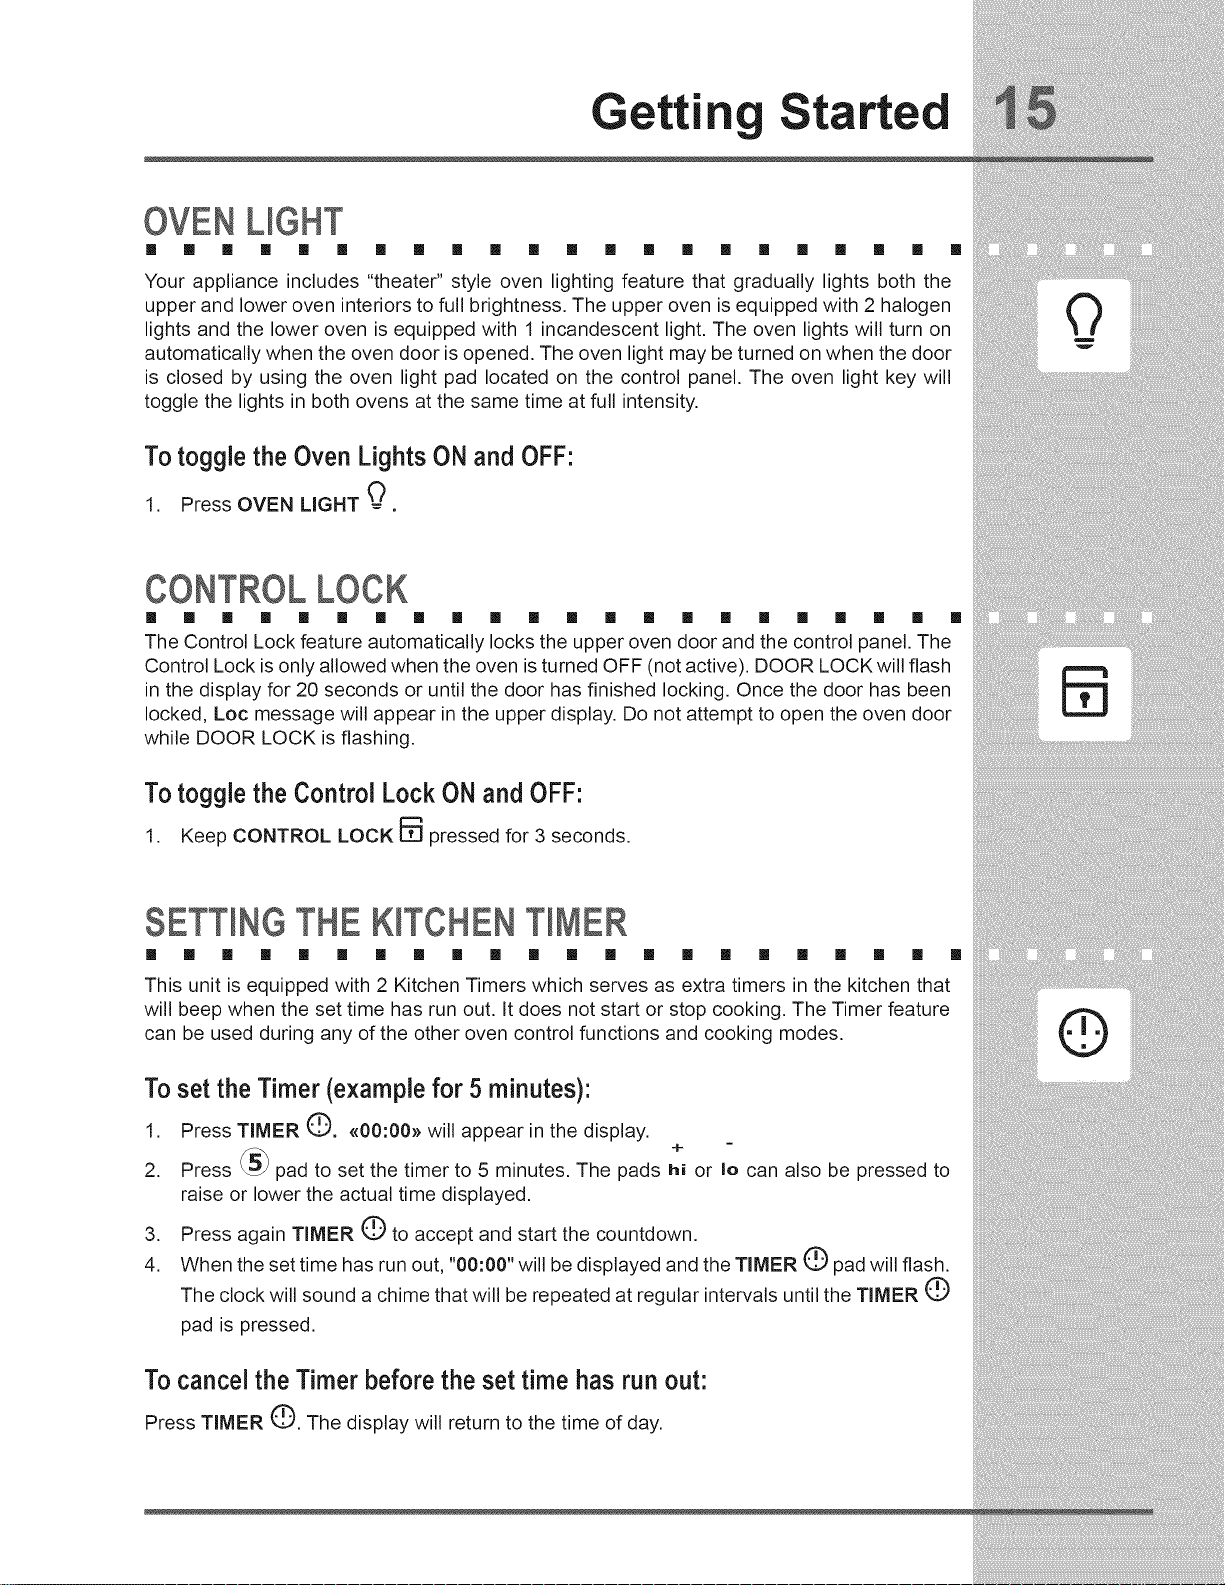
Your appliance includes "theater" style oven lighting feature that gradually lights both the
upper and lower oven interiors to full brightness. The upper oven is equipped with 2 halogen
lights and the lower oven is equipped with 1 incandescent light. The oven lights will turn on
automatically when the oven door is opened. The oven light may be turned on when the door
is closed by using the oven light pad located on the control panel. The oven light key will
toggle the lights in both ovens at the same time at full intensity.
Totoggle the Oven Lights ONand OFF:
1. Press OVEN LIGHT _
CONTROLLOCK
[] m [] [] [] [] [] [] [] [] [] [] [] [] [] [] [] [] [] [] [] []
The Control Lock feature automatically locks the upper oven door and the control panel. The
Control Lock is only allowed when the oven is turned OFF (not active). DOOR LOCK will flash
in the display for 20 seconds or until the door has finished locking. Once the door has been
locked, Loc message will appear in the upper display. Do not attempt to open the oven door
while DOOR LOCK is flashing.
Totoggle the Control Lock ONand OFF:
1. Keep CONTROL LOCK _ pressed for 3 seconds.
SETTINGTHE KITCHENTIMER
[] [] [] [] [] [] [] [] [] [] [] [] [] [] [] [] [] [] [] [] [] []
This unit is equipped with 2 Kitchen Timers which serves as extra timers in the kitchen that
will beep when the set time has run out. It does not start or stop cooking. The Timer feature
can be used during any of the other oven control functions and cooking modes.
Toset the Timer(example for 5 minutes):
1. Press TIMER (_. _{00:00>>will appear in the display,
2. Press _5_ pad to set the timer to 5 minutes, The pads hi or Io can also be pressed to
raise or lower the actual time displayed,
3. Press again TIMER Q to accept and start the countdown.
4. When the set time has run out, "00:00" will be displayed and the TIMER C) pad will flash.
The clock will sound a chime that will be repeated at regular intervals until the TIMER (_
pad is pressed.
4-
Tocancel the Timerbefore the set time has run out:
Press TIMER (_. The display will return to the time of day.
Surface Cookin
LOCATIONSOF THE BURNERS
[] [] [] [] [] [] [] [] [] [] [] [] [] [] [] [] [] [] [] [] [] []
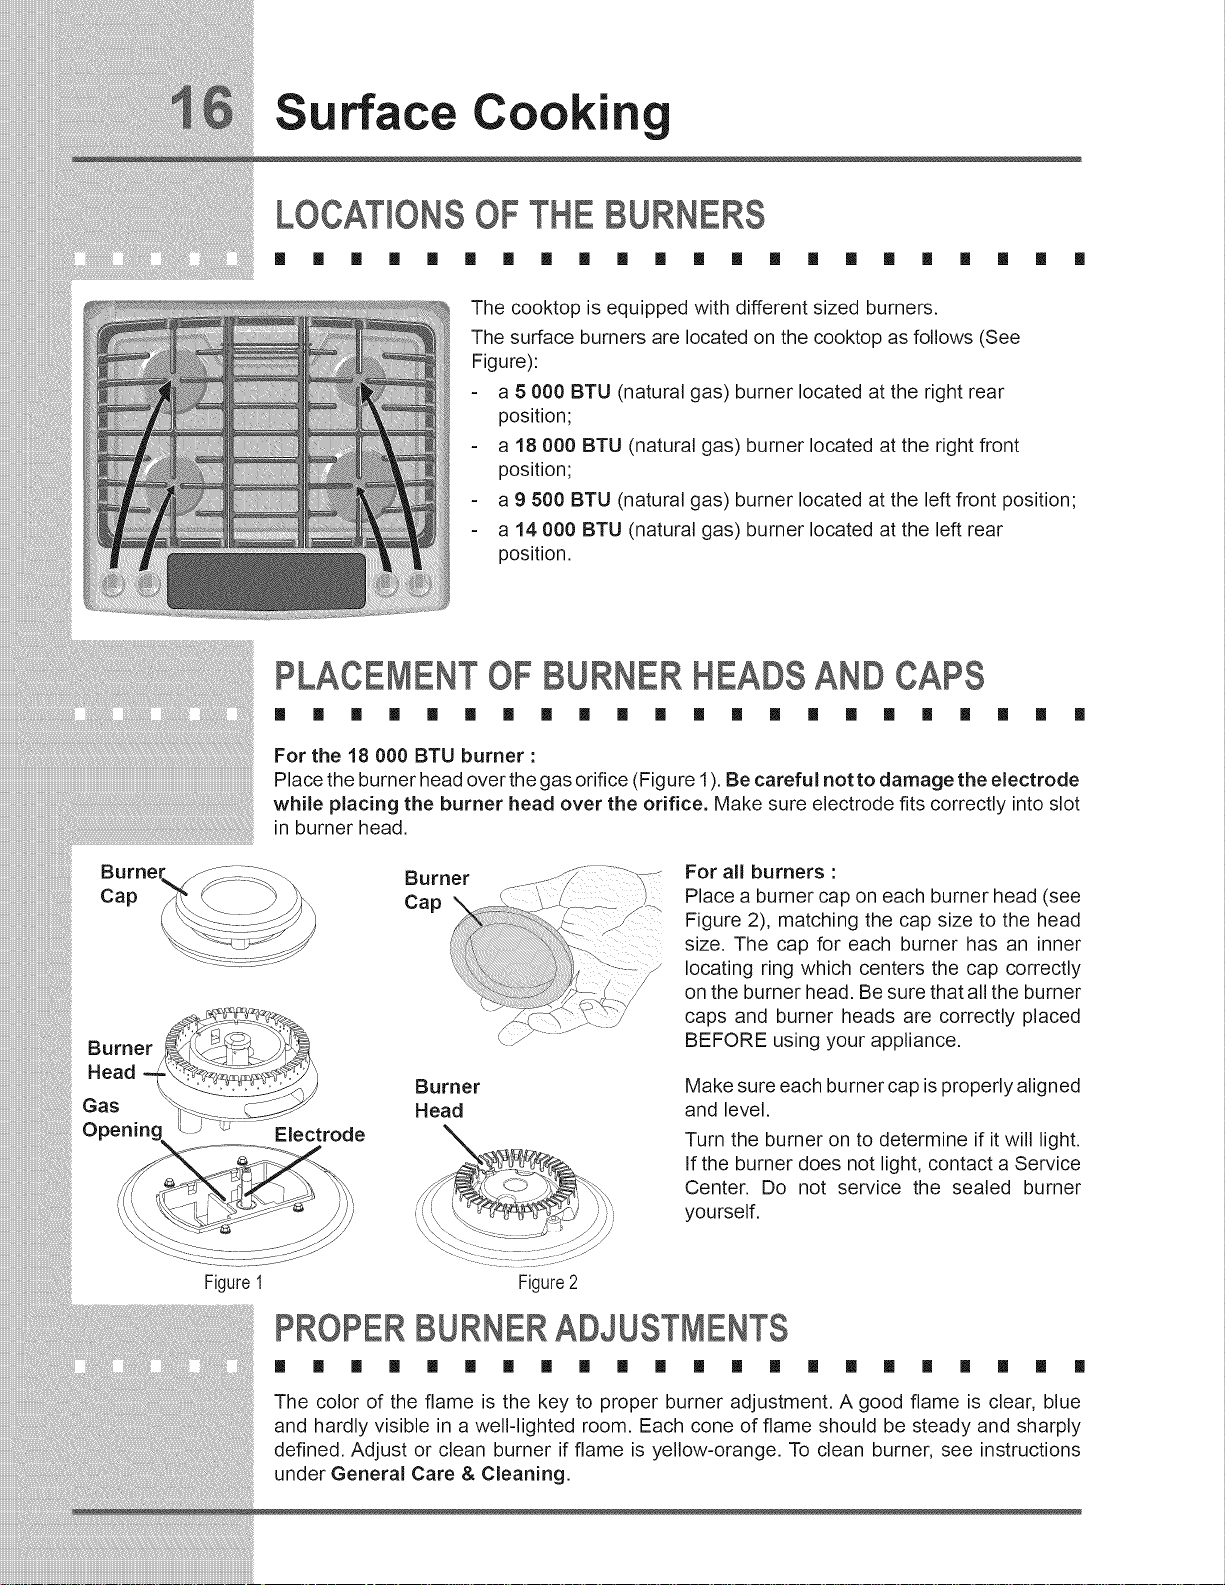
The cooktop is equipped with different sized burners.
The surface burners are located on the cooktop as follows (See
Figure):
a 5 000 BTU (natural gas) burner located at the right rear
position;
a 18 000 BTU (natural gas) burner located at the right front
position;
a 9 500 BTU (natural gas) burner located at the left front position;
a 14 000 BTU (natural gas) burner located at the left rear
position.
PLACEMENTOF BURNER HEADSAND CAPS
[] [] [] [] [] [] [] [] [] [] [] [] [] [] [] [] [] [] [] [] [] []
Burner __
For the 18 000 BTU burner :
Place the burner head over the gas orifice (Figure 1).Be careful not to damage the electrode
while placing the burner head over the orifice. Make sure electrode fits correctly into slot
in burner head.
Burner
Cap J
Burner
Head
Electrode
Figure1 Figure2
PROPER BURNER ADJUSTMENTS
For all burners :
Place a burner cap on each burner head (see
Figure 2), matching the cap size to the head
size. The cap for each burner has an inner
locating ring which centers the cap correctly
on the burner head. Be sure that all the burner
caps and burner heads are correctly placed
BEFORE using your appliance.
Make sure each burner cap is properly aligned
and level.
Turn the burner on to determine if it will light.
If the burner does not light, contact a Service
Center. Do not service the sealed burner
yourself.
[] [] [] [] [] [] [] [] [] [] [] [] [] [] [] [] [] [] [] [] [] []
The color of the flame is the key to proper burner adjustment. A good flame is clear, blue
and hardly visible in a well-lighted room. Each cone of flame should be steady and sharply
defined. Adjust or clean burner if flame is yellow-orange. To clean burner, see instructions
under General Care & Cleaning.
 Loading...