

Page 1
Originalbetriebsanleitung
k
Batterie-Ladegerät
Original operating instructions
t
Battery Charger
Istruzioni per l’uso originali
C
Caricabatteria
Original-bruksanvisning
U
Batteriladdare
Manual de instrucciones original
m
Cargador de batería
Alkuperäiskäyttöohje
q
Akkulaturi
Πρωτότυπες Οδηγίες χρήσης
z
Φορτιστής µπαταριών
7
Art.-Nr.: 10.021.50 I.-Nr.: 11010
BT-BC 2 D
Page 2
1
3 A B
1
2
2 3
C
H2O dest.
1 cm
2
Page 3
4 5
6
7
(20° C)
kg/l
1,28
1,21
1,16
A
A
A
98
3
Page 4
12
1 2 3
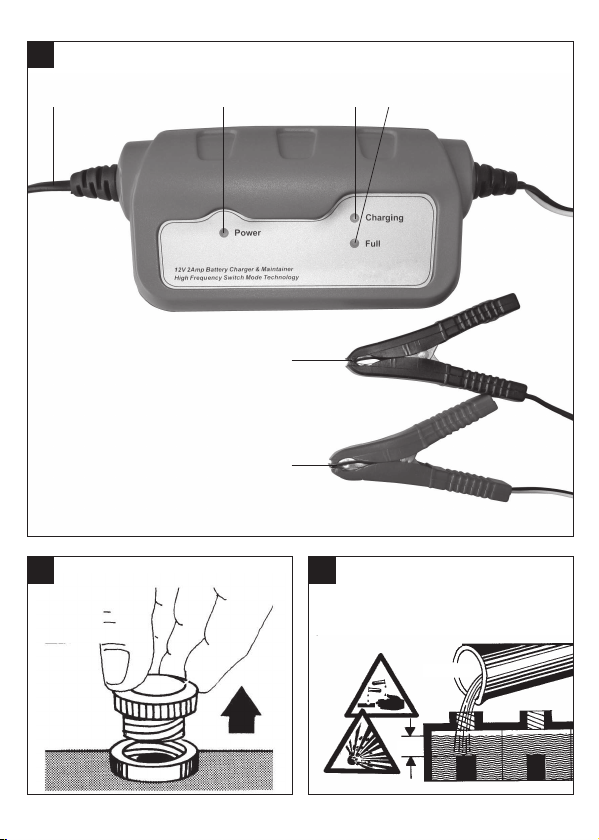
Vor dem Laden Gebrauchsanweisung lesen · Nur zur Verwendung
in Innenräumen · Vom Netz trennen, bevor Verbindungen zur
Batterie geschlossen oder geöffnet werden · ACHTUNG: Explosive
Gase, Flammen und Funken vermeiden. Während des Ladens für
ausreichende Belüftung sorgen.
4
1110
4
Page 5

Inhaltsverzeichnis
1. Sicherheitshinweise
2. Gerätebeschreibung und Lieferumfang
3. Bestimmungsgemäße Verwendung
4. Technische Daten
5. Vor Inbetriebnahme
6. Bedienung
7. Austausch der Netzanschlussleitung
8. Reinigung, Wartung und Ersatzteilbestellung
9. Entsorgung und Wiederverwertung
10. Lagerung
D
5
Page 6

D
m Achtung!
Beim Benutzen von Geräten müssen einige
Sicherheitsvorkehrungen eingehalten werden, um
Verletzungen und Schäden zu verhindern. Lesen Sie
diese Bedienungsanleitung / Sicherheitshinweise
deshalb sorgfältig durch. Bewahren Sie diese gut auf,
damit Ihnen die Informationen jederzeit zur
Verfügung stehen. Falls Sie das Gerät an andere
Personen übergeben sollten, händigen Sie diese
Bedienungsanleitung / Sicherheitshinweise bitte mit
aus. Wir übernehmen keine Haftung für Unfälle oder
Schäden, die durch Nichtbeachten dieser Anleitung
und den Sicherheitshinweisen entstehen.
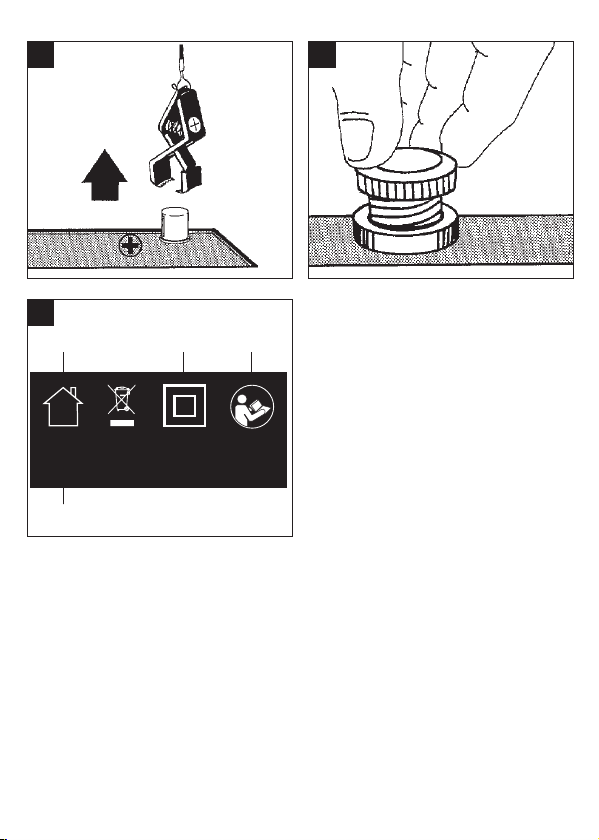
Erklärung des Hinweisschildes auf dem Gerät
(siehe Bild 12)
1 = Nur zur Verwendung in Innenräumen
2 = Gerät ist schutzisoliert
3 = WARNUNG - Zur Verringerung eines Ver-
letzungsrisikos Bedienungsanleitung lesen!
4 = Vor dem Laden Gebrauchsanweisung lesen; Nur
zur Verwendung in Innenräumen; Vom Netz trennen, bevor Verbindungen zur Batterie geschlossen oder geöffnet werden; ACHTUNG! Explosive
Gase, Flammen und Funken vermeiden. Während des Ladens für ausreichende Belüftung sorgen.
1. Sicherheitshinweise
● Beim Aufladen der Batterie unbedingt eine
Schutzbrille und Handschuhe tragen! Es besteht
durch die ätzende Säure erhöhte
Verletzungsgefahr!
● Beim Aufladen der Batterie darf keine Kleidung
aus synthetischen Stoffen getragen werden, um
Funkenbildung durch elektrostatische Entladung
zu vermeiden.
● WARNUNG! Explosive Gase - Flammen und
Funken sind zu vermeiden
● Vor dem Anschließen und Abklemmen der
Batterie ist das Gerät vom Netz zu trennen.
● Das Ladegerät beinhaltet Bauteile, wie z. B.
Schalter und Sicherung, die möglicherweise
Lichtbogen und Funken erzeugen. Unbedingt auf
gute Belüftung in der Garage oder Raum achten!
● Das Ladegerät ist nur für 12V Bleiakkus geeignet.
● Keine “nicht-wieder-aufladbaren Batterien” oder
defekte Batterien laden.
● Beachten Sie die Hinweise des
Batterieherstellers.
● Trennen Sie das Gerät vom Netz, bevor Sie die
Batterie an- bzw. abklemmen.
● Achtung! Flammen und Funken vermeiden.
6
Beim Laden wird explosives Knallgas frei.
● Gerät nur in trockenen Räumen benutzen.
● Das Ladegerät nicht auf geheizten Untergrund
stellen.
● Halten Sie die Lüftungsschlitze frei von
Verunreinigungen.
● Vorsicht! Batteriesäure ist ätzend.
Spritzer auf Haut und Kleidung sofort mit
Seifenlauge abwaschen. Säurespritzer im
Auge sofort mit Wasser spülen (15 min.) und
Arzt aufsuchen.
● Laden Sie keine nicht ladefähigen Batterien.
● Angaben und Hinweise des Fahrzeugherstellers
zum Batterieladen beachten.
● Laden Sie nicht mehrere Batterien gleichzeitig
● Schließen Sie die Ladezangen nicht kurz.
● Das Netzanschlusskabel und die Ladeleitungen
müssen in einwandfreien Zustand sein
● Halten Sie die Kinder von der Batterie und dem
Ladegerät fern.
● Achtung! Bei stechenden Gasgeruch besteht
akute Explosionsgefahr. Gerät nicht
abschalten. Ladezangen nicht entfernen.
Raum sofort gut belüften. Batterie von einem
Kundendienst überprüfen lassen.
● Zweckentfremden Sie nicht das Kabel
Tragen Sie das Ladegerät nicht am Kabel, und
benützen Sie es nicht, um den Stecker aus der
Steckdose zu ziehen. Schützen Sie das Kabel vor
Hitze, Öl und scharfen Kanten.
● Kontrollieren Sie Ihr Gerät auf Beschädigungen.
Defekte oder beschädigte Teile dürfen nur
sachgemäß durch eine Kundendienstwerkstatt
repariert oder ausgewechselt werden, soweit
nichts anderes in der Bedienungsanleitung
angegeben ist.
● Netzspannungswert (220-240V ~ 50Hz) einhal-
ten.
● Halten Sie die Anschlüsse sauber und schützen
Sie sie vor Korrosion.
● Bei jeglichen Reinigungs- und Wartungsarbeiten
ist das Gerät vom Netz zu trennen.
● Bei Anschluss und Aufladen der Batterie, bei
Auffüllen von Säure bzw. Nachfüllen von
destillierten Wasser sind säurefeste
Schutzhandschuhe und Schutzbrille zu
tragen.
● Die Netzleitung muss regelmäßig auf Schäden
oder Abnutzung überprüft und gegebenfalls
ausgewechselt werden. Verwenden Sie bitte
mind. PVC Schlauchleitungen (H03VV).
● Wenn die Anschlussleitung dieses Gerätes
beschädigt wird, muss sie durch den Hersteller
oder seinen Kundendienst oder eine ähnlich
qualifizierte Stelle ersetzt werden, um
Gefährdungen zu vermeiden.
Page 7

● Achtung! Ladezeit nicht überschreiten. Nach
dem Ladezeitende den Netzstecker aus der
Steckdose ziehen und das Ladegerät von der
Batterie trennen,
Dieses Gerät ist nicht dafür bestimmt, durch Personen (einschließlich Kinder) mit eingeschränkten physischen, sensorischen oder geistigen Fähigkeiten
oder mangels Erfahrung und/oder mangels Wissen
benutzt zu werden, es sei denn, sie werden durch
eine für ihre Sicherheit zuständige Person beaufsichtigt oder erhielten von ihr Anweisungen, wie das Gerät zu benutzen ist. Kinder sollten beaufsichtigt werden, um sicherzustellen, dass sie nicht mit dem Gerät spielen.
m WARNUNG
Lesen Sie alle Sicherheitshinweise und Anweisungen. Versäumnisse bei der Einhaltung der Si-
cherheitshinweise und Anweisungen können elektrischen Schlag, Brand und/oder schwere Verletzungen verursachen zur Folge haben.
Bewahren Sie alle Sicherheitshinweise und Anweisungen für die Zukunft auf.
Entsorgung
Batterien: Nur über KFZ-Werkstätten, spezielle
Annahmestellen oder Sondermüll-Sammelstellen.
Erkundigen Sie sich in der örtlichen Gemeinde.
beuteln, Folien und Kleinteilen spielen! Es besteht Verschluckungs- und Erstickungsgefahr!
● Batterieladegerät
● Originalbetriebsanleitung
3. Bestimmungsgemäße Verwendung
Das Ladegerät ist zum Laden von nicht wartungsfreien oder wartungsfreien 12V Starterbatterien (Bleisäureakkus) die bei Kraftfahrzeugen eingesetzt werden bestimmt. Das Gerät ist auch für Bleigel Batterien geeignet.
Das Gerät darf nur nach seiner Bestimmung verwendet werden. Jede weitere darüber hinausgehende
Verwendung ist nicht bestimmungsgemäß. Für daraus hervorgerufene Schäden oder Verletzungen
aller Art haftet der Benutzer/Bediener und nicht der
Hersteller.
Bitte beachten Sie, dass unsere Geräte
bestimmungsgemäß nicht für den gewerblichen,
handwerklichen oder industriellen Einsatz konstruiert
wurden. Wir übernehmen keine Gewährleistung,
wenn das Gerät in Gewerbe-, Handwerks- oder
Industriebetrieben sowie bei gleichzusetzenden
Tätigkeiten eingesetzt wird.
2. Gerätebeschreibung und
Lieferumfang (Bild 1)
2.1 Gerätebeschreibung
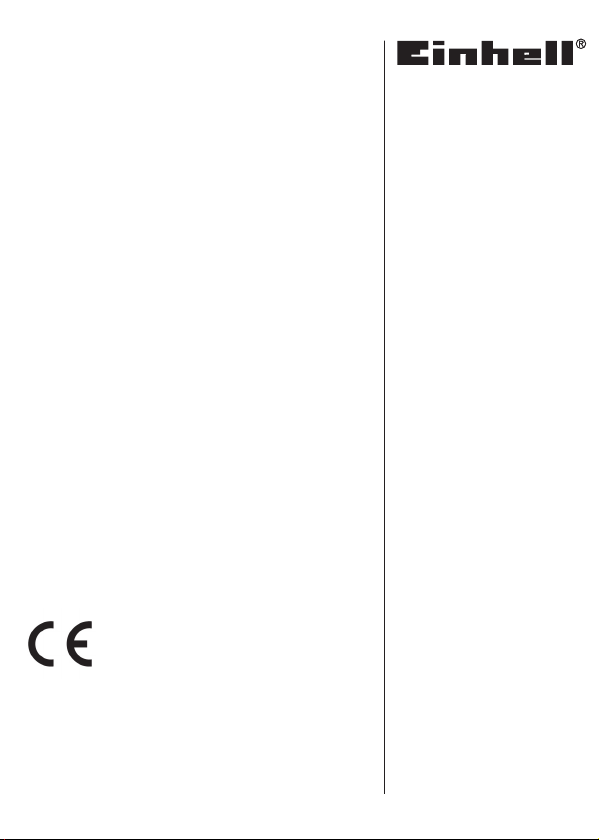
1 Ladezange schwarz (-)
2 Ladezange rot (+)
3 Netzleitung
2.2 Lieferumfang
● Öffnen Sie die Verpackung und nehmen Sie das
Gerät vorsichtig aus der Verpackung.
● Entfernen Sie das Verpackungsmaterial sowie
Verpackungs-/ und Transportsicherungen (falls
vorhanden).
● Überprüfen Sie, ob der Lieferumfang vollständig
ist.
● Kontrollieren Sie das Gerät und die Zubehörteile
auf Transportschäden.
● Bewahren Sie die Verpackung nach Möglichkeit
bis zum Ablauf der Garantiezeit auf.
ACHTUNG
Gerät und Verpackungsmaterial sind kein Kinderspielzeug! Kinder dürfen nicht mit Kunststoff-
4. Technische Daten
Netzspannung: 220-240V ~ 50Hz
Nenn - Eingangsstrom: 0,32 A
Nenn-Ausgangsspannung: 12 V d.c.
Nennausgangsstrom: 2 A
Batteriekapazität bei: 3-40 Ah
5. Vor Inbetriebnahme
Nach Angabe der meisten KFZ-Hersteller ist die
Batterie vor dem Laden vom Bordnetz zu
trennen. Wir weisen darauf hin, dass die Fahrzeuge in der Standardausstattung bereits mit
zahlreichen Elektronikbausteinen (wie z. B. ABS,
ASR, Einspritzpumpe, Bordcomputer) ausgerüstet sind. Auftretende Spannungsspitzen können
zu evtl. Defekten in den Elektronikbausteinen
führen. Daher sollte die Batterie beim Laden vom
Bordnetz getrennt werden.
Beachten Sie bitte die Hinweise in den Bedie-
7
Page 8

D
nungsanleitungen für Auto, Radio, Navigationssystem usw.
Hinweis zur Automatikladung
Das Ladegerät ist ein Microprozessor gesteuertes
Automatikladegerät, d.h. es ist besonders zum Laden von wartungsfreien Batterien sowie zur Langzeitladung und zur Ladeerhaltung von Batterien, die
nicht ständig in Gebrauch sind, z.B. für Boote, Rasenmäher und dergleichen geeignet. Aufgrund des
integrierten Mikroprozessors erfolgt das Laden in
drei Stufen.
Stufe eins lädt die Batterie mit einem annähernd konstanten Strom bis etwa 70% voll. Stufe zwei lädt die
Batterie bei konstanter Spannung bis etwa 90% voll.
Stufe drei hält die Batteriespannung konstant und
damit die Batterie immer voll geladen.
Der Ladevorgang muss nicht überwacht werden.
Bild 1: LED Anzeigen
A) LED Anzeige „Power“
Befindet sich der Netzstecker in einer spannungsführenden (220-240V~50Hz) Steckdose, leuchtet die
LED.
B) LED Anzeige „Charging“
Die LED leuchtet, sobald das Gerät lädt.
C) LED Anzeige „Full“
Die LED leuchtet, sobald die Batterie vollgeladen ist
und das Ladegerät auf automatische Erhaltungsladung geschaltet hat.
Hinweise:
● In einigen Fällen wird der Ladevorgang sehr
schnell beendet, ohne dass die Batterie
anschließend die angegebene Leistung
erbringen kann. Die Batterie hat an Kapazität
verloren und ist zu ersetzen.
● Zeigt das Ladegerät nichts an und wird die
Batterie nicht geladen, so prüfen Sie ob am
Ladegerät Netzspannung anliegt. Ziehen Sie den
Netzstecker und prüfen Sie die
Batterieanschlüsse.
● Laden Sie die Batterie nur bei Temperaturen
über 0°C.
● Laden Sie Bootsbatterien nur außerhalb des
Bootes.
● Das Gerät überprüft den Batteriestatus einige
Sekunden und schaltet anschließend auf den
richtigen Ladezustand.
● Starten Sie niemals einen Motor ohne ange-
schlossene Batterie.
● Starten Sie niemals einen Motor mit ange-
schlossenem Ladegerät.
8
● Im Normalfall ist der negative Batteriepol mit der
Karosserie verbunden und Sie gehen zum Laden
wie in den Bildern 2 – 11 beschrieben vor.
● Im Ausnahmefall kann es möglich sein, dass der
positive Batteriepol mit der Karosserie verbunden
ist. In diesem Ausnahmefall ändern sich Bild 4
und Bild 5. Schließen Sie in diesem Fall zuerst
das schwarze Ladekabel an den Minuspol der
Batterie an und anschließend das rote Ladekabel
entfernt von Batterie und Benzinleitung an der
Karosserie.
Zusätzliche Hinweise zum Laden von Batterien
außerhalb des Fahrzeuges
● Beim Entfernen der Batterie immer zuerst die
Verbindung zum geerdeten Batteriepol entfernen
und sicherstellen, dass alle Verbraucher
ausgeschaltet sind.
● Schließen Sie zuerst das rote Ladekabel an den
Pluspol der Batterie, anschließend das schwarze
Ladekabel an den Minuspol der Batterie an.
Stecken Sie den Netzstecker in die Steckdose.
Nach dem Laden entfernen Sie zuerst den Netzstecker aus der Steckdose, anschließend das
schwarze Ladekabel und zuletzt das rote Ladekabel von den Batteriepolen. Beachten Sie alle
Hinweise in dieser Anleitung.
● Achten Sie beim Einbauen der Batterie auf die
Polarität und stellen Sie zuerst die Verbindung
zum geerdeten Batteriepol her.
6. Bedienung
Zum Laden der Batterie gehen Sie wie folgt vor:
Bild 2:
Lösen oder entnehmen Sie die Batteriestopfen (falls
vorhanden) von der Batterie.
Bild 3:
Überprüfen Sie den Säurestand Ihrer Batterie. Falls
notwendig füllen Sie destilliertes Wasser ein (falls
möglich). Achtung! Batteriesäure ist ätzend.
Säurespritzer sofort mit viel Wasser gründlich
abspülen, notfalls einen Arzt aufsuchen.
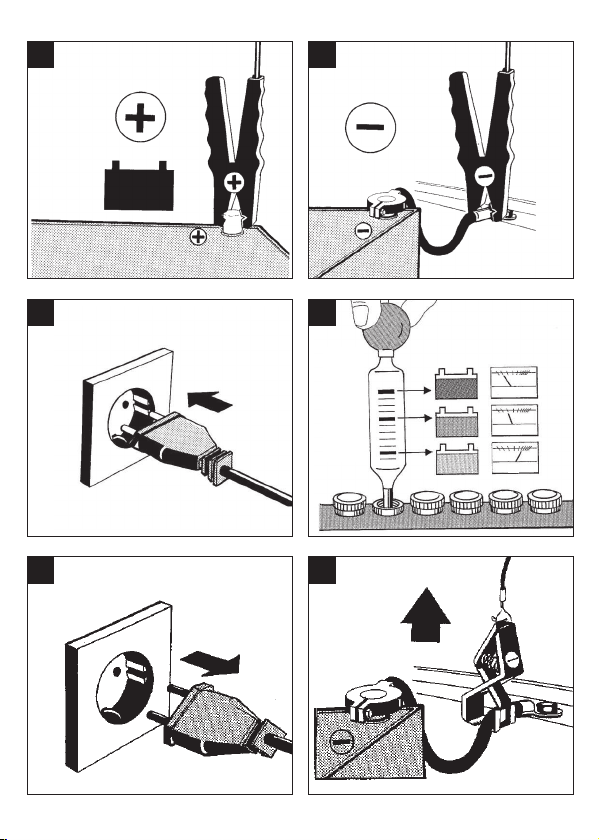
Bild 4:
Schließen Sie zuerst das rote Ladekabel an den
Pluspol der Batterie an.
Bild 5:
Anschließend wird das schwarze Ladekabel entfernt
von Batterie und Benzinleitung an der Karrosserie
angeschlossen.
Page 9

Bild 6:
Nachdem die Batterie an das Ladegerät angeschlossen ist, können Sie das Ladegerät an eine Steckdose
mit 220-240V~50Hz anschließen. Ein Anschluss an
eine Steckdose mit einer anderen Netzspannung ist
nicht zulässig. Achtung! Durch das Laden kann gefährliches Knallgas entstehen, daher während des
Ladens Funkenbildung und offenes Feuer vermeiden.
Explosionsgefahr!
Berechnung der Ladezeit:
Die Ladezeit wird vom Ladezustand der Batterie
bestimmt. Bei einer leeren Batterie kann die
ungefähre Ladezeit mit folgender Formel berechnet
werden:
Ladezeit/h =
Beispiel = = 9,6 h max.
Bild 7:
Der genaue Ladezustand kann nur durch Messen der
Säuredichte mit einem Säureheber ermittelt werden.
Hinweis! Beim Ladevorgang werden Gase frei (Bläschenbildung an der Oberfläche der Batterieflüssigkeit). Achten Sie daher auf gute Belüftung in den
Räumen.
Bild 8:
Ziehen Sie den Netzstecker aus der Steckdose.
Bild 9:
Lösen Sie zuerst das schwarze Ladekabel von der
Karrosserie.
Bild 10:
Anschließend lösen Sie das rote Ladekabel vom
Pluspol der Batterie.
Bild 11:
Batteriestopfen wieder aufschrauben oder
aufdrücken (falls vorhanden).
Überlastschutz
Das Ladegerät ist elektronisch gegen Überlastung,
Kurzschluss und Falschpolung geschützt.
Bei falsch angeschlossenen Polklemmen funktioniert
das Gerät nicht.
Batteriekapazität in Ah
Amp. (Ladestrom arithm.)
24 Ah
2,5 A
D
7. Austausch der Netzanschlussleitung
Wenn die Netzanschlussleitung dieses Gerätes
beschädigt wird, muss sie durch den Hersteller oder
seinen Kundendienst oder eine ähnlich qualifizierte
Person ersetzt werden, um Gefährdungen zu
vermeiden.
8. Reinigung, Wartung und
Ersatzteilbestellung
Ziehen Sie vor allen Reinigungsarbeiten den
Netzstecker.
8.1 Reinigung
● Halten Sie Schutzvorrichtungen, Luftschlitze und
Gehäuse so staub- und schmutzfrei wie möglich.
Reiben Sie das Gerät mit einem sauberen Tuch
ab oder blasen Sie es mit Druckluft bei niedrigem
Druck aus.
● Wir empfehlen, dass Sie das Gerät direkt nach
jeder Benutzung reinigen.
● Reinigen Sie das Gerät regelmäßig mit einem
feuchten Tuch und etwas Schmierseife.
Verwenden Sie keine Reinigungs- oder Lösungsmittel; diese könnten die Kunststoffteile des Gerätes angreifen. Achten Sie darauf, dass kein
Wasser in das Geräteinnere gelangen kann.
● Das Ladegerät soll zur Aufbewahrung in einem
trockenem Raum abgestellt werden. Die Ladeklemmen sind von Korrosion zu reinigen.
8.2 Wartung
Im Geräteinneren befinden sich keine weiteren zu
wartenden Teile.
8.3 Wartung und Pflege der Batterie
● Achten Sie darauf, dass Ihre Batterie immer fest
eingebaut ist.
● Eine einwandfreie Verbindung an das
Leitungsnetz der elektrischen Anlage muss
gewährleistet sein.
● Batterie sauber und trocken halten.
Anschlussklemmen mit einem säurefreien und
säurebeständigen Fett
(Vaseline) leicht einfetten.
● Bei nicht wartungsfreien Batterien ca. alle 4
Wochen Höhe des Säurestandes prüfen und bei
Bedarf nur destilliertes Wasser nachfüllen.
9
Page 10

D
8.4 Ersatzteilbestellung:
Bei der Ersatzteilbestellung sollten folgende Angaben
gemacht werden;
● Typ des Gerätes
● Artikelnummer des Gerätes
● Ident-Nummer des Gerätes
● Ersatzteilnummer des erforderlichen Ersatzteils
Aktuelle Preise und Infos finden Sie unter
www.isc-gmbh.info
9. Entsorgung und Wiederverwertung
Das Gerät befindet sich in einer Verpackung um
Transportschäden zu verhindern. Diese Verpackung
ist Rohstoff und ist somit wieder verwendbar oder
kann dem Rohstoffkreislauf zurückgeführt werden.
Das Gerät und dessen Zubehör bestehen aus
verschiedenen Materialien, wie z.B. Metall und
Kunststoffe. Führen Sie defekte Bauteile der
Sondermüllentsorgung zu. Fragen Sie im
Fachgeschäft oder in der Gemeindeverwaltung nach!
10. Lagerung
Lagern Sie das Gerät und dessen Zubehör an einem
dunklen, trockenen und frostfreiem sowie für Kinder
unzugänglichem Ort. Die optimale Lagertemperatur
liegt zwischen 5 und 30 ˚C. Bewahren Sie das
Elektrowerkzeug in der Originalverpackung auf.
10
Page 11

Table of contents
1. Safety Information
2. Layout and items supplied
3. Intended use
4. Technical data
5. Before starting the equipment
6. Operation
7. Replacing the power cable
8. Cleaning, maintenance and ordering of spare parts
9. Disposal and recycling
10. Storage
GB
11
Page 12

GB
m Important.
When using the equipment, a few safety precautions
must be observed to avoid injuries and damage.
Please read the complete operating instructions and
safety information with due care. Keep this manual in
a safe place so that the information is available at all
times. If you give the equipment to any other person,
hand over these operating instructions and the safety
information as well. We cannot accept any liability for
damage or accidents which arise due to failure to
follow these instructions and the safety information.
Explanation of the warning signs on the
equipment (see Fig. 12)
1 = For indoor use only!
2 = The equipment is totally insulated
3 = CAUTION - Read the operating instructions to
reduce the risk of injury
4 = Read the operating instructions prior to charging;
For indoor use only; Disconnect the charger from
the mains supply before inserting or removing the
battery; CAUTION! Avoid explosive gases,
flames and sparks. Provide good ventilation
during the charging process.
1. Safety Information
●
Wear safety goggles and gloves when charging
the battery. The caustic acid presents a high risk
of injury.
● Do not wear any items of clothing made of
synthetic materials so as to avoid spark formation
caused by electrostatic discharge when charging
the battery.
● CAUTION! Explosive gases – avoid flames and
sparks
● Disconnect the equipment from the mains supply
before you connect or disconnect the battery.
● The charger contains components such as the
switch and fuse which may generate arcs and
sparks. It is essential to ensure that there is good
ventilation in the garage or room.
● The charger is suitable for only 12 V lead
batteries.
● Do not charge any “non-rechargeable batteries”
or defective batteries.
● Refer to the instructions supplied by the battery
manufacturer.
● Disconnect the equipment from the mains supply
before you connect or disconnect the battery.
● Important. Avoid flames and sparks. Explosive
gas is released during the charging process.
● Store the equipment in a dry indoor location only.
● Do not place the charger on a heated surface.
12
● Keep the air vents clean.
● Caution! Battery acid is aggressive. Should
any acid splash onto hands or clothing, wash
off immediately with soap solution. Should
any acid splash into your eyes, wash it out
immediately with water (for 15 minutes) and
seek the advice of a doctor.
● Do not charge any non-rechargeable batteries.
● Refer to the information and instructions provided
by the vehicle manufacturer relating to charging
the battery.
● Do not charge more than one battery at any one
time.
● Do not short circuit the charger clamps.
● The mains connection lead and the charging
cables must be in perfect condition.
● Keep children away from the battery and charger.
● Important. If you smell an acrid odor of gas,
this indicates that there is an acute danger of
explosion. Do not switch off the device. Do
not remove the charger clamps. Ventilate the
room immediately. Have the battery checked
by customer service staff.
● Do not use the cable for purposes other than that
for which it is designed.
Do not carry the charger by its cable and do not
use the cable to pull the plug out of the socket.
Protect the cable from heat, oil and sharp edges.
● Check the equipment for damage. Unless
otherwise stated in the operating instructions,
defective or damaged parts must be repaired or
replaced by a customer service workshop.
● Only ever use the supply voltage specified (220-
240V ~ 50Hz).
● Keep the connectors clean and protect them from
corrosion.
● Disconnect the equipment from the mains supply
before starting any cleaning or maintenance
work.
● Wear acid-resistant gloves and safety
goggles when connecting and charging the
battery and when topping up the battery with
acid or distilled water.
● Check the mains cable for signs of damage or
wear at regular intervals and replace if necessary.
Use only PVC hose cables (H03VV).
● If the power cable for this machine is damaged, it
must be replaced by the manufacturer or its aftersales service or similarly trained personnel to
avoid danger.
● Important. Do not exceed the charging time.
After the end of the charging time pull the plug out
of the socket and disconnect the charger from the
battery.
Page 13

This equipment is not designed to be used by people
(including children) with limited physical, sensory or
mental capacities or those with no experience and/or
knowledge unless they are supervised by a person
who is responsible for their safety or they have
received instructions from such a person in how to
use the equipment safely. Children must always be
supervised in order to ensure that they do not play
with the equipment.
m CAUTION
Read all the safety regulations and instructions.
Any errors made in following the safety regulations
and instructions may result in an electric shock, fire
and/or serious injury.
Keep all safety regulations and instructions in a
safe place for future use.
Waste disposal
Batteries: Only dispose of these items through motor
vehicle workshops, special collection points or
special waste collection points. Ask your local
council.
2. Layout and items supplied (Figure 1)
2.1 Layout
1 Charger clamp, black (-)
2 Charger clamp, red (+)
3 Mains cable
2.2 Supplied package
● Open the packaging and take out the equipment
with care.
● Remove the packaging material and any
packaging and/or transportation braces (if
available).
● Check to see if all items are supplied.
● Inspect the equipment and accessories for
transport damage.
● If possible, please keep the packaging until the
end of the guarantee period.
IMPORTANT
The equipment and packaging material are not
toys. Do not let children play with plastic bags,
foils or small parts. There is a danger of
swallowing or suffocating!
● Battery charger
● Original operating instructions
GB
3. Intended use
The charger is designed for charging nonmaintenance-free or maintenance-free12 V starter
batteries (lead acid batteries) which are used in motor
vehicles. This equipment is also designed for lead gel
batteries.
The equipment may only be used for the tasks it is
designed to handle. Any other use is deemed to be a
case of misuse. The user/operator and not the
manufacturer will be liable for any damage or injuries
of any kind caused as a result of this.
Please note that our equipment has not been
designed for use in commercial, trade or industrial
applications. Our warranty will be voided if the
equipment is used in commercial, trade or industrial
businesses or for equivalent purposes.
4. Technical data
Mains voltage: 220-240V ~ 50Hz
Rated input current: 0.32 A
Nominal output voltage: 12 V DC
Nominal output current: 2 A
Battery capacity at: 3-40 Ah
5. Before starting the equipment
Most motor vehicle manufacturers recommend
that the battery should be disconnected from the
vehicle’s electrical system before being charged.
We would like to point out that even standard
vehicles are fitted with a whole host of electronic
equipment (such as ABS, ASR, injection pump
and on-board computer). Any voltage peaks that
occur may cause defects in these electronic
modules. Therefore the battery should be
disconnected from the electrical system before
being charged.
Please also refer to the instructions in the
owner’s manuals for the car, radio, navigation
system, etc.
13
Page 14

GB
Notes on automatic charging
The charger is a microprocessor controlled automatic
charger, i.e. it is suitable in particular for charging
maintenance-free batteries and for the long-term
charging and maintenance-charging of batteries
which are not in constant use, e.g. for boats, lawn
mowers and the like. The integrated microprocessor
enables charging in three steps.
In step one the battery is charged to approximately
70% with an almost constant current. In step two the
battery is charged with a constant current until it
reaches 90%. Step three keeps the battery voltage
constant and the battery is always fully charged.
The charging operation does not need to be
monitored.
Fig. 1: LED indicators
A) LED indicator “Power”
When the mains plug is connected to a live socketoutlet (220-240V~50Hz), the LED will light up.
B) LED indicator “Charging”
The LED will light up as soon as the equipment starts
charging
C) LED indicator “Full”
The LED will light up as soon as the battery is fully
charged and the charger has switched to automatic
maintenance charging.
Note:
● In some cases the charging process is completed
very quickly and the battery is not able to provide
the quoted power output. The battery has lost
some of its capacity and must be replaced.
● If the charger indicates nothing and the battery is
not charged, check if the charger is connected to
the mains voltage. Pull the mains plug and check
the battery connections.
● Charge the battery only at temperatures over
0°C.
● Charge boat batteries only outside of the boat.
● The equipment checks the status of the battery
for a number of seconds and then switches to the
correct charge mode.
● Never start an engine without the battery
connected.
● Never start an engine with the charger
connected.
● Under normal circumstances the negative battery
pole is connected to the bodywork and you
proceed as shown in Figures 2 - 11.
● In exceptional cases it is be possible that the
positive battery pole is connected to the
bodywork. In these cases the instructions shown
in Figure 4 and Figure 5 need to be modified, i.e.
connect the black charging cable to the negative
pole of the battery first and then connect the red
charging cable to the bodywork at a point away
from the battery and the petrol pipe.
Additional instructions on the charging of
batteries outside of vehicles
● Before removing a battery always first remove the
connection to the earthed battery poles and make
sure that all consumers are switched off.
● First connect the red charging cable to the
positive pole of the battery, then connect the
black charging cable to the negative pole of the
battery. Plug the mains plug into the mains socket
outlet. After the charging process is completed,
first remove the mains plug from the mains socket
outlet, then disconnect the black charging cable
and finally the red charging cable from the battery
poles. Adhere to all instructions set forth in this
manual.
● When inserting the battery, observe the correct
polarity of the battery and start with connecting
the earthed battery pole.
6. Operation
Proceed as follows to charge the battery:
Fig. 2:
Release or remove the battery stoppers (if fitted) from
the battery.
Fig. 3:
Check the acid level in the battery. If necessary, top
up the battery with distilled water (if possible).
Important. Battery acid is aggressive. Rinse off any
acid splashes thoroughly with lots of water and seek
medical advice if necessary.
Fig. 4:
First connect the red charging cable to the positive
pole of the battery.
Fig. 5:
Then connect the black charging cable to the
bodywork of the vehicle away from the battery and
the petrol pipe.
14
Page 15

Fig. 6:
After the battery has been connected to the charger,
you can connect the charger to a socket supplying
220-240V~50Hz. Do not connect it to a socket that
supplies any other mains voltage. Important.
Charging may create dangerous explosive gas and
therefore you should avoid spark formation and
naked flames whilst the battery is charging. There is a
risk of explosion!
Calculating the charging time
The charging time depends on the charge status of
the battery. If the battery is fully discharged, the
approximate charging time can be calculated using
the following formula:
Charging time/h =
Example = = 9.6 h max.
Fig. 7:
A high charge can only be identified by measuring the
acid density using an acid tester. Note! Gases are
released during the charging process (bubbles will
form on the surface of the battery fluid). It is essential
that you ventilate the rooms well.
Fig. 8:
Pull the plug out of the socket.
Fig. 9:
First disconnect the black charging cable from the
bodywork.
Fig. 10:
Then release the red charging cable from the positive
pole on the battery.
Fig. 11:
Screw or push the battery stoppers back into position
(if there are any).
Overload cut-out
The charger is equipped with electronic protection
against overload, short circuit and polarity reversal.
If the pole terminals are wrongly connected, the
equipment will not work.
Battery capacity in Ah
Amp. (arithmetic charging current)
24 Ah
2.5 A
GB
7. Replacing the power cable
If the power cable for this equipment is damaged, it
must be replaced by the manufacturer or its aftersales service or similarly trained personnel to avoid
danger.
8. Cleaning, maintenance and ordering
of spare parts
Always pull out the mains power plug before starting
any cleaning work.
8.1 Cleaning
● Keep all safety devices, air vents and the housing
free of dirt and dust as far as possible. Wipe the
equipment with a clean cloth or blow it down with
compressed air at low pressure.
● We recommend that you clean the equipment
immediately after you use it.
● Clean the equipment regularly with a damp cloth
and some soft soap. Do not use cleaning agents
or solvents; these may be aggressive to the
plastic parts in the equipment. Ensure that no
water can get into the interior of the equipment.
● The charger should be placed in a dry room for
storage. Any corrosion must be cleaned off the
charging terminals.
8.2 Servicing
There are no parts inside the equipment which
require additional maintenance.
8.3 Maintenance and care of the battery
● Ensure that your battery is always fitted securely.
● A perfect connection to the cable network of the
electrical system must be ensured at all times.
● Keep the battery clean and dry. Apply a thin
coating of grease to the connection terminals
using an acid-free, acid-resistant grease
(Vaseline).
● Check the level of the acid in batteries that are
not maintenance-free versions approximately
every 4 weeks and top up with distilled water if
necessary.
15
Page 16

GB
8.4 Ordering replacement parts:
Please provide the following information on all orders
for spare parts:
● Model/type of the equipment
● Article number of the equipment
● ID number of the equipment
● Spare part number of the required spare part
For our latest prices and information please go to
www.isc-gmbh.info
9. Disposal and recycling
The equipment is supplied in packaging to prevent it
from being damaged in transit. The raw materials in
this packaging can be reused or recycled. The
equipment and its accessories are made of various
types of material, such as metal and plastic. Defective
components must be disposed of as special waste.
Ask your dealer or your local council.
10. Storage
Store the equipment and accessories out of children’s
reach in a dark and dry place at above freezing
temperature. The ideal storage temperature is
between 5 and 30 °C. Store the electric tool in its
original packaging.
16
Page 17

Indice
1. Avvertenze di sicurezza
2. Descrizione dell’apparecchio ed elementi forniti
3. Utilizzo proprio
4. Caratteristiche tecniche
5. Prima della messa in esercizio
6. Utilizzo
7. Sostituzione del cavo di alimentazione
8. Pulizia, manutenzione e ordinazione dei pezzi di ricambio
9. Smaltimento e riciclaggio
10. Conservazione
I
17
Page 18

I
m Attenzione!
Nell’usare gli apparecchi si devono prendere diverse
misure di sicurezza per evitare lesioni e danni. Quindi
leggete attentamente queste istruzioni per
l’uso/avvertenze di sicurezza. Conservate bene le
informazioni per averle a disposizione in qualsiasi
momento. Se date l’apparecchio ad altre persone,
consegnate anche queste istruzioni per
l’uso/avvertenze di sicurezza insieme all’apparecchio.
Non ci assumiamo alcuna responsabilità per incidenti
o danni causati dal mancato rispetto di queste
istruzioni e delle avvertenze di sicurezza.
Spiegazione della targhetta di avvertenze
sull’apparecchio (vedi Fig. 12)
1 = Solo per l’impiego in ambienti interni
2 = L’apparecchio possiede un isolamento di
protezione
3 = AVVERTIMENTO – Per ridurre il rischio di lesioni
leggete le istruzioni per l’uso!
4 = Prima della ricarica leggete le istruzioni per l’uso;
solo per l’impiego in ambienti interni; staccate
dalla rete prima di eseguire o interrompere i
collegamenti alla batteria; ATTENZIONE! Evitate
gas esplosivi, fiamme e scintille. Provvedete ad
un’aerazione sufficiente durante la ricarica.
1. Avvertenze di sicurezza
●
Prima di effettuare la ricarica della batteria
indossate sempre occhiali protettivi e guanti!
Notevole pericolo di lesioni a causa della
presenza di acidi caustici!
● Quando effettuate la ricarica della batteria non
indossate indumenti in materiali sintetico, in
modo da evitare lo sviluppo di scintille dovute a
scariche elettrostatiche.
● AVVERTIMENTO! Gas esplosivi: si devono
evitare fiamme e scintille.
● Prima di collegare e scollegare la batteria,
staccate l’apparecchio dalla rete elettrica.
● Il caricabatteria contiene componenti, quali ad es.
l’interruttore e il fusibile, che possono produrre
archi voltaici e scintille. Provvedete sempre ad
una buona aerazione del garage o dell’ambiente!
● Il caricabatteria è adatto solo a batterie al piombo
da 12V.
● Non ricaricate batterie “non ricaricabili” o
difettose.
● Osservate le avvertenze del costruttore.
● Staccate l’apparecchio dalla rete elettrica prima
di collegare o scollegare la batteria.
● Attenzione! Evitate fiamme e scintille. Durante la
ricarica viene liberato gas tonante.
● Utilizzate l’apparecchio solo in luoghi asciutti.
● Non posizionate il caricabatteria su piani
riscaldati.
● Tenete pulite le fessure di aerazione.
● Attenzione! L’acido della batteria è caustico.
Lavate subito con acqua saponata eventuali
spruzzi su pelle e vestiti. In caso di spruzzi di
acido negli occhi lavate immediatamente con
acqua (15 min.) e consultate un medico.
● Non ricaricate batterie non ricaricabili.
● Per effettuare la ricarica fate attenzione alle
indicazioni e alle avvertenze del costruttore del
veicolo.
● Non ricaricate diverse batterie
contemporaneamente.
● Non cortocircuitate le pinze di ricarica.
● Il cavo di collegamento alla rete ed i cavi di
ricarica devono essere in perfetto stato.
● Tenete i bambini lontani dalla batteria e dal
caricabatteria.
● Attenzione! In caso di intenso odore di gas
sussiste serio pericolo di esplosione. Non
spegnete l’apparecchio. Non staccate le
pinze di ricarica. Arieggiate subito a fondo il
locale. Fate controllare la batteria dal
servizio assistenza.
● Non usate il cavo per scopi diversi da quelli a cui
è destinato.
Non usate il cavo per trasportare il caricabatteria
e non usatelo per staccare la spina dalla presa di
corrente. Tenete il cavo a riparo da calore, olio e
spigoli vivi.
● Verificate che l’apparecchio non presenti danni.
Le parti difettose o danneggiate devono venire
riparate a regola d’arte o sostituite solo da
un’officina del servizio assistenza clienti, a meno
che non sia diversamente indicato nelle istruzioni
per l’uso.
● Rispettate il valore della tensione di rete (220-
240V ~ 50Hz).
● Tenete gli attacchi puliti e proteggeteli dalla
corrosione.
● L’apparecchio deve essere staccato dalla rete
per tutte le operazioni di pulizia e manutenzione.
● Si devono portare guanti e occhiali protettivi
resistenti agli acidi mentre si collega e
ricarica la batteria, si versa l’acido ovvero si
rabbocca l’acqua distillata.
● Si deve controllare regolarmente che il cavo di
alimentazione non sia danneggiato o consumato,
eventualmente sostituitelo. Usate cavi flessibili
rivestiti in PVC (HO3VV).
18
Page 19

● Se il cavo di alimentazione dell’apparecchio viene
danneggiato, deve essere sostituito dal
produttore, dal suo servizio di assistenza o da
un’officina con qualifiche simili in modo da evitare
rischi.
● Attenzione! Non superate il tempo di ricarica. Al
termine della ricarica staccate la spina dalla
presa di rete e scollegate il caricabatteria dalla
batteria.
Questo apparecchio non è destinato ad essere usato
da persone (bambini compresi) con capacità fisiche,
sensoriali o mentali limitate o che manchino di
esperienza e/o conoscenze, a meno che non
vengano sorvegliati da una persona responsabile per
la loro sicurezza o abbiano ricevuto da questa
istruzioni su come usare l’apparecchio. I bambini
devono essere sorvegliati per assicurarsi che non
giochino con l’apparecchio.
m AVVERTIMENTO
Leggete tutte le avvertenze di sicurezza e le
istruzioni. Dimenticanze nel rispetto delle
avvertenze di sicurezza e delle istruzioni possono
causare scosse elettriche, incendi e/o gravi lesioni.
Conservate tutte le avvertenze e le istruzioni per
eventuali necessità future.
Smaltimento
Batterie: solo presso officine auto, ecocentri o centri
di raccolta di rifiuti speciali. Informatevi presso gli
uffici comunali del posto.
2. Descrizione dell’apparecchio ed
elementi forniti (Fig. 1)
2.1 Descrizione dell’apparecchio
1 Pinza di ricarica nera (-)
2 Pinza di ricarica rossa (+)
3 Cavo di alimentazione
2.2 Elementi forniti
● Aprite l’imballaggio e togliete con cautela
l’apparecchio dalla confezione.
● Togliete il materiale d’imballaggio e anche i fermi
di trasporto / imballo (se presenti).
● Controllate che siano presenti tutti gli elementi
forniti.
● Verificate che l’apparecchio e gli accessori non
presentino danni dovuti al trasporto.
● Se possibile, conservate l’imballaggio fino alla
scadenza della garanzia.
I
ATTENZIONE
L’apparecchio e il materiale d’imballaggio non
sono giocattoli! I bambini non devono giocare
con sacchetti di plastica, film e piccoli pezzi!
Sussiste pericolo di ingerimento e
soffocamento!
● Caricabatteria
● Istruzioni per l’uso originali
3. Utilizzo proprio
Il caricabatteria è destinato alla ricarica di batterie
senza bisogno di manutenzione e di batterie di
avviamento (accumulatori piombo-acido) da 12V
impiegate in veicoli a motore. L’apparecchio è adatto
anche per batterie al piombo gel.
L’apparecchio deve essere usato solamente per lo
scopo a cui è destinato. Ogni altro tipo di uso che
esuli da quello previsto non è conforme.
L’utilizzatore/l’operatore, e non il costruttore, è
responsabile dei danni e delle lesioni di ogni tipo che
ne risultino.
Tenete presente che i nostri apparecchi non sono
stati costruiti per l’impiego professionale, artigianale o
industriale. Non riconosciamo alcuna garanzia se
l’apparecchio viene usato in imprese commerciali,
artigianali o industriali, o in attività equivalenti.
4. Caratteristiche tecniche
Tensione di rete: 220-240V ~ 50Hz
Corrente in entrata nominale: 0,32 A
Tensione in uscita nominale: 12 V d.c.
Corrente in uscita nominale: 2 A
Capacità della batteria a: 3-40 Ah
5. Prima della messa in esercizio
Secondo le indicazioni della maggior parte dei
costruttori di autovetture la batteria deve essere
staccata dalla rete di bordo prima di essere
ricaricata. Facciamo presente che i veicoli
dispongono già nell’equipaggiamento standard
di numerosi componenti elettronici (come per
es. ABS, ASR, pompa di iniezione, computer di
bordo). Il verificarsi di picchi di tensione può
19
Page 20

I
causare eventuali difetti nei componenti
elettronici. Per questo motivo la batteria deve
essere staccata dalla rete di bordo.
Tenete comunque presenti le indicazioni nelle
istruzioni per l’uso dell’auto, della radio, del
sistema di navigazione ecc.
Avvertenza sulla ricarica automatica
Il caricabatteria è un apparecchio automatico,
controllato da un microprocessore, ed è quindi
particolarmente adatto a caricare le batterie senza
bisogno di manutenzione, ma è anche adatto al
mantenimento in carica di batterie che non vengono
utilizzate continuamente, come per es. in
imbarcazioni, tosaerba e simili. Grazie al
microprocessore integrato la ricarica si effettua in tre
fasi.
Durante la prima fase avviene la ricarica della batteria
con una corrente quasi costante fino a circa il 70% di
carica. Durante la fase due avviene la ricarica della
batteria con una corrente costante fino a circa il 90%
di carica. Durante la fase tre la tensione della batteria
rimane costante per caricarla al massimo.
La ricarica non deve essere controllata.
Figura 1: Indicatori LED
A) Indicatore LED “Power”
Il LED si illumina se la spina di alimentazione si trova
in una presa di corrente sotto tensione (220240V~50Hz).
B) Indicatore LED “Charging”
Il LED si illumina non appena l’apparecchio sta
caricando.
C) Indicatore LED “Full”
Il LED si illumina non appena la batteria è
completamente carica e il caricabatteria è passato
alla carica di mantenimento automatica.
Avvertenze
● In alcuni casi il processo di ricarica avviene molto
velocemente e la batteria non fornisce poi la
potenza indicata. La batteria ha perso parte della
sua capacità e deve essere sostituita.
● Se il caricabatteria non indica nulla e la batteria
non si ricarica, verificate se vi è tensione di rete
sul caricabatteria. Staccate la spina dalla presa e
verificate gli attacchi della batteria.
● Caricate la batteria solo a temperature superiori a
0°C.
● Caricate le batterie per imbarcazioni solo
all’esterno dell’imbarcazione.
● L’apparecchio controlla lo stato della batteria per
alcuni secondi e passa poi allo stato di carica
giusto.
20
● Non avviate mai un motore senza aver connesso
la batteria.
● Non avviate mai un motore con attaccato il
caricabatteria.
● Normalmente il polo negativo della batteria è
collegato alla carrozzeria e, quindi, per la ricarica
procedete come descritto nelle figure 2 – 11.
● In casi eccezionali è possibile che il polo positivo
della batteria sia collegato alla carrozzeria. In tali
casi la Fig. 4 e la Fig. 5 cambiano. Collegate
quindi prima il cavo di ricarica nero al polo
negativo della batteria e poi il cavo rosso alla
carrozzeria, lontano da batteria e tubazione della
benzina.
Ulteriori indicazioni per caricare le batterie
esternamente al veicolo
● Mentre rimuovete la batteria, per prima cosa
interrompete sempre il collegamento al polo della
batteria collegato a massa ed accertatevi che
tutte le utenze siano disinserite.
● Collegate prima il cavo di ricarica rosso al polo
positivo della batteria, poi il cavo nero al polo
negativo della batteria. Inserite la spina di
alimentazione nella presa di corrente. Al termine
della ricarica togliete prima la spina di
alimentazione dalla presa di corrente, poi il cavo
di ricarica nero e infine il cavo rosso dai poli della
batteria. Rispettate tutte le avvertenze di questo
manuale.
● Nel montare la batteria prestate attenzione alla
polarità e ripristinate per prima cosa il
collegamento al polo della batteria collegato a
massa.
6. Utilizzo
Per ricaricare la batteria procedete nel modo
seguente
Figura 2
Svitate o togliete i tappi dalla batteria (se presenti).
Figura 3
Controllate il livello di acido della batteria. Se
necessario aggiungete acqua distillata (se possibile).
Attenzione! L’acido della batteria è caustico. Lavate
subito con abbondante acqua eventuali spruzzi di
acido, se necessario consultate un medico.
Figura 4
Collegate prima il cavo rosso al polo positivo della
batteria.
Page 21

Figura 5
Poi il cavo nero viene collegato alla carrozzeria,
lontano da batteria e tubazione della benzina.
Figura 6
Dopo che la batteria è stata collegata al
caricabatteria, potete collegare questo ad una presa
da 220-240V~50Hz. Non è consentito il collegamento
ad una presa con una diversa tensione di rete.
Attenzione! Con l’operazione di ricarica si può
sviluppare del pericoloso gas tonante, evitate perciò
fiamme e scintille durante la ricarica. Pericolo di
esplosione!
Calcolo del tempo di ricarica
Il tempo di ricarica viene determinato dallo stato di
carica della batteria. In caso di batteria scarica il
tempo approssimativo di ricarica può essere
calcolato con la seguente formula:
Tempo di ricarica/h =
Per esempio = = 9,6 h max.
Figura 7
Lo stato esatto di carica può essere accertato solo
misurando la densità dell’acido con un densimetro.
Avvertenza! Durante la ricarica si sviluppano gas
(formazione di bollicine sulla superficie del liquido
della batteria). Fate perciò attenzione ad una buona
ventilazione dei locali.
Figura 8
Staccate la spina dalla presa.
Figura 9
Staccate prima il cavo di ricarica nero dalla
carrozzeria.
Figura 10
Poi staccate il cavo di ricarica rosso dal polo positivo
della batteria.
Figura 11
Riavvitate o rimettete i tappi della batteria (se
presenti).
Capacita della batteria in Ah
Amp. (corrente di ricarica aritm.)
24 Ah
2,5 A
I
Protezione da sovraccarico
Il caricabatteria è protetto elettronicamente da
sovraccarico, cortocircuito e inversione di polarità.
Se i morsetti non sono correttamente collegati,
l’apparecchio non funziona.
7. Sostituzione del cavo di
alimentazione
Se il cavo di alimentazione di questo apparecchio
viene danneggiato, deve essere sostituito dal
produttore, dal suo servizio di assistenza clienti o da
una persona al pari qualificata al fine di evitare
pericoli.
8. Pulizia, manutenzione e ordinazione
dei pezzi di ricambio
Prima di qualsiasi lavoro di pulizia staccate la spina
dalla presa di corrente.
8.1 Pulizia
● Tenete il più possibile i dispositivi di protezione,
le fessure di aerazione e la carcassa liberi da
polvere e sporco. Passate un panno pulito
sull’apparecchio o pulitelo con un getto di aria
compressa a bassa pressione.
● Consigliamo di pulire l’apparecchio subito dopo
averlo usato.
● Pulite l’apparecchio regolarmente con un panno
umido ed un po’ di sapone. Non usate detergenti
o solventi, perché questi ultimi potrebbero
danneggiare le parti in plastica dell’apparecchio.
Fate attenzione che non possa penetrare
dell’acqua all’interno dell’apparecchio.
● Il caricabatteria deve essere conservato in un
ambiente asciutto. Le pinze di ricarica devono
essere pulite togliendo le tracce di corrosione.
8.2 Manutenzione
All’interno dell’apparecchio non si trovano altre parti
che richiedano manutenzione.
21
Page 22

I
8.3 Manutenzione e cura della batteria
● Fate attenzione che la batteria sia sempre ben
fissata.
● Deve essere garantito il collegamento corretto
alla rete dell’impianto elettrico.
● Tenete la batteria pulita ed asciutta. Ingrassate
leggermente i morsetti di collegamento con un
grasso neutro e resistente agli acidi (vaselina).
● Nel caso di batterie che richiedono manutenzione
controllate ca. ogni 4 settimane il livello dell’acido
e se necessario aggiungere solo acqua distillata.
8.4 Ordinazione dei pezzi di ricambio
In caso di ordinazione dei pezzi di ricambio è
necessario indicare quanto segue:
● Tipo di apparecchio
● Numero di articolo dell’apparecchio
● Numero di identificazione dell’apparecchio
● Numero del pezzo di ricambio richiesto
Per i prezzi e le informazioni attuali si veda
www.isc-gmbh.info
9. Smaltimento e riciclaggio
L’apparecchio si trova in un imballaggio per evitare i
danni dovuti al trasporto. Questo imballaggio
rappresenta una materia prima e può perciò essere
utilizzato di nuovo o riciclato. L’apparecchio e i suoi
accessori sono fatti di materiali diversi, per es.
metallo e plastica. Consegnate i pezzi difettosi allo
smaltimento di rifiuti speciali. Per informazioni
rivolgetevi a un negozio specializzato o
all’amministrazione comunale!
10. Conservazione
Conservate l’apparecchio e i suoi accessori in un
luogo buio, asciutto, al riparo dal gelo e non
accessibile ai bambini. La temperatura ottimale per la
conservazione è compresa tra i 5 e i 30 °C.
Conservate l’elettroutensile nell’imballaggio originale.
22
Page 23

Innehållsförteckning
1. Säkerhetsanvisningar
2. Beskrivning av apparaten samt leveransomfattning
3. Ändamålsenlig användning
4. Tekniska data
5. Innan du använder apparaten
6. Använda apparaten
7. Byta ut nätkabeln
8. Rengöring, underhåll och reservdelsbeställning
9. Skrotning och återvinning
10. Förvaring
S
23
Page 24

S
m Obs!
Innan produkterna kan användas måste särskilda
säkerhetsanvisningar beaktas för att förhindra olyckor
och skador. Läs därför noggrant igenom denna
bruksanvisning och dessa säkerhetsanvisningar.
Förvara den på ett säkert ställe så att du alltid kan
hitta önskad information. Om apparaten ska överlåtas
till andra personer måste även denna bruksanvisning
och dessa säkerhetsanvisningar medfölja. Vi övertar
inget ansvar för olyckor eller skador som har uppstått
om denna bruksanvisning eller dessa
säkerhetsanvisningar åsidosätts.
Förklaring av skylten på apparaten (se bild 12)
1 = Får endast användas inomhus
2 = Apparaten är skyddsisolerad
3 = VARNING - Läs igenom bruksanvisningen för att
sänka risken för skador!
4 = Läs igenom bruksanvisningen innan du laddar
batterier. Får endast användas inomhus. Skilj
apparaten åt från nätet innan du stänger eller
öppnar anslutningarna till batteriet;VARNING!
Undvik explosiva gaser, lågor och gnistor. Sörj för
fullgod ventilation medan batteriet laddas.
1. Säkerhetsanvisningar
●
Bär tvunget skyddglasögon och skyddshandskar
medan du laddar batteriet: Risk för skador av
frätande syra:
● När batteriet laddas får du inte bära kläder av
syntetiskt material. Dessa kan laddas ur
elektrostatiskt och därmed bilda gnistor.
● VARNING! Explosiva gaser! Undvik lågor och
gnistor.
● Åtskilj apparaten från elnätet innan du ansluter
eller kopplar ifrån batteriet.
● Laddaren innehåller komponenter, t ex brytare
och säkring, som kan skapa ljusbågar och
gnistor. Se tvunget till att garaget eller utrymmet
är tillräckligt ventilerat.
● Laddaren är endast avsedd för blyackumulatorer
vars spänning uppgår till 12 V.
● Försök inte ladda “icke-laddningsbara batterier”
eller defekta batterier.
● Beakta informationen från batteritillverkaren.
● Koppla loss apparaten från nätet innan du
ansluter eller kopplar ifrån batteriet.
● Obs! Undvik lågor och gnistor. Explosiv knallgas
bildas när batteriet laddas.
● Använd apparaten endast i torra utrymmen.
● Ställ inte laddaren på uppvärmda ytor.
● Håll ventilationsöppningarna rena från smuts.
24
● Varning! Batterisyra är frätande. Tvätta
genast av stänk från hud och kläder med
tvållösning. Om syra har stänkt upp i
ögonen, spola genast ur med vatten (15 min)
och uppsök sedan läkare.
● Försök inte ladda icke-laddningsbara batterier.
● Beakta fordonstillverkarens information och
instruktioner för uppladdning av batterier.
● Ladda inte flera batterier samtidigt.
● Kortslut inte laddningsklämmorna.
● Nätkabeln och laddningskablarna måste befinna
sig i fullgott skick.
● Se till att inga barn befinner sig i närheten av
batteriet och laddaren.
● Varning! Akut explosionsfara föreligger vid
stickande gaslukt. Slå inte ifrån apparaten.
Ta inte av laddningsklämmorna. Ventilera
genast rummet. Låt kundtjänst kontrollera
batteriet.
● Använd endast kabeln till avsett ändamål.
Bär inte apparaten i kabeln och använd den inte
till att dra ut stickkontakten ur vägguttaget.
Skydda kabeln mot värme, olja och vassa kanter.
● Kontrollera om apparaten har skadats. Defekta
eller skadade delar ska repareras eller bytas ut av
kundtjänstverkstad, såvida inget annat anges i
bruksanvisningen.
● Beakta nätspänningen (220-240 V ~ 50 Hz).
● Se till att anslutningarna hålls rena och skydda
dem mot korrosion.
● Skilja alltid apparaten åt från elnätet inför
rengörings- och underhållsarbeten.
● Bär syrafasta handskar och skyddsglasögon
när batteriet ansluts och laddas upp, och när
syra eller destillerat vatten ska fyllas på.
● Kontrollera nätkabeln regelbundet om den har
skadats eller nötts. Byt ut kabeln vid behov.
Använd minst slangledningar av PVC (HO3VV).
● Om nätkabeln till denna apparat har skadats
måste den bytas ut av tillverkaren, kundtjänst
eller av en annan person med liknande
behörighet eftersom det annars finns risk för
personskador.
● Obs! Överskrid inte laddningstiden. Dra ut
stickkontakten ur stickuttaget efter att
laddningstiden har avslutats och kopplas sedan
loss apparaten från batteriet.
Denna apparat är inte avsedd att användas av
personer (inkl. barn) med begränsad fysisk, sensorisk
eller mental förmåga eller bristfällig erfarenhet
och/eller kunskap, såvida inte en person som
ansvarar för säkerheten håller uppsikt eller ger
instruktioner om korrekt användning av apparaten.
Barn ska hållas under uppsikt för att säkerställa att de
inte använder apparaten som leksak.
Page 25

m VARNING!
Läs igenom alla säkerhetsanvisningar och
instruktioner. Om säkerhetsanvisningarna eller
instruktionerna inte beaktas på avsett vis finns det
risk för elektriska slag, brand och/eller allvarliga
personskador.
Spara på alla säkerhetsanvisningar och
instruktioner för framtida bruk.
Avfallshantering
Batterier: Endast till bilverkstäder, särskilda
avfallsstationer eller insamlingsställen för farligt avfall.
Hör efter med din kommun.
2. Beskrivning av apparaten samt
leveransomfattning (bild 1)
2.1 Beskrivning av apparaten
1 Svart laddningsklämma (-)
2 Röd laddningsklämma (+)
3 Nätkabel
2.2 Leveransomfattning
● Öppna förpackningen och ta försiktigt ut
apparaten ur förpackningen.
● Ta bort förpackningsmaterialet samt
förpacknings- och transportsäkringar (om
förhanden).
● Kontrollera att leveransen är komplett.
● Kontrollera om apparaten eller tillbehörsdelarna
har skadats i transporten.
● Spara om möjligt på förpackningen tills
garantitiden har gått ut.
VARNING!
Apparaten och förpackningsmaterialet är ingen
leksak! Barn får inte leka med plastpåsar, folie
eller smådelar! Risk för att barn sväljer delar och
kvävs!
● Batteriladdare
● Original-bruksanvisning
3. Ändamålsenlig användning
Laddaren är avsedd för laddning av icke
underhållsfria eller underhållsfria startbatterier vars
spänning uppgår till 12 V (batterier med blysyra) som
används i motorfordon. Apparaten är även avsedd för
blygelbatterier.
S
Apparaten får endast användas till sitt avsedda
ändamål. Användningar som sträcker sig utöver detta
användningsområde är ej ändamålsenliga. För
materialskador eller personskador som resulterar av
sådan användning ansvarar användaren själv.
Tillverkaren övertar inget ansvar.
Tänk på att våra produkter endast får användas till
ändamålsenligt syfte och inte har konstruerats för
yrkesmässig, hantverksmässig eller industriell
användning. Vi ger därför ingen garanti om apparaten
används inom yrkesmässiga, hantverksmässiga eller
industriella verksamheter eller vid liknande aktiviteter.
4. Tekniska data
Nätspänning 220-240 V ~ 50 Hz
Nominell ingångsström 0,32 A
Nominell utgångsspänning 12 V DC
Nominell utgångsström 2 A
Batterikapacitet vid 3-40 Ah
5. Innan du använder apparaten
Enligt instruktionerna från de flesta
fordonstillverkare måste batteriet kopplas ifrån
fordonets elsystem innan det laddas. Tänk på att
många fordon redan i standardutrustningen
innehåller många elektroniska komponenter (t ex
ABS, ASR, injektionspump, färddator).
Spänningstoppar kan ev. leda till att de
elektroniska komponenterna förstörs. Av denna
anledning bör du koppla loss batteriet från
fordonets elsystem innan det laddas.
Beakta instruktionerna i användarmanualerna till
fordonet, radion, navigationssystemet osv.
Instruktioner för automatisk laddning
Laddaren är en automatisk laddare som styrs av en
mikroprocessor, dvs. den är särskilt lämpad för
laddning av underhållsfria batterier samt för
långtidsladdning och underhållsladdning av batterier
som inte ständigt används, t ex för båtar, gräsklippare
och liknande utrustning. Med den integrerade
mikroprocessorn laddas batteriet upp i tre olika steg.
I steg ett laddas batteriet till 70 % med en nästintill
konstant ström. I steg två laddas batteriet till 90 %
med en konstant spänning. I steg tre hålls
batterispänningen konstant, vilket innebär att batteriet
alltid är fulladdat.
Laddningen behöver inte övervakas.
25
Page 26

S
Bild 1: LED-indikeringar
A) LED-indikering “Power”
Lysdioden lyser om stickkontakten är ansluten till ett
spänningsförande stickuttag (220-240 V ~50 Hz).
B) LED-indikering “Charging”
Lysdioden lyser medan apparaten laddar.
C) LED-indikering “Full”
Lysdioden lyser när batteriet är fulladdat och
laddaren har kopplat om till automatisk
underhållsladdning.
Obs!
● I vissa fall går uppladdningen mycket fort utan att
batteriet därefter kan avge den förväntade
kapaciteten. Batteriet har förlorat sin kapacitet
och måste bytas ut.
● Om ingen indikering visas på laddaren och om
batteriet inte laddas, måste du kontrollera om
laddaren är ansluten till elnätet. Dra ut
stickkontakten och kontrollera anslutningarna till
batteriet.
● Ladda endast batteriet om temperaturen
överstiger 0°C.
● Båtbatterier får endast laddas om de först tagits
ut ur båten.
● Apparaten kontrollerar batteristatus under ett par
sekunder och skiftar sedan till rätt
laddningsstatus.
● Försök aldrig att starta en motor om ett batteri inte
har anslutits.
● Försök aldrig att starta en motor om laddaren
fortfarande är ansluten.
● I normalfall är den negativa batteripolen ansluten
till karossen. Ladda enligt beskrivningen i bild 2 -
11.
● I undantagsfall kan det vara möjligt att den
positiva batteripolen är ansluten till karossen. I
detta undantagsfall gäller inte bild 4 och bild 5.
Anslut då först den svarta laddningskabeln till
batteriets minuspol och därefter den röda
laddningskabeln till karossen på ett visst avstånd
till batteriet och bensinledningen.
Ytterligare instruktioner för att ladda batterier
utanför fordonet
● När batteriet ska tas ut ur fordonet måste du först
kontrollera att alla förbrukande utrustningar har
slagits ifrån. Lossa sedan på anslutningen till den
jordade batteripolen.
● Anslut först den röda laddningskabeln till
batteriets pluspol, därefter den svarta
laddningskabeln till batteriets minuspol. Anslut
stickkontakten till vägguttaget. Efter att batteriet
har laddats ska du först dra ut stickkontakten ur
vägguttaget. Lossa sedan på den svarta
laddningskabeln och senast den röda
laddningskabeln från batteripolerna. Beakta
samtliga instruktioner i denna bruksanvisning.
● Beakta polariteten när batteriet sätts in i igen och
anslut först till den jordade batteripolen.
6. Använda apparaten
Ladda batteriet på följande sätt:
Bild 2:
Lossa eller ta av batteripluggen (om förhanden) från
batteriet.
Bild 3:
Kontrollera syranivån i batteriet. Fyll på destillerat
vatten vid behov (om möjligt). Obs! Batterisyra är
frätande. Spola genast av syrastänk med mycket
vatten, uppsök läkare vid allvarliga besvär.
Bild 4:
Anslut först den röda laddningskabeln till batteriets
pluspol.
Bild 5:
Anslut därefter den svarta laddningskabeln till
karossen, på tillräckligt avstånd från batteriet och
bensinledningen.
Bild 6:
Efter att batteriet har anslutits till laddaren kan du
ansluta laddaren till ett stickuttag med 220240 V~50 Hz. Det är inte tillåtet att ansluta laddaren
till stickuttag med en annan nätspänning. Obs! När
batteriet laddas finns det risk för att farlig knallgas
bildas. Undvik därför gnistbildning och öppna lågor.
Explosionsfara!
26
Page 27

Beräkna laddningstiden:
Laddningstiden bestäms av batteriets laddningsnivå.
Om batteriet är tomt kan den ungefärliga
laddningstiden beräknas med följande folrmel:
Laddningstid/h =
Exempel = = 9,6 h max.
Bild 7:
Den exakta laddningsnivån kan endast bestämmas
genom att syrakoncentrationen mäts upp med en
syrahävert. Obs! Medan laddningen genomförs bildas
gaser (bubblor på ovanytan av batterivätskan). Se
därför till att rummet är tillräckligt ventilerat.
Bild 8:
Dra ut stickkontakten ur vägguttaget.
Bild 9:
Lossa först på den svarta laddningskabeln från
karosseriet.
Bild 10:
Lossa sedan på den röda laddningskabeln från
batteriets pluspol.
Bild 11:
Skruva in eller tryck in batteripluggen igen (om
förhanden).
Överbelastningsskydd
Laddaren skyddas elektroniskt mot överbelastning,
kortslutning och förväxlad polaritet.
Om polklämmorna har anslutits fel kommer apparaten
inte att fungera.
Batterikapacitet i Ah
Amp. (laddningsström aritm.)
24 Ah
2,5 A
7. Byta ut nätkabeln
Om nätkabeln till denna apparat har skadats måste
den bytas ut av tillverkaren, kundtjänst eller av en
annan person med liknande behörighet eftersom det
annars finns risk för personskador.
S
8. Rengöring, underhåll och
reservdelsbeställning
Dra alltid ut stickkontakten om apparaten ska
rengöras.
8.1 Rengöring
● Håll skyddsanordningarna,
ventilationsöppningarna och kåpan i så dammoch smutsfritt skick som möjligt. Torka av
apparaten med en ren duk eller blås av den med
tryckluft med svagt tryck.
● Vi rekommenderar att du rengör apparaten efter
varje användningstillfälle.
● Rengör apparaten med jämna mellanrum med en
fuktig duk och en aning såpa. Använd inga
rengörings- eller lösningsmedel. Dessa kan
skada apparatens plastdelar. Se till att inga
vätskor tränger in i apparatens inre.
● Laddaren måste förvaras i ett torrt utrymme.
Rengör laddningsklämmorna från korrosion.
8.2 Underhåll
I apparatens inre finns inga delar som kräver
underhåll.
8.3 Underhålla och sköta batteriet
● Se till att batteriet alltid är fast monterat.
● Kontakten mellan batteriet och det elektriska
systemet måste vara i fullgott skick.
● Håll batteriet rent och torrt. Fetta in
anslutningsklämmorna en aning med syrafritt och
syrabeständigt fett (vaselin).
● Vid icke underhållsfria batteriet ska syranivån
kontrolleras ungefär var 4:e vecka. Endast
destillerat vatten får fyllas på vid behov.
8.4 Reservdelsbeställning
Ange följande uppgifter när du beställer reservdelar:
● Produkttyp
● Produktens artikelnummer
● Produktens ID-nr.
● Reservdelsnumret för reservdelen
Aktuella priser och ytterligare information finns på
www.isc-gmbh.info
27
Page 28

S
9. Skrotning och återvinning
Apparaten ligger i en förpackning som fungerar som
skydd mot transportskador. Denna förpackning
består av olika material som kan återvinnas. Lämna in
förpackningen till ett insamlingsställe för återvinning.
Apparaten och dess tillbehör består av olika material
som t ex metaller och plaster. Lämna in defekta delar
till ett godkänt insamlingsställe i din kommun. Hör
efter med din kommun eller med försäljaren i din
specialbutik.
10. Förvaring
Förvara apparaten och dess tillbehör på en mörk, torr
och frostfri plats samt otillgängligt för barn. Den bästa
förvaringstemperaturen är mellan 5 och 30˚C.
Förvara apparaten i originalförpackningen.
28
Page 29

Índice de contenidos
1. Instrucciones de seguridad
2. Descripción del aparato y volumen de entrega
3. Uso adecuado
4. Características técnicas
5. Antes de la puesta en marcha
6. Manejo
7. Cambiar el cable de conexión a la red eléctrica
8. Mantenimiento, limpieza y pedido de piezas de repuesto
9. Eliminación y reciclaje
10. Almacenamiento
E
29
Page 30

E
m ¡Atención!
Al usar aparatos es preciso tener en cuenta una serie
de medidas de seguridad para evitar lesiones o
daños. Por este motivo, es preciso leer atentamente
este manual de instrucciones/advertencias de
seguridad. Guardar esta información
cuidadosamente para poder consultarla en cualquier
momento. En caso de entregar el aparato a terceras
personas, será preciso entregarles, asimismo, el
manual de instrucciones/advertencias de seguridad.
No nos hacemos responsables de accidentes o
daños provocados por no tener en cuenta este
manual y las instrucciones de seguridad.
Explicación de la placa de advertencia del
aparato (véase fig. 12)
1 = Utilizar solo en espacios interiores
2 = Aparato a prueba de sacudidas eléctricas
3 = AVISO - ¡Leer el manual de instrucciones para
reducir cualquier riesgo de sufrir daños!
4 = Leer el manual de instrucciones antes de
proceder a la carga; Utilizar solo en espacios
interiores; Desenchufar de la red antes de
conectar o desconectar de batería; ATENCIÓN!
Evitar gases explosivos, llamas y chispas.
Asegurar que haya ventilación suficiente durante
el proceso de carga.
1. Instrucciones de seguridad
●
Al cargar la batería, es imprescindible usar unas
gafas y guantes protectores! ¡El ácido corrosivo
puede causar heridas considerables!
● No utilice ropa sintética al cargar la batería, de
esta forma evitará la formación de chispas por
descargas electrostáticas.
● ¡AVISO! Gases explosivos - Es imprescindible
evitar llamas y chispas
● Antes de conectar y desconectar la batería es
preciso desenchufar el aparato de la red
eléctrica.
● El cargador contiene componentes como, por
ejemplo, interruptor y fusible, que podrían
generar un arco voltaico e incluso chispas.
Asegurar que el garaje o el recinto estén bien
ventilados!
● Este cargador ha sido concebido exclusivamente
para baterías de plomo de 12 V.
● No cargar “baterías no recargables” o que estén
defectuosas.
● Observar las advertencias del fabricante de
baterías.
● Desenchufar el aparato de la red eléctrica antes
de conectar o desconectar la batería.
30
● Atención! Evitar llamas y chispas. Al cargar la
batería se produce un gas explosivo.
● Utilizar el aparato solo en salas secas.
● No colocar el cargador sobre una superficie
caldeada.
● Mantener siempre limpia la rejilla de ventilación.
● Cuidado! El ácido de la batería es corrosivo.
Las salpicaduras sobre la piel o la ropa
deberán lavarse de inmediato con agua y
jabón. Las salpicaduras de ácido deben
enjuagarse de inmediato con agua (en
menos de 15 min) y consultar a un médico.
● No cargar baterías no recargables.
● Al cargar una batería se tendrán en cuenta las
instrucciones y datos del fabricante de la misma.
● No cargar varias baterías a la vez
● No poner en cortocircuito las pinzas de carga.
● El cable de conexión a red y los cables deben
estar en perfecto estado.
● Mantener el cargador y la batería fuera del
alcance de los niños.
● Atención! Si se percibe un olor fuerte de gas
existe peligro inminente de explosión. No
desconectar el aparato. No desenganchar las
pinzas de carga. Ventilar de inmediato el
recinto. Llevar la batería a que la compruebe
un taller de servicio de asistencia al cliente.
● No utilizar el cable de forma inapropiada.
No sostener el cargador por el cable, y no
utilizarlo para desenchufar. Es preciso proteger el
cable del calor, del aceite y de cantos vivos.
● Comprobar si el aparato ha sufrido daños. La
reparación o sustitución de piezas defectuosas o
dañadas debe correr a cargo de un taller de
atención al cliente, a menos que en el manual de
uso se indique lo contrario.
● Respetar el valor de tensión de red (220-240V ~
50Hz).
● Mantener limpias las conexiones y protegerlas
contra la corrosión.
● Desenchufar el aparato de la red eléctrica antes
de realizar trabajos de limpieza y mantenimiento.
● Al conectar y cargar la batería, así como para
llenar el ácido o el agua destilada es
necesario llevar guantes resistentes a los
ácidos y gafas protectoras.
● Comprobar periódicamente que el cable de red
no presente daños ni indicios de desgaste y, de
ser necesario, cambiarlo. Utilizar al menos
conductos de PVC (H03VV).
● Cuando el cable de conexión de este aparato
esté dañado, deberá ser sustituido por el
fabricante o su servicio de asistencia técnica o
entidad cualificada para ello, evitando así
cualquier peligro.
Page 31

● Atención! No superar el tiempo de carga. Una
vez finalizado el tiempo de carga, desenchufar el
cargador y desconectarlo de la batería.
Este aparato no ha sido concebido para ser utilizado
por personas (incluyendo niños) cuyas capacidades
estén limitadas física, sensorial o psíquicamente, o
que no dispongan de la experiencia y/o los
conocimientos necesarios. Las personas aptas
deberán recibir formación o instrucciones necesarias
sobre el funcionamiento del aparato por parte de una
persona responsable para su seguridad. Vigilar a los
niños para asegurarse de que no jueguen con el
aparato.
m AVISO
Leer todas las instrucciones de seguridad e
indicaciones. El incumplimiento de dichas
instrucciones e indicaciones puede provocar
descargas, incendios y/o daños graves.
Guardar todas las instrucciones de seguridad e
indicaciones para posibles consultas
posteriores.
Eliminación de residuos:
Baterías: Deben eliminarse llevándolas a un taller de
automóviles, a un lugar de recogida especial o a una
entidad de recolección oficial de desechos
industriales. Informarse en cualquier entidad local.
2. Descripción del aparato y volumen
de entrega (fig 1)
2.1 Descripción del aparato
1 Pinza de carga negra (-)
2 Pinza de carga roja (+)
3 Cable de red
2.2 Volumen de entrega
● Abrir el embalaje y extraer cuidadosamente el
aparato.
● Retirar el material de embalaje, así como las
fijaciones del embalaje y para el transporte (si
existen).
● Comprobar que el volumen de entrega esté
completo.
● Comprobar que el aparato y los accesorios no
presenten daños ocasionados durante el
transporte.
● Si es posible, almacenar el embalaje hasta que
transcurra el periodo de garantía.
E
ATENCIÓN
¡El aparato y el material de embalaje no son un
juguete! ¡No permitir que los niños jueguen con
bolsas de plástico, láminas y piezas pequeñas!
¡Riesgo de ingestión y asfixia!
● Cargador
● Manual de instrucciones original
3. Uso adecuado
El cargador ha sido concebido para baterías de
arranque que requieren o no mantenimiento de 12V
(baterías de plomo) que se utilizan en vehículos. El
aparato es también adecuado para baterías de
plomo-gel.
Este aparato sólo debe emplearse en aquellos casos
para los que se ha destinado. Cualquier otro uso no
será adecuado. En caso de uso inadecuado, el
fabricante no se hace responsable de daños o
lesiones de cualquier tipo; el responsable es el
usuario u operario de la máquina.
Es preciso tener en consideración que nuestro
aparato no está indicado para un uso comercial,
industrial o en taller. No asumiremos ningún tipo de
garantía cuando se utilice el aparato en zonas
industriales, comerciales o talleres, así como
actividades similares.
4. Características técnicas
Tensión de red: 220-240V ~ 50 Hz
Corriente nominal de entrada: 0,32 A
Tensión de salida nominal: 12 V d.c.
Corriente nominal de salida: 2 A
Capacidad de la batería a: 3-40 Ah
5. Antes de la puesta en marcha
Según la información de la mayoría de
fabricantes de vehículos, antes de cargar la
batería es preciso desconectarla de la red de a
bordo. Advertimos que los vehículos en su
equipamiento estándar disponen de numerosos
componentes electrónicos (como. p. ej., ABS,
ASR, bomba de inyección, ordenador de a bordo
y teléfono móvil). Las posibles puntas de tensión
31
Page 32

E
podrían provocar defectos en los componentes
eléctricos. Por este motivo es preciso
desconectar la batería de la red de a bordo antes
de cargarla.
Es preciso observar las advertencias que se
hallan en los manuales del vehículo, de la radio,
del GPS, etc.
Advertencia sobre la carga automática
El cargador es un aparato automático controlado por
microprocesador, con lo que resulta especialmente
adecuado para cargar baterías que no requieren
mantenimiento, así como para cargar de forma
duradera o mantener cargadas baterías que no están
en uso de forma continua, como por ejemplo para
barcos hinchables, cortacésped es y aparatos
similares. Debido al microprocesador integrado, la
carga se realiza en tres niveles.
El nivel uno carga la batería con una corriente
prácticamente constante hasta aprox. el 70%. El nivel
dos carga la batería con una corriente constante
hasta aprox. 90%. El nivel tres mantiene constante la
tensión de la batería y consecuentemente siempre
cargada al máximo.
No es necesario controlar el proceso de carga.
Fig. 1: Indicadores LED
A) Indicación LED “Power”
Si el enchufe está conectado a un toma de corriente
(220-240V~50Hz) bajo tensión, se ilumina el LED.
B) Indicación LED “Charging”
El LED se enciende en cuanto el aparato se está
cargando.
C) Indicación LED “Full”
El LED se ilumina en rojo en cuanto la batería se
haya cargado completamente y el cargador haya
pasado a carga de mantenimiento automática.
Instrucciones:
● En algunos casos, el proceso de carga termina
muy rápidamente sin que la batería pueda
transmitir la potencia indicada. La batería ha
perdido capacidad de carga y debe
reemplazarse.
● Si el cargador no indica nada y la batería no se
carga, comprobar si el cargador tiene tensión de
red. Retirar el enchufe de la toma de corriente y
comprobar las conexiones de la batería.
● Cargar la batería sólo a temperaturas superiores
a 0° C.
● Las baterías de embarcaciones sólo deben
cargarse fuera de la embarcación.
● El aparato comprueba el estado de la batería
durante unos segundos y a continuación pasa al
estado de carga adecuado.
● No arrancar nunca el motor sin la batería
conectada.
● No arrancar nunca el motor con el cargador
conectado.
● Por lo general, el polo negativo de la batería está
conectado a la carrocería y se carga según se
explica en las fig. 2-11.
● Excepcionalmente es posible conectar el polo
positivo a la carrocería. En ese caso excepcional
cambian las figuras 4 y 5. En tal caso conectar en
primer lugar el cable de carga negro al polo
negativo de la batería y, a continuación, el cable
de carga negro a la carrocería, en un punto
alejado de la batería y del conducto de gasolina .
Instrucciones adicionales sobre la carga de
baterías fuera del vehículo
● Al retirar la batería, retirar primero la conexión al
polo con conexión a tierra y asegurarse de que
todos los dispositivos consumidores estén
desconectados.
● Conectar primero el cable de carga rojo al polo
positivo de la batería, a continuación el cable de
carga negro al polo negativo de la batería.
Enchufar el aparato a la toma de corriente. Una
vez finalizada la carga, retirar primero el enchufe
de la toma de corriente, a continuación el cable
de carga negro y, finalmente, el cable de carga
rojo de los polos de la batería. Observar todas las
instrucciones del presente manual.
● Al montar la batería, tener en cuenta la polaridad
y realizar en primer lugar la conexión con el polo
de la batería con conexión a tierra.
6. Manejo
Para cargar la batería proceder como sigue:
Fig. 2:
Soltar o quitar los tapones de la batería (en caso de
existir).
Fig. 3:
Comprobar el estado de ácido de la batería. De ser
necesario, llenarla de agua destilada (siempre y
cuando sea posible). Atención! El ácido de la batería
es corrosivo. Las salpicaduras de ácido se deben
aclarar de inmediato con abundante agua y en caso
de emergencia consultar a un médico.
32
Page 33

Fig 4:
Conectar primero el cable de carga rojo al polo
positivo de la batería.
Fig. 5:
A continuación, quitar el cable de carga negro de la
batería y cargar el cable de gasolina a la carrocería.
Fig 6:
Tras conectar la batería al cargador se puede
enchufar el cargador a una toma de corriente de 220240V~50Hz. No conectar el cargador a una toma de
corriente que presente otra tensión de red. Atención!
De la carga puede emanar un gas detonante
peligroso, por lo tanto se recomienda evitar la
formación de chispas y el fuego abierto durante la
carga. ¡Peligro de explosión!
Cálculo del tiempo de carga:
El tiempo de carga depende del estado de carga de
la batería. En el caso de una batería vacía, el tiempo
de carga aproximado se puede calcular con ayuda de
la siguiente fórmula:
Tiempo de carga/h =
Ejemplo = = 9,6 h máx.
Fig. 7:
El estado de carga exacto solo se puede determinar
midiendo la estanqueidad al ácido con un sifón para
ácidos. Advertencia! En el proceso de carga emanan
gases (formación de burbujitas en la superficie del
líquido de la batería). Asegurar que en las salas hay
un ventilación suficiente.
Fig 8:
Desenchufar el aparato.
Fig. 9:
Soltar primero el cable de carga negro de la
carrocería.
Fig. 10:
A continuación, soltar el cable de carga rojo del polo
positivo de la batería.
Fig. 11:
Volver a enroscar o poner los tapones de la batería
(en caso de existir).
Capacidad de la batería en Ah
Amp. (Corriente de carga arit.)
24 Ah
2,5 A
E
Protección contra sobrecarga
El cargador está protegido electrónicamente contra
sobrecargas, cortocircuito y polaridad incorrecta.
Si los bornes de polos están mal conectados no
funcionará el aparato.
7. Cambiar el cable de conexión a la
red eléctrica
Cuando el cable de conexión a la red de este aparato
esté dañado, deberá ser sustituido por el fabricante o
su servicio de asistencia técnica o por una persona
cualificada para ello, evitando así cualquier peligro.
8. Mantenimiento, limpieza y pedido
de piezas de repuesto
Desenchufar el aparato siempre antes de realizar
cualquier trabajo de limpieza.
8.1 Limpieza
● Evitar al máximo posible que la suciedad y el
polvo se acumulen en los dispositivos de
seguridad, las rendijas de ventilación y la
carcasa. Frotar el aparato con un paño limpio o
limpiarlo con aire comprimido manteniendo la
presión baja.
● Se recomienda limpiar el aparato tras cada uso.
● Limpiar el aparato de forma periódica con un
paño húmedo y un poco de jabón blando. No
utilizar productos de limpieza o disolventes; ya
que podrían deteriorar las piezas de plástico del
aparato. Es preciso evitar que entre agua en el
interior del aparato.
● Guardar el cargador en una sala seca. Limpiar la
corrosión de las pinzas de carga.
8.2 Mantenimiento
No es preciso realizar el mantenimiento de otras
piezas en el interior del aparato.
8.3 Mantenimiento y cuidado de la batería
● Asegurar que la batería esté siempre bien
montada.
● Es preciso asegurar que la conexión a la red del
equipo eléctrico sea correcta.
● Mantener la batería limpia y seca. Engrasar
ligeramente las pinzas de conexión con una
grasa sin ácido y resistente al ácido (vaselina).
● En el caso de baterías que precisan de
mantenimiento comprobar cada 4 semanas el
nivel del ácido y, de ser necesario, rellenar con
agua destilada.
33
Page 34

E
8.4 Pedido de piezas de repuesto:
A la hora de pasar pedido de piezas de repuesto, es
preciso indicar los siguientes datos;
● Tipo de aparato
● Número de artículo del aparato
● Número de identificación del aparato
● Número de la pieza de repuesto requerida
Los precios y la información actual se hallan en
www.isc-gmbh.info
9. Eliminación y reciclaje
El aparato está protegido por un embalaje para evitar
daños producidos por el transporte. Este embalaje es
materia prima y, por eso, se puede volver a utilizar o
llevar a un punto de reciclaje. El aparato y sus
accesorios están compuestos de diversos materiales,
como, p. ej., metal y plástico. Depositar las piezas
defectuosas en un contenedor destinado a residuos
industriales. Informarse en el organismo responsable
al respecto en su municipio o en establecimientos
especializados.
10. Almacenamiento
Guardar el aparato y sus accesorios en un lugar
oscuro, seco, protegido de las heladas e inaccesible
para los niños. La temperatura de almacenamiento
óptima se encuentra entre los 5 y 30 ˚C. Guardar la
herramienta eléctrica en su embalaje original.
34
Page 35

Sisällysluettelo
1. Turvallisuusmääräykset
2. Laitteen kuvaus ja toimituksen laajuus
3. Määräysten mukainen käyttö
4. Tekniset tiedot
5. Ennen käyttöönottoa
6. Käyttö
7. Verkkoliitäntäjohdon vaihto
8. Puhdistus, huolto ja varaosatilaus
9. Käytöstäpoisto ja uusiokäyttö
10. Säilytys
FIN
35
Page 36

FIN
m Huomio!
Laitteita käytettäessä tulee noudattaa tiettyjä
turvallisuusvarotoimia tapaturmien ja vaurioiden
välttämiseksi. Lue sen vuoksi tämä käyttöohje / nämä
turvallisuusmääräykset huolellisesti läpi. Säilytä ne
hyvin, jotta niissä olevat tiedot ovat myöhemminkin
milloin vain käytettävissäsi. Jos luovutat laitteen
muille henkilöille, ole hyvä ja anna heille myös tämä
käyttöohje / nämä turvallisuusmääräykset laitteen
mukana. Emme ota mitään vastuuta tapaturmista tai
vaurioista, jotka ovat aiheutuneet tämän käyttöohjeen
tai turvallisuusohjeiden noudattamisen
laiminlyönnistä.
Laitteessa olevan ohjekilven selostus (katso
kuvaa 12)
1 = Käytetään vain sisätiloissa
2 = Laite on suojaeristetty
3 = VAROITUS – Tapaturmanvaaran vähentämiseksi
tulee lukea käyttöohje!
4 = Lue käyttöohje ennen lataamista; Käytetään vain
sisätiloissa; Erota sähköverkosta ennen
akkuliitäntöjen kiinnittämistä tai irrottamista;
HUOMIO! Räjähdysalttiita kaasuja, avotulta ja
kipinöitä tulee välttää. Lataamisen aikana tulee
huolehtia riittävästä tuuletuksesta.
1. Turvallisuusmääräykset
●
Akkua ladattaessa tulee ehdottomasti käyttää
suojalaseja ja käsineitä! Syövyttävä happo
aiheuttaa vakavan tapaturmanvaaran!
● Akkua ladattaessa ei saa käyttää synteettisistä
kuiduista valmistettuja vaatteita, jotta vältetään
sähköstaattisten purkautumisien aiheuttamat
kipinät.
● VAROITUS! Räjähdysalttiita kaasuja – avotulta ja
kipinöitä tulee välttää
● Ennen akun liittämistä ja irrottamista tulee laturi
irroittaa verkosta.
● Laturissa on rakenneosia, kuten esim. kytkimiä ja
varoke, jotka saattavat aiheuttaa valokaaren ja
kipinöitä. Huolehdi ehdottomasti autotallin tai tilan
hyvästä tuuletuksesta!
● Laturi on tarkoitettu vain 12 V lyijyakkujen
lataamiseen.
● Ei saa ladata “uudelleen ladattavaksi
sopimattomia akkuja” tai viallisia akkuja.
● Noudata akun valmistajan antamia ohjeita.
● Irrota laite verkosta ennen kuin liität akun siihen
tai irroitat liitännän.
● Huomio! Vältä avotulta ja kipinöitä. Ladatessa
vapautuu räjähtävää paukkukaasua.
● Käytä laitetta vain kuivissa tiloissa.
● Älä aseta laturia kuumennetulle alustalle.
● Pidä tuuletusraot puhtaina liasta.
● Varo! Akkuhappo on syövyttävää. Iholle ja
vaatteisiin joutuneet roiskeet on pestävä heti
pois saippuavedellä. Silmiin joutuneet
happoroiskeet on huuhdottava heti vedellä
(15 min ajan) ja hakeuduttava
lääkärinhoitoon.
● Älä lataa akkuja, joita ei voi ladata.
● Noudata ajoneuvon valmistajan akun
lataamisesta antamia ohjeita.
● Älä lataa useampia akkuja samanaikaisesti
● Älä koskaan liitä latauspihtejä oikosulkuun.
● Verkkoliitäntäjohdon ja latausjohtojen tulee olla
moitteettomassa kunnossa
● Pidä lapset poissa akun ja laturin läheltä.
● Huomio! Kun havaitset pistävän
kaasunhajun, on räjähdysvaara välitön. Älä
sammuta laitetta. Älä irrota latauspihtejä.
Tuuleta tila heti hyvin. Anna huoltokorjaamon
tarkastaa akku.
● Älä käytä johtoa väärin.
Älä kanna laturia johdosta, äläkä irroita pistoketta
pistorasiasta johdosta vetämällä. Suojaa johtoa
kuumuudelta, öljyltä ja teräviltä reunoilta.
● Tarkasta, onko laitteesi vaurioitunut. Vialliset tai
vahingoittuneet osat tulee korjauttaa
asiantuntevasti alan ammattikorjaamossa tai
vaihtaa uusiin, ellei käyttöohjeessa ole
nimenomaan toisin sanottu.
● Käytä oikeaa verkkojännitettä (220-240V ~
50Hz).
● Pidä liitännät puhtaina ja suojaa niitä korroosiolta.
● Laite tulee irrottaa verkosta kaikkien puhdistus- ja
huoltotoimien ajaksi.
● Käytä aina haponkestäviä suojakäsineitä ja
suojalaseja, kun liität tai lataat akun, kun
täytät happoa tai lisäät tislattua vettä.
● Tarkasta säännöllisin väliajoin, onko
verkkojohdossa vaurioita tai kulumista ja vaihda
se tarvittaessa uuteen. Käytä vähintään PVCletkujohtoja (HO3VV).
● Jos tämän laitteen liitäntäjohto vahingoittuu, niin
valmistajan tai sen asiakaspalvelun tai vastaavan
ammattiliikkeen tulee vaihtaa se uuteen
vaaratilanteiden välttämiseksi.
● Huomio! Älä ylitä latausaikaa. Kun latausaika on
päättynyt, vedä verkkopistoke pistorasiasta ja
irroita laturi akusta.
36
Page 37

Tätä laitetta ei ole tarkoitettu sellaisten henkilöiden
(eikä myöskään lasten) käytettäväksi, joiden fyysiset,
aistiperäiset tai henkiset kyvyt ovat rajoitetut, tai joilla
ei ole käyttöön tarvittavaa kokemusta ja/tai taitoja,
paitsi sellaisen heidän turvallisuudestaan vastuullisen
henkilön valvonnassa, joka voi opastaa heitä
käyttämään laitetta oikein. Lapsia tulee valvoa, jotta
he eivät missään tapauksessa voi leikkiä laitteella.
m VAROITUS
Lue kaikki turvallisuusmääräykset ja ohjeet. Jos
turvallisuusmääräyksiä tai muita ohjeita ei noudateta,
saattaa tästä aiheutua sähköiskuja, tulipaloja ja/tai
vaikeita vammoja.
Säilytä kaikki turvallisuusmääräykset ja ohjeet
myöhempää tarvetta varten.
Hävittäminen
Akut: Vain autokorjaamojen, erityisten
keräyspisteiden tai erikoisjätteen keräyspisteiden
kautta. Tiedustele asiaa kunnanhallinnosta.
2. Laitteen kuvaus ja toimituksen
laajuus (kuva 1)
2.1 Laitteen kuvaus
1 Latauspihdit, musta (-)
2 Latauspihdit, punainen (+)
3 Verkkojohto
2.2 Toimituksen laajuus
● Avaa pakkaus ja ota laite varovasti pakkauksesta.
● Poista pakkausmateriaalit sekä pakkaus- ja
kuljetusvarmistukset (mikäli käytetty).
● Tarkasta, onko toimitus täysilukuinen.
● Tarkasta, onko laitteessa tai varusteissa
kuljetusvaurioita.
● Säilytä pakkaus, mikäli mahdollista, takuuajan
loppuun saakka.
HUOMIO
Laite ja pakkausmateriaalit eivät ole lasten
leikkikaluja! Lapset eivät saa leikkiä
muovipusseilla, kelmuilla tai pienillä osilla! Niistä
uhkaa nielaisu- ja tukehtumisvaara!
● Akkulaturi
● Alkuperäiskäyttöohje
FIN
3. Määräysten mukainen käyttö
Laturi on tarkoitettu huoltoa tarvitsevien tai
tarvitsemattomien 12V käynnistysakkujen
(lyijyhappoakkujen) lataamiseen, joita käytetään
moottoriajoneuvoissa. Laite soveltuu myös
lyijygeeliakkujen lataamiseen.
Laitetta saa käyttää ainoastaan sille määrättyyn
tarkoitukseen. Kaikkinainen tämän ylittävä käyttö ei
ole määräysten mukaista. Laitteen omistaja/käyttäjä
eikä suinkaan sen valmistaja on vastuussa kaikista
tästä aiheutuvista vahingoista tai loukkaantumisista.
Ole hyvä ja ota huomioon, että laitteitamme ei ole
suunniteltu käytettäväksi pienteollisuus-, käsityöläistai teollisuustarkoituksiin. Emme hyväksy mitään
takuuvaateita, jos laitetta käytetään pienteollisuus-,
käsityöläis- tai teollisuustyöpaikoilla tai näihin
verrattavissa olevissa toimissa.
4. Tekniset tiedot
Verkkojännite: 220-240V ~ 50Hz
Nimellis-ottovirta: 0,32 A
Nimellis-antojännite 12 V tasavirta
Nimellisantovirta: 2 A
Akun kapasiteetti teholla: 3-40 Ah
5. Ennen käyttöönottoa
Useimpien ajoneuvonvalmistajien ohjeiden
mukaan tulee akku erottaa auton verkosta ennen
lataamista. Viittaamme siihen, että ajoneuvoissa
on jo vakiovarusteisina lukuisia elektronisia
rakenneosia (kuten esim. ABS, ASR,
polttoainepumppu, tietokoneohjaus). Esiintyvät
jännitehuiput saattavat aiheuttaa vikoja
elektronisiin rakenneosiin. Sen vuoksi akku tulee
irrottaa auton verkosta lataamisen ajaksi.
Ole hyvä ja noudata autosi, radiosi,
navigaattorisi jne. käyttöohjeissa annettuja
ohjeita.
37
Page 38

FIN
Automaattilatauksen lisätiedot
Laturi on mikroprosessoriohjattu automaattinen laturi,
ts. se soveltuu erityisen hyvin huoltoa
tarvitsemattomien akkujen lataamiseen sekä
sellaisten akkujen pitkäaikaiseen lataamiseen ja
lataustason säilyttämiseen, joita ei käytetä jatkuvasti,
kuten esim. veneissä, ruohonleikkureissa tms. olevat
akut. Integroidun mikroprosessorin vuoksi lataaminen
tapahtuu kolmessa vaiheessa.
Ensimmäinen vaihe lataa akun lähes tasaisella virralla
noin 70% täyteen. Toinen vaihe lataa akun tasaisella
jännitteellä noin 90% täyteen. Kolmas vaihe pitää
akun jännitteen tasaisena ja akun siten aina täyteen
ladattuna.
Lataamista ei tarvitse valvoa.
Kuva 1: Valodiodinäytöt
A) Valodiodinäyttö „Power“
Kun verkkopistoke on pantu jännitteelliseen (220240V~50Hz) pistorasiaan, niin valodiodi palaa.
B) Valodiodinäyttö „Charging“
Valodiodi syttyy palamaan heti kun laite lataa.
C) Valodiodinäyttö „Full“
Valodiodi syttyy palamaan heti kun akku on ladattu
täyteen ja laturi on kytkeytynyt automaattiselle
pitolataukselle.
Ohjeita:
● Joissakin tapauksissa lataaminen lopetetaan
hyvin pian, mutta akku ei sitten kuitenkaan anna
ilmoitettua tehoa. Akun kapasiteetti on vähentynyt
ja se tulee vaihtaa uuteen.
● Jos laturi ei näytä mitään eikä akkua ladata,
tarkasta, saako laturi lainkaan verkkojännitettä.
Vedä verkkopistoke irti ja tarkasta akun liitäntöjen
kunto.
● Lataa akku vain kun lämpötila on yli 0°C.
● Lataa veneiden akut vain veneen ulkopuolella.
● Laite tarkastaa akun tilan muutaman sekunnin
aikana ja kytkeytyy sitten oikeaan lataustilaan.
● Älä koskaan käynnistä moottoria ilman siihen
liitettyä akkua.
● Älä koskaan käynnistä moottoria, kun laturi on
liitetty siinä olevaan akkuun.
● Normaalitapauksessa miinusnapa on liitetty koriin
ja suoritat lataamisen kuten kuvissa 2 – 11 on
näytetty.
● Poikkeustapauksessa on mahdollista, että
plusnapa on liitetty koriin. Tässä
poikkeustapauksessa muuttuvat kuvat 4 ja 5. Liitä
tässä tapauksessa ensin musta latausjohto akun
miinusnapaan ja sitten punainen latausjohto
koriin mahdollisimman kauas akusta ja
polttoainejohdosta.
Lisäohjeita akkujen lataamiseen poissa
ajoneuvosta
● Kun otat akun pois, irrota aina ensimmäiseksi
yhteys maadoitettuun akun napaan ja varmista,
että kaikki kuluttajalaitteet on kytketty pois päältä.
● Liitä ensin punainen latausjohto akun plusnapaan
ja sitten musta latausjohto akun miinusnapaan.
Työnnä verkkopistoke verkkopistorasiaan.
Lataamisen jälkeen irrota ensin verkkopistoke
pistorasiasta, sitten ensin musta latausjohto akun
navasta ja lopuksi punainen latausjohto akun
navasta. Noudata kaikkia tässä käyttöohjeessa
annettuja ohjeita.
● Huolehdi akkua paikalleen asettaessasi napojen
oikeista paikoista ja liitä ensimmäiseksi yhteys
maadoitettuun akun napaan.
6. Käyttö
Lataa akku seuraavasti:
Kuva 2:
Irrota tai poista akun tulpat (mikäli ne kuuluvat
varustukseen) akusta.
Kuva 3:
Tarkasta akkusi hapon määrä. Mikäli tarpeen, lisää
tislattua vettä (jos tämä on mahdollista). Huomio!
Akkuhappo on syövyttävää. Happoruiskeet on
huuhdeltava heti hyvin pois runsaalla vedellä,
tarvittaessa on hakeuduttava lääkärinhoitoon.
Kuva 4:
Liitä ensin punainen latausjohto akun plusnapaan.
Kuva 5:
Liitä sitten musta latausjohto ajoneuvon koriin
mahdollisimman kauas akusta ja polttoainejohdosta.
Kuva 6:
Sen jälkeen kun olet liittänyt akun laturiin, voit liittää
laturin pistorasiaan, jossa on 230V~50Hz verkkovirta.
Liittäminen pistorasiaan, jossa on muu verkkojännite,
on kielletty. Huomio! Lataamisessa saattaa kehittyä
vaarallista paukkukaasua, sen vuoksi on vältettävä
kipinöiden muodostumista ja avotulta lataamisen
aikana. Räjähdysvaara!
38
Page 39

Latauksen keston laskeminen:
Latauksen kesto määräytyy akun lataustilan
perusteella. Tyhjän akun latausaika voidaan laskea
suunnilleen seuraavalla kaavalla:
Latausaika/h =
Esimerkki: = = 9,6 h kork.
Kuva 7:
Tarkan lataustilan voi saada selville ainoastaan
mittaamalla happopitoisuuden happopumppua
käyttäen. Viite! Ladattaessa vapautuu kaasuja
(akkunesteen pinnalle muodostuu pieniä kuplia).
Huolehdi siksi tilojen hyvästä tuuletuksesta.
Kuva 8:
Irrota verkkopistoke pistorasiasta.
Kuva 9:
Irrota ensin musta latausjohto ajoneuvon korista.
Kuva 10:
Irrota sitten punainen latausjohto akun plusnavasta.
Kuva 11:
Ruuvaa akun tulpat takaisin paikalleen tai paina ne
paikalleen (jos tulpat on).
Ylikuormitussuoja
Laturi on suojattu elektronisesti ylikuormitukselta,
oikosululta ja vääränapaiselta asennukselta.
Jos pihdit on pantu vääriin napoihin, niin laite ei toimi.
akun kapasiteetti Ah
Amp. (latausvirta lask.)
24 Ah
2,5 A
7. Verkkoliitäntäjohdon vaihto
Jos tämän laitteen verkkoliitäntäjohto vahingoittuu,
niin valmistajan tai sen asiakaspalvelun tai vastaavan
ammattitaitoisen henkilön tulee vaihtaa se uuteen
vaaratilanteiden välttämiseksi.
FIN
8. Puhdistus, huolto ja varaosatilaus
Irrota verkkopistoke ennen kaikkia puhdistustoimia.
8.1 Puhdistus
● Pidä turvalaitteet, ilmaraot ja laitteen kotelo niin
puhtaina pölystä ja liasta kuin suinkin mahdollista.
Pyyhi laite puhtaalla rievulla tai puhalla lika pois
paineilmalla käyttäen alhaista paineasetusta.
● Suosittelemme laitteen puhdistamista aina heti
käytön jälkeen.
● Puhdista laite säännöllisin väliajoin kostealla
rievulla käyttäen hieman saippuaa. Älä käytä
puhdistusaineita tai liuotteita; ne saattavat
syövyttää laitteen muoviosia. Huolehdi siitä, ettei
laitteen sisälle pääse vettä.
● Laturi tulee säilyttää kuivassa tilassa.
Latauspihdeistä tulee puhdistaa korroosio.
8.2 Huolto
Laitteen sisällä ei ole muita huoltoa tarvitsevia osia.
8.3 Akun huolto ja hoito
● Huolehdi siitä, että akkusi on aina asennettu
lujasti paikalleen.
● Moitteeton yhteys sähkölaitteiston
johtoverkostoon tulee varmistaa.
● Pidä akku puhtaana ja kuivana. Rasvaa
liitäntäpihdit ohuesti hapottomalla,
haponkestävällä rasvalla (vaseliinilla).
● Akuissa, jotka täytyy huoltaa, tulee tarkastaa
happomäärä n. 4 viikon välein ja tarvittaessa
lisätä ainoastaan tislattua vettä.
8.4 Varaosatilaus:
Varaosia tilattaessa tulee antaa seuraavat tiedot:
● laitteen tyyppi
● laitteen tuotenumero
● laitteen tunnusnumero
● tarvittavan varaosan varaosanumero
Aktuellit hinnat ja muita tietoja löydät verkkosivustosta
www.isc-gmbh.info
39
Page 40

FIN
9. Käytöstäpoisto ja uusiokäyttö
Laite on pakattu kuljetuspakkaukseen, jotta vältetään
kuljetusvauriot. Tämä pakkaus on raaka-ainetta ja sitä
voi siksi käyttää uudelleen tai sen voi toimittaa
kierrätyksen kautta takaisin raaka-ainekiertoon. Laite
ja sen varusteet on valmistettu eri materiaaleista,
kuten esim. metallista ja muoveista. Toimita vialliset
rakenneosat ongelmajätehävitykseen. Tiedustele
ohjeita alan ammattiliikkeestä tai kunnanhallitukselta!
10. Säilytys
Säilytä laite ja sen varusteet valolta, kosteudelta ja
pakkaselta suojatussa tilassa poissa lasten
ulottuvilta. Paras säilytyslämpötila on 5°C ja 30°C
välillä. Säilytä sähkötyökalut
alkuperäispakkauksissaan.
40
Page 41

Περιεχόµενα
1. Υποδείξεις ασφαλείας
2. Περιγραφή της συσκευής και συµπαραδιδόµενα
3. Ενδεδειγµένη χρήση
4. Τεχνικά χαρακτηριστικά
5. Πριν τη θέση σε λειτουργία
6. Χειρισµός
7. Αντικατάσταση καλωδίου σύνδεσης µε το δίκτυο
8. Καθαρισµός, συντήρηση και παραγγελία ανταλλακτικών
9. ∆ιάθεση στα απορρίµµατα και επαναχρησιµοποίηση
10. Φύλαξη
GR
41
Page 42

GR
m Προσοχή!
Κατά τη χρήση των συσκευών πρέπει, προς
αποφυγή τραυµατισµών, να τηρούνται και να
λαµβάνονται ορισµένα µέτρα ασφαλείας. ∆ιαβάστε
για το λόγο αυτό προσεκτικά τις Οδηγίες χρήσης /
Υποδείξεις ασφαλείας. Φυλάξτε τις καλά για να
έχετε τις πληροφορίες πάντα στη διάθεσή σας. Εάν
παραδώσετε τη συσκευή σε άλλα άτοµα, δώστε µαζί
και αυτές τις Οδηγίες χρήσης / Υποδείξεις
ασφαλείας. ∆εν αναλαµβάνουµε καµµία ευθύνη για
ατυχήµατα ή βλάβες που οφείλονται σε µη τήρηση
αυτών των Οδηγιών χρήσης και των Υποδείξεων
ασφαλείας.
Εξήγηση της ετικέτας στη συσκευή
(βλ. εικ. 12)
1 = Μόνο για χρήση σε εσωτερικούς χώρους
2 = Η συσκευή διαθέτει µόνωση ασφαλείας
3 = ΠΡΟΕΙ∆ΟΠΟΙΗΣΗ – Για την ελάττωση του
κινδύνου τραυµατισµών να διαβάσετε τις
Οδηγίες χρήσης
4 = Πριν τη φόρτιση να διαβάσετε τις οδηγίες
χρήσης. Μόνο για χρήση σε εσωτερικούς
χώρους. Να διακότπετε την παροχή ρεύµατος
πριν ανοίξετε ή κλείσετε τις συνδέσεις προς τη
µπαταρία. ΠΡΟΣΟΧΗ! Εκρηκτικά αέρια, να
αποφεύγετε τις φλόγες και τους σπινθήρες
Κατά τη διάρκεια της φόρτισης να φροντίζετε
για επαρκή αερισµό.
1. Υποδείξεις ασφαλείας
●
Κατά τη φόρτιση της µπαταρίαςνα φοράτε
οπωσδήποτε προστατευτικά γυαλιά και γάντια!
Λόγω του καυστικού οξέος υφίσταται σοβαρός
κίνδυνος τραυµατισµού!
● Κατά τη φόρτιση της µπαταρίας δεν
επιτρέπεται να φοράτε ρούχα από συνθετικά
υφάσµατα, για να αποφευχθεί ο σχηµατισµός
σπινθήρων από ηλεκτροστατική εκφόρτιση.
● ΠΡΟΣΟΧΗ! Εκρηκτικά αέρια – Να αποφεύγετε
τις φλόγες και τους σπινθήρες
● Πριν τη σύνδεση και αποσύνδεση της µπαταρίας
να διακόπτετε την παροχή ρεύµατος.
● Ο φορτιστής περιλαµβάνει εξαρτήµατα, όπως
π.χ. διακόπτη και ασφάλεια, που ενδεχοµένως
παράγουν φωτεινό τόξο και σπινθήρες. Να
προσέχετε οπωσδήποτε να υπάρχει καλός
αερισµός στο γκαρτάζ ή στο χώρο χρήσης!
● Ο φορτιστής είναι κατάλληλος µόνο για
µπαταρίες µολύβδου 12V.
● Μη φορτίζετε „µη επαναφορτιζόµενες
µπαταρίες“ ή ελαττωµατικές µπαταρίες.
42
● Προσέξτε τις Υποδείξεις του κατασκευαστή της
µπαταρίας.
● Πριν συνδέσετε ή αποσυνδέσετε τη µπαταρία,
να διακόπτετε την παροχή του ρεύµατος προς
τη συσκευή .
● Προσοχή! Να αποφεύγετε φλόγες και
σπινθήρες. Κατά τη φόρτιση ελευθερώνεται
εκρηκτικό κροτούν αέριο.
● Να χρησιµοποιείτε τη συσκευή µόνο σε
στεγνούς χώρους.
● Μη τοποθετείτε τη συσκευή σε θερµασµένη
επιφάνεια.
● Να διατηρείτε τις σχισµές αερισµού ελεύθερες
από ακαθαρσίες.
● ΠΡΟΣΟΧΗ! Το οξύ των µπαταριών είναι
καυστικό. Να πλένετε αµέσως µε
σαπουνόνερο ενδεχόµενες πιτσιλιές στο
δέρµα ή στα ρούχα. Να ξεπλένετε αµέσως
µε νερό τις πιτσιλιές οξέος από τα µάτια
(15 λεπτά) και να συµβουλεύεστε ένα
γιατρό.
● Μη φορτίζετε µη επαναφορτιζόµενες
µπαταρίες.
● Να ακολουθείτε τα στοιχεία και τις υποδείξεις
του κατασκευαστή του αυτοκίνητου για τη
φόρτιση της µπαταρίας.
● Μη φορτίζετε συγχρόνως περισσότερες
µπαταρίες
● Μη βραχυκυκλώνετε τις λαβίδες της φόρτισης.
● Το καλώδιο για σύνδεση µε το δίκτυο και οι
αγωγοί φόρτισης πρέπει να είναι σε άψογη
κατάσταση.
● Κατά τη διαδικασία της φόρτισης τα παιδιά να
είναι µακριά.
● Προσοχή! Σε περίπτωση εντατικής οσµής
αερίου υφίσταται άµεσος κίνδυνος
έκρηξης. Μην απενεργοποιείτε τη
συσκευή. Μην αποµακρύνετε τις λαβίδες
φ΄ροτισης. Να αερίζετε αµέσως καλά το
χώρο. Να δώσετε τη µπαταρία να ελεγχθεί
από συνεργείο εξυπηρέτησης πελατών.
● Μην χρησιµοποιείτε το καλώδιο για άλλο
σκοπό.
Μη µεταφέρετε το καλώδιο κρατώντας από
αυτό τη συσκευή, και µη το χρησιµοποιείτε για
να τραβήξετε το βύσµα από την πρίζα. Να
προστατεύετε το καλώδιο από ψηλές
θερµοκρασίες, λάδι και αιχµηρά αντικείµενα.
● Να ελέγχετε τη συσκευή σας για ενδεχόµενες
βλάβες. Τα ελαττωµατικά εξαρτήµατα πρέπει
να επισκευάζονται ή να αντικαθίστανται σωστά
από αναγνωρισµένο εξειδικευµένο συνεργείο
εάν δεν αναφέρεται κάτι διαφορετικό στην
Οδηγία χρήσης.
● Να τηρείτε την τιµή τάσης δικτύου (220-240V ~
50Hz).
Page 43

● Να διατηρείτε τις συνδέσεις καθαρές κα ινα τις
προστατεύετε από διάβρωση.
● Πριν από όλες τις εργασίες καθαρισµού και
συντήρησης να διακόπτετε την παροχή
ρεύµατος προς τη συσκευή.
● Σε περίπτωση σύνδεσης και φόρτισης της
µπαταρίας, όταν γεµίζετε οξύ ή
συµπληρώνετε αποσταγµένο νερό να
χρησιµοποιείτε γάντια που αντέχουν σε
οξέα και προστατευτικά γυαλιά.
● Να ελέγχετε τακτικά το καλώδιο σύνδεσης µε
το δίκτυο για ελαττώµατα ή φθορά και αν
χρειάζεται, να το αντικαταστήσετε. Να
χρησιµοποιείτε τουλάχιστον σωλήνες PVC
(H03VV).
● Εάν το καλώδιο σύνδεσης µε το δίκτυο αυτής
της συσκευής είναι ελαττωµατικό, πρέπει, προς
αποφυγή κινδύνων, να αντικατασταθεί από τον
κατασκευαστή ή το τµήµα του εξυπηρέτησης
πελατών ήάπό παρόµοια εξειδικευµένο άτοµο.
● Προσοχή! Μην υπερβαίνετε το χρόνο
φ΄ροτισης. Μετά το πέρας του χρόνου
φόρτισης να βγάζετε το βύσµα από την πρίζα
και να αποσυνδέετε το φορτιστή από τη
µπαταρία.
Αυτή η συσκευή δεν προορίζεται για άτοµα
(συµπεριλαµβανοµένων και παιδιών) µε
περιορισµένες σωµατικές, αισθητικές ή
πνευµατικές ικανότητες ή ελλείψει πείρας ή/και
ελλείψει γνώσεων, εκτός εάν επιτηρούνται από
άτοµο αρµόδιο για την ασφάλεια ή εάν έλαβαν
οδηγίες για το πώς πρέπει να χρησιµοποιηθεί η
συσκευή. Τα παιδιά να επιβλέπονται για να είναι
σίγουρο πως δεν παίζουν µε τη συσκευή.
m ΠΡΟΕΙ∆ΟΠΟΙΗΣΗ
∆ιαβάστε όλες τις Υποδείξεις ασφαλείας και
τις Οδηγίες. Σε περίπτωση παραλήψεων κατά την
τήρηση των Υποδείξεων ασφαλείας µπορούν να
προκαλέσουν ηλεκτροπληξία, πυρκαγιά και/ή
σοβαρούς τραυµατισµούς.
Φυλάξτε για µελλοντική χρήση όλες τις
Υποδείξεις ασφαλείας και τις οδηγίες.
Απόσυρση
Μπαταρίες: Μόνο µέσω συνεργείων αυτοκινήτων,
ειδικές υπηρεσίες συλλογής ειδικών απορριµµάτων.
Ενηµερωθείτε στην τοπική διοίκηση της κοινότητάς
σας.
GR
2. Περιγραφή της συσκευής και
συµπαραδιδόµενα (εικ. 1)
2. 1 Περιγραφή της συσκευής
1 Μανταλάκι φόρτισης µαύρο (-)
2 Μανταλάκι φόρτισης κόκκινο (+)
3 Αγωγός σύνδεσης µε το δίκτυο
2.2 Συµπαραδιδόµενα
● Ανοίξτε τη συσκευασία και βγάλτε προσεκτικά
τη συσκευή.
● Αποµακρύντε τα υλικά συσκευασίας καθώς και
τα συστήµατα προστασίας της συσκευασίας /
µεταφοράς (εάν υπάρχουν).
● Ελέγξτε εάν είναι πλήρες το περιεχόµενο.
● Ελέγξτε τη συσκευή και τα αξεσουάρ για
ενδεχόµενες ζηµιές από τη µεταφορά.
● Φυλάξτε τη συσκευασία αν γίνεται µέχρι την
πάροδο της προθεσµάις της εγγύησης.
ΠΡΟΣΟΧΗ
H συσκευή και τα υλικά συσκευασίας δεν είναι
παιχνίδια! Τα παιδιά δεν επιτρέπεται να
παίζουν µε πλαστικές σακούλες, πλαστικές
µεµβράνες και µικροαντικείµενα! Υφίσταται
κίνδυνος κατάποσης και ασφυξίας!
● Φορτιστής µπαταριών
● Πρωτότυπες Οδηγίες χρήσης
3. Ενδεδειγµένη χρήση
Ο φορτιστής προορίζεται για τη φόρτιση µπαταριών
εκκίνησης χωρίς συντήρηση 12V και (µολύβδουοξέος) που χρησιµοποιούνται σε αυτοκίνητα. Η
συσκευή είναι κατάλληλη και για µπαταρίες µε ζελ
µολύβδου.
Η συσκευή επιτρέπεται να χρησιµοποιείται µόνο για
τον σκοπό για τον οποίο προορίζεται. Κάθε πέραν
τούτου χρήση δεν είναι ενδεδειγµένη. Για ζηµιές ή
τραυµατισµούς παντός είδους που οφείλονται σε µη
ενδεδειγµένη χρήση ευθύνεται ο χρήστης /
χειριστής και όχι ο κατασκευαστής.
Παρακαλούµε να προσέξετε, πως οι συσκευές µας
δεν έχουν κατασκευαστεί για επαγγελµατική,
βιοτεχνική και βιοµηχανική χρήση. ∆εν
αναλαµβάνουµε καµµία εγγύηση, εάν η συσκευή
χρησιµοποιηθεί σε βιοτεχνίες ή βιοµηχανίες ή σε
παρόµοιες εργασίες.
43
Page 44

GR
4. Τεχνικά χαρακτηριστικά
Τάση δικτύου: 220-240V ~ 50Hz
Ονοµαστικό ρεύµα εισόδου: 0,32 Α
Ονοµαστική τάση εξόδου 12 V d.c.
Ονοµαστικό ρεύµα εξόδου: 2 Α
Χωρητικότητα µπαταρίας σε: 3-40 Ah
5. Πριν τη θέση σε λειτουργία
Σύµφωνα µε τις υποδείξεις των περισς΄τοερων
κατασκευαστών αυτοκινήτων πρέπει η
µπαταρία πριν τη φόρτιση να αποσυνδεθεί από
το δίκτυο. Κάνουµε µνεία ότι τα αυτοκίνητα
είναι στάνταρ εξοπλισµένα ήδη µε πολλά
ηλεκτρονικά εξαρτήµατα (όπως π. ABS, ASR,
αντλία έγχυσης, ηλεκτρονικός εγκέφαλος).
Ενδεχόµενες τάσεις κορυφής µπορεί να
προκαλέσουν ζηµιέ στα ηλεκτρονικά
δοµοστοιχεία. Για το λόγο αυτό να
αποσυνδέεται η µπαταρία απ΄οτο δίκτυο πριν
φορτιστεί.
Να ακολουθείτε τις υποδείξεις στις Οδηγίες
χρήσης για το αυτοκίνητο, ραδιόφωνο,
σύστηµα πλοήγησης κλπ.
Υπόδειξη για την αυτόµατη φόρτιση
Ο φορτιστής µπαταριών είναι ένας αυτόµατος
φορτιστής µε µικροεπεξεργαστή, δηλ. είναι
ιδιαίτερα κατάλληλος για φόρτιση µπαταριών που
δεν χρειάζονται συντήρηση καθώς και για φόρτιση
µακράς διαρκείας και για διατήρηση της φόρτισης
µπαταριών που δεν χρησιµοποιούνται συνεχώς,
π.χ. Για σκάφη, χορτοκοπτικά και παρόµοιες
συσκευές. Χάρη στον ενσωµατωµένο
µικροεπεξεργαστή η φόρτιση γίνεται σε τρία
στάδια.
Κατά το πρώτο στάδιο φορτίζεται η µπαταρία έως
σχεδόν 70% µε σχεδόν σταθερό ρεύµα. Κατά το
δεύτερο στάδιο φορτίζεται η µπαταρία έως σχεδόν
90% µε σταθερό ρεύµα. Κατά το τρίτο στάδιο
διατηρείται η τάση της µπαταρίας σε σταθερό
επίπεδοι και έτσι η µπαταρία είναι πάντα
φορτισµένη.
∆εν απαιτείται παρακολούθηση της διαδικασίας
φόρτισης.
Εικ 1: Ενδείξεις LED
A) LED ένδειξη „Power“
Εάν το βύσµα δικτύου βρίσκεται σε πρίζα µε τάση
(220 - 240V ~50Hz), το LED ανάβει.
Β) LED ένδειξη „Charging“
Το LEDανάβει, µόλις αρχίσει να φορτίζει η συσκευή.
Γ) LED ένδειξη „Full“
Το LED ανάβει µόλις φορτιστεί πλήρως η µπαταρία
και µεταβεί ο φορτιστής σε λειτουργία αυτόµατης
διατήρησης της φόρτισης.
Υποδείξεις:
● Σε µερικές περιπτώσεις λήγει γρήγορα η
διαδικασία φόρτισης, χωρίς να µπορεί η
µπαταρία κατόπιν να προσφέρει την
αναφερόµενη ισχύ. Μειώθηκε η χωρητικότητα
της µπαταρίας και πρέπει να αντικατασταθεί.
● Εάν δεν δείχνει τίποτα ο φορτιστής και εάν δεν
φορτίζεται η µπαταρία, ελέγξτε εάν ο
φορτιστής έχει τάση δικτύου. Βγάλτε το φις
από την πρίζα και ελέγξτε τις συνδέσεις της
µπαταρίας.
● Να φορτίζετε τη µπαταρία µόνο σε
θερµοκρασίεςάνω των 0°C.
● Να φορτίζετε τις µπαταρίες σκαφών µόνο εκτός
του σκάφους.
● Η συσκευή ελέγχεπί µερικά δευτερόλεπτα την
κατάσταση της µπαταρίας και κατόπιν δείχνει
την πραγµατική κατάσταση φόρτισης.
● Ποτέ µην κάνετε εκκίνηση κινητήρα χωρίς
συνδεδεµένη µπαταρία.
● Ποτέ µην κάνετε εκκίνηση κινητήρα µε
συνδεδεµένο φορτιστή.
● Σε κανονική περίπτωση να συνδεθεί ο
αρνητικός πόλος της µπαταρίας µε το αµάξωµα
και συνεχίζετε µε τη φόρτιση όπως
περιγράφεται στις εικόνες 2 – 11.
● Σε εξαιρετικές περιπτώσεις µπορεί να συνδεθεί
ο θετικός πόλος της µπαταρίας µε το αµάξωµα.
Σε αυτή την εξαιρετική περίπτωση αλλάζουν οι
εικόνες 4 και 5. Στην περίπτωση αυτή συνδέστε
το µαύρο καλώδιο φόρτισης στον αρνητικό
πόλο της µπαταρίας και κατόπιν το κόκκινο
καλώδιο φόρτισης µακριά από τη µπαταρία και
τον αγωγό βενζίνης στο αµάξωµα.
Πρόσθετες υποδείξεις για τη φόρτιση
µπαταριών εκτός του οχήµατος
● Κατά την αφαίρεση της µπαταρίας να
αποµακρύνετε πρώτα τη σύνδεση προς τον
γειωµένο πόλο της µπαταρίας και να
σιγουρεύεστε πως έχουν απενεργοποιηθεί όλοι
οι καταναλωτές.
44
Page 45

● Συνδέστε πρώτα το κόκκινο καλώδιο φόρτισης
στον θετικό πόλο της µπαταρίας και κατόπιν το
µαύρο καλώδιο φόρτισης στον αρνητικό πόλο
της µπαταρίας. Βάλτε το φις στην πρίζα. Μετά
τη φόρτιση βγάλτεε πρώτα το φις σύνδεσης µε
το δίκτυο από την πρίζα, κατόπιν το µαύρο
καλώδιο φόρτισης και στο τέλος το κόκκινο
καλώδιο φόρτισης από τους πόλους της
µπαταρίας. Προσέξτε τις υποδείξεις σε αυτές
τις οδηγίες χρήσης.
● Προσέξτε κατά την τοποθέτηση της µπαταρίας
τη σωστή κατεύθυνση των πόλων και συνδέστε
πρώτα µε τον γειωµένο πόλο µπαταρίας.
6. Χειρισµός
Για την φόρτιση της µπαταρίας ακολουθήστε
τα εξής βήµατα:
Eικ. 2:
Αφαιρέστε το πώµα της µπαταρίας (εάν υπάρχει)
από τη µπαταρία.
Eικ. 3:
Ελέγξτε τη στάθµη του οξέος της µπαταρίας. Εάν
χρειαστεί γεµίστε αποσταγµένο νερό (εάν είναι
δυνατό). Προσοχή! Το οξύ των µπαταριών είναι
καυστικό. Να ξεπλένετε αµέσως καλά µε νερό τις
πιτσιλιές οξέος, εάν χρειαστεί, να συµβουλευθείτε
ένα γιατρό.
Eικ. 4:
Συνδέστε πρώτα το κόκκινο καλώδιο φόρτισης στον
θετικό πόλο της µπαταρίας.
Eικ. 5:
Κατόπιν αποµακρύνετε το µαύρο καλώδιο φόρτισης
από τη µπαταρία και το σωλήνα βενζίνης και
συνδέεται στην καροσσερί.
Eικ. 6:
Αφού συνδεθεί η µπαταρία µε τον φορτιστή,
µπορείτε να συνδέσετε τον φορτιστή σε πρίζα µε
220-240V~50Hz. ∆εν επιτρέπεται η σύνδεση σε µία
πρίζα µε άλλη τάση δικτύου. Προσοχή! Από τη
φόρτιση µπορεί να δηµιουργηθεί επικίνδυνο
κροτούν αέριο. Γιαυτό να αποφεύγετε κατά τη
φ΄ροτιση τον σχηµατισµό σπινθήρων και ανοικτή
φωτιά. Κίνδυνος έκρηξης!
GR
Υπολογισµός χρόνου φόρτισης:
Η διάρκεια της φόρτισης εξαρτάται από την
κατάσταση φόρτισης της µπαταρίας. Σε άδειες
µπαταρίες ηµπορεί να υπολογισθεί περίπου η
διάρκεια φόρτισης µε τον ακόλουθο τύπο:
∆ιάρκεια Χωρητικότητα µπαταρίας σε Αh
φόρτισης/ώρα=
Παράδειγµα = = 9,6 h max.
Eικ. 7:
Η ακριβής κατάσταση της µπαταρίας µπορεί να
διαπιστωθεί µόνο µε µέτρηση της πυκνότητας του
οξέος µε την ειδική συσκευή προσδιορισµού του
ειδικού βάρους. Υπόδειξη! Κατά τη διαδικασία
φόρτισης ελευθερώνονται αέρια (δηµιουργία
φυσαλίδων στην επιφάνεια του υγρού της
µπαταρίας. Γιαυτό να προσέχετε τον καλό αερισµό
του χώρου.
Eικ. 8:
Βγάλτε το βύσµα από την πρίζα.
Eικ. 9:
Αποµακρύνετε πρώτα το µαύρο καλώδιο φόρτισης
από την καροσσερί.
Eικ. 10:
Κατόπιν αποµακρύνετε το κόκκινο καλώδιο
φόρτισης στον θετικό πόλο της µπαταρίας.
Eικ. 11:
Επαναβιδώστε ή πιέστε µέσα το πώµα της
µπαταρίας (εάν υπάρχει).
Ασφάλεια υπερφόρτωσης
Ο φορτιστής διαθέτει ασφάλεια κατά
υπερφόρτωσης, βραχυκυκλώµατος και λάθος
πολικότητας.
Σε περίπτωση λάθος σύνδεσης των ακροδεκτών
των πόλων, δεν λειτουργεί η συσκευή.
Amp. (ρεύµα φόρτισης αριθµ.)
24 Ah
2,5 Α
45
Page 46

GR
7. Αντικατάσταση καλωδίου
σύνδεσης µε το δίκτυο
Εάν το καλώδιο σύνδεσης µε το δίκτυο αυτής της
συσκευής είναι ελαττωµατικό, πρέπει, προς
αποφυγή κινδύνων, να αντικατασταθεί από τον
κατασκευαστή ή το τµήµα του εξυπηρέτησης
πελατών ή από παρόµοια εξειδικευµένο άτοµο.
8.4 Παραγγελία ανταλλακτικών:
Κατά την παραγγελία ανταλλακτικών να
αναφέρετε τα εξής:
● Τύπος της συσκευής
● Αριθµός είδους της συσκευής
● Αριθµός ταύτισης της συσκευής
● Αριθµός ανταλλακτικού
Θα βρείτε τις ισχύουσες τιµές και πληροφορίες
στην ιστοσελίδα www.isc-gmbh.info
8. Καθαρισµός, συντήρηση και
παραγγελία ανταλλακτικών
Πριν από όλες τις εργασίες τοποθέτησης να
βγάζετε το φις από την πρίζα
8.1 Καθαρισµός
● Να διατηρείτε τα συστήµατα ασφαλείας, τις
σχισµές αερισµού και το περίβληµα όσο πιο
καθαρά και ελεύεθρα από σκόνη γίνεται .
Σκουπίζετε τη συσκευή µε ένα καθαρό πανί, ή
καθαρίστε το µε πεπεισµένο αέρα σε χαµηλή
πίεση.
● Συνιστούµε να καθαρίζετε τη συσκευή αµέσως
µετά από κάθε χρήση.
● Να καθαρίζετε τη συσκευή τακτικά µε ένα νωπό
πανί και λίγο µαλακό σαπούνι. Μη
χρησιµοποιείτε καθαριστικά ή διαλύτες, γιατί
δεν αποκλείεται να καταστρέψουν την
επιφάνεια της συσκευής. Προσέξτε να µην
περάσει νερό στο εσωτερικό της συσκευής.
● Να φυλάγετε το φορτιστή σε στεγνό χώρο. Να
καθαρίζονται οι κλέµες από σκουριά.
8.2 Συντήρηση
Στο εσωτερικό της συσκευής δεν υπάρχουν
εξαρτήµατα που χρειάζονται συντήρηση.
8.3 Συντήρηση και περιποίηση της µπαταρίας
● Προσέξτε να είναι πάντα καλά στερεωµένη η
µπαταρία σας.
● Πρέπει να είναι εξασφαλισµένη η άψογη
σύνδεση µε το δίκτυο της ηλεκτρικής
εγκατάστασης.
● Να διατηρείτε τη µπαταρία καθαρή και στεγνή.
Να λιπαίνετε ελαφρά τους ακροδέκτες
σύνδεσης µε λίπος χωρίς οξύ και ανθεκτικό σε
οξύ (βαζελίνη).
● Σε µπαταρίες που χρειάζονται συντήρηση να
ελέγχετε περ. κάθε 4 εβδοµάδες το ύψος της
στάθµης του οξέος και εάν χρειαστεί να
συµπληρώνετε αποσταγµένο νερό.
9. ∆ιάθεση στα απορρίµµατα και
επαναχρησιµοποίηση
Η συσκευή βρίσκεται σε µία συσκευασία προς
αποφυγή ζηµιών κατά τη µεταφορά Αυτή η
συσκευασία αποτελείται από πρώτες ύλες και έτσι
µπορεί να επαναχρησιµοποιηθεί ή να ανακυκλωθεί.
Η συσκευή και τα εξαρτήµατά της αποτελούνται
από διάφορα υλικά, όπως π.χ. µέταλλο και πλαστικά
υλικά. Να παραδίδετε τα ελαττωµατικά εξαρτήµατα
σε κέντρα συλλογής ειδικών απορριµµάτων.
Ενηµερωθείτε στα ειδικά καταστήµατα ή στην
διοίκηση της κοινότητας!
10. Φύλαξη
Nα διατηρείτε τη συσκευή και τααξεσουάρ της σε
σκοτεινό, στεγνό χώρο, χωρίς παγετό, και µακριά
από παιδιά. Η ιδανική θερµοκρασία αποθήκευσης
είναι µεταξύ 5 και 30 °C. Να φυλάξετε την
ηλεκτρική σας συσκευή στην πρωτότυπη
συσκευασία της.
46
Page 47

ISC GmbH · Eschenstraße 6 · D-94405 Landau/Isar
Konformitätserklärung
k erklärt folgende Konformität gemäß EU-Richtlinie und
Normen für Artikel
t explains the following conformity according to EU
directives and norms for the following product
p déclare la conformité suivante selon la directive CE et les
normes concernant l’article
C dichiara la seguente conformità secondo la direttiva UE e
le norme per l’articolo
N verklaart de volgende overeenstemming conform EU
richtlijn en normen voor het product
m declara la siguiente conformidad a tenor de la directiva y
normas de la UE para el artículo
O declara a seguinte conformidade, de acordo com a
directiva CE e normas para o artigo
l attesterer følgende overensstemmelse i medfør af
EU-direktiv samt standarder for artikel
U förklarar följande överensstämmelse enl. EU-direktiv och
standarder för artikeln
q vakuuttaa, että tuote täyttää EU-direktiivin ja standardien
vaatimukset
. tõendab toote vastavust EL direktiivile ja standarditele
j vydává následující prohlášení o shodě podle směrnice
EU a norem pro výrobek
X potrjuje sledečo skladnost s smernico EU in standardi za
izdelek
W vydáva nasledujúce prehlásenie o zhode podľa smernice
EÚ a noriem pre výrobok
A a cikkekhez az EU-irányvonal és Normák szerint a
következő konformitást jelenti ki
Batterieladegerät BT-BC 2 D (Einhell)
2009/105/EC
x
2006/95/EC
2006/28/EC
2005/32/EC
x
2004/108/EC
2004/22/EC
1999/5/EC
97/23/EC
90/396/EC
89/686/EC_96/58/EC
Standard references: EN 60335-1; EN 60335-2-29; EN 62233; EN 55014-1; EN 55014-2;
2006/42/EC
Annex IV
Notified Body:
Notified Body No.:
Reg. No.:
2000/14/EC_2005/88/EC
Annex V
Annex VI
Noise: measured LWA= dB (A); guaranteed LWA= dB (A)
P = kW; L/Ø = cm
Notified Body:
2004/26/EC
Emission No.:
EN 61000-2-3; EN 61000-3-3
P deklaruje zgodność wymienionego poniżej artykułu z
następującymi normami na podstawie dyrektywy WE.
e декларира съответното съответствие съгласно
Директива на ЕС и норми за артикул
H paskaidro šādu atbilstību ES direktīvai un standartiem
G apibūdina šį atitikimą EU reikalavimams ir prekės
normoms
Q declară următoarea conformitate conform directivei UE
şi normelor pentru articolul
z δηλώνει την ακόλουθη συµµόρφωση σύµφωνα µε την
Οδηγία ΕΚ και τα πρότυπα για το προϊόν
B potvrđuje sljedeću usklađenost prema smjernicama EU
i normama za artikl
f potvrđuje sljedeću usklađenost prema smjernicama EU
i normama za artikl
4 potvrđuje sledeću usklađenost prema smernicama EZ i
normama za artikal
T следующим удостоверяется, что следующие
продукты соответствуют директивам и нормам ЕС
1 проголошує про зазначену нижче відповідність
виробу директивам та стандартам ЄС на виріб
5 ја изјавува следната сообрзност согласно
ЕУ-директивата и нормите за артикли
Z Ürünü ile ilgili AB direktifleri ve normları gereğince
aşağıda açıklanan uygunluğu belirtir
L erklærer følgende samsvar i henhold til EU-direktivet
og standarder for artikkel
E Lýsir uppfyllingu EU-reglna og annarra staðla vöru
Landau/Isar, den 04.01.2010
First CE: 10 Archive-File/Record: 1002150-10-4155050-10
Art.-No.: 10.021.50 I.-No.: 11010 Documents registrar: Josef Landauer
Subject to change without notice Wiesenweg 22, D-94405 Landau/Isar
Weichselgartner/General-Manager Liu/Product-Management
47
Page 48

k Nur für EU-Länder
Werfen Sie Elektrowerkzeuge nicht in den Hausmüll!
Gemäß europäischer Richtlinie 2002/96/EG über Elektro- und Elektronik-Altgeräte und Umsetzung in
nationales Recht müssen verbrauchte Elektrowerkzeuge getrennt gesammelt werden und einer
umweltgerechten Wiederverwertung zugeführt werden.
Recycling-Alternative zur Rücksendeaufforderung:
Der Eigentümer des Elektrogerätes ist alternativ anstelle Rücksendung zur Mitwirkung bei der sachgerechten Verwertung im Falle der Eigentumsaufgabe verpflichtet. Das Altgerät kann hierfür auch einer
Rücknahmestelle überlassen werden, die eine Beseitigung im Sinne der nationalen Kreislaufwirtschaftsund Abfallgesetze durchführt. Nicht betroffen sind den Altgeräten beigefügte Zubehörteile und Hilfsmittel
ohne Elektrobestandteile.
t For EU countries only
Never place any electric tools in your household refuse.
To comply with European Directive 2002/96/EC concerning old electric and electronic equipment and its
implementation in national laws, old electric tools have to be separated from other waste and disposed of
in an environment-friendly fashion, e.g. by taking to a recycling depot.
Recycling alternative to the demand to return electrical devices:
As an alternative to returning the electrical device, the owner is obliged to cooperate in ensuring that the
device is properly recycled if ownership is relinquished. This can also be done by handing over the used
device to a returns center, which will dispose of it in accordance with national commercial and industrial
waste management legislation. This does not apply to the accessories and auxiliary equipment without
any electrical components which are included with the used device.
C Solo per paesi membri dell'UE
Non gettate gli utensili elettrici nei rifiuti domestici.
Secondo la Direttiva europea 2002/96/CE sui rifiuti di apparecchiature elettriche ed elettroniche e
l'applicazione nel diritto nazionale gli elettroutensili usati devono venire raccolti separatamente e smaltiti
in modo ecologico.
Alternativa di riciclaggio alla richiesta di restituzione
Il proprietario dellʼapparecchio elettrico è tenuto in alternativa, invece della restituzione, a collaborare in
modo che lo smaltimento venga eseguito correttamente in caso ceda lʼapparecchio. Lʼapparecchio
vecchio può anche venire consegnato ad un centro di raccolta che provvede poi allo smaltimento
secondo le norme nazionali sul riciclaggio e sui rifiuti. Non ne sono interessati gli accessori e i mezzi
ausiliari senza elementi elettrici forniti insieme ai vecchi apparecchi.
48
Page 49

U Endast för EU-länder
Kasta inte elverktyg i hushållssoporna.
Enligt det europeiska direktivet 2002/96/EG om avfall som utgörs av eller innehåller elektriska eller
elektroniska produkter och dess tillämpning i den nationella lagstiftningen, måste förbrukade elverktyg
källsorteras och lämnas
Återvinnings-alternativ till begäran om återsändning:
Som ett alternativ till återsändning är ägaren av elutrustningen skyldig att bidraga till ändamålsenlig
avfallshantering för det fall att utrustningen ska skrotas. Efter att den förbrukade utrustningen har läm
nats in till en avfallsstation kan den omhändertas i enlighet med gällande nationella lagstiftning om återvinning och avfallshantering. Detta gäller inte för tillbehörsdelar och hjälpmedel utan elektriska komponenter vars syfte har varit att komplettera den förbrukade utrustningen.
m Sólo para países miembros de la UE
No tire herramientas eléctricas en la basura casera.
Según la directiva europea 2002/96/CE sobre aparatos usados electrónicos y eléctricos y su aplicación
en el derecho nacional, dichos aparatos deberán recojerse por separado y eliminarse de modo ecológico
para facilitar su posterior reciclaje.
Alternativa de reciclaje en caso de devolución:
El propietario del aparato eléctrico, en caso de no optar por su devolución, está obligado a reciclar
adecuadamente dicho aparato eléctrico. Para ello, también se puede entregar el aparato usado a un
centro de reciclaje que trate la eliminación de residuos respetando la legislación nacional sobre residuos
y su reciclaje. Esto no afecta a los medios auxiliares ni a los accesorios sin componentes eléctricos que
acompañan a los aparatos usados.
q Koskee ainoastaan EU-jäsenmaita
Älä heitä sähkötyökaluja kotitalousjätteisiin.
Sähkökäyttöisiä ja elektronisia vanhoja laitteita koskevan Euroopan direktiivin 2002/96/EY mukaan, joka
on sisällytetty kansallisiin lakeihin, tulee loppuun käytetyt sähkökäyttöiset työkalut kerätä erikseen ja
toimittaa ympäristöystävälliseen kierrätykseen uusiokäyttöä varten.
Kierrätys vaihtoehtona takaisinlähettämiselle:
Sähkölaitteen omistajan velvollisuus on takaisinlähettämisen vaihtoehtona avustaa laitteen asianmukai
sta hävittämistä kierrätyksen kautta, kun laite poistetaan käytöstä. Laitteen voi toimittaa myös
kierrätyspisteeseen, joka suorittaa laitteen hävittämisen paikallisten kierrätys- ja jätteenpoistomääräysten
mukaisesti hyödyntäen käyttökelpoiset raaka-aineet. Tämä ei koske käytöstä poistettaviin laitteisiin
kuuluvia lisävarusteita tai apulaitteita, joissa ei ole sähköosia.
z ªfiÓÔ ÁÈ· ¯ÒÚ˜ Ù˘ ∂∂
ªЛ ВЩ¿ЩВ ЛПВОЩЪИО¤˜ Ы˘ЫОВ˘В˜ ЫЩ· ФИОИ·О¿ ·ФЪЪ›ММ·Щ·.
™‡МКˆУ· МВ ЩЛУ √‰ЛБ›· 2002/96/∂∫ БИ· МВЩ·¯ВИЪИЫМ¤УВ˜ ЛПВОЩЪИО¤˜ О·И ЛПВОЩЪФУИО¤˜ Ы˘ЫОВ˘¤˜ О·И
БИ· ЩЛУ МВЩ·ЩЪФ‹ ЫВ ∂ıУИОfi ¢›О·ИФ Ъ¤ВИ У· Ы˘БОВУЩЪТУФУЩ·И ¯ˆЪИЫЩ¿ Щ· ЛПВОЩЪИО¿ ВЪБ·ПВ›· О·И
У· ·У·О˘ОПТУФУЩ·И.
∂У·ПП·ОЩИО‹ П‡ЫЛ ·У·О‡ОПˆЫЛ˜ ·УЩ› ВИЫЩЪФК‹˜
√ И‰ИФОЩ‹ЩЛ˜ ЩЛ˜ ЛПВОЩЪИО‹˜ Ы˘ЫОВ˘‹˜ ˘Ф¯ЪВФ‡Щ·И ВУ·ПП·ОЩИО¿, ·УЩ› У· ВИЫЩЪ¤„ВИ ЩЛ Ы˘ЫОВ˘‹, У·
Ы˘М‚¿ПВИ ЫЩЛУ ЫˆЫЩ‹ ‰И¿ıВЫЛ ЫВ ВЪ›ЩˆЫЛ Ф˘ ‰ВУ ¯ЪВИ¿˙ВЩ·И П¤ФУ ЩЛ Ы˘ЫОВ˘‹. ∏ МВЩ·¯ВИЪИЫМ¤УЛ
Ы˘ЫОВ˘‹ МФЪВ› У· ·Ъ·¯ˆЪЛıВ› ЫВ АЛЪВЫ›· ·fiЫ˘ЪЫЛ˜ Л ФФ›· ı· ВОЩ¤П¤ЫВИ ЩЛУ ‰И¿ıВЫЛ ЩФ˘
ЪФ˚fiУЩФ˜ Ы‡МКˆУ· МВ ЩИ˜ ВıУИО¤˜ ЪФ‰И·БЪ·К¤˜ ·У·О‡ОПˆЫЛ˜ О·И ·ФЪЪИММ¿ЩˆУ. ¢ВУ
Ы˘МВЪИП·М‚¿УФУЩ·И Щ· ВН·ЪЩ‹М·Щ· ‹ ‚ФЛıЛЩИО¿ ВН·ЪгЩЛМ·Щ· ЩˆУ МВЩ·¯ВИЪИЫМ¤УˆУ Ы˘ЫОВ˘ТУ ¯ˆЪ›˜
ЛПВОЩЪИО¿ ЩМ‹М·Щ·.
49
Page 50

D
Der Nachdruck oder sonstige Vervielfältigung von Dokumentation und
Begleitpapieren der Produkte, auch auszugsweise ist nur mit ausdrücklicher Zustimmung der ISC GmbH zulässig.
G
The reprinting or reproduction by any other means, in whole or in part,
of documentation and papers accompanying products is permitted only
with the express consent of ISC GmbH.
I
La ristampa o lʼulteriore riproduzione, anche parziale, della
documentazione o dei documenti dʼaccompagnamento dei prodotti è
consentita solo con lʼesplicita autorizzazione da parte della ISC GmbH.
S
Eftertryck eller annan duplicering av dokumentation och medföljande
underlag för produkter, även utdrag, är endast tillåtet med uttryckligt
tillstånd från ISC GmbH.
E
La reimpresión o cualquier otra reproducción de documentos e
información adjunta a productos, incluida cualquier copia, sólo se
permite con la autorización expresa de ISC GmbH.
q
Tuotteiden dokumentaatioiden ja muiden mukaanliitettyjen asiakirjojen
vain osittainenkin kopiointi tai muunlainen monistaminen on sallittu
ainoastaan ISC GmbH:n nimenomaisella luvalla.
z
∏ ·У·Щ‡ˆЫЛ ‹ ¿ППЛ ·У··Ъ·БˆБ‹ ЩВОМЛЪИТЫВˆУ О·И Ы˘УФ‰В˘ЩИОТУ
К˘ПП·‰›ˆУ ЩˆУ ЪФ˚fiУЩˆУ ЩЛ˜ ВЩ·ИЪВ›·˜, ·ОfiМЛ О·И ЫВ
·ФЫ¿ЫМ·Щ·, ВИЩЪ¤ВЩ·И МfiУФ МВЩ¿ ·fi ЪЛЩ‹ ¤БОЪИЫЛ ЩЛ˜
ВЩ·ИЪВ›·˜ ISC GmbH.
50
Page 51

D Technische Änderungen vorbehalten
G Technical changes subject to change
I Con riserva di apportare modifiche tecniche
S Förbehåll för tekniska förändringar
E Salvo modificaciones técnicas
q Oikeus teknisiin muutoksiin pidätetään
K √ О·Щ·ЫОВУ·ЫЩ‹˜ ‰И·ЩЛЪВ› ЩФ ‰ИО·›ˆМ· ЩВ¯УИОТУ ·ПП·БТУ
51
Page 52

52
Page 53

t
GUARANTEE CERTIFICATE
Dear Customer,
All of our products undergo strict quality checks to ensure that they reach you in perfect condition. In the unlikely
event that your device develops a fault, please contact our service department at the address shown on this
guarantee card. Of course, if you would prefer to call us then we are also happy to offer our assistance under
the service number printed below. Please note the following terms under which guarantee claims can be made:
1. These guarantee terms cover additional guarantee rights and do not affect your statutory warranty rights.
We do not charge you for this guarantee.
2. Our guarantee only covers problems caused by material or manufacturing defects, and it is restricted to the
rectification of these defects or replacement of the device. Please note that our devices have not been
designed for use in commercial, trade or industrial applications. Consequently, the guarantee is invalidated
if the equipment is used in commercial, trade or industrial applications or for other equivalent activities. The
following are also excluded from our guarantee: compensation for transport damage, damage caused by
failure to comply with the installation/assembly instructions or damage caused by unprofessional
installation, failure to comply with the operating instructions (e.g. connection to the wrong mains voltage or
current type), misuse or inappropriate use (such as overloading of the device or use of non-approved tools
or accessories), failure to comply with the maintenance and safety regulations, ingress of foreign bodies
into the device (e.g. sand, stones or dust), effects of force or external influences (e.g. damage caused by
the device being dropped) and normal wear resulting from proper operation of the device. This applies in
particular to rechargeable batteries for which we nevertheless issue a guarantee period of 12 months.
The guarantee is rendered null and void if any attempt is made to tamper with the device.
3. The guarantee is valid for a period of 2 years starting from the purchase date of the device. Guarantee
claims should be submitted before the end of the guarantee period within two weeks of the defect being
noticed. No guarantee claims will be accepted after the end of the guarantee period. The original guarantee
period remains applicable to the device even if repairs are carried out or parts are replaced. In such cases,
the work performed or parts fitted will not result in an extension of the guarantee period, and no new
guarantee will become active for the work performed or parts fitted. This also applies when an on-site
service is used.
4. In order to assert your guarantee claim, please send your defective device postage-free to the address
shown below. Please enclose either the original or a copy of your sales receipt or another dated proof of
purchase. Please keep your sales receipt in a safe place, as it is your proof of purchase. It would help us if
you could describe the nature of the problem in as much detail as possible. If the defect is covered by our
guarantee then your device will either be repaired immediately and returned to you, or we will send you a
new device.
Of course, we are also happy offer a chargeable repair service for any defects which are not covered by the
scope of this guarantee or for units which are no longer covered. To take advantage of this service, please send
the device to our service address.
53
Page 54

C
CERTIFICATO DI GARANZIA
Gentili clienti,
i nostri prodotti sono soggetti ad un rigido controllo di qualità. Se l’apparecchio non dovesse tuttavia funzionare
correttamente, ci scusiamo e vi preghiamo di rivolgervi al nostro servizio di assistenza clienti all’indirizzo
indicato in questa scheda di garanzia. Siamo a vostra disposizione anche telefonicamente al numero del
servizio assistenza sotto indicato. Per la rivendicazione dei diritti di garanzia vale quanto segue:
1. Queste condizioni di garanzia regolano ulteriori prestazioni di garanzia. La presente garanzia non tocca i
vostri diritti al ricorso di garanzia previsti dalla legge. Le nostre prestazioni di garanzia sono per voi gratuite.
2. La prestazione di garanzia riguarda esclusivamente le anomalie riconducibili a difetti del materiale o di
produzione ed è limitata all’eliminazione di queste anomalie o alla sostituzione dell’apparecchio. Tenete
presente che i nostri apparecchi non sono stati costruiti per l’impiego professionale, artigianale o
industriale. Un contratto di garanzia non viene concluso quando l’apparecchio viene usato in imprese
commerciali, artigianali o industriali, o con attività equivalenti. Dalla nostra garanzia sono escluse inoltre le
prestazioni di risarcimento per danni dovuti al trasporto o danni causati dalla mancata osservanza delle
istruzioni per il montaggio o per installazione non corretta, dalla mancata osservanza delle istruzioni per
l’uso (come per es. collegamento a tensione di rete o tipo di corrente non corretto), dall’uso improprio o
illecito (come per es. sovraccarico dell’apparecchio o utilizzo di utensili o accessori non consentiti), dalla
mancata osservanza delle norme di sicurezza e di manutenzione, dalla penetrazione di corpi estranei
nell’apparecchio (come per es. sabbia, pietre o polvere), dall’impiego della forza o dall’influsso esterno
(come per es. danni dovuti a caduta) e dall’usura normale e dovuta all’impiego. Ciò vale particolarmente per
batterie, per esse concediamo tuttavia 12 mesi di garanzia
Il diritti di garanzia decadono quando sono già effettuati interventi sull’apparecchio.
3. Il periodo di garanzia è 2 anni e inizia alla data d’acquisto dell’apparecchio. I diritti di garanzia devono
essere fatti valere prima della scadenza del periodo di garanzia, entro due settimane dopo avere accertato
il difetto. È esclusa la rivendicazione di diritti di garanzia dopo la scadenza del relativo periodo. La
riparazione o la sostituzione dell’apparecchio non comporta una proroga del periodo di garanzia e con
questa prestazione per l’apparecchio o per pezzi di ricambio eventualmente installati non inizia un nuovo
periodo di garanzia. Questo vale anche nel caso si ricorra ad un servizio sul posto.
4. Per la rivendicazione dei vostri diritti di garanzia inviate l’apparecchio difettoso franco di porto all’indirizzo
sotto indicato. Allegate lo scontrino di cassa in originale o un’altra prova d’acquisto che riporti la data.
Conservate bene perciò lo scontrino di cassa come prova! Indicate il motivo di reclamo nel modo più
dettagliato possibile. Se il difetto dell’apparecchio rientra nella nostra prestazione di garanzia, ricevete
l’apparecchio riparato o un apparecchio nuovo a stretto giro di posta.
Naturalmente effettuiamo a pagamento anche riparazioni sull’apparecchio che non rientrano o non rientrano più
nella garanzia. A tale scopo inviate l’apparecchio all’indirizzo del servizio assistenza.
54
Page 55

U
GARANTIBEVIS
Bästa kund,
Våra produkter genomgår en sträng kvalitetskontroll. Om denna produkt mot förmodan inte fungerar på rätt sätt,
beklagar vi detta och ber dig att kontakta vår serviceavdelning under adressen som anges på garantikortet. Vi
står även gärna till tjänst på telefon under servicenumret som anges nedan. Följande punkter gäller för att du
ska kunna göra anspråk på garantin:
1. I dessa garantivillkor regleras extra garantitjänster. Garantianspråk som regleras enligt lag påverkas inte av
denna garanti. Våra garantitjänster är gratis för dig.
2. Garantitjänsterna täcker endast in sådana brister som kan härledas till material- eller fabrikationsfel och är
begränsade till arbetsuppgifter som syftar till att åtgärda dessa brister eller byta ut produkten. Tänk på att
våra produkter endast får användas till ändamålsenligt syfte och inte har konstruerats för yrkesmässig,
hantverksmässig eller industriell användning. Ett garantiavtal sluts därför ej om produkten ska användas
inom yrkesmässiga, hantverksmässiga eller industriella verksamheter eller vid liknande aktiviteter. Vår
garanti omfattar dessutom inte ersättning för transport skador, skador som kan härledas till missaktade
monterings anvisningar eller ej föreskriven installation, åsidosatt bruksanvisning (t ex anslutning till felaktig
nätspänning eller strömart), missbruk eller ej ändamålsenliga användningar (t ex överbelastning av
produkten eller användning av ej godkända insatsverktyg eller tillbehör), åsidosatta underhålls- och
säkerhetsbestämmelser, främmande partiklar som har trängt in i produkten (t ex sand, sten eller damm),
yttre våld eller yttre påverkan (t ex skador om produkten har fallit ned) samt normalt och användningsbundet
slitage. Detta gäller särskilt för batterier som täcks av en 12 månaders garanti.
Anspråk på garanti upphör att gälla om ingrepp redan har gjorts i produkten.
3. Garantitiden uppgår till 2 år och gäller från datumet när produkten köptes. Medan garantitiden fortfarande
gäller ska anspråk på garanti ställas inom två veckor efter att defekten fastställdes. Det är inte möjligt att
ställa anspråk på garanti efter att garantitiden har löpt ut. Garantitiden förlängs inte när produkten repareras
eller byts ut, dessutom medför sådana arbeten inte att en ny garantitid börjar gälla för produkten eller för ev.
reservdelar som har monterats in. Detta gäller även vid hembesök.
4. För att du ska kunna ställa anspråk på garantin ska den defekta produkten skickas in i tillräckligt frankerat
skick till adressen som anges nedan. Bifoga kvittot i original eller ett annat daterat köpebevis. Förvara därför
kassakvittot på en säker plats! Beskriv orsaken till reklamationen så noggrant som möjligt. Om defekten i
produkten täcks av våra garantitjänster, får du genast en reparerad eller ny apparat av oss.
Givetvis kan vi även, mot debitering, åtgärda skador som antingen inte täcks av garantin eller som har uppstått
efter garantitidens slut. Skicka in produkten till nedanstående serviceadress.
55
Page 56

m
CERTIFICADO DE GARANTÍA
Estimado cliente:
Nuestros productos están sometidos a un estricto control de calidad. No obstante, lamentaríamos que este
aparato dejara de funcionar correctamente, en tal caso, le rogamos que se dirija a nuestro servicio de atención
al cliente en la dirección indicada en la parte inferior de la presente tarjeta de garantía. Con mucho gusto le
atenderemos también telefónicamente en el número de servicio indicado a continuación. Para hacer válido el
derecho de garantía, proceda de la siguiente forma:
1. Estas condiciones de garantía regulan prestaciones de la garantía adicionales. Sus derechos legales a
prestación de garantía no se ven afectados por la presente garantía. Nuestra prestación de garantía es
gratuita para usted.
2. La prestación de garantía se extiende exclusivamente a defectos ocasionados por fallos de material o de
producción y está limitada a la reparación de los mismos o al cambio del aparato. Tenga en consideración
que nuestro aparato no está indicado para un uso comercial, en taller o industrial. Por lo tanto, no
procederá un contrato de garantía cuando se utilice el aparato en zonas industriales, comerciales o talleres,
así como actividades similares. De nuestra garantía se excluye cualquier otro tipo de prestación adicional
por daños ocasionados por el transporte, daños ocasionados por la no observancia de las instrucciones de
montaje o por una instalación no profesional, no observancia de las instrucciones de uso (como, p. ej.,
conexión a una tensión de red o corriente no indicada), aplicaciones impropias o indebidas (como, p. ej.,
sobrecarga del aparato o uso de herramientas o accesorios no homologados), no observancia de las
disposiciones de mantenimiento y seguridad, introducción de cuerpos extraños en el aparato (como, p. ej.,
arena, piedras o polvo), uso violento o influencias externa (como, p. ej., daños por caídas), así como por el
desgaste habitual por el uso. Esto se aplica especialmente en aquellas baterías para las que ofrecemos un
plazo de garantía de 12 meses.
El derecho a garantía pierde su validez cuando ya se hayan realizado intervenciones en el aparato.
3. El periodo de garantía es de 2 años y comienza en la fecha de la compra del aparato. El derecho de
garantía debe hacerse válido, antes de finalizado el plazo de garantía, dentro de un periodo de dos
semanas una vez detectado el defecto. El derecho de garantía vence una vez transcurrido el plazo de
garantía. La reparación o cambio del aparato no conllevará ni una prolongación del plazo de garantía ni un
nuevo plazo de garantía ni para el aparato ni para las piezas de repuesto montadas. Esto también se aplica
en el caso de un servicio
4. Para hacer efectivo su derecho a garantía, envíe gratuitamente el aparato defectuoso a la dirección
indicada a continuación. Adjunte el original del ticket de compra u otro tipo de comprobante de compra con
fecha. ¡A tal efecto, guarde en lugar seguro el ticket de compra como comprobante! Describa con la mayor
precisión posible el motivo de la reclamación. Si nuestra prestación de garantía incluye el defecto
aparecido en el aparato, recibirá de inmediato un aparato reparado o nuevo de vuelta.
Naturalmente, también solucionaremos los defectos del aparato que no se encuentren comprendidos o ya no
se encuentren comprendidos en la garantía, en este caso contra reembolso de los costes. Para ello, envíe el
aparato a nuestra dirección de servicio técnico.
in situ
.
56
Page 57

q
TAKUUTODISTUS
Arvoisa asiakas,
tuotteemme läpikäyvät erittäin tiukan laadunvalvontatarkastuksen. Mikäli tämä laite ei kuitenkaan toimi
moitteettomasti, valitamme tapahtunutta suuresti ja pyydämme sinua kääntymään teknisen asiakaspalvelumme
puoleen käyttäen tässä takuukortissa annettua osoitetta. Voit halutessasi myös ottaa yhteyttä puhelimitse
allaolevaan palvelunumeroon. Takuuvaateiden esittämistä koskevat seuraavat säädökset:
1. Nämä takuumääräykset koskevat laajennettuja takuusuorituksia. Ne eivät vaikuta lakimääräisiin
takuusuoritusvaateisiisi millään tavalla. Takuumme on sinulle maksuton.
2. Takuusuoritus kattaa ainoastaan sellaiset puutteellisuudet, jotka aiheutuvat materiaali- tai
valmistusvirheistä, ja se on rajattu ainoastaan näiden puutteellisuuksien korjaamiseen tai laitteen
korvaamiseen uudella. Ole hyvä ja ota huomioon, että laitteitamme ei ole suunniteltu ja valmistettu
käytettäväksi pienteollisuus-, käsityöläis- tai teollisuustarkoituksiin. Takuusopimusta ei siksi synny, jos
laitetta käytetään pienteollisuus-, käsityöläis- tai teollisuustyöpaikoilla tai näihin verrattavissa olevissa
toimissa. Takuumme ei myöskään sisällä kuljetusvaurioiden tai sellaisten vaurioiden korvaussuorituksia,
jotka ovat aiheutuneet asennusohjeen noudattamatta jättämisestä tai asiantuntemattomasta asennuksesta,
käyttöohjeen noudattamatta jättämisestä (esim. liitäntä vääräntyyppiseen verkkovirtaan), väärinkäytöstä tai
virheellisestä käytöstä (esim. laitteen ylikuormittaminen tai hyväksymättömien työkalujen tai lisävarusteiden
käyttäminen), huolto- ja turvallisuusmääräysten noudattamatta jättämisestä, vieraiden esineiden (esim.
hiekan, kivien tai pölyjen) pääsystä laitteen sisään, väkivaltaisesta käsittelystä tai ulkopuolisista tekijöistä
(esim. putoamisesta aiheutuneet vauriot) sekä käytöstä aiheutuvasta tavallisesta kulumisesta. Tämä
koskee erityisesti niitä akkuja, joille me kuitenkin myönnämme 12 kuukauden pituisen takuun.
Takuuvaateet raukeavat, jos laitteelle on jo tehty jotain toimenpiteitä.
3. Takuuaika on 2 vuotta ja se alkaa laitteen ostopäivästä. Takuuvaateet tulee esittää ennen takuuajan
päättymistä kahden viikon kuluessa siitä, kun olet havainnut vian. Takuuvaateiden esittäminen takuuajan
päätyttyä ei ole mahdollista. Laitteen korjaus tai vaihto ei johda takuuajan pitenemiseen tai laitteen tai siihen
mahdollisesti asennettujen varaosien takuuajan alkamiseen uudelleen alusta. Tämä koskee myös paikan
päällä suoritettuja palveluja.
4. Takuuvaateesi esittämiseksi tulee viallinen laite lähettää postikulut maksettuna allaolevaan osoitteeseen.
Ole hyvä ja liitä mukaan alkuperäinen maksukuitti tai muu päiväyksellä varustettu ostotosite. Säilytä tämän
vuoksi kassakuitti huolella tositteena! Ole hyvä ja kuvaa valituksen syy meille mahdollisimman tarkoin. Jos
takuumme kattaa laitteessa olevan vian, saat korjatun tai uuden laitteen välittömästi takaisin.
Tietysti korjaamme mielellämme korvausta vastaan myös sellaiset laitteiden viat, jotka eivät kuulu tai eivät enää
kuulu takuumme piiriin. Lähetä tätä varten laite tekniseen asiakaspalveluumme allaolevalla osoitteella.
57
Page 58

z
ΕΓΓΥΗΣΗ
Αξιότιµη πελάτισα, αξιότιµε πελάτη,
Τα προϊόντα µας υπόκεινται σε αυστηρούς ελέγχους ποιότητας. Εάν παρ΄όλα αυτά κάποτε δεν
λειτουργήσουν άψογα, λυπούµαστε πολύ και σας παρακαλούµε να αποτανθείτε προς το τµήµαµας
Εξυπηρέτησης Πελατών, στη διεύθυνση που αναφέρετε σε αυτή την εγγύηση. Ευχαρίστως σας βοηθούµε
και τηλεφωνικώς στον αριθµό που αναφέρετε πιο κάτω. Για την κατίσχυση των αξιώσεων εγγύησης ισχύουν
τα εξής:
1. Αυτοί οι όροι εγγύησης ρυθµίζουν πρόσθετες παροχές εγγύησης. Από την εγγύηση αυτή δεν θίγονται οι
νόµιµες αξιώσεις σας για εγγύηση. Η παροχή της εγγύησής µας είναι για σας δωρεάν.
2. Η εγγύηση καλύπτει αποκλειστικά και µόνο βλάβες που οφείλονται σε ελαττώµατα υλικών ή
παραγωγής και περιορίζονται στην αποκατάσταση αυτών των ελαττωµάτων ή την αντικατάσταση της
συσκευής. Παρακαλούµε να προσέξετε πως οι συσκευές µας δεν προορίζονται για τη βιοµηχανία, τη
βιοτεχνία και την επαγγελµατική χρήση. Για το λόγο αυτό δεν υφίσταται σύµβαση εγγύησης σε
περίπτωση χρήσης της συσκευής στη βιοµηχανία, βιοτεχνία, για επαγγελµατικό ή άλλο παρόµοιο
σκοπό. Από την εγγύησή µας αποκλείονται πέραν τούτου αποζηµιώσεις για βλάβες µεταφοράς, βλάβες
οφειλόµενες σε µη τήρηση της Οδηγίας συναρµολόγησης, ή σε εσφαλµένη εγκατάσταση, µη τήρηση
της Οδηγίας χρήσης (π.χ. σύνδεση σε λάθος τάση δικτύου ή είδος ρεύµατος), καταχρηστική ή όχι ορθή
χρήση (π.χ. υπερφόρτωση ή χρήση µη εγκεκριµένων ανταλλακτικών εργαλείων ή εξαρτηµάτων), µη
τήρηση των Υποδείξεων συντήρησης και ασφαλείας, είσοδος ξένων αντικειµένων στη συσκευή (όπως
π.χ. άµµος ή σκόνη), χρήση βίας ή εξωτερική επίδραση (όπως π.χ. βλάβες από πτώση) καθώς και βλάβες
που οφείλονται σε κοινή φθορά. Αυτό ισχύει ιδιαίτερα για συσσωρευτές για τους οποίους παρ΄όλα αυτά
παρέχουµε εγγύηση 12 µηνών.
Η αξίωση εγγύησης εκπίπτει σε περίπτωση που έγιναν ήδη ξένες επεµβάσεις στη συσκευή.
3. Η διάρκεια της εγγύησης ανέρχεται σε 2 έτη και αρχίζει από την ηµεροµηνία αγοράς της συσκευής. Οι
αξιώσεις εγγύησης πρέπει να κατισχυθούν πριν την πάροδος της προθεσµάις της εγγύησης εντός δύο
εβδοµάδων από την διαπίστωση του ελαττώµατος. Αποκλείεται η κατίσχυση αξιώσεων εγγύησης µετά
την πάροδο της προθεσµίας της εγγύησης. Η επισκευή ή η αντικατάσταση της συσκευής δεν
συνεπάγεται ούτε την επέκταση της διάρκειας της εγγύησης ούτε την έναρξη νέας προθεσµίας
εγγύησης για τη συσκευή ή τα ενδεχοµένως τοποθετηθέντα εξαρτήµατα. Το ίδιο ισχύει και σε
περίπτωση σέρβις επί τόπου.
4. Για την κατίσχυση της αξίωσης της εγγύησης σας παρακαλούµε να µας αποστείλετε τη συσκευή, χωρίς
επιβάρυνσή µας µε ταχυδροµικά τέλη, στην πιο κάτω αναφερόµενη διεύθυνση. Μη ξεχάσετε να
επισυνάψετε το πρωτότυπο της απόδειξης αγοράς ή άλλο ισχύον αποδεικτικό αγοράς. Για το λόγο αυτό
σας παρακαλούµε να φυλάξετε καλά την απόδειξη του ταµείου! Παρακαλούµε επίσης να µας
περιγράψετε την αιτία για την διαµαρτυρία σας όσο πιο αναλυτικά γίνεται. Εάν το ελάττωµα της
συσκευής σας καλύπτεται από την εγγύησή µας, είτε θα σας επιστραφεί ταχύτατα η επισκευασµένη
συσκευή σας, είτε θα λάβετε µία νέα συσκευή.
Φυσικά επισκευάζουµε ευχαρίστως έναντι αµοιβής και ελαττώµατα στη συσκευή σας που δεν καλύπτονται ή
δεν καλύπτονται πλέον από την εγγύηση. Για το σκοπό αυτό σας παρακαλούµε να αποστείλετε τη συσκευή
σας στη διεύθυνση του τµήµατος µας για Εξυπηρέτηση Πελατών.
58
Page 59

k
GARANTIEURKUNDE
Sehr geehrte Kundin, sehr geehrter Kunde,
unsere Produkte unterliegen einer strengen Qualitätskontrolle. Sollte dieses Gerät dennoch einmal nicht einwandfrei funktionieren, bedauern wir dies sehr und bitten Sie, sich an unseren Servicedienst unter der auf dieser Garantiekarte angegebenen Adresse zu wenden. Gern stehen wir Ihnen auch telefonisch über die unten
angegebene Servicerufnummer zur Verfügung. Für die Geltendmachung von Garantieansprüchen gilt Folgendes:
1. Diese Garantiebedingungen regeln zusätzliche Garantieleistungen. Ihre gesetzlichen Gewährleistungsansprüche werden von dieser Garantie nicht berührt. Unsere Garantieleistung ist für Sie kostenlos.
2. Die Garantieleistung erstreckt sich ausschließlich auf Mängel, die auf Material- oder Herstellungsfehler zurückzuführen sind und ist auf die Behebung dieser Mängel bzw. den Austausch des Gerätes beschränkt.
Bitte beachten Sie, dass unsere Geräte bestimmungsgemäß nicht für den gewerblichen, handwerklichen
oder industriellen Einsatz konstruiert wurden. Ein Garantievertrag kommt daher nicht zustande, wenn das
Gerät in Gewerbe-, Handwerks- oder Industriebetrieben sowie bei gleichzusetzenden Tätigkeiten eingesetzt wird.
Von unserer Garantie sind ferner Ersatzleistungen für Transportschäden, Schäden durch Nichtbeachtung
der Montageanleitung oder aufgrund nicht fachgerechter Installation, Nichtbeachtung der Gebrauchsanleitung (wie durch z.B. Anschluss an eine falsche Netzspannung oder Stromart), missbräuchliche oder unsachgemäße Anwendungen (wie z.B. Überlastung des Gerätes oder Verwendung von nicht zugelassenen
Einsatzwerkzeugen oder Zubehör), Nichtbeachtung der Wartungs- und Sicherheitsbestimmungen, Eindringen von Fremdkörpern in das Gerät (wie z.B. Sand, Steine oder Staub), Gewaltanwendung oder
Fremdeinwirkungen (wie z. B. Schäden durch Herunterfallen) sowie durch verwendungsgemäßen, üblichen
Verschleiß ausgeschlossen. Dies gilt insbesondere für Akkus, auf die wir dennoch eine Garantiezeit von
12 Monaten gewähren
Der Garantieanspruch erlischt, wenn an dem Gerät bereits Eingriffe vorgenommen wurden.
3. Die Garantiezeit beträgt 2 Jahre und beginnt mit dem Kaufdatum des Gerätes. Garantieansprüche sind vor
Ablauf der Garantiezeit innerhalb von zwei Wochen, nachdem Sie den Defekt erkannt haben, geltend zu
machen. Die Geltendmachung von Garantieansprüchen nach Ablauf der Garantiezeit ist ausgeschlossen.
Die Reparatur oder der Austausch des Gerätes führt weder zu einer Verlängerung der Garantiezeit noch
wird eine neue Garantiezeit durch diese Leistung für das Gerät oder für etwaige eingebaute Ersatzteile in
Gang gesetzt. Dies gilt auch bei Einsatz eines Vor-Ort-Services.
4. Für die Geltendmachung Ihres Garantieanspruches übersenden Sie bitte das defekte Gerät portofrei an die
unten angegebene Adresse. Fügen Sie den Verkaufsbeleg im Original oder einen sonstigen datierten Kaufnachweis bei. Bitte bewahren Sie deshalb den Kassenbon als Nachweis gut auf! Beschreiben Sie uns bitte
den Reklamationsgrund möglichst genau. Ist der Defekt des Gerätes von unserer Garantieleistung erfasst,
erhalten Sie umgehend ein repariertes oder neues Gerät zurück.
Selbstverständlich beheben wir gegen Erstattung der Kosten auch gerne Defekte am Gerät, die vom Garantieumfang nicht oder nicht mehr erfasst sind. Dazu senden Sie das Gerät bitte an unsere Serviceadresse.
Telefon: +49 [0] 180 5 120 509 • Telefax +49 [0] 180 5 835 830 (Festnetzpreis: 14 ct/min, Mobilfunkpreise maximal: 42 ct/min)
iSC GmbH • Eschenstraße 6 • 94405 Landau/Isar (Deutschland)
Außerhalb Deutschlands fallen stattdessen Gebühren für ein reguläres Gespräch ins dt. Festnetz an.
E-Mail: info@isc-gmbh.info
• Internet: www.isc-gmbh.info
59
Page 60

 Loading...