

CE-BC 4 M / CE-BC 6 M
CE-BC 10 M
D Originalbetriebsanleitung
Batterie-Ladegerät
GB Original operating instructions
Battery charger
F Instructions d’origine
Chargeur de batterie
I Istruzioni per l’uso originali
Carica batteria
DK/ Original betjeningsvejledning
N Batterilader
S Original-bruksanvisning
Batteriladdare
CZ Originální návod k obsluze
Nabíječka baterií
SK Originálny návod na obsluhu
Batériová nabíjačka
NL Originele handleiding
Batterijlader
E Manual de instrucciones original
Cargador de batería
FIN Alkuperäiskäyttöohje
Akkulaturi
SLO Originalna navodila za uporabo
Baterijski polnilec
H Eredeti használati utasítás
Akkumulátor-töltő készülék
RO Instrucţiuni de utilizare originale
Aparat de încărcat baterii
GR Πρωτότυπες Οδηγίες χρήσης
Φορτιστικο μπαταριας
9
Art.-Nr.: 10.022.25 (CE-BC 4 M) I.-Nr.: 11018
Art.-Nr.: 10.022.35 (CE-BC 6 M) I.-Nr.: 11018
Art.-Nr.: 10.022.45 (CE-BC 10 M) I.-Nr.: 11018

- 2 -
1
3
4
2 1
5
6
A B C D
2
F
E
K
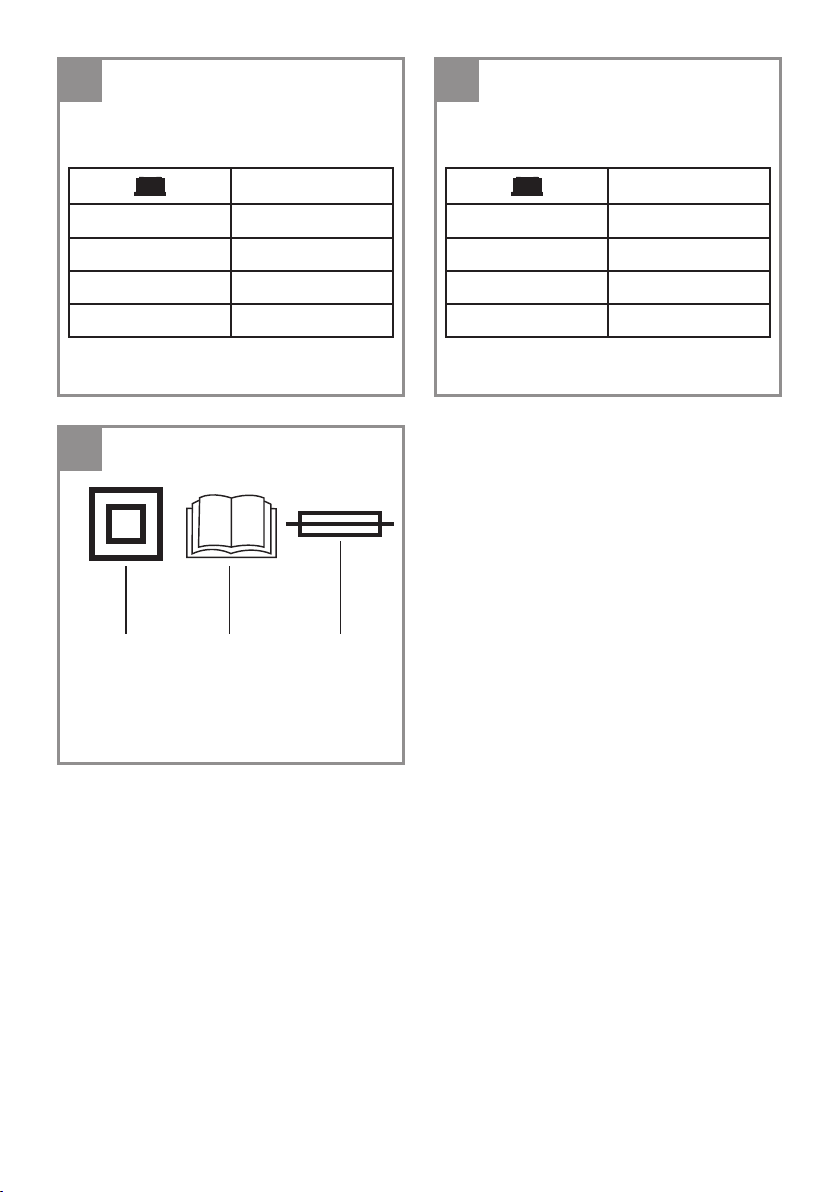
3a
CE-BC 4 M
80%
8 Ah 2 h
20 Ah 5 h
40 Ah 10 h
80 Ah 20 h
G
H
- 3 -
3b
3c
CE-BC 6 M
80%
12 Ah 2 h
30 Ah 5 h
60 Ah 10 h
120 Ah 20 h
4
3,15A
1 2 3
k
Vom Netz trennen, bevor Verbindungen zur Batterie geschlossen oder geöff net werden.
ACHTUNG: Explosive Gase. Flammen und Funken vermeiden. Während des Ladens für
ausreichende Belüftung sorgen.
t
Disconnect from the mains supply before connecting or disconnecting the battery to or
IMPORTANT: Explosive gases. Avoid fl ames and sparks. Provide good ventilation during
the charging process.
CE-BC 10 M
80%
20 Ah 2 h
50 Ah 5 h
100 Ah 10 h
200 Ah 20 h
- 4 -

D
Gefahr!
Beim Benutzen von Geräten müssen einige Sicherheitsvorkehrungen eingehalten werden, um
Verletzungen und Schäden zu verhindern. Lesen
Sie diese Bedienungsanleitung / Sicherheitshinweise deshalb sorgfältig durch. Bewahren Sie diese gut auf, damit Ihnen die Informationen jederzeit
zur Verfügung stehen. Falls Sie das Gerät an andere Personen übergeben sollten, händigen Sie
diese Bedienungsanleitung / Sicherheitshinweise
bitte mit aus. Wir übernehmen keine Haftung für
Unfälle oder Schäden, die durch Nichtbeachten
dieser Anleitung und den Sicherheitshinweisen
entstehen.
1. Sicherheitshinweise
Die entsprechenden Sicherheitshinweise fi nden
Sie im beiliegenden Heftchen!
Gefahr!
Lesen Sie alle Sicherheitshinweise und Anweisungen. Versäumnisse bei der Einhaltung der
Sicherheitshinweise und Anweisungen können
elektrischen Schlag, Brand und/oder schwere
Verletzungen verursachen. Bewahren Sie alle
Sicherheitshinweise und Anweisungen für
die Zukunft auf.
Dieses Gerät kann von Kindern ab 8 Jahren und
darüber sowie von Personen mit verringerten physischen, sensorischen oder mentalen Fähigkeiten
oder Mangel an Erfahrung und Wissen benutzt
werden, wenn sie beaufsichtigt oder bezüglich
des sicheren Gebrauchs des Gerätes unterwiesen wurden und die daraus resultierenden Gefahren verstehen. Kinder dürfen nicht mit dem Gerät
spielen. Reinigung und Benutzer-Wartung dürfen
nicht von Kindern ohne Beaufsichtigung durchgeführt werden.
Entsorgung
Batterien: Nur über KFZ-Werkstätten, spezielle
Annahmestellen oder Sondermüll-Sammelstellen.
Erkundigen Sie sich in der örtlichen Gemeinde.
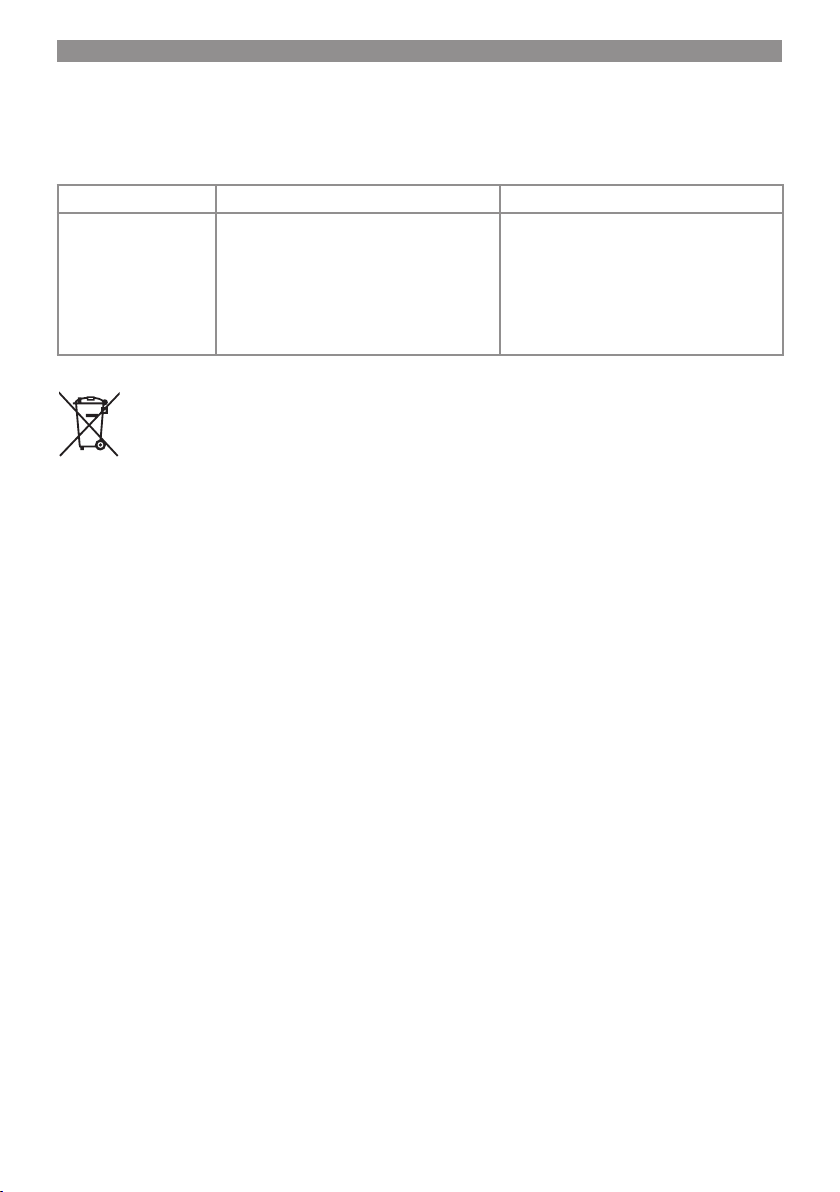
Erklärung des Hinweisschildes auf dem Gerät (siehe Bild 4)
1 = Gerät ist schutzisoliert
2 = WARNUNG – Zur Verringerung eines
Verletzungsrisikos Bedienungsanleitung
lesen!
3 = Sicherungswert auf Elektronikplatine
4 = Vom Netz trennen, bevor Verbindungen zur
Batterie geschlossen oder geöff net werden.
ACHTUNG: Explosive Gase. Flammen und
Funken vermeiden. Während des Ladens für
ausreichende Belüftung sorgen.
2. Gerätebeschreibung und
Lieferumfang
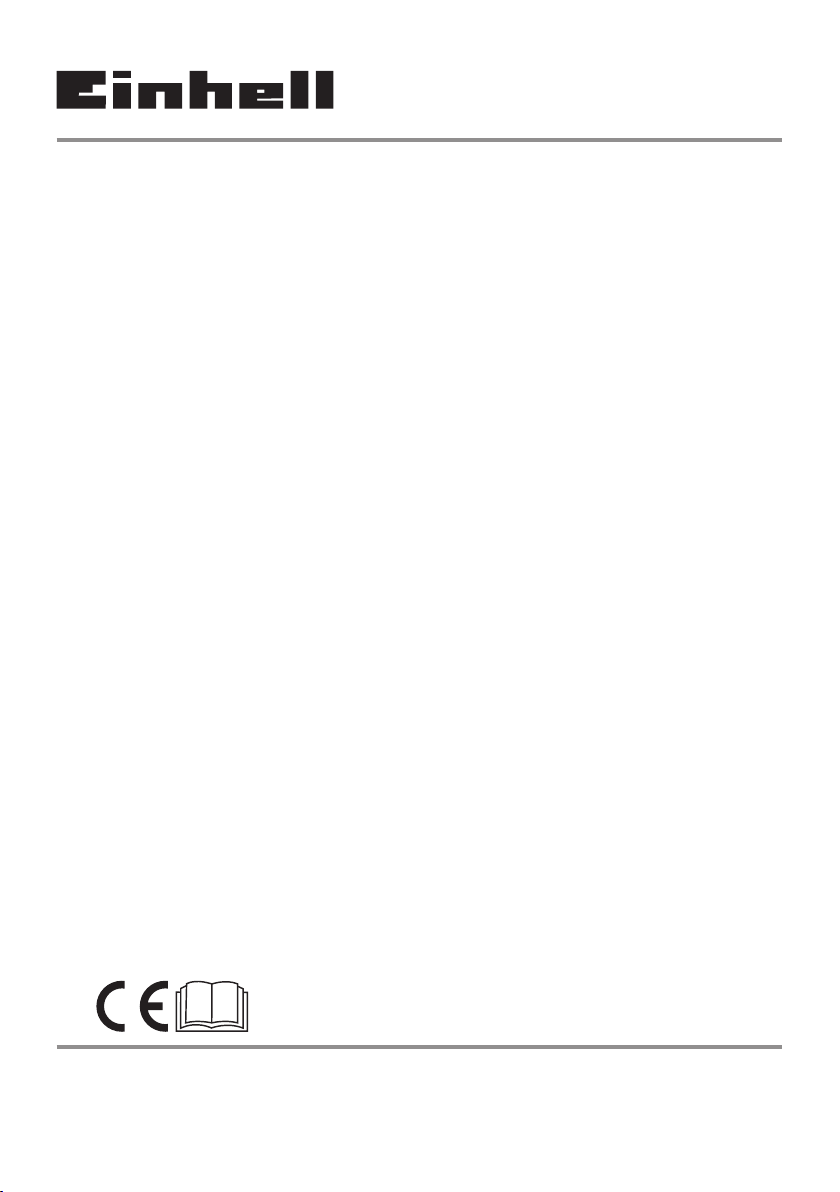
2.1 Gerätebeschreibung (Bild 1)
1 Funktionstaster
2 LCD-Anzeige
3 Ladekabel schwarz (-)
4 Ladekabel rot (+)
5 Aufhängeöse
6 Netzleitung
2.2 Lieferumfang
Öffnen Sie die Verpackung und nehmen Sie
•
das Gerät vorsichtig aus der Verpackung.
Entfernen Sie das Verpackungsmaterial so-
•
wie Verpackungs-/ und Transportsicherungen
(falls vorhanden).
Überprüfen Sie, ob der Lieferumfang vollstän-
•
dig ist.
Kontrollieren Sie das Gerät und die Zubehör-
•
teile auf Transportschäden.
Bewahren Sie die Verpackung nach Möglich-
•
keit bis zum Ablauf der Garantiezeit auf.
Gefahr!
Gerät und Verpackungsmaterial sind kein
Kinderspielzeug! Kinder dürfen nicht mit
Kunststoff beuteln, Folien und Kleinteilen
spielen! Es besteht Verschluckungs- und Erstickungsgefahr!
Originalbetriebsanleitung
•
Sicherheitshinweise
•
3. Bestimmungsgemäße
Verwendung
Das Ladegerät ist zum Laden von nicht wartungsfreien oder wartungsfreien 12V Bleisäurebatterien (Nass- / Ca/Ca- / EFB- Batterien) sowie für
Bleigel- und AGM-Batterien, die bei Kraftfahrzeugen eingesetzt werden, bestimmt.
Das 12V M Ladeprogramm ist zur Erhaltungsladung und Ladung von Batterien mit kleiner Batteriekapazität geeignet. Mit der SUPPLY Funktion
kann das Gerät auch zur Puff er-Stromversorgung
- 5 -

D
z.B. während eines Batteriewechsels oder zum
Betrieb von 12V d.c. Verbrauchern (max. Stromaufnahme beachten) verwendet werden. Das
RECOND Programm ist ausschließlich zur Wiederbelebung tiefentladener Bleisäurebatterien
(nicht für AGM und GEL Batterien) bestimmt.
Verwenden Sie dieses Programm nur kurzzeitig
und unter Aufsicht.
Das Gerät darf nicht zum Laden von Lithium-Eisenphosphat-Akkus (z.B. LiFePO4) oder anderen
Lithium Akkus verwendet werden. Das Gerät ist
nur für den mobilen Gebrauch und nicht für den
Einbau in Wohnwagen, Wohnmobil oder ähnlichen Fahrzeugen bestimmt. Das Ladegerät ist vor
Regen und Schnee zu schützen.
Das Gerät darf nur nach dessen Bestimmung verwendet werden. Jede weitere darüber hinausgehende Verwendung ist nicht bestimmungsgemäß.
Für daraus hervorgerufene Schäden oder Verletzungen aller Art haftet der Benutzer/Bediener und
nicht der Hersteller.
Bitte beachten Sie, dass unsere Geräte bestimmungsgemäß nicht für den gewerblichen, handwerklichen oder industriellen Einsatz konstruiert
wurden. Wir übernehmen keine Gewährleistung,
wenn das Gerät in Gewerbe-, Handwerks- oder
Industriebetrieben sowie bei gleichzusetzenden
Tätigkeiten eingesetzt wird.
4. Technische Daten
CE-BC 4 M
Netzspannung: ........................220-240 V ~ 50Hz
Nenn-Aufnahmeleistung max.: .................... 70 W
Nenn-Ausgangsspannung: ....................12 V d.c.
Nenn-Ausgangsstrom: ................................... 4 A
Batteriekapazität „STD/AGM/Winter“: . 10-120 Ah
Batteriekapazität „12V M“ (max. 1A): ....... 2-32 Ah
Funktion “SUPPLY” Ausgang max.: ................ 3 A
Ladeprogramm “RECOND”: .....15,3 V d.c. / 1,5 A
Schutzklasse: .................................................... II
Schutzart: ..................................................... IP65
Umgebungstemperatur: .................- 20°C – 40°C
CE-BC 6 M
Netzspannung: ........................220-240 V ~ 50Hz
Nenn-Aufnahmeleistung max.: .................. 100 W
Nenn-Ausgangsspannung: ....................12 V d.c.
Nenn-Ausgangsstrom: ................................... 6 A
Batteriekapazität „STD/AGM/Winter“: . 20-150 Ah
Batteriekapazität „12V M“ (max. 1A): ....... 2-32 Ah
Funktion “SUPPLY” Ausgang max.: ................ 5 A
Ladeprogramm “RECOND”: .....15,3 V d.c. / 1,5 A
Schutzklasse: .................................................... II
Schutzart: ..................................................... IP65
Umgebungstemperatur: .................- 20°C – 40°C
CE-BC 10 M
Netzspannung: ........................220-240 V ~ 50Hz
Nenn-Aufnahmeleistung max.: .................. 160 W
Nenn-Ausgangsspannung: ....................12 V d.c.
Nenn-Ausgangsstrom: ................................. 10 A
Batteriekapazität „STD/AGM/Winter“: . 30-200 Ah
Batteriekapazität „12V M“ (max. 2 A): ......3-60 Ah
Funktion “SUPPLY” Ausgang max.: ................ 8 A
Ladeprogramm “RECOND”: .....15,3 V d.c. / 2,5 A
Schutzklasse: .................................................... II
Schutzart: ..................................................... IP65
Umgebungstemperatur: .................- 20°C – 40°C
5. Bedienung
Überzeugen Sie sich vor dem Anschließen, dass
die Daten auf dem Datenschild mit den Netzdaten
übereinstimmen.
Gefahr! Laden Sie keine gefrorenen Batterien.
Beachten Sie bitte die Hinweise in den
Bedienungsanleitungen für Auto, Radio,
Navigationssystem usw.
Hinweis zur Automatikladung
(nur Ladeprogramme 12V STD, 12V AGM, 12V
Winter, 12 V M)
Das Ladegerät ist ein Microprozessor gesteuertes Automatikladegerät, d.h. es ist besonders
zum Laden von wartungsfreien Batterien sowie
zur Langzeitladung und zur Ladeerhaltung von
Batterien, die nicht ständig in Gebrauch sind,
z.B. für Oldtimer, Freizeitfahrzeuge, Traktorrasenmäher und dergleichen, geeignet. Aufgrund des
integrierten Mikroprozessors erfolgt das Laden in
mehreren Stufen. Die letzte Ladestufe, die Erhal-
- 6 -

D
tungsladung, hält die Batteriekapazität bei 95 –
100 % und damit die Batterie immer vollgeladen.
Der Ladevorgang muss nicht überwacht werden.
Lassen Sie dennoch bei Ladung über einen längeren Zeitraum die Batterie nicht unbeaufsichtigt,
damit Sie bei einer Störung das Ladegerät per
Hand vom Stromnetz trennen können.
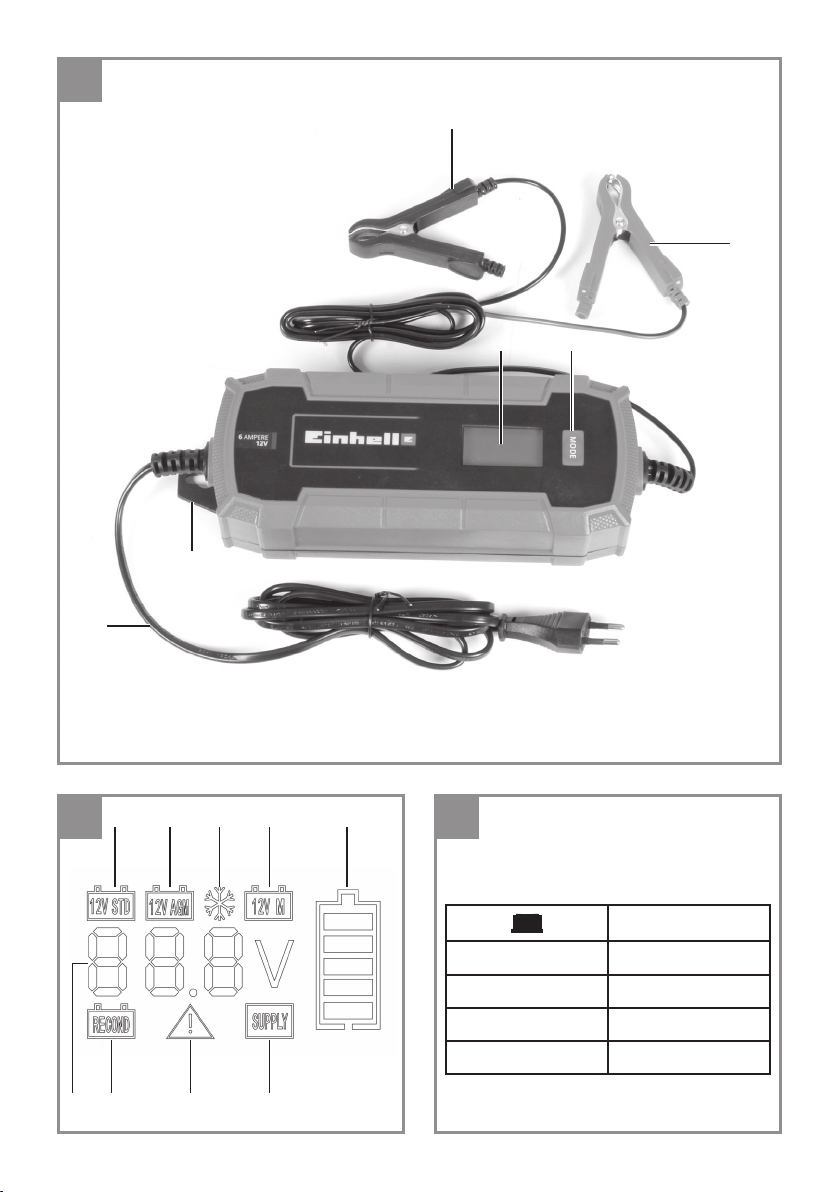
5.1 Erklärung der Symbole (Abb. 2)
A Laden einer 12V Batterie (Bleisäure Batterie
und GEL Batterie).
B Laden einer 12V AGM Batterie.
C Laden einer 12V Batterie (Bleisäure Batterie,
AGM Batterie und GEL Batterie) im
Wintermodus bei einer Umgebungstempe-
ratur von – 20°C bis +5°C. Gefahr! Laden Sie
keine gefrorenen Batterien.
D Laden einer 12V Batterie (Bleisäure Batterie,
AGM Batterie und GEL Batterie) im Ladeer-
haltungsmodus.
E Ladespannung in Volt, Batterie defekt (BAt)
/ vollgeladen (FUL) / verpolt angeschlossen
oder Kurzschluss an Klemmen (Err)
F Wiederherstellung der Ladefähigkeit entla-
dener Bleisäurebatterien mit erhöhter Lade-
spannung
G Klemmen falsch angeklemmt (verpolt) oder
Kurzschluss
H Spannungsversorgung z.B. bei Batteriewech-
sel
K Ladezustand der Batterie in Prozent (1 Teil-
strich = 25%) und Ladevorgang (Teilstrich
leuchtet = Batterie hat den Ladezustand
erreicht, Teilstrich im Batteriesymbol blinkt
= Batterie wird auf nächsten Ladezustand
geladen, alle Teilstriche leuchten = Batterie ist
vollgeladen).
Laden geeignet oder defekt. Die Meldung
„BAt“ erscheint im LCD-Display. Das Symbol
„G“ blinkt. Auch andere Batteriefehler können
dazu führen, dass die Batterie nicht geladen
werden kann.
Ist während der SUPPLY Funktion ein Kurz-
•
schluss zwischen den Ladeklemmen vorhanden, erscheint die Meldung „Lo V“ im LCD
Display. Das Symbol „G“ blinkt.
Bei entfernen des Ladegerätes von der
•
Steckdose wird das zuletzt eingestellte Ladeprogramm gespeichert (außer RECOND und
SUPPLY) und ist beim nächsten Benutzen
voreingestellt.
Nur CE-BC 4M: Werden die Ladezangen mit
•
der Batterie verbunden, zieht das Ladegerät
einen sehr geringen Strom aus der Batterie
und es erscheint kurz das LCD Display. Dies
ist kein Fehler.
5.2.1 Standardladeprogramme
A) 12V STD: Ladeprogramm für Bleisäurebatteri-
en (Nass-, Ca/Ca-, EFB-Batterien) und Gel Batterien. Nach Erstinbetriebnahme des Ladegerätes
erscheint 12V STD im Display.
B) 12V AGM: Ladeprogramm für AGM Batterien
„Mode“-Taste drücken –> umschalten von 12V
STD auf 12V AGM Ladeprogramm
5.2.2 Spezielle Ladeprogramme
C) Winter: Empfohlenes Ladeprogramm bei
kalter Witterung (-20°C - +5°C Umgebungstemperatur) für normale Bleisäurebatterien (Nass- /
Ca/Ca- Batterien)
„Mode“-Taste drücken –> umschalten von 12V
AGM auf „Winter“ Ladeprogramm
5.2 Ladeprogramme einstellen (Abb. 2)
Hinweise:
Durch Drücken der „Mode“-Taste (Abb. 1/Pos.
•
1) wird auf die verschiedenen Programme
umgeschaltet. Das dem Programm entspre-
chende Symbol erscheint im Display. Die
Batterien werden mit dem angezeigten Pro-
gramm geladen.
Um zum RECOND Programm zu gelangen,
•
drücken Sie die „Mode“–Taste für 5 Sekun-
den.
Um vom RECOND Programm oder der
•
SUPPLY Funktion zum 12V STD Programm
zurück zu gelangen drücken Sie die „Mode“–
Taste ebenfalls für 5 Sekunden.
Ist die Spannung der Batterie kleiner 3,5 V
•
oder größer 15 V, ist die Batterie nicht zum
D) 12V M: Ladeprogramm für Batterien mit
kleiner Kapazität (s. Technische Daten) und zur
Erhaltungsladung aller unter 3. Bestimmungsgemäße Verwendung genannter Batterien.
„Mode“-Taste drücken –> umschalten von „Winter“ auf „12 M“ Ladeprogramm
F) RECOND: Ladeprogramm mit erhöhter Ladeschlussspannung und Konstantstromladung,
ausschließlich zur Wiederherstellung der Ladefähigkeit tiefentladener Bleisäurebatterien.
Der RECOND-Vorgang muss halbstündlich kontrolliert werden und darf die Dauer von 4h nicht
überschreiten. Beachten Sie die Hinweise des
Batterieherstellers.
- 7 -

D
Wichtig! Um zu diesem Programm zu gelangen,
muss die „Mode“-Taste (Abb. 1/Pos. 1) 5 Sekunden lang gedrückt werden.
Warnung!
Durch Gasung entsteht Knallgas – Explo-
•
sionsgefahr! Auf gute Belüftung achten.
Das RECOND Programm nur bei einer Blei-
•
säurebatterie und nur so wie nachfolgend
beschrieben verwenden. Achten Sie darauf
keine Batteriesäure zu verschütten. Batterie-
säure ist ätzend. Sicherheitshinweise beach-
ten.
Keinesfalls bei einer Batterie geschlossener
•
Bauart (VRLA Batterie wie z.B. AGM- oder
GEL Batterie) verwenden. Beachten Sie die
Hinweise des Batterieherstellers.
Nur bei einer freistehenden, ausgebauten
•
Batterie und nicht im eingebauten Zustand
mit Verbindung zur Bordelektronik ihres Kfz
verwenden. Erhöhte Ladespannung kann die
Bordelektronik beschädigen. Beachten Sie
die Bedienungsanleitung Ihres Kfz bzw. wen-
den Sie sich an Ihren Kfz-Hersteller.
RECOND Ladeprogramm verwenden
Schließen Sie das Ladegerät wie unter Ab-
•
schnitt 5.3 beschrieben an eine Bleisäurebat-
terie an und kontrollieren Sie den Ladevor-
gang halbstündlich.
Nach spätestens 4h oder sobald die Batterie
•
hörbar gast (blubbert), entfernen Sie das La-
degerät wie unter Abschnitt 5.3 beschrieben.
Überprüfen Sie, falls möglich, den Säures-
•
tand und füllen Sie, falls möglich, die Batterie-
zellen ggf. nur mit destilliertem Wasser nach.
Der Säurestand liegt idealerweise zwischen
dem aufgedruckten max. und min. Wert und
sollte für alle Zellen identisch sein. Schrauben
Sie die Batteriestopfen, falls vorhanden, wie-
der fest.
5.2.3 Zusätzliche Funktion
H) SUPPLY: Zur 12V Gleichspannungsversor-
gung z.B. bei Batterietausch oder zum Betrieb
von 12V d.c. Verbrauchern.
„Mode“-Taste drücken –> umschalten von RECOND auf SUPPLY Funktion
Warnung! Der Verpolungsschutz steht nicht zu
Verfügung. Bei Verpolung besteht die Gefahr
von Schäden am Ladegerät und an der Batterie
/ Bordnetz des Kfz bzw. am angeschlossenen
Verbraucher. Achten Sie unbedingt auf die richtige Polarität beim Anschließen. Beachten Sie die
max. Stromaufnahme (s. Technische Daten) des
Verbrauchers.
Hinweise:
Die zur Verfügung gestellte Gleichspannung
•
(im Display angezeigt) ist lastabhängig und
beträgt ohne Belastung ca. 14,5 V.
Die Funktion ist für Verbraucher, die an einem
•
Kfz-Zigarettenanzünder betrieben werden,
nutzbar.
Beachten Sie die Bedienungsanleitung Ihres
•
12 V Verbrauchers.
5.3 Laden der Batterie:
Lösen oder entnehmen Sie die Batteriestop-
•
fen (falls vorhanden) von der Batterie.
Überprüfen Sie den Säurestand Ihrer Batterie.
•
Falls notwendig füllen Sie destilliertes Wasser
ein (falls möglich). Achtung! Batteriesäure ist
ätzend. Säurespritzer sofort mit viel Wasser
gründlich abspülen, notfalls einen Arzt aufsuchen.
Schließen Sie zuerst das rote Ladekabel
•
an den Pluspol der Batterie an.
Anschließend wird das schwarze Ladekabel
•
entfernt von Batterie und Benzinleitung an der
Karrosserie angeschlossen.
Warnung! Im Normalfall ist der negative
•
Batteriepol mit der Karosserie verbunden und
Sie gehen zum Laden wie zuvor beschrieben
vor. Im Ausnahmefall kann es möglich sein,
dass der positive Batteriepol mit der Karosserie verbunden ist (positive Erdung). In diesem
Fall schließen Sie das schwarze Ladekabel
am Minuspol der Batterie an. Anschließend
verbinden Sie das rote Ladekabel, entfernt
von Batterie und Benzinleitung, mit der Karosserie.
Nachdem die Batterie an das Ladegerät an-
•
geschlossen ist, können Sie das Ladegerät
an eine Steckdose (s. Technische Daten)
anschließen. Sie können jetzt die Ladeeinstellungen ändern (s. Abschnitt 5.2).
Achtung! Durch das Laden kann gefährli-
•
ches Knallgas entstehen, daher während des
Ladens Funkenbildung und offenes Feuer
vermeiden. Explosionsgefahr! Achten Sie auf
gute Belüftung in den Räumen.
Erscheint im LCD Display „FUL“ (und alle
•
Teilstriche Abb.2/Pos. K), so ist der Ladevorgang abgeschlossen. Das Ladegerät hält
die Batterie durch Impulsladung bei 95 – 100
% verfügbarer Batteriekapazität. Sollte das
Ladegerät dies bereits nach wenigen Minuten
anzeigen, so ist dies ein Hinweis darauf, dass
- 8 -

D
die Batteriekapazität gering ist. Die Batterie
ist zu ersetzen.
Berechnung der Ladezeit (Bild 3a-3c)
Die Ladezeit wird vom Ladezustand der Batterie
bestimmt. Bei einer leeren Batterie kann die ungefähre Ladezeit bis ca. 80% Ladung mit folgender Formel berechnet werden:
Batteriekapazität in Ah
Ladezeit/h =
Amp. (Ladestrom)
Der Ladestrom sollte 1/10 bis 1/6 der Batteriekapazität betragen.
5.4 Fehleranzeige (Abb. 2 / Pos. G)
Die Fehleranzeige blinkt (leuchtet) in folgenden
Fällen:
Wenn die Spannung der Batterie kleiner 3,5 V
•
oder größer 15 V ist. Die Batterie ist nicht zum
Laden geeignet oder defekt. Auch andere
Batteriefehler können dazu führen, dass die
Batterie nicht geladen werden kann.
Wenn die Anschlussklemmen an den Bat-
•
terieanschlüssen mit falscher Polarität an-
geschlossen wurden. Der Verpolungsschutz
stellt sicher, dass Batterie und Ladegerät
nicht beschädigt werden. Entfernen Sie das
Ladegerät von der Batterie und beginnen Sie
den Ladevorgang noch einmal. Vorsicht! Im
SUPPLY Programm steht der Verpolungs-
schutz nicht zu Verfügung.
Wenn ein Kurzschluss der beiden
•
Anschlussklemmen vorhanden ist
(Metallteile der Klemmen berühren sich). Der
Kurzschlussschutz stellt sicher, dass das
Ladegerät nicht beschädigt wird.
Hinweis! Wird der Netzstecker gezogen, die
Ladekabel bleiben aber weiterhin an der Batterie,
so entnimmt das Ladegerät der Batterie einen
geringen Strom. Wir empfehlen daher, das Ladegerät bei Nichtgebrauch immer komplett von der
Batterie zu entfernen.
6. Überlastschutz
Das Ladegerät ist in den Ladeprogrammen 12V
STD, 12V AGM, 12V Winter und 12V M elektronisch gegen Überlastung, Kurzschluss und
Verpolung geschützt. Zusätzlich sind ein oder
mehrere Feinsicherungen eingebaut. Bei einem
Defekt der Sicherung muss diese ausgewechselt
werden und durch eine Sicherung mit gleichem
Amperewert ersetzt werden. Wenden Sie sich bei
Bedarf bitte an Ihre Kundendienststelle.
7. Wartung und Pfl ege der Batterie
Achten Sie darauf, daß Ihre Batterie immer
•
fest eingebaut ist.
Eine einwandfreie Verbindung an das Lei-
•
tungsnetz der elektrischen Anlage muss
gewährleistet sein.
Batterie sauber und trocken halten. An-
•
schlussklemmen mit einem säurefreien und
säurebeständigen Fett
(Vaseline) leicht einfetten.
Bei nicht wartungsfreien Batterien ca. alle 4
•
Wochen Höhe des Säurestandes prüfen und
bei Bedarf nur destilliertes Wasser nachfüllen.
5.5 Laden der Batterie beenden
Ziehen Sie den Netzstecker aus der Steck-
•
dose.
Lösen Sie zuerst das schwarze Ladekabel
•
von der Karrosserie.
Anschließend lösen Sie das rote Ladekabel
•
vom Pluspol der Batterie.
Achtung! Bei positiver Erdung lösen Sie
•
zuerst das rote Ladekabel von der Karosse-
rie dann das schwarze Ladekabel von der
Batterie.
Batteriestopfen wieder aufschrauben oder
•
aufdrücken (falls vorhanden).
- 9 -

D
8. Reinigung, Wartung und
Ersatzteilbestellung
Gefahr!
Ziehen Sie vor allen Reinigungsarbeiten den
Netzstecker.
8.1 Reinigung
Halten Sie Schutzvorrichtungen, Luftschlitze
•
und Gehäuse so staub- und schmutzfrei wie
möglich. Reiben Sie das Gerät mit einem sau-
beren Tuch ab oder blasen Sie es mit Druck-
luft bei niedrigem Druck aus.
Wir empfehlen, dass Sie das Gerät direkt
•
nach jeder Benutzung reinigen.
Reinigen Sie das Gerät regelmäßig mit einem
•
feuchten Tuch und etwas Schmierseife. Ver-
wenden Sie keine Reinigungs- oder Lösungs-
mittel; diese könnten die Kunststoffteile des
Gerätes angreifen. Achten Sie darauf, dass
kein Wasser in das Geräteinnere gelangen
kann. Das Eindringen von Wasser in ein Elek-
trogerät erhöht das Risiko eines elektrischen
Schlages.
Das Ladegerät soll zur Aufbewahrung in ei-
•
nem trockenem Raum abgestellt werden. Die
Ladeklemmen sind von Korrosion zu reinigen.
8.2 Wartung
Im Geräteinneren befi nden sich keine weiteren zu
wartenden Teile.
9. Entsorgung und
Wiederverwertung
Das Gerät befi ndet sich in einer Verpackung um
Transportschäden zu verhindern. Diese Verpackung ist Rohstoff und ist somit wieder verwend-
bar oder kann dem Rohstoff kreislauf zurückge-
führt werden. Das Gerät und dessen Zubehör
bestehen aus verschiedenen Materialien, wie
z.B. Metall und Kunststoff e. Defekte Geräte ge-
hören nicht in den Hausmüll. Zur fachgerechten
Entsorgung sollte das Gerät an einer geeigneten
Sammelstellen abgegeben werden. Wenn Ihnen
keine Sammelstelle bekannt ist, sollten Sie bei
der Gemeindeverwaltung nachfragen.
8.3 Ersatzteilbestellung:
Bei der Ersatzteilbestellung sollten folgende Angaben gemacht werden;
Typ des Gerätes
•
Artikelnummer des Gerätes
•
Ident-Nummer des Gerätes
•
Ersatzteilnummer des erforderlichen Ersatz-
•
teils
Aktuelle Preise und Infos fi nden Sie unter
www.isc-gmbh.info
- 10 -
D
10. Hinweise zur Fehlerbeseitigung
Wird das Gerät richtig betrieben, dürften keine Störungen auftreten. Bei Störungen prüfen Sie die fol-
genden Möglichkeiten, bevor Sie den Kundendienst verständigen.
Störung Mögliche Ursache Behebung
Gerät lädt nicht - Ladezangen falsch angeschlossen
- Kontakt der Ladezangen zueinander
- Batterie ist schadhaft
Nur für EU-Länder
Werfen Sie Elektrowerkzeuge nicht in den Hausmüll!
Gemäß europäischer Richtlinie 2012/19/EU über Elektro- und Elektronik-Altgeräte und Umsetzung
in nationales Recht müssen verbrauchte Elektrowerkzeuge getrennt gesammelt werden und einer
umweltgerechten Wiederverwertung zugeführt werden.
Recycling-Alternative zur Rücksendeauff orderung:
Der Eigentümer des Elektrogerätes ist alternativ anstelle Rücksendung zur Mitwirkung bei der
sachgerechten Verwertung im Falle der Eigentumsaufgabe verpfl ichtet. Das Altgerät kann hierfür
auch einer Rücknahmestelle überlassen werden, die eine Beseitigung im Sinne der nationalen
Kreislaufwirtschafts- und Abfallgesetze durchführt. Nicht betroff en sind den Altgeräten beigefügte
Zubehörteile und Hilfsmittel ohne Elektrobestandteile.
- rote Ladezange an Pluspol,
schwarze Ladezange an Karosserie
anschließen
- Kontakt beseitigen
- Batterie von Fachmann prüfen lassen und ggf. austauschen
Der Nachdruck oder sonstige Vervielfältigung von Dokumentation und Begleitpapieren der Produkte,
auch auszugsweise, ist nur mit ausdrücklicher Zustimmung der iSC GmbH zulässig.
Technische Änderungen vorbehalten
- 11 -

D
Garantieurkunde
Sehr geehrte Kundin, sehr geehrter Kunde,
unsere Produkte unterliegen einer strengen Qualitätskontrolle. Sollte dieses Gerät dennoch einmal nicht
einwandfrei funktionieren, bedauern wir dies sehr und bitten Sie, sich an unseren Servicedienst unter
der auf dieser Garantiekarte angegebenen Adresse zu wenden. Gerne stehen wir Ihnen auch telefonisch über die angegebene Servicerufnummer zur Verfügung. Für die Geltendmachung von Garantieansprüchen gilt folgendes:
1. Diese Garantiebedingungen richten sich ausschließlich an Verbraucher, d. h. natürliche Personen,
die dieses Produkt weder im Rahmen ihrer gewerblichen noch anderen selbständigen Tätigkeit
nutzen wollen. Diese Garantiebedingungen regeln zusätzliche Garantieleistungen, die der u. g.
Hersteller zusätzlich zur gesetzlichen Gewährleistung Käufern seiner Neugeräte verspricht. Ihre
gesetzlichen Gewährleistungsansprüche werden von dieser Garantie nicht berührt. Unsere Garantieleistung ist für Sie kostenlos.
2. Die Garantieleistung erstreckt sich ausschließlich auf Mängel an einem von Ihnen erworbenen neuen Gerät des u. g. Herstellers, die auf einem Material- oder Herstellungsfehler beruhen und ist nach
unserer Wahl auf die Behebung solcher Mängel am Gerät oder den Austausch des Gerätes beschränkt. Bitte beachten Sie, dass unsere Geräte bestimmungsgemäß nicht für den gewerblichen,
handwerklichen oder berufl ichen Einsatz konstruiert wurden. Ein Garantievertrag kommt daher nicht
zustande, wenn das Gerät innerhalb der Garantiezeit in Gewerbe-, Handwerks- oder Industriebetrieben verwendet wurde oder einer gleichzusetzenden Beanspruchung ausgesetzt war.
3. Von unserer Garantie ausgenommen sind:
- Schäden am Gerät, die durch Nichtbeachtung der Montageanleitung oder aufgrund nicht fachgerechter Installation, Nichtbeachtung der Gebrauchsanleitung (wie durch z.B. Anschluss an eine
falsche Netzspannung oder Stromart) oder Nichtbeachtung der Wartungs- und Sicherheitsbestimmungen oder durch Aussetzen des Geräts an anomale Umweltbedingungen oder durch mangelnde
Pfl ege und Wartung entstanden sind.
- Schäden am Gerät, die durch missbräuchliche oder unsachgemäße Anwendungen (wie z.B. Überlastung des Gerätes oder Verwendung von nicht zugelassenen Einsatzwerkzeugen oder Zubehör),
Eindringen von Fremdkörpern in das Gerät (wie z.B. Sand, Steine oder Staub, Transportschäden),
Gewaltanwendung oder Fremdeinwirkungen (wie z. B. Schäden durch Herunterfallen) entstanden
sind.
- Schäden am Gerät oder an Teilen des Geräts, die auf einen gebrauchsgemäßen, üblichen oder
sonstigen natürlichen Verschleiß zurückzuführen sind.
4. Die Garantiezeit beträgt 24 Monate und beginnt mit dem Kaufdatum des Gerätes. Garantieansprüche sind vor Ablauf der Garantiezeit innerhalb von zwei Wochen, nachdem Sie den Defekt erkannt
haben, geltend zu machen. Die Geltendmachung von Garantieansprüchen nach Ablauf der Garantiezeit ist ausgeschlossen. Die Reparatur oder der Austausch des Gerätes führt weder zu einer
Verlängerung der Garantiezeit noch wird eine neue Garantiezeit durch diese Leistung für das Gerät
oder für etwaige eingebaute Ersatzteile in Gang gesetzt. Dies gilt auch bei Einsatz eines Vor-OrtServices.
5. Für die Geltendmachung Ihres Garantieanspruches melden Sie bitte das defekte Gerät an unter:
www.isc-gmbh.info. Halten Sie bitte den Kaufbeleg oder andere Nachweise Ihres Kaufs des Neugeräts bereit. Geräte, die ohne entsprechende Nachweise oder ohne Typenschild eingesendet werden, sind von der Garantieleistung aufgrund mangelnder Zuordnungsmöglichkeit ausgeschlossen.
Ist der Defekt des Gerätes von unserer Garantieleistung erfasst, erhalten Sie umgehend ein repariertes oder neues Gerät zurück.
Selbstverständlich beheben wir gegen Erstattung der Kosten auch gerne Defekte am Gerät, die vom
Garantieumfang nicht oder nicht mehr erfasst sind. Dazu senden Sie das Gerät bitte an unsere Serviceadresse.
Für Verschleiß-, Verbrauchs- und Fehlteile verweisen wir auf die Einschränkungen dieser Garantie gemäß den Service-Informationen dieser Bedienungsanleitung.
iSC GmbH · Eschenstraße 6 · 94405 Landau/Isar (Deutschland)
- 12 -
D
Sehr geehrte Kundin, sehr geehrter Kunde,
um Ihnen noch mehr Service zu bieten, haben Sie die Möglichkeit auf unserem Onlineportal weitere
Informationen abzurufen.
Sollten einmal Probleme oder Fragen zu Ihrem Produkt auftreten, können Sie schnell und einfach unter
www.isc-gmbh.info viele Aktionen durchführen. Hier einige Beispiele:
Ersatzteile bestellen
•
Aktuelle Preisauskünfte
•
Verfügbarkeiten der Ersatzteile
•
Servicestellen Vorort für Benzingeräte
•
Defekte Geräte anmelden
•
Garantieverlängerungen (nur bei bestimmten Geräten)
•
Bestellverfolgung
•
Wir freuen uns auf Ihren Besuch online unter www.isc-gmbh.info!
Telefon: 09951 / 95 920 00 ·Telefax: 09951/95 917 00
E-Mail: info@einhell.de · Internet: www.isc-gmbh.info
iSC GmbH · Eschenstraße 6 · 94405 Landau/Isar (Deutschland)
- 13 -

GB
Danger!
When using the equipment, a few safety precautions must be observed to avoid injuries and
damage. Please read the complete operating
instructions and safety regulations with due care.
Keep this manual in a safe place, so that the information is available at all times. If you give the
equipment to any other person, hand over these
operating instructions and safety regulations as
well. We cannot accept any liability for damage
or accidents which arise due to a failure to follow
these instructions and the safety instructions.
1. Safety regulations
The corresponding safety information can be
found in the enclosed booklet.
Danger!
Read all safety regulations and instructions.
Any errors made in following the safety regulations and instructions may result in an electric
shock, fi re and/or serious injury.
Keep all safety regulations and instructions
in a safe place for future use.
This equipment can be used by children of 8 years and older and by people with limited physical,
sensory or mental capacities or those with no experience and knowledge if they are supervised or
have received instruction in how to use the equipment safely and understand the dangers which
result from such use. Children are not allowed
to play with the equipment. Unless supervised,
children are not allowed to clean the equipment
and carry out user-level maintenance work.
Waste disposal
Batteries: Only dispose of these items through
motor vehicle workshops, special collection
points or special waste collection points. Ask your
local council.
Explanation of the warning signs on the
equipment (see Fig. 4)
1 = The equipment is totally insulated
2 = CAUTION - Read the operating instructions to
reduce the risk of injury
3 = Fuse value on pcb
4 = Disconnect from the mains supply before
connecting or disconnecting the battery to or
from the charger.
IMPORTANT: Explosive gases. Avoid fl ames
and sparks. Provide good ventilation during
the charging process.
2. Layout and items supplied
2.1 Layout (Fig. 1)
1 Function key
2 LCD display
3 Charging cable, black (-)
4 Charging cable, red (+)
5 Suspension eye
6 Mains power cable
2.2 Items supplied
Open the packaging and take out the equip-
•
ment with care.
Remove the packaging material and any
•
packaging and/or transportation braces (if
available).
Check to see if all items are supplied.
•
Inspect the equipment and accessories for
•
transport damage.
If possible, please keep the packaging until
•
the end of the guarantee period.
Danger!
The equipment and packaging material are
not toys. Do not let children play with plastic
bags, foils or small parts. There is a danger of
swallowing or suff ocating!
Original operating instructions
•
Safety instructions
•
3. Proper use
The charger is designed for charging nonmaintenance-free or maintenance-free 12V lead
acid batteries (wet / Ca/Ca / EFB batteries) and
for lead gel and AGM batteries which are used in
motor vehicles.
The 12V M charging program is suitable for
trickle charging and charging of batteries with
small battery capacities. The SUPPLY function
enables the device to be used as a buff er power
supply as well, e.g. while changing a battery or
for the operation of 12V d.c. consumers (observe
the max. power consumption). The RECOND
program is intended to be used only for bringing
lead acid batteries (not for AGM and GEL
batteries) which have undergone exhaustive
discharge back to life. Only use this program for a
- 14 -

GB
short time and under supervision.
The equipment must not be used for charging lithium iron phosphate rechargeable batteries (e.g.
LiFePO4) or other lithium rechargeable batteries.
The equipment is designed for mobile use only
and not for installation in caravans, mobile homes
or similar vehicles. Do not expose the charger to
rain or snow.
The equipment is to be used only for its prescribed purpose. Any other use is deemed to be a
case of misuse. The user / operator and not the
manufacturer will be liable for any damage or injuries of any kind caused as a result of this.
Please note that our equipment has not been designed for use in commercial, trade or industrial
applications. Our warranty will be voided if the
machine is used in commercial, trade or industrial
businesses or for equivalent purposes.
4. Technical data
CE-BC 4 M
Mains voltage: .........................220-240 V ~ 50Hz
Max. power rating: ...................................... 70 W
Rated output voltage: ............................. 12 V DC
Rated output current: .....................................4 A
Battery capacity “STD/AGM/Winter”: ...10-120 Ah
Battery capacity “12V M” (max. 1A): ........2-32 Ah
“SUPPLY” function output max.: .....................3 A
“RECOND” charging program: . 15.3 V DC / 1.5 A
Protection class: ................................................ II
Protection type: ........................................... IP65
Ambient temperature: .....................- 20°C – 40°C
CE-BC 6 M
Mains voltage: .........................220-240 V ~ 50Hz
Max. power rating: .................................... 100 W
Rated output voltage: ............................. 12 V DC
Rated output current: .....................................6 A
Battery capacity “STD/AGM/Winter”: ...20-150 Ah
Battery capacity “12V M” (max. 1A): ........2-32 Ah
“SUPPLY” function output max.: .....................5 A
“RECOND” charging program: . 15.3 V DC / 1.5 A
Protection class: ................................................ II
Protection type: ........................................... IP65
Ambient temperature: .....................- 20°C – 40°C
CE-BC 10 M
Mains voltage: .........................220-240 V ~ 50Hz
Max. power rating: .................................... 160 W
Rated output voltage: ............................. 12 V DC
Rated output current: ...................................10 A
Battery capacity “STD/AGM/Winter”: ...30-200 Ah
Battery capacity “12V M” (max. 2 A): .......3-60 Ah
“SUPPLY” function output max.: .....................8 A
“RECOND” charging program: . 15.3 V DC / 2.5 A
Protection class: ................................................ II
Protection type: ........................................... IP65
Ambient temperature: .....................- 20°C – 40°C
5. Operation
Before you connect the equipment to the power
supply make sure that the data on the specifi ca-
tions label are identical to the supply voltage.
Danger! Do not charge any frozen batteries.
Please also refer to the instructions in the
owner’s manuals for the car, radio, navigation
system, etc.
Notes on automatic charging
(charging programs 12V STD, 12V AGM, 12V
Winter, 12 V M only)
The charger is a microprocessor controlled automatic charger, i.e. it is suitable in particular for
charging maintenance-free batteries and for the
long-term charging and maintenance-charging of
batteries which are not in constant use, e.g. for
classic cars, recreational vehicles, lawn tractors
and the like. The integrated microprocessor enables charging in several steps. The fi nal charging
step, maintenance charging, maintains the battery capacity at 95–100% and therefore keeps the
battery fully charged at all times. The charging
operation does not need to be monitored. However, do not leave the battery unattended if you
charge it over an extended period of time, so that
you can disconnect it from the mains power supply in the event of a fault in the charger.
5.1 Explanation of the symbols (Fig. 2)
A Charging a 12V battery (lead acid battery and
GEL battery).
B Charging a 12V AGM battery.
C Charging a 12V battery (lead acid battery,
AGM battery and GEL battery) in winter mode
with an ambient temperature of – 20°C to
+5°C. Danger! Do not charge any frozen bat-
- 15 -

GB
teries.
D Charging a 12V battery (lead acid battery,
AGM battery and GEL battery) in charge
maintenance mode.
E Charging voltage in volts, faulty battery (BAt)
/ fully charged (FUL) / connected with reverse
polarity or short-circuit at the clamps (Err)
F Restoration of the charging capability of
discharged lead acid batteries with higher
charging voltage
G Clamps are wrongly connected (reverse pola-
rity) or there is a short-circuit
H Power supply, e.g. when changing a battery
K Charge status of the battery in percent (1 in-
crement = 25%) and charging process (incre-
ment lit = the battery has reached the charge
level shown; increment in the battery symbol
fl ashes = the battery is being charged to the
next charge level; all increments are lit = the
battery is fully charged).
5.2 Setting the charging programs (Fig. 2)
Note:
Press the “Mode” button (Fig. 1/Item 1) to
•
switch to the various programs. The symbol
for the applicable program will appear in the
display. The batteries will be charged using
the program which is displayed.
To go to the RECOND program, press the
•
“Mode” button for 5 seconds.
To get back to the 12V STD program from the
•
RECOND program or the SUPPLY function,
also press the “Mode” button for 5 seconds.
If the voltage of the battery is less than 3.5 V
•
or more than 15 V, the battery is either not sui-
table for charging or it is faulty. The message
“BAt” will appear in the LCD display. The “G”
symbol will flash. It is also possible that other
battery errors or faults can mean that the bat-
tery cannot be charged.
If there is a short-circuit between the charging
•
terminals while the SUPPLY function is on,
the message “Lo V” will appear in the LCD
display. The “G” symbol will flash.
When the charger is disconnected from the
•
socket outlet, the last charging program to
have been set will be saved (apart from RE-
COND and SUPPLY) and will be the default
program the next time the charger is used.
CE-BC 4M only: When the charger clamps
•
are connected to the battery, the charger
draws a very small amount of electricity from
the battery and the LCD display comes on
briefly. This is not a fault.
5.2.1 Standard charging programs
A) 12V STD: Charging program for lead acid
batteries (wet, Ca/Ca, EFB batteries) and gel batteries. When the charger is used for the fi rst time,
12V STD will appear in the display.
B) 12V AGM: Charging program for AGM batteries Press the “Mode” button –> switch from the
12V STD to the 12V AGM charging program
5.2.2 Special charging programs
C) Winter: The recommended charging program
for cold weather conditions (ambient temperature
of -20°C to +5°C) for normal lead acid batteries
(wet / Ca/Ca batteries) Press the “Mode” button
–> switch from the 12V AGM to the “Winter” charging program
D) 12V M: Charging program for batteries with a
low capacity (see “Technical data”) and for trickle
charging of all batteries listed in 3. “Proper use”.
Press the “Mode” button –> switch from the “Winter” to the “12 M” charging program
F) RECOND: Charging program with higher endof-charge voltage and constant current charging,
used only for restoring the charging capability
of lead acid batteries which have undergone exhaustive discharge.
The RECOND process must be checked every
half an hour and must never exceed a time of 4
hours. Refer to the instructions supplied by the
battery manufacturer.
Important! To go to this program, the “Mode” button (Fig. 1/Item 1) must be pressed for 5 seconds.
Warning!
Gassing generates explosive gas – risk of
•
explosion! Ensure that there is good ventilation.
Only use the RECOND program for lead acid
•
batteries and only as described below. Take
care to avoid spilling any battery acid. Battery
acid is aggressive. Read and observe the safety information.
Never use for a battery which is of sealed de-
•
sign (VRLA battery such as, e.g. AGM or GEL
battery). Refer to the instructions supplied by
the battery manufacturer.
Only use for batteries which are free-standing
•
and have been taken out of the car, not while
installed in your car with a connection to the
car’s electrical system. The higher charging
voltage could damage the electrical system.
- 16 -

GB
Refer to and observe the operating manual
for your car and/or contact the manufacturer
of your car.
Using the RECOND charging program
Connect the charger to a lead acid battery as
•
described in section 5.3 and check the char-
ging process every half hour.
After 4 hours at the latest or as soon as the
•
battery starts audibly gassing (bubbling), re-
move the charger as described in section 5.3.
If possible, check the acid level and, if pos-
•
sible, top up the battery cells, if necessary
just with distilled water. The acid level should
ideally be between the marked max. and min.
level and should be identical for all the cells.
Screw the battery stoppers, if there are any,
tightly in place.
5.2.3 Additional function
H) SUPPLY: For supplying 12V d.c. voltage, e.g.
when changing a battery or for operating 12V d.c.
consumers.
Press the “Mode” button –> switch from the RECOND to the SUPPLY function
Warning! Protection against swapped poles will
not be available. If the poles are swapped there
is a risk of damaging the charger and the battery/
on-board vehicle power supply or a connected
consumer. It is imperative that you make sure the
polarity is correct when you connect up. Observe
the maximum power consumption (see “Technical
data”) of the consumer.
Note:
The direct voltage which is provided (shown
•
in the display) is load-dependent and without
load it is approx. 14.5 V.
This function can be used for consumers
•
which are operated from a vehicle’s cigarette
lighter.
Refer to and observe the operating manual
•
for your 12 V consumer.
positive pole of the battery.
Then connect the black charging cable to the
•
bodywork of the vehicle away from the battery
and the petrol pipe.
Warning! Under normal circumstances the
•
negative battery pole is connected to the bodywork and you proceed as described above.
In exceptional cases it is possible that the positive battery pole is connected to the bodywork (positive earthing). In this case, connect
the black charger cable to the negative pole
on the battery. Then connect the red charger
cable to the bodywork at a point away from
the battery and the petrol pipe.
After the battery has been connected to the
•
charger, you can connect the charger to a
socket (see Technical Data). You can now
change the charging settings (see section
5.2).
Important! Charging may create dangerous
•
explosive gas and therefore you should avoid
spark formation and naked flames whilst the
battery is charging. There is a risk of explosion! It is essential that you ventilate the rooms
well.
When “FUL” appears in the LCD display (and
•
all increments Fig. 2/Item K), charging has
been completed. The charger holds the battery at 95% – 100% available battery capacity
using pulsed charging. If the charger shows
this after just a few minutes, this indicates that
the battery capacity is low. The battery needs
replacing.
Calculating the charging time (Fig. 3a-3c)
The charging time depends on the charge status
of the battery. If the battery is fully discharged,
the approximate charging time up to approx. 80%
charged can be calculated using the following
formula:
Battery capacity in Ah
Charging time/h =
Amp. (charging current)
5.3 Charging the battery:
Release or remove the battery stoppers (if
•
fitted) from the battery.
Check the acid level in the battery. If neces-
•
sary, top up the battery with distilled water (if
possible). Important! Battery acid is aggres-
sive. Rinse off any acid splashes thoroughly
with lots of water and seek medical advice if
necessary.
First connect the red charging cable to the
•
The charging current should be 1/10 to 1/6 of the
battery capacity.
5.4 Fault indicator (Fig. 2/Item G)
The fault indicator will fl ash (light up) in the fol-
lowing cases:
If the voltage of the battery is less than
•
3.5 V or more than 15 V. The battery is either
unsuitable for charging or is defective. It is
also possible that other battery errors or faults
- 17 -

GB
can mean that the battery cannot be charged.
If the terminal clamps are connected to the
•
battery terminals with the wrong polarity. The
protection against swapped poles ensures
that the battery and charger do not get damaged. Remove the charger from the battery
and start the charging process from the
beginning again. Caution! Protection against
swapped poles is not available when the
SUPPLY program is used.
If there is a short-circuit between the two ter-
•
minal clamps (the metal parts of the clamps
come into contact with each other). The protection against short-circuits ensures that the
battery and charger do not get damaged.
5.5 Finishing charging the battery
Pull the plug out of the socket.
•
First disconnect the black charging cable
•
from the bodywork.
Then release the red charging cable from the
•
positive pole on the battery.
Important! In case of positive earthing, first
•
disconnect the red charging cable from the
bodywork and then the black charging cable
from the battery.
Screw or push the battery stoppers back into
•
position (if there are any).
Important! If the mains plug is pulled out but the
charger cables are still connected to the battery,
the charger will draw off a small amount of elec-
tricity from the battery. We therefore recommend
that you always completely remove the charger
from the battery when not in use.
6. Overload cut-out
The charger has electronic protection against
overloading, short-circuits and swapped poles
when the 12V STD, 12V AGM, 12V Winter and
12V M programs are used. One or more fi ne
fuses are also fi tted. If the fuse suff ers a defect
it must be replaced by a new fuse with the same
amp value. If necessary, please contact our customer service center.
7. Maintenance and care of the
battery
Ensure that your battery is always fitted se-
•
curely.
A perfect connection to the cable network of
•
the electrical system must be ensured at all
times.
Keep the battery clean and dry. Apply a thin
•
coating of grease to the connection terminals
using an acid-free, acid-resistant grease
(Vaseline).
Check the level of the acid in batteries that
•
are not maintenance-free versions approximately every 4 weeks and top up with distilled
water if necessary.
8. Cleaning, maintenance and
ordering of spare parts
Danger!
Always pull out the mains power plug before starting any cleaning work.
8.1 Cleaning
Keep all safety devices, air vents and the
•
motor housing free of dirt and dust as far as
possible. Wipe the equipment with a clean
cloth or blow it with compressed air at low
pressure.
We recommend that you clean the device
•
immediately each time you have finished
using it.
Clean the equipment regularly with a moist
•
cloth and some soft soap. Do not use
cleaning agents or solvents; these could attack the plastic parts of the equipment. Ensure that no water can seep into the device. The
ingress of water into an electric tool increases
the risk of an electric shock.
The charger should be placed in a dry room
•
for storage. Any corrosion must be cleaned
off the charging terminals.
8.2 Maintenance
There are no parts inside the equipment which
require additional maintenance.
- 18 -

8.3 Ordering replacement parts:
Please quote the following data when ordering
replacement parts:
Type of machine
•
Article number of the machine
•
Identification number of the machine
•
Replacement part number of the part required
•
For our latest prices and information please go to
www.isc-gmbh.info
9. Disposal and recycling
The equipment is supplied in packaging to prevent it from being damaged in transit. The raw
materials in this packaging can be reused or
recycled. The equipment and its accessories are
made of various types of material, such as metal
and plastic. Never place defective equipment in
your household refuse. The equipment should
be taken to a suitable collection center for proper
disposal. If you do not know the whereabouts of
such a collection point, you should ask in your
local council offi ces.
GB
- 19 -

GB
10. Troubleshooting
If the equipment is operated properly you should experience no problems with malfunctions or faults.
In the event of any malfunctions or faults, please check the following before you contact your customer
services.
Fault Possible cause Remedy
Equipment does not
charge up
- Charger clamps connected incorrectly
- Connect the red clamp to the positive pole and the back clamp to the
bodywork
- Contact between the charger
clamps
- Battery defective
For EU countries only
Never place any electric power tools in your household refuse.
To comply with European Directive 2012/19/EC concerning old electric and electronic equipment and
its implementation in national laws, old electric power tools have to be separated from other waste and
disposed of in an environment-friendly fashion, e.g. by taking to a recycling depot.
- Prevent contact
- Have the battery checked by an
expert and replace it if necessary
Recycling alternative to the return request:
As an alternative to returning the equipment to the manufacturer, the owner of the electrical equipment
must make sure that the equipment is properly disposed of if he no longer wants to keep the equipment.
The old equipment can be returned to a suitable collection point that will dispose of the equipment in
accordance with the national recycling and waste disposal regulations. This does not apply to any accessories or aids without electrical components supplied with the old equipment.
The reprinting or reproduction by any other means, in whole or in part, of documentation and papers
accompanying products is permitted only with the express consent of the iSC GmbH.
Subject to technical changes
- 20 -

GB
Warranty cer tifi cate
Dear Customer,
All of our products undergo strict quality checks to ensure that they reach you in perfect condition. In the
unlikely event that your device develops a fault, please contact our service department at the address
shown on this guarantee card. You can also contact us by telephone using the service number shown.
Please note the following terms under which guarantee claims can be made:
1. These guarantee terms apply to consumers only, i.e. natural persons intending to use this product
neither for their commercial activities nor for any other self-employed activities. These warranty
terms regulate additional warranty services, which the manufacturer mentioned below promises to
buyers of its new products in addition to their statutory rights of guarantee. Your statutory guarantee
claims are not aff ected by this guarantee. Our guarantee is free of charge to you.
2. The warranty services cover only defects due to material or manufacturing faults on a product which
you have bought from the manufacturer mentioned below and are limited to either the rectifi cation of
said defects on the product or the replacement of the product, whichever we prefer.
Please note that our devices are not designed for use in commercial, trade or professional applications. A guarantee contract will not be created if the device has been used by commercial, trade or
industrial business or has been exposed to similar stresses during the guarantee period.
3. The following are not covered by our guarantee:
- Damage to the device caused by a failure to follow the assembly instructions or due to incorrect
installation, a failure to follow the operating instructions (for example connecting it to an incorrect
mains voltage or current type) or a failure to follow the maintenance and safety instructions or by exposing the device to abnormal environmental conditions or by lack of care and maintenance.
- Damage to the device caused by abuse or incorrect use (for example overloading the device or the
use or unapproved tools or accessories), ingress of foreign bodies into the device (such as sand,
stones or dust, transport damage), the use of force or damage caused by external forces (for example by dropping it).
- Damage to the device or parts of the device caused by normal or natural wear or tear or by normal
use of the device.
4. The guarantee is valid for a period of 24 months starting from the purchase date of the device. Guarantee claims should be submitted before the end of the guarantee period within two weeks of the
defect being noticed. No guarantee claims will be accepted after the end of the guarantee period.
The original guarantee period remains applicable to the device even if repairs are carried out or
parts are replaced. In such cases, the work performed or parts fi tted will not result in an extension
of the guarantee period, and no new guarantee will become active for the work performed or parts
fi tted. This also applies if an on-site service is used.
5. To make a claim under the guarantee, please register the defective device at: www.isc-gmbh.info.
Please keep your bill of purchase or other proof of purchase for the new device. Devices that are
returned without proof of purchase or without a rating plate shall not be covered by the guarantee,
because appropriate identifi cation will not be possible. If the defect is covered by our guarantee,
then the item in question will either be repaired immediately and returned to you or we will send you
a new replacement.
Of course, we are also happy off er a chargeable repair service for any defects which are not covered by
the scope of this guarantee or for units which are no longer covered. To take advantage of this service,
please send the device to our service address.
Also refer to the restrictions of this warranty concerning wear parts, consumables and missing parts as
set out in the service information in these operating instructions.
- 21 -

F
Danger !
Lors de l’utilisation d’appareils, il faut respecter
certaines mesures de sécurité afi n d’éviter des
blessures et dommages. Veuillez donc lire attentivement ce mode d’emploi/ces consignes de
sécurité. Veillez à le conserver en bon état pour
pouvoir accéder aux informations à tout moment.
Si l’appareil doit être remis à d’autres personnes,
veillez à leur remettre aussi ce mode d’emploi/
ces consignes de sécurité. Nous déclinons toute
responsabilité pour les accidents et dommages
dus au non-respect de ce mode d’emploi et des
consignes de sécurité.
1. Consignes de sécurité
Vous trouverez les consignes de sécurité correspondantes dans le cahier en annexe.
Danger !
Veuillez lire toutes les consignes de sécurité
et instructions. Tout non-respect des consignes
de sécurité et instructions peut provoquer une
décharge électrique, un incendie et/ou des blessures graves.
Conservez toutes les consignes de sécurité
et instructions pour une consultation ultérieure.
Cet appareil peut être utilisé par les enfants à partir de 8 ans et les personnes avec des capacités
physiques, sensorielles ou intellectuelles diminuées ou possédant un manque d’expérience
ou de connaissances à condition qu’elles soient
surveillées ou aient reçus les instructions relatives à l’utilisation sûre de l’appareil et qu’elles
comprennent les risques résultant de cette utilisation. Les enfants ne doivent pas jouer avec
l’appareil. Les enfants ne doivent pas eff ectuer le
nettoyage et la maintenance de l’utilisateur sans
surveillance.
Elimination
Batteries : Exclusivement par l’intermédiaire
d’ateliers de véhicules automobiles, de points de
collecte spéciaux ou de points de collecte des
déchets nocifs. Veuillez vous renseigner auprès
de la commune locale.
Explication de la plaque signalétique sur
l‘appareil (voir fi gure 4)
1 = L‘appareil est doté d‘une protection isolante
2 = AVERTISSEMENT – Lisez le mode d‘emploi
afi n de diminuer le risque de blessure !
3 = Valeur de fusible sur la carte électronique
4 = Débranchez du réseau avant de fermer ou
d’ouvrir des raccords sur la batterie.
ATTENTION : Gaz explosifs. Évitez les fl am-
mes et les étincelles. Pendant la charge, veil-
lez à une aération suffi sante.
2. Description de l’appareil et
volume de livraison
2.1 Description de l’appareil (fi gure 1)
1 Touche de fonctionnement
2 Affi chage LCD
3 Câble de charge noir (-)
4 Câble de charge rouge (+)
5 Œillets de suspension
6 Câble réseau
2.2 Volume de livraison
Ouvrez l’emballage et prenez l’appareil en le
•
sortant avec précaution de l’emballage.
Retirez le matériel d’emballage tout comme
•
les sécurités d’emballage et de transport (s’il
y en a).
Vérifiez si la livraison est bien complète.
•
Contrôlez si l’appareil et ses accessoires ne
•
sont pas endommagés par le transport.
Conservez l’emballage autant que possible
•
jusqu’à la fin de la période de garantie.
Danger !
L’appareil et le matériel d’emballage ne sont
pas des jouets ! Il est interdit de laisser des
enfants jouer avec des sacs et des fi lms en
plastique et avec des pièces de petite taille.
Ils risquent de les avaler et de s’étouff er !
Mode d’emploi d’origine
•
Consignes de sécurité
•
- 22 -

F
3. Utilisation conforme à
l’aff ectation
Le chargeur est conçu pour charger des batteries
plomb-acide de 12 V avec ou sans besoin
d’entretien (batteries humides / Ca/Ca / EFB)
ainsi que des batteries au gel de plomb et AGM
utilisées dans les véhicules automobiles.
Le programme de charge 12V M convient
à la charge de conservation et à la charge
de batteries de faible capacité. La fonction
SUPPLY permet également d‘utiliser l‘appareil
pour l‘alimentation électrique tampon par ex.
pendant un changement de batterie ou pour
le fonctionnement de consommateurs de 12V
d.c. (respectez le courant absorbé max.). Le
programme RECOND est exclusivement destiné
à la revitalisation de batteries plomb-acide
en décharge profonde (pas pour les batteries
AGM et GEL). N‘utilisez ce programme que
temporairement et sous surveillance.
L‘appareil ne doit pas être utilisé pour charger
des accumulateurs lithium-fer-phosphate (par
ex. LiFePO4) ou autres accumulateurs au lithium.
L‘appareil est uniquement destiné à une utilisation mobile et ne convient pas à un montage
dans une caravane, un camping-car ou véhicules
similaires. Protégez le chargeur de la pluie et de
la neige.
La machine doit exclusivement être employée
conformément à son aff ectation. Chaque uti-
lisation allant au-delà de cette aff ectation est
considérée comme non conforme. Pour les
dommages en résultant ou les blessures de tout
genre, le producteur décline toute responsabilité
et l’opérateur/l’exploitant est responsable.
Veillez au fait que nos appareils, conformément
à leur aff ectation, n’ont pas été construits, pour
être utilisés dans un environnement professionnel, industriel ou artisanal. Nous déclinons toute
responsabilité si l’appareil est utilisé professionnellement, artisanalement ou dans des sociétés
industrielles, tout comme pour toute activité
équivalente.
4. Données techniques
CE-BC 4 M
Tension du réseau : ...............220-240 V ~ 50 Hz
Puissance absorbée nominale max. : ......... 70 W
Tension de sortie nominale : ..................12 V d. c.
Courant de sortie nominal : ............................ 4 A
Capacité de la batterie « STD/AGM/hiver » : .......
.............................................................10-120 Ah
Capacité de la batterie « 12V M » (max. 1A) : .....
.................................................................2-32 Ah
Fonction « SUPPLY » sortie max. : ................. 3 A
Programme de charge « RECOND » : ................
.................................................15,3 V d. c. / 1,5 A
Catégorie de protection : .................................. II
Type de protection : .................................... IP65
Température ambiante : .................- 20°C – 40°C
CE-BC 6 M
Tension du réseau : ...............220-240 V ~ 50 Hz
Puissance absorbée nominale max. : ....... 100 W
Tension de sortie nominale : ..................12 V d. c.
Courant de sortie nominal : ............................ 6 A
Capacité de la batterie « STD/AGM/hiver » : .......
.............................................................20-150 Ah
Capacité de la batterie « 12V M » (max. 1A) : .....
.................................................................2-32 Ah
Fonction « SUPPLY » sortie max. : ................. 5 A
Programme de charge « RECOND » : ................
.................................................15,3 V d. c. / 1,5 A
Catégorie de protection : .................................. II
Type de protection : .................................... IP65
Température ambiante : .................- 20°C – 40°C
CE-BC 10 M
Tension du réseau : ...............220-240 V ~ 50 Hz
Puissance absorbée nominale max. : ....... 160 W
Tension de sortie nominale : ..................12 V d. c.
Courant de sortie nominal : .......................... 10 A
Capacité de la batterie « STD/AGM/hiver » : .......
.............................................................30-200 Ah
Capacité de la batterie « 12V M » (max. 2 A) : ....
.................................................................3-60 Ah
Fonction « SUPPLY » sortie max. : ................. 8 A
Programme de charge « RECOND » : ................
.................................................15,3 V d. c. / 2,5 A
Catégorie de protection : .................................. II
Type de protection : .................................... IP65
Température ambiante : .................- 20°C – 40°C
- 23 -

F
5. Commande
Assurez-vous, avant de brancher la machine, que
les données se trouvant sur la plaque signalétique correspondent bien aux données du réseau.
Danger ! Ne chargez pas de batteries gelées.
Veuillez respecter les consignes qui se trouvent dans les modes d’emploi des voitures,
de la radio, du système de navigation etc.
Remarque relative au chargement automatique
(Seulement programmes de charge 12V STD,
12V AGM, 12V hiver, 12 V M)
Le chargeur est un chargeur automatique piloté
par un microprocesseur. Autrement dit, il convient
particulièrement bien au chargement de batteries
sans besoin d‘entretien tout comme au chargement de longue durée et à la conservation de la
charge de batteries n‘étant pas constamment
utilisées, p. ex. les batteries pour les vieilles voitures, les véhicules de loisir, les tondeuses à gazon
et autres appareils de ce type. En raison du microprocesseur intégré, le chargement s‘eff ectue
en plusieurs étapes. La dernière étape de chargement, la charge de conservation, maintient la
capacité de la batterie à 95 – 100 %. Celle-ci est
ainsi toujours entièrement chargée. Le processus
de chargement n‘a pas besoin d‘être surveillé. Ne
laissez pas la batterie sans surveillance pendant
un chargement prolongé afi n de pouvoir débran-
cher manuellement le chargeur du réseau en cas
de dérangement.
5.1 Explication des symboles (fi g. 2)
A Charge d‘une batterie 12V (batterie plomb-
acide et batterie GEL).
B Charge d‘une batterie AGM 12V.
C Charge d‘une batterie 12V (batterie plomb-
acide, batterie AGM et batterie GEL) en
mode hiver avec une température ambiante
de – 20°C à +5°. Danger ! Ne chargez pas de
batteries gelées.
D Charge d‘une batterie 12V (batterie plomb-
acide, batterie AGM et batterie GEL) dans le
mode de conservation de charge.
E Tension de charge en volts, batterie défec-
tueuse (BAt) / entièrement chargée (FUL) /
branchée avec pôles inversés ou court-circuit
aux bornes (Err)
F Rétablissement de la capacité de charge de
batteries plomb-acide déchargées avec tensi-
on de charge accrue
G Bornes mal branchées (inversion des pôles)
ou court-circuit
H Alimentation en tension par ex. en cas de
changement de batterie
K État de charge de la batterie en pourcentage
(1 graduation = 25 %) et processus de charge (la graduation est allumée = la batterie
a atteint l‘état de charge, la graduation du
symbole de batterie clignote = la batterie est
en charge jusqu‘au prochain état de charge,
toutes les graduations sont allumées = la batterie est chargée).
5.2 Réglage des programmes de charge (fi g.
2)
Remarques :
Appuyez sur la touche « Mode » (fig. 1/
•
pos. 1) pour commuter entre les différents
programmes. Le symbole correspondant au
programme apparaît sur l‘écran Les batteries
sont chargées avec le programme affiché.
Pour accéder au programme RECOND,
•
appuyez sur la touche « Mode » pendant 5
secondes.
Pour revenir du programme RECOND ou de
•
la fonction SUPPLY au programme 12V STD,
appuyez également pendant 5 secondes sur
la touche « Mode ».
Si la tension de la batterie est inférieure à 3,5
•
V ou supérieure à 15 V, la batterie ne convient pas à la charge ou est défectueuse. Le
message « BAt » apparaît sur l‘écran LCD.
Le symbole « G » clignote. D‘autres erreurs
de batterie peuvent également avoir pour
conséquence que la batterie ne peut pas être
chargée.
S‘il y a un court-circuit entre les bornes de
•
charge pendant la fonction SUPPLY, le message « Lo V » apparaît sur l‘écran LCD. Le
symbole « G » clignote.
Lors du retrait du chargeur de la prise de cou-
•
rant, le dernier programme de charge réglé
est enregistré (sauf RECOND et SUPPLY) et
préréglé lors de la prochaine utilisation.
Uniquement CE-BC 4M : Si les pinces de
•
charge sont reliées à la batterie, le chargeur
tire un très faible courant de la batterie et
l‘écran LCD s‘affiche brièvement. Ceci n‘est
pas une défaillance.
5.2.1 Programmes de charge standards
A) 12V STD : Programme de charge pour batte-
ries plomb-acier (batteries humides, Ca/Ca, EFB)
et batteries Gel. Après la première mise en service du chargeur, 12V STD apparaît sur l‘écran.
- 24 -

F
B) 12V AGM : Programme de charge pour batteries AGM Appuyez la touche « Mode » –> Passez
du programme de charge 12V STD à 12V AGM
5.2.2 Programmes de charge spéciaux
C) Hiver : Programme de charge recommandé
par temps froid (température ambiante -20°C +5°C) pour des batteries plomb-acier normales
(batteries humides / Ca/Ca) Appuyez la touche «
Mode » –> Passez du programme de charge 12V
AGM à « hiver »
D) 12V M : Programme de charge pour batteries
de faible capacité (voir caractéristiques techniques) et pour la charge de conservation de
toutes les batteries indiquées au 3. Utilisation
conforme à l‘aff ectation.
Appuyez sur la touche « Mode » –> Passez du
programme de charge « hiver » à « 12 M »
F) RECOND : Programme de charge avec tension de fi n de charge accrue et charge de courant
constant, exclusivement pour le rétablissement
de la capacité de charge de batteries plombacide en décharge profonde.
Le processus RECOND doit être contrôlé toutes
les demi-heures et ne doit pas durer plus de 4h.
Respectez les consignes du fabricant de la batterie.
Important ! Pour accéder à ce programme, il
faut appuyer sur la touche « Mode » (fi g. 1/pos. 1)
pendant 5 secondes.
Avertissement !
Lors du bouillonnement, de
•
l‘oxyhydrogène se forme – Risque
d‘explosion ! Veillez à une bonne aérati-
on.
Utilisez le programme RECOND uniquement
•
avec une batterie plomb-acier et uniquement
comme décrit ci-après. Veillez à ne pas ren-
verser l‘acide de batterie. L‘acide de batterie
est caustique. Respectez les consignes de
sécurité.
À n‘utiliser en aucun cas avec une batterie de
•
type fermée (batterie VRLA par ex. batterie
AGM ou GEL). Respectez les consignes du
fabricant de la batterie.
À utiliser uniquement avec une batterie in-
•
dépendante, démontée et non à l‘état monté
avec liaison à l‘électronique de bord de votre
automobile. Une tension de charge accrue
peut endommager l‘électronique de bord. Re-
spectez le mode d’emploi de votre véhicule
automobile ou adressez-vous à votre constructeur automobile.
Utilisation du programme de charge RECOND
Raccordez le chargeur comme décrit au
•
paragraphe 5.3 à la batterie plomb-acide et
contrôlez le processus de charge toutes les
demi-heures.
Au plus tard après 4h ou dès que la batterie
•
bouillonne (gargouille) de manière audible,
retirez le chargeur comme décrit au paragraphe 5.3.
Vérifiez, si possible, le niveau d‘acier et rem-
•
plissez, si possible, les éléments de batterie
le échéant seulement avec de l‘eau distillée.
Le niveau d‘acide se situe idéalement entre la
valeur max. et min. indiquée et doit être identique pour tous les éléments. Revissez à fond
les bouchons de la batterie, si présents.
5.2.3 Fonction supplémentaire
H) SUPPLY : Pour l‘alimentation en courant con-
tinu de 12V par ex. en cas d‘échange de batterie
ou pour le fonctionnement de consommateurs
12V d.c.
Appuyez sur la touche « Mode » –> Passez de
RECOND à la fonction SUPPLY
Avertissement ! La protection contre l‘inversion
des pôles n‘est pas disponible. En cas d‘inversion
des pôles, il y a un risque de dommages sur le
chargeur et sur la batterie / alimentation de bord
du véhicule automobile ou sur le consommateur
raccordé. Veillez impérativement à la bonne polarité lors du raccordement. Respectez le courant
absorbé max. (voir caractéristiques techniques)
du consommateur.
Remarques :
La tension continue mise à disposition (affi-
•
chée sur l‘écran) dépend de la charge et est
sans sollicitation d‘env. 14,5 V.
La fonction est utilisable pour les consomma-
•
teurs qui fonctionnent sur un allume-cigare
automobile.
Respectez le mode d’emploi de votre con-
•
sommateur 12 V.
5.3 Charge de la batterie :
Desserrez ou retirez les bouchons de la bat-
•
terie (si présents).
Contrôlez le niveau d‘acier de votre batterie.
•
Si nécessaire, remplissez d‘eau distillée (si
possible). Attention ! L‘acide de batterie est
caustique. Rincez immédiatement toute éc-
- 25 -

F
laboussure d‘acide à l‘eau en abondance, en
cas de besoin consultez un(e) médecin.
Raccordez tout d‘abord le câble de charge
•
rouge au pôle plus de la batterie.
Ensuite, retirez le câble de charge noir de la
•
batterie, et raccordez la conduite d‘essence à
la carrosserie.
Avertissement ! Normalement, le pôle né-
•
gatif de la batterie est relié à la carrosserie et
pour charger la batterie, on procède comme
décrit précédemment. Dans des cas excep-
tionnels, il peut arriver que le pôle positif de
la batterie soit relié à la carrosserie (mise à
la terre positive). Dans ce cas, branchez le
câble de chargement noir sur le pôle négatif
de la batterie. Ensuite, reliez le câble de char-
gement rouge à la carrosserie à distance de
la batterie et de la conduite d‘essence.
Une fois que la batterie est raccordée au
•
chargeur, vous pouvez brancher le chargeur
à une prise de courant (cf. caractéristiques
techniques). Vous pouvez modifier à présent
les réglages de chargement (cf. paragraphe
5.2).
Attention ! Pendant le chargement, il peut
•
se dégager un gaz explosif, évitez donc toute
étincelle et toute flamme nue pendant la char-
ge. Risque d‘explosion ! Veillez à une bonne
aération dans les salles.
Si « FUL » (et toutes les graduations fig. 2/
•
pos. K) apparaît sur l‘écran LCD, le processus
de charge est terminé. Le chargeur maintient
la batterie par charge par impulsion à 95 –
100 % de la capacité de batterie disponible.
Si le chargeur affiche ceci après quelques
minutes, cela indique que la capacité de la
batterie est faible. La batterie doit être rem-
placée.
Calcul du temps de charge (fi gure 3a-3c)
Le temps de charge est déterminé par l‘état de
charge de la batterie. Si la batterie est vide, on
peut calculer le temps de charge approximatif
pour atteindre env. 80 % de charge grâce à la
formule suivante :
capacité de la batterie en Ah
Temps de charge/h =
Amp. (Courant de charge)
Le courant de charge doit s’élever à 1/10 – 1/6 de
la capacité de la batterie.
5.4 Affi chage d‘erreur (fi g. 2 / pos. G)
L‘affi chage d‘erreur clignote (est allumé) dans les
cas suivants :
Lorsque la tension de la batterie est inférieure
•
à 3,5 V ou supérieure à 15 V. La batterie ne
doit pas être chargée ou est défectueuse.
D’autres erreurs de batterie peuvent également avoir pour conséquence que la batterie
ne peut pas être chargée.
Lorsque les bornes de raccordement ont été
•
branchées sur les raccords de batterie avec
inversion de polarité. La protection contre
l‘inversion des pôles assure que la batterie et
le chargeur ne s‘endommagent pas. Retirez
le chargeur de la batterie et recommencez
le processus de charge. Attention ! Dans le
programme SUPPLY, la protection contre
l‘inversion des pôles n‘est pas disponible.
Lorsqu’il y a un court-circuit des deux bornes
•
de raccordement (les pièces métalliques des
bornes se touchent). La protection contre
les courts-circuits assure que le chargeur ne
s’endommage pas.
5.5 Fin de la charge de la batterie
Retirez la fiche de contact de la prise.
•
Desserrez tout d’abord le câble noir de la
•
carrosserie.
Ensuite, desserrez le câble rouge su pôle
•
plus de la batterie.
Attention ! En cas de mise à la terre positive,
•
débranchez d‘abord le câble de chargement
rouge de la carrosserie puis le câble de chargement noir de la batterie.
Revissez les bouchons de la batterie ou
•
enfoncez-les (si présents).
Remarque ! Si la fi che de contact est débran-
chée, mais que les câbles de charge restent
branchés sur la batterie, le chargeur consomme
un faible courant de la batterie. Nous recommandons donc de toujours retirer complètement le
chargeur de la batterie en cas de non utilisation.
6. Protection contre les surcharges
Le chargeur est protégé électroniquement contre
la surcharge, le court-circuit et l‘inversion des
pôles dans les programmes de charge 12V STD,
12V AGM, 12V hiver et 12V M. De plus, un ou plusieurs fusibles fi ns sont intégrés. En cas de défaut
du fusible, il convient de remplacer celui-ci en utilisant un fusible ayant la même valeur d‘ampères.
- 26 -

F
Veuillez-vous adresser en cas de besoin à votre
service client.
7. Maintenance et entretien de la
batterie
Veiller à ce que votre batterie soit toujours
•
bien montée de façon fixe.
Il faut garantir un raccordement impeccable
•
au réseau de conduites de l’installation élec-
trique.
Gardez la batterie propre et sèche. Graissez
•
légèrement les bornes de raccordement avec
une graisse sans acide et résistante aux aci-
des (vaseline).
Pour les batteries n’étant pas sans mainte-
•
nance, contrôlez environ toutes les quatre
semaines la hauteur du niveau d’acide et
remplissez uniquement d’eau distillée en cas
de besoin.
8. Nettoyage, maintenance et
commande de pièces de
rechange
Danger !
Retirez la fi che de contact avant tous travaux de
nettoyage.
8.2 Maintenance
Aucune pièce à l’intérieur de l’appareil n’a besoin
de maintenance.
8.3 Commande de pièces de rechange :
Pour les commandes de pièces de rechange,
veuillez indiquer les références suivantes:
Type de l’appareil
•
No. d’article de l’appareil
•
No. d’identification de l’appareil
•
No. de pièce de rechange de la pièce requise
•
Vous trouverez les prix et informations actuelles à
l’adresse www.isc-gmbh.info
9. Mise au rebut et recyclage
L‘appareil se trouve dans un emballage permettant d‘éviter les dommages dus au transport.
Cet emballage est une matière première et peut
donc être réutilisé ultérieurement ou être réintroduit dans le circuit des matières premières.
L‘appareil et ses accessoires sont en matériaux
divers, comme par ex. des métaux et matières
plastiques. Les appareils défectueux ne doivent
pas être jetés dans les poubelles domestiques.
Pour une mise au rebut conforme à la réglementation, l‘appareil doit être déposé dans un centre
de collecte approprié. Si vous ne connaissez pas
de centre de collecte, veuillez vous renseigner
auprès de l‘administration de votre commune.
8.1 Nettoyage
Maintenez les dispositifs de protection, les
•
fentes à air et le carter de moteur aussi pro-
pres (sans poussière) que possible. Frottez
l’appareil avec un chiffon propre ou soufflez
dessus avec de l’air comprimé à basse pres-
sion.
Nous recommandons de nettoyer l’appareil
•
directement après chaque utilisation.
Nettoyez l’appareil régulièrement à l’aide d’un
•
chiffon humide et un peu de savon. N’utilisez
aucun produit de nettoyage ni détergeant;
ils pourraient endommager les pièces en
matières plastiques de l’appareil. Veillez à
ce qu’aucune eau n’entre à l’intérieur de
l’appareil. La pénétration de l’eau dans un
appareil électrique augmente le risque de
décharge électrique.
Il faut stocker le chargeur dans un endroit
•
sec. Il faut nettoyer les bornes de charge tou-
te corrosion.
- 27 -
F
10. Consignes de dépannage
Lorsque l’appareil est correctement exploité, aucun dérangement ne devrait se produire. En cas de
dérangement, vérifi ez les possibilités suivantes avant d’appeler le service après-vente.
Dérangement Cause probable Remède
L‘appareil ne se
recharge pas
- Pinces de charge mal branchées
- Connectez la prince de charge
rouge au pôle plus, la pince de
charge noire à la carrosserie
- Contact des pinces l‘une vers
l‘autre
- Batterie endommagée
Uniquement pour les pays de l’Union Européenne
Ne jetez pas les outils électriques dans les ordures ménagères!
Selon la norme européenne 2012/19/CE relative aux appareils électriques et systèmes électroniques
usés et selon son application dans le droit national, les outils électriques usés doivent être récoltés à
part et apportés à un recyclage respectueux de l’environnement.
- Eliminer le contact
- Faites contrôler la batterie par un
ou une spécialiste ou remplacez-la
Possibilité de recyclage en alternative à la demande de renvoi :
Le propriétaire de l’appareil électrique est obligé, en guise d’alternative à un envoi en retour, à contribuer à un recyclage eff ectué dans les règles de l’art en cas de cessation de la propriété. L’ancien appareil
peut être remis à un point de collecte dans ce but. Cet organisme devra l’éliminer dans le sens de la Loi
sur le cycle des matières et les déchets. Ne sont pas concernés les accessoires et ressources fournies
sans composants électroniques.
Toute réimpression ou autre reproduction de la documentation et des papiers joints aux produits, même
sous forme d’extraits, est uniquement permise une fois l’accord explicite de l’ISC GmbH obtenu.
Sous réserve de modifi cations techniques
- 28 -

F
Bon de garantie
Chère cliente, cher client,
nos produits sont soumis à un contrôle de qualité très strict. Si toutefois, il arrivait que cet appareil ne
fonctionne pas parfaitement, nous en sommes désolés et nous vous prions de vous adresser à notre
service après-vente à l‘adresse indiquée sur le bon de garantie. Nous nous tenons également volontiers
à votre disposition par téléphone au numéro de service après-vente indiqué. La garantie est valable
dans les conditions suivantes :
1. Ces conditions de garantie s‘adressent uniquement à des consommateurs, c‘est à dire à des personnes physiques qui ne souhaitent ni utiliser ce produit dans le cadre de leur activité industrielle ou
artisanale, ni dans le cadre de toute autre activité indépendante. Les conditions de garantie réglementent les prestations de garantie supplémentaires que le fabricant mentionné ci-dessous promet
aux acheteurs de ses appareils en supplément de la prestation de garantie légale. Vos droits légaux
en matière de garantie restent inchangés. Notre prestation de garanti est gratuite pour vous.
2. La prestation de garantie s‘étend exclusivement aux défauts résultant d‘une erreur de fabrication ou
de matériau d‘un appareil neuf du fabricant mentionné ci-dessous et acheté par vos soins. La prestation de garantie se limite selon notre décision soit à la résolution de tels défauts sur l‘appareil, soit
à l‘échange de l‘appareil.
Veillez au fait que nos appareils, conformément au règlement, n‘ont pas été conçus pour être utilisés dans un environnement professionnel, industriel ou artisanal. Il n‘y a donc pas de contrat de
garantie quand l‘appareil a été utilisé professionnellement, artisanalement ou par des sociétés industrielles ou exposé à une sollicitation semblable pendant la durée de la garantie.
3. Sont exclus de notre garantie :
- les dommages liés au non-respect des instructions de montage ou en raison d‘une installation
incorrecte, au non-respect du mode d‘emploi (en raison par ex. du branchement de l‘appareil sur la
tension de réseau ou le type de courant incorrect), au non-respect des dispositions de maintenance
et de sécurité ou résultant d‘une exposition de l‘appareil à des conditions environnementales anormales ou d‘un manque d‘entretien et de maintenance.
- les dommages résultant d‘une utilisation abusive ou non conforme (comme par ex. une surcharge
de l‘appareil ou une utilisation d‘outils ou d‘accessoires non autorisés), de la pénétration d‘objets
étrangers dans l‘appareil (comme par ex. du sable, des pierres ou de la poussière), de l‘utilisation
de la force ou de la violence (comme par ex. les dommages liés aux chutes).
- les dommages sur l‘appareil ou des parties de l‘appareil résultant de l‘usure normale liée à
l‘utilisation de l‘appareil ou de toute autre usure naturelle.
4. La durée de garantie est de 24 mois et débute à la date d‘achat de l‘appareil. Les droits à la garantie
doivent être revendiqués avant l‘expiration de la durée de garantie dans un délai de deux semaines
après avoir constaté le défaut. La revendication de droits à la garantie après expiration de la durée
de garantie est exclue. La réparation ou l‘échange de l‘appareil n‘entraîne ni une extension de la durée de garantie ni le début d‘une nouvelle durée de garantie pour cet appareil ou toute autre pièce
de rechange installée sur l‘appareil. Cela est valable également dans le cas d‘une intervention du
service après-vente à domicile.
5. Pour faire valoir vos droits à la garantie, veuillez enregistrer l‘appareil défectueux à l‘adresse suivante : www.isc-gmbh.info. Veuillez garder à disposition la preuve d‘achat ou tout autre justifi catif
de l‘achat de votre nouvel appareil. Les appareils envoyés sans les justifi catifs correspondants ou
sans plaque signalétique sont exclus de la prestation de garantie en raison de l‘impossibilité de les
enregistrer. Si le défaut de l‘appareil est inclut dans la garantie, vous recevrez sans délai un appareil
réparé ou un nouvel appareil.
Bien entendu, nous réparons volontiers les défauts de votre appareil qui ne sont pas ou plus compris
dans l‘étendue de la garantie contre le remboursement des frais de réparation. Pour cela, veuillez envoyer l‘appareil à notre adresse de service après-vente.
Pour les pièces d‘usure, de consommation et manquantes, nous renvoyons aux restrictions de cette garantie conformément aux informations du service après-vente de ce mode d‘emploi.
- 29 -

I
Pericolo!
Nell’usare gli apparecchi si devono rispettare
diverse avvertenze di sicurezza per evitare lesioni e danni. Quindi leggete attentamente queste
istruzioni per l’uso/le avvertenze di sicurezza.
Conservate bene le informazioni per averle a
disposizione in qualsiasi momento. Se date
l’apparecchio ad altre persone, consegnate queste istruzioni per l’uso/le avvertenze di sicurezza
insieme all’apparecchio. Non ci assumiamo alcuna responsabilità per incidenti o danni causati
dal mancato rispetto di queste istruzioni e delle
avvertenze di sicurezza.
1. Avvertenze sulla sicurezza
Le relative avvertenze di sicurezza si trovano
nell’opuscolo allegato.
Pericolo!
Leggete tutte le avvertenze di sicurezza e le
istruzioni. Dimenticanze nel rispetto delle avver-
tenze di sicurezza e delle istruzioni possono causare scosse elettriche, incendi e/o gravi lesioni.
Conservate tutte le avvertenze e le istruzioni
per eventuali necessità future.
Questo apparecchio può essere usato da bambini a partire dagli 8 anni e da persone con capacità fi siche, sensoriali o mentali ridotte o prive
di esperienza e conoscenze solo se vengono
sorvegliati o sono stati istruiti riguardo l’uso sicuro
dell’apparecchio e conoscono i rischi ad esso
connessi. I bambini non devono giocare con
l’apparecchio. Le operazioni di pulizia e di manutenzione a carico dell’utilizzatore non devono venire eseguite dai bambini se non sono sorvegliati.
Smaltimento
Batterie: solo presso offi cine auto, ecocentri o
centri di raccolta di rifi uti speciali. Informatevi
presso gli uffi ci comunali del posto.
Spiegazione della targhetta di avvertenze
sull’apparecchio (vedi Fig. 4)
1 = L‘apparecchio possiede un isolamento di pro-
tezione
2 = AVVERTIMENTO – Per ridurre il rischio di
lesioni leggete le istruzioni per l‘uso!
3 = Valore del fusibile sulla scheda elettronica
4 = Staccate dalla rete prima di eseguire o inter-
rompere i collegamenti alla batteria.
ATTENZIONE: gas esplosivi. Evitate fi amme
e scintille. Provvedete ad un‘aerazione suffi ci-
ente durante la ricarica.
2. Descrizione dell’apparecchio ed
elementi forniti
2.1 Descrizione dell’apparecchio (Fig. 1)
1 Tasto funzione
2 Display LCD
3 Cavo di ricarica nero (-)
4 Cavo di ricarica rosso (+)
5 Occhiello di sospensione
6 Cavo di alimentazione
2.2 Elementi forniti
Aprite l’imballaggio e togliete con cautela
•
l’apparecchio dalla confezione.
Togliete il materiale d’imballaggio e anche i
•
fermi di trasporto / imballo (se presenti).
Controllate che siano presenti tutti gli elemen-
•
ti forniti.
Verificate che l’apparecchio e gli accessori
•
non presentino danni dovuti al trasporto.
Se possibile, conservate l’imballaggio fino
•
alla scadenza della garanzia.
Pericolo!
L’apparecchio e il materiale d’imballaggio
non sono giocattoli! I bambini non devono
giocare con sacchetti di plastica, fi lm e pic-
coli pezzi! Sussiste pericolo di ingerimento e
soff ocamento!
Istruzioni per l’uso originali
•
Avvertenze di sicurezza
•
3. Utilizzo proprio
Il caricabatterie è destinato alla ricarica sia di
batterie al piombo-acido da 12V (a umido, Ca/Ca,
EFB) che richiedono manutenzione sia di batterie
senza manutenzione nonché di batterie al piombo
gel e AGM impiegate in veicoli a motore.
Il programma di ricarica 12V M è adatto per la
carica di mantenimento e la ricarica di batterie
con capacità ridotta. Con la funzione SUPPLY
l‘apparecchio può essere usato anche per
l‘alimentazione tampone di corrente, per es.
durante la sostituzione di una batteria o per
l‘esercizio di utenze da 12V DC (osservate la
corrente assorbita max.). Il programma RECOND
è destinato esclusivamente al ricondizionamento
- 30 -

I
di batterie al piombo-acido che si sono scaricate
completamente (non è adatto per batterie AGM o
GEL). Utilizzate questo programma solo per breve
tempo e sotto sorveglianza.
L‘apparecchio non deve essere utilizzato per
ricaricare batterie al litio-ferro-fosfato (ad es.
LiFePO4) o altre batterie al litio. L‘apparecchio è
concepito soltanto per l‘impiego mobile e non per
l‘installazione fi ssa in roulotte, camper o veicoli
simili. Il caricabatterie deve essere protetto da
pioggia e neve.
L’apparecchio deve venire usato solamente per
lo scopo a cui è destinato. Ogni altro tipo di uso
che esuli da quello previsto non è un uso conforme. L’utilizzatore/l’operatore, e non il costruttore, è
responsabile dei danni e delle lesioni di ogni tipo
che ne risultino.
Tenete presente che i nostri apparecchi non sono
stati costruiti per l’impiego professionale, artigianale o industriale. Non ci assumiamo alcuna
garanzia quando l’apparecchio viene usato in
imprese commerciali, artigianali o industriali, o in
attività equivalenti.
4. Caratteristiche tecniche
CE-BC 4 M
Tensione di rete: ......................220-240 V ~ 50Hz
Potenza assorbita nominale max.: ............. 70 W
Tensione in uscita nominale: ..................12 V DC
Corrente in uscita nominale: ........................... 4 A
Capacità della batteria „STD/AGM/Inverno“: .......
.............................................................10-120 Ah
Capacità della batteria „12V M“ (max. 1A): ..........
.................................................................2-32 Ah
Funzione „SUPPLY“ uscita max.: .................... 3 A
Programma di ricarica „RECOND“: .....................
.................................................. 15,3 V DC / 1,5 A
Grado di protezione: .......................................... II
Tipo di protezione: ...................................... IP65
Temperatura ambiente: ..................- 20°C – 40°C
CE-BC 6 M
Tensione di rete: ......................220-240 V ~ 50Hz
Potenza assorbita nominale max.: ........... 100 W
Tensione in uscita nominale: ..................12 V DC
Corrente in uscita nominale: ........................... 6 A
Capacità della batteria „STD/AGM/Inverno“: .......
.............................................................20-150 Ah
Capacità della batteria „12V M“ (max. 1A): ..........
.................................................................2-32 Ah
Funzione „SUPPLY“ uscita max.: .................... 5 A
Programma di ricarica „RECOND“: .....................
.................................................. 15,3 V DC / 1,5 A
Grado di protezione: .......................................... II
Tipo di protezione: ...................................... IP65
Temperatura ambiente: ..................- 20°C – 40°C
CE-BC 10 M
Tensione di rete: ......................220-240 V ~ 50Hz
Potenza assorbita nominale max.: ........... 160 W
Tensione in uscita nominale: ..................12 V DC
Corrente in uscita nominale: ......................... 10 A
Capacità della batteria „STD/AGM/Inverno“: .......
.............................................................30-200 Ah
Capacità della batteria „12V M“ (max. 2 A): .........
.................................................................3-60 Ah
Funzione „SUPPLY“ uscita max.: .................... 8 A
Programma di ricarica „RECOND“: .....................
.................................................. 15,3 V DC / 2,5 A
Grado di protezione: .......................................... II
Tipo di protezione: ...................................... IP65
Temperatura ambiente: ..................- 20°C – 40°C
5. Uso
Prima di inserire la spina nella presa di corrente,
assicuratevi che i dati sulla targhetta delle caratteristiche tecniche corrispondano a quelli di rete.
Pericolo! Non ricaricate batterie congelate.
Tenete comunque presenti le indicazioni
nelle istruzioni per l’uso dell’auto, della radio,
del sistema di navigazione ecc.
Avvertenza sulla ricarica automatica
(solo programmi di ricarica 12V STD, 12V
AGM, 12V Inverno, 12 V M)
Il caricabatterie è un apparecchio automatico,
controllato da un microprocessore, ed è quindi
particolarmente adatto a caricare le batterie senza bisogno di manutenzione, ma è anche adatto
al mantenimento in carica di batterie che non vengono utilizzate continuamente, come per es. in
auto d‘epoca, veicoli per il tempo libero, trattorini
rasaerba e simili. Data la presenza del microprocessore integrato, la ricarica si eff ettua in più fasi.
L‘ultima fase, la carica di mantenimento, manti-
- 31 -

I
ene la capacità della batteria tra il 95 e il 100 % e
quindi la batteria è sempre completamente carica. La ricarica non deve essere controllata. Non
lasciate tuttavia la batteria incustodita per molto
tempo durante la ricarica in modo da poter scollegare a mano il caricabatterie dalla rete elettrica in
caso di anomalia.
5.1 Spiegazione dei simboli (Fig. 2)
A Ricarica di una batteria da 12V (batteria
piombo-acido o batteria GEL).
B Ricarica di una batteria AGM da 12V.
C Ricarica di una batteria da 12V (batteria
piombo-acido, batteria AGM o batteria GEL)
in modalità invernale con una temperatura
ambiente tra – 20°C e +5°C. Pericolo! Non
ricaricate batterie congelate.
D Ricarica di una batteria da 12V (batteria
piombo-acido, batteria AGM o batteria GEL)
in modalità mantenimento di carica.
E Tensione di carica in volt, batteria difettosa
(BAt) / completamente ricaricata (FUL) / col-
legata con polarità errata o cortocircuito sulle
pinze (Err)
F Ripristino della capacità di carica di batterie
al piombo-acido scariche con tensione di ca-
rica elevata
G Pinze collegate in modo errato (polarità erra-
ta) o cortocircuito.
H Alimentazione di tensione, per es. durante la
sostituzione di una batteria
K Stato di carica della batteria in percentuale
(1 tacca = 25%) e processo di ricarica (una
tacca illuminata = la batteria ha raggiunto
quel livello di carica, una tacca del simbolo
della batteria lampeggia = la batteria viene
ricaricata al livello di carica successivo, tutte
le tacche sono illuminate = la batteria è com-
pletamente carica).
5.2 Impostare i programmi di ricarica (Fig. 2)
Avvertenze:
Premendo il tasto „Mode“ (Fig. 1/Pos. 1) si
•
può passare ai diversi programmi. Il simbolo
corrispondente al programma appare sul
display. Le batterie vengono caricate con il
programma indicato.
Per passare al programma RECOND preme-
•
te il tasto „Mode“ per 5 secondi.
Premete il tasto „Mode“ per 5 secondi anche
•
per tornare al programma 12V STD dal pro-
gramma RECOND o dalla funzione SUPPLY.
Se la tensione della batteria è inferiore a 3,5
•
V o superiore a 15 V, la batteria non è adatta
a essere ricaricata o è difettosa. Sul display
LCD appare il messaggio „BAt“. Il simbolo „G“
lampeggia. Anche altri difetti della batteria
possono fare in modo che questa non possa
essere ricaricata.
Se durante la funzione SUPPLY si verifica
•
un cortocircuito tra le pinze di ricarica, sul
display appare il messaggio „Lo V“. Il simbolo
„G“ lampeggia.
Staccando il caricabatterie dalla presa viene
•
memorizzato l‘ultimo programma di ricarica
impostato (tranne RECOND e SUPPLY) che
quindi è preimpostato all‘impiego successivo.
Solo CE-BC 4M: quando le pinze di ricarica
•
vengono collegate alla batteria, il caricabatterie assorbe da essa una leggera quantità di
corrente e il display LCD si attiva brevemente.
Non si tratta di un‘anomalia.
5.2.1 Programmi di ricarica standard
A) 12V STD: programma di ricarica per batterie
al piombo-acido (a umido, Ca/Ca, EFB) e batterie
GEL. Dopo la prima messa in esercizio del caricabatterie sul display appare 12V STD.
B) 12V AGM: programma di ricarica per batterie
AGM, premendo il tasto „Mode“ –> si passa dal
programma di ricarica 12V STD a 12V AGM.
5.2.2 Programmi di ricarica speciali
C) Inverno: programma di ricarica consiglia-
to in caso di temperature basse (temperatura
ambiente -20°C - +5°C) per normali batterie al
piombo-acido (a umido / Ca/Ca), premendo il tasto „Mode“ –> si passa dal programma di ricarica
12V AGM a „Inverno“.
D) 12V M: programma di ricarica per batterie con
capacità ridotta (vedi Caratteristiche tecniche) e
carica di mantenimento di tutte le batterie indicate
al punto 3. Utilizzo proprio.
Premendo il tasto „Mode“ –> si passa dal programma di ricarica „Inverno“ a „12 M“.
F) RECOND: programma di ricarica con tensione di carica fi nale elevata e ricarica a corrente
costante, esclusivamente per il ripristino della
capacità di carica di batterie al piombo-acido
completamente scariche.
La procedura RECOND deve essere controllata
ogni mezz‘ora e non deve superare una durata
di 4 ore. Osservate le avvertenze del costruttore
della batteria.
Importante! Per passare a questo programma si
deve premere il tasto „Mode“ (Fig. 1/Pos. 1) per 5
- 32 -

I
secondi.
Avvertimento!
La gassificazione provoca la formazione
•
di gas tonante – pericolo di esplosione!
Provvedete a una buona aerazione.
Impiegate il programma RECOND solo con
•
batterie al piombo-acido e solo secondo la
seguente descrizione. Fate attenzione a non
sversare l‘acido della batteria. L‘acido della
batteria è caustico. Osservate le avvertenze
di sicurezza.
Non utilizzate il programma per una batteria
•
dalla struttura chiusa (batteria VRLA come
per es. AGM o GEL). Osservate le avvertenze
del costruttore della batteria.
Utilizzate il programma solo per batterie
•
smontate e non collegate e non per batterie
montate e collegate al sistema elettronico di
bordo del vostro veicolo. La tensione di carica
elevata può danneggiare il sistema elettronico
di bordo. Tenete presenti le istruzioni per l‘uso
del veicolo o rivolgetevi al relativo costruttore.
Impiegare il programma di ricarica RECOND
Collegate il caricabatterie a una batteria al
•
piombo-acido nel modo descritto al punto 5.3
e controllate ogni mezz‘ora il processo di rica-
rica.
Togliete il caricabatterie nel modo descritto al
•
punto 5.3 al più tardi dopo 4 ore o non appe-
na sentite che la batteria gorgoglia.
Se possibile controllate il livello di acido ed
•
eventualmente ricaricate le celle della batteria
solo con acqua distillata. Nel caso ideale il
livello di acido è compreso tra i valori max. e
min. indicati e dovrebbe essere identico per
tutte le celle. Avvitate di nuovo i tappi della
batteria, se presenti.
5.2.3 Ulteriore funzione
H) SUPPLY: per l‘alimentazione di tensione conti-
nua da 12V, per es. nel caso di sostituzione della
batteria o per l‘esercizio di utenze da 12V DC.
Premendo il tasto „Mode“ –> si passa dalla funzione „RECOND“ a „SUPPLY“.
Avvertimento! Non è disponibile la protezione
contro l‘inversione di polarità. In caso di inversione di polarità c‘è il rischio di danni al caricabatterie e alla batteria / alla rete del veicolo ovvero
all‘utenza collegata. Collegando la batteria, controllate assolutamente la giusta polarità. Osservate la corrente assorbita max. dell‘utenza (vedi
Caratteristiche tecniche).
Avvertenze:
La tensione continua messa a disposizione
•
(indicata sul display) dipende dal carico, in
assenza di carico è pari a ca. 14,5 V.
La funzione può essere utilizzata per utenze
•
che impiegano la presa accendisigari del veicolo.
Tenete presenti le istruzioni per l‘uso della
•
vostra utenza da 12 V.
5.3 Ricaricare la batteria:
Svitate o togliete i tappi dalla batteria (se pre-
•
senti).
Controllate il livello di acido della batteria. Se
•
necessario aggiungete acqua distillata (se
possibile). Attenzione! L‘acido della batteria
è caustico. Lavate subito con abbondante acqua eventuali spruzzi di acido, se necessario
consultate un medico.
Collegate prima il cavo rosso al polo positivo
•
della batteria.
Poi il cavo nero viene collegato alla carroz-
•
zeria, lontano da batteria e tubazione della
benzina.
Avvertimento! Normalmente il polo negati-
•
vo della batteria è collegato alla carrozzeria
e, quindi, per la ricarica procedete come
descritto in precedenza. In casi eccezionali
è possibile che il polo positivo della batteria
sia collegato alla carrozzeria (messa a terra
positiva). In questo caso collegate il cavo di
ricarica nero al polo negativo della batteria.
Collegate poi il cavo di ricarica rosso alla carrozzeria, lontano da batteria e tubazione della
benzina.
Dopo che la batteria è stata collegata al ca-
•
ricabatterie, potete collegare questo ad una
presa (vedi Caratteristiche tecniche). È ora
possibile cambiare le impostazioni di ricarica
(vedi punto 5.2).
Attenzione! Con l‘operazione di ricarica si
•
può sviluppare del pericoloso gas tonante,
evitate perciò fiamme e scintille durante la ricarica. Pericolo di esplosione! Fate attenzione
ad una buona ventilazione dei locali.
Se sul display appare „FUL“ (e tutte le tacche
•
come in Fig. 2/Pos. K), il processo di ricarica
è terminato. Il caricabatterie mantiene la batteria a una capacità disponibile di 95 – 100 %
con una ricarica a impulsi. Se il caricabatterie
riporta queste indicazioni già dopo pochi minuti si tratta di un indizio che la capacità della
batteria è bassa. La batteria deve essere sostituita.
- 33 -

I
Calcolo del tempo di ricarica (Fig. 3a-3c)
Il tempo di ricarica viene determinato dallo stato
di carica della batteria. In caso di batteria scarica
il tempo approssimativo di ricarica fi no all‘80%
può essere calcolato con la seguente formula:
capacità della batteria in Ah
Tempo di ricarica/h =
Amp. (corrente di ricarica)
La corrente di ricarica dovrebbe essere da 1/10 a
1/6 della capacità della batteria.
5.4 Segnalazione di errore (Fig. 2 / Pos. G)
La segnalazione di errore lampeggia (si illumina)
nei seguenti casi:
Se la tensione della batteria è inferiore a
•
3,5 V o superiore a 15 V. La batteria non è
adatta alla ricarica o è difettosa. Anche altri
difetti della batteria possono fare in modo che
questa non possa essere ricaricata.
Se le pinze sono state collegate ai terminali
•
della batteria con polarità errata. La protezi-
one contro l‘inversione di polarità assicura
che la batteria e il caricabatterie non vengano
danneggiati. Scollegate il caricabatterie dalla
batteria e ricominciate da capo le operazioni
di ricarica. Attenzione! Nel programma SUP-
PLY non è disponibile la protezione contro
l‘inversione di polarità.
Se si verifica un cortocircuito tra i due mor-
•
setti di collegamento (le parti in metallo dei
morsetti entrano in contatto). La protezione
contro il cortocircuito assicura che il carica-
batterie non venga danneggiato.
5.5 Terminare la ricarica della batteria
Staccate la spina dalla presa.
•
Staccate prima il cavo nero di ricarica dalla
•
carrozzeria.
Poi staccate il cavo rosso di ricarica dal polo
•
positivo della batteria.
Attenzione! Nel caso di messa a terra po-
•
sitiva staccate prima il cavo di ricarica rosso
dalla carrozzeria e poi il cavo di ricarica nero
dalla batteria.
Riavvitate o rimettete i tappi della batteria (se
•
presenti).
Avvertenza! Se viene staccata la spina, ma i cavi
di ricarica rimangono collegati alla batteria, il caricabatterie preleva da questa una quantità ridotta
di corrente. Consigliamo quindi di scollegare
sempre completamente il caricabatterie dalla batteria quando questo non viene utilizzato.
6. Protezione da sovraccarico
Nei programmi 12V STD, 12V AGM, 12V Inverno
e 12V M il caricabatterie è protetto elettronicamente da sovraccarico, cortocircuito e inversione
di polarità. Sono inoltre montati uno o più fusibili a
fi lo sottile. In caso di fusibile difettoso questo deve
essere sostituito con un dispositivo dello stesso
amperaggio. In caso di necessità rivolgetevi al
centro assistenza clienti competente.
7. Manutenzione e cura della
batteria
Fate attenzione che la batteria sia sempre
•
ben fissata.
Deve essere garantito il collegamento corret-
•
to alla rete dell’impianto elettrico.
Tenete la batteria pulita ed asciutta. Ingras-
•
sate leggermente i morsetti di collegamento
con un grasso neutro e resistente agli acidi
(vaselina).
Nel caso di batterie che richiedono manuten-
•
zione controllate ca. ogni 4 settimane il livello
dell’acido e se necessario aggiungere solo
acqua distillata.
8. Pulizia, manutenzione e
ordinazione dei pezzi di ricambio
Pericolo!
Prima di qualsiasi lavoro di pulizia staccate la spina dalla presa di corrente.
8.1 Pulizia
Tenete il più possibile i dispositivi di protezio-
•
ne, le fessure di aerazione e la carcassa del
motore liberi da polvere e sporco. Strofinate
l’apparecchio con un panno pulito o soffiatelo
con l’aria compressa a pressione bassa.
Consigliamo di pulire l’apparecchio subito
•
dopo averlo usato.
Pulite l’apparecchio regolarmente con un
•
panno asciutto ed un po’ di sapone. Non usate detergenti o solventi perché questi ultimi
potrebbero danneggiare le parti in plastica
dell’apparecchio. Fate attenzione che non
possa penetrare dell’acqua nell’interno
dell’apparecchio. La penetrazione di acqua
in un elettroutensile aumenta il rischio di una
scossa elettrica.
- 34 -

Il caricabatteria deve essere conservato in un
•
ambiente asciutto. Le pinze di ricarica devono
essere pulite togliendo le tracce di corrosione.
8.2 Manutenzione
All’interno dell’apparecchio non si trovano altre
parti sottoposte ad una manutenzione qualsiasi.
8.3 Ordinazione di pezzi di ricambio:
Volendo commissionare dei pezzi di ricambio, si
dovrebbe dichiarare quanto segue:
modello dell’apparecchio
•
numero dell’articolo dell’apparecchio
•
numero d’ident. dell’apparecchio
•
numero del pezzo di ricambio del ricambio
•
necessitato.
Per i prezzi e le informazioni attuali si veda
www.isc-gmbh.info
9. Smaltimento e riciclaggio
L‘apparecchio si trova in un imballaggio per evitare i danni dovuti al trasporto. Questo imballaggio
rappresenta una materia prima e può perciò essere utilizzato di nuovo o riciclato. L‘apparecchio
e i suoi accessori sono fatti di materiali diversi,
per es. metallo e plastica. Gli apparecchi difettosi
non devono essere gettati nei rifi uti domestici. Per
uno smaltimento corretto l‘apparecchio va consegnato ad un apposito centro di raccolta. Se non
vi è noto nessun centro di raccolta, rivolgetevi per
informazioni all‘amministrazione comunale.
I
- 35 -

I
10. Avvertenze per l’eliminazione di anomalie
Se l’apparecchio viene fatto funzionare correttamente non si dovrebbero verifi care anomalie. In caso di
anomalie verifi cate le seguenti possibilitŕ prima di rivolgervi al servizio assistenza.
Anomalia Possibile causa Rimedio
L‘apparecchio non
ricarica.
- Pinze di ricarica collegate in modo
errato
- Collegate la pinza rossa al polo positivo, quella nera alla carrozzeria
- Contatto delle pinze di ricarica tra
loro
- Batteria difettosa
Solo per paesi membri dell’UE
Non smaltite gli elettroutensili nei rifi uti domestici!
Secondo la direttiva europea 2012/19/CE sui rifi uti di apparecchiature elettriche ed elettroniche e il suo
recepimento nelle normative nazionali, gli elettroutensili usati devono venire raccolti separatamente e
venire smaltiti in modo ecocompatibile.
- Eliminate il contatto
- Fate controllare la batteria da un
tecnico ed eventualmente sostituitela
Alternativa di riciclaggio alla richiesta di restituzione:
il proprietario dell’apparecchio elettrico è tenuto in alternativa, invece della restituzione, a collaborare in
modo che lo smaltimento venga eseguito correttamente in caso ceda l’apparecchio. L’apparecchio vecchio può anche venire consegnato ad un centro di raccolta che provvede poi allo smaltimento secondo
le norme nazionali sul riciclaggio e sui rifi uti. Non ne sono interessati gli accessori e i mezzi ausiliari sen-
za elementi elettrici forniti insieme ai vecchi apparecchi.
La ristampa o l’ulteriore riproduzione, anche parziale, della documentazione o dei documenti
d’accompagnamento dei prodotti è consentita solo con l’esplicita autorizzazione da parte della
iSC GmbH.
Con riserva di apportare modifi che tecniche
- 36 -

I
Certifi cato di garanzia
Gentili clienti,
i nostri prodotti sono soggetti ad un rigido controllo di qualità. Se l‘apparecchio non dovesse tuttavia
funzionare correttamente, ci scusiamo e vi preghiamo di rivolgervi al nostro servizio di assistenza clienti
all‘indirizzo indicato in questa scheda di garanzia. Siamo a vostra disposizione anche telefonicamente al
numero del Servizio Assistenza indicato. Per la rivendicazione dei diritti di garanzia vale quanto segue:
1. Le presenti condizioni di garanzia si rivolgono esclusivamente a consumatori, vale a dire a persone
fi siche che non intendono utilizzare questo prodotto né in ambito professionale né per altre attività
di lavoro autonomo. Le presenti condizioni di garanzia regolano prestazioni di garanzia supplementari che il produttore su indicato concede in aggiunta alla garanzia legale agli acquirenti di nuovi
apparecchi. La presente garanzia non tocca i vostri diritti al ricorso in garanzia previsti dalla legge.
Le nostre prestazioni di garanzia sono per voi gratuite.
2. La prestazione di garanzia riguarda esclusivamente i difetti di un nuovo apparecchio da voi
acquistato del produttore di cui sopra, riconducibili a errori di materiale o di produzione, ed è limitata, a nostra discrezione, all‘eliminazione di questi difetti dell‘apparecchio o alla sostituzione
dell‘apparecchio stesso.
Tenete presente che i nostri apparecchi non sono stati costruiti per l‘impiego artigianale, professionale o imprenditoriale. Pertanto un contratto di garanzia non viene concluso se l‘apparecchio è stato
usato entro il periodo di garanzia in attività artigianali, imprenditoriali o industriali o se è stato sottoposto a sollecitazioni equivalenti.
3. Sono esclusi dalla nostra garanzia:
- Danni all‘apparecchio causati dalla mancata osservanza delle istruzioni di montaggio o per
un‘installazione non corretta, dalla mancata osservanza delle istruzioni per l‘uso (come ad es. collegamento a una tensione di rete o a un tipo di corrente non corretti), dalla mancata osservanza delle
norme relative alla manutenzione e alla sicurezza, dall‘esposizione dell‘apparecchio a condizioni
ambientali anomale o per la mancata esecuzione di pulizia e manutenzione.
- Danni all‘apparecchio dovuti a usi impropri o illeciti (come per es. sovraccarico dell‘apparecchio
o utilizzo di utensili di ricambio o accessori non consentiti), alla penetrazione di corpi estranei
nell‘apparecchio (come per es. sabbia, pietre o polvere, danni dovuti al trasporto), all‘impiego della
forza o a infl ussi esterni (come per es. danni causati da caduta).
- Danni all‘apparecchio o a parti di esso da ricondurre a un‘usura comune, dovuta all‘uso o di altro
tipo naturale.
4. Il periodo di garanzia è 24 mesi e inizia a partire dalla data di acquisto dell‘apparecchio. I diritti di
garanzia devono essere fatti valere prima della scadenza del periodo di garanzia, entro due settimane dopo avere accertato il difetto. È esclusa la rivendicazione di diritti di garanzia dopo la scadenza
del relativo periodo. La riparazione o la sostituzione dell‘apparecchio non comporta una proroga del
periodo di garanzia e con questa prestazione per l‘apparecchio o per pezzi di ricambio eventualmente installati non inizia un nuovo periodo di garanzia. Ciò vale anche nel caso in cui si ricorra a un
servizio sul posto.
5. Per rivendicare il diritto di garanzia vi preghiamo di comunicare che l‘apparecchio è difettoso tramite
sito internet: www.isc-gmbh.info. Tenete a portata di mano il documento di acquisto o altri documenti
come prova dell‘acquisto del vostro apparecchio nuovo. Apparecchi inviati senza i relativi documenti
o senza targhetta d‘identifi cazione sono esclusi dalla prestazione di garanzia perché non possono
essere classifi cati in modo corrispondente. Se il difetto dell‘apparecchio rientra nella nostra presta-
zione di garanzia, ricevete prontamente l‘apparecchio riparato o un apparecchio nuovo.
Naturalmente eff ettuiamo a pagamento anche riparazioni sull‘apparecchio che non rientrano o non rien-
trano più nella garanzia. A tale scopo inviate l‘apparecchio all‘indirizzo del nostro Centro Assistenza.
Per parti mancanti, di consumo e soggette a usura rimandiamo alle limitazioni di questa garanzia secondo le informazioni sul Servizio Assistenza di queste istruzioni per l‘uso.
- 37 -

DK/N
Fare!
Ved brug af el-værktøj er der visse sikkerhedsforanstaltninger, der skal respekteres for at undgå
skader på personer og materiel. Læs derfor betjeningsvejledningen / sikkerhedsanvisningerne
grundigt igennem. Opbevar betjeningsvejledningen et praktisk sted, så du altid kan tage den frem
efter behov. Husk at lade betjeningsvejledningen
/ sikkerhedsanvisningerne følge med værktøjet,
hvis du overdrager det til andre. Vi fraskriver
os ethvert ansvar for skader på personer eller
materiel, som måtte opstå som følge af, at anvisningerne i denne betjeningsvejledning, navnlig
vedrørende sikkerhed, tilsidesættes.
1. Sikkerhedsanvisninger
Relevante sikkerhedsanvisninger fi nder du i det
medfølgende hæfte.
Fare!
Læs alle sikkerhedsanvisninger og øvrige
anvisninger. Følges anvisningerne, navnlig sik-
kerhedsanvisningerne, ikke nøje som beskrevet,
kan elektrisk stød, brand og/eller svære kvæstelser være følgen. Alle sikkerhedsanvisninger og
øvrige anvisninger skal gemmes.
Dette produkt kan tages i brug af børn fra 8 år
samt personer med nedsatte fysiske, mentale
eller sensoriske evner samt personer, der ikke
har den nødvendige erfaring eller besidder det
fornødne kendskab, såfremt dette sker under
opsyn eller under forudsætning af, at disse personer har fået instruktion i sikker omgang med maskinen og er bekendt med de hermed forbundne
risici. Børn må ikke bruge produktet som legetøj.
Renholdelse og vedligeholdelse må ikke overlades til børn, medmindre det sker under opsyn.
Bortskaff else
Batterier: Via autoværksteder, særlige indsamlingssteder eller genbrugsstationer. Spørg din
kommune.
Oplysningsskiltets betydning på produktet
(se fi g. 4)
1 = Produkt er beskyttelsesisoleret
2 = ADVARSEL – Læs betjeningsvejledningen for
at reducere risikoen for personskade!
3 = sikringsværdi på elektronikkort
4 = Kobles fra strømforsyningen, før forbindel-
ser til batteriet lukkes eller åbnes. VIGTIGT:
Eksplosive gasser. Undgå fl ammer og gnister.
Sørg for god udluftning under opladningen.
2. Produktbeskrivelse og
leveringsomfang
2.1 Produktbeskrivelse (fi g. 1)
1 Funktionsknap
2 LCD-display
3 Ladekabel sort (-)
4 Ladekabel rødt (+)
5 Ring til ophængning
6 Netledning
2.2 Leveringsomfang
Åbn pakken, og tag forsigtigt maskinen ud af
•
emballagen.
Fjern emballagematerialet samt emballage-/
•
og transportsikringer (hvis sådanne forefindes).
Kontroller, at der ikke mangler noget.
•
Kontroller maskine og tilbehør for transports-
•
kader.
Opbevar så vidt muligt emballagen indtil ga-
•
rantiperiodens udløb.
Fare!
Maskinen og emballagematerialet er ikke
legetøj! Børn må ikke lege med plastikposer,
folier og smådele! Fare for indtagelse og
kvælning!
Original betjeningsvejledning
•
Sikkerhedsanvisninger
•
3. Formålsbestemt anvendelse
Ladeaggregatet er beregnet til at lade ikke-vedligeholdelsesfrie eller vedligeholdelsesfrie 12V
blysyrebatterier (våd- / Ca/Ca- / EFB-batterier)
samt til blygel- og AGM-batterier, der bruges til
motorkøretøjer.
12V M ladeprogrammet er egnet til
vedligeholdelsesladning og ladning af batterier
med lille batterikapacitet. Med SUPPLY
funktionen kan produktet også bruges til
buff er-strømforsyning f.eks. under et batteriskift
eller til at køre 12V d.c. forbrugere (overhold
maks. strømforbrug). RECOND programmet er
udelukkende beregnet til at genoplive meget
afl adte blysyrebatterier (ikke til AGM og GEL
batterier). Brug kun dette program i kort tid og
- 38 -

DK/N
under opsyn.
Produktet må ikke bruges til at lade lithiumjernfosfat-akkuer (f.eks. LiFePO4) eller andre
lithium-akkuer. Produktet er kun beregnet til mobil
brug og må ikke indbygges i campingvogne, autocampere eller lignende køretøjer. Ladeaggregatet
skal beskyttes mod regn og sne.
Saven må kun anvendes i overensstemmelse
med dens tiltænkte formål. Enhver anden form
for anvendelse er ikke tilladt. Vi fraskriver os ethvert ansvar for skader, det være sig på personer
eller materiel, som måtte opstå som følge af, at
maskinen ikke er blevet anvendt korrekt. Ansvaret
bæres alene af brugeren/ejeren.
Bemærk, at vore produkter ikke er konstrueret til
erhvervsmæssig, håndværksmæssig eller industriel brug. Vi fraskriver os ethvert ansvar, såfremt
produktet anvendes i erhvervsmæssigt, håndværksmæssigt, industrielt eller lignende øjemed.
4. Tekniske data
CE-BC 4 M
Netspænding: .........................220-240 V ~ 50Hz
Nominel optagen eff ekt maks.: ................... 70 W
Nominel udgangsspænding: ..................12 V d.c.
Nominel udgangsstrøm: ................................. 4 A
Batterikapacitet „STD/AGM/vinter“: .....10-120 Ah
Batterikapacitet „12V M“ (maks. 1A): ....... 2-32 Ah
Funktion „SUPPLY“ udgang maks.: ................ 3 A
Ladeprogram „RECOND“: ........15,3 V d.c. / 1,5 A
Beskyttelsesklasse: .......................................... II
Beskyttelsesgrad: ....................................... IP65
Omgivelsestemperatur: ................ - 20 °C – 40 °C
CE-BC 6 M
Netspænding: .........................220-240 V ~ 50Hz
Nominel optagen eff ekt maks.: ................. 100 W
Nominel udgangsspænding: ..................12 V d.c.
Nominel udgangsstrøm: ................................. 6 A
Batterikapacitet „STD/AGM/vinter“: .....20-150 Ah
Batterikapacitet „12V M“ (maks. 1A): ....... 2-32 Ah
Funktion „SUPPLY“ udgang maks.: ................ 5 A
Ladeprogram „RECOND“: ........15,3 V d.c. / 1,5 A
Beskyttelsesklasse: .......................................... II
Beskyttelsesgrad: ....................................... IP65
Omgivelsestemperatur: ................ - 20 °C – 40 °C
CE-BC 10 M
Netspænding: .........................220-240 V ~ 50Hz
Nominel optagen eff ekt maks.: ................. 160 W
Nominel udgangsspænding: ..................12 V d.c.
Nominel udgangsstrøm: ............................... 10 A
Batterikapacitet „STD/AGM/vinter“: .....30-200 Ah
Batterikapacitet „12V M“ (maks. 2 A): ......3-60 Ah
Funktion „SUPPLY“ udgang maks.: ................ 8 A
Ladeprogram „RECOND“: ........15,3 V d.c. / 2,5 A
Beskyttelsesklasse: .......................................... II
Beskyttelsesgrad: ....................................... IP65
Omgivelsestemperatur: ................ - 20 °C – 40 °C
5. Betjening
Inden produktet sluttes til strømforsyningsnettet,
skal det kontrolleres, at angivelserne på datapladen svarer til strømforsyningsnettets data.
Fare! Lad ikke frossede batterier.
Følg også anvisningerne i betjeningsvejledninger til bil, radio, navigationssystem osv.
Information om automatisk opladning
(kun ladeprogrammer 12V STD, 12V AGM,
12V vinter, 12 V M)
Batteriladeren er en mikroprocessor-styret automatisk oplader, hvilket gør den særligt velegnet til
opladning af vedligeholdelsesfrie batterier samt
til langtidsladning og til vedligeholdelsesladning
af batterier, der ikke er i konstant brug, f.eks. batterier til oldtimere, fritidskøretøjer, traktordrevet
græsslåmaskine og lignende. Den integrerede
mikroprocessor gør, at opladningen gennemføres
i fl ere trin. Det sidste opladningstrin, vedligehol-
delsesopladningen, holder batterikapaciteten ved
95 – 100%, hvorved batteriet altid er helt opladet.
Overvågningen af ladeprocessen er ikke nødvendig. Sørg for, at batteriet ikke er uden opsyn, hvis
det lades over et længere tidsrum, så batteriladeren kan afbrydes fra strømnettet, hvis der skulle
opstå en fejl.
5.1 Forklaring af symbolerne (fi g. 2)
A Ladning af et 12V batteri (blysyre batteri og
GEL batteri).
B Ladning af et 12V AGM batteri.
C Ladning af et 12V batteri (blysyre batteri,
AGM batteri og GEL batteri) i vinterfunktion
ved en omgivelsestemperatur fra – 20 °C til
+5 °C. Fare! Lad ikke frossede batterier.
D Ladning af et 12V batteri (blysyre batteri,
- 39 -

DK/N
AGM batteri og GEL batteri) i funktionen vedligeholdelsesladning.
E Ladespænding i volt, batteri defekt (BAt) / helt
opladt (FUL) / tilsluttet forkert eller kortslutning på klemmer (Err)
F Genetablering af ladeevnen for afl adte blysy-
rebatterier med øget ladespænding
G Klemmer er klemt forkert på (forkert polarise-
ring) eller kortslutning
H Spændingsforsyning f.eks. ved batteriskift
K Batteriets ladetilstand i procent (1 delstreg =
25%) og opladning (delstreg lyser = batteri
har nået ladetilstanden, delstreg i batteri-
symbol blinker = batteri lades til næste lade-
tilstand, alle delstreger lyser = batteri er helt
opladt).
5.2 Indstilling af ladeprogrammer (fi g. 2)
Bemærk:
Trykkes på „mode“-taste (fig. 1/pos. 1), skiftes
•
til de forskellige programmer. Symbolet, der
svarer til programmet ses i displayet. Batteri-
erne lades med det viste program.
Tryk på „Mode“–tasten i 5 sekunder for at
•
springe til RECOND programmet.
Tryk på „Mode“–tasten i 5 sekunder for at
•
springe fra RECOND programmet eller SUP-
PLY funktionen tilbage til 12V STD program-
met.
Er batterispændingen mindre end 3,5 V eller
•
større end 15 V, er batteriet ikke egnet til at
lade eller defekt. Meldingen „BAt“ ses i LCD-
displayet. Symbolet „G“ blinker. Også andre
batterifejl kan medføre, at batteriet ikke kan
lades.
Konstateres en kortslutning mellem lade-
•
klemmerne under SUPPLY funktionen, ses
meldingen „Lo V“ i LCD-displayet. Symbolet
„G“ blinker.
Fjernes ladeaggregatet fra stikdåsen, gem-
•
mes det sidst indstillede ladeprogram (und-
tagen RECOND og SUPPLY), og dette er så
forindstillet til næste brug.
Kun CE-BC 4M: Forbindes ladetængerne
•
med batteriet, trækker ladeaggregatet meget
lidt strøm ud af batteriet, og LCD-displayet
ses kort. Dette er helt normalt.
5.2.1 Standardladeprogrammer
A) 12V STD: Ladeprogram til blysyrebatterier
(våd-, Ca/Ca-, EFB-batterier) og Gel batterier. Når
ladeaggregatet tages i brug første gang, ses 12V
STD i displayet.
B) 12V AGM: Til ladeprogram til AGM batterier
tryk på „Mode“-taste –> skift fra 12V STD til 12V
AGM ladeprogram
5.2.2 Specielle ladeprogrammer
C) Vinter: Anbefalet ladeprogram når det er koldt
(-20 °C - +5 °C omgivelsestemperatur) til normale
blysyrebatterier (våd- / Ca/Ca- batterier) tryk på
„Mode“-taste –> skift fra 12V AGM til „Vinter“
ladeprogram
D) 12V M: Ladeprogram til batterier med
lille kapacitet (se tekniske data) og til
vedligeholdelsesladning af alle batterier, der er
nævnt under 3. Tilsigtet brug.
Tryk på „Mode“-taste –> skift fra „Vinter“ til „12 M“
ladeprogram
F) RECOND: Ladeprogram med øget
ladeslutspænding og konstant strømladning,
udelukkende til genetablering af ladeevnen til
meget afl adte blysyrebatterier.
RECOND-processen skal kontrolleres hver
30. minut og må ikke overskride 4 timer. Følg
batteriproducentens anvisninger.
Vigtigt! Der springes til dette program ved at
trykke på „Mode“-taste (fi g. 1/pos. 1) i 5 sekunder.
Advarsel!
Gasning fører til knaldgas – eksplosions-
•
fare! Sørg for god udluftning.
RECOND programmet må kun bruges til
•
blysyrebatterier og kun iht. efterfølgende
beskrivelse. Sørg for, at batterisyre ikke
spildes. Batterisyre er ætsende. Læs og
overhold sikkerhedsanvisningerne.
Må under ingen omstændigheder bruges
•
til batterier med lukket konstruktion (VRLA
batteri som f.eks. AGM- eller GEL batteri).
Følg batteriproducentens anvisninger.
Må kun bruges til et fritstående, udbygget
•
batteri og ikke i indbygget tilstand med
forbindelse til bordelektronikken i din
bil. Øget ladespænding kan beskadige
bordelektronikken. Læs og overhold
betjeningsvejledningen til din bil eller kontakt
bilfirmaet.
RECOND ladeprogram bruges
Forbind ladeaggregatet (iht. beskrivelse i
•
afsnit 5.3) til et blysyrebatteri og kontroller
opladningen hver halve time.
Senest efter 4 timer eller så snart batteriet
•
begynder at klukke, fjernes ladeaggregatet
- 40 -

DK/N
iht. beskrivelse i afsnit 5.3.
Kontroller, hvis muligt, syreniveauet og fyld,
•
hvis muligt, battericellerne evt. kun med des-
tilleret vand. Syreniveauet skal helst ligge mel-
lem den påtrykte maks. og min. værdi og bør
være ens for alle celler. Skru batteripropperne
fast igen, hvis sådanne findes.
5.2.3 Yderligere funktion
H) SUPPLY: Til 12V jævnspændingsforsyning
f.eks. til batteriskift eller til drift af 12V d.c. forbrugere.
Tryk på „Mode“-taste –> skift fra RECOND til
SUPPLY funktion
Advarsel! Beskyttelsen mod forkert poling står
ikke til rådighed. Ved forkert poling kan der opstå
skader på ladeaggregatet og batteriet / bordnettet
i bilen eller på den tilsluttede forbruger. Kontroller
ubetinget, at batterierne tilsluttes rigtigt. Overhold
det maks. strømforbrug (se tekniske data) for forbrugeren.
Bemærk:
Den disponible jævnspænding (ses i display-
•
et) er lastafhængig og er uden belastning ca.
14,5 V.
Funktionen er praktisk til forbrugere, der er
•
forbundet med en cigarettænder i bilen.
Læs og overhold betjeningsvejledningen til
•
din 12 V forbruger.
5.3 Opladning af batteri:
Løsn eller fjern eventuelle batteripropper på
•
batteriet.
Kontroller batteriets syreniveau. Ved behov
•
fyldes destilleret vand på (om muligt). Pas på!
Batterisyre er ætsende. Syrestænk skal om-
gående vaskes af med masser af vand, opsøg
om nødvendigt en læge.
Slut først det røde ladekabel til batteriets plus-
•
pol.
Bagefter fjernes det sorte ladekabel fra batte-
•
riet, og benzinledningen sluttes til karosseriet.
Advarsel! Normalt er den negative batteripol
•
forbundet med karosseriet, og opladningen
gennemføres som beskrevet ovenfor. I undta-
gelsestilfælde kan det være, at den positive
batteripol er forbundet med karosseriet (po-
sitiv jordforbindelse). I dette tilfælde tilsluttes
det sorte ladekabel til batteriets minuspol.
Herefter forbindes det røde ladekabel, på
afstand af batteri og benzinledning, med ka-
rosseriet.
Når batteriet er blevet sluttet til
•
ladeaggregatet, kan ladeaggregatet sluttes
til en stikkontakt (se Tekniske data). Nu kan
ladeindstillingerne ændres (se afsnit 5.2).
Pas på! Opladningen kan fremkalde farlig
•
knaldgas - undgå derfor gnistdannelse og
åben ild, mens opladning finder sted. Eksplosionsfare! Sørg for god udluftning i lokalerne.
Ses „FUL“ i LCD-displayet (og alle delstrege
•
fig. 2/pos. K), så er opladningen afsluttet.
Ladeaggregatet holder batteriet vha.
impulsladning ved 95 – 100 % disponibel
batterikapacitet. Viser ladeaggregatet dette
allerede efter få minutter, er det tegn på en
lille batterikapacitet. Batteriet skal udskiftes.
Beregning af ladetiden (fi g. 3a-3c)
Ladetiden afhænger af batteriets ladetilstand.
Ved et tomt batteri kan den omtrentlige ladetid
indtil ca. 80% opladning beregnes ud fra følgende
formel:
Batterikapacitet i Ah
Ladetid/h =
Amp. (ladestrøm)
Ladestrømmen skal udgøre 1/10 til 1/6 af
batterikapaciteten.
5.4 Fejlvisning (fi g. 2 / pos. G)
Fejlvisningen blinker (lyser) i følgende tilfælde:
Hvis batterispændingen er under 3,5 V eller
•
over 15 V. Batteriet er ikke egnet til at lade
eller er defekt. Også andre batterifejl kan
medføre, at batteriet ikke kan lades.
Hvis tilslutningsklemmerne er forbundet
•
forkert på batteriet (forkert poling).
Beskyttelsen mod forkert poling sikrer, at
batteri og ladeaggregat ikke beskadiges.
Fjern ladeaggregatet fra batteriet og start
opladningen igen. Forsigtig! I SUPPLY
programmet står der ingen beskyttelse mod
forkert poling til rådighed.
Hvis der opstår en kortslutning på begge
•
tilslutningsklemmer (klemmernes metaldele
berører hinanden). Kortslutningsbeskyttelsen
sikrer, at ladeaggregatet ikke beskadiges.
5.5 Opladning af batteri afsluttes
Træk stikket ud af stikkontakten.
•
Frigør først det sorte ladekabel fra karosseriet.
•
Bagefter frigør du det røde ladekabel fra
•
batteriets pluspol.
Vigtigt! Ved positiv jordforbindelse løsnes
•
først det røde ladekabel fra karosseriet og så
det sorte ladekabel fra batteriet.
Påskru/Påsæt eventuelle batteripropper.
•
- 41 -

DK/N
Bemærk! Trækkes stikket ud, og bliver
ladekablerne på batteriet, tapper ladeaggregatet
kun lidt strøm fra batteriet. Af den grund anbefales
det at fjerne ladeaggregatet helt fra batteriet, når
det ikke bruges.
6. Overbelastningssikring
Ladeaggregatet er beskyttet elektronisk mod
overbelastning, kortslutning og forkert poling i ladeprogrammerne 12V STD, 12V AGM, 12V vinter
og 12V M. Desuden er der indbygget en eller fl ere
fi nsikringer. Er sikringen defekt, skal den skiftes
ud med en sikring med samme ampereværdi.
Kontakt vores kundeservice efter behov.
7. Vedligeholdelse og pleje af batteri
Batteriet skal altid være fast indbygget.
•
Der skal være etableret en fejlfri forbindelse til
•
det elektriske anlægs ledningsnet.
Hold batteriet rent og tørt. Smør forbindelses-
•
klemmerne med lidt syrefri og syrefast fedt
(vaseline).
Ved batterier, der ikke er vedligeholdelsesfri,
•
skal syreniveauet kontrolleres ca. hver 4. uge;
ved behov påfyldes destilleret vand.
8.2 Vedligeholdelse
Der fi ndes ikke yderligere dele, som skal
vedligeholdes inde i maskinen.
8.3 Reservedelsbestilling:
Ved bestilling af reservedele skal følgende oplyses:
Savens type.
•
Savens artikelnummer.
•
Savens identifikationsnummer.
•
Nummeret på den nødvendige reservedel.
•
Aktuelle priser og øvrige oplysninger fi nder du på
internetadressen www.isc-gmbh.info
9. Bortskaff else og genanvendelse
Produktet leveres indpakket for at undgå transportskader. Emballagen består af råmaterialer
og kan genanvendes eller indleveres på genbrugsstation. Produktet og dets tilbehør består af
forskelligartede materialer, f.eks. metal og plast.
Defekte produkter må ikke smides ud som almindeligt husholdningsaff ald. For at sikre en fagmæs-
sig korrekt bortskaff else skal produktet indleveres
på et aff aldsdepot. Hvis du ikke har kendskab til
lokalt aff aldsdepot, så kontakt din kommune.
8. Rengøring, vedligeholdelse og
reservedelsbestilling
Fare!
Træk stikket ud af stikkontakten inden vedligeholdelsesarbejde.
8.1 Rengøring
Hold så vidt muligt beskyttelsesanordninger,
•
luftsprækker og motorhuset fri for støv og
snavs. Gnid maskinen ren med en ren klud,
eller foretag trykluftudblæsning med lavt tryk.
Vi anbefaler, at maskinen rengøres hver gang
•
efter brug.
Rengør af og til maskinen med en fugtig klud
•
og lidt blød sæbe. Undgå brug af rengørings-
eller opløsningsmiddel, da det vil kunne
ødelægge maskinens kunststofdele. Pas på,
at der ikke kan trænge vand ind i maskinens
indvendige dele. Trænger der vand ind i et el-
værktøj, øger det risikoen for elektrisk stød.
Opladeren skal opbevares i et tørt rum. Lade-
•
klemmerne skal frigøres for korrosion.
- 42 -

DK/N
10. Information om fejlafhjælpning
Hvis apparatet anvendes korrekt, skulle der ikke opstå forstyrrelser. I tilfælde af forstyrrelse skal du kontrollere følgende, inden du kontakter kundeservice.
Fejl Mulig årsag Afhjælpning
Apparat lader ikke - Ladetænger tilsluttet forkert
- Slut rød ladetang til pluspol, sort
ladetang til karosseri
- Ladetængernes indbyrdes kontakt
- Batteri beskadiget
Kun for EU-lande
Smid ikke el-værktøj ud som almindeligt husholdningsaff ald!
I medfør af Rådets direktiv 2012/19/EF om aff ald af elektrisk og elektronisk udstyr og dettes omsættelse
i den nationale lovgivning skal brugt el-værktøj indsamles separat og indleveres til videreanvendende
formål på miljømæssig forsvarlig vis.
- Afhjælp kontaktproblem
- Lad batteriet efterse af en fagmand,
skiftes evt. ud
Recycling-alternativ til tilbagesendelse:
Ejeren af el-værktøjet er – med mindre denne tilbagesender maskinen – forpligtet til at bortskaff e mas-
kinen og dens dele ifølge miljøforskrifterne. Den brugte maskine kan indleveres hos en genbrugsstation
– spørg evt. personalet her, eller forhør dig hos din kommune. Tilbehør og hjælpemidler, som følger med
maskinen, og som ikke indeholder elektriske dele, er ikke omfattet af ovenstående.
Genoptryk eller anden kopiering af dokumentation og følgedokumenter til produkter, også i uddrag, er
kun tilladt med udtrykkelig tilladelse fra iSC GmbH.
Ret til tekniske ændringer forbeholdes
- 43 -

DK/N
Garantibevis
Kære kunde!
Vore produkter er underlagt en streng kvalitetskontrol. Hvis produktet alligevel på et tidspunkt skulle
udvise fejl, beklager vi naturligvis dette, i dette tilfælde beder vi dig kontakte vores kundeservice på
adressen, som er anført på dette garantibevis. Du kan naturligvis også ringe til os på det anførte servicenummer. For indfrielse af garantikrav gælder følgende:
1. Disse garantibetingelser retter sig udelukkende til forbrugere, dvs. naturlige personer, der hverken
vil bruge dette produkt i forbindelse med udøvelse af deres erhvervsmæssige eller andet selvstændigt arbejde. Disse garantibetingelser regulerer ekstra garantiydelser, som nedenstående producent
lover købere af sine nye apparater som supplement til den lovfastsatte garanti. Garantibestemmelser fastsat ved lov berøres ikke af nærværende garanti. Vores garantiydelse er gratis.
2. Garantiydelsen dækker udelukkende mangler på et nyt apparat fra nedenstående producent, der
skyldes materiale- eller produktionsfejl, og vi har ret til at vælge, om sådanne mangler afhjælpes på
produktet, eller om produktet udskiftes.
Bemærk, at vore produkter ikke er konstrueret til erhvervsmæssig, håndværksmæssig eller faglig
brug. Garantien dækker således ikke forhold, hvor produktet er blevet brugt i erhvervsmæssige,
håndværksmæssige eller faglige virksomheder eller er blevet udsat for lignende belastning.
3. Garantien dækker ikke følgende:
- Skader på produktet som følge af tilsidesættelse af montagevejledningens anvisninger eller som
følge af usagkyndig installation, tilsidesættelse af brugsanvisningen (f.eks. tilslutning til forkert netspænding eller strømtype) eller tilsidesættelse af vedligeholdelses- og sikkerhedsforskrifter eller
som følge af at produktet udsættes for ikke normale miljøbetingelser eller manglende pleje og vedligeholdelse.
- Skader på produktet som følge af misbrug eller usagkyndig anvendelse (f.eks. overbelastning af
produktet eller brug af værktøj eller tilbehør, som ikke er godkendt), indtrængen af fremmedlegemer
i produktet (f.eks. sand, sten eller støv, transportskader), brug af vold eller eksterne påvirkninger
udefra (f.eks. fordi produktet tabes).
- Skader på produktet eller dele af produktet, der skyldes almindelig brug, normalt eller andet naturligt slid.
4. Garantiperioden udgør 24 måneder at regne fra købsdatoen. Garantikrav skal gøres gældende inden garantiperiodens udløb og inden for to uger, efter at defekten er blevet konstateret. Garantikrav
kan ikke gøres gældende efter garantiperiodens udløb. Reparation eller udskiftning af produktet
medfører ikke forlængelse af garantiperioden, heller ikke for eventuelt indbyggede reservedele. Dette gælder også servicearbejder, der foretages på stedet.
5. Hvis du ønsker at gøre brug af garantien, bedes du melde det defekte produkt til: www.isc-gmbh.
info. Sørg for at have købskvitteringen eller anden form for dokumentation af købet af det nye apparat ved hånden. Apparater, der sendes ind uden passende dokumentation eller uden typeskilt, er
udelukket fra garantiydelsen på grund af manglende identifi cering. Er defekten omfattet af garanti-
en, vil produktet omgående blive repareret og returneret, eller du vil modtage et helt nyt.
Mod betaling udbedrer vi naturligvis også gerne defekter på produktet, som ikke/ikke længere er omfattet af garantien. Du skal blot indsende produktet til vores serviceadresse.
Hvad angår slid- og forbrugsdele samt manglende dele henviser vi til garantiens indskrænkninger i henhold til serviceinformationerne i nærværende betjeningsvejledning.
- 44 -

S
Fara!
Innan maskinen kan användas måste särskilda
säkerhetsanvisningar beaktas för att förhindra
olyckor och skador. Läs därför noggrant igenom
denna bruksanvisning och dessa säkerhetsanvisningar. Förvara dem på ett säkert ställe så att du
alltid kan hitta önskad information. Om maskinen
ska överlåtas till andra personer måste även
denna bruksanvisning och dessa säkerhetsanvisningar medfölja. Vi övertar inget ansvar för olyckor
eller skador som har uppstått om denna bruksanvisning eller säkerhetsanvisningarna åsidosätts.
1. Säkerhetsanvisningar
Gällande säkerhetsanvisningar fi nns i det bifoga-
de häftet.
Fara!
Läs alla säkerhetsanvisningar och instruktioner. Försummelser vid iakttagandet av säker-
hetsanvisningarna och instruktionerna kan förorsaka elstöt, brand och/eller svåra skador. Förvara
alla säkerhetsanvisningar och instruktioner
för framtiden.
Denna apparat kan användas av barn från 8 års
ålder samt av personer med begränsade fysiska,
sensoriska eller mentala förmågor eller som saknar erfarenhet och kunskap, under förutsättning
att de hålls under uppsikt eller har instruerats om
säker användning av apparaten och förstår vilka
faror som kan uppstå. Barn får inte leka med apparaten. Barn får endast rengöra och underhålla
apparaten under uppsikt.
Avfallshantering
Batterier: Endast till bilverkstäder, särskilda
avfallsstationer eller insamlingsställen för farligt
avfall. Hör efter med din kommun.
Förklaring av informationsskylten på apparaten (se bild 4)
1 = Apparaten är skyddsisolerad
2 = VARNING – Läs igenom bruksanvisningen för
att sänka risken för skador!
3 = Säkring på kretskortet
4 = Skilj apparaten åt från elnätet innan du stän-
ger eller öppnar anslutningarna till batteriet.
OBS! Explosiva gaser. Undvik lågor och gnis-
tor. Sörj för fullgod ventilation medan batteriet
laddas.
2. Beskrivning av maskinen samt
leveransomfattning
2.1 Beskrivning av maskinen (bild 1)
1 Funktionsknapp
2 LCD-display
3 Svart laddningskabel (-)
4 Röd laddningskabel (+)
5 Upphängningsögla
6 Nätkabel
2.2 Leveransomfattning
Öppna förpackningen och ta försiktigt ut pro-
•
dukten ur förpackningen.
Ta bort förpackningsmaterialet samt förpack-
•
nings- och transportsäkringar (om förhanden).
Kontrollera att leveransen är komplett.
•
Kontrollera om produkten eller tillbehörsdelar-
•
na har skadats i transporten.
Spara om möjligt på förpackningen tills ga-
•
rantitiden har gått ut.
Fara!
Produkten och förpackningsmaterialet är
ingen leksak! Barn får inte leka med plastpåsar, folie eller smådelar! Risk för att barn
sväljer delar och kvävs!
Original-bruksanvisning
•
Säkerhetsanvisningar
•
3. Ändamålsenlig användning
Laddaren är avsedd för laddning av icke
underhållsfria eller underhållsfria 12V
blysyrabatterier (våt- / Ca/Ca- / EFB-batterier)
samt för blygel- och AGM-batterier som kan
användas i motorfordon.
12V M laddningsprogrammet är avsett för
underhållsladdning och laddning av batterier med
låg batterikapacitet. Med SUPPLY-funktionen
kan apparaten även användas till temporär
strömförsörjning, t.ex. vid batteribyte eller för
drift av förbrukare med 12 V DC (beakta max.
strömförbrukning). RECOND-programmet är
endast avsett för att återuppliva djupurladdade
blysyrabatterier (inte för AGM- och GEL-batterier).
Använd detta program endast under kort tid och
håll apparaten under uppsikt.
Apparaten får inte användas för laddning av
- 45 -

S
litium-järnfosfatbatterier (t.ex. LiFePO4) eller andra litiumbatterier. Apparaten är endast avsedd
för mobil användning och inte för montering i
husvagnar, husbilar eller liknande fordon. Skydda
laddaren mot regn och snö.
Maskinen får endast användas till sitt avsedda
ändamål. Användningar som sträcker sig utöver
detta användningsområde är ej ändamålsenliga.
För materialskador eller personskador som resulterar av sådan användning ansvarar användaren/
operatören själv. Tillverkaren påtar sig inget
ansvar.
Tänk på att våra produkter endast får användas
till ändamålsenligt syfte och inte har konstruerats
för yrkesmässig, hantverksmässig eller industriell
användning. Vi ger därför ingen garanti om produkten ska användas inom yrkesmässiga, hantverksmässiga eller industriella verksamheter eller
vid liknande aktiviteter.
4. Tekniska data
CE-BC 4 M
Nätspänning ..........................220-240 V ~ 50 Hz
Nom. eff ektbehov max. .............................. 70 W
Nom. utgångsspänning .......................... 12 V DC
Nom. utgångsström ........................................ 4 A
Batterikapacitet ”STD/AGM/Vinter” .....10-120 Ah
Batterikapacitet ”12V M” (max. 1 A) ......... 2-32 Ah
Funktion ”SUPPLY” utgång max. ....................3 A
Laddningsprogram ”RECOND” 15,3 V DC / 1,5 A
Skyddsklass ...................................................... II
Kapslingsklass ........................................... IP 65
Omgivningstemperatur .................... - 20°C – 40°
CE-BC 6 M
Nätspänning ..........................220-240 V ~ 50 Hz
Nom. eff ektbehov max. ............................ 100 W
Nom. utgångsspänning .......................... 12 V DC
Nom. utgångsström ........................................ 6 A
Batterikapacitet ”STD/AGM/Vinter” .....20-150 Ah
Batterikapacitet ”12V M” (max. 1 A) ......... 2-32 Ah
Funktion ”SUPPLY” utgång max. ....................5 A
Laddningsprogram ”RECOND” 15,3 V DC / 1,5 A
Skyddsklass ...................................................... II
Kapslingsklass ........................................... IP 65
Omgivningstemperatur .................... - 20°C – 40°
CE-BC 10 M
Nätspänning ..........................220-240 V ~ 50 Hz
Nom. eff ektbehov max. ............................ 160 W
Nom. utgångsspänning .......................... 12 V DC
Nom. utgångsström ...................................... 10 A
Batterikapacitet ”STD/AGM/Vinter” .....30-200 Ah
Batterikapacitet ”12V M” (max. 2 A) ......... 3-60 Ah
Funktion ”SUPPLY” utgång max. ....................8 A
Laddningsprogram ”RECOND” 15,3 V DC / 2,5 A
Skyddsklass ...................................................... II
Kapslingsklass ........................................... IP 65
Omgivningstemperatur .................... - 20°C – 40°
5. Använda apparaten
Innan du ansluter apparaten ska du övertyga dig
om att informationen på märkskylten stämmer
överens med nätets data.
Fara! Ladda inga frusna batterier.
Beakta instruktionerna i användarmanualerna till fordonet, radion, navigationssystemet
osv.
Instruktioner för automatisk laddning
(endast laddningsprogram 12V STD, 12V
AGM, 12V Vinter, 12 V M)
Laddaren är en automatisk laddare som styrs av
en mikroprocessor, dvs. den är särskilt lämpad för
laddning av underhållsfria batterier samt för långtidsladdning och underhållsladdning av batterier
som inte ständigt används, t ex för veteranbilar,
fritidsfordon, traktorgräsklippare och liknande
utrustning. Med den integrerade mikroprocessorn
laddas batteriet upp i fl era olika steg. Den sista
laddningsnivån, underhållsladdningen, håller batterikapaciteten på 95 – 100 %, vilket innebär att
batteriet alltid är fulladdat. Laddningen behöver
inte övervakas. Tänk ändå på att batteriet inte får
lämnas utan uppsikt under längre tid medan det
laddas. Om störning uppstår i laddaren måste du
kunna kopplas loss den manuellt från elnätet.
5.1 Förklaring av symbolerna (bild 2)
A Ladda ett 12 V-batteri (blysyrabatteri och
GEL- batteri).
B Ladda ett 12 V AGM-batteri.
C Ladda ett 12 V-batteri (blysyrabatteri, AGM-
batteri och GEL-batteri) i vinterläge med
omgivningstemperatur –20°C till +5°C. Fara!
Ladda inga frusna batterier.
D Ladda ett 12 V-batteri (blysyrabatteri, AGM-
- 46 -

S
batteri och GEL-batteri) i underhållsladdning.
E Laddningsspänning i V, batteri defekt (BAt) /
fulladdat (FUL) / anslutits med polerna förväxlade eller kortslutning vid klämmorna (Err)
F Återupprätta laddningsförmågan i urladdade
blysyrabatterier med högre laddningsspänning
G Klämmorna har anslutits felaktigt (polerna
omkastade) eller kortslutning föreligger
H Spänningsförsörjning t.ex. vid batteribyte
K Batteriets laddningsnivå i procent (1 delstreck
= 25 %) och laddning (delstreck lyser = bat-
teriet har nått sin laddningsnivå, delstreck i
batterisymbolen blinkar = batteriet laddas till
nästa laddningsnivå, alla delstreck lyser =
batteriet fulladdat).
5.2 Ställa in laddningsprogram (bild 2)
Märk:
Tryck på ”Mode”-knappen (bild 1/pos. 1) för
•
att skifta mellan olika program. Symbolen för
programmet visas på displayen. Batterierna
laddas med det program som visas.
Håll ”Mode”-knappen intryckt i 5 sekunder om
•
du vill öppna RECOND-programmet.
Håll ”Mode”-knappen intryckt i 5 sekunder om
•
du vill gå tillbaka från RECOND-programmet
eller SUPPLY-funktionen till 12V STD-pro-
grammet.
Om spänningen i batteriet är under 3,5 V eller
•
över 15 V är batteriet antingen olämpligt för
att laddas eller defekt. Texten ”Bat” visas på
LCD-displayen. Symbolen ”G” blinkar. Även
andra batterifel kan leda till att batteriet inte
kan laddas.
Om en kortslutning föreligger mellan ladd-
•
ningsklämmorna medan SUPPLY-funktionen
utförs, visas texten ”Lo V” på LCD-displayen.
Symbolen ”G” blinkar.
När laddaren kopplas loss från stickuttaget
•
sparas det senast inställda laddningspro-
grammet (utom RECOND och SUPPLY). Näs-
ta gång laddaren används är detta program
förinställt.
Endast CE-BC 4M: När laddningsklämmorna
•
ansluts till batteriet drar laddaren en mycket
låg ström ur batteriet. LCD-displayen tänds
kort. Detta är normalt.
B) 12V AGM: Tryck på ”Mode”-knappen för laddningsprogram för AGM-batterier –> koppla om
från 12V STD till 12V AGM laddningsprogram
5.2.2 Särskilda laddningsprogram
C) Vinter: Tryck på ”Mode”-knappen för rekom-
menderat laddningsprogram vid kall väderlek
(omgivningstemperatur -20°C - +5°C) för normal
blysyrabatterier (våt- / Ca/Ca-batterier) –> koppla
om från 12V AGM till ”Vinter” laddningsprogram
D) 12V M: Laddningsprogram för batterier med
låg kapacitet (se Tekniska data) och underhållsladdning för alla batterier som anges under
3. Ändamålsenlig användning.
Tryck på ”Mode”-knappen –> koppla om från ”Vinter” till ”12 M” laddningsprogram
F) RECOND: Laddningsprogram med högre
laddningsslutspänning och konstantströmladdning, endast för att återställa laddningsförmågan i
djupurladdade blysyrabatterier.
RECOND-processen måste kontrolleras varje
halvtimme och får inte överskrida 4 tim. Beakta
informationen från batteritillverkaren.
Viktigt! Håll ”Mode”-knappen (bild 1/pos. 1) i 5
sekunder för att öppna detta program.
Varning!
Knallgas bildas – Explosionsrisk! Sörj för
•
fullgod ventilation.
RECOND-programmet får endast användas
•
vid ett blysyrabatteri och endast enligt nedanstående beskrivning. Var försiktig så att ingen
batterisyra spills ut. Batterisyra är frätande.
Beakta säkerhetsanvisningarna.
Detta program får aldrig användas till ett
•
slutet batteri (VRLA-batteri, t.ex. AGM- eller
GEL-batteri). Beakta informationen från batteritillverkaren.
Får endast användas vid ett fristående,
•
demonterat batteri och inte i monterat skick
med anslutning till fordonselektroniken i ditt
motorfordon. Förhöjd laddningsspänning kan
skapa fordonselektroniken. Beakta bruksanvisningen till ditt fordon eller kontakta fordonstillverkaren.
5.2.1 Standardladdningsprogram
A) 12V STD: Laddningsprogram för blysyrabatte-
rier (våt-, Ca/Ca-, EFB-batterier) och gelbatterier.
Efter att laddaren har tagits i drift visas 12V STD
på displayen.
Använda RECOND-laddningsprogram
Anslut laddaren till ett blysyrabatteri enligt
•
beskrivningen i avsnitt 5.3. Kontrollera laddningsprocessen varje halvtimme.
Efter senast 4 tim eller när batteriet hörbart
•
avger gas (bubblar) kan du koppla lossa lad-
- 47 -

S
daren enligt beskrivningen i avsnitt 5.3.
Kontrollera om möjligt syranivån och fyll
•
vid behov på battericellerna med destillerat
vatten. I optimalfall ligger syranivån mellan
indikerat max. och min. värde och ska vara
detsamma för alla celler. Dra åt batteriplug-
gen (om förhanden) igen.
5.2.3 Extra funktion
H) SUPPLY: För matning av 12 V likspänning t.ex.
vid batteribyte eller för drift av förbrukare med 12
V DC.
Tryck på ”Mode”-knappen –> koppla om från RECOND till SUPPLY-funktion
Varning! Polförväxlingsskyddet är inte tillgängligt.
Om polerna förväxlas fi nns det risk för skador på
laddaren och på batteriet / fordonselektroniken i
fordonet eller på anslutna förbrukare. Se tvunget
till att polariteten stämmer när batterierna ansluts.
Beakta max. strömförbrukning (se Tekniska data)
för förbrukaren.
Märk:
Likspänningen som ställs till förfogande (vi-
•
sas på displayen) är beroende av aktuell last
och uppgår utan belastning till ca. 14,5 V.
Funktionen kan användas till förbrukare som
•
drivs med cigarettuttaget i fordonet.
Beakta bruksanvisningen för din förbrukare
•
för 12 V.
5.3 Ladda batteriet
Lossa eller ta av batteripluggen (om förhan-
•
den) från batteriet.
Kontrollera syranivån i batteriet. Fyll på de-
•
stillerat vatten vid behov (om möjligt). Obs!
Batterisyra är frätande. Spola genast av syra-
stänk med mycket vatten, uppsök läkare vid
allvarliga besvär.
Anslut först den röda laddningskabeln till bat-
•
teriets pluspol.
Anslut därefter den svarta laddningskabeln till
•
karossen, på tillräckligt avstånd från batteriet
och bensinledningen.
Varning! I normalfall är den negativa batte-
•
ripolen ansluten till karossen. Ladda enligt
beskrivningen ovan. I undantagsfall kan det
vara möjligt att den positiva batteripolen är
ansluten till karossen (positiv jordning). I
sådana fall ska den svarta laddningskabeln
anslutas till batteriets minuspol. Anslut däref-
ter den röda laddningskabeln till karossen på
tillräckligt avstånd från batteriet och bensin-
ledningen.
Efter att batteriet har anslutits till laddaren,
•
kan du ansluta laddaren till ett stickuttag (se
Tekniska data). Därefter kan laddningsinställningarna ändas (se avsnitt 5.2).
Obs! När batteriet laddas finns det risk för att
•
farlig knallgas bildas. Undvik därför gnistbildning och öppna lågor. Explosionsrisk! Se till
att rummet är tillräckligt ventilerat.
Om ”FUL” (och alla delstreck, bild 2/pos. K)
•
visas på LCD-displayen är laddningen avslutad. Med impulsladdning kan laddningen
behålla batterikapaciteten i batteriet på 95
– 100 %. Om laddaren indikerar detta redan
efter ett par minuter är detta ett tecken på att
batterikapaciteten är låg. Byt då ut batteriet.
Beräkna laddningstiden (bild 3a-3c)
Laddningstiden bestäms av batteriets laddningsnivå. Om batteriet är tomt kan den ungefärliga
laddningstiden upp till 80 % laddning beräknas
med följande formel:
Batterikapacitet i Ah
Laddningstid/h =
Amp. (laddningsström)
Laddningsströmmen bör uppgå till 1/10 till 1/6 av
batteriets kapacitet.
5.4 Felindikering (bild 2 / pos. G)
Felindikeringen blinkar (lyser) i följande situationer:
Om spänningen i batteriet är lägre än 3,5 V
•
eller högre än 15 V. Batteriet är inte avsett för
att laddas eller är defekt. Även andra batterifel
kan leda till att batteriet inte kan laddas.
Om anslutningsklämmorna vid batterianslut-
•
ningarna har anslutits till fel polaritet. Polförväxlingsskyddet ska säkerställa att batteriet
och laddaren inte skadas. Koppla lossa
laddaren från batteriet och försök ladda igen.
Obs! I SUPPLY-programmet finns inget polförväxlingsskydd.
Om en kortslutning föreligger mellan de båda
•
anslutningsklämmorna (metalldelarna i klämmorna rör vid varandra). Kortslutningsskyddet
ska säkerställa att laddaren inte skadas.
5.5 Avsluta laddningen av batteriet
Dra ut stickkontakten ur vägguttaget.
•
Lossa först på den svarta laddningskabeln
•
från karosseriet.
Lossa sedan på den röda laddningskabeln
•
från batteriets pluspol.
Obs! Vid en positiv jordning ska först den
•
- 48 -

S
röda laddningskabeln lossa från karossen.
Lossa därefter den svarta laddningskabeln
från batteriet.
Skruva in eller tryck in batteripluggen igen
•
(om förhanden).
Märk Om stickkontakten dras ut men laddningskabeln fortfarande är ansluten till batteriet, så
kommer laddaren att dra en mindre ström från
batteriet. Vi rekommenderar därför att laddaren
kopplas loss komplett från batteriet när laddningen har avslutats.
6. Överbelastningsskydd
I laddningsprogrammen 12V STD, 12V AGM,
12V Vinter och 12V M är laddaren elektroniskt
skyddad mot överbelastning, kortslutning och
förväxlade poler. Dessutom fi nns en eller fl era
fi nsäkringar i apparaten. Om säkringen är defekt
ska den bytas ut och ersättas med en annan
säkring med samma amperevärde. Kontakta vår
kundtjänst vid behov.
7. Underhålla och sköta batteriet
Se till att batteriet alltid är fast monterat.
•
Kontakten mellan batteriet och det elektriska
•
systemet måste vara i fullgott skick.
Håll batteriet rent och torrt. Fetta in anslut-
•
ningsklämmorna en aning med syrafritt och
syrabeständigt fett (vaselin).
Vid icke underhållsfria batteriet ska syranivån
•
kontrolleras ungefär var 4:e vecka. Endast
destillerat vatten får fyllas på vid behov.
8. Rengöring, Underhåll och
reservdelsbeställning
efter varje användningstillfälle.
Rengör maskinen med jämna mellanrum med
•
en fuktig duk och en aning såpa. Använd inga
rengörings- eller lösningsmedel. Dessa kan
skada maskinens plastdelar. Se till att inga
vätskor tränger in i maskinens inre. Om vatten
tränger in i ett elverktyg höjs risken för elektriska slag.
Laddaren måste förvaras i ett torrt utrymme.
•
Rengör laddningsklämmorna från korrosion.
8.2 Underhåll
I maskinens inre fi nns inga delar som kräver un-
derhåll.
8.3 Reservdelsbeställning
Lämna följande uppgifter vid beställning av reservdelar:
Maskintyp
•
Maskinens artikel-nr.
•
Maskinens ident-nr.
•
Reservdelsnummer för erforderlig reservdel
•
Aktuella priser och ytterligare information fi nns på
www.isc-gmbh.info
9. Skrotning och återvinning
Produkten ligger i en förpackning som fungerar
som skydd mot transportskador. Denna förpackning består av olika material som kan återvinnas.
Lämna in förpackningen till ett insamlingsställe för
återvinning. Produkten och dess tillbehör består
av olika material som t ex metaller och plaster.
Defekta produkter får inte kastas i hushållssoporna. Lämna in produkten till ett insamlingsställe
i din kommun för professionell avfallshantering.
Hör efter med din kommun om du inte vet var
närmsta insamlingsställe fi nns.
Fara!
Dra alltid ut stickkontakten inför alla rengöringsarbeten.
8.1 Rengöra maskinen
Håll skyddsanordningarna, ventilationsöpp-
•
ningarna och motorkåpan i så damm- och
smutsfritt skick som möjligt. Torka av mas-
kinen med en ren duk eller blås av den med
tryckluft med svagt tryck.
Vi rekommenderar att du rengör maskinen
•
- 49 -

S
10. Åtgärder vid störningar
Om apparaten används på avsett vis bör inga störningar förekomma. Om störningar ändå skulle uppstå,
kontrollera nedanstående möjligheter innan du kontaktar kundtjänst.
Störning Möjlig orsak Åtgärder
Överbelastningsskyddet löser ut
- Laddningsklämmorna har anslutits
felaktigt
- Anslut den röda laddningsklämman
till pluspolen, den svarta laddningsklämman till karosseriet.
- Laddnings¬klämmorna har kontakt
med varandra
- Batteriet är skadat
Endast för EU-länder
Kasta inte elverktyg i hushållssoporna.
Enligt det europeiska direktivet 2012/19/EG om avfall som utgörs av eller innehåller elektriska eller
elektroniska produkter och dess tillämpning i den nationella lagstiftningen, måste förbrukade elverktyg
källsorteras och lämnas in för miljövänlig återvinning.
- Åtgärda kontakten
- Låt en expert kontrollera batteriet
och ev. byta ut
Återvinnings-alternativ till begäran om återsändning:
Som ett alternativ till returnering är ägaren av elutrustningen skyldig att bidraga till ändamålsenlig avfallshantering för det fall att utrustningen ska skrotas. Efter att den förbrukade utrustningen har lämnats
in till en avfallsstation kan den omhändertas i enlighet med gällande nationella lagstiftning om återvinning och avfallshantering. Detta gäller inte för tillbehörsdelar och hjälpmedel utan elektriska komponenter vars syfte har varit att komplettera den förbrukade utrustningen.
Eftertryck eller annan duplicering av dokumentation och medföljande underlag för produkterna, även
utdrag, är endast tillåtet med uttryckligt tillstånd från iSC GmbH.
Med förbehåll för tekniska ändringar.
- 50 -

S
Garantibevis
Bästa kund,
våra produkter genomgår en sträng kvalitetskontroll. Om denna produkt mot förmodan inte fungerar på
rätt sätt, beklagar vi detta och ber dig att kontakta vår serviceavdelning under adressen som anges på
garantikortet. Vi står även gärna till tjänst på telefon under servicenumret som anges nedan. Följande
punkter gäller för att du ska kunna göra anspråk på garantin:
1. Dessa garantivillkor vänder sig enbart till konsumenter, dvs. naturliga personer som inte har för avsikt att använda denna produkt i kommersiellt syfte eller inom egen verksamhet. Dessa garantivillkor
reglerar ytterligare garantitjänster som nedanstående tillverkare erbjuder köpare av nya produkter.
Dessa tjänster är en komplettering till den lagstadgade garantin. Garantianspråk som regleras enligt
lag påverkas inte av denna garanti. Våra garantitjänster är gratis för dig.
2. Garantitjänsterna omfattar endast sådana brister som bevisligen kan härledas till material- eller tillverkningsfel. Produkten som du har köpt ska vara ny och härstamma från nedanstående tillverkare.
Vi avgör om sådana brister i produkten ska åtgärdas eller om produkten ska bytas ut.
Tänk på att våra produkter endast får användas till ändamålsenligt syfte och inte har konstruerats
för kommersiell, hantverksmässig eller yrkesmässig användning. Ett garantiavtal sluts därför ej om
produkten inom garantitiden har använts inom yrkesmässiga, hantverksmässiga eller industriella
verksamheter eller har utsatts för liknande påkänning.
3. Garantin omfattar inte:
- Skador på produkten som kan härledas till att monteringsanvisningen missaktats eller på grund av
felaktig installation, åsidosatt bruksanvisning (t ex anslutning till felaktig nätspänning eller strömart),
missaktade underhålls- och säkerhetsbestämmelser, om produkten utsätts för onormala miljöfaktorer eller bristfällig skötsel och underhåll.
- Skador på produkten som kan härledas till missbruk eller ej ändamålsenlig användning (t ex överbelastning av produkten eller användning av ej godkända insatsverktyg eller tillbehör), främmande
partiklar som har trängt in i produkten (t ex sand, sten eller damm, transportskador), yttre våld eller
yttre påverkan (t ex skador efter att produkten fallit ned).
- Skador på produkten eller delar av produkten som kan härledas till bruksmässigt, normalt eller för
övrigt naturligt slitage .
4. Garantitiden uppgår till 24 månader och gäller från datumet när produkten köptes. Medan garantitiden fortfarande gäller ska anspråk på garanti ställas inom två veckor efter att defekten fastställdes.
Det är inte möjligt att ställa anspråk på garanti efter att garantitiden har löpt ut. Garantitiden förlängs
inte när produkten repareras eller byts ut, dessutom medför sådana arbeten inte att en ny garantitid
börjar gälla för produkten eller för ev. reservdelar som har monterats in. Detta gäller även vid hembesök.
5. Anmäl den defekta produkten på följande webbplats för att göra anspråk på garantin: www.iscgmbh.info. Se till att du har sparat på kvittot eller ett annat köpebevis som påvisar att du har köpt
denna produkt i nytt skick. Produkter som sänds in utan köpebevis eller utan märkskylt täcks inte av
våra garantitjänster eftersom de inte kan identifi eras. Om defekten i produkten täcks av våra garan-
titjänster, får du genast en reparerad eller ny produkt av oss.
Givetvis kan vi även, mot debitering, åtgärda skador som antingen inte täcks av garantin eller som har
uppstått efter garantitidens slut. Skicka in produkten till nedanstående serviceadress.
För slitage- och förbrukningsdelar samt för delar som saknas hänvisar vi till begränsningarna i garantin
enligt serviceinformationen som anges i denna bruksanvisning.
- 51 -

CZ
Nebezpečí!
Při používání přístrojů musí být dodržována určitá
bezpečnostní opatření, aby se zabránilo zraněním
a škodám. Přečtěte si proto pečlivě tento návod
k obsluze / bezpečnostní pokyny. Dobře si ho/
je uložte, abyste měli tyto informace kdykoliv
po ruce. Pokud předáte přístroj jiným osobám,
předejte s ním prosím i tento návod k obsluze/
bezpečnostní pokyny. Nepřebíráme žádné ručení
za škody a úrazy vzniklé v důsledku nedodržování
tohoto návodu k obsluze a bezpečnostních
pokynů.
1. Bezpečnostní pokyny
Příslušné bezpečnostní pokyny naleznete v
přiložené brožurce.
Nebezpečí!
Přečtěte si všechny bezpečnostní pokyny a instrukce. Zanedbání při dodržování
bezpečnostních pokynů a instrukcí mohou mít
za následek úder elektrickým proudem, požár
a/nebo těžká zranění. Všechny bezpečnostní
pokyny a instrukce si uložte pro budoucí
použití.
Tento přístroj smějí používat děti starší 8 let a
osoby se sníženými fyzickými, smyslovými nebo
duševními schopnostmi nebo s nedostatečnými
zkušenostmi a vědomostmi, pouze pokud jsou
pod dohledem nebo byly poučeny ohledně
bezpečného používání přístroje a rozumějí
nebezpečím, které mohou v důsledku použití vzniknout. Děti si nesmějí s přístrojem hrát. Čištění a
údržbu nesmějí provádět děti bez dohledu.
Likvidace
Baterie: Pouze prostřednictvím autoservisu, speciálních sběren nebo sběren zvláštního odpadu.
Informujte se u místních úřadů.
Vysvě
tlení informačního štítku na přístroji
(viz obr. 4)
1 = Přístroj je vybaven ochrannou izolací
2 = Varování – Za účelem snížení rizika zranění si
přečtěte návod k obsluze!
3 = Hodnota jištění na elektronické desce ploš.
spojů
4 = Odpojte od sítě před připojením nebo odpo-
jením baterie.
POZOR: Výbušné plyny. Předejděte vzniku
plamenů a jisker. Během nabíjení se postarejte o dostatečné větrání.
2. Popis přístroje a rozsah dodávky
2.1 Popis přístroje (obr. 1)
1 Tlačítko funkce
2 LCD displej
3 Nabíjecí kabel černý (-)
4 Nabíjecí kabel červený (+)
5 Závěsné očko
6 Síťové vedení
2.2 Rozsah dodávky
Otevřete balení a přístroj opatrně vyjměte z
•
balení.
Odstraňte obalový materiál a ochrany balení /
•
dopravní pojistky (jsou-li k dispozici).
P řekontrolujte, zda je rozsah dodávky úplný.
•
Zkontrolujte přístroj a příslušenství, zda neby-
•
ly při přepravě poškozeny.
Balení si pokud možno uložte až do uplynutí
•
záruční doby.
Nebezpečí!
Přístroj a obalový materiál nejsou dětská
hračka! Děti si nesmějí hrát s plastovými
sáčky, fóliemi a malými díly! Hrozí nebezpečí
spolknutí a udušení!
Originální návod k obsluze
•
Bezpečnostní pokyny
•
3. Použití podle účelu určení
Nabíječka je určena k nabíjení údržbu
vyžadujících nebo bezúdržbových olověných
akumulátorů s kyselinovým elektrolytem o napětí
12 V (mokré baterie / baterie Ca/Ca- / EFB) a
rovněž pro gelové olověné baterie a baterie AGM
používané u motorových vozidel.
Nabíjecí program 12 V M je vhodný k
udržovacímu nabíjení a k nabíjení baterií s menší
kapacitou. Díky funkci SUPPLY lze přístroj použít
také k přechodnému napájení např. během
výměny baterie nebo k provozu spotřebičů
využívajících stejnosměrné napětí 12 V (dbejte
max. příkonu). Program RECOND je určen
výhradně k oživení hluboce vybitých kyselinoolověných baterií (nepoužívat pro baterie AGM a
gelové baterie). Tento program používejte pouze
krátkodobě a pod dohledem.
Přístroj se nesmí používat k nabíjení lithio-železofosfátových akumulátorů (např. LiFePO4) nebo
- 52 -

CZ
jiných lithiových akumulátorů. Přístroj je určen
pouze pro mobilní použití a není určen pro montáž
do obytných vozů, karavanů nebo jiných vozidel. Nabíječku je nutno chránit před deštěm a
sněhem.
Přístroj smí být používán pouze podle svého
účelu určení. Každé další, toto překračující
použití, neodpovídá použití podle účelu určení.
Za z toho vyplývající škody nebo zranění všeho
druhu ručí uživatel/obsluhující osoba a ne
výrobce.
Dbejte prosím na to, že naše přístroje nebyly
podle svého účelu určení konstruovány pro
živnostenské, řemeslnické nebo průmyslové
použití. Nepřebíráme proto žádné ručení, pokud
je přístroj používán v živnostenských, řemeslných
nebo průmyslových podnicích a při srovnatelných
činnostech.
4. Technická data
CE-BC 4 M
Síťové napětí: ..........................220-240 V ~ 50Hz
Jmenovitý příkon max.: .............................. 70 W
Jmenovité výstupní napětí: .....................12 V d.c.
Jmenovitý výstupní proud: .............................. 4 A
Kapacita baterie „STD/AGM/zimní program“: ......
............................................................ 10–120 Ah
Kapacita baterie „12V M“ (max. 1A): ...... 2–32 Ah
Funkce „SUPPLY“, max. výstup: .....................3 A
Nabíjecí program „RECOND“: ..15,3 V d.c. / 1,5 A
Třída ochrany: ................................................... II
Třída ochrany: ............................................. IP65
Teplota okolního prostředí: ..........-20 °C až 40 °C
CE-BC 6 M
Síťové napětí: ..........................220-240 V ~ 50Hz
Jmenovitý příkon max.: ............................ 100 W
Jmenovité výstupní napětí: .....................12 V d.c.
Jmenovitý výstupní proud: .............................. 6 A
Kapacita baterie „STD/AGM/zimní program“: ......
............................................................ 20–150 Ah
Kapacita baterie „12V M“ (max. 1A): ...... 2–32 Ah
Funkce „SUPPLY“, max. výstup: .....................5 A
Nabíjecí program „RECOND“: ..15,3 V d.c. / 1,5 A
Třída ochrany: ................................................... II
Třída ochrany: ............................................. IP65
Teplota okolního prostředí: ..........-20 °C až 40 °C
CE-BC 10 M
Síťové napětí: ..........................220-240 V ~ 50Hz
Jmenovitý příkon max.: ............................ 160 W
Jmenovité výstupní napětí: .....................12 V d.c.
Jmenovitý výstupní proud: ............................ 10 A
Kapacita baterie „STD/AGM/zimní program“: ......
............................................................ 30–200 Ah
Kapacita baterie „12V M“ (max. 2 A): ...... 3-60 Ah
Funkce „SUPPLY“, max. výstup: .....................8 A
Nabíjecí program „RECOND“: ..15,3 V d.c. / 2,5 A
Třída ochrany: ................................................... II
Třída ochrany: ............................................. IP65
Teplota okolního prostředí: ..........-20 °C až 40 °C
5. Obsluha
Před připojením se ujistěte, zda údaje na datovém štítku souhlasí s údaji sítě.
Nebezpečí! V žádném případě nenabíjejte zmrz-
lé baterie.
Dodržujte prosím pokyny v návodech k obsluze pro automobil, rádio, navigační systém
atd.
Pokyn k automatickému nabíjení
(pouze nabíjecí programy 12V STD, 12V AGM,
12V zimní program, 12 V M)
Nabíječka je automatický přístroj ovládaný mikroprocesorem, je tedy vhodná zvláště k nabíjení
bezúdržbových baterií a k dlouhodobému
nabíjení a k udržování nabitých baterií, které se nepoužívají trvale, např. u historických
automobilů, vozidel pro volný čas, traktorových
sekaček na trávu apod. Díky integrovanému mikroprocesoru probíhá nabíjení v několika stupních.
Poslední stupeň nabíjení, udržovací nabíjení,
udržuje kapacitu baterie na 95–100 % a díky
tomu je baterie vždy plně nabitá. Proces nabíjení
nevyžaduje dohled. Přesto nenechávejte baterie
a nabíječku při nabíjení po delší dobu bez dozoru,
abyste mohli v případě poruchy odpojit nabíječku
ručně od elektrické rozvodné sítě.
5.1 Vysvětlení symbolů (obr. 2)
A Nabíjení 12V baterie (kyselinová baterie a
gelová baterie)
B Nabíjení 12V AGM baterie
C Nabíjení 12V baterie (kyselino-olověná bate-
rie, AGM baterie a gelová baterie) v zimním
programu při teplotě okolí od -20 °C do +5 °C.
- 53 -

CZ
Nebezpečí! V žádném případě nenabíjejte
zmrzlé baterie.
D Nabíjení 12V baterie (kyselino-olověná bate-
rie, AGM baterie a gelová olověná baterie) v
režimu udržování nabití
E Nabíjecí napětí ve V, baterie defektní (BAt)
/ plně nabitá (FUL) / připojená k opačným
pólům nebo zkrat na svorkách (Err)
F Obnovení nabíjitelnosti vybitých kyselino-
olověných baterií se zvýšeným nabíjecím
napětím
G Špatně připojené svorky (záměna pólů) nebo
zkrat
H Napájení např. při výměně baterie
K Stav nabití baterie v procentech (1 dílek = 25
%) a průběh nabíjení (dílek na symbolu bate-
rie svítí = baterie dosáhla stavu nabití, dílek
na symbolu baterie bliká = baterie se nabíjí na
nejbližší stupeň nabití, všechny dílky blikají =
baterie je plně nabitá).
5.2 Nastavení nabíjecích programů (obr. 2)
Pokyny:
Stisknutím tlačítka „Mode“ (obr. 1 / pol. 1)
•
přepínáte mezi různými programy. Symbol
odpovídající danému programu se objeví na
displeji. Baterie se nabíjejí při zobrazeném
programu.
Pro zapnutí programu RECOND držte tlačítko
•
„Mode“ stisknuté po dobu 5 sekund.
Pro návrat z programu RECOND nebo z funk-
•
ce SUPPLY k programu 12 V STD stiskněte
tlačítko „Mode“ opět po dobu 5 sekund.
Pokud je napětí baterie nižší než 3,5 V nebo
•
větší než 15 V, není baterie vhodná k nabíjení
nebo je defektní. Na LCD displeji se zobrazí
hlášení „BAt“. Bliká symbol „G“. Také jiné
chyby baterie mohou vést k tomu, že ji není
možné nabít.
Pokud během funkce SUPPLY nastal zkrat
•
mezi nabíjecími svorkami, zobrazí se na LCD
displeji hlášení „Lo V“. Bliká symbol „G“.
P ři odpojení nabíječky ze zásuvky se uloží
•
poslední nastavený nabíjecí program (vyjma
RECOND a SUPPLY) a při dalším použití
bude přednastaven.
Pouze CE-BC 4M: Pokud jsou nabíjecí kleště
•
připojené k baterii, odebírá nabíječka velice
malý proud z baterie a krátce se zobrazí LCD
displej. Toto ovšem není žádná porucha.
5.2.1 Standardní nabíjecí programy
A) 12V STD: Nabíjecí program pro kyselino-
olověné baterie (mokré baterie / baterie Ca/Ca- /
EFB) a pro gelové olověné baterie. Po prvním
uvedení nabíječky do provozu se na displeji objeví „12 V STD“.
B) 12V AGM: Nabíjecí program pro baterie AGM,
stiskněte tlačítko „Mode“–> přepnutí z nabíjecího
programu „12V STD“ na „12V AGM“.
5.2.2 Speciální nabíjecí programy
C) Zimní program: Nabíjecí program
doporučený při chladném počasí (teplota
okolního prostředí -20 °C až +5 °C) pro normální
kyselino-olověné baterie (mokré baterie / Ca/Ca);
stiskněte tlačítko „Mode“ –> přepnete z nabíjecího
programu „12V AGM“ na „Zimní program“.
D) 12V M: Nabíjecí program pro baterie s menší
kapacitou (viz Technická data) a k udržovacímu
nabíjení všech baterií uvedených v bodě 3. Použití
v souladu s určením.
Stiskněte tlačítko „Mode“ –> přepnete z
nabíjecího režimu „Zimní program“ na „12 M“.
F) RECOND: Nabíjecí program se zvýšeným koncovým nabíjecím napětím a nabíjením konstantním proudem, výlučně pro obnovu nabíjitelnosti
hluboce vybitých kyselino-olověných baterií.
Proces RECOND se musí každou půlhodinu kontrolovat a nesmí překročit celkovou dobu 4 hodin.
Dodržujte pokyny výrobce baterie.
Důležité! Pro přepnutí do tohoto programu se
musí tlačítko „Mode“ (obr. 1 / pol. 1) držet stisknuté po dobu 5 sekund.
Varování!
V důsledku odpařování vzniká třaskavý
•
plyn – nebezpečí výbuchu! Dbejte na dobré větrání.
Program RECOND používejte pouze pro
•
kyselino-olověné baterie a pouze tak, jak je
popsáno dále. Dbejte na to, abyste z baterie
nevylili žádnou kyselinu. Kyselina obsažená v
autobaterii je žíravá. Dodržujte bezpečnostní
pokyny.
V žádném případě nepoužívejte baterie
•
uzavřené konstrukce (baterie VRLA, např.
AGM nebo gelové olověné baterie). Dodržujte
pokyny výrobce baterie.
Používejte pouze u volně stojících vymonto-
•
vaných baterií, které nejsou připojeny k palubní elektronice vašeho auta. Zvýšené nabíjecí
- 54 -

CZ
napětí může poškodit palubní elektroniku.
Dbejte návodu k obsluze vašeho auta, příp.
se obraťte na výrobce svého auta.
Používání programu RECOND
Nabíječku připojte tak, jak je popsáno v části
•
5.3, ke kyselino-olověné baterii a každou
půlhodinu kontrolujte proces nabíjení.
Nejpozději po 4 hodinách, nebo jakmile v ba-
•
terii vzniká plyn (slyšitelně bublá), nabíječku
odpojte tak, jak je popsáno v části 5.3.
Pokud možno zkontrolujte stav hladiny kyse-
•
liny a pokud je to možné, dolijte k článkům
baterie příp. jen destilovanou vodu. Stav
hladiny kyseliny je v ideálním případě mezi
natištěnými značkami max. a min. a měl
by být identický pro všechny články. Zátku
baterie, pokud je instalována, opět pevně
přišroubujte.
5.2.3 Přídavná funkce
H) SUPPLY: Pro napájení stejnosměrným prou-
dem o napětí 12 V např. při výměně baterie nebo
při provozu 12V spotřebičů.
Stiskněte tlačítko „Mode“ –> přepnete z
nabíjecího režimu „RECOND“ na funkci „SUPPLY“.
Varování! Není k dispozici ochrana proti
přepólování. Při přepólování vzniká nebezpečí
poškození nabíječky a baterie / palubní sítě vozidla, resp. připojeného spotřebiče. Při připojení
bezpodmínečně dbejte na správnou polaritu.
Dbejte na maximální příkon spotř
nická data).
Pokyny:
Dostupné stejnosměrné napětí (zobrazené na
•
displeji) je závislé na zatížení a bez zatížení
činí cca 14,5 V.
Tato funkce je využitelná pro spotřebiče,
•
které se provozují připojené do cigaretového
zapalovače vozidla.
Dbejte návodu k obsluze vašeho 12V
•
spotřebiče.
5.3 Nabíjení baterie:
Uvolněte nebo odeberte zátky baterie (pokud
•
jsou na baterii) z baterie.
Zkontrolujte stav kyseliny vaší baterie. Po-
•
kud je to nutné, nalijte dovnitř destilovanou
vodu (pokud je to možné). Pozor! Kyselina
obsažená v autobaterii je žíravá. Vystříknutou
kyselinu ihned důkladně opláchněte velkým
množstvím vody, v případě potřeby vyhledejte
ebiče (viz Tech-
lékaře.
Nejdříve připojte červený nabíjecí kabel na
•
kladný pól baterie.
Poté se odstraní černý nabíjecí kabel z bate-
•
rie a benzínové vedení se připojí na karoserii.
Varování! V normálním případě je záporný
•
pól baterie spojen s karoserií a proto postupujte při nabíjení tak, jak je popsáno výše.
Ve výjimečných případech může být s karoserií spojen kladný pól baterie (uzemnění
kladného pólu). V takovém případě připojte
černý nabíjecí kabel na záporný pól baterie.
Následně spojte červený nabíjecí kabel, odpojený od baterie a benzínového potrubí, s
karoserií.
Po připojení baterie na nabíječku můžete
•
nabíječku připojit do zásuvky (viz Technická
data). Nyní můžete změnit nastavení nabíjení
(viz část 5.2).
Pozor! Při nabíjení může vznikat nebezpečný
•
třaskavý plyn, proto během nabíjení zabraňte
tvorbě jisker a výskytu otevřeného ohně.
Nebezpečí výbuchu! Dbejte na dobré větrání
v místnostech.
Pokud se na displeji zobrazí „FUL“ (a všechny
•
dílky symbolu, obr. 2 / pol. K), pak je proces
nabíjení dokončen. Nabíječka udržuje baterii
impulsním nabíjením na 95–100 % dostupné kapacity baterie. Pokud by to nabíječka
začala signalizovat už po několika minutách,
je to signál nízké kapacity baterie. Takovou
baterii je nutno nahradit novou.
Výpočet doby nabíjení (obr. 3a-3c)
Doba nabíjení je určená stavem nabití baterie. U
prázdné baterie lze přibližnou dobu nabíjení až do
cca 80 % nabití vypočítat pomocí následujícího
vzorce:
kapacita baterie v Ah
Doba nabíjení/h =
amp. (nabíjecí proud)
Nabíjecí proud by měl činit 1/10 až 1/6 kapacity
baterie.
5.4 Signalizace chyb (obr. 2 / pol. G)
Signalizace chyb bliká (svítí) v následujících
případech:
Pokud je napětí baterie nižší než 3,5 V nebo
•
vyšší než 15 V. Baterie není vhodná k nabíjení
nebo je defektní. Také jiné chyby baterie mohou vést k tomu, že ji není možné nabít.
Pokud jsou připojovací svorky připojeny
•
na nesprávné póly baterie. Ochrana proti
přepólování zajišťuje, že nedojde k poškození
- 55 -

CZ
baterie a nabíječky. Odpojte nabíječku z ba-
terie a zahajte proces nabíjení znovu. Pozor!
V programu SUPPLY není k dispozici ochrana
proti přepólování.
Pokud je na obou připojovacích svorkách in-
•
dikován zkrat (kovové díly svorky se dotýkají).
Ochrana proti zkratu zajišťuje, že nedojde k
poškození nabíječky.
5.5 Ukončení nabíjení baterie
Vytáhněte zástrčku ze zásuvky.
•
Nejdříve uvolněte černý nabíjecí kabel z ka-
•
roserie.
Poté uvolněte červený nabíjecí kabel z klad-
•
ného pólu baterie.
Pozor! Při uzemnění kladného pólu nejprve
•
odpojte červený kabel od karoserie a teprve
poté černý nabíjecí kabel z baterie.
Zátky baterie opět našroubovat a přitlačit (po-
•
kud jsou na baterii).
Upozornění! Pokud se vytáhne síťová zástrčka
do baterie, ale nabíjecí kabely zůstanou připojeny
k baterii, odebírá nabíječka z baterie nízké
množství proudu. Proto doporučujeme nabíječku
při nepoužívání vždy kompletně odpojit od baterie.
6. Ochrana proti přetížení
V nabíjecích programech 12V STD, 12V AGM,
12V zimní program a 12V M je nabíječka elektronicky chráněna proti přetížení, zkratu a
přepólování. Navíc je v ní zabudována jedna nebo
více jemných pojistek. Pokud je pojistka defektní,
musí se provést její výměna a nahrazení pojistkou se stejnou ampérovou hodnotou. V případě
potřeby se obraťte na náš zákaznický servis.
nou vodu.
8. Čištění, údržba a objednání
náhradních dílů
Nebezpečí!
Před všemi čisticími pracemi vytáhněte síťovou
zástrčku.
8.1 Čištění
Udržujte bezpečnostní zařízení, větrací otvory
•
a kryt motoru tak prosté prachu a nečistot, jak
jen to je možné. Otřete přístroj čistým hadrem
nebo ho profoukněte stlačeným vzduchem při
nízkém tlaku.
Doporučujeme přímo po každém použití
•
přístroj vyčistit.
Pravidelně přístroj čistěte vlhkým hadrem
•
a trochou mazlavého mýdla. Nepoužívejte
čisticí prostředky nebo rozpouštědla; tyto
by mohly narušit plastové díly přístroje.
Dbejte na to, aby se do přístroje nedostala
voda. Vniknutí vody do elektrického přístroje
zvyšuje riziko úderu elektrickým proudem.
Nabíječka by měla být uložena v suché míst-
•
nosti. Nabíjecí svorky je třeba zbavit koroze.
8.2 Údržba
Uvnitř přístroje se nevyskytují žádné další díly
vyžadující údržbu.
8.3 Objednání náhradních dílů:
Při objednávce náhradních dílů je třeba uvést
následující údaje:
Typ přístroje
•
Číslo artiklu přístroje
•
Identifikační číslo přístroje
•
Číslo požadovaného náhradního dílu
•
Aktuální ceny a informace naleznete na
www.isc-gmbh.info
7. Údržba a péče baterie
Dbejte na to, aby byla Vaše baterie vždy
•
pevně zabudovaná.
Musí být zaručeno bezvadné připojení na
•
rozvodnou síť elektrického zařízení.
Baterii udržovat čistou a suchou. Připojovací
•
svorky lehce namazat kyselin prostým a
odolným tukem (vazelínou).
U baterií, které nejsou bezúdržbové, kontrolo-
•
vat cca každé 4 týdny výšku hladiny kyseliny
a v případě potřeby doplnit pouze destilova-
9. Likvidace a recyklace
Přístroj je uložen v balení, aby bylo zabráněno
poškození při přepravě. Toto balení je surovina a
tím znovu použitelné nebo může být dáno zpět do
cirkulace surovin. Přístroj a jeho příslušenství jsou
vyrobeny z rozdílných materiálů, jako např. kov
a plasty. Defektní přístroje nepatří do domovního
odpadu. K odborné likvidaci by měl být přístroj
odevzdán na příslušném sběrném místě. Pokud
žádné takové sběrné místo neznáte, měli byste se
informovat na místním zastupitelství.
- 56 -

CZ
10. Pokyny k odstranění poruch
Pokud je přístroj správně provozován, neměly by se vyskytnout žádné poruchy. Při poruchách
překontrolujte následující možnosti dříve, než budete informovat zákaznický servis.
Porucha Možná příčina Odstranění
Přístroj nenabíjí - Nabíjecí kleště nesprávně připojeny
- Červené nabíjecí kleště připojit na
kladném pólu, černé na karoserii
- Kontakt mezi nabíjecími kleštěmi
- Baterie je poškozená
Jen pro země EU
Elektrické nářadí a přístroje neodhazujte do domovního odpadu!
Podle evropské směrnice 2012/19/ES o odpadních elektrických a elektronických zařízeních (OEEZ) a
při prosazování národního práva musí být spotřebované elektrické nářadí sbíráno samostatně a musí
být dopraveno do odpovídajícího ekologického recyklačního závodu.
- Odstranit kontakt
- Baterii nechat zkontrolovat odborníkem a popř. vyměnit
Alternativa recyklace k výzvě na zpětné odeslání výrobku:
Vlastník elektrického přístroje je povinen alternativně namísto zpětného odeslání zařízení spolupůsobit
při jeho správném zužitkování v případě, že se vzdá jeho vlastnictví. Starý přístroj lze v takovém případě
odevzdat také ve sběrně, která provede odstranění ve smyslu národního zákona o recyklaci a odpadech. Tyto předpisy se nevztahují na díly příslušenství a pomocné prostředky bez elektrických součástí
přidané ke starým přístrojům.
Patisk nebo jiné rozmnožování dokumentace a průvodních listin, také ve výtažcích, je přípustný pouze s
výslovným souhlasem fi rmy iSC GmbH.
Technické změny vyhrazeny
- 57 -

CZ
Záruční list
Vážená zákaznice, vážený zákazníku,
naše výrobky podléhají přísné kontrole kvality. Pokud i přesto tento přístroj bezvadně nefunguje, je
nám to velice líto a prosíme Vás, abyste se obrátili na naši servisní službu na adrese uvedené na tomto
záručním listu. Rádi Vám budeme k dispozici také telefonicky na uvedeném servisním telefonním čísle.
Pro uplatňování požadavků poskytnutí záruky platí následující:
1. Tyto záruční podmínky jsou určeny výlučně pro spotřebitele, tzn. fyzické osoby, které tento výrobek
nebudou používat ani v rámci své profesní, ani jiné výdělečně činné aktivity. Tyto záruční podmínky
upravují dodatečné záruky, které níže uvedený výrobce poskytuje kupujícím nových přístrojů navíc
k zákonné záruce. Vaše zákonem stanovené nároky na záruku zůstanou touto zárukou nedotčeny.
Naše záruka je pro Vás bezplatná.
2. Záruka se vztahuje výhradně na nedostatky na vámi zakoupeném novém přístroji níže uvedeného
výrobce, které jsou způsobené chybou materiálu nebo výrobní chybou, a podle našeho uvážení je
omezena na odstranění těchto nedostatků na přístroji nebo výměnu přístroje.
Dbejte prosím na to, že naše přístroje nebyly podle svého účelu určení konstruovány pro
živnostenské, řemeslnické nebo odborné použití. Záruční smlouva se proto nenaplní, pokud byl
přístroj během záruční doby používán v živnostenských, řemeslnických nebo průmyslových podnicích nebo byl vystaven srovnatelnému zatížení.
3. Z naší záruky jsou vylou
- Škody na přístroji, které vznikly nedodržením montážního návodu nebo na základě neoborné
instalace, nedodržením návodu k použití (jako např. připojení na chybné síťové napětí nebo druh
el. proudu), nebo nedodržením pokynů k údržbě a bezpečnostních pokynů, vystavením přístroje
nepřirozeným povětrnostním podmínkám nebo nedostatečnou péčí a údržbou.
- Škody na přístroji, které vznikly neoprávněným nebo nesprávným použitím (jako např. přetížení
přístroje nebo použití neschválených přídavných nástrojů nebo příslušenství), vniknutím cizích těles
do přístroje (jako např. písek, kameny nebo prach, škody při přepravě), používáním násilí nebo cizím
působením (jako např. škody způsobené pádem).
- Škody na přístroji nebo na dílech přístroje, které jsou způsobeny běžným opotřebením
přiměřeného použití nebo jiným přirozeným opotřebením.
4. Záruční doba činí 24 měsíc
být uplatňovány před uplynutím záruční doby během dvou týdnů poté, co byla vada zjištěna.
Uplatňování požadavků poskytnutí záruky po uplynutí záruční doby je vyloučeno. Oprava nebo
výměna přístroje nevede ani k prodloužení záruční doby, ani nedojde tímto výkonem k zahájení nové
záruční doby pro tento přístroj nebo pro jakékoli zabudované náhradní díly. To platí také při využití
místního servisu.
5. Pro uplatňování požadavků na poskytnutí záruky nahlaste prosím váš defektní přístroj na: www.
isc-gmbh.info. Mějte připravenu nákupní účtenku nebo jiné doklady o vašem nákupu. Přístroje, které
jsou zaslány bez odpovídajících dokladů a bez typového štítku, jsou ze záručního plnění vyloučeny
z důvodu nedostatečné možnosti jednoznačného přiřazení. Pokud je defekt přístroje zahrnut v naší
záruce, obdržíte obratem zpátky opravený nebo nový přístroj.
čeny:
ů a začíná datem koupě přístroje. Požadavky poskytnutí záruky musí
Samozřejmě Vám rádi odstraníme nedostatky na přístroji na Vaše náklady, pokud tyto nedostatky nejsou nebo už nejsou zahrnuty v rozsahu záruky. V takovém případě nám prosím zašlete přístroj na naší
servisní adresu.
V případě rychle opotřebitelných dílů, spotřebních dílů a chybějících dílů poukazujeme na omezení této
záruky podle servisních informací uvedených v tomto návodu k obsluze.
- 58 -

SK
Nebezpečenstvo!
Pri používaní prístrojov sa musia dodržiavať
príslušné bezpečnostné opatrenia, aby bolo
možné zabrániť prípadným zraneniam a vecným
škodám. Preto si starostlivo prečítajte tento návod na obsluhu/bezpečnostné pokyny. Následne
ich starostlivo uschovajte, aby ste mali vždy k
dispozícii potrebné informácie. V prípade, že
budete prístroj požičiavať tretím osobám, prosím
odovzdajte im spolu s prístrojom tento návod na
obsluhu/bezpečnostné pokyny. Nepreberáme
žiadne ručenie za nehody ani škody, ktoré vzniknú nedodržaním tohto návodu na obsluhu a
bezpečnostných pokynov.
1. Bezpečnostné pokyny
Príslušné bezpečnostné pokyny nájdete v
priloženej brožúrke.
Nebezpečenstvo!
Prečítajte si všetky bezpečnostné predpisy a pokyny. Nedostatky pri dodržovaní
bezpečnostných predpisov a pokynov môžu
mať za následok úraz elektrickým prúdom, vznik požiaru a/alebo ťažké poranenia. Všetky
bezpečnostné predpisy a pokyny si odložte
pre budúce použitie.
Tento prístroj smie byť používaný deťmi vo veku
8 rokov a staršími, ako aj osobami so zníženými
psychickými, senzorickými alebo mentálnymi
schopnosťami alebo nedostatkami skúseností
a vedomostí, pokiaľ budú pod dohľadom alebo
budú poučené ohľadne bezpečného používania
prístroja a o príslušných z toho plynúcich rizikách. Deti sa nesmú s prístrojom hrať. Čistenie
a užívateľskú údržbu nesmú vykonávať deti,
pokiaľ nie sú pod dozorom.
Likvidácia
Batérie: Výlučne len prostredníctvom autoservi-
sov, špeciálnych zberných miest alebo zberov
zvláštneho odpadu. Informujte sa na miestnej
samospráve.
Vysvetlenie výstražného štítku na prístroji
(pozri obr. 4)
1 = Prístroj má ochrannú izoláciu
2 = VÝSTRAHA – Aby ste znížili riziko poranenia,
prečítajte si návod na obsluhu!
3 = Záložná hodnota na elektronickej doske
4 = Odpojiť zo siete pred zapojením alebo odpo-
jením batérie.
POZOR: Explozívne plyny. Zabrániť výskytu
ohňa a iskier. Počas nabíjania sa postarajte o
dostatočné vetranie.
2. Popis prístroja a objem dodávky
2.1 Popis prístroja (obr. 1)
1 Funkčné tlačidlo
2 LCD displej
3 Nabíjací kábel čierny (-)
4 Nabíjací kábel červený (+)
5 Závesné oko
6 Sieťové vedenie
2.2 Objem dodávky
Otvorte balenie a opatrne vyberte prístroj von
•
z balenia.
Odstráňte obalový materiál ako aj obalové/
•
transportné poistky (pokiaľ sú obsiahnuté).
Skontrolujte, či obsah dodávky kompletný.
•
Skontrolujte, či nedošlo k poškodeniu prístro-
•
ja a príslušenstva transportom.
Pokiaľ možno, uschovajte si obal až do konca
•
záručnej doby.
Nebezpečenstvo!
Prístroj a obalový materiál nie sú hračky! Deti
sa nesmú hrať s plastovými vreckami, fóliami
ani malými dielmi! Hrozí nebezpečenstvo
prehltnutia a udusenia!
Originálny návod na obsluhu
•
Bezpečnostné predpisy
•
3. Správne použitie prístroja
Táto nabíjačka je určená na nabíjanie bežných
(nie bezúdržbových) alebo bezúdržbových 12V
akumulátorov s kyselinou olovnatou (mokré
batérie Ca/Ca/EFB), ako aj olovených gélových
batérií a AGM batérií, ktoré sa používajú v
automobiloch.
Nabíjací program 12V M je určený na udržiavacie
nabíjanie a nabíjanie akumulátorov s malou
kapacitou. Funkcia SUPPLY umožňuje
používanie nabíjačky aj na napájanie riadiacej
jednotky alebo na napájanie 12 V= spotrebičov
(dodržiavajte max. odber prúdu) napr. počas
výmeny akumulátora. Program RECOND je
určený výlučne na oživenie hlboko vybitých
elektrolytických akumulátorov (nie AGM
- 59 -

SK
alebo gélových akumulátorov). Tento program
používajte iba krátkodobo a pod dohľadom.
Nabíjačka sa nesmie používať na nabíjanie lítiumFe-fosfátových akumulátorov (napr. LiFePO4)
alebo iných lítiových akumulátorov. Nabíjačka
je určená iba na mobilné používanie a nie pre
montáž do karavanov, obytných automobilov alebo podobných vozidiel. Nabíjačku chráňte pred
dažďom a snehom.
Prístroj smie byť použitý len na ten účel, na ktorý
bol určený. Akékoľvek iné odlišné použitie sa
považuje za nespĺňajúce účel použitia. Za škody
alebo zranenia akéhokoľvek druhu spôsobené
nesprávnym používaním ručí používateľ / obsluhujúca osoba, nie však výrobca.
Prosím berte ohľad na skutočnosť, že naše prístroje neboli svojim určením konštruované na profesionálne, remeselnícke ani priemyselné použitie.
Nepreberáme žiadne záručné ručenie, ak sa
prístroj bude používať v profesionálnych, remeselníckych alebo priemyselných prevádzkach ako
aj na činnosti rovnocenné s takýmto použitím.
4. Technické údaje
CE-BC 4 M
Sieťové napätie: .....................220-240 V~, 50 Hz
Max. menovitý príkon: ................................ 70 W
Menovité výstupné napätie: .......................12 V=
Menovitý výstupný prúd: ................................ 4 A
Kapacita akumulátora „STD/AGM/zima“: ............
.............................................................10-120 Ah
Kapacita akumulátora „12 V M“ (max. 1 A): .........
.................................................................2-32 Ah
Max. výstup, funkcia „SUPPLY“: .....................3 A
Nabíjací program „RECOND“: ......15,3 V= / 1,5 A
Ochranná trieda: ............................................... II
Druh krytia: .................................................. IP65
Teplota prostredia: ........................-20 °C – 40 °C
CE-BC 6 M
Sieťové napätie: .....................220-240 V~, 50 Hz
Max. menovitý príkon: .............................. 100 W
Menovité výstupné napätie: .......................12 V=
Menovitý výstupný prúd: ................................ 6 A
Kapacita akumulátora „STD/AGM/zima“: ............
.............................................................20-150 Ah
Kapacita akumulátora „12 V M“ (max. 1 A): .........
.................................................................2-32 Ah
Max. výstup, funkcia „SUPPLY“: .....................5 A
Nabíjací program „RECOND“: ......15,3 V= / 1,5 A
Ochranná trieda: ............................................... II
Druh krytia: .................................................. IP65
Teplota prostredia: ........................-20 °C – 40 °C
CE-BC 10 M
Sieťové napätie: .....................220-240 V~, 50 Hz
Max. menovitý príkon: .............................. 160 W
Menovité výstupné napätie: .......................12 V=
Menovitý výstupný prúd: .............................. 10 A
Kapacita akumulátora „STD/AGM/zima“: ............
.............................................................30-200 Ah
Kapacita akumulátora „12 V M“ (max. 2 A): .........
.................................................................3-60 Ah
Max. výstup, funkcia „SUPPLY“: .....................8 A
Nabíjací program „RECOND“: ......15,3 V= / 2,5 A
Ochranná trieda: ............................................... II
Druh krytia: .................................................. IP65
Teplota prostredia: ........................-20 °C – 40 °C
5. Obsluha
Presvedčte sa pred zapojením prístroja do siete o
tom, či údaje na údajovom štítku prístroja súhlasia
s údajmi elektrickej siete.
Nebezpečenstvo! Nenabíjajte zamrznuté batérie.
Prosím dodržiavajte pritom upozornenia
v návodoch na obsluhu automobilu, rádia,
navigačného systému atď.
Upozornenie pre automatické nabíjanie
(iba nabíjacie programy 12V STD, 12V AGM, 12 V
zima, 12 V M)
Táto nabíjačka je mikroprocesorom riadená automatická nabíjačka, t.j. je určená predovšetkým
na nabíjanie bezúdržbových batérií ako aj na
dlhodobé nabíjanie a udržovanie nabitého stavu
batérií, ktoré nie sú trvale v prevádzke, napr. pre
historické vozidlá, vozidlá na voľný čas, záhradné
traktory a podobne. Pomocou mikroprocesoru
sa uskutočňuje nabíjanie vo viacerých stupňoch.
Posledný stupeň nabitia, udržiavacie nabíjanie,
udržiava kapacitu batérie na 95 – 100 % a tým je
batérie stále plne nabitá. Proces nabíjania nie je
potrebné kontrolovať. Pri nabíjaní počas dlhšej
doby napriek tomu nenechávajte batériu bez dozoru, aby ste mohli v prípade poruchy nabíjačku
- 60 -

SK
ručne odpojiť zo siete.
5.1 Význam symbolov (obr. 2)
A Nabíjanie 12 V akumulátora (elektrolytický
olovený akumulátor a gélový akumulátor).
B Nabíjanie 12 V akumulátora AGM.
C Nabíjanie 12 V akumulátora (elektrolyti-
cký olovený akumulátor, akumulátor AGM
a gélový akumulátor) v zimnom režime
pri teplote prostredia od -20 °C do +5 °C.
Nebezpečenstvo! Nenabíjajte zamrznuté akumulátory.
D Nabíjanie 12 V akumulátora (elektrolytický
olovený akumulátor, AGM akumulátor a gélový akumulátor) v režime udržiavacieho nabíjania.
E Nabíjacie napätie vo V, chybný (BAt) / úplne
nabitý akumulátor (FUL) / prepólovanie alebo
skrat na svorkách (Err)
F Obnovenie nabíjateľnosti vybitých elektro-
lytických olovených akumulátorov zvýšeným
nabíjacím napätím
G Nesprávne pripojené (prepólované) svorky
alebo skrat
H Napájanie napr. pri výmene akumulátora
K Stav nabitia akumulátora v percentách (1
dielik = 25 %) a postup nabíjania (dielik svieti
= akumulátor dosiahol stav nabitia, dielik v
symbole akumulátora svieti = akumulátor sa
nabil na nasledujúci stav nabitia, všetky dieliky svietia = akumulátor je úplne nabitý).
5.2 Nastavenie nabíjacích programov (obr. 2)
Upozornenia:
Stlačením tlačidla „Mode“ (obr. 1/pol. 1) sa
•
prepínajú rôzne programy. Na displeji sa zobrazí symbol príslušného programu. Akumulátory sa nabíjajú zobrazeným programom.
Pre prepnutie do programu RECOND, tlačidlo
•
„Mode“ podržte stlačené 5 sekúnd.
Pre návrat z programu RECOND alebo z
•
funkcie SUPPLY späť do programu 12 V
STD tlačidlo „Mode“ opäť podržte stlačené 5
sekúnd.
Ak je napätie akumulátora menšie ako 3,5
•
V alebo väčšie ako 15 V, akumulátor nie je
vhodný na nabíjanie alebo je chybný. Na LCD
displeji sa zobrazí správa „BAt“. Symbol „G“
bliká. Aj iné chyby akumulátora môžu viesť k
tomu, že akumulátor nie je možné nabiť.
Ak sa počas funkcie SUPPLY vyskytne skrat
•
medzi nabíjacími svorkami, na LCD displeji sa
zobrazí správa „Lo V“. Symbol „G“ bliká.
Po odpojení nabíjačky zo zásuvky sa na-
•
posledy nastavený program nabíjania uloží
(okrem RECOND a SUPPLY) a pri jej nasledujúcom použití sa prednastaví.
Iba CE-BC 4M: Po pripojení nabíjacích
•
svoriek k akumulátoru nabíjačka odoberie z
akumulátora veľmi nízky prúd, čo sa krátko
zobrazí na LCD displeji. Nie je to žiadna chyba.
5.2.1 Štandardné nabíjacie programy
A) 12 V STD: Nabíjací program pre elektrolytické
olovené akumulátory (mokré akumulátory, Ca/
Ca, EFB akumulátory) a gélové akumulátory. Pri
prvom použití nabíjačky sa na displeji zobrazí 12
V STD.
B) 12 V AGM: pre nabíjací program pre AGM
akumulátory stlačte tlačidlo „Mode“ -> prepnutie
z nabíjacieho programu 12 V STD do programu
12 V SGM
5.2.2 Špeciálne nabíjacie programy
C) Zima: Odporúčaný program nabíjania pri
chladnom počasí (pri teplote prostredia -20 °C –
+5°C) pre nabíjanie normálnych elektrolytických
olovených akumulátorov (mokrých akumulátorov
a akumulátorov Ca/Ca) stlačte tlačidlo „Mode“ ->
prepnutie z nabíjacieho programu 12 V AGM do
programu „Zima“
D) 12 V M: Nabíjací program pre akumulátory
s malou kapacitou (pozri technické údaje) a na
udržiavacie nabíjanie všetkých akumulátorov,
uvedených v odseku 3. Určený účel používania.
Stlačte tlačidlo „Mode“ -> prepnutie z nabíjacieho
programu „Zima“ do programu „12 M“.
F) RECOND: Nabíjací program so zvýšeným
nabíjacím napätím na konci nabíjania a
konštantným prúdom, výlučne pre obnovenie
nabíjateľnosti hlboko vybitých elektrolytických
olovených akumulátorov.
Proces RECOND sa musí kontrolovať každú polhodinu a nesmie prekročiť 4 hodiny. Dodržiavajte
pokyny výrobcu akumulátora.
Dôležité! Pre prepnutie do tohto programu
sa tlačidlo „Mode“ (obr. 1/pol. 1) musí podržať
stlačené 5 sekúnd.
Varovanie!
Pri nabíjaní sa uvoľňuje výbušný plyn
•
– nebezpečenstvo explózie! Dbajte na
dostatočné vetranie.
Program RECOND používajte iba pri elekt-
•
rolytických olovených akumulátoroch a iba
- 61 -

SK
podľa nasledujúceho opisu. Dávajte pritom
pozor, aby sa elektrolyt (kyselina) nevylial.
Elektrolyt (kyselina) je žieravý. Dodržiavajte
bezpečnostné pokyny.
Program nikdy nepoužívajte na uzavreté typy
•
akumulátorov (akumulátor VRLA, napr. AGM
alebo gélový akumulátor). Dodržiavajte pokyny výrobcu akumulátora.
Program používajte iba na voľný, vymonto-
•
vaný akumulátor, ktorý nie je namontovaný vo
vozidle a pripojený k palubnej elektronike vozidla. Zvýšené nabíjacie napätie môže palubnú elektroniku poškodiť. Dodržiavajte pokyny
návodu na používanie vášho vozidla alebo sa
obráťte na výrobcu vášho vozidla.
Používanie nabíjacieho programu RECOND
Nabíjačku podľa opisu v odseku 5.3 pripojte
•
k elektrolytickému olovenému akumulátoru a
proces nabíjania kontrolujte každú polhodinu.
Po max. 4 hodinách, alebo ak akumulátor
•
počuteľne uvoľňuje plyn (buble), nabíjačku
podľa opisu v odseku 5.3 odpojte.
Ak je to možné, skontrolujte hladinu elektro-
•
lytu, a ak je to možné, články akumulátora v
prípade potreby doplňte iba destilovanou vodou. Úroveň hladiny elektrolytu sa má ideálne
nachádzať medzi vyznačenými značkami
max. a min. a vo všetkých článkoch musí byť
rovnaká. Zátky akumulátora (ak existujú) opäť
pevne zaskrutkujte.
5.2.3 Prídavná funkcia
H) SUPPLY: Na napájanie jednosmerným
napätím 12 V, napr. pri výmene akumulátora alebo
na napájanie 12 V= spotrebičov.
Stlačte tlačidlo „Mode“ -> prepnutie z funkcie RECOND do funkcie SUPPLY
Varovanie! Ochrana proti prepólovaniu nie je k
dispozícii. Pri prepólovaní hrozí riziko poškodenia
nabíjačky a akumulátora / palubnej siete vozidla, resp. pripojeného spotrebiča. Pri pripájaní
bezpodmienečne dbajte na správnu polaritu.
Dbajte na dodržiavanie max. odberu prúdu (pozri
technické údaje) spotrebiča.
Upozornenia:
Jednosmerné napätie, ktoré je k dispozícii
•
(zobrazené na displeji), závisí od zaťaženia a
bez zaťaženia má hodnotu cca 14,5 V.
Táto funkcia je vhodná pre spotrebiče, ktoré
•
sa pripájajú k zapaľovaču cigariet vo vozidle.
Dodržiavajte návod na používanie vášho 12 V
•
spotrebiča.
5.3 Nabíjanie akumulátora:
Z akumulátora uvoľnite alebo odstráňte zátky
•
(ak sú prítomné).
Skontrolujte hladinu elektrolytu vášho akumu-
•
látora. V prípade potreby doplňte destilovanú
vodu (ak to je možné). Pozor! Elektrolyt (kyselina) je žieravý. Ostreknutie kyselinou je potrebné dôkladne opláchnuť vodou, v prípade
potreby vyhľadať lekára.
Zapojte najskôr červený nabíjací kábel na
•
plusový pól batérie.
Potom z akumulátora a palivového potrubia,
•
pripojeného ku karosérii, odpojte čierny nabíjací kábel.
Varovanie! V normálnom prípade je záporný
•
pól akumulátora pripojený ku karosérii a pri
nabíjaní postupujte podľa vyššie uvedeného
opisu. Vo výnimočných prípadoch môže byť
ku karosérii pripojený kladný pól akumulátora
(kladné ukostrenie). V takomto prípade čierny
nabíjací kábel pripojte k zápornému pólu
akumulátora. Potom červený nabíjací kábel,
odstránený z akumulátora a palivového potrubia, pripojte ku karosérii.
Po pripojení akumulátora k nabíjačke môžete
•
nabíjačku pripojiť do zásuvky (pozri technické
údaje). Teraz môžete zmeniť nastavenia nabíjania (pozri odsek 5.2).
Pozor! Pri nabíjaní sa môže uvoľňovať
•
nebezpečný výbušný plyn, preto je potrebné
počas nabíjania zabrániť vzniku iskier a otvorenému ohňu. Nebezpečenstvo výbuchu!
Dbajte na riadne vetranie v miestnosti.
Ak sa na displeji zobrazí „FUL“ (a všetky
•
dieliky, obr. 2/pol. K), je nabíjanie ukončené.
Nabíjačka impulzným nabíjaním udržiava
akumulátor na úrovni 95 – 100 % dostupnej
kapacity akumulátora. Ak sa to na nabíjačke
zobrazí už po niekoľkých minútach, znamená
to, že kapacita akumulátora je nízka. Akumulátor sa musí vymeniť.
Výpočet doby nabíjania (obr. 3a-3c)
Doba nabíjania závisí od stavu nabitia batérie. V
prípade prázdnej batérie sa môže približná doba
nabíjania do stavu cca 80 % nabitia vypočítať pomocou tohto vzorca:
kapacita batérie v Ah
Doba nabíjania/h =
amp. (nabíjací prúd)
Nabíjací prúd by mal byť v rozsahu 1/10 až 1/6
kapacity batérie.
- 62 -

SK
5.4 Indikátor chýb (obr. 2 / pol. G)
Indikátor chýb bliká (svieti) v nasledujúcich prípadoch:
Ak je nabitie batérie menšie ako 3,5 V alebo
•
väčšie ako 15 V. Batéria nie je vhodná na
nabíjanie alebo je poškodená. Aj iné chyby
batérie môžu spôsobiť, že sa batéria nedá
nabiť.
Ak boli pripájacie svorky pripojené k pólom
•
akumulátora s nesprávnou polaritou. Ochrana proti prepólovaniu chráni akumulátor a
nabíjačku pred poškodením. Nabíjačku odpojte od akumulátora a nabíjanie zopakujte.
Opatrne! Ochrana proti prepólovaniu v programe SUPPLY nie je k dispozícii.
Ak dôjde ku skratu medzi oboma svorkami
•
(kovové časti svoriek sa dotýkajú). Ochrana
proti skratu zabezpečí, aby sa nabíjačka
nepoškodila.
5.5 Ukončenie nabíjania batérie
Vytiahnite elektrickú zástrčku von zo zásuvky.
•
Uvoľnite najskôr čierny nabíjací kábel z ka-
•
rosérie.
Potom uvoľnite červený nabíjací kábel z plu-
•
sového pólu batérie.
Pozor! V prípade pozitívneho uzemnenia
•
uvoľnite najskôr červený nabíjací kábel z
karosérie a potom čierny nabíjací kábel z
batérie.
Znovu naskrutkujte alebo založte zátky baté-
•
rie (ak sú na batérii).
Upozornenie! Ak je sieťová zástrčka vytiahnu-
tá, nabíjacie káble však naďalej zostanú v
batérii, odoberá nabíjačka z batérie malý prúd.
Preto odporúčame, aby ste nabíjačku, keď ju
nepoužívate, kompletne odpojili od batérie.
6. Ochrana proti preťaženiu
Nabíjačka je v nabíjacích programoch 12 V STD,
12 V AGM, 12 V zima a 12 V M elektronicky chránená proti preťaženiu, skratu a prepólovaniu. Okrem toho obsahuje jednu alebo niekoľko jemných
poistiek. Chybná poistka sa musí vymeniť za novú
s rovnakou hodnotou prúdu (v A). V prípade potreby sa obráťte na váš zákaznícky servis.
7. Údržba a starostlivosť o batériu
Dbajte na to, aby bola Vaša batéria vždy pev-
•
ne zabudovaná.
Musí byť zaručené bezchybné zapojenie na
•
sieťové rozvody elektrického zariadenia.
Batériu udržiavať v čistom a suchom stave.
•
Prípojné svorky zľahka namažte tukom neobsahujúcim kyseliny a odolným kyselinám
(vazelínou).
V prípade batérií, ktoré nie sú bezúdržbové,
•
kontrolujte cca každé 4 týždne výšku hladiny
kyseliny a v prípade potreby dolejte destilovanú vodu.
8. Čistenie, údržba a objednanie
náhradných dielov
Nebezpečenstvo!
Pred všetkými údržbovými a čistiacimi prácami
vytiahnite kábel zo siete.
8.1 Čistenie
Udržujte ochranné zariadenia, vzduchové
•
otvory a kryt motora vždy v čistom stave bez
prachu a nečistôt. Utrite prístroj čistou utierkou alebo ho vyčistite vyfúkaním stlačeným
vzduchom pri nastavení na nízky tlak.
Odporúčame, aby ste prístroj čistili priamo po
•
každom použití.
Čistite prístroj pravidelne pomocou vlhkej
•
utierky a malého množstva tekutého mydla.
Nepoužívajte žiadne agresívne čistiace prostriedky ani riedidlá; tieto prostriedky by mohli
napadnúť umelohmotné diely prístroja. Dbajte
na to, aby sa do vnútra prístroja nedostala
voda. Vniknutie vody do elektrického prístroja
zvyšuje riziko úrazu elektrickým prúdom.
Nabíjačku uschovajte pri skladovaní v suchej
•
miestnosti. Nabíjacie svorky sa musia čistiť
od korózie.
8.2 Údržba
Vo vnútri prístroja sa nenachádzajú žiadne ďalšie
diely vyžadujúce údržbu.
8.3 Objednávanie náhradných dielov:
Pri objednávaní náhradných dielov je potrebné
uviesť nasledovné údaje:
Typ prístroja
•
Výrobné číslo prístroja
•
Identifikačné číslo prístroja
•
Číslo potrebného náhradného dielu
•
- 63 -

Aktuálne ceny a informácie nájdete na stránke
www.isc-gmbh.info
9. Likvidácia a recyklácia
Prístroj sa nachádza v obale za účelom zabránenia poškodeniu pri transporte. Tento obal je vyrobený zo suroviny a tým pádom je ho možné znovu
použiť alebo sa môže dať do zberu na recykláciu
surovín. Prístroj a jeho príslušenstvo sa skladajú
z rôznych materiálov, ako sú napr. kovy a plasty.
Poškodené prístroje nepatria do domového odpadu. Prístroj by sa mal odovzdať k odbornej likvidácii na príslušnom zbernom mieste. Pokiaľ Vám
nie je známe takéto zberné miesto, informujte sa
prosím na miestnej samospráve.
SK
- 64 -

SK
10. Pokyny k odstraňovaní porúch
Keď sa s prístrojom správne zaobchádza, nemali by sa vyskytnúť žiadne poruchy. V prípade výskytu
poruchy preverte nasledujúce možnosti ešte predtým, ako budete kontaktovať zákaznícky servis.
Porucha Možná príčina Pomoc pri odstraňovaní
Spúšťa sa ochrana
proti preťaženiu
- Nesprávne zapojené nabíjacie
kliešte
- Červené nabíjacie kliešte zapojiť na
plusový pól, čierne nabíjacie kliešte
na karosériu
- Kontakt medzi nabíjacími kliešťami
- Batéria je poškodená
Len pre krajiny EÚ
Neodstraňujte elektrické prístroje ako domový odpad!
Podľa Európskej smernice 2012/19/ES o odpade z elektrických a elektronických zariadení (OEEZ) a v
súlade s národnými právnymi predpismi sa musia použité elektronické prístroje odovzdať do triedeného
zberu a musí sa zabezpečiť ich špecifi cké spracovanie v súlade s ochranou životného prostredia (recy-
klácia).
- Odstrániť kontakt
- Nechajte batériu skontrolovať odborníkovi, prípadne vymeniť
Recyklačná alternatíva k výzve na spätné zaslanie výrobku:
Majiteľ elektrického prístroja je alternatívne namiesto spätnej zásielky povinný spolupracovať pri riadnej recyklácii prístroja v prípade vzdania sa jeho vlastníctva. Starý prístroj môže byť za týmto účelom
taktiež prenechaný zbernému miestu, ktoré vykoná odstránenie v zmysle národného zákona o recyklácii
a odpadovom hospodárstve. Netýka sa to dielov príslušenstva, priložených k starým prístrojom a pomocných prostriedkov bez elektronických komponentov.
Dodatočná tlač alebo iné reprodukovanie dokumentácie a sprievodných dokladov výrobkov, taktiež ich
častí, je prípustná len s výslovným súhlasom spoločnosti iSC GmbH.
Technické zmeny vyhradené
- 65 -

SK
Záručný list
Vážená zákazníčka, vážený zákazník,
naše výrobky podliehajú prísnej kontrole kvality. V prípade, že nebude prístroj napriek tomu bezchybne
fungovať, je nám to veľmi ľúto a prosíme Vás, aby ste sa obrátili na našu servisnú službu na adrese
uvedenej na tomto záručnom liste. Radi Vám budeme k dispozícii taktiež telefonicky na uvedenom servisnom telefónnom čísle. Pre uplatnenie nárokov na záručné plnenie platia nasledujúce podmienky:
1. Tieto záručné podmienky sa týkajú výlučne štandardných spotrebiteľov, t.j. takých osôb, ktoré tento
výrobok nechcú používať na účely v rámci svojich remeselníckych činností ani na iné samostatne
zárobkové činnosti. Tieto záručné podmienky upravujú dodatočné záručné plnenia, ktoré nižšie
uvedený výrobca poskytuje kupujúcim svojich nových prístrojov dodatočne k zákonnej záruke. Vaše
zákonné nároky na záruku nie sú touto zárukou dotknuté. Naše záručné plnenie je pre Vás zadarmo.
2. Záručné plnenie sa vzťahuje výlučne len na nedostatky na Vami zakúpenom novom prístroji nižšie
uvedeného výrobcu, ktoré sú spôsobené chybami materiálu alebo výrobnými chybami, a podľa
nášho uváženia sa obmedzuje na odstránenie týchto nedostatkov na prístroji alebo výmenu prístroja. Prosím, dbajte na to, že naše prístroje neboli svojim určením konštruované na profesionálne,
remeselnícke ani odborné použitie. Táto záručná zmluva sa preto neuzatvára, ak sa prístroj počas
záručnej doby používal v profesionálnych, remeselníckych alebo priemyselných prevádzkach, alebo
ak bol vystavený namáhaniu rovnocennému s takýmto použitím.
3. Z našej záruky sú vylúčené:
- Škody na prístroji, ktoré boli spôsobené nedodržaním montážneho návodu alebo na základe neodbornej inštalácie, nedodržaním návodu na použitie (ako napr. pripojením na nesprávne sieťové
napätie alebo druh prúdu) alebo nedodržaním pokynov pre údržbu a bezpečnostných pokynov
alebo vystavením prístroja abnormálnym poveternostným podmienkam alebo nedostatočnou
starostlivosťou a údržbou.
- Škody na prístroji, ktoré boli spôsobené zneužívaním alebo nesprávnym používaním (ako napr.
preťaženie prístroja alebo použitie neprípustných pracovných nástrojov alebo príslušenstva),
vniknutím cudzích telies do prístroja (ako napr. piesok, kamene alebo prach, prepravné
poškodenia), použitím násilia alebo cudzieho pôsobenia (napr. škody spôsobené pádom).
- Škody na prístroji alebo na častiach prístroja, ktoré zodpovedajú príslušnému pracovnému,
bežnému alebo inému prirodzenému opotrebeniu.
4. Doba záruky je 24 mesiacov a začína plynúť od dátumu zakúpenia prístroja. Nároky na záruku sa
musia uplatniť pred koncom uplynutia záručnej doby do dvoch týžd
Uplatnenie nárokov na záruku po uplynutí záručnej doby je vylúčené. Oprava alebo výmena prístroja nevedie k predĺženiu záručnej doby ani nedochádza na základe tohto plnenia ku vzniku novej
záručnej doby pre prístroj ani pre akékoľvek inštalované náhradné diely. To platí taktiež pri použití
miestneho servisu.
5. Pre uplatnenie Vášho nároku, prosím nahláste defektný prístroj na adrese: www.isc-gmbh.info.
Prosíme, aby ste mali k dispozícii účtenku alebo iné doklady o zakúpení nového prístroja. Prístroje, ktoré budú zaslané bez príslušných dokladov alebo bez typového štítku, budú vylúčené zo
záručného plnenia kvôli nedostatočnej možnosti identifi kácie. Ak spadá defekt prístroja pod naše
záručné plnenie, dostanete obratom naspäť opravený alebo nový prístroj.
ňov od zistenia nedostatku.
Samozrejme Vám radi opravíme nedostatky na prístroji na Vaše náklady, ak tieto nedostatky nespadajú
alebo už nespadajú do rozsahu záruky. Prosím, pošlite nám v takom prípade prístroj na našu servisnú
adresu.
Ohľadne opotrebovávaných, spotrebných a chýbajúcich dielov poukazujeme na obmedzenia tejto
záruky podľa servisných informácií uvedených v tomto návode na obsluhu.
- 66 -

NL
Gevaar!
Bij het gebruik van toestellen dienen enkele
veiligheidsmaatregelen te worden nageleefd om
lichamelijk gevaar en schade te voorkomen. Lees
daarom deze handleiding / veiligheidsinstructies
zorgvuldig door. Bewaar deze goed zodat u de informatie op elk moment kunt terugvinden. Mocht
u dit toestel aan andere personen doorgeven,
gelieve dan deze handleiding / veiligheidsinstructies mee te geven. Wij zijn niet aansprakelijk
voor ongevallen of schade die te wijten zijn aan
niet-naleving van deze handleiding en van de veiligheidsinstructies.
1. Veiligheidsaanwijzingen
De overeenkomstige veiligheidsinstructies vindt u
in de bijgaande brochure.
Gevaar!
Lees alle veiligheidsinstructies en aanwijzingen. Nalatigheden bij de inachtneming van de
veiligheidsinstructies en aanwijzingen kunnen
elektrische schok, brand en/of zware letsels tot
gevolg hebben. Bewaar alle veiligheidsinstruc-
ties en aanwijzingen voor de toekomst.
Dit toestel kan door kinderen vanaf 8 jaar en ouder en ook door personen met verminderde fysieke, sensorische of mentale vaardigheden of een
gebrek aan ervaring en kennis worden gebruikt,
mits deze onder toezicht staan of met betrekking
tot het veilige gebruik van het toestel geïnstrueerd
werden en begrijpen welke gevaren van het toestel kunnen uitgaan. Kinderen mogen niet met het
toestel spelen. Reiniging en onderhoud door de
gebruiker mogen niet zonder toezicht door kinderen worden uitgevoerd.
Afvalbeheer
Verwijderen van batterijen: enkel via motorvoerjtuig-werkplaatsen, speciale deponeerplaatsen
of inzamelplaatsen voor gevaarlijke afvalstoff en.
Informeer u bij het locale gemeentebestuur.
Verklaring van het informatiebord op het apparaat (zie fi g. 4)
1 = Apparaat is randgeaard
2 = WAARSCHUWING – Handleiding lezen om
een verwondingsrisico te verminderen!
3 = Waarde van de zekering op elektronische
printplaat
4 = Isoleren van het net, voordat verbindingen
met de accu worden gesloten of geopend.
OPGELET: Explosieve gassen. Vlammen
en vonken vermijden. Tijdens het laden voor
voldoende beluchting zorgen.
2. Beschrijving van het gereedschap
en leveringsomvang
2.1 Beschrijving van het gereedschap
(fi g. 1)
1 Functieknop
2 LCD-display
3 Laadkabel zwart (-)
4 Laadkabel rood (+)
5 Ophangoog
6 Netsnoer
2.2 Leveringsomvang
Open de verpakking en neem het toestel
•
voorzichtig uit de verpakking.
Verwijder het verpakkingsmateriaal alsmede
•
verpakkings-/transportbeveiligingen (indien
aanwezig).
Controleer of de leveringsomvang compleet
•
is.
Controleer het toestel en de accessoires op
•
transportschade.
Bewaar de verpakking indien mogelijk tot het
•
verloop van de garantieperiode.
Gevaar!
Het toestel en het verpakkingsmateriaal zijn
geen speelgoed voor kinderen! Kinderen mogen niet met plastic zakken, folies en kleine
stukken spelen! Er bestaat inslik- en verstikkingsgevaar!
Originele handleiding
•
Veiligheidsinstructies
•
3. Reglementair gebruik
De lader is bedoeld voor het laden van niet
onderhoudsvrije of onderhoudsvrije 12V loodzuur
accu´s (natte / Ca/Ca- / EFB-accu´s) en voor
loodgel- en AGM-accu´s die worden ingezet bij
voertuigen.
Het 12V M laadprogramma is geschikt voor
het behoud van lading en het laden van
accu’s met kleine capaciteit. Met de SUPPLY
functie kan het apparaat ook worden ingezet
voor buff erstroomvoorziening, bijv. tijdens de
- 67 -

NL
vervanging van een accu of voor het bedrijf van
12V DC verbruikers (rekening houden met max.
krachtontneming). Het RECOND programma
is uitsluitend bedoeld voor het regenereren van
diep ontladen loodzuur accu’s (niet voor AGM
en gel accu’s). Gebruik dit programma slechts
kortstondig en alleen onder toezicht.
Het apparaat mag niet worden gebruikt om lithium-ijzerfosfaat accu´s (bijv. LiFePO4) of andere
lithium accu´s te laden. Het apparaat is alleen bedoeld voor mobiele inzet, en niet voor de inbouw
in caravans, campers of gelijkaardige voertuigen.
De lader moet tegen regen en sneeuw worden
beschermd.
De machine mag slechts voor werkzaamheden
worden gebruikt waarvoor ze bedoeld is. Elk
ander verder gaand gebruik is niet reglementair.
Voor daaruit voortvloeiende schade of verwondingen van welke aard dan ook is de gebruiker/
bediener, niet de fabrikant, aansprakelijk.
Wij wijzen erop dat onze gereedschappen overeenkomstig hun bestemming niet geconstrueerd
zijn voor commercieel, ambachtelijk of industrieel
gebruik. Wij geven geen garantie indien het gereedschap in ambachtelijke of industriële bedrijven alsmede bij gelijk te stellen activiteiten wordt
gebruikt.
Accucapaciteit ‘STD/AGM/Winter’: ...... 20-150 Ah
Accucapaciteit ‘12V M’ (max. 1A): ........... 2-32 Ah
Functie ‘SUPPLY’ uitgang max.: .....................5 A
Laadprogramma ‘RECOND’: .... 15,3 V DC / 1,5 A
Beschermklasse: .............................................. II
Beschermklasse: ........................................ IP65
Omgevingstemperatuur: ................- 20°C – 40°C
CE-BC 10 M
Netspanning: ...........................220-240 V ~ 50Hz
Nominale krachtontneming max.: ............. 160 W
Nominale uitgangsspanning: .................. 12 V DC
Nominale uitgangsstroom: ........................... 10 A
Accucapaciteit ‘STD/AGM/Winter’: ...... 30-200 Ah
Accucapaciteit ‘12V M’ (max. 2 A): ..........3-60 Ah
Functie ‘SUPPLY’ uitgang max.: .....................8 A
Laadprogramma ‘RECOND’: .... 15,3 V DC / 2,5 A
Beschermklasse: .............................................. II
Beschermklasse: ........................................ IP65
Omgevingstemperatuur: ................- 20°C – 40°C
5. Bediening
Controleer of de gegevens vermeld op het typeplaatje overeenkomen met de gegevens van het
stroomnet, alvorens het apparaat aan te sluiten.
Gevaar! Laad geen bevroren accu´s.
4. Technische gegevens
CE-BC 4 M
Netspanning: ...........................220-240 V ~ 50Hz
Nominale krachtontneming max.: ............... 70 W
Nominale uitgangsspanning: .................. 12 V DC
Nominale uitgangsstroom: ............................. 4 A
Accucapaciteit ‘STD/AGM/Winter’: ......10-120 Ah
Accucapaciteit ‘12V M’ (max. 1A): ........... 2-32 Ah
Functie ‘SUPPLY’ uitgang max.: .....................3 A
Laadprogramma ‘RECOND’: .... 15,3 V DC / 1,5 A
Beschermklasse: .............................................. II
Beschermklasse: ........................................ IP65
Omgevingstemperatuur: ................- 20°C – 40°C
CE-BC 6 M
Netspanning: ...........................220-240 V ~ 50Hz
Nominale krachtontneming max.: ............. 100 W
Nominale uitgangsspanning: .................. 12 V DC
Nominale uitgangsstroom: ............................. 6 A
Gelieve de instructies in de handleidingen
voor auto, radio, navigatiesysteem enz. in
acht te nemen.
Aanwijzing bij de automatische lading
(alleen laadprogramma’s 12V STD, 12V AGM,
12V Winter, 12V M)
De lader is een microprocessorgestuurd automatisch werkend apparaat, d.w.z. hij is bijzonder
geschikt voor het laden van onderhoudsvrije
accu´s en voor het langdurig laden en het behoud
van lading van accu´s die niet permanent in gebruik zijn, bijv. voor oldtimers, recreatievoertuigen,
zitmaaiers en dergelijke. Omwille van de geïntegreerde microprocessor gebeurt het laden in meerdere fases. De laatste laadfase, het behoud van
lading, houdt de accucapaciteit bij 95 – 100 % en
zo de accu altijd vol geladen. Op het laadproces
hoeft niet te worden toegezien. Laat de accu bij
lading gedurende een langere periode echter niet
zonder toezicht, opdat u de lader bij een storing
met der hand van het stroomnet kunt isoleren.
- 68 -

NL
5.1 Verklaring van de symbolen (afb. 2)
A Laden van een 12V accu (loodzuur accu en
gel accu).
B Laden van een 12V AGM accu.
C Laden van een 12V accu (loodzuur accu,
AGM accu en gel accu) in de wintermodus
bij een omgevingstemperatuur van -20°C tot
+5°C. Gevaar! Laad geen bevroren accu´s.
D Laden van een 12V accu (loodzuur accu,
AGM accu en gel accu) in de behoudmodus.
E Laadspanning in volt, accu defect (BAt) / vol
geladen (FUL) / verkeerd gepoold aangeslo-
ten of kortsluiting aan klemmen (Err).
F Herstellen van het laadvermogen van ont-
laden loodzuur accu’s met verhoogde laad-
spanning.
G Klemmen verkeerd aangesloten (verkeerd
gepoold) of kortsluiting.
H Spanningsvoeding bijv. bij vervanging van
een accu.
K Laadtoestand van de accu in procent (1 deel-
streepje = 25%) en laadproces (deelstreepje
brandt = accu heeft de laadtoestand bereikt,
deelstreepje in het accusymbool knippert
= accu wordt tot de volgende laadtoestand
geladen, alle deelstreepjes branden = accu is
vol geladen).
5.2 Laadprogramma’s instellen (afb. 2)
Instructies:
Door de ‘Mode’ toets (afb. 1, pos. 1) in
•
te drukken wordt omgeschakeld naar de
verschillende programma’s. Het bij het pro-
gramma horende symbool verschijnt op het
display. De accu’s worden geladen met het
weergegeven programma.
Om naar het RECOND programma te gaan
•
drukt u de ‘Mode’ toets 5 seconden in.
Om van het RECOND programma of de SUP-
•
PLY functie terug te gaan naar het 12V STD
programma drukt u de ‘Mode’ toets eveneens
5 seconden in.
Als de spanning van de accu lager is dan
•
3,5V of hoger dan 15V, dan is de accu niet
geschikt om te laden of defect. De melding
‘BAt’ verschijnt op het LCD-display. Het sym-
bool ‘G’ knippert. Ook andere accufouten
kunnen ertoe leiden dat de accu niet kan wor-
den geladen.
Als er tijdens de SUPPLY functie sprake is
•
van een kortsluiting tussen de laadklemmen,
dan verschijnt de melding ‘Lo V’ op het LCD-
display. Het symbool ‘G’ knippert.
Als de lader uit de contactdoos wordt getrok-
•
ken, dan wordt het als laatste ingestelde laad-
programma opgeslagen (behalve RECOND
en SUPPLY) en is bij het volgende gebruik
vooringesteld.
Alleen CE-BC 4M: Als de laadtangen wor-
•
den verbonden met de accu, dan ontneemt
de lader een zeer geringe stroom uit de accu
en verschijnt kort het LCD-display. Dit is geen
fout.
5.2.1 Standaard laadprogramma’s
A) 12V STD: Laadprogramma voor loodzuur
accu’s (natte, Ca/Ca-, EFB-accu’s) en gel accu’s.
Na eerste inbedrijfstelling van de lader verschijnt
12V STD op het display.
B) 12V AGM: Laadprogramma voor AGM accu’s,
‘Mode’ toets indrukken –> omschakelen van 12V
STD op 12V AGM laadprogramma.
5.2.2 Speciale laadprogramma’s
C) Winter: Aanbevolen laadprogramma bij koud
weer (-20°C - +5°C omgevingstemperatuur) voor
normale loodzuur accu’s (natte, Ca/Ca-accu’s),
‘Mode’ toets indrukken –> omschakelen van 12V
AGM op ‘Winter’ laadprogramma.
D) 12V M: Laadprogramma voor accu’s met kleine capaciteit (z. Technische gegevens) en voor
het behoud van lading van alle onder 3. Doelmatig gebruik genoemde accu’s.
‘Mode’ toets indrukken –> omschakelen van ‘Winter’ op ‘12 M’ laadprogramma.
F) RECOND: Laadprogramma met verhoogde
laadeindspanning en constante stroomlading,
uitsluitend voor het herstellen van het laadvermogen van diep ontladen loodzuur accu’s.
Het RECOND proces moet elk half uur worden
gecontroleerd en mag een duur van 4h niet overschrijden. Neem de instructies van de fabrikant
van de accu in acht.
Belangrijk! Om naar dit programma te gaan
moet de ‘Mode’ toets (afb. 1, pos. 1) 5 seconden
lang worden ingedrukt.
Waarschuwing!
Door vrijkomende gassen ontstaat knal-
•
gas – explosiegevaar! Voor goede ventilatie zorgen.
Het RECOND programma alleen gebruiken
•
bij een loodzuur accu en alleen zoals hieronder beschreven. Let erop geen accuzuur te
morsen. Accuzuur is bijtend. Veiligheidsinstructies in acht nemen.
- 69 -

NL
In geen geval gebruiken bij een accu met
•
gesloten bouwwijze (VRLA accu zoals bijv.
AGM of gel accu). Neem de instructies van de
fabrikant van de accu in acht.
Alleen gebruiken bij een vrijstaande, gede-
•
monteerde accu en niet in ingebouwde toe-
stand met verbinding met de boordelektroni-
ca van uw voertuig. Verhoogde laadspanning
kan de boordelektronica beschadigen. Neem
de handleiding van uw voertuig in acht of
wend u tot de fabrikant.
RECOND laadprogramma gebruiken
Sluit de lader zoals beschreven in hoofdstuk
•
5.3 aan aan een loodzuur accu en controleer
het laadproces om het half uur.
Na ten laatste 4h of zodra de accu hoorbaar
•
gast (blubbert), verwijdert u de lader zoals
beschreven in hoofdstuk 5.3.
Controleer indien mogelijk de zuurstand en
•
vul, indien mogelijk, de accucellen evt. alleen
met gedestilleerd water bij. De zuurstand ligt
idealiter tussen de opgedrukte max. en min.
waarde en moet voor alle cellen gelijk zijn.
Schroef het accudeksel, indien voorhanden,
weer vast.
5.2.3 Aanvullende functie
H) SUPPLY: Voor de 12V gelijkspanningsvoeding,
bijv. bij vervanging van een accu of het bedrijf van
12V DC verbruikers.
‘Mode’ toets indrukken –> omschakelen van RECOND op SUPPLY functie.
Waarschuwing! De beveiliging tegen verkeerde
poling staat niet ter beschikking. Bij verkeerde
poling bestaat het gevaar van schade aan de lader en aan de accu/het boordnet van het voertuig
resp. aan de aangesloten verbruiker. Let absoluut
op de juiste polariteit bij het aansluiten. Houd
rekening met de max. krachtontneming (z. Technische gegevens) van de verbruiker.
Aanwijzingen:
De geleverde gelijkspanning (weergegeven
•
op het display) is van de last afhankelijk en
bedraagt zonder belasting ca. 14,5V.
De functie kan worden gebruikt voor verbru-
•
ikers die zijn aangesloten aan een sigaret-
tenaansteker in het voertuig.
Neem de handleiding van uw 12V verbruiker
•
in acht.
5.3 Laden van de accu
Maak het accudeksel (indien voorhanden) los
•
of haal het van de accu af.
Controleer de zuurstand van uw accu. Indien
•
nodig giet u er gedestilleerd water in (indien
mogelijk). Opgelet! Accuzuur is bijtend. Zuurspetters meteen grondig afspoelen met veel
water, indien nodig een arts raadplegen.
Sluit eerst de rode laadkabel aan op de
•
pluspool van de accu.
Daarna wordt de zwarte laadkabel, op af-
•
stand van accu en benzineleiding, aangesloten aan de carrosserie.
Waarschuwing! Normaal gezien is de nega-
•
tieve accupool verbonden met de carrosserie
en gaat u om te laden te werk zoals hierboven
beschreven. In uitzonderingsgevallen kan
het mogelijk zijn dat de positieve accupool is
verbonden met de carrosserie (positieve aarding). In dit geval sluit u de zwarte aardkabel
aan op de minpool van de accu. Vervolgens
verbindt u de rode laadkabel, op afstand van
accu en benzineleiding, met de carrosserie.
Nadat de accu is aangesloten aan de lader
•
kunt u de lader aansluiten aan een contactdoos (z. Technische gegevens). U kunt nu de
laadinstellingen wijzigen (z. hoofdstuk 5.2).
Opgelet! Door het laden kan gevaarlijk
•
knalgas ontstaan; daarom tijdens het laden
vonkvorming en open vuur vermijden. Explosiegevaar! Zorg voor een goede beluchting in
de ruimtes.
Als op het LCD-display ‘FUL’ verschijnt (en
•
alle deelstreepjes (afb. 2, pos. K)), dan is het
laadproces afgesloten. De lader houdt de
accu door impulslading op 95 – 100% beschikbare capaciteit. Mocht de lader dit al na
enkele minuten aangeven, dan wijst dit erop
dat de accucapaciteit gering is. De accu moet
worden vervangen.
Berekening van de laadtijd (afbeelding 3)
De laadtijd wordt bepaald door de laadtoestand
van de accu. Bij een lege accu kan de laadtijd bij
benadering tot ca. 80% lading met de volgende
formule worden berekend:
batterijcapaciteit in Ah
laadtijd/h =
amp. (laadstroom)
De laadstroom moet 1/10 tot 1/6 van de batterijcapaciteit bedragen.
- 70 -

NL
5.4 Foutindicatie (afb. 2, pos. G)
De foutindicatie knippert (brandt) in de volgende
gevallen:
Wanneer de spanning van de accu lager dan
•
3,5 V of hoger dan 15 V is. De accu is niet
geschikt om te laden of defect. Ook andere
accufouten kunnen ertoe leiden dat de accu
niet kan worden geladen.
Wanneer de aansluitklemmen met verkeer-
•
de polariteit werden aangesloten aan de
accu. De beveiliging tegen verkeerde poling
garandeert dat accu en lader niet worden
beschadigd. Verwijder de lader van de accu
en start het laadproces nog een keer. Voor-
zichtig! In het SUPPLY programma staat de
beveiliging tegen verkeerde poling niet ter
beschikking.
Wanneer er sprake is van een kortsluiting van
•
de beide aansluitklemmen (metalen delen en
klemmen raken elkaar). De beveiliging tegen
kortsluiting garandeert dat de lader niet wordt
beschadigd.
5.5 Laden van de accu beëindigen
Trek de netstekker uit het stopcontact.
•
Neem eerst de zwarte laadkabel los van de
•
carrosserie.
Neem daarna de rode laadkabel los van de
•
pluspool van de batterij.
Opgelet! Bij positieve aarding maakt u eerst
•
de rode laadkabel los van de carrosserie en
dan de zwarte laadkabel van de accu.
Batterijdoppen terug opschroeven of erop
•
drukken (indien aanwezig).
Aanwijzing! Als de netstekker wordt uitgetrokken
maar de laadkabel verder blijft aangesloten aan
de accu, dan ontneemt de lader een geringe
stroom uit de accu. Wij raden daarom aan om de
lader als hij niet wordt gebruikt altijd compleet van
de accu te isoleren.
6. Beveiliging tegen overbelasting
De lader is in de laadprogramma’s 12V STD, 12V
AGM, 12V Winter en 12V M elektronisch beveiligd
tegen verkeerde poling en kortsluiting. Bovendien
zijn er een of meerdere veiligheden voor zwakstroom ingebouwd. Bij een defect van de zekering
moet deze vervangen en door een zekering met
dezelfde ampèrewaarde vervangen worden.
Gelieve u indien nodig te wenden tot onze voor u
verantwoordelijke klantendienst.
7. Onderhoud van de batterij
Let er steeds op dat uw batterij steeds vast
•
ingebouwd is.
Er moet een perfecte verbinding met het
•
leidingnet van de elektrische installatie verzekerd zijn.
Batterij schoon en droog houden. Aansluit-
•
klemmen lichtjes invetten met een zuurvrij en
zuurvast vet (vaseline).
Bij niet onderhoudsvrije batterijen ca. om de
•
4 weken hoogte van het zuurpeil controleren
en, indien nodig, enkel gedestilleerd water
bijvullen.
8. Reiniging, onderhoud en
bestellen van wisselstukken
Gevaar!
Trek vóór alle schoonmaakwerkzaamheden de
netstekker uit het stopcontact.
8.1 Reiniging
Hou de veiligheidsinrichtingen, de ventila-
•
tiespleten en het motorhuis zo veel mogelijk
vrij van stof en vuil. Wrijf het toestel met een
schone doek af of blaas het met perslucht bij
lage druk schoon.
Het is aan te bevelen het toestel direct na elk
•
gebruik te reinigen.
Reinig het toestel regelmatig met een vochti-
•
ge doek en wat zachte zeep. Gebruik geen
reinigings- of oplosmiddelen; die zouden de
kunststofcomponenten van het toestel kunnen aantasten. Let er goed op dat geen water
in het toestel terechtkomt. Door binnendringen van water in een elektrische apparatuur
verhoogt het risico van een elektrische schok.
De lader moet in een droge ruimte worden
•
opgeborgen. De laadklemmen moeten van
corrosie worden ontdaan.
8.2 Onderhoud
In het toestel zijn er geen andere te onderhouden
onderdelen.
8.3 Bestellen van wisselstukken:
Gelieve bij het bestellen van wisselstukken volgende gegevens te vermelden:
Type van het toestel
•
Artikelnummer van het toestel
•
Ident-nummer van het toestel
•
Wisselstuknummer van het benodigd stuk
•
- 71 -

Actuele prijzen en info vindt u terug onder
www.isc-gmbh.info
9. Verwijdering en recyclage
Het toestel bevindt zich in een verpakking om
transportschade te voorkomen. Deze verpakking
is een grondstof en bijgevolg herbruikbaar of kan
naar de grondstofkringloop worden teruggevoerd. Het toestel en zijn accessoires bestaan uit
diverse materialen, zoals b.v. metaal en kunststof.
Defecte toestellen horen niet thuis in het huisvuil.
Om zich van het toestel naar behoren te ontdoen
dient het naar een geschikte verzamelplaats te
worden gebracht. Als u geen verzamelplaats kent
gelieve u dan bij de gemeente te informeren.
NL
- 72 -

NL
10. Aanwijzingen omtrent het verhelpen van fouten
Als het apparaat naar behoren wordt gebruikt zouden er zich geen storingen mogen voordoen. In geval
van problemen gelieve eerst de volgende mogelijkheden na te gaan alvorens de klantendienst te verwittigen.
Storing Mogelijke oorzaak Verhelpen
Apparaat laadt niet - Laadtangen fout aangesloten
- Rode laadtang op de pluspool,
zwarte laadtang op de carrosserie
aansluiten
- Onderling contact van de laadtangen
- Batterij is defect
Enkel voor EU-landen
Elektrisch gereedschap hoort niet bij het huisvuil thuis!
Volgens de Europese richtlijn 2012/19/EG op afgedankte elektrische en elektronische toestellen en
omzetting in nationaal recht dienen afgedankte elektrische gereedschappen afzonderlijk te worden verzameld en milieuvriendelijk te worden gerecycleerd.
- Contact opheff en
- Batterij door een vakman laten nazien en, indien nodig, vervangen
Recyclagealternatief i.p.v. het toestel terug te sturen:
De eigenaar van het elektrische toestel is alternatief verplicht, i.p.v. het toestel terug te sturen, mede te
werken bij de behoorlijke recyclage in geval hij zich van het eigendom ontdoet. Het afgedankte toestel
kan hiervoor ook bij een verzamelplaats worden afgegeven die voor een verwijdering als bedoeld in de
wetgeving in zake recyclage en afvalverwerking zorgt. Hieronder vallen niet bij de afgedankte toestellen
gevoegde accessoires en hulpmiddelen zonder elektrische componenten.
Nadruk of andere reproductie van documentatie en geleidepapieren van de producten, geheel of gedeeltelijk, enkel toegestaan mits uitdrukkelijke toestemming van iSC GmbH.
Technische wijzigingen voorbehouden
- 73 -

NL
Garantiebewijs
Geachte klant,
onze producten worden onderworpen aan een strenge kwaliteitscontrole. Mocht dit apparaat echter ooit
niet naar behoren functioneren, spijt dit ons ten zeerste en vragen u zich te wenden tot onze servicedienst onder het adres vermeld op dit garantiebewijs. Wij staan ook graag telefonisch tot uw dienst via
het vermelde servicetelefoonnummer. Voor eisen in verband met het recht garantie geldt het volgende:
1. Deze garantievoorwaarden zijn uitsluitend gericht aan de gebruikers, d.w.z. natuurlijke personen die
dit product niet in het kader van hun ambachtelijke noch van een andere zelfstandige activiteit willen
gebruiken. Deze garantievoorwaarden regelen aanvullende garantieprestaties, die de hieronder genoemde fabrikant kopers van zijn nieuwe apparaten toezegt in aanvulling tot de wettelijke garantie.
Uw wettelijke garantieclaims blijven onaangetast door deze garantie. Onze garantieprestatie is voor
u gratis.
2. De garantieprestatie geldt uitsluitend voor gebreken aan een door u aangekocht nieuw apparaat
van de hieronder genoemde fabrikant die aantoonbaar berusten op een materiaal- of productiefout,
en is naar onze keuze beperkt tot het verhelpen van zulke gebreken aan het apparaat of de vervanging ervan.
Wij wijzen erop dat onze apparaten overeenkomstig hun bestemming niet ontworpen zijn voor commercieel, ambachtelijk of industrieel gebruik. Van een garantiecontract is derhalve geen sprake, als
het apparaat binnen de garantieperiode in commerciële, ambachtelijke of industriële bedrijven werd
ingezet of aan een daarmee gelijk te stellen belasting werd blootgesteld.
3. Van onze garantie zijn uitgesloten:
- Schade aan het apparaat als gevolg van niet-inachtneming van de montagehandleiding of op
grond van ondeskundige installatie, als gevolg van niet-inachtneming van de gebruiksaanwijzing
(zoals bijv. door aansluiting aan een verkeerde netspanning of stroomsoort) of niet-inachtneming
van de onderhouds- en veiligheidsvoorschriften, door blootstelling van het apparaat aan abnormale
omgevingsvoorwaarden of door nalatig onderhoud en verzorging.
- Schade aan het apparaat als gevolg van misbruik of ondeskundige toepassingen (zoals bijv. overbelasting van het apparaat of de inzet van niet toegelaten gereedschappen of toebehoren), binnendringen van vreemde voorwerpen in het apparaat (zoals bijv. zand, stenen of stof, transportschade),
gebruik van geweld of als gevolg van externe invloeden (zoals bijv. schade door vallen).
- Schade aan het apparaat of aan delen van het apparaat die valt te herleiden tot slijtage als gevolg
van gebruik, en als gevolg van normale of andere natuurlijke slijtage.
4. De garantieperiode bedraagt 24 maanden en gaat in op de datum van aankoop van het apparaat.
Garantieclaims dienen voor het verloop van de garantieperiode binnen de twee weken na het vaststellen van het defect geldend te worden gemaakt. Het indienen van garantieclaims na verloop van
de garantieperiode is uitgesloten. De herstelling of vervanging van het apparaat leidt niet tot een
verlenging van de garantieperiode noch wordt door deze prestatie een nieuwe garantieperiode voor
het apparaat of voor eventueel ingebouwde wisselstukken op gang gebracht. Dit geldt ook bij het ter
plaatse uitvoeren van een serviceactiviteit.
5. Gelieve om een garantieclaim in te dienen het defecte apparaat aan te melden onder: www.iscgmbh.info. Houd het aankoopbewijs of een ander bewijs van uw aankoop van het nieuwe apparaat
bij de hand. Apparaten die zonder bijhorende bewijzen of zonder typeplaatje worden teruggestuurd,
worden op grond van de ontbrekende mogelijkheid om het apparaat toe te kennen uitgesloten van
de garantieprestatie. Valt het defect van het apparaat binnen onze garantieprestatie, dan bezorgen
wij u per omgaande een gerepareerd of nieuw apparaat terug.
Uiteraard staan wij ook tot u dienst om, mits betaling van de kosten, defecten van het apparaat te verhelpen die buiten de garantieomvang vallen. Te dien einde stuurt u het apparaat aan ons serviceadres
op.
Voor slijtstukken, verbruiksmateriaal en ontbrekende onderdelen wordt verwezen naar de beperkingen
van deze garantie conform de service-informatie van deze handleiding.
- 74 -

E
Peligro!
Al usar aparatos es preciso tener en cuenta una
serie de medidas de seguridad para evitar lesiones o daños. Por este motivo, es preciso leer
atentamente este manual de instrucciones/advertencias de seguridad. Guardar esta información
cuidadosamente para poder consultarla en cualquier momento. En caso de entregar el aparato
a terceras personas, será preciso entregarles,
asimismo, el manual de instrucciones/advertencias de seguridad. No nos hacemos responsables
de accidentes o daños provocados por no tener
en cuenta este manual y las instrucciones de
seguridad.
1. Instrucciones de seguridad
Encontrará las instrucciones de seguridad correspondientes en el prospecto adjunto.
Peligro!
Lea todas las instrucciones de seguridad e
indicaciones. El incumplimiento de dichas inst-
rucciones e indicaciones puede provocar descargas, incendios y/o daños graves. Guarde todas
las instrucciones de seguridad e indicaciones para posibles consultas posteriores.
Este aparato podrá ser utilizado por niños a partir
de 8 años y personas cuyas capacidades estén
limitadas física, sensorial o psíquicamente, o que
no dispongan de la experiencia y/o los conocimientos necesarios siempre y cuando estén vigiladas o hayan recibido formación o instrucciones
sobre el funcionamiento seguro del aparato y de
los posibles peligros. Está prohibido que los niños
jueguen con el aparato. Los niños no podrán realizar los trabajos de limpieza y mantenimiento a
no ser que estén vigilados por un adulto.
Eliminación de residuos:
Baterías: Deben eliminarse llevándolas a un taller
de automóviles, a un lugar de recogida especial o
a una entidad de recolección ofi cial de desechos
industriales. Informarse en cualquier entidad
local.
Explicación de la placa de advertencia del
aparato (véase fi g. 4)
1 = El aparato está protegido a prueba de sacudi-
das eléctricas
2 = AVISO - Leer el manual de instrucciones para
reducir cualquier riesgo de sufrir daños.
3 = Valor del fusible en platina electrónica
4 = Desenchufar de la red antes de conectar o
desconectar de batería.
ATENCIÓN: Gases explosivos. Evitar llamas
y chispas. Asegurar que haya ventilación sufi -
ciente durante el proceso de carga.
2. Descripción del aparato y
volumen de entrega
2.1 Descripción del aparato (fi g. 1)
1 Botón de funcionamiento
2 Display LCD
3 Cable de carga negro (-)
4 Cable de carga rojo (+)
5 Anilla para colgar
6 Cable de red
2.2 Volumen de entrega
Abrir el embalaje y extraer cuidadosamente
•
el aparato.
Retirar el material de embalaje, así como los
•
dispositivos de seguridad del embalaje y para
el transporte (si existen).
Comprobar que el volumen de entrega esté
•
completo.
Comprobar que el aparato y los accesorios
•
no presenten daños ocasionados durante el
transporte.
Si es posible, almacenar el embalaje hasta
•
que transcurra el periodo de garantía.
Peligro!
¡El aparato y el material de embalaje no son
un juguete! ¡No permitir que los niños jueguen con bolsas de plástico, láminas y piezas pequeñas! ¡Riesgo de ingestión y asfi xia!
Manual de instrucciones original
•
Instrucciones de seguridad
•
3. Uso adecuado
El cargador ha sido concebido para baterías
de ácido de plomo que requieren o no
mantenimiento de 12V (baterías húmedas/ Ca/
Ca/ EFB), así como para baterías de plomo-gel y
AGM que se utilizan en vehículos.
El programa de carga 12V M está indicado para
mantener la carga y para cargar baterías con
capacidad reducida. Con la función SUPPLY,
el aparato se puede utilizar como fuente de
- 75 -

E
alimentación de reserva, por ejemplo mientras
se cambia una batería, o para dispositivos
consumidores de 12 V CC (tener en cuenta el
consumo máximo de corriente). El programa
RECOND ha sido concebido exclusivamente
para recuperar baterías de ácido de plomo muy
descargadas (no para baterías AGM y de GEL).
Utilizar este programa solo brevemente y bajo
vigilancia.
El aparato no se puede utilizar para cargar baterías de litio-ferrofosfato (p. ej. LiFePO4) u otras
baterías de litio. El aparato ha sido concebido
exclusivamente para su uso portátil y no para
ser montado en caravanas, roulottes o vehículos
similares. Proteger el cargador de la lluvia y la
nieve.
Utilizar la máquina sólo en los casos que se indican explícitamente como de uso adecuado. Cualquier otro uso no será adecuado. En caso de uso
inadecuado, el fabricante no se hace responsable
de daños o lesiones de cualquier tipo; el responsable es el usuario u operario de la máquina.
Tener en consideración que nuestro aparato no
está indicado para un uso comercial, industrial o
en taller. No asumiremos ningún tipo de garantía
cuando se utilice el aparato en zonas industriales, comerciales o talleres, así como actividades
similares.
CE-BC 6 M
Tensión de red: ........................220-240 V ~ 50Hz
Consumo nominal máx.: ........................... 100 W
Tensión de salida nominal: ..................... 12 V CC
Corriente de salida nominal: ...........................6 A
Capacidad de la batería „STD/AGM/invierno“: ....
.............................................................20-150 Ah
Capacidad de la batería „12V M“ (máx. 1A): .......
.................................................................2-32 Ah
Función “SUPPLY” salida máx.: ...................... 5 A
Programa de carga “RECOND”: 15,3 V CC / 1,5 A
Clase de protección: ......................................... II
Tipo de protección: ..................................... IP65
Temperatura ambiente: ...................- 20°C – 40°C
CE-BC 10 M
Tensión de red: ........................220-240 V ~ 50Hz
Consumo nominal máx.: ........................... 160 W
Tensión de salida nominal: ..................... 12 V CC
Corriente de salida nominal: .........................10 A
Capacidad de la batería „STD/AGM/invierno“: ....
.............................................................30-200 Ah
Capacidad de la batería „12V M“ (máx. 2 A): .......
.................................................................3-60 Ah
Función “SUPPLY” salida máx.: ...................... 8 A
Programa de carga “RECOND”: 15,3 V CC / 2,5 A
Clase de protección: ......................................... II
Tipo de protección: ..................................... IP65
Temperatura ambiente: ...................- 20°C – 40°C
4. Características técnicas
CE-BC 4 M
Tensión de red: ........................220-240 V ~ 50Hz
Consumo nominal máx.: ............................. 70 W
Tensión de salida nominal: ..................... 12 V CC
Corriente de salida nominal: ...........................4 A
Capacidad de la batería „STD/AGM/invierno“: ....
.............................................................10-120 Ah
Capacidad de la batería „12V M“ (máx. 1A): .......
.................................................................2-32 Ah
Función “SUPPLY” salida máx.: ...................... 3 A
Programa de carga “RECOND”: 15,3 V CC / 1,5 A
Clase de protección: ......................................... II
Tipo de protección: ..................................... IP65
Temperatura ambiente: ...................- 20°C – 40°C
5. Manejo
Antes de conectar la máquina, asegurarse de
que los datos de la placa de datos coincidan con
los datos de la red eléctrica.
¡Peligro! No cargar baterías que estén congeladas.
Es preciso observar las advertencias que se
hallan en los manuales del vehículo, de la
radio, del GPS, etc.
Advertencia sobre la carga automática
(solo programas de carga 12V STD, 12V
AGM, 12V invierno, 12 V M
El cargador es un aparato automático controlado
por microprocesador, con lo que resulta especialmente adecuado para cargar baterías que no
requieren mantenimiento, así como para cargar
de forma duradera o mantener cargadas baterías
- 76 -

E
que no están en uso de forma continua, como por
ejemplo para coches antiguos, vehículos recreativos, tractores cortacésped y similares. Debido
al microprocesador integrado, la carga se realiza
en varios niveles. El último nivel de carga, la
carga de mantenimiento, mantiene la capacidad
de la batería a 95 a 100 % y, con ello, la batería
siempre totalmente cargada. No es necesario
controlar el proceso de carga. No obstante, si se
va a cargar la batería durante mucho tiempo, no
dejarla sin vigilancia para que, en caso de que
se produzca alguna avería en el cargador, se
pueda desenchufar manualmente de la toma de
corriente.
5.1 Explicación de los símbolos (fi g. 2)
A Cargar una batería 12 V (batería de ácido de
plomo y de GEL).
B Cargar una batería 12 V AGM.
C Cargar una batería 12 V (de plomo, AGM y de
GEL) en el modo invierno a una temperatura
ambiente de – 20°C a +5°C. ¡Peligro! No car-
gar baterías que estén congeladas.
D Cargar una batería 12 V (batería de ácido de
plomo, AGM y de GEL) en el modo de mante-
nimiento de la carga.
E Tensión de carga en voltios, batería defec-
tuosa (BAt) / completamente cargada (FUL)
/ polaridad incorrecta o cortocircuito en los
bornes (Err)
F Restablecer la capacidad de carga de ba-
terías de ácido de plomo descargadas subi-
endo la tensión de carga
G Conexión incorrecta de los bornes (polaridad
incorrecta) o cortocircuito
H Alimentación de tensión, p. ej. al cambiar de
batería
K Estado de carga de la batería en % (1 divisi-
ón = 25%) en proceso de carga (la división
se enciende = la batería ha alcanzado el
estado de carga, la división en el símbolo de
la batería parpadea = la batería se carga al
siguiente estado de carga, todas las divisio-
nes se encienden = la batería está totalmente
cargada).
5.2 Cómo ajustar los programas de carga
(fi g. 2)
Advertencias:
Si se pulsa la tecla „Mode“ (fig. 1/pos. 1), se
•
cambia a los distintos programas. El símbolo
que corresponde al programa aparece en el
display. Las baterías se cargan con el progra-
ma que se muestra.
Para acceder al programa RECOND, pulsar
•
la tecla „Mode“ durante 5 segundos.
Para volver del programa RECOND o de
•
la función SUPPLY al programa 12 V STD,
pulsar la tecla „Mode“ también durante 5 segundos.
Si la tensión de la batería es inferior a 3,5 V
•
o mayor a 15 V, la batería ya no es apta para
ser cargada o está defectuosa. El mensaje
„BAt“ aparece en el display LCD. El símbolo
„G“ parpadea. También otros fallos de la
batería pueden provocar que no se pueda
cargar.
Si durante la función SUPPLY se produce un
•
cortocircuito entre los bornes de carga, aparece el mensaje „Lo V“ en el display LCD. El
símbolo „G“ parpadea.
Cuando se desenchufa el cargador de la
•
toma de corriente, se guarda el último programa de carga usado (excepto RECOND y
SUPPLY) y viene prefijado la próxima vez que
se use el cargador.
Solo CE-BC 4M: Si las pinzas de carga
•
están conectadas a la batería, el cargador
absorbe de la batería un poco de corriente y
se enciende brevemente el display LCD. Eso
no significa que haya una avería.
5.2.1 Programas de carga estándar
A) 12V STD: Programa de carga para baterías de
ácido de plomo (baterías húmedas/ Ca/Ca/ EFB)
y de gel. Después de la primera puesta en marcha del cargador, aparece 12V STD en el display.
B) 12V AGM: Programa de carga para baterías
AGM, pulsar la tecla „Mode“ –> cambiar del
programa de carga 12V STD a 12V AGM
5.2.2 Programas de carga especiales
C) Invierno: Programa de carga recomendado
cuando hace frío (temperatura ambiente entre
-20°C y +5°C), para baterías de ácido de plomo
normales (baterías húmedas/Ca/Ca), pulsar tecla
„Mode“ -> cambiar del programa de carga 12V
AGM a „invierno“
D) 12V M: Programa de carga para baterías
con poca capacidad (véanse las Características
técnicas) y para mantener la carga de todas las
baterías mencionadas en 3. Uso adecuado.
Pulsar la tecla „Mode“ -> cambiar del programa
de carga „invierno“ a „ 12 M“
F) RECOND: Programa de carga con tensión de
fi n de carga aumentada y carga de corriente de
contacto, exclusivamente para restablecer la cap-
- 77 -

E
acidad de carga de baterías de ácido de plomo.
El proceso RECOND se tiene que controlar cada
media hora y no puede superar 4 h de duración.
Observar las advertencias del fabricante de baterías.
¡Importante! Para acceder a este programa,
se tiene que pulsar durante 5 segundos la tecla
„Mode“ (fi g. 1/pos. 1).
¡Aviso!
Durante el gaseado se produce un gas
•
detonante - ¡Peligro de explosión! Asegu-
rar que haya buena ventilación.
Utilizar el programa RECOND solo en caso
•
de una batería de ácido de plomo y solo
como se describe a continuación. Asegurarse
de no verter ácido de la batería. El ácido de la
batería es corrosivo. Observar las instruccio-
nes de seguridad.
No utilizarlo nunca con una batería de tipo
•
cerrado (batería VRLA, como p. ej. AGM o de
GEL). Observar las advertencias del fabrican-
te de baterías.
Utilizar solo con una batería independiente y
•
desmontada y no montada con conexión al
sistema electrónico de a bordo del vehículo.
Una tensión de carga alta puede dañar el sis-
tema electrónico de a bordo. Tener en cuenta
el manual de instrucciones del vehículo y
ponerse en contacto con el fabricante del
mismo.
Utilizar el programa de carga RECOND
Conectar el cargador como se describe en el
•
apartado 5.3 a una batería de ácido de plomo
y controlar el programa de carga cada media
hora.
Transcurridas al menos 4 h o en cuento se
•
perciba que la batería gasea (burbujeo),
retirar el cargador como se describe en el
apartado 5.3.
Comprobar, de ser posible, el nivel de ácido y
•
rellenar, de ser posible, las células de batería,
de ser necesario solo con agua destilada. Lo
ideal es que el nivel de ácido se encuentre
entre el valor impreso máx. y mín. y debería
ser idéntico para todas las células. Volver a
apretar los tapones de la batería (de existir).
5.2.3 Función adicional
H) SUPPLY: Para alimentación de tensión conti-
nua de 12 V, p. ej. si se cambia la batería o para
dispositivos consumidores de 12 V CC.
Pulsar la tecla „Mode -> cambiar de la función
RECOND a SUPPLY
¡Aviso! La protección contra una polaridad incorrecta no está disponible. Si la polaridad es
incorrecta, existe el peligro de que se dañe el
cargador y la batería/red de a bordo del vehículo
o el dispositivo consumidor conectado. Al realizar
la conexión, asegurarse de que la polaridad sea
correcta. Tener en cuenta el consumo máximo
(véanse las Características técnicas) del dispositivo consumidor.
Advertencias:
La corriente continua disponible (mostrada
•
en el display) depende de la carga y es, sin
carga, de aprox. 14,5 V.
La función es útil para dispositivos consumi-
•
dores que se operan en un encendedor de
coche.
Observar el manual de instrucciones de su
•
dispositivo consumidor de 12 V.
5.3 Cómo cargar la batería:
Soltar o quitar los tapones de la batería (en
•
caso de existir).
Comprobar el estado de ácido de la batería.
•
De ser necesario, llenarla de agua destilada
(siempre y cuando sea posible). ¡Atención! El ácido de la batería es corrosivo. Las
salpicaduras de ácido se deben aclarar de
inmediato con abundante agua y en caso de
emergencia consultar a un médico.
Conectar primero el cable de carga rojo al
•
polo positivo de la batería.
A continuación, quitar el cable de carga neg-
•
ro de la batería y cargar el cable de gasolina
a la carrocería.
¡Aviso! Por lo general, el polo negativo de la
•
batería está conectado a la carrocería y se
carga según se ha explicado previamente.
Excepcionalmente es posible conectar el
polo positivo a la carrocería (puesta a tierra
positiva). En este caso, conectar el cable de
carga negro al polo negativo de la batería. A
continuación, conectar el cable de carga rojo
a la carrocería alejándolo de la batería y del
conducto de la gasolina.
Tras conectar la batería al cargador, se puede
•
enchufar el cargador a una toma de corriente
(ver características técnicas). Ahora se puede
proceder a cambiar los ajustes de carga (ver
apartado 5.2).
¡Atención! De la carga puede emanar un
•
gas detonante peligroso, por lo tanto se recomienda evitar la formación de chispas y el
- 78 -

E
fuego abierto durante la carga. ¡Peligro de ex-
plosión! Asegurarse de que en las salas haya
una ventilación suficiente.
Si en el display LCD aparece „FUL“ (y todas
•
las divisiones fig. 2/pos. K), el proceso de
carga ha terminado. El cargador detiene la
batería mediante carga en pulsos cuando la
capacidad de la batería disponible es de 95
– 100%. Si el cargador ya lo muestra trans-
curridos pocos minutos, quiere decir que la
capacidad de la batería es reducida. En tal
caso es preciso cambiar la batería.
Cálculo del tiempo de carga (fi g. 3a-3c)
El tiempo de carga depende del estado de carga
de la batería. En el caso de una batería vacía, el
tiempo de carga hasta aprox. el 80% de carga se
puede calcular con ayuda de la siguiente fórmula:
Capacidad de la batería en Ah
Tiempo de carga/h =
Amp. (Corriente de carga)
La corriente de carga debería oscilar entre un
1/10 y un 1/6 de la capacidad de la batería.
5.4 Indicador de fallos (fi g. 2/pos. G)
El indicador de fallos parpadea (se enciende) en
los siguientes casos:
Si la tensión de la batería es inferior a 3,5 V
•
o superior a 15 V. La batería no está indicada
para ser cargada o es defectuosa. También
otros fallos de la batería pueden provocar que
no se pueda cargar.
Si los bornes están mal conectados a la
•
batería (polaridad incorrecta). La protección
contra la polaridad incorrecta asegura que no
se puedan dañar ni la batería ni el cargador.
Quitar el cargador de la batería y empezar de
nuevo el proceso de carga.
Si se ha producido un cortocircuito de los dos
•
bornes de conexión (las piezas metálicas de
los bornes se tocan). La protección contra
circuito asegura que el cargador no se dañe.
5.5 Cómo fi nalizar la carga de la batería
Desenchufar el aparato.
•
Soltar primero el cable de carga negro de la
•
carrocería.
A continuación, soltar el cable de carga rojo
•
del polo positivo de la batería.
¡Atención! En caso de puesta a tierra positi-
•
va, soltar primero el cable de carga rojo de la
carrocería y luego el cable de carga negro de
la batería.
Volver a enroscar o poner los tapones de la
•
batería (en caso de existir).
¡Advertencia! Si se retira el enchufe de la toma
de corriente pero el cargador sigue conectado a
la batería, el cargador absorbe de la batería un
poco de corriente. Por este motivo, si no se utiliza
el cargador recomendamos quitarlo completamente de la batería.
6. Protección contra sobrecarga
En los programas de carga 12V STD, 12V AGM,
12V invierno y 12V M, el cargador está protegido
electrónicamente contra sobrecarga, cortocircuito
y polaridad incorrecta. Adicionalmente se han
montado uno o varios fusibles para corriente
débil. Si el fusible está defectuoso, cambiarlo y
sustituirlo por un fusible con el mismo valor de
amperios. De ser necesario, ponerse en contacto
con el servicio de atención al cliente.
7. Mantenimiento y cuidado de la
batería
Asegurar que la batería esté siempre bien
•
montada.
Es preciso asegurar que la conexión a la red
•
del equipo eléctrico sea correcta.
Mantener la batería limpia y seca. Engrasar
•
ligeramente las pinzas de conexión con una
grasa sin ácido y resistente al ácido (vaselina).
En el caso de baterías que precisan de man-
•
tenimiento comprobar cada 4 semanas el
nivel del ácido y, de ser necesario, rellenar
con agua destilada.
8. Mantenimiento, limpieza y pedido
de piezas de repuesto
Peligro!
Desenchufar siempre antes de realizar algún trabajo de limpieza.
8.1 Limpieza
Reducir al máximo posible la suciedad y
•
el polvo en los dispositivos de seguridad,
las rendijas de ventilación y la carcasa del
motor. Frotar el aparato con un paño limpio o
- 79 -

soplarlo con aire comprimido manteniendo la
presión baja.
Se recomienda limpiar el aparato tras cada
•
uso.
Limpiar el aparato con regularidad con un
•
paño húmedo y un poco de jabón blando. No
utilizar productos de limpieza o disolventes ya
que se podrían deteriorar las piezas de plástico del aparato. Es preciso tener en cuenta
que no entre agua en el interior del aparato.
Si entra agua en el aparato eléctrico existirá
mayor riesgo de una descarga eléctrica.
Guardar el cargador en una sala seca. Limpi-
•
ar la corrosión de las pinzas de carga.
8.2 Mantenimiento
No hay que realizar el mantenimiento a más
piezas en el interior del aparato.
8.3 Pedido de piezas de recambio:
Al solicitar recambios se indicarán los datos siguientes:
Tipo de aparato
•
No. de artículo del aparato
•
No. de identidad del aparato
•
No. del recambio de la pieza necesitada.
•
Encontrará los precios y la información actual en
www.isc-gmbh.info
E
9. Eliminación y reciclaje
El aparato está protegido por un embalaje para
evitar daños producidos por el transporte. Este
embalaje es materia prima y, por eso, se puede
volver a utilizar o llevar a un punto de reciclaje. El
aparato y sus accesorios están compuestos de
diversos materiales, como, p. ej., metal y plástico.
Los aparatos defectuosos no deben tirarse a la
basura doméstica. Para su eliminación adecuada, el aparato debe entregarse a una entidad
recolectora prevista para ello. En caso de no
conocer ninguna, será preciso informarse en el
organismo responsable del municipio.
- 80 -

E
10. Indicaciones para la eliminación de fallos
Si el aparato se maneja de manera adecuada, no se producirán averías. En caso de avería, comprobar
si se trata de alguno de los casos siguientes antes de consultar el servicio técnico posventa.
Avería Posibles causas Solución
El aparato no se
carga
- Las pinzas de carga están mal
conectadas
- Conectar la pinza de carga roja al
polo positivo y la pinza de carga
negra a la carrocería
- Contacto de las pinzas entre sí
- La batería está defectuosa
Sólo para países miembros de la UE
No tirar herramientas eléctricas en la basura casera.
Según la directiva europea 2012/19/CE sobre aparatos usados electrónicos y eléctricos y su aplicación
en el derecho nacional, dichos aparatos deberán recojerse por separado y eliminarse de modo ecológico para facilitar su posterior reciclaje.
- Eliminar el contacto
- Dejar que un especialista compruebe la batería y, de ser necesario,
cambiarla
Alternativa de reciclaje en caso de devolución:
El propietario del aparato eléctrico, en caso de no optar por su devolución, está obligado a reciclar adecuadamente dicho aparato eléctrico. Para ello, también se puede entregar el aparato usado a un centro
de reciclaje que trate la eliminación de residuos respetando la legislación nacional sobre residuos y
su reciclaje. Esto no afecta a los medios auxiliares ni a los accesorios sin componentes eléctricos que
acompañan a los aparatos usados.
Sólo está permitido copiar la documentación y documentos anexos del producto, o extractos de los
mismos, con autorización expresa de iSC GmbH.
Nos reservamos el derecho a realizar modifi caciones técnicas
- 81 -

E
Certifi cado de garantía
Estimado cliente:
Nuestros productos están sometidos a un estricto control de calidad. No obstante, lamentaríamos que
este aparato dejara de funcionar correctamente, en tal caso, le rogamos que se dirija a nuestro servicio
de atención al cliente en la dirección indicada en la parte inferior de la presente tarjeta de garantía. Con
mucho gusto le atenderemos también telefónicamente en el número de servicio indicado a continuación. Para hacer válido el derecho de garantía, proceda de la siguiente forma:
1. Estas condiciones de garantía van dirigidas exclusivamente a los consumidores, es decir, personas
naturales que no desean emplear este producto en el marco de su actividad comercial ni autónoma. Estas condiciones de garantía regulan prestaciones adicionales de garantía que el fabricante
abajo mencionado se compromete a otorgar, de manera adicional a la garantía legal, a los compradores de sus nuevos aparatos. Las prestaciones de garantía que le corresponden conforme a ley
no se ven afectadas por la presente. Nuestra prestación de garantía es gratuita para usted.
2. La garantía se extiende exclusivamente a defectos en un aparato nuevo adquirido por usted del
fabricante abajo mencionado, ocasionados por fallos de material o de producción, y está limitada,
según nuestra elección, a la reparación de los defectos o al cambio del aparato.
Es preciso tener en consideración que nuestro aparato no está indicado para un uso comercial,
industrial o en taller. Por lo tanto, no procederá un contrato de garantía cuando se utilice el aparato
dentro del periodo de garantía en zonas industriales, comerciales o talleres, así como actividades
similares.
3. Nuestra garantía no cubre:
- Daños en el aparato ocasionados por la no observancia de las instrucciones de montaje o por una
instalación no profesional, no observancia de las instrucciones de uso (como, p. ej., conexión a una
tensión de red o corriente no indicada) o la no observancia de las disposiciones de mantenimiento
y seguridad o por la exposición del aparato a condiciones anormales del entorno o por la falta de
cuidado o mantenimiento.
- Daños en el aparato ocasionados por aplicaciones impropias o indebidas (como, p. ej., sobrecarga del aparato o uso de herramientas o accesorios no homologados), introducción de cuerpos
extraños en el aparato (como, p. ej., arena, piedras o polvo, daños producidos por el transporte),
uso violento o infl uencias externa (como, p. ej., daños por caídas).
- Daños en el aparato o en piezas del aparato provocados por el desgaste natural, habitual o producido por el uso.
4. El periodo de garantía es de 24 meses y comienza en la fecha de la compra del aparato. El derecho
de garantía debe hacerse válido, antes de fi nalizado el plazo de garantía, dentro de un periodo de
dos semanas una vez detectado el defecto. El derecho de garantía vence una vez transcurrido el
plazo de garantía. La reparación o cambio del aparato no conllevará ni una prolongación del plazo
de garantía ni un nuevo plazo de garantía ni para el aparato ni para las piezas de repuesto montadas. Esto también se aplica en el caso de un servicio in situ.
5. Para hacer efectivo su derecho a garantía, registre su aparato defectuoso en: www.isc-gmbh.info.
Tenga a mano el recibo de compra o cualquier otro comprobante que acredite la compra del aparato nuevo. La garantía no cubre aquellos aparatos que se envíen sin el comprobante pertinente
o sin la placa de identifi cación puesto que resulta difícil clasifi carlos del modo correspondiente. Si
nuestra prestación de garantía incluye el defecto aparecido en el aparato, recibirá de inmediato un
aparato reparado o nuevo de vuelta.
Naturalmente, también solucionaremos los defectos del aparato que no se encuentren comprendidos
o ya no se encuentren comprendidos en la garantía, en este caso contra reembolso de los costes. Para
ello, envíe el aparato a nuestra dirección de servicio técnico.
Para piezas de desgaste, de repuesto y falta de piezas nos remitimos a las limitaciones de esta garantía
conforme a la información de servicio de este manual de instrucciones.
- 82 -

FIN
Vaara!
Laitteita käytettäessä tulee noudattaa tiettyjä
turvallisuusvarotoimia tapaturmien ja vaurioiden
välttämiseksi. Lue sen vuoksi tämä käyttöohje /
nämä turvallisuusmääräykset huolellisesti läpi.
Säilytä ne hyvin, jotta niissä olevat tiedot ovat
myöhemminkin milloin vain käytettävissäsi. Jos
luovutat laitteen muille henkilöille, ole hyvä ja
anna heille myös tämä käyttöohje / nämä turvallisuusmääräykset laitteen mukana. Emme ota
mitään vastuuta tapaturmista tai vaurioista, jotka
ovat aiheutuneet tämän käyttöohjeen tai turvallisuusohjeiden noudattamisen laiminlyönnistä.
1. Turvallisuusmääräykset
Laitetta koskevat turvallisuusmääräykset löydät
oheistetusta vihkosesta.
Vaara!
Lue kaikki turvallisuusmääräykset ja ohjeet.
Jos turvallisuusmääräyksiä tai muita ohjeita ei
noudateta, saattaa tästä aiheutua sähköiskuja,
tulipaloja ja/tai vaikeita vammoja. Säilytä kaikki
turvallisuusmääräykset ja ohjeet myöhempää
tarvetta varten.
Tätä laitetta ei ole tarkoitettu sellaisten henkilöiden (myöskään lasten) käytettäväksi, joiden fyysiset, aistiperäiset tai henkiset kyvyt ovat rajoitetut,
tai joilla ei ole käyttöön tarvittavaa kokemusta ja/
tai taitoja, paitsi sellaisen heidän turvallisuudestaan vastuullisen henkilön valvonnassa, joka
voi antaa heille laitteen oikeaa käyttöä koskevat
ohjeet. Lapsia tulee valvoa, jotta he eivät missään
tapauksessa voi leikkiä laitteella.
Hävittäminen
Akut: Vain autokorjaamojen, erityisten keräyspisteiden tai erikoisjätteen keräyspisteiden kautta.
Tiedustele asiaa kunnanhallinnosta.
Laitteessa olevan ohjekilven selostus (katso
kuva 4)
1 = Laite on suojaeristetty
2 = VAROITUS – Tapaturmanvaaran vähentämi-
seksi tulee lukea käyttöohje!
3 = Varokearvo elektroniikkapiirikortilla
4 = Irrotettava verkosta, ennen kuin akun liitännät
suljetaan tai avataan.
HUOMIO: räjähdysalttiita kaasuja. Vältä
avotulta ja kipinöitä. Lataamisen aikana tulee
huolehtia riittävästä tuuletuksesta.
2. Laitteen kuvaus ja toimituksen
sisältö
2.1 Laitteen kuvaus (kuva 1)
1 Toimintopainike
2 Nestekidenäyttö
3 Latausjohto musta (-)
4 Latausjohto punainen (+)
5 Ripustin
6 Verkkojohto
2.2 Toimituksen sisältö
Avaa pakkaus ja ota laite varovasti pakkauk-
•
sesta.
Poista pakkausmateiriaalit sekä pakkaus- ja
•
kuljetusvarmistukset (mikäli käytetty).
Tarkasta, onko toimitus täysilukuinen.
•
Tarksta, onko laitteessa ja varusteissa kulje-
•
tusvaurioita.
Säilytä pakkaus, mikäli mahdollista, takuua-
•
jan loppuun saakka.
Vaara!
Laite ja pakkausmateriaalit eivät ole lasten
leikkikaluja! Lapset eivät saa leikkiä muovipusseilla, kelmuilla tai pienillä osilla! Niistä
uhkaa nielaisu- ja tukehtumisvaara!
Alkuperäiskäyttöohje
•
Turvallisuusmääräykset
•
3. Määräysten mukainen käyttö
Latauslaite on tarkoitettu moottoriajoneuvoihin
asennettavien, huoltoa tarvitsevien tai
huoltovapaiden 12 V lyijyhappoakkujen (märkä- /
Ca/Ca- / EFB-akkujen) sekä lyijygeeli- ja AGMakkujen lataamiseen.
12 V M -latausohjelma soveltuu
ylläpitolataamiseen sekä pienikapasiteettisten
akkujen lataamiseen. SUPPLY -toiminnolla laitetta
voidaan käyttää myös puskurivirtalähteenä,
esim. paristoa/akkua vaihdettaessa, tai 12 V
tasavirtalaitteita käytettäessä (huomioi suurin
virranotto). RECOND -ohjelma on tarkoitettu
ainoastaan syvätyhjennettyjen lyijyhappoakkujen
(ei AGM- tai geeliakkujen) elvyttämiseen. Käytä
tätä ohjelmaa vain lyhyen aikaa ja valvottuna.
Laitetta ei saa käyttää litium-rautafosfaattiakkujen
(esim. LiFePO4) tai muiden litiumakkujen lataamiseen. Laite on tarkoitettu vain mobiiliin käyttöön
- 83 -

FIN
eikä asennettavaksi asuntovaunuun, matkailuautoon tai senkaltaisiin ajoneuvoihin. Latauslaite on
suojattava sateelta ja lumelta.
Konetta saa käyttää ainoastaan sille määrättyyn
tarkoitukseen. Kaikkinainen tämän ylittävä käyttö
ei ole määräysten mukaista. Kaikista tästä aiheutuvista vahingoista tai loukkaantumisista on vastuussa laitteen omistaja/käyttäjä eikä suinkaan
sen valmistaja.
Ole hyvä ja ota huomioon, että laitteitamme ei ole
suunniteltu ja valmistettu käytettäväksi pienteollisuus- tai teollisuustarkoituksiin. Emme siksi ota
mitään vastuuta vaurioista, jos laitetta käytetään
pienteollisuus-, käsityöläis- tai teollisuustyöpaikoilla tai näihin verrattavissa olevissa toimissa.
4. Tekniset tiedot
CE-BC 4 M
Verkkojännite: ..........................220-240 V ~ 50Hz
Nimellisottoteho enint.: ............................... 70 W
Nimellislähtöjännite: .......................12 V tasavirta
Nimellis-antovirta ...........................................4 A
Akun kapasiteetti „STD/AGM/Talvi“: .... 10-120 Ah
akun kapasiteetti „12 V M“ (enint. 1 A): .... 2-32 Ah
„SUPPLY“-toiminnon lähtö enint.: ................... 3 A
„RECOND“ -latausohjelma: 15,3 V tasavirta 1,5 A
Suojausluokka: .................................................. II
Suojauslaji: .................................................. IP65
Ympäristön lämpötila: ....................- 20°C – 40°C
CE-BC 6 M
Verkkojännite: ..........................220-240 V ~ 50Hz
Nimellisottoteho enint.: .............................. 100 W
Nimellislähtöjännite: .......................12 V tasavirta
Nimellis-antovirta ...........................................6 A
Akun kapasiteetti „STD/AGM/Talvi“: .... 20-150 Ah
akun kapasiteetti „12 V M“ (enint. 1 A): .... 2-32 Ah
„SUPPLY“-toiminnon lähtö enint.: ................... 5 A
„RECOND“ -latausohjelma: 15,3 V tasavirta 1,5 A
Suojausluokka: .................................................. II
Suojauslaji: .................................................. IP65
Ympäristön lämpötila: ....................- 20°C – 40°C
CE-BC 10 M
Verkkojännite: ..........................220-240 V ~ 50Hz
Nimellisottoteho enint.: ............................. 160 W
Nimellislähtöjännite: .......................12 V tasavirta
Nimellis-antovirta .........................................10 A
Akun kapasiteetti „STD/AGM/Talvi“: .... 30-200 Ah
akun kapasiteetti „12 V M“ (enint. 2 A): .... 3-60 Ah
„SUPPLY“-toiminnon lähtö enint.: ................... 8 A
„RECOND“ -latausohjelma: 15,3 V tasavirta 2,5 A
Suojausluokka: .................................................. II
Suojauslaji: .................................................. IP65
Ympäristön lämpötila: ....................- 20°C – 40°C
5. Käyttö
Tarkasta ennen laitteen liittämistä sähköverkkoon,
että tyyppikilven tiedot vastaavat käytettävän verkkovirran tietoja.
Vaara! Älä lataa jäätyneitä akkuja.
Ole hyvä ja noudata autosi, radiosi, navigaattorisi jne. käyttöohjeissa annettuja ohjeita.
Automaattilatauksen lisätiedot
(vain latausohjelmat 12V STD, 12V AGM, 12V
Talvi, 12 V M)
Latauslaite on mikroprosessoriohjattu automaattinen latauslaite, ts. se soveltuu erityisen hyvin
huoltoa tarvitsemattomien akkujen lataamiseen
sekä sellaisten akkujen pitkäaikaiseen lataamiseen ja lataustason säilyttämiseen, joita ei
käytetä jatkuvasti, kuten esim. museoautoissa,
vapaa-ajan ajoneuvoissa, päälläistuttavissa ruohonleikkureissa tms. olevat akut. Integroidun mikroprosessorin vuoksi lataaminen tapahtuu useammassa vaiheessa. Viimeinen eli lataustason
säilyttävä vaihe pitää lataustason 95 - 100 %:
ssa, niin että akku on aina ladattu täyteen. Lataamista ei tarvitse valvoa. Älä kuitenkaan jätä pitempään kestävän latausajanjakson aikana akkua
valvomatta, jotta voit erottaa latauslaitteen käsin
sähköverkosta häiriön sattuessa.
5.1 Merkkien selitys (kuva 2)
A Yhden 12 V akun (lyijyhappoakku ja geeliak-
ku) lataaminen.
B Yhden 12 V AGM-akun lataaminen.
C Yhden 12 V akun (lyijyhappoakku, AGM-akku
ja geeliakku) lataaminen talvitilassa ympäris-
tön lämpötilan ollessa -20 °C ja +5°C välillä.
Varoitus! Älä lataa jäätyneitä akkuja.
D Yhden 12 V akun (lyijyhappoakku, AGM-akku
- 84 -

FIN
ja geeliakku) lataaminen ylläpitokäyttötavalla.
E Latausjännite voltteina, akku viallinen (BAt) /
ladattu täyteen (FUL) / liitetty vääriin napoihin
tai pinteissä oikosulku (Err)
F Tyhjentyneiden lyijyhappoakkujen latausky-
vyn palauttaminen korkeammalla latausjännitteellä
G Pinteet liitetty väärin (vääriin napoihin) tai oi-
kosulku
H Jännitteensyöttö esim. akkua/paristoa vaih-
dettaessa
K Akun lataustila prosentteina (1 osaviiva = 25
%) ja lataustapahtuma (osaviiva palaa = akku
on saavuttanut tämän lataustilan, akkumerkin
osaviiva vilkkuu = akkua ladataan seuraavaan
lataustilaan, kaikki osaviivat vilkkuvat = akku
on ladattu täyteen).
5.2. Latausohjelman asetus (kuva 2)
Ohjeita:
Painamalla „Mode“-painiketta (kuva 1/nro 1)
•
vaihdetaan käyttötapa ohjelmasta toiseen.
Ohjelmaa vastaava merkki tulee näyttöön.
Akut ladataan näytössä olevalla ohjelmalla.
RECOND-ohjelmaan päästäksesi paina
•
„Mode“-painiketta 5 sekunnin ajan.
Palataksesi RECOND-ohjelmasta tai
•
SUPPLY-toiminnosta takaisin 12 V STD -ohjelmaan paina „Mode“-painiketta samoin 5
sekunnin ajan.
Jos akun jännite on alle 3,5 V tai yli 15 V, niin
•
akku ei sovellu lataamiseen tai se on viallinen.
Nestekidenäytössä näkyy ilmoitus „BAt“.
Merkki „G“ vilkkuu. Muutkin akun virheet
voivat aiheuttaa sen, ettei akkua voida ladata.
Jos SUPPLY-toiminnon aikana latauspintei-
•
den välillä on oikosulku, niin nestekidenäyttöön tulee ilmoitus „Lo V“. Merkki „G“ vilkkuu.
Kun latauslaite erotetaan pistorasiasta, niin
•
viimeksi asetettu latausohjelma tallennetaan
(paitsi RECOND ja SUPPLY) ja se on täten
esiasetettu seuraavaa käyttökertaa varten.
Vain CE-BC 4M: Kun latauspihdit liitetään
•
akkuun, niin latauslaite vetää akusta hyvin
vähäisen virran ja tämä näkyy lyhyen aikaa
nestekidenäytössä. Tämä ei ole häiriö.
5.2.1 Vakiolatausohjelmat
A) 12 V STD: Latausohjelma lyijyhappoakkuja
(märkä-, Ca/Ca-, EFB-akut) ja geeliakkuja varten.
Latauslaitteen ensikäyttöönoton jälkeen näyttöön
tulee 12 V STD.
B) 12 V AGM: Latausohjelma AGM-akkuja varten.
Paina „Mode“-painiketta –> vaihto 12 V STD
-latausohjelmasta 12 V AGM -latausohjelmaan
5.2.2 Erikoislatausohjelmat
C) Talvi: Suositeltu latausohjelma kylmällä säällä
(ympäristön lämpötila -20 °C - +5 °C) tavallisia
lyijyhappoakkuja (märkä-, Ca/Ca-akkuja) varten.
Paina „Mode“-painiketta –> vaihto 12 V AGM -latausohjelmasta „Talvi“ -latausohjelmaan
D) 12 V M: Latausohjelma pienikapasiteettisiä
akkuja varten (ks. Tekniset tiedot) sekä kaikkien
kohdassa 3. Määräysten mukainen käyttö mainittujen akkujen ylläpitolataukseen.
Paina „Mode“-painiketta –> vaihto „Talvi“ -latausohjelmasta „12 M“ -latausohjelmaan
F) RECOND: Latausohjelma lisätyllä latausloppujännitteellä ja jatkuvalla latausvirralla, ainoastaan
täysin tyhjentyneiden lyijyhappoakkujen latautumiskyvyn palauttamiseen.
RECOND-tapahtumaa tulee valvoa puolen tunnin
välein, eikä se saa kestää yli 4 tuntia. Noudata
akun valmistajan antamia ohjeita.
Tärkeää! Tähän ohjelmaan päästäksesi täytyy
sinun painaa „Mode“-painiketta (kuva 1/nro 1) 5
sekunnin ajan.
Varoitus!
Kaasuuntuessa syntyy paukkukaasua
•
- räjähdysvaara! Huolehdi hyvästä ilman-
vaihdosta.
RECOND-ohjelmaa saa käyttää vain lyijyhap-
•
poakkuun ja vain kuten jäljempänä on seli-
tetty. Huolehdi siitä, ettei akkuhappoa kaadu
pois. Akkuhappo on syövyttävää. Noudata
turvallisuusmääräyksiä.
Älä missään tapauksessa käytä akkuihin,
•
joiden rakenne on suljettu (VRLA-akku, kuten
esim. AGM- tai geeliakku). Noudata akun val-
mistajan antamia ohjeita.
Käytä ainoastaan käyttöpaikasta irrotettuun,
•
erilleen asetettuun akkuun eikä ajoneuvoon
asennettuna ja ajoneuvon elektroniikkajärjes-
telmiin liitettynä. Korkeampi latausjännite voi
vahingoittaa elektroniikkajärjestelmiä. Nouda-
ta ajoneuvosi käyttöohjetta tai pyydä ohjeita
ajoneuvosi valmistajalta.
RECOND-latausohjelman käyttö
Liitä latauslaite kuten kohdassa 5.3 on seli-
•
tetty lyijyakkuun ja tarkasta lataustapahtuma
puolen tunnin välein.
- 85 -

FIN
Erota latauslaite kohdassa 5.3 annettujen oh-
•
jeiden mukaisesti viimeistään 4 tunnin kuluttua tai heti kun akku alkaa kuultavasti päästää
kaasua (kuplii).
Tarkasta happomäärä, mikäli mahdollista,
•
ja lisää akun kennoihin tarvittaessa, mikäli
mahdollista, vain tislattua vettä. Ihanteellisesti hapon pinta on merkittyjen max.- ja
min.-merkkien välissä, ja sen tulisi olla sama
kaikissa kennoissa. Ruuvaa kennojen tulpat
jälleen tiukkaan kiinni.
5.2.3 Lisätoiminto
H) SUPPLY: 12 V jännitteensyöttöä varten esim.
akkua/paristoa vaihdettaessa, tai 12 V -tasavirtalaitteiden käyttöä varten.
Paina „Mode“-painiketta –> vaihto „RECOND“ -latausohjelmasta „SUPPLY“ -toimintoon
Varoitus! Vääränapaisuussuojaus ei toimi tässä.
Vääriin napoihin liitettäessä uhkaa latauslaitteen
sekä ajoneuvon tai liitetyn laitteen akun / ajoneuvoelektroniikan vahingoittuminen. Huolehdi ehdottomasti siitä, että pinteet liitetään oikeisiin napoihin! Huomioi käyttölaitteen enimmäisvirranotto
(ks. Tekniset tiedot).
Ohjeita:
Käyttöön asetettu tasavirta (näkyy näytössä)
•
on riippuvainen kuormituksesta, ilman kuormitusta se on n. 14,5 V.
Toimintoa voidaan soveltaa laitteisiin, joita
•
käytetään moottoriajoneuvon savukkeensytyttimen kautta.
Noudata 12 V -laitteesi käyttöohjetta.
•
5.3 Akun lataaminen:
Irrota tai poista akun tulpat (mikäli ne kuuluvat
•
varustukseen) akusta.
Tarkasta akkusi hapon määrä. Mikäli tarpeen,
•
lisää tislattua vettä (jos tämä on mahdollista).
Huomio! Akkuhappo on syövyttävää. Happoroiskeet on huuhdeltava heti hyvin pois runsaalla vedellä, tarvittaessa on hakeuduttava
lääkärinhoitoon.
Liitä ensin punainen latausjohto akun plusna-
•
paan.
Liitä sitten musta latausjohto ajoneuvon koriin
•
mahdollisimman kauas akusta ja polttoainejohdosta.
Varoitus! Normaalitapauksessa miinusnapa
•
on liitetty koriin ja suoritat lataamisen kuten
edellä on selitetty. Poikkeustapauksessa on
mahdollista, että plusnapa on liitetty koriin
(positiivinen maadoitus). Siinä tapauksessa
liitä musta latausjohto akun miinusnapaan. Liitä sitten punainen latausjohto koriin mahdollisimman kauas akust ja polttoainejohdosta.
Sen jälkeen kun olet liittänyt akun latauslait-
•
teeseen, voit liittää latauslaitteen pistorasiaan
(ks. Tekniset tiedot). Nyt voit muuttaa latausasetuksia (ks. luku 5.2).
Huomio! Lataamisessa saattaa kehittyä
•
vaarallista paukkukaasua, sen vuoksi on vältettävä kipinöiden muodostumista ja avotulta
lataamisen aikana. Räjähdysvaara! Huolehdi
tilojen hyvästä tuuletuksesta.
Kun nestekidenäyttöön tulee „FUL“ (ja kaikki
•
osaviivat, kuva 2/kohta K), niin lataaminen
on päättynyt. Latauslaite pitää akkua sykäyslatauksella 95 - 100 % akkukapasiteetissa.
Mikäli latauslaite näyttää tämän jo muutaman
minuutin kuluttua, niin se kertoo akun lataustehon olevan alhainen. Akku tulee korvata
uudella.
Latauksen keston laskeminen (kuva 3a-3c)
Latauksen kesto määräytyy akun lataustilan
perusteella. Tyhjän akun latausaika noin 80 % lataukseen voidaan laskea suunnilleen seuraavalla
kaavalla:
Akun kapasiteetti Ah
Latausaika / h =
Amp. (latausvirta)
Latausvirran tuliee olla 1/10 - 1/6 akun varaustehosta.
5.4 Virhenäyttö (kuva 2 / kohta G)
Virhenäyttö vilkkuu (palaa) seuraavissa tapauksissa:
Jos akun jännite on alle 3,5 V tai yli 15 V. Akku
•
ei sovellu ladattavaksi, tai siinä on vika. Muutkin akun virheet voivat aiheuttaa sen, ettei
akkua voida ladata.
Jos akkuliitäntöjen liitinpinteet on liitetty
•
vääränapaisesti. Vääränapaisuussuojaus varmistaa, ettei akku eikä latauslaite vahingoitu.
Ota latauslaite irti akusta ja aloita lataustapahtuma uudelleen alusta. Varo! SUPPLYtoiminnossa vääränapaisuussuojaus ei toimi.
Jos molempien liitinpinteiden välissä ssä on
•
oikosulku (pinteiden metalliosat koskettavat
toisiaan). Oikosulkusuojaus varmistaa, ettei
latauslaite vahingoitu.
5.5 Akun lataamisen lopettaminen:
Irroita verkkopistoke pistorasiasta.
•
Irroita ensin musta latausjohto ajoneuvon
•
korista.
- 86 -

FIN
Irroita sitten punainen latausjohto akun plus-
•
sanavasta.
Huomio! Plussamaadoitustapauksessa irrota
•
ensin punainen latauskaapeli rungosta ja
vasta sitten musta latauskaapeli akusta.
Ruuvaa akun tulpat takaisin paikalleen tai pai-
•
na ne paikalleen (jos tulpat on).
Viite! Jos verkkopistoke irrotetaan pistorasiasta,
mutta latausjohdot jäävät edelleen akkuun kiinni,
niin latauslaite vetää akusta vähäisen virran. Siksi
suosittelemme latauslaitteen poistamista akusta
kokonaan aina kun sitä ei käytetä.
6. Ylikuormitussuoja
Latauslaitteessa on elektroninen suojaus ylikuormitusta, oikosulkua ja vääränapaisuutta vastaan
latausohjelmissa 12 V STD, 12 V AGM, 12 V Talvi
ja 12 V M. Lisäksi siihen on asennettu yksi tai useampia hienovarokkeita. Jos varoke on viallinen,
tulee se vaihtaa uuteen ja korvata varokkeella,
jonka ampeeriarvo on sama. Ole hyvä ja käänny
tarvittaessa teknisen asiakaspalvelumme puoleen.
7. Akun huolto ja hoito
Huolehdi siitä, että akkusi on aina asennettu
•
lujasti paikalleen.
Moitteeton yhteys sähkölaitteiston johtover-
•
kostoon tulee varmistaa.
Pidä akku puhtaana ja kuivana. Rasvaa liitän-
•
täpinteet ohuesti hapottomalla, haponkestävällä rasvalla (vaseliinilla).
Akuissa, jotka täytyy huoltaa, tulee tarkastaa
•
happomäärä n. 4 viikon välein ja tarvittaessa
lisätä ainoastaan tislattua vettä.
joka käytön jälkeen.
Puhdista laite säännöllisin väliajoin käyttäen
•
kosteaa riepua ja vähän saippuaa. Älä käytä
sellaisia puhdistusaineita tai liuotteita, jotka
saattavat syövyttää laitteen muoviosia. Huo-
lehdi siitä, ettei laitteen sisäpuolelle pääse
vettä. Veden tunkeutuminen sähkötyökaluun
lisää sähköiskun vaaraa.
Laturi tulee säilyttää kuivassa tilassa. La-
•
tauspinteistä tulee puhdistaa korroosio.
8.2 Huolto
Laitteen sisäpuolella ei ole mitään huoltoa tarvitsevia osia.
8.3 Varaosatilaus:
Varaosia tilatessasi anna seuraavat tiedot:
Laitteen tyyppi
•
Laitteen tuotenumero
•
Laitteen tunnusnumero
•
Tarvittavan varaosan varaosanumero.
•
Ajankohtaiset hinnat ja muut tiedot löydät osoitteesta www.isc-gmbh.info
9. Käytöstäpoisto ja uusiokäyttö
Laite on pakattu kuljetuspakkaukseen, jotta vältetään kuljetusvauriot. Tämä pakkaus on raaka-ainetta ja sitä voi siksi käyttää uudelleen tai sen voi
toimittaa kierrätyksen kautta takaisin raaka-ainekiertoon. Laite ja sen varusteet on valmistettu eri
materiaaleista, kuten esim. metallista ja muoveista. Vialliset laitteet eivät kuulu kotitalousjätteisiin.
Laite tulee toimittaa asianmukaiseen keräyspisteeseen ammattitaitoista hävittämistä varten. Jos
et tiedä, missä on tällainen keräyspiste, tiedustele
asiaa kuntasi hallinnosta.
8. Puhdistus, huolto ja varaosatilaus
Vaara!
Irroita verkkopistoke pistorasiasta ennen kaikkia
puhdistusstoimia.
8.1 Puhdistus
Pidä suojalaitteet, ilmaraot ja moottorin kotelo
•
niin puhtaina pölystä ja liasta kuin suinki mahdollista. Pyyhi laite puhtaalla rievulla tai puhalla se puhtaaksi vähäpaineisella paineilmalla.
Suosittelemme laitteen puhdistamista heti
•
- 87 -

FIN
10. Vianhakuohjeita
Jos laitetta käytetään oikein, ei siinä tulisi esiintyä häiriöitä. Häiriön ilmetessä tarkasta seuraavat mahdollisuudet, ennen kuin otat yhteyttä huoltopalveluun.
Häiriö Mahdollinen syy Poisto
Laite ei lataa - Latauspihdit liitetty väärin
- Liitä punainen latauspihti plussanapaan, musta latauspihti ajoneuvon
koriin
- Latauspihdeillä yhteys toisiinsa
- Akku on viallinen
Koskee ainoastaan EU-maita
Älä heitä sähkötyökaluja kotitalousjätteisiin!
Euroopan direktiivin 2012/19/EY loppuunkäytetyistä sähkö- ja elektronisista laitteista ja sen kansalliseksi laiksi muuntamisen mukaan tulee käytetyt sähkötyökalut koota erikseen ja toimittaa ne ympäristöystävälliseen kierrätykseen.
- Poista kontakti
- Anna alan ammattihenkilön tarkastaa akku ja vaihda se tarvittaessa
Kierrätysvaihtoehto takaisinlähetykselle:
Sähkölaitteen omistaja on velvoitettu laitteen palauttamisen vaihtoehtona vaikuttamaan siihen, että
hänen luovuttamansa omaisuus hävitetään asianmukaisesti. Loppuun käytetty laite voidaan tätä varten
luovuttaa myös keräyspisteeseen, joka suorittaa sen käytöstäpoiston kansallisten kierrätystalous- ja
jätehuoltolakien tarkoittamalla tavalla. Tämä ei koske käytettyihin laitteisiin liitettyjä lisävarusteita ja apuvälineitä, joissa ei ole sähköosia.
Tuotedokumentaation ja tuotteen mukana toimitettujen papereiden osittainenkin kopiointi tai muu monistaminen on sallittu ainoastaan iSC GmbH:n nimenomaisella luvalla.
Oikeus teknisiin muutoksiin pidätetään
- 88 -

FIN
Takuutodistus
Arvoisa asiakas,
tuotteemme läpikäyvät erittäin tiukan laadunvalvontatarkastuksen. Mikäli tämä laite ei kuitenkaan toimi
moitteettomasti, valitamme tapahtunutta suuresti ja pyydämme sinua kääntymään teknisen asiakaspalvelumme puoleen käyttäen tässä takuukortissa annettua osoitetta. Selvitämme asian mielellämme
myös puhelimitse allaolevan palvelunumeron kautta. Takuuvaateiden esittämistä koskevat seuraavat
määräykset:
1. Nämä takuuehdot koskevat ainoastaan kuluttajia, ts. luonnollisia henkilöitä, jotka eivät käytä tätä
tuotetta sen enempää pienteollisessa kuin muussakaan itsenäisessä ammatinharjoituksessa. Nämä
takuuehdot säätelevät täydentäviä takuusuorituksia, jotka allamainittu valmistaja lupaa uusien
laitteidensa ostajille lakimääräisen takuun lisäksi. Ne eivät vaikuta lakimääräisiin takuusuoritusvaateisiisi millään tavalla. Takuumme on sinulle maksuton.
2. Takuusuoritus kattaa ainoastaan sellaiset hankkimasi allamainitun valmistajan uuden laitteen
puutteellisuudet, jotka todistettavasti aiheutuvat materiaali- tai valmistusvirheistä, ja se on rajattu
valintamme mukaan ainoastaan näiden laitteen vikojen korjaamiseen tai laitteen korvaamiseen uudella.
Ole hyvä ja ota huomioon, että laitteitamme ei ole suunniteltu käytettäväksi pienteollisuus-, käsityöläis- tai ammattitarkoituksiin. Takuusopimusta ei siksi synny, jos laitetta on takuun kestoaikana
käytetty pienteollisuus-, käsityöläis- tai teollisuustyöpaikoilla tai siihen on kohdistunut näihin verrattavissa oleva rasitus.
3. Antamamme takuu ei kata näitä vaurioita:
- laitteessa esiintyneet vauriot, jotka aiheutuvat asennusohjeen noudattamatta jättämisestä tai asiantuntemattomasta asennuksesta, käyttöohjeen noudattamatta jättämisestä (kuten esim. liitäntä
väärään verkkojännitteeseen tai virtalajiin) tai huolto- ja turvallisuusmääräysten laiminlyönnistä tai
laitteen altistamista epänormaaleille ympäristöolosuhteille tai puutteellisesta hoidosta ja huollosta.
- laitteessa esiintyneet vauriot, jotka aiheutuvat määräysten vastaisesta tai virheellisestä käytöstä
(esim. laitteen ylikuormitus tai hyväksymättömien liitostyökalujen tai varusteiden käyttö), vieraiden
esineiden tunkeutumisesta laitteeseen (esim. hiekka, kivet tai pöly, kuljetusvauriot), väkivoiman käytöstä tai ulkopuolisista tekijöistä (esim. putoamisesta aiheutuneet vahingot).
- laitteessa tai sen osissa esiintyneet vauriot, jotka aiheutuvat käytöstä johtuvasta, tavanomaisesta
tai muuten tavallisesta kulumisesta.
4. Takuuajan kesto on 24 kuukautta ja se alkaa laitteen ostopäivästä. Takuuvaateet tulee esittää ennen takuuajan päättymistä kahden viikon kuluessa siitä, kun olet havainnut vian. Takuuvaateiden
esittäminen takuuajan päätyttyä ei ole mahdollista. Laitteen korjaus tai vaihto ei johda takuuajan
pitenemiseen tai laitteen tai siihen mahdollisesti asennettujen varaosien takuuajan alkamiseen uudelleen alusta. Tämä koskee myös paikan päällä suoritettuja palveluja.
5. Viallista laitetta koskevat takuuvaateet tulee esittää osoitteella: www.isc-gmbh.info. Pidä uuden
laitteesi ostotosite tai muu ostonäyttö valmiina. Ilman vastaavia tositteita tai tyyppikilpeä meille lähetettyjen laitteiden osalta takuuvaateet on suljettu pois, koska mahdollisuudet laitteen tunnistamiseen
puuttuvat. Mikäli takuumme kattaa laitteen vian, asiakkaalle toimitetaan korjattu tai uusi laite viipymättä.
Tietysti korjaamme mielellämme korvausta vastaan myös sellaiset laitteiden viat, jotka eivät kuulu tai
eivät enää kuulu takuumme piiriin. Lähetä tätä varten laite teknisen asiakaspalvelumme osoitteeseen.
Kuluvien osien, käyttöosien ja puuttuvien osien suhteen viittaamme tämän takuun rajoituksiin, jotka on
selostettu tämän käyttöohjeen asiakaspalvelutiedoissa.
- 89 -

SLO
Nevarnost!
Pri uporabi naprav je potrebno upoštevati nekaj
varnostnih ukrepov, da bi preprečili poškodbe
in materialno škodo. Zato skrbno preberite ta
navodila za uporabo/varnostne napotke. Le-te
dobro shranite tako, da boste imeli zmeraj pri
roki potrebne informacije. Če bi napravo izročili
drugim osebam, Vas prosimo, da jim izročite tudi
ta navodila za uporabo/varnostne napotke. Ne
prevzemamo nobene odgovornosti za nezgode
ali škodo, ki bi nastale zaradi neupoštevanja teh
navodil za uporabo in varnostnih napotkov.
1. Varnostni napotki
Odgovarjajoče varnostne napotke lahko preberete v priloženi knjižici!
Nevarnost!
Preberite varnostne napotke in navodila.
Neupoštevanje varnostnih napotkov in navodil
ima lahko za posledico električni udar, požar in/ali
hude poškodbe. Shranite vse varnostne napot-
ke in navodila za kasnejšo uporabo.
To napravo lahko otroci, stari 8 let ali več, osebe z zmanjšanimi psihičnimi, senzoričnimi ali
duševnimi sposobnostmi ter osebe, ki nimajo
dovolj izkušenj in znanja uporabljajo le pod nadzorom ali če so bile podučene o varni uporabi naprave in razumejo nevarnosti, ki lahko pri uporabi
nastanejo. Otroci se z napravo ne smejo igrati.
Čiščenja in vzdrževanja, ki ga opravlja uporabnik,
ne smejo opravljati otroci brez nadzora.
Odstranjevanje
Akumulator: Akumulator predajte le na servis
motornih vozil ali na posebna zbiralna mesta
ali na mesta za zbiranje posebnih odpadkov.
Povprašajte pri lokalni skupnosti.
Obrazložitev napisov na napravi (glej sliko 4)
1 = naprava je zaščitno izolirana
2 = OPOZORILO – Preberite navodila za upora-
bo, da zmanjšate tveganje poškodb!
3 = Vrednost varovalke na elektronski matični
plošči
4 = Ločite od omrežja, preden zaprete ali odprete
povezavo z akumulatorjem. POZOR: Eksplozivni plini. Preprečite nastajanje plamenov in
isker. Med polnjenjem poskrbite za ustrezno
zračenje.
2. Opis naprave na obseg dobave
2.1 Opis naprave (Slika 1)
1 Funkcijska tipka
2 Zaslon LCD
3 Polnilni kabel – črn (-)
4 Polnilni kabel – rdeč (+)
5 Obešalno ušesce
6 Omrežna napeljava
2.2 Obseg dobave
Odprite embalažo in previdno vzemite napra-
•
vo iz embalaže.
Odstranite embalažni material in embalažne
•
in transportne varovalne priprave (če obstajajo).
Preverite, če je obseg dobave popoln.
•
Preverite morebitne poškodbe naprave in
•
delov pribora, do katerih bi lahko prišlo med
transportom.
Po možnosti shranite embalažo do poteka
•
garancijskega roka.
Nevarnost!
Naprava in embalažni material nista igrača za
otroke! Otroci se ne smejo igrati s plastičnimi
vrečkami, folijo in malimi deli opreme! Obstaja nevarnost zadušitve in zaužitja takšnih
delov materiala!
Originalna navodila za uporabo
•
Varnostni napotki
•
3. Predpisana namenska uporaba
Polnilnik je primeren za polnjenje
svinčenokislinskih akumulatorjev 12 V, ki
potrebujejo vzdrževanje ali ne (mokri/Ca/Ca/EFB
akumulatorji) ter za akumulatorje na svinec-gel in
AGM, ki se uporabljajo pri motornih vozilih.
12V M program polnjenja je primeren za
vzdrževalno polnjenje in polnjenje akumulatorjev
z manjšo zmogljivostjo akumulatorja. S funkcijo
SUPPLY lahko napravo uporabljate tudi za
vmesno oskrbo z energijo, npr. med menjavo
akumulatorja ali za delovanje 12V d.c. porabnikov
(upoštevajte največjo porabo energije). Program
RECOND je primeren izključno za obujanje
globoko izpraznjenih svinčevih akumulatorjev
(ne za akumulatorjev AGM in GEL). Ta program
uporabljajte le za kratek čas in pod nadzorom.
- 90 -

SLO
Naprave ni dovoljeno uporabljati za polnjenje
akumulator iz litija-železovega fosfata (npr. LiFePO4) ali drugih litijevih akumulatorjev. Naprava je
primerna le za mobilno uporabo in ne za vgradnjo
v avtodome, prikolice ali podobna vozila. Polnilnik
zaščitite pred dežjem in snegom.
Ta stroj se lahko uporablja le v skladu z njegovo namembnostjo. Vsaka druga uporaba šteje
kot nenamenska nedovoljena uporaba. Za
kakršnekoli poškodbe ali škodo, ki bi nastale
zaradi nedovoljene uporabe, nosi odgovornost
uporabnik/upravljalec in ne proizvajalec.
Prosimo, da upoštevate, da naše naprave niso
bile konstruirane za namene uporabe v obrtništvu
ali industriji. Ne prevzemamo nobene odgovornosti, če je bila naprava uporabljana v obrtništvu
ali industriji ter v podobnih dejavnostih.
4. Tehnični podatki
CE-BC 4 M
Omrežna napetost: ..................220-240 V ~ 50Hz
Nazivna poraba najv.: ................................. 70 W
Nazivni izhodna napetost: ......................12 V d.c.
Nazivni izhodni tok: ........................................ 4 A
Zmogljivost akumulatorja »STD/AGM/Zima«: .....
.............................................................10-120 Ah
Zmogljivost akumulatorja »12V M« (najv. 1A): .....
.................................................................2-32 Ah
Funkcija »SUPPLY« izhod najv.: .....................3 A
Polnilni program »RECOND«: ..15,3 V d.c. / 1,5 A
Zaščitni razred: ................................................. II
Vrsta zaščite: ............................................... IP65
Temperatura okolice: ....................- 20 °C – 40 °C
CE-BC 6 M
Omrežna napetost: ..................220-240 V ~ 50Hz
Nazivna poraba najv.: ............................... 100 W
Nazivni izhodna napetost: ......................12 V d.c.
Nazivni izhodni tok: ........................................ 6 A
Zmogljivost akumulatorja »STD/AGM/Zima«: .....
.............................................................20-150 Ah
Zmogljivost akumulatorja »12V M« (najv. 1A): .....
.................................................................2-32 Ah
Funkcija »SUPPLY« izhod najv.: .....................5 A
Polnilni program »RECOND«: ..15,3 V d.c. / 1,5 A
Zaščitni razred: ................................................. II
Vrsta zaščite: ............................................... IP65
Temperatura okolice: ....................- 20 °C – 40 °C
CE-BC 10 M
Omrežna napetost: ..................220-240 V ~ 50Hz
Nazivna poraba najv.: ............................... 160 W
Nazivni izhodna napetost: ......................12 V d.c.
Nazivni izhodni tok: ...................................... 10 A
Zmogljivost akumulatorja »STD/AGM/Zima«: .....
.............................................................30-200 Ah
Zmogljivost akumulatorja »12V M« (najv. 2A): .....
.................................................................3-60 Ah
Funkcija »SUPPLY« izhod najv.: .....................8 A
Polnilni program »RECOND«: ..15,3 V d.c. / 2,5 A
Zaščitni razred: ................................................. II
Vrsta zaščite: ............................................... IP65
Temperatura okolice: ....................- 20 °C – 40 °C
5. Upravljanje
Pred priključitvijo preverite, ali se podatki na tipski
tablici ujemajo z omrežnimi podatki.
Nevarnost! Ne polnite zamrznjenih akumulatorjev.
Ravnajte se po napotkih iz navodil za avtomobil, radio in navigacijski sistem itd.
Napotek za samodejno polnjenje
(le polnilni programi 12V STD, 12V AGM, 12V
Zima, 12 V M)
Napajalnik je samodejna napajalna naprava,
ki jo krmili mikroprocesor, tj. primeren je zlasti
za polnjenje akumulatorjev, ki ne potrebujejo
vzdrževanja, in za dolgotrajno polnjenje in ohranjanje polnjenja akumulatorjev, ki se ne uporabljajo stalno, npr. za starodobnike, prostočasna
vozila, traktorske kosilnice in podobno. Zaradi
vgrajenega mikroprocesorja poteka polnjenje večstopenjsko. Zadnja stopnja polnjenja,
vzdrževalno polnjenje, ohranja zmogljivost
akumulatorja pri 95 – 100 %, zato je akumulator
vedno poln. Postopka polnjenja ni treba nadzirati.
Kljub temu akumulatorja med polnjenjem ne
puščajte nenadzorovanega dlje časa, da lahko
pri motnjah polnjenja napajalnik ročno ločite od
električnega omrežja.
5.1 Razlaga simbolov (sl. 2)
A Polnjenje 12V akumulatorja (svinčev akumu-
lator in gel-akumulator)
B Polnjenje 12V AGM-akumulatorja.
C Polnjenje 12V akumulatorja (svinčev akumu-
lator, AGM-akumulator in gel-akumulator) v
zimskem načinu pri temperaturi okolice
- 91 -

SLO
– 20 °C do +5°C. Nevarnost! Ne polnite zam-
rznjenih akumulatorjev.
D Polnjenje 12V akumulatorja (svinčev akumu-
lator, AGM-akumulator in gel-akumulator) v
načinu ohranjanja polnosti.
E Polnilna napetost v voltih, akumulator ok-
varjen (BAt) / poln (FUL) / zamenjani poli ali
kratek stik na sponkah (Err)
F Ponovna vzpostavitev sposobnosti polnjenja
praznih svinčevih akumulatorjev s povečano
napajalno napetostjo
G Napačno pritrjene sponke (zamenjani poli) ali
kratki stik
H Oskrba z napetostjo, npr. pri menjavi akumu-
latorja
K Stanje polnosti akumulatorja v odstotkih (1
črtica = 25%) in postopek polnjenja (črtica
sveti = akumulator je dosegel stanje polnosti,
črtica v simbolu akumulatorja utripa = akumulator se polni na naslednje stanje polnosti,
vse črtice svetijo = akumulator je poln).
5.2 Nastavitev programov polnjenja (sl. 2)
Napotki:
S pritiskom na tipko »Mode« (sl. 1/poz. 1)
•
preklapljate na različne programe. Simbol,
ki ustreza programu, se prikaže na zaslonu.
Akumulatorji se polnijo s prikazanim programom.
Za vstop v program RECOND 5 sekund pri-
•
tiskajte tipko »Mode«.
Če se želite vrniti iz programa RECOND ali
•
funkcije SUPPLY v program 12V STD, ponovno 5 sekund pritiskajte tipko »Mode«.
Če je napetost akumulatorja manjša kot 3,5
•
V ali večja kot 15 V, akumulator ni primeren
za polnjenje ali je okvarjen. Na LCD zaslonu
se prikaže sporočilo »BAt«. Simbol »G« utripa. Tudi druge napake akumulatorja lahko
povzročijo, da se ne polni.
Če nastane med funkcijo SUPPLY kratek stik
•
med polnilnima sponkama, se na LCD-zaslonu prikaže sporočilo »Lo V«. Simbol »G«
utripa.
Ob odstranitvijo polnilnika iz vtičnice se sh-
•
rani nazadnje nastavljen program polnjenja
(razen RECOND in SUPPLY), ki je nastavljen
za naslednjo uporabo.
Samo CE-BC 4M: Če so polnilne klešče po-
•
vezane z akumulatorjem, polnilnik uporablja
malo toka iz akumulatorja in na kratko se
prikaže LCD-zaslon. To ni napaka.
5.2.1 Standardni polnilni programi
A) 12V STD: Polnilni program za svinčene aku-
mulatorje (mokri, Ca/Ca-, EFB-akumulatorji) in
gel-akumulatorje. Po prvi uporabi polnilnika se na
zaslonu prikaže 12V STD.
B) 12V AGM: Pritisnite tipko »Mode« za polnilni
program za AGM-akumulatorje –> preklop s polnilnega programa 12V STD na 12V AGM
5.2.2 Posebni polnilni programi
C) Zima: Priporočeni polnilni program pri mrazu
(-20 °C - +5 °C temperatura okolice) za normalne
svinčeve akumulatorje (mokri/Ca/Ca akumulatorji); s pritiskom na tipko »Mode« –> preklopite z
12V AGM na polnilni program »Zima«
D) 12V M: Polnilni program za akumulatorje z
majhno zmogljivostjo (gl. Tehnične podatke) in
za vzdrževalno polnjenje vseh akumulatorjev, navedenih pod 3. Namenska uporaba.
Pritisnite tipko »Mode« –> preklop s programa
polnjenja »Zima« na »12 M«
F) RECOND: Polnilni program z večjo priključno
napajalno napetostjo in polnjenje s stalnim tokom,
izključno za vzpostavitev sposobnosti polnjenja
globoko izpraznjenih svinčevih akumulatorjev.
Postopek RECOND je treba nadzorovati vsake
pol ure in ne sme trajati dlje kot 4h. Upoštevajte
navodila izdelovalca akumulatorja.
Pomembno! V ta program pridete tako, da tipko
»Mode« (sl. 1/poz. 1) pritiskate 5 sekund.
Opozorilo!
Z nastajanjem plina nastaja pokalni plin –
•
nevarnost eksplozije! Poskrbite za dobro
zračenje.
Program RECOND uporabljajte le pri
•
svinčenem akumulatorju in kot je opisano
spodaj. Pazite, da ne boste razlili kisline iz
akumulatorja. Kislina v akumulatorju je jedka.
Upoštevajte varnostne napotke.
V nobenem primeru ne uporabljajte akumu-
•
latorja zaprtega načina izdelave (akumulator
VRLA, kot so npr. AGM- ali GEL-akumulator-
ji). Upoštevajte navodila izdelovalca akumula-
torja.
Uporabljajte le v prostem, demontiranem aku-
•
mulatorju in ne v vgrajenem stanju v povezavi
s krovno elektroniko vašega vozila. Povečana
polnilna napetost lahko poškoduje krovno
elektroniko. Upoštevajte navodila za uporabo
vozila ali pa se obrnite na izdelovalca vozila.
- 92 -

SLO
Uporaba polnilnega programa RECOND
Polnilnik priključite na svinčev akumulator,
•
kot je opisano v poglavju 5.3 in vsake pol ure
nadzorujte postopek polnjenja.
Polnilnik odstranite najkasneje v 4h ali ta-
•
koj, ko začne akumulator slišno uplinjati
(mehurčki), kot opisuje poglavje 5.3.
Če je mogoče, preverite stanje kisline in aku-
•
mulatorske celice po možnosti napolnite z
destilirano vodo. Stanje kisline je v idealnem
primeru med natisnjeno vrednostjo najv. in
najm. in mora biti enako za vse celice. Privijte
akumulatorske zamaške, če obstajajo.
5.2.3 Dodatne funkcije
H) SUPPLY: Za 12V enosmerno napetost, npr.
pri menjavi akumulatorja ali za uporabo 12V d.c.
porabnikov.
Pritisnite tipko »Mode« –> preklop s funkcije RECOND na SUPPLY
Opozorilo! Zaščita pred zamenjavo pola ni
na voljo. Pri zamenjavi pola obstaja nevarnost
poškodovanja polnilnika in akumulatorja/krovnega omrežja vozila ali priključenih porabnikov.
Pri priključevanju obvezno pazite, da so poli
priključeni pravilno. Upoštevajte najv. porabo
energije porabnika (gl. Tehnične podatke).
Napotki:
Enosmerna napetost, ki je na voljo (prikazana
•
na zaslonu), ni odvisna od bremena in je brez
obremenitve pribl. 14,5 V.
Funkcija je primerna za porabnike, ki delujejo
•
npr. na vžigalniku v vozilu.
Upoštevajte navodila za uporabo vašega 12 V
•
porabnika.
5.3 Polnjenje akumulatorja:
Čepke akumulatorja odpustite in snemite z
•
akumulatorja (če obstajajo).
Preverite stanje kisline v akumulatorju. Če je
•
treba, dolijte destilirano vodo (če je mogoče).
Pozor! Kislina v akumulatorju je jedka. Brizge
kisline takoj temeljito izperite z vodo in pojdite
po potrebi k zdravniku.
Najprej priključite rdeči polnilni kabel na plus-
•
pol akumulatorja.
Nato odstranite črni polnilni kabel z akumula-
•
torja in priključite napeljavo bencina na ohišje.
Opozorilo! V običajnem primeru je negativni
•
pol akumulatorja povezan s šasijo, zato pri
polnjenju ravnajte, kot je opisano. V izjemnih
primerih je lahko s šasijo povezan pozitivni
pol akumulatorja (pozitivna ozemljitev). V tem
primeru priključite črni napajalni kabel na mi-
nus pol akumulatorja. Nato s šasijo povežite
rdeči polnilni kabel, proč od akumulatorja in
napeljave za bencin.
Ko akumulator priključite na napajalnik, lahko
•
napajalnik priključite v vtičnico (gl. Tehnične
podatke). Sedaj lahko spreminjate nastavitve
polnjenja (gl. poglavje 5.2).
Pozor! Ob polnjenju lahko nastaja nevaren
•
pokalni plin, zato med polnjenjem preprečite
nastajanje isker in odprti ogenj. Nevarnost
eksplozije! Pazite na dobro prezračenost
prostorov.
Če se na LCD-zaslonu pokaže »FUL« (in
•
vse črtice sl.2/poz. K), je postopek poln-
jenja končan. Polnilnik ohranja akumulator
z impulznim polnjenjem pri 95–100 %
razpoložljive zmogljivosti akumulatorja. Če
prikazuje polnilnik to prikazuje že po nekaj
minutah, to pomeni, da je zmogljivost akumu-
latorja majhna. Akumulator zamenjajte.
Izračun časa polnjenja (slika 3a-3c)
Čas polnjenja je odvisen od stanja polnosti
akumulatorja. Pri praznem akumulatorju lahko približen čas do 80-odstotnega polnjenja
izračunate z naslednjo formulo:
Kapaciteta baterije (Ah)
Čas polnjenja/h =
Amp. (polnilni tok)
Polnilni tok mora znašati 1/10 do 1/6 kapacitete
baterije.
5.4 Prikaz napake (sl. 2 / poz. G)
Prikaz napake utripa (sveti) v naslednjih primerih:
Če je napetost akumulatorja manjša od 3,5 V
•
ali večja od 15 V. Akumulator ni primeren za
polnjenje ali je okvarjen. Tudi druge napake
akumulatorja lahko povzročijo, da se ne polni.
Napačno priključene priključne sponke na
•
priključkih akumulatorja z napačnimi poli.
Zaščita pred zamenjavo polov zagotovi, da
se akumulator in polnilnik ne poškodujeta.
Polnilnik odstranite z akumulatorja in ponovno
začnite s polnjenjem. Previdno! V programu
SUPPLY zaščita pred zamenjavo polov ni na
voljo.
Če je na priključnih sponkah kratek stik (ko-
•
vinski deli sponk se dotikajo). Zaščita prede
kratkim stikom zagotovi, da se polnilnik ne
poškoduje.
- 93 -

SLO
5.5 Končanje polnjenje akumulatorja
Omrežni vtikač potegnite iz električne
•
priključne vtičnice.
Prvo od karoserije odstranite črni kabel.
•
Nato pa še z akumulatorjevega pozitivnega
•
(+) pola odstranite še rdeči polnilni kabel.
Pozor! Pri pozitivni ozemljitvi najprej odpusti-
•
te rdeč napajalni kabel od šasije, nato pa črn
napajalni kabel od akumulatorja.
Ponovno vstavite ali privijte zamaške akumu-
•
latorja (če so prisotni).
6. Preobremenitvena zaščita
Polnilnik je v polnilnih programih 12V STD, 12V
AGM, 12V Zima in 12V M elektronsko zaščiten
pred preobremenitvijo, kratkim stikom in zamenjavo polov. Dodatno je vgrajena ena ali več mikrovarovalk. Če je varovalka okvarjena, jo morate
zamenjati in uporabiti drugo z enako ampersko
vrednostjo. Po potrebi se obrnite na servis za
stranke.
7. Vzdrževane in nega akumulatorja
Pazite na to, da bo akumulator vedno trdno
•
vgrajen.
Zagotovljena mora biti brezhibna povezava
•
na omrežje električne naprave.
Akumulator naj je vedno čist in suh. Priključne
•
klešče rahlo namažite z brezkislinsko in proti
kislini odporno mastjo (Vaseline).
Pri akumulatorjih, ki terjajo vzdrževanje, je
•
potrebno pribl. vsakih 4 tedne preveriti višino
nivoja kisline in po potrebi doliti destilirano
vodo.
8. Čiščenje, vzdrževanje in
naročanje nadomestnih delov
Priporočamo, da napravo očistite neposredno
•
po vsakem končanem delu.
Redno čistite napravo z vlažno krpo in nekaj
•
milnice. Ne uporabljajte nobenih čistilnih ali
razredčilnih sredstev; le-ta lahko poškodujejo
plastične dele naprave. Pazite na to, da ne
pride voda v notranjost naprave. Vstop vode
v električno napravo povečuje tveganje
električnega udara.
Polnilno napravo je potrebno hraniti v suhem
•
prostoru. Polnilne celice je potrebno zaščititi
pred koroijo.
8.2 Vzdrževanje
V notranjosti naprave ni nobenih delov, ki bi jih
bilo potrebno vzdrževati.
8.3 Naročanje nadomestnih delov:
Pri naročanju nadomestnih delov je potrebno navesti naslednje navedbe:
Tip naprave
•
Art. številko naprave
•
Ident- številko naprave
•
Številka potrebnega nadomestnega dela
•
Aktualne cene in informacije najdete na spletni
strani www.isc-gmbh.info
9. Odstranjevanje in ponovna
uporaba
Naprava se nahaja v embalaži, da ne bi prišlo do
poškodb med transportom. Ta embalaža je surovina in s tem ponovno uporabna ali pa jo je možno
reciklirati. Naprava in njen pribor sta izdelana iz
različnih materialov kot npr. kovine in plastika.
Okvarjene naprave ne sodijo med gospodinjske odpadke. Napravo odložite na ustreznem
zbirališču, da bo pravilno odstranjena. Če ne poznate primernih zbirališč, se pozanimajte pri svoji
občinski upravi.
Nevarnost!
Pred izvajanjem vsakega čistilnega dela izvlecite
električni priključni kabel.
8.1 Čiščenje
Zaščitno opremo, zračne reže in ohišje mo-
•
torja vzdržujte kar se le da v stanju brez prisotnosti prahu in umazanije. Napravo obrišite
s suho krpo ali s komprimiranim zrakom pod
nizkim pritiskom.
- 94 -

SLO
10. Napotki za odpravljanje napak
Ob pravilni uporabi naprave ne bi smelo priti do nobenih motenj. V primeru motenj preverite naslednje
možnosti, preden o tem obvestite servisno službo.
Motnja Možni vzrok Pomoč
Naprava ne polni - Polnilne klešče so narobe
priključene
- Rdečo kleščo priključite na pozitivni
pol, črno kleščo pa na karoserijo
- Polnilne klešče se med seboj stika-
jo
- Akumulator je poškodovan
Samo za dežele EU
Električnega orodja ne mečite med gospodinjske odpadke!
V skladu z evropsko smernico 2012/19/EG o starih električnih in elektronskih napravah in v skladu z izvajanjem nacionalne zakonodaje morate ločeno zbirati izrabljena električna orodja in jih predati v okoljsko varno ponovno predelavo.
- Odpravite stik
- Strokovnjak naj pregleda akumulator in ga po potrebi zamenjajte.
Reciklažna alternativa za poziv za vračanje:
Lastnik električne naprave je alternativno zavezan, da namesto vračanja sodeluje pri pri strokovno
ustreznem recikliranju v primeru predaje lastnine. Staro napravo se lahko v ta namen tudi prepusti na
odvzemnem mestu, ki izvaja odstranjevanje v smislu nacionalne zakonodaje o odstranjevanju takšnih
odpadkov. To se ne nanaša na starim napravam priložene dele pribora in opreme brez električnih komponent.
Ponatis ali kakršnokoli razmnoževanje dokumentacije in spremljajočih papirjev o proizvodu, tudi po
izvlečkih, je dovoljeno samo z izrecnim soglasjem ISC GmbH.
Pridržana pravica do tehničnih sprememb
- 95 -

SLO
Garancijska listina
Spoštovani uporabnik,
za naše izdelke izvajamo strogo končno kontrolo kakovosti. Če ta naprava kljub temu ne deluje brezhibno, to zelo obžalujemo in vas prosimo, da se obrnete na našo servisno službo na naslovu, ki je naveden
na tej garancijski kartici. Z veseljem vam bomo svetovali tudi po telefonu na navedeni številki servisne
službe. Za uveljavljanje garancijskih zahtevkov velja naslednje:
1. Ti garancijski pogoji so namenjeni izključno porabniku, tj. fi zičnim osebam, ki tega izdelka ne bodo
uporabljale za svojo obrt ali druge samostojne dejavnosti. Ti garancijski pogoji urejajo dodatne
garancijske storitve, ki jih spodaj navedeni proizvajalec zagotavlja svojim kupcem novih naprav dodatno k zakonskemu jamstvu.Ta garancija ne vpliva na vaše zakonske garancijske zahtevke. Naše
garancijske storitve so za vas brezplačne.
2. Garancijske storitve se nanašajo izključno na pomanjkljivosti na novih napravah zgoraj navedenega proizvajalca, ki ste jih kupili, in so posledica materialnih ali tovarniških napak, in ki jih po lastni
presoji odpravimo na tej napravi ali napravo nadomestimo z drugo.
Prosimo, upoštevajte, da naše naprave niso bile zasnovane za uporabo v poklicu, obrti ali za poklicno uporabo. Garancijska pogodba tako ne nastane, če napravo v garancijskem obdobju uporabljate
za v obrtnih, rokodelskih ali industrijskih obratih ali če je bila izpostavljena obremenitvam, ki so temu
enakovredna.
3. Iz garancije so izvzeti:
- Škoda na napravi, ki je nastala zaradi neupoštevanja navodil za montažo ali zaradi nestrokovne
inštalacije, neupoštevanja navodil za uporabo (kot npr. s priključitvijo na napačno omrežno napetost
ali vrsto toka), neupoštevanja navodil za vzdrževanje in varnostnih določil ali zaradi izpostavitve naprave nenormalnim okoljskim pogojem ali zaradi neustrezne nege in vzdrževanja.
- Škoda na napravi, ki je nastala zaradi nenamenske ali nestrokovne uporabe (npr. zaradi preobremenitve naprave ali uporabe v orodjih ali opremi, za katera ni odobrena), vdor tujkov v napravo (npr.
peska, kamnov ali prahu, poškodb pri transportu), uporabe sile ali zunanje sile (npr. poškodbe pri
padcih).
- Škode na napravi ali delih naprave, ki je nastala kot posledica uporabe oz. običajne ali drugačne
obrabe.
4. Garancijsko obdobje traja 24 mesecev in se začne z datumom nakupa naprave. Garancijske zahtevke je treba uveljaviti pred potekom garancijskega obdobja v roku dveh tednov, ko opazite okvaro.
Uveljavljanje garancijskih zahtevkov po poteku garancijskega obdobja je izključeno. Popravilo ali
menjava naprave ne podaljša garancijskega obdobja, niti ne predstavlja začetka novega garancijskega obdobja za storitev, izvedeno na napravi ali za morebitne vgrajene nadomestne dele. To velja
tudi pri servisih na kraju samem.
5. Za uveljavljanje vašega garancijskega zahtevka okvarjeno napravo prijavite na: www.isc-gmbh.info.
Pripravite račun ali drugo dokazilo o vašem nakupu nove naprave. Naprave, poslane brez ustreznega dokazila ali tipske tablice, so izključene iz garancijskih storitev, saj jih ni možno uvrstiti. Če je
okvara zajeta v naših garancijskih storitvah, boste takoj prejeli popravljeno ali novo napravo.
Seveda bomo proti plačilu z veseljem odpravili tudi okvare na napravi, ki v garancijski obseg ne sodijo
ali ne sodijo več. Napravo nam pošljite na spodaj naveden naslov servisa.
Opozarjamo na omejitve v okviru te garancije za obrabne, potrošne in manjkajoče dele v skladu s servisnimi informacijami, opisanimi v teh navodilih za uporabo.
- 96 -

H
Veszély!
A készülékek használatánál, a sérülések és a
károk megakadályozásának az érdekébe be kell
tartani egy pár biztonsági intézkedést. Ezért ezt
a használati utasítást / biztonsági utasításokat
gondosan átolvasni. Őrizze ezeket jól meg, azért
hogy mindenkor a rendelkezésére álljanak az
információk. Ha más személyeknek adná át a
készüléket, akkor kérjük kézbesítse ki vele együtt
ezt a használati utasítást / biztonsági utasításokat
is. Nem vállalunk felelőséget olyan balesetekért
vagy károkért, amelyek ennek az utasításnak és
a biztonsági utasításoknak a fi gyelmen kívül ha-
gyásából keletkeznek.
1. Biztonsági utasítások
A megfelelő biztonsági utasítások a mellékelt füzetecskében találhatóak!
Veszély!
Olvason minden biztonsági utalást és utasítást el. A biztonsági utalások és utasítások
betartásán belüli mulasztások következménye
áramcsapás, tűz és/vagy nehéz sérülések lehetnek. Őrizze meg a biztonsági utalásokat és
utasításokat a jövőre nézve.
Ezt a készüléket 8 éves és a felett levő gyerekeknek, valamint csökkentett pszihikai, szenzórikus
vagy szellemmie képességekkel vagy tapasztalattal és tudással nem rendelkezőeknek lehet használni, ha felügyelve vannak vagy a készülék biztos használatával kapcsolatban ki lettek oktatva
és megértették az abból eredő veszélyeket. Nem
szabad gyerekeknek játszaniuk a készülékkel. A
tisztítást és a használó-karbantartást nem szabad
gyerekeknek felügyelet nélkül elvégezniük.
Megsemmisítés
Akkumulátor: Csakis gépkocsi-műhelyeken keresztül, speciális átvevő helyeken vagy a külön
hulladékgyűjtőhelyeken. Érdeklődjön a helyi önkormányzatnál.
A készüléken található tájékoztató tábla magyarázata (lásd a 4-es képet)
1 = a készülék védőizolálva
2 = FIGYELMEZTETÉS – Sérülés veszélyének
a lecsökkentéséhez olvassa el a használati
utasítást!
3 = Biztosítóérték az elektronika platinán
4 = Mielőtt az akkumulátorhoz levő csatlakozást
bezárná vagy kinyitná, leválasztani a hálózat-
ról.
FIGYELEM: Robbanékony gázok. Elkerülni
a lángokat és a szikrákat. A töltés ideje alatt
gondoskodni elegendő szellőztetésről.
2. A készülék leírása és a szállítás
terjedelme
2.1 A készülék leírása (képek 1)
1 Funkcióbillentyű
2 LCD – kijelzés
3 Töltőkábel fekete (-)
4 Töltőkábel piros (+)
5 Akasztógyűrű
6 Hálózati vezeték
2.2 A szállítás terjedelme
Nyissa ki a csomagolást és vegye ki óvatosan
•
a készüléket a csomagolásból.
Távolítsa el a csomagolási anyagot valamint
•
a csomagolási- / és szállítási biztosítékot (ha
létezik).
Ellenőrizze le, hogy teljes a szállítás terjedel-
•
me.
Ellenőrizze le a készüléket és a tartozékrés-
•
zeket szállítási károkra.
Ha lehetséges, akkor őrizze meg a csomago-
•
lást a garanciaidő lejáratának a végéig.
Veszély!
A készülék és a csomagolási anyag nem
gyerekjáték! Nem szabad a gyerekeknek a
műanyagtasakokkal, foliákkal és aprórészekkel játszaniuk! Fennáll a lenyelés és a megfulladás veszélye!
Eredeti használati utasítás
•
Biztonsági utasítások
•
3. Rendeltetésszerűi használat
A töltőkészülék a gépjárműveknél használt, nem
gondozásmentes vagy gondozásmentes 12V
ólomsavas akkumulátorok (Nedves- /Ca/Ca-/
EFB-akkumulátorok) valamint ólomgél - és AGM
akkumulátorok töltésére lett meghatározva.
A 12V M töltő program az töltésmegtartásra és
a kis akkumulátorkapacitású akkumulátorok
töltésére alkalmas. A SUPPLY funkcióval a
készüléket puff er-áramellátásként lehet használni
például egy akkumulátorcsere ideje alatt vagy
- 97 -

H
12V d.c. fogyasztók üzemeltetésére (fi gyelembe
venni a max. áramfelvételt). A RECOND program
kizárólagosan a mélyenlemerült ólomsavas
akkumulátorok újraélesztésére lett meghatározva
(nem AGM és GEL akkumulátorokhoz). Ezt a
programot csak rövid ideig és felügyelet alatt
használni.
A készüléket nem szabad a Lítium-vas-foszfátakkuk (mint például LiFePO4) vagy más Lítium
akkuk töltésére felhasználni. A készülék csak
mobilis használatra van meghatározva és nem
pedig a lakókocsikba, lakóautókba vagy hasonló
gépjárművekbe való beépítésre. A töltőkészüléket
óvni kell eső és hó elöl.
A készüléket csak rendeltetése szerint szabad
használni. Ezt túlhaladó bármilyen használat,
nem számít rendeltetésszerűnek. Ebből adódó
bármilyen kárért vagy bármilyen fajta sérülésért a
használó ill. a kezelő felelős és nem a gyártó.
Kérjük vegye fi gyelembe, hogy a készülékeink
rendeltetésük szerint nem az ipari, kézműipari
vagy gyári használatra lettek konstruálva. Nem
vállalunk szavatosságot, ha a készülék ipari,
kézműipari vagy gyári üzemek területén valamint
egyenértékű tevékenységek területén van használva.
4. Technikai adatok
CE-BC 4 M
Hálózati feszültség: .................220-240 V ~ 50Hz
Névleges – felvevő teljesítmény max.: ........ 70 W
Névleges – kimeneti feszültség: .............12 V d.c.
Névleges – kimeneti áram: ............................. 4 A
Akkumulátorkapacitás „STD/AGM/tél“: 10-120 Ah
Akkumulátorkapacitás „12V M“ (max. 1A): .. 2-32
Ah
„SUPPLY“ funkció, kimenete max.: .................3 A
„RECOND“ töltőprogram: ..........15,3 V d.c. /1,5 A
Védelmi osztály: ................................................ II
Védelmi rendszer: ....................................... IP65
Környezeti hőmérséklet: .................- 20°C – 40°C
CE-BC 6 M
Hálózati feszültség: .................220-240 V ~ 50Hz
Névleges – felvevő teljesítmény max.: ...... 100 W
Névleges – kimeneti feszültség: .............12 V d.c.
Névleges – kimeneti áram: ............................. 6 A
Akkumulátorkapacitás „STD/AGM/tél“: 20-150 Ah
Akkumulátorkapacitás „12V M“ (max. 1A): .........
.................................................................2-32 Ah
„SUPPLY“ funkció, kimenete max.: .................5 A
„RECOND“ töltőprogram: ..........15,3 V d.c. /1,5 A
Védelmi osztály: ................................................ II
Védelmi rendszer: ....................................... IP65
Környezeti hőmérséklet: .................- 20°C – 40°C
CE-BC 10 M
Hálózati feszültség: .................220-240 V ~ 50Hz
Névleges – felvevő teljesítmény max.: ...... 160 W
Névleges – kimeneti feszültség: .............12 V d.c.
Névleges – kimeneti áram: ........................... 10 A
Akkumulátorkapacitás „STD/AGM/tél“: 30-200 Ah
Akkumulátorkapacitás „12V M“ (max. 2 A): ........
.................................................................3-60 Ah
„SUPPLY“ funkció, kimenete max.: .................8 A
„RECOND“ töltőprogram: ..........15,3 V d.c. /2,5 A
Védelmi osztály: ................................................ II
Védelmi rendszer: ....................................... IP65
Környezeti hőmérséklet: .................- 20°C – 40°C
5. Kezelés
Győződjön meg a hozzácsatlakoztatás előtt arról,
hogy az adattáblán megadott adatok megegyeznek a hálózati adatokkal.
Veszély! Ne töltsön megfagyott akkumulátorokat.
Kérjük vegye fi gyelembe a használati utasí-
tásban megadott utasításokat az autóra, rádióra, autótelefonra, stb. vonatkozóan.
Utasítás az automata töltéshez
(csak töltőprogramok 12V STD, 12V AGM,
12V tél, 12 V M)
A töltőkészülék az egy mikroprocesszor által
vezérelt automata töltőkészülék, ez annyit jelent,
hogy különösen alkalmas a gondozásmentes
akkumulátorok úgymint a nem állandóan használt akkumulátorok hosszan tartó töltésére
és töltésmegtartására, mint például oldtimereknél, szabadidő gépjárműveknél, traktor
fűnyírógépeknél és hasonlóknál. Az integrált
mikroprocesszor által a töltés több fokozatban történik. Az utolsó töltőfokon, a megtartó töltésen, az
akkumulátorkapacitást 95 – 100 % között tartja és
ezáltal mindig teljesen fel van töltve az akkumulátor. A töltésfolyamatot nem kell felügyelni. Töl-
- 98 -

H
tésnél mégsem hagyja hosszabb ideig felügyelet
nélkül az akkumulátort azért, hogy egy zavar esetén kézzel le tudja vállasztani a töltőkészüléket az
áram hálózatról.
5.1 A szimbólumok magyarázata (2-es ábra)
A Egy 12V-os akkumulátor (ólomsav akkumulá-
tor és GEL akkumulátor) töltése.
B Egy 12V-os AGM akkumulátor töltése.
C Egy 12V-os akkumulátornak a töltése (óloms-
avas akkumulátor, AGM akkumulátor és GEL
akkumulátor) téli móduszban egy -20°C-tól
+5°C-ig terjedő környezeti hőmérséklet mel-
lett. Veszély! Ne töltsön megfagyott akkumu-
látorokat.
D Egy 12V-os akkumulátor töltése (ólomsavas
akkumulátor, AGM akkumulátor és GEL akku-
mulátor) a töltésmegtartó móduszban.
E Töltőfeszültség Volt-ban, defektes az ak-
kumulátor (BAt) / teljesen feltöltve (FUL) /
fordított pólussal rácsatlakoztatva vagy rövid-
zárlat a csipeszen (Err).
F A lemerült ólomsavas akkumulátorok
töltőképességének a helyreállítása növelt
töltőfeszültséggel
G A csipeszek rosszul lettek rászorítva (fordított
pólussal) vagy rövidzárlat
H Feszültségellátás például az akkumulátor
cserénél
K Az akkumulátor töltési állapota százalékban
(1 skálaosztás = 25%) és töltési folyamat
(világít a skálaosztás = elérte az akkumulátor
a töltési állapotot, pislog a skálaosztás az
elemszimbólumban = fel lesz töltve az akku-
mulátor a következő töltési állapotra, minden
skálaosztás világít = az akkumulátor teljesen
fel van töltve).
defektes. A „BAt“ jelentés jelenik meg az
LCD-képernyőn. Pislog a „G“ szimbólum. Más
akkumulátorhibák is vezethetnek ahhoz, hogy
nem lehet tölteni az akkumulátort.
Ha a SUPPLY funkció ideje alatt egy rövidzár-
•
lat áll fenn a töltő csipeszek között, akkor az
LCD képernyőn a „Lo V“ jelentés jelenik meg.
Pislog a „G“ szimbólum.
A töltőkészüléknek a dugaszoló aljzatról való
•
eltávolításánál az utoljára beállított töltési
program lesz elmentve (kivéve RECOND
és SUPPLY) és a következő használatnál
előlegesen be van állítva.
Csak CE-BC 4M: Ha össze lesznek csatla-
•
koztatva a töltő csipeszek az akkumulátorral,
akkor a töltőkészülék egy nagyon kevés áramot húz az akkumulátorból és röviden megjelenik az LCD-képernyő. Ez nem hiba.
5.2.1 Standard töltő programok
A) 12V STD: Töltő program az ólomsavas akku-
mulátorokhoz (nedves-, Ca/Ca-, EFB-akkumulátorok) és GEL akkumulátorok. A töltőkészülék
első üzembevétele után a képernyőn 12V STD
jelenik meg.
B) 12V AGM: Töltő program az AGM akkumuláto-
rokhoz magnyomni a „Mode“-tasztert -> átkapcsolni a 12V STD-röl a 12V AGM töltő programra.
5.2.2 Speciális töltő programok
C) Tél: Ajánlott töltő program hideg időjárásnál
(-20°C - +5°C környezeti hőmérséklet) normális
ólomsavas akkumulátorokhoz (nedves- / Ca/Caakkumulátorok) megnyomni a „Mode“-tasztert
-> átkapcsolni a 12V AMG-röl a „Téli“ töltő programra
5.2 A töltőprogramok beállítása (2-es ábra)
Utasítások:
A „Mode“-taszter (1-es ábra / poz. 1) nyomá-
•
sa által lesz a különböző programokra átkap-
csolva. A programnak megfelelő szimbólum
jelenik meg a képernyőn. Az akkumulátorok a
kimutatott programmal lesznek töltve.
Ahhoz hogy a RECOND programhoz jusson,
•
nyomja meg 5 másodpercig a „Mode“-tasz-
tert.
Ahhoz hogy a RECOND programból vagy a
•
SUPPLY funkcióból a 12V STD programhoz
vissza kerüljön, nyomja meg úgyszintén 5
másodpercig a „Mode“-tasztert.
Ha az akkumulátor feszültsége 3,5 V-nál
•
alacsonyabb vagy magasabb 15 V-nál, akkor
az akkumulátor nem alkalmas töltésre vagy
D) 12V M: Töltő program kis kapacitású akku-
mulátorokhoz (lásd a technikai adatokat) és a 3.
Rendeltetésszerűi használat alatt megnevezett
akkumulátorok töltésmegtartására.
Nyomni a „Mode“-tasztert -> átkapcsolás a „Tél“-í
töltő programról a „12 M“-re
F) RECOND: Töltő program magasabb töltő vég-
feszültséggel és konstans áramtöltéssel, kizárólagosan a mélyen lemerült ólomsavas akkumulátorok töltésképességének a helyreállítására.
A RECOND-folyamatot félóránként le kell
ellenőrizni és nem szabad túllépni a 4 órás
időtartamot. Vegye fi gyelembe az akkumulátor
gyártójának az utasításait.
- 99 -

H
Fontos! Ahhoz hogy ehhez a programhoz jusson,
5 másodpercig nyomni kell a „Mode“-tasztert (1es ábra /poz. 1).
Figyelmeztetés!
A gázképződés által durranógáz keletke-
•
zik - robbanás veszélye! Ügyelni egy jó
szellőztetésre.
A RECOND programot csak ólomsavas ak-
•
kumulátoroknál és csak a következőekben
leírottak szerint használni. Ügyeljen arra, hogy
ne öntsön ki akkumlátorsavat. Az akkumu-
látorsav maró hatású. Figyelembe venni a
biztonsági utasításokat.
Ne használja semmi esetre sem zárt
•
szerkezetű akkumulátoroknál (VRLA akku-
mulátorok mint például AGM vagy GEL akku-
mulátorok). Vegye figyelembe az akkumulátor
gyártójának az utalásait.
Csak egy szabadon álló, kiszerelt akku-
•
mulátornál és nem beszerelt a gépjármű a
fedélzeti elektronikájával összeköttetésben
levő állapotban használni. A magasabb
töltőfeszültség megrongálhatja a fedélzeti
elektronikát. Vegye figyelem a gépjárműjének
a használati utasítását ill. forduljon a
gépjármű-gyártójához.
A RECOND töltő program használata
Az 5.3-as fejezet alatt leírottak szerint rács-
•
atlakoztatni a töltőkészüléket egy ólomsavas
akkumulátorra és félóránként leellenőrizni a
töltési folyamatot.
Legkésőbb 4 óra leteltével vagy miután az
•
akkumulátor hallhatóan gázasodik (bugyboré-
kol), távolítsa el az 5.3-as fejezetben leírottak
szerint a töltőkészüléket.
Ellenőrizze le, ha lehetséges, a savállást és
•
ha lehetséges, akkor az akkumulátorcellákat
adott esetben csak desztillált vizzel utántöl-
teni. A savállás ideális módon a felnyomtatott
max. és min. érték között van és minden cel-
lánál azonosnak kellene lennie. Ha léteznek,
akkor csavarja ismét feszesre az akkumu-
látordugókat.
5.2.3 Kiegészítő funkció
H) SUPPLY: A 12V egyenfeszültségű ellátáshoz
például az akkumulátorcserénél vagy pedig a 12V
d.c. fogyasztók üzemeltetésére.
„Mode“-tasztert nyomni -> átkapcsolni a RECOND-ról a SUPPLY funkcióra
Figyelmeztetés! A fordított pólus elleni biztosítás
nem áll rendelkezésre. Fordított pólus esetében
a töltőkészüléken és az akkumulátorokon / a
gépjármű kocsihálózatán ill. a csatlakozott fogyasztókon megrongálódás veszélye áll fenn. Ügyeljen
a csatlakoztatásnál okvetlenül a helyes polaritásra. Vegye fi gyelmbe a fogyasztó max. áramfelvé-
telét (lásd a technikai adatokat).
Utasítások:
A rendelkezésre állított egyenfeszültség (a
•
képernyőn kimutatva) függ a megteheléstöl
és teher nélkül cca. 14,5 V.
A funkció azoknak a fogyasztóknak hasz-
•
nálható, amelyek egy gépjármű szivargyújtó
aljzaton keresztül lesznek üzemeltetve.
Vegye figyelembe a 12 V-os fogyasztójának a
•
használati utasítását.
5.3 Az akkumulátor feltöltése:
Engedje meg, vagy vegye ki az akkumulátor-
•
ból az akkumlátordugókat (ha léteznek).
Vizsgálja meg az akkumulátorjának a sav
•
állását. Szükség esetén töltsön bele desztillált
vízet (ha lehetséges). Figyelem! Az akkumulátorsav maró hatású. A savfröccsenéseket
azonnal sok vízzel alaposan lemosni, szükség esetén egy orvost felkeresni.
Elősször a piros töltőkábelt kapcsolni rá az
•
akkumulátor pozitív pólusára.
Azután az akkumulátotól és a benzínvezetékt-
•
öl távol rá lesz csatlakoztatva a karrosszériára
a fekete töltőkábel.
Figyelmeztetés! Normális esetben az
•
akkumulátor negatív pólusa rá van csatlakoztatva a karosszériára és a töltéshez Ön az
előbbiekben leírottak szerint jár el. Kivételes
esetben lehetséges lehet, hogy az akkumulátor pozitiv pólusa van a karosszeriával összecsatlakoztatva (pozitív földelés). Ebben az
esetben csatlakoztasa rá a fekete töltőkábelt
az akkumulátor minusz pólusára. Azután
csatlakoztasa a piros töltőkébelt, messze az
akkumulátortól és a benzinvezetéktől, a karosszériára.
Miután az akkumulátor a töltőkészülékre
•
rá lett kapcsolva, be lehet kapcsolni a
töltőkészüléket egy dugaszoló aljzatba (lásd a
techikai adatokat). Most meg tudja változtatni
a töltési beállításokat (lásd az 5.2-es fejezetet).
Figyelem! A töltés által veszélyes dur-
•
ranógáz keletkezhet, ezért kerülje el a töltés
ideje alatt a szikraképzést és a nyílt tüzet.
Robbanásveszély! Ügyeljen termekben egy jó
- 100 -
 Loading...