

Page 1

www.ecovacs.com
Instruction Manual
WINBOT
7 Series
TM
TM
TM
Page 2

Welcome and congratulations on the purchase of your Ecovacs Winbot!
We trust that your new Winbot will help you keep your home clean and save
valuable time that you can use to do other things you enjoy.
For your convenience, we have provided a space for you to record your
Winbot model number, product number and date of purchase below. We
also suggest you attach your receipt to this page for your records. (Model
and product numbers are located on the label on the bottom of the Winbot.)
If you have questions or comments about your Winbot, we ask that you call
Customer Service at 1-888-966-0895.
MODEL # ________________
PRODUCT # ________________
DATE OF PURCHASE ___ / ___ / ___
Thank you for choosing the Ecovacs Winbot!
TM
EN
Page 3

Quick User Guide
1. PREPARATON BEFORE USE
Important notes to help you get a quick start.
3. IMPORTANT SAFETY PRECAUTIONS
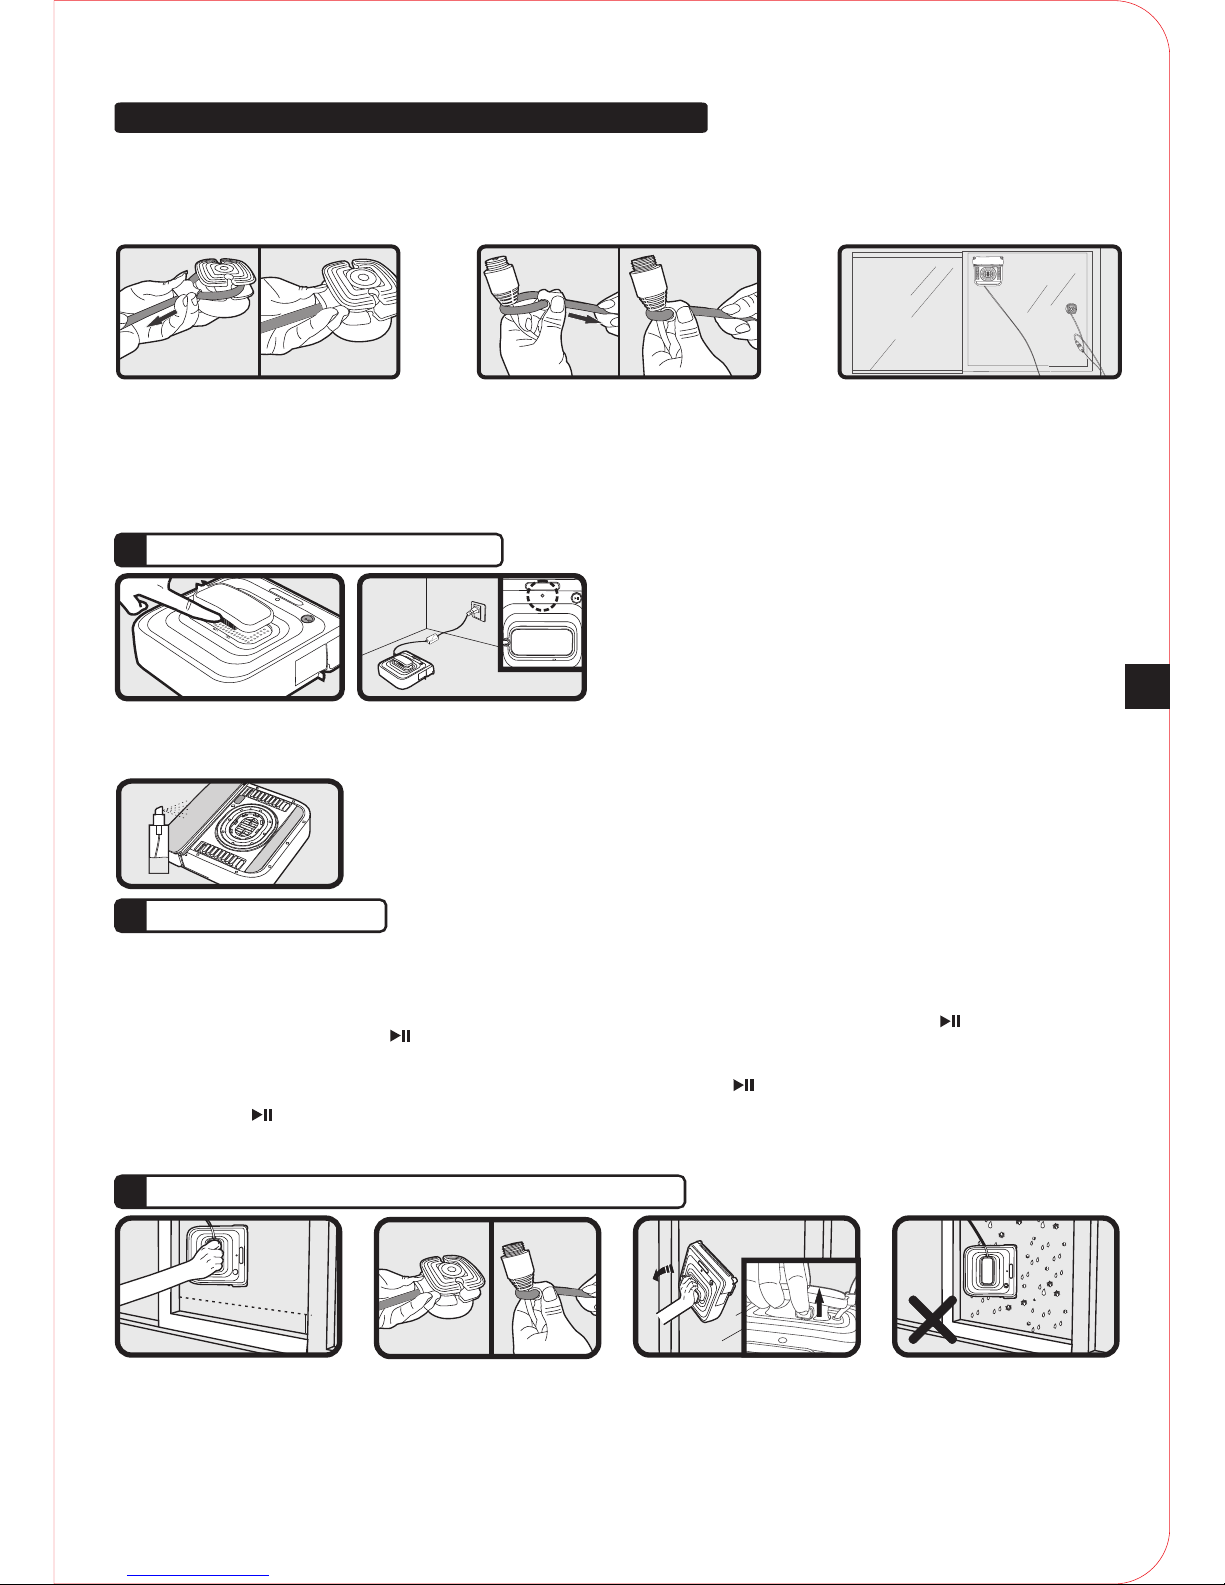
1. Be sure to place the Winbot horizontally on the window and that it is at least 4 inches from the lower corners of the window.
2. The Safety Pod MUST be used when cleaning the outside of a window above ground level. Please read the instructions for Safety Pod use in this
Instruction Manual.
3. To safely remove the Winbot, grasp the handle of the unit and move the switch under the handle to the OFF position (far left). While still grasping the
unit, insert finger into the Air Release Trigger and pull up on it. Remove the unit from the window when the suction has diminished.
4. The Winbot may NOT be used outside while raining, snowing or colder than 40º F or hot te r th an 114º F, as it will damage the product and could
cause electrical problems.
.
.
.
.
OFF
ON
≥4 in
che s
● Assemble the supply cord connector to the Power Adapter, tightening
the nut so the connector will not pull apart, then plug the Power Adapter
into your electrical receptacle. Place the Winbot’s switch button, located
under the handle, to the CHARGE position (far right) and charge the
Back Up Battery for 2 hours. The flashing Indicator Light will change to a
steady GREEN when charging is complete.
2. USE OF PRODUCT
For best results, please read the entire contents of this Instruction Manual. It provides complete and detailed information on safety, use, and maintenance
of your Ecovacs Winbot.
ONOFF
● While the unit is charging, take time to read the Instruction Manual for the proper and safe use of the unit.
● Should you be cleaning the outside of a window above ground level, you must use the Safety Pod. Read the instructions on Safety Pod use in this
Instruction Manual.
●
●
Turn the Winbot unit over to attach the Cleaning Pads. Attach the large Cleaning Pad to the front floating plate,
making sure to cover the entire plate. Attach the small Cleaning Pad to the small area provided at the rear of
the unit. Make sure the Rear Cleaning Pad is placed exactly within its velcro area. Take care not to
cover any part of the Cupule (suction ring), or the plate that holds it, wi th t he R ea r Cl ea ni ng P ad .
NOTE: Cleaning Pads are removable and machine washable.
Immediately prior to placing the Winbot onto the window, take the glass Cleaning Solution bottle and spray
ONLY the FRONT Cleaning Pad. The pad should be slightly damp, not wet.
●
●
●
●
●
Grasp the Winbot by the handle and move the switch under the handle to the ON position (Center).
Place the Winbot horizontally on the window, making sure it is at least 4 inches from the lower corners of the window frame. There will be a slight noise.
This is the vacuum motor creating suction to hold the Winbot to the window. When the indicator light turns BLUE, Winbot has attached itself to the
window and the handle can be released.
After ensuring the Winbot is correctly placed on the glass, press the “Start/Pause” button on the Remote Control or press the “Start/Pause”
button directly on the Winbot unit. The product will use automatic cleaning mode to measure and clean the window. When Winbot is finished cleaning,
it will return to its start position, the Indicator Light will flash BLUE and the unit will emit a song to indicate the end of the cleaning cycle.
To pause Winbot during the cleaning cycle, press the “Start/Pause” button on the Remote Control or press the “Start/Pause” button directly on the
Winbot unit. The product will then pause and go into stand-by mode. To restart the cleaning process, press the “Start/Pause” again on the Remote
Control or directly on the Winbot unit.
When the Winbot is done cleaning remove it from the window. Grasp the handle of the unit and move the switch under the handle to the OFF position
(far left). While still grasping the unit, insert finger into the Air Release Trigger and pull up on it. Remove the unit from the window after suction has
Winbot is NOT intended to replace heavy duty or first time cleaning, this must be done manually as you have done in the past. Winbot is intended for maintenance
cleaning on standard windows.
WINBOT on that particular window until a WINBOT Extension Cord is attached (Extension Cord sold separately).
2. Loop one end of the Safety Rope around the Safety Pod's channel and pull it tight.
3. Loop the other end of the Safety Rope to the nut on the power cord and tighten. (If an Extension Cord is attached the Safety Rope should still be tied to the nut on the power
cord.)
Note: Do NOT attach the Safety Rope to the thin part of the cord.
4. Press the Safety Pod suction cup FIRMLY on the inside, lower corner of the window. Make sure the Safety Pod suction cup is securely in place.
5. Place WINBOT on the window, close the window, and start WINBOT.
6. After WINBOT is done cleaning remove it from the window. Grasp the handle, switch the unit OFF, insert finger into Air Release Trigger and pull up on it for 20 seconds until
suction has diminished.
1. Make sure that there is enough power cord for the WINBOT to clean the entire window without restricting its movement. If there is not enough cord, it is not safe to use the
Warning
If Winbot is used to clean an outside window above ground level, the Safety Pod MUST be used.
Winbot must be used in strict accordance with the directions in the Instruction Manual. Ecovacs Robotics, Inc. can not be held liable or
responsible for any damages or injuries caused due to improper use.
EN
Page 4

1. Package Contents & Product Diagram . . . . . . . . . . . . . . . . . . . . . . . . . . . . . . . . . . . . . . . . . . . . . . . . . . . . . . . . . . . . . . . . . . . . . . . . . . . . . . . . . . . . 5
1.1 Package Contents . . . . . . . . . . . . . . . . . . . . . . . . . . . . . . . . . . . . . . . . . . . . . . . . . . . . . . . . . . . . . . . . . . . . . . . . . . . . . . . . . . . . . . . . . . . . . . . . . . . . . 5
1.2 Product Diagram . . . . . . . . . . . . . . . . . . . . . . . . . . . . . . . . . . . . . . . . . . . . . . . . . . . . . . . . . . . . . . . . . . . . . . . . . . . . . . . . . . . . . . . . . . . . . . . . . . . . . . . 5
1.3 Technical Specifications . . . . . . . . . . . . . . . . . . . . . . . . . . . . . . . . . . . . . . . . . . . . . . . . . . . . . . . . . . . . . . . . . . . . . . . . . . . . . . . . . . . . . . . . . . . . . 5
2. Product Information. . . . . . . . . . . . . . . . . . . . . . . . . . . . . . . . . . . . . . . . . . . . . . . . . . . . . . . . . . . . . . . . . . . . . . . . . . . . . . . . . . . . . . . . . . . . . . . . . . . . . . . . . . . . 6
2.1 About this Instruction Manual . . . . . . . . . . . . . . . . . . . . . . . . . . . . . . . . . . . . . . . . . . . . . . . . . . . . . . . . . . . . . . . . . . . . . . . . . . . . . . . . . . . . . . . 6
2.2 Winbot Power. . . . . . . . . . . . . . . . . . . . . . . . . . . . . . . . . . . . . . . . . . . . . . . . . . . . . . . . . . . . . . . . . . . . . . . . . . . . . . . . . . . . . . . . . . . . . . . . . . . . . . . . . . . . 6
2.3 Product Application Range . . . . . . . . . . . . . . . . . . . . . . . . . . . . . . . . . . . . . . . . . . . . . . . . . . . . . . . . . . . . . . . . . . . . . . . . . . . . . . . . . . . . . . . . . . . 6
2.4 Product Precautionary Items . . . . . . . . . . . . . . . . . . . . . . . . . . . . . . . . . . . . . . . . . . . . . . . . . . . . . . . . . . . . . . . . . . . . . . . . . . . . . . . . . . . . . . . 7
2.5 Children Safety .. . . . . . . . . . . . . . . . . . . . . . . . . . . . . . . . . . . . . . . . . . . . . . . . . . . . . . . . . . . . . . . . . . . . . . . . . . . . . . . . . . . . . . . . . . . . . . . . . . . . . . . . 7
2.6 Pet Safety . . . . . . . . . . . . . . . . . . . . . . . . . . . . . . . . . . . . . . . . . . . . . . . . . . . . . . . . . . . . . . . . . . . . . . . . . . . . . . . . . . . . . . . . . . . . . . . . . . . . . . . . . . . . . . . . 8
2.7 Disposal of Packing Material. . . . . . . . . . . . . . . . . . . . . . . . . . . . . . . . . . . . . . . . . . . . . . . . . . . . . . . . . . . . . . . . . . . . . . . . . . . . . . . . . . . . . . . . . 8
2.8 Replacement of Back Up Battery. . . . . . . . . . . . . . . . . . . . . . . . . . . . . . . . . . . . . . . . . . . . . . . . . . . . . . . . . . . . . . . . . . . . . . . . . . . . . . . . . . . . 8
2.9 Product Problems. . . . . . . . . . . . . . . . . . . . . . . . . . . . . . . . . . . . . . . . . . . . . . . . . . . . . . . . . . . . . . . . . . . . . . . . . . . . . . . . . . . . . . . . . . . . . . . . . . . . . . 8
3. Preparation For Use . . . . . . . . . . . . . . . . . . . . . . . . . . . . . . . . . . . . . . . . . . . . . . . . . . . . . . . . . . . . . . . . . . . . . . . . . . . . . . . . . . . . . . . . . . . . . . . . . . . . . . . . . . 8
3.1 Charge Winbot's Back-up Battery . . . . . . . . . . . . . . . . . . . . . . . . . . . . . . . . . . . . . . . . . . . . . . . . . . . . . . . . . . . . . . . . . . . . . . . . . . . . . . . . . . . 8
4. Using the Product. . . . . . . . . . . . . . . . . . . . . . . . . . . . . . . . . . . . . . . . . . . . . . . . . . . . . . . . . . . . . . . . . . . . . . . . . . . . . . . . . . . . . . . . . . . . . . . . . . . . . . . . . . . . . . 9
4.1 Placement of the Winbot and Safety Pod Use . . . . . . . . . . . . . . . . . . . . . . . . . . . . . . . . . . . . . . . . . . . . . . . . . . . . . . . . . . . . . . . . . 9
4.2 Product Start . . . . . . . . . . . . . . . . . . . . . . . . . . . . . . . . . . . . . . . . . . . . . . . . . . . . . . . . . . . . . . . . . . . . . . . . . . . . . . . . . . . . . . . . . . . . . . . . . . . . . . . . . . 10
4.3 Product Pause . . . . . . . . . . . . . . . . . . . . . . . . . . . . . . . . . . . . . . . . . . . . . . . . . . . . . . . . . . . . . . . . . . . . . . . . . . . . . . . . . . . . . . . . . . . . . . . . . . . . . . . . 10
4.4 Product Stop . . . . . . . . . . . . . . . . . . . . . . . . . . . . . . . . . . . . . . . . . . . . . . . . . . . . . . . . . . . . . . . . . . . . . . . . . . . . . . . . . . . . . . . . . . . . . . . . . . . . . . . . . . . 10
4.5 Product Restart . . . . . . . . . . . . . . . . . . . . . . . . . . . . . . . . . . . . . . . . . . . . . . . . . . . . . . . . . . . . . . . . . . . . . . . . . . . . . . . . . . . . . . . . . . . . . . . . . . . . . . . 10
5. Accessories . . . . . . . . . . . . . . . . . . . . . . . . . . . . . . . . . . . . . . . . . . . . . . . . . . . . . . . . . . . . . . . . . . . . . . . . . . . . . . . . . . . . . . . . . . . . . . . . . . . . . . . . . . . . . . . . . . . 11
5.1 Safety Pod . . . . . . . . . . . . . . . . . . . . . . . . . . . . . . . . . . . . . . . . . . . . . . . . . . . . . . . . . . . . . . . . . . . . . . . . . . . . . . . . . . . . . . . . . . . . . . . . . . . . . . . . . . . . . 11
5.2 Remote Control . . . . . . . . . . . . . . . . . . . . . . . . . . . . . . . . . . . . . . . . . . . . . . . . . . . . . . . . . . . . . . . . . . . . . . . . . . . . . . . . . . . . . . . . . . . . . . . . . . . . . . . 11
6. Day-to-day Storage . . . . . . . . . . . . . . . . . . . . . . . . . . . . . . . . . . . . . . . . . . . . . . . . . . . . . . . . . . . . . . . . . . . . . . . . . . . . . . . . . . . . . . . . . . . . . . . . . . . . . . . . . . 12
7. Maintenance. . . . . . . . . . . . . . . . . . . . . . . . . . . . . . . . . . . . . . . . . . . . . . . . . . . . . . . . . . . . . . . . . . . . . . . . . . . . . . . . . . . . . . . . . . . . . . . . . . . . . . . . . . . . . . . . . . . 12
7.1 Cleaning the Unit . . . . . . . . . . . . . . . . . . . . . . . . . . . . . . . . . . . . . . . . . . . . . . . . . . . . . . . . . . . . . . . . . . . . . . . . . . . . . . . . . . . . . . . . . . . . . . . . . . . . . 12
7.2 Cleaning and Replacing Cleaning Pads . . . . . . . . . . . . . . . . . . . . . . . . . . . . . . . . . . . . . . . . . . . . . . . . . . . . . . . . . . . . . . . . . . . . . . . . . 12
7.3 Squeegee. . . . . . . . . . . . . . . . . . . . . . . . . . . . . . . . . . . . . . . . . . . . . . . . . . . . . . . . . . . . . . . . . . . . . . . . . . . . . . . . . . . . . . . . . . . . . . . . . . . . . . . . . . . . . . . 12
7.4 Cleaning Driving Treads. . . . . . . . . . . . . . . . . . . . . . . . . . . . . . . . . . . . . . . . . . . . . . . . . . . . . . . . . . . . . . . . . . . . . . . . . . . . . . . . . . . . . . . . . . . . . 12
7.5 Cupule. . . . . . . . . . . . . . . . . . . . . . . . . . . . . . . . . . . . . . . . . . . . . . . . . . . . . . . . . . . . . . . . . . . . . . . . . . . . . . . . . . . . . . . . . . . . . . . . . . . . . . . . . . . . . . . . . . . 13
8. Indicator Lights . . . . . . . . . . . . . . . . . . . . . . . . . . . . . . . . . . . . . . . . . . . . . . . . . . . . . . . . . . . . . . . . . . . . . . . . . . . . . . . . . . . . . . . . . . . . . . . . . . . . . . . . . . . . . . . 14
9. Alarm & Solutions . . . . . . . . . . . . . . . . . . . . . . . . . . . . . . . . . . . . . . . . . . . . . . . . . . . . . . . . . . . . . . . . . . . . . . . . . . . . . . . . . . . . . . . . . . . . . . . . . . . . . . . . . . . . 14
10. Common Malfunctions. . . . . . . . . . . . . . . . . . . . . . . . . . . . . . . . . . . . . . . . . . . . . . . . . . . . . . . . . . . . . . . . . . . . . . . . . . . . . . . . . . . . . . . . . . . . . . . . . . . . . . 15
11. Back Up Battery Charge Status. . . . . . . . . . . . . . . . . . . . . . . . . . . . . . . . . . . . . . . . . . . . . . . . . . . . . . . . . . . . . . . . . . . . . . . . . . . . . . . . . . . . . . . . . . . 16
12. Questions & Answers. . . . . . . . . . . . . . . . . . . . . . . . . . . . . . . . . . . . . . . . . . . . . . . . . . . . . . . . . . . . . . . . . . . . . . . . . . . . . . . . . . . . . . . . . . . . . . . . . . . . . . . . 16
TABLE OF CONTENTS
TM
EN
Page 5

4
Live Smart. Enjoy Life.
If there is not enough cord, it is not safe to use the WINBOT on that particular window until a WINBOT Extension Cord is
attached (Extension Cord sold separately).
2. Loop one end of the Safety Rope around the Safety Pod's channel and pull it tight.
3. Loop the other end of the Safety Rope to the nut on the power cord and tighten. (If an Extension Cord is attached the
Safety Rope should still be tied to the nut on the power cord.)
Note: Do NOT attach the Safety Rope to the thin part of the cord.
4. Press the Safety Pod suction cup FIRMLY on the inside, lower corner of the window. Make sure the Safety Pod suction
cup is securely in place.
5. Place WINBOT on the window, close the window, and start WINBOT.
6. After WINBOT is done cleaning remove it from the window. Grasp the handle, switch the unit OFF, insert finger into Air
Release Trigger and pull up on it for 20 seconds until suction has diminished.
1. Make sure that there is enough power cord for the WINBOT to clean the entire window without restricting its movement.
Warning
If Winbot is used to clean a window above ground level, the Safety Pod MUST be used.
Winbot must be used in strict accordance with the directions in the Instruction Manual. Ecovacs Robotics, Inc. can not
be held liable or responsible for any damages or injuries caused due to improper use.
Warning
●
● To safely clean the outside of a window above ground level, the Safety Pod MUST be used. Please read
the instructions on Safety Pod use in this Instruction Manual.
● To ensure safe operation of the Winbot, the Back Up Battery must be fully charged before use. If the
product has not been used for over a month or the product has alarmed (which consumes the Back Up
Battery's power), please recharge its battery.
● To safely remove the Winbot from a window, grasp the handle of the unit and move the switch under the
handle to the OFF position (far left). While still grasping the unit, insert finger into the Air Release Trigger
and pull up on it. Remove the unit from the window when the suction has diminished.
When Winbot is working, a person should be in the vicinity to assist should there be a problem.
EN
Page 6

5
Model
1.3 Technical Specifications
Winbot 710 Winbot 730
Working speed (f/s)
Built-in battery capacity (mAh)
Working time (min)
Working noise (db)
Frameless window identification
Cleanable glass thickness
Back Up Battery for loss of electricity
0.5
400
Unlimited
55
NO
Unlimited
Lithium
1. Package Contents & Product Diagram
1.1 Packa ge Contents
1.2 Part Name
Bumpe r
Air Rel ease
Trigge r
Sta tus Light
Ind icator
Sta rt / Pause
Butto n
Handl e
OFF - O N CHARG E Butto n
Top
Fro nt F loati ng
Plate /Clea ning Pa d
Sta tus Light
Ind icator
Drivi ng Tread
Side Ro ller
Cupul e
Dryin g Pad
Bottom
Squee gee
OFF ON
Fra me less Se nsor
15 Volt Co rd
to Adapt er
About noise:
The data is from laboratory noise testing done in accordance with IEC 60704-1:1997, IEC 60704-2-1:2001 International Standard.
Actual noise level may vary depending on environment - room temperature, humidity, atmospheric pressure. The company reserves the right to make technological and/or
design changes to this product for continuous improvement. The right of interpretation belongs to ECOVACS Robotics Co., Ltd.
0.5
400
Unlimited
55
YES
Unlimited
Lithium
WINBOT
TM
Main Unit
Instruction Manual
OFF ON
Safety Pod and Safety Rope
Cleaning Solution
(2) Remote Control Batteries
(2) Sets of Cleaning Pads
Power Adapter
www.ecovac s.co m
Instruct ion Ma nual
WINBOT
7 Series
TM
TM
WINBOT
TM
Remote Control
Finishing Cloth
TM
EN
Page 7

● Winbot is powered through the Power Adapter provided. Only use the
Power Adapter that is sold with the unit.
● The Back Up Battery in the Winbot is used to power the motor should the Power
Adapter become unplugged or the electricity fail. This safety feature ensures
that the unit will not lose suction. If the electricity fails or the Power Adapter
becomes unplugged, a warning will sound every three (3) minutes until you
turn the Winbot switch under the handle to the OFF position (far left) and
remove it from the window.
● While the Winbot is plugged in and being used, the Back Up Battery will be
charging. You may also charge the Back Up Battery after use by placing the
switch under the handle to the CHARGE position (far right) until the Indicator
Light glows a steady GREEN.
● Do NOT use the product if the Power Adapter cord, supply cord, or the power
plug is damaged.
● Do not bend, twist, pinch, or close the Power Adapter cord or supply cord in a
window or door. Do not place heavy objects on the power cords.
● Do not let any part of the Power Adapter or supply cord come into contact with
water, hot surfaces or sharp objects.
● Do not unplug the Power Adapter by pulling on the cord. Always unplug by
grasping the plug at the outlet.
● Do not touch power plug or the unit with wet hands.
● If necessary, dust on the plug may be cleaned with a dry cotton cloth.
2.2 W inbot Power
2.3 Product Application Range
OFF
ON
6
● This product is intended for maintenance cleaning on common windows.
The Winbot is NOT intended to replace heavy duty or first time cleaning.
● Windows with an uneven surface, such as frosted, textured, patterned or
leaded glass are not suitable to be cleaned by the Winbot.
● Windows with a film, coating or tint are not suitable to be cleaned by the
Winbot as it may damage the coating.
● Winbot is not intended for industrial use.
● Winbot is not designed for use on small windows (less than 18” x 24”), rounded
windows, or glass that is mounted on an angle.
● The product will not work on wet, greasy, heavily soiled, or oily windows as the
Driving Tread will not be able to grasp the window and move the unit; instead it
will slide down the window.
● Do NOT use the Winbot outside when it is raining, snowing or colder than 40º F
as it will damage the product and could cause electrical problems.
● Do NOT use the unit in areas where flammable materials are used or stored.
● The product may not be used to clean cracked or broken windows as the suction
will do further damage to the window and could also damage the product.
● Winbot is designed for use on vertically mounted glass. Do not use Winbot on
horizontally mounted glass or glass that is mounted at an angle.
● Do not use Winbot upside down.
● Winbot W710 is to be used ONLY on framed windows. Winbot W730 can be
used on framed or frameless windows.
Live Smart. Enjoy Life.
2. Product Information
2.1 About this Instruction Manual
●
● Operation of the unit inconsistent with the enclosed instructions could damage the product and require repair outside of
Warranty. Ecovacs Robotics, Inc. can not be held liable or responsible for any damages or injuries caused due to
improper use.
● Keep the Instruction Manual in a safe place so it can easily be referred to with questions on operation or troubleshooting
problems you might encounter. Make sure all people who will use this product have read the Instruction Manual and
know where it is kept.
Please carefully read the entire contents of this Instruction Manual, and use the Winbot in accordance with its instructions.
EN
Page 8

2.4 Product Precautionar y Items
7
2.5 Children Safety
OFF ON
● Please make sure that both Cleaning Pads are installed on Winbot before
cleaning.
● Winbot can NOT be used to clean stains such as paint, or windows with stickers
attached, as these may cause suction failure.
● Do NOT place any obstacles on the window or the window sill that would obstruct
Winbot’s cleaning path. Please make sure there is 4” clearance between the
window and curtains so Winbot can move freely on the window. Blinds/shades
must be pulled completely open. Outside windows should have 4” clearance
between window and any outdoor plants or shrubs.
● Since cleaning the window does not take a long time, it is recommended that a
person remain in the vicinity so when the Winbot is done it can be removed from
the window. Should there be a dirty spot left on the window, use the Remote
Control to guide the unit to clean the spot, return the unit to a convenient place
and remove from the window.
● The Safety Pod MUST be used for cleaning the outside of a window above ground
level as described in the Safety Pod section of this Instruction Manual.
● The Power Adapter should be plugged into a receptacle as close to the window as
possible. The Power Adapter must never be allowed to hang from its cord. It
should rest on the floor at all times.
● The supply cord from the Power Adapter must be free to move as the unit cleans
the inside of the window. If the unit is cleaning the outside of the window, enough
supply cord must be on the outside of the window so as not to restrict movement
of the unit.
● When Winbot has finished cleaning (or electrical connection has failed) safely
remove it from the window. Grasp the handle of the unit and move the switch
under the handle to the OFF position (far left). While still grasping the unit, insert
finger into the Air Release Trigger and pull up on it. Remove the unit from the
window when the suction has diminished.
● The suction generated on the bottom of the unit is strong. Do NOT place hands
near the bottom of the unit as it could suction to the skin. If this occurs move the
switch under the handle to the OFF position (far left) and slowly remove the unit
from the body part.
● Please check the Driving Tread (see Product Diagram) on the bottom of the unit
for damage before each use. Damaged Driving Treads can weaken traction on
the window and need to be replaced. Please call Customer Service at 1-888-
966-0895 or visit www.ecovacs.com to order.
● The product should not be used by children.
● The product should be stored out of the reach of children.
● Cleaning Solution should be kept out of reach of children.
● The product is not a toy for children to play with.
● Keep all packing material out of the reach of children and dispose of
immediately.
TM
EN
Page 9

2.7 Disposal of Packing Material
2.9 Product Problems
2.8 Replacement Back Up Batter y
8
3.1 Charging Winbot' s Backup Batter y
3. Preparation For Use
WARNING: To avoid injury, keep the supply cord and Power Adapter out of
reach of children.
OFF ON
● As soon as the unit is unpacked and all components are accounted for, please
dispose of any packing material not needed for storage to keep children from
playing with it.
● Please recycle all applicable packing material.
● If it is necessary to replace the lithium Back Up Battery, please call Customer
Service at 1-888-966-0895. Please have the model number and product
number that was recorded on the Welcome Page of this manual available.
● If a problem is encountered with the unit please consult sections 8-12 at the back of this Instruction Manual for help.
Should the necessary answers, not be found in the Instruction Manual, please call Customer Service for further
assistance at 1-888-966-0895 or visit www.ecovacs.com.
● To find a factory authorized repair facility, please contact Customer Service at 1-888-966-0895 or visit
www.ecovacs.com.
● Assemble the supply cord connector to the Power Adapter, tightening the nut so
the connector will not pull apart, then plug the Power Adapter into an electrical
receptacle.
● Place the Winbot's switch button, located under the handle, to the CHARGE
position (far right) and charge for 2 hours. The Back Up Battery MUST be fully
charged for the unit to work properly. The Indicator Light will flash GREEN until
the Back Up Battery is fully charged. When the Back Up Battery is fully
charged the Indicator Light will glow a continuous GREEN.
● Charging time for the battery is approximately 2 hours. This time will vary
depending on the temperature of the room, a cooler or warmer room may take
longer to charge the battery.
Live Smart. Enjoy Life.
2.6 Pet Safety
● This product should be used and stored away from pets.
● Cleaning Solution should be kept away from pets.
EN
Page 10

NOTE: Before cleaning the outside or inside of a window check for possible
obstructions on the glass (refer to section 2.4 in this Manual). Please make sure there
is 4" clearance between the window and curtains so Winbot can move freely on
the window. Blinds/shades must be pulled completely open. Outside windows
should have 4" clearance between window and any outdoor plants or shrubs.
4.1 Placement of the Winbot and Safety Pod use
4. Using the Product
9
≥4 inc hes
● Turn the Winbot unit over to attach the Cleaning Pads. Attach the large Cleaning Pad
to the front floating plate, making sure to cover the entire plate. Attach the small
cleaning pad to the small area provided in the rear of the unit. Make sure the Rear
Cleaning Pad is placed exactly within its velcro area. Take care not to cover
any part of the Cupule (suction ring), or the plate that holds it, with the Rear
Cleaning Pad. NOTE: Cleaning Pads are removable and machine washable.
● After charging the Winbot's Back Up Battery, plug the Winbot into the Power Adapter
and plug the Power Adapter into a receptacle close to the window to be cleaned.
Note: Before operating the Winbot, please carefully read the entire contents of this Instruction Manual. Any
operation inconsistent with the instructions in the Manual may cause damage to the product or cause personal injury.
The Winbot is intended to be used for maintenance cleaning on common windows. The product is NOT
intended to replace heavy duty or first time cleaning.
Warning
If Winbot is used to clean a window above ground level, the Safety Pod MUST be used.
Winbot must be used in strict accordance with the directions in the Instruction Manual. Ecovacs Robotics, Inc. can not
be held liable or responsible for any damages or injuries caused due to improper use.
● To use Winbot on an interior window that is at ground level, please skip the
Safety Pod instructions (the next 6 steps).
● To use the Winbot on the outside of a window above ground level, the Safety
Pod MUST be used.
● Make sure that there is enough power cord for the WINBOT to clean the entire
window without restricting its movement. If there is not enough cord, it is not
safe to use the WINBOT on that particular window until a WINBOT Extension
Cord is attached(Extension Cord sold separately).
● Loop one end of the Safety Rope around the Safety Pod’s channel and pull it
tight.
● Tie the other end of the Safety Rope to the nut on the power cord and tighten.
● If an Extension Cord is attached the Safety Rope should still be tied to the
nut on the power cord.
Note: Do NOT attach the Safety Rope to the thin part of the cord.
● Press the Safety Pod suction cup FIRMLY on the inside, lower corner of the window.
Make sure the Safety Pod suction cup is securely in place.
● Immediately prior to placing the Winbot on the window, lightly spray the Front
Cleaning Pad with the provided Cleaning Solution. The pad should be
damp, not wet. Do NOT spray the back pad as this pad is for wiping the
window after the treads.
● Grasp the Winbot by the handle and move the switch under the handle to the
ON position (Center). Place the Winbot horizontally on the window, making
sure it is at least 4 inches from the lower corners of the window. A slight
noise will be heard. This is the vacuum motor creating suction to hold the
Winbot onto the window.
● When the indicator light turns BLUE, Winbot has attached itself to the
window and you can let go of the handle.
● If cleaning the outside of a window, close the window as far as possible
without pinching or damaging the supply cord.
TM
EN
Page 11

4.2 Product Star t
4.3 Product Pause
10
4.4 Product Stop
● Once the unit is attached to the window, press the Start/Pause button on the
unit or the Start/Pause button on the Remote Control. The Winbot will use its
automatic cleaning mode to clean the window.
NOTE:
● Winbot can NOT be used to clean stains such as paint, or windows with
stickers attached, as these may cause suction failure.
● Windows with uneven surfaces, such as frosted, textured, patterned or
leaded glass are not suitable to be cleaned by the Winbot.
● Windows with a film, coating or tint are not suitable to be cleaned by the
Winbot as it may damage the coating.
● After Winbot has finished cleaning one window, if the Cleaning Pads are
excessively dirty, please replace them with a clean, completely dry set.
Cleaning Pads are machine washable. Extra sets of Cleaning Pads can be
purchased by calling Customer Service at 1-888-966-0895.
● Do NOT use the unit outside when it is raining, snowing or colder than 40º F as
it could damage the product and could cause electrical problems.
● If the product needs to be paused during the cleaning process, press the
“Start/Pause” button on the Remote Control or press the “Start/Pause”
button on the unit. The product will pause and wait for further
instructions.
● While the unit is in the Pause Mode, the Remote can be used to move the unit
around the window to clean any area by pressing the appropriate directional
arrow. To return the unit to automatic mode, press the “Start/Pause”
button on the Remote Control or directly on the unit.
.......
● After the Winbot has finished cleaning the window, it will return to the place it
started, emit a song and the Indicator Light will flash BLUE. If the stopping
location is not convenient to remove the unit, use the Remote Control to move
it by pressing the appropriate directional arrow until the unit is where you can
grasp the handle more conveniently.
● To remove the Winbot from the window, grasp the handle of the unit, move the
switch under the handle to the OFF position (far left). While still grasping the
unit, insert finger into the Air Release Trigger and pull up on it. Remove the unit
from the window when the suction has diminished.
● Use the Finishing Cloth to wipe away any mark left from removing Winbot.
● Do NOT try to use the handle as leverage to pry the unit from the window as that
could damage the product. If the Air Release does not work, hold the handle
for 45-60 seconds and the unit will release itself from the window.
● Always store the unit with the switch in the OFF position (far left) and in the
original box, if possible.
Live Smart. Enjoy Life.
O
FF
ON
OFF
O
N
4.5 Product Restart
OFF
ON
● If the unit cycles in a place repeatedly during operation, or stops working, and
sends a warning sound and a RED Indicator Light flashes, grasp the unit by
the handle and turn the switch to the OFF position (far left). Then, turn the
switch to the ON position (center) and press the Pause/Start button on the
Remote Control or the unit to continue the cleaning process.
● If using Winbot continuously for a long period of time, it is recommended
to give Winbot a 10 minute break for every hour of use. This will extend
the life and performance of robot and prevent overheating.
EN
Page 12

5. Accessories
5.2 Remote Control
Before using the remote control, please confirm that the batteries have been installed in accordance with the
diagram on the Remote Control casing.
11
● The remote control uses two AAA batteries (provided).
● If the battery power is low, replace both batteries. Never use a new battery with an old battery.
● If the remote control is not used for a long period of time, remove the batteries during storage.
● Should liquid be spilled on the Remote Control, remove the batteries immediately and shake so as much
of the liquid is out of the Remote Control as possible. Allow to dry for 24 hours before replacing the
batteries. Test the Remote Control with the unit on the window while the unit is within easy reach to see
that it works. If the Remote does NOT work, do not use the unit until the Remote has been replaced.
● Please follow environmental regulations for the disposal of the used batteries.
The Remote Control has a series of functions to become familiar with. The
Remote Control is very easy to use.
1. RESET button - Should the Winbot stop working in any way, the RESET button
can be pressed to restart the product and/or restore it to the factory defaults.
2. Start / Pause button - Starts and/or Stops the product.
3.4.5.6 Arrows - When pressed each arrow indicates the direction the unit will
move, remembering that the UP arrow corresponds to the front of the Winbot.
7. Pairing button - This button pairs the Remote Control with WINBOT.
Notice - The Remote Control is already paired with WINBOT when it arrives from
the factory. If you need to replace the Remote Control, please use the Pairing
button to pair the Remote Control with Winbot.
Pairing method:
Plug Winbot in and place Winbot's switch to the CHARGE position. Hold the Pairing
button on the Remote Control unit. Then press the Start/Pause button on Winbot
until Winbot beeps (about 3 seconds). Pairing action is complete when WINBOT beeps.
The Remote Control will work best when within 6.5 feet of the unit. Maximum
distance between Remote Control and Winnbot is 39.4 feet.
5.1 Safety Pod
Warning
If Winbot is used to clean a window above ground level, the Safety Pod MUST be used.
Winbot must be used in strict accordance with the directions in the Instruction Manual. Ecovacs Robotics, Inc. can not
be held liable or responsible for any damages or injuries caused due to improper use.
TM
If there is not enough cord, it is not safe to use the WINBOT on that particular window until a WINBOT Extension Cord is
attached (Extension Cord sold separately).
2. Loop one end of the Safety Rope around the Safety Pod’s channel and pull it tight.
3. Loop the other end of the Safety Rope to the nut on the power cord and tighten. (If an Extension Cord is attached the
Safety Rope should still be tied to the nut on the power cord.)
Note: Do NOT attach the Safety Rope to the thin part of the cord.
4. Press the Safety Pod suction cup FIRMLY on the inside, lower corner of the window. Make sure the Safety Pod suction
cup is securely in place.
5. Place WINBOT on the window, close the window, and start WINBOT.
6. After WINBOT is done cleaning remove it from the window. Grasp the handle, switch the unit OFF, insert finger into Air
Release Trigger and pull up on it for 20 seconds until suction has diminished.
1. Make sure that there is enough power cord for the WINBOT to clean the entire window without restricting its movement.
EN
1
2
3
4
5
6
7
OFF ON
Page 13

12
6. Day-to-day Storage
● Store the Winbot in the original box, in a cool, dry place to protect electronic
components.
● Do not store the Winbot close to liquids or where the liquid might be spilled onto
it.
● Abide by maintenance requirements for the unit as described in Section 7 of this
Instruction Manual.
7.1 Cleaning the Unit
7. Product Maintenance
● Before cleaning the Winbot, move the switch under the handle to the OFF
position (far left) and unplug it from the electrical source.
● Clean the top of the Winbot with a damp cotton cloth.
● Do NOT clean the Unit with any volatile liquid, solvent, or a detergent containing
acidic ingredients as they can damage the plastic.
7.2 Cleaning and Replacing Cleaning Pads
● After each cleaning cycle, or if the Cleaning Pads become very dirty, they can be
rinsed in clear warm water and allowed to dry completely (generally 24 hours)
before re-attaching. The Cleaning Pads are also machine washable. An
additional set of Cleaning Pads may be purchased by calling Customer
Service at 1-888-966-0895 or visit www.ecovacs.com.
Live Smart. Enjoy Life.
7.3 Squeegee
● After each use, gently wipe the Squeegee on the bottom of the unit with a damp,
not wet, cloth to remove residue from its surface. (A wet cloth will allow water to
get inside the unit and cause damage to the internal components.)
7.4 Cleaning Driving Treads
NOTE: Dirty Driving Treads can negatively affect the function of the treads
guiding the unit on the window.
● After each use inspect the Driving Treads for possible accumulation of dirt. The
entire Driving Tread can be inspected by using the Remote Control and
pressing the Forward or Reverse arrow. Clean any dirt with a soft damp cloth.
EN
Page 14

13
7.5 Cupule
● The Cupule assembly is a basic part of the Winbot’s function and is located on
the bottom of the unit (see Product Diagram). After each use, inspect the
Cupule’s surface to make sure it is not dirty, torn or cut. Any debris that is stuck
to the surface must be carefully removed with a damp cloth to make it smooth
again.
● The Cupule may need to be replaced if it becomes scratched or torn.
Additional Cupules can be ordered by calling Customer Service at
1-888-966-0895 or visit www.ecovacs.com.
TM
EN
Page 15

14
9. Alarm & Solutions
1. Turning Winbot ON when not
plugged into receptacle.
Toot, toot
2. While cleaning the window,
Winbot becomes disconnected
from the Power Source.
3. Vacuum is leaking at the cupule.
4. Bumper is pressed against the
window frame and is raised.
RED
Indicator
Light
flashes
5. Window is too small for Winbot to
clean.
6. The window frame is too thin.
8. Meaning of Indicators
NO.
Sound
None
None
Emits Song
Emits Double
Tone
1
2
3
4
5
6
7
None
None
Emits “ding
dong”Tone
Indicat or Light
None
Indicator Light flashes GREEN
Indicator Light steady GREEN
Indicator Light flashes BLUE
Indicator Light steady BLUE
Indicator Light flashes BLUE
Indicator Light Flashes RED
Meaning
Winbot has been connected to power
Back up battery is charging
Back up Battery is Fully Charged
Winbot has been placed on window and has
successfully suctioned itself to the glass.
Winbot is in the process of cleaning the window.
Winbot has finished cleaning the window
and is ready to be removed
Winbot may need to be moved or reset.Please
refer to Alarm and Solutions section.
Alarm Sou nd Light Causes Solutio ns
1.
plug into the receptacle.
2. Plug the Power Adapter back into the
receptacle.
3. Remove Winbot from the window and
turn the power switch OFF (far left).
Turn the unit over, inspect the Cupule
for dirt stuck on the Cupule surface.
Gently clean the surface with a soft
damp cloth to make it smooth again.
Check the window to make sure there
is no hard debris that would affect the
Cupule.
4. Use the Remote Control to move the
Winbot away from the window frame
by pushing Arrow buttons.
5. The smallest window Winbot can
automatically clean is 18 inches wide
by 24 inches high.
6. The window frame thickness must be
over .19 inches thick.
*If problem persists,please contact
Customer Service at 1-888-966-0895 or
visit www.ecovacs.com.
Connect unit to the Power Adapter and
Live Smart. Enjoy Life.
Emits Double
Tone
8
Indicator Light steady RED
Winbot has a problem and requires a call to
Customer Service at 1-888-966-0895 or
visit www.ecovacs.com.
EN
Page 16

15
7
6
5
NO.
a. Check power connection. Make sure that the Winbot is connected to the Power Adapter
and that the Adapter is plugged into the receptacle, or
b. Check window surface. If the window surface is not smooth, is wet, too dirty or greasy,
Winbot will not able to suction to the window, or
c. Check Cupule surface for dirt or damage. If the Cupule’s surface is dirty, clean it with a
damp cloth. If the Cupule surface is damaged, it may need to be replaced. Call
Customer Service at 1-888-966-0895 or visit www.ecovacs.com.
d. Check Rear Cleaning Pad position. Make sure the Rear Cleaning Pad is placed exactly
within its velcro area. Take care not to cover any part of the Cupule (suction ring), or the
plate that holds it, with the Rear Cleaning Pad.
2
Winbot fails to stick
to window
1
4
3
10. Common Malfunctions
Problem Solutio ns
an alarm and the
Indicator Light flashes
RED
Winbot stops,sounds
Winbot leaves streaks
on the window while
cleaning
Loud noise i s
produced w hen the
unit is cleaning
Reduced cleaning
ability
Driving Treads slip
on the window
Remote control
does not work
a. Check Winbot’s location on window. If the Winbot is stuck against the window frame or
edge of the glass, move it away from the frame using the Remote Control Arrow buttons.
Restart cleaning by,pressing the START button on the unit or RESET on the Remote
Control, or
b. Check window surface. If Winbot has encountered hard debris on the window and can
not maneuver itself away from the spot without losing suction, use the Remote Control to
move the unit away from the spot by pushing the Arrow buttons. Then press the RESET
button on the Remote or the START button on the unit to restart cleaning.
a. Check Cleaning Pads.
1. Winbot’s Front Cleaning Pad may be too dirty to clean the dirt from the window. Replace
with a clean Pad. (Cleaning Pads can be rinsed with warm water and allowed to dry. They
are also machine washable), or
2. Winbot’s Front Cleaning Pad may not be moist enough to properly absorb dirt into the
pad. Re-spray Front Cleaning Pad with Cleaning Solution until damp, not wet, or
3. Winbot’s Rear Cleaning Pad may be too dirty. Replace with a clean, dry pad.
b. Check Squeegee. Winbot’s Squeegee may be dirty, clean dirt residue with damp cloth, or
c. Check Dri ving Treads. Driving Treads may be dirty and/or have accumulated debris
that needs to be cleaned. Clean with a damp cloth.
d. Your window may be too dirty. Winbot is not intended for heavy duty or first time cleaning, you
still need to do that by hand as you have done in the past.
a. Check Cleaning Pads. Cleaning Pads may have debris in the pads causing friction noise.
Replace with clean Pads, or
b. Check Cupule surface. The Cupule may have dirt stuck on its surface causing friction
noise. Gently clean the surface with a damp cloth to make it smooth again, or
c. Check Driving Treads. Driving Treads may be dirty and/or have accumulated debris that
needs to be cleaned. Clean with a damp cloth, or
d. Check Cleaning Plate. The Cleaning Plate may have something obstructing its ability to
move up and down. Clear any obstruction from the Cleaning Plate.
* If noise persists,call Customer Service at 1-888-966-0895 or visit www.ecovacs.com.
a. Check Cleaning Pads. Cleaning Pads may be too dirty to clean properly. Replace with fresh
Cleaning Pads. (Cleaning Pads can be rinsed with warm water and allowed to dry, or can be
machine washed), or
b. Check Driving Treads. Driving Treads may be dirty and/or have accumulated debris that
needs to be cleaned. Clean with a damp cloth, or
c. Check Cleaning Plate. The Cleaning Plate may have something obstructing its ability to
move up and down. Clear any obstruction from the Cleaning Plate.
* If problem persists,please contact Customer Service at 1-888-966-0895 or visit
www.ecovacs.com.
a. Check Front Cleaning Pad. The Front Cleaning Pad may be too wet and leaves water on the
window. Remove Front Cleaning Pad and allow it to dry, or
b. Check Driving Treads. Driving Treads may be dirty and/or have accumulated debris that
needs to be cleaned. Clean with a damp cloth.
* If problem persists,please call Customer Service at 1-888-966-0895 or visit
www.ecovacs.com.
a. Remote Control works best when used within 6.5 feet of Winbot, or
b. Check batteries. If batteries are installed properly and the Remote Control is not functioning,
replace the batteries, or
c. Remote Control may need to be Paired with Winbot. For Pairing instructions, please see section
5.2, or
d. Check Alarm or Indicator Light. If Winbot has sounded a toot toot warning because it has lost
power or suction, it can not be maneuvered with the Remote Control. Reconnect power or reattach Winbot to window.
.
.
.
.
TM
EN
Page 17

12. Questions and Answers
11. Back Up Batter y Charge Status
To check the level of your Back Up Battery Charge, connect the Winbot to the Power Adapter and plug the Power
Adapter into an electrical receptacle. Place the Winbot’s switch button, located under the handle, to the CHARGE
position (far right). If the Indicator Light flashes GREEN, the Battery needs to charge. Once the Back Up Battery is
fully charged, the Indicator Light will change to glow a continuous GREEN. You may then use the unit.
16
1.
5
2.
6
3
7
4
Can Wi nbot fall of f the window d uring section of this Instruction Manual where
cleanin g? indicator sounds and lights are covered
in more detail.
Winbot is designed to keep from
encountering situations where it would Winb ot has been pl aced on the window
lose suction. If the power to the unit fails but is NOT work ing and the In dicator
during cleaning, the Back Up Battery has Light has n ot turned BL UE. What doe s
enough stored energy to keep suction this mean ?
until it can be attended to. When
If this occurs, it means that the suction
cleaning the outside of a window higher
power has been compromised. Please
than ground level, the Safety Pod must
examine the Winbot’s Cupule and Driving
be used. The Safety Pod is a second line
Treads for accumulated dirt or dust which
of defense, in addition to the Back Up
would cause the unit to lose suction and
Battery, to prevent the Winbot from falling
stop working. Clean the Cupule and
from a window. The Safety Pod also
Driving Treads in accordance to the
allows for easy retrieval of the Winbot
Product Maintenance section (section 7)
from an outside window.
in this Instruction Manual.
Can Wi nbot work wi thout someone
Winb ot was place d properly to the
present ?
window an d the START button was
Winbot is designed to clean the window pressed , but the unit m oved to the
without a person’s physical assistance. bottom of t he window an d failed to
However, since the cleaning cycle does work. W hat happen ed?
not take a long time, it is recommended
Winbot will not clean the window if it is
that a person remain in the vicinity so
not plugged into a receptacle. Its Back Up
when the Winbot is done it can be
Battery will send the unit to the bottom of
removed from the window and/or
the window and it will go into stand-by
attended to.
mode. Should this happen, plug the
Can the pro duct be used o n any glass
Power Adapter into a receptacle for
thickne ss? (windo ws, slidin g glass
power and restart the cleaning cycle by
doors, et c)
pushing the START button on the unit or
on the Remote Control. Make sure that
Winbot can be used on any glass
the Winbot has enough supply cord to
thickness. However, windows with an
clean the entire window without pulling
uneven surface, such as frosted,
on the Adapter.
textured, patterned or leaded glass are
not suitable to be cleaned by the Winbot
What happ ens if Wi nbot encou nters an
as the uneven surface will cause the unit
obstruc tion like a wi ndow lock or
to lose suction and fall from the window.
handle?
Why does th e Winbo t send out “toot”
Under normal circumstances, Winbot will
alarm and t he Indicat or Light flash
automatically maneuver around the
RED after j ust starting th e product?
obstruction and continue its cleaning
process.
Please refer to the Common Malfunctions
.
.
.
.
.
Live Smart. Enjoy Life.
EN
Page 18

8.
.
9.
10.
.
.
.
What happ ens if Wi nbot encou nters Winbot is equipped with both audio and
curtain s or blinds?
visual indicators should a problem occur.
For added convenience, there are two
Please make sure there is 4" clearance
visual Indicator Lights - one on each side
between the window and curtains so
of the unit - so if the Winbot is working
Winbot can move freely on the window.
outside the Indicator Light on the bottom
Blinds/shades must be pulled completely
of the unit can still be seen inside.
open. Outside windows should have 4"
clearance between window and any
If Win bot gets int o trouble, s ounds
outdoor plants or shrubs.
and/or fl ashes an ala rm and stops,
cleanin g, what shou ld I do?
Can Wi nbot clean rounded glass or
glass tha t is mounted o n an angle?
It is possible for Winbot to get into trouble
when cleaning. In most cases, it can get
Winbot is not intended for use on rounded
out of trouble on its own, but if that fails,
glass or glass that is mounted at an
the cleaning cycle will be stopped and an
angle. Do not use Winbot upside down.
alarm will indicate that assistance is
Can I use Winbot W710 on a frameless
necessary. Consult sections Meaning of
window?
Indicators and Alarms and Solutions
(section 8 and 9) in this Instruction
Winbot W710 can only be used on framed
Manual to determine what to do.
windows. Winbot W730 can be used on
both framed and frameless windows.
Can Wi nbot clean completely, even in
the corne rs of the wind ow? What can I
Winb ot didn't cl ean the window
do if Wi nbot misse s a spot?.
complet ely, or le ft streaks , what
happene d?
Winbot is programmed to clean the
windows as completely and efficiently as
Winb ot is NOT inte nded to replace
possible. However, in some
heavy dut y or first time cle aning, thi s
circumstances, corners may not be
needs to be d one by hand as y ou have
completely cleaned or a spot may be
done in the p ast. Winbot is designed
missed. Once the unit has finished its
for maint enance cleani ng on standa rd
cleaning cycle, use the Remote Control
windows . Winbot can NOT be used to
to maneuver the Winbot it to the spots
clean stains such as paint, or windows
that need to be attended to using the
with stickers attached, as these may
ARROW buttons.
cause suction failure. For streaking,
reduced cleaning ability and other
Where can I p urchase acces sories,
issues, please refer to the Common
additio nal parts, o r find a factory
Malfunctions section (section 10) in this
approve d repair center ?
Instruction Manual. The majority of these
Please contact Customer Service at 1-
issues can be avoided with regular
888-966-0895 or visit www.ecovacs.com.
maintenance detailed in the Product
to purchase additional parts and
Maintenance section (section 7).
accessories or find a factory approved
How shoul d Winbo t be stored wh en not
repair facility. Please have the model
in use?
number and product number that you
recorded on the Welcome Page of this
Place Winbot’s switch under the handle
manual available.
in the OFF position (far left) and clean the
unit as described in the Product
If you have questions or concerns that are
Maintenance section (section 7) in this
not addressed in this Manual, we welcome
Instruction Manual. Then store Winbot in
your questions and comments. Please
its original box a cool, dry place away
contact Customer Service 1-888-966-0895
from liquids and direct sunlight.
so that we may address any concerns you
may have.
When Winbot is cle aning an outside
window an d the alarm go es off
Thank you for your purchase of the
indicat ing a proble m, what happ ens if I
Winbot 7 Series. We hope you enjoy it
can’t hea r it?
for years to come.
14
15
11.
16
12.
13
17
TM
EN
Page 19

TM
ECOVACS WINBOT
Limited Warranty to Original Purchaser
ECOVACS Robotics, Inc. stands behind the WINBOTS they build with the following Limited Warranty
1. Limited Warranty. ECOVACS Robotics, Inc. also warrants to you, the original purchaser, that your
WINBOT will be free from defects in materials and workmanship when used under normal conditions for
one (1) year from the product purchase date. This Limited Warranty applies only to new products
purchased and used in the United States and Canada. Some states/jurisdictions do not allow limitations on
duration on an implied warranty, so the above limitation may not apply to you.
2. Proof of Purchase. To make a claim under our Limited Warranty, you must first show us the date on
which you purchased the WINBOT. Your bill of sale or similar document is sufficient. If you are unable to
show us the original date of purchase, the time periods in this Limited Warranty will start on the date we
shipped your WINBOT from our factory.
3. Exclusions. This Limited Warranty does not cover defects or damages caused by (1) alterations not
approved by us, improper repairs or service, or improper parts and accessories not supplied by us; (2)
misuse or failure to follow operating instructions, and failure to perform recommended maintenance; (3)
parts that must be replaced periodically; or (4) use in any other manner than normal and expected use.
4. Your Responsibilities. You are responsible for (1) preventative maintenance of the product (such as
cleaning of driving treads, cupule, cleaning pads, etc.); and (2) insuring that the instruction manual is
following for care and use of your product.
5. Customer Service. Please contact Customer Service at 1(888) 966-0895 to determine your problem
and the next steps. ECOVACS Robotics, Inc. and its suppliers' entire liability and your exclusive remedy
shall be, at our option, either (1) return of the price paid, or (b) replacement of parts or product.
Replacement parts and products assume the remaining original Limited Warranty or thirty (30) days,
whichever time period is greater.
6. No Other Warranties. ECOVACS Robotics, Inc. does not warrant the functions contained in the
WINBOT will meet your requirements. The entire risk as to the quality and performance of the WINBOT is
with you. To the maximum extent permitted by applicable law, ECOVACS Robotics, Inc. and its suppliers
disclaim all other warranties, either express or implied, including, but not limited to, implied warranties of
merchantability and fitness for a particular purpose, with regard to the WINBOT and the accompanying
written materials. This Limited Warranty gives you specific legal rights. You may have others which vary
from state/jurisdiction to state/jurisdiction.
7. No Liability for Consequential Damages. To the maximum extent permitted by applicable law, in no
event shall ECOVACS Robotics, Inc. or its suppliers be liable for any damages whatsoever (including
without limitation, damages for loss of business profits, business interruption, loss of business information,
or any other pecuniary loss) arising out of the use or inability to use the WINBOT, even if ECOVACS
Robotics, Inc. has been advised of the possibility of such damages. Because some states/jurisdictions do
not allow the exclusion or limitation of liability for consequential or incidental damages, the above limitation
may not apply to you.
8. California Law. The terms of our Limited Warranty shall be governed by, construed, interpreted and
enforced in accordance with the laws of the State of California without reference to conflict of laws
provisions. The exclusive venue for any dispute arising out of this agreement shall be a court of competent
jurisdiction in Los Angeles County, California. Should any of the provisions of our Limited Warranty be
declared invalid by any court of competent jurisdiction, the balance of our Limited Warranty will remain in full
force and effect.
EN
Page 20

Page 21

www.ecovacs.com
WINBOT
7 Series
TM
TM
TM
Manual de Instrucciones
Page 22

¡Le damos la bienvenida y le felicitamos por haber comprado su
Winbot de Ecovacs!
Confiamos en que su nuevo Winbot le ayudará a mantener su hogar
limpio y a ahorrar tiempo valioso que puede utilizar para hacer otras
cosas que le gustan.
Para su comodidad, hemos proporcionado un espacio para que
registre el número de modelo, número de producto y fecha de compra
de su Winbot debajo. También sugerimos que anexe su recibo a esta
página para su archivo. (Los números de modelo y producto están
ubicados en la etiqueta colocada en la parte inferior del Winbot).
# DE MODELO _____________________
# DE PRODUCTO ____________________
FECHA DE COMPRA _____/_____/______
¡GRACIAS por elegir el Winbot de Ecovacs!
TM
SP
Si tiene preguntas o comentarios sobre su Winbot, le pedimos
que llame aServicio al Cliente al 1-888-966-0895.
Page 23
Guía Rápida del Usuario
1. PREPARACIÓN ANTES DEL USO
Notas importantes pa ra ayudarle a comenzar rápido.
3. PRECAUCIONES DE SEGURIDAD IMPORTANTES
OFF
ON
≥4 in
che s
2. USO DEL PRODUCTO
Para mejores resultados, lea el contenido completo del Manual de Instrucciones. Este proporci on a in fo rm ac ió n co mp le ta y d et al lada sobre
seguridad, uso y mantenimiento de su Winbot de Ecovacs.
ONOFF
● Mientras la unidad se está cargando, lea el Manual de Instrucciones para el uso correcto y seguro de la uni da d.
● En caso de que limpie la parte exterior de una ventana sobre el nivel del suelo, debe usar el Dispositivo de Segurida d. L ea l as
instrucciones sobre el uso del Dispositivo de Seguridad en este Manual de Instrucciones.
El Winbot NO pretende sustituir la limpieza profunda o la primera limpieza; esto debe hacerse manualmente de la misma manera en la que lo ha
hecho en el pasado. El Winbot está destinado para la limpieza de rutina en ventanas estándar.
Advertencia
Si el Winbot se usa para limpiar la parte externa de una ventana sobre el nivel del suelo, se DEBE usar el Dispositivo de Seguridad.
El Winbot debe usarse en estricta conformidad con las instrucciones en este Manual de Instrucciones. Ecovacs Robotics, Inc. no será
responsable por los daños o lesiones causados debido a su uso inapropiado.
● Ensamble el conector del cable de alimentación al adaptador
de corriente apretando la tuerca para que el conector no se
separe, después conecte el adaptador de corriente a su toma de
corriente. Coloque el interruptor del Winbot, ubicado debajo del
mando, en la posición de CARGA (extrema derecha) y cargue la
Batería de Reserva por 2 horas. La Luz indicadora intermitente
cambiará a un VERDE fijo cuando la carga esté completa.
●
●
Voltee el Winbot para colocar las Almohadillas de Limpieza. Coloque la Almohadilla de Limpieza grande
en la placa flotante del frente, asegúrese de cubrir la placa completa. Coloque la almohadilla de Limpieza
pequeña en la pequeña área ubicada en la parte trasera de la unidad.Asegúrese de que la Almohadilla
de Limpieza Posterior sea puesta exactamente dentro de su área de velcro. Tenga cuidado de no cubrir
ninguna parte de la Cúpula (anillo de succión), ni de la placa que la sujeta, con la Almohadilla de
Limpieza Posterior. NOTA: Las Almohadillas de Limpieza son removibles y lavables a máquina.
Inmediatamente antes de colocar el Winbot en la ventana, tome la botella de Solución
Limpiavidrios y rocíe SOLO la Almohadilla de Limpieza del FRENTE. La almohadilla debe
estar ligeramente húmeda, no mojada.
●
●
●
●
●
Sostenga el Winbot por el mango y mueva el interruptor debajo del mango a la posición de ENCENDIDO (Centr o) .
Coloque el Winbot en posición horizontal sobre la ventana, asegurándose de que se encuentre a por lo me no s 4 pu lg ad as d e la s es qu in as
inferiores del marco de la ventana. Escuchará un ligero ruido. Esto es el motor de vacío creado succi ón p ar a so st en er e l Wi nb ot e n la
ventana. Cuando la luz indicadora se torne AZUL, el Winbot se ha adherido a la ventana y puede soltar el mango.
Después de asegurarse que el Winbot esté correctamente colocado en el vidrio, presione el botón “In ic io /P au sa ” en e l Co nt rol Remoto
o presione el botón “Inicio/Pausa” directamente en la unidad Winbot. El producto usará el modo limp ie za a ut om át ic a pa ra m ed ir y
limpiar la ventana. Cuando el Winbot ha terminado de limpiar, regresará a su posición de inicio, la Luz indicado ra s e to rn ar á AZU L
intermitente y la unidad emitirá una canción para indicar el fin del ciclo de limpieza.
Para pausar el Winbot durante el ciclo de limpieza, presione el botón “Inicio/Pausa” en el contro l re mo to o d ir ec ta me nt e en l a un id ad
Winbot. El producto entonces hará una pausa y entrará en el modo de espera. Para reiniciar el proceso de limpieza , pr es io ne e l bo tó n
“Inicio/Pausa” nuevamente en el Control Remoto o directamente en la unidad Winbot.
Cuando el Winbot haya terminado de limpiar, retírelo de la ventana. Sostenga el mango de la unidad y coloque el inte rr up to r ba jo e l ma ng o
en la posición APAGAD O (e xt re ma i zq ui er da ). M ie ntras aún sostiene la unidad, inserte su dedo en el Disparador de Liberación de Aire y
levántelo. Retire la unidad de la ventana cuando la succión haya disminuido.
1. Asegúrese de colo ca r el Winbot horizontalmente e n la v en tana y que este se encuentre a por lo m en os 4 p ulgadas de las esquinas infer io re s de la
ventana.
2.El Disposit iv o de S eguridad se DEBE usar cuando se l im pi a la parte externa de una ventana s ob re e l nivel del suelo. Por favor lea la s in strucciones
sobre el uso del Di sp os itivo de Seguridad en este Manu al d e In strucciones.
3. Para retirar e l Wi nbot de manera segura, sosten ga e l ma ngo de la unidad y coloque el inter ru pt or bajo el mango en la posición APAGADO (extrema
izquierda). M ie nt ras sostiene la unidad, inser te s u dedo en el Disparador de Liberaci ón d e Air e y levántelo. Retire la unidad d e la v en tana cuando
disminuya la su cc ió n.
4. El Winbot NO se pu ed e usar afuera mientras esté llo vi en do, nevando o a una temperatura m en or a l os 40° F o mayor a los 114° F, ya qu e es to
dañará el produ ct o y pu ede causar problemas eléctr ic os .
1. Asegúre se de que el Winb ot t iene cable su fi ciente para l impiar la venta na completa s in r estringir s us movimiento s. Si no hay sufi ci ente cable, n o es seguro
utili za r el WINBOT en esa ventana e n pa rticular ha sta que este se con ecte a un cable d e ex tensión WIN BOT (el cab le d e extensión s e vende por separ ado).
2. Ate un ex tr emo de la Cuerd a de S eguridad al re dedor del can al del Disposit ivo de Segurida d y apriételo .
3. Ate el ot ro e xtremo de la Cu er da de Segurid ad a l a tuerca del ca ble de alimenta ción y apriet e. ( Si se ha conect ad o un cable de ext ensión de cualq uier
maner a la C uerda de Segu ri dad debe esta r at ada a la tuerca d el cable de alime ntación).
Nota: N O at e la C ue rda de Se gu ri dad a la pa rt e de lgada del c ab le .
4. Colo qu e la ventosa de l Di spositivo d e Se guridad en la e squina inferi or de la ventan a po r la parte inte rn a, presiona ndo FIRMEMENT E. Asegúrese d e
que la ve nt osa del Dispo si tivo de Segur id ad esté bien af ianzada.
5. Colo qu e el WINBOT sobre la venta na , cierre la ven tana y encienda e l WINBOT.
6. Desp ué s de que el WINBO T termine d e li mpiar retír elo de la ventana . Agárrelo por el ma ngo, apague l a un idad, inser te s u dedo en el Disp arador de
Liber ac ión de Aire y levá nt elo durante 2 0 se gundos hast a que haya dismin uido la succión .
SP
Page 24

1. Contenido del Paquete y Diagrama del Producto……….........…………………………...............................5
1.1 Contenido del Paquete...........................................................................................................5
1.2 Diagrama del Producto...........................................................................................................5
1.3 Especificaciones Técnicas......................................................................................................5
2. Información del Producto ………………………………….........……………................................................6
2.1 Sobre este Manual de Instrucciones ………………….........………………………….........................6
2.2 Corriente del Winbot……………………………………….........……………………..…........................6
2.3 Rango de Aplicaciones del Producto…………………….........………………………………................6
2.4 Medidas Preventivas Relacionadas con el Producto….........……………………………………………7
2.5 Seguridad de los Niños ………………………........………………………………………………………...7
2.6 Seguridad de las Mascotas………………….........………………………………………………………….8
2.7 Cómo Desechar el Material de Empaque…........………………………………………………………….8
2.8 Reemplazo de la Batería de Reserva……........……………………………………………………………8
2.9 Problemas con el Producto……………………........…………………………………………………….....8
3. Preparación para el Uso…………………………………........……………………………………………………….8
3.1 Cambiar la Batería de Reserva del Winbot………………........…………………………………….........8
4. Uso del Producto.……………………………………………………….......………………………………………….9
4.1 Colocación del Winbot y Uso del Dispositivo de Seguridad ........……………………………………….9
4.2 Encendido del Producto……........………………………………………………………………………….10
4.3 Pausa del Producto……........……………………………………………………………………………….10
4.4 Apagado del Producto…........……………………………………………………………………………….10
4.5 Reinicio del Producto…........………………………………………………………………………………..10
5. Accesorios………………………….......………………………………………………………………………………11
5.1 Dispositivo de Seguridad .......………………………………………………………………………………11
5.2 Control Remoto…......………………………………………………………………………………………..11
6. Almacenado Diario .......……………………………………………………………………………………..…….....12
7. Mantenimiento .......……………………………………………………………………………………………………12
7.1 Limpieza de la Unidad ......……………………………………………………………………………........12
7.2 Limpieza y Reemplazo de las Almohadillas de Limpieza ......………………………………………….12
7.3 Goma ......……………………………………………………………………………………………….........12
7.4 Limpieza de las Bandas de Conducción.. .....………………………………………………………….....12
7.5 Cúpula ......………………………………………………………………………….................................13
8. Luces Indicadoras ......…………………………………………………………………………………..................14
9. Alarma y Soluciones ......……………………………………………………………………………......................14
10. Averías Comunes ......………………………………………………………………………………………...........15
11. Estado de Carga de la Batería de Reserva ......………………………………………………........................16
12. Preguntas y Respuestas .....……………………………………………………………………........................16
ÍNDICE
TM
SP
Page 25

4
Advertencia
Si el Winbot se usa para limpiar una ventana sobre el nivel del piso, se DEBE usar el
Dispositivo de Seguridad.
El Winbot debe usarse en estricta conformidad con las instrucciones en este Manual de Instrucciones. Ecovacs Robotics, Inc.
no será responsable por los daños o lesiones causados debido a su uso inapropiado.
Advertencia
1. Asegúrese de que el Winbot tiene cable suficiente para limpiar la ventana completa sin restringir sus
movimientos. Si no hay suficiente cable, no es seguro utilizar el WINBOT en esa ventana en particular hasta
que este se conecte a un cable de extensión WINBOT (el cable de extensión se vende por separado).
2. Ate un extremo de la Cuerda de Seguridad alrededor del canal del Dispositivo de Seguridad y apriételo.
3. Ate el otro extremo de la Cuerda de Seguridad a la tuerca del cable de alimentación y apriete. (Si se ha
conectado un cable de extensión de cualquier manera la Cuerda de Seguridad debe estar atada a la tuerca
del cable de alimentación).
Nota: NO at e la Cuerda de S eguridad a la par te delgada d el cable.
4. Coloque la ventosa del Dispositivo de Seguridad en la esquina inferior de la ventana por la parte interna,
presionando FIRMEMENTE. Asegúrese de que la ventosa del Dispositivo de Seguridad esté bien afianzada.
5. Coloque el WINBOT sobre la ventana, cierre la ventana y encienda el WINBOT.
6. Después de que el WINBOT termine de limpiar retírelo de la ventana. Agárrelo por el mango, apague la
unidad, inserte su dedo en el Disparador de Liberación de Aire y levántelo durante 20 segundos hasta que
haya disminuido la succión.
●
●
●
●
Cuando el Winbot esté trabajando, debe haber una persona en las proximidades para asistir
encaso dque haya algún problema.
Para limpiar de manera segura la parte externa de una ventana sobre el nivel del suelo, se
DEBE usar el Dispositivo de Seguridad. Lea las instrucciones sobre el uso del Dispositivo
de Seguridad en este Manual de Instrucciones.
Para garantizar la operación segura del Winbot, la Batería de Reserva debe estar
completamente cargada antes de usarlo. Si el producto no ha sido usado por más de un mes
o si el producto ha hecho funcionar la alarma (lo que consume la energía de la Batería de
Reserva), recargue la batería.
Para retirar el Winbot de la ventana con seguridad, sostenga el mango de la unidad y coloque
el interruptor debajo del mango en la posición APAGADO (extrema izquierda). Mientras
sostiene la unidad, inserte su dedo en el Disparador de Liberación de Aire y levántelo. Retire
la unidad de la ventana cuando la succión haya disminuido.
SP
Live Smart. Enjoy Life.
Page 26

5
Modelo
1.3 Especificaciones Técnicas
Winbot 710 Winbot 730
Velocidad de trabajo (p/s)
0.5
400
Ilimitado
55
NO
llimitado
Litio
1.1 Contenido del Paquete
1.2 Nombre de la Pieza
Tope
Dispa rador
de Libe ració n
de Aire
Luz Ind icado ra
de Esta do
Botón d e
Ini cio /
Pausa
Mango
Botón d e
ENCEN DIDO –
APAGA DO CARGA
Vista Superior
Placa F lotan te
Fro nt al / Almoh adill a
de Limp ieza
Luz Ind icado ra
de Esta do
Banda s de
Condu cción
Rodil lo Late ral
Cúpul a
Almoh adill a
de Seca do
Vista Inferiorvva
Gom a
OFF ON
Senso r sin Mar co
Cable d e 15
Voltio s al
Adapt ador
Sobre e l ruido:
Los dat os provie nen de las pr ue bas de ruid o en labora torio lle va das a cabo de c onformi dad con el es tá ndar inte rnacion al IEC 6070 4- 1:1997, I EC 60704- 21:200 1.
Los niv eles real es de ruido pue den varia r dependi en do del ambi ente – temp eratura e n la habita ci ón, humed ad, presi ón atmosf érica. La c ompañía s e re serva
el dere cho de hace r ca mbios tec nológic os y/o de dis eño a este pr od ucto para m ejora con tinua. El d er echo de int erpreta ción pert enece a ECO VACS Rob ot ics
Co., Lt d.
0.5
400
llimitado
55
YES
llimitabo
Litio
WINBOT
TM
Unidad Principal
Manual de Instrucciones
OFF ON
Dispositivo y Cuerda de Seguridad
(2) Baterías del Control Remoto (2) Juegos de Almohadillas Limpiadoras
Power Adapter
WINBOT
TM
Remote Control
Secador
www.ecovac s.co m
Instruct ion Ma nual
WINBOT
7 Series
TM
TM
TM
Capacidad de la batería incorporada
Tiempo de trabajo (min)
Ruido de trabajo (db)
Identificación de ventanas sin marco
Espesor de los vidrios que se pueden limpiar
Batería de reserva en caso de pérdida de electricidad
1. Contenido del Paquete y Diagrama del Producto
Solución Limpiadora
SP
Page 27

● Win bo t se a li me nt a a través del Adaptador de Corriente incluido. Use so lo e l
Adaptador de Corriente que se ve nd e co n la unidad.
● La Batería de Reserva en el Winbot se usa para alimentar el motor en caso de que el
Adaptador de Corriente se desconecte o de que falle la energía. Esta característica
de seguridad garantiza que la unidad no perderá succión. Si hay una falla en la
energía eléctrica o el Adaptador de Corriente se desconecta, se escuchará un
sonido de advertencia cada tres (3) minutos hasta que coloque el interruptor del
Winbot, ubicado bajo el mango, en la posición APAGADO (extrema izquierda) y lo
retire de la ventana.
● Mientras el Winbot esté conectado y en uso, la Batería de Reserva se estará
cargando. También puede cargar la Batería de Reserva después del uso colocando
el interruptor debajo del mango en la posición de CARGA (extrema derecha) hasta
que la Luz Indicadora brille en color VERDE fijo.
● NO use el producto si el cable del Adaptador de Corriente, cable de alimentación o
la clavija están dañados.
● No doble, tuerza, pinche o presione el cable del Adaptador de Corriente o cable
alimentador con una ventana o puerta. No coloque objetos pesados sobre los cables
de electricidad.
● No permita que ninguna parte del Adaptador de Corriente o cable de alimentación
entre en contacto con agua, superficies calientes u objetos afilados.
● No desconecte el Adaptador de Corriente jalando el cable. Siempre desconéctelo
sujetando la clavija en la toma de corriente.
● No toque la clavija o la unidad con las manos mojadas.
● De ser necesario, se puede limpiar el polvo en la clavija con un trapo de algodón
2.2 Cor riente del Winbot
2.3 Rango de Aplicaciones del Producto
OFF
ON
6
● Este producto está destinado para la limpieza de rutina de ventanas comunes.
El Winbot NO pretende sustituir la limpieza profunda o primera limpieza.
● No es apropiado utilizar el Winbot para limpiar ventanas con superficies irregulares,
tal como vidrio escarchado, texturizado, con patrones o con plomo.
● No es apropiado usar el Winbot para limpiar ventanas con película, revestimiento o
entintadas ya que este puede dañar el recubrimiento.
● El Winbot no está destinado para uso industrial.
● El Winbot no está diseñado para ser usado en ventanas pequeñas (menos de 18” x
24”), ventanas redondas o en vidrio que está montado en ángulo.
● El producto no funcionará sobre ventanas mojadas, grasosas, muy sucias o
aceitosas ya que las Bandas de Conducción no podrán adherirse a la ventana y
mover la unidad; sino que esta se deslizará por la ventana.
● NO use el Winbot en el exterior si está lloviendo, nevando o la temperatura es
menor a 40° F ya que esto dañará el producto y puede causar problemas eléctricos.
● NO use la unidad en áreas en donde se usan o guardan materiales inflamables.
● El producto no se puede usar para limpiar ventanas rotas o estrelladas ya que la
succión causará un daño mayor a la ventana e incluso puede dañar el producto.
● El Winbot está diseñado para su uso en vidrio montado verticalmente. No use el
Winbot en vidrio montado horizontalmente o en ángulo.
● No use el Winbot al revés.
● El Winbot W710 SOLO debe usarse en ventanas con marco. El Winbot W730 puede
ser usado en ventanas con o sin marco.
2. Información de Producto
2.1 Sobre este Manual de Instr ucciones
● Lea cuidad osamente el contenido completo de este Manual de Instrucciones, y use el Winbot de conformidad con sus
instrucciones.
● El funcionamiento de la unidad que no sea acorde con las instrucciones adjuntas puede da?ar el producto y
requerirreparaciones fuera de garantía. Ecovacs Robotics, Inc., no será responsable por da?os o lesiones causadas por el
usoinapropiado.
● Guarde el Manual de Instrucciones en un lugar se guro para poder usarlo de referencia en caso de preguntas sobre la
operación o resolución de problemas que puedan surgir. Asegúrese de que todas las personas que usarán este producto
hayan leído el Manual de Instrucciones y que sepan en donde se guarda.
SP
Live Smart. Enjoy Life.
Page 28

2.4 Medidas Preventivas Relacionadas con el Producto
7
2.5 Seguridad de los Niños
OFF ON
TM
●
●
●
●
●
●
●
●
●
●
Asegúrese de que ambas Almohadillas de Limpieza estén instaladas en
el Winbot antes de limpiar.
El Winbot NO se puede usar para limpiar manchas de pintura, o ventanas con
calcomanías, ya que esto puede causar que la succión falle.
NO coloque ningún obstáculo en la ventana o en el alféizar de la ventana que
pueda obstruir la trayectoria de limpieza del Winbot. Asegúrese de que haya
un espacio de 4” entre la ventana y las cortinas para que el Winbot se pueda
mover con libertad por la ventana. Las persianas deben abrirse
completamente. El exterior de las ventanas debe tener un espacio de 4” entre
la ventana y cualquier planta o arbusto.
Ya que limpiar la ventana no toma mucho tiempo, se recomienda que haya
una persona cerca para que cuando el Winbot termine, este pueda ser
retirado de la ventana. En caso de que haya quedado alguna parte sucia en la
ventana, use el Control Remoto para guiar la unidad para limpiar esa parte,
regrese la unidad a un lugar conveniente y retírelo de la ventana.
El Dispositivo de Seguridad DEBE ser usado para limpiar la parte
exterior de una ventana arriba del nivel del sue lo según se describe en
la sección Dispositivo de Seguridad de este Manual de Instrucciones.
El Adaptador de Corriente debe estar conectad o a una toma de
corriente cercana a la ventana, si esto es posible. Nunca se debe
permitir que el Adaptador de Corriente cuelgue de su cable. Este
debe descansar
sobre el piso en todo momento.
El cable de alimentación del Adaptador de Corriente debe tener libertad de
movimiento mientras la unidad limpia el interior de la ventana. Si la unidad
está limpiando el exterior de una ventana, debe haber el suficiente cable de
alimentación por fuera de la ventana para no restringir los movimientos de la
unidad.
Cuando el Winbot ha terminado de limpiar (o la conexión eléctrica ha fallado)
retírelo de forma segura de la ventana. Sostenga el mango de la unidad y
coloque el interruptor debajo del mango en la posición APAGADO (extrema
izquierda). Mientras aún sostiene la unidad, inserte el dedo en el Disparador
de Liberación de Aire y levántelo. Retire la unidad de la ventana cuando la
succión haya disminuido.
La succión generada en la parte inferior de la unidad es fuerte. NO coloque las
manos cerca de la parte inferior de la unidad ya que esta podría succionar su
piel. Si esto ocurre, coloque el interruptor debajo del mango en la posición
APAGADO (extrema izquierda) y retire la unidad lentamente de la parte del
cuerpo que succionó.
Revise que las Bandas de Conducción (ver Diagrama de Producto) en la parte
inferior de la unidad no estén dañadas antes de cada uso. Las Bandas de
Conducción dañadas pueden debilitar la tracción sobre la ventana y deben
ser reemplazadas. Llame a Servicio al Cliente al 1-888-966-0895 o visite
www.ecovacs.com para hacer un pedido.
●
●
●
●
El producto no debe ser usado por niños.
El producto debe ser almacenado fuera del alcance de los niños.
La Solución Limpiadora debe mantenerse fuera del alcance de
los niños.
Eu cto no es un juguete para que jueguen los niños.
Mantenga todo el material de empaque fuera del alcance de
los niños y deséchelo inmediatamente.
l prod
SP
Page 29

2.7 Eliminación de Materiales de Empaque
2.9 Problemas con el Producto
2.8 Reemplazo de la Batería de Reserva
8
3.1 Cargando la Batería de Reserva del Winbot
3. Preparación para el Uso
ADVE RTENC IA: Para evitar lesiones, mantenga el cable de alimentación y el
Adaptador de Corriente fuera del alcance de los niños.
OFF ON
● Tan pronto como haya desempacado la unidad y todos los componentes
hayan sido contabilizados, deseche cualquier material de empaque que no
sea necesario para almacenaje para evitar que los niños jueguen con este.
● Por favor recicle todos los materiales de empaque que se puedan reciclar.
● Si es necesario reemplazar la Batería de Litio de Reserva, llame a
Servicio al Cliente al 1-888-966-0895. Tenga a la mano el número de
modelo y de producto registrado en la Página de Bienvenida de este
manual.
● Si hay algún problema con la unidad consulte las secciones 8-12 al reverso de este Manual de
Instrucciones. Si no encuentra las respuestas necesarias en el Manual de Instrucciones, llame a Servicio
al Cliente para obtener ayuda al 1-888-966-0895 o visite www.ecovacs.com.
● Para encontrar un centro de reparación autorizado por el fabricante, contacte a Servicio al Cliente al
1-888-966-0895 o visite www.ecovacs.com
● Ensamble el conector del cable de alimentación al Adaptador de Corriente,
apriete la tuerca para que el conector no se separe, después conecte el
Adaptador de Corriente a la toma de corriente.
2.6 Seguridad de las mascotas
● Este producto debe ser usado y almacenado lejos de las mascotas.
● La Solución Limpiadora debe mantenerse fuera del alcance de las mascotas.
●
●
Coloque el interruptor del Winbot, ubicado debajo del mango, en la
posición CARGA (extrema derecha) y cárguelo durante 2 horas. La Batería
de Reserva DEBE estar completamente cargada para que la unidad
funcione adecuadamente. La Luz Indicadora se tornará VERDE
intermitente hasta que la Batería de Reserva esté completamente cargada.
Cuando la Batería de Reserva esté completamente cargada la Luz
Indicadora se tornará VERDE sólido.
El tiempo de carga de la batería es de aproximadamente 2 horas. Este
tiempo variará dependiendo de la temperatura de la habitación; una
habitación más fría o caliente hará que la batería tarde más tiempo en
cargarse.
SP
Live Smart. Enjoy Life.
Page 30

NOTA: Antes de limpiar el exterior o interior de una ventana, revise si hay
posibles obstrucciones en el vidrio (refiérase a la sección 2.4 en este Manual).
Asegúrese de que haya un espacio de 4” entre la ventana y las cortinas para
que el Winbot se pueda mover con libertad por la ventana. Las persianas
deben abrirse por completo. Debe haber 4” de espacio entre el exterior de la
ventana y cualquier planta o arbusto.
4.1 Colocación del Winbot y uso del Dispositivo de Seguridad
4. Uso del Producto
9
≥4 inc hes
Nota: Antes de operar el Winbot, lea cuidadosamente el contenido completo del Manual de Instrucciones.
El funcionamiento de la unidad que no sea acorde con las instrucciones en el Manual puede dañar el
producto o causar lesiones personales.
El Win bot está destinado para la li mpieza de ru tina en vent anas comunes. N O se pretend e que este
product o reemplac e la limpieza pro funda o por pr imera vez.
Advertencia
Si se usa el Winbot para limpiar una ventana sobre el nivel del piso, se DEBE usar el Dispositivo de Seguridad.
El Winbot debe usarse en estricta conformidad con las instrucciones en este Manual de Instrucciones. Ecovacs
Robotics, Inc. no será responsable por los daños o lesiones causados debido a su uso inapropiado.
TM
● Voltee el Winbot para colocar las Almohadillas de Limpieza. Coloque la Almohadilla
de Limpieza grande en la placa flotante del frente, asegurándose de cubrir la placa
completa. Coloque la Almohadilla de Limpieza pequeña en la parte trasera de la
unidad. Asegúrese de que la Almohadilla de Limpieza Posterior sea puesta
exactamente dentro de su área de velcro. Tenga cuidado de no cubrir ninguna parte
de la Cúpula (anillo de succión), ni de la placa que la sujeta, con la Almohadilla de
Limpieza Posterior.NOTA: Las Almohadillas de Limpieza son removibles y
lavables a máquina.
● Después de cargar la Batería de Reserva del Winbot, conéctelo al Adaptador de
Corriente y conecte el Adaptador de Corriente a una toma de corriente cercana a la
ventana a limpiar.
● Para usar el Winbot en una ventana interior que esté a nivel del suelo, omita las
instrucciones del Dispositivo de Seguridad (los siguientes 6 pasos).
● Para usar el Winbot en el exterior de una ventana sobre el nivel del suelo, se
DEBE usar el Dispositivo de Seguridad.
● Asegúrese de que el Winbot tenga suficiente cable alimentador para limpiar la
ventana completa sin restringir su movimiento. Si no hay suficiente cable, no es
seguro usar el WINBOT en esa ventana en particular hasta que se le haya
conectado un Cable de Extensión WINBOT (el Cable de Extensión se vende por
separado).
● Ate un extremo de la Cuerda de Seguridad al canal del Dispositivo de Seguridad
y apriételo.
● Ate el otro extremo de la Cuerda de Seguridad a la tuerca del cable de alimentación y
apriételo.
● Si se conecta un Cable de Extensión, la Cuerda de Seguridad debe ser atada a la
tuerca del cable de alimentación de cualquier manera.
Nota: NO ate la Cuerda de Seguridad a la parte delgada del cable.
● Coloque la ventosa del Dispositivo de Seguridad en la esquina inferior de la
ventana por la parte interna, presionando FIRMEMENTE. Asegúrese de que la
ventosa del Dispositivo de Seguridad esté bien afianzada.
● Inmediatamente antes de colocar el Winbot en la ventana, rocíe ligeramente la
Almohadilla de Limpieza del frente con la Solución Limpiadora incluida. La
almohadilla debe estar húmeda, no mojada. NO rocíe la almohadilla trasera ya que
esta almohadilla es para limpiar las marcas de las bandas de conducción.
● Sostenga el Winbot por el mango y coloque el interruptor debajo del mango en la
posición ENCENDIDO (Centro). Coloque el Winbot horizontalmente en la ventana,
asegúrese de que esté a por lo menos 4 pulgadas de las esquinas inferiores de la
ventana. Se escuchará un ligero ruido. Esto es el motor de vacío creando succión
para sostener el Winbot en la ventana.
● Cuando la luz indicadora se torne AZUL, el Winbot se ha adherido a la ventana y
puede soltar el mango.
● Si limpia el exterior de una ventana, cierre la ventana tanto como sea posible sin
pinchar o dañar el cable de alimentación.
SP
Page 31

4.2 Encendido del Producto
4.3 Pausa del Producto
10
4.4 A pagado del Producto
● Una vez que la unidad esté adherida a la ventana, presione el botón Inicio/Pausa en la
unidad o en el Control Remoto. El Winbot usará su modo de limpieza automática para
limpiar la ventana.
NOTA:
● El Winbot NO se puede usar para limpiar manchas de pintura, o ventanas con calcomanías,
ya que esto puede causar que la succión falle.
● No es apropiado limpiar ventanas con superficies irregulares, tal como vidrio escarchado,
texturizado, con patrones o plomo con el Winbot.
● No es apropiado usar el Winbot para limpiar ventanas con película, revestimiento o
entintadas ya que este puede dañar el recubrimiento.
● Después de que el Winbot ha terminado de limpiar una ventana, si las Almohadillas de
Limpieza están excesivamente sucias, reemplácelas con un juego completamente limpio y
seco. Las Almohadillas de Limpieza se pueden lavar a máquina. Se pueden comprar
juegos adicionales de Almohadillas de Limpieza llamando a Servicio al Cliente al
1-888-966-0895.
● NO use la unidad afuera cuando esté lloviendo, nevando o la temperatura sea menor a 40°
F ya que esto puede dañar el producto y puede causar problemas eléctricos.
OFFONOFF
ON
4.5 Reinicio del Producto
OF
F
ON
● Si la unidad hace ciclos en un lugar repetidamente durante su operación, o
deja de funcionar, y emite un sonido de advertencia y la Luz Indicadora se torna
ROJA intermitente, sostenga la unidad por el mango y coloque el interruptor en
posición APAGADO (extrema izquierda). Después, coloque el interruptor en la
posición ENCENDIDO (centro) y presione el botón Pausa/Inicio en el Control
Remoto o en la unidad para continuar con el proceso de limpieza.
● Si se usa el Winbot de manera continua por un periodo de tiempo extendido,
se recomienda darle un descanso de 10 minutos por cada hora de uso. Esto
extenderá la vida y desempeño del robot y evitará el sobrecalentamiento.
● Si el producto necesita ser pausado durante el proceso de limpieza, presione el
botón “Inicio/Pausa” en el Control Remoto o en la unidad. El producto hará una
pausa y esperará instrucciones.
● Mientras que la unidad esté en Modo Pausa, se puede usar el control remoto para
mover la unidad por la ventana para limpiar cualquier área presionando la flecha
de dirección adecuada. Para regresar la unidad a modo automático, presione el
botón “Inicio/Pausa” en el Control Remoto o directamente en la unidad.
● Después de que el Winbot ha terminado de limpiar la ventana, regresará a su lugar
de inicio, emitirá una canción y la Luz Indicadora se tornará AZUL intermitente. Si la
ubicación en la que se detuvo no es conveniente para retirar la unidad, use el
Control Remoto para moverla presionando la flecha de dirección adecuada hasta
que la unidad esté en un lugar en donde pueda sostener el mango de manera
conveniente.
● Para retirar el Winbot de la ventana, sostenga el mango de la unidad, coloque el
interruptor bajo el mango en la posición APAGADO (extrema izquierda). Mientras
aún sostenga la unidad, inserte el dedo en el Disparador de Liberación de Aire y
levántelo. Retire la unidad de la ventana cuando la succión haya disminuido.
● Use el secador para limpiar cualquier marca que haya quedado al retirar el Winbot.
● NO trate de usar el mango como palanca para arrancar la unidad de la ventana ya
que esto puede dañar el producto. Si el Liberador de Aire no funciona, sostenga el
mango por 45-60 segundos y la unidad se despegará sola de la ventana.
● Guarde siempre la unidad con el interruptor en la posición APAGADO (extrema
izquierda) y en la caja original, si es posible.
SP
Live Smart. Enjoy Life.
Page 32

5. Accesorios
5.2 Control Remoto
Antes de usar el control remoto, confirme que las baterías hayan sido instaladas de acuerdo con el diagrama en la cubierta
del Control Remoto.
11
El Control Remoto tiene una serie de funciones con las que debe familiarizarse. El Control
Remoto es muy fácil de usar.
1. Botón de REINICIO – En caso de que el Winbot deje de funcionar por cualquier motivo, se
puede presionar el botón de REINICIO para reiniciar el producto y/o restaurar la
configuración predeterminada de fábrica.
2. Botón de Inicio/Pausa – Inicia y/o detiene el producto.
3. 4.5.6 Flechas – Cuando se presionan, cada flecha indica la dirección en que la unidad se
moverá, recordando que la flecha ARRIBA corresponde al frente del Winbot.
7. Bot ón d e em parejamie nt o – Este botón empareja el Control Remoto con el
WINBOT.
Aviso: El Control Remoto ya está emparejado con el WINBOT cuando llega de la
fábrica. Si necesita reemplazar el Control R emoto, use el botón de emparejamiento
para empar ejar el Control Remoto con el Winbot.
Méto do d e em parejamie nt o: C onecte el Winbot y coloque el interruptor en la
posición CARGAR. Sostenga el botón de emparejamiento en la unidad del Control
Remoto. Después presione el botón Inicio/Pausa en el Winbot hasta que este emita
un sonido (alrededor de 3 segundos). Cuando el WINBOT emita un sonido, la acción
de emparej amiento está completa.
El Control Remoto funcionará mejor dentro de u na distancia de 6.5 pies de la unidad.
La distancia máxima entre el Control Remoto y el Winbot es de 39.4 pies.
5.1 Dispositivo de Se guridad
Advertencia
Si el Winbot se usa para limpiar la parte externa de una ventana sobre el nivel del suelo, se DEBE usar el Dispositivo
de Seguridad.
El Winbot debe usarse en estricta conformidad con las instrucciones en este Manual de Instrucciones. Ecovacs
Robotics, Inc. no será responsable por los daños o lesiones causados debido a su uso inapropiado.
TM
1. Asegúrese de que el WINBOT tiene cable suficiente para limpiar la ventana completa sin restringir sus movimientos. Si no hay suficiente
cable, no es seguro utilizar el WINBOT en esa ventana en particular hasta que este se conecte a un cable de extensión WINBOT (el cable de
extensión se vende por separado).
2. Ate un extremo de la Cuerda de Seguridad alrededor del canal del Dispositivo de Seguridad y apriételo.
3. Ate el otro extremo de la Cuerda de Seguridad a la tuerca del cable de alimentación y apriete. (Si se ha conectado un cable de extensión de
todas maneras la Cuerda de Seguridad debe estar atada a la tuerca del cable de alimentación).
Nota: NO ate la Cuerda de Seguridad a la parte delgada del cable.
4. Coloque la ventosa del Dispositivo de Seguridad en la esquina inferior de la ventana por la parte interna, presionando FIRMEMENTE.
Asegúrese de que la ventosa del Dispositivo de Seguridad esté bien afianzada.
5. Coloque el WINBOT sobre la ventana, cierre la ventana y encienda el WINBOT.
6. Después de que el WINBOT termine de limpiar, retírelo de la ventana. Agárrelo por el mango, apague la unidad, inserte su dedo en el
Disparador de Liberación de Aire y levántelo durante 20 segundos hasta que haya disminuido la succión.
●
●
●
●
●
El control remoto usa dos baterías AAA (incluidas).
Si la energía de las baterías está baja, reemplace ambas baterías. Nunca use una batería nueva con una batería vieja.
Si el control remoto no se usa durante un largo periodo de tiempo, retire las baterías durante el almacenaje.
En caso de derramar líquido sobre el Control Remoto, retire las baterías inmediatamente y sacuda de tal forma que la mayoría
del líquido salga del Control Remoto. Déjelo secar por 24 horas antes de reemplazar las baterías. Pruebe el Control Remoto con
la unidad en la ventana mientras la unidad esté a su alcance para verificar que funciona. Si el Control Remoto NO funciona, no
use la unidad hasta que el control remoto haya sido reemplazado.
Por favor siga las regulaciones ambientales para desechar las baterías usadas.
SP
1
2
3
4
5
6
7
OFF ON
Page 33

12
6. Almacenado Diario
● Guarde el Winbot en su caja original, en un lugar fresco y seco para
proteger los componentes electrónicos.
● No guarde el Winbot cerca de líquidos o en donde haya líquidos que se
puedan derramar sobre este.
● Cumpla con los requisitos de mantenimiento de la unidad según se
describe en la Sección 7 de este Manual de Instrucciones.
7.1 Mantenimiento del Producto
7. Product Maintenance
● Antes de limpiar el Winbot, coloque el interruptor bajo el mango en la
posición APAGADO (extrema izquierda) y desconéctelo de la toma
eléctrica.
● Limpie la parte superior del Winbot con un trapo de algodón húmedo.
● NO limpie la unidad con ningún líquido volátil, solvente, o un detergente
que contenga ingredientes ácidos ya que estos pueden dañar el
7.2 Limpieza y Reemplazo de las Almohadillas de Limpieza
● Después de cada ciclo de limpieza, o si las Almohadillas de Limpieza se
ensucian demasiado, se pueden enjuagar con agua tibia y dejarse
secar por completo (generalmente 24 horas) antes de volverlas a
colocar. Las Almohadillas de Limpieza se pueden lavar a máquina.
Puede adquirir un juego adicional de Almohadillas de Limpieza
llamando a Servicio al Cliente al 1-888-966-0895 o visite
7.3 Goma
● Después de cada uso, limpie suavemente la Goma en la parte inferior de
la unidad con un trapo húmedo, no mojado, para retirar los residuos de
su superficie. (Un trapo mojado permitiría la entrada de agua en la
unidad y causaría daños a los componentes internos).
7.4 Limpieza de las Bandas de Conducción
NOTA: Las Bandas de Conducción sucias pueden tener un efecto
negativo en la función de las bandas de guiar la unidad en la ventana.
● Después de cada uso, verifique que no haya acumulación de suciedad
en las Bandas de Conducción. Puede inspeccionar la banda de
conducción completa usando el Control Remoto presionando las
flechas Adelantar o Retroceder. Limpie la suciedad con un trapo suave
húmedo.
SP
Live Smart. Enjoy Life.
Page 34

13
7.5 Cúpula
● El ensamble de la Cúpula es una parte básica de la función del Winbot y
está ubicada en la parte inferior de la unidad (ver Diagrama de
Producto). Después de cada uso, inspeccione la superficie de la Cúpula
para asegurarse de que no esté sucia, desgarrada o rota. Cualquier
desecho que se haya pegado en la superficie debe ser retirado
cuidadosamente con un trapo húmedo para que esté lisa de nuevo.
● Puede ser necesario reemplazar la Cúpula si está se raya o se rompe.
Se pueden ordenar cúpulas adicionales llamando a Servicio al Cliente
al 1-888-966-0895 o visitando www.ecovacs.com
TM
SP
Page 35

14
9. Alarma y Soluciones
1. Se encendió el Winbot sin estar
conectado a la toma de corriente.
Toot, Toot
2. Mientras limpia la ventana, el
Winbot se desconecta de la Fuente
de Energía.
3. El vacío tiene una fuga en la
cúpula.
4. El borde contra el marco de la
ventana y se ha elevado.
La Luz
Indicadora
se torna
ROJO
intermitente
5. La ventana es demasiado
pequeña para que el Winbot la
limpie.
6. El marco de la ventana es
demasiado delgado.
8. Significado de los Indicadores
NO.
Sonido
Ninguno
Emite una
canción
Emite un
tono doble
1
2
3
4
5
6
7
Emite un tono
“ding dong”
Luz Indic adora
Ninguna
Luz Indicadora se torna
VERDE intermitente
Luz Indicadora se torna
VERDE sólido
Luz Indicadora se torna
AZUL intermitente
Luz Indicadora se torna
AZUL sólido
Luz Indicadora se torna
AZUL intermitente
Luz Indicadora se torna
ROJO intermitente
Signifi cado
El Winbot se ha conectado a la toma de corriente.
La Batería de Reserva se está cargando.
La Batería de Reserva está completamente cargada.
El Winbot se ha colocado sobre la ventana y se ha
adherido con éxito al vidrio.
El Winbot está en proceso de limpiar la ventana.
El Winbot ha terminado de limpiar la ventana y está
listo para ser retirado.
Se necesita mover o reiniciar el Winbot. Refiérase
a la sección de Alarma y Soluciones.
Sonido de
la Alarm a
Luz Cau sas Sol uciones
1. Conecte la unidad al Adaptador de
Corriente y conéctelo a la toma de
corriente.
2. Conecte nuevamente el Adaptador de
Corriente a la toma de corriente.
3. Retire el Winbot de la ventana y
coloque el interruptor en APAGADO
(extrema izquierda). Voltee la unidad,
revise que no haya suciedad pegada a
la superficie de la cúpula. Limpie
suavemente la superficie con un trapo
húmedo para que quede lisa
nuevamente. Revise la ventana para
asegurarse de que no hay restos
duros que puedan afectar la Cúpula.
4. Use el Control Remoto para mover el
Winbot lejos del marco de la ventana
presionando los botones de Flecha.
5. La ventana más pequeña que el
Winbot puede limpiar
automáticamente es de 18 pulgadas
de ancho por 24 pulgadas de alto.
Emite un
tono doble
8
Luz Indicadora se torna
ROJO sólido
El Winbot tiene un problema y necesita que llame
a Servicio al Cliente al 1-888-966-0895 o visite
www.ecovacs.com
Ninguno
Ninguno
Ninguno
SP
Live Smart. Enjoy Life.
Page 36

15
7
6
5
NO.
a. Revise la conexión a la electricidad. Asegúrese de que el Winbot esté conectado al Adaptador de
Corriente y que el Adaptador esté conectado a la toma de corriente, o
b. Revise la superficie de la ventana. Si la superficie de la ventana no es lisa, está mojada, demasiado
sucia o grasosa, el Winbot no podrá adherirse a la ventana, o
c. Revise que no haya suciedad o daños en la superficie de la Cúpula. Si la superficie de la cúpula está
sucia, límpiela con un trapo húmedo. Si la superficie de la Cúpula está dañada, puede ser necesario
reemplazarla. Llame a Servicio al Cliente al 1-888-966-0895 o visite www.ecovacs.com
d. Revise la posición de la Almohadilla de Limpieza Posterior. Asegúrese de que la Almohadilla de
Limpieza Posterior sea puesta exactamente dentro de su área de velcro. Tenga cuidado de no cubrir
ninguna parte de la Cúpula (anillo de succión), ni de la placa que la sujeta, con la Almohadilla de
Limpieza Posterior.
2
El Winbot no se adhiere
a la ventana
1
4
3
10. Averías Comunes
Problem a Solutio ns
El Winbot deja rayas en
la ventana mientras
limpia
Se produce u n fuerte
ruido cuan do la unidad
está limpiando.
Disminución de la
capacidad de limpieza
Las Bandas de
Conducción se deslizan
por la ventana
El Control Remoto no
funciona
a. Revise la ubicación del Winbot en la ventana. Si el Winbot está atorado en el marco de la ventana o la
orilla del vidrio, muévalo usando los botones de Flecha del Control Remoto. Reinicie la limpieza
presionando el botón INICIO en la unidad o REINICIO en el Control Remoto, o
b. Revise la superficie de la ventana. Si el Winbot ha encontrado desechos duros en la ventana y no se
puede alejar del lugar sin perder succión, use el Control Remoto para mover la unidad lejos del sitio
presionando los botones de Flechas. Después presione el botón de REINICIO en el Control Remoto o
el botón INICIO en la unidad para reiniciar la limpieza.
a. Revise las Almohadillas de Limpieza.
1. La Almohadilla de Limpieza frontal del Winbot puede estar demasiado sucia. Reemplácela con una
almohadilla limpia. (Las Almohadillas de Limpieza se pueden enjuagar con agua tibia y dejarse secar.
También se pueden lavar a máquina), o
2. La Almohadilla de Limpieza frontal del Winbot puede no estar lo suficientemente húmeda para absorber
adecuadamente la suciedad en la almohadilla. Rocíe nuevamente la Almohadilla de Limpieza frontal con la
Solución Limpiadora hasta que esté húmeda, no mojada, o
3. La Almohadilla de Limpieza trasera del Winbot puede estar demasiado sucia. Reemplácela con una
almohadilla limpia y seca.
b. Revise la Goma. La Goma del Winbot puede estar sucia, limpie los residuos de suciedad con un
trapo húmedo, o
c. Revise las Bandas de Conducción. Las Bandas de Conducción pueden estar sucias y/o tener
suciedad acumulada que necesita limpiarse. Limpie con un trapo húmedo.
d. Su ventana puede estar demasiado sucia. El Winbot no pretende reemplazar la limpieza profunda o
por primera vez; tendrá que realizar esta a mano como lo ha hecho en el pasado.
a. Revise las Almohadillas de Limpieza. Las Almohadillas de Limpieza pueden tener suciedad en las
almohadillas causando ruido por fricción. Reemplace con almohadillas limpias, o
b. Revise la superficie de la Cúpula. La Cúpula puede tener suciedad en su superficie que cause
ruido por fricción. Limpie suavemente la superficie con un trapo húmedo para que quede lisa
nuevamente, o
c. Revise las Bandas de Conducción. Las Bandas de Conducción pueden estar sucias y/o tener
suciedad acumulada que necesita limpiarse. Limpie con un trapo húmedo, o
d. Revise la Placa de Limpieza. La Placa de Limpieza puede tener algo que obstruya su capacidad
de moverse hacia arriba y abajo. Retire cualquier obstrucción de la Placa de Limpieza.
*Si el ruido persiste, llame a Servicio al Cliente al 1-888-966-0895 o visite www.ecovacs.com
a. Revise las Almohadillas Limpiadoras. Las Almohadillas Limpiadoras pueden estar demasiado
sucias para limpiar adecuadamente. Reemplácelas con Almohadillas de Limpieza limpias. (Las
Almohadillas de Limpieza se pueden enjuagar con agua tibia y dejar que se sequen, o se pueden
lavar a máquina), o
b. Revise las Bandas de Conducción. Las Bandas de Conducción pueden estar sucias y/o tener
suciedad acumulada que necesita limpiarse. Limpie con un trapo húmedo, o
c. Revise la Placa de Limpieza. La Placa de Limpieza puede tener algo que obstruya su capacidad de
moverse hacia arriba y abajo. Retire cualquier obstrucción de la Placa de Limpieza.
*Si el problema persiste, contacte a Servicio al Cliente al 1-888-966-0895 o visite www.ecovacs.com
a. Revise la Almohadilla de Limpieza frontal. La Almohadilla de Limpieza frontal puede estar demasiado
mojada y deja agua en la ventana. Retire la Almohadilla de Limpieza frontal y déjela secar, o
b. Revise las Bandas de Conducción. Las Bandas de Conducción pueden estar sucias y/o tener suciedad
acumulada que necesita limpiarse. Limpie con un trapo húmedo.
*Si el problema persiste, llame a Servicio al Cliente al 1-888-966-0895 o visite www.ecovacs.com
a. El Control Remoto funcionará mejor dentro de una distancia de 6.5 pies de la unidad, o
b. Revise las baterías. Si las baterías están instaladas adecuadamente y el Control Remoto no está
funcionando, reemplace las baterías, o
c. El Control Remoto necesita emparejar secon el Winbot. Para instrucciones de emparejamiento, vea la
sección 5.2, o
d. Revise la Alarma o Luz Indicadora. Si el Winbot ha emitido un sonido “toot toot” como advertencia
debido a que ha perdido energía o succión, no se podrá maniobrar con el Control Remoto.
Reconecte la electricidad o vuelva a adherir el Winbot a la ventana.
TM
El Winbot se detiene,
hace sonar la alarma y
la Luz Indicadora se
torna ROJO intermitente
SP
Page 37

12. Preguntas y Respuestas
11. Estado de Car ga de la Batería de Reserva
Para revisar el nivel de carga de su Batería de Reserva, conecte el Winbot al Adaptador de Corriente y conecte el
Adaptador de Corriente en la toma de corriente. Coloque el interruptor del Winbot, ubicado debajo del mango, en
la posición CARGAR (extrema derecha). Si la Luz Indicadora se torna VERDE intermitente, la Batería necesita
cargarse. Una vez que la Batería de Reserva esté completamente cargada, la Luz Indicadora se tornará VERDE
sólida. En este momento, ya puede usar la unidad.
16
1. ¿Pued e caerse el Winbot de l a ventana
durante l a limpieza ?
El Winbot está diseñado para evitar
situaciones en las que pudiera perder
succión. Si el suministro de electricidad a 5
la unidad falla durante la limpieza, la
Batería de Reemplazo tiene suficiente
energía almacenada para mantener la
succión hasta que se pueda retirar la
unidad. Al limpiar el exterior de una
ventana sobre el nivel del suelo, se debe
usar el Dispositivo de Seguridad. El
Dispositivo de Seguridad es una segunda
línea de defensa, además de la Batería
de Reserva, para prevenir que el Winbot
caiga de la ventana. El Dispositivo de
Seguridad también permite la fácil
recuperación del Winbot cuando este
está en el exterior de una ventana.
2.
6
3
7
4
Averías Comunes de este Manual de
Instrucciones en donde se cubre con
mayor detalle las luces y sonidos
indicadores.
Por favor refiérase a la sección de
. El Win bot ha sido co locado en la
ventana p ero NO está funcionando y la
Luz Indic adora no se ha t ornado AZ UL.
¿Qué sign ifica esto ?
Si esto ocurre, significa que la potencia
de succión ha sido comprometida.
Examine la Cúpula del Winbot y las
Bandas de Conducción y asegúrese
que no haya suciedad o polvo
acumulado, lo que puede causar que la
unidad pierda succión y deje de
funcionar. Limpie la Cúpula y las Bandas
de Conducción de acuerdo con la sección
de Mantenimiento del Producto (sección
7) en este Manual de Instrucciones.
¿Puede tr abajar el Wi nbot sin que h aya
. El Win bot estaba c orrectament e
alguien p resente?
colocad o en la ventan a y se presionó
El Winbot está diseñado para limpiar la el botón de I NICIO, per o la unidad se
ventana sin la presencia física de una movió al fo ndo de la vent ana y no
persona. Sin embargo, ya que el ciclo de funcion ó. ¿Qué paso ?
limpieza no toma mucho tiempo, se
El Winbot no limpiará la ventana si no
recomienda que haya una persona cerca
está conectado a una toma de corriente.
para que cuando el Winbot termine lo
Su Batería de Reserva enviará la unidad
pueda retirar de la ventana.
al fondo de la ventana y se pondrá en
. ¿Se puede u sar el produ cto sobre modo de espera. Si esto sucede, conecte
vidrio de c ualquier g rosor? (venta nas, el Adaptador de Corriente a la toma de
puertas d eslizables de v idrio, etc .) corriente y reinicie el ciclo de limpieza
presionando el botón de INICIO en la
El Winbot se puede usar en vidrio de
unidad o en el Control Remoto.
cualquier grosor. Sin embargo, no es
Asegúrese de que el Winbot tenga
apropiado limpiar con el Winbot las
suficiente cable de alimentación para
ventanas con superficies irregulares, con
limpiar la ventana completa sin jalar el
vidrio escarchado, texturizado, con
Adaptador.
patrones o plomo, ya que las superficies
irregulares causarán que la unidad . ¿Qué suced e si el Winbot se encuentr a
pierda succión y caiga de la ventana. co n una obstru cción como u na manija
o seguro de l a ventana?
. Por qué el Winbot ha ce sonar la alarm a
“toot” y la L uz Indicad ora se torna
En circunstancias normales, el Winbot
ROJO inte rmitente just o después de
maniobrará automáticamente alrededor
encende r el product o?
de la obstrucción y seguirá con su
proceso de limpieza.
Live Smart. Enjoy Life.
SP
Page 38

8. Qué suce de si el Winbot se encuent ra visuales y auditivos en caso de que
con corti nas o persia nas ?
ocurra un problema. Para mayor
comodidad, hay dos Luces Indicadoras –
Asegúrese de que haya un espacio de al
colocadas en ambos lados de la unidad-
menos 4” pulgadas entre la ventana y las
por lo que si el Winbot está trabajando
cortinas para que el Winbot se pueda
afuera, la luz indicadora en la parte
mover con libertad por la ventana. Las
inferior de la unidad aún puede ser vista
persianas deben abrirse completamente.
desde el interior.
En el exterior de la ventana debe haber al
menos 4” de espacio entre la ventana y
. Si el Wi nbot tiene a lgún probl ema,
cualquier planta o arbusto.
hace sona r la alarma o encie nde las
luces y se de tiene, ¿qu é debo hacer?
9. ¿Puede l impiar el Winbot vidrios
redondo s o vidrios mo ntados en
Es posible que el Winbot tenga
ángulo?
problemas al limpiar. En la mayoría de
los casos, puede resolver esos
El Winbot no está diseñado para su uso
problemas por sí mismo, pero si no
en vidrio redondo o vidrio montado en un
puede, el ciclo de limpieza se detendrá y
ángulo. No use el Winbot al revés.
una alarma indicará que se necesita
10. ¿Pued o usar el Winbot W710 en
asistencia. Consulte las secciones
ventana s sin marco?
Significado de los Indicadores y Alarmas
y Soluciones (sección 8 y 9) en este
El Winbot W710 solo puede ser usado en
Manual de Instrucciones para determinar
ventanas con marco. El Winbot W730
que debe hacer.
puede ser usado tanto en ventanas con
marco como en ventanas sin marco.
. ¿Puede el Winbot l impiar por
complet o, incluso l as esquinas de la
El Win bot no limpi ó la ventana por
ventana ? ¿Qué puedo h acer si el
complet o, o dejó marc as, ¿ Qué
Winb ot no limpia a lgún lugar ?
sucedió ?
El Winbot está programado para limpiar
NO se prete nde que el Winbot
las ventanas de forma tan completa y
sustitu ya la limpie za profunda o la
eficiente como sea posible. Sin embargo,
limpiez a por primer a vez ; esto debe
en algunas circunstancias, puede ser
hacerse a m ano como lo ha hech o en el
que no limpie completamente las
pasado. E l Winbo t está diseñado p ara
esquinas o que no limpie algún área. Una
la limpie za de rutina e n ventanas
vez que la unidad haya terminado su
estánda r. El Winbot NO puede ser usado
ciclo de limpieza, use el Control Remoto
para limpiar manchas de pintura o
para llevar al Winbot hasta esas áreas
ventanas con calcomanías, ya que esto
que necesitan atención usando los
puede causar que la succión falle. Para
botones de FLECHAS.
las marcas, reducción en la capacidad de
limpiar y otros problemas, refiérase a la
. ¿En dónde p uedo compr ar accesorios ,
sección de Averías Comunes (sección
partes ad icionale s, o encontrar un
10) en este Manual de Instrucciones. La
centro de r eparación aut orizado?
mayoría de estos problemas se pueden
Por favor contacte a Servicio al Cliente al
evitar con el mantenimiento regular
1-888-966-0895 o visite
detallado en la sección de Mantenimiento
www.ecovacs.com para comprar partes
del Producto (sección 7).
adicionales y accesorios o encontrar un
¿Cómo deb e guardars e el Winbot
centro de reparación autorizado. Por
cuando no e sté en uso?
favor tenga el número de modelo y
producto que registró en la Página de
Coloque el interruptor del Winbot debajo
Bienvenida de este manual a la mano.
del mango en la posición de APAGADO
(extrema izquierda) y limpie la unidad
Si tiene pr eguntas o pr eocupacione s
según se describe en la sección de
que no haya n sido resue ltas en este
Mantenimiento del Producto (sección 7)
Manual, e nvíenos su s pregunta s y
en este Manual de Instrucciones.
comenta rios. Por favor c ontacte a
Después almacene el Winbot en su caja
Servici o al Cliente a l 1-8 88-966-0 895
original, en un lugar fresco y seco, lejos
para que po damos abor dar cualquier
de líquidos y luz directa del sol.
preocup ación que us ted pueda tener.
. Cuando el Winbot e sté limpiando el
exterio r de una ventana y ha ga sonar
Gracias por comprar el Winbot
la alarma i ndicando u n problema, ¿qué
Serie 7. Esperamos que lo
pasa si no la e scucho?
disfrute en los próximos años.
El Winbot está equipado con indicadores
14
15
11.
16
12.
13
17
TM
SP
Page 39

TM
ECOVACS WINBOT
Garantía Limitada de Compra Original
ECOVACS Robotics, Inc. otorga la siguiente Garantía Limitada para sus productos WINBOT.
1. Garantía Limitada. ECOVACS Robotics, Inc., también le garantiza, en la compra original, que su
WINBOT estará libre de defectos en materiales y mano de obra cuando se usa en condiciones
normales durante un (1) año a partir de la fecha de compra del producto. Esta Garantía Limitada solo
aplica a los productos nuevos comprados y usados en los Estados Unidos y Canadá. Algunos
estados/jurisdicciones no permiten limitaciones en la duración en una garantía implícita, por lo que la
limitación anterior puede no aplicar para usted.
2. Prueba de Compra. Para hacer un reclamo bajo su Garantía Limitada, primero debe mostrarnos
la fecha en la que compró su WINBOT. Su nota de venta o documento similar es suficiente. Si no
puede demostrar la fecha de compra original, los periodos de la Garantía Limitada comenzarán en la
fecha en que enviamos su WINBOT de la fábrica.
3. Exclusiones. Esta Garantía Limitada no cubre defectos o daños causados por (1) alteraciones no
aprobadas por nosotros, reparaciones o servicio no apropiado, partes no adecuadas y accesorios no
proporcionados por nosotros; (2) mal uso o no seguir las instrucciones de operación y no llevar a
cabo el mantenimiento recomendado; (3) partes que deben reemplazarse periódicamente; o (4) el
uso en cualquier otra manera que no sea la manera normal y esperada de uso.
4. Sus Responsabilidades. Usted es responsable de (1) el mantenimiento preventivo del producto
(tal como limpiar las bandas de conducción, cúpula, almohadillas de limpieza, etc.); y (2) asegurar
que se sigan las instrucciones del manual sobre el cuidado y uso del producto.
5. Servicio al Cliente. Contacte a Servicio al Cliente al 1(888)966-0895 para determinar su problema
y los siguientes pasos. La responsabilidad total de ECOVACS Robotics, Inc., y sus proveedores y su
remedio exclusivo será, a nuestra elección, (1) el reembolso del precio pagado, o (b) el reemplazo de
las partes o el producto. Las partes de reemplazo y productos asumen el resto de la garantía original
limitada o treinta (30) días, lo que sea mayor.
6. Ninguna Otra Garantía. ECOVACS Robotics, Inc. no garantiza que las funciones contenidas en el
WINBOT cumplirán con sus requerimientos. El riesgo completo en cuanto a la calidad y desempeño
del WINBOT es suyo. Al grado máximo permisible por la ley aplicable, ECOVACS Robotics, Inc., y
sus proveedores se deslindan de cualquier otra garantía, expresa o implícita, incluyendo, sin
limitación, garantías implícitas de comercialización y aptitud para un propósito en particular, en
referencia al WINBOT y los materiales escritos que lo acompañan. Esta garantía limitada le otorga
derechos específicos. Puede tener otros derechos que pueden variar de estado/jurisdicción a
estado/jurisdicción.
7. Ninguna Responsabilidad por Daños Consecuentes. Al grado máximo permisible por la ley
aplicable, en ningún caso serán responsables ECOVACS Robotics, Inc., o sus proveedores por
daños (incluyendo sin limitación, daños por pérdidas de ganancias, interrupciones de trabajo, pérdida
de información de negocios, o cualquier otra pérdida pecuniaria) que surjan del uso o imposibilidad
de uso del WINBOT, incluso si ECOVACS Robotics, Inc., haya sido advertida de la posibilidad de
dichos daños. Debido a que algunos estados/jurisdicciones no permiten la exclusión o limitación de
responsabilidad por daños consecuentes o incidentales, la limitación anterior puede no aplicar para
usted.
8. Ley de California. Los términos de nuestra garantía limitada se regirán, interpretarán y harán
cumplir de conformidad con las leyes del Estado de California sin referencia a provisiones de
conflicto de leyes. El lugar exclusivo para cualquier disputa que surja de este acuerdo será una corte
con jurisdicción en el Condado de Los Ángeles, California. Si cualquiera de las provisiones de
nuestra garantía limitada es declarada inválida por cualquier corte competente, el resto de la misma
permanecerá en total fuerza y efecto.
SP
Page 40

Page 41

Page 42

Page 43

Page 44

Page 45
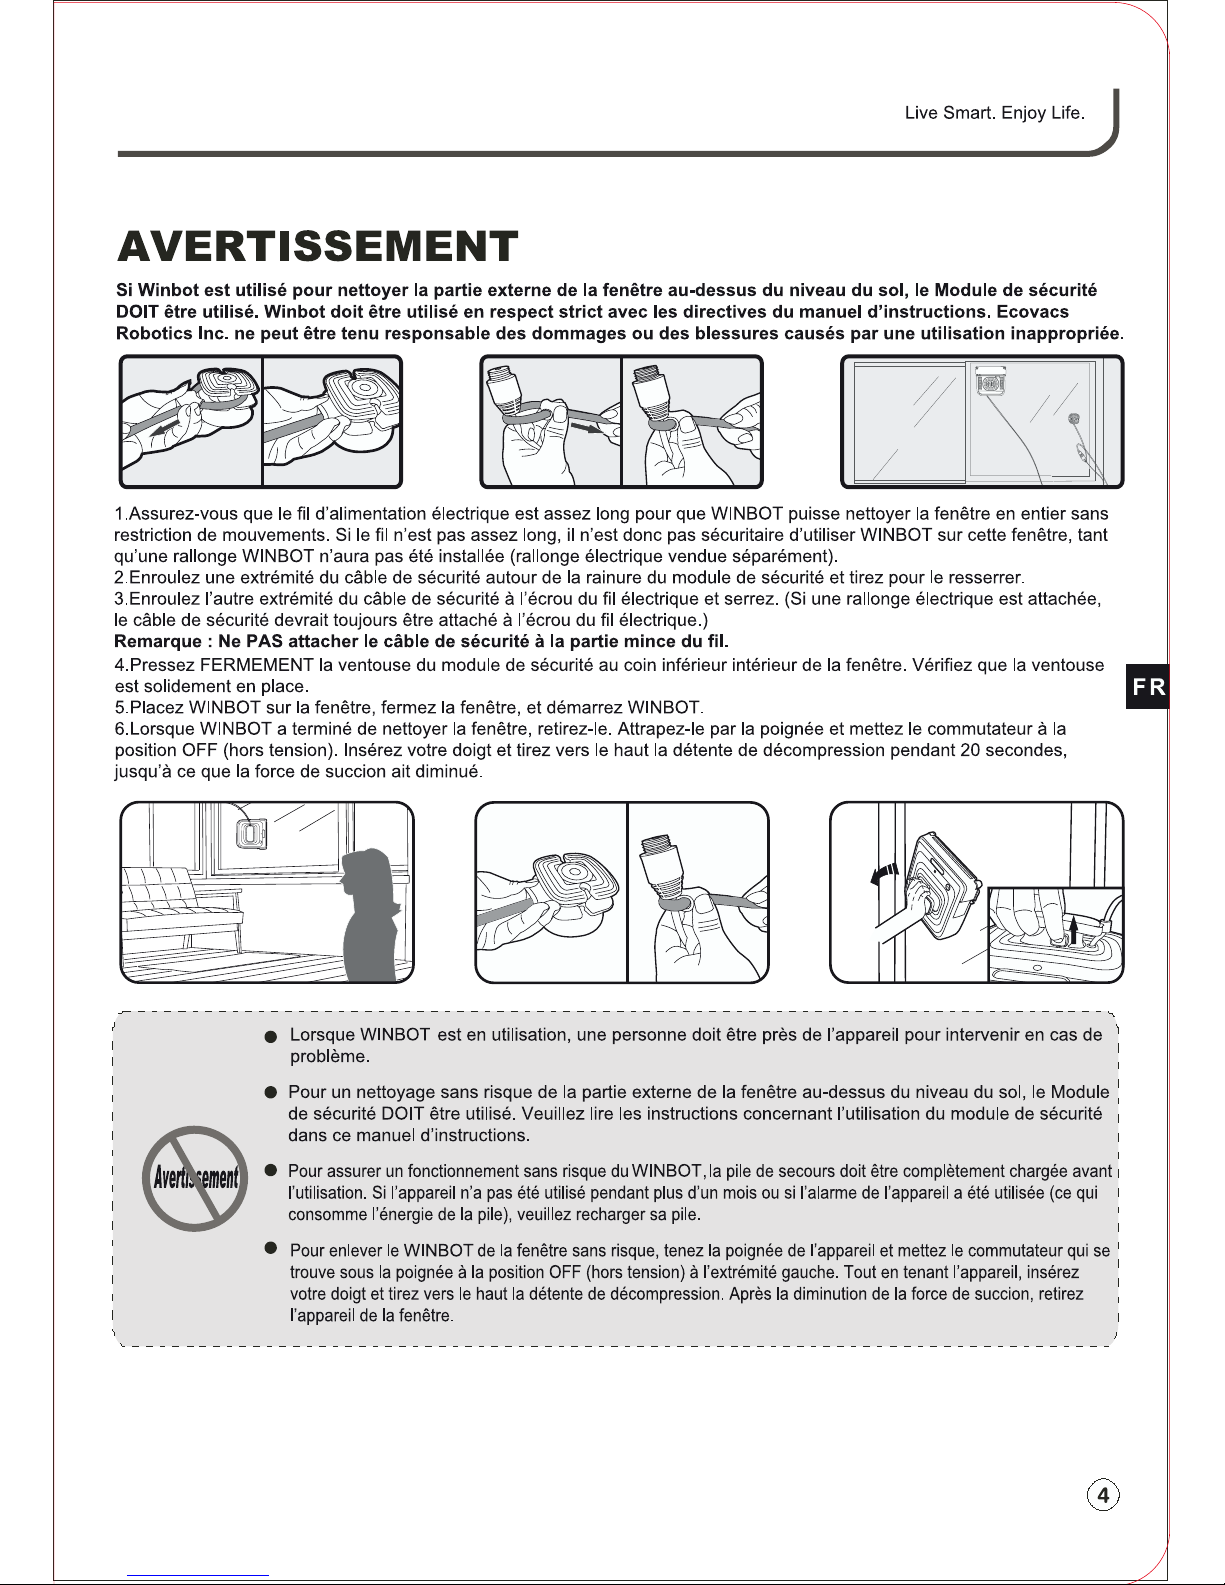
Page 46
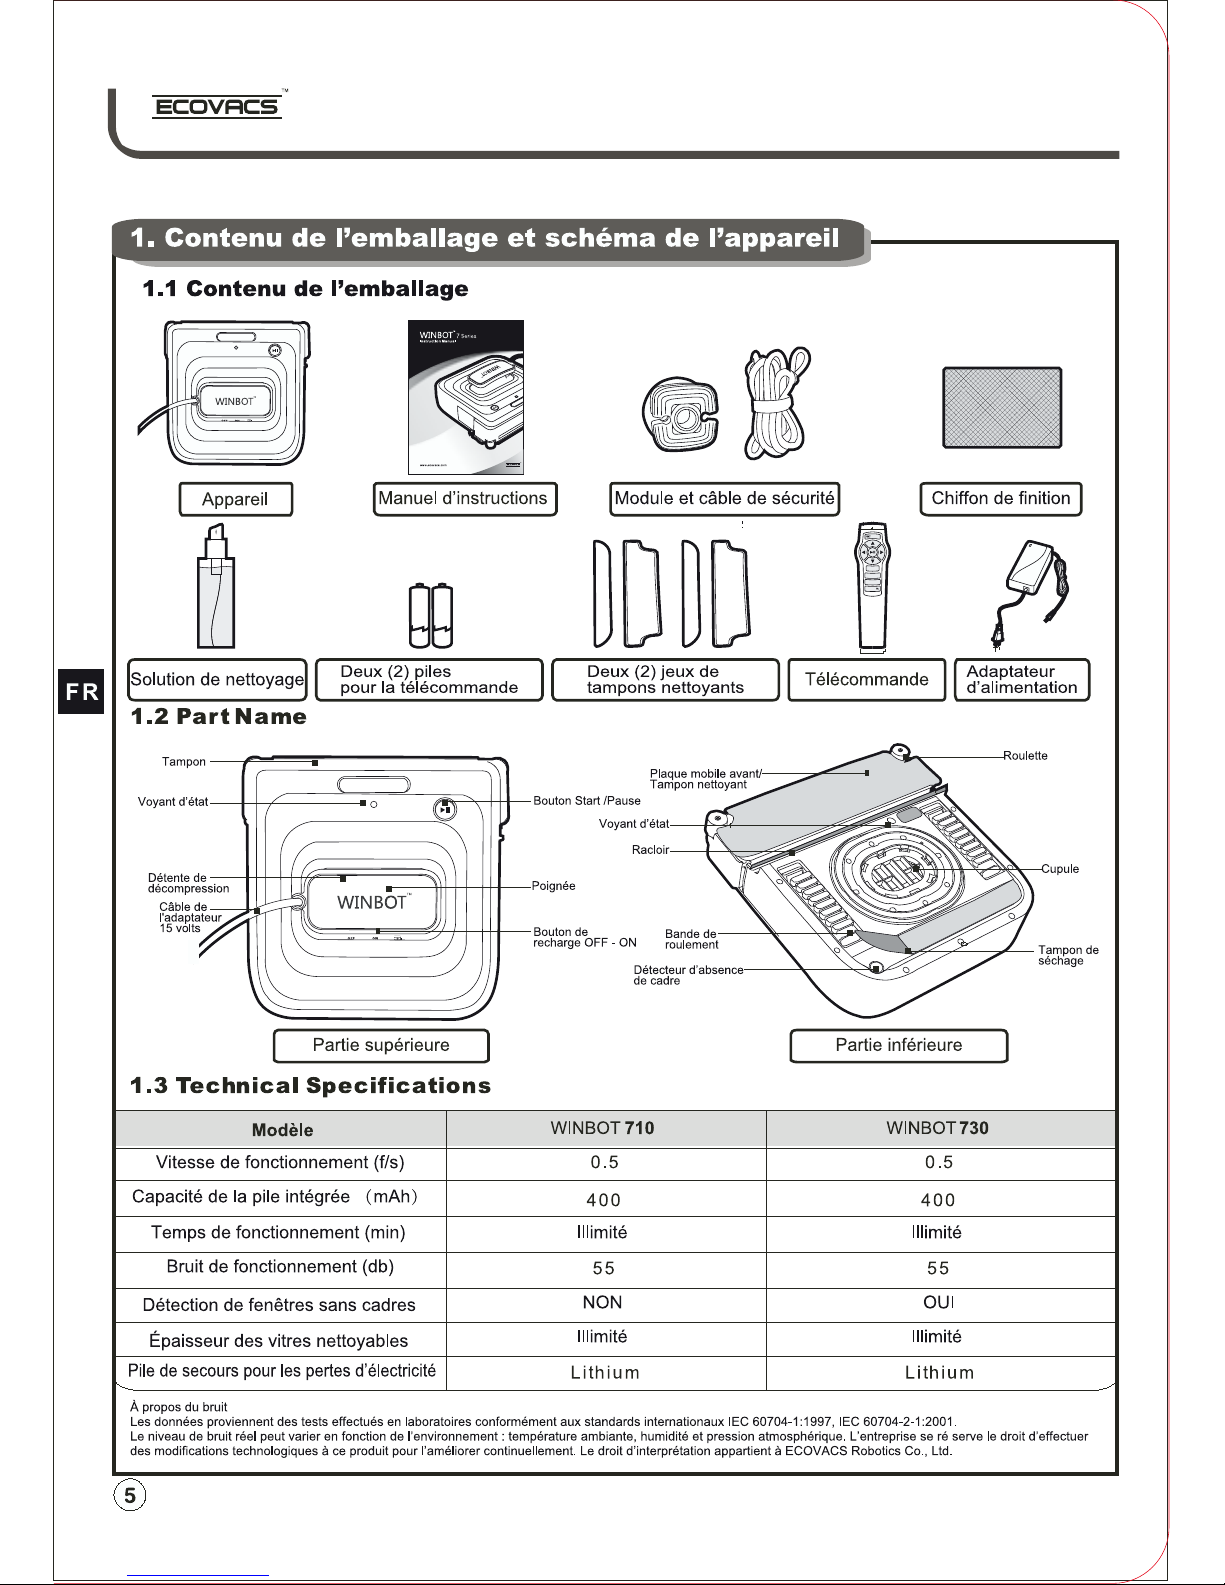
Page 47

Page 48

Page 49
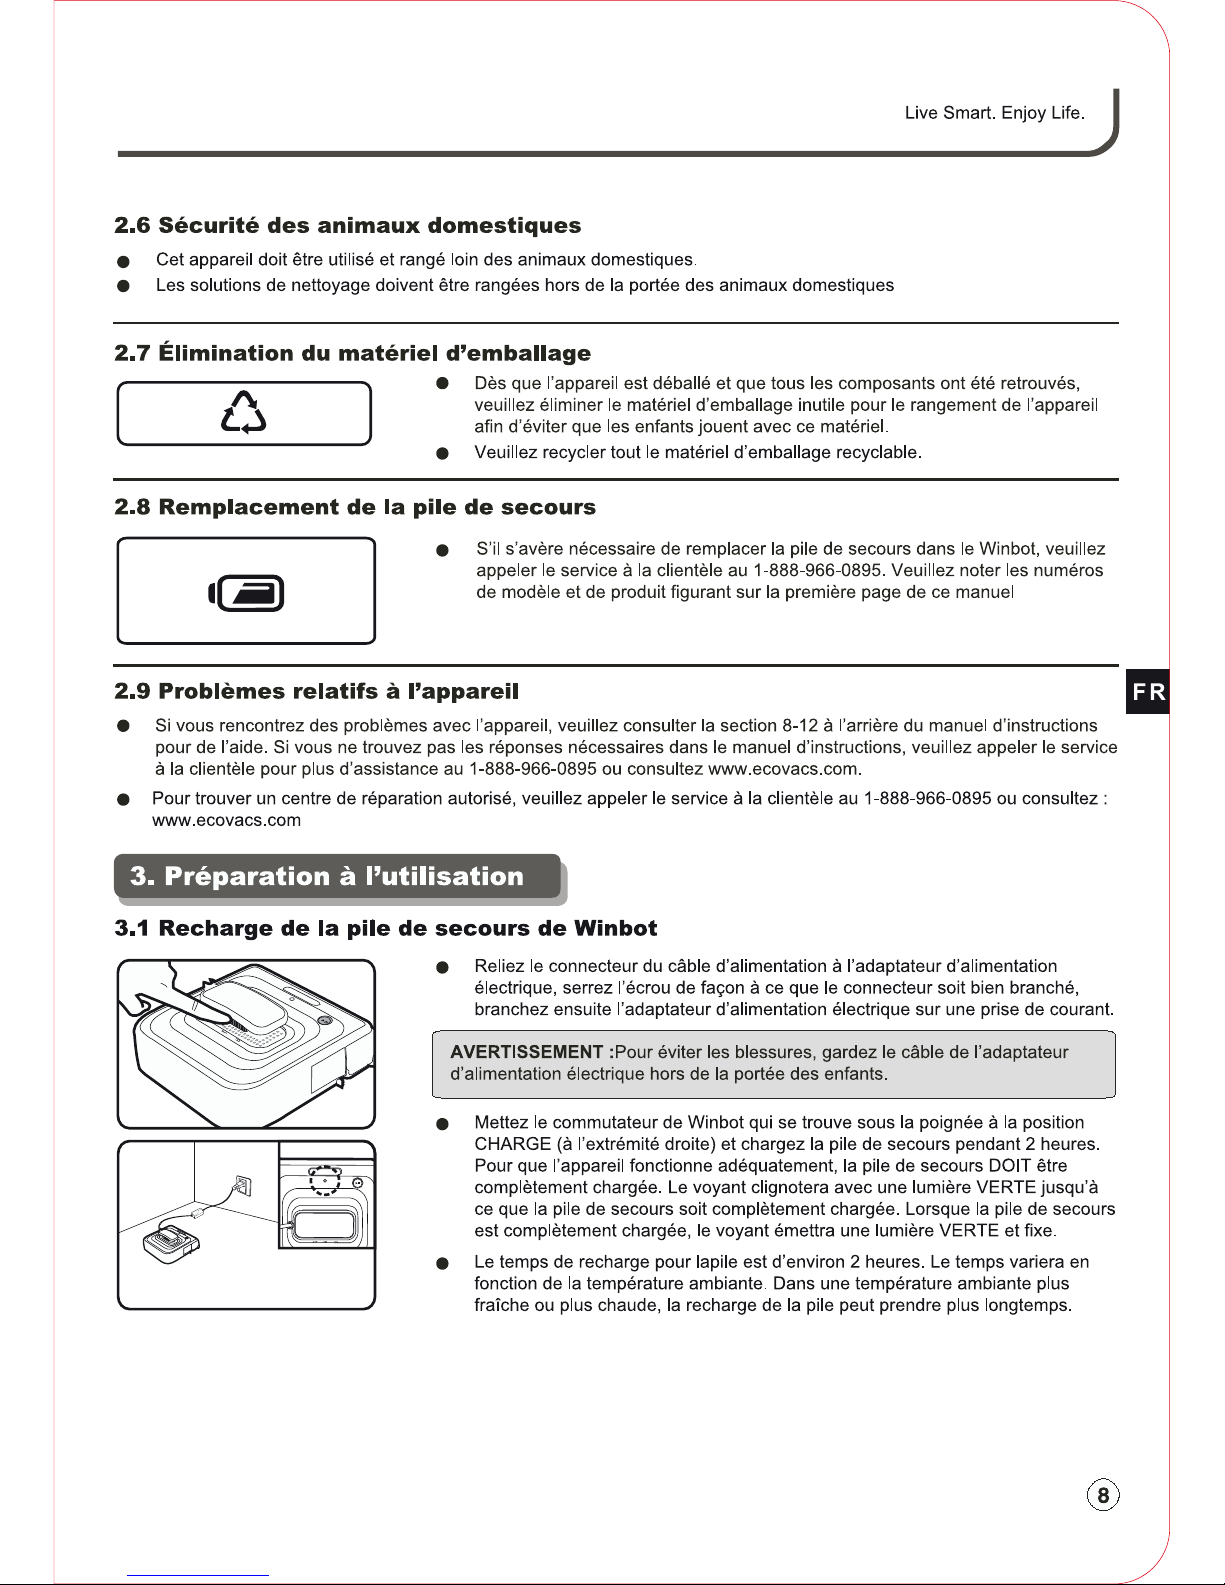
Page 50

Page 51

Page 52

Page 53

Page 54

Page 55

Page 56

Page 57

Page 58

Page 59

Page 60

 Loading...